
D1120 - Phone GRUNDIG - Free user manual and instructions
Find the device manual for free D1120 GRUNDIG in PDF.


User questions about D1120 GRUNDIG
0 question about this device. Answer the ones you know or ask your own.
Ask a new question about this device
Download the instructions for your Phone in PDF format for free! Find your manual D1120 - GRUNDIG and take your electronic device back in hand. On this page are published all the documents necessary for the use of your device. D1120 by GRUNDIG.
USER MANUAL D1120 GRUNDIG
DIGITAL CORDLESS PHONE
D1110 - D1120 - D1130 - D1140
D1115 - D1125 - D1135 - D1145

FOR A GOOD
REASON
GRUNDIG
OVERVIEW
Introduction....3
Presentation of the telephone 4
The base 4
Handset keys 5
Navigator 5
Installing the phone....6
Status icons 7
Menu structure....8
Quick reference 8
Navigation....8
Calls 9
Making a call....9
Answering a call 9
Handsfree (Models D1120, D1125, D1140 and D1145 only) 9
Ending a call 9
Microphone mute function....9
Checking your voice mailbox 9
Calling a number from the speed dial list 10
Inserting a pause (in dialing) 10
Two outside calls....10
Call log 11
Calling Line Identification Presentation (CLIP) 11
Received call log....11
Dialed call log 11
Calling back a number in your call list 11
Making an entry in the phonebook from the list of calls 11
Deleting caller list record....12
Phonebook....13
Calling a contact from your phonebook.... 13
Adding a contact to the phonebook....13
Editing a contact 13
Deleting a contact / The entire phonebook.... 13
Adding numbers to speed dial list 13
Using the multi-handset capabilities.... 14
Intercom Call/Intercom 14
Answering an internal call....14
Managing an external and an internal call.... 14
Customising the handset 15
Handset naming 15
Handset ringer level 15
Handset ringer melody 15
Key tone On/Off 15
Modifying the language....15
Auto talk off....15
Key lock....15
Setting the date and time.... 16
Time and date 16
Hour format (12H/24H) 16
Date format 16
Alarm clock....16
Modifying alarm tone 16
Advanced settings 17
Modifying Base master PIN code....17
Association of handset with your base....17
Deleting a handset 17
Modifying the country (depending on version)....17
Restoring the Handset / Base Default Settings 17
Prefix....18
Flash timing 18
Modifying the dialing mode....18
First ring 18
Answering machine (Models D1115 - D1125 - D1135 - D1145 only) ..... 19
Enabling / disabling the answering machine....19
Modifying the answering machine mode 19
Modifying the outgoing message (OGM)....19
Playing outgoing message 20
Erasing your personal outgoing message 20
Listening to your messages....20
Deleting all old messages....20
Answering machine setup
(Models D1115 - D1125 - D1135 - D1145 only).... 21
Number of rings 21
Remote access to answering machine 21
Batteries safety precautions 22
General product care.... 22
Changing the batteries....22
Troubleshooting 23
Auto-diagnostics 23
INTRODUCTION
Dear Customer,
You have just acquired a new generation Grundig telephone. Thank you for placing your confidence in us.
This device has been manufactured with the utmost care. If you should have difficulties in operating it, we recommend that you consult this manual.
You can also find information on the following site:
http://www.grundig-ject.com
For your comfort and safety, we urge you to carefully read the paragraph « Recommendations and safety instructions » of the warranty card included in the pack.

The CE label confirms that the product complies with the 1999/5/EC regulations of the European Union Parliament regarding wireless systems and telecommunications.
The declaration of compliance may be looked up on the www.grundig-ject.com site or can be obtained from the following address:
X-GEM SAS
3 - Short press: find handset (Paging).
- Long press: handset pairing mode.
Handset keys
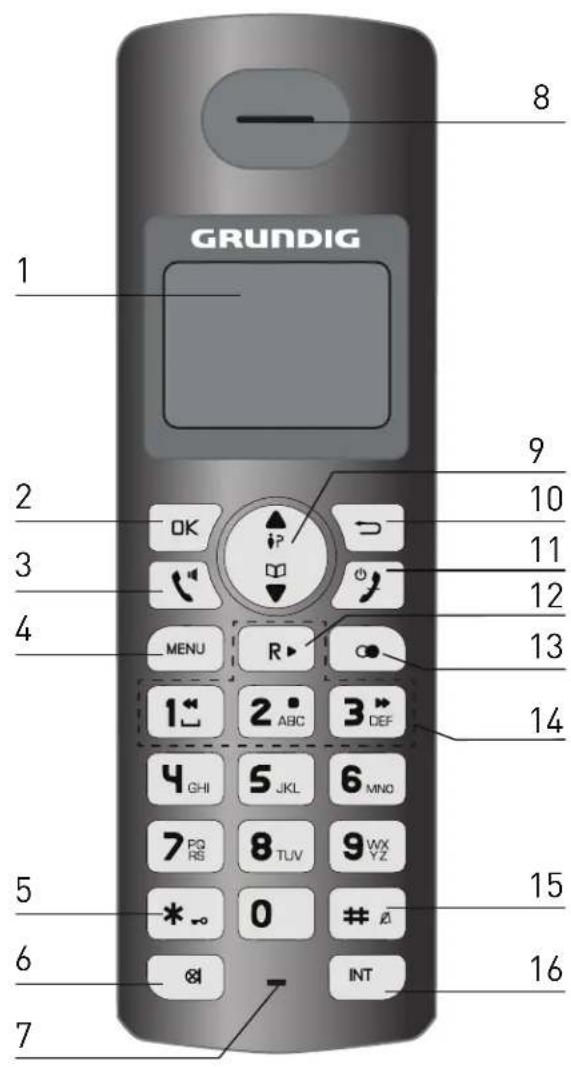
text_image
GRUNDIG 1 2 3 4 5 6 7 8 9 10 11 12 13 14 15 16 OK OK MENU R▶ ABC DEF GHI JKL MNO 7 PQ RS TUV WX YZ * 0 # # INT* The icon on the key is specific for models D1125 and D1145 only.
| 1 | Screen with backlight(Models D1130, D1135, D1140 and D1145 only) |
| 2 | Validation key |
| 3 | - Accept call- Activate / Deactivate handsfree mode (during a call)(Models D1120, D1125, D1140 et D1145 only)* |
| 4 | Access to main menu |
| 5 | Activate / Deactivate keypad lock(long press in standby mode) |
| 6 | Activate / Deactivate the microphone mute function (during a call) |
| 7 | Microphone |
| 8 | Earpiece |
| 9 | Browsing through the menus:▲ Access to the caller list▼ Access to the phonebook |
| 10 | - Cancel the action- Return to previous menu |
| 11 | - End a call (during a call)- Switch handset on-off (long press) |
| 12 | R key: Manage multiple calls |
| 13 | Access to the outgoing call list |
| 14 | Answering machine control keys(Models D1115, D1125, D1135 and D1145 only) |
| 15 | Activate - Deactivate the silent mode(long press in standby mode) |
| 16 | Call an additional handset(in standby mode) |
Navigator

- From the home screen: access to the caller list.
- On the menu: navigation key up.
- From the home screen: access phonebook.
- On the menu: navigation key down.
Installing the phone
- Plug one end of the telephone line cord into the telephone socket of the base.
- Plug the other end of the telephone line cord into the modular wall phone socket.
- Plug the end of the power supply into the power socket of the base.
- Plug the power supply cord into AC outlet.
- Insert the batteries. Take care to respect the polarity as indicated in the compartment.
- Put the compartment door back on. «SEARCHING...» appears on the screen.
- Place the handset on the base station to charge for 15 hours prior to first use.
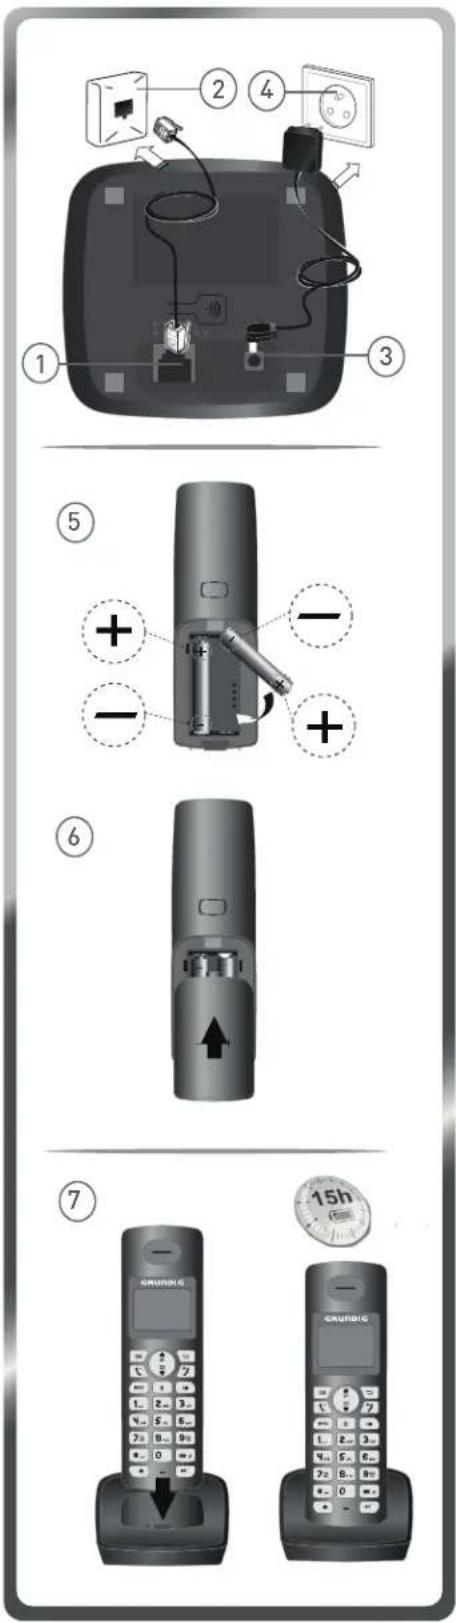
text_image
Diagram showing a mobile phone control panel with numbered parts and a 15-hour timer for call completion.Status icons
| [1978] | Signal (flashes when the handset is out of range or when the base is disconnected from power). |  | Received call list (appears when a new call is in the caller list). |
 | During a call | [AT00] | Phonebook icon (appears when you enter to the phonebook list). |
| [0YAH] | New voice messages | [OWCK] | Charging status iconFull: batteries are full.Flashing (out of charger): batteries are low.Blinks (on the charger): charging in progress. |
| [500Z] | Silent mode activated Alarm activated | [660K] | |
 | Hands-free activated * | [8850] | Answering machine **On: answering machine activated.Blinks: new message(s) on your answering machine. |
* Models D1120, D1125, D1140 and D1145 only
** Models D1115, D1125, D1135 and D1145 only
MENU STRUCTURE
Quick reference
| PHONEBOOK | NEW ENTRY |
| LIST REGISTRATION | |
| EDIT ENTRY UNREGISTER | |
| DELETE COUNTRY * | |
| DELETE ALL RESET | |
| DIRECT MEM. AUTO PREFIX | |
| RECALL TIME | |
| PERSONAL SET | HANDSET NAME |
| HANDSET TONE | |
| LANGUAGE | |
| AUTO HANG-UP | |
| CLOCK&ALARM | DATE / TIME |
| SET FORMAT | |
| ALARM | |
| ALARM TONE | |
| ADVANCED SET | CHANGE PIN |
| * | |
| DIAL MODE | |
| FIRST RING | |
| ANSU MACHINE ** | PLAY |
| DELETE ALL | |
| ANSU . ON/OFF | |
| RECORD OGM | |
| ANSWER MODE | |
| SETTINGS |
* Depending on version
** Models D1115, D1125, D1135 and D1145 only
Navigation
To navigate among the menus, use the keys: MENU, OK, ∨, ⬇P (▲) and ▼ (▲).
Example:
To change the ring tone, go to the menu PERSONAL SET / HANDSET TONE / RING TONES.
To do this:
- Press MENU. Select "PERSONAL SET" using the ▲ or ▼ key.
- Press OK. Select "HANDSET TONE" using the ▲ or ▼ key.
- Press OK . Select "RING TOMES" using the ▲ or ▼ key.
- Press OK . 10 melodies are available: "RELODY 1" ... "RELODY 10". Select the desired melody using the ▲ or ▼ key.
- Press OK key to confirm your selection.
CALLS
Making a call
Ensure that the handset is switched on.
-
Press the talk key icon 📋. You will hear the dialing tone and the display will show you the phone
-
Enter the phone number.
- OR-
-
Enter the phone number first.
-
Press key.
Answering a call
When the phone rings, press the key to answer the call.
NOTE!
You can adjust the volume of what you hear through the handset at any time by pressing ▲ or ▼ key.
Handsfree (Models D1120, D1125, D1140 and D1145 only)
You can enable the handsfree mode of the handset while having a conversation with your contact.
-
Press to activate the handsfree mode of the handset.
-
To deactivate the handsfree mode, press
Ending a call
To end a call press
Microphone mute function
- Activate mute function: press the key. The display shows "RUTE ON".
- Deactivate mute function: press the 🔒 key. Your correspondent can hear you again.
Checking your voice mailbox
With this function you can receive calls in your absence on a voice message recorder in the switched telephone network. To indicate that a new message has been received the envelope icon 📧 and the new event message "VOICEMAIL" are displayed on the screen of the handset.
NOTE!
To use this feature you need to set up a voice mailbox (Please refer to section « Adding numbers to speed dial list », page 13).
To check your voicemail:
- Hold down the key 1 ^2 [or 2 ^2 ABC]
- OR -
-
Dial your voice mail number.
-
Once you have consulted the messages, the icon 📧 disappears.
Calling a number from the speed dial list
You can quickly call a number stored under the speed dial keys.
Hold down the key (1 or 2) where the number has been stored.
To set the speed dial list, please refer to section «Adding numbers to speed dial list», page 13.
Inserting a pause (in dialing)
While dialing the number, press and hold the key to insert the pause.
The pause is indicated by the symbol "P".
Two outside calls
To take a second call while you are already on line
During the call, a beep is transmitted to your telephone by your service provider to let you know that you have a second call waiting and on the screen it displays the number of this second caller.
Press R. then the key to take this new call.
Your other caller is then put on hold and you can talk with your second caller.
To make a second call while you already on line
During a call, you can put your contact on hold and call a second one by pressing and that the number using the keypad.
The second call is then launched, with the first call still on hold.
To switch from one call to the other
To switch from one call to the other, press R then the key 2.
The call in progress is put on hold, and you can then take the second call.
To end one of the calls and continue the other one
To end one call and continue with the other, press then the key.
The call in progress is definitely terminated, and you can then take the second call.
To set up a 3-way conference (the two parties and yourself)
During a conversation, press R then the key 3
You can then talk to both parties simultaneously.
To end the 3-way conference, press the key
CALL LOG
Calling Line Identification Presentation [CLIP]
This CLIP phone stores and displays CLIP information provided by your local telephone company. You must subscribe to CLIP service in order to use this unit. If you have not subscribed to CLIP service or if the caller number is suppressed, the display shows "unknown".
NOTE!
Display of numbers not available:
- UNAVAILABLE: you are not in same area as your contact.
- PRIVATE: your contact does not want its number to be displayed.
Received call log
The received call log presents the calls you received (max.10 last calls).
- Press

-
The most recent name or call number is displayed according to whether your contact's number is included in your phonebook or not.
-
Press

- Press the ▲ or ▼ key to go through the list.
NOTE!
If the number is too long (more than 12 digits), the screen will not show the entire number.
Press key to view the rest of this number.
Dialed call log
The dialed call log presents the calls you made (max. 5 last calls).
To consult the list:
- Press the

- The last dialed number is displayed. Press the ▲ △ or ▼ key to consult the list of the last 5 numbers dialed.
Calling back a number in your call list
-
Press the on key.
-
Press the ▲ or ▼ key to select a call record.
-
Press the 🔺 key to dial the number.
Making an entry in the phonebook from the list of calls
-
Press the on key.
-
Use ▲ or ▼ to select the desired caller number.
-
Press ok key, then select "SAVE NUMBER".
-
Press OK.
-
Enter the name of the entry. Press OK.
Deleting caller list record
- Press the on key
- Press ▲ or ▼ key to select a call record.
- Press OK
- Select "DELETE" (or "DELETE ALL" to delete the entire Caller list) to delete the current record.
- Press OK.
- A confirmation screen appears.
- Using the telephone keypad:
- If you do not wish to delete the current record, press

- To delete the current record, press OK.
PHONEBOOK
You can store 50 phonebook entries (24 digits and 12 characters) in your phonebook.
Calling a contact from your phonebook
[NO TEXT]
-
Press key to consult the list of contacts.
-
Press the ▲ or ▼ key to consult directory entries.
-
When you have selected the desire number, press
![GRUNDIG D1120 - [NO TEXT] - 1](/content/2026/05/773616/images/f91350faf65421f0273a2999b5cd3105e7aefd1b0ad57137c3b69eec48894858.jpg)
Adding a contact to the phonebook
-
Go to the menu "PHONEBOOK" / "NEW ENTRY".
-
Enter the name of the entry. Press OK.
-
Enter the number of your entry using the keypad keys. Press OK.
Editing a contact
-
Go to the menu "PHONEBOOK" / "EDIT ENTRY".
-
Select the entry you want to edit using ▲ or ▼. Press OK.
-
You will then enter the name input screen and the cursor will be at the end of the name, press ☐ key to delete characters.
-
Enter the new name and press OK key.
-
You will then enter the number screen and the cursor will be at the end of the number, press 🔔 key to delete the numbers.
-
Enter the new number and press ok key.
Deleting a contact / The entire phonebook
-
Go to the menu "PHONEBOOK" / "DELETE" (or "DELETE ALL" to delete the entire phonebook list).
-
Select the entry you want to delete using ▲ or ▼. Press OK
-
To confirm the deletion of the entry, press OK key.
Adding numbers to speed dial list
This menu allows you to record two quick dial numbers assigned to the keys and on the keypad.
NOTE!
The number of your voice mail is not set at the factory, you can assign to the key
1 or 2 ABC
-
Go to the menu "PHONEBOOK" / "DIRECT MEM."
-
Select the key you want to assign a number ( or 2.
-
Press OK, "NO NUMBER" is displayed on the screen.
-
Press OK, "ELOT NUMBER" appears on the screen.
-
Press OK
-
Enter the name of the entry and press OK to confirm.
-
Enter the number of the entry. Press OK to confirm. You will hear a confirmation tone.
USING THE MULTI-HANDSET CAPABILITIES
These functions are used for handset management when two or more handsets are registered on the same base.
Intercom Call/Intercom
- Make sure your handset is on standby mode.
- Press the ☑ key on the handset.
If your installation has two handsets:
The second handset rings and the message "INTERCOM" and the calling handset number appear on the screen.
If your telephone installation has more than two handsets:
- The icon INT blinks on the screen and the number of all registered handsets.
- Enter the desired handset number. The desired handset rings.
- OR -
Press the * - key if you want to call all handsets.
Answering an internal call
- "INTERCOM" and the calling handset number appear on the screen. The "f" is blinking.
- Press the key to answer.
Managing an external and an internal call
Transferring an external call to another handset registered on same base
- During a call, press INT. The external user is put on hold.
- Enter the internal call number. When the user answers, you can announce the call.
- Press the key to transfer the call.
NOTE!
If the called handset does not answer, press to take back the call.
Switching between an external call and an internal call
During a double conversation, hold down the key ^INT to switch between an external call and an internal call.
Making conference calls (3-way conversation)
You can connect one external call to two handsets registered at the base station. To set up a telephone conference from an external call:
- Press ☑ key. The external user is put on hold.
- Enter the internal call number. Wait until the internal user answers.
- Press OK key, until an aural signal is heard to start a three-way conference.
"CONFERENCE" is displayed on the handset screen.
NOTE!
The activation of 3-way conference is possible only when you are in conversation with the internal handset call.
CUSTOMISING THE HANDSET
Handset naming
The default name of the handset is " HANDET N" where N is the number of the registered handset.
- Go to the menu " PERSONAL SET" / " HANDSET NAME".
- Use the keypad to enter the new name (up to 10 characters).
- Use ▷ key to delete wrong input if necessary. Press OK
Handset ringer level
- Go to the menu "PERSONAL SET" / "HANOSET TONE" / "RING VOLUME".
- Use ▲ or ▼ to select the volume level then press OK to confirm your selection.
Handset ringer melody
- Go to the menu "PERSONNALIS." / "HANDSET TONE" / "RING TONES".
- Use ▲ or ▼ to select the ring tone.
- Press OK.
Key tone On/Off
- Go to the menu "PERSONAL SET" / "HANDSET TONE" / "KEY BEEP".
- Use ▲ or ▼ to modify it.
- Press OK key to confirm your selection.
Modifying the language
- Go to the menu "PERSONAL SET" / "LANGUAGE".
- Use ▲ or ▼ to choose the desired language. Press OK key to confirm your selection.
Auto talk off
When active, the auto talk off feature enables you to automatically hang up as soon as you put the handset on its base.
- Go to the menu " PERSONAL SET " / " AUTO HANG-UP".
An information screen shows you the current state. Use ▲ or ▼ to modify it.
- Press OK key to confirm your selection.
Key lock
- Press and hold key for 1 second. An information screen shows you that the keys are locked.
- To recover to normal, press and hold * key (more than 1 second).
SETTING THE DATE AND TIME
Time and date
- Go to the menu "CLOCK & ALARM" / "DATE/TIME". Current date is displayed.
- To keep the date, press OK.
- To change it, enter the new date in 2099/00/JJ format.
- Press OK. Current time is displayed.
- To keep the time, press OK.
- To change it, enter the new time in the HH : mm format.
(If the time format is 12H, use the ▲ key to set Rn and the ▼ key to set Pn, after entering the time).
- Press OK.
NOTE!
If you make a mistake press

Hour format (12H/24H)
-
Go to the menu "CLOCK & ALARM" / "SET FORMAT" / "TIME FORMAT".
-
A screen displays the current format, use ▲ or ▼ to change it.
-
Press OK.
Date format
-
Go to the menu "CLOCK & ALARM" / "SET FORMAT" / "DATE FORMAT".
-
A screen displays the current format, use ▲ or ▼ to change it.
-
Press OK.
Alarm clock
- Go to the menu "CLOCK & ALARM" / "ALARM".
- To activate the alarm once, select "ON ONCE".
- To repeat the alarm each day at the programmed time, select "ON DAILY".
■ To deactivate the alarm, select "OFF".
-
Select your choice then press OK.
-
Enter the time when you want the alarm to go off: "HH - m"
(If the time format is 12H, use ▲ key to set PM and the ▼ key to set PM, after entering the time).
- Press OK.
Modifying alarm tone
-
Go to the menu "CLOCK & ALARM" / "ALARM TONE".
-
Select the desired melody.
-
Press OK key to confirm your selection. You will hear a confirmation tone.
ADVANCED SETTINGS
Modifying Base master PIN code
Your base station code (default setting 0000) is required to access some security functions. It must be 4 digits.
-
Go to the menu " ADVANCED SET " / " CHANGE PIN".
-
Enter your old code first, press OK.
-
Enter your new PIN code using the keypad. Each time a digit is entered the «_» is replaced by a «*».
-
Press OK key to confirm your new PIN code. You will hear a confirmation tone.
NOTE!
Carefully note your base station code. You will need it to change some settings.
Association of handset with your base
-
On the base, press and hold the pairing button (for at least 5 seconds). If no handset has been detected within 60 seconds, the base will exit the pairing mode.
-
On the handset, go to the menu " ADVANCED SET " / " REGISTRATION".
-
Enter the base master PIN code (default 0000). Press OK
-
Once the handset is registered, it automatically exists the registering mode.
-
The handset number (assigned automatically by the base) appears on the screen.
Deleting a handset
-
Go to the menu " ADVANCED SET " / " UNREGISTER".
-
Enter the base master PIN code (default 0000). Press OK
-
Select the handset you want to delete using the ▲ or ▼ key then press OK.
Modifying the country (depending on version)
-
Go to the menu " ADVANCED SET " / " COUNTRY".
-
Enter the base master PIN code (default 0000). Press OK
-
Select the country where you will use the telephone. Press OK
-
A confirmation screen appears, press OK
Restoring the Handset / Base Default Settings
-
Go to the menu " ADVANCED SET " / " RESET".
-
A confirmation screen appears, press OK
Prefix
If a PABX is used in a private network, you can program the outside call prefix.
This function sets:
The PABX prefix number: this number will be added at the beginning of the number you dialed.
The number to be detected: if the number you dialed starts with the recorded sequence, this sequence will be automatically deleted.
These two settings are not applied if number you dialed starts with "#", "*" or "P".
- Go to the menu " ADVANCED SET " / " AUTO PREFIX".
- Select "DETECT DIGIT" to define the number giving you access to the outside line.
- Select "PREFIX NO." to specify the «digits before prefix».
- Press OK.
Flash timing
If you connect your telephone to a private automatic branch exchange or use it in a foreign country, you may need to modify the flash duration in order to use your telephone correctly with regard to the following functionalities: outgoing 2nd call, incoming 2nd call, conference call.
Contact your administrator, who will supply the appropriate time period, and proceed to the new settings.
-
Go to the menu " ADVANCED SET " / " RECALL TIME".
-
Select the appropriate time period, press OK.
SHORT Spain, United Kingdom, Italy, Switzerland, Austria, Netherlands, Poland, Belgium, Ireland, Hungary, Slovenia, Romania, Slovakia, Czech Republic and Sweden
MEDIUM Germany, France, Greece, Portugal, Croatia, Serbia, Montenegro, Bosnia and Macedonia
LONG Bulgaria
Modifying the dialing mode
Most telephone systems use the tone dialing mode. You can, however, use the pulse dialing mode:
-
Go to the menu " ADVANCED SET " / " DIAL MODE " / " TONE" or " PULSE".
-
Press . OK
First ring
Activating this function is only useful if your line does not have the CLIP service.
This menu allows you to arrange for your telephone to ring when a call is received even if it is connected on the same line with another device (a fax, a cord telephone, etc.).
This function is activated as default. It will be automatically deactivated when a CLIP call is received (the number of which will be displayed on the handset screen).
-
Go to the menu " ADVANCED SET " / " FIRST RING".
-
Use the ▲ or ▼ key to change the state.
-
Press OK.
ANSWERING MACHINE (MODELS D1115 - D1125 - D1135 - D1145 ONLY)
The recording capacity of your answering machine is 15 minutes (2 minutes for the announcement and 13 minutes for the messages).
Your telephone features an answering machine with pre-recorded announcements and the possibility of remote access.
The answering machine function of your telephone has two operating modes:
- Basic answering machine: an announcement indicates that you are not available. Your correspondent cannot leave any message.
- Recording answering machine: an announcement tells your correspondents that they can leave you a message, after the beep.
Note!
Your phone offers pre-recorded announcements (depending on the version). It is recommended to record your own announcements, please refer to section « Modifying the outgoing message (OGM)», page 19.
Enabling / disabling the answering machine
- Go to "ANSU MACHINE" / "ANSU. ON/OFF".
- Select "ON" or "OFF" using the ▲ or ▼ key to activate or deactivate your answering machine.
- Press OK
Modifying the answering machine mode
- Go to "ANSU MACHINE" / "ANSWER MODE" / "ANSU. BRECORD" (or "ANSWER ONLY").
- Select "ANSU. GRECORD" or "ANSWER ONLY" using the ▲ or ▼ key, press OK. You will hear a confirmation tone.
Modifying the outgoing message (OGM)
Recording a personal outgoing message
- Go to "ANSW MACHINE" / "RECORD OGA" / "ANSW & RECORO" (or "ANSWER ONLY") / "RECORD OGA".
- Clear state your announcement close to the base.
- At the end of your announcement, press OK. A confirmation beep is issued.
NOTE!
The recording of a new announcement will automatically replace the previous announcement.
If you make a mistake while recording the announcement, repeat the operations described above until you are satisfied with your announcement.
NOTE!
The beeps at the start of recording and at the end are not part of your announcement.
Playing outgoing message
-
Go to "ANSU MACHINE" / "RECORD OGM" / "ANSU. GRECORD." (or "ANSWER ONLY") / "PLAY".
-
The currently used announcement is played. When the personal announcement has finished, your answering machine returns to the standby mode.
Note!
If no announcement is recorded, you will hear a beep.
Erasing your personal outgoing message
-
Go to "ANSW MACHINE" / "RECORD OGM" / "ANSW. GRECORD" (or "ANSWER ONLY") / "DELETE".
-
Press OK.
Listening to your messages
If you have received new messages, the icon flashes on the handset.
-
Go to "ANSW MACHINE" / "PLAY".
-
Press OK to play the messages. New messages are read first.
-
Press OK to access the various message options.
The list of options is displayed on the screen:
- REPEAT: replay the current message.
- N EXT: go on to the next message.
- PREVIOUS: return to previous message.
- D ELETE: delete the current message.
- Press ☐ to quit the menu.
Or you can use the handset keys:
Key Action
に
Return to previous message
Key Action

Go on to the next message.
2.
Stop reading the messages

Play messages
Deleting all old messages
-
Go to "ANSU MACHINE" / "DELETE ALL".
-
Press OK, the massage "CONFIRM?" is displayed.
-
Press OK to confirm deletion.
A beep indicates that all messages already played back have been deleted.
ANSWERING MACHINE SETUP (MODELS D1115 - D1125 - D1135 - D1145 ONLY)
Number of rings
This parameter enables you to set the number of times your telephone should ring, before the answering machine starts to operate. The number of rings can be set between 2 and 7.
You can also select the "ECONOMY" mode. The "ECONOMY" mode automatically determines the number of rings: If there are no new messages on the answering machine, the number of rings will be 4, otherwise the number of rings will be 2.
- Go to " AMSW MACHINE "/ " SETTINGS" / "RING DELAY".
- In the list, select the desired number of rings (between 2 and 7) using the ▲ or ▼ key or the "ECONOMY" mode.
- Press OK.
Remote access to answering machine
Your answering machine can be consulted remotely. With this function you can read your messages and consult your answering machine from any other telephone outside your home.
NOTE!
The code for remote access to the answering machine corresponds in fact to the PIN Code of your Base (0000 by default).
This code must be modified for remote access to be activated.
You can change the remote access code from the menu "ADVANCED SET" / "CHANGE PIN" menu (refer to section « Modifying Base master PIN code » page 17).
Activate/deactivate remote access
- Go to "ANSW MACHINE" / "SETTINGS" / "REMOTE ACC."
- Use ▲ or ▼ to select "ACTIVATE" or "DERACTIVATE" setting.
- Press OK key to confirm your selection. You will hear a confirmation tone.
Remote access control
To remotely access your answering machine: Dial your telephone number and wait for the answering machine to come on.
When your outgoing message is played, press # and enter your remote access code (0000 by default).
A beep will indicate access to the answering machine and you have to press the 2 key to read the messages.
New messages are read first.
You can also perform the following operations:
| Key Fonction | Key Fonction | ||
| 1 | Previous message. | 6 | Delete the current message |
| 2 | Listen to your messages / back to the beginning of the message | 8 | Stop the playback of the message |
| 3 | Next message | 9 | Switch off the answering machine |
BATTERIES SAFETY PRECAUTIONS
To avoid any risk of explosion:
- Make sure you have inserted the batteries correctly.
- Use only 2 x AAA 1,2V 300mAh type or equivalent rechargeable batteries pack.
- Do not dispose of the batteries in a fire. The cell may explode.
- Check with local code for possible special disposal instructions.
- Do not burn, disassemble, mutilate or puncture. Like other batteries of this type, toxic materials could be released which can cause injury.
- To reduce the risk of fire or personal injury, use only the battery listed in the user's guide.
- Keep batteries out of the reach of children.
- Remove batteries if storing over 30 days.
GENERAL PRODUCT CARE
To keep your telephone working and looking good, follow these guidelines:
- Avoid putting the phone near heating appliances and devices that generate electrical noise (for example, motors or fluorescent lamps).
- DO NOT expose to direct sunlight or moisture.
- Avoid dropping and other rough treatment to the phone.
- Clean with a soft cloth.
- Never use a strong cleaning agent or abrasive powder because this will damage the finish.
- Retain the original packaging in case you need to ship the phone at a later date.
Changing the batteries
Make sure the telephone is OFF before you replace batteries.
- Remove the batteries compartment door.
- Remove old batteries.
- Insert the new batteries.
- Put the batteries compartment door back on.
- Place handset in the base to charge
TROUBLESHOOTING
Causes of poor reception:
- Aluminium siding.
■ Foil backing on insulation. - Heating ducts and other metal construction can shield radio signals.
- You are too close to appliances such as microwaves, stoves, computers, etc).
- Atmospheric conditions, such as strong storms.
- Base installed in the basement or lower floor of the house.
- Base is plugged into an AC outlet with other electronic devices.
■ Baby monitor is using the same frequency. - Handset batteries is low.
- You are out of range of the base.
Auto-diagnostics
| Problem Solution | |
| No display | Make sure the batteries are properly installed.Place the handset in the base station to charge (for 15 hours). |
| Handset does not ring | Make sure the ringer setting on the handset is programmed to ON.You may have too many extension phones on your line. Try unplugging some phones. |
| You experience static, noise or fading in and out. | Move closer to the base (about 50 metres and up to 300 metres in open space).Does the base need to be relocated? |
http://www.grundig-ject.com
AUS GUTEM
GRUND
GRUNDIG