
AV820C Plus - To scan AVISION - Free user manual and instructions
Find the device manual for free AV820C Plus AVISION in PDF.


| Product Type | Document Scanner |
| Model | AV820C Plus |
| Brand | Avision |
| Scanning Element | CIS (Contact Image Sensor) |
| Optical Resolution | 600 dpi |
| Document Feeder Capacity | 50 sheets (80 gsm) |
| Duplex Scanning | Yes, one-pass duplex |
| Max Scan Size | 216 x 356 mm (Legal) |
| Scan Speed | Up to 20 ppm / 40 ipm (200 dpi, A4) |
| Daily Duty Cycle | Up to 1,000 scans |
| Dimensions (W x D x H) | 320 x 180 x 160 mm |
| Weight | 4.2 kg |
| Power Supply | AC 100-240V, 50/60 Hz |
| Power Consumption | 18W (operating), 5W (standby) |
| Interface | USB 2.0 |
| Supported OS | Windows 10/8/7, macOS 10.12+ |
| Bundled Software | Avision Capture Tool, Twain driver, ISIS driver |
| Maintenance | Clean scanner glass and ADF rollers periodically |
| Safety Certifications | CE, FCC, RoHS |
| Repairability | Spare parts and service manuals available via Avision support |
Frequently Asked Questions - AV820C Plus AVISION
User questions about AV820C Plus AVISION
0 question about this device. Answer the ones you know or ask your own.
Ask a new question about this device
Download the instructions for your To scan in PDF format for free! Find your manual AV820C Plus - AVISION and take your electronic device back in hand. On this page are published all the documents necessary for the use of your device. AV820C Plus by AVISION.
USER MANUAL AV820C Plus AVISION
natural_image
Office desk setup with a white typewriter, stacked books, a coffee cup, and colorful palettes against a brick wall (no visible text or symbols)Doc. No.250-0070-03 Rev. C
Avision Inc.
Trademarks
Microsoft is a U.S. registered trademark of Microsoft Corporation.
Windows and MS-DOS are trademarks of Microsoft Corporation.
IBM, PC, AT, XT are registered trademarks of International Business Machines Corp.
Other brands and product names herein are trademarks or registered trademarks of their respective holders.
Copyright
All rights reserved. No part of this publication may be reproduced, transmitted, transcribed, stored in a retrieval system, or translated into any language or computer language, in any form or by anymeans, electronic, mechanical, magnetic, optical, chemical, manual, or otherwise, without the prior written permission of Avision Inc.
Material scanned by this product may be protected by governmental laws and other regulations, such as copyright laws, the customer is solely responsible for complying with all such laws and regulations.
Warranty
The information contained in this document is subject to change without notice.
Avision makes no warranty of any kind with regard to this material, including, but not limited to, the implied warranties of fitness for a particular purpose.
Avision shall not be liable for errors contained herein or for incidental or consequential damages in connection with the furnishing, performance, or use of this material.
FCC Radio Frequency Interference Statement
This equipment has been tested and found to comply with the limits for a class B digital device, pursuant to Part 15 of the FCC rules. These limits are designed to provide reasonable protection against harmful interference in a residential installation. This equipment generates, uses, and can radiate radio frequency energy and, if not installed and used in accordance with the instruction manual, may cause harmful interference to radio communication. However, there is no guarantee that interference will not occur in a particular installation. If this equipment does cause harmful interference to radio or television reception, which can be determined by turning the equipment off and on, the user is encouraged to try to correct the interference by one or more of the following measures:
– Reorient or relocate the receiving antenna.
– Increase the separation between the equipment and receiver.
- Connect the equipment into an outlet on a circuit different from that to which the receiver is connected.
- Consult the dealer or an experienced radio/TV technician for help.
FCC CAUTION: To assure continued compliance, (example - use only shield interface cables when connecting to computer or peripheral devices). Any changes or modifications not expressly approved by the manufacture of this device could void the user's authority to operate the equipment. This device complies with Part 15 of the FCC Rules. Operation is subject to the following two conditions: (1) This device may not cause harmful interference, and (2) this device must accept any interference received, including interference that may cause undesired operation.
Responsible
Avision Labs, Inc.
Party:
Telephone No.: +1 (510) 739-2369
Table of Contents
1. INTRODUCTION 1-1
2. SCANNER INSTALLATION.... 2-1
2.1 PRECAUTIONS 2-1
2.2 SCANNER UNPACKING 2-1
2.3 ADF PAPER CHUTE INSTALLATION 2-5
2.4 DOCUMENT LOADING.... 2-7
2.5 CONNECTING THE CABLES 2-9
2.6 INSTALLATION OF THE SCSI CARD....2-11
2.6.1 PC USERS....2-11
2.6.2 MAC USER....2-12
3. SCANNER DRIVER INSTALLATION 3-1
3.1 MAC USERS 3-1
3.2 PC USERS 3-4
3.2.1 WINDOWS 3.1 OR WINDOWS 3.1X 3-4
3.2.2 WINDOWS 95 OR WINDOWS NT4.0.... 3-5
5.1 CLEANING THE ADF 5-1
5.2 CLEANING THE GLASS 5-3
5.3 REPLACING THE ADF DETACHABLE PAD MODULE .... 5-4
6. TROUBLESHOOTING.... 6-1
6.1 FREQUENTLY ASKED QUESTIONS...... 6-1
6.2 PAPERJAM IN THE ADF 6-4
6.3 TECHNICAL SERVICE.... 6-6
7. SPECIFICATIONS.... 7-1
7.1 MODEL: DOCUMENT SCANNERS.... 7-2
1. INTRODUCTION
Congratulations on your purchase of the Avision document scanner. Avision is one of the leading company to make high quality document scanner.
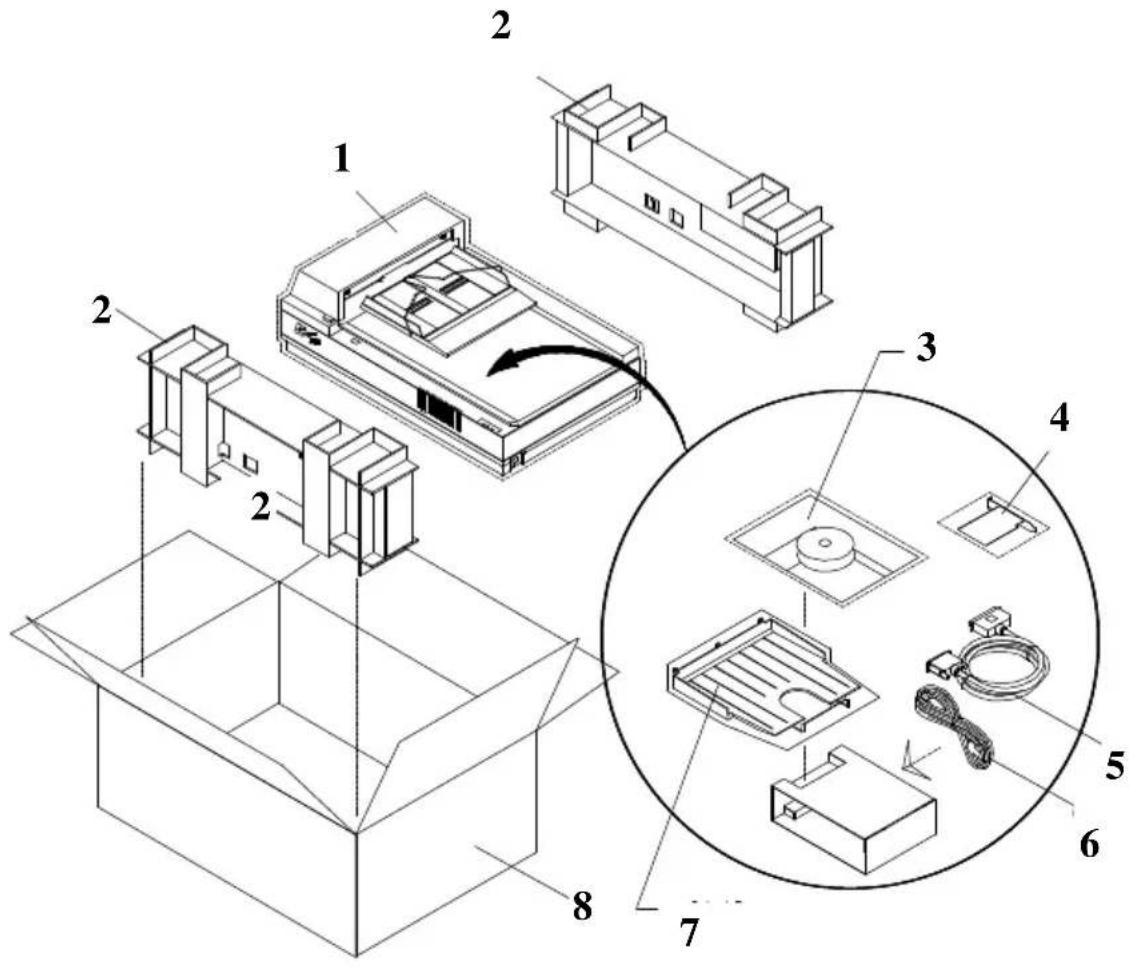
To ensure the optimum performance of the scanner, please take a few minutes to read through this manual before you install and operate the new scanner. The manual contains important information on how to unpack, install, operate, and maintain the scanner properly. Figure 2-1 in below shows how the scanner is packed. Please check if all items are included.
text_image
Technical diagram of a mechanical assembly with numbered components and an inset view of a device layout.- Scanner main unit
- Cushion
- Users manual, Software CD
- SCSI host adapter
- SCSI cable
- Power adapter
- Output paper rack
- Carton
Figure 1-1 Scanner Packaging
2. SCANNER INSTALLATION
2.1 PRECAUTIONS
Keep the scanner out of direct sunlight. Direct exposure to the sun or excessive heat may cause damage to the unit.
Do not install the scanner in a humid or dusty place.
- Be sure to use the proper AC power source.
Place the scanner securely on an even, flat surface. Tilted or uneven surfaces may cause mechanical or paper-feeding problems.
Keep the shipping box and the material in case you may need to ship the scanner again.
2.2 SCANNER UNPACKING
Please unpack the scanner carefully. If any item is missing or damaged, please contact your authorized Avision dealer immediately.
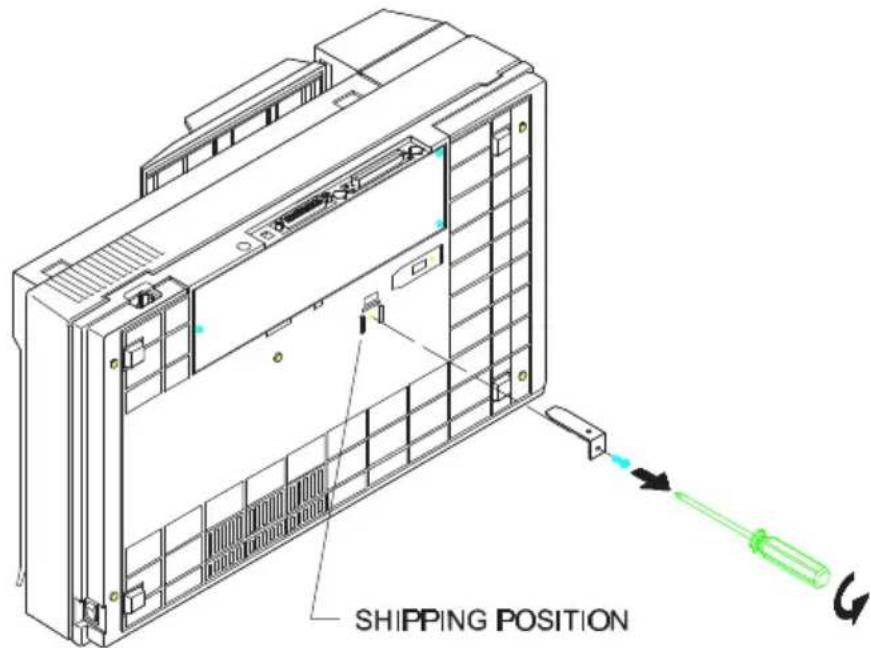
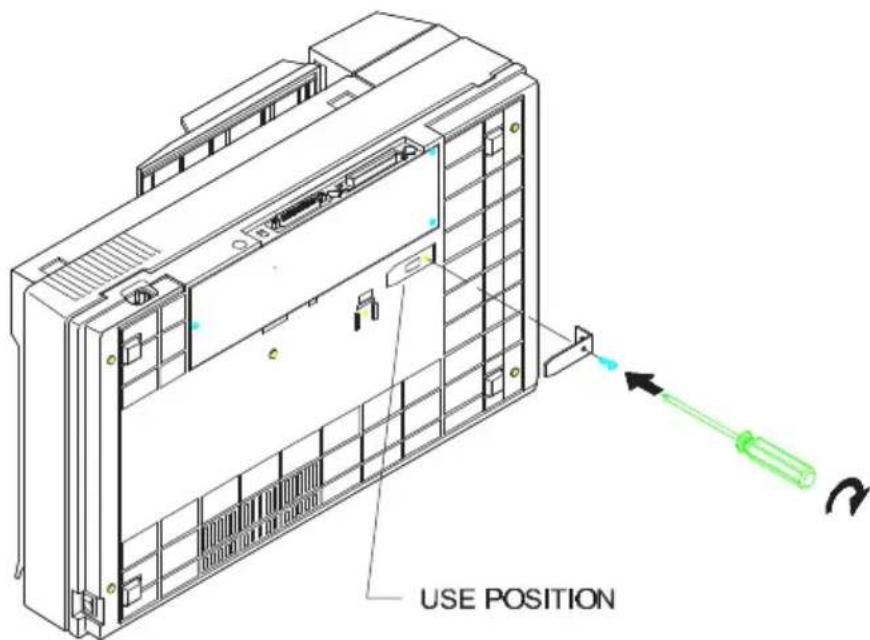
Remove the shipping retainer:
- Place the scanner on its side as shown to reveal the shipping retainer as shown in Figure 2-1.
- Unscrew the retainer screw.
- Pull out the shipping retainer and put it in the "use position"(See Figure 2-2) and secure it with the screw.
- Lay down the scanner on the desk for normal operation.
text_image
SHIPPING POSITIONFigure 2-1 Remove the shipping retainer.
text_image
USE POSITIONFigure 2-2 Fasten the shipping retainer.
Refit the shipping retainer:
Whenever you need to transport the scanner, please follow the instructions below:
- Turn off the scanner.
- Raise the document cover. You can see clearly the flatbed glass as well as the reading engine.
- Turn on the scanner. At this moment, the reading engine will move a few inches forward and stay there for a few seconds. Turn off the scanner during this pause.
- Raise the scanner high enough to unscrew the shipping retainer from the “use position” and fix it in the “shipping position.”
SCSI ID:
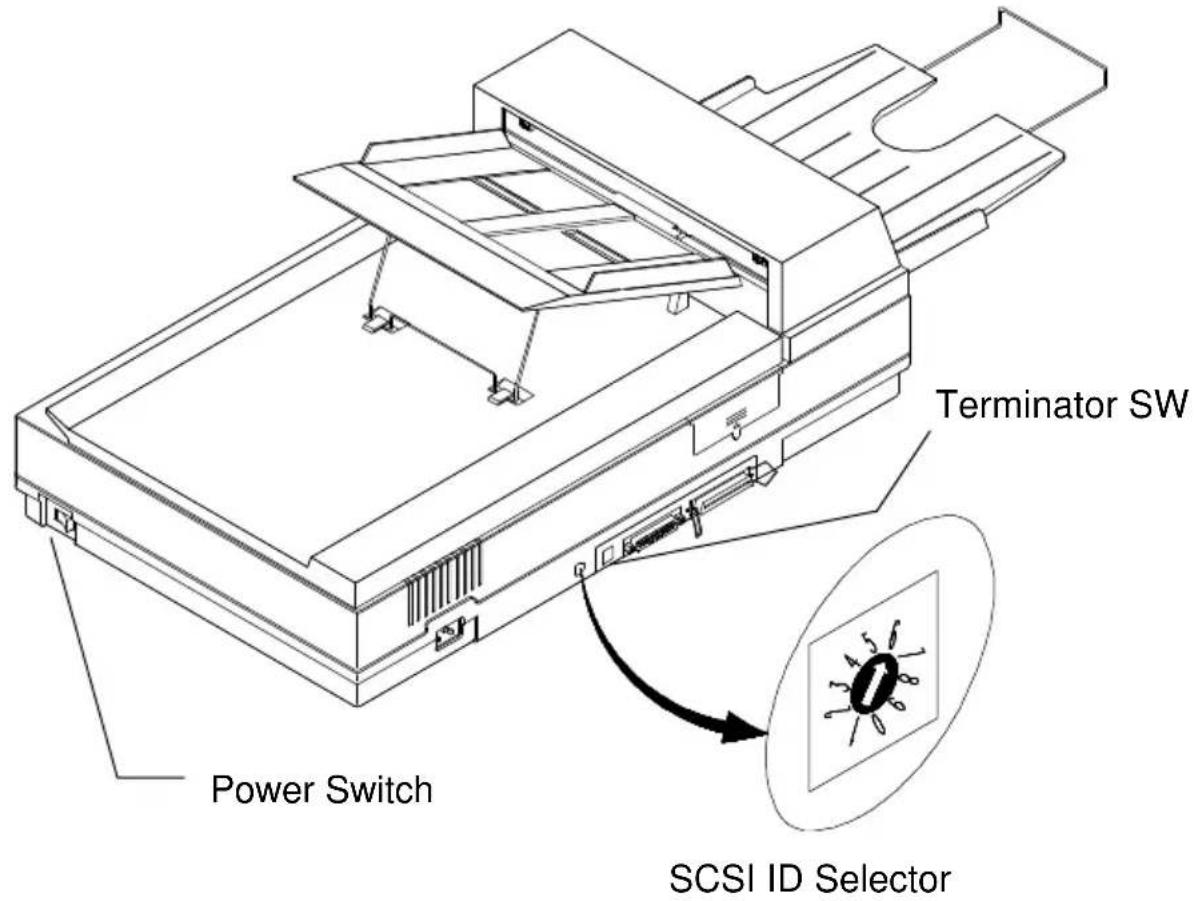
When you have several devices on a SCSI chain, you may need to adjust the SCSI ID selector setting located on the back of the scanner(See Figure 2-3). This setting assigns a specific "device ID" to the scanner. If the ID number is duplicate with an existing SCSI device, please select a new ID.
Note: The factory setting for the scanner is ID# 6. Usually, ID# 0 is assigned to an internal hard disk drive, and ID# 7, to SCSI adapter or host. ID# 8 and #9 are not in use actual.
Setting Terminator
The scanner is equipped with a built-in terminator switch on the rear of the scanner. (See Figure 2-3) Turn the terminator switch on if the scanner is to be connected to the computer as the only or the last SCSI device. Turn the terminator switch off if the scanner is to be located between the computer and other SCSI device.
text_image
Power Switch Terminator SW SCSI ID SelectorFigure 2-3 SCSI ID setting/Terminator switch
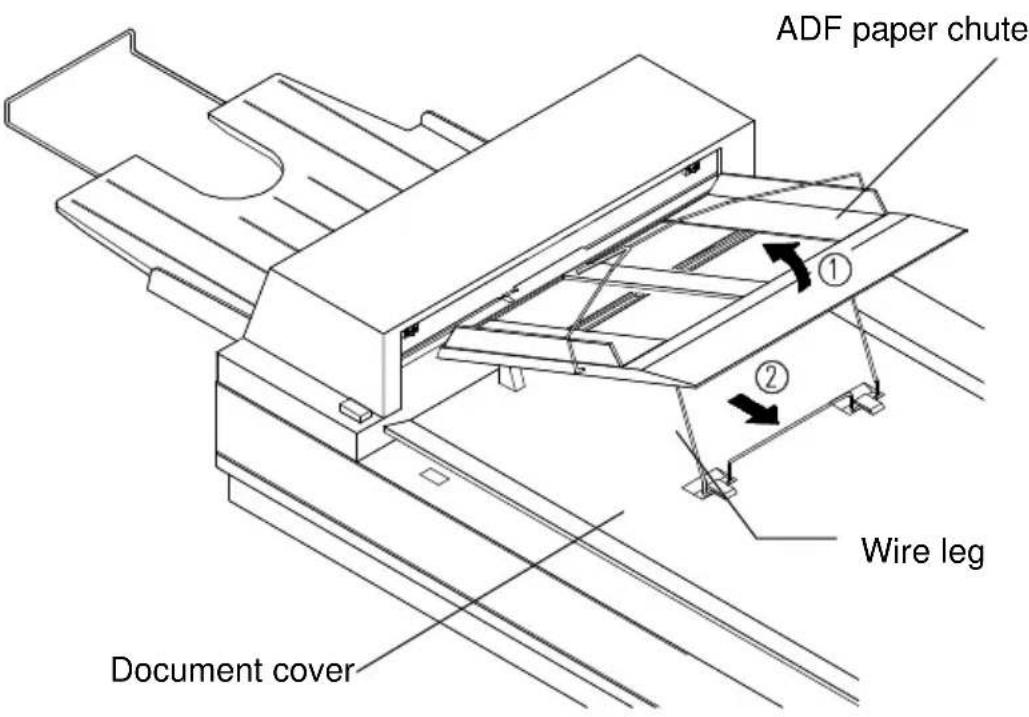
2.3 ADF PAPER CHUTE INSTALLATION
- Raise the document cover to about 45 degrees.
- Place the ADF paper chute to about 45 degrees. Insert the ADF paper chute to auto feeder holes on the document cover as shown in Figure 2-4.
- Pull out the wire leg under the paper chute.
- Pull out the paper chute extension to the length you wish.
text_image
ADF paper chute ① ② Wire leg Document coverFigure 2-4 Install the ADF paper chute
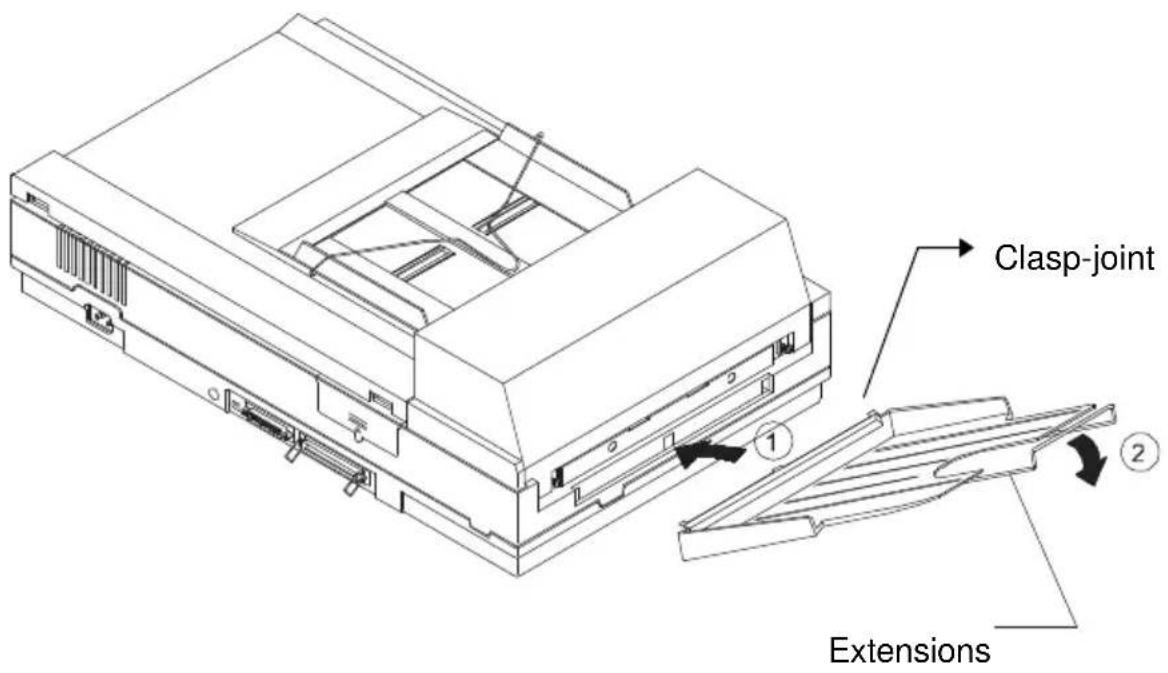
ADF output paper rack installation
- Hold the output paper rack some 30 degrees as shown in Figure 2-5.
- Insert the three clasp-joints on the output paper rack in their respective places on the ADF.
- Release the paper rack gently. Make sure the rack is firmly attached to the ADF.
- Pull out the output paper rack extension to the length you want.
text_image
Clasp-joint ExtensionsFigure 2-5 Install the ADF output paper rack
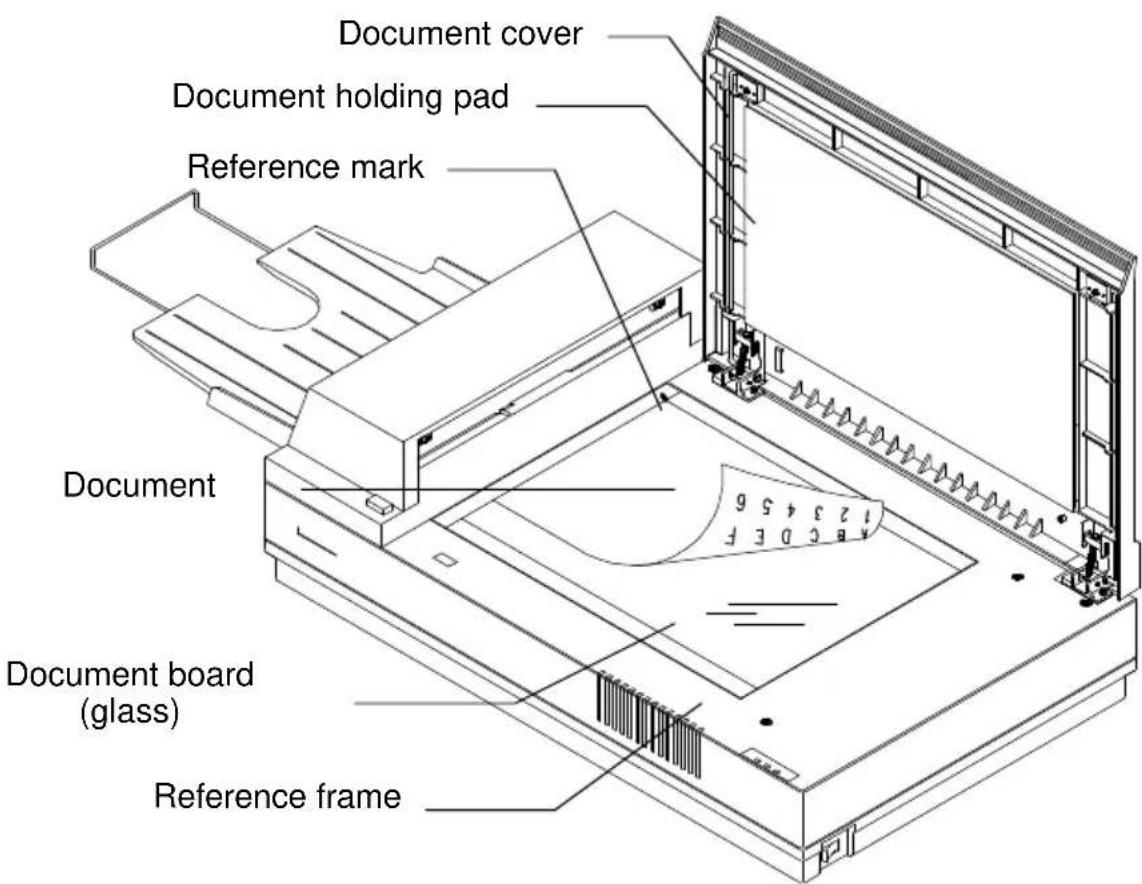
2.4 DOCUMENT LOADING
For flatbed scanning, see Figure 2-6.
text_image
Document cover Document holding pad Reference mark Document Document board (glass) Reference frameFigure 2-6 Lay the paper on the scanner
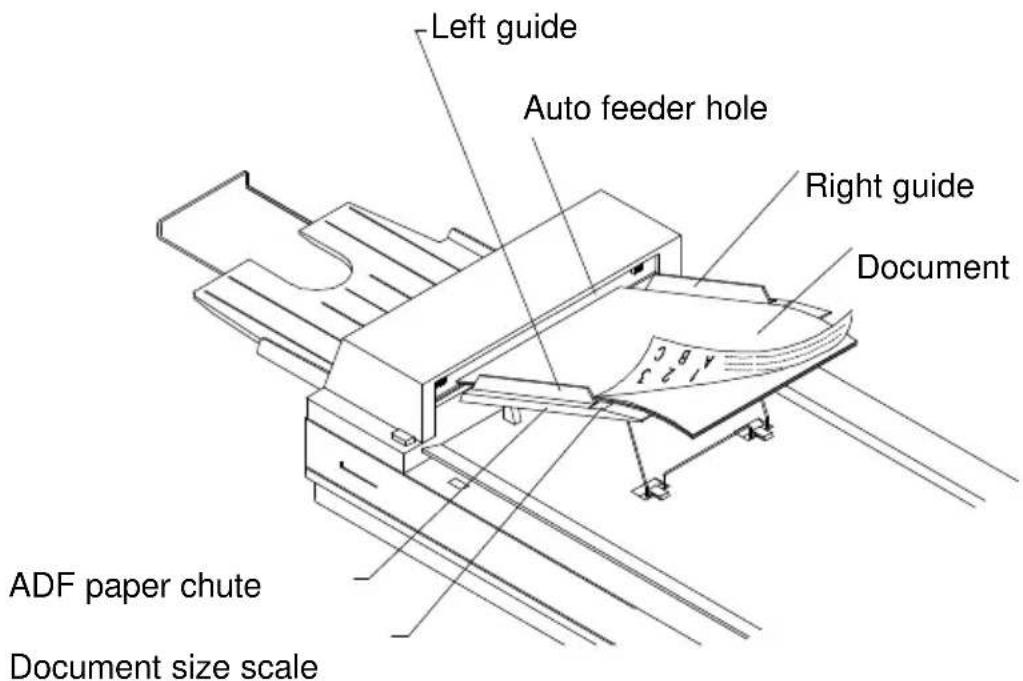
Standard paper size should feed easily through the scanner. To prevent occasional paper jam when automatically feeding multiple documents, loosen the paper before loading(See Figure 2-7).
text_image
Left guide Auto feeder hole Right guide Document ADF paper chute Document size scaleFigure 2-7 Use ADF to load multiple documents
2.5 CONNECTING THE CABLES
Be sure the scanner power is switched off.
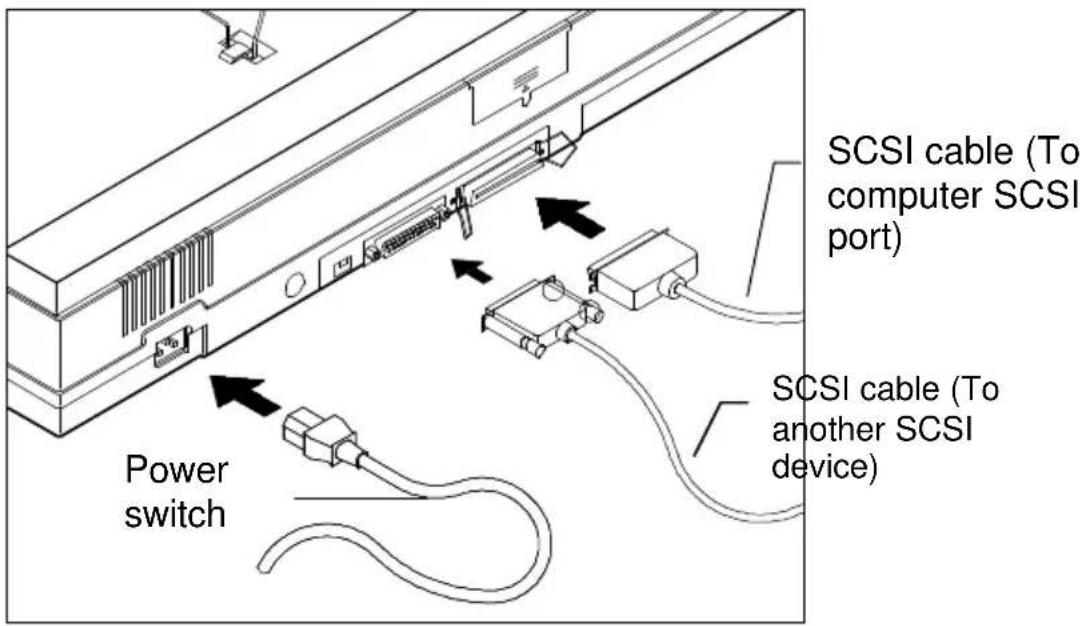
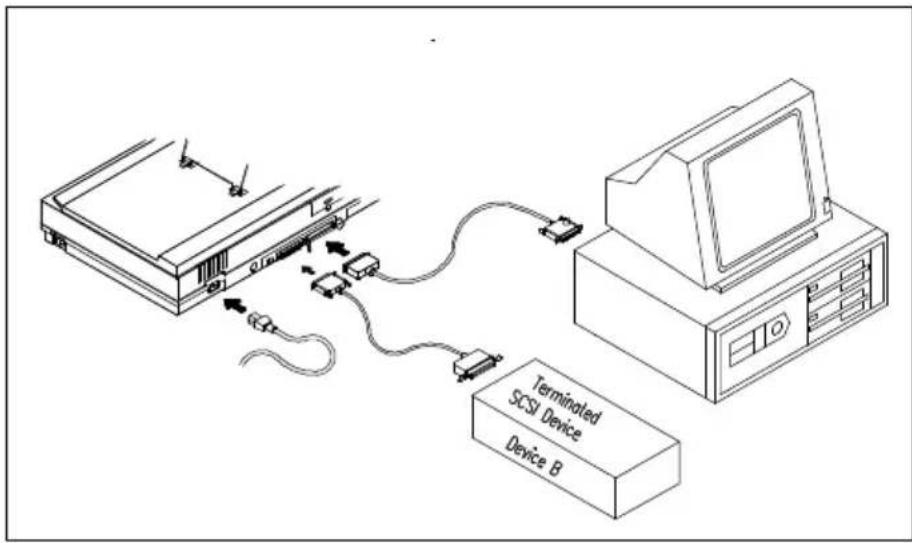
Connect the power cable and signal cable as Figure 2-8 and Figure 2-9.
Turning on the Power
The power is controlled by a toggle switch on the side of the scanner. To turn on the scanner, press the switch toward "1."
At this moment, the POWER LED should light up. If not, check the power.
Scanner Diagnostics
The scanner has a built-in self-diagnostic function to detect system errors. The self test is initiated each time the scanner is turned on. During the test, the READY LED is flashing. At the end of the test, if no error occurs, the READY LED is steadily on.
text_image
SCSI cable (To computer SCSI port) Power switch SCSI cable (To another SCSI device)Figure 2-8 Cable connection (Close view)
text_image
Terminated SCSI Device Device BFigure 2-9 Cable connection (General view)
2.6 INSTALLATION OF THE SCSI CARD
2.6.1 PC USERS
2.6.1.1 ADAPTEC SCSI CARD
Hardware Installation
- Turn off your computer.
- Plug the SCSI card in an available slot of your computer. Be sure to screw it firmly.
- Turn on your computer.
Software Installation
Windows 3.1
If your scanner comes with an Adaptec AVA-1505Ae, then the installation of the SCSI card driver will be complete during the installation of the scanner driver.
Windows 95
Windows 95 has embedded driver support for your host adapter. When you start Windows 95, the host adapter is detected and the appropriate driver is automatically installed.
Windows NT
- Press Start>Setting>Control Panel. And choose "SCSI Adapter" from the Control Panel menu. The "SCSI Adapter" dialog box is displayed. Choose Driver.
- Choose "Add" and "Select manufacturer and SCSI adapter".
- Select "Adaptec" as the manufacturer and "AIC-6X60 ISA Single Chip SCSI Controller" as the adapter and then Confirm.
- Follow the on-screen instruction to complete the installation.
- Restart your Windows NT.
2.6.1.2 OTHER SCSI CARDS
If you purchase your SCSI card separately from the scanner, then please follow the installation instruction provided by your SCSI card supplier.
2.6.2 MAC USER
The Mac system already has SCSI controller built in. Connect the system, therefore, set a different SCSI ID for each SCSI device.
3. SCANNER DRIVER INSTALLATION
3.1 MAC USERS
The AV800C series document scanner must have the following minimum requirements to run at rated speed as recommended:
• MAC II series; Quadra series, Perfoma series; Power Macintosh series, PowerBook series or later;
• At least 20M bytes of free hard disk space;
• A minimum of 16M bytes of system memory required, 32M bytes or higher recommended;
• Mac compatible display card and monitor with at least 256 colors; thousands colors or million colors display card recommended;
• System 7 or later.
• A floppy disk drive
The installation procedures of Avision scanner driver are as follows:
- Close all the applications including the anti-virus program.
- Install on your computer the image-editing or scanner-related application you want to use with the scanner, such as OmniPage, PhotoShop, etc.
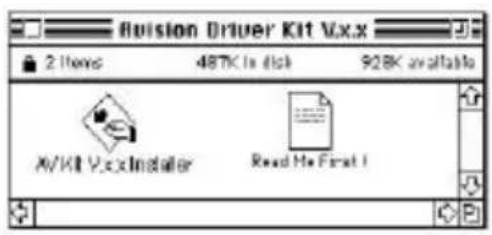
- Insert "Avision Driver Kit" disk into your floppy disk drive. The Avision Driver Kit X.x.x dialog box as Fig. 3-1 will appear. Read "Read Me First" for some valuable information which you should note.
- Double click on the "AV Kit X.x.x Installer" icon. AV Kit X.x.x Installer dialog box will appear as Fig. 3-2.
-
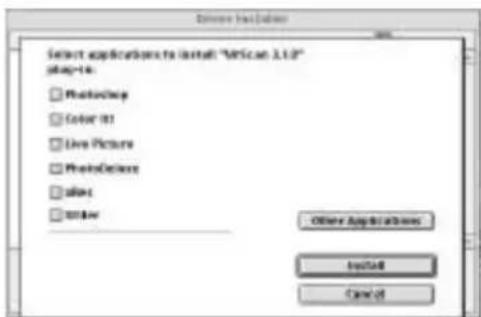
Click Easy Install icon and drag it to the system icon in the right side. A "Select a folder for plug-in" dialog box as Fig. 3-3 will appear. Select your application folder and select the "Choose plug-ins" button. The installation will then be completed.
-
Choose Restart to proceed your next step.
- If you want to use other Optical Character Recognition (OCR) applications such as OmniPage, Xerox TextBridge, Type Reader, etc., you have to setup the ISIS driver to access the scanner. The ISIS driver is a file named “Avision Scan.” To setup, select “Chooser” command from the
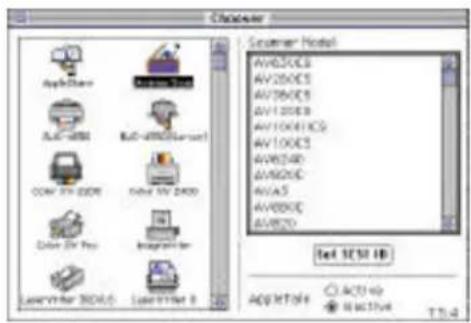
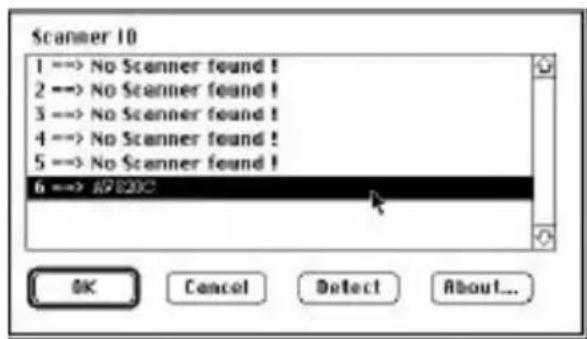
"Apple" menu. A dialog box as Figure 3-4 will appear on the screen. Select the "Avision Scan" icon, ignore the "Scanner Model" list and the "Set SCSI ID" button, The list of scanner model will be displayed. Click on the "Set SCSI ID" button. The "Scanner ID" window as Fig. 3-5 will appear. Choose "Detect". The current Scanner ID number will be verified and highlighted. Press OK button. You can then start your application to use the scanner, or refer to your application manual for more details.
text_image
Revision Driver Kit V.x.x 2 Items 487K is disk 928K available AVKIT V.x.x Installer Read He First 1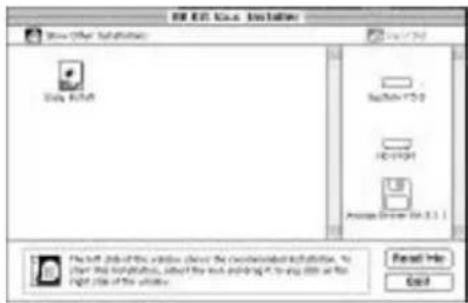
text_image
File Edit View Options Show Other Subactions Save As-Off Save As-Off AC-01/04 Agrace Drive IA 3.1.1 File Edit Job of the website driver the customized installation, to start the following: click the link adding it to any other on the right side of the website. Send Info: CallFigure 3-1 Avision Driver Kit X.xx
text_image
Select applications to install "MISCAN 3.1.0" play-16. □ PhotoShop □ Color 81 □ Live Picture □ PhotoDelivery □ Select □ Other Other Applications Install CancelFigure 3-3 Select a folder for plug-in
Figure 3-2 AV Kit X.x.x Installer
text_image
Controller AppWizard AutoCAD AutoCAD AV/200CS AV/200CS AV/200CS AV/100CS AV/100CS AV/800C AV/800C AV/65 AV/600C AV/30 System Manager AV/200CS AV/200CS AV/200CS AV/100CS AV/100CS AV/800C AV/800C AV/65 AV/600C AV/30 System Manager System Manager System Manager System Manager System Manager System Manager System Manager System Manager System Manager System Manager System Manager System Manager System Manager System Manager System Manager System Manager System Manager System Manager System Manager System Manager System Manager System Manager System Manager System Manager System Manager System Manager System Manager System Manager System Manager System Manager System Manager System Manager System Manager System ManagerFigure 3-4 Chooser
text_image
Scanner 10 1 --> No Scanner found ! 2 --> No Scanner found ! 3 --> No Scanner found ! 4 --> No Scanner found ! 5 --> No Scanner found ! 6 --> R7820C OK Cancel Detect About...Figure 3-5 Scanner ID
Note: You can find the latest driver in our homepage located at the World Wide Web(WWW) with the web site: http://www.avision.com
3.2 PC USERS
To run the scanner at rated speed as recommended, you must have the following minimum requirements:
IBM compatible PC 486, Pentium or later;
Microsoft Windows 3.1, Windows 95, or Windows NT;
One SCSI card installed one your computer;
20M bytes of available hard disk space for installation;
16M bytes of RAM (32M bytes or higher recommended);
A video graphics array (VGA) monitor;
A Microsoft Windows-compatible pointing device (e.g., the mouse);
A CD-ROM drive.
Installation procedures of Avision Scanner driver are as follows:
- Start Windows 3.1 Windows 95 or Windows NT.
- Insert Avision PaperCom Supreme CD to your CD-ROM drive.
3.2.1 WINDOWS 3.1 OR WINDOWS 3.1X
- From the File Menu, choose RUN. Type d:\driver\scsi.exe (d means the letter indicating your current CD-ROM drive). Choose O.K.
3.2.2 WINDOWS 95 OR WINDOWS NT4.0
- Press the Start button and choose RUN. Type d:\driver\scsi.exe (d means the letter indicating your current your CD-ROM drive). Choose O.K.
- Follow the subsequent instruction on the screen to complete the instruction. (Normally just press OK and the installation will be completed.)
- Start your application. From File menu, choose Import command.
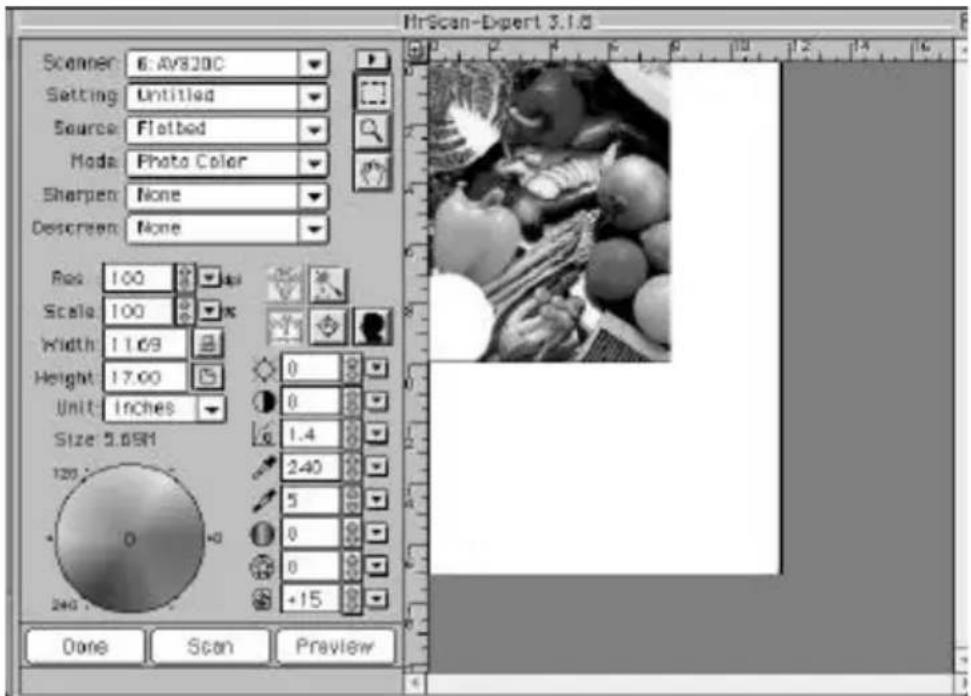
- Select MrScan X.x.x from the submenu of Import. The Mac Plug-in user interface will pop up on the screen.
- Place the document upside down on the document board(glass) with the text facing away from you.
- Click the Preview or Scan button to preview or scan your document or image.
text_image
MrScan-Expert 3.1.0 Scanner: 6. AV820C Setting: Untitled Source: Flatbed Mode: Photo Color Sharpen: None Descreen: None Res: 100 Scale: 100 Width: 11.6/9 Height: 17.00 Unit: Inches Size: 5.05M 120 240 Done Scan PreviewFigure 4-1 The Mac Plug-in user interface
PC Users
- Open your application and choose Select Source from the File menu. If the Select Source command is not available from the File menu, see the user guide of your application to learn how the TWAIN link is used.
- A dialog box appears containing the different TWAIN sources for you to choose from to bring an image into your application.
- Select MrScan-Expert as the source.
- You need to select MrScan-Expert for just once except when you need to use the dialog box to select a different source. In that case, you will need to select MrScan-Expert as the source again before you can reuse the scanner.
- Place the document upside down on the document board with the text facing away from you.
- From the File menu, choose Acquire.
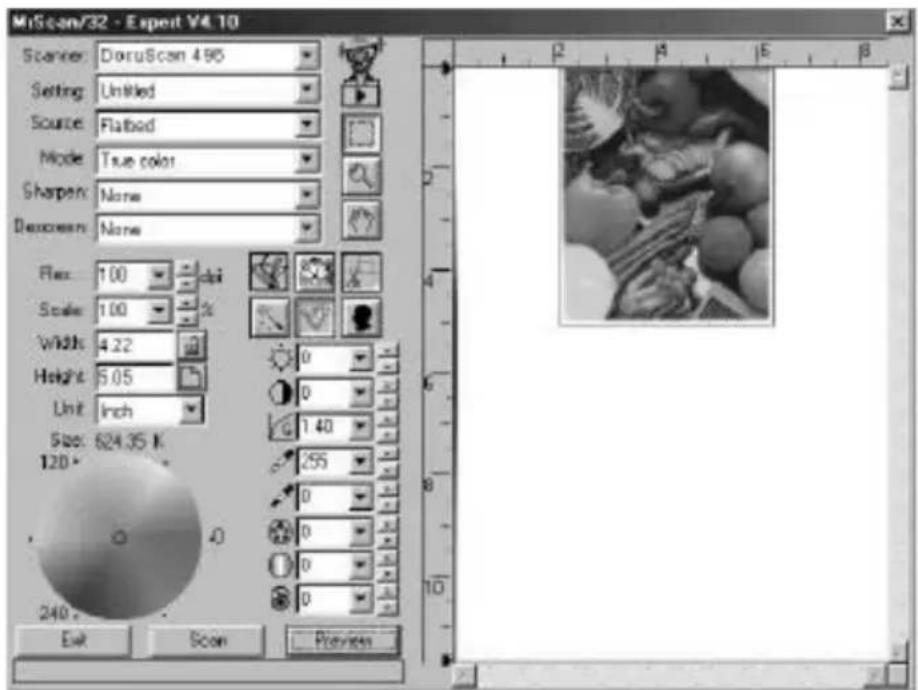
- Avision TWAIN user interface as Figure 4-2 will pop up on the screen. Click Preview or Scan button to scan the document.
text_image
MiScan/32 - Expert V4.10 Scanner: DoruScan 496 Setting: Untitled Source: Flatbed Mode: True color Sharpen: None Decoosen: None Flex: 1.00 Scale: 1.00 Width: 4.22 Height: 5.05 Unit: Inch Size: 624.35 K 120° Exit Scan PreviewFigure 4-2 Avision TWAIN user interface
Scanning Source:
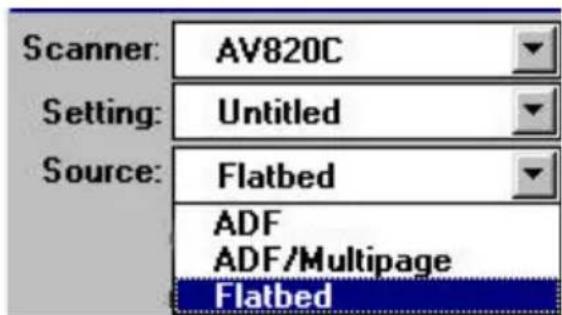
The document scanner scans three types of source, the document as well as the ADF and ADF/Multipage. Select either one from the source box of the screen of Avision TWAIN user interface for your own purpose. Please see Figure 4-3 as shown below:
text_image
Scanner: AV820C Setting: Untitled Source: Flatbed ADF ADF/Multipage FlatbedFigure 4-3 Scanning Source
4.1 IMAGE TYPE
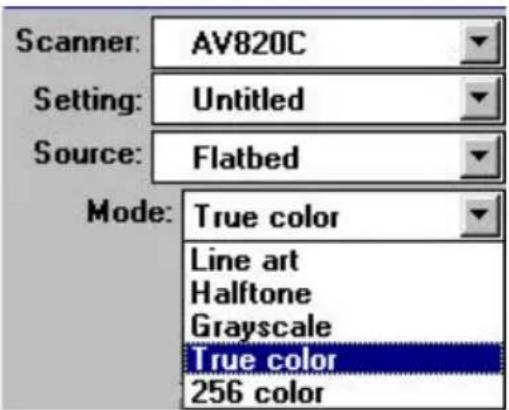
Select image type through the mode from the screen of Avision TWAIN user interface for your own purpose. Please see Figure 4-4 as below:
text_image
Scanner: AV820C Setting: Untitled Source: Flatbed Mode: True color Line art Halftone Grayscale True color 256 colorFigure 4-4 Image Type
Each image type is described as follows:
Line art
Line art displays the image only in black and white. There are no intermediate shades of gray in between.
Halftone
Halftone simulates different shades of gray by varying the threshold value of a matrix.
Gray (1024 levels of gray scale internally)
Scanner recognizes each point in the image as a shade of gray (continuous tone). 10-bit gray gives more detailed information about the image.
True Color (30 bits)
Color image have continuous tones and a broader range of colors.
256 Colors
The 256 colors image provides 256 levels of color hues.
4.2 RESOLUTION CONTROL
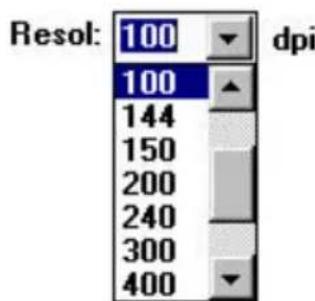
A good control of the resolution results a satisfactory detail of an image that scans. The resolution is measured by dots per inch(dpi). Normally, the greater the dpi number, the higher the resolution and the image file size. Be aware that the greater resolution takes more time, memory and disk space, therefore, up to a certain degree of dpi, the resolution will not visually be improved, on the contrary, it makes your files more unmanageable.
text_image
Resol: 100 dpi 100 144 150 200 240 300 400Figure 4-5 Resolution Control
Scaling: You can lock the X-Y scaling factor to keep the ratio of the axis. Or you can use a different scaling factor for each axis.
Unit: A reminder of the measure system in use. By clicking on the abbreviation you can change the measure system.
4.3 IMAGE CONTROL
text_image
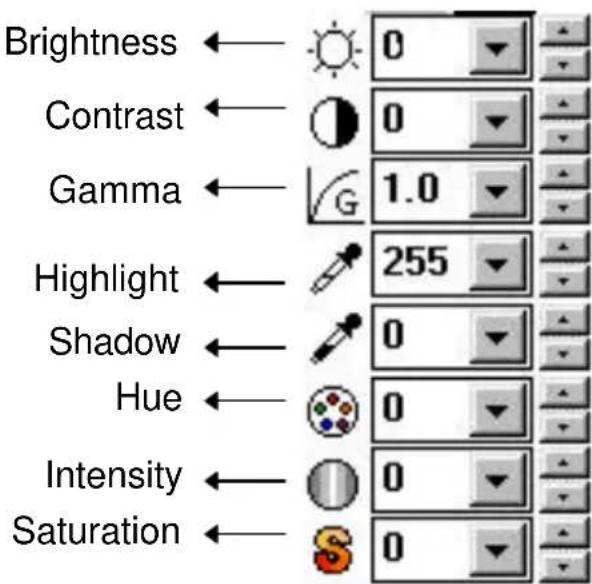
Brightness ← Contrast ← Gamma ← Highlight ← Shadow ← Hue ← Intensity ← Saturation ←Brightness: Adjusts the lightness or darkness of an image. The higher the value, the brighter the image.
Contrast: Adjusts the range between the darkest and the lightest shades in the image. The higher the contrast, the bigger the different gray scales.
Gamma: Adjusts the midtone of the image without losing details of the lightest and the darkest areas.
Highlight: Adjusts the highlight area of the image.
Shadow: Adjusts the darkest area of the image.
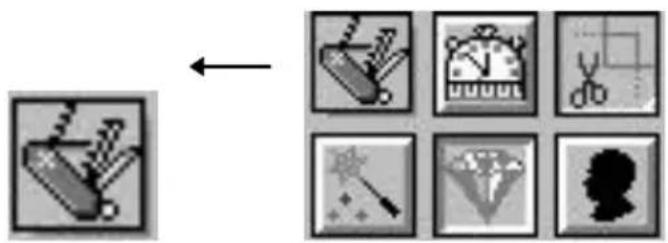
Advance Settings: (PC)
Click to remove R(Red), G(Green), or B(Blue) color background to sharpen your text or drawing.
text_image
Diagram showing a pencil icon pointing to six different icons, likely representing tools or applications in a software interface.Invert:
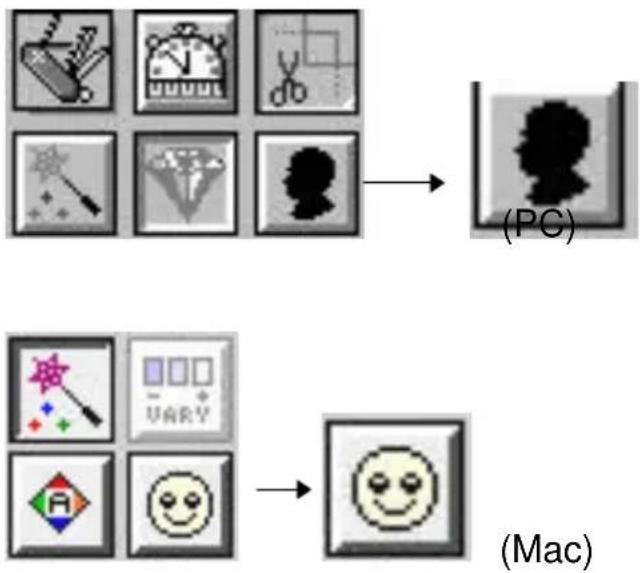
The invert command reverses the brightness and the color in the image. For color images, each pixel will be changed into its complementary color at the command of Invert.
flowchart
graph TD
    A["PC Icon"] --> B["Mac Icon"]
    style A fill:#f9f,stroke:#333
    style B fill:#bbf,stroke:#333
Color Matching:
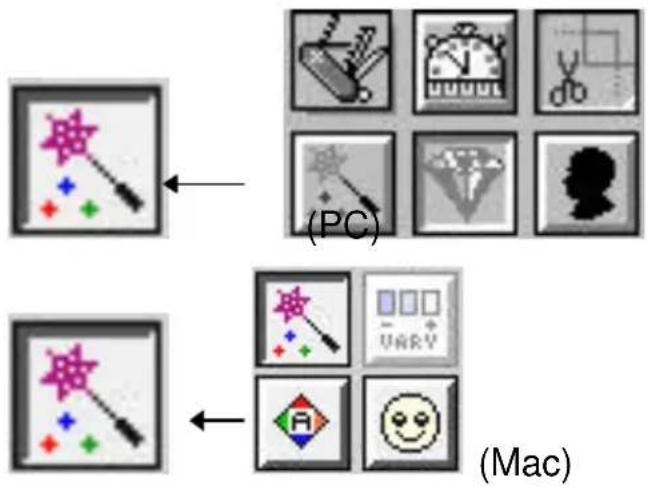
Adjusts the color quality of the image so that it comes close to that of the original. This function uses default parameters to adjust the image.
flowchart
graph TD
    A["(PC)"] --> B["(Mac)"]
    B --> C["Color Check Icon"]
    C --> D["Arrow to (PC)"]
    D --> E["Arrow to (Mac)"]
    E --> F["Arrow to (PC)"]
    F --> G["Arrow to (Mac)"]
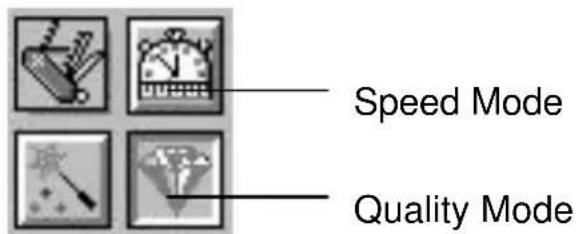
Quality/Speed Mode:
Choose Speed Mode if you need to speed up your scanning task. Choose Quality Mode if you need a better quality of your scanning result.
text_image
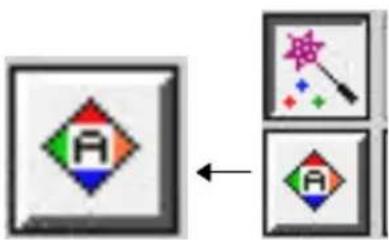
Speed Mode Quality ModeAuto Level: (Mac)
Automatically adjusts the highlight and shadow areas of the scanned image to give it an optimal effect.
flowchart
graph TD
    A["Process Step 1"] --> B["Product Box 1"]
    C["Process Step 2"] --> D["Product Box 2"]
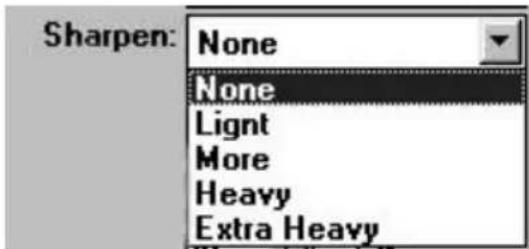
Sharpen: Sharpens the scanned image. Look for more selections under this item.
text_image
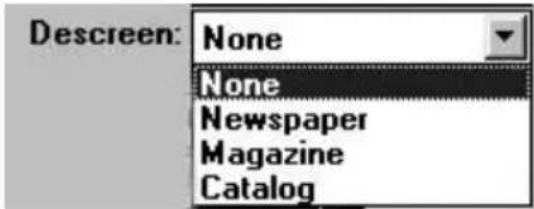
Sharpen: None None Light More Heavy Extra HeavyDescreen:
Eliminates the moire patterns commonly found in printed matter.
text_image
Descreen: None None Newspaper Magazine Catalog
natural_image
Close-up of a baby's face showing redness and absorption, with no visible text or symbolsBefore Descreen

natural_image
Close-up of a baby's face showing a pacifier and tongue, with no visible text or symbols.After Descreen
4.4 SCANNING
Preview: Previews your image to allocate the area to be scanned.
Scan: Scans the area with the parameters you have set.
Exit: Cancels the current job.
As shown in the figure below, in the Preview window, you can define the area to be scanned by dragging the cursor auxiliary lines with the mouse.

text_image
Click here to shift between different measure systems. The cursor auxiliary lines. The Preview Window5. CARE AND MAINTENANCE
5.1 CLEANING THE ADF
Your scanner is designed to be maintenance-free.
However, it still needs to be cleaned occasionally to ensure optimum image quality and performance.
The scanner parts may be contaminated with ink, toner particles or paper coatings. As a result, the scanner needs to be cleaned occasionally particularly in the following cases:
- Documents do not feed smoothly or easily;
- Several documents feed at one time.
The cleaning procedures
- Wet a cotton swab with some isopropyl alcohol. (95%)
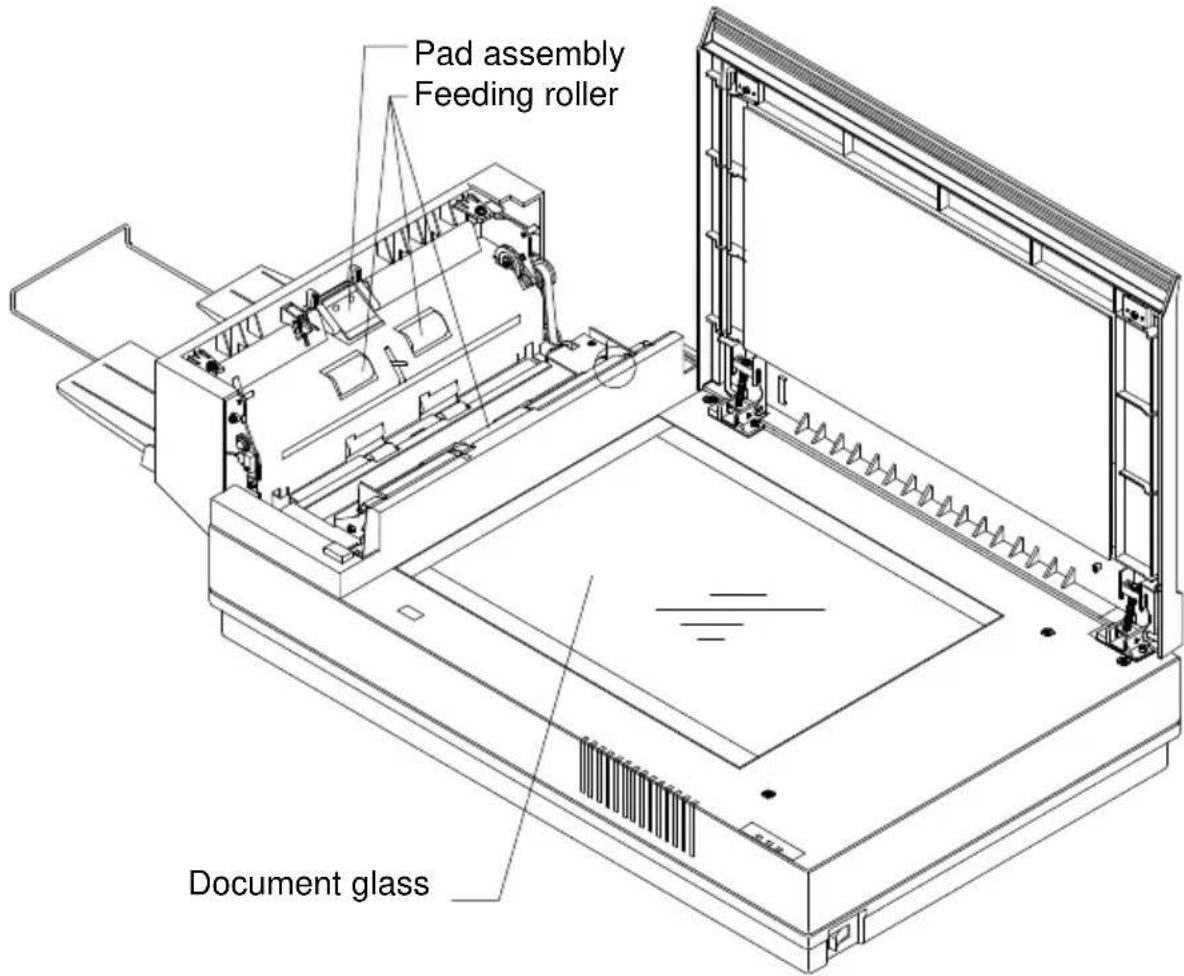
- Open the ADF unit as shown in Figure 5-1 and wipe the upper feeding roller by moving the swab from side to side. Rotate the roller forward with your finger and repeat the above cleaning procedures until the entire roller is cleaned. Be careful not to snag or damage the pick springs.
- Wipe the pad in the direction from top to bottom. Be careful not to hook the pick springs.
- Close the ADF unit. Your scanner is now ready for use.
text_image
Pad assembly Feeding roller Document glassFigure 5-1 Opening the ADF unit.
5.2 CLEANING THE GLASS
The procedures
1) Soak a cotton swab with some isopropyl alcohol. (95%)
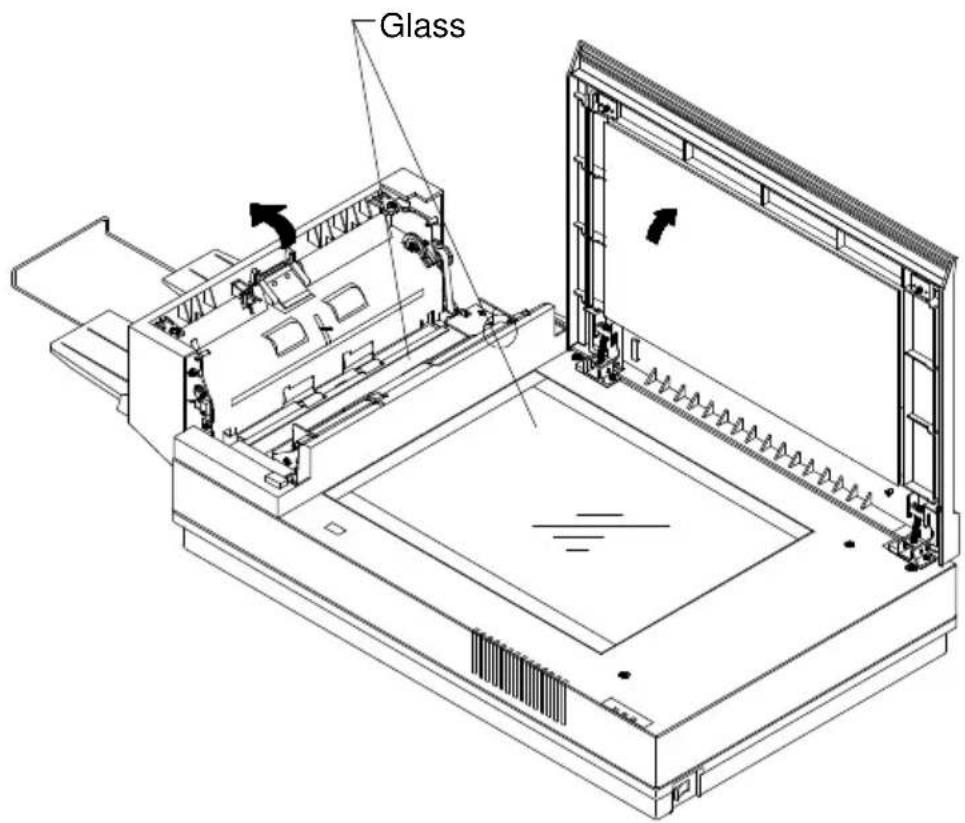
2) Open the ADF unit and document cover as shown in Figure 5-2. Wipe the glass of flatbed and ADF area by moving the swab from side to side.
3) Close the ADF unit and document cover. Your scanner is now ready for use.
text_image
GlassFigure 5-3 The cleaning area
5.3 REPLACING THE ADF DETACHABLE PAD MODULE
After scanning approximately 150,000 pages through the ADF, the pad spring may be worn out and you may experience problems with document feeding. In this case, it is highly recommended to replace the pad module with a new one. For ordering the pad module, please consult your nearest dealer and follow the procedure in below to replace it.
Removing Procedure
- Open the ADF front cover by depressing the ADF release button.
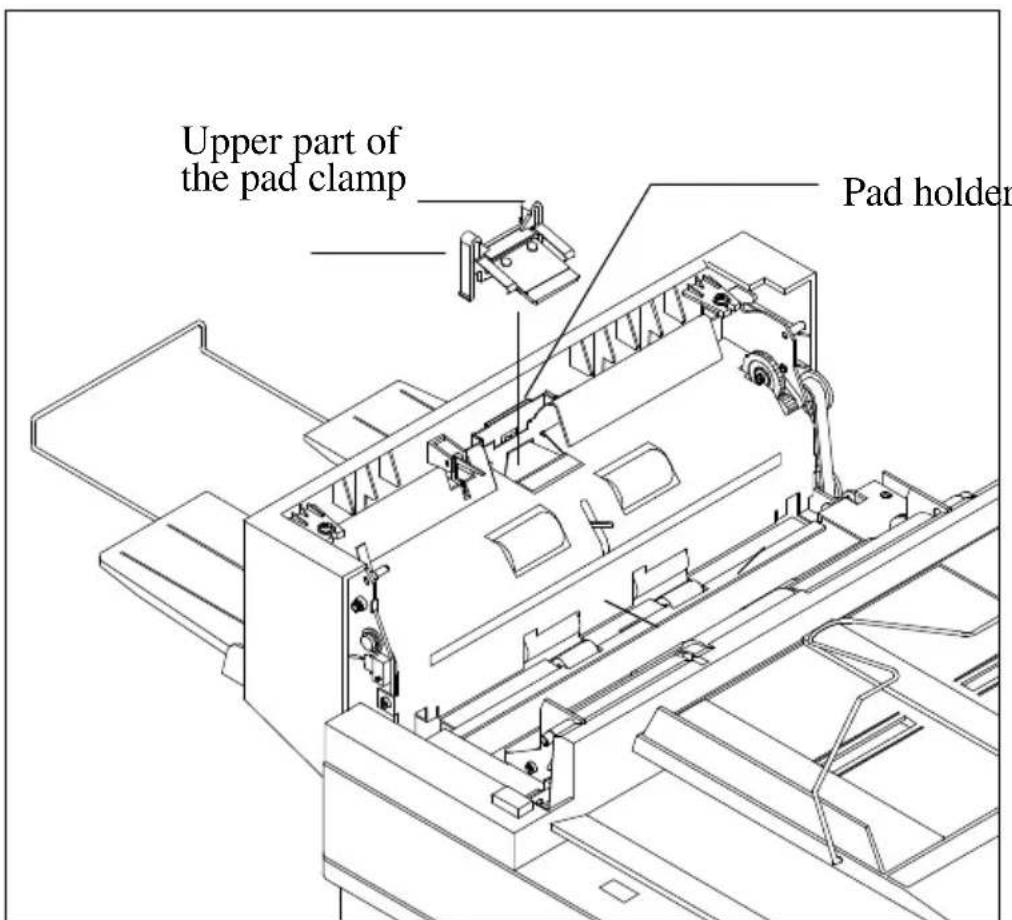
- Remove the ADF detachable pad module by pulling out the upper part of the pad clamp as shown in Figure 1.

text_image
Upper part of the pad clamp ADF unit ADF cover ADF release buttonFigure 1 Remove the pad module
Assembling Procedure
-
Take out the ADF pad module from the box.
-
Hold the upper part of the pad clamp and place it gently to the pad holder as shown in Figure 2.
text_image
Upper part of the pad clamp Pad holderFigure 2 Install the pad module
6. TROUBLESHOOTING
The scanner will automatically perform a simple self-test each time it is turned on. This will help spot majorsystem errors in the scanner itself.
When the test is initiated, the READY LED is flashing. When the test is completed, the READY LED is steadily on.
If you have problems with the operation of your scanner, please check the following troubleshooting hints.
6.1 FREQUENTLY ASKED QUESTIONS
Question: The LED indicates that the scanner is ready, but the scanner does not respond to the scan command form the host computer.
Answer: Please check the signal cable is firmly seated, and invoke the scan command again. If there is still no response, please reset the scanner by turning it off and then on again, and reboot your host computer as well.
Question: Paper becomes jammed during scanning.
Answer: 1) Open the ADF unit.
2) Pull out the jammed paper carefully.
3) Close the ADF unit.
Question: More than one sheet of paper were fed into the scanner.
Answer: 1) Open ADF unit.
2) Remove the multi-fed sheets of paper.
3) Close the ADF unit.
4) Flatten the corners and edges; loosen the paper before reloading it in the paper guide.
5) Check the feeding roller condition and do the cleaning if necessary.
Question: Paper becomes skewed in the scanner.
Answer: 1) Check the feeding roller condition; do the cleaning if necessary.
2) Use the paper guide when feeding the paper.
Question: When I power on the scanner, it makes noises and will not stand ready.
Answer: There are two possibilities:
1) You forgot to remove the shipping retainer from the scanner. Please remove the shipping retainer first.
2) You did not place the scanner on a flat desktop surface. This may cause the scanner to function improperly.
Question: The scanner is power-on and ready, but is not accessible from the application.
Answer: It is a connection problem and can be explained in terms of PC and SCSI version.
Question: Getting an image from the scanner is not a problem, but, when scanning, the scanner or system will often crash.
Answer: Please check
1) If the cable is firmly seated;
2) Please note only two SCSI terminators can be connected to your SCSI daisy chain. One is at the end of the SCSI device, another is already in your host adapter.
Question: While scanning, the scanner often makes noises or it scans back and forth.
Answer: Please choose lower speed from the TWAIN user interface for low speed PC.
Question: The scanned image always comes out to be too dark.
Answer: 1) Use your application to modify the Gamma setting to 2.2 and 1.8 for your printer and monitor respectively.
2) Adjust Brightness setting from the TWAIN interface to get a brighter image.
Question: The scanner works well except for the line art, the lines of which seem much thicker than the original.
Answer: Increase the Brightness or adjust the Threshold setting to adjust the line art image.
6.2 PAPERJAM IN THE ADF
In case of paper jam, please follow the procedures below.
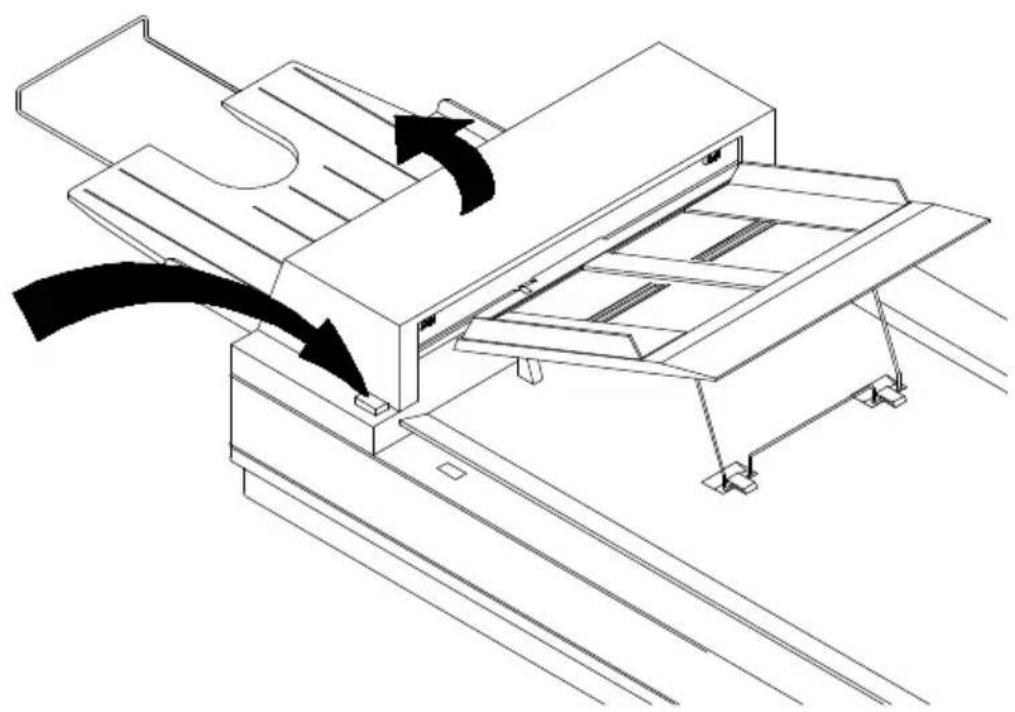
- Turn off the scanner. Press the button at the front left of the scanner
- The ADF cover will pop up a little.
- Backward on its hinge, open the ADF cover to its full position.
- Pull the paper gently out of the ADF unit.
natural_image
Technical line drawing of a mechanical assembly with directional arrows indicating motion (no text or symbols)Figure 6-1 Handle the paper jam problem - press the button.
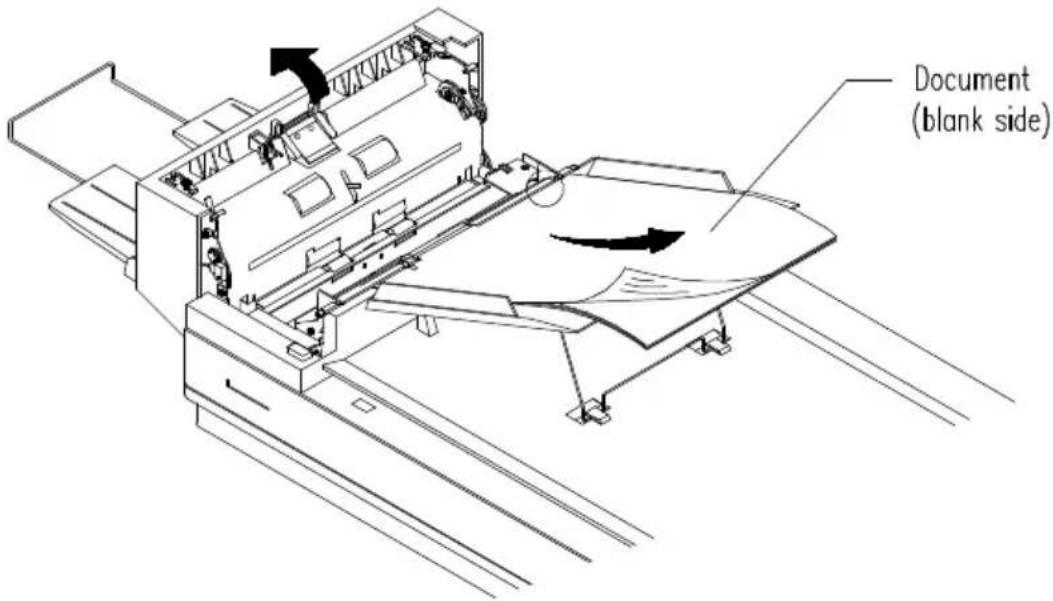
text_image
Document (blank side)Figure 6-2 Handle the paper jam problem - pull out the paper.
6.3 TECHNICAL SERVICE
Technical support for Avision scanner is provided at Avision Technical Assistance Center (ATAC). Before contact with ATAC, please prepare the following information.
Scanner serial & revision number (located on the bottom of the scanner)
Hardware configuration (e.g., your host CPU type, RAM size, free disk space, display card, interface card, etc.)
The name and version of your software application
The version of your scanner driver.
Please call us at:
US and Canada Area: Avision Labs., Inc.
Address: 6815 Mowry Ave. Newark CA 94560, USA
Telephone number: +1 (510) 739-2369
Fax number: +1 (510) 739-6060
Web Site: http://www.avision.com
E-mail: support@avision-labs.com
Other Area: Avision Inc.
Address: No.20, Creation Road I, Science-Based
Industrial Park, Hsinchu, Taiwan, R.O.C.
Telephone number: +886 (3) 578-2388
Fax number: +886 (3) 577-7017
Web Site: http://www.avision.com
Email: service@avision.com.tw
7. SPECIFICATIONS
All specifications are subject to change without notice.
The following can not be properly fed by the ADF:
Paper with clip or staple attached;
Paper with ink not totally dry;
Paper with inconsistent thickness, such as envelopes;
Paper with wrinkles, curls, folds or tears;
Tracing paper;
Coated paper;
◆ Carbonless paper;
Paper narrower than 3.5" or wider than 8.5";
Items other than papers, such as cloth, metal or OHP film;
Notched paper;
Paper with an odd (non-rectangular) shape;
Very thin paper.
7.1 MODEL: DOCUMENT SCANNERS
Scanner Type 1-pass color
Flatbed with ADF built-in
Scanning Mode 30-bit color
10-bit Gray scale
Line Art / Halftone
Error Diffusion (single bit)
Optical Resolution
■ AV810C/AV815C/AV820C 300 * 600 dpi
■ AV880C 600 * 1200 dpi
Light Source Cold cathode fluorescent
lamp
ADF Capacity 50 pages
ADF Scanning Speed
■ AV820C 20 PPM (200 dpi, B&W mode)
■ AV810C 10 PPM (200 dpi, B&W mode)
■ AV815C/AV880 15 PPM (200 dpi, B&W mode)
Scanning Document Size ADF
mode 8.5" x 14"
Flatbed mode 8.5" x 11.69"
Drivers Bundled TWAIN & ISIS
Interface SCSI-2
Power Requirement
■ AV820C/AV880C 100 to 240 Vac, 50 to 60 Hz
■ AV810C/AV815C 90 to 264 Vac, 47 to 63 Hz
Power Consumption
■ AV810C/AV815C 25 watts
■ AV820C/AV880C 35 watts
Humidity 20% to 80% RH
Operation Temperature 10 to 40°C
Storage Temperature -10 to 50°C
Dimension 570 x 350 x 165 mm (WxDxH)
Weight 12 kgs (26.5 lbs)