Smarty BX1500 Plus - Dash cam D-Teg - Free user manual and instructions
Find the device manual for free Smarty BX1500 Plus D-Teg in PDF.


User questions about Smarty BX1500 Plus D-Teg
0 question about this device. Answer the ones you know or ask your own.
Ask a new question about this device
Download the instructions for your Dash cam in PDF format for free! Find your manual Smarty BX1500 Plus - D-Teg and take your electronic device back in hand. On this page are published all the documents necessary for the use of your device. Smarty BX1500 Plus by D-Teg.
USER MANUAL Smarty BX1500 Plus D-Teg
Smarty Drive Partner for your Safety
HD
High-Definition
USER GUIDE
Model: BX1500 / BX1500+
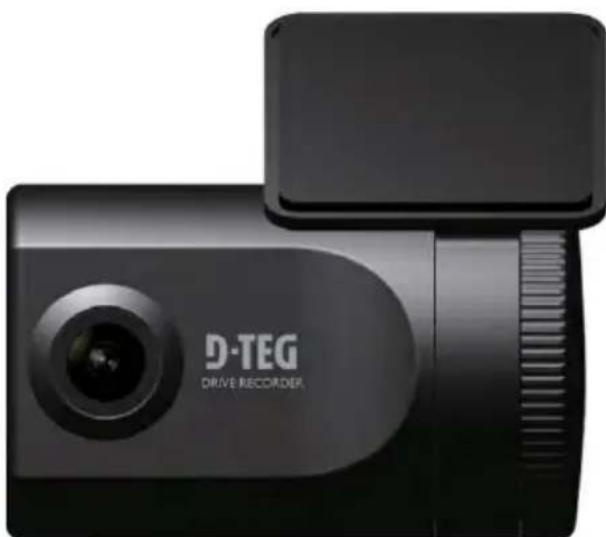
natural_image
Black D-TEG Drive Recorder device with lens and scroll (no visible text or symbols beyond branding)VER 1.0
● Thank you for purchasing this Drive Recorder.
- Please ensure that you read and understand this USER GUIDE and use it before connecting and installing this Recorder.
- Please store the USER GUIDE in an easily accessible location.

text_image
Warning symbol depicting a lightning bolt inside a triangle, indicating electrical hazard or current risk.CAUTION
RISK OF ELECTRIC SHOCK DO NOT OPEN

text_image
Warning symbol with exclamation mark inside triangle, commonly used to indicate caution or hazardCAUTION: TO REDUCE THE RISK OF ELECTRIC SHOCK, DO NOT REMOVE COVER.
NO USER-SERVICEABLE PARTS INSIDE.
REFER SERVICING TO QUALIFIED SERVICE PERSONNEL.
Please make sure you follow the safety advice/instructions given in the user guide.

Caution
RISK OF EXPLOSION IF BATTERY IS REPLACED BY AN INCORRECT TYPE. DISPOSE OF USED BATTERIES ACCORDING TO THE INSTRUCTIONS.
Battery for RTC(Real Time Clock) inside

Caution
Connect your vehicle's power cable (cigarette jack) to the product after starting the vehicle.
The instant over voltage generated when starting up the vehicle may damage the product if it is already connected.

Caution
Install the product where it does not block driver's visibility and where there is no airbag installed. This could cause an accident or might injure the passengers in case of accident.

Caution
Damages due to production malfunction, loss of data, or other damages occurring while using this product shall not be the responsibility of the manufacturer. Although the product is a device used for recording videos, the product may not save all videos in the case of a malfunction. In the case of an accident, the sensor may not recognize the shock when the impact is light and as a result it may not begin recording automatically.
WARNING:
TO PREVENT FIRE OR ELECTRIC SHOCK HAZARD, DO NOT EXPOSE THIS APPLIANCE TO RAIN OR MOISTURE.
1. Activate the product in an area without large buildings to improve GPS reception.
The commercial purpose GPS has the average rage error of more than 15 meters and the range error could be more than 100 meters due to environmental conditions like buildings, roadside trees etc.
2. The temperature range for optimum operation of the GP S receiver in your car is -10 \~ 50°C.
3. When using the product for the first time or after a long period (more than three days), it may take a little longer to recognize your current location.
It may take between five and thirty minutes to get GPS reception.
GPS reception may be impaired under the following circumstances.
1) If there is an object at the end of the GPS antenna
2) If your vehicle has metallic elements on the windshields
3) If equipment generating electromagnetic waves that interfere with the GPS signal is installed in the vehicle e.g.: Other GPS devices such as a certain type of wireless activated alarms, MP3 and CD players and camera alarms using GPS.
4) If you are using a receiver connected by cable, electric interference can be avoided by simply changing the location of the receiver (antenna).
5) On heavily overcast or cloudy days, if the vehicle is in a covered location such as under a bridge or raised roadway, in a tunnel, an underground roadway or parking area, inside a building or surrounded by high-rise buildings.
6) If GPS signal reception is poor, it may take longer to locate your current position when the vehicle is moving than when it is stationary.
CONTENTS
Each BX1500/BX1500+ order includes the following items
- Smarty BX1500 / BX1500+ unit

natural_image
Close-up of a black D-TEG camera with lens and screen (no visible text or symbols on body)- SD memory card
(The PC software is on the provided SD card. The SD card capacity should be at least 4GB.)
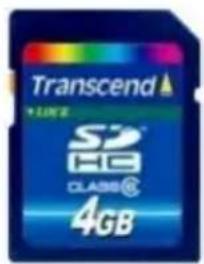
text_image
Transcend + LIVE SD CG CLASS® 4GB-
Power cable (cigarette jack)
-
Video out cable (3m)
-
Wire Splice clip (5pcs)
-
3M Adhesive for windshield mounting

natural_image
Coiled black cable with two connectors, no visible text or symbols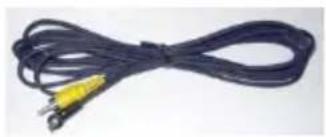
natural_image
Coiled black cable with two yellow connectors, no visible text or symbols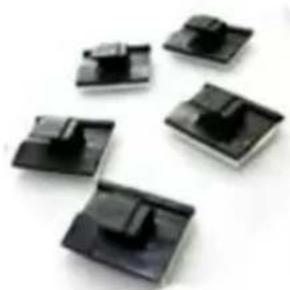
natural_image
Five black plastic clips arranged on a white background (no text or symbols visible)
text_image
Red printed label with alphanumeric codes and symbols, likely a technical or financial documentINTRODUCTION
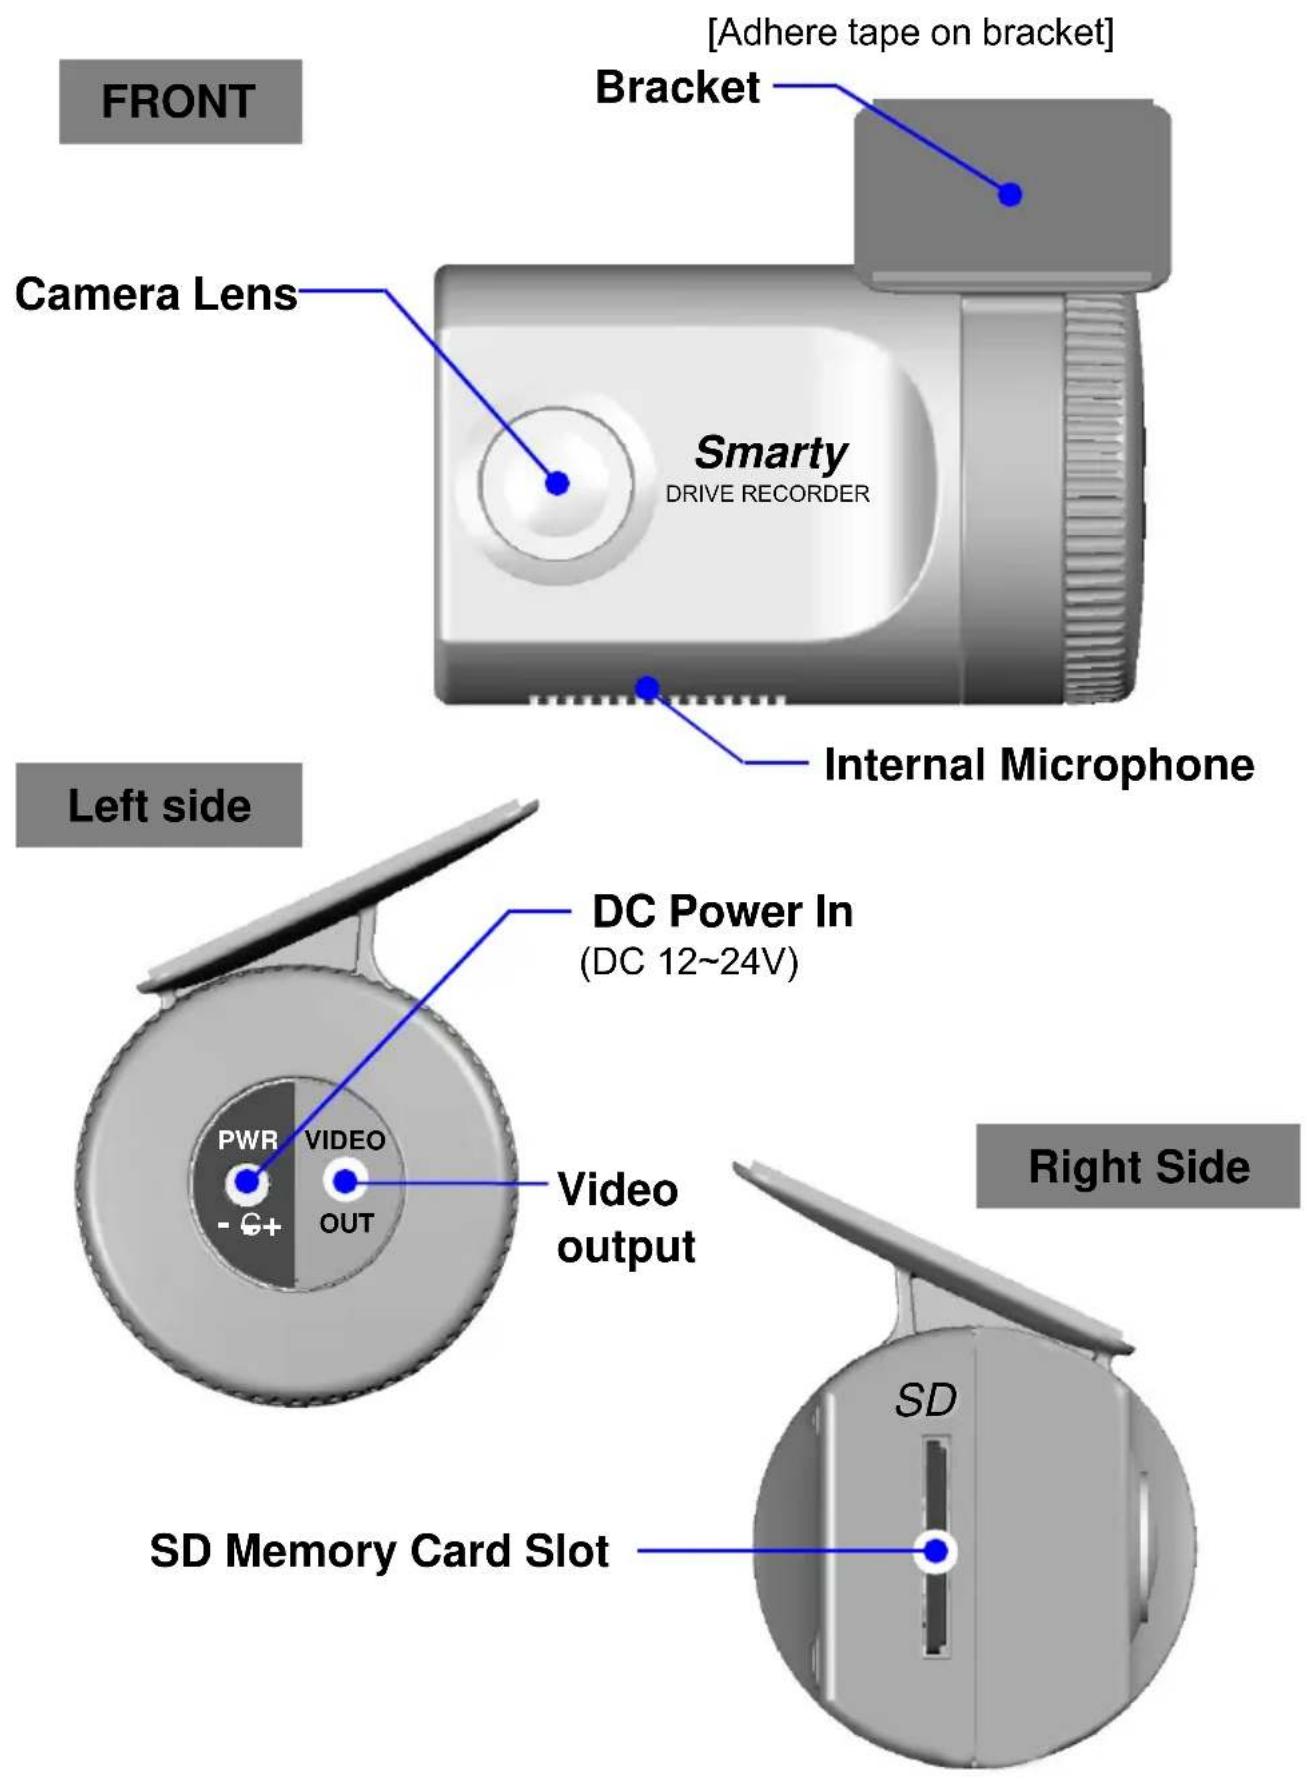
text_image
FRONT Camera Lens [Adhere tape on bracket] Bracket Smarty DRIVE RECORDER Internal Microphone Left side DC Power In (DC 12~24V) Video output PWR VIDEO OUT SD Memory Card Slot Right Side SDBACK
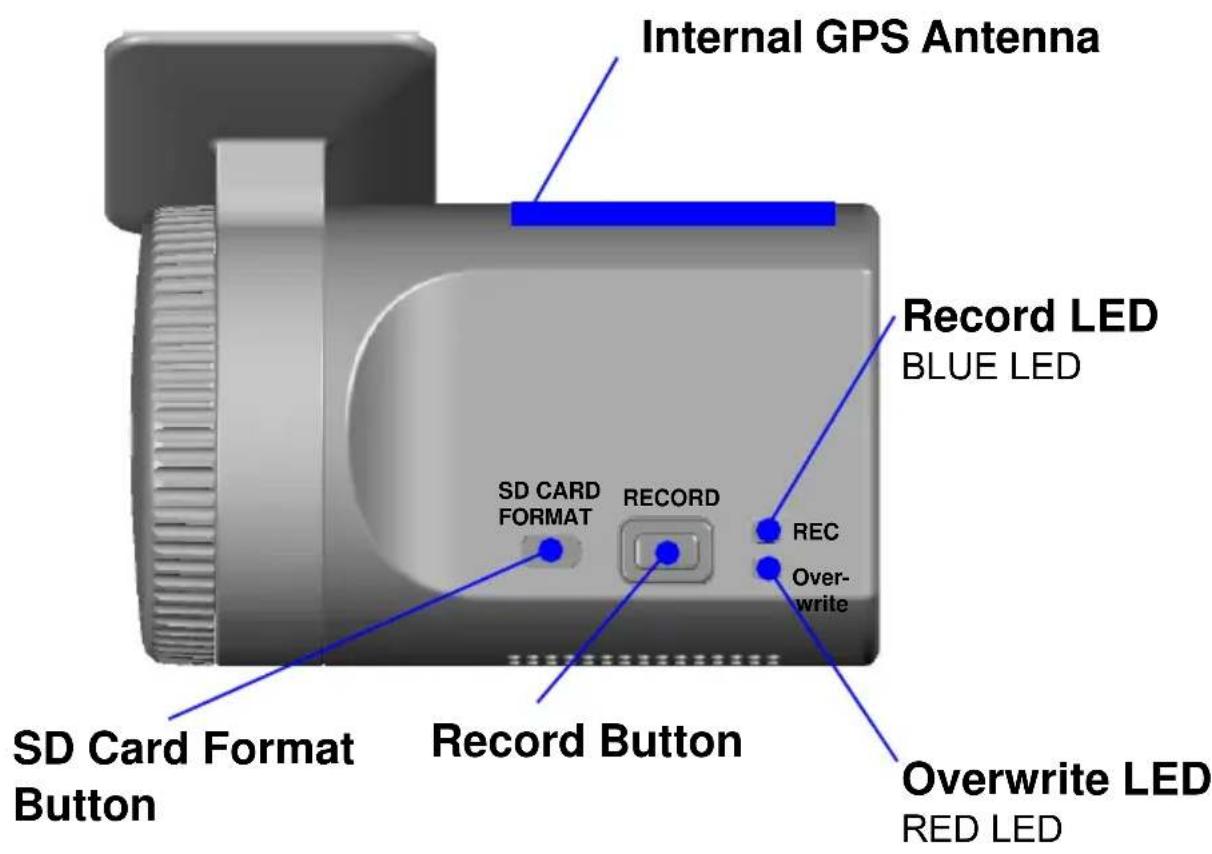
text_image
Internal GPS Antenna Record LED BLUE LED SD CARD FORMAT RECORD REC Over-write Record Button SD Card Format Button Overwrite LED RED LED[Note] Formatting [initializing] SD memory card can be done using SD Card Format Button. However we recommend format [initialize] SD card using the PC Viewer software on your PC.
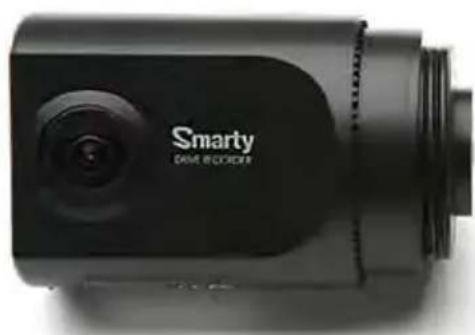
natural_image
Close-up of a Smart camera with lens and control panel (no visible text or symbols on body)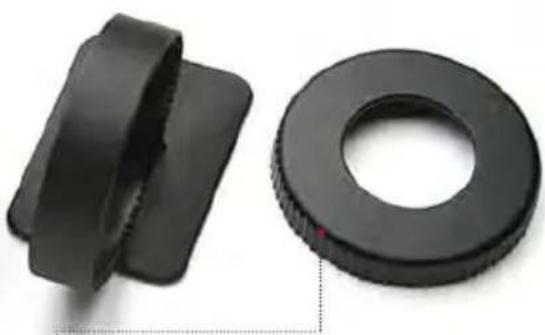
natural_image
Two black plastic washers, one with a flanged tip and the other a circular ring (no text or symbols visible)Holder: Before installing on the windshield, unscrew the cap and adjust the angle. Rotate clockwise to attach the body. The lens should preferably be parallel to the ground.
INSTALLATION
Park your vehicle on a flat level surface.
Turn off the engine before installing the BX1500 / BX1500+.
-
Insert the SD memory card into the SD card slot. Please make sure to disconnect the power cable when inserting or ejecting the SD memory card.
-
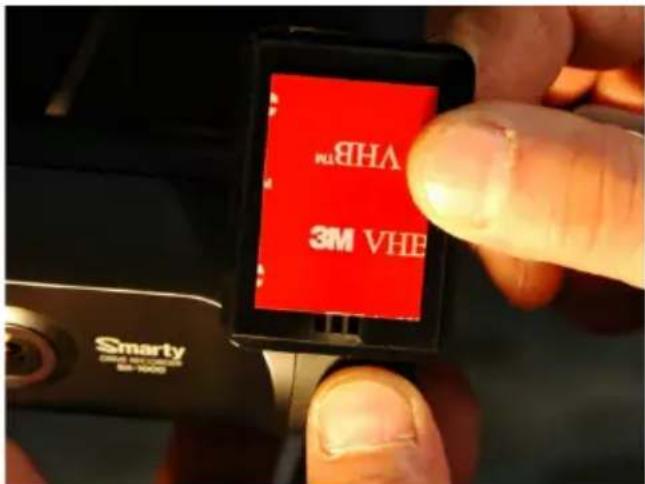
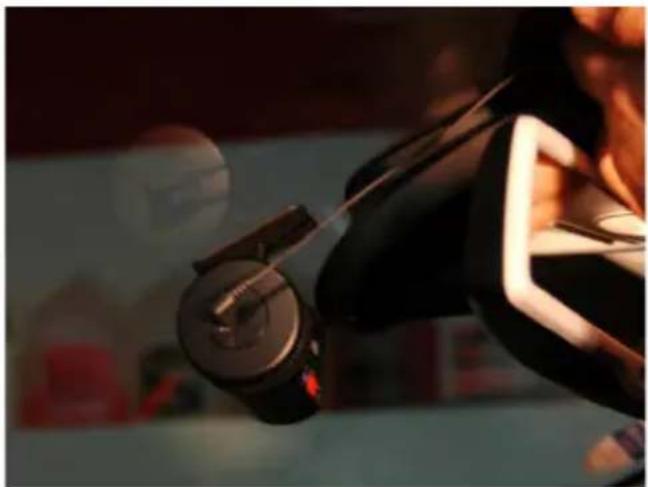
Attach the BX1500/BX1500+ using the provided double sided tape. The surface must be clean and dry before you install. We recommended to install the product behind the rear view mirror on the front windshield.
text_image
VHBB 3M VHB SMARTY GND & CNTS B1-2000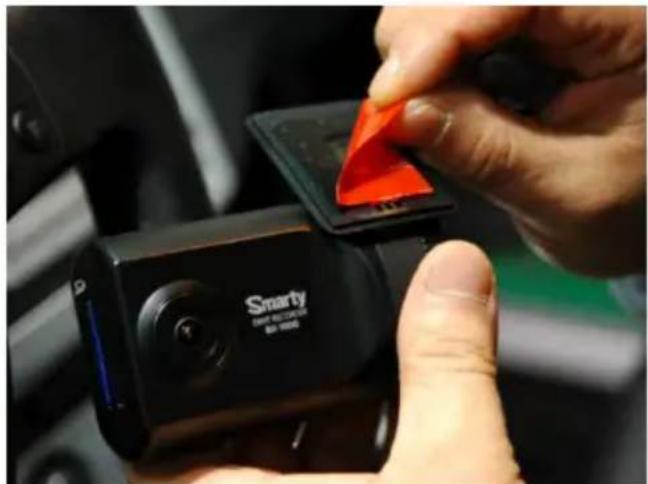
natural_image
Close-up of hands using a Smart TV camera to add a red CD to a black LCD screen (no visible text or symbols)[Attachment notes] Adhesive tape will not stick well with dust or oil, etc. Warm temperatures are best (above 30 degrees centigrade) when applying tape.
natural_image
Close-up of a gloved hand holding a small electronic device with wires, blurred background (no visible text or symbols)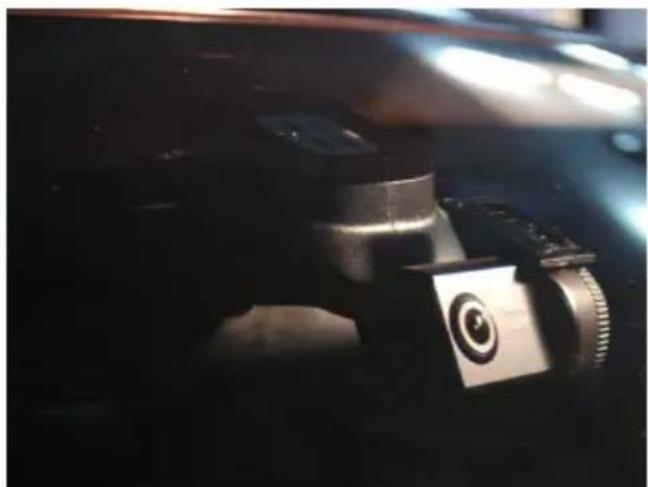
natural_image
Close-up of a camera lens and optical component with visible lens (no text or symbols)INSTALLATION
- Adjust camera view. Make sure the lens has an unobstructed view. Check from outside the vehicle to check the camera angle.
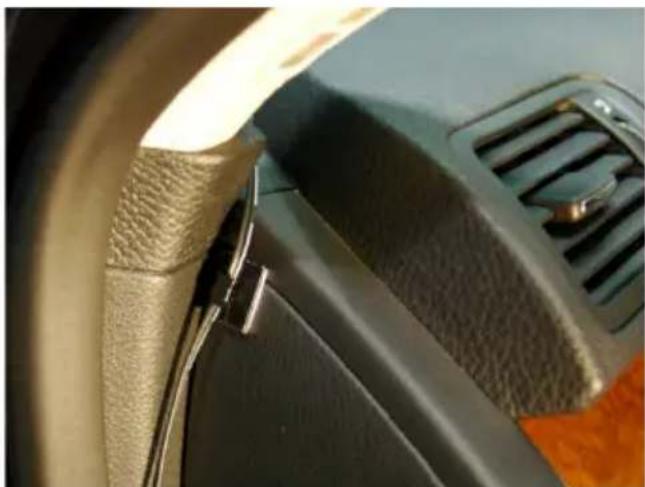
natural_image
Close-up of a car's side panel showing leather seat, grille, and vent (no text or symbols visible)Arrange the power cord neatly alongside of the windshield and door pillar trim. Use the provided wire splice clip as seen in the picture on left.
- The BX1500/BX1500+ requires a continuous 12\~24volt power source from the vehicle. Plug in the power. The provided power cord cable route should be from the left side of the BX1500/BX1500+ towards your power source.
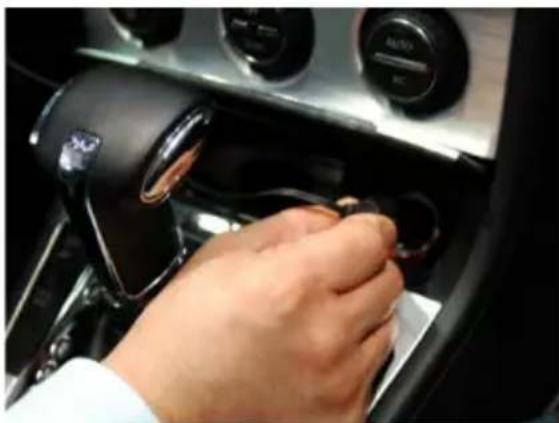
natural_image
Close-up of a hand inserting a coin into a car gear shift lever (no visible text or symbols)Caution
When the impact is light like very light, such as a minor bump In the road, the G-sensor may not recognize the impact and as a result it may not begin recording automatically.
Test and set your own G-sensor level for your vehicle.
FUNCTION
Automatic start
Connect your vehicle's power cord to the BX1500/BX1500+ after starting the vehicle. Then BX1500/BX1500+ will be automatically started. (Use the provided power cord.)
⚠️ Notice : The unit will not start recording immediately after power on. It takes around 1 minute for the built-in power backup system to charge. Thereafter, the internal flash memory will be ready to record.
Event record (when Record Method set as “Event record”)
The event recording will be automatically started by G-sensor.
G-sensor sensitivity can be set with your PC.
Each event file contains 20 seconds prior & 20 seconds post event.
Manual record (when Record Method set as “Event record”)
Press the [RECORD] button to begin recording manually. Each manual file contains 20 seconds prior to activation & 20 seconds post activation.
Continuous record (when Record Method set as “Normal record”)
The continuous recording will be automatically started after power on.
BX1500/BX1500+ doesn't make a separate event file during the continuous recording. It will mark the Event area by G-sensor or Record button at the continuous recording file which can be easily searched for during playback.
SD Memory Card Format
Remove the power first. Press the [SD CARD FORMAT] button and hold Then connect the power for initialization. Once complete, all video & log files will be deleted and the configurations will default to the factory settings.
Note : PC Viewer software is pre-loaded on the SD card. Please ensure you have installed the software to your PC before you format the card.
Built-in power backup (Super Capacitor)
When power to the unit is interrupted, BX1500/BX1500+ creates the last file using the internal Super Capacitor.
BLUE LED (RECORD)
The blue LED shows the power is on. The blue LED flash during the event recording.
RED LED (OVERWRITE)
The red LED will be turned on during overwriting.
Buzzer
“Beep” sound will occur when recording starts (this can be turned off at setup page on PC viewer, if required) and to signal a system error.
OPERATION
When Record Method set as “Event record”
- Connect your vehicle's power cable to the BX1500/BX1500+ after starting the vehicle.
- Blue LED & Red LED will be slowly blinking simultaneously and then Blue LED will remain on. Blue LED light means BX1000/BX1000+ is now ready for the event recording.
- The event recording will automatically begin by G-sensor with one short "Beep" sound.
- The manual recording will start by pressing the [RECORD] button.
[Notice] Multiple impacts coverage
Flash memory continuously captures the video data during the second or third impact and record it to the first impact file.
When Record Method set as "Normal record"
- Connect your vehicle's power cable to the BX1500/BX1500+ after starting the vehicle.
- Blue LED & Red LED will be slowly blinking simultaneously and then the Blue LED will remain on and flash every 5 seconds.
- Blue LED light flashing every 5 seconds means BX1500/BX1500+ is now recording continuously.
- The continuous recording(normal recording) will automatically begin just after power on.
- The manual recording that started by pressing the [RECORD] button or the event recording by G-sensor make a event making in the continuous recording file.
Take out SD memory card
Turn off the power and then check the BLUE LED light. Once the LED light is off, take out the SD memory card.
Insert SD memory card
Turn off the power and then check the BLUE LED light. Once the LED light is off, insert the SD memory card.
System Error Buzzer
"Beep" "Beep" sound will occur and the BLUE & RED LED light will blink simultaneously when there is a system error or SD card is not inserted. [Check the SD memory card when this occurs. To solve the problem, initialize the SD card or replace the SD card.]
BX1500/BX1500+ PC Viewer Guide
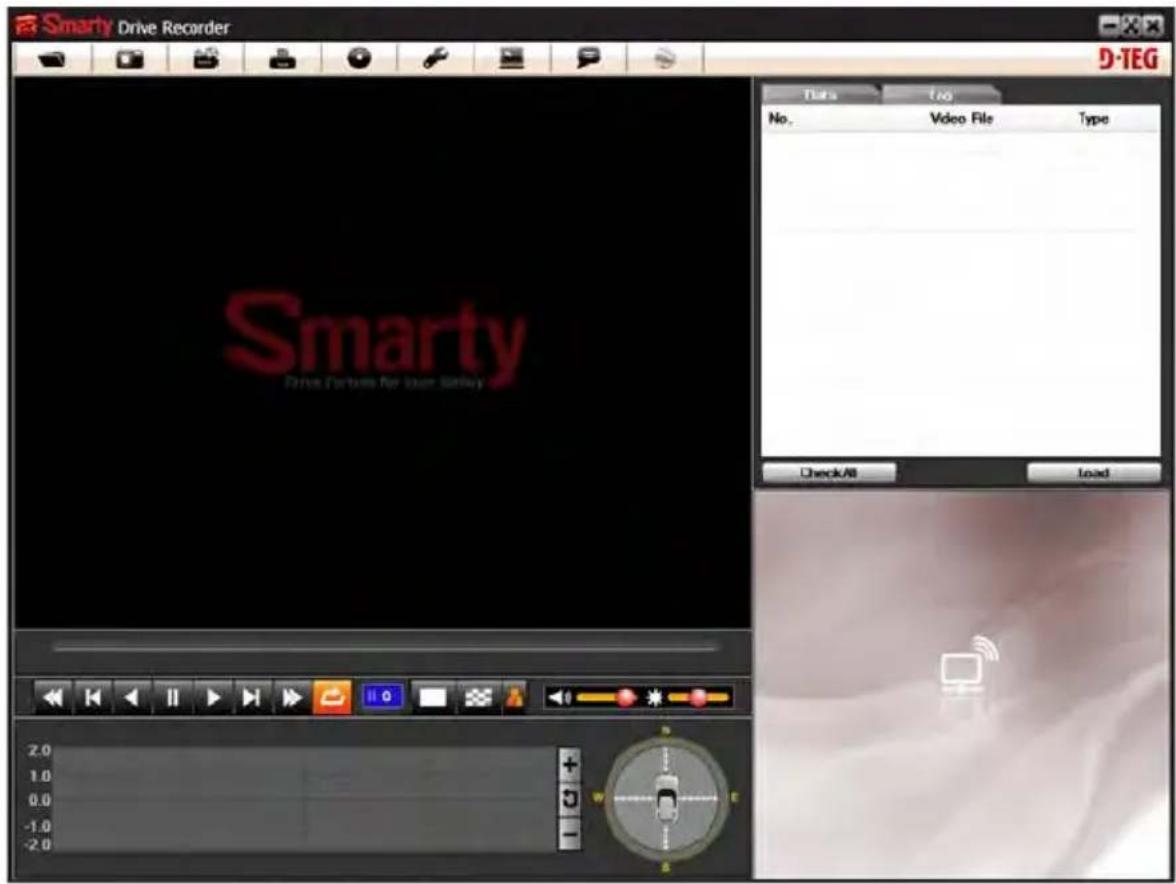
text_image
Smarty Drive Recorder D-TEG Trina Too No. Video File Type Check/All Load 2.0 1.0 0.0 -1.0 -2.0[PC SYSTEM REQUIREMENT]
Recommended PC specifications for PC Viewer software
| OS Windows 2000, Windows XPWindows Vista, Windows 7 | |
| CPU Pentium4 | 2.6GHz or higher |
| RAM 512MB or higher | |
| Interface SD Memory Card Reader | |
| HDDFree space | Install 20MB or higherBackup 2GB or higher |
| Display 1,024 x | 768 pixel/High Color(16bit) or higher |
If the PC does not meet the minimum system requirement, the PC Viewer may not function properly.
PC Viewer software is on the provided SD card.
- Connect the SD card into your PC (if your computer does not have and SD card slot use the USB SD card reader) and open the "My Computer"
- Right-click the "HDREC1" drive and select [Open]
- Double click [SETUP.EXE] at [pcsw] folder.
- Select the language and then follow the dialog box.
![D-Teg Smarty BX1500 Plus - [PC SYSTEM REQUIREMENT] - 1](/content/2026/05/773136/images/c9f3fc9709070175ca578c4023e6575e44a20e3abf5fd75fc893c96f2a1e6e3f.jpg)
text_image
Welcome to the PCViewer BX1500 Setup Wizard This will install PCViewer BX1500 0.9.1.RC4 on your computer. It is recommended that you dose all other applications before continuing. Click Next to continue, or Cancel to exit Setup.- The "PCViewer" icon will be displayed on your desktop.
![D-Teg Smarty BX1500 Plus - [PC SYSTEM REQUIREMENT] - 2](/content/2026/05/773136/images/7ad93c1bb1521b130da5ddf6db6a4153daa4daae3f49aca90103fd39a8e9c5df.jpg)
text_image
PCViewer BX1500※ NOTE: To Un-install the "PC Viewer BX1500"
Open the "Control Panel"
Select [Remove Program] and remove [PC Viewer BX1500]
Connect SD memory card
- Connect SD memory card into your PC's SD card slot or a USB SD card reader.
- Run "PC Viewer BX1500"
- Select [File] and then click "Select Data Folder" or Click [OPEN] button
[OPEN] button
- Select SD memory card folder at the folder select window.
b HDREC1 (L:)
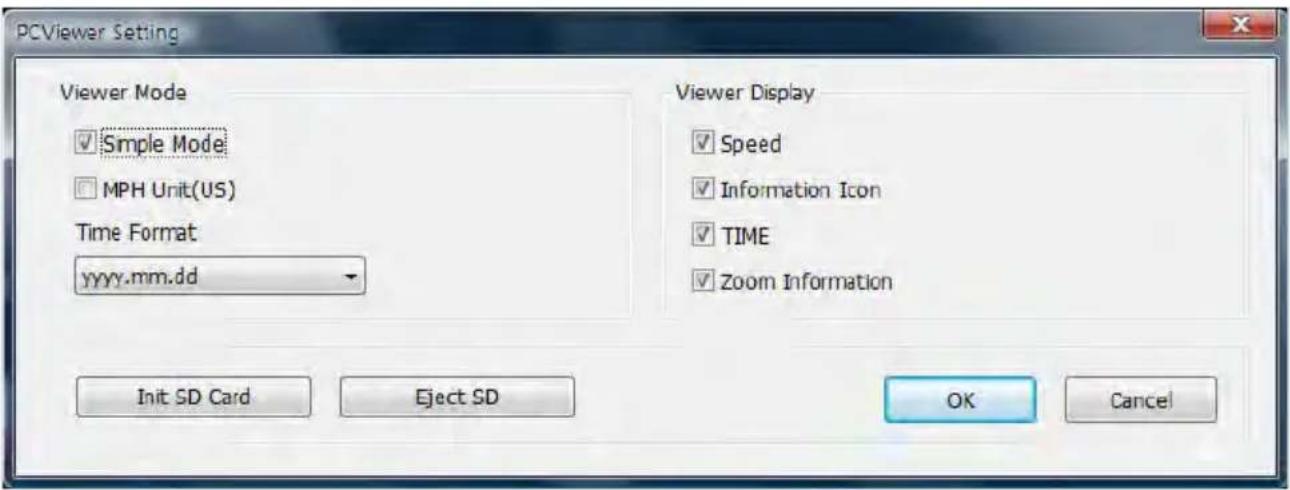
This setting is for the PC Viewer itself.
To set the Video Recorder (i.e. resolution, frame rate, etc. refer to page26).

[PC Viewer Setting] button
text_image
PCViewer Setting Viewer Mode ✓ Simple Mode ☐ MPH Unit(US) Time Format yyyy.mm.dd Viewer Display ✓ Speed ✓ Information Icon ✓ TIME ✓ Zoom Information Init SD Card Eject SD OK CancelThe ‘date’ formats and ‘speed’ unit will be set automatically according to the PC Windows setting. However it can be changed with this PC viewer setting menu.
Simple Mode
Check Simple Mode and press [OK] button.
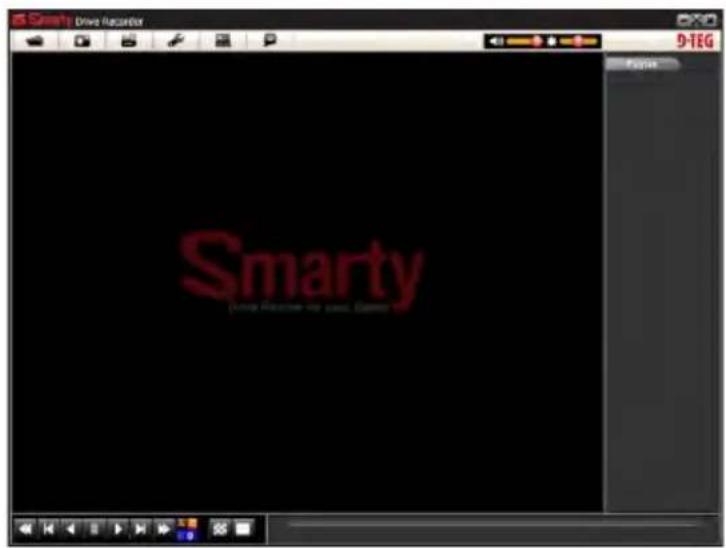
Then PC Viewer skin will change to Simple Mode PC Viewer skin.
text_image
Smarty Drive Recorder D-TEG Smarty Drive Record the case. Games[Simple Mode PC Viewer]
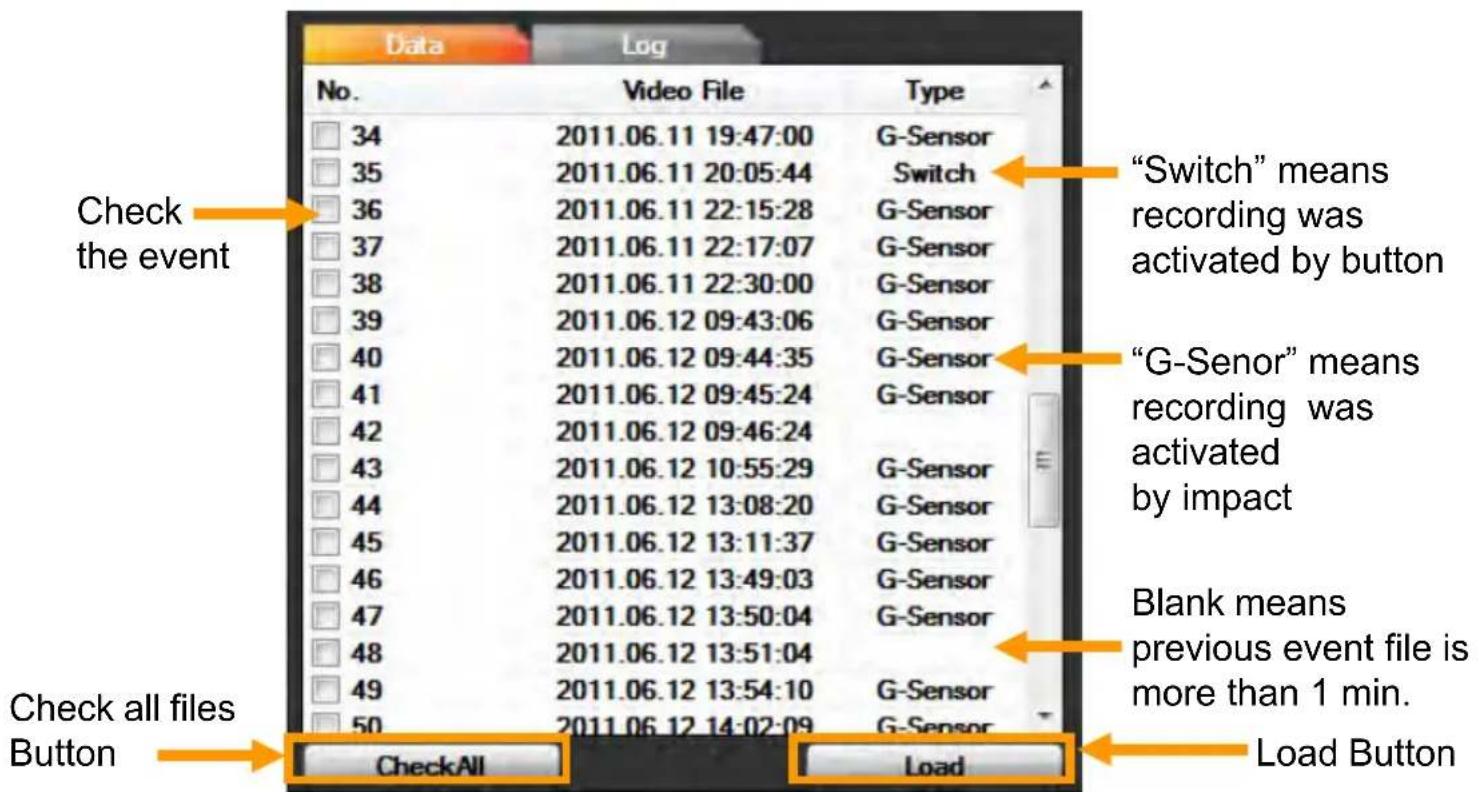
When Record Method set as "Event record"
text_image
Data Log No. Video File Type 34 2011.06.11 19:47:00 G-Sensor 35 2011.06.11 20:05:44 Switch 36 2011.06.11 22:15:28 G-Sensor 37 2011.06.11 22:17:07 G-Sensor 38 2011.06.11 22:30:00 G-Sensor 39 2011.06.12 09:43:06 G-Sensor 40 2011.06.12 09:44:35 G-Sensor 41 2011.06.12 09:45:24 G-Sensor 42 2011.06.12 09:46:24 G-Sensor 43 2011.06.12 10:55:29 G-Sensor 44 2011.06.12 13:08:20 G-Sensor 45 2011.06.12 13:11:37 G-Sensor 46 2011.06.12 13:49:03 G-Sensor 47 2011.06.12 13:50:04 G-Sensor 48 2011.06.12 13:51:04 Blank means previous event file is more than 1 min. Check the event Check all files Button CheckAll Load “Switch” means recording was activated by button “G-Senor” means recording was activated by impact Load ButtonWhen Record Method set as "Normal record"
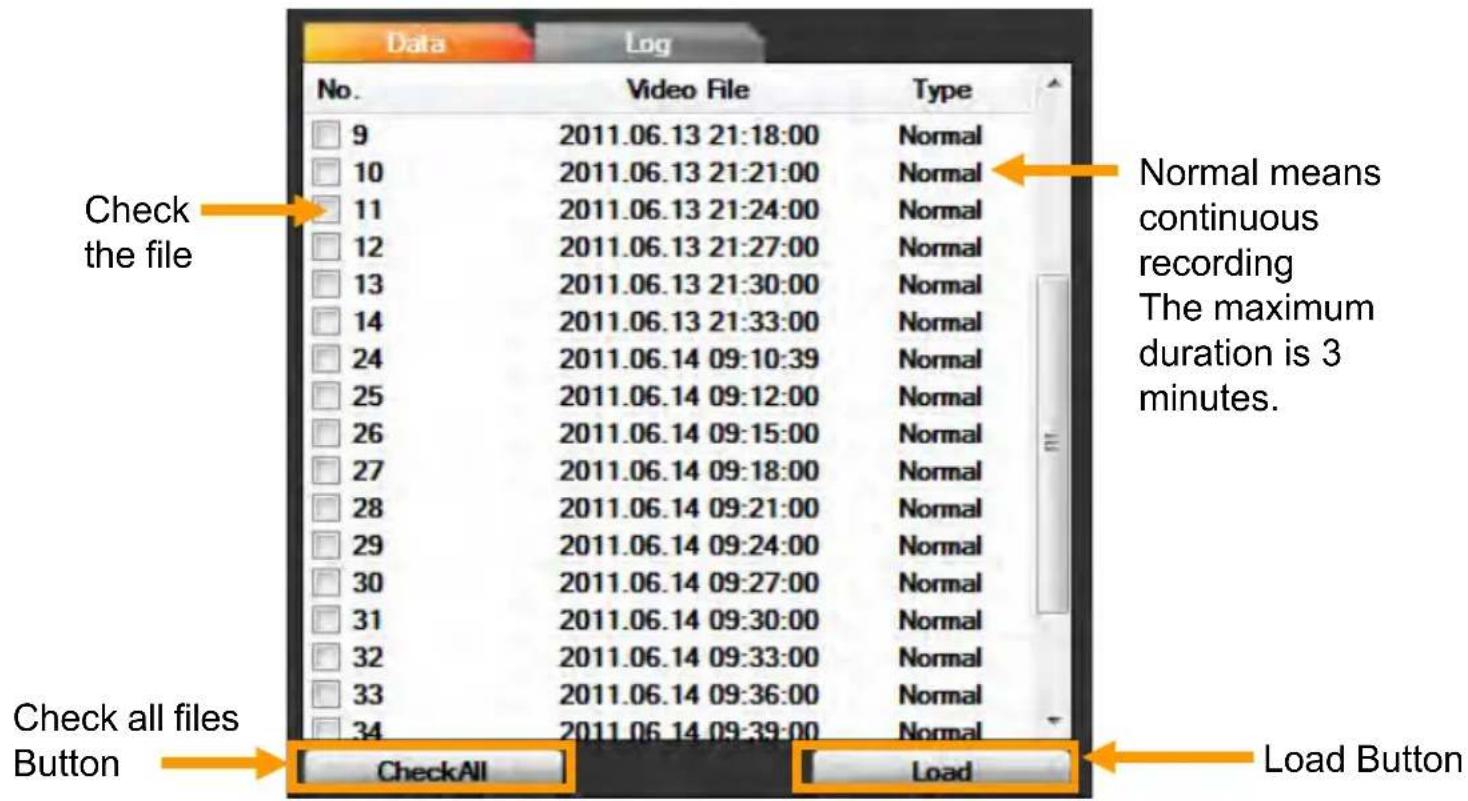
text_image
Data Log No. Video File Type 9 2011.06.13 21:18:00 Normal 10 2011.06.13 21:21:00 Normal 11 2011.06.13 21:24:00 Normal 12 2011.06.13 21:27:00 Normal 13 2011.06.13 21:30:00 Normal 14 2011.06.13 21:33:00 Normal 24 2011.06.14 09:10:39 Normal 25 2011.06.14 09:12:00 Normal 26 2011.06.14 09:15:00 Normal 27 2011.06.14 09:18:00 Normal 28 2011.06.14 09:21:00 Normal 29 2011.06.14 09:24:00 Normal 30 2011.06.14 09:27:00 Normal 31 2011.06.14 09:30:00 Normal 32 2011.06.14 09:33:00 Normal 33 2011.06.14 09:36:00 Normal 34 2011.06.14 09:39:00 Load Check the file Check all files Button CheckAll Load Button-
Check the event or normal recorded file from the list using mouse or click [Check All] button. Then click [Load] button.
-
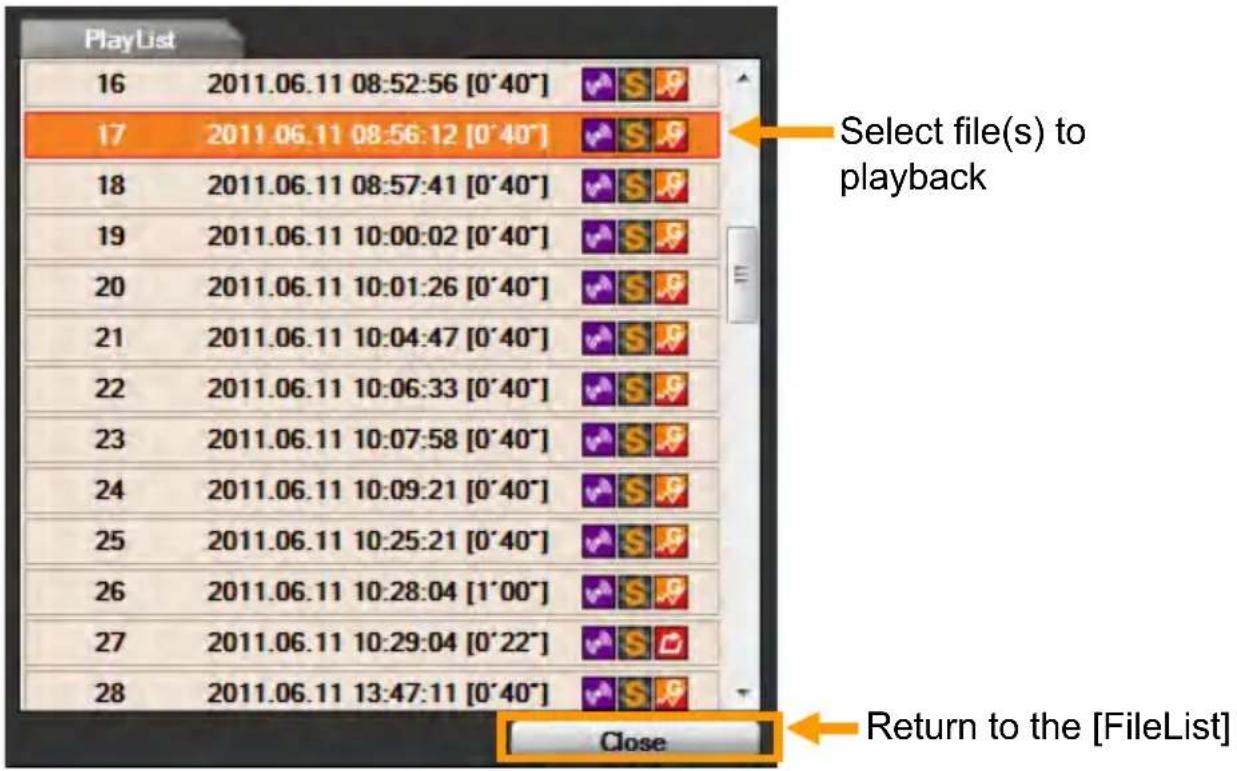
Once click [Load] button, the [FileList] tab will be changed to the [PlayList] tab as below
When Record Method set as "Event record"
text_image
PlayList 16 2011.06.11 08:52:56 [0'40"] 17 2011.06.11 08:56:12 [0'40"] 18 2011.06.11 08:57:41 [0'40"] 19 2011.06.11 10:00:02 [0'40"] 20 2011.06.11 10:01:26 [0'40"] 21 2011.06.11 10:04:47 [0'40"] 22 2011.06.11 10:06:33 [0'40"] 23 2011.06.11 10:07:58 [0'40"] 24 2011.06.11 10:09:21 [0'40"] 25 2011.06.11 10:25:21 [0'40"] 26 2011.06.11 10:28:04 [1'00"] 27 2011.06.11 10:29:04 [0'22"] 28 2011.06.11 13:47:11 [0'40"] Select file(s) to playback Close Return to the [FileList]When Record Method set as "Normal record"
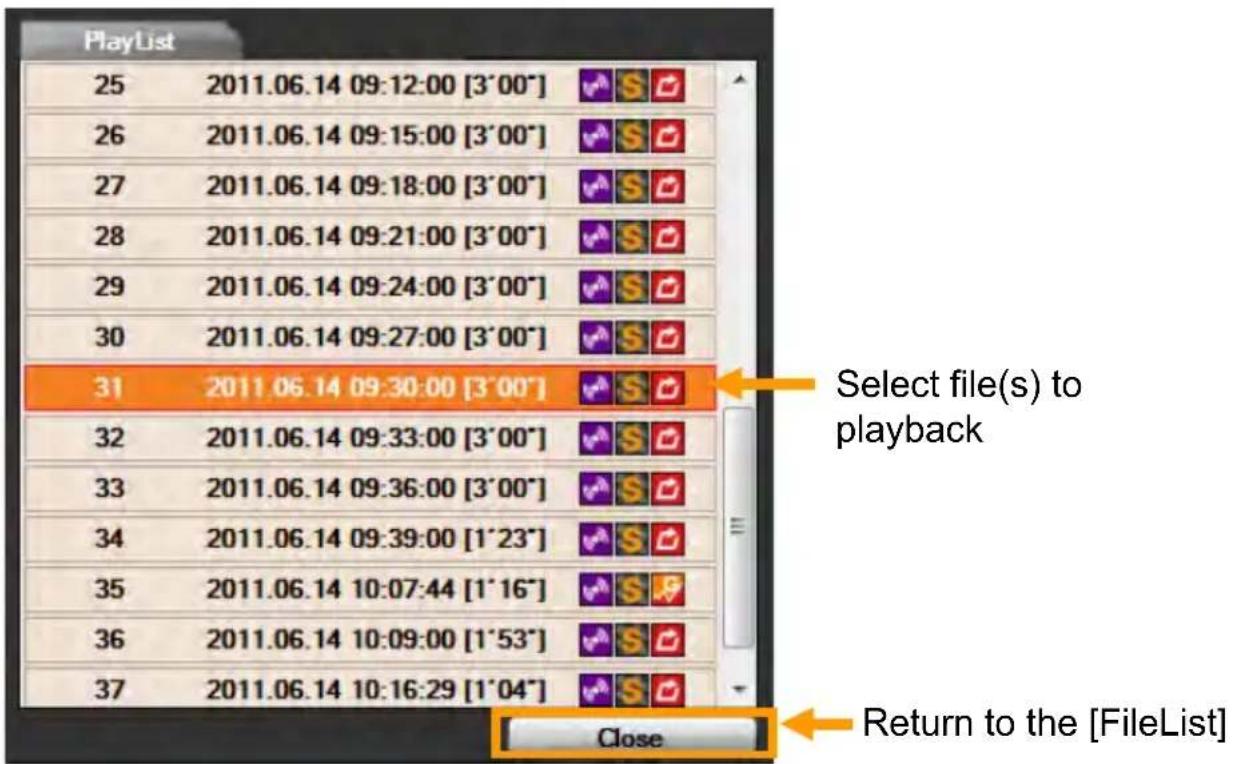
text_image
PlayList 25 2011.06.14 09:12:00 [3'00"] 26 2011.06.14 09:15:00 [3'00"] 27 2011.06.14 09:18:00 [3'00"] 28 2011.06.14 09:21:00 [3'00"] 29 2011.06.14 09:24:00 [3'00"] 30 2011.06.14 09:27:00 [3'00"] 31 2011.06.14 09:30:00 [3'00"] 32 2011.06.14 09:33:00 [3'00"] 33 2011.06.14 09:36:00 [3'00"] 34 2011.06.14 09:39:00 [1'23"] 35 2011.06.14 10:07:44 [1'16"] 36 2011.06.14 10:09:00 [1'53"] 37 2011.06.14 10:16:29 [1'04"] Select file(s) to playback Close Return to the [FileList]
This file includes GPS data.

This file resolution is SXVGA (1280x960).

This file resolution is VGA (640x480).

This file recorded by G-Sensor.

This file recorded by Record button.

This file recorded by Normal (Continuous) record.
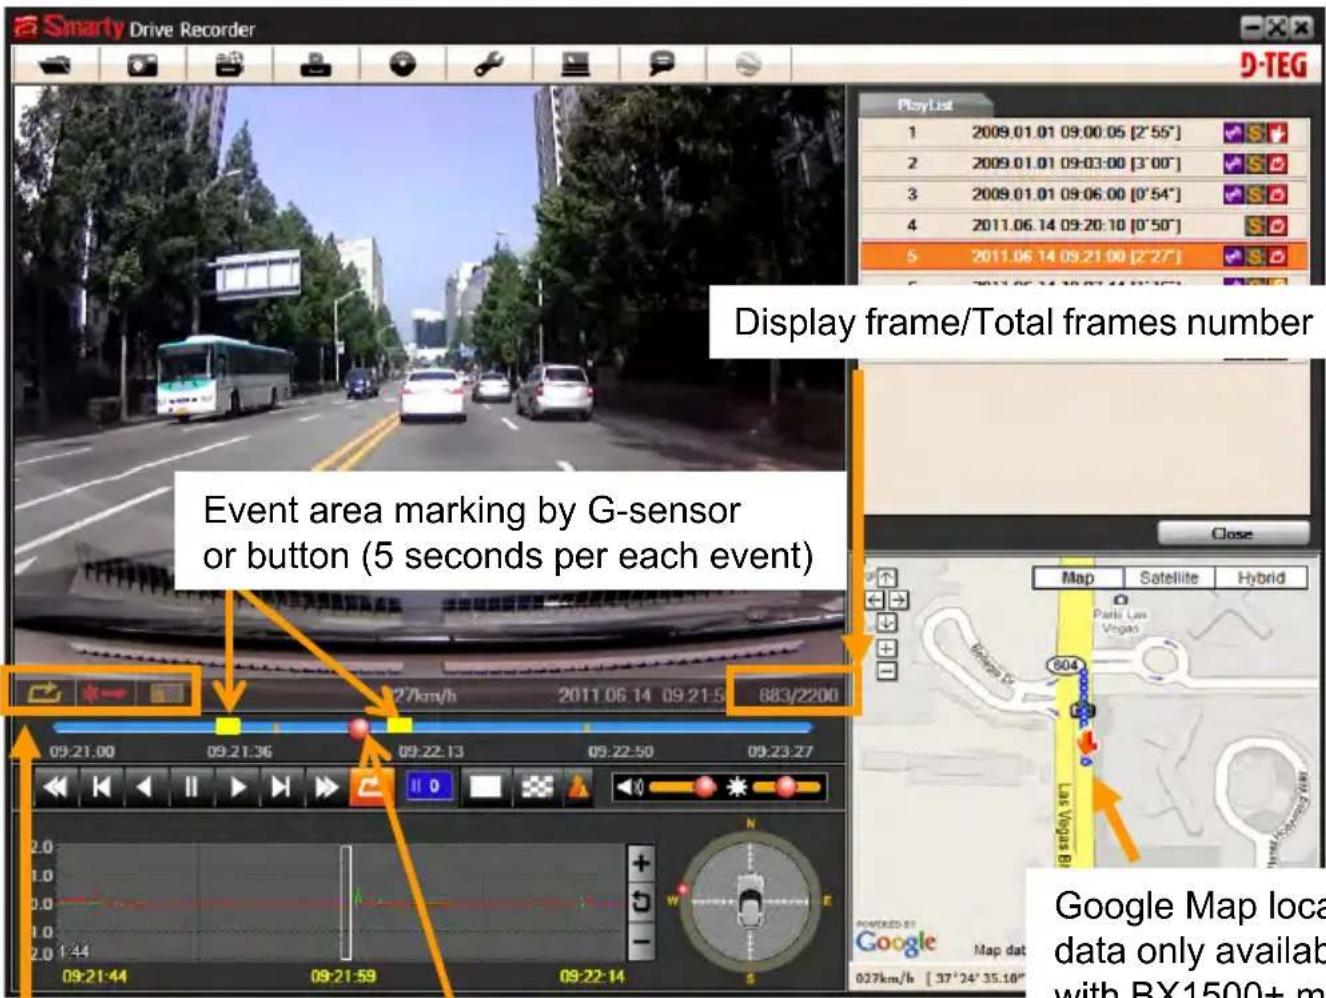
When Record Method set as "Normal record"
text_image
Smarty Drive Recorder D-TEG PlayList 1 2009.01.01 09:00:05 [2'55"] 2 2009.01.01 09:03:00 [3'00"] 3 2009.01.01 09:06:00 [0'54"] 4 2011.06.14 09:20:10 [0'50"] 5 2011.06.14 09:21:00 [2'27"] Display frame/Total frames number Event area marking by G-sensor or button (5 seconds per each event) Close Map Satellite Hybrid Google Map loca data only availab with RX1500+ mPlayback position indicator
Google Map location data only available with BX1500+ model
Playback Icons

text_image
Vertical sequence of directional and symbolic icons including arrows, arrows, and symbols like 's' and 'v'This file recorded by Normal (Continuous) record.
This file recorded by G-Sensor.
This file recorded by Record button.
This file resolution is SXVGA (1280x960).
This file resolution is VGA (640x480).
Pre-recorded frame
Post-recorded frame
Continuously recorded frame
7. Click play button for playback.
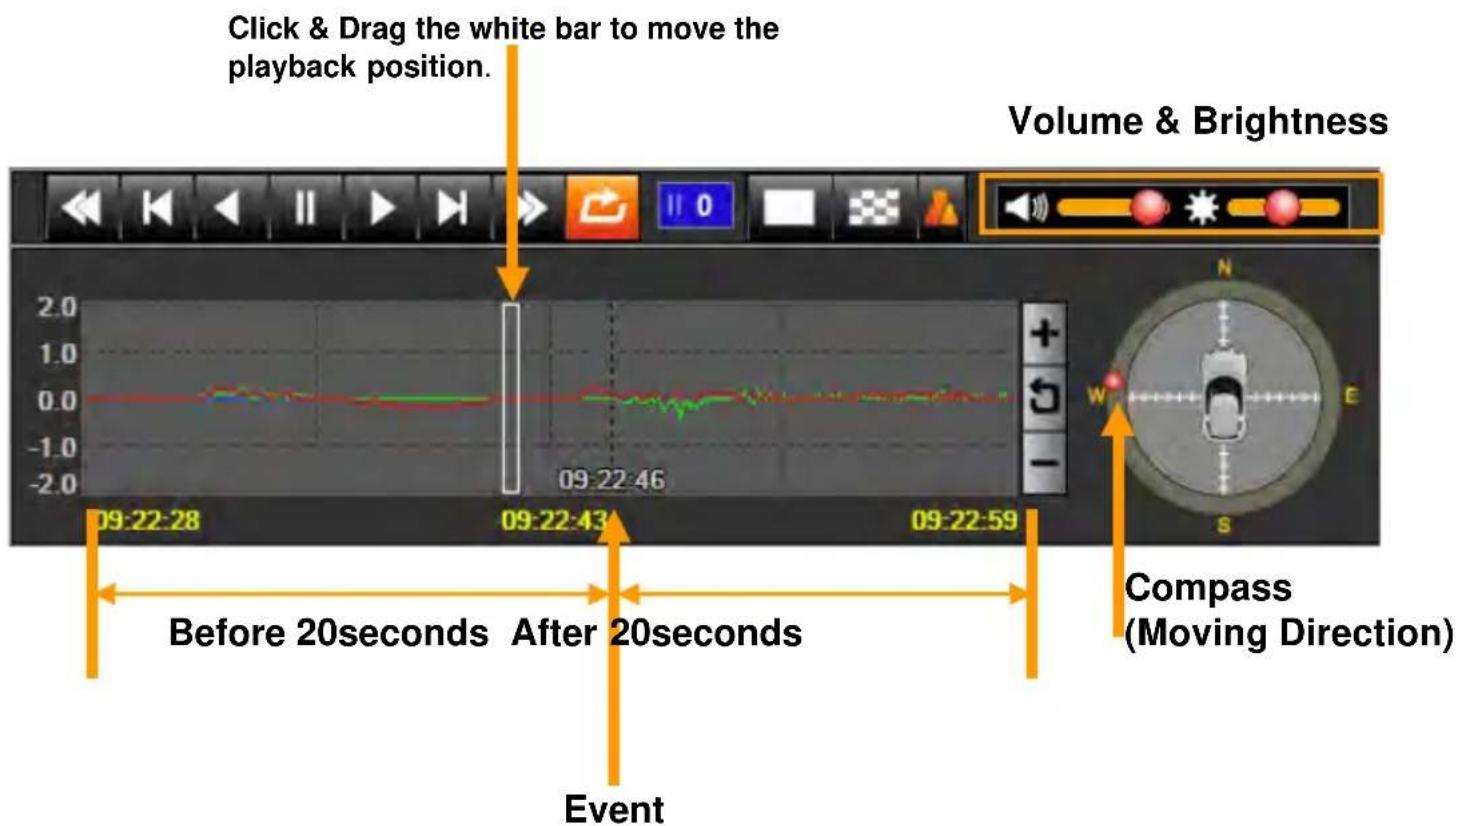
text_image
Click & Drag the white bar to move the playback position. Volume & Brightness Before 20seconds After 20seconds Event Volume & Brightness 09:22:46 09:22:43 09:22:59 Compass (Moving Direction)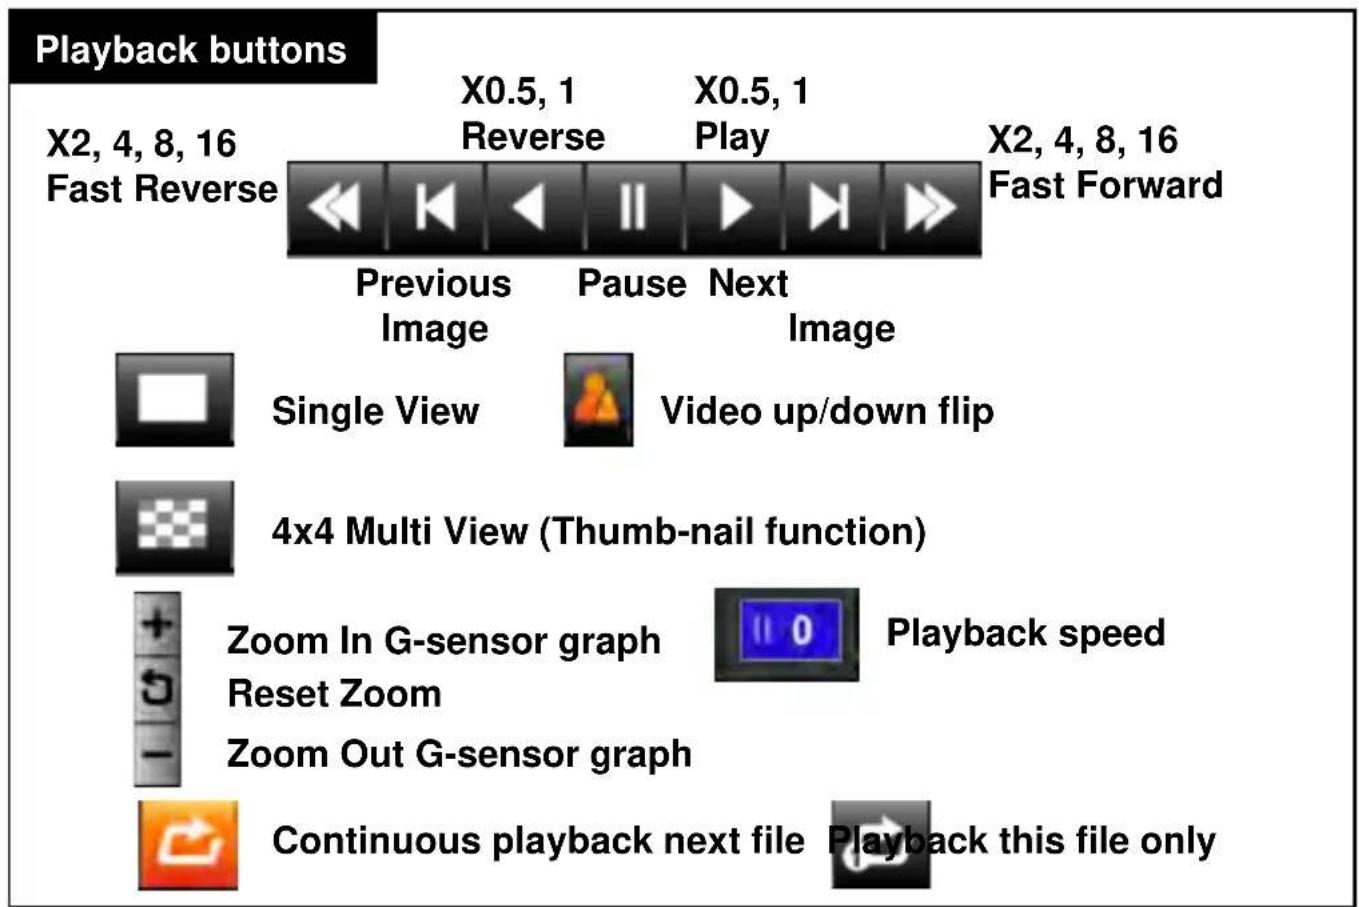
text_image
Playback buttons X2, 4, 8, 16 Fast Reverse X0.5, 1 Reverse X0.5, 1 Play X2, 4, 8, 16 Fast Forward Previous Image Pause Next Image Single View Video up/down flip 4x4 Multi View (Thumb-nail function) Zoom In G-sensor graph Reset Zoom Playback speed Zoom Out G-sensor graph Continuous playback next file Playback this file onlyNOTE: PC Keyboard hot buttons
| Function PC Hot Keys | |
| 1280x768 mode Enter | Return to the previous mode: Enter |
| Playback speed control Ctrl + F | 0.5 => 1 |
| Reverse playback speed control Ctrl + B | 0.5 => 1 |
| Pause / Play Space | |
| Previous Image → direction button. | |
| Next Image ← direction button |
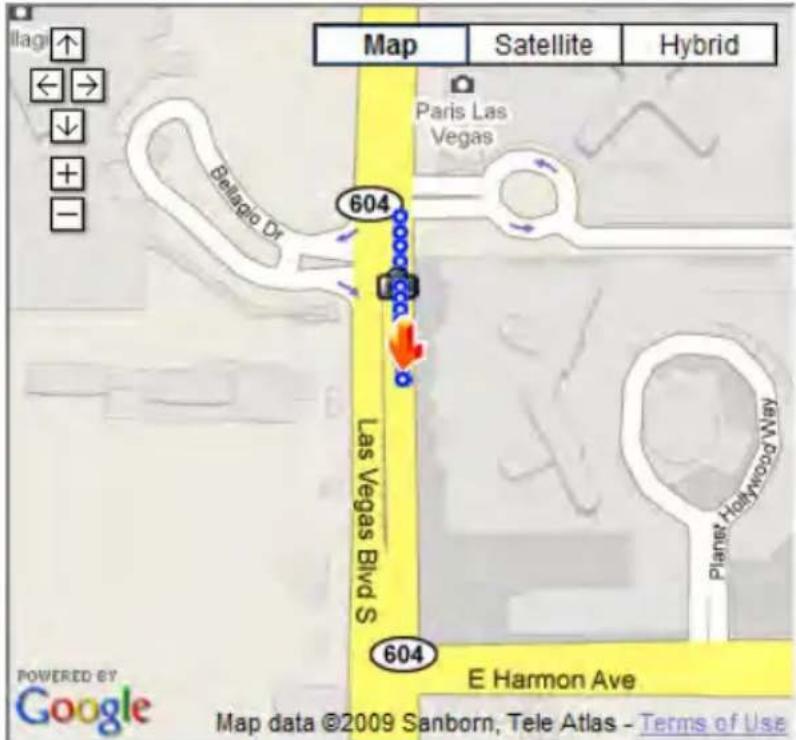
The route taken will be displayed on the Google maps at lower right corner of the software UI.
text_image
Map Satellite Hybrid Paris Las Vegas 604 Las Vegas Blvd S 604 E Harmon Ave Powered by Google Map data ©2009 Sanborn, Tele Atlas - Terms of Use
To see the route & position on the Google map, the GPS data should be recorded with video.
To see the map, the PC must be connected to the Internet.
The playback position will be shown on the map with an arrow. The blue markings show the route taken.
Double click the blue mark to change the video playback position to that point.
The camera icon indicates that there is a recorded file.
When the unit is set to Normal recording mode, there is no route & camera icon on the map.
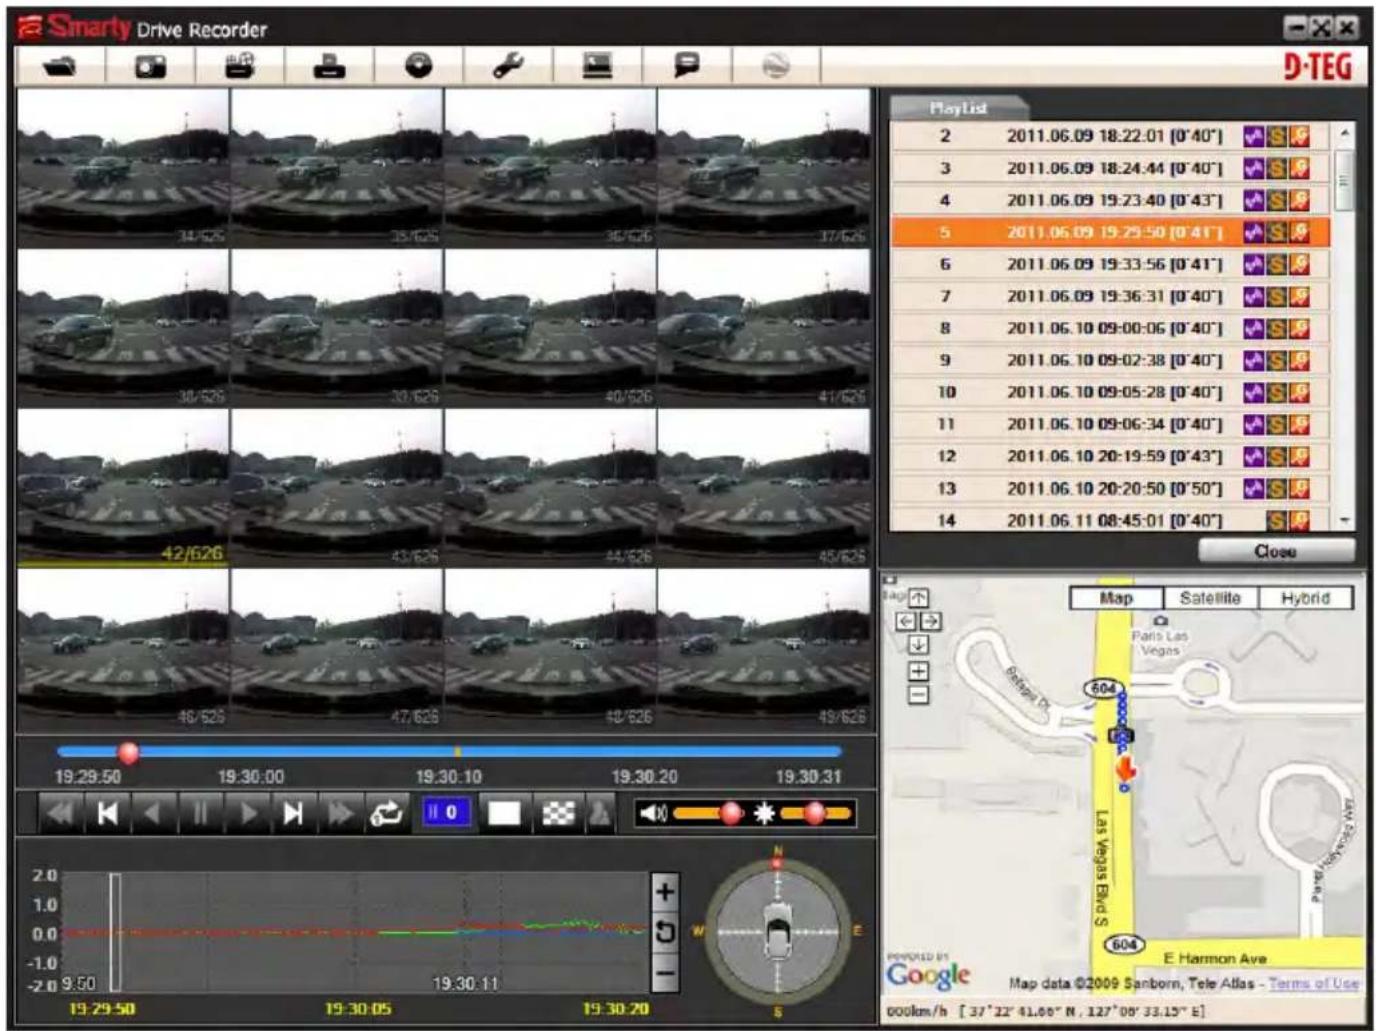
- Click the button for 4x4 multi view (Thumb-nail function)
text_image
Smarty Drive Recorder D-TEG 2011.06.09 18:22:01 [0'40"] 3 2011.06.09 18:24:44 [0'40"] 4 2011.06.09 19:23:40 [0'43"] 5 2011.06.09 19:29:50 [0'41"] 6 2011.06.09 19:33:56 [0'41"] 7 2011.06.09 19:36:31 [0'40"] 8 2011.06.10 09:00:06 [0'40"] 9 2011.06.10 09:02:38 [0'40"] 10 2011.06.10 09:05:28 [0'40"] 11 2011.06.10 09:06:34 [0'40"] 12 2011.06.10 20:19:59 [0'43"] 13 2011.06.10 20:20:50 [0'50"] 14 2011.06.11 08:45:01 [0'40"] Close Map Satellite Hybrid Paris Las Vegas Los Vegas Blvd S E Harmon Ave Google Map data ©2009 Sanborn, Tele Atlas - Terms of Use 604 604 E Harmon Ave Map data ©2009 Sanborn, Tele Atlas - Terms of Use 604km/h [ 37°22' 41.08" N , 127°08' 33.15" E ]Click the thumbnail image to change the playback position. Click right the mouse button to single image playback mode.
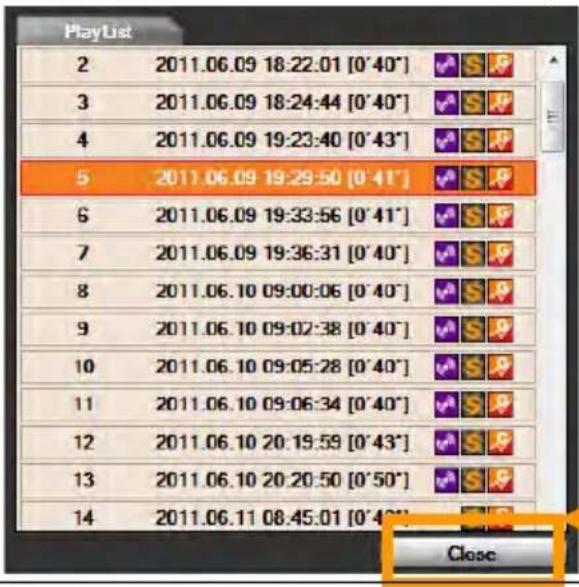
- Click [Close] button to quit the playback.
text_image
PlayList 2 2011.06.09 18:22:01 [0'40"] 3 2011.06.09 18:24:44 [0'40"] 4 2011.06.09 19:23:40 [0'43"] 5 2011.06.09 19:29:50 [0'41"] 6 2011.06.09 19:33:56 [0'41"] 7 2011.06.09 19:36:31 [0'40"] 8 2011.06.10 09:00:06 [0'40"] 9 2011.06.10 09:02:38 [0'40"] 10 2011.06.10 09:05:28 [0'40"] 11 2011.06.10 09:06:34 [0'40"] 12 2011.06.10 20:19:59 [0'43"] 13 2011.06.10 20:20:50 [0'50"] 14 2011.06.11 08:45:01 [0'40'] CloseClick [Close] to finish the playback. Then the [PlayList] window will be changed to the initial status.
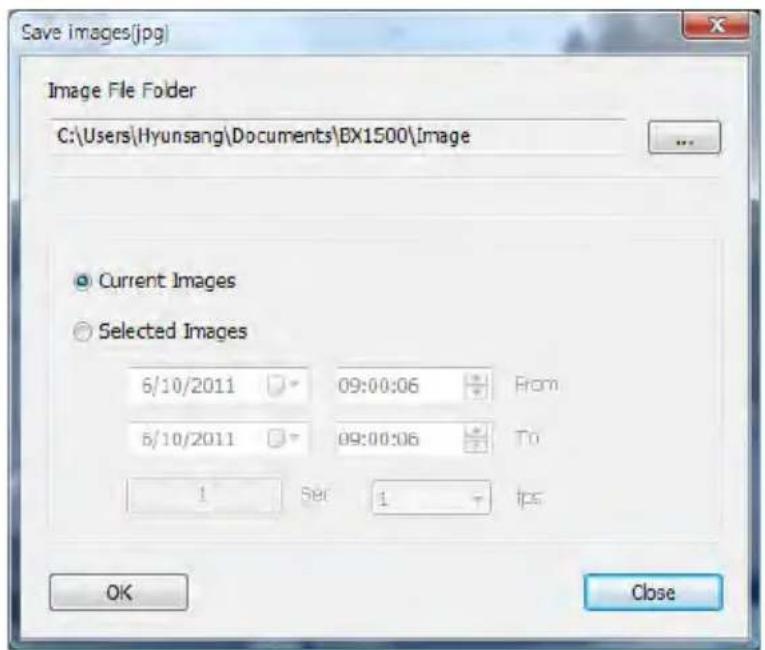
- Pause the playback and click 'Save Image' icon to make a JPG file.

'Save Image' icon
text_image
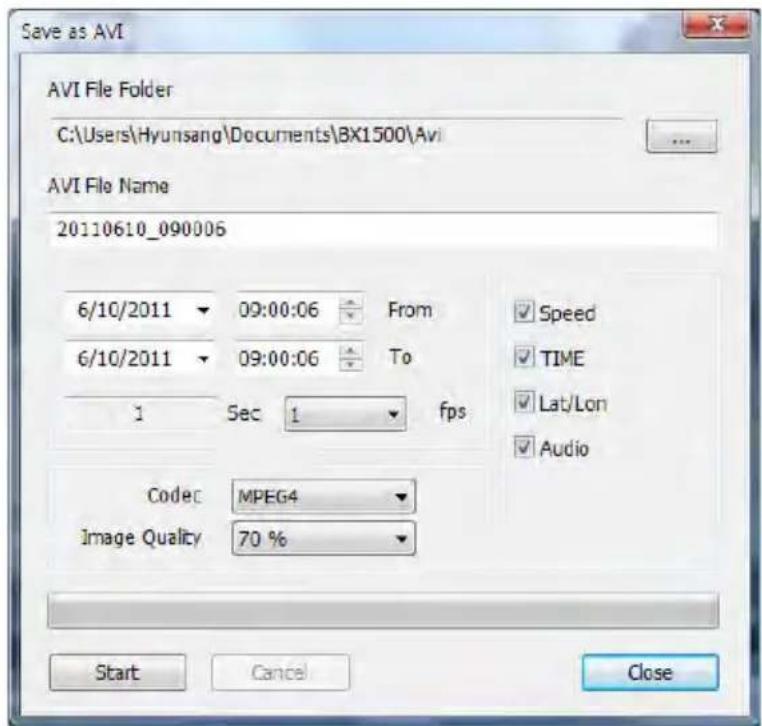
Save images(jpg) Image File Folder C:\Users\Hyunsang\Documents\BX1500\image Current Images Selected Images 6/10/2011 09:00:06 From 6/10/2011 09:00:06 To 1 Set 1 fps OK Close- Click the 'Save AVI' icon to make an AVI file.

'Save AVI' icon
text_image
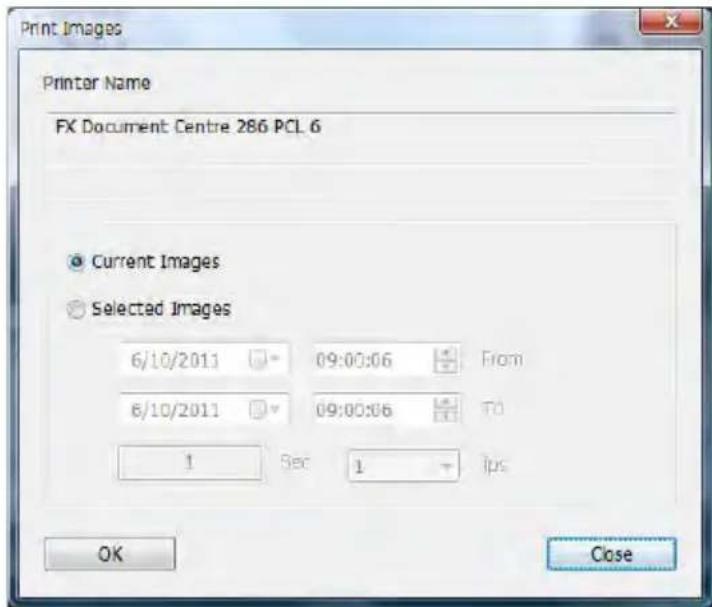
Save as AVI AVI File Folder C:\Users\Hyunsang\Documents\BX1500\Avi AVI File Name 20110610_090006 6/10/2011 09:00:06 From 6/10/2011 09:00:06 To 1 Sec 1 fps Speed TIME Lat/Lon Audio Codec MPEG4 Image Quality 70 % Start Cancel Close- Pause the playback and click the printer icon.
Printer icon
text_image
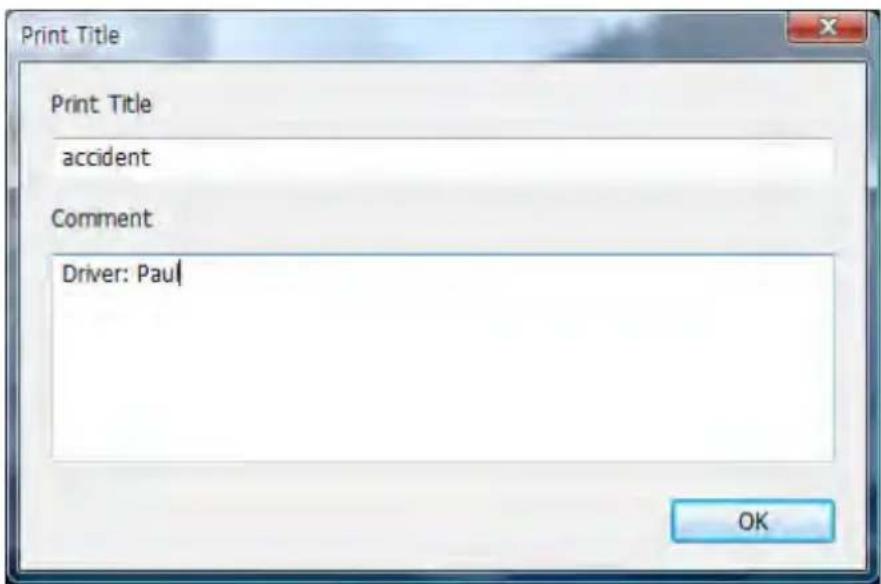
Print Images Printer Name FX Document Centre 286 PCL 6 Current Images Selected Images 6/10/2011 09:00:06 From 6/10/2011 09:00:06 To 1 Sec 1 fps OK CloseType in the Title [Print Title] & any comments [Comment] using the Keyboard.
text_image
Print Title print title accident Comment Driver: Pau OKThe ‘Print Comment’ window allows up to 7 lines total.
- Click [Print] button in the print preview windows for printing.
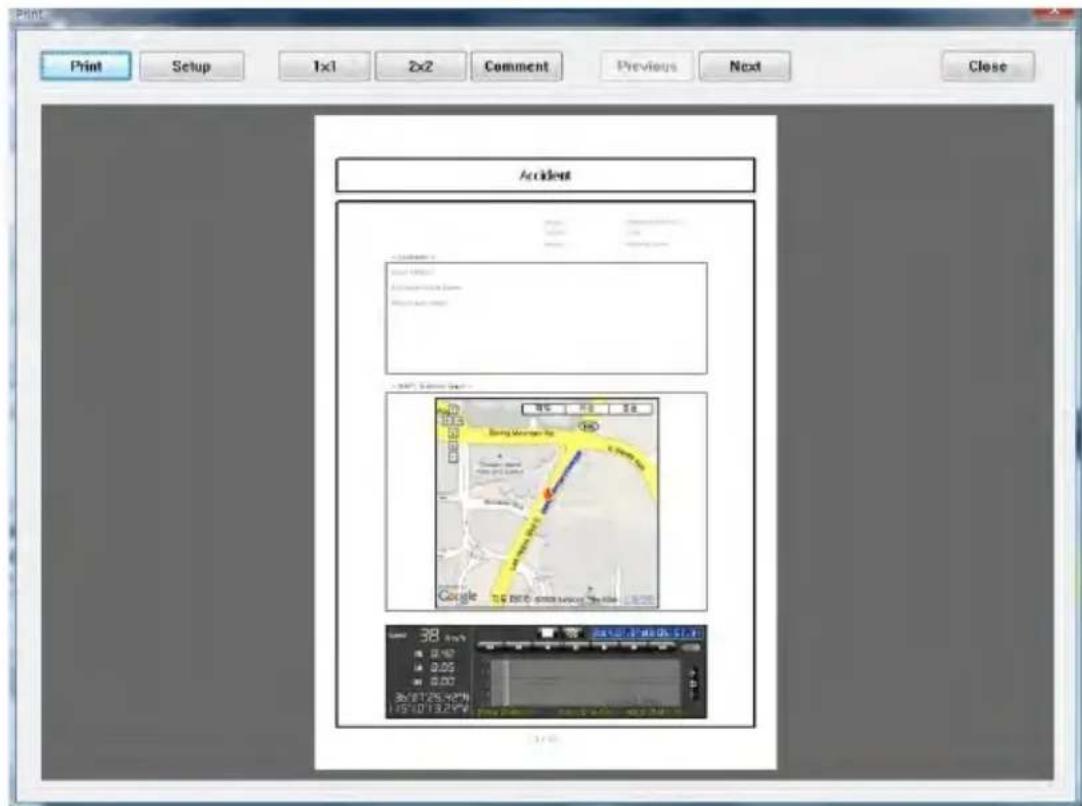
The File Name [Print Title], Comment [Print Comment], G-sensor graph & map (for BX1500+ Model only) will be printed on the first page.
text_image
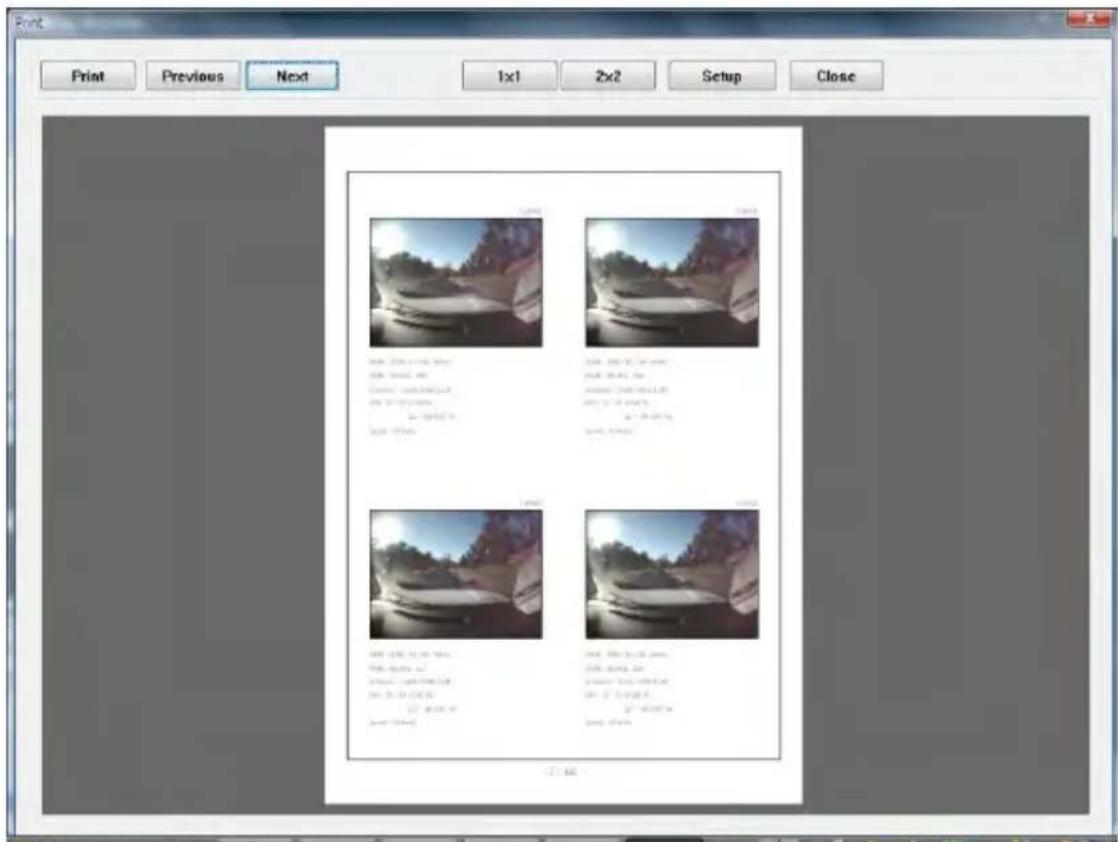
Print Setup 1x1 2x2 Comment Previous Next Close Accident 38 0.00 0.05 0.00 36/97/25:32"# 15:10/13:25" Google Borg Manager Up Google Google Google Google Google Google Google Google Google Google Google Google Google Google Google Google Google Google Google Google Google Google Google Google Google Google Google Google Google Google Google Google Google Google Google Google Google Google Google Google Google Google Google Google Google Google Google Google Google Google GOGClick [2x2] and then click [Print] to print 4 images per page.
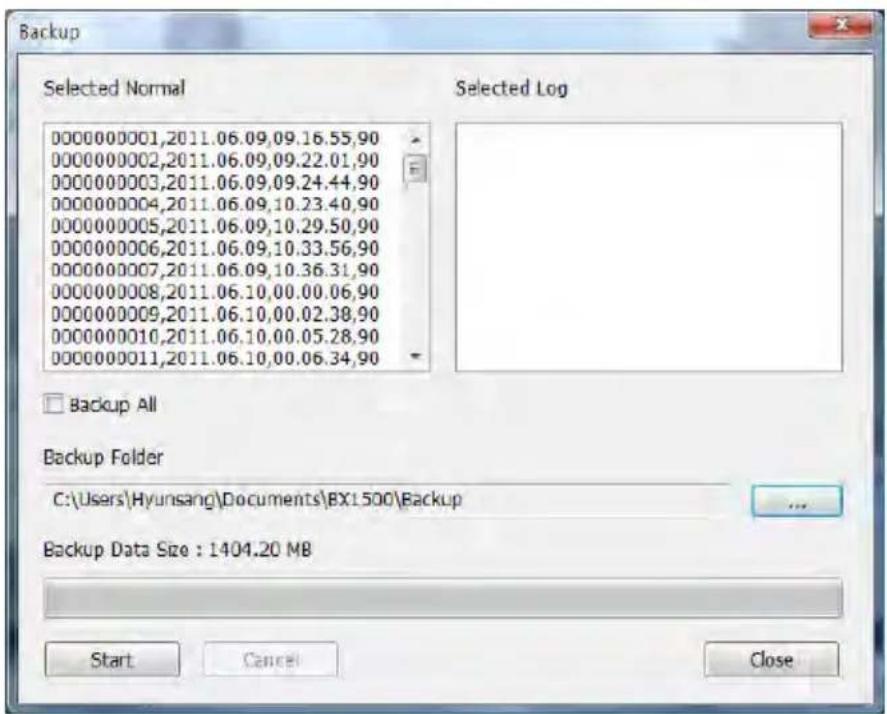
- Click [Backup Event/Log files] icon to backup the files to the PC.

[Backup Event/Log files] icon
text_image
Backup Selected Normal 0000000001,2011.06.09,09.16.55,90 0000000002,2011.06.09,09.22.01,90 0000000003,2011.06.09,09.24.44,90 0000000004,2011.06.09,10.23.40,90 0000000005,2011.06.09,10.29.50,90 0000000006,2011.06.09,10.33.56,90 0000000007,2011.06.09,10.36.31,90 0000000008,2011.06.10,00.00.06,90 0000000009,2011.06.10,00.02.38,90 0000000010,2011.06.10,00.05.28,90 0000000011,2011.06.10,00.06.34,90 Selected Log Backup All Backup Folder C:\Users\Hyunsang\Documents\BX1500\Backup Backup Data Size : 1404.20 MB Start Cancel CloseSelect [Event data] or [Normal data] and select [Log data] first, before clicking the [Backup Event/Log files] icon. Then the selected Event, Normal, and Log data files are backed up on Windows to your preferred destination.
To backup the entire SD card data to the PC, check [Backup All]
- Click [Recorder Setting] icon for setup.

[Recorder Setting] icon
text_image
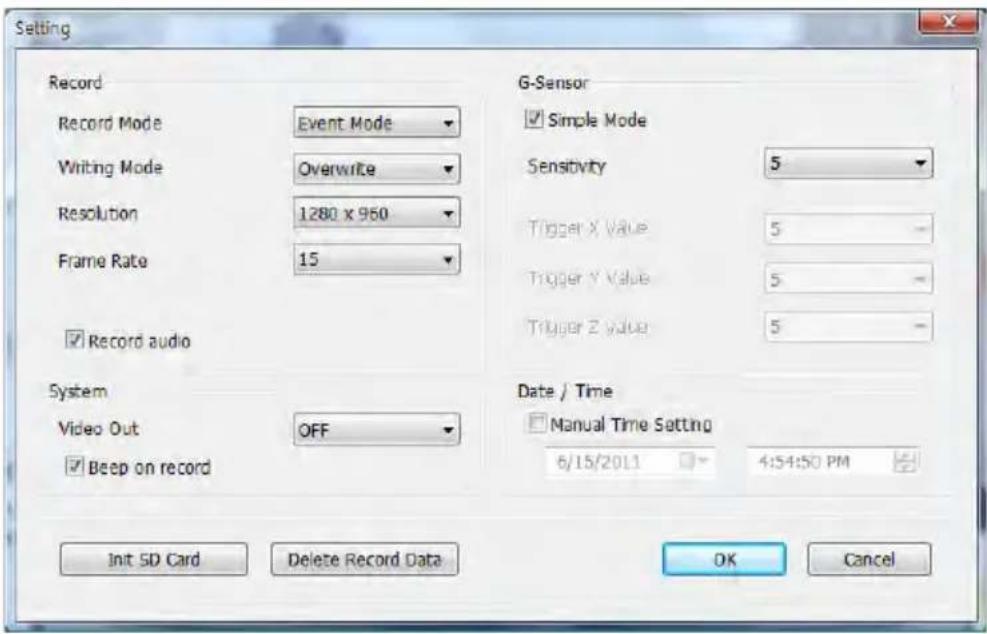
Setting Record Record Mode Event Mode Writing Mode Overwrite Resolution 1280 x 960 Frame Rate 15 ✓ Record audio System Video Out OFF ✓ Beep on record G-Sensor ✓ Simple Mode Sensitivity 5 Trigger X Value 5 - Trigger Y Value 5 - Trigger Z Value 5 - Date / Time ☐ Manual Time Setting 6/15/2011 4:54:50 PM Init SD Card Delete Record Data OK CancelCaution
Backup the SD data first, before clicking initializing the SD card. The old data is removed when you save new settings.
| Record Mode Event | Mode (Automatically starts Recording by G-sensor event or Record Button)Normal Mode (Is always recording when powered by 12V) |
| Writing Mode Overwrite | (The oldest data is overwritten when the SD memory is full.)One time (The recording stops automatically when the SD memory is full.) |
| Resolution | 1280x960(SXVGA), 640x480(VGA) |
| Frame Rate | 30 means real-time recording640x480 Record supports 1, 2, 3, 5, 10, 15, 30 fps1280x960 Record supports 1, 2, 3, 5, 10, 15 fps |
| Record audio | Check it to record Audio |
| Video Out OFF, NTSC, PALSet it OFF, to set 15fps at 1280x960.If set it NTSC or PAL, the maximum recording frame rate of 1280x960 is 10fps. | |
| Beep on record | “Beep” sound ON/OFF when Event recordings are started |
| G-sensor setting | Check simple setting mode and then change the sensitivity. High sensitivity (8 or 9) means recording will be started at very low impact. |
| Date/Time Automatically | synchronize with GPS time. However Manual time setting is also available. |
| Initialize SD card | The SD configuration of the Drive Recorder will default to the factory settings. All video and GPS data will be deleted. |
| Delete record data | All data will be deleted. |

Caution Once the record settings are changed, all recorded data on the SD card will be removed.

text_image
Setting The set is changed and removes a data, Continue ? Yes CancelBackup the recorded file first and then change the settings to avoid losing all recorded data.
G-Sensor

Simple Mode
Sensitivity

Trigger X Value

Trigger Y Value

Trigger Z Value

G-Sensor setting
If G-sensor sensitivity value is high (8 or 9), it may be too sensitive, it will detect even a light impact or light turn. If G-sensor sensitivity value is a low setting (1 or 2), it might not detect a notable incident.
Sensitivity should be set in consideration of a vehicle's suspension and also the road condition.
Date / Time

Manual Time Setting
6/15/2011

4:58:21 PM

[BX1000] doesn't have the GPS time sync.
function. So please click the manual time setting, and set your time before installing it in your car.
[BX1000+] has an internal GPS supporting the automatic GPS Time Synchronize function. The time recording is done based on UTC at the BX1000+ and automatically converts to the local time at the PC according to the PC time zone setting when playing back using the PC Viewer.
If you use a NEW SD Memory card, initializing must be done first.
STEP1. Insert new SD memory card into the PC.
STEP2. Run "PC Viewer BX1000"
STEP3. Select [ ] record setting and then click [Init SD card]
We recommend the [Init SD card] at least once per month to reduce the possibility of any software errors.
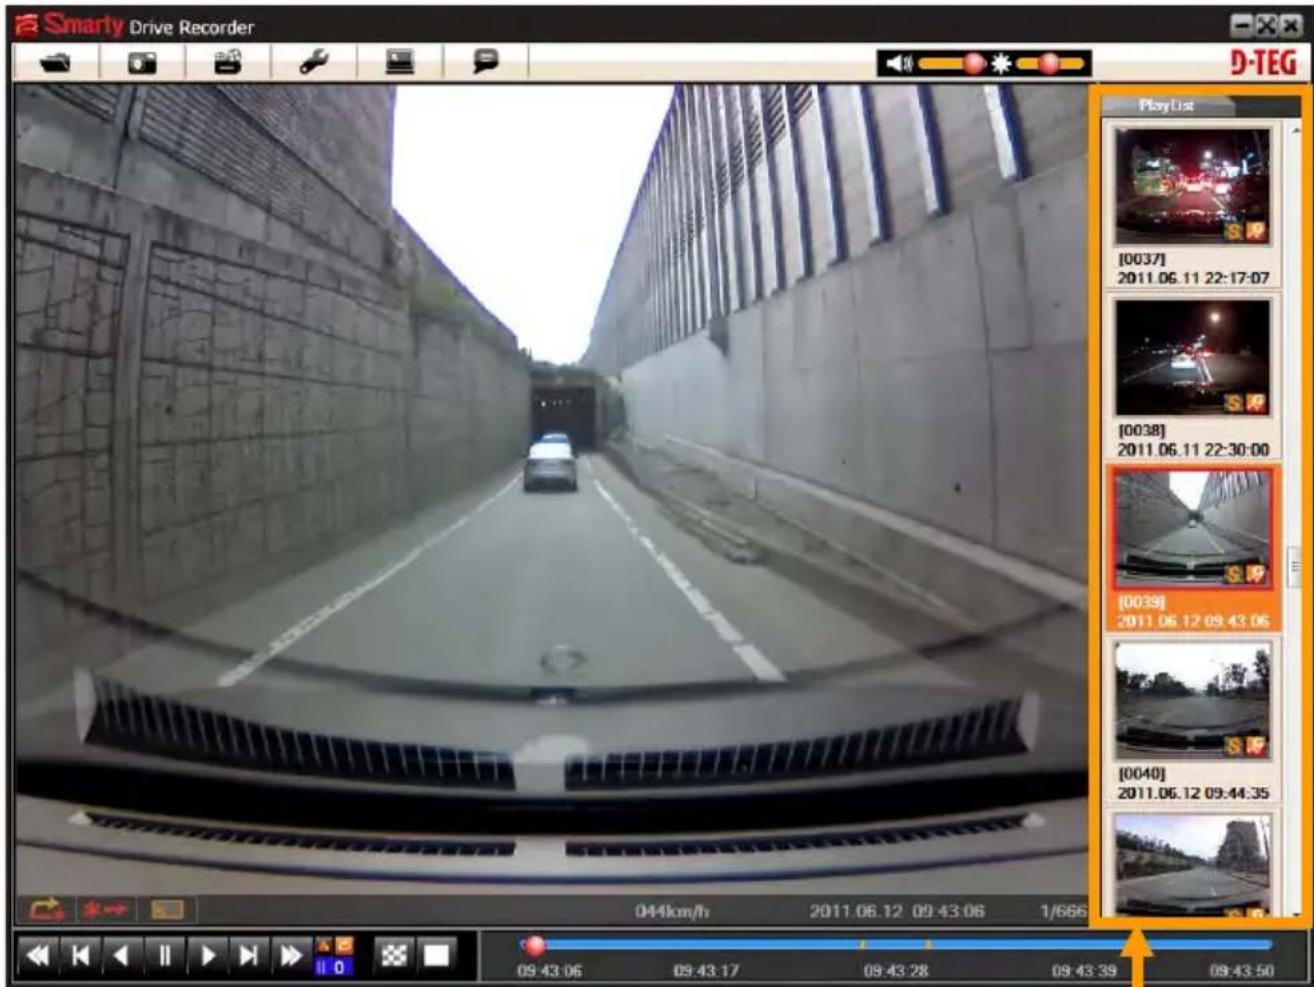
Simple Mode Viewer
With this option, the video is maximized and a panel of video previews appears in the right panel.
text_image
Smarty Drive Recorder D-TEG PlayList [0037] 2011.06.11 22:17:07 [0038] 2011.06.11 22:30:00 [0039] 2011.06.12 09:43:06 [0040] 2011.06.12 09:44:35 044km/h 2011.06.12 09:43:06 1/666 09.43:06 09.43:17 09.43:28 09.43:39 09.43:50Preview images
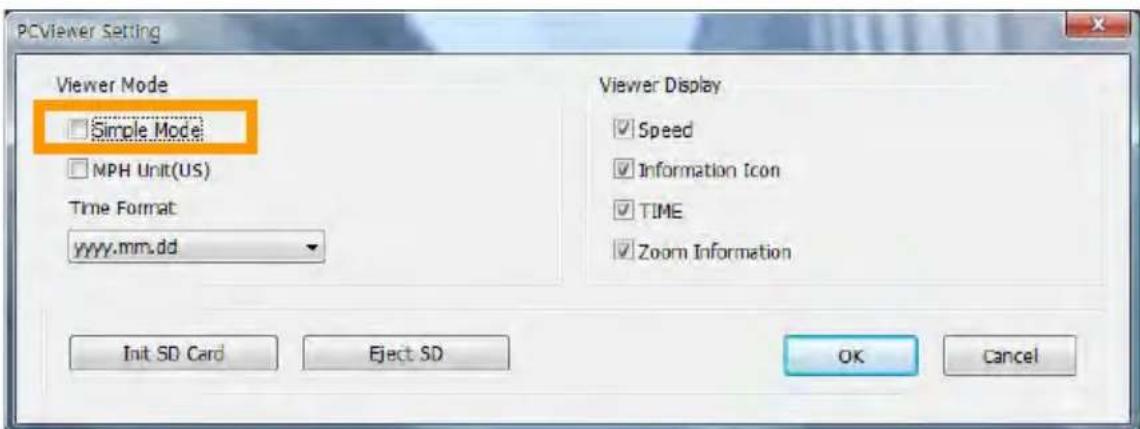
To change it to Normal Mode Viewer:

Click [Setting viewer program] icon
text_image
PCViewer Setting Viewer Mode Simple Mode MPH Unit(US) Time Format yyyy.mm.dd Viewer Display Speed Information Icon TIME Zoom Information Init SD Card Eject SD OK CancelUn-check Simple Mode and press [OK]
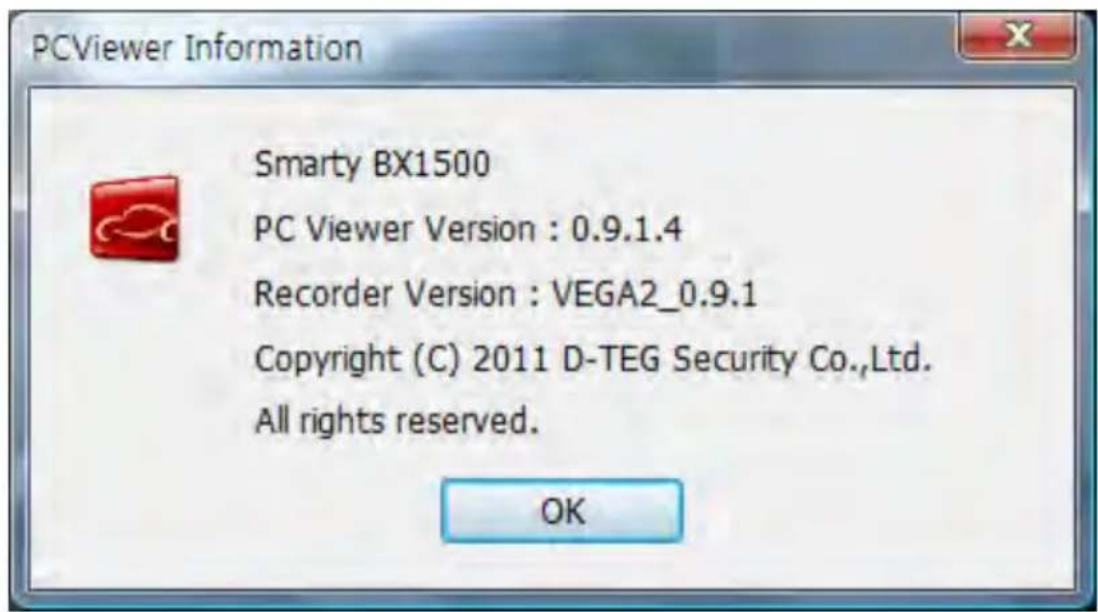
- Click [About] icon to check the product information.

About icon
text_image
PCViewer Information Smarty BX1500 PC Viewer Version : 0.9.1.4 Recorder Version : VEGA2_0.9.1 Copyright (C) 2011 D-TEG Security Co.,Ltd. All rights reserved. OK- Select [LOG] windows and then check the log from the log list using mouse or click [Check All] button. Then click [Load] button.
Log data
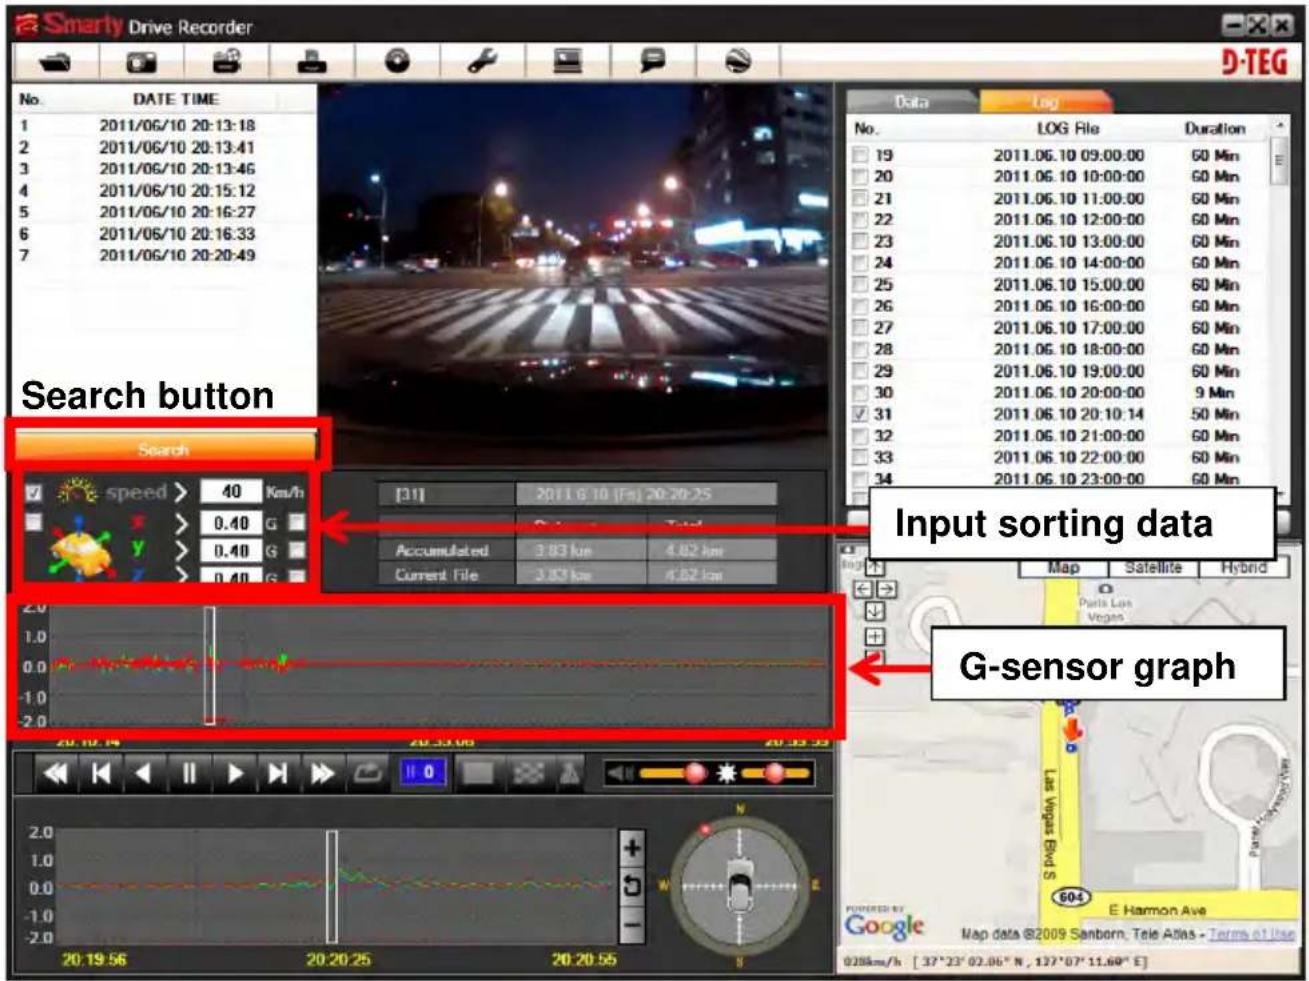
Log data will be recorded during driving even if there are no events or video. The maximum amount of log data saved is 60MB. The log data overwrites the oldest data when 60MB is reached. Using this log data, we can use the data sorting function which helps to find specific data or driving behaviors, such as more than 80mph(or 80km) or 1G of X-axis force exceeded.
text_image
Smarty Drive Recorder D-TEG No. DATE TIME 1 2011/06/10 20:13:18 2 2011/06/10 20:13:41 3 2011/06/10 20:13:46 4 2011/06/10 20:15:12 5 2011/06/10 20:16:27 6 2011/06/10 20:16:33 7 2011/06/10 20:20:49 Search button Search speed > 40 Km/h > 0.40 G > 0.40 G > 0.40 G [31] 2011 6.10 [Fm] 20:20:25 Accumulated 3.83 km 4.82 km Current File 3.83 km 4.82 km Input sorting data G-sensor graph Data Log No. LOG File Duration 19 2011.06.10 09:00:00 60 Min 20 2011.06.10 10:00:00 60 Min 21 2011.06.10 11:00:00 60 Min 22 2011.06.10 12:00:00 60 Min 23 2011.06.10 13:00:00 60 Min 24 2011.06.10 14:00:00 60 Min 25 2011.06.10 15:00:00 60 Min 26 2011.06.10 16:00:00 60 Min 27 2011.06.10 17:00:00 60 Min 28 2011.06.10 18:00:00 60 Min 29 2011.06.10 19:00:00 60 Min 30 2011.06.10 20:00:00 9 Min 31 2011.06.10 20:10:14 50 Min 32 2011.06.10 21:00:00 60 Min 33 2011.06.10 22:00:00 60 Min 34 2011.06.10 23:00:00 60 MinGPS speed, G sensor X value, G sensor Y value, G sensor Z value,
Can each be checked first on the right side of each value. And then specify the input data for data filtering.
If there is recorded video data, [Switch] or [G Sensor] a black dotted line will be displayed on the graph.
G sensor X value: Front & Back (i.e. hard brake or quick acceleration)
G sensor Y value: Left & Right (i.e sharp turn)
G sensor Z value: Up & Down (prominence and depression)

Google Earth icon
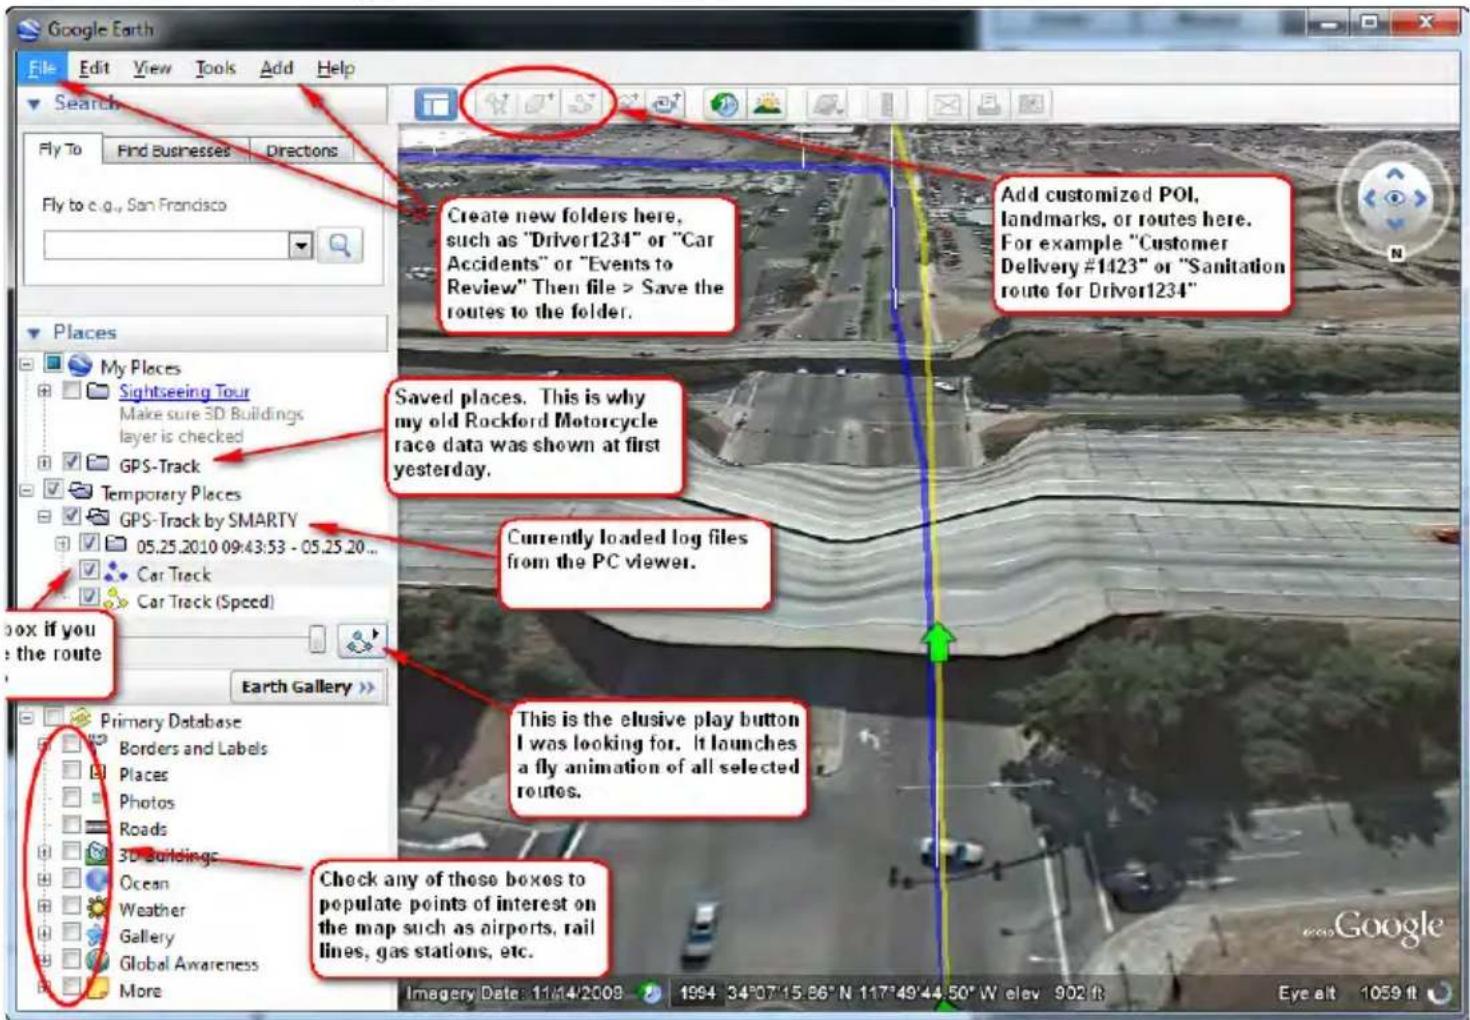
To see the whole route on Google Earth, select a log file and click Google Earth button. (BX1500+ only)
STEP1. Install the Google Earth on your PC. It is free of charge. (http://earth.google.com/)
STEP2. Check the log file
STEP3. Click Google Earth button
Then the route will be exported to Google Earth, which will automatically launch.
text_image
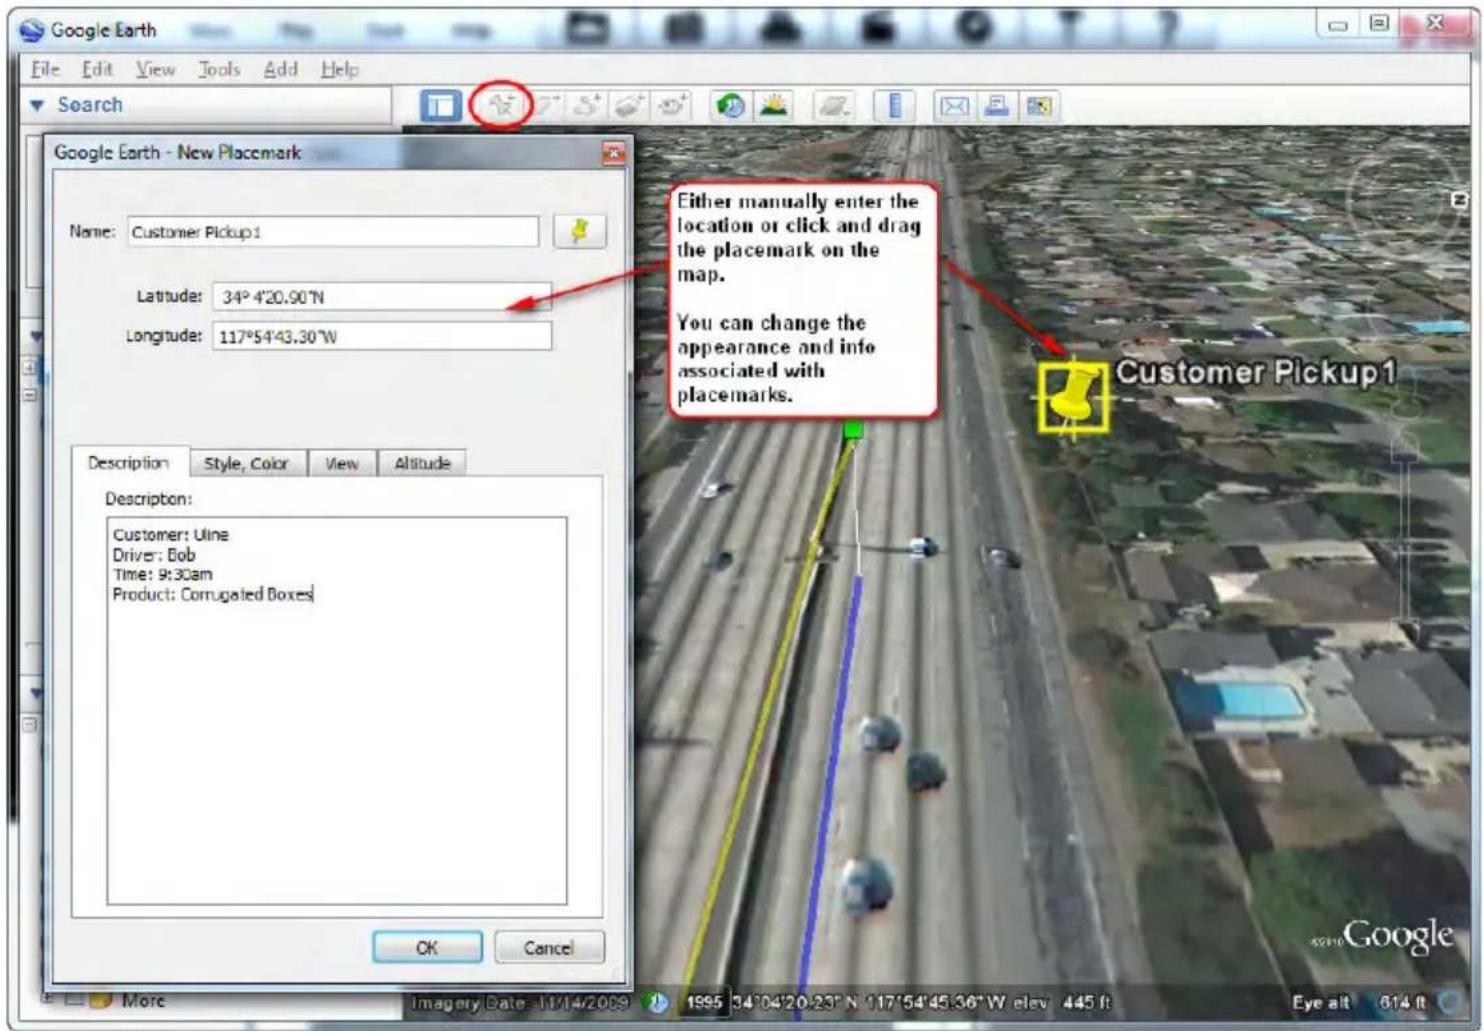
Google Earth File Edit View Tools Add Help Search Fly To Find Businesses Directions Fly to e.g., San Francisco Place My Places Sightseeing Tour Make sure 3D Buildings layer is checked GPS-Track Temporary Places GPS-Track by SMARTY 05.25.2010 09:43:53 - 05.25.20 ... Car Track Car Track (Speed) box if you e the route Earth Gallery >> Primary Database Borders and Labels Places Photos Roads 3D Buildings Ocean Weather Gallery Global Awareness More Create new folders here, such as "Driver1234" or "Car Accidents" or "Events to Review" Then file > Save the routes to the folder. Add customized POI, landmarks, or routes here. For example "Customer Delivery #1423" or "Sanitation route for Driver1234" Saved places. This is why my old Rockford Motorcycle race data was shown at first yesterday. Currently loaded log files from the PC viewer. This is the elusive play button I was looking for. It launches a fly animation of all selected routes. Check any of these boxes to populate points of interest on the map such as airports, rail lines, gas stations, etc. Imagery Date: 11/14/2009 1994 34°07'15.86" N 117°49'44.50" W elav 902 R Eye alt 1059 ftGoogle Earth lets you import the log data and save routes, add place marks (i.e. customer pick up locations, or other points of interest), add driving routes (to compare with the actual route taken, and it lets you save it all within Google Earth for easy and free data management!
text_image
Google Earth - New Placemark Name: Customer Pickup1 Latitude: 34°4'20.90"N Longitude: 117°54'43.30"W Description Style, Color View Altitude Description: Customer: Uline Driver: Bob Time: 9:30am Product: Corrugated Boxes Order: 10000000000000000000000000000000000000000000000000000000000000000000000000000000000000 Order: 1995 34°4'20.23" N 117°54'45.36"W clay 445 ft Eye alt 814 ft Order: 1995 34°4'20.23" N 117°54'45.36"W clay 445 ft Eye alt 814 ftYou can view and download Google Earth tutorials and user guides here:
http://earth.google.com/support/bin/static.py?page=guide_toc.cs
SPECIFICATIONS
| Image sensor 1/4" CMOS Digital Sensor 1.3M pixels | |
| Angle of View | BX1500/BX1500+: 120° (horizontal: 88°, vertical: 65°)BX1500+ 170: 170° (horizontal: 131° vertical: 96°) |
| Video resolution | 1280x960(SXVGA), 640x480(VGA) |
| Frames per second | 30 frames @ 640x480, 15frames @ 1280x960 |
| Recording | By continuous, By impact, By emergency button |
| Recording time | before 20 sec after 20 secContinuous recording: Min 65min ~ Max 148hours |
| GPS Internal GPS | |
| G-Sensor | Internal 3-axis G-sensor |
| Memory | SD/SDHC flash memory card (support 4GB, 8GB, 16GB, 32GB) |
| RTC Internal battery | |
| Buzzer Recording start, error | |
| LED 2 LED (Record, Overwrite) | |
| Supper Capacitor | Enable recording last file and shut down |
| PC software PC Viewer | |
| Power input 12V ~ 24V (cigarette plug) | |
| Power consumption | 2.8W |
| Size/Weight 80 mm | X 50 ∅, 100g |
| Operation Temp. | -10°C~60°C |
Technical Support & Warranty
TECHNICAL SUPPORT
For Technical Support, please contact your local distributor.
LIMITED WARRANTY
This product is supplied with 1 year warranty from date of sale. The Warranty excludes products:
That have been misused, (including accidental damage) and damage caused by normal wear and tear. In the unlikely event that you encounter a problem with this product, it should be returned to the place of purchase.
Optional Accessory (Permanent Power Cable)
Model name: DPWR-100
The permanent power supply cable will allow you to hard wire the Smasrty BX series to the fuse box of your vehicle.
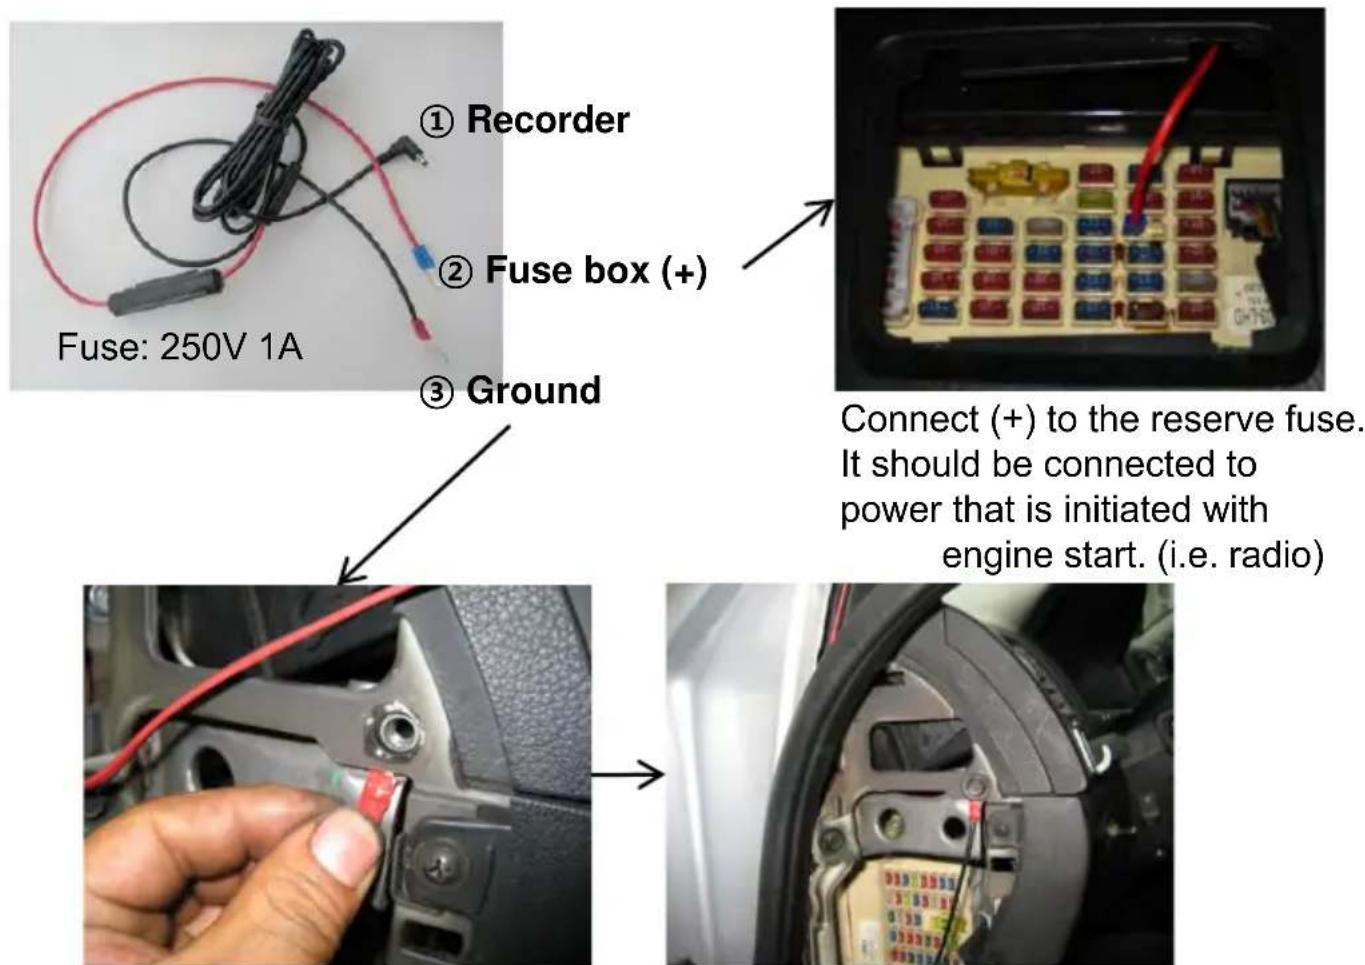
The ground cable should be contacted to the car body/chassis.
Optional Accessory (Permanent Power Cable)
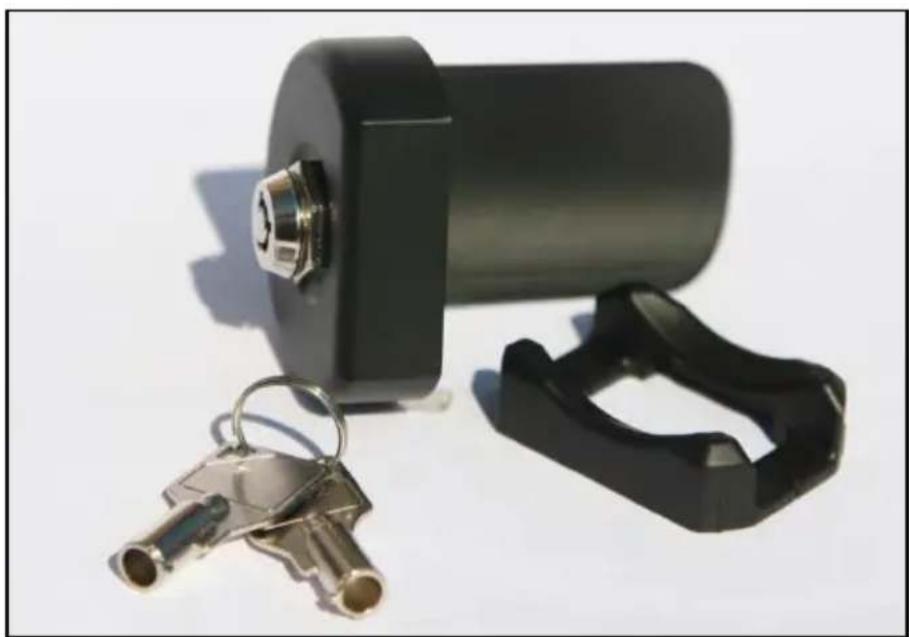
Model: LNB-100
The Locking cover can protect the SD card from unwanted removal or tampering.
LNB-100 includes: A locking cover, an end block with two-position lock, and barrel key. End block must be adhered with super glue.
natural_image
Close-up of a black cylindrical device with metallic keys and a clip, no visible text or symbols.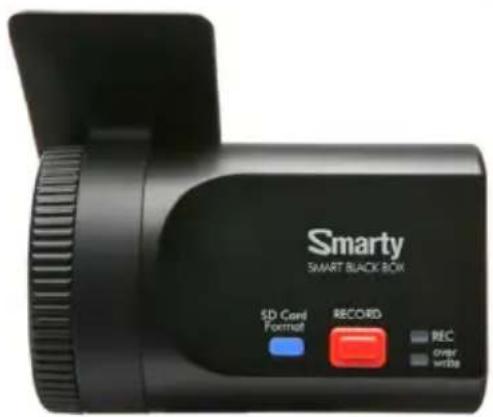
text_image
Smarty SMART BLACK BOX SD Cord Format RECORD REC Grayr write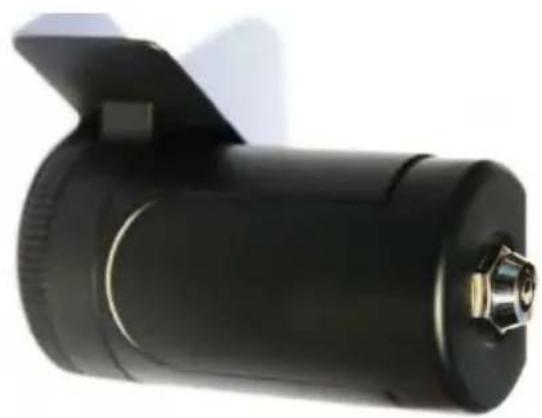
natural_image
Black cylindrical device with a metallic connector and a flat blade, shown against a white background (no text or symbols visible)Before After
First, upgrade the BX1500/BX1500+ main unit, Second, install new PC viewer software on your PC, and then initialize the SD card using new PC viewer software.
[NOTE] To get the upgrade firmware, please contact your local distributor. New firmware is released occasionally by D-Teg.
1. Preparing Firmware
Make [program] folder at SD root folder as below,

text_image
HDREC1 (L:) video config log pcsw programCopy "BX1500_X.X.X.bin" file in to the SD card [program] folder.
2. Upgrade BX1500/BX1500+
Insert the prepared SD card to BX1500 Series and turn on the power.
The Blue & Red LED will be quickly blink while the unit is upgrading. It will also “Beep” continuously, Upgrading the unit usually takes about 2 to 3 minutes.
Warning: Do not turn off the power during upgrading. If the upgrade fails, the “Smarty BX1500/BX1500+” unit should be returned to your local distributor.
Once the upgrading is finished, the unit will automatically turn off and on the power.
If BX1500 series records as normal, turn off the power.
Insert the SD card into your PC and initialize it using the software once you have successfully tested the unit.
APPENDIX (Upgrade)
3. Uninstall the old version PC Viewer from the PC
PC Windows [Start] => [Control panel]
And uninstall [PCViewer]
4. Install the new PC Viewer
Run setup.exe and install the new PC Viewer X.X.X.X
Note: After installation the new PC Viewer, initialize the SD card. The new software will automatically be copied to [pcsw] folder at SD card.
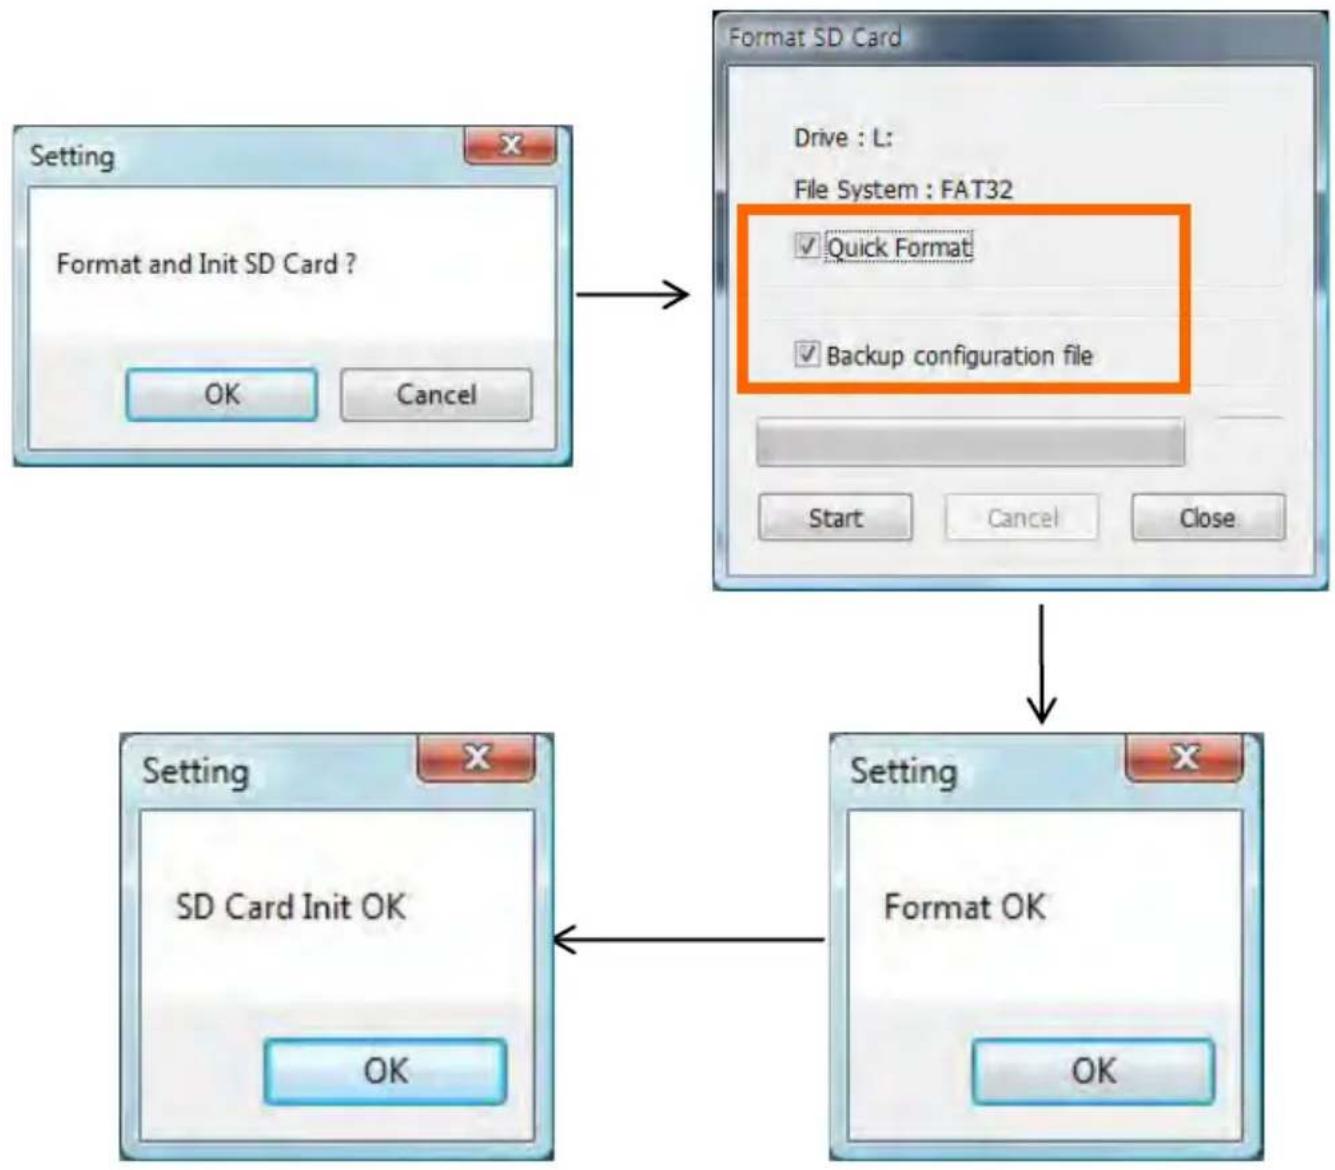
To initialize the SD card.
Run the 'PC Viewer' software and select [Tool] > [SD initialize]
flowchart
graph TD
    A["Setting"] --> B["Format and Init SD Card ?"]
    B --> C{OK}
    B --> D{Cancel}
    E["Format SD Card"] --> F["Drive : L: File System : FAT32"]
    F --> G{Quick Format}
    F --> H{Backup configuration file}
    G --> I["Start"]
    G --> J["Cancel"]
    G --> K["Close"]
    L["Setting"] --> M["SD Card Init OK"]
    M --> N{OK}
    L --> O["Setting"]
    O --> P["Format OK"]
Smarty Drive Partner for your Safety
D-TEG
D-TEG America, LLC
600 Morse Ave., Unit A
Schaumburg, IL 60293
877-601-9918
info@d-teg.us
www.d-teg.us