XV 1 19 TV - TV Swedx - Free user manual and instructions
Find the device manual for free XV 1 19 TV Swedx in PDF.


User questions about XV 1 19 TV Swedx
0 question about this device. Answer the ones you know or ask your own.
Ask a new question about this device
Download the instructions for your TV in PDF format for free! Find your manual XV 1 19 TV - Swedx and take your electronic device back in hand. On this page are published all the documents necessary for the use of your device. XV 1 19 TV by Swedx.
USER MANUAL XV 1 19 TV Swedx
natural_image
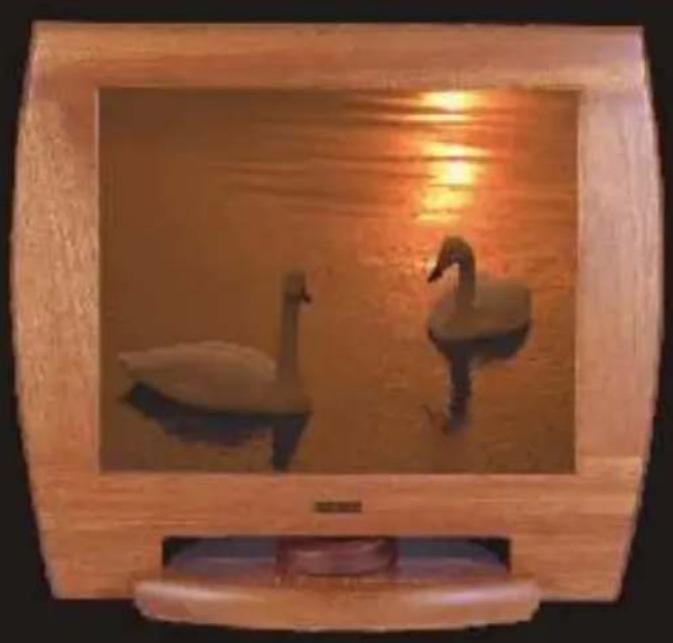
Photo of four swans swimming in water, framed with wooden frame (no text or symbols visible)User's Manual
XV1-19AV-series
Index

Index 3

Safety Instructions
Power 4
Installation 4
- Cleaning 5
Other 5

Introduction
Unpacking 6
Front 6
Rear 7
Connecting The Monitor 7

Setup
Navigate The OSD 7

On-Screen Display
Adjustable Values 8

Troubleshooting
Check List 9-11
Q & A 12

Specifications
General 13
Plug & Play Capability 13
PowerSaver 13-14
Preset Timing Modes 14

Information
Terms 15
For Better Display 16
Authority 16

Warranty and Service Terms 17-19
Safety Instructions
Power
When not used for extended periods of time, set your PC to DPMS. If using a screen saver, set it to the active screen mode.
If the size of your monitor is small, or if the same image is present for long periods of time, you may see afterimages due to damage to the fluorescent substance on the inside of the TFT-LCD.
Do not use a damaged or loose plug.
This may cause an electric shock or fire.
Do not pull the plug out by the wire nor touch the plug with wet hands.
This may cause an electric shock or fire
Use only a properly grounded plug and recepticle.
An improper ground may cause electric shock or equipment damage.
Do not excessively bend the plug and wire nor place heavy objects upon them, which could cause damage.
Failure to do so may cause an electric shock or fire.
Disconnect the plug from the outlet during storms or lightening or if it is not used for a long period of time.
Failure to do so may cause an electric shock or fire.
Do not connect too many extension cords to plugs to an outlet.
This may cause a fire.
Installation
Do not cover the vents on the monitor cabinet.
Bad ventilation may cause a breakdown or fire.
Put your monitor in a location with low humidity and a minimum of dust.
An electric shock or fire could result inside the monitor.
Do not drop the monitor when moving it.
This may cause damage to the product or human body.
Place the monitor on a flat and stable surface.
The monitor can cause injury by falling.
Set down the monitor carefully.
It could be damaged or broken.
Do not place the monitor face down.
The TFT-LCD surface maybe damaged.
Safety Instructions
Clean
When cleaning the monitor case or the surface of the TFT-LCD, wipe with a slightly moistened, soft fabric.
Do not spray detergent directly on the monitor. Use the recommended detergent with a smooth cloth.
If the connector between the plug and the pin is dusty or dirty, clean it properly with a dry cloth.
A dirty connector can cause an electric shock or fire.
Do not set liquids, chemicals or any small metal objects on the monitor.
This may cause damage, electric shock or a fire. If a foreign substance gets into the monitor, disconnect the plug and then contact a service center.
Other
Do not remove cover (or back), No user serviceable parts inside.
This may cause an electric shock or a fire. Refer servicing to qualified service personnel.
If your monitor does not operate normally-in particular, if there are any unusual sounds or smells coming from it- unplug it immediately and contact an authorized dealer or service.
This may cause an electric shock or a fire.
Do not place any heavy objects on the monitor.
This may cause an electric shock or a fire.
Let your eyes rest for 5 minutes. For each hour of looking at the monitor.
This will reduce eye fatigue.
Do not use or store inflammable substances near the monitor.
This may cause an explosion or fire.
Do not move the monitor by pulling the wire or the signal cable.
This may cause a breakdown, electric shock or a fire due to damage to the cable.
Never insert anything metallic into the monitor openings.
This may cause an electric shock, fire or injury.
Keep the monitor away from any magnetic substances.
This may cause discoloring or distortion of the image.
Introduction
Unpacking
Please make sure the following items are included with your monitor. If any items are missing, contact your dealer.
For SWEDX XV1-19AV series
- Monitor
- AC/DC power adapter
- AC adapter Cord
• 15-pin D-sub signal cable - User's manual
- Warranty card (not available in all locations)
- Drivers installation CD (not available in all locations)
• Multimedia Cable (not available in all locations) - Remote Control (not available in all locations)
Front
1. Power button:
Use this button to turn the monitor on and off.
2. Remote control receiver
3. Power indicator:
This light glows green during normal operation.
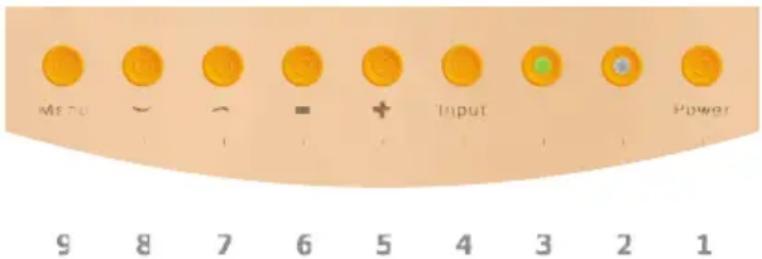
text_image
ME TU ON ON ON + Input Power 9 8 7 6 5 4 3 2 1- Input button: Use this button to specify the input of the video signal.
5-6. Adjust button: These buttons allow you to adjust the value the menu. When the OSD is not active, these buttons will adjust the speakers volume. - Up-button: Navigation up.
- Down-button: Navigation down.
- Menu button: Use this button to activate the OSD and activate a highlighted menu item and exit function.
Note: See PowerSaver described in the manual for further information regarding power saving functions. For energy conservation, turn the monitor OFF when it is not needed, or when leaving it unattended for long periods.
Introduction
Rear
The configuration at the back of the monitor may vary from product to product.
- Power port
- VGA-Signal port
- S-Video port
- Composite Video port
- Audio-in left
- Audio-in right
- Audio-in from PC
- Audio-out from Monitor
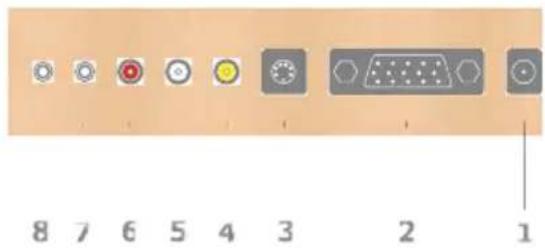
text_image
8 7 6 5 4 3 2 1Note: See "Connecting your monitor" for further Information regarding cable connections.
Connecting The Monitor
- Connect the power cord for the monitor to the power port on the back of the monitor, Plug the power cord for the monitor into a nearby outlet.
- Connect the VGA-signal cable to the VGA D-sub connector on the back of the monitor, or connect the monitor to another device through the S-video or Composite Video ports
- If you are using a Macintosh computer, connect the cable to a Macintosh adapter, and set the pins on your adapter (Adapter not included). PC-compatible computers do not need an adapter.
- When connecting to a computer, turn on the computer and monitor. If the monitor displays an image, installation is complete.
Navigate the OSD
How to navigate the OSD menu?
- Push the Menu button to enter the OSD menu.
- Use the up/down buttons to select a main category.
- Push the Menu button to enter the main category you selected in the step 2.
- Use the up/down buttons to select the sub category you want to adjust.
-
Use the +/- button to adjust to a desired value.
-
Push the Menu button to exit the category and push the Menu button again to exit the OSD.
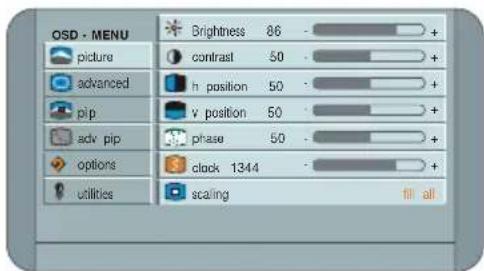
text_image
OSD - MENU picture advanced pip adv pip options utilities Brightness 86 - contrast 50 - h position 50 - v position 50 - phase 50 - clock 1344 - scaling fill allOn-Screen Display "OSD"
Adjustable values
Picture
Brightness: Adjust the brightness of the monitor's entire display.
Contrast: Adjust the contrast of the monitor's entire display.
H-Position: Adjust the horizontal position of the monitor's entire display.
V-Position: Adjust the vertical position of the monitor's entire display.
Phase: Adjust the phase of the monitor's entire display.
Clock: Adjust the frequency of the monitor's entire display.
Scaling: Adjust the scale of the monitor's entire display.
Advanced
Sharpness: Adjust the sharpness of the monitor's entire display.
Gamma: Adjust the gamma of the monitor's entire display.
Color Temp: Adjust the color temperature of the monitor's entire display.
User Red: Adjust the red color of the monitor's entire display.
User Green: Adjust the green color of the monitor's entire display.
User Blue: Adjust the blue color of the monitor's entire display.
PIP (Picture in Picture)
Size: Adjust the size of the PIP window.
Position: Adjust the position of the PIP window.
Source: Specify the source of the PIP window.
Brightness: Adjust the brightness of the PIP window.
Contrast: Adjust the contrast of the PIP window.
Color: Adjust the colors for the PIP window.
Tint: Adjust the tint of the PIP window.
Sharpness: Adjust the sharpness of the PIP window.
Advanced PIP
H-Position: Adjust the horizontal position of the PIP window.
V-Position Adjust the vertical position of the PIP window.
Video format: Specify the video signal format.
Video type Specify the video signal type.
Options
OSD position: Adjust the OSD position to a preprogrammed position
OSD h position: Adjust the horizontal position of the OSD.
OSD v position: Adjust the vertical position of the OSD.
OSD timeout: Adjust the time the OSD will be displayed before it turns off. The OSD will automatically turn off if no adjustments are made for the certain time.
OSD background: Specify the background of the OSD.
Mode information: Display the actual resolution, frequency and mode.
Utilities
Language: Specify the OSD language.
Volume: Adjust the speakers volume.
Freeze Frame: Freeze the actual displayed picture.
Factory Reset: Reset all values to the factory settings.
Version Number: Display the OSD's software version.
Troubleshooting
Check List
Before calling for service, check the information in this section to see if you can remedy any problems yourself. If you do need assistance, please contact your dealer or visit our homepage .http://www.swedx.com
| Symptom Check list Solution | ||
| No images on the screen. I can’t turn on the monitor. | Is the power cord connected properly? | Check the power cord connection and supply. |
| Can you see “No Connection, Check Signal Cable” on the screen? | Check the signal cable connection. | |
| If the power is on, reboot the computer to see the initial screen (the login screen). | If the initial screen(the login screen) appears, boot the computer in the applicable mode(the safe mode for Windows 95/98/2000/NT/XP) and then change the frequency of the video card. (Refer to the Preset Display Modes). If the initial screen (the login screen) does not appear, contact your dealer. | |
| Can you see “Video mode not supported” on the screen? | You can see this message when the signal from the video card exceeds the maximum resolution and frequency that the monitor can properly handle. Adjust the maximum resolution and frequency that the monitor can properly handle. | |
| There is no image on the screen. Is the power indicator on the monitor blinking at 1 second intervals? | The monitor is in Power Saver mode. Press a key on the keyboard or move the mouse to activate the monitor and restore the image on the screen. | |
Troubleshooting
Check List
| Symptom Check list Solution | ||
| The image on the screen is shaking. | Check the monitor configuration to see if it is in Interlace Mode. (Interlace Mode: Vertical frequency 43Hz, 87Hz(i),etc). | The signal from the video card exceeds the maximum resolution and frequency of the monitor. |
| Are there any magnetic products such as a power adapter, speaker or a high voltage wire near by? | Move the monitor away from anything that can create a strong magnetic field. | |
| Is the voltage stable? | The screen image can appear to shake or vibrate at a particular time of day due to low supply voltage. | |
| The screen image can also appear to shake or vibrate if there is a problem with the video card or the computer's main board. | ||
| The screen shows strange colors or just black and white. | Is the screen displaying only one color as if looking at the screen through a cellophane paper? | Check the signal cable connection.Make sure the video card is fully inserted in it's slot. |
| Have the screen colors become strange after running a program or due to a crash between applications? | Reboot the computer. | |
| Has the video card been set properly? | Set the video card by referring to the video card manual. | |
| The screen suddenly has become unbalanced. | Have you changed the video card or the drivers? | Adjust screen image position and size using the OSD. |
| Have you adjusted the resolution or frequency to the monitor? | Adjust the resolution and frequency at the video card. | |
Troubleshooting
Check List
| Symptom Check list Solution | ||
| The screen is out of focus or OSD cannot be adjusted. | Have you adjusted the resolution or frequency to the monitor? | Adjust the resolution and frequency at the video card. (Refer to the Preset Display Modes) |
| LED is blinking but no images on the screen. | Is the frequency properly adjusted when checking the Display Timing on the menu? | Adjust the frequency properly by referring to the video card manual and the Preset Display Modes. |
| There are only 16 colors shown on the screen. The screen colors have changed after changing the video card. | Have the Windows colors been set properly? | For Windows95/98:Set the colors properly at the Control Panel, Display Settings. |
| Has the video card been set properly? | Set the video card by referring to the video card manual. | |
| There is a message that readsUnrecognized monitor, Plug & Play (VESA DDC) monitor found. | Have you installed the monitor drivers? | Find updated monitor driver in our web site_.http://www. |
| See the video card manual to see if the Plug & Play (VESA DDC ) function can be supported. | Install the monitor driver according to the Driver Installation Instructions. | |
Check the following items if there is trouble with the monitor.
- Check if the power cord and the cable are properly connected to the computer.
- Check if the computer beeps more than 3 times when booting.
(If it does, request an after-service for the main board of the computer.) - If you installed a new video card or if you assembled the PC, check if the installed the adapter (video) driver and the monitor driver.
- Check if the scanning ratio of the video screen is set at 75Hz or 85Hz.
(Do not exceed 60Hz when using the maximum resolution.) - If you have problems in installing the adapter (video) driver, boot the computer in Safe Mode, remove the Display Adapter at the Control Panel, System, Device Administrator and then reboot the computer to reinstall the adapter (video) driver.
Note: If problems repeatedly occur, contract an authorized service center.
Troubleshooting
Q & A
| Question Answer | |
| How can I change the frequency? | Frequency can be changed by reconfiguring the video card. Note that video card support can vary, depending on the version of the driver used.(Refer to the computer or the video card manual for details.) |
| How can I adjust the resolution? | Windows 95/98/2000/NT/XP: Set the resolution at the Control Panel, Display, Setting.Windows 3.1: Change the resolution and the colors using the VGA Utility provided by the video card.Contact the video card manufacture for details. |
| How can I set the Power Saving function? | For Windows 95/98/2000/NT/XP: Set the function at BIOS-SETUP of the computer or the screen saver.(Refer to Windows/Computer Manual).Windows 3.1: Set the function using the VGA Utility provided by the video card. |
| How can I clean the outer case/ LCD panel? | Disconnect the power cord and then clean the monitor with a soft cloth, using either a cleaning solution or plain water.Do not leave any remains of the detergent nor scratch the case. Do not allow any water to go inside the monitor. |
Specification
General
| Features/ Model | XV1-19AV-*** |
| Resolution | SXGA |
| Number of Pixels | 1.280x1.024 |
| Active Area (mm) | 376.3x301.1 |
| Pixel Pitch (mm) | 0.294 |
| Mode | PVA |
| Number of Colors | 16.7m |
| Contrast Ratio | 500:1 |
| Brightness (cd/ m ) ^2 | 250 |
| Response Time (at 25jC) | <25ms |
| Viewing Angle (U/ D/ L/ R) | 80/80/80/80 |
| Backlight | 4CCFL |
| Outline Dimension (mm) | 522x460x225 |
| Power Supply Voltage (V) | 12 |
| Power Consumption | 40W Maximum |
Environmental considerations
| Operating | Temperature: 50^ 104^(10^ 40^) |
| Humidity: 10% 80% , non-condensing | |
| Storage | Temperature: -4^ 113^(-20^ 45^) |
| Humidity: 5% 95% , non-condensing. |
Plug and Play Capability
This monitor can be installed on any Plug & Play compatible system. Interaction of the monitor and computer systems will provide the best operating conditions and monitor settings. In most cases, monitor installation will proceed automatically, unless the user wishes to select alternate settings.
PowerSaver
This monitor has a built-in power management system called PowerSaver. This system saves energy by switching your monitor into a low-power mode when it has not been used for a certain amount of time. The monitor automatically returns to normal operation when you move the computers mouse or press a key on the keyboard. For energy conservation, turn your monitor OFF when it is not needs, or when leaving it unattended for long periods. The PowerSaver system operates with a VESA DPMS compliant video card installed in your computer. Use a software utility installed on your computer to set up this feature.
Specification
PowerSaver
State Normal Operation Power Saving Mode Power Switch off EPA/EERGY 2000
Power Indicator Green Green, Blinking Lamp off Power Consumption Less than 40W Less than 3W Less than 1W
This monitor is EPA ENERGY STAR compliant and ENERGY 2000 compliant when used with a computer equipped with DPMS functionality. SWEDX has determined that this product meets the ENERGY STAR guidelines for energy efficiency.
Preset Timing Modes
The Swedx XV1-19-** can support any video mode at the input within the following constraints:
The signal sample frequency on the input 80MHz.
The horizontal sync frequency between 30KHz and 60KHz.
The modes are detected when presented to the input and previous alignments for setup are automatically recalled. A true multi-sync monitor emulation is implemented.
The factory preset supported modes include:
Table1. Preset Timing Modes
| Mode Resolution Refresh rate H-freq. Pixel freq. Remarks | |||||
| VGA | 640x350 | 70Hz | 31.47KHz | 25.175MHz | VESA Standard |
| VGA | 720x400 | 59.940Hz | 31.469KHz | 25.175MHz | IBM VGA 3H |
| VGA | 640x480 | 60Hz | 31.5KHz | 25.175MHz | Industry Standard |
| VGA | 640x480 | 72Hz | 37.9KHz | 31.500MHz | VESA Standard |
| VGA | 640x 480 | 75Hz | 37.5KHz | 31.500MHz | VESA Standard |
| SVGA | 800x600 | 60Hz | 37.9KHz | 40.000MHz | VESA Guidelines |
| SVGA | 800x600 | 72Hz | 48.1KHz | 50.000MHz | VESA Standard |
| SVGA | 800x600 | 75Hz | 46.9KHz | 49.500MHz | VESA Standard |
| XGA | 1024x768 | 60Hz | 48.4KHz | 65.000MHz | VESA Guidelines |
| XGA | 1024x768 | 70Hz | 56.5KHz | 75.000MHz | VESA Standard |
| XGA | 1024x768 | 75Hz | 60KHz | 78.750MHz | VESA Standard |
| SXXA | 1280x1024 | 60Hz | 64KHz | 108.000MHz | VESA Standard |
| SXGA | 1280x1024 | 75Hz | 80KHz | 135.000MHz | VESA Standard |
Information
Terms
Dot Pitch
The image on a monitor is composed of red, green and blue dots. The closer the dots, the higher the resolution. The distance between two dots of the same color is called the Dot Pitch. Unit: mm
Vertical Frequency
The screen must be redrawn several times per second in order to create and display an image for the user. The frequency of this repetition per second is called Vertical Frequency or Refresh Rate. Unit: Hz.
Example: If the same light repeats itself 60 times per second, this is regarded as 60 Hz. In this case, flickering of the screen can be detected. To avoid this problem, there is a Flicker-free Mode using a vertical frequency over 70 Hz.
Horizontal Frequency
The time to scan one line connecting the right edge to the left edge of the screen horizontally is called Horizontal Cycle. The inverse number of the Horizontal Cycle is called Horizontal Frequency. Unit: kHz
Interlace and Non-Interlace Methods
Showing the horizontal lines of the screen from the top to the bottom in order is called the Non-Interlace method while showing odd lines and then even lines in turn is called the Interlace method. The Non-Interlace method is used for the majority of monitors to ensure a clear image. The Interlace method is the same as that used in TVs.
Plug & Play
This is a function that provides the best quality screen for the user by allowing the computer and the monitor to exchange information automatically. This monitor follows the international standard VESA DDC for the Plug & Play function.
Resolution
The number of horizontal and vertical dots used to compose the screen image is called resolution. This number shows the accuracy of the display. High resolution is good for performing multiple tasks as more image information can be shown on the screen.
Example: If the resolution is 1024 x 768, this means the screen is composed of 1024 horizontal dots (horizontal resolution) and 768 vertical lines (vertical resolution).
Information
For Better Display
- Adjust computer resolution and screen injection rate (refresh rate) in control panel of computer as described below to enjoy the best quality of picture. You can have an uneven quality of picture in the screen if the best quality of picture is not provided in TFT-LCD.
Resolution: 1024 x 768
Vertical frequency (refresh rate): 60 Hz
-
TFT LCD panel manufactured by using advanced semiconductor technology with precision of 99.999% above is used for this product. But the pixels of RED, GREEN, BLUE and WHITE color seem to be bright sometimes or some of black pixels could be seen. This is not from bad quality and you can use it without uneasiness. For example, the number of TFT LCD pixels that is contained in the 15" are 2,359,296.
-
When you clean the monitor and the panel outside, please apply the recommended small amount of cleaner by using soft and dry cloth and polish it. Let LCD area not to be forced but to be scrubbed out softly. If excessive force is applied, you can have a stain on it.
Authority
Information in this document is subject to change without prior notice.
Reproduction in any manner whatsoever without the written permission of SWEDX is strictly forbidden. SWEDX shall not be liable for errors contained herein or for incidental or consequential damages in connection with the furnishing, performance, or use of this material.
Warranty and Service Terms
The following terms apply only to new "in the original carton" SWEDX products marketed and distributed by SWEDX, which are purchased and used by the original consumer purchaser. This information is subject to the terms and conditions of the written SWEDX warranty statement included with each product, and are available for examination from the dealer prior to purchase.
Depending on the model, your terms and conditions may be different from those shown below, and this information is subject to change without prior notice. Unless specifically stated otherwise, used and reconditioned products that are resold have no warranty from SWEDX and are considered sold "AS-IS", however, the selling dealer may offer additional service options.
Warranty for SWEDX TFT-LCD Monitor:
Product LCD Panel Labor Parts
SWEDX TFT LCD Monitor 2 Years 3 Years 3 Years
What the warranty covers:
SWEDX warrants your SWEDX display(s) against defects in material and workmanship during the warranty period from SWEDX factory delivery date shown in the shipping documents. If a product proves to be defective in material or workmanship during the warranty period, SWEDX will, at its sole option repair or replace the product with a similar product, provided the purchaser adheres to certain return authorization procedures and guidelines. SWEDX reserves the right to charge customer in case of warranty conditions not are fulfilled
How long the warranty is effective:
SWEDX display products are warranted for one (1) year for LCD Panel, three (3) years for parts and labor, starting from the delivery date as per shown on the corresponding shipping documents.
Who the warranty protects:
This warranty is valid only for the first purchaser.
What the warranty does not cover:
- Any product which the serial number has been defaced, modified or removed.
- Damage, deterioration or malfunction resulting from:
A. Accident, misuse, neglect, fire, water, lightning, or other acts of nature, unauthorized product modification, or failure to follow instructions supplied with the product.
B. Repair or attempted repair by anyone not authorized by SWEDX.
C. Any damage of the product due to shipment.
D. Removal or installation of the product.
E. Causes external to the product, such as electric power fluctuations or failure.
F. Use of supplies or parts not meeting SWEDX specifications.
G. Normal wear and tear
H. Any other cause which does not relate to a product defect.
Warranty and Service Terms
- Cosmetic damage by purchaser, such as markings, discoloration, scratches, dents, anti-theft devices markings, gouges or any other defacement
- Physically damaged products by purchaser, such as broken PCB, Housing, damaged LCD Module
- No Defect Found (product returned to SWEDX as defective but failure is not duplicated by SWEDX's test method.)
- The product is not in accordance with the fault in the application
- Timber is a lifelike natural material which can cause some little changes in the precision of the produced product such as small openings line beside the connecting point and some other small changes which are out of SWEDX control and don't make any effect for the product functionality.
Dead on Arrival (DOA)
If the product fails within the manufacturer's DOA period, a replacement product will be offered.
Before contacting us:
In many cases, your monitor may not need repair. Before you contact us, please consult the troubleshooting section in your user's manual or SWEDX's FAQ webpages at (http://www.swedx.com/support/faq.htm) to see if you can easily remedy the problem yourself.
How to get service:
- For information on obtaining warranty service, contact SWEDX dealer (the place where you bought your product) in first choice. If of any reason you can not contact your dealer, please contact SWEDX Customer Service by emailing to support@swedx.com or call SWEDX at the telephone number of +46-8-4418444. To obtain warranty service, you will be required to fill out RMA Request Form (return merchandise/material authorization) available on side 19 of the user's manual, or on the following address (http://www.swedx.com/support/rma.htm) to provide:
A. Your information.
B. Reference of your purchase and copy of your invoice confirming your warranty.
C. Product information.
D. A description of the problem.
- If the contact is maid with SWEDX Customer Service, SWEDX will contact the customer upon receipt of the RMA Request Form and issue a RMA number within normally 48 hours, and give the customer further instructions.
SWEDX technical support services:
During the period of product warranty, we support your basic configuration, setup and troubleshooting questions, and when required, we provide you with all instructions on how to return your product for repair. For support inquiries, please call +46-8-4418444 or e-mail us at support@swedx.com
RMA program is subject to changes at any time without prior notice. The above policies are for warranty service and the customer will be responsible for any costs associated with non-warranty conditions such as control test, shipping and administration costs etc.
Warranty and Service Terms
SWEDX reserves the right to make final decisions regarding problem determination and the appropriate service option. Exchange units assume the remaining warranty of the original product. Please refer to your SWEDX Limited Warranty Statement for complete terms and conditions, as some models have other terms and conditions. Some limitations and restrictions apply and these programs are subject to change without prior notice.
Limitation of liability
If your SWEDX product fails to work as warranted above, your sole and exclusive remedy shall be repaired or replaced. SWEDX's maximum liability under this limited warranty is expressly limited to the lesser of the price you have paid for the product or the cost of repairing or replacement of any hardware components that malfunction in conditions of normal use. SWEDX is not liable for any damages caused by the product or the failure of the product to perform, including any lost profits or savings or special, incidental, or consequential damages. SWEDX is not liable for any claim made by a third party or made by you for a third party.
This limitation of liability applies whether damages are sought, or a claim made, under this limited warranty or as a tort claim (including negligence and strict product liability), a contract claim, or any other claim. This limitation of liability cannot be waived or amended by any person. This limitation of liability will be effective even if you have advised SWEDX or an authorized representative of SWEDX of the possibility of any such damages. This limitation of liability, however, will not apply to claims for personal injury.
| RMA Request Form | |||
| Your information | |||
| Name/Comapny Name | |||
| Address | |||
| City / State / Zip | |||
| Contact Name | |||
| Title | |||
| Daytime Phone Fax | |||
| E-mail Address | |||
| Product Information | |||
| Numbers of Units Returning i.e. "Invoice Number", "Order Number", etc. | |||
| Reference Number(s) | |||
| Model ID | Problem Description | ||