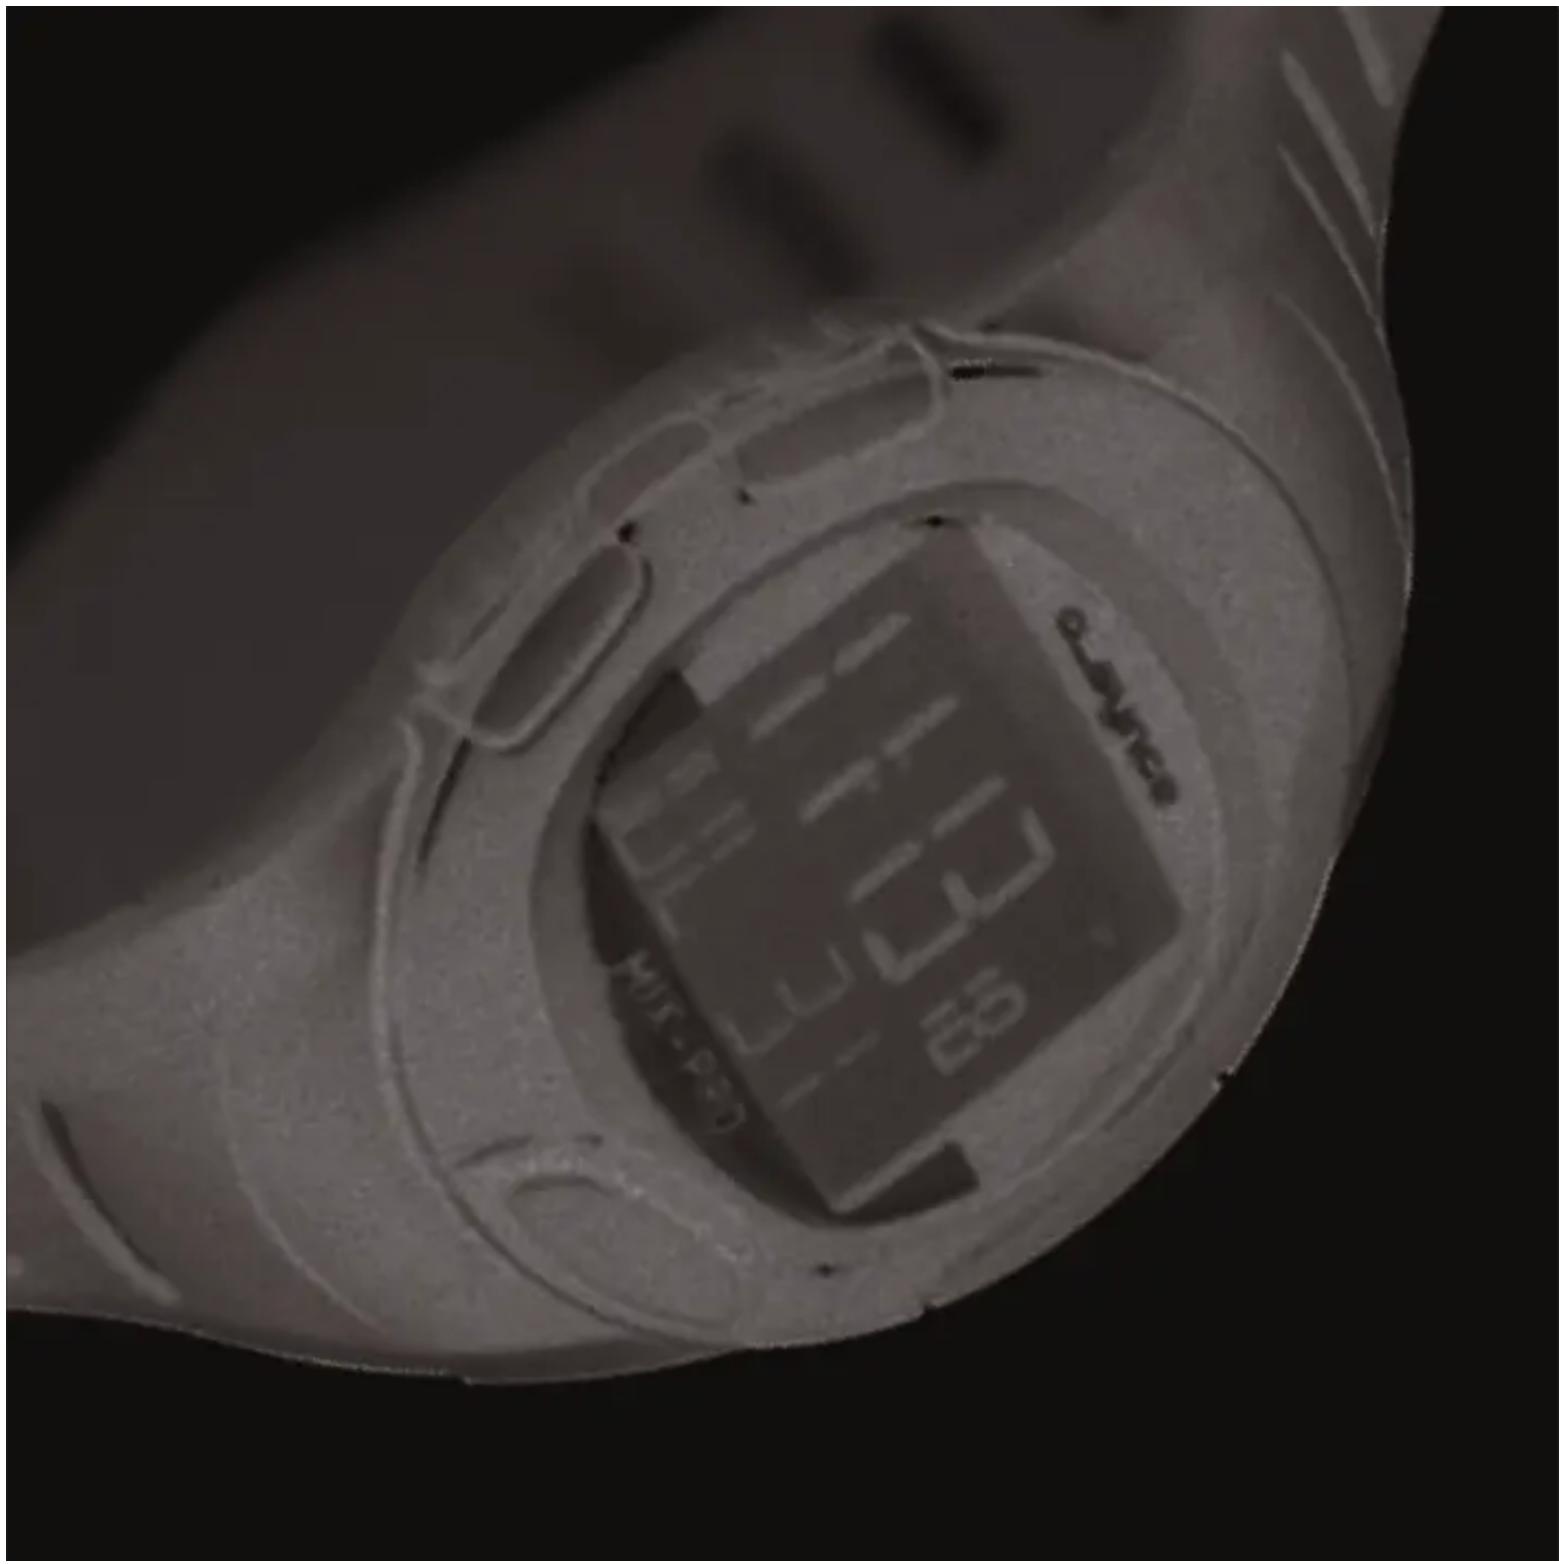
MIXpro - Bike computer OSynce - Free user manual and instructions
Find the device manual for free MIXpro OSynce in PDF.


User questions about MIXpro OSynce
0 question about this device. Answer the ones you know or ask your own.
Ask a new question about this device
Download the instructions for your Bike computer in PDF format for free! Find your manual MIXpro - OSynce and take your electronic device back in hand. On this page are published all the documents necessary for the use of your device. MIXpro by OSynce.
USER MANUAL MIXpro OSynce
natural_image
Close-up of a mechanical component with grooves and cutouts, no visible text or symbols
natural_image
Abstract orange geometric shape on black background (no text or symbols)o_synce
MIXpro
QUICK START GUIDE
ACCESSORIES
GENERAL
Congratulations for buying this advanced multifunctional outdoorwatch. Take a moment to read this guide carefully.
These resources provide important setup information and are designed to help you get the most from your device.
If you regularly carry out a sporting activity or wish to step up your training, the MIXpro heart rate monitor is the perfect choice for you. An option would be to use several accessories like the MAXrun, an accelerometer sensor that will be attached under your shoe layers, or the MACRO X bike sensors that can be mounted on the fork or frame of any bike.
These products optimize your physiological performance in terms of data for speed and distance travelled when running or cycling.
The design and comfort of these product have also been specifically developed to suit all body types and for easy use during your sport.
This is a quick start guide which can help you to use your MIXpro watch basic functions. For the latest product information and more details of the optional accessories and the free SAS sport analyse system, visit the o-synce Web site at www.o-synce.com
CAUTION! Always consult your physician before beginning or modifying any exercise program. If you have a pacemaker or other implanted electronic devices, consult your physician before using a heart rate monitor.
CONTENTS
General 2
Contents _3
1 IN THE BOX \_4
2 GETTING STARTED \_5
Buttons _5
Icons _5
Turn on the MIXpro _6
Backlight _6
Navigations _6
Time _6
Date _6
Chimes/beeper _7
Alarm _7
Second Time zone _7
3 SETTING AND PAIRING (optional) \_7
What is Pairing? _7
Switch on the sensors _8
Personal and basic settings _8
4 USING ACCESSORIES \_12
Switch off the sensors _13
5 SPORT-MODE \_14
Stop watch w/o sensors _14
Stop watch with sensors _14
6 TIMER-MODE (Countdown) \_16
Setting the Countdowns _17
Setting the Timer _18
Countdowns 1 & 2 and repeat function _18
7 HISTORY MODE \_19
Viewing Workout History _19
Deleting Workout History _19
Managing Memory _19
8 PC SAS SOFTWARE \_19
Software Downloading _19
9 APPENDIX \_20
Technical Features _20
Battery 20
Maintenance and Care _21
Warranty _21
Recycling _22
Contact _22
1 IN THE BOX
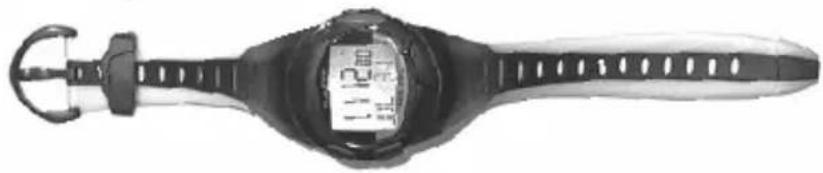
1x MIXpro Multi watch
natural_image
Close-up of a black and white swimming device with digital display (no visible text or symbols)For more information about Optional Compatible Accessories go to www.o-synce.com
MAXrun Foot pod sensor for running and walking
MACRO2SXspe Speed sensor for biking
MACRO2SXcad Cadence sensor for biking
MAXpc USB transceiver for PC-Download of the training data (store & analyse with SAS)
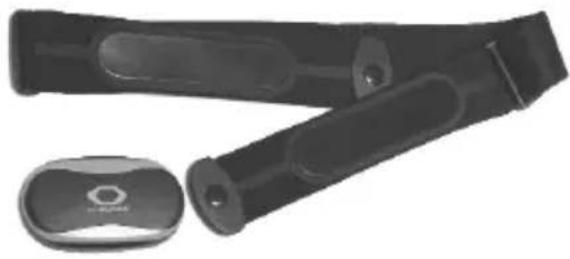
1x HEART2feel X Heart rate monitor belt
natural_image
Two black athletic fitness equipment with circular buttons, no visible text or symbols
natural_image
Two black plastic mechanical components with textured surfaces, one resembling a tray or bracket and the other a handle (no visible text or symbols)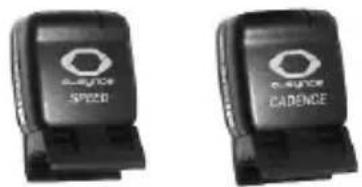
text_image
SP200 CADENCE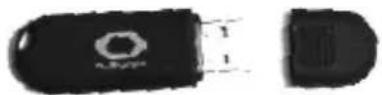
Strong electromagnetic fields and some 2.4 GHz wireless sensors can interfere with your heart rate monitor and other accessories. Sources of interference may include very high voltage power lines, electric motors, microwave ovens, 2.4 GHz cordless phones, and wireless LAN access points. After you moveaway from the source of interference, your heart rate data should return to normal.
2 GETTING STARTED
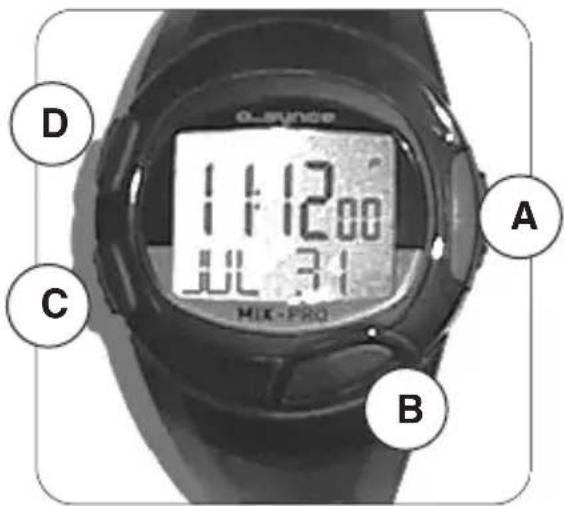
BUTTONS (meaning is written on the backplate of the watch)
Button A (right): START/STOP/+
Stop watch > Start and Stopp press to increase value for settings press to customize settings press & hold
Button B (front): VIEW/LIGHT
to scroll through data pages in Sport or History mode press to advance to the next setting press for switching on the backlight press & hold
Button C (left down): MODE
To change modes press
To exit a menu or page press
To jump back to the time mode press & hold
Button D (left up): LAP/MEM/-
To create a new lap press
to decrease value for settings press to save workouts & reset the timer press & hold
text_image
D 11:12.00 JUL 31 A C B MIX-PROICONS

Above high zone setting Data upload


Below low zone setting Timer mode


Bike sensor active Alarm on


Foot pod sensor active Chime on


Heart rate sensor active Second time zone

TURN ON YOUR MIXpro
Press and hold C to turn on your MIXpro because the watch from factory is on stand by mode to conserve the battery. For more information see BATTERY.
BACKLIGHT
Press and hold B to turn on the backlight for 5 seconds. Extend the backlight for 5 more seconds by pressing any button.
NAVIGATION
The MIXpro watch includes four modes:
TIME SPORT
With the key C you can switch from one mode to the next.

flowchart
graph LR
    A["TIME"] --> B["TIMER S"]
    B --> C["DATA"]
    C --> D["C CCC"]
    D --> E["Output"]
    E --> A
SET THE TIME AND DATE
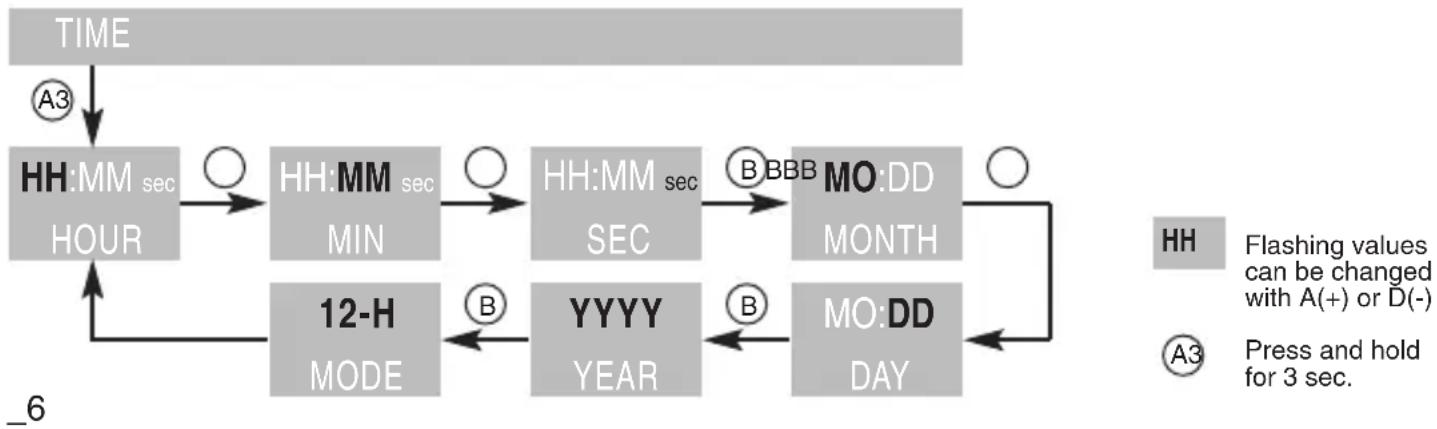
On the Time page, press and hold A until the hour setting blinks. Use A - and/or C + to adjust the hour.
TIP: Press and hold + or - to scroll quickly through the hours, minutes, and other Time mode settings. Continue this process to set seconds, month, day, year, and 12/24 hour mode. Press C any time to resume to the Time mode.
flowchart
graph TD
    A["TIME"] --> B["HH:MM sec HOUR"]
    B --> C["HH:MM MIN"]
    C --> D["HH:MM sec SEC"]
    D --> E["MO:DD MONTH"]
    E --> F["MO:DD DAY"]
    F --> G["YYYY YEAR"]
    G --> H["12-H MODE"]
    H --> B
    style A fill:#ccc,stroke:#333
    style B fill:#ccc,stroke:#333
    style C fill:#ccc,stroke:#333
    style D fill:#ccc,stroke:#333
    style E fill:#ccc,stroke:#333
    style F fill:#ccc,stroke:#333
    style G fill:#ccc,stroke:#333
    style H fill:#ccc,stroke:#333
    note right of B "12-H MODE"
    note right of G "YYYY YEAR"
    note right of H "12-H MODE"
    note right of G "YYYY YEAR"
    note right of H "12-H MODE"
    note_right_of_I["HH"]
    note_right_of_J["A3"]
    note_right_of_K["A3"]
    note_right_of_L["HH: Flashing values can be changed with A(+) or D(-)"]
    note_right_of_M["Press and hold for 3 sec."]
BEEPER
The key tone /beeper will be active then the beep icon is shown in the TIME mode. To activate the beeper you have to hold B for 5 seconds. The icon will be shown on the screen!
ALARM
The alarm icon will be shown on the Time mode, press A or D to switch the alarm on or off. Press C to go back to the alarm mode.
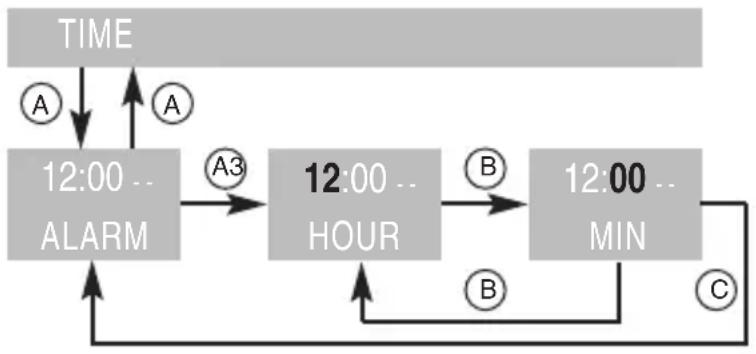
flowchart
graph TD
    A["TIME"] -->|A| B["12:00 ALARM"]
    B -->|A3| C["12:00 HOUR"]
    C -->|B| D["12:00 MIN"]
    D -->|C| B
    B -->|A| A
    C -->|B| D
12
Flashing values can be changed with A(+) or D(-)
A3
Press and hold for 3 sec.
SETTING THE 2ND TIME ZONE
The T2 offset enable a second time zone. To change the current time to T2 press & hold D for 5 sec in the TIME mode. When the T2 icon is shown in the right upper corner of the display – the second time can be set in the same way like the TIME setting.
3 SETTING AND PAIRING OF ACCESSORIES (OPTIONAL)
WHAT IS PAIRING?
Pairing is the connecting of sensors, like your heart rate monitor with the MIXpro. After you pair the first time, your MIXpro automatically recognizes the paired sensor each time it is activated. This process occurs automatically when you turn on the SPORT mode and only takes a few seconds when the sensors are activated and begin functioning correctly. Once paired, your MIXpro only receives data from your sensor, and you can go close to other sensors without interference.
TO PAIR SENSORS WITH THE WATCH:
Move away (10 m) from other sensors while the MIXpro is trying to pair with your sensor for the first time. Bring your sensor within range (3 m) of the MIXpro. Press C until the SPORT mode appears. Follow the instruction in the basic setting to 'PAIR' the sensors.
SWITCH ON THE SENSORS
After 30 minutes of inactivity the sensors are on standby and ready to send data. As soon as you install the sensors and start moving, the sensors send data to the watch (after pairing!). If you use the MACROX sensor on the bike, turn the wheel and crankset where the magnet is mounted.
UNITS, TRAINING PARAMETER, SENSORS PAIRING
Will be set in the SPORT-Mode (see diagram).
NOTE: You can't get in the setting mode while using the stop watch and before the last training is saved or reset to -zero-first!
BASIC SETTING (see following diagram)
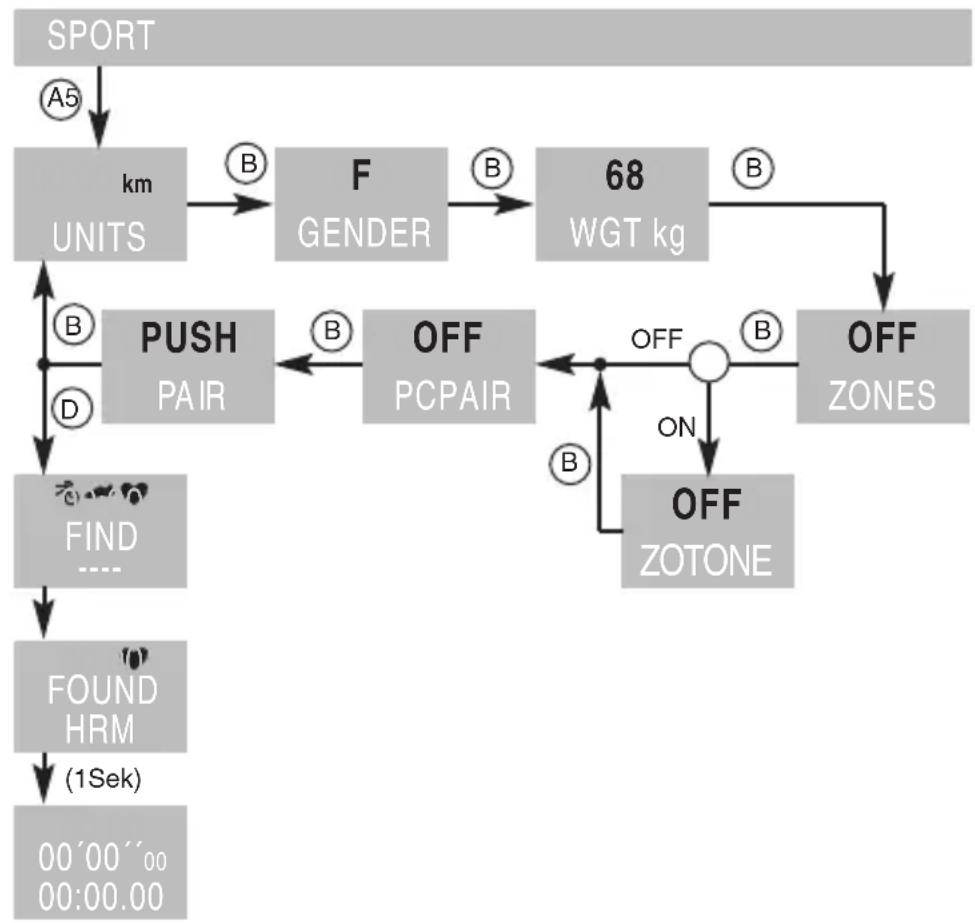
flowchart
graph TD
    A["SPORT"] -->|A5| B["km UNITS"]
    B -->|B| C["F GENDER"]
    C -->|B| D["68 WGT kg"]
    D -->|B| E["OFF ZONES"]
    E -->|ON| F["OFF ZOTONE"]
    F -->|B| G["OFF PCPAIR"]
    G -->|B| H["PUSH PAIR"]
    H -->|B| I["FIND ----"]
    I --> J["FOUND HRM (1Sek)"]
    J --> K["00'00''00 00:00.00"]
    B -->|D| H
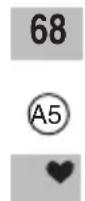
Flashing values can be changed with A(+) or D(-)
Press and hold for 5 sec.
Shown icons for found Sensors
Setting mode: Press and hold A for 5 seconds.
UNITS: KM blinks. Press A or D to switch to Miles (MI). press B to confirm.
GENDER: F blinks. Press A or D to switch to Male. press B to confirm.
WGT KG (Weight): 68 blinks. Press A (+) or D (-) to change the value. press B to confirm.
ZONES (Training zones): OFF blinks. Press A or D to switch it ON, if you want to use the Training zones. press B to confirm
If Training Zone ON:
ZOTONE (beeper): OFF blinks. Press A or D to switch it ON, if you want the warning signal. press B to confirm
PC PAIR: OFF blinks. Press A or D for ON, to activate the PC connection. If you want to use the SAS analyse software with the MAXpc USB-Stick. Press B to confirm.
PAIR (Sensor-pairing): PUSH blinks. Press A or D to activate the search for the (switched on) sensor. While the MIXpro scans for new sensors, the sensor icons blink. The icons are solid on the display when paired. The watch will exit automatically to the Stop watch mode when all active sensors have been found.
The Heart rate belt is already paired. Press C until the Train page appears. The heart rate icon appears on the screen when the sensor is paired.
SET UPSENSORS (OPTIONAL)
IMPORTANT: If you purchas an accessory you have to pair all sensors together again together!
_ Please make sure that all to be paired sensors are switched on and in range (3 m).
PARAMETER
After the pairing the sensors of your choice you have to re-do the setting mode again.
SETTING MODE: Press & Hold A for 5 seconds.
And now you can change and set the values like shown in the diagram Confirm with B or exit anytime by pressing C.
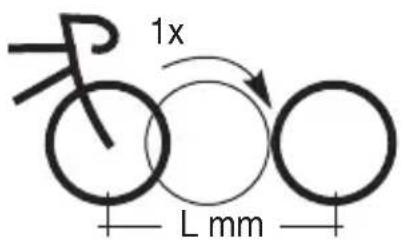
The wheel circumference can be done by rolling the wheel once or if you take the values shown in the ERTRO-chart named with L below:
| Weelsize L (mm) | 40-635 28x1 1/2 2265 | 25-622 700x25C 2146 |
| 47-305 16x1.75x2 1272 | 40-559 26x1.5 2026 | 57-559 26x2.125 2133 |
| 32-630 27x1 1/4 2199 | 37-622 28x1 3/8x1 5/8 2205 | 28-622 700x28C 2149 |
| 47-406 20x1.75x2 1590 | 44-559 26x1.6 2051 | 37-590 26x1 3/8 2105 |
| 28-630 27x1 1/4 Fifty 2174 | 18-622 700x18C 2102 | 32-622 700x32C 2174 |
| 37-540 24x1 3/8 A 1948 | 47-559 26x1.75x2 2070 | 37-584 26x1 3/8x1 1/2 2086 |
| 40-622 28x1.5 2224 | 20-622 700x20C 2114 | 37-622 700x35C 2205 |
| 47-507 24x1.75x2 1907 | 50-559 2-6x1.9 2089 | 20-571 26x3/4 1954 |
| 47-622 28x1.75 2268 | 23-622 700x23C 2133 | 40-622 700x40C 2224 |
| 23-571 26x1 1973 | 54-559 26x2.00 2114 |
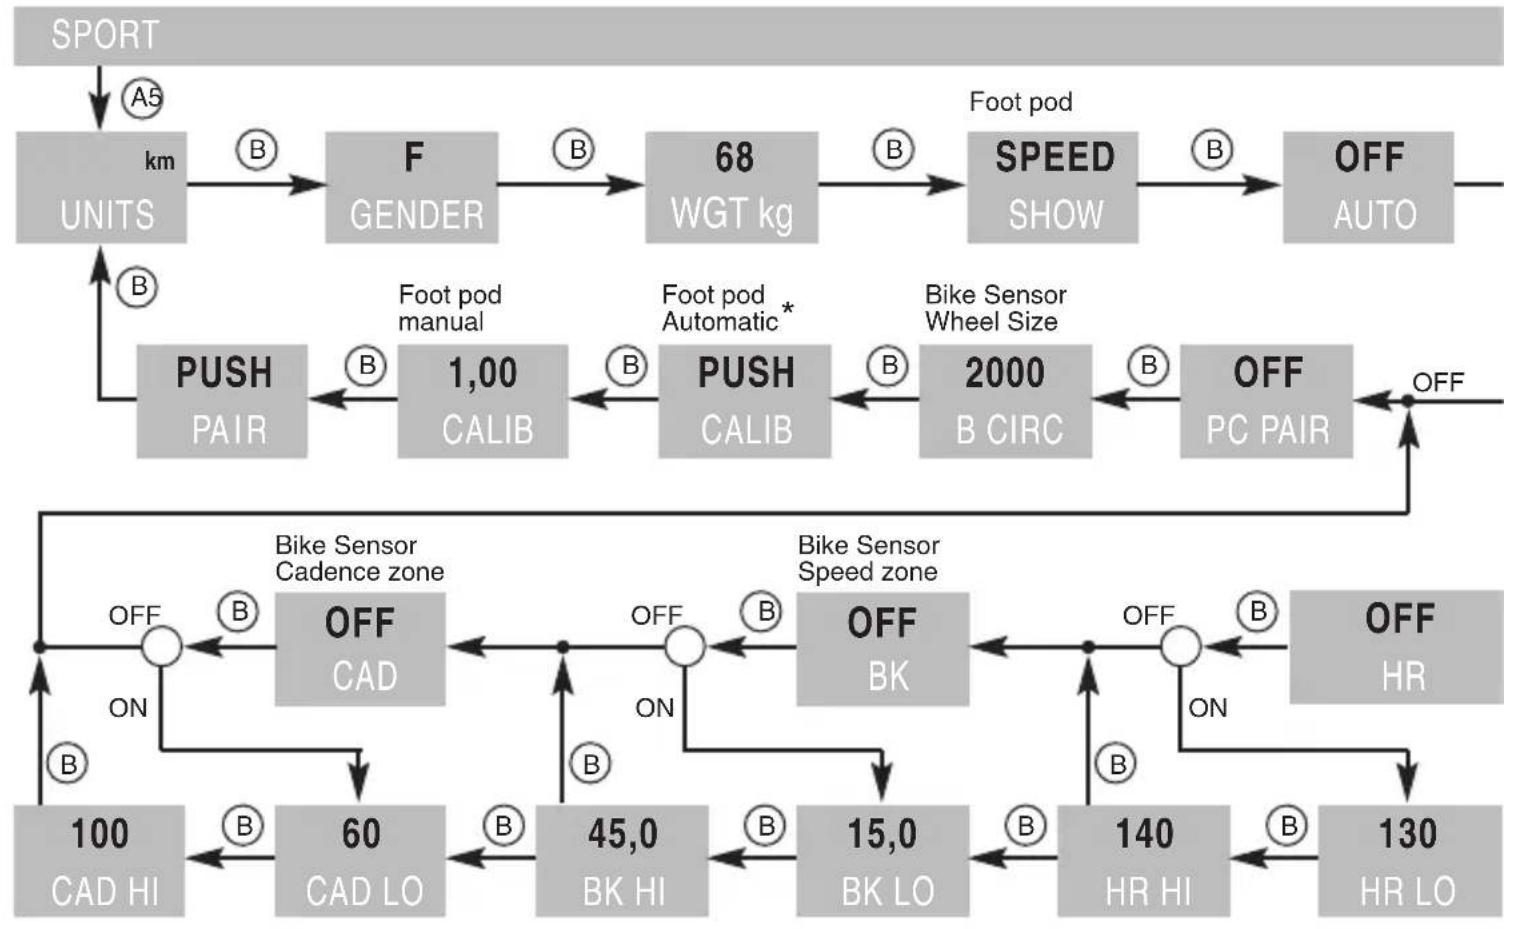
flowchart
graph TD
    A["SPORT"] -->|A5 km| B["UNITS"]
    B --> C["F GENDER"]
    C --> D["68 WGT kg"]
    D --> E["SPEED SHOW"]
    E --> F["OFF AUTO"]
    F --> G["PUSH PAIR"]
    G --> H["1,00 CALIB"]
    H --> I["PUSH CALIB"]
    I --> J["2000 B CIRC"]
    J --> K["OFF PC PAIR"]
    K --> L["OFF HR"]

    subgraph Foot pod manual
        G
        H
        I
        J
    end

    subgraph Bike Sensor Speed zone
        K
        L
    end

    M["100 CAD HI"] --> N["60 CAD LO"]
    N --> O["45,0 BK HI"]
    O --> P["15,0 BK LO"]
    P --> Q["140 HR HI"]
    Q --> R["130 HR LO"]

    style Foot pod manual fill:#f9f,stroke:#333
    style Bike Sensor Speed zone fill:#ccf,stroke:#333
Please have a look on the diagram to see the setting
text_image
1x L mm
text_image
F Flashing values can be changed with A(+) or D(-) A5 Press and hold for 5 sec.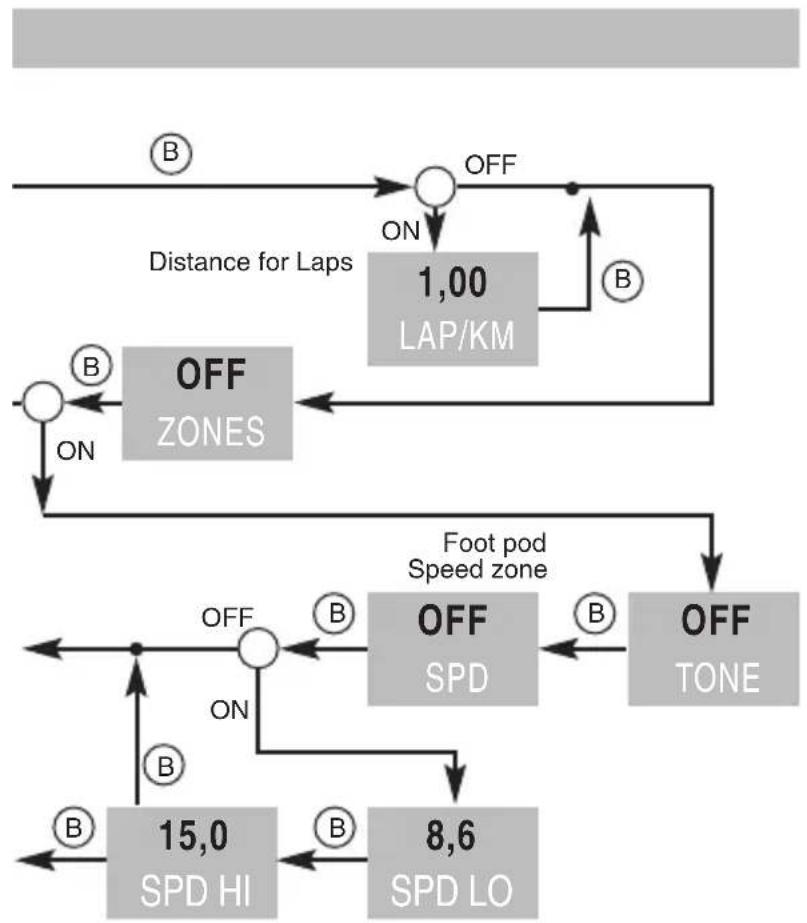
flowchart
graph TD
    A["Distance for Laps"] --> B["OFF ZONES"]
    B --> C["1,00 LAP/KM"]
    C --> D["OFF TONE"]
    D --> E["OFF SPD"]
    E --> F["15,0 SPD HI"]
    F --> G["8,6 SPD LO"]
    G --> H["OFF"]
    H --> I["OFF ZONES"]
    I --> J["OFF ZONES"]
    J --> K["1,00 LAP/KM"]
    K --> L["OFF TONE"]
    L --> M["15,0 SPD HI"]
    M --> N["8,6 SPD LO"]
    N --> O["OFF TONE"]
    O --> P["15,0 SPD HI"]
    P --> Q["8,6 SPD LO"]
    Q --> R["OFF TONE"]
    R --> S["15,0 SPD HI"]
    S --> T["8,6 SPD LO"]
    T --> U["OFF TONE"]
    U --> V["15,0 SPD HI"]
    V --> W["8,6 SPD LO"]
    W --> X["OFF TONE"]
    X --> Y["15,0 SPD HI"]
    Y --> Z["8,6 SPD LO"]
    Z --> AA["OFF TONE"]
    AA --> AB["15,0 SPD HI"]
    AB --> AC["8,6 SPD LO"]
    AC --> AD["OFF TONE"]
    AD --> AE["15,0 SPD HI"]
    AE --> AF["8,6 SPD LO"]
    AF --> AG["OFF TONE"]
    AG --> AH["15,0 SPD HI"]
    AH --> AI["8,6 SPD LO"]
    AI --> AJ["OFF TONE"]
flowchart
graph TD
    A["1,00 CALIB"] -->|A| B["0:00.0 RUN"]
    C["PUSH CALIB"] -->|B| D["00:00.00 ACTUAL"]
    B -->|A| E["00:00.00"]
    D -->|B| F["CALIB SAVED (1Sek)"]
    F --> G["00'00''00 00:00.00"]
    style A fill:#ccc,stroke:#333
    style C fill:#ccc,stroke:#333
    style D fill:#ccc,stroke:#333
    style F fill:#ccc,stroke:#333
    style G fill:#ccc,stroke:#333
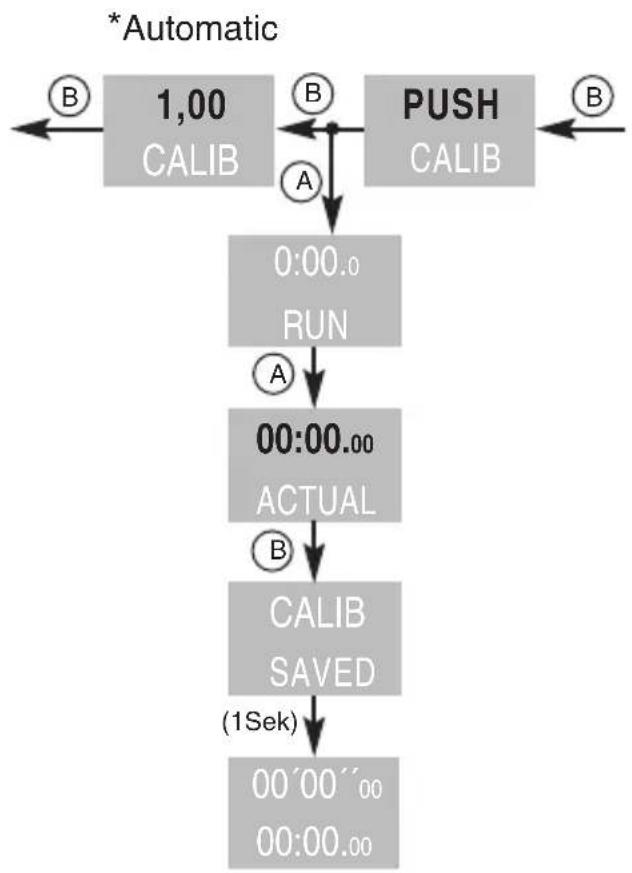
CALIBRATE THE FOOT POD SENSOR
You can calibrate the foot pod sensor (MAXrun) by running a precise distance of minimum 400 meter.
4 USING ACCESSORIES HEART2feelIX SOFT BELT
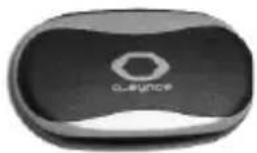
The chest strap must be positioned around your chest. when correctly placed, it sends heart rate information to the watch located on your wrist. The watch then displays the heart rate and provides other extra information (target zone, intensity of exercises) to manage and optimize your fitness and training. The soft belt will be connected with two clips at the sensor case. The rubber areas have to be placed on the skin (see photo below)
natural_image
Close-up of a black ergonomic device with a hexagonal logo and 'Q-synce' text (no additional symbols or readable text)Sensor

text_image
Sensors BELT on one side.USING THE HEART2feel X SOFT BELT
1 Connect the soft belt with the sensor on one side.
Push one bottom of the heart rate sensor on the strap.
2 Wet both sensors on the back (rubber area) of the heart rate monitor to create a strong connection between your chest and the transmitter.
(for extremely dry skin use some special gel)
3 Wrap the strap around your chest and attach it to the other side of the heart rate monitor.
NOTE: The o-synce logo should be right-side up.
4 Bring the MIXpro within range (3 m) of the heart ratemonitor.
5 Press C to access SPORT mode. The heart rate icon appears on the SPORT page.
6 Press B to advance to the HEART data page.
7 If or heart rate data does not appear or if you have erratic heart rate data, you may have to tighten the strap on your chest or warm up for 5–10 minutes. If the problem persists, you may have to pair the sensors
Reapply moisture to the sensors. Use water, saliva, or electrode gel. Clean the sensors. Dirt and sweat residue on the sensor can interfere with heart rate signals.
Synthetic fabrics that rub or flap against the heart rate monitor can create static electricity that interferes with heart rate signals.
NOTE: In cold conditions, wear appropriate clothing to keep the heart rate monitor near your body temperature. Accuracy may be degraded by poor sensor contact, electrical inter-
ference and receiver distance from transmitter. Strong electromagnetic fields and some 2.4 GHz wireless sensors can interfere with your heart rate monitor. Sources of interference may include very high voltage power lines, electric motors, microwave ovens, 2.4 GHz cordless phones, and wireless LAN access points. After you move away from the source of interference, your heart rate data should return to normal.
NOTE:
Stay 10 m away from other ANT sensors while pairing. Bring the MIXpro within range (3 m) of the heart rate
monitor while pairing. If the problem persists, replace the battery.
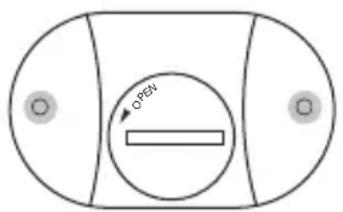
TO REPLACE THE BATTERY:
1 Locate the circular battery cover on the back of the sensor.
2 Use a coin to twist the cover counter-clockwise until it is loose enough to remove.
3 Remove the cover and replace the battery with the positive side facing up.
NOTE: Be careful not to damage or lose the o-ring gasket on the cover.
4 Use a coin to twist the coverback into place.
natural_image
Pure electrical circuit lines without any symbols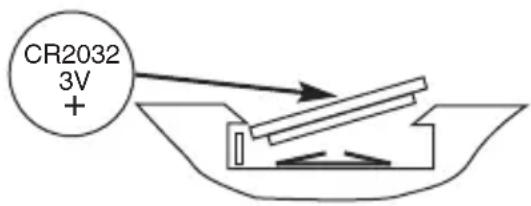
text_image
CR2032 3V +MAXRUN FOOT POD SENSOR (OPTIONAL)
The MIXpro is ready to use with the MAXrun foot pod sensor for running and walking. The MACRO 2SX spe for speed on the bike and MACRO 2SX cad for cadence. For more information about optional accessories, go to www.o-synce.com. You can also contact your o-synce dealer to purchase accessories.
SWITCHING OFF THE SENSORS
After 30 minutes of inactivity, all sensors are automatically powers off to conserve the battery.
5 SPORT-MODE
The SPORT-Mode offers several options:
_ Stop watch with 99 laps
_ Speed, distance and cadence for biking or running
_ Heart frequency
_ Personal settings
_ Data recording
_ Recording max. 7 hours
If you don't use any sensor, only the stop watch is working. Any sensor which is paired will be shown permanently as symbol on the display.
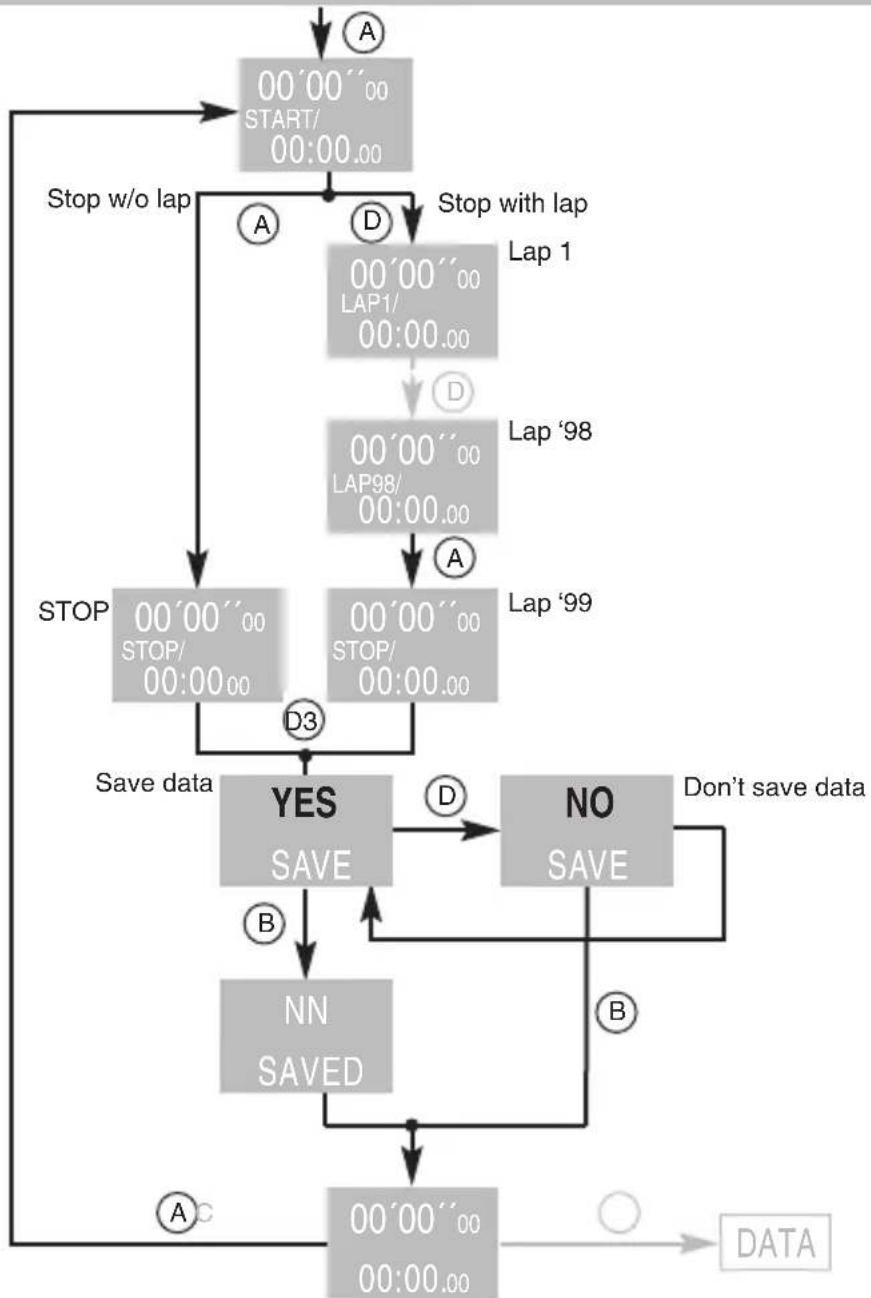
USE OF THE STOP WATCH WITHOUT ANY SENSOR
START
LAP TIME
STOP
ERASE THE RECORDING
press A - START will be shown
press D during the recording
press A - STOP will be shown
press & hold D for 3 Seconds - SAVE will be shown
(lower area), YES blinks up. Press A or D to switch to NO.
Press B to confirm
SAVE THE RECORDING
press & hold D for 3 Seconds - SAVE will be shown
(lower area), YES blinks up. Press B to confirm
USE OF THE STOP WATCH WITH SENSORS
The following sensors can be used:
HEART2feel
_ MAXrun (optional)
_ MACROX 2Sspe (optional)
_ MACROX 2Scad (optional)
NOTE: You can't use the foot pod together with the bike speed sensor (MACROX 2Sspe)
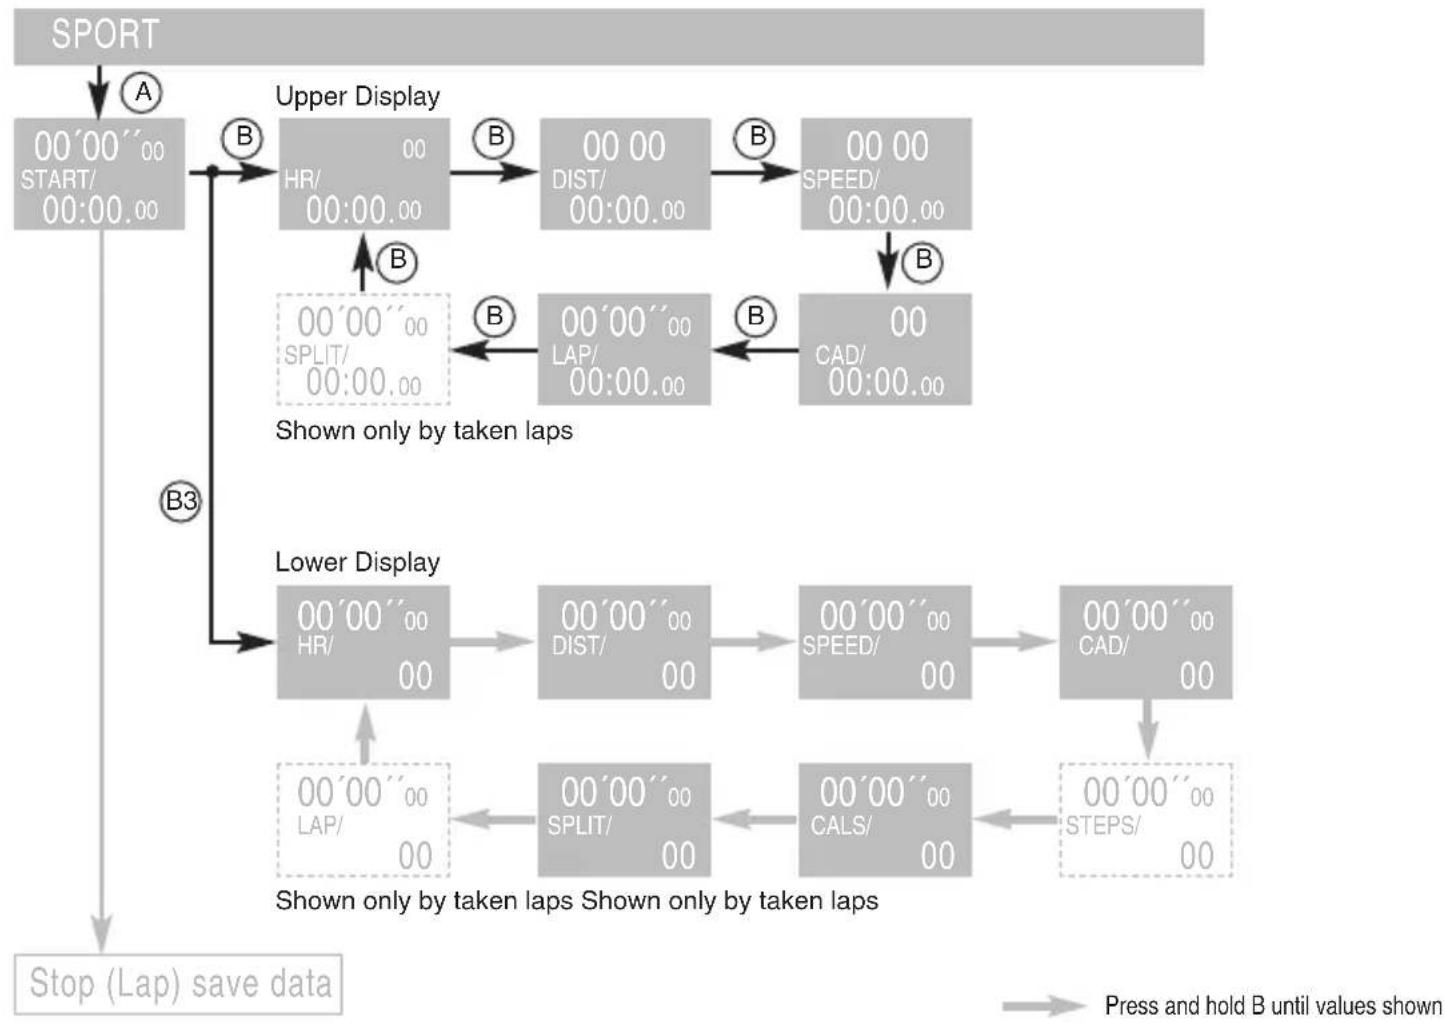
For the use of the ,stop watch with sensors' have a closer look at the diagram below.
After the start of the stop watch you can change the shown data in the upper display by pressing B once. Heart frequency (HR) Distance (DIST) SPEED CAD LAP Stop watch (SPLIT)
If you press & hold B the data in the lower display will be changed:
Heart frequency (HR) > Distance (DIST) > SPEED > CAD > STEPS, not by using the bike sensors > calories (CALS) > Stop watch (SPLIT) > LAP
SPORT
flowchart
graph TD
    A["00'00''00 START/00:00.00"] --> B["Stop w/o lap"]
    B --> C["00'00''00 LAP1/00:00.00"]
    C --> D["Stop with lap"]
    D --> E["00'00''00 LAP98/00:00.00"]
    E --> F["00'00''00 STOP/00:00.00"]
    F --> G["STOP"]
    G --> H["YES SAVE"]
    H --> I["NN SAVED"]
    I --> J["DATA"]
    J --> K["00'00''00 00:00.00"]
    K --> L["Stop w/o lap"]
    L --> C
    M["Start"] --> N["A"]
    N --> O["D"]
    O --> P["Lap 1"]
    P --> Q["D"]
    Q --> R["Lap '98"]
    R --> S["A"]
    S --> T["Lap '99"]
    T --> U["D3"]
    U --> V["Save data"]
    V --> W["B"]
    W --> X["NN SAVED"]
    X --> Y["DATA"]
    Y --> Z["○"]
    Z --> AA["DATA"]
    AA --> AB["○"]
    AB --> AC["DATA"]
    AC --> AD["○"]
    AD --> AE["DATA"]
    AE --> AF["○"]
    AF --> AG["DATA"]
    AG --> AH["○"]
    AH --> AI["DATA"]
    AI --> AJ["○"]
    AJ --> AK["DATA"]
    AK --> AL["○"]
    AL --> AM["DATA"]
    AM --> AN["○"]
    AN --> AO["DATA"]
    AO --> AP["○"]
    AP --> AQ["DATA"]
    AQ --> AR["○"]
    AR --> AS["DATA"]
    AS --> AT["○"]
    AT --> AU["DATA"]
    AU --> AV["○"]
    AV --> AW["DATA"]
    AW --> AX["○"]
    AX --> AY["DATA"]
flowchart
graph TD
    A["SPORT"] --> B["A"]
    B --> C["00'00''00 START/ 00:00.00"]
    C --> D["B"]
    D --> E["HR/ 00 00:00.00"]
    E --> F["B"]
    F --> G["00 00 DIST/ 00:00.00"]
    G --> H["B"]
    H --> I["00 00 SPEED/ 00:00.00"]
    I --> J["B"]
    J --> K["00'00''00 SPLIT/ 00:00.00"]
    K --> L["B"]
    L --> M["00'00''00 LAP/ 00:00.00"]
    M --> N["B"]
    N --> O["00 CAD/ 00:00.00"]
    O --> P["B"]
    P --> Q["Lower Display"]
    Q --> R["00'00''00 HR/ 00"]
    R --> S["00'00''00 DIST/ 00"]
    S --> T["00'00''00 SPEED/ 00"]
    T --> U["00'00''00 CAD/ 00"]
    U --> V["Steps/ 00"]
    V --> W["Step 1"]
    W --> X["Step 2"]
    X --> Y["Step 3"]
    Y --> Z["Step 4"]
    Z --> AA["Step 5"]
    AA --> AB["Step 6"]
    AB --> AC["Step 7"]
    AC --> AD["Step 8"]
    AD --> AE["Step 9"]
    AE --> AF["Step 10"]
    AF --> AG["Step 11"]
    AG --> AH["Step 12"]
    AH --> AI["Step 13"]
    AI --> AJ["Step 14"]
    AJ --> AK["Step 15"]
    AK --> AL["Step 16"]
    AL --> AM["Step 17"]
    AM --> AN["Step 18"]
    AN --> AO["Step 19"]
    AO --> AP["Step 20"]
    AP --> AQ["Step 21"]
    AQ --> AR["Step 22"]
    AR --> AS["Step 23"]
    AS --> AT["Step 24"]
    AT --> AU["Step 25"]
    AU --> AV["Step 26"]
    AV --> AW["Step 27"]
    AW --> AX["Step 28"]
    AX --> AY["Step 29"]
    AY --> AZ["Step 30"]
    AZ --> BA["Step 31"]
    BA --> BB["Step 32"]
    BB --> BC["Step 33"]
    BC --> BD["Step 34"]
    BD --> BE["Step 35"]
    BE --> BF["Step 36"]
    BF --> BG["Step 37"]
    BG --> BH["Step 38"]
    BH --> BI["Step 39"]
    BI --> BJ["Step 40"]
    BJ --> BK["Step 41"]
    BK --> BL["Step 42"]
    BL --> BM["Step 43"]
    BM --> BN["Step 44"]
    BN --> BO["Step 45"]
    BO --> BP["Step 46"]
    BP --> BQ["Step 47"]
    BQ --> BR["Step 48"]
    BR --> BS["Step 49"]
    BS --> BT["Step 50"]
    BT --> BU["Step 51"]
    BU --> BV["Step 52"]
    BV --> BW["Step 53"]
    BW --> BX["Step 54"]
    BX --> BY["Step 55"]
    BY --> BZ["Step 56"]
    BZ --> CA["Step 57"]
    CA --> CB["Step 58"]
    CB --> CC["Step 59"]
    CC --> CD["Step 60"]
    CD --> CE["Step 61"]
    CE --> CF["Step 62"]
    CF --> CG["Step 63"]
    CG --> CH["Step 64"]
    CH --> CI["Step 65"]
    CI --> CJ["Step 66"]
    CJ --> CK["Step 67"]
    CK --> CL["Step 68"]
    CL --> CM["Step 69"]
    CM --> CN["Step 70"]
All stored data can be seen in the DATA mode.
6 TIME-MODE (COUNTDOWN)
You can set two timers in Interval Time-Mode. Press C until the Timer page appears.
Setting the Timers (similar to setting the time of day)
On the Timer page, press and hold A until the hour setting blinks. Use D (+) and A (-) to adjust the hour.
Press B to advance to the next setting. Repeat this process for minutes and seconds.
When finished, press B to advance to the REPEAT setting
Press D (+) and A (-) to turn on or off the repeat function. Press B to advance to TIMER 2 settings.
Press D (+) and A (-) to turn on or off the TIMER 2 function.
Repeat the steps from TIMER1 to set TIMER 2. When finished, press mode to resume
Timer mode.
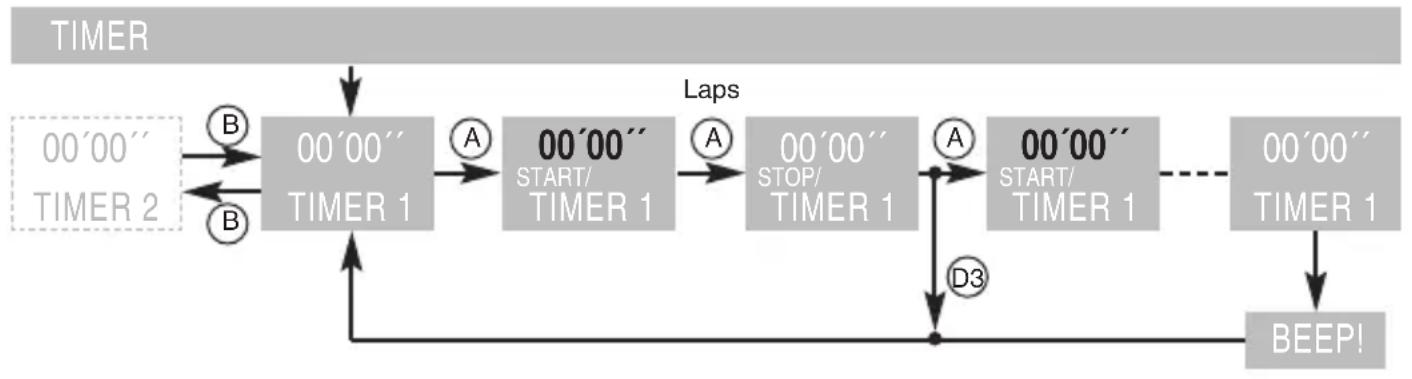
USE OF THE COUNTDOWN
TIMER 1 START press A
TIMER 1 STOP press A
TIMER 1 RESET press & hold D
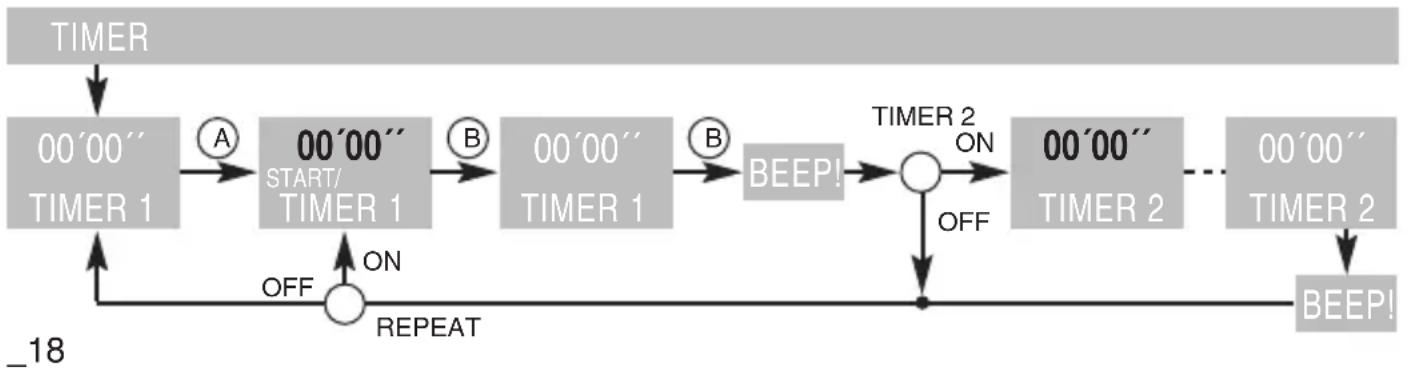
USING TIMER REPEAT
Set the timer to REPEAT to automatically restart the timer after it beeps.
If both TIMER 1 and TIMER 2 are active, the repeat function runs
TIMER 1 > TIMER2 > TIMER 1 > TIMER 2, and so forth until you press A.
TIMER 2 starting values (if active): press B
flowchart
graph TD
    A["TIMER"] --> B["00'00'' TIMER 1"]
    B --> C["00'00'' START/TIMER 1"]
    C --> D["00'00'' STOP/TIMER 1"]
    D --> E["00'00'' START/TIMER 1"]
    E --> F["00'00'' TIMER 1"]
    F --> G["BEEP!"]
    H["Laps"] --> I["A"]
    I --> J["A"]
    J --> K["D3"]
    L["00'00'' TIMER 2"] --> M["B"]
    M --> N["B"]
    N --> O["B"]
    O --> P["D3"]
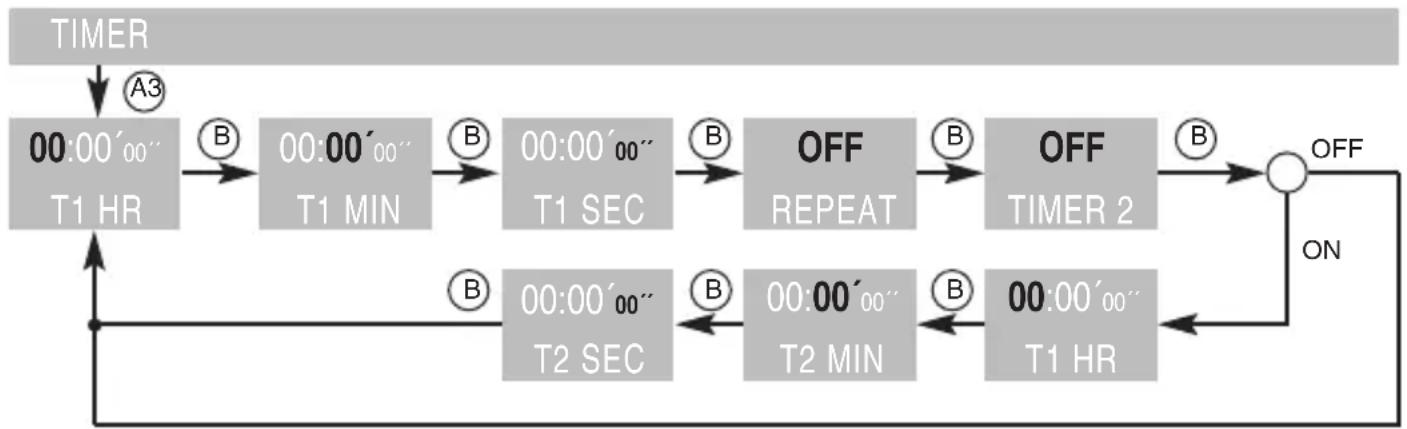
SETTING OF THE COUNTDOWN
NOTE: You can't get in this mode if the TIMER 1 is not on the starting value (still running or stopped!)
Change the TIMER-setting mode: press & hold A for 3 seconds
The starting value of the TIMER 1 will be shown.
When the hours blinks. Press A (+) or D (-) to change the values. Press B to confirm.
Then do minutes and seconds in the same way. See the diagram below.
Switch on the repeat countdowns of one or both TIMERS – infinite loop
REPEAT: OFF (blinks): Press D, to switch ON. Confirm with B
Activate Countdown TIMER 2: OFF (blinks): Press D, to switch ON. Confirm with B
Set the starting values of TIMER 2 (only if TIMER 2: ON):
Hours, minutes, seconds: analog like TIMER 1, see the diagram below:
flowchart
graph TD
    A["TIMER"] --> B["00:00'00'' T1 HR"]
    B --> C["00:00'00'' T1 MIN"]
    C --> D["00:00'00'' T1 SEC"]
    D --> E["OFF REPEAT"]
    E --> F["OFF TIMER 2"]
    F --> G["OFF"]
    G --> H["ON"]
    H --> I["TIME T1 HR"]
    I --> J["00:00'00'' T2 SEC"]
    J --> K["00:00'00'' T2 MIN"]
    K --> L["OFF REPEAT"]
    L --> M["OFF TIMER 2"]
    M --> N["OFF"]
    N --> O["TIME T1 HR"]
    O --> P["TIME T1 MIN"]
    P --> Q["OFF REPEAT"]
    Q --> R["OFF TIMER 2"]
    R --> S["OFF"]
    S --> T["TIME T1 HR"]
    T --> U["TIME T1 MIN"]
    U --> V["OFF REPEAT"]
    V --> W["OFF TIMER 2"]
    W --> X["OFF"]
    X --> Y["TIME T1 HR"]
    Y --> Z["TIME T1 MIN"]
    Z --> AA["OFF REPEAT"]
    AA --> AB["OFF TIMER 2"]
    AB --> AC["OFF"]
    AC --> AD["TIME T1 HR"]
    AD --> AE["TIME T1 MIN"]
    AE --> AF["OFF REPEAT"]
    AF --> AG["OFF TIMER 2"]
    AG --> AH["OFF"]
    AH --> AI["TIME T1 HR"]
    AI --> AJ["TIME T1 MIN"]
    AJ --> AK["OFF REPEAT"]
    AK --> AL["OFF TIMER 2"]
    AL --> AM["OFF"]
    AM --> AN["TIME T1 HR"]
    AN --> AO["TIME T1 MIN"]
    AO --> AP["OFF REPEAT"]
    AP --> AQ["OFF TIMER 2"]
    AQ --> AR["OFF"]
    AR --> AS["TIME T1 HR"]
    AS --> AT["TIME T1 MIN"]
    AT --> AU["OFF REPEAT"]
    AU --> AV["OFF TIMER 2"]
    AV --> AW["OFF"]
    AW --> AX["TIME T1 HR"]
00
Flashing values can be changed with A(+) or D(-)
Press C to exit the setting at any time.
USE OF THE COUNTDOWNS 1 AND 2 AND THE REPEAT
You have to start both Countdowns with repeat like the Countdown TIMER 1 with A, shown on the diagram below:
flowchart
graph TD
    A["TIMER"] --> B["00'00'' TIMER 1"]
    B --> C["A START/TIMER 1"]
    C --> D["B START/TIMER 1"]
    D --> E["B BEEP!"]
    E --> F["TIMER 2 ON"]
    F --> G["OFF"]
    G --> H["REPEAT"]
    H --> I["OFF"]
    I --> J["18"]
    J --> K["BEEP!"]
    K --> L["00'00'' TIMER 2"]
    L --> M["..."]
    M -.-> N["TIMER 2 ON"]
    N --> O["OFF"]
7 HISTORY MODE
The MIXpro holds up to 100 laps and up to seven hours of exercise files and stores workout data based on the type of workout, the accessories used, and your training settings.
Press C until the DATA mode appears.
VIEWING WORKOUT HISTORY
On the DATA mode, press D (+) and A (-) to scroll through your saved runs and workout data.
Press B to display the start time for that run.
Press D (+) and A (-) to view the rest of the run data depending on which accessories, settings and training zones were used: Total run time, Total distance, Total steps, Total calories and Time in each zone (ZONES must be set to ON).
Press B from any of these pages to view the next level of history data. Press D (+) and A (-) to view the available data pages: Average lap time - Average lap speed - Average heart rate. Press B from any of these pages to view the next level of history data and details for each lap in your workout. Press D (+) or A (-) to view the available data pages.
DELETING WORKOUT HISTORY
On the DATA mode, press D (+) or A (-) to scroll through your saved runs to the run you want to delete. Press and hold D to delete a single run. Continue to hold D to delete all runs. No DATA appears.
MANAGING MEMORY
The MIXpro holds up to 100 laps and up to seven hours of exercise files. Periodically upload data to your computer using the MAXpc and the SAS sw. When there is approximately one hour of memory remaining, the Lo MEM warning appears on the MIXpro screen in Train mode. When the memory is full, the Full MEM warning appears, and the MIXpro stops recording data.
8 PC SAS SOFTWARE
With the optional MAXpc stick you can use the free SAS Software to store and analyze your workout data. Go to download area on www.o-synce.com – support – downloads – SAS. Follow the instructions and install the soft ware and the needed driver for the MAXpc stick. Connect the MAXpc stick to an available USB port on your computer. Bring the MIXpro within range (3 m) of your computer. Verify there are no timers running or active training sessions.
Open the SAS sw on your computer and press the button for ‘connection to the device’. If you are using the watch the first time you have to confirm the connection by pressing B on the watch. After the connection, the recorded data will be automatically transmitted. NOTE: If you are having problems uploading data, you may need to enable computer pairing.
9 APPENDIX
Technical features
MIXpro
Watch size: 58 mm × 42 mm × 20 mm
Wrist band size: 204 mm × 28 mm × 3 mm
Weight: 44 g
LCD-Display: 23,75 mm × 18,25 mm, with backlight
Water resistance: to 30 m NOTE: don't press any button under water!
Computer interface: Wireless, automatic ANT+Sport receiver
Battery type: User-replaceable CR2032 (3 volts)
Battery life: 12 months, depending on usage
Operating temperature range: 5° F to 158° F (-15° C to 70° C)
Radio frequency/protocol: 2.4GHz/Dynastream ANT+Sport wireless communications protocol
Heart2feel (heart rate sensor and belt)
Physical size: 65 x 38 x 11 mm
Weight: 25 g
Water Resistance: 10 m
Transmission range: approximately 3 m (9.8 ft)
Battery: User-replaceable CR2032 (3 volts)
Battery Life: approximately 3 years (1 hour per day)
BATTERY
All products (also the accessories) contain a user replaceable CR2032 battery. The battery will last approximately 12 months for the watch, 200 hours for the MAXrun, 18 months for the heart2feel belt and the MACRO 2S sensors (typical use).
When the battery is low, the LoBATT warning blinks on the MIXpro screen in Time mode.
CAUTION: Replacing the battery resets the MIXpro software and restores the factory
settings. Workout data is deleted. You must reset the time and custom settings.
NOTE: o-synce recommends that you take the MIXpro to a professional watch repair person to have the battery replaced.
MAINTENANCE AND CARE
Clean the MIXpro and accessories using a cloth dampened with a mild detergent solution, and then wipe dry. Avoid chemical cleaners and solvents that may damage plastic components. Do not store the MIXpro and accessories where prolonged exposure to temperature extremes may occur (such as in the trunk of a car), as permanent damage may result.
WATER RESISTANCE
The MIXpro is water resistance to 30 meter (3ATM). The heart2feel belt is water resistance to 10 meter (1ATM) – don't use it for swimming.
NOTE: To maintain the water resistance, do not operate the MIXpro buttons under water.
LIMITED WARRANTY
This o-synce product is guaranteed to be free from defects in materials or workmanship for one year in the Countries of America and Asia and two years in the European Countries and Switzerland from the date of purchase. Within this period, o-synce will, at its sole discretion, repair or replace any components that fail in normal use.
Such repairs or replacement will be made at no charge to the customer for parts or labor, provided that the customer is responsible for any transportation cost.
This warranty does not cover failures due to abuse, misuse, accident, or unauthorized alteration or repairs nor does it include batteries.
To obtain warranty service, contact your local o-synce authorized dealer or call o-synce Product Support in Germany for shipping instructions and an RMA tracking number. Securely pack the unit and a copy of the original sales receipt, which is required as the proof of purchase for warranty repairs. Write the tracking number clearly on the outside of the package. Send the unit, freight charges prepaid, to any o-synce warranty service station.
Online Auction Purchases: Products sold through online auctions are not eligible for rebates or other special offers from o-synce. Online auction confirmations are not accepted for warranty verification. To obtain warranty service, an original or copy of the sales receipt from the original retailer is required. O-synce will not replace missing components from any package purchased through an online auction.
International Purchases: A separate warranty is provided by international distributors for
units purchased outside Germany. This warranty is provided by the local in-country distributor and this distributor provides local service for your unit. Distributor warranties are only valid in the area of intended distribution.
RECYCLING
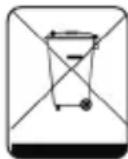
The symbol means that you are not allowed to waste the batteries in your normal waste. PLease contact your local waste department to properly dispose of the units and batteries. Do not incinerate. Keep used batteries away from children.
Do not disassemble, puncture, or damage the battery.
CONTACT
Help us better support you by sending us your comments or questions by using our email contact on our web site www.o-synce.com
Keep the original sales receipt, or a photocopy, in a safe place.
FCC COMPLIANCE
This product has been tested and found to comply with Part 15 of the FCC interference limits for Class B digital devices FOR HOME OR OFFICE USE.
These limits are designed to provide more reasonable protection against harmful interference in a residential installation, and are more stringent than “outdoor” requirements.
RESTRICTED PROPRIETARY INFORMATION
This information disclosed herein is the exclusive property of o-synce Europe GmbH and is not to be disclosed without the written consent of o-synce Europe GmbH. No part of this publication may be reproduced or transmitted in any form or by any means including electronic storage, reproduction, execution or transmission without the prior written consent of o-synce Europe GmbH. The recipient of this document by its retention and use agrees to respect the security status of the information contained herein.
Information in this document is subject to change without notice. O-synce reserves the right to change or improve its products and to make changes in the content without obligation to notify any person or organization of such changes or improvements. Visit the o-synce Web site (www.o-synce.com) for current updates and supplemental information concerning the use and operation of this and other o-synce products.
This document is intended for limited circulation.
© 2009 o-synce Europe GmbH. All Rights Reserved.