
LifeBook UH572 - Laptop FUJITSU - Free user manual and instructions
Find the device manual for free LifeBook UH572 FUJITSU in PDF.


User questions about LifeBook UH572 FUJITSU
0 question about this device. Answer the ones you know or ask your own.
Ask a new question about this device
Download the instructions for your Laptop in PDF format for free! Find your manual LifeBook UH572 - FUJITSU and take your electronic device back in hand. On this page are published all the documents necessary for the use of your device. LifeBook UH572 by FUJITSU.
USER MANUAL LifeBook UH572 FUJITSU
Congratulations, you have decided to buy an innovative Fujitsuproduct.
The latest information about our products, useful tips, updates etc. is available fromourwebsite:" http://ts.fujitsu.com"
For automatic driver updates, go to: "http://support.ts.fujitsu.com/com/support/index.html"
Should you have any technical questions, please contact:
- ourHotline/ServiceDesk(seeServiceDesklistorvisit: "http://ts.fujitsu.com/support/servicedesk.html")
- Yoursalespartner
•Yoursalesoffice
WehopeyoureallyenjoyusingyournewFujitsusystem.
FUJITSU
Copyright
FujitsuTec hnologySolutions03/2012
Publishedby
Fujitsu Technology Solutions GmbH
Mies-van-der-Rohe-Straße8(Mies-van-der-RoheStreetNo.8)
80807Munich, Germany
Contact
http://ts.fujitsu.com/support
All rights reserved, including intellectual property rights. Subject to technical alterations. Delivery subject to availability.
Nowarranty is offered by liability accepted in regard to the completeness, correctness, or current applicability of any
dataor illustrations.Brandnamesmaybeprotectedtrademarksoftherespectivemanufacturerand/orprotected
bycopyright. Useofthesebythirdpartiesfortheirownpurposesmayconstituteaninfringementoftheholders'
rights.Furtherinformationcanbefoundat" http://ts.fujitsu.com/terms_of_use.html"
OrderNo.Fujitsu Technology Solutions GmbH:A26391-K348-Z320-1-7619,edition1
LIFEBOOKUH552 LIFEBOOKUH572
OperatingManual
Innovativetechnology7
Portsandcontrols9
Importantnotes12
First-timesetupofyourdevice15
Workingwiththenotebook18
Securityfunctions35
Connectingexternaldevices39
SettingsinBIOSSetupUtility43
Troubleshootingandtips 45
Technical data 52
Manufacturer'snotes 53
Index 55
Microsoft, MSandWindowsareregisteredtrademarksoftheMicrosoftCorporation.
AdobeReaderisattrademarkofAdobeSystemsIncorporated.
MultiMediaCard is a registered trademark of Infineon Technologies AG
SonyandMemoryStickareregisteredtrademarksofSonyElectronics,Inc.


Boost
ManufacturedunderlicencefromDTSLicensingLimited.DTSandthesymbol areregisteredtrademarks&DTSBoostisattrademarkofDTS,Inc.Product includessoftware.©DTS,Inc.Allrightsreserved.
All other trademarks referenced are trademarks or registered trademarks of their respective owners, whose protected rights are acknowledged.
Copyright©FujitsuTechnologySolutionsGmbH2012
Allrightsreserved, including rightsoftranslation, reproductionbyprinting, copying orsimilarmethods, inpartorinwhole.
Intheeventofviolations, perpetratorswillbeliebotoprocutionfordamages.
All rights reserved, including rights created by patent grant or registration of a utility model or design.
Subject to availability and technical modifications.
Contents
Innovative technology 7
Furtherinformation 7
Notationalconventions....8
Ports and controls 9
Importantnotes 12
Safetynotes 12
Additional safety notes for devices with radio components 12
Energysaving 13
Energy saving under Windows 13
Travelling withyournotebook 13
Beforeyoutravel 13
Notebook: transporting 14
Cleaningthenotebook 14
First-timesetupo f your device 15
Unpackingandche cking the device 15
Selecting a location 16
Mainsadaptercon necting 16
Switching on the device for the first time 17
Working with the notebook 18
Status indicators 18
Switching on the notebook 19
Notebook:switchingoff. 20
Keyboard 21
Virtual numeric keypad 23
Key combinations 23
Country and keyboard settings 25
Touchpad and touchpad buttons 26
Moving the pointer 26
Selecting an item 26
Executing commands 26
Dragging items 27
Switching the Touchpad on and off 27
LCD screen 27
Webcam 28
Rechargeable battery 28
Charging, caring for and maintaining the battery 28
Using the power-management features 29
Memory cards 30
Supported formats 30
Inserting the memory card 30
Removing the memory card 31
Loudspeakers and microphones 31
SIM card 32
Inserting the SIM card 32
Removing a SIM card 33
Wireless LAN/BlueTooth/UMTS (optional) 33
Switchingthewirelesscomponentsonandoff.... 34
Setting up WLAN access 34
AccessviaUMTS 34
Securityfunctions 35
UsingtheSecurityLock 35
Configuring password protection in BIOS Setup Utility 35
Protecting BIOS Setup Utility (supervisor and user password) 36
Passwordprotectionforbootingoftheoperatingsystem.... 37
Password protectionfortheharddisk 37
Connectingexternaldevices 39
HDMIport 40
ConnectingUSBdevices....40
USBportwith charging function(Anytime USBcharge) ......
HowtoremoveUSBdevicescorrectly 41
Headphone port 42
Settings in BIOS Setup Utility 43
StartingtheBIOS Setup Utility 43
Operating BIOS Setup Utility 43
ExitingBIOS SetupUtility 44
Exit Saving Changes - save changes and exit BIOS Setup Utility 44
Exit Discarding Changes – Discard changes and exit BIOS Setup Utility 44
LoadSetupDefaults-CopyStandardEntries. 4 4
DiscardChanges-DiscardchangeswithoutexitingtheBIOSSetupUtility. 4 4
Save Changes - save changes without exiting the BIOS Setup Utility 44
Save Changes and Power Off 44
Troubleshooting and tips 45
Help if problemsoccur 45
Using the reset key 46
RestoringtheharddiskcontentsunderWindows.... 46
Thenotebook'sdateortimeisincorrect 4
When certain characters are entered on the keyboard, only numerals are written 47
Thenotebook'sLCDscreenremainsblank 4
The LCD screen is difficult to read 47
The external monitorremainsblank 48
The external monitor is blank for the image is unstable ....
The notebook cannot be started 49
Thenotebook stops working 49
Theprinterdoesnotprint. 49
The radio connection to a network does not work 50
Acoustic warnings 50
Error messages on the screen 50
Technicaldata 52
LIFEBOOK 52
Rechargeable battery 52
Mains adapter 52
Manufacturer'snotes 53
Energy Star 53
Disposal and recycling 53
DeclarationsofConformity 53
CE marking 54
Index 55
Innovativetechnology
...andergonomicdesignmakeyourdeviceareliableandconvenientcompanion.
The device boots very quickly, is ready for immediate use and offers a particularly long operating time because of fit high capacity battery.
With the user-friendly "BIOS Setup Utility" you can control your notebook's hardware and better protectyoursystemagainstunauthorisedaccessbyusingthepowerfulpasswordproperties.

Information on the connections and user components of your notebook can be found Ports arld controls", Page 9.
Furtherinformation

The Windows drivers for your device can be found on our Internetsite. The factory installation of your device does not support any other operating system. Fujitsu Technology Solutions accepts no liability whatsoever if any other operating system is used.
SoftwareorientedcomponentsoftheseinstructionsrefertoMicrosoftproducts, iftheycomewithinthescopeofthedelivery.
If you install other software products, pay attention to the operating instruction so the manufacturer.
Notationalconventions
 | Payparticularattentiontotextmarkedwiththissymbol.Failureretoobserve thesewarningscouldposearisktohealth,damagethedeviceorlead tolossofdata.Thewarrantywillbeinvalidatedifthedevicebecomes defectivethroughfailuretoobservethesewarnings. | |
 | Indicatesimportantinforma tionfortheproperuseofthedevice. | |
| ### | Indicatesanactivitythatmustbeperformed | |
| ### | Indicatesaresult | |
| ### | indicatesdataentered usingthekeyboardinaprogramdialogueorat thecommandline,e.g. yourpassword(Name123)oracommandusedto startaprogram(star t.exe) | |
| ### | indicatesinformationthatisdisplayonthescreenbyaprogram,e.g.: Installationiscomplete. | |
| ### | Indicates•termsandtextsusedinasoftwareinterface,e.g.:ClickonSave• names of programs or files, e.g. Windows or setup.exe. | |
| ### | Indicates•cross-referencestoanothersection,e.g."Safetyinformation"•cross-referencestoanexternalsource,e.g.awebaddress:Formore information,goto" http://ts.fujitsu.com"•NamesofCDs,DVDsandtitlesordesignationsforothermaterials, e.g.:"CD/DVDDrivers&Utilities"or"Safety/Regulations"manual | |
| Key | indicatesakeyonthekeyboard,e.g: F10 | |
| ### | indicatestermsandtextsthatareemphasisedorhighlighted,e.g.:Do notswitchoffthedevice | |
Portsandcontrols
Thischapterpresentstheindividualhardwarecomponentsofyourdevice.Itgivesan overviewoftheindicatorsandconnectionsofthedevice.Pleasefamiliariseyourselfwith thesecomponentsbeforeyoustarttoworkwiththedevice.
Front
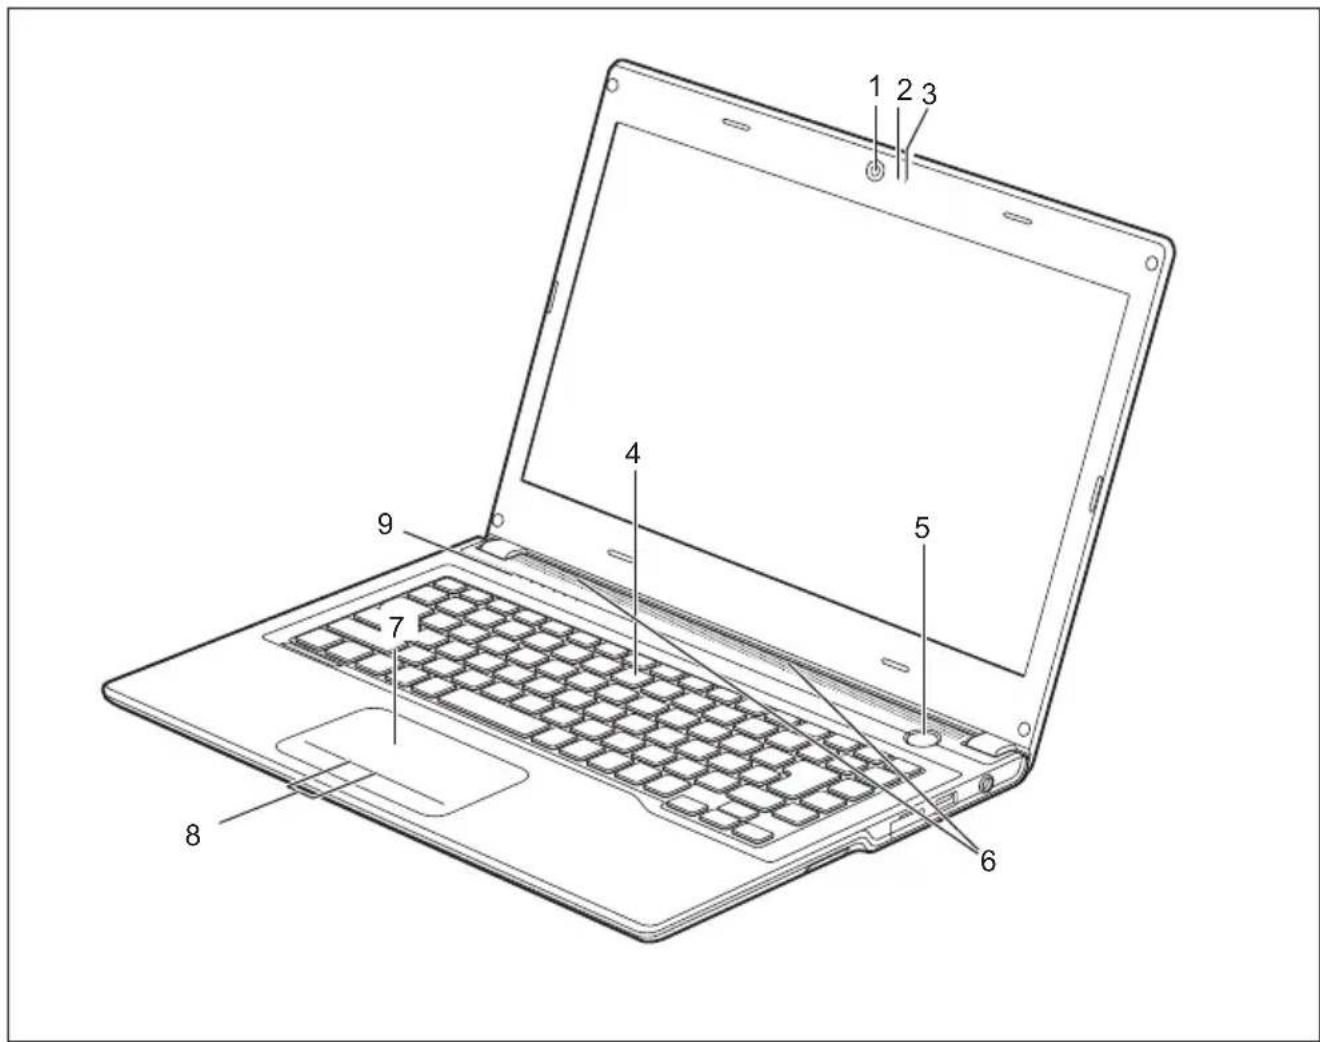
text_image
Laptop diagram with numbered parts for identification and assembly reference1=WebCam
2=WebCam LED
3=Microphone
4=Keyboa rd
5=ON/OFFswitch
6=Loudspeakers
7=Touchp ad
8=Touchpadbuttons
9=Status indicators
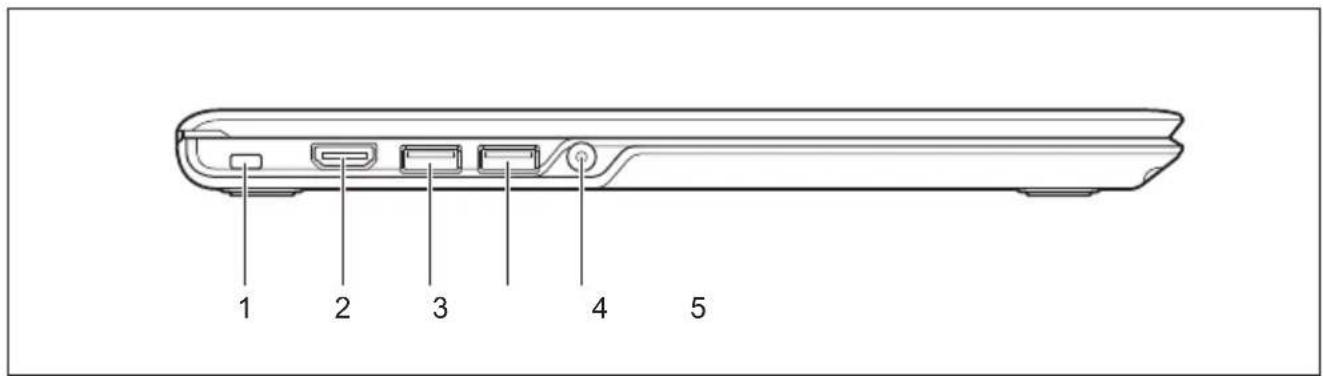
Leftpanel
text_image
1 2 3 4 51=SecurityLockdevice
2=HDMIport
3=USBport3.0
4=USB3.0portwithchargingfunction
(AnytimeUSBcharge)
5=Headphonesport
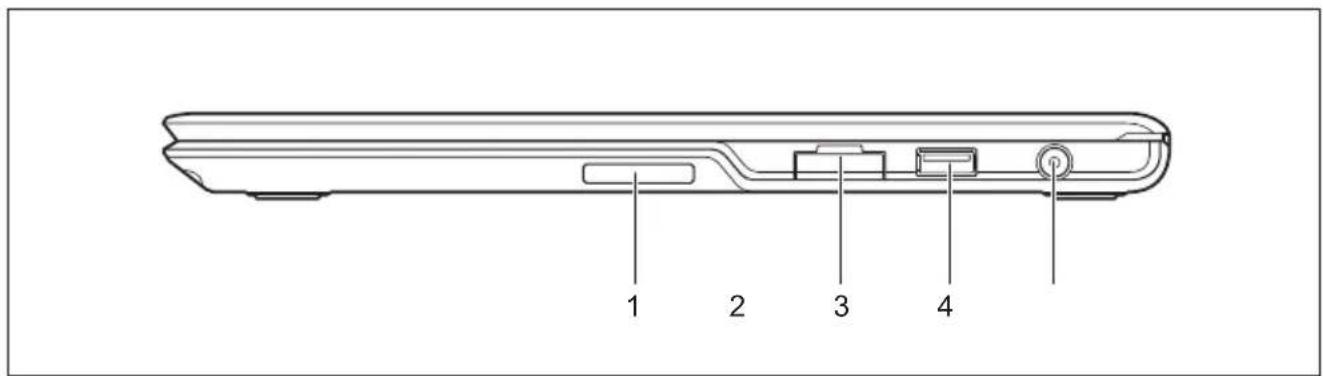
Right-handside
text_image
1 2 3 41=Memorycardslot
natural_image
Top-down schematic of a laptop chassis showing front panel, rear panel, and internal components (no text or labels)1 = R e s e t k e y
Importantnotes

Thischaptercontainsessential safety information which must be followed when working with your notebook. Other notes also provide useful information which will help you with your notebook.
Safetynotes

Please follow the safety notes provided in the "Safety/Regulations" manual as well as the safety notes given below.
Pleasepayspecialattentiontothesectionsinthemanualmarked withthesymbolontheleft.
When connecting and disconnecting cables, observetherelevant notes in this operating manual.
Readtheinformationontheambientconditionsinthe" Technicaldata", Page 52 and "First-time setup of your device", Page 15 before preparing your notebookforuseandswitchingitonforthefirsttime.
Whencleaningthedevice,pleaseobservetherelevantnotesinthe section" Cleaningthenotebook",Page14.
Payattentiontotheadditionalsafetynotesfordeviceswithradiocomponents providedinthe"Safety/Regulations"manual.
Thisnotebookc omplieswiththerelevantsafetyregulationsfordataprocessing equipment.If youhavequestionsaboutusingyournotebookinaparticulararea, pleasecontac yoursalesoutletorourHotline/ServiceDesk.
Additionalsafetynotesfordeviceswith radiocomponents
Ifaradiocomponent(WirelessLAN,Bluetooth,UMTS)isintegratedinyournotebook,you mustbesuretoobservethefollowingsafetynoteswhenusingyournotebook:
- Switchofftheradiocomponentswhenyouareinanaircraftordrivinginacar.
- Switch off the radio components when you are in a hospital, an operating room or near a medical electronics system. The transmitted radio waves can impair the operation of medical devices.
- Switch off the radio components when you let the device get near flammable gasesorintohazardousenvironments(e.g.petrolstation,paintshops),asthe transmittedradiowavescancauseanexplosionorafire.

Forinformationonhowtoswitchradiocomponentsonandoff,seechapter "Switchingthewirelesscomponentsonandoff",Page34.
Energysaving
Switchthenotebookoffwhenitisnotinuse.Switchoffexternal,connecteddevicesifyou arenotusingthem.Ifyouusetheenergysavingfunctions,thenotebookuseslessenergy. Youwillthenbeabletoworkforlongerbeforehavingtorechargethebattery.
Energy efficiency is increased and the environmental impact is reduced. Yousavemoneywhileprotectingtheenvironment.
EnergysavingunderWindows
▶ Make use of the power management features (see ""Using the power-management features", Page29").
Travellingwithyou rnotebook
Please observe the points listed below when travelling with your notebook.
Beforeyoutravel
▶ Back up important data stored on your hard disk.
▶ Switch off the radio component for data security reasons. With data traffic via a wireless connection, it is also possible for unauthorised third partiestore received data.

Informationonactivatingdataencryptionisprovidedinthedocumentation for your radio component.
▶ If you wish to use your notebook during a flight, first check with the flight attendants if it is OK to do so.
Whentravellinginothercountries
If you are travelling abroad, check that the mains adapter can be operated with the local mains voltage. If this is not the case, obtain the appropriate mains adapter for yournotebook.Donotuseanyothervoltageconverter!
▶ Check whether the local mains voltage and the power cable are compatible. If this is notthecase, buyapowercablethatmatchesthelocalconditions.
▶ Enquire with the corresponding government office of the country you will be travellinginastowhetheryoumayoperatetheradiocomponentintegratedin yournotebookthere(seealso" CEmarking",Page54).
Notebook: transporting

Protectthenotebookfromsevereshocksandextremetemperatures (e.g.directsunlightinacar).
▶ If your device has an optical drive, remove all data media (e.g. CD, DVD) from the drives.
▶ Switchthenotebookoff.
▶ Unplugthemainsadapterandallexternaldevicesfromthepowersocket.
▶ Disconnect the mains adapter cable and the data cables for all external devices.
▶ ClosetheLCDscreen.
▶ To protect against damaging jolts and bumps, use a notebook carrying casetotransportyournotebook.
Cleaningthenotebo ok

Donotcleananyinteriorpartsyourself;leavethisjobtoaservicetechnician.
Onlyusecleaningproductsdesignedforcomputers.Normalhousehold cleanersandpolishescandamagethemarkingsonthekeyboardandthe device,thepaintworkorthenotebookitself.
Ensure that noliquidentersthenotebook.
The LCD screen very sensitivetoscratches. Only clean the display surface with a very soft, slightly damp cloth.
▶ Switchthenotebookoff.
▶ Topreventaccidentalactivationofthedevice,removethepowerplugof themainsadapterfromthepowersocket.
→ Thesurfacemaybecleanedwithadrycloth.Ifparticularlydirty,useadampcloththathas been dipped in water mixed with mild domestic detergent and then carefully wrung out. Tocleanthekeyboardandthetouchpad,ifavailable,youcanusedisinfectantwipes.
Ensure that noliquidentersthedevice.
First-timesetupofyourdevic e

Pleasereadthechapter"Importantnotes", Page12.
If your device is equipped with a Windows operating system, then necessary hardwaredrivers and supplied software are already pre-installed.
Before you switch on the device for the first time, connect it to the mains voltage using themainsadapter,see" Mainsadapterconnecting",Page16. The mains adaptermustbeconnectedduringtheentireinstallationprocess.
A system test is performed when your device is first switched on. Various messages can appear. The display may remain dark for a short time or may flicker.
Pleasefollowtheinstructionsonthescreen.
NEVERswitchoffyourdeviceduringthefirst-timesetupprocess.
The battery must be securely fitted and charged if you want to operate your device using the battery.
When used on them move, the built-in battery provides the device with the necessary power. You can increase the operating time by using the available energy-saving functions.
Forinstructionsonhowtoconnectexternaldevices(e.g.mouse, printer)toyour device, pleaserefertotheoperatingmanualforyourdevice.
Unpacking and checking the device

Should you discover any damage that occurred during transportation, notify your locals sales outlet immediately!
▶ Unpackalltheindividualparts.
▶ Checkyourd eviceforanyvisibledamagewhichmayhaveoccurredduringtransportation.
You may need the packaging in the future, if you need to transport your device.
Selectingalocation

Selectasuitablelocationforthedevicebeforesettingitup.Follow theinstructionsbelowwhendoingso:
- Neverplacethedeviceorthemainsadapteronaheat-sensitivesurface. Thesurfacecouldbedamagedasaresult.
- Neverplacethedeviceonasoftsurface(e.g.carpeting,upholsteredfurniture, bed). Thiscanblocktheairventsandcauseoverheatinganddamage.
•Theundersideofthedeviceheatsupduringnormaloperation.Prolongedcontact withtheskinmaybecomeunpleasantorevenresultinburns.
- Place the device on a stable, flat, non-slippery surface. Please note that the rubberfeetofthedevicemaymarkcertaintypesofdelicatesurfaces.
- Keepotherobjectsatleast100mmawayfromthedeviceandits mainsadaptertoensureadequateventilation.
- Nevercovertheventilationslotsofthedevice.
- Donotexposethedevicetoextremeenvironmentalconditions.Protect thedevicefromdust,humidity,andheat.
Mainsadapterconnecting

Observethesafetynotesintheenclosed"Safety/Regulations"manual.
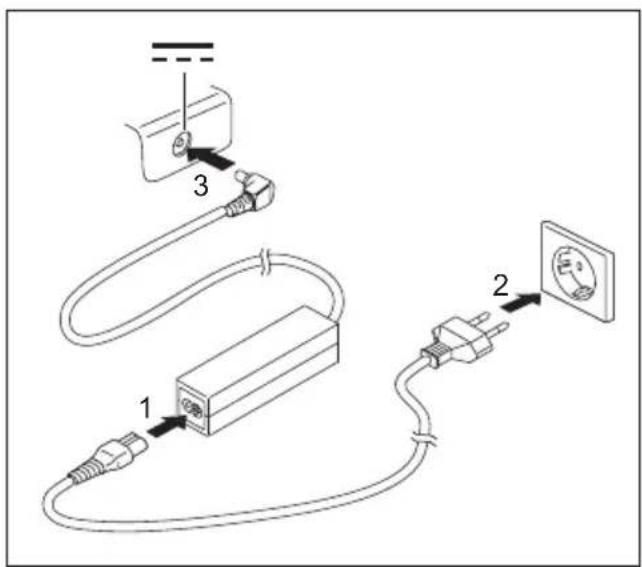
Thesuppliedpowercableconformstotherequirementsofthecountryin whichyoupurchasedyourdevice.Makesurethatthepowercableisapproved foruseinthecountryinwhichyouintendtouseit.
text_image
Diagram showing cable installation and connection to a wall socket, labeled with components 1, 2, and 3.▶ Connectthepowercable(1)tothe mainsadapter.
▶ Plug the mains cable (2) into a mains outlet.
Connectthemainsadaptercable(3)to theDCjack(DCIN)ofthedevice.
Switchingonthedeviceforthefirsttime

Onder Devices with ON/OFF switch for wireless components: Slidethe ON/OFF switch for wireless component to the ON position before switching on the device.
When you switch on the device for the first time, the supplied software is installed and configured. Because this procedure must not be interrupted, you should set asideenoughtimeforittobefullycompletedandconnect the device to themainsusingthemainsadapter.
Duringtheinstallationprocess,DONOTrestartthedeviceunless youarerequestedtodoso!
Tomakeiteasiertousey our device for the first time, the operating system ispre-installedonth eharddisk.
natural_image
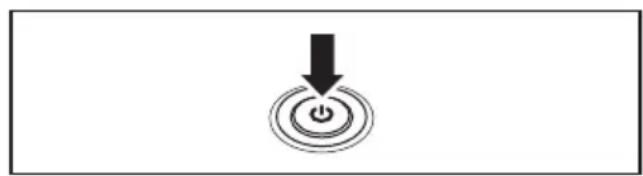
Simple diagram showing a black arrow pointing downward to a circular button with a power symbol (no text or labels)▶ Switchonyourdevice.
▶ Duringinstallation,followtheinstructionsonscreen.
If a Windows operating system is installed on your device, you will find more information on the system and drivers, help programmes, updates, manuals etc. onthedeviceoronthelInternetat" http://ts.fujitsu.com/support".
Workingwiththenotebook
Thischapterdescribesthebasicsforoperatingyournotebook.Pleasereadthechapter entitled" Connecting external devices", Page 39 for instructions on how to connect devicessuchasamouseandaprintertothenotebook.

Pleaserefertothenotesin"Importantnotes", Page12.
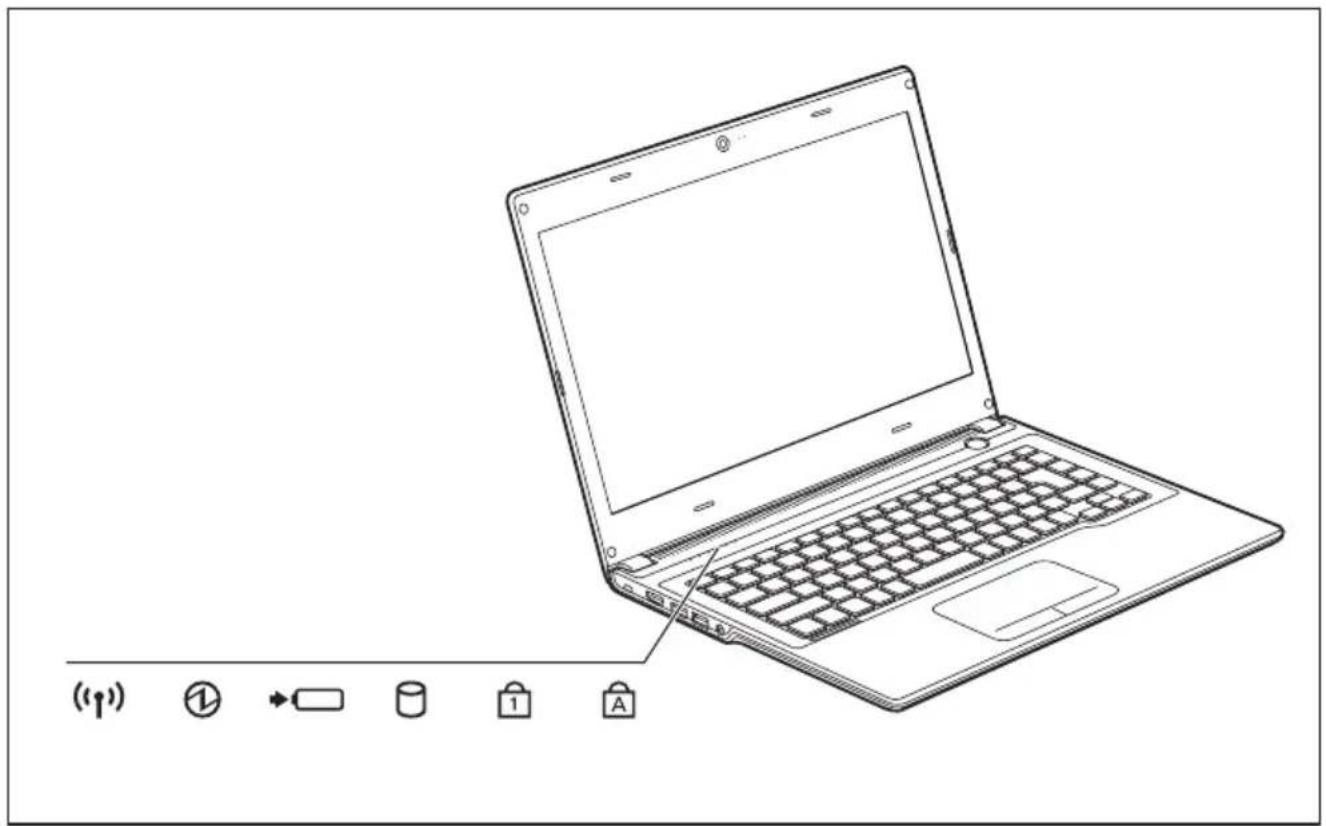
Statusindicators
Thestatusindicatorsprovideinformationaboutthestatusofthepowersupply, thedrivesandthekeyboardfunctions.
text_image
(↑)| StatusindicatorsDescription | |
| (1) | RadiocomponentsindicatorTheindicatorisilluminated:Theradiocomponentsareswitchedon.Indicatorisoff:Theradiocomponentsareswitchedoff. |
 | Power-onindicator/StandbyTheindicatorislit:Thenotebookisswitchedon.Theindicatorflashes:Then otebookisinstandbymode.Theindicatorisnotlit:Thenotebookisswitchedoff. |
 | Batterychargingindicator/powerconnectorThestateofchargeofthebatteryisshownbythebatteryindicator.Withmainsadapterconnected:Theindicatorlightsupblue:Thebatteryisfullycharged.Theindicatorlightsuporange:Thebatteryischarging.The indicator flashes orange: The battery is nearly discharged. Charge withthemainsadapter.Indicatorisoff:Thesystemisinbatterymodeandthemainsadapteris notconnected. |
 | DriveindicatorIndicatorisilluminated:Theharddiskisbeingaccessed |
 | NumLockindicatorTheindicatorislit:The Num keyhasbeenpressed.Thevirtualnumerical keypadisactivated.Youcanoutputthecharactersindicatedontheupper rightofthekeys. |
 | CapsLockindicatorThe indicator is lit: The Caps Lock key has been pressed. All the characters youtypewillappearinuppercase.Inthecaseofoverlaykeys,the characterprintedontheupperleftofthekeywillappearwhenthatkey ispressed. |
Switchingonthenotebook
natural_image
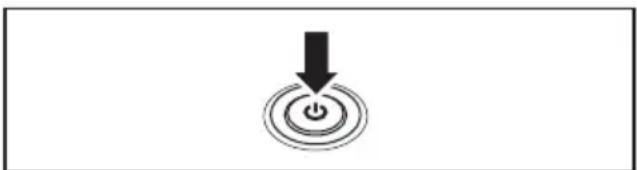
Simple diagram showing a downward arrow pointing to a circular button with a power symbol (no text or labels)→ Thepower-onindicator islit.
▶ Open theLCDscreen.
▶ PresstheON/OFFswitchforaboutone secondtoswitchthenotebookon.
Notebook:switchingoff

Backupyourdataandcloseallapplicationsbeforeyouswitchoffyour device.Otherwisedatamightbelost.
▶ Shutdowntheoperatingsystemproperly (e.g. from the Windows Startmen by clicking on Start-Shutdown-OK).
▶ Ifthenotebookisnotswitchedoff automatically, presstheON/OFFswitch forapprox.fiveseconds.
▶ ClosetheLCDscreen.
Keyboard

Thekeyboardofyournotebookissubjecttocontinuouswearthroughnormal use. Thekeymarkingsareespeciallypronetowear. Thekeymarkingsare liabletowearawayoverthelifeofthenotebook.
Thekeyboardhasbeendesig nedtoprovideallthefunctionsofanenhancedkeyboard. Someenhancedkeyboardfun ctionsaremappedwithkeycombinations.
The following description of cofkeysreferstoWindows.Additionalfunctionssupportedbythekeys aredescribedintherelev antmanualssuppliedwithyourapplicationprograms.
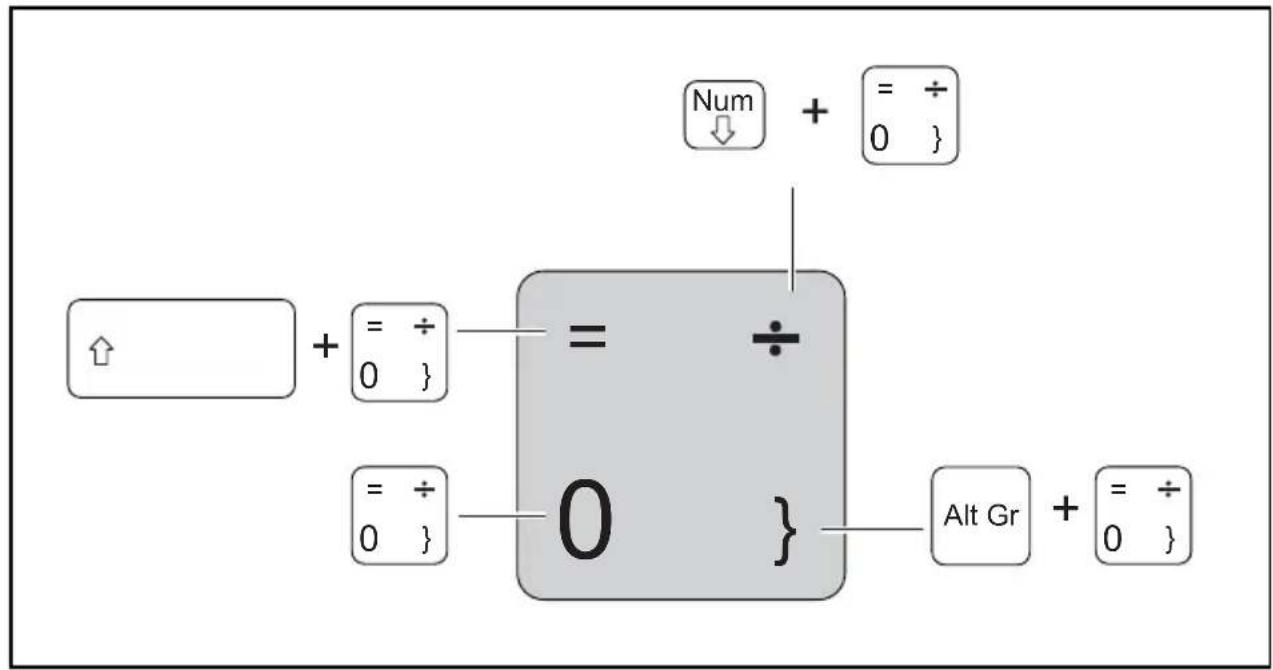
Thefigurebelowshowshow toaccessthedifferentcharactersonkeyswithoverlaidfunctions. Theexampleapplieswhen theCapsLockkeyhasnotbeenactivated.

Theillustrationsshow nbelowmaydifferfromyouractualdevice.
text_image
Num + = ÷ ↓ ↓ 0 } ↑ + = ÷ 0 } = ÷ 0 } 0 } Alt Gr + = ÷ 0 }| KeyDescription | |
 | BackspacekeyTheBackspacekeydeletesthecharactertotheleftofthecursor. |
 | TabkeyTheTabkeymovesthecursorto thenexttabstop. |
 | Enterkey(return)TheEnterkeyterminates acommandline.Thecommandyouhaveentered isexecutedwhenyoupres sthiskey. |
 | CapsLockkeyThe Caps Lock key activates the Caps Lock mode, and the corresponding icon is displayed in the Windows information area. In Caps Lock mode, all ofthecharactersyoutypeappearinuppercase.Inthecaseofoverlay keys, the character printed on the upper left of the key will appear when thatkeyispressed.TocanceltheCapsLockfunction,simplypressthe CapsLockkeyagain. |
 | ShiftkeyTheShiftkeyca usesuppercasecharacterstoappear.Inthecaseofoverlay keys,thechara cterprintedontheupperleftofthekeyappearswhenthat key is pressed . |
 | FnbuttonThe Fn keyenabl esthespecialfunctionsindicatedonoverlaykeys(see "Keycombina tions",Page23). |
 | CursorkeysThecursor keysmovethecursorinthedirectionofthearrow,i.e.up,down,left,orri ght. |
 | StartkeyTheStart keyopenstheWindowsStartmenu. |
 | MenukeyTheMenukeyinvokesthemenuforthemarkeditem. |
Virtualnumerickeypad
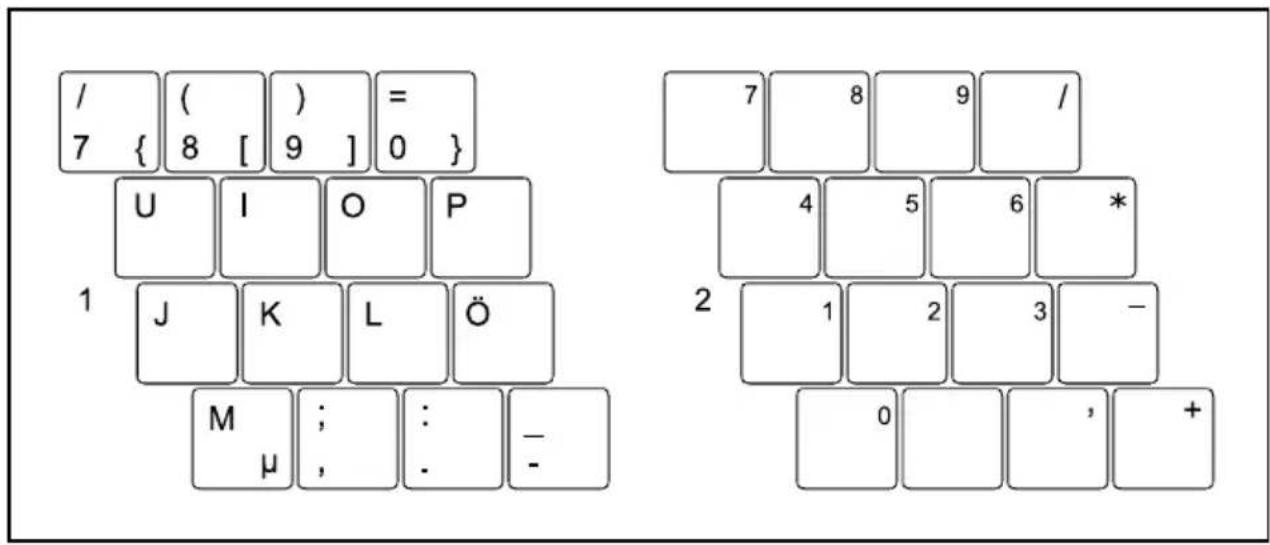
Toprovidetheconvenienceofanumerickeypad,yourkeyboardisequippedwithavirtual numerickeypad.Thespecialkeysofthevirtualnumerickeypadarerecognisablebythenumbers andsymbolsprintedintheupperrightcornerofeachkey.Ifyouhaveswitchedonthevirtual numerickeypad,youcanoutputthecharactersshownontheupperrightofthekeys.

Thekeyboardlayoutshownbelowmaydifferfromyouractualdevice.
text_image
/ ( ) = 7 { 8 [ 9 ] 0 } U I O P 1 J K L Ö M ; : - μ , . -1=Validcharacterswhenthe keyisnotactivated
Num
2=Validcharacterswhenthe isactivated
Num
Furtherinformationaboutthestatusindicatorsscanbefoundinchapter"
Statusindicators", Page 18.
Keycombinations
The following description of key combinations applies to Windows operating systems. Some of the following key combinations may not function in other operating systems or with certain device drivers.
Otherkeycombinationsaredescribedintherelevantmanualssupplied withyourapplicationprograms.
Keycombinationsareenteredasfollows:
▶ Press the first key in the combination and keep it pressed.
▶ While holding the first key down, press the other key or keys in the combination.
| Combination | Description |
| Fn + F3 | SwitchingtheloudspeakersonandoffThiskeycombinationswitchesyournotebook'sloudspeakersoff andon. |
| CombinationDescription | |
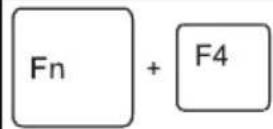 | Switchingthemousefunctionon /offThiskeycombinationswitchest hemouseoffandon. |
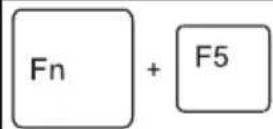 | RadiocomponentsThiskeycombinationswitchestheradiocomponentsonoroff. |
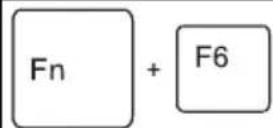 | DecreasescreenbrightnesssThiskeycombinationdec reasesthescreenbrightness. |
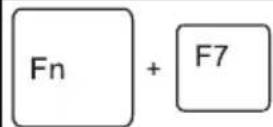 | IncreasescreenbrightnessThiskeycombinationincreasesthescreenbrightness. |
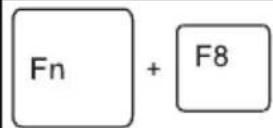 | DecreasevolumeThiskeycombinationreducesthevolumeoftheinternal loudspeakers. |
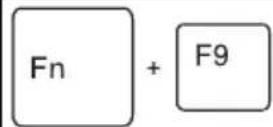 | IncreasevolumeThiskeycombina tionincreasesthevolumeoftheinternal loudspeakers. |
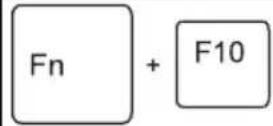 | TogglemonitoroutputUsethiskeycombinationtoselectwhichmonitorisusedfor displayifanexternalmonitorisconnected.Monitoroutputispossible:onlyonthenotebook'sLCDmonitoronthenotebook'sLCDmonitorandtheexternalmonitorat h es a m e t i m eonlyontheexternalmonitorThissettingisusefulifyouwouldlikeahighresolutionanda highrefreshrateonanexternalmonitor. |
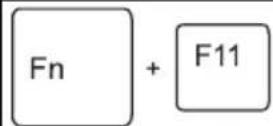 | EcoFunctionThis key combination is a simple way of activating and deactivating powermanagementfunctions(e.g.reducingscreenbrightness), see"Usingthepower-managementfeatures",Page29. |
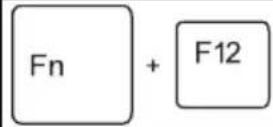 | WebCamUseth iskeycombinationtoswitchtheWebCamonandoff. |
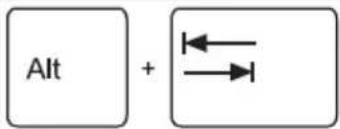 | SwitchbetweenopenapplicationnsUsethiskeycombinationbetweenseveralopen applications. |
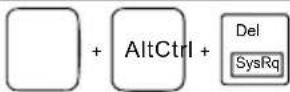 | Windowssecurity/Task-ManagerThiskeycombinationopenstheWindowssecurity/TaskManager window. |
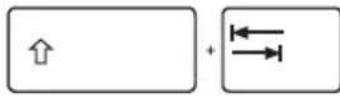 | BacktabThiskeycombinationmovesthecursorbacktotheprevioustab stop. |

KeycombinationsusingtheWindowskeysaredetailedinthemanual foryouroperatingsystem.
Countryandkeyboardsettings
If you want to change the country and keyboard settings, proceeds as follows:
▶ Enter the settings by clicking Start – (Settings) – Control Panel – Time, Regional and Language Options.
Touchpadandtouchpadbuttons

Keepthetouchpadclean.Protectitfromdirt,liquidsandgrease.
Do not use the touchpad if your fingers are dirty.
Donotrestheavyobjects(e.g.books)onthetouchpadorthetouchpadbuttons.
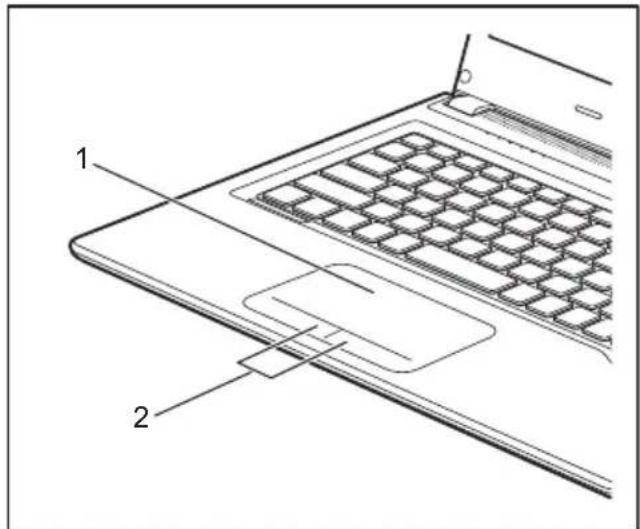
text_image
Technical diagram of a laptop keyboard with labeled parts 1 and 21=Touchpad
2=Touchpadbuttons
Thetouchpadenablesyoutomovethemousepointeronthescreen.
The touchpad buttons allow you to select and execute commands. They correspond to the buttonsonaconventional mouse.

Youcanuseakeycombinationtodisablethetouchpad,toavoidaccidentallymoving thepointeronthescreen(seealso" Keycombinations",Page23).
Movingthepo inter
▶ Moveyourfingeronthetouchpad.
→ Thepointer willmove.
Selectinganitem
▶ Movethepointertotheitemyouwishtoselect.
▶ Tapthetouchpadonceorpresstheleftbuttononce.
→ Theitemisselected.
Executingcommands
▶ Move the pointer to the field you wish to select.
▶ Tapthetouchpadtwiceorpresstheleftbuttontwice.
→ Thecommandisexecuted.
Draggingitems
▶ Selectthedesireditem.
▶ Press and hold the left button and drag the item to the desired position withthefingeronthetouchpad.
→ Theitemwillbemoved.
SwitchingtheTouchpadonandoff
YoucanswitchtheTouchp adonandoffusingakeycombination, see" Keycombinations", Page23.
LCDscreen
High-quality TFT displays are installed in notebooks from Fujitsu Technology Solutions GmbH. For technical reasons, TFT monitors are manufactured for a specific resolution. An optimal, clear picturecanonlybeensuredwiththecorrectresolutionintendedfortherelevantTFTmonitor.A monitor resolution which differs from the specification can result in an unclear picture.
ThescreenresolutionoftheLCDmonitorofyournotebookisoptimallysetatthefactory.
The standard of production technique today cannot guarantee an absolutely fault-free screen display. Afewisolated constant litor unlit pixels (picture elements) may be present. The maximum permitted number of pixels faults is stipulated in the international standard ISO 9241-3 (Class II).
Example:
A monitor with a resolution of 1280 x 800 has 1280 x 800 = 1024000 pixels. Each pixel consists of three subpixels (red, green and blue), so there are almost 3 million subpixels in total. According to ISO9241-3(classII), a maximum of 2 light and 2 dark pixels and an additional 5 light or 10 dark subpixels or a corresponding mix may be defective (1 light subpixel counts as 2 dark subpixels).
| Pixel | Apixelconsi stsof3subpixels,normallyred,greenand blue.Apixel isthesmallestelementthatcanbegenerated bycomplete functionalityofthedisplay. |
| Subpixel | Asubpixeli saseparatelyaddressableinternalstructure withinapi xelthatenhancesthepixelfunction. |
| Cluster | A cluster contains two or more defective pixels or subpixelsina5x5pixelblock. |
Backgroundlighting
TFTmoni tors are operated with background lighting. The luminosity of the background lighting can decrease during the period of use of the notebook. However, you can setthe brightnessofyourmonitorindividually.
SynchronisingthedisplayontheLCDscreenandanexternalmonitor
For more information, please refer to the chapter "Keycombinations", Page23 under "Displayoutput, switchbetween".
Webcam
TheWebCamhasitsownstatusindicator.TheindicatorlightsupwhentheWebCamisswitchedon.
Dependingonthesoftwareused,youcanuseyourWebcamtotakepictures,recordvideoclipsortakepartinwebchats.
• The picture quality depends on the lighting conditions and the software being used.
- Youcanonlyoperatethewebcamwithaparticularapplication(e.g.anInternettelephony program or a video conferencing program which supports a webcam).
- When using the webcam then notebooks support must not wobble.
- Thewebcamautomaticallyadjustsitselftothecurrentlightlevel.Forthisreason theLCDscreenmayflickerwhilethelightlevelisadjusted.

Furtherinformationonusingthewebcamandontheadditionalsettings whicharepossibleforyourwebcamcanbefoundinthehelpfunction oftheprogramwhichusesthewebcam.
If you wish to carry out a function test with your webcam, you can use the corresponding test software available at "http://ts.fujitsu.com/support/".
Rechargeablebattery
When not plugged into a mains socket, the notebook runs on its built-in battery. You can increase the life of the battery by caring for the battery properly. The average battery life is around 500 charge/discharge cycles.
You can extend the battery life by taking advantage of the available energy savings functions.
Charging, caringforandmaintainingthebattery
Thenotebookb atterycanonlybecharged,whentheambienttemperature isbetween5° Candmax.35°C.
Youcanchar gethebatterybyconnectingthenotebooktothemainsadapter (see" Mains adapterconnecting", Page16).
If the batt eryisrunninglowyouwillhearawarningalarm.If you donotconnectthemainsadapter within five minutes of the warning alarm described above, your notebook will automatically switch off.
monitoringthebatterycharginglevel
Windowsa Isohasa"Batterystatusmeter"inthetaskbarformonitoringthebatterycapacity.When youplac ethemousepointeronthebatterysymbol,thesystemdisplaysthebatterystatus.
Using the power-management features
Thenotebookuseslesspowerwhentheavailablepower-managementfeaturesareused. You willthenbeabletoworklongerwhenusingthebatterybeforehavingtorechargeit.

Power efficiency is increased and environmental pollution reduced. By choosing the best power options, you can make significant savings and atthesametimehelpprotecttheenvironment.
When you close the LCD screen, depending on these setting in Windows, the notebook automatically enters apowersaving mode.
Werecommendthefollowingsettings:
| FunctionOnexternalpowerOnbatterypower | ||
| TurnoffmonitorAfter10minutesAfter5minutes | ||
| Turnoffharddisk(s) | After15minutesAfter10minutes | |
| Energysaving(S3) | After20minutesAfter15minutes | |
| Hibernatemode(S 4) | After1hour | After30minutes |
▶ Selectthepowerma nagementfunctionsinyourControlPanel.
▶ SelecttheScreenSaverinyourControlPanel.
or
▶ Right-click on the desktop. Switch on the screen saver by clicking Personalization – Changescreensaver.
If you need further information about an option, you can get help with most settings by pressing F1 to open the Microsoft Help.
When the notebook is in power-saving mode, the following must be remembered:

Duringpowersavingmode, openfilesareheldinthemainmemory or in a swap file on the hard disk.
Neverturnoffyournotebookwhileitisinapowersavingmode.Ifthebuilt-inbatteryis nearly empty, close the open files and do not go into power saving mode.
If you donotintendtouseyournotebookforalongperiodoftime:
▶ Exit power saving mode if necessary via the mouse or keyboard or by switching on the notebook.
▶ Close all opened programs and completely shut down the notebook.
Memorycards
Yournotebookisequippedwithanintegratedmemorycardreader.

Observethemanufacturer's instructions when handling thememorycards.
Supportedformats
Yournotebooksupportsthefollowingformats:
Withoutadapter:
•SecureDigital(SD TM card)
• S D H C
• S D X C
- Memory Stick
- MemoryStickPro
Withadapter:
• MicroSD
- MiniSDmicro
• M i c r o S D H C
- Memory Stick Duo
•MemoryStickProDuo
•MemoryStickPro-HGDuo
- MemoryStickMicro
Insertingthememorycard
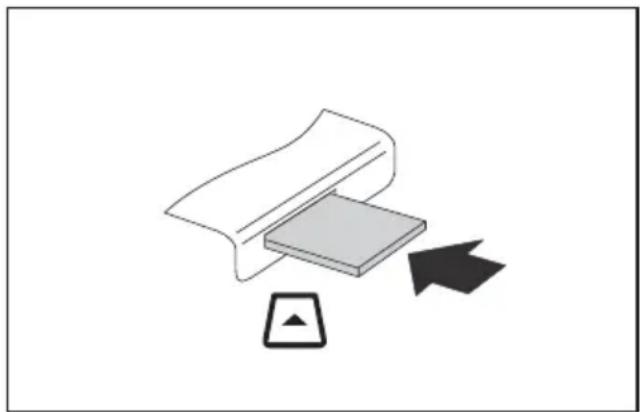
natural_image
Diagram showing a folded paper sheet with a gray block and a black arrow pointing to it, no text or symbols present.▶ Carefullyslidethememorycardintothe slot. Thelabelshouldbefacingupward. Do notapplyexcessiveforce, asotherwisethe delicatecontactsurfacescouldbedamaged.
→ Dependingontheparticulartype used,thememorycardmayprotrude slightlyfromtheslot.
Removingthememorycard

Inordertoprotectyourdata,alwaysfollowthecorrectprocedure forremovingthecardoutlinedbelow.
Youcanstopthememorycardviathecorrespondingiconinthetaskbar:
▶ Left-clickontheicon.
▶ Selectthecardyouwanttostopandremove.
▶ PresstheEnterkey.
→ Waitforthedialogueboxwhichtellsyouthatitisnowsafetoremovethememorycard.
text_image
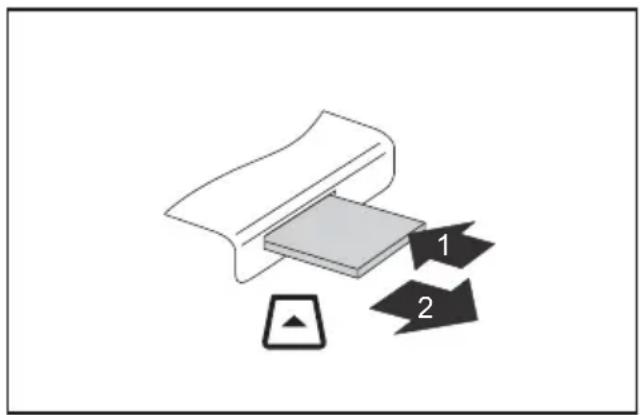
Diagram showing a folded paper or sheet with two labeled arrows (1 and 2) pointing to a small icon, likely illustrating a folding or cutting process.▶ Ondeviceswithcardlocking:Press onthestoragecard(1).
→ Thestoragecardisreleasedand cannowberemoved.
▶ Pullthestoragecardoutoftheslot(2).
Loudspeakersandmicrophones
Informationontheexactpositionofthespeakersandmicrophonecanbe foundin"Portsandcontrols",Page9._
Pleaserefertochapter" Keycombinations", Page23 for informationonsettingthevolume and alsoenabling/disablingtheloudspeakersusingkeycombinations.
If you attach an external microphone, the built-in microphone is disabled. When you connect the headphones are external speakers, the built-ins speakers are disabled. Information on connecting headphones and a microphone can be found in "Connecting external devices", Page 39.
SIMcard

FollowtheinstructionssuppliedbytheprovideroftheSIMcard.
InsertingtheSIMcard
natural_image
Line drawing of a laptop keyboard with an arrow indicating left side (no text or symbols present)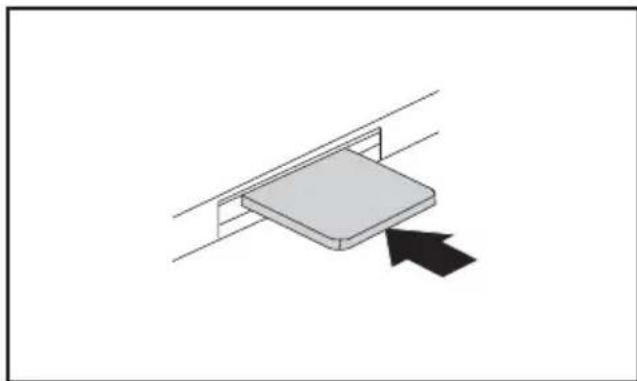
natural_image
Simple 3D diagram of a rectangular object with an arrow pointing to it, connected by parallel lines (no text or symbols)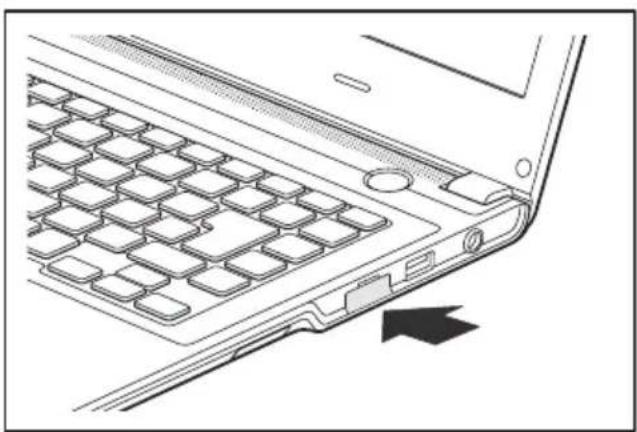
natural_image
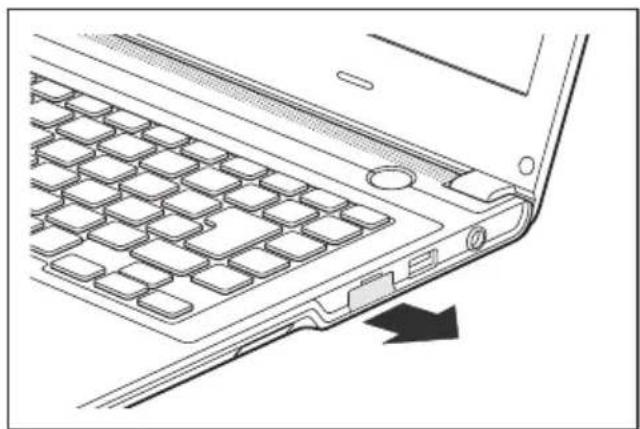
Line drawing of a laptop keyboard with an arrow pointing to the left side (no text or symbols present)▶ RemovethecoveroftheSIMcardslot.
▶ SlidetheSIMcard intotheslot, with thecontactsfac ingupwards, until youfeelitengag e.
▶ ClosethecoveroftheSIMcardslot.
RemovingaSIMcard
natural_image
Line drawing of a laptop keyboard with an arrow indicating left side (no text or symbols present)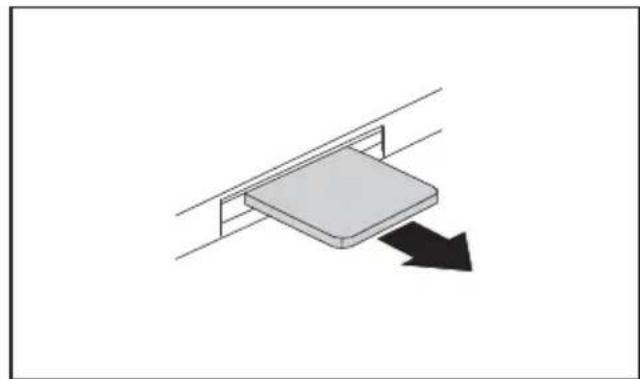
natural_image
Simple 3D diagram of a rectangular block on a platform supported by two parallel lines, with a black arrow indicating direction (no text or symbols)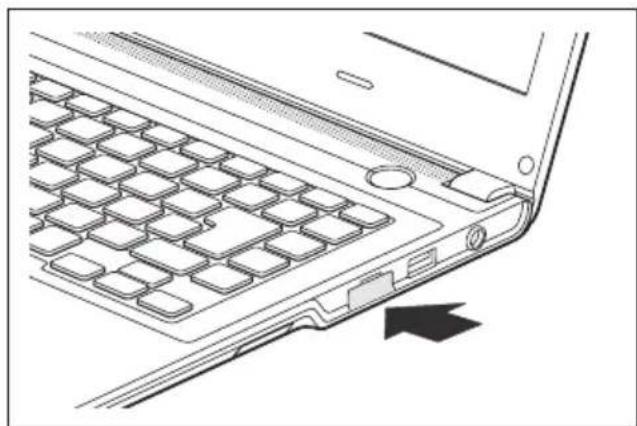
natural_image
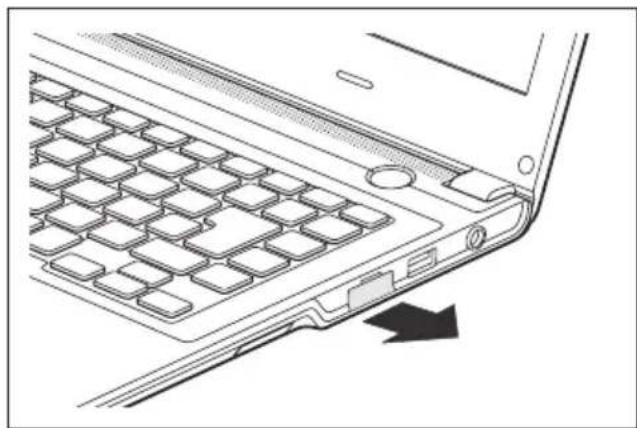
Line drawing of a laptop keyboard with an arrow pointing to the front panel (no text or symbols present)▶ RemovethecoveroftheSIMcardslot.
▶ PressontheedgeoftheSIMcardsothat itjumpsupslightlyoutoftheslot.
▶ PulltheSIMcardout oftheslotin thedirectionofthe arrow.
▶ Close the cover of the SIM card slot.
WirelessLAN/BlueTooth/UMTS(optional)

Theinst allation of radio components not approved by Fujitsu Technology Solutions willin validatethecertificationsissuedforthisdevice.
Switchingthewirelesscomponentsonandoff
▶ Pressthekeycombination Fn + F5 tostarttheWirelessSelector.
→ Thewirelesscomponentindicatorwillilluminatewhenoneormorewireless componentsareswitchedon.

TheBluetoothandUMTSmodulesandthewirelessLANtransmissionunit(antenna) will alsobeswitchedoffwhenyouswitchoffthewirelesscomponents.
Payattentiontotheadditionalsafetynotesfordeviceswithwireless componentsprovidedinthe"Safety"manual.
DetailsonusingaWirelessLANcanbefoundintheonlinehelpsystem includedintheWirelessLANsoftware.
YoucanobtainmoreinformationonUMTSfromyourserviceprovider.
SettingupWLANaccess
- Requirement: AWLAN must be available and you must have the corresponding access information.

InformationonconfiguringtheWLANaccesscanbefoundinthe documentationforyouroperatingsystem.
AccessviaUMTS

YoucanpurchasetheaccessoriesforUMTSreceptionfromyourretaileroryourFujitsuTechnologySolutionsdealer.
If you have ordered a UMTS module, your device will already be prepared when you receive it.
You will find information on establishing the connection with the UMTS networkinthedocumentationforthehardwareused.
Your device can connect with the Internet via UMTS. To do this, use one of the following types of connection:
- USBdongle
aUSBstickwithyourmobilephoneprovider'sSIMcard - amobileend-device(e.g.mobilephone)withBluetoothconnection
- amobileend-device(e.g.mobilephone)withdatacable
Securityfunctions
Yournotebookhasseveralsecurityfeaturesthatyoucanusetosecureyour systemfromunauthorisedaccess.
This chapter explains how to use each function, and what the benefits are.

Pleaserememberthatinsomecases,forexample,forgettingyourpassword, youmaybelockedoutandunabletoaccessyourdata.Therefore, pleasenotethefollowinginformation:
- Makeregularbackupstoexternaldatacarrierssuchasexternalhard drives, CDs, DVDsorBlu-rayDiscs.
- Some security function is needy to choose passwords. Make an of the passwords and keep them in a safe place.
If you forget your passwords you will need to contact the our Service Desk. Deletion or resetting of passwords is not covered by your warranty and a chargewill bemade for assistance.
UsingtheSecurityLock
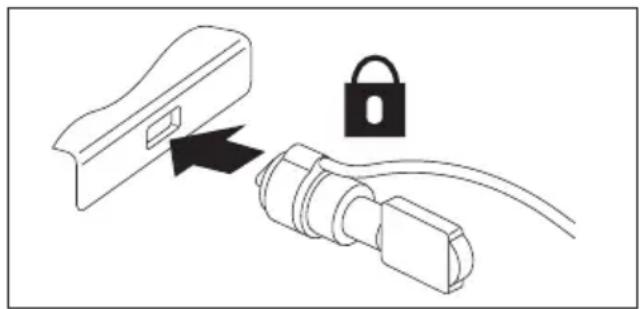
YourdevicecomeswithaSecurityLockdevicefortheKensingtonLockCable.Youcan usetheKensingtonLockCable,asturdysteelcable,tohelpprotectyournotebookfrom theft.TheKensingtonLockCableisavailableeasanaccessory.
natural_image
Diagram showing a lock being inserted into a plug, with no text or symbols present.▶ FittheKensingtonLockCableonthe deviceonyournotebook.
ConfiguringpasswordprotectioninBIOSSetupUtility

Before using the various options for password protection in the BIOSSetuputility to increase data security, please observ the following:
Makeanoteofthepasswordsandkeeptheminasafeplace.Ifyouforgetyour supervisorpasswordyouwillnotbeabletoaccessyournotebook.Passwordsare notcoveredbyyourwarrantyandachargewillbemadeforassistance.
Yourp asswordcanbeuptoeightcharacterslongandcontainlettersandnumbers. Nodis tinctionismadebetweenuppercaseandlowercase.
ProtectingBIOSSetupUtility(supervisoranduserpassword)

If you have opened these operating instructions on the screen, were recommend that you print out the following instructions. Because you cannot call the instructions onto the screen while you are setting up the password.
You prevent unauthorised use of the BIOS Setup Utility with both the supervisor and the user password. The supervisor password gives you access to all functions of the BIOS Setup Utility, while the user password only provides some of the functions. You can only set a user password if as supervisor password has already been assigned.

Please refer to the ""Settings in BIOS Setup Utility", Page 43 section for a description of how to call up and operate the BIOS Setup Utility.
Settingsupervisoranduserpassword
▶ StarttheBIOSSetup Utility and go to the Security menu.
▶ Select the Set Supervisor Password field and press the Enter key.
→ WithEnternewPass word:youareaskedtoenterapassword.
▶ Enter the password and press the Enter key.
→ ConfirmnewPasswo rd requires you to confirm the password.
▶ EnterthepasswordagainandpresstheEnterkey.
→ Changeshavebe en saved is a confirmation that the new password has been saved.
▶ To set the user password, select Set User Password and proceed exactly as whenconfiguringthesupervisorpassword.
→ If you don on two exchange any other settings, you can exit BIOS Setup Utility.
▶ In the Exit menu, select the option Save Changes & Exit.
▶ SelectYesan dpresstheEnterkey.
→ Thenotebookwillberebootedandthenewpasswordwillcomeintoeffect.Itwillnowbe necessary to first enter your supervisor or user password in order to open the BIOS Setup Utility. PlesenotethattheuserpasswordonlyprovidesaccesstoafewoftheBIOSsettings.
Changingt hesupervisororuserpassword
Youcanonlychangethesupervisorpasswordwhenyouhavelloggedintothe BIOS Setup Utility with the supervisor password.
▶ Call the BIOS Setup Utility and go to the Security menu.
▶ When changing the password, proceed exactly as for password assignment.
Removing passwords
Toremoveapassword(withoutsettinganewpassword)performthefollowingsteps:
▶ Start the BIOS Setup Utility and go to the Security menu.
▶ Highlight the Set Supervisor Password or Set User Password field and press the Enter key.
→ You will be requested to enter the current password by the Enter Current Password prompt. You will be requested to enter a new password by the Enter New Password prompt.
▶ PresstheEnterkeytwice.
▶ In the Exit menu, select the option Save Changes & Exit.
▶ Select Yes and press the Enter key.
→ Thenotebookwillnowrebootwiththepasswordremoved.
Removingthesupervisorpasswordsimultaneouslydeactivatestheuserpassword.
Passwordprotectio nforbootingoftheoperatingsystem

With the supervisor password you have set in the BIOS Setup Utility (see section" Setting supervisor and user password", Page 36), you can also preventbootingoftheoperatingsystem.
Activatingsystem protection
▶ Start the BIOS Setup Utility and go to the Security menu.
▶ Select the Password on Boot option and press the Enter key.
▶ Select the desired option (Disabled, First Boot or Every Boot) and press the Enter key
▶ Select the Save Changes & Exit option under Exit.
→ The notebook will reboot. You will be prompted to enter your password (the supervisor password).
Deactivating system protection
▶ Start the BIOS Setup Utility and go to the Security menu.
▶ Select the Password on Boot option and press the Enter key.
▶ Select the Disabled option and press the Enter key.
→ If you do not want to change any other settings, you can exit BIOS Setup Utility.
▶ Select the Save Changes & Exit option under Exit.
→ Thenotebookwillreboot. Thesystemisnolongerpassword-protected.
Password protectionforthehard disk

Thehad diskpasswordpreventsunauthorisedaccesstotheharddiskdrives andisc heckedinternallyeachtimethesystemisbooted. Theconditionforthis isthat youhaveassignedatleastthesupervisorpassword.
Activatingharddiskprotection
▶ Call up the BIOS Setup and select the Security menu.
If you have not assigned BIOS passwords yet, define the supervisor and the user passwordnow, if desired (see" Security functions", Page35).
▶ Mark the Hard Disk Security field and press the Enter key.
In the Drive0 area mark the Set Master Password field and press the Enter key.
EnternewPasswordthenappearsandyouareaskedtoenterapassword.
▶ EnterthepasswordandpresstheEnterkey.
→ Confirm new Password requires you to confirm the password.
▶ EnterthepasswordagainandpresstheEnterkey.
Setup Notice: Changes have been saved is displayed to confirm that the newpasswordhasbeensaved.
▶ To assign the password for the second hard disk (Drive1), go to the Drive1 area and select the field Set Master Password, then proceed in exactly the same way as for setting up the password for the first hard disk (Drive0).
→ The field Password Entry on Boot is set to Enabled by default. You can exit the BIOS Setup once you have finished changing the settings.
▶ From the Exit menu, choose the option Exit Saving Changes.
▶ Press the Enter key and select Yes.
→ Thenotebookrebootsandyourharddiskisnowprotectedwithapassword. Thesystem willaskyoutoenterthepasswordwhenthenotebookisrestartedagain.
Deactivatingharddiskprotection
Tocancelapasswordwithoutsettinganewone,proceedasfollows:
▶ Call up the BIOS Setup and select the Security menu.
▶ Mark the Hard Disk Security field and press the Enter key.
In the Drive0 area mark the Set Master Password field and press the Enter key.
→ You will be initially requested to enter the old password by the Enter current Password prompt. You will then be requested to enter a new password by the Enter new Password prompt.
▶ Afterenteringthepassword, presstheEnterkeythreetimes.
▶ From the Exit menu, choose the option Exit Saving Changes.
▶ Press the Enter key and select Yes.
→ Thenotebookreboots, and password protection for the hard disk is cancelled.
▶ To cancel the password for the second hard disk (Drive1), go to the Drive1 area and select the field Set Master Password, then proceed in exactly the same way as for cancelling the password for the first hard disk (Drive0).
Connectingexternaldevices

Always refer to the safety information provided in "Important notes", Page 12 before connectingordisconnectinganydevicestoorfromyournotebook.
Alwaysreadthedocumentationsuppliedwiththedeviceyouwishtoconnect.
Neverconnectordisconnectcablesduringathunderstorm.
Neverpullatacablewhendisconnectingit.Alwaysgrasptheplug.
Followthestepsbelowinorder,whenconnectingordisconnecting devicestoyournotebook:
WithsomedevicessuchasUSBdevices,itisnotnecessarytoswitchoff thenotebookandthedevicebeforeconnecting/disconnecting.Formore informationaboutwhetherornotdevicesneedtobeswitchedoff,pleaserefer tothedocumentationsuppliedwiththeexternaldevice.
Someoftheexternaldevicesrequirespecialdrivers(seetheoperating systemandexternaldevicedocumentation).
Connectingdevicestothenotebook
- Turn off your notebook and all external devices.
- Unplugyournot ebookandalldevicesfromthemainssockets.
- Connect the cables for your external devices following the instructions.
- Plugallpower cables into themains sockets.
Disconnectingdevicesfromthenotebook
- Turn off your notebook and all external devices.
- Unplug your notebook and all devices from them in six sockets.
- Disconnect the cables for your external devices following the instructions.
HDMIport
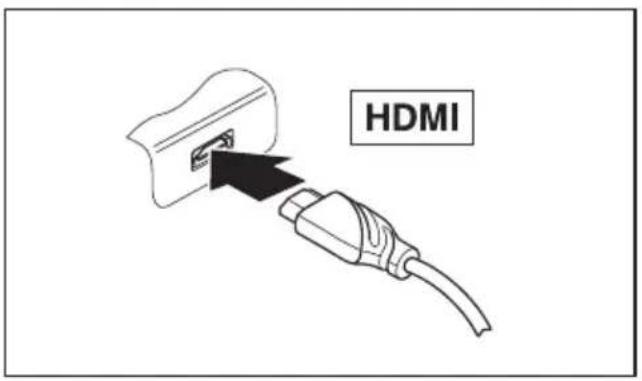
TheHDMIportonyournotebookcanbeusedtoconnectanexternalamplifier, LCDTVoraplasmaTVwithanHDMIconnection.
text_image
HDMI▶ Connectthedatacabletothe externaldevice.
ConnectthedatacabletotheHDMI portofthenotebook.
ConnectingUSBdevices
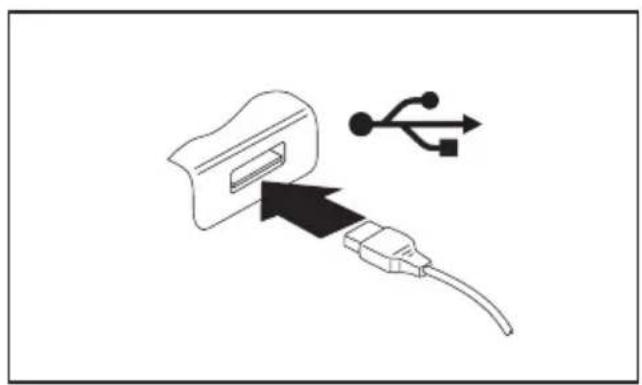
OntheUSBports,youcanconnectexternaldevicesthatalsohaveaUSBport (e.g.aDVDdrive,aprinter,ascanneroramodem).

USB devices are hot-pluggable. This means you can connect and disconnect deviceswhileyouoperatingsystemisrunning.
USB1.xhasamaximumdatatransferrateof12Mbit/s.
USB2.0hasadatatransferrateofupto480Mbit/s.
USB3.0hasadatatransferrateofupto5Gbit/s.
Additional information can be found in the documentation for the USB devices.
natural_image
Diagram showing a USB plug inserted into a cable with an arrow indicating the direction (no text or symbols present)▶ Connectthedatacabletothe externaldevice.
▶ ConnectthedatacabletoaUSB portofthenotebook.

Devidedrivers
USBdeviceswillbeautomaticallyrecognisedandinstalledbyyouoperatingsystem.
USBportwithchargingfunction(AnytimeUSBcharge)

It is recommended that then notebook be operated with the powers supply connected whenever the USB port with charging function is in use, asthis function will drain the battery more quickly if an external USB device is being charged.
Thepowersupplyunitmustalreadybeconnectedwhenthenotebookis switchedoff,asotherwisetheUSBchargingfunctionwillbedisabledand theconnectedUSBdeviceswillnotbecharged.
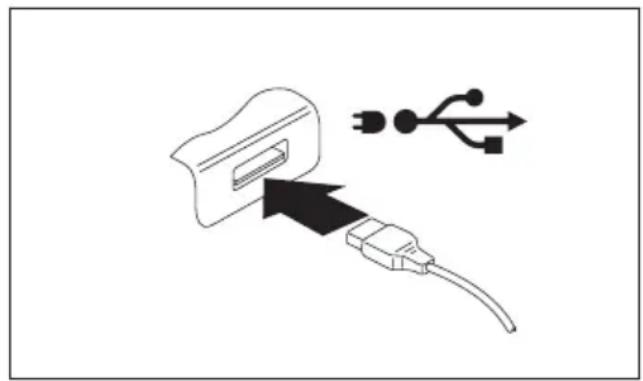
SomeUSBdevices(e.g.mobiletelephones)requireadriverinordertoutilisethe USBchargingfunction.InthiscasetheUSBchargingfunctionwillnotworkwhenthe notebookisswitchedoff,asnodriversareactivewhenthenotebookisswitchedoff.
natural_image
Diagram showing a USB cable inserted into a socket with an arrow indicating the cable's direction (no text or symbols present)Youcanusethis USBporttochargeorsupplypowertoaUSBdevice(e.g.tochargeaPDA oramobilephon eortoconnectaUSBlamp), evenifthenotebookisswitchedoff.
HowtoremoveUSBdevicescorrectly

Alwayscorrectlyremovethedeviceaccordingtotherulesdescribedbelow, toensurethatnoneofyourdataislost.
▶ Leftclickontheicontosafelyremovehardware, locatedinthetaskbar.
▶ Selectthedevicewhichyouwanttoshutdownandremove.
▶ PresstheEnterkey.
→ Waitforthedialogueboxwhichtellsyouthatitisnowsafetoremovethedevice.
Headphoneport
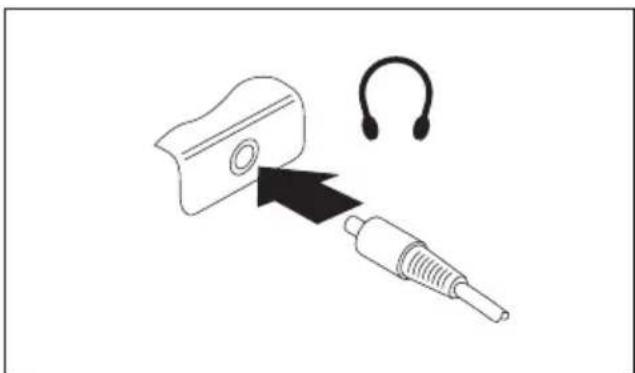
Youcanconnectheadphonesorexternalloudspeakerstoyournotebookviatheheadphoneport.
natural_image
Diagram showing a mechanical component being inserted into a connector with an earpin (no text or symbols present)▶ Connecttheaudiocabletothe externaldevice.
Connecttheaudiocabletotheheadphone portofthenotebook.
→ Theinternalloudspeakersaredisabled.
If you purchase a capable from a retailer, please not the following information:
Theheadphoneportonyournotebookisa"3.5mmjacksocket".
If you want to connect headphones or a speaker you will need a "3.5 mm jack plug".
SettingsinBIOSSetupUtility
The BIOS Setup Utility allows you to set the system functions and the hardware configurationforthenotebook.
Whenitisdelivered, thenotebookissettofactorydefaultsettings. You can change these settings in BIOS Setup Utility. Any changes you make take effect as soon as you save and exit the BIOS Setup Utility.
The BIOS Setup Utility program contains the following menus:
| About | Displays information relating to the BIOS, processor and notebook |
| System | Advancedsystemsettings |
| Advanced | Configurationofva rioushardwarecomponents,suchasmouse,keyboard,processor |
| Security | Passwordsettingsandsecurityfunctions |
| Boot | Configurationoftheststart-upsequence |
| Exit | ExitstheBIOSSetupUtility |
Starting the BIOS Setup Utility
▶ Reboot the device (switch off/on or reboot the operating system).
→ The following or asimilard display appear on the screen at start-up:
<F2>BIOSSetup<F12>BootMenu
▶ Pressthefunctionkey F2.
▶ If a password has been assigned, enter the password and press the Enter key.
If you have forgotten the password, contact your system administrator or contact our customers service centre.
TheBI OSSetupUtilitystarts.
Operating BIOS Setup Utility
Press the F1 key to display help on the operation of the BIOS Setup Utility. The description of the individual settings is shown in the right-hand window of the BIOS Setup Utility.
Withthe F9 keyyoucanloadthedefaultsettingsoftheBIOSSetupUtility.
▶ Usethecursorkeys ← or → toselectthemenuyouwishtoaccesstomakechanges.
→ Themenuisdisplayedonthescreen.
▶ Selecttheoptionyouwanttochangewiththecursorkeys or .
▶ PresstheEnterkey.
▶ Pressthe ESC keytoexittheselectedmenu.
For future reference, make a note of the changes you have made (for example, in this manual).
ExitingBIOSSetupUtility
You need to select the desired option in the Exit menu and activate it by pressing the Enter key:
ExitSavingChanges-savech angesandexitBIOSSetupUtility
▶ To save the current menu settings and exit the BIOS Setup Utility, select Exit Saving Changes and Yes.
→ Thenotebookisrebooted andthenewsettingscomeintoeffect.
ExitDiscardingChanges-Discardchangesand exitBIOSSetupUtility
▶ To discard the changes, select Exit Discarding Changes and Yes.
The settings in place when BIOS Setup Utility was called remain effective. BIOS SetupUtilityisterminatedandthenotebookisrebooted.
LoadSetupDefault ts-CopyStandardEntries
▶ To copy the standard entries for all menus of the BIOS Setup Utility, choose Load Setup Defaults and Yes.
Discard Changes – Discard changes without exiting theBIOSSetup Utility
▶ To discard the changes you have made, select Discard Changes and Yes.
→ The settings in place when BIOS Setup Utility was called remain effective. You can now make additional settings in the BIOS Setup Utility.
▶ If you want to exitBIOS Setup Utility with these settings, select Exit Saving Changes and Yes.
Save Changes - save changes without exiting the BIOSSetupUtility
▶ To save the changes, select Save Changes and Yes.
→ Thechangesaresaved. YoucannowmakeadditionalsettingsintheBIOSSetupUtility.
▶ If you want to exit BIOS Setup Utility with these settings, choose Exit Saving Changes and Yes.
SaveChanges and Power Off
▶ To save the changes and switch off your device, select Save Changes and Power Off and Yes.
→ Thechangesaresaved.Yourdeviceisshutdown.
Troubleshootingandtips

Followthesafetynotesinthe"Safety/Regulations"manualwhen connectingordisconnectingcables.
Ifafaultoccurs,trytocorrectitasdescribed.Ifyoufailtocorrecttheproblem,proceedasfollows:
▶ Make a note of the steps and the circumstances that led to the fault. Also make an annotation of any error messages displayed.
▶ Switchthenotebookoff.
▶ PleasecontacttheHotline/ServiceDesk.
You can find the telephone numbers in the service desk list. Please have the following information ready when you call:
- The model name and serial number of the notebook. The serial number is located on a sticker on the underside of then otebook.
• Notes of any messages that appear on the screen and information on acoustic signals. - Anychangesyouhavemadetothehardwareorsoftwaresince receivingthenotebook.
• Any changes you have made to the BIOS Setup settings since receiving the notebook. - Your system configuration and all peripheral devices connected to your system.
- Yoursalescontract.

Our notebooks have been designed primarily with mobile applications in mind. This meansthatcon siderableefforthasbeenmadetooptimisecomponentsandequipment in terms ofwe ight, space and energy requirements. Depending on the particular configuration you have purchased, it is possible that functionality may be slightly reduced comparedtoa desktopPCifyouarerunningprocessor-intensiveegaming software,e.g. gameswithi ntensive 3D graphics. Updating your hardware with drivers which have not beenappro vedbyFujitsuTechnologySolutionsmayresultinperformancelosses,data lossesor m alfunction of the equipment. A list of approved drivers and current BIOS versions can be downloaded from: "http://ts.fujitsu.com/support/downloads.html"
Helpif pr oblemsoccur
Should you encounter a problem with your computer that you cannot resolve yourself:
▶ Note the ID number of your device. The ID number is found on the type rating plateonthebackorundersideofthecasing.
For further clarification of the problem, contact the Help Desk for your country (see the Help Desk list or visit the Internet at "http://ts.fujitsu.com/support/servicedesk.html"). When you do this, please have ready the ID number and serial number of your system.
Usingtheresetkey
If the device is nolonger responding and nolonger respond to the on/off switch, us the reset key to switch the device off.
▶ Disconnectthedevicefromthemainsadapter.
▶ Push a pen or a piece of wire (such as a paperclip) firmly into the opening of theresetkeytoswitchthesystemoff.
▶ Connectthemainsadaptertothedeviceagain.
▶ Switchthedeviceonagain.
Restoringtheharddisk contentsunderWindows
To perform the following steps, you must connect an external optical drive (available as an option) to the device.
Youcanusethe"Wind owsRecoveryCD"(optionallyavailable)andthe"Drivers&Utilities CD/DVD"toreinsta lltheoperatingsystem.
The instructionsa reprovidedonthecaseoftheRecoveryCD.

Duringthereinst allprocessyourpersonalfilesandanyinstalledprograms willbedeleted. We advise you to backup your files to an external hard drive,orCD/DV Ddiskbeforeyoustart.
▶ Switchthenotebookon.
The following display briefly appears on the screen during start-up:
▶ Whenthismessageappears, pressthefunctionkey F12
▶ Insertthe"WindowsRecoveryCD"intotheopticaldrive.
▶ Select CD-ROM and press the Enter key.
▶ Followtheinstructionsonthescreen.
Aftertheinstallationyoumustinstallallthedriversagain.Someinstalledhardware componentswillnotbecorrectlysupporteduntilthishasbeendone.
▶ Click on the Desk Update button.
▶ Select Automatic driver installation (Express) and click on Start installation.
▶ Followtheinstructionsonthescreen.
▶ Restartyournotebookwhenthedriverinstallationiscompleted.
▶ Insert the "Drivers & Utilities" CD/DVD into the optical drive. The CD starts automatically.
Thenotebook'sdateortimeisin correct
| CauseTroubleshooting | |
| Time and date are incorrect. | ► With the BIOS-Setup-Utility, youcansetthe dateandtimeinthemainmenu. |
| Ifthetimeanddatearestillsetincorrectlyafter switchingonthenotebook. | ► Pleasecontactyoursalesout letorour Hotline/ServiceDesk. |
Whencertaincharactersareenteredonthe keyboard,onlynumeralsarewritten
| CauseTroubleshooting | |
| Thevirtualnumerickeypadofyourdeviceis activated, see "Virtual numeric keypad", Page 23 | ▶ Pressthe Num key. |
The notebook's LCD screen remains blank
| CauseTroubleshooting | |
| Monitorisswitchedoff. | ▸ Press a key or touch the touchpad. |
| External monitor or television set connected. | ▸ Press the key combination to switch the screenoutput,see" Keycombinations", Page23. |
TheLCDscreenisdifficulttoread
| CauseTroubleshooting | |
| Reflected glare | ► Turn the notebook or alter the tilt of the LCD screen.► Increase the brightness of the screen. |
Theexternalmonitorremainsbl ank
| CauseTroubleshooting | |
| Monitorisswitchedoff.► Switchtheexternalmonitoron. | |
| Powersavinghasbeenactivated(monitoris blank). | ► Pressanykeytocontinue. |
| Brightnessissettodark. | ► Adjustthebrightnessofthe monitor. |
| Screenoutputissettothenotebook'sLCD screen | ► Pressthekeycombination toswitchthe screenoutput,see" Keyc ombinations", Page23. |
| Theexternalmonitor's powercableordata cableisnotconnectedp roperly. | ► Switchofftheexternalmonitorandthe notebook.► Check whether the power cable is plugged properlyintotheexternalmonitorandinto thepowersocket.► Checkwhetherthedatacableisproperly connectedtothenotebookandtheexternal monitor(ifitispluggedinwithaconnector).► Switchontheexternalmonitorandthe notebook. |
The external monitor is blank for the image is unstable
| CauseTroubleshooting | |
| Thewrongexternalmonitorhasbeenselectedorthewrongscreenresolutionhasbeensetfortheapplicationprogram. | ► TerminatetheapplicationprograminWindowsbypressing Alt + F4. If the faultpersistenceafterclosingtheprogram,use thekeycombinationforswitchingthescreen output(see" Keycombinations",Page23) to switchovertothenotebook'sLCDscreen. Changethefollowingsetting:► Setthescreenresolution:Setthescreen resolutionasdescribedinthedocumentation for your operating system.► Selectmonitor:Selectmonitor1or2as describedinthedocumentationforyour operatingsystem. |
Thenotebookcannotbestarted
| CauseTroubleshooting | |
| Thebatteryisdead. | ▶ Chargethebattery.or▶ Connectthemainsadapterterot he notebook. |
| Thepoweradapterisnotco nectedcorrectly. | ▶ Checkwhetherthemainsadapteris connectedcorrectlytothenotebook.▶ Switchthenotebookon. |
Thenotebookstopsworking
| CauseTroubleshooting | |
| Notebookisinenergysavingmode.►Leaveenergysavingmode. | |
| Anapplicationprogrammehascausedthemalfunction. | ►Closetheapplicati onprogramorrestart thenotebook(byres tartingtheoperatings y s t e m o r s w gthed deviceoffandback onagain). |
| Thebatteryisdea d. | ►Chargethebattery.or►Connectthemai nsadaptertothenotebook. |
Theprinterdoesnotprint
| CauseTroubleshooting | |
| The printer is not switched on. | ► Make sure that the printer is switched onandreadyforoperation(refertothe documentationsuppliedwiththeprinter). |
| Theprinterisnotconnectedcorrectly. | ► Checkthatthedatacableconnecting thenotebooktotheprinterisproperly connected. |
| Theprinterdriverisfaultyornotcorrectly installed,oritisthewrongprinterdriver. | ► Checkthatthedatacableconnecting thenotebooktotheprinterisproperly connected.► Checkwhetherthecorrectprinteris loaded (refertotheprinterdocumentation). |
Theradioconnectiontoanetwork k does not work
| CauseTroubleshooting | |
| Thewirelesscomponentisdisa bled. | ► Switchtheradiocomponenton(see "Switchingthewirelesscomponentsonand off",Page34). |
| Thewirelesscomponentisenabled.Despite this,thewirelessconnectiontoanetworkdoes notwork. | ► Checkwhethertheradioconnectionis switchedonviathesoftware.► Furtherinformationonusingtheradio componentcanbefoundinthehelpfiles. |
Acousticwarnings
| Cause | Troubleshooting |
| Abeepsoundseveryfewseconds.Thebatteryisalmostflat. | ▶ Chargethebattery. |
Errormessagesonthescreen
This section describes the error messages generated by the BIOS Setup. Error messages displayed by the operating system or programmes are described in therelevant documentation.

If the error message appears repeatedly, despite troubleshooting measures, please contact the place of purchase or our customers service centre.
| Errormessage/causeResolution | |
| CMOSbatterybadIftheerrormessageoccursrepeatedly,the bufferbatteryinthenotebookisflat. | ▸ Contactyoursalesoutletorourcustomer servicecentre. |
| SystemCMOSchecksumbad-defaultconfiguration usedThesystemconfigurationinformationis incorrect. | ▸ Switchthenotebookoff.▸ Switchthenotebookon.▸ Pressthefunctionkey F2 toaccessthe BIOSSetup.▸ In the BIOS Setup, select the Exit menu.▸ Select the entry Load Setup Defaults.▸ Select OK and press the Enter key. |
| Extendedmemoryfailedatoffset:xxxxFailingBits:zzzzzzzzWhentestingtheextended memoryanerror has resultedattheaddressxxxx. | ▸ Checkw hethertheadditionalmemory module hasbeeninsertedcorrectly. |
| FailureFixedDisknThesettingsoftheharddiskdriveareincorrect. | ▸ Start the BIOS Setup (Primary Master submenu)andselectthecorrectsettings. |
| Keyboardcontrollererror | ► Switchthenotebookoffwiththe ON/OFF switch.► Wait3-5secondsandswitchonthe notebookagain. |
| Keyboarderror | Ifyouareusinganexternalkeyboard:► Checktheconnectionandrebootthe notebook. |
| nnStuckkey | ► Makesurethatnokeyispressed. |
| Operatingsystemnotfound | ► Check in the BIOS Setup whether your hard diskhasbeensetcorrectly.► Makesurethattheoperatingsystemis installedonthecorrespondingdrive. |
| Press(toresume,toSETUP Thiserrormessageappearsifanerroroccurs duringtheself-testbeforestartingtheoperating system. | ► Pressthe F1 functionke ytostartthe operatingsystem.► Pressthefunctionkey F2 toaccessthe BIOSSetup. |
| Previousbootincomplete-Defaultconfiguration usedDuetoanerrorduringtheprevioussystem boot,defaultvalueswereusedforcertain settings.CheckthesettingsintheBIOSSetup. | ► Pressthe F1 functionkeywhenprompted todos. |
| Realtimeclockerror | ► Contactyoursalesoutletorourcustomer servicecentre. |
| nnnnKShadowRAMfailedatoffset:xxxxFailing Bits:zzzz | ► Contactyour salesoutletorourcustomer servicecent re. |
| Systembatt eryisdead-ReplaceandrunSETUP | ► Contactyoursalesoutletorourcustomer servicecentre. |
| Systemcacheerror-Cachedisabled | ► Contactyoursalesoutletorourcustomer servicecentre. |
| Systemtimererror | ► Contactyoursalesoutletorourcustomer service centre. |
Technicaldata
LIFEBOOK
| Ambientconditions | |
| Environmentclass3K2 | DINIEC721 |
| Mechanicalclass7M2 | DINIEC721 |
| Temperature: | |
| Operation5°C...35°C | |
| Transportation | -15°C...60°C |
| Dimensions | |
| Widthxdepthxheight(front/back) | 323mmx234mmx18mm |
| Weight(including4-cellrechargeablebattery) | Approx.1.6kg |

The data sheet for the device provides further technical data. You will find the data sheetonyourdeviceoronthelInternetat" http://ts.fujitsu.com/support".
Rechargeablebattery

You can find information on the batteries used in your device on the Internetat" http://ts.fujitsu.com/support".
| 4-cellrechargeablebattery | |
| Ratedvoltage | 14.8V |
| Ratedcapacity | 42Wh(2840mAh) |
Mains adapter
Mainsadapter(65W)
| Ratedvolt age | 100Vto240V(automatic) |
| Max.ratedcurrent | 3.42A |
Anadditionalmainsadapterorpowercablecanbeorderedatanytime.
Manufacturer'snotes
EnergyStar

Products which are Energy Star certificated and labelled always meet the full requirementsofthestandardwhenshipped.Pleasenotethatinstallationof after-markethardwareandsoftware,changestotheBIOSortothepower options may affect power consumption. The properties guaranteed by the EnergyStarlabelcanthennolongerbeguaranteed.

text_image
ENERGY ENERGY STARDevices which are certified according to the Energy Star environmental markhelptosavemoneyandreducetheemissionofgreenhousegases.
PowerManagementsettingsondelivery:
•Monitorswitchedoffafter<15minutesofinactivity
•Automaticactivati onofenergysavingmode(ACPIS3):<20minutes ofinactivity
Detailed information about therequirements of the "EnergyStar" environmental mark and the products which satisfy these requirements can be found on the Internet at "https://www.energystar.gov/".
Disposalandrecycling
InformationaboutthissubjectcanbefoundonyournotebookoronourInternetpages.
DeclarationsofConformity
The "Declarations of Conformity" for the device can be found at our Internet address under: "http://ts.fujitsu.com/ce".
Fujitsu Technology Solutions hereby declares that your device is in compliance with the essential requirements and other relevant provisions of Directive 1999/5/EC.
CEmarking

CEmarkingfordeviceswithradiocomponent
This equipment complies with therequirements of Directive 1999/5/EC of the European Parliament and Commission from 9 March, 1999 governing Radio and Telecommunications Equipment and mutual recognition of conformity.
Thisequipmentcanbeusedinthefollowingcountries:
BelgiumBulgariaDenmark Germany
EstoniaFinlandFrance Greece
UKIrelandIcelandItaly
LatviaLiechtenstein LithuaniaLuxembourg
Malta The Norway Austria Netherlands
Poland Portugal Rumania Sweden
Switzerland Slovakia Slovenia Spain
CzechRepublic Hungary Cyprus
Contact the corresponding government office in the respective country for current information on possible operating restrictions. If your country is not included in the list, then please contact the correspondings supervisory authority as to whether the use of this product is permitted in your country.
Index
A
Abeepsoundseverysecond47
Acousticerrormessages50
Alt+Tab25
Anti-theftprotection35
Audiports42
B
Backtab25
Backspace22
Bassloudspeaker(subwoofer)31
Battery
batterylife28
caringforandmaintaining28
chargelevel28–29
charging28
Batteryindicator19
Batterystatusindicator
seeBatteryindicator19
Batterystatusmeter28
Batterysymbol
seeBatteryindicator19
BIOSSetupUtility
calling43
exiting44
operating43
protectingwithpassword36
settings43
Bluetooth
Switchingthemoduleoff34
Switchingthemoduleon34
Bluetooth,safetynotes12
Bufferbattery,load47
Buttons21
C
CapsLock22
indicator19
CEmarking54
Cleaning14
Configuration,BIOSSetupUtility43
Connectingaudiodevices42
Connectingheadphones42
CrystalViewdisplay
cleaning14
Ctrl+Alt+Del25
Cursorcontrolkeys22
Cursorkeys22
D
Dateisincorrect47
Declarationofconformity53
Device
settingup16
Devices
connecting39
disconnecting39
Drive
indicator19
E
Ecofunction24
Energy
energysaving13
Energysaving13
Energysavingmode
leaving49
Enter22
Enterkey22
Errormessage:
onthescreen50
Errormessagesonthescreen50
Errors
Acousticwarnings50
F
Fault
correction45
First-timesetup15
Fnkey22
Fn+F1024
Fn+F1124
Fn+F1224
Fn+F323
Fn+F424
Fn+F524
Fn+F624
Fn+F724
Fn+F824
Fn+F924
G
Gettingstarted15
H
Harddisk:
restoringthecontents46
Hardwareconfiguration43
HDMIport40
|
Importantnotes12
Incorrectdate/time47
Indicator
CapsLock19
drive19
NumLock19
K
Keycombinations23
Keyboard21
cleaning14
L
LCDmonitor
Decreasebrightness24
LCDscreen
cleaning14
difficulttoread47
notes27
reflectedglare47
remainsblank47
LCDscreenistoodark47
Life, battery28
Linefeed22
Loudspeakers31
switchoff23
switchon23
M
Mainsadapter
connecting16
settingup16
Mechanicalbackup35
Memorycard
handling30
inserting30
removing31
Microphone31
Mobileoperation13
Monitor
driftingdisplay48
remainsblank48
N
Notebook
beforeyoutravel13
cannotbestarted49
cleaning14
stopsworking49
switchingoff20
transporting13–14
using18
Notebook,operation18
Notes12
cleaning14
disposal/recycling53
energysaving13
LCDscreen27
Safety12
transport13
NumLock
indicator19,23
Numerickeypad21
seeVirtualnumerickeypad23
0
Operatingsystem
activatingsystemprotection37
cancelsystemprotection37
protectingwithpassword37
Operatingsystem, restoring46
P
Packaging15
Password
changing36
entering36
removing37
Passwordprotection35
Passwordprotection:
harddisk37
Peripheraldevices
connecting39
disconnecting39
Power
powerconsumption29
power-managementfeatures29
Powerindicator19
Preparingforoperation16
Printerdoesnotprint49
R
Radiocomponent:
safetynotes12
Radiocomponents24
Rechargeablebattery28
seeBattery28
Return22
s
Safetynotes12
Screen
noscreendisplay48
Screenbrightness
decrease24
increase24
Securityfunctions35
SecurityLock35
Selectingalocation16
Setup
seeBIOSSetupUtility43
Shift22
Shiftkey22
Shift+Tab25
Slot
Memorycards30
Standbyindicator19
Startkey22
Statusindicators18
Summertime47
Supervisorpassword
changing36
entering36
removing37
Switchingon
thenotebook19
Switchingonforthefirsttime17
Systemconfiguration43
Systemsettings,BIOSSetupUtility43
T
Tabkey22
Technicaldata52
Mainsadapter52
notebook52
Theradioconnectiontoanetworkdoes
notwork50
Timenotcorrect47
Time, daylightsavings47
Tips45
Togglemonitoroutput24
Touchpad24,26
buttons26
cleaning14
draggingitems27
executingcommands26
movingthepointer26
selectinganitem 26
switchoff24
Touchpadbuttons24
Transport
Transportdamage15
Transportation13–14
Travel, notebook 13
Troubleshooting45
U
USBchargingfunction41
USBports40
Userpassword
changing36
entering36
removing37
UsingtheKensingtonLockCable35
V
Virtualnumerickeypad23
Volume
decrease24
increase24
Volumecontrol31
W
Webcam28
WebCam24
WirelessLAN
Switchingthemoduleoff34
Switchingthemoduleon 34
WirelessLAN:
safetynotes12