
Harmony 8100 - Sewing machine JANOME - Free user manual and instructions
Find the device manual for free Harmony 8100 JANOME in PDF.


| Product Type | Sewing Machine |
| Brand | Janome |
| Model | Harmony 8100 |
| Dimensions (approx) | 16 x 7 x 12 inches (40.6 x 17.8 x 30.5 cm) |
| Weight | 14.3 lbs (6.5 kg) |
| Power Supply | AC 100-240V, 50/60 Hz |
| Power Consumption | 70 W |
| Built-in Stitches | 20 stitch patterns, including straight, zigzag, and decorative stitches |
| Buttonhole Type | 4-step automatic buttonhole |
| Stitch Length | Adjustable, 0-4 mm |
| Stitch Width | Adjustable, 0-5 mm |
| Needle Positions | Center and left (adjustable) |
| Free Arm | Yes, for sewing cuffs and sleeves |
| Bobbin Winding | Winding while sewing (top drop-in bobbin) |
| Presser Foot Types | All-purpose, zipper, buttonhole, button sewing (included) |
| Maximum Sewing Speed | Approximately 820 stitches per minute |
| Maintenance | Periodic cleaning of shuttle race and oiling of moving parts |
| Safety Features | Disconnect power when not in use; keep away from moisture |
| Accessories Included | Needles, bobbins, seam ripper, screwdriver, oil bottle |
| Warranty | Limited warranty (check dealer for details) |
Frequently Asked Questions - Harmony 8100 JANOME
User questions about Harmony 8100 JANOME
0 question about this device. Answer the ones you know or ask your own.
Ask a new question about this device
Download the instructions for your Sewing machine in PDF format for free! Find your manual Harmony 8100 - JANOME and take your electronic device back in hand. On this page are published all the documents necessary for the use of your device. Harmony 8100 by JANOME.
USER MANUAL Harmony 8100 JANOME
natural_image
Illustration of a Jánome sewing machine (8100) with no visible text or symbols on the device itself.Harmony
8100
IMPORTANT SAFETY INSTRUCTIONS
When using an electrical appliance, basic safety precautions should always be followed, including the following:
Read all instructions before using this appliance.
DANGER – To reduce the risk of electric shock:
- An appliance should never be left unattended when plugged in. Always unplug this sewing machine from the electric outlet immediately after using and before cleaning.
- Always unplug before replacing a sewing machine bulb. Replace bulb with same type rated 13.2 V d.c., 3 Watts.
WARNING – To reduce the risk of burns, fire, electric shock, or injury to persons:
- Do not allow to be used as a toy. Close attention is necessary when this sewing machine is used by or near children.
- Use this appliance only for its intended use as described in this owner's manual.
Use only attachments recommended by the manufacturer as contained in this owner's manual. - Never operate this sewing machine if it has a damaged cord or plug, if it is not working properly, if it has been dropped or damaged, or dropped into water. Return this sewing machine to the nearest authorized dealer service center for examination, repair, electrical or mechanical adjustment.
-
Never operate the appliance with any air opening blocked. Keep ventilation openings of this sewing machine and foot controller free from accumulation of lint, dust and loose cloth.
-
Never drop or insert any object into any opening.
-
Do not use outdoors.
-
Do not operate where aerosol (spray) products are being used or where oxygen is being administered.
-
To disconnect, turn all controls to the off ("O") position, then remove plug from outlet.
-
Do not unplug by pulling on cord. To unplug, grasp the plug, not the cord.
-
Keep fingers away from all moving parts. Special care is required around the sewing machine needle.
-
Always use the proper needle plate. The wrong plate can cause the needle to break.
-
Do not use bent needles.
-
Do not pull or push fabric while stitching. It may deflect the needle causing it to break.
-
Switch this sewing machine off ("O") when making any adjustment in the needle area, such as threading the needle, changing the needle, threading the bobbin or changing the presser foot, and the like.
-
Always unplug this sewing machine from the electrical outlet when removing covers, lubricating, or when making any other adjustments mentioned in this owner's manual.
SAVE THESE INSTRUCTIONS
TABLE OF CONTENTS
SECTION I NAMES OF PARTS
Names of Parts 3-4
Detachable Extension Table 4
Standard Accessories 5
SECTION II GETTING READY TO SEW
Connecting Machine to Power Supply ..... 6
Controlling Sewing Speed.... 7
- To Use Start/Stop Button .... 7
- Speed Setting Lever 7
- To Use Foot Control .... 7
Winding the Bobbin 8–9
- Removing the Bobbin 8
- Winding the Bobbin 8
- Inserting the Bobbin .... 9
Threading the Machine ..... 10–11
- Threading the Machine .... 10
- Needle Threader .... 10
- Drawing Up the Bobbin Thread ..... 11
Presser Foot Lifter 11
Pressure Dial.... 12
Up/Down Needle, Auto-Lock and Reverse
Buttons 12
- Up/Down Needle Button 12
- Auto-Lock Button 12
- Reverse Button 12
Selecting Needle and Thread ..... 13
Adjust the Top Thread Tension ..... 14
- Choose the Correct Tension ..... 14
- Tension is too Tight 14
- Tension is too Loose .... 14
SECTION III STRAIGHT, BUTTONHOLE AND UTILITY SEWING
Selecting Patterns (Ordinary Sewing) ..... 15
- Changing the Screen 15
- Selecting Patterns .... 16
Language Selection Key 16
Straight Seam Sewing 17–20
- Up/Down Needle Key 17
- Starting to Sew 17
- Changing Sewing Direction ..... 17
- Finishing Sewing 18
-
Seam Allowance Lines ..... 19
-
Turn a Square Corner 19
- Sewing on Heavy Fabrics ..... 19
- Setting Stitch Length and Left/Right Needle Position.... 20
- Manual Stitch Length 20
- Variable Needle Position ..... 20
Straight Stitches 21
Zigzag Stitch 22
- Manual Stitch Width and Length ..... 22
Overcasting.... 23–24
- Zigzag Stitch 23
- Multiple Zigzag 23
• Overcasting 23 - Knit Stitch 24
- Double Overedge Stitch 24
• Overlock Stitch 24
Sensor Buttonholes 25-28
- Three Types of Buttonhole 25
- Preparation for Sewing 25
• To Sew.... 25–27 - To Alter Buttonhole Stitch Width and Density 27
- Rounclend and Keyhole Buttonhole .... 28
Corded Buttonhole 29
Zipper Sewing 30-31
• To Snap On the Zipper Foot ..... 30
- Fabric Preparation 30
• To Sew.... 30–31
Blind Stitch Hemming 32
- Changing Needle Position ..... 32
Darning 33
Eyelets 34
Shell Stitch 34
Appliqué 34
Drawn work 35
Scallop Hems 36
Patchwork 36
Fagoting. 37
Elastic Stitch 37
Smocking 37
Pintack 38
Decorative Stitch 38
Cross Stitch 38
Changing Needles 39
To Attach and Remove Presser Feet ..... 39
Adjusting Pattern Balance 40
SECTION IV PROFESSIONAL STYLE EMBROIDERY
Getting Ready to Sew Professional Style
Embroidery 41
- Interfacing 41
- Selecting Needle and Thread 41
- Template 41
Using Built-in Monogramming Mode ..... 42–44
• To Raise or Lower the Feed Dog ..... 42
• To Attach Embroidery Foot P ..... 42
- To Set the Fabric in the Embroidery Hoop .. 43
- Threading the Machine .... 44
- To Attach the Embroidery Hoop to the Machine.... 44
Sewing Built-in Letters and Numbers ..... 45–50
- To Select Letter Style .... 45
• To Compose Words, Etc. 46
• To Sew 47–48 - If the Thread Breaks While Embroidering ... 49
- Combining Letters in Script Style (Upper & Lowercase).... 50
- European Letters in Block Style (Lowercase) 50
Embroidery with Optional Memory Cards .. 51–54
- To Insert the Memory Card .... 51
• To Eject the Memory Card ..... 51
• To Set the Fabric in the Embroidery Hoop .. 52 - Embroidery with Large Pattern Memory Card.... 52
- Skipping 53
- Embroidery with Large Pattern Memory Card.... 54
Embroidery with Blank Memory Card and Scan'n.
Sew, Scan'n SewPC (Optional Accessories) .... 54
When Messages Appear on Screen 55
SECTION V CARE OF YOUR MACHINE
Care of Your Machine.... 55-57
- Replancing the Light Bulb 56
- Cleaning the Bobbin Holder 56
- Exposing the Hook Race .... 56
- Cleaning the Hook Race .... 57
- Replacing the Bobbin Holder 57
Troubleshooting.... 58–60
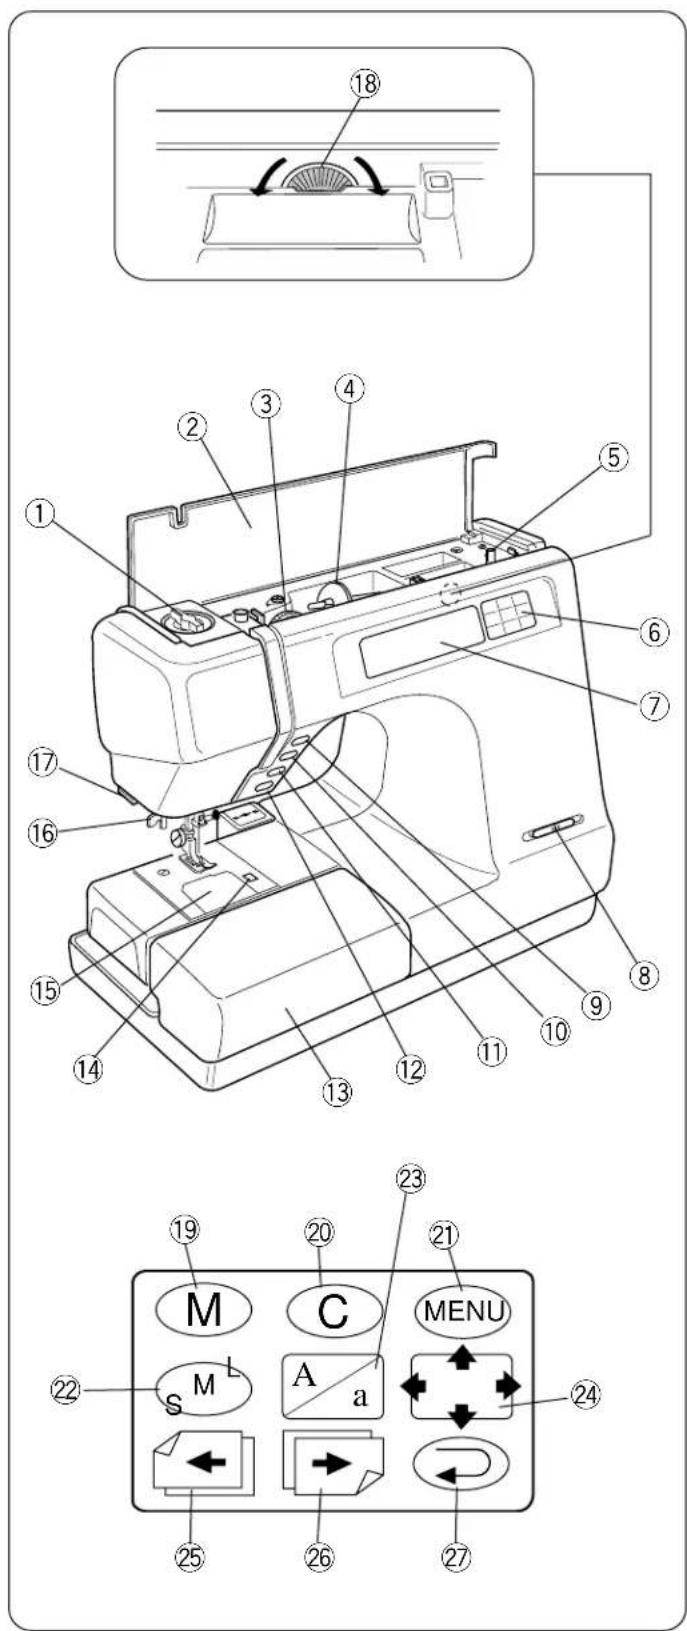
SECTION 1 NAMES OF PARTS
text_image
Technical diagram of a sewing machine with numbered parts and labeled function keys including M, C, MENU, and S.Names of Parts
①Pressure dial
②Flip-top sewing instruction panel
③Thread tension dial
④Spool holder (Large)
⑤Bobbin winder spindle
⑥Key pad
⑦Visual touch screen
⑧Speed setting lever
⑨Up/down needle button
⑩Auto-lock button
⑪Reverse button
⑫Start/stop button
⑬Extension table (Accessory box)
⑭Hook cover plate release button
⑮Hook cover plate
⑯Needle threader
⑰Thread cutter
⑱Screen sharpness adjustment dial*
⑲Memory key (see page 33 and 46)
⑳Clear key (see page 46)
②Menu key (see pages 15 and 42)
②Letter size key (see pages 45 and 48)
②3Letter style key (see page 45)
②4Space check key (see page 48 and 49)
②5Previous page key (see page 15)
②6Next page key (see page 15)
②7Return key (see pages 15, 27 and 48)
* Brightness of the screen can be changed by turning the screen sharpness adjustment dial (located beneath the flip-top sewing instruction panel).
text_image
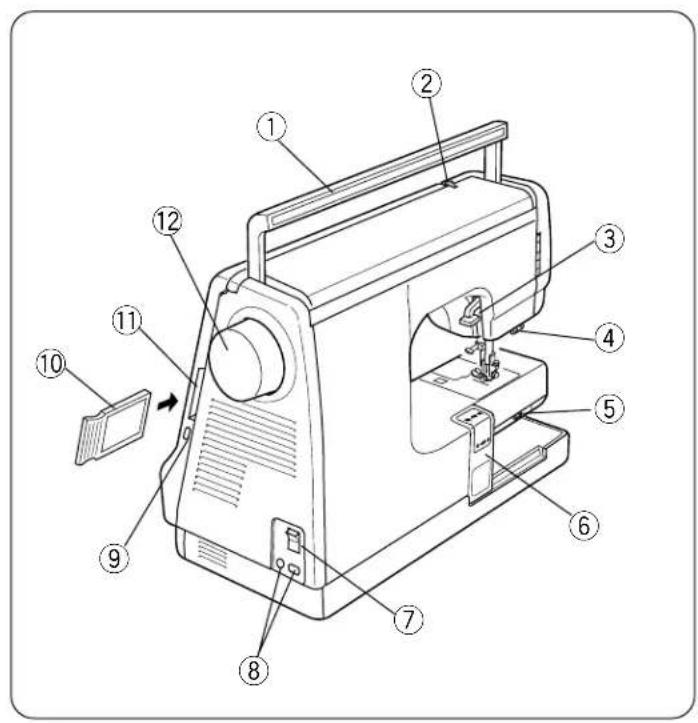
Technical diagram of a sewing machine with numbered parts for identification and assembly reference.Names of Parts
① Carrying handle
② Thread take-up lever
③ Presser foot lifter
④ Buttonhole lever
⑤ Drop feed lever
⑥ Carriage
⑦ Power switch
⑧ Machine sockets
⑨ Card eject button
⑩ Memory card
⑪ Memory card slot
⑫ Handwheel
text_image
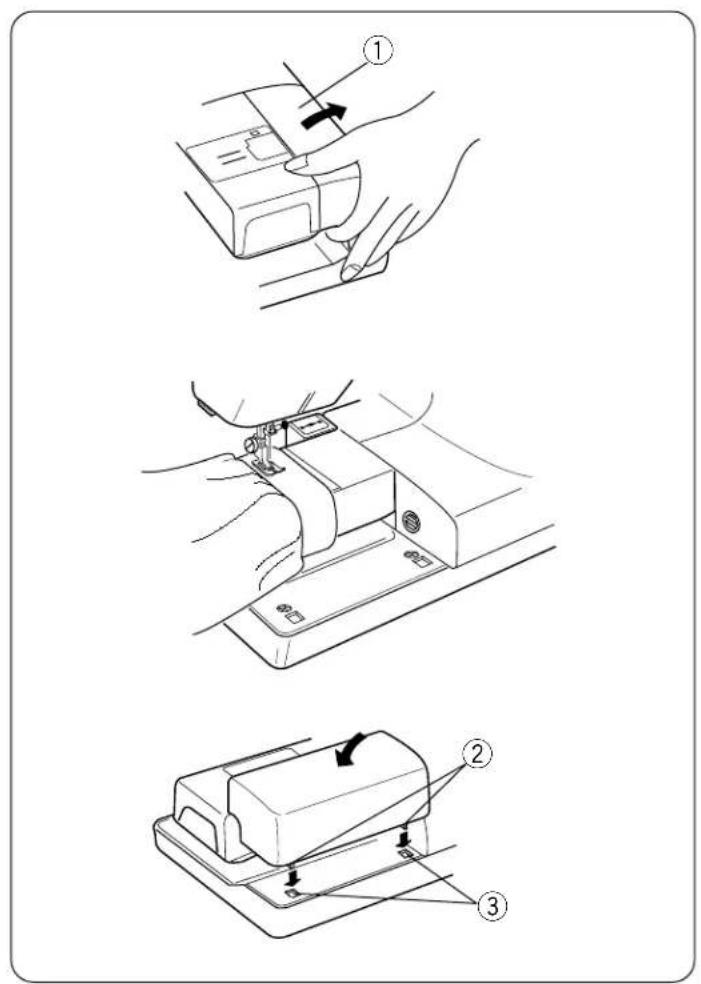
Technical diagram showing three steps of a sewing machine operation: cutting, using a sewing machine, and adjusting the base.Detachable Extension Table
For Free Arm Sewing
To remove, lift out the extension table toward you as illustrated.
Advantages of free arm sewing:
* Avoid fabric bunching around the needle when bar tacking to reinforce pockets, plackets and waistlines.
* For stitching sleeves, waistbands, pants legs, or any circular garment area.
* For darning socks or mending knees, elbows, or areas of wear in children's clothes.
For Flat-bed Sewing
Position the tabs on the base grooves and push down gently.
① Extension table
②Tabs
③Base grooves
①
②
③
④
⑤
⑥
⑦
⑧
⑨
⑩
⑪
⑫

⑬
⑭
15
⑯

⑰
Standard Accessories
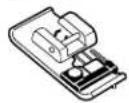
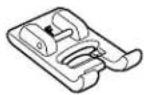
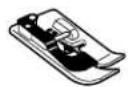
①C: Overedge foot
② F: Satin stitch foot
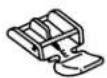
③ G: Blind hem foot
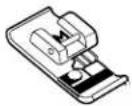
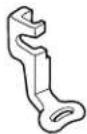
④ E: Zipper foot
⑤M: Overcasting foot
⑥ P: Embroidery foot
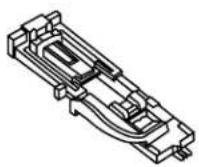
⑦ R: Automatic buttonhole foot
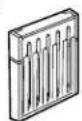
⑧ Set of needles
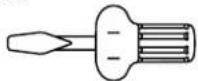
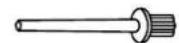
⑨ Screwdriver
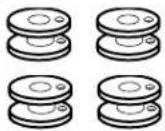
⑩ Bobbins
⑪Additional spool pin
⑫Spool pin felt
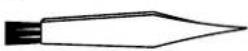
⑬Lint brush
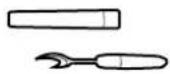
⑭Seam ripper
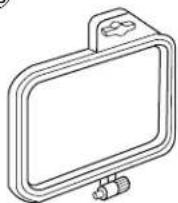
⑮Embroidery hoop No. 1
⑯Small spool holder
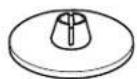
⑰Large spool holder
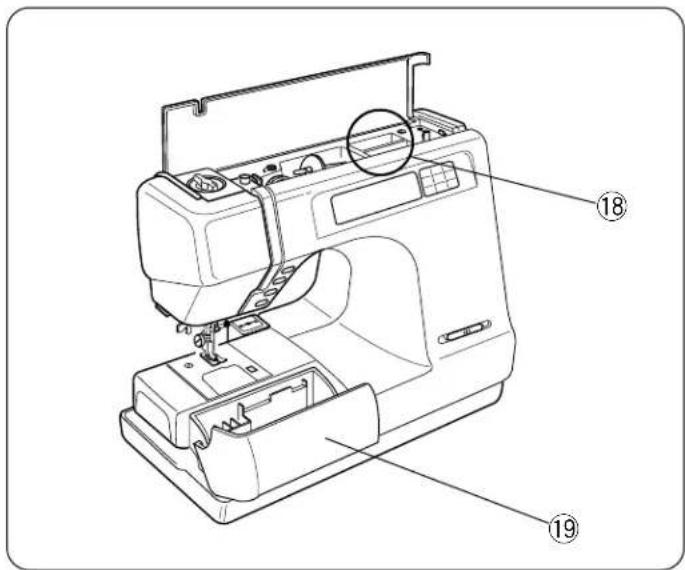
⑱Foot compartment
⑲Extension table (Accessory Box)
⑳Power supply cord
②1Foot control
②Carrying case
text_image
Technical diagram of a sewing machine with numbered parts labeled 18 and 19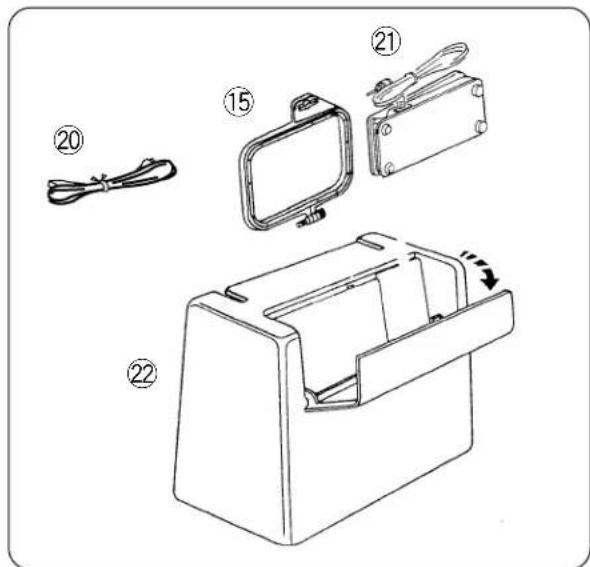
text_image
Technical diagram showing exploded view of a mechanical device with numbered parts and a highlighted component.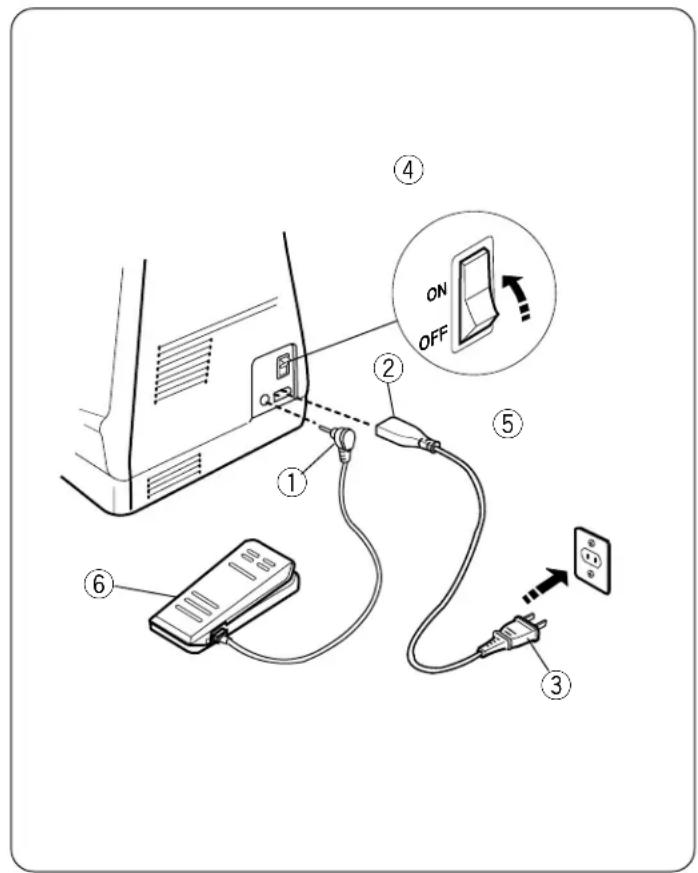
text_image
Diagram showing a device connected to an electrical outlet with labeled parts and a magnified inset showing 'ON OFF' and connection point.SECTION II GETTING READY TO SEW
Connecting Machine to Power Supply
Before connecting the power cord, make sure the voltage and frequency shown on the machine conform to your electrical power.
• To sew using foot control
* Turn off the power switch, and insert the foot control plug ①, machine plug ② into the machine and power supply plug ③ into the wall in this order.
① Foot control plug
② Machine plug
③ Power supply plug
④ Power switch
⑤ Power supply cord
⑥ Foot control
• To sew using start/stop button
* Turn off the power switch, insert only the machine plug ② into the machine and power supply plug ③ into the wall.
* Turn on the power switch.
Note:
* The foot control cannot be used in embroidery mode.
* If you turn off the power switch, wait 5 seconds before turning it on again.
* After turning on the power it is not abnormal to hear a slight humming sound coming from the internal motor.
For Your Safety
- While in operation, always keep your eye on the sewing area, and do not touch any moving parts such as the thread take-up lever, handwheel or needle.
- Always turn off the power switch and unplug from the power supply:
* When leaving the machine unattended.
* When attaching or removing parts.
* When cleaning the machine.
- Do not place anything on the foot control, except in use.
Operating Instructions:
The symbol “0” of a switch indicates the “off” position of a switch.
"For appliances with a polarized plug (one blade wider than the other).
To reduce the risk of electric shock, this plug is intended to fit in a polarized outlet only one way. If the plug does not fit fully in the outlet, reverse the plug. If it still does not fit, contact a qualified electrician to install the proper outlet. Do not modify the plug in any way."
"Foot Controller Model 21371 or Model 21249 for use with Sewing Machine Model 8100."
(For U.S.A. market only).
natural_image
Line drawing of a hand inserting a component into a device (no text or symbols)Controlling Sewing Speed
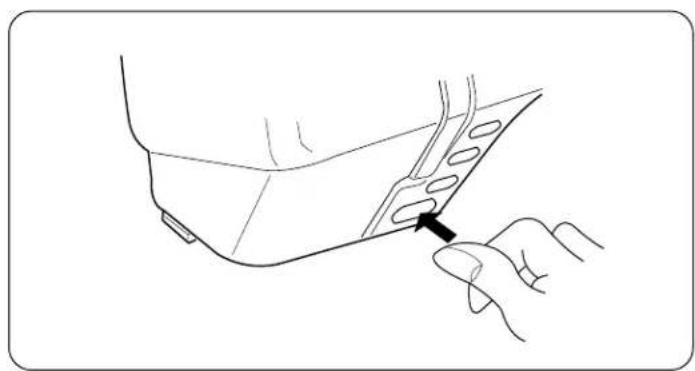
• To Use Start/Stop Button
To use this button you must disconnect the foot control from the machine.
This button can be used for Professional style Embroidery. It can be also be used for ordinary sewing, if you wish. The machine starts running slowly for the first few stitches, then it runs at the speed set by the speed setting lever.
* You cannot use the Start/Stop button when the foot control is connected to the sewing machine.
natural_image
Diagram of a mechanical or fluid system with directional arrows and a central pipe-like structure (no text or symbols)- Speed Setting Lever
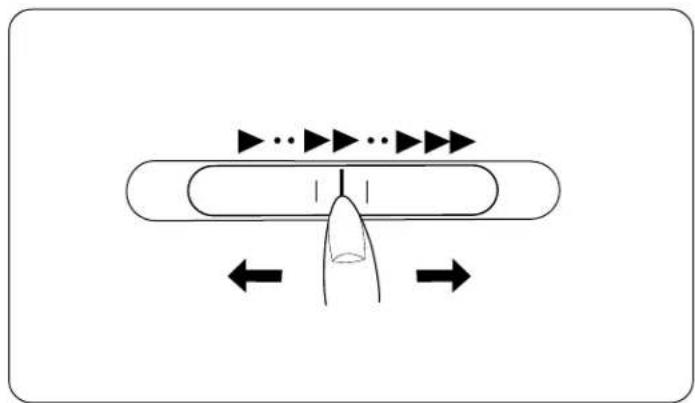
Sewing speed can be controlled by the speed setting lever.
To increase sewing speed, slide the lever to the right. To decrease sewing speed, slide the lever to the left.
natural_image
Line drawing of a shoe roller being adjusted on a slide, with a double-headed arrow indicating motion (no text or symbols)• To Use Foot Control
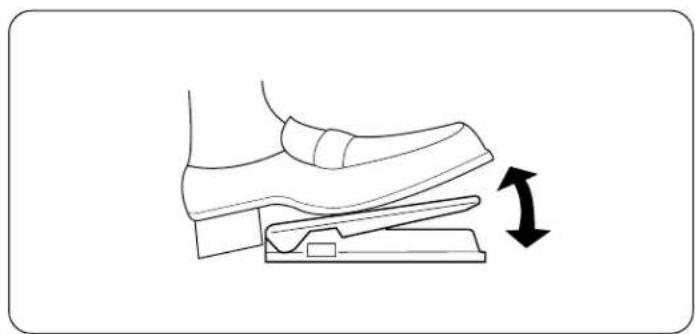
Sewing speed can be varied by the foot control. The harder you press on the foot control, the faster the machine runs.
* To use the foot control, slide the speed setting lever to "High".
text_image
Diagram of a mechanical assembly with numbered parts, showing a thread and pin assembly.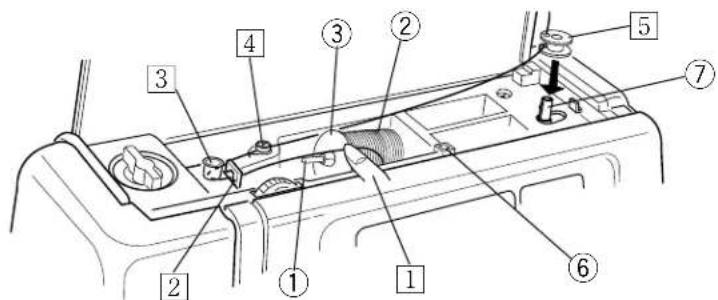
text_image
Labeled diagram of a car interior showing numbered components for engine or vehicle maintenance.6
natural_image
Simple line drawing of a mechanical component with an arrow indicating direction (no text or symbols)7
8
natural_image
Diagram of a mechanical device with a spool, rotating base, and directional arrows indicating motion (no text or symbols)Winding the Bobbin
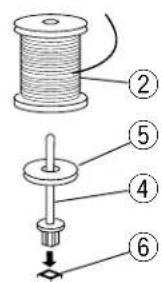
① Lift up the spool pin. Place the spool of thread on the spool pin with the thread coming off the spool as shown.
Attach the large spool holder, and press it firmly against the spool of thread.
* The small spool holder is used with narrow or small spools of thread.
* To use the additional spool pin, guide the upper thread as shown in 2, 3 and then 4.
2 Pass the thread under the thread guide.
3 Guide the thread around the thread guide.
4 Pass the thread through the thread guide.
5 Thread through the hole in the bobbin from the inside to the outside. Put the bobbin on the bobbin winder spindle.
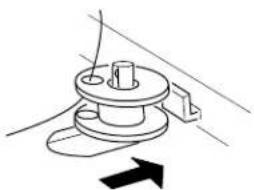
6 Push the bobbin to the right.
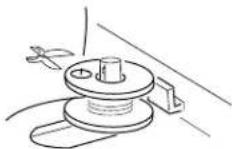
7 With the free end of the thread held in your hand, depress the foot control. Stop the machine when it has made a few turns, and cut the thread close to the hole in the bobbin.
8 Depress the foot control again. When the bobbin is fully wound, it will stop automatically. Return the bobbin winder to its original position by moving the spindle to the left, and cut the thread as shown.
* The machine will not sew until the spindle is in the left position.
① Spool pin ② Spool ③ Spool holder
④ Additional spool pin ⑤ Felt
⑥ Additional spool pin hole
⑦ Bobbin winder spindle
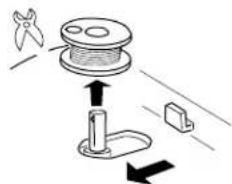
- Removing the Bobbin
Slide the hook cover plate release button to the right, and remove the cover plate.
① Hook cover plate release button
② Hook cover plate
1
text_image
Technical diagram showing a mechanical component with labeled parts and directional arrows indicating motion or movement.2
text_image
Technical diagram showing mechanical assembly with labeled parts A and 2, including directional arrows and dashed lines indicating motion or movement.3

text_image
Technical diagram showing a mechanical assembly with labeled parts and directional arrow4
text_image
Diagram showing sewing machine operation with magnified view of measurement device and labeled parts- Inserting the Bobbin
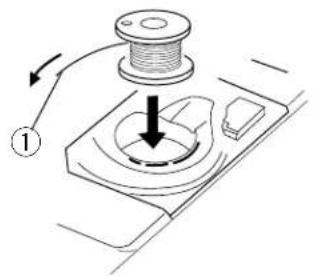
①Place the bobbin in the bobbin holder with the thread running off in the counterclockwise direction.
① End of thread
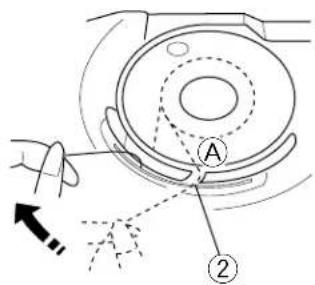
②Guide the thread into the Notch Ⓐ on the front side of the bobbin holder. Draw the thread to the left, sliding it between the tension spring blades.
② Notch A
③ Continue to draw the thread lightly until the thread slips into Notch Ⓗ. Pull out about 15 cm (6") of thread.
③ Notch B
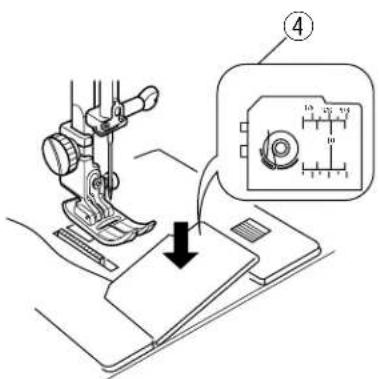
④ Attach the hook cover plate. Check the threading by referring to the chart shown on the hook cover plate.
④ Threading chart
text_image
Technical diagram of a sewing machine with numbered parts and labeled motion arrows, including a close-up inset showing the thread mechanism.Threading the Machine
• Threading the Machine
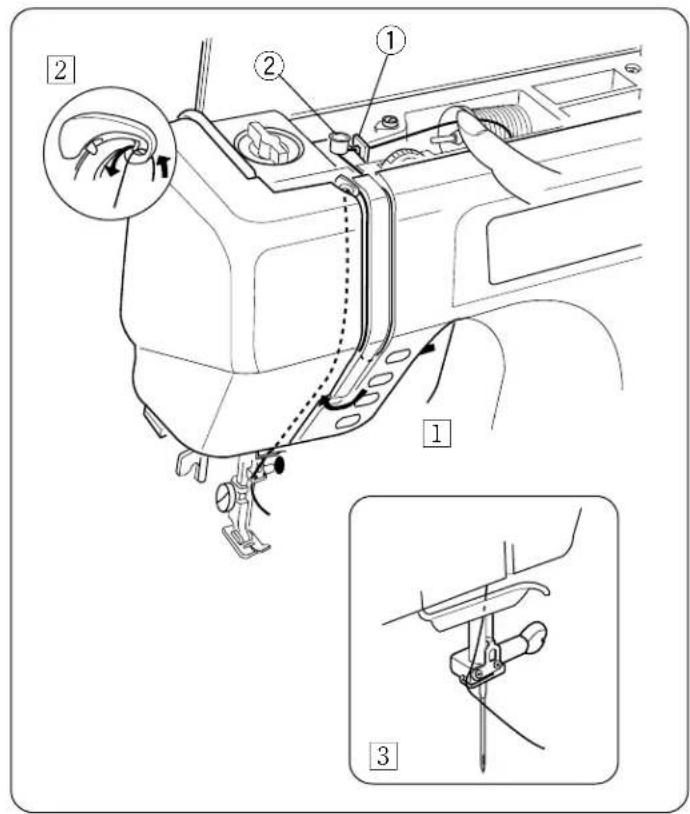
① Raise the presser foot lifter. Press the up/down needle button twice to raise the needle (see page 10). Hold the upper thread as shown and pass the thread under the thread guide ①.
Guide the thread around thread guide ② as shown.
Pull the thread down and around the check spring holder from right to left, then pull up the thread.
② Firmly draw the thread from right to left into the eye of the take-up lever.
Then down through the lower thread guide.
3 Slide the thread behind the needle bar thread guide from the left.
Thread the needle from front to back or use the needle threader.
① Thread guide
② Thread guide
- Needle Threader
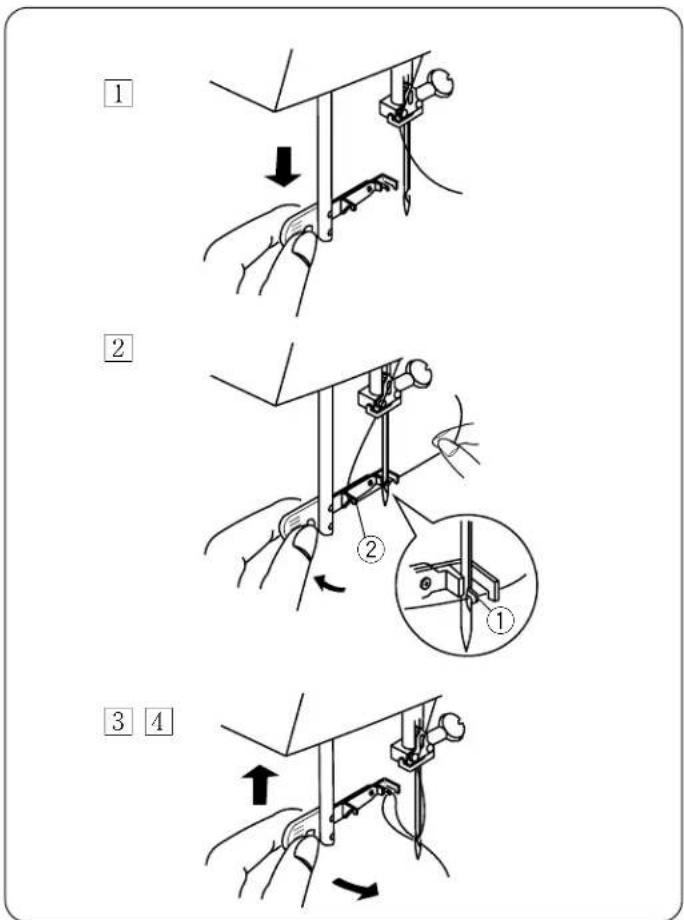
① Raise the needle to its highest position. Pull down the needle threader knob as far as it will go.
②Turn the knob in the direction of the arrow in the illustration, then insert Hook ① into the needle eye. Lead the thread around Guide ② and under Hook ①.
3 Turn the knob in the direction of the arrow in the illustration, drawing the thread loop through the needle.
4 Pull the thread through the needle eye.
* The needle threader can be used with a #11 to #16 needle or a Janome Blue Tip needle. Thread size 50 to 100 should also work well.
① Hook
② Guide
text_image
Diagram illustrating four-step hairpin sewing technique steps with labeled instructions and arrows indicating movement.1
natural_image
Line drawing of a sewing machine with a hand pulling the rope (no text or symbols)2
text_image
Technical diagram showing sewing machine operation with labeled parts and directional arrow indicating motion3
natural_image
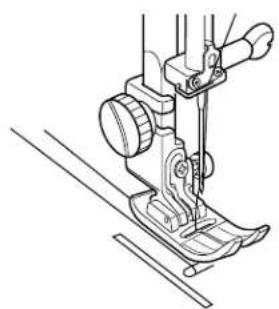
Line drawing of a sewing machine needle and base (no text or symbols)• Drawing Up the Bobbin Thread
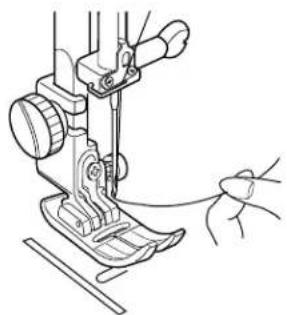
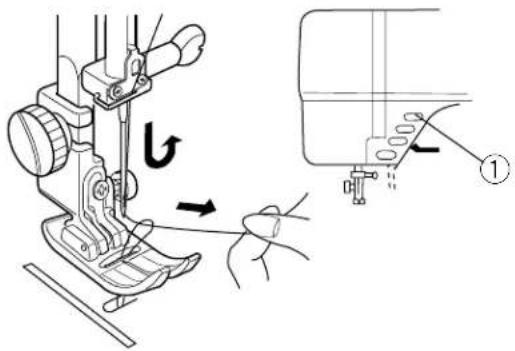
① Raise the presser foot. Hold the needle thread lightly with your left hand.
2 Press the up/down needle button twice to pick up the bobbin thread. Draw up the needle thread together with a loop of bobbin thread.
① Up/down needle button
3 Slide 10 cm (4") of both threads to the back under the presser foot.
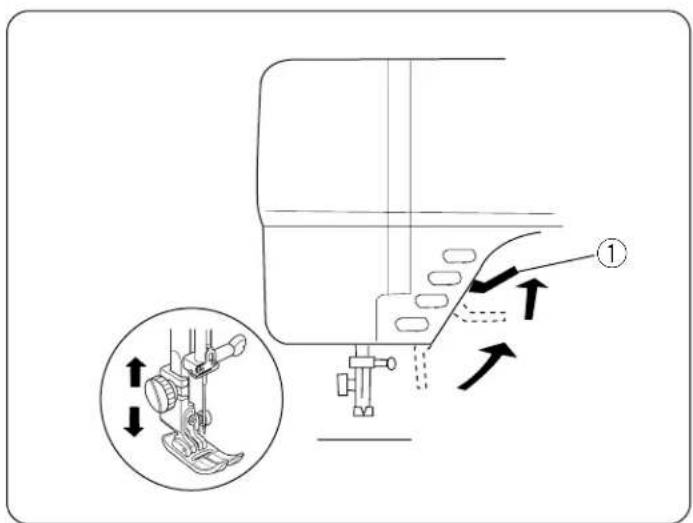
Presser Foot Lifter
The presser foot lifter raises and lowers your presser foot. You can raise it about 1/4" higher than the normal up position for easy removal of the presser foot or to help you place heavy fabric under it.
① Presser foot lifter
text_image
Diagram illustrating a sewing machine operation with labeled parts and directional arrows indicating movement or positioning.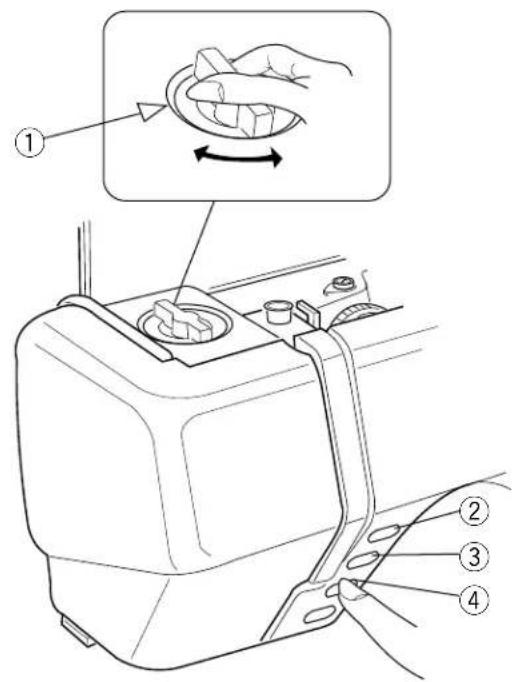
text_image
Diagram of a car interior showing hand positioning and tool manipulation, with numbered annotations for each step.
Pressure Dial
The pressure dial should be set at “3” for regular sewing. Reduce the pressure to “2” for appliqué, cut work, drawn work, basting and embroidery.
Set the pressure to “1” when sewing chiffon, lace, organdy and other fine fabrics. Velours and knits with a lot of stretch may also require a “1” setting.
Align the number on the dial with the setting mark.
① Setting mark
Up/Down Needle, Auto-Lock and Reverse Buttons
• Up/Down Needle Button
When this button is pressed, the needle bar goes down and stops in the lowest position. When pressed again, the needle bar goes up and stops in the highest position.
② Up/down needle button
• Auto-Lock Button
When stitches 1 , 2 or 3 are selected, the machine will immediately sew locking stitches and automatically stop when the auto-lock button is pressed. When sewing all other stitches, the machine will sew locking stitches at the end of the current pattern and automatically stop.
③ Auto-lock button
- Reverse Button
When stitches 1, 2, 3 and selected, the machine will sew in reverse while the reverse button is pressed. If you press the reverse button when sewing all other stitches, the machine will immediately sew locking stitches and automatically stop.
④ Reverse button
Selecting Needle and Thread
For general sewing use needle size 11 or 14. A fine thread and needle should be used for sewing lightweight fabrics, so the fabric will not be marred. Heavy fabrics require a needle large enough to pierce the fabric without fraying the needle thread.
In the needle case you will find Two size 14s, two size 11s and one blue tipped needle. Use a blue tipped needle to eliminate skipped stitches when sewing knits and synthetic fabrics.
There are also specialty needles available from your sewing machine dealer. A denim needle with a sharp tip is used to effectively pierce dense fabrics such as denim and canvas. For topstitching, a special topstitching needle with a larger eye accommodates heavier weight thread. Leather needles punch small holes in leather and suede allowing the thread to follow through the hole.
Check your needles frequently for rough or blunt tips. Snags and runs in knits, fine silks and silk-like fabrics are permanent and are often caused by damaged needles.
Always purchase a good quality thread. It should be strong, smooth and consistent in thickness.
| WEIGHT | FABRIC | TYPE OF NEEDLE | NEEDLE SIZE |
| Very Light | Chiffon, Georgette, Fine Lace, Organdy, Organdy Net, Tulle | Universal Ball Point | 9 (65) 9 (65) |
| Light | Batiste, Voile, Lawn, Pure Silk, Crepe de Chine, Sheer Crepe, Chambray, Handkerchief Linen, Gingham, Challis, Percale, Wool Crepe, Peau de Soie, Taffeta, Satin, Silk Surah, Satin-backed Crepe, Qiana | Blue Tipped Needle Universal | 11 (75) 11 (75) 12 (80) |
| Single Knits, Jersey, Swimwear, Tricot | Blue Tipped Needle Ball Point | 11 (75) 11 (75) | |
| Leather, Suede | Wedge Point Leather Needle | 11 (75) | |
| Medium | Flannel, Velour, Velvet, Muslin, Velveteen, Poplin, Corduroy, Broadcloth, Linen, Chintz, Gabardine, Felt, Terry, Burlap, Quilted Fabrics | Universal | 14 (90) |
| Double Knits, (synthetic and natural) Stretch Velour, Stretch Terry, Sweater Knits | Ball Point | 14 (90) | |
| Leather, Vinyl, Suede | Wedge Point Leather Needle | 14 (90) | |
| Heavy | Denim, Sailcloth, Ticking | Denim Needle | 16 (100) |
| Double Faced Wool, Heavy Coating, Fake Fur, Drapery Fabrics | Universal | 16 (100) | |
| Leather, Suede | Wedge Point Leather Needle | 16 (100) | |
| Very Heavy | Canvas, Duck, Upholstery Fabrics | Universal | 18 (110) |
| Topstitching for Special Finish | Topstitching Needle | 11 (75) 14 (90) | |
text_image
Diagram of a sewing machine with numbered parts including thread, spine, and fabric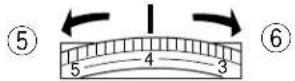
text_image
Diagram of a mechanical component with labeled parts 1, 2, and a dashed line indicating a reference or section.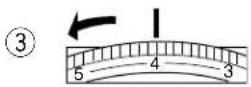
text_image
Technical diagram of a mechanical component with labeled parts ① and ②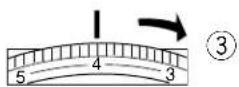
Adjust the Top Thread Tension
- Choose the Correct Tension
For Straight Stitch:
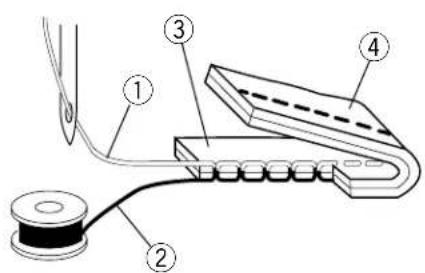
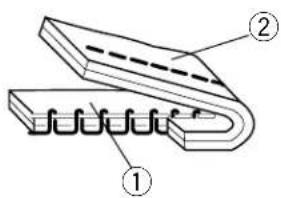
The ideal straight stitch will have threads locked between the two layers of fabric, as shown left (magnified to show detail).
If you look at the top and bottom of the seam, you will notice that there are no gaps; that each stitch is smooth and even.
When adjusting top thread tension, the higher the number, the tighter the top thread.
Results depend on;
* stiffness and thickness of the fabric
* number of fabric layers
* type of stitch
① Needle thread (Top thread)
② Bobbin thread (Bottom thread)
③ Right side of fabric
④ Wrong side of fabric
⑤ To loosen
⑥ To tighten
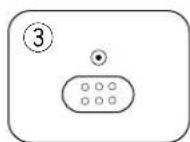
• Tension is too tight
The bobbin thread shows through on the right side of the fabric and it will feel bumpy.
Turn the dial to the left to loosen the top thread tension.
① Right side of fabric
② Wrong side of fabric
③ To loosen
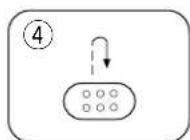
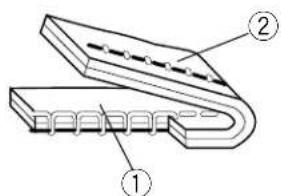
• Tension is too loose
The top thread shows through on the wrong side of the fabric and it will feel bumpy.
Turn the dial to the right to tighten the top thread tension.
① Right side of fabric
② Wrong side of fabric
③ To tighten
SECTION III STRAIGHT, BUTTONHOLE AND UTILITY SEWING
1
text_image
***MENU** ABC M C MENU M A a 2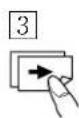
A
text_image
1 2 3 4 5 6 7B
text_image
3~7 C©
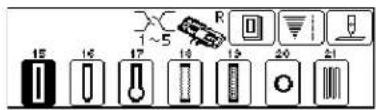
text_image
15 16 17 18 19 20 21D
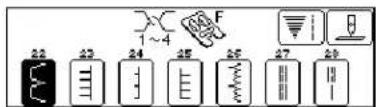
text_image
22 23 24 25 26 27 28 1~4 FE
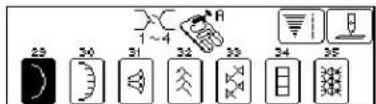
text_image
25 30 31 32 33 34 35F
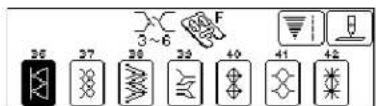
text_image
36 37 38 39 40 41 42G
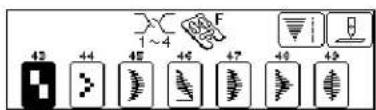
text_image
43 44 45 46 47 48 49 1~4 FH
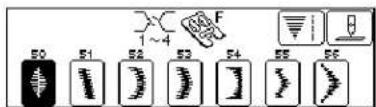
text_image
50 51 52 53 54 55 56 1~4 F①
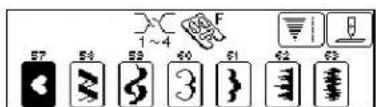
text_image
57 54 53 40 61 62 63 1~4 FJ
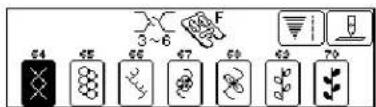
text_image
64 65 66 67 68 69 70Pattern Selection (Utility Stitches)
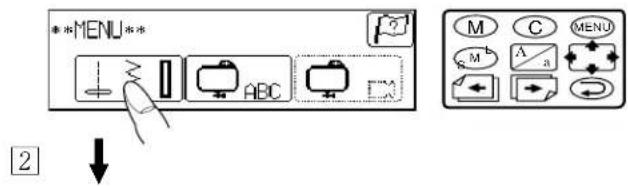
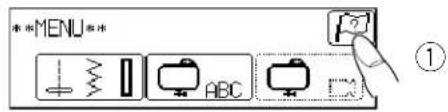
• How to scroll the display screen
When you turn the power switch the MENU screen is displayed.
2Press ↓3□ key.
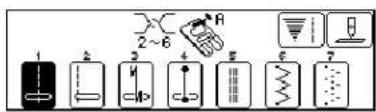
The display screen shows Ⓐ.
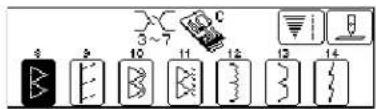
3You can get the stitch patterns from Ⓑ to Ⓙ
display screen as shown, when you turn on the power switch.
Press the ➕ key to scroll through screens Ⓑ to Ⓙ. (To return to a previous screen, press the ➕ key.)
* Press the ← or MENU key to go back to the main MENU screen.
text_image
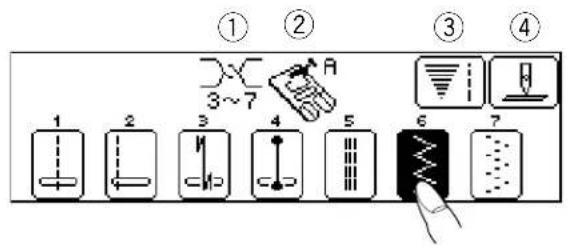
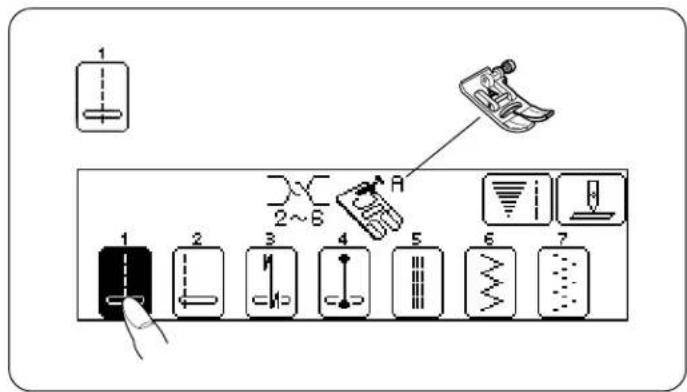
① ② ③ ④ 1 2 3 4 5 6 7- Selecting Patterns
Press the center of a desired pattern on the screen.
① Appropriate top thread tension is displayed.
② A suitable foot is displayed.
③ Stitch Width and Length Key : ▼
When the Key is pressed, the stitch width and length can be adjusted (see page 22).
④ Up/Down Needle Key :
When this key is pressed, the needle bar alternates between up and down position (see page 17).
text_image
MENU ABC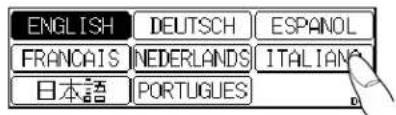
text_image
ENGLISH DEUTSCH ESPANOL FRANCAIS NEDERLANDS ITALIANO 日本語 PORTUGUES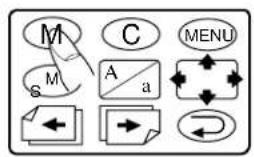
text_image
M C MENU A a S MLanguage Selection Key
* Press ☐ key.
* Select the language you need.
* Press the Ⓜkey to memorize the language selected.
The screen will automatically be returned to the main menu.
①Language selection key
Note:
Regardless of which language is selected on the machine, any message stored in the Memory Card is shown on the visual touch screen in English only.
text_image
1 2~6 A 1 2 3 4 5 6 7Straight Seam Sewing
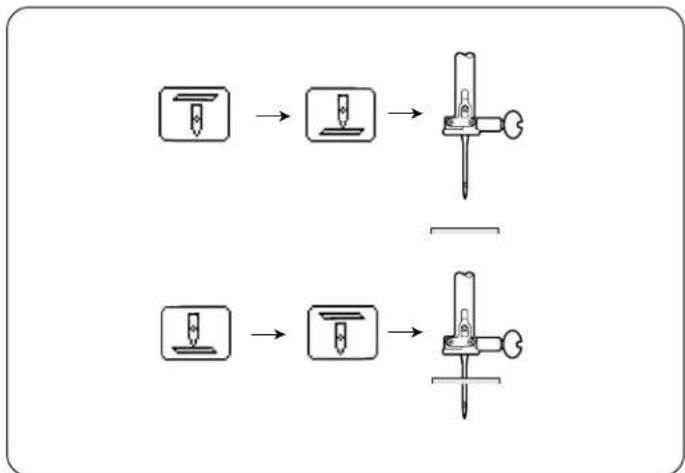
- Up/Down Needle Key :
Pressing this key toggles back and forth between the needle up 📄 and needle down 📅 display.
flowchart
graph TD
    A["Step 1: Tool with pins"] --> B["Step 2: Pin alignment"]
    B --> C["Step 3: Screw assembly with pin"]
    C --> D["Step 4: Tail alignment with screw"]
Needle Up
If you want the needle to be in the up position after sewing a seam, press this key until the needle up display appears:
Needle Down
If you would like the needle to end in the down position after sewing a seam, press this key until the needle down display appears:
natural_image
Line drawing of a sewing machine needle stitching on fabric (no text or symbols)- Starting to Sew
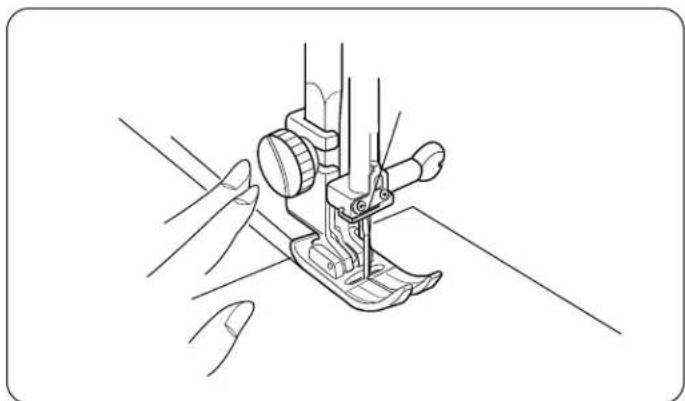
Raise the presser foot and position the fabric next to a seam guide line on the needle plate (see page 19). Lower the needle to the point where you want to start.
Lower the presser foot and pull the threads toward the back. Depress the foot control. Gently guide the fabric along the seam guide line letting the fabric feed naturally.
text_image
Technical diagram of a sewing machine with labeled parts and directional arrow indicating rotation• Changing Sewing Direction
Stop the machine and bring the needle down into the fabric by pressing the up/down needle button.
Raise the presser foot.
Pivot the fabric around the needle to change sewing direction as desired. Lower the presser foot.
① Up/down needle button
② Presser foot lifter
natural_image
Technical line drawing of a sewing machine needle and base (no text or symbols)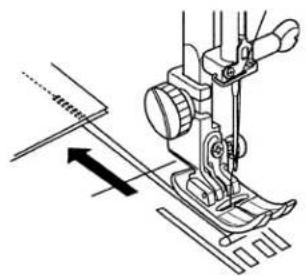
natural_image
Technical line drawing of a sewing machine needle and fabric (no text or symbols)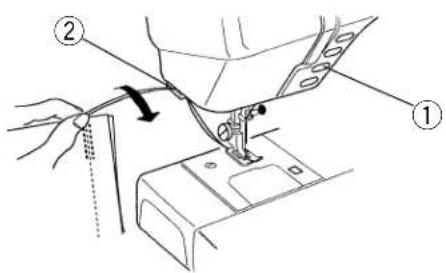
text_image
Diagram showing sewing process with labeled parts ① and ②, including a hand operating the sewing machine.- Finishing Sewing
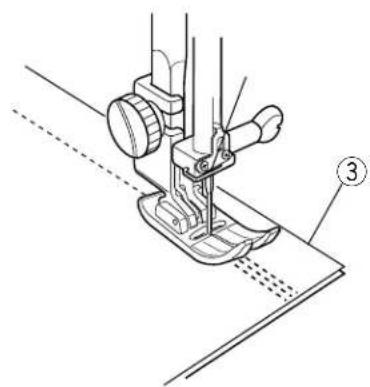
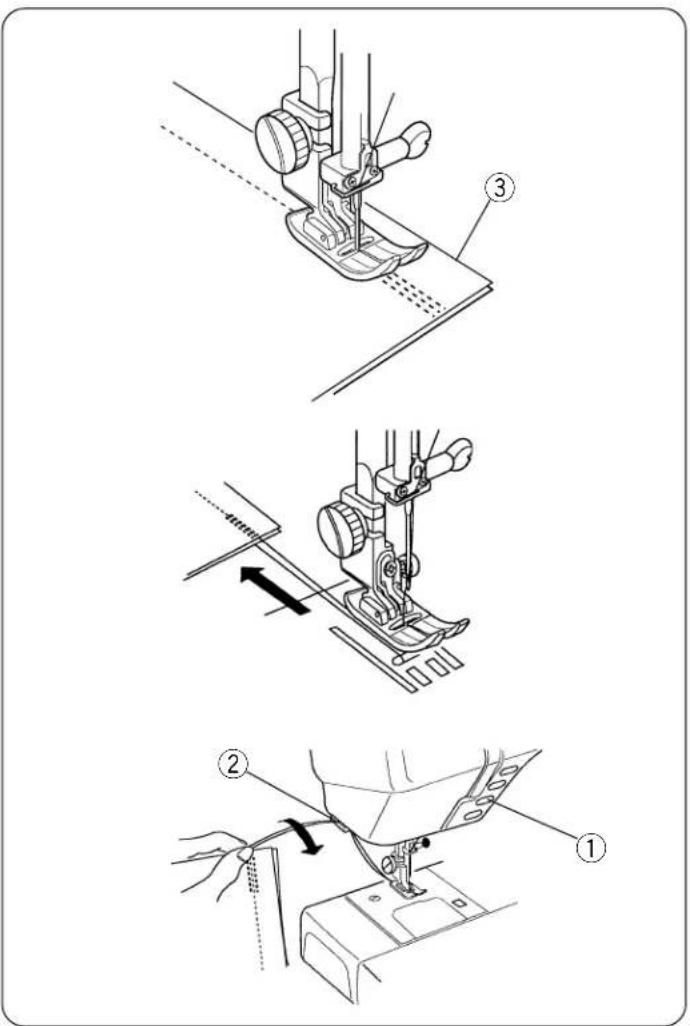
To fasten the ends of seams, press the reverse button and sew several reverse stitches.
* When pattern is selected, reverse stitches are sewn automatically at the beginning of the seam, and forward again. Raise the presser foot. Remove the fabric, draw the threads to the back and cut using the thread cutter. The threads are cut the proper length for starting the next seam.
① Reverse button
② Thread cutter
③ Fabric
text_image
Technical diagram showing three steps of a sewing machine: cutting, fastening, and fastening with numbered instructions.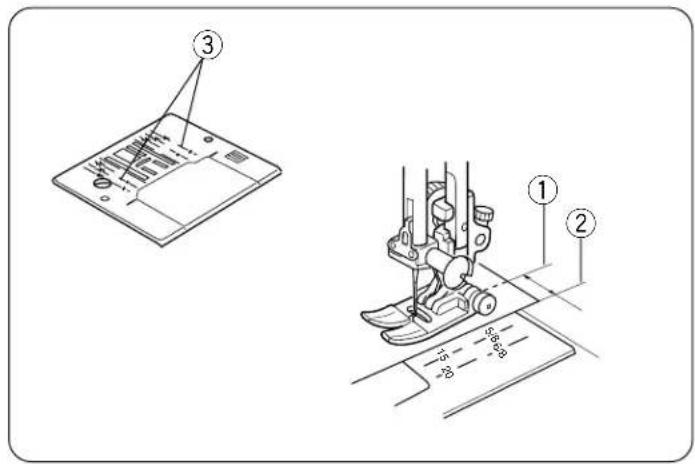
text_image
Technical diagram showing a sewing machine with labeled parts and measurement markings- Seam Allowance Lines
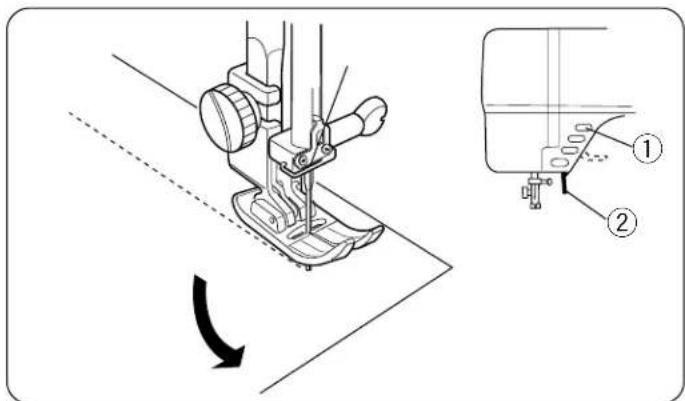
The seam guides on the needle plate and hook cover plate help you measure seam width.
* The number indicates the distance between the middle needle position ○ and the seam allowance line.
| Millimeters Inches | |||||
| Marks on needle plate | 4/8" | 5/8" | 6/8"2015 | ||
①Middle needle position
②Edge of fabric
③Needle plate guide lines
text_image
Technical diagram showing sewing machine operation with numbered parts and directional arrows indicating motion- Turn a Square Corner
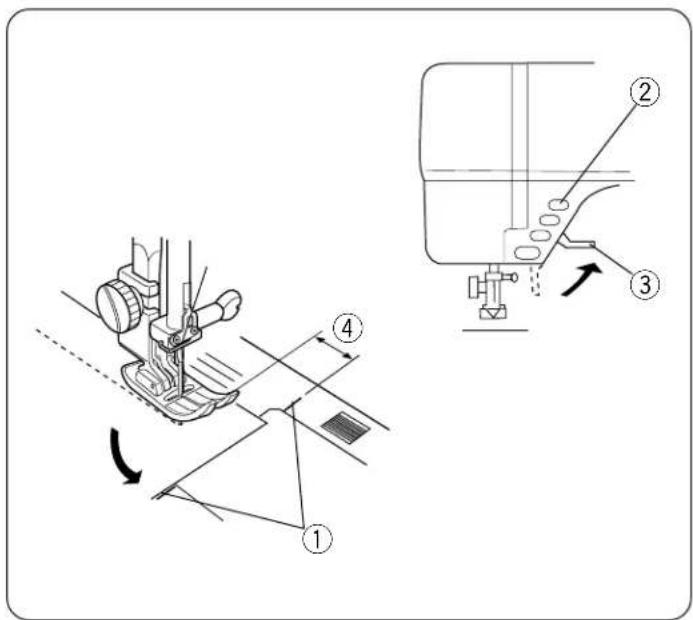
To turn a square corner 1.6 cm aprox. (5/8") from the fabric edge.
-
Stop stitching and lower the needle by pressing the up/down needle button when the fabric edge facing you lines up with the cornering guide as shown.
-
Raise the presser foot and turn the fabric to line the edge with the 1.6 cm (5/8") seam guide.
-
Lower the presser foot and begin stitching in the new direction.
① Cornering guide
② Up/down needle button
③ Presser foot lifter
text_image
Technical diagram showing sewing machine foot and base mechanism with labeled parts ① and ②, including a magnified inset view.- Sewing on Heavy Fabrics
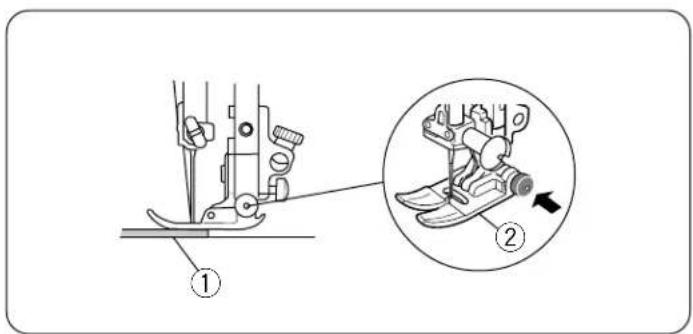
Pressing the black button on Foot A (before lowering) locks it in a horizontal position. This ensures even feeding at the beginning of seams and helps when sewing many layers of fabric. When you reach a point of increased thickness, lower the needle and raise the foot. Press in the black button, then lower the foot and continue sewing. It releases automatically after a few stitches.
① Fabric
② A: Zigzag foot
text_image
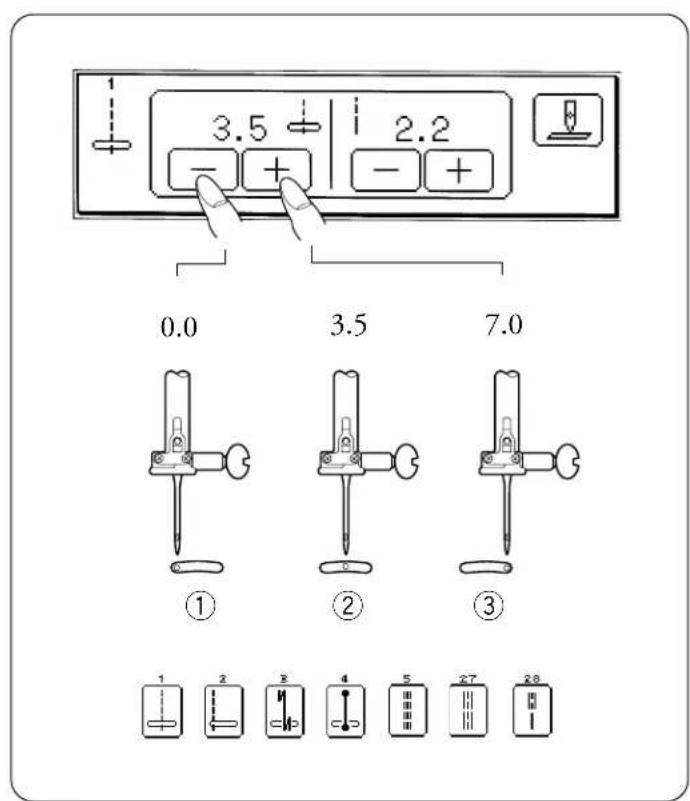
1 2 3 4 5 6 7 3.5 2.2 - + - + - +Setting Stitch Length and Left/Right Needle Position
- Manual Stitch Length
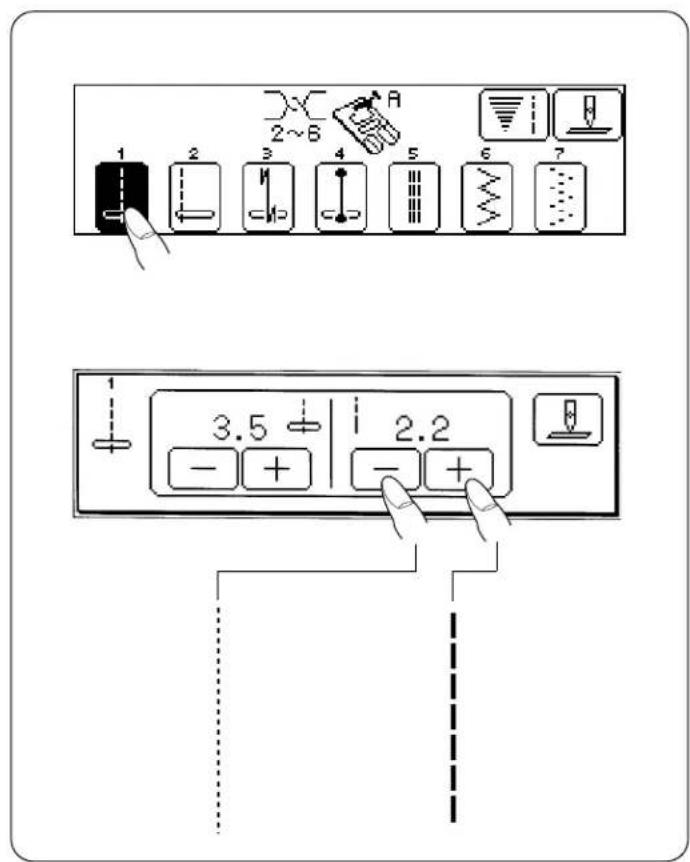
* These settings apply only to “straight” stitch patterns 1 through 5.
Press the ▼i key to adjust the stitch length manually. Use the − or + keys (on the right) to adjust the stitch length. To decrease, press the − key. To increase, press the + key.
The pre-programmed stitch length setting will be suitable for most of your sewing needs. However, you can change these settings to accommodate different fabric characteristics or achieve a desired effect. Hold down the - or + key until you reach the setting you desire.
* The reverse stitch length cannot be set longer than 2.5 mm (3/32").
Press the ⬆ key again to return the visual touch screen to the former display.
text_image
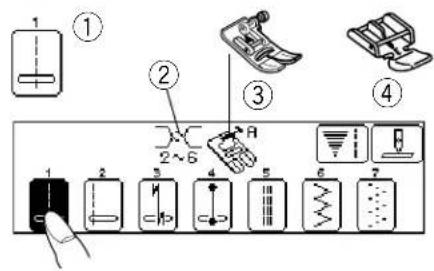
1 3.5 2.2 - + - + 0.0 3.5 7.0 ① ② ③ 1 2 3 4 5 27 28•Variable Needle Position
When stitch patterns 1 through 5 are selected (see bottom of box on left), you can adjust the left/right needle position. When the ☐ key is pressed, the needle position will be moved to the left.
When the + key is pressed, the needle position will be moved to the right.
① Left
② Middle
③ Right
text_image
Diagram showing labeled parts of a sewing machine with numbered parts and a hand operating the base panel.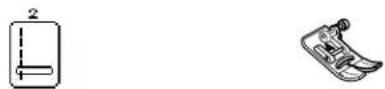
text_image
1 2 3 4 5 6 7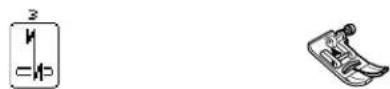
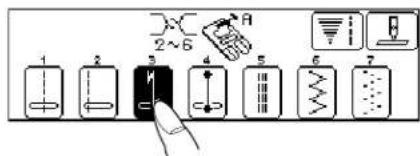
text_image
1 2 3 4 5 6 7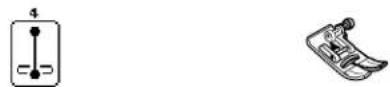
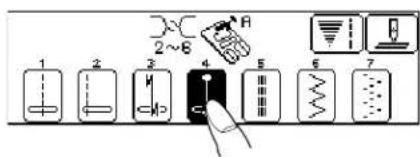
text_image
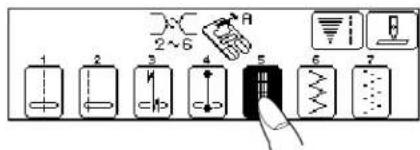
1 2 3 4 5 6 7 2~8 A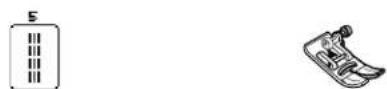
text_image
1 2 3 4 5 6 7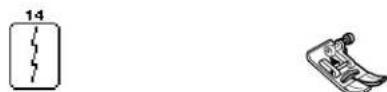
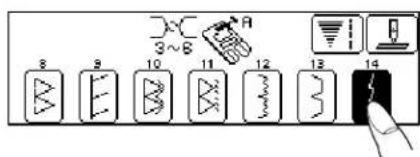
text_image
8 9 10 11 12 13 14Straight Stitches
Basic Straight Stitch

This stitch can be used for sewing regular seams, zippers, pintucking and rolled hems.
① Selected stitch
③A: Zigsag foot
② Thread tension
④E: Zipper foot
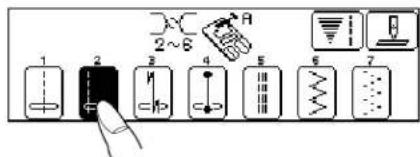
Straight Stitch (Left)

This stitch can be used for regular seams, zippers, topstitching, etc.
Lock-A-Matic

The machine will automatically sew four stitches forward, four stitches in reverse, then continue sewing forward. When you reach the end of the fabric, press the reverse button once. The machine will sew four reverse stitches, four forward stitches, then stop sewing automatically.
Locking Stitch

Lower the needle close to the front edge of the fabric. The machine will sew several locking stitches in place and continue sewing forward. If you press the Auto-Lock button at the end of the seam, the machine will sew several locking stitches in place, then stop sewing automatically.
Triple Stretch Stitch

This strong, durable stitch is recommended where both elasticity and strength are needed to insure comfort and durability. Use it to reinforce areas such as crotch and armhole seams. Also use when constructing items such as backpacks for extra strength.
Stretch Stitch

This stitch is a narrow stretch stitch designed to eliminate puckering on knit fabrics and bias seams, while permitting the seam to be pressed completely flat. The stitch can also be used to simultaneously seam and overcast when sewing on tricot and chiffons for a narrow, almost invisible seam or seam finish.
text_image
Diagram illustrating sewing machine tool components with numbered parts and corresponding fabric swatches and iconsZigzag Stitch

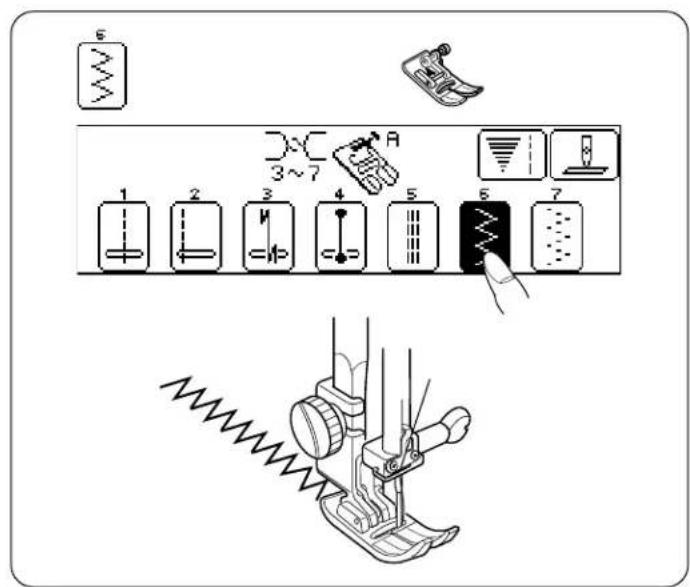
A simple zigzag stitch is widely used for overcasting, appliqué, etc.
* Stabilize with interfacing on stretch fabric.
text_image
1 2 3 4 5 6 7 1 2 5.0 2.0 - + - + ③ ① ② ③ ④ ⑤ ⑥- Manual Stitch Width and Length
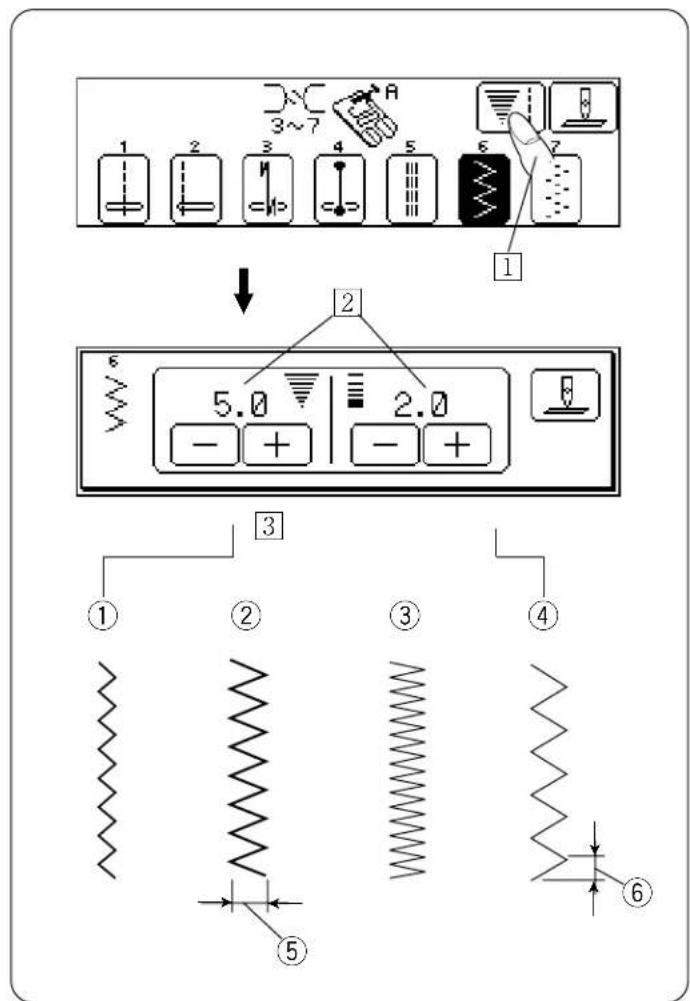
1 Press the ▼ key to change the stitch width and length manually.
②Pre-programmed stitch settings
3 When the - or + key is pressed, the width and the length will be changed accordingly.
① Narrower width (smaller number)
② Wider width (larger number)
③ Denser stitch (smaller number)
④ Coarser stitch (larger number)
⑤ Width
⑥ Length
text_image
Technical diagram showing sewing machine tool and component assembly with numbered parts and labeled partsOvercasting
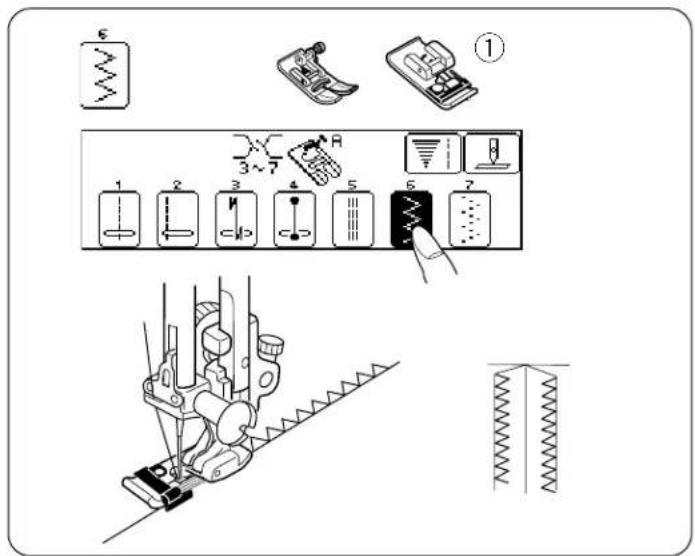
• Zigzag Stitch

This stitch can be used on most woven fabrics. It's the fastest way to finish an edge, leaving it neat and flat.
A dense zigzag can also be used for appliqué.
① C: Overedge foot
Set the stitch width from 0.5 cm (3/16") to 0.7cm (9/32") when the overedge foot C is used to prevent needle breakage or damaging the foot
text_image
Diagram illustrating sewing machine tool components including base, print, and sewing tools with numbered parts and a sewing machine sketch.• Multiple Zigzag

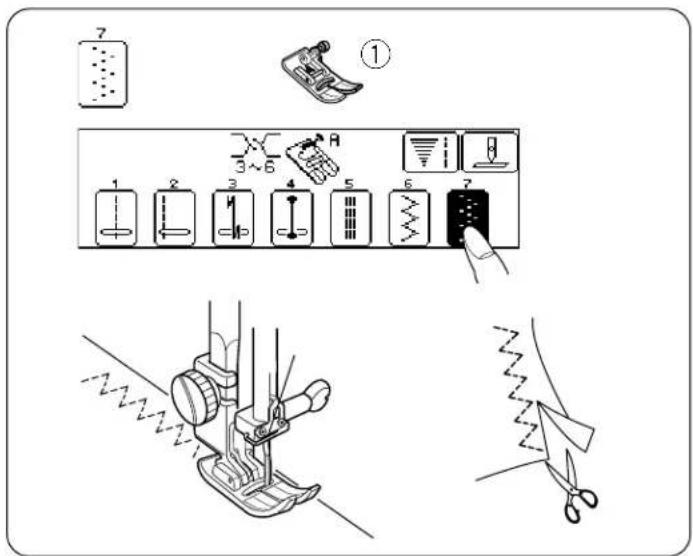
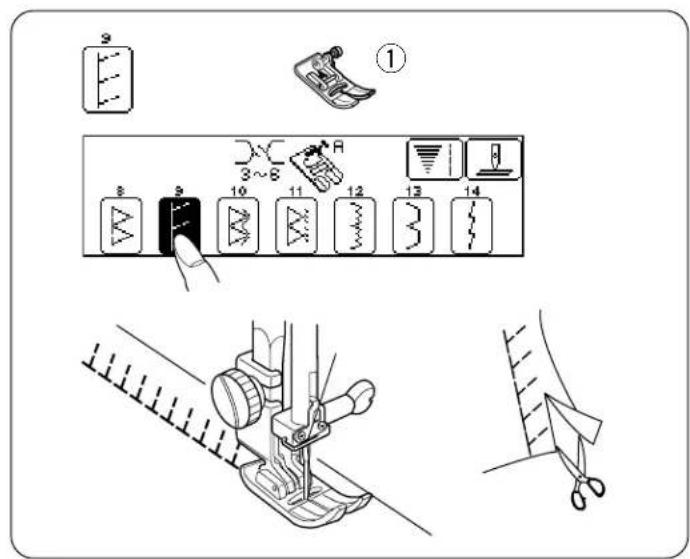
This stitch is used to finish the seam allowance on synthetics and other fabrics that tend to pucker. The stitch is excellent for darning and mending tears. Place your fabric to allow a 1.5 cm (5/8") seam. Trim the seam allowance after sewing.
Note:
Be careful not to cut the stitches.
① A: Zigzag foot
text_image
Technical diagram showing mechanical assembly steps with labeled components and tool icons• Overcasting

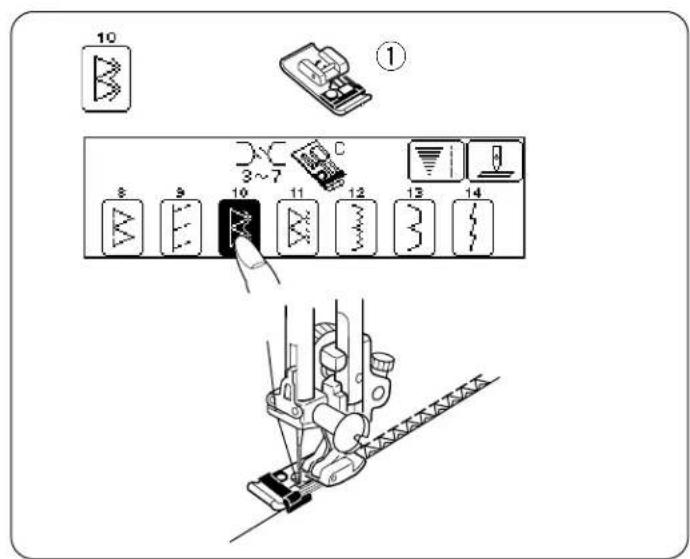
This stitch can be used to simultaneously stitch and overcast seams in one step. Use this stitch when you do not need to press seams open flat. Test the stitch on the actual fabric for best results.
① C: Overedge foot
② Guide
③ Edge of fabric
Set the stitch width at 5.0 cm (3/16") to 7.0 cm (9/32") for overcasting.
text_image
Technical diagram illustrating sewing machine tool components including base, cutting, and sewing machine parts with numbered labels.- Knit Stitch

This knit stitch is ideal for sewing swimwear and stretch velour because it provides the greatest amount of elasticity and strength.
Place your fabric to allow a 1.5 cm (5/8") seam.
Trim the seam allowance after sewing.
Note:
Be careful not to cut the stitches.
① A: Zigzag foot
text_image
10 ① 3~7 C 8 9 10 11 12 13 14• Double Overedge Stitch

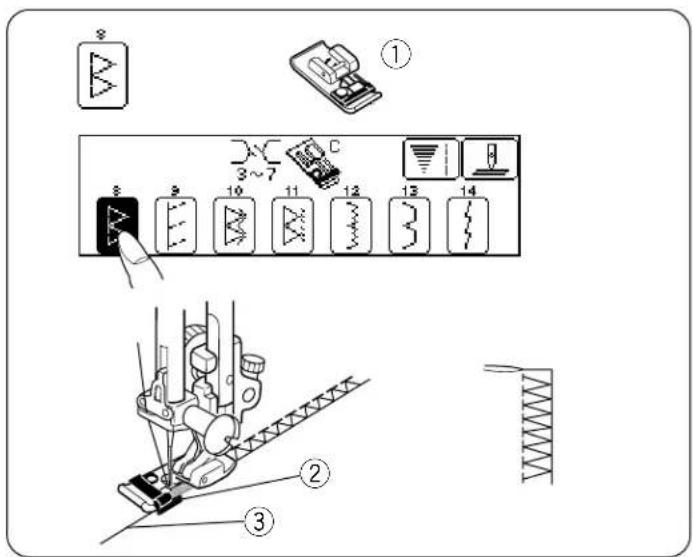
This stitch is an excellent stitch for fabrics that tend to fray extensively such as lines and gabardines. Two rows of zigzag stitches are simultaneously sewn over the edge to insure that your seams will not ravel.
① C: Overedge foot
text_image
Technical diagram showing assembly steps of a sewing machine, including pinning, cutting, and sewing machine components with numbered labels.• Overlock Stitch

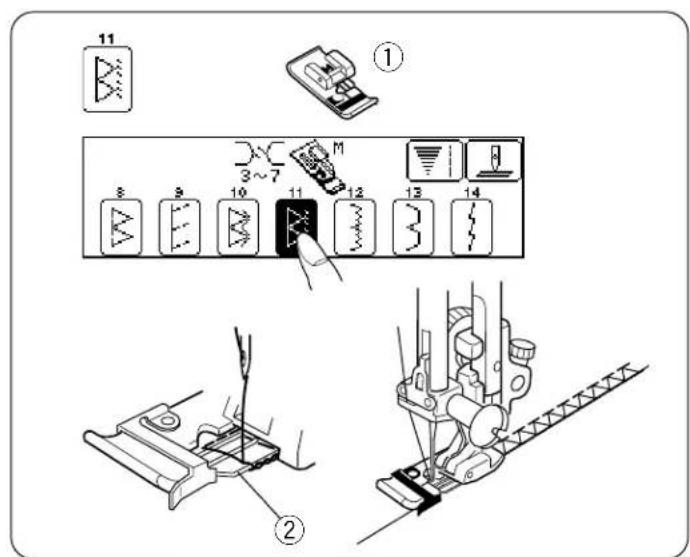
This stitch finishes the edges of your seams similar to a commercial overlocking machine for a professional look.
Ajust the thread tension dial so that the upper and lower threads meet at the edge of the fabric.
① M: Overcasting foot
② Pin
①


②

③

Sensor Buttonholes
• Three types of Buttonhole
① Square Buttonhole
For buttonholes on shirts and blouses.
Stitch patterns 18 and 19 are intended to be used on stretch fabrics.
② Rounded Buttonhole
For buttonholes on shirts and blouses made of fine fabric.
③ Keyhole Buttonhole For buttonholes on jackets.
• Preparation for Sewing
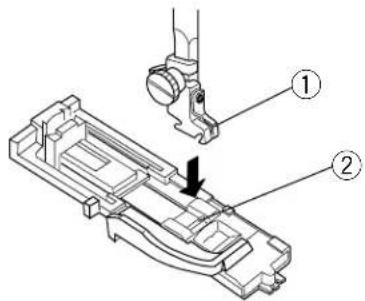
Attach the automatic buttonhole foot R. Make sure the groove on the holder catches the pin on the foot, when lowering the presser foot.
① Groove
② Pin
text_image
Technical diagram of a mechanical assembly with labeled parts ① and ②, showing internal components and a directional arrow.1

text_image
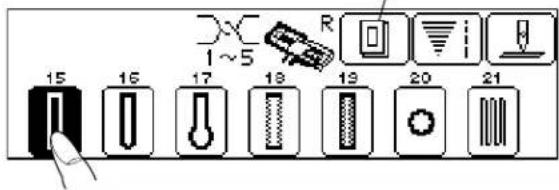
1~5 15 16 17 18 19 20 21• To Sew
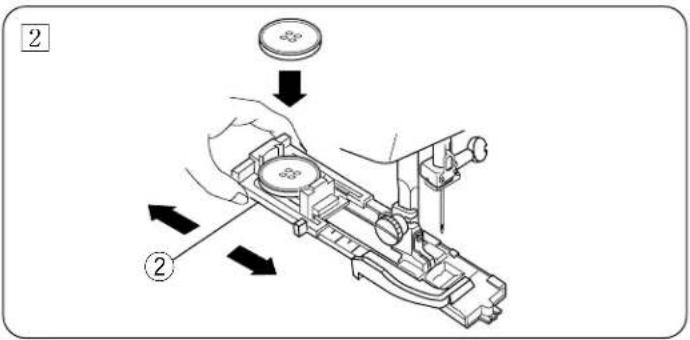
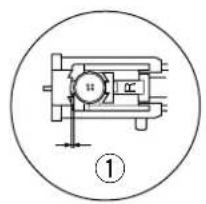
The size of buttonhole is automatically set by placing the button in the rear of the automatic buttonhole foot. The button holder on the foot takes a button up to 2.5 cm (1") in diameter. Alter the buttonhole width to match the material and thread (see page 27). Make a test buttonhole on an extra piece of the fabric to check your settings. Use interfacing on stretch fabrics.
① Buttonhole double sewing key :
If you want to sew double the stitching on a buttonhole, press this key before selecting a buttonhole pattern.
text_image
Technical diagram showing mechanical assembly with labeled parts and directional arrows indicating motion or movement.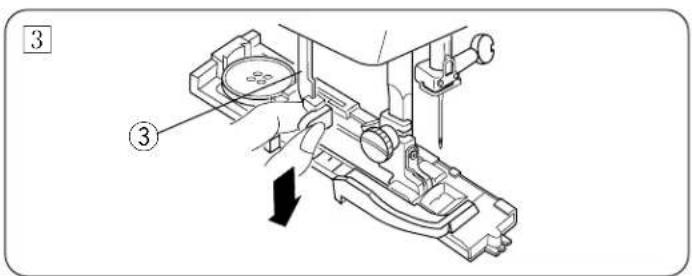
text_image
Technical diagram of a sewing machine with labeled parts and directional arrow indicating motion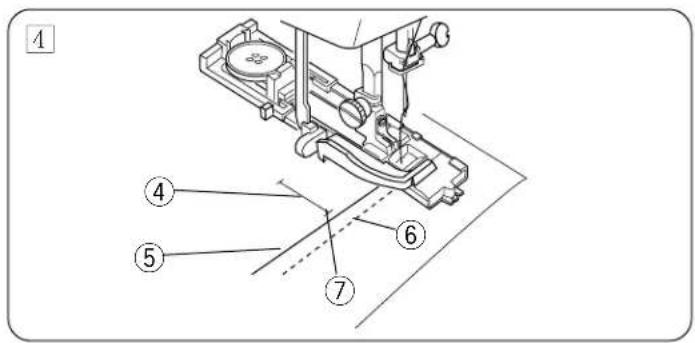
text_image
Technical diagram of a mechanical device with numbered parts labeled 1 through 7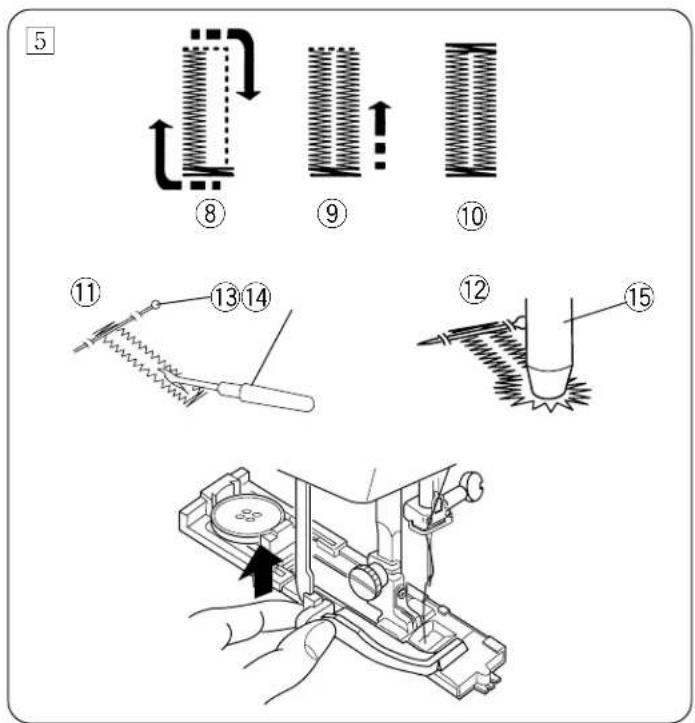
text_image
Technical diagram illustrating a mechanical assembly process with numbered steps and component illustrations.Sensor Buttonhole, cont'd
② Pull the button holder to the back, and place the button in it. Push it together tightly on the button.
② Button holder
③ Pull the buttonhole lever downward as far as it will go.
③ Buttonhole lever
4Draw both threads to the left under the foot. Insert the garment under the foot, and lower the needle at the starting point. Then lower the automatic buttonhole foot.
④ Mark
⑤ Needle thread
⑥ Bobbin thread
⑦ Starting point
5Depress the foot control until the machine stops by itself.
* The buttonhole will be sewn automatically; the front bartack and left row first, then the right row and back bartack. The machine will stop automatically when the buttonhole is completed. Remove the fabric and place a pin just before the bartack at each end to prevent accidentally cutting bartacks. Cut the opening with the seam ripper. When finished, push the buttonhole lever upward as far as it will go.
⑧ Step 1
⑨ Step 2
⑩ Step 3
⑪ Square buttonhole
⑫ Keyhole buttonhole
⑬ Pin
⑭ Seam ripper
⑮ Eyelet puncher
text_image
①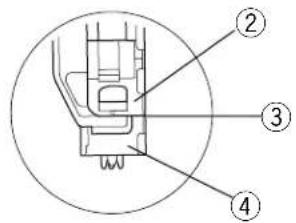
text_image
Technical diagram of a mechanical component with numbered parts labeled ②, ③, and ④.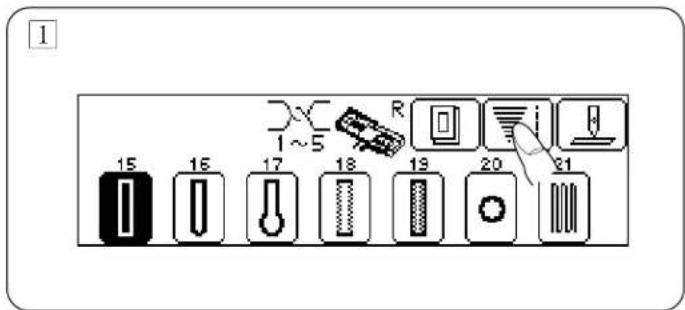
text_image
1 15 16 17 18 19 20 21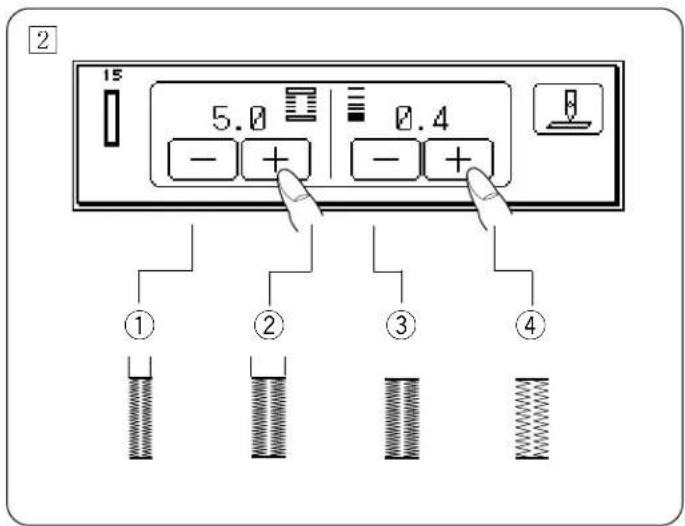
text_image
2 15 5.0 0.4 - + - + ① ② ③ ④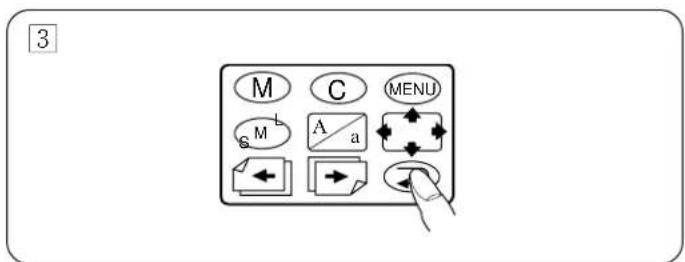
text_image
3 M C MENU 6 M A aSensor Buttonhole, cont'd
If the button is extremely thick, make a test buttonhole. If it is difficult to fit the button through the test buttonhole, you can lengthen the buttonhole by pulling the carriage on the foot back a little extra. The length of the hole will be automatically increased.
① Gap
② Slider
③ There should be no gap.
④ Spring holder
• To Alter Buttonhole Stitch Width and Density
1 Press the ▼ key.
②The pre-programmed stitch setting are shown on the screen.
① Narrow
② Wide
③ Dense
④ Coarse
Return Key :
3 Press the key to return the display to the former one.
text_image
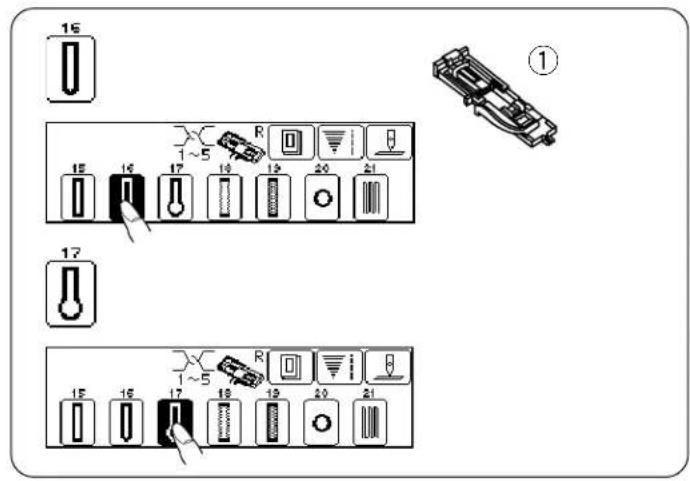
16 15 16 17 18 19 20 21 ① 17 15 16 17 18 19 20 21• Roundend and Keyhole Buttonholes
① R: Automatic buttonhole foot
flowchart
graph TD
    A["16"] --> B["①"]
    B --> C["②"]
    D["17"] --> E["①"]
    E --> F["②"]
    style A fill:#f9f,stroke:#333
    style D fill:#f9f,stroke:#333
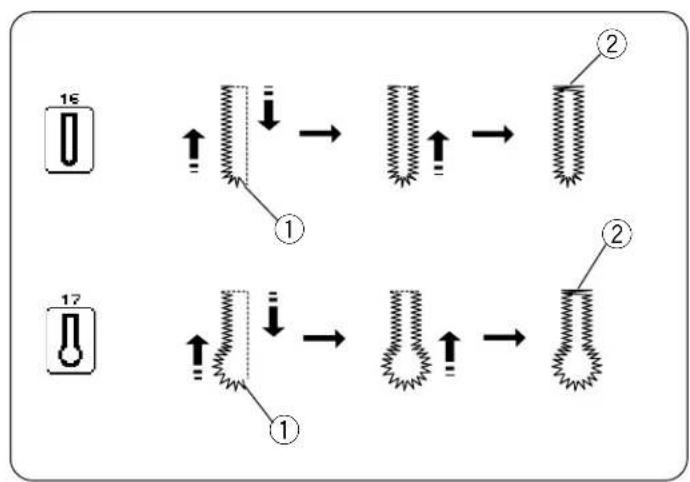
• To sew:
For sewing, use the same procedure as Sensor Buttonhole.
①Starting point
②Bartack
text_image
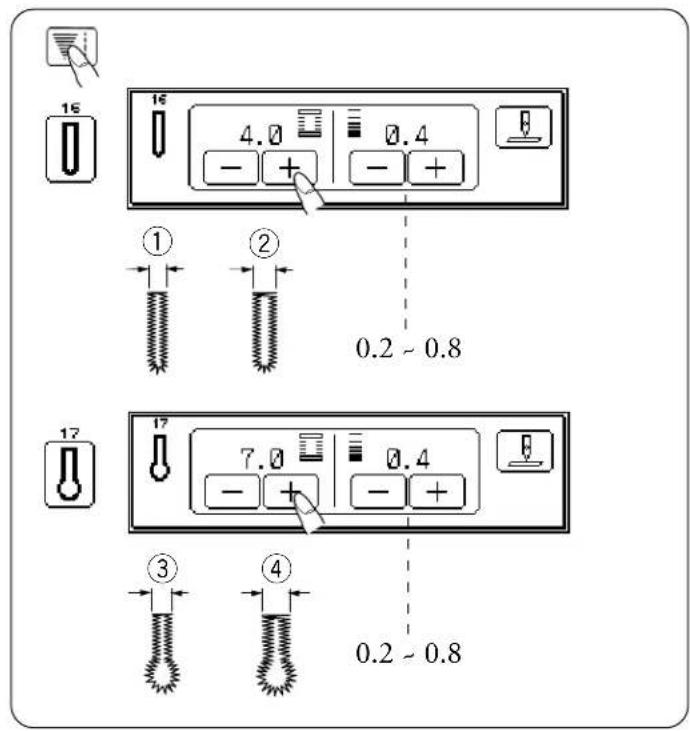
16 16 4.0 0.4 - + - + ① ② 0.2 ~ 0.8 17 17 7.0 0.4 - + - + ③ ④ 0.2 ~ 0.8- Adjust the Stitch Width and Density:
Each time “-” or “+” is pressed, the width and length will be changed.
① Width 2.5
②Width 5.5
You can change the stitch width between 2.5 and 5.5 and the stitch length between 0.2 and 0.8 for pattern 16.
③ Width 5.5
④Width 7.0
You can change the stitch width between 5.5 and 7.0 and the stitch length between 0.2 and 0.8 for pattern 17.
text_image
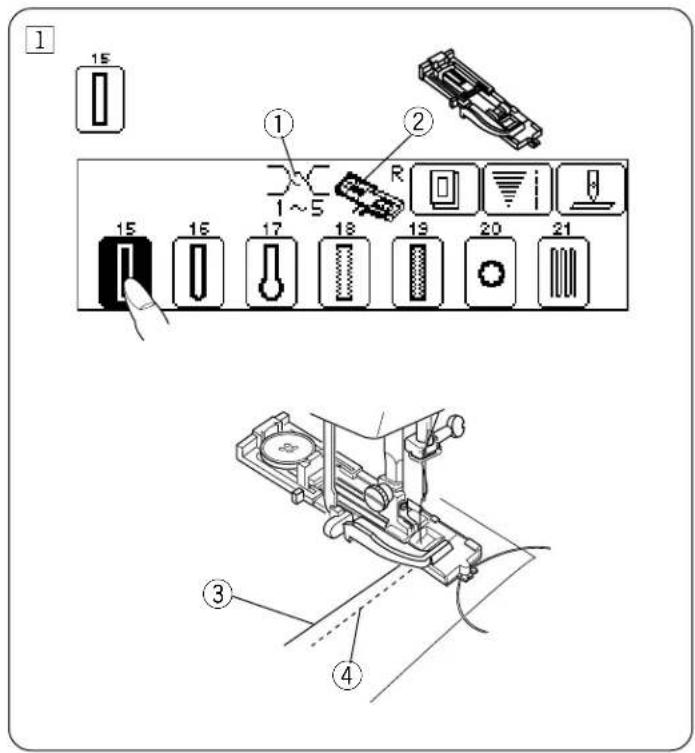
1 15 ① ② R 1~5 15 16 17 18 19 20 21 ③ ④Corded Buttonhole
For sewing, use the same procedure as when the pattern is selected (see pages 25 - 27).
* Set the stitch width to match the thickness of the cord used.
With the buttonhole foot raised, hook the filler cord on the spur at the back of the buttonhole foot. Bring the ends toward you under the buttonhole foot, clearing the front end.
Hook the filler cord into the forks on the front of automatic buttonhole foot R to hold them tight. Lower the needle into the garment where the buttonhole will start and lower the foot.
① Tension
② BH foot
③ Needle thread
④ Bobbin thread
text_image
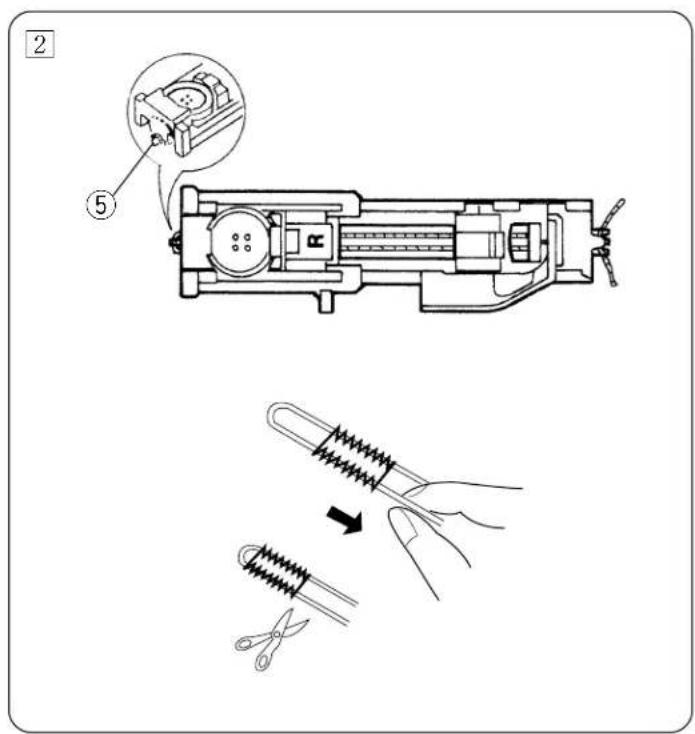
Technical diagram showing a mechanical device with labeled parts and a corresponding illustration of a hand holding scissors.②Depress the foot control gently and sew the buttonhole. Each side of the buttonhole and the bartacks will be sewn over the cord.
Remove the fabric from the machine and cut the sewing threads only.
Pull the left end of the filler cord to tighten it. Thread the end through a darning needle, draw to the wrong side of the fabric and cut.
* To cut the buttonhole opening, refer to the instructions on page 26.
⑤ Spur
text_image
Diagram showing a control panel with labeled components and icons, including a hand gesture and tool icons.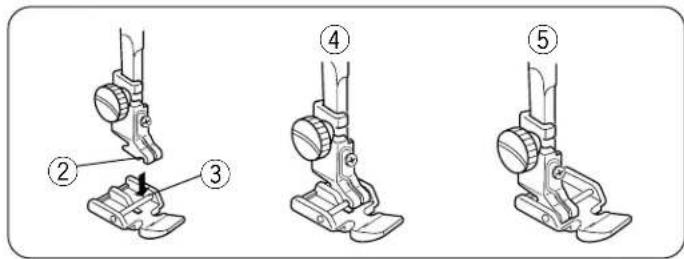
text_image
Diagram showing three different foot positioning steps of a sewing machine, labeled ② to ⑤ with numbered annotations.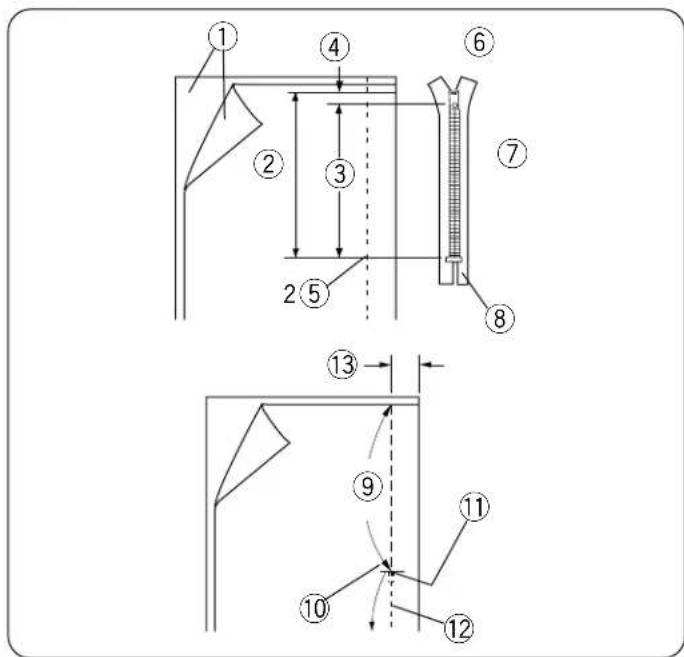
text_image
Technical diagram showing numbered components of a mechanical or architectural assembly with dimension annotations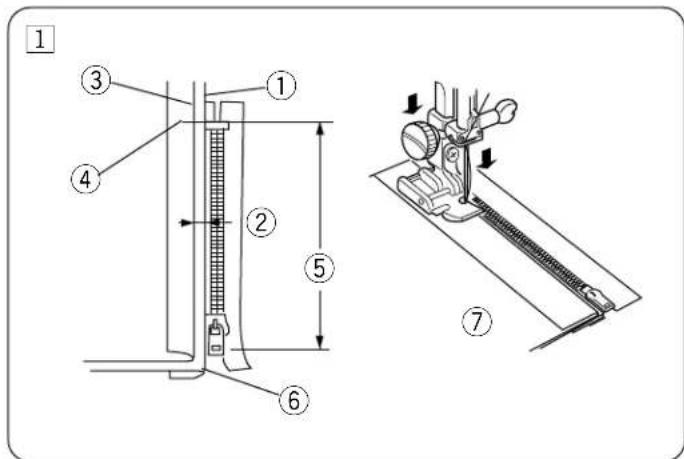
text_image
Technical diagram showing mechanical assembly with numbered components and a sewing machine sketchZipper Sewing

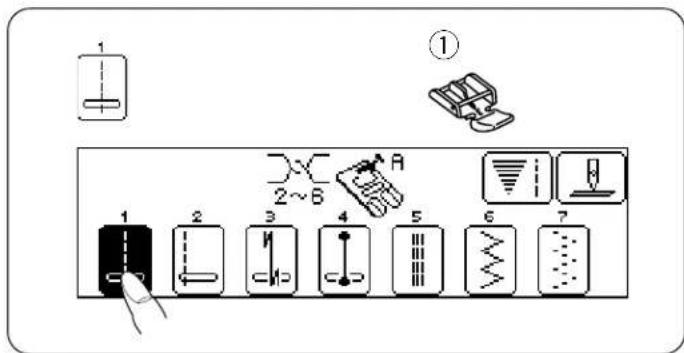
Choose Stitch Pattern 1 and attach Foot E.
① E: Zipper foot
• To Snap On the Zipper Foot
Fit the pin on the zipper foot into the groove on the foot holder.
* To sew the left side of the zipper, attach the zipper foot on the right-hand side. * To sew the right side of the zipper, attach the zipper foot on the left-hand side.
② Groove
③ Pin
④ When the left side is sewn.
⑤ When the right side is sewn.
- Fabric Preparation
Add 1 cm to the zipper size. This is the overall opening size.
①Right side of fabric
⑤End of opening
②Opening size
⑥Slider
③Zipper size
⑦Zipper teeth
④1 cm
⑧Zipper tape
Place right sides of fabric together and sew to the end of the zipper opening. Reverse stitch to lock the stitches.
Manually increase the stitch length to 4.5 and sew the zipper opening.
⑨ 4.5(Stitch Length)
⑫ Straight Stitch
⑩ End of opening
⑬ 2 cm (3/4")
⑪ Reverse stitch
• To Sew
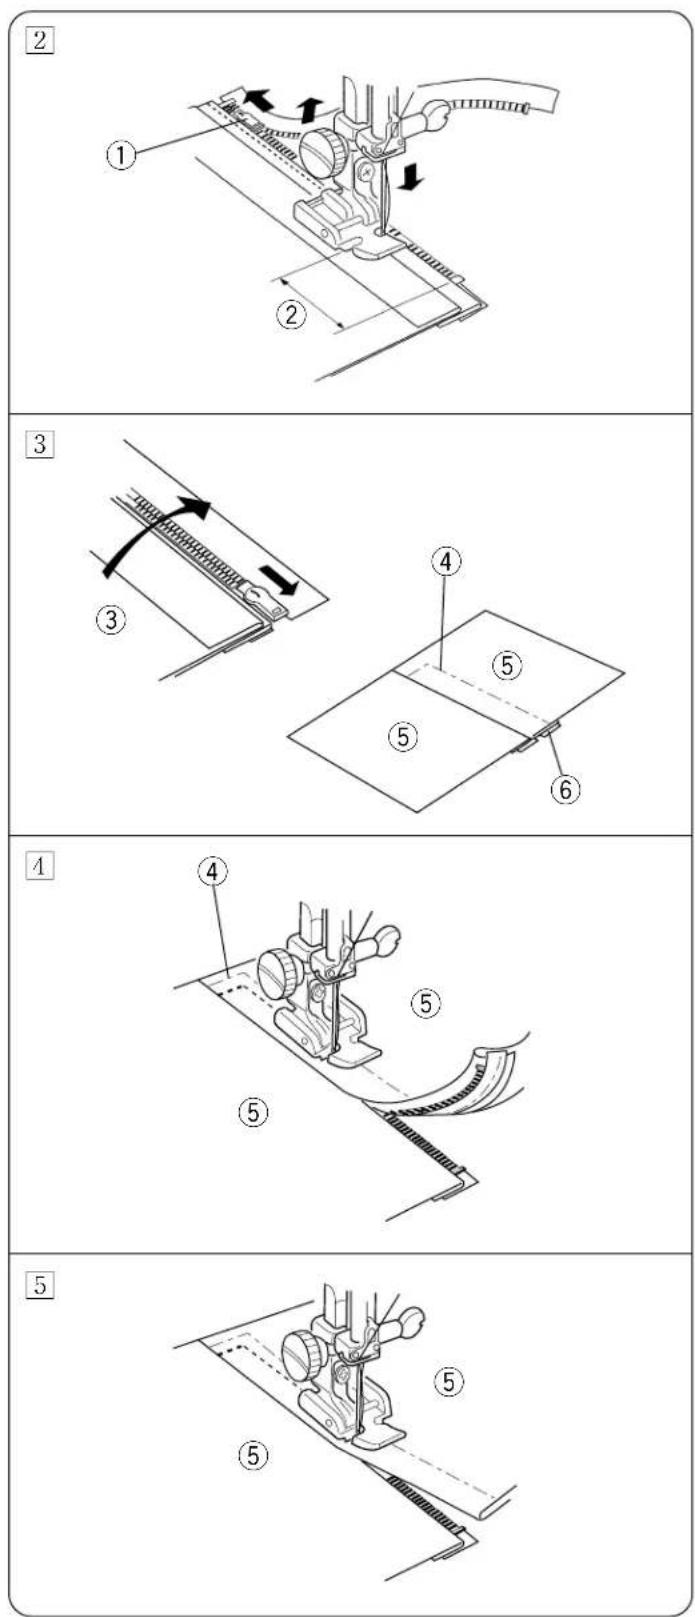
Fold back the left seam allowance. Turn under the right seam allowance to form a 0.2 to 0.3 cm (1/8") fold. Place the zipper teeth next to this fold and pin in place. Attach the zipper foot with the pin on the right hand side. Lower the zipper foot on the top side at the bottom of the zipper so that the needle pierces the fabric next to the fold and the zipper tape.
① Fold
⑤ Opening size
② 0.3 cm (1/8")
⑥ Lower fabric
③ Stitch line
⑦ Wrong side of fabric
④ End of opening
Zipper Sewing, cont'd
② Sew through all layers next to fold. Stop just before the zipper foot reaches the slider on the zipper tape. Lower the needle slightly into the fabric. Raise the zipper foot and open the zipper. Lower the foot and stitch the remainder of the seam.
① Slider
② 5 cm (2")
3 Close the zipper and spread the fabric flat with the right side facing up. Baste the opened fabric and zipper tape together.
③ Wrong side of upper fabric
④ Basting stitch
⑤ Right side of fabric
⑥ Zipper tape
4 Move the zipper foot to the left pin. Guide the edge of foot along the zipper teeth and stitch through the garment and zipper tape. Stop about 5 cm (2") from the top of the zipper.
5 Lower the needle slightly into the fabric, raise the foot, remove the basting stitches and open the zipper. Lower the foot and stitch the remainder of the seam, making sure the fold is even.
text_image
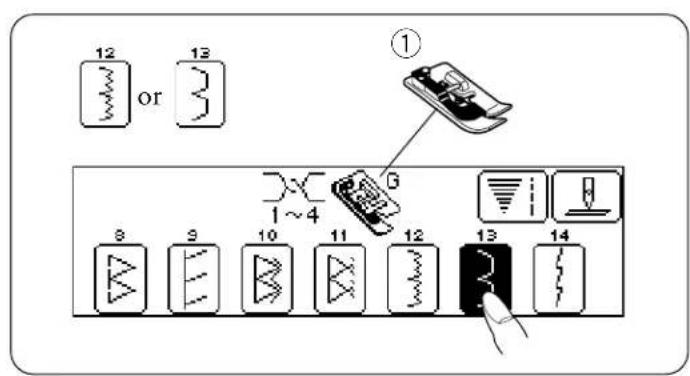
12 or 13 ① 8 9 10 11 12 13 14 1~4Blind Stitch Hemming 3 Choose Stitch Pattern 3 or 3 and attach Foot G.
① G: Blind hem foot
text_image
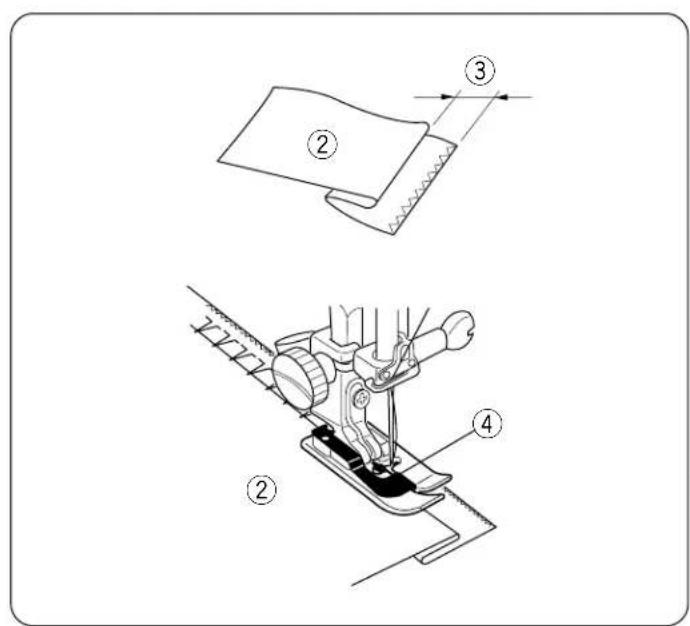
Technical diagram showing two sewing machine steps with labeled parts and dimensionsPosition the fabric so that the folded edge comes to the left side of guide. Lower the presser foot.
Adjust the position of needle swing with the stitch width key so that the needle just pierces the folded edge of the fabric when the needle comes over to the left side.
Sew guiding the folded edge along the guide.
For a professional looking hem, fold the fabric reducing the width to about 0.2 cm(1/8").
As you sew, the right hand stitch will fall off the fabric edge forming a chain stitch.
② Wrong side of fabric
③ 0.4–0.7 cm (5/32"–1/4")
④ Guide
text_image
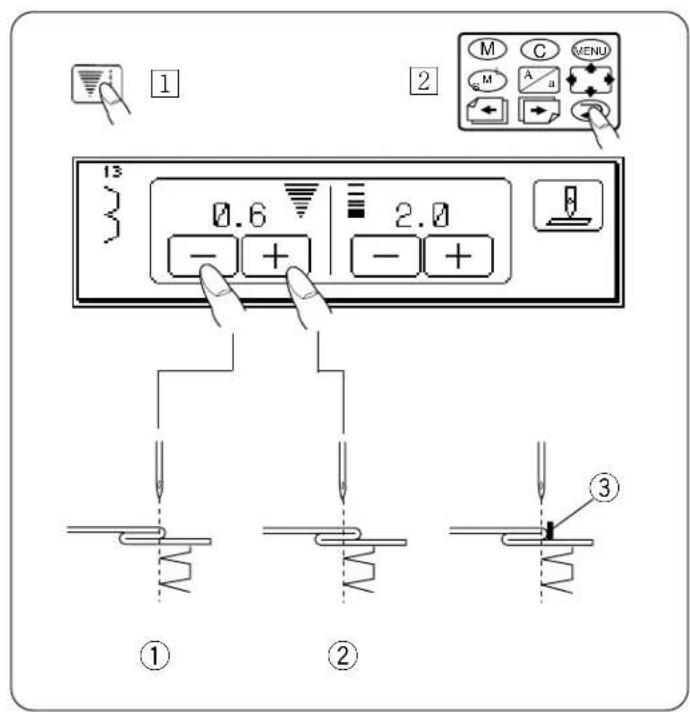
1 2 M C MENU 0.6 2.0 - + - + ① ② ③- Changing Needle Position
1Press the ▼key.
① The needle position is moved to the right.
② The needle position is moved to the left.
②Press the ⬇key to return the display to the former one.
“0.6” on the visual touch screen indicates the distance between the guide and the needle drop point.
③ Guide
* When you choose patterns 3 or 3 the zigzag width cannot be changed. Instead, the needle drop position moves left and right, as shown.
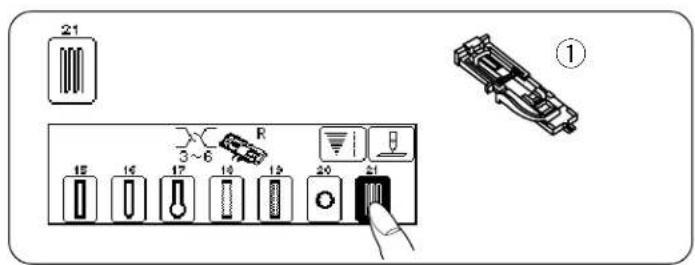
text_image
21 3~6 R 15 16 17 18 19 20 21 ①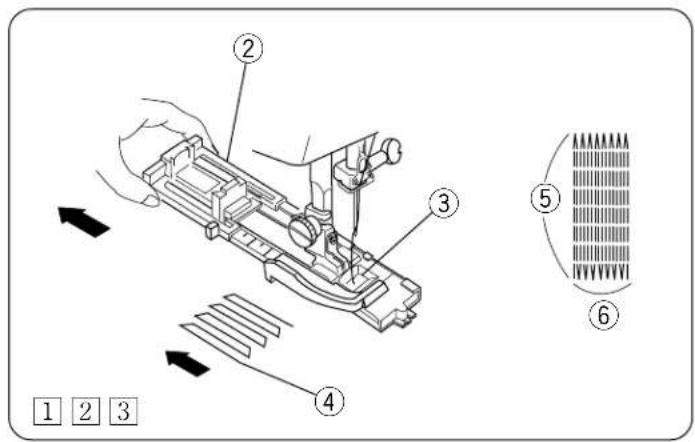
text_image
Technical diagram showing a sewing machine with numbered components and a corresponding schematic of a mesh structure.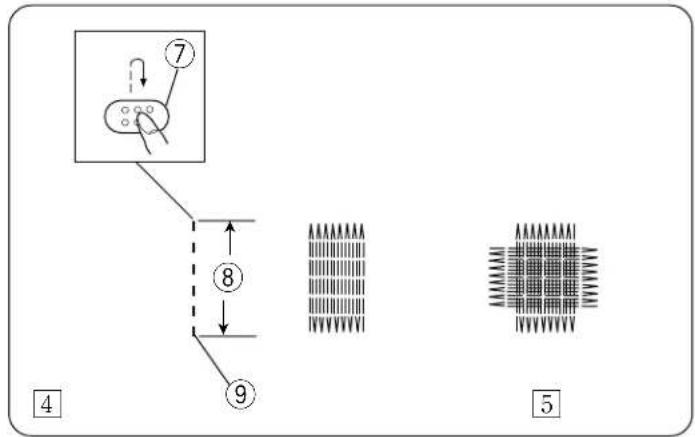
text_image
⑦ ⑧ ⑨ ④ ⑤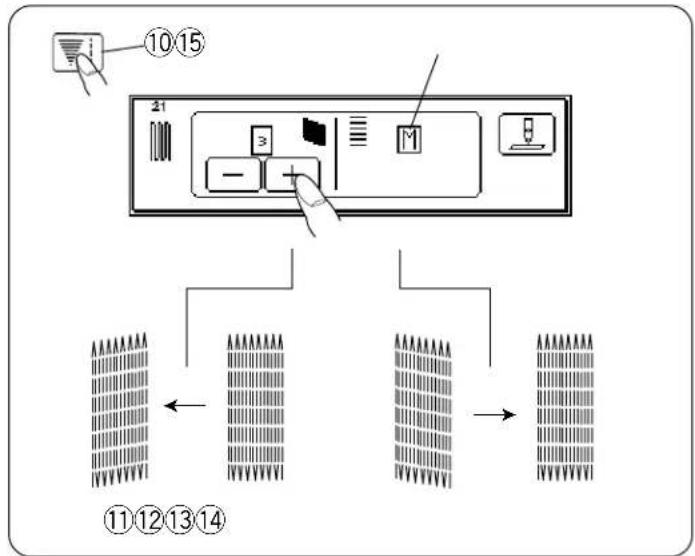
flowchart
graph TD
    A["⑩⑮"] --> B["①⑤"]
    B --> C["②①"]
    C --> D["③④"]
    D --> E["④⑤"]
    E --> F["⑤⑥"]
    style A fill:#f9f,stroke:#333
    style B fill:#ccf,stroke:#333
    style C fill:#cfc,stroke:#333
    style D fill:#fcc,stroke:#333
    style E fill:#ffc,stroke:#333
    style F fill:#cfc,stroke:#333
Darning
①R: Automatic buttonhole foot
1 Pull the button holder to the rear.
② Place the garment under the presser foot. Press the up/down needle button key twice to pull up the bobbin thread.
Remove the fabric to the left to draw both threads under the presser foot and put the fabric under the foot again.
③Place the needle where you would like to sew and lower the foot. Press the foot control.
The machine will lock stitch, sew 16 rows of darning, lock stitch and stop automatically. The machine will lock stitch, sew 16 rows of darning, lock stitch again and stop automatically.
* The size of darn cycle is variable. However, the maximum stitch length is 2 cm (3/4") and the maximum stitch width is 0.7 cm (1/4").
② Button holder
③Foot hole
④Starting point for darning
⑤2 cm (3/4")
⑥0.7 cm (1/4")
[For darning a length of less than 2cm (3/4"),]
4 For darning a length of less than 2 cm.
First stop the machine after sewing the desired length and then press the reverse button. The required length has now been determined. Now, restart the machine and continue sewing until the machine stops automatically.
⑤Turn the fabric to change the sewing direction for repeat sewing from step 1 to 3.
⑦ Reverse key
⑧Length required
⑨Starting point for darning
[To memorize darning stitches:]
When you press the memory key after step 3 and 4 you can repeatedly sew the samesize darn to repair a side rip.
[To adjust the balance of the darning stitches.]
If one side of the darn is higher or lower than the other, make them even by pressing the “-” or “+” key between 1 and 5.
⑩ Stitch width, Stitch length key
⑪When the left side is lower
⑫Select “1” or “2” to balance the stitches.
⑬When the right side is lower
⑭Select "4" or "5" to balance the stitches.
⑮This indication will be shown when you press the Memory key.
![JANOME Harmony 8100 - [To adjust the balance of the darning stitches.] - 1](/content/2026/05/772094/images/70d7505ee95dd6bb0d9d248ff3885424b94f1e86a9421c67ea1729ce61fb8327.jpg)
text_image
20 ① 15 16 17 18 19 20 21 1~4 F ②![JANOME Harmony 8100 - [To adjust the balance of the darning stitches.] - 2](/content/2026/05/772094/images/4e634a8026e47e59630465c5f657f5b6c0815f7efac743e344a773189a05ec9c.jpg)
The pattern 20 can be used to sew a small eyelet for belts passing cord, etc.
Remove the fabric and cut the small eye with the seam ripper, pointed scissors or awl.
① F: Satin stitch foot
②Eyelets
![JANOME Harmony 8100 - [To adjust the balance of the darning stitches.] - 3](/content/2026/05/772094/images/9d3ed500650b82599c00d3cc2af3284280588038d7538aadf57ad35abb9a3bac.jpg)
text_image
22 ① 1~4 F 22 23 24 25 26 27 28Shell Stitch

①F: Satin stitch foot
* Use a lightweight fabric such as tricot.
Fold and stitch on the bias.
Set the stitch width and length as you desire.
You may need to tighten the top thread slightly.
Allow the needle to just clear the folded edge of the fabric when it zigzags.
If you sew rows of shell stitches, space the rows 1.5 cm (5/8") apart.
You can sew shell stitches on knits or soft silky wovens in any direction.
text_image
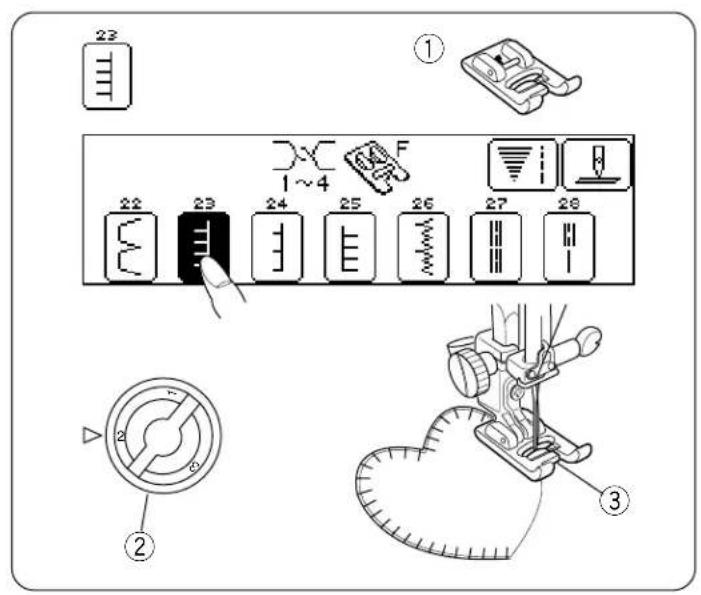
22 ① 1~4 F 22 23 24 25 26 27 28 ② ③Appliqué

① F: Satin stitch foot
Stitch patterns 24, 25 and 26 can be used for appliqué. In this type of appliqué raw edges are folded under.
To finish the raw edge, first cut the appliqué design out of cardboard.
Fuse a lightweight interfacing to the wrong side of the fabric, then cut the fabric slightly larger than the cardboard.
Fold the fabric around the cardboard and press to form a perfectly shaped design.
Tape the appliqué in place and sew, guiding the slit on Foot F next to the finished edge of the appliqué.
② Pressure dial
③ Slit
text_image
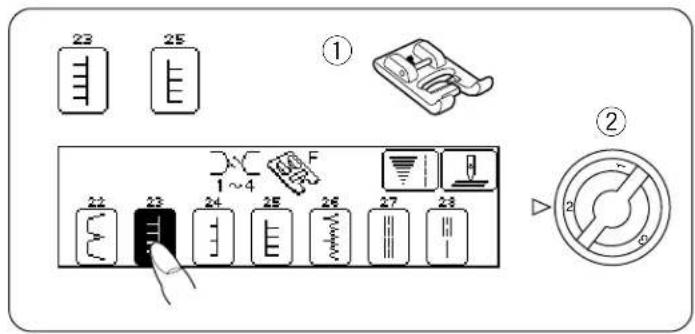
23 25 ① 22 23 24 25 26 27 28 ②Drawn work 23 25
①F: Satin stitch foot
②Pressure dial "2"
* You can also use stitch pattern

1
natural_image
Illustration of a hand holding a ruler above a vertical line, with an arrow indicating measurement direction (no text or symbols)2
natural_image
Technical line drawing of a sewing machine needle stitching a slotted edge (no text or symbols)3
natural_image
Pure electrical circuit lines without any symbols4
natural_image
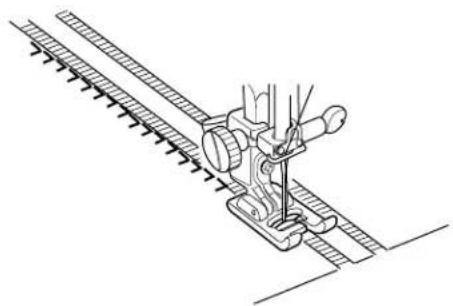
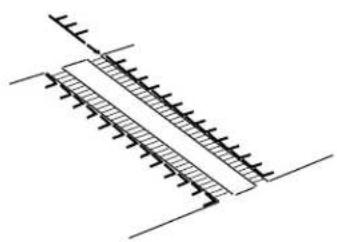
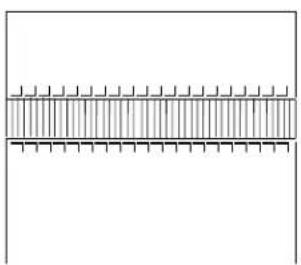
Pure electrical circuit lines without any symbols1 Pull out one or two threads beside the both sides where you would like to sew the drawn work, as shown.
2 Select the pattern 22. Sew down the left side where you pulled out the threads.
3 Select the pattern 25. Sew down the right side.
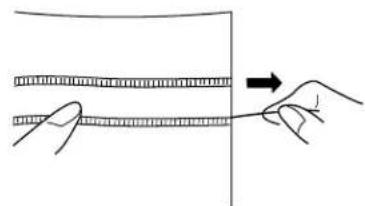
4 After both sides are sewn where you pulled out threads, pull out all the remaining threads from the fabric, as shown.
* After sewing, reset the pressure dial to "3".
text_image
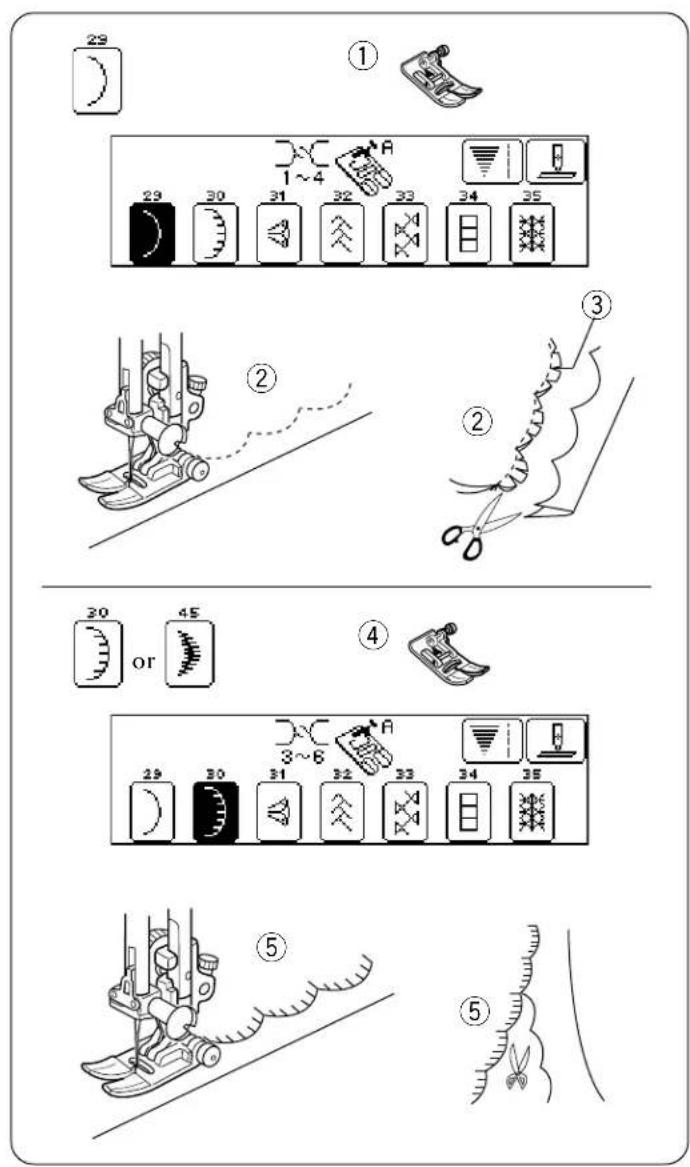
29 ① 29 30 31 32 33 34 35 ② ③ ② 30 or 45 ④ 29 30 31 32 33 34 35 ⑤ ⑤Scallop Hems

①A: Zigzag foot
②Wrong side of fabric
③Trimming
Fold fabric with the right sides together. Sew scallops 1cm (3/8") from folded edge.
Trim close to stitching leaving 0.3 cm (1/8") seam allowance.
Clip seams as shown or trim with pinking shears. Turn the fabric to right side and press.
- Edging

④ A: Zigzag foot
Some of the craft patterns can be used to attractively finish the edges of collars, pockets and place mats.
To edge a collar, place interfacing between upper and under collar and sew the pattern on the seam line.
After sewing, trim fabric close to stitching, taking care not to cut thread.
⑤ Right side of fabric
text_image
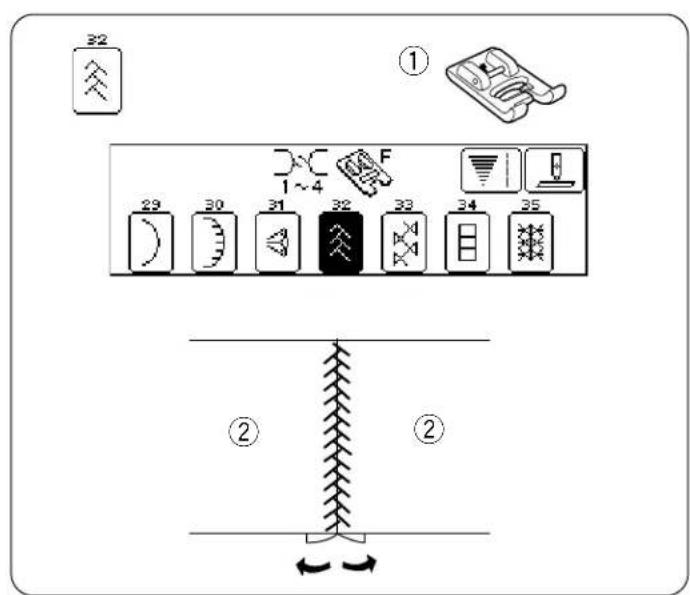
32 ① 23 30 31 32 33 34 35 1~4 F ② ②Patchwork

①F: Satin stitch foot
Sew seam and press seam allowance open. Sew pattern stitch on right side of garment centering over the seam line.
② Right side of fabric
text_image
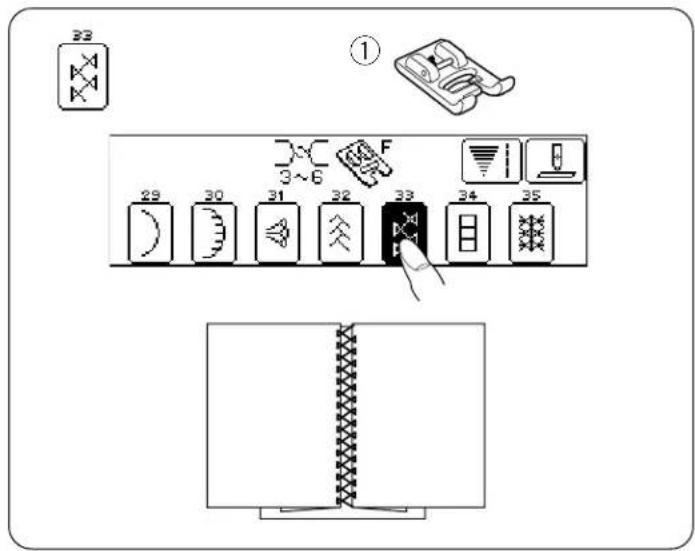
22 ① 29 30 31 32 33 34 35Fagoting

①F: Satin stitch foot
Fold under 1.5 cm (1/2") on each fabric edge and press.
Pin the two edges to paper 0.3 cm (1/8") apart.
Sew slowly guiding the fabric so the needle catches the folded edge on each side.
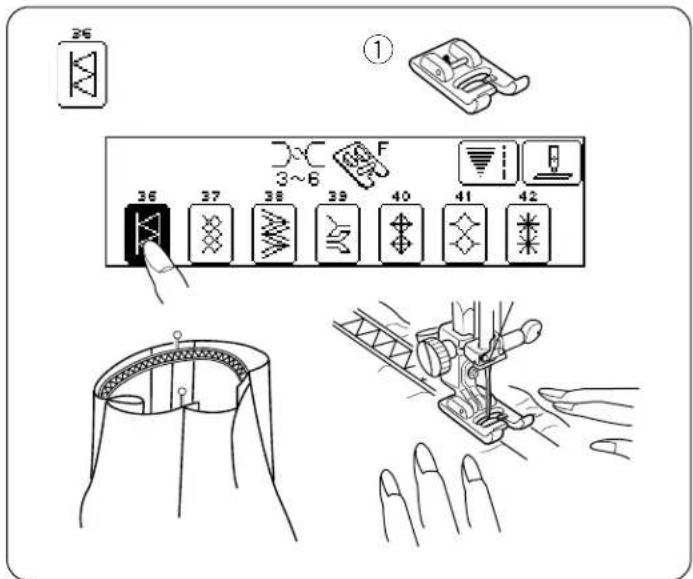
text_image
26 ① 36 37 38 39 40 41 42 3~6Elastic Stitch

①F: Satin stitch foot
Choose this stitch to attach elastic to garments.
Mark the elastic into quarters and match these to the center front, center back and side seams.
Place the middle of the elastic under the center of the presser foot and stitch into place, making sure the elastic is evenly distributed.
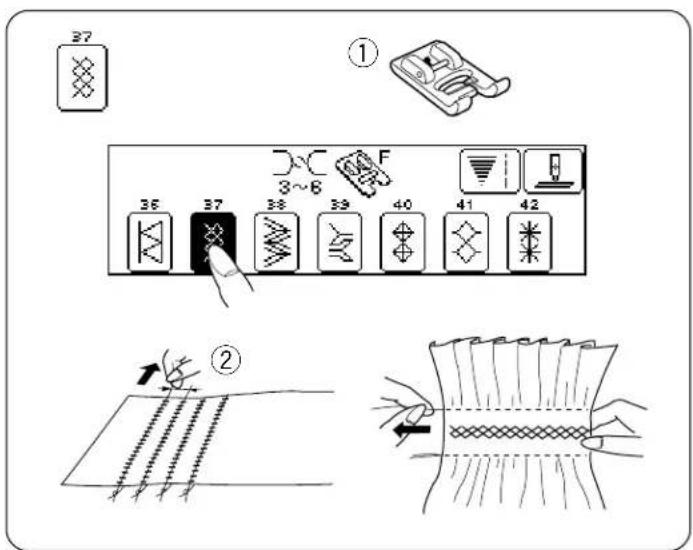
text_image
37 ① 36 37 38 39 40 41 42 ②Smocking

①F: Satin stitch foot
With the manual stitch length at 4.5, sew straight lines 1 cm (3/8") apart, across the area to be smocked.
A looser needle thread tension will make gathering easier. Knot the threads along one edge.
Pull the bobbin threads and distribute the gathers evenly.
Secure the threads at the other end.
Reduce the tension and pressure if necessary and sew pattern stitches between the straight seams.
Pull out the gathering stitches.
② 1.0 cm (3/8")
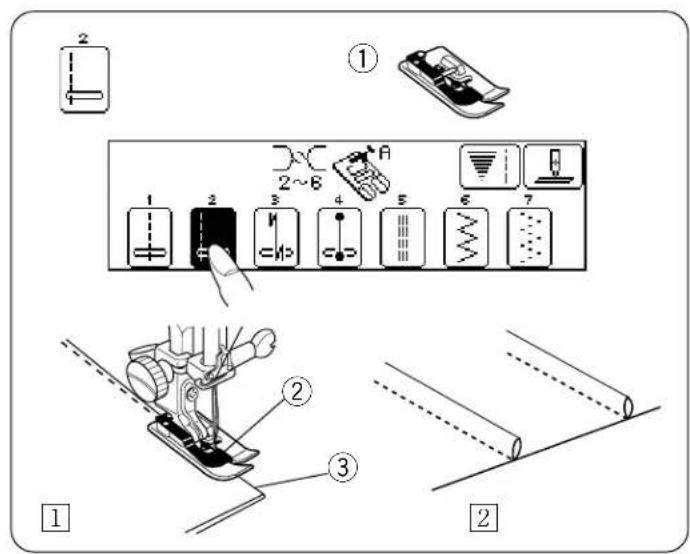
text_image
Technical diagram illustrating sewing machine tool components with numbered parts and labeled partsPintucking

①G: Blind hem foot
①Fold the fabric with wrong side together. Position the folded edge next to the fabric guide.
Lower the presser foot. Sew the folded edge, guiding it along the fabric guide.
2 Press the pintucks to one side.
② Guide
③Folded fabric
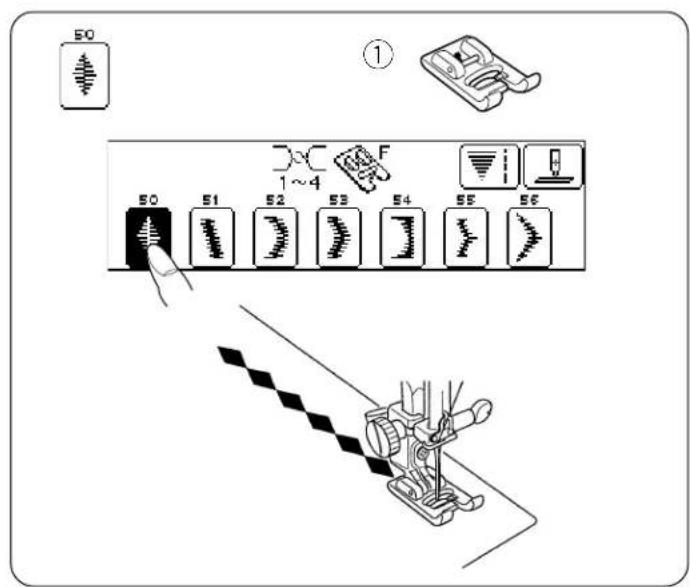
text_image
50 ① 50 51 52 53 54 55 56 1~4 FDecorative Stitch
①F: Satin stitch foot
For a delicate appearance on fabric such as chiffon, use a single layer with a teat-away backing if necessary.
* You can use stitch patterns 43 through 63 for decorative stitching.
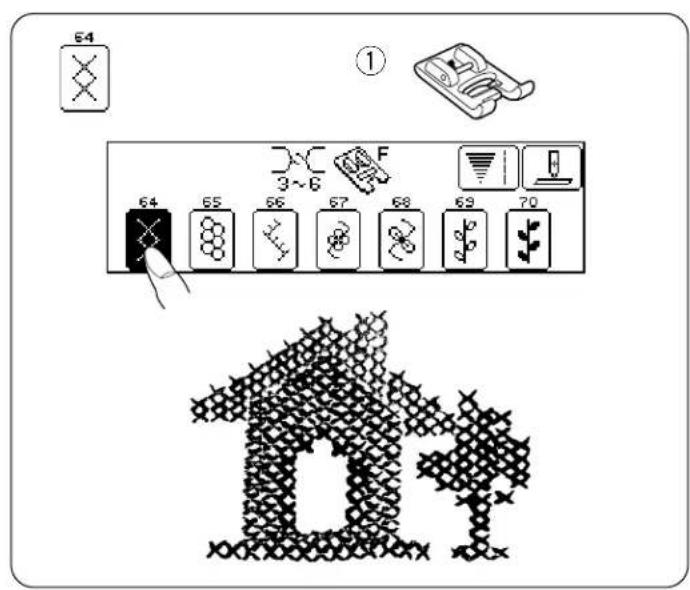
text_image
54 ① 64 65 66 67 68 69 70Cross Stitch
①F: Satin stitch foot
You'll love the beautiful designs you can sew with this craft stitch pattern, and in half the time it would take if embroidered by hand.
1
text_image
Diagram showing a hand holding a screwdriver with labeled component 1 and directional arrow indicating motion2
text_image
Diagram showing three-step tool installation steps with labeled parts and directional arrows3
natural_image
Simple line drawing of a hand holding a tool or probe (no text or symbols)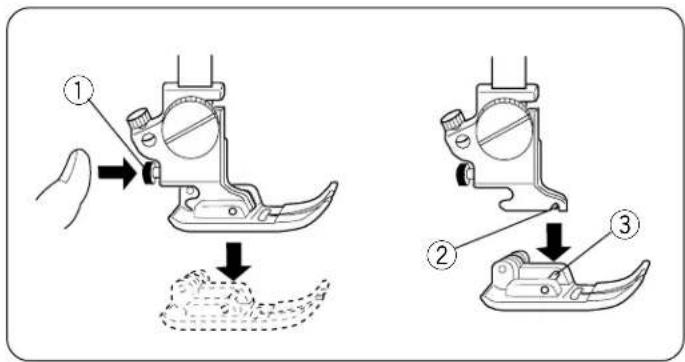
text_image
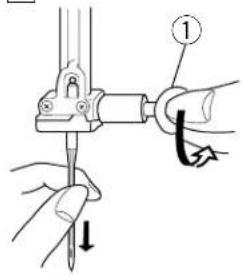
Diagram illustrating three-step shoe sewing process with labeled steps and directional arrowsChanging Needles
☐ Raise the needle by pressing the up/down needle button and lower the presser foot.
Turn off the power switch.
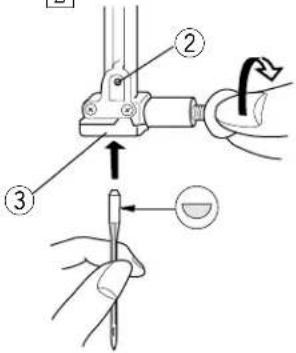
Loosen the needle clamp screw by turning it counterclockwise.
② Remove the needle from the clamp.
Insert the new needle into the needle clamp with the flat side to the rear.
When inserting the needle into the clamp, push it up as far as it will go and tighten the clamp screw firmly.
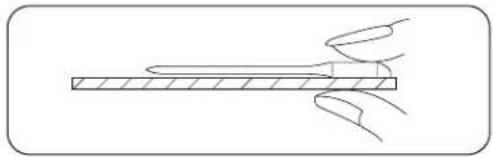
3 To find a good needle, put the flat side of the needle onto something flat (a needle plate, glass, etc.).
The gap between the needle and the flat surface should be consistent. Never use a bent or blunt needle.
① Needle clamp screw
② Pin
③ Needle clamp
To Attach and Remove Presser Feet
Press the red button on the back of the foot holder. The presser foot will drop off.
Place the selected presser foot so the pin on the foot lies just under the groove of the foot holder. Lower the presser bar to lock the foot in place.
① Red button
② Groove
③ Pin
text_image
Technical diagram of a sewing machine with labeled parts and connection points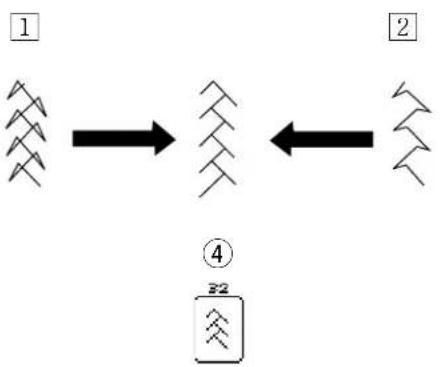
flowchart
graph TD
    A["1: Triangle arrangement"] --> B["2: Double arrow structure"]
    B --> C["4: Box containing 32 symbols"]
Adjusting Pattern Balance
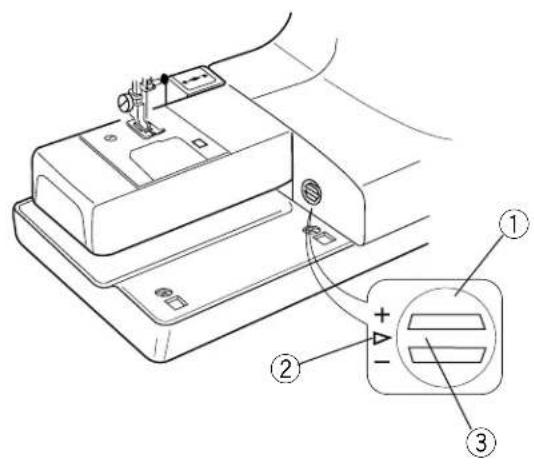
If stretch stitch patterns are uneven when you sew on a particular fabric, adjust them with the feed balancing dial.
① Feed balancing dial
② Standard mark
③ Setting mark
• To Adjust distorted patterns
1 If patterns are compressed, correct by turning the dial in the direction of “+”.
2 If patterns are drawn out, correct by turning the dial in the direction of “-”.
④ Example: Stitch pattern
SECTION IV PROFESSIONAL STYLE EMBROIDERY
Getting Ready to Sew Professional Style Embroidery
- Interfacing
Interfacing material for embroidery is available in adhesive type (iron-on) and non-adhesive type. Interfacing should be attached to the wrong side of fabric. (More than one layer may be required).
The non-adhesive type should be used with fabric which cannot be ironed or on sections which are difficult to iron. For both types, cut the interfacing larger than the embroidery frame and set it on the frame so that the entire piece is fastened in it.
* Note that the ironing temperature varies with the kind of adhesive interfacing.
Selection of interfacing
To obtain perfectly formed letters, it is important to use the correct interfacing:
* Adhesive type (iron-on) Use for stretch fabric (such as knit), thin fabric and shrinkable fabric.
* Non-adhesive type Use for firm fabrics and fabrics which cannot be ironed.
Note:
In embroidery sewing, the foot control cannot be used. Please use the start/stop button.
- Selecting Needle and Thread
| WEIGHT OF FABRIC | TYPE OF THREAD | TYPE OF NEEDLE | NEEDLE SIZE |
| Light Medium | Size 50Machine Embroidery Thread(Janome Embroidery Thread) | Universal Ball Point Blue Tipped Needle | 11 (75) |
| Heavy | Size 50 to 100Synthetic | Universal | 14 (90) |
* For embroidery sewing, we recommend Janome embroidery bobbin thread.
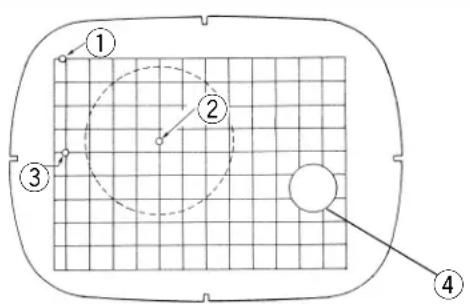
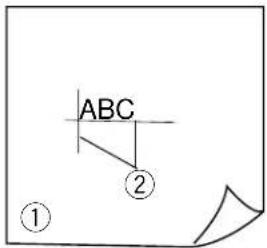
- Template
The illustration shows various strating points.
① Starting point for optional Memory Card #2, #3, etc.
② Starting point for optional Memory Card #102, #103, etc.
③ Starting point for Monogramming (see page 43).
④ Thumb hole (see page 43).
text_image
Diagram of a grid layout with numbered annotations indicating positions or zones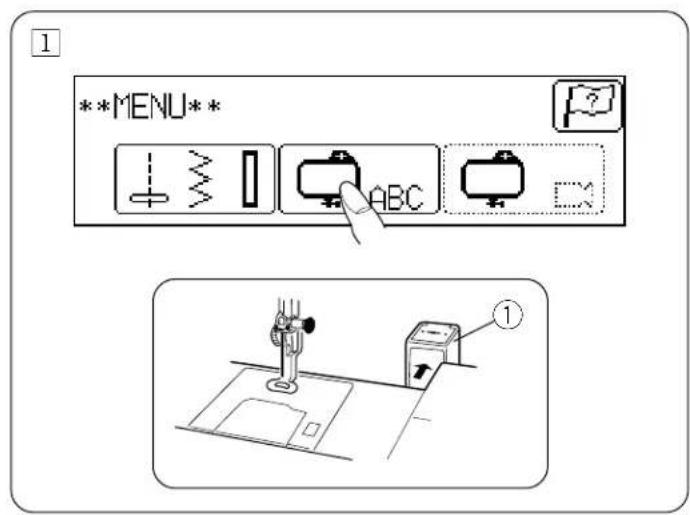
text_image
1 **MENU** ABC ①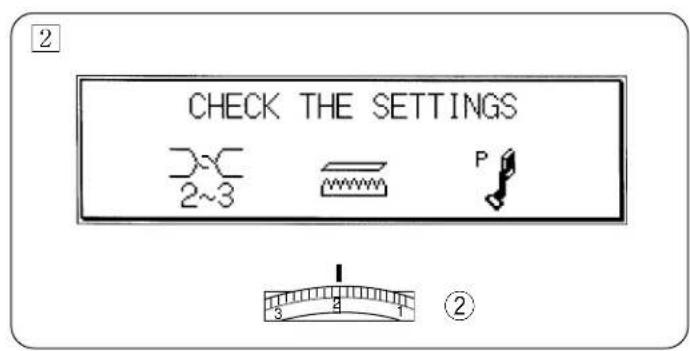
text_image
CHECK THE SETTINGS 2~3 P ②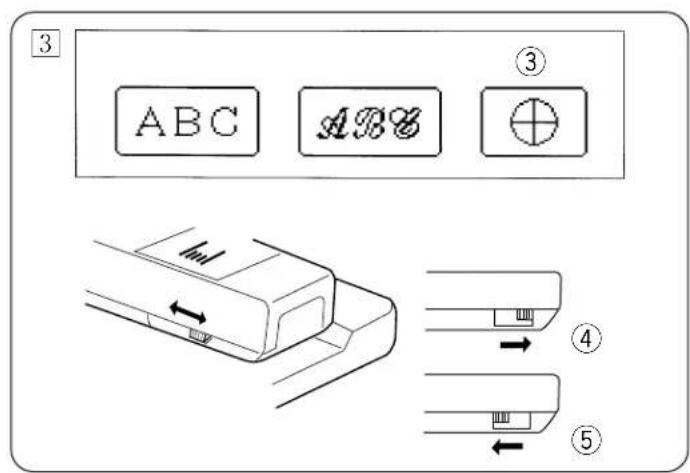
text_image
3 ABC ABC ③ ④ ⑤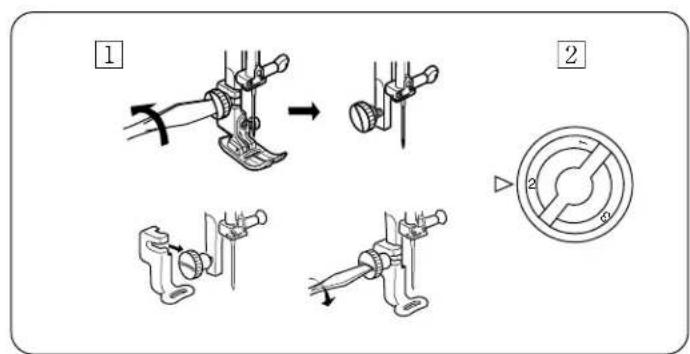
text_image
Technical diagram showing mechanical assembly steps with labeled components and a circular dial indicator.Using Built-in Monogramming Mode
1Turn on the power switch:
When the built-in monogramming mode key is selected, the carriage will move.
* Make sure nothing is blocking it.
* Before turning off the power switch and covering the machine, be sure to return to the first menu. This will return the carriage to its home position.
* Avoid turning the handwheel by hand while the carriage is moving.
① Carriage
② A setting reminder message is displayed for three seconds. Suitable thread tension level is indicated. Adjust the top thread tension by turning the thread tension dial, if necessary. Make sure that the feed dog is in lowered position. Attach the embroidery foot P.
② Thread tension dial
Clothsetter Key
3 Alphabet (block style or script style) can be selected.
The clothsetter key ⊕ is for using the clothsetter (optional).
Press the menu key to return to the menu screen.
③ Clothsetter Key : ⊕
④ Raised position
⑤ Lowered position
• To Attach Embroidery Foot P
☐ Raise the presser foot lifter, loosen the screw and remove the foot holder.
Attach Embroidery Foot P and securely tighten the screw with the screwdriver.
② Set the pressure dial at “2”.
Note: After the completion of sewing, return the dial position "3".
1
text_image
ABC ② ①2
text_image
Technical diagram showing labeled parts of a mechanical assembly with numbered annotations3
text_image
Medical diagram showing a hand holding a medical device with an inset close-up of the device's rotation.4
text_image
Technical diagram showing a device with labeled parts and magnified views, including grid, arrow, and linear measurements.5
natural_image
Line drawing of a mechanical component with a housing and cable, no text or symbols present6
natural_image
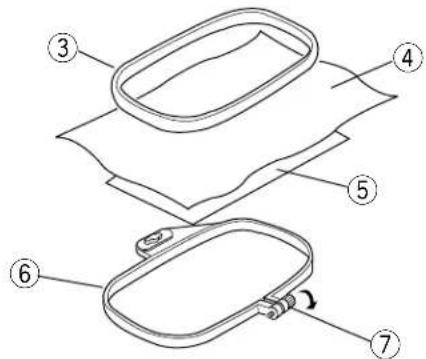
Diagram of a hand holding a rectangular object with an arrow and dashed outline, no text or symbols present• To set the Fabric in the Embroidery Hoop
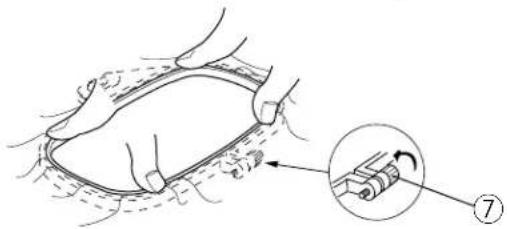
①First, mark the embroidering position on the fabric with tailor's chalk.
① Fabric
② Reference line
②Second, loosen the tightening screw on the outer hoop, lay the fabric on it, and press the fabric down with the inner hoop.
③ Inner hoop
④ Right side of fabric
⑤ (Interfacing)
⑥ Outer hoop
⑦ Hoop tightening screw
③Third, tighten the hoop screw with your fingers.
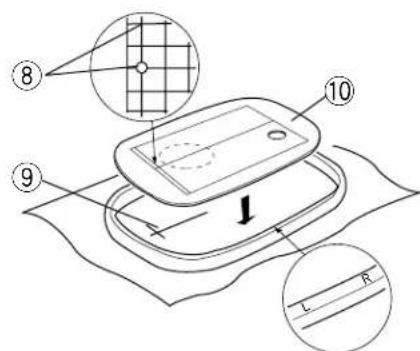
4 Put the template on the fabric, and match the reference lines on the template and fabric.
⑧ Reference lines on the template
⑨ Reference line on the fabric
⑩ Template
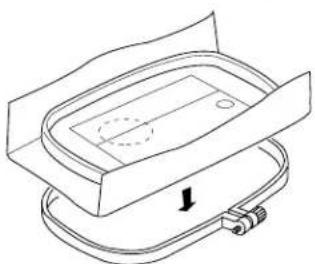
5 Press them all into the outer hoop taking care that the reference lines on the fabric and template do not move away from each other.
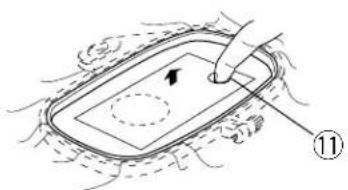
⑥Take out the template by putting your finger in the thumb hole.
⑪ Take off hole (thumb hole)
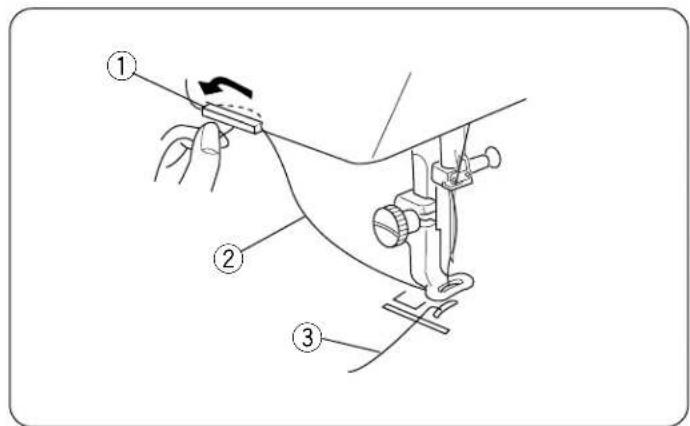
text_image
Diagram of a sewing machine needle with labeled parts including handle, roller, and base• Threading the Machine
For threading, refer to the description of ordinary sewing (see page 10).
Pass the needle thread through the hole in the Embroidery Foot P in the downward direction, and guide the thread around the thread holder from the front side. (Leave 2 to 3 cm [1"] hanging.)
① Thread cutter
② Needle thread
③ Bobbin thread
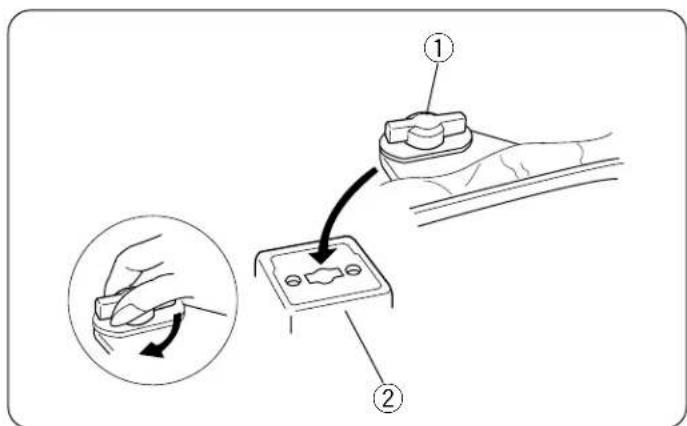
text_image
Diagram showing hand holding a switch with labeled parts and a magnified view of the switch being inserted.• To Attach the Embroidery Hoop to the Machine
Turn the knob so it is parallel with the hoop, and set it on the carriage.
Attach the outer hoop by fitting the prong into the carriage, and turning the knob clockwise.
① Knob
② Carriage
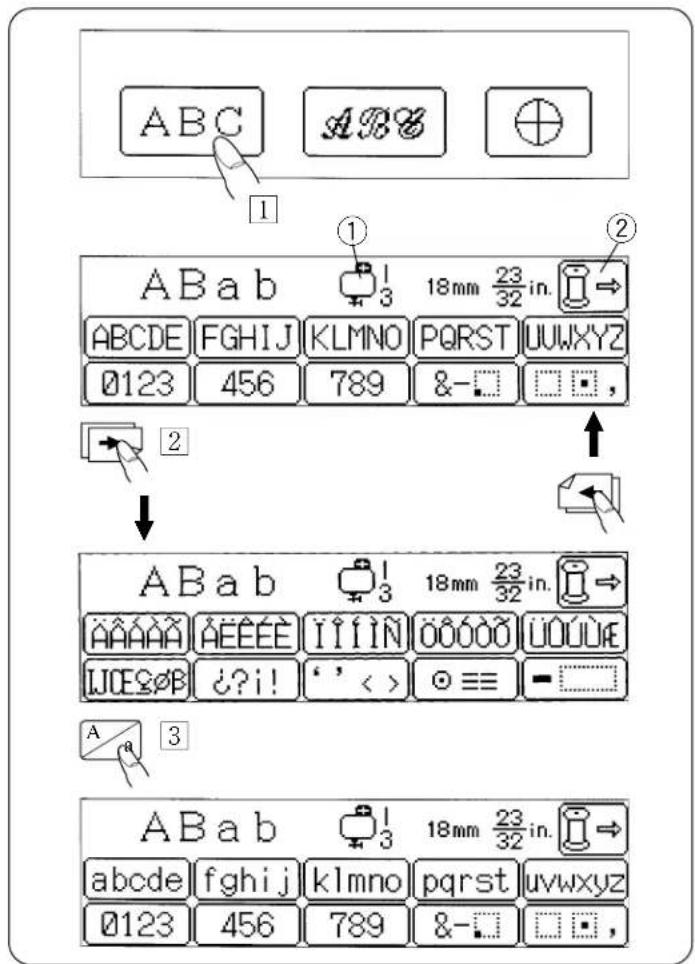
text_image
ABC ABC ① ② ABab 18mm 23/32 in. ABCDE FGHJ KLMNO PQRST UUWXYZ 0123 456 789 &-□ □ □ , ③ ABab 18mm 23/32 in. AABAA AEEE E I I I N OOOOO UOUUE LICES∅B ??i! ' ' < > ⊙ ≡ = - □ A 3 ABab 18mm 23/32 in. abcde fghij klmno pqrst uvwxyz 0123 456 789 &-□ □ □ ,Sewing Built-in Letters and Numbers
• To Select Letter Style (Block Style Letters)
1 Press the ABC key to select block style letters.
① The number next to the symbol indicates which number embroidery hoop may be used.
(Embroidery Hoop 3 is optional.)
② Color select key: this (see page 47) key to change the needle thread color.
② When the ▶key is pressed, European letters (block style) can be selected.
The ◀key returns to the previous screen.
Letter StyleKey : A a
3The A/a key alternately selects uppercase or lowercase each time pressed.
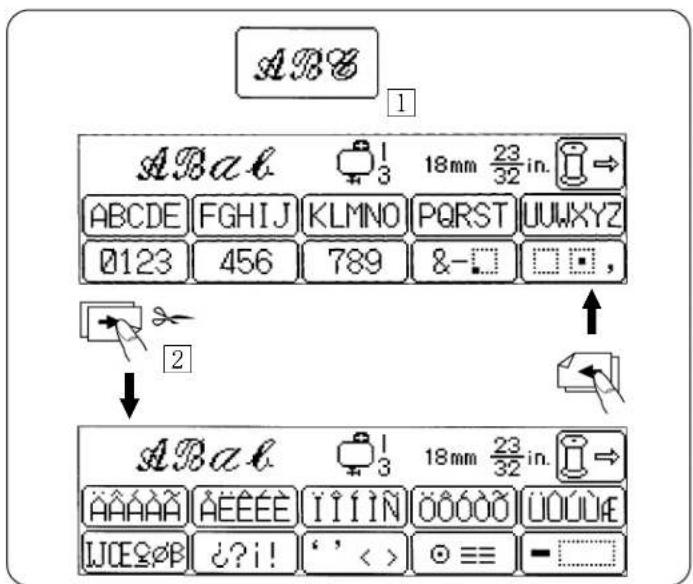
text_image
ABC 1 ABa6 3 18mm 23/32 in. ABCDE FGHJ KLMNO PQRST UUWXYZ 0123 456 789 &-□ □ □ , 2 ABa6 3 18mm 23/32 in. AABAA AEEEE I I I N OOOO UOUAE IJCE∅B ?i! ' ' < > ⊙ ≡ = -• To Select Letter Style (Script Style Letters)
1Press the ABC key to select script style letters.
② When the → key is pressed, European letters (script type) can be selected.
text_image
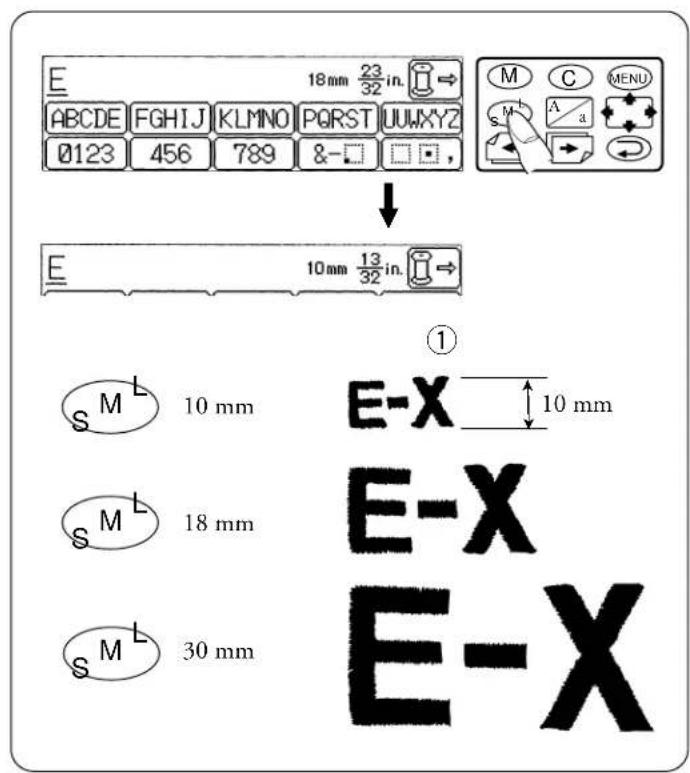
S M LLetter Size Key : S^M
The size key s^M changes the overall size of letters and numbers each time pressed. L–30 mm M–18 mm S–10 mm
flowchart
graph TD
    A["1 ABCDE"] --> B["2 M"]
    B --> C["3 &"]
    C --> D["4 M"]
    D --> E["5 UUKYZ"]
    E --> F["6 M"]
    F --> G["789 789 &-"]
    G --> H["8 -"]
    H --> I["E-X"]
    style A fill:#f9f,stroke:#333
    style B fill:#ccf,stroke:#333
    style C fill:#cfc,stroke:#333
    style D fill:#fcc,stroke:#333
    style E fill:#cff,stroke:#333
    style F fill:#ffc,stroke:#333
    style G fill:#fcf,stroke:#333
    style H fill:#cff,stroke:#333
    style I fill:#ffc,stroke:#333
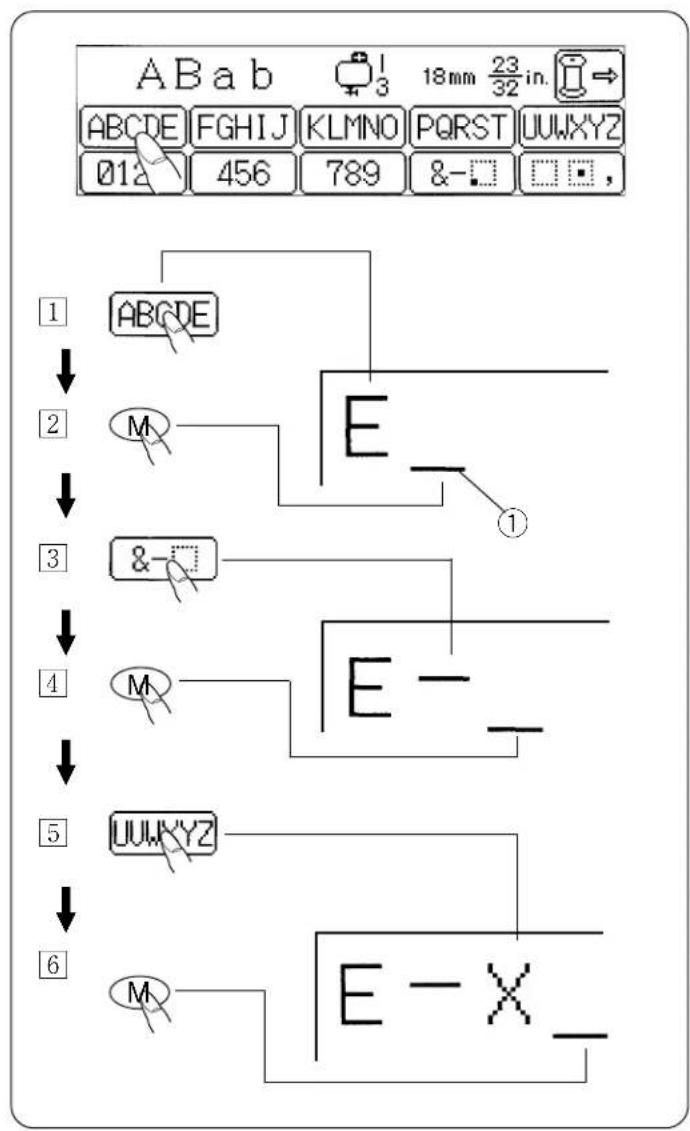
• To Compose Words, Etc.
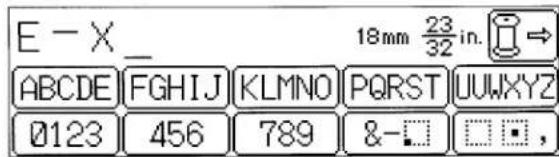
Example: Block Style "E-X"
1 Select "E" by pressing the ABCkey 5 times.
2 Press the memory key M once.
“E” is memorized and the cursor moves to the next position.
3 Select “ -” by pressing the &-□ key twice.
4Press the memory key M once.
5 Select "X" by pressing the UUWXYZ key four times.
6 Press the memory key M once.
① Cursor
text_image
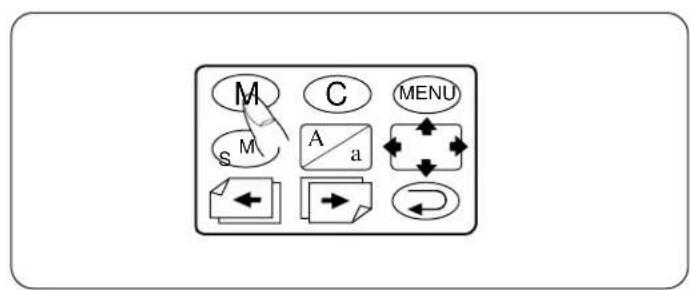
M C MENU S M A a ← → ←Memory Key: M
When this key is pressed after selecting a character, the character will be memorized as many times as the key is pressed.
When the key is pressed after selecting another character, that character will be memorized after the previous one. (Up to 20 characters can be memorized.)
flowchart
graph TD
    M["Node M"] -->|L| S["Node S"]
    G["Node G"] -->|a| A["Node A"]
    MENU["Node MENU"] -->|dashed arrow| A
    A -->|dashed arrow| A
    A -->|dashed arrow| A
    A -->|dashed arrow| A
    A -->|dashed arrow| A
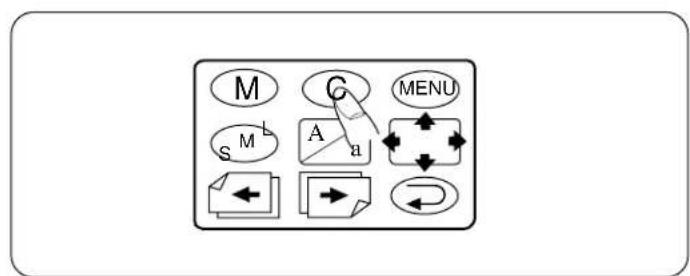
Clear Key: C
If a wrong character is memorized, pressing this key will immediately clear it (like a “ backspace ” key).
text_image
E - X _ 18mm 23/32 in. ABCDE FGHIJ KLMNO PQRST UUWXYZ 0123 456 789 &-□ □□ ,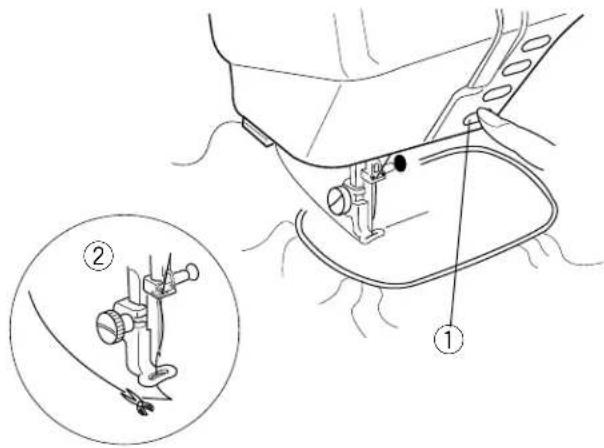
text_image
Technical diagram showing sewing process with labeled parts and a magnified detail view of the thread mechanism.• To Sew
Lower the presser foot, press the start/stop button and sew 5 or 6 stitches.
Then, press the start/stop button again to stop the machine.
Raise the presser foot, cut off the extra thread at the starting point close to the beginning and lower the presser foot.
① Start/stop button
② Cut the extra thread.
text_image
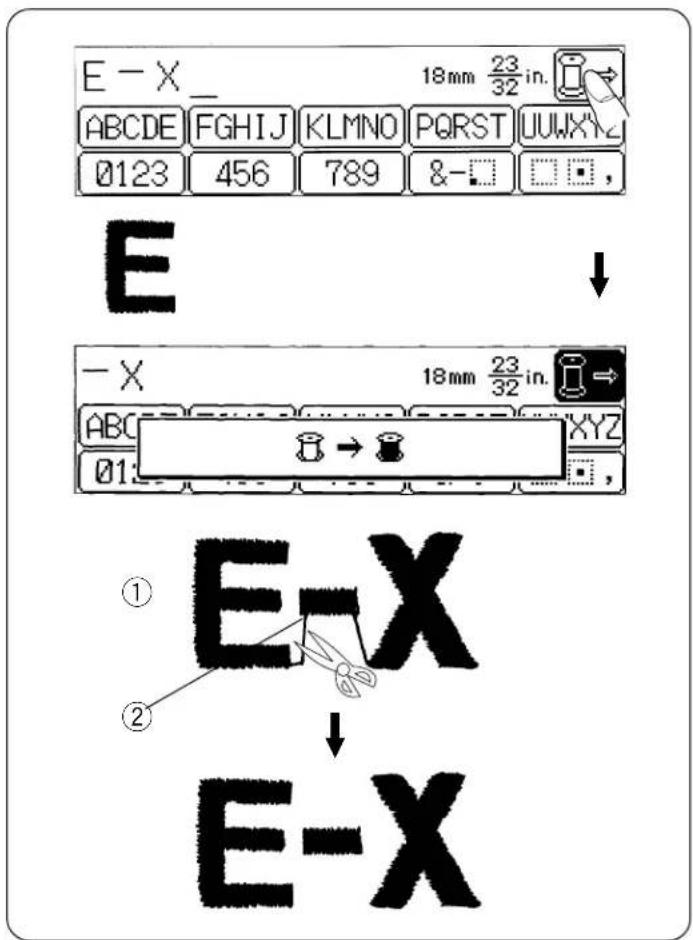
E - X _ 18mm 23/32 in. ABCDE FGHIJ KLMNO PQRST UUWX 0123 456 789 &-☐ ☐ ☐ , E - X 18mm 23/32 in. ABC → XYZ 01: ① E-X ② E-XColor Select Key:

Press the key when you want to change the color of each letter.
This key is released when pressed again.
The machine stops automatically after “each letter” is sewn allowing you to replace the thread with a different colored one.
① Sewing sample
② Cut the connecting thread.
text_image
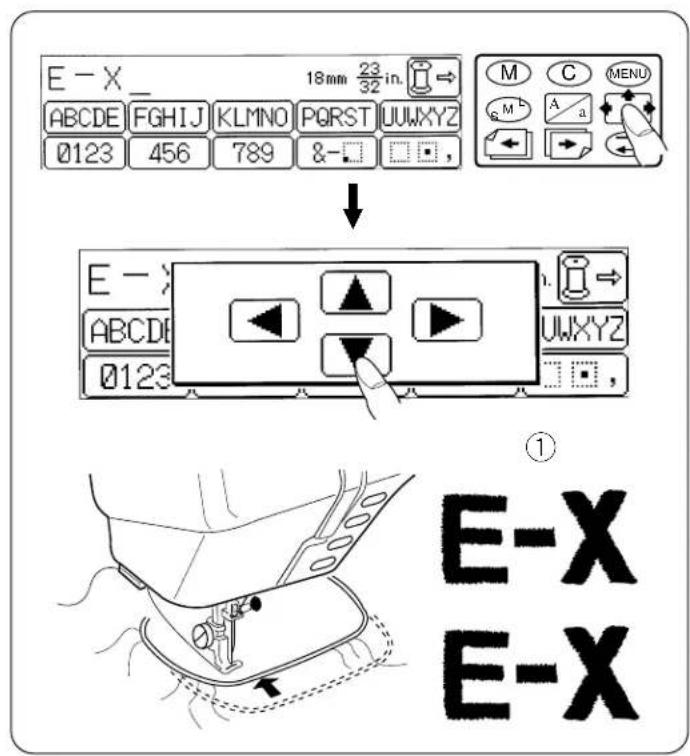
E-X_ 18mm 23 32 in. ABCDE FGHIJ KLMNO PQRST UUWXYZ 0123 456 789 &- M C MENU M A a E-X ABCDI 0123 UWXYZ ① E-X E-XSpace Check Key :
( To Sew a Second Row of Letters/Numbers )
Press the space check key .
Press one of the arrow keys ▶▶ to move to the desired position. The frame will move.
* Press the ⬆ key to return to the previous display.
* Press the start/stop button to start sewing after setting the sewing position.
* The space check key can also be used if the needle drop position is incorrect.
① Sewing sample
text_image
E 18 mm 23/32 in. ABCDE FGH I J KLM NO PQR ST UUWXYZ 0123 456 789 &-□ □ □ ↓ E 10 mm 13/32 in. ① S M L 10 mm E-X 10 mm S M L 18 mm E-X S M L 30 mm E-XLetter Size Key: ^M
( To Change the Size of Letters/Numbers )
Example: E-X
Press the size key |s before memorizing the letters and numbers. The character height is displayed in both millimeters and inches.
① Sewing sample

text_image
E - X 18mm 23/32 in. MACHINE IS STOPPED 01: M C MENU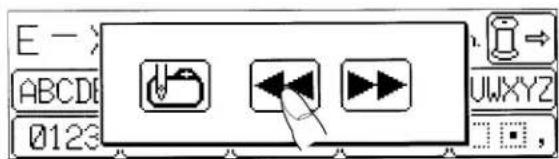
text_image
E- ABCD 0123 UWXYZ ↓ ↓ ↓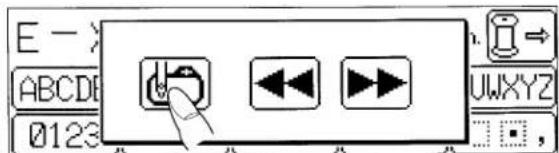
text_image
E- ABCDE 0123 UWXYZ ↓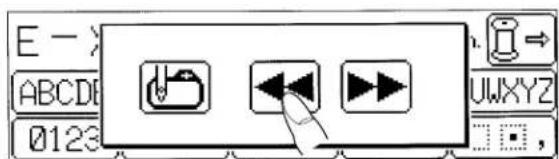
text_image
E- ABCD8 0123 UWXYZ ↓ ↓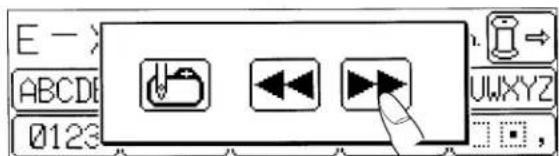
text_image
E- ABCD8 0123 UWXYZ ↓- If the Thread Breaks While Embroidering
Stop the machine by pressing the start/stop button. Raise the presser foot.
Rethread the machine.
Guide the thread end around the thread holder of the thread cutter from the front side.
Press the key.
Press the ◀◀ key.
Lower the presser foot, and press the start/stop button. (Don't cut off the extra thread yet.)
Upon completion of sewing, remove the embroidery hoop and secure the loose ends of the thread tail where the break occurred.
Beginning Key :
If you run out of thread in the middle of sewing a word (or some other pattern), and you want to start sewing again from the beginning, press the beginning key 📁.
Frame Return Key :
This key is used to resume sewing where the thread has been broken. By pressing this key, you can move the hoop to the point where the thread broke.
* The hoop is moved backward 10 stitches each time the key is pressed.
Frame Advance Key : ▶▶▶
Pressing this key moves the hoop forward without sewing. The key is used for correction when the hoop is returned too far.
* The hoop is moved forward 10 stitches each time the key is pressed.
Note: Before pressing


keys,
make sure that the needle is at its highest position.
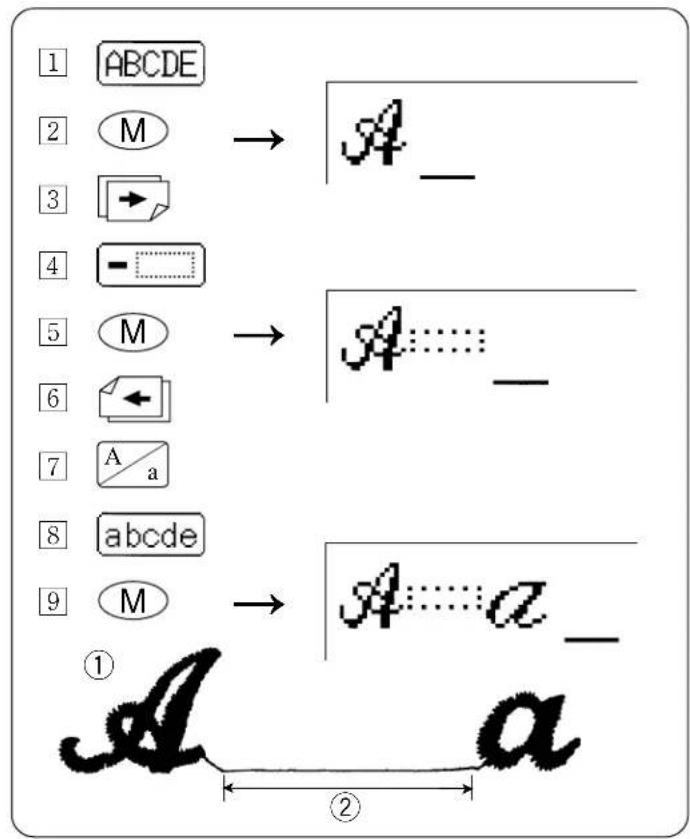
• Combining Letters in Script Style
(Upper & Lowercase)
Example: A □ a
1 Select "A" by pressing the ABCDE key once.
2 Press the memory key M once.
3 Change the display by pressing the → key.
4 Select " □" by pressing the -□key twice.
5 Press the M key.
6 Change the display by pressing the key.
7 Press the A a key.
8 Select "a" by pressing the abcde key once.
9 Press the memory key M once.
① Sewing sample
② Space of 35 mm
text_image
1 UUWXYZ 2 M → z _ 3 4 âëêêè 5 M → z ê _ 6 7 klmno 8 M → z ê l _ 9 klmno 10 M → z ê l o _ ① zêlo• European (Accented) Letters in Block Style
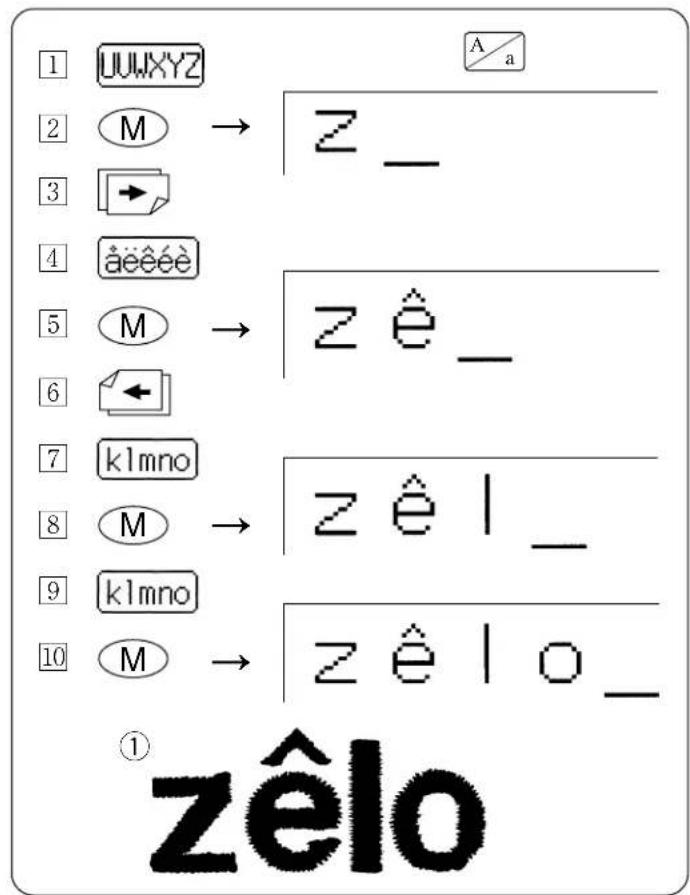
(Lowercase)
Example : zêlo
1 Select "z" by pressing UUWXYZ key six times.
2 Press the memory key M once.
3 Chang the display by pressing the → key.
4 Select “ê” by pressing the âeêêê key three times.
5 Press the memory key M once.
6 Chang the display by pressing the key.
7 Select "1" by pressing the klmno key twice.
8 Press the memory key M once.
9 Select "o" by pressing the klmno key three times.
10Press the memory key M once.
Uppercase or lowercase can be alternately selected by pressing the upper/lowercase selection key A/a
① Sewing sample
text_image
1 ON OFF 2 3 ① ② 4 ON OFF 5 ***MENU** ABC CHECK THE SETTINGS 2~3 P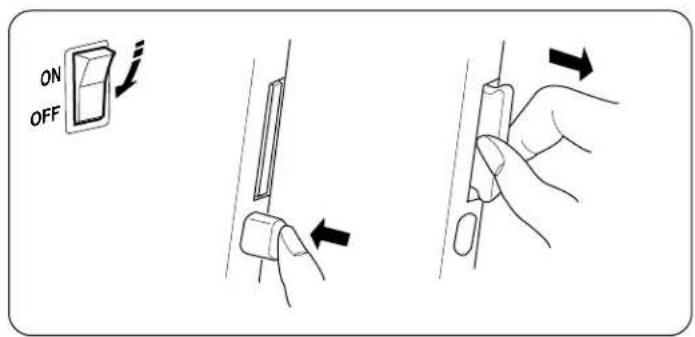
text_image
ON OFF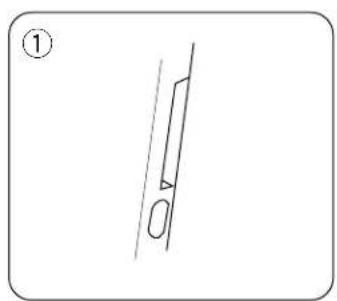
natural_image
Simple line drawing of a vertical object with an oval base and a triangular top, labeled (1) in the top-left corner.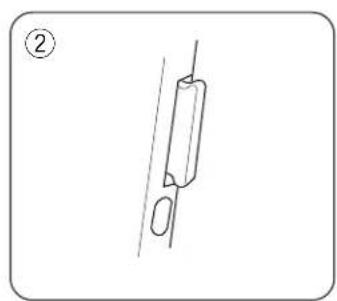
natural_image
Simple line drawing of a cylindrical object with a looped end, no text or symbols presentEmbroidery with Optional Memory Cards
To Insert and Eject the Memory Card.
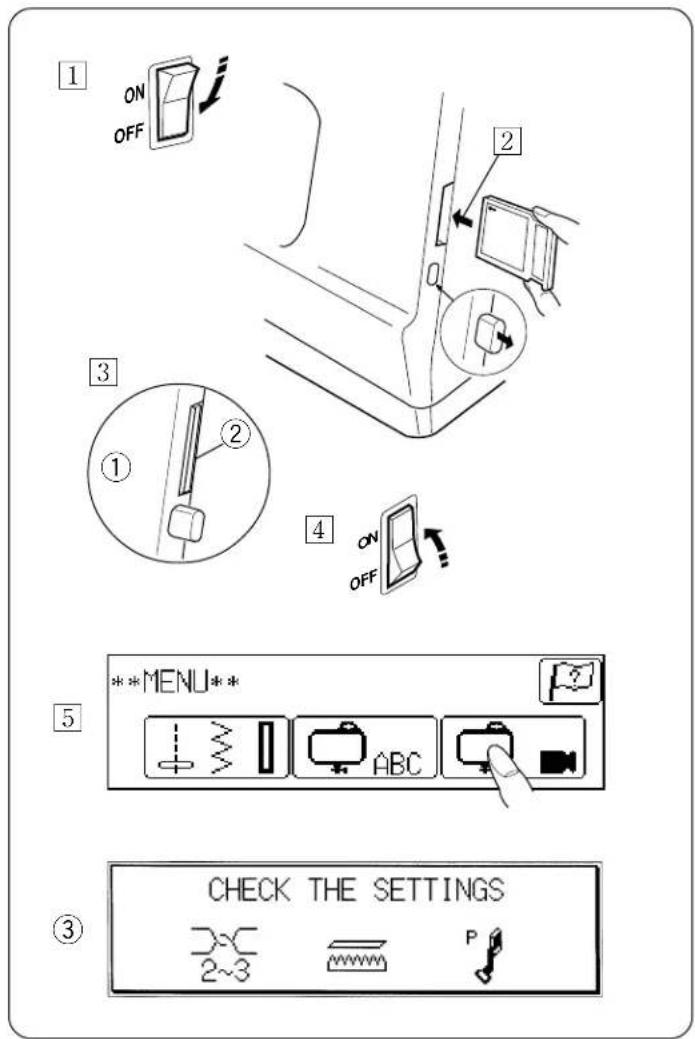
• To Insert the Memory Card
1Turn off the power switch.
②Insert the card making sure the arrow on the label is facing you.
3 Push the card straight in until it clicks (see illustration).
4Turn on the power switch. The menu screen appears.
⑤Select the pattern by pressing the key.
① Memory card is correctly inserted.
② Memory card sticks out about 0.2 cm (1/8").
③ Settings reminder message is displayed for about 3 seconds.
• To Eject the Memory Card
Turn off the power switch.
Upon pressing the card eject button, the memory card comes out halfway and can be taken out.
① No memory card is inserted and the eject button is not sticking out.
② Memory card is incorrectly inserted.
If the eject button is not sticking out, the memory card is not pushed in far enough.

text_image
Diagram showing four labeled geometric shapes (①, ②, ③, ④) with internal dashed lines and a central crosshair.• To set the Fabric in the Embroidery Hoop
Mark the fabric with reference lines, match them with those on the template, and set the fabric in the embroidery hoop.
Then attach the hoop to the carriage.
The pattern can be sewn based on this starting point.
① Mark
② Reference line
③ Template
④ Starting point
text_image
Illustration showing ten different seafood and seafood illustrations with numbered labels, likely for a cooking or food preparation task.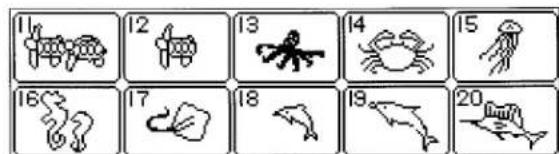
text_image
Grid of 20 numbered illustrations with animals and symbols, possibly for educational or educational purposes.
text_image
1 SALMON PINK 233 PEACH 212 PALE PINK 211 IVORY WHITE 253 UMBER 237 ② 13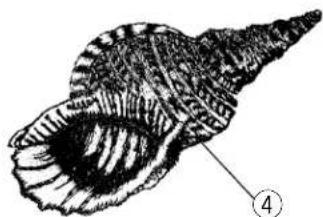
natural_image
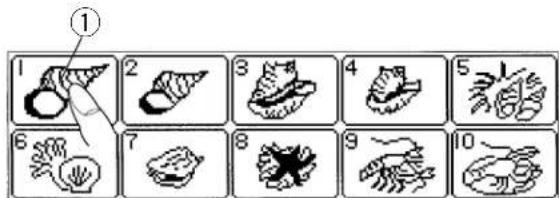
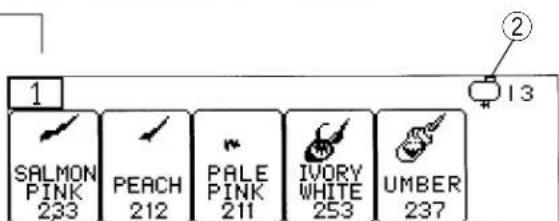
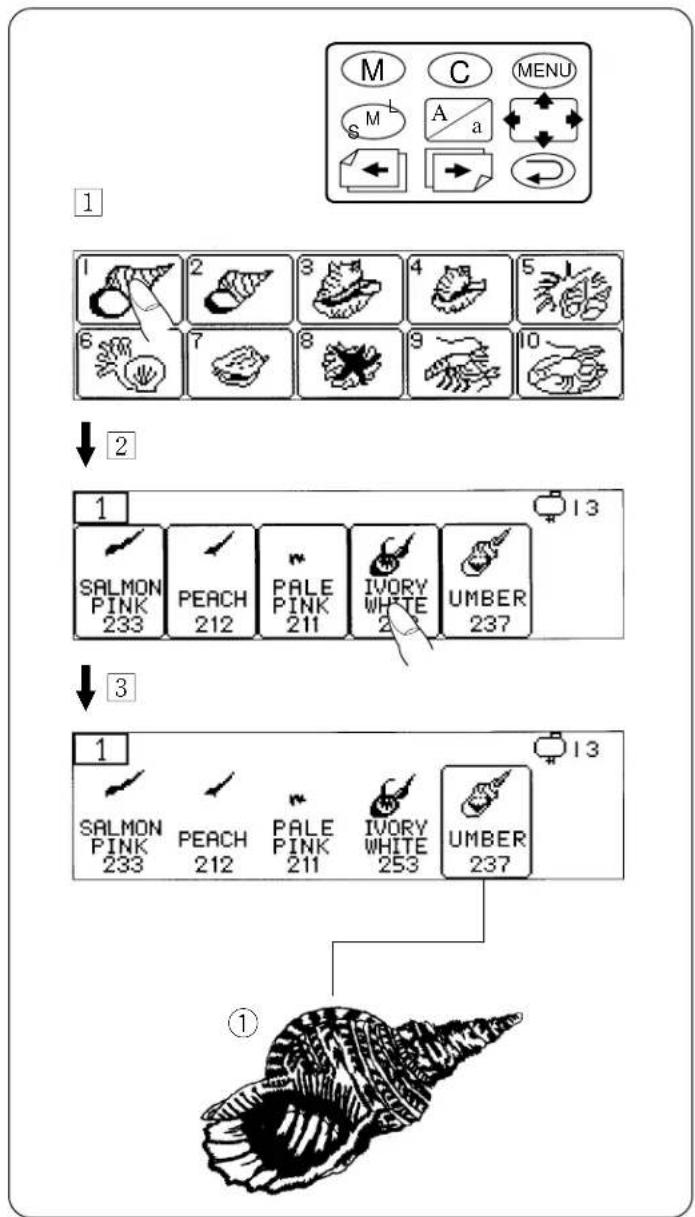
Illustration of a seashell with labeled parts (no text or symbols present)• Embroidery with Large Pattern Memory Card
Example: Memory Card 104
The color of thread and sewing procedure are indicated.
Upon pressing the start/stop button, the machine sews the pattern in step 1 and stops automatically.
When doing multi-color embroidering, cut the connecting thread each time you change colors.
① Pattern 1
② The number next to the ☐13 display indicates which number embroidery hoop may be used.
③ The number shown under the thread color is the color code of Janome embroidery thread.
④ Sewing sample
* Use of the keypad is same as for embroidering letters.
Note: In embroidery sewing, do not sew the same pattern twice in the same place, as it may cause skipped stitches.
flowchart
graph TD
    A["1: Seashell"] --> B["2: Coral with 🍾️"]
    B --> C["3: Coral with 🍎️"]
    C --> D["4: Coral with 🍎️"]
    D --> E["5: Coral with 🍎️"]
    E --> F["6: Coral with 🍎️"]
    F --> G["7: Coral with 🍎️"]
    G --> H["8: Coral with 🍎️"]
    H --> I["9: Coral with 🍎️"]
    I --> J["10: Coral with 🍎️"]
    J --> K["1: Salmon Pink 233, Peach 212, Pale Pink 211, Ivory White 2, UMBER 237"]
    K --> L["1: Salmon Pink 233, Peach 212, Pale Pink 211, Ivory White 253, UMBER 237"]
    L --> M["1: Seashell with 🍎️ icon"]
- Skipping
(Use to sew only part of a design.)
Example : select Design 1.
1 Select design 1.
② To sew only the fifth part of the pattern, press the key previous to it.
③ Sew the pattern until the machine stops automatically.
① Sewing sample
Note:
* When the Ⓐkey is pressed, the screen returns to the previous screen.
Sew the pattern until the machine stops automatically.
* To cancel Skipping, press the ⏻key. The screen will return to the previous display.
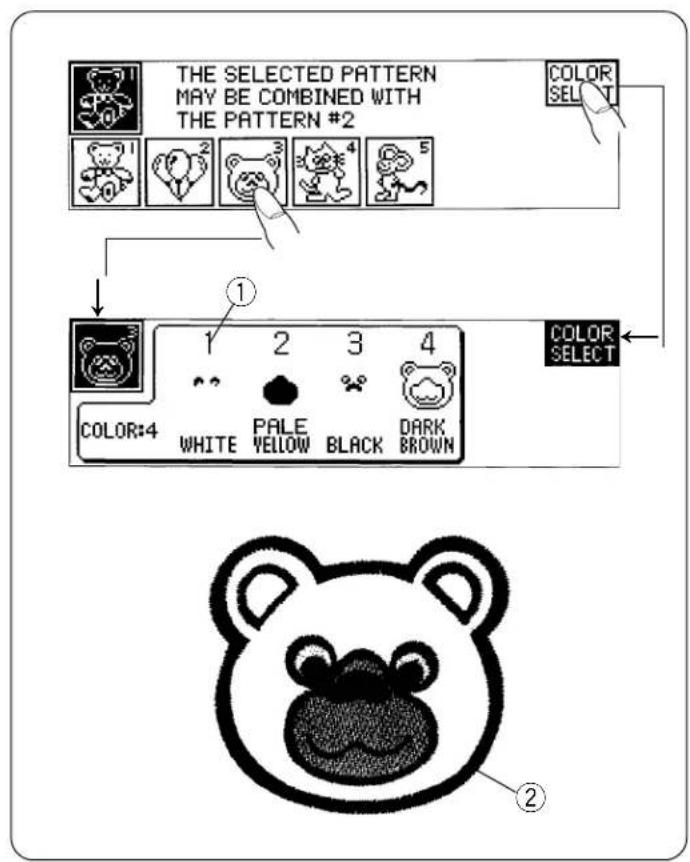
text_image
THE SELECTED PATTERN MAY BE COMBINED WITH THE PATTERN #2 COLOR SELECT ① 1 2 3 4 COLOR:4 WHITE PALE 3 DARK YELLOW BLACK BROWN COLOR SELECT ②- Embroidery with Large Pattern Memory Card Example: Memory Card 8
Total thirteen designs are available on this card. Select the design by pressing the display.
* The COLOR SELECT key is displayed only for the patterns which can be sewn in more than one color.
Example : Design 3
Press the COLOR SELECT key to see the suggested thread color and sewing sequence.
Press the start/stop button. The machine sews the pattern in Step 1 and stops automatically.
When doing multi-color embroidery, cut the connecting thread each time you change colors.
* When finished sewing, cut the thread at the end point.
* Cut the connecting threads on the wrong side of the fabric (leave about 5 mm). Use of the keypad is same as for embroidering letters.
① Step 1
② Sewing sample
Embroidery with Blank Memory Card and Scan'n Sew, Scan'n Sew PC (Optional Accessories)
Sew patterns in the same way as for normal embroidery.
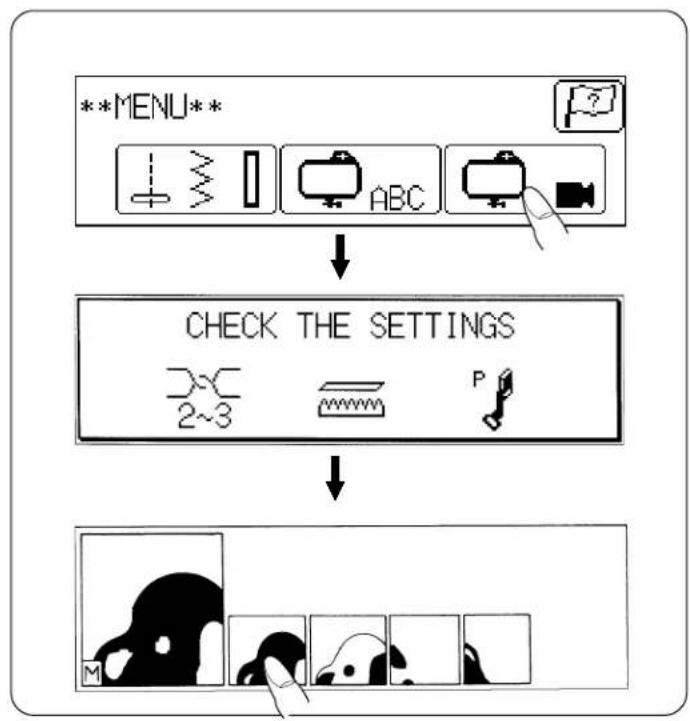
flowchart
graph TD
    A["**MENU**"] --> B["ABC"]
    B --> C["CHECK THE SETTINGS"]
    C --> D["2-3 Icon"]
    C --> E["P Marker Icon"]
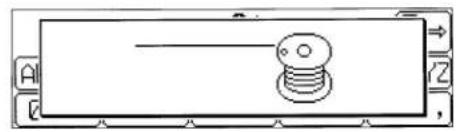
natural_image
Simple line drawing of a screw with a handle, no text or symbols present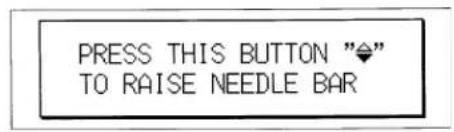
text_image
PRESS THIS BUTTON "♦" TO RAISE NEEDLE BAR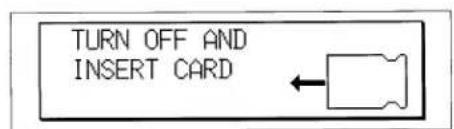
text_image
TURN OFF AND INSERT CARD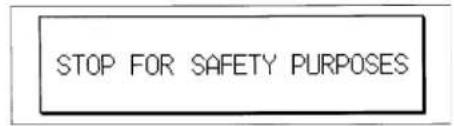
text_image
STOP FOR SAFETY PURPOSES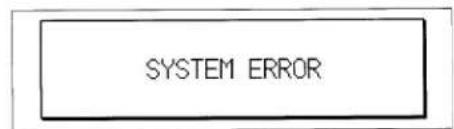
text_image
SYSTEM ERROR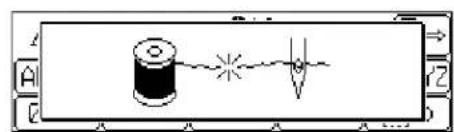
text_image
Diagram showing a cylindrical object connected to a star-shaped light source, with directional arrows and labels A, B, C.When Messages Appear on Screen
The visual touch screen shows "Bobbin winding" condition.
After the bobbin is wound, return the bobbin winder to its original position by moving the spindle to the left.
Raise the needle bar by pressing the up/down needle button.
Turn off the power switch, and insert the Memory Card again.
Stop operating the machine until this message disappears (about 15 seconds).
Contact your Janome outlet.
This screen indicates the needle thread has run out or has broken.
Turn off the power switch and rethread the machine.
SECTION V CARE OF YOUR MACHINE
Care of Your Machine
The Harmony 8100 has been meticulously designed and manufactured to give you a lifetime of trouble-free sewing. The machine never needs oiling but the bobbin area and hook race should be cleaned after completion of every garment. Do not store the machine in a high-humidity area, near a heat radiator or in direct sunlight. Clean the outside of the machine with a soft cloth and neutral soap. Press the up/down needle button to raise the needle and unplug the machine before cleaning.
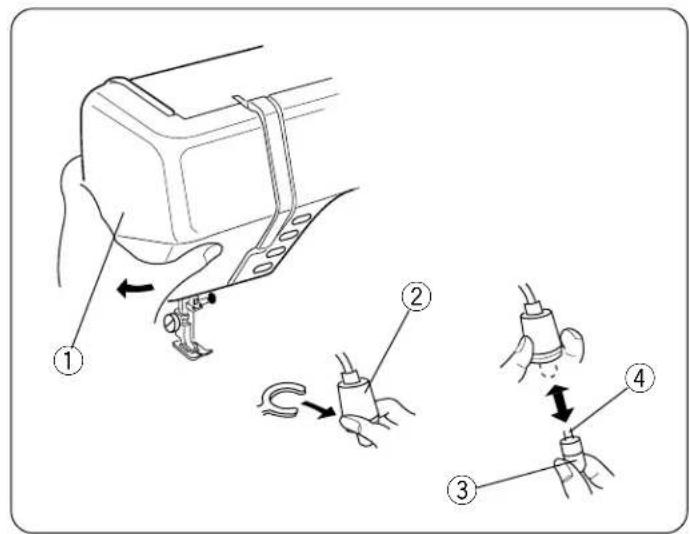
text_image
Diagram illustrating a mechanical assembly with numbered steps and directional arrows indicating motion or assembly.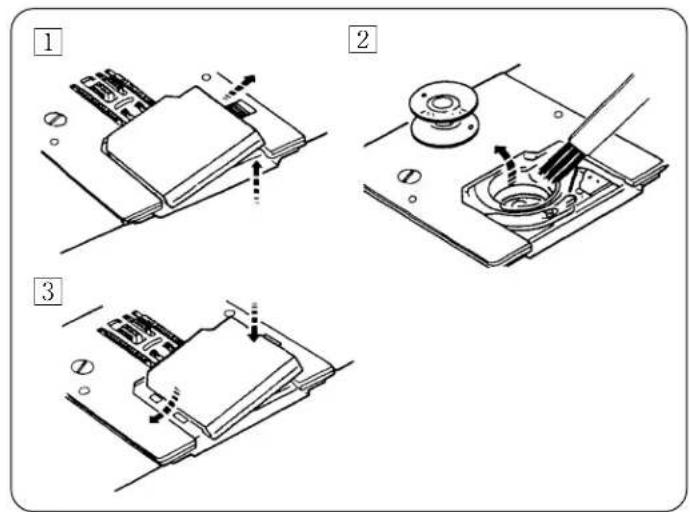
text_image
Technical diagram showing three steps of a mechanical assembly or assembly process with labeled components and directional arrows.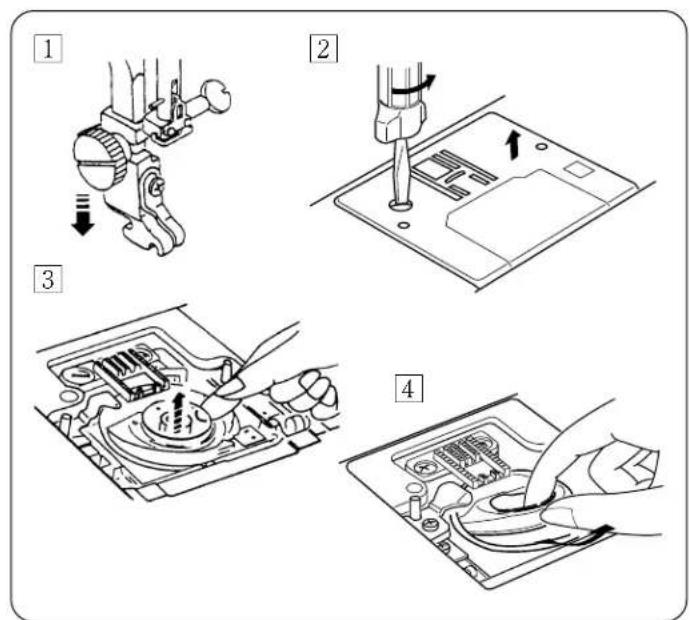
text_image
Technical diagram showing four steps of a mechanical assembly or tool operation, labeled 1 to 4.• Replacing the Light Bulb
How to remove
Open the face plate and pull out the lamp socket, then gently pull out the lamp.
① Face plate
② Lamp socket
③ Lamp
To replace
Insert the lamp being careful to match the holes and pins. Attach the lamp socket and close the face plate.
④ Pin
Note:
To replace the light bulb, turn off the power supply and remove power the cord from the wall outlet. Remove the light after it has cooled down.
• Cleaning the Bobbin Holder
Loose threads and dust may cause puckered stitches and thread breakage during stitching. Check for lint build-up after each garment is completed. Turn off the power switch or unplug the machine.
☐ Remove the cover plate by sliding the hook cover plate release button to the right.
②Take out the bobbin, brush out dust and lint. (You may also use a small vacuum cleaner.)
3 Insert the bobbin and attach the hook cover plate.
- Exposing the Hook Race
1 Unplug the machine and remove the presser foot and needle.
② Remove the screw on the left side of the needle plate with the screwdriver supplied with the machine.
③ Remove the needle plate and take out the bobbin.
4 Lift up the bobbin holder and remove it.
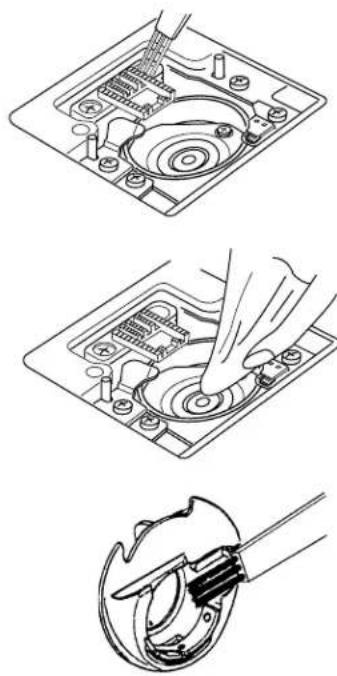
natural_image
Three technical line drawings showing a mechanical assembly process: disassembly, cleaning, and disassembly of a circular component (no text or symbols present)- Cleaning the Hook Race
Clean the feed dogs, hook race and bobbin holder with the lint brush and a soft dry cloth.
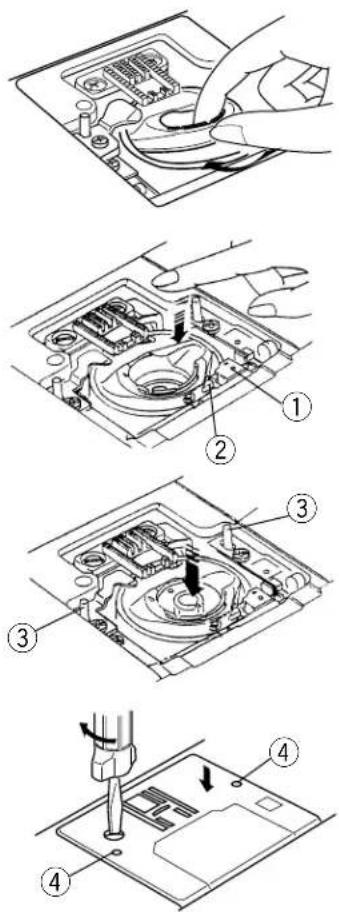
text_image
Technical diagram showing four steps of a device's internal components with Chinese labels• Replacing the Bobbin Holder
Insert the bobbin holder so that the knob fits next to the stopper in the hook race.
① Stopper
② Knob
Insert the bobbin.
Replace the needle plate, inserting the two needle plate guide pins into the holes in the needle plate. Replace the screw.
③ Needle plate guide pin
④ Guide hole
Troubleshooting
| Problem | Type of Sewing | Cause | Reference |
| The machine is noisy. | All | 1 Threads have been caught in the hook mechanism. | See pages 56,57. |
| All | 2 The feed dog is packed with lint. | See pages 56,57. | |
| All | 3 Slight humming sound coming from internal moter. | See page 6.Not abnormal | |
| The needle thread breaks. | All | 1 The needle thread is not threaded properly. | See pages 8-11. |
| All | 2 The needle thread tension is too tight. | See page 14. | |
| All | 3 The needle is bent or blunt. | See page 39. | |
| All | 4 The needle is incorrectly inserted. | See page 39. | |
| All | 5 The thread is too heavy for the needle. | See page 13. | |
| Normal | 6 The needle thread and the bobbin thread are not set properly under (drawn to the rear of) the presser foot when sewing is starting. | See page 11. | |
| Embroidery | 7 The needle thread is not set in the thread holder when embroidery sewing is starting. | See page 44. | |
| The bobbin thread breaks. | All | 1 The bobbin thread is not threaded properly in the bobbin holder. | See page 9. |
| All | 2 Lint has collected in the bobbin holder. | See page 57. | |
| All | 3 The bobbin is damaged and doesn't turn smoothly. | Replace bobbin. | |
| The needle breaks. | All | 1 The needle is incorrectly inserted. | See page 39. |
| All | 2 The needle is bent or blunt. | See page 39. | |
| All | 3 The needle clamp screw is loose. | See page 39. | |
| All | 4 The needle thread tension is too tight. | See page 14. | |
| All | 5 The fabric is not drawn to the rear when sewing is finished. | See page 18. | |
| Normal | 6 The needle is too fine for the fabric being sewn. | See page 13. | |
| Visual touch screen is not clear. | All | 1 The sharpness of visual touch screen is not adjusted properly. | See page 3.Turn the knob to correct. |
| The embroidery key doesn't work. | Embroidery | 1 The memory card is not inserted properly. | See page 51. |
| Key doesn't work. | Embroidery | 1 The needle is in the lowered position. | See pages 12, 49.Raise the needle. |
| Skipped stitches | All | 1 The needle is incorrectly inserted. | See page 39. |
| All | 2 The needle is bent or blunt. | See page 39. | |
| All | 3 The needle and/or threads are not suitable for the work being sewn. | See page 13. | |
| All | 4 A blue-tipped needle is not being used for sewing stretch, very fine fabrics and synthetics. | See page 13. | |
| All | 5 The needle thread is not threaded properly. | See page 10. | |
| All | 6 The wrong needle is used. | Change the needle. | |
| Normal | 7 The presser foot pressure is not strong enough. | See page 12. | |
| Embroidery | 8 The embroidery hoop is not set properly. | See pages 43, 44. | |
| Embroidery | 9 The fabric is not tightly pulled on the embroidery hoop. | See page 43. | |
| All | 10 Interfacing is not being used with stretch or fine fabrics. | See pages 25,41,43. | |
| Seam puckering | All | 1 The needle thread tension is too tight. | See page 14. |
| All | 2 The needle thread or the bobbin thread is not threaded correctly. | See pages 8-11. | |
| All | 3 The needle is too heavy for the fabric being sewn. | See page 13. | |
| Normal | 4 The stitch length is too long for the fabric. | Make the stitches denser. | |
| Normal | 5 The presser foot pressure is not correctly adjusted.* When sewing extremely lightweight materials, place stabilizer underneath the fabric. | See page 12. | |
| Embroidery | 6 The fabric is not tightly pulled on the embroidery hoop. | See page 43. | |
| All | 7 Interfacing is not being used with stretch or fine fabrics. | See pages 25, 43. | |
| Slipping fabric | Normal | 1 The presser foot pressure is not correctly adjusted. | See page 12. |
| Normal | 2 The correct presser foot is not being used. | Use the correct Presser foot | |
| The cloth is not feeding smoothly. | Normal | 1 The feed dog is packed with lint. | See pages 56, 57. |
| Normal | 2 The presser foot pressure is too weak. | See page 12. | |
| Normal | 3 The stitches are too fine. | Make the stitches coarser. | |
| Normal | 4 The fabric is not fed when sewing is starting. | See page 19. | |
| Normal | 5 The feed dog is lowered. | See page 42. | |
| Normal | 6 The correct presser foot is not used. | Use the correct Presser foot | |
| The machine doesn't run. | AllAllAllEmbroidery | 1 The machine is not plugged in.2 A thread is caught in the hook race.3 The control circuit is not working correctly.4 The foot control is plugged in when sewing embroidery. | See page 6.See page 9.Turn off the machine and turn it on again.Then set for desired pattern.See page 41. |
| Strange sound occurs when the machine is switched on. | AllAll | 1 Something is caught between the carriage and the arm.2 The carriage is rubbing against something touching the machine. | Remove the object.See page 42. |
| Patterns are distorted. | AllAllNormalNormalAllEmbroideryEmbroideryEmbroideryEmbroideryEmbroidery | 1 The correct presser foot is not being used.2 The needle thread tension is too tight.3 The stitch length is not suitable for the fabric being sewn.4 The feed balancing dial is not set properly.5 Interfacing is not used for sewing stretch and very fine fabrics.6 The embroidery hoop knob is loose.7 The carriage has bumped into something near the machine.8 The fabric is not pulled tightly on the embroidery hoop.9 The end of the fabric is caught or pulled for some reason when sewing embroidery.10 The needle thread on the wrong side of fabric is not cut correctly. | Use the correct presser foot.See page 14.See page 20.See page 40.See pages 25, 41, 43.See page 44.See page 42.See page 43.Stop the machine and free the end of the fabric.Cut the extra needle thread on the wrong side of fabric. |
| The sensor buttonhole stitches are not balanced. | NormalNormalNormal | 1 The stitch length is not suitable for the fabric being sewn.2 Interfacing is not used with stretch fabrics.3 The presser foot is not the correct one. | See page 27.See page 25.See page 25. |
| Pattern selection keys don't work. | AllEmbroideryAllAll | 1 The bobbin winder spindle is in the winding position.2 The number of characters is beyond the capacity of memory.3 The control circuit is not working correctly.4 Ordinary sewing or embroidery modes have not been selected properly. | See pages 8-55.See pages 46.Turn off the machine and turn it on again. Then set for desired pattern.See pages 15, 42. |