V22XXPR - TV Tatung - Free user manual and instructions
Find the device manual for free V22XXPR Tatung in PDF.


User questions about V22XXPR Tatung
0 question about this device. Answer the ones you know or ask your own.
Ask a new question about this device
Download the instructions for your TV in PDF format for free! Find your manual V22XXPR - Tatung and take your electronic device back in hand. On this page are published all the documents necessary for the use of your device. V22XXPR by Tatung.
USER MANUAL V22XXPR Tatung
Tatung LCD TV User Manual
Table of contents
- General Information ....3
- Safety Precautions ....4
- Features ....7
- Connection ....8
- Controls Location ....11
- Accessories ....12
- Remote Control....13
Summary of Control Button....14
8. Controls & Adjustment
A. General Adjustment ....15
Turning the LCD-TV On and Off....15
View Menus and On-Screen Displays 15
Switching PC/Video/S-Video/TV/Component Modes....16
Switching Language Modes....16
Adjusting the Volume....17
How to enter the Menu Items....18
Setting the Sleep Timer 18
B. PC mode Adjustment....19
Adjusting Contrast and Brightness Settings....19
Adjusting the Picture Settings 20
Adjusting Image Settings ....21
Adjusting the Audio Settings ....22
Viewing Picture-in-Picture (PIP)....24
C. TV mode Adjustment ....27
Adjustment the TV Settings ......27
Special Sound Option....28
Adjusting the Picture Settings ...... 29
Memorizing the Channel....30
Changing the Channel....33
How to use the Parent Control....34
How to Set up Restrictions Using the 'TV Rating'....37
How to Set up Restrictions Using the "MPAA Rating"....39
Viewing Closed Captions....41
D. AV/SV/CV mode Adjustment....42
Adjustment the AV/SV/CV settings:....42
E. Other function explanation ....43
9.OSD Language List....45
- Troubleshooting....50
11.Specifications....54
General Information
Tatung LCD TV is the latest multi-display active matrix TFT (thin film transistor) liquid crystal high brightness display unit. It is designed to use with VIDEO electronics appliances and PC.
Important Information
Warning: To reduce the risk of fire or electric shock, do not expose this product to rain or moisture.

CAUTION
Risk of electric shock. Do not open.

Caution: To reduce the risk of electric shock, do not remove the cover (or back). No user-serviceable parts inside. Refer servicing to qualified service personnel.
Note to CATV system installer: This reminder is provided to call CATV system Installer's attention to Article 820-40 of the National Electrical Code (Section 54 of Canadian Electrical Code, Part 1), that provides guidelines for proper grounding and, In particular, specifies that the cable ground shall be connected to the grounding system of the building as close as to the point of cable entry as practical.
Caution: FCC/ CSA regulations state that any unauthorized changes or modifications to this equipment may void the user's authority to operate it.
Important: One Federal Court has held that unauthorized recording of copyrighted TV programs is an infringement of U.S. copyright laws. Certain Canadian programs may also be copyrighted and any unauthorized recording in whole or in part may be in violation of these rights.
WARNING:
According to industry standards, there are certain numbers of defective pixels both bright and dark that are acceptable. Although we produce panels with more than 99.99 percent active cells, there still may be some cells that do not produce light or remain lit. For more information, please contact sales or the technical support at 800.827.2850.
Thank You for Choosing This Product
Your new LCD TV represents the latest product in television technology. We have designed it with easy-to-use on-screen menus and closed caption capabilities making it one of the best products in its class. We are proud to offer you a product that will provide convenient, dependable service and enjoyment for years to come.
Safety Precautions
-
Cleaning: Unplug the power cord from the AC outlet before cleaning the product. Use a damp cloth to clean the product. Do not use liquid or aerosol cleaners.
-
Water and moisture: Do not use the product near water, such as bathtubs, washbasins, kitchen sinks, laundry tub, swimming pools or wet basements.
-
Heat sources: Keep away from heat sources such as radiators, heaters, stoves and other heat-generating products (including amplifiers).
-
For added protection for this television equipment during a lightning storm, or when it is left unattended and unused for long periods of time, unplug it from the wall outlet and disconnect the antenna. This will prevent damage to the equipment due to lightning and power-line surges.
-
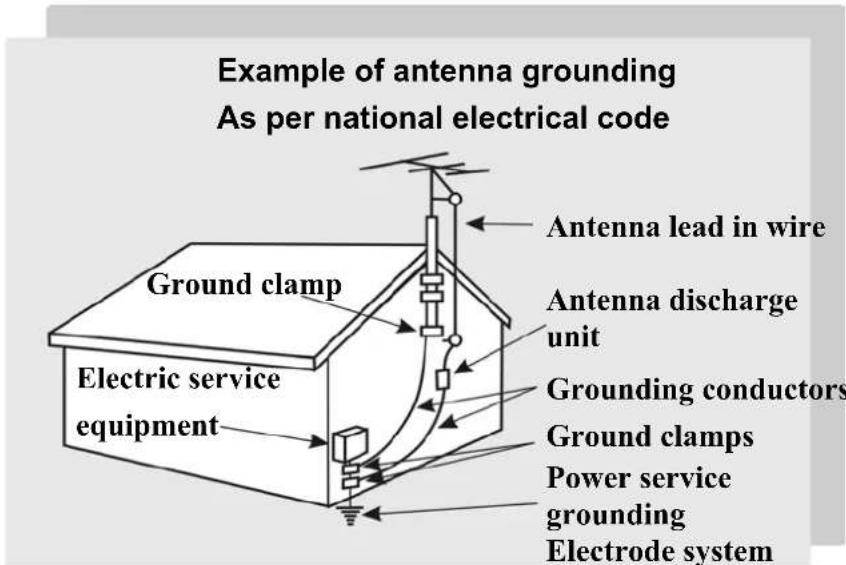
If an outside antenna is connected to the television equipment, be sure the antenna system is grounded to provide protection against voltage surges.
text_image
Example of antenna grounding As per national electrical code Ground clamp Electrical service equipment Antenna lead in wire Antenna discharge unit Grounding conductors Ground clamps Power service grounding Electrode system- Stand: Do not place the product on an unstable cart, stand, tripod or table. Placing the product on an unstable base can cause the product to fall, resulting in serious personal injuries as well as damage to the product. Use only a cart, stand, tripod, bracket or table recommended by the manufacturer or sold with the product. Use only mounting hardware recommended by the manufacturer.

natural_image
Silhouette of a person pushing a large object through a circular frame (no text or symbols)-
Use care when moving the product on a rolling cart. Sudden stops, excessive force and an uneven floor surface may cause the product to fall from the cart.
-
Ventilation: The vents and other openings in the cabinet are designed for ventilation. Do not cover or block these vents and openings because insufficient ventilation can cause overheating and/or shorten the life of the product. Do not place the product on a bed, sofa, rug or other similar surface, because they can block the ventilation opening. This product is not designed for built-in installation, do not place the product in an enclosed environment such as a bookcase or rack, unless proper ventilation is provided or the manufacturer's instructions are followed.
-
The LCD panel is made of glass. Therefore, it can break when the product is dropped or struck.
-
The LCD panel is a technologically advanced product giving you fine picture details. Occasionally, a few non-active pixels may appear on the screen as a fixed point of blue, green or red. These non-active pixels are considered acceptable according to industry standards.
-
An outside antenna system should not be located in the vicinity of overhead power lines or other electric light or power circuits, or where it can fall into such power lines or circuits. When installing an outside antenna system, extreme care should be taken to keep from touching such power lines or circuits as contact with them may lead to severe personal injury.
Features
List of Features
Your TV was designed with the latest technology that includes the following special features:
- Standard VESA mounting holes for use of a wall mount or robot arm.
- Rotate and tilt features to optimize viewing.
- Easy-to-use remote control.
- Easy-to-use on-screen menu system.
- PIP (picture in picture)
- Headphone jack for private listening.
- 16:9 letterbox format available depending upon source.
- Built-in dual channel speakers.
- Fine tuning control for the sharpest picture possible.
- A built-in multi-channel sound decoder for stereo, mono, and SAP.
- Automatic channel tuning up to 125 channels.
- Sleep timer.
- Adjustable picture and sound settings that are stored in the TV's memory.
Connection
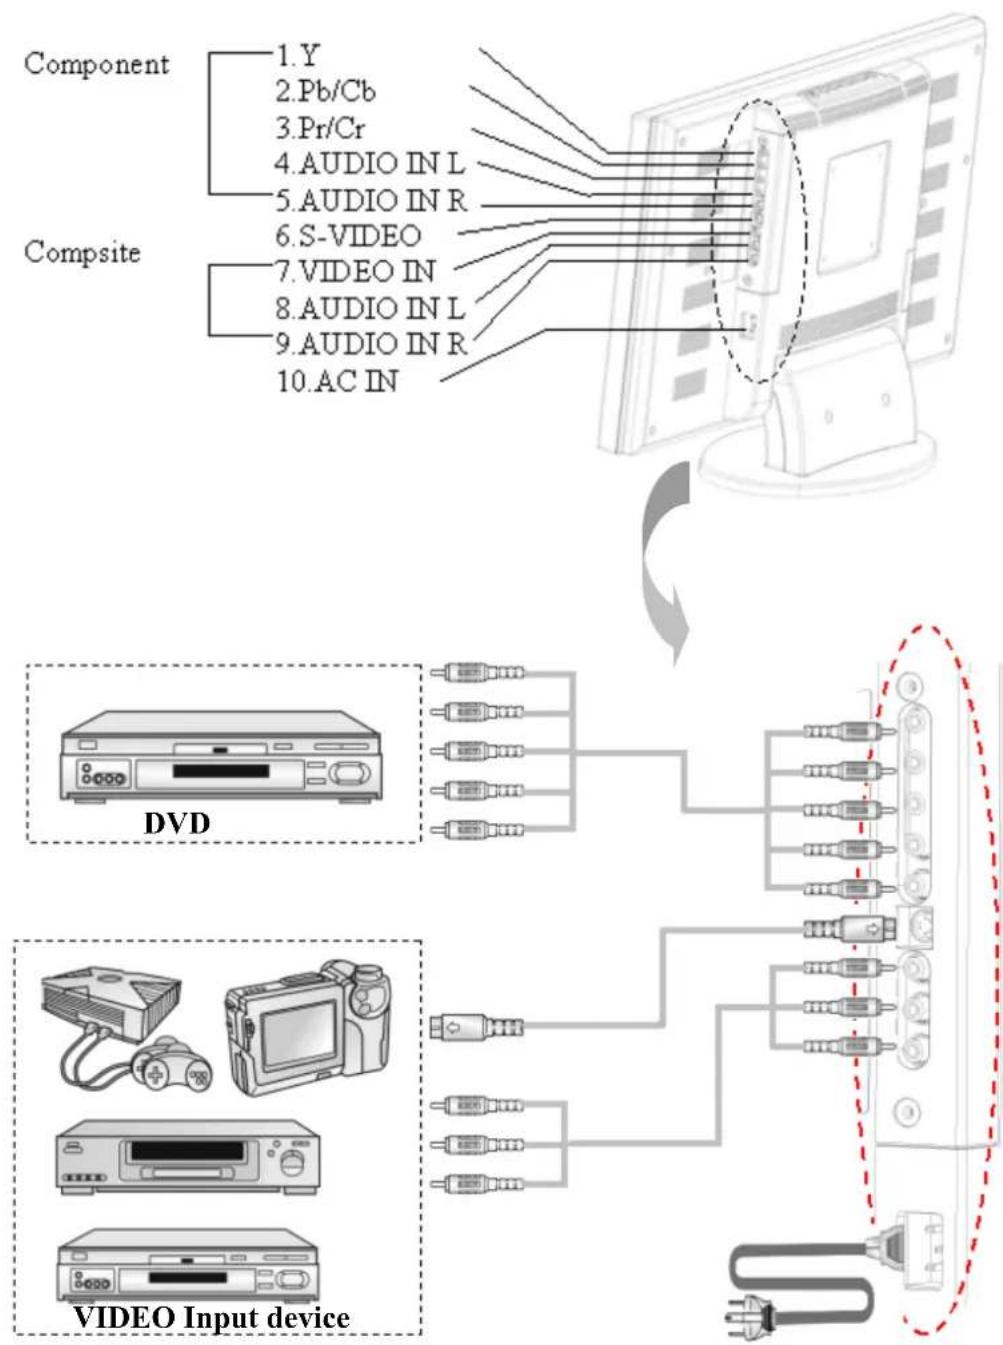
text_image
Component 1.Y 2.Pb/Cb 3.Pr/Cr 4.AUDIO IN L 5.AUDIO IN R 6.S-VIDEO 7.VIDEO IN 8.AUDIO IN L 9.AUDIO IN R 10.AC IN Composite DVD VIDEO Input device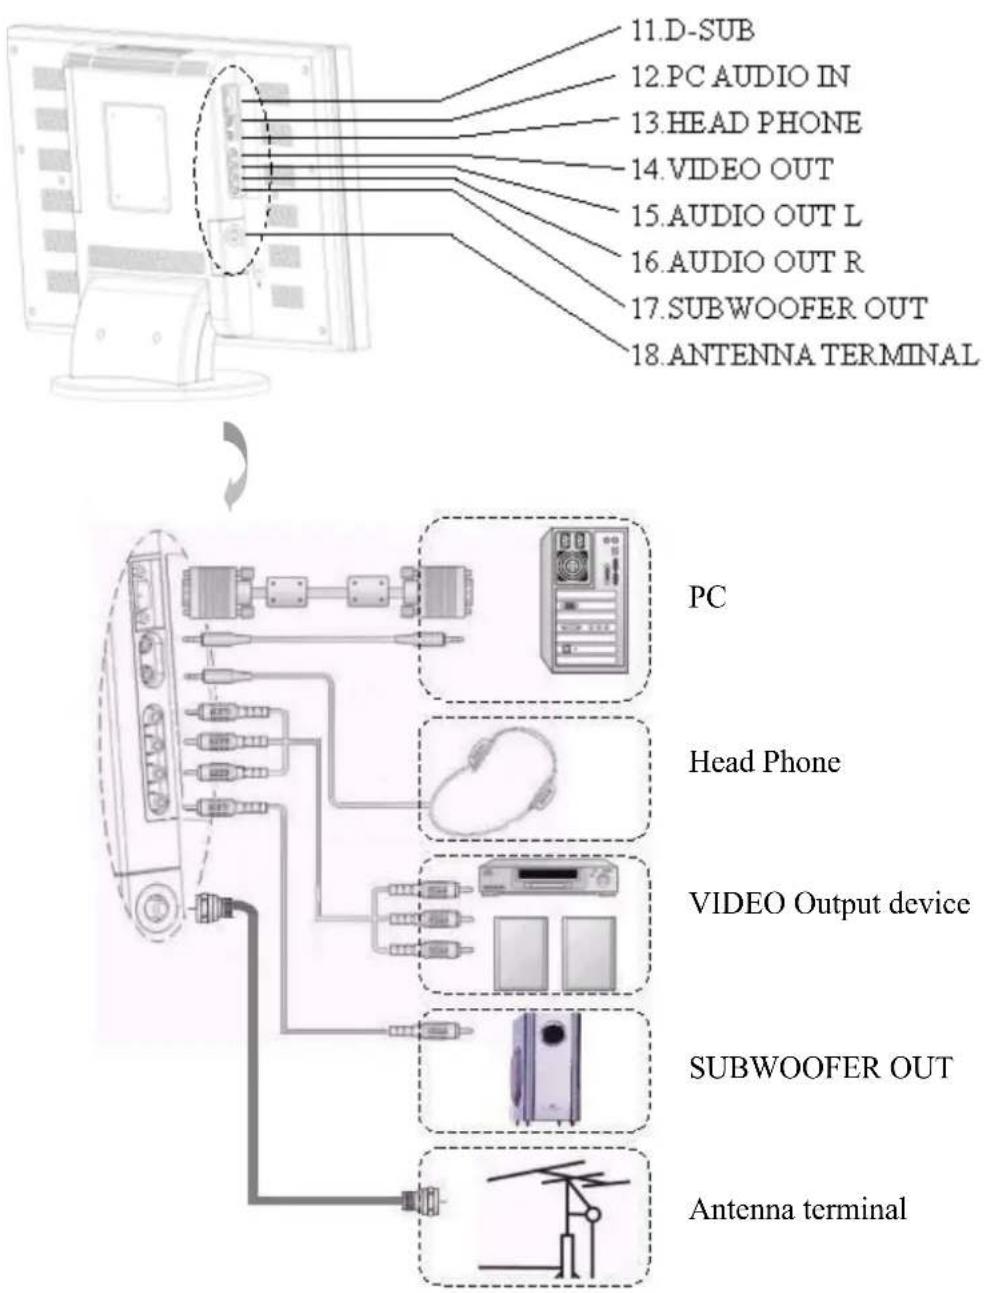
text_image
11.D-SUB 12.PC AUDIO IN 13.HEAD PHONE 14.VIDEO OUT 15.AUDIO OUT L 16.AUDIO OUT R 17.SUBWOOFER OUT 18.ANTENNA TERMINAL PC Head Phone VIDEO Output device SUBWOOFER OUT Antenna terminalControl Location
These buttons control your TV's basic features including on-screen menus. To use the advanced features, you must the remote control.
POWER: turn on or turn off the LCD TV.
SOURCE: set up the input source (PC,VIDEO,SV,TV,CV).
MENU: displays the main menu.
CHANEL (down/up): change channels on sequence.
VOLUME(+/-): turn up or turn down the volume.
ASPECT RATIO: sets up the display (Normal, Periscope, Zoom or Full).
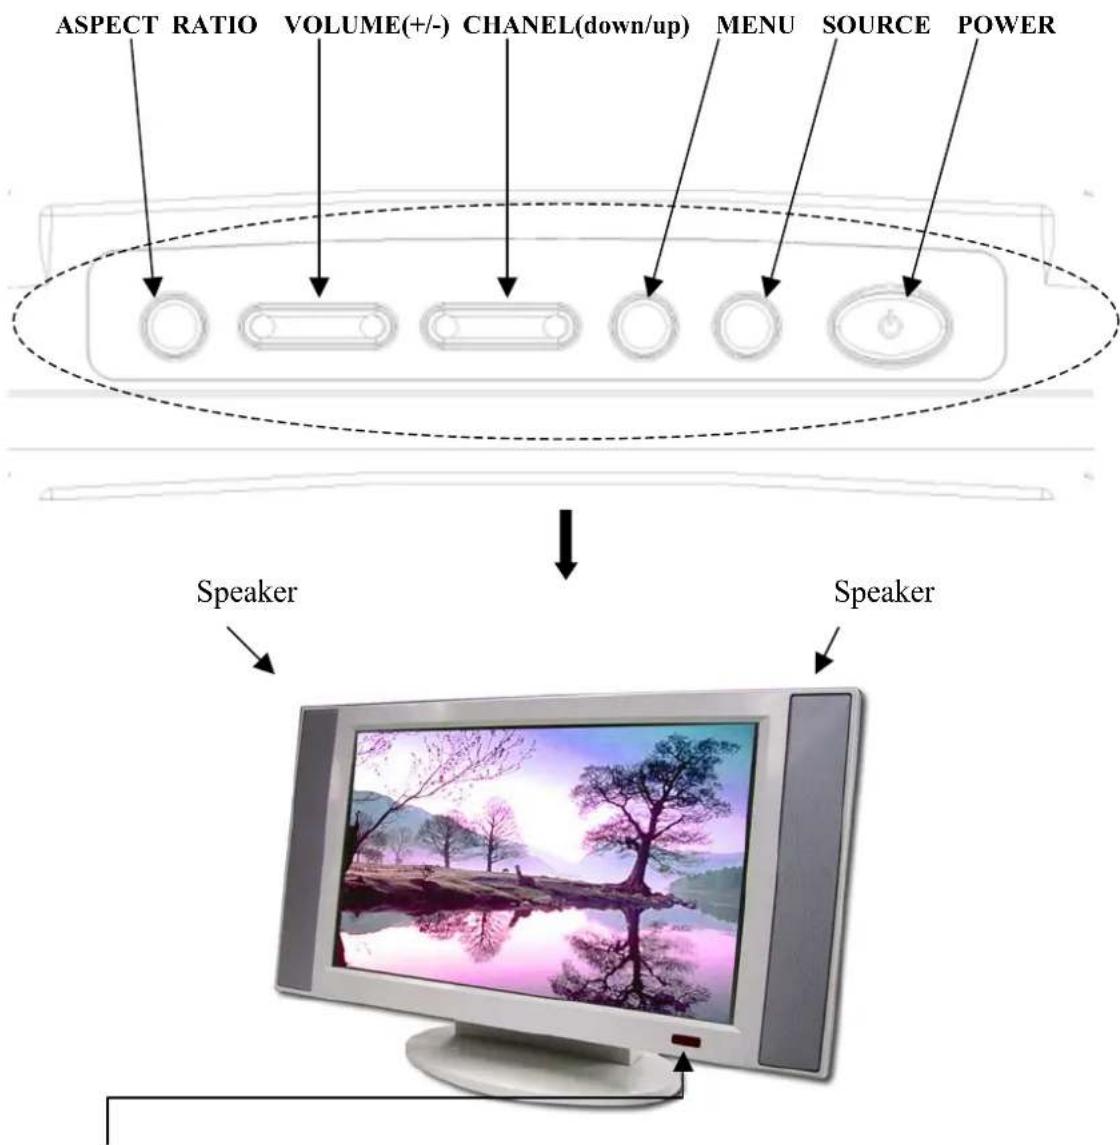
text_image
ASPECT RATIO VOLUME(+/-) CHANEL(down/up) MENU SOURCE POWER Speaker SpeakerRemote sensor window
Aim the remote control at the sensor window.
Accessories
text_image
23" LCD TV User's ManualUser's manual
natural_image
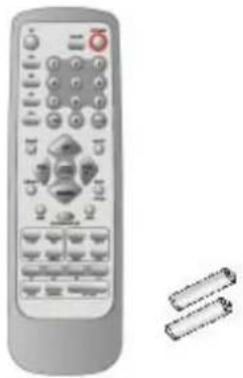
Illustration of a remote control with keyboard and buttons, alongside two cylindrical objects (no text or symbols)Remote control & Batteries (4A x2)
natural_image
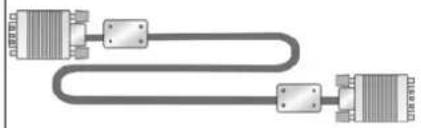
Pure diagram of two connected audio/video cables with no text or symbols15 Pin D-Sub Signal Cable

natural_image
Pure electrical circuit lines without any symbolsAntenna Cable
natural_image
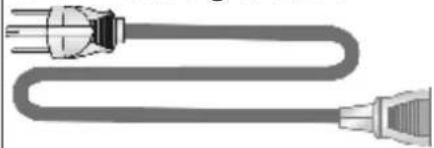
Illustration of a U-shaped cable with two connectors (no text or symbols)Power Cord
Remote Control
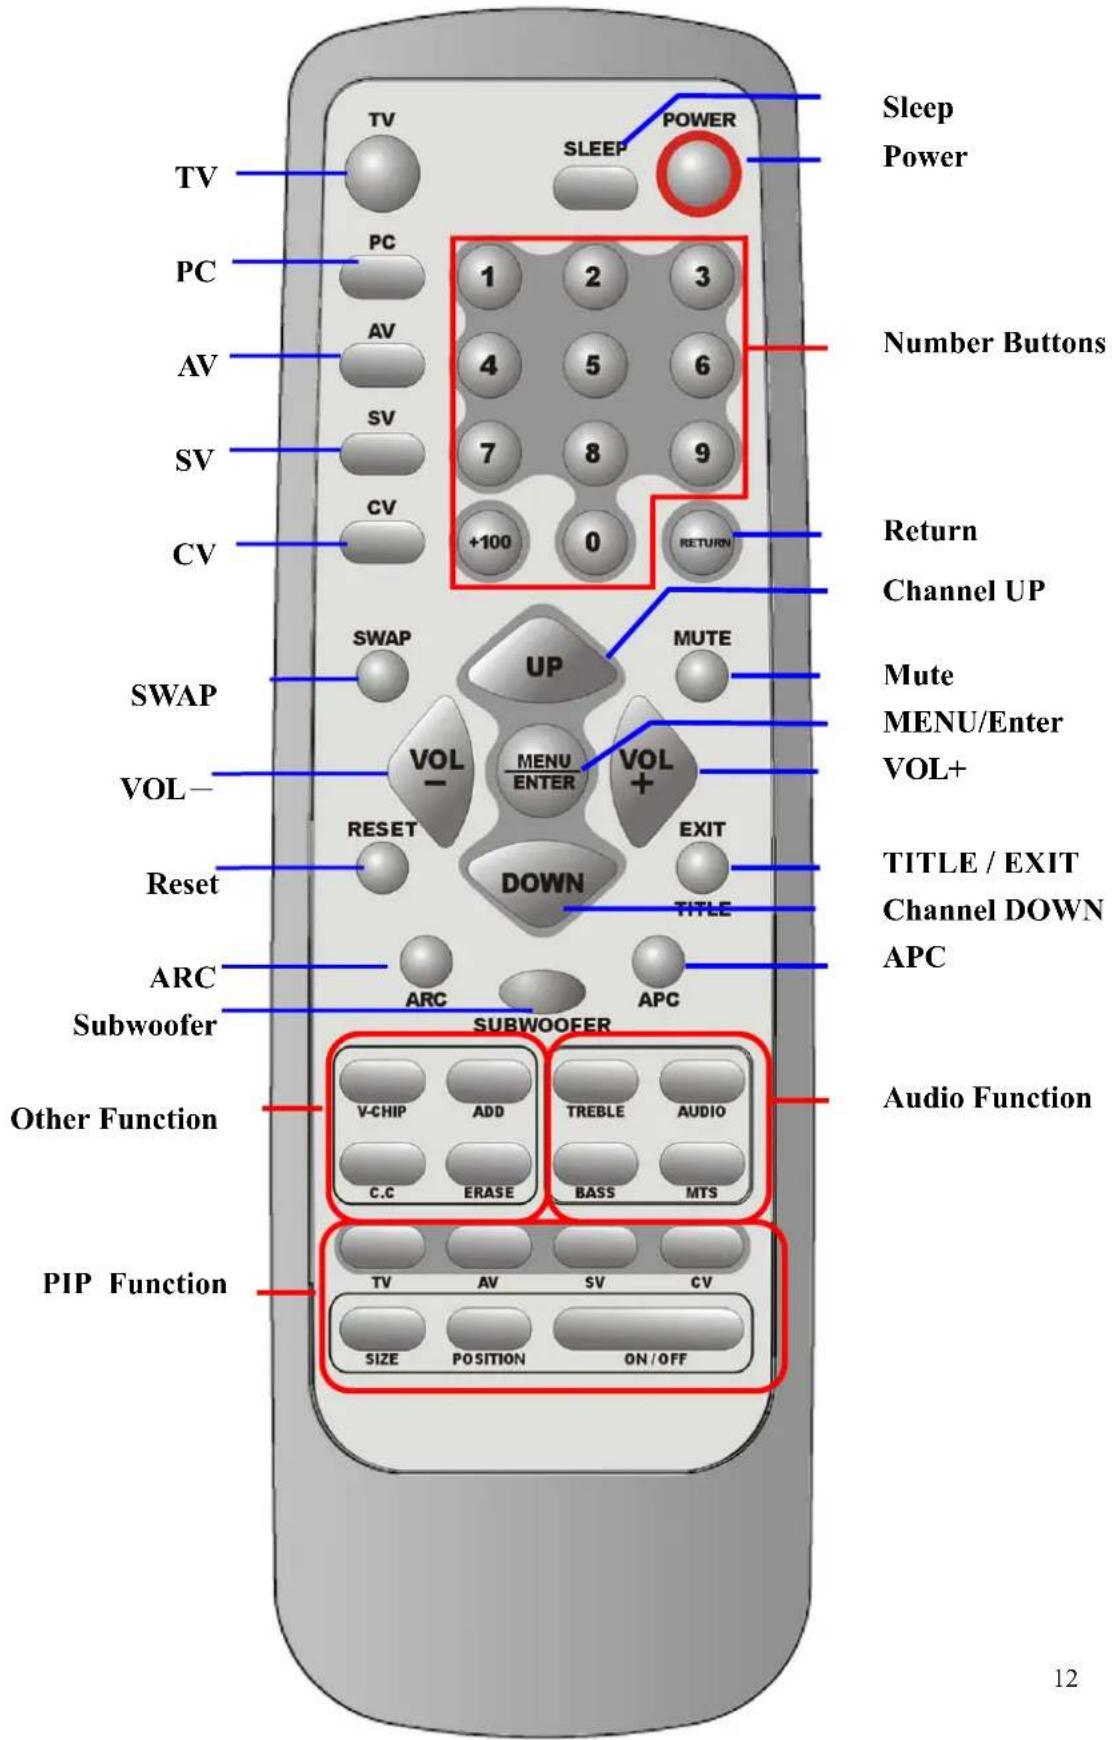
The remote control pad illustrates the basic functions or your remote control.
text_image
Sleep Power TV PC AV SV CV Number Buttons 1 2 3 4 5 6 7 8 9 +100 0 RETURN Return Channel UP MUTE VOL- UP MENU ENTER VOL+ RESET DOWN TITLE VOL- RETLE V-CHIP ADD TREBLE AUDIO C.C ERASE BASS MTS Subwoofer Other Function Audio Function PIP Function TV AV SV CV SIZE POSITION ON/OFF 12Summary of Control Button
Power control
Press POWER button Turns the display on/off
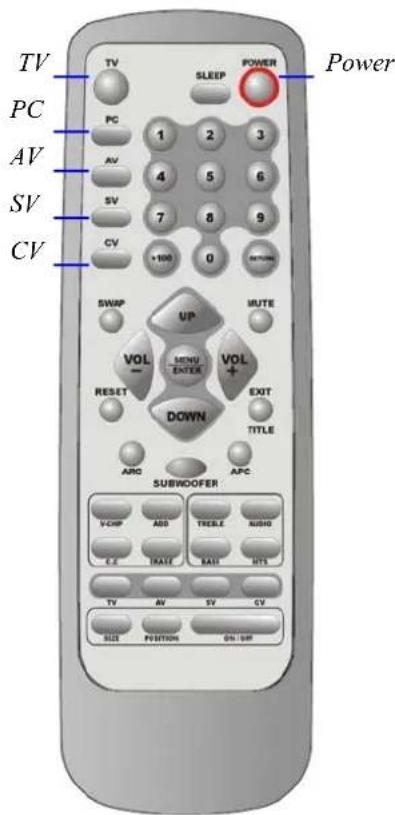
Selecting the signal source
Press TV button Switches to TV mode.
Press AV button Switches to AV Video mode.
Press SV button Switches to S-Video mode.
Press CV button Switches to Component mode (Y Pb Pr).
Press PC button Switches to PC mode.
Menu Setting
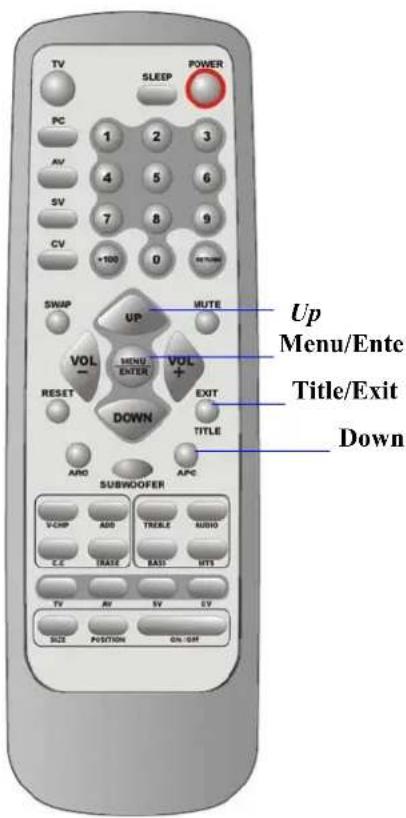
Press MENU/ENTER button Displays the main on-screen menu or enter for the next menu.
Press TITLE/EXIT button Displays the current channel digits or exits from the menu.
Changing Channels
Press UP button Forwards the channel on the TV.
Press DOWN button Reverses the channel on the TV.
Press 0\~9 , +100 button
Selects channels directly on the TV.
Press RETURN button Return to previous channel on the TV.
Sound Control
Press VOL+ button Increases the sound.
Press VOL- button Decreases the sound.
Press MUTE button
Temporarily disables the audio
Press MTS button
Press to choose stereo, mono or separate audio program supply multi-channel sound services.
Press AUDIO button
Select present audio is main display or sub display.
Press TREBLE button
Adjusts the treble.
Press BASS button
Adjusts the bass.
Press SUBWOOFER button.
Opens the subwoofer function.
PIP Control
Press ON/OFF button
Press to watch one of the video sources on sub display. Press again to make the sub display disappear.
Press to select one of the PIP window input sources.
Press SIZE button
Adjusts the size of the PIP box.
Press POSITION button
Press to move the PIP window to : Top Left→Top Right→Bottom Right→Bottom Left→Repeat
Other Function
Press SWAP button
Change main display and sub display.
Press RESET button
Returns to original factory settings.
Press ARC button
In PC source : Set the picture window to full or normal.
In Video source : Set the picture window to normal →full→periscope→zoom.
Press APC button Select Normal, Clear, Dark, and Theater mode for
picture control.
Press SLEEP button
Press to select a present time interval for shut off. Sets Parental Control function.
Press V-CHIP button
Sets the caption of TV programs show on or off.
Press CC button
Adds the channel of TV programs in TV source.
Press ADD button
Erases the channel of TV programs in TV source.
Press ERASE button
Controls & Adjustment
A. General Adjustment
Turning the LCD-TV On and Off:
To turn on the TV, plug the power cable into a 110V or 220V outlet.
Press the Power button on the top of the panel or you can use the remote to turn the TV on.
An indicator light shows as follows:
In PC mode
In PC mode (power save)
Viewing the Menus and On-Screen Displays:
text_image
TV SLEEP POWER PC 1 2 3 AV 4 5 6 SV 7 8 9 CV +100 0 SWAP UP MUTE VOL- MENU ENTER VOL+ EXIT RESET DOWN TITLE AND AIPC SUBWDOFER T-CHP ADD TICLE AUDIO C.C. TRADE BASE MTS TV AV SV CV SIZE POSITION ON/OH Up Menu/Ente Title/Exit DownViewing the Menus
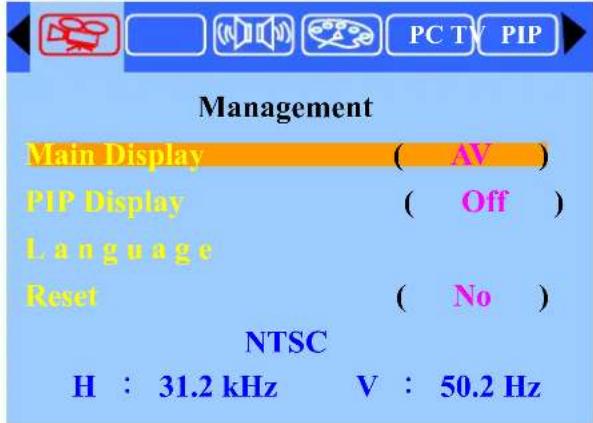
- With the power on, press the MENU Button. The main menu appears on the screen.
text_image
PC TV PIP Management Main Display ( AV ) PIP Display ( Off ) Language Reset ( No ) NTSC H : 31.2 kHz V : 50.2 Hz-
Use the VOL (+) or VOL (-) button to select one of the menu options. Then press the ENTER button to access the menu's Sub-menu.
-
Press the EXIT button to exit from the Menu.
Switching PC/Video/S-Video/TV/Component Modes:
text_image
TV PC AV SV CV TV SLEEP POWER Power PC PC 1 2 3 AV 4 5 6 SV 7 8 9 CV +100 0 SWAP UP MUTE VOL MENU ENTER VOL RESET DOWN EXIT TITLE ARD APC SUBWOOFER VCHP ADD TREELE AUDIO C E DATE SATE BTS TV AV SV CV SIZE POSITION ON/EXP- Turn on the power of the connected video equipment.
- Press the applicable input source.
Press TV button to switch to TV mode.
Press PC button to switch to PC mode (VGA).
Press AV button to switch to AV mode.
Press SV button to switch to S-Video mode.
Press CV button to switch to CV mode (Y, Pb/Cb, Pr/Cr).
Switching Language Modes:
text_image
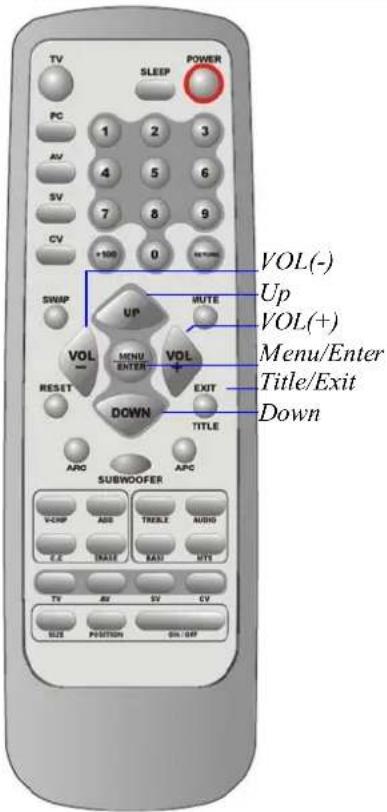
TV SLEEP POWER PC 1 2 3 AV 4 5 6 SV 7 8 9 CV +100 0 SWAP UP MUTE VOL(-) Up VOL(+) Menu/Enter Title/Exit Down VOL MENU ENTER VOL RESET DOWN EXIT TITLE SUBWOOFER ARC APC VAMP ADD TREELE AUDIO C.C. RATE BAND MTE TV AV SV CV SIZE POSITION SIN-0.0P- Press the MENU button to display the main menu.
- Press the ENTER button to enter Management.
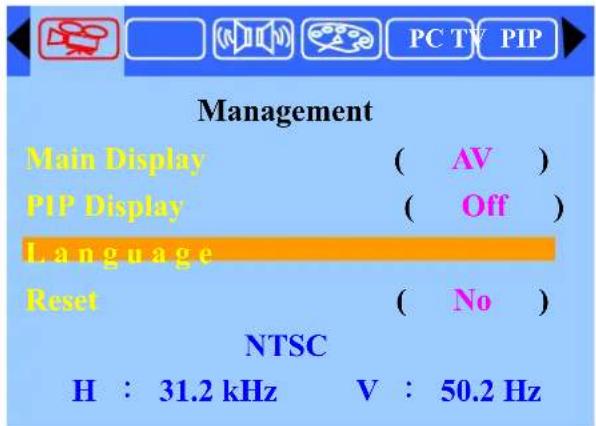
Press the UP or DOWN button to select Language. Then press the ENTER button.
text_image
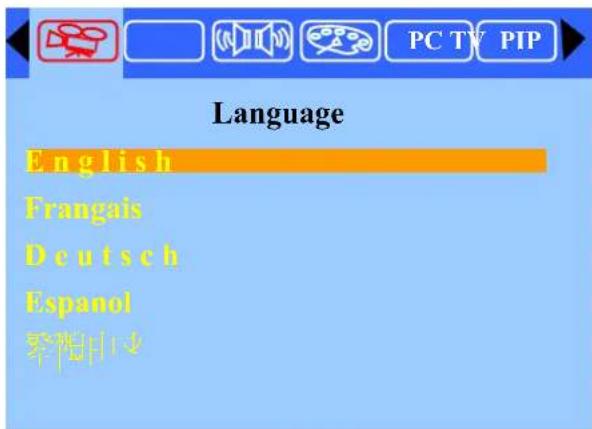
PC TV PIP Management Main Display ( AV ) PIP Display ( Off ) Language Reset ( No ) NTSC H : 31.2 kHz V : 50.2 Hz- Press the UP or DOWN button to select the desired language mode then press the ENTER Button.
text_image
Language English Français Deutsch Espanol 華陽門- Press the EXIT button to exit OSD mode.
Adjusting the Volume:
Using Volume Control
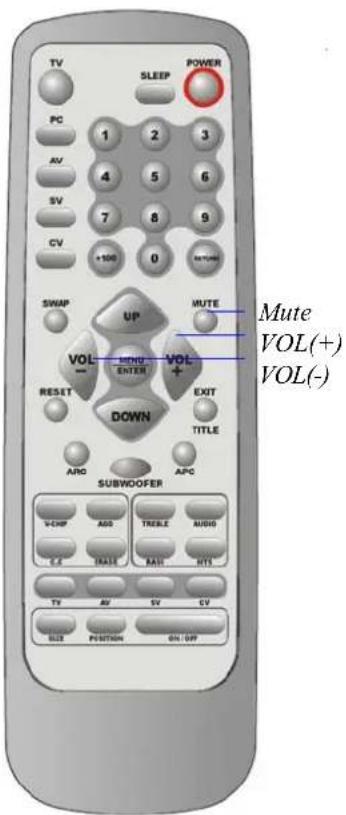
Press the VOL (+) or VOL (-) button to increase or decrease the sound volume.
Using Mute
At any time, you can temporarily disable the sound using the Mute button.
- Press the MUTE button and the sound is disabled.
- Press the MUTE again or VOL(+) or VOL(-) button to turn the sound back to the previous level.
The mute function is automatically turned off when any of the following buttons is pressed: VOL(+) or VOL(-).
text_image
TV SLEEP POWER PC 1 2 3 AV 4 5 6 SV 7 8 9 CV +100 0 SWAP UP MUTE VOL(+) MIND ENTER VOL RESET DOWN EXIT TITLE ARD SUBWOOFER APC VCHP ADD ITEMS AUDIO G.E. BASE BAID BYD TV AV SV CV BLUE POSITION ON/OFF Mute VOL(+) VOL(-)How to enter the Menu Items :

text_image
TV SLEEP POWER PC 1 2 3 AV 4 5 6 SV 7 8 9 CV +100 0 SWAP UP MUTE VOL(-) Up VOL(+) Menu/Enter Title/Exit Down VOL MENU ENTER VOL RESET DOWN TITLE SUBWOOFER ARC APC V-CHF ADD TRESLE AUDIO C-C EXE LAI MTS TV AV SV CV SIZE POSITION ON-OFF- Press the MENU button to display the main menu screen.
text_image
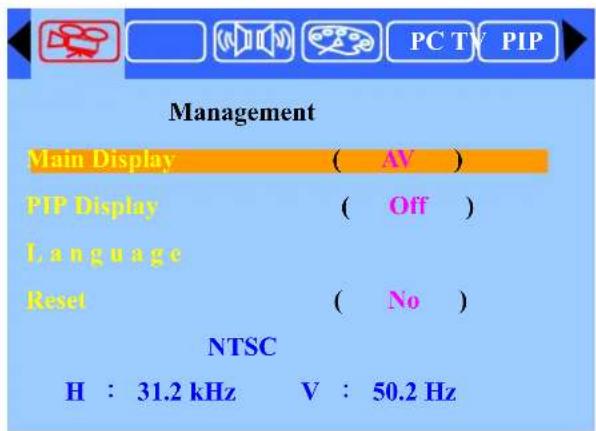
PC TV PIP Management Main Display ( AV ) PIP Display ( Off ) Language Reset ( No ) NTSC H : 31.2 kHz V : 50.2 Hz- Use the VOL(+) or VOL(-) button to select one of the menu option. Then press the ENTER button to access the menu's Sub-menu.
- Press the VOL(+) or VOL(-) button to make adjustments.
- Press the EXIT button to return to the previous screen or exit from the Menu.
Setting the Sleep Timer:
text_image
TV SLEEP POWER PC 1 2 3 AV 4 5 6 SV 7 8 9 CV +100 0 RETURN SWAP UP MUTE VOL MENU VOL - ENTER EXIT RESET DOWN TITLE AND APD SUBWOOFER V-CROP ADD TRIPLE AUDIO C-C EXCEL GASS MTS TV AV SV CV SIZE POSITION ON/OFFSleep
You can set the Sleep Timer to automatically turn off the LCD TV.
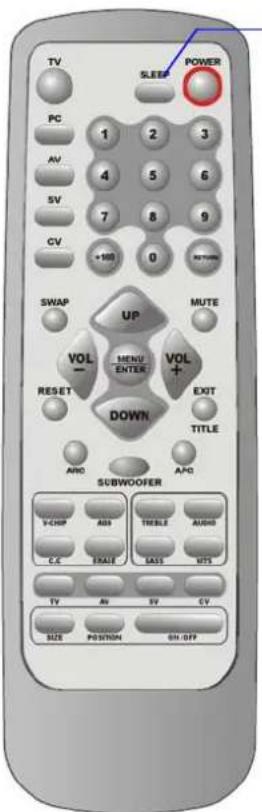
- Press the SLEEP button to display the Sleep Timer screen.
- Press the SLEEP button to set the sleep timer (in minutes).
The time can be set in increments of 30 minut the range between 30 and 90 minutes.
$$ 3 0 \mathrm{min} \rightarrow 6 0 \mathrm{min} \sim > 9 0 \mathrm{min} \rightarrow \text { OFF } $$
Note:
The Sleep Timer screen automatically disap
B.PC mode Adjustment
Adjusting the Contrast & Brightness Settings:
You may need to perform separate adjustments for brightness and contrast for different video modes. Generally, PC mode will be best viewed with lower brightness and contrast settings than are appropriate for the other modes.
text_image
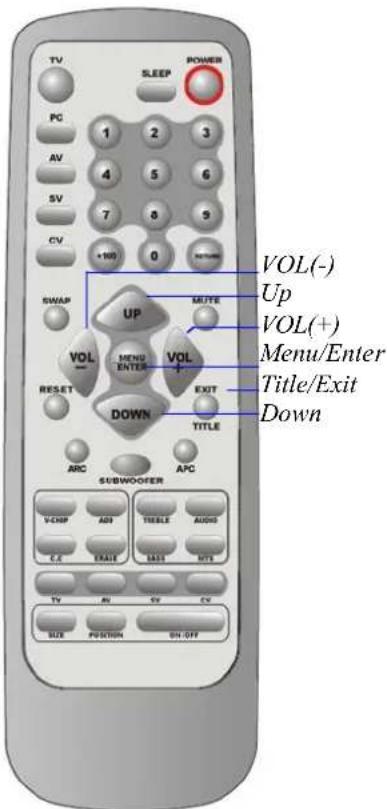
TV SLEEP POWER PC 1 2 3 AV 4 5 6 SV 7 8 9 CV +100 0 SWAP UP MUTE VOL(-) Up VOL(+) Menu/Enter VOL MENU ENTER VOL RESET DOWN EXIT TITLE SUBWOOFER ADC APC VCHP ADD ITEMS AUDIO CC FAISE DATA MTS TV AU SV CV SIZE POSITION ON/OFF- Press the MENU button to display the main menu.
text_image
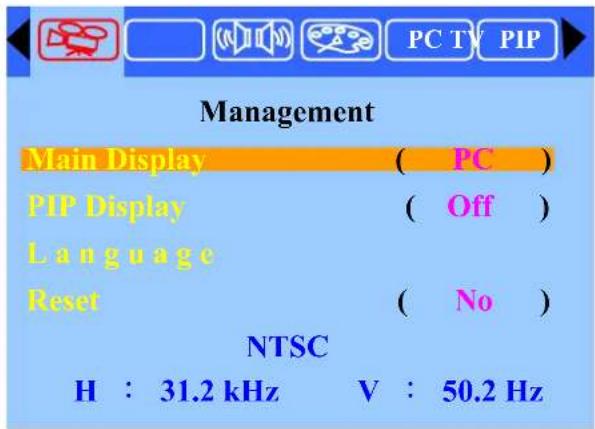
PC TV PIP Management Main Display ( PC ) PIP Display ( Off ) Language Reset ( No ) NTSC H : 31.2 kHz V : 50.2 Hz- Press the VOL(+) or VOL(-) button to move the cursor to Picture Adjust.
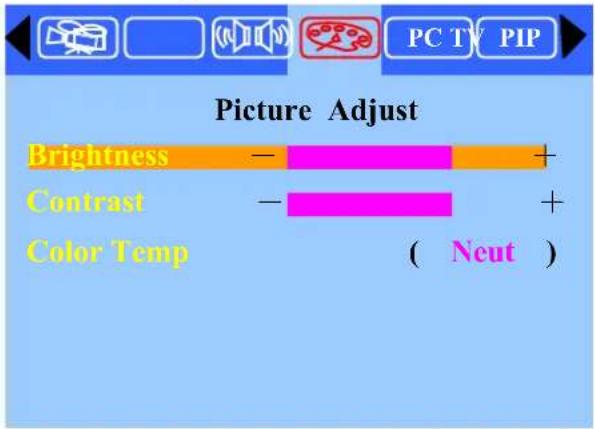
text_image
Picture Adjust Brightness — + Contrast — + Color Temp ( Neut )-
Press the ENTER button to enter Color Adjust.
-
Press the UP or DOWN button to the desired item (Brightness, Contrast).
-
Press the VOL (+) or VOL (-) button to set the desired item.


- Press the EXIT button to return to the previous screen or exit.
Adjusting the Picture Adjust Settings:
- Press the MENU button to display the main menu.
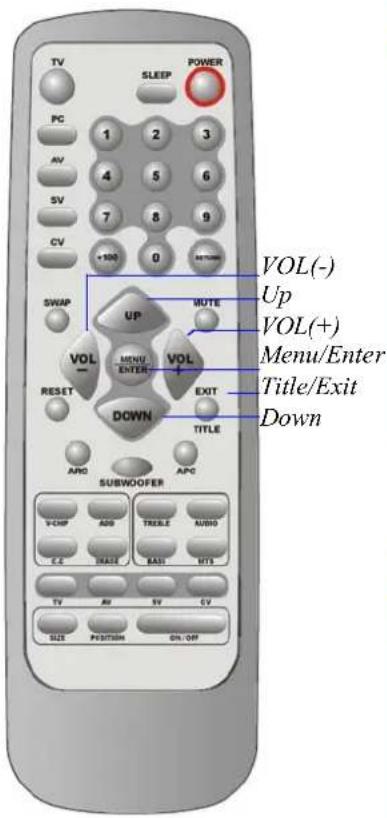
text_image
TV SLEEP POWER PC 1 2 3 AV 4 5 6 SV 7 8 9 CV +100 0 SWAP UP MUTE VOL(-) Up VOL(+) Menu/Enter Title/Exit Down VOL MENU ENTER VOL RESET DOWN EXIT TITLE APO SUBWOOFER VCHP ADD TREE AUDIO C.C RATE BASI MTS TV AU SV CV SIZE POSITION ON OFF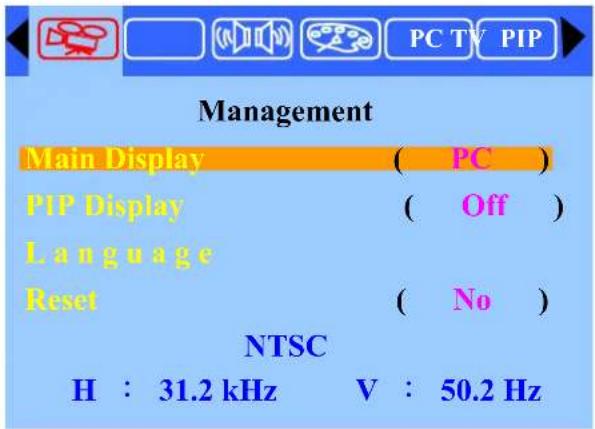
text_image
PC TV PIP Management Main Display ( PC ) PIP Display ( Off ) Language Reset ( No ) NTSC H : 31.2 kHz V : 50.2 Hz- Press the VOL(+) or VOL(-) button to move the cursor to Picture Adjust.
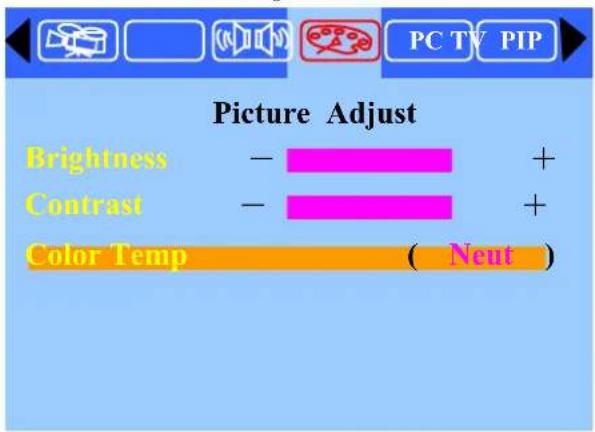
text_image
Picture Adjust Brightness - + Contrast - + Color Temp ( Neut )- Press the ENTER button to enter Picture Adjust.
- Press the UP or DOWN button to Color temp (Neut.).
- Press the VOL (+) or VOL (-) button to set the desired item (Cool Neutral Warm User).

text_image
Cool Neutral Warm User - ← ▶ +5.1 When selecting user, press the ENTER button to enter User Color Adjust.
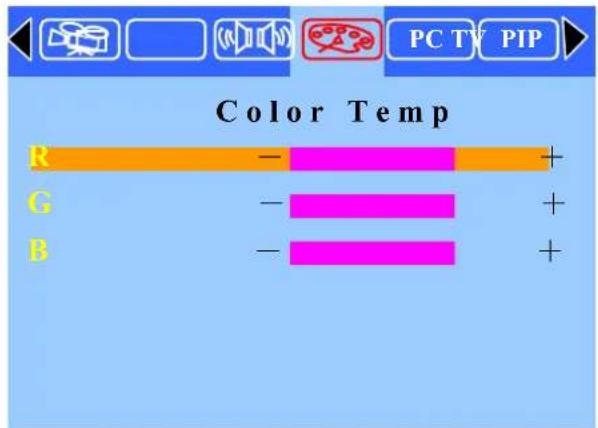
text_image
PC TV PIP Color Temp R — + G — + B — +5.2 Press the UP or DOWN button to the desired item(R, G, B).
5.3 Press the VOL (+) or VOL (-) button to set the desired item(R, G, B).
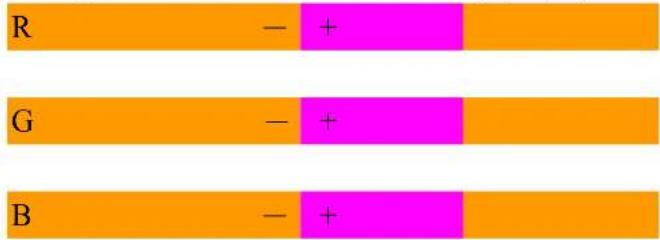
text_image
R — + G — + B — +- Press the EXIT button to return to the previous screen or exit.
Adjusting the Image Adjust Settings :
- Press the MENU button to display the main menu.
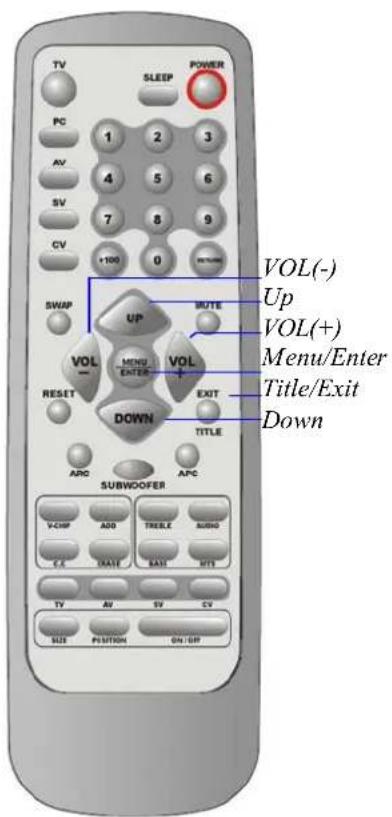
text_image
TV SLEEP POWER PC 1 2 3 AV 4 5 6 SV 7 8 9 CV +100 0 SWAP UP MUTE VOL(-) Up VOL(+) Menu/Enter Title/Exit Down VOL MENU ENTER VOL RESET DOWN EXIT TITLE SUBWOOFER ARC APC V-CHIP ADD TICLE AUDIO C.C. DATE BATH MTS TV AV SV CV SIZE POSITION ON/OFF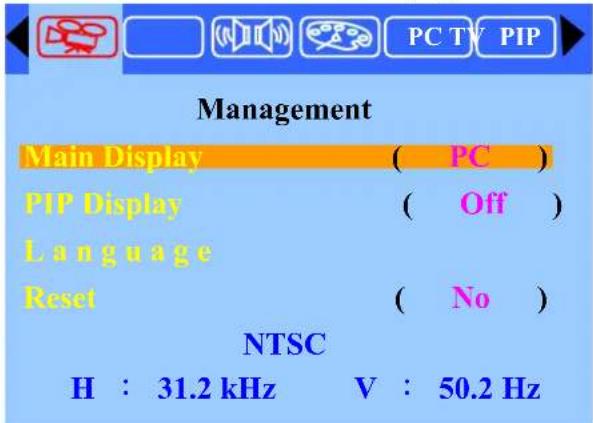
text_image
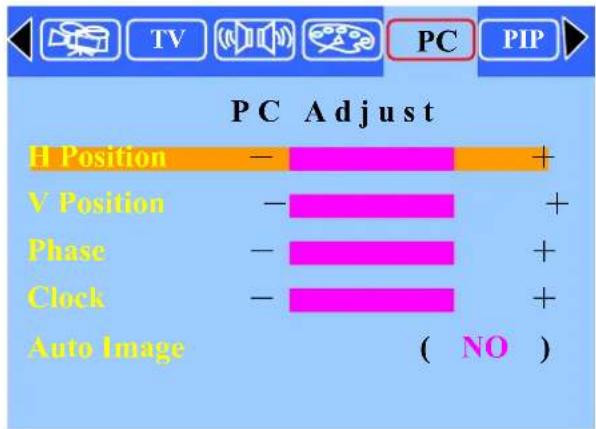
PC TV PIP Management Main Display ( PC ) PIP Display ( Off ) Language Reset ( No ) NTSC H : 31.2 kHz V : 50.2 Hz- Press the VOL (+)/VOL (-) button to move the cursor to PC Adjust.
text_image
PC Adjust H Position - + V Position - + Phase - + Clock - + Auto Image ( NO )- Press the ENTER button to enter PC Adjust.
- Press the UP or DOWN button to the desired item (H. Position V. Position Phase. Clock. Auto Image).
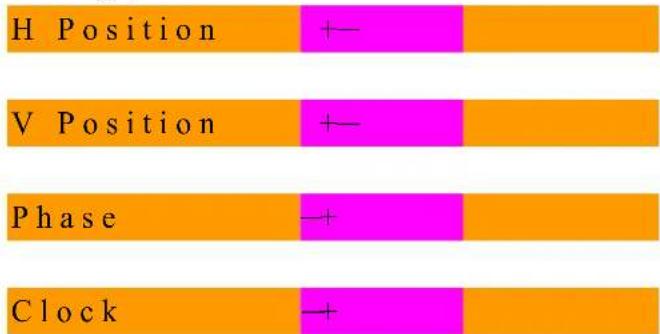
- Press the VOL (+) or VOL (-) button to set the desired item (H Position V Position Phase, Clock, Auto Image).
text_image
H Position V Position Phase Clock- Press the EXIT button to return to the previous screen or exit.
Adjusting the Audio Adjust Settings :
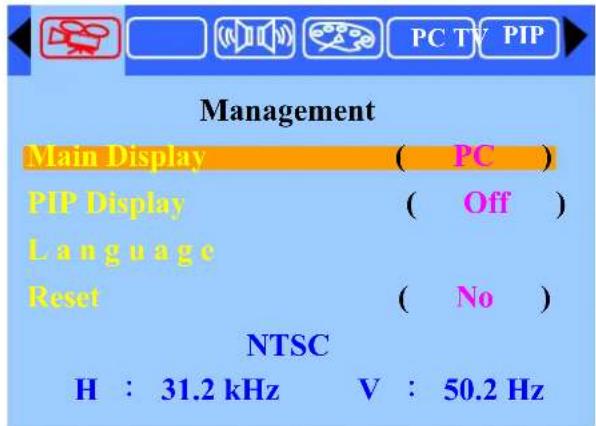
- Press the MENU button to display the main menu.
text_image
PC TV PIP Management Main Display ( PC ) PIP Display ( Off ) Language Reset ( No ) NTSC H : 31.2 kHz V : 50.2 Hz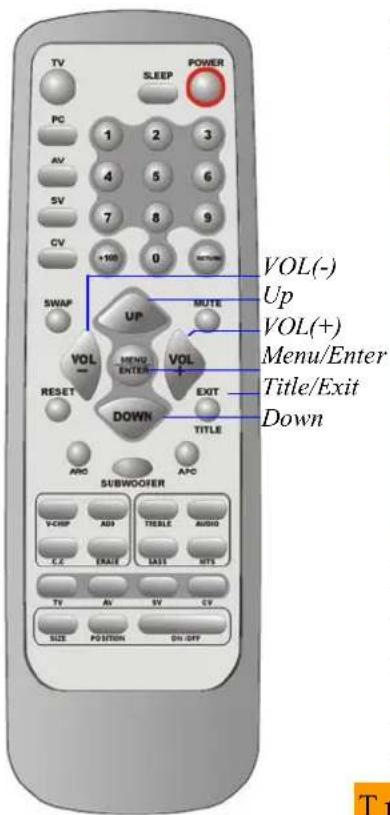
text_image
TV SLEEP POWER PC 1 2 3 AV 4 5 6 SV 7 8 9 CV +100 0 SWAP UP MUTE VOL(-) Up VOL(+) Menu/Enter Title/Exit Down VOL MENU ENTER VOL RESET DOWN EXIT TITLE APO SUBWOOFER VCHP ADD ITEMS AUDIO C.C FALE LAIT MTS TV AV SV CV SIZE POSITION ON-OFF- Press the VOL(+) or VOL(-) button to move the cursor to Audio Adjust.
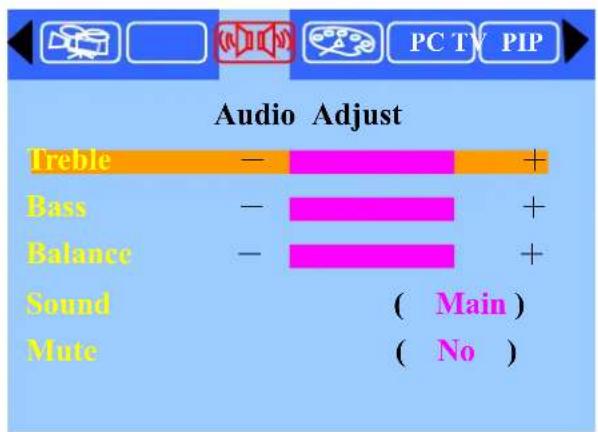
text_image
Audio Adjust Treble — + Bass — + Balance — + Sound ( Main ) Mute ( No )- Press the ENTER button to enter Audio Adjust.
- Press the UP or DOWN button to the desired item (Treble. Bass. Balance. Sound. Mute.).
- Press the VOL (+) or VOL (-) button to set the desired item (Treble, Bass, Balance, Sound, Mute).



Note:
When using the PIP feature in PC mode, you can listen to the sound of the sub screen instead of the main screen.
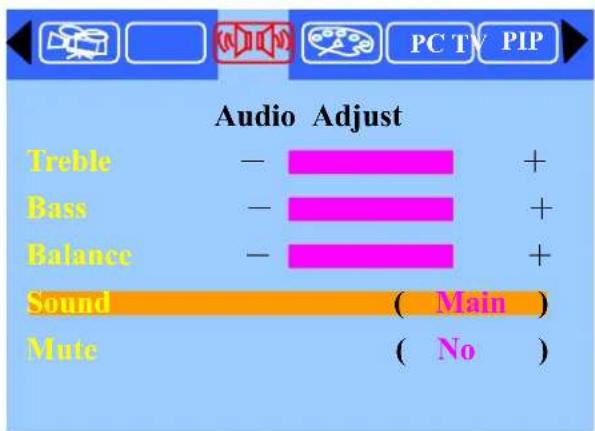
text_image
Audio Adjust Treble — Bass — Balance — Sound ( Main ) Mute ( No )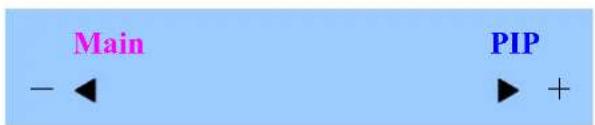
text_image
Main - ← PIP ► +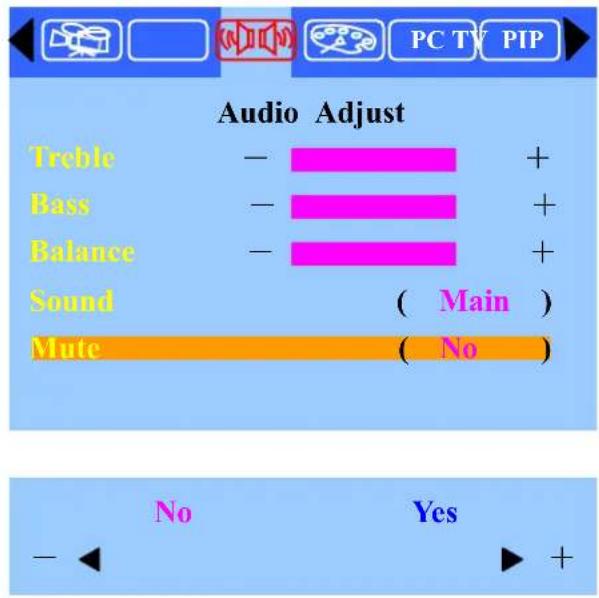
text_image
Audio Adjust Treble — — + Bass — — + Balance — — + Sound ( Main ) Mute ( No ) No Yes - ← ▶ +- Press the EXIT button to return to the previous screen or exit.
Viewing Picture-in-Picture (PIP):
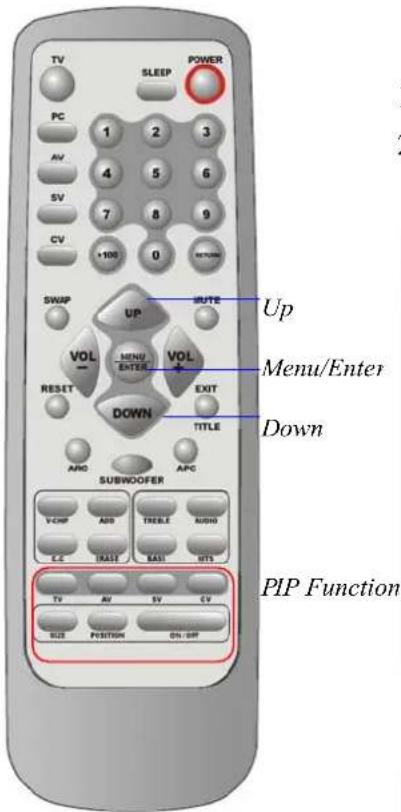
PIP: When you select PC source as the main display, you can also select another source as sub-display: Video, S-video, TV and Component video. PC source cannot be used in PIP Display. You can use the PIP feature to simultaneously watch two video sources.
text_image
TV SLEEP POWER PC 1 2 3 AV 4 5 6 SV 7 8 9 CV +100 0 SWAP UP VOL MENU ENTER VOL RESET DOWN TITLE AND SUBWOOFER APC Up Menu/Enter Down VCHP ADD TREE AUDIO EC IRAS BASI MTS TV AV SV CV SIZE POSITION ON/OR PIP FunctionActivating Picture-in-Picture
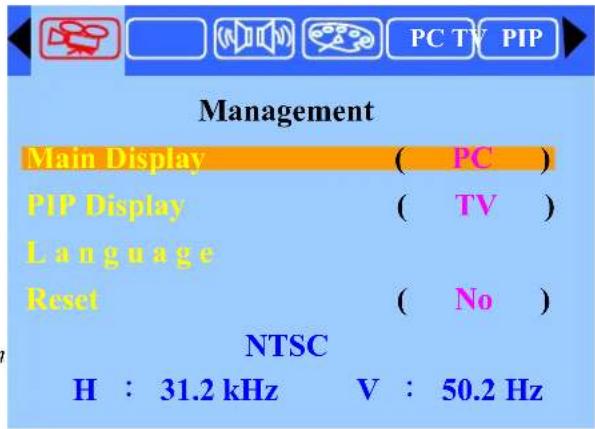
- Press the MENU button to display the main menu.
- Press the UP or DOWN button to select the PIP
Display and press the MENU button to select source.
text_image
PC TV PIP Management Main Display ( PC ) PIP Display ( TV ) Language Reset ( No ) NTSC H : 31.2 kHz V : 50.2 Hz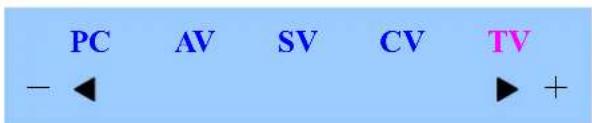
text_image
PC AV SV CV TV - ◀ ▶ +- Press the VOL (+) or VOL (-) button to select the desired source.
- Return to previous OSD and press the VOL(+) or VOL(-) button to select the PIP.
text_image
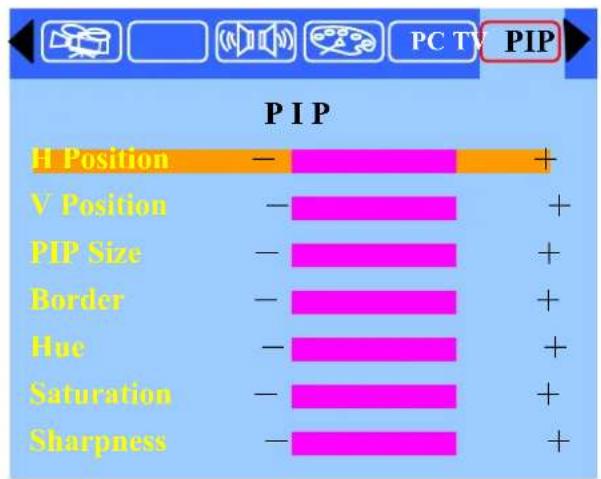
P IP H Position — V Position — PIP Size — Border — Hue — Saturation — Sharpness —- Press the ENTER button to enter PIP.
- Press the UP or DOWN button to select the desired item (H/V Position, PIP Size, Border, Hue, Saturation, Sharpness).
- Press the VOL (+) or VOL (-) button to set the desired item.
H Position ←
V Position +
PIP Size
Border
Hue - +
Saturation - +
Sharpness +—
- Press the EXIT button to return to the previous screen or exit from the Menu.
A shortcut to access the PIP menu: Simply press the PIP Function Button on the remote control.
Selecting a Signal Source (External A/V) for PIP
Press the ON/OFF button to display the PIP window.
Press the AV SV CV TV to select all of the available signal sources:
"Video", "S-Video", "DVD" and "TV".
Changing the Position of the PIP Window
When you press the Position button repeatedly, the PIP window moves from corner to corner on the TV screen.
Changing the Size of the PIP Window
Press the Size button to alternate between a smaller and Larger PIP window.
C.TV mode Adjustment
Adjustment the TV adjust settings:
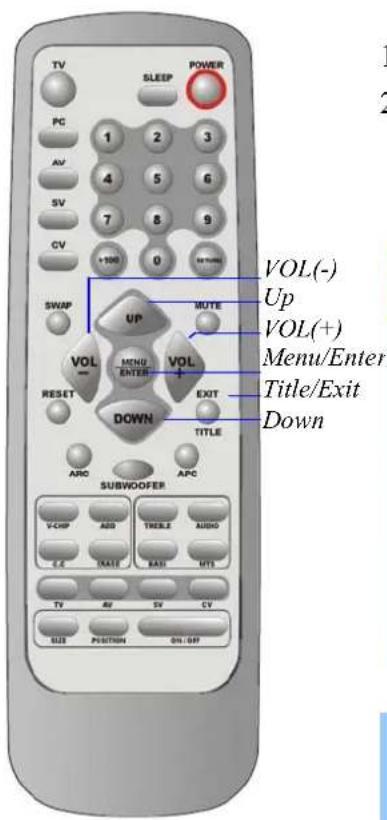
text_image
TV SLEEP POWER PC 1 2 3 AV 4 5 6 SV 7 8 9 CV +100 0 SWAP UP MUTE VOL(-) Up VOL(+) Menu/Enter VOL MENU ENTER VOL RESET DOWN EXIT TITLE SUBWOOFER ARC APC V-CHIP ADD ITEMS AUDIO E.C. TIME BASE MTS TV AV SV CV SIZE POSITION ON/OFF- Press the MENU button to display the main menu.
- Press the ENTER button to enter Management Press the UP or DOWN button to select the Main Display (TV).
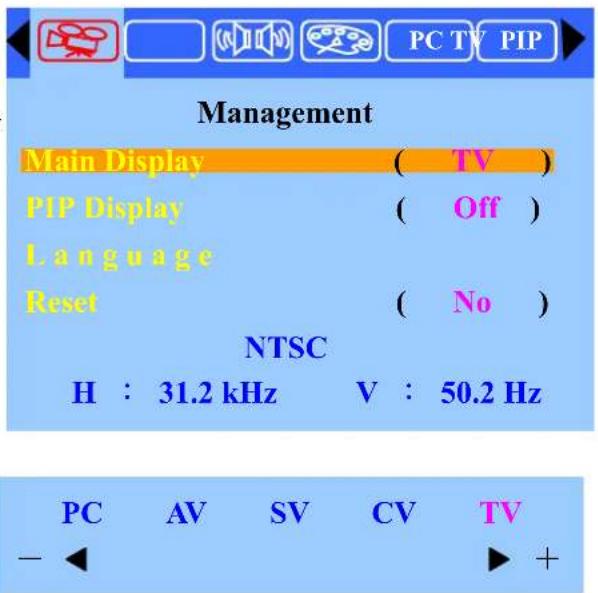
text_image
PC TV PIP Management Main Display ( TV ) PIP Display ( Off ) Language Reset ( No ) NTSC H : 31.2 kHz V : 50.2 Hz PC AV SV CV TV - +- Press the VOL (+) or VOL (-) button to select TV source.
- Press the EXIT button to return to the previous screen Press the VOL(+) or VOL(-) button to select the TV Setting.
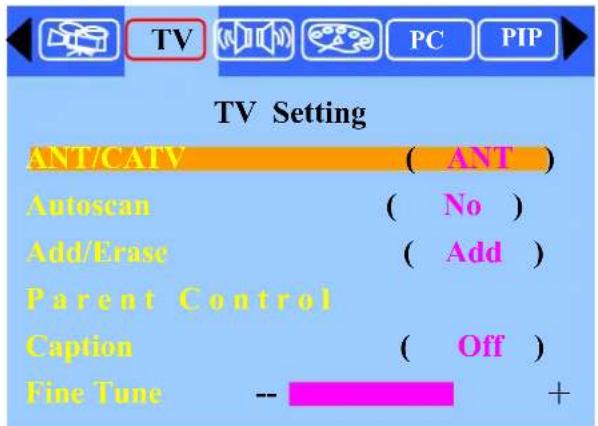
text_image
TV Setting ANT/CATV ( ANT ) Autoscan ( No ) Add/Erase ( Add ) Parent Control Caption ( Off ) Fine Tune -- +- Press the ENTER button to TV Setting.
- Press the UP or DOWN button to select the desired item.
- Press the VOL (+) or VOL (-) button to set the desire item.
- Press the EXIT button to return to the previous screen or exit from the Menu.
Special Sound Option:
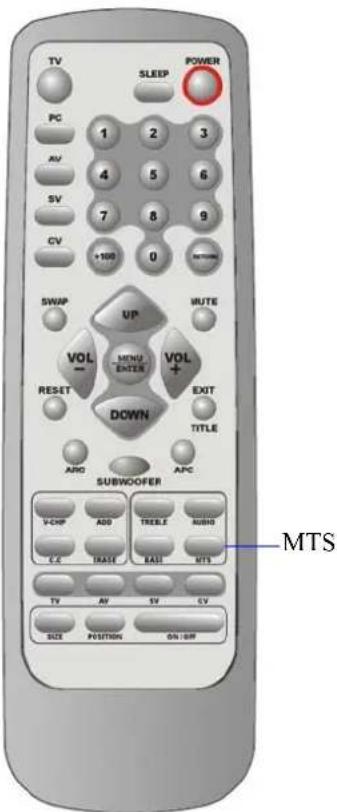
text_image
TV SLEEP POWER PC 1 2 3 AV 4 5 6 SV 7 8 9 CV +100 0 SWAP UP MUTE VOL - MENU ENTER VOL + RESET DOWN EXIT TITLE ARG APC SUBWOOFER V-EXP ADD TREELE MUSH C-X DRIVE BASE MTS TV AV SV CV SIZE POSITION ON/OFF MTSChoosing a Multi-Channel Sound (MTS)
Soundtrack
Depending or the particular program being broadcast, you can listen to stereo, mono, or a Separate Audio Program. (SAP audio is typically a foreign-language translation; SAP may have unrelated information like News or Weather).
Choose Stereo for channels that are broadcasting in stereo.
Choose Mono for channels that are broadcasting in mono or are having difficulty receiving a stereo signal. Choose SAP to listen to the Separate Audio Program, which is usually a foreign-language translation.
Adjusting the Picture settings:

text_image
TV SLEEP POWER PC 1 2 3 AV 4 5 6 SV 7 8 9 CV +100 0 SWAP UP MUTE VOL(-) Up VOL(+) Menu/Enter VOL MENU ENTER VOL RESET DOWN EXIT TITLE SUBWOOFER ARC APC V-CHIP ADD TABLE AUDIO C.C DATE DATA UFS TV AV SV CV SIZE POSITION OIL OFF- Press the MENU button to display the main menu.
- Press the ENTER button to enter Management Press the UP or DOWN button to select the Main Display (TV).

text_image
PC TV PIP Management Main Display ( TV ) PIP Display ( Off ) Language Reset ( No ) NTSC H : 31.2 kHz V : 50.2 Hz PC AV SV CV TV - +-
Press the VOL (+) or VOL (-) button to select TV source.
-
Press the EXIT button to return to the previous screen. Press the VOL(+) or VOL(-) button to select the Picture Adjust than Press the ENTER button.
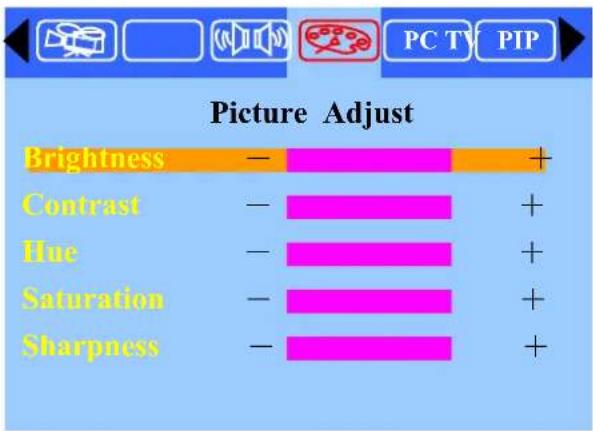
text_image
Picture Adjust Brightness — Contrast — Hue — Saturation — Sharpness —-
Press the UP or DOWN button to select the desired item.
-
Press the VOL (+) or VOL (-) button to set the desired item.
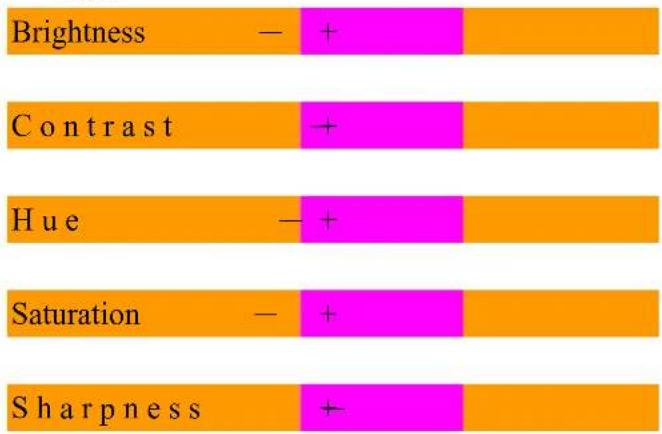
text_image
Brightness — + Contrast — Hue — + Saturation — + Sharpness —- Press the EXIT button to return to the previous screen or exit from the Menu.
Memorizing the Channel:
Your TV can memorize and store all of the available channels for both standard broadcast (antenna) and cable channels. After the available channel are memorized, press the UP and Down button to scan through the channels. This eliminates the need to change channels by entering the channel digits.
There are two steps for memorizing channels:
Selecting a broadcast source, memorizing the channels (automatic) or adding/deleting channels (manual)
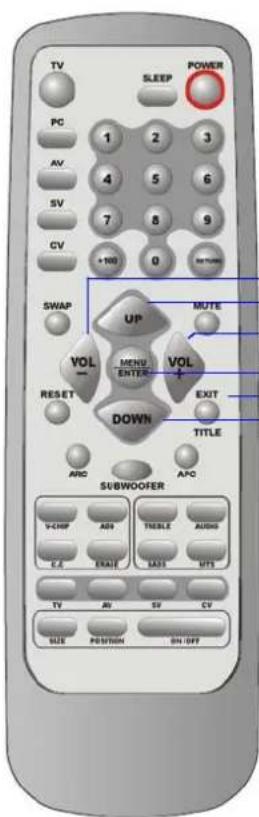
text_image
TV SLEEP POWER PC 1 2 3 AV 4 5 6 SV 7 8 9 CV +NO 0 NET TUBE SWAP UP MUTE VOL MENU ENTEX VOL RESET DOWN EXIT TITLE ARC APC SUBWOOFER VCHF ADJ TIMELE AUDIO E.C. EALIE LASS UTS TV AV SV CV SIZE POSITION ON/OFFSelecting the Video Signal-source
Before your television can memorize the available channels, you must specify the type of signal source that is connected to the TV (i.e., an antenna or a cable system).
- Press the MENU button to display the main menu.
- Press the ENTER button to enter Management Press the UP or DOWN button to select the Main Display (TV).
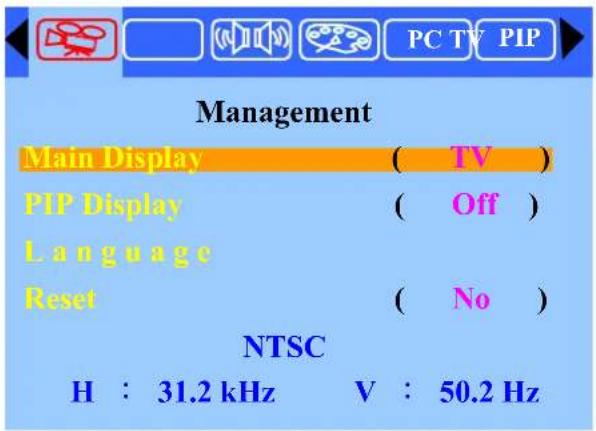
text_image
PC TV PIP Management Main Display ( TV ) PIP Display ( Off ) Language Reset ( No ) NTSC H : 31.2 kHz V : 50.2 Hz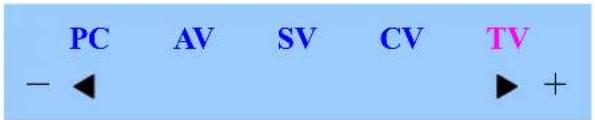
text_image
PC AV SV CV TV - ◀ ▶ +- Press the VOL (+) or VOL (-) button to select TV source than press the ENTER button.
- Press the EXIT button to return to the previous screen Press the VOL(+) or VOL(-) button to select the TV Setting.
Note:
1.ANT is standard broadcast television received through your antenna for channels 2-69 2.STD, IRC, and HRC are all formats of cable TV. Contact your TV provider to find out which format is used in your area.

text_image
TV Setting ANT/CATV ( ANT ) Autoscan ( No ) Add/Erase ( Add ) Parent Control Caption ( Off ) Fine Tune -- +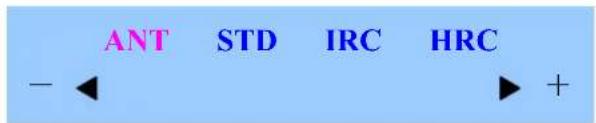
text_image
ANT STD IRC HRC - ◀ ► +- Press the ENTER button to TV Setting.
- Press the VOL (+) or VOL (-) button to select TV system type than press the ENTER button.
Storing Channel & Memory (Automatic Method)
text_image
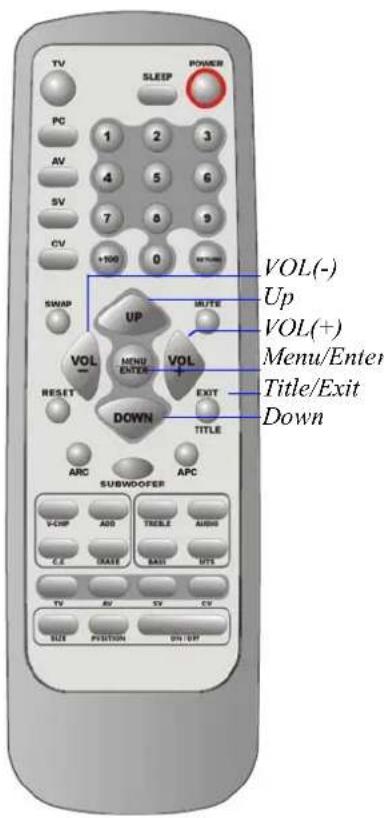
TV SLEEP POWER PC 1 2 3 AV 4 5 6 SV 7 8 9 CV +100 0 SWAP UP VOL(-) Up VOL(+) Menu/Enter Title/Exit Down VOL MENU ENTER VOL RESET DOWN EXIT TITLE ARC SUBWOOFER APC V-CHIP ADD TICKLE AUDIO C.E DATE BATT UTS TV SV TV CV SIZE POSITION ON/UPFirst, select the correct signal source (ANT, STD, IRC, HRC). See previous step.
1Press the MENU button to display the main menu.
2. Press the VOL(+) or VOL(-) button to select the TV Setting.
3. Press the ENTER button to TV Setting.
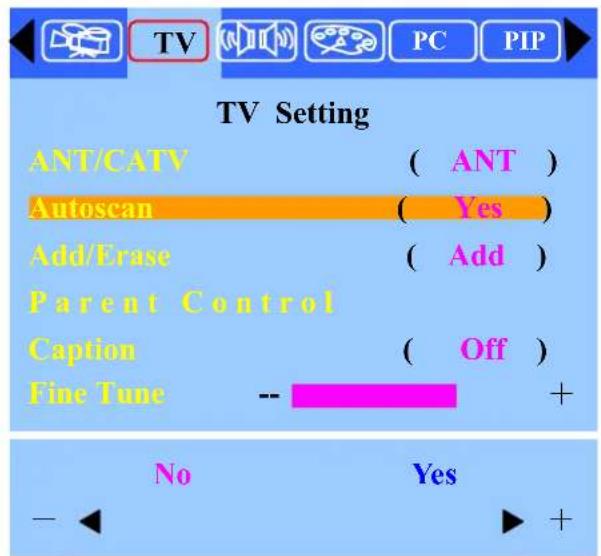
4. Press the UP or DOWN button to select the Auto scan (Yes).
text_image
TV Setting ANT/CATV ( ANT ) Autoscan ( Yes ) Add/Erase ( Add ) Parent Control Caption ( Off ) Fine Tune -- No Yes - +-
Press the VOL (+) or VOL (-) button to select "Yes", The TV automatically cycles through all of the available channels and stores them in memory. This takes about one or two minutes.
-
After all the available channels are stored, the CH program menu reappears.
Adding and Erasing Channels (Manual Method)
- Press the MENU button to display the main menu.
- Press the VOL(+) or VOL(-) button to select the TV Setting.
- Press the ENTER button to TV Setting.
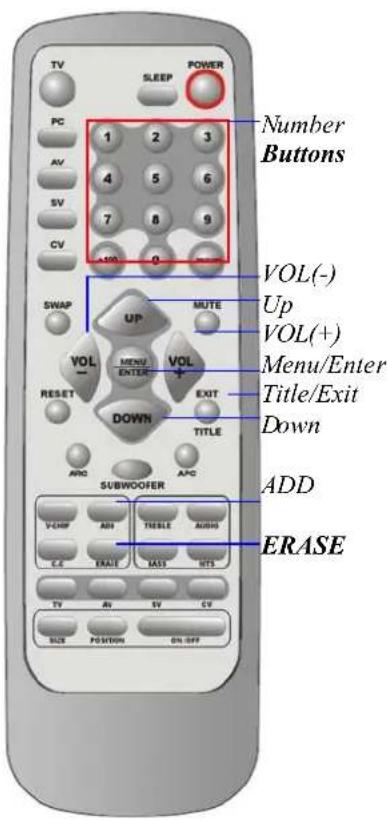
- Press the UP or DOWN button to select the Add/Erase (Add).
text_image
Number Buttons VOL(-) Up VOL(+) Menu/Enter Title/Exit Down ADD ERASE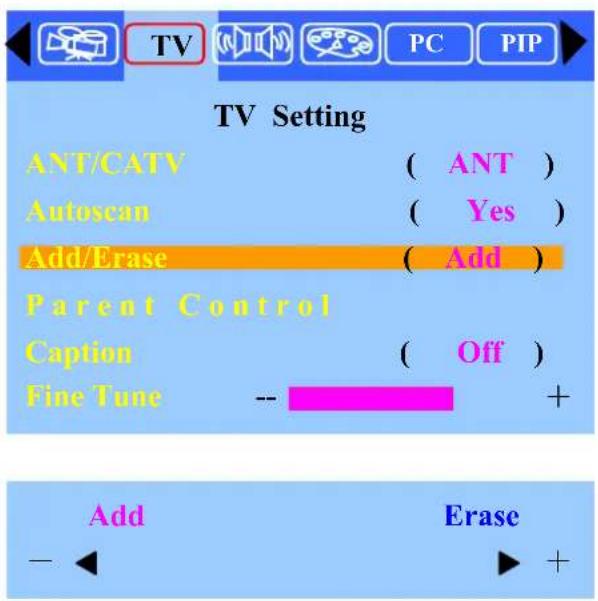
text_image
TV Setting ANT/CATV ( ANT ) Autoscan ( Yes ) Add/Erase ( Add ) Parent Control Caption ( Off ) Fine Tune -- + Add Erase - +- Press the VOL (+) or VOL (-) button to select Add/Erase than press the ENTER button.
- You can use the ADD/ERASE button on the remote control to add/erase the channel directly.
You can view any channel including an erased channel by using the number buttons on the remote control. However, the channel you erased can't be memorized unless you do the steps as above.
Changing the Channel
This LCDTV set allows you to select up to 125 channels (1 to 125).
To select a channel, enter a 2-or 3-digit number.
Using the Channel Buttons
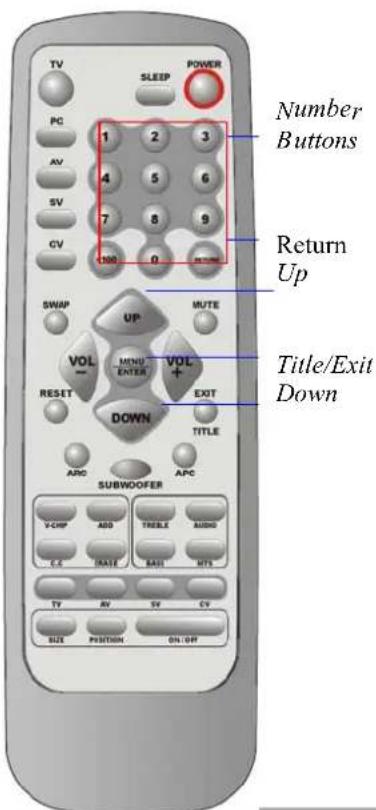
- Press the UP or DOWN button to change channels.
When you press the UP or DOWN button, the TV
changes channel in sequence. You will see all the channels that have been memorized, (the TV must be memorized). You will not see channels that were either erased or not memorized.
text_image
Number Buttons Return Up Title/Exit Down SLEEP POWER PC 1 2 3 AV 4 5 6 SV 7 8 9 CV 100 0 Return SWAP UP MUTE VOL - MENU ENTER VOL + RESET DOWN EXIT TITLE AND APC SUBWOOFER Y-CHP ADD TREE AUDIO C.E INATE BAUT MTS TV AV SV CV SIZE POSITION ON/OFFDirectly Accessing Channel
Using the Number buttons to watch a specific channel.
For example, to select channel 27, press "2" then "7". The TV will change channels.
When you use the number buttons, you can select channels that were either erased or not memorized. To select a channel over 100, press the +100 button. (For example, to select channel 122, press "+100" then "2". then "2").
How to using the Parent Control:
The Parental Control feature automatically locks out programming that is deemed inappropriate for children.
The user must first enter a PIN (Personal ID number) before any of the Parent Control restrictions can be setup or changed.
Setting Up Your Personal ID Number (PIN)
- Press the MENU button to display the main menu.
- Press the VOL (+) or VOL (-) button to select the TV Setting.
- Press the ENTER button to TV Setting.
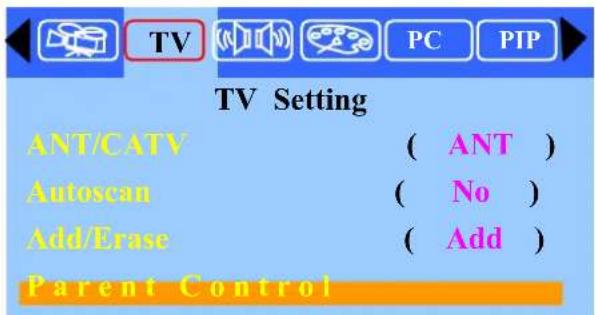
- Press the UP or DOWN button to select the Parent Control than press the ENTER button.
text_image
TV Setting ANT/CATV ( ANT ) Autoscan ( No ) Add/Erase ( Add ) Parent Control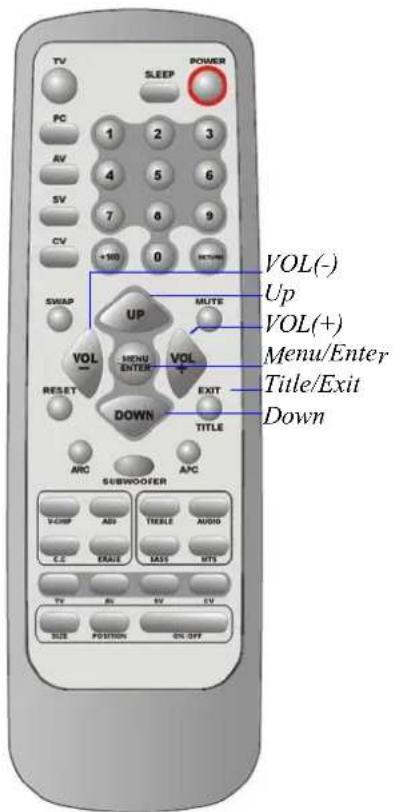
text_image
TV SLEEP POWER PC 1 2 3 RV 4 5 6 SV 7 8 9 CV +100 0 RETURN SWAP UP VOL(-) Up VOL(+) Menu/Enter Title/Exit Down VOL MENU ENTER VOL + RESET DOWN TITLE ARC SUBWOOFER APC VCHF ADD TIEBLE AUDIO C.C. EFAE MASS MTS TV BV EV EV SIZE POSITION ON/OFFPlease Enter Pin :
- The "Please Enter Pin" screen will appear, enter your 4-digit PIN number. For the initial setup, you must enter 1234 (initial code).
- After entering a valid PIN number, the Parent Control screen will appear, Press the UP or DOWN button to select the "Change PIN".

text_image
TV PC P1PParent Control
Parent Control ( Off )
TV-Rating ( TV-G )
MAPP ( PG-13. )
Change Pin
Please Enter New Pin :
- The Change PIN screen will appear. Choose any 4-digits for your PIN and enter them.
Change Pin OK!!
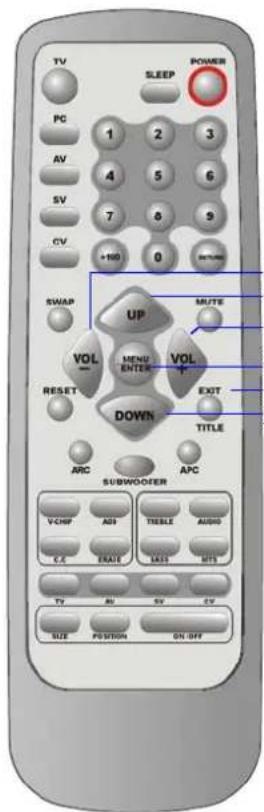
text_image
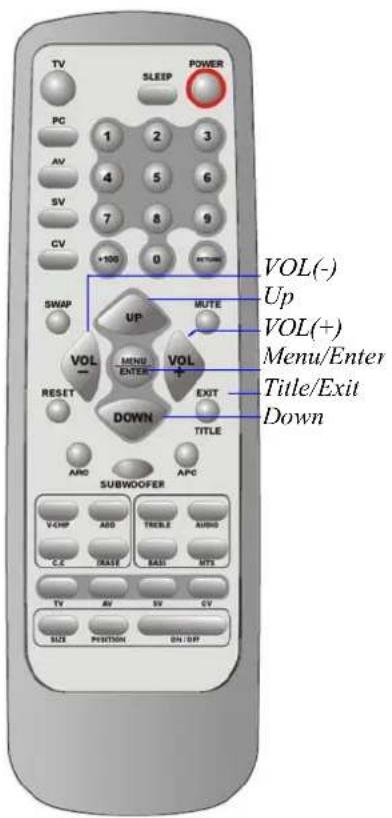
TV SLEEP POWER PC 1 2 3 AV 4 5 6 SV 7 8 9 CV +100 0 SWAP UP MUTE VOL MENU ENTER VOL RESET DOWN EXIT TITLE ARC SUBWOOFER APC V-CHF ADD ITEMS AUDIO C.C EAVE SAID MTS TV AU SV CV SIZE POSITION ON-OFFVOL(-)
Up
VOL(+)
Menu/Enter
Title/Exit
Down
As soon as the 4-digits are entered, the “Change Pin OK!!” screen appears. Your PIN has been memorized. Press the EXIT button to exit.
How to Enable / Disable the Parent Control
- Press the MENU button to display the main menu.
- Press the VOL (+) or VOL (-) button to select the TV Setting.
- Press the ENTER button to TV Setting.
- Press the UP or DOWN button to select the Parent Control than press the ENTER button.
- The "Please Enter Pin" screen will appear, enter your 4-digit PIN number.
- After entering a valid PIN number, the Parent Control screen will appear, Press the UP or DOWN button to select the Parent Control (ON)".
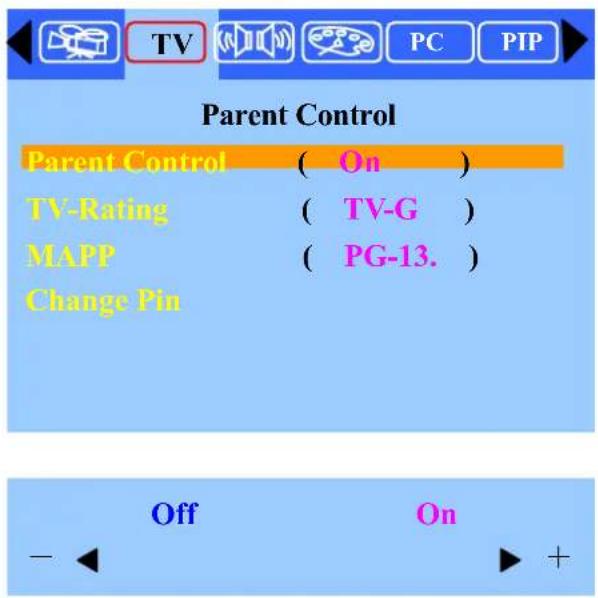
text_image
Parent Control Parent Control ( On ) TV-Rating ( TV-G ) MAPP ( PG-13. ) Change Pin Off On - +- Press the VOL (+) or VOL (-) button to select On than press the ENTER button. The "TV Rating" and "MPAA Rating" will lock out the program that you don't want to watch. If you want to disable the Parental Control Function. Select "Parent Control (OFF)". The locked programs will be released automatically.
How to Set up Restrictions Using the "TV Rating":
First, set up a personal identification number (PIN), and enable the Parent control.
(See previous section). Parental restrictions can be set up using either of two methods:
The TV Guidelines or MPAA rating.
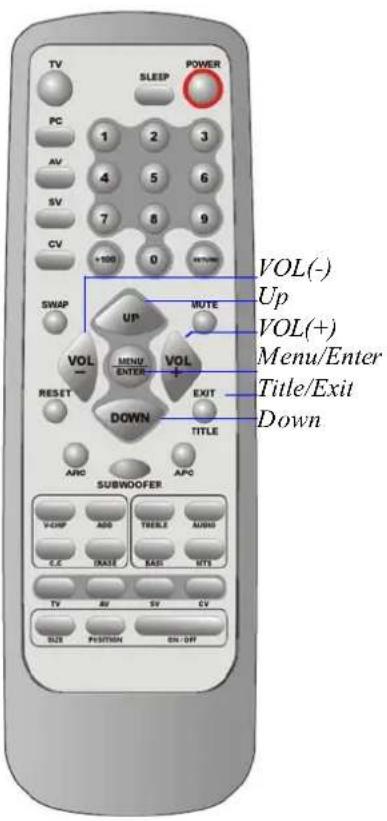
text_image
TV SLEEP POWER PC 1 2 3 AV 4 5 6 SV 7 8 9 CV +100 0 RETURN SWAP UP MUTE VOL(-) Up VOL(+) Menu/Enter Title/Exit Down VOL MENU ENTER VOL RESET DOWN EXIT TITLE ARG SUBWOOFER APC VCHF ADD ITEMS AUDIO C.C DATE BASE NTG TV AV SV CV SIZE POSITION ON OFFTV-Y Young children
TV-Y7 Children 7 and over
TV-G General audience
TV-PG Parental guidance
TV-14 Viewers 14 and over
TV-14 Viewers 14 and over
TV-MA Mature audience
- Press the MENU button to display the main menu.
- Press the VOL (+) or VOL (-) button to select the TV Setting.
- Press the ENTER button to TV Setting.
- Press the UP or DOWN button to select the
Parent Control than press the ENTER button.
- The "Please Enter Pin" screen will appear, enters your 4-digit PIN number.
- After entering a valid PIN number, the Parent Control screen will appear, Press the UP or DOWN button to select the "TV Rating (TV-G)".
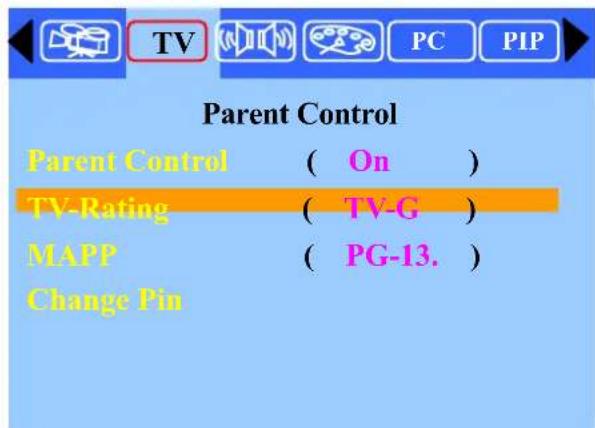
text_image
Parent Control Parent Control ( On ) TV-Rating ( TV-G ) MAPP ( PG-13. ) Change Pin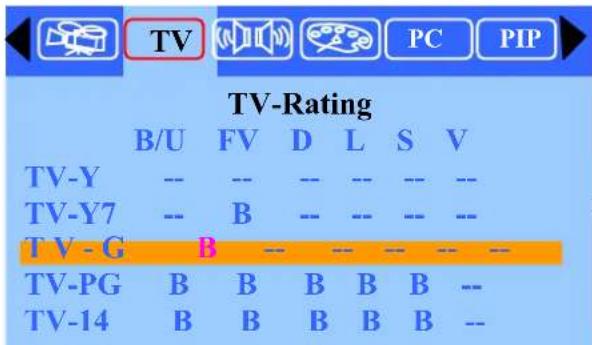
- The "TV Rating" screen will appear, press the UP or DOWN button to select a particular TV category.
Press the Enter button to select "B":
Note 1: The Parental Control will automatically block certain categories that are “More restrictive”. For example, if you block “TV-GB” then “TV-PG B”, “TV-14 B” and “TV-MA B” will automatically be blocked also. The Parental Control will automatically unblock certain categories that are “Less restrictive”. For example, if you block “TV-G B” then “TV-Y U” and “TV-Y U” will automatically be unblocked also.
Note 2: If you want unblock "TV-G", you must block "TV-PG B "to let " TV-G U " be unblocked automatically.
- Press the VOL (+) or VOL (-) button to select a particular TV category. Sub-rating. (FV, D, L, S, V)
Press the Enter button to select "B" or "U".
FV : Fantasy violence
D : Sexual suggestive dialog
L : Adult language
S : Sexual situation
V : Violence
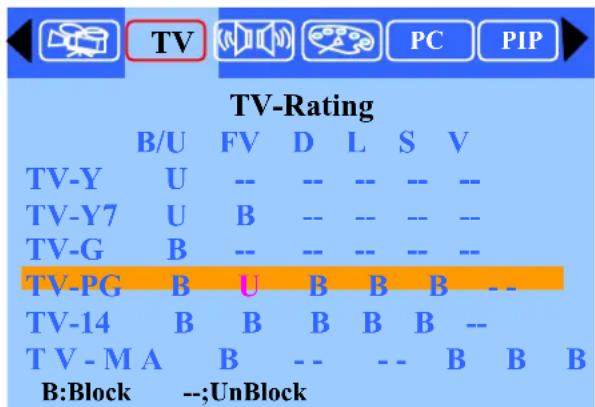
Note: The Parent control will automatically block certain categories that are
“More restrictive”. For example, if you block: L” sub-rating in TV-PG, then the “L” sub-rating in TV-14 and TV-MA will automatically be blocked also.
If the TV is turned to a restricted channel, the parent control will block it. The Screen will go blue and the following message will appear:
“ Parent Control working Level: ”
TV-G
How to set up Restrictions using the MPAA Ratings:
The MPAA rating system uses the Motion Picture Association of America (MPAA) system, and its main application is for movies. (Eventually, movie videocassettes will be encoded with MPAA ratings). When the parent control lock is on, the TV will automatically block any programs that are coded with objectionable ratings (either MPAA or TV-Ratings).
text_image
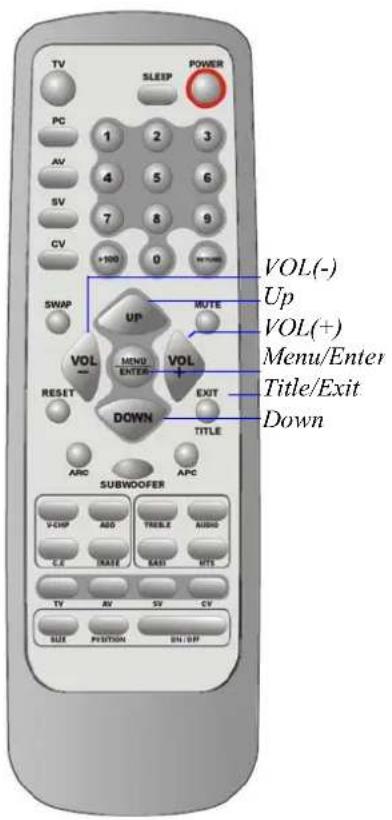
TV SLEEP POWER PC 1 2 3 AV 4 5 6 SV 7 8 9 CV +100 0 SWAP UP MUTE VOL(-) Up VOL(+) Menu/Enter Title/Exit Down VOL MENU ENTER VOL RESET DOWN EXIT TITLE SUBWOOFER APC VCHP ADD TREEA AUDIO C.E RATE EASI MTS TV AV SV CV SIZE POSITION ON/UP- Press the MENU button to display the main menu.
- Press the VOL (+) or VOL (-) button to select the TV Setting.
- Press the ENTER button to TV Setting.
- Press the UP or DOWN button to select the Parent Control than press the ENTER button.
- The "Please Enter Pin" screen will appear, enters your 4-digit PIN number.
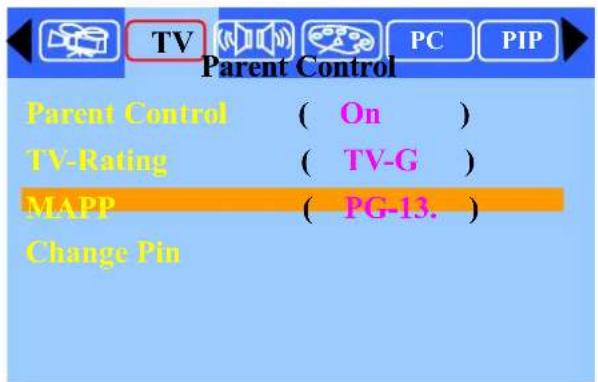
- After entering a valid PIN number, the Parent Control screen will appear, Press the UP or DOWN button to select the "MPAA (PG-13)" than press the ENTER button.
text_image
Parent Control Parent Control ( On ) TV-Rating ( TV-G ) MAPP ( PG-13. ) Change Pin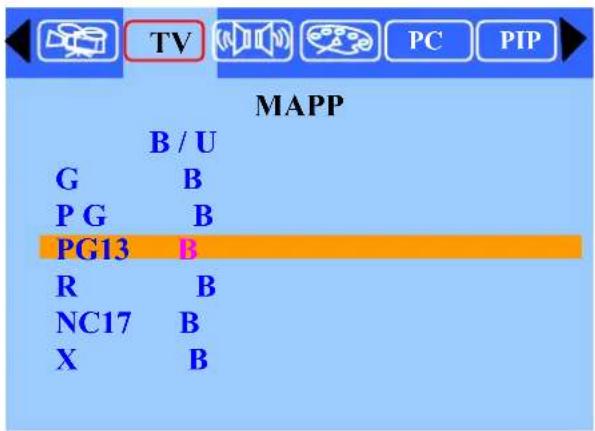
- Press the UP or DOWN button to select a particular MPAA category. Press the Enter button to select "B".
G : General audience (no restrictions).
PG : Parental guidance suggested.
PG-13 : Parents strongly cautioned.
R : Restricted. Children under 17 should be accompanied by an adult.
NC-17 : No Children
X : Adults only under 17.
Note 1: The Parental Control will automatically block certain categories that are “More restrictive”. For example, if you block “PG-13 B” then “R B”, “NC-17 B” and “X B” will automatically be blocked also. The parental control will automatically unblock certain categories that are “Less restrictive”. For example, if you block “PG-13 B” then “G U” and “PG U” will automatically be unblocked also.
Note 2: If you want unblock “MPAA PG-13”, you must block “R B” to let “PG-13 U” be unblocked automatically.
If the TV is turned to a restricted channel, the parent control will block it. The Screen will go blue and the following message will appear.
“ Parent Control working Level: ”
MPAA PG-13
Viewing Closed Captions:
Your TV decodes and displays closed captions that are broadcast with certain TV shows. These captions are usually for the hearing impaired or foreign-language translations. All VCRs record closed caption signals from television programs, so home-recorded videotapes also provide closed captions. Most pre-recorded commercial videotapes provide closed captions as well. Check for the closed caption symbol in your television schedule and on the tape's packaging:
Note: The Caption feature does not work with DVD or DTV signal.
text_image
TV SLEEP POWER PC 1 2 3 AV 4 5 6 SV 7 8 9 CV +100 0 RETURN SWAP UP MUTE VOL(-) Up VOL(+) Menu/Enter VOL MENU ENTER VOL RESET DOWN EXIT TITLE SUBWOOFER APOC VCHP AID TICLE AMIO C.C DASE BAS MTG TV AV SV CV SIZE POSITION ON OFF-
Press the MENU button to display the main menu.
-
Press the VOL (+) or VOL (-) button to select the
TV Setting.
-
Press the ENTER button to TV Setting.
-
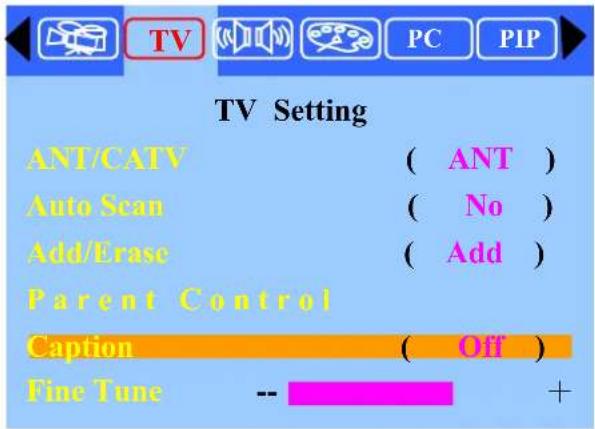
Press the UP or DOWN button to select the
Caption.
text_image
TV Setting ANT/CATV ( ANT ) Auto Scan ( No ) Add/Erase ( Add ) Parent Control Caption ( Off ) Fine Tune -- +
text_image
CC1 CC2 CC3 CC4 TT 1 TT 2 TT 3 TT 4 OFF - +-
Press the VOL (+) or VOL (-) button to select "Caption" or "Text" mode. If you don't to display the closed captions, you can select OFF to eliminate it.
-
Depending on the particular broadcast, it might be necessary to make changes to “Channels” and “Field”: To make the change follow the same procedure as in Steps 4\~5 above.
Different channels and fields display different information: Field 2 carries additional information that supplements the information in Field1. (For example, Channel 1 may have subtitles in English, while Channel 2 has subtitles in Spanish).
D: AV/SV/CV mode Adjustment
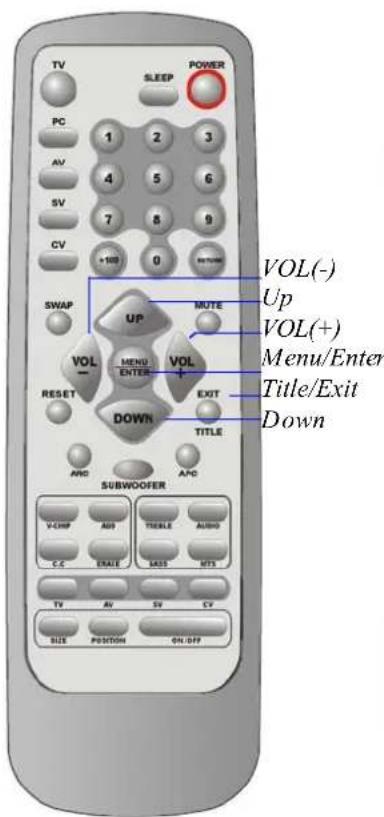
Adjustment the AV/SV/CV adjust settings:
- Press the MENU button to display the main menu.
- Press the ENTER button to enter Management.
Press the UP or DOWN button to select the Main Display (AV/SV/CV).
text_image
TV SLEEP POWER PC 1 2 3 AV 4 5 6 SV 7 8 9 CV +100 0 SWAP UP MUTE VOL(-) Up VOL(+) Menu/Enter Title/Exit Down VOL MENU ENTER VOL RESET DOWN EXIT TITLE AND AFC SUBWOOFER V-CHF ADD TICKLE AUDIO C-C EFAE MASS MTS TV AV SV CV SIZE POSITION ON/OFF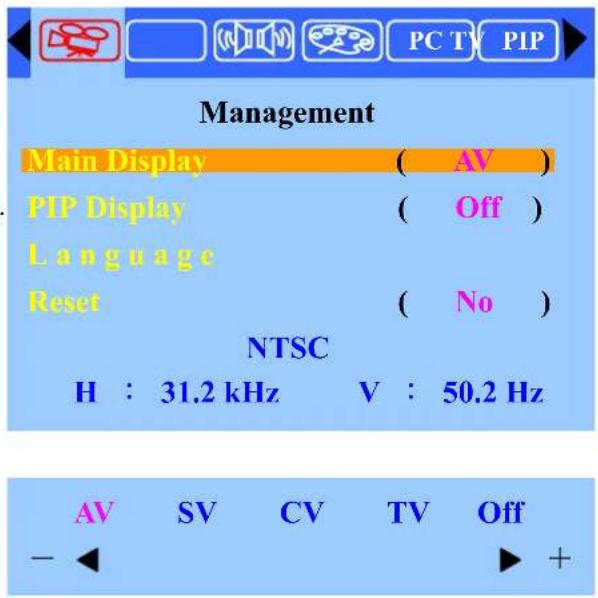
text_image
PC TV PIP Management Main Display ( AV ) PIP Display ( Off ) Language Reset ( No ) NTSC H : 31.2 kHz V : 50.2 Hz AV SV CV TV Off - +-
Press the VOL (+) or VOL (-) button to select AV/SV/CV source.
-
Press the EXIT button to return to the previous screen.
-
Press the UP or DOWN button to select the desired
item.
-
Press the VOL (+) or VOL (-) button to set the desired item.
-
Press the EXIT button to return to the previous screen or exit from the Menu.
NOTE: All the adjustment items in AV/SV/CV menu are described in TV mode menu, so you can refer to the TV mode adjustment.
E. Other functions explained
- Use "Channel up/down" as function keys.
-When you press “Menu” to go into OSD, ”Ch up/down ”will become the up/down function control key.
- To use “VOL (+) or VOL (-)” as the level control key.
-When you press “Menu” to go into sub control bar, the level can be adjusted by the “VOL (+) or VOL (-)”.
- "Aspect" key (Screen Aspect Ratio).
ARC-Aspect Ratio Control.
*Normal: This sets the aspect ratio to 4:3 for traditional TV programs. There will be a black bar at either of the screen.
*Periscope: Expands 4:3 video sources to fit the 16:9 screen by magnifying the image at the edges of the screen. This creates less distortion at the center of the screen.
*Zoom: Some DVD movies may not fill the top and bottom of the screen. The zoom function extends the height to fill the screen.
*Full: This mode expands the width of 4:3 video sources evenly to fill the 16:9 screens. There will be distortion at the center of the screen as well as the edges.
- "APC" Control key (Automatic Picture Control).
If you continue to press “APC” key you will see the display on the right upper screen to change to “Normal”, “Clear”, “Dark” or “Theater”.
For example, when the screen is showing a night scene or darker screen, you can use APC to change the screen to “Clear” and get a brighter picture. If the screen is too bright, you can use this APC key to change the screen to “normal” or “dark”.
- MTS control key (multiple sources of sound).
-This LCDTV can reproduce the original sound track you choose: “Mono”, “Stereo” or “SAP”(sound audio program) to let you enjoy the best sound.
-MTS (Multi Channel Television Sound) means: This LCDTV has a built-in decoder to decode stereo sound or second audio program (SAP) from the TV broadcasting. (When the TV station has such built-in sound sources during broadcasting.).
6."Reset" control key (recall factory's initial setting).
-In PC mode: This will recall “Brightness”, “Contrast”, “Color temp”, “Volume”, “Treble”, “Bass”, and “Balance”, back to factory initial values.
-In Video mode: This will recall “Brightness”, “Contrast”, “Hue”, “Saturation”, “Sharpness”, “Volume”, “Treble”, “Bass”, “Balance”, back to initial factory values.
English
| Main Display | PIP Display | Main | PIP | H. Position |
| V. Position | PIP Size | Border | Language | Recall |
| ANT/CATV Auto S | Scan Add/Erase Caption Parent Control | |||
| Fine Tune Bass Treble Balance Sound | ||||
| Mute | Brightness | Contrast | Hue | Saturation |
| Sharpness | Color Temp. | Warm | Cool | Neut. |
| User | R | G | B | U |
| Auto Image | V position | V Position | Clock | Phase |
| Add | Erase | TV-Rating | MPAA | Chang Pin |
| On | Off | Normal | Full | Zoom |
| Periscope | SAP | Stereo | Mono | Sleep OFF |
| Sleep 30 Clear | Normal | Dark | Theater | |
| Volume | Power Down | Out of Range | Over size | No Signal |
| Cable no Insert | English | Yes | No | Please Enter Pin: |
| Wrong Code Try Again: | Please Enter New Pin: | V Chip Working Level: | INITIAL EEPROM | |
French
| Affichage Pri. | Affichage PIP | Pri.ncipal | PIP | Position H. |
| Position V. | Taille ISI | Frontière | Langue | Rappel |
| ANT/CATV | Balayage | Ajout./Effac. | Légende | Parent |
| Feglaheimage | Graves | Aigus | Balance | Bruit |
| Muet | Luminosite | Contraste | Teinte | Saturation |
| Acuité | Temp. Couleur | Chaud | Frais | Neut. |
| Util. | R | V | B | O |
| Image Auto. | Position H | Position V | Horloge | Phase |
| Ajou. | Effa. | TV-Estimation | MPAA | Changer NIP |
| ON | OFF | Normal | Complètement | Zoom |
| Periscope | SÈVE | Stéréo | Mono | Sommeil off |
| Sommeil 30 | Espace libre | Normal | Foncé | Théâtre |
| Volume | Mise hors tension | Hors de portée | Taille finie | Aucun Signal |
| Ne Câblez aucune insertion | Français | Oui | Non | Svp entrez goupille: |
| Code Faux Essai Encore: | Svp Entrez Nouvelle Num.: | V-Chip niveau de travail: | INITIAL EEPROM |
Commande
German
When there is no picture or sound

natural_image
Solid dark gray rectangle with no visible text, symbols, or features.- Make sure the AC adapter is properly inserted in the Power outlet.
- Reception other than those of broadcasting stations can be considered.
• Make sure the input mode is set to TV. - Make sure the main power switch of the main unit is on.
When there is no picture from AV.

text_image
Picture• Make sure the BLACK LEVEL is properly adjusted.
- The fluorescent lamp may have reached the end of service life.
- Make sure the video I/P terminal is not free of connections.
When there is no sound.
natural_image
Illustration of two soccer players in action, one kicking the ball while the other plays a block (no text or symbols)• Make sure the volume is not set to minimum.
• Make sure the sound is not set to mute.
• Make sure that headphones are not connected.
When there is no picture or sound, just noise.
natural_image
Grid of evenly spaced black dots on white background, no text or symbols present• The reception may be weak.
• The state of the broadcast may also be bad.
• Make sure the antenna is not disconnected.
When there picture is not clear.
natural_image
Illustration of two soccer players in action, one kicking a ball while the other plays a rule (no text or symbols present)• The reception may be weak.
• The state of the broadcast may also bad.
• Make sure the antenna is not disconnected.
When the picture is light or improperly tinted.
natural_image
Illustration of two soccer players in action, one kicking a ball (no text or symbols)- Check color adjustment.
- Check color system setting.
When there picture is too dark.
natural_image
Illustration of two soccer players competing for the ball (no text or symbols)- Press the Brightness button.
- Check PICTURE and BLACK LEVEL adjustment.
- The fluorescent lamp may have reached the end of service life.
When there remote control does not work.
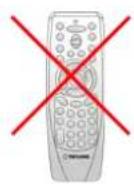
- Check the batteries of the remote controller.
• Make sure the remote sensor window is not under strong fluorescent lighting. - The fluorescent lamp may have reached the end of service life.
When the picture is not sharp.
natural_image
Two soccer players in action, one kicking a ball while the other plays a shot (no text or symbols visible)• The reception may be weak.
• The state of the broadcast may also be bad.
• Make sure the antenna is not disconnected.
When ther picture moves.
natural_image
Two soccer players in action, one kicking the ball while the other plays a shot (no text or symbols visible)• The reception may be weak.
• The state of the broadcast may also be bad.
• Make sure the antenna is not disconnected.
When the picture is doubled or tripled.
natural_image
Illustration of two soccer players in action, one kicking a ball (no text or symbols)• Make sure the antenna is facing the right direction.
- There may be reflected electric waves from mountains or buildings.
The picture is spotted.
natural_image
Illustration of two soccer players competing for the ball on a dotted grid background (no text or symbols)- There may be interference from automobiles, trains, high voltage lines, neon light, etc.
- There may be interference between the antenna cable and power cable. Try to pull them further apart.
When there are stripes on the screen or colors fade.
natural_image
Two soccer players in action on a wavy field, one kicking the ball (no text or symbols visible)• Is the unit receiving interference from other devices?
• Transmission antennas of radio broadcasting station and transmission antennas of amateur radio and cellular phones may also cause interference.
- Use the units as far apart as possible from device that may cause possible interference.