
MC CD 40 - Hi-Fi BLAUPUNKT - Free user manual and instructions
Find the device manual for free MC CD 40 BLAUPUNKT in PDF.

| Product Type | CD Microsystem |
| Brand | Blaupunkt |
| Model | MC CD 40 |
| Mains Supply Voltage | 220-240 V ~ 50 Hz |
| Power Consumption | 40 W |
| Speaker Output Power | 2 x 5 W |
| FM Frequency Range | 87.5 - 108 MHz |
| Net Weight | 3.0 kg |
| Audio Input | AUX IN (3.5 mm RCA) |
| Speaker Connectors | Left and Right outputs |
| Disc Playback | CD, CD-R, CD-RW |
| Radio Bands | FM |
| Preset Stations | 60 (0-60) |
| Sound Effects | DSP (Jazz, Rock, Classic, Pop, Live, Dance), Loudness, Tone controls |
| Playback Modes | Repeat (1/All), Program, Shuffle, Intro |
| Remote Control | Included with AAA batteries |
| Antenna | Pig tail antenna |
| Safety Class | Class 1 Laser Product |
Frequently Asked Questions - MC CD 40 BLAUPUNKT
User questions about MC CD 40 BLAUPUNKT
0 question about this device. Answer the ones you know or ask your own.
Ask a new question about this device
Download the instructions for your Hi-Fi in PDF format for free! Find your manual MC CD 40 - BLAUPUNKT and take your electronic device back in hand. On this page are published all the documents necessary for the use of your device. MC CD 40 by BLAUPUNKT.
USER MANUAL MC CD 40 BLAUPUNKT
natural_image
Black and white photo of a digital audio workstation with speaker, control panel, and speaker tower (no visible text or symbols)MC CD 40

www.blaupunkt.com
natural_image
Illustration of three hands holding different objects: a cross, a bowl with liquid, and a circular object (no text or symbols)UKW (FM): 87.5 - 108 MHz
Gewicht: 3,0 kg
TO PREVENT FIRE OR SHOCK HAZARD DO NOT EXPOSE THIS APPLIANCE TO RAIN OR MOISTURE


LIGHTNING FLASH WITH ARROWHEADSYMBOL-
within an equilateral triangle, is intended to alert the user to the presence of uninsulated dangerous voltage within the products enclosure that may be of sufficient magnitude to constitute a risk of electric shock to persons.
EXCLAMATION POINT-
POINT-within an equilateral triangle, is used to indicate that a specific component shall be replaced only by the component specified in that documentation for safety reason.
To achieve the utmost in enjoyment and performance, and in order to become familiar with its features, please read this manual carefully before attempting to operate this product, this will assure you years of trouble free performance and listening pleasure.
Important Notes
· This safety and operating instruction should be retained for future reference.
- The apparatus should not be exposed to dripping or splashing or placed in a humid atmosphere such as a bathroom.
- Do not install the product in the following areas:
o Places exposed to direct sunlight or close to radiators
o On top of other stereo equipment that radiate too much heat
o Blocking ventilation or in a dusty area
o Areas where there is constant vibration
o Humid or moist places.
- Do not place near candles or other naked flames
- Operate the product only as instructed in this manual
- Before turning on the power for the first time, make sure the power adaptor is properly connected.
For safety reasons, do not remove any covers or attempt to gain access to the inside of the product. Refer any servicing to qualified personnel.
Do not attempt to remove any screws, or open the casing of the unit; there are no user serviceable parts inside, refer all servicing to qualified service personnel.
CE Conformity
Model number: MC CD 40
Description: CD Microsystem
Brand name: Blaupunkt
Responsible party: M3 Electronic GmbH
Gutenbergstrasse 5, D-65830 Kriftel. Germany
Hereby, Blaupunkt Competence Center Audio M3 Electronic GmbH, declares that this Class 1 equipment is in compliance with the essential requirement and other relevant provisions of Directive 1999/5/EC.
Letter of conformity can be obtained from info@m3-electronic.de.
Safety Instructions
-
READ INSTRUCTIONS – All the safety and operating instructions should be read before appliance's operated.
-
RETAIN INSTRUCTIONS - The safety and operating instructions should be retained for future reference.
-
HEED WARNINGS – All warnings on the appliance and in the operating instructions should be adhered to.
-
FOLLOW INSTRUCTIONS – All operating instructions should be followed.
-
WATER AND MOISTURE – The appliance should not be used near water, for example, near a bathtub, washbowl, kitchen sink, laundry tub, swimming pool or in web basement.
-
VENTILATION – The appliance should be situated so that its location or position does not interfere with its proper ventilation. Do not place on bed, sofa, rug or similar surface that may block the ventilation openings, in a built-in installation, such as a bookcase or cabinet that may impede the flow of air through the ventilation openings.
-
HEAT – The appliance should be situated away from heat sources such as radiators, stoves, or other appliances (including amplifiers) that produce heat.
-
POWER SOURCE – the appliance should be connected to power supply only of the type described in the operating instructions or as marked on the appliance.
-
POWER CORD PROTECTION – power supply cords should be routed so that they are not likely to be walked on or pinched by items placed upon or against them.
-
POWER LINES – an outdoor antenna should be located away from power lines.
-
OBJECT AND LIQUID ENTRY – care should be taken so that objects do not fall and liquids are not spilled into the enclosure through openings.
-
ESD WARNING – the display does not function properly or not reaction to operation of any the control may due to the electrostatic discharge. Switch off and unplug the set. Reconnect after a few seconds.
-
DAMAGE REQUIRING SERVICE – the appliance should be serviced by qualified service personal when: a. the power-supply cord or plug has been damaged. b. Objects have fallen into, or liquid has been spilled into the appliance enclosure. c. The appliance has been exposed to rain. d. The appliance has been dropped, or the enclosure damaged. e. The appliance does not appear to operate normally.
-
SERVICING – the user should not attempt to service the appliance beyond that described in the user operation instructions. All other servicing should be referred to qualified service personnel.
-
DO ensure that all electrical connections (including the mains plug, extension leads and inter-connections between the pieces of equipment) are properly made and in accordance with the manufacturer's instructions. Switch off and unplug the power before making or changing connections.
-
Unplug this apparatus during lightning storms or when unused for long periods of time.
-
Never unplug your radio by pulling on the power cord. Always grasp the plug firmly and pull straight out from the outlet.
-
DON'T remove any fixed cover as this may expose dangerous voltages.
-
DON'T place hot objects or naked flame sources such as lighted candles or nightlight on, or close to equipment. High temperatures can melt plastic and lead to fires.
-
DON'T leave equipment switched on when it is unattended unless it is specifically stated that it is designed for unattended operation. Switch off using the switch on the equipment and make sure that your family knows how to do this. Special arrangements may need to be made for infirm or handicapped people.
-
DON'T continue to operate the equipment if you are in any doubt about if it's working normally or if it's damaged in any way. Switch it off, unplug the mains power and consult your dealer.
-
REPAIR OR REPLACE all electric service cords that have become frayed or otherwise damaged immediately. Do not use a cord that shows cracks or abrasion damage along its length, the plug, or the connector end.
-
DON'T place objects filled with liquids, such as vases on the apparatus.
-
Batteries shall not be exposed to excessive heat such as sunshine, fire or the like.
-
The mains plug shall remain readily operable.
-
Ensure a minimum distance of 5cm around the apparatus for sufficient ventilation.
- The ventilation should not be impeded by covering the ventilation opening with items such as newspapers, table-cloths, curtains, etc.
- The batteries should be drawn to the environmental aspects of battery disposal.
Warning: Danger of radiation

These labels tell you that the unit contains a laser component. Opening the CD compartment lid and defeating the safety interlocks will expose the user to radiation from the laser beam. Do not stare into the laser while it is operating.
Electrical information
Mains Supply: The mains operating voltage of this unit is marked on a rating plate on the back of the unit.
The means of disconnecting this appliance from the mains supply is the mains plug. This should be unobstructed and readily operable at all times.
Controls and connectors
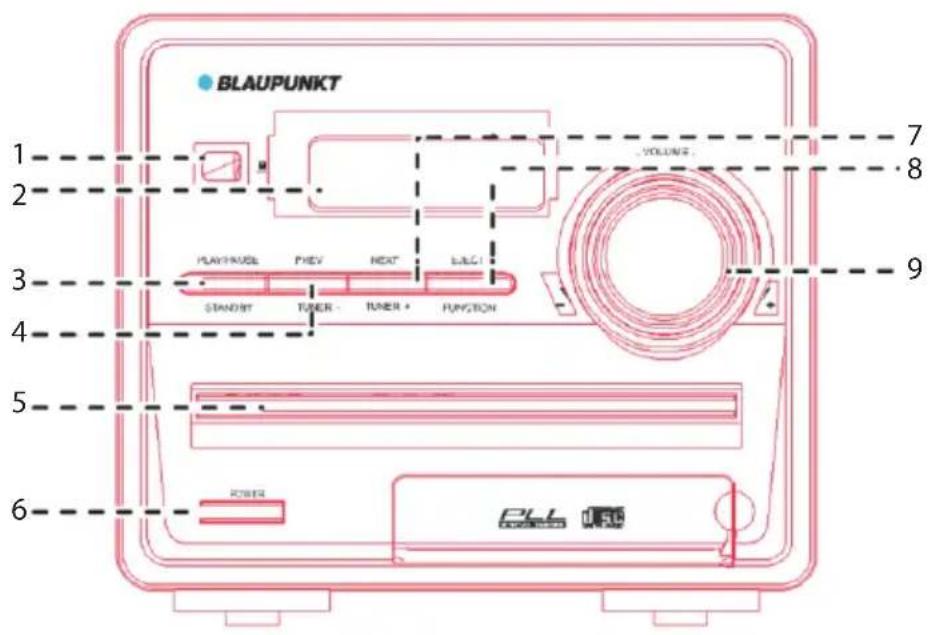
- IR receiver
- LED display
- STANDBY/PLAY/PAUSE button
- SKIP PREV button
- CD loading drawer
- POWER button
-
SKIP NEXT button
-
EJECT ▲/FUNCTION button
- VOLUME control
- AUDIO input
- SPEAKER outputs
- PIGTAIL antenna
- POWER cable
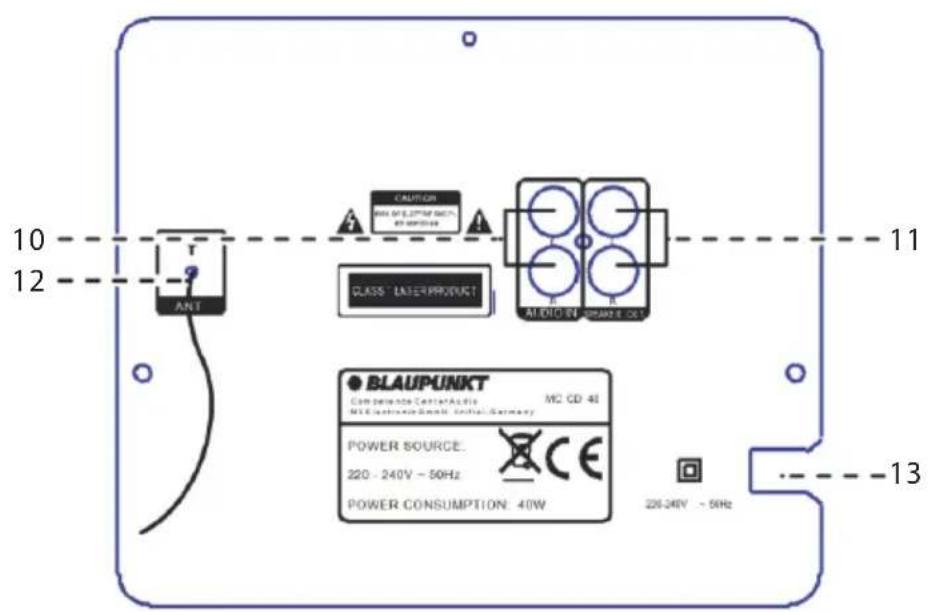
Controls and connectors
- STANDBY button
- CD button
- FM button
- SEARCH/ ▶ button
- SAVE/STOP ■button
- ◀◀/TUNER-button
- ◀◀/PRVE button
- NUMERIC buttons
- FREQUENCY button
23.EJECT ▲button -
AUXIN button
-
MUTE button
- REPEAT/MO/ST button
- ▶/ NEXT button
- ▶▶/TUNER+ button
- ENTER button
- PROGRAM button
- SHUFFLE button
- LOUD button
- DSP button
- TONE button
- VOLUME-/+ buttons
Preparation for use
Loudspeakers
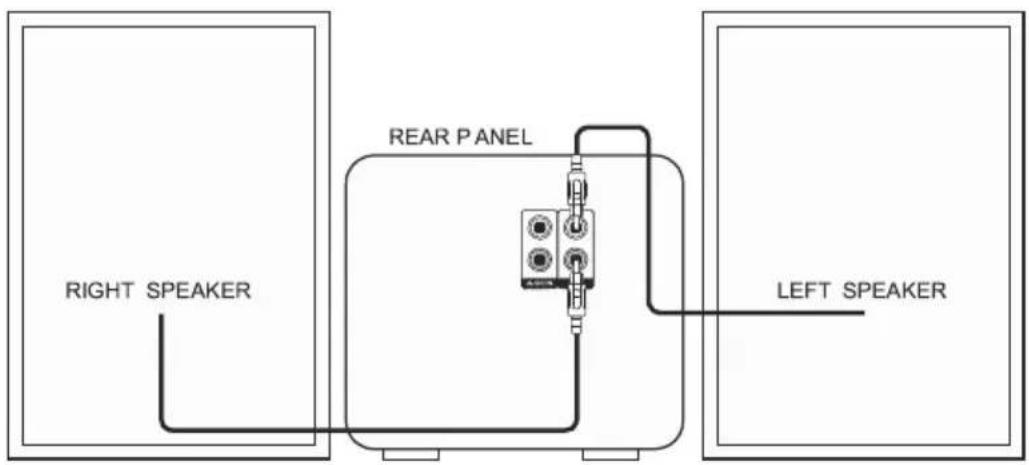
Placing & connecting the speakers
• Unwrap the speaker wires.
- Place a speaker on either side of the main unit, preferably at the same height, and with at least 150mm between each speaker and the main unit.
- Connect the speaker plugs to the rear of the unit (11). Take care to match the speaker placed to the LEFT to the LEFT output on the rear of the unit. Repeat for the RIGHT speaker.
Connecting the power
Connecting mains power
- Check the voltage marked on the rear rating plate is the same as the voltage in your area.
- Connect the mains plug to the wall socket and switch the mains power ON.
- Press the POWER button (6) on the main unit to power ON the unit.
Remote control batteries
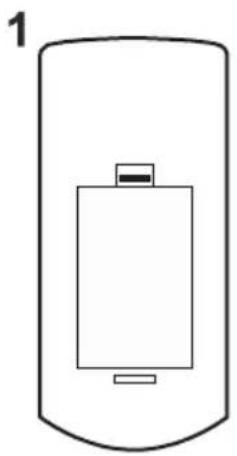
Fitting or replacing the remote control batteries
natural_image
Simple line drawing of a cylindrical container with a rectangular slot and two small rectangular blocks inside (no text or symbols)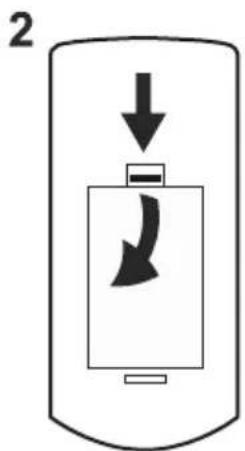
natural_image
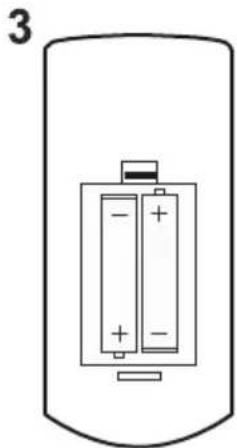
Simple line drawing of a cylindrical battery with two internal compartments and one battery, labeled with number 3 (no text or symbols on the diagram itself)When replacing the batteries in the remote control, refer to the diagram above.
- Push the catch on the battery door in the direction of the embossed arrow on the rear of the remote.
- While pushing the catch, open the battery door.
- Fit two AAA batteries observing polarity as shown. When replacing the batteries, use only the same AAA type supplied.
- Re-fit the battery door and clip it in place.
Disposal of batteries
Dispose of used batteries with regard to the recycling regulations in your area. Do NOT short circuit batteries or throw them into water, the general rubbish or in a fire. Weak batteries can leak and damage the remote control. Replace them in good time!
Getting started
Switching on the MC CD 40 for the first time
-
Connect the mains plug to a wall outlet.
-
Extend the pig tail antenna as far as it can go.
NOTE: The quality of the FM reception will be influenced by the positioning of the pigtail aerial.
- Press the POWER button (6) to power on the unit.
Standby mode
Press and hold the STANDBY/PLAY/PAUSE button on the unit (3) or press the STANDBY button (14) on the remote to put the system into standby mode. To resume normal operation press either button again.
NOTE: When you power on the unit from standby the last used mode will resume.
General operation
DSP effects
Pressing the DSP button (33) repeatedly cycles through a set of EQ presets to alter the sound field. Choose from 1:Jazz, 2:Rock, 3:Classic, 4:Pop, 5:Live, 6:Dance & Off.
Loudness function
This function will add a rounder bass sound at low levels. Press the LOUD button (32) on the remote to enable. Press again to disable the effect.
Mute function
Press the MUTE button (25) at any time to silence the output. Press again to resume.
Tone controls
Adjust the Bass & Treble tone controls if required.
- Press the TONE button (34) on the remote control.
- The first adjustment is Bass. Use the VOL+/- buttons to adjust.
- Press the TONE button (34) again to edit the Treble. Use the VOL+/- buttons to adjust.
- Press the TONE button once more to edit Volume. Use the VOL+/- buttons to adjust.
Switching modes
To switch between the available modes : CD, FM & AUX IN.
Press and hold the EJECT/FUNCTION button (unit) (8) to cycle through the options or press the relevant button on the remote control from CD/FM & AUX IN.
FM operation
See Switching modes to switch to FM.
Scanning for stations
Before scanning for stations it is advised to position the antenna for best reception.
Press the SEARCH button (17). The unit will perform a scan from 87.50 MHz to 108.00 MHz and store all found stations into the channel preset locations.
Press and hold the buttons PREV or NEXT (4&7) on the unit from the current frequency to scan the previous or next stations, but the scanned stations will not be stored.
Setting a frequency manually
If you know the frequency of a station you wish to listen to, you can manually enter the details.
- Press the F (FREQUENCY) button (22). You will see the below appear on the display.

- Use the numeric buttons (21) to enter the frequency.
NOTE: you will need to enter the full 4 digit frequency for the unit to find the station eg:- 96.6 would be 96.60.
When entered the unit will play the station found at that entered frequency. If static is heard and you know the frequency is correct, re-position the antenna.
Fine tuning the frequency
Should you need to fine tune a frequency you can skip up or down the frequency range in 0.05 MHz increments.
-
Press the ▶ button (28) or press TUNER+ (7) button to skip 0.05 MHz up the frequency range.
-
Press the ◀ button (19) or press TUNER- (4) button to skip 0.05 MHz down the frequency range.
Saving a station to a preset channel
Should you wish to save a station to a specific preset channel follow the below steps.
- First enter the numeric digits for the preset location from 0-60 eg:- location 1 would be 01.
- Then press the F (FREQUENCY) button (22) to allow a frequency to be entered.
- Use the numeric buttons (21) to enter the frequency.
- Press the SAVE button (18) to store the entered frequency into the entered preset location.
Recalling station presets
- Press the ▶▶ button to skip up through the preset channels 0-60
- Press the ◀◀ button to skip down through the preset channels 0-60
- You can also jump directly to a preset location by entering the location digits using the numeric buttons (21) eg:- Preset channel 27, you would type 2 & 7. The unit will begin to play any station stored at that location.
CD operation
- Make sure you are in CD mode, if not press the CD button on the remote or press & hold the FUNCTION button until you reach CD.
- Press the EJECT button (8,23), when the disc drawer pops out insert a disc (label side facing upwards), press the EJECT button again to close.
- When the door is closed "LOAD" will appear on the display and the unit detects how many tracks are found on the current disc, this will be displayed on screen.
- Playback will begin automatically from Track 01.
- To stop playback press the STOP button (18).
- To pause playback press the PLAY/PAUSE ▶/II button (3,17) during playback. To resume playback press once more.
Skipping Tracks
To skip to the next track on a disc press ▶ (remote 27) or NEXT (unit 7). To skip to the previous track press ◀ (remote 20) or PREV (unit 4).
Fast Searching Tracks
To fast forward a track during playback press the (remote 28) button or press and hold the NEXT (unit 7). Each press of the button increases the search speed. EG: 2x & 4x the next press will resume normal playback. To fast rewind a track during playback press the (remote 19) button or press and hold the PREV (unit 4).
Repeat Operation
- During playback pressing the REPEAT button (26) will flag the current track to repeat indefinitely.
- Pressing the REPEAT button (26) again will repeat all tracks on the disc.
- To cancel the repeat function press the REPEAT button (26) for a third time.
Programme playback
You may wish to play back tracks of a CD in a different order than the original disc was recorded in.
- Press the PROGRAM button (30) to enter the program setup function. You will see the below appear on the display.
Program indicator Track order Track to play
Pr 01:00
-
Use the numeric buttons to enter the tracks you want played in order. EG:- first track to be played is track 5 on the disc. The playback track order No is 01 so we'd enter 0 and then 5 using the numeric buttons.
-
As soon as the 2 digit number has been entered you will see the display change to indicate the next track can be entered.
Program indicator Track order Track to play
Pr 02:00
-
Continue entering the digits for each track until finished.
-
Press the ENTER button (29) to begin playback in the programmed order.
-
To review the program you can press the PROGRAM button again and use the PREV / ▶ NEXT buttons (4,7,20,27) to cycle through the programmed order.
-
To cancel the program sequence press the STOP button twice.
Random Operation
Press the SHUFFLE button (31) on the remote control. The CD contents will be played once in a random order. Pressing the SHUFFLE button again activates the INTRO option. This will play the first 10 seconds of each track.
To cancel the random operation press the SHUFFLE button again.
Numeric buttons
While listening to a CD a specific track number can be played by pressing the relative digit on the number buttons. EG track 6 would be 06. To play track 12 you would press the 1 button then 2.
NOTE: the display will not react instantly although the track has been selected to play. After a few seconds the track number will appear on the display as 006 for track 6.
External input
Connecting external audio sources
External audio sources such as iPod's & MP3 players can be connected using a 3.5mm to RCA audio cable (not supplied).
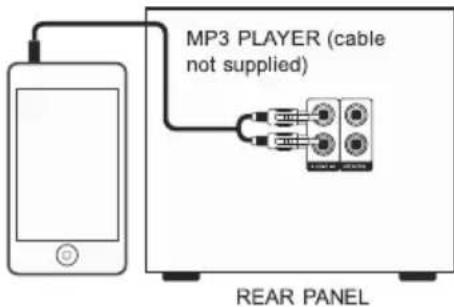
- Connect one end of the cable to the MP3 players headphone / Line output and the other end to the AUX IN input (10) on the back of the unit.
- Press and hold the FUNCTION button until you reach the AUX-IN option or press the AUX-IN button on the remote control.
- Adjust the volume to your desired level.
NOTE: when connecting via the headphone output the volume of the Microsystem is affected by the volume control on the player. Ensure that the player is set to about 70-80% to avoid distortion.
Maintenance
- Set to Standby.
- Switch the unit off at the mains and unplug it if you are leaving it unattended for a long period (holidays etc).
- Avoid leaving batteries fitted if you leave the radio unattended for long periods. They may leak and damage the radio.
Care and cleaning
All care and cleaning operations should be carried out with.
Occasionally wipe the cabinet with a lint free duster. Never clean the unit with liquids or solvents.
Trouble shooting
| PROBLEM | CAUSE SOLUTION | |
| No soundStatic SoundSound is distorted | Volume not turned upSignal reception too lowVolume is too high | Adjust the main volume knobAdjust the antenna or move the unit to a stronger signal location |
| Desired station not found | Weak signal | Use the Manual Tune function |
| The display is blank | This may occur if the broadcaster changes the lable of a service or removes a lable while tuned. | The radio will try to retune performance a scan. |
| I can hear a burbling noise on some stations | weak signal Try re-positioning the aerial |
Specifications
Supply Voltage, Mains: AC 220-240V\~50Hz
Max. Power Consumption....40W
Speaker Power: 2 x 5W
FM:87.5-108 MHz
Net Weight: 3.0kg
Contents
The carton should contain:
• The MC CD 40 Microsystem
- 2 x Speakers
- Remote control (with batteries)
- Operating Manual
LOCATION
Place the unit on a dry stable surface away from heat and damp and where it is unlikely to fall or be knocked over.

This symbol on the product or in the instructions means that your electrical and electronic equipment should be disposed at the end of its life separately from your household waste. There are separate collection systems for recycling in the EU.
For more information, please contact the local authority or your retailer where you purchased the product.
© All rights reserved by Blaupunkt Competence Center Audio M3 Electronic GmbH. This material may be reproduced, copied or distributed for personal use only.

BLAUPUNKT
Competence Center Audio
M3 Electronic GmbH
Gutenbergstrasse 5
D-65830 Kriftel - Germany
www.blaupunkt.com
Service Hotline Deutschland (Germany): 0180 55 88 66 4
All rights reserved. All brand names are registered
trademarks of their respective owners. Specifications are
subject to change without prior notice.


- LIGHTNING FLASH WITH ARROWHEADSYMBOL-
- EXCLAMATION POINT-
- Important Notes
- CE Conformity
- Safety Instructions
- Warning: Danger of radiation
- Electrical information
- Controls and connectors
- Preparation for use
- Loudspeakers
- Placing & connecting the speakers
- Connecting the power
- Connecting mains power
- Remote control batteries
- Disposal of batteries
- Getting started
- Switching on the MC CD 40 for the first time
- Standby mode
- General operation
- DSP effects
- Loudness function
- Mute function
- Tone controls
- Adjust the Bass & Treble tone controls if required.
- Switching modes
- FM operation
- Scanning for stations
- Setting a frequency manually
- Fine tuning the frequency
- Saving a station to a preset channel
- Recalling station presets
- CD operation
- Skipping Tracks
- Fast Searching Tracks
- Repeat Operation
- Programme playback
- Random Operation
- Numeric buttons
- External input
- Connecting external audio sources
- Maintenance
- Care and cleaning
- Specifications
- Contents
- BLAUPUNKT
Brand : BLAUPUNKT
Model : MC CD 40
Category : Hi-Fi