
Traveller 1776 X2 - Laptop TARGA - Free user manual and instructions
Find the device manual for free Traveller 1776 X2 TARGA in PDF.


| Product Type | Laptop |
| Dimensions (L x D x H) | 395 mm x 278 mm x 35 mm |
| Weight | 3.5 kg |
| Power Supply | AC Adapter: 90W, 19V; Battery: 9-cell Li-ion, 7200mAh |
| Processor | AMD Turion 64-bit Dual Core, 800MHz FSB |
| Memory | DDR2 667 MHz, up to 2GB (2 slots) |
| Storage | 120GB SATA HDD (2.5", 5400rpm); DVD Dual Layer optical drive |
| Display | 17" WXGA (1440x900), NVIDIA GeForce Go 7600 (256MB GDDR3 VRAM) |
| Connectivity | WiFi 802.11g, Bluetooth, 10/100/1000 LAN, 56K modem |
| Ports | USB 2.0 (4), DVI, S-Video, IEEE 1394, RJ-11, RJ-45, audio jacks, 5-in-1 card reader, ExpressCard, PC Card |
| Audio | Realtek ALC883, 4 speakers + subwoofer |
| Operating System | Windows XP Home/Professional/MCE, Vista compatible |
| Recovery | EasyInstall CD/DVD with boot, system, or full restore options |
| Cleaning Instructions | Use glass detergent on TFT display; apply sparingly and dry with cotton cloth. Avoid liquid ingress. |
| Safety Features | Lithium battery caution, Class 1 laser product, WLAN safety instructions |
| Spare Parts & Repairability | Official spare parts and BIOS updates at www.service.targa.co.uk; only use approved BIOS versions |
| Warranty & Support | Manufacturer hotline +49 2921 / 99-3030 (English); Pickup service available |
| Regulatory Compliance | CE, WEEE, EN 55022, EN 55024, EN 60950 |
Frequently Asked Questions - Traveller 1776 X2 TARGA
User questions about Traveller 1776 X2 TARGA
0 question about this device. Answer the ones you know or ask your own.
Ask a new question about this device
Download the instructions for your Laptop in PDF format for free! Find your manual Traveller 1776 X2 - TARGA and take your electronic device back in hand. On this page are published all the documents necessary for the use of your device. Traveller 1776 X2 by TARGA.
USER MANUAL Traveller 1776 X2 TARGA
General Introductions
Chapter 2
Getting Started
Chapter 3
Customizing this Notebook
Chapter 4
BIOS setup
Chapter 5
Troubleshooting, First Aid and FAQ
Chapter 6
Watching TV and Videotext on your Notebook
Chapter 7
Restoring the System by Using the System Recovery Software
Chapter 8
Mandatory Activation
Chapter 9
Safety EMC and Safety Regulations
Regulations Information

廢電池請回收
For better environmental protection, waste batteries should be collected separately for recycling or special disposal.
Safety Guideline for Using Lithium Battery
(English) CAUTION: Danger of explosion if battery is incorrectly replaced. Replace only with the same or equivalent type recommended by the equipment manufacturer. Discard used batteries according to manufacturer's instructions.
Caution on Using Modem
- Never install telephone wiring during a lightning storm.
- Never install telephone jacks in wet locations unless the jack is specifically designed for wet locations.
- Never touch uninsulated telephone wires or terminals unless the telephone line has been disconnected at the network interface.
- Use caution when installing or modifying telephone lines.
- Avoid using the telephone function (other than a cordless type) during an electrical storm. There may be a remote risk of electric shock from lightning.
- Do not use the telephone function to report a gas leak in the vicinity of the leak.
Optical Device Drive Notice
CAUTION: This appliance contains a laser system and is classified as a "CLASS 1 LASER PRODUCT." To use this model properly, read the instruction manual carefully and keep this manual for your future reference. In case of any trouble with this model, please contact your nearest "AUTHORIZED service station." To prevent direct exposure to the laser beam, do not try to open the enclosure.
Macrovision Notice
This product incorporates copyright protection technology that is protected by U.S. patents and other intellectual property rights. Use of this copyright protection technology must be authorized by Macrovision, and is intended for home and other limited viewing uses only unless otherwise authorized by Macrovision. Reverse engineering or disassembly is prohibited.
Safety Instructions
-
Read the safety instructions carefully and thoroughly.
-
Save this User Guide for possible use later.
-
Keep this equipment away from humidity and high temperature.
-
Lay this equipment on a stable surface before setting it up.
-
The openings on the enclosure are used for air convection and to prevent the equipment from overheating. Do not cover the openings.
-
Make sure that the power voltage is within its safety range and has been adjusted properly to the value of 100\~240V before connecting the equipment to the power inlet.
-
Place the power cord in a way that people are unlikely to step on it. Do not place anything on the power cord.
-
Always unplug the power cord before inserting any add-on card or module.
-
All cautions and warnings on the equipment should be noted.
-
If any of the following situations arises, get the equipment checked by a service personnel:
- The power cord or plug is damaged.
Notebook
Preface
- Liquid has penetrated into the equipment.
- The equipment has been exposed to moisture.
- The equipment has not worked well or you can not get it work according to User's Manual.
- The equipment was dropped and damaged.
-
The equipment has obvious signs of breakage.
-
Never pour any liquid into the opening that could damage the equipment or cause an electrical shock.
- Do not leave the equipment in an unconditioned environment with a storage temperature of 60ircC (140°F) or above, which may damage the equipment.
- To prevent explosion caused by improper battery replacement, use the same or equivalent type of battery recommended by the manufacturer only.
WEEE Statement
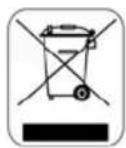
(English) Under the European Union ("EU") Directive on Waste Electrical and Electronic Equipment, Directive 2002/96/EC, which takes effect on August 13, 2005, products of "electrical and electronic equipment" cannot be discarded as municipal waste anymore and manufacturers of covered electronic equipment will be obligated to take back such products at the end of their useful life.
All trademarks are the properties of their respective owners.
- Microsoft is a registered trademark of Microsoft Corporation. Windows®98/ME, 2000/XP are registered trademarks of Microsoft Corporation.
♦ AMI® is a registered trademark of American Megatrends Inc. - PCMCIA and CardBus are registered trademarks of the Personal Notebook Memory Card International Association.
Release History
| Version | Revision | Note | Date |
| 1.0 First Release | June 2006 |
Table of Content
Preface
Regulations Information ....II
Safety Guideline for Using Lithium Battery ....III
Caution on Using Modem IV
Optical Device Drive Notice IV
Macrovision Notice ...... V
Safety Instructions ...... V
WEEE Statement...... VI
Trademarks ...... X
Release History ......X
Introductions
How to Use This Manual ....1-2
Unpacking 1-4
Getting Started
Specification 2-2
Product View....2-5
Top-open View....2-5
Front View 2-8
Notebook
Preface
Right-side View 2-10
Left-side View....2-12
Rear View....2-13
Bottom View 2-14
Power Management....2-15
AC Adapter....2-15
Battery Pack....2-17
Charging the Battery Properly....2-21
Basic Operations....2-23
Safety and Comfort Tips....2-23
Have a Good Work Habit 2-24
Knowing the Keyboard 2-25
Knowing the Touchpad....2-30
About Hard Disk Drive....2-34
Using the Optical Storage 2-35
Customizing this Notebook
Connecting the External Devices 3-2
Connecting the Peripheral Devices....3-3
Connecting the Communication Devices 3-6
PC Card Installation 3-7
Installing the PC card 3-7
Removing the PC card 3-8
Safely Remove Hardware 3-9
BIOS Setup
About BIOS Setup 4-2
When to Use BIOS Setup....4-2
How to Run BIOS Setup 4-2
Control Keys....4-3
BIOS Setup Menu 4-4
Main menu....4-5
Advanced menu 4-7
Boot menu....4-8
Security menu 4-9
Exit menu 4-11
Troubleshooting, First Aid and FAQ
Troubleshooting, First Aid and FAQ 5-2
Troubleshooting....5-3
FAQ – Frequently Asked Questions....5-6
Watching TV and Videotext on your Notebook
Watching TV and Videotext on your Notebook....6-2
Using Teletext (Videotext) on a Computer (Only for Analog TV) ......6-5
Receiving Radio Channels with the Media Center....6-6
The Media Center as a Video Recorder....6-8
Restoring the System by Using the System Recovery Software
Restoring the System by Using the System Recovery Software ....7-2
Mandatory Activation
Mandatory Activation....8-2
Safety EMC and Safety Regulations
Safety EMC and Safety Regulations....9-2
Laser (Safety Warning) 9-3
Additional Safety Instructions for Devices with Wireless LAN....9-4
CE Marking for Devices with Wireless LAN 9-5
Preface
Chapter 1
General Introductions
Chapter 2
Getting Started
Chapter 3
Customizing this Notebook
Chapter 4
BIOS setup
Chapter 5
Troubleshooting, First Aid and FAQ
Chapter 6
Watching TV and Videotext on your Notebook
Chapter 7
Restoring the System by Using the System Recovery Software
Chapter 8
Mandatory Activation
Chapter 9
Safety EMC and Safety Regulations
Congratulations on becoming a new user of this notebook, the finely designed notebook. This brand-new exquisite notebook will give you a delightful and professional experience in using notebook. We are proud to tell our users that this notebook is thoroughly tested and certified by our reputation for unsurpassed dependability and customer satisfaction.
How to Use This Manual
This User's Manual provides instructions and illustrations on how to operate this notebook. It is recommended to read this manual carefully before using this notebook.
Chapter 1, General Introductions, includes the descriptions of all the accessories of this notebook. It is recommended to check out that if you have all the accessories included when you open the packing box. If any item is damaged or missing, please contact the vendor where you purchased this notebook.
Chapter 2, Getting Started, provides the specification of this notebook, and introduces the function buttons, quick launch buttons, connectors, LEDs and externals of this notebook. Also, this chapter instructs the correct procedure of installing or uninstalling the battery pack, and the brief ideas on how to use this notebook.
Notebook
General Introductions
Chapter 3, Customizing this Notebook, gives instructions not only in connecting the mouse, keyboard, webcam, printer, external monitor, IEEE 1394 devices, and communication devices, but also in installing and removing the PC card.
Chapter 4, BIOS setup, provides information on BIOS Setup program and allows you to configure the system for optimum use.
Unpacking
First, unpack the shipping carton and check all items carefully. If any item contained is damaged or missing, please contact your local dealer immediately. Also, keep the box and packing materials in case you need to ship the unit in the future.
| Chapter 1 | General Introductions |
| Chapter 2 | Getting Started |
| Chapter 3 | Customizing this Notebook |
| Chapter 4 | BIOS setup |
| Chapter 5 | Troubleshooting, First Aid and FAQ |
| Chapter 6 | Watching TV and Videotext on your Notebook |
| Chapter 7 | Restoring the System by Using the System Recovery Software |
| Chapter 8 | Mandatory Activation |
| Chapter 9 | Safety EMC and Safety Regulations |
Specification
| Physical Characteristic | |
| Dimension 395mm(L) x 278mm(D) x 35mm(H) | |
| Weight | 3.5kg |
| CPU | |
| Processor Type Socket S1 (638-pins, uPGA) | |
| Support Processor Turion 64 bit dual core 64 bit | |
| L1 Cache 128KB | |
| L2 Cache 1MB | |
| FSB Speed 800MHz | |
| Core Chips | |
| North Bridge nVidia C51MV | |
| South Bridge nVidia MCP51 | |
| Memory | |
| Technology DDRII 667 MHz | |
| Memory DDR II SO-DIMM X 2 slot | |
| Maximum 2GB (1024MB DDRII SO-DIMM X 2) | |
| Power | |
| AC Adapter 90W, 19 Volt, KSAFK1900474T1M2 | |
| Battery Type 9 cells (Li-ion) (7200mAh) | |
| Storage | |
| HDD form factor | 2.5" 9.5mm High, SATA120GB, (5400rpm) |
| Optical Device COMBO/DVD dual/DVD Dual layer | |
| I/O Port | |
| Monitor(DVI) | DVI |
| USB x 4 (USB version 2.0) | |
| Mic-in | x 1 |
| Internal Microphone x 1 | |
| Webcam | x 1 |
| Headphone/SPDIF Out x 1 | |
| RJ11 | x 1 |
| RJ45 | x 1 |
| IEEE 1394 x 1 | |
| TV-Out x 1 (S-Video) | |
| 5-in-1 Card Reader XD/SD/MMC/MS/MS Pro | |
| Express Card x 1 | |
| Communication Port | |
| 56K Fax/MODEM | AZALIA Modem |
| MDC (AZALIA) | Controller --- AZALIA Embedded |
| LAN 10/100/1000 Base on board LAN | |
| Wireless LAN IEEE 802.11G MS6855B | |
| Bluetooth | MS6855 WLAN + BT COMBO |
| Display | |
| LCD Type | 17" WXGA |
| Brightness | Brightness controlled by K/B hot-keys |
Video
| Controller NVIDIA Geforce Go 7600 | |
| VRAM GDDR III (256MB) | |
| LCD 1440 x 900 for WXGA | |
| CRT Support 640x480, max, 32bit color | |
Audio
| Sound Codec chip Realtek ALC883 (Azalia) | |
| Internal Speaker 4 Speakers + 1 Subwoofer | |
| Sound Volume Adjust by volume button, K/B hot-key & SW |
Software & BIOS
| Support OS Win XP Home, Professional edition, Vista,MCE |
| USB Flash Boot Yes, USB floppy boot up DOS only |
| BIOS Fast Boot Support --- Yes (Win XP) |
Others
| Kensington Lock Hole x 1 |
Product Overview
This section provides you the description of basic aspects of your Notebook. It will help you to know more about the appearance of this Notebook before using it.
Top-open View
Press the Cover Latch to open the top cover (LCD Panel). The figure of top-open view and description showing below will lead you to browse the main operating area of your NOTEBOOK.
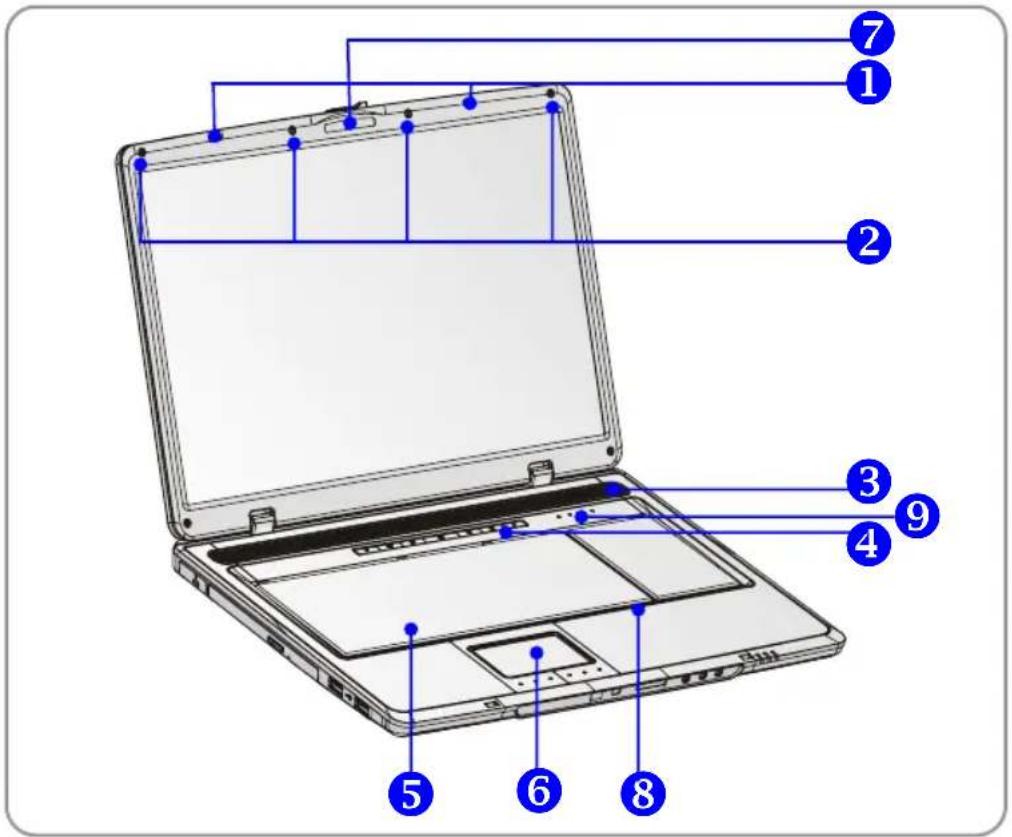
1. Cover Latch (Internal View)
It is a bounce-back device to lock the cover with the deck when closing your Notebook PC.
2. Rubber Pads
Protect your Notebook PC from random closing.
3. Stereo Speakers
Make high quality sound blaster with stereo system and Hi-Fi function supported.
4. Quick Launch Buttons and Power Button
 | Power Button: To turn your Notebook power ON and OFF. |
 | Quick Launch Buttons: Simply click the quick launch buttons to speed up the starting of the programs in common use. It helps you to do works more efficiently. |
5. Keyboard
The built-in keyboard provides all the functions of a full-sized 103-key keyboard.
6. Touchpad
It is the pointing device of the computer.
7. Webcam
This camera takes pictures every few minutes and updates those pictures to a Web page where everyone can watch.
8. Internal Microphone
There is built-in microphone and its function is the same with microphone.
9. Status LED
 | Hard Disk In-use: Glowing when the Notebook PC is accessing the hard disk drive. |
 | Num Lock: Glowing when the Num Lock function is activated. |
 | Caps Lock: Glowing when the Caps Lock function is activated. |
 | Scroll Lock: Glowing when the Scroll Lock function is activated. |
Front View
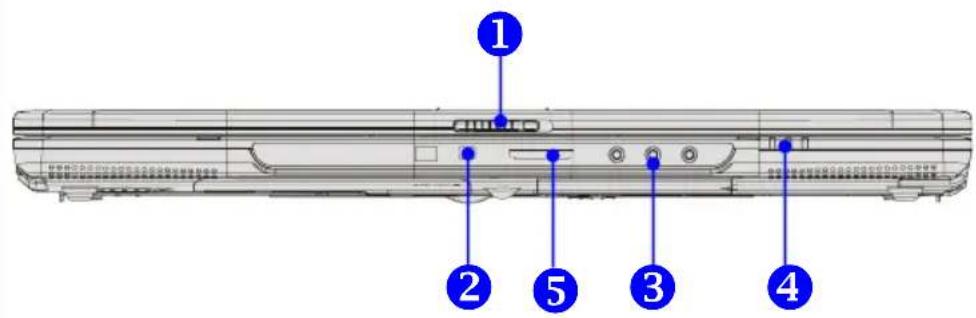
1. Cover Latch (External View)
Press Cover Latch rightward and lift the cover. The Cover Latch will bounce back when loosing it.
2. IEEE 1394
The IEEE 1394 port is a high-speed bus that allows you to connect high-end digital devices such as the DV (digital video camera).
3. Audio Port Connectors
Make high quality sound blaster with stereo system and Hi-Fi function supported.
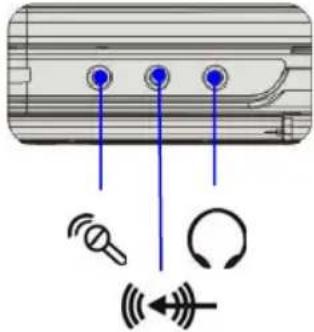 |  | Headphones: A connector for speakers or headphones.5.1: Front |
 | Line In: Used for an external audio device.5.1: Rear | |
 | Microphone: Used for an | |
| external5.1: Central/Subwoofer |
micropho
4. Status LED
 | Battery: Glowing Green when recharging.Battery LED goes out when recharging is done or when the AC adapter is disconnected.Glowing Orange when the battery is in low battery status.Blinking Orange if the battery is out of order, and it is recommended to replace a new battery. |
 | Power On/ Off/ Suspend: Blinking when the system is in suspend mode; LED goes off when the system is activated. |
 | 1. Wireless LAN/ 2. Bluetooth: 1.Glowing Green when wireless LAN function of the computer is enabled. LED goes out when wireless LAN function is disabled. 2.Glowing Blue when Bluetooth function of the computer is enabled. LED goes out when Bluetooth function is disabled. 3. Glowing light blue when wireless LAN and Bluetooth function in enabled. |
5. 5 in 1 Card Reader
The built-in card reader supports MMC (multi-media card), SD (secure digital), MS (memory stick), MS Pro and XD cards.
Right-side View
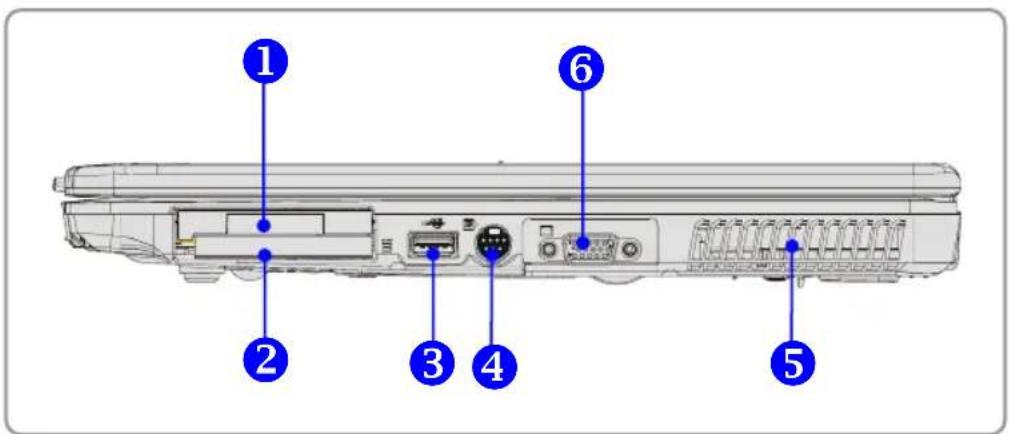
1. Express Card Slot
The computer provides an Express Card slot. The new Express Card interface is smaller and faster than PC Card interface. The Express Card technology takes advantage of the scalable, high-bandwidth serial PCI Express and USB 2.0 interfaces.
2. PC Card Slot
The computer provides a PC card slot to support one Type-II PC card for expansion functions, such as LAN/WLAN card, modem card, memory card, etc.
3. USB Port
The USB 2.0 port allows you to connect USB-interface peripheral devices, such as the mouse, keyboard, modem, portable hard disk module, printer and more.
4. S-Video Connector
By using a Super VHS (S-Video) cable, this connector allows you to connect a television (NTSC/PAL system) to use as a computer display.
Notebook
Getting Started
5. Ventilator
The ventilator is designed to cool the system. DO NOT block the ventilator for air circulation.
6. DVI Port
DVI stands for Digital Visual Interface, and is a standard for connecting computers to digital monitors. The DVI port provides a pure digital video signal to a digital flat-panel display or projector for a great view of the computer display.
Left-side View

1. USB Port
The USB 2.0 port allows you to connect USB-interface peripheral devices, such as the mouse, keyboard, modem, portable hard disk module, printer and more.
2. Optical Storage Device
A slim CD-ROM/DVD-ROM/CD-RW/DVD Combo/DVD Dual drive is available in the computer, depending on the model you purchased. The optical device allows you to use the CD/DVD disc for installing software, accessing data and playing music/movie on the computer.
3. USB Port
The USB 2.0 port allows you to connect USB-interface peripheral devices, such as the mouse, keyboard, modem, portable hard disk module, printer and more.
Rear View
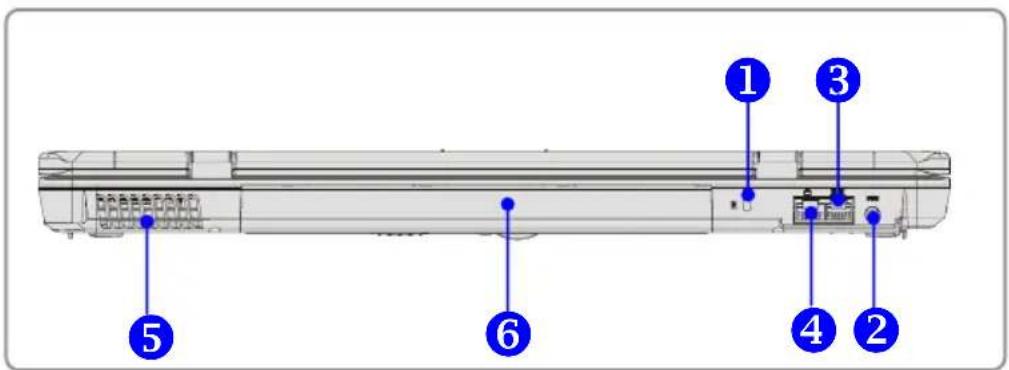
1. Kensington Lock
This port is used to lock the computer to location for security.
2. Power Connector
To connect the AC adapter and supply power for the computer.
3. RJ-11 Connector
The computer provides a built-in modem that allows you to connect an FJ-11 telephone line through this connector. With the 56K V.90 modem, you can make a dial-up connection.
4. RJ-45 Connector
This connector is used to connect a LAN cable for network connection.
5. Ventilator
The ventilator is designed to cool the system. DO NOT block the ventilator for air circulation.
6. Battery Pack (Rear View)
To supply power to computer when AC adapter is not connected.
Bottom View
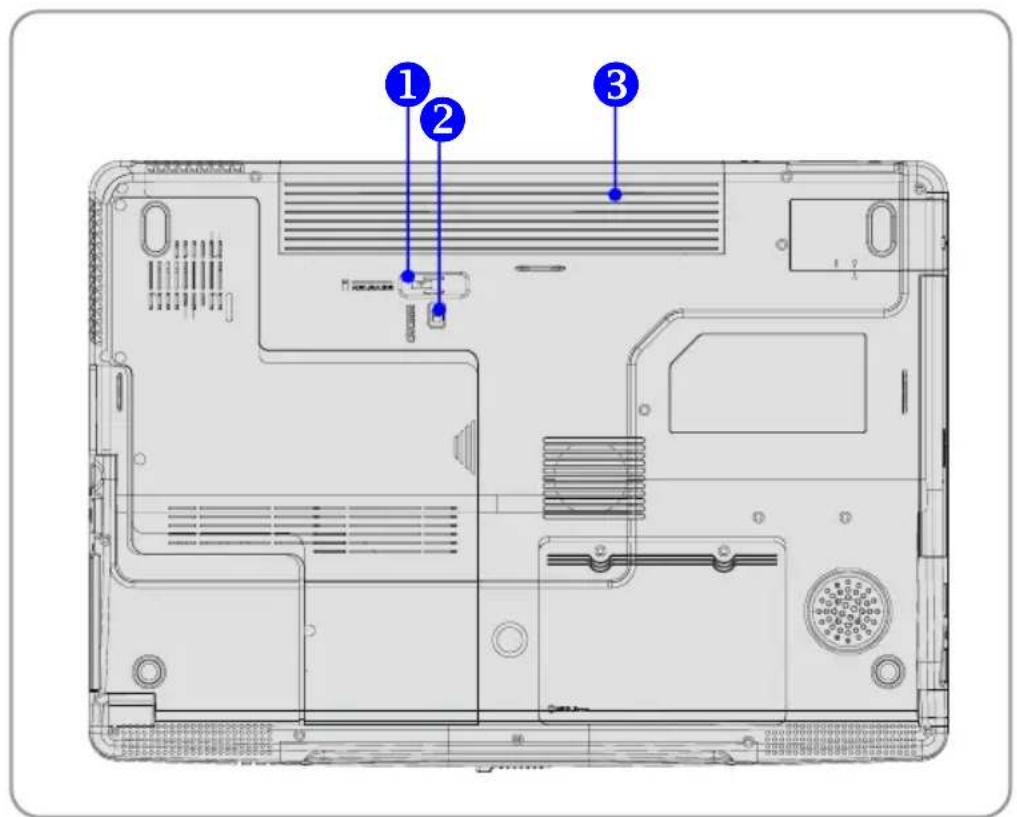
1. Battery Release Button
It is a bounce-back device as a preparation for releasing the battery pack.
Press it with one hand and pull the battery pack carefully with the other.
2. Battery Lock/Unlock Button
Battery cannot be moved when the button is positioned on lock status.
Once the button is pushed to unlock position, the battery is removable.
3. Battery Pack
Supply power to your computer when the AC adapter is not connected.
Power Management
AC Adapter
Please be noted that it is strongly recommended to connect the AC adapter and use the AC power while using this Notebook for the first time. When the AC adapter is connected, the battery is being charged immediately.
NOTE that the AC adapter included in the package is approved for your Notebook; using other adapter model may damage the Notebook or other devices on the Notebook.
Connecting the AC Power
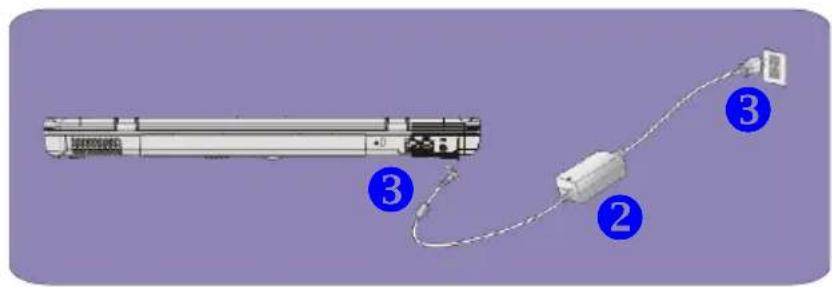
- Unpack the package to find the AC adapter and power cord.
- Attach the power cord to the connector of the AC adapter.
- Plug the DC end of the adapter to the Notebook, and the male end of the power cord to the electrical outlet.
Notebook
Getting Started
Disconnecting the AC Power
When you disconnect the AC adapter, you should:
- Unplug the power cord from the electrical outlet first.
- Unplug the connector from the Notebook.
- Disconnect the power cord and the connector of AC adapter.
- When unplugging the power cord, always hold the connector part of the cord. Never pull the cord directly!
Battery Pack
This Notebook is equipped with a high-capacity 6-cell/9-cell Li-ion Battery pack. The rechargeable Li-ion battery pack is an internal power source of the Notebook.
Releasing the Battery Pack
It's a better way to have extra battery for enough power supply, so you don't have to worry about the lack of battery power. It's recommend to buy a battery pack from your local dealer.
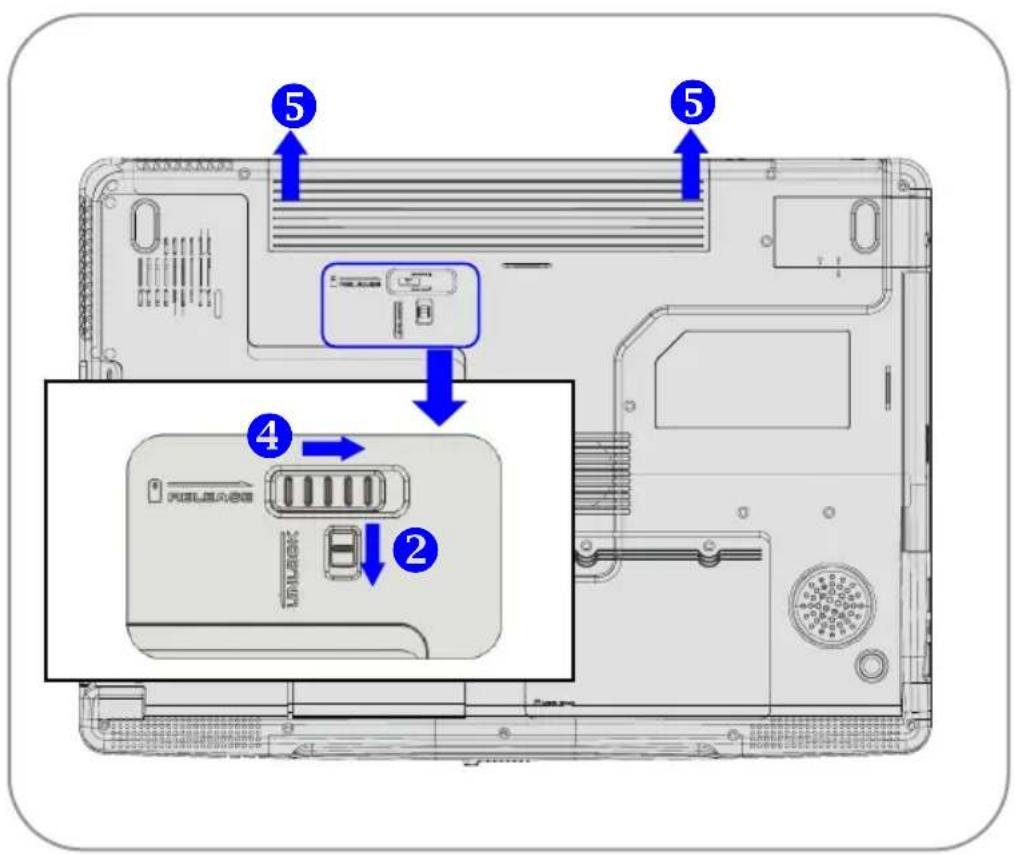
To remove the battery pack:
- Make sure the computer is turned off.
- Check the Lock/Unlock button is in unlocked status.
- Locate the Battery Release Button on the bottom side.
- Push the Release Button to the direction of arrow showing below the button.
- Slide the left side of the battery pack first out of the compartment and then pull the right side of the battery pack.
Replacing the Battery Pack
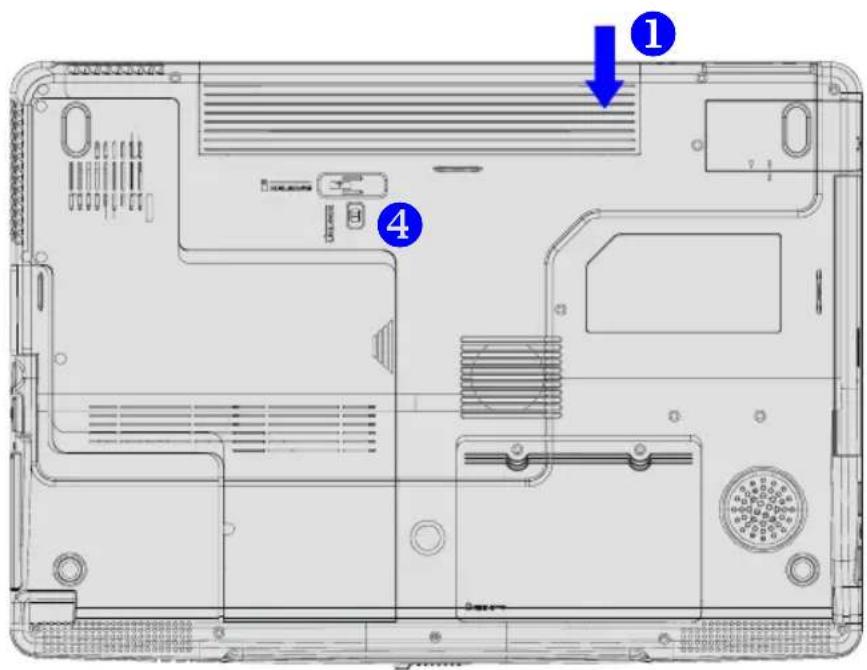
- Insert the right side of battery pack into the compartment.
- Slightly slide and press the battery pack into the right place.
- After the right side of the battery pack fitting the right track, then slightly press the left side of battery pack into the battery chamber.
- Make sure the Lock/Unlock Button is in lock position.
info
Warning
- Do not try to disassemble THE BATTERY PACK.
- Please follow your local laws and regulations to recycle the unused battery pack.
Using the Battery Pack
Battery Safety Tips
Replacing or handling the battery incorrectly may present a risk of fire or explosion, which could cause serious injury.
- Only replace the main battery pack with the same or equivalent type of battery.
Do not disassemble, short-circuit or incinerate batteries or store them to temperatures above +60°C (+140°F). - Do not temper with batteries. Keep them away from children.
- Do not use rusty or damaged batteries.
- Dispose of batteries according to local regulations. Check with your local solid waste officials for details about recycling options or for proper disposal in your area.
Conserving Battery Power
Efficient battery power is critical to maintain a normal operation. If the battery power is not managed well, the saved data and customized settings may be lost.
Follow these tips to help optimizing battery life and avoid a sudden power loss.
- Suspend system operation if the system will be idle for a while or shorten the Suspend Timer's time period.
- Turn off the system if you won't be using it for a period of time.
- Disable unneeded settings or remove idle peripherals to conserve power.
- Connect an AC adapter to the system whenever possible.
Charging the Battery Pack Properly
Your notebook computer features a powerful, rechargeable Li-Ion battery pack. Normally, a fully charged battery delivers approx. 2 to 3 hours of battery operation for your notebook. It is very important that you enable the Power Management features under Windows XP for careful management of power consumption. The endurance will vary depending on the different notebook configurations as well as work habits. A very bright display, lots of hard disk access using the DVD drive as well as an extensive use of the WLAN adapter will increase power consumption and therefore reduce battery endurance.
- To charge the battery, connect the power adapter to the notebook and to a wall outlet.
During the charging process, the battery indicator (LED) located next to the status indicators (LEDs) will light up. If the notebook is turned off, an empty battery will take approx. 3 hours to become fully charged. The charging time will be longer if the notebook is turned on and being used. It is normal that the battery becomes warm during the charging process.
-
The battery will develop its full capacity after completing 20 charging and discharging cycles without performing any quick charging.
-
In order to maintain its full capacity, it is recommended that you fully discharge the battery from time to time. To do so, disconnect the power adapter and keep
Notebook
Getting Started
your notebook turned on until it automatically toggles to the Standby mode. Then reconnect the power adapter in order to recharge the battery.
-
As a rule the battery capacity will reduce to approx. 85% after performing 500 charging cycles.
-
Never leave the battery unused for a long period of time. All batteries are subject to self-discharge. Storing the battery for a long time may cause a low discharge status that could damage the battery. Make sure that you charge the battery from time to time (approx. every 4 weeks).
-
While charging, never exposure the battery to high temperatures (higher than 45irc C or 113irc F ).
Basic Operations
If you are a beginner to the Notebook, please read the following tips to make yourself safe and comfortable during the operations.
Safety and Comfort Tips
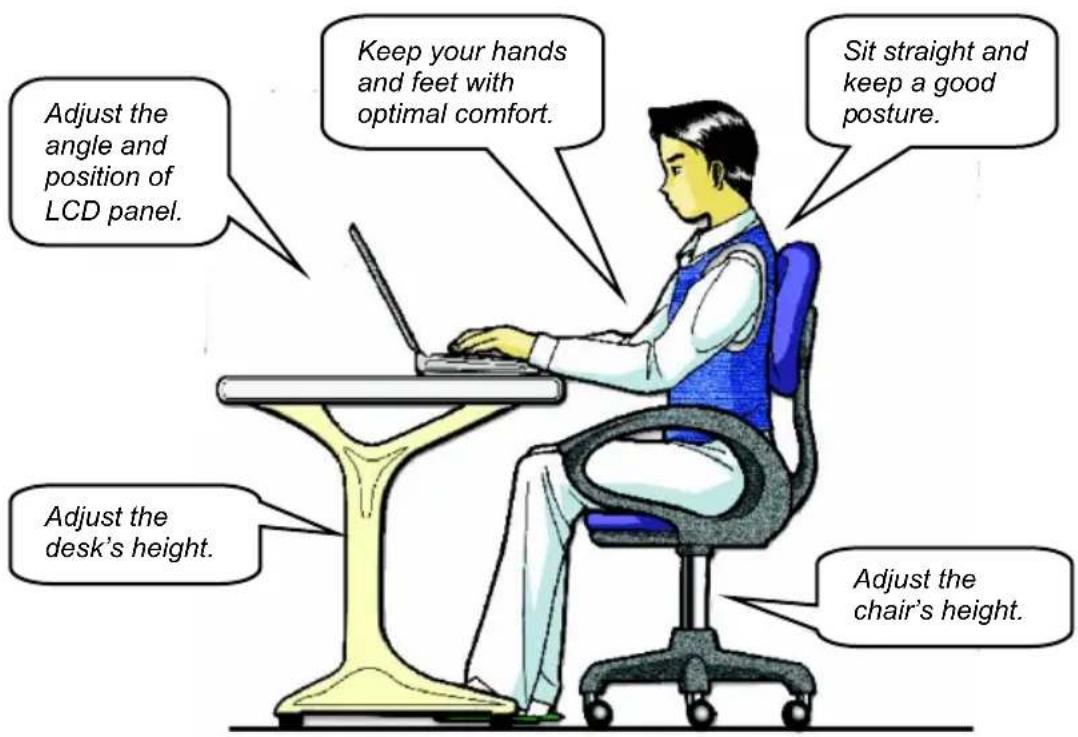
The Notebook is a portable platform that allows you to work anywhere. However, choosing a good workspace is important if you have to work with your Notebook for long periods of time.
- Your work area should have enough illumination.
- Choose the proper desk and chair and adjust their height to fit your posture when operating.
- When sitting on the chair and adjust the chair's back (if available) to support your back comfortably.
- Place you feet flat and naturally on the floor, so that your knees and elbows have the proper position (about 90-degree) when operating.
Put your hands on the desk naturally to support your wrists. - Adjust the angle/position of the LCD panel, so that you can have the optimal view.
- Avoid using your Notebook in the space where may cause your discomfort (such as on the bed).
- The Notebook is an electrical device, please treat it with great care to avoid personal injury.
Have a Good Work Habit
Have a good work habit is important if you have to work with your Notebook for long periods of time; otherwise, it may cause discomfort or injury to you. Please keep the following tips in mind when operating.
- Change your posture frequently.
♦ Stretch and exercise you body regularly. - Remember to take breaks after working for a period of time.
Knowing the Keyboard
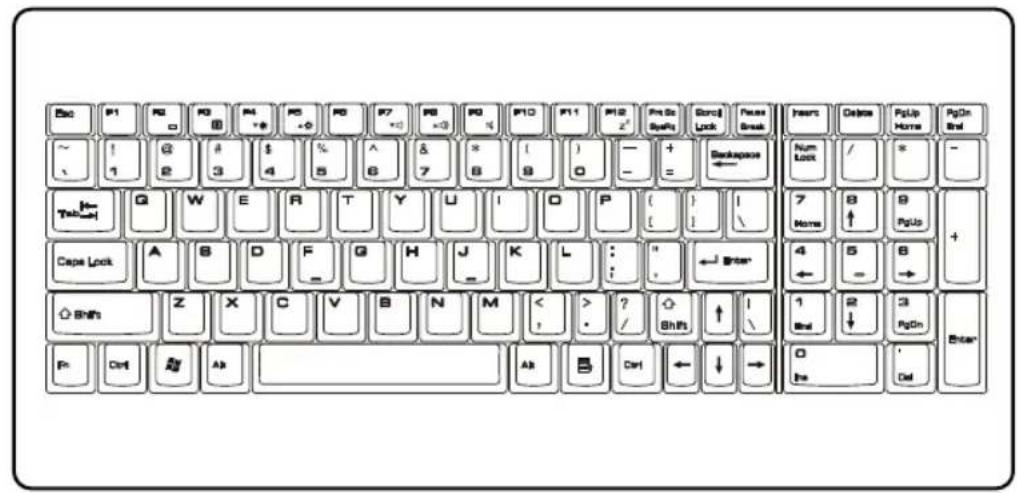
The Notebook's keyboard provides all the functions of a full-sized 103-key keyboard and an additional [Fn] key for specific functions on the Notebook. The keyboard can be divided into four categories: Typewriter keys, Cursor keys, Numeric keys and Function keys.
Typewriter Keys
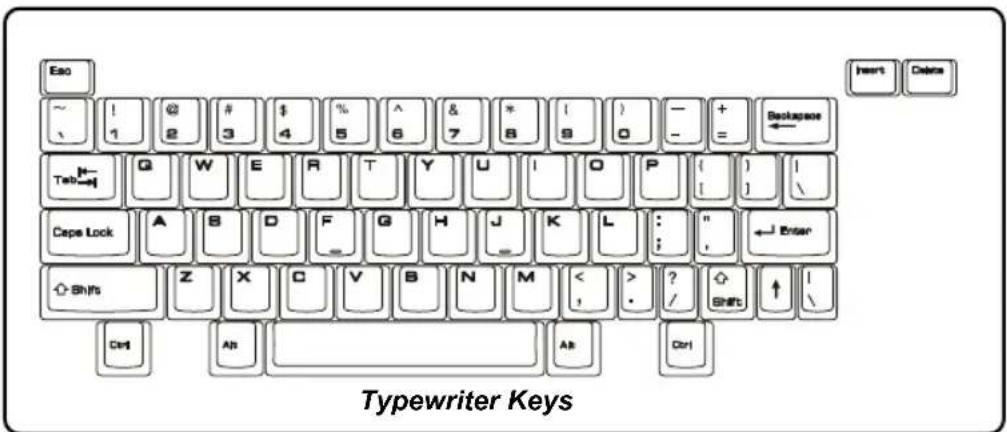
The function of these Typewriter keys is the major function of the keyboard, which is similar to the keys on a typewriter. It also provides several keys for special purposes, such as the [Ctrl], [Alt] and [Esc] key.
When the lock keys are pressed, the corresponding LEDs will light up to indicate their status:
Num Lock: Press and hold the [Fn] key and press this key to toggle the Num Lock on and off. When this function is activated, you can use the numeric keys that are embedded in the typewriter keys.
■ Caps Lock: Press this key to toggle the Caps Lock on and off. When this function is activated, the letters you type are kept in uppercase.
■ Scroll Lock: Press and hold the [Fn] key and press this key to toggle the Scroll Lock on and off. This function is defined by individual programs, and it is usually used under DOS.
Cursor Keys
The keyboard provides four cursor (arrow) keys and [Home], [PgUp], [PgDn], [End] keys at the lower right corner, which are used to control the cursor movement.
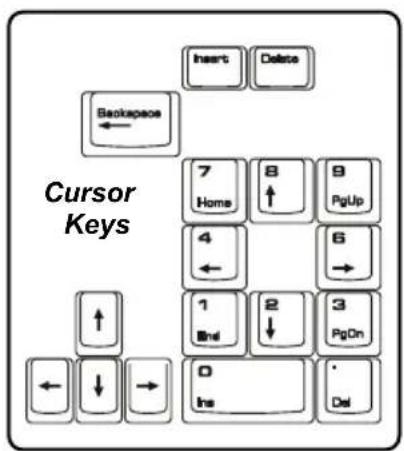
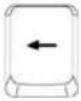 | Move the cursor left for one space. |
 | Move the cursor right for one space. |
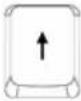 | Move the cursor up for one line. |
 | Move the cursor down for one line. |
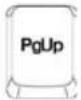 | Move to the previous page. |
 | Move to the next page. |
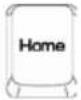 | Move to the beginning of the line (or document). |
 | Move to the end of the line (or document). |
The Backspace key, [Ins] and [Del] keys at upper right corner are use for editing purpose.
 | This key is used to switch the typing mode between “insert” and “overtype” modes. |
 | Press this key to delete one character to the right of the cursor and move the following text left for one space. |
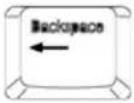 | Press this key to delete one character to the left of the cursor and move the following text left for one space. |
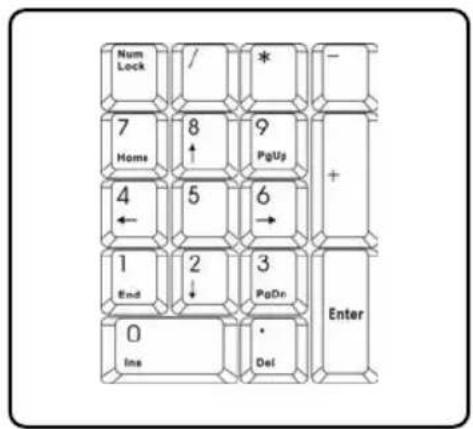
Numeric Keys
The keyboard provides a set of numeric keypad, which is embedded in the typewriter keys. When the Num Lock is activated, you can use these numeric keys to enter numbers and calculations.
Function Keys
■ Windows Keys
You can find the Windows Logo key (☐) and one Application Logo key (☐) on the keyboard, which are used to perform Windows-specific functions, such as opening the Start menu and launching the shortcut menu. For more information of the two keys, please refer to your Windows manual or online help.
■ [Fn] Key
![TARGA Traveller 1776 X2 - ■ [Fn] Key - 1](/content/2026/05/770372/images/883fa22e38f9ea65b6a4d5dd5fd48c679e701d6d8cdb5b34724476735fbfd276.jpg) | Switch the display output mode between the LCD, external monitor and Both. |
![TARGA Traveller 1776 X2 - ■ [Fn] Key - 2](/content/2026/05/770372/images/be335f0d902cf9f958cc6a19bd0c7ec0040dd92fe6b19bd266dbcd022f5c2ae6.jpg) | Disable/enable Touchpad. |
![TARGA Traveller 1776 X2 - ■ [Fn] Key - 3](/content/2026/05/770372/images/4071c15a6c61c1ec85163957c89b0df57800c601f8637a7f83ce4f5a4803693a.jpg) | Decrease the LCD brightness. |
![TARGA Traveller 1776 X2 - ■ [Fn] Key - 4](/content/2026/05/770372/images/990dd3c8be7befe1730cacac448aaa76f9add19023f30687a780581551cc0d9e.jpg) | Increase the LCD brightness. |
![TARGA Traveller 1776 X2 - ■ [Fn] Key - 5](/content/2026/05/770372/images/116a0f6b4f1efd65e1bf950fcb682120892151b42f132e728a3dd01bf0eef3ff.jpg) | Decrease the built-in speaker's volume. |
![TARGA Traveller 1776 X2 - ■ [Fn] Key - 6](/content/2026/05/770372/images/29b440ee2839a5e0c516bf22fef8202acc68110b466e7e89bb5de5db5674ea60.jpg) | Increase the built-in speaker's volume. |
![TARGA Traveller 1776 X2 - ■ [Fn] Key - 7](/content/2026/05/770372/images/d892c042e95321250b04c0c66315e9b1ea9c93a8d041527de848c0c80bd4fb12.jpg) | Disable the Notebook's audio function. |
![TARGA Traveller 1776 X2 - ■ [Fn] Key - 8](/content/2026/05/770372/images/edc2ae6fe1d6b1e829e68637d3cf3b3e701c24a523eae52b5777c2a2ea3cf007.jpg) | Force the Notebook into suspend mode (depending on the system configuration). |
Knowing the Touchpad
The touchpad integrated in your Notebook is a pointing device that is compatible with standard mouse, allowing you to control the Notebook by pointing the location of the cursor on the screen and making selection with its two buttons.
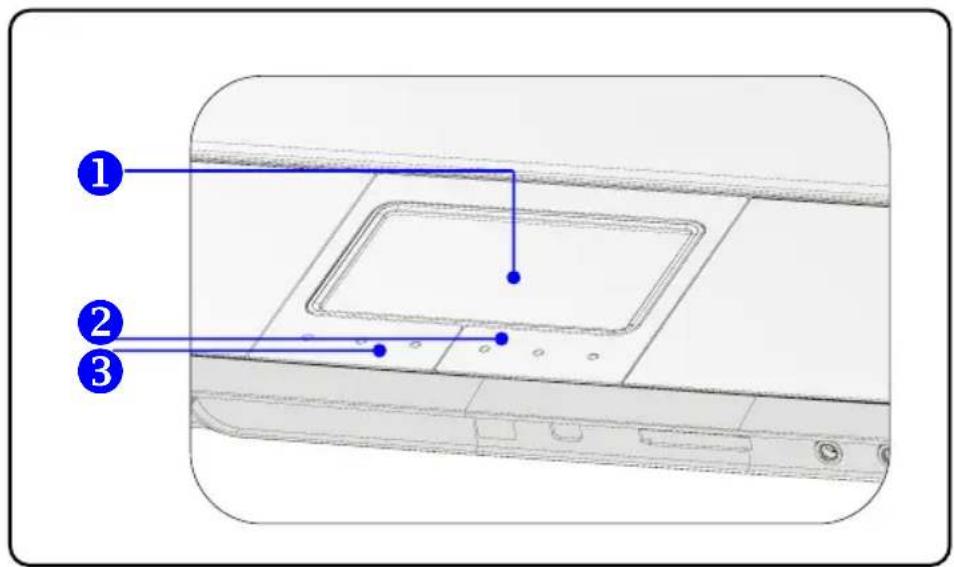
1. Cursor Movement Area
This pressure-sensitive area of the touchpad, allows you to place your finger on it and control the cursor on the screen by moving your finger.
2. Right Button
Acts as the mouse's right button.
3. Left Button
Acts as the mouse's left button.
Using the Touchpad
Read the following description to learn how to use the touchpad:
■ Positioning and Moving
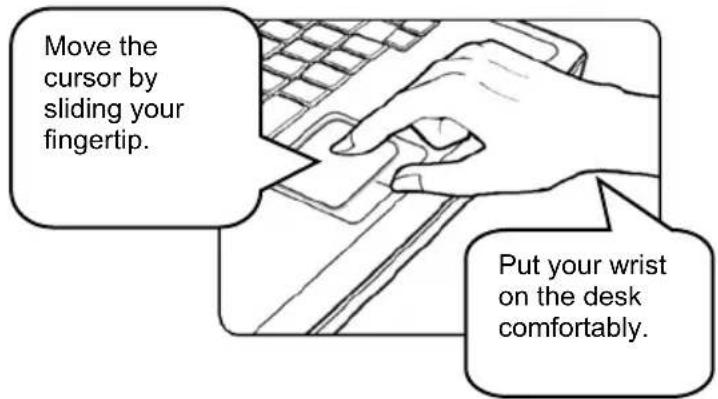
Place your finger on the touchpad (usually using the forefinger), and the rectangular pad will act as a miniature duplicate of your display. When you move your fingertip across the pad, the cursor on the screen will move simultaneously in the same direction. When your finger reaches the edge of the pad, lift your finger and replace it on a proper location of the touchpad.
■ Point and Click
When you have moved and placed the cursor over an icon, a menu item or a command that you want to execute, simply tap slightly on the touchpad or press the left button to select. This procedure, called as point and click is the basics of operating your Notebook. Unlike the traditional pointing device such as the mouse, the whole touchpad can act as a left button, so that your each tap on the touchpad is equivalent to pressing the left button. Tapping twice more rapidly on the touchpad is to execute a double-click.
■ Drag and Drop
You can move files or objects in your Notebook by using drag-and-drop. To do so, place the cursor on the desired item and slightly tap twice on the touchpad, and then keep your fingertip in contact with the touchpad on the second tap. Now, you can drag the selected item to the desired location by moving your finger on the touchpad, and then lift your finger from the touchpad to drop the item into place. Alternately, you can press and hold the left button when you select an item, and then move your finger to the
desired location; finally, release the left button to finish the drag-and-drop operation.
Using the Touchpad
■ Configuring the Touchpad
You can customize the pointing device to meet your personal needs. For example, if you are a left-hand user, you may want to swap the functions of the two buttons. In addition, you can change the size, shape, moving speed and other advanced features of the cursor on the screen.
To configure the touchpad, you can use the standard Microsoft or IBM PS/2 driver in your Windows operating system. The Mouse Properties in Control Panel allows you to change the configuration.
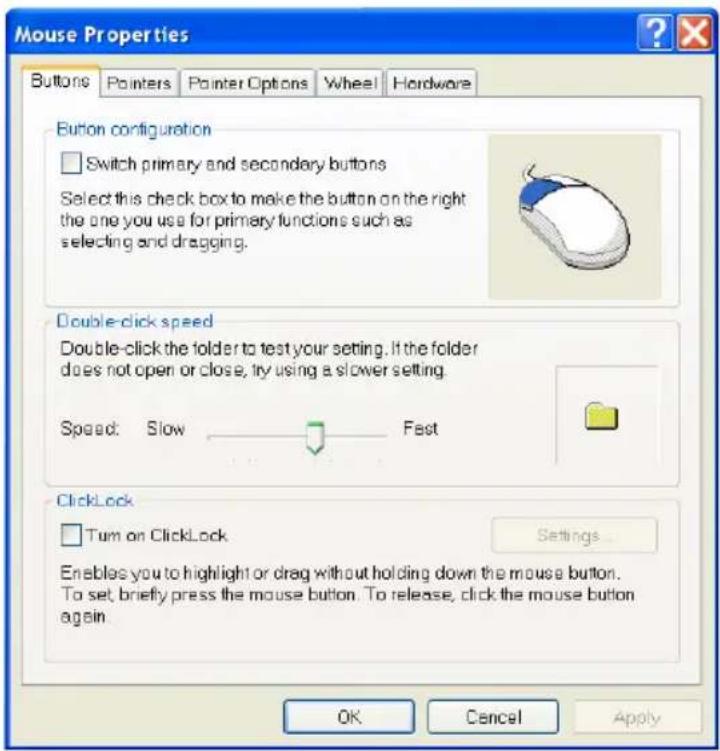
Mouse Properties Window
About Hard Disk Drive
Your Notebook is equipped with a 2.5-inch IDE (Integrated Drive Electronics) hard disk drive. The hard disk drive is a storage device with much higher speed and larger capacity than other storage devices, such as the floppy disk drive and optical storage devices. Therefore, it is usually used to install the operating system and software applications.
info
- To avoid unexpected data loss in your system, please backup your critical files regularly.
- Do not turn off the Notebook when the Hard Disk In-use LED is on.
- Do not remove or install the hard disk drive when the Notebook is turned on. The replacement of hard disk drive should be done by an authorized retailer or service representative.
Using the Optical Storage
Your Notebook is equipped with an optical storage device, which is known as the CD/DVD-ROM, CD-RW, DVD Combo and DVD Dual drive. The actual device installed in your Notebook depends on the model you purchased.
■ CD-ROM Drive: Allows you to read CD disks, including audio CDs and CD-R/RW disks.
■ DVD-ROM Drive: Allows you to read DVD disks and CD disks, including movie DVDs, audio CDs and CD-R/RW disks.
■ CD-RW Drive: Allows you to create the CD-R/RW disks containing your own contents.
■ DVD Combo Drive: A cost-effective solution that can work both as a DVD-ROM drive and a CD-RW drive.
■ DVD Dual Drive: A dual format recorder, allows you to record both the -R/RW and +R/RW formats.
■ DVD Dual Layer: It provides two individual recordable layers on a single sided DVD disc. To take advantage of dual layer technology when recording DVDs, you must use a dual layer enabled DVD burner and dual layer DVD media.
info
- The optical storage devices are classified as a Class 1 Laser products. Use of controls or adjustments or performance of procedures other than those specified here in may result in hazardous radiation exposure.
- Do not touch the lens inside the drive.
Inserting the CD
The following instruction describes the general procedure when operating the optical storage device, including the DVD-ROM drive.
- Confirm that the Notebook is turned on.
- Press the Eject Button on the drive's panel and the CD tray will slide out partially. Then, gently pull the tray out until fully extended.
- Place your CD in the tray with its label facing up. Slightly press the center of the CD to secure it into place.
- Push the tray back into the drive.
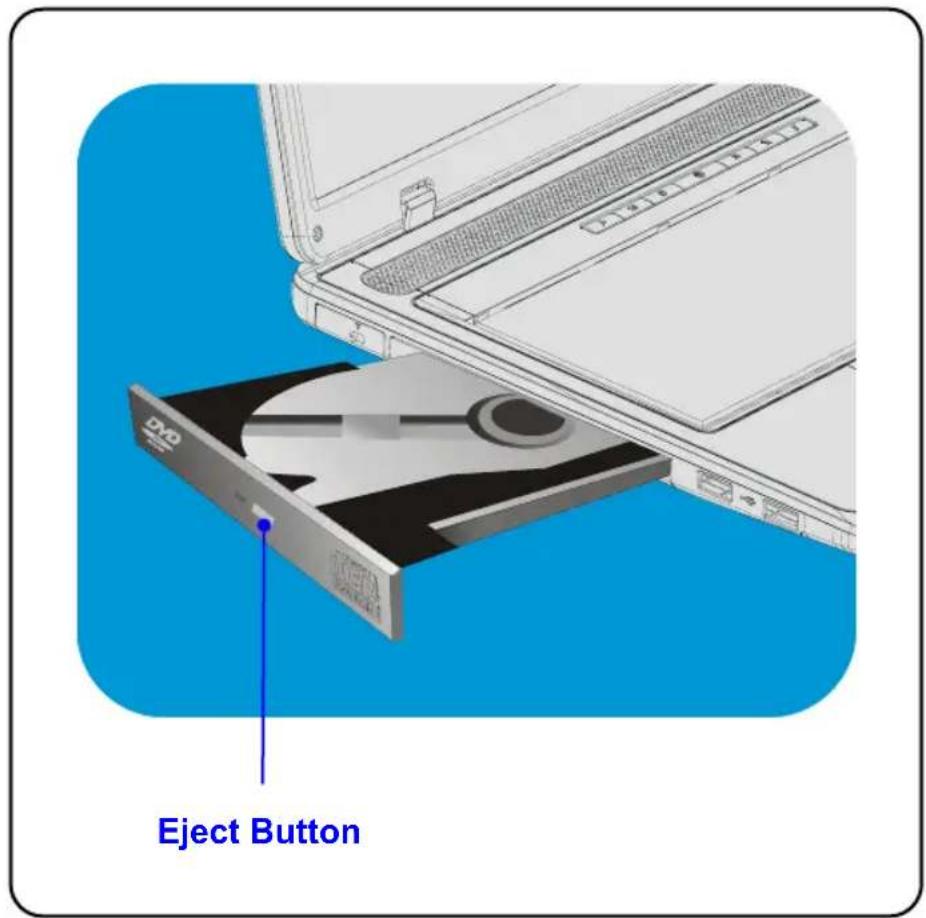
Notebook
Getting Started
Removing the CD
- Press the Eject Button on the drive's panel and the CD tray will slide out partially. Then, gently pull the tray out until fully extended.
- Hold the CD by its edge with your fingers and lift it up from the tray.
- Push the tray back into the drive.
info
- Confirm that the CD is placed correctly and securely in the tray before closing the tray.
- Do not leave the CD tray open.
Preface
Chapter 1
General Introductions
Chapter 2
Getting Started
Chapter 3
Customizing this Notebook
Chapter 4
BIOS setup
Chapter 5
Troubleshooting, First Aid and FAQ
Chapter 6
Watching TV and Videotext on your Notebook
Chapter 7
Restoring the System by Using the System Recovery Software
Chapter 8
Mandatory Activation
Chapter 9
Safety EMC and Safety Regulations
Connecting the External Devices
The I/O (input/output) ports on the Notebook allow you to connect peripheral devices.
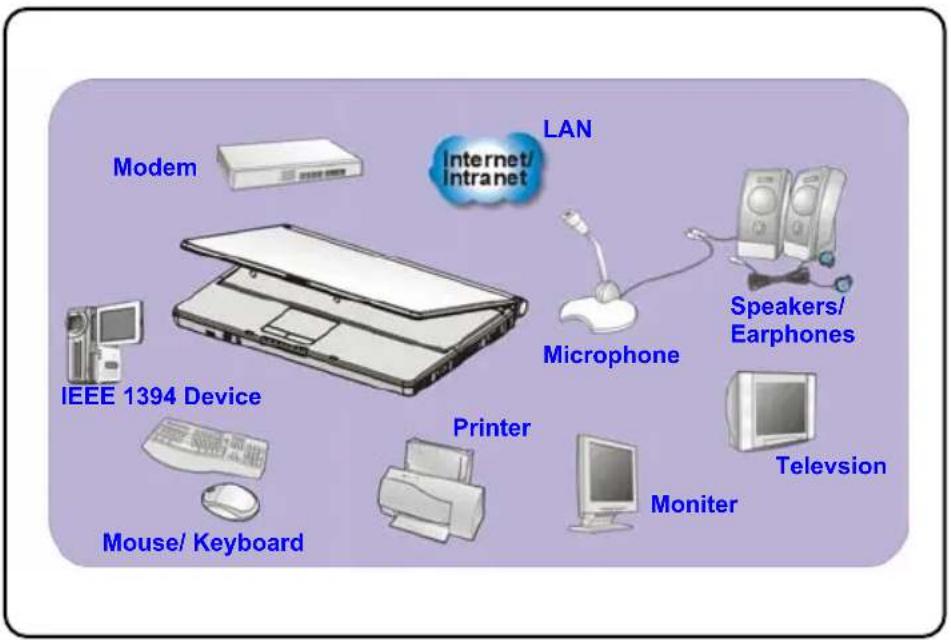
Connecting the Peripheral Devices
Connecting the Mouse
You can connect a mouse to your Notebook through the USB port. To connect the mouse:
- Turn on the Notebook and install the mouse driver.
- Connect your mouse to the Notebook.
- The Notebook may auto detect your mouse driver and enable the mouse function. If there is no detection of you mouse you can manually enable the mouse by going to Start Menu → Control Panel → Add Hardware to add the new device.
Connecting the Keyboard
You can connect a keyboard to your Notebook through the USB port. To connect the keyboard:
- Turn on the Notebook and install the keyboard driver.
- Connect your keyboard to the Notebook.
- The Notebook may auto detect your keyboard driver and enable the keyboard function. If there is no detection of you keyboard you can manually enable the keyboard by going to Start Menu → Control Panel → Add Hardware to add the new device.
Connecting the Printer
If your printer has a USB interface, you can then use the USB port on the Notebook to connect the printer. The following instruction describes the general procedure to connect a printer:
- Turn off the Notebook.
- Connect one end of the printer cable to the Notebook's USB port and the other end to the printer.
- Connect the power cord and turn on the printer.
- Turn on the Notebook and the system will detect a new device. Install the required driver.
For further instructions, please refer to your printer's manual.
Connecting the External Monitor
You can connect an external monitor to your Notebook through the VGA port for a larger view with higher resolution. To connect the monitor:
- Make sure that the Notebook is turned off.
- Plug the monitor's D-type connector into the Notebook's VGA port.
- Connect the monitor's power cord and turn on the monitor.
- Turn on the Notebook and the monitor should respond by default. If not, you can switch the display mode by pressing [Fn]+[F2]. Alternately, you can change the display mode by configuring the settings in Display Properties of Windows operating system.
Connecting the IEEE 1394 devices
The IEEE 1394 port of your Notebook is a next-generation serial bus that features a high-speed transfer rate and the connection of up to 63 devices, allowing you to connect many high-end peripheral devices and consumer electronic appliances, such as the DV (digital video camera). The IEEE 1394 standard interface supports “plug-and-play” technology, so that you can connect and remove the IEEE 1394 devices without turning off the Notebook.
To connect the IEEE 1394 device, simply connect the cable of the device to the IEEE 1394 port of your Notebook.
Connecting the Communication Devices
Using the LAN
The RJ-45 connector of the Notebook allows you to connect the LAN (local area network) devices, such as a hub, switch and gateway, to build a network connection. This built-in 10/100 Base-T LAN module supports data transfer rate up to 100Mbps.
For more instructions or detailed steps on connecting to the LAN, please ask your MIS staff or network manager for help.
Using the Modem
The built-in 56Kbps fax/data modem allows you to use a telephone line to communicate with others or to dial-up to connect the Internet.
For more instructions or detailed steps on dialing-up through the modem, please consult your MIS staff or Internet service provider (ISP) for help.
info
-
To reduce the risk of fire, use only No. 26 AWG or larger telecommunication lone cord.
-
You are strongly recommended to install the modem driver included in the software CD of your Notebook to take full advantage of the modem feature.
PC Card Installation
The PC card slot of your Notebook allows you to install comprehensive Type-II PC cards that support various functions for your necessary, including the LAN/WLAN card, modem card and memory card.
The following instruction provides you with a basic installation for the PC card, including how to install and remove it. For more information, please refer to the manual of your PC card.
Installing the PC card
- Locate the PC card slot on your notebook Notebook. If there is the dummy card in the slot, remove it first.
- Insert the PC card into the slot (usually with its label facing up) and push it until it is firmly seated.
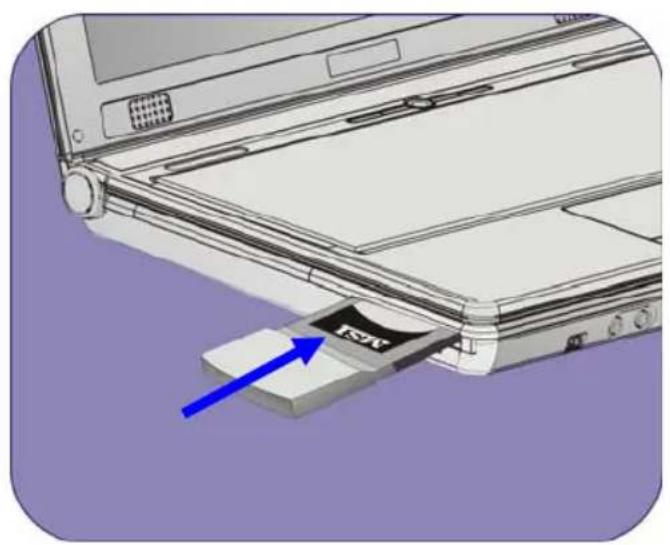
natural_image
Illustration of a laptop with an I2X chip inserted, showing the device's internal structure and blue arrow indicating insertion (no text or symbols present)Removing the PC card
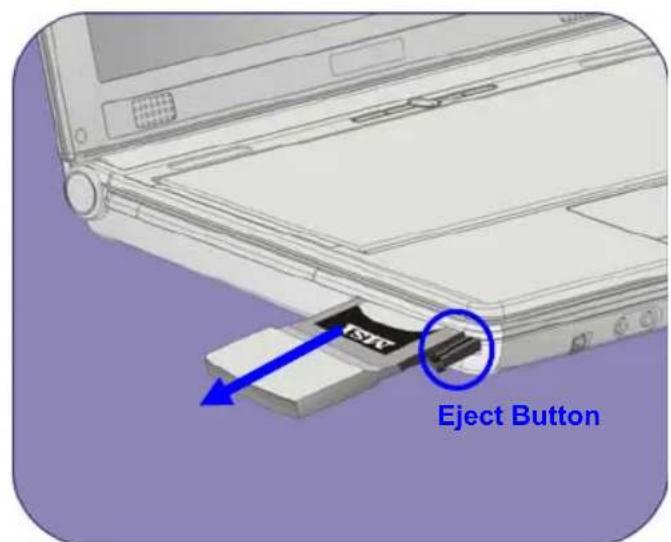
- Press the Eject Button to make it stretch out.
- Push the Eject Button and the PC card will slide out. Pull it out of the slot.
info
- Do not hold the "golden finger" when installing the PC card; otherwise, it may cause interference or damage to the PC card.
- Before removing the PC card, you should stop the device in Windows operating system.
Safely Remove Hardware
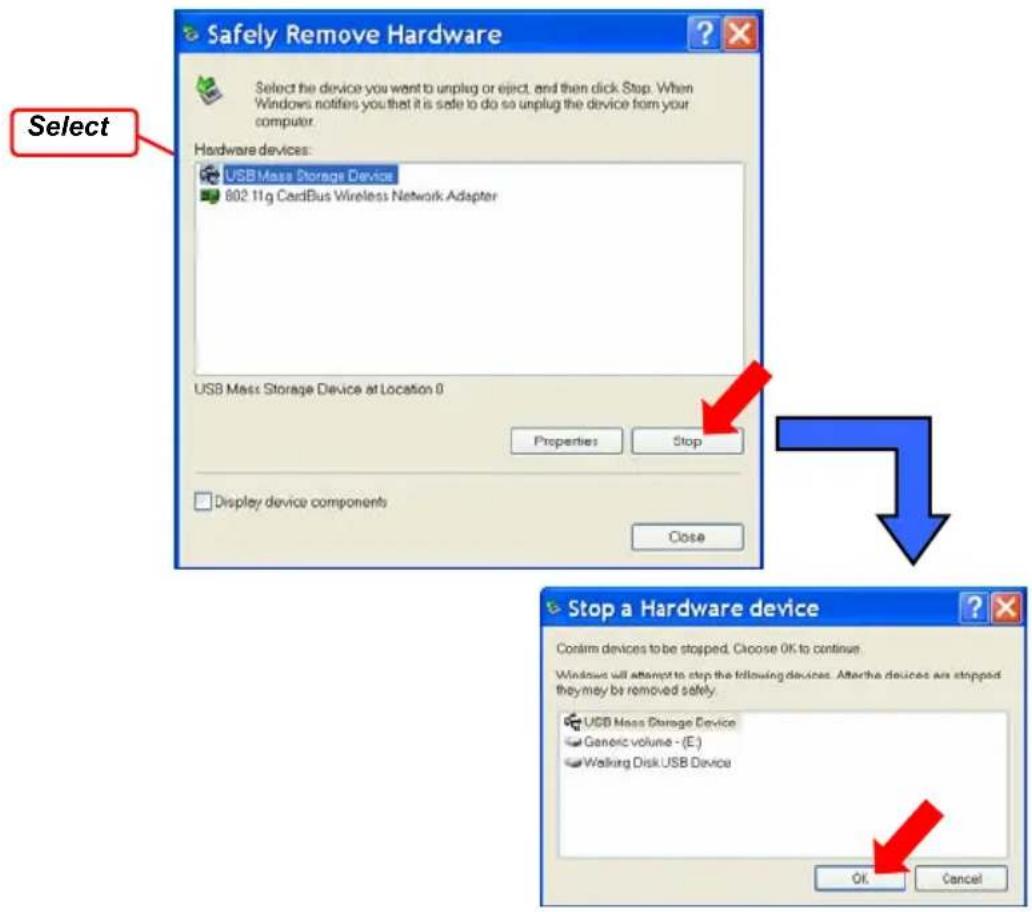
If you connect any peripheral device to your system, the Safely Remove Hardware icon (💡) will appear on the taskbar. Double-click the icon to bring up the Safely Remove Hardware dialog box. You can see all connected peripheral devices here. If you want to remove any of the devices, move the cursor to the device and click Stop.
Notebook
Customizing this Notebook
Preface
Chapter 1
General Introductions
Chapter 2
Getting Started
Chapter 3
Customizing this Notebook
Chapter 4
BIOS setup
Chapter 5
Troubleshooting, First Aid and FAQ
Chapter 6
Watching TV and Videotext on your Notebook
Chapter 7
Restoring the System by Using the System Recovery Software
Chapter 8
Mandatory Activation
Chapter 9
Safety EMC and Safety Regulations
About BIOS Setup
When to Use BIOS Setup?
You may need to run the BIOS Setup when:
An error message appears on the screen during the system booting up and requests you to run SETUP.
- You want to change the default settings for customized features.
- You want to reload the default BIOS settings.
How to Run BIOS Setup?
To run the BIOS Setup Utility, turn on the Notebook and press the [Del] key during the POST procedure.
If the message disappears before you respond and you still wish to enter Setup, restart the system by turning it OFF and ON, or simultaneously pressing [Ctrl]+[Alt]+[Delete] keys to restart.
info
The screen snaps and setting options in this chapter are for your references only. The actual setting screens and options on your Notebook may be different because of BIOS update.
Control Keys
You can use only the keyboard to control the cursor in the BIOS Setup Utility.
 | Press left arrow to select one menu title. |
 | Press right arrow to select one menu title. |
 | Press up arrow to select one item under the menu title. |
 | Press down arrow to select one item under the menu title. |
 | Increase the setting value or make changes. |
 | Decrease the setting value or make changes. |
 | 1) Open the selected item to change setting options.2) Bring up a sub-menu when available. |
 | In some items, press this key to change setting field. |
 | Bring up help screen providing the information of control keys. |
 | 1) Exit the BIOS Setup Utility.2) Return to the previous screen in a sub-menu. |
BIOS Setup Menu
Once you enter the BIOS Setup Utility, the Main menu will appear on the screen.
The Main menu displays the system information, including the basic configuration.
![BIOS SETUP UTILITY Main Advanced Security Boot Exit Market Name MEGA BOOK L735 Model Name MS-1717X System Date [Tue 06/02/2099] System Time [15:18:30] ► Serial-ATA [Hard Disk] ► Primary IDE [Not Detected] ► System Information Use [ENTER] to select a field. Use (+) or (-) to configure system Date. → Select Screen ↑↓ Select Item ← Change Field Tab Select Field F1 General Help F10 Save and Exit ESC Exit v02-59 (C) Copyright 1985-2005, American Megatrends, Inc.](/content/2026/05/770372/images/4423b013f2cbd2b9360583411741b4ab3e273f0a3cb76cc0e51a5c89d1ee78f9.jpg)
Main menu
Show System Overview information about BIOS version, CPU features, Memory size and setting of System Time and Date.
Advanced menu
Configure IDE and USB settings.
Security menu
Install or clear Supervisor's and User's Password settings.
Boot menu
Set up Boot Type and Boot Sequence.
Exit menu
Choose decided status before leaving the BIOS menu.
Main menu
![BIOS SETUP UTILITY Main Advanced Security Boot Exit Market Name MEGA BOOK L735 Model Name MS-1717X System Date [Tue 06/02/2099] System Time [15:18:30] ► Serial-ATA [Hard Disk] ► Primary IDE [Not Detected] ► System Information Use ENTER to select a field. Use [•] or [-] to configure system Date. ← Select Screen ↑↓ Select Item ← Change Field Tab Select Field F1 General Help F10 Save and Exit ESC Exit v02-59 (C) Copyright 1985-2005, American Megatrends, Inc.](/content/2026/05/770372/images/9d326f2d6be0151cd597cf7d7a461c3ab1efee8431eb30ae5a30c66309a83f43.jpg)
System Overview
System Overview will show you BIOS version and other information about its build date and update notes. Following is CPU's information about its Type and Speed.
System Time
This item allows you to set the system time. The system clock will go on no matter you shut down the PC or get into sleep mode. The set format is [hour:minute:second].
System Date
This item allows you to set the system date. The date format is [day:month:date:year].
Day Day of the week, from Sun to Sat, which is determined by BIOS (read-only).
Month The month from 01 (January) to 12 (December).
Date The date from 01 to 31.
Year The year can be adjusted by users.
Primary IDE
The item displays the types of the primary IDE devices installed in the Notebook. Press [Enter] to bring up a window showing the detailed information of the device, including the device name, vendor, LBA mode, PIO mode and more.
System Information
This item indicates the information of firmware, processor, and system memory.
Advanced menu
![BIOS SETUP UTILITY Main Advanced Security Boot Exit PowerNow [Enabled] PCI Latency Timer [64] Legacy USB Support [Enabled] Enable/disable the generation of ACPI _PPC, _PSS, and _PCT objects. ← Select Screen ↑1 Select Item ← Change Option F1 General Help F10 Save and Exit ESC Exit v02-59 (C) Copyright 1985-2005, American Megatrends, Inc.](/content/2026/05/770372/images/d909fe5616bb3ae42766194c6c820db4ba01b68b28bd76dc9c4c56a0ba8381bd.jpg)
Advanced Settings
PowerNow
This item allows you to enable or disable PowerNow technology. When set to Enabled, the system always operates in a conserve power mode. If you want optimize the processor, set this item to Disabled, so that the processor's speed will vary depending on the use of your operating system and applications. Default setting is set to Enabled.
PCI Latency Timer
Value in units of PCI clocks for PCI device latency timer register.
Legacy USB Support
If you want to use USB device, such as mouse, keyboard, portable disk, in DOS system or boot your system by USB device, you should enable this function by selecting Enabled.
Boot menu

Boot Settings Configuration
Configure settings during system boot.
Boot Device Priority --1st, 2nd, and 3rd Boot Device
The three items allow you to set the sequence of boot devices where BIOS attempts to load the disk operating system.
Security menu
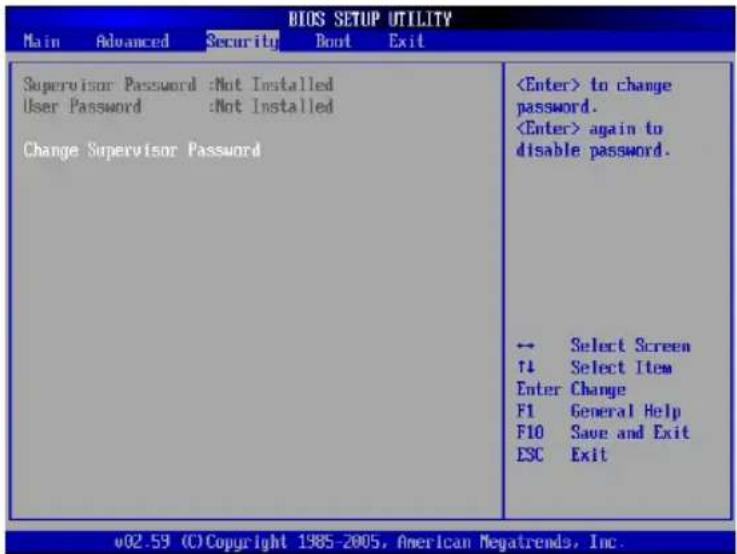
Security Settings
Change Supervisor/User Password
When you select the function, a message box will appear on the screen as below:
Enter New Password
Type the password you want, up to six characters in length and press [Enter]. The password typed now will replace any previously set password from CMOS memory. You may also press [ESC] to abort the selection and not enter a password.
When the Supervisor Password is set, the new item User Access Level and Password Check will be added in the menu. You can make further settings of access right in the User Access Level item. Setting options: No Access, View Only, Limited and Full Access. The Password Check item is used to specify the type of BIOS password protection that is implemented. Settings are described below:
| Setup The password prompt appears only when end users try to run Setup. | |
| Always A | password prompt appears every time when the Notebook is powered on or when end users try to run Setup. |
To clear a set password, just press [Enter] when you are prompted to enter the password. A message box will show up confirming the password will be disabled. Once the password is disabled, the system will boot and you can enter Setup without entering any password.
info
About Supervisor Password and User Password Supervisor Password allows the user to enter and change the settings of the setup menu; User Password only allows the user to enter the setup menu, but do not have the right to make changes.
Exit menu
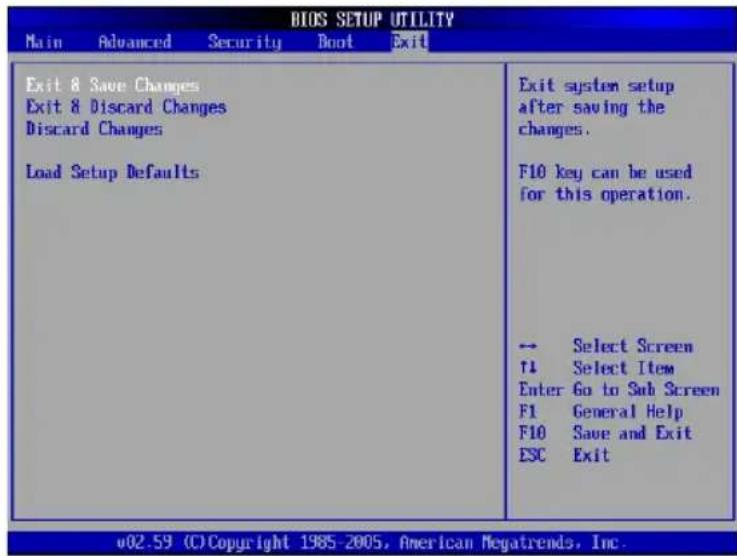
Exit & Save Changes
Save the changes you have made and exit the utility.
Exit & Discard Changes
Exit the utility without saving the changes you have made.
Discard Changes
Abandon your changes and reload the previous configuration before running the utility.
Load Setup Defaults
Select this item to load the default settings for optimal system performance.
Notebook
BIOS Setup
| Chapter 1 | General Introductions |
| Chapter 2 | Getting Started |
| Chapter 3 | Customizing this Notebook |
| Chapter 4 | BIOS setup |
| Chapter 5 | Troubleshooting, First Aid and FAQ |
| Chapter 6 | Watching TV and Videotext on your Notebook |
| Chapter 7 | Restoring the System by Using the System Recovery Software |
| Chapter 8 | Mandatory Activation |
| Chapter 9 | Safety EMC and Safety Regulations |
Troubleshooting, First Aid and FAQ
This notebook computer is a carefully tested, high-quality computer system offering the latest technology. However, problems and malfunction can never be totally avoided. In order to help you restore a fully-functional system we have collected together some detailed information about identifying and resolving the most common problems. If you have any problem, proceed as follows:
- Read the "Troubleshooting" section.
- Try to find the solution to your problem in the Chapter "FAQ".
NOTE
You'll find the latest FAQ on your desktop under Manufacturer Information and also on the Internet.
Go to http://www.service.targa.co.uk/ to search for the latest FAQ and drivers.
- Read the corresponding chapter in this manual.
- Make use of the Windows System Recovery.
- If the notebook does not boot or there are errors during the booting up process, use the Recovery Software found on the EasyInstall CD. This software will help you restore the Windows boot and system files, and also reset your notebook to the factory default configuration if necessary.
- Call our hotline.
- If none of the above has helped you solve the problem, you can use our Pickup Service.
Troubleshooting
If your notebook hangs while running or booting this can be due to a recently installed software. This can be solved as follows:
- Power your notebook on. First of all you'll see the usual BIOS messages. As soon as they have finished, press the [F8] key. This will display the Windows XP boot menu. Select the Safe Mode command. Windows will now boot in a special "emergency mode".
- Click Start/All Programs/Accessories/System Tools/System Restore to restore it to an earlier time when it worked. If this does not succeed, please also try all the other restore options.
- Uninstall the recently installed software via the Add or Remove Programs option from the Control Panel (this also works in Safe Mode).
- Start your notebook with the Windows XP Home Edition CD inserted into the drive and hold any letter key (e.g. . [H]) until the Windows Setup is launched. Wait until all files have been loaded. In the Windows Welcome screen, press [Enter], confirm the End User License Agreement by pressing [F8] and press [R] to repair an installation. (You only need to reinstall the drivers from the supplied EasyInstall CD once Windows has been repaired.)
- Contact the manufacturer of the third-party software.
If you do not hear any sound, there are several possible reasons for hardware or software malfunction. In order to locate them better, proceed as follows:
- Make sure that the sound card driver has been installed and that you have selected the sound card as default audio device. To do so, open the Control Panel and double-click on Sounds and Audio Devices, click the Audio tab and check that Realtek Audio is selected as the default recording and playback device.
- For the standard playback device, click the Volume button and make sure that there is no check mark on any Mute option. Drag all the volume rulers to a medium volume level.
- Re-install the sound driver form the EasyInstall CD.
- Contact our Hotline.
If you cannot connect to the Internet via a modem, there are several possible reasons. Follow these steps to locate the problem:
- Uninstall the modem by opening the Device Manager found in Control Panel/System/Hardware. Click the plus sign next to Modems and right-click on the modem to choose the Uninstall command. The modem will be removed from the list. Now you can reinstall it automatically from the Device Manager by clicking on the Action/Scan for hardware changes.
- You can also perform a diagnostics from the Device Manager. Double-click on the modem, open the Diagnostics tab and click the Query Modem button. The list that pops up should contain a first entry Succeeded for a modem that
Notebook
Troubleshooting, First Aid and FAQ
is working properly.
- Try a different modem cable.
- Make sure that the modem cable has been properly inserted into the modem port.
- Try a different telephone wall socket (easy when using a notebook).
- Try connecting to a different ISP to get Internet access.
- Establish a test connection to a normal telephone number (e.g. your mobile
phone)
by
clicking
Start/All
Programs/Accessories/Communications/HyperTerminal.
FAQ – Frequently Asked Questions
Where Can I Find Spare Parts and Accessories?
Targa offers a wide range of spare parts and accessories for your PC.
+49 2921 / 99-3030 only English
Information About Drivers, FAQs and Manual
In order to have all components of your Targa computer optimally tuned, you should regularly install the latest drivers. You can download them free from the Targa Service site on the Internet. There you'll also find additional FAQs plus this manual as a PDF document for opening in Adobe Reader. Adobe Reader offers a comfortable search function that you can access via Edit/Search, so that you can easily find the desired information and help texts. You'll find the Targa Service portal on the Internet at: http://www.service.targa.co.uk
Java applets do not execute.
Solution: Download the current version of Java Virtual Machine from java.sun.com.
Why does My Computer Show a Smaller Hard Disk Size than the Advertised Size, e.g. 111GB Instead of the Advertised 120GB?
Solution: The reason is the different units used for calculating this value. All manufacturer documents use units referring to base 10 digits. Therefore, 120 GB correspond to 120 billion bytes (this is a 120 followed by 9 zeros). However, the computer calculates using units based on 1024. 1 GB is equal to 1024 * 1024 * 1024 bytes = 1 073 741 824 bytes. Thus, for the computer 1 GB is a little more than 1 billion bytes. The conversion of the (decimal) 120 GB is: (120 billion) divided by (1073741824) = approx. 111 GB in units of 1024 for the computer.
How can I determine the exact capacity of the hard disk?
Solution: Open the Control Panel, followed by the Administrative Tools folder. All system programs of this folder are displayed. Open Computer Management. Computer Management is a general program that includes an area with the name Storage. Click on the + symbol in front of this area and select the suboption Disk Management. On the right of the window, all the existing data media are displayed. Disk 0 represents the system hard disk. The list also displays the total size and the partitions on each medium, along with the size of each partition.
Please note: currently there is more than one partition because of the Recovery and Driver partitions. These partitions total the following size of the hard disk.
How Can I Enable/Disable the Autorun of CD-ROMs in Windows XP?
Solution: Click Start/Run and enter "regedit". Search for the key HKEY_LOCAL_MACHINE\System\CurrentControlSet \Services\Cdrom and then the entry Autorun. Double-click on the entry to edit the value: 1 = enabled 0 = disabled. After changing this value you must restart your computer.
The e-mail hotkey always launches Microsoft Outlook, but I want to use a different mail program. Is this possible?
Solution: Yes. In Control Panel, select the Internet options and then select the Programs tab. Under E-Mail, select the program you want to launch by pressing the hotkey.
The Internet browser hotkey always launches Microsoft Internet Explorer, but I want to use a different browser. Is this possible?
Solution: Yes. Click on Start/All Programs/Program Access and Defaults.
Select User-defined. Next, click the down arrow. Here you can select a different browser to become your default browser. As an alternative, during the installation of the browser there should be an option to select whether to use it as your default browser.
Are you receiving undesired messages (spam) via Windows Messaging Service?
This is a new form of “Internet spam”. The Windows Messaging Service normally used for sending messages in a local network is misused to spread undesired or sometimes dangerous publicity mail to Internet users. In order to block these messages under Windows XP proceed as follows:
Click the Start button in the lower-left corner.
Next click Control Panel, then on Performance and Maintenance.
In Control Panel, click on Administrative Tools.
Double-click on Services.
In the list of services, select Messaging Service.
Double-click on it.
Under Startup Type select Stop.
Under Service Status, click Stop.
Next click Apply and then OK.
The service has been stopped, you will not receive any further messages.
How do I clean my notebook TFT display?
Solution: To clean a TFT display you can use normal brand glass detergent. However, be careful that you don't apply too much detergent and that the liquid enters the display. Use a dry cotton cloth to dry the unit and avoid scratching the surface. It's best to use cleaning sets made especially for notebooks and TFT displays.
Pixel errors on LCDs (notebook computers + monitors)
Active Matrix LCDs (TFT) with a resolution of 1440 x 900 pixels (XGA) rendered by three sub-pixels each (red, green, blue), a total of almost 3,9 million control transistors are used. Due to this high amount of transistors and the corresponding complex manufacturing process, in some cases faulty or the wrong driving of pixels and/or sub-pixels can occur. In the past there have been different attempts to define the number of permitted pixel errors. Normally, these were very complicated and completely different from manufacturer to manufacturer. Therefore, for manufacturing and guarantee repairs, Targa follows the strict and transparent definition of the ISO 13406-2, Class II standard that will be summarized in the following. Among others, ISO Standard 13406-2 defines universal specifications regarding pixel errors. The pixel errors are categorized into four error classes and three error types. And each pixel is composed of three sub-pixels with one primary color (red, green, blue) each.
Notebook
Troubleshooting, First Aid and FAQ
Types of pixel errors
Type 1: pixel always lights (bright, white dot)
Type 2: pixel never lights (dark, black dot)
Type 3: abnormal or defective sub-pixel of the colors red, green or blue (lighting continuously, not lighting or blinking)
Classes of pixel errors
| I 0 | 0 | 0 | |
| II | 3 | 3 | |
| III 5 | 15 | 50 | |
| IV 50 | 150 | 500 |
7
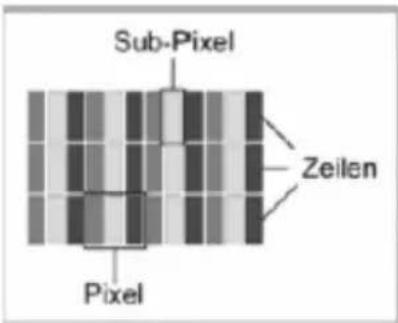
The number of errors for the above mentioned types in each error class refers to one million pixels and must be converted according to the physical display resolution. For example, for Active Matrix LCDs (TFT) with a resolution of 1440 x 900 pixels (WXGA) rendered by three sub-pixels each (red, green, blue), a total of almost 3,9 million control transistors are used. for example, consider a 17-inch WXGA+ display with 1440 horizontal and 900 vertical dots (pixels). This is
Notebook
Troubleshooting, First Aid and FAQ
1,296,000 pixels in total. Referring this figure to 1 million pixels, a factor of approx. 1.29 is obtained. Therefore, error class II permits two errors of type 1 or type 2 and five errors of type 3.
Error class 1 only applies for special applications (e.g. medical) and implies higher costs. Error class II has become a standard for quality-orientated manufacturers with very good displays.
BIOS updates for your notebook
Only use official BIOS versions from our service site on the Internet. Never install any third-party or modified BIOS versions as this can void the warranty. Start downloading the proper BIOS Update from our service site http://www.service.targa.co.uk. You can find the proper update by entering the serial number or searching by model. Only use the BIOS that has been approved for your device. Open the Downloads tab and download the ZIP file containing the latest BIOS version. Extract the ZIP file and follow the instructions of the supplied readme.txt file.
Preface
Chapter 1
General Introductions
Chapter 2
Getting Started
Chapter 3
Customizing this Notebook
Chapter 4
BIOS setup
Chapter 5
Troubleshooting, First Aid and FAQ
Chapter 6
Watching TV and Videotext on your Notebook
Chapter 7
Restoring the System by Using the System Recovery Software
Chapter 8
Mandatory Activation
Chapter 9
Safety EMC and Safety Regulations
Watching TV and Videotext on your Notebook
The Windows Media Center also features a complete TV receiver with which you can watch live TV programmes with total convenience. Operation is truly simple as the Media Center is very similar to a traditional TV. Most functions can be used intuitively so that you can master the operation with a few simple steps. Before you can use the TV programme on the computer, you must have the Setup Wizard for the TV receiver configured. You can find the step-by-step instructions for this at the beginning of this chapter. Alternatively, you can select the Einstellungen/TV option in the main menu of the Media Center. Here you will find the option TV-Signal einrichten and TV-Programm. With these you can configure the receiver signal (cable, DVB.T) and initiate a channel scan. The manual setup is no different from the Wizard but only takes you through these single steps.
A Firstly invoke the Media Center from the Windows Start menu. You will automatically be taken to the Start page of the program. Here select the option Eigene TV-Kanäle by clicking with the mouse. Here you can see the interface for the TV receiver. Several functions are available. The button Live-TV switches you directly to the current TV programme. This will automatically display the last-selected channel. The option TV-Aufzeichnungen enables the recording and playback of channels. Clicking TV-Programm will take you to an electronic TV newspaper and the option enables the channel to search for programmes of interest.
C To watch the current TV programme simply select Live-TV. The Media Center will enable the TV receiver and display the channel that was last watched. In the bottom left of the control panel you can control the TV programmes. By using the + and - keys in the channel function (ch + / -) you can scroll through all programmes. If you find an interesting channel, you need do nothing more. After a few seconds the control panel will automatically hide, so that you have a clear view of the programme. Using the keys in the upper right in the title list, you can additionally alternate between the full-screen mode and the window mode. The Media Center also has a Timeshift function. This saves the currently-showing TV programme for a certain amount of time, invisibly in the background. This means you can watch the time-displaced programme using the forwards and backwards keys on the control panel. For example, you can rewind to an interesting report to view it again or see the beginning of a film that you missed.
D If you would like information on the currently-viewed TV programme, select the option TVProgramm in the main menu of the TV interface. You will be taken to an electronic TV newspaper where you can view all channels in an easy-to-view list. You can navigate the channel list using the arrow keys to the lower right. With the arrow keys above-right, you can switch between the daytimes. If you would like to watch one of the displayed channels, simply double-click on the name. You will then automatically be taken to the function Live-TV and see the chosen
channel.
E The more channels you receive, the more difficult it is to search for channels of interest. This is especially so if you have more than a hundred channels via satellite: they can easily be lost track of. This is where the function Suchen can help. By using this you have a clear and convenient search mask. You can search for channels according to categories, titles or keywords. You will always be shown on which channel the programme is and when.
Using Teletext (Videotext) on a Computer (Only for Analog TV)
With the Windows Media Center you can naturally not only watch the current TV programmes, but also see Teletext/Videotext or their respective channels. The same information is available to you as you would find on a traditional TV. You can access this additional information with a few clicks of the mouse.
A Firstly, use the function Live-TV to go the current TV programme. As usual, select the desired channel using the plus and minus keys. Now right-click once on a free space in the Media Center window – eg., on the picture now showing. This opens up a menu in the right-hand corner. Select the Teletext command.
C Navigating the Teletext contents is very easy and does not differ from use to any traditional TV. You can navigate Teletext using the four colored keys (red, green, yellow, blue). With the three buttons next to them you can invoke further functions such as showing the Teletext with a black background or superpose it on the currently-showing programme. With the numeric keypad on the keyboard you can directly enter the desired Teletext page. It is not necessary to confirm your entry: you need only type the three digits. If you would like to close the Teletext, click Schließen once with the mouse. You will then be taken automatically back to the current TV programme.
Receiving Radio Channels with the Media Center
The Windows Media Center also has a full-function FM radio receiver. With this you can receive traditional radio channels and listen directly to the computer. In this case, it offers you the comfort of a normal radio receiver. Prior to being able to receive radio broadcasts with your computer, you must guarantee a good signal reception. The easiest way to do this is by using a cable box. A cable box features a coaxial radio output connector next to the TV connector. You can connect it directly to the radio connector on the PCMCIA TV/radio card. If you don't have a cable box or if you don't wish to install an extra cable to your computer, you can also use an indoor (wire) antenna. Simply connect this with the radio connector to the PCMCIA TV/radio card and you can start listening to the radio broadcasts.
A Firstly, start up the Media Center as usual using the Windows Start menu. You will be taken to the main or start screen. Here click on the media list the option Radio. You will now be taken directly to the radio section.
B Upon first use of the radio no channels have been saved as yet and no playback of the programmes is possible. In order to now search for programmes, simply use the plus and minus keys (+ / -) in the Suche function. Just as with a traditional radio the channel scanning process will begin.
C As soon as a channel with good reception has been found, the scanning stops. By using the plus and minus keys in the function Abstimmung (+ / -) you can carry out a fine tuning of the frequency.
D
If you would like to hear a channel regularly, you can save it. There are nine memory preset available. As soon as the desired channel is configured, click the button Speichern next to the frequency display. The channel with automatically be set in the next free memory preset. If you would like to invoke a previously-saved channel, simply click on the corresponding memory preset.
E
The Media Center also has a Timeshift function for the radio receiver. The programme retains a certain part of the radio programme in its memory. It is therefore possible for you to go backwards and forwards through the programme, for example, to listen to an article again. For this use the forwards and backwards keys on the control panel in the lower left corner.
The Media Center as a Video Recorder
Once you have configured the Media Center and all the TV programmes are set up, you can watch current TV programmes comfortably and in high quality. The programme package can do more though. It also features a complete digital video recorder. This means you can record the TV programme you are viewing and save it as a file on your hard disk. The saved TV shows can be opened later anytime and watched as you wish. And you can of course edit the programmes with a suitable video editing program and burn them onto a DVD that can be played back on any traditional DVD player.
A
Before you can begin to record programmes you need to take a look at the configuration settings. Videos are by nature very data-intensive, and a few hours of film can easily flood out your hard disk! For this reason, the recording is done in a reduced data format which has a qualitative effect on the picture. To configure the video compression, first click as usual on Live-TV. Then right-click to open a menu and select the option Einstellungen. You will be taken to the general settings of the Media Center. Select TV/Rekorder and choose the function Standardeinstellungen für Aufnahmen.
B
You are now shown the settings for programme recording. Several options are available. Enter Qualität from the selection list and choose
the quality with which the film should be saved. Options available are: Ausreichend, Gut, Besser and Optimal These are quality levels that work with different compression rates. The higher the desired recording quality, the more data will be saved to your hard disk. For everyday recording the setting Gut is perfectly suitable. The setting Besser clearly compresses the picture less, but at the same time uses more hard disk space. The setting Optimal is best suited for when you want to record in high quality and later burn it to a DVD. The picture quality is especially good here, but it also uses a great deal of space.
C
With the option Aufzeichnung behalten you can specify for how long the Media Center should save a recording. By default the setting Bis ich lösche is configured here. But you can also specify that programmes should be deleted automatically after a certain amount of time – for example, if you have already seen them or if the recordings have not been used after a while. Additionally, you can find in this window a whole array of further settings with which you can control the performance of the Media Center. This means that, for example, in order not to miss the beginning of a programme you can tell the video recorder how many minutes before the broadcast the recording should begin. Likewise, you can make a few settings for regular programmes such as series or weekly documentaries. Once you have made all your settings, click Speichern. With the Zurück key you will return to the current TV programme.
D Back in the main window you can start recording your TV programme. First choose the desired programme. When you are ready, simply click on the recording button – that's the red cricle below on the control panel. Additionally, the Media Center displays an icon in the Windows task bar that reminds you of the current recording.
E Just as with a traditional video recorder you can now watch the currently-running programme whilst you are recording it. Always remember that video recording is extremely data-intensive and compression also requires a lot of processing time. For this reason, you should not do other computer-intensive work during a recording, such as photo editing. This may cause disturbances or fuzziness in the picture and/or sound. If you wish to stop the recording, simply click on the Stop button. So that you do not accidentally interrupt an important recording, you are asked again whether you really wish to stop the recording. Then the programme is saved onto the hard disk.
F If you would like to record a film whilst you are not at home, this is also no problem for the Media Center. To do this you can pre-program a recording, just as with a conventional video recorder. Simply go to the menu in the TV-Aufzeichnungen window. By clicking Sortieren a previously recorded programme can be listed and a desired recording played back. The Geplant button indicates the programmed TV programmes that the Media Center will record for you in the near future.
By clicking Aufzeichn. hinzufügen you can program a new TV programme to be automatically recorded.
G
Use the Aufzeichn. hinzufügen button to go to the window for new recordings. There are several ways to program the desired programme. The electronic TV newspaper is listed using the TV-Programm function. With this you can conveniently click on the programme of your choice and the video recorder soon receives all the necessary data. And you can also search with the Suchen button for categories, keywords or titles if you are not sure of the channel or name of the programme. For many programmes, however, adequate information is unfortunately not available on the electronic programme newspaper. In this case, you can manually select a programme using the Kanal und Zeit button and enter the start and end time for the recording.
After recording you will find all the saved programmes as video files on your hard disk. The Media Center saves all recordings in the Shared Documents\TV-Aufzeichnungen folder. Open this folder in Windows Explorer and you will see all the files. The Media Center principally saves in DVR-MS format. Simply double-click to open a file and your recording will be played back on the Media Center.
Notebook
Watching TV and Videotext on your Notebook
| Chapter 1 | General Introductions |
| Chapter 2 | Getting Started |
| Chapter 3 | Customizing this Notebook |
| Chapter 4 | BIOS setup |
| Chapter 5 | Troubleshooting, First Aid and FAQ |
| Chapter 6 | Watching TV and Videotext on your Notebook |
| Chapter 7 | Restoring the System by Using the System Recovery Software |
| Chapter 8 | Mandatory Activation |
| Chapter 9 | Safety EMC and Safety Regulations |
Restoring the System by Using the System Recovery Software
The EasyInstall CD/DVD supplied with your Targa PC contains a completely new Recovery software that lets you restore your PC gradually into a normal operating status. It offers four options:
- Restore Boot Files Only
- Restore System Files
- Restore All Files (Leaves User Files Unchanged)
- Complete Restore (All Files will be Deleted)
If your PC does not boot or only boots giving trouble, insert the EasyInstall DVD-ROM into your CD/DVD drive and restart your computer.
Notebook
Restoring the System by Using the System Recovery Software
- A message warning of a possible loss of data will appear. Click the button Run program.
SystemRecovery
powered by HTRONIC
Information for Recovery. Process
With this program you can set back the software installation of your system step-by-step into the delivery state. It is precondition that the Factory-Prepared-Recovery data is remaining on your hard disk.
Please consider that the data of the system partition (Drive C) can be deleted by the restore-process.
If you don't want this, please exit this program now. Save your user data on a suitable media e.g. CD-ROM. After this start the process once more to put your system back into the delivery state.
There are four different methods of system restore. These methods are explained in the following menu. You can phase the individual methods top down. After each step you

- In the next step you can choose between the four options mentioned above.
SystemRecovery
Chose Restore Mode
Restore Boot Files only The files needed by Windows for the start will be written newly:
Restore Systemfiles The system files of Windows will be written newly
- Restore all files (Leaves User files unchanged) The software installation will be reseted to the delivery state.
- Complete Restore (All files will be deleted) The software installation will be reseted to the delivery state.

- If you have trouble starting Windows, first try the option Restore Boot Files Only.
- If you have problems with Windows system files that cannot be solved after executing the Windows System Restore, try the second option Restore System Files.
- If the computer still does not start after applying these procedures, try the third option Restore All Files (Leaves User Files Unchanged). Any user files will be kept as long as they have been saved into the pre-defined user folders.
- Only if this option also fails should you select the last item Complete Restore (All Files will be Deleted). Please note that this procedure will completely erase any data from your PC. Use this option to restore the factory-default software configuration.
Notebook
Restoring the System by Using the System Recovery Software
Important!
Please remember that launching this process will restore the factory default configuration of your computer. This will erase any data from your hard disk (under Windows labeled drive C:). If you don't want this, exit the Recovery software and backup your personal data first (e.g. on a CD-ROM or on the second partition (Install) of your hard disk).
- Launch the recovery process by clicking the Start button.
SystemRecovery
Summary
Systemrestore could be started now
( Complete Restore ( All files will be deleted ) )
Back
Nex
Stall
Abort
Notebook
Restoring the System by Using the System Recovery Software
- Click the OK button to confirm the warning message in the next window.
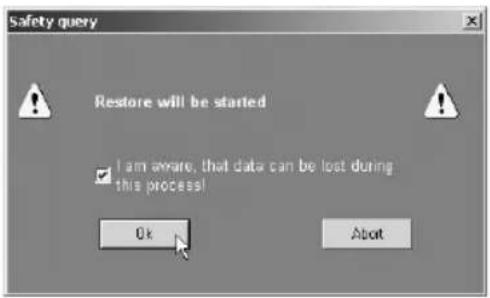
- The system recovery process starts. This process may take a while. You can monitor the completion status of the recovery in the progress bar.
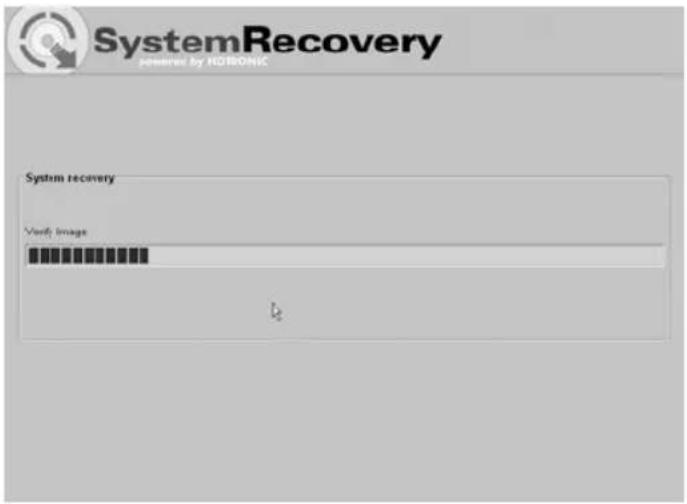
Important!
You must never turn off your computer while the recovery process is running. You must not interrupt the recovery process!
Notebook
Restoring the System by Using the System Recovery Software
- After the recovery has finished click Restart Computer to restart your computer.
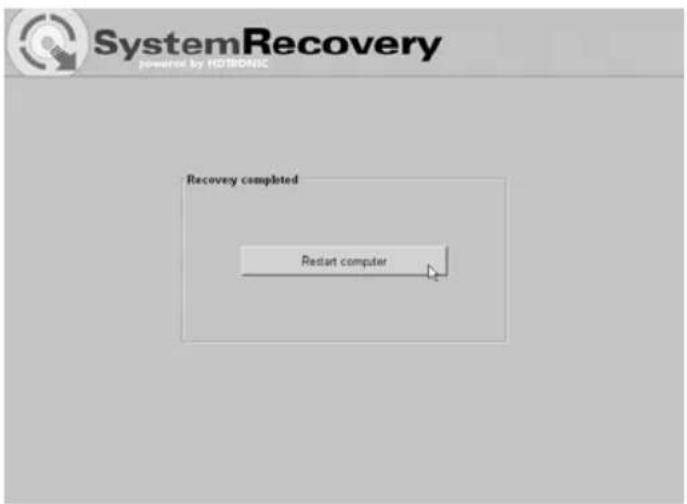
Notebook
Restoring the System by Using the System Recovery Software
Preface
Chapter 1
General Introductions
Chapter 2
Getting Started
Chapter 3
Customizing this Notebook
Chapter 4
BIOS setup
Chapter 5
Troubleshooting, First Aid and FAQ
Chapter 6
Watching TV and Videotext on your Notebook
Chapter 7
Restoring the System by Using the System Recovery Software
Chapter 8
Mandatory Activation
Chapter 9
Safety EMC and Safety Regulations
Restoring the System by Using the Mandatory Activation
The license rights granted under this EULA are limited to the first thirty (30) days after you first install the SOFTWARE unless you supply information required to activate your licensed copy in the manner described during the setup sequence of the SOFTWARE.
You can activate the SOFTWARE through the use of the Internet or telephone; toll charges may apply. You may also need to reactivate the SOFTWARE if you modify your computer hardware or alter the SOFTWARE. There are technological measures in this SOFTWARE that are designed to prevent unlicensed use of the SOFTWARE. Microsoft will use those measures to confirm you have a legally licensed copy of the SOFTWARE. If you are not using a licensed copy of the SOFTWARE, you are not allowed to install the SOFTWARE or future SOFTWARE updates. Microsoft Licensing, GP, Microsoft Ireland Operations Limited and/or Microsoft (China) Co. Limited (collectively "MS"), Microsoft Corporation and its subsidiaries will not collect any personally identifiable information from your COMPUTER during this process.
| Chapter 1 | General Introductions |
| Chapter 2 | Getting Started |
| Chapter 3 | Customizing this Notebook |
| Chapter 4 | BIOS setup |
| Chapter 5 | Troubleshooting, First Aid and FAQ |
| Chapter 6 | Watching TV and Videotext on your Notebook |
| Chapter 7 | Restoring the System by Using the System Recovery Software |
| Chapter 8 | Mandatory Activation |
| Chapter 9 | Safety EMC and Safety Regulations |
Safety EMC and Safety Regulations
This device is compliant to the standards EN 55022, EN 55024, EN 61000-3-2, EN 61000-3-3 and EN 60950. The included RF appliances, e.g. WLAN, comply with the R&TTE Directive (1999/5/EG, ETSI EN 300 328, EN 301489-1, EN 301489-17). The supplied TV receiver conforms to the standards EN 55013 and EN 55020.
Any changes to the equipment other than those recommended by the manufacturer may result in these directives not being met any longer. In order to ensure the Electromagnetic Compatibility (EMC) of this equipment, follow the instructions of this User's Guide.
You'll find the signed CE Declaration of Conformity on the website www.service.targa.co.uk
Note to the User
This equipment has been tested and found to be within the limits for interference suppression. When using external signal cables, please note the following: When replacing any of the signal cables provided by the manufacturer, the user must ensure that the EMC guidelines are followed. The shielding characteristics of all replaced cables must be at least equivalent to the original cables. You may only use shielded cables and only connect devices equivalent to the safety and EMC standards of this product.
If you do not follow the above-mentioned points, these directives are no longer met.
Laser (Safety Warning)
This device contains a laser system and is rated as a "Class 1 Laser Product". Please refer to the Operating Instructions, and read them carefully for instructions on correct operation. Keep them as reference for future use. If you encounter problems with your notebook, please contact qualified service or maintenance personnel. In order to avoid direct contact with the laser beam, you must not open the case of optical drives such as the DVD-ROM or DVD burner.
CAUTION! Laser radiation when cover is removed!
This equipment may contain devices belonging to Laser Class 1 up to Laser Class 3B. When the cover is closed, the equipment meets the Laser Class 1 requirements. When opening the equipment, laser devices up to Class 3B may be exposed.
This kind of laser radiation is contained in the optical drives. When removing or opening these drives you must follow these guidelines:
Safety
- Never look into the laser beam, not even when using optical devices and tools.
- Do not expose yourself to the laser beam.
- Avoid direct or indirect (reflection/refraction) radiation to your eyes or skin.
The installed optical drives do not contain any parts that can be serviced by the user. Optical drives must be maintained and repaired exclusively by the manufacturer.
Additional Safety Instructions for Devices with Wireless LAN
Your notebook features a Wireless LAN appliance. Therefore you must read and follow these safety instructions when working with your notebook:
- Turn the notebook off when traveling in an airplane or in a car.
- When you are in a hospital, a surgery area or near an electronic medical device, turn off the wireless adapter of your notebook! The RF signals may interfere with the functionality of the medical equipment.
- Place the notebook at least 20 cm (8 inch) away from pacemakers, as the RF signals may interfere with the functionality of the pacemaker.
- The transmitted RF signals can cause interference to hearing aids.
- Do not place the notebook with the wireless adapter turned on near flammable gas or in an explosion-sensitive area, as the transmitted RF signals can cause explosions or fire.
- The range of the RF signals depend on the environmental conditions.
- When transmitting wireless data it is possible that unauthorized parties may receive data.
TARGA GmbH is not liable for any interference caused to RF or TV signals caused by unauthorized modification to this device. Furthermore, TARGA does not assume any liability for replacing any cables or devices that have not been specifically approved by TARGA GmbH. The user is solely responsible and liable for troubleshooting any interference caused by unauthorized modification of this device and for replacing any appliances.
CE Marking for Devices with Wireless LAN
This device complies with the Directive 1999/5/EG of the European Parliament and Council dated March 9, 1999 for radio and telecommunications equipment and has been proven to meet mutual immunity and conformity.
Safety
This notebook may be used in Belgium, Denmark, Germany, Finland, France, Greece, Great Britain, Ireland, Italy, Luxembourg, Netherlands, Austria, Portugal, Sweden, Switzerland, Spain, Iceland, Liechtenstein and Norway.
For information about possible operating restrictions, please contact the corresponding authority of the respective country. If your country is not listed here, please contact the corresponding Regulation Authority in order to find out whether you may use this product in your country.
Belgium – www.bipt.be Netherlands – www.opta.nl
Denmark – www.tst.dk Austria – www.rtr.at
Germany – www.regtp.de Portugal – www.urt.gov.pt
Finland – www.fi cora.fi Sweden – www.pts.se
France – www.art-telecom.fr Switzerland – www.bakom.ch
Greece – www.eett.gr Spain – www.cmt.es
England – www.oftel.gov.uk Iceland – www.pta.is
Ireland – www.comreg.ie Liechtenstein – www.ak.li
Italy – www.agcom.it Norway – www.npt.no
Luxembourg – www.etat.lu/ILT
Restrictions
France
Restricted Frequency Band Only channels 10 to 11 (2,457 MHz and 2,462 MHz) may be used in France. Outdoor use of the device is not allowed.
Info: www.art-telecom.fr
Italy
A ministerial license is also required for indoor use. Contact your reseller for the required procedure. Outdoor use of the device is not allowed.
Info: www.agcom.it
Netherlands
A license is required for outdoor use. Contact your reseller for the required procedure.
Info: www.opta.nl
RF Frequencies for Wireless LAN Devices
For up-to-date information, please contact the corresponding authority of your country
(e.g. www.regtp.de).
Safety
Frequencies
According to the IEEE Standard 802.11b+g Wireless LAN adapters are designed for use on the ISM frequency band (Industrial, Scientific, Medical) between 2.4 and 2.4835 GHz.
As each of the 11 available channels requires a DSSS (Direct Sequence Spread Spectrum) bandwidth of 22MHz , a maximum of three independent channels are available (for instance, channels 3, 8, and 11). In the following table you'll find the
Notebook
Safety EMC and Safety Regulations
channels that may be used in each country:
Channel MHz Europe, R&TTE France, R&TTE
1 2412 X
2 2417 X
3 2422 X
4 2427 X
5 2432 X
6 2437 X
7 2442 X
8 2447 X
9 2452 X
10 2457 X X
11 2462 X X
Regulations – Exclusion of Liability
Exclusion of Liability for Wireless LAN Devices
Installing and operating wireless LAN devices must be in accordance with the instructions contained in the user documentation. This user documentation is contained in the product package. Any modifications to the device that have not explicitly been approved by the manufacturer may void the operating authorization of the device. The manufacturer will not be liable for any interference in the reception of radio and TV signals resulting from unauthorized modifications on the device or from replacing or installing cables and accessories that have not been explicitly recommended by the manufacturer. It is the full responsibility of the user to troubleshoot any existing interference resulting from unauthorized modifications, or from replacing or installing components. Neither the manufacturer nor its authorized resellers or distributors are liable for any damage or violation of existing laws resulting from violating these Regulations.
- General Introductions
- Chapter 2
- Getting Started
- Chapter 3
- Customizing this Notebook
- Chapter 4
- BIOS setup
- Chapter 5
- Troubleshooting, First Aid and FAQ
- Chapter 6
- Watching TV and Videotext on your Notebook
- Chapter 7
- Restoring the System by Using the System Recovery Software
- Chapter 8
- Mandatory Activation
- Chapter 9
- Safety EMC and Safety Regulations
- Regulations Information
- 廢電池請回收
- Safety Guideline for Using Lithium Battery
- Caution on Using Modem
- Optical Device Drive Notice
- Macrovision Notice
- Safety Instructions
- Notebook
- Preface
- WEEE Statement
- Table of Content
- Introductions
- Power Management....2-15
- Basic Operations....2-23
- Connecting the External Devices 3-2
- PC Card Installation 3-7
- Safely Remove Hardware 3-9
- About BIOS Setup 4-2
- BIOS Setup Menu 4-4
- Chapter 1
- How to Use This Manual
- Unpacking
- Product Overview
- Top-open View
- Cover Latch (Internal View)
- Rubber Pads
- Stereo Speakers
- Quick Launch Buttons and Power Button
- Keyboard
- Touchpad
- Webcam
- Internal Microphone
- Status LED
- Front View
- Cover Latch (External View)
- IEEE 1394
- Audio Port Connectors
- Status LED
- 5 in 1 Card Reader
- Right-side View
- Express Card Slot
- PC Card Slot
- USB Port
- S-Video Connector
- Ventilator
- DVI Port
- Left-side View
- USB Port
- Optical Storage Device
- Rear View
- Kensington Lock
- Power Connector
- RJ-11 Connector
- RJ-45 Connector
- Battery Pack (Rear View)
- Bottom View
- Battery Release Button
- Battery Lock/Unlock Button
- Battery Pack
- Power Management
- AC Adapter
- Connecting the AC Power
- Disconnecting the AC Power
- Battery Pack
- Releasing the Battery Pack
- Replacing the Battery Pack
- info
- Warning
- Using the Battery Pack
- Battery Safety Tips
- Conserving Battery Power
- Charging the Battery Pack Properly
- Basic Operations
- Safety and Comfort Tips
- Have a Good Work Habit
- Knowing the Keyboard
- 2#
- 3#
- Typewriter Keys
- Cursor Keys
- Numeric Keys
- Function Keys
- ■ Windows Keys
- ■ [Fn] Key
- Knowing the Touchpad
- Cursor Movement Area
- Right Button
- Left Button
- Using the Touchpad
- ■ Positioning and Moving
- ■ Point and Click
- ■ Drag and Drop
- ■ Configuring the Touchpad
- About Hard Disk Drive
- Using the Optical Storage
- Inserting the CD
- Removing the CD
- Connecting the External Devices
- Connecting the Peripheral Devices
- Connecting the Mouse
- Connecting the Keyboard
- Connecting the Printer
- Connecting the External Monitor
- Connecting the IEEE 1394 devices
- Connecting the Communication Devices
- Using the LAN
- Using the Modem
- PC Card Installation
- Installing the PC card
- Removing the PC card
- Safely Remove Hardware
- About BIOS Setup
- When to Use BIOS Setup?
- How to Run BIOS Setup?
- Control Keys
- BIOS Setup Menu
- Main menu
- Advanced menu
- Security menu
- Boot menu
- Exit menu
- System Overview
- System Time
- System Date
- Primary IDE
- System Information
- Advanced Settings
- PowerNow
- PCI Latency Timer
- Legacy USB Support
- Boot Settings Configuration
- Boot Device Priority --1st, 2nd, and 3rd Boot Device
- Security Settings
- Enter New Password
- Exit & Save Changes
- Exit & Discard Changes
- Discard Changes
- Load Setup Defaults
- NOTE
- Troubleshooting
- FAQ – Frequently Asked Questions
- Where Can I Find Spare Parts and Accessories?
- Information About Drivers, FAQs and Manual
- Java applets do not execute.
- How can I determine the exact capacity of the hard disk?
- How Can I Enable/Disable the Autorun of CD-ROMs in Windows XP?
- The e-mail hotkey always launches Microsoft Outlook, but I want to use a different mail program. Is this possible?
- The Internet browser hotkey always launches Microsoft Internet Explorer, but I want to use a different browser. Is this possible?
- Pixel errors on LCDs (notebook computers + monitors)
- BIOS updates for your notebook
- Using Teletext (Videotext) on a Computer (Only for Analog TV)
- Receiving Radio Channels with the Media Center
- D
- E
- The Media Center as a Video Recorder
- A
- B
- C
- G
- SystemRecovery
- Information for Recovery. Process
- Chose Restore Mode
- Important!
- Restoring the System by Using the Mandatory Activation
- Note to the User
- Laser (Safety Warning)
- Safety
- Additional Safety Instructions for Devices with Wireless LAN
- CE Marking for Devices with Wireless LAN
- Restrictions
- RF Frequencies for Wireless LAN Devices
- Regulations – Exclusion of Liability
Brand : TARGA
Model : Traveller 1776 X2
Category : Laptop