
Network Mediaplayer 1000 - Media player LOEWE - Free user manual and instructions
Find the device manual for free Network Mediaplayer 1000 LOEWE in PDF.


| Product Type | Network Media Player (built-in to Loewe TV sets) |
| Model | Network Mediaplayer 1000 |
| Brand | Loewe |
| Network Interfaces | Ethernet (10Base-T, 100Base-Tx) and WLAN (IEEE 802.11b/g) |
| Supported Home Network Standard | UPnP AV |
| Supported Photo Formats | JPEG, PNG, BMP (uncompressed, 8/24 bit, non-RLE, Windows format) |
| Supported Music Formats | MP3, WAV (without ADPCM), WMA 8/9 (compressed), LPCM, AAC-LC |
| Supported Video Formats | MPEG 1/2/4, WMV 9/HD, DivX, Xvid |
| WLAN Encryption Supported | WEP 64/128 (ASCII/HEX), WPA PSK/TKIP, WPA2 AES |
| Antenna | Internal WLAN antenna; additional external antenna included (not with Connect 32) |
| Media Server Software Compatibility | TwonkyMedia, Windows Media Player 11 or higher |
| Playback Features | Photo slideshow with adjustable interval (2-60 sec), background music, repeat/shuffle modes, full screen display |
| Remote Control | Dedicated colored buttons for media functions (e.g., repeat, shuffle, screen off) |
| Connectivity Display | LED indicator on TV set; can be disabled via menu |
| Maximum Photo File Size | 6 MB; Progressive JPEG limited to 1024x768 pixels |
| DRM Support | Does not play DRM-protected content |
| Power Supply | Via TV set (no separate power adapter) |
Frequently Asked Questions - Network Mediaplayer 1000 LOEWE
User questions about Network Mediaplayer 1000 LOEWE
0 question about this device. Answer the ones you know or ask your own.
Ask a new question about this device
Download the instructions for your Media player in PDF format for free! Find your manual Network Mediaplayer 1000 - LOEWE and take your electronic device back in hand. On this page are published all the documents necessary for the use of your device. Network Mediaplayer 1000 by LOEWE.
USER MANUAL Network Mediaplayer 1000 LOEWE
natural_image
Illustration of a modern flat-screen monitor with surrounding devices and a barcode symbol (no text or labels)Operating instructions Mode d'emploi Instrucciones de manejo
Accessories TV Accessoires TV Accesorios TV
Network Mediaplayer
LOEWE.
Contents
Remote control – Network Mediaplayer functions .... 3 Troubleshooting .... 14
About the Network Mediaplaver 4 Notes on high definition films 15
Help for problems with home network ....4Other ....16
Access to the MediaNetwork 4 Technical specifications 16
Selection of menu items 4 File formats supported 16
Ethernet (wired network) 16
Exit MedianNetwork....4 WLAN (wireless network)....16
Initial installation .... 5 Supported home network standard .... 16
Example of wired connection ....5 Media server software ....16
Example of wireless connection ....5 Legal notices....16
Connecting TV set and home network ....5 Masthead....16
Connecting up the additional antenna ....5Glossary .... 17
Initial installation....6 Index....19
Select Network Interface 6
Select wireless router 6
Enter WLAN key 6
Select IP address assignment method 7
Network Setting 7
Select Server 7
Operating convenience 8
Media selection....8
Select media type 8
Exit Network Mediaplayer 8
Function of coloured buttons in the media selection 8
MediaNetwork menu 9
Explanation of setting options in the MediaNetwork menu....9
Device information....9
Explanation of display items 9
Media overview – photo operation.... 10
Full screen mode 10
Slide show 10
Media overview – video operation 11
Play back video files 11
Media overview – music operation 12
Playback of music files 12
Function of coloured buttons during music playback 12
Status bar....13
Internet radio 13
Remote control – Network Mediaplayer functions
Enter a static IP address / Subnet mask ......(page 7)
(page 4).... Go to ASSIST+ menu
(page 7).... Enter separation points for IP address / Subnet mask
(page 9)......Go to MediaNetwork menu
Select object / Go to menu item
(page 8)....Order by...
(page 11, 12) VIDEO / MUSIC: Repeat
(page 12) Screen off/on
(page 6, 7) ....Search for Server / Router
(page 6, 7) ......Delete WLAN key / IP address / Subnet mask
(page 4)......In the media overview: one level back
(page 10)......PHOTO: previous file
(page 11)......VIDEO: rewind
(page 12) ...... MUSIC: previous title
Media overview: Back to media selection ....(page 4)
Media selection: Exit Network Mediaplayer ......(page 8)
PHOTO: Show / hide screen information ......(page 10)
VIDEO: Show status bar ......(page 11)
Show Device information ......(page 9)
Information on multimedia file ...... (page 10, 11, 12)
P+/P- change page up/down ...... (page 10, 11, 12)
Adopt selection ......(page 4)
In the picture overview: Full screen mode on/off ......(page 10)
Delete last digit of IP address / Subnet mask ......(page 7)
Change view ......(page 8)
MUSIC: Random on/off ......(page 12)
Go to page ......(page 8)
PHOTO/MUSIC: next file ......(page 10, 1
VIDEO: fast forwards ......(page
Start / continue playback / slide show...... (page 10, 11, 12)
Stop playback / slide show ...... (page 10, 11, 12)
Pause playback / slide show ...... (page 10, 11, 12)
Welcome
About the Network Mediaplayer
Your Loewe TV set is equipped with the Network Mediaplayer. This allows you to play back multimedia contents (photos, music files, videos) that are saved on a data medium on your home network and are made available via a media server. The Network Mediaplayer can access various types of storage media on the network for this purpose (e.g. PCs, Network Attached Storages (NAS)).
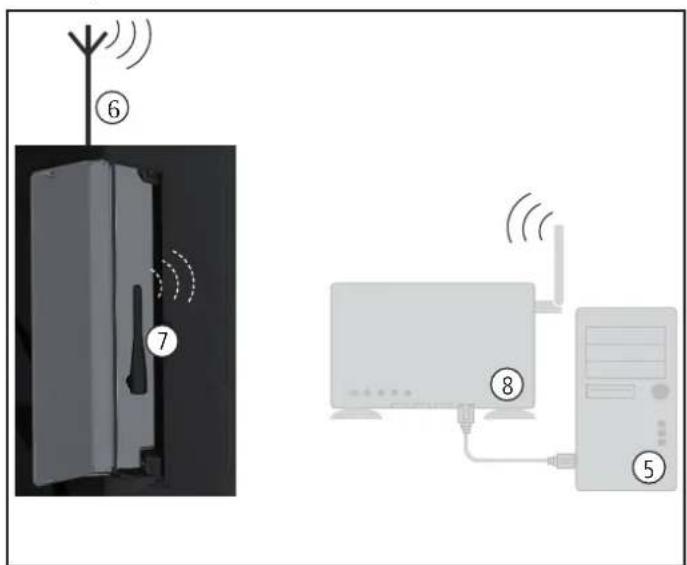
You can connect your TV set either wired (Ethernet, PowerLine) or also via a wireless radio connection (WLAN) to your home network. The TV set has wireless connections via an internal WLAN antenna. To operate it when there is bad reception there is an additional antenna included (not with Connect 32). You will find connection examples on page 5 on the right.
The Network Mediaplayer supports UPnP AV standard. You will find more detailed information in the technical data on page 16 and in the glossary from page 17.
All photos, albums and album graphics shown in these operating instructions are just examples.
Help for problems with home network
For support with configuration of and maintaining network connections, storage media and network devices, such as routers (position④, ⑤ and ⑧ in the connection examples on page 5) please contact the administrator of your network and/or the specialist retailer.
Access to the MediaNetwork
Start the MediaNetwork using the Assist+ menu.
ASSIST
Go to Assist+ menu.

▲▼ Mark MediaNetwork, call with OK.

Selection of menu items

Use the arrow buttons ▲▼◀▶ to move the marker on the user interface.
Use the OK button to select or adopt the object you have currently marked.

Use the ◀ button to go back up a level respectively.

With the END button you return from any item in the menu overview to the media selection (page 8).

This screen symbol shows you that the required operating function is currently not available.
Exit MediaNetwork
ASSIST
Go to Assist+ menu and select another function (see above).

Or:
Press TV or RADIO button to change to the corresponding type of operation.
Or:

Press END button in the media selection (page 8) to change to the last previously active type of operation (TV, radio).
Initial installation
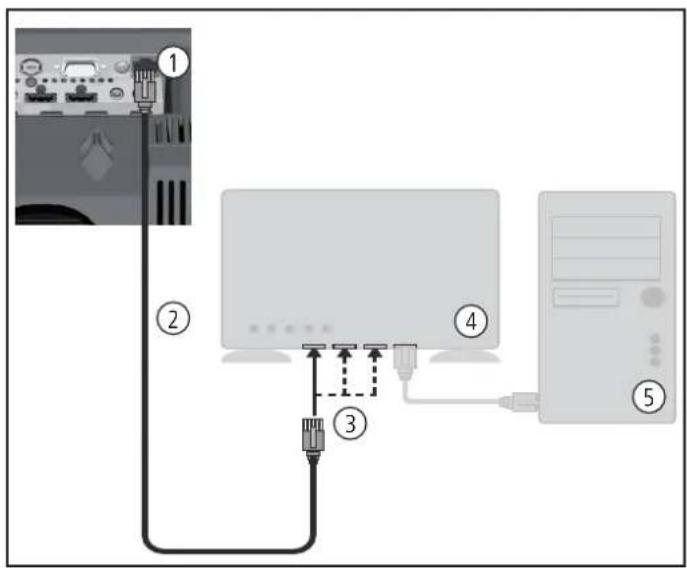
Connecting TV set and home network
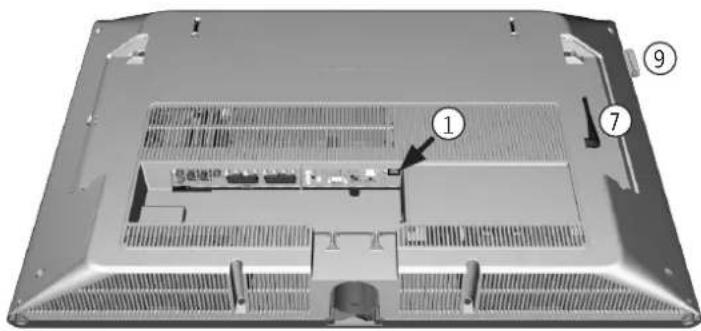
Network socket on Loewe TV set
Wired connection between TV set and home network with a network cable (available from specialist retailers)
LAN 4 switch / Router
PC ⑤
WLAN antenna inside device
Additional antenna (optional, see below)
WLABRouter
Connectivity display (see page 7)
Connecting up the additional antenna
(not with Connect 32)
If your TV set should not recognise a wireless router despite it being set up correctly, then it may help to mount the additional antenna supplied on to the set.
Screw the antenna on to the thread available for it (connection is under a flap on the back of the TV set on the right looking at the set from behind).
Align the antenna to optimise the reception.
Example of wired connection
Example of wireless connection
Initial installation
Initial installation
The first time MediaNetwork is called up, initial installation is started.
Select Network Interface
Here you enter whether you want to connect your TV set Wired via cable or Wireless (with wireless router) to your home network. You will find connection examples on page 5.

▲▼ Select Network Interface, adopt with OK.

If you select Wired then initial installation is continued with the menu item Select IP address assignment method (page 7).
Select wireless router
If you have selected Wireless (with wireless router), then the TV set starts to search for wireless routers.
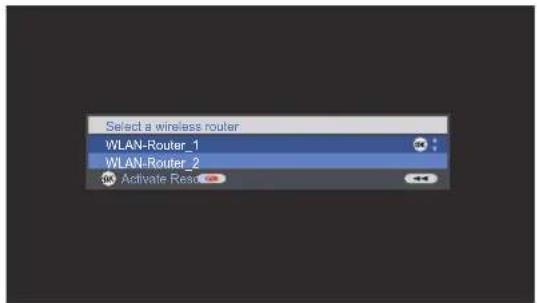
▲▼ Select required WLAN router, adopt with OK.
As soon as ◀ is displayed, you can go back one installation step by pressing this button.

If your router is not found the first time, then you can press the red button to Rescan for routers. If there are any problems making a wireless connection, it can help to install the additional antenna on the TV set (see page 5). Please also refer to the information on wireless connections on page 15.
Enter WLAN key
If your network has an access code, then it is necessary to enter the code that allows access to the network. A screen keyboard will appear to enter the key.
![Please enter password 12378_ky& 0 1 2 3 4 5 6 7 8 9 a b c d e f g h l j k l m n o p q r s t u v w x y z ! ? ( ) @ # $ % & ^ * { } _ - ~ + = / \ [ ] : ; ' . < > Adopt Password Delete password Delete last positionSelect character a.z→A.Z](/content/2026/05/770318/images/dc282becbfca5620815306376bd39d00c34db857e0f1c82b103248b59c9a344b.jpg)

Arrow buttons: Mark characters.

Function of coloured buttons:
Blue: Accept marked character.
Yellow: Delete last character.
Red: Delete entire line.
Green: Switch from small to capital letters and vice versa.

To finish, adopt the WLAN key with the OK button.
→ Mutated vowels (umlauts) are not supported.
If you do not know the WLAN key, contact your network administrator.
→ Supported encryption types: page 16.
Initial installation
Select IP address assignment method

▲▼ Select IP address and Subnet mask Assignment method, adopt with OK.
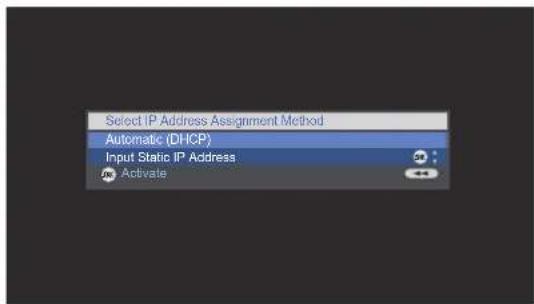
Automatic (DHCP): IP address and Subnet mask are automatically issued by a DHCP server on your home network.
A DHCP server has to be set up on a device on the network (e.g. WLAN router).
Input Static IP Address: IP address and Subnet mask are entered manually.
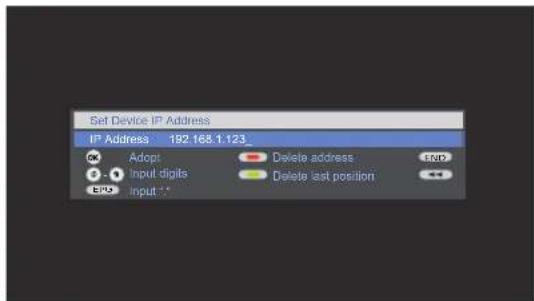
Digit buttons: Input digits of IP address.
EPG button: Enter dots.

Function of coloured buttons:
Yellow: Delete last position.
Red: Delete address.
OK button: Adopt IP address.
Proceed in the same way with the subsequent entry of the Subnet mask.
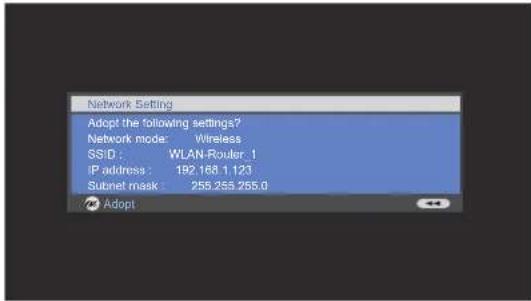
Network Setting

Afterwards you will see a summary of the settings.
Press OK button to adopt settings.

backwards step by step for changes.
Select Server
In the last step you select the required media server on your home network.
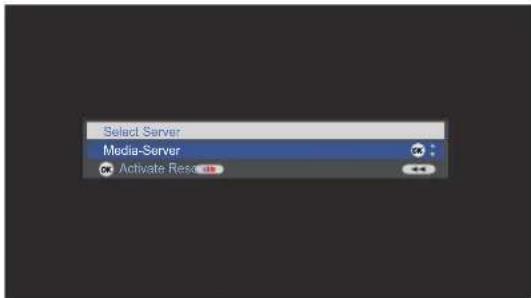

▲▼ Select server.
Confirm with OK.
If your required media server should not be found the first time, then you can press the red button to Rescan for media servers.
After successful initial installation, the media overview opens up (page 8) and the Connectivity display on the left of the TV set lights up. The Connectivity display can, if required, be switched off via the MediaNetwork menu (page 9).
Operating convenience
Media selection
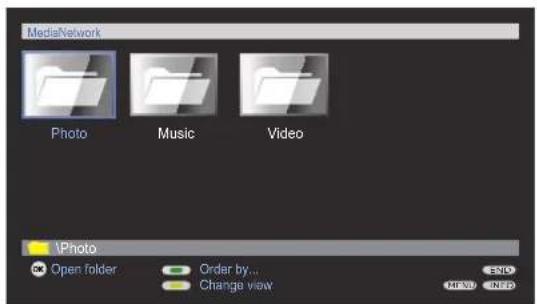
The Network Mediaplayer starts with the media selection. Select the media type you want.
Select media type

▶ Select required media folder, confirm OK to go to the respective overview.
Photo operation: see page 10.
Video operation: see page 11.
Music operation: see page 12.
Exit Network Mediaplayer

Press the END button to exit the Network Mediaplayer for the most recently active operating mode (TV, Radio).
Function of coloured buttons in the media selection


Change order objects displayed (folders or files). Selection options:
Name, Name (reversed), Size, Size (reversed), Date, Date (reversed).
The function depends on the media server used.
Yellow button: Change view
Switches between preview and list view:
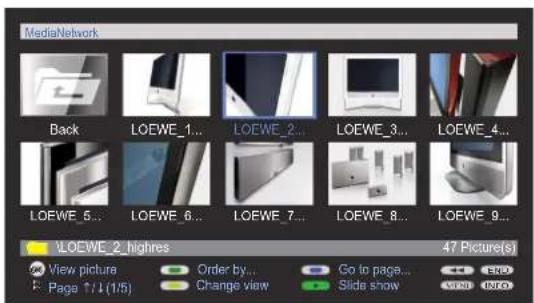
Example: Photo operation, preview
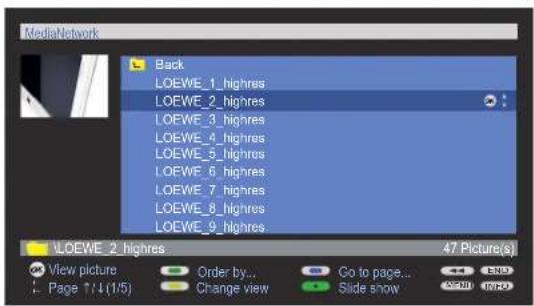
Example: Photo operation, list view
Blue button: Go to page...
Alternatively to going through pages with P+/P- you can also go directly to the individual pages on the overview. On the Go to page... overview the first title on each page respectively is shown.
The number of pages depends in the view selected (preview or list). You can see the number at the bottom on the left.
Operating convenience
MediaNetwork menu

Go to MediaNetwork menu
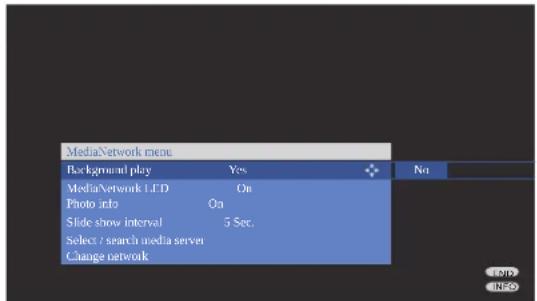

Go to Device information (see right hand column).

▲▼ Select menu item.
◀ ▶ or
OK Adopt settings.

Exit MediaNetwork menu
Explanation of setting options in the MediaNetwork menu
Background Play Select Yes to continue to play back music files that were being played back even if you are no longer in the music view (e.g. as background music for a slide show in photo operation).
Media Select whether the Connectivity display on the left Network LED of the TV set is to light up when there is a connection.
Photo Info Select On, to always have the photo information (file name and number of files in folder) shown with Full screen display or Slide show (photo operation see page 10).
Slide show Select how long each picture is to be shown for during interval a slide show. The display time can be 2, 3, 5, 10, 30 and 60 seconds.
Select / search In the current network you can rescan for a media media server server, for example if a new server has been added.
Change Here you can designate a new network, e.g. change from network wired to wireless.
Device information
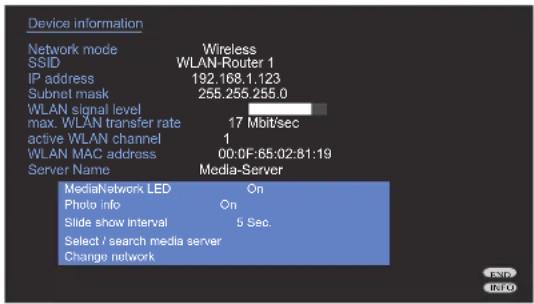

Open Device information.
This window provides you all information about your network connection that is currently active.
Explanation of display items
Network Shows the type of connection (wired or wireless). mode
SSID (only appears with wireless connection) The name of your network.
The SSID of your wireless home network must be visibly transmitted, as otherwise the network will not be recognised.
IP address Your current IP address.
Subnet mask Your current Subnet mask.
WLAN signal (only appears with wireless connection) level Display of current strength of reception: The more fields that are filled white, the better the reception.
max. WLAN (only appears with wireless connection)
transfer rate Shows you the maximum amount of data can be transmitted wirelessly per second.
active WLAN (only appears with wireless connection)
channel Shows you which of the total of 13 WLAN channels is being used for radio transmission between TV set and router.
WLAN MAC (only appears with wireless connection)
address Provides the MAC address of the WLAN component of your TV set that is secured in the hardware.
Server Name The name of your media server.
Operating convenience
Media overview – photo operation
Media selection is shown (page 8).

◀ ▶ Select folder with photos, OK open folder.
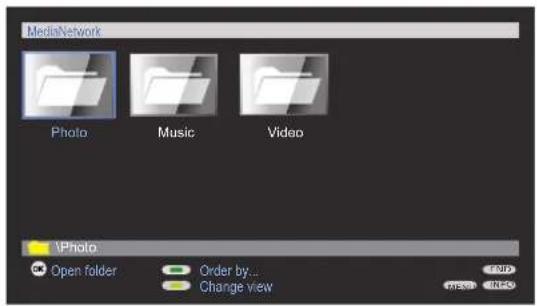
The name of the folder depends on your media server setting (in example picture: Photo).

▲▼◄► Select required sub-folder, OK open folder. If required, repeat.
P+/P- Page up / down. OK View marked picture in full screen mode.
MENU: Open MediaNetwork menu (page 9).
Green button: Order by...
Change order of objects displayed (folders or files).
Selection options: Name, Name (reversed), Size, Size (reversed), Date, Date (reversed).
The function depends on the media server installed on the storage medium (PC, NAS).
Yellow button: Change view
Switches between preview and list view.
Blue button: Go to page...
Alternatively to going through pages with
P+/P- you can also go directly to the individual pages on the overview. On the Go to page... overview, the first title on each page respectively is shown.
▶ Only available if there are more objects than can be displayed.
Full screen mode

A picture has been selected in the photo overview.
OK Go to / close full screen mode.
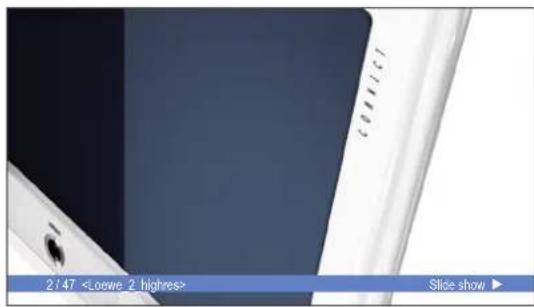


Show previous / next picture.

Show / hide context information (e.g. recording date, camera model used, picture format etc.).

Temporarily show / hide file names and number of files in the folder.
Permanent display of this information can be set in the MediaNetwork menu (page 9).
Slide show

PLAY button: Start slide show.
→ from photo overview: Start slide show with marked picture.
in full screen mode: Start slide show with displayed picture.

PAUSE button: Pause slide show.
PLAY button: Continue slide show.
STOP button: Stop slide show and return to overview.
Operating convenience
Media overview – video operation
Media selection is shown (page 8).

▶ Select folder with videos, OK open folder.
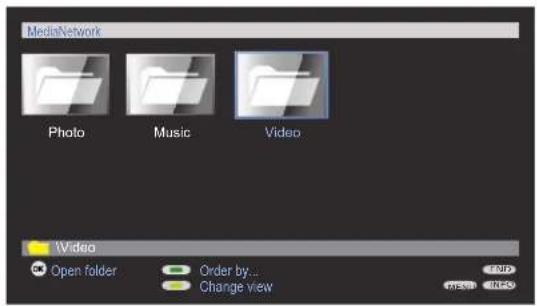
The name of the folder depends on your media server setting (in example picture: Video).
▲▼◄► Select required sub-folder, OK open folder.
P+/P- Page up / down.
MENU: Open MediaNetwork menu (page 9).



Green button: Order by...
Change order objects displayed (folders or files).
Selection options: Name, Name (reversed), Size, Size (reversed), Date, Date (reversed).
The function depends on the media server installed on the storage medium (PC, NAS).
Yellow button: Change view
Switches between preview and list view.
Blue button: Go to ...
Alternatively to going through pages with P+/P- you can also go directly to the individual pages on the overview. On the Go to ... overview the first title on each page respectively is shown.
The number of pages depends in the view selected (preview or list).
Play back video files

Press OK or

PLAY button to play the marked file.
Green button: Set playback mode:
Repeat title/Repeat all/Repeat off.
A message on the corresponding playback mode is shown briefly at the bottom edge of the picture.

INFO button: Display information on video played.

END button: Show video status bar.
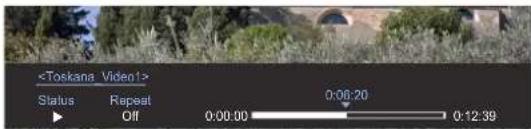
The status bar provides you with further information about the current playback.
Status Playback (▶), Pause (II) or Wind (◀◀ or ▶▶).
Repeat Shows whether one Title or All are being repeated or whether repeat is switched Off.
The bar on the right hand side shows you how far the video has been played.

PAUSE button: Pause current playback.
PLAY button: Continue playback.

STOP button: Stop current playback and return to overview.

Wind
You can wind/rewind videos to search for desired scenes.

Rewind at double speed.
Press again for 4 times speed.

Wind at double speed.
Press again for 4 times speed.

OK Continue playing at the marked position.

END button: Abort search and continue playing at the starting point of the winding process.
Operating convenience
Media overview – music operation
Media selection is shown (page 8).
◀ ▶ Select folder with music files, OK open folder.

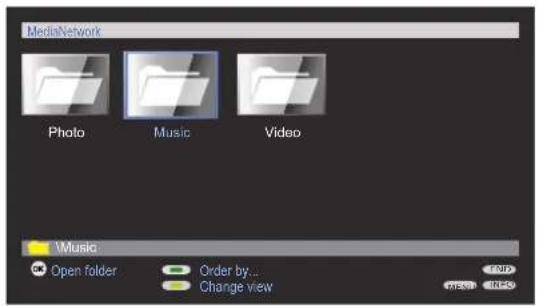
The name of the folder depends on your media server setting (in example picture: Music).
▲▼◄► Select required sub-folder, OK open folder.
P+/P- Page up / down.
MENU: Open MediaNetwork menu (page 9).

Green button: Order by...
Change order objects displayed (folders or files).
Selection options: Name, Name (reversed), Size, Size (reversed), Date, Date (reversed).
The function depends on the media server installed on the storage medium (PC, NAS).
Yellow button: Change view
Switches between preview and list view.
Blue button: Go to page...
Alternatively to going through pages with P+/P- you can also go directly to the individual pages on the overview. On the Go to page... overview the first title on each page respectively is shown.
→ Only available if there are more objects than can be displayed.
Playback of music files

Press PLAY button or

OK to play the marked file. Press OK again to jump to the beginning of the file.

PAUSE button: Pause current playback.

PLAY button: Continue playback.

STOP button: Stop current playback and return to overview.


Playback previous / next title.

INFO button: Display information on marked music file (Metadata).
Function of coloured buttons during music playback
Red button: Switch Screen off/on.
Green button: Repeat individual Title/All titles/Repeat Off.
Yellow button: Random on/off.
→ Random and Repeat are mutually exclusive.
In the additional information (metadata) of a music file, graphics can be stored as an album cover. If there are such graphics available for the piece currently being played, then this connection is shown in the picture.
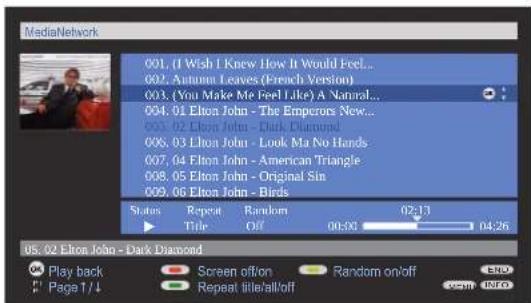
Music playback – List view with album cover
Operating convenience
Status bar
The status bar below the music file list provides you with further information on the current playback.

Status Playback (▶), Pause (■) or Stop (■).
Repeat Shows whether one Title or All are being repeated or whether repeat is switched Off.
Random Shows whether Random has been activated.
The bar on the right shows you how far playback of the file has progressed.
Internet radio
Several media servers give you the option of making internet radio programmes available apart from multimedia contents (e.g. TwonkyMedia, see section Media server software on page 16).
Internet Radio programmes that are available are also shown in the Music folder of the media overview. The precise name of the folder or file depends on the setting of the media server and on the Internet Radio station.
Troubleshooting
| Problem Possible cause Remedy | ||
| The TV set is not getting any connection to the server. On the main screenConnectis shown and the Connectivity display does not light up. | a) No connection to the media server.b) On your PC with Windows XP several media servers runat the sametime, e.g.Windows Media Player (WMP) 11andTwonkyMedia(also see page 16). | a) Check whether the media server is switched on.PressOKto make a new attempt at connecting.Check the connection using the PING command. To do this, in the entry request on your PC, enter the command ping.exe, followed by the IP address of your TV set. You will find the current IP address in theDevice information(see page 9). Example:ping.exe 192.168.1.123If the data packages are not transferred, then there is a problem with the network.With awiredconnection:Check the arrangement of the cables.With awirelessconnection:Check your wireless router. Attach the additional antenna to the TV set (page 5).b) If there are several media servers, they can impede each other. For example, when working withTwonkyMediaclose file release byWMP11. |
| Your TV set does not have an IP assigned to it despite required type of IP assignmentAutomatic (DHCP). | a) No DHCP server is working on your network.b) With anencryptedwirelessconnection, you have entered the key incorrectly. | a) Set up a DHCP server.Assign a fixed IP address for the TV set.b) SelectChange networkin theMedia Network menu. Rescan for routers using the red coloured buttons. Then correctly enter the WLAN key for your router. |
| Despite video or music file being played back, no sound can be heard. | a) The TV set is set to mute or the volume has been turned down too far.b) An audio device that does not exist or that is not connected is registered in theTVmenu underConnections→Sound components(e.g. HiFi/AV amplifier). | a) Increase the volume by pressing theV+buttonon your remote control. This will also cancel any mute setting.b) Connect up the audio device and switch it on.In theSound components wizardchange back toTV speakers. |
Troubleshooting
| Problem Possible cause Remedy | ||
| Although the file is visible on the media server, it is not shown in the Network Mediaplayer. | a) The file is not being made available by your media server.b) There are more than 300 files in the corresponding folder. | a) Change your media server. Read up about this in the section "Media Server Software" on page 16.b) Distribute the objects among several folders. Delete files that are no longer required. |
| A media file that is displayed can not be played back. | The format of the file is not supported (see also limitations in section Supported File Formats on page 16). | No remedy. |
| Characters contained in the WLAN key are not shown on the input screen (page 6). | The device only supports the characters shown (ASCII standard). | Change the WLAN key of the router. |
| When searching for wireless routers, no device is found. | The router is not ready for wireless communication. | Check your wireless router.Try to make the connection again a few minutes later. |
If with wireless operation there should be any interference such as disruptions during playback or slow reactions by devices to commands, you could try the following:
- Keep at least three metres distance from microwave ovens, bluetooth devices, mobile telephones and Wi-Fi compatible devices such as printers and PDAs.
- Change the active channel on the WLAN router.
Notes on high definition films
High definition film material (HD films) from format 720p upwards (resolution 1280 x 720 or higher) should be played back via a wired connection. If there is a wireless connection, then technical limitations (e.g. fault liability, bandwidth limitations) can cause disruptions in the playback right up to a complete breakdown of the playback.
Other
Technical specifications
File formats supported
Pictures: JPG, PNG, BMP
Picture files may generally not exceed a size of 6MB.
- Photos in Bitmap format (BMP) are supported if not compressed in 8 bit and 24 bit (not RLE) and only in Windows format.
Photos in Progressive JPEG format may not exceed a resolution of 1024x768 pixels.
Music: MP3, WAV (without ADPCM), WMA 8/9 (compressed), LPCM, AAC-LC
Video: MPEG 1/2/4, WMV 9/HD, DivX, Xvid
This device can not play back any DRM protected contents.
In individual cases it is possible that media files can not be played back due to the numerous available technical design and editing options.
Ethernet (wired network)
Standards supported: 10 Mbit/s Ethernet (10Base-T), 100 Mbit/s Fast Ethernet using. (100Base-T) Conta
WLAN (wireless network)
Standards supported:
IEEE 802.11b and 802.11g
Frequency range used:
2400-2483.5 MHz
Types of encoding that are supported:
WEP 64 and 128 Bit (ASCII and HEX), WPA PSK and TKIP, WPA2 AES
Supported home network standard
Universal Plug and Play Audio / Video (UPnP AV)
Media server software
To play multimedia contents you will need media server software which makes the appropriate files available to you. Handling individual files depends on the technical properties and also on the media server software used.
On our homepage at www.loewe-int.de you can download a test version of the TwonkyMedia Media server. With your TV set you have simultaneously acquired the option if obtaining a free license for this media server. Alternatively to that, you can also use other media software such as the Windows Media Player (WMP) as of version 11.
For communication with your PC, certain port addresses of the network connection are required. They may not be blocked by a firewall if there is one, otherwise this could cause serious connection errors.
Windows Media Player 11 requires the port addresses 1900 and the block of 10280 up to and including 10284 (all for UDP) as well as 2869 and 10243 (both for TCP). For TwonkyMedia the port addresses 1030, 1900 and 9080 (all for UDP) and 9000 (for TCP) must be available.
Other ports to be kept free depend on the operating system you are
Contact your network administrator about configuring the firewall.
Legal notices
The screen font "LoeweL2700" is based on the "Tavmjong Bah Arev (tavmjong.free.fr)" font, which in turn is based on "Bitstream Vera". Bitstream Vera is a trademark of Bitstream Inc.
This set contains a software which is based partly on the work of the Independent JPEG Group.
Masthead
Loewe Opta GmbH
Printed in Germany
Industriestraße 11
Issue 12/07-2.0 FP
D-96317 Kronach
© Loewe Opta GmbH, Kronach
www.loewe.de
All rights including translation, technical modifications and errors reserved.
This equipment is in compliance with the essential requirements and other relevant provisions of Directive 1999/5/EU. It may be operated in all countries in the EU (with the exception of Bulgaria) and also in Iceland, Norway and Switzerland. In France and Italy it may only be used indoors.
C€ 0682①
Glossary
A
Administrator: Person who administers the network, i.e. takes care of setting up and maintaining all components belonging to the network.
AVI: Abbreviation for Audio Video Interleave, a video container file format developed by Microsoft. A single AVI video file can contain several audio, video and text data streams (thus the name container format).
B
BMP: Abbreviation for Bitmap, a grid graphics format designed for Microsoft Windows and OS/2 that is wide spread and therefore supported by almost every popular graphics software package without any problems.
C
Channel (WLAN): The channel is a certain part of the WLAN frequency band. Devices that want to communicate with each other have to use the same WLAN channel. In Europe the WLAN frequency band is currently divided into 13 channels.
Client: Also referred to as network client; describes an end device such as your TV set that is connected to the network and gets data from a (media) server to make it accessible to the user.
D
DHCP: Abbreviation for Dynamic Host Configuration Protocol. DHCP allows automatic assignment of IP addresses with the aid of a DHCP server.
DHCP server: Network service which takes care of automatic assignment of IP addresses to clients.
DivX: Video Codec which allows even large files to be relatively highly compressed in their file size without having to tolerate important quality losses.
DRM: Digital Rights Management. Processes to control copyright protected data. To be used correctly, DRM protected contents require not only a DRM capable device but also the possession of a license issued by the provider (to be paid for).
E
Ethernet: Cable linked data net technology for local networks (LANs). Also covers standards for e.g. plug connectors and transfer speeds.
H
Host: Computer that the server services are provided from, i.e. that makes data available. Refer also to media server.
|
ID3 tags: Additional information on MP3 files. Here you can save information on the artist, title, album and album cover. This data is then processed by the PC using an ID3 tag editor.
IP address: IP addresses (Internet Protocol Addresses) are used to identify devices in an Internet Protocol (IP) network. IP addresses are made up of four groups of numbers of three digits each.
J
JPEG: Joint Photographic Experts Group. A body that has developed a standardised process for compressing digital images. This process JPEG (abbreviated to JPG) that was named after the body is a wide spread graphics format for photos.
L
LAN: Abbreviation for Local Area Network. Mainly used as a name for networks with cabling (Ethernet).
M
MAC address: Hardware address of a network adapter, e.g. the network card in the PC. It is permanently assigned by the manufacturer and is used to uniquely identify devices in networks.
Mbit/sec: Information about the transfer rate in networks in megabits, i.e. millions of characters per second. With WLAN, the maximum speed is 11 (IEEE 802.11b) or respectively 54 (IEEE 802.11g) Mbit/sec, in wired nets 10 Mbit/sec or 100 Mbit/sec (Fast Ethernet).
Media server: Stands for the device which multimedia contents are stored on, but is also the name for the service provided by the device that makes this data available to the network.
MP3: Data format for compressed audio data.
Multimedia contents: Videos, music files and photos are grouped together under this term.
N
NAS: Abbreviation for Network Attached Storage. The term describes a hard disk which is independently linked to the network (i.e. without a PC).
Network Mediaplayer: The technology in your Loewe TV set which presents multimedia contents on the screen for you.
Glossary
P
PNG: Abbreviation for Portable Network Graphics, a freely available grid graphics format for loss-free compression.
Port: A port is part of a network address (or also IP address). It allows assignment of data packages to various services which are running on one device under the same network address.
PSK: Stands in connection with WLAN encoding for Pre-Shared Key. Clients, who want to connect up to a wireless network secured with PSK have to know this key.
R
Router: Device for connecting up several networks, e.g. home network and Internet.
S
Switch: Device for connecting several computers to a network.
U
UPnP AV: Abbreviation for Universal Plug and Play Audio / Video. Is used to control network devices from all manufacturers. Has become a wide spread standard for home networking.
W
WEP: Abbreviation for Wired Equivalent Privacy. Former standard process in the WLAN encryption, now outdated.
Wired network: see LAN.
Wireless network: see WLAN.
WLAN: Abbreviation for Wireless Local Area Network. Also abbreviated as wireless network.
WMA: Abbreviation for Windows Media Audio, Microsoft own audio data format. As with MP3 files, the content is compressed here as well.
WMV: Abbreviation for Windows Media Video, Microsoft own video data format.
WPA: Abbreviation for Wi-Fi Protected Access. Replaced WEP as standard encryption for wireless networks.
Index
A
Active WLAN channel 9
Additional antenna 4, 5
C
Change network type 9
Coloured buttons 8
E
Enter WLAN key 6
|
Initial installation 5
Internal WLAN antenna 4, 5
IP address 7, 9
M
Maximum WLAN transfer rate 9
MediaNetwork 4
Access 4
Exit 4
Selection of menu items 4
Multimedia contents 4
Music operation 12
N
NAS 4
Network connection
Wired 4,5
Wireless 4,5
Network mode 9
Network Setting 7
P
PC 4
Photo operation 10
Full screen mode 10
Slide show 10
R
Remote control 3
S
Select IP address assignment method 7
Select Network Interface 6
Select server 7
Select wireless router 6
Server Name 9
SSID 9
Subnet mask 7, 9
U
UPnP 4
V
Video operation 11
W
WLAN MAC address 9
WLAN signal strength 9


- Operating instructions Mode d'emploi Instrucciones de manejo
- Contents
- Remote control – Network Mediaplayer functions .... 3 Troubleshooting .... 14
- Help for problems with home network ....4Other ....16
- Initial installation .... 5 Supported home network standard .... 16
- Connecting up the additional antenna ....5Glossary .... 17
- Operating convenience 8
- Remote control – Network Mediaplayer functions
- Welcome
- About the Network Mediaplayer
- Help for problems with home network
- Access to the MediaNetwork
- Selection of menu items
- Exit MediaNetwork
- Initial installation
- Connecting up the additional antenna
- Select Network Interface
- Select wireless router
- Enter WLAN key
- Select IP address assignment method
- Network Setting
- Select Server
- Operating convenience
- Function of coloured buttons in the media selection
- Yellow button: Change view
- Blue button: Go to page...
- MediaNetwork menu
- Explanation of setting options in the MediaNetwork menu
- Device information
- Explanation of display items
- Media overview – photo operation
- Green button: Order by...
- Full screen mode
- Slide show
- Media overview – video operation
- Play back video files
- Wind
- Media overview – music operation
- Playback of music files
- Function of coloured buttons during music playback
- Status bar
- Internet radio
- Troubleshooting
- Notes on high definition films
- Other
- Technical specifications
- File formats supported
- Ethernet (wired network)
- WLAN (wireless network)
- Standards supported:
- Supported home network standard
- Media server software
- Legal notices
- Masthead
- Glossary
- A
- B
- C
- D
- E
- H
- |
- J
- L
- M
- N
- P
- R
- S
- U
- W
- Index
- V
Brand : LOEWE
Model : Network Mediaplayer 1000
Category : Media player