
IdeaPad N586 - Laptop LENOVO - Free user manual and instructions
Find the device manual for free IdeaPad N586 LENOVO in PDF.


| Product Type | Laptop |
| Brand | Lenovo |
| Model | IdeaPad N586 |
| Processor | Intel Core series (varies by configuration) |
| Operating System | Windows 8 (preinstalled) |
| Display Size | 15.6 inches (typical) |
| Display Technology | LED-backlit LCD |
| Memory Type | DDR3 SDRAM |
| Memory Slots | 2 (SO-DIMM) |
| Storage Type | Hard Disk Drive (HDD), replaceable |
| Graphics | Switchable (integrated + dedicated on select models) |
| Camera | Integrated webcam |
| Audio | Built-in microphone, stereo speakers |
| Network | 10/100/1000 Ethernet (RJ-45) |
| Wireless | Wi-Fi (802.11 b/g/n) |
| Bluetooth | On select models |
| USB Ports | 4 (USB 2.0 and USB 3.0 on select models) |
| Video Outputs | VGA, HDMI (on select models) |
| Optical Drive | DVD±RW |
| Battery Type | 6-cell Li-ion (typical) |
| Security Features | Kensington lock slot, password protection |
| Recovery System | Lenovo OneKey Recovery |
Frequently Asked Questions - IdeaPad N586 LENOVO
User questions about IdeaPad N586 LENOVO
0 question about this device. Answer the ones you know or ask your own.
Ask a new question about this device
Download the instructions for your Laptop in PDF format for free! Find your manual IdeaPad N586 - LENOVO and take your electronic device back in hand. On this page are published all the documents necessary for the use of your device. IdeaPad N586 by LENOVO.
USER MANUAL IdeaPad N586 LENOVO
Lenovo IdeaPad P580/P585/N580/ N581/N585/N586
User Guide v2.0
Note
- Before using the product, be sure to read Lenovo Safety and General Information Guide first.
- Some instructions in this guide may assume that you are using Windows® 8. If you are using other Windows operating system, some operations may be slightly different. If you are using other operating systems, some operations may not apply to you.
- The features described in this guide are common to most models. Some features may not be available on your computer and/or your computer may include features that are not described in this user guide.
- The illustrations used in this manual are for Lenovo IdeaPad N580 unless otherwise stated.
- The illustrations in this manual may differ from the actual product. Please refer to the actual product.
- To learn more about Lenovo Applications, go to: http://www.lenovo.com.
Second Edition (June 2012)
© Copyright Lenovo 2012.
LIMITED AND RESTRICTED RIGHTS NOTICE: If data or software is delivered pursuant a General Services Administration "GSA" contract, use, reproduction, or disclosure is subject to restrictions set forth in Contract No. GS-35F-05925.
Contents
Chapter 1. Getting to know your computer ....1
Top view....1
Left-side view ....5
Right-side view....6
Front view 7
Bottom view....8
Chapter 2. Learning the basics.... 10
Configuring the operating system for the first time 10
Operating system interfaces ....10
The Charms....11
Putting the computer to sleep or shutting it down....13
Using the touchpad....15
Function key combinations....16
Connecting external devices....18
Special keys and buttons....20
System status indicators....22
Securing your computer....23
Using Switchable Graphics (specific models only) 23
Chapter 3. Connecting to the Internet.... 24
Wired connection 24
Wireless connection 25
Chapter 4. Lenovo OneKey Recovery system ......27
Chapter 5. Troubleshooting ...... 28
Frequently asked questions 28
Troubleshooting 30
Appendix A. CRU instructions....34
Replacing the battery....34
Replacing the hard disk drive 35
Replacing memory 40
Replacing the wireless LAN card 43
Removing the optical drive ....45
Trademarks....47
Chapter 1. Getting to know your computer
Top view
P580/P585
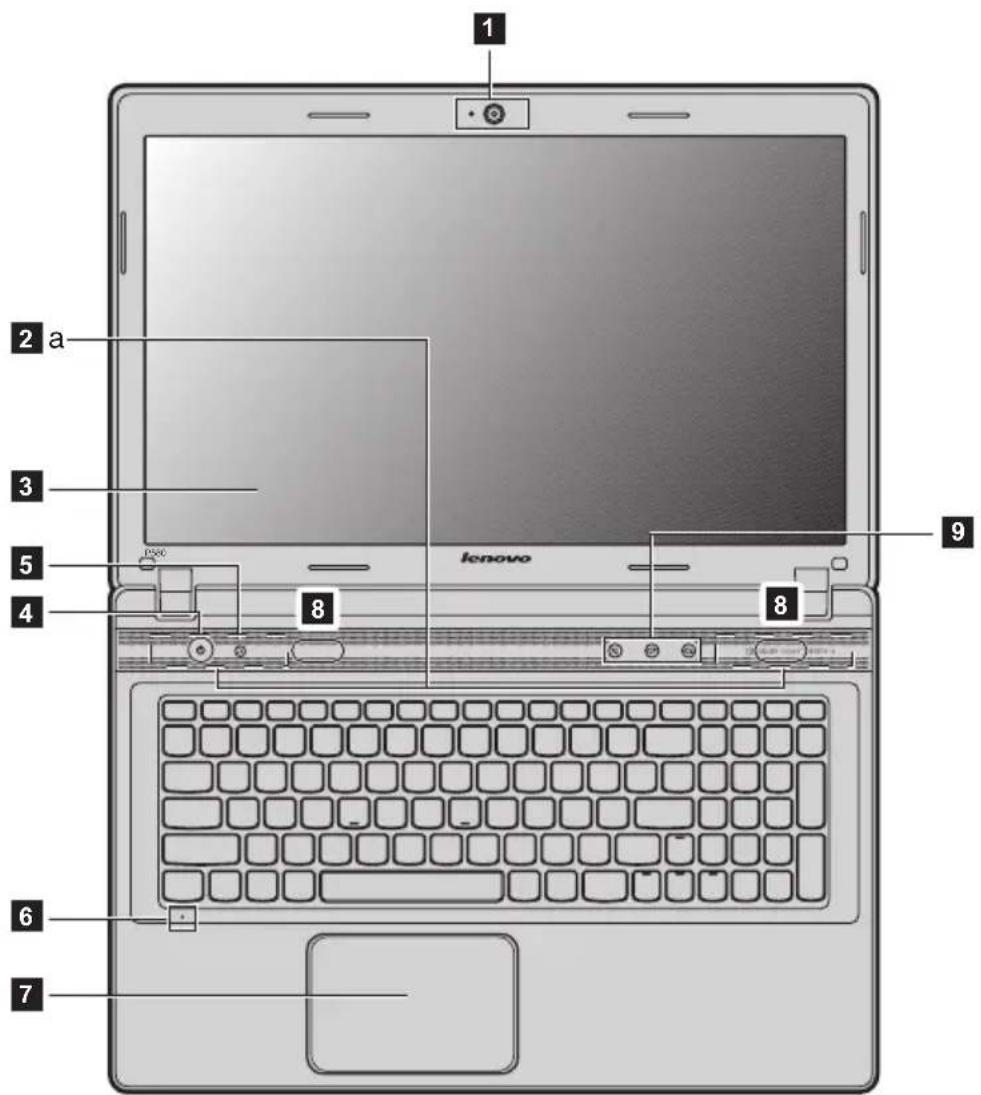
text_image
1 2 a 3 4 5 8 9 lenovo 8 6 7Chapter 1. Getting to know your computer
N580/N585
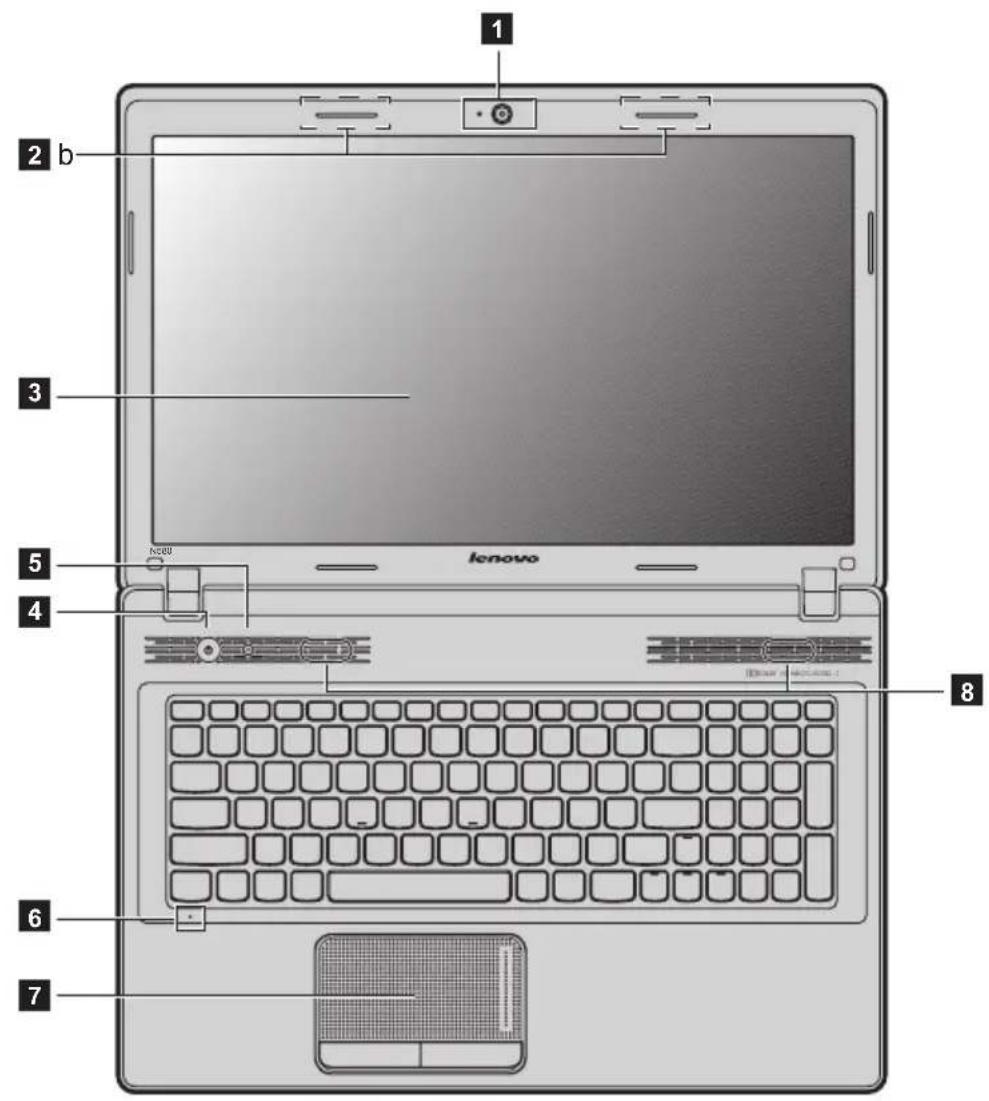
text_image
1 2 b 3 5 4 lenovo 8 6 7Chapter 1. Getting to know your computer
N581/N586
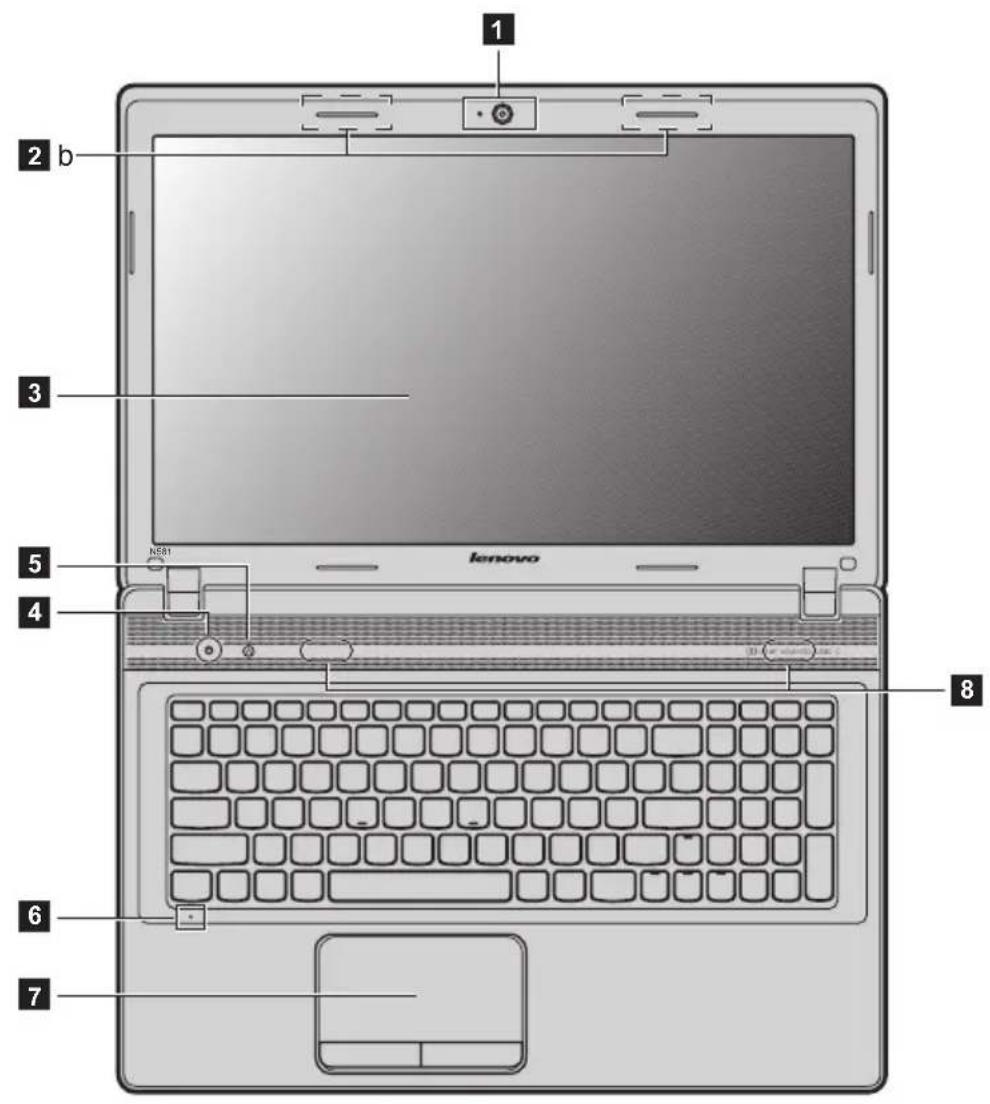
text_image
1 2 b 3 4 5 NSR1 lenovo 8 6 7- Attention:
• The dashed part is invisible.
- Do NOT open the display panel beyond 130 degrees. When closing the display panel, be careful NOT to leave pens or any other objects in between the display panel and the keyboard. Otherwise, the display panel may be damaged.
Chapter 1. Getting to know your computer
| 1 | Integrated camera | Use the camera for video communication. |
| 2 | Wireless module antennas (on select models) | The built-in antennas ensure optimal reception of wireless radio. |
| Note: Wireless module antennas may be placed in different positions (2a/2b) depending on different configurations. | ||
| 3 | Computer display | The LCD display with LED backlight provides brilliant visual output. |
| 4 | Power button | Press this button to turn on the computer. |
| 5 | Novo button | When the computer is off, press this button to start the Lenovo Recovery system or the BIOS setup utility, or to enter the boot menu. |
| Note: For details, see “Lenovo OneKey Recovery system” on page 27. | ||
| 6 | Built-in microphone | The built-in microphone (with noise reduction) can be used for video conferencing, voice narration, or simple audio recordings. |
| 7 | Touchpad | The touchpad functions as a conventional mouse. |
| Note: For details, see “Using the touchpad” on page 15. | ||
| 8 | Speakers (on select models) | The stereo speakers provide rich and powerful sound. |
| Note: For sound effects and speaker locations specific to your model, refer to the actual product. | ||
| 9 | Volume buttons | For details, see “Volume buttons” on page 21. |
Left-side view
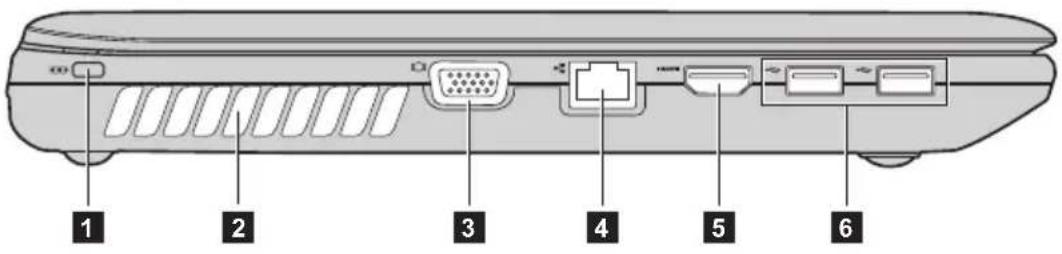
text_image
1 2 3 4 5 61 Kensington slot Attach a security lock (not supplied) here.
Note: For details, see "Attaching a security lock (not supplied)" on page 23.
2 Fan louvers Dissipate internal heat.
Note: Make sure that none of the fan louvers are blocked or else overheating of the computer may occur.
3 VGA port Connects to external display devices.
4 RJ-45 port This port connects the computer to an Ethernet network.
Note: For details, see "Wired connection" on page 24.
5 HDMI port (on select models) Connects to devices with HDMI input such as a TV or a display.
6 USB port (on select models) Connect to USB devices.
Note:
- The blue ports are USB 3.0 ports. The black ports are USB 2.0 ports.
- For details, see "Connecting a universal serial bus (USB) device" on page 19.
Chapter 1. Getting to know your computer
Right-side view
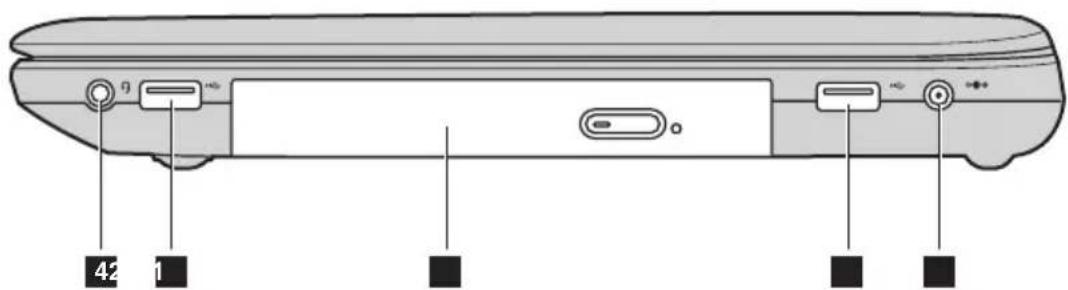
text_image
42 11 AC power adapter jack Connect the AC adapter here.
2 USB port (on select models) Connects to USB devices.
Note:
• The blue ports are USB 3.0 ports. The black ports are USB 2.0 ports.
- For details, see "Connecting a universal serial bus (USB) device" on page 19.
3 Optical drive Reads/Burns optical discs.
4 Combo audio jack Connects to headsets or headphones.
- Attention:
- Listening to music at high volume over extended periods of time may damage your hearing.
Front view
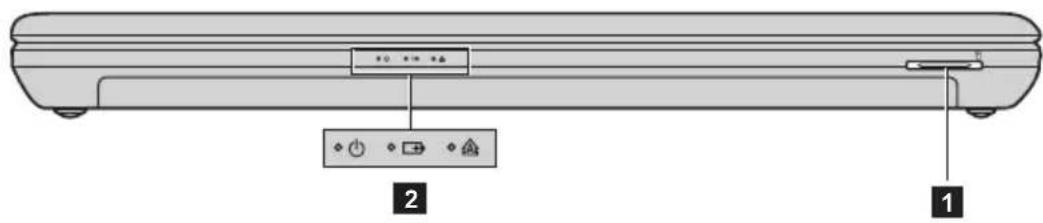
text_image
Diagram of a device rear panel with labeled buttons and indicators, showing two labeled positions 1 and 2.1 Memory card slot Insert memory cards (not supplied) here.
Note: For details, see "Using memory cards (not supplied)" on page 18.
2 System status indicators For details, see "System status indicators" on page 22.
Chapter 1. Getting to know your computer
Bottom view
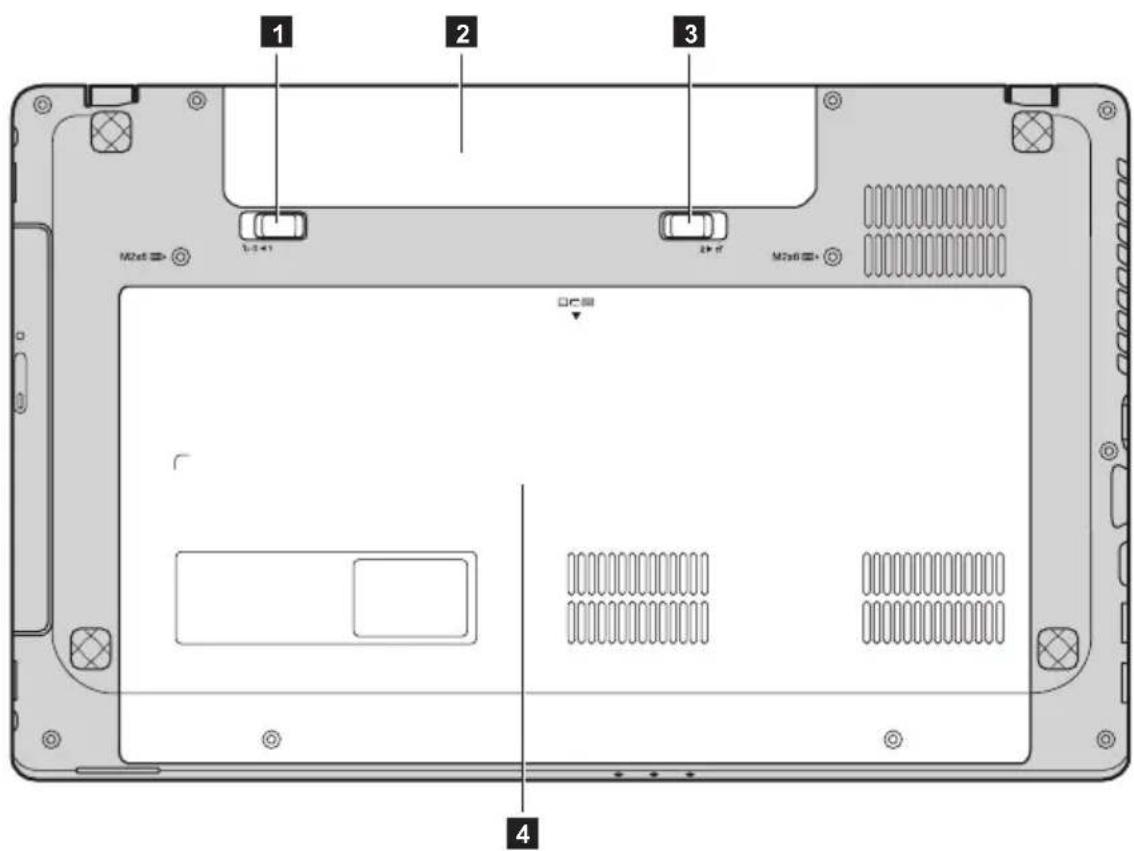
text_image
1 2 3 M2x8 L-3 x1 24 x7 M2x8 DC 4Chapter 1. Getting to know your computer
1 Battery latch - manual
2 Battery pack
3 Battery latch - spring loaded
4 Optical drive/ Hard disk drive (HDD)/Memory/ CPU (Central processing unit)/ Mini PCI Express Card slot compartment
The manual battery latch is used to keep the battery pack secured in place.
The spring-loaded battery latch keeps the battery pack secured in place.
Chapter 2. Learning the basics
- Configuring the operating system for the first time
You may need to configure the operating system when it is first used. The configuration process may include the procedures below:
- Accepting the end user license agreement
- Configuring the Internet connection
- Creating a user account
Operating system interfaces
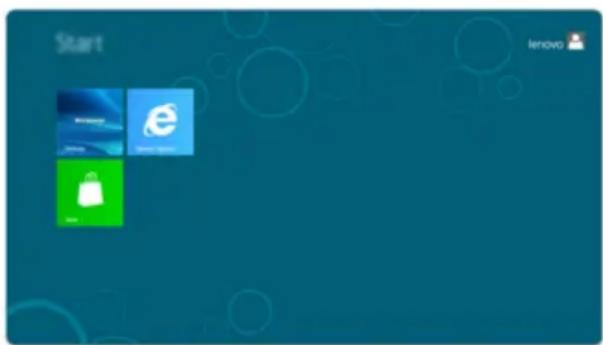
Windows 8 comes with two main user interfaces: the Start screen and the Windows desktop.
To switch from the Start screen to the Windows desktop, do one of the following:
- Select the Windows desktop tile on the Start screen.
- Press the Windows key + D.
To switch from desktop to Start screen, do one of the following:
- Select Start from the Charms.
- Move the pointer to the lower-left corner and then select the Start screen thumbnail when it is displayed.
Start screen Desktop
text_image
Start lenovo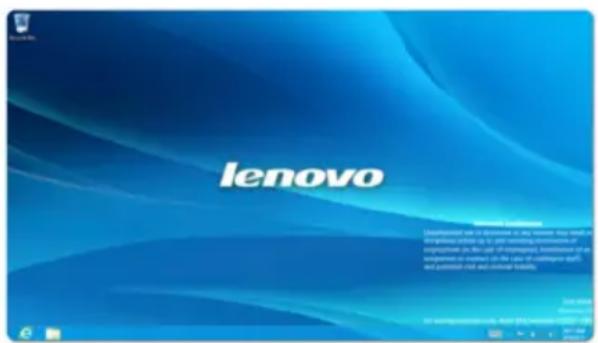
text_image
lenovo Microsoft Windows Downloaded all a version of the author, you should be belarginal, which is to get something important or important as the use of company, information of the software or updates (in the case of company, the company itself, and yourself not and external liability) © 2016 Microsoft © Microsoft ExcelThe Charms
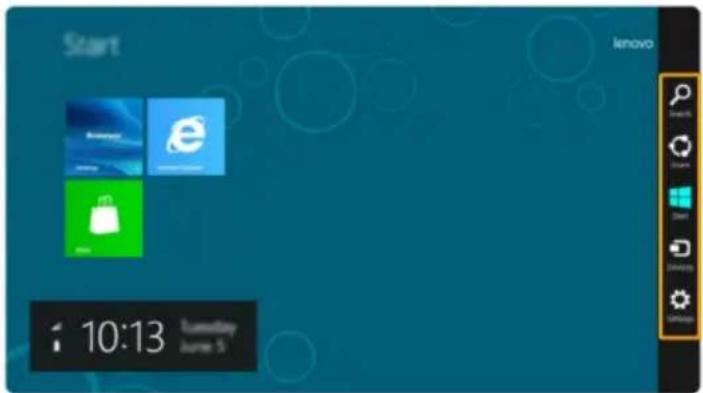
The five Charms provide new and faster ways to perform many basic tasks, and are always available regardless of which app you are currently in.
To display the Charms, do one of the following:
- Move the pointer to the upper-right or lower-right corner until the Charms bar is displayed.
- Press Windows key + C.
text_image
Start lenovo 10:13 Tuesday June 5Search charm
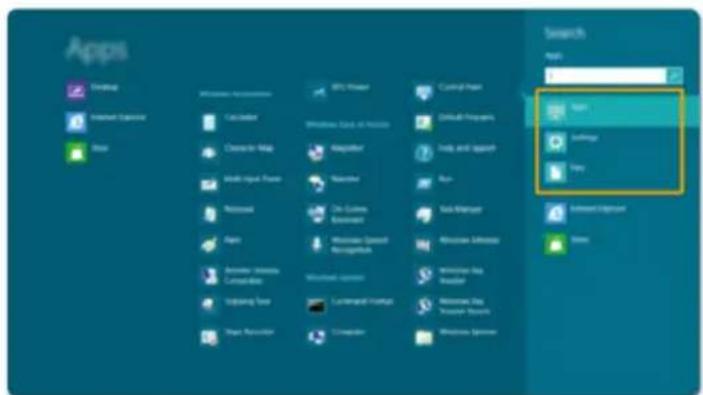
The Search charm is a powerful new way to find whatever you are looking for, including apps, settings and files.
text_image
Apps Start Settings Help Accessories Catalator Chrome Map Multi-Input Format Network Agent Hardware Manager Compatible Upgrading Tool Hyper Assistant IPCs Header Windows Tools All Options Regulator Navigator On-Clining Environment Windows Control Monitoring Windows System Customized Features Computer Control Help Default Programs Help and Approach Run... Sub-Manager Windows Additional Windows Key Header Windows Key Manager Tools Windows OptionsChapter 2. Learning the basics

Share charm
The Share charm lets you send links, photos, and more to your friends and social networks without leaving the app you are in.

Start charm
The Start charm is a fast way to go to the Start screen.

Devices charm
The Devices charm allows you to connect or send files to any external devices, such as digital cameras, TVs, or printers.

Settings charm
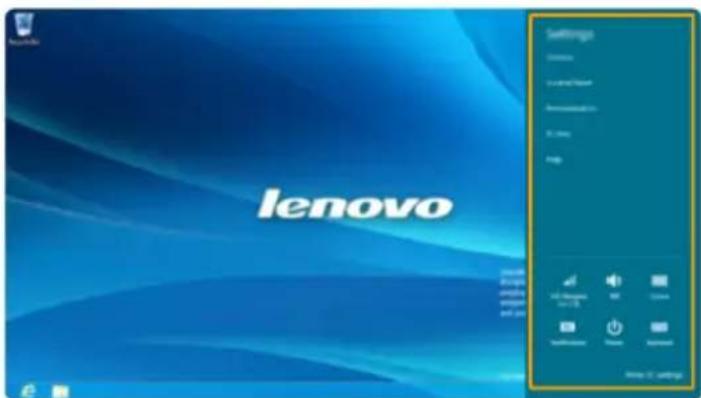
The Settings charm lets you perform basic tasks, such as setting the volume or shutting down the computer. Also, you can get to the Control Panel through the Settings charm when using the desktop screen.
text_image
lenovo Settings 1.2.3.0 (Windows) 2.4.0 (Windows) 3.5.0 (Windows) 4.6.0 (Windows) 5.7.0 (Windows) 6.8.0 (Windows) 7.9.0 (Windows) 8.0.0 (Windows) 8.1.0 (Windows) 8.2.0 (Windows) 8.3.0 (Windows) 8.4.0 (Windows) 8.5.0 (Windows) 8.6.0 (Windows) 8.7.0 (Windows) 8.8.0 (Windows) 8.9.0 (Windows) 9.0.0 (Windows) 9.1.0 (Windows) 9.2.0 (Windows) 9.3.0 (Windows) 9.4.0 (Windows) 9.5.0 (Windows) 9.6.0 (Windows) 9.7.0 (Windows) 9.8.0 (Windows) 9.9.0 (Windows) 10.0.0 (Windows)- Putting the computer to sleep or shutting it down
When you have finished working with your computer, you can put it to sleep or shut it down.
- Putting your computer to sleep
If you will be away from your computer for a short time, put the computer to sleep.
When the computer is in sleep mode, you can quickly wake it to resume use, bypassing the startup process.
To put the computer to sleep, do one of the following:
- Close the display panel.
- Press the power button.
- Press Fn+F1.
- Open the Charms and then select Settings → Power → Sleep.
Note: Wait until the power indicator light starts blinking (indicating that the computer is in sleep mode) before you move your computer. Moving your computer while the hard disk is spinning can damage the hard disk, causing loss of data.
To wake the computer, do one of the following:
- Press the power button.
- Press any key on the keyboard.
Chapter 2. Learning the basics
■ Shutting down the computer
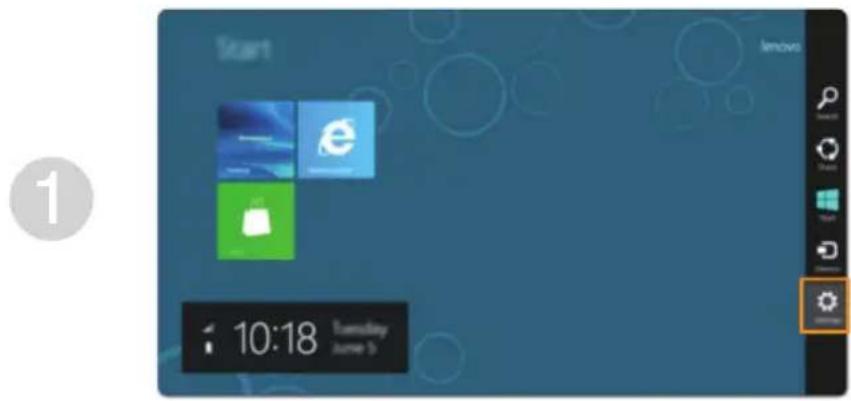
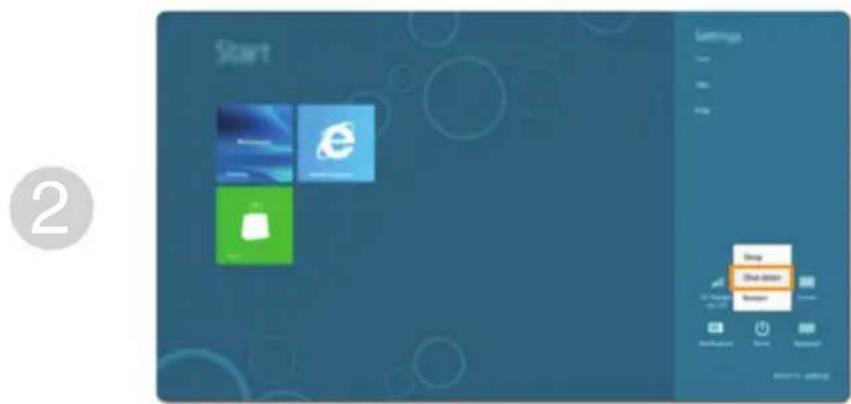
If you are not going to use your computer for a long time, shut it down. To shut down your computer:
① Open the Charms, and then Settings
text_image
Start lenovo 1 10:18 Tuesday June 5② Select Power ⏻ → Shutdown.
text_image
Start 2 Settings Open Start Menu Save HelpUsing the touchpad
text_image
1 2 3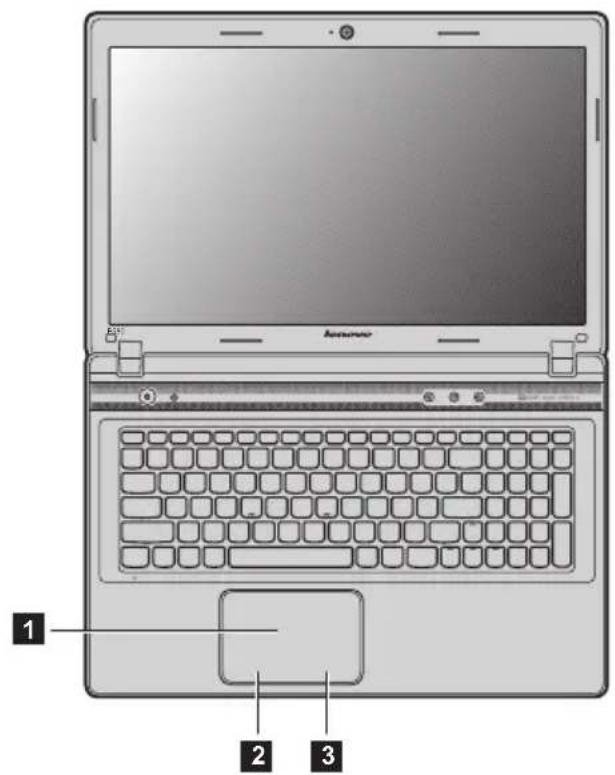
text_image
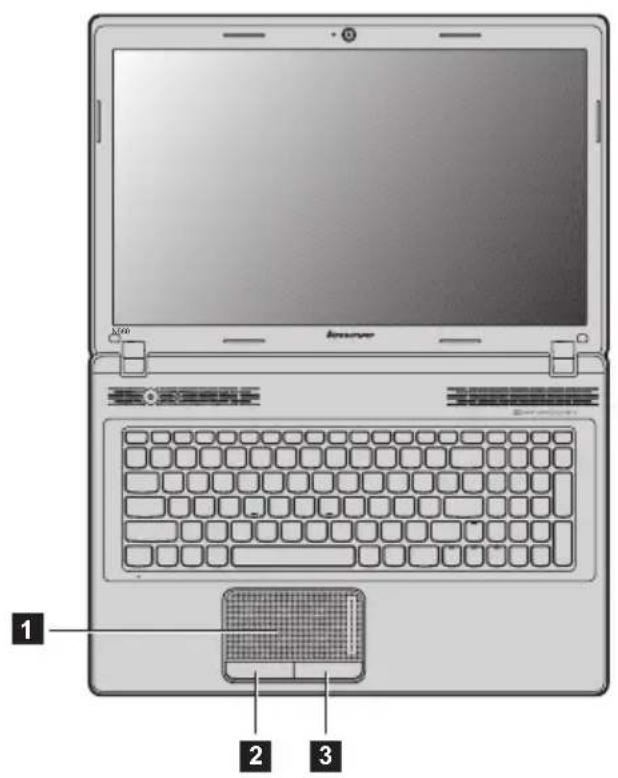
1 2 31 Touchpad
To move the pointer on the screen, slide your fingertip over the pad in the direction in which you want the pointer to move.
2 Left click button
The function corresponds to that of the left mouse button on a conventional mouse.
3 Right click button
The function corresponds to that of the right mouse button on a conventional mouse.
Note: You can enable/disable the touchpad using Fn+F6.
Chapter 2. Learning the basics
Function key combinations
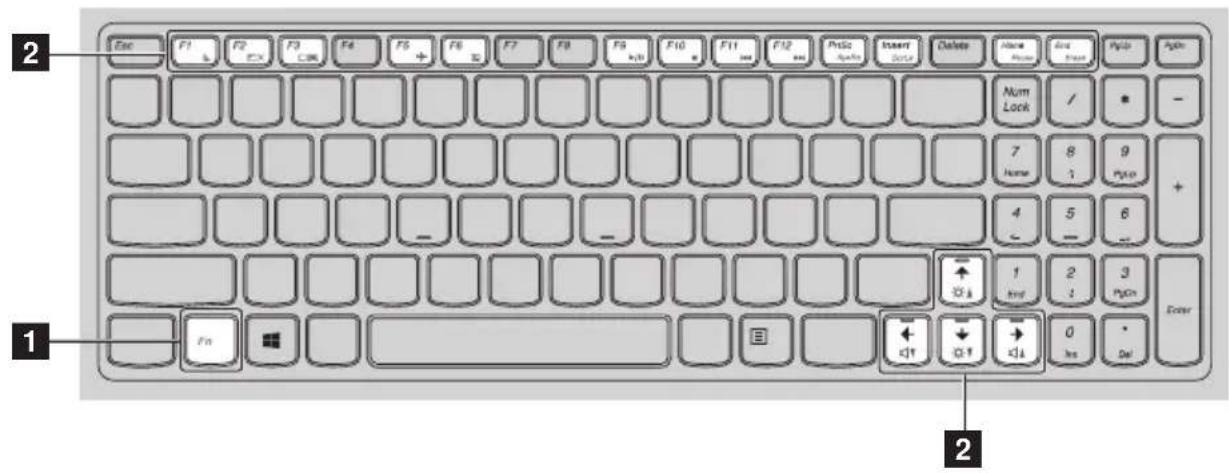
Through the use of the function keys, you can change operational features instantly. To use this function, press and hold Fn 1; then press one of the function keys 2
text_image
2 1 2The following describes the features of each function key.
Fn + F1: Enter sleep mode.
Fn + F2: Turn on/off the backlight of the LCD screen.
Fn + F3: Open the interface for the display device switch to select this notebook or an external display.
Fn + F5: Enable/Disable Airplane mode.
Fn + F6: Enable/Disable the touchpad.
Fn + F9: Start/Pause playback of Windows Media Player.
Fn + F10: Stop playback of Windows Media Player.
Fn + F11: Skip to the previous track.
Fn + F12: Skip to the next track.
Fn + PrtSc: Activate the system request.
Fn + Insert: Enable/Disable the scroll lock.
Fn + Home: Activate the pause function.
Fn + End: Activate the break function.
Fn + ↑ / ↓: Increase/Decrease display brightness.
Fn + → / ←: Increase/Decrease sound volume.
■ Connecting external devices
Your computer has a wide range of built-in features and connection capabilities.
■ Using memory cards (not supplied)
Your computer supports the following types of memory cards:
- Secure Digital (SD) card
- MultiMediaCard (MMC)
Note:
- Insert ONLY one card in the slot at a time.
- This card reader does not support SDIO devices (e.g., SDIO Bluetooth, etc.).
Inserting a memory card
① Push the dummy card until you hear a click. Gently pull the dummy card out of the memory card slot.
Note: The dummy card is used for preventing dust and small particles from entering the inside of your computer when the memory card slot is not in use. Retain the dummy card for future use.
② Slide the memory card in until it clicks into place.
Removing a memory card
① Push the memory card until you hear a click.
② Gently pull the memory card out of the memory card slot.
Note: Before removing the memory card, disable it via Windows safely remove hardware and eject media utility to avoid data corruption.
■ Connecting a universal serial bus (USB) device
Your computer comes with four USB ports compatible with USB devices.
Note: When using a high power consumption USB device such as USB ODD, use the external device's power adapter. Otherwise, the device may not be recognized, and system shut down may result.
■ Connecting a Bluetooth device (on select models)
If your computer has an integrated Bluetooth adapter, it can connect to and transfer data wirelessly with other Bluetooth enabled devices, such as notebook computers, PDAs and cell phones. You can transfer data between these devices without cables and up to 10 meters range in open space.
Note: The actual maximum range may vary due to interference and transmission barriers. To get the best possible connection speed, place the device as near your computer as possible.
Enabling Bluetooth communications on your computer
To enable Bluetooth functions, do one of the following:
- Press Fn+F5 to disable Airplane mode.
- Open the Charms and select Settings → to open the Network configuration page, and then toggle the Airplane mode switch to Off.
Notes:
- When you do not need to use the Bluetooth function, turn it off to save battery power.
- You need to pair the Bluetooth enabled device with your computer before you can transfer data between them. Read the documentation supplied with the Bluetooth enabled device for details on how to pair the device with your computer.
Chapter 2. Learning the basics
Special keys and buttons
text_image
Diagram of a laptop with labeled components including a logo and connection point 1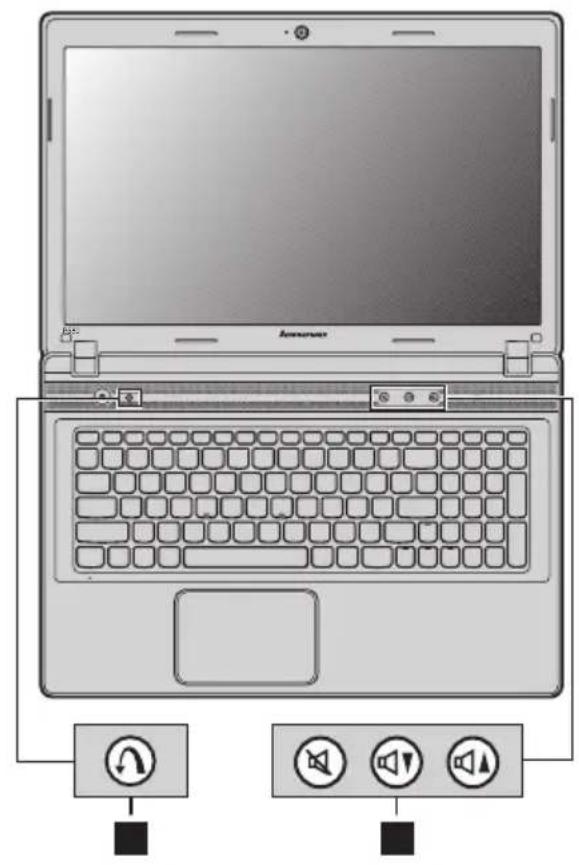
text_image
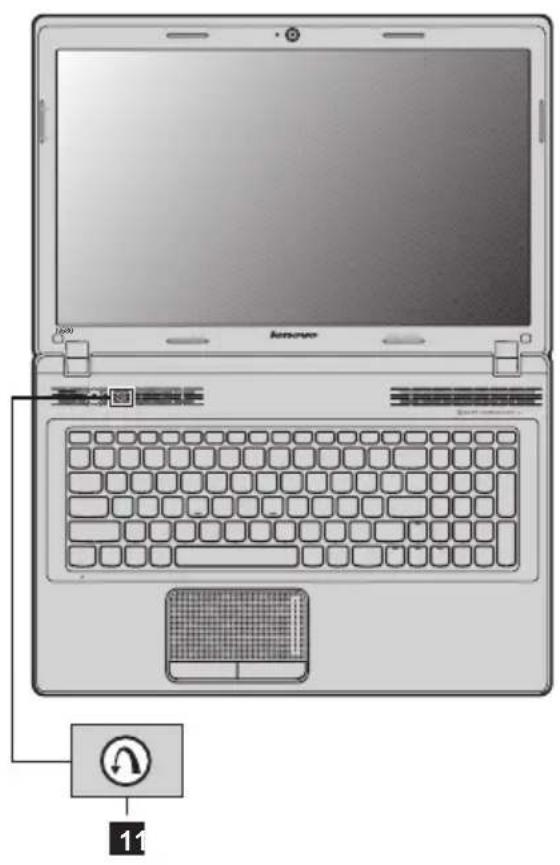
Diagram of a laptop with labeled control buttons and speaker icons for audio and sound recording functionsNovo button 1
When the computer is off, press this button to start the Lenovo Recovery system or the BIOS setup utility, or to enter the boot menu.
Volume buttons 2
Mute button:
Mute/Unmute the sound.
Volume Down button:
Quickly decrease the volume level.
Volume Up button:
Quickly increase the volume level.
Chapter 2. Learning the basics
System status indicators
These indicators inform you of the computer status.

text_image
Diagram of a remote control panel with labeled buttons and indicator lightsa Power status indicator
b Battery status indicator
C Caps lock indicator
Securing your computer
This section provides information about how to help protect your computer from theft and unauthorized use.
■ Attaching a security lock (not supplied)
You can attach a security lock to your computer to help prevent it from being removed without your permission. For details on installing the security lock, please refer to the instructions shipped with the security lock that you have purchased.
Refer to the “Left-side view” on page 5 for the location of the Kensington slot.
Note:
- Before purchasing any security product, verify that it is compatible with this type of security keyhole.
- You are responsible for evaluating, selecting, and implementing the locking devices and security features. Lenovo offers no comment judgment or warranty regarding the function, quality or performance of locking devices and security features.
■ Using passwords
Passwords help prevent your computer from being used by others. After you set a password and enable it, a prompt will appear on the screen each time you power on the computer. Enter your password at the prompt. The computer cannot be used until you enter the correct password. For details about how to set a password, see the Help information on the right side of the screen in the BIOS setup utility.
■ Using Switchable Graphics (specific models only)
Some IdeaPad models support Switchable Graphics. The system will automatically choose and switch over to the integrated or dedicated GPU according to the current loading.
©
Wireless connection
Wireless connections provide mobile access to the Internet, allowing you to stay online anywhere the wireless signal covers.
Divided by the signal scales, wireless connection to the Internet can be built based on the following standards.
| Wi-Fi | Wi-Fi networks cover a small physical area, like a home, office, or small group of buildings. An access point is necessary for the connection. |
| WiMAX WiMAX networks | s connect several Wireless LAN systems to cover a metropolitan area, providing high-speed broadband access without the need for cables. |
Note: Your computer may not support all wireless connection methods.
Chapter 3. Connecting to the Internet
■ Using Wi-Fi/WiMAX (on select models)
Enabling wireless connection
To enable wireless functions, do one of the following:
- Press Fn+F5 to disable Airplane mode.
- Open the Charms and select Settings → to open the Network configuration page, and then toggle the Airplane mode switch to Off.
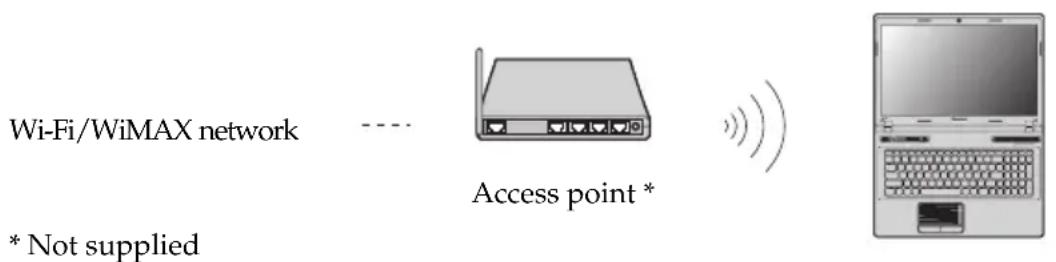
Hardware connection
text_image
Wi-Fi/WiMAX network * Not supplied Access point * *Connecting to a wireless network
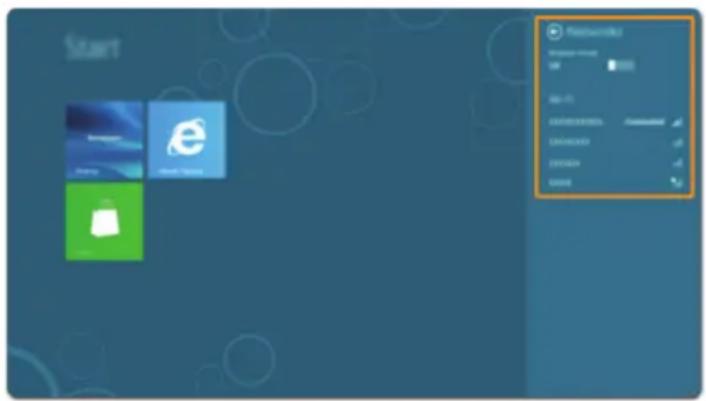
After wireless has been enabled, the computer will automatically scan for available wireless networks and display them in the wireless network list. To connect to a wireless network, click the network name in the list, and then click Connect.
Note: Some networks require a network security key or passphrase for connection. To connect to one of those networks, ask the network administrator or the Internet service provider (ISP) for the security key or passphrase.
text_image
Start Password Password name: mail email ID: password:12340000000 email:12340000000 email:12340000000 email:12340000000 email:12340000000 email:12340000000 email:12340000000 email:12340000000 email:unknown email:unknown email:unknown email:unknown email:unknown email:unknown email:unknown email:unknown email:unknown email:unknown email:unknown email:unknown email:unknown email:unknown email:unknown email:unknown email:unknown email:unknown email:unknown email:unknown email:unknown email:unknown email:unknown email:unknown email:unknown email: unknown email:unknown email:unknown email:unknown email:unknown email:unknown email:unknown email:unknown email:unknown email:unknown email:unknown email:unknown email:unknown email:unknown email:unknown email:unknown email:unknown email:unknown email:unknown email:unknown email:unknown email:unknown email:unknown email:unknown email:unknown email:known email:known email:known email:known email:known email:known email:known email:known email:known email:known email:known email:known email:known email:known email:known email:known email:known email:known email:known email:known email:known email:known email:known email:known email:known email:unknownChapter 4. Lenovo OneKey Recovery system
The Lenovo OneKey Recovery system is software designed to back up and restore your computer. You can use it to restore the system partition to its original status in case of a system failure. You can also create user backups for easy restoration as required.
Note: To utilize the features of the OneKey Recovery system, your hard disk already includes a hidden partition by default to store the system image file and the OneKey Recovery system program files. This default partition is hidden for security reasons, which explains why the available disk space is less than the stated capacity.
■ Backing up the system partition
You can back up the system partition to an image file. To back up the system partition:
① Press the Novo button to start the Lenovo OneKey Recovery system.
② Click System Backup.
③ Select a back-up location and click Next to start the backup.
Notes:
- You can choose a back-up location on the local hard disk drive or an external storage device.
- The back-up process may take a while.
- The back-up process is only available when Windows can be started normally.
Restoring
You can choose to restore the system partition to its original status or to a previously created back-up point. To restore the system partition:
① Press the Novo button to start the Lenovo OneKey Recovery system.
② Click System Recovery. The computer will restart to the recovery environment.
③ Follow the on-screen instructions to restore the system partition to its original status or to a previously created back-up point.
Notes:
- The recovery process is irreversible. Make sure to back up any data you wish to save on the system partition before starting the recovery process.
- The recovery process may take a while. So be sure to connect the AC adapter to your computer during the recovery process.
- The above instructions should be followed when Windows can be started normally.
If Windows cannot be started, then follow the steps below to start the Lenovo OneKey Recovery system:
① Shut down the computer.
② Press the Novo button. From the Novo button menu, select the Lenovo OneKey Recovery system and press Enter.
Chapter 5. Troubleshooting
Frequently asked questions
This section lists frequently asked questions by category.
■ Finding information
What safety precautions should I follow when using my computer?
The Lenovo Safety and General Information Guide which came with your computer contains safety precautions for using your computer. Read and follow all the precautions when using your computer.
Where can I find the hardware specifications for my computer?
You can find the hardware specifications for your computer on the printed flyers which came with your computer.
Where can I find warranty information?
For the warranty applicable to your computer, including the warranty period and type of warranty service, see the Lenovo limited warranty flyer that came with your computer.
- Drivers and preinstalled software
Where are the installation discs for Lenovo preinstalled (desktop) software?
Your computer did not come with any installation discs for Lenovo preinstalled software. If you need to reinstall any preinstalled software, you can find the installation program located on the D partition of your hard disk. If you cannot find the installation program there, you can also download it from the Lenovo consumer support website.
Where can I find drivers for the various hardware devices of my computer?
If your computer is preinstalled with a Windows operating system, Lenovo provides drivers for all the hardware devices that you need on the D partition of your hard disk. You can also download the latest device drivers from the Lenovo consumer support website.
■ Lenovo OneKey Recovery system
Where are the recovery discs?
Your computer did not come with any recovery discs. Use the Lenovo OneKey Recovery system if you need to restore the system to its original factory status.
What can I do if the back-up process fails?
If you can start the backup but it fails during the back-up process, try the following steps:
① Close all open programs, and then restart the back-up process.
② Check to see if the destination media is damaged. If it is, replace the damaged media. Otherwise, select another destination path and try again.
When do I need to restore the system to its original factory status?
Use this feature when the operating system fails to start. If you have any critical data on the computer that you want to save, back it up before starting the recovery process.
BIOS setup utility
What is the BIOS setup utility?
The BIOS setup utility is a ROM-based software program. It displays basic computer information and provides options for setting boot devices, security, hardware mode, and other user preferences.
How can I start the BIOS setup utility?
To start the BIOS setup utility:
① Shut down the computer.
② Press the Novo button and then select BIOS Setup.
How can I change the boot mode?
There are two boot modes: UEFI and Legacy. To change the boot mode, start the BIOS setup utility and set boot mode to UEFI or Legacy support on the boot menu.
When do I need to change the boot mode?
The default boot mode for your computer is UEFI mode. If you choose to install a legacy Windows operating system (that is, any operating system prior to Windows 8) on your computer, you must change the boot mode to Legacy support. A legacy Windows operating system cannot be installed until you change the boot mode.
Getting help
How can I contact the customer support center?
See "Chapter 3. Getting help and service" of the Lenovo Safety and General Information Guide.
Troubleshooting
Display problems
| When I turn on the computer, nothing appears on the screen. | ·If the screen is blank, make sure that:- The battery is installed correctly.- The AC adapter is connected to the computer and the power cord is plugged into a working electrical outlet.- The computer power is on. (Press the power button again for confirmation.)- The memory is installed correctly.·If these items are properly set, and the screen remains blank, have the computer serviced. |
| When I turn on the computer, only a white cursor appears on a blank screen. | ·Restore the system partition to its original status or a previously created back-up point using the OneKey Recovery system. If you still see only the cursor on the screen, have the computer serviced. |
| My screen goes blank while the computer is on. | ·Your screen saver or power management may be enabled.Do one of the following to exit from the screen saver or to resume from sleep mode:- Press any key on the keyboard.- Press the power button.- Press Fn+F2 to confirm whether the backlight for the LCD screen has been turned off. |
Password problems
| I forgot my password. | ·If you forget your user password, ask the system administrator to clear your user password.·If you forget your HDD password, a Lenovo authorized servicer cannot reset your password or recover data from the hard disk. You must take your computer to a Lenovo authorized servicer or a marketing representative to have the hard disk drive replaced. Proof of purchase is required, and a fee will be charged for parts and service.·If you forget your supervisor password, a Lenovo authorized servicer cannot reset your password. You must take your computer to a Lenovo authorized servicer or a marketing representative to have the system board replaced. Proof of purchase is required, and a fee will be charged for parts and service. |
Sleep problems
The critical low-battery error message appears, and the computer immediately turns off.
The computer enters sleep mode immediately after Power-on self-test (POST).
- The battery power is getting low. Connect the AC adapter to the computer, or replace the battery with a fully charged one.
- Make sure that:
- The battery is charged.
- The operating temperature is within the acceptable range. See "Chapter 2. Use and care Information" of Lenovo Safety and General Information Guide.
Note: If the battery is charged and the temperature is within range, have the computer serviced.
The computer does not return from sleep mode and the computer does not work.
- If your computer is in sleep mode, connect the AC adapter to the computer, then press any key or the power button.
- If the system still does not return from sleep mode, your system has stopped responding, and you cannot turn off the computer; reset the computer. Unsaved data may be lost. To reset the computer, press and hold the power button for 4 seconds or more. If the computer is still not reset, remove the AC adapter and the battery.
Computer screen problems
The screen is blank. • Do the following:
- If you are using the AC adapter, or using the battery, and the battery status indicator is on, press Fn+↑ to make the screen brighter.
- If the power indicator is in blinking, press the power button to resume from the sleep mode.
- If the problem persists, follow the solution in the following problem “The screen is unreadable or distorted.”
- Press Fn+F2 to confirm whether the backlight for the LCD screen has been turned off.
The screen is unreadable or distorted.
- Make sure that:
- The display device driver is installed correctly.
- The screen resolution and color quality are correctly set.
- The monitor type is correct.
Incorrect characters appear on the screen.
- Did you install the operating system or programs correctly? If they are installed and configured correctly, have the computer serviced.
Chapter 5. Troubleshooting
Sound problems
No sound can be heard from the speaker even when the volume is turned up.
- Make sure that:
- The Mute function is off.
- The headphone jack is not used.
- Speakers are selected as the playback device.
Battery problems
Your computer shuts down before the battery status indicator shows empty. -or- Your computer operates after the battery status indicator shows empty.
- Discharge and recharge the battery.
The computer does not operate with a fully charged battery.
- The surge protector in the battery might be active. Turn off the computer for one minute to reset the protector; then turn on the computer again.
A hard disk drive problem
The hard disk drive does not work.
- In the Boot menu in BIOS setup utility, make sure that the hard disk drive is included in the EFI/Boot device priority correctly.
A startup problem
The Microsoft ^® Windows operating system does not start.
- Use the OneKey Recovery system to restore the system partition to its original status or a previously created backup point. For details about the OneKey Recovery system, see "Lenovo OneKey Recovery system" on page 27.
A backup problem
Backup cannot be made.
- You are not currently using a Windows operating system.
- There is not enough space to store the backed-up data. You will need to free more space on the destination device.
Other problems
Your computer does not respond.
The computer does not start from a device you want.
The connected external device does not work.
- To turn off your computer, press and hold the power button for 4 seconds or more. If the computer still does not respond, remove the AC adapter and the battery.
- Your computer might lock when it enters sleep mode during a communication operation. Disable the sleep timer when you are working on the network.
- See the Boot menu of the BIOS setup utility. Make sure that the EFI/Boot device priority in the BIOS setup utility is set so that the computer starts from the device you want.
- Press the Novo button when the computer is powered off and select Boot Device Menu. Then select the device you want the computer to start from.
- Do not connect or disconnect any external device cables other than USB while the computer power is on; otherwise, you might damage your computer.
- When using a high power consumption external devices such as an external USB optical disk drive, use external device power adapter. Otherwise, the device may not be recognized, or system shut down may result.
Appendix A. CRU instructions
Note:
- The illustrations used in this chapter are of the Lenovo IdeaPad N580, unless otherwise stated.
- The following procedures about removing and replacing devices are the same for the Lenovo IdeaPad P580/P585/N580/N581/N585/N586.
Replacing the battery
Note: Use only the battery provided by Lenovo. Any other battery could ignite or explode.
To replace the battery, do the following:
① Turn off the computer. Disconnect the AC adapter and all cables from the computer.
② Close the computer display, and turn the computer over.
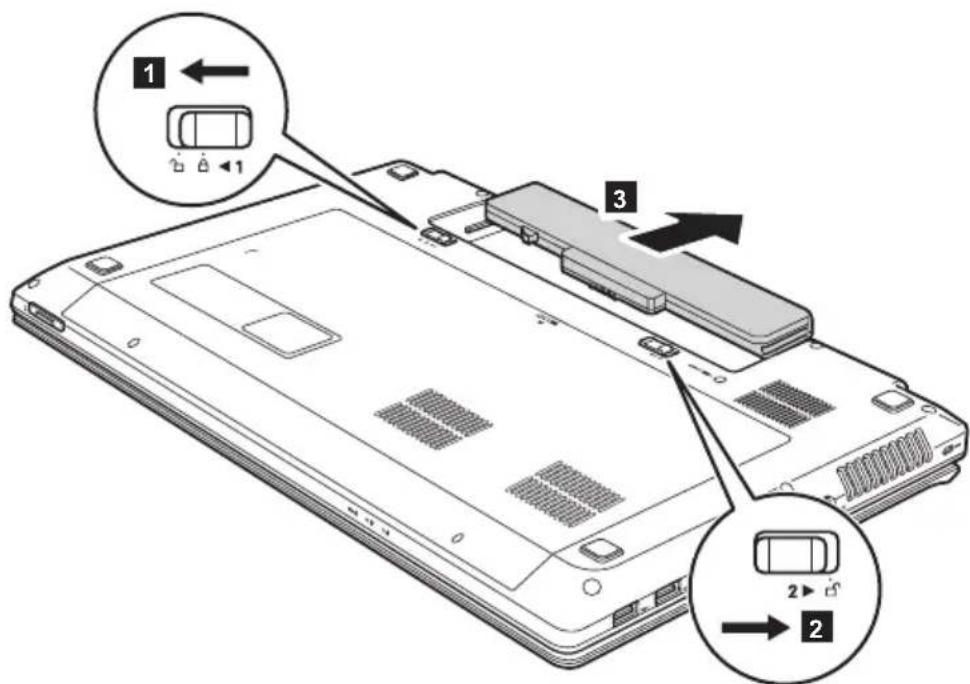
③ Unlock the manual battery latch 1 Holding the spring-loaded battery latch in the unlocked position 2 remove the battery pack in the direction shown by the arrow 3
text_image
Diagram of a laptop chassis showing labeled components and directional arrows indicating assembly or movement.4 Install a fully charged battery.
⑤ Slide the manual battery latch to the locked position.
6 Turn the computer over again. Connect the AC adapter and the cables to the computer again.
Replacing the hard disk drive
You can increase the storage capacity of your computer by replacing the hard disk drive with one of greater capacity. You can purchase a new hard disk drive from your reseller or Lenovo marketing representative.
Note:
- Replace the hard disk drive only if you upgrade it or have it repaired. The connectors and bay of the hard disk drive were not designed for frequent changes, or drive swapping.
- The preinstalled softwares are not included on an optional hard disk drive.
Handling a hard disk drive
- Do not drop the drive or subject it to physical shocks. Put the drive on a material, such as soft cloth, that absorbs the physical shock.
- Do not apply pressure to the cover of the drive.
- Do not touch the connector.
The drive is very sensitive. Incorrect handling can cause damage and permanent loss of data on the hard disk. Before removing the hard disk drive, make a backup copy of all the information on the hard disk, and then turn the computer off. Never remove the drive while the system is operating or in sleep mode.
Appendix A. CRU instructions
To replace the hard disk drive, do the following:
① Turn off the computer; then disconnect the AC adapter and all cables from the computer.
② Close the computer display, and then turn the computer over.
③ Remove the battery pack.
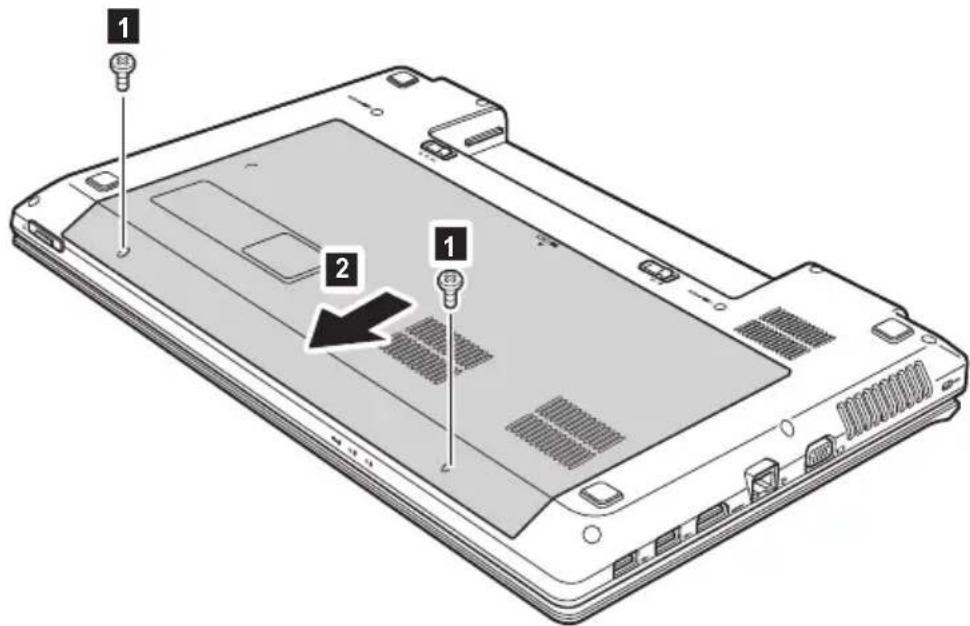
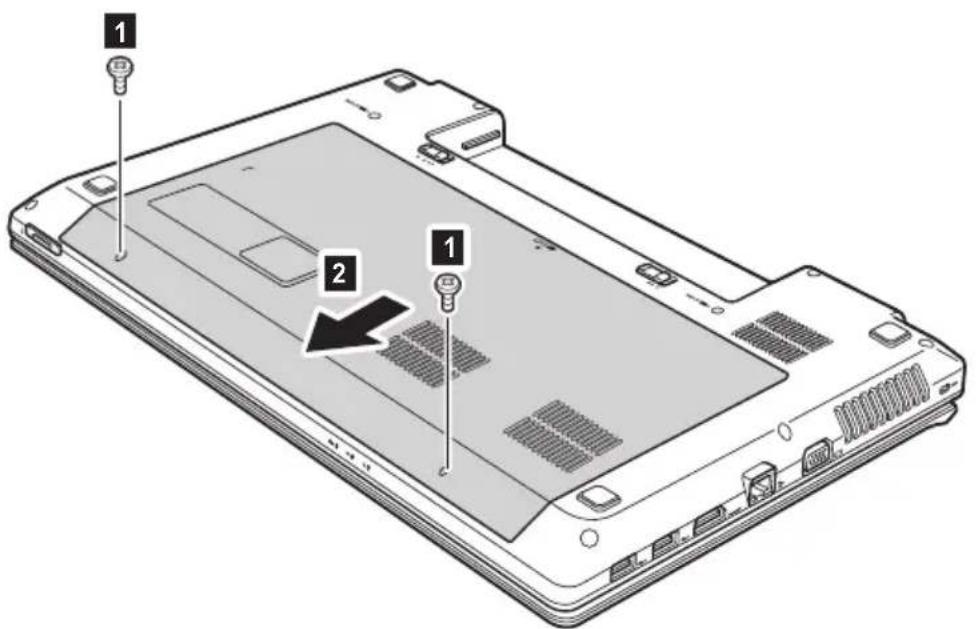
4 Remove the Optical drive/Hard disk drive (HDD)/Memory/CPU (Central processing unit)/Mini PCI Express Card slot compartment cover.
a. Remove the screws that secure the compartment cover 1 b. Remove the compartment cover 2
text_image
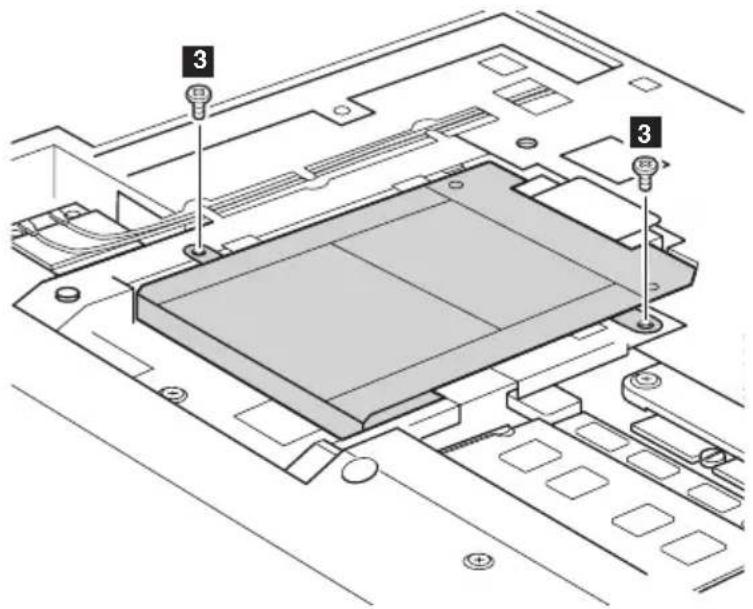
Diagram of a laptop rear panel with labeled components and an arrow indicating a specific area or feature.⑤ Remove the frame fixing screws 3
text_image
Technical diagram of a computer motherboard with labeled components and numbered partsAppendix A. CRU instructions
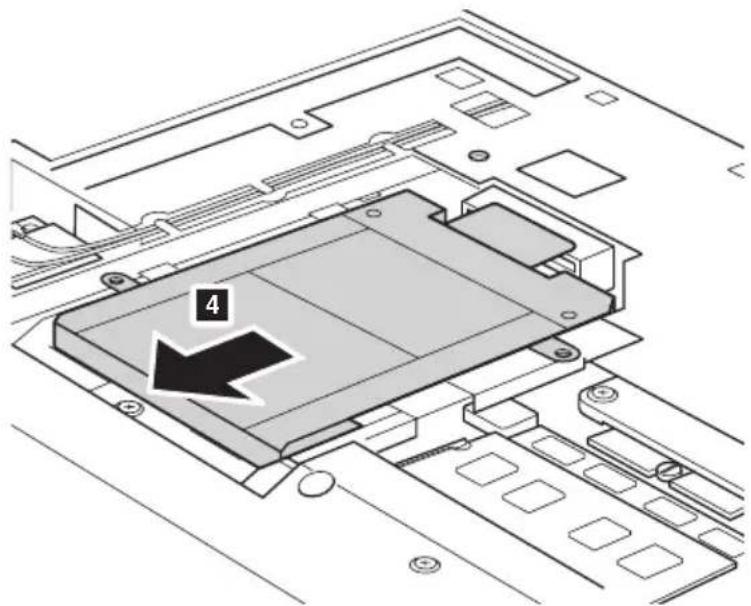
⑥ Pull the HDD bracket in the direction shown by arrow 4
text_image
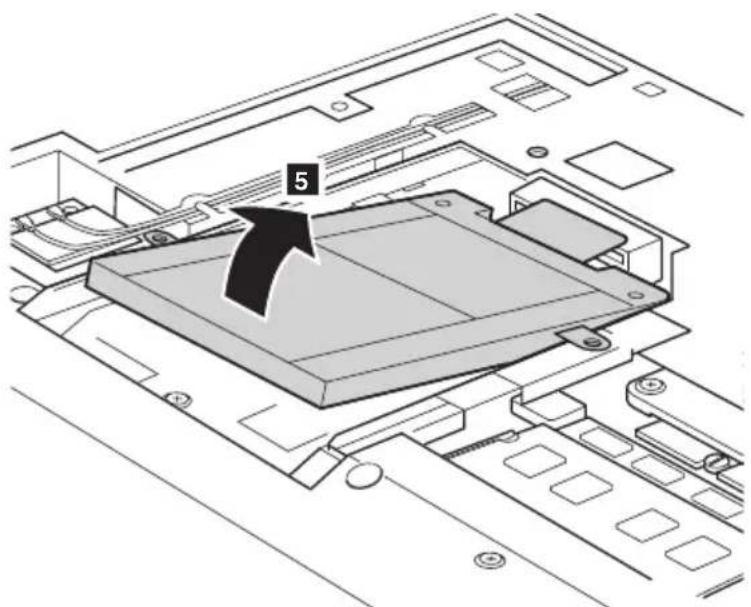
4⑦ Take out the hard disk drive secured in a metal frame 5
text_image
58 Remove the screws and detach the metal frame from the hard disk drive.
9 Attach the metal frame to a new hard disk drive and tighten the screws.
10 Put the hard disk drive gently into the hard disk drive bay with the tab facing upwards and the connectors facing each other; then push it firmly into space.
⑪ Reinstall the frame fixing screws.
12 After aligning the attachment clips with their matching gaps, reinstall the compartment cover.
⑬ Reinstall and tighten the screws.
14 Reinstall the battery pack.
15 Turn the computer over again. Connect the AC adapter and the cables to the computer again.
Replacing memory
You can increase the amount of memory in your computer by installing a double-data-rate three synchronous dynamic random access memory (DDR3 SDRAM)-available as an option-in the memory slot of your computer. DDR3 SDRAMs are available in various capacities.
Note:
- Use only the memory types supported by your computer. If you incorrectly install optional memory, or install an unsupported memory type, a warning beep will sound when you try to start the computer.
- Select models of the computer may have only one memory slot. Refer to the actual product. However, the procedure for replacing the memory is the same as listed below.
To install a DDR3 SDRAM, do the following:
① Touch a metal table or a grounded metal object to reduce any static electricity in your body, which could damage the DDR3 SDRAM. Do not touch the contact edge of the DDR3 SDRAM.
② Turn off the computer. Disconnect the AC adapter and all cables from the computer.
③ Close the computer display, and turn the computer over.
④ Remove the battery again.
⑤ Remove the Optical drive/Hard disk drive (HDD)/Memory/CPU (Central processing unit)/Mini PCI Express Card slot compartment cover.
a. Remove the screws that secure the compartment cover 1 b. Remove the compartment cover 2
text_image
Diagram of a device rear panel with labeled components and an arrow indicating a specific area or feature.6 If two DDR3 SDRAMs are already installed in the memory slot, remove one of them to make room for the new one by pressing out on the latches on both edges of the socket at the same time. Be sure to save the old DDR3 SDRAM for future use.

text_image
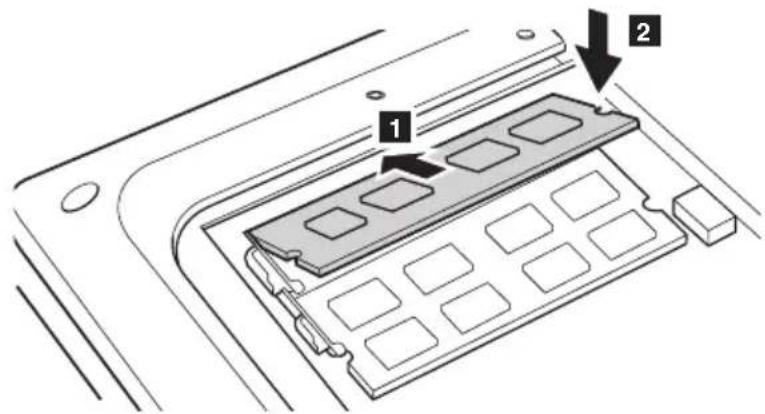
Diagram of a device panel with labeled components and directional arrows indicating movement or assembly.⑦ Align the notch of the DDR3 SDRAM with the protrusion of the socket and gently insert the DDR3 SDRAM into the socket at a 30-45° angle.
Appendix A. CRU instructions
⑧ Push the DDR3 SDRAM inward toward the socket until the latches on both edges of the socket are pushed into the closed position.
text_image
Technical diagram showing a device with labeled components, including numbered parts 1 and 2.⑨ After aligning the attachment clips with their matching gaps, reinstall the compartment cover.
10 Reinstall and tighten the screws.
⑪ Reinstall the battery.
⑫ Turn the computer over again. Connect the AC adapter and the cables to the computer again.
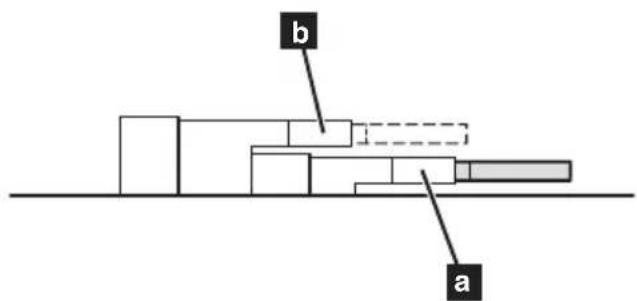
Note: If only one DDR3 SDRAM is used on the computer you are servicing, the card must be installed in SLOT-0 (lower slot), but not in SLOT-1 (upper slot).
text_image
b aTo make sure that the DDR3 SDRAM is installed correctly, do as follows:
① Turn the computer on.
② Hold F2 during startup. The BIOS setup utility screen opens. The System Memory item shows the total amount of memory installed in your computer.
■ Replacing the wireless LAN card
To replace the wireless LAN card, do the following:
① Turn off the computer; then disconnect the AC adapter and all cables from the computer.
② Close the computer display, and then turn the computer over.
③ Remove the battery pack.
4 Remove the Optical drive/Hard disk drive/Memory/Central processing unit/Mini PCI Express Card slot compartment cover.
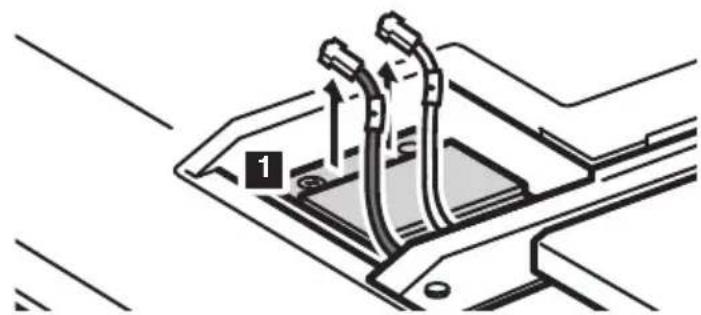
⑤ Disconnect the two wireless LAN cables (one black marked, one white marked) 1.
natural_image
Technical diagram of a mechanical component with labeled parts (no text or symbols present)Note: The wireless LAN card in select models may have only one cable (black).
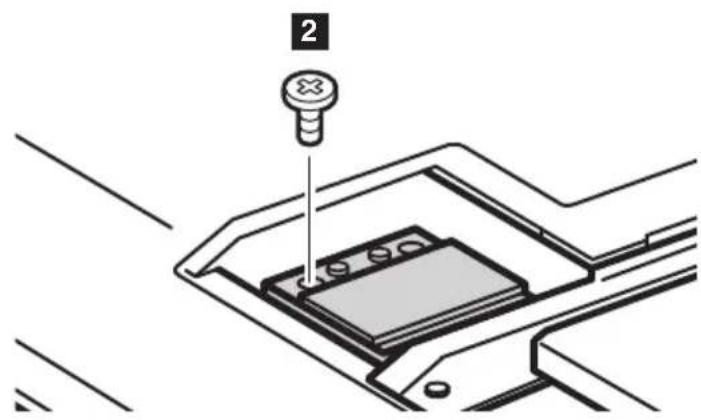
6 Remove the screw that secures the wireless LAN card . 2
text_image
2Appendix A. CRU instructions
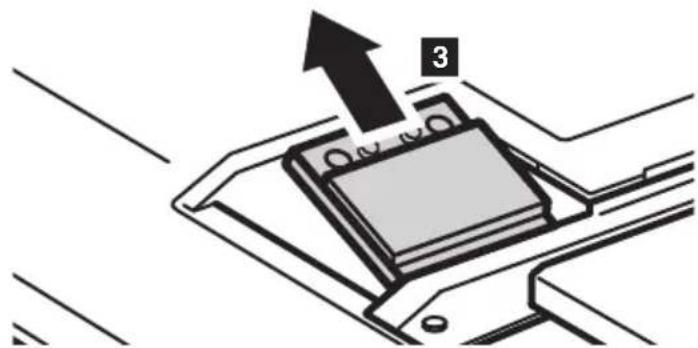
⑦ Take out the wireless LAN card ③
text_image
38 Install the new wireless LAN card.
⑨ Reinstall and tighten the screw.
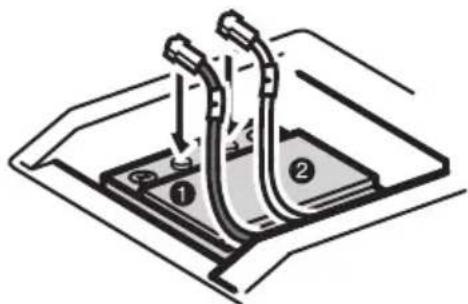
⑩ Reconnect the two wireless LAN cables (one black marked, one white marked).
natural_image
Diagram of a mechanical device with two labeled parts (① and ②), showing internal components and directional arrows (no text or symbols beyond labels)Note: When installing or reinstalling the wireless card:
- In models with a wireless LAN card that has two cables:
Bug the black cable (MAIN) into the jack 1.
15.ug the white cable (AUX) into the jack 2.
- In models with a wireless LAN card that has only one cable, plug the black cable (MAIN) into the jack 1.
⑪ Reinstall the compartment cover and tighten the screws.
⑫ Reinstall the battery pack.
13 Turn the computer over again. Connect the AC adapter and the cables to the computer again.
■ ■ Removing the optical drive
To remove the optical drive, do the following:
① Remove the Optical drive/Hard disk drive/Memory/Central processing unit/Mini PCI Express Card slot compartment cover.
② Remove the screw shown in the illustration 1
③ Gently pull the optical drive out ②

text_image
Technical diagram showing a device with labeled parts and an inset magnified view of the tool interacting with a component.Appendix A. CRU instructions
The following table provides a list of CRUs (Customer Replaceable Units) for your computer, and informs you of where to find replacement instructions.
| Setup Poster User Guide | |
| AC adapter O | |
| Power cord for AC adapter O | |
| Battery O O | |
| Bottom access doors O | |
| Hard disk drive O | |
| Memory O | |
| Wireless LAN card O | |
| Optical drive O |
Trademarks
Lenovo is trademark or registered trademark of Lenovo in the United States, other countries, or both.
Other company, products, or service names may be trademarks or service marks of others.
lenovo
©Lenovo China 2012