
Aspire Z3771 - Desktop computer ACER - Free user manual and instructions
Find the device manual for free Aspire Z3771 ACER in PDF.


User questions about Aspire Z3771 ACER
0 question about this device. Answer the ones you know or ask your own.
Ask a new question about this device
Download the instructions for your Desktop computer in PDF format for free! Find your manual Aspire Z3771 - ACER and take your electronic device back in hand. On this page are published all the documents necessary for the use of your device. Aspire Z3771 by ACER.
USER MANUAL Aspire Z3771 ACER
do not place the product on a vibrating surface.
- Never use it under sporting, exercising, or any vibrating environment which will probably cause unexpected short current or damage rotor devices, HDD, Optical drive, and even exposure risk from lithium battery pack.
Safe listening
Follow these instructions, suggested by hearing experts, to protect your hearing.
• Gradually increase the volume until you can hear it clearly and comfortably and without distortion.
• After setting the volume level, do not increase it after your ears adjust.
- Limit the amount of time listening to music at high volume.
- Avoid turning up the volume to block out noisy surroundings.
- Turn the volume down if you can't hear people speaking near you.
Using electrical power
- This product should be operated from the type of power indicated on the marking label. If you are not sure of the type of power available, consult your dealer or local power company.
- Do not allow anything to rest on the power cord. Do not locate this product where people will walk on the cord.
- If an extension cord is used with this product, make sure that the total ampere rating of the equipment plugged into the extension cord does not exceed the extension cord ampere rating. Also, make sure that the total rating of all products plugged into the wall outlet does not exceed the fuse rating.
- Do not overload a power outlet, strip or receptacle by plugging in too many devices. The overall system load must not exceed 80% of the branch circuit rating. If power strips are used, the load should not exceed 80% of the power strip's input rating.
- This product's power supply is equipped with a three-wire grounded plug. The plug only fits in a grounded power outlet. Make sure the power outlet is properly grounded before inserting the power supply plug. Do not insert the plug into a non-grounded power outlet. Contact your electrician for details.

Warning! The grounding pin is a safety feature. Using a power outlet that is not properly grounded may result in electric shock and/or injury.

Note: The grounding pin also provides good protection from unexpected noise produced by other nearby electrical devices that may interfere with the performance of this product.

vi
Disposal instructions
Do not throw this electronic device into the trash when discarding.
To minimize pollution and ensure utmost protection of the global environment, please recycle. For more information on the Waste from Electrical and Electronics Equipment (WEEE) regulations, visit http://global.acer.com/about/sustainability.htm.
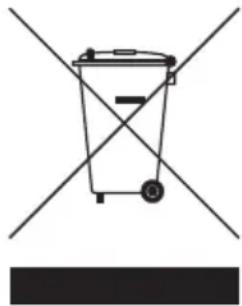
natural_image
Simple line drawing of a trash bin with two crossed lines and a solid black rectangle below (no text or symbols)Mercury advisory
For projectors or electronic products containing an LCD/CRT monitor or display: Lamp(s) inside this product contain mercury and must be recycled or disposed of according to local, state or federal laws. For more information, contact the Electronic Industries Alliance at www.eiae.org. For lamp-specific disposal information, check www.lamprecycle.org.


text_image
Energy ENERGY STARENERGY STAR
Acer's ENERGY STAR qualified products save your money by reducing energy cost and protecting the environment without sacrificing features or performance. Acer is proud to offer our customers products with the ENERGY STAR mark.
What is ENERGY STAR?
Products that are ENERGY STAR qualified use less energy and prevent greenhouse gas emissions by meeting strict energy efficiency guidelines set by the U.S. Environmental Protection Agency. Acer is committed to offer products and services worldwide that help customers save money, conserve energy and improve the quality of our environment. The more energy we can save through higher energy efficiency, the more we reduce greenhouse gases and the risks of
climate change. More information refers to http://www.energystar.gov or http://www.energystar.gov/powermangement.

Note: The statement above is applicable only to Acer system with an ENERGY STAR sticker.
Acer ENERGY STAR qualified products:
- Produce less heat and reduce cooling loads, and warmer climates.
- Automatically go into "display sleep" and "computer sleep" mode after 15 and 30 minute of inactivity respectively.
- Wake the computer from sleep mode by pushing keyboard or moving mouse.
•Computers will save more than 80% energy at "sleep" mode.
ENERGY STAR and the ENERGY STAR mark are registered U.S. marks
Tips and information for comfortable use
Computer users may complain of eyestrain and headaches after prolonged use. Users are also at risk of physical injury after long hours of working in front of a computer. Long work periods, bad posture, poor work habits, stress, inadequate working conditions, personal health and other factors greatly increase the risk of physical injury.
Incorrect computer usage may lead to carpal tunnel syndrome, tendonitis, tenosynovitis or other musculoskeletal disorders. The following symptoms may appear in the hands, wrists, arms, shoulders, neck or back:
•numbness, or a burning or tingling sensation
- aching, soreness or tenderness
•pain, swelling or throbbing
•stiffness or tightness
•coldness or weakness
If you have these symptoms, or any other recurring or persistent discomfort and/or pain related to computer use, consult a physician immediately and inform your company's health and safety department.
The following section provides tips for more comfortable computer use.
Finding your comfort zone
Find your comfort zone by adjusting the viewing angle of the monitor, using a footrest, or raising your sitting height to achieve maximum comfort. Observe the following tips:
•refrain from staying too long in one fixed posture
- avoid slouching forward and/or leaning backward
- stand up and walk around regularly to remove the strain on your leg muscles
•take short rests to relax your neck and shoulders
- avoid tensing your muscles or shrugging your shoulders
viii
• install the external display, keyboard and mouse properly and within comfortable reach
- if you view your monitor more than your documents, place the display at the center of your desk to minimize neck strain
Taking care of your vision
Long viewing hours, wearing incorrect glasses or contact lenses, glare, excessive room lighting, poorly focused screens, very small typefaces and low-contrast displays could stress your eyes. The following sections provide suggestions on how to reduce eyestrain.
Eyes
•Rest your eyes frequently.
- Give your eyes regular breaks by looking away from the monitor and focusing on a distant point.
- Blink frequently to keep your eyes from drying out.
Display
- Keep your display clean.
- Keep your head at a higher level than the top edge of the display so your eyes point downward when looking at the middle of the display.
- Adjust the display brightness and/or contrast to a comfortable level for enhanced text readability and graphics clarity.
-
Eliminate glare and reflections by:
-
placing your display in such a way that the side faces the window or any light source
- minimizing room light by using drapes, shades or blinds
• using a task light - changing the display's viewing angle
• using a glare-reduction filter - using a display visor, such as a piece of cardboard extended from the display's top front edge
- Avoid adjusting your display to an awkward viewing angle.
- Avoid looking at bright light sources, such as open windows, for extended periods of time.
Developing good work habits
Develop the following work habits to make your computer use more relaxing and productive:
•Take short breaks regularly and often.
- Perform some stretching exercises.
- Breathe fresh air as often as possible.
•Exercise regularly and maintain a healthy body.
Warning! We do not recommend using the computer on a couch or bed. If this is unavoidable, work for only short periods, take breaks regularly, and do some stretching exercises.
Note: For more information, please refer to "Regulations and safety notices" on page 9 in the AcerSystem User Guide.
©

Remark: All images are for reference purposes only.
Actual configuration may vary.
System tour
Your computer consists of the following:
| Icon Description Icon Description | |||
 | Power button Floppy drive |  | (selected models only) |
 | Microphone jack Optical drive |  | (selected models only) |
 | Speaker or headphone jack |  | Media card reader (selected models only) |
 | USB port IEEE 1394/FireWire jack | (selected models only) | |
| Copy button (selected models only) | Backup button (selected models only) | ||
| Media navigation interface (selected models only) | Removable hard drivecarriers (selected models only) | ||
| RCA jack (selected models only) | S/PDIF port (selected models only) | ||
 | PS/2 keyboard connector PS/2 m  connector connector | ||
 | VGA port Serial port |  | (selected models only) |
 | Printer connector (selected models only) |  | USB port |
 | Microphone-in jack RJ-45 Ethernet connector | ||
 | Line-in jack Line-out / Speaker-port | ||
| HDMI port (selected models only) | ESATA port (selected models only) | ||
©
Ensure that all items are present and in good condition. If any of the following items are missing or appear damaged, contact your dealer immediately:
- AcerSystem
- Mouse (PS/2 or USB)
- Keyboard (PS/2 or USB)
- Wireless keyboard with pointing function
- Remote control for Microsoft ^ Windows ^ Vista / Microsoft ^ Windows ^ XP Media Center Edition

Note: Mouse, keyboard, wireless keyboard or remote control configuration may vary by selected models
- User's Guide and Starter poster
Other user documentation and third-party software.
Connecting peripherals
After everything is connected, plug the power cord into the system and insert the other end into a power outlet.

Note: Don't connect the system power cord before connecting all peripherals to the system.
Starting your computer
After connecting all the peripheral equipment, start your computer according to the steps below:
1 Turn on all peripheral equipment, such as the monitor, printer, fax, speakers, etc.
2 Turn on the system. Once the start up process is complete, you can begin to use your computer.
Shutting down your computer
From the "Start" menu, select "Shut Down" and click OK.
In the event of a system crash, press and hold the power button on the front of the system for four seconds. After the system has shut down, turn off all peripheral devices.
System upgrade
You can expand your AcerSystem system quickly and easily by adding components. You can also upgrade the components of your AcerSystem system.
Opening the computer
Before removing any panels or covers, please make sure to shut off the computer and unplug the power cord from the outlet.
- Remove the screws on the chassis.
- Slide the panel off.
Setting up new components
You can only use components compatible with AcerSystem computers. Before you choose new components, please ask your authorized Acer dealer whether the part will operate within your AcerSystem system.
In order to ensure proper setup and installation, please refer to the instructions provided with your new components.
Probable upgrades are:
- Upgrade to high-capacity HDD
- Expand high-level memory
- Upgrade from a CD-ROM drive to CD-RW, DVD-ROM, DVD/CD-RW combo or DVD write (selected models only)r
- Install additional interface cards in empty PCI slots, e.g., PCI fax/modem card (selected models only)
Frequently asked questions
The following questions are possible situations that may arise during the use of your computer and each is followed by easy answers and solutions to the situation.
Q: I pressed the power switch but the system did not boot up.
A: Check the LED located above the power switch.
If the LED is not lit, no power is being applied to the system. Do any of the following:
- Check if the voltage selector switch located on the rear panel of the computer is set to the correct voltage.
- Check if you plugged the power cable properly into an electrical outlet.
- If you are using a power strip or AVR, make sure that it is plugged in and turned on.
If the LED is lit, check the following:
- Is a non-bootable (non-system) diskette in the floppy drive? If yes, remove or replace it with a system diskette and press Ctrl + Alt + Del to restart your computer.
- The operating system files may be damaged or missing. Insert the start-up disk you created during Windows setup into the floppy drive and press Ctrl + Alt + Del to restart your computer. This will automatically diagnose your system and make necessary fixes. However, if the diagnostic utility still reports a problem, then you may have to perform the recovery process to restore your system to its original default factory settings.
Note: For more information about recovering your system, refers to the RCD instruction sheet.
Q: Nothing appears on the screen.
A: Your computer's power management function automatically blanks the screen to save power. Just press any key to turn the display back on.
If pressing a key does not work, you can restart your computer. If restarting your computer does not work, contact your dealer or the technical support center for assistance.
Q: The printer does not work.
A: Do the following:
- Make sure that the printer is connected to a power outlet and that it is turned on.
- Make sure that the printer cable is connected securely to the system's parallel port and the corresponding port on the printer.
- For additional information concerning the printer, refer to the printer's documentation.
Q: No sound comes out from the computer.
A: Check the following:
- The volume may be muted. Look for the Volume icon on the taskbar. If it is crossed-out, click on the icon and deselect the Mute option. You can also press the volume control/mute knob on your USB keyboard to toggle from mute to sound on.
- If headphones, earphones, or external speakers are connected to the line-out jack of your computer, the internal or built-in speakers are automatically turned off.
Q: System cannot read diskette, hard disk, CD or DVD information.
A: Check the following:
- Make sure that you are using the correct type of disk.
- Make sure the CD or DVD is inserted into the drive correctly.
- Check if the CD or DVD is clean and not scratched.
- Check your drive by using a good (i.e., undamaged) disk. If your drive cannot read the information on the good disc there may be a problem with the drive. Contact your dealer or technical support center for assistance.
Q: System cannot write data on the hard disk or writeable/re-writeable disk.
A: Check the following:
- Make sure the diskette or hard disk is not write-protected.
- Make sure that you are using the correct type of disk or diskette.
Taking care of your computer
Please read the important instructions listed in this section. Following these instructions will help you maximize the durability of your computer.
Important tips
- Do not expose the computer to direct sunlight. Do not place it near sources of heat, such as a radiator.
- Do not expose the computer to temperatures below 0 °C (32°F), or above 50°C (122°F).
- Do not subject the computer to magnetic fields.
- Do not expose the computer to rain or moisture.
- Do not spill liquid on the computer.
- Do not subject the computer to heavy shock or vibration.
- Do not expose the computer to dust and dirt.
- Never place the system on uneven surfaces.
- Do not step on the power cord or place heavy objects on top of it. Carefully route the power cord and any cables away from personal traffic.
- When unplugging the power cord, do not pull on the cord itself but pull on the plug.
- The total ampere rating of the equipment plugged in should not exceed the ampere rating of the cord if you are using an extension cord. Also, the total current rating of all equipment plugged into a single wall outlet should not exceed the fuse rating.
Cleaning and servicing
To clean your computer and keyboard
1 Turn off the computer and unplug the power cord.
2 Use a soft cloth moistened with water and gently wipe the exterior of the computer and the keyboard. Do not use liquid or aerosol cleaners.
To clean your pointing device
To clean a regular mouse (with rubber ball)
1 Open the circular cover at the base of the mouse.
2 Take out the rubber ball and wipe it with a soft, damp cloth.
©
©

Your telephone company may make changes in its facilities, equipment, operations, or procedures that could affect the proper functioning of your equipment. If they do, you will be notified in advance to give you an opportunity to maintain uninterrupted telephone service.
If this equipment should fail to operate properly, disconnect the equipment from the phone line to determine if it is causing the problem. If the problem is with the equipment, discontinue use and contact your dealer or vendor.

Caution: To reduce the risk of fire, use only No. 26 AWG or larger UL Listed or CSA Certified Telecommunication Line Cord.
TBR 21
This equipment has been approved [Council Decision 98/482/EC - "TBR 21"] for single terminal connection to the Public Switched Telephone Network (PSTN). However, due to differences between the individual PSTNs provided in different countries, the approval does not, of itself, give an unconditional assurance of successful operation on every PSTN termination point. In the event of problems, you should contact your equipment supplier in the first instance.
List of applicable countries
EU member states as of May 2004 are: Belgium, Denmark, Germany, Greece, Spain, France, Ireland, Italy, Luxembourg, the Netherlands, Austria, Portugal, Finland, Sweden, United Kingdom Estonia, Latvia, Lithuania, Poland, Hungary, Czech Republic, Slovak Republic, Slovenia, Cyprus and Malta. Usage allowed in the countries of European Union, as well as Norway, Switzerland, Iceland and Liechtenstein. This device must be used in strict accordance with the regulations and constraints in the country of use. For further information, please contact local office in the country of use.
Notice for Australia
For safety reasons, only connect headsets with a telecommunications compliance label. This includes customer equipment previously labelled permitted or certified.
Notice for New Zealand
1 The grant of a Telepermit for any item of terminal equipment indicates only that Telecom has accepted that the item complies with minimum conditions for connection to its network. It indicates no endorsement of the product by Telecom, nor does it provide any sort of warranty. Above all, it provides no assurance that any item will work correctly in all respects with another item of Telepermitted equipment of a different make or model, nor does it imply that any product is compatible with all of Telecom's network services.
2 This equipment is not capable, under all operating conditions, of correct operation at the higher speeds for which it is designed. Telecom will accept no responsibility should difficulties arise in such circumstances.
3 Some parameters required for compliance with Telecom's Telepermit requirements are dependent on the equipment (PC) associated with this device. The associated equipment shall be set to operate within the following limits for compliance with Telecom's Specifications:
a There shall be no more than 10 call attempts to the same number within any 30 minute period for any single manual call initiation, and
b The equipment shall go on-hook for a period of not less than 30 seconds between the end of one attempt and the beginning of the next call attempt.
4 Some parameters required for compliance with Telecom's Telepermit requirements are dependent on the equipment (PC) associated with this device. In order to operate within the limits for compliance with Telecom's specifications, the associated equipment shall be set to ensure that automatic calls to different numbers are spaced such that there is not less than 5 seconds between the end of one call attempt and the beginning of another.
5 This equipment shall not be set up to make automatic calls to Telecom's 111 Emergency Service.
6 This device is equipped with pulse dialing while the Telecom standard is DTMF tone dialing. There is no guarantee that Telecom lines will always continue to support pulse dialing.
7 Use of pulse dialing, when this equipment is connected to the same line as other equipment, may give rise to bell tinkle or noise and may also cause a false answer condition. Should such problems occur, the user should NOT contact the telecom Fault Service.
8 This equipment may not provide for the effective hand-over of a call to another device connected to the same line.
9 Under power failure conditions this appliance may not operate. Please ensure that a separate telephone, not dependent on local power, is available for emergency use.
©
©


R&TTE Directive 1999/5/EC as attested by conformity with the following harmonized standard:
• Article 3.1(a) Health and Safety
• EN60950-1:2001 + A11:2004
• EN50371:2002
• Article 3.1(b) EMC
• EN301 489-1 V1.6.1
• EN301 489-3 V1.4.1 (Applicable to non-bluetooth wireless keyboard mouse set).
• EN301 489-17 V1.2.1
• Article 3.2 Spectrum Usages
- EN300 440-2 V1.1.2 (Applicable to non-bluetooth wireless keyboard mouse set).
• EN300 328 V1.7.1
• EN301 893 V1.4.1 (Applicable to 5GHz high performance RLAN).
Year to begin affixing CE marking 2009.
Easy Lai
Feb.9. 2009
Easy Lai, Manager
Date
Regulation Center, Acer Inc.
Remark: All images are for reference purposes only.
Actual configuration may vary.
V09A1