
AV32X25EK - TV JVC - Free user manual and instructions
Find the device manual for free AV32X25EK JVC in PDF.


User questions about AV32X25EK JVC
0 question about this device. Answer the ones you know or ask your own.
Ask a new question about this device
Download the instructions for your TV in PDF format for free! Find your manual AV32X25EK - JVC and take your electronic device back in hand. On this page are published all the documents necessary for the use of your device. AV32X25EK by JVC.
USER MANUAL AV32X25EK JVC
text_image
Cover.fm 2002/03/11 Cover.fm Page 1 Friday, March 29, 2002 2:47 PMAV32&28X25EKS&EIS / LCT1187-001A-U / ENGLISH
JVC
AV32X25EK/AV28X25EK/AV32X25EI/AV28X25EI
Colour Television
AV32X25EK
AV28X25EK
AV32X25EI
AV28X25EI
Natural Vision
T-V LINK
Contents
Setting up your TV....5
TV buttons and functions....10
Remote control buttons and functions. . 11
Teletext function 16
Using the TV's menu 18
Additional menu operations ..... 31
Additional preparation 34
Troubleshooting....36
Specifications 38

natural_image
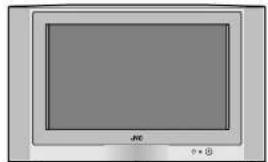
Illustration of a vintage CRT monitor with a blank screen and control buttons (no text or symbols)INSTRUCTIONS
natural_image
Abstract diagonal line pattern with a small crosshair at the origin (no text or symbols)plain English approved
by the word centre
© 2002 VICTOR COMPANY OF JAPAN, LIMITED
LGT1187-001A-U 0402-T-CR-JMUK
Thank you for buying this JVC colour television.
To make sure you understand how to use your new TV, please read this manual thoroughly before you begin.
WARNING: TO PREVENT FIRE OR SHOCK HAZARD, DO NOT EXPOSE THIS APPLIANCE TO RAIN OR MOISTURE.
CAUTION:
- Operate only from the power source specified (AC 220 – 240 V, 50 Hz) on the unit.
- Avoid damaging the AC plug and power cord.
- When you are not using this unit for a long period of time, it is recommended that you disconnect the power cord from the main outlet.
- The main power button on the TV does not fully isolate the TV from the mains supply. If you are not going to use this TV for a long period of time, be sure to disconnect the mains plug from the mains outlet.
Avoid improper installation and never position the unit where good ventilation is unattainable.
When installing this TV, distance recommendations must be maintained between the set and the wall, as well as inside a tightly enclosed area or piece of furniture.
Adhere to the minimum distance guidelines shown for safe operation.
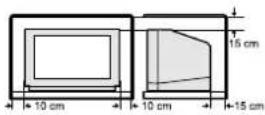
Failure to heed the following precautions may result in damage to the TV or remote control.
DO NOT block the TV's ventilation openings or holes.
(If the ventilation openings or holes are blocked by a newspaper or cloth, etc., the heat may not be able to get out.)
DO NOT place anything on top of the TV.
(such as cosmetics or medicines, flower vases, potted plants, cups, etc.)
DO NOT allow objects or liquid into the cabinet openings.
(If water or liquid is allowed to enter this equipment, fire or electric shock may be caused.)
DO NOT place any naked flame sources, such as lighted candles, on the TV.
The surface of the TV screen is easily damaged. Be very careful with it when handling the TV. Should the TV screen become soiled, wipe it with a soft dry cloth. Never rub it forcefully. Never use any cleaner or detergent on it.
In the event of a fault, unplug the unit and call a service technician. Do not attempt to repair it yourself or remove the rear cover.

natural_image
Pure electrical circuit lines without any symbols■ Warning
DO NOT cut off the mains plug from this equipment. If the plug fitted is not suitable for the power points in your home or the cable is too short to reach a power point, then obtain an appropriate safety approved extension lead or adaptor or consult your dealer.
If nonetheless the mains plug is cut off, remove the fuse and dispose of the plug immediately, to avoid a possible shock hazard by inadvertent connection to the mains supply.
If a new mains plug has to be fitted, then follow the instruction given below:
Important
Do not make any connection to the larger terminal which is marked with the letter E or by the safety earth symbol - or coloured green or green-and-yellow.
The wires in the mains lead on this product are coloured in accordance with the following code:
Blue: Neutral
Brown: Live
As these colours may not correspond with the coloured marking identifying the terminals in your plug proceed as follows:
The wire which is coloured blue must be connected to the terminal which is marked with the letter N or coloured black.
The wire which is coloured brown must be connected to the terminal which is marked with the letter L or coloured red.
When replacing the fuse only a correctly rated approved type should be used and be sure to re-fit the fuse cover.
■ If in doubt — consult a competent electrician.
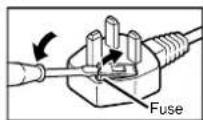
How to replace the fuse
Open the fuse compartment with a blade screwdriver, and replace the fuse.
■ Guidelines for safe operation
This equipment has been designed and manufactured to comply with international safety standards. However, as with any electrical appliance, care must be taken to ensure optimal results and operational safety.
- Before attempting to use this equipment, read the operating instructions thoroughly.
- Ensure that all electrical connections (including the mains plug, extension leads, etc.) have been made in accordance with the manufacturer's instructions.
- If ever in doubt about the installation, operation or safety of this equipment, consult your dealer.
- Handle all glass panels or covers with care.
- Never operate this equipment if it appears damaged or operates abnormally. Turn the power off, disconnect the main power plug and consult your dealer.
- Never remove any affixed panels or covers. Doing so may result in electrical shock.
- Never leave this equipment operating unattended unless otherwise specifically stated that it is designed to do so or in standby mode. Only use the designated power switch to turn off the power and ensure that all potential users are instructed how to do so. Make special arrangements for infirm or handicapped persons.
- Never watch TV while operating a motor vehicle. It is illegal to watch TV while driving.
- Never listen to headphones at high volume. Doing so may damage your hearing.

natural_image
Pure geometric lines and crosshair symbols without any text or labels
natural_image
Pure geometric diagram with crosshair and circular pattern, no text or symbols- Never obstruct the ventilation of this equipment. Doing so may cause overheating and result in a malfunction or damage.
- Never use makeshift stands or attempt to affix legs with wood screws. When using a manufacturer's approved stand or legs, use only the fixtures provided and follow the installation instructions.
- Never allow this equipment to be exposed to rain or moisture.
- Never allow anyone, especially children, to insert anything into an opening in the case. Doing so may result in a fatal electrical shock.
- Never guess or take chances with electrical equipment of any kind. It is better to be safe than sorry.
natural_image
Pure geometric diagram with intersecting lines and circles, no text or symbols present
natural_image
Pure geometric diagram with intersecting lines and circles, no text or symbols presentSetting up your TV
Caution
- Turn off all the equipment including the TV before connecting anything.
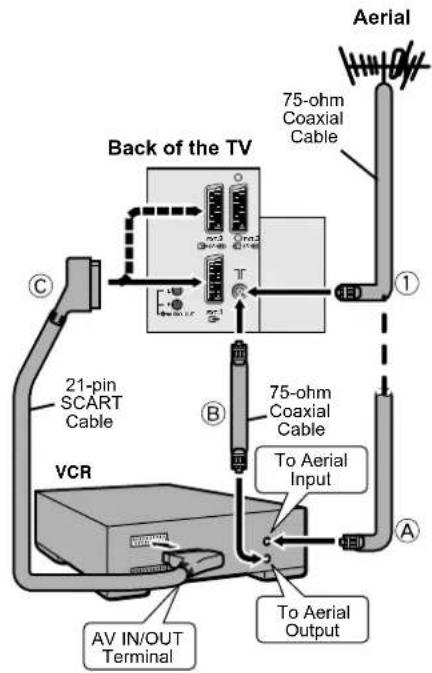
Connecting the aerial and video cassette recorder (VCR)
• The connecting cables are not provided.
- For further details, refer to the manuals provided with the devices to be connected.
If you are connecting a VCR, follow in the diagram opposite.
■ If you are not connecting a VCR, follow ①.
To use the T-V LINK functions, you must have a T-V LINK compatible VCR connected by a SCART cable © to the EXT-2 terminal on the TV. For details about T-V LINK functions, see "T-V LINK functions" on page 8.
- You can watch a video using the VCR without doing ©. For details, see your VCR instruction manual.
- To connect more equipment, please see "Additional preparation" on page 34.
- To connect external speakers and an audio system, please see "Connecting speakers/amplifier" on page 35.
- If you connect a decoder to a T-V LINK compatible VCR, set the DECODER (EXT-2) function to ON. For details, see "Using the DECODER (EXT-2) function" on page 32.
Otherwise, you will not be able to watch scrambled channels.
flowchart
graph TD
    A["Back of the TV"] --> B["75-ohm Coaxial Cable"]
    B --> C["Aerial"]
    D["VCR"] --> E["21-pin SCART Cable"]
    E --> F["To Aerial Input"]
    F --> G["To Aerial Output"]
    H["AV IN/OUT Terminal"] --> I["To Aerial Output"]
■ Rear Panel
text_image
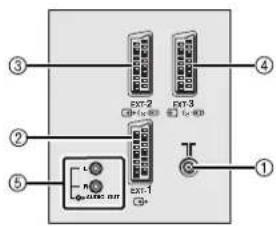
ext-2 ext-3 ext-1 ext-2 ext-1 ① ② ③ ④①Aerial socket (page 5)
②EXT-1 terminal (pages 5, 22, 34)
③EXT-2 terminal (pages 5, 8, 22, 34)
④EXT-3 terminal (pages 22, 34)
⑤AUDIO OUT terminal (page 35)
natural_image
Pure geometric diagram with intersecting lines and shapes, no text or symbols presentSetting up your TV
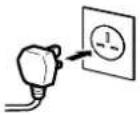
Connecting the power cord to the AC outlet
Caution
- Operate only from the power source specified (AC 220 – 240 V, 50 Hz) on the unit.
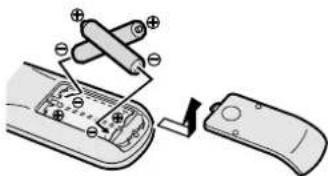
Putting the batteries into the Remote control
Use two AAA/R03 dry cell batteries. Insert the batteries from the end, making sure the and polarities are correct.
text_image
Diagram showing a device with labeled components and a close-up of its internal structure, likely illustrating a battery or switch mechanism.- Follow the warnings printed on the batteries.
- Battery life is about six months to one year, depending on how much you use the remote control.
• The batteries we supply are only for setting up and testing your TV, please replace them as soon as you need to. - If the remote control does not work properly, replace the batteries.
Initial settings
When the TV is first turned on, it goes into the initial setting mode, and you will see the JVC logo. Follow the instructions on the screen display to make the initial settings.
text_image
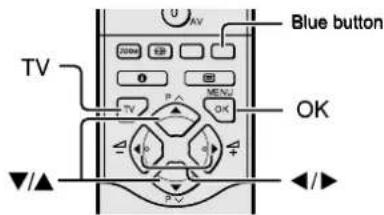
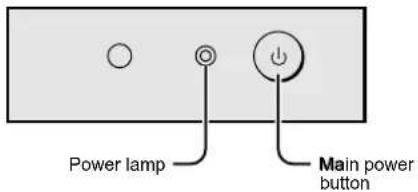
TV Blue button OK ▼/▲ P-V1 Press the Main power button on the TV
The Power lamp lights red (for power on), then green (for TV on) and the JVC logo appears.
text_image
Power lamp Main power button- If the power lamp stays red and does not change to green: your TV is in the standby mode. Press the ⏻/l (standby) button on the remote control to turn your TV on.
- If the JVC logo does not appear this is because your TV has already been turned on for the first time: use the "LANGUAGE" and "AUTO PROGRAM" functions to make the initial settings. For details, see "INSTALL" on page 26.

natural_image
Pure electrical circuit lines without any symbols
natural_image
Pure geometric diagram with intersecting lines and circles, no text or symbols present2 Press the OK button
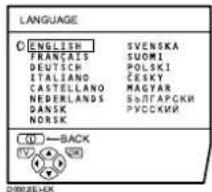
The LANGUAGE menu appears.
text_image
LANGUAGE C ENGLISH SVENSKA FRANÇAIS SUOMI DEUTSCH POLSKI ITALIANO ČESKY CASTELLANO MAGYAR NEERLANDS ŠLITAPČKI DANSK PYCČKIM NORSK C0 —BACK D3002EJ-UK3 Press the ▼/▲ buttons to choose ENGLISH
The on-screen display will then be in English.
To receive SKY 1 you need a satellite tuner. You must have the satellite tuner set to SKY 1 before starting the AUTO PROGRAM function which follows.
4 Press the OK button to start the AUTO PROGRAM function
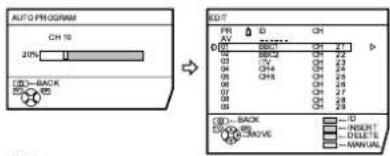
The AUTO PROGRAM menu appears and received TV channels are automatically stored in the programme numbers (PR).
• To cancel the AUTO PROGRAM function: Press the TV button.
text_image
AUTO PROGRAM CH 10 20% CD3-BACK 20% OFF EDIT FR A B C D E F G H I J K L M N O P Q R S T U V W X Y Z AD AB AC AD AD AD AD AD AD AD AD AD AD AD AD AD AD AD AD AD AD AD AD AD AD AD AD AD AD AD AD AD AD AD AD AD AD AD AD AD AD AD AD ADAfter the TV channels have been registered in the programme numbers (PR), the EDIT menu appears
- If you want to, you can now edit the programme numbers (PR) using the EDIT/MANUAL function. For details, see "EDIT/MANUAL" on page 27.
- If you do not want to edit programme numbers (PR), go to the next step.
If "ACI START/ACI SKIP" appears in the AUTO PROGRAM menu:
You can use the ACI (Automatic Channel Installation) function to decode the ACI data and complete the registration of all the TV channels quickly. For details of the ACI function and how to use it, see "Using the ACI function" on page 31. If you don't want to use the ACI function, press the ▼/▲ buttons to choose ACI SKIP and then press OK.
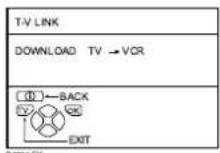
5 Press the OK button to display the T-V LINK menu
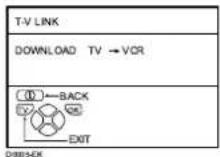
6 If you do not have a T-V LINK compatible VCR connected:
Press the TV button to exit the T-V LINK menu. The T-V LINK menu disappears.
If you have a T-V LINK compatible VCR connected to the EXT-2 terminal:
Follow the operating procedure "Using the DECODER (EXT-2) function" on page 32 to transmit the programme number (PR) data.

Now, the initial settings are complete, and you can watch the TV
- For UK model
(AV32X25EK/AV28X25EK):
BBC1, BBC2, ITV, Channel 4 and Channel 5 are automatically set to the programme numbers PR1 to PR5. If the TV doesn't receive one of these TV channels, that programme number (PR) will not be set. Programme number PR6 not normally set.
• For Ireland model
(AV32X25EI/AV28X25EI):
If your TV can detect the TV channel name from the TV channel broadcast signal, the TV channel name is assigned to the programme number (PR) to which the TV channel has been set. However, which TV channels are set to which programme numbers (PR) will depend on the area in which you live.
- If a TV channel you want to view is not set to a programme number (PR), you can set it using the MANUAL function. For details, see “EDIT/MANUAL” on page 27.
- The AUTO PROGRAM function does not set the programme number PR 0 (AV) for your video cassette recorder. You will need to set this using the MANUAL function.
• In some areas you may get TV reception from more than one transmitter, for example different ITV regions. In this case each TV channel could be set twice. If this happens, the first set of channels will have the stronger signal. If you want to delete the second set of channels, you will have to do it manually (see page 30).
For users in the UK:
If you have any problems setting up your new TV, please call the JVC
Helpline on 0870 330 5000.
For users in the Republic of Ireland:
If you have any problems setting up your new TV, please call the JVC
Helpline on 1890-582500.
T-V LINK functions
When you have a T-V LINK compatible VCR connected to the EXT-2 Terminal on the TV, it is easier to set up the VCR and to view videos. T-V LINK uses the following features:
To use T-V LINK functions:
A "T-V LINK compatible VCR" means a JVC video cassette recorder with the T-V LINK logo, or with one of the following logos. However, these VCRs may support some or all of the features described earlier. For details, see your VCR instruction manual.
"Q-LINK" (a trademark of Panasonic Corporation)
"Data Logic" (a trademark of Metz Corporation)
"Easy Link" (a trademark of Phillips Corporation)
"Megalogic" (a trademark of Grundig Corporation)
"SMARTLINK" (a trademark of Sony Corporation).
■ Pre-set download
The VCR will automatically download the registered data on the TV channels from the TV. This means you do not need to set up the program channels on your VCR manually. The preset download function automatically begins when the initial setting is complete or whenever you carry out the AUTO PROGRAM or EDIT/MANUAL functions.
You can also carry out this function using your VCR controls.
When "FEATURE NOT AVAILABLE" is displayed:
If "FEATURE NOT AVAILABLE" is displayed, the download was not performed correctly. Before trying to download again, check that:
• the VCR power is turned on
• the VCR is T-V LINK compatible
• the VCR is connected to the EXT-2 terminal
• the SCART cable is fully wired.




■ Direct Rec
"What You See Is What You Record"
You can easily record to VCR the images that you are watching on the TV.
For details, read the manual for your VCR. Use your VCR controls. "VCR IS RECORDING" is displayed.
In the following situations, the VCR will stop recording if the TV is turned off, if the TV channel or input is changed, or if the menu is displayed on the TV:
- when recording images from an external device connected to the TV (for example a camcorder)
- when recording a TV channel after it has been unscrambled on a decoder
- when recording a TV channel by using the TV's output because the VCR's own tuner cannot properly receive that channel.
When the VCR is not ready (for example when there is no tape inserted), "NO RECORDING" is displayed.
You cannot carry out Direct Rec using your TV's control.
Generally, the VCR cannot record a TV channel that it cannot receive properly on its own tuner, even if you can view that TV channel on the TV. However, some VCRs can record a TV channel by using the TV's output if that channel can be viewed on the TV. For details, see your VCR instruction manual.
■ TV auto power on/VCR image view
When the VCR starts playing, the TV automatically turns on and the images from the EXT-2 terminal appear on the screen.
When the VCR menu is operated, the TV automatically turns on and the images from the EXT-2 terminal appear on the screen.
- This function does not happen if your TV's main power is turned off. Set your TV's main power to on (standby mode).
9



TV buttons and functions
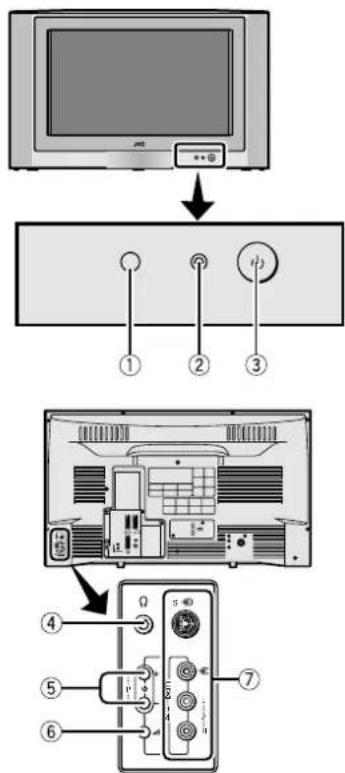
text_image
Diagram showing TV setup with labeled components including monitor, buttons, and control panelRefer to the pages in brackets for details.
①Remote control sensor
②Power lamp (6, 10)
③Main power button (6, 10)
④Headphone jack (mini jack) (34)
⑤ P ∨/∧ buttons/ -/+ buttons (11)
⑥△ (Volume) button (10)
⑦EXT-4 terminal (22, 34)
Turn the main power on
Press the Main power button on the TV.
The power lamp lights red and your TV is in the standby mode.
- If the power lamp lights green, the TV is already on.
To turn the main power off:
Press the main power button again.
The power lamp goes off.
Caution
- The main power button on the TV does not fully isolate the TV from the AC supply. If you are not going to use the TV for a long period of time, be sure to disconnect the AC plug from the AC socket.
Turn the TV on from standby mode
Press the P ∨ ∧ buttons to turn the TV on from standby mode
Choose a TV channel
Press the P ∨ ∧ buttons to choose a programme number (PR) or an EXT terminal
Adjust the volume
1 Press the △ (Volume) button The volume level indicator appears.
2 Press the - / + buttons while the volume level indicator is on screen

natural_image
Pure geometric diagram with crosshair and circular pattern, no text or symbols
natural_image
Pure electrical circuit lines without any symbols
natural_image
Pure electrical circuit lines without any symbolsRemote control buttons and functions
text_image
① ② ③ ④ ⑤ ⑥ ⑦ ⑧ 1 3 3 4 6 7 9 0 200M 1 TV OK P Mobile HOLD MORE REVEIL SUE AMOUNT STONE CANCEL INDEX ICN DVD JVC TV
natural_image
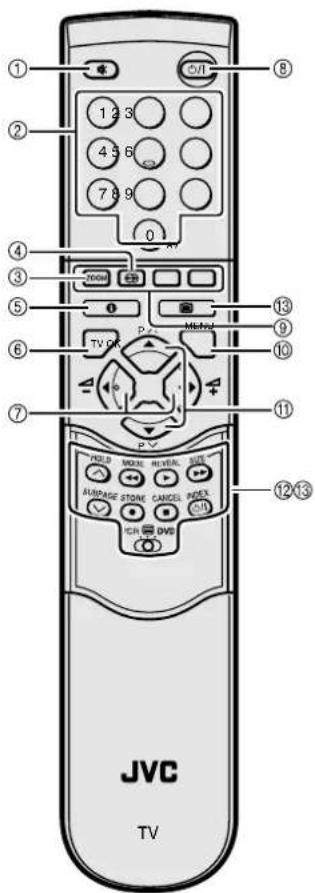
Illustration of a hand holding a remote control with an arrow indicating rotation (no text or symbols)①Muting button
②Number buttons
③ZOOM button
④HYPER SOUND button
⑤Information button
⑥TV button
⑦◀/▶ buttons
⑧Standby button
⑨Colour buttons
⑩OK button
⑪▼/▲ buttons
⑫VCR/DVD/Teletext control button
⑬VCR ☐ DVD switch
(Text) button
Turn the TV on or off from standby mode
Press the ⏻/l (standby) button to turn the TV on or off.
When the TV is turned on, the power lamp changes from red to green.
- The power can be turned on by pressing the TV button, ▼/▲ buttons or Number buttons.
Choose a TV channel
■ Use the number buttons: Enter the programme number (PR) of the channel using the number buttons.
Example:
• P R 6 → press 6
- PR12 → press 1 and 2
■ Use the▼/▲ buttons: Press the ▼/▲ buttons to choose the programme number (PR) you want.
Remote control buttons and functions
■ Use the PR LIST:
1 Press the ⓘ (Information) button to display the PR LIST
Pressing the ① (information) button changes the display as follows:
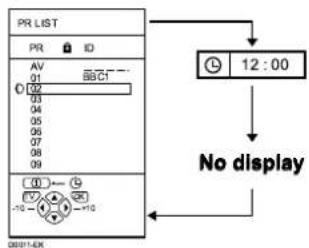
flowchart
graph TD
    A["PR LIST"] --> B["AV"]
    B --> C["01"]
    C --> D["02"]
    D --> E["03"]
    E --> F["04"]
    F --> G["05"]
    G --> H["06"]
    H --> I["07"]
    I --> J["08"]
    J --> K["09"]
    K --> L["10"]
    L --> M["No display"]
    M --> N["12:00"]
    N --> O["12:00"]
2 Press the ◀/▶ and ▼/▲ buttons to choose a programme number (PR). Then press the OK button
- For programme numbers (PR) with the CHILD LOCK function set, the (CHILD LOCK) mark appears next to the Programme number (PR) in the PR LIST.
- You cannot use the ▼/▲ buttons to choose a programme number (PR) with the CHILD LOCK set.
- Even if you try to choose a programme number (PR) with the CHILD LOCK set, the Ⓞ (CHILD LOCK) mark will appear, and you cannot watch the TV channel. To watch the TV channel, see "CHILD LOCK" on page 24.
- If the picture is tilted, this can be corrected. See "PICTURE TILT" on page 21.
Adjust the volume
Press the ◀/▶ buttons to adjust the volume.
The volume indicator appears and the volume changes as you press the -/+ buttons.
■ Muting the sound Press the Ⓧ (muting) button to turn off the sound.
Pressing the ⚙ (muting) button again restores the previous volume level.
Watch images from external equipment
■ Use the O (AV) button: Press the O (AV) button to choose an EXT terminal.
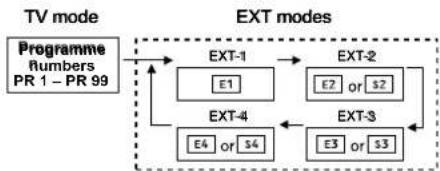
flowchart
graph TD
    A["Programme Numbers PR 1 – PR 99"] --> B["EXT-1"]
    B --> C["EXT-2"]
    C --> D["EXT-3"]
    D --> E["EXT-4"]
    E --> F["E1"]
    E --> G["E2 or S2"]
    E --> H["E3 or S3"]
    E --> I["E4 or S4"]
    style A fill:#f9f,stroke:#333
    style B fill:#ccf,stroke:#333
    style C fill:#cfc,stroke:#333
    style D fill:#fcc,stroke:#333
    style E fill:#cff,stroke:#333
    style F fill:#ffc,stroke:#333
    style G fill:#ffc,stroke:#333
    style H fill:#ffc,stroke:#333
    style I fill:#ffc,stroke:#333
■ Use the▼/▲ buttons:
Press the ▼/▲ buttons to choose an EXT terminal.
■ Use the PR LIST:
1 Press the ⓘ (Information) button to display the PR LIST
2 Press the ◀/▶ and ▼/▲ buttons to choose an EXT terminal. Then press the OK button
- For programme numbers (PR) where you have the CHILD LOCK function set, the (CHILD LOCK) mark appears next to the programme number (PR) in the PR LIST.
- You cannot use the ▼/▲ buttons to choose a Programme number (PR) which has the CHILD LOCK set.
- Even if you try to choose a programme number (PR) with the CHILD LOCK set, the mark will appear, and you cannot watch the TV channel. To watch the TV channel, see "CHILD LOCK" on page 24.
- If the picture is tilted, correct it. See "PICTURE TILT" on page 21.


natural_image
Pure geometric diagram with crosshair and circular pattern, no text or symbols

natural_image
Pure geometric lines and shapes without any text, numbers, or symbolsRemote control buttons and functions
To return to a TV channel:
Press the TV button, the ▼/▲ buttons or the number buttons.
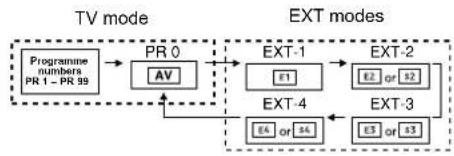
To use the programme number PR 0 (AV):
When the TV and VCR are connected only by the aerial cable, choosing the programme number PR 0 (AV) allows you to view images from the VCR. Set the VCR RF channel to the programme number PR 0 (AV) manually. For details, see "EDIT/MANUAL" on page 27.
Pressing the O(AV) button changes the choice as follows:
flowchart
graph LR
    A["Programme numbers PR 1 - PR 99"] --> B["PR 0"]
    B --> C["AV"]
    C --> D["EXT-1"]
    D --> E["E2 or S2"]
    D --> F["EXT-4"]
    F --> G["E4 or S4"]
    F --> H["EXT-3"]
    H --> I["E5 or S3"]
    style A fill:#f9f,stroke:#333
    style B fill:#ccf,stroke:#333
    style C fill:#cfc,stroke:#333
    style D fill:#fcc,stroke:#333
    style E fill:#cff,stroke:#333
    style F fill:#ffc,stroke:#333
    style G fill:#cfc,stroke:#333
    style H fill:#fcc,stroke:#333
    style I fill:#cfc,stroke:#333
- The VCR sends its playback image along the aerial cable as an RF (radio frequency) signal.
- Also see your VCR instruction manual.
ZOOM function
You can change the screen size according to the picture aspect ratio. Choose the optimum one from the following ZOOM modes.
AUTO:
For any picture format except normal picture (4:3 aspect ratio), the picture will be automatically displayed in the ideal screen size.
For normal picture (4:3 aspect ratio), the picture is displayed in the ZOOM mode set on the 4:3 AUTO ASPECT menu. For details, see "4:3 AUTO ASPECT" on page 21.
- AUTO may not work properly with poor signal quality. In this case, choose the best ZOOM mode manually.
- This TV supports WSS (wide-screen signals). When broadcasts with WSS are received with the ZOOM mode set at AUTO, the most suitable ZOOM mode is automatically chosen according to the WSS received.
REGULAR:
Use to view a normal picture (4:3 aspect ratio) as this is its original shape.
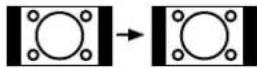
PANORAMIC:
This stretches the left and right sides of a normal picture (4:3 aspect ratio) to fill the screen, without making the picture appear unnatural.
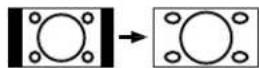
- The top and bottom of the picture are slightly cut off.
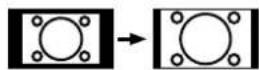
14:9 ZOOM:
This zooms up the wide picture (14:9 aspect ratio) to the upper and lower limits of the screen.
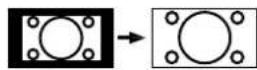
16:9 ZOOM:
This zooms up the wide picture (16:9 aspect ratio) to the full screen.
16:9 ZOOM SUBTITLE:
This zooms up the wide picture (16:9 aspect ratio) with subtitles to the full screen.
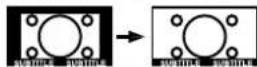
Remote control buttons and functions
FULL:
This uniformly stretches the left and right sides of a normal picture (4:3 aspect ratio) to fill the wide TV screen.
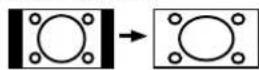
- For 16:9 aspect ratio pictures that have been squeezed into a normal picture (4:3 aspect ratio), use the FULL mode to restore the picture to its original shape.
■ Choose the ZOOM mode
1 Press the ZOOM button to display the ZOOM menu
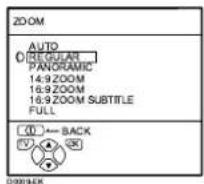
2 Press the ▼/▲ buttons to choose a ZOOM mode. Then press the OK button
The picture expands and the chosen ZOOM mode is displayed in about 5 seconds.
- You can pre-set a ZOOM mode for the normal picture. See "4:3 AUTO ASPECT" on page 21.
■ Adjusting the visible area of the picture
If subtitles or the top (or bottom) of the picture are cut off, you can adjust the visible area of the picture manually.
1 Press the ZOOM button
The ZOOM menu appears.
2 Press the OK button to display the ZOOM mode indicator
The indicator appears.
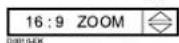
3 While it is displayed, press the ▼▲▲ buttons to change the position of the picture
- You cannot adjust the visible area in REGULAR or FULL mode.
HYPER SOUND function
You can enjoy sounds with a wider ambience.
Press the ⬤ (HYPER SOUND) button to turn the HYPER SOUND function on or off
• The HYPER SOUND function does not work properly with mono sound.
- The HYPER SOUND function can be also turned on or off by using the SOUND SETTING menu. For details, see "HYPER SOUND" on page 22.
- When HYPER SOUND is on, the balance cannot be adjusted.
Displaying the current time
You can display the current time on the screen.
Press the ⓘ (Information) button to display the current time
Pressing the ① (Information) button changes the display as follows:
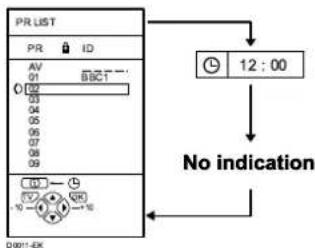
flowchart
graph TD
    A["PR LIST"] --> B["AV 01 BBCT"]
    B --> C["02"]
    C --> D["03"]
    D --> E["04"]
    E --> F["05"]
    F --> G["06"]
    G --> H["07"]
    H --> I["08"]
    I --> J["09"]
    J --> K["10"]
    K --> L["11"]
    L --> M["12"]
    M --> N["No indication"]
    N --> O["D001-EK"]
- This TV uses teletext data to set the time. If the TV has not received a TV channel that has teletext programmes since it was turned on, the time display is blank. To see the time, choose a TV channel that has teletext programmes. The time will still be displayed as long as you do not turn off the TV, even if you choose other TV channels.
- When watching videos, an incorrect time is sometimes displayed.
Return to TV channel instantly
You can return to a TV channel instantly.
Press the TV button
The TV returns to the TV mode and a TV channel appears.
Operating a JVC brand VCR or DVD player
These buttons will operate a JVC brand VCR or DVD player. Pressing a button that looks the same as the device's original remote control button has the same effect as the original remote control.
1 Set the VCR ☐ DVD switch to the VCR or DVD position
VCR:
When you are using a VCR, set the switch to the VCR position.
DVD:
When you are using a DVD player, set the switch to the DVD position.
(Text):
When you are viewing Teletext programmes, set the switch to the
(Text) position.
2 Press the VCR/DVD control button to control your VCR or DVD player
- If your device is not made by JVC, these buttons will not work.
• Even if your device is made by JVC, some of these buttons may not work, depending on the device you are using. - You can use the V//A buttons to choose a TV channel the VCR will receive, or choose the chapter the DVD player plays back.
- Some models of DVD player use the V//A buttons for both operating the fast forward/backward functions and for choosing the chapter. In this case, the ◀◀/▶▶ buttons do not work.
natural_image
Pure electrical circuit lines without any symbols
Teletext function
text_image
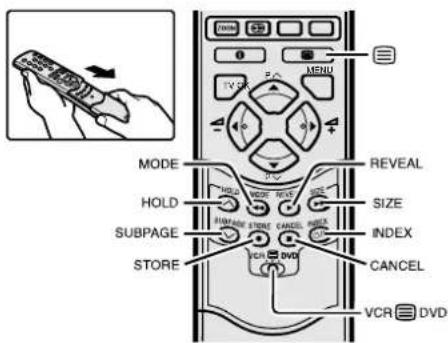
MODE HOLD SUBPAGE STORE REVEAL SIZE INDEX CANCEL VCR DVDBasic operation
You can view two types of teletext broadcasts on the TV: FLOF (Fastext) and WST.
1 Choose a TV channel with a teletext broadcast
2 Set the VCR 📋 DVD switch to the 📋 (Text) position

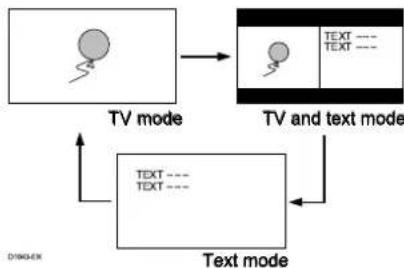
3 Press ☐ (Text) button to display the teletext
Pressing ☐ (Text) button changes the mode as follows:
flowchart
graph TD
    A["TV mode"] --> B["TV and text mode"]
    B --> C["Text mode"]
    C --> D["Text ---"]
    C --> E["Text ---"]
    D --> F["Image 1"]
    E --> G["Image 2"]
4 Choose a teletext page by pressing the ▼/▲ buttons, number buttons or colour buttons
To return to the TV mode: Press the TV button or ☐ (Text) button.
- If you have trouble receiving teletext broadcasts, consult your local dealer or the teletext station.
- The ZOOM function will not work in the TV and text mode or Text mode.
- You cannot operate menus when viewing a teletext programme.
Using the List Mode
You can store the numbers of your favourite teletext pages in memory and call them up quickly using the colour buttons.
To store the page numbers:
1 Press the MODE button to go into the List mode The page numbers you have stored are displayed at the bottom of the screen.
2 Press a colour button to choose a position. Then press the number buttons to enter the page number
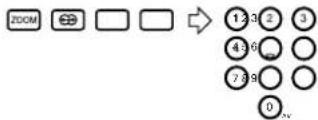
3 Press and hold down the STORE button
The four page numbers blink white to show that they are stored in memory.
To call up a stored page:
1 Press the MODE button to enter the List mode The page stored with the red button (ZOOM) is displayed.
2 Press a colour button having a stored page

To leave the List mode: Press the MODE button again.

natural_image
Pure geometric diagram with intersecting lines and circular shapes, no text or symbols presentHold
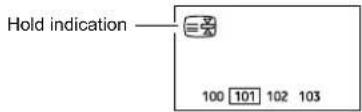
You can hold a teletext page on the screen for as long as you want, even while several other teletext pages are being received.
Press the HOLD button
text_image
Hold indication 100 101 102 103To cancel the Hold function:
Press the HOLD button again.
Sub-page
Some teletext pages include sub-pages that are automatically displayed.
You can hold any sub-page, or view it at any time.
1 Press the SUBPAGE button to operate the sub-page function
Sub-page numbers are displayed at the left of the screen.
| Colour* Meaning of sub-page number |
| Yellow Currently being displayed. |
| White Can be displayed. |
| Blue or Red Cannot be displayed and it is not sent. |
*: Background colour of the sub-page number.
2 Press the ▼/▲ buttons to choose a sub-page number
To cancel the sub-page function:
Press the SUBPAGE button again.
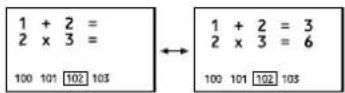
Reveal
Some teletext pages include hidden text (such as the answers to a quiz).
You can display the hidden text.
Each time you press the REVEAL button, text is hidden or revealed
Size
You can double the height of the teletext display.
Press the SIZE button

flowchart
graph TD
    A["|TEXT SIZE|"] --> B["|TEXT SIZE|"]
    B --> C["|SIZE|"]
Index
You can return to the index page instantly.
Press the INDEX button
Returns to page 100 or a previously specified page.
Cancel
You can search for a teletext page while watching TV.
1 Press the number button to enter a page number, or press a colour button
The TV searches for a teletext page.
2 Press the CANCEL button
The TV programme appears. When the TV finds the teletext page, its page number appears in the upper left of the screen.
3 Press the CANCEL button to return to a teletext page when the page number is on the screen
- The TV mode cannot be resumed by pressing the CANCEL button. To return to the TV mode press TV.
Using the TV's menu
This TV has a number of functions you can operate using menus. To use all your TV's functions, you need to understand the basic menu operating techniques fully.
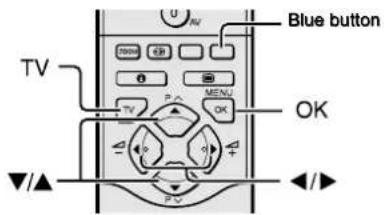
text_image
TV Blue button OK TV P MENJ OK ▼/▲ PVBasic operation
1 Press the OK button to display the MENU (main menu)
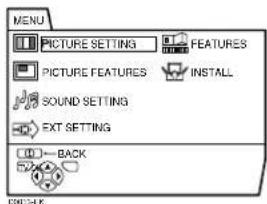
text_image
MENU PICTURE SETTING FEATURES PICTURE FEATURES INSTALL SOUND SETTING EXT SETTING 0 BACK- The display appearing at the bottom of a menu shows the buttons on the remote control you can use when you operate a chosen function.
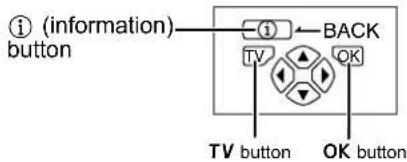
text_image
i (information) button BACK TV OK TV button OK button2 Press the ▼/▲ buttons to choose a menu title, and press the OK button The menu appears.
To return to the previous menu: Press the ⓘ (information) button.
To exit a menu instantly: Press the TV button.
3 Press the ▼/▲ buttons to choose a function
- For details of the functions in the menus, see the following pages.
4 Press the ◀/▶ buttons to choose the setting of that function
- If you want to operate a function which appears only with its name, follow the descriptions of that function on the following pages.
- The display appearing at the bottom of a menu shows you the button on the remote control that you can use when you operate a chosen function.
5 Press the OK button to complete the setting
The menu disappears.
- When watching the television with the NTSC system, the menus are displayed at about half of their normal vertical size.
PICTURE SETTING
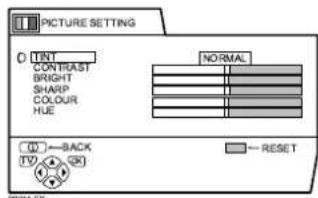
text_image
PICTURE SETTING O UNT CONTRAST BRIGHT SHARP COLOUR HUE NORMAL →BACK →RESET TV OKTINT
You can select one of three TINT modes (three kinds of picture settings) to adjust the picture settings automatically.
COOL:
A cool white colour base with a boost in the colour and contrast levels that creates a more vivid picture.
WARM:
A warm orange/red colour base that creates the appropriate colour and contrast levels for watching films.
NORMAL:
A normal white colour base with normal colour and contrast levels.
■ Picture Adjustment
You can change the picture settings of each TINT mode as you like.
CONTRAST
You can adjust the picture contrast.
◀: lower
▶: higher
BRIGHT
You can adjust the picture brightness.
◀ : darker
▶: brighter
SHARP
You can adjust the picture sharpness.
◀ : softer
▶ : sharper
COLOUR
You can adjust the picture colour.
◀ : lighter
▶ : deeper
HUE
You can adjust the picture tint.
◀ : reddish
▶: greenish
- You can change the HUE setting (picture hue) only when the colour system is NTSC 3.58 or NTSC 4.43. (See "Specifications" on page 38.)
To return to the default settings in each TINT mode:
Press the blue button.
- This returns the picture settings in the TINT mode you have chosen to the default settings, and stores them in the TINT mode.
PICTURE FEATURES
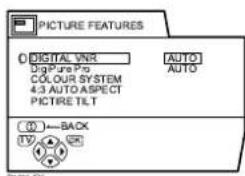
text_image
PICTURE FEATURES 0 DIGITAL VNR AUTO DigPure Pro AUTO COLOUR SYSTEM 4.3 AUTO ASPECT PICTURE TILT ( )—BACK TV 125KDIGITAL VNR
The DIGITAL VNR function cuts down the amount of 'noise' ('snow' or interference) in the original picture.
You can choose from the three DIGITAL VNR function settings of AUTO, MIN and MAX.
AUTO:
The TV will automatically adjust the level of the DIGITAL VNR effect to match the amount of noise in the picture, giving you the best possible picture.
- If you set the DIGITAL VNR effect too high it can make the picture less sharp. It is recommended to use the AUTO setting if you can.
Using the TV's menu
MIN:
The level of the DIGITAL VNR effect is set to the minimum. If you set the DIGITAL VNR function to AUTO but feel that the sharpness of the original picture has not been reproduced fully, change the setting from AUTO to MIN.
- The MIN setting is not suitable for low-quality pictures which contain a lot of noise.
MAX:
The level of the DIGITAL VNR effect is set to the maximum. If you set the DIGITAL VNR function to AUTO but still notice some noise, change the setting from AUTO to MAX.
- The MAX setting is not suitable for high-quality pictures which contain very little noise.
■ DigiPure Pro
The DigiPure Pro function uses the latest in digital technology to give you a natural-looking picture. The DigiPure Pro function includes the following two functions.
DigiPure function:
This function helps to create a natural-looking picture by eliminating unnecessary edges from high-contrast and crisp images. For images with low-contrast, edges are added to produce a sharper, more detailed picture. You can choose from the three DigiPure function settings of AUTO, MIN and MAX.
- If you set the DigiPure effect too high on a low-quality picture that contains a lot of noise, this may actually make the noise worse. We recommend you use the AUTO setting if you can.
Picture motion compensation function:
This function displays fast-moving pictures (for example, the players or ball in a football game) more smoothly and naturally on the screen.
- The effect level of the picture motion compensation function cannot be changed. The effect level is the same no matter which of the AUTO, MIN or MAX settings is used.
1 Choose DigiPure Pro
2 Press the ◀◀▶ buttons to choose a setting. Then press the OK button
■ COLOUR SYSTEM
The colour system is chosen automatically. However, if the picture is not clear or no colour appears, choose the colour system manually.
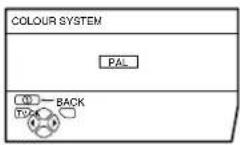
1 Choose COLOUR SYSTEM then press the OK button
2 Press the ◀/▶ buttons to choose the appropriate colour system. Then press the OK button
PAL:
PAL system
NTSC 3.58:
NTSC 3.58 MHz system
NTSC 4.43:
NTSC 4.43 MHz system
AUTO:
This function detects a colour system from the input signal. You can only use this when you are viewing a picture from programme number PR 0 (AV), or EXT terminal.
• The AUTO function may not work properly if you have poor signal quality. If the picture is abnormal in the AUTO function, choose another colour system manually.
- You cannot choose NTSC 3.58 or NTSC 4.43 for programme number PR 0 (AV) to PR 99.


natural_image
Pure electrical circuit lines without any symbols■ 4:3 AUTO ASPECT
You can choose one of three ZOOM modes, REGULAR, PANORAMIC or 14:9 ZOOM, as the ZOOM mode for the normal picture (4:3 aspect ratio).
1 Choose 4:3 AUTO ASPECT then press the OK button
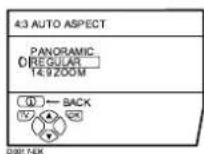
2 Press the ▼/▲ buttons to choose a ZOOM mode
■ PICTURE TILT
Sometimes the Earth's own magnetic field may make the picture tilt. If this happens, you can correct the picture tilt.
1 Choose PICTURE TILT. Then press the OK button
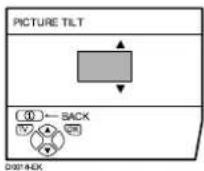
2 Press the ▼/▲ buttons until the picture becomes level. Then press the OK button
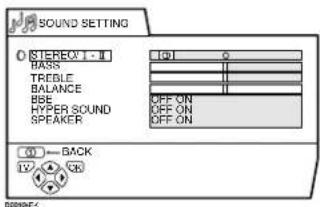
SOUND SETTING
text_image
SOUND SETTING STEREOV - II BASS TREELE BALANCE BRE HYPER SOUND SPEAKER OFF ON OFF ON OFF ON OFF ON BACK■ STEREO / I • II
When you are viewing a bilingual broadcast programme, you can choose the sound from Bilingual I (Sub I) or Bilingual II (Sub II). If you have poor reception on a stereo broadcast, you can change from stereo to mono sound so that you can hear the broadcast more clearly and easily.
∞: Stereo sound
O::mono sound
• The sound mode you can choose differs depending on the TV programme.
- This function does not work in the EXT modes. And this function does not appear in the SOUND SETTING menu.
■ Sound Adjustment
You can adjust the sound to your liking.
BASS
You can adjust the low tone of the sound.
◀: weaker
▶: strong
TREBLE
You can adjust the high tone of the sound.
◀: weaker
▶ : strong
BALANCE
You can adjust the volume balance between the left and right speaker.
◀: turn the left speaker's volume level up.
▶: turn the right speaker's volume level up.


text_image
21Using the TV's menu
■ HYPER SOUND
You can enjoy sounds with a wider ambience.
ON:
This function is turned on.
OFF:
This function is turned off. The menu disappears.
• The HYPER SOUND function does not work properly with mono sound.
- You can turn on or off the HYPER SOUND function with a single press. For details, see "HYPER SOUND function" on page 14.
■ SPEAKER
You can turn off the sound from the TV speakers; but you should only do this if you have connected an audio system to the TV instead of the TV speakers.
ON:
The TV speakers issue sound.
OFF:
The TV speakers do not issue sound.
- The ◀/▶ buttons of the TV remote control and the △ (volume) buttons at the front panel of your TV set can be used to control the volume of each speaker simultaneously.
- Setting the volume of the amplifier too high may damage the front speakers.
EXT SETTING
text_image
EXT SETTING EXT-1 EXT-3 EXT-4 IV DUBBING EXT-2 ID LIST S-IN■ S-IN (S-VIDEO input)
You can connect a device (such as an S-VHS VCR) to enjoy the high-quality picture of the S-VIDEO signal (Y/C signal).
Preparation:
- First read the device's instruction manual and "Additional preparation" on page 34 to connect the device to the TV properly. Second, follow the device's instruction manual to set the device so that it sends an S-VIDEO signal (Y/C signal) to the TV.
- Do not set S-IN (S-VIDEO input) to an EXT terminal connected to a device which cannot output an S-VIDEO (Y/C signal). If it is set wrongly, a picture cannot appear.
1 Choose an EXT terminal
2 Press the yellow button and set the S-IN (S-VIDEO input). Then press the OK button
An S-IN (S-VIDEO input) mark is displayed. You can view an S-VIDEO signal (Y/C signal) instead of the regular video signal (composite signal).
To cancel the S-IN (S-VIDEO input) setting:
Press the yellow button and turn off S-IN (S-VIDEO input) mark. The regular video signal (composite signal) pictures are resumed.
natural_image
Pure geometric lines and shapes without any text, numbers, or symbols
natural_image
Pure geometric diagram with intersecting lines and circular shapes, no text or symbols present• The EXT-1 terminal does not support S-VIDEO signal (Y/C signal) and you cannot set S-IN (S-VIDEO input) in the EXT-1 terminal.
- Setting S-IN (S-VIDEO input) changes the head character from "E" to "S". When an EXT terminal receives a normal video signal, "E1", "E2", "E3" or "E4" appears on the display. This changes to "S2", "S3" or "S4" when it receives an S-VIDEO signal.
• Even a device which can output an S-VIDEO signal (Y/C signal) may output a regular video signal (composite signal) depending on the device setting. If a picture cannot appear because the S-IN (S-VIDEO input) setting has been made, read the device instruction manual carefully again to check for the device settings.
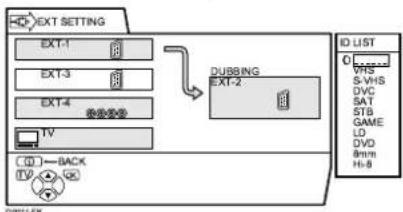
LIST
You can store a name for each of the devices connected to each EXT terminal. Giving a name to an EXT terminal makes the EXT terminal number appear on the screen, together with its name.
1 Choose an EXT terminal
2 Press the blue button to display the name list (ID LIST)
flowchart
graph TD
    A["EXT SETTING"] --> B["EXT-1"]
    A --> C["EXT-3"]
    A --> D["EXT-4"]
    A --> E["TV"]
    F["DUBBING"] --> G["EXT-2"]
    G --> H["ID LIST"]
    H --> I["0: VDS"]
    H --> J["S-VHS"]
    H --> K["DVC"]
    H --> L["SAT"]
    H --> M["STB"]
    H --> N["GAME"]
    H --> O["LD"]
    H --> P["DVD"]
    H --> Q["8mm"]
    H --> R["H=8"]
3 Press the ▼/▲ buttons to choose a name. Then press the OK button
The ID LIST disappears and the name is assigned to the EXT terminal.
- You cannot choose an EXT terminal name that is not on the name list (ID LIST).
To erase a name assigned to the EXT terminal:
Choose a blank space.
4 Press the OK button to complete the setting
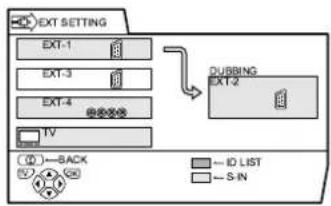
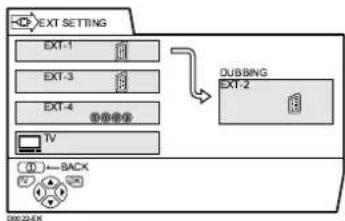
■ DUBBING
You can choose a signal source to be output from the EXT-2 terminal.
You can do this with the output signals of the devices connected to other EXT terminals, or with the picture and sound from a TV channel you are currently viewing.
1 Press the ◀/▶ buttons to choose the arrow from the menu
2 Press the ▼/▲ buttons to choose an EXT terminal or TV. Then press the OK button
flowchart
graph TD
    A["EXT SETTING"] --> B["EXT-1"]
    A --> C["EXT-3"]
    A --> D["EXT-4"]
    A --> E["TV"]
    F["DUBBING"] --> G["EXT-2"]
    H["Back"] --> I["Control Icon"]
The arrow in the menu represents a signal flow. The left side of the arrow shows a signal source output from the EXT-2 terminal.
EXT-1/EXT-3/EXT-4:
The output signal of the device connected to an EXT terminal passes through the TV and is output from the EXT-2 terminal.
TV:
The picture and sound of the TV channel you are currently viewing are output from the EXT-2 terminal.
Using the TV's menu
- During dubbing, you cannot turn off the TV. Turning off the TV also turns off the output from the EXT-2 terminal.
- When you choose an EXT terminal as an output, you can view a TV programme or a picture from the other EXT terminal while dubbing the picture from a device connected to the EXT terminal onto a VCR connected to the EXT-2 terminal.
• The RGB signals from TV games cannot be output. Teletext programmes cannot be output.
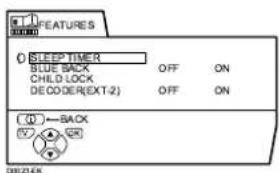
FEATURES
text_image
FEATURES SLEEP TIMER BLUE BACK CHILD LOCK DECOER(EXT-2) OFF ON OFF ON ←BACK 01 02 03 00:23:4K■ SLEEP TIMER
You can set the TV to automatically turn off after a specified period of time.
1 Choose SLEEP TIMER, then press the OK button
A Sub-menu of the SLEEP TIMER function appears.
text_image
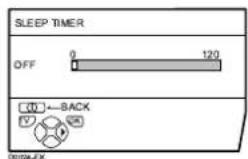
SLEEP TIMER OFF 0 120 (0)←BACK (1)←(2)←(3) 00:04-EX2 Press the ◀/▶ buttons to set the period of time.
Then press the OK button
You can set the period of time up to a maximum of 120 minutes (2 hours) in 10 minute steps.
- One minute before the SLEEP TIMER function turns off the TV, "GOOD NIGHT!" appears.
- The SLEEP TIMER function cannot be used to turn off the TV's main power.
- When the SLEEP TIMER function is on, you can display the sub-menu of the SLEEP TIMER function again to confirm or change the remaining period of time of the SLEEP TIMER function. Press the OK button to leave the menu after confirming or changing the remaining time.
To cancel the SLEEP TIMER function:
Press the ◀ button to set a period of time to "OFF".
BLUE BACK
You can set the TV to automatically change to a blue screen and mute the sound if the signal is weak or absent, or when there is no input from an external device.
ON:
This function is turned on.
OFF:
This function is turned off.
■ CHILD LOCK
When there is a TV channel you do not want your children to watch, you can use the CHILD LOCK function to lock out the TV channel. Even when a child chooses a programme number (PR) for a locked TV channel the screen will change to blue and display (CHILD LOCK) so the TV channel cannot be viewed. Unless you enter a pre-set ID number by a special operation, the lock cannot be released and the child cannot view the TV channel.
To set the CHILD LOCK function
1 Choose CHILD LOCK, then press the 0 (AV) button
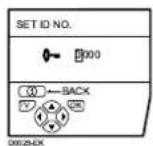
"SET ID NO." (ID number setting screen) appears.
natural_image
Pure electrical circuit lines without any symbols
natural_image
Pure geometric diagram with intersecting lines and circular shapes, no text or symbols present2 Set the ID number to your liking
1 Press the ▼/▲ buttons to choose a number.
2 Press the ◀/▶ buttons to move the cursor.
3 Press the OK button
The Sub-menu of CHILD LOCK appears.
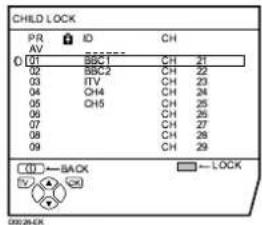
text_image
CHILD LOCK PR ID CH AV AV 01 BBG1 CH 21 02 BBG2 CH 22 03 ITV CH 23 04 ITV CH 24 05 CH5 CH 25 06 07 08 09 CH CH CH 26 CH CH CH 27 CH CH CH 28 CH CH CH 29 CO ← BACK ← LOCK EV → QX4 Press the ▼/▲ buttons to choose a TV channel
Every time you press the ▼/▲ buttons, the Programme number (PR) changes, and the picture of the TV channel registered in the Programme number (PR) is displayed on the screen.
5 Press the blue button and set the CHILD LOCK function. Then press the OK button
(CHILD LOCK) appears and the TV channel is locked.
To reset the CHILD LOCK function: Press the blue button again. (CHILD LOCK) disappears.
To disable easy resetting of the CHILD LOCK function, the menu disappears if you choose the CHILD LOCK function and press the OK button.
2 Press the ⓘ (Information) button to display "ID NO." (ID No. input screen)
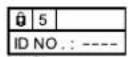
3 Press the number buttons to enter the ID number
The lock is temporarily released so you can view the TV channel.
If you have forgotten the ID number:
Perform step 1 of "To set the CHILD LOCK function". After confirming the ID number, press the TV button to exit the menu.
• Even if you reset the lock temporarily, it does not mean that the CHILD LOCK function set for the TV channel is cancelled. The next time anyone tries to view the TV channel, it will be locked again.
- When you want to cancel the CHILD LOCK function, you must perform the operation "To set the CHILD LOCK function" again.
- To stop it being easy to choose the programme number (PR) of a locked TV channel, the programme number (PR) has been set so that it cannot be chosen with the ▼/▲ buttons or the buttons of the TV.
- To stop it being easy to reset the lock, "ID NO." (ID No. input screen) is set so that it cannot appear unless you press the ① (Information) button.
To view a locked TV channel
1 Choose a programme number (PR) of a locked TV channel with the number buttons or PR LIST
The screen changes to blue and the Ⓞ (CHILD LOCK) appears. You cannot view the TV channel.
5 DH027-EK
Using the TV's menu
■ DECODER (EXT-2)
You can only use this function if you have a decoder connected to a T-V LINK compatible VCR, which in turn is connected to the EXT-2 terminal. To use this function, see "Using the DECODER (EXT-2) function" on page 32.
Caution
- If you have not connected a decoder with a T-V LINK compatible VCR to the EXT-2 terminal, setting this function to "ON" by mistake causes the picture/sound of a TV channel you are currently viewing to disappear.
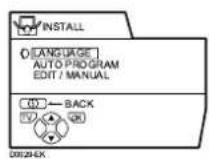
INSTALL
LANGUAGE
You can choose the language you want to use for the on-screen display from the language list in a menu.
1 Choose LANGUAGE, then press the OK button
A sub-menu of the LANGUAGE function appears.
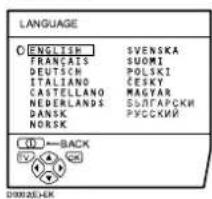
text_image
LANGUAGE O ENGLISH FRANÇAIS DEUTSCH ITALIANO CASTELLANO NEERLANDS DANSK NORSK SVENSKA SUOMI POLSKI ČESKY MAGYAR SOLITAPСКИ РУСКИЙ CO — BACK D0002E+EK2 Press the ◀/▶ and ▼/▲ buttons to choose a language. Then press the OK button
■ AUTO PROGRAM
To receive SKY 1 you need a satellite tuner. You must have the satellite tuner set to SKY 1 before starting the AUTO PROGRAM function.
You can automatically store the TV channels for which you have the best reception. Store them in the TV's programme numbers (PR) list by doing the following.
1 Choose AUTO PROGRAM
2 Press the OK button to start the AUTO PROGRAM function
The AUTO PROGRAM menu appears and the TV channels you receive are automatically registered in the programme numbers (PR) list.
• To cancel the AUTO PROGRAM function, press the TV button.
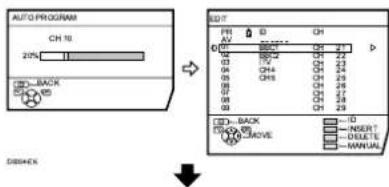
text_image
AUTO PROGRAM CH 10 20% BACK EDIT FR AV D CH 03 27 04 28 05 29 06 29 07 29 08 29 09 29 0D BACK MOVE -0 -INSERT -DELETS -MANUAL DISBACKAfter the TV channels have been registered in the programme numbers (PR), the EDIT menu appears.
- You can now edit the programme numbers (PR) using the EDIT/MANUAL function. For details, see "EDIT/MANUAL" on page 27.
- If you do not need to use the EDIT/MANUAL function, go to the next step.
If "ACI START/ACI SKIP" appears in the AUTO PROGRAM menu:
You can use the ACI (Automatic Channel Installation) function to decode the ACI data and complete the registration of all the TV channels quickly. For details of the ACI function and how to use it, see "Using the ACI function" on page 31. If you don't want to use the ACI function, press the ▼/▲ buttons to choose ACI SKIP and then press OK.

natural_image
Pure geometric diagram with intersecting lines and circular shapes, no text or symbols present3 Press the OK button to display the T-V LINK menu
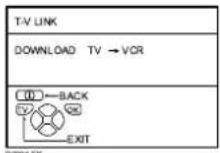
4 If you do not have a T-V LINK compatible VCR connected:
Press the TV button to leave the T-V LINK menu.
The T-V LINK menu disappears and all the settings are completed.
If you have a T-V LINK compatible VCR connected to the EXT-2 terminal:
See "Downloading data to a VCR" on page 32 to transmit the programme number (PR) data to the VCR.
- If a TV channel you want to view is not set to a programme number (PR), set it manually using the MANUAL function. For details, see "EDIT/MANUAL" on page 27.
• The AUTO PROGRAM function does not set the programme number PR 0 (AV) for your video cassette recorder. You will need to set this using the manual function. - In some areas you may get TV reception from more than one transmitter, for example, different ITV regions. In this case each TV channel could be set twice. If this happens, the first set of channels will have the stronger signal. If you want to delete the second set of channels, you will have to do it manually (see page 30).
EDIT/MANUAL
The EDIT/MANUAL functions are divided into two types:
• editing the current programme numbers (PR) (EDIT functions); and
- manually storing a TV channel you want to view on a particular programme number (PR) (MANUAL function).
Here are the details about these functions:
Caution
- Using the MOVE, DELETE or INSERT functions rewrites the current programme numbers (PR) list. Therefore, the programme numbers (PR) of some of the TV channels will change
• Using the MANUAL function for a TV channel for which the CHILD LOCK function has been set cancels the CHILD LOCK function for that channel. - Using the MANUAL function for a TV channel for which the DECODER (EXT-2) function has been set to ON returns the setting of the DECODER (EXT-2) function for that channel to OFF.
- When a TV channel has already been registered in PR 99, using the INSERT function deletes that TV channel.
1 Choose EDIT/MANUAL, then press the OK button
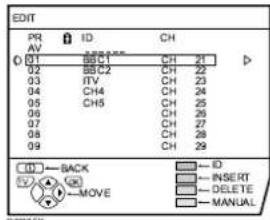
text_image
EDIT PR AV ID CH 01 BBC1 CH 25 02 BBC2 CH 22 03 ITV CH 23 04 CH4 CH 24 05 CH5 CH 25 06 CH 26 07 CH 27 08 CH 28 09 CH 29 ID — BACK ID — INSERT GO — DELETE MOVE — MANUAL- For programme number PR 0, "AV" appears in the programme numbers (PR) list.
- An EXT terminal number does not appear in the programme numbers (PR) list.
- The CH/CC number is a number unique to the TV and corresponds to the channel number of a TV channel. For the relationship between a channel number and a CH/CC number, see "CH/CC NUMBER" on page 30.

2 Follow the description for a function you want to use
MOVE:
This function changes a programme number (PR) of a TV channel.
ID:
This function registers a channel name (ID) to a TV channel.
INSERT:
This function adds a new TV channel in the current programme numbers (PR) list by using the CH number.
- You cannot use the INSERT function if you do not know a channel number of a TV channel. Use the MANUAL function to register a TV channel in the programme number (PR).
DELETE:
This function deletes a TV channel you do not want to list.
MANUAL:
This function manually stores a new TV channel in a programme number (PR).
3 Press the OK button to complete the settings
The T-V LINK menu appears.
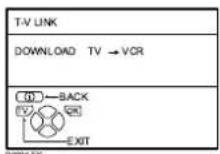
4 If you do not have a T-V LINK compatible VCR connected:
Press the TV button to exit the T-V LINK menu.
The T-V LINK menu disappears and all the settings are completed.
If you have a T-V LINK compatible VCR connected:
Follow the operating procedure "Downloading data to a VCR" on page 32 to transmit the programme number (PR) data to the VCR.
MOVE
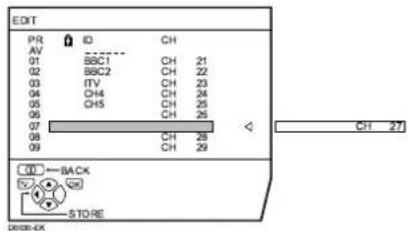
1 Press the ▼/▲ buttons to choose a TV channel
Every time you press the ▼/▲ buttons, the programme number (PR) changes and the picture of the TV channel stored in the programme number (PR) appears on the screen.
2 Press the ▶ button to start the MOVE function
text_image
EDIT PR ID CH AV SMC G1 BBC1 CH 21 G2 BBC2 CH 22 G3 ITV CH 23 G4 OH4 CH 24 G5 OH5 CH 25 G6 CH 26 G7 CH 27 G8 CH 28 G9 CH 29 ID BACK STORE3 Press the ▼/▲ buttons to choose a new programme number (PR)
To cancel the MOVE function: Press the ⓘ (Information) button.
4 Press the ◀ button to change the programme number (PR) of a TV channel to a new programme number (PR)
ID
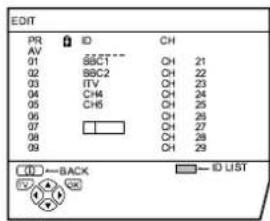
1 Press the ▼/▲ buttons to choose a TV channel
Every time you press the ▼/▲ buttons, the programme number (PR) changes and the picture of the TV channel stored in the programme number (PR) appears on the screen.
2 Press the red button to start the ID function
text_image
EDIT PR ID CH AV 01 SBC1 CH 21 02 SBC2 CH 22 03 ITV CH 23 04 CH4 CH 24 05 CH6 CH 25 06 07 [ ] CH 26 08 09 CH 27 CH 28 CH 29 (II)←BACK → ID LIST
text_image
28
natural_image
Pure electrical circuit lines without any symbols3 Press the ▼/▲ buttons to choose the first character of a channel name (ID) you want to give the TV channel
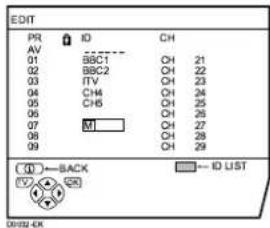
text_image
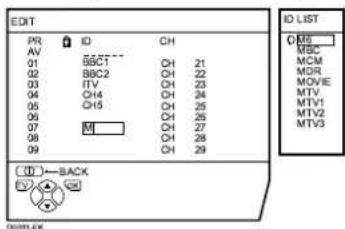
EDIT PR ID CH AV 01 BBC1 OH 21 02 BBC2 OH 22 03 ITV OH 23 04 CH4 OH 24 05 CH6 OH 25 06 CH7 OH 26 07 M OH 27 08 09 ( )←BACK ←ID LIST ( )←BACK ←ID LIST4 Press the blue button to display the ID LIST (channel name list)
text_image
EDIT PR ID CH AV 01 B5C1 CH 21 02 B8C2 CH 22 03 ITV CH 23 04 CI4 CH 24 05 CI5 CH 25 06 MI CH 26 07 08 CH 27 09 CH 28 ID LIST 0MS MBC MCM MDR MOVIE MTV MTV1 MTV2 MTV3 ( )-BACK EV Q1 00:03:4K5 Press the ▼/▲ buttons to choose the channel name (ID)
To cancel the ID function: Press the ⓘ (Information) button.
6 Press the OK button to give a channel name (ID) to a TV channel
- You can give your own unique channel name (ID) to the TV channel. When you have finished step 3, do not go to step 4. Press the ◀/▶ buttons to move the cursor, and press the ▼/▲ buttons to choose each character of the channel name (ID). Then press the OK button to register the channel name (ID) to the TV channel.
INSERT
Preparation:
- You need to find the CH/CC number for the TV channel. Find the CH/CC number from the "CH/CC NUMBER" table on page 30 based on the channel number of the TV channel.
1 Press the ▼/▲ buttons to choose a programme number (PR) for which you will register a new TV channel
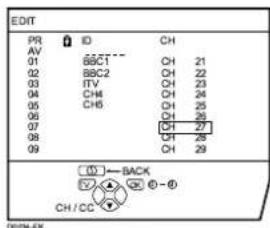
2 Press the green button and start the INSERT function.
text_image
EDIT PR ID CH AV 01 BBCCT CH 21 02 BBC2 CH 22 03 ITV CH 23 04 CH4 CH 24 05 CH6 CH 25 06 CH 26 07 CH 27 08 CH 28 09 CH 29 ① BACK CH/CC ② -③To cancel the INSERT function: Press the ⓘ (Information) button.
3 For UK model (AV32X25EK/AV28X25EK): Press the number buttons to enter the remaining CH number • You cannot enter CC numbers. For Ireland model (AV32X25EI/AV28X25EI): Press the ▼/▲ buttons to choose "CH" or "CC", then enter the remaining CH or CC number
The TV shifts to registration mode. When the registration is completed, the picture of the TV channel appears on the screen.
- The CH/CC number is a number given to each broadcast frequency that carries a TV channel. If the TV cannot detect the TV channel corresponding to the broadcast frequency indicated by the CH/CC number, a “no-signal” picture appears.
DELETE
1 Press the ▼/▲ buttons to choose a TV channel
Every time you press the ▼/▲ buttons, the programme number (PR) changes and the picture of the TV channel stored in the programme number (PR) appears on the screen.
2 Press the yellow button to delete the TV channel
The TV channel is deleted from the programme numbers (PR) list.
MANUAL
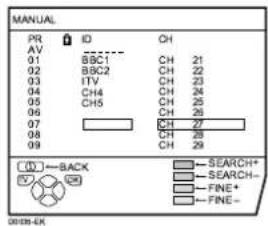
1 Press the ▼/▲ buttons to choose a programme number (PR) for a new TV channel
2 Press the blue button to activate the MANUAL function
text_image
MANUAL PR ID CH AV 01 BSC1 CH 21 02 BSC2 CH 22 03.ITV CH 23 04 CH4 CH 24 05 CH5 CH 25 06 07 08 09 (□)→BACK SEARCH+ (□)→SSEARCH- (□)→FINE+ (□)→FINE- 00:00-0KTo cancel the MANUAL function: Press the ⓘ (Information) button.
3 Press the green or red button to search for a TV channel
Scanning stops when the TV finds a TV channel. Then the TV channel is displayed.
4 Press the green or red button repeatedly until the TV channel you want appears
If the TV channel reception is poor: Press the blue or yellow button to fine-tune the TV channel.
5 Press the OK button and register the TV channel to a programme number (PR)
The normal EDIT menu is resumed.
CH/CC NUMBER
- When you want to use the INSERT function on page 29, find the CH/CC number corresponding to the channel number of the TV channel from this table. If you want to know a particular TV channel's channel menu, look in TV listings magazines or contact the broadcaster.
• The UK model (AV32X25EK/AV28X25EK) cannot receive the CC number channels or the channels from CH/CC 02 to CH/CC 12.
| CH Channel | Channel |
| CH 02 E2, | FE8, IR A |
| CH 03 E3, | FE8, IR B |
| CH 04 E4, | FE8, IR C |
| CH 05 E5, | FE8, IR D |
| CH 06 E6, | FE8, IR E |
| CH 07 E7, | FE7, IR F |
| CH 08 E8, | FE8, IR G |
| CH 09 E9 | E9 |
| CH 10 E10, | IR H, IR H |
| CH 11 E11, | IR J |
| CH 12 E12 | |
| CH 21 E21 | |
| CH 22 E22 | |
| CH 23 E23 | |
| CH 24 E24 | |
| CH 25 E25 | |
| CH 26 E26 | |
| CH 27 E27 | |
| CH 28 E28 | |
| CH 29 E29 | |
| CH 30 E30 | |
| CH 31 E31 | |
| CH 32 E32 | |
| CH 33 E33 | |
| CH 34 E34 | |
| CH 35 E35 | |
| CH 36 E36 | |
| CH 37 E37 | |
| CH 38 E38 | |
| CH 39 E39 |
| CH Channel | |
| CH 40 E40 | |
| CH 41 E41 | |
| CH 42 E42 | |
| CH 43 E43 | |
| CH 44 E44 | |
| CH 45 E45 | |
| CH 46 E46 | |
| CH 47 E47 | |
| CH 48 E48 | |
| CH 49 E49 | |
| CH 50 E50 | |
| CH 51 E51 | |
| CH 52 E52 | |
| CH 53 E53 | |
| CH 54 E54 | |
| CH 55 E55 | |
| CH 56 E56 | |
| CH 57 E57 | |
| CH 58 E58 | |
| CH 59 E59 | |
| CH 60 E60 | |
| CH 61 E61 | |
| CH 62 E62 | |
| CH 63 E63 | |
| CH 64 E64 | |
| CH 65 E65 | |
| CH 66 E66 | |
| CH 67 E67 | |
| CH 68 E68 | |
| CH 69 E69 | |
text_image
30
natural_image
Pure electrical circuit lines without any symbolsAdditional menu operations
Using the ACI function
This TV has an ACI function which decodes the ACI (Automatic Channel Installation) data.
Using the ACI function allows all TV channels transmitted from the cable TV station to be properly registered quickly according to the data from the cable TV station.
Caution
- If your cable TV station broadcasts ACI data and if "ACI START/ACI SKIP" appears in the AUTO PROGRAM menu, the ACI function is enabled. In all other cases, it is disabled.
1 Press the ▼▲ buttons to choose ACI START. Then press the OK button to start the ACI function
When you don't want to use the ACI function:
Press the ▼/▲ buttons to choose ACI SKIP and then press the OK button.
If the AUTO PROGRAM menu changes to another menu:
Depending on your cable TV station, there may be a broadcast selection menu set up by the cable TV station.
Follow the menu and use the ◀/▶ and ▼/▲ buttons. After you have made the setting, press the OK button.
If "ACI ERROR" is displayed in the AUTO PROGRAM menu:
"ACI ERROR" means that the ACI function is not working properly. Press the OK button to start the ACI function again.
If "ACI ERROR" still appears even after you have tried to start the ACI function several times, press the ▶ button to start the AUTO PROGRAM function. It does not cause any problem because all the TV channels are registered to the Programme numbers (PR) by the AUTO PROGRAM function.
2 When the settings are completed, the EDIT menu is displayed. Return to the instructions that you were reading before, and continue the operation.
When the "Initial settings" have been made:
Return to step 6 of "Initial settings" on page 7.
When the "AUTO PROGRAM" has finished:
Return to step 3 of "AUTO PROGRAM" on page 27.
- If you have any questions about the items in the Broadcast Selection menu or how to operate the menu, please contact your cable TV station.
- When the cable TV broadcast reception is poor, the ACI function will not work properly.
- If there is an error in the ACI data itself, the TV channel cannot be registered properly. If this happens, turn the ACI function off (ACI SKIP) and use the AUTO PROGRAM function. Or, use the EDIT/MANUAL function to correct the Programme number (PR) setting.
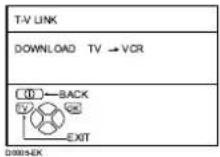
Downloading data to a VCR
You can send the latest programme numbers (PR) data to a VCR with the T-V LINK function.
- You can only do this when a T-V LINK compatible VCR is connected to the EXT-2 terminal.
- This only works when the T-V LINK menu is being displayed.
1 Turn on the VCR
2 Press the OK button
The data transmission begins.
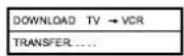
The T-V LINK menu disappears once the data transmission ends.
When the T-V LINK menu changes over to another menu:
The TV has finished its menu. This new menu is operated from the VCR. See the VCR instruction manual for what to do next.
If "FEATURE NOT AVAILABLE" appears at the T-V LINK menu, check the following three items.
- Has a T-V LINK compatible VCR been connected to the EXT-2 terminal?
- Has the VCR power been turned on?
- Does the SCART cable that connects the EXT-2 terminal to the T-V LINK compatible VCR have all its proper connections?
Then press the OK button to retry data transmission.
Using the DECODER (EXT-2) function
If you have a decoder connected to a T-V LINK compatible VCR, which in turn is connected to the EXT-2 terminal, use the DECODER (EXT-2) function to unscramble the scrambled TV channels.
1 Turn on the decoder power
2 Display the scrambled TV channel on the TV
Even if the decoder is working, a scrambled picture appears.
3 Press the OK button to display the MENU
The MENU (main menu) appears.
4 Press the 6 buttons to choose FEATURES. Then press the OK button
The FEATURES menu appears.
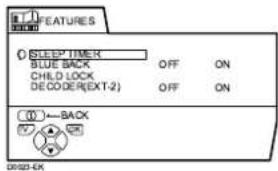
An unscrambled picture appears.
To cancel the DECODER (EXT-2) function:
Press the 5 buttons to choose OFF.
6 Press the OK button to complete the setting
The T-V LINK menu appears.

natural_image
Pure geometric diagram with intersecting lines and circular shapes, no text or symbols present©
Additional preparation
Connecting external equipment
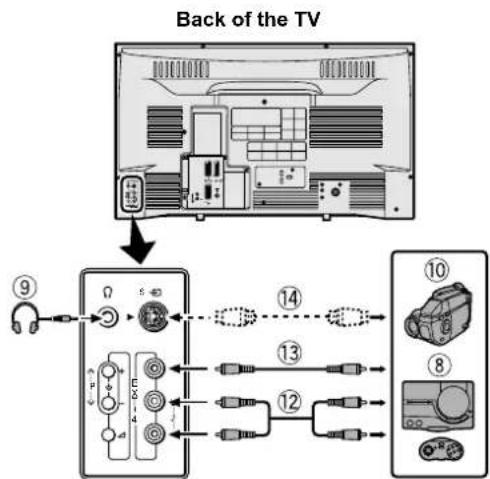
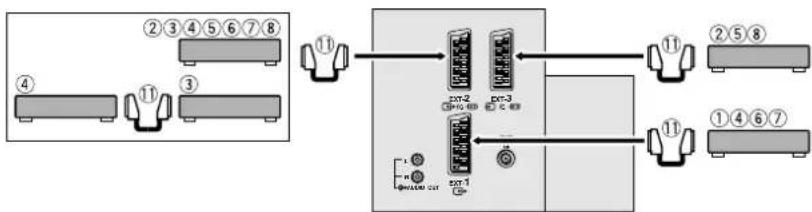
Connect the equipment to the TV, making the correct rear panel and front panel connections.
Before connecting anything:
- Read the manuals that came with the equipment.
Depending on the equipment, the connection method may be different from the diagram. Also, the equipment settings may need to change depending on the connection method. - Turn off all the equipment including the TV.
- The “Specifications” on the back cover give the details of the EXT terminals. If you are connecting equipment not listed in the following connection diagram, see the table to choose the best EXT terminal.
- Connecting cables are not supplied.
①VCR (composite signal)
②VCR (composite signal/S-VIDEO signal)
③T-V LINK compatible VCR (composite signal/S-VIDEO signal)
④Decoder
⑤DVD player (composite signal/S-VIDEO signal)
⑥DVD player (composite signal/RGB signal)
⑦TV game (composite signal/RGB signal)
⑧TV game (composite signal/S-VIDEO signal)
⑨Headphones
⑩Camcorder (composite signal/S-VIDEO signal)
⑪SCART cable
⑫Audio cable
⑬Video cable
⑭S-VIDEO cable
flowchart
graph TD
    A["Back of the TV"] --> B["Device ⑨"]
    B --> C["Switch ①"]
    C --> D["Central Device ④"]
    D --> E["Switch ③"]
    E --> F["Switch ②"]
    F --> G["Switch ④"]
    G --> H["Switch ⑤"]
    H --> I["Switch ⑥"]
    I --> J["Switch ⑧"]
    J --> K["Switch ⑩"]
Back of the TV
flowchart
graph TD
    A["①"] --> B["②"]
    B --> C["③"]
    C --> D["④"]
    D --> E["⑤"]
    E --> F["⑥"]
    F --> G["⑦"]
    G --> H["⑧"]
    H --> I["⑨"]
    I --> J["⑩"]
    J --> K["⑪"]
    K --> L["⑫"]
    L --> M["⑬"]
    M --> N["⑭"]
    N --> O["⑮"]
    O --> P["⑯"]
    P --> Q["⑰"]
    Q --> R["⑱"]
    R --> S["⑲"]
    S --> T["⑳"]
    T --> U["㉑"]
    U --> V["㉒"]
    V --> W["㉓"]
    W --> X["㉔"]


natural_image
Pure geometric diagram with intersecting lines and circular shapes, no text or symbols present■ Equipment which can output the S-VIDEO signal (Y/C signal) such as an S-VHS VCR
Connect the equipment to an EXT terminal (but not the EXT-1 terminal).
You can choose between an S-VIDEO signal (Y/C signal) and a regular video signal (composite signal). For details of how to operate the equipment, see "S-IN (S-VIDEO input)" on page 22.
■ T-V LINK compatible VCR
Be sure to connect the T-V LINK compatible VCR to the EXT-2 terminal. If not, the T-V LINK function will not work properly.
- When connecting a T-V LINK compatible VCR to the EXT-2 terminal, be sure to connect the decoder to the VCR. If not, the T-V LINK function may not work properly. After you have stored TV channels in the programme numbers (PR) list, set the DECODER (EXT-2) function for the programme number (PR) to ON to unscramble a scrambled TV channel. For details, see “Using the DECODER (EXT-2) function” on page 32.
■ Connecting headphones
Connect the headphones with a stereo mini-jack (3.5 mm diameter) to the headphone jack at the TV front panel.
- When you connect the headphones, the TV speakers go off.
■ Video or sound signal output from the EXT-2 terminal
You can change over the output of the video/sound signal from the EXT-2 terminal. This is useful when you want to dub the video/sound from another device onto the VCR connected to the EXT-2 terminal. For details on how to do this, see "DUBBING" on page 23.
■ TV output from the EXT-1 terminal
The video/sound signal of a TV channel you are viewing is always output from the EXT-1 terminal.
- Changing over a programme number (PR) also changes over the TV output from the EXT-1 terminal.
- The video/sound signal from an EXT terminal cannot be output.
- Teletext programmes cannot be output.
■ Connecting speakers amplifier
See the audio equipment connection diagram and connect the audio equipment to the TV. You can use external front speakers to listen to the TV sound instead of the TV speakers.
Before connecting anything:
- Read the manuals provided with the amplifier and speakers.
- Turn the TV and amplifier off.
• To prevent magnetism from the speakers adversely affecting the TV screen, use magnetically-shielded speakers for the front speakers. - Note that connecting cables are not supplied.
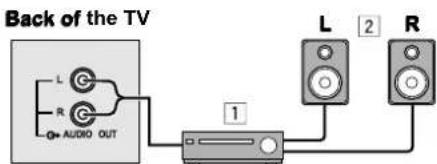
text_image
Back of the TV L R AUDIO OUT 1 L 2 R1 Amplifier 2 Front speakers (Magnetic-shielded type)
• The output from the AUDIO OUT terminal is not interrupted by connecting headphones to the TV. You cannot cut the sound from the front speaker even if you connect a headphone to the TV.
Troubleshooting
If a problem arises while you are using the TV, please read this troubleshooting guide carefully before you ask to have the TV repaired. You may be able to fix it easily by yourself. For example, if the mains plug is disconnected from the mains outlet, or the TV aerial has problems, you may think there is a problem with the TV itself.
Important:
- This troubleshooting guide only covers problems whose causes are not easy to decide. If you have a question when you are operating a function, read the page(s) for that function carefully, not this troubleshooting guide.
- If you follow the advice in this troubleshooting guide without any success, unplug the mains plug and ask for your TV to be repaired. Do not attempt to repair the TV by yourself or to remove the rear cover of the TV.
■ If you cannot turn on the TV
- Is the mains plug connected to the mains outlet?
- Is the power lamp lit? If not, press the main power button.
■ No picture or no sound
- Have you chosen a TV channel with very poor reception? If so, the BLUE BACK function will be activated: the entire screen becomes blue, and the sound is muted. If you still want to view the TV channel, follow the description "BLUE BACK" on page 24 to try to change the BLUE BACK function setting to OFF.
• Have you connected headphones to the TV? Connecting headphones to the TV turns off the TV speakers. - Have you set the SPEAKER function to OFF? Follow the description "SPEAKER" on page 22 to check the SPEAKER function setting.
■ Poor picture
- If noise (snow) totally blocks out the picture, there may be a problem with the aerial or aerial cable. Check the following to try to solve the problem:
– Have the TV and aerial been connected properly?
- Has the aerial cable been damaged?
– Is the aerial pointing in the right direction?
– Is the aerial itself faulty?
- If the TV or aerial suffers interference from other equipment, stripes or noise may appear in the picture. Move any equipment such as an amplifier, personal computer, or a hair drier, that can cause interference away from your TV. Or try moving the TV. If the aerial suffers interference from a radio tower or high-voltage wire, please contact your local dealer.
- If the TV suffers interference from signals reflecting from mountains or buildings, double-pictures (ghosting) will occur. Try to change the aerial's direction or replace it with one with better directionality.
- Are your COLOUR SYSTEM settings correct? Follow the description "COLOUR SYSTEM" on page 20 to try to solve the trouble.
- Have the COLOUR and BRIGHT settings been adjusted properly? Follow the description "Picture Adjustment" on page 19 to try to adjust them properly.
- Videotaping teletext is not recommended because it may not record correctly.
- When a white and bright still image (such as a white dress) is displayed on the screen, the white part may look as if it is coloured. This is unavoidable due to the nature of the picture tube itself, and not due to a TV failure. When the picture disappears from the screen, the unnatural colours will also disappear.
- When viewing images from commercially available video software products, or videos from videotapes which have been recorded improperly, the top of the image may be distorted. This is due to the condition of the video signal. There is nothing wrong with the TV.
Troubleshooting
■ Poor sound
- Have you adjusted BASS or TREBLE properly? If not, follow the description "Sound Adjustment" on page 21.
- When TV channel reception is poor, it can be hard to hear stereo or bilingual sound. In this case, follow the description "STEREO / I • II" on page 21 to hear the sound more easily by changing it to a mono sound.
■ If the TV does not respond to the remote control
- Have the batteries of the remote control worn out? Follow the description "Putting the batteries into the Remote control" on page 6 and replace them with new batteries.
- Have you attempted to use the remote control from the sides or rear of the TV or from more than seven metres away from the TV? Use the remote control in the front of your TV or from less than seven metres away.
- When you are viewing a teletext programme, you cannot operate the menus. Press the TV button to return to the ordinary TV programme, and then try operating the menus.
- If the TV will not respond suddenly, press the main power button on the TV and turn off the main power. Press the main power button again to turn on the TV. If the TV returns to a normal state, it is not a failure.
■ Other issues
- When the SLEEP TIMER function operates, the TV is automatically turned off. If the TV is turned off suddenly, try to press the Ⓗ/l (standby) button to turn on the TV once again. If the TV goes back to normal, there is no problem.
-
When the TV is receiving a wide-screen signal (WSS) or a signal from an external device affecting the screen size, the ZOOM mode automatically changes. When you want to resume the previous ZOOM mode, press the ZOOM button again.
-
If you bring a magnetised equipment such as a speaker near to your TV, the picture may be warped or unnatural colours now appear at the corners of the screen. In this case, keep the equipment away from your TV. If speakers cause this to happen, use magnetic-shielded speakers instead.
- A picture may be tilted due to the earth's own magnetic field. If so, use the "PICTURE TILT" on page 21 to correct the tilt.
- It takes a short period of time from the time an operation such as changing channels is performed until an image is displayed. This is not a malfunction. This is the time required for the image to stabilize before it can be displayed.
- The TV may make a crackling sound due to a sudden change in temperature. The picture or sound may be normal. If you hear crackling sounds frequently while you are viewing the TV, there may be other causes. As a precaution, ask your service technician to inspect it.
- Touching the screen may cause you to feel a slight electric shock due to its static electricity. This is unavoidable due to the construction of the picture tube. It is not a problem with the TV. You can rest assured that this static discharge is not harmful.

Specifications
| Item\Model | AV32X25EK* (UK model) AV28 | X25EK* (UK model) |
| Broadcasting systems CCIR | ||
| Colour systems PAL | • The EXT terminals also support the NTSC 3.58/4.43 MHz system. | |
| Channels and frequencies E21-E69 | ||
| Sound-multiplex systems NICAM (I) system | ||
| Teletext systems FLOF (Fastext), WST (World Standard Text) | ||
| Power requirements 220 - 240 V AC, 50 Hz | ||
| Power consumption Maximum: 187 W, Average: 138 W, Standby: 2.6 W | Maximum: 178 W, Average: 125 W, Standby: 2.6 W | |
| Picture tube size Viewable area 76 cm (measured diagonally) | Viewable area 66 cm (measured diagonally) | |
| Audio output Rated Power output: 7.5 W + 7.5 W | ||
| Speakers | (13 cm × 6.5 cm) oval × 2 | |
| EXT-1 terminal Euroconnector (21-pin, SCART)• Video input, Audio L/R inputs and RGB inputs are available.• TV broadcast outputs (Video and Audio L/R) are available. | ||
| EXT-2 terminal Euroconnector (21-pin, SCART)• Video input, S-VIDEO (Y/C) input and Audio L/R inputs are available.• Video and Audio L/R outputs are available.• T-V LINK functions are available. | ||
| EXT-3 terminal Euroconnector (21-pin, SCART)• Video input, S-VIDEO (Y/C) input and Audio L/R inputs are available. | ||
| EXT-4 terminal RCA connectors × 3S-VIDEO connector × 1• Video input, S-VIDEO (Y/C) input and Audio L/R inputs are available. | ||
| AUDIO OUT terminal RCA connectors × 2• Variable audio L/R outputs are available.• Variable out 0-1 Vrms, low impedance | ||
| Headphone jack | Stereo mini-jack (3.5 mm in diameter) | |
| Dimensions (W × H × D) | 946 mm × 562 mm × 547 mm | 854 mm × 508 mm × 490 mm |
| Weight | 51.8 kg | 38.9 kg |
| Accessories | Remote control unit × 1 (RM-C55H (Grey) or RM-C51 (Black) is supplied.) AAA/R03 dry cell battery × 2 | |
* : A basic model number. The actual model number may have characters added (such as "S" denoting silver) indicating the colour of the TV set.
We may change the design and specifications without notice.
Pictures displayed on the screen using this TV's ZOOM functions should not be shown for any commercial or demonstration purpose in public places (cafes, hotels, etc.) without the consent of the owners of copyright of the original picture sources, as this would be an infringement of copyright.
natural_image
Pure geometric diagram with crosshair and circular pattern (no text or symbols)

natural_image
Pure geometric diagram with intersecting lines and circles, no text or symbols presentSpecifications
| Item\Model | AV32X25EI* (Ireland model) AV28X25EI* (Ireland model) | |
| Broadcasting systems CCIR | ||
| Colour systems PAL | The EXT terminals also support the NTSC 3.58/4.43 MHz system. | |
| Channels and frequencies IR | A-J, E21-E69 | |
| Sound-multiplex systems NICAM (I) system | ||
| Teletext systems FLOF (Fastext), WST (World Standard Text) | ||
| Power requirements 220 - 240 V AC, 50 Hz | ||
| Power consumption Maximum: 187 W, Average: 138 W, Standby: 2.6 W | Maximum: 178 W, Average: 125 W, Standby: 2.6 W | |
| Picture tube size Viewable area 76 cm (measured diagonally) | Viewable area 66 cm (measured diagonally) | |
| Audio output Rated Power output: 7.5 W + 7.5 W | ||
| Speakers | (13 cm × 6.5 cm) oval × 2 | |
| EXT-1 terminal Euroconnector (21-pin, SCART)Video input, Audio L/R inputs and RGB inputs are available.TV broadcast outputs (Video and Audio L/R) are available. | ||
| EXT-2 terminal Euroconnector (21-pin, SCART)Video input, S-VIDEO (Y/C) input and Audio L/R inputs are available.Video and Audio L/R outputs are available.T-V LINK functions are available. | ||
| EXT-3 terminal Euroconnector (21-pin, SCART)Video input, S-VIDEO (Y/C) input and Audio L/R inputs are available. | ||
| EXT-4 terminal RCA connectors × 3S-VIDEO connector × 1Video input, S-VIDEO (Y/C) input and Audio L/R inputs are available. | ||
| AUDIO OUT terminal RCA connectors × 2Variable audio L/R outputs are available.Variable out 0-1 Vrms, low impedance | ||
| Headphone jack Stereo mini-jack (3.5 mm in diameter) | ||
| Dimensions (W × H × D) | 946 mm × 562 mm × 547 mm | 854 mm × 508 mm × 490 mm |
| Weight | 51.8 kg | 38.9 kg |
| Accessories | Remote control unit × 1 (RM-C55H (Grey) or RM-C51 (Black) is supplied.) AAA/R03 dry cell battery × 2 | |
* : A basic model number. The actual model number may have characters added (such as "S" denoting silver) indicating the colour of the TV set.
We may change the design and specifications without notice.
Pictures displayed on the screen using this TV's ZOOM functions should not be shown for any commercial or demonstration purpose in public places (cafes, hotels, etc.) without the consent of the owners of copyright of the original picture sources, as this would be an infringement of copyright.