
Elegance 21 flat tvd 55 2502 - TV GRUNDIG - Free user manual and instructions
Find the device manual for free Elegance 21 flat tvd 55 2502 GRUNDIG in PDF.


| Product Type | CRT Television |
| Screen Size | 21 inches (diagonal) |
| Screen Type | Flat CRT |
| Aspect Ratio | 4:3 |
| Display Resolution | 576i (PAL) |
| Tuner | Analog PAL/SECAM |
| Inputs | 1 SCART, 1 RF Antenna, 1 Composite (RCA) |
| Outputs | Headphone jack (3.5mm) |
| Audio Power | 2 x 5W |
| Power Supply | 220-240V, 50/60Hz |
| Power Consumption | 80 W typical, <1 W standby |
| Dimensions (WxHxD) | 510 x 460 x 480 mm |
| Weight | 22 kg |
| Remote Control | Included |
| Teletext | Yes |
| Child Lock | Yes (via menu) |
| Safety Certification | CE |
| Cleaning | Use a soft, dry cloth. Do not use liquids. |
| Spare Parts Availability | Contact Grundig service center |
Frequently Asked Questions - Elegance 21 flat tvd 55 2502 GRUNDIG
User questions about Elegance 21 flat tvd 55 2502 GRUNDIG
0 question about this device. Answer the ones you know or ask your own.
Ask a new question about this device
Download the instructions for your TV in PDF format for free! Find your manual Elegance 21 flat tvd 55 2502 - GRUNDIG and take your electronic device back in hand. On this page are published all the documents necessary for the use of your device. Elegance 21 flat tvd 55 2502 by GRUNDIG.
USER MANUAL Elegance 21 flat tvd 55 2502 GRUNDIG
4 Connection and preparation
4 Connecting the antenna and the power cable
4 Inserting batteries in the remote control
5-8 Overview
5-7 The remote control
8 The front of the television
9-12 Settings
9 Tuning television channels automatically
9-10 Changing stored channels
11 Picture settings
11-12 Audio settings
13-14 Television operation
15-16 Teletext mode
15 FLOF text and normal text mode
15-16 Additional functions
17-19 Convenience functions
17-18 Convenience functions with the »FEATURES« menu
18-19 TV-Guide
20-30 DVD mode
20 Special DVD features
20 Disc formats
21-24 Preparation
25-27 Using a DVD, video CD or audio CD
27-28 Additional functions during DVD or video CD playback
29 Using an MP3 CD or JPEG CD
29-30 Additional JPEG CD playback functions
30 Creating and playing a playlist
31-32 DVD settings
31 Selecting the setup menu
31-32 Menu options
33-36 Using external devices
33 Decoder or satellite receiver
33 Headphones
34 Video recorder or set top box
35 Camcorder
36 Connecting a multi-channel amplifier or digital two channel audio system
37-39 Special settings
37-39 Setting television channels
40-43 Information
40-43 Technical data, service information for dealers,
General instructions for laser devices, troubleshooting,
Additional Information for units sold in the UK
SET-UP AND SAFETY
text_image
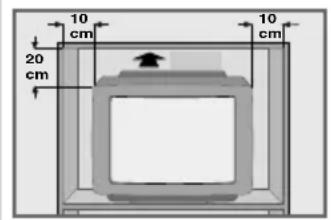
10 cm 20 cm 10 cm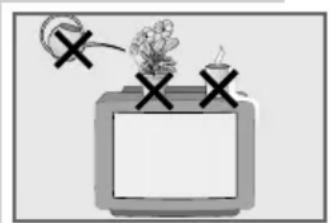
natural_image
Illustration of a vintage television with a monitor, a candle, and a flower on top (no text or symbols)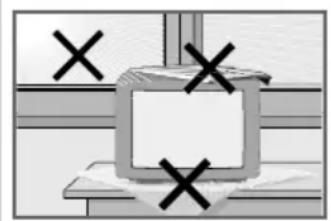
natural_image
Simple line drawing of a window with a monitor and two 'X' marks, no text or symbols present.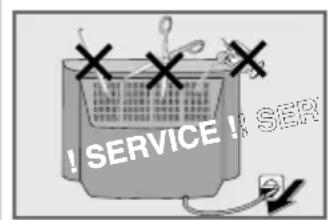
text_image
! SERVICE ! SER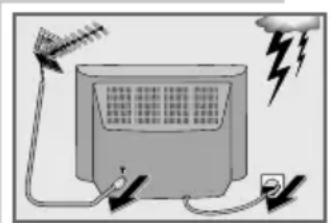
natural_image
Illustration of an outdoor air conditioner unit with antenna, power cord, and lightning bolt (no text or symbols)Please note the following information when setting up your television set.
This television set is designed to receive and display video and audio signals. Any other use is expressly prohibited.
The ideal viewing distance is 5 times the screen diagonal.
External light falling on the screen impairs picture quality.
Ensure sufficient clearance between the TV and the wall cabinet.
The television set is designed for use in dry rooms. If you do use it in the open, please ensure that it is protected from moisture, such as rain or splashing water. Do not expose the television set to any moisture.
If the television is subject to sudden changes in temperature, for example if it is brought in from the cold to a warm room, connect it to the mains supply and let it stand for at least two hours before you insert a disc.
Do not place any vessels such as vases on the television, as they may spill liquid, thus presenting a safety risk.
Place the television set on a solid, level surface. Do not place any objects such as newspapers on the television set or cloth or similar items beneath it.
Do not place the television set close to heating units or in direct sunlight, as this will impair cooling.
Heat build-up can be dangerous and shortens the operating life of the television set. For reasons of safety, have a specialist remove any dirt deposits in the set from time to time.
Keep the television set away from magnetic fields (loudspeaker boxes, for example).
Do not open the television set under any circumstances. No warranty claims are accepted for damage resulting from improper handling.
Ensure that the mains cable is not damaged.
Thunderstorms are a danger to all electrical devices. Even if the television set is switched off, it can be damaged by a lightning strike to the mains or the antenna cable. Always disconnect the mains and antenna plugs during a storm.
Do not insert foreign objects in the disc compartment.
If the device is unable to scan discs perfectly, use a standard, commercially available cleaning CD to clean the laser optics. Other cleaning methods may damage the laser optics.
Always keep the disc compartment closed to prevent dust from collecting on the laser optics.
Clean the screen with a soft, damp cloth. Only use plain water.
CONNECTION AND PREPARATION\_
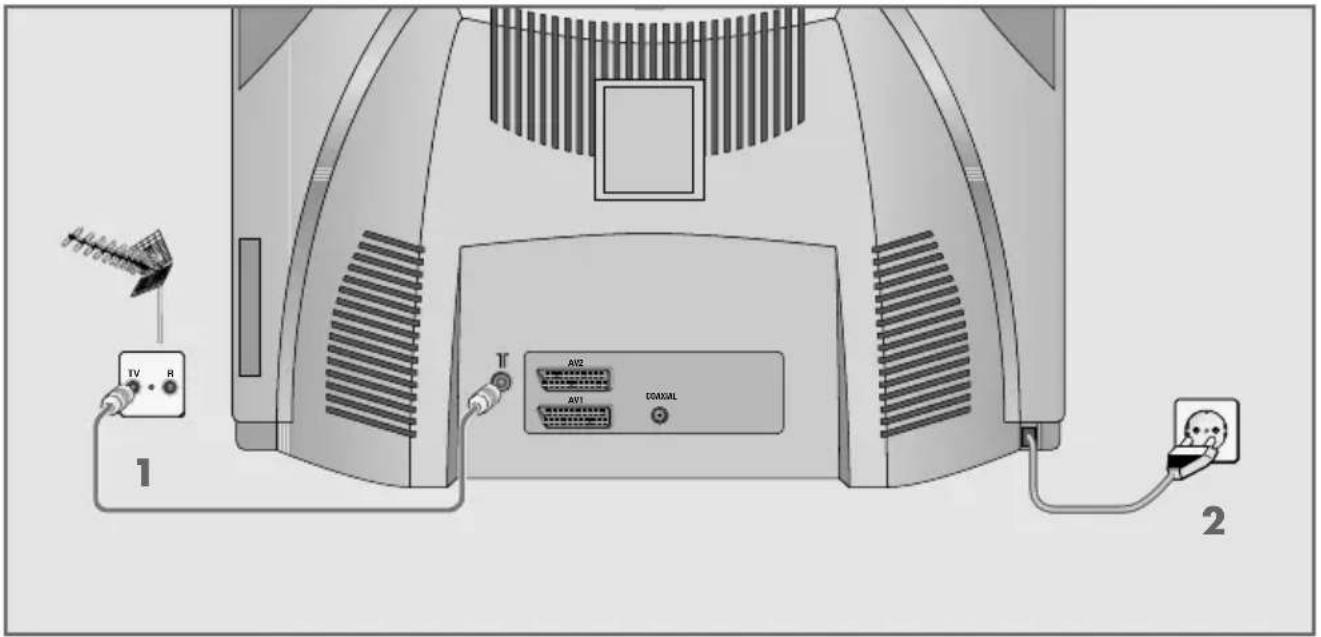
Connecting the antenna and the mains cable
text_image
TV R 1 AV2 AV1 CONEXAL 21 Plug the antenna cable of the rooftop antenna into the »─┐« antenna socket on the television.
2 Plug the mains cable into the wall socket.
Inserting batteries in the remote control
natural_image
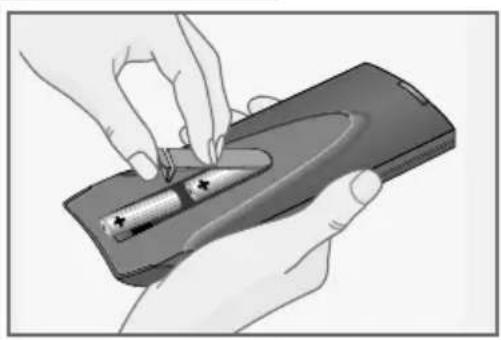
Illustration of hands using a handheld device to hold a battery, no text or symbols visible1 Open the battery compartment by removing the lid.
2 Insert batteries (micro type, e.g. LR 03 or AAA, 2 x 1.5 V). Observe the polarity (marked on the base of the battery compartment).
3 Close the battery compartment.
Note:
If the television no longer reacts properly to remote control commands, the batteries may be flat. Be sure to remove used batteries.
The manufacturer accepts no liability for damage resulting from leaking batteries.
Environmental note
Batteries, including those which contain no heavy metal, may not be disposed of with household waste. Please dispose of used batteries in an environmentally sound manner. Find out about the legal regulations which apply in your area.
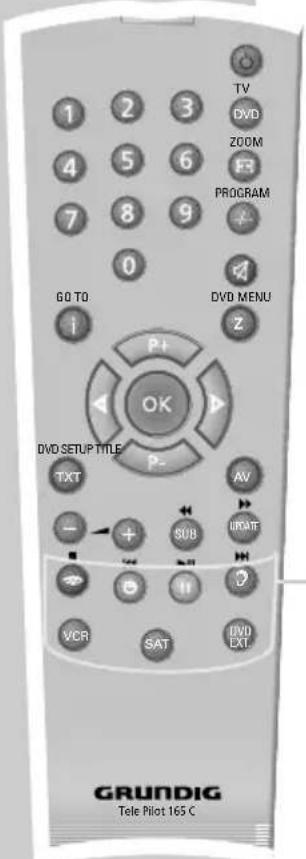
The remote control
text_image
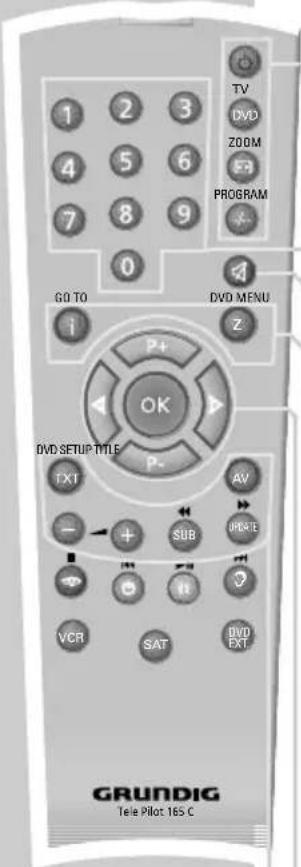
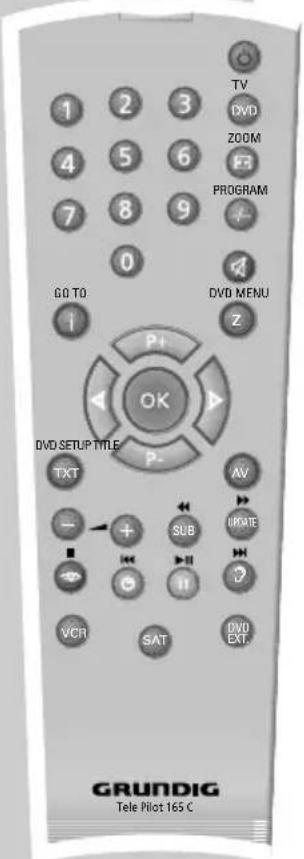
1 2 3 4 5 6 7 8 9 0 GO TO i P+ DVD MENU Z OK DVD SETUP TITLE TXT AV - + SUB UPDATE VCR SAT DVD EXT GRUNDIG Tele Pilot 165 CTV operation
Switches off the television set (stand-by).
TV/DVD Switches the remote control from TV mode to DVD mode and back.

Switches between picture formats.
Reveal answer in teletext mode.
-/-- Switches between single- and double-digit preset channels.
Switches to double character size in teletext mode.
1...0 Switch the television on from standby mode.
Select channels directly.
Sound on/off (mute).
i Opens and closes the info menu; closes all menus.
Z Zap function.
Page hold in teletext mode.
P+, P- Switch the television on from standby.
Select channels step-by-step.
Move the cursor up and down.
OK Calls up the station list.
Activates various functions.

Move cursor to the left/right.
TXT Switches between teletext and TV modes.
Hides the menu.
AV Selects the AV channels and the most recently viewed television channel.

Adjust the volume.
SUB
Selects sub-pages in teletext mode.
UPDATE
Updates the page in teletext mode.
OVERVIEW
text_image
TV DVD ZOOM PROGRAM GO TO DVD MENU P+ OK DVD SETUP TITLE TXT AV SUB URSAT VCR SAT DVD EXT. GRUNDIG Tele Pilot 165 C
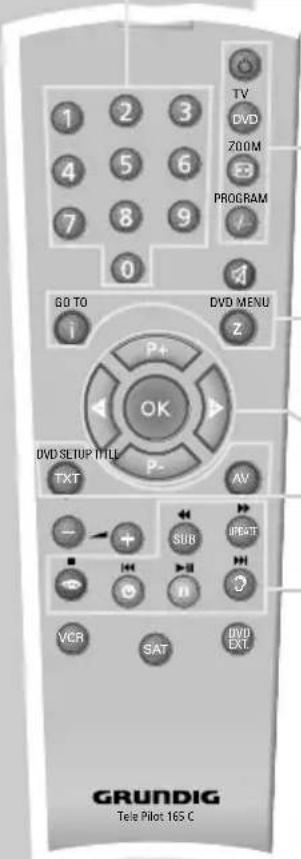
Selects various picture settings; scrolls back a page in teletext mode.
Calls up the TV Guide (information about the current and next broadcast) and time. Moves to the next page in teletext mode.

Selects the desired chapter in teletext mode.

Selects various audio settings; selects the desired topic in teletext mode
VCR, SAT Switches to operating a GRUNDIG videorecorder, DVD EXT. a GRUNDIG satellite receiver or a GRUNDIG DVD player.
Keep the appropriate button (»VCR«, »SAT«, »DVD EXT.«) pressed down. Then press the appropriate button.
Note:
The functions available depend on the model of the device you are using. Just try it out.
OVERVIEW
text_image
TV DVD ZOOM PROGRAM GO TO DVD MENU P+ OK DVD SETUP TIME P- TXT AV SUB UEXT VCR SAT DVD EXT. GRUNDIG Tele Pilot 165 CDVD mode
1...0 Numerical keys for various inputs.
TV/DVD Switches the remote control from TV mode to DVD mode and back.
ZOOM Zooms in/out on scenes during playback.
PROGRAM For programming a playback list for the inserted disc.
GO TO Opens the info menu of DVD unit.
DVD During playback, opens the disc menu* on a DVD. MENU
P+, P- Select various functions in the menus.

OK Confirms functions.
DVD Opens the main menu on the DVD unit. SETUP
TITLE Calls up the DVD title menu* during playback.
Switches to reverse frame search at various speeds during playback.
Switches to forward frame search at various speeds during playback.
■ Interrupts all drive functions.
Selects the previous title or section during playback.
Starts playback. Freeze-frame for DVDs and video CDs. Pause for audio CDs and MP3 CDs.
▶ Selects the next title or section during playback.
* Depends on the DVD in use
OVERVIEW
The front of the television set

①Switches the television into and out of standby mode.
MENU Opens the TV menu, switches to the previous page in the TV menu. Opens the main menu of the DVD unit.
PROG/VOL Preset button for volume or channel selection.
- Channel selection down.
Reduce volume.
+ Switches the television on from stand-by. Channel selection up. Increase volume.
TV/DVD Switches the device from TV mode to DVD mode and back.
■Interrupts all drive functions.
Selects the previous title or section during playback. Selects various functions in the menus.
▶/Starts playback. Freeze-frame for DVDs and video CDs. Pause for audio CDs and MP3 CDs; activates menu functions.
▶ Selects the next title or section during playback. Selects various functions in the menus.
▲ Opens and closes the disc compartment.
A Compartment for CD media.
Headphone jack (3.5 mm ø jack plug).
S-VIDEO Video signal input for S-video camcorders
VIDEO Video signal input for camcorder.
R AUDIO L Audio signal input for camcorder.
Setting television channels automatically
The television set is equipped with an automatic channel search system.
You start the search and can then sort the television channels into your order of preference.
100 preset positions are provided, to which you can assign television channels from the antenna or from the cable connection.
You can also delete television channels from the channel list which were found more than once or which have poor reception.
Language
English Svenska Romaneste
Deutsch Dansk Hirvatski
Dutch Magyar Makedohckdi
Türkçe
Ελληνικο
Русский
川
Srpski

Select
Country Selection
Belgium Hungary
Portugal
Czech Rep.
Ireland
Schweiz
Danmark
Italia Suomi
-
Deutschland Netherlands Sverige
Ελλαδα
Norge
Türkiye
España
Österreich
U.K.
France
Polska
......

Start Autoprogramming
i Exit
1 Switch on the television with » ①« on the television set, then press »P+« on the remote control.
- The »Language« menu appears when the television is first switched on.
Hint:
If the »Language« menu does not appear on the screen, then set it in accordance with the chapter on resetting all television channels on page 39.
– The automatic search may last a few minutes, depending on the number of television channels received.
- After performing the search, the menu »Provider Selection« is displayed, (only if a provider was found). Kabel 1 in Germany, for example.) Press »P+« or »P-« to select the TV Guide provider and confirm by pressing »OK«.
Changing stored channels
You can delete channels that have been stored more than once during the automatic search. You can also store channels in a different preset position, change or enter the name of a channel as well as skip channels.
MAIN MENU
Sound
Picture
Preset List
Channel Settings
Settings
GRUNDIG

Select
i Exit
Selecting the station list
1 Press »i« to open the »MAIN MENU«.
2 Select »Preset List« with »P++« or »P-« and confirm with »OK« – The »Preset List« menu appears.
Note:
Further operation is explained in the following sections.
Preset List
0 5 PRO 7 10 VOX
1 ARD 6 BR3 11 SRTL
2 RTL 7 TELE5 12
3 SAT1 8 WDR 13
4 ZDF 9 KABEL1 14

Select
Exit
Skip
Move
Delete
Name
Preset List
05 PRO 7 10 VOX
1 ARD 6 BR3 11 SRTL
2 RTL 7 TELE5 12
3 SAT1 8 WDR 13
4 ZDF 9 KABEL1 14

Select
i Exit
Skip
Move
Delete
Name
Preset List
0 5 PRO 7 10 VOX
1 ARD 6 BR3 11 SRTL
2 RTL 7 TELE5 12
3 SAT1 8 WDR 13
4 ZDF 9 KABEL1 14

Select
Exit
Skip
Move
Delete
Name
Preset List
0 5 PRO 7 10 VOX
1 ARD 6 BR3 11 SRTL
2 RTL 7 TELE5 12
3 SAT1 8 WDR 13
4 ZDF 9 KABEL1 14

Select Move
Exit
Skip
Delete
Name
Deleting channels
1 In the »Preset List« menu, select the station to be deleted by pressing »P+«, »P-«, »◀« or »▶«.
2 Press » 📁 (yellow) to delete the channel.
Note:
To delete other stations, repeat steps 1 and 2.
Sorting television channels
1 In the »Preset List« menu, select the channel to be moved with »P+«, »P-«, »◀« or »▶«.
2 Highlight the channel with » ⏻(green).
3 Select a new channel position by pressing »P+«, »P-«, »◀« or »▶« and then press »💡« to confirm. – All of the channels that follow move up one position.
Note:
To sort the other television channels repeat steps 1 to 3.
Entering the channel names (maximum of 5 characters)
1 In the »Preset List« menu, select the desired channel with »P+«, »P-«, »◀« or »▶«.
2 Highlight the channel with » ♂« (blue).
3 Select letters or numbers with »P+« or »P-«, move to the next position with »◀« or »▶« and repeat.
4 Store the channel name with » ⭕« (blue).
Note:
To enter additional channel names, repeat steps 1 to 4.
Skipping television channels
You can mark television channels which should be skipped during selection with »P+« or »P-«. A selection with the number keys is also possible.
1 In the »Preset List« menu, select the desired channel with »P+«, »P-«, »◀« or »▶«.
- The television channel is now displayed against a red background.
- You can deselect the selected channel by pressing the red button again.
Concluding the settings
1 Press »i« to finish the settings.
Picture settings
text_image
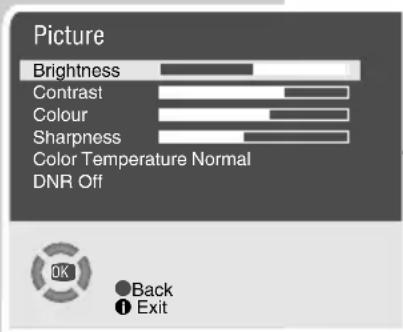
Picture Brightness Contrast Colour Sharpness Color Temperature Normal DNR Off Back ExitThe settings are saved as the »User« picture default setting. The »DNR« function improves the picture if the antenna signal is poor.
4 Press » i« to finish the settings.
Audio settings
text_image
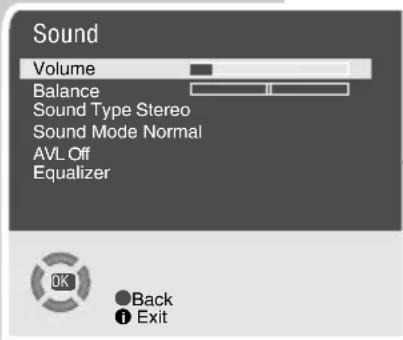
Sound Volume Balance Sound Type Stereo Sound Mode Normal AVL Off Equalizer OK ● Back ● Exit1 Press »i« to open the »MENU«.
– The »MENU« appears.
2 Select »Sound« with »P+« or »P-« and confirm with »OK«. – The »Sound« menu appears.
Note:
Further operation is explained in the following sections.
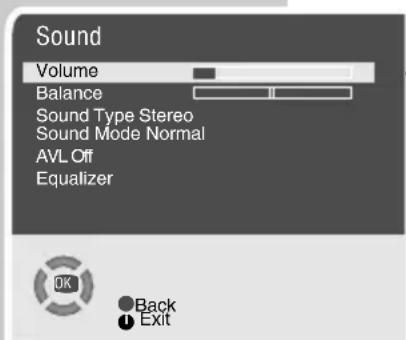
text_image
Sound Volume Balance Sound Type Stereo Sound Mode Normal AVL Off Equalizer OK ● Back ● ExitVolume
The standard volume is set here. This is the volume of the device after switching on.
1 Select »Volume« with »P+« or »P-« and adjust the setting with »◀« or »▶«.
Balance
text_image
Sound Volume Balance Sound Type Stereo Sound Mode Normal AVL Off Equalizer
Back Exit
Stereo / two channel, mono
If the device receives two channel programmes, e.g. a film with the original sound on sound channel B (display: »Dual II «) and the dubbed version on sound channel A (display: »Dual I«), you can select the sound channel you desire.
If the device receives stereo or Nicam programmes, it switches automatically to stereo sound (display: »Stereo«).
You can switch the sound to »Mono« if the stereo reception quality is poor.
Widens the audio output for stereo programmes and improves the sound with mono reception.
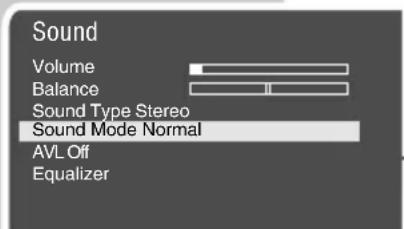
text_image
Sound Volume Balance Sound Type Stereo Sound Mode Normal AVL Off Equalizer
●Back
● Exit
1 Select »Sound mode« with »P+« or »P-«.
2 Press » ◀« or »▶« to select the setting.
Automatic volume
The television channels broadcast at different volumes. The automatic volume limiting (AVL) function means the volume is kept the same when you switch between channels.
The equalizer offers you four preset sound settings (Music, Sports, Cinema and Speech) and one which you can create yourself (User).
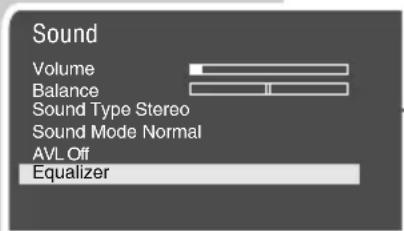
text_image
Sound Volume Balance Sound Type Stereo Sound Mode Normal AVL Off Equalizer
Select
● Back
i Exit

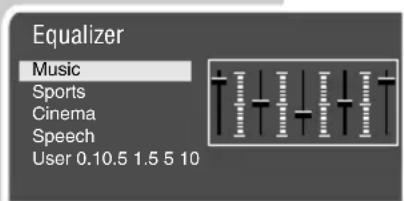
text_image
Equalizer Music Sports Cinema Speech User 0.10.5 1.5 5 10
Back
Exit
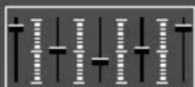
1 Select »Equalizer« by pressing »P+« or »P-« and press »OK« to confirm.
– The »Equalizer« menu appears.
2 Select the »User« audio setting using »P+« or »P-« and press »OK« to confirm.
– The »0.1 kHz« frequency band is activated.
3 Set the value using »P+« or »P-« and select the next frequency band by pressing »◀« or »▶«.
4 Press »OK« to save the setting.
Concluding the settings
1 Press »i« to finish the settings.
text_image
TV DVD ZOOM PROGRAM GO TO DVD MENU P+ OK DVD SETUP TITLE P- TXT AV - + SUB IPRXTE VCR SAT DVD EXT GRUNDIG Tele Pilot 165 CSwitching on and off
1 Switch on the television by pressing the »①« button on the television set. - The device switches to standby mode. Switch the television on with »1...0« or »P+« or »P-«.
2 Press the » ⏻« button to switch the television to standby mode. Press »1...0« or »P+« or »P-« to switch on the device from standby mode. - After switching on, the station preset of the TV Guide provider is automatically selected. After a short time, the information about the current and upcoming broadcast is displayed.
3 Completely switch the television off by pressing » ①« on the television set. - This saves electricity.
Selecting channels
1 Select channel positions directly with »1...0«. Use »-/- -« to select two digit channel positions.
2 Press »P+« or »P-« to move up and down channels.
Selecting AV channels
1 Use »AV« to select AV channels directly.
Adjusting the volume
1 Adjust the volume with »- ▲« or » ▲ +«.
Muting
1 Use » ◀ « to switch the sound off (mute) and to switch it on again.
Call up TV Guide and time.
After switching the station presets, information about the current broadcast is displayed (TV Guide).
1 Call up information about the current and next broadcast by pressing »♡«. - The information and the time are briefly displayed.
Note:
If the message »No info« is displayed, switch to the channel preset of the TV Guide provider by pressing »1...0« or »P+« or »P-«. After a few minutes the new data will have been loaded.
Displaying information
1 Press »UPDATE« to display the information. - The display disappears automatically after a short while.
1 Select the desired picture setting from »User«, »Natural«, »Rich« or »Soft« with »
- You can alter the »User« picture setting, see the "Picture settings" chapter on page 11.
Audio settings
1 Press »?« to select the audio setting »User«, »Music«, »Sports«, »Cinema« or »Speech«.
- You can alter the »User« audio setting – see the "equalizer" chapter on page 12.
Changing the picture format
The television automatically switches to the 16:9 format, if this format is recognised via the Euro-AV socket.
1 Select the picture format with » [←→]«. The selected picture format, for example »16:9«, appears on the screen.
- You can choose between the following picture formats:
»Auto« format
The picture format is automatically switched to »16:9« for 16:9 programmes.
The picture format is automatically switched to »4:3« for 4:3 programmes.
»4:3« format
For 4:3 programmes, select picture format »4:3«.
»16:9« format
For 16:9 programmes, select picture format »16:9«.
Zap function
This function allows you to save the television channel which you are currently watching and switch to other channels (zapping).
1 Select the channel you want to save in the zap memory with »1...0« or »P+« »P-«, (e.g. channel 1, BBC 1) and save by pressing »Z«.
- The display »z -> P1 BBC1« appears in the screen.
2 Change channels with »1...0« or »P+« »P-«.
3 You can now use »Z« to switch between the saved channel (in the example, BBC1) and the channel you were watching before.
4 Press » i« to quit the zap function.
- The display disappears.
TELETEXT MODE
TOP text or FLOF text mode
1 Press »TXT« to switch to teletext mode.
2 You can directly select teletext pages with »1...0«. Return to the overview page 100 with »i«.
Note:
At the bottom of the screen, you will see an information line consisting of a red, green and, depending on the station, yellow and blue text field. Your remote control has buttons with the corresponding colours.
3 Press » (red) to scroll back a page.
4 Press » ⏻(green) to scroll to the next page.
5 Press » (yellow) to select chapters.
6 Press » ⚙ « (blue) to select topics.
7 Press »TXT« to switch off teletext mode.
Normal text mode
1 Press »TXT« to switch to teletext mode.
2 You can directly select teletext pages with »1...0«. Return to the overview page 100 with »i«.
3 Press »P-« to scroll back a page.
4 Press »P+« to scroll to the next page.
5 Press »TXT« to switch off teletext mode.
Additional functions
Skipping the waiting time
While a page is being searched for, you can switch to the television channel.
1 Enter the teletext page number with »1...0« and then press »UPDATE«.
- As soon as the page is found, the teletext page number appears in the top left hand corner of the screen.
2 Switch to the teletext page by pressing »UPDATE«.
Increasing the character height
If you have difficulty reading the text on the screen, you can double the character height.
1 To enlarge the character height of a teletext page, keep pressing »-/- -«.
TELETEXT MODE
text_image
TV DVD ZOOM PROGRAM GO TO P+ DVD MENU Z OK DVD SETUP TITLE P- AV SUB UPATE VCR SAT DVD EXT. GRUNDIG Tele Pilot 165 CPage hold
A multiple page may contain several sub-pages, which are automatically scrolled by the transmitting station.
1 Hold the sub-pages with »Z««.
2 Press »Z« to end the function.
Opening a sub-page directly
If the selected teletext page contains additional pages, the number of the current sub-page and the total number of pages are displayed.
1 Press »SUB« to select the sub-page function.
2 Enter the four-digit sub-page number with »1...0«.
- The selected sub-page is displayed after a short delay.
Reveal answer
Certain teletext pages contain hidden answers or information. These can be viewed.
1 Press »DVD« to display the information.
2 Press »DVD« to conceal the information.
CONVENIENCE FUNCTIONS
Convenience functions with the »Settings« menu
1 Press »i« to open the »MAIN MENU«.
2 Select »Settings« with »P+« or »P-« and confirm with »OK«.
Note:
Further operation is explained in the following sections.
Changing the menu language
1 Select »Language« with »P+« or »P-« and confirm with »OK«.
- The »Language« menu appears.
2 Select the language with »P+«, »P-« and press »OK« to confirm.
3 Press » i« to finish the setting.
Entering the switch-on and alarm times
You can select various timer functions in the »Timer« menu.
»Clock« shows the current time.
»On time«, after this time has elapsed, the television switches on from standby mode. In »Program« you can enter the TV station with which the television switches on.
»Off time«, after this time has elapsed, the television switches to standby mode.
»Alarm time«, after this time has elapsed, the television switches on from standby mode. An alarm tone also sounds.
1 Select »Timer« with »P++ or »P-« and press »OK« to confirm.
3 Enter the switch-on time, switch-off time or alarm time and TV station with »1...0«.
4 Press » i« to finish the setting.
Note:
You can switch off the alarm tone by pressing »i«.
Settings
Language
Timer
TV Guide

Select
●Back
Exit
Settings
Language
Timer
TV Guide

Select
●Back
i Exit
Timer
Clock 08:24
On time
Off time --:--
Alarm time ---:---
Program P1 ARD

0-9
Back
i Exit
CONVENIENCE FUNCTIONS
Parental lock
You can block any station. The screen goes black.
Channel settings
System BG
Channel C 06
Search < >
Fine Tune 0
Prog No P1
Child Lock Off
Store
Autoprogram

Back
Exit
1 Press » i« to open the »MAIN MENU«. – The »MAIN MENU« appears.
2 Select »Channel setting« by pressing »P+« or »P-«.
3 Select »Child Lock« with »P+« or »P-«.
4 Press » ◀« or »▶« to activate or deactivate the parental lock (On) or (Off).
5 Press » i« to finish the setting.
TV Guide
TV Guide provides you with information about the current and the next broadcast.
Who offers TV Guide?
Certain stations - Kabel 1, for example - offer this service for almost all TV programs.
How TV Guide works
The station information is »loaded« once you have selected the pre-set for the programme provider.
Transferring all information to the television is somewhat time-consuming, but you can call up the most current information in just a few minutes.
Notes:
Operation with a satellite receiver is not possible with TV Guide.
If you change the station position during the time the device uses for data transfer, it is possible that not all information will be loaded.
Settings
Language
Timer
TV Guide

Select
Back
Exit
TV Guide settings
1 Call up the »MAIN MENU« by pressing »i«.
2 Select the line »Settings« and confirm by pressing »OK«.
3 Select the line »TV Guide« by pressing »P+« or »P-« and confirm by pressing »OK«.
Note:
Additional operations are explained in the following sections.
CONVENIENCE FUNCTIONS
TV Guide
Date 10.12.2004
Provider P13 Kabel
Station Match ARD
Display Info On

Back
Exit
TV Guide
Date 10.12.2004
Provider P13 Kabel
Station Match ARD
Display Info On

Back
Exit
Settings
Language
Timer
TV Guide

Select
Back
Exit
TV Guide
Date 10.12.2004
Provider P13 Kabel
Station Match ARD
Display Info On

Back
i Exit
Changing stations
Check to see which television programme (provider) offers service for TV Guide.
1 Select »Provider« by pressing »P+« or »P-«.
2 Select the television station (provider) by pressing » ◀ or »▶« and confirm by pressing »OK«.
3 Exit settings by pressing » i«.
Switching the station, name display on/off
If you switch off the station name display, this information is not shown when switching the programme presets.
1 Select the line »Display Info« by pressing »P+« or »P-« and confirm by pressing »OK«.
2 Activate (On) or deactivate (Off) the function by pressing » ◀« or »▶«.
3 Exit the setting by pressing » i«.
Assigning television stations (station matching)
You will need to use the station matching function if stations are not recognised by TV Guide.
In the »Station Match« line these are designated as »None«.
1 Select the program that you would like to assign by pressing »P+« or »P-«.
2 Call up the »MAIN MENU« by pressing » i«.
3 Select the line »Settings« and confirm by pressing »OK«.
4 Select the line »TV Guide« by pressing »P+« or »P-« and confirm by pressing »OK«.
5 Select the line »Station Match« by pressing »P+« or »P-«.
6 Select the station ID for the selected television station by pressing»◀« or »▶« .
- If the station ID is not available at the selection, the station is not supported by the provider.
7 Exit the setting by pressing » i«.
Special DVD features






Your DVD player provides you with perfect digital video playback of studio quality.
It also provides superb cinema-quality audio playback – in stereo or with digital multi-channel sound – depending on the type of DVD and audio system or stereo television.
Other features of DVD video include the choice of audio channel and language, choice of subtitle language, and various camera recording angles. Your DVD player is suitable for DVDs with regional code 2.
As well as DVDs, it can also play DivX®Video-CDs, MP3 CDs, JPEG coded (photo) CDs, video CDs, S-video CDs and audio CDs.

Disc formats
Your DVD player can play back CD-R, CD-RW, VCD 2.0, Super-VCD, DVD R, DVD RW discs.
Due to the difference in quality of the recording media and the quality of the recording itself, it can occasionally happen that a home-made DVD or CD cannot be read. This does not indicate a malfunction of the DVD player.
You have to finalise your own CD-R and CD-RW recordings.
Note that the settings of your CD burning program must meet the ISO 9660 standard in order to create a CD-R or CD-RW.
When DivX ^® Video or MP3 or JPEG CDs are played back, individual tracks/pictures may be skipped or incorrectly played back and displayed. This can be due to the disc configuration, the encoder software or the hardware used for the recording.
Audio CDs (CDDA) correspond to the specification and bear the corresponding logo. Copy-protected CDs do not meet this specification and do not bear the corresponding logo. These CDs can cause playback errors.

Preparation
Switching on
1 Switch on the television and press »TV/DVD« to select DVD mode.
2 If an audio system or an AV receiver is connected to the device, switch it on and select the audio input for the device.
Inserting a disc
1 Open the disc compartment by pressing »▲«. - The disc compartment opens.
2 Insert the disc you want to play in the disc compartment with the label facing upwards.
3 Close the disc compartment with » ▲«. - The disc tray retracts again and the disc is scanned.
Notes:
Playback of a DVD, VCD, SVCD, DivX ^© Video or audio CD (CDDA) starts automatically.
The file browser appears if an MP3 or JPEG CD is inserted.
If the » symbol appears on the television screen, the selected function is not possible with this disc.
Removing discs
1 Press »▲« to open the compartment and take out the disc.
DVD features
You can recognise a DVD by the logo on the label.
Depending on the content of the DVD, the discs contain one or more titles.
Each title may contain one or more chapters. Titles and chapters can be selected easily and conveniently.
You can control and direct playback of a DVD using the menu of the DVD player on the television screen.
Special DVD features
DVDs have a title menu which provides an overview of the available titles and the passages they contain.
Some of the DVD player's functions, such as slow motion, freeze-frame and auto-play, can also be controlled by the DVD itself. It is therefore possible that the freeze-frame function, for example, cannot be selected during certain scenes.
Many DVDs have audio tracks recorded in up to eight languages. This enables you to select the language you prefer.
Many DVDs are recorded by the manufacturer with subtitles in several languages. You can select subtitles from up to 32 different languages.
Since films are released in different parts of the world at different times, all DVD players world-wide are given a regional code. The regional code for your DVD player is 2.
DVDs may also be given a supplementary regional code. If you insert a DVD with a code different to that of the DVD player, a reference to the regional code appears on the television screen. The DVD player will not be able to play back the DVD.
S-VCD/VCD features
You can recognise S-VCD/VCDs (video CDs) by the logo on the label.
Depending on the contents of the S-VCD/VCD (films, music videos etc.), the discs may carry one or more tracks.
Like audio CDs, S-VCDs/VCDs have a track structure.
S-VCDs/VCDs can be created using the PBC (playback control) system for track navigation. This depends on the processing and burning software used.
You can control and direct playback of the S-VCD/VCD using the menu on the television screen.
You cannot select some of the functions (slow motion, camera angle, marking scenes) when you are playing an S-VCD/VCD. This depends on how the S-VCD/VCD was created.
Depending on how they were created, S-VCDs can have various subtitles and dubbed languages.


MP3 CD features
MP3 stands for MPEG-1 Audio Layer 3 and arises from the Motion Picture Expert Group (MPEG) Standard which was developed for compressing film data.
The MP3 format enables audio files to be saved on a computer with a sound quality similar to that of a CD. This only requires approx. 10% of the original data quantity. The standard encoding bit rate for MP3 files is 128 kbps. Generally, the higher the bit rate of an MP3 file, the better the sound quality.
Most MP3 files on the Internet are encoded at 128 or 160 kbps. 160 kbps is considered CD quality.
MP3 files can be downloaded from the Internet and then burned onto a CD-ROM disc. Your DVD player can read the ID3 tag from the file header, which contains information on title and artist, and display this in the info menu/status display.
MP3 CDs contain sound recordings. They can be played in the normal manner on an audio system. The digital signals transmitted during MP3 playback are PCM coded, regardless of the audio output setting. The signals are output with the same data rate as the music source (possibilities are: 32 kbps – 320 kbps, ideal: 128 kbps).
MP3 files can be organised into folders and subfolders, similar to files within a PC.
JPEG CD features
JPEG stands for Joint Picture Experts Group. This process was designed to compress picture files.
JPEG files can be burned onto a CD along with other file types. Such CDs are known as file CDs or mixed mode CDs. For example, the CD could contain MP3 files (audio) and JPEG files (for example to display album covers).
The files on a JPEG CD can be organised in directories. This structure is similar to that of an MP3 CD.
JPEG CDs only contain data in the compressed JPEG format. This is mostly data from digital cameras or from imaging programs. The data (images) can be displayed individually or in sequence in a slide show.
Audio CD features
An audio CD is identified by this logo.
Audio CDs contain only sound recordings. They can be played in the normal manner on an audio system.
The individual tracks are stored in a sequence. There are no folders.
Features of the DivX®VIDEO CD
DivX©Video is an encoder/decoder, based on the MPEG-4 compression system, which is used to encrypt and display compressed video data.
This enables the DVD player to play back videos compressed in the DivX® format. This results in playback quality with less artefacts and higher compression.
DivX©video files have the suffix .AVI. DivX©Video data are packed into the AVI file along with audio data which is compressed as MP3 data, this means:
DivX©Video and MP3 audio form the AVI file.
Further information on DivX©Video and how to create AVI files can be found under www.DivX Networks.de.
You can see the registration code in the »Child Lock« → »DivX Registration« menu on page 32.
Using a DVD, video CD or audio CD
Depending on the disc being used, some functions may not be available.
Playing back a title
1 After the disc compartment closes and the disc is scanned, playback starts automatically.
2 To pause playback (freeze-frame), press » ▶ ||«.
3 Press » ▶ || « to resume playback.
4 Press » ■ « to interrupt playback.
5 Press » ▶ II « to resume playback.
6 End playback with » ■ « (press twice).
Note:
Depending on the disc being used, you may have to select chapters or titles on the disc using »P+«, »P-«, »◀« or »▶« and press »OK« to activate the or »▶▶▶◀« to start playback.
Calling up information\*
You can call up information on the title, chapter and playing time for display on the screen.
1 Press »GO TO« twice to display the info menu.
- You will see information on:
DVD, VCD Disc type
Title 01/02 The current title and available titles
Chapter 03/18 The current chapter and available chapters
2:05:00 Elapsed playing time of the chapter
0:03:50 Remaining playing time of the chapter
Sound 1/3 Dubbing languages available (in this example 3)
5.1 Ch Ger Audio system (German)
Angle 39/4 Camera angles available (in this example 4)
Subtitle 1/5 Subtitles available (in this example 5)
Bit rate 6400 Mbps Bit rate
2 Repeatedly press »GO TO« to hide the info menu.
Calling up the zero setting function\*
You can select a playback position to the precise second with the zero setting function.
1 Press »GO TO« three times to display the zero setting function.
2 Select the time, title and chapter input with » « or »«.
3 Using the numerical buttons »1...0« enter the time, title or chapter number and press »OK« to confirm.
4 Playback starts at the position you entered.
Selecting the camera angle and repeat function\*
Many DVDs contain scenes or passages which were filmed several times from different camera angles. You can choose from among these different angles.
You can repeat the current chapter or title with the repeat function.
1 Press »GO TO« four times to display the camera angle and repeat function.
2 Select the »Angle« or »Repeat« function with »◀« or »▶«.
3 Press »OK« to select the camera angle or repeat function you want.
4 Repeatedly press »GO TO« to hide the menu.
Selecting titles and chapters using the disc menu\*
If a disc contains several titles and/or chapters, you can select them. If a disc contains several tracks/chapters, this can be seen by »Title« and »Chapter« in the info menu.
1 Call up the contents of the disc with »DVD MENU« (Disc Menu) or »TITLE« (Title Menu).
- If the disc has a title menu it will appear on the screen.
2 Select tracks or chapters with »P+«, »P-«, »◀« or »▶« and activate with »OK«.
- Playback of the selected title or chapter begins.
Selecting chapters in steps (SKIP)
1 To select the next chapter, press » ▶▶|« during playback.
2 Press » |«« to select the previous chapter.
– Playback of the selected chapter begins.
Pausing and resuming playback
The playback of a DVD can be interrupted at any point and then resumed from the same place.
1 Interrupt playback by pressing » ■ « once only.
2 Press » ▶ III« to resume playback at the point where it was interrupted.
Ending playback
You can stop playback at any point by pressing » ■ « twice.
Additional functions during DVD or video CD playback
Notes:
The sound is muted during the "Frame search", "Slow motion" and "Freeze-frame" functions. Depending on the disc, some functions cannot be selected.
Frame search
Several different speeds are available.
1 Select the playback speed during playback by pressing »◀◀« or »▶▶«.
2 Press » ▶ || « to resume playback.
Slow motion
You can choose between different speeds (1/2, 1/4, 1/6, 1/8, forwards or reverse).
1 Press » ▶ || « during playback.
2 Select the slow motion speed by pressing » ◀◀◀ or »▶▶◀.
3 Press » ▶ || « to resume playback.
Freeze-frame (Pause)
1 Press »▶ ||« during playback.
2 Press » ▶ II« to resume normal playback.
Enlarging the picture (zoom)
This function allows you to enlarge various picture sections. The picture enlargement options are selected in the sequence: 1, 2, 3, 4, Off (normal size).
1 During playback or pause, press » 📄» repeatedly.
– Part of the picture is enlarged.
2 Move the picture section on the screen with »P+«, »P-«, »◀« or »▶«.
3 Switch back to "normal" picture size with »
Open file browser (DivX®VIDEO CD only)
1 During playback, open the file browser (the contents list of the DivX©video CD) with »■«.
2 Select the folder or track with »P+«or »P-«.
3 Press »OK« to open the folder.
4 Press »P+«, »P-« to select the track you want to hear and then »OK« to start playback.
Using an MP3 CD or JPEG CD
Playback
1 After the disc compartment has closed and the MP3 CD or JPEG CD has been scanned, the File Browser (Contents menu) of the disc is displayed.
2 Press »P+«, »P-«, »◀« or »▶« to select the track you want to hear and then »OK« to start playback.
3 Press » ▶ || « to pause playback.
4 Press » ▶ || « to resume playback.
5 End playback by pressing » ■«
Selecting specific tracks using the numerical buttons
1 During playback, select the track with »1 ... 0« and press »OK« to confirm.
- Playback begins with the selected track.
Selecting a track in steps (SKIP)
1 Select the next track by pressing » ▶▶|« during playback.
2 Select the previous track by pressing » |◀◀«.
- Playback begins with the selected track.
Additional JPEG CD playback functions
Adjusting the picture display
The pictures can be rotated or reversed.
1 During playback, press » ◀« or »▶« to rotate the pictures by 90°.
2 During playback, press »P++ or »P-« to reverse the pictures.
Enlarging/reducing the picture (Zoom)
This function allows you to enlarge or reduce various picture sections.
1 During playback or pause, press » 🏠️» repeatedly.
- Part of the picture is enlarged.
3 Switch back to "normal" picture size with »
Call up the file browser or thumbnail picture overview
1 During playback open the file browser (the table of contents) for the disc by pressing »■«;
or
During playback, press »TITLE« to show the thumbnail picture overview.
2 Press » ▶▶|« or »|◀◀« to go to the next or previous page of the thumbnail picture overview.
3 Press » ◀«, »▶«, »P+« or »P-« to select the picture and »OK« to confirm.
- The JPEG picture appears as a still image on the screen, and after a short while the next picture appears.
Note:
To view the picture for longer, press »▶‖«.
Press »▶ ||« to continue the slide show.
Creating and playing a playlist
This function enables you to create a playback list for all types of discs.
Up to 12 titles, chapters or tracks can be stored.
1 Place a disc in the tray.
2 Open the »Program Input« menu by pressing »PROGRAM«.
- Depending on the type of disc in use the program menu appears, and position 1 is marked.
3 Enter the number of the title, chapter or track with »1...0«.
4 Select the next input position with » ◀«, »▶«, »P+« or »P-«.
Note:
Delete all entries by selecting »Clear All« using »P+«, »P-«, »◀« or »▶« and press »OK« to confirm.
5 To play back the track memory, select »Play Program« with »P+«, »P-«, »◀« or »▶« and press »OK« to confirm.
- Playback of the program starts.
Program Input Title/Chapter
1 ---- 4 ---- 7 ---- 10 ----
No settings are necessary for operating the DVD unit of the television set.
However, in the menu, you can change the language, select sound effects, select the picture format and make many other settings.
Selecting the menu
text_image
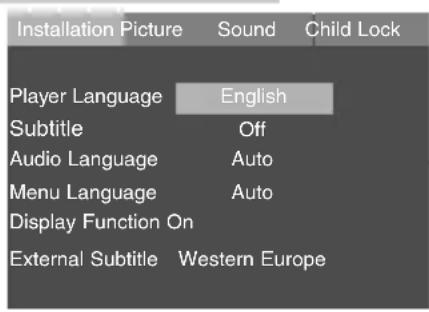
Installation Picture Sound Child Lock Player Language English Subtitle Off Audio Language Auto Menu Language Auto Display Function On External Subtitle Western Europe1 Press »DVD SETUP« to open the menu.
– The menu appears.
2 Select the menu with » ◀« or »▶« and press »OK« to activate.
– The selected menu item is highlighted.
3 Select the item with »P+« or »P-« and press »OK« to confirm.
– The setting options are displayed.
4 Select the function or setting using »P+« or »P-« and press »OK« to confirm.
Note:
Press »P+« to go back one step in the menu items.
5 Press »DVD SETUP« to quit the menu.
Menu options
text_image
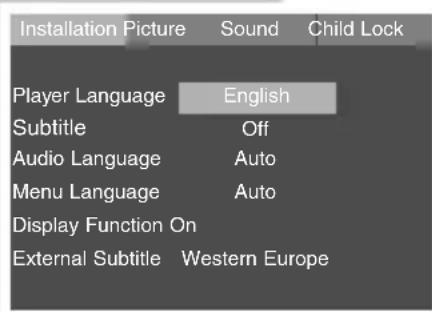
Installation Picture Sound Child Lock Player Language English Subtitle Off Audio Language Auto Menu Language Auto Display Function On External Subtitle Western EuropeVoice
- Player Language: Select the on-screen menu "language".
- Subtitle: Select and display subtitles.
- Audio Language: Select the dubbing "language".
- Menu Language: Select the language of the DVD menus.
- Display Function: Switch function displays (e.g. on/off. II Pause)
- External Subtitle: Select the language group (character set) for additional subtitles on DivX ^ video CDs.
text_image
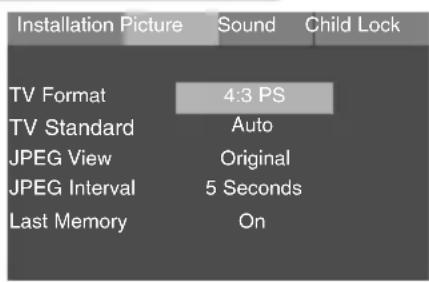
Installation Picture Sound Child Lock TV Format 4:3 PS TV Standard Auto JPEG View Original JPEG Interval 5 Seconds Last Memory OnPicture menu
- TV Format: Set the picture format (4:3 PS (PanScan), 4:3 LB (Letterbox), 16:9).
- TV Standard: Select the TV standard (NTSC, PAL, Auto).
- JPEG View: Select the display of JPEG pictures (Original, Screen size).
- JPEG Interval: Select the display time of JPEG pictures (5, 10, 15 seconds).
- Last Memory: Switch on/off.
text_image
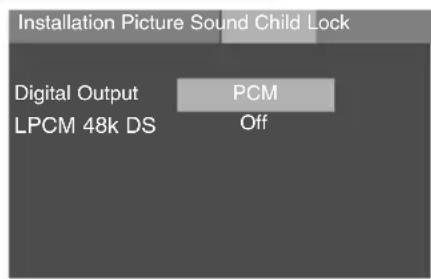
Installation Picture Sound Child Lock Digital Output PCM LPCM 48k DS Off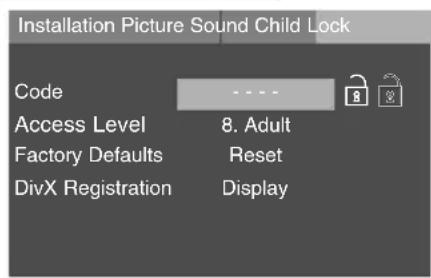
text_image
Installation Picture Sound Child Lock Code Access Level 8. Adult Factory Defaults Reset DivX Registration DisplaySound menu
- Digital Output: Set the digital output (Off, Raw (Original format), PCM).
- LPCM 48k DS: Set the scanning rate 48 kHz (setting: On) or 98 kHz (setting: Off).
Parental lock
- Code: Enter the password and press »OK« to confirm. (After you enter a randomly selected numerical code the access level can no longer be changed.)
- Access Level: Select access level (1 to 8). (The lock symbol must be opened using a code.)
- Factory Defaults: Return to default settings.
- Divx Registration View the internet registration code.
USING EXTERNAL DEVICES
Decoder or satellite receiver
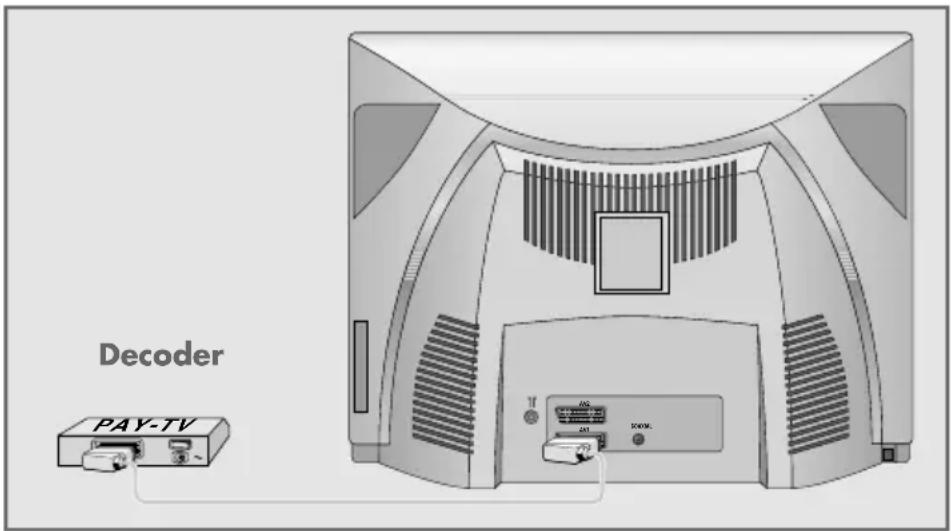
A decoder is needed if the television receives encoded programs from a privately operated station.
Connecting a decoder or satellite receiver
text_image
Decoder PAY-TV1 Connect the »AV1« socket on the television set and the corresponding socket on the decoder using a EURO-AV cable.
Notes:
A satellite receiver can also be connected to this socket. If you want to use both a satellite receiver and a decoder, the decoder must be connected to the satellite receiver.
Using a decoder
1 Switch on the television and the decoder.
2 Select the »AV1« preset channel by pressing »AV« repeatedly until »AV1« appears on the screen.
Headphones
natural_image
Diagram of a computer monitor with headphones attached to the front panel (no text or symbols visible)Connecting headphones
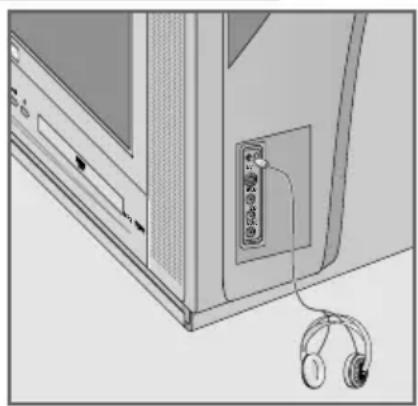
1 Insert the headphone jack (3.5 mm ø jack plug) in the headphone socket on the television.
Adjusting the headphone volume
1 Press » ◀ « to mute the television sound.
2 Press » ◀« or »▶« to adjust the headphone volume.
USING EXTERNAL DEVICES
Video recorder, DVD player or SET-TOP box
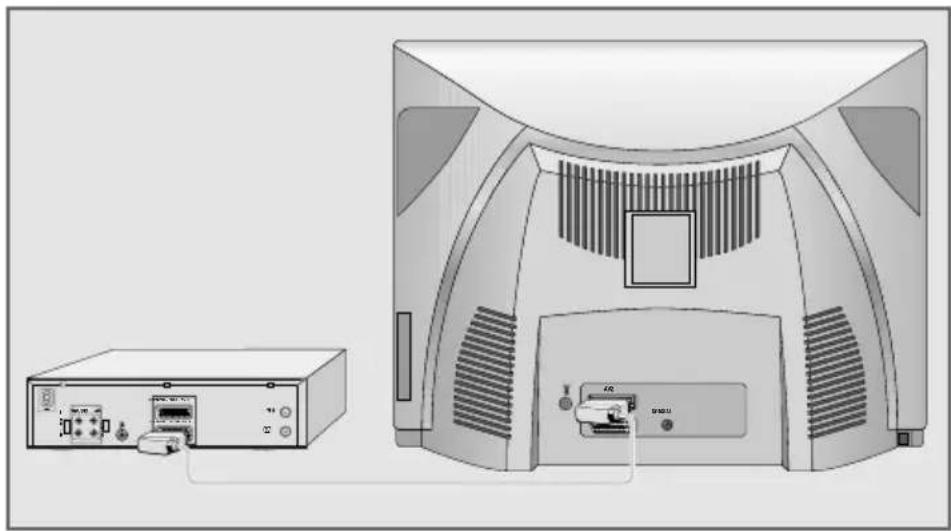
Connecting the video recorder, DVD player or SET-TOP box
natural_image
Diagram of a computer monitor front view and its internal components, showing ports, ventilation, and a small device (no text or symbols present)1 Connect the »AV1« or »AV2« television sockets and the corresponding sockets of the video recorder, DVD player or the SET-TOP box with a Euro-AV (Scart) cable.
Using a video recorder, DVD player or SET-TOP box
1 Switch on the video recorder, DVD player or SET-TOP box and select the function you wish to use.
2 Select the »AV1« or »AV2« channel positions with »AV«. - You can hear and see the video and audio information from the video recorder or the SET-TOP box on the television set.
Connecting the SVHS video recorder
If you own a SVHS video recorder, you can connect it using a Euro-AV cable to the »AV2« socket.
Using a SVHS video recorder
1 Switch on the video recorder and select the function you wish to use.
2 Select the »AV2S« preset channel with »AV«.
- You will see the picture and hear the sound of the video recorder on the television.
USING EXTERNAL DEVICES
Camcorder
natural_image
Diagram of a computer monitor with ports and cable connections (no text or symbols)Connecting the camcorder
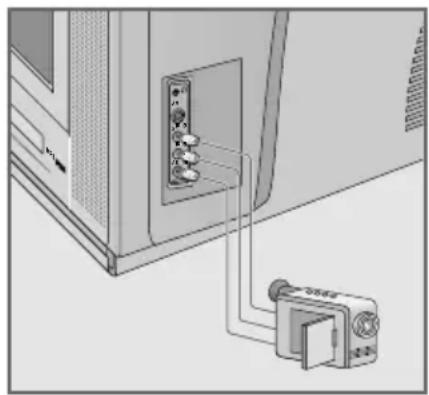
1 Connect the yellow socket (VIDEO – picture signal) on the television and the corresponding socket on the camcorder (VHS, Video 8) with a cinch cable.
or
connect the S-Video socket (S-VIDEO – picture signal) on the television and the corresponding socket on the camcorder (S-VHS, Hi 8) with a cinch cable.
2 Connect the white and red sockets (L AUDIO R – sound signal) on the television and the corresponding sockets of the camcorder with a cinch cable.
Note:
If a mono camera is connected, connect the white socket (L) of the television and the corresponding socket of the camera. Select »Mono« in the »Sound« menu during mono operation.
Operating with a camcorder
1 Switch on the camcorder, insert a cassette and start playback.
2 Select the preset channel »AV3« (for VHS, Video 8) or »AV3S« (for S-VHS, Hi 8), by pressing »AV« repeatedly until »AV3« or »AV3S« appears in the screen. - You will see the picture and hear the sound of the camcorder on the television.
USING EXTERNAL DEVICES
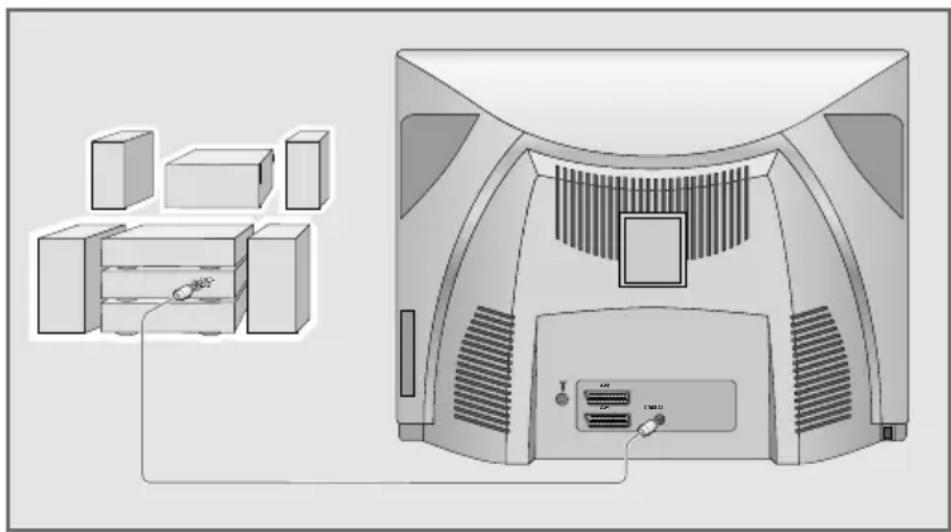
Connecting a multi-channel amplifier or digital two channel audio system
The digital multi-channel sound of a DVD can best be decoded and played back with a multi-channel audio/video amplifier (Dolby* digital decoder or DTS).
natural_image
Diagram of a computer monitor rear panel with connected ports and storage units (no text or symbols)1 Plug a standard cinch cable into the cinch socket »COAXIAL« (digital audio signal) on the television and into the corresponding socket on the digital multi-channel amplifier.
* Manufactured under licence from Dolby Laboratories Licensing Corporation. "Dolby", "Dolby Pro Logic", "Dolby Digital" and the double-D symbol "☐" are trademarks of the Dolby Laboratories Licensing Corporation. Copyright 1992 Dolby Laboratories, Inc. All rights reserved.
SPECIAL SETTINGS
Setting television channels
This setting is only necessary if a new channel comes on air and you do not want to change the order of your channels. The television channel can be set directly or using the search.
MAIN MENU
Sound
Picture
Preset list
Channel settings
Settings
GRUNDIG

Select
i Exit
Channel settings
System BG
Channel C 06
Fine Tune 0
Prog No P1
Child Lock Off
Store
Autoprogram

Back
i Exit
Setting channels using the search
1 Press »i« to open the »MAIN MENU«. – The »MAIN MENU« appears.
2 Select »Channel settings« with »P+« or »P-« and confirm with »OK«. – The »Channel settings« menu appears.
3 Select »Prog No« with »P+« or »P« and set the preset channel with »◀« or »▶«.
4 Select »Search« with »P+« or »P-« and start the search with »◀« or »▶«. – If a strong station signal is received, the search is interrupted and the picture appears. Repeat the search until the channel you want appears on the screen.
Note:
The current system is automatically displayed in the »System« line.
To set other television stations, repeat steps 3 to 5.
6 Press » i« to finish the setting.
SPECIAL SETTINGS
Channel settings
System BG
Channel C 06
Search < >
Fine Tune 0
Prog No P1
Child Lock Off
Store
Autoprogram

Back
i Exit
MAIN MENU
Sound
Picture
Preset list
Channel settings
Settings
GRUNDIG

Select
Exit
Channel settings
System BG
Channel C 06
Search < >
Fine Tune 0
Prog No P1
Child Lock Off
Store
Autoprogram

0-9
C/S
Back
i Exit
Channel settings
System BG
Channel C 06
Search < >
Fine Tune 0
Prog No P1
Child Lock Off
Store
Autoprogram

Store
Back
Exit
Fine tuning television channels
The television automatically tunes itself to the best possible reception. You may need to carry out manual fine tuning in areas where there is poor reception.
1 Press » i« to open the »MAIN MENU«.
- The »MAIN MENU« appears.
2 Select »Channel settings« with »P+« or »P-« and confirm with »OK«.
- The »Channel settings« menu appears.
5 Press » i« to finish the setting.
Setting the television channels by entering the channel numbers
1 Press »i« to open the »MAIN MENU«.
- The »MAIN MENU« appears.
2 Select »Channel settings« with »P++ or »P-« and confirm with »OK«.
– The »Channel settings« menu appears.
3 Select »Prog No« with »P+« or »P-« and set the channel with »◀« or »▶«.
4 Select »Channel« with »P++ or »P-« and confirm with »OK«.
5 Press »OK« to choose between »S« (special channel) and »C« (channel).
6 Press » ◀« or »▶« to switch up and down channels or use »1...0« to enter the channel number directly.
Note:
The current system is automatically displayed in the »System« line.
To set other television stations, repeat steps 3 to 7.
8 Press » i« to finish the setting.
SPECIAL SETTINGS
Channel settings
System BG
Channel C 06
Search < >
Fine Tune 0
Child Lock Off
Store
Autoprogram

0-9 -/--
Back
Exit
Country Selection
Belgium Hungary Portugal
Czech Rep. Ireland Schweiz
Danmark Italia Suomi
Deutschland
Ελλαδα
España
France
Netherlands
Norge
Österreich
Polska
Sverige
Türkiye
U.K.
......

Start Autoprogramming
Back
i Exit
Re-tuning all television channels
You can re-tune all the television stations, for example if you move to another town.
1 Press » i« to open the »MAIN MENU«.
- The »MAIN MENU« appears.
2 Select »Channel settings« with »P+« or »P-« and confirm with »OK«.
- The »Channel settings« menu appears.
3 Select »Prog No« with »P+« or »P-« and using »◀« or »▶« enter the channel numbers from the point they should be saved.
4 Select »Autoprogram« with »P+« or »P-« and confirm with »OK«.
- The »Country Selection« menu appears.
5 Select the country using »P+«, »P-«, »◀« or »▶« and confirm with »OK«.
- The automatic search may last a few minutes, depending on the number of television channels received.
Note:
You can interrupt the search by pressing »i«.
Technical data
Mains voltage: 230 V, 50/60 Hz
Power consumption: 2 W in standby, 73 W in operation
Sound output: 2x14 W music power
Reception range: C01 ... C99, special channels S01 ... S41, frequency band 1 ... 4
Preset channels: 100 and 4 AV
Disc formats: DVD R (+/-), DVD RW (+/-), CD-R, CD-RW
Media formats: DVD video, audio CD, video CD, S-Video CD, CD-ROM (DivX®Video, MP3, JPEG)
CE
CLASS 1 LASER PRODUCT

Service information for dealers
The product complies with the following EU directives:
73/23/EEC directive for electrical equipment to be used within defined voltage ranges. 89/336/EEC directive on electromagnetic compatibility.
The television set complies with the following standards: EN 60065, EN 55013, EN 55020.
General instructions for laser devices
Your system is a CLASS 1 LASER PRODUCT. This means that the laser is designed in such a way as to ensure that the maximum permissible emission value cannot be exceeded under any circumstances.
Caution:
If operating devices or methods other than those specified here are employed, it may lead to dangerous exposure to emissions.
This device emits laser radiation. Because of the danger of eye injuries, the unit may only be opened or serviced by trained personnel.
If settings other than those specified here are employed or OTHER PROCEDURES are carried out, this may lead to dangerous radiation exposure.
This product contains components which are covered by certain U.S. patents or for other reasons are considered intellectual property of the Macrovision Corporation and other proprietors. Use of this protected technology must be approved by the Macrovision Company and is only permissible for private presentation at home or for other limited applications, where no special permission has been granted by Macrovision. Reproduction or disassembly of the device is prohibited.
Manufactured with permission from Dolby Laboratories. The "Dolby" label and the double-D logo "☐" are trademarks of Dolby Laboratories. Confidential unpublished material.
©1992-1997 Dolby Laboratories, Inc. All rights reserved.
During playback of DTS-coded CDs and DVDs, a high noise level is produced at the analogue stereo outputs. In order to avoid possible damage to the audio system, the user should take appropriate preventive measures when the stereo outputs of the DVD player are connected to an amplification system. For DTS Digital Surround playback, an external 5.1-channel DTS Digital Surround decoder must be connected to the digital output (S/PDIF) of the DVD player.
DTS and DTS Digital Out are trademarks of Digital Theater Systems, Inc. All rights reserved.
Troubleshooting
If the remedies given below do not work, please consult an authorised GRUNDIG dealer. Please bear in mind that malfunctions can also be caused by external devices such as video recorders or satellite receivers.
TV operation
| Fault | Possible cause | Remedy |
| Screen lit (snow), but no station | Antenna cable | Is the antenna cable connected? |
| No television station programmed | Start the station search | |
| Poor picture contrast | Picture settings incorrectly set | Adjust the brightness, contrast or colour setting |
| Problem at station | Test with another channel | |
| Interference to picture and/or sound | Interference from other devices | Change the position of the devices |
| Ghosting, reflection | Channel setting | Automatic or manual channel setting/fine tuning |
| Antenna | Have antenna cable or system checked | |
| No colour | Colour intensity at minimum | Turn up the colour |
| TV standard setting (if setting option is available) | Select the correct colour standard | |
| Problem at station | Test with another channel | |
| Inappropriate colour, colour spots | Strong magnetic field due, for example, to loud-speakers | Move the loudspeakers away from the television If colour spots remain, switch off the television set at the mains and switch on again after 10 minutes |
| Picture but no sound | Volume set to minimum | Turn up or switch on the volume |
| Problem at station | Test with another channel | |
| Teletext missing or faulty | Television station (has no teletext) or antenna system | Test another channel for fine tuning and ghosting |
| Station signal too weak | Check the antenna system | |
| Remote control does not work | No optical connection | Point the remote control at the television set |
| Remote control batteries | Check the batteries, change if necessary | |
| Operating condition undefined | Switch off the television with the main power button for approximately 2 minutes | |
| The picture is unrecognisable after switching on the television | Parental lock has been activated | Deactivating the parental lock |
DVD mode
| Fault | Cause/Remedy |
| The disc compartment will not open, picture/sound problems. | Switch the DVD player off and back on again using the power switch.»1« |
| Distorted picture | Make sure that there are no fingerprints on the disc, follow the cleaning instructions. |
| DVD/CD cannot be played | Check if the label on the disc is facing upwards. |
| Clean the disc. | |
| Check if the disc is damaged by testing another disc. | |
| No sound | Try another playback source. |
| Use an external decoder for DTS audio formats. | |
| No sound at the digital output. | The scanning rate was set to 96 kHz. Set the scanning rate to 48 kHz as described on page 32. |
Cleaning discs
Wipe the dirty disc with a cloth from the centre outwards in a straight line.
Do not use any solvents such as benzene, thinners, conventional cleaner or anti-static spray for vinyl records.
Software information
We wish to point out explicitly that only operating software authorised by GRUNDIG is permissible for the DVD player. This operating software is available from specialist dealers or from the Grundig web sites www.grundig.com or www.grundig.de. Any instance of operating software from a dubious Internet source being loaded to the device will impair functioning and also, since it is an unauthorised intervention, invalidate any claims under the guarantee.
GRUNDIG will refuse to refund any costs resulting in such cases. Any repair costs in such cases, even those occurring within the guarantee period, are to be paid by the customer.
Additional Information for units sold in the UK.
Units sold in the UK are suitable for operation from a 240V ac, 50Hz mains supply.
The range of multi-system receivers is built to work in most European countries. However, the mains plug and socket system for the UK differs from many European countries.
This appliance has been supplied with a fitted, non-removable, approved converter plug for use in the UK. This converter plug is fitted with a 5A rated fuse.
In case this appliance is supplied with a moulded 2-pin Euro plug only, which is unsuitable for UK operation, this must be cut off and immediately disposed of. An approved 13A, 3-pin UK plug should then be fitted by a qualified electrician.
Note:
The severed Euro plug must be destroyed to avoid a possible shock hazard should it be inserted into a socket elsewhere.
If a non-rewireable 3-pin plug or a rewireable 13A (BS1363) 3-pin plug is used, it must be fitted with a 5A ASTA or BSI approved BS1362 fuse. If any other type of plug is used it must be protected by a 5A fuse either in the plug, or at the distribution board. If this type of plug becomes defective, ensure that the fuse is removed before disposal, to eliminate potential shock hazard.
If it is necessary to change the fuse in the non-rewireable plug, the correct type and rating (5A ASTA or BSI approved BS1362) must be used and the fuse cover must be refitted. If the fuse cover is lost or damaged, the lead and plug must not be used until a replacement is obtained. Replacement fuse covers should be obtained from your dealer.
Important:
The wires in the mains lead are colour coded in accordance with the following code:
BLUE - NEUTRAL
BROWN - LIVE
As the colours of the wires in the mains lead of your appliance may not correspond with the coloured marking identifying terminals in your plug, proceed as follows:
Connect the BLUE coloured wire to plug terminal marked with the letter "N" or coloured black.
Connect the BROWN coloured wire to the plug terminal marked with the letter "L" or coloured red.
In no circumstance must any of the wires be connected to the terminal marked with the letter "E", earth symbol "ħ", coloured green, or green & yellow.