
PCG-FX505 - Laptop SONY - Free user manual and instructions
Find the device manual for free PCG-FX505 SONY in PDF.


| Product Type | Laptop |
| Brand | Sony |
| Model | PCG-FX505 |
| Operating System | Microsoft Windows XP Home Edition |
| Processor | Mobile AMD Athlon 4 processor 1.20 GHz (with PowerNow!) |
| Hard Drive Capacity | 30 GB |
| Standard RAM | 256 MB SDRAM (expandable to 512 MB) |
| Display | 15.0" XGA (1024x768) TFT LCD |
| Graphics | ATI 3D RAGE Mobility-M1 with 8 MB VRAM (Dual Display support) |
| Optical Drive | CD-RW/DVD-ROM combo (24x CD-ROM read, 8x DVD-ROM read, 8x CD-R write, 8x CD-RW write) |
| Floppy Disk Drive | 3.5" 1.44 MB (internal, removable) |
| Modem | Built-in V.90/K56flex 56kbps data/fax modem |
| Network | Ethernet (10BASE-T/100BASE-TX) and PSTN |
| Connectivity Ports | 2 USB, serial, printer, monitor (VGA), TV Out, i.LINK (IEEE1394 S400), headphone, microphone, PC Card slots (2 Type II or 1 Type III), port replicator |
| Battery | Lithium ion, rechargeable (supports dual batteries) |
| Power Adapter | 19.5V DC, AC 100-240V |
| Dimensions (WxHxD) | 324 mm x 35.8-46.9 mm x 265.5 mm |
| Weight | From 3.20 kg (with battery and weight saver) |
| Audio | 16-bit CD-quality stereo sound (built-in speakers) |
| Input Devices | Keyboard, touchpad (with scroll function) |
| Included Accessories | AC adapter, power cord, phone cable, phone plug, video cable, weight saver, floppy disk drive, rechargeable battery |
| Safety Features | ENERGY STAR compliant, laser class 1 (optical drive), automatic power-off (over 4 seconds hold) |
| Operating Temperature | +5°C to +35°C |
| Storage Temperature | -20°C to +60°C |
Frequently Asked Questions - PCG-FX505 SONY
User questions about PCG-FX505 SONY
0 question about this device. Answer the ones you know or ask your own.
Ask a new question about this device
Download the instructions for your Laptop in PDF format for free! Find your manual PCG-FX505 - SONY and take your electronic device back in hand. On this page are published all the documents necessary for the use of your device. PCG-FX505 by SONY.
USER MANUAL PCG-FX505 SONY
Sony notebook user guide
PCG-FX Series

natural_image
Blue stylized logo design featuring a wave and circular element (no text or symbols)Read this first
Notice
© 2001 Sony Corporation. All rights reserved.
This manual and the software described herein, in whole or in part, may not be reproduced, translated, or reduced to any machine-readable form without prior written approval.
Sony Corporation provides no warranty with regard to this manual, the software, or other information contained herein and hereby expressly disclaims any implied warranties or merchantability or fitness for any particular purpose with regard to this manual, the software or such other information. In no event shall Sony Corporation be liable for any incidental, consequential, or special damages, whether based on tort, contract, or otherwise, arising out of or in connection with this manual, the software, or other information contained herein or the use thereof.
Macrovision: This product incorporates copyright protection technology that is protected by method claims of certain U.S. patents and other intellectual property rights owned by Macrovision Corporation and other rights owners. Use of this copyright protection technology must be authorized by Macrovision Corporation, and is intended for home and other limited viewing uses only unless otherwise authorized by Macrovision Corporation. Reverse engineering or disassembly is prohibited.
Sony Corporation reserves the right to make any modification to this manual or the information contained herein at any time without notice. The software described herein is governed by the terms of a separate user license agreement.
Sony, DVgate, i.LINK™ and the i.LINK logo, PictureGear, Memory Stick and the Memory Stick logo, VAIO and the VAIO logo are trademarks of Sony Corporation.
i.LINK™ is a trademark of Sony used only to designate that a product contains an IEEE1394 connection.
Microsoft, Windows and the Windows logo, Windows Media and Outlook are trademarks or registered trademarks of U.S. Microsoft Corporation in the U.S. and other countries.
Adobe ^® and Adobe ^® Acrobat ^® Reader ^™ are trademarks of Adobe Systems Incorporated.
QuickTime and the QuickTime logo are trademarks used under license. QuickTime is registered in the U.S. and other countries.
RealPlayer is a trademark or registered trademark of RealNetworks, inc. in the U.S. and other countries.
Symantec Norton AntiVirus is a trademark of Symantec Corporation.
text_image
2 are not specified.All other names of systems, products and services are trademarks of their respective owners. In the manual, the ^TM or ^ marks are not specified. Specifications are subject to change without notice.
ENERGY STAR®
As an ENERGY STAR ^® Partner, Sony has determined that this product meets the ENERGY STAR ^® guidelines for energy efficiency.
The International ENERGY STAR ^® Office Equipment Program is an international program that promotes energy saving through the use of computers and their office equipment. The program backs the development and dissemination of products with functions that effectively reduce energy consumption. It is an open system in which business proprietors can participate voluntarily. The targeted products are office equipment such as computers, displays, printers, facsimiles and copiers. Their standards and logos are uniform among participating nations.
ENERGY STAR ^® is a U.S. registered mark.

text_image
energySafety information
Owner's record
The model number and serial number are located on the bottom of your Sony notebook. Record the serial number in the space provided here. Refer to the model and serial number if you call VAIO-Link.
Serial number: ____
Model Number (product name in brackets):
PCG-FX501 (PCG-9B3M) /PCG-FX502 (PCG-9B2M) /PCG-FX505 (PCG-9B1M)
Warnings
General
☐ Opening the unit, for whatever reason, could lead to damages that are not covered by the guarantee.
☐ To avoid electrical shock, do not open the cabinet. Refer servicing to qualified personnel only.
☐ To prevent fire or shock hazard, do not expose your VAIO notebook to rain or moisture.
☐ Avoid using the modem during a severe electrical storm.
Do not use the modem or a telephone to report a gas leak in the vicinity of the leak.
☐ To change the backup battery, please contact your nearest Sony Service Center.
Audio/video
☐ Audio and picture distortion may occur if this equipment is positioned in close proximity to any equipment emitting electromagnetic radiation.
Connectivity
☐ Never install modem or telephone wiring during a severe lightning storm.
☐ Never install telephone jacks in wet locations unless the jack is specifically designed for wet locations.
☐ Be cautious when installing or modifying telephone lines.
☐ Use your notebook only with the supplied AC adapter. To disconnect your notebook completely from mains voltage, unplug the AC adapter.
☐ Please make sure that the socket outlet is easily accessible.
☐ Never touch uninsulated telephone wire or terminals unless the telephone line has been disconnected at the network interface.
Optical disc drive
☐ Misuse of the optical instruments supplied with your notebook can cause eye hazard. As the laser beam used in this product is harmful to eyes, do not attempt any disassembling process. For servicing, refer to qualified personnel only.
There are visible and invisible radiations when the optical disc drive is open: avoid direct exposure to the laser beam.
text_image
5 an Directive 1999/5/ECRegulatory information
Sony hereby declares that this product is in compliance with the essential requirements and other relevant provisions of European Directive 1999/5/EC

This product complies with EN 55022 Class B and EN 55024 for use in following areas: residential, commercial and light-industrial.
This product has been tested and found compliant with the limits set out in the EMC Directive for using connection cables not longer than 3 metres (9.8 feet).
The optical disk drive is classified as a CLASS 1 LASER PRODUCT and complies with the Laser Product Safety Standard EN 60825-1. Repair and maintenance only by authorized Sony technicians. Improper repairs and use can create safety hazards.
CLASS 1 LASER PRODUCT TO EN 60825-1
Read this first
text_image
6Disposing of lithium ion batteries
Do not handle damaged or leaking lithium ion batteries. Dispose of promptly and properly.
Danger of explosion if battery is incorrectly replaced. Replace only with the same or equivalent type recommended by the manufacturer. Discard used batteries according to the manufacturer's instructions.
The battery pack used in this device may present a fire or chemical burn hazard if mistreated. Do not disassemble, heat above 60^ C ( 140^ F) or incinerate.
Dispose of used batteries promptly and properly.
Keep away from children.
Your notebook is equipped with an internal backup memory battery. For changing this battery, please contact VAIO-Link:
http://www.vaio-link.com
In some areas the disposal of lithium ion batteries in household or business waste may be prohibited.
Use the public collection system.
Welcome
Congratulations on purchasing a Sony VAIO notebook. Sony has combined leading-edge technology in audio, video, computing and communications to provide you with state-of-the-art personal computing.
Here are just some of the features your VAIO notebook has to offer.
Exceptional performance - Your PC includes a fast processor, a fast CD-RW/DVD-ROM drive* or DVD-ROM drive* and an internal modem.
- Portability - The rechargeable battery pack provides hours of use without AC power.
- Sony audio and video quality - A high-resolution LCD screen enables you to take advantage of today's advanced multimedia applications, games, and entertainment software.
Multimedia features – Enjoy audio and video CDs.
Interconnectivity – Your computer has Ethernet and i.LINK™ functionalities. i.LINK™ is a bidirectional digital interface for exchanging data.
Windows® - Your system includes the latest operating system from Microsoft.
Communications - Access popular online services, send and receive e-mails, browse the Internet...
☐ Excellent customer support - If you are experiencing any problems with your computer, please check the VAIO-Link web site for a possible solution:
http://www.vaio-link.com
Before contacting VAIO-Link, you may try to solve the problem by reading the User Guide or the manuals and help files for the peripherals or software.
Documentation pack
Your Documentation Pack contains paper and online user guides on a Documentation CD-ROM.
Printed documentation
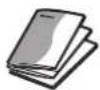
A Getting Started brochure, where you find a brief description of the items in your box, some specifications of your notebook, and how to set up your notebook;
A Customer Guide, where you find all the basic information you need to start using your notebook as well as troubleshooting and VAIO-Link information;
YourSony Guarantee conditions;
☐ A Safety Regulations flyer;
☐ A Modem Regulations Flyer applying to the modem.
Online documentation
1 The Sony Notebook User Guide:
Using Your Sony Notebook shows you how to use the standard components of your system. In this part of the manual you will also find out what you can do with a Memory Stick™.
Connecting Peripheral Devices explains how you can add functionality by connecting various peripherals.
☐ Getting Help explains the support options available to you, and offers basic troubleshooting tips.
☐ Precautions provides facts and advice about using your notebook.
Specifications provides details on your computer, drivers and accessories.
☐ Glossary refers to terms used in this manual.
Welcome
text_image
9 ns. our system.2 Refer to your Software Guide for information on the bundled software and the Sony applications.
☐ About the Software is a short description of the features of the software pre-installed on your system.
Customizing your notebook explains how to set your system and power management.
☐ Using the Product Recovery CD-ROMs explains how to perform a system and application recovery.
3 Consult the Online Help files of the software you are using for detailed information on features and troubleshooting.
4 Refer to the Microsoft Quick Start manual for more information on Windows.
5 Go to http://www.club-vaio.sony-europe.com to find online tutorials about your favorite VAIO software.
text_image
10Your notebook and its accessories
Following hardware items are in the box:
1

natural_image
Line drawing of a laptop computer with blank screen and keyboard (no text or symbols)5
9

2
6
10

3
7
11
4
8
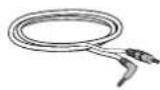
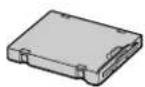
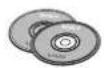
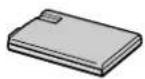
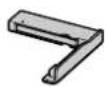
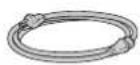
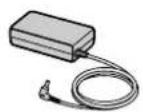
| 1 main unit 7 weight saver | ||
| 2 product recovery CD-ROMs 8 video cable | ||
| 3 documentation pack 9 phone plug (country specific) | ||
| 4 AC adapter 10 phone cable | ||
| 5 floppy disk drive 11 power cord | ||
| 6 rechargeable battery pack | ||
Ergonomic considerations
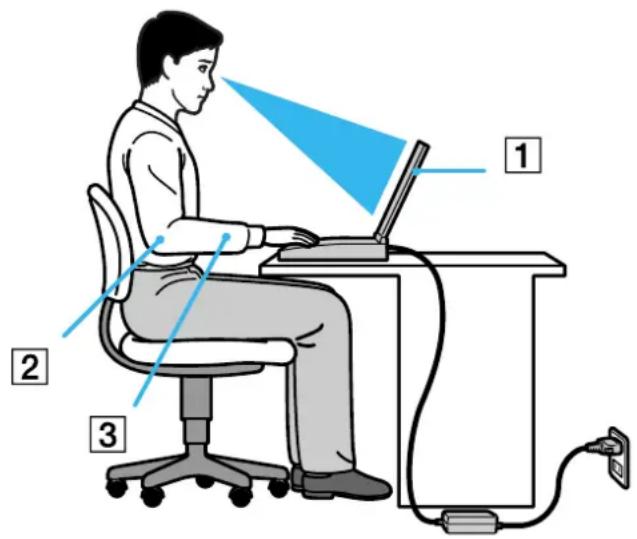
You will be using your notebook as a portable device in a variety of environments. Whenever possible, you should attempt to take account of the following ergonomic considerations to both stationary and portable environments:
text_image
Illustration of a person using a laptop with labeled parts including pointer, magnified view, and connected device☐ Position of your computer – Place the computer directly in front of you (1). Keep your forearms horizontal (2), with your wrists in a neutral, comfortable position (3) while using the keyboard, touchpad, or external mouse. Let your upper arms hang naturally at your sides. Have breaks during sessions with your computer. Excessive use of the computer may strain muscles or tendons.
☐ Furniture and posture – Sit in a chair with good back support. Adjust the level of the chair so your feet are flat on the floor. A footrest may make you more comfortable. Sit in a relaxed, upright posture and avoid slouching forward or leaning far backwards.
Welcome
text_image
12 position. You can just the- Viewing angle of the computer's display – Use the display's tilting feature to find the best position. You can reduce eye strain and muscle fatigue by adjusting the tilt of the display to the proper position. Adjust the brightness setting of the display as well.
Lighting – Choose a location where windows and lights do not create glare and reflection on the display. Use indirect lighting to avoid bright spots on the display. You can also purchase accessories for your display that help reduce glare. Proper lighting adds to your comfort and work effectiveness.
☐ Placement of an external display – When using an external display, set the display at a comfortable viewing distance. Make sure the display screen is at eye level or slightly lower when you are sitting in front of the monitor.
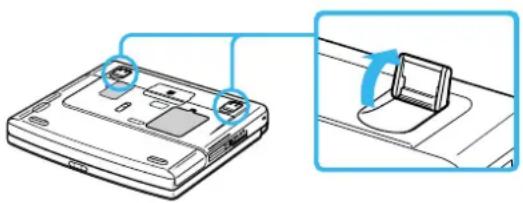
☐ Tilt stands – You use the tilt stands to place the computer at an angle that allows comfortable typing.
natural_image
Diagram of a device rear panel with two blue arrows pointing to its top panel (no text or symbols present)
text_image
13 external devices.Using your notebook
This section describes how to start using your computer and how to use your computer's internal and external devices.
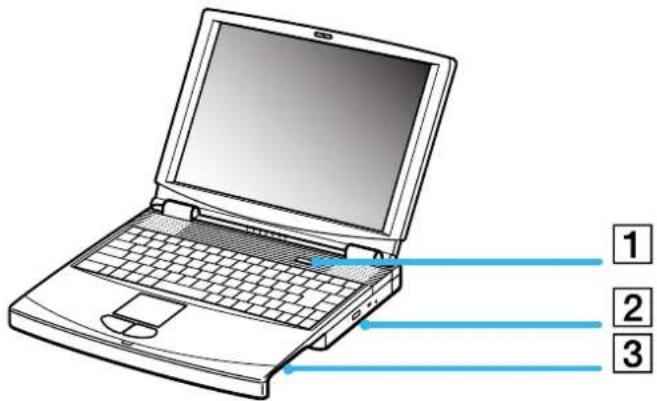
Locating controls and connectors
Right
text_image
1 2 3| 1 power button (page 27) | |
| 2 DVD-ROM drive*/CD-RW + DVD-ROM drive** (page 35) | |
| 3 multi-purpose bay (page 19) | (page 44) |
** on the PCG-FX502 and PCG-FX505
* on the PCG-FX501
** on the PCG-FX502 and PCG-FX505
text_image
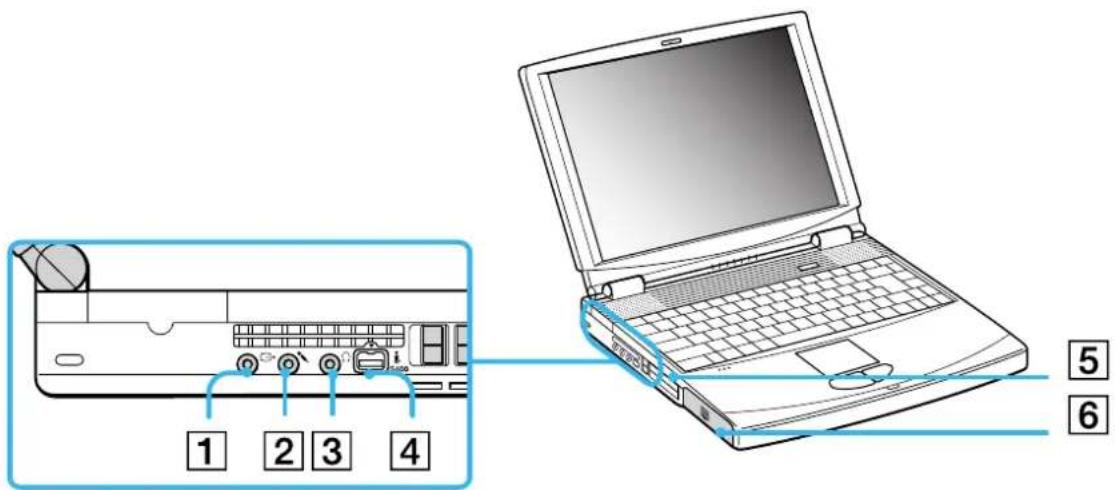
14Left
text_image
1 2 3 4 5 6| 1 | TV Out connector | (page 68) | 4 | i.LINKTM connector | (page 75) |
| 2 | microphone connector | (page 71) | 5 | PC Card slots | (page 45) |
| 3 | headphone connector | (page 70) | 6 | battery bay | (page 19) |
text_image
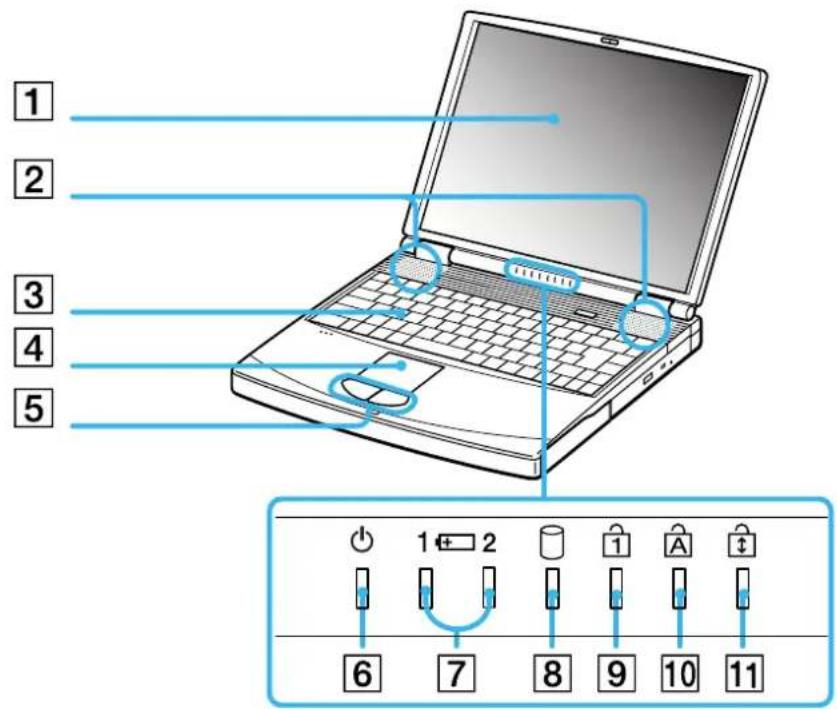
15Front
text_image
1 2 3 4 5 6 1 2 8 9 10 11| 1 LCD screen (page 33) | |
| 2 speakers (page 70) | |
| 3 keyboard (page 29) | |
| 4 touchpad (page 34) | |
| 5 left/right buttons (page 34) | |
| 6 power indicator (page 32) | |
| 7 battery 1 and 2 indicators (page 32) | |
| 8 hard disk drive indicator (page 32) | |
| 9 Num Lock indicator (page 32) | |
| 10 Caps Lock indicator (page 32) | |
| 11 Scroll Lock indicator (page 32) |
text_image
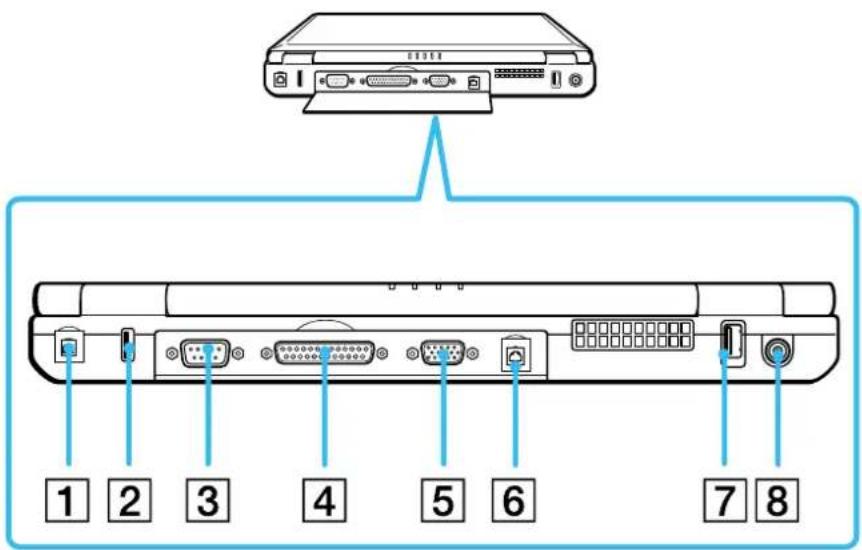
16Back
text_image
1 2 3 4 5 6 7 8| 1 | phone line jack | (page 57) | 5 | monitor/VGA connector | (page 65) |
| 2 | USB | (page 72) | 6 | Ethernet connector | (page 77) |
| 3 serial connector 7 USB port (page 72) | |||||
| 4 | printer connector | (page 73) | 8 | DC In connector | (page 18) |

There is a ventilation slot located near the USB connector. Do not cover the ventilation slot when the computer is on.
Using your notebook
text_image
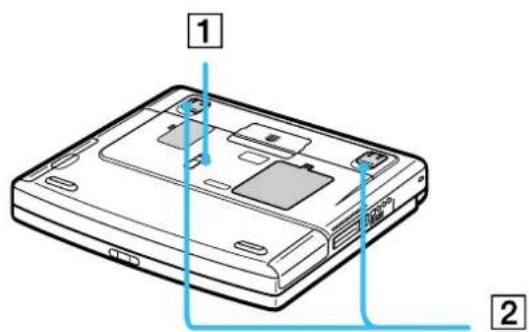
17Bottom
text_image
Diagram of a computer rear panel with labeled parts, showing front and back views and internal components.| 1 | r e l e | a s |
| 2 tilt | stands (page 11) |
e l e v e r (page 41)
text_image
18Connecting a power source
You can use either an AC adapter or a rechargeable battery pack as a power source.
Using the AC adapter
To use the AC adapter, proceed as follows:
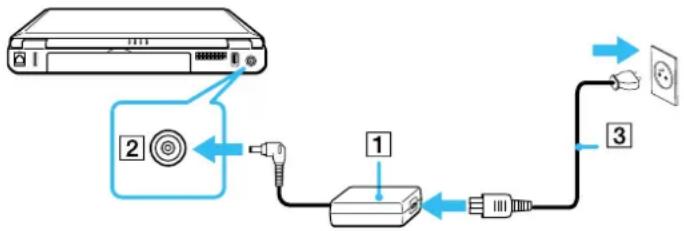
1 Plug the cable attached to the AC adapter (1) into the DC In connector (2) on the computer.
2 Plug one end of the power cord (3) into the AC adapter.
3 Plug the other end of the power cord into an AC outlet.
flowchart
graph TD
    A["Computer monitor"] -->|2| B["USB port"]
    B --> C["Power outlet"]
    C -->|3| D["Output"]

Use your notebook only with the supplied AC adapter.
To disconnect your notebook completely from mains voltage, unplug the AC adapter.
Make sure that the socket outlet is easily accessible.
text_image
19 multi-purposeUsing the battery pack
You can use one or two batteries as a source of power. You can insert the second battery pack into the multi-purpose bay on the right side of the computer. Additional battery packs are available as a separate option. The battery pack supplied with your computer is not fully charged at the time of purchase.
Inserting the battery pack
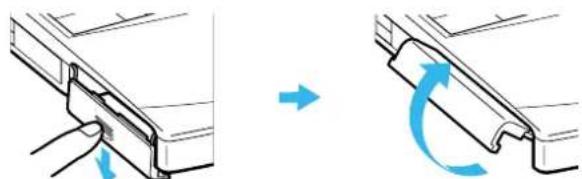
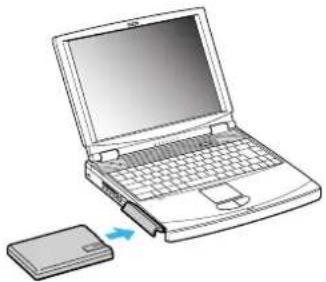
To insert the battery pack, proceed as follows:
1 Open the cover of the battery bay.
natural_image
Diagram showing two mechanical components with blue arrows indicating rotation or movement, no text or symbols present2 Insert the battery pack with the label facing down into the battery bay on the left side of the computer.
natural_image
Line drawing of a laptop with an open case and a separate rectangular device emitting a blue arrow (no text or symbols)3 Close the cover of the battery bay until it clicks.
When the computer is directly connected to AC power and has a battery pack inserted in the battery bay, it uses power from the AC outlet.
Sony Notebook User Guide
Sony Notebook User Guide
Sony Notebook User Guide
text_image
20Charging the battery pack
To charge the battery pack, proceed as follows:
1 Connect the AC adapter to the computer.
2 Insert the battery pack.
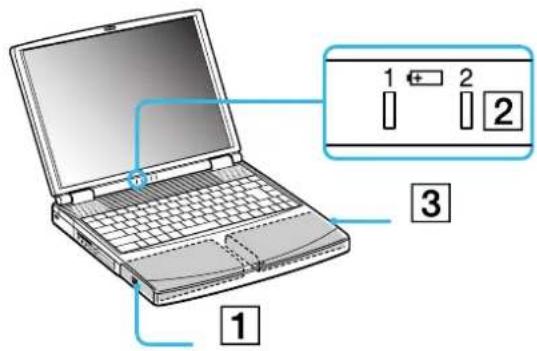
The computer automatically charges the battery (1) (the battery indicator (2) light flashes in a double blink pattern as the battery charges). When the battery is 85% full, the battery indicator light turns off. This process takes approximately 2.5 hours if your notebook is on. To charge the battery completely, continue charging for an additional hour.
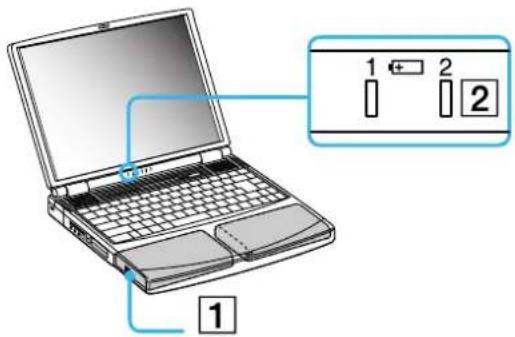
There are two battery indicator lights on the computer:
1 indicates the status of the battery pack in the battery bay on the left side of the computer.
2 indicates the status of the battery pack in the multi-purpose bay on the right side of the computer.
text_image
Diagram of a laptop with labeled parts and control buttons, showing front panel and side buttons.battery indicator light status meaning
| On The computer is using battery power. |
| Single blink The battery is running out of power. |
| Double blink The battery is charging. |
| Off The computer is using AC power. |
When the battery is running out of power, both the battery and power indicators blink.
Keep the battery pack in the computer while it is directly connected to AC power. The battery pack continues to charge while you are using the computer.
If the battery level falls below 10%, you should either attach the AC adapter to recharge the battery or shut down your computer and insert a fully charged battery.
The battery pack supplied with your computer is a lithium ion battery and can be recharged any time. Charging a partially discharged battery does not affect battery life.
The battery indicator light is on while you use the battery pack as a power source. When the battery life is nearly depleted, the battery indicator starts flashing.
For some software applications and some peripheral devices, your computer may not enter Hibernate mode when battery life is low. To avoid loss of data when using battery power, you should save your data frequently and manually activate a power management mode, such as Standby or Hibernate.
When the computer is directly connected to AC power and has a battery pack inserted in the battery bay, it uses power from the AC outlet.
Using your notebook
text_image
22Removing the battery pack
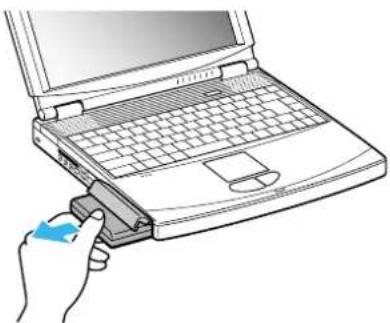
To remove the battery pack, proceed as follows:
1 Turn off the computer.
2 Open the cover of the battery bay.
3 Pull out the battery pack.
natural_image
Illustration of a hand inserting a USB into a laptop keyboard (no text or symbols visible)4 Close the cover of the battery bay.
You may lose data if you remove the battery pack while the computer is on and not connected to the AC adapter or if you remove the battery while the computer is in Standby mode.
text_image
23Using the second battery pack
You can purchase a second rechargeable battery pack. With two battery packs, you can extend the time you use your computer with battery power. When using two battery packs, the battery pack you insert first, charges first. The battery pack you insert second, charges when the first battery pack is 85 percent full. You can monitor which battery pack is charging by observing the battery indicator lights.
Inserting the second battery pack
To insert a second battery pack, proceed as follows:
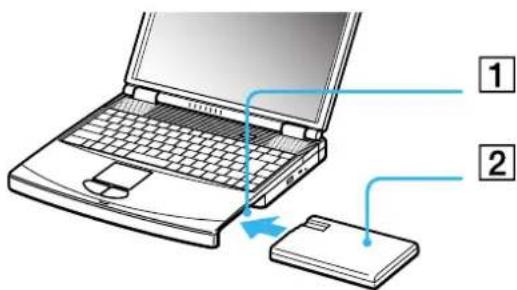
1 If the weight saver is in the multi-purpose bay (1), remove the device.
2 Insert the battery pack (2) into the multi-purpose bay.
The battery 2 indicator light turns on.
text_image
Diagram showing a laptop connected to a device with labeled parts 1 and 23 Attach the weight saver (3) to the computer to stabilize the battery pack.
4 Slide the eject lever on the bottom of the weight saver toward the front of the computer to lock it.
Using your notebook
text_image
24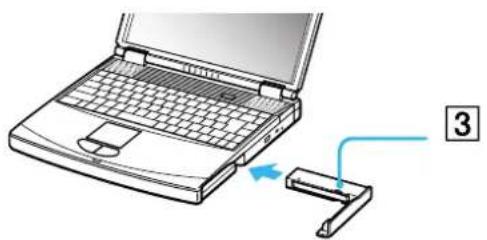
natural_image
Diagram of a laptop with a cable being inserted into a clip, showing the cable attachment point (no text or symbols present)
If you attach two battery packs, you can remove one of them without shutting down the computer. When removing one battery pack, make sure that the other battery pack indicator is on. If the indicator of the battery pack your are going to remove is on, right-click the battery icon in the system tray and click the Switch Discharge Battery option.
Using your notebook
text_image
25Charging the second battery pack
To charge the second battery pack, proceed as follows:
1 Keep the battery pack (1-3) in the computer while it is connected to AC power. The battery indicator (2) flashes while the battery is charging.
2 When the battery indicator stops flashing, the battery is fully charged.
text_image
1 2 3 1 2
text_image
26Removing the second battery pack
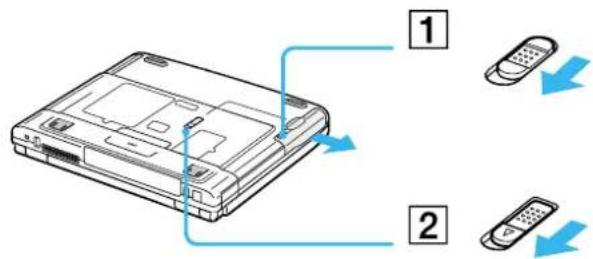
To remove the second battery pack, proceed as follows:
1 Slide the eject lever on the bottom of the weight saver, in the direction of arrow 1.
2 Slide the release lever on the bottom of the computer in the direction of arrow 2.
text_image
Diagram showing two labeled components (1 and 2) of a device with directional arrows indicating connection or movement.3 Remove the weight saver.
4 Pull out the battery pack.
5 Reinsert the weight saver.
Sony Notebook User Guide
text_image
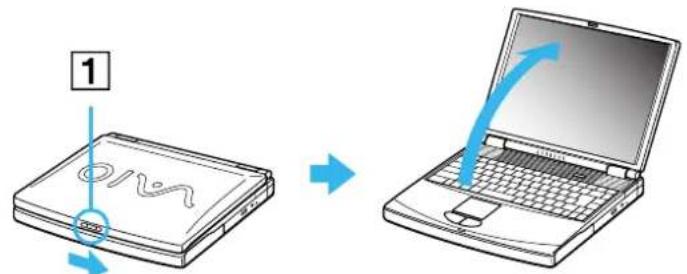
27Starting your notebook
To start your computer, proceed as follows:
1 Slide the LCD lock lever (1) in the direction of the arrow, and lift the cover.
text_image
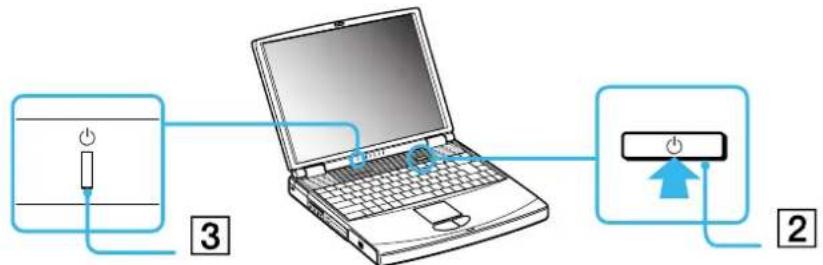
1 OVA2 Press the power button (2) of the computer until the green power indicator (3) light turns on.
text_image
Diagram showing a laptop connected to two labeled components, with numbered annotations 2 and 3 indicating different connection points.3 If necessary, press

If you press the power button for more than four seconds, the computer will turn off.
Shutting down your notebook
It is important that you shut down your computer properly so you do not lose unsaved data.
To shut down your computer, proceed as follows:
1 Click the Start button on the Windows® taskbar.
2 Click Turn Off Computer.
The Turn off computer dialog box appears.
3 Select Turn Off.
4 Wait for your computer to turn off automatically.
The power indicator turns off.
5 Turn off any peripheral connected to your computer.
Respond to any prompts warning you to save documents.
If you are unable to shut down your computer:
- Close all software in use.
- Remove the PC Cards, if inserted. To do so, right-click the Safely Remove Hardware icon in the taskbar. Select the hardware you want to unplug and click Stop.
- Disconnect any USB devices.
- Then press the
If this does not work, you can press the power button for more than four seconds. This will shut down the computer. This operation may result in data loss.
If you want to shut down the computer for a short period only, you can save power by using the Standby mode.
text_image
29 notebook-relatedUsing the keyboard
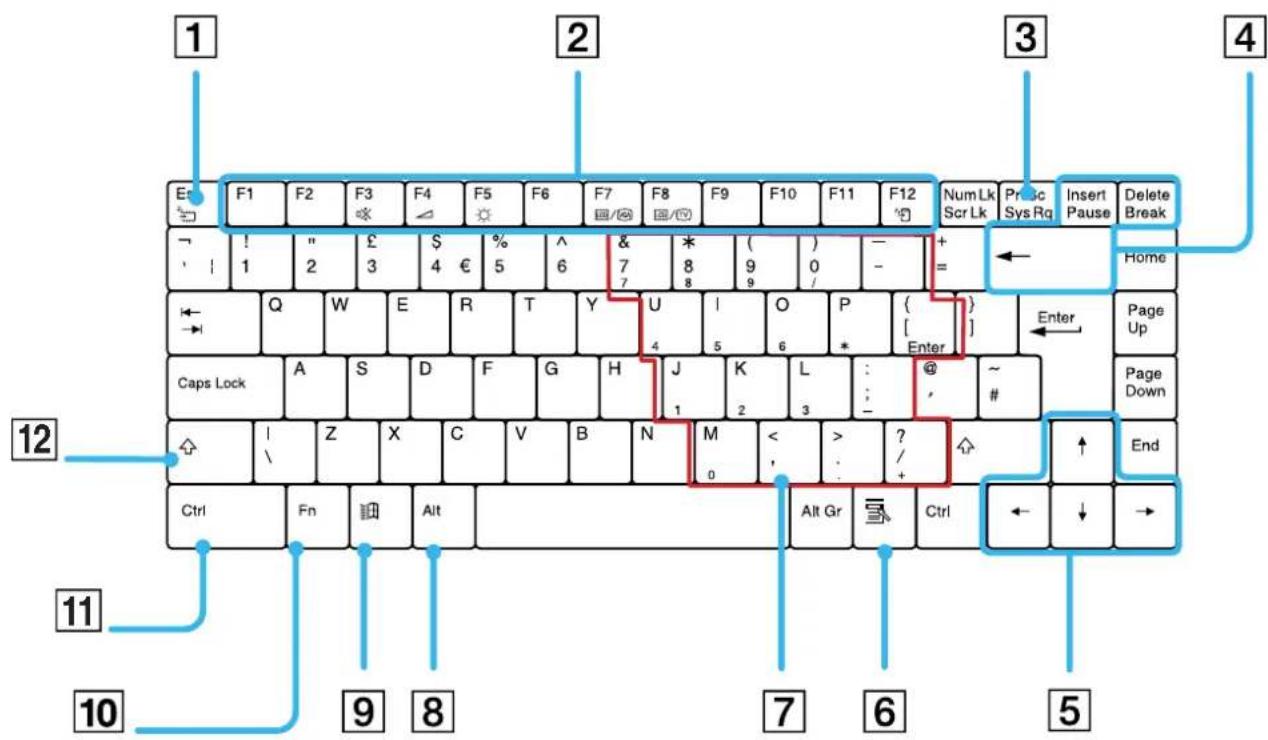
Your keyboard is very similar to a desktop computer's, but has additional keys that perform specific notebook-related tasks.
text_image
1 2 3 4 F1 F2 F3 F4 F5 F6 F7 F8 F9 F10 F11 F12 Num Lk Prisc Insert Delete E! ! 1 " 2 £ 3 $ 4 € 5 ^ 6 & 7 7 * 8 ( ) - + = Home Q W E R T Y U I O P ( ) Enter Page Up Caps Lock A S D F G H J K L : @ - # Z X C V B N M < > ? / End Ctrl Fn Alt Alt Gr Ctrl ← ↓ → 12 11 10 9 8 7 6 5
text_image
30Keys Descriptions
| Escape key (1) | The(Escape) key is used to cancel commands. |
| Function keys (2) The twelve function | keys along the top of the keyboard are used to perform designated tasks. For example, in many applications,is the Help key. The task associated with each function key may vary from one application to the other. |
| Print Screen key (3) | Thekey takes an electronic snapshot of the screen and moves it to the Windows Clipboard. You can then paste the screenshot into a document and print it. |
| Correction keys (4) | The,andkeys enable you to make corrections. |
| Navigation keys (5) These keys enable you to move the cursor on the screen. | |
| Application key (6) | The Application key displays a shortcut menu; pressing this key is equivalent to clicking the right mouse button. |
| Numeric keypad area (7) Contains the keys found on a typical calculator. Use the numeric keypad area to type numbers or to perform mathematical calculations such as addition and subtraction. Note that you must press thekey to activate the numeric keypad. When you do so, the Num Lock light illuminates. | |
| Operator keys (8-11-12) | Several keys are always used with at least one other key:,and.When held down with another key, the(Control) and(Alternate) keys offer another way to execute commands. For example, in many applications, instead of choosing the Save command from a menu, you can hold downand press(referred to as+). Thekey is used to produce capital letters or special symbols such as @ and $. |
| Windows® key (9) | The key with the Windows® logo displays the Windows® Start menu; it is equivalent to clicking the Start button on the taskbar. |
| Fn key (10) | Thekey is used in combination with other keys to execute commands. |
Sony Notebook User Guide
Sony Notebook User Guide
text_image
31Combinations and functions with the Windows key
Combinations Functions
| + F1 Displays Windows Help and Support Center. | |
| + Tab Switches the selected button on the taskbar. | |
| + E | Displays My Computer. |
| + F | Displays the Search Results window to find a file or folder. This is equivalent to selecting Search and then All files or folders from the Start menu. |
| + Ctrl + F | Displays the Search Results - Computers window where you can locate other computers. |
| + M Minimizes all displayed windows. | |
| Shift + + M | Returns all minimized windows to their previous size. |
| + R | Displays the Run window. This is equivalent to selecting Run from the Start menu. |
| Fn + + Insert | Displays the System Properties window. This is equivalent to double-clicking the System icon in the Control Panel. |
text_image
32Indicators
Indicator Functions
| Power | Power on: lights green.Standby mode: flashes umber. |
| Battery 1 | Indicates the status of the battery inserted in the battery bay on the left side of the computer. |
| Battery 2 | Indicates the status of the battery inserted in the battery bay on the right side of the computer. |
Light On Off
| [Grv3] hard disk | Data is read from or written to the hard drive. Do not enter Standby mode or turn off the computer when this indicator light is on. | The hard drive is not being accessed. |
| [Grv4] Num Lock | Turns on when the number keys in the numeric keypad are active. | Turns off when the alphanumeric character keys in the keypad area are active. |
| [Grv5] Caps Lock | Turns on when the characters appear in uppercase as you type. Thekey lowers the case of typed letters when Caps Lock is on. | Turns off when the characters appear in lowercase as you type (unless you hold down thekey). |
| [Grv7] Scroll Lock | Turns on when the screen scrolls differently (depends on the application, no effect in many applications). | Turns off when the information moves across the display normally. |
text_image
33Combinations and functions with the Fn key
Combinations/ Feature Functions
| Puts the system into Standby mode, a power management state. To return the system to the active state, press any key. | |
| Toggles the built-in speaker on and off. | |
| Adjusts the built-in speaker volume.To increase volume, press. | |
| Adjusts the brightness of the LCD.To increase lightness intensity, press. | |
| Toggles between the LCD, external display (connected to the monitor connector) and both LCD and external display. | |
| Toggles between the LCD and both LCD and TV. | |
| Provides for the lowest level of power consumption. When you execute this command, the states of the system and of the peripheral devices are written to the hard disk and the system power is turned off. To return the system to its original state, use the power switch to turn on the power. |

This function can only be used by the first user to log on. It will not work if you have switched to another user account.
First you need to connect your external display, then you turn on your notebook. If you connect your external display when the computer is already on, you cannot use
Some functions are not available until Windows is launched.
text_image
34 scroll objects onUsing the touchpad
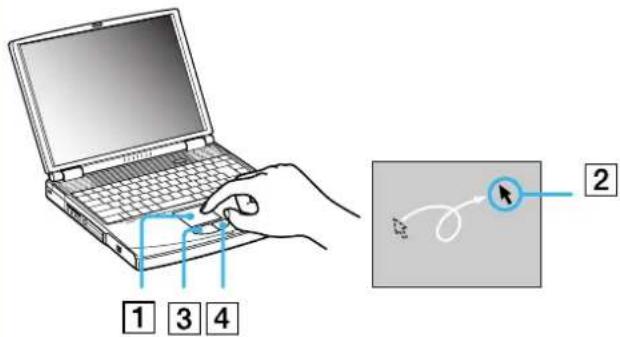
The keyboard contains a cursor-pointing device, your touchpad (1). You can point to, select, drag, and scroll objects on the screen using the built-in touchpad.
text_image
1 3 4 2Action Description
| point Slide one finger on the touchpad to place the pointer (2) on an item or object. | |
| click Press the left button (3) once. | |
| double-click Press the left button twice. | |
| right-click Press the right button (4) once. In many applications, this action displays a shortcut menu. | |
| drag Slide one finger while pressing the left button. | |
| scroll Move your finger along the right edge of the touchpad to scroll vertically. Move your finger along the bottom to scroll horizontally. (The scroll function is available only with applications that support a touchpad scroll feature.) |
text_image
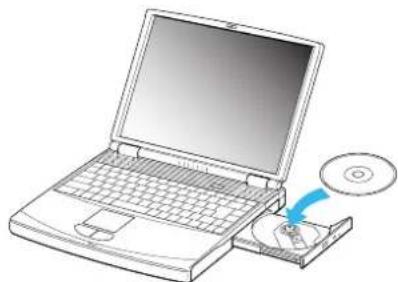
35Using the CD-RW/DVD-ROM drive or DVD-ROM
Depending on your model, your computer is equipped with a CD-RW/DVD-ROM drive or a DVD-ROM.
To insert a disc, proceed as follows:
1 Turn on the computer.
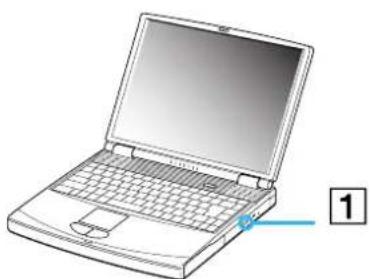
2 Press the eject button (1) to open the drive. The tray slides out.
natural_image
Illustration of a laptop computer with visible keyboard and front panel (no text or symbols)3 Place a disc in the middle of the tray with the label side facing up until the disc clicks into place.
natural_image
Line drawing of a laptop computer with an open CD and a separate CD/DVD (no text or symbols)4 Close the tray by pushing it gently.
Sony Notebook User Guide
text_image
36 may not be able to openWhen the computer is in Standby or Hibernate mode, you cannot insert or remove a disc.
Be sure to seat the disc firmly over the disc drive hub fingers. If you do not seat the disc firmly, you could damage your disc drive and you may not be able to open the tray.
When you finish using a disc, wait until the LED indicator turns off and then press the eject button to remove the disc.
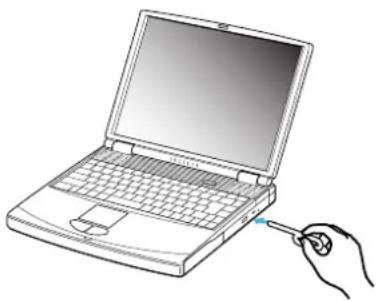
If the disc does not come out when you press the Eject button, go to My Computer. Select the drive, click the right button of your mouse and select Eject. If it still does not work, turn off the computer and insert a thin, pointed object into the manual eject hole.
natural_image
Line drawing of a laptop with a hand holding a pen inserted into it (no text or symbols)Using the CD-RW function (PCG-FX502 and PCG-FX505 only)
Depending on your model, your notebook is equipped with a CD-RW/DVD-ROM combo drive.
To burn CDs, you can use CD-RW and CD-R discs:
☐ The CD-RW (CD-ReWriteable) disc is a data memory medium that can be used to write, erase and rewrite a program or other data.
☐ The CD-R (CD-Recordable) disc is a data memory medium that can be used to write a program or other data, but once only.
To achieve optimum performance when writing data on a CD-RW disc, follow these recommendations :
Before writing to a new CD-RW, you must first format the disc. If you do not format the disc, your computer will not recognize it.
To make a CD-R's data readable on a CD-ROM drive, you need to close the session when you eject it. To complete this process, follow the instructions included with your software.
☐ Only use circular discs. Do not use discs with any other shape (star, heart, card, etc.), as this may damage the CD-RW drive.
☐ Do not strike or shake the computer while writing data to a disc.
☐ For optimal writing speed, deactivate the screensaver before writing data to a disc.
☐ Memory-resident disc utilities may cause unstable operation or data loss. Deactivate these utilities before writing data to a disc.
☐ For best results, use CD-Rs that are compatible with 4x speed, as the software pre-installed on your computer is preset to that speed. Your VAIO notebook does not support 1x writing speed.
☐ When using your software application to burn CDs, be sure to exit and close all other applications.
☐ Exit anti-virus software before writing data to a disc.
☐ Never touch the surface of the disc. Fingerprints and dust on the surface of a disc may cause writing errors.
Do not put your VAIO notebook into a power saving mode while using the pre-installed software.
Using the DVD function
To achieve optimum performance when playing DVD-ROM discs, you should follow these recommendations.
☐ You can play DVDs using the DVD-ROM drive and the WinDVD software. See the help file on the WinDVD software for details.
☐ Your computer should not be connected to the port replicator while playing DVD movies or using DVD applications.
☐ Close all open applications before playing a DVD-ROM movie.
☐ When playing DVD movies on battery power, set the power management profile to DVD. With other profiles, the movies can be choppy.
Do not switch power saving modes while playing a DVD video.
☐ If the virus checker is active, you need to disable it.
☐ Do not use resident disc utilities or resident utilities to speed up the access of discs, because they may cause the system to become unstable.
Make sure that the screensaver is deactivated.
☐ Depending on the display setup properties you selected, you may use the
☐ Region codes indicators are labeled on the DVD discs to indicate in which region and on what type of player you can play the disc. Unless a '2' (Europe belongs to region '2') or 'all' (this means that you can play this DVD everywhere in the world) is labeled on your DVD disc or on the packaging, you cannot play the disc on this player.
☐ Do not try to change the region code settings of the DVD-ROM drive. Any difficulties caused by changing the region code settings of the DVD-ROM drive are out of warranty.
☐ When a DVD video disc is inserted in the DVD-ROM drive, you cannot toggle between LCD and TV by pressing
☐ When a TV is connected, a part of the video screen will not appear with the factory settings. Adjust the display resolution to 640x480.
Dual display (when applicable) is not possible when watching DVD movies.
text_image
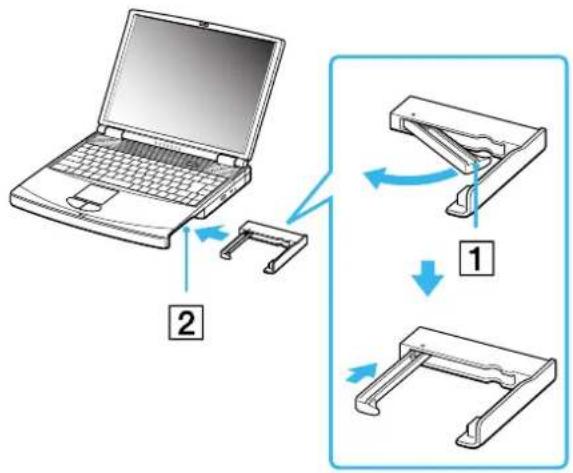
39Using the weight saver
The weight saver protects the multi-purpose bay when it is empty.
To attach the weight saver, proceed as follows:
1 If another device is in the multi-purpose bay, remove the device.
2 Pull out the guide (1) of the weight saver and slide the weight saver in the direction of the arrow (2) until it clicks.
text_image
Diagram illustrating the process of a laptop device with two steps: adding a component to a slide and then adding a slide to a stand.Sony Notebook User Guide
Using your notebook
text_image
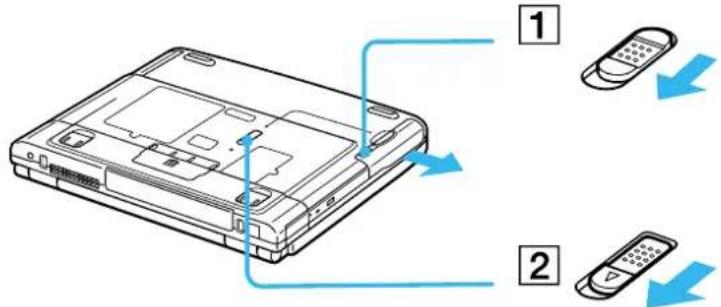
40To remove the weight saver, proceed as follows:
1 Slide the eject lever of the weight saver in the direction of arrow 1.
2 Slide the release lever on the bottom of the computer in the direction of arrow 2.
text_image
Diagram showing two labeled components (1 and 2) of a laptop with directional arrows indicating movement or connection.
text_image
41 it with theUsing the floppy disk drive
Your computer is supplied with a removable floppy disk drive. When you do not use it, you can replace it with the bundled weight saver.
Inserting the floppy disk drive
To insert the floppy disk drive, proceed as follows:
1 Turn off the computer.
2 If the weight saver is in the multipurpose bay (1), remove the device.
3 Insert the floppy disk drive (2) into the multipurpose bay with the metallic part up.
4 Continue pushing the drive into the bay until the release lever locks into place.
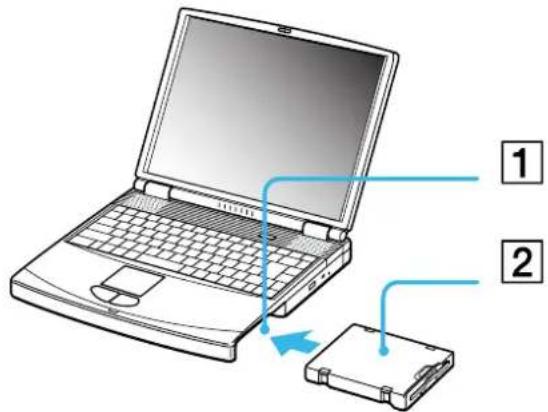
text_image
Diagram showing a laptop connected to a physical drive, labeled with parts 1 and 2.Using your notebook

text_image
42Inserting a diskette
To insert a diskette, proceed as follows:
1 Hold the diskette (1) with the label side facing up.
2 Gently push the diskette into the floppy disk drive (2) until it clicks into place.
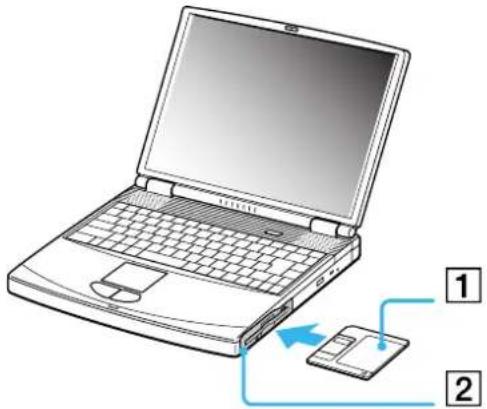
text_image
Diagram of a laptop with an open circuit and connected to a memory card, labeled with parts 1 and 2.Using your notebook
text_image
43Removing a diskette
To remove a diskette, proceed as follows:
1 Wait until the LED indicator (1) turns off.
2 Press the eject button (2) to remove the diskette.
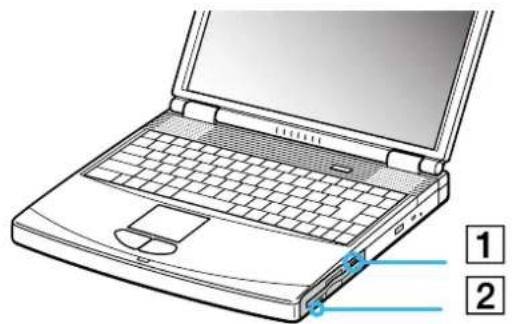
text_image
Laptop keyboard diagram with labeled parts showing two ports and a numbered indicator for component identification.Do not press the Eject button when the LED indicator is turned on. Otherwise, data may be lost.
text_image
44Removing the floppy disk drive
To remove the floppy disk drive, proceed as follows:
1 Turn off the computer.
2 Slide the release lever (1) on the bottom of the computer in the direction of the arrow.
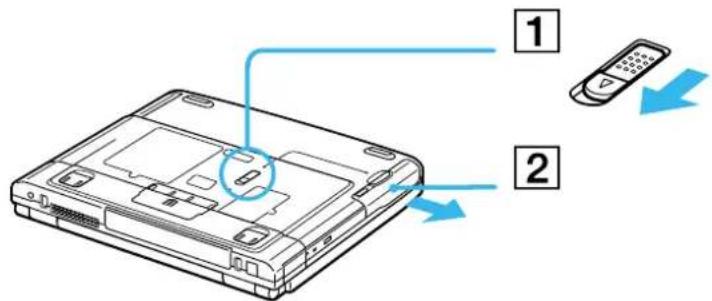
text_image
Diagram showing a laptop with labeled parts and directional arrows indicating mobile phone usage or connection.3 Slide the drive (2) out of the multi-purpose bay.
4 Insert the weight saver.
Sony Notebook User Guide
text_image
45 cle externalUsing PC Cards
This computer has a PC Card slot that supports Type II PC Cards. PC Cards allow you to connect portable external devices.
You do not need to shut down your computer when inserting a PC Card.
Inserting a PC Card
To insert a PC Card, proceed as follows:
1 Insert the PC Card into one of the PC Card slots front label facing up.
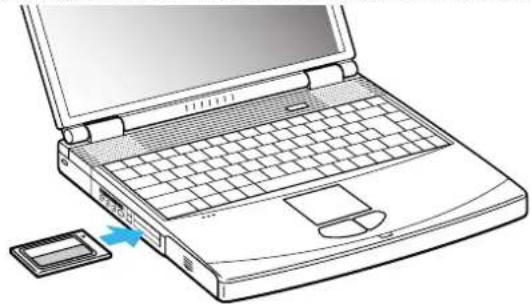
natural_image
Line drawing of a laptop with an open screen and a small electronic device attached to the front panel (no text or symbols)2 Gently push the PC Card slot into the connector.
The PC Card is automatically detected by your system.
The Safely Remove Hardware icon appears in the system tray.
Some devices may not function properly if you repeat Returning to Normal mode from Standby mode or Hibernate mode.
The computer will return to its original state if you restart it.
The PC Card slots can accommodate two Type II PC Cards (at the same time) or one Type III PC Card. These slots are compatible with Card Bus ports. Use the lower slot for Type III PC Cards.
Some PC Cards may require you to disable idle devices when using the PC Card.
Be sure to use the most recent software driver provided by the PC Card manufacturer.
If an “!” mark appears in the Device Manager dialog box, remove the software driver and then reinstall it.
You do not need to shut down the computer before inserting or removing a PC Card.
Do not force a PC Card into the slot. It may damage the connector pins. If you have difficulty inserting a PC Card, check that you are inserting the PC Card in the correct direction. See the manual supplied with your PC Card for more information on use.
For some PC Cards, if you alternate between Normal power operation and Standby or Hibernate power management modes while the card is inserted, you may find that a device connected to your system is not recognized. Reboot your system to correct the problem.
Do not carry your notebook while touching the head of a PC Card, as pressure or shock may damage the connector pins.
It is recommended that you always use the same slot for a PC Card as switching slots can cause problems with some PC Cards.
Removing a PC Card
Follow the steps below to remove the PC card while your computer is on. If it is not removed properly, your system may not work properly. If you want to remove a PC Card when your computer is off, skip steps 1 to 6.
To remove a PC Card, proceed as follows:
1 Right-click the Safely Remove Hardware icon in the taskbar. The Safely Remove Hardware dialog box appears.
2 Select the hardware you want to unplug.
3 Click Stop.
4 In the Stop a Hardware device dialog box, confirm that the device can be safely removed from the system.
5 Click OK.
You get a message saying that it is safe to remove the device.
6 Click Close.
7 Press the PC Card release button so that it pops out.
8 Push the PC Card release button to eject the card.
9 Gently grasp the card and pull it out.
10 If the PC Card release button is still out, push it back in to close the front panel cover.
If you unplug the PC Card from the computer when this is still turned on, your system might crash and you might lose data that you did not save before.
Before you remove the PC Card, right-click the PC Card icon in the taskbar and close the card. Close any applications that use the PC Card before removing the card. Otherwise, data may be lost.
While the card is inserted, your computer may not enter the Hibernate power management mode. It may enter Stand by mode. It is recommended that you remove the card when your computer enters Hibernate mode by pressing
Some PC Cards or their functions may not be compatible with this computer.
Using Memory Stick™
Your VAIO notebook is designed to support the Memory Stick™. The Memory Stick™ is a compact, portable, and versatile device especially designed for exchanging and sharing digital data with compatible products. Because it is removable, it can be used for external data storage.
Use the flash memory technology to download anything that can be converted into digital data, such as pictures, music, words, sounds, movies and photographs.
Foreseen as the universal data storage device of the future, the Memory Stick™ can already be used with an ever-increasing range of compatible products, including:
Audio systems
Visual devices
VAIO products
CLIE handhelds
Mobile phones.
There are currently two different types of Memory Stick™:
☐ The generic Memory Stick™, coloured blue.
☐ The MagicGate Memory Stick ^TM , coloured white.
You can purchase Memory Sticks™ from the Sony Style website (http://www.sonystyle-europe.com), or from your local Sony dealer.
Why Memory Stick™?
Sony's vision is to expand the world of communication, promoting the portability of digital data. The Memory Stick ^TM is the resulting medium, through which digital devices can be instantly connected. With it, you can download data from any compatible device, then transfer it to another in a single and instant transfer.
The main advantages of the Memory Stick ^TM are its:
☐ Compactness: with dimensions of just 21.5 mm (W) x 2.8 mm (H) x 50 mm (D), compatible products can also be small, lightweight and attractive in their design.
☐ Capacity: its data capacity far exceeds that of a floppy disk.
☐ Security: its lock option means you can protect your data from accidental erasure.
☐ Versatility: memory capacity ranges from 4MB up to 128MB (the equivalent capacity of 88 floppy disks).
☐ Reliability: by way of protecting the hardware and its contents, the number of terminals is reduced to only 10 pins. This, and the overall robust structure of the stick, gives it a longer lifespan than other storage devices.
Durability: the same Memory Stick ^™ can be used thousands of times.
Forward compatibility: the Memory Stick's™ current format is designed to be compatible with future products and higher capacity Memory Sticks™.
The future of Memory Stick™
Memory Stick's™ potential is virtually unlimited, with the number of compatible products increasing rapidly in both personal and professional spheres.
The introduction of the 256 MB and 512 MB Memory Stick ^™ is anticipated in 2002, and a 1 gigabyte capacity Memory Stick ^™ is expected in 2003. Additionally, the native transfer speed of the Memory Stick ^™ will be increased to accommodate the increasing capacity. By the end of 2002, Memory Stick's ^™ transfer speed will be increased by eight times to a maximum of 20MB/sec.
text_image
50 cameras, etc. or e.Generic Memory Stick™
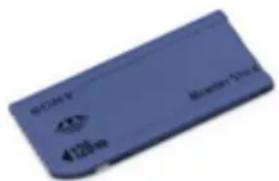
The original Memory Stick™, blue in colour, can be used to record image data taken with digital still cameras, etc. or data from the PC. With it, you can record, play back and transfer various kinds of data at any given time.
natural_image
Blue rectangular electronic device labeled 'Braemar Drive' with visible ports and branding (no readable text beyond branding)Because it is easy to remove and transport safely, you can use Memory Stick™ anywhere by inserting it into any compatible device to transfer and share the information you have saved.
For you, this means you can expand the capabilities of your VAIO computer in the following scenarios:
☐ With your still digital camera, share your holiday pictures instantly by e-mail.
From your handycam to your VAIO, make the most of your captured moments with the VAIO's movie editing tools.
Carry pictures on you by copying image files from the Internet to your VAIO and then to your CLIE handheld.
With your voice recorder, add your voice to e-mails so your tone is never misunderstood.
The blue Memory Stick™ is currently available with a 4MB, 8MB, 16MB, 32MB, 64MB or a 128MB memory (the equivalent capacity of 88 floppy disks).
Generic Memory Sticks™ cannot be used with the Memory Stick™ Walkman, or with data that is protected by copyright.
MagicGate Memory Stick™
The MagicGate Memory Stick™, white in colour, records PC and image data just like its blue counterpart; the difference is it uses the MagicGate copyright protection technology.
With this type of Memory Stick™, also called the MG Memory Stick™, you can enjoy the following features:
32MB, 64MB and 128MB capacity versions.
Storage of up to 120 minutes of audio data.
Download and save:
digital music
pictures
movies, and more.
Combine data files to add music to your home movies, for example.
Transfer and share data between several digital products.
MagicGate Copyright Protection Technology.
SDMI (Secure Digital Music Initiative) Compliance.
SonicStage software.
So that you further distinguish a MagicGate Memory Stick™ from a generic one, look for:
the logo printed on it and a protruding dot located on the back.
MagicGate is a copyright protection technology that complies with the standards set by SDMI (Secure Digital Music Initiative, an organization working to draw up industry standard specifications in order to protect copyrights of digital music).
The logo indicates the copyright protection system devised by Sony. It is not meant to guarantee compatibility with other media.
MagicGate
MagicGate refers to the copyright protection technology used by the MagicGate Memory Stick™ and other MagicGate Memory Stick™ compatible devices.
The Memory Stick™ Walkman and MagicGate Memory Stick™ work together to check the data and ensure it complies with copyright protection.
If no problems are detected, the data is exchanged in encrypted form; if authentication is not passed, data cannot be exchanged or played back.
SonicStage
This is a copyright protection technology that is used to manage the digital music content downloaded to the PC from CDs, the Internet and/or other sources.
Software installed on the PC records music content in encrypted form onto the hard disk. As well as allowing you to enjoy music on the PC, this technology protects against unauthorized distribution on the Internet. Since it is compatible with MagicGate, you can use SonicStage to transfer music that you have downloaded onto your PC to your MG Memory Stick™, and play it back on other Magic Gate-equipped devices and media.
Copyright protection
People who create artistic works such as music are entitled to a "copyright", meaning that they have exclusive rights to dictate how their work is used. When they are created, artistic works are automatically protected by a copyright without having to submit notification or registration, and may not be used without the permission of the person who created the work.
In the music world, however, illegal acts of distributing music without the permission of the artist, particularly on the Internet, have recently been on the increase. That is why the Recording Industry Association of America (RIAA) took the initiative to organize a forum called Secure Music Digital Initiative (SDMI) to study technology for protecting copyrights during the electronic distribution of music.
Sony offers the MagicGate Memory Stick™ and Memory Stick™ Walkman with a copyright protection function that complies with SDMI standards, thereby providing an environment where individuals can record and enjoy third-party music data without worrying about copyright infringement.

Artistic works that are recorded by individuals are permitted for private usage only.
Compatible devices
There are nearly 80 Memory Stick™-enabled products on the market or announced for introduction worldwide, ranging from camcorders and portable music players to voice recorders and many other electronic devices.
You can currently use Memory Sticks™ with the following Sony products:
Visual:
Cybershot digital camera
Mavica digital camera
PC, TRV and VX series digital video cameras
☐ LC data projector
Audio:
MS Walkman
MS Hi-fi system
Network Walkmans
Voice recorders
Other:
VAIO notebooks
VAIO desktops
CLIE Handheld Entertainment Organiser
□ Sony mobile phones
Digital printers
AIBO, the Sony Entertainment Robot
To find out more about the products available in your country, go to:
http://www.sonystyle-europe.com
text_image
54Inserting a Memory Stick™
To insert a Memory Stick ^™ , proceed as follows:
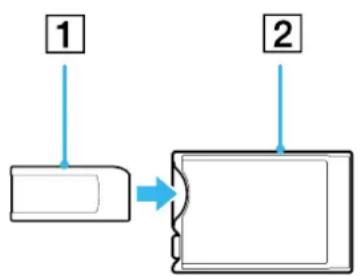
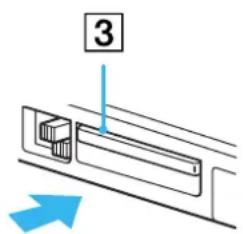
1 Once you have stored your data from your digital device, insert the Memory Stick™ (1) into the optional PC Card adapter (2).
2 Push the Release button.
The Release button pops out.
3 Push the Release button once again.
The PC Card comes out.
4 Pull the PC Card out of the connector.
5 Insert the PC Card adapter into the connector (3) on your computer (label facing up) and push it gently.
6 The Memory Stick™ is automatically detected by your system and appears in your My Computer window as a local drive, under the appropriate letter (depending on the configuration of your computer).
When your Memory Stick™ is detected, the Safely Remove Hardware icon appears in the taskbar.
flowchart
graph TD
    A["1"] --> B["2"]
    B --> C["→"]
text_image
3! Hold the Memory Stick™ with the arrow pointing in the correct direction when you insert it into the slot. To avoid damaging the computer or the Memory Stick™, do not force the Memory Stick™ into the slot if it does not insert smoothly.
Sony Notebook User Guide
Sony Notebook User Guide
Removing a Memory Stick™
To remove a Memory Stick™, proceed as follows:
1 Double-click the Safely Remove Hardware icon in the taskbar. The Safely Remove Hardware dialog box appears.
2 Select the hardware device you want to unplug.
3 Click Stop.
4 In the Stop a Hardware device dialog box, select the device that can be safely removed from the system.
5 Click OK.
You get a message saying that it is safe to remove the device.
6 Click Close.
7 Press the PC Card release button so that it pops out.
8 Push the PC Card release button to eject the card.
9 Gently grasp the card and pull it out.
Always remove the Memory Stick™ gently, or it may pop out unexpectedly. It is recommended that you remove the Memory Stick™ before shutting down the computer.
text_image
56Write-protecting a Memory Stick™
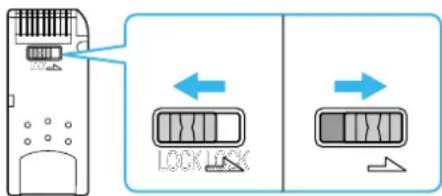
Memory Sticks™ are designed with an erasure prevention switch to protect valuable data from accidental erasure or overwriting.
Move the tab to the right or left to set or release write-protection. When the erasure prevention switch is off, data can be saved on the Memory Stick™. When the erasure prevention switch is on, data can be read from but not saved on the Memory Stick™.
text_image
Diagram showing device lock state with arrows and labeled buttons, illustrating a lock mechanism.
text_image
57 vantage of onlineUsing the modem
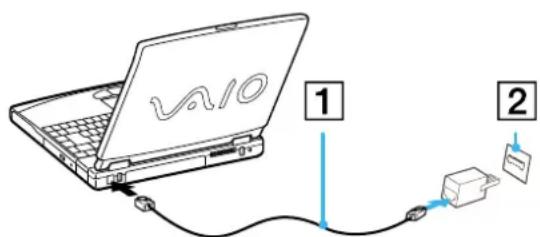
Your notebook is equipped with an internal modem. You need to connect a phone line to take advantage of online services and the Internet, to register your computer and software online, and to contact VAIO-Link.
To connect a phone line, proceed as follows:
1 Plug one end of the phone cable (1) into the phone line jack on the computer.
2 Plug the other end into the wall jack (2).
text_image
v410 1 2A country-specific phone plug is supplied with your VAIO notebook, allowing you to plug the phone line into the wall jack. We recommend you to use the supplied plug, because the usage of any other phone plug can decrease the connection quality.
Your computer cannot be connected to a coin-operated telephone, and may not work with multiple phone lines or a private branch exchange (PBX). If you connect the modem to a parallel connected phone line, the modem or the other connected device may not function properly. Some of these connections may result in excess electrical current and could cause a malfunction in the internal modem.
Only DTMF (Dual Tone Multi Frequency) signalling (tone dialling) is supported.
Configuring the modem
Before using your modem, you will need to select the country where you are actually using it.
The detailed procedure for selecting the country is explained in Configuring your modem in the software guide.
Using power saving modes
When you use a battery as the source of power for your computer, you can take advantage of power management settings to conserve battery life. In addition to the normal operating mode, which allows you to turn off specific devices, your computer has two distinct power saving modes: Standby and Hibernate. When using battery power, you should be aware that the computer automatically enters Hibernate mode when the remaining battery charge drops below 7 percent, regardless of the power management setting you select.

If the battery level falls to below 10 percent, you should either attach the AC adapter to recharge the battery or shut down your computer and insert a fully charged battery.
Using Normal mode
This is the normal state of your computer when it is in use. The green power indicator light is on in this mode. To save power, you can turn off a specific device such as the LCD or the hard disk.
Using Standby mode
The computer saves the current state of the system in RAM and switches off power to the CPU. The umber power light flashes in this mode.
To activate Standby mode, proceed as follows:
Press
Or,
Press the power button.
To return to Normal mode, proceed as follows:
Press any key.
If you press the power button for more than four seconds, the computer will switch off automatically. When the computer is in Standby mode, you cannot insert a disc. Standby requires less time than Hibernate. Standby uses more power than Hibernate.
Using Hibernate mode
The state of the system is saved on the hard disk and power is turned off. The power indicator light is off in this mode.
To activate Hibernate mode, proceed as follows:
Press
To return to Normal mode, proceed as follows:
Turn on the computer by pressing the power button.
The computer returns to its previous state.
When the computer is in Hibernate mode, you cannot insert a disc. Hibernate mode requires more time than Standby mode. Hibernate mode uses less power than Standby mode.
Connecting peripheral devices
You can add functionality to your computer by connecting or using any of these peripherals.
Before you connect peripherals, turn off the computer and all peripherals.
Connect the power cord only after connecting all cables.
Turn on the computer only after turning on all peripherals.
Connecting a port replicator (page 61)
Connecting an external display (page 65)
Connecting external speakers (page 70)
Connecting an external microphone (page 71)
Connecting a Universal Serial Bus (USB) mouse (page 72)
Connecting a printer (page 73)
Connecting an i.LINK™ device (page 75)
Connecting to a network (LAN) (page 77)
Hot plug and play devices should be plugged when the computer is switched on.
USB devices are hot plug and play devices. You do not need to shut down your computer prior to connecting these devices unless the manual supplied with the device states otherwise.
text_image
61 u to connectConnecting a port replicator
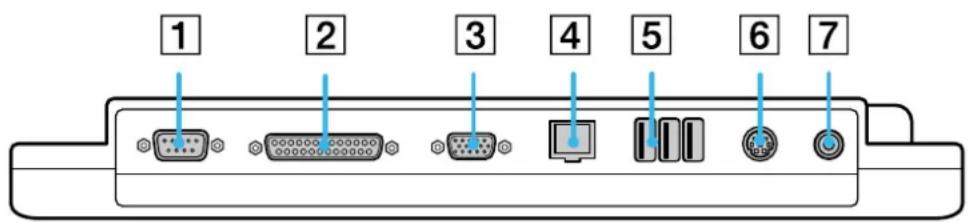
Your notebook supports the use of an optional port replicator. Attaching a port replicator enables you to connect additional peripherals to your computer, such as a printer or an external display.
text_image
1 2 3 4 5 6 7| 1 serial connector 5 3 USB ports (page 72) | |||||
| 2 | printer connector | (page 73) | 6 | mouse/keyboard connector | (page 83) |
| 3 | monitor/VGA connector | (page 71) | 7 | DC In connector | (page 18) |
| 4 network connector (Ethernet) | (page 77) | ||||

The port replicator can be powered only with the AC adapter supplied with your notebook. Do not remove the AC adapter from the port replicator; this may cause data damage or hardware malfunctions.
Connecting peripheral devices
text_image
62Attaching your computer to the port replicator
To attach your computer to the port replicator, proceed as follows:
1 Turn off the computer and disconnect all peripherals.
2 On the bottom of the computer, lift the port replicator port cover.
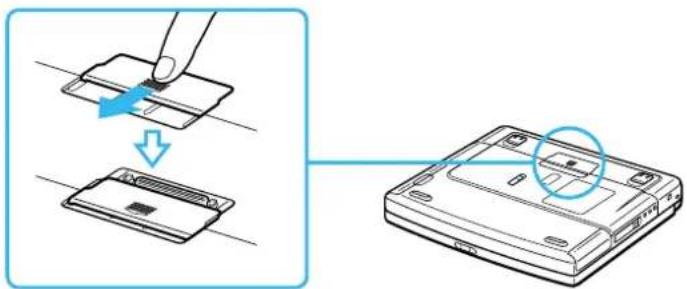
text_image
Diagram showing a hand inserting a card into a device, with arrows indicating the process and a magnified view highlighting the card's internal structure.3 Attach the bottom of the computer to the port replicator connector until it clicks.
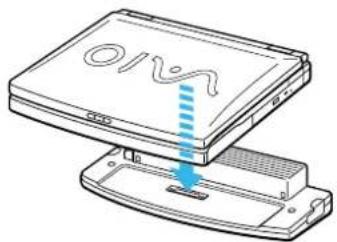
text_image
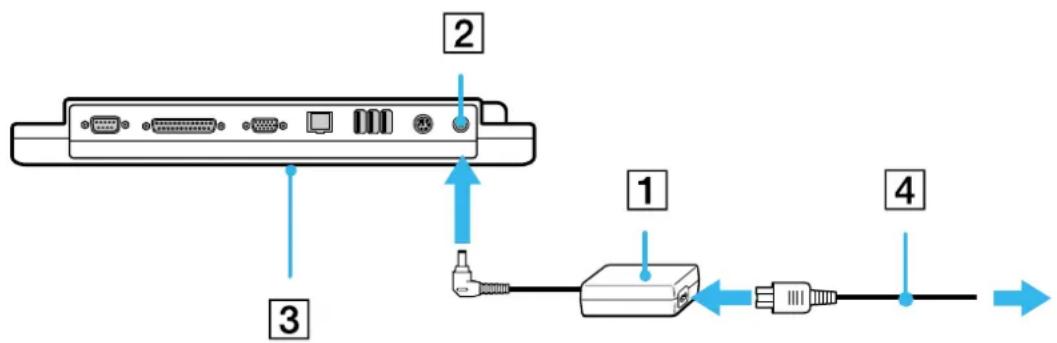
On4 Plug the cable attached to the AC adapter (1) into the DC In (2) connector on the port replicator (3).
text_image
635 Plug the power cord (4) into the AC adapter and an AC outlet.
The power indicator light turns green.
text_image
Diagram showing connection between a device with labeled ports and cable links, including numbered annotations.6 Turn on the computer.
When you use the port replicator for the first time, the installation of the network drivers starts automatically.
When attaching your computer to the port replicator, do not attempt to insert or remove the battery pack. Lifting and turning the computer with the attached port replicator may cause a temporary loss of power.
You do not need to use the floppy disk supplied with your port replicator.
text_image
64Disconnecting your computer from the port replicator
To disconnect your computer from the port replicator, proceed as follows:
1 Turn off the computer and the connected peripherals.
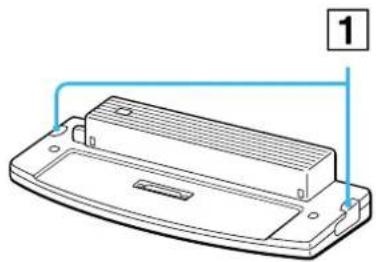
2 Pull the levers on each side of the port replicator (1) to disconnect the computer from the port replicator.
3 Lift the computer away from the port replicator.
4 Close the port replicator connector cover on the bottom of your computer.
natural_image
Line drawing of a device casing with a labeled component (no text or symbols present)It is extremely important to close the port replicator connector cover after removing your computer from the port replicator. If the cover is left open, dirt may get inside and damage the computer.
To disconnect your port replicator completely from the mains voltage, unplug the AC adapter.
Connecting an external display
You can connect an external display to your notebook. For example, you can use your computer with the following devices:
Computer display (monitor);
□ Multimedia computer display;
TV;
Projector.
Turn off your computer and the peripherals, unplug the AC adapter and the power cord before connecting the external display.
Connect the power cord after connecting all other cables.
Turn on the peripherals, then turn on your computer.
Connected external displays are used as second screens.
On Windows ^® systems only, you can also use an external display to set up a virtual desktop.
text_image
66Connecting a computer display
To connect a computer display, proceed as follows:
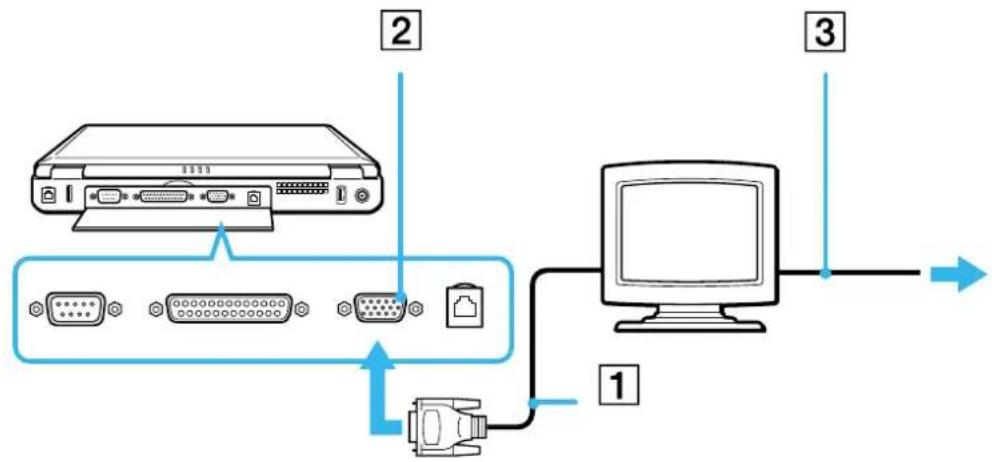
1 Plug the display cable (1) in the monitor/VGA connector (2) □ on the computer.
2 If necessary, plug one end of the display's power cord (3) into the display, and the other end into an AC outlet.
text_image
Diagram showing connection between a computer via three labeled components: printer, VGA, and USB port.Sony Notebook User Guide
text_image
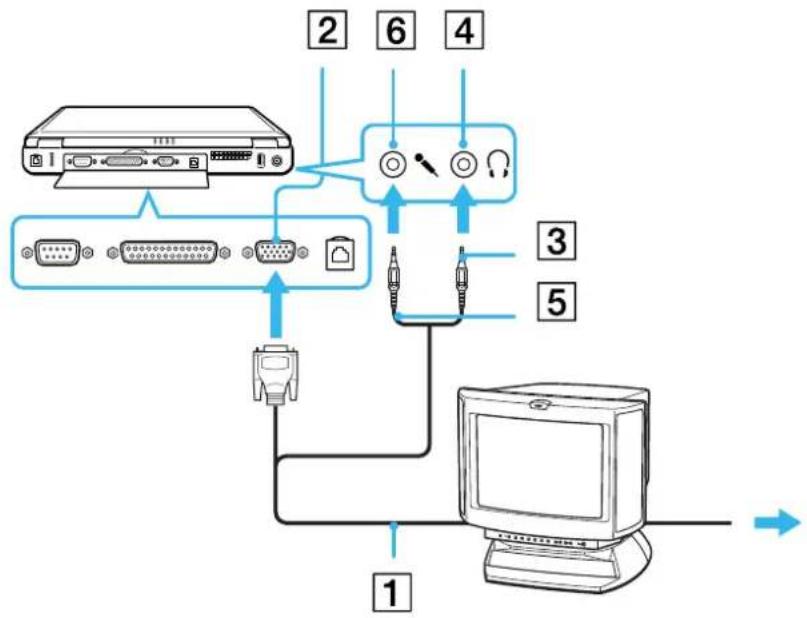
67 microphone.Connecting a multimedia computer display
You can connect the notebook to a multimedia computer display that includes built-in speakers and a microphone.
To connect a multimedia computer display, proceed as follows:
1 Plug the display cable (1) in the monitor connector (2) on the computer.
2 Plug the speaker cable (3) in the headphone connector (4) on the computer.
3 Plug the microphone cable (5) in the microphone connector (6) on the computer.
flowchart
graph TD
    A["Computer"] -->|1| B["Switch"]
    A -->|2| C["Analog/Video Device"]
    A -->|3| D["Microcontroller"]
    A -->|4| E["Audio/Residential Interface"]
    A -->|5| F["USB Interface"]
    A -->|6| G["Desktop Interface"]
text_image
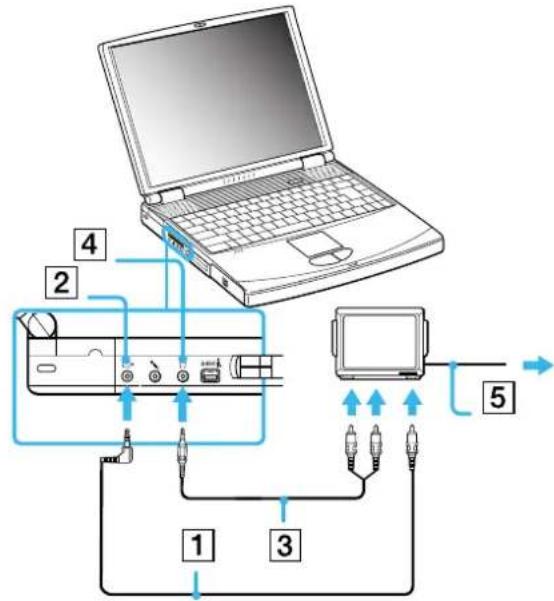
68Connecting a TV
To connect a TV, proceed as follows:
1 Plug one end of the audio/video cable (1) into the TV Out connector (2) (yellow) and the other end into the TV.
2 Plug one end of the sound cable (3) into the headphone connector (4) and the other end into the TV.
3 Plug the power cord of the TV (5) into an AC outlet.
4 Switch the input channel of the TV to external input.
5 Set up the TV configuration system.
text_image
Diagram showing connections between a laptop, audio equipment, and a monitor with labeled componentsSee the manual supplied with your peripheral for more information on installation and use.
If you insert a DVD in your DVD-ROM drive to watch a movie on your TV, the
Solution:
- Eject the DVD from your computer.
- Once the DVD is ejected, toggle between your LCD and your TV with the combination
+ .
Your image is now displayed on both LCD and TV. Re-insert your DVD to launch your DVD software.
If the display resolution of your computer is more than 800 x 600 dots, a part of the image cannot be displayed on your TV. The hidden area on your TV can be seen by moving the cursor on your computer. If you want to display the full image, change the display resolution of your computer to 640 x 480 dots.

text_image
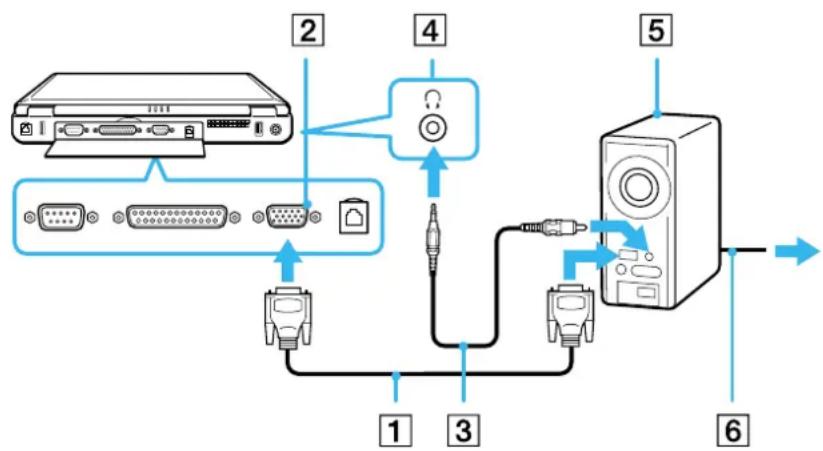
69Connecting a projector
You can use a projector as an external display, such as the Sony LCD Projector.
To connect a projector, proceed as follows:
1 Plug the RGB signal cable (1) into the monitor connector (2) identified by the □ symbol.
2 Plug the audio cable (3) (not supplied) into the earphone connector (4) identified by the ⏻ symbol.
3 Plug the RGB signal cable and the audio cable into the connector of the projector (5).
4 Connect the power cord (6) of the projector into an AC outlet.
flowchart
graph TD
    A["CD"] -->|2| B["USB Port"]
    A -->|4| C["Audio System"]
    B -->|1| D["USB Link"]
    C -->|3| E["Audio Link"]
    C -->|5| F["Server"]
    F -->|6| G["Output"]
    style A fill:#f9f,stroke:#333
    style B fill:#ccf,stroke:#333
    style C fill:#cfc,stroke:#333
    style D fill:#fcc,stroke:#333
    style E fill:#cff,stroke:#333
    style F fill:#ffc,stroke:#333
    style G fill:#fcf,stroke:#333
You may not be able to display the computer's LCD and the external display together, depending on the types of computer display and projector used. You can toggle the output between the notebook LCD screen and the external monitor by pressing the
©
©
text_image
72Connecting a Universal Serial Bus (USB) mouse
You can connect a USB device (e.g. mouse, floppy disk drive, keyboard, printer, ...) to your computer.
Before connecting or disconnecting a USB peripheral, you do not need to shut down the computer.
You may need to install software (device drivers) supplied with your USB device before using the USB device.
There are 2 USB ports at the back of your notebook and 3 USB ports at the back of the optional port replicator.
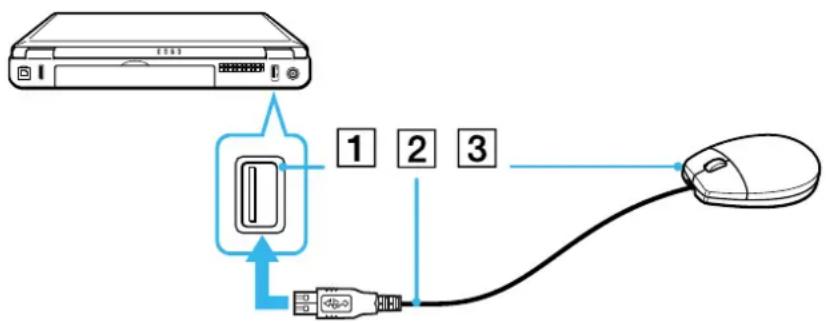
To connect a USB mouse, proceed as follows:
1 Select the USB port (1) of your choice.
2 Plug the USB mouse cable (2) into the USB connector.
You can use your USB mouse (3).
text_image
Diagram showing connection between a computer monitor, USB cable, and mouse with numbered labels pointing to the device.You do not need to shut down the computer before connecting or disconnecting a USB peripheral.
The USB mouse software driver is preinstalled on your notebook, therefore, you only need to plug the USB mouse into the USB connector and you can start working.
You may need to install software (device drivers) supplied with your USB device before using the USB device.
text_image
73Connecting a printer
You can connect a Windows-compatible printer to your computer to print documents.
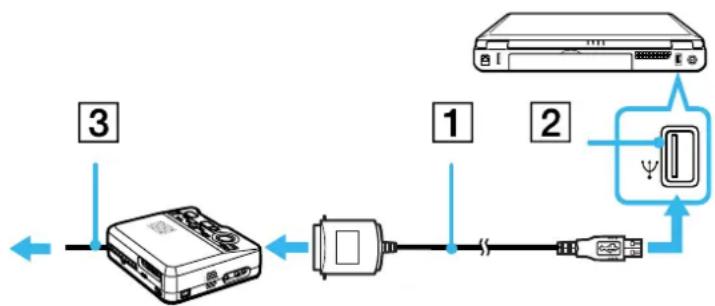
Connecting a printer using the USB connector
You can connect a USB printer compatible with your version of Windows to your computer.
To connect a printer using the USB connector, proceed as follows:
1 Plug an optional USB printer cable (1) into the USB connector (2) identified by the symbol on your computer and printer.
2 Plug the printer (3) power cord into an AC outlet.
flowchart
graph LR
    A["Device 1"] --> B["Switch"]
    B --> C["Switch"]
    C --> D["Server"]
    D --> E["Switch"]
    style A fill:#f9f,stroke:#333
    style B fill:#ccf,stroke:#333
    style C fill:#cfc,stroke:#333
    style D fill:#fcc,stroke:#333
    style E fill:#ffc,stroke:#333

Turn off your computer and the printer, unplug the AC adapter and the power cord before connecting the printer.
text_image
74Connecting a printer using the printer connector
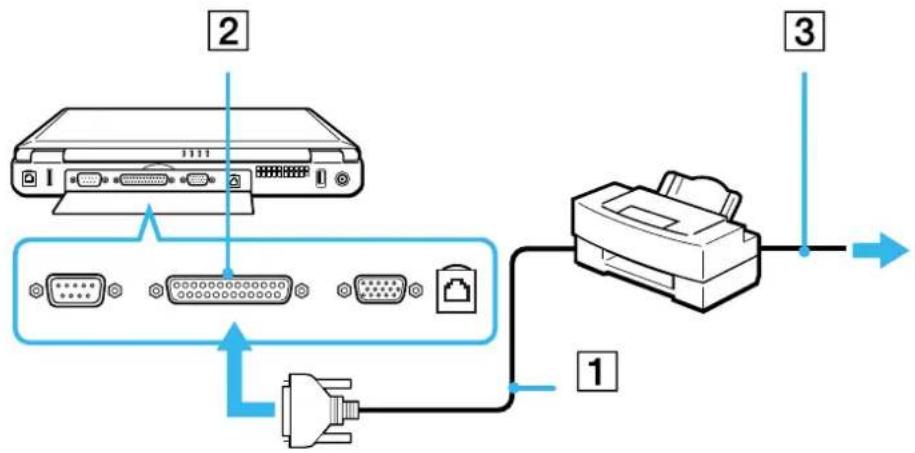
To connect a printer using the printer connector, proceed as follows:
1 Plug the printer cable (1) supplied with the printer into the printer connector (2) identified by the symbol.
2 Plug the printer power cord (3) into an AC outlet.
text_image
1 2 3 1
text_image
75Connecting an i.LINK™ device
Your computer includes an i.LINK™ (IEEE1394) connector, which you can use to connect to an i.LINK™ device such as a digital video camera recorder or to connect two VAIO notebooks in order to copy, delete or edit files.
The i.LINK™ connector of your notebook does not supply power to external devices generally powered by i.LINK™ connectors.
The i.LINK™ connector supports transfer rates up to 400 Mbps; however, the actual transfer rate depends on the transfer rate of the external device.
The i.LINK™ features available may vary depending on the software applications you use. Refer to the documentation that came with your software for more information.
i.LINK™ cables compatible with your VAIO notebook include cables with the following part numbers: VMC-IL4415 (a 1.5 meter cable with a 4-pin connector at each end), VMC-IL4408Series (a 0.8 meter cable with a 4-pin connector at each end).
text_image
76Connecting a digital video camera recorder
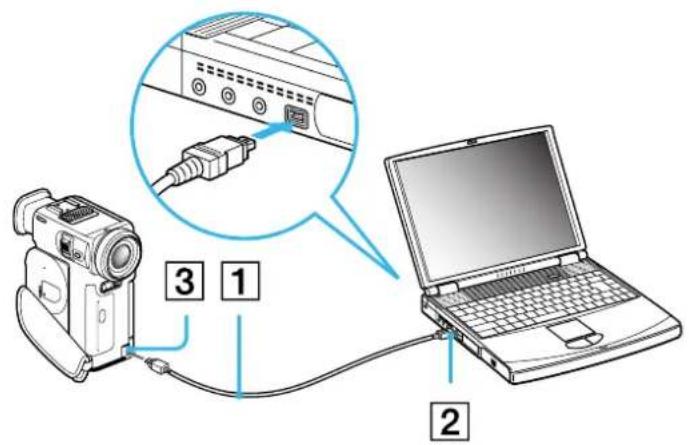
To connect a digital video camera recorder, proceed as follows:
1 Plug one end of the optional i.LINK™ cable (1) into the i.LINK™ connector (2) of the computer and the other end into the DV Out connector (3) on the digital video camera recorder.
text_image
Diagram showing a video camera connected to a laptop via cable, with labeled components and an inset image of the device's cable connector.2 Launch the DVgate application.
On Sony digital video cameras, connectors labeled DV Out, DV In/Out or i.LINK™ are i.LINK™-compatible.
The Sony digital video camera recorder is an example; your digital video camera recorder may need to be connected differently.
If your digital video camera recorder includes a Memory Stick™ slot, you can copy images from it to your computer via a Memory Stick™. To do so, simply copy images on the Memory Stick™, then insert it into the Memory Stick™ slot of your computer.
You cannot access the pictures stored on a Memory Stick™ when using an i.LINK™ connection.
text_image
77 e. For theConnecting to a network (LAN)
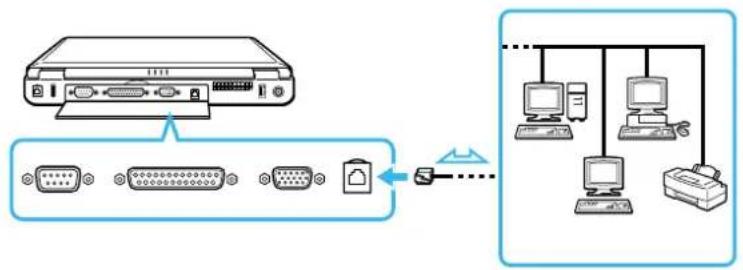
You can connect your computer to 10BASE-T/100BASE-TX-type networks via an Ethernet network cable. For the detailed settings and devices needed to connect to the network, consult your Network Administrator.
flowchart
graph LR
    A["Printer"] --> B["USB Port"]
    B --> C["Switch"]
    C --> D["Computer"]
    D --> E["Desktop"]
    E --> F["Computer"]
    F --> G["Printer"]
    style A fill:#f9f,stroke:#333
    style B fill:#ccf,stroke:#333
    style C fill:#cfc,stroke:#333
    style D fill:#fcc,stroke:#333
    style E fill:#cff,stroke:#333
    style F fill:#ffc,stroke:#333
    style G fill:#fcc,stroke:#333

For more information about connecting your notebook to the network, please consult the Hardware troubleshooting section of the Vaio-Link website: How to troubleshoot network problems
! Do not plug a phone cable into your computer network jack.
Getting help
This section describes how to get help and support from Sony, as well as troubleshooting tips for your computer.
Sony support options
Sony provides several support options for your computer.
Printed documentation supplied with your notebook
A Getting Started brochure, where you find a brief description of the items in your box, some specifications of your notebook, and how to set up your notebook;
A Customer Guide, where you find all the basic information you need to start using your notebook, as well as troubleshooting and VAIO-Link information;
YourSony Guarantee conditions;
☐ A Safety Regulations flyer;
A Modem Regulations flyer.
Online user guides on your Documentation CD-ROM
☐ The Sony notebook user guide (hardware guide) explains how to use your computer, connect peripheral devices. It contains a list of specifications of your computer and accessories.
The About the software on your Sony notebook guide (software guide) lists the pre-installed software titles and explains how to use the utility programs and perform basic computer tasks.
Go to http://www.club-vaio.sony-europe.com to find online tutorials about your favorite VAIO software.
The Customer Service Guide gives you complete information on the VAIO-Link Services.
Getting help
text_image
79 the software.Other sources of information
☐ The online help files that accompany your pre-installed software contain instructions on using the software.
VAIO-Link website: if you have any problem with your computer, you can access the VAIO-Link web site. Go to: http://www.vaio-link.com
☐ VAIO-Link Response Centre: Before contacting VAIO-Link Response Centre, try to solve the problem by reading the User Guides and help files for the peripherals or software.
You need to plug in the phone line and configure your modem for use before using the communication features described in this manual.
Troubleshooting
This section describes how to solve common problems you might encounter when using your notebook. Many problems have simple solutions. Please, try these suggestions before contacting VAIO-Link.
About the computer and software
My computer does not start
☐ Check that the computer is plugged into a power source and that it is turned on.
☐ Check that the power indicator on the front panel of the computer indicates that the power is on.
☐ Check that the battery packs are inserted properly and that they are charged.
Make sure there is no diskette in the floppy disk drive.
☐ Confirm that the power cord and all cables are connected firmly.
☐ If you have plugged the computer into a UPS (Uninterruptible Power Supply), make sure the UPS is turned on and works.
☐ If you are using an external display, check that it is plugged into a power source and turned on. Check that you have switched to the external display and that the brightness and contrast controls are adjusted correctly.
☐ Moisture condensation may have occurred. Do not use the computer for at least one hour and then turn it on.
☐ If the message Press
Take the battery pack off the notebook, unplug the power cord and plug it again, then turn on the power.
Getting help
text_image
81The message Press
If the floppy disk drive is empty, proceed as follows to initialize the BIOS:
1 Turn off the computer.
2 Remove any peripheral devices connected to the computer.
3 Turn on the computer and press
4 Set the date (month/day/year).
5 Press Enter.
6 Press the arrow keys to select System Time.
7 Set the time (hour:minute:second).
8 Press Enter.
9 Press the arrow keys to select the Exit menu.
10 Press the arrow keys to select Get Default Values and then press
11 Make sure that Yes is selected and then press
12 Press the arrow keys to select Exit (save changes) and then press
13 Make sure that Yes is selected and then press
My computer does not shut down
It is recommended that you shut down your computer using the Turn Off Computer command on the Windows® Start menu. Using other methods, including those listed here, may result in loss of unsaved data.
If the Turn Off command does not work properly, proceed as follows:
1 Restart the computer by pressing
2 Click Shut Down and then Turn Off.
3 If this does not work, press the power button and hold it for at least four seconds. This turns off the power.
4 Unplug the computer from the AC adapter and remove the battery pack from your computer.
My computer locks up
☐ If you suspect one application is locking your system, you can try to stop it. To do this, press
☐ If the above method does not work or you do not know which application is locking your system, restart the computer. On the Windows ^® taskbar, click the Start button, click Turn Off Computer, and then select Restart.
☐ If the above method does not work, press the power button and hold it for at least four seconds. This turns off the power.
☐ If your computer locks up while playing a CD-ROM or DVD-ROM, stop the CD, and shut down the computer by pressing
Sony Notebook User Guide
Getting help
text_image
83My software program locks up or crashes
Contact the software publisher or designated provider for technical support.
My touchpad interprets a single tap as a double-click
Open the Mouse icon in the Control Panel and change the button assignments in the Mouse Properties dialog box. One of the buttons is assigned to the double-click action.
My mouse does not work
☐ If you are using an external serial PS/2 mouse, check that the mouse is plugged into the mouse connector of your optional port replicator.
☐ If you are using a USB mouse, check that the appropriate driver and software are properly installed.
☐ Check that the USB mouse is plugged into the USB connector.
About the display
My LCD does not display anything
☐ Check that the computer is plugged into a power source and that it is turned on.
☐ Check that the power indicator on the front panel of the computer is on.
☐ Check that the battery packs are inserted properly and that they are charged.
☐ Adjust the brightness of the LCD.
☐ The computer may be in LCD (video) standby mode. Press any key to activate the display.
☐ The display mode may be set to external display mode. Press and hold the
Getting help
text_image
84The screen image on my external display is not centered or sized properly
Use the controls on your external display to adjust the image.
About CDs and diskettes
My CD-RW/DVD-ROM drive tray or DVD-ROM drive tray does not open
☐ Make sure the computer is turned on.
☐ Press the eject button on the drive.
☐ If the eject button does not work, you can open the tray by inserting a sharp, pointed object into the hole to the right or left of the eject button, depending on your model.
I cannot play a CD-ROM
After inserting the CD, wait for a few seconds for the system to detect it before you try to access it.
☐ Make sure the label of the disc is facing up.
☐ If the disc requires software, make sure the software is installed according to the instructions of the program.
☐ Check the volume of your speakers.
□ Clean the disc.
☐ Moisture condensation may have occurred. Leave the computer for at least 1 hour while it is turned on.
I cannot play a DVD-ROM
☐ If a region code warning appears when you are using the DVD player, it could be that the DVD-ROM you are trying to play is incompatible with the DVD-ROM drive in your notebook. The region code is listed on the packaging of the disc.
Getting help
text_image
85 best results, minimum color☐ If you hear sound but cannot see video, your computer's video resolution may be set too high. For best results, change the resolution in Windows Control Panel - Display - Settings to 800 x 600 using the minimum color settings.
☐ If you see video but cannot hear sound, check all of the following:
☐ Make sure the mute setting is off on your DVD player.
☐ Check the Master Volume settings of the Sounds and Audio Device Properties. If you have connected speakers externally, check the volume settings of your computer speakers and check the connections between your speakers and the computer.
In the Device Manager, check that the correct drivers are installed properly. To display the Device Manager, click Start, then Control Panel. Double-click the System icon. On the Hardware tab, click the Device Manager button.
☐ A dirty or damaged disc may cause the computer to 'hang' while it tries to read the disc. If necessary, reboot the computer, remove the disc and then check that it is not dirty or damaged.
☐ Check your PG settings (Parental Guidance) in the DVD software as they might be preventing you from playing certain DVDs when they are activated.
On your computer, the default DVD region code is 2. Do not change this setting using the Region Code Change function in Windows ^® , or using any other software applications. System malfunctions originating from the user changing the DVD region code are beyond the scope of your warranty and will result in service charges for repair.
If you do not immediately see the Display icon after clicking Control Panel, click Switch to Classic View on the left.
My floppy disk drive cannot write to a diskette
☐ The diskette is write-protected. Disable the write-protect feature or use a diskette that is not write-protected.
☐ Check that the diskette is properly inserted into the (optional) floppy disk drive.
☐ Your diskette may be corrupt. Try to insert another diskette.
Getting help
When I double-click an application icon a message such as You must insert the application CD into your CD-ROM drive appears and the software does not start.
☐ Some titles require specific files that are located on the application CD-ROM. Insert the disc and try starting the program again.
☐ Make sure you place the disc in the tray with the label side facing up.
Why does my CD-RW drive not record at the highest speed?
You must use 8x CD-R or 4x CD-RW media or higher to achieve optimum performance.
If you want to use other media and are having difficulty formatting non-4x CD-RW discs, change the writing speed from 4x to a lower setting.
To change the writing speed from the default to a lower speed, proceed as follows:
1 Click Start and then My Computer.
2 Right-click the Compact Disc icon.
3 Select Properties.
4 Select the Recording tab.
5 From the lower dropdown list, select the 2x write speed.
6 Click Apply and then OK.
The disc tray does not eject even when the Eject button is pressed
☐ Check that the notebook is turned on.
☐ The application software when burning a CD may prohibit it.
Getting help
text_image
87The disc tray ejects even when it has been locked into place
☐ Ensure that the disc is placed with the label side facing up.
□ Clean the disc and the CD-ROM drive lens.
☐ The disc may be scratched. Place another disc to see if that is the reason.
☐ There may be condensation in the drive. Remove the disc and leave the drive open for approximately one hour.
About sound
My speakers are not producing sound
☐ The built-in speakers may be turned off. Press
☐ The speaker volume may be turned to the minimum. Press
☐ If your computer is powered by battery, check that the battery is inserted properly and that it is charged.
☐ If you are using an application that has its own volume control, check that the volume is turned up.
☐ Check the volume controls in Windows®.
☐ If you use external speakers, check that the speakers are properly connected and the volume is turned up. If the speakers have a mute button, make sure it is off. If batteries power the speakers, check that the batteries are inserted properly and that they are charged.
☐ If you have connected an audio cable to the headphone connector, disconnect the cable.
My microphone does not work
If you are using an external microphone, check that the microphone is plugged into the microphone connector.
About the modem
My internal modem does not work
☐ Check that the phone line is plugged into your computer.
☐ Check that the phone line is working. You can check the line by plugging in an ordinary phone and listening for a dial tone.
☐ Check that the phone number the program is dialing is correct.
In the Phone and Modem Options dialog box (Control Panel / Phone and Modem Options), check that your modem is listed in the Modems tab, and that the location information is correct on the Dialing Rules tab.
If you do not see the Phone and Modem Options icon, proceed as follows:
1 In Control Panel click Switch to Classic View on the right side.
2 Double-click Phone and Modem Options.
The Phone and Modem Options dialog box appears.
The modem may not work if you are connected to a PABX.
My modem cannot establish a connection
☐ The modem dialing mode may be incompatible with your telephone line.
☐ The modem may not work properly if you are behind a Private Automatic Branch eXchange (PABX).
☐ Make sure that the modem is the only device connected to your telephone line.
My modem connection is slow
Many factors influence modem connection speed, including telephone line noise or compatibility with telephone equipment (such as fax machines or other modems). If you think your modem is not connecting properly to other PC-based modems, fax machines, or your Internet Service Provider, check the following:
Getting help
text_image
89 ng and that it is☐ Have your phone company check that your phone line is free from any line noise.
☐ If your problem is fax-related, check that there are no problems with the fax machine you are calling and that it is compatible with fax modems.
☐ If you are having a problem connecting with your Internet Service Provider, check that the ISP is not experiencing technical problems.
☐ If you have a second phone line available, try connecting the modem to that line.
About peripherals
I cannot establish an i.LINK™ connection between two VAIO computers
☐ Disconnect then reconnect the i.LINK™ cable. If you still have no connection after waiting for a while, restart both computers.
☐ If either computer has just returned from a power saving mode, the connection may be affected. In this case, make sure you perform a full restart before connecting them.
I cannot use DV devices. The message DV equipment seems to be disconnected or turned off appears
☐ Check that the DV device is turned on and that the cables are properly connected.
☐ If you are using multiple i.LINK™ devices, the combination of the connected devices may cause unstable operation. In this case, turn off the power of all connected devices and disconnect unused devices. Check the connection and then turn on the power again.
☐ Use manual import/export in DVGate motion if problems occur with third party cameras.
☐ You are strongly advised to use only Sony i.LINK™ cables, as using other brands may cause problems with the i.LINK™ devices.
My PC Card is not working
Make sure the PC card is compatible with your version of Windows ^® .
Getting help

text_image
90I cannot print
☐ Check that the printer cables are correctly connected.
☐ Check that your printer is correctly configured and that you have up-to-date drivers. If needed, contact your dealer.
☐ The default setting for the printer port mode is correct for most printers. If you cannot print, try changing the printer port mode.
To change the printer port mode, proceed as follows:
1 Restart your computer.
2 When you see the Sony logo, press
3 Go to the Advanced menu.
4 Use the minus sign on the numeric keyboard to change the printer port mode.
If the printer port mode is set to ECP, change it to Bidirectional (for HP printers). If the printer port is set to Bidirectional, change it to ECP.
5 Press
☐ Check the cable to see if you do not have missing or bent pins.
☐ Try a printer self test (if available) to see if the printer itself is still functioning properly. For more information, please consult the manual supplied with your printer.
About digital video captures and DVgate
While I am recording images to a digital video device using DVgate, my system displays the message Recording to DV device failed. Check the power and cable connections to the DV device and try the operation again...
☐ Close all open applications and restart your computer. Frequent recording of images to a digital video device while using DVgate sometimes causes this error.
Your DV device will need to have DV In/Out in order to be able to transfer your files to the DV device.
Getting help
text_image
91About power management
The power management setting is not responding
Your notebook's operating system may become unstable if a lower power state, such as Hibernate is initiated, and then changed before the notebook completely enters the lower power state.
To restore the notebook to its normal operating stability, proceed as follows:
1 Close all open applications.
2 Push and hold the power button for four seconds or longer to shut down the notebook.
Precautions
This section describes safety guidelines and precautions to help you protect your computer from potential damage.
Your notebook and memory modules use high precision components and electronic connectors technology. To avoid the invalidation of your guarantee by mishandling, it is recommended that:
☐ You contact your dealer to install a new memory module.
☐ You do not install it yourself, if you are not familiar with upgrading memory on a notebook.
☐ You do not touch the connectors or open the memory panel.
Please contact VAIO-Link if you need assistance.
Changing the memory
In the future you may want to change memory modules in order to expand the functionality of your computer. You can increase the memory by installing optional memory modules.
Be careful when changing memory. Mistakes on installation or removal of the memory module may cause a malfunction.
For memory upgrades, use only PC100 (CL2) SDRAM SO-DIMM (gold leaf contacts).
Electrostatic discharge can damage electronic components. Before touching a memory expansion board, ensure the following:
☐ Handle the memory module gently.
☐ The procedures described in this document assume familiarity with the general terminology associated with personal computers and with the safety practices and regulatory compliance required for using and modifying electronic equipment.
☐ Disconnect the system from its power source and from any telecommunication links, networks, or modems before you open the system. Failure to do so may result in personal injury or equipment damage.
Electrostatic Discharge (ESD) can damage memory modules and other components. Install the memory Module only at an ESD workstation. If such a station is not available, do not work in a carpeted area, and do not handle materials that produce or hold static electricity (cellophane wrappers, for example). Ground yourself by maintaining contact with an unpainted metal portion of the chassis while performing the procedure.
Do not open the memory module package until you are ready to change the module. The package protects the module from ESD.
! Use the special bag delivered with the memory module or wrap the module in aluminium foil to protect it from electrostatic discharge.
! Do not place the memory module in places subject to:
- Heat sources such as radiators or air ducts,
- Direct sunlight,
- Excessive dust,
- Mechanical vibration or shock,
Precautions
text_image
94- Strong magnets or speakers that are not magnetically shielded,
- Ambient temperature of more than +35°C or less than +5°C,
- High humidity.
Removing a memory module
To remove a memory module, proceed as follows:
1 Shut down your computer.
2 Disconnect all peripheral devices.
3 Unplug the computer and remove the battery pack.
4 Wait until the computer cools down.
☐ Turn your computer upside down.
Open the cover on the bottom by unscrewing the screws (turn counter clockwise).
☐ To remove the memory module, pull the tabs in the direction of the arrows 1. The memory module is released.
☐ Pull the memory module in the direction of arrow 2.
Close the cover.
□ Gently tighten the screws.
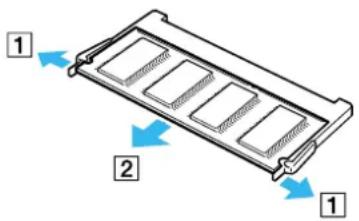
text_image
Diagram of a heat exchanger with labeled components and directional arrows indicating flow or movement.Precautions
text_image
95Installing a memory module
To install a memory module, proceed as follows:
1 Shut down your computer and disconnect all peripheral devices.
2 Unplug the computer and remove the battery packs.
3 Wait until the computer cools down.
4 Turn your computer upside down.
5 Open the cover on the bottom by unscrewing the screw (turn counter clockwise).
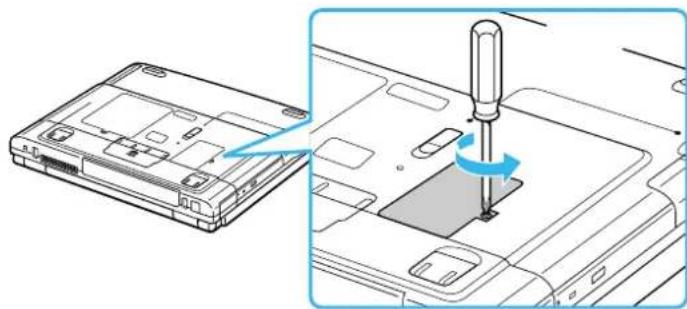
natural_image
Diagram showing a device being inserted into a hard drive, with no visible text or symbols6 Remove the memory module from its packaging.
7 Install the memory module.
Precautions
text_image
96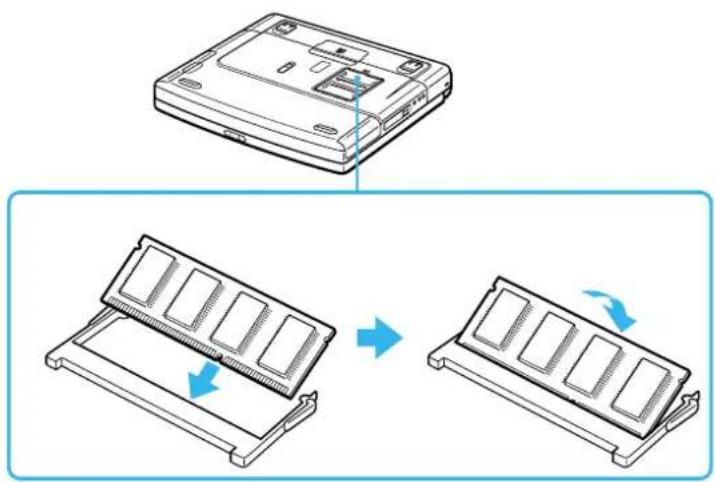
text_image
Diagram illustrating the process of inserting a device into a rack, showing step-by-step assembly and rotation.8 Close the computer cover.
9 Tighten the screws on the bottom of the computer.
10 Turn on the computer.
Other precautions
On handling the hard disk
The hard disk has a high storage density and reads or writes data in a short time. On the other hand, it may be easily damaged by mechanical vibration, shock or dust.
Although the hard disk has the safety device in itself to prevent losing data due to mechanical vibration, shock or dust, you should be careful when handling your computer.
To avoid damaging your hard disk:
☐ Do not give a shock to your computer.
□ Keep away from magnets.
Do not place your computer in a location subject to mechanical vibration or in unstable situation.
Do not move your computer while the power is on.
Do not turn off the power or restart the computer while reading or writing data.
Do not use your computer in a place subject to extreme change of temperature.
☐ If the hard disk is damaged, the data cannot be restored.
On handling the LCD screen
Do not leave the LCD facing the sun as it can damage the LCD. Be careful when using the computer near a window.
☐ Do not scratch the LCD or exert pressure on it. This could cause malfunction.
☐ Using the computer in low temperature conditions may produce a residual image on the screen. This is not a malfunction. When the computer returns to normal temperature, the screen returns to normal.
☐ A residual image may appear on the screen if the same image is displayed for a lengthy period of time. The residual image disappears in a while. You can use a screensaver to prevent residual images.
☐ The screen becomes warm during operation. This is normal and does not indicate a malfunction.
Precautions
The LCD is manufactured using high-precision technology. You may, however, see tiny black points and/or bright points (red, blue, or green) that continuously appear on the LCD. This is a normal result of the manufacturing process and does not indicate a malfunction.
☐ Avoid rubbing the LCD screen, as this can damage the screen. Use a soft, dry cloth to wipe the LCD screen.
On using power source
☐ Your computer operates on 100V-240V AC 50/60 Hz.
Do not share the AC outlet with other power-consuming equipment, such as a photocopier or shredder.
☐ You can purchase a power strip with a surge protector. This device prevents damage to your computer caused by sudden power surges such as those that may occur during an electrical storm.
Do not place heavy objects on the power cord.
☐ To disconnect the cord, pull it out by the plug. Never pull the cord itself.
☐ Unplug your computer from the wall outlet, if you will not be using the computer for a long time.
☐ When the AC adapter is not used, unplug it from the AC outlet.
☐ Use only the supplied AC adapter. Do not use any other AC adapter.
On handling your notebook
☐ Clean the cabinet with a soft, dry cloth or a soft cloth lightly moistened with a mild detergent solution. Do not use any type of abrasive pad, scouring powder, or solvent such as alcohol or benzine, as these may damage the finish of your computer.
☐ Should any solid object or liquid fall into the computer, shut down your computer and then unplug it. You may want to have the computer checked by qualified personnel before operating it any further.
☐ Do not drop the computer or place heavy objects on top of the computer.
Do not place your computer in a location subject to:
☐ Heat sources, such as radiators or air ducts,
Precautions

text_image
99Direct sunlight,
Excessive dust,
Moisture or rain,
□ Mechanical vibration or shock,
☐ Strong magnets or speakers that are not magnetically shielded,
☐ Ambient temperature of more than 35^ C or less than 10^ C,
□ High humidity.
Do not place electronic equipment near your computer. The electromagnetic field of your computer may cause a malfunction.
☐ Provide adequate air circulation to prevent that internal heat builds up. Do not place your computer on porous surfaces such as rugs or blankets, or near material such as curtains or draperies that may block its ventilation slots.
☐ The computer uses high-frequency radio signals and may cause interference to radio or TV reception. Should this occur, relocate the computer a suitable distance away from the set.
☐ Use only specified peripheral equipment and interface cables; otherwise, problems may result.
☐ Do not use cut or damaged connection cables.
☐ Your computer cannot be connected to a coin-operated telephone, and may not work with a private branch exchange (PBX).
☐ If the computer is brought directly from a cold location to a warm one, moisture may condense inside your computer. In this case, allow at least one hour before turning on your computer. If any problem occurs, unplug your computer and contact VAIO-Link.
☐ Make sure to disconnect the power cord before cleaning the computer.
As you may lose important data once your computer is damaged, you should back up your data regularly. Restore the original application programs from the Product Recovery CD-ROM.
On handling diskettes
Do not open the shutter manually and touch the surface of the diskette.
- Keep diskettes away from magnets.
- Keep diskettes away from direct sunlight and other heat sources.
On handling CDs
Do not touch the surface of the disc.
☐ Do not drop or bend the disc.
☐ Fingerprints and dust on the surface of a disc may cause read errors. Proper care of the disc is essential to maintain its reliability. Do not use solvents such as benzine, thinner, commercially available cleaners or anti-static spray, as they may cause damage to the disc.
☐ For normal cleaning, hold the disc by its edge and use a soft cloth to wipe the surface from the center out.
☐ If the disc is badly soiled, moisten a soft cloth with water, wring it out well, and use it to wipe the surface of the disc from the center out. Wipe off any remaining moisture with a dry soft cloth.
On using the battery pack
☐ Never leave the battery pack in temperatures above 60^ C, such as in a car parked in the sun or under direct sunlight.
☐ Battery life is shorter in a cold environment. This is due to decreased battery efficiency at low temperatures.
☐ Charge the batteries at temperatures between 10^ C to 30^ C. Lower temperatures require a longer charging time.
While the battery is in use or being discharged, the battery pack heats up. This is normal and is not cause for concern.
- Keep the battery pack away from all sources of heat.
□ Keep the battery pack dry.
☐ Do not open or try to disassemble the battery pack.
Precautions
text_image
101 the computer to☐ Do not expose the battery pack to any mechanical shock.
☐ If you are not using the computer for an extended period of time, remove the battery pack from the computer to prevent damage to the battery.
☐ If, after fully charging the battery pack, the battery power is still low, the battery pack may be reaching the end of its life and should be replaced.
☐ You do not need to discharge the battery before recharging.
☐ If you have not used the battery pack for a considerable amount of time, recharge the battery.
On using earphones
Road safety – Do not use earphones while driving, cycling, or operating any motorized vehicle. It may create a traffic hazard and is illegal in some areas. It can also be potentially dangerous to play loud music while walking, especially at pedestrian crossings.
☐ Preventing hearing damage – Avoid using earphones at high volume. Hearing experts advise against continuous, loud and extended play. If you experience a ringing in your ears, reduce the volume or discontinue use.
On handling Memory Stick™ (optional)
Do not touch the connector with your finger or metallic objects.
Use only the label supplied with the Memory Stick™ as a label.
Do not bend, drop, or apply strong shock to the Memory Stick™.
☐ Do not disassemble or modify Memory Sticks™.
Do not let cards get wet.
Do not use or store Memory Sticks™ in a location subject to:
☐ Extremely high temperatures, such as in a car parked in the sun,
Direct sunlight,
☐ High humidity or near corrosive substances.
Use the storage case supplied with the Memory Stick™.
Specifications
Model Number: PCG-FX501 PCG-FX502
| Operating system | Microsoft® Windows® XP Home Edition |
| Processor | Mobile AMD DuronTM processor 1.00 GHz featuring PowerNow! |
| Hard disk drive | 20 GB |
| Standard RAM | 256 MB SDRAM (in slot) |
| Maximum RAM | 512 MB |
| LCD screen | 14.1" XGA (1024x768) TFT |
| L2 cache memory | 64 KB (on die) |
| MPEG | MPEG 1 Digital Video Supports full-screen playback |
| Graphics | ATITM 3D RAGE Mobility-M1 with 8 MB Video RAM and 3D accelerator |
| Display | Dual Display |
| Sound capabilities | 16-bit CD-quality stereo sound |
| Floppy disk drive | 3.5" 1.44 MB Internal |
text_image
103Model Number: PCG-FX501 PCG-FX502
| CD-ROM driveDVD-ROM driveCD-RW drive | DVD-ROM drive:up to 24x max. CD-ROM reading speedup to 8x max. DVD-ROM reading speedlaser diode properties:wave length: 660 nmlaser output: 14.1 μW (max) | CD-RW/DVD-ROM drive:up to 24x max. CD-ROM reading speedup to 8x max. CD-R writing speedup to 8x max. CD-RW writing speedup to 8x max. DVD-ROM reading speedlaser diode properties:wave length: DVD 660 nm, CD-RW 785 nmlaser output:DVD 11 μW (max), CD-RW 468 μW |
| Internal modem | built-in modem V.90/K56flex (56kbps) data/fax modem | |
| Telecommunication capabilities | Ethernet network, PSTN data connectivity | |
| Expansion capabilities | two PCMCIA type II or one type III Cards and Cardbus support | |
| Built-in capabilities | stereo speakers, touchpad | |
| Connection capabilities on notebook | port replicator, monitor (VGA output), printer, external speakers or headphone, external microphone, 2 x type II PC Card slots, 1x type III PC Card slot, 2 USB, serial, TV Out, modem, i.LINKTM (IEEE1394) S400, Ethernet | |
| Supplied accessories | rechargeable battery, AC adapter, AC power cord, phone cable, phone plug, video cable, weight saver, internal removable floppy disk drive. | |
| Service | ‡ 1 year free VAIO-Link Service | |
text_image
104Model Number: PCG-FX501 PCG-FX502
| Power source | 19.5V DC/AC100-240V | |
| Power management | ACPI (Advanced Configuration & Power Interface) | |
| Battery | Lithium ion | |
| DimensionsWidthHeightDepth | 324 mm35.8 mm to 46.9 mm265.5 mm | |
| Weightwith 1 battery andweight saverwith 1 battery andfloppy disk drive | 3.00 kg3.20 kg | 3.00 kg3.20 kg |
| Operating temperature | +5°C to +35°C (temperature gradient less than 10°C/hour) | |
| Storage temperature | -20°C to +60°C (temperature gradient less than 10°C/hour) | |
| Operating humidity | 20% to 80% (not condensed), provided that humidity is less than 65% at +35°C (hygrometer reading of less than 29°C) | |
| Storage humidity | 10% to 90% (not condensed), provided that humidity is less than 20% at +60°C (hygrometer reading of less than 35°C) | |
text_image
105Model Number: PCG-FX505
| Operating system | Microsoft® Windows® XP Home Edition |
| Processor | Mobile AMD AthlonTM 4 processor 1.20 GHz featuring PowerNow! |
| Hard disk drive | 30 GB |
| Standard RAM | 256 MB SDRAM (in slot) |
| Maximum RAM | 512 MB |
| LCD screen | 15.0" XGA (1024x768) TFT |
| L2 cache memory | 256 KB (on die) |
| MPEG | MPEG 1 Digital Video Supports full-screen playback |
| Graphics | ATTTM 3D RAGE Mobility-M1 with 8 MB Video RAM and 3D accelerator |
| Display | Dual Display |
| Sound capabilities | 16-bit CD-quality stereo sound |
| Floppy disk drive | 3.5" 1.44 MB Internal |
text_image
106Model Number: PCG-FX505
| CD-ROM driveDVD-ROM driveCD-RW drive | CD-RW/DVD-ROM drive:up to 24x max. CD-ROM reading speedup to 8x max. CD-R writing speedup to 8x max. CD-RW writing speedup to 8x max. DVD-ROM reading speedlaser diode properties:wave length: DVD 660 nm, CD-RW 785 nmlaser output:DVD 11 μW (max), CD-RW 468 μW |
| Internal modem | built-in modem V.90/K56flex (56kbps) data/fax modem |
| Telecommunication capabilities | Ethernet network, PSTN data connectivity |
| Expansion capabilities | two PCMCIA type II or one type III Cards and Cardbus support |
| Built-in capabilities | stereo speakers, touchpad |
| Connection capabilities on notebook | port replicator, monitor (VGA output), printer, external speakers or headphone, external microphone, 2 x type II PC Card slots, 1x type III PC Card slot, 2 USB, serial, TV Out, modem, i.LINKTM (IEEE1394) S400, Ethernet |
text_image
107Model Number: PCG-FX505
| Supplied accessories | rechargeable battery, AC adapter, AC power cord, phone cable, phone plug, video cable, weight saver, internal removable floppy disk drive. |
| Service | ‡ 1 year free VAIO-Link Service |
| Power source | 19.5V DC/AC100-240V |
| Power management | ACPI (Advanced Configuration & Power Interface) |
| Battery | Lithium ion |
| DimensionsWidthHeightDepth | 324 mm35.8 mm to 46.9 mm265.5 mm |
| Weightwith 1 battery and weight saverwith 1 battery and floppy disk drive | 3.20 kg3.40 kg |
| Operating temperature | +5°C to +35°C (temperature gradient less than 10°C/hour) |
| Storage temperature | -20°C to +60°C (temperature gradient less than 10°C/hour) |
text_image
108Model Number: PCG-FX505
| Operating humidity | 20% to 80% (not condensed), provided that humidity is less than 65% at +35°C (hygrometer reading of less than 29°C) |
| Storage humidity | 10% to 90% (not condensed), provided that humidity is less than 20% at +60°C (hygrometer reading of less than 35°C) |
‡ See our special Guarantee extension conditions.
Specifications are subject to change without notice.
Sony Notebook User Guide
Glossary
This section refers to terms used in this manual. These terms and definitions have been compiled to provide you with a better understanding of your VAIO computer.
Term Definition
| key | |
| 10BASE-T/100BASE-TX | Ethernet system providing data transfer rates of 10 Mbps (megabits per second) and 100 Mbps. The 100BASE-TX is a very direct derivative of 10BASE-T. Its 100 Mbps speed is achieved by simply sending the signal 10 times faster. |
| ACPI | Short for Advanced Configuration and Power Interface, a power management specification. ACPI enables the operating system to turn peripherals on and off and to control the amount of power given to each device attached to the computer. With ACPI, a CD-ROM player can be turned off by the operating system if it is not in use. |
| Application recovery | A recovery process that enables you to recover any of the applications initially available on the computer. Performing an application recovery is useful when an individual application does not run properly or to reinstall a driver when a device does not work properly. |
| Application recovery CD-ROM | CD-ROM that enables a VAIO computer user to recover all the applications that were available when the computer was purchased. The CD-ROM is supplied with the computer. |
| BIOS | An acronym for Basic Input/Output System. The BIOS is a program that enables the computer to start when you turn it on. It monitors the data stream between the operating system and the computer's hardware devices. |
| CardBus | CardBus is the commercial name for an advanced PC Card. The CardBus technology allows computer users to enjoy higher performances as far as data transfer and operating speed are concerned. See PCMCIA. |
text_image
110Term Definition
| CD-ROM | Abbreviation for Compact Disc Read-Only Memory. A high-capacity optical disc, usually 650 MB in size, capable of being read from but not written to. |
| CD-RW | Short for Compact Disc-ReWriteable. Compact Disc that can be used to write or rewrite data to it. A CD-RW can be written to several times, a CD-R can only be written to once. |
| CPU | The CPU (Central Processing Unit) is the brains of the computer; it processes the instructions of your system's programs. The CPU is also known as the processor or microprocessor and can be found on the motherboard of your computer. |
| DC In | The Direct Current interface to which you connect your computer's AC adapter. |
| Docking station | An additional device that you can connect to your notebook. The docking station contains slots for expansion boards, bays for storage devices and ports for additional peripherals (such as printers or monitors). |
| Driver | A driver is software enabling you to use hardware devices. For example, in order for you to be able to use a printer, you must first install its driver. Many drivers, such as the mouse driver, come with the operating system. |
| DVD-ROM | Short for Digital Video Disc. A type of read-only CD with a minimum capacity of 4.7 GB (maximum capacity can reach 17 GB). This high storage power makes it the ideal medium for storing films. |
| Ethernet | Ethernet is the most widely implemented local area network (LAN) technology. The Ethernet system called 10BASE-T provides data transfer rates of 10 Mbps (megabits per second). A more recent version of Ethernet, called 100BASE-T, provides data transfer rates of 100 Mbps. Gigabit Ethernet supports data rates of 1 gigabit (1000 megabits) per second. |
text_image
111 are fTerm Definition
| EULA | EULA (End-User License Agreement) is the name given to a license governing the software on your computer. The EULA can be found in the Read this first section at the beginning of the software guide or directly on the VAIO desktop. |
| i.LINKTM | i.LINKTM is Sony's version of the IEEE 1394 standard for high-speed digital serial interface. The standard is regarded in the audio/video and IT industries as the most suitable interface for connecting computers and digital audio/video devices (such as digital cameras etc.). |
| ISP | An ISP (Internet Service Provider) is a company which provides you with a user name, password and telephone number in order to connect to the Internet. |
| L2 cache memory | Cache memory is RAM-like memory that enables quick access to data that has already been read by the computer. L1 and L2 are levels of cache memory in a computer. |
| LAN | A LAN (Local Area Network) is a group of computers connected together within a limited geographical area. It enables users to share devices (such as printers) and information using one processor or server. |
| LCD | Short for Liquid Crystal Display. Flat notebook display technology using liquid crystals (and light polarisation) to provide sharp, flicker-free images on a screen comprised of millions of tiny cells. Color can be produced by two basic techniques. Passive matrix is the less expensive of the two technologies. The active matrix technology (or TFT) produces better quality but is also more expensive. |
| LED | Short for Light-Emitting Diode. A semiconductor device that lights up when electricity passes through it. |
| Lithium-ion battery | A lithium-ion battery uses lithium cobalt oxide and carbon as electrodes and ions move from one electrode to the other during charge and discharge. Lithium-ion batteries are the first choice for notebooks because of their light weight, high energy density and because they have no memory effect. In addition they do not use heavy metals like lead, mercury or cadmium. |
text_image
112Term Definition
| MAPI | Short for Messaging Application Program Interface. A Microsoft Windows interface enabling you to send e-mail messages. It allows e-mail access and distribution among applications. MAPI-compatible applications include a Send Mail or Send in the File menu of the application. |
| maximum RAM | The maximum amount of RAM that your computer can contain. Once this amount is reached, you can no longer add additional RAM to your computer. |
| Motherboard | The motherboard is the main circuit board inside your computer. It holds the CPU, the BIOS, the memory and so on. |
| MPEG | MPEG or Moving Pictures Experts Group is a standard for audio-visual compression of video sequences. MPEG achieves high compression rates by storing only the changes from one frame to another. The decrease in data is generally imperceptible to the human eye. MPEG-1 was developed for digital storage of video and audio data on CD-ROM. MPEG-2 achieves better image and audio quality and is more targeted to TV broadcasting and DVD. |
| Operating system | The operating system is software that manages all the other programs in a computer. It defines how the computer reads and writes information to its disks (and other hardware). Windows 2000, Windows Millennium Edition, Windows XP Professional and Windows XP Home Edition are examples of operating systems found on VAIOs. |
| Partition | A partition is a logical division of a computer's hard disk. A two-partition hard drive would typically contain C: and D: drives. Partitioning is particularly useful if you run more than one operating system or to clearly separate your data files from your installed software. |
| PBX | A PBX (Private Branch Exchange) is a private telephone network within an enterprise. Under this system, the calls between the enterprise members are local and the phone numbers are made up of 3 or 4 digits. Companies generally choose this phone system for internal communication because it is less expensive than the regular network. The users can still share a number of outside lines for making calls external to the PBX. |
text_image
113Term Definition
| PC Card | A PCMCIA card. The term PC Card is more widely used than PCMCIA. See PCMCIA. |
| PCMCIA | PCMCIA (Personal Computer Memory Card International Association) is the name of the group that produced the specification for the credit card-sized plug-in boards for laptop computers. The cards used to be called PCMCIA cards, but as this was rather unpronounceable, these cards are now termed PC cards. An example of a PC card is a credit card-sized modem. |
| Pixel | A pixel (Picture Element) is a part of your screen. Your screen is made up of thousands of pixels, enabling you to see colours and pictures on it. The more pixels, the higher the resolution and the better the image quality. |
| Port replicator | An additional device that you can connect to your notebook. The port replicator contains ports that enable you to connect additional peripherals (such as a printer or a monitor) to your VAIO. A port replicator is similar to a docking station, but does not include additional slots for adding expansion boards or storage devices. |
| Processor | The processor is the brains of the computer; it processes the instructions of your system's programs. The processor is also known as the CPU or microprocessor and can be found on the motherboard (see this word) of your computer. |
| Product recovery CD-ROM | The product recovery CD-ROMs include the application recovery CD-ROM and the system recovery CD-ROM(s). |
| PSI2 | A type of mouse or keyboard port. |
| PSTN | PSTN (Public Switched Telephone Network) refers to the plain old telephone service, the national telecommunication networks implementing voice transmission by using analog signals. |
Term Definition
| RAM | Short for Random Access Memory, the memory used to run programs and store data in current use. RAM is the fastest kind of memory to read from and write to. Information stored in RAM is lost when you turn off the computer. The higher the RAM capacity, the faster your current data can be processed. |
| Resolution | The degree of sharpness and clarity of an image. Resolution is expressed in pixels. Frequent computer screen resolutions are 640 x 480 pixels (VGA resolution; appropriate for a 14-inch screen), 800 x 600 (appropriate for a 15-inch screen), 1024 by 768 (appropriate for a 17-inch screen), and 1280 by 1024. LCD displays usually use a higher resolution than a CRT of the same size. |
| RGB signal cable | RGB stands for Red, Green, Blue. A cable that requires separate transmission types for the three colours on the display. |
| SDRAM | Synchronous DRAM is a kind of dynamic random access memory running at a much higher clock speed than regular memory. |
| Standard RAM | The amount of RAM that is available on your computer when you purchase it. |
| System recovery | A recovery process that enables you to recover the hard disk image initially available on the computer. Performing a system recovery is useful in the event of a serious system crash or if you want to modify the size of your partitions. |
| System recovery CD-ROM | CD-ROM that is supplied with your computer and that enables a VAIO computer user to recover the hard disk image that was available when the computer was purchased. |
| TFT | Short for Thin Film Transistor. Top-of-the-range notebook display for excellent picture quality. The TFT technology offers the sharpest resolution for flat displays; each pixel is supported by one to four transistors. |

text_image
115Term Definition
| UPS | A UPS (Uninterruptible Power Supply) is a device including a battery that protects your computer from data loss in the event of a power failure. The battery takes over as soon as a power interruption is detected. If you are using the computer when the power failure occurs, you have time to save all unsaved data and to shut down your computer. |
| USB | USB (Universal Serial Bus) is a hardware interface for attaching devices (such as a keyboard, mouse, joystick, scanner or printer). You can connect up to 127 devices to a USB port. The USB standard is Hot Plug and Play. |
| VAIO | Short for Video Audio Integrated Operation. Brand name covering Sony's PC products, peripherals, accessories and software. VAIO-branded items are all designed to make the best use of Sony's Audio-Video (AV) and Information Technology (IT) skills. |
| WAN | WAN (Wide Area Network) is a computer network connected together and covering a relatively large geographical area. This is in contrast to LAN, where the network is usually set up within one building or small geographical area. The largest existing WAN is the Internet. |
| XGA | Short for Extended Graphic Array, a graphics standard. An XGA board can provide up to 1024 x 768 pixels and supports up to 65 thousand colours. |