
ML390 - Printer OKI - Free user manual and instructions
Find the device manual for free ML390 OKI in PDF.


User questions about ML390 OKI
0 question about this device. Answer the ones you know or ask your own.
Ask a new question about this device
Download the instructions for your Printer in PDF format for free! Find your manual ML390 - OKI and take your electronic device back in hand. On this page are published all the documents necessary for the use of your device. ML390 by OKI.
USER MANUAL ML390 OKI
Note to Customers ...... E-2
Important Safety Instructions ...... E-3
Important Wiring Instructions ...... E-4
Installing Your Printer ....E-5
Preliminaries ...... E-6
Connecting to the Computer...... E-9
Installing the Ribbon Cartridge ...... E-10
Loading Paper ...... E-12
Loading Continuous Paper ...... E-12
Loading Cut Sheet paper ...... E-18
Setting the Top of Form ...... E-20
Positioning of the Printer...... E-21
Running a Self Test ...... E-22
Printing Demo Patterns ...... E-23
Changing Menu Settings ...... E-24
Specifications...... E-26
Note to Customers
Every effort has been made to ensure that the information in this manual is complete, accurate and up-to-date. Oki assumes no responsibility for errors beyond its control. Oki also can not guarantee that changes in software and equipment made by other manufacturers and referred to in this book will not affect the applicability of the information in this manual.
Copyright 1994 by Oki. All rights reserved.
Microline is a registered trademark of Oki Electric Industry Company Limited.
Epson is registered trademark of Seiko Epson Corporation.
IBM, PC, Proprintere XL and Graphics Printer are registered trademarks of International Business Machines Corporation.
MS-DOS is a trademark of Microsoft Corporation.
Important Safety Instructions
Your printer has been carefully designed to perform safely and reliably. However, as with all electrical equipment certain precautions should be allowed:
➢ Read all documentation supplied with and on the printer before commencing.
➢ Always disconnect the printer from the mains source before cleaning.
➢ Be certain that your power source matches the rating listed on the back of the printer. If you are using an extension cord, ensure that the total rating does not exceed 15 amperes.
➢ Your printer has an earthed 3-pin plug, DO NOT use this plug with a socket that is not earthed.
➢ DO NOT make any adjustments, other than those outlined in this manual, it could damage the printer.
If you have persistent problems with your printer, switch off, disconnect from the mains source and contact your dealer for assistance.
Important Wiring Instructions
The wires in the mains lead are coloured in accordance with the following code:
Green and Yellow Earth
Blue Neutral
Brown Live
If the colours of the wires in the mains lead of this printer do not correspond with the markings of the terminals of your plug, proceed as follows:
Green and Yellow must be connected to the terminal marked with the letter E (or the safety earth symbol) or the terminal coloured Green or Green and Yellow. Brown must be connected to the terminal marked with the letter L or coloured Red. Blue must be connected to the terminal marked with the letter N or coloured Blue or Black.
Warning: This printer must be earthed.
If you are in any doubt regarding the wiring, please contact a qualified electrician.
Installing Your Printer
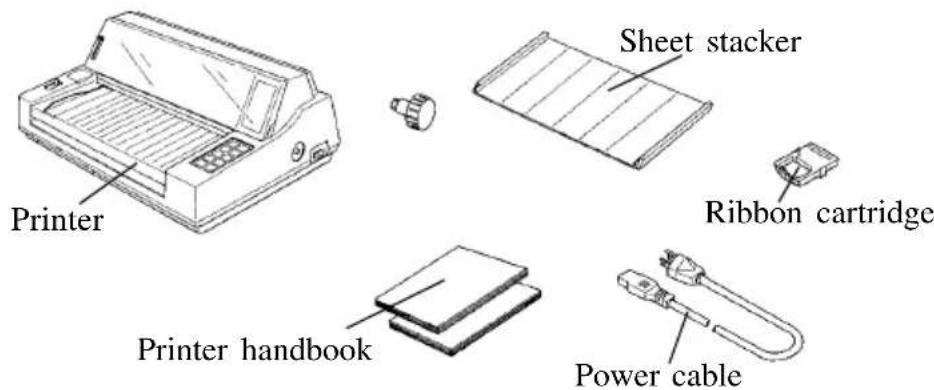
Prior to unpacking the printer, find a flat, sturdy surface to place it on, for example, a desk, printer stand, etc. Gently remove the printer from its carton. Make sure you have everything shown below:
MICROLINE 320/390 FLATBED printer
▶ Sheet stacker
Power cord
▶ Ribbon cartridge
▶ Printer Handbook
Note: Save the box and all packing material. Repack the printer when planning to transport it long distances, in order to protect it from rough handling and damage.
Note: You can purchase an interface cable and paper for the MICROLINE 320/390 FLATBED from your dealer.
text_image
Printer Sheet stacker Ribbon cartridge Printer handbook Power cableIn the unlikely event that anything is missing or damaged, contact your dealer immediately.
Preliminaries
Before plugging in the printer, follow these steps to install your printer.
- Hold both sides of the access cover and lift up.
There is a shipping retainer to protect the printhead from jamming. Remove this shipping retainer and keep it with the other packing materials. (To transport the printer long distances, make sure to re-install the shipping retainer). Close the access cover.

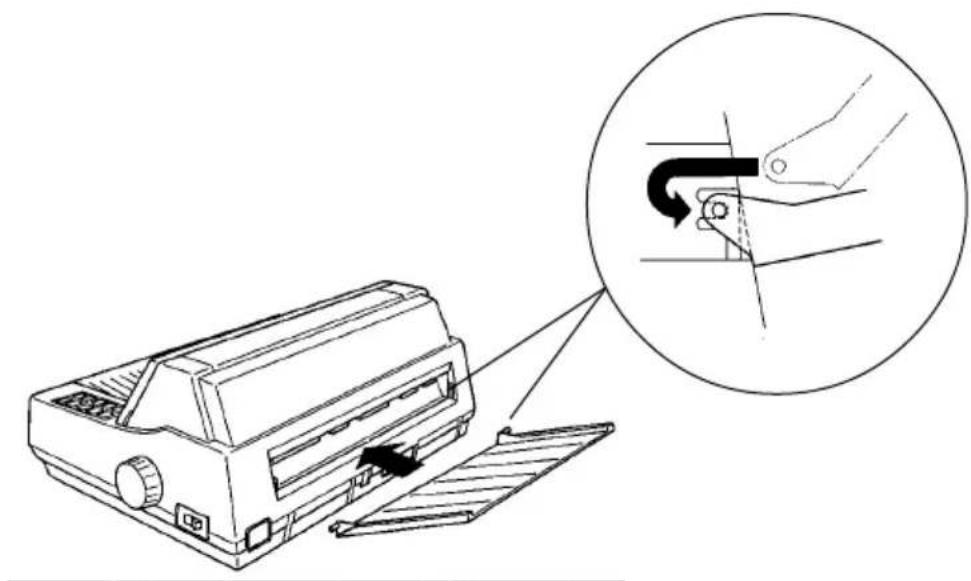
- Next install the sheet stacker.
Put the stud of one of the stacker's legs into the hole at the end of the rear vent. Gently press the other leg until it slips into the other hole.
text_image
Diagram showing a printer with a magnified view of the mechanism being adjusted, with Chinese annotation.-
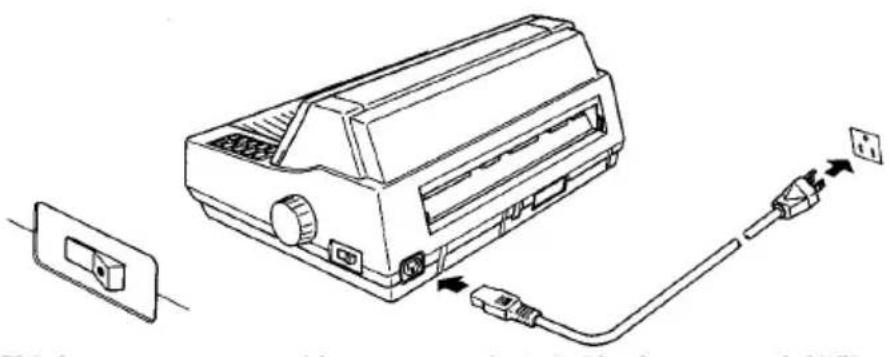
Make sure the power switch is OFF. Plug the power cord into the back of the printer. Plug the other end into an earthed socket.
-
Turn the power switch on, and check that the POWER lamp and the ALARM lamp are illuminated. If paper is loaded, the POWER lamp and the SEL lamp will be illuminated.
natural_image
Line drawing of a portable air conditioner unit connected to a plug, showing internal components and wiring (no text or symbols)- Turn the power switch off.

Important: Make sure the socket is earthed. Do not use an adapter because it will defeat the earthing.
Connecting to the Computer
These instructions are for the standard centronics parallel interface.
- Make sure that both the printer and the computer are switched OFF.
text_image
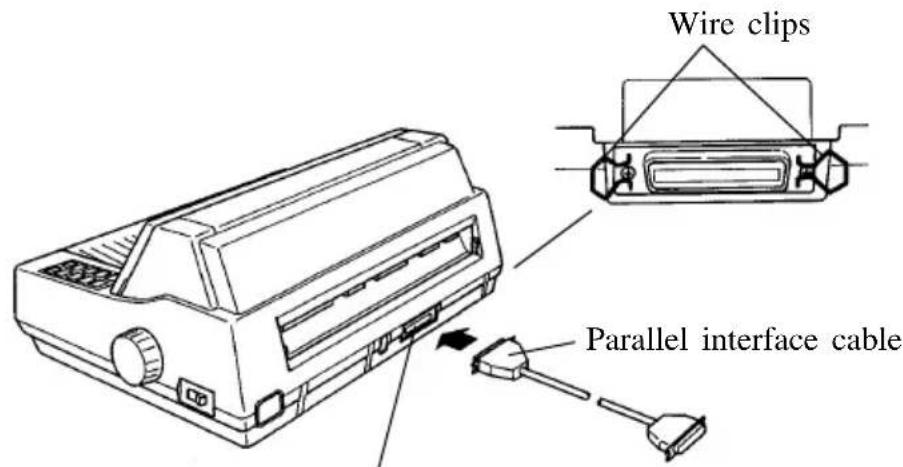
Wire clips Parallel interface cableParallel interface connector
-
Plug the interface cable into the port on the back of your printer. Fasten the the cable using the wire clips that can be found on both sides of the connector port.
-
Plug the other end of the cable into the printer port of your computer.
Installing the Ribbon Cartridge
-
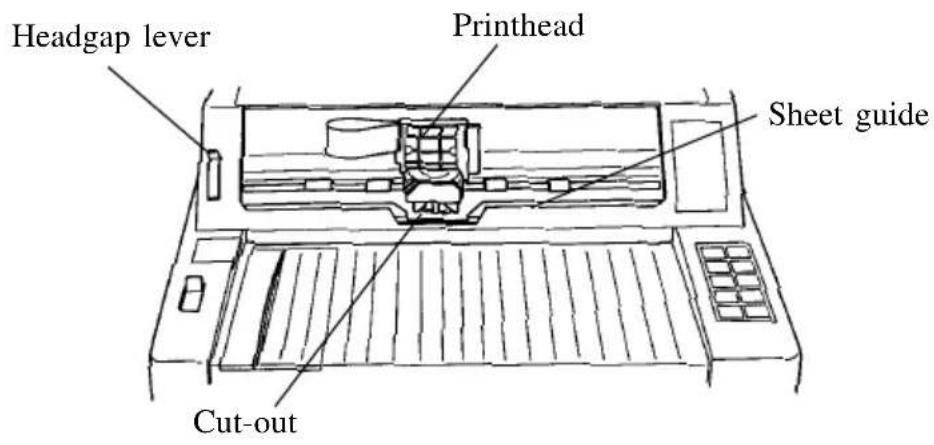
Set the headgap lever to the "R" position.
-
Open the access cover.
-
Slide the print head gently towards the centre to give yourself some working room. There is a cut-out at the centre of the sheet guide for changing cartridges.
text_image
Headgap lever Printhead Sheet guide Cut-out
Important:
a) The printhead gets very hot during extended periods of printing, be sure to let it cool off before you touch it.
b) Make sure that you are using the correct ribbon. If you attempt to use any other ribbon it may cause print quality problems.
-
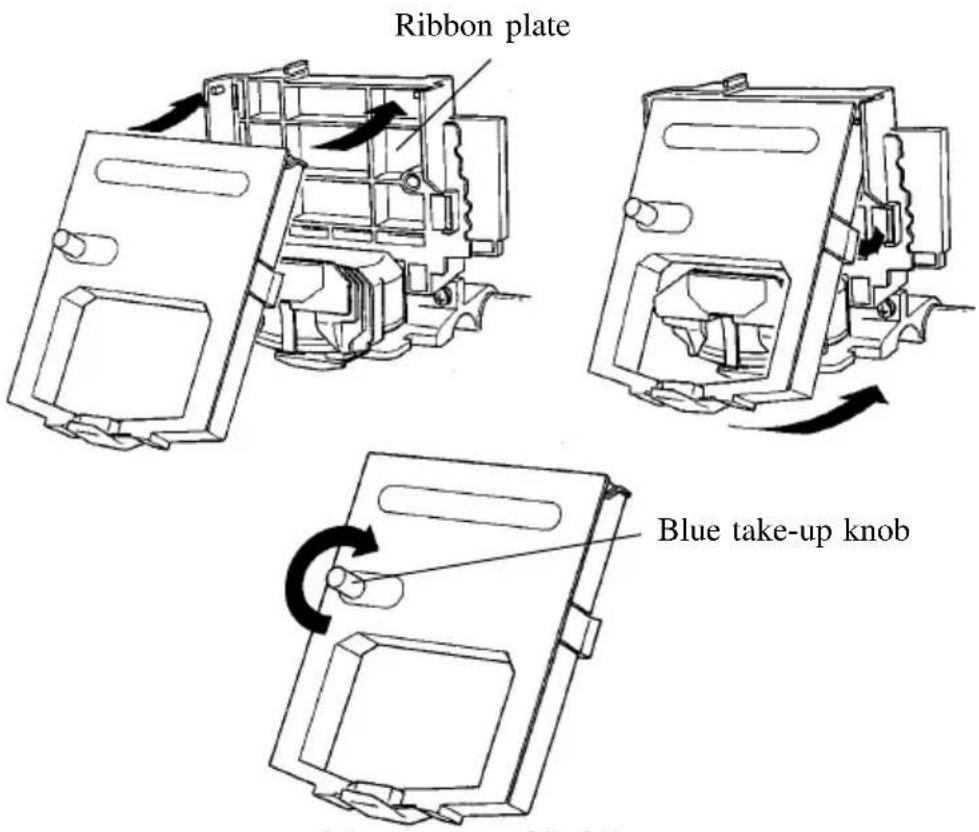
Hold the ribbon cartridge with the blue take-up knob facing up.
-
Insert the flat end of the cartridge into the upper part of the ribbon plate, then lower the front of the cartridge over the printhead until it snaps into place.
text_image
Ribbon plate Blue take-up knob-
Turn the take-up knob in the direction of the arrow icon to tighten the ribbon.
-
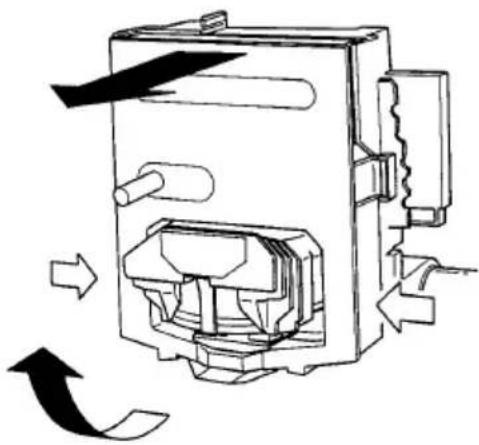
To remove a ribbon, move the cartridge to the position indicated by two arrow icons at the bottom of the cartridge then lift it out gently.
natural_image
Technical line drawing of a mechanical device with internal components and directional arrows indicating motion (no text or symbols)
Important: Do not peel off the plastic film (ribbon mask) on the top of the cartridge. Do not stack the ribbon cartridge sideways, it will cause poor quality printing.
Loading Paper
Loading Continuous Paper
-
Check that the POWER lamp is turned on.
-
Check that the SEL lamp is turned off. If it is lit, push the SEL button once to turn it off.

Note: You cannot print continuous paper and cut-sheets at the same time. If a cut sheet is already loaded, pull the paper lever forwards, and press the FORM FEED button while the SEL lamp is on. The cut sheet will feed automatically.
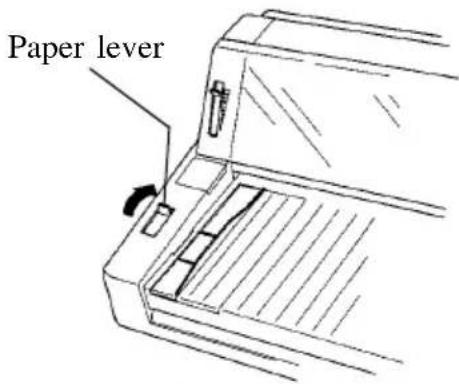
- Push the paper lever to the continuous paper position.
text_image
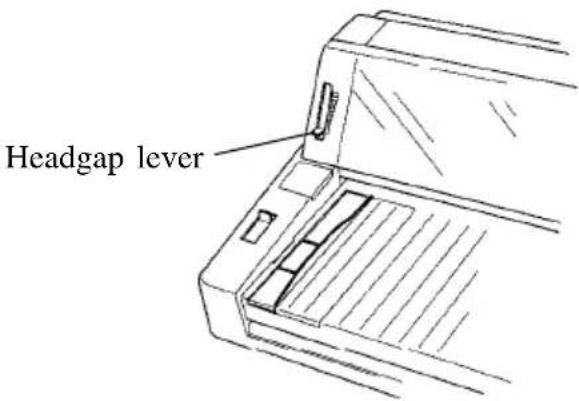
Paper lever- Adjust the headgap lever on the left side of the printer according to your paper thickness.
text_image
Headgap leverAt its lowest (position 1), the lever sets a thickness for one sheet of paper. It clicks through seven positions showing the number of sheets. The eighth position is for extra-thick paper.
Note: In the positions above 5, the printer slows down to maintain print quality with thicker multipart forms.
Note: “R” position indicates ribbon cartridge replacement position.
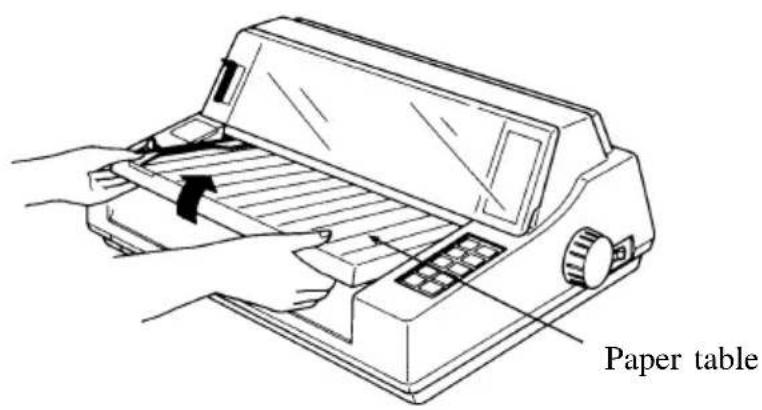
- Hold both sides of the paper table and lift up gently.
text_image
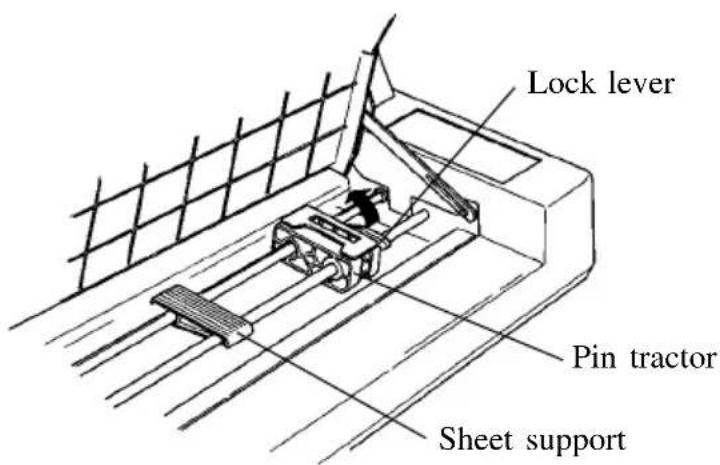
Paper table- Open the lock levers on both pin tractors. This unlocks the pin tractor so that you can adjust them to the width of the paper. Slide the sheet support to the centre of the paper.
text_image
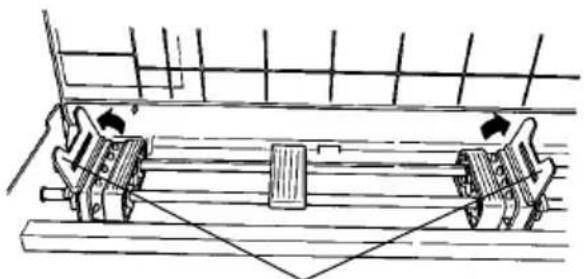
Lock lever Pin tractor Sheet support- Open both of the pin-tractors covers.
natural_image
Technical line drawing of a mechanical assembly with no visible text or symbolsPin tractor covers
- Lay down the continuous paper with printing face upwards on to the pin-tractors. Adjust the paper so that the first two pins of both pin tractors poke through the two sprocket holes of the paper. Make sure that the paper covers the pin tractors.
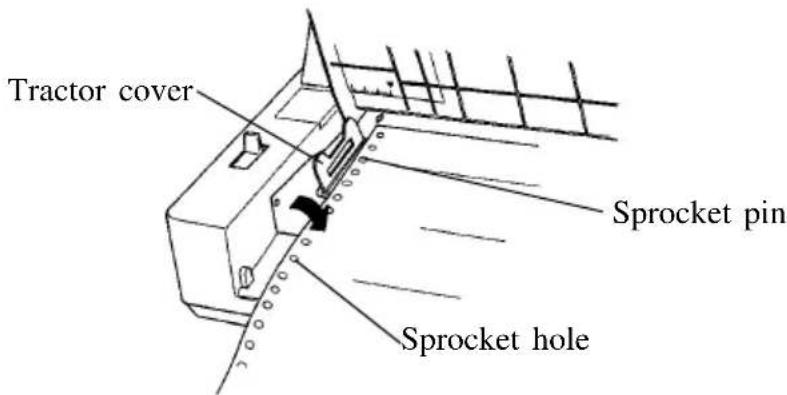
text_image
Tractor cover Sprocket pin Sprocket hole
Important: The space between the left edge of the paper and the left end of the platen must be more than 12 inch. Check that your paper covers the notch on the platen, if it does not, a Paper Out alarm will light.
- Check again that the holes fit into the pins correctly, then close the left pin-tractor cover. Push the left lock lever into a backwards position. (Lock position.)

Note: The arrow icon (▼) on the scale and also the centre of the diamond shaped hole indicate the centre of the first printed character.
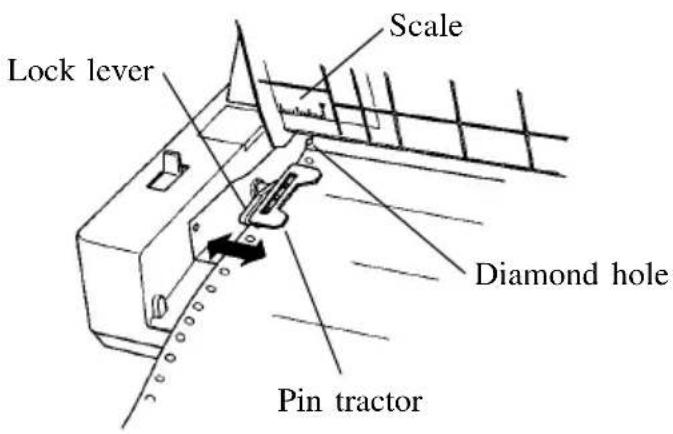
text_image
Lock lever Scale Diamond hole Pin tractor- Slide the right pin-tractor to tighten the paper. Press the right lock lever down. (Lock position.) Close the pin tractor cover.
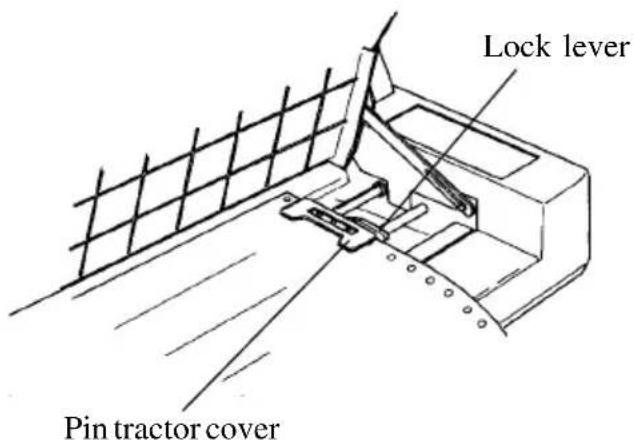
text_image
Lock lever Pin tractor cover- Close the table. The extension guide is not necessary when using continuous paper. Push it clockwise so that it folds under the sheet stacker.
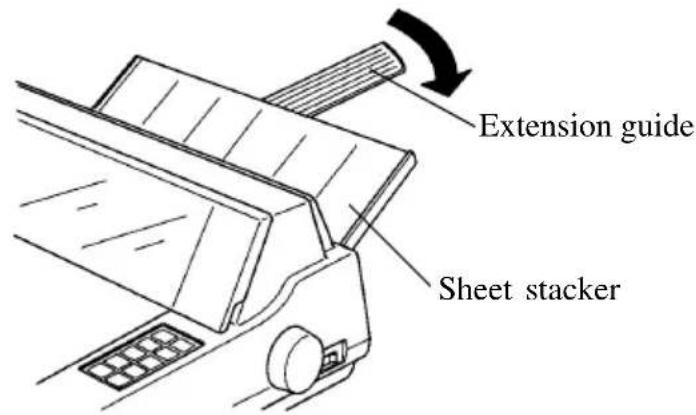
text_image
Extension guide Sheet stacker- When you close the table, the ALARM lamp comes on, do not worry, it is just telling you that there is no paper loaded.
Press the FORM FEED button. Your paper will be loaded automatically.
The ALARM lamp goes off, and the SEL lamp comes on, you are now ready to start printing.
Loading Cut Sheet paper
- Check that the power is on.
- Check that the SEL lamp is off (printer off-line). If it is on push the SEL button to turn it off.
- Pull the paper lever to the forwards position, (cut sheet paper position).
- Position the headgap lever to the appropriate setting for your paper thickness.

Note: You can not print cut sheets and continuous paper at the same time. If continuous paper is already loaded, push the paper lever to its backwards position, and press the PAPER PARK button while the printer is on line (SEL lamp is on). The continuous paper will eject automatically.
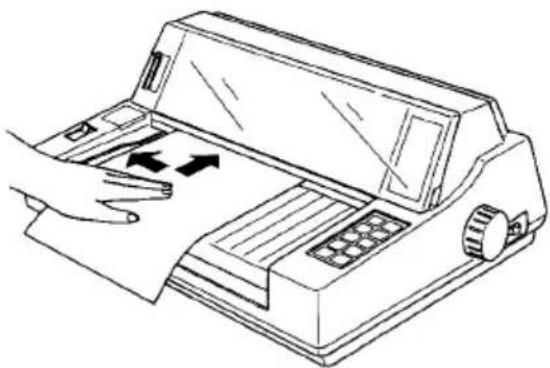
- Place the cut-sheet along the paper guide with the printing face uppermost, and insert into the feed slot. The arrow icon (▼) indicates the centre of the first printing character.
natural_image
Line drawing of a hand pressing down on a printer with arrows indicating press direction (no text or symbols)
Note: Unless you alter the standard margin setting using the MENU MODE, the paper guide must be placed correctly against the arrow icon: too big a left margin may cause printing on the platen and not the paper, resulting in a loss of data.
- The sheet will be loaded automatically. The ALARM lamp goes off and the SEL lamp comes on, you are now ready to start printing.

Note: If the paper gets jammed, the ALARM lamp will start blinking. Open the access cover and remove the paper. Close the cover and press the SEL button. The lamp will stop blinking.
-
If the paper was not straight or positioned incorrectly for printing, set the paper lever to the backwards position (continuous paper position) remove the paper and try again.
-
When printing has finished, press the SEL button to take the printer off line. (The SEL lamp goes off.) Press the PAPER PARK button, the last page will be ejected.
Setting the Top of Form
Your printer can adjust the top of form (the first line of the printing surface) by increments of ^1/_144 inch. This allows you to set a desired top of form very precisely.
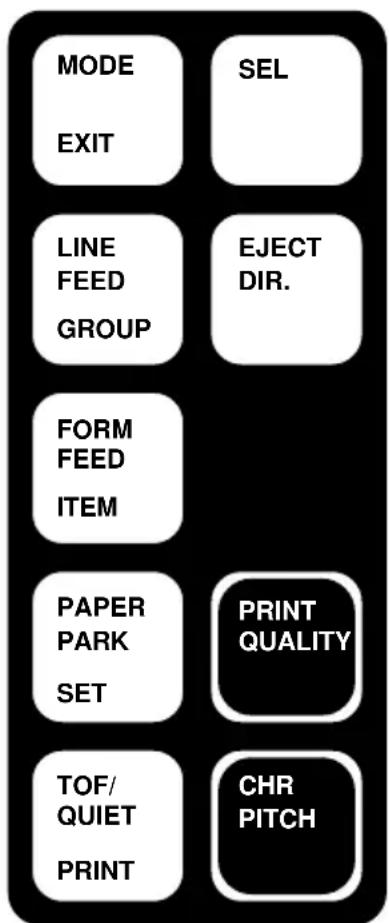
- To advance the paper, keep pressing the TOF/QUIET button and press the FORM FEED button.
- To reverse, keep pressing the TOF/QUIET button and press the LINE FEED button.
text_image
MODE EXIT SEL LINE FEED GROUP EJECT DIR. FORM FEED ITEM PAPER PARK SET PRINT QUALITY TOF/ QUIET PRINT CHR PITCH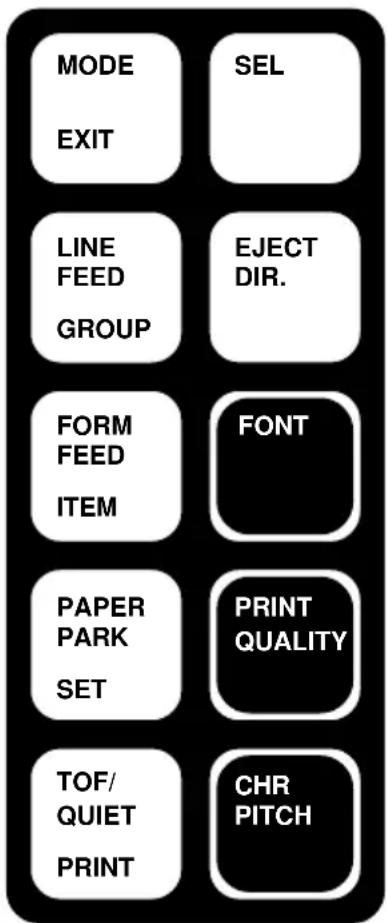
text_image
MODE EXIT LINE FEED GROUP FORM FEED ITEM PAPER PARK SET TOF/ QUIET PRINT SEL EJECT DIR. FONT PRINT QUALITY CHR PITCHML320FB ML390FB
- Release the two buttons at the desired top of form position. Press the TOF/QUIET button again to fix the setting. It remains in the printer's memory and will not change until the printer is reset.
Note 1: The reverse process is limited in order to avoid paper jams.
Note 2: You can also preset the top of form by hand. Make sure the SEL lamp is out, and turn the platen knob.
Important: Make sure the paper is in deep enough for the platen to grip it. If not, the bail may catch the paper and cause jamming.
Positioning of the Printer
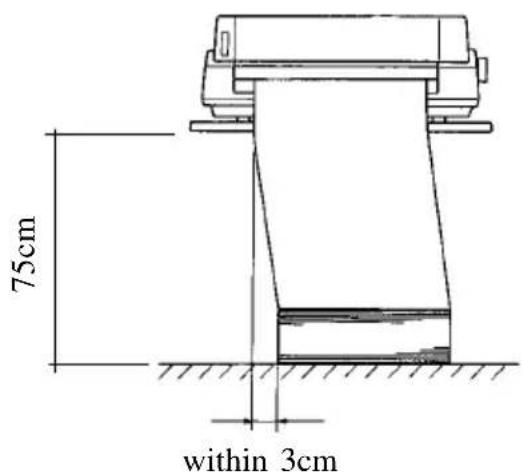
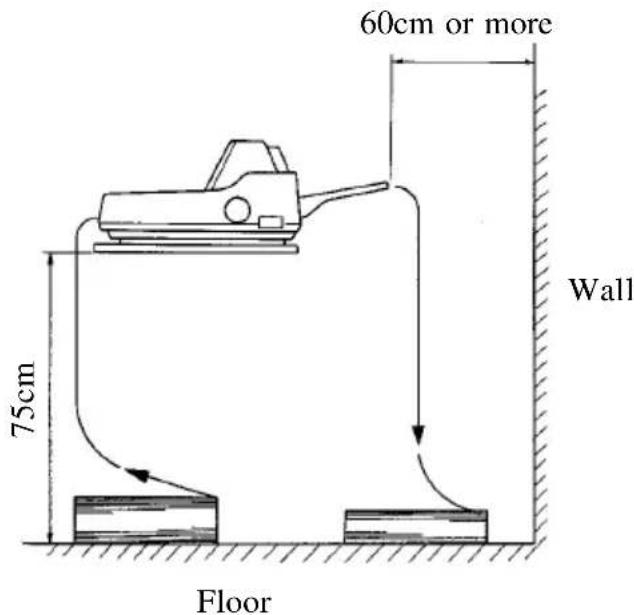
- When printing large amounts of continuous paper, set your printer on a table around 75 cm high in order to store the paper underneath. Make sure the paper feed to the printer is straight.
text_image
75cm within 3cm- Also, keep the printer 60 cm or more from the wall in order to store paper. These storage requirements are necessary to avoid jammmg.
text_image
60cm or more 75cm Wall FloorRunning a Self Test
Now that you have installed the ribbon and paper, you are ready to run one of two types of self test.
The default paper setting is 269.24mm. When using paper of smaller width, change the width setting to 203.2mm by using the MENU MODE.
Printing Demo Patterns
- First load the printer with the correct paper.
- Switch off the power to the printer.
- Choose the demo pattern you want to produce and associated button, from the following table.
- Keep pressing the button and turn on the power. The self test will start almost immediately.
- In self test mode, the printer senses the paper end signal and stops printing. If you want to interrupt printing press the MODE button.
- When the self test is completed, the SEL lamp will come on.
- Your printer is now ready to receive data from the computer.
| No. LINE TOF/ Position Content of FEED Quiet of the Self-test Group Paper lever | |||
| 1 * Continuous Demo pattern | paper self test once | ||
| 2 * Cut-sheet Demo pattern | paper self test once | ||
| 3 * Continuous Rolling ASCII | paper self test series | ||
| 4 * Cut-sheet Rolling ASCII | paper self test series | ||
* Press this button while switching on the printer.
Changing Menu Settings
To change the menu settings follow these steps:
- Make sure that the printer is on line.
- Press the MODE/Exit button to put the printer in Menu Mode.
- Press the TOF/QUIET/Print button to print a list of menu settings.
- Press the LINE FEED/Group button to select the menu group.
- Press the FORM FEED/Item button to select the menu group item.
- Press the PAPER PARK/Set button to change the current item setting.
- When all changes have been made press the MODE/Exit button to exit from the Menu Mode.
- Press the PAPER PARK/Set button to eject the paper.

Note: It is recommended that you run a self test when you have made changes to the menu settings, it will help you to check the print quality.
If you want to return the printer to the factory default settings, turn the power on while holding down the MODE/Exit and SEL buttons, all menu settings will then return to the factory default.
An example of a menu printout:
ML390FB
| Font | Print Mode | Letter Gothic |
| Font | Pitch | Proportional |
| Font | Style | Normal |
| Font | Size | Single |
| General Control | Emulation Mode | IBM X24 AGM |
| General Control | Graphics | Uni-directional |
| General Control | Max Receive Buffer | 8K |
| General Control | Paper Out Override | No |
| General Control | Print Registration | 0 |
| General Control | Operator Panel Functions | Full Operation |
| General Control | Reset Inhibit | No |
| General Control | Print Supercase Effective | Yes |
| General | Font | Print Mode |
| General | Font | Pitch |
| General | Font | Style |
| Vertical | Font | Size |
| Vertical | Font | SI Select (IBM) |
| Vertical | General Control | Emulation Mode |
| Vertical | General Control | Graphics |
| Vertical | General Control | Buffer Size |
| Vertical | General Control | Paper Out Override |
| Symbol S | General Control | Print Registration |
| Symbol S | General Control | Operator Panel Functions |
| Symbol S | General Control | Reset Inhibit |
| Symbol S | General Control | Print Suppress Effective |
| Symbol S | General Control | Page Width |
| General Control | CPU Compensation | |
| General Control | Wait Time | |
| General Control | Eject Direction | |
| Vertical Control | Line Spacing | |
| Vertical Control | Form Tear-Off | |
| Vertical Control | Skip Over Perforation | |
| Vertical Control | Auto LF | |
| Vertical Control | Auto CR (IBM) | |
| Vertical Control | Auto Feed XT (EPSON) | |
| Vertical Control | Page Length | |
| Vertical Control | Sheet Page Length |
ML320FB
Specifications
Print method Impact dot matrix
Printhead 24 pin (ML390FB)
9 pin (ML320FB)
Print speed
Utility 270 cps at 12 cpi
(ML390FB)
250 cps at 12 cpi
(ML320FB)
Letter quality 90 cps at 12 cpi
(ML390FB)
62.5 cps at 12 cpi
(ML320FB)
Characters per line
at 10 cpi 106
at 12 cpi 127
at 15 cpi 159
at 17.1 cpi 181
at 20 cpi 212
Reliability
Mean time 5000 hours at 25% duty
between failures cycle, 35% page density.
(MTBF)
Mean time to repair 30 minutes.
(MTTR)
Printhead life 200 million characters.
Ribbon life 2 million characters.
Electrical characteristics
Voltage 230V AC(+6%-14%).
240V AC(±10%).
Frequency 50/60Hz ±2%.
Data interface Centronics parallel
standard.
RS232C serial optional.
Dimensions
Depth 343mm.
Width 465mm.
Height 200mm.
Weight 12kg.
Continuous paper
Width 76.2mm to 304.8mm.
Length 76.2mm to 355.6mm.
Single part
Weight 12 to 34lb.
Thickness 0.051mm to 0.16mm.
Multipart carbon lined or pressure sensitive
Weight 9 to 11lb.
Number of copies Original plus 4 copies.
Thickness 0.36mm max.
Multipart interleaf
Weight Paper: 10 to 12lb.
Carbon: 9lb.
Number of copies Original plus 4 copies.
Thickness 0.36mm max.
Cut sheets
Width 90mm to 304.8mm.
Length 70mm to 420mm.
Single part
Weight 12 to 41lb.
Thickness 0.051mm to 0.196mm.
Multipart\*
Weight Paper: 10 to 12lb.
Carbon: 9lb.
Number of copies Original plus 4 copies.
Thickness 0.36mm max.
* Note: All parts must be glued at the top.
Envelopes (individual)
Weight 24lb. max.
Thickness 0.406mm max.
Dimensions 165mm x 92mm.
225.4mm x 98.4mm.
241.3mm x 104.8mm.
Card stock
Weight 50lb. max.
Thickness 0.24mm max.
Dimensions 127mm x 203mm max.
Labels
Carrier 208.3mm max.
Thickness 0.28mm max.
Transparencies
Thickness 0.25mm max.
Dimensions 208.3mm (width)
x 279.4mm (length)
These specifications are subject to change without notice.