
Page 14e - Printer OKI - Free user manual and instructions
Find the device manual for free Page 14e OKI in PDF.


User questions about Page 14e OKI
0 question about this device. Answer the ones you know or ask your own.
Ask a new question about this device
Download the instructions for your Printer in PDF format for free! Find your manual Page 14e - OKI and take your electronic device back in hand. On this page are published all the documents necessary for the use of your device. Page 14e by OKI.
USER MANUAL Page 14e OKI
natural_image
Exterior view of a white paper printer with control panel and display screen (no visible text or symbols)59334501
Document Title and Part Number
OKIPAGE 14e User's Guide
59334501
Disclaimer
Every effort has been made to ensure that the information in this document is complete, accurate, and up-to-date. Oki Data assumes no responsibility for the results of errors beyond its control. Oki Data also cannot guarantee that changes in software and equipment made by other manufacturers and referred to in this document will not affect the applicability of the information in it. Mention of software products manufactured by other companies does not necessarily constitute endorsement by Oki Data.
Copyright Information
Copyright 2001 by Oki Data. All rights reserved.
Written and produced by the Oki Data Training and Publications Department.
Contact Information
Please address any comments on this publication to:
Web Site
Please visit Oki Data's multilingual web site at: http://
www.okidata.com
e-Mail Address
pubs@okidata.com
Mailing Address
Oki Data Americas, Inc.
Training & Publications Dept.
2000 Bishops Gate Blvd.
OKI, Oki Data and MICROLINE are registered trademarks of Oki Electric Industry Company, Ltd.
OKIPAGE is a trademark of OKI America, Inc.
Energy Star is a registered trademark of the United States Environmental Protection Agencyx
TrueType is a registered trademark of Apple Computer Company.
Hewlett-Packard, HP, and PCL are registered trademarks of Hewlett-Packard Company.
IBM is a registered trademark of International Business Machines Corp.
Microsoft and MS-DOS are registered trademarks and Windows is a registered trademark of Microsoft Corporation in the U.S. and other countries.
Intellifont is a registered trademark of Compugraphic Corporation.
Epson is a registered trademark of Seiko Epson Corp.
Contents
Features 5
Consumables.... 5
Options....6
Operating Your Printer 7
Using the Front Operator Panel 7
OKIPAGE 14e Front Operator Panel Reference...... 8
OKIPAGE 14e Function Reference .....12
Changing the Menu Settings ....14
Using the Printer Menu Setup 14
Resetting the Menu 15
Using Power Save to Minimize Warm-up Time ..15
To Disable Power Save ....15
Printing the Menu....16
Maintenance Menu 16
Using Special Print Media....16
Printing a Special Document....16
Enhancing Print Quality 17
Printing Envelopes....17
Selecting Envelopes 19
Printing Transparencies and Adhesive Labels .....19
Guidelines for Transparencies and Labels......20
Using Recycled Print Media 20
Printer Maintenance 22
Replacing The Toner Cartridge ....22
Toner Cartridge Life 23
Replacing the Image Drum Cartridge .....23
Reset the Drum Counter 24
Image Drum Cartridge Life....24
Cleaning the LED Array....25
Printing a Cleaning Page....26
Problem Solving....28
Clearing Paper Jams 28
Print Quality Problems 32
Software Problems 34
Hardware Problems ....37
Service and Support ....38
Oki Data Online 38
Your Dealer 39
The Oki Data Customer Support Center ....39
Oki Data Customer Service Representatives......39
Purchasing Supplies 40
Ways to Purchase 40
Warranty Service 40
Oki Data Service Centers 40
Index......43
Features
- Fast print speed: 14ppm with a 28 MHz RISC microprocessor
• Excellent print quality: 600 dpi class output - Large paper capacity: 250 sheet paper tray and manual sheet/envelope feeder plus options for increasing paper capacity up to 850 sheets
- Memory: 4 MB installed, expandable to 36MB
- Fonts: 35 PCL ^a fonts (Agfa), 10 TrueType fonts, USPS Barcode font, OCR-A/B supported
- Emulations: Standard HP ^a LaserJet (PCL ^a ), IBM ^a Proprinter III/ Epson ^a FX (9-pin emulation)
- Printer drivers: Windows ^a Millennium, Windows 2000, Windows 98, Windows 95, Windows NT 4.0
-
Interface: IEEE 1284 bi-directional parallel and USB
-
On-screen status monitor and interactive software operator panel
- Energy Savings: Power is reduced when not printing
- 1 year overnight exchange warranty, 5 year warranty on the LED printhead (overnight exchange available in the US and Canada)
Consumables
Toner: 2,000 pages @ 5% print density (Type 5 Toner Cartridge Kit, Part# 52109001)
Drum: 20,000 pages with continuous printing (Type 8 Image Drum Cartridge Kit, Part# 41331601)
Options
- 500 sheet 2^nd Paper Tray/ Mechanism (Part#70028701)
- 100 sheet/50 envelope Multi-purpose Feeder (Part#70025101)
• 250 Sheet Letter/Legal/Universal Tray (Part#70028101)
• 500 Sheet Letter/Legal/Universal Tray (Part#70028001) - Memory Expansion Board (0 MB) with 2 expansion (SIMM) sockets (Part#70036201)
- RS-232C Serial Interface Board with 2 expansion (SIMM) sockets (Part#70036301)
- OkiLAN 6010e External Print Server (Part#70034401)
- OkiLAN 6020e External Print Server (Part#70036001)
To install the following options, a Memory Expansion Board or RS-232C Serial Interface Board must be installed.
• Memory SIMM 16MB (Part#70033901)
• Memory SIMM 32MB (Part#70034001)
- Flash Memory SIMM 4MB (Part#70035701)
- Flash Memory SIMM 8MB (Part#70035801)
Operating Your Printer
This section provides the following information:
• Using the front operator panel
- Setting printer features using the printer menu
• Using the printer software
• Using manual feed
- Printing envelopes
- Printing transparencies and labels
• Using recycled print media
Using the Front Operator Panel
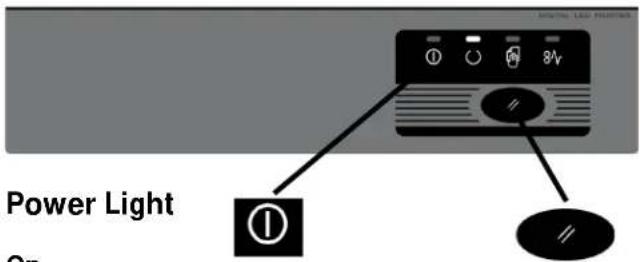
text_image
Power Light OnOn
Printer is turned on.
Off
Printer is turned off.
Switch
See the following pages for switch functions.
OKIPAGE 14e Front Operator Panel Reference
| Ready(Green) | ManualFeed(Amber) | Error(Red) | Meaning User Options/Switch Function | ||
 | [OXY] | [6KWS] | |||
| on off off Ready | • Quick press: takes printer off line | ||||
| off off off Off line | • Quick press: ready• 2 second press: print demo page and menu page• 5 second press: print cleaning page | ||||
| blink off off | Processing/receiving data | • Quick press: pause printing (off line) | |||
slow blink: one blink every 4 seconds
blink: one blink per second
fast blink: several blinks per second
| Ready(Green) | ManualFeed(Amber) | Error(Red) | Meaning User Options/Switch Function | |
| [7702] | [465V] |  | ||
| slow blink off | off Printing | paused | ·Quick press:resume printing(on line)·2 second press:print buffercontents·5 second press:clear bufferand reset printer | |
| off off blink | ·Paper out·Paper jam(feed, eject and size error)·Cover open·Printing errors | ·Quick press:resume printing·Open cover, remove paperjam, close cover | ||
slow blink: one blink every 4 seconds
blink: one blink per second
fast blink: several blinks per second
Ready(Green) | ManualFeed(Amber)[BW67] | Error(Red)[3HZ0] | Meaning User Options/Switch Function | |
| blink orfast blink | blink orfast blink | blink orfast blink | Hardware error Turn off and then re-power printer.If still not recovered, call service. | |
| - | - | slow blink | WarningChange image drumToner lowToner sensor | Refer to on-screen status monitor |
slow blink: one blink every 4 seconds
blink: one blink per second
fast blink: several blinks per second
| Ready(Green) | ManualFeed(Amber) | Error(Red) | Meaning User Options/Switch Function | |
| [WWHC] | [7DKS] | 8V | ||
| off blink off | Ready for manual feed Place | sheet in manual feeder | ||
| Light onfor a fewseconds,then off,then blinksuntil ready | Light onfor a fewseconds,then off,then blinksuntil ready | Light onfor a fewseconds,then off,then blinksuntil ready | Powering-on | 2 second press: set Menu 1and Menu 2 to factorydefaults |
slow blink: one blink every 4 seconds
blink: one blink per second
fast blink: several blinks per second
OKIPAGE 14e Function Reference
| User Options/Switch Function | Ready (Green) [kX82] | Manual Feed (Amber) [6x42] | Error (Red) 8V |
| Print demo page and menu page: 2 second press | off off off | ||
| Pause printing (off line): quick press | blink off off | ||
| Form feed (print buffer contents): 2 second press | slow blink off off |
slow blink: one blink every 4 seconds
blink: one blink per second
fast blink: several blinks per second
| User Options/Switch Function | Ready (Green) [0AXH] | Manual Feed (Amber)  | Error (Red)  |
| Resume printing (on line): quick press | off off blink | ||
| slow blink off off | |||
| Set Menu 1 and Menu 2 to factory defaults: 2 second press | Light on for a few seconds, then off, then blinks until ready | Light on for a few seconds, then off, then blinks until ready | Light on for a few seconds, then off, then blinks until ready |
slow blink: one blink every 4 seconds
blink: one blink per second
fast blink: several blinks per second
Changing the Menu Settings
The Menu provides a way to select printer operations and features using the printer's Printer Menu Settings.
! Operations and features set in your application software, will override Menu settings.
Using the Printer Menu Setup
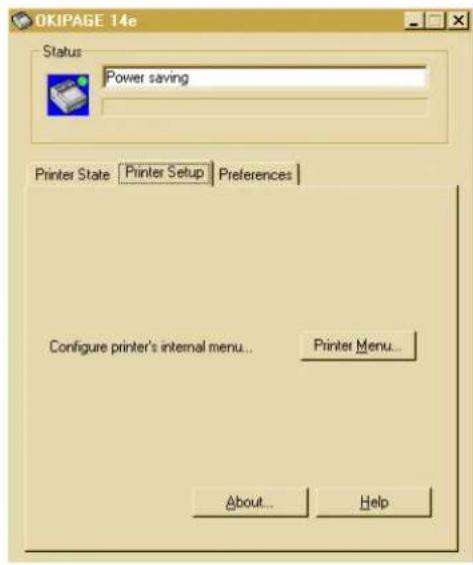
The printer menu setup is designed to perform as an interactive software "front panel" for accessing the printer's menu from your computer. To invoke the printer menu setup, open the status monitor, click the printer setup tab, then click the Printer Menu button. Click the Help button for an explanation of each feature.
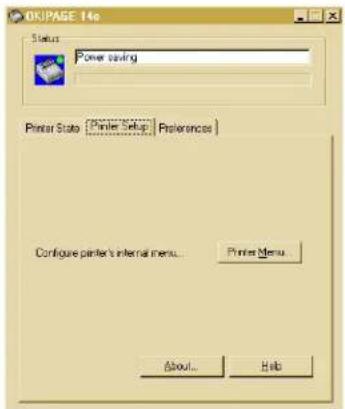
text_image
OK/PAGE 14o Status Power saving Printer Status [Printer Setup] Preferences Configure printer's internal menu... Printer Menu... About... Help! Printer features set in your application software will override printer menu settings.
Click on the appropriate tab to see the menu settings.
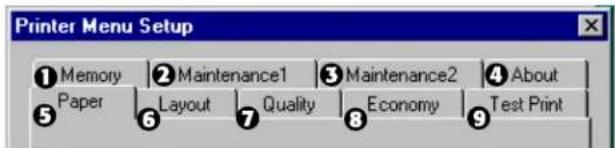
text_image
Printer Menu Setup ① Memory ② Maintenance1 ③ Maintenance2 ④ About Paper Layout Quality Economy Test Print! Click the Help button for a explanation of the menu settings.
1 Set Raster Buffer, Font Protection.
2 Reset menu, drum count, print menu, interface.
3 Set display language, page placement, and print position.
We suggest that only experienced users should change these settings.
4 Access printer hardware and firmware information.
5 Select paper source, weight, size, transparencies.
6 Adjust lines per page, orientation, edit size, and select emulation (PCL, IBM ^® , EPSON ^® ).
7 Set print output quality, darkness setting.
8 Set power save, toner save.
9 Print demo page, font page, menu settings, cleaning page.
Resetting the Menu
The menu can be reset to the factory (default) settings in the Printer Reset box of the Maintenance 1 Menu.
Using Power Save to Minimize Warm-up Time
To minimize the printer's warm-up time between print jobs:
1 Open the Status Monitor.
2 Select the Printer Setup tab.
3 Click the Printer Menu button.
4 Select the Economy tab.
5 In the Power Save menu, choose a higher setting to delay power save mode (default setting is 15 min.)
6 Click Apply. Click OK.
To Disable Power Save
1 Open the Status Monitor.
2 Select the Printer Setup tab.
3 Click the Printer Menu button.
4 Select the Maintenance 2 tab.
5 Under Setting Power Save, click the Setting button.
6 Remove the check in the Enable Power Save box. Click OK.
Printing the Menu
For a printout of all menu settings including default (factory) and user settings, firmware revisions, and total RAM capacity:
1 Enter the Test Print tab.
2 Click Menu Print.
The menu prints.
Maintenance Menu
The Maintenance Menu includes printer maintenance and operating functions.
Using Special Print Media
Use manual feed to print:
- Envelopes
- Labels
- Transparencies
- A special document not loaded in the paper tray, like a single letterhead page
• Paper heavier than 28 lbs.
Printing a Special Document
If you have plain paper loaded in the paper tray and you want to print one letterhead page or special document, do the following:
1 Set manual feed and paper size in your software.
2 Pull down the manual feed tray.
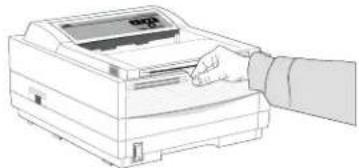
natural_image
Illustration of a hand inserting a printer into a paper airplane (no text or symbols visible)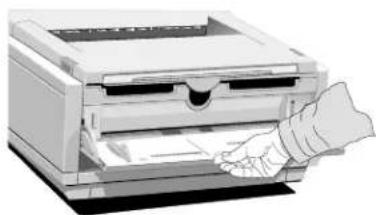
natural_image
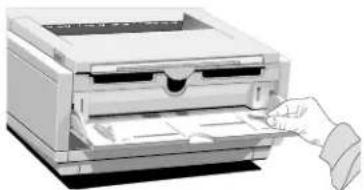
Illustration of a hand inserting a card into a printer (no text or symbols visible)3 Adjust the paper guides to the width of the media.
natural_image
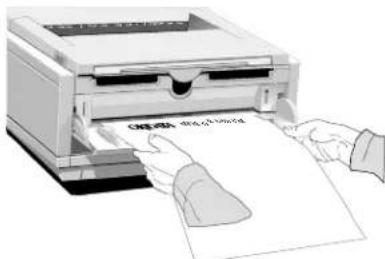
Illustration of a printer with a hand inserting paper into the cover (no text or symbols visible)4 Insert the sheet (letterhead: top edge in first, facing up) until the printer grips it.
text_image
Illustration of a printer printing paper with Chinese text, showing hands and a paper sheet.5 Issue the print command in your software.
Enhancing Print Quality
To enhance print quality when printing on different types of media, you can adjust the following settings using the printer Menu:
- Resolution - Select dots per inch
• Darkness Control - Adjust print density - Smoothing - Select Medium or Dark to smooth out character edges
- Toner Saving - Select proof copy quality to conserve toner
Printing Envelopes
1 Set envelope size and landscape orientation in your software.
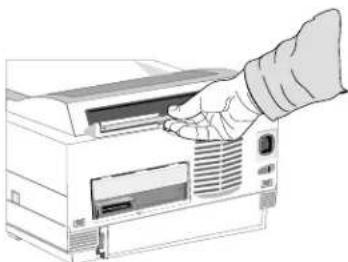
2 Pull out the rear exit extender until it locks.
natural_image
Illustration of a hand inserting a printer into a rack (no text or symbols visible)3 Lift out the support bar.
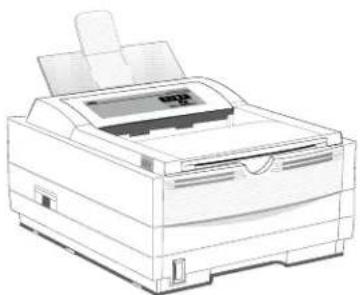
natural_image
Line drawing of a printer with paper feed and paper lid (no text or symbols)4 Pull the manual feed tray down.
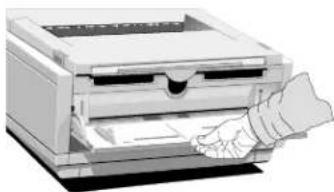
natural_image
Illustration of a hand inserting a card into a printer (no text or symbols visible)5 Adjust the paper guides to the width of the media.
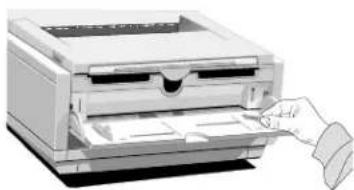
natural_image
Illustration of a printer with a hand inserting paper from the page (no text or symbols visible)6 Insert the envelope - flap down and to the left - until the printer grips it.

natural_image
Illustration of a printer being inserted into a paper, with a hand pointing to the printer (no text or symbols visible)7 Issue the print command in your software.
Selecting Envelopes
- No windows, metal clasps, or snaps – they can damage the image drum.
• Paper no heavier than 28 lb. - Sturdy construction.
- Smooth, even surface.
- Seams down the sides, not across the middle.
- Squared-off flaps that don't cover the print area.
- No self-sealing flaps.
• Always use rear output when printing envelopes.
Printing Transparencies and Adhesive Labels
1 Pull out the rear exit extender until it locks
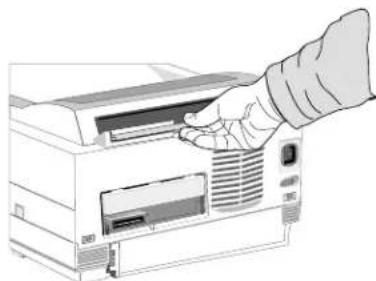
natural_image
Illustration of a hand inserting a printer into a paper airplane (no text or symbols visible)2 Lift out the support bar.
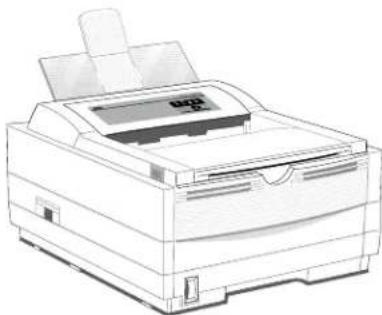
natural_image
Line drawing of a printer with paper lid and paper spool (no text or symbols)3 Insert the label sheet with print-side up.
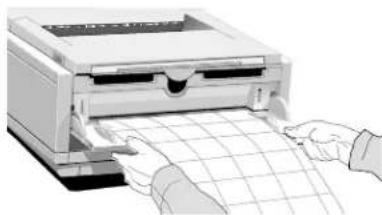
natural_image
Illustration of a printer printing a sheet of paper with hands operating it (no text or symbols visible)Guidelines for Transparencies and Labels
• Always use manual feed.
- Always use rear output when printing transparencies and adhesive labels.
- Should be specifically made for laser printers or photocopiers.
- Must be able to withstand heat of 200^ for 0.1 second.
- Labels should cover the entire sheet carrier and adhesive must not be exposed to any part of the printer.
- Use rear paper output to reduce heat exposure and curling.
Using Recycled Print Media
Recycled paper should be restricted to 20% to 35% Post Consumer Content and not exceed 50%. Paper must be relatively stiff and have minimum edge curl. Paper should be white and bright for maximum contrast. The surface should be smooth, clean, and stable electrically and dimensionally.
Recycled paper used by OKI printers must be specifically denoted by the paper manufacturer to be for laser printers, or laser guaranteed or compatible. Using media outside these specifications may cause problems requiring service that will not be covered by OKI DATA warranty or service agreements.
The following recycled paper has been tested and approved for use in OKI printers.
- Weyerhaeuser, Lynx Opaque, 20% PCW, 20lb., 28 lb. and Laser Copy, 20 lb.
- Union Camp Great White (Laser), 25% PCW, 20lb., 24lb.
• International Paper, Beckett Division, Enhanced Marble, 50% Recycled, 20% PCW, 24lb.
• International Paper, Hammermill Division, Savings DP, 20% PCW, 20 lb.
• Georgia Pacific, GeoCycle, 20% PCW, 20lb.
• James River, WordPro Laser, 20% PCW, 20lb., 24lb.
- Warren, SpectraTech, Gloss and Matte, 10% PCW, 28lb., 32lb.
• Cross Pointe, Worx, 50% Recycled, 20% PCW
- Strathmore, Script Bright White Wove, 50% Recycled
Printer Maintenance
This section provides the following printer maintenance information:
- Replacing the Toner Cartridge
- Replacing the Image Drum
- Cleaning the LED Array
- Printing a Cleaning Page
Replacing The Toner Cartridge
Replace the toner cartridge after TONER LOW displays on your screen in the Status Monitor if you have installed the printer software. After TONER LOW displays, the printer will print approximately 100 more sheets, then display TONER EMPTY and stop printing. Printing will resume when a new toner cartridge is installed.
1 You will need a new toner cartridge (OKIPAGE Type 5 Toner Kit, Part# 52109001).
2 Open the printer cover.
3 Grasp the lock lever and pull towards the front of the printer to unlock the cartridge. Carefully lift out toner cartridge and discard the used toner cartridge.
Loose toner powder may exist. Be careful.
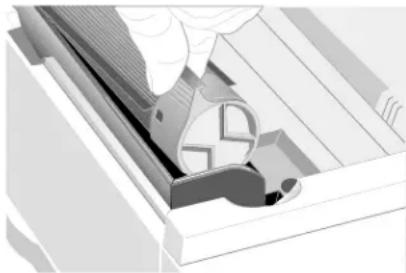
natural_image
Close-up of a mechanical component with a hand pressing a circular feature (no text or symbols visible)4 To install a new toner cartridge, follow the instructions included in the toner cartridge kit.
5 Be sure to clean the LED array.
! Drum and Toner are consumables and as such are subject to a 90-day warranty on workmanship.
Toner Cartridge Life
How long your toner cartridge lasts depends on the print density, the percentage of the page that prints black.
- A typical letter has 3% to 5% print density, graphics usually have higher density.
- Higher print density means toner is used up faster.
- At 5% print density, a toner cartridge will print an average of 2,000 pages. Remember, this is only an average. Actual results may vary.
The first toner cartridge in your new printer has to fill the drum reservoir and saturate the developing roller with toner. It's normal that the first cartridge will produce about 1,000 pages.
Replacing the Image Drum Cartridge
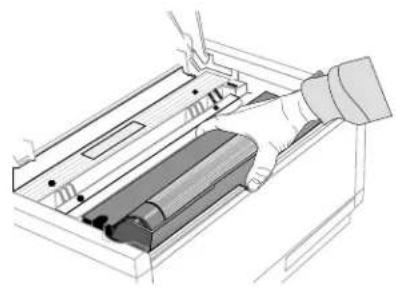
When the image drum reaches 90% of its life, the CHANGE DRUM message displays on your screen in the Status Monitor if you have installed the printer software. Change the image drum cartridge when the print becomes faint or begins to deteriorate. It's a good idea to keep a new cartridge on hand.
1 You need a new image drum cartridge (OKIPAGE Type 8 Image Drum Cartridge Kit, Part# 41331601) and a new toner cartridge (OKIPAGE Type 5 Toner Kit, Part# 52109001).
2 Open the printer cover.
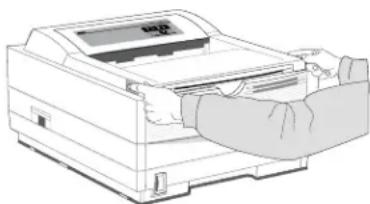
natural_image
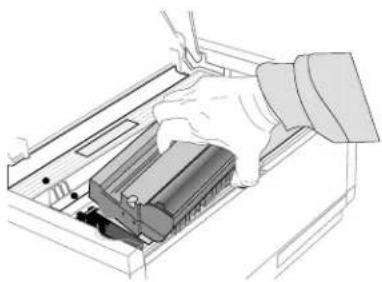
Illustration of hands operating a printer with a screen (no text or symbols visible)3 Lift out the used image drum cartridge with toner cartridge installed. Dispose of properly with the black plastic bag included with the new image drum kit.
natural_image
Illustration of a hand inserting a device into a printer (no text or symbols visible)4 Remove the new image drum cartridge from the package. To install the new image drum cartridge, follow the installation instructions included in the replacement kit.
Reset the Drum Counter in the Status Monitor
5 Be sure to reset the drum counter located on the Maintenance 1 tab in the printer menu. See "Using the Printer Menu Setup" for details (page 14).
To reset the drum counter without the Status Monitor
1 Power off the printer.
2 Open the top cover.
3 Press and hold the oval switch on the operator panel.
4 While continuing to hold down the switch, power on the printer.
5 The lights on the front panel will flash twice, release the button and close the cover.
Image Drum Cartridge Life
The life of the image drum depends on a number of factors, including the operating temperature, humidity, the type of paper you use, and the number of pages per job. Each time you print or power on/off, the drum has to rotate to start up and to wind down. As a result, frequent one-page print jobs will wear down your drum more quickly than multiple-page print jobs. The image drum cartridge should last up to 20,000 pages of continuous printing with Power Save off and up to 14,000 pages at 3 pages per job. These numbers are approximate, since you won't print the same number of pages each time, and environmental conditions and paper type used may vary.
Cleaning the LED Array
Clean the LED array each time you install a new toner cartridge, or if you have faded vertical areas or light printing down a page.
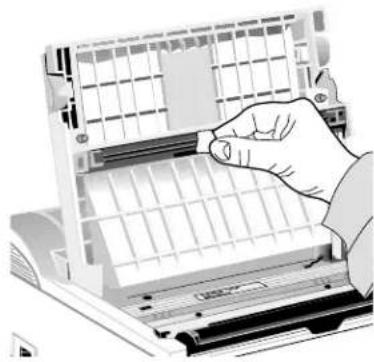
The LED array is on the underside of the printer cover. Wipe it gently with the cleaning pad that is included in the toner cartridge kit. You can also use a clean, soft cloth with a small amount of rubbing alcohol on it.
natural_image
Hand inserting a component into a computer motherboard (no text or symbols visible)Printing a Cleaning Page
The cleaning page process removes residual impurities from printing surfaces. Printing a cleaning page helps reduce print quality problems, such as repeated marks, blotches, and shaded areas.
From the status monitor:
1 Click the Printer Menu button on the status monitor Controls tab.
text_image
OKIPAGE 14e Status Power saving Printer State Printer Setup Preferences Configure printer's internal menu... Printer Menu... About... Help2 Click the Test Print tab.
text_image
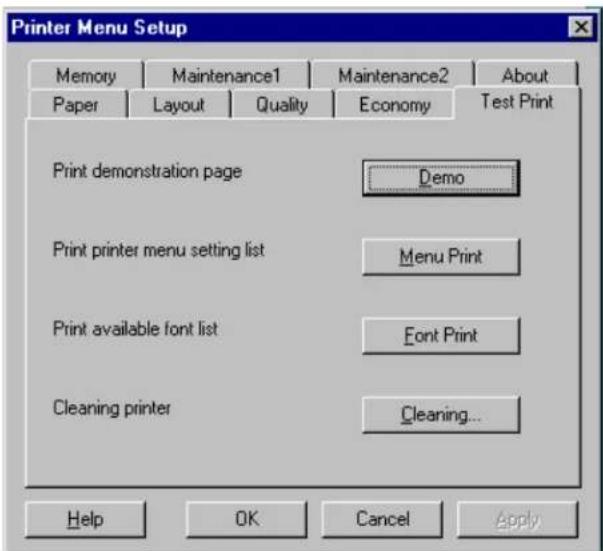
Printer Menu Setup Memory Maintenance1 Maintenance2 About Paper Layout Quality Economy Test Print Print demonstration page Demo Print printer menu setting list Menu Print Print available font list Font Print Cleaning printer Cleaning... Help OK Cancel Apply3 Click the Cleaning... button. Follow the on-screen instructions.
Problem Solving
This Section provides the following problem solving information:
- Clearing Paper Jams
• Print Quality Problems - Software Problems
- Hardware Problems
Clearing Paper Jams
! The error light on the printer's operator panel blinks (one blink per second) whenever there is a paper jam of any kind.
To reduce paper jams:
- Do not fill tray above Paper Full mark.
-
Use only recommended paper weight
-
Tray: 16 to 28 lb. (60 to 105 g/m²)
- Manual feed: 16 to 32 lb (60 to 120.5 g/m²)
- Do not open the cover, or remove the paper tray during a print job.
- Do not switch paper exit paths while printing.
- Use paper that is smooth and of high quality.
- Store paper in its ream wrapper until you are ready to use it, and keep it away from moisture or other conditions that can cause it to wrinkle or curl.
- Avoid printing on both sides of the paper for more than a few pages, or preprinted documents that have been in a photocopier.
- Try paper before you buy in quantity.
If a paper jam message displays, remove the jam using the instructions that follow.
TRAY "n" INPUT JAM
“n” indicates the tray number in which the jam occurred (standard configuration is tray 1).
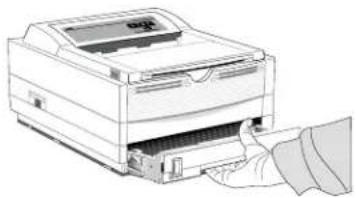
1 Slide the paper tray out of the printer.
natural_image
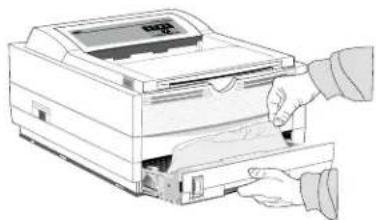
Illustration of a hand inserting a printer into a paper airplane (no text or symbols visible)2 Remove the sheet that did not feed.
natural_image
Illustration of a hand inserting a printer into a paper airplane (no text or symbols visible)3 Check the remaining sheets to make sure they're not wrinkled or stuck together. Replace the tray.
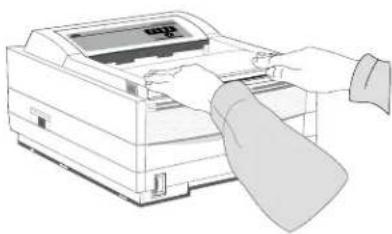
4 Open and close the cover to clear the display message.
natural_image
Line drawing of a printer with a cloth partially inserted, no text or symbols presentTRAY "n" FEED JAM or PAPER EXIT JAM (top bin)
Displays when paper exits to the top bin
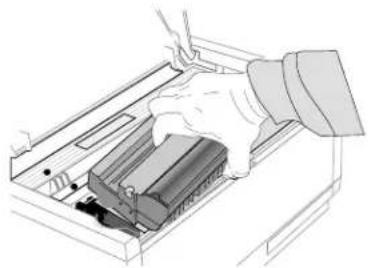
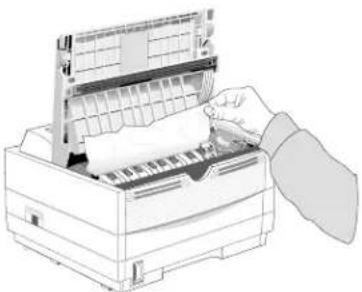
1 Open the cover. Lift out the image drum. Be careful: the fuser unit at the back of the printer is hot!
natural_image
Illustration of a hand inserting a device into a container (no text or symbols visible)2 Remove the jammed paper.
natural_image
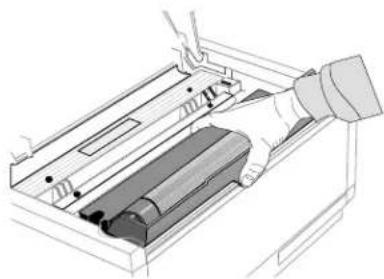
Illustration of a hand inserting a printer into a paper airplane (no text or symbols visible)3 Replace the image drum. Close the cover.
natural_image
Technical line drawing of a printer holder with a hand operating the tray (no text or symbols)PAPER EXIT JAM (rear tray)
Displays if paper exits to rear exit tray
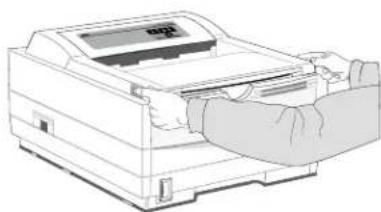
1 Lift the top cover.
natural_image
Illustration of a hand operating a printer with a digital display (no text or symbols visible)2 Pull the jammed paper out from the back of the printer. Pulling from the front may damage the printer.
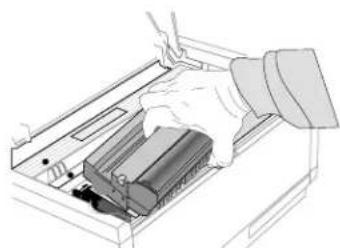
3 Remove the image drum and look to make sure the paper is cleared and no pieces are left.
natural_image
Illustration of a hand inserting a device into a drawer (no text or symbols visible)4 Replace the image drum and close the cover.
natural_image
Technical line drawing of a mechanical device with a handle and internal components (no text or symbols)Print Quality Problems
Before consulting a service representative regarding a print quality problem, check the table below to see if there is a solution, or something you might have overlooked.
Symptom: Blank sheets printed.
Problem: Image drum cartridge not properly installed.
Solution: Reinstall image drum cartridge.
Problem: Empty or missing toner cartridge.
Solution: Install new toner cartridge.
Symptom: Entire page prints faintly.
Problem: Empty toner cartridge. Pages get fainter when toner is low.
Solution: Install new toner cartridge.
Problem: LED array is dirty.
Solution: Clean LED array. (See Printer Maintenance section.)
Symptom: Page has gray background.
Problem: Static electricity, generally from dry, cotton fiber papers, causes toner to stick to background.
Solution: Change papers to an acceptable laser bond or use a humidifier.
Symptom: Vertical white streaking or faint areas on page.
Problem: Toner is low and does not distribute properly, or the drum is worn out.
Solution: Replace toner cartridge. Check drum and replace the drum, if necessary. Contact service.
Problem: LED array dirty.
Solution: Clean LED array.
Symptom: Vertical black lines.
Problem: Scratched image drum.
Solution: Replace the image drum cartridge.
Problem: Hardware problem.
Solution: Contact service.
Symptom: Fuzzy print
Problem: Dirty LED array.
Solution: Clean LED array.
Symptom: Distorted print
Problem: Paper path, lamp assembly, or fusing unit problem.
Solution: Generate Cleaning Page. Contact service.
Symptom: Faded print after installation.
Problem: Toner cartridge is not correctly installed.
Solution: Install toner cartridge correctly.
Symptom: Smeared or blotched print.
Problem: Dirty or defective fuser assembly or other hardware problem.
Solution: Generate Cleaning Page. Contact service.
Symptom: Printed page is light or blurred.
Problem: Is toner low?
Solution: Replace toner cartridge.
Problem: Is paper meant for laser printers?
Solution: Use recommended paper.
Problem: LED array is dirty.
Solution: Clean LED array.
Symptom: Bold characters and dark lines are smeared.
Problem: Toner is low.
Solution: Install new toner cartridge.
Symptom: Print is darker than usual.
Problem: Darkness setting is too high.
Solution: Change darkness setting in the printer menu.
Symptom: Pages curl excessively
Problem: Printing on wrong side of paper. High humidity.
Solution: Turn paper over in tray. Note arrow on paper package. Install paper print side down in tray.
Problem: Moisture in paper. Improper storage.
Solution: Avoid storing paper in areas of excessive temperature changes and humidity.
Problem: High Humidity.
Solution: Recommended operating humidity: 20-80%
Software Problems
Software controls printing features. Make sure you have selected the correct printer driver in your software. See your software application documentation for more information.
Symptom: Status Monitor displays Checking Status indefinitely. The Printer Menu button is greyed and not active.
Problem: Bi-directional communication is not being achieved through the printer port.
Solution: Check cable for IEEE 1284. Verify PC is set for bi-directional printing. Remove any previously-installed printer software that may cause conflict.
Symptom: Blank pages appear between printed pages.
Problem: Number of lines per page in software is not equal to number of lines per page of printer.
Solution: Many software packages assume 66 lines per page; your printer default is 60. Adjust software accordingly, or set LINES/Pg in Menu 1 to equal lines per page in software.
Symptom: Cannot get justified right margin with a proportionally spaced font.
Problem: Right justification with proportional fonts is a software feature.
Solution: Check your software manual to see if this feature is supported.
Symptom: Control codes not operating correctly.
Problem: Incorrectly entered control codes.
Solution: Check for confusion of letter / with number 1, letter O with number 0; make sure you are using upper/lower case correctly; make sure font is specified correctly and is available.
Symptom: Last page of document not printed.
Problem: No form feed provided at end of document.
Solution: Press the ON-LINE button to take the printer off-line, then press the FORM FEED button to eject the final page or send the form feed code (decimal character 12).
Symptom: First line on page won't print.
Problem: Tops of letters extend into unprintable area, so none of them print.
Solution: Set your software to print within the printable area.
Symptom: Parts of control codes are printed at the beginning of documents.
Problem: Command sent is not a true printer command, generally because the ESC character was not sent.
Solution: Before sending control codes through an application, make sure the ESC character can be entered, and is entered properly.
Symptom: Parts of documents are missing at the edges of the printed sheet.
Problem: Software is attempting to print beyond the printer's maximum image area.
Solution: Adjust software page margins to printer's maximum margins (8" X 10 1/2" for standard sheets).
Symptom: Print job started with italics, changed to bold, but italics still output.
Problem: Font selection is by priority, and italic is "higher" than bold.
Solution: Turn italics off before turning bold on.
Symptom: Printer ignores control codes sent prior to printing a document.
Problem: The application software automatically sends a reset command before printing.
Solution: Embed the control codes in the text to be printed.
Symptom: "Garbage" prints out.
Problem: Incorrect driver is installed.
Solution: Install an appropriate driver.
Symptom: Printer's output is below rated speed.
Problem: Delays are caused by software formatting routines, graphics downloads, and other application specific factors.
Solution: For maximum speed, output plain text.
Symptom: Size of top margin increases with each page printed.
Problem: "Creeping text." Number of lines per page in software is not equal to number of lines per page of printer.
Solution: Many software packages assume 66 lines per page, but your printer's default is 60. Adjust software accordingly, or set LINES/ Pg in Menu 1 to equal lines per page in software.
Problem: In Epson FX Emulation, when command for 66 lines is sent to the printer, printer prints only 64 lines on a page, looses the 65 and 66 line and prints 67 ^th line on the second page.
Solution: Set line spacing to 35/216 with a software command ESC "3" Pn (Pn=number of 216ths). Then send the command to set the page length to 66 lines per page, ESC C Pn (Pn = number of lines per page).
Symptom: Strange symbols appear during normal printing.
Problem: Wrong symbol set.
Solution: Make sure the symbol set selected corresponds to symbol set resident, or in soft font.
Hardware Problems
Symptom: Graphic image prints partly on one page, partly on the next.
Problem: Insufficient printer memory for this image at this resolution.
Solution: Change the resolution, reduce the image size, or install more memory in your printer.
Symptom: Nothing happens, but printer indicates it is ready to receive data.
Problem: Configuration error.
Solution: Check cable connection; if serial, make sure appropriate MODE command has been used (PC). If more than one printer is available, make sure your printer has been selected. Make sure your printer is on-line.
Symptom: "Garbage" prints.
Problem: Incorrect cable configuration. (Also, see "Software Problems.")
Solution: Check cable configuration, continuity, and length.
Symptom: Printer freezes or displays error message when computer is rebooted.
Problem: Booting the computer while the printer is on can cause a communications error.
Solution: Take printer off-line before rebooting computer.
Problem: Gases are given off by forms or adhesives passing through the hot fusing unit.
Solution: Make sure the forms you use can withstand heating, and provide adequate ventilation.
Symptom: Data is sent to printer, but nothing happens. ON-LINE message appears.
Problem: Wrong interface cable.
Solution: Use correct cable. If optional Serial I/F is installed, make sure RS232C Serial is selected in the Level 1 menu and RS232C Serial settings in Level 2 menu are correct.
Service and Support
This information is valid for the United States and Canada only.
This section provides the following service and support information:
• OKI Online
- Your Dealer
• The Oki Data Customer Support Center
- Oki Data Customer Service Representatives
• Purchasing Supplies
- Warranty Service
• Oki Data Service Centers
If you can't solve your printer problem after reading this manual, contact these sources for service or support.
Oki Data Online
Visit the our Web Site at http://my.okidata.com
for the latest information on:
- Software drivers
- Product guides
- Customer support
- Dealers
- Documentation
• Corporate information
Your Dealer
Consult the store where you purchased your printer, or call 1-800-OKI-DATA for the location of the nearest authorized Okidata service dealer. Have your ZIP code ready.
- Proof of purchase is required for warranty work. Be sure to retain your purchase documents.
- Prices and minimum charges may vary.
The Oki Data Customer Support Center
For customer service, call 1-800-OKI-DATA. The Oki Data Information System Automated Attendant is available 24 hours a day, 7 days a week. The system can provide immediate assistance with:
- Basic printer operating procedures
• Sales and service referrals - Parts and consumable referrals
- Product information
Oki Data Customer Service Representatives
Agents are available 24 hours a day, 7 days a week. Please be sure that you are calling from a telephone close to your printer, so you can describe your problem accurately. Our customer service representative are trained on all current OKI products. They can answer your questions regarding:
• Installation of your printer
• Determination of printer issues
- Consumer relations
- Availability and installation of printer drivers. (CSRs are not trained to provide assistance with the use of commercial software packages. Please consult your software user's manual for times and availability of their support.)
Purchasing Supplies
Before you order, know your printer model number (see the front of the printer) and have the correct part number and description of the item.
Ways to Purchase
- Consult the dealer where you purchased your printer.
- Consult an Oki Data authorized sales or service dealer.
- Call 1-800-OKI-DATA for the nearest Authorized Sales and Service location. Have your ZIP code ready for our Customer Support Representatives.
- Check office supply catalogs or your local stationery store. Most carry OKI brand supplies.
Warranty Service
Your printer is warranted for one year from date of purchase except for the printhead (LED imaging array), which is warranted for a period of five years from date of purchase. If your printer hardware should fail during the warranty period, you have the option of returning it, shipped prepaid to OKI DATA or an authorized service center, or using the overnight exchange procedure (U.S. and Canada only). See the list of OKI DATA Service Centers or call 1-800-OKI-DATA for the location of the nearest authorized Okidata service dealer. Have your ZIP code ready. See the Limited Warranty and Overnight Exchange insert for more information.
Oki Data Service Centers
If you need to ship your printer to a service center, replace it in the original packing materials. If the original packaging in not available, contact your dealer or 1-800-OKIDATA for shipping instructions.
For out-of-warranty repairs, allow 30 days for round trip shipping and repair. Before shipping your printer, call for a return authorization number (RA).
Oki Data Service Center Locations
United States
Tel: 1-800-OKI-DATA (1-800-654-3282)
FAX: (856) 222-5247
Canada
Tel: 1-800-OKI-DATA (1-800-654-3282)
FAX:1-905-238-4427
Oki Data do Brasil, Ltda.
Tel: 5511-3444-3500
FAX: 5511-3444-3501
Oki Data de Mexico, S.A. de C.V.
Tel: (525) 263-8780
FAX: 525-263-8785
Index
A
Adhesive Labels 19
C
CHANGE DRUM 23
Cleaning Page 26
Cleaning the LED Array 25
Consumables 5
image drum 5
toner 5
Contact Information for Oki Data 2
Customer Information Center 39
Customer Service Representatives 39
Customer Support Center 39
D
drivers, printer 5
drum counter, resetting 24
E
E-mail address for Oki Data 2
emulations 5
Energy Savings 5
Envelopes 17
F
Fonts 5
OCR-A/B 5
True Type 5
Front Operator Panel 7
|
Image Drum Cartridge, replacing 23
Interface 5
Internet
Oki Data Web Site 2
L
Labels 19
LED Array, cleaning 25
M
Mailing address for Oki Data 2
Maintenance Menu 16
Memory 5
Menu
printing 16
resetting 15
using 14
0
Oki Data
e-mail address 2
Mailing address 2
Online 38
Web Site 2
Operator Panel 5
on-screen 14
Options 6
P
paper capacity 5
Paper Jam
exit jam (rear tray) 31
exit jam (top bin) 30
feed jam 30
Paper Jams
clearing 28
input jam 29
print quality 5
Print Quality Problems 32
print speed 5
printer drivers 5
printing
cleaning page 26
enhancing quality 17
envelopes 17
labels, adhesive 19
menu 16
special document 16
transparencies 19
Printing Envelopes 17
Purchasing Supplies 40
S
Service and Support 38
Customer Information Center 39
Customer Service Representatives 39
Dealers 39
Oki Data Online 38
regional service centers 40
Warranty Service 40
Web Site 38
Status Monitor 5, 22, 23, 26
Supplies, purchasing 40
T
Toner Cartridge, replacing 22
Transparencies 19
U
USPS Barcode font 5
W
Web Site, Oki Data 2, 38