
C534 - Printer LEXMARK - Free user manual and instructions
Find the device manual for free C534 LEXMARK in PDF.


User questions about C534 LEXMARK
0 question about this device. Answer the ones you know or ask your own.
Ask a new question about this device
Download the instructions for your Printer in PDF format for free! Find your manual C534 - LEXMARK and take your electronic device back in hand. On this page are published all the documents necessary for the use of your device. C534 by LEXMARK.
USER MANUAL C534 LEXMARK
C530, C532, and C534
User's Guide
July 2006 www.lexmark.com
Lexmark and Lexmark with diamond design are trademarks of Lexmark International, Inc., registered in the United States and/or other countries. All other trademarks are the property of their respective owners.
© 2006 Lexmark International, Inc
All rights reserved.
740 West New Circle Road
Lexington, Kentucky 40550
Safety information
Connect the power supply cord to a properly grounded electrical outlet that is near the product and easily accessible.

CAUTION: Do not set up this product or make any electrical or cabling connections, such as the power supply cord or telephone, during a lightning storm.
Refer service or repairs, other than those described in the user documentation, to a professional service person.
This product is designed, tested, and approved to meet strict global safety standards with the use of specific Lexmark components. The safety features of some parts may not always be obvious. Lexmark is not responsible for the use of other replacement parts.

CAUTION: Make sure that all external connections (such as Ethernet and telephone system connections) are properly installed in their marked plug-in ports.
This product uses a laser.

CAUTION: Use of controls or adjustments or performance of procedures other than those specified herein may result in hazardous radiation exposure.
This product uses a printing process that heats the print media, and the heat may cause the media to release emissions. You must understand the section in your operating instructions that discusses the guidelines for selecting print media to avoid the possibility of harmful emissions.
This symbol indicates the presence of a hot surface or component.

CAUTION: To reduce the risk of injury from a hot component, allow the surface to cool before touching.

CAUTION: The printer weighs 25.40kg (56 lb); therefore, it requires at least two people to lift it safely. Use the handholds on the sides of the printer to lift it, and make sure your fingers are not under the printer when you set it down.

CAUTION: If you are installing a 550-sheet drawer after setting up the printer, turn the printer off, and unplug the power cord before continuing.

CAUTION: If you are installing memory or option cards sometime after setting up the printer, turn the printer off, and unplug the power cord before continuing. If you have any other devices attached to the printer, turn them off as well and unplug any cables going to the printer.

CAUTION: If installing a flash memory or firmware card after setting up the printer, turn the printer off, and unplug the power cord before continuing.
Contents
Learning about the printer....9
Configured models....9
Using the security lock feature....10
Understanding the control panel....11
Menus list....12
Installing options....14
Installing a 550-sheet drawer....14
Installing internal options....15
Available options 15
Accessing the system board to install internal options....15
Installing a memory card .... 18
Installing a flash memory or firmware card....21
Installing a printer hard disk....22
Installing an internal print server or port interface card 24
Reinstalling the system board access cover 25
Attaching cables....26
Loading paper and specialty media....27
Loading the standard tray....27
Loading the optional 550-sheet tray....29
Loading the multipurpose feeder....30
Using the multipurpose feeder....32
Loading the manual feeder....33
Using the manual feeder....33
Using the standard exit bin....34
Setting the Paper Size and Paper Type....35
Tray linking....36
Paper and specialty media guide....37
Media guidelines....37
Media characteristics....37
Unacceptable media....38
Selecting media....38
Selecting preprinted forms and letterhead....38
Using letterhead....38
Using transparencies....39
Using envelopes....39
Using labels....40
Using card stock....40
Storing media....41
Supported paper sizes, types, and weights....41
Supported paper sizes....41
Support for paper types....43
Paper types and weights 43
Paper capacities....44
Printing....45
Installing printer software....45
Printing a document from Windows....45
Printing a document from a Macintosh computer....45
Printing confidential and other held jobs....45
Holding jobs in the printer 45
Printing confidential and other held jobs from Windows....46
Printing confidential and other held jobs from Macintosh 46
Printing from a USB flash memory device....47
Printing a menu settings page....48
Printing a network setup page....49
Printing a font sample list....49
Printing a directory list....49
Printing the print quality test pages....50
Printing a duplex job manually from a Macintosh computer....50
Printing only black text and graphics....50
Configuring the printer for black-only printing....51
Removing the color supplies 51
Configuring the printer for color printing and replacing the color supplies....54
Canceling a print job....55
Canceling a print job from the control panel 55
Canceling a print job from the Windows taskbar 55
Canceling a print job from the Windows desktop 55
Canceling a print job from Mac OS 9.x....56
Canceling a print job from Mac OS X 56
Clearing jams....57
Avoiding jams....57
Identifying the paper path....57
Accessing jam areas....58
Clearing jams just beyond Tray 1....60
Clearing Tray 2 jams....61
Clearing jams behind the inner door....62
Clearing jams under the fuser or fuser cover....63
Clearing jams between the fuser and the standard exit bin....65
Clearing jams in the standard exit bin....65
Clearing jams in the duplex path....65
Clearing jams in the multipurpose feeder....67
Clearing jams in the manual feeder....68
Maintaining the printer....69
Storing supplies....69
Checking the status of supplies....69
Conserving supplies....69
Aligning the toner cartridges....69
Cleaning the printhead lenses....70
Ordering supplies....70
Ordering toner cartridges....71
Ordering a transfer belt....72
Ordering a waste toner box 73
Ordering a fuser....73
Ordering photoconductors....73
Moving the printer....73
Before moving the printer 73
Moving the printer to another location 74
Administrative support....75
Adjusting the brightness or contrast of the display....75
Disabling control panel menus....75
Enabling control panel menus....75
Disabling Quick Start mode....76
Restoring factory default settings....76
Adjusting Power Saver....77
Encrypting the printer hard disk....77
Disabling printer hard disk encryption....78
Locking the control panel menus using the Embedded Web Server....78
Locking the entire printer....78
Modifying confidential print settings....79
Supporting IPSec....79
Supporting SNMPv3....80
Using 802.1x authentication....80
Using Secure mode....81
Troubleshooting....82
Checking an unresponsive printer....82
Solving printing problems....82
Multiple-language PDFs do not print 82
Control panel display is blank or displays only diamonds 82
Error message about reading USB drive appears....82
Jobs do not print 83
Confidential and other held jobs do not print 83
Job takes longer than expected to print....84
Job prints from the wrong tray or on the wrong paper....84
Incorrect characters print....84
Tray linking does not work....84
Large jobs do not collate 85
Unexpected page breaks occur....85
Solving option problems....85
Option does not operate correctly or quits after it is installed....85
Drawers 85
Flash memory card....85
Hard disk with adapter....86
Infrared adapter....86
Internal print server....86
Memory card....86
USB/parallel interface card....86
Solving paper feed problems....86
Paper frequently jams....86
Paper jam message remains after jam is cleared 87
Page that jammed does not reprint after you clear the jam....87
Solving print quality problems....87
Isolating print quality problems....87
Repeating defects....88
Color misregistration....88
Dark lines....89
Light colored line, white line, or incorrectly colored line 89
Streaked horizontal lines 89
Streaked vertical lines 90
Print is too light....90
Print irregularities....91
Print is too dark....91
Transparency print quality is poor 91
Toner fog or background shading appears on the page 91
Gray background....92
Uneven print density....92
Characters have jagged or uneven edges....92
Ghost images 92
Clipped images....93
Incorrect margins....93
Skewed print....93
Blank pages....93
Solid color pages....93
Paper curl 94
Toner specks....94
Toner rubs off 94
Solving color quality problems....95
Quality menu 95
Frequently Asked Questions (FAQ) about color printing....97
Contacting Customer Support....100
Notices....102
Power consumption....105
Index....108
Learning about the printer
Configured models
Basic models
The following illustrations show the basic printer models.
C532n
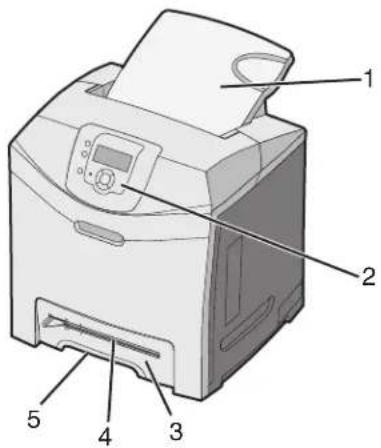
text_image
Diagram of a printer with numbered parts labeled 1 through 5 for identification.| 1 Standard exit bin |
| 2 Control panel |
| 3 Standard 250-sheet tray (Tray 1) |
| 4 Manual feeder |
| 5 Tray 1 handhold |
C530dn, C532dn. C534n, C534dn
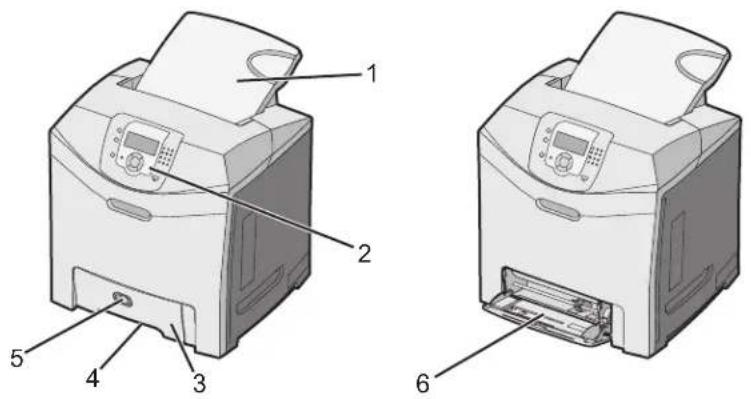
text_image
Technical diagram of a printer with numbered parts labeled 1 through 6 for identification.| 1 Standard exit bin |
| 2 Control panel |
Learning about the printer
| 3 Standard 250-sheet tray (Tray 1) |
| 4 Tray 1 handhold |
| 5 Multipurpose feeder latch |
| 6 Multipurpose feeder |
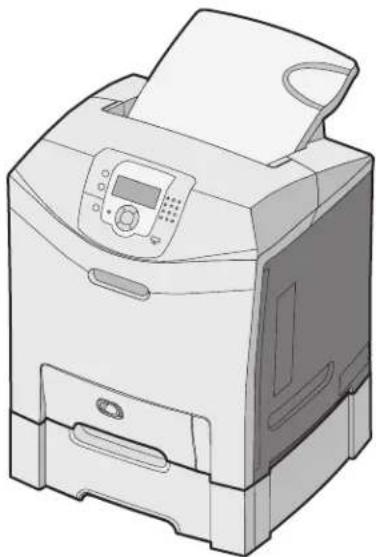
Fully configured model
The following illustration shows the fully configured printer model. Not all models can be fully configured by adding an optional 550-sheet drawer.
natural_image
Line drawing of a printer with control panel and paper feed (no text or symbols)Using the security lock feature
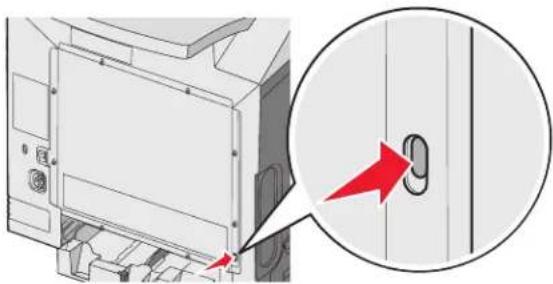
The printer is equipped with a security lock feature. When a lock compatible with most laptop computers is attached, the printer is locked. Once locked, the metal plate and the system board cannot be removed. Attach a security lock to the printer in the location shown.
natural_image
Diagram of a computer monitor with an open door and a close-up view showing a lock mechanism (no text or symbols present)Learning about the printer
Understanding the control panel
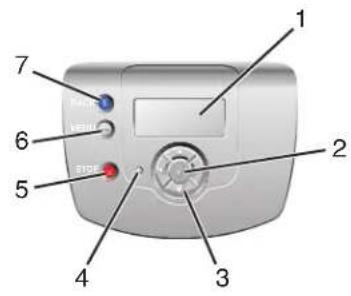
text_image
Diagram of a device with numbered components labeled for identification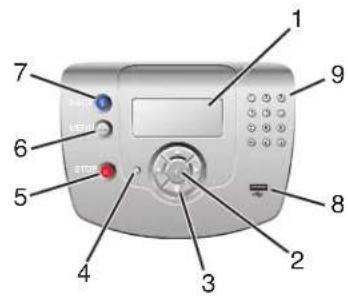
text_image
Labeled diagram of a device control panel with numbered components for identification| Control panel item Description | ||
| 1 | Display The display | shows messages and pictures that communicate information about the printer:Printer status messages—Indicate the current status of the printer, such as Ready.Supplies messages—Provide information about supplies, such as Toner Low.Show-me screens—Provide instructions for resolving common printer errors. These screens are only available when the printer detects an error code. |
| 2 | Select | Pressinginitiates action on a menu item. |
| 3 | Navigation buttons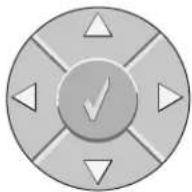 | Pressarto scroll through menu lists.Pressorto scroll through values or text that rolls to another screen. |
| 4 | Indicator light Indicates the printer status:Off—The power is off.Blinking green—The printer is warming up, processing data, or printing.Solid green—The printer is on, but idle.Solid red—Operator intervention is needed. | |
| 5 | Stop Stops all printer activity[A list of options is offered once Stopped appears on the display. | |
| 6 | Menu Opens the menu index | Note:These menus are only available when the printer is in the Ready state. |
| 7 | Back Returns the display to the previous screen | |
| 8 | USB direct port Insert a USB flash drive to send data to the printer. | |
| 9 | Numeric keypad Consists of the numbers 0–9, a backspace button, and a pound button1 2 34 5 67 8 9← 0 # | |
Menus list
A number of menus are available to make it easy for you to change printer settings. This diagram shows the items available under each menu.
Note: Some menu items may not be available based on the printer model or the options installed.
Supplies Menu Paper Menu Reports Settings
| Replace Supply | Default Source | Menu Settings Page | Setup Menu |
| Cyan Cartridge | Paper Size/Type | Device Statistics | Finishing Menu |
| Magenta Cartridge | Configure MP | Network Setup Page | Quality Menu |
| Yellow Cartridge | Substitute Size | Network Setup Page | Utilities Menu |
| Black Cartridge | Paper Texture | Wireless Setup Page | PDF Menu |
| Cyan PC Unit | Paper Weight | Profiles List | PostScript Menu |
| Magenta PC Unit | Paper Loading | NetWare Setup Page | PCL Emul Menu |
| Yellow PC Unit | Custom Types | Print Fonts | HTML Menu |
| Black PC Unit | Universal Setup | Print Directory | Image Menu |
| Fuser | |||
| Transfer Belt |
Security Network/Ports Help
| Max Invalid PIN | TCP/IP | Color Quality |
| Job Expiration | IPv6 | Print Quality |
| Wireless | Printing Guide | |
| Standard Network | Supplies Guide | |
| Network <x> | Media Guide | |
| Standard USB | Print Defects | |
| USB <x> | Menu Map | |
| NetWare | Information Guide | |
| AppleTalk | Connection Guide | |
| LexLink | Moving Guide | |
| USB Direct |
Installing a 550-sheet drawer

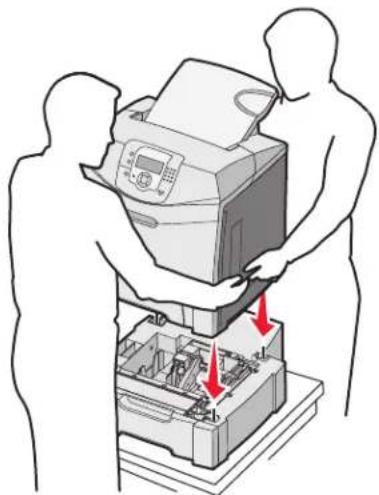
CAUTION: The printer weighs 25.40 kg (56 lb); therefore, it requires at least two people to lift it safely. Use the handholds on the sides of the printer to lift it, and make sure your fingers are not under the printer when you set it down.

The printer supports one optional drawer which allows an additional 550 sheets of paper to be loaded.

CAUTION: If you are installing a 550-sheet drawer after setting up the printer, turn the printer off and unplug the power cord before continuing.
1 Unpack the 550-sheet drawer, and remove any packing material.
2 Place the drawer in the location chosen for the printer.
3 Align the printer with the 550-sheet drawer, and lower the printer into place.
natural_image
Illustration of two silhouetted figures assembling a printer with red arrows indicating process (no text or symbols)4 Set the printer software to recognize the 550-sheet tray.
a Click Start → Settings → Printers.
b Double-click the printer icon.
c Click File → Properties.
d Click the Install Options tab.
e From the Available Options list, select the 550-sheet tray.
f Click Add.
g Click OK.
Installing internal options

CAUTION: If you are installing memory or option cards sometime after setting up the printer, turn the printer off and unplug the power cord before continuing. If you have any other devices attached to the printer, turn them off as well and unplug any cables going to the printer.
You can customize your printer connectivity and memory capacity by adding optional cards. The instructions in this section explain how to install the available cards; you can also use them to locate a card for removal.
Available options
Memory cards
- Printer memory
- Flash memory
- Fonts
Firmware cards
- Bar Code
- PrintCryption™
Note: Use a #2 Phillips screwdriver to remove the system board access cover.
Other internal options
The following internal options may be installed on some models:
- Printer hard disk
• RS-232 serial interface card
• Parallel 1284-B interface card - MarkNet ^TM N8000 Series internal print servers
Accessing the system board to install internal options
Remove the system board cover to access the system board.
Note: This operation requires a #2 Phillips screwdriver.

CAUTION: Turn the printer off, and unplug the power cord before continuing.
Note: Before attempting to access the system board, see "Using the security lock feature" on page 10 and verify there is no security lock on the system board cover.
1 Notice the eight screws located on the metal plate. Turn the screws counterclockwise until they are loose. Do not remove the screws.
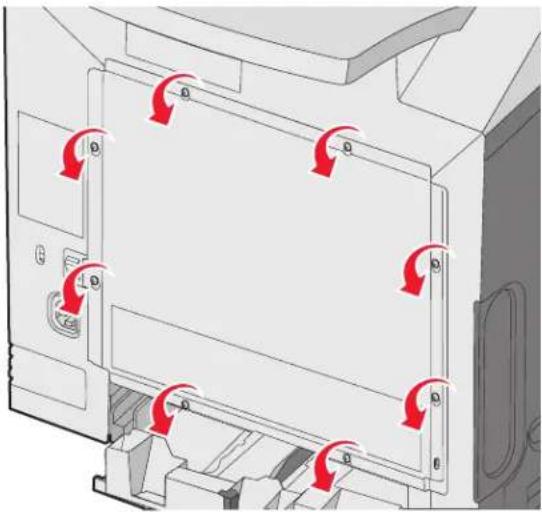
natural_image
Diagram of a computer monitor with red directional arrows indicating rotation or movement (no text or symbols present)2 Lift the metal plate up until each screw is in the keyhole.
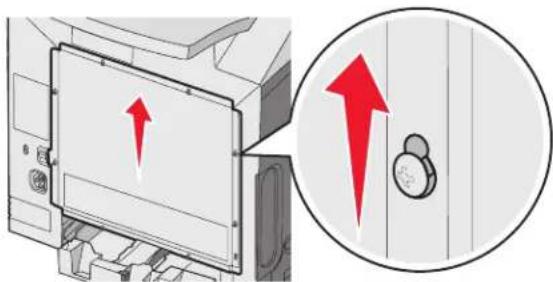
natural_image
Diagram showing a printer's door mechanism with red arrows indicating direction, and a magnified inset showing the close-up of the door (no text or symbols present)3 Pull the metal plate forward to remove it.
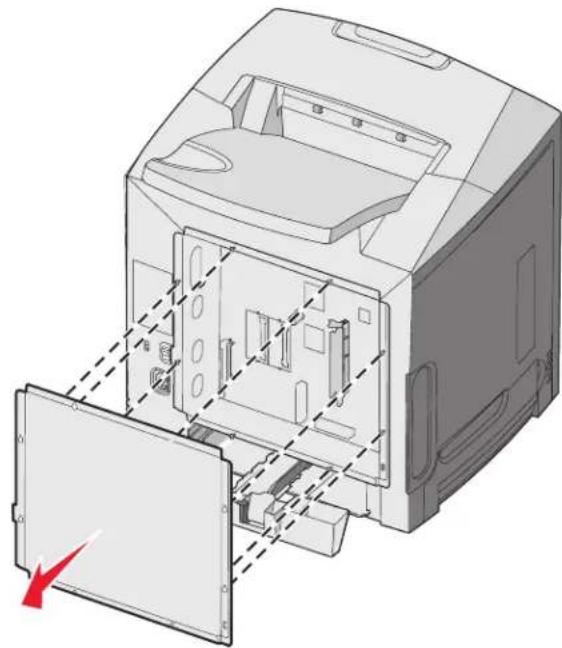
natural_image
3D technical illustration of a computer monitor internal structure with no visible text or symbols4 Use the illustration to locate the connector for the card being installed.
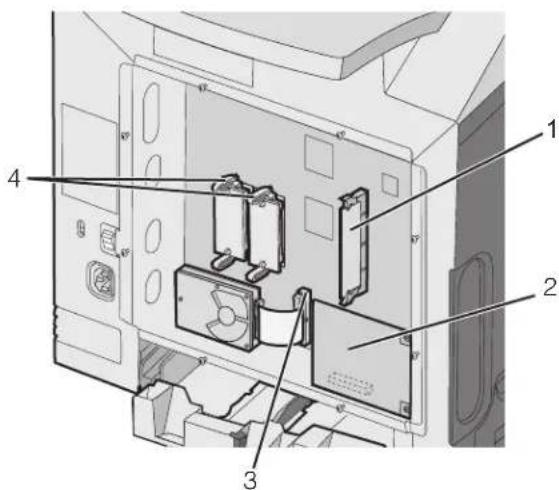
text_image
Technical diagram of an internal computer case with numbered components labeled 1, 2, 3, and 4| 1 | Memory card connector |
| 2 | Internal print server connector |
| 3 | Hard disk connector |
| 4 | Firmware and flash memory card connectors |

Warning: System board electrical components are easily damaged by static electricity. Touch something metal on the printer before touching any system board electronic components or connectors.
Installing a memory card
The system board has one connector for an optional memory card.

CAUTION: If you are installing a memory card after setting up the printer, turn the printer off, and unplug the power cord before continuing.
1 Access the system board.
2 Open both latches on the connector completely.
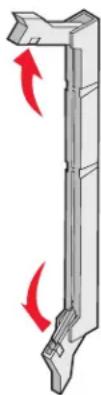
natural_image
Diagram of a mechanical component with red directional arrows indicating rotation or movement (no text or symbols)3 Unpack the memory card.
Note: Avoid touching the connection points along the edge of the card.
4 Align the notches on the memory card with the ridges on the connector.
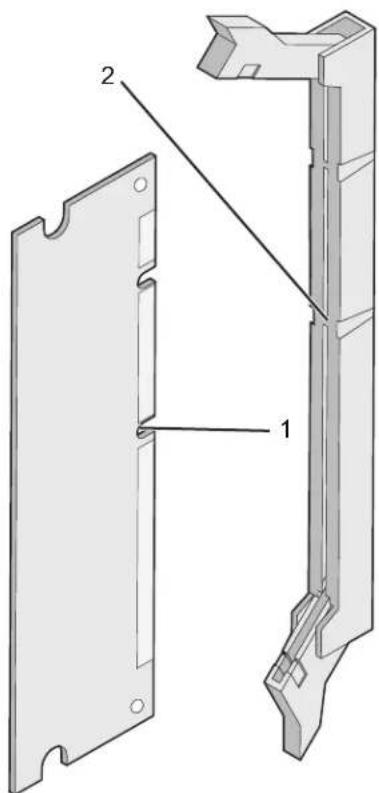
text_image
Technical diagram of a mechanical component with labeled parts 1 and 2| 1 | Notches |
| 2 | Ridges |
5 Push the memory card straight into the connector until it snaps into place. Make sure each latch fits over the notch located on either side of the memory card.
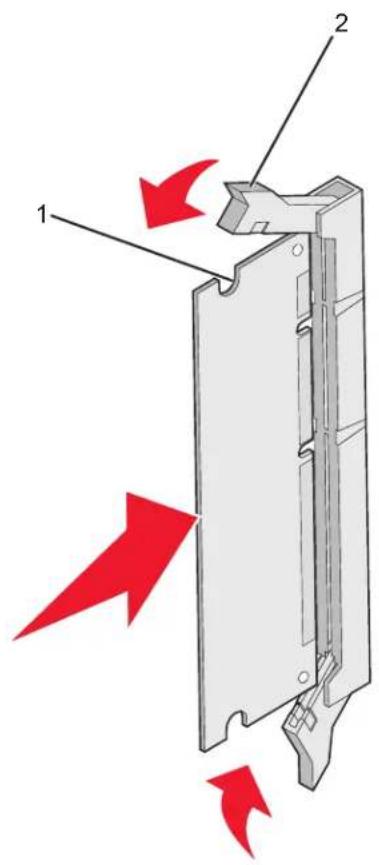
text_image
Diagram showing a mechanical component with red arrows indicating directional flow or force, labeled with parts 1 and 2.| 1 | Notch |
| 2 | Latch |
6 Reinstall the system board access cover.
7 Set the printer software to recognize the memory card.
a Click Start → Settings → Printers.
b Double-click the printer icon.
c Click File → Properties.
d Click the Install Options tab.
e Increase the printer memory to the appropriate number.
f Click OK.
Installing a flash memory or firmware card
The system board has two connections for an optional flash memory or firmware card. Only one of each may be installed, but the connectors are interchangeable.

CAUTION: If installing a flash memory or firmware card after setting up the printer, turn the printer off, and unplug the power cord before continuing.
1 Access the system board. For more information, see "Accessing the system board to install internal options" on page 15.
2 Unpack the memory card.
Note: Avoid touching the connection points along the edge of the card.
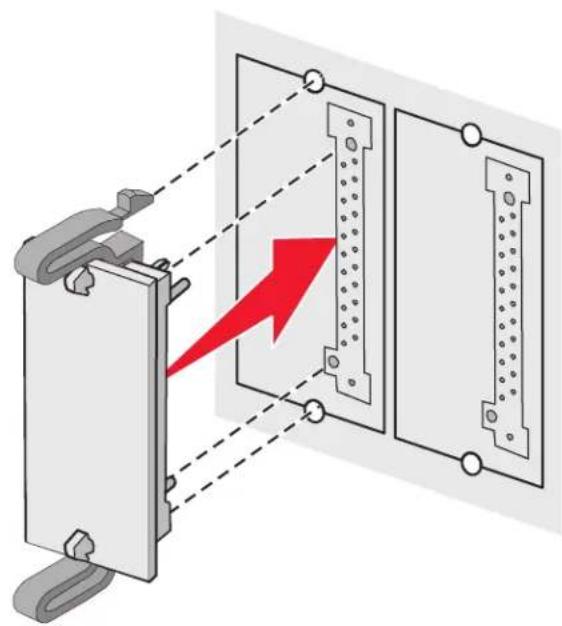
3 Holding the card by its sides, align the plastic pins on the card with the holes on the system board. This ensures the metal pins line up correctly as well.
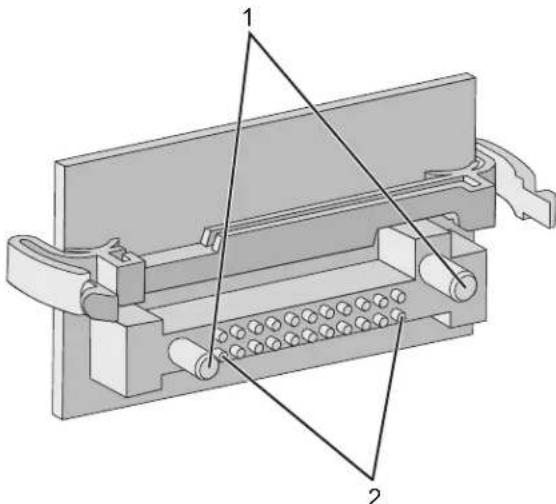
natural_image
Technical diagram of a mechanical component with labeled parts (1 and 2), showing internal structure without any text or symbols.| 1 | Plastic pins |
| 2 | Metal pins |
4 Push the card firmly into place.
natural_image
Diagram of a device with two panels, one showing a red lightning bolt and dashed lines indicating alignment or connection (no text or symbols present)Notes:
- The entire length of the connector on the card must touch and be flush against the system board. - Be careful not to damage the connectors.
5 Reinstall the system board access cover.
6 Set the printer software to recognize the flash memory.
a Click Start → Settings → Printers.
b Double-click the printer icon.
c Click File → Properties.
d Click the Install Options tab.
e From the Available Options list, select Flash memory.
f Click Add.
g Click OK.
Installing a printer hard disk
Note: A #2 Phillips screwdriver is needed to attach the hard disk to the mounting plate.
Warning: Hard disks are easily damaged by static electricity. Touch something metal on the printer before touching a disk.
Note: If an option card has been installed, you may need to remove it before installing the hard disk.
1 Access the system board. For more information, see "Accessing the system board to install internal options" on page 15.
2 Remove the mounting plate, hard disk, ribbon cable, and attachment screws from the package.
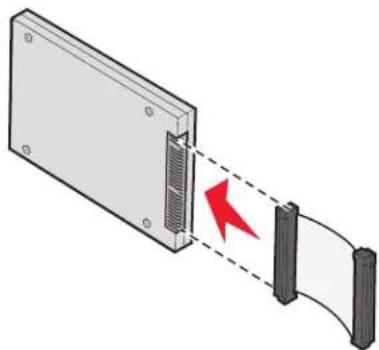
3 Align the ribbon cable connector with the connector pins on the hard disk.
4 Attach the ribbon cable to the hard disk.
natural_image
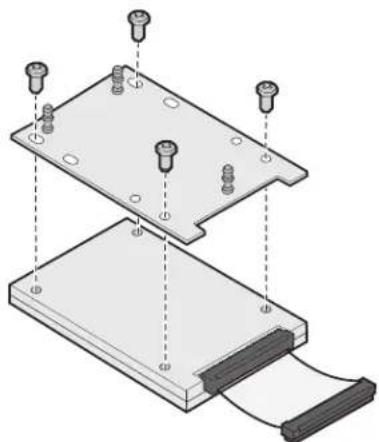
Diagram showing a device with a red arrow indicating a connection or force, connected to a black cable (no text or symbols present)5 Align the screw holes on the mounting plate with the holes in the hard disk.
6 Secure the mounting plate to the hard disk with the screws.
natural_image
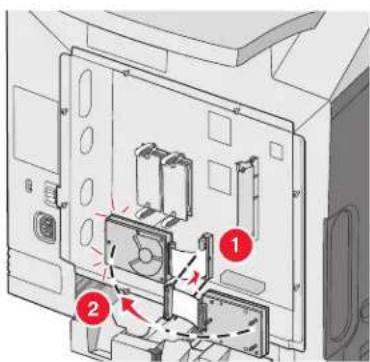
3D diagram of a mechanical assembly with two plates and mounting holes, showing internal components (no text or symbols)7 Press the ribbon cable connector into the connector on the system board.
8 Flip the hard disk over, and then press the three posts on the mounting plate into the holes on the system board. The hard disk snaps into place.
text_image
Technical diagram of a device interior with numbered components and directional arrows indicating movement or assembly.9 Reinstall the system board access cover. For more information, see "Reinstalling the system board access cover" on page 25.
Installing an internal print server or port interface card
Note: A #2 Phillips screwdriver is needed to install an internal print server or port interface card.
Warning: System board electrical components are easily damaged by static electricity. Touch something metal on the printer before touching any system board electronic components or connectors.
An internal print server allows connection from the printer to the local area network (LAN). An optional port interface card expands the ways the printer can connect to a computer or external print server.
1 Access the system board. For more information, see "Accessing the system board to install internal options" on page 15.
2 Unpack the internal print server or port interface card.
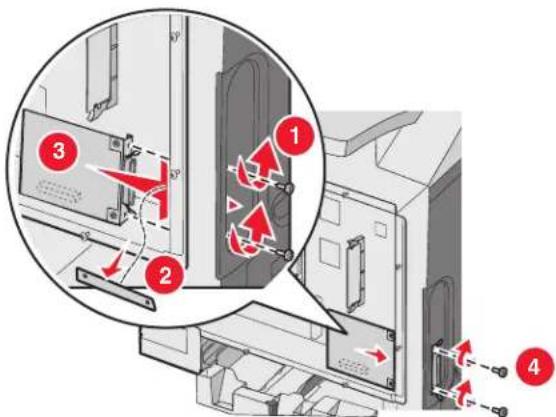
3 Locate the two screws on the printer that attach the metal plate to the connector slot. Remove and save the two screws.
4 Remove the metal plate covering the connector slot and save the metal plate.
5 Align the connector on the internal print server or port interface card with the connector on the system board. The cable connectors on the side of the optional card must fit through the opening in the faceplate. Push the internal print server or port interface card firmly into the card connector on the system board.
text_image
Diagram showing a computer tower with labeled parts and directional arrows indicating movement or operation.6 Insert the two screws saved from the metal plate (or the extra screws shipped with the optional card) into the holes on either side of the connector slot. Gently tighten the screws to secure the card to the system board.
7 Reinstall the system board access cover. For more information, see "Reinstalling the system board access cover" on page 25.
Reinstalling the system board access cover
Note: This operation requires a #2 Phillips screwdriver.
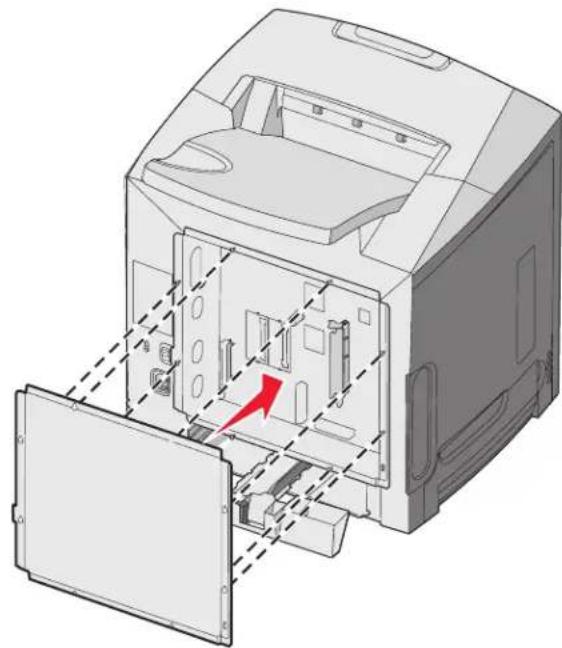
1 Align and place the eight keyholes on the system board metal plate onto the screws on the system board.
natural_image
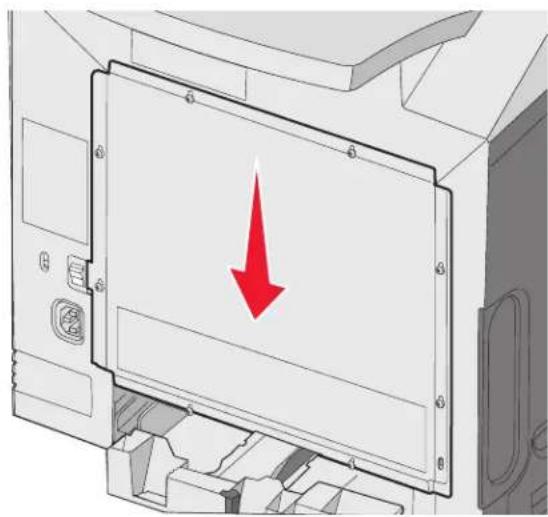
3D diagram of a computer monitor internal structure with a red arrow indicating a component (no text or symbols present)2 Slide the metal plate down.
natural_image
Diagram of a device with a red downward arrow pointing to a screen or panel, no text or symbols present3 Tighten the screws firmly.

natural_image
Diagram of a computer monitor with red arrows indicating rotation or movement, showing no text or symbols present.Attaching cables
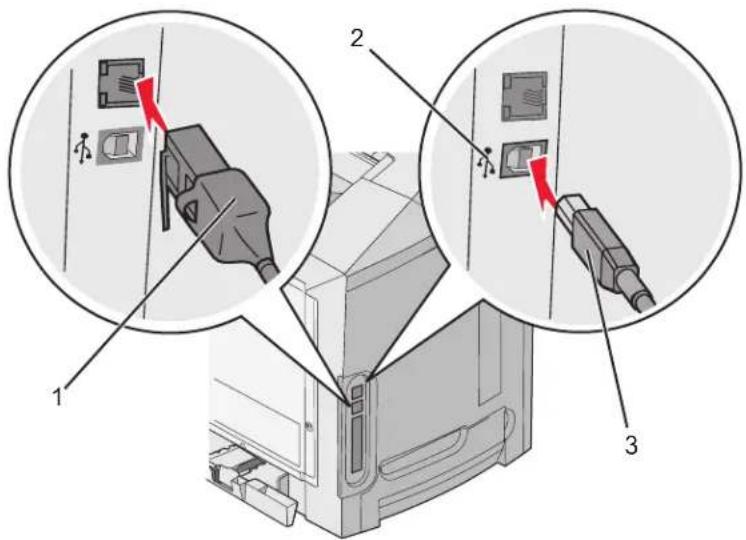
Connect the printer to the computer using a USB cable or an Ethernet cable.
A USB port requires a USB cable. Be sure to match the USB symbol on the cable with the USB symbol on the printer.
Match the appropriate cable with the connector shown:
text_image
Diagram showing three views of a printer's internal structure with labeled components and red arrows indicating insertion or repair steps.| 1 | Ethernet connector |
| 2 | USB symbol |
| 3 | USB connector |
Loading paper and specialty media
This section shows how to load the standard tray (250-sheet letter size tray), the multipurpose feeder, and the optional 550-sheet tray which is part of the optional 550-sheet drawer. It also includes information about the standard exit bin.
Loading the standard tray
The printer has two trays to select from: the standard tray (Tray 1), also known as the 250-sheet tray, and the optional 550-sheet tray (Tray 2). Load the paper or specialty media used for the majority of print jobs in Tray 1. Proper paper loading prevents jams and facilitates trouble-free printing.
Do not remove trays while a job prints or while Busy blinks on the display. Doing so may cause a jam.
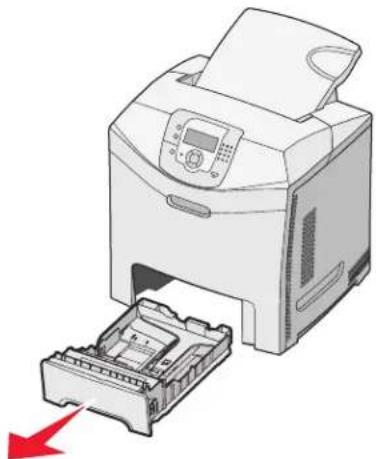
1 Grasp the handle and pull the tray out. Remove the tray completely.
natural_image
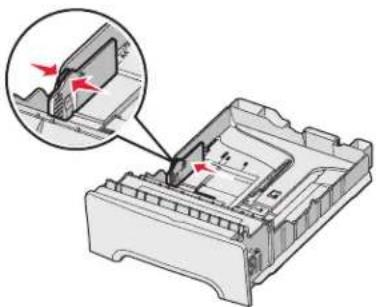
Illustration of a printer with a red arrow indicating compression or disassembly (no text or symbols present)2 Squeeze the width guide tabs together as shown, and move the width guide to the side of the tray.
text_image
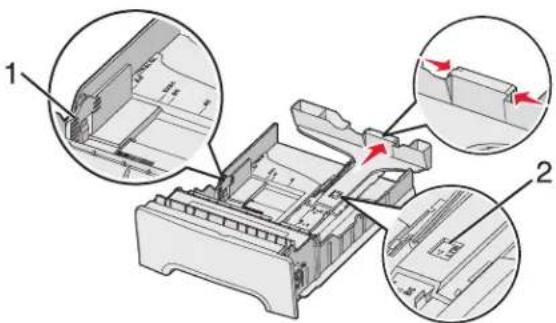
Technical diagram showing a mechanical assembly with labeled components and directional arrows indicating motion or force.3 Squeeze the length guide tabs together as shown, and slide the length guide to the correct position for the size of paper being loaded. Notice the size indicators in the window in the bottom of the tray. Use these indicators to help position the guide. Notice the load lines on the width guide tab: they indicate the maximum height for loading paper.
text_image
Technical diagram of a printer internal structure with labeled parts and directional arrows indicating assembly or movement.| 1 | Load lines |
| 2 | Length indicator |
4 Flex the sheets back and forth to loosen them, and then fan them. Do not fold or crease the paper. Straighten the edges on a level surface.
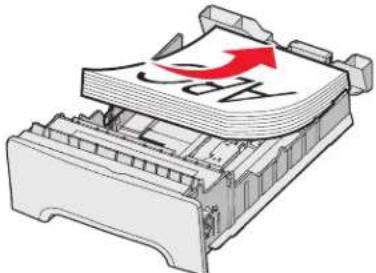
5 Load the paper stack with the recommended print side faceup. Load the stack toward the back of the tray as shown.
When loading preprinted letterhead, place the header toward the front of the tray.
text_image
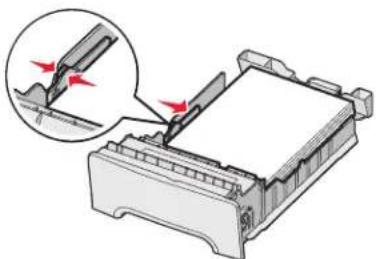
Apc6 Squeeze the width guide tabs, and slide the width guide to lightly touch the side of the stack.
natural_image
Diagram of a printer or printer with a magnified view showing a printer's edge being cut (no text or symbols present)Loading paper and specialty media
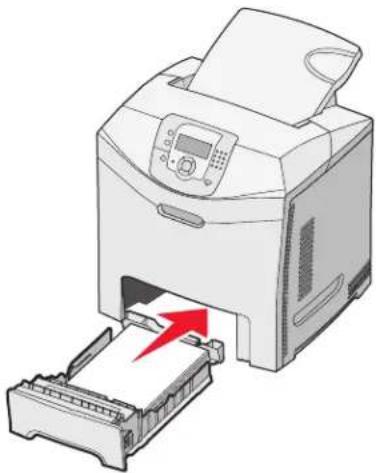
7 Align the tray, and insert it.
natural_image
Illustration of a printer with a red arrow indicating compression or disassembly (no text or symbols present)8 If a different type of paper was loaded than the type previously loaded in the tray, change the Paper Type setting for the tray from the control panel. For more information, see "Setting the Paper Size and Paper Type" on page 35.
Loading the optional 550-sheet tray
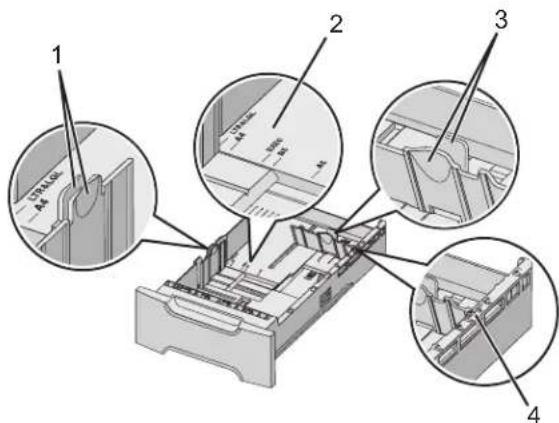
The optional 550-sheet drawer consists of a 550-sheet tray and a support unit. This tray is loaded in the same way that the standard tray is loaded. The only differences between the trays are the look of the guide tabs and the location of the paper size indicators, as shown in the following illustration. When the 550-sheet tray is loaded for the first time or when a new size is loaded, remove the tray completely from the support unit.
text_image
Technical diagram of a mechanical assembly with numbered components and cross-sectional views| 1 | Width guide tabs |
| 2 | Size indicators |
| 3 | Length guide tabs |
| 4 | Size indicators |
Note: If the same paper size is loaded again, the tray does not need to be completely removed from the support unit. Just remove and load the paper without adjusting the guides.
Loading the multipurpose feeder
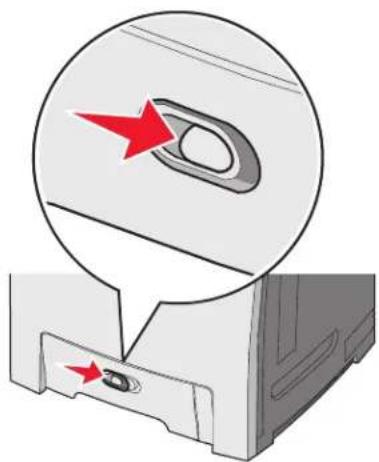
1 Push the multipurpose feeder latch to the right.
natural_image
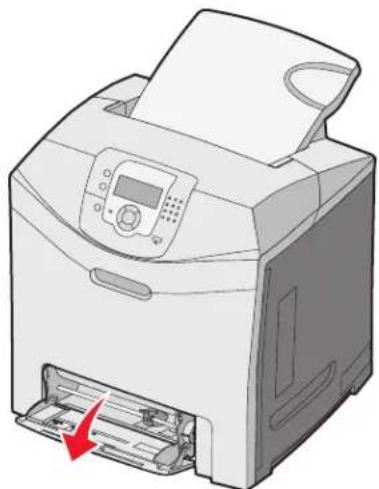
Diagram of a computer monitor with a close-up view showing the screen and keyhole (no text or symbols present)2 Pull the multipurpose feeder door down.
natural_image
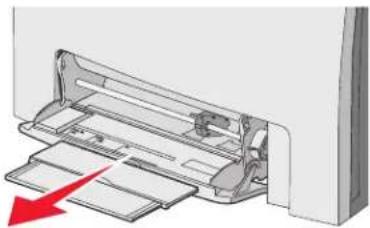
Illustration of a printer with a paper feed into the print area, showing no text or symbols on the device itself.3 Grasp the extension, and then pull it straight out until it is fully extended.
natural_image
Diagram of a printer holder with a red arrow indicating compression or disassembly (no text or symbols present)Loading paper and specialty media
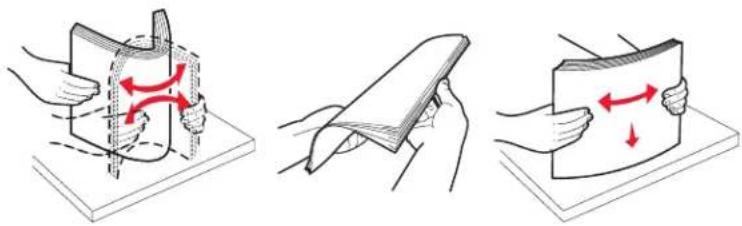
4 Prepare the paper for loading.
- Flex sheets of paper back and forth to loosen them, and then fan them. Do not fold or crease the paper. Straighten the edges on a level surface.
natural_image
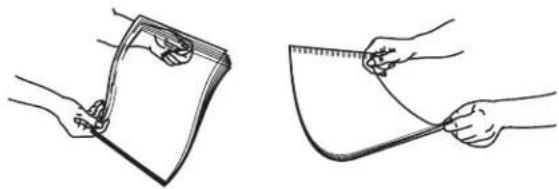
Three-step illustration showing hands holding a folded paper or sheet, with red arrows indicating direction of movement (no text or symbols present)- Hold transparencies by the edges and fan them. Straighten the edges on a level surface.
Note: Avoid touching the print side of transparencies. Be careful not to scratch them.
natural_image
Illustration of two hands holding a measuring tape, showing different measurement methods (no text or symbols present)- Flex a stack of envelopes back and forth to loosen them, and then fan them. Straighten the edges on a level surface.
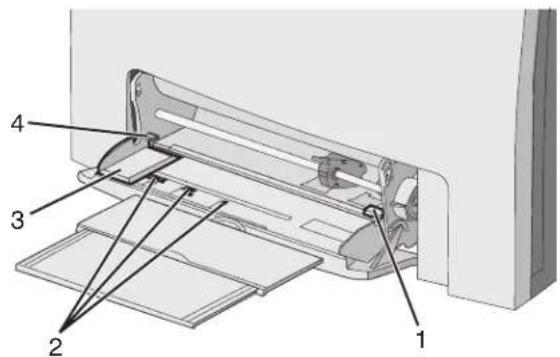
5 Locate the stack height limiter and tab.
Note: Do not exceed the maximum stack height by forcing paper under the stack height limiter.
text_image
Technical diagram of a printer or printer with numbered parts labeled 1 to 4| 1 | Stack height limiter |
| 2 | Size indicators |
| 3 | Width guide |
| 4 | Tab |
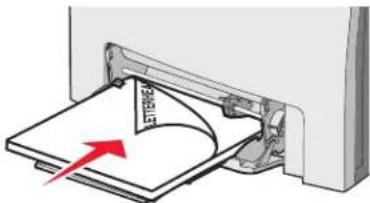
6 Load the paper, and then adjust the width guide to lightly touch the edge of the paper stack.
- Load paper, card stock, and transparencies with the recommended print side facedown and the top edge entering first.
natural_image
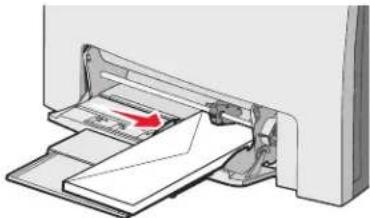
Diagram of a printer or printer with a paper sheet being inserted, showing a red arrow indicating the process (no text or symbols present)- Load envelopes with the flap side up.
Warning: Never use envelopes with stamps, clasps, snaps, windows, coated linings, or self-stick adhesives. These envelopes may severely damage the printer.
natural_image
Diagram of a printer printer with paper feed and paper holder, showing internal structure without any text or symbols7 Make sure the paper is as far into the multipurpose feeder as it will go with very gentle pushing. Paper should lie flat in the multipurpose feeder.
Make sure the paper fits loosely in the multipurpose feeder and is not bent or wrinkled.
8 From the control panel, set the Paper Size and Paper Type.
Using the multipurpose feeder
The multipurpose feeder handles a variety of media, including envelopes. Paper not kept in a tray can also be loaded into the multipurpose feeder. The multipurpose feeder can be closed when not in use.
From Print Properties, set the Paper Size and Paper Type. When Load MP Feeder with
Follow these guidelines when using the multipurpose feeder:
- Load paper with the top edge going into the multipurpose feeder first.
- Load preprinted letterhead facedown.
- To achieve the best possible print quality, use only high-quality paper designed for laser printers.
- Remove paper from the multipurpose feeder, and then push the extensions back into place before opening the lower door.
- Do not place objects on the multipurpose feeder or apply excessive force to it.
• To prevent jams:
- Load only one size and type of paper at a time.
- Do not add paper to the multipurpose feeder when it already contains paper.
- Do not load or close the multipurpose feeder while a job is printing.
For information about supported paper sizes and types, see the section about paper and specialty media.
Loading the manual feeder
Note: The multipurpose feeder can also be used as a manual feeder.
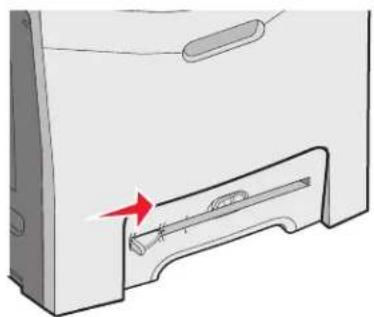
1 Use the marks above the slot to adjust the width guide for standard paper sizes. For odd sizes, once the paper is loaded, move the width guide until it lightly touches the sheet.
Warning: Do not force the width guide against the paper, or it could be damaged.
natural_image
Diagram of a device with a red arrow pointing to a component, no text or symbols present2 Load one sheet of paper flush with the right side of the slot.
Load an envelope with the flap side up. The orientation of the envelope in this case is the same as its orientation when it is loaded into the multipurpose feeder. For an illustration of proper envelope orientation, see "Load envelopes with the flap side up." on page 32.
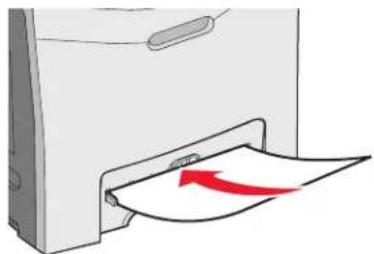
natural_image
Illustration of a printer with a paper being inserted, showing paper being inserted (no text or symbols present)3 Push the paper in until it stops. The printer pulls it in farther.
Using the manual feeder
Use the manual feeder to load single sheets not kept in a tray, such as letterhead.
From Print Properties, set the Paper Size and Paper Type. When Load manual feeder with
Follow these guidelines when using the manual feeder:
- Load only one sheet at a time.
- Load paper with the top edge going into the manual feeder first.
- Load preprinted letterhead facedown.
- To prevent jams, do not add paper to the manual feeder while a job is printing.
• To achieve the best possible print quality, use only high-quality paper designed for laser printers.
For information about supported paper sizes and types, see the section about paper and specialty media.
Using the standard exit bin
The standard exit bin holds up to 250 sheets of 20 lb paper. It collects print jobs facedown.
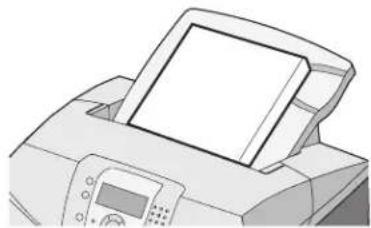
natural_image
Illustration of a printer with a paper sheet being inserted (no text or symbols visible)The standard exit bin collects every type of paper and specialty media the printer supports. For more information, see "Paper and specialty media guide" on page 37.
Attaching the standard exit bin
To attach the standard exit bin to the printer:
1 Align it with the opening on top of the printer and slide it down.
2 Press it down into place.
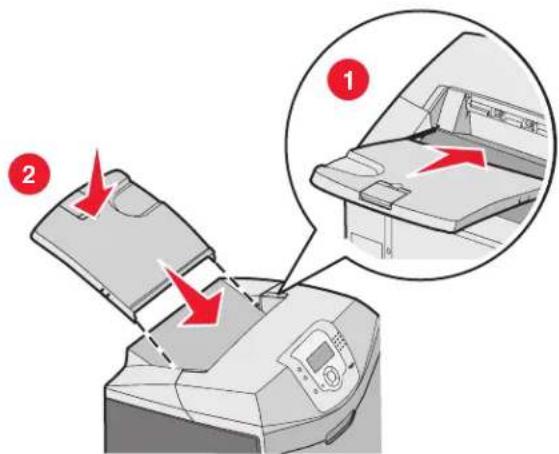
text_image
Diagram showing a printer with red arrows indicating process steps, including zoomed-in detail of the printer's internal structure.Using the paper stop
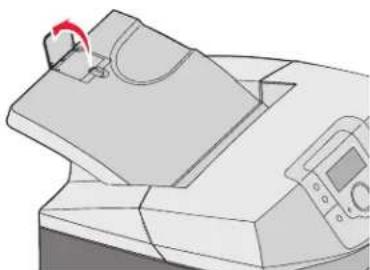
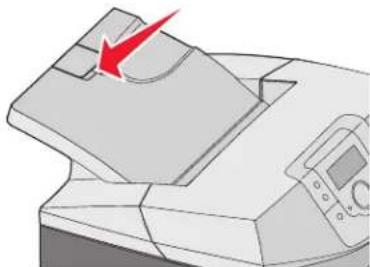
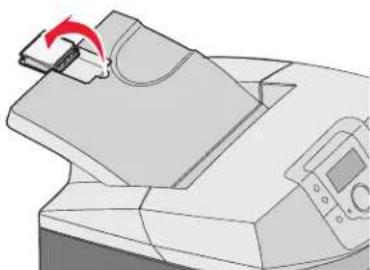
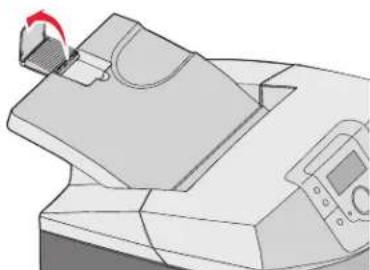
The standard exit bin has a paper stop which is used to keep paper from sliding off the back of the printer. It can be set to two lengths, one for shorter paper sizes such as letter and A4, and one for longer sizes such as legal.
To extend the paper stop for short paper sizes:
1 Grasp the flap at the indentation nearest the top of the bin.
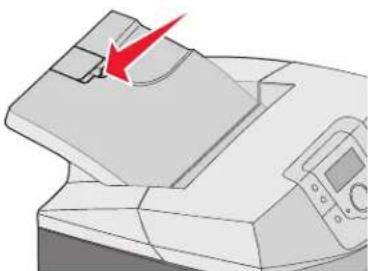
natural_image
Illustration of a printer with a red arrow pointing to the cover (no text or symbols present)2 Rotate it back until it stops at a 90^ angle.
Loading paper and specialty media
natural_image
Illustration of a printer with a paper airplane and a red arrow indicating rotation (no text or symbols)To close it, fold it back down.
To extend the paper stop for longer paper sizes, start with the paper stop fully closed:
1 Grasp the paper stop at the indentation farthest from the top of the bin.
natural_image
Illustration of a printer with a red arrow pointing to the cover (no text or symbols present)2 Rotate it up and back until it is lies flat.
natural_image
Illustration of a printer with a red arrow indicating rotation (no text or symbols)3 Lift up the flap and rotate it back until it stops at a 90^ angle.
natural_image
Illustration of a printer with a paper feeding into a slot (no text or symbols visible)To close the paper stop, fold the flap forward and down. Rotate the paper stop back into its closed position.
Setting the Paper Size and Paper Type
Note: Trays with matching Paper Size and Paper Type settings are automatically linked by the printer. When a linked tray runs out of paper, the printer draws from another tray.
Loading paper and specialty media
To change the Paper Size and Paper Type settings:
1 Make sure the printer is on and Ready appears.
2 From the control panel, press
3 Press ▼ until √ Paper Menu appears, and then press ⏻.
4 Press ▼ until √ Paper Size/Type appears, and then press ⏻.
5 Press ▼ until the correct tray appears, and then press ⏻.
6 Press ▼ until √ appears next to the correct size, and then press ⏻.
7 Press ◀ or ▶ to scroll through the list of possible paper types. Highlight the correct type, and then press ⚙.
Submitting Selection appears. The printer returns to the Paper Menu.
8 Press 5 twice to return to the Ready state.
Tray linking
Tray linking enables the automatic linking feature for trays when the same size and type of paper is loaded in multiple sources. By linking trays, you can create a larger capacity for output. When one tray is empty, paper feeds from the next linked tray. For example, if Trays 1 and 2 are linked, once Tray 1 is empty, the printer will use paper from Tray 2 to finish printing.
Once the selected trays are loaded with same size and type of paper, set the Paper Type to be the same for both trays. To disable tray linking, set the Paper Type setting to be different for each tray. For information about linking trays, see the Paper menu table in the Menus and Messages Guide.
Media guidelines
Media characteristics
The following media characteristics affect print quality and reliability. Consider these characteristics when evaluating new media stock.
Weight
The printer can automatically feed media weights from 60 to 176 g/m ^2 (16 to 47 lb bond) grain long. Media lighter than 60 g/m ^2 (16 lb) might not be stiff enough to feed properly, causing jams. For best performance, use 90 g/m ^2 (24 lb bond) grain long media. For media smaller than 182 x 257 mm (7.2 x 10.1 in.), we recommend 90 g/m ^2 or heavier media.
Curl
Curl is the tendency for media to curl at its edges. Excessive curl can cause media feeding problems. Curl can occur after the media passes through the printer, where it is exposed to high temperatures. Storing media unwrapped in hot, humid, cold, or dry conditions, even in the trays, can contribute to media curling prior to printing and can cause feeding problems.
Smoothness
Media smoothness directly affects print quality. If media is too rough, toner cannot fuse to it properly. If media is too smooth, it can cause media feeding or print quality issues. Always use media between 100 and 300 Sheffield points; however, smoothness between 150 and 200 Sheffield points produces the best print quality.
Moisture content
The amount of moisture in media affects both print quality and the ability of the printer to feed the media correctly. Leave media in its original wrapper until it is time to use it. This limits the exposure of media to moisture changes that can degrade its performance.
Condition media before printing by storing it in its original wrapper in the same environment as the printer for 24 to 48 hours before printing. Extend the time several days if the storage or transportation environment is very different from the printer environment. Thick media may also require a longer conditioning period.
Grain direction
Grain refers to the alignment of the media fibers in a sheet of media. Grain is either grain long, running the length of the media, or grain short, running the width of the media. For 60 to 90 g/m ^2 (16 to 24 lb bond) media, use grain long fibers.
Fiber content
Most high-quality xerographic media is made from 100% chemically treated pulped wood. This content provides the media with a high degree of stability resulting in fewer media feeding problems and better print quality. Media containing fibers such as cotton possesses characteristics that can negatively affect media handling.
Unacceptable media
The following media types are not recommended for use with the printer:
- Chemically treated media used to make copies without carbon paper, also known as carbonless papers, carbonless copy paper (CCP), or no carbon required (NCR) paper
- Preprinted media with chemicals that may contaminate the printer
- Preprinted media that can be affected by the temperature in the printer fuser
- Preprinted media that requires a registration (the precise print location on the page) greater than ± 2.3 mm ( ± 0.09 in.), such as optical character recognition (OCR) forms
In some cases, registration can be adjusted with a program to successfully print on these forms.
- Coated media (erasable bond), synthetic media, thermal media
- Rough-edged, rough, or heavily textured surface media, or curled media
• Recycled media containing more than 25% post-consumer waste that does not meet DIN 19 309
• Media weighing less than 60 g/m ^2 (16 lb)
- Multiple-part forms or documents
Selecting media
Using appropriate media prevents jams and helps ensure trouble-free printing.
To help avoid jams and poor print quality:
• Always use new, undamaged media.
- Before loading media, know the recommended print side of the media. This information is usually indicated on the media package.
- Do not use media that has been cut or trimmed by hand.
- Do not mix media sizes, types, or weights in the same source; mixing results in jams.
- Do not use coated media unless they are specifically designed for electrophotographic printing.
Selecting preprinted forms and letterhead
Use these guidelines when selecting preprinted forms and letterhead:
- Use grain long papers for best results for 60 to 90g / m^2 weights.
- Use only forms and letterhead printed using an offset lithographic or engraved printing process.
- Avoid papers with rough or heavily textured surfaces.
User papers printed with heat-resistant inks designed for use in xerographic copiers. The ink must be able to withstand temperatures up to 180^ C ( 356^ F) without melting or releasing hazardous emissions. Use inks that are not affected by the resin in toner. Inks that are oxidation-set or oil-based generally meet these requirements; latex inks might not. When in doubt, contact the paper supplier.
Preprinted papers such as letterhead must be able to withstand temperatures up to 180^ C ( 356^ F) without melting or releasing hazardous emissions
Using letterhead
Check with the manufacturer or vendor to determine whether the chosen preprinted letterhead is acceptable for laser printers.
Page orientation is important when printing on letterhead. Use the following table for help when loading letterhead.
| Process or paper source Print side Top of page | ||
| Tray 1 | Letterhead faceup | Letterhead goes toward the front of the tray |
| Tray 2 | Letterhead faceup | Letterhead goes toward the front of the tray |
| Duplex (two-sided) printing from trays 1 and 2 | Letterhead facedown | Letterhead goes toward the rear of the tray |
| Multipurpose feeder | Letterhead facedown | Letterhead top edge enters first |
| Manual feeder | Letterhead facedown | Letterhead top edge enters first |
| Duplex (two-sided) printing from the multitpurpose feeder | Letterhead faceup Letterhead top edge enters last | |
Using transparencies
Print samples on the transparencies being considered for use before buying large quantities.
When printing on transparencies:
- From MarkVision™ Professional, the printer software, or the control panel, set the Paper Type to Transparency. For more information, see “Setting the Paper Size and Paper Type” on page 35.
- Feed transparencies from the standard tray (Tray 1) or the multipurpose feeder.
- Use transparencies designed specifically for laser printers. Check with the manufacturer or vendor to ensure transparencies are able to withstand temperatures up to 180°C (356°F) without melting, discoloring, offsetting, or releasing hazardous emissions.
- Use transparencies that are 0.12–0.14 mm (4.8–5.4 mil) in thickness or 161–179 g/m ^2 in weight. Print quality and durability depend on the transparencies used.
- To prevent print quality problems, avoid getting fingerprints on the transparencies.
- Before loading transparencies, fan the stack to prevent sheets from sticking together.
- We recommend Lexmark part number 12A8240 for letter-size and Lexmark part number 12A8241 for A4-size transparencies.
Using envelopes
Print samples on the envelopes being considered for use before buying large quantities. For information on loading envelopes, see “Loading the multipurpose feeder” on page 30 or “Loading the manual feeder” on page 33.
When printing on envelopes:
- From the control panel, set the Paper Source based on the source in use. From the control panel, the printer software, or MarkVision Professional, set the Paper Type to Envelope, and select the envelope size. For more information, see “Setting the Paper Size and Paper Type” on page 35.
- Use envelopes designed specifically for laser printers. Check with the manufacturer or vendor to ensure the envelopes can withstand temperatures up to 180°C (356°F) without sealing, wrinkling, curling excessively, or releasing hazardous emissions.
- For the best performance, use envelopes made from 90g / m^2 (24 lb bond) paper. Use up to 105g / m^2 (28 lb bond) weight for envelopes as long as the cotton content is 25% or less. All-cotton envelopes must not exceed 90g / m^2 (24 lb bond) weight.
- Use only new envelopes.
- To optimize performance and minimize jams, do not use envelopes that:
- Have excessive curl or twist
- Are stuck together or damaged in any way
- Have windows, holes, perforations, cutouts, or embossing
- Have metal clasps, string ties, or folding bars
- Have an interlocking design
– Have postage stamps attached - Have any exposed adhesive when the flap is in the sealed or closed position
- Have bent corners
- Have rough, cockle, or laid finishes
- Adjust the width guide to fit the width of the envelopes.
Note: A combination of high humidity (over 60%) and the high printing temperature may wrinkle or seal envelopes.
Using labels
Print samples on the labels being considered for use before buying large quantities. For detailed information on label printing, characteristics, and design, see the Card Stock & Label Guide available on the Lexmark Web site at www.lexmark.com/publications.
Note: Vinyl labels are not supported on this product. Use only paper labels.
When printing on labels:
- From the printer software, MarkVision Professional, or the control panel, set the Paper Type to Labels.
- Use only letter-, A4-, and legal-size label sheets.
- Use labels designed specifically for laser printers. Check with the manufacturer or vendor to verify that label adhesives, face sheet (printable stock), and topcoats can withstand temperatures up to 180°C (356°F) and pressure up to 30 psi without delaminating, oozing around the edges, or releasing hazardous fumes. Do not use vinyl labels.
- Do not use labels with slick backing material.
- Use full label sheets. Partial sheets may cause labels to peel off during printing, resulting in a jam. Partial sheets also contaminate the printer and the cartridge with adhesive, and could void the printer and cartridge warranties.
- Do not print within 1 mm (0.04 in) of the edge of the label, of the perforations, or between die-cuts of the label.
- Be sure adhesive backing does not reach to the sheet edge. Zone coating of the adhesive at least 1 mm (0.04 in) away from edges is recommended. Adhesive material contaminates the printer and could void the warranty.
- If zone coating of the adhesive is not possible, remove a 3 mm (0.125 in.) strip on the leading and driver edge, and use a non-oozing adhesive.
- Portrait orientation works best, especially when printing bar codes.
- Do not use labels with exposed adhesive.
Using card stock
Card stock is heavy, single-ply print media. Many of its variable characteristics, such as moisture content, thickness, and texture, can significantly impact print quality.
Print samples on the card stock being considered for use before buying large quantities.
When printing on card stock:
- From MarkVision Professional, the printer software, or the control panel:
1 Set the Paper Type to Card Stock.
2 Set the Paper Weight to Card Stock Weight.
3 Set the Card Stock Weight to Normal or Heavy.
- Be aware that preprinting, perforation, and creasing may significantly affect the print quality and cause jams or other paper handling problems.
- Check with the manufacturer or vendor to ensure the card stock can withstand temperatures up to 180°C (356°F) without releasing hazardous emissions.
- Do not use preprinted card stock manufactured with chemicals that may contaminate the printer. Preprinting introduces semi-liquid and volatile components into the printer.
- Use grain long card stock when possible.
Storing media
Use these media storage guidelines to help avoid jams and uneven print quality:
- For best results, store media where the temperature is 21^ (70°F) and the relative humidity is 40%.
- Store media in cartons when possible, on a pallet or shelf, rather than on the floor.
- Store individual packages of media on a flat surface.
- Do not store anything on top of individual media packages.
Supported paper sizes, types, and weights
The following tables provide information on standard and optional paper sources and the types of paper they support.
Note: For an unlisted paper size, select the closest larger listed size.
For information on card stock and labels, see the Card Stock & Label Guide
Supported paper sizes
√—supported
X—unsupported
| Paper size Dimensions Standard 250-sheet | tray (Tray 1) | Optional 550-sheet tray (Tray 2) | Multipurpose feeder or manual feeder | |
| Letter | 215.9 x 279.4 mm(8.5 x 11 in.) | √ | √ | √ |
| Legal | 215.9 x 355.6 mm(8.5 x 14 in.) | √ | √ | √ |
| JIS B5 | 182 x 257 mm(7.17 x 10.1 in.) | √ | √ | √ |
| A4 | 210 x 297 mm(8.27 x 11.7 in.) | √ | √ | √ |
| Executive | 184.2 x 266.7 mm(7.25 x 10.5 in.) | √ | √ | √ |
| A5 | 148 x 210 mm(5.83 x 8.27 in.) | √ | √ | √ |
| Folio | 216 x 330 mm(8.5 x 13 in.) | √ | √ | √ |
| *This size setting formats the page or envelope for 215.9 x 355.6 mm (8.5 x 14 in.) for the 250-sheet tray unless the size is specified by the program.Measurements apply to simplex (one-sided) printing only. For duplex (two-sided) printing, the minimum size is 139.7 x 210 mm (5.50 x 8.27 in.). | ||||
| Statement | 139.7 x 215.9 mm(5.5 x 8.5 in.) | X | X | ✓ |
| Universal* | 148 x 210 mm to 215.9 x 355.6 mm(5.83 x 8.27 in. to 8.5 x 14 in.) | ✓ | ✓ | X |
| 76.2 x 123.8 mm(3 x 4.88 in.) to 215.9 x 355.6 mm(8.5 x 14 in.) | X | X | ✓(Multipurpose feeder) | |
| 76.2 x 152.4 mm(3 x 6 in.) to 215.9 x 355.6 mm(8.5 x 14 in.) | X | X | ✓(Manual feeder) | |
| 7 3/4 Envelope(Monarch) | 98.4 x 190.5 mm(3.875 x 7.5 in.) | X | X | ✓ |
| Commercial 9Envelope | 98.4 x 225.4 mm(3.875 x 8.9 in.) | X | X | ✓ |
| Commercial 10Envelope | 104.8 x 241.3 mm(4.12 x 9.5 in.) | X | X | ✓ |
| International DLEnvelope | 110 x 220 mm(4.33 x 8.66 in.) | X | X | ✓ |
| International C5Envelope | 162 x 229 mm(6.38 x 9.01 in.) | X | X | ✓ |
| International B5Envelope | 176 x 250 mm(6.93 x 9.84 in.) | X | X | ✓ |
| Other Envelope* | 104.8 x 210 mm to 215.9 x 355.6 mm(4.125 x 8.27 in. to 8.5 x 14 in.) | X | X | ✓ |
| *This size setting formats the page or envelope for 215.9 x 355.6 mm (8.5 x 14 in.) for the 250-sheet tray unless the size is specified by the program.Measurements apply to simplex (one-sided) printing only. For duplex (two-sided) printing, the minimum size is 139.7 x 210 mm (5.50 x 8.27 in.). | ||||
Support for paper types
| Paper type Standard | 250-sheet tray (Tray 1) | Optional 550-sheet tray (Tray 2) | Multipurpose feeder or manual feeder | Duplex |
| Paper | √ | √ | √ | √ |
| Card stock X | √ | √ | √ | |
| Transparencies X | √ | √ | √ | |
| Paper labels* X | √ | √ | √ | |
| Envelopes X X X | √ | |||
| Glossy paper | √ | √ | √ | √ |
| * Vinyl labels are not supported. | ||||
Paper types and weights
| Paper type Standard 250-sheet tray (Tray 1) | Optional 550-sheet tray (Tray 2) | Multipurpose feeder or manual feeder |
| Plain (xerographic or business) paper ^2 | Simplex only—60 to 177 g/m^2 grain long (16 to 47 lb bond) ^1 Simplex or duplex—75 to 120 g/m^2 grain long (20 to 32 lb bond) | Simplex only—60 to 177 g/m^2 grain long (16 to 47 lb bond) ^1 Simplex or duplex—75 to 120 g/m^2 grain long (20 to 32 lb bond) |
| Glossy papers—maximum | Text— 120 g/m^2 (80 lb Text, 32 lb Bond) | Text— 120 g/m^2 (80 lb Text, 32 lb Bond) |
| Recycled papers Simplex only—75 to 177 g/m^2 grain long (20 to 47 lb bond)Simplex or duplex—75 to 120 g/m^2 grain long (20 to 32 lb bond) | Simplex only—75 to 177 g/m^2 grain long (20 to 47 lb bond)Simplex or duplex—75 to 120 g/m^2 grain long (20 to 32 lb bond) | Simplex only—75 to 177 g/m^2 grain long (20 to 47 lb bond)Simplexor duplex—75 to 120 g/m^2 grain long (20 to 32 lb bond) |
| ^1 Paper weighing less than 75 g/m^2 (20 lb bond) is limited to simplex printing only at less than 60% relative humidity. ^2 For 60 to 176 g/m^2 (16 to 47 lb bond) paper, we recommend grain long fibers.For papers heavier than 176 g/m^2 (47 lb bond), we recommend grain short. ^3 The label area (pressure-sensitive area) must enter the printer first. ^4 Vinyl labels are not supported. ^5 Use sulfite, wood-free, or up to 100% cotton envelopes. ^6 Maximum weight for 100% cotton envelopes is 90 g/m^2 . ^7 105 g/m^2 (28 lb bond) envelopes must not exceed 25% cotton content. | ||
| Paper type Standard 250-sheet tray (Tray 1) | Optional 550-sheet tray (Tray 2) | Multipurpose feeder or manual feeder | |
| Card stock—maximum (grain long) | Index Bristol—120 g/m2(67 lb)Tag—120 g/m2(74 lb)Cover—135 g/m2(50 lb) | Index Bristol—120 g/m2(67 lb)Tag—120 g/m2(74 lb)Cover—135 g/m2(50 lb) | Index Bristol—120 g/m2(67 lb)Tag—120 g/m2(74 lb)Cover—135 g/m2(50 lb) |
| Card stock—maximum (grain short) | Index Bristol—163 g/m2(90 lb)Tag—163 g/m2(100 lb)Cover—176 g/m2(65 lb) | Index Bristol—163 g/m2(90 lb)Tag—163 g/m2(100 lb)Cover—176 g/m2(65 lb) | Index Bristol—163 g/m2(90 lb)Tag—163 g/m2(100 lb)Cover—176 g/m2(65 lb) |
| Transparencies | 0.12–0.14 mm (4.8–5.4 mil) thick161–179 g/m2 | 0.12–0.14 mm (4.8–5.4 mil) thick161–179 g/m2 | 0.12–0.14 mm (4.8–5.4 mil) thick161–179 g/m2 |
| Paper Labels—maximum3,4 | 131 g/m2(35 lb bond) 131 g/m2(35 lb bond) 131 g/m2(35 lb bond) | g/m2(35 lb bond) 131 g/m2(35 lb bond) | g/m2(35 lb bond) |
| Envelopes5 | X | X | 60 to 105 g/m2(16 to 28 lb bond)6,7 |
| 1 Paper weighing less than 75 g/m2(20 lb bond) is limited to simplex printing only at less than 60% relative humidity.2 For 60 to 176 g/m2(16 to 47 lb bond) paper, we recommend grain long fibers.For papers heavier than 176 g/m2(47 lb bond), we recommend grain short.3 The label area (pressure-sensitive area) must enter the printer first.4 Vinyl labels are not supported.5 Use sulfite, wood-free, or up to 100% cotton envelopes.6 Maximum weight for 100% cotton envelopes is 90 g/m2.7 105 g/m2(28 lb bond) envelopes must not exceed 25% cotton content. | |||
Paper capacities
| Paper type | Standard 250-sheet tray (Tray 1) | Optional 550-sheet tray (Tray 2) | Multipurpose feeder |
| Paper | 250 sheets* 550 sheets* 100 sheets* | ||
| Envelopes X | X | 10 | |
| * Based on 75 g/m ^2 (20 lb) paper | |||
This chapter covers printing, printer reports, and job cancelation. Selection and handling of paper and specialty media can affect how reliably documents print.
Installing printer software
A printer driver is software that lets the computer communicate with the printer. The printer software is typically installed during the initial printer setup. For more information, see the Setup sheet or Setup Guide that shipped with the printer or click Install printer and software on the Software and Documentation CD.
When Print is chosen from a software application, a dialog representing the printer driver opens. Click Properties, Preferences, Options, or Setup from the initial Print dialog to open Print Properties and see all of the available printer settings that may be changed. If a feature in Print Properties is unfamiliar, open the online Help for more information.
Note: Print settings selected from the driver override the default settings selected from the control panel.
Printing a document from Windows
1 With a document open, click File → Print.
2 Click Properties, Preferences, Options, or Setup.
3 Adjust the settings.
4 Click OK.
5 Click OK or Print.
Printing a document from a Macintosh computer
1 With a document open, choose File → Print.
2 From the Copies & Pages or General pop-up menu, adjust the settings.
3 Click OK or Print.
Printing confidential and other held jobs
Holding jobs in the printer
When sending a job to the printer, you can specify in the Print Properties that you want the printer to hold the job in memory until you start the job from the control panel. All print jobs that can be initiated by the user at the printer are called held jobs.
Note: Confidential, Repeat, Reserve, and Verify print jobs may be deleted if the printer requires extra memory to process additional held jobs.
| Job type Description | |
| Confidential When you send a Confidential print job to the printer, you must create a PIN in Print Properties. The PIN must be four digits using the numbers 0–9. The job is held in printer memory until you enter the PIN from the control panel and choose to print or delete the job. | |
| Repeat | When you send a Repeat print job, the printer prints all requested copies of the job and stores the job in memory so you can print additional copies later. You can print additional copies as long as the job remains stored in memory. |
| Reserve When you send a Reserve print job, the printer does not print the job immediately. It stores the job in memory so you can print the job later. The job is held in memory until you delete it from the Held Jobs menu. | |
| Verify | When you send a Verify print job, the printer prints one copy and holds the remaining copies in printer memory. Verify lets you examine the first copy to see if it is satisfactory before printing the remaining copies. Once all copies are printed, the job is automatically deleted from printer memory. |
Printing confidential and other held jobs from Windows
1 With a document open, click File → Print.
2 Click Properties, Preferences, Options, or Setup.
3 Click Other Options, and then click Print and Hold.
4 Select your job type (Confidential, Reserve, Repeat, or Verify), and then assign a user name. For a confidential job, also enter a four-digit PIN.
5 Click OK or Print, and then go to the printer to release the job.
6 From the control panel, press ▼ until √ Held jobs appears, and then press ⚙.
7 Press ▼ until √ appears next to your user name, and then press ⏻.
8 Press ▼ until √ appears next to your job, and then press ⏻.
9 For confidential jobs, use the numeric keypad to enter your PIN.
If you enter an invalid PIN, the Invalid PIN screen appears.
- To re-enter the PIN, make sure √Try again appears, and then press ⏻.
- To cancel the PIN, press ▼ until √Cancel appears, and then press ⏻.
10 Press ▼ until √ appears next to the job you want to print, and then press √.
Confidential and Verify print jobs are automatically deleted from memory after they print. Repeat and Reserve jobs continue to be held in the printer until you choose to delete them.
Printing confidential and other held jobs from Macintosh
1 With a document open, choose File → Print.
2 From the Copies & Pages or General pop-up menu, choose Job Routing.
a When using Mac OS 9.x, if Job Routing is not a choice from the pop-up menu, choose Plug-in Preferences → Print Time Filters.
b Turn down the disclosure triangle to the left of Print Time Filters, and choose Job Routing.
Printing
3 From the radio group, select your job type (Confidential, Reserve, Repeat, or Verify), and then assign a user name. For a confidential job, also enter a four-digit PIN.
4 Click OK or Print, and then go to the printer to release the job.
5 From the control panel, press ▼ until √Held jobs appears, and then press √.
6 Press ▼ until √ appears next to your user name, and then press ⏻.
7 Press ▼ until √ appears next to your job, and then press ⏻.
8 For confidential jobs, use the numeric keypad to enter your PIN.
If you enter an invalid PIN, the Invalid PIN screen appears.
- To re-enter the PIN, make sure √ Try again appears, and then press √.
- To cancel the PIN, press ▼ until √Cancel appears, and then press ⏻.
9 Press ▼ until √ appears next to the job you want to print, and then press √.
Confidential and Verify print jobs are automatically deleted from memory after they print. Repeat and Reserve jobs continue to be held in the printer until you choose to delete them.
Printing from a USB flash memory device
A USB Direct interface is located on the control panel so you can insert a USB flash memory device and print PDF documents. Printing a document from a USB flash memory device is similar to printing a held job.
Many USB flash memory devices are tested and approved for use with the printer. For more information, see the Lexmark Web site at www.lexmark.com.
Notes:
- USB devices must be compatible with the USB 2.0 standard.
- Hi-Speed USB devices must support the Full-Speed standard as well. Devices only supporting USB low-speed capabilities are not supported.
- USB devices must support the FAT (File Allocation Tables) system. Devices formatted with NTFS (New Technology File System) or any other file system are not supported.
- You cannot print encrypted files or files without printing permissions.
- A USB Direct interface is available only on some models.
To print from a USB memory device:
1 Make sure the printer is on and Ready or Busy appears.
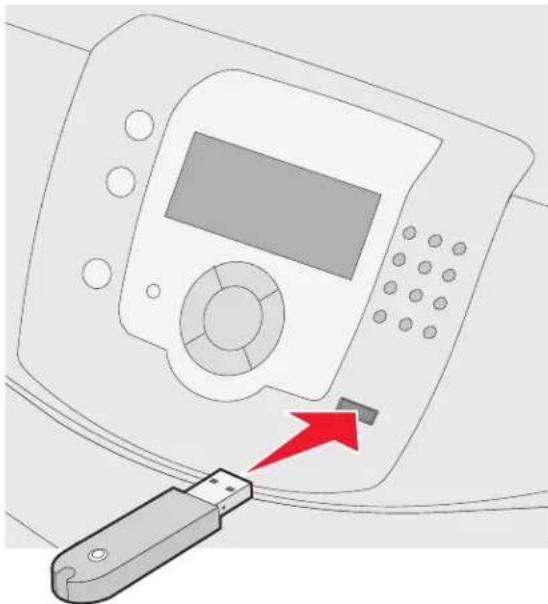
2. Insert a USB flash memory device into the USB Direct interface.
Warning: Do not remove the USB key, or touch the printer near the area of the USB key while actively reading, writing, or printing from the USB key. Data corruption can occur.
natural_image
Illustration of a medical device with a red arrow pointing to a device on a USB cable (no text or symbols present)Notes:
- If you insert the memory device when the printer requires attention, such as when a jam has occurred, the printer ignores the memory device.
- If you insert the memory device when the printer is busy printing other jobs, Printer Busy appears. Once the other jobs have finished processing, you may need to view the held jobs list to print documents from your memory device.
3 Press ▼ until √ appears next to the document you want to print, and then press ⏻.
Note: Folders found on the flash memory device appear as folders. File names are appended by the extension type (for example, .jpg).
The display prompts you for the number of copies to be printed.
4 Press √ to print only one copy, or enter the number of copies using the numeric keypad, and then press √.
Note: Do not remove the USB flash memory device from the USB Direct interface until the document has finished printing.
If you leave the USB flash memory device in the printer after leaving the initial USB menu screen, you can still print PDFs from the USB flash memory device as held jobs.
Printing a menu settings page
Print a menu settings page to review the current menu settings and to verify printer options are installed correctly.
1 Make sure the printer is on and Ready appears.
2 From the control panel, press .
3 Press ▼ until √ Reports appears, and then press ⏻.
4 Press ▼ until √ Menu Settings Page appears, and then press ⏻.
Printing Menu Settings appears. After the menu settings page prints, Ready appears.
Printing a network setup page
If the printer is attached to a network, print a network setup page to verify the network connection. This page also provides important information that aids network printing configuration.
1 Make sure the printer is on and Ready appears.
2 From the control panel, press
3 Press ▼ until √ Reports appears, and then press ⏻.
4 Press ▼ until √ Network Setup Page appears, and then press √.
After the network setup page prints, Ready appears.
Note: If an optional internal print server is installed, Print Network
5 Check the first section on the network setup page, and confirm that Status is "Connected."
If Status is "Not Connected," the LAN drop may not be active, or the network cable may be malfunctioning. Consult a system support person for a solution, and then print another network setup page.
Printing a font sample list
To print samples of the fonts currently available for your printer:
1 Make sure the printer is on and Ready appears.
2 From the control panel, press
3 Press ▼ until √ Reports appears, and then press ⏻.
4 Press ▼ until √ Print Fonts appears, and then press ⏻.
5 Press ▼ until √ appears next to PCL Emul Fonts, PostScript Fonts, or PPDS Fonts, and then press ⏻.
After the font sample list prints, Ready appears.
Printing a directory list
A directory list shows the resources stored in flash memory or on the hard disk.
1 Make sure the printer is on and Ready appears.
2 From the control panel, press
3 Press ▼ until √ Reports appears, and then press ⏻.
4 Press ▼ until √ Print Directory appears, and then press ⏻.
Printing Directory List appears. After the directory list prints, Ready appears.
Printing the print quality test pages
Print the print quality test pages to isolate print quality problems.
1 Turn the printer off.
2 Hold down √ and ▶ while turning the printer on.
3 Release the buttons when the clock appears, and wait for CONFIG MENU to appear.
4 Press ▼ until √ Prt Quality Pgs appears, and then press √.
The print quality test pages print.
5 Press ▼ until √ Exit Config Menu appears, and then press ⏻.
Resetting the Printer appears briefly, followed by a clock, and then Ready appears.
Printing a duplex job manually from a Macintosh computer
1 Click File → Print.
2 From the drop-down list, choose Paper Handling.
3 Make sure Page order is set to Reverse order.
4 From the Print options area, select Even numbered pages.
5 Click Print.
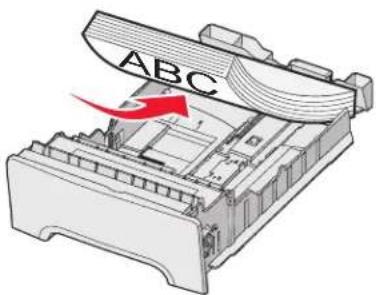
6 Remove the pages from the output bin and load them into the paper tray facedown with the top of the page facing you.
text_image
ABC7 Click File → Print.
8 From the drop-down list, choose Paper Handling.
9 Make sure Page order is set to Normal.
10 From the Print options area, select Odd numbered pages.
11 Click Print.
Printing only black text and graphics
To print with black toner only for an extended period, set the printer to Color Lock Out mode, and remove and store the color printing supplies.
Note: Store the color supplies in a clean, cool, dark, dry place where the photoconductors will not be touched or scratched.
Configuring the printer for black-only printing
1 Turn the printer off.
2 From the control panel, hold down √ and ▶ while turning the printer on.
3 Release the buttons when the clock appears, and wait for CONFIG MENU to appear.
4 Press ▼ until √ Color Lock Out appears, and then press ⏻.
5 Press ▲ until √ on appears, and then press ⏻.
Submitting Selection appears.
6 Press ▼ until √ Exit Config Menu appears, and then press ⏻.
7 Wait until Remove all color supplies appears.
Removing the color supplies
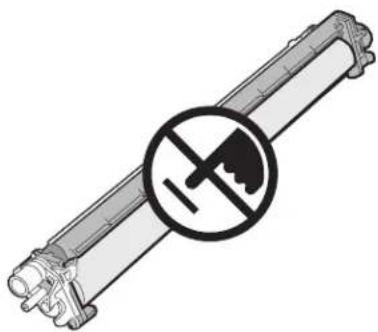
Warning: Do not touch the shiny photoconductor drums.
natural_image
Exterior view of a cylindrical mechanical component with a circular no-smoking symbol (no text or labels)1 Grasp the handhold.
natural_image
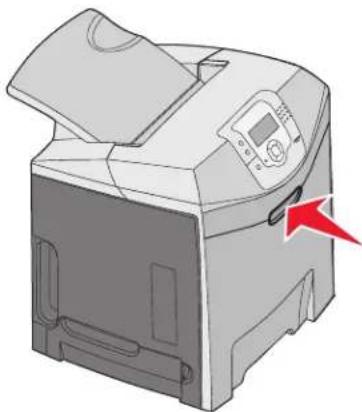
Illustration of a printer with a red arrow pointing to its side panel (no text or symbols present)2 Open the upper door fully. Grasp the inner door handle and pull to open both the inner and lower doors. Now the photoconductors can be seen.
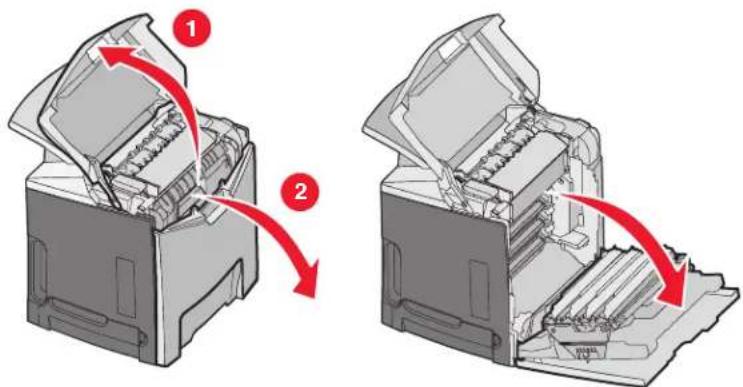
text_image
Diagram showing two views of a printer with red arrows indicating process steps, labeled 1 and 2.3 Lift the photoconductor release knob, and then pull the photoconductor out by the handle. Remove all three color photoconductors.
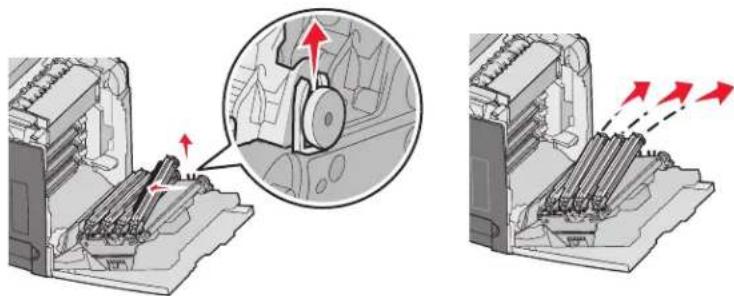
natural_image
Mechanical assembly diagram showing internal components and motion arrows (no text or symbols)4 Wrap each photoconductor in its original packaging or in a sheet of paper. Tape the packaging to secure it, but do not let the tape touch the shiny photoconductor drums.
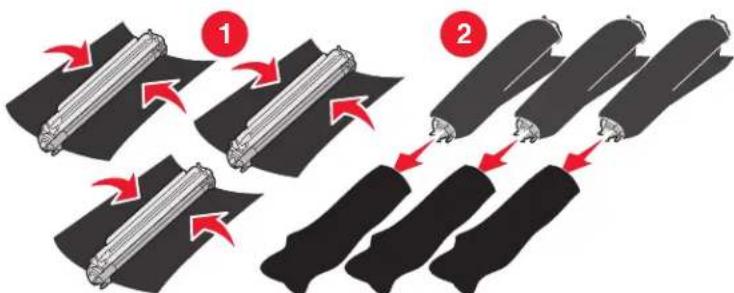
flowchart
graph TD
    A["Step 1: Cylinder with red arrows"] --> B["Step 2: Stacked cylindrical parts with black segments"]
    B --> C["Step 3: Stacked cylindrical parts with red arrows"]
5 Place the photoconductors in their original box, or in any clean, sturdy box.
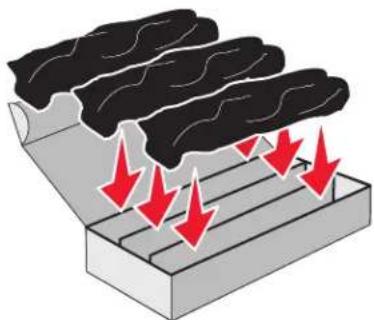
natural_image
Illustration of a conveyor belt system with red arrows indicating downward flow (no text or symbols)Printing
6 Close the box to protect the photoconductors from light.
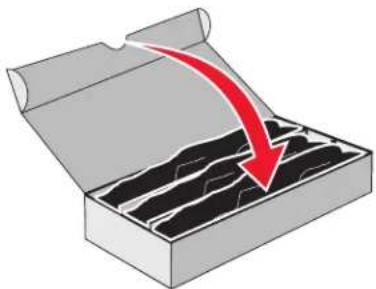
natural_image
Illustration of a box with contents and a red arrow indicating downward motion (no text or symbols)7 Lift the small toner cartridge handles slightly and pull straight out. Remove all three color toner cartridges.
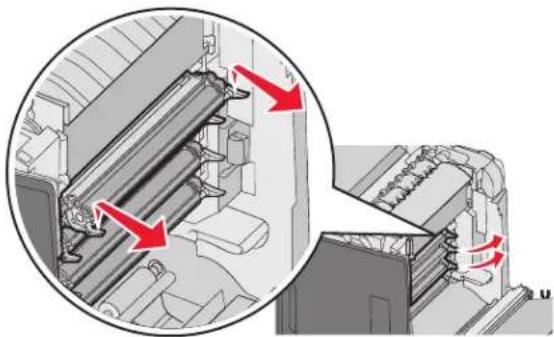
natural_image
Mechanical assembly diagram showing a component being processed into a machine, with red arrows indicating motion direction (no text or symbols present)8 Place the toner cartridges in a clean, sturdy box.
9 Close the lower door.
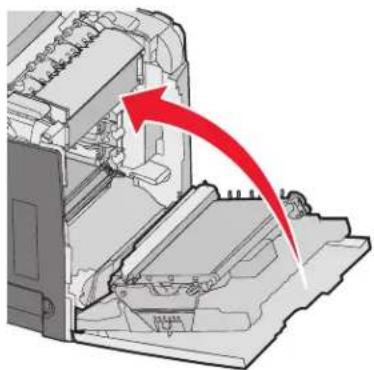
natural_image
Mechanical assembly diagram showing a component being cut with a red arrow indicating direction (no text or symbols present)10 Close the upper door.
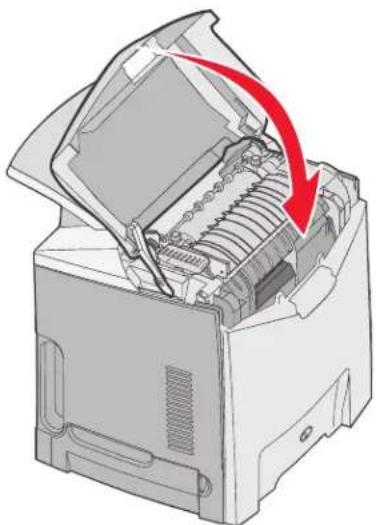
natural_image
Diagram of a printer internal structure with a red arrow indicating compression or disassembly (no text or symbols present)Configuring the printer for color printing and replacing the color supplies
To return to color printing, complete the following steps:
1 Turn the printer off.
2 From the control panel, hold down √ and ▶ while turning the printer on.
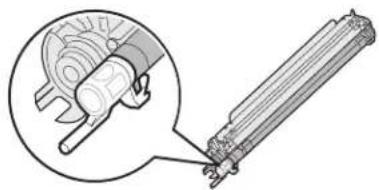
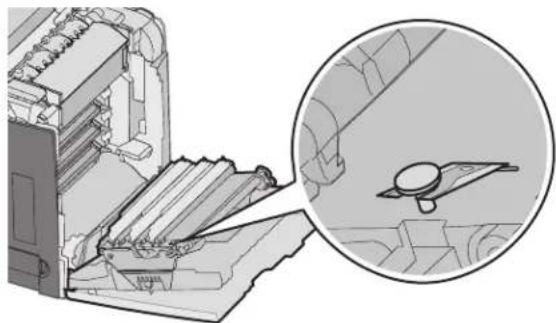
3 Release the buttons when the clock appears, and wait for CONFIG MENU to appear. Locate the color residue on the clear end of each photoconductor.
natural_image
Mechanical assembly diagram showing a hand operating a gear and a cylindrical shaft (no text or symbols)Match the residue to the color label on the transfer belt.
natural_image
Technical illustration of a mechanical assembly with an inset close-up showing a component detail (no text or symbols)4 Press ▼ until √ Color Lock Out appears, and then press ⏻.
Printing
5 Press ▼ until √ off appears, and then press ⏻.
Submitting Selection appears.
6 Press ▼ until √Exit Config Menu appears, and then press ⏻.
If supplies were not installed, you may see any of the following messages:
| 84 Cyan PC Unit missing | 31 Missing or defective Cyan cartridge |
| 84 Magenta PC Unit missing 31 Missing or defective Magenta cartridge | |
| 84 Yellow PC Unit missing 31 Missing or defective Yellow cartridge | |
Canceling a print job
There are several methods for canceling a print job. The following sections explain how to cancel a print job from the control panel or from a computer (depending on the operating system).
Canceling a print job from the control panel
If the job is formatting or already printing, and Cancel a job appears on the first line of the display:
1 Press ▼ until √Cancel appears.
A list of jobs appears.
2 Press ▼ until √ appears next to the job you want to cancel, and then press ⏻.
Canceling
Note: Once a print job is sent, to easily cancel a job, press ✗. The Stopped screen appears. Press ▼ until √Cancel a job appears, and then press √.
Canceling a print job from the Windows taskbar
When you send a job to print, a small printer icon appears in the right corner of the taskbar.
1 Double-click the printer icon.
A list of print jobs appears in the printer window.
2 Select a job to cancel.
3 From the keyboard, press Delete.
Canceling a print job from the Windows desktop
1 Minimize all programs to reveal the desktop.
2 Double-click the My Computer icon.
3 Double-click the Printers icon.
4 Double-click the printer icon.
5 Select the job to cancel.
6 From the keyboard, press Delete.
Canceling a print job from Mac OS 9.x
When you send a job to print, the printer icon for your selected printer appears on the desktop.
1 Double-click the printer icon.
A list of print jobs appears in the printer window.
2 Choose a job to cancel.
3 Click the trash icon.
Canceling a print job from Mac OS X
1 Choose Applications → Utilities, and then double-click Print Center or Printer Setup Utility.
2 Double-click the printer you are printing to.
3 From the printer window, select the job to cancel.
4 From the icon bar at the top of the window, click the Delete icon.
Avoiding jams
The following hints can help you avoid jams:
- Use only recommended media.
For more information, see the Card Stock & Label Guide available on the Lexmark Web site at www.lexmark.com/publications.
- For detailed information about purchasing large quantities of customized media, see the Card Stock & Label Guide.
- Do not load too much media. Make sure the stack height does not exceed the indicated maximum height.
- Do not load wrinkled, creased, damp, or curled media.
• Flex, fan, and straighten media before loading it.
- Do not use media that has been cut or trimmed by hand.
- Do not mix media sizes, weights, or types in the same stack.
- Store the media in an appropriate environment.
- Do not remove trays while the printer is printing. Wait for Load tray
- Do not load the manual feeder while the printer is printing. Wait for Load manual feeder with
- Push all trays in firmly after loading media.
- Make sure the guides in the trays are properly positioned and are not pressing too tightly against the paper.
- Make sure all media sizes and media types are set correctly in the control panel menu.
- Make sure all printer cables are attached correctly. For more information, see the setup documentation.
Note: If a jam occurs, clear the entire media path. For information on the media path, see the User's Guide.
Identifying the paper path
The path that paper takes through the printer varies depending on where the paper enters, and whether a duplex (two-sided) job is being printed. When a jam occurs, a message indicating the jam location appears. The following illustration indicates the area of the printer the numbers in the messages describe.
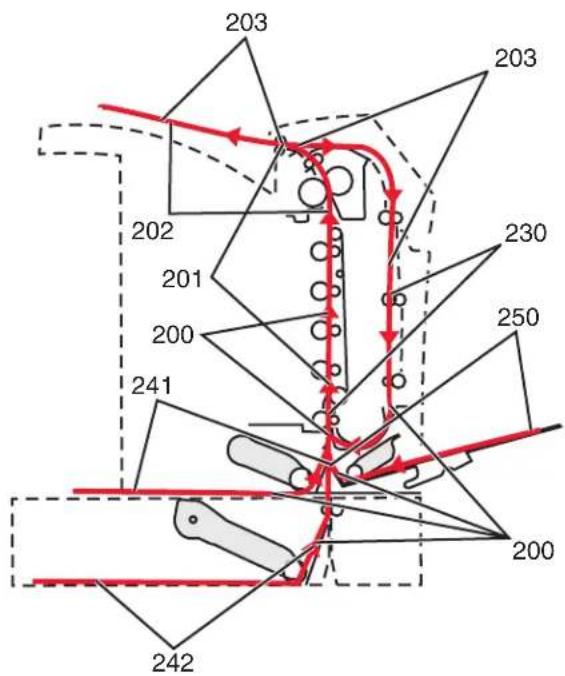
text_image
203 203 202 201 230 200 250 241 200 242Accessing jam areas
Open doors and covers, and remove trays to access jam areas. The illustration shows the possible jam areas.
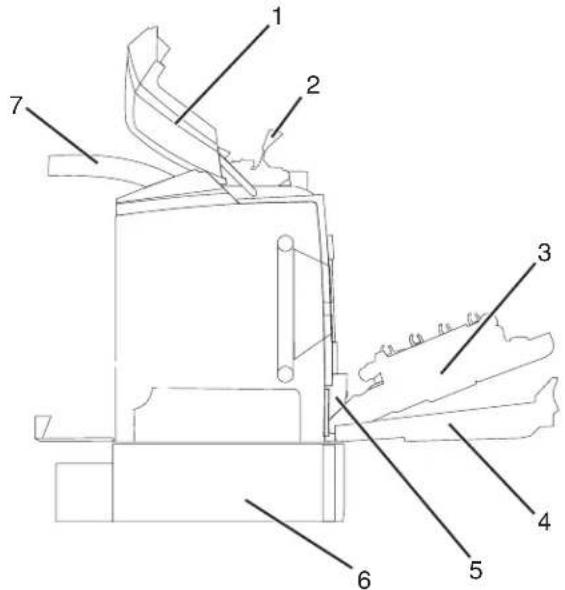
text_image
Technical diagram of a mechanical device with numbered components for identification| 1 | Upper door |
| 2 | Fuser cover |
| 3 | Inner door |
| 4 | Lower door |
| 5 | Standard tray (Tray 1) |
Clearing jams
| 6 | Optional 550-sheet tray (Tray 2) |
| 7 | Exit bin |
Use the following table to locate instructions for a particular jam.
Note: To resolve any message, all media must be cleared from the entire media path.
| Control panel message | Area description | See |
| 200.xx Paper Jam | Jam at the input sensor “Clearing jams just | beyond Tray 1” on page 60 |
| “Clearing Tray 2 jams” on page 61 | ||
| “Clearing jams behind the inner door” on page 62 | ||
| “Jams under the photoconductors” on page 62 | ||
| 200.xx Paper Jam | Jam in the manual feed slot “Clearing jams | in the manual feeder” on page 68 |
| 201.xx Paper Jam | Jam between an input sensor and the fuser exit sensor | “Jams under the photoconductors” on page 62 |
| “Jams under the fuser or fuser cover” on page 63 | ||
| 202.xx Paper Jam | Jam after the fuser exit sensor “Jams under | and behind the fuser” on page 64 |
| “Clearing jams between the fuser and the standard exit bin” on page 65 | ||
| 203.xx Paper Jam | Jam in the duplex page-turnaround area “ | Jams under the rollers near the fuser” on page 65 |
| 230.xx Paper Jam | Jam in the duplex area “Jams in the duplex area” on page 66 | |
| 241.xx Paper Jam | Jam in Tray 1 “Clearing jams just beyond Tray 1” on page 60 | |
| 242.xx Paper Jam | Jam in Tray 2 “Clearing Tray 2 jams” on page 61 | |
| 250.xx Paper Jam | Jam in the multipurpose feeder “Clearing jams in the multipurpose feeder” on page 67 |
Clearing jams just beyond Tray 1
If the paper did not feed from Tray 1 correctly, the jam is in the tray. 241.xx Paper Jam appears.
1 Open Tray 1.
2 Remove the jam.
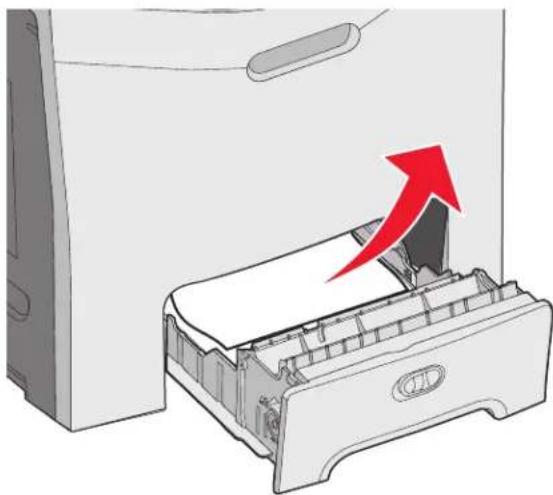
natural_image
Diagram of a computer printer internal structure with a red arrow indicating the process (no text or symbols present)3 Reinsert the tray.
If the paper fed from Tray 1 and jammed just beyond the tray, 200.xx Paper Jam appears.
1 Open Tray 1.
2 Remove the jam.
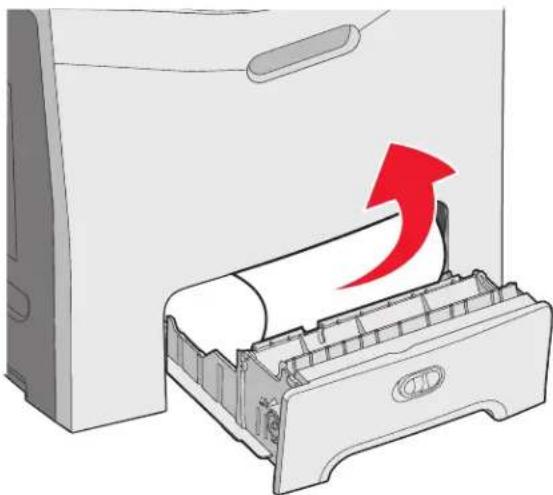
natural_image
Diagram of a printer with a paper roll being inserted, showing a red upward arrow (no text or symbols present)3 Reinsert the tray.
Clearing Tray 2 jams
If the paper did not feed from Tray 2 correctly, the jam is in the tray. 242.xx Paper Jam appears.
1 Open Tray 2.
2 Remove the jam.
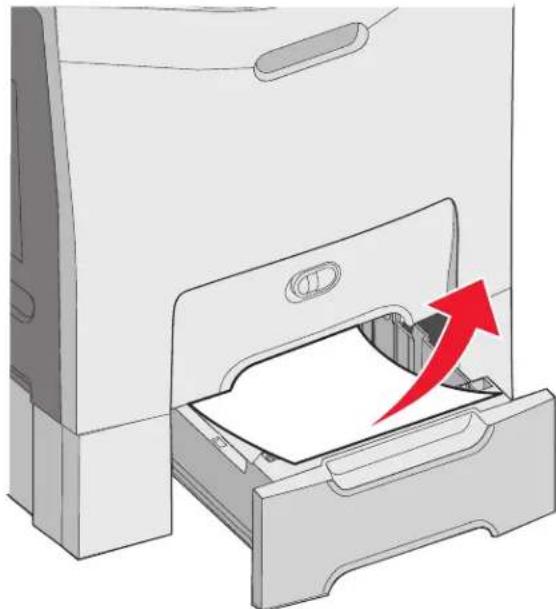
natural_image
Illustration of a printer drawer with paper inside, showing a red upward arrow indicating print direction (no text or symbols present)3 Reinsert the tray.
If the paper fed from Tray 2, but is caught between Tray 1 and Tray 2, 242.xx Paper Jam may appear.
1 Open Tray 2.
2 Grasp the paper on both sides. Pull it out gently to avoid tearing it.
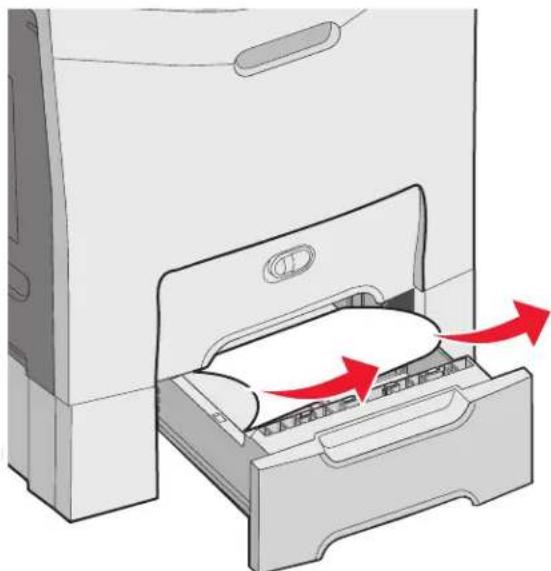
natural_image
Diagram of a computer drawer with an open drawer containing a sheet of paper, showing red arrows indicating flow or movement (no text or symbols present)Clearing jams
3 Reinsert the tray.
If the paper fed from Tray 2, but is caught between Tray 1 and Tray 2, 200.xx Paper Jam may appear.
1 Open Tray 1.
2 Pull the paper up and then out of the tray.
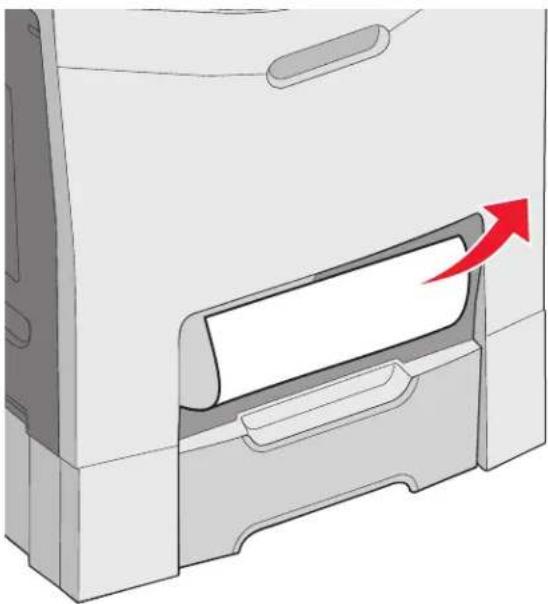
natural_image
Diagram of a computer monitor with a red arrow pointing to the screen area (no text or symbols present)3 Reinsert the tray.
Clearing jams behind the inner door
If the paper is jammed behind the inner door, but not under the photoconductors, 200.xx Paper Jam appears.
Warning: To avoid overexposing the photoconductors, do not leave the inner door open longer than 10 minutes.
1 Open the upper and inner doors. The lower door opens with the inner door.
2 Pull the jammed paper up and out.
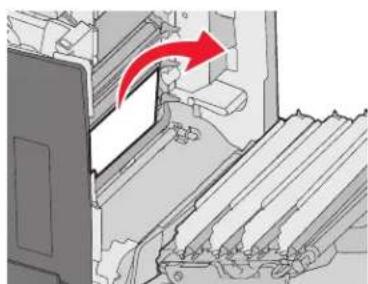
natural_image
Mechanical assembly diagram showing a person moving through a channel with a red arrow indicating motion (no text or symbols present)3 Close the lower door, and then close the upper door.
Jams under the photoconductors
Follow these instructions to remove jams under the photoconductors.
Clearing jams
If the paper is jammed under the photoconductors, 200.xx Paper Jam or 201.xx Paper Jam may appear.
1 Open the upper and inner doors. The lower door opens with the inner door.
2 Pull the jammed paper out straight.
Note: Be careful not to dislodge the photoconductors.
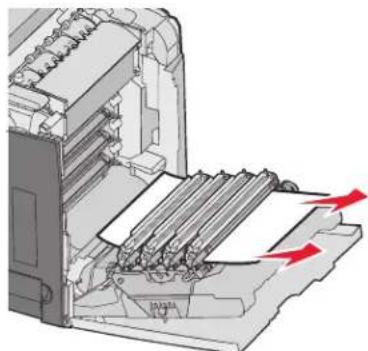
natural_image
Mechanical assembly diagram showing a device with internal components and directional arrows indicating motion (no text or symbols)3 If the paper will not move, remove all four photoconductors (for more information, see "Removing the color supplies" on page 51). Clear the jam, and then replace the photoconductors.
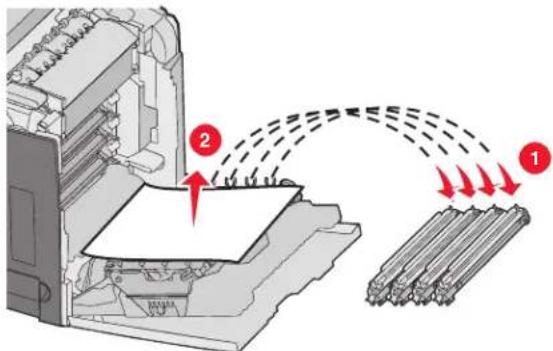
text_image
Diagram illustrating a printer's printing process with labeled parts and directional arrows indicating flow or movement.4 Close the lower door, and then close the upper door.
Clearing jams under the fuser or fuser cover
Jams under the fuser or fuser cover
When paper is jammed under the fuser or the fuser cover, 201.xx Paper Jam appears.

CAUTION: The fuser and the inside of the printer near the fuser may be hot. Wait for the fuser to cool before clearing jams from this area.
Warning: To avoid overexposing the photoconductors, do not leave the inner door open longer than 10 minutes.
1 Open the upper and inner doors. The lower door opens with the inner door.
2 Determine where the jam is located:
a If paper is visible under the fuser, grasp it on each side and pull it forward.
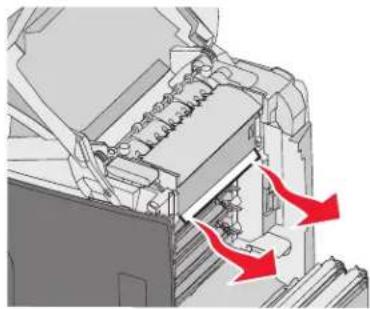
natural_image
Mechanical assembly diagram showing internal components with red arrows indicating motion or force (no text or symbols)b Otherwise, grasp the fuser cover by the tabs and lift it. Pull the jammed paper up and out. Close the fuser cover.
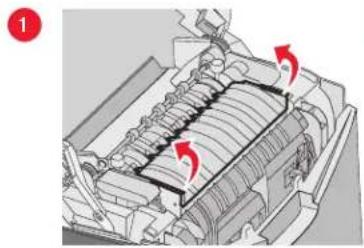
natural_image
Technical diagram of a mechanical assembly with red arrows indicating directional flow (no text or symbols)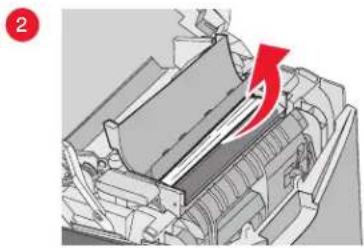
natural_image
Mechanical assembly diagram showing a printer or printer with internal components and a red arrow indicating a specific part (no text or symbols present)3 Close the lower door, and then close the upper door.
Jams under and behind the fuser
When paper jams both under the fuser and in the slot behind the fuser, 202.xx Paper Jam appears.

CAUTION: The fuser and the inside of the printer near the fuser may be hot. Wait for the fuser to cool before clearing jams from this area.
Warning: To avoid overexposing the photoconductors, do not leave the inner door open longer than 10 minutes.
1 Open the upper and inner doors. The lower door opens with the inner door.
2 Pull the paper gently up and to the rear of the printer.
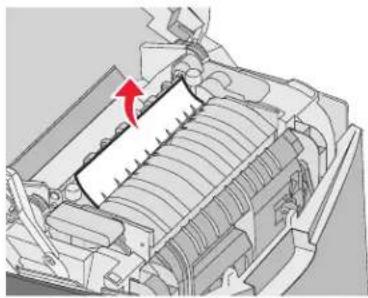
natural_image
Mechanical assembly diagram showing a component with a red arrow indicating direction (no text or symbols present)3 Close the lower door, and then close the upper door.
Clearing jams between the fuser and the standard exit bin
When the jammed paper is visible in the standard exit bin, 202.xx Paper Jam appears.
Grasp the paper, and pull it away from the bin.
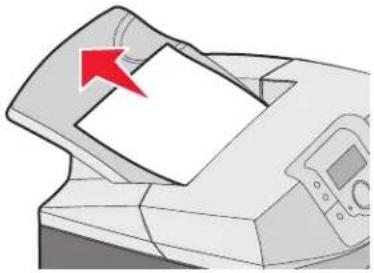
natural_image
Illustration of a printer with a paper being inserted, showing no text or symbols on the printer itself.Clearing jams in the standard exit bin
When paper jams in the standard exit bin, 203.xx Paper Jam appears.
Grasp the paper and pull it away from the bin.
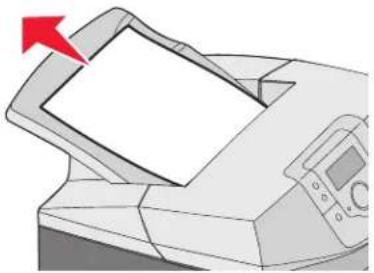
natural_image
Illustration of a printer with a paper sheet being inserted, showing no text or symbols on the device itself.Clearing jams in the duplex path
Jams under the rollers near the fuser
When paper is jammed under the rollers near the fuser, 203.xx Paper Jam appears.
1 Open the upper door.
2 Grasp the paper on each side, and pull it out gently.
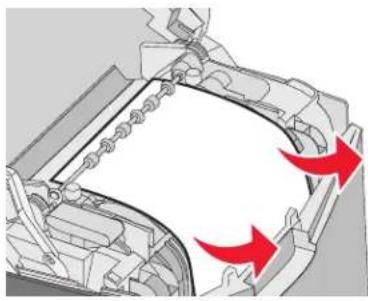
natural_image
Mechanical assembly diagram showing internal components with red arrows indicating motion or flow (no text or symbols)3 Close the upper door.
Jams in the duplex area
When paper is jammed between the inner door and the lower door, 230.xx Paper Jam appears.
1 Open the upper door.
2 Pull the jammed paper straight up.
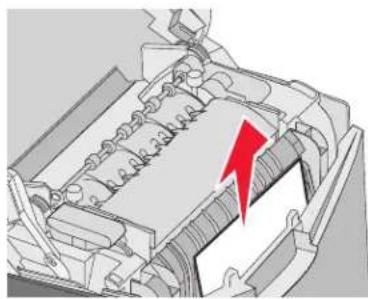
natural_image
Cross-sectional diagram of an internal combustion engine cylinder with a red lightning bolt indicating a specific component (no text or labels present)Note: For more room to grasp the paper, pull the handle to open the lower door.
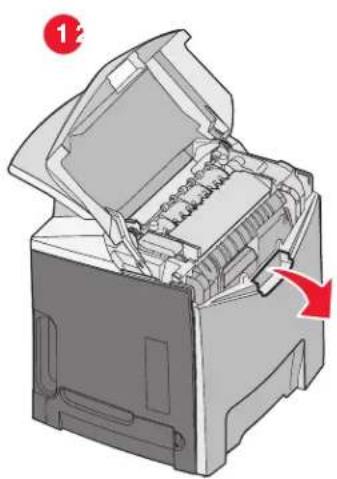
natural_image
Illustration of an open printer with internal components and a red arrow indicating a process (no text or symbols present)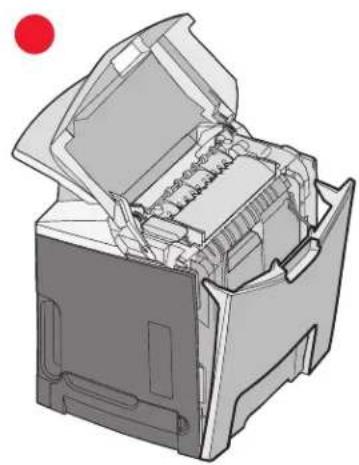
natural_image
3D illustration of an open industrial machine with internal components and a red circular marker (no text or symbols)3 Remove the jam and close the door(s).
When paper jams entering Tray 1, 230.xx Paper Jam appears.
1 Remove Tray 1.
2 Pull the jammed paper down and out.
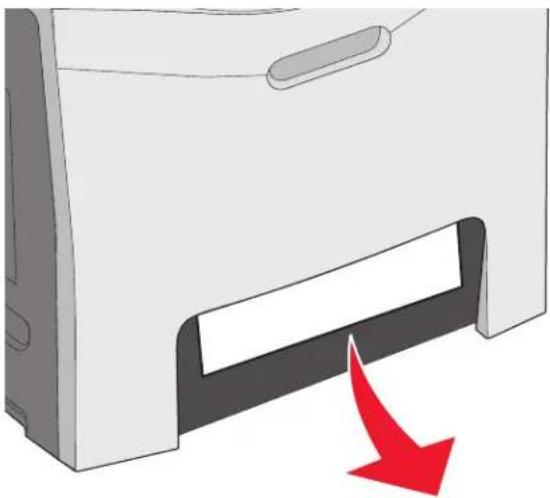
natural_image
Illustration of a computer monitor with a red arrow pointing to the side panel (no text or symbols)3 Replace the tray.
When paper jams as shown in the following illustration, 200.xx Paper Jam or 230.xx Paper Jam appears.
1 Open Tray 1.
2 Pull the jammed paper straight up.
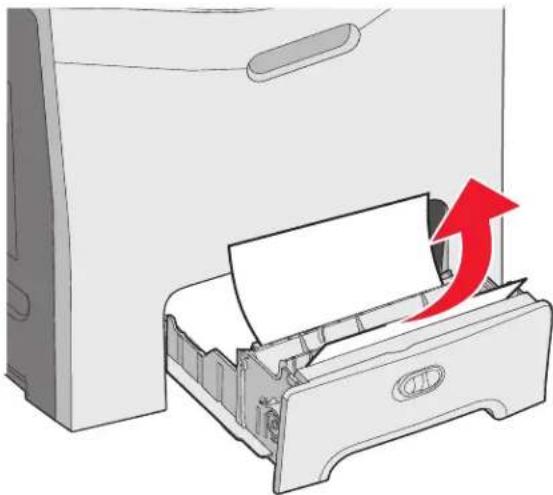
natural_image
Illustration of a printer's paper feeding into a paper holder, with a red arrow indicating the process (no text or symbols present)Note: If no jam is visible, remove the tray completely. Also look for a jam behind the upper and lower doors.
3 Replace the tray.
Clearing jams in the multipurpose feeder
When paper jams in the multipurpose feeder, 250.xx Paper Jam appears.
Pull the paper down and out.
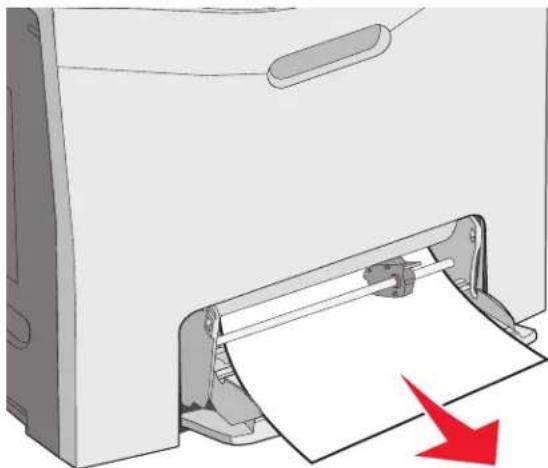
natural_image
Illustration of a printer with paper being inserted, showing paper roll and paper attachment (no text or symbols)Clearing jams in the manual feeder
When paper is not placed far enough into the manual feeder, the display prompts you to insert paper.
If the paper is pushed far enough into the manual feeder for the printer to sense it, but not far enough to feed properly, 200.xx Paper Jam appears.
In either case, push the paper farther into the manual feeder.
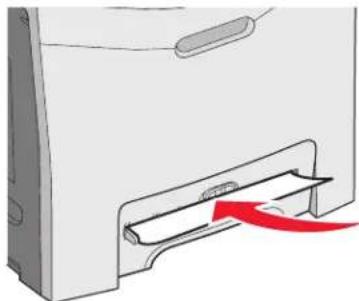
natural_image
Diagram of a computer monitor with a red arrow indicating the handle or scroll (no text or symbols present)Periodically, certain tasks are required to maintain optimum print quality.
Storing supplies
Choose a cool, clean storage area for the printer supplies. Store supplies right side up in their original packing until you are ready to use them.
Do not expose supplies to:
- Direct sunlight
• Temperatures above 35°C (95°F)
• High humidity above 80% - Salty air
- Corrosive gases
- Heavy dust
Checking the status of supplies
A message appears on the display when a replacement supply item is needed or when maintenance is required.
You can check the status of printer supplies anytime using:
- The control panel menus—See the Menus and Messages Guide for a listing of menus and supply status messages.
- The IP address of a network printer—Type the IP address of a network printer in the address bar of any browser (ex: 192.264.26.3). Supply status is usually available on the initial screen.
Conserving supplies
There are some settings that you can change from the control panel that will help you to conserve toner and paper. For more information, see the Supplies menu, Quality menu, and Finishing menu in the Menus and Messages Guide.
If you need to print several copies, you can conserve supplies by printing the first copy and checking it for accuracy before printing the remaining copies. For more information, see “Printing confidential and other held jobs” on page 45.
Aligning the toner cartridges
Sometimes replacing the transfer belt affects the alignment of the toner cartridges. For the best print quality, complete the following steps after replacing the transfer belt:
1 Make sure the printer is turned off.
2 From the control panel, press and hold √ and ▶ while turning the printer on.
3 Release both buttons when Performing Self Test appears.
The printer performs its power-on sequence, and then CONFIG MENU appears.
4 Press ▼ until √ Color Alignment appears, and then press ⏻.
5 Press again to print the alignment page.
6 Press ▼ until √ Set A appears, and then press ⏻.
7 From the printed sheet, find the straightest of the 20 lines beside the letter A.
8 Press ◀ or ▶ until that number is displayed, and then press √.
Submitting Selection appears.
9 Repeat steps 6 through 8 to align sets A through L.
10 Press √
11 Press ▼ until √ Exit Config Menu appears, and then press ⏻.
Resetting the Printer appears briefly, followed by a clock, and then Ready appears.
Cleaning the printhead lenses
Clean the printhead lenses if you encounter print quality problems. For more information, see "Solving print quality problems" on page 87.
Warning: To avoid overexposing the photoconductors, do not leave the inner door open longer than 10 minutes.
1 Open the upper and inner doors.
2 Remove all four toner cartridges. For more information, see "Removing the color supplies" on page 51, but do not remove the photoconductors for this procedure.
3 Locate the four printhead lenses.
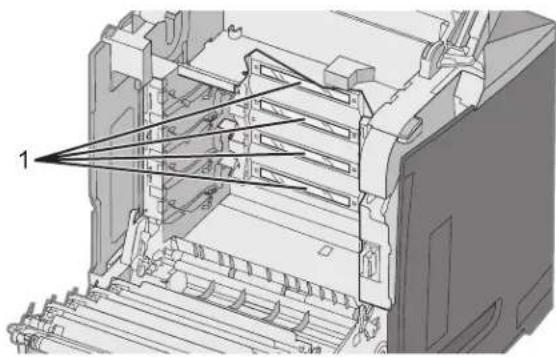
natural_image
Technical diagram of a mechanical device interior showing internal components and structural lines (no text or symbols)1 Printhead lenses
4 Clean the lenses using a can of compressed air.
Warning: Do not touch the printhead lenses or they may be damaged.
5 Reinstall the toner cartridges.
6 Close the doors.
Ordering supplies
To order supplies in the U.S., contact Lexmark at 1-800-539-6275 for information about Lexmark authorized supplies dealers in your area. In other countries or regions, visit the Lexmark Web Site at www.lexmark.com or contact the place you purchased the printer.
Note: All life estimates for printer supplies assume printing on letter- or A4-size plain paper.
Ordering toner cartridges
When 88 Cyan cartridge low, 88 Magenta cartridge low, 88 Yellow cartridge low, or 88 Black cartridge low appears on the control panel or when the print becomes faded, first try to extend the life of the specified cartridge:
1 Remove the specified toner cartridge.
2 Rotate the toner cartridge as shown, and firmly shake the cartridge up and down several times to redistribute the toner toward the front of the toner cartridge.
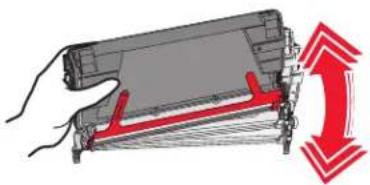
natural_image
Illustration of a hand holding a device with red arrows indicating motion or force (no text or symbols)3 Reinsert the toner cartridge to continue printing.
4 Repeat this procedure multiple times until printed text and graphics remain faded.
Note: Several hundred pages may be printed after one of the messages first appears.
Once the printed text and graphics remain faded, replace the specified toner cartridge.
The recommended toner cartridges specifically designed for your printer are:
| Part name Part number For printer(s) | ||
| Cyan Extra High Yield Return Program Toner Cartridge | C5340CX C534 | |
| Magenta Extra High Yield Return Program Toner Cartridge | C5340MX C534 | |
| Yellow Extra High Yield Return Program Toner Cartridge | C5340YX C534 | |
| Cyan Extra High Yield Toner Cartridge | C5342CX C534 | |
| Magenta Extra High Yield Toner Cartridge | C5342MX C534 | |
| Yellow Extra High Yield Toner Cartridge | C5342YX C534 | |
| Cyan High Yield Return Program Toner Cartridge | C5240CH C532, C534 | |
| Magenta High Yield Return Program Toner Cartridge | C5240MH C532, C534 | |
| Yellow High Yield Return Program Toner Cartridge | C5240YH C532, C534 | |
| Black High Yield Return Program Toner Cartridge | C5240KH C534 | |
| Cyan High Yield Toner Cartridge C5242CH C532, C534 | ||
| Magenta High Yield Toner Cartridge C5242MH C532, C534 | ||
| Yellow High Yield Toner Cartridge C5242YH C532, C534 | ||
| Black High Yield Toner Cartridge C5242KH C534 | ||
| Cyan Return Program Toner Cartridge | C5220CS C530, C532, C534 | |
| Magenta Return Program Toner Cartridge | C5220MS C530, C532, C534 | |
| Yellow Return Program Toner Cartridge | C5220YS C530, C532, C534 | |
| Black Return Program Toner Cartridge | C5220KS C530, C532, C534 | |
| Cyan Return Program Toner Cartridge | C5200CS C530 | |
| Magenta Return Program Toner Cartridge | C5200MS C530 | |
| Yellow Return Program Toner Cartridge | C5200YS C530 | |
| Black Return Program Toner Cartridge | C5200KS C530 | |
| Cyan Toner Cartridge C5222CS C530, C532, C534 | ||
| Magenta Toner Cartridge C5222MS C530, C532, C534 | ||
| Yellow Toner Cartridge C5222YS C530, C532, C534 | ||
| Black Toner Cartridge | C5222KS | C530, C532, C534 |
| Cyan Toner Cartridge C5202CS C530 | ||
| Magenta Toner Cartridge C5202MS C530 | ||
| Yellow Toner Cartridge C5202YS C530 | ||
| Black Toner Cartridge | C5202KS C530 |
Ordering a transfer belt
When Transfer belt life warning appears, replace the transfer belt soon. Make sure one is on order.
When Replace transfer belt appears, replace the transfer belt immediately.
Note: Because transfer belt life is affected by environment, duty cycle, and toner coverage, actual page count at the end of life may vary.
For installation information, see the documentation that came with the transfer belt.
| Part number | Part name |
| 40X3572 | Transfer belt |
Ordering a waste toner box
When 82 Waste Toner Box Nearly Full or 82 Replace Waste Toner Box appears, you need to order a replacement waste toner box.
| Part number Part name | |
| C52025X Waste toner box |
Ordering a fuser
When Fuser Life Warning appears, replace the fuser soon. Make sure one is on order.
When Replace Fuser appears, replace the fuser immediately. For installation information, see the documentation that came with the fuser.
| Part number Part name | |
| 40X3569 (120V/50–60Hz) | Fuser |
| 40X3570 (220–240V/50–60Hz) | |
| 40X3571 (100V/50–60Hz) |
Ordering photoconductors
When Black PC Unit Life Warning or Cyan PC Unit Life Warning, Magenta PC Unit Life Warning, or Yellow PC Unit Life Warning appears, you need to order replacement photoconductor(s).
| Part number Part name | |
| C53030X Photoconductor Unit | |
| C53034X Photoconductor Unit, Multi-Pack | |
Moving the printer
Before moving the printer

CAUTION: The printer weighs 25.40 kg (56 lb); therefore, it requires at least two people to lift it safely. Use the handholds on the sides of the printer to lift it, and make sure your fingers are not under the printer when you set it down.

Follow these guidelines to avoid personal injury or printer damage:
• Always use at least two people to lift the printer.
• Always turn off the printer using the power switch before moving it.
- Disconnect all cords and cables from the printer before moving it.
- Remove all printer options before moving the printer.
Warning: Damage to the printer caused by improper moving is not covered by the printer warranty.
Moving the printer to another location
The printer and options can be safely moved to another location by following these precautions:
- Remove all printer options before moving the printer.
- Any cart used to move the printer must have a surface able to support the full footprint of the printer. Any cart used to move the options must have a surface able to support the dimensions of the options.
- Keep the printer in an upright position.
- Avoid severe jarring movements.
Adjusting the brightness or contrast of the display
Note: These options are available on some models.
To adjust the brightness or contrast settings:
1 Make sure the printer is on and Ready appears.
2 From the control panel, press
3 Press ▼ until √ Settings appears, and then press ⏻.
4 Press ▼ until √ Utilities Menu appears, and then press ⏻.
5 Press ▼ until √Brightness appears, and then press ⚙.
Press ▼ until √Contrast appears, and then press √.
6 Press ▲ to increase the setting or ▼ to decrease the setting.
7 When the adjustment is complete, press ⏻. This saves the setting as the new default. Ready appears on the display.
Disabling control panel menus
Since many people could be using the printer, a support person may choose to lock the control panel menus to keep menu settings from being changed.
1 Make sure the printer is turned off.
2 From the control panel, press and hold √ and ▶ while turning the printer on.
3 Release both buttons when Performing Self Test appears.
The printer performs its power-on sequence, and then CONFIG MENU appears.
4 Press ▼ until √ Panel Menus appears, and then press ⏻.
5 Press ▼ until √ Disable appears, and then press ⏻.
Submitting Selection and Disabling Menus appear briefly.
6 Press ▼ until √ Exit Config Menu appears, and then press ⏻.
When Activating Menu Changes appears, the menus are disabled. Resetting the Printer appears briefly, followed by a clock, and then Ready appears.
Enabling control panel menus
1 Make sure the printer is turned off.
2 From the control panel, press and hold √ and ▶ while turning the printer on.
3 Release both buttons when Performing Self Test appears.
The printer performs its power-on sequence, and then CONFIG MENU appears.
4 Press ▼ until √ Panel Menus appears, and then press ⏻.
5 Press ▼ until √ Enable appears, and then press ⏻.
Submitting Selection, Enabling Menus, and Panel Menus appear briefly.
6 Press ▼ until √ Exit Config Menu appears, and then press ⏻.
When Activating Menu Changes appears, the menus are enabled. Resetting the Printer appears briefly, followed by a clock, and then Ready appears.
Disabling Quick Start mode
Quick Start mode allows the printer to begin printing before the engine has warmed to normal operating temperature. When the printer receives a print job, the pages print slowly at first, and then more quickly as the printer warms up. This reduces the overall time required to print a job from a standby mode.
Quick Start mode is turned on by default.
To turn Quick start mode off:
1 From the control panel, press .
2 Press ▼ until √ Settings appears, and then press ⏻.
3 Press ▼ until √ Setup Menu appears, and then press ⏻.
4 Press ▼ until √ Quick Start appears, and then press ⏻.
5 Press ▼ until √ off appears, and then press ⏻.
Submitting Selection appears, followed by Ready.
Restoring factory default settings
Menu settings marked with an asterisk (*) indicate the active settings. You can restore the original printer settings, often referred to as the factory default settings.
1 Make sure the printer is on and Ready appears.
2 From the control panel, press
3 Press ▼ until √ Settings appears, and then press ⏻.
4 Press ▼ until √ Setup Menu appears, and then press ⏻.
5 Press ▼ until √ Factory Defaults appears, and then press ⏻.
6 Press ▼ until √Restore Now appears, and then press ⏻.
Restoring Factory Defaults appears briefly, then Ready appears.
The following factory default settings are restored:
- All downloaded resources in the printer memory are deleted. This includes fonts, macros, and symbol sets.
- All settings return to the factory default settings except Display Language in the Setup menu and custom settings in the Parallel, Serial, Network, Infrared, LocalTalk, USB, and Fax menus.
Adjusting Power Saver
1 Make sure the printer is on and Ready appears.
2 From the control panel, press
3 Press ▼ until √ Settings appears, and then press ⏻.
4 Press ▼ until √ Setup Menu appears, and then press ⏻.
5 Press ▼ until √ Power Saver appears, and then press ⏻.
6 Using the numeric keypad, enter the number of minutes for the printer to wait before entering the Power Saver mode. Available settings range from 2–240 minutes.
If the printer does not have a numeric keypad, press the left and right arrows to change the setting.
7 Press √
Submitting Selection appears, followed by Ready.
Note: Power Saver settings can also be adjusted by issuing a Printer Job Language (PJL) command. For more information, see the Technical Reference available on the Lexmark Web site at www.lexmark.com/publications.
Encrypting the printer hard disk
This functionality is only available when a printer hard disk is installed and working properly.
Warning: All files and resources on the printer hard disk will be deleted. Resources residing in the printer flash memory or RAM will not be affected.
1 Make sure the printer is turned off.
2 From the control panel, press and hold √ and ▶ while turning the printer on.
3 Release both buttons when Performing Self Test appears.
The printer performs its power-on sequence, and then CONFIG MENU appears.
4 Press ▼ until √Disk Encryption appears, and then press ⏻.
5 Press ▼ until √ Enable appears, and then press ⏻.
Contents will be lost. Continue? appears.
6 Press ▼ until √ Yes appears, and then press ⏻.
A progress bar appears.
7 When the process is finished, press 5
8 Press ▼ until √ Exit Config Menu appears, and then press ⏻.
Resetting the Printer appears briefly, followed by a clock, and then Ready appears.
Disabling printer hard disk encryption
This functionality is only available when a printer hard disk is installed and working properly.
Warning: All files and resources on the printer hard disk will be deleted. Resources residing in the printer flash memory or RAM will not be affected.
1 Make sure the printer is turned off.
2 From the control panel, press and hold √ and ▶ while turning the printer on.
3 Release both buttons when Performing Self Test appears. The printer performs its power-on sequence, and then CONFIG MENU appears.
4 Press ▼ until √Disk Encryption appears, and then press ⏻.
5 Press ▼ until √ Disable appears, and then press ⏻.
Contents will be lost. Continue? appears.
6 Press ▼ until √ Yes appears, and then press ⏻.
A progress bar shows the amount completed.
7 When the process is finished, press 5
8 Press ▼ until √Exit Config Menu appears, and then press ⏻.
Resetting the Printer appears briefly, followed by a clock, and then Ready appears.
Locking the control panel menus using the Embedded Web Server
You can use the control panel lockout functionality to create a PIN and choose specific menus to lock. Each time a locked menu is selected, the user will be prompted to enter the correct PIN. The PIN does not affect access through the Embedded Web Server.
To lock control panel menus:
1 Open a Web browser. In the address line, enter the IP address of the printer or print server to be protected using the format: http://ip_address/.
2 Click Configuration.
3 Under Other Settings, click Security.
4 Click Menu Lockout Setup.
Locking the entire printer
You can use the printer lockout functionality to create a PIN that must be entered in order to use the printer. When the printer is locked, every print job it receives will buffer to the hard disk. To print the jobs, the user must enter the correct PIN using the control panel.
Notes:
- A printer hard disk must be installed in the printer and working properly for the printer lockout functionality to be available.
- Some data will continue to be processed while the printer is locked. Reports such as user or event logs can be retrieved from a locked printer.
To lock control panel menus:
1 Open a Web browser. In the address line, enter the IP address of the printer or print server to be protected using the format: http://ip_address/.
2 Click Configuration.
3 Under Other Settings, click Security.
4 Click Printer Lockout PIN.
Modifying confidential print settings
You can modify confidential print settings using the Embedded Web Server. You can set a maximum number of PIN entry attempts. When a user exceeds a specific number of PIN entry attempts, all of the jobs for that user are deleted.
You can set an expiration time for confidential print jobs. When a user has not printed the jobs within the designated time period, all of the jobs for that user are deleted.
Note: This functionality is only available on network printers.
To modify the confidential print settings:
1 Open a Web browser. In the address line, enter the IP address of the printer or print server to be protected using the format: http://ip_address/.
2 Click Configuration.
3 Under Other Settings, click Security.
4 Click Confidential Print Setup.
Supporting IPSec
Internet Protocol Security (IPSec) provides authentication and encryption at the network layer allowing all application and network connections over the IP protocol to be secure. IPSec can be set up between the printer and up to five hosts, using both IPv4 and IPv6.
To configure IPSec using the Embedded Web Server:
1 Open a Web browser. In the address line, enter the IP address of the printer or print server to be protected using the format: http://ip_address.
2 Click Configuration.
3 Under Other Settings, click Network/Ports.
4 Click IPSec.
IPSec supports two types of authentication:
- Shared Key Authentication—Authenticates any ASCII phrase shared among all participating host computers. This is the easiest way to configure when only a few host computers on the network use IPSec.
- Certificate Authentication—Authenticates any host computer or subnet of hosts for IPSec. Each host computer must have a public/private key pair. Validate Peer Certificate is enabled by default, requiring each host to have a signed authority certificate that is installed. Each host must have its identifier in the Subject Alternate Name field of the signed certificate.
Note: After a printer is configured for IPSec with a host, IPSec is required for any IP communications to take place.
Supporting SNMPv3
Simple Network Management Protocol version 3 (SNMPv3) allows for encrypted and authenticated network connections. It also lets a system support person select the desired level of security. Prior to use, at least one user name and password must be assigned from the settings page.
To configure SNMPv3 through the Embedded Web Server:
1 Open a Web browser. In the address line, enter the IP address of the printer or print server to be protected using the format: http://ip_address/.
2 Click Configuration.
3 Under Other Settings, click Network/Ports.
4 Click SNMP.
SNMPv3 authentication and encryption has three levels of support:
- No authentication and no encryption
- Authentication with no encryption
- Authentication and encryption
Using 802.1x authentication
802.1x authentication allows the printer to join networks that require authentication before allowing access. 802.1x port authentication can be used with the WPA (Wi-Fi Protected Access) feature of wireless printers or print servers to provide WPA-Enterprise security support.
Support for 802.1x requires the establishment of credentials for the printer, such as certificates. Certificates provide a way for the printer to be known to the Authentication Server (AS). The AS allows network access to wireless printers or print servers presenting a valid set of credentials. You can manage the credentials by using the Embedded Web Server.
To install and use certificates as part of the credentials:
1 Open a Web browser. In the address line, enter the IP address of the printer or print server to be protected using the format: http://ip_address/.
2 Click Configuration.
3 Under Other Settings, click Network/Ports.
4 Click Certificate Management.
To enable and configure 802.1x after installing the required certificates:
1 Open a Web browser. In the address line, enter the IP address of the printer or print server to be protected using the format: http://ip_address/.
2 Click Configuration.
3 Under Other Settings, click Network/Ports.
4 Click 802.1x Authentication. If a wireless internal print server is installed in the printer, click Wireless instead.
Using Secure mode
Secure mode is a way to securely communicate over TCP and UDP ports.
There are three ways to configure the TCP and UDP ports:
- Disabled—Never allows network connections
- Secure and Unsecure—Allows the port to remain open, even in Secure mode
- Unsecured Only—Allows the port to open only when the printer is not in Secure mode
Note: A password must be set to enable Secure mode. Once enabled, only the ports set to Secure and Unsecure will be open.
To configure Secure mode using the Embedded Web Server:
1 Open a Web browser. In the address line, enter the IP address of the printer or print server to be protected using the format: http://ip_address.
2 Click Configuration.
3 Under Other Settings, click Network/Ports.
4 Click TCP/IP Port Access.
Checking an unresponsive printer
If your printer is not responding, make sure:
- The power cord is plugged into the printer and a properly grounded electrical outlet.
- The electrical outlet is not turned off by any switch or breaker.
- The printer is not plugged into any surge protectors, uninterrupted power supplies, or extension cords.
- Other electrical equipment plugged into the outlet is working.
- The printer is turned on.
- The printer cable is securely attached to the printer and the host computer, print server, option, or other network device.
Once you have checked each of these possibilities, turn the printer off and then back on. This often fixes the problem.
Solving printing problems
Multiple-language PDFs do not print
| Cause Solution | |
| Documents contain unavailable fonts. | 1 Open the document you want to print in Adobe Acrobat.2 Click the printer icon.The Print dialog appears.3 Select Print as image.4 Click OK. |
Control panel display is blank or displays only diamonds
| Cause Solution | |
| Printer self test failed. | Turn the printer off, wait about 10 seconds, and then turn the printer back on.If Performing Self Test and Ready do not appear, turn the printer off and contact Customer Support. |
Error message about reading USB drive appears
| USB device may not be supported. | For information regarding tested and approved USB flash memory devices, see the Lexmark Web site at www.lexmark.com. |
Jobs do not print
| Cause Solution | |
| Printer is not ready to receive data. | Make sure Ready or Power Saver appears on the display before sending a job to print. Press √ to return the printer to the Ready state. |
| Specified output (exit) bin is full. | Remove the stack of paper from the output (exit) bin, and then press √. |
| Specified tray is empty. Load media in the tray. | |
| Wrong printer software is installed. | · Verify you are using the correct printer software with your printer.· If you are using a USB port, make sure you are running Windows 2000, Windows XP, or Windows Server 2003 and using Windows ME, Windows 2000, Windows XP, or Windows Server 2003 compatible printer software. |
| Internal print server is not set up properly or is not connected properly. | Verify that you have properly installed the print server and configured the printer for network printing.For more information about installing a network printer, click View User's Guide and Documentation on the Software and Documentation CD.Copies of the printer software are also available on the Lexmark Web site at www.lexmark.com. |
| You are using the wrong USB or Ethernet cable, or the cable is not securely connected. | · Make sure you are using a recommended cable.· Make sure the connection is secure. |
Confidential and other held jobs do not print
| Cause Solution | |
| Formatting error has occurred. | Print the job. (Only part of the job may print.)Delete the job. |
| Printer has insufficient memory. | Free up additional printer memory by scrolling through the list of held jobs and deleting some of them. |
| Printer has received invalid data. | Delete the job. |
Job takes longer than expected to print
| Cause Solution | |
| Job is too complex. | Reduce the complexity of your print job by eliminating the number and size of fonts, the number and complexity of images, and the number of pages in the job. |
| Page Protect is set to On. | Set Page Protect to Off:1 From the control panel, press 😊2 Press ▼ until √Settings appears, and then press ⏻.3 Press ▼ until √Setup Menu appears, and then press ⏻.4 Press ▼ until √Page Protect appears, and then press ⏻.5 Press ▼ until √off appears, and then press ⏻. |
Job prints from the wrong tray or on the wrong paper
| Cause Solution | |
| Control panel menu settings do not match the media loaded in the tray. | Make sure the Paper Size and Paper Type specified in the printer software match the paper size and type in the tray. |
Incorrect characters print
| Cause Solution | |
| Printer is in Hex Trace mode. | If Ready Hex appears on the display, you must exit Hex Trace mode before you can print your job. Turn the printer off and back on to exit Hex Trace mode. |
Tray linking does not work
| Cause Solution | |
| Tray linking is not configured properly. | Make sure the media size and type are the same in both trays.Make sure the paper guides in the trays are set for the correct media size.Make sure the Paper Size and Paper Type are set correctly in the Paper menu.For more information, see “Tray linking” on page 36 or see the Menus and Messages Guide on the Software and Documentation CD. |
Large jobs do not collate
| Cause Solution | |
| Collate is not set to On. | From the Finishing menu or the printer software, set Collate to On.Note: Setting Collate to Off in the software overrides the setting in the Finishing menu.For more information, see the Menus and Messages Guide on the Software and Documentation CD. |
| Job is too complex. | Reduce the complexity of the print job by eliminating the number and size of fonts, the number and complexity of images, and the number of pages in the job. |
| Printer does not have enough memory. | Add printer memory or an optional hard disk. |
Unexpected page breaks occur
| Cause Solution | |
| Job has timed out. Set the Print Timeout to a higher value:1 From the control panel, press 😊2 Press ▼ until √Settings appears, and then press ⏻.3 Press ▼ until √Setup Menu appears, and then press ⏻.4 Press ▼ until √Timeouts appears, and then press ⏻.5 Press ▼ until √Print Timeout appears, and then press ⏻.6 Press ▶ until the desired value appears, and then press ⏻. | |
Solving option problems
Option does not operate correctly or quits after it is installed
If an option does not operate correctly or quits working after it is installed:
- Turn the printer off, wait for about 10 seconds, and then turn the printer on. If this does not fix the problem, unplug the printer, and then check the connection between the option and printer.
- Print the menu settings page and check to see if the option is listed in the Installed Options list. If the option is not listed, reinstall it.
- Make sure the option is selected in the program you are using.
Mac OS 9 users: Make sure the printer is set up in the Chooser.
Troubleshooting for specific options follows. If the suggested corrective action does not fix the problem, contact Customer Support.
Drawers
- Make sure the connection between the drawer and printer is secure.
- Make sure the media is loaded correctly.
Flash memory card
Make sure the flash memory card is securely connected to the printer system board.
Hard disk with adapter
Make sure the hard disk is securely connected to the printer system board.
Infrared adapter
If infrared communication stops or does not occur, make sure:
- The distance between the two infrared ports is 1 meter (39 in.) or less. If communication does not occur between ports, move the ports closer together.
- Both ports are stable.
The computer and printer are on a level surface.
- The angle of communication between the two infrared ports is within 15 degrees of either side of an imaginary line drawn between the two infrared ports.
- No bright light, such as direct sunlight, is interfering with communication.
- No objects are placed between the two infrared ports.
Internal print server
- Make sure the internal print server is securely connected to the printer system board. For more information, see "Installing an internal print server or port interface card" on page 24.
- Make sure you are using the correct cable, that it is securely connected, and the network software is correctly set up. For information about installing software for network printing, click View User's Guide and Documentation on the Software and Documentation CD.
Memory card
Make sure the memory card is securely connected to the printer system board.
USB/parallel interface card
- Make sure the USB/parallel interface card is securely connected to the printer system board.
- Make sure you are using the correct cable and that it is securely connected.
Solving paper feed problems
Paper frequently jams
| Cause Solution | |
| Media loaded does not meet the printer specifications. | Use recommended paper and other specialty media. For detailed specifications, see the Card Stock & Label Guide available on the Lexmark Web site at www.lexmark.com. |
| Too much media was loaded. Make sure the stack of media | media you load does not exceed the maximum stack height indicated in the tray or on the multipurpose feeder. |
| Guides in the selected tray are not set to the appropriate position for the paper size loaded. | Move the guides in the tray to the correct position. |
| Media has absorbed moisture due to high humidity. | Load media from a fresh package.Store media in its original wrapper until you load it. |
Paper jam message remains after jam is cleared
| Cause Solution | |
| The entire paper path was not cleared, or √was not pressed. | Clear media from the entire paper path, and then press √. |
Page that jammed does not reprint after you clear the jam
| Cause Solution | |
| Jam Recovery in the Setup menu is set to Off. | Set Jam Recovery to Auto or On:1 Press2 Press ▼ until √ Settings appears, and then press√.3 Press ▼ until √ Setup Menu appears, and then press√.4 Press ▼ until √ Print Recovery appears, and then press√.5 Press ▼ until √ Jam Recovery appears, and then press√.6 Press ▼ until √ on or √ Auto appears, and then press√. |
Solving print quality problems
Isolating print quality problems
To help isolate print quality problems, print the print quality test pages:
1 Turn the printer off.
2 From the control panel, press and hold √ and ▶ while turning the printer on.
3 Release both buttons when Performing Self Test appears.
The printer performs its power-on sequence, and then CONFIG MENU appears.
4 Press ▼ until √ Prt Quality Pgs appears, and then press ⏻.
The pages are formatted. Printing Quality Test Pages appears, and then the pages print. The message remains on the control panel until all the pages print.
5 After the print quality test pages print, press ▼ until √ Exit Config Menu appears, and then press √.
The information in the following topics may help you solve print quality problems. If these suggestions still do not correct the problem, contact Customer Support. You may have a printer part that requires adjustment or replacement.
Repeating defects
| Example Cause Solution | |
 | If marks occur repeatedly only in one color and multiple times down a page, a toner cartridge or photoconductor may be defective. |
| Replace the toner cartridge if the defects occur every:33.5 mm (1.32 in.)35.7 mm (1.41 in.)Replace the photoconductor if the defects occur every:28.3 mm (1.11 in.)72.4 mm (2.85 in.) | |
| If marks occur down the page repeatedly in all colors, the fuser may be defective. | |
| Replace the fuser if the defects occur every 116.2 mm (4.58 in.). |
Color misregistration
| Example Cause Solution | |||
 | ABCDE | Color has shifted outside of the appropriate area or has been superimposed over another color area. | Adjust the color alignment. For more information, see “Adjusting the color alignment” on page 88.Remove and reinstall the photoconductors. For more information about installing supplies, see the User's Guide on the Software and Documentation CD.Note:If you have not resolved the issue, adjust the color alignment again. |
Adjusting the color alignment
1 Make sure the printer is turned off.
2 From the control panel, press and hold ⏻ and ▶ while turning the printer on.
3 Release both buttons when Performing Self Test appears.
The printer performs its power-on sequence, and then CONFIG MENU appears.
4 Press ▼ until √ Color Alignment appears, and then press ⏻.
5 Press ① again to print the alignment page.
6 Press ▼ until √ Set A appears, and then press ⏻.
7 From the printed sheet, find the straightest of the 20 lines beside the letter A.
8 Press ◀ or ▶ until that number is displayed, and then press √.
Submitting Selection appears.
9 Repeat steps 6 through 8 to align sets A through L.
10
Press

11
Press

until
√Ex
kit
Config
Menu
appe
ars, an
d the
n press
√
Resetting the Printer appears briefly, followed by a clock, and then Ready appears.
Dark lines
| Example Cause Solution | ||
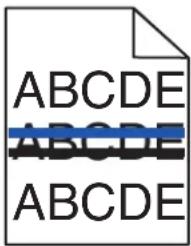 | Toner cartridge(s), photoconductor, or transfer belt is defective. | If the problem is on the front (print side) of the page:1 Replace the toner cartridge(s) causing the line.2 If the problem still occurs, replace the photoconductor unit.If the problem is on the back of the page, replace the transfer belt. |
Light colored line, white line, or incorrectly colored line
| Example Cause Solution | ||
 | Toner cartridge is defective. Replace the color cartridge causing the line. | |
| Photoconductors are defective. Replace the photoconductor units. | ||
| Transfer belt is defective. Replace the transfer belt. | ||
| Printhead lenses are dirty. Clean the printhead lenses. | ||
 | ||
Streaked horizontal lines
| Example Cause Solution | |||
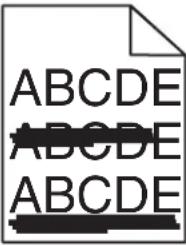 | A toner cartridge is defective, empty, or worn. | Replace the toner cartridge. | |
| Fuser is defective or worn. Replace the fuser. | |||
| Photoconductors may be defective. | Replace the photoconductor units. | ||
Streaked vertical lines
| Example Cause Solution | ||
 | Toner is smeared before fusing to the media. | If media is stiff, try feeding from another tray. |
| Toner cartridge is defective. Replace the toner cartridge causing the streaks. | ||
| Transfer belt is defective. Replace the transfer belt. | ||
Print is too light
| Cause Solution | |
| Toner Darkness setting is too light, RGB Brightness setting is too bright, or RGB Contrast setting is incorrect. | Select a different Toner Darkness setting, RGB Brightness setting, or RGB Contrast setting from Print Properties before sending the job to print.Note: This solution applies to Windows users only.Adjust the color quality settings in the Quality menu. |
| The media being used does not meet the printer specifications. | Load media from a new package.Avoid textured media with rough finishes.Make sure the media you load in the trays is not damp.Make sure the Paper Type and Paper Weight settings match the type of media you are using. |
| Color Saver is On. Turn Color Saver off. | |
| Toner is low. Replace the toner cartridge. | |
| Toner cartridge is defective or worn. |
Print irregularities
| Example Cause Solution | ||
 | Media has absorbed moisture due to high humidity. | Load media from a fresh package into the paper tray. |
| The media being used does not meet the printer specifications. | Make sure the Paper Type and Paper Weight settings match the type of media you are using.Avoid textured media with rough finishes. | |
 | A toner cartridge is low or may be almost empty. | Replace the toner cartridge. |
| Fuser is worn or defective. Replace the fuser. | ||
Print is too dark
| Cause Solution | |
| Toner Darkness setting is too dark, RGB Brightness setting is too dark, or RGB Contrast setting is too high. | Select a different Toner Darkness setting, RGB Brightness setting, or RGB Contrast setting from Print Properties before sending the job to print.Note: This solution applies to Windows users only. |
| Toner cartridge is defective. Replace the toner cartridge. |
Transparency print quality is poor
| Cause Solution | |
| You are using transparencies that do not meet the printer specifications. | Use only transparencies recommended by the printer manufacturer. |
| Paper Type setting for the tray you are using is set to something other than Transparency. | Make sure the Paper Type setting is set to Transparency. |
Toner fog or background shading appears on the page
| Cause Solution | |
| Toner cartridge is worn or defective. Reinstall or replace the cartridge. | |
| Transfer belt is worn or defective. Replace the transfer belt. | |
| Photoconductor is worn or defective. Replace the photoconductor. | |
| Fuser is worn or defective. Replace the fuser. | |
| Toner is in the paper path. Call for customer service. | |
Gray background
| Example Cause Solution | |
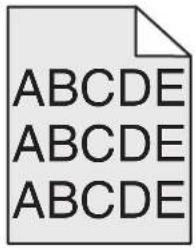 | Toner darkness setting is too dark. Select a different toner darkness setting in the Print Properties before sending the job to print. |
Uneven print density
| Example Cause Solution | ||
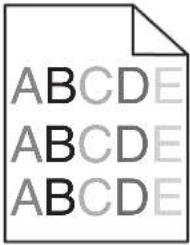 | Toner cartridge is defective. Replace the toner cartridge. | |
| Photoconductor is worn or defective. | Replace the photoconductor. | |
Characters have jagged or uneven edges
| Cause Solution | |
| Downloaded font is not supported. | If you are using downloaded fonts, verify the fonts are supported by the printer, the host computer, and the software application. |
Ghost images
| Example Cause Solution | ||
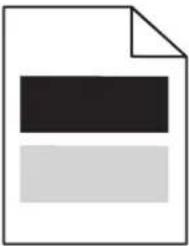 | The photoconductors are not functioning properly. | Make sure the Paper Type setting is correct for the media you are using.Replace the photoconductors. |
| Toner is low. Replace the toner cartridge. |
Clipped images
| Cause Solution | |
| Guides in the selected tray are set for a different media size than what is loaded in the tray. | Move the guides in the tray to the proper positions for the size loaded. |
| There could be an incorrect page size selected in the driver or program. | Specify the correct page size in the driver or program.Set the Paper Size to match the media in the tray. |
Incorrect margins
| Cause Solution | |
| Guides in the selected tray are set for a different paper size than what is loaded in the tray. | Move the guides in the tray to the proper positions for the size loaded. |
| Auto size sensing is set to Off, but you loaded a different size paper in a tray. For example, you inserted A4-size paper into the selected tray but did not set the Paper Size to A4. | Set the Paper Size to match the media in the tray.Specify the correct page size in Print Properties or the program. |
Skewed print
| Cause Solution | |
| Guides in the selected tray are not in the correct position for the media size loaded in the tray. | Move the guides in the tray to the proper positions for the size loaded. |
| The media being used does not meet the printer specifications. | Make sure you are using media that meets the printer specifications. |
Blank pages
| Cause Solution | |
| Toner is low. | Remove the toner cartridge from the printer. Shake the cartridge back and forth several times, and then reinstall it.Install a new toner cartridge. |
| Toner cartridge is defective or empty. Replace the | toner cartridge. |
Solid color pages
| Cause Solution | |
| Photoconductor is installed incorrectly. Remove and then reinstall the photoconductor. | |
| Photoconductor is defective. Replace the photoconductor. | |
| Printer requires servicing. Call for customer service. | |
Paper curl
| Cause Solution | |
| Paper Type and Paper Weight settings are not appropriate for the type of paper or specialty media you are using. | Change the Paper Type and Paper Weight settings to match the paper or specialty media loaded in the printer. |
| Paper has been stored in a high humidity environment. | Load paper from a fresh package.Store paper in its original wrapper until you use it. |
Toner specks
| Cause Solution | |
| Toner cartridges are worn or defective. | Replace the defective or worn toner cartridges. |
| Toner is in the media path. Call for customer service. |
Toner rubs off
| Cause Solution | |
| Specialty media is being used. | Make sure the correct Media Type is selected. |
| The Paper Weight setting in the Paper Menu is wrong for the type of media being used. | Change the Paper Weight from Normal to Heavy. If necessary, change Paper Texture from Normal to Rough. |
| The fuser is worn or defective. Replace the fuser. |
Solving color quality problems
This section helps answer some basic color-related questions and describes how some of the features provided in the Quality Menu can be used to solve typical color problems.
Quality menu
| Menu item Description | Settings | |
| Print Mode Specifies whether images are printed in monochromegrayscale or in colorNote: Color is the default setting. | ColorBlack Only | |
| Color Correction Adjuststhe color output on the printed pageNotes:Due to the differences in additive and subtractive colors,certain colors that appear on computer monitors areimpossible to duplicate on the printed page.Auto is the default setting. Auto applies different colorconversion tables to each object on the printed page. Itlooks at how the color for each object is defined.Off turns off color correction.Manual allows customization of the color tables using thesettings available under the Manual Color menu. | AutoOffManual | |
| Print Resolution Specifiesthe printed output resolutionNotes:4800 CQ is the default setting.1200 dpi provides the highest resolution output. Thissetting increases gloss. | 1200 dpi4800 CQ | |
| Toner Darkness Lightensor darkens the printed outputNotes:4 is the default setting.Selecting a smaller number can help conserve toner.If Print Mode is set to Black Only, a setting of 5 increasestoner density and darkness to all print jobs.If Print Mode is set to Color, a setting of 5 is the same asa setting of 4. | 1-5 | |
| Enhance Fine Lines Enables a print mode preferable for files such as architecturaldrawings, maps, electrical circuit diagrams, and flow chartsNotes:To set Enhance Fine Lines from the software program witha document open (applicable to Windows users), clickFile → Print, and then click Properties, Preferences,Options, or Setup.To set Enhance Fine Lines using the Embedded WebServer, type the network printer IP address in a browserwindow. | OnOff | |
| Color Saver Reduces the | amount of toner used for graphics and images.The amount of toner used for text is not reduced.Notes:Off is the default setting.On overrides Toner Darkness settings.Color Saver is not supported in PPDS, and only partially supported by the PCL emulation printer software. | OnOff |
| RGB Brightness Adjusts | brightness in color outputsNotes:0 is the default setting.-6 is the maximum decrease. 6 is the maximum increase.This does not affect files where CMYK color specifications are being used. | -6 to 6 |
| RGB Contrast Adjusts | contrast in color outputsNotes:0 is the default setting.This does not affect files where CMYK color specifications are being used. | 0 to 5 |
| RGB Saturation Adjusts | saturation in color outputsNotes:0 is the default setting.This does not affect files where CMYK color specifications are being used. | 0 to 5 |
| Color Balance →CyanMagentaYellowBlackReset Defaults | Adjusts color in printed output by increasing or decreasing the amount of toner being used for each colorNote:0 is the default setting. | -5 to 5 |
| Color Samples Prints sa | sample pages for each of the RGB and CMYK color conversion tables used in the printerNotes:Selecting any setting prints the sample.Color samples consist of a series of colored boxes along with the RGB or CMYK combination that creates the color observed. These pages can be used to help decide which combinations to use to get the desired printed output.The easiest way to access a complete list of these pages is by using the Embedded Web Server, a series of resident pages located in network printers. Type the IP address of the printer in a browser window to see these pages. | sRGB DisplaysRGB VividDisplay—True BlackVividOff—RGBUS CMYKEuro CMYKVivid CMYKOff—CMYK |
| Manual Color →RGB ImageRGB TextRGB Graphics | Customizes the RGB color conversionsNotes:sRGB Display is the default setting. This applies a color conversion table that tries to produce output that matches the colors displayed on a computer monitor.Vivid applies a color conversion table that produces brighter, more saturated colors.Display—True Black applies a color conversion table that uses only black toner for neutral gray colors.sRGB Vivid applies a color table that increases saturation. This is preferred for business graphics and text.Off turns off color conversion. | VividsRGB DisplayDisplay—True BlacksRGB VividOff |
| Manual Color →CMYK ImageCMYK TextCMYK Graphics | Customizes the CMYK color conversionsNotes:US CMYK is the default setting. This applies a color conversion table that tries to produce output that matches SWOP color output.Euro CMYK applies a color conversion table that tries to produce output that matches EuroScale color output.Vivid CMYK increases color saturation for the US CMYK color conversion table.Off turns off color conversion. | US CMYKEuro CMYKVivid CMYKOff |
| Color Adjust Initiates arecalibration of color conversion tables and allows the printer to make adjustments for color variations in outputNotes:Calibrating starts when this menu is selected.Calibrating appears on the display until the process is finished.Color variations in output sometimes result from changeable conditions such as room temperature and humidity. Color adjustments are made on printer algorithms. Color alignment is also recalibrated in this process. | None | |
Frequently Asked Questions (FAQ) about color printing
What is RGB color?
Red, green, and blue light can be added together in various amounts to produce a large range of colors observed in nature. For example, red and green can be combined to create yellow. Televisions and computer monitors create colors in this manner. RGB color is a method of describing colors by indicating the amount of red, green, or blue needed to produce a certain color.
What is CMYK color?
Cyan, magenta, yellow, and black inks or toners can be printed in various amounts to produce a large range of colors observed in nature. For example, cyan and yellow can be combined to create green. Printing presses, inkjet printers, and color laser printers create colors in this manner. CMYK color is a method of describing colors by indicating the amount of cyan, magenta, yellow, and black needed to reproduce a particular color.
How is color specified in a document to be printed?
Software programs typically specify document color using RGB or CMYK color combinations. Additionally, they commonly let users modify the color of each object in a document. For more information, see the software program Help section.
How does the printer know what color to print?
When a user prints a document, information describing the type and color of each object is sent to the printer. The color information is passed through color conversion tables that translate the color into appropriate amounts of cyan, magenta, yellow, and black toner needed to produce the desired color. The object type information lets different color conversion tables be used for different types of objects. For example, it is possible to apply one type of color conversion table to text while applying a different color conversion table to photographic images.
Should I use PostScript or PCL emulation printer software? What settings should I use for the best color?
The PostScript driver is strongly recommended for best color quality. The default settings in the PostScript driver provide preferred color quality for the majority of printouts.
Why doesn't the printed color match the color I see on the computer screen?
The color conversion tables used in Auto Color Correction mode generally approximate the colors of a standard computer monitor. However, because of technology differences that exist between printers and monitors, there are many colors that can also be affected by monitor variations and lighting conditions. For recommendations on how the printer color sample pages may be useful in solving certain color-matching problems, see the question, "How can I match a particular color (such as a color in a corporate logo)?"
The printed page appears tinted. Can I slightly adjust the color?
Sometimes a user may consider printed pages to appear tinted (for example, everything printed seems to be too red). This can be caused by environmental conditions, paper type, lighting conditions, or user preference. In these instances, adjusting the Color Balance setting may be used to create more preferable color. Color Balance provides the user with the ability to make subtle adjustments to the amount of toner being used in each color plane. Selecting positive (or negative) values for cyan, magenta, yellow, and black under the Color Balance menu will slightly increase (or decrease) the amount of toner used for the chosen color. For example, if a user believes the overall printed page to be too red, then decreasing both magenta and yellow could potentially improve color preferences.
For information about adjusting the Color Balance setting, see the Menus and Messages Guide on the Software and Documentation CD.
My color transparencies seem dark when being projected. Is there anything I can do to improve the color?
This problem most commonly occurs when projecting transparencies with reflective overhead projectors. To obtain the highest projected color quality, transmissive overhead projectors are recommended. If a reflective projector must be used, then adjusting the Toner Darkness setting to 1, 2, or 3 will lighten the transparency. For more information, see the Menus and Messages Guide on the Software and Documentation CD.
Make sure to print on the recommended type of color transparencies. For more information about the paper and media specifications, see the User's Guide on the Software and Documentation CD.
What is manual color correction?
The color conversion tables applied to each object when using the default Auto Color Correction setting generate preferred color for the majority of documents. Occasionally, a user may want to apply a different color table mapping. This customization is accomplished using the Manual Color menu and the Manual Color Correction setting.
Manual Color Correction applies to RGB and CMYK color conversion table mappings as defined in the Manual Color menu.
Users may select any of the different color conversion tables for RGB or CMYK:
| Color conversion table Settings | |
| RGB | sRGB DisplayDisplay—True BlacksRGB VividVividOff |
| CMYK | US CMYKEuro CMYKVivid CMYKOff |
Note: The Manual Color Correction setting is not useful if the software program does not specify colors with RGB or CMYK combinations. It is also not effective in situations where the software program or the computer operating system controls the adjustment of colors.
How can I match a particular color (such as a corporate logo)?
Occasionally, users have a need for the printed color of a particular object to closely match a specific color. For example, a user may need to match the color of a corporate logo. While instances can occur in which the printer cannot exactly reproduce the desired color, users should be able to identify adequate color matches for the majority of cases.
The Color Samples menu item can provide useful information in helping solve this particular type of color-matching problem. The nine Color Samples values correspond to color conversion tables in the printer. Selecting any of the Color Samples values generates a multiple-page printout consisting of hundreds of colored boxes. Either a CMYK or RGB combination is located on each box, depending on the table selected. The observed color of each box is obtained by passing the CMYK or RGB combination labeled on the box through the selected color conversion table.
The user can examine the color samples pages and identify the box whose color is the closest to the desired color. The color combination labeled on the box can then be used for modifying the color of the object in a software program. For instructions, see the software program Help. Manual Color Correction may be necessary to utilize the selected color conversion table for the particular object.
Selecting which Color Samples pages to use for a particular color-matching problem depends on the Color Correction setting being used (Auto, Off, or Manual), the type of object being printed (text, graphics, or images), and how the color of the object is specified in the software program (RGB or CMYK combinations). When the printer Color Correction setting is set to Off, the color is based on the print job information; no color conversion is implemented.
Note: The Color Samples pages are not useful if the software program does not specify colors with RGB or CMYK combinations. Additionally, certain situations exist where the software program or the computer operating system adjusts the RGB or CMYK combinations specified in the program through color management. The resulting printed color may not be an exact match of the Color Samples pages.
The following table can help identify which Color Sample pages to use for color matching.
| Color specification and object to be printed | Color Correction setting Sample pages to use | |
| RGB—Text Auto SRGB Vivid | ||
| Manual Manual Color RGB Text Setting | ||
| RGB—Graphic Auto SRGB Vivid | ||
| Manual Manual Color RGB Graphic Setting | ||
| RGB—Image Auto SRGB Display | ||
| Manual Manual Color RGB Image Setting | ||
| CMYK—Text Auto US CMYK or Euro CMYK | ||
| Manual Manual Color CMYK Text Setting | ||
| CMYK—Graphic Auto US CMYK | ||
| Manual Manual Color CMYK Graphic Setting | ||
| CMYK—Image Auto US CMYK | ||
| Manual Manual Color CMYK Image Setting | ||
What are Detailed Color Samples and how do I access them?
This topic applies only to network printers. These pages require the use of the Embedded Web Server. The Embedded Web Server is a series of resident pages stored in the network printer firmware. To access these pages, browse to the IP address of the network printer. Click Configuration Menu, and then click Detailed Color Samples.
For more information about using the Embedded Web Server, see the User's Guide on the Software and Documentation CD.
Detailed Color Samples are pages similar to the default pages of color samples accessible from the Quality menu using the control panel. The default color samples available using this method have an increment value of 10% for red, green, and blue. If the user finds a value on this page that is close, but would like to scan more colors in a nearby area, the user can use the Detailed Color Samples to select the desired color values and a more specific increment. This provides a way to print multiple pages of colored boxes that surround a specific color of interest.
There are nine conversion tables available with the following three options:
- Print—Prints the default pages
- Detailed—Lets you enter individual red, green, and blue values and a specific increment of color
- Reset—Lets you clear the existing information and enter new values
The process can be duplicated for Cyan (C), Magenta (M), Yellow (Y), and Black (K) color conversion tables, too. Collectively, these values are known as CMYK color. The default increment is 10% for Black and 20% each for Cyan, Magenta, and Yellow.
Contacting Customer Support
When you call Customer Support, describe the problem you are experiencing, the message on the display, and the troubleshooting steps you have already taken to find a solution.
You need to know your printer model type and serial number. For more information, see the label on the inside top front cover of the printer. The serial number is also listed on the menu settings page.
In the U.S. or Canada, call (1-800-539-6275). For other countries/regions, visit the Lexmark Web site at www.lexmark.com.
| Product name Machine type Model number | ||
| Lexmark C530dn 5022-130 C530dn | ||
| Lexmark C532n 5022-310 C532n | ||
| Lexmark C532dn 5022-330 C532dn | ||
| Lexmark C534n 5022-510 C534n | ||
| Lexmark C534dn 5022-530 C534dn |
Edition notice
July 2006
The following paragraph does not apply to any country where such provisions are inconsistent with local law: LEXMARK INTERNATIONAL, INC., PROVIDES THIS PUBLICATION "AS IS" WITHOUT WARRANTY OF ANY KIND, EITHER EXPRESS OR IMPLIED, INCLUDING, BUT NOT LIMITED TO, THE IMPLIED WARRANTIES OF MERCHANTABILITY OR FITNESS FOR A PARTICULAR PURPOSE. Some states do not allow disclaimer of express or implied warranties in certain transactions; therefore, this statement may not apply to you.
This publication could include technical inaccuracies or typographical errors. Changes are periodically made to the information herein; these changes will be incorporated in later editions. Improvements or changes in the products or the programs described may be made at any time.
Comments about this publication may be addressed to Lexmark International, Inc., Department F95/032-2, 740 West New Circle Road, Lexington, Kentucky 40550, U.S.A. In the United Kingdom and Eire, send to Lexmark International Ltd., Marketing and Services Department, Westhorpe House, Westhorpe, Marlow Bucks SL7 3RQ. Lexmark may use or distribute any of the information you supply in any way it believes appropriate without incurring any obligation to you. To obtain additional copies of publications related to this product, visit the Lexmark Web site at www.lexmark.com.
References in this publication to products, programs, or services do not imply that the manufacturer intends to make these available in all countries in which it operates. Any reference to a product, program, or service is not intended to state or imply that only that product, program, or service may be used. Any functionally equivalent product, program, or service that does not infringe any existing intellectual property right may be used instead. Evaluation and verification of operation in conjunction with other products, programs, or services, except those expressly designated by the manufacturer, are the user's responsibility.
© 2006 Lexmark International, Inc
All rights reserved.
UNITED STATES GOVERNMENT RIGHTS
This software and any accompanying documentation provided under this agreement are commercial computer software and documentation developed exclusively at private expense.
Trademarks
Lexmark and Lexmark with diamond design, MarkNet, and MarkVision are trademarks of Lexmark International, Inc., registered in the United States and/or other countries.
PrintCryption is a trademark of Lexmark International, Inc.
PCL® is a registered trademark of the Hewlett-Packard Company. PCL is Hewlett-Packard Company's designation of a set of printer commands (language) and functions included in its printer products. This printer is intended to be compatible with the PCL language. This means the printer recognizes PCL commands used in various application programs, and that the printer emulates the functions corresponding to the commands.
All other trademarks are the property of their respective owners.
Conventions
Note: A Note identifies something that could help you.
Warning: A Warning identifies something that could damage your product hardware or software.

Warning: This type of Warning indicates that you should not touch the marked area.

CAUTION: A CAUTION identifies something that could cause you harm.

CAUTION: This type of CAUTION indicates a hot surface.

CAUTION: This type of CAUTION indicates a shock hazard.

CAUTION: This type of CAUTION indicates a tipping hazard.
Federal Communications Commission (FCC) compliance information statement
This product has been tested and found to comply with the limits for a Class B digital device, pursuant to Part 15 of the FCC Rules. Operation is subject to the following two conditions: (1) this device may not cause harmful interference, and (2) this device must accept any interference received, including interference that may cause undesired operation.
The FCC Class B limits are designed to provide reasonable protection against harmful interference when the equipment is operated in a residential installation. This equipment generates, uses, and can radiate radio frequency energy and, if not installed and used in accordance with the instructions, may cause harmful interference to radio communications. However, there is no guarantee that interference will not occur in a particular installation. If this equipment does cause harmful interference to radio or television reception, which can be determined by turning the equipment off and on, the user is encouraged to try to correct the interference by one or more of the following measures:
- Reorient or relocate the receiving antenna.
- Increase the separation between the equipment and receiver.
- Connect the equipment into an outlet on a circuit different from that to which the receiver is connected.
- Consult your point of purchase or service representative for additional suggestions.
The manufacturer is not responsible for radio or television interference caused by using other than recommended cables or by unauthorized changes or modifications to this equipment. Unauthorized changes or modifications could void the user's authority to operate this equipment.
Note: To assure compliance with FCC regulations on electromagnetic interference for a Class B computing device, use a properly shielded and grounded cable such as Lexmark part number 1021294 for USB attach. Use of a substitute cable not properly shielded and grounded may result in a violation of FCC regulations.
Any questions regarding this compliance information statement should be directed to:
Director of Lexmark Technology & Services
Lexmark International, Inc.
740 West New Circle Road
Lexington, KY 40550
(859) 232–3000
Industry Canada compliance statement
This Class B digital apparatus meets all requirements of the Canadian Interference-Causing Equipment Standard ICES-003.
European Community (EC) directives conformity
This product is in conformity with the protection requirements of EC Council directives 89/336/EEC and 73/23/EEC on the approximation and harmonization of the laws of the Member States relating to electromagnetic compatibility and safety of electrical equipment designed for use within certain voltage limits.
A declaration of conformity with the requirements of the directives has been signed by the Director of Manufacturing and Technical Support, Lexmark International, Inc., S.A., Boigny, France.
Notices
This product satisfies the Class B limits of EN 55022 and safety requirements of EN 60950.
Japanese VCCI notice
Noise emission levels
The following measurements were made in accordance with ISO 7779 and reported in conformance with ISO 9296. Note: Some modes may not apply to your product.
| 1-meter average sound pressure, dBA | |
| Printing 53 dBA | |
| Scanning N/A | |
| Copying N/A | |
| Ready 32 dBA | |
Values are subject to change. See www.lexmark.com for current values.
Waste from Electrical and Electronic Equipment (WEEE) directive

text_image
Prohibition sign for a trash bin with red X marks and a black base symbolThe WEEE logo signifies specific recycling programs and procedures for electronic products in countries of the European Union. We encourage the recycling of our products. If you have further questions about recycling options, visit the Lexmark Web site at www.lexmark.com for your local sales office phone number.
ENERGY STAR
Applicable only to models with a duplexer installed.

Laser notice
The printer is certified in the U.S. to conform to the requirements of DHHS 21 CFR Subchapter J for Class I (1) laser products, and elsewhere is certified as a Class I laser product conforming to the requirements of IEC 60825-1.
Notices
Class I laser products are not considered to be hazardous. The printer contains internally a Class IIIb (3b) laser that is nominally a 5 milliwatt gallium arsenide laser operating in the wavelength of 770-795 nanometers. The laser system and printer are designed so there is never any human access to laser radiation above a Class I level during normal operation, user maintenance, or prescribed service condition.
Laser advisory label
A laser notice label may be affixed to this printer as shown:
Power consumption
Product power consumption
The following table documents the power consumption characteristics of the product.
Note: Some modes may not apply to your product.
| Mode Description | Power consumption (Watts) | |
| Printing | The product is generating hard-copy output from electronic inputs. | 410 W |
| Copying The product | is generating hard-copy output from hard-copy original documents. | N/A |
| Scanning The product | is scanning hard-copy documents. N/A | |
| Ready The product | is waiting for a print job. 120 W | |
| Power Saver The product | is in energy-saving mode. <18 W (C534); <16 W (C530, C532n, C532dn) | |
| High Off | The product is plugged into a wall outlet, but the power switch is turned off. | N/A |
| Low Off (<1 W Off) | The product is plugged into a wall outlet, the power switch is turned off, and the product is in the lowest possible power consumption mode. | N/A |
| Off | The product is plugged into a wall outlet, but the power switch is turned off. | .25 W |
The power consumption levels listed in the previous table represent time-averaged measurements. Instantaneous power draws may be substantially higher than the average.
Values are subject to change. See www.lexmark.com for current values.
Power Saver
This product is designed with an energy-saving mode called Power Saver. The Power Saver Mode is equivalent to the EPA Sleep Mode. The Power Saver Mode saves energy by lowering power consumption during extended periods of inactivity. The Power Saver Mode is automatically engaged after this product is not used for a specified period of time, called the Power Saver Timeout.
| Factory default Power Saver Timeout for this product (in minutes): | 30 minutes |
By using the configuration menus, the Power Saver Timeout can be modified between 1 minute and 240 minutes. Setting the Power Saver Timeout to a low value reduces energy consumption, but may increase the response time of the product. Setting the Power Saver Timeout to a high value maintains a fast response, but uses more energy.
Off mode
If this product has an off mode which still consumes a small amount of power, then to completely stop product power consumption, disconnect the power supply cord from the wall outlet.
Total energy usage
It is sometimes helpful to calculate the total product energy usage. Since power consumption claims are provided in power units of Watts, the power consumption should be multiplied by the time the product spends in each mode in order to calculate energy usage. The total product energy usage is the sum of each mode's energy usage.
Statement of Limited Warranty
Lexmark C530dn
Lexmark C532n
Lexmark C532dn
Lexmark C534n
Lexmark International, Inc., Lexington, KY
This limited warranty applies to the United States and Canada. For customers outside the U.S., refer to the country-specific warranty information that came with your product.
This limited warranty applies to this product only if it was originally purchased for your use, and not for resale, from Lexmark or a Lexmark Remarketer, referred to in this statement as "Remarketer."
Limited warranty
Lexmark warrants that this product:
—Is manufactured from new parts, or new and serviceable used parts, which perform like new parts
—Is, during normal use, free from defects in material and workmanship
If this product does not function as warranted during the warranty period, contact a Remarketer or Lexmark for repair or replacement (at Lexmark's option).
If this product is a feature or option, this statement applies only when that feature or option is used with the product for which it was intended. To obtain warranty service, you may be required to present the feature or option with the product.
If you transfer this product to another user, warranty service under the terms of this statement is available to that user for the remainder of the warranty period. You should transfer proof of original purchase and this statement to that user.
Limited warranty service
The warranty period starts on the date of original purchase as shown on the purchase receipt and ends 12 months later provided that the warranty period for any supplies and for any maintenance items included with the printer shall end earlier if it, or its original contents, are substantially used up, depleted, or consumed.
To obtain warranty service you may be required to present proof of original purchase. You may be required to deliver your product to the Remarketer or Lexmark, or ship it prepaid and suitably packaged to a Lexmark designated location. You are responsible for loss of, or damage to, a product in transit to the Remarketer or the Lexmark designated location.
When warranty service involves the exchange of a product or part, the item replaced becomes the property of the Remarketer or Lexmark. The replacement may be a new or repaired item.
The replacement item assumes the remaining warranty period of the original product.
Replacement is not available to you if the product you present for exchange is defaced, altered, in need of a repair not included in warranty service, damaged beyond repair, or if the product is not free of all legal obligations, restrictions, liens, and encumbrances.
Before you present this product for warranty service, remove all print cartridges, programs, data, and removable storage media (unless directed otherwise by Lexmark).
For further explanation of your warranty alternatives and the nearest Lexmark authorized servicer in your area contact Lexmark on the World Wide Web at www.lexmark.com/support.
Remote technical support is provided for this product throughout its warranty period. For products no longer covered by a Lexmark warranty, technical support may not be available or only be available for a fee.
Extent of limited warranty
Lexmark does not warrant uninterrupted or error-free operation of any product or the durability or longevity of prints produced by any product.
Warranty service does not include repair of failures caused by:
—Modification or unauthorized attachments
—Accidents, misuse, abuse or use inconsistent with Lexmark user's guides, manuals, instructions or guidance
—Unsuitable physical or operating environment
—Maintenance by anyone other than Lexmark or a Lexmark authorized servicer
—Operation of a product beyond the limit of its duty cycle
—Use of printing media outside of Lexmark specifications
—Refurbishment, repair, refilling or remanufacture by a third party of products, supplies or parts
—Products, supplies, parts, materials (such as toners and inks), software, or interfaces not furnished by Lexmark
TO THE EXTENT PERMITTED BY APPLICABLE LAW, NEITHER LEXMARK NOR ITS THIRD PARTY SUPPLIERS OR REMARKETERS MAKE ANY OTHER WARRANTY OR CONDITION OF ANY KIND, WHETHER EXPRESS OR IMPLIED, WITH RESPECT TO THIS PRODUCT, AND SPECIFICALLY DISCLAIM THE IMPLIED WARRANTIES OR CONDITIONS OF MERCHANTABILITY, FITNESS FOR A PARTICULAR PURPOSE, AND SATISFACTORY QUALITY. ANY WARRANTIES THAT MAY NOT BE DISCLAIMED UNDER APPLICABLE LAW ARE LIMITED IN DURATION TO THE WARRANTY PERIOD. NO WARRANTIES, EXPRESS OR IMPLIED, WILL APPLY AFTER THIS PERIOD. ALL INFORMATION, SPECIFICATIONS, PRICES, AND SERVICES ARE SUBJECT TO CHANGE AT ANY TIME WITHOUT NOTICE.
Limitation of liability
Your sole remedy under this limited warranty is set forth in this document. For any claim concerning performance or nonperformance of Lexmark or a Remarketer for this product under this limited warranty, you may recover actual damages up to the limit set forth in the following paragraph.
Lexmark's liability for actual damages from any cause whatsoever will be limited to the amount you paid for the product that caused the damages. This limitation of liability will not apply to claims by you for bodily injury or damage to real property or tangible personal property for which Lexmark is legally liable. IN NO EVENT WILL LEXMARK BE LIABLE FOR ANY LOST PROFITS, LOST SAVINGS, INCIDENTAL DAMAGE, OR OTHER ECONOMIC OR CONSEQUENTIAL DAMAGES. This is true even if you advise Lexmark or a Remarketer of the possibility of such damages. Lexmark is not liable for any claim by you based on a third party claim.
This limitation of remedies also applies to claims against any Suppliers and Remarketers of Lexmark. Lexmark's and its Suppliers' and Remarketers' limitations of remedies are not cumulative. Such Suppliers and Remarketers are intended beneficiaries of this limitation.
Additional rights
Some states do not allow limitations on how long an implied warranty lasts, or do not allow the exclusion or limitation of incidental or consequential damages, so the limitations or exclusions contained above may not apply to you.
This limited warranty gives you specific legal rights. You may also have other rights that vary from state to state.
Numerics
550-sheet drawer
installing 14
802.1x authentication 80
A
aligning
toner cartridges 69
attaching cables 26
B
black-only printing 51
brightness, adjusting 75
buttons, control panel
Back 11
Menu 11
navigation 11
numeric keypad 11
Select 11
Stop 11
C
cables, attaching
Ethernet 26
USB 26
calling Customer Support 100
canceling a job
from Mac OS 9.x 56
from Mac OSX 56
from the control panel 55
from Windows desktop 55
from Windows taskbar 55
card stock
guidelines 40
loading 30
checking an unresponsive printer 82
cleaning
printhead lenses 70
color printing 54
confidential jobs
modifying print settings 79
Confidential print jobs 45
printing from Macintosh 46
printing from Windows 46
conserving supplies 69
contacting Customer Support 100
contrast, adjusting 75
control panel 11
disabling hard disk encryption 78
disabling menus 75
enabling menus 75
encrypting printer hard disk 77
locking menus 75, 78
D
directory list, printing 49
disabling
control panel menus 75
hard disk encryption 78
Quick Start mode 76
display troubleshooting
display is blank 82
display shows only diamonds 82
display, control panel 11
adjusting brightness and contrast 75
documents, printing
from Macintosh 45
from Windows 45
duplex printing, manual 50
E
Embedded Web Server
locking control panel menus 78
locking entire printer 78
modifying confidential print
settings 79
supporting IPSec 79
supporting SNMPv3 80
using 802.1x authentication 80
using Secure mode 81
emission notices 103, 104
enabling
control panel menus 75
encrypting printer hard disk 77
envelopes
guidelines 39
loading 30, 33
Ethernet connector 26
exit bin
attaching 34
using 34
F
FAQ about color printing 97
FCC notices 103
firmware card
installing 21
flash memory card
installing 21
font sample list, printing 49
fuser
ordering 73
G
guidelines
card stock 40
envelopes 39
labels 40
letterhead 38
transparencies 39
H
hard disk
installing 22
held jobs 45
printing from Macintosh 46
printing from Windows 46
|
installing printer software 45
internal print server, installing 24
IPSec 79
J
jam areas, accessing 58
jams
avoiding 57
behind inner door 62
between fuser and standard exit
bin 65
in manual feeder 68
in multipurpose feeder 67
in standard exit bin 65
in the duplex path 65
involving Tray 2 61
just beyond Tray 1 60
locations of 57
under fuser or fuser cover 63
L
labels
guidelines 40
letterhead
guidelines 38
light, indicator 11
linking trays 36
loading
card stock 30
envelopes 30, 33
manual feeder 33
multipurpose feeder 30
optional 550-sheet tray 29
standard tray 27
transparencies 30
lock, security 10
locking
control panel menus 75, 78
entire printer 78
M
manual feeder
loading 33
using 33
media
characteristics 37
selecting 38
storing 41
unacceptable 38
memory card
installing 18
menu settings page, printing 48
menus, diagram of 12
moving the printer 73, 74
multipurpose feeder
loading 30
using 32
N
network setup page 49
noise emission levels 104
notices 102, 103, 104, 105, 106
0
options
550-sheet drawer 14
firmware card 21
firmware cards 15
flash memory card 21
hard disk 22
internal 15
internal print server 24
memory card 18
memory cards 15
port interface card 24
ordering
fuser 73
photoconductors 73
toner cartridges 71
transfer belt 72
waste toner box 73
P
paper
capacities 44
letterhead 38
preprinted forms 38
setting size 35
setting type 35
storing 41
paper feed troubleshooting
message remains after jam is
cleared 87
paper jams
avoiding 57
behind inner door 62
between fuser and standard exit bin 65
in manual feeder 68
in multipurpose feeder 67
in standard exit bin 65
in the duplex path 65
just beyond Tray 1 60
under fuser or fuser cover 63
paper path, identifying 57
paper sizes, supported 41
paper types
duplex support 43
where to load 43
paper types and weights 43
photo conductors
removing 51
photoconductors
ordering 73
port interface card 24
Power Saver
adjusting 77
print job
canceling from Mac OS 9.x 56
canceling from Mac OSX 56
canceling from Windows desktop 55
canceling from Windows taskbar 55
print quality
cleaning the printhead lenses 70
print quality test pages, printing 50
print quality troubleshooting
blank pages 93
characters have jagged edges 92
clipped images 93
color misregistration 88
dark lines 89
ghost images 92
gray background 92
light colored line, white line, or
incorrectly colored line 89
poor transparency quality 91
print irregularities 91
print is too dark 91
print is too light 90
print quality test pages 87
repeating defects 88
skewed print 93
solid color pages 93
streaked horizontal lines 89
streaked vertical lines 90
toner fog or background shading 91
toner rubs off 94
toner specks 94
uneven print density 92
print troubleshooting
held jobs do not print 83
incorrect characters print 84
incorrect margins 93
jammed page does not reprint 87
job prints from wrong tray 84
job prints on wrong paper 84
job takes longer than expected 84
jobs do not print 83
large jobs do not collate 85
media frequently jams 86
multiple-language PDFs do not
print 82
paper curls badly 94
tray linking does not work 84
unexpected page breaks occur 85
printer
configurations 9
models 9
moving 73, 74
printer option problems
hard disk with adapter 86
printer options troubleshooting
drawers 85
flash memory card 85
infrared adapter 86
internal print server 86
memory card 86
option not working 85
USB/parallel interface card 86
printhead lenses
cleaning 70
printing
black-only 51
color 54
directory list 49
duplex jobs manually 50
font sample list 49
from Macintosh 45
from USB flash memory device 47
from Windows 45
installing printer software 45
menu settings page 48
network setup page 49
print quality test pages 50
printing confidential and other held jobs
from Macintosh 46
from Windows 46
Q
Quality menu 95
Quick Start mode 76
R
recycling
WEEE statement 104
Repeat print jobs 45
printing from Macintosh 46
printing from Windows 46
Reserve print jobs 45
printing from Macintosh 46
printing from Windows 46
restoring factory default settings 76
s
safety information 2
Secure mode 81
security
Embedded Web Server 81
locking control panel menus 78
locking entire printer 78
modifying confidential print
settings 79
supporting IPSec 79
supporting SNMPv3 80
using 802.1x authentication 80
security lock 10
setting
paper size 35
paper type 35
SNMPv3 80
standard exit bin
attaching 34
using 34
standard tray
loading 27
status of supplies, checking 69
storing
media 41
paper 41
supplies 69
supplies
conserving 69
removing photoconductor 51
removing toner cartridges 51
status of 69
storing 69
supplies, ordering
fuser 73
photoconductors 73
toner cartridges 71
transfer belt 72
waste toner box 73
system board
accessing 15
reinstalling access cover 25
T
toner cartridges
aligning 69
ordering 71
removing 51
transfer belt
ordering 72
transparencies
guidelines 39
loading 30
tray linking 36
troubleshooting
checking an unresponsive printer 82
contacting Customer Support 100
error reading USB drive 82
FAQ about color printing 97
hard disk with adapter 86
troubleshooting, display
display is blank 82
display shows only diamonds 82
troubleshooting, paper feed
message remains after jam is
cleared 87
troubleshooting, print
held jobs do not print 83
incorrect characters print 84
incorrect margins 93
jammed page does not reprint 87
job prints from wrong tray 84
job prints on wrong paper 84
job takes longer than expected 84
jobs do not print 83
large jobs do not collate 85
media frequently jams 86
multiple-language PDFs do not
print 82
paper curls badly 94
tray linking does not work 84
unexpected page breaks occur 85
troubleshooting, print quality
blank pages 93
characters have jagged edges 92
clipped images 93
color misregistration 88
dark lines 89
ghost images 92
gray background 92
light colored line, white line, or
incorrectly colored line 89
poor transparency quality 91
print irregularities 91
print is too dark 91
print is too light 90
print quality test pages 87
repeating defects 88
skewed print 93
solid color pages 93
streaked horizontal lines 89
streaked vertical lines 90
toner fog or background shading 91
toner rubs off 94
toner specks 94
uneven print density 92
troubleshooting, printer options
drawers 85
flash memory card 85
infrared adapter 86
internal print server 86
memory card 86
option not working 85
USB/parallel interface card 86
U
USB connector 26
USB direct port 11
USB flash memory device 47
using
manual feeder 33
multipurpose feeder 32
V
Verify print jobs 45
printing from Macintosh 46
printing from Windows 46
W
waste toner box
ordering 73