
C762 - Printer LEXMARK - Free user manual and instructions
Find the device manual for free C762 LEXMARK in PDF.


User questions about C762 LEXMARK
0 question about this device. Answer the ones you know or ask your own.
Ask a new question about this device
Download the instructions for your Printer in PDF format for free! Find your manual C762 - LEXMARK and take your electronic device back in hand. On this page are published all the documents necessary for the use of your device. C762 by LEXMARK.
USER MANUAL C762 LEXMARK
Lexmark™ C76x Troubleshooting Guide
Online customer support
Customer support is available on the Lexmark Web site at www.lexmark.com.
Calling for service
When you call for printer service, describe the problem you are experiencing, the message on the display, and the troubleshooting steps you have already taken to find a solution.
You need to know your printer model type and serial number. See the label behind the toner waste container door of the printer for this information. The toner waste container door is on the left side of the printer.
The serial number is also listed on the menu settings page.
For service in the U.S. or Canada, call 1-800-Lexmark (1-800-539-6275). For other countries/regions, visit the Lexmark Web site at www.lexmark.com
Note: When calling for service, call from the location of the printer.
Checking an unresponsive printer
If your printer is not responding, first make sure:
- The power cord is plugged into the printer and a properly grounded electrical outlet.
-
The electrical outlet is not turned off by any switch or breaker.
-
The printer is not plugged into any surge protectors, uninterrupted power supplies, or extension cords.
- Other electrical equipment plugged into the outlet is working.
• The printer is turned on. - The printer cable is securely attached to the printer and the host computer, print server, option, or other network device.
Solving printing problems
Multilanguage PDFs do not print
1 Open the document you want to print in Adobe Acrobat.
2 Click the printer icon.
3 The Print dialog box appears.
4 Check the Print as image box.
Note: For Acrobat 7.x or later, click the advanced button to display the Print as Image option.
5 Click OK.
The operator panel display is blank or displays only diamonds
Turn the printer off, wait about 10 seconds, and turn the printer back on.
Performing Self Test appears on the display. When the test is completed, the Ready message is displayed.
If the messages do not appear, turn the printer off and call for service.
Jobs do not print
The printer is not ready to receive data
Make sure Ready or Power Saver appears on the display before sending a job to print. Press to return the printer to the Ready state.
The specified output bin is full
Remove the stack of paper from the output bin, and then press √
The specified tray is empty
Load paper in the tray.
You are using the wrong printer driver or are printing to a file
- Verify that you selected the printer driver associated with the Lexmark ABC.
- If you are using a USB port, make sure you are running Windows Vista, Windows 2000, Windows XP, or Windows Server 2003 and using a Windows Vista, Windows 2000, Windows XP, or Windows Server 2003 compatible printer driver.
Your MarkNet N8000 series internal print server is not set up properly or is not connected properly
Verify that you have properly configured the printer for network printing.
See the Software and Documentation CD or go to the Lexmark Web site for information.
You are using the wrong interface cable, or the cable is not securely connected
Make sure you are using a recommended interface cable.
Make sure the connection is secure.
Held jobs do not print
A formatting error has occurred
- Print the job. (Only part of the job may print.)
- Delete the job.
- Free up additional printer memory by scrolling through the list of held jobs and deleting others you have sent to the printer.
The printer has insufficient memory
- Print the job. (Only part of the job may print.)
- Delete the job.
- Free up additional printer memory by scrolling through the list of held jobs and deleting others you have sent to the printer.
The printer has received invalid data
Delete the job.
Job takes longer than expected to print.
The job is too complex
Reduce the complexity of your print job by eliminating the number and size of fonts, the number and complexity of images, and the number of pages in the job.
Page Protect is set to On
Set Page Protect to Off from Print Recovery.
For more information, see the Menus and Messages Guide.
Job prints from the wrong tray or on the wrong paper or specialty media
Make sure the Paper Size and Paper Type specified in the printer driver match the paper size and type in the tray and what is set on the printers operator panel.
Incorrect characters print.
You are using an incompatible parallel cable.
If you are using a parallel interface, make sure you are using an IEEE 1284-compliant parallel cable. We recommend Lexmark part number 1329605 (10 ft) or 1427498 (20 ft) for the standard parallel port.
The printer is in Hex Trace mode
If Ready. Hex Trace appears on the display, you must exit Hex Trace mode before you can print your job. Turn the printer off and back on to exit Hex Trace mode.
Tray linking does not work
- Make sure both the size and type of media are the same in both trays.
- Make sure the paper guides in the trays are set for the correct size media.
- Make sure the menu values for both size and type are set correctly in the Paper Menu.
- For more informations, see the Menus and Messages Guide.
Large jobs do not collate
Collate is not set to On
Set Collation to on in the Finishing Menu or through the printer driver.
Note: Setting Collation to off in the driver overrides the setting in the Finishing Menu.
For more informations, see the Menus and Messages Guide.
The job is too complex
Reduce the complexity of the print job by eliminating the number and size of fonts, the number and complexity of images, and the number of pages in the job.
The printer does not have enough memory
Add printer memory or an optional hard disk.
Unexpected page breaks occur.
The job has timed out
Set Print Timeout to a higher value from the Setup Menu.
For more informations, see the Menus and Messages Guide
Solving mailbox problems
The mailbox and the printer are misaligned
Realign the mailbox and the printer.
The mailbox is not connected properly
Check the electrical connection.
Solving option problems
If an option does not operate correctly after it is installed or if it quits working:
- Turn the printer off, wait for about 10 seconds, and turn the printer on. If this does not fix the problem, unplug the printer, and check the connection between the option and printer.
- Print the menu settings page and check to see if the option is listed in the Installed Options list. If the option is not listed, reinstall it.
- Make sure the option is selected in the software application you are using.
Service messages
A service message indicates printer failure that may require service.
Turn the printer off, wait about 10 seconds, and then turn the printer on.
If the error recurs, write down the error number, the problem, and a detailed description. Call 1-800-LEXMARK for service.
Solving paper feed problems
Paper frequently jams
You are using paper that does not meet the printer specifications.
Use recommended paper and other specialty media. See the Card Stock & Label Guide available on the Lexmark Web site at www.lexmark.com for detailed specifications.
For information that can help prevent jams from occurring, see the Clearing Jams Guide.
You have loaded too much paper or too many envelopes.
Make sure the stack of paper you load does not exceed the maximum stack height indicated at the front of the tray or on the multipurpose feeder.
Guides in the selected tray are not set to the appropriate position for the size paper loaded.
Move the guides in the tray to the correct position.
The paper has absorbed moisture due to high humidity.
Load paper from a fresh package.
Store paper in its original wrapper until you load it.
The Paper Jam message remains after you remove the jammed paper.
Clear paper from the entire paper path, and then press √.
The page that jammed does not reprint after you clear the jam.
Set Jam Recovery to Auto or On.
For more information, see the Menus and Messages Guide
Blank pages feed into the output bin.
Load the correct type media for your print job, or change the Paper Type to match the type of media loaded.
For more information, see the Menus and Messages Guide.
Solving print quality problems
Color misregistration
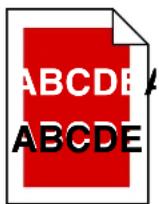
Color has shifted outside of the appropriate area or has been superimposed over another color area.
Open the printer door, and make sure all four packaging tabs are removed.
Top to Bottom or Left to Right:
1 Re-seat the cartridges by removing them from the printer and then reinserting them.
2 Invoke a Color Adjust operation from the Settings → Quality menu.
Repeating defects


Marks occur repeatedly only in one color and multiple times on a page:
- Replace the cartridge if the defects occur every:
-38 mm (1.5 in.)
-48 mm (1.9 in.)
-97 mm (3.8 in.)
Marks occur down the page repeatedly in all colors:
- Replace the transfer roll if the defects occur every 60 mm (2.4 in.)
- Check the first transfer bellcranks and springs or replace the image transfer unit if the defects occur every 101 mm (4 in.)
- Replace the fuser if the defects occur every 148 mm (5.8 in.)
Marks occur on every third or sixth page in any color:
Replace the image transfer unit.
White or colored lines
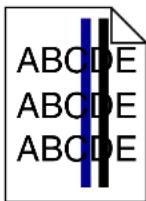
1 Replace the color print cartridge that is causing the line.
2 If you still have the problem, replace the image transfer unit and transfer roller.
3 If you still have the problem, replace the fuser.
Streaked horizontal lines
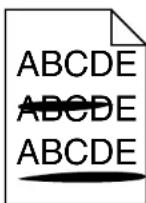
Replace the print cartridge, the transfer roller, the image transfer unit, or fuser as needed.
From the printer operator panel, print the repetitive defects guide to determine which component needs to be replaced.
Streaked vertical lines
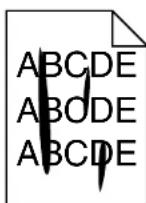
- If paper is stiff, try feeding from another tray.
- Replace the print cartridge that corresponds to the color displayed on the control panel.
Print irregularities
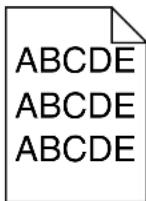
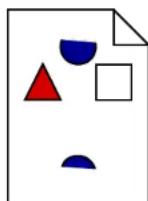
- Load paper from a fresh package in the paper tray.
- Avoid textured paper with rough finishes.
- Make sure the printer paper type, paper texture, and paper weight settings match the type of paper you are using.
- Replace the image transfer unit and transfer roller.
- Replace the fuser.
Print too light
- Make sure the printer paper type, paper texture, and paper weight settings match the type of paper you are using.
-
The default Paper Weight setting in the Paper Menu is Normal. For paper less than 20 lb bond (75 g/m ^2 ), choose the Light setting. For 28 lb bond to 47 lb bond (105 g/m ^2 to 175 g/m ^2 ), choose the Heavy setting.
-
Select a different Toner Darkness setting from the printer driver before sending the job to print.
- Scroll to the Color Adjust setting in the Quality Menu and press Select to adjust the color.
- Load paper from a new package.
- Avoid textured paper with rough finishes.
- Make sure the paper you load in the trays is not damp.
- Shake the specified print cartridge to utilize the remaining toner.
- Replace the print cartridge that corresponds to the color displayed on the control panel.
Print too dark
- Select a different Toner Darkness setting from the printer driver before sending the job to print.
- Scroll to the Color Adjust setting in the Quality Menu and press Select to adjust the color.
- Replace the print cartridge that corresponds to the color displayed on the control panel.
Transparency print quality is poor
- Use only transparencies recommended by the printer's manufacturer.
- Make sure the Paper Type setting is set to Transparency.
Toner specks
- Replace the print cartridge that corresponds to the color displayed on the control panel.
- Replace the transfer roller.
- Replace the image transfer unit.
- Replace the fuser.
- Call for service.