CT6 V1.0 - Security Camera Tenda - Free user manual and instructions
Find the device manual for free CT6 V1.0 Tenda in PDF.


User questions about CT6 V1.0 Tenda
0 question about this device. Answer the ones you know or ask your own.
Ask a new question about this device
Download the instructions for your Security Camera in PDF format for free! Find your manual CT6 V1.0 - Tenda and take your electronic device back in hand. On this page are published all the documents necessary for the use of your device. CT6 V1.0 by Tenda.
USER MANUAL CT6 V1.0 Tenda
natural_image
Three women in a room with green shutters, one lying down and another standing, against an orange wall (no text or symbols visible)User Guide
TDSEE App for Security Camera
Shenzhen Tenda Technology Co., Ltd.
Copyright Statement
© 2021 Shenzhen Tenda Technology Co., Ltd. All rights reserved.
Tenda is a registered trademark legally held by Shenzhen Tenda Technology Co., Ltd. Other brand and product names mentioned herein are trademarks or registered trademarks of their respective holders. Copyright of the whole product as integration, including its accessories and software, belongs to Shenzhen Tenda Technology Co., Ltd. No part of this publication can be reproduced, transmitted, transcribed, stored in a retrieval system, or translated into any language in any form or by any means without the prior written permission of Shenzhen Tenda Technology Co., Ltd.
Disclaimer
Pictures, images and product specifications herein are for references only. To improve internal design, operational function, and/or reliability, Tenda reserves the right to make changes to the products without obligation to notify any person or organization of such revisions or changes. Tenda does not assume any liability that may occur due to the use or application of the product described herein. Every effort has been made in the preparation of this document to ensure accuracy of the contents, but all statements, information and recommendations in this document do not constitute a warranty of any kind, express or implied.
Preface
Thank you for choosing Tenda! Please read this user guide before you start.
Conventions
This user guide applies to all Tenda products that can be managed by the TDSEE App. The contained images and UI screenshots are subject to the actual products. CP6 is used for illustrations here unless otherwise specified.
Operations in this guide are based on iOS. Devices of other operating systems may differ.
The typographical elements that may be found in this document are defined as follows.
| Item | Presentation | Example |
| Cascading menus | > | System > Live Users |
| Parameter and value | Bold | Set User Name to Tom. |
| Variable | Italic | Format: XX:XX:XX:XX:XX:XX |
| UI control | Bold | On the Policy page, click the OK button. |
| Message | “” | The “Success” message appears. |
The symbols that may be found in this document are defined as follows.
| Symbol | Meaning |
| NOTE | This format is used to highlight information of importance or special interest. Ignoring this type of note may result in ineffective configurations, loss of data or damage to the device. |
| TIP | This format is used to highlight a procedure that will save time or resources. |
Technical Support
If you need more help, contact us by any of the following means. We will be glad to assist you as soon as possible.


Website
Global: (86) 755-27657180
Toll Free: Mon - Fri 9 am - 6 pm (China Time Zone)
United States: 1-800-570-5892
Toll Free: 7 x 24 hours
Canada: 1-888-998-8966
Toll Free: Mon - Fri 9 am - 6 pm PST
Hong Kong: 00852-81931998
Toll Free: Mon - Fri 9 am - 6 pm (China Time Zone)

support@tenda.com.cn
Contents
Install the TDSEE App .... 1
Login....2
Add the camera to TDSEE App .... 4
Method 1: Add a camera through QR code ....4
Method 2: Add a camera through hotspot....9
Method 3: Add a camera in a wired manner ....14
Home page....18
Basic settings 19
Monitoring operation....19
Name your device 22
Check the basic information of your device 23
Modify the Wi-Fi settings 24
Upgrade device software....27
Cloud 28
Subscribe to the cloud storage service 29
Method 1 (Recommended)......29
Method 2....30
Check and edit cloud storage video 31
Method 1 (Recommended)......31
Method 2....33
Method 3....34
Disable the cloud storage service 35
Check remaining time of cloud storage 36
Check my order 37
Micro SD card recording storage 38
Use Micro SD card for the first time....38
Micro SD card recording settings 40
Format Micro SD card 41
Check or edit the Micro SD card video....42
Check micro SD card avaliable storage....44
Set up alarm....45
Method 1 (Recommended)......45
Method 2....48
Enable S-motion Tracking 49
Method 1 (Recommended)......49
Method 2....50
Set up scheduled patrol....51
Set up video flip-over 54
Set up infrared night vision....55
Turn off device indicator....57
Turn off device 58
Modify the time zone 59
Delete the device 60
Check messages 61
Album 62
Delete photos/videos....62
Download photos/videos to the smartphone 63
Share photos/videos with friends or through social platform....64
Share device....65
Method 1 (Recommended)....65
Method 2....66
Method 3....68
Accept sharing 70
Method 1 (Recommended)....70
Method 2....71
Dissolve sharing relationship....72
Method 1 The sharer cancels the sharing....73
Method 2 The accepter deletes the share....74
Method 3 The accepter deletes the device ....75
Add your friends 76
Method 1....76
Method 2....77
Accept invitation from your friends 78
Method 1 (Recommended)....78
Method 2....79
Delete your friends....80
About us 81
FAQ....82
Feedback......83
Settings....84
My profile 85
Install the TDSEE App
If you already have the TDSEE App, please Login.
If you have NOT got one, scan the following QR code, or search for TDSEE in Google Play or App Store, download and install it onto your smartphone/tablet
Or

TDSEE
Login

Ensure that your smart device used for setup, such as a smartphone, can access the internet.
■ If you already have a registered account
Step 1 Open the TDSEE App.
Step 2 Enter the registered mobile phone number or Email address and password, and tap Login.
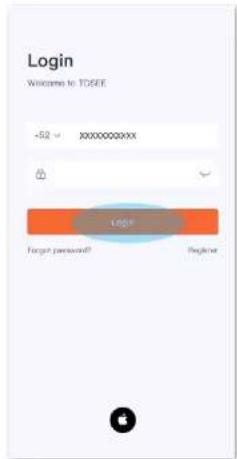
text_image
Login Welcome to TCSFF -52 x XXXXXXXXXX LOGP Forgot password! Register---End
■ If you DO NOT have a registered account
Step 1 Open the TDSEE App. Tap Register.
Step 2 Choose the region where you are. Then enter your email address, and tap
Get Verification Code
Step 3 Enter the Verification Code.

If you do not receive activation code:
- Please check your spam box.
- Check if you enter the correct email address.
- Enter another email address.
Step 4 Set the login password, and tap OK.
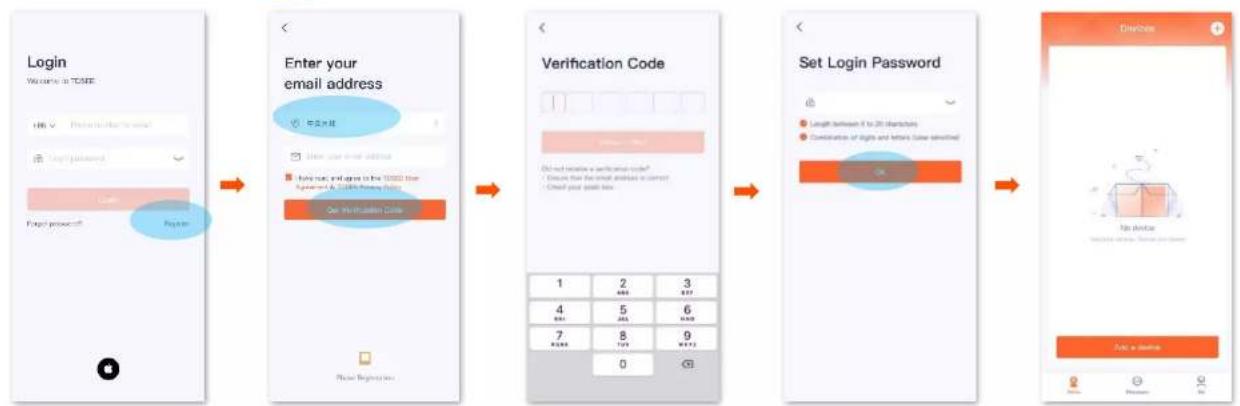
flowchart
Mobile login and password verification flowchart covering email access, verification code generation, and password setup steps---End
Add the camera to TDSEE App

Before adding the camera, please ensure that the router is connected to the internet successfully and the filter function is disabled.
Method 1: Add a camera through QR code
Step 1 Power on the camera.
The LED indicator lights solid red after the camera is powered on. When the LED indicator blinks blue quickly, the camera is waiting to connect to a 2.4 GHz Wi-Fi network.
Assume that the Wi-Fi name and Wi-Fi password of the router are:
- Wi-Fi name: Tenda_123456
- Wi-Fi password: UmXmL9UK
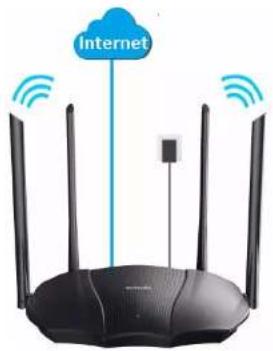
natural_image
Romega router with wireless signal lines and a cloud icon above it (no text or symbols on the device itself)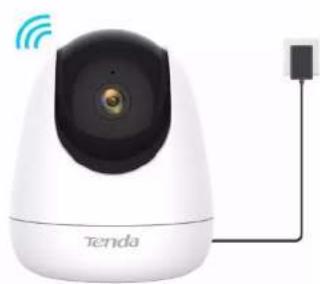
natural_image
White Tenda remote control camera with wireless signal icon and power cord (no text or symbols on device body)Step 2 Add the camera to TDSEE App.
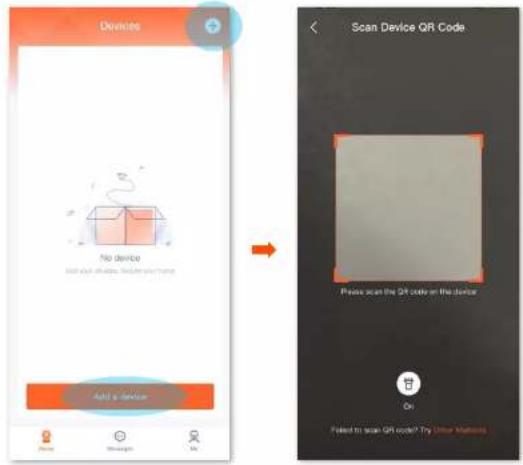
1 Open the TDSEE App. Enter the home page, tap Add a device or + in the upper right corner of the home page.
2 Scan the QR code on the bottom of the camera.

If a prompt pop up asking for access to the camera of your smartphone, please allow it.
text_image
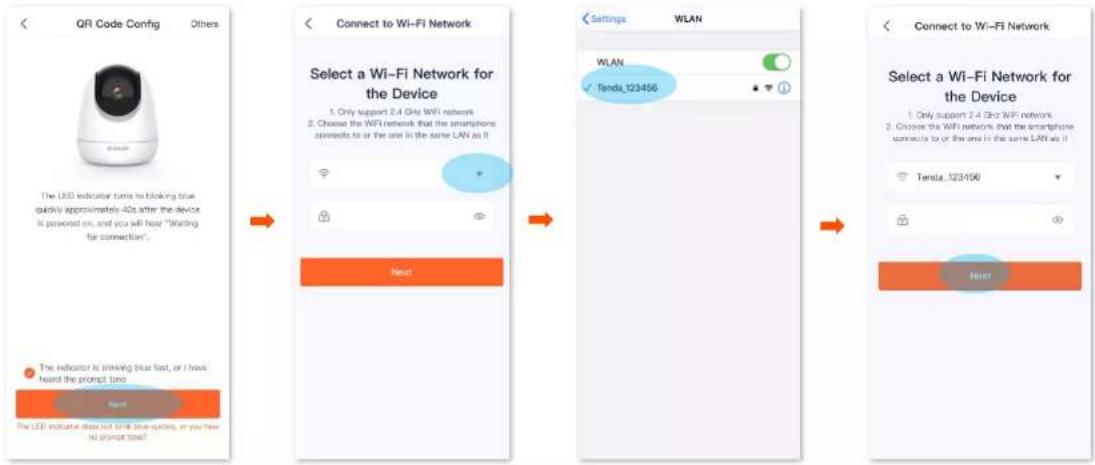
Devices No device Add a device Scan Device QR Code Please scan the QR code on the device On Pooled to scan QR code? The Other Websites3 Confirm and tick The indicator is blinking blue fast, or I have heard the prompt tone, and tap Next
4 Tap * to go to Settings > WLAN of your smartphone. Then connect to the 2.4 GHz Wi-Fi network of the router, which is Tenda_123456 in this example.
5 Return to the TDSEE App, enter the Wi-Fi password, and tap Next.

If a prompt pop up asking for access to the location information of your smartphone, please allow it.
flowchart
graph LR
    A["QR Code Config"] --> B["Connect to Wi-Fi Network"]
    B --> C["Select a Wi-Fi Network for the Device"]
    C --> D["Next"]
    D --> E["Settings: WLAN"]
    E --> F["WLAN"]
    F --> G["Tenda_123456"]
    G --> H["Next"]
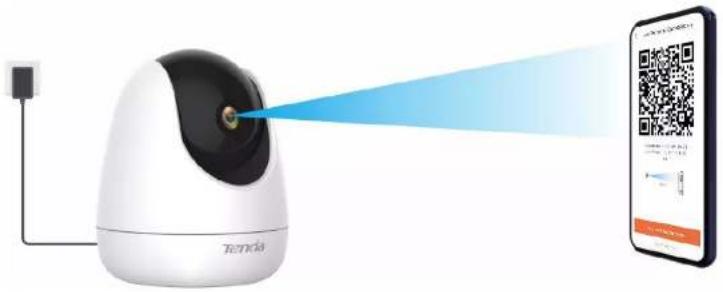
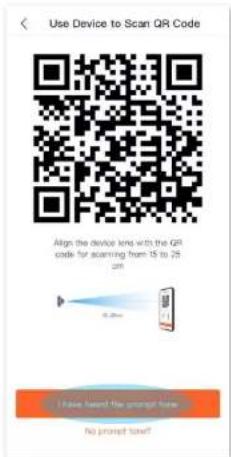
6 Align the lens of the camera with the QR code for scanning from 15 to 25 cm.

- Try moving the smartphone back and forth to adjust the distance between the screen of the smartphone and the camera, and keep each position for about two seconds.
- Ensure that the camera lens has no shade or blemishes. Remove the protective film (if any) and try again.
- Ensure that the smartphone screen is clear, no crack and no reflections.
natural_image
White remote control device with laser beam projecting a QR code on a smartphone (no text or symbols on device)7 When you hear a prompt tone Connecting Wi-Fi. Please wait, tap I have heard the prompt tone , then the TDSEE App is adding the device...
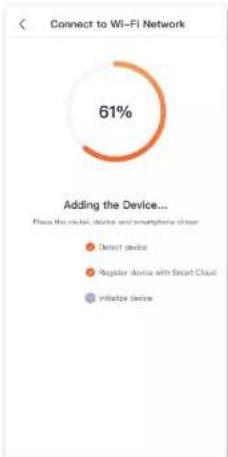
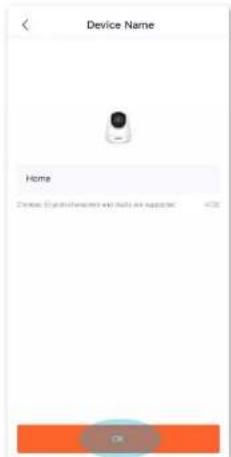
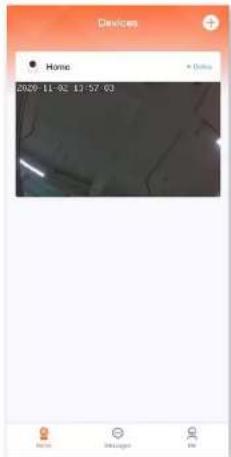
8 Wait a moment, and the camera is added successfully. You can name your camera, which is Home in this example. Tap OK
text_image
Use Device to Scan QR Code Align the device long with the QR code for scanning from 15 to 25 cm 6.2m I have heard the prompt here No prompt tone?→
text_image
Connect to Wi-Fi Network 61% Adding the Device... Please use devices, devices and smartphones other • Detect devices • Regular device with Smart Cloud • Initialize devices→
text_image
Device Name Home Device: Crystalcharacter with tools are supported. <75 OK→
text_image
Devices Home 2029-11-02 13:57:03 Access Diskskip OK---End
Method 2: Add a camera through hotspot
Step 1 Power on the camera.
The LED indicator lights solid red after the camera is powered on. When the LED indicator blinks blue quickly, the camera is waiting to connect to a 2.4 GHz Wi-Fi network.
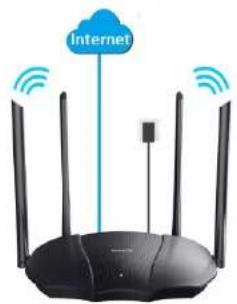
Assume that the Wi-Fi name and Wi-Fi password of the router are:
Wi-Fi name: Tenda_123456
Wi-Fi password: UmXml9UK
natural_image
Risikawa 800 wireless router with network connections and a cloud icon above it (no text or symbols on the device itself)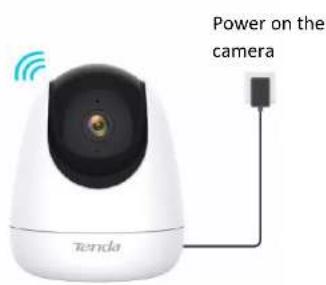
text_image
Power on the camera TendaStep 2 Add the camera to TDSEE App.
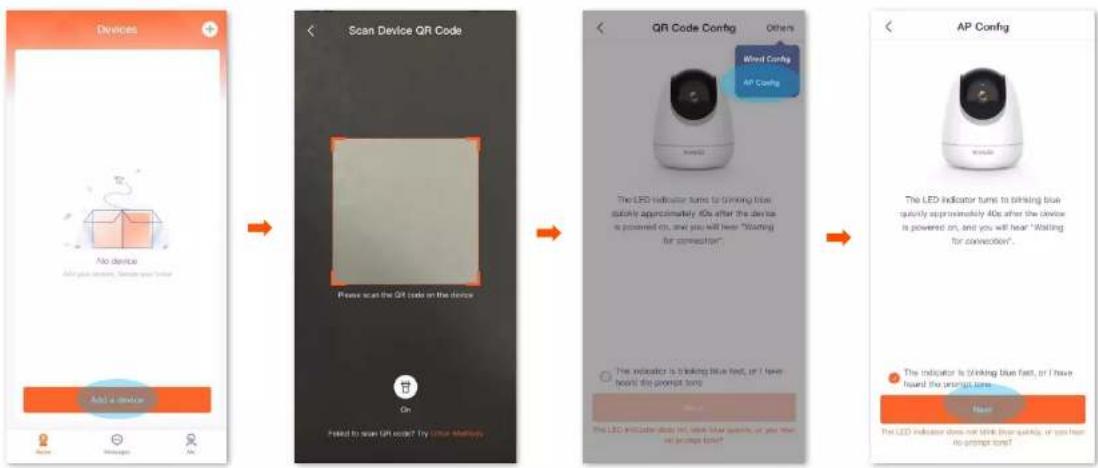
1 Open the TDSEE App. Enter the home page, tap Add a device or in the upper right corner of the home page.
2 Scan the QR code on the bottom of the camera.

If a prompt pop up asking for access to the camera of your smartphone, please allow it.
3 Tap Others in the upper right corner, then select AP Config. Confirm and tick The indicator is blinking blue fast, or I have heard the prompt tone, and tap Next.
flowchart
graph LR
    A["Devices"] --> B["Scan Device QR Code"]
    B --> C["QR Code Config"]
    C --> D["AP Config"]

    subgraph Design
        E["No device"] --> F["Add a device"]
        G["Add device"] --> H["Add device"]
        I["Add device"] --> J["Add device"]
    end

    subgraph Coding
        K["Press scan the QR code on the device"]
        L["On"]
        M["Pooled to scan URI code? Try User Methods"]
    end

    subgraph Testing
        N["The LED indicator turns to triggering blue quickly approximately 40s after the device is powered on, and you will hear "Waiting for connection""]
        O["The indicator is leaking blue feet, or I have heard the prompt touch"]
        P["The LED icon can be able to show blue quicks, or you know no prompt touch"]
    end

    subgraph Deployment
        Q["The LED indicator turns to triggering blue quickly approximately 40s after the device is powered on, and you will hear "Waiting for connection""]
        R["The LED indicator does not think from quickup, or you hear no prompt touch"]
    end

    subgraph Review
        S["Add a device"]
        T["Add device"]
        U["Add device"]
        V["Add device"]
        W["Add device"]
        X["Add device"]
        Y["Add device"]
        Z["Add device"]
        AA["Add device"]
        AB["Add device"]
        AC["Add device"]
        AD["Add device"]
        AE["Add device"]
        AF["Add device"]
        AG["Add device"]
        AH["Add device"]
        AI["Add device"]
        AJ["Add device"]
        AK["Add device"]
        AL["Add device"]
        AM["Add device"]
        AN["Add device"]
        AO["Add device"]
        AP["Add device"]
    end

    B --> C --> D --> E --> F --> G --> H --> I --> J --> K --> L --> M --> N --> O --> P --> Q --> R --> S --> T --> U --> V --> W --> X --> Y --> Z --> AA --> AB --> AC --> AD --> AE --> AF --> AG --> AH
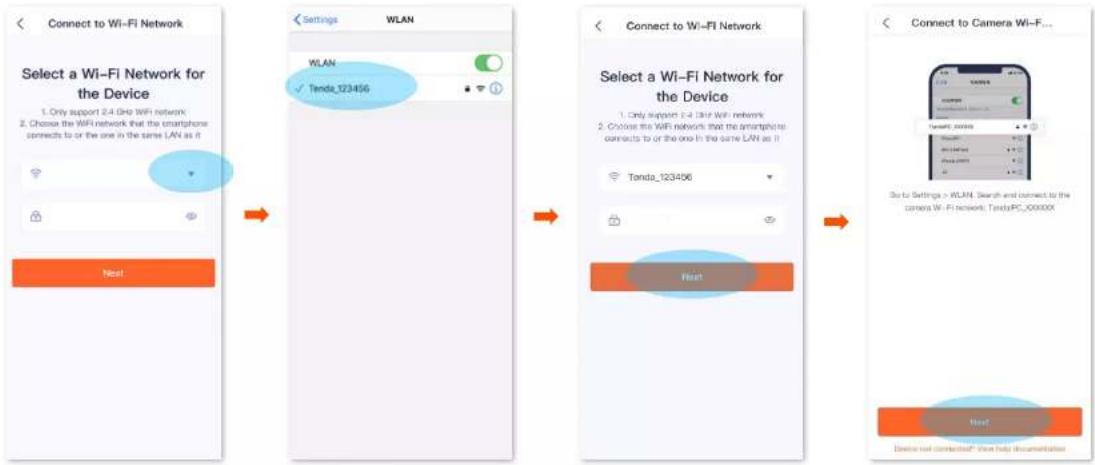
4 Tap to go to Settings > WLAN of your smartphone. Then connect to the 2.4 GHz Wi-Fi network of the router, which is Tenda_123456 in this example.
5 Return to the TDSEE App, then enter the Wi-Fi password, and tap Next

If a prompt pop up asking for access to the location information of your smartphone, please allow it.
6 Tap Next
flowchart
graph TD
    A["Select a Wi-Fi Network for the Device"] --> B["Connect to Wi-Fi Network"]
    B --> C["Select a Wi-Fi Network for the Device"]
    C --> D["Connect to Camera Wi-Fi..."]
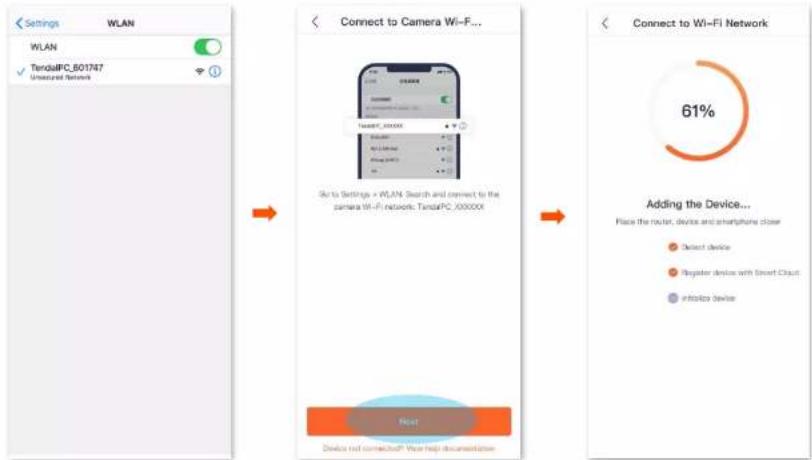
7 Connect to the default SSID (Wi-Fi name) of the camera.

The SSID is TendaIPC_XXXXXX, XXXXXX indicates the last six characters of its UUID which can be found on the bottom of the device.
8 Return to TDSEE App, then tap Next. The TDSEE App is adding the device....
text_image
Settings WLAN WLAN TendalIPC_801747 Unstructured Network Connect to Camera Wi-Fi... So to Settings > WLAN Search and connect to the camera Wi-Fi network. TendalIPC_80000X Float Device not connected? Was help documentation Connect to Wi-Fi Network 61% Adding the Device... Place the router, device and smartphone closer • Detect device • Register device with Smart Chip • Infinitio device9 Wait a moment, the camera is added successfully. You can name your camera, which is Home in this example, and tap OK
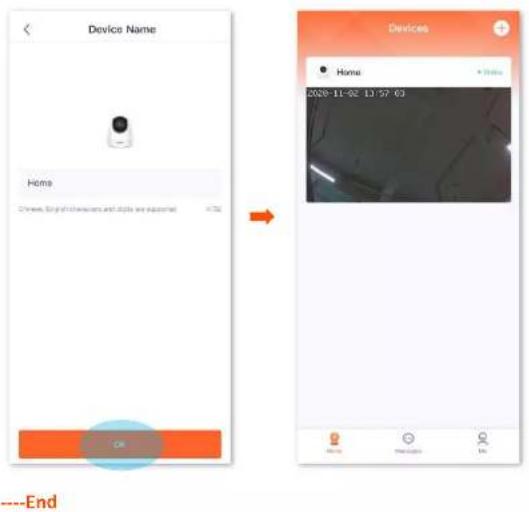
text_image
Device Name Home Chrome, Light of devices and clips are available. X:72 OK ---End Devices Home 2020-11-02 13:57:63 Entry Next page EndMethod 3: Add a camera in a wired manner
Assume that the Wi-Fi name and Wi-Fi password of the router are:
Wi-Fi name: Tenda_123456
Wi-Fi password: UmXmL9UK
Step 1 Connect to the camera.
1 Power on the camera. The LED indicator lights solid red after the camera is powered on. When the LED indicator blinks blue quickly, the camera is waiting to connect to a 2.4 GHz Wi-Fi network.
2 Connect the LAN port of the camera to a LAN port of the router using an Ethernet cable.
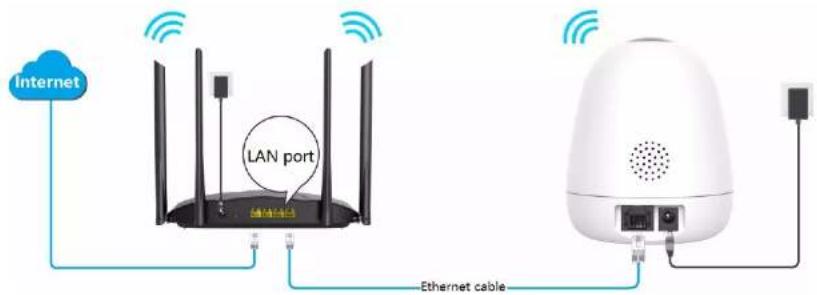
text_image
Internet LAN port Ethernet cableStep 2 Connect the smartphone to the Wi-Fi network of the router. Which is Tenda_123456 in this example.

text_image
Settings WLAN WLAN ✓ Tenda_123456Step 3 Add the camera to TDSEE App.
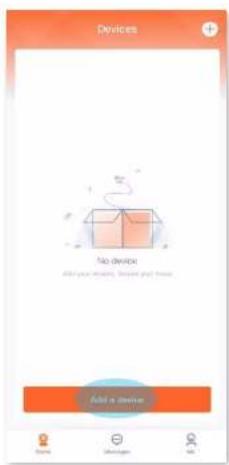
1 Open the TDSEE App. Enter the home page, tap Add a device or + in the upper right corner of the home page.
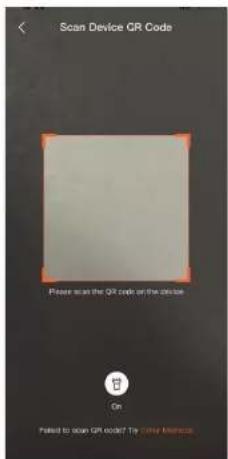
2 Scan the QR code on the bottom of the camera.

If a prompt pop up asking for access to the camera of your smartphone, please allow it.
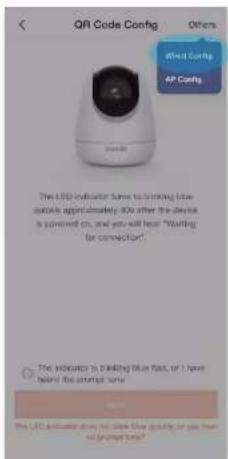
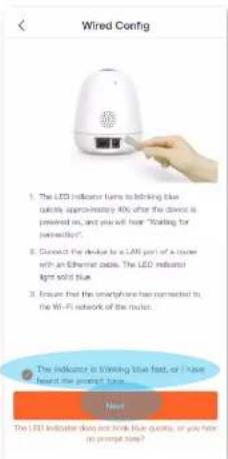
3 Tap Others in the upper right corner, then select Wired Config.
4 Confirm and tick The indicator is blinking blue fast, or I have heard the prompt tone, and tap Next
text_image
Devices No device Add your device. Add your home. Add a new
text_image
Scan Device QR Code Please scan the QR code on the code On Failed to scan QR code? The other device
text_image
QRI Code Config Others Word Config AR Config The LED Indicator turns to matching blue quickable approximately 40s after the device is powered on, and you will learn "Starting for connection". The indicator is drinking blue fact, or I have heard the prompt turn The LED indicator does not show blue quicky, or you have not grape turn?
text_image
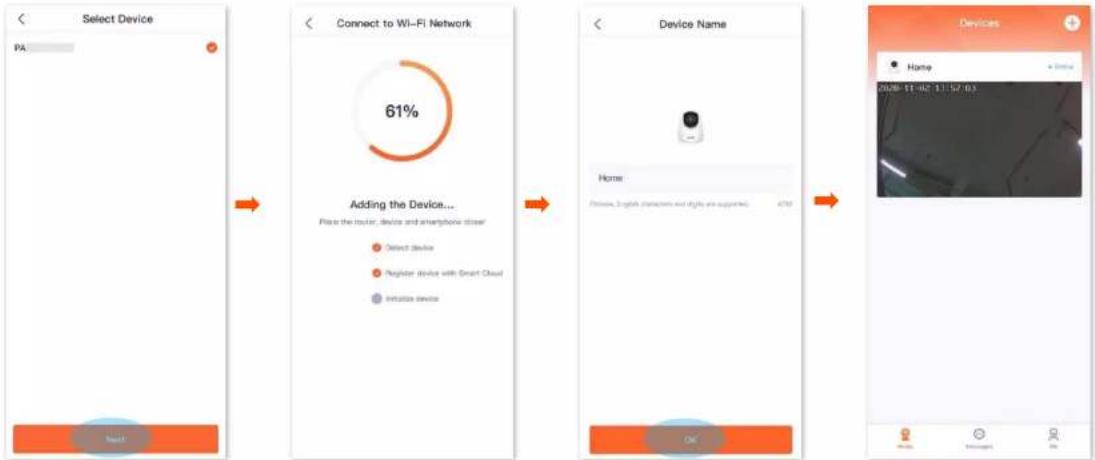
Wired Config 1. The LED indicator turns to drinking blue quiky approximately 40% after the device is powered on, and you will have "Knitting for connection". 2. Connect the device to a LAN port of a router with an Ethernet cable. The LED indicator light solid blue. 3. Ensure that the smartphone has connected to the Wi-Fi network of the router. The indicator is blowing blue feet, or I have heard the prompt turn. Next The LED indicator does not look blue quickly, or you hate no prompt turn?5 Select the camera that you want to add, then tap Next. The TDSEE App is adding the device...

The default name of the device is PA+UUID, and the UUID can be found on the bottom of the device.
6 Wait a moment, and the camera is added successfully. You can name your camera, which is Home in this example. Then tap
OK
flowchart
graph TD
    A["Select Device"] --> B["Connect to Wi-Fi Network"]
    B --> C["Adding the Device..."]
    C --> D["Device Name"]
    D --> E["Home: Chinese, English characters and styles are supported"]
---End

After added the camera successfully via Wired Config, do not disconnect the Ethernet cable between the camera and the router, but you can connect the camera via the Ethernet cable to the LAN port of other routers that are connected the internet successfully.
Home page
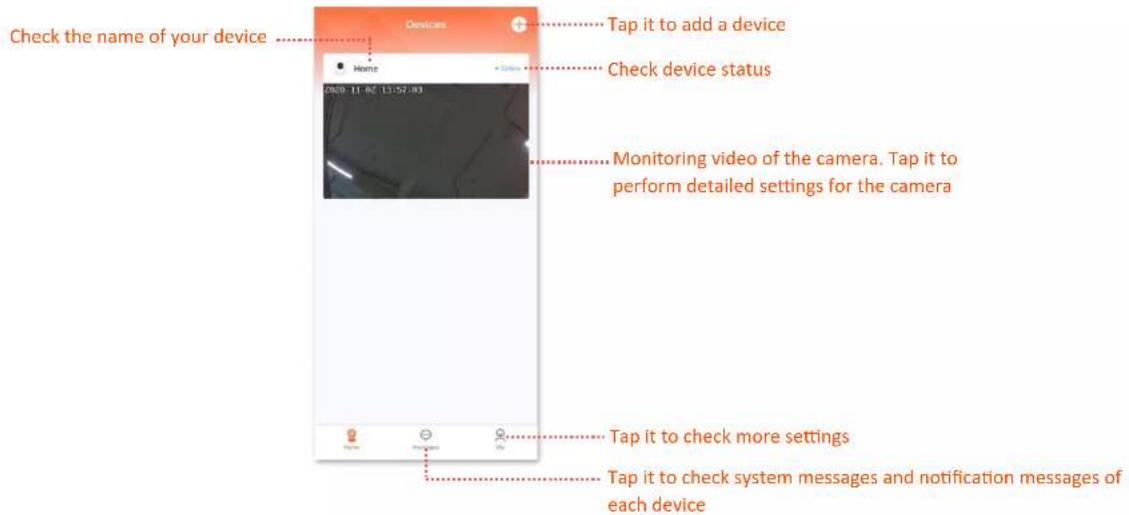
After logging in to TDSEE App, the default page is Home page. You can preview all devices under this account, or add a device, etc.
text_image
Check the name of your device Tape it to add a device Check device status Monitoring video of the camera. Tap it to perform detailed settings for the camera Tap it to check more settings Tap it to check system messages and notification messages of each deviceBasic settings
Monitoring operation
Log in to TDSEE App. Tap the specific device on the home page, which is the camera Home in this example, then you can perform basic settings.
If you want to scale up any part of the video, you can double-tap the video and slide, or use the pinch-to-zoom gesture to see the details.
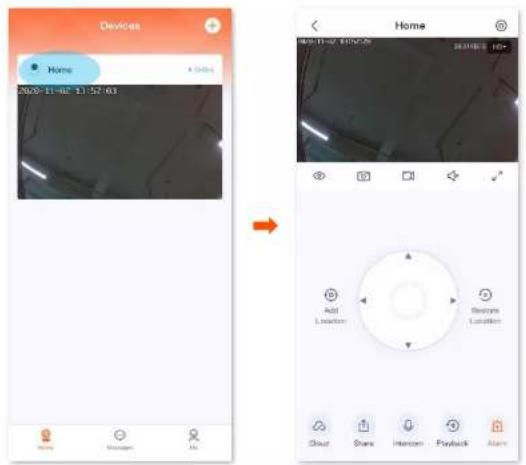
text_image
Devices Home 2020-11-02 13:57:03 Home Message Air Home Home Add Location Remove Location Clout Share Intercom Playback AlarmParameter description
| Parameter | Description |
| Tap it to shutter or unshutter the camera lens. By default, the camera lens is unshuttered.After the camera lens is shuttered, the video image is disabled. At the same time the camera lens automatically rotates downward to hide itself, and no longer monitors. | |
| Screenshots.Tap it to save the screenshot of the current monitoring image to TDSEE Album. | |
| Recording.Tap it to start recording, and tap it again to stop recording. Successful recordings are automatically saved to TDSEE Album. | |
| Tap it to enable or disable the camera audio. By default, the audio is disabled. | |
| Tap it to view in full screen. | |
| Add location.Tap it to add a specified monitoring location for the camera. | |
| Location selection panel.Tap it to adjust the monitoring position of the camera. | |
| Restore location.Tap it to restore the lens of the camera to the default location. | |
| If the monitoring position changes owing to external forces, such as manual rotation, in order to ensure that the location recorded by the TDSEE App matches the actual location of the camera, it is recommended to perform the Restore Location operation before selecting the monitoring location of the camera via the TDSEE App. | |
| Cloud storage service.After subscribed the cloud storage service, the device uploads monitoring videos to the cloud, you can watch and edit cloud storage video as required. | |
| Share device or add friends.Tap it to share the device with others for management. Only members with registered account could be shared. | |
| Intercom.Tap it to realize real-time call between TDSEE App and the device (such as camera). | |
| Playback.Tap it to check the video stored in Micro SD card. | |
| Alarm.Tap it to set up alarm-related parameters of the camera. |
Name your device
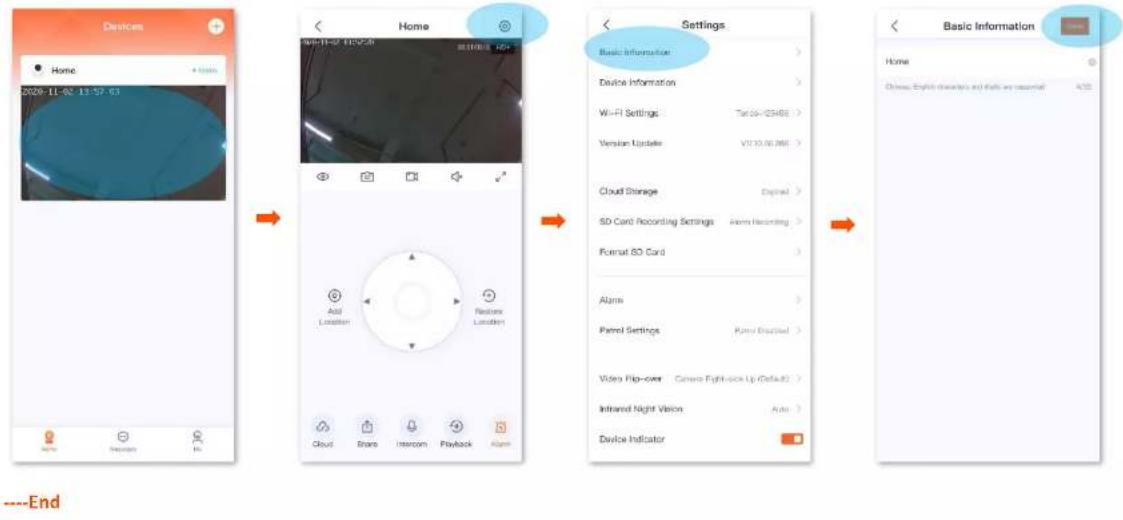
You can name your camera on Settings page.
Step 1 Log in to TDSEE App. Tap the specific device on the home page, which is the camera Home in this example. Tap ☐ in the upper right corner.
Step 2 Tap Basic Information, and name your camera as required, then tap Save.
flowchart
graph LR
    A["Home Screen"] --> B["Device Status"]
    B --> C["Settings"]
    C --> D["Basic Information Panel"]
Check the basic information of your device
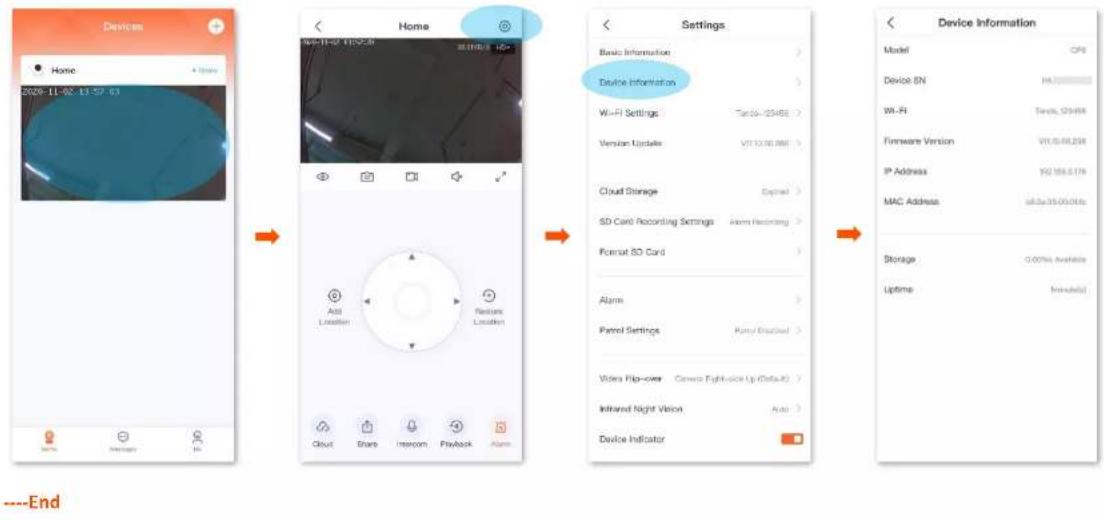
You can check the basic information of the camera, such as the model, device serial number, Wi-Fi name, IP address, MAC address, storage, and uptime.
Step 1 Log in to TDSEE App. Tap the specific device on the home page, which is the camera Home in this example. Tap ☐ in the upper right corner.
Step 2 Tap Device Information, then you can check the relevant parameters of your device.
flowchart
graph LR
    A["Home Screen"] --> B["Device Status"]
    B --> C["Settings"]
    C --> D["Device Info Panel"]
    D --> E["Model: CN"]
Modify the Wi-Fi settings
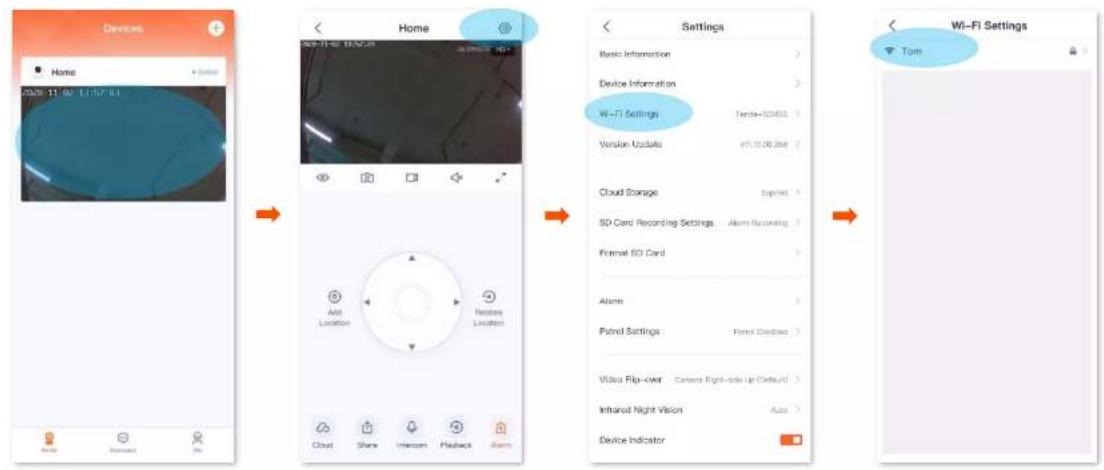
You can modify information of the Wi-Fi which the device is connected to on the Settings page.

Before modifying or configuring the Wi-Fi settings of your camera, please ensure that the camera status is online.
Scenario: The current monitoring videos of the camera is not smooth, so you want to change a Wi-Fi network to which the camera is connected.
Requirement: Ensure that the camera can monitor normally and the monitoring video is smooth.
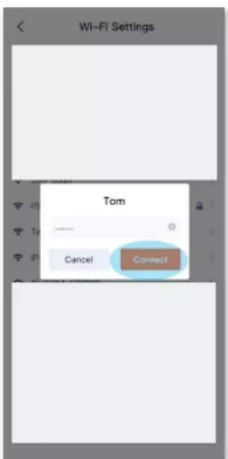
Solution: You need to connect to another 2.4 GHz Wi-Fi network. Assume that the Wi-Fi name is Tom, and the Wi-Fi password is Tom12345. The Wi-Fi Settings function can meet this requirement.
Step 1 Log in to TDSEE App. Tap the specific device on the home page, which is the camera Home in this example. Tap ☐ in the upper right corner.
Step 2 Tap Wi-Fi Settings, then select a new Wi-Fi network, which is Tom in this example.
text_image
Devices Home 2028-11-02 1:15:7:01 Home Settings Basic Information > Device Information > Wi-Fi Settings Tanda=50455 > Version Update V1.10.00.268 ? Cloud Storage Coprint > SD Card Recording Settings Alarm Recording > Format SO Card Alarms Patrol Settings Patrol Clipped > Video Flip-over Camera Right-side Up Default > Infrared Night Vision Auto > Device Indicator Tom Wi-Fi SettingsStep 3 Enter the Wi-Fi password of the Wi-Fi network, which is Tom12345 in this example, and tap Connect. Wait for 1 to 2 minutes till it can monitor normally after the camera successfully establish the connection again.
text_image
Wi-Fi Settings Tom Cancel Connect----End
Upgrade device software
Tenda is devoted to constantly improving and innovating products to provide users with a smoother online experience. The device can achieve new functions or more stable performance through software upgrades.
Please upgrade the software if a new App version is detected.

During upgrade, do not cut off the power or disconnect the device from the internet, otherwise the upgrading may fail and damage the device.
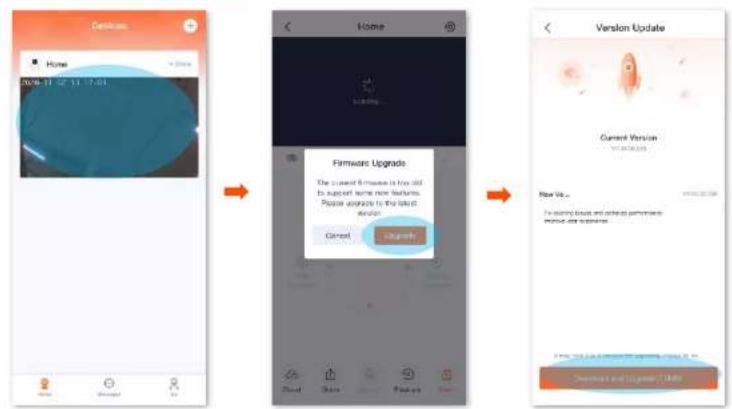
Step 1 Log in to TDSEE App. Tap the specific device on the home page, which is the camera Home in this example. The software upgrade windows will pops up if the new App version is detected. Tap Upgrade.
Step 2 Tap Download and Upgrade, the TDSEE App will download the firmware and upgrade automatically.
text_image
Device Home 2019-01-22 17:01 Firmware Upgrade The current firmware is too old to support some new features. Please approve to the latest option Cancel Upgrade Version Update Current Version 2019-01-22 Now Vis... I'm seeing issues and changes performances important and experiences Download and Upgrade (Edit)---End
Cloud
After you subscribe to the cloud storage service, the monitoring video of the device will be stored on the cloud. You can check the video at any time.
Cloud storage service description:
Cloud storage service is only applicable for Tenda device.
Network bandwidth shall not be lower than 4 M.
- The current subscribed cloud storage service is only applicable for the current device.
- The cloud storage service types of the camera include continuous recording and detection recording.
You can enjoy free cloud storage service (7-days loop detection recording) for 3 months upon the first activation.
Subscribe to the cloud storage service
Method 1 (Recommended)
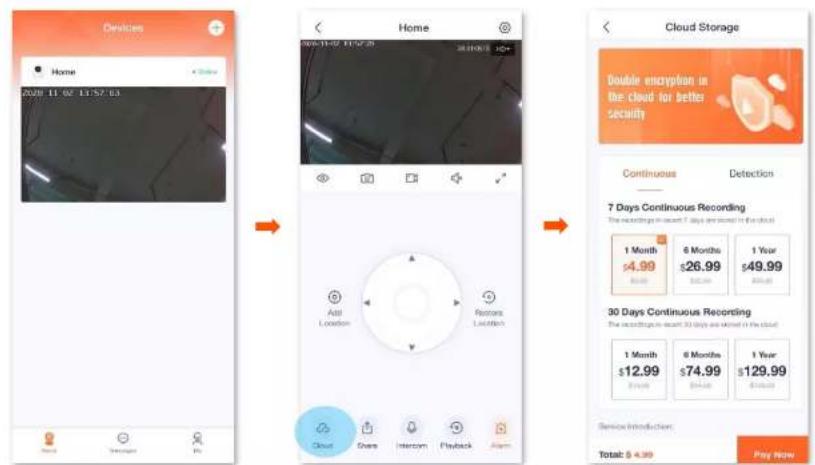
Step 1 Log in to TDSEE App. Tap the specific device on the home page, which is the camera Home in this example. Tap ∞ in the lower left corner.
Step 2 Follow the on-screen instructions to subscribe to the cloud storage service package. After subscribed successfully, the service is activated immediately.
text_image
Devices Home 2028 11:02 13:57:03 Home Cloud Storage Double encryption in the cloud for better security Continuous Detection 7 Days Continuous Recording The recordings in recent 30 days are saved in the cloud 1 Month $4.99 6 Months $26.99 1 Year $49.99 30 Days Continuous Recording The recordings in recent 30 days are saved in the cloud 1 Month $12.99 6 Months $74.99 1 Year $129.99 Service Introduction: Total: $ 4.39 Pay Now---End
Method 2
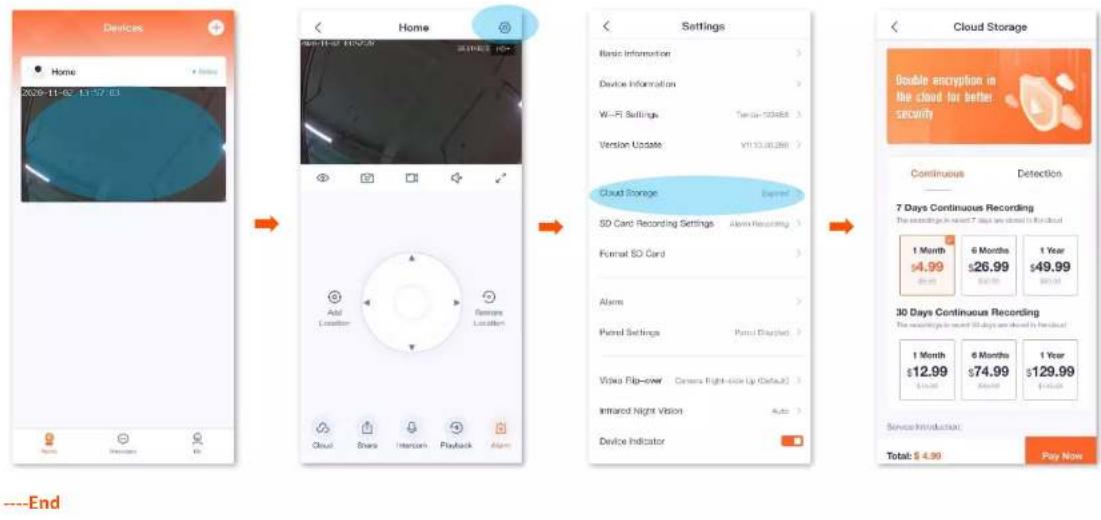
Step 1 Log in to TDSEE App. Tap the specific device on the home page, which is the camera Home in this example. Tap ☐ in the upper right corner.
Step 2 Tap Cloud Storage, and follow the on-screen instructions to subscribe to the cloud storage service package. After subscribed successfully, the service is activated immediately.
flowchart
graph LR
    A["Home Screen"] --> B["Cloud Storage Settings"]
    B --> C["Cloud Storage"]
    C --> D["Continuous Detection Time"]
    D --> E["30 Days Continuous Recording Time"]
Check and edit cloud storage video
Method 1 (Recommended)
Step 1 Log in to TDSEE App. Tap the specific device on the home page, which is the camera Home in this example. Tap in the lower left corner.
Step 2 You can check and edit the video according to the actual conditions.
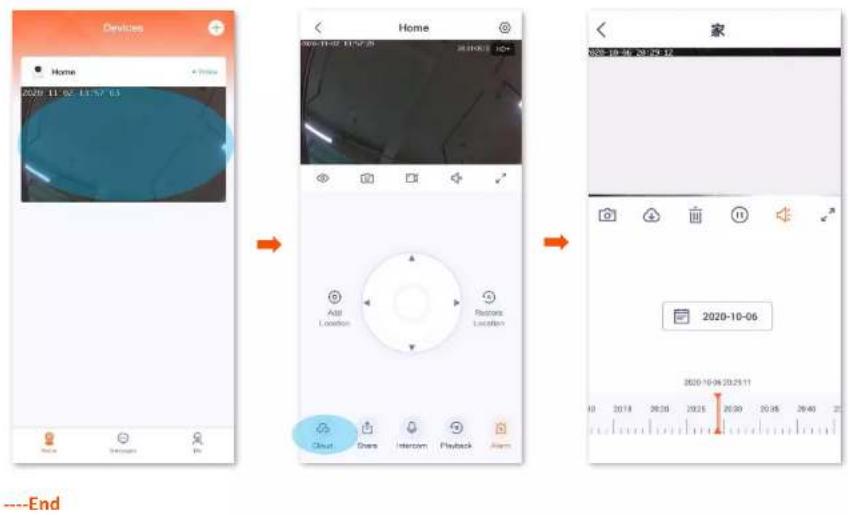
text_image
Devices Home 2020-11-02 13:57:03 Home Air Location Restore Location Cloud Divers Intercom Playback Alarm ---End 家 2020-10-06 2020-10-04 20:29:11 2020-10-06 2020-10-04 20:29:11 2020-10-04 20:29:11 2020-10-04 20:29:11 2020-10-04 20:29:11 2020-10-04 20:29:11 2020-10-04 20:29:12 2020-10-04 20:29:12 2020-10-04 20:29:12 2020-10-04 20:29:12 2020-10-04 20:29:12 2020-10-04 20:29:13 2020-10-04 20:29:13 2020-10-04 20:29:13 2020-10-04 20:29:13 2020-10-04 20:29:13 2020-10-04 20:29:14 2020-10-04 20:29:14 2020-10-04 20:29:14 2020-10-04 20:29:14 2020-10-04 20:29:14 2020-10-04 20:29:15 2020-10-04 20:29:15 2020-10-04 20:29:15 2020-10-04 20:29:15 2020-10-04 20:29:16 2020-10-04 20:29:16 2020-10-04 20:29:16 2020-10-04 20:29:17 2020-10-04 20:29:17 2020-10-04 20:29:18 2020-10-04 20:29:18 2020-10-04 20:29:18 2020-10-04 20:29:19 2020-10-04 20:29:19 2020-10-04 20:29:19 ----EndCloud video parameter description
| Parameter | Description |
| Screenshots.Tap it to save the screenshot of the current monitoring image to TDSEE Album. | |
| Download.Tap it to download the specific video to TDSEE Album. | |
| Tap it to delete the specific cloud storage video. Deleted videos cannot be restored. | |
| Tap it to pause the video. | |
| Tap it to play the video. | |
| Tap it to enable or disable the camera audio. | |
| Tap it to view in full screen. | |
| Recording video timeline | Orange means detection recording. Blue means continuous recording. Gray means no recording.TIPYou can choose a specific time on the timeline. |
Method 2
Step 1 Log in to TDSEE App. Tap the specific device on the home page, which is the camera Home in this example. Tap ☐ in the upper right corner.
Step 2 Tap Cloud Storage > My Cloud Storage, then you can check and edit the video according to the actual conditions. The relevant parameters refer to Cloud video parameter description.
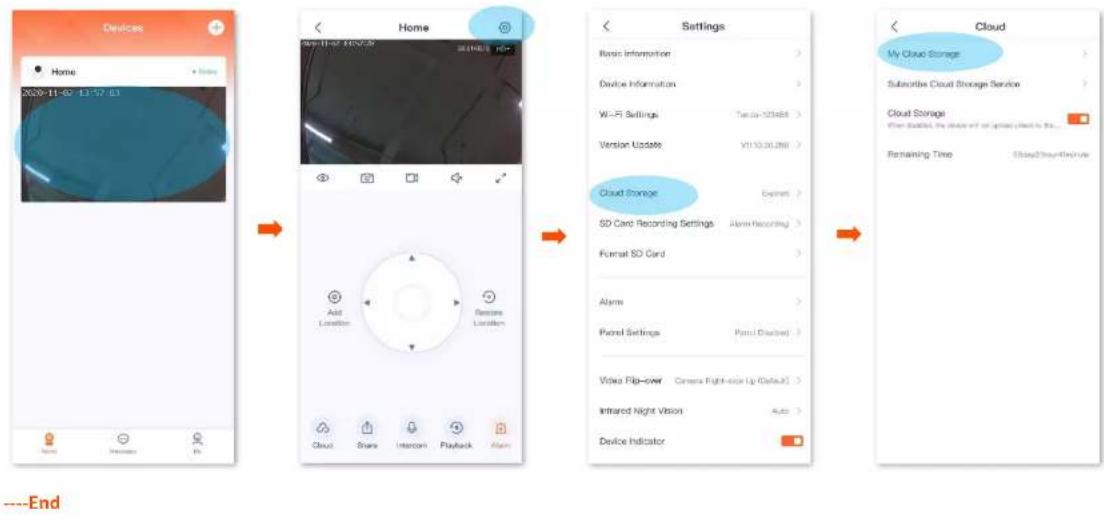
flowchart
graph LR
    A["Home Screen"] --> B["Device Status"]
    B --> C["Cloud Storage Settings"]
    C --> D["Cloud Storage Service"]
    D --> E["Cloud Storage Options"]
Method 3

If your device is shared by your friends, this method is not applicable.
Step 1 Log in to TDSEE App. Tap Me > Cloud Storage.
Step 2 Select a device of which you want to check the cloud storage video, which is Home in this example. Then you can check and edit the video according to the actual conditions. The relevant parameters refer to Cloud video parameter description.
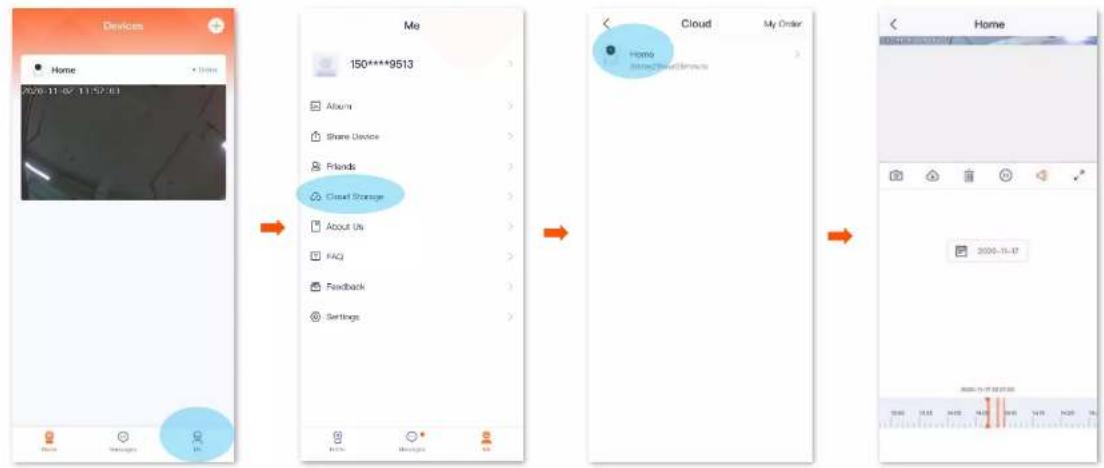
text_image
Devices Home 20/09-11-04 1:15:31 Me 150****9513 Album Share Device Friends Cloud Storage About Us FAQ Feedback Settings Cloud My Order Home 2008-11-17---End
Disable the cloud storage service
After the cloud storage service function is disabled, the device will not upload videos to the cloud. Please operate carefully.
Step 1 Log in to TDSEE App. Tap the specific device on the home page, which is the camera Home in this example. Tap ☐ in the upper right corner.
Step 2 Tap Cloud Storage, disable this function, then set the Cloud Storage from to.
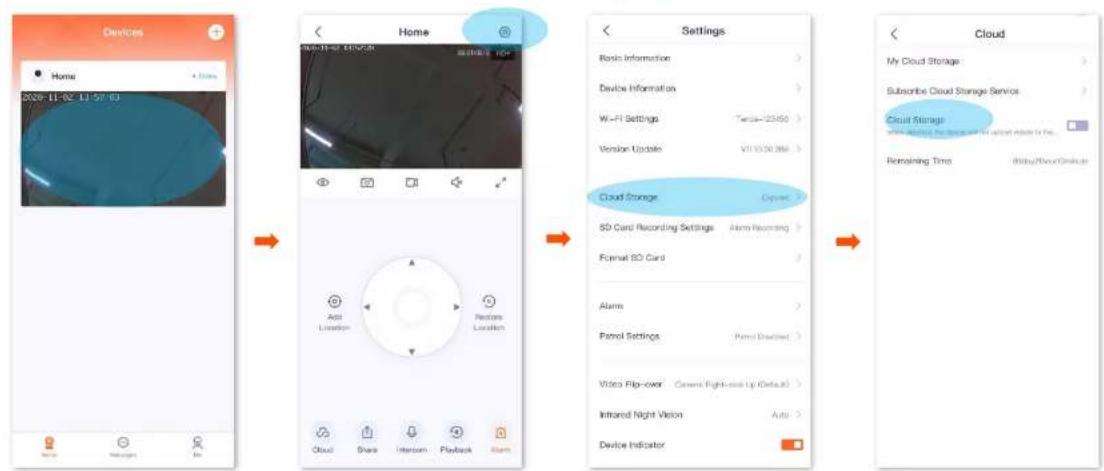
flowchart
graph LR
    A["Home"] --> B["Device Information"]
    B --> C["Wi-Fi Settings"]
    C --> D["Version Update"]
    D --> E["Cloud Storage"]
    E --> F["SD Card Recording Settings"]
    F --> G["Format SD Card"]
    G --> H["Alarms"]
    H --> I["Panel Settings"]
    I --> J["Video Flip-over"]
    J --> K["Infrared Night Vision"]
    K --> L["Device Indicator"]
---End
Check remaining time of cloud storage
Step 1 Log in to TDSEE App. Tap the specific device on the home page, which is the camera Home in this example. Tap ☐ in the upper right corner.
Step 2 Tap Cloud Storage to check remaining time of cloud storage service.
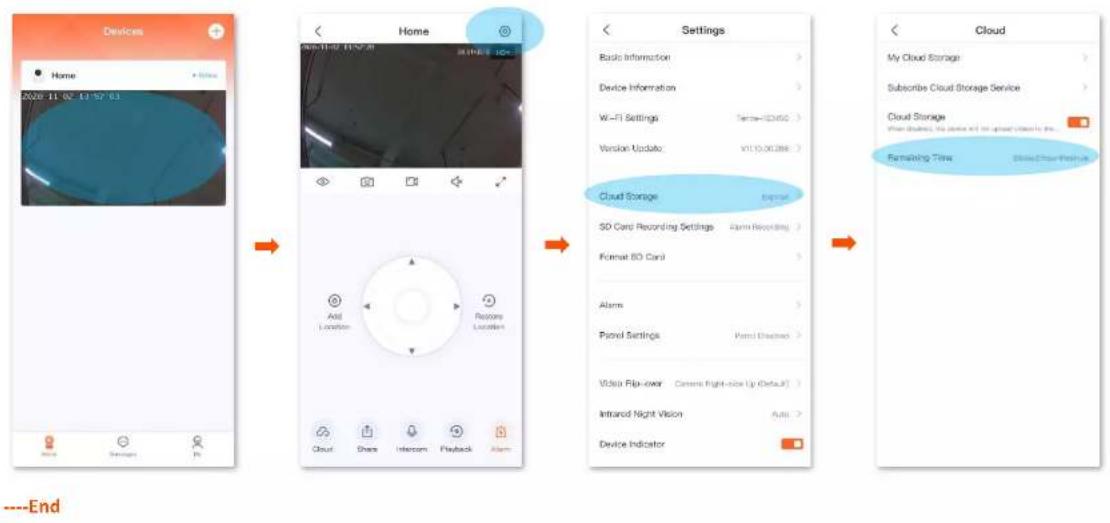
flowchart
graph LR
    A["Home"] --> B["Add Location"]
    B --> C["Restore Location"]
    C --> D["Cloud Storage"]
    D --> E["SD Card Recording Settings"]
    E --> F["Format BD Card"]
    F --> G["Alarms"]
    G --> H["Panel Settings"]
    H --> I["Video Flip-cover"]
    I --> J["Content Right-side Up (Default)"]
    J --> K["Infrared Night Vision"]
    K --> L["Device Indicator"]
Check my order
You can check the order status of cloud storage service, including orders pending payment and paid orders.
Step 1 Log in to TDSEE App. Tap Me > Cloud Storage.
Step 2 Tap My Order in the upper right corner to check the order status of cloud storage service.
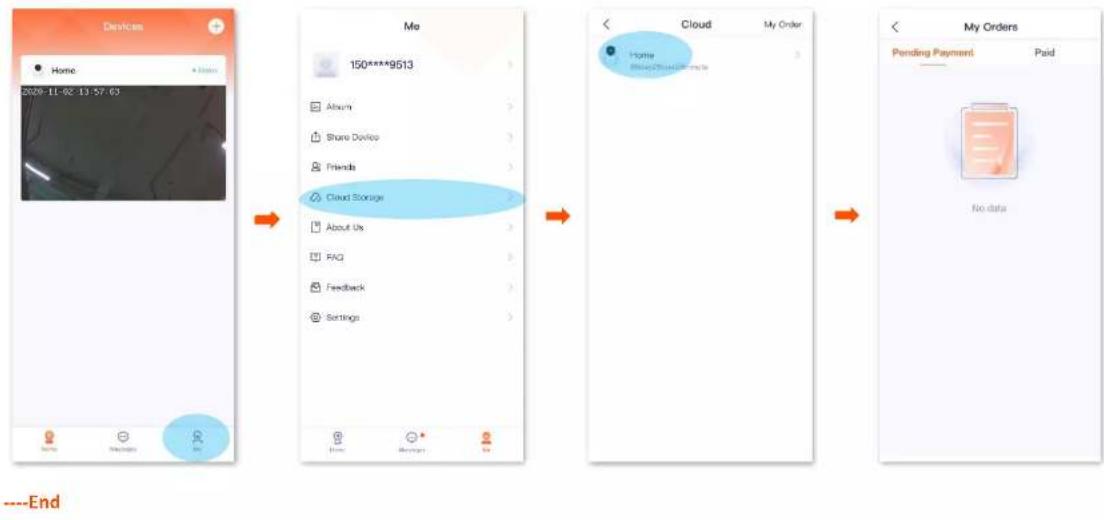
flowchart
graph LR
    A["Device Home"] --> B["Cloud Storage"]
    B --> C["Cloud Storage"]
    C --> D["Cloud Storage"]
    D --> E["Cloud Storage"]
    E --> F["Cloud Storage"]
    F --> G["Cloud Storage"]
    G --> H["Cloud Storage"]
    H --> I["Cloud Storage"]
    I --> J["Cloud Storage"]
    J --> K["Cloud Storage"]
    K --> L["Cloud Storage"]
    L --> M["Cloud Storage"]
    M --> N["Cloud Storage"]
    N --> O["Cloud Storage"]
    O --> P["Cloud Storage"]
    P --> Q["Cloud Storage"]
    Q --> R["Cloud Storage"]
    R --> S["Cloud Storage"]
    S --> T["Cloud Storage"]
    T --> U["Cloud Storage"]
    U --> V["Cloud Storage"]
    V --> W["Cloud Storage"]
    W --> X["Cloud Storage"]
    X --> Y["Cloud Storage"]
    Y --> Z["Cloud Storage"]
    Z --> AA["Cloud Storage"]
    AA --> AB["Cloud Storage"]
    AB --> AC["Cloud Storage"]
    AC --> AD["Cloud Storage"]
    AD --> AE["Cloud Storage"]
    AE --> AF["Cloud Storage"]
    AF --> AG["Cloud Storage"]
    AG --> AH["Cloud Storage"]
    AH --> AI["Cloud Storage"]
    AI --> AJ["Cloud Storage"]
    AJ --> AK["Cloud Storage"]
    AK --> AL["Cloud Storage"]
    AL --> AM["Cloud Storage"]
    AM --> AN["Cloud Storage"]
    AN --> AO["Cloud Storage"]
    AO --> AP["Cloud Storage"]
    AP --> AQ["Cloud Storage"]
    AQ --> AR["Cloud Storage"]
    AR --> AS["Cloud Storage"]
    AS --> AT["Cloud Storage"]
    AT --> AU["Cloud Storage"]
    AU --> AV["Cloud Storage"]
    AV --> AW["Cloud Storage"]
    AW --> AX["Cloud Storage"]
    AX --> AY["Cloud Storage"]
    AY --> AZ["Cloud Storage"]
    AZ --> BA["Cloud Storage"]
    BA --> BB["Cloud Storage"]
    BB --> BC["Cloud Storage"]
    BC --> BD["Cloud Storage"]
    BD --> BE["Cloud Storage"]
    BE --> BF["Cloud Storage"]
    BF --> BG["Cloud Storage"]
    BG --> BH["Cloud Storage"]
    BH --> BI["Cloud Storage"]
    BI --> BJ["Cloud Storage"]
    BJ --> BK["Cloud Storage"]
    BK --> BL["Cloud Storage"]
    BL --> BM["Cloud Storage"]
    BM --> BN["Cloud Storage"]
    BN --> BO["Cloud Storage"]
    BO --> BP["Cloud Storage"]
    BP --> BQ["Cloud Storage"]
    BQ --> BR["Cloud Storage"]
    BR --> BS["Cloud Storage"]
    BS --> BT["Cloud Storage"]
    BT --> BU["Cloud Storage"]
    BU --> BV["Cloud Storage"]
    BV --> BW["Cloud Storage"]
    BW --> BX["Cloud Storage"]
    BX --> BY["Cloud Storage"]
    BY --> BZ["Cloud Storage"]
    BZ --> CA["Cloud Storage"]
    CA --> CB["Cloud Storage"]
    CB --> CC["Cloud Storage"]
    CC --> CD["Cloud Storage"]
    CD --> CE["Cloud Storage"]
    CE --> CF["Cloud Storage"]
    CF --> CG["Cloud Storage"]
    CG --> CH["Cloud Storage"]
    CH --> CI["Cloud Storage"]
    CI --> CJ["Cloud Storage"]
    CJ --> CK["Cloud Storage"]
    CK --> CR["Cloud Storage"]
    CR --> CS["Cloud Storage"]
    CS --> CT["Cloud Storage"]
    CT --> CU["Cloud Storage"]
    CU --> CV["Cloud Storage"]
    CV --> CW["Cloud Storage"]
    CW --> CX["Cloud Storage"]
    CX --> CY["Cloud Storage"]
    CY --> CZ["Cloud Storage"]
    CZ --> DA["Cloud Storage"]
    DA --> DB["Cloud Storage"]
    DB --> DC["Cloud Storage"]
    DC --> DD["Cloud Storage"]
    DD --> DE["Cloud Storage"]
    DE --> DF["Cloud Storage"]
    DF --> DG["Cloud Storage"]
    DG --> DH["Cloud Storage"]
    DH --> DI["Cloud Storage"]
    DI --> DJ["Cloud Storage"]
    DJ --> DK["Cloud Storage"]
    DK --> DL["Cloud Storage"]
    DL --> DJ
Micro SD card recording storage
Use Micro SD card for the first time
Tenda camera supports recording storage in Micro SD card (self-prepared by users). After the camera successfully identifies the Micro SD card, it will automatically start recording according to the recording mode.

- Ensure that the storage capacity of the Micro SD card is 2 to 128 G, and the read and write speed is Class 10.
- Tenda camera supports recording via Micro SD card of FAT32, exFAT and NTFS formats.
- If the App prompts that the Micro SD card needs to be formatted, please follow the on-screen instructions.
Step 1 Insert the Micro SD card in the slot of the camera (turn the lens upward, then you can see it).
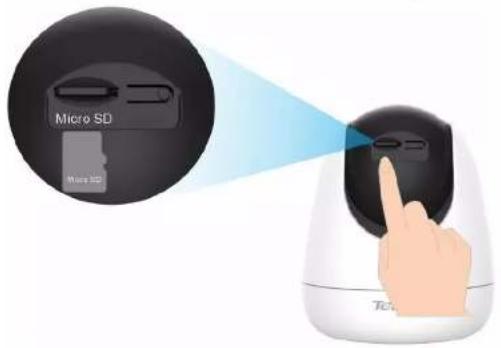
text_image
Micro SD Micro SD TechStep 2 Log in to TDSEE App to check whether the Micro SD card can be identified normally.
Log in to TDSEE App. Tap the camera on the home page. If a window pops up that Micro SD Card Error. It indicates that the current format of the Micro SD card does not meet the requirements. Please format it according to the instructions.
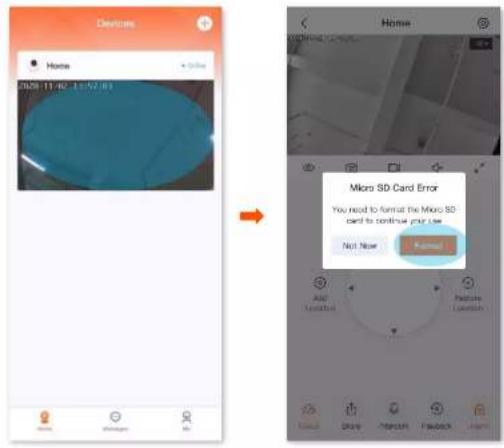
text_image
Devices Home 00:00 11:30 - 1:57:00 Home Micro SD Card Error You need to format the Micro SD card to continue your use Not Now Add Location Place Location Home
If the formatting of the Micro SD card fails, please try the following solutions:
- Cut off the power of the camera, unplug and insert the Micro SD card, then power on the camera again.
- You can find a professional to test or use MyDiskTest software to check whether the Micro SD card is normal.
Step 3 Set the recording mode of Micro SD card. Please refer to Micro SD card recording settings for detailed steps.
---End
Micro SD card recording settings
Tenda camera supports recording storage in Micro SD card (self-prepared by users). You can set recording type of Micro SD card here.
Step 1 Log in to TDSEE App. Tap the specific device on the home page, which is the camera Home in this example. Tap ☐ in the upper right corner.
Step 2 Tap SD Card Recording Settings, and select the recording mode according to the actual conditions.
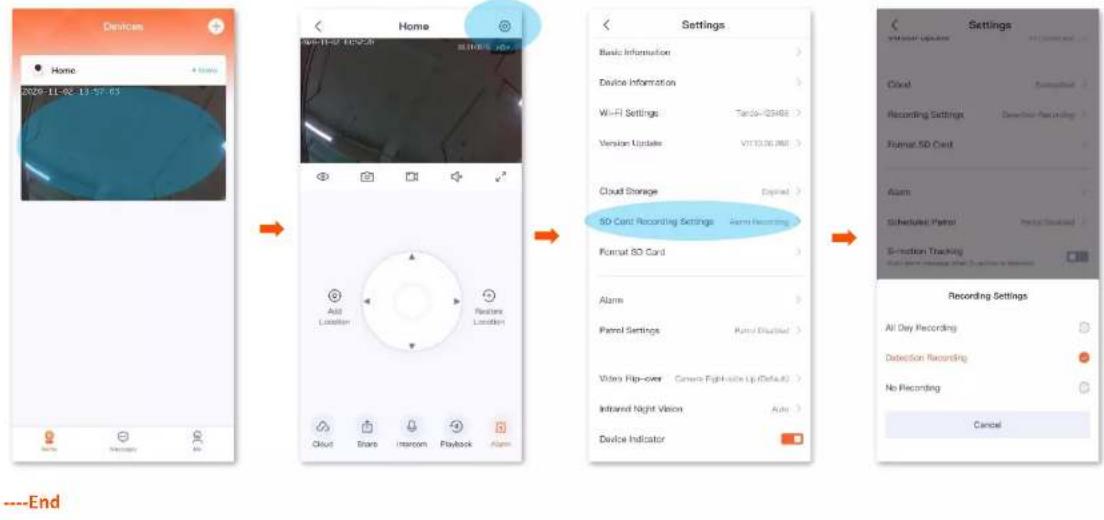
flowchart
graph LR
    A["Device Home"] --> B["Home"]
    B --> C["Settings"]
    C --> D["Recording Settings"]
    D --> E["End"]
Format Micro SD card
If the camera cannot identify the Micro SD card, or you want to clear the recording video of the Micro SD, you can format the Micro SD card.
Step 1 Log in to TDSEE App. Tap the specific device on the home page, which is the camera Home in this example. Tap ☐ in the upper right corner settings.
Step 2 Tap Format SD Card, then tap Format SD Card. Tap Format in the pops up window. Settings completed, the camera will format the Micro SD card.
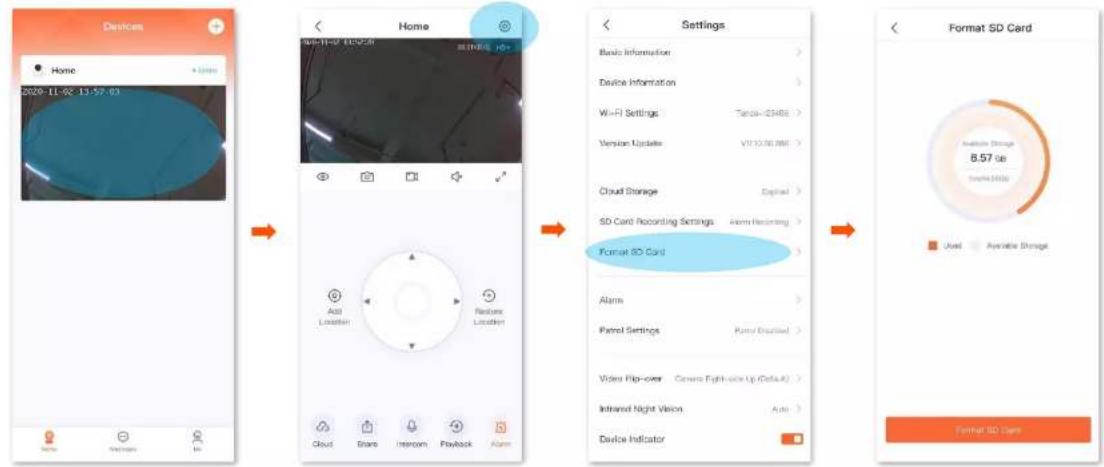
flowchart
graph LR
    A["Home Screen"] --> B["Device Status"]
    B --> C["Storage Settings"]
    C --> D["Format SD Card Display"]
    D --> E["Output: 8.57 GB Volume"]
---End
Check or edit the Micro SD card video
Step 1 Log in to TDSEE App. Tap the specific device on the home page, which is the camera Home in this example. Then tap Playback in the lower right corner.
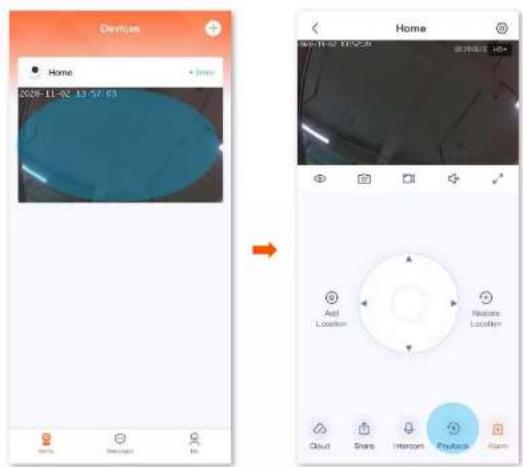
text_image
Device Home 2020-11-02 13:57:03 Home Add Location Restairs: Location Cloud Share Intercom Physical AlarmStep 2 You can check and edit the video according to the actual conditions.
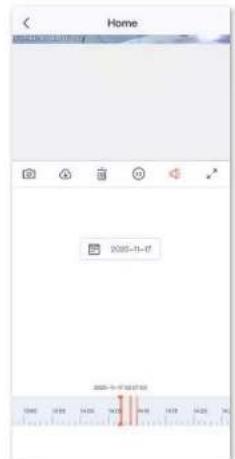
text_image
Home 2020-11-17 2020-11-17 10:37:50---End
Parameter description
| Parameter | Description |
| [5478] | Screenshots.Tap it to save the screenshot of the current monitoring image to TDSEEAlbum. |
| [1Y06] | Recordings.Tap it to start recording, and tap it again to stop recording. Successfully recordings are automatically save to TDSEEAlbum. |
| [XT22] | Tap it to delete the specific cloud storage video. Deleted videos cannot be restored. |
| [4702] | Tap it to pause the video. |
| [7058W] | Tap it to play the video. |
| [3008] | Tap it to enable or disable the camera audio. |
 | Tap it to view in full screen. |
| Recording video timeline | Orange means detection recording. Blue means continuous recording. Gray means no recording. V_TIP You can choose a specific time on the timeline. |
Check micro SD card avaliable storage
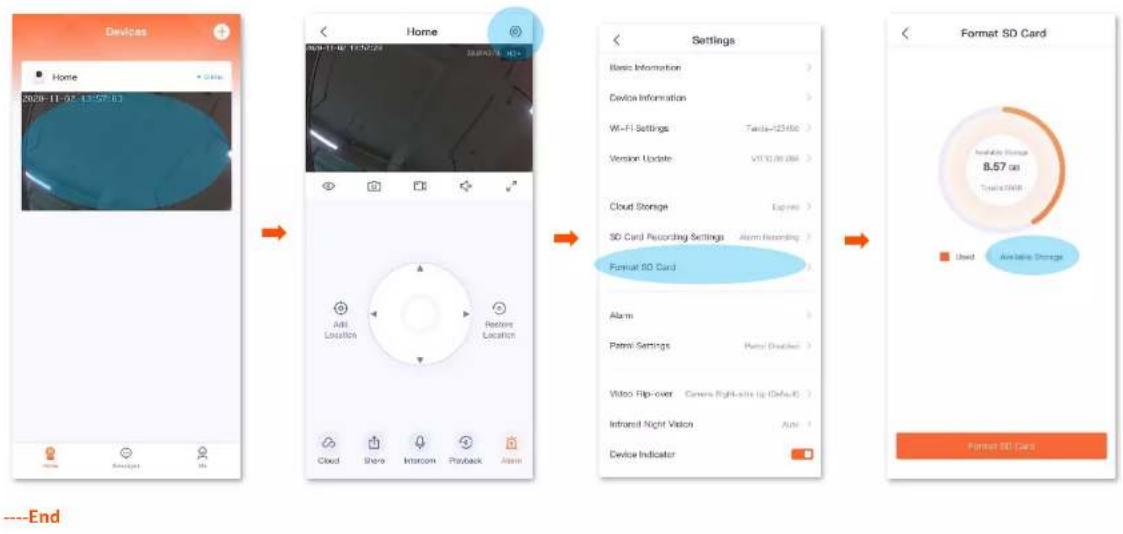
Step 1 Log in to TDSEE App. Tap the specific device on the home page, which is the camera Home in this example. Then tap Ⓞ in the upper right corner.
Step 2 Tap Format SD Card to check Available Storage of Micro SD card.
flowchart
graph LR
    A["Home Screen"] --> B["Control Panel"]
    B --> C["Storage Settings"]
    C --> D["Format SD Card Display"]
Set up alarm
After the alarm function is enabled, the camera can send alarm messages and monitoring image to TDSEE according to alarm type. You can check specific messages in message page.
Method 1 (Recommended)
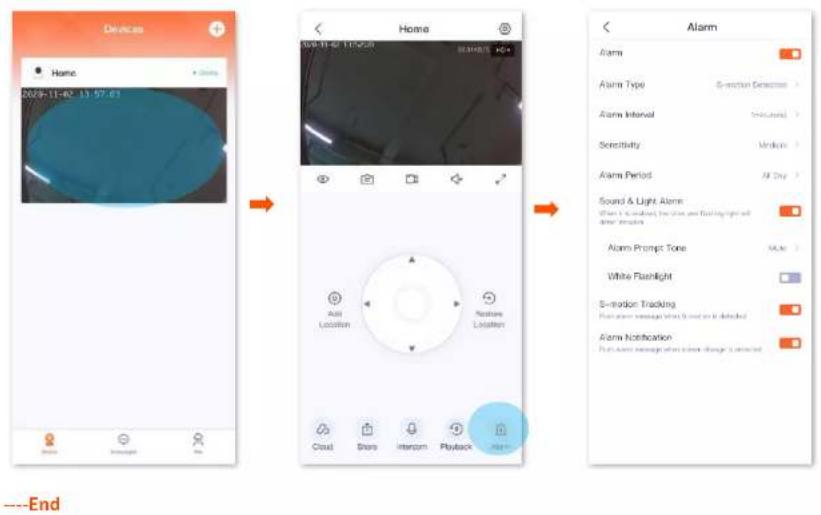
Step 1 Log in to TDSEE App. Tap the specific device on the home page, which is the camera Home in this example. Then tap Alarm in the lower right corner.
Step 2 You can modify the relevant parameters according to the actual conditions.
text_image
Devices Home 2029-11-02 13:57:61 Home Alarm Alarm Type S-motion Detection Alarm Interval Continuous Selectivity Moderate Alarm Period All Day Sound & Light Alarm: When it is checked, the alarm and Flash lights will be detected Alarm Prompt Tone None White Flashlight S-motion Tracking Please screen message when it is detected Alarm Notification Please screen message when it is changed to be detected Cloud Store Intercom Playback ---EndParameter description
| Parameter | Description |
| Alarm | It specifies whether or not to enable the alarm function. |
| Alarm Type | It specifies alarm type of the camera.Motion Detection:When image change is detected, the camera will send alarm information and monitoring image to TDSEE.S-motion Detection:When S-motion change is detected, the camera will send alarm information and monitoring image to TDSEE. |
| Alarm Interval | It specifies the time interval at which the camera sends alarm messages. You can select it according to the actual condition. |
| Sensitivity | It specifies the detection sensitivity of the camera.By default, the detection sensitivity isMedium, you can selectHighorLowaccording to the actual condition. |
| Alarm Period | It specifies the period in which the camera generates alarms.You can select the period preset by the system, or customize it as required. |
| Sound & Light Alarm | After the function is enabled, the camera flashes white, and produces audio alert when the alarm is detected. |
| Alarm Prompt Tone | It specifies alarm prompt tone of the camera.You can select the prompt tone preset by the system, or record it by yourself when the sound and light alarm function is enabled. |
| White Flashlight | When the sound and light alarm function is enabled, if the camera detects an alarm image, the camera will flash white light. |
| S-motion Detection | After the function is enabled, when S-motion activity is detected, the TDSEE tracks and follows the subject. |
| Alarm Notifications | After the function is enabled, when image change is detected, the camera will send notifications and monitoring image to the TDSEE App according to the Alarm Period. |
Method 2
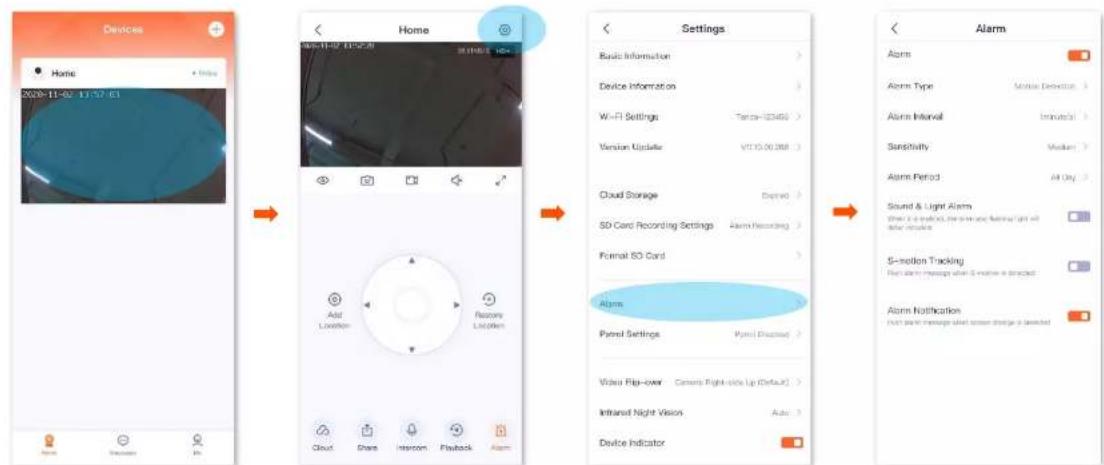
Step 1 Log in to TDSEE App. Tap the specific device on the home page, which is the camera Home in this example. Tap ☐ in the upper right corner.
Step 2 Tap Alarm, then you can modify the relevant parameters according to the actual conditions.
text_image
Devices Home Basic Information > Device Information > Wi-Fi Settings - Torco-103490 > Version Update: VCT10.00.2681 > Cloud Storage - Drated > SD Card Recording Settings Alarm Recording > Format SD Card > Alarms Patrol Settings - Patrol Discontinued > Video Flip-over Camera Fight-side Up (Default) > Infrared Night Vision Auto > Device Indicator Alarm Alarm Type Alarm Interval Sensitivity Alarm Period Sound & Light Alarm When it is read, the screen and fan light will be included S–sotion Tracking Alarm Notification Alarm notification when a signal is stopped---End
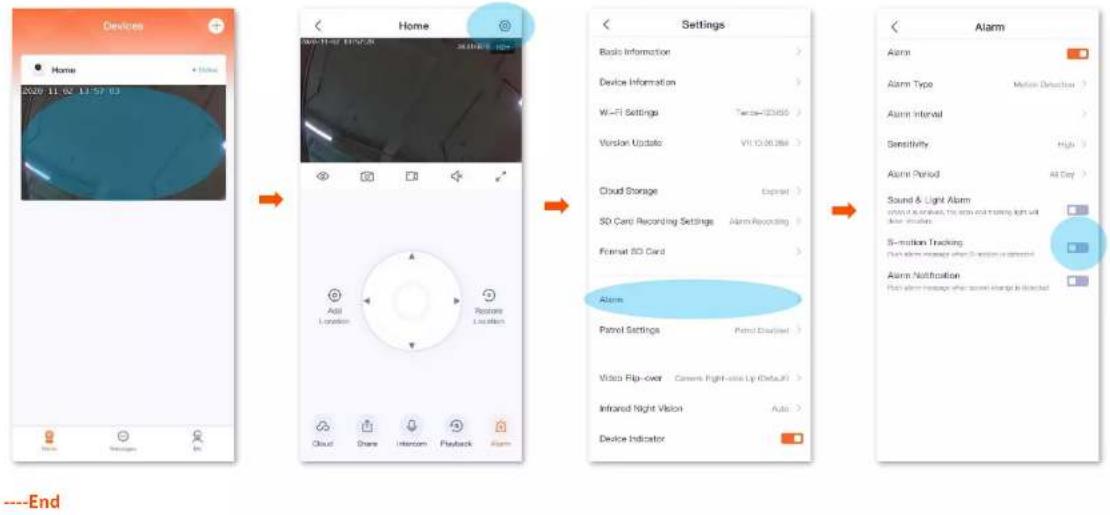
Enable S-motion Tracking
After the S-motion tracking function is enabled, when the camera detects figure movement, the TDSEE tracks and follows the subject.
Method 1 (Recommended)
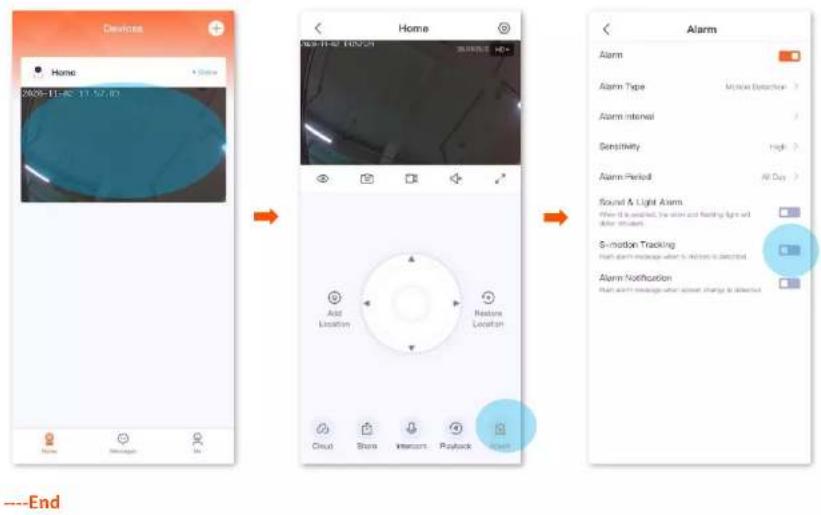
Step 1 Log in to TDSEE App. Tap the specific device on the home page, which is the camera Home in this example. Then tap Alarm 📋 in the lower right corner.
Step 2 Find S-motion Tracking, and set the S-motion Tracking from to.
flowchart
graph LR
    A["Home Detection"] --> B["Add Location"]
    B --> C["Restore Location"]
    C --> D["Alarm"]
    D --> E["Alarm Type: Module Detection"]
    E --> F["Alarm Interval"]
    F --> G["Sensitivity: High"]
    G --> H["Alarm Period: All Day"]
    H --> I["Sound & Light Alarm"]
    I --> J["S-motion Tracking"]
    J --> K["Alarm Notification"]
Method 2
Step 1 Log in to TDSEE App. Tap the specific device on the home page, which is the camera Home in this example. Tap ☐ in the upper right corner.
Step 2 Tap Alarm, find S-motion Tracking, and set the S-motion Tracking from to.
flowchart
graph LR
    A["Home Screen"] --> B["Device Setup"]
    B --> C{Settings}
    C -->|Basic Information| D["Alarm"]
    C -->|Device Information| E["Alarm Type"]
    C -->|Wi-Fi Settings| F["Alarm Interval"]
    C -->|Version Update| G["Sensitivity"]
    C -->|Cloud Storage| H["Alarm Period"]
    C -->|SD Card Recording Settings| I["Sound & Light Alarm"]
    C -->|Format SD Card| J["5-motion Tracking"]
    C --> K["Alarm Notification"]
    K --> L["Alarm"]
Set up scheduled patrol
You can set up scheduled patrol of the camera, including panoramic patrol and location patrol.
- Panoramic patrol: The camera performs 360^ patrol of its surroundings.
- Location patrol: The camera patrols the location you specified. You need to add the location in Basic settings in advance.

After 2 hours' patrol, the patrol function will be automatically disabled.
Assume that you want to use the camera to monitor the bedroom, balcony, kitchen area.
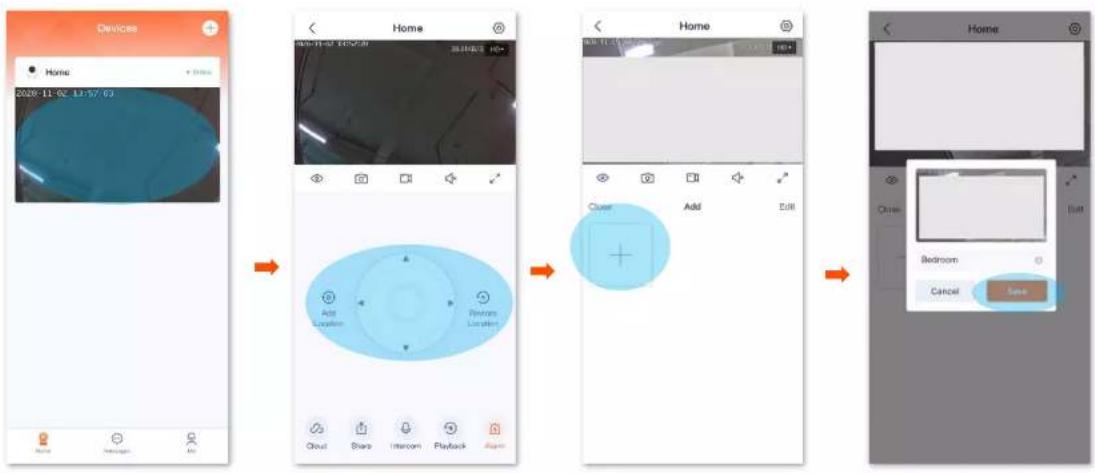
Step 1 Add the camera patrol location.
1 Log in TDSEE App. Tap the specific device on the home page, which is the camera Home in this example.
2 Tap to choose the location you want to monitor, which is Bedroom in this example. Then tap Add Location.
3 Tap , personalize a name with location, which is Bedroom in this example, and tap Save .
4 Refer to steps 2 to 3 to add the locations of the balcony and kitchen.
flowchart
graph LR
    A["Devices"] --> B["Home"]
    B --> C["Add Location"]
    C --> D["Add Location"]
    D --> E["Add Location"]
    E --> F["Add Location"]
    F --> G["Add Location"]
    G --> H["Add Location"]
    H --> I["Add Location"]
    I --> J["Add Location"]
    J --> K["Add Location"]
    K --> L["Add Location"]
    L --> M["Add Location"]
    M --> N["Add Location"]
    N --> O["Add Location"]
    O --> P["Add Location"]
    P --> Q["Add Location"]
    Q --> R["Add Location"]
    R --> S["Add Location"]
    S --> T["Add Location"]
    T --> U["Add Location"]
    U --> V["Add Location"]
    V --> W["Add Location"]
    W --> X["Add Location"]
    X --> Y["Add Location"]
    Y --> Z["Add Location"]
    Z --> AA["Add Location"]
    AA --> AB["Add Location"]
    AB --> AC["Add Location"]
    AC --> AD["Add Location"]
    AD --> AE["Add Location"]
    AE --> AF["Add Location"]
    AF --> AG["Add Location"]
    AG --> AH["Add Location"]
    AH --> AI["Add Location"]
    AI --> AJ["Add Location"]
    AJ --> AK["Add Location"]
    AK --> AL["Add Location"]
    AL --> AM["Add Location"]
    AM --> AN["Add Location"]
    AN --> AO["Add Location"]
    AO --> AP["Add Location"]
    AP --> AQ["Add Location"]
    AQ --> AR["Add Location"]
    AR --> AS["Add Location"]
    AS --> AT["Add Location"]
    AT --> AU["Add Location"]
    AU --> AV["Add Location"]
    AV --> AW["Add Location"]
    AW --> AX["Add Location"]
    AX --> AY["Add Location"]
    AY --> AZ["Add Location"]
    AZ --> BA["Add Location"]
    BA --> BB["Add Location"]
    BB --> BC["Add Location"]
    BC --> BD["Add Location"]
    BD --> BE["Add Location"]
    BE --> BF["Add Location"]
    BF --> BG["Add Location"]
    BG --> BH["Add Location"]
    BH --> BI["Add Location"]
    BI --> BJ["Add Location"]
    BJ --> BK["Add Location"]
    BK --> BL["Add Location"]
    BL --> BM["Add Location"]
    BM --> BN["Add Location"]
    BN --> BO["Add Location"]
    BO --> BP["Add Location"]
    BP --> BQ["Add Location"]
    BQ --> BR["Add Location"]
    BR --> BS["Add Location"]
    BS --> BT["Add Location"]
    BT --> BU["Add Location"]
    BU --> BV["Add Location"]
    BV --> BW["Add Location"]
    BW --> BX["Add Location"]
    BX --> BY["Add Location"]
    BY --> BZ["Add Location"]
    BZ --> CA["Add Location"]
    CA --> CB["Add Location"]
    CB --> CC["Add Location"]
    CC --> CD["Add Location"]
    CD --> CE["Add Location"]
    CE --> CF["Add Location"]
    CF --> CG["Add Location"]
    CG --> CH["Add Location"]
    CH --> CI["Add Location"]
    CI --> CJ["Add Location"]
    CJ --> CK["Add Location"]
    CK --> CR["Add Location"]
    CR --> CS["Add Location"]
    CS --> CT["Add Location"]
    CT --> CU["Add Location"]
    CU --> CV["Add Location"]
    CV --> CW["Add Location"]
    CW --> CX["Add Location"]
    CX --> CY["Add Location"]
    CY --> CZ["Add Location"]
    CZ --> DA["Add Location"]
    DA --> DB["Add Location"]
    DB --> DC["Add Location"]
    DC --> DD["Add Location"]
    DD --> DE["Add Location"]
    DE --> DF["Add Location"]
    DF --> DG["Add Location"]
    DG --> DH["Add Location"]
    DH --> DI["Add Location"]
    DI --> DJ["Add Location"]
    DJ --> DK["Add Location"]
    DK --> DL["Add Location"]
    DL --> DM["Add Location"]
    DM --> DN["Add Location"]
    DN --> DO
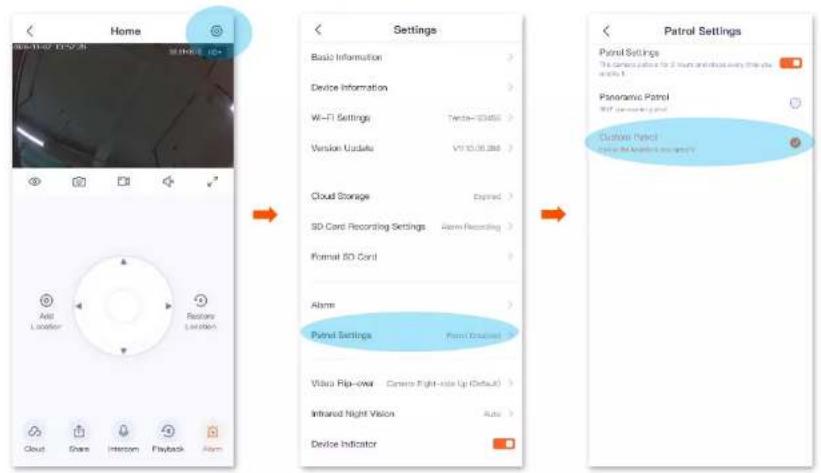
Step 2 Set Scheduled Patrol to Custom Patrol.
1 Enter the camera monitor page, tap ☑ the upper right corner, then tap Patrol Settings.
2 Enable Patrol Settings function, select Custom Patrol. Settings completed, the camera will patrol for 2 hours according to the location you specified.
text_image
Home Basic Information Device Information Wi-Fi Settings Version Update Cloud Storage SD Cord Recording Settings Format SO Cord Alarm Patrol Settings Video Flip-over Camera Right-side Up (Default) Infrared Night Vision Device Indicator Settings Patrol Settings The camera provides for 2 hours and how every time is available to Panoramic Patrol SOP Screening Plot Custom Patrol Illumina - Illumina - Illumina - Illumina - Illumina - Illumina - Illumina - Illumina - Illumina - Illumina - Illumina - Illumina - Illumina - Illumina - Illumina - Illumina - Illumina - Illumina - Illumina - Illumina - Illumina - Illumina - Illumina - Illumina - Illumina - Illumina - Pansol Patrol Settings---End
Set up video flip-over
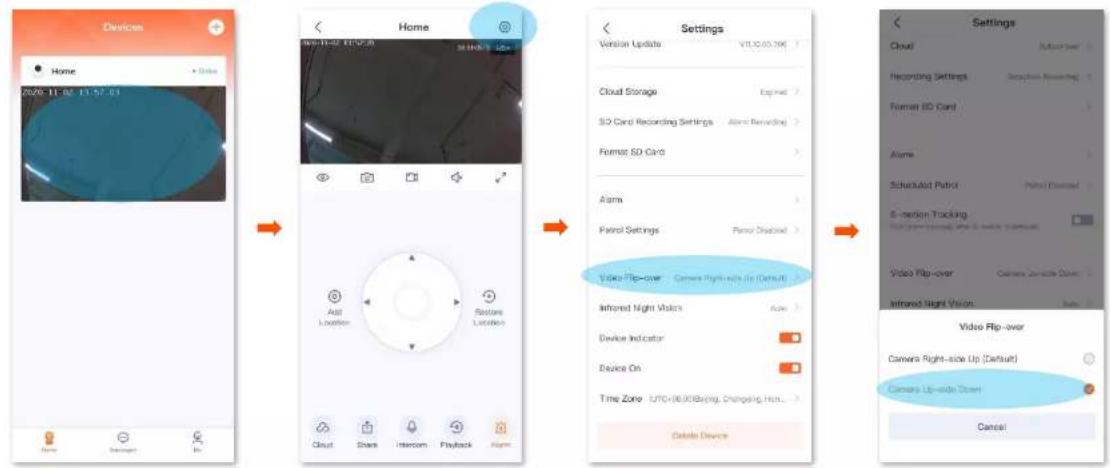
If the camera installation method is ceiling installation, in order to facilitate monitoring, you need to set the direction to Camera Up-side Down.
Step 1 Log in to TDSEE App. Tap the specific device on the home page, which is the camera Home in this example. Tap ☐ in the upper right corner.
Step 2 Scroll down to the bottom of the page, tap Video Flip-over, and select Camera Up-side Down.
text_image
Devices Home 2020-11-02 11:57:03 Home Settings Home Cloud Storage SD Card Recording Settings Format SD Card Alarm Patrol Settings Video Flip-over Camera Right-side Up (Default) Infrared Night Vision Device Indicator Device On Time Zone UTC+06:00 Buying, Changing, Hot... Delete Device Settings Cloud Recording Settings Desktop Recording Former SD Card Alarm Scheduled Patrol Photo Connected E-section Tracking Video Flip-over Camera Upside Down Entered Night Vision Video Flip-over Camera Right-side Up (Default) Camera Up-side Down Cancel---End
Set up infrared night vision
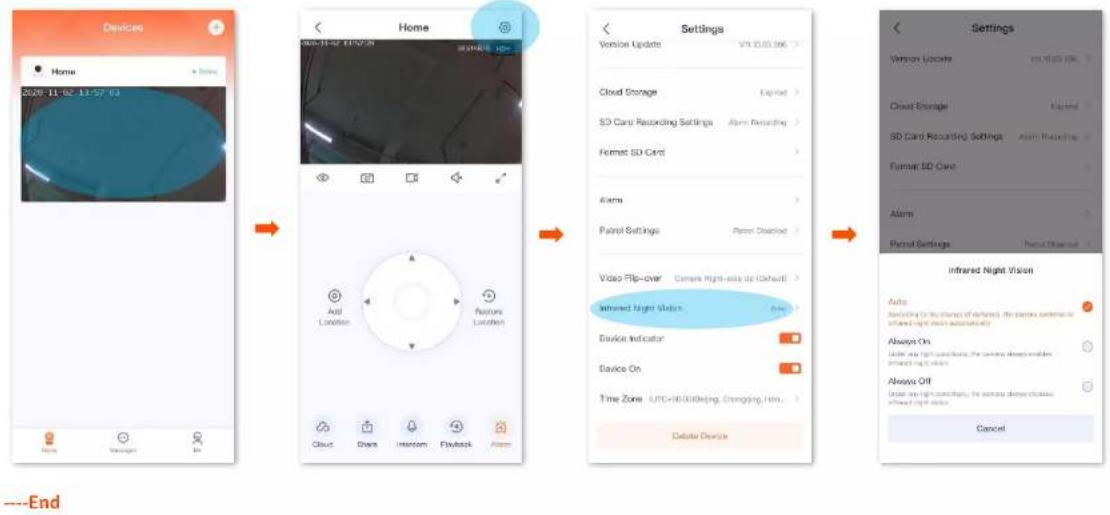
Infrared night vision indicates that in the dark environment without visible light or weak light, the camera turns on the infrared light. Even in the dark environment, the camera can monitor normally, and the image is black and white.
Set up infrared night vision
Step 1 Log in to TDSEE App. Tap the specific device on the home page, which is the camera Home in this example. Tap ☐ in the upper right corner.
Step 2 Scroll down to the bottom of the page, and tap Infrared Night Vision. Select the mode according to the actual conditions.
flowchart
graph LR
    A["Home Screen"] --> B["Add Location"]
    B --> C["Features Location"]
    C --> D["Cloud"]
    D --> E["Share"]
    E --> F["Intercom"]
    F --> G["Playback"]
    G --> H["Alarm"]

    I["Settings"] --> J["Video Update"]
    J --> K["Cloud Storage"]
    K --> L["SD Card Recording Settings"]
    L --> M["Alarm Recording"]
    M --> N["Format SD Card"]
    N --> O["Alarm"]
    O --> P["Pattern Settings"]
    P --> Q["Pattern Detected"]
    Q --> R["Video Flip-over"]
    R --> S["Camera High-sets Up Default"]
    S --> T["Infrared Night Vision"]
    T --> U["Device Indicator"]
    U --> V["Device On"]
    V --> W["Time Zone: UTC+36.000(Beijing, Chongqing, Hon...)"]
    W --> X["Debate Device"]

    Y["Settings"] --> Z["Auto"]
    Z --> AA["Setting"]
    AA --> AB["Infrared Night Vision"]
    AB --> AC["Auto"]
    AC --> AD["Setting"]
Parameter description
| Infrared night vision | The camera infrared light | Monitoring image |
| Auto | According to the change of darkness, the camera turns on or off the infrared night vision automatically.If the light is strong, turn off the infrared night vision.If no light or weak light, turn on the infrared night vision. | If the camera turns off the infrared light, the monitoring image is colorful.If the camera turns on the infrared light, the monitoring image is black and white. |
| Always on | Under any light conditions, the camera always enables infrared night vision. | The monitoring image is black and white. |
| Always off | Under any light conditions, the camera always disables infrared night vision. | If the light is strong, the monitoring image is colorful.If no light or weak light, the camera cannot monitor normally. |
Turn off device indicator
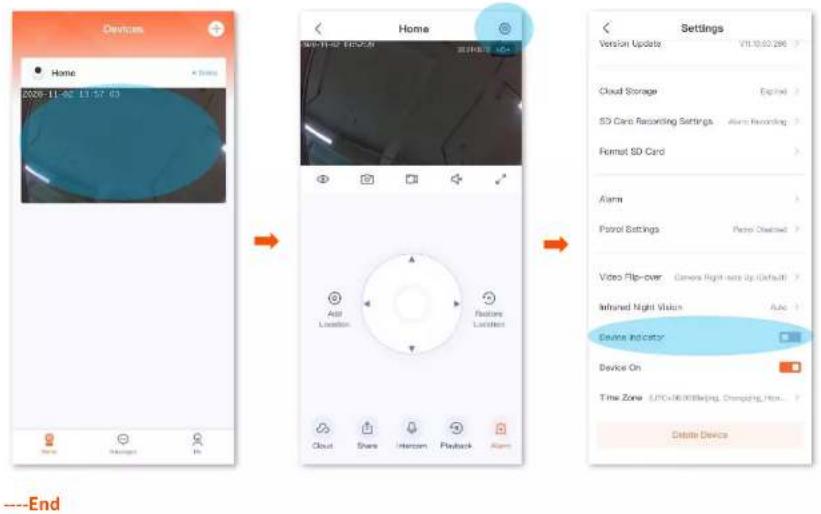
You can turn on or off the device indicator on the Settings page. By default, the device indicator is turn on.
Step 1 Log in to TDSEE App. Tap the specific device on the home page, which is the camera Home in this example. Tap ☐ in the upper right corner.
Step 2 Scroll down to the bottom of the page, find Device Indicator, and set the Device Indicator from ☐ to ☐.
text_image
Devices Home 2020-11-02 13:57:03 Home Settings Version Update: VH10.02.296 Cloud Storage: Expired SD Card Recording Settings: Alarm Recording Format SD Card Alarms Patrol Settings: Policy Checked Video Flip-over: Camera Right rate Up (Default) Infrared Night Vision: Also Device Indicator Device On Time Zone: UTC+0000Bleping, Champing, Hox... Delete Device ----EndTurn off device
You can turn on or off the device. After the device is turn off, the device stands by, and stops monitoring.
Step 1 Log in to TDSEE App. Tap the specific device on the home page, which is the camera Home in this example. Tap ☐ in the upper right corner.
Step 2 Scroll down to the bottom of the page, find Device On, and set the Device On from ☐ to ☐.

After the device is turn off, if you want to turn on it again, you can turn on it on the monitoring live page of the device.

text_image
Devices Home 20/20:15:00:11:52:01 Home Settings Mobile Updates Cloud Browser 3D Core Recording Settings Purmy 3D Card Airline Planar Settings Maps Top-View Infineal High Mode Device Indicator Device On: Time Zone: 0.5GHz/80Hz/80Hz/80Hz/80Hz/80Hz/80Hz/80Hz/80Hz/80Hz/80Hz/80Hz/80Hz/80Hz/80Hz/80Hz/80Hz/80Hz/80Hz/80Hz/80Hz/80Hz/80Hz/80Hz/80Hz/80Hz/80kHz Add Location Restore Location Cloud Share Intercom Playback Alarm ----EndModify the time zone
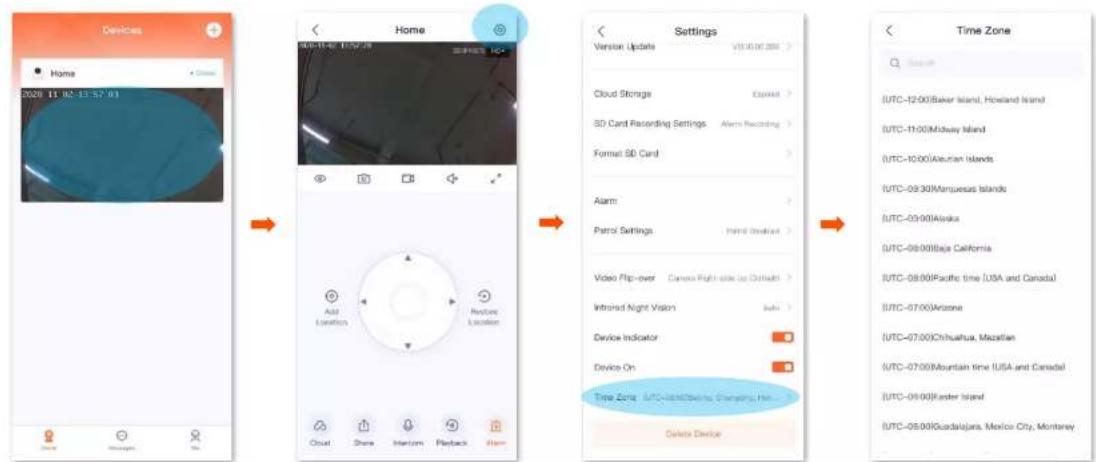
You can modify the time zone here.
For time-based functions to take effect correctly, please ensure that the time zone of your device is correct.
Step 1 Log in to TDSEE App. Tap the specific device on the home page, which is the camera Home in this example. Tap ☐ in the upper right corner.
Step 2 Scroll down to the bottom of the page, find Time Zone, and select a time zone according to the actual conditions.
text_image
Devices Home 2029 11 02:15 17:03 Home Add Location Remove Location Cloud Share Horizon Playback Alarm Settings Version Update V10.00.00.2006 > Cloud Storage Open SD Card Recording Settings Alarm Recording Format SD Card Alarm Patrol Settings Patrol Drifted Video Flip-over Camera Right side Up Default Infrared Night Vision Auto Device Indicator Device On Time Zone UTC-08:00(Berling Company) Inc... Delete Device Time Zone Search (UTC-12:00)Baker Island, Howard Island (UTC-11:00)Midway Island (UTC-10:00)Aurian Islands (UTC-09:30)Mampesas Islands (UTC-09:00)Alaska (UTC-08:00)Iaja California (UTC-08:00)Pacific time (USA and Canada) (UTC-07:00)Anzone (UTC-07:00)Chihuahua, Mazifan (UTC-07:00)Mountain time (USA and Canada) (UTC-09:00)Faster Island (UTC-08:00)Guadalajara, Mexico City, Monterey---End
Delete the device
A device can only be added by one account. If any of the following situations occurs, please delete the device on the TDSEE App first.
- Another account needs to add the device.
- The device is abnormal and needs to be repaired or returned.

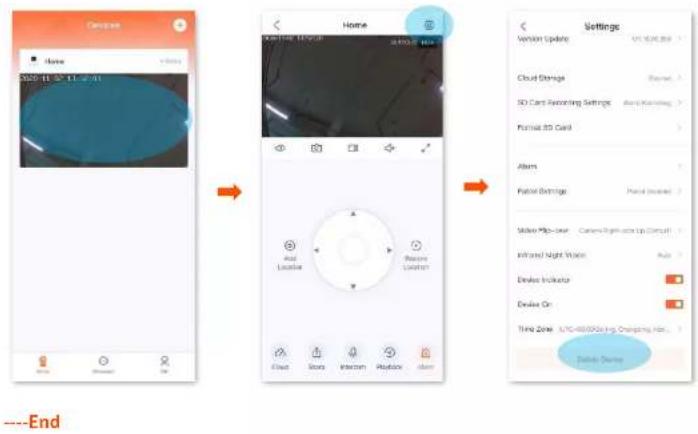
Delete device will clear the binding relationship between the device and the account, including Wi-Fi configuration information, add location information, and custom alarm prompt tone.
Step 1 Log in to TDSEE App. Tap the specific device on the home page, which is the camera Home in this example. Tap ☐ in the upper right corner.
Step 2 Scroll down to the bottom of the page, and tap Delete Device.
text_image
C:\Users\Home 2020-11-07 11:30:41 Home Air Air Location Air Air Location Air Air Location Air Air Location Air Air Location Air Air Location Air Air Location Air Air Location Air Air Location Air Air Location Air Air Location Air Air Location Air Air Location Air Air Location Air Air Location Air Air Location Air Air Location Air Air Location Air Air Location Air Air Location Air Air Position Air Air Position Air Air Position Air Air Position Air Air Position Air Air Position Air Air Position Air Air Position Air Air Position Air Air Position Air Air Position Air Air Position Air Air Position Air Air Position Air Air Position Air Air Position Air Air Position Air Air Position Air Air Position Air Air Position Air Air Location Air Air Location Air Air Location Air Air Location Air Air Location Air Air Location Air Air Location Air Air Location Air Air Location Air Air Location Air Air Location Air Air Location AirCheck messages
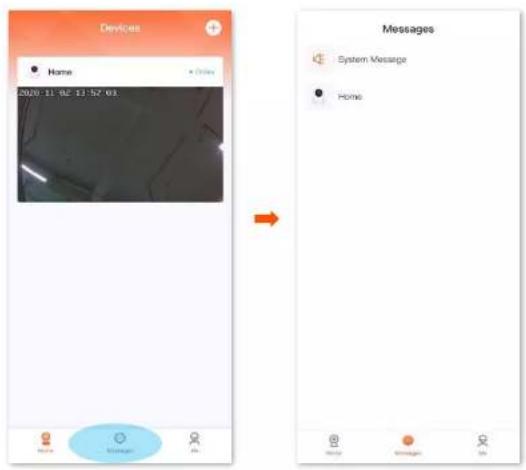
You can check system messages and notification messages of each device on the Messages page.
Log in to TDSEE App. Enter the Messages page, and tap System Message to check login notification, friend notification, device sharing notification, etc. Tap the specific device to check relevant alarm messages.
text_image
Devices Home 2020: 11:02 13:52'03 Messages System Message HomeAlbum
You can check and edit the photos or videos saved by the TDSEE App.
Delete photos/videos
Log in to TDSEE App, tap Me > Album. Tap Edit in the upper right corner to delete the selected photos or videos.

text_image
Me 150****9513 Album Share Devices Friends Cloud Storage About Us FAQ Feedback Settings Album Edit 2020-07-04 Australia Local Storage 45.8.08Download photos/videos to the smartphone

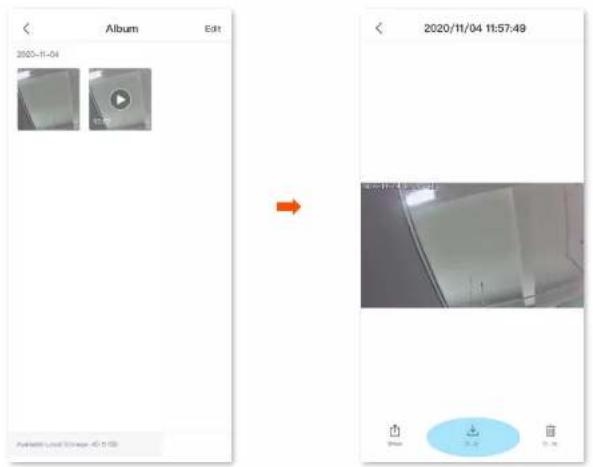
Only one photo or one video can be downloaded at a time.
Log in to TDSEE App, tap Me > Album. Select the photo or video you want to download, and tap Download.
text_image
Album Edit 2020-11-04 → 2020/11/04 11:57:49 Audio Level Video - 40.0 GB Show 关闭Share photos/videos with friends or through social platform

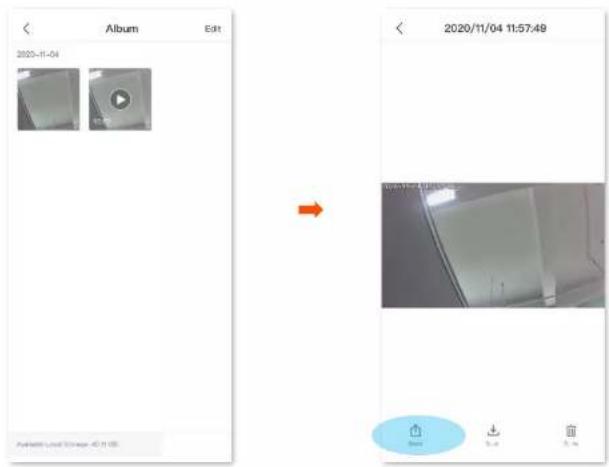
Only one photo or one video can be shared at a time.
Log in to TDSEE App, tap Me > Album. Select the photo or video you want to share, tap Share, then follow the instructions.
text_image
Album Edit 2020-11-04 → 2020/11/04 11:57:49 Avalent Live Video - 45.11.18Share device
Sharing the devices under your account with friends, then your friends can check the monitoring video of the cameras, and also can obtain certain management rights.
Method 1 (Recommended)
Step 1 Add the TDSEE App account of your friends. Refer to Add your friends for detailed steps.
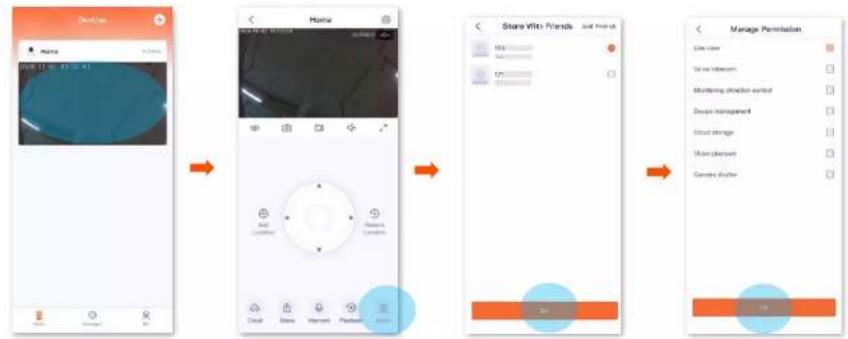
Step 2 Share the device with your friends.
1 Log in to TDSEE App, tap the device you want to share with your friends on the home page, which is the camera Home in this example. Tap Share 📋 in the lower left corner.
2 Choose a friend, tap OK. Choose the management permissions you want to share, and click OK.
flowchart
graph LR
    A["Home Image"] --> B["Hotel"]
    B --> C["Store Visit Friends"]
    C --> D["Manage Permission"]
---End
After logging in to TDSEE App to accept the device shared from you, your friends can view the monitoring video of the camera, and also enjoy certain management rights.
Method 2
Step 1 Add the TDSEE App account of your friends. Refer to Add your friends for detailed steps.
Step 2 Share the device with your friends.
1 Log in to TDSEE App, enter the home page, then tap Share Device.
2 Choose the device you want to share with your friends, which is the camera Home in this example. Then tap
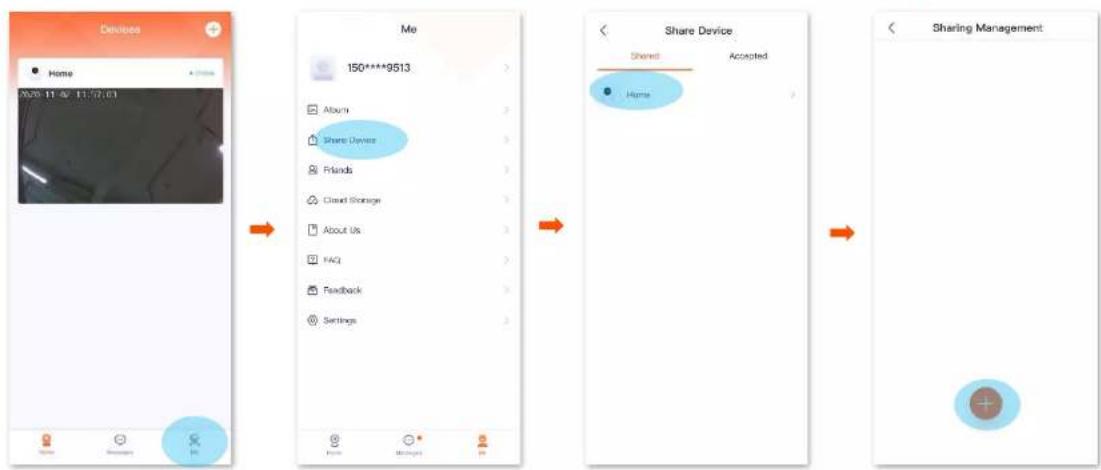
flowchart
graph LR
    A["Device Home Access"] --> B["Share Device"]
    B --> C["Shared/Accepted Device"]
    C --> D["Sharing Management"]
3 Choose a friend, tap OK. Choose the management permissions you want to share, and click OK.
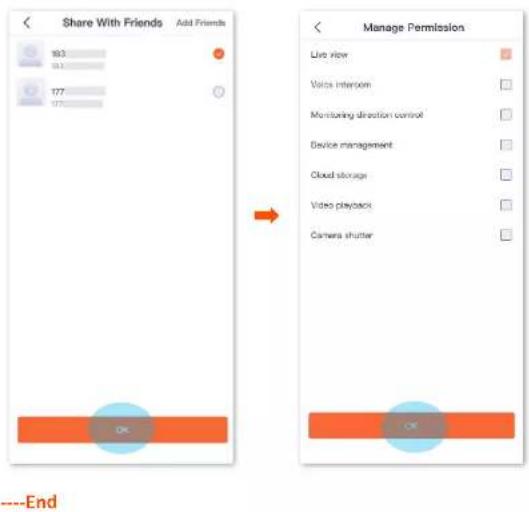
text_image
Share With Friends Add Friends 163 177 OK Manage Permission Live View Voice interroom Monitoring direction control Device management Cloud storage Video playback Camera shutter OK ---EndAfter logging in to TDSEE App to accept the device shared from you, your friends can view the monitoring video of the camera, and also enjoy certain management rights.
Method 3
Step 1 Add the TDSEE App account of your friends. Refer to Add your friends for detailed steps.
Step 2 Share the device with your friends.
1 Log in to TDSEE App, enter the home page, then tap Friends.
2 Choose a friend, then tap Share.
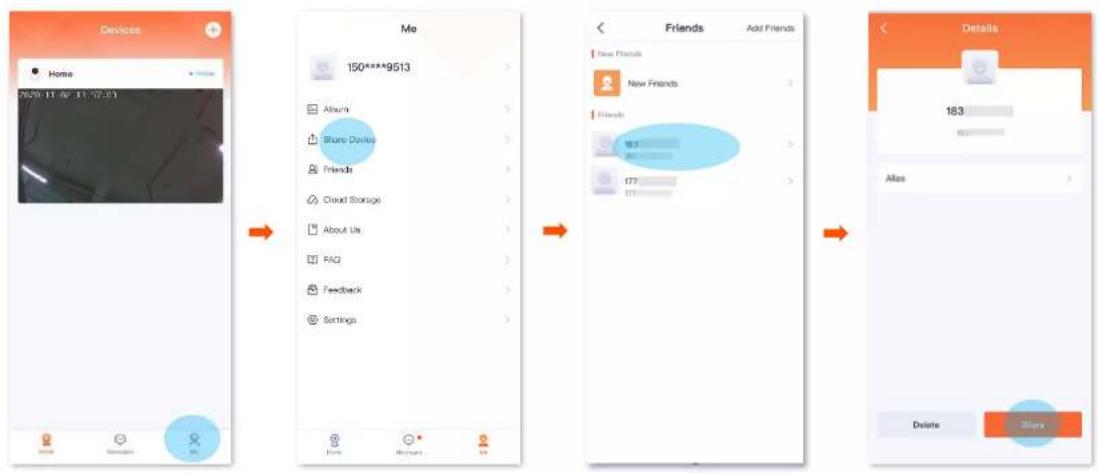
text_image
Devices Home 2670: 11:46' 11:25:01 Mo 150****9513 Album Share Devices Friends Cloud Storage About Us FAQ Feedback Settings Friends Add Friends New Friends New Friends Friends 183 177 Details 183 Alias Delete Share3 Choose a device share with your friend, which is the camera Home in this example, then tap OK.
4 Choose the management permissions you want to share, and click OK.
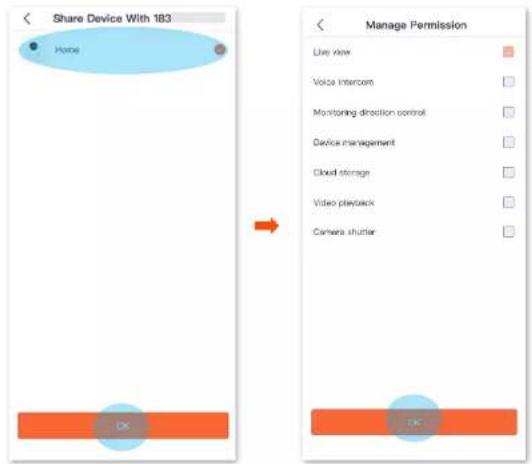
text_image
Share Device With 183 Home Manage Permission Live View Voice Intercom Monitoring direction control Device management Closed storage Video playback Camera shutter---End
After logging in to TDSEE App to accept the device shared from you, your friends can view the monitoring video of the camera, and also enjoy certain management rights.
Accept sharing
If someone share a device with you, after you accept sharing request, you can check the monitoring videos and have some management rights.
Method 1 (Recommended)
Log in to TDSEE App, tap Messages at the bottom of the home page, find the corresponding notification message, and tap Accept.
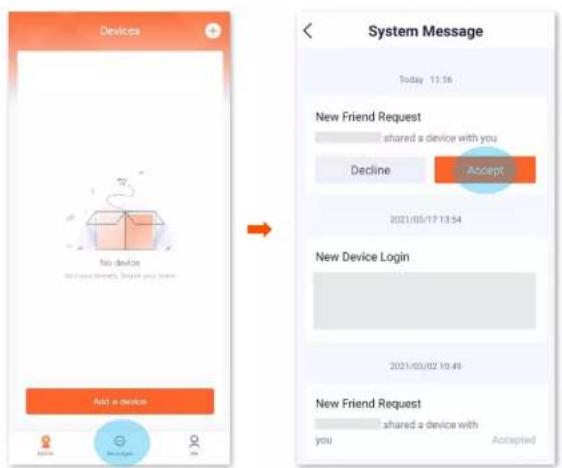
text_image
Devices No device Add a device System Message Today 13:16 New Friend Request shared a device with you Decline Accept 2021/05/17 13:54 New Device Login 2021/03/02 10:49 New Friend Request shared a device with you AcceptedMethod 2
Step 1 Log in to TDSEE App, enter the home page, then tap Share Device.
Step 2 Tap Accepted, find the device that your friends share with you, and tap Accept, which is CP6-1747 in this example.

- The name of the shared camera is camera model - the last four characters of camera's UUID, and the UUID can be found on the bottom of the device.
- After shared successfully, the friend relationship does not exist or the device is deleted, which will invalid the share.
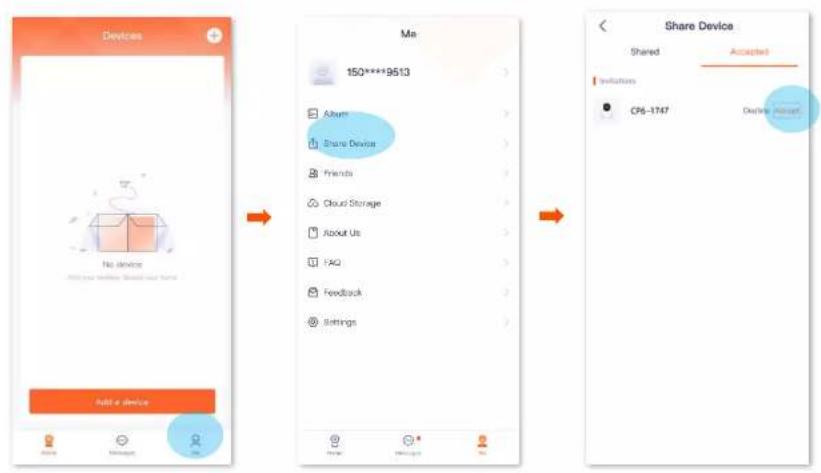
text_image
Devices No device Add a device Me 150****9513 About Share Device Friends Cloud Storage About Us FAQ Feedback Settings Share Device Shared Accepted Institutions CP6-1747 Options Shared Accepted---End
After accepting the shared device successfully, you can check the monitoring image of the camera on the home page.
Dissolve sharing relationship
After you successfully share the device with your friends, if you do not want to continue to share the device, you can dissolve the sharing relationship. Methods to dissolve the sharing relationship are shown as follows:
- The sharer cancels the sharing
- The accepter deletes the share
- The accepter deletes the device

The sharing relationship will also be dissolved in the following situations:
- Dissolve the friend relationship in the TDSEE App.
- The sharer deletes the shared device.
Method 1 The sharer cancels the sharing
Step 1 The sharer logs in to TDSEE App, enter the home page, then tap Share Device.
Step 2 Tap the device of which you want to cancel sharing, which is the camera Home in this example. Find the friends you want to cancel sharing with, and tap Delete.
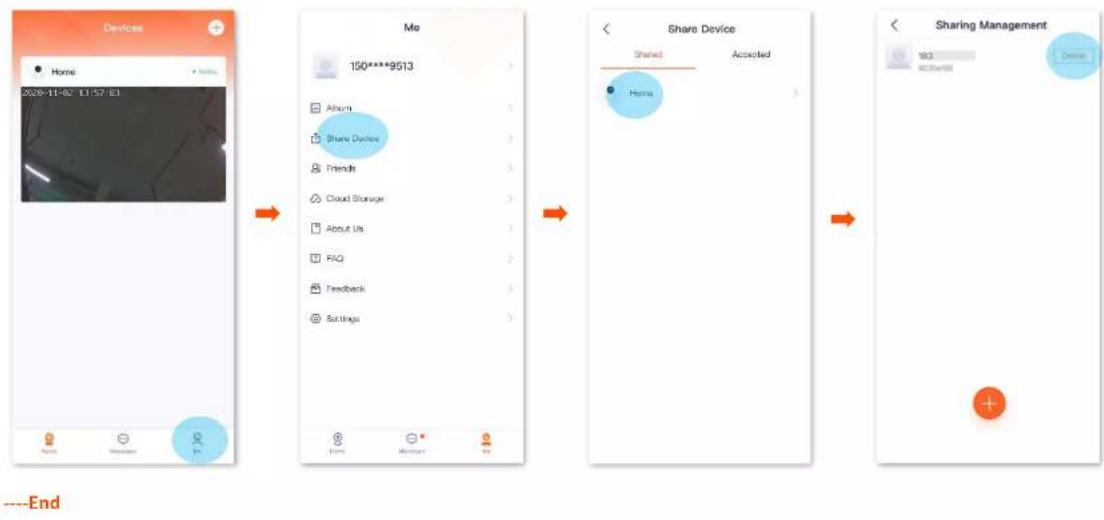
flowchart
graph TD
    A["Devices"] --> B["Share Device"]
    B --> C["Sharing Management"]
    subgraph Before
        D["Home: 2029-11-02 13:57:61"]
        E["Message: Home"]
        F["Message: Message"]
        G["Message: Message"]
    end
    subgraph After
        H["Shared: 150****9513"]
        I["Accepted: Home"]
        J["Shared: Shared"]
        K["Accepted: Accepted"]
        L["Shared: Shared"]
        M["Accepted: Shared"]
    end
Method 2 The accepter deletes the share
Step 1 The accepter logs in TDSEE App, enter the home page, then tap Share Device.
Step 2 Tap Accepted, find the device shared by another user, which is CP6-1747 in this example, and tap Delete.

text_image
Devices Home 2020-11 02:13:57:03 Me 150****9513 Album Share Device Friends Cloud Storage About Us FAQ Feedback Settings Share Device Shared Accepted Accepted Devices CPS-T47 Editor---End
Method 3 The accepter deletes the device
Step 1 The accepter logs in TDSEE App, tap the device shared by another use, which is the camera Home in this example. Then tap ☐ in the upper right corner.
Step 2 Scroll down to the bottom of the page, find and tap Delete Device. Tap OK in the pops up window.
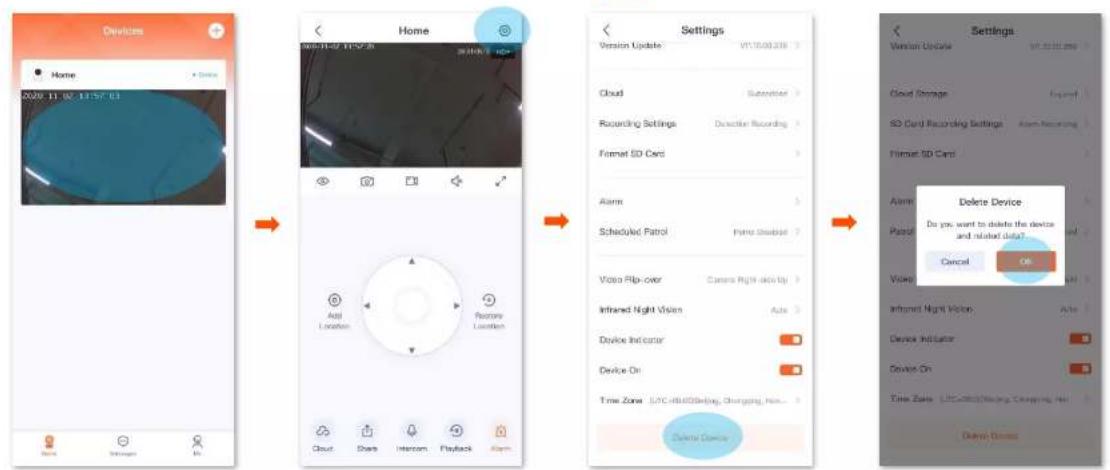
text_image
Devices Home 2020.11.02.13:57:61 Home Settings Version Update V1.18.09.2018 Cloud Subscriber Recording Settings Director Recording Format SD Card Alarm Scheduled Patrol Panel Shuburi Video Flip-over Camera Right-click Up Infrared Night Vision Auto Device Indicator Device On Time Zone: UTC dB400Setting, Charging, Hot... Delete Device Settings Version Update V1.22.2018 2020 Cloud Storage recorded SD Card Recording Settings Alarm Recording Filter SD Card Alarm Delete Device Do you want to delete the device and related data? Cancel OK Volume Internet Night Vision Auto Device Indicator Device On Time Zone: LLC@all/Alasing Clearing, Hi... Delete Devices---End
Add your friends
You can add the TDSEE App accounts of your friends here.
After adding friends successfully, you can share the devices under the current account of the TDSEE App with your friends, and your friends also can manage the device.
Method 1
Step 1 Log in to TDSEE App, tap the device you want to share with friends on the home page, which is the camera Home in this example.
Step 2 Tap Share ↑ in the lower left corner.
Step 3 Tap Add Friends in the upper right corner, enter the phone number or email address of your friends.
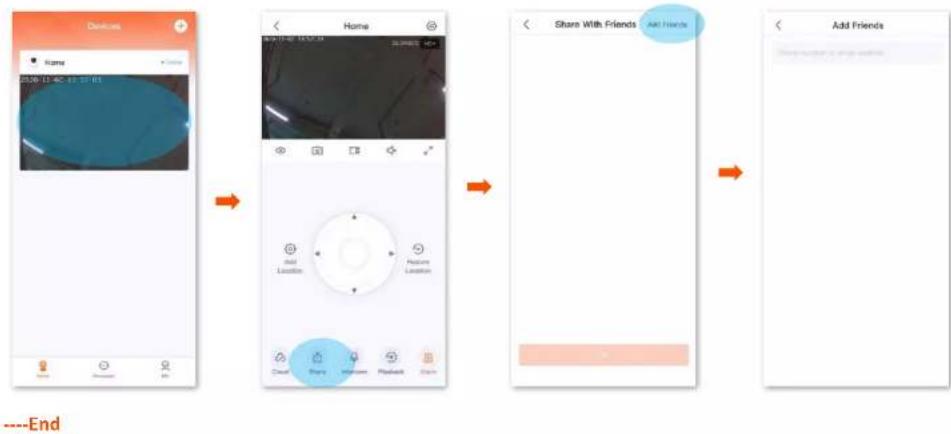
flowchart
graph LR
    A["Name"] --> B["Home"]
    B --> C["Share With Friends"]
    C --> D["Add Friends"]
Your friends log in to TDSEE App and accept the invitation from you. Refer to Accept invitation from your friends for detailed steps.
Method 2
Step 1 Log in to TDSEE App, tap Me at the bottom of the home page, then tap Friends.
Step 2 Tap Add Friends in the upper right corner, and enter the phone number or email address.
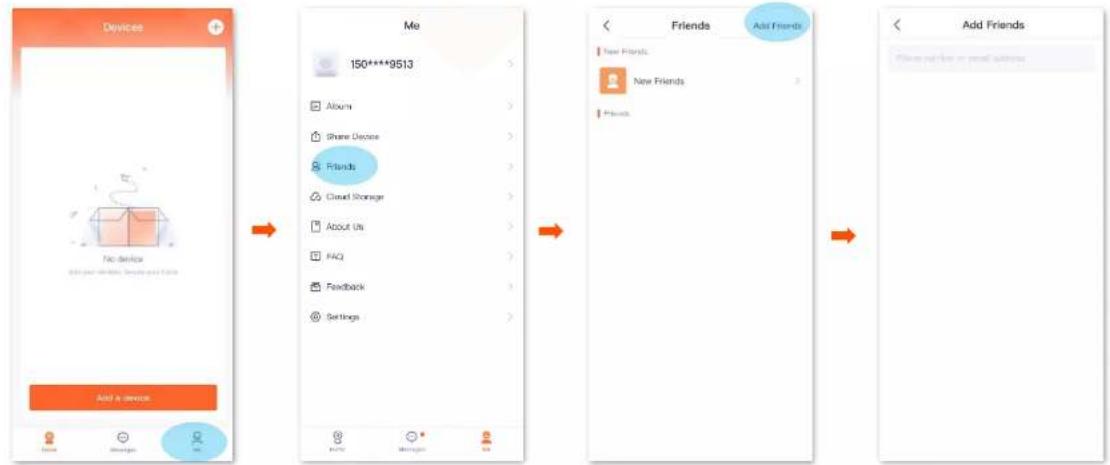
text_image
Devices No device Add a device Me 150****9513 Album Share Device Friends Cloud Storage About Us FAQ Feedback Settings Friends Add Friends New Friends New Friends Friends Add Friends Please put back on email accounts---End
Your friends log in to TDSEE App and accept the invitation from you. Refer to Accept invitation from your friends for detailed steps.
Accept invitation from your friends
If someone has sent you an invitation to add you as a friend in TDSEE App, you can accept the invitation here.
Method 1 (Recommended)
Log in to TDSEE App, and enter the Message page. Find the corresponding notification message, then tap Accept.
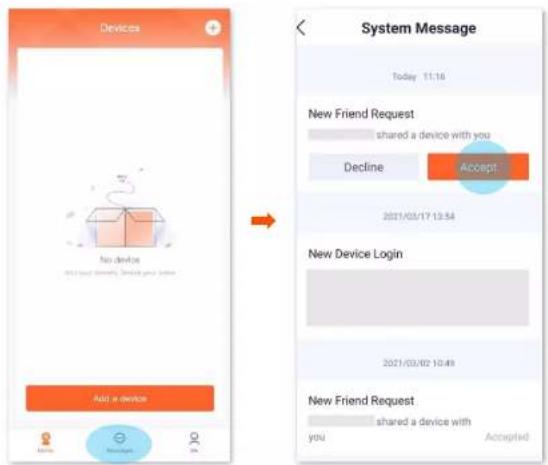
text_image
Devices No device Add a device System Message Today 11:16 New Friend Request shared a device with you Decline Accept 2021/03/17 13:54 New Device Login 2021/03/02 10:49 New Friend Request shared a device with you AcceptedMethod 2
Step 1 Enter the Me page, then tap Friends.
Step 2 Tap New Friends. Find the invitation information, then tap Accept.
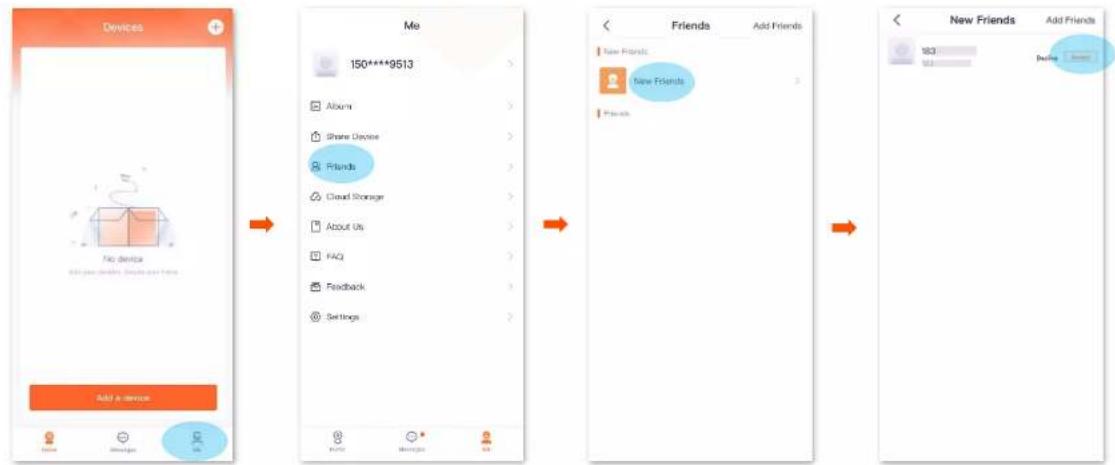
flowchart
graph LR
    A["Add a device"] --> B["Device 150***9513"]
    B --> C["Alburs"]
    C --> D["Share Diouse"]
    D --> E["Friends"]
    E --> F["Cloud Storage"]
    F --> G["About Us"]
    G --> H["FAQ"]
    H --> I["Feedback"]
    I --> J["Settings"]

    B --> K[" Friends"]
    K --> L["Add Friends"]
    L --> M["New Friends"]
    M --> N["Add Friends"]
---End
Delete your friends
You can delete friends of TDSEE App here.
Step 1 Log in TDSEE App, enter the Me page, then tap Friends.
Step 2 Tap the account of a friend you want to delete, and tap Delete. Tap Delete in the pop-up windows.
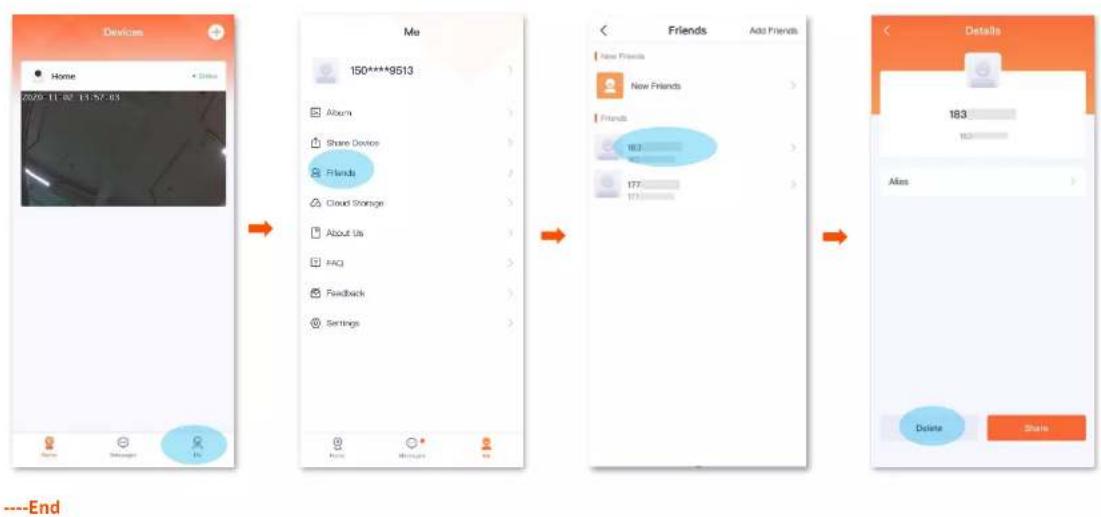
flowchart
graph LR
    A["Device Home"] --> B["Me 150****9513"]
    B --> C["Friends Add Friends"]
    C --> D["Details 183"]
    D --> E["Ales Delete Share"]
About us
Tap Me > About Us to enter the About Us page.

text_image
About Us TDSEE Version 12.10 (us to Date) Official Website www.tenda.org/ipo.com TDSEE User Agreement TDSEE Privacy Policy ............ Check software version and upgrade device software ............ Tap it to visit Tenda official website ............ Tap it to check TDSEE user agreement ............ Tap it to check TDSEE privacy policyFAQ
Tap Me > FAQ to enter the FAQ page.
If you cannot find the solutions, please contact us, and we will solve the problem for you as soon as possible.
You can give us feedbacks through the two ways below:
- Contact us according to the contact information shown in the previous Technical Support part.
- Submit your feedback in Feedback.
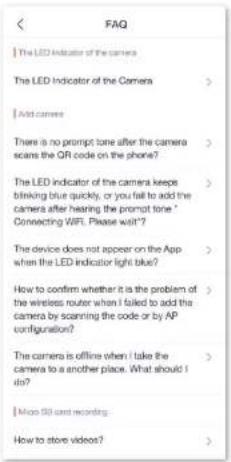
text_image
[The LED Indicator of the camera] The LED Indicator of the Camera [Add camera] There is no prompt tone after the camera scars the QR code on the phone? The LED indicator of the camera keeps blinking blue quickly, or you fail to add the camera after hearing the prompt tone * Connecting WIFI. Please wait? The device does not appear on the App when the LED indicator light blue? How to confirm whether it is the problem of the wireless router when I failed to add the camera by scanning the code or by AP configuration? The camera is offline when I take the camera to a another place. What should I do? [More SD card recording] How to store videos?Feedback
Tap Me > Feedback to enter the Feedback page.
If you have problems when using our device or App, or you have any comments or suggestions on us, you can give us a feedback, and we will solve the problem for you as soon as possible.
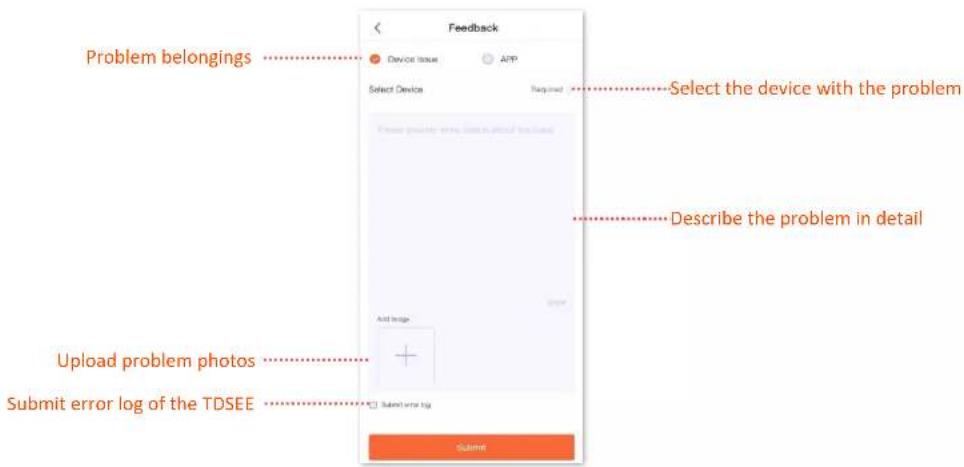
text_image
Problem belongings Device Issue APP Select Device Required Select the device with the problem Describe the problem in detail Add Image Upload problem photos Submit error log of the TDSEE Submit error log SubmitSettings
Tap Me > Settings to enter the Settings page.
You can clear cache of the TDSEE, or enable/disable Notifications function here.
After the Notification function is disabled, the terminal device will block the message notification of the TDSEE App.
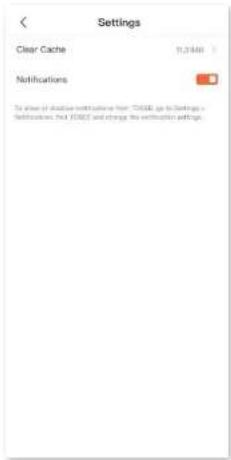
text_image
Settings Clear Cache 11.2446 Notifications To reveal that shutdown events must have from "COVID" to Settings a methods that COVID will change the verification settings.My profile
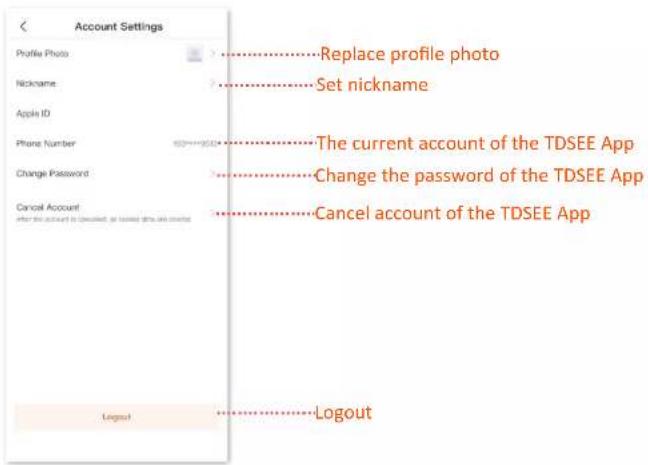
To replace profile photo, set nickname, change password, cancel account, or logs out, tap the account in the upper on the Me page.