
My Size - Child car seat Chipolino - Free user manual and instructions
Find the device manual for free My Size Chipolino in PDF.


| Type | Child car seat (i-Size) |
| Brand | Chipolino |
| Model | My Size |
| Child Height Range | 40 - 150 cm |
| Age Range | 0 - 12 years (approx.) |
| Approval Standard | UN/ECE R129 (i-Size) |
| Installation Positions | Rearward facing (40-105 cm), Forward facing (76-150 cm) |
| Installation Methods | ISOFIX + Top Tether + Vehicle 3-point belt (height-dependent) |
| Rotation | 360° rotation on base |
| Backrest Recline | Yes, adjustable (4 positions) |
| Headrest Adjustment | Yes, height adjustable |
| Harness Type | 5-point safety harness |
| Included Pads | Soft seat pad and 3D pillow (for children 40-75 cm) |
| Materials | Plastic, metal, textile (outer fabric: 100% polyester, filling: 100% polyester) |
| Care Instructions | Hand wash fabric at 30°C with mild detergent; no bleach, no tumble dry, no iron; wipe plastic/metal with damp cloth |
| Safety Features | ISOFIX connection indicators (green/red), top tether, anti-airbag warning, seatbelt must be 3-point |
| Do Not Use | Second-hand, modified, without original cover, on seats with airbags |
| Vehicle Compatibility | i-Size compatible seats and specific vehicle models (see manual) |
| Spare Parts | Only from manufacturer |
| Storage | Indoors, dry and clean place, avoid direct sunlight |
Frequently Asked Questions - My Size Chipolino
User questions about My Size Chipolino
0 question about this device. Answer the ones you know or ask your own.
Ask a new question about this device
Download the instructions for your Child car seat in PDF format for free! Find your manual My Size - Chipolino and take your electronic device back in hand. On this page are published all the documents necessary for the use of your device. My Size by Chipolino.
USER MANUAL My Size Chipolino
natural_image
Line drawing of a car comfort seat with seats and seatbelt (no text or symbols)This child restraint system is manufactured in compliance with the requirements of Regulation No 129 of the Economic Commission for Europe of the United Nations (UN/ECE) — Uniform provisions concerning the approval of enhanced Child Restraint Systems used on board of motor vehicles (ECRS), the provisions of the Product safety Directive 2001/95/EU of the European Parliament and The Council as well as the Consumer Protection Law of Bulgarian Legislation.
| Position of car seat | Child's height Approx age of child Car seat installation | ||
| REARWARD facing 40-1 | 105 cm 0-4 years | ISOFIX+Top tether+Car seat safety belt for secure the child | |
| FORWARD facing 76-10 | 5 cm 15 months - 4 years | ISOFIX+Top tether+Car seat safety belt for secure the child | |
| FORWARD facing 100-1 | 50 cm 3-12 years | ISOFIX+3-point vehicle belt | |
NOTICE
Size range: 40-105 cm
This is an “i-Size” Child Restraint System. It is approved to Regulation No.129, for use in, “i-Size compatible” vehicle seating positions as indicated by vehicle manufacturers in the vehicle users’ manual.
If in doubt, consult either the child restraint manufacturer or the retailer.
Size range: 100-135 cm
This is an “i-Size” Booster seat Child Restraint System. It is approved to Regulation No.129, for use primarily in, “i-Size seating positions” as indicated by vehicle manufacturers in the vehicle users’ manual.
If in doubt, consult either the child restraint manufacturer or the retailer.
Size range: 135-150 cm
This is an “i-Size” Booster seat Child Restraint System. It is approved to Regulation No.129, for use primarily in, “i-Size seating positions” as indicated by vehicle manufacturers in the vehicle users’ manual.
If in doubt, consult either the child restraint manufacturer or the retailer.
CAUTION! The child restraint is suitable for use in vehicles, equipped with APPROVED 3-POINT SAFETY BELTS WITH RETRACTOR in compliance with ECE R16 of (UN/ECE).

DO NOT FORGET THAT NO RESTRAINT SYSTEM CAN PROVIDE ABSOLUTE PROTECTION IN CASE OF A CRASH OR ROAD ACCIDENT! DRIVE WITH CARE WHEN THERE IS A CHILD IN YOUR VEHICLE!
IN ORDER TO ENSURE THE SAFETY OF YOUR CHILD, FOLLOW EXACTLY THE INSTRUCTIONS AND SAFETY RECOMMENDATIONS IN THIS MANUAL!
MISUSE OF THE CAR SEAT WILL CONTRIBUTE TO REDUCING ITS SECURITY AND SAFETY FEATURES! FAILURE OF THE GUIDELINES OF THIS INSTRUCTION INCREASES THE RISK OF SERIOUS INJURY OR DEATH!
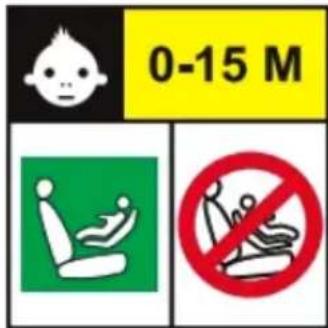
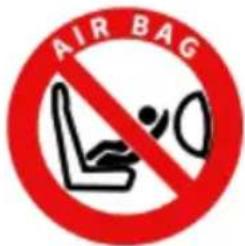
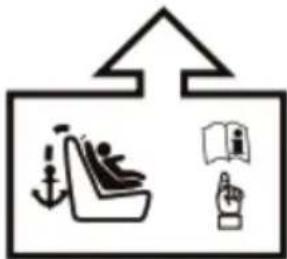
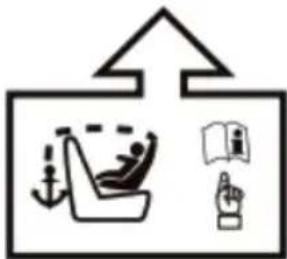
flowchart
graph TD
    A["Person relaxing"] --> B["Book"]
    B --> C["Hand"]
flowchart
graph TD
    A["Person relaxing in chair"] --> B["Open Book"]
    A --> C["Hand pointing hand"]
CAUTION!
- NEVER INSTALL THE CAR SEAT IN "FORWARD FACING" POSITION BEFORE THE CHILD'S AGE EXCEEDS 15 MONTHS!
- DO NOT PLACE THE RESTRAINT SYSTEM ON A VEHICLE SEAT EQUIPPED WITH AIR BAG! THIS MAY RESULT IN DEATH OR SERIOUS! Review the instructions of the vehicle for information about airbags and conditions of transportation of children.
- DO NOT USE ANCHOR POINTS OTHER THAN THE ONES DESCRIBED IN THIS MANUAL AND MARKED ON THE RESTRAINT SYSTEM!
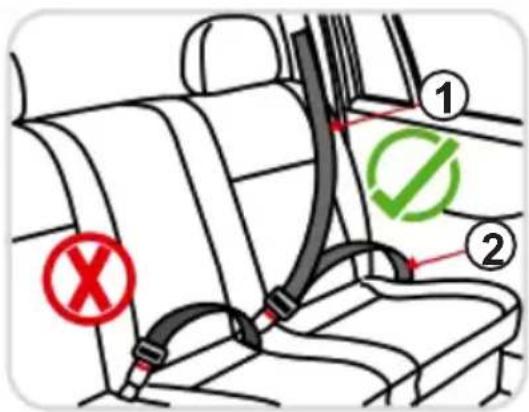

NEVER INSTALL THE CAR SEAT IN
VEHICLE WITH 2-POINT BELT! INSTALL IT ONLY IN VEHICLE WITH 3-POINT BELT!

DIAGONAL BELT

BELT

Rearward facing installation of the car seat Height of the child: 40-105 cm
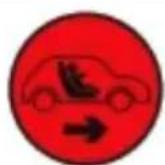
Forward facing installation of the car seat Height of the child: 76-150 cm


lot install on seat, equipped with air bag.

e the car seat ONLY on a vehicle seat with a 3-point seat safety belt.
CAUTION! WARNINGS!
CAUTION! NEVER LEAVE YOUR CHILD UNATTENDED!
CAUTION! DO NOT USE ANCHOR POINTS OTHER THAN THE ONES DESCRIBED IN THIS MANUAL AND MARKED ON THE RESTRAINT SYSTEM.
CAUTION! WHEN YOU INSTALL THE CAR SEAT IN POSITION „REARWARD FACING“, NEVER PLACE IT ON PASSENGER SEAT, EQUIPPED WITH AIRBAG! THIS MAY LEAD TO SERIOUS INJURY OR DEATH!
CAUTION! NEVER INSTALL THE CAR SEAT IN DIRECTION OF NORMAL MOVEMENT OF THE VEHICLE AND POSITION OF THE CHILD "FORWARD FACING" BEFORE THE CHILD EXCEEDS 15 MONTHS OLD!
✿ CAUTION! THE VEHICLE SAFETY BELTS WHICH HOLD THE CAR SEAT TO THE PASSENGER SEAT MUST BE TIGHTENED AND FIXED!
CAUTION! THE CAR SEAT SAFETY BELTS MUST BE PROPERLY ADJUSTED ACCORDING TO CHILD'S HEIGHT, NOT TWISTED AND SNUG WELL AGAINST BABY'S BODY.
✿ THE LAP BELT MUST BE PLACED LOW DOWN, SO THAT THE PELVIS IS FIRMLY ENGAGED WITHOUT PRESSING!
✿ CAUTION! DO NOT MAKE CHANGES, ADDITIONS OR MODIFICATIONS ON THE CAR SEAT WITHOUT THE APPROVAL OF THE NOTIFYING AUTHORITY ! IT IS DANGEROUS NOT TO KEEP STRICTLY THE INSTRUCTIONS GIVEN BY THE MANUAFACTURER!
CAUTION! KEEP AWAY FROM FIRE!
Installation in the vehicle and securing the child in the car seat to be done only by adult!
The hard parts and the parts of the child restraint made of plastic should be located and installed so that when the vehicle is in normal use, they can not be trapped by a sliding seat or in a door of the vehicle.
Do not allow the safety belts of the car seat and the vehicle to be twisted, frayed or torn, latches and locks (buckles) must be always in good order and firmly fixed.
If you find uncertainty or defect in the structure, latches, straps or locking mechanisms of the car seat or ISOFIX attachments, discontinue usage until removal of the damaged parts and replacement with new ones.
✿ After a violent impact the car seat and belts may be damaged, therefore, it is recommended to replace the car seat with a new one.
✿ Never use a second hand child restraint. It may have suffered structural damage, which may make the child restraint extremely dangerous.
Do not use this car seat without its seat cover and do not replace it with a new one, unless supplied by the manufacturer. The fabric parts are integral parts of the restraint system and its safety features!
✿ Any luggage or other objects that could cause injury in the event of a collision must be well secured. Remove or secure at a safe distance from the seat and child any luggage that may cause injury in the event of a sudden stop or accident while driving.
Always check that the seat is firmly attached to the vehicle seat, even when you are not placing a child in it. A loose car seat, even without a child in it, can cause injury in the event of a collision.
Do not put additional pads except the ones supplied from the manufacturer!
Do not use spare parts and other components not supplied by the manufacturer. The manufacturer assumes no responsibility for safety in the event that are used spare parts other than original.
- Keep the instructions for use in the space provided in the car seat or in the vehicle in which you are going to use the car seat.
Do not expose the car seat to direct sunlight to prevent the child from burning, deforming the car seat and especially the plastic parts.
The car seat does not replace the child's cot or bed. When a child needs a sleep, you have to place him/her in a suitable baby stroller, baby crib or bed.
Do not attach objects with long cords or strings on the car seat in order to avoid danger of suffocation!
✿ Never place the car seat on beds, couches or similar soft surfaces!
Do not allow children to play with the product!
Do not remove stickers and warnings – they contain important information!
The packaging of the product must be kept out of the reach of children at the time of and after unpacking in order to avoid the risk of strangulation!
PRODUCT FEATURES
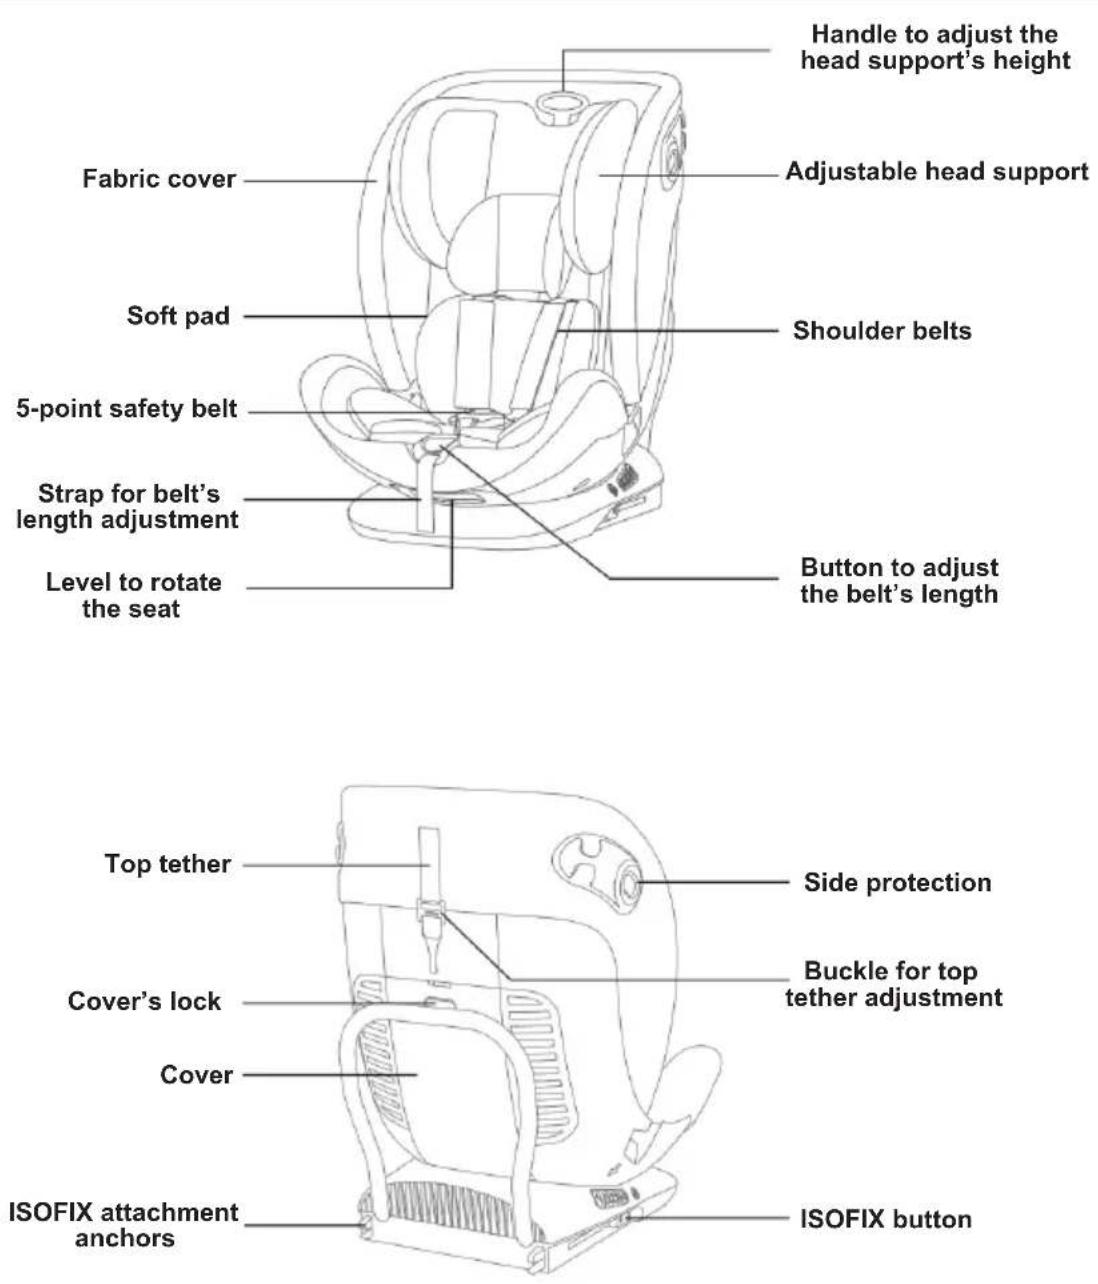
This is I-Size child restraint system, suitable for children with height 40-150 cm, age 0-12 years.
❖ The child restraint rotates 360 degrees on the base;
◆ Backrest recline;
◆ Headrest height adjustment;
◆ 5-point safety harness on the restraint;
◆ Additional soft pads;
INSTRUCTIONS FOR USE OF THE CHILD RESTRAINT SYSTEM
IMPORTANT!
- Follow exactly the instructions and sequence of installation steps and use of the product described in the text and figures of this manual.
- Check the security of fixing after each operation!
• ALWAYS CHECK THE SECURITY OF FIXING OF THE SAFETY BELTS! - After each installation make sure that the seat belts are not twisted and they are in the correct position.
natural_image
Line drawing of a car seatbelt with a green belt and magnified inset showing the seat (no text or symbols)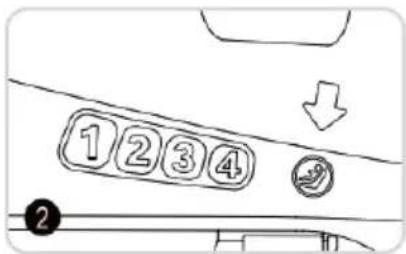
natural_image
Line drawing of a car seatbelt with a magnified inset showing the seat (no text or symbols)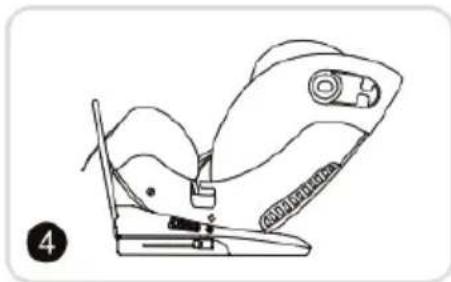
natural_image
Line drawing of a car seat assembly with no text or symbols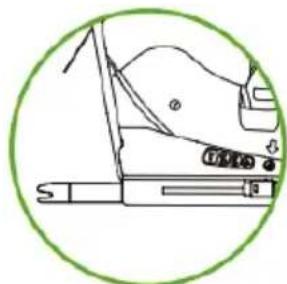
natural_image
Line drawing of a mechanical device inside a green circular frame (no text or symbols)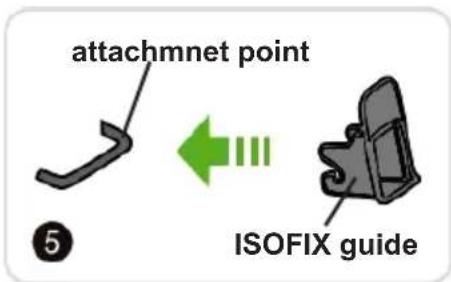
natural_image
Illustration of a hand holding a small object with green arrows indicating motion or force (no text or symbols)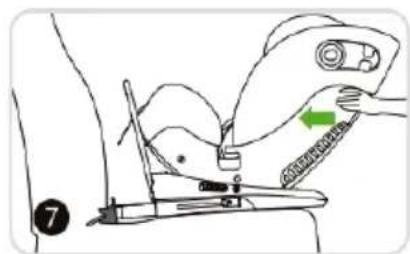
natural_image
Line drawing of a car seatbelt with a hand adjusting the seatbelt and a green arrow indicating the angle (no text or symbols)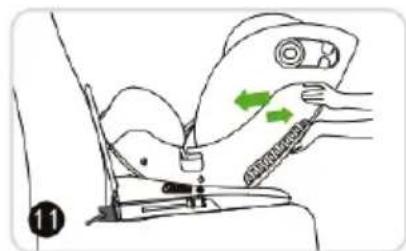
natural_image
Illustration of a sewing machine being adjusted for a seatbelt, showing green arrows indicating movement (no text or symbols)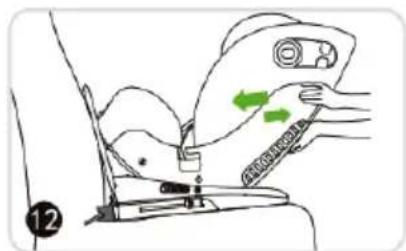
natural_image
Illustration of a sewing machine being adjusted for a garment (no text or symbols visible)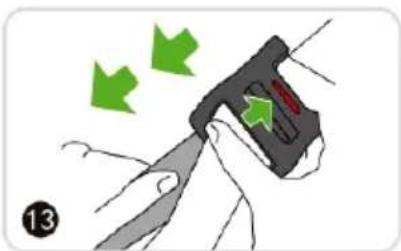
natural_image
Illustration of a hand holding a device with green arrows indicating motion or force (no text or symbols)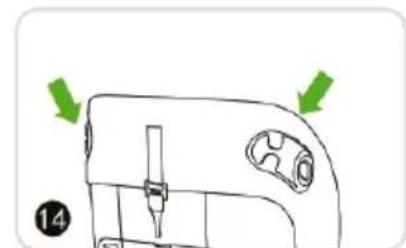
natural_image
Line drawing of a sewing machine with green arrows indicating direction (no text or symbols)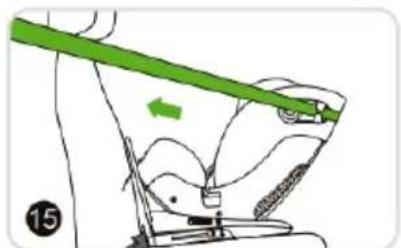
natural_image
Illustration of a hand holding a green tool with a green arrow indicating motion (no text or symbols)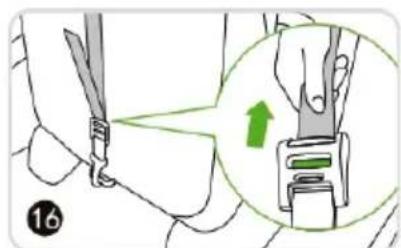
natural_image
Illustration of hands holding a small object with a green arrow indicating direction (no text or symbols)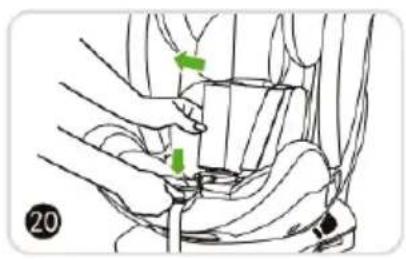
natural_image
Illustration of a hand performing a medical or anatomical procedure on a seated leg, with green arrows indicating specific points of interest (no text or symbols present)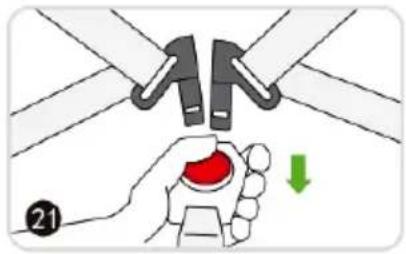
natural_image
Line drawing of a hand pressing down on a car seat with a green arrow indicating upward motion (no text or symbols)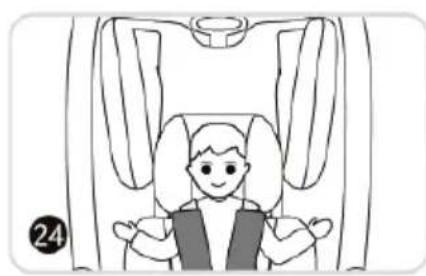
natural_image
Line drawing of a person inside a car seat, viewed from the side (no text or symbols)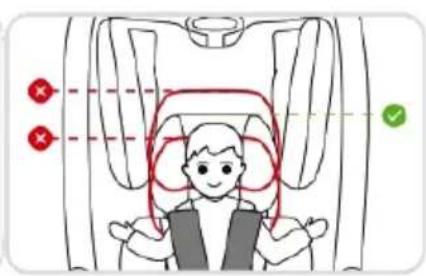
natural_image
Line drawing of a car seatbelt with a hand adjusting the seat (no text or symbols)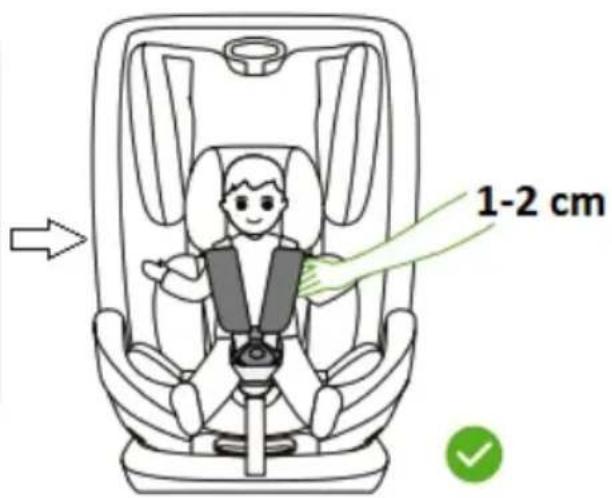
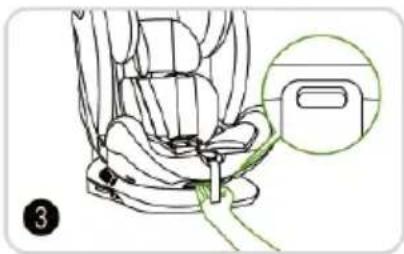
- Pull the handle to adjust the recline.
- Set in required position - 1, 2, 3, 4.
- Pull the level and adjust the seat in REARWARD facing position (fig. 4).
- Select the lying position corresponding with REARWARD facing (fig 4).
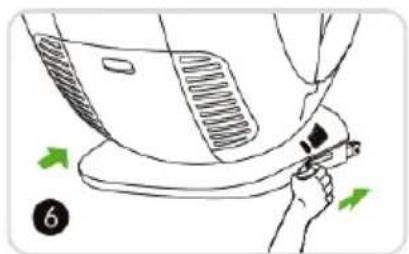
ATTENTION! Make sure that your vehicle is equipped with ISOFIX attachment points!
- Install the ISOFIX guide to the ISOFIX attachmnet point of vehicle.
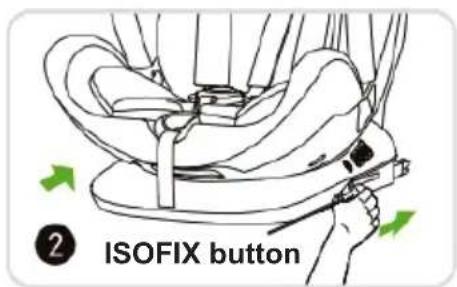
- Release the ISOFIX anchors and set them maximum out.
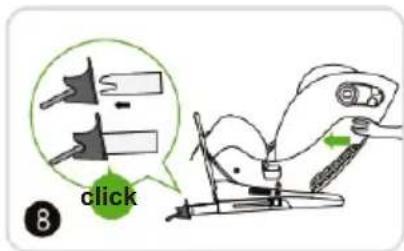
- Insert ISOFIX anchors of car seat to ISOFIX attachment point of vehicle.
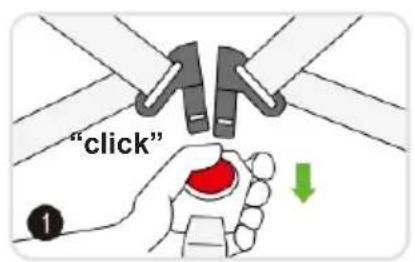
- You must hear click sound by fixing.
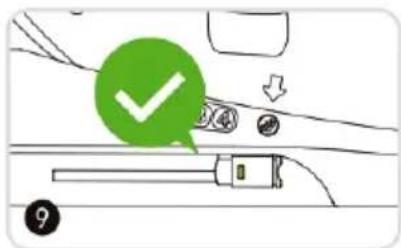
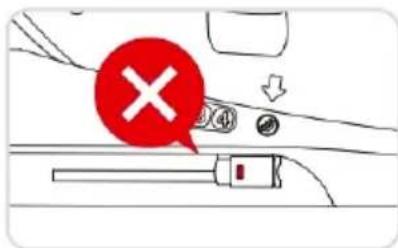
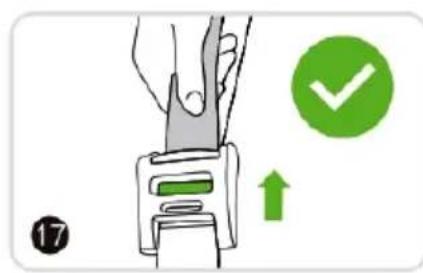
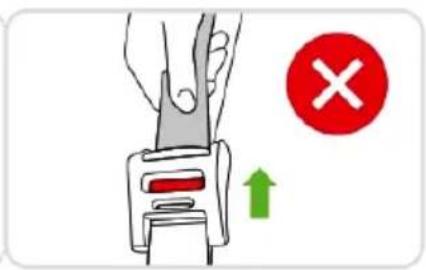
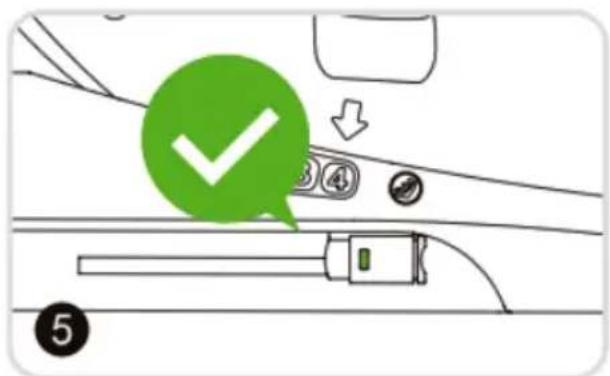
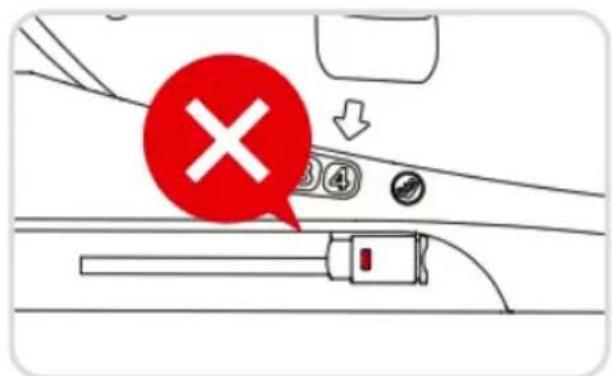
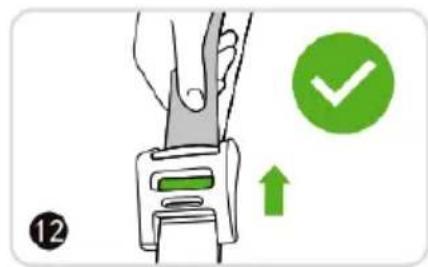
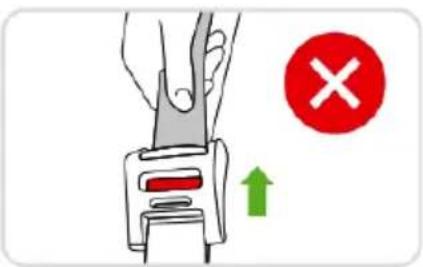
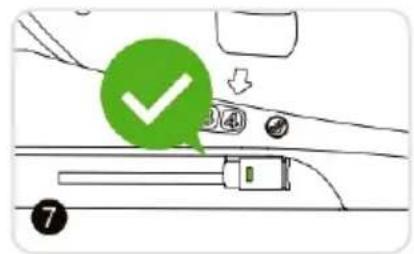
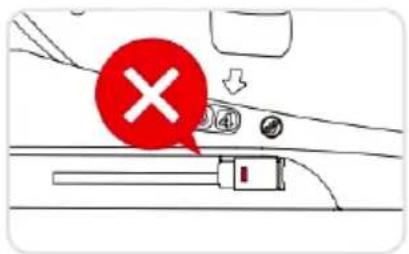
- CAUTION! ISOFIX anchors are fixed when both of them are fully green.
Note: If indicators are red, do the installation again following the above described sequence of actions.
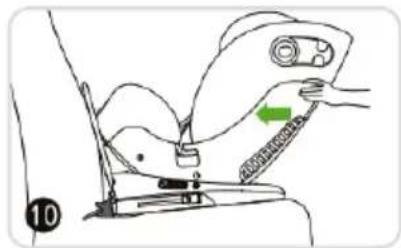
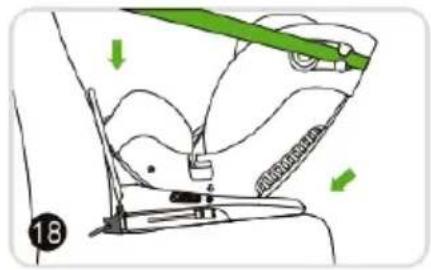
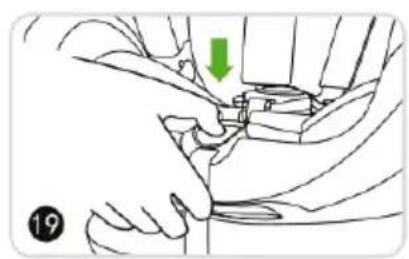
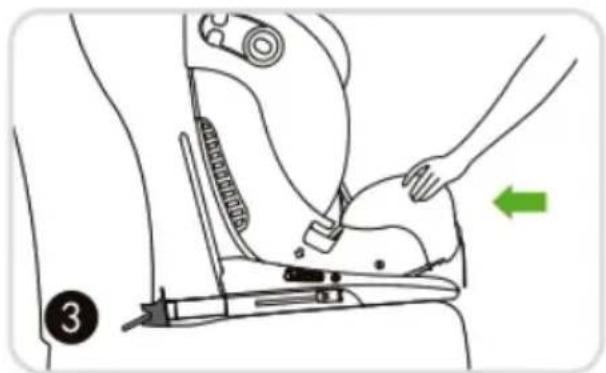
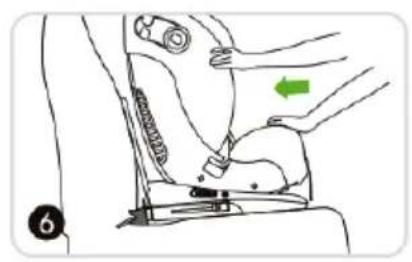
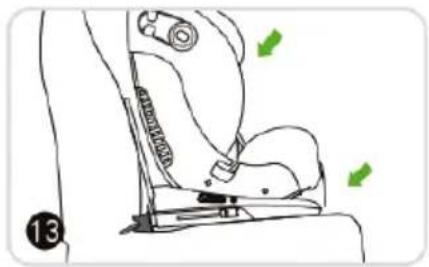
- Press the car seat until it reaches the backrest of vehicle's seat.
- and 12 Try to pull the car seat to assure that ISOFIC anchors are fixed to ISOFIX attachment point of vehicle.
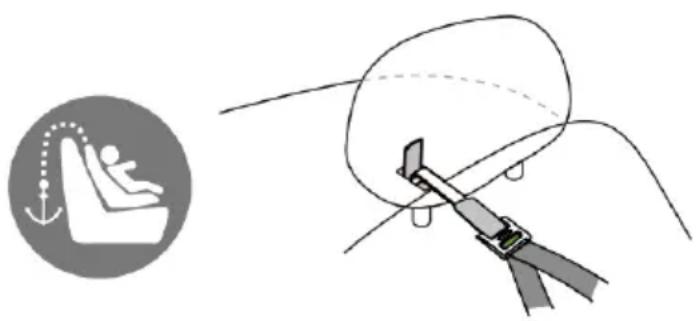
PLACES AND WAYS TO ATTACH THE TOP TETHER TO VEHICLE
natural_image
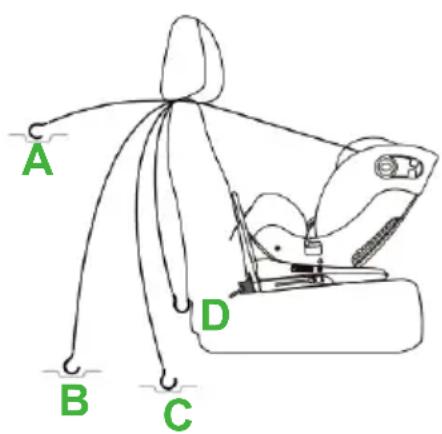
Illustration showing a person using a curved ramp to lift a person's seat, with a hand operating a steering wheel (no text or symbols present)Places to attach to top tether to different vehicles can be located at one of the shown in figure – A, B, C or D. Before installing the car seat, you must check this in instruction manual of the vehicle.
- Press the button of buckle for adjustment of top tether's length and pull it at maximum.
- Thread the top tether belt through the one of the side guides of car seat.
- Attach the hook of top tether to the attachmnet point of your vehicle. Note: Belt must not be twisted.
- Tighten the top tether.
- After tightening indicator of top tether belt must be fully green.
Note: If indicator is red, do the installation again following the above described sequence of actions.
- Make sure that car seat is stable fixed.
19, 20 Press the button for belts adjustment and at the same time pull the shoulder belts towards you.
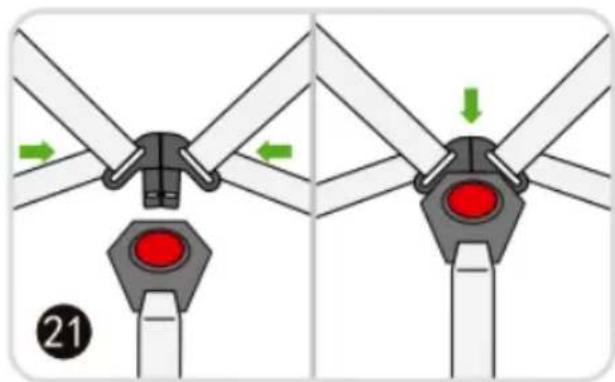
21, 22 Press the button at central buckle to release the belts and place the child in car seat.
23, 24 Pull the handle for head rest adjustment and set the head support in suitable position (see the figure - correct height).
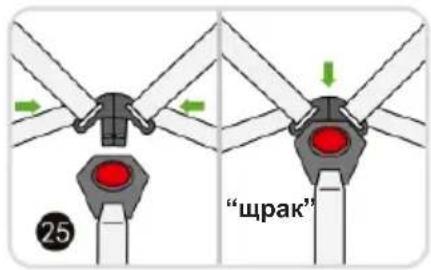
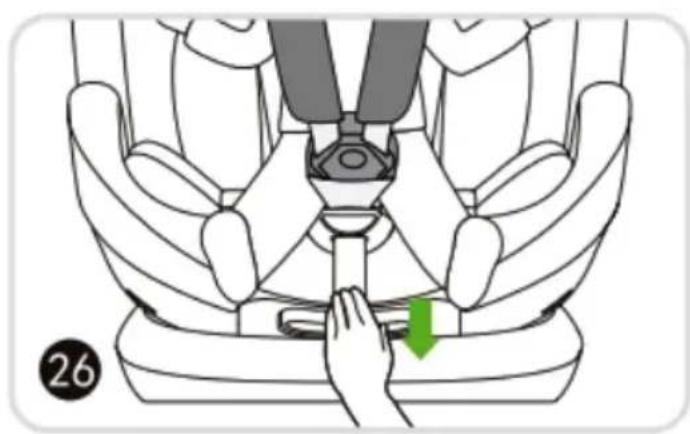
25, 26 Join the shoulder belts into the central buckle. Pull the strap that adjusts the length of belts so that the belts hold will the body of child without bringing pressure and discomfort to the child. Recommended space between child's body and belts is 1-2 cm.

ATTENTION!
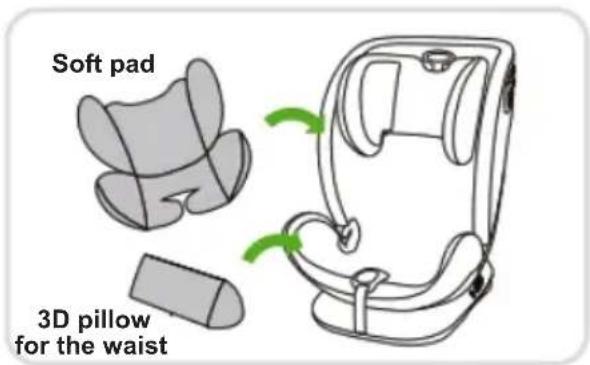
For child's height:
- 40 up to 75 ~cm use soft pad of the seat and 3D pillow of the waist.
- 76 up to 80 cm use only the soft pad of the seat.
natural_image
Line drawing of a mechanical component with a green circular outline (no text or symbols)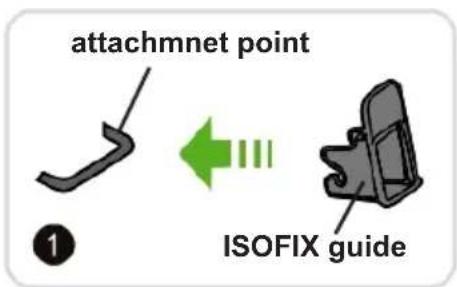
natural_image
Illustration of a person's seatbelt being adjusted, with a green arrow indicating the right side (no text or symbols present)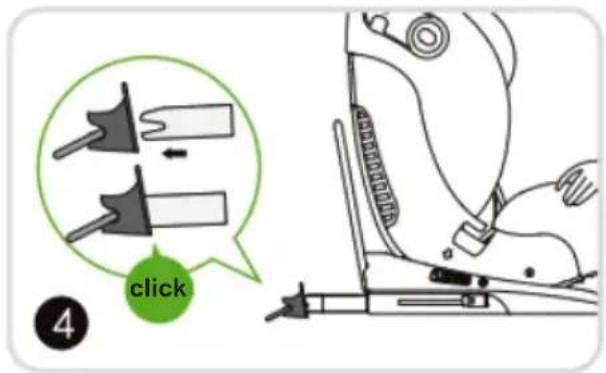
natural_image
Illustration of a person performing a medical or therapeutic procedure on a seated leg, with a green arrow indicating direction (no text or symbols present)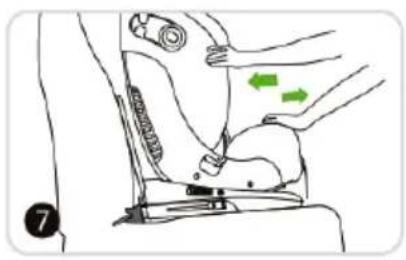
natural_image
Illustration of a person's seatbelt with hands adjusting the seat area and green arrows indicating motion (no text or symbols)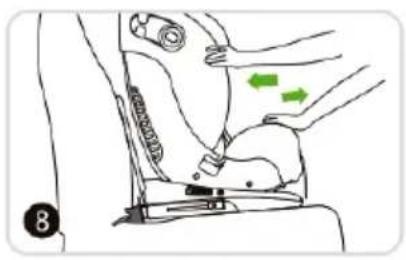
natural_image
Illustration of a person adjusting a seatbelt with green directional arrows indicating movement (no text or symbols)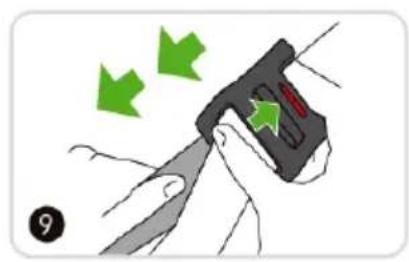
natural_image
Illustration of a hand holding a device with green arrows indicating motion or force (no text or symbols)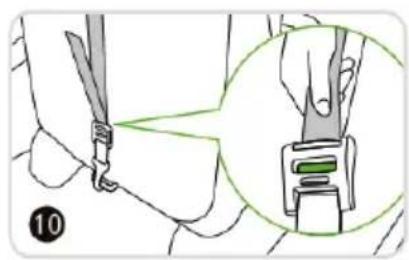
natural_image
Illustration of a hand adjusting a seatbelt with a magnified inset showing the green belt (no text or symbols)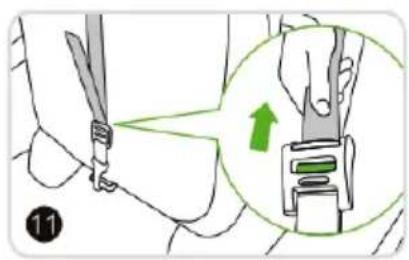
natural_image
Line drawing of a person's seatbelt with green arrows indicating movement or force (no text or symbols)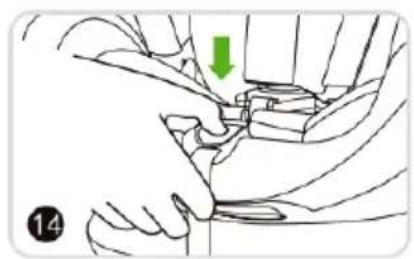
natural_image
Illustration of hands adjusting a mechanical component with a green arrow indicating direction (no text or symbols)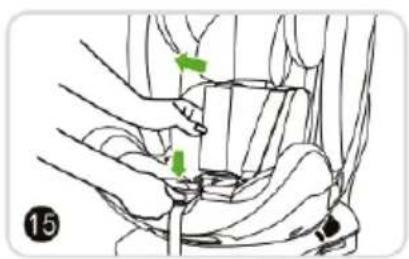
natural_image
Illustration of a person's seatbelt with green arrows indicating movement or force (no text or symbols)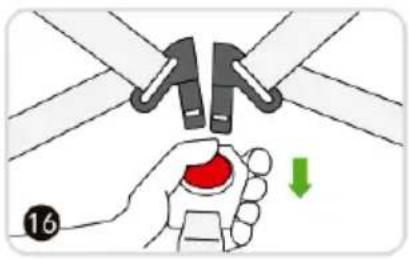
natural_image
Line drawing of a hand pressing down on a car seat with an upward arrow (no text or symbols)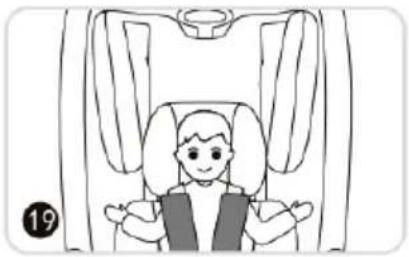
natural_image
Line drawing of a child seated in a car seat, viewed from the side (no text or symbols)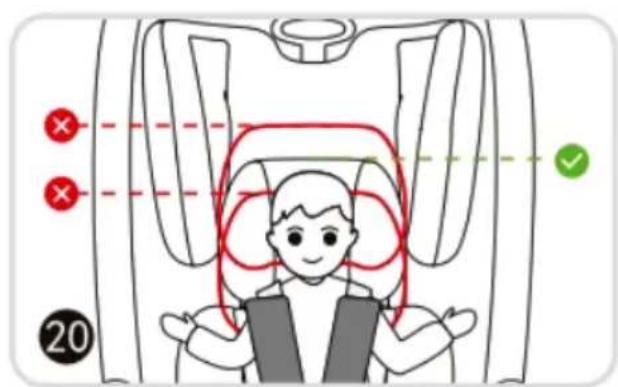
natural_image
Diagram showing two mechanical assembly steps with arrows indicating motion direction (no text or symbols)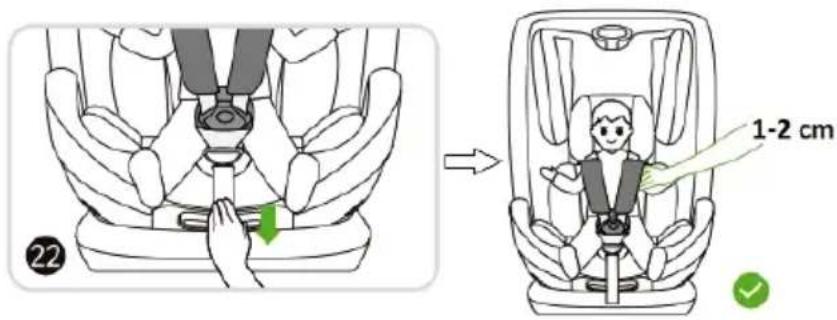
- ATTENTION! Make sure that your vehicle is equipped with ISOFIX attachment points! Install the ISOFIX guide to the ISOFIX attachmnet point of vehicle.
- Release the ISOFIX anchors by pressing the ISOFIX buttons. Set them maximum out.
- Insert ISOFIX anchors of car seat to ISOFIX attachment point of vehicle.
- You must hear click sound by fixing.
- CAUTION! ISOFIX anchors are fixed when both of them are fully green.
Note: If indicators are red, do the installation again following the above described sequence of actions.
Adjust the recline in position 1, 2, 3 or 4.
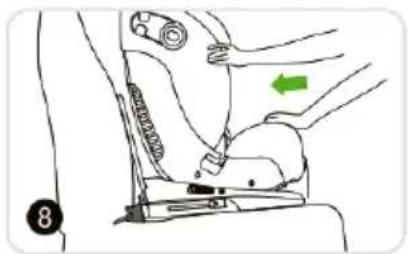
- Press the car seat until it reaches the backrest of vehicle's seat.
- and 8 Try to pull the car seat to assure that ISOFIX anchors are fixed to ISOFIX attachment point of vehicle.
- Press the button of buckle for adjustment of top tether's length and pull it at maximum.
- Attach the hook of top tether to the attachmnet point of your vehicle. Note: Belt must not be twisted.
- Tighten the top tether.
- After tightening indicator of top tether belt must be fully green.
Note: If indicator is red, do the installation again following the above described sequence of actions.
- Make sure that car seat is stable fixed.
14, 15. Press the button for belts adjustment and at the same time pull the shoulder belts towards you.
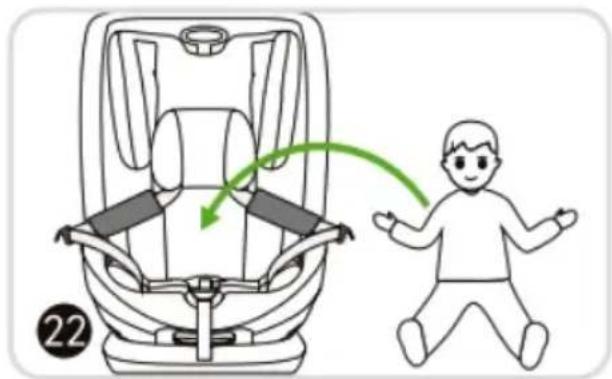
16, 17 Press the button at central buckle to release the belts and place the child in car seat.
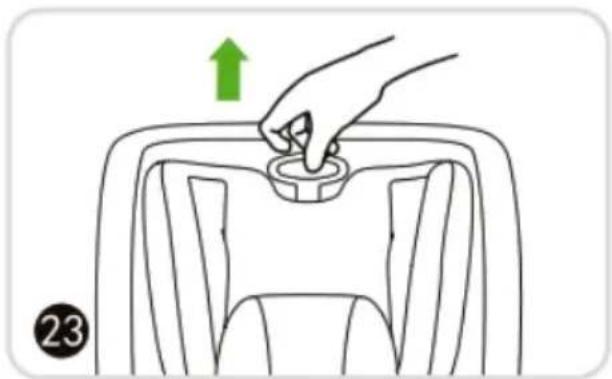
18, 19, 20 Pull the handle for head rest adjustment and set the head support in suitable position (see the figure - correct height).
21, 22 Join the shoulder belts into the central buckle. Pull the strap that adjusts the length of belts so that the belts hold will the body of child without bringing pressure and discomfort to the child. Recommended space between child's body and belts is 1 - 2 ~cm .

ATTENTION!
For child's height:
• 76 up to 80 cm use only soft pad of the seat
CHILD'S HEIGHT 100-150 cm
INSTALLATION OF THE CAR SEAT IN "FORWARD FACING" POSITION
3-POINT BELT OF VEHICLE
natural_image
Line drawing of a mechanical device with a green arrow indicating rotation or movement (no text or symbols)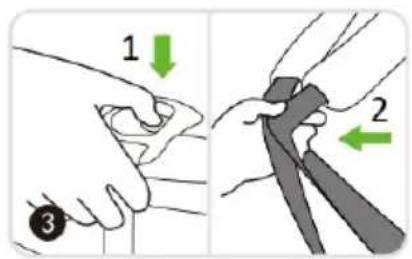
natural_image
Diagram showing a mechanical component with green arrows indicating motion or rotation (no text or symbols present)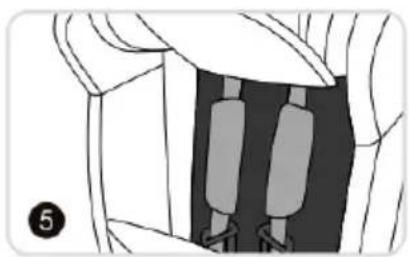
natural_image
Diagram of a mechanical or architectural component with two vertical bars and a numbered label (5), no readable text or symbols present.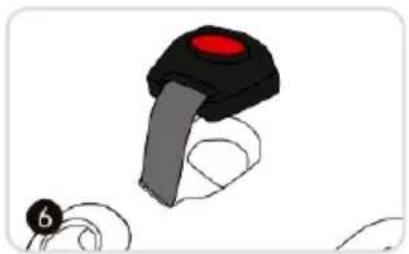
natural_image
Illustration of a black and gray mechanical component with a red highlight, partially connected to a circular object (no text or symbols)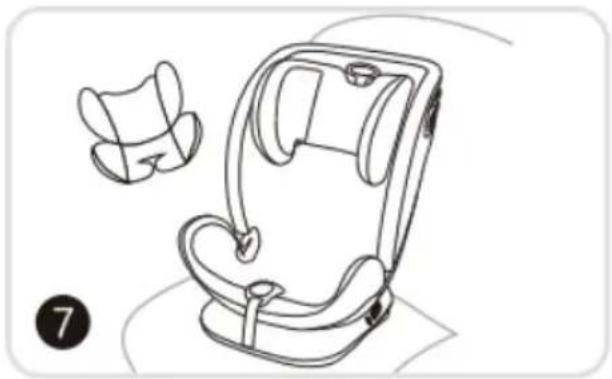
natural_image
Line drawing of a car seat assembly with two side views (no text or symbols)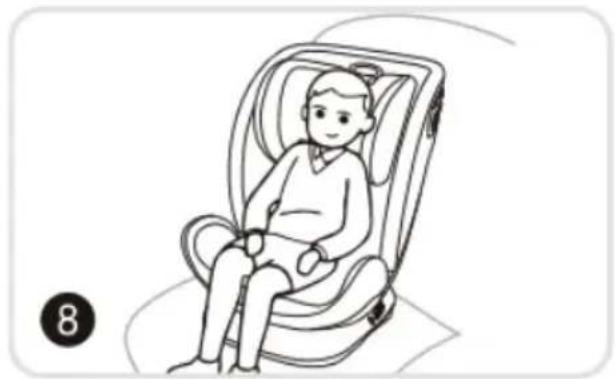
natural_image
Line drawing of a child seated in a car seat (no text or symbols)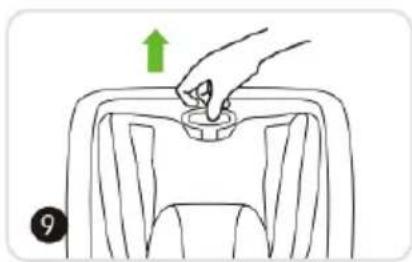
natural_image
Illustration of a hand pressing down on a car seat with an upward arrow (no text or symbols)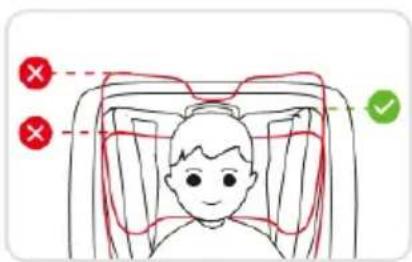
natural_image
Line drawing of a sewing machine needle with a green blade (no text or symbols)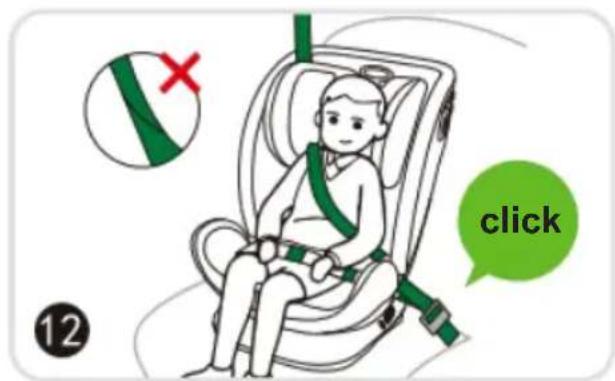
- Press the button at central buckle to release the belt.
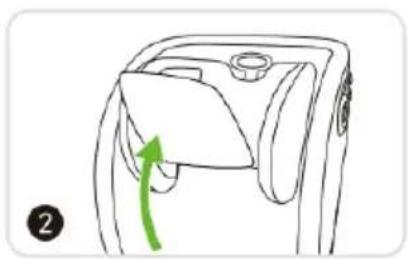
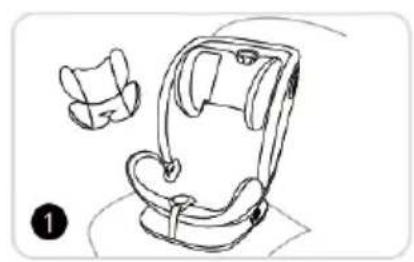
- Lift the upper part fo the seat cover as figure shows.
- Press the button for belts adjustment and at the same time pull the shoulder belts towards you.
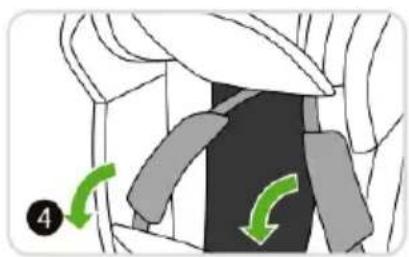
- Unfasten the down part of the seat cover and place it down as figure shows.
- Fix the belts and cover them with both parts of the seat cover.
- Place the central buckle in car seat's slot.
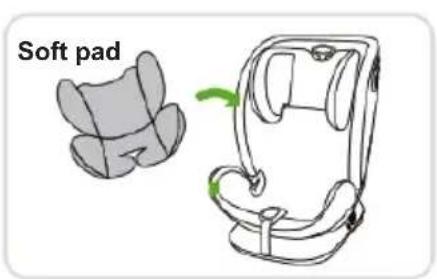
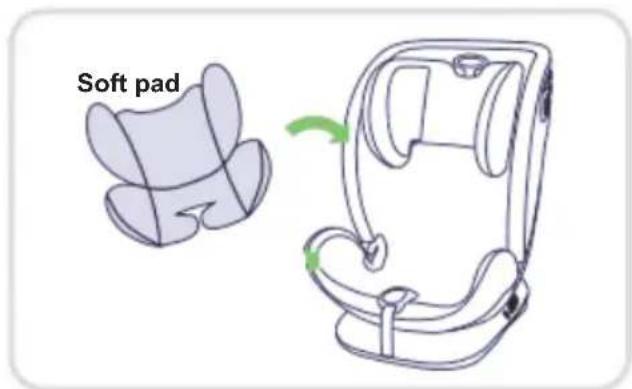
- Remove the soft pad.
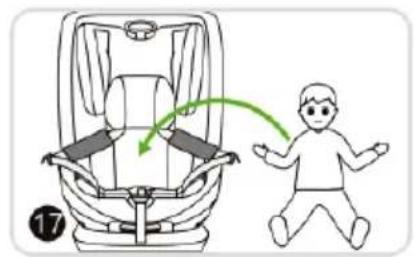
- Place the child in car seat.
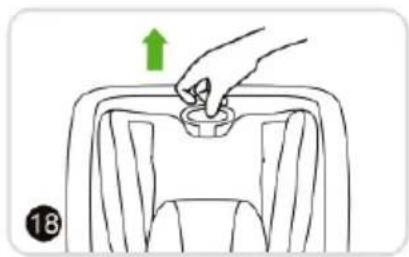
- Pull the handle for head rest adjustment and set the head support in suitable position (see the figure √- correct height).
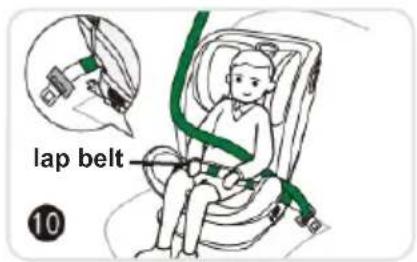
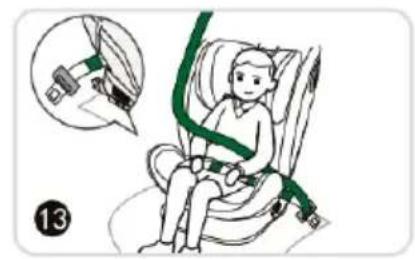
- Thread the lap belt through the guide under the armrest of car seat and above the legs of the child. Make sure the belt snugs will the child's pelvis.
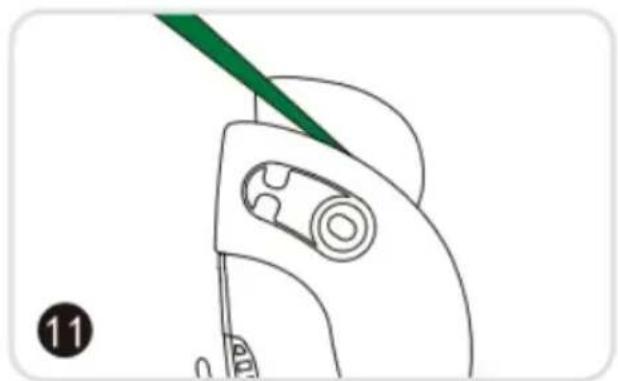
- Thread the diagonal belt through the guide at the upper part of backrest.
- Lock the 3-pont belt of vehicle into the buckle of vehicle's seat.
CAUTION! Make sure that belt is not twisted.
CHILD'S HEIGHT 100-150 cm
INSTALLATION OF THE CAR SEAT IN "FORWARD FACING" POSITION
3-POINT BELT OF VEHICLE + ISOFIX
natural_image
Line drawing of a car seatbelt device with a separate inset showing a small object (no text or symbols)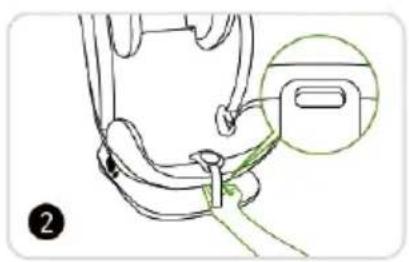
natural_image
Line drawing of a car seatbelt with a highlighted component (no text or symbols)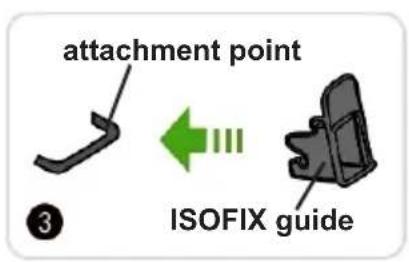
natural_image
Illustration of a person using a sewing machine to adjust the shoe (no text or symbols visible)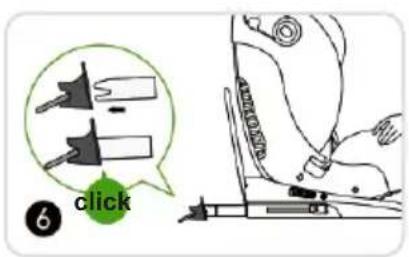
natural_image
Line drawing of a person's seatbelt with hands and a green arrow indicating movement (no text or symbols)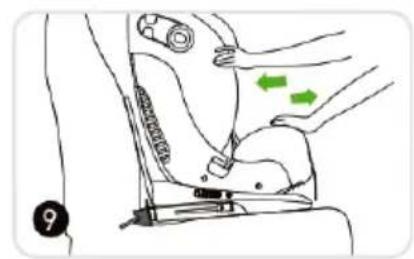
natural_image
Illustration of a person's seatbelt being adjusted for a finger, with green arrows indicating movement direction (no text or symbols)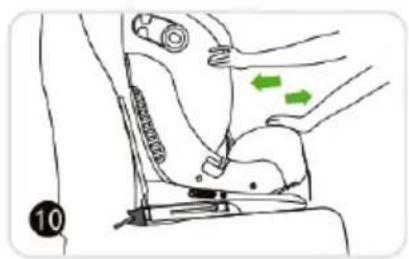
natural_image
Illustration of a person's seatbelt being adjusted for pressure, with green arrows indicating direction (no text or symbols)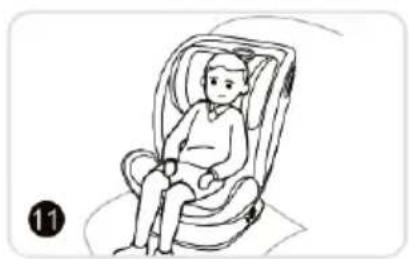
natural_image
Line drawing of a child seated in a car seat (no text or symbols)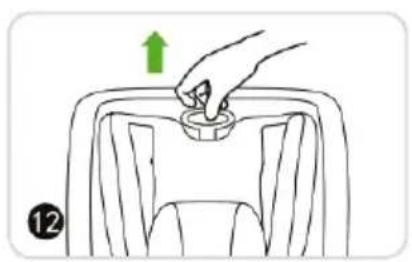
natural_image
Line drawing of a hand pressing down on a car seat with an arrow indicating upward motion (no text or symbols)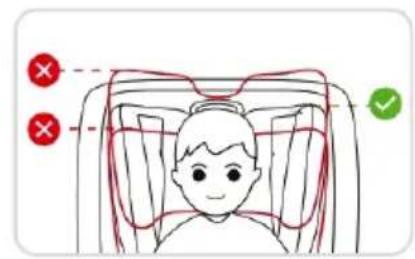
natural_image
Illustration of a child seated in a car seat with a green safety belt, showing a close-up inset (no text or symbols)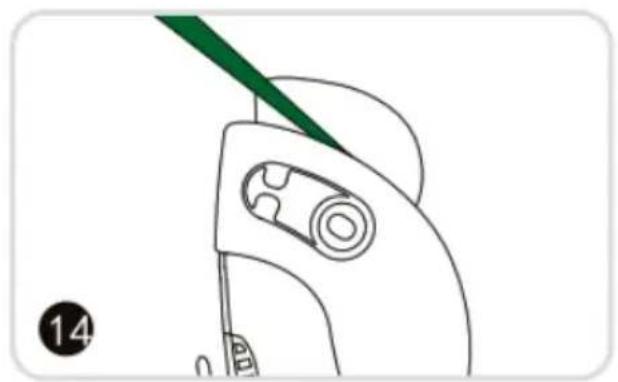
natural_image
Line drawing of a mechanical device with a green tool inserted, no text or symbols present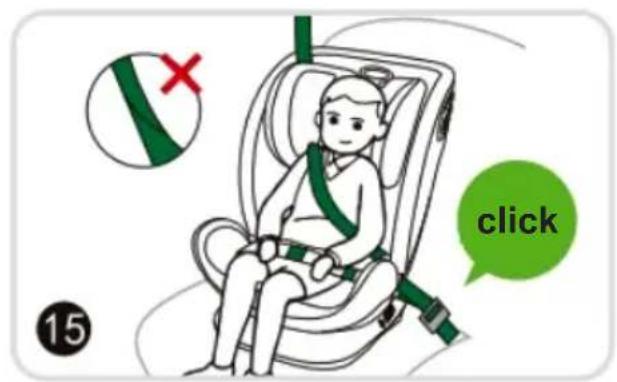
ATTENTION! Make sure that your vehicle is equipped with ISOFIX attachment points!
- Hide the car seat belts and remove the soft pad.
- Set the recline is position 1.
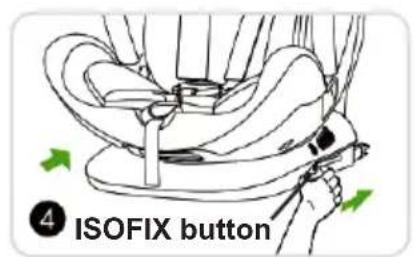
- Install the ISOFIX guide (option) to the ISOFIX attachmnet point of vehicle.
- Release the ISOFIX anchors by pressing the ISOFIX buttons. Set them maximum out.
- Insert ISOFIX anchors of car seat to ISOFIX attachment point of vehicle.
- You must hear click sound by fixing.
- CAUTION! ISOFIX anchors are fixed when both of them are fully green.
Note: If indicators are red, do the installation again following the above described sequence of actions.
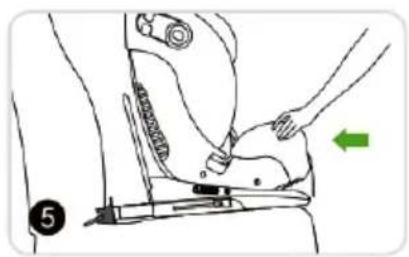
- Press the car seat until it reaches the backrest of vehicle's seat.
- and 10 Try to pull the car seat to assure that ISOFIX anchors are fixed to ISOFIX attachment point of vehicle.
- Place the child in car seat.
- Pull the handle for head rest adjustment and set the head support in suitable position (see the figure - correct height).
- Thread the lap belt through the guide under the armrest of car seat and above the legs of the child. Make sure the belt snugs will the child's pelvis.
- Thread the diagonal belt through the guide at the upper part of backrest.
- Lock the 3-pont belt of vehicle into the buckle of vehicle's seat.
CAUTION! Make sure that belt is not twisted.
REMOVING AND PLACING THE SEAT COVER
natural_image
Diagram of a car interior showing seat, dashboard, and seatbelt with a green arrow indicating direction (no text or symbols)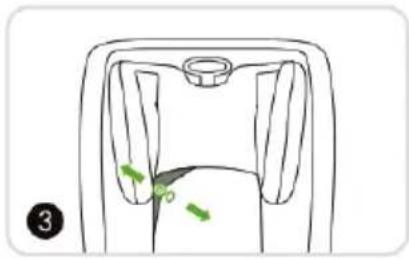
natural_image
Diagram of a seated anatomical structure with green arrows indicating movement or force direction (no text or labels)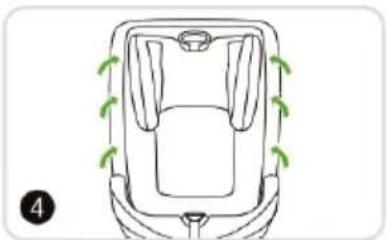
natural_image
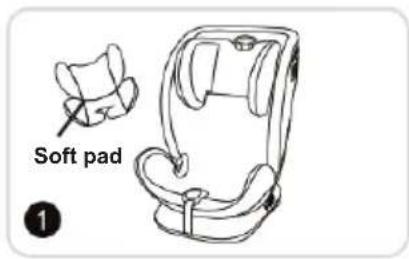
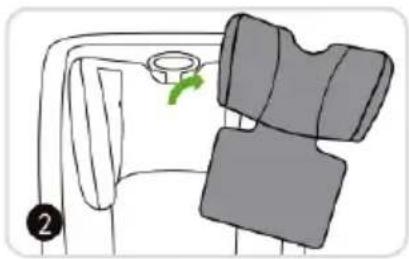
Top-down diagram of a car seat with green arrows indicating clockwise motion (no text or symbols)- Hide the car seat belts and remove the soft pad.
- Remove the fabric cover of head support.
- Unfasten and remove the fabric cover under the head support.
- Remove all the rest of seat fabric cover.
To place the cover back, do the same actions in opposite order.
CARE AND MAINTENANCE
- Clean the fabrics, plastic parts and metal parts with damp cotton cloth or sponge and mild soap
Fabric cover and soft pads may be hand washed at 30 °C using mild detergent!
Do not bleach! Do not tumble dry! Do not machine wash! Do not iron!
Do not use abrasive, bleach or other aggressive detergents.
❖ Always after cleaning leave the car seat fully dry and after that use it or store it.
◆ Harnesses must be cleaned with damp cloth and mild soap!
Do not wet or remove the stickers. They contain important information!
Always store your car seat indoors – on dry and clean place. Do not expose to direct environment influence - sun, rain, moisture and high temperature intervals.
Please, contact your authorized dealer for problems connected with the use or repair.
Fabric:
Outer: 100% polyester
Filling: 100% polyester


Materials used: plastic, metal, textile
List of vehicles that are suitable for installation of child restraint system "MY SIZE" as booster seat for specific vehicle.
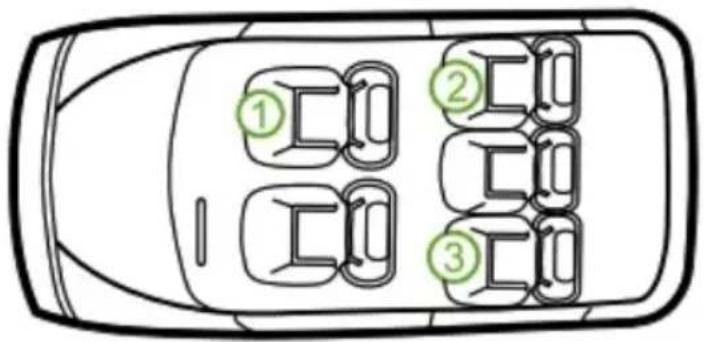
Vehicle Model ISOFIX
3-point belt of the vehicle
Ford
| B Max(2012>) |
| Fiesta(2008>) |
| Focus(2010>) |
| KA(2009>) |
| Kuga(2013>) |
Nissan
| Juke(2010>) |
| X-Trail(2007>) |
Volvo
| C30(2007-2012) |
| S80(2007>) |
| V40(2012>) |
| V60(2011>) |
| V70(2008>) |
| XC70(2008>) |
| 1 | 2 | 3 |
| ○ | ● | ● |
| ○ | ● | ● |
| ○ | ● | ● |
| ○ | ● | ● |
| ○ | ● | ● |
| ○ | ● | ● |
| ○ | ● | ● |
| ○ | ● | ● |
| ○ | ● | ● |
| ○ | ● | ● |
| ○ | ● | ● |
| ○ | ● | ● |
| 1 | 2 | 3 |
| ○ | ● | ● |
| ○ | ● | ● |
| ○ | ● | ● |
| ○ | ● | ● |
| ○ | ● | ● |
| ○ | ● | ● |
| ○ | ● | ● |
| ○ | ● | ● |
| ○ | ● | ● |
| ○ | ● | ● |
| ○ | ● | ● |
| ○ | ● | ● |
Vehicle Model ISOFIX
3-point belt of the vehicle
Alfa Romeo
| Guilietta(2010>) |
| Mito(2009>) |
Audi
| A1(2011>) |
| AI Sportback(2012>) |
| A4 Allroad(2009>) |
| A4 Av ant(2008>) |
| A4 | S4(2009>) |
| A54(2007>) |
| A5 Sportback(2009>) |
| A6(2011>) |
| A6 Allroad(2011>) |
| A6 Avant(2011>) |
| A6 | S6(2011>) |
| A7 Sportback(2011>) |
| A8(2011>) |
| A8 | S8(2011>) |
| Q3(2013>) |
| Q5(2009>) |
| Q7(2006>) |
Bentley
| Continental GT(2003-2011) |
| Continental GTC(2005-2012) |
| Mulsanne(2010>) |
| 1 | 2 | 3 |
| ○ | ○ | ○ |
| ○ | ● | ● |
| ○ | ● | ● |
| ○ | ● | ● |
| ○ | ● | ● |
| ○ | ● | ● |
| ○ | ● | ● |
| ○ | ● | ● |
| ○ | ● | ● |
| ○ | ● | ● |
| ○ | ● | ● |
| ○ | ● | ● |
| ○ | ● | ● |
| ○ | ● | ● |
| ○ | ● | ● |
| 1 | 2 | 3 |
| ○ | ● | ● |
| ○ | ● | ● |
| ○ | ● | ● |
| ○ | ● | ● |
| ○ | ● | ● |
| ○ | ● | ● |
| ○ | ● | ● |
| ○ | ● | ● |
| ○ | ● | ● |
| ○ | ● | ● |
| ○ | ● | ● |
| ○ | ● | ● |
| ○ | ● | ● |
| ○ | ● | ● |
Vehicle Model ISOFIX
3-point belt of the vehicle
BMW
| 1 Series Convertible(2008>) |
| 1 Series Coupe(2008>) |
| 3 Series Coupe(2007>) |
| 5 Series(2011>) |
| 6 Series Coupe(2011>) |
| 7 Series(2010>) |
| X3 F25(2011>) |
| X5(2007>) |
| X6(2008>) |
| 5-GT(2010>) |
Cadillac
| BLS Saloon(2006-2011) |
Chevrolet
| Aveo 3dr(2012>) |
| Aveo 5dr(2012>) |
| Captiva(2007>) |
| Cruze(2009>) |
| Spark(2009>) |
| Volt(2008>) |
| A4 S4(2011>) |
Chrysler
| Grand Voyager(2008>) |
| Ypsilon(2011>) |
| 300C(2012>) |
| 1 | 2 | 3 |
| ○ | ● | ● |
| ○ | ● | ● |
| ○ | ● | ● |
| ○ | ● | ● |
| ○ | ● | ● |
| ○ | ● | ● |
| ○ | ● | ● |
| ○ | ● | ● |
| ○ | ● | ● |
| ○ | ● | ● |
| ○ | ● | ● |
| ○ | ● | ● |
| ○ | ● | ● |
| 1 | 2 | 3 |
| ○ | ● | ● |
| ○ | ● | ● |
| ○ | ● | ● |
| ○ | ● | ● |
| ○ | ● | ● |
| ○ | ● | ● |
| ○ | ● | ● |
| ○ | ● | ● |
| ○ | ● | ● |
| ○ | ● | ● |
| ○ | ● | ● |
| ○ | ● | ● |
| ○ | ● | ● |



- NOTICE
- Size range: 40-105 cm
- Size range: 100-135 cm
- Size range: 135-150 cm
- CAUTION!
- CAUTION! WARNINGS!
- PRODUCT FEATURES
- INSTRUCTIONS FOR USE OF THE CHILD RESTRAINT SYSTEM
- IMPORTANT!
- ATTENTION!
- For child's height:
- REMOVING AND PLACING THE SEAT COVER
- CARE AND MAINTENANCE
- Fabric:
- List of vehicles that are suitable for installation of child restraint system "MY SIZE" as booster seat for specific vehicle.
- Vehicle Model ISOFIX
- 3-point belt of the vehicle
Brand : Chipolino
Model : My Size
Category : Child car seat