
PS-1206P - Print Server Edimax - Free user manual and instructions
Find the device manual for free PS-1206P Edimax in PDF.


| Product Type | Print Server |
| Brand | Edimax |
| Model | PS-1206P |
| Network Interface | 1 x 10/100 Mbps Ethernet (RJ-45) |
| Printer Interface | 1 x IEEE 1284 Parallel (DB-25 female) |
| Supported Protocols | TCP/IP, IPX/SPX, NetBEUI, AppleTalk |
| Print Protocols | LPR, RAW TCP/IP, IPP, SMB (Windows) |
| OS Support | Windows, macOS, Linux, Unix |
| Dimensions (W x D x H) | 130 x 90 x 30 mm (5.1 x 3.5 x 1.2 in) |
| Weight | 200 g (7.1 oz) |
| Power Supply | External AC adapter, 5V DC, 2A |
| LED Indicators | Power, Link/Act, Status, Error |
| Installation | Web-based setup, PS Utility, DHCP/Static IP |
| Management | Web interface, SNMP, Telnet, PS Admin utility |
| Security | IP filtering, MAC address filtering |
| Operating Temperature | 0°C to 40°C (32°F to 104°F) |
| Storage Temperature | -20°C to 60°C (-4°F to 140°F) |
| Humidity | 10% to 90% non-condensing |
| Package Contents | Print server, power adapter, Ethernet cable, quick installation guide, CD-ROM |
| Warranty | 2 years |
| Repairability | Replacement power adapter available; no user-serviceable parts inside |
| Maintenance | Keep dry and dust-free; clean exterior with soft dry cloth |
| Safety | Do not expose to water or moisture; use only supplied power adapter |
Frequently Asked Questions - PS-1206P Edimax
User questions about PS-1206P Edimax
0 question about this device. Answer the ones you know or ask your own.
Ask a new question about this device
Download the instructions for your Print Server in PDF format for free! Find your manual PS-1206P - Edimax and take your electronic device back in hand. On this page are published all the documents necessary for the use of your device. PS-1206P by Edimax.
USER MANUAL PS-1206P Edimax
EDIMAX NETWORKING PEOPLE TOGETHER
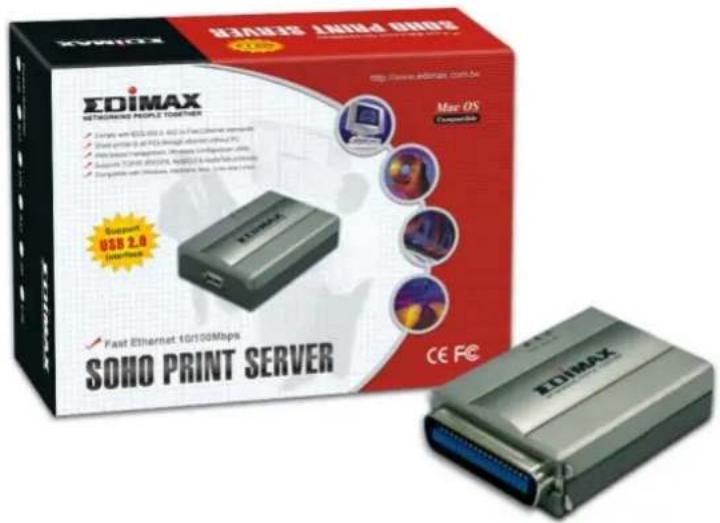
Fast Ethernet Print Server
User's Manual
Version: 1.0(July, 2005)
COPYRIGHT
Copyright ©2005/2006 by Edimax Technology. All rights reserved. No part of this publication may be reproduced, transmitted, transcribed, stored in a retrieval system, or translated into any language or computer language, in any form or by any means, electronic, mechanical, magnetic, optic, chemical, manual or otherwise, without the prior written permission of this company.
Federal Communication Commission Interference Statement
This equipment has been tested and found to comply with the limits for a Class B digital device, pursuant to Part 15 of FCC Rules. These limits are designed to provide reasonable protection against harmful interference in a residential installation. This equipment generates, uses, and can radiate radio frequency energy and, if not installed and used in accordance with the instructions, may cause harmful interference to radio communications. However, there is no guarantee that interference will not occur in a particular installation. If this equipment does cause harmful interference to radio or television reception, which can be determined by turning the equipment off and on, the user is encouraged to try to correct the interference by one or more of the following measures:
- Reorient or relocate the receiving antenna.
- Increase the separation between the equipment and receiver.
- Connect the equipment into an outlet on a circuit different from that to which the receiver is connected.
- Consult the dealer or an experienced radio technician for help.
FCC Caution
This equipment must be installed and operated in accordance with provided instructions and a minimum 20 cm spacing must be provided between computer mounted antenna and person's body (excluding extremities of hands, wrist and feet) during wireless modes of operation.
This device complies with Part 15 of the FCC Rules. Operation is subject to the following two conditions: (1) this device may not cause harmful interference, and (2) this device must accept any interference received, including interference that may cause undesired operation.
Any changes or modifications not expressly approved by the party responsible for compliance could void the authority to operate equipment.
Federal Communication Commission (FCC) Radiation Exposure Statement
This equipment complies with FCC radiation exposure set forth for an uncontrolled environment. In order to avoid the possibility of exceeding the FCC radio frequency exposure limits, human proximity to the antenna shall not be less than 20cm (8 inches) during normal operation.
The antenna(s) used for this transmitter must not be co-located or operating in conjunction with any other antenna or transmitter.
R&TTE Compliance Statement
This equipment complies with all the requirements of DIRECTIVE 1999/5/EC OF THE EUROPEAN PARLIAMENT AND THE COUNCIL of March 9, 1999 on radio equipment and telecommunication terminal Equipment and the mutual recognition of their conformity (R&TTE)
The R&TTE Directive repeals and replaces in the directive 98/13/EEC (Telecommunications Terminal Equipment and Satellite Earth Station Equipment) As of April 8, 2000.
Safety
This equipment is designed with the utmost care for the safety of those who install and use it. However, special attention must be paid to the dangers of electric shock and static electricity when working with electrical equipment. All guidelines of this and of the computer manufacture must therefore be allowed at all times to ensure the safe use of the equipment.
EU Countries Intended for Use
The ETSI version of this device is intended for home and office use in Austria, Belgium, Denmark, Finland, France, Germany, Greece, Ireland, Italy, Luxembourg, the Netherlands, Portugal, Spain, Sweden, and the United Kingdom.
The ETSI version of this device is also authorized for use in EFTA member states: Iceland, Liechtenstein, Norway, and Switzerland.
EU Countries Not intended for use
None.
DISCLAIMER
This company makes no representations or warranties, either expressed or implied, with respect to the contents hereof and specifically disclaims any warranties, merchantability or fitness for any particular purpose. Any software described in this manual is sold or licensed "as is". Should the programs prove defective following their purchase, the buyer (and not this company, its distributor, or its dealer) assumes the entire cost of all necessary servicing, repair, and any incidental or consequential damages resulting from any defect in the software. Further, this company reserves the right to revise this publication and to make changes from time to time in the contents hereof without obligation to notify any person of such revision or changes.
Contents
1. PRODUCT INTRODUCTION 1.1 PRODUCT INTRODUCTION....1
1.3 Network Printing Architecture......2
Print Server Network Functions....2
Network Printing Functions for Clients....3
Network Printing Functions for Network Server....5
1.4 Network Printing Environment....6
1.6 Firmware & Printing Function......8
3. WINDOWS PEER-TO-PEER NETWORK 3.1 SYSTEM ARCHITECTURE....9
3.2 Administrator Installation and Setup....10
3.4 Client Installation and Setup....16
3.5 Client Utilities....20
3.5.1 Network Ports Quick Setup....20
3.5.2 Remote Ports (Utility)....21
3.6 Windows Add Printer Procedure 24
4. WINDOWS NT/2000/2003 NETWORK 4.1 SYSTEM ARCHITECTURE....28
4.2 Windows NT/2000/2003 Server Installation and Setup.....29
4.3 User Installation and Setup....30
5. NETWARE NETWORK 5.1 SYSTEM ARCHITECTURE....31
5.2.1 Installation Using PCONSOLE 32
6. UNIX SYSTEM NETWORK 6.1 INTRODUCTION....35
6.3.1 DHCP....36
6.3.2 BOOTP....36
7. CONFIGURATION UTILITY 7.1 INTRODUCTION ..39
7.3 Status of Print Server....41
7.4 Setup the Print Server....42
7.5 AppleTalk Configuration....43
7.6 General Configuration....44
7.7 Netware Print Server Configuration....45
7.8 System Configuration....46
7.9 TCP/IP Configuration....48
7.10 Wireless Configuration....50
7.11 SNMP Configuration....57
8. WEB MANAGEMENT
8.1 INTRODUCTION......62
8.3 Device Status....63
8.3.1 System....63
8.3.2 Printer....63
8.3.3 TCP/IP....64
8.3.4 SMB....64
8.3.5 SNMP....65
8.3.6 NetWare....65
8.3.7 AppleTalk....66
8.4.1 System....66
8.4.2 Advanced Settings....67
8.4.3 TCP/IP....68
8.4.4 SMB....69
8.4.5 SNMP....69
8.4.6 NetWare....70
8.4.7 AppleTalk....71
8.4.8 Save Settings 72
8.5 System Tools....73
8.5.1 Load Default 73
8.5.2 Upgrade Firmware from Browser....73
9.2 System Setup....75
9.2.1 Print Server Side 75
9.2.2 Client Side....75
10. WINDOWS XP SP2 SETUP....78
1. Product Introduction
1.1 Product Introduction
Thank you for purchasing and using our print server. This print server allows your printer to become a shared device on the network. It offers printing flexibility and manageability on your Local Area Network at an extremely low cost and with an absolute minimum setup and maintenance required.
This print server provides IEEE 802.11g/b wireless LAN (up to 54Mbps data transfer rate), an Ethernet network port (10/100Mbps Ethernet) and one print port for printer.
This print server supports IPX/SPX, NetBEUI, TCP/IP and AppleTalk protocols. It is the best network printing solutions for various common network operating systems such as Windows 95/98/Me/NT/2000/XP/2003, NetWare, Unix/Linux and MAC OS, etc.
With the help of Installation Wizard, you can easily and instantly complete the settings for the printing environment, and start enjoying the fantastic features provided by the print server.
In the following chapters, we will introduce in detail the printing features, installation methods, and system configuration for different network environments.
If you would like to set up and install print server quickly, please refer to the Quick Installation Guide that comes along with this print server.
1.2 Product Package
This package contains the following components:
• One Print Server
- One Antenna
• One Power Adapter
• One Quick Installation Guide
One CD-ROM (Including all the software utilities, drivers and User's Manual)
1.3 Network Printing Architecture
This section illustrates how print server functions and operates on the network. Before you install and use print server, it is strongly recommended that you read this section completely, and select only the chapters you need according to your network operating system by “Contents of the User’s Manual” in next section.
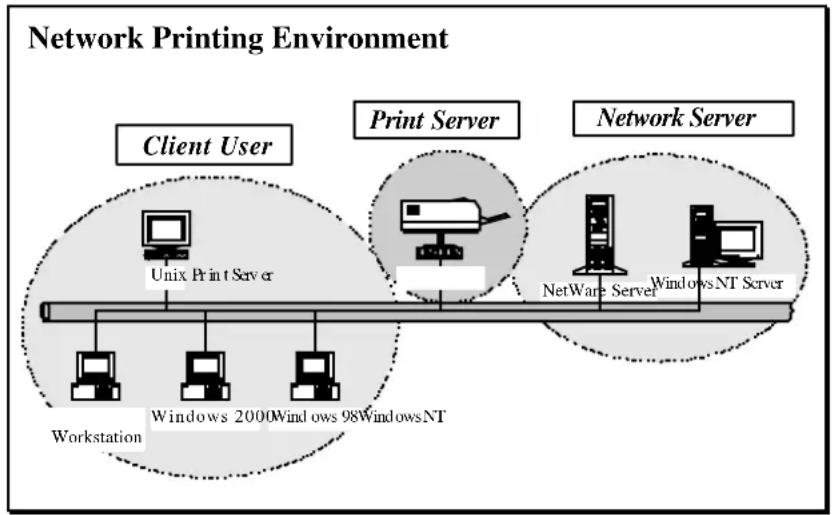
This section will first introduce the role every component plays in the network-printing environment.
Print Server
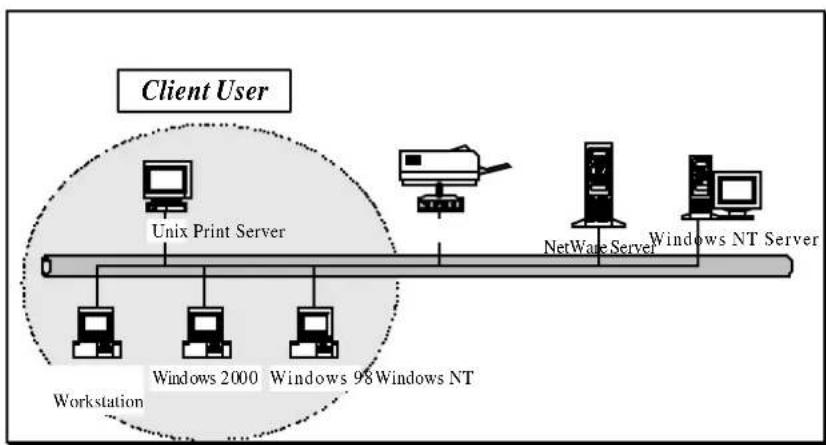
Client User
Network Server (optional)
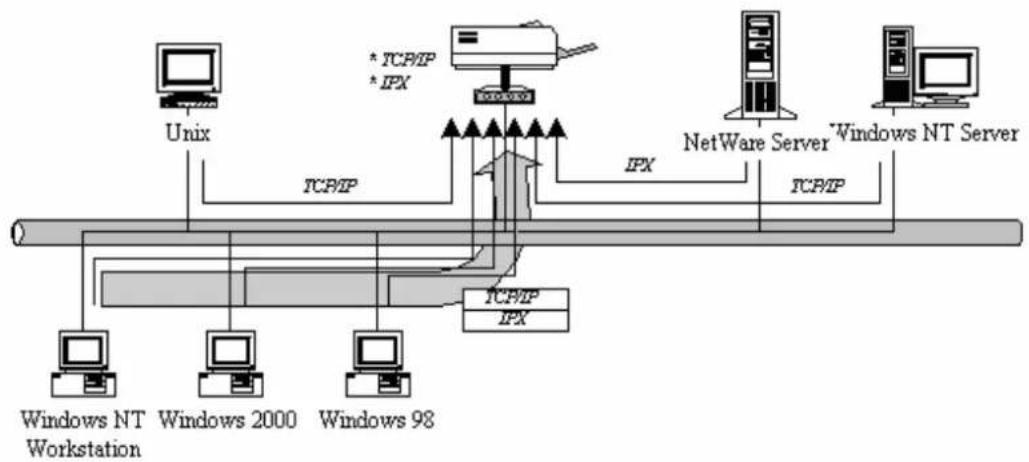
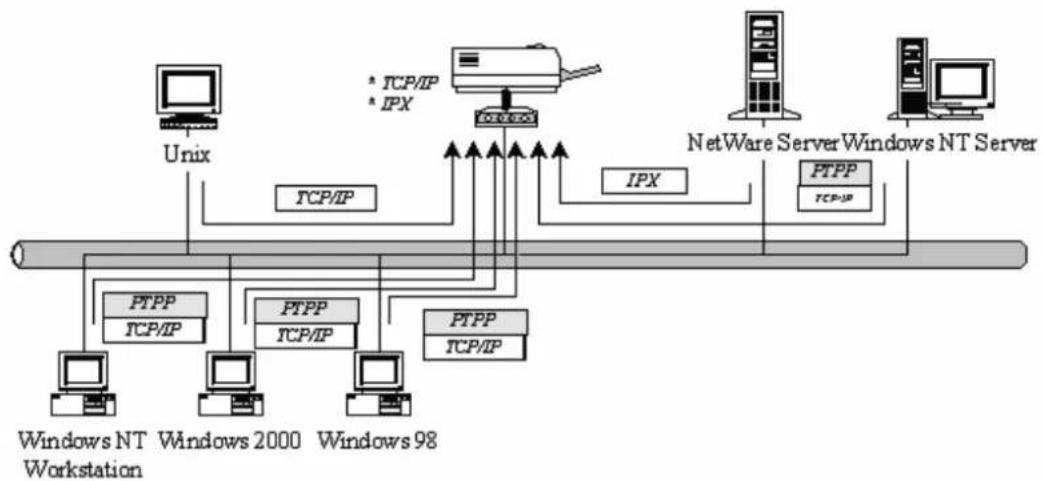
Because print server supports IPX/SPX, NetBEUI, TCP/IP and AppleTalk network protocols, any networked computer
can directly print to the print server from any of its installed protocol.
flowchart
graph TD
    A["Unix"] -->|TCP/IP| B["NetWare Server"]
    B -->|IPX| C["Windows NT Server"]
    D["Windows NT Workstation"] -->|TCP/IP| E["Windows 2000"]
    F["Windows 98"] -->|TCP/IP| G["Windows NT Server"]
    H["IPX"] -->|TCP/IP| B
    I["IPX"] -->|TCP/IP| B
    J["* TCP/IP * IPX"] --> B
    style A fill:#f9f,stroke:#333
    style D fill:#f9f,stroke:#333
    style F fill:#f9f,stroke:#333
    style H fill:#f9f,stroke:#333
    style I fill:#f9f,stroke:#333
    style J fill:#f9f,stroke:#333
Network Printing Functions for Clients
flowchart
graph LR
    A["Client User"] --> B["Unix Print Server"]
    B --> C["Workstation"]
    B --> D["Windows 2000"]
    B --> E["Windows 98"]
    B --> F["Windows NT"]
    B --> G["NetWare Server"]
    G --> H["Windows NT Server"]
Common operating systems for clients are classified as following:
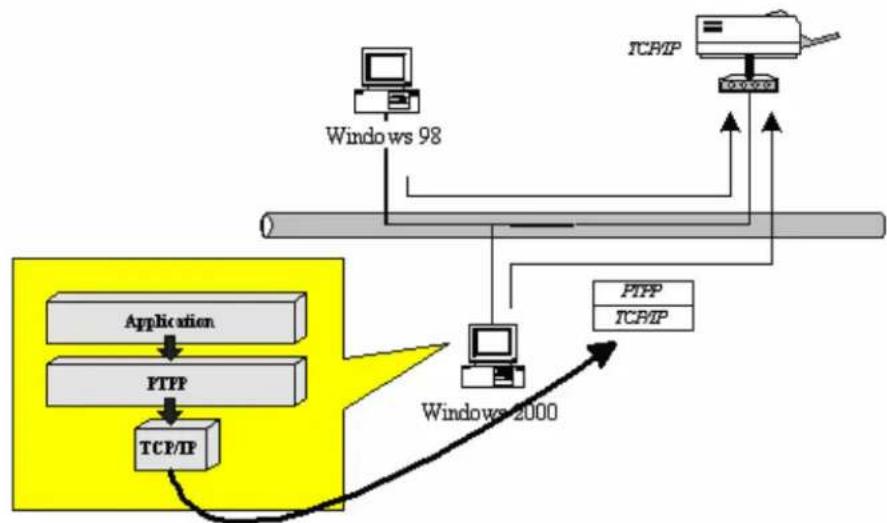
Windows 95/98/Me/NT/2000/XP/2003 Our print server system provides PTPP (Peer-to-Peer Printing) driver and utilities for Windows 95/98/Me/NT/2000/XP/2003 users. PTPP (Peer-to-Peer Printing) supports TCP/IP protocol.
flowchart
graph TD
    A["Application"] --> B["PTPP"]
    B --> C["TCP/IP"]
    D["Windows 98"] --> E["Computer"]
    F["TCR/IP"] --> G["Server"]
    H["Windows 2000"] --> I["Computer"]
    J["PTPP"] --> K["TCR/IP"]
    L["PTPP"] --> M["TCR/IP"]
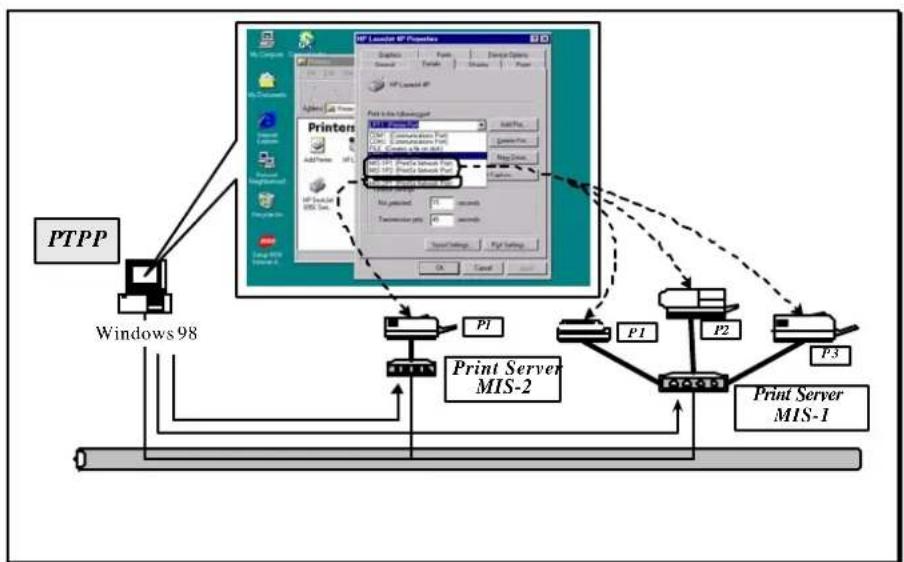
In the client installation procedure, after PTPP (Peer-to-Peer Printing Driver) is installed into Windows, the system will automatically (manual configuration is also allowed) search all the print servers on the network, and then add their printing ports into Windows' printing port (see below).
flowchart
graph TD
    A["Windows 98"] --> B["Print Server MIS-1"]
    A --> C["Print Server MIS-2"]
    A --> D["PTPP"]
    B --> E["P1"]
    C --> F["P2"]
    D --> G["P3"]
    E --> H["Print Server MIS-1"]
    F --> I["Print Server MIS-2"]
    G --> J["Print Server MIS-1"]
    H --> K["Print Server MIS-2"]
    I --> L["Print Server MIS-1"]
    J --> M["Print Server MIS-2"]
    K --> N["Print Server MIS-1"]
    L --> O["Print Server MIS-2"]
    M --> P["Print Server MIS-1"]
    N --> Q["Print Server MIS-2"]
    O --> R["Print Server MIS-1"]
    P --> S["Print Server MIS-2"]
    Q --> T["Print Server MIS-1"]
    R --> U["Print Server MIS-2"]
    S --> V["Print Server MIS-1"]
    T --> W["Print Server MIS-2"]
UNIX / Linux
UNIX (include HP/UX, SCO Unix, SunOS, Solaris, Unixware DECUnix, IBM AIX and others) and Linux use the system-standard LPR to print through print server.
MAC OS
MAC OS can use the system-standard AppleTalk network to print through print server.
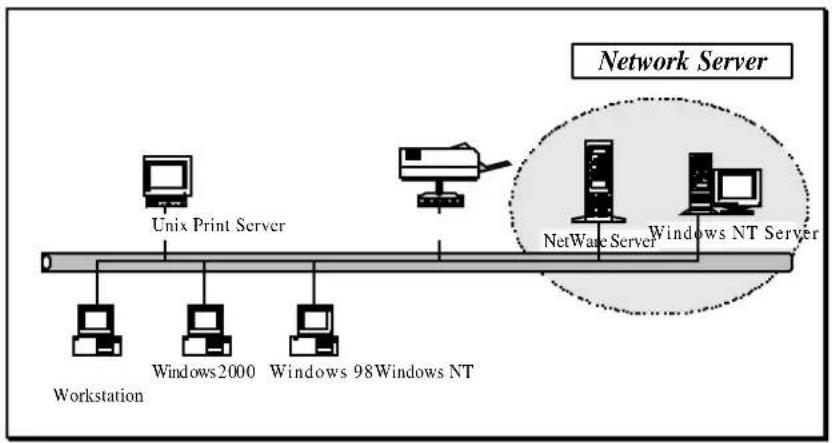
Network Printing Functions for Network Server
flowchart
graph LR
    A["Workstation"] --> B["Unix Print Server"]
    C["Windows 2000"] --> D["Windows 98Windows NT"]
    E["Windows NT Server"] --> F["NetWare Server"]
    G["Network Server"] --> H["Internet Icon"]
    style A fill:#f9f,stroke:#333
    style C fill:#f9f,stroke:#333
    style E fill:#f9f,stroke:#333
    style G fill:#f9f,stroke:#333
    style B fill:#ccf,stroke:#333
    style D fill:#ccf,stroke:#333
    style F fill:#ccf,stroke:#333
    style H fill:#ccf,stroke:#333
Common network servers are classified as following:
Windows NT/2000/2003
Our print server system provides PTPP (Peer-to-Peer
Printing) driver and utilities for Windows NT/2000/2003.
After PTPP is installed, the server can directly print through print server. Adding this printing function into Windows NT/2000/2003 Server allows print queue, user authority management, and many other advanced features to be used.
NetWare 3.x/4.x/5.x
In NetWare environment, print server offers various printing modes like print queue, remote printer, etc.
1.4 Network Printing Environment
Common network environment are classified as following: Windows Peer-to-Peer Network
The client's PTPP driver will use TCP/IP protocol to print through print server.
flowchart
graph TD
    A["Unix"] -->|TCP/IP| B["NetWare Server"]
    B -->|IPX| C["Windows NT Server"]
    A --> D["Windows NT Workstation"]
    A --> E["Windows 2000 Workstation"]
    A --> F["Windows 98 Workstation"]
    B --> G["NetWare Server"]
    B --> H["Windows NT Server"]
    style A fill:#f9f,stroke:#333
    style B fill:#ccf,stroke:#333
    style C fill:#cfc,stroke:#333
    style D fill:#fcc,stroke:#333
    style E fill:#cff,stroke:#333
    style F fill:#ffc,stroke:#333
Windows NT/2000/2003 Network
Network printing function will become available after PTPP driver is installed into Windows NT/2000/2003. Adding this printing function into Windows NT/2000/2003 Server allows print queue, user authority management, and many other advanced features to be used.
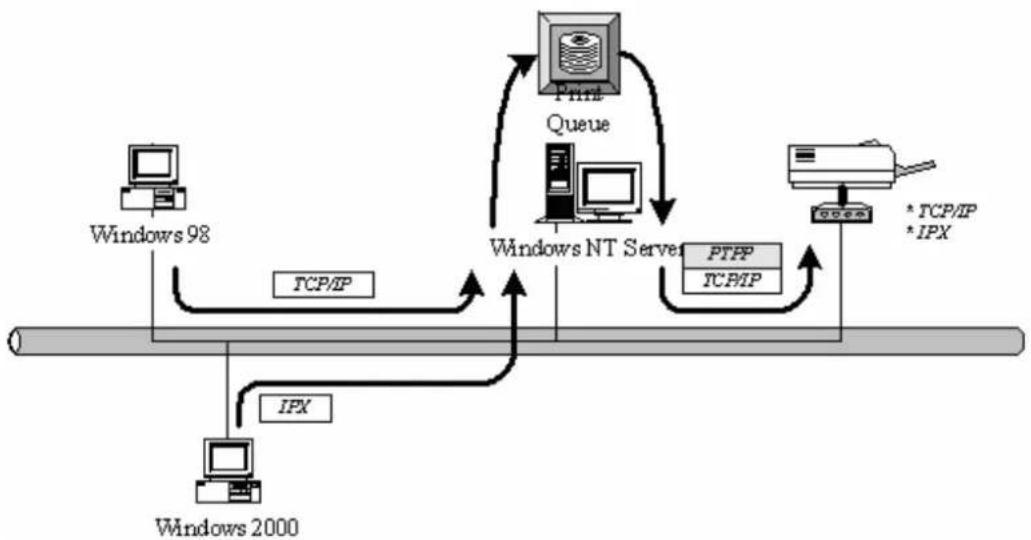
flowchart
graph TD
    A["Windows 98"] -->|TCP/IP| B["Windows NT Server"]
    B -->|PTPP| C["IPX"]
    C -->|IPX| D["Windows 2000"]
    D -->|TCP/IP| B
    B -->|PTPP| E["IPX"]
    E --> F["Windows 2000"]
    F -->|TCP/IP| G["Windows 98"]
    G -->|IPX| H["Windows 2000"]
    H -->|TCP/IP| I["Windows NT Server"]
    I -->|PTPP| J["IPX"]
    J --> K["Windows 2000"]
    K -->|TCP/IP| L["Windows NT Server"]
    L -->|PTPP| M["IPX"]
    M --> N["Windows 2000"]
    N -->|TCP/IP| O["Windows NT Server"]
    O -->|PTPP| P["IPX"]
    P --> Q["Windows 2000"]
    Q -->|TCP/IP| R["Windows NT Server"]
    R -->|PTPP| S["IPX"]
    S --> T["Windows 2000"]
    T --> U["Windows NT Server"]
    U --> V["Windows NT Server"]
    V --> W["PTPP"]
    W --> X["IPX"]
    X --> Y["Windows 2000"]
    Y --> Z["PTPP"]
    Z --> AA["IPX"]
    AA --> AB["Windows 2000"]
    AB --> AC["PTPP"]
    AC --> AD["IPX"]
    AD --> AE["Windows 2000"]
    AE --> AF["PTPP"]
    AF --> AG["IPX"]
    AG --> AH["Windows 2000"]
    AH --> AI["PTPP"]
    AI --> AJ["IPX"]
    AJ --> AK["Windows 2000"]
    AK --> AL["PTPP"]
    AL --> AM["IPX"]
    AM --> AN["Windows 2000"]
    AN --> AO["PTPP"]
    AO --> AP["IPX"]
    AP --> AQ["Windows 2000"]
    AQ --> AR["PTPP"]
    AR --> AS["IPX"]
    AS --> AT["Windows 2000"]
    AT --> AU["PTPP"]
    AU --> AV["IPX"]
    AV --> AW["Windows 2000"]
NetWare Network (see below)
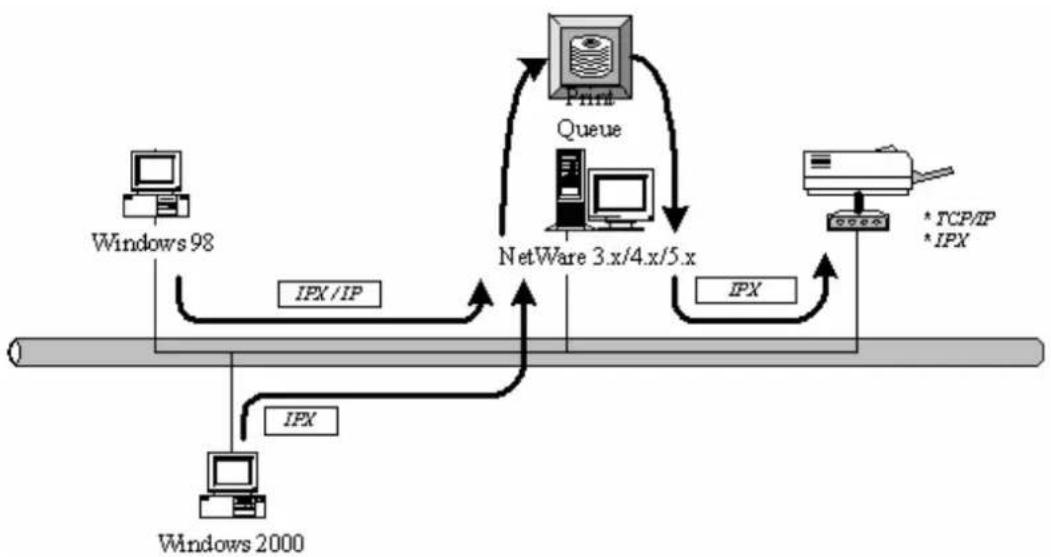
flowchart
graph TD
    A["Windows 98"] -->|IPX/IP| B["NetWare 3.x/4.x/5.x"]
    C["Windows 2000"] -->|IPX| B
    B -->|IPX| D["Internet"]
    D -->|TCP/IP *IPX| E["Server"]
    F["Print Queue"] --> B
1.5 Contents of the User's Manual
Chapter 2 explains print server's hardware installation and configuration. It is strongly recommended for you to read.
The following chapters introduce:
Chapter 3. Windows Peer-to-Peer Network
Chapter 4. Windows NT/2000/2003 Server-Based Network
Chapter 5. NetWare Network
Chapter 6. UNIX System Network
You may select the appropriate chapters and sections to read depending on your network printing's requirement.
Chapter 7 and chapter 8 introduce print server's management and configuration utilities on Windows and Web Browser's environment respectively. You may select the appropriate management utility according to the administrator's computer platform.
Chapter 9 introduces Print Server's IPP Printing function and setup procedure. The IPP Printing provides a convenient way to print documents across the Internet by the IPP protocol.
Chapter 10 introduces how to deal with the problem that if you can't find any print server listed on the "Available Ports" in "Network Ports Quick Setup" in Windows XP SP2.
1.6 Firmware & Printing Function
The print server provides a complete network printing solution. The feature set is listed below:
PTPP (Peer-to-Peer-Printing)
TCP/IP (LPR)
IPP Printing
NetWare Bindery Printing
AppleTalk
SMB Printing
2. Hardware Installation
Unpack the print server package and verify that all the items listed in the section 1.2 are provided.
Connect the print server to the printer you want to share on the network.
Connect the print server to your network by attached the network cable to the UTP port of the print server.
Connect the power adapter to the print server. The print server will perform the Power-On-Self-Test (POST) after it is powered on. During the POST, the Status and Ready LEDs will be on. When the LEDs are unlighted, the print server is ready.
NOTE1: MUST use the power adapter shipped with the print server, do NOT use any other power adapter from any sources.
NOTE2: To prevent the compatibility problem between print server and a few printer, it is recommended that you power on the print server before the printer.
3. Windows Peer-to-Peer Network 3.1 System Architecture
Print server supports Windows Peer-to-Peer network printing mode, which is suitable for most medium and small network environments. Through quick and simple installation procedure, users can immediately enjoy the convenience of network printing.
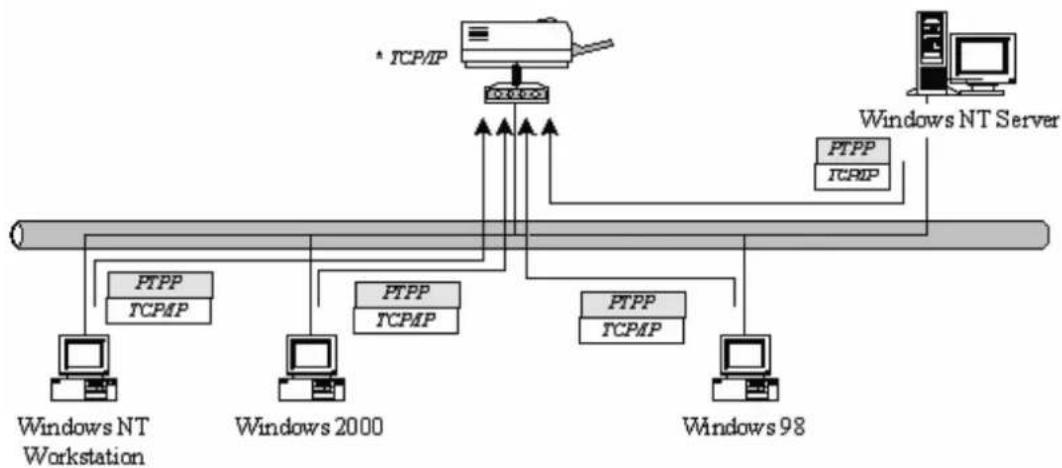
flowchart
graph TD
    A["Windows NT Workstation"] --> B["PTPP TCPMP"]
    C["Windows 2000"] --> D["PTPP TCPMP"]
    E["Windows 98"] --> F["PTPP TCPMP"]
    G["Windows NT Server"] --> H["PTPP TCPMP"]
    I["* TCP/IP"] --> J["Central Interface"]
    K["Windows 98"] --> L["Computer"]
Installation procedure is separated into following two parts:
- Administrator Installation and Setup (refer to section 2 for more detailed information).
System administrators must:
Install administrator's utilities into his/her computer.
Configure print server from administrator's configuration utility.
- Client Installation and Configuration (refer to section 3 for more detailed information).
Client users must install Windows PTPP driver (Peer-to-Peer Printing) for network printing.
In addition, after PTPP is installed, the system will automatically search for all print servers on the network, and add the printing port of the print servers into Windows' printing port (refer to Network Printing Architecture in section 1.4 for more detailed information).
3.2 Administrator Installation and Setup
The Administrator Installation can be performed on Windows 95/98/Me/NT/2000/XP/2003 with the same user interface. Before the installation, please verify that your network protocol is installed on your PC (TCP/IP, IPX and/or NetBEUI).
Insert the CD shipped along with the print server into your CD-ROM drive. The Autorun.exe program should be executed automatically. If not, run Autorun.exe manually from CD-ROM drive's root directory.
The “Installation Manager” will be displayed on the screen as following. Click “Admin Utility” then click “English Version”.

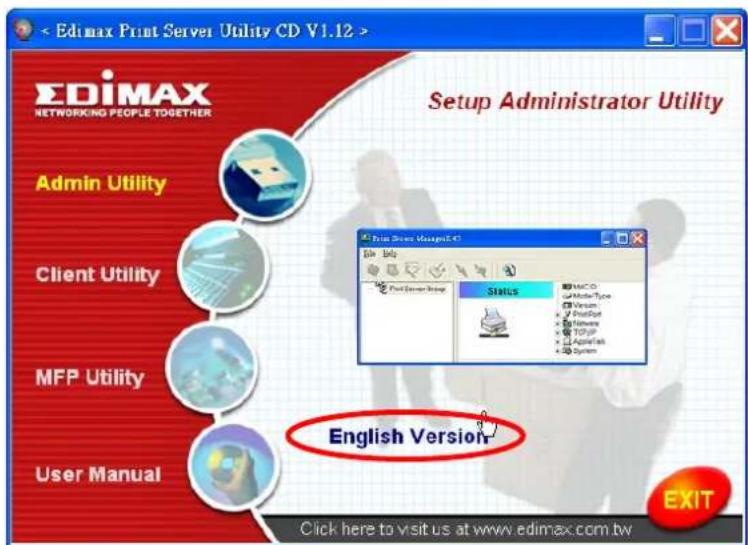
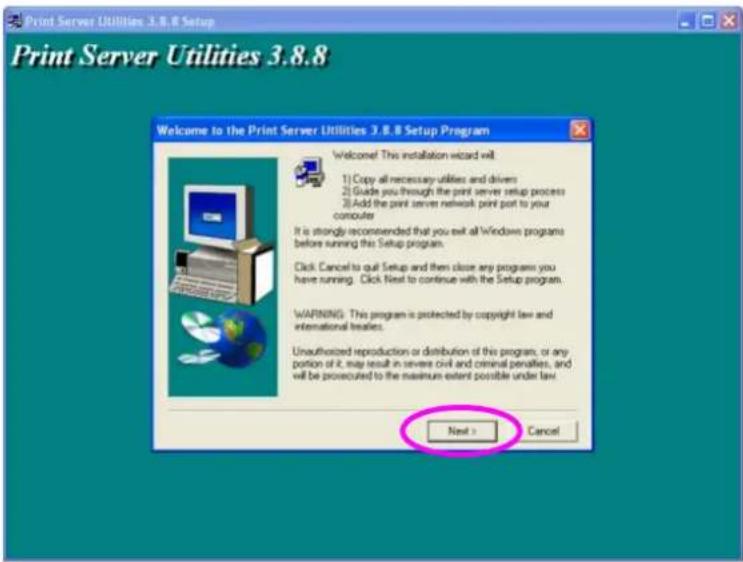
The "Utilities Setup" window will be displayed. Click "Next".
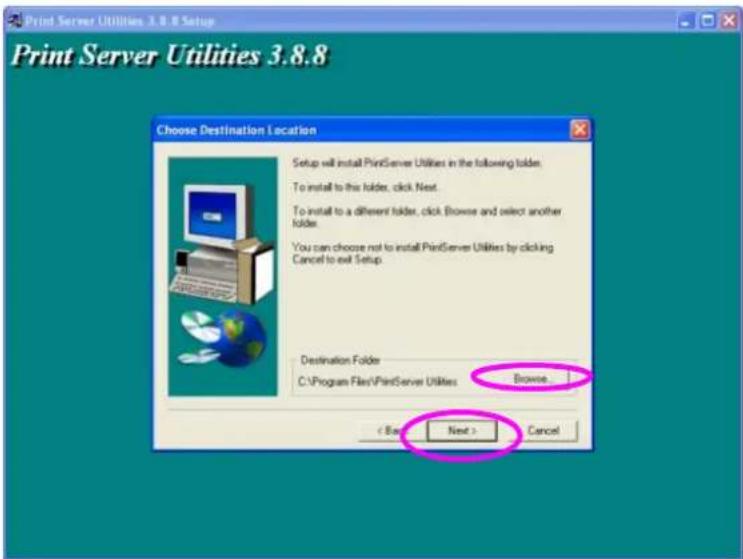
Click "Next" to install the utilities in the default folder or click "Browse" to specify the destination folder where you would like to install the utilities.
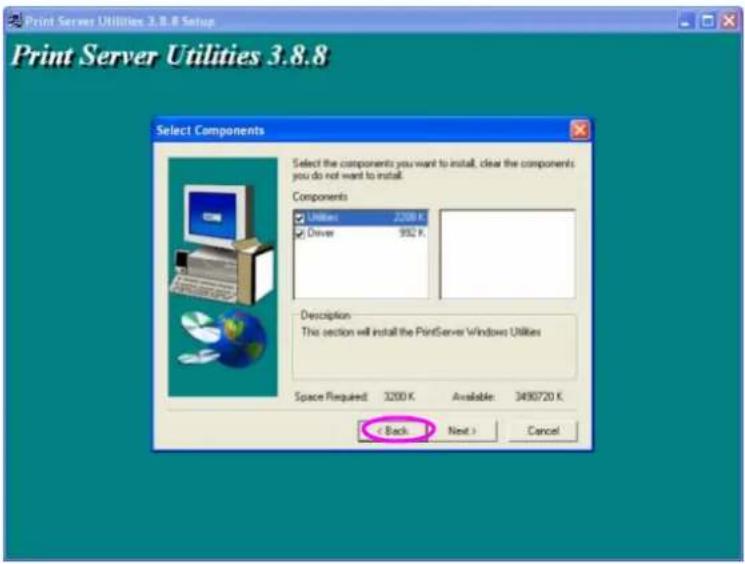
Select the components you want to install. It is highly recommended to install all provided components. Click "Next" to continue.
Specify the program folder where the program icons will be added to, click "Next"
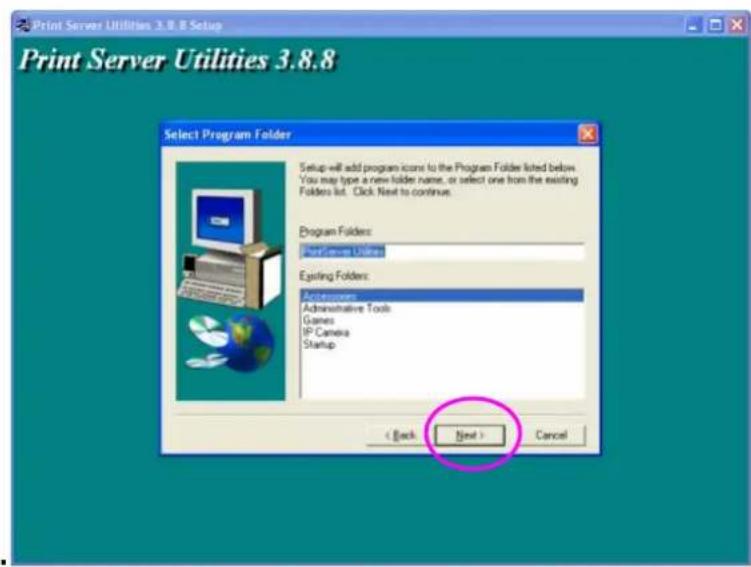
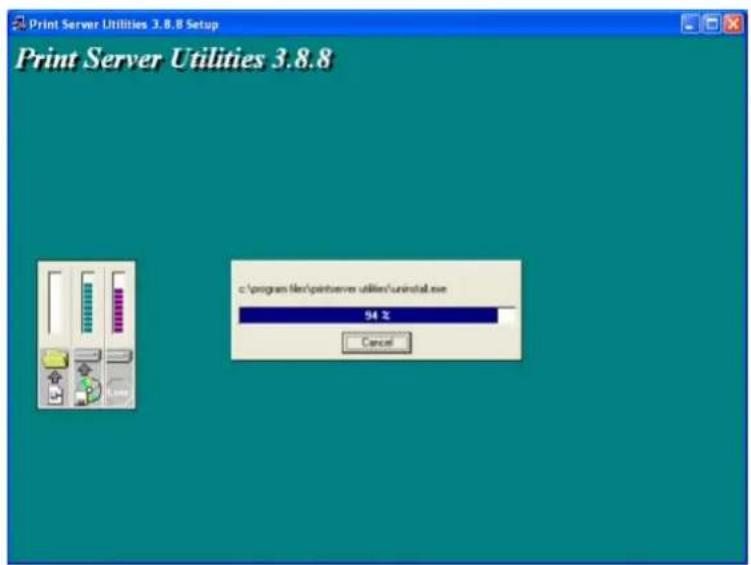
The system will start to install the utilities automatically.
You have completed the installation phase and prepare to configure the Print Server. The “Choose Print Server” will list all Print Servers within the network. Select the Print Server you would like to configure and click “Next”.
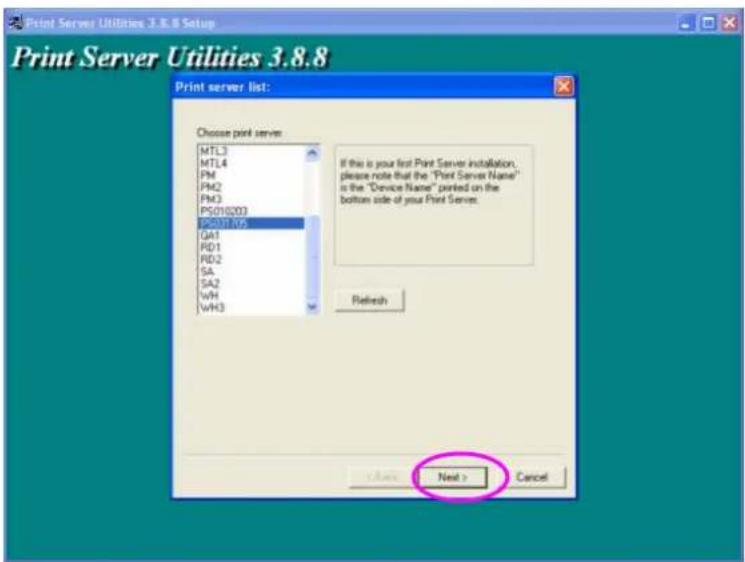
NOTE 1: If this is the first time you configure the Print Server, the “Print Server Name” is the last 6-digit of MAC ID with prefix “PS”. Please check the MAC ID on the print server.
NOTE 2: The list can only display the devices from the same manufacturer.
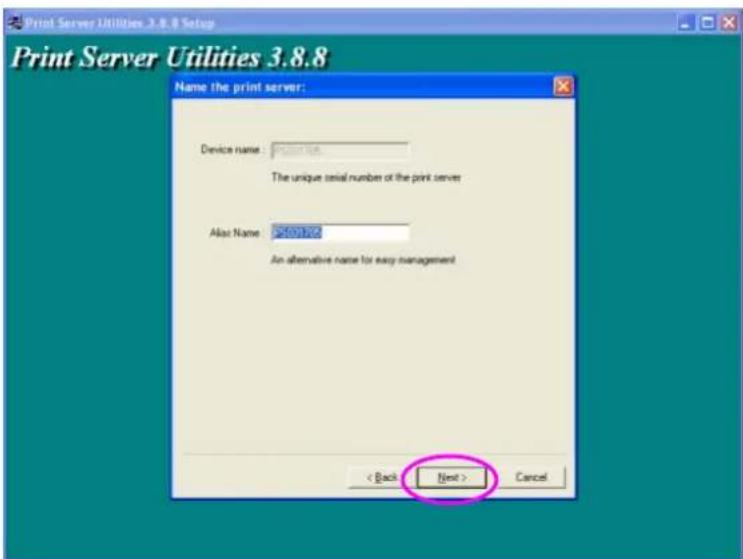
Specify a recognizable name for the Print Server and click "Next".
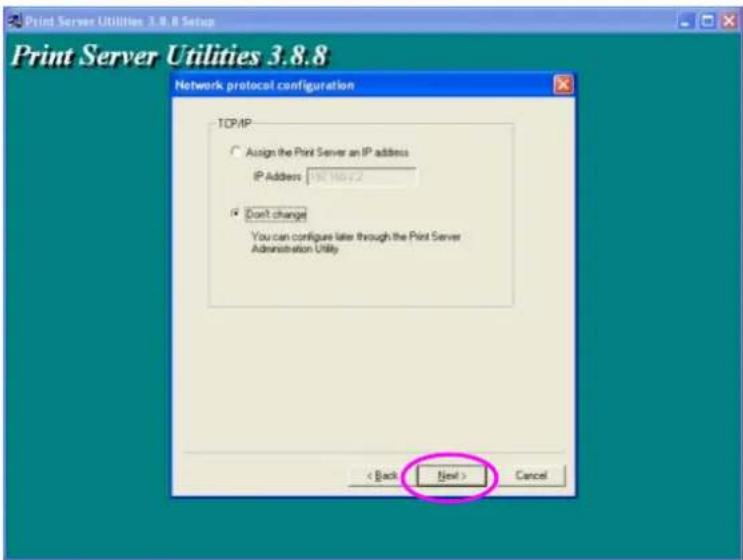
Specify the IP Address for the Print Server manually or click “Next” to keep default IP Address, i.e. 192.168.2.2.
The configuration summary is displayed in the window. Now, you have completed the “Print Server Setup”. Click “Finish” and your system will add network port of the Print Server to your PC automatically.
![Print Server Utilities 3.8.8 Setup Print Server Utilities 3.8.8 Add network port Device Name: P5001705 Alias Name: P5001726 TCP/IP support: Enable IP Address: 940-196-12 Port 1: 541 Port 2: Port 3: Click [Finish] to add your Print Server's Network Port to your PC < Back Finish Cancel](/content/2026/05/765663/images/b7c39eb846447ba85427876f2c4ff19e5db762bcd24e97af9bf609c1fcb5e29a.jpg)
The Administrator Installation procedure is totally completed. Click “Finish”.
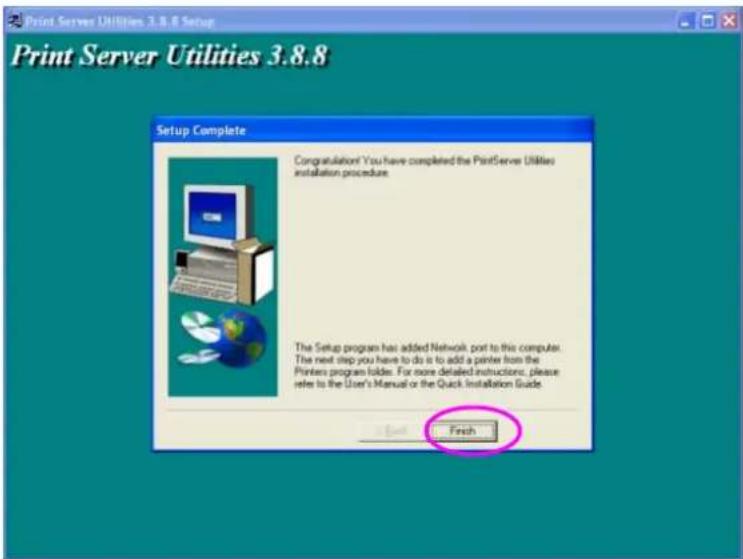
The Administrator Installation Program have executed the installation procedure that performs the following tasks: Install all utilities and drivers to the administrator's PC. Configure the print server (including the print server name and network protocol)
Add the network port of the print server to the administrator's PC.
If you want to print from this administrator's PC to the print server, all you need to do is to perform Windows' standard "Add Printer" procedure (please refer to Section 3.6).
3.3 Administrator Utilities
After Administrator Installation is completed, there will be four utilities in print server's program folder.
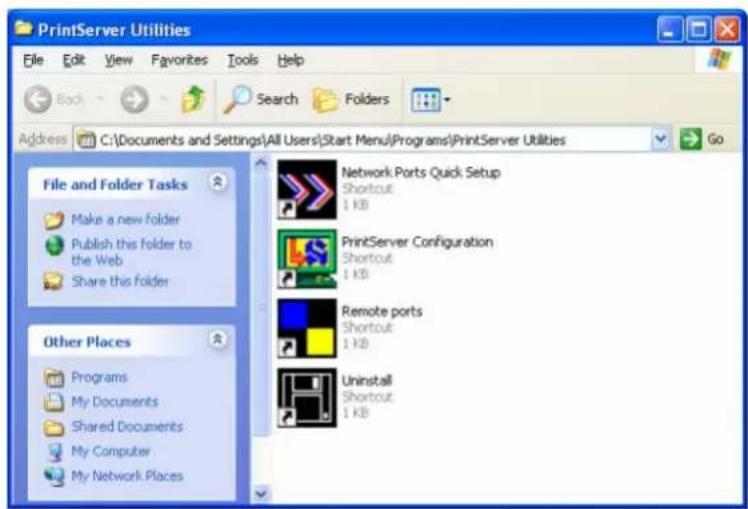
3.4 Client Installation and Setup
The Client Installation can be performed on Windows 95/98/Me/NT/2000/XP/2003 with the same user interface. Before the installation procedure, please confirm that your PC has connected to the network and installed at least one network protocol.
Insert the CD shipped along with the print server into your CD-ROM drive. The Autorun.exe program should be executed automatically. If not, run Autorun.exe manually from CD-ROM drive's root directory.
The "Installation Manager" will be displayed on the screen as follows. Click "Client Utility" then click "English Version".
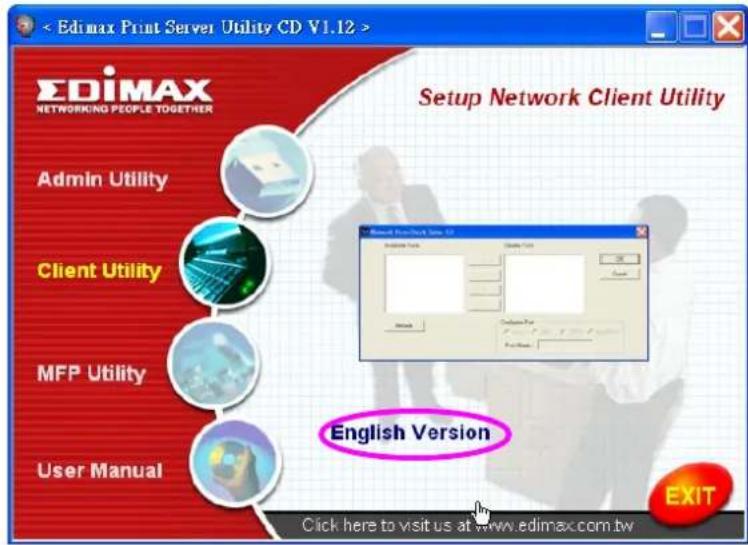
The "Utilities Setup" window will be displayed. Click "Next".
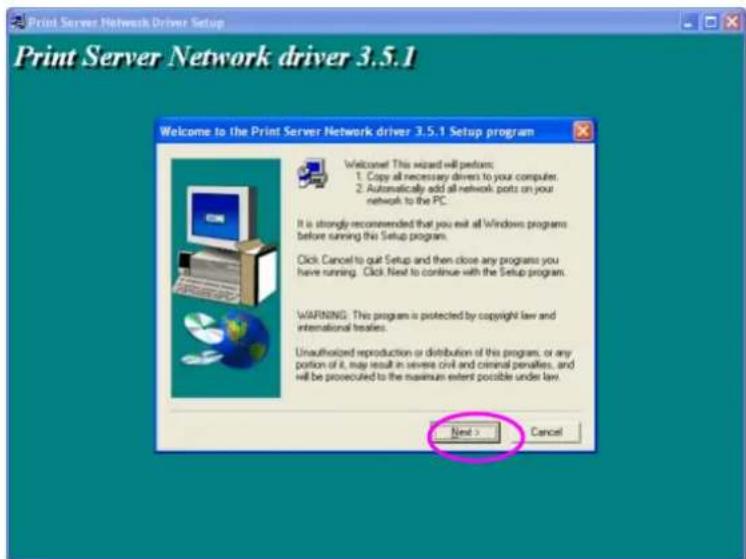
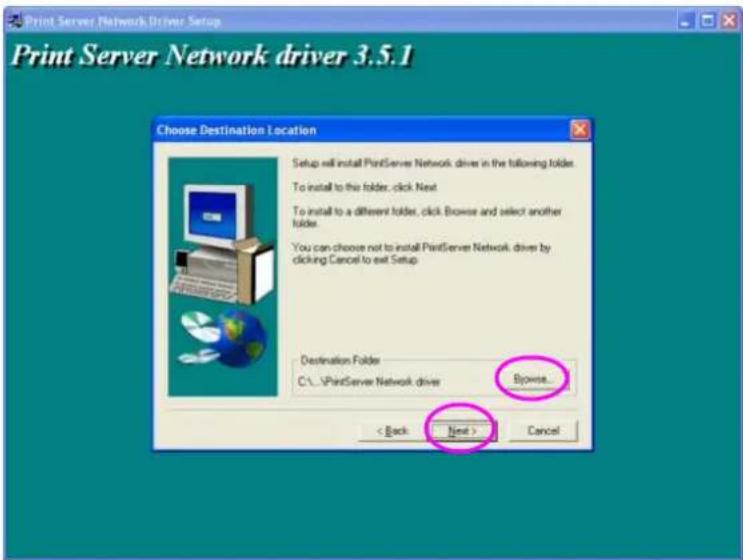
Click "Next" to install the utilities in the default folder or click "Browse" to specify the destination folder where you would like to install the utilities.
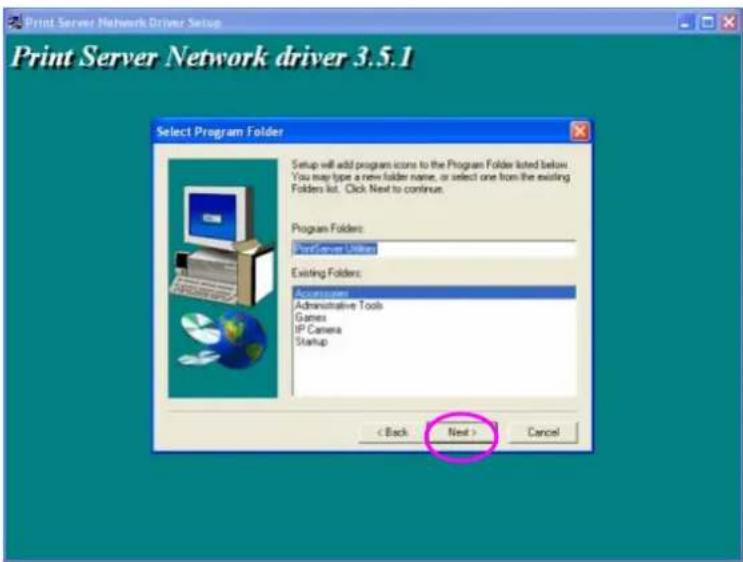
Specify the program folder where the program icons will be added to, click "Next".
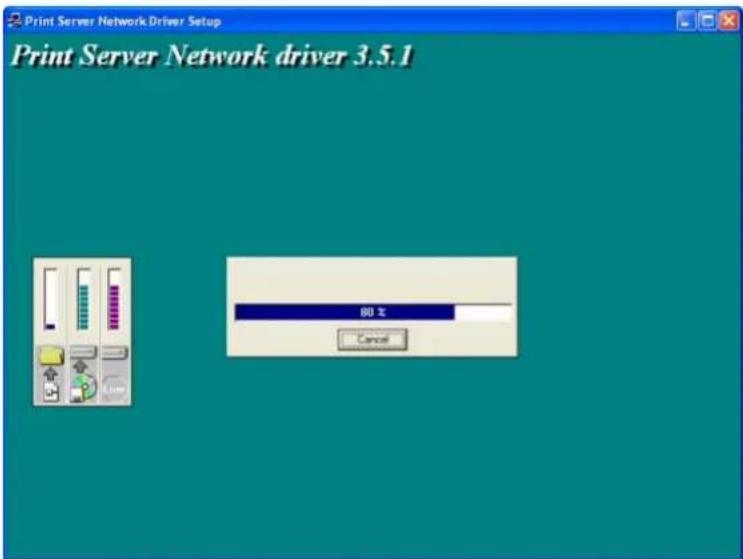
The system will start to install the utilities automatically.
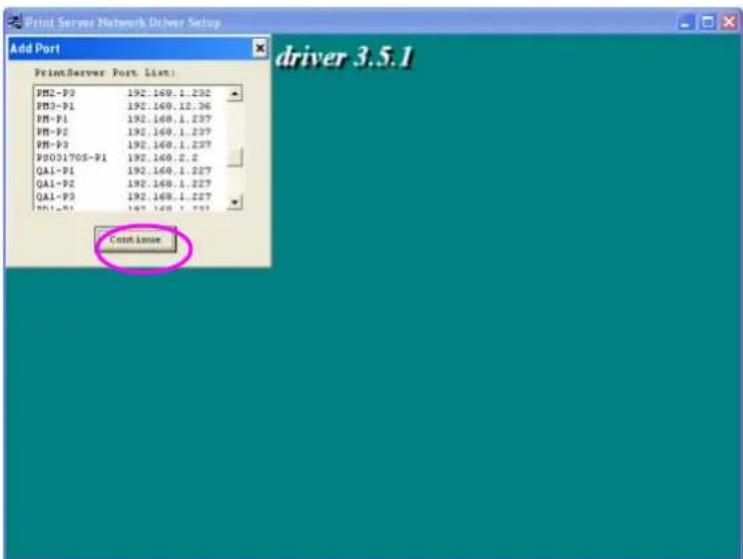
Now, the installation procedure is completed, you are ready to set up the client's computer. All network ports of the Print Servers detected on the network will be added to your PC automatically, click "Continue".
The Client Installation procedure is completed. Click "Finish".
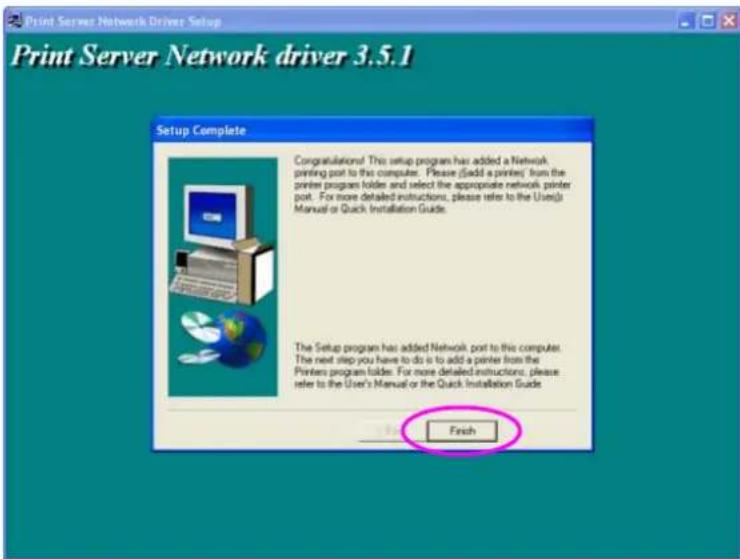
After the installation, you have completed the following tasks:
Install all utilities and drivers to the client's PC.
Add all the print server's network ports of the network to the client's PC.
You can then perform the Windows' standard "Add Printer" procedure to add network printers to your PC. Please refer to Section 3.6.
3.5 Client Utilities
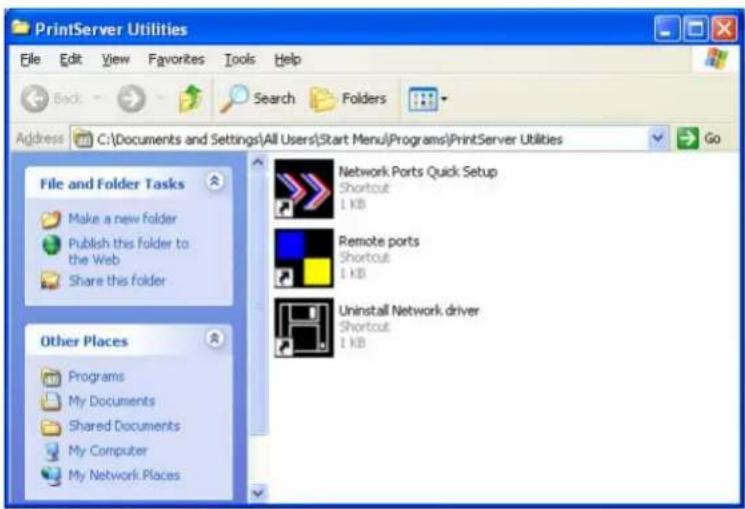
After Client Installation is completed, there will be three tools in print server's Program folder.
• Network Ports Quick Setup
- Remote Ports
• Uninstall Network Driver
3.5.1 Network Ports Quick Setup
Network Ports Quick Setup Utility offers a very simple method to add or remove print server's printer port from the client's computer.
During the client's installation procedure, the system will automatically search for all print servers on the network, and add them into the printer ports of the client's computer
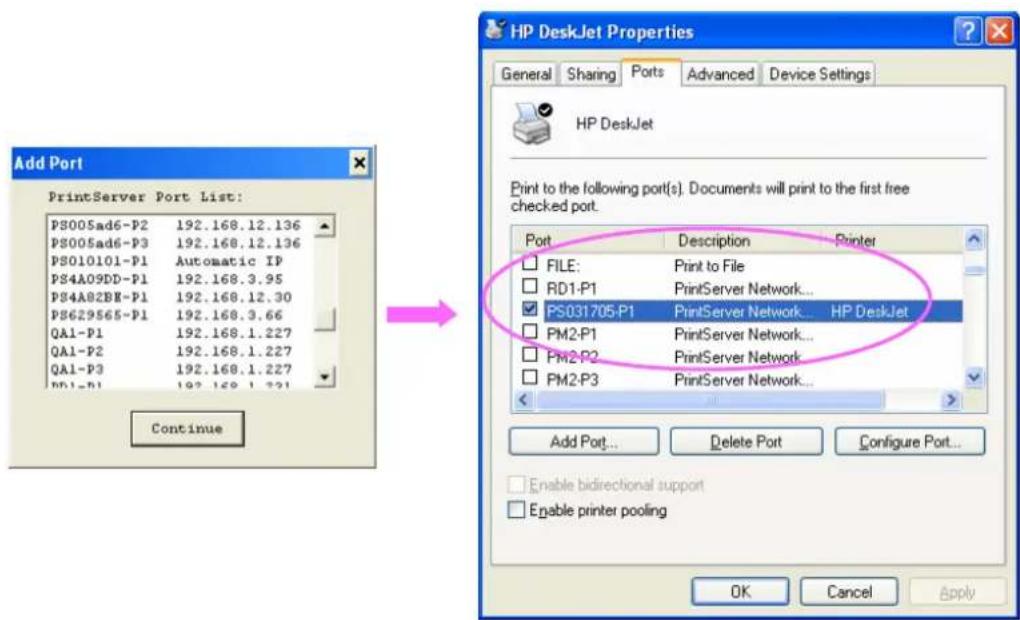
If you have just installed another new print server in the network, you must run this program first. This program will search for new print servers and allow you to add the new network printer port into client's computer conveniently. Perform the standard Add Printer procedure, then you can print directly to the printer through the newly installed print server.
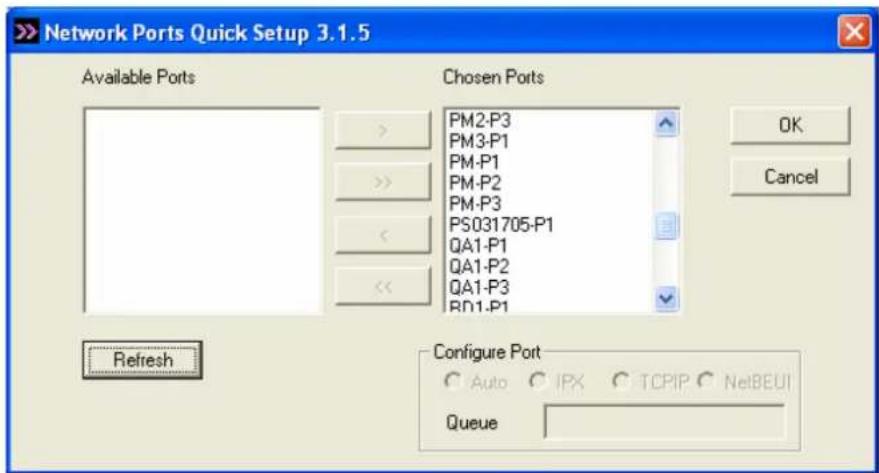
Please be aware that Network Ports Quick Setup Utility can only detect and configure all print servers on the same network, it cannot search and configure print servers on other subnets across network segments. You must use Remote Ports Utility described in the next section to manage remote (across network segments) print servers.
3.5.2 Remote Ports (Utility)
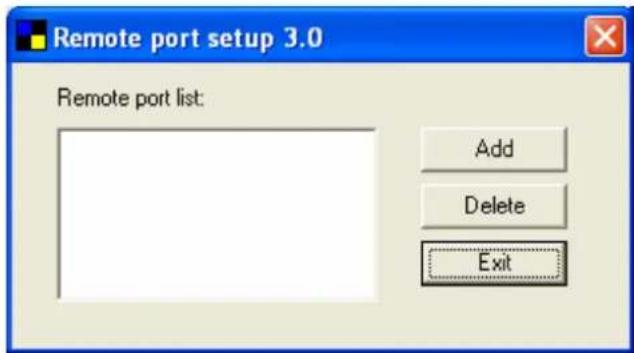
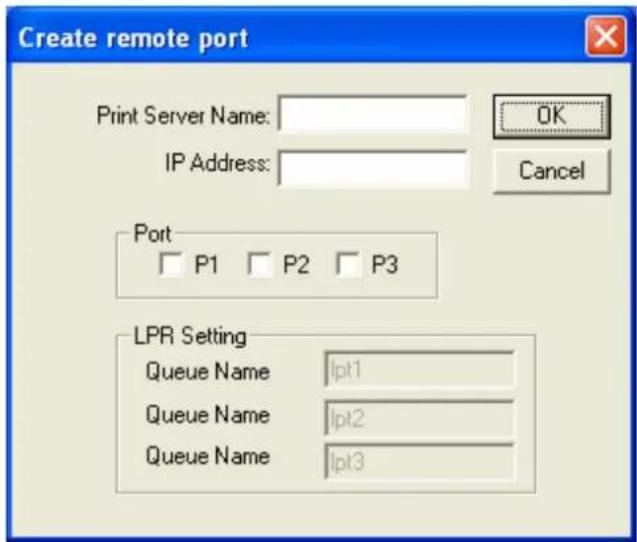
Remote Ports Utility offers a convenient way for you to manage and add printer port of the remote print server. From the assistant of this utility, you can print to other print servers outside the subnet across network segment. However, please note that this function only supports TCP/IP network protocol.
Please follow the procedures described below: Step1. Run Remote Ports Utility. Clicks "Add" to add a remote print port.
Step2. Enter print server's name, IP address, select used ports, and enter LPR queue name of each port. Click "Ok".
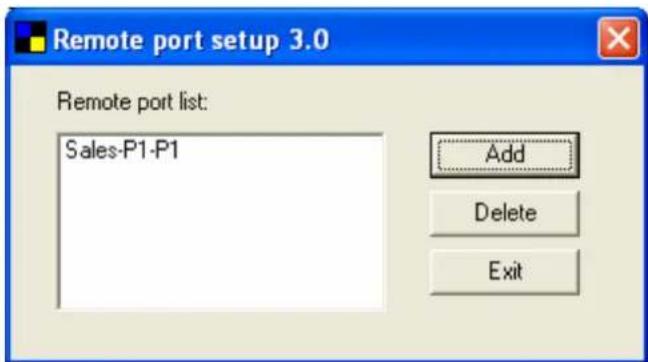
Step3. The new remote print port is displayed as follows.
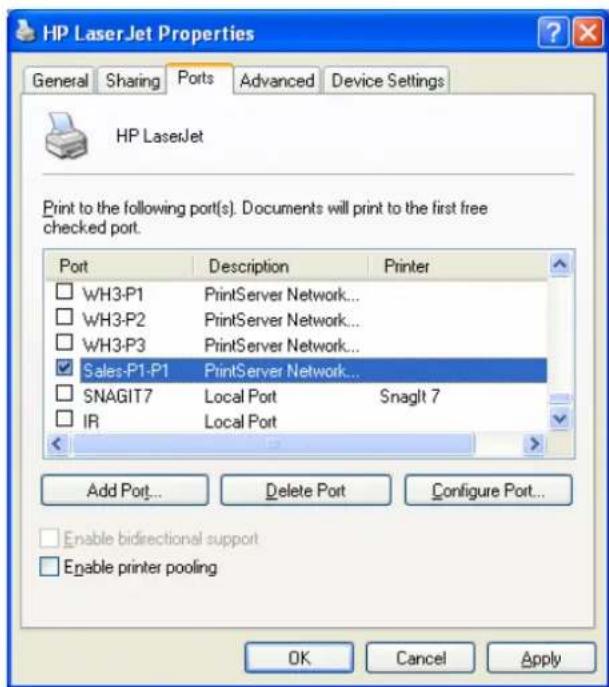
In order to use the remote printing function, you will have to proceed with normal Add Printer procedure and select your printer port as the newly added remote printer port.
3.6 Windows Add Printer Procedure
After adding a “Network Port” of the print server to your PC by Administrator or Client Installation Program, you can follow the procedure described below to add printer to the Windows. Note that following “Add Printer” steps are running in Windows XP, the steps in other Operating Systems are similar.
Step1. Click "Start", choose "Settings" and select "Printers and Faxes".
Step2. Click "Add a Printer".
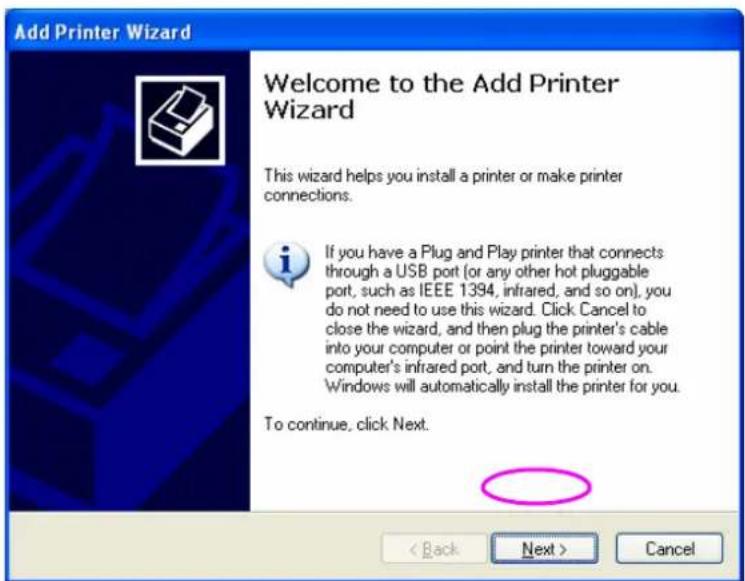
Step3. The "Add Printer Wizard" is displayed. Click "Next".
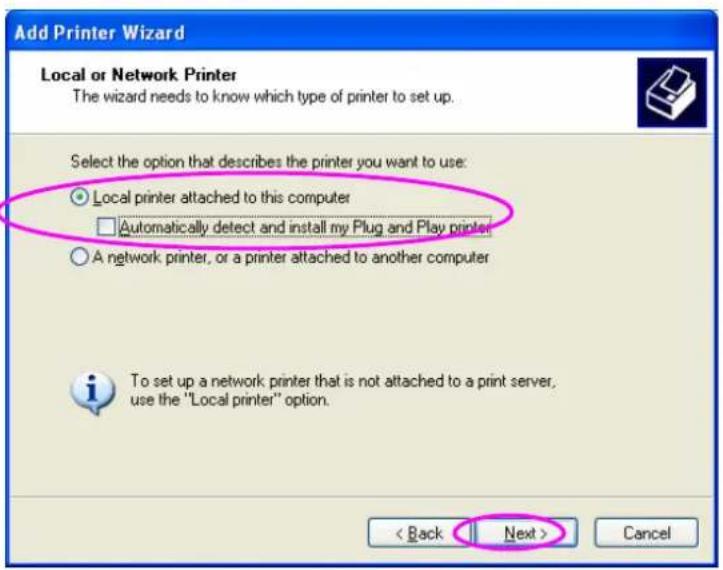
Step4. Select “Local printer attached to this computer” and make sure that “Automatically detect and install my Plug and Play printer” is not selected. Click “Next”.
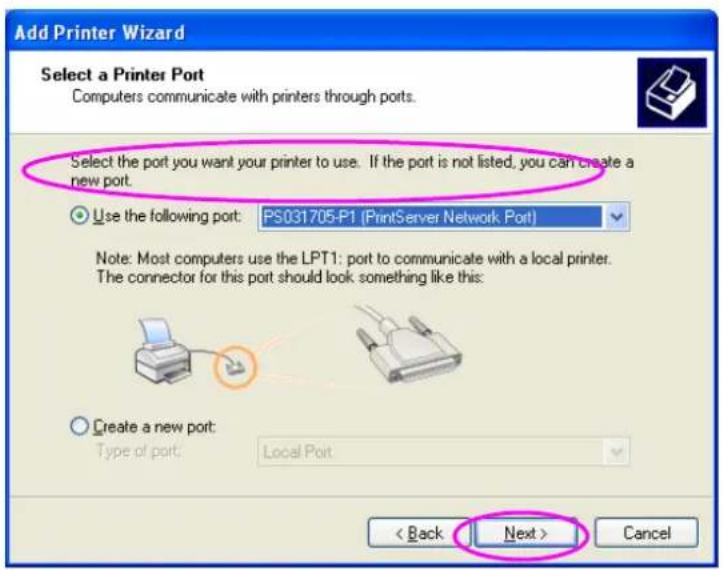
Step5. Choose the suitable “Print Server Network Port” which was created by the Administrator Installation or Client Installation process and click “Next”.
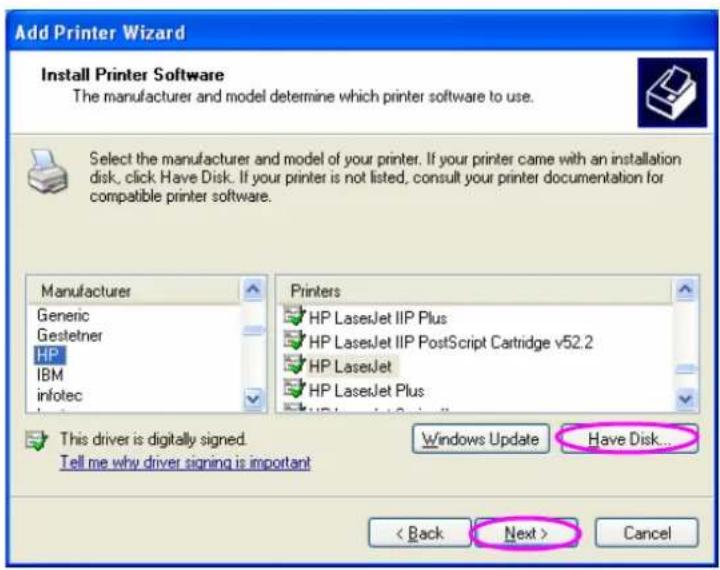
Step6. Select a suitable printer manufacturer and the printer model and click "Next". If your printer is not in the list, click "Have Disk..." to install the driver of the printer. After installation, the printer model will be added to the list.
Step7. Name your printer and setup the default printer, click "Next".
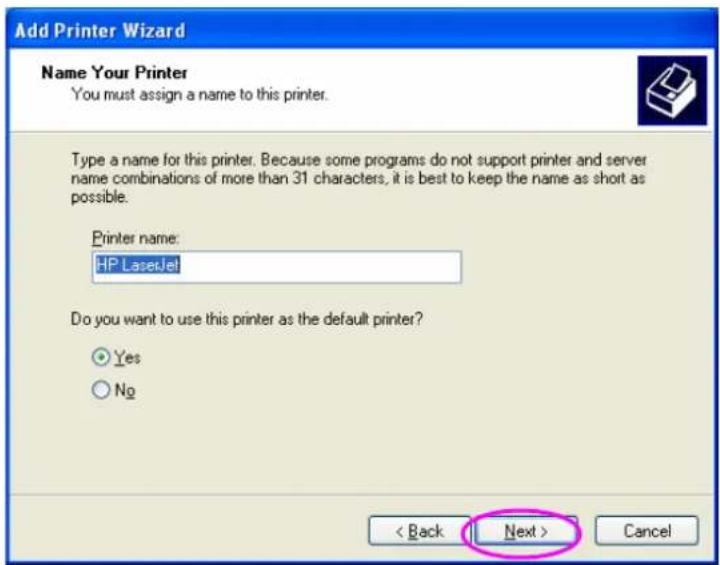
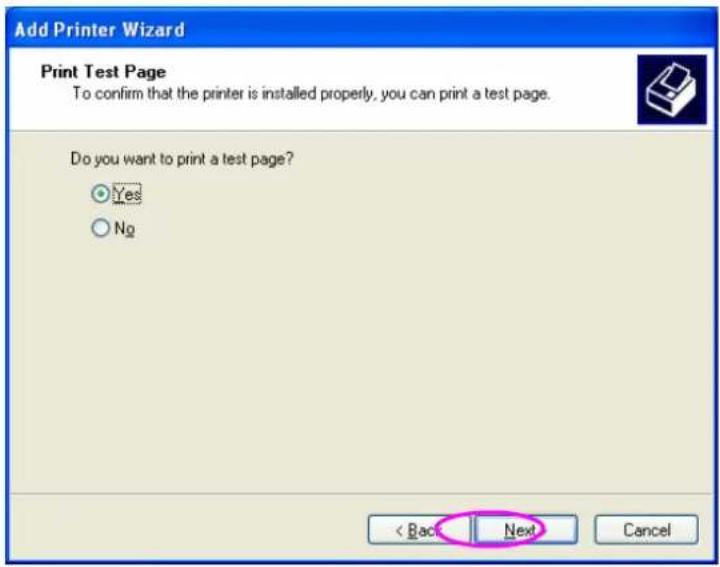
Step8. Choose to print the test page or not. It is recommended to print a test page. Click "Next".
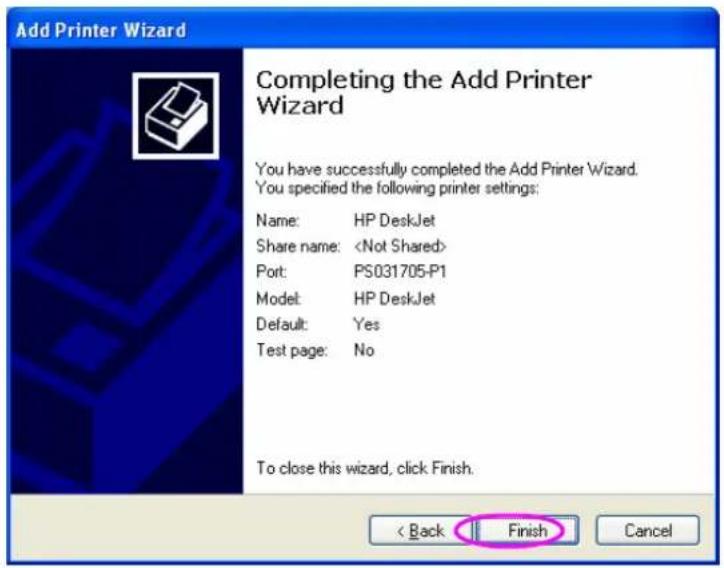
Step9. You have added the printer to the PC successfully. The information of the printer is displayed in the windows. Click "Finish".
4. Windows NT/2000/2003 Network
4.1 System Architecture
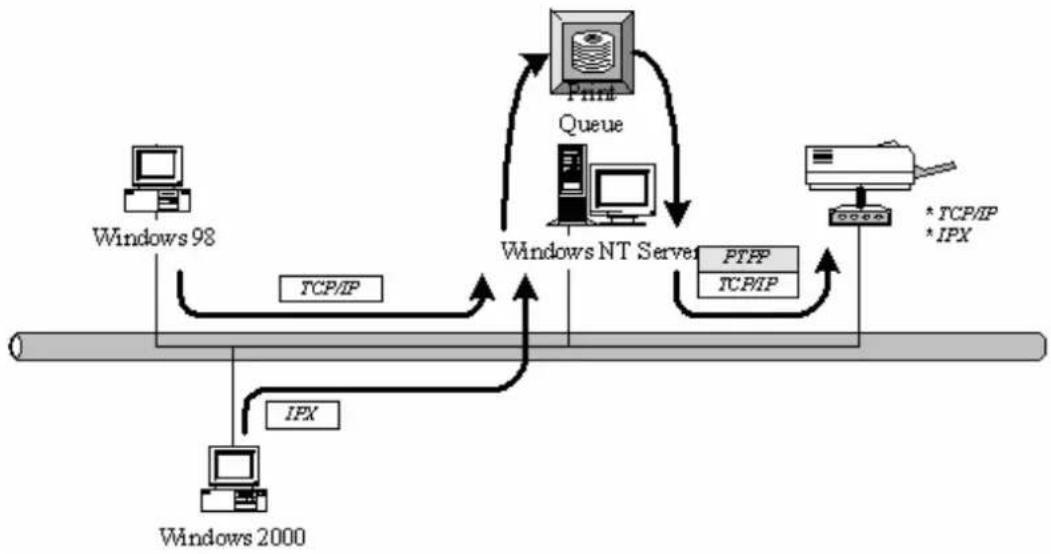
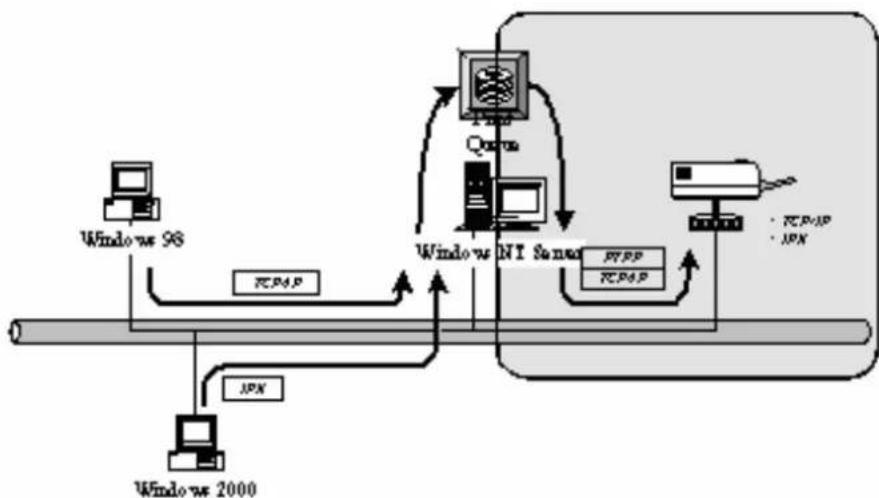
In Windows network environment, other than the Peer-to-Peer network printing architecture described in the previous chapter, we also offer the Server-Based Printing architecture for Windows NT/2000/2003 server. Only one Windows NT/2000/2003 is required to have Windows PTPP (Peer-to-Peer Printing) driver installed and share the printing service on the network. Other network users can simply connect to the server and access the shared printer (see below).
flowchart
graph TD
    A["Windows 98"] -->|TCP/IP| B["Windows NT Server"]
    C["Windows 2000"] -->|IPX| B
    B -->|PTPP\nTCP/IP| D["Computer"]
    D -->|* TCP/IP\n* IPX| E["Server"]
    F["Print Queue"] --> B
    G["Windows 98"] -->|TCP/IP| B
4.2 Windows NT/2000/2003 Server Installation and Setup
Please follow the procedures described below for installation and construct a peer-to-peer connection (PTPP) between Windows NT/2000/2003 Server and Print Server.
flowchart
graph TD
    A["Windows 98"] -->|TCP/IP| B["Window 2000"]
    B -->|JPX| C["Window 2000"]
    C -->|TCP/IP| D["Window 2000"]
    D -->|TCP/IP| E["Window 2000"]
    E -->|JPX| F["Window 2000"]
    F -->|TCP/IP| G["Window 2000"]
    G -->|TCP/IP| H["Window 2000"]
    H -->|JPX| I["Window 2000"]
    I -->|TCP/IP| J["Window 2000"]
    J -->|TCP/IP| K["Window 2000"]
    K -->|JPX| L["Window 2000"]
    L -->|TCP/IP| M["Window 2000"]
    M -->|TCP/IP| N["Window 2000"]
    N -->|JPX| O["Window 2000"]
    O -->|TCP/IP| P["Window 2000"]
    P -->|TCP/IP| Q["Window 2000"]
    Q -->|JPX| R["Window 2000"]
    R -->|TCP/IP| S["Window 2000"]
    S -->|TCP/IP| T["Window 2000"]
    T -->|JPX| U["Window 2000"]
    U -->|TCP/IP| V["Window 2000"]
    V -->|TCP/IP| W["Window 2000"]
    W -->|JPX| X["Window 2000"]
    X -->|TCP/IP| Y["Window 2000"]
    Y -->|TCP/IP| Z["Window 2000"]
Step1.
If this is your first time installing print server, please install the administrator software on Windows NT/2000/2003 server first. Refer to section 3.2 for installation instructions. If your network has already installed a working print server and your Windows NT/2000/2003 server has not yet installed the PTPP driver, please install the client software. Refer to section 3.4 and 3.5 for installation instructions.
Step2.
Please add/configure the Peer-to-Peer Printing of the Windows NT/2000/2003 network printer and verify that you can print from Windows NT/2000/2003 to the print server by the installed PTPP driver.
Step3.
Share the above server's printer to the network by performing the standard Windows printer sharing process.
4.3 User Installation and Setup
flowchart
graph TD
    A["Windows 96"] -->|TCP-IP| B["Windows 2000"]
    B -->|JPN| A
    C["Print-Journal"] -->|JPN| D["Windows NT Server"]
    D -->|JPN| E["PTPP"]
    E --> F["TCP-IP"]
    F --> G["Server"]
    G --> H["• TCP-IP"]
    G --> I["• JPN"]
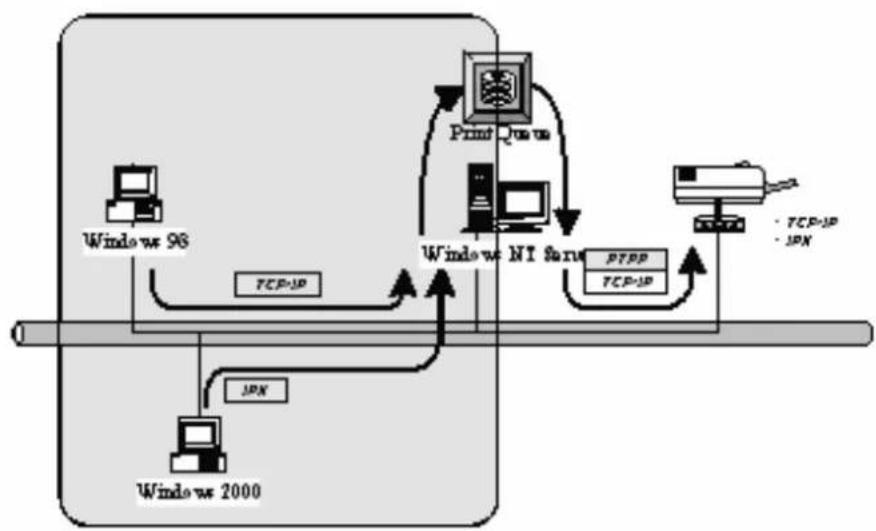
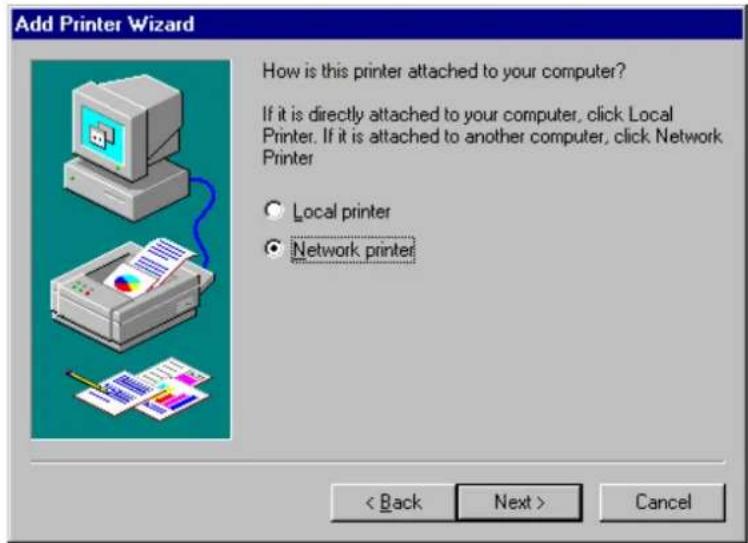
After server side's installation is completed, client side will be able to find the server's shared printer in Network Neighborhood. You only need to perform Window's standard Add New Printer procedure, select "Network Printer" shown in the screen below, and complete the configurations afterwards to access the shared printer.
5. NetWare Network
5.1 System Architecture
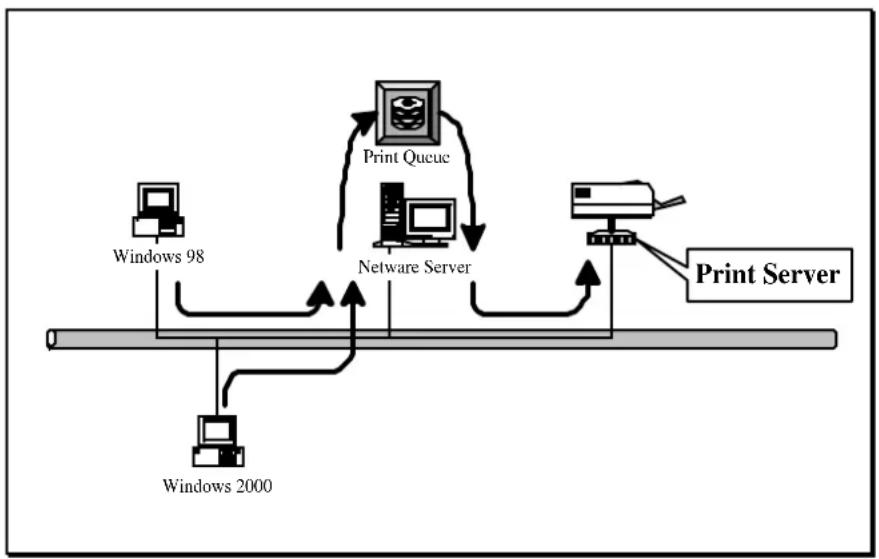
We implement NetWare printer sharing functionality into the print server itself, thus allowing one or more printers attached by a print server to be connected to the network.
We have developed the print server to support NetWare print server.
Embedded print server, which emulates the “queue management functionality” of NetWare print server,
PSERVER program running on the NetWare server. A user first prints a job at a workstation, the job is routed to a NetWare server, the NetWare server stores the job in a print queue and then the print server gets the print job from the queue to printers.
flowchart
graph TD
    A["Windows 98"] --> B["Print Queuc"]
    C["Windows 2000"] --> D["Netware Server"]
    D --> E["Print Server"]
    B --> E
Compare with NetWare printing functionality, the advantages of embedding the NetWare network printing functionality in the print server include:
Installation is easier and quicker.
Network management is easier.
Printing performance is enhanced.
Relieve NetWare file server's burden.
Relieve the need of a workstation running the remote printer utility.
Improve productivity by locating the printer near the workgroup.
Each print server should log into a NetWare server before servicing the print jobs. Each print server will occupy a user account with which it can log into the NetWare server.
5.2 NetWare 3.x/4.x/5.x Installation & Setup
Once your print server is connected to your Ethernet network, you can set it up for use with your networking software.
5.2.1 Installation Using PCONSOLE
5.2.1.1 Configuring as Print Server Mode
- Run the NetWare PCONSOLE program.
- Change the current file server, if necessary, using the Change Current File Server menu selection.
- Choose the Print Queue Information menu selection.
- Press the Insert key to add a new print queue.
- Type in a print queue name, such as "PQ" or "Q1".
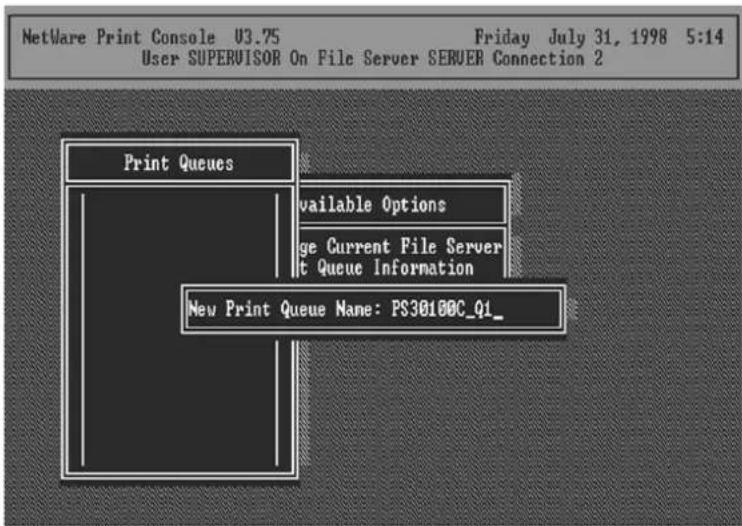
- You have now successfully created the print queue that your print server will serve. Press the Escape key until the Available Options main menu is displayed.
- Select Print Server Information.
- Press the Insert key to add a new NetWare print server object. The print server name can be identical to the PSxxxxxx name printed on the label of the print server.
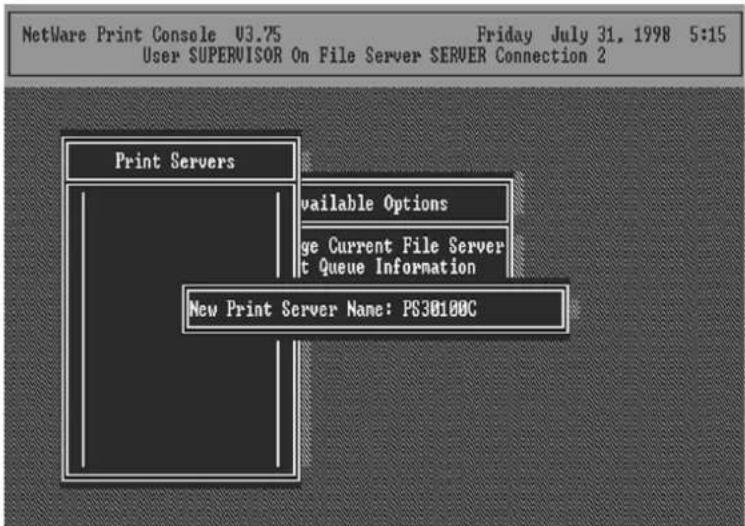
- Press Enter to select the newly created print server.
- Select Print Server Configuration.
- Select Printer Configuration.
- Select Printer 0 (or Printer 1, Printer 2), and press Enter, then select LPT1 (or LPT2, LPT3) in the Type field. If your print server is with only one port, you do not need to configure this Type field.
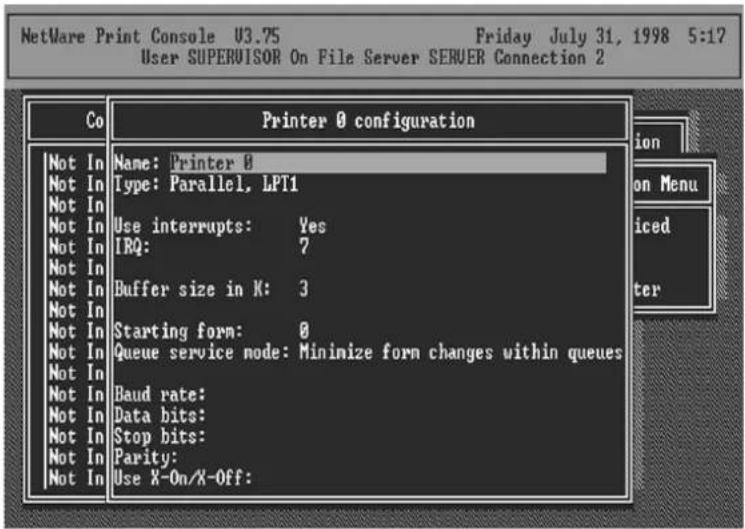
- Press Escape, and answer Yes to the Save Changes question.
- Select Queues Serviced by Printer, then select Printer 0 (or Printer 1, Printer 2) and press Enter.
- Press Insert and add your newly created print queue to the list of queues serviced by the printer. Enter a priority
number for the queue service, or press Enter to accept the default.
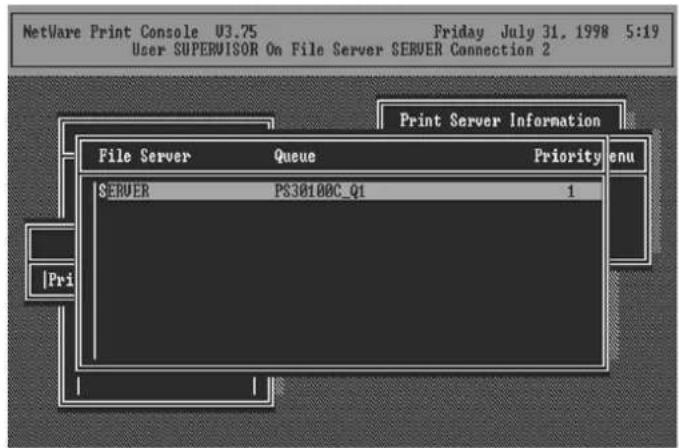
- Repeatedly press Escape to exit the PCONSOLE program.
- Reset the print server to have the changes take effect.
NOTE: If the print server you have is with multiple printer connectors, you may create multiple print queues and printer objects.
Your print server should now be ready to use. You should be able to redirect printing to your print server using a CAPTURE command such as the one shown in the previous section.
6. UNIX System Network
6.1 Introduction
The print server is available for TCP/IP printing by Unix LPD (Line Printer Daemon) protocol. The LPD protocol originated with Unix release is based on the BSD version of Unix and supported under most versions of Unix.
This chapter explains how to configure the print server for TCP/IP operation, and how to modify configuration files on your Unix system to allow printing to the print server. The configuration examples in this manual follow the syntax for BSD based Unix systems. Please refer to the related system documentation for the correct syntax of your systems.
To configure the print server for LPD printing, perform the procedures below:
- Enable Print Server's TCP/IP Support.
- Set up Print Server's IP address.
- Verify Print Server's IP Address.
- Configure remote LPD printing on the host.
- Print a test page.
In the next sections, we will describe these five procedures step by step.
6.2 Enable Print Server's TCP/IP Support
The default configuration of the print server is with TCP/IP support enabled. Anyway, you can configure the print server to enable TCP/IP support using the configuration program.
6.3 Setup Print Server's IP Address
The print server must have a unique IP address in order to be recognized by the network.
You can set up the IP address on the various Unix systems using any one of the following methods:
- DHCP (Dynamic Host Configuration Protocol)
- BOOTP (Bootstrap Protocol)
The print server will use the last three methods to obtain its IP address automatically if its IP address is configured as Auto (0.0.0.0).
6.3.1 DHCP
There are many Unix systems that support DHCP protocol, and the procedures to configure the DHCP server database are different. This manual does not describe the DHCP server configuration on the Unix systems. It is highly recommended that the DHCP server should be located on the same network as the print server.
6.3.2 BOOTP
If you have the BOOTP daemon, bootpd, running on your UNIX system that is accessible by the print server, you can use the BOOTP protocol to set up the IP address of the print server. We recommend that the BOOTP server should be located on the same subnet as the print server. If you use Network Information Services (NIS) in your system, you may need to rebuild the NIS map with the BOOTP services before doing the following BOOTP configuration. To rebuild the NIS map, please refer to your system documentation.
To configure the IP address data for the BOOTP server, you will need to log in the host of BOOTP server as the superuser (root). Perform the following steps to add address entries,
- Optionally, assign a name corresponding to the print server's IP address. You can add this address to the /etc/hosts file, by adding a line such as:
203.66.191.12
pserver
- Add an entry to the host's /etc/bootptab file, similar to the following:
hostname:\
:ht=1:\
:ha=print_server_ethernet_address:\
:ip=print_server_ip_address:
Lines should be indented with tabs.
Where hostname is the device name of a print server, the ht=1 tag specifies the hardware type is Ethernet, the ha= tag specifies the Ethernet address of a print server, which is the Node ID located on the print server. The ha tag
must be preceded by the ht tag. The ip= tag should correspond to the IP address you want to assign to the print server.
For example, a print server with the following configuration:
Node ID: 0000B4010101 (this implies Ethernet
address is 0000B4010101),
IP address: 203.66.191.12
The entry for this print server in the /etc/bootptab file should be:
PS010101:\
:ht=1 :\
:ha=0000B4010101:\
:ip=203.66.191.12:
6.4 Verify Print Server's IP Address
To verify that your print server is responding to the newly assigned IP address using a PING command:
ping ip-address
6.5 Configure Remote LPD Printing on the Host
The procedure you use to configure your Unix host(s) to allow printing to your network remote print server varies between different varieties of Unix. The procedure below can be used for Unix variants that are related to BSD Unix, such as SunOS or Linux. For other versions of Unix, consult your system documentation, keeping in mind that:
- The print server should be treated as a BSD networked print server host.
- The host name should be the name (or IP address) that you have assigned to the print server.
- The printer name (or queue name) on the remote host should be lpt1, lpt2 or lpt3, the name of the printer port on the print server.
You will need to perform the tasks below, logged in as the superuser (root). To configure your Unix host for printing,
- Optionally, assign a name corresponding to the print server's IP address. You can add this address to the /etc/hosts file, by adding a line such as:
203.66.191.186
pserver
- Create a spool directory for the printer in the same directory where spool directories are normally kept on the machine, such as /var/spool or /var/spool/lpd:
mkdir /var/spool/lpd/pserverd
chown daemon /var/spool/lpd/pserverd
chgrp daemon /var/spool/lpd/pserverd
chmod 775 /var/spool/lpd/pserverd
- Add an entry to the host's /etc/printcap file, similar to the following:
printer-name:\
:lp=:\
:rm=203.66.191.186:\
:rp=lpt1:\
:lf=/var/spool/lpd/pserverd.log:\
:sd=/var/spool/lpd/p serverd:\
:mx#0:
Lines should be indented with tabs. More than one printer name can be used, with variants separated by vertical bars (name1|name2).
The rm= entry should correspond to the IP address you have assigned to the print server. You can also use a host name if you have assigned one in the /etc/hosts file.
The sd= entry should correspond to the spool directory you created in the previous step.
The rp= entry should correspond to the port name of the remote printer. The values should be one of lpt1, lpt2 or lpt3 depends on the printer port.
The print server should now be available for printing from your Unix host.
7. Configuration Utility
7.1 Introduction
This chapter introduces print server's system configuration utility in Windows environment. This utility is automatically installed during Windows Administrator Utility installation procedure - refer to section 3.2 and 3.3.
This utility provides the most complete management and configuration functions on the print server side. This utility only provides configuration functions for print server itself; it does not include configuration functions for client side or other file server or NetWare server in the network environment.
The Configuration Utility provides the following configuration and management functions:
Search Print Server: Search All Available Printer Servers on the Network.
Print Server Status: Display Print Server Network Status.
AppleTalk Configuration: AppleTalk Protocol Setting.
General Configuration: General Information of print server.
NetWare Configuration: NetWare Printing Configuration.
System Configuration: Print Server Network Ability
Setting and Firmware Upgrade.
TCP/IP Configuration: IP Address and DHCP Server Configuration.
Wireless Configuration: Wireless LAN Configuration.
SNMP Configuration: SNMP Information Configuration.
Setup Wizard: Guide You Through All the Settings.
Report: List the Status of All Available Print Servers on the Network.
We will explain each function separately in the following section.
7.2 Search for All Available Print Server
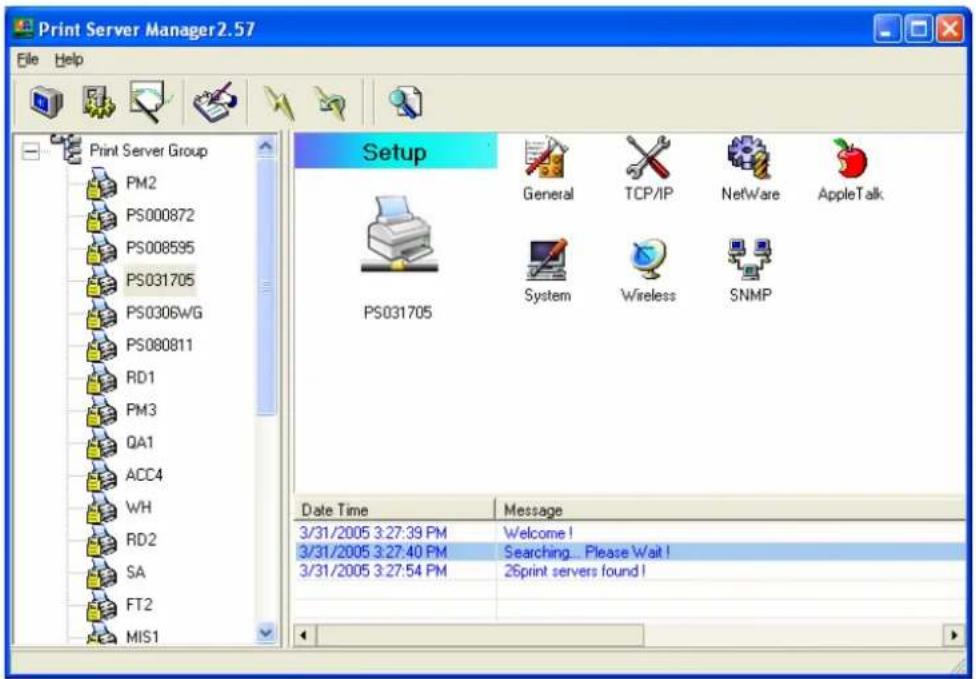
Every time when you run print server's configuration utility, click the "Search" icon on the tool bar. The configuration utility will delay for several seconds because the utility is using system's available network protocols to search for all print servers on the network. All available print servers will be listed under "Print Server Group" on the left side of the window.
You must select the print server you would like to configure from the list. The system will, at the same time, display the selected print server's status on the right side of the window.
7.3 Status of Print Server
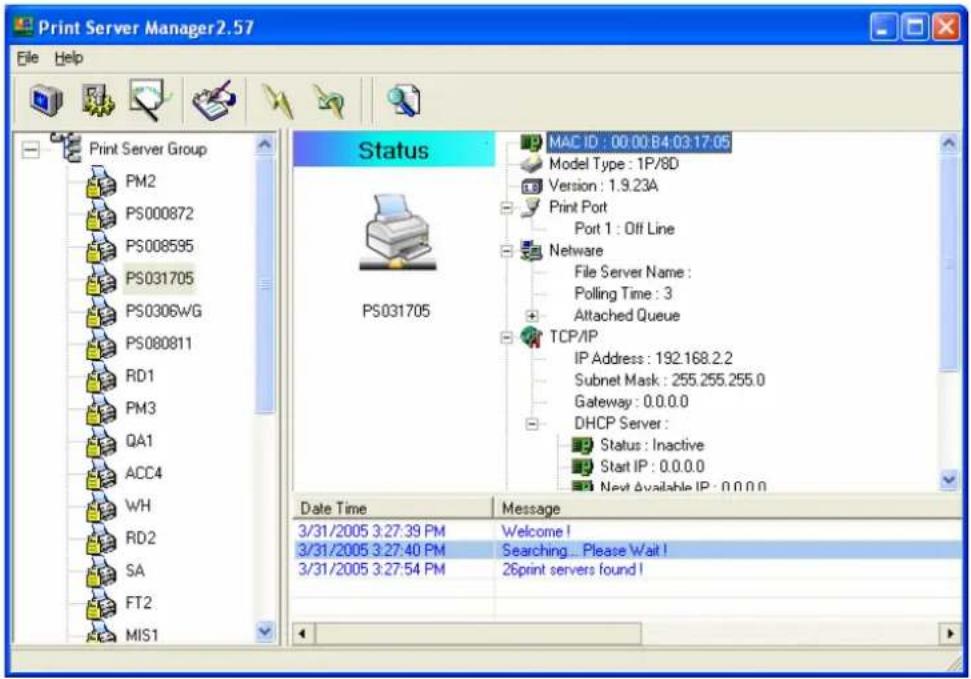
Click "Status" icon on the tool bar, the status of the current selected print server will be showed on the right side of the window.
The information of the print server displayed are MAC ID, Model Type, Firmware Version, status of each printer port, NetWare file server name, NetWare file server polling interval, NetWare printer queue names, IP address, subnet mask, default gateway, AppleTalk printer type, AppleTalk zone and print server printing ability...etc.
You can refresh the print server's status by pressing the
"Refresh" button
You can restart the print server by pressing the "Reboot" button.
7.4 Setup the Print Server
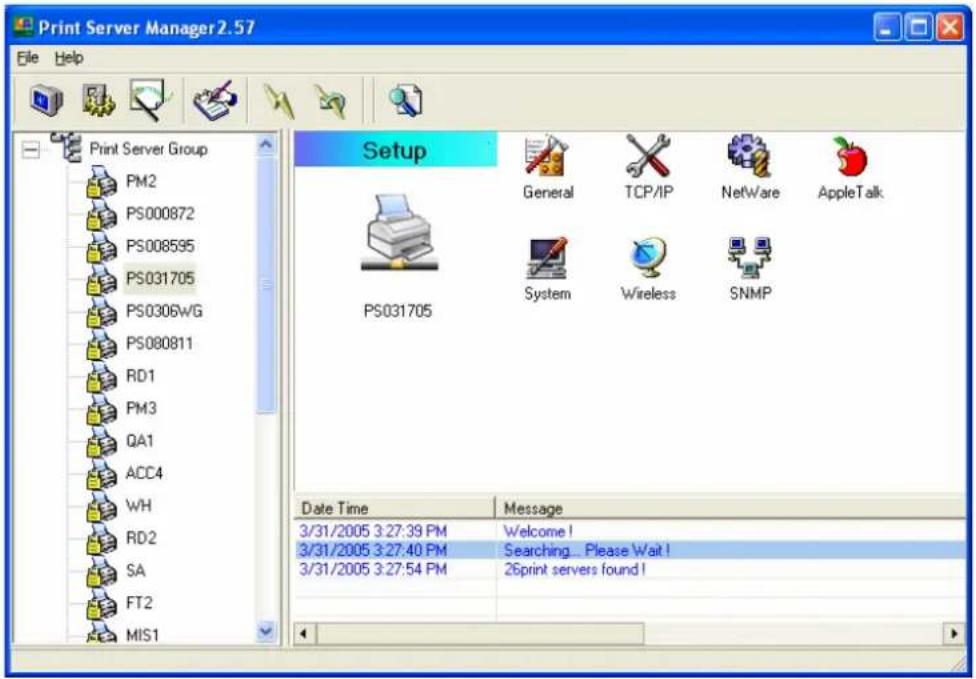
Click "Setup" icon on the tool bar, the setup items of the current selected print server will be showed on the right side of the window.
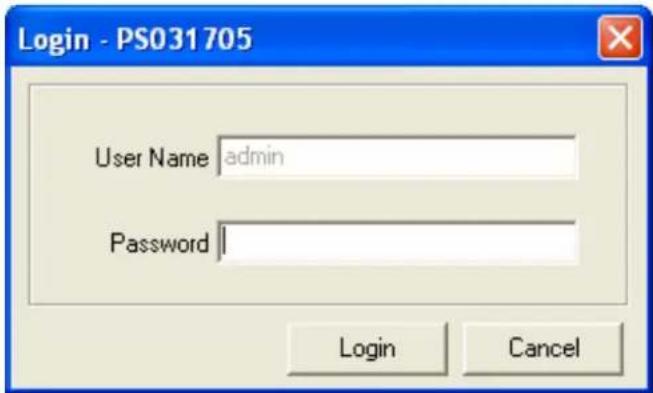
Double click one of the icons to set up the selected print server. A screen will pop up to verify "User Name" and "Password" of the print server. The default values are as follows.
- User Name: admin
- Password: 1234
7.5 AppleTalk Configuration
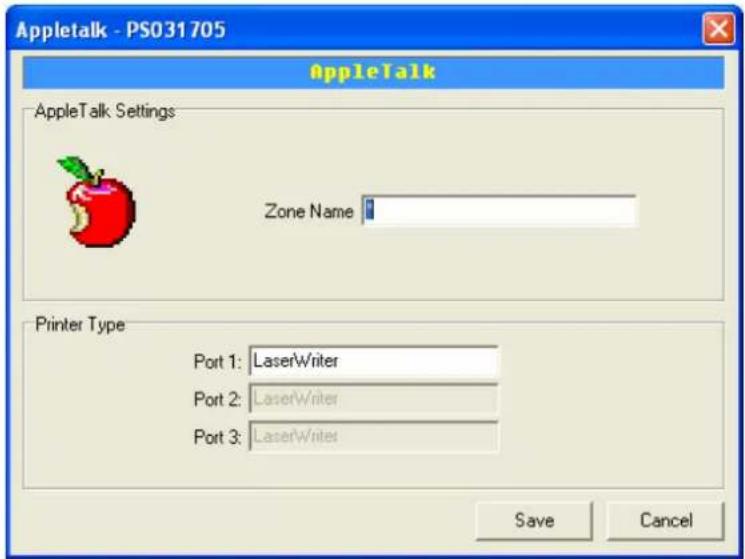
Double Click "AppleTalk" icon and the AppleTalk configuration window will pop-up.
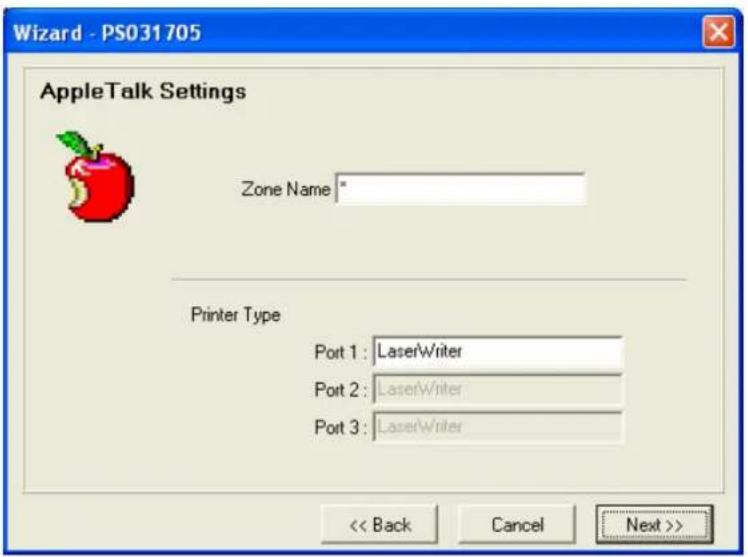
AppleTalk is a data communication protocol often used by Macintoshes. The print server can use these parameters to join the AppleTalk network and share the printer to other AppleTalk workstations. You have to setup the “Zone Name” and “Printer Type” for each printer port of this print server.
Zone Name: Print server has to join zones of AppleTalk before it can be shared to other workstations. Only workstations in the same zone can share the printer. If you want to share the printer to all workstations in all Zones, you should enter only “*” in the “Zone Name” field. Printer Type, the type of printer attached to each printer port. You can get the printer type from the manufacturer of the printer.
7.6 General Configuration
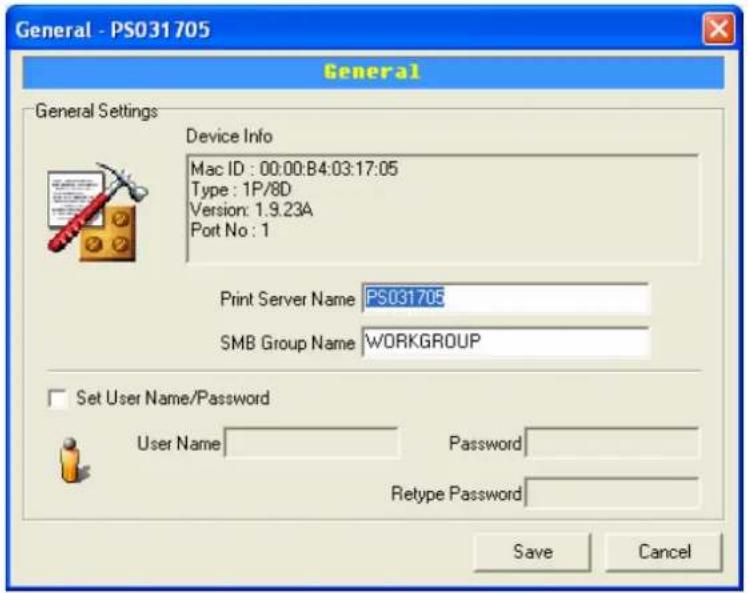
Double Click "General" icon and the General configuration window will pop-up.
You can see basic print server information in this page. You also can configure the "Print Server Name", "SMB Group Name", "User Name" and "Password" here.
Printer Server Name, the name of the print server. You can use this name to identify the print server when you are searching for the print server by the administration and client utilities.
SMB Group Name, the name of SMB group that this print server belongs to. All PC should join the same group before they can use this print server by SMB protocol.
User Name / Password is used to authenticate the administrator by the Web administration tool.
7.7 Netware Print Server Configuration
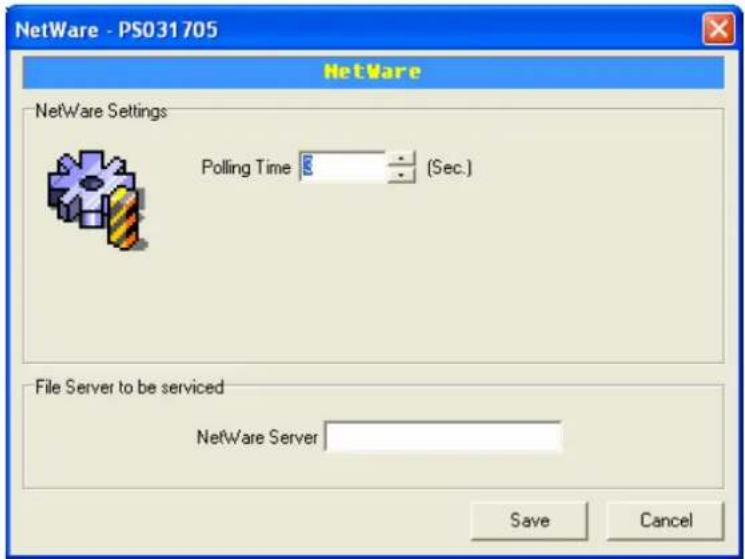
Double Click "NetWare" icon and the NetWare configuration window will pop-up.
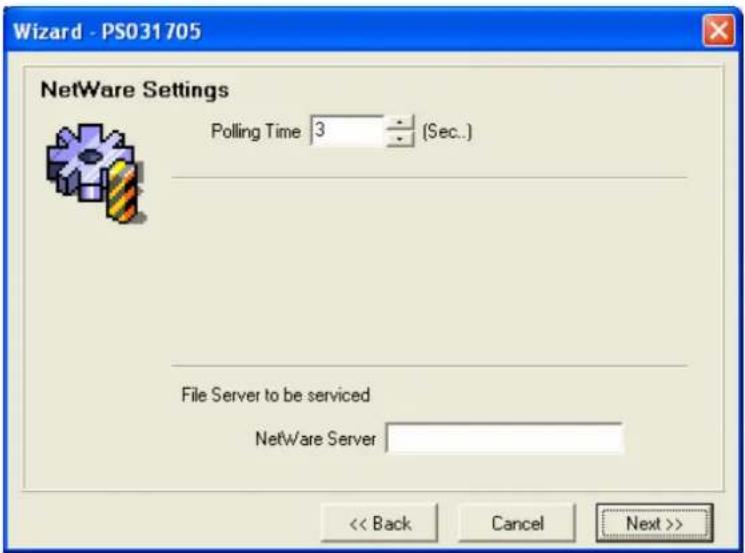
This print server supports NetWare Bindery Printing method. The print server periodically polls the NetWare server printer queues for printing jobs. You have to assign the NetWare server name, print server polling interval and the name of queue on the NetWare server for each printer port. Polling Time is the polling interval of the print server for waiting printing jobs on the NetWare server.
NetWare Server is the name of the NetWare file server that provides printer queues.
7.8 System Configuration
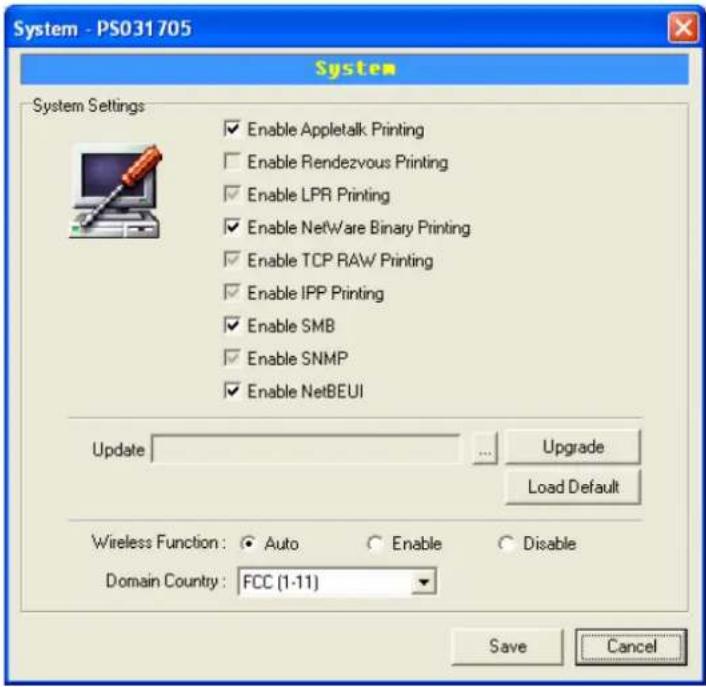
Double Click "System" icon and the System configuration window will pop-up.
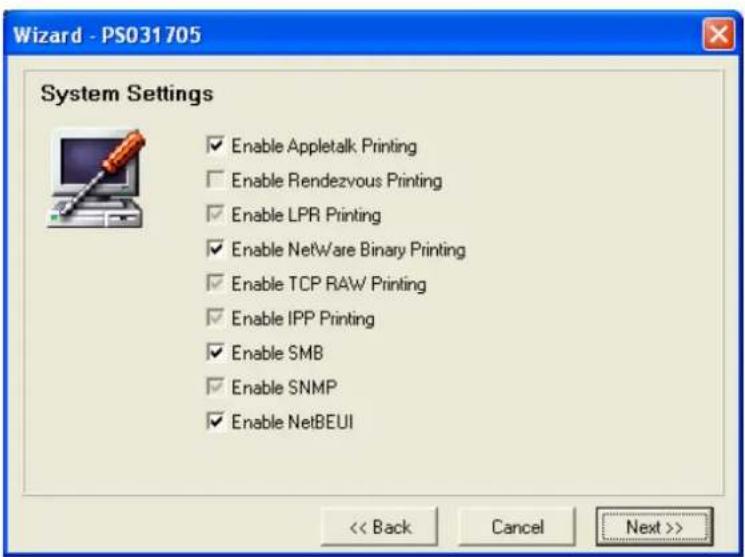
In the System configuration page, you can select to enable/disable each printing or management protocol, upgrade the new firmware for this print server, and enable/disable wireless function.
Upgrade Firmware: You can use this “Upgrade Firmware” tool to update the newest firmware of the print server. Click “☐” button and select the correct firmware in your PC. After selecting the firmware file, click the “Upgrade” button to finish the firmware update process. If you want to reset the Print Server to default factory settings, please click “Load Default”.
Wireless Function: You can select “Enable” or “Disable” to manually enable or disable the wireless function. If you manually enable wireless function, the print server’s wireless LAN will be always enabled and Ethernet will be always disabled. If you manually disable the wireless function, the print server’s wireless LAN will be always disabled and Ethernet will be always enabled. You also can select “Auto” to let the print server automatically decide to
enable or disable the wireless function. The print server only can work in ether Ethernet or wireless LAN mode. It cannot work in both Ethernet and wireless LAN mode at the same time. When the print server starts up, it will auto-detect if the LAN port is connected to an active network by an Ethernet cable. If the print server is connected to an active network by Ethernet cable when starting up, the print server will run in Ethernet mode. If the print server is not connected to an active network by Ethernet cable when starting up, the print server will run in wireless LAN mode. The print server default is in “Auto” mode.
Domain Country: The wireless channels are different from country to country. Generally, the channels are from 1 to 11 in USA and from 1 to 13 in Europe. The Domain Country setting is for you to set the available channels according to your location.
7.9 TCP/IP Configuration
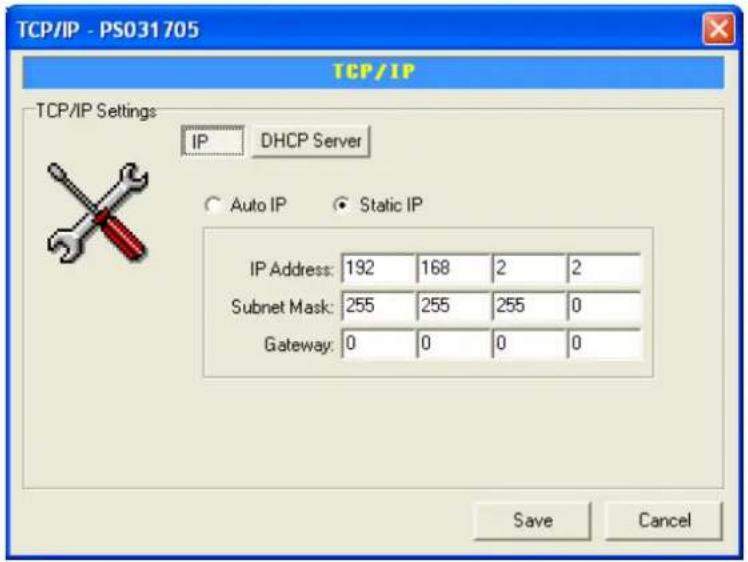
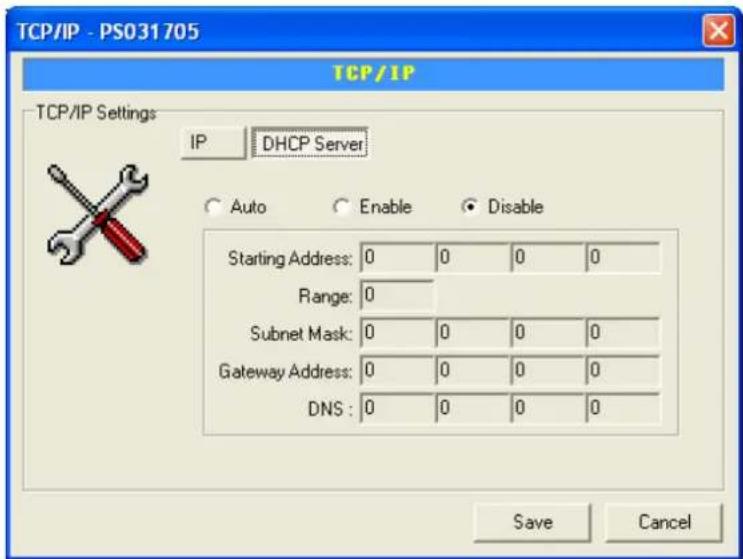
Double Click "TCP/IP" icon and the TCP/IP configuration window will pop-up.
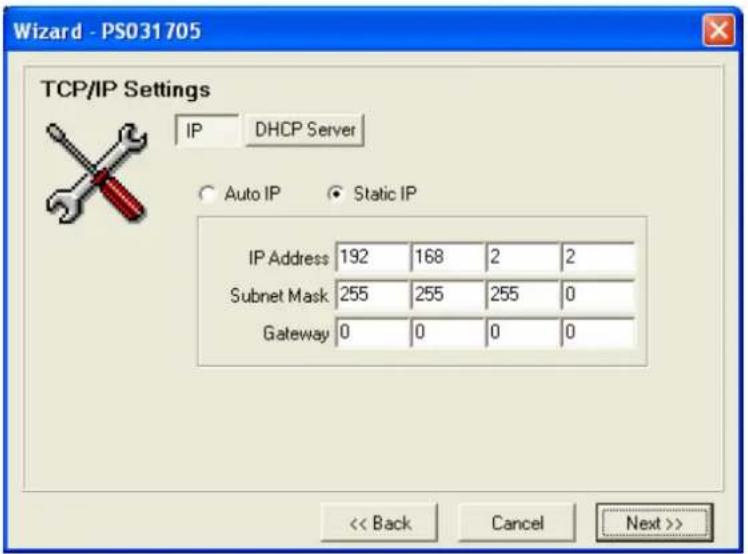
You can configure the print server to automatically get IP from DHCP server or manually specify static IP. The print server also has a built-in DHCP server. You can enable this DHCP server and let it manages IP for you.
Click the “IP” button to enter the IP setting page. If you need the print server to automatically get an IP from DHCP server, select “Auto IP”. You also can select “Static IP” to manually assign “IP Address”, “Subnet Mask” and “Gateway” for the print server.
Click the "DHCP Server" button to enter the DHCP server's setting page. You can "Enable/Disable" the DHCP server or
set “Auto” and assign a range of IP addresses here. The DHCP server is disabled by default. If “Auto” is selected, the DHCP Server of print server will be enabled only when there is no other DHCP Server within the network. When “Enable” or “Auto” is selected, you have to configure “Starting Address”, “Range”, “Subnet Mask”, “Gateway Address” and “DNS”. The print server will assign a unique IP for each client.
7.10 Wireless Configuration
If you want to use the print server through wireless LAN, please set up the print server through Ethernet first and make sure your wireless LAN setting is correct. After setting the wireless LAN, unplug the Ethernet cable and restart the print server, then you can start to use the print server through wireless LAN. If the wireless configuration does not work, please plug the Ethernet cable again, restart the print server and configure the print server through Ethernet until the wireless LAN settings are correct.
The default settings of the print server wireless function are as follows.
- Mode: Ad-Hoc
- SSID: Default
- Channel: 11
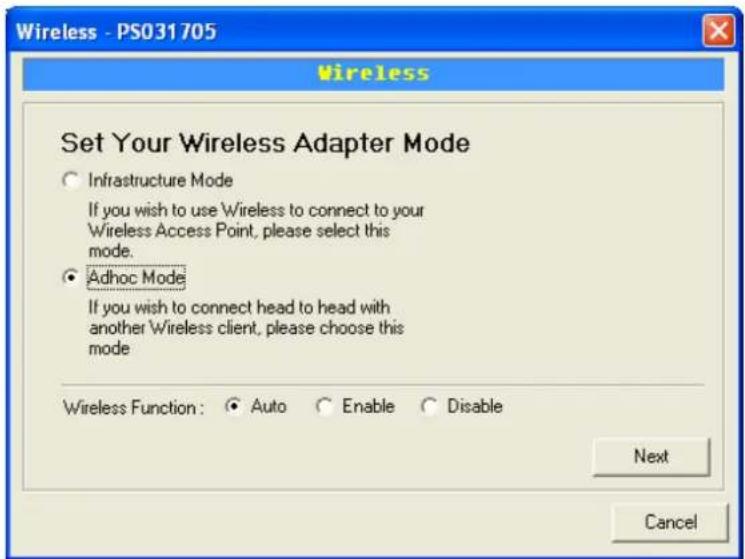
Double Click "Wireless" icon and the wireless configuration window will pop-up.
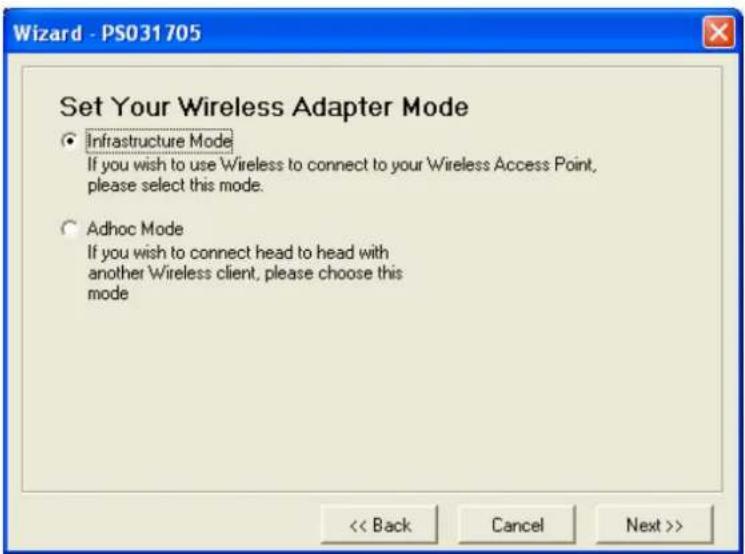
If you use access point to build up wireless network, you have to select “Infrastructure Mode”. If you do not have any access point and want to use peer-to-peer connection to build up wireless network, you have to select “Ad-Hoc Mode”.
After selecting the operation modes of the wireless function, click “Next” to go to further detailed configuration.
Infrastructure Mode:
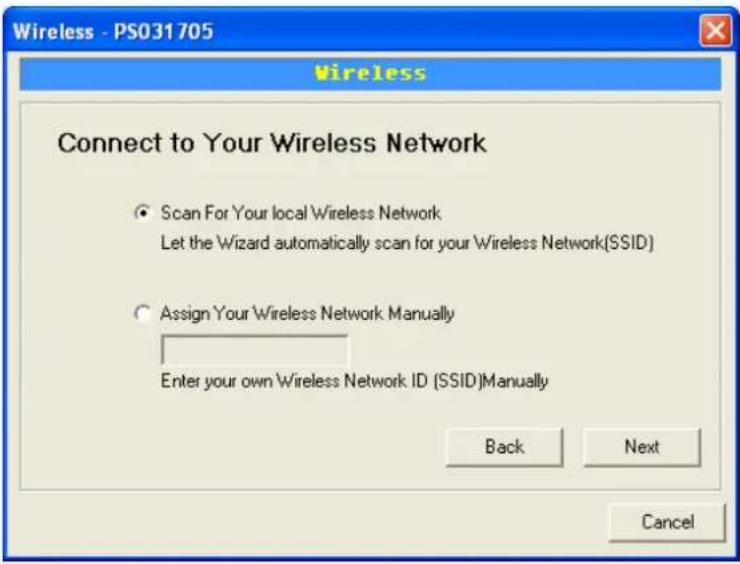
In the Infrastructure mode, you have to let the print server associate with an access point. You let the print server scan for an available access point automatically or manually assign the SSID of the access point you want to use.
If you select to let the print server scan for an available access point, the following window will pop up.
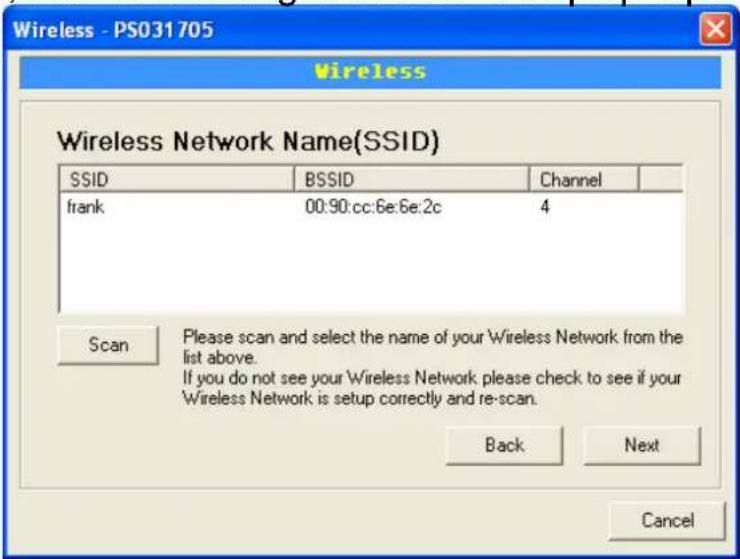
The list is the scanned available access points. Select an access point in the list and click “Next”. If you cannot find the access point that you want to use, click “Scan” to let the print server scan again.
Ad Hoc Mode:
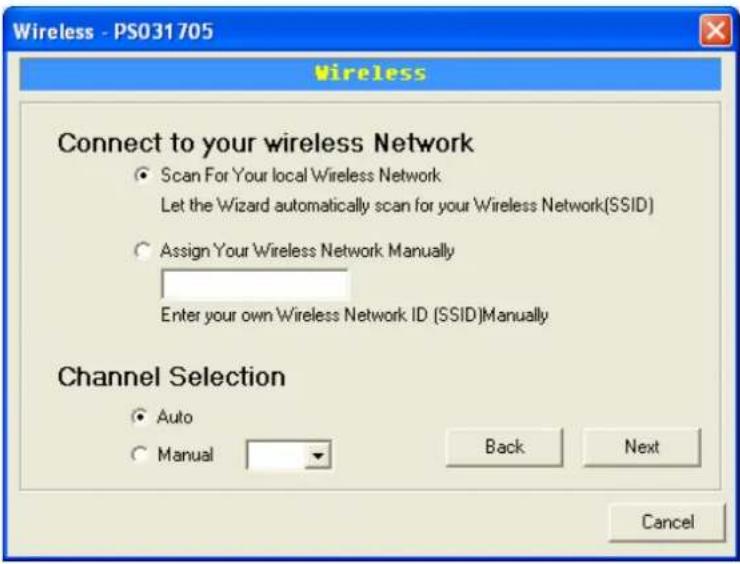
In the Ad-Hoc mode, you can let the print server automatically associate with other wireless station or manually assign the SSID of your wireless network. You can let the print server automatically select the channel that is the same with the peer or manually assign a channel. If you select to let the print server scan for an active wireless station, the following window will pop up.
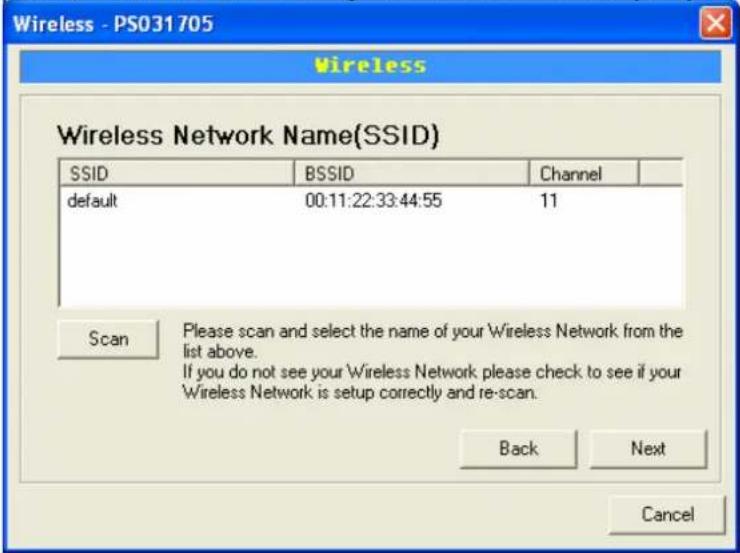
The list is the scanned active wireless stations. Select a wireless station in the list and click “Next”. If you cannot find the wireless station that you want the print server to communicate with, click “Scan” to let the print server scan again.
Both “Infrastructure” and “Ad-Hoc” mode have to go through the following procedure:
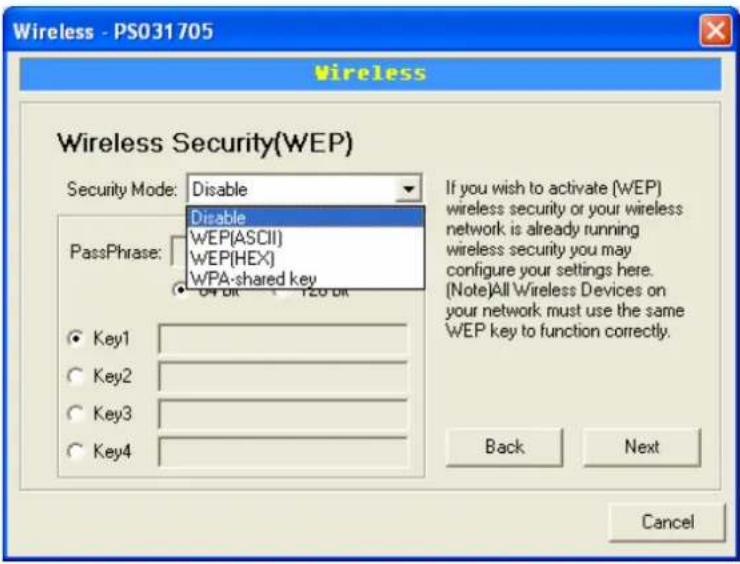
This print server supports WEP and WPA-PSK security mode. If you want to use WEP encryption to protect your wireless network, you have to select “WEP(ASCII)” or “WEP(HEX)”. If you want to use WPA-PSK, you have to select “WPA-shared key”. The wireless security setting should be the same with other wireless devices in the same network.
WEP Security Mode:
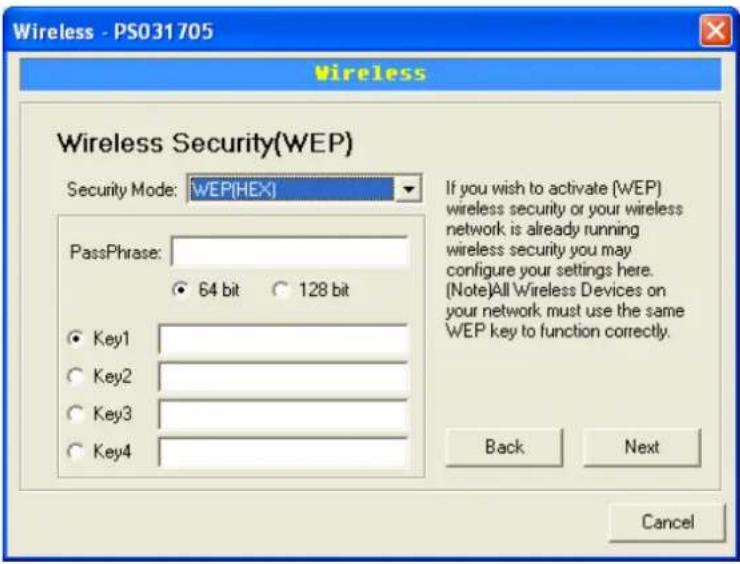
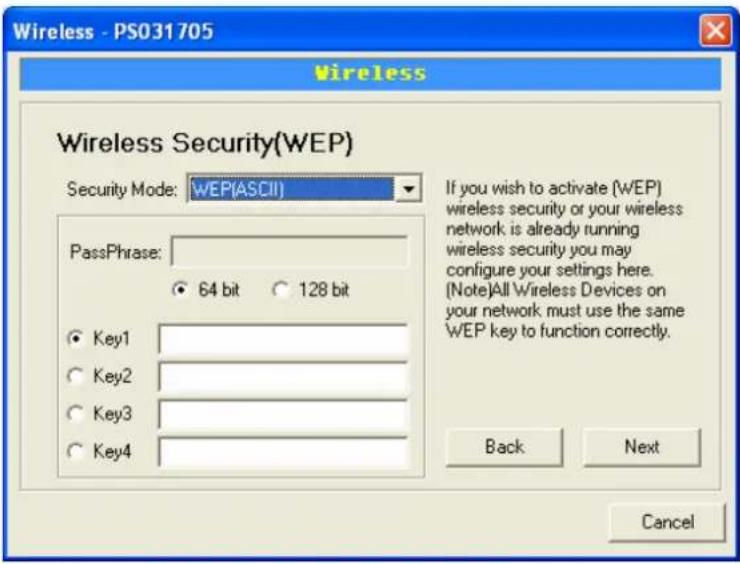
You can select “64 bit” or “128 bit” length and “Hexadecimal” or “ASCII” format for the encryption key. Longer key length can provide stronger security but worth communication performance.
Enter four key values by following the rules below and select one key as the default key.
- PassPhrase – A passphrase simplifies the WEP encryption process by automatically generating the WEP encryption keys for the print server. This setting is only valid when the security mode is in “WEP(HEX)”.
- Key 1 to Key 4 – If the key length is 64-bit, enter 10-digit Hex values or 5-digit ASCII values as the encryption keys. For example: "0123456aef" or "Guest".
If the key length is 128-bit, enter 26-digit Hex values or 13-digit ASCII values as the encryption keys. For example: "01234567890123456789abcdef" or "administrator".
WPA-shared key Security Mode:
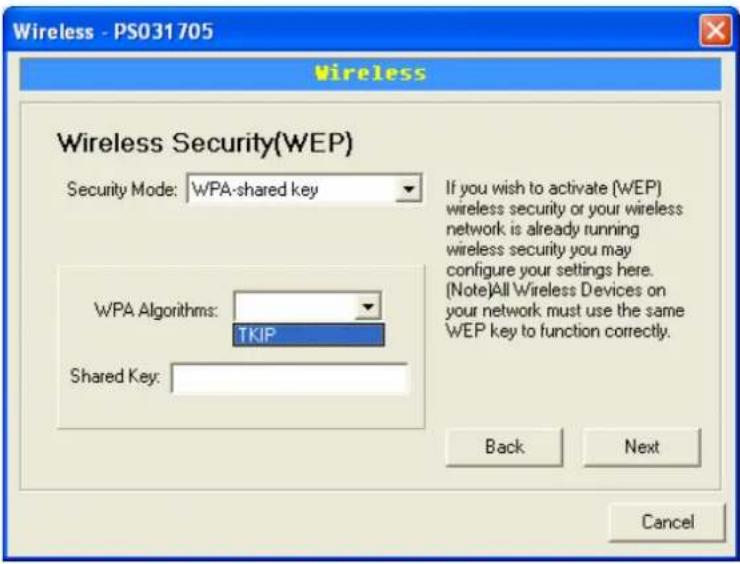
When “WPA-shared key”, also named “WPA-PSK” requires users to select the advanced encryption methods, i.e. TKIP and enter a set of shared key.
- TKIP – TKIP (Temporal Key Integrity Protocol) changes the temporal key every 10,000 packets. This insures much greater security than the standard WEP security.
- Shared Key – Enter 8 to 63 digits of ASCII format to be the key for the authentication within the network.
When you finish configuring the wireless security, click "Next" to go to next step.
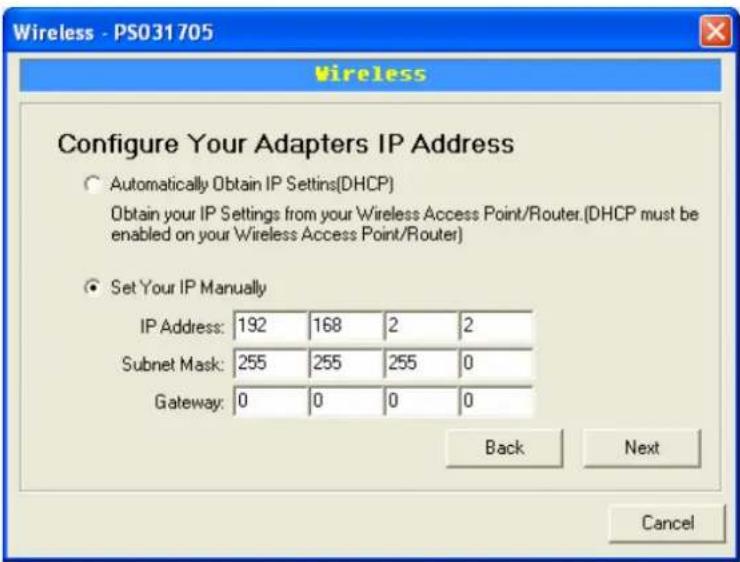
You can select to let the print server automatically obtain IP settings with DHCP client or manually assign the IP settings.
If you manually assign the IP settings, you have to enter IP address, subnet mask and default gateway address.
When you finish configuring the IP settings, click "Next" to confirm the IP Address configuration.

Click "Save" to save the wireless configuration.
7.11 SNMP Configuration
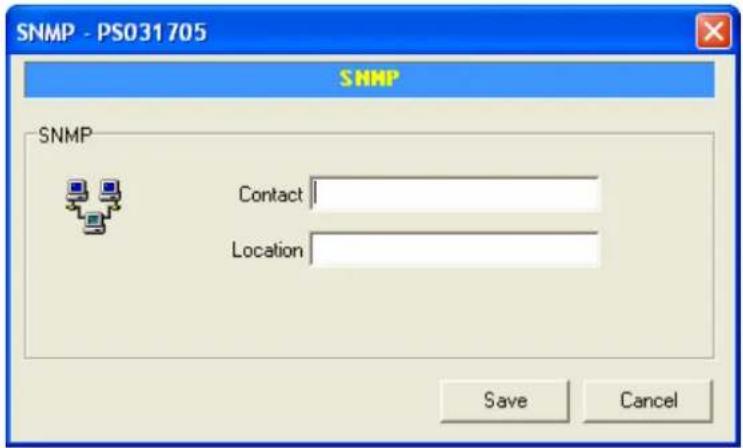
Double Click "SNMP" icon and the SNMP configuration window will pop up.
Contact: You can enter the print server administrator's contact information here. This information will be displayed in the SNMP management tool.
Location: You can enter the installed location of the print server here. This information will be displayed in the SNMP management tool.
7.12 Wizard
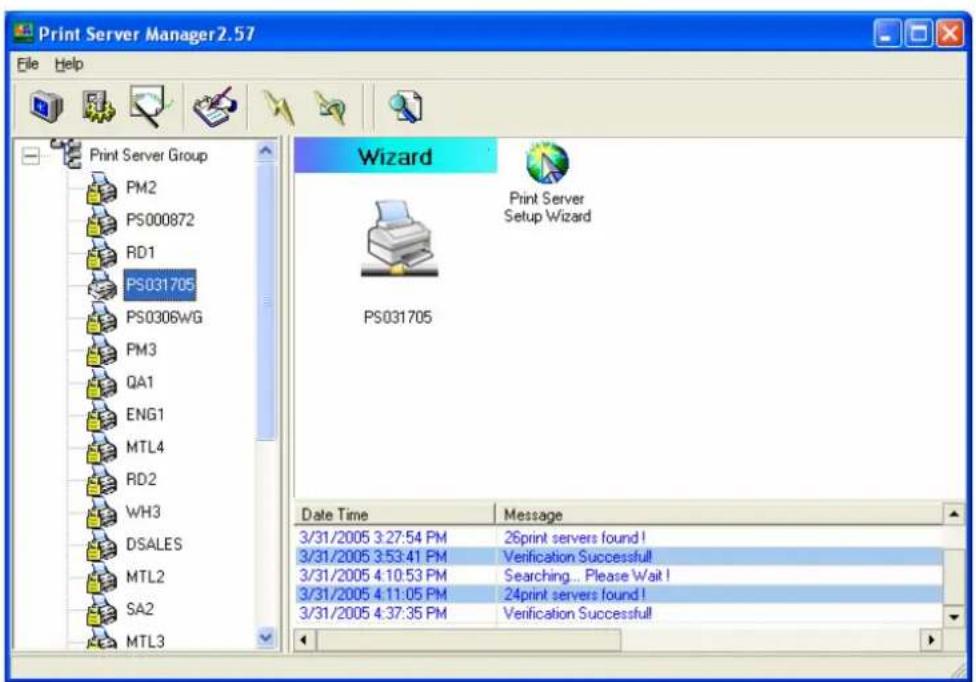
Click "Wizard" icon on the tool bar, the setup wizard item of the current selected print server will be showed on the right side of the window.
Double click the "Print Server Setup Wizard" the setup wizard will guide you through all the setup process.
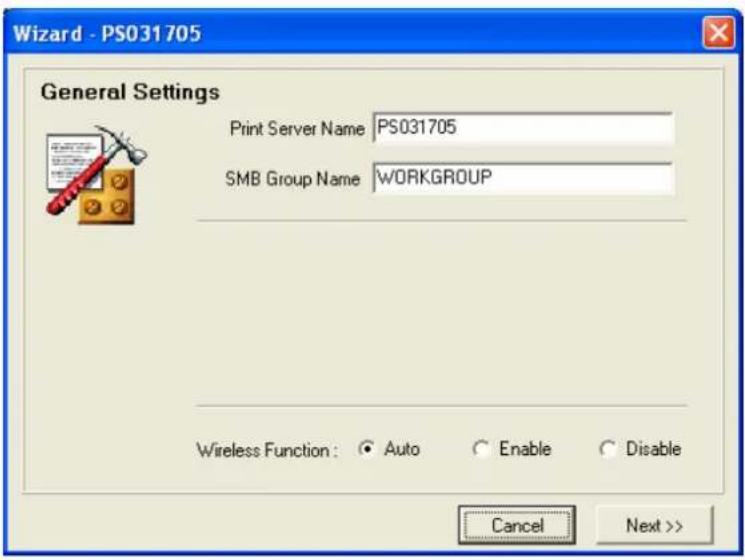
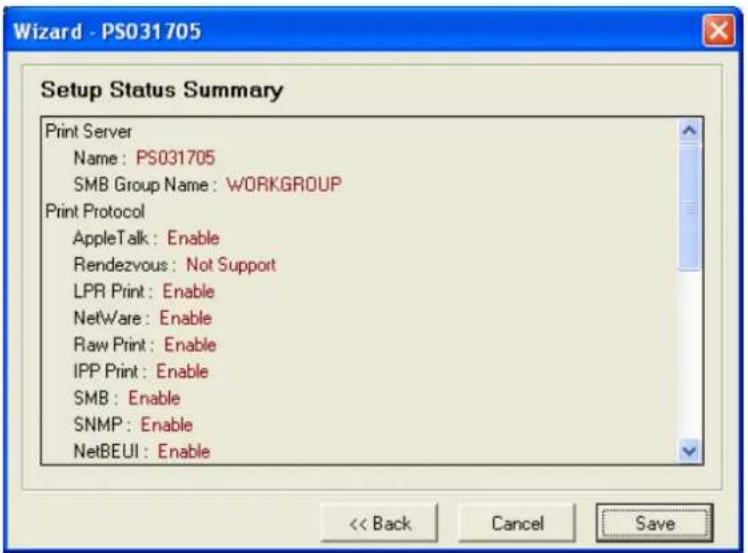
Step 1: Set up the name of this print server and the SMB Group Name for the print server. Also set up “Enable”, “Disable” or “Auto” for the wireless function here. Please refer to section 7.6 and 7.8 for detail information.
Step 2: Select to enable required printing protocol. Please refer to section 7.8 for detail information.
Step 3: Setup the IP of this print server and the DHCP server. Please refer to section 7.9 for detail information.
Step 4: Setup the AppleTalk printing. Please refer to section 7.5 for detail information.
Step 5: Setup the NetWare printing. Please refer to section 7.7 for detail information.
Step 6: Select the Wireless Adapter mode and complete wireless LAN settings. The other procedures are the same with “Wireless” Setting in “Setup” screen. Please refer to section 7.10 for detail information.
Step 7: Click "Save" to finish setting.
7.13 Report
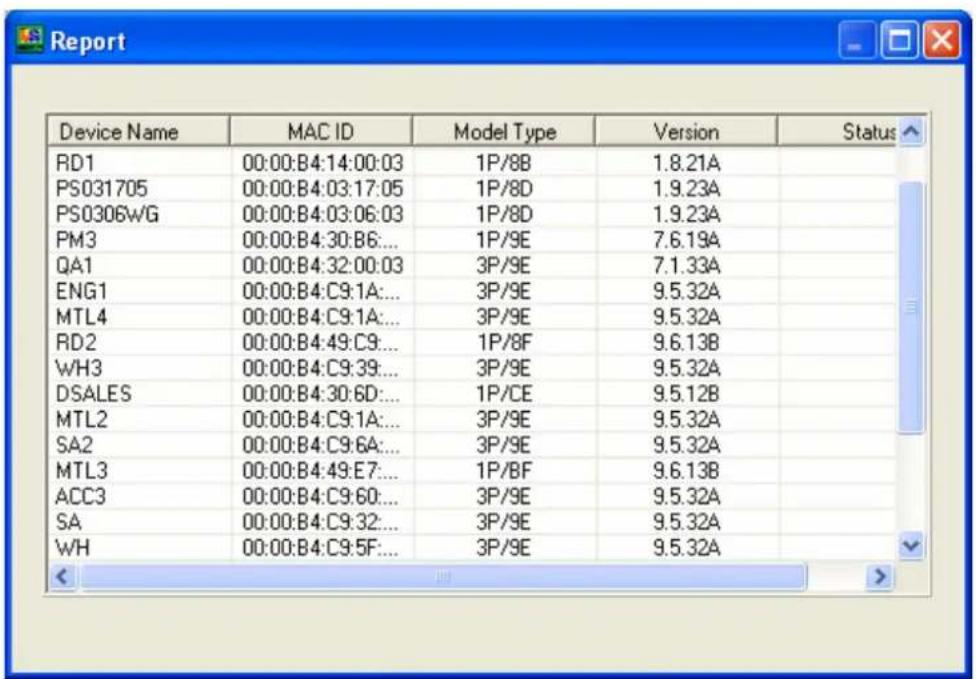
Click "Report" icon on the tool bar, the Report window will pop up.
The report lists basic information of all available print servers on the network. The information includes Device Name, MAC ID, Model Type, Firmware Version and Status of print server.
8. Web Management
8.1 Introduction
Print server can be configured and managed on the Web. Through Local Area Network, or even Internet, administrator can easily configure and manage print server's various main functions in browsers. Simply enter print server's IP address into your browser's address field to manage a print server by print server's built-in Web Server.
The default IP Address, User Name and Password settings of the Print server are as follows.
IP Address: 192.168.2.2
User Name: Admin
Password: 1234
8.2 Login
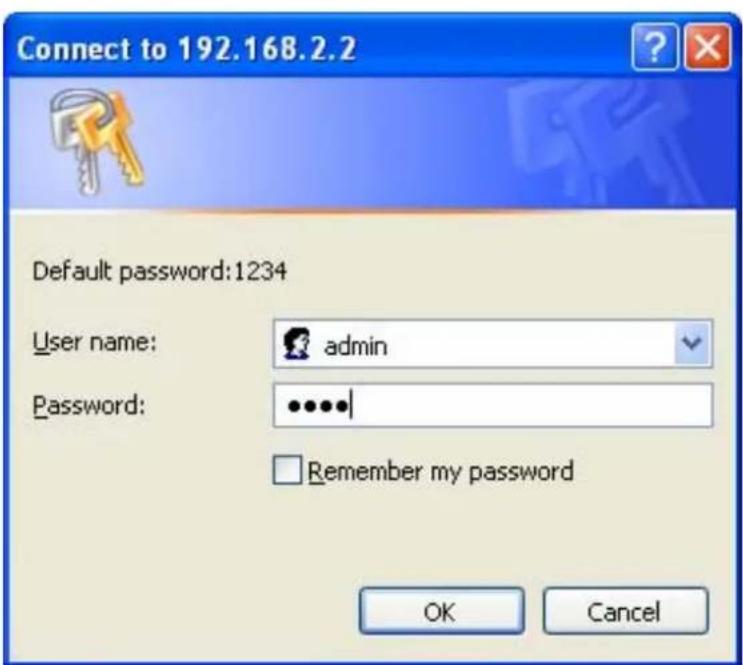
You may use any Web Browser to review the status or configure the settings of the print server. After entering the IP address of the print server, a login page display. You have to enter correct "User Name" and "Password" before going to the Web Management pages.
Notes: Default User Name is "admin", default password is "1234".
8.3 Device Status
8.3.1 System
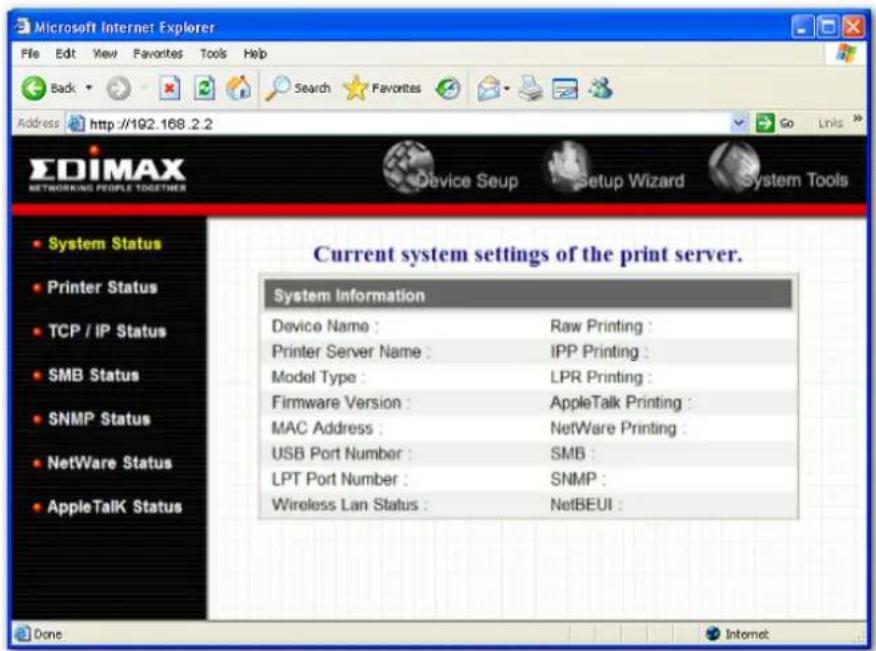
System Information includes "Device Name", "Print Server Name", "Model Type", "System Up Time", "Firmware Version", "MAC Address", "Wireless LAN Status" and the protocols enabled status, etc.
8.3.2 Printer
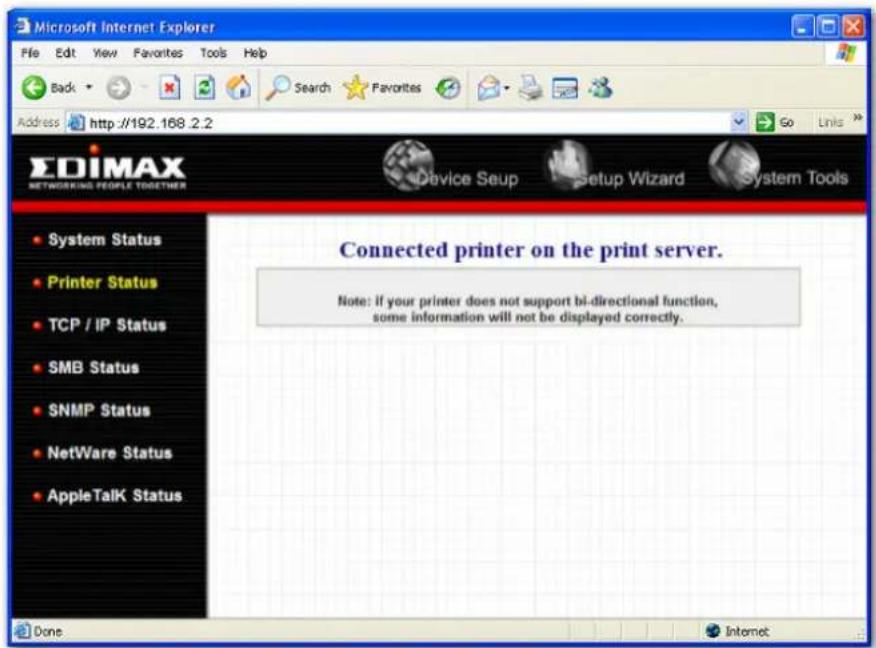
This page lists information of printers connected to all printer ports.
8.3.3 TCP/IP
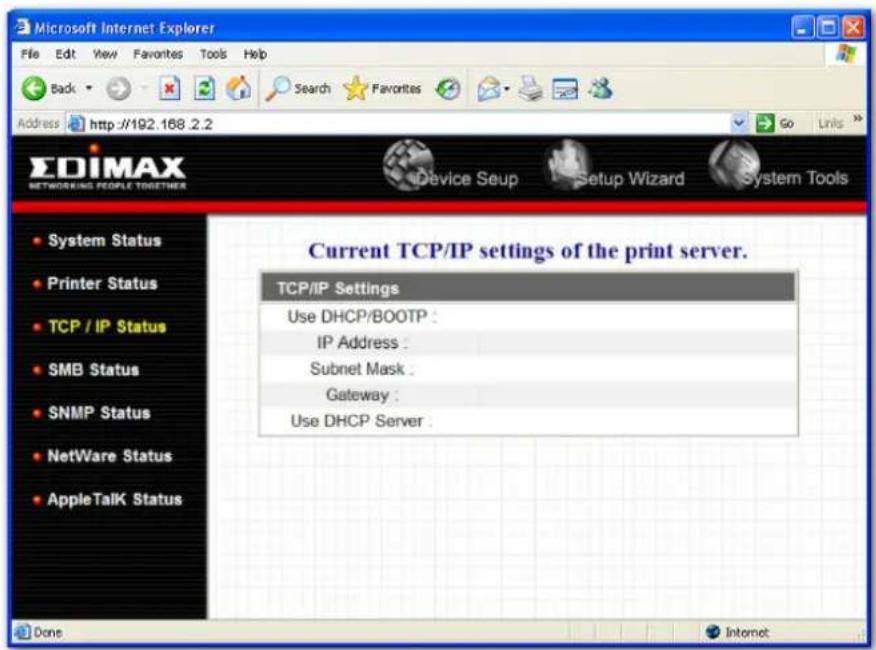
This page lists all TCP/IP settings of the print server including "IP Address", "Subnet Mask" and "Gateway". It also lists DHCP server setting.
8.3.4 SMB
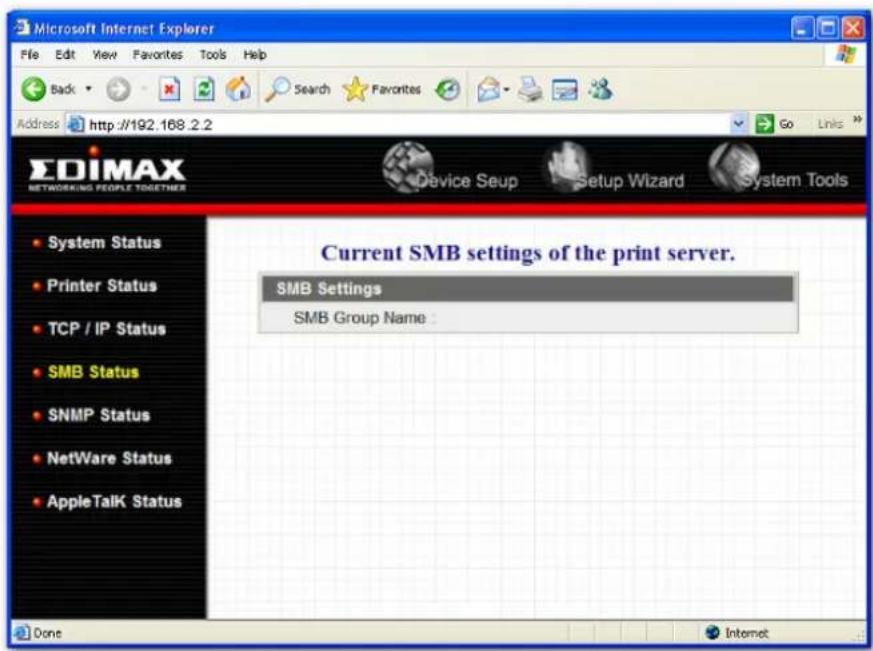
This page lists the SMB group setting of the print server.
8.3.5 SNMP
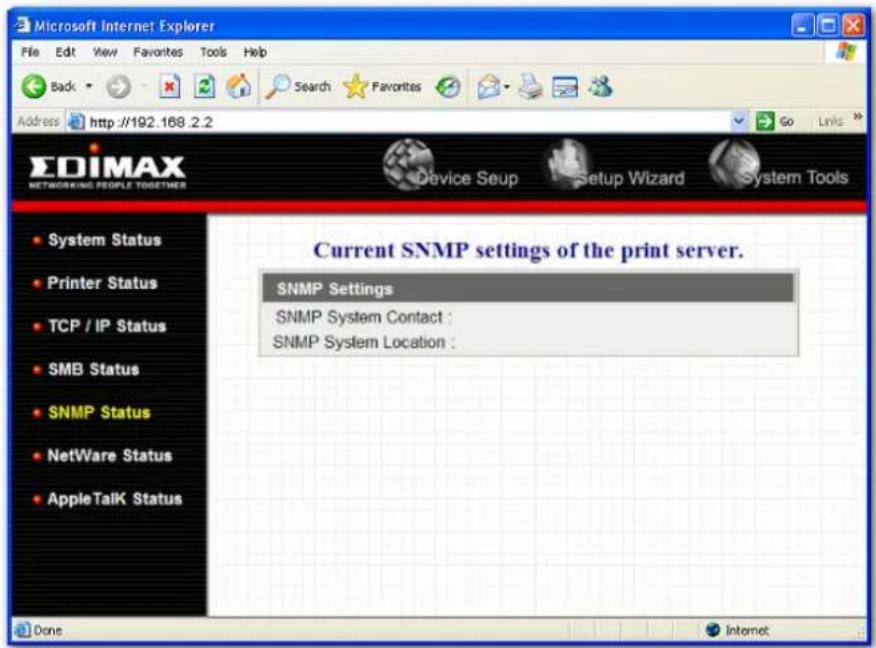
This page lists the SNMP settings of the print server. It includes the settings of "SNMP System Contact" and "SNMP System Location".
8.3.6 NetWare
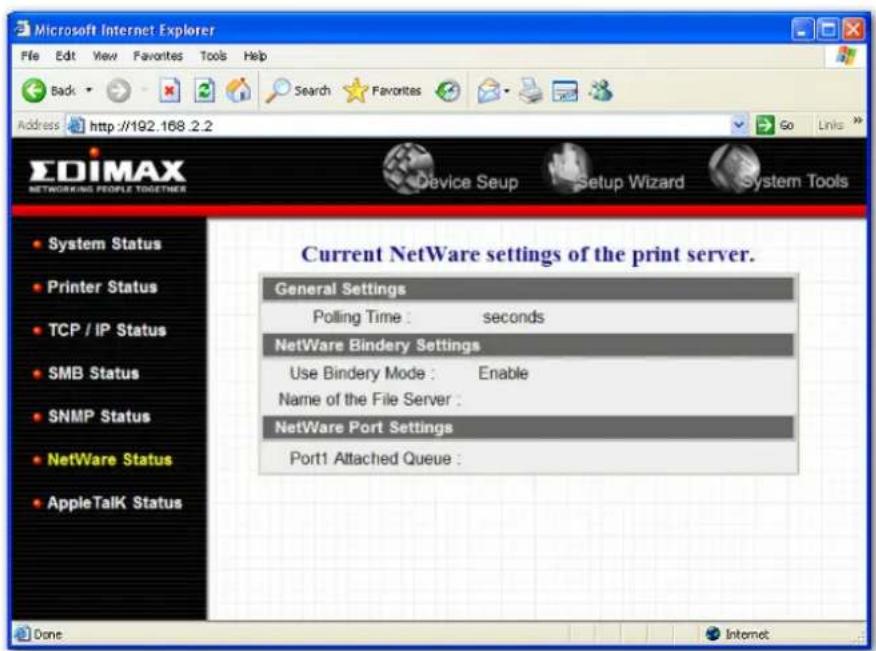
This page lists NetWare settings, including "Polling Time", "Use Bindery Mode", "Name of the File Server" and "Port Attached Queue".
8.3.7 AppleTalk
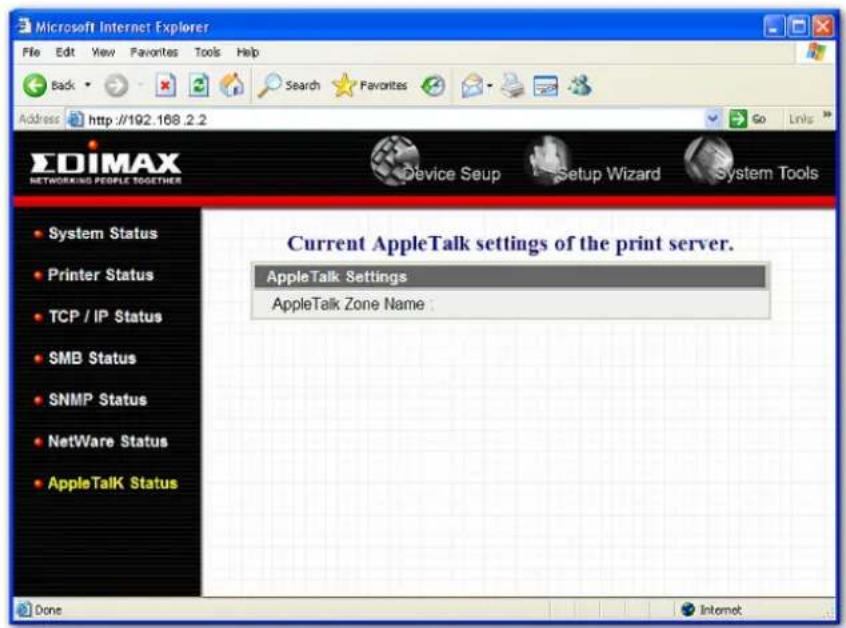
This page lists AppleTalk settings, including "AppleTalk Zone Name" and "Printer Type" of printers connected to all print ports.
8.4 Setup Wizard
8.4.1 System
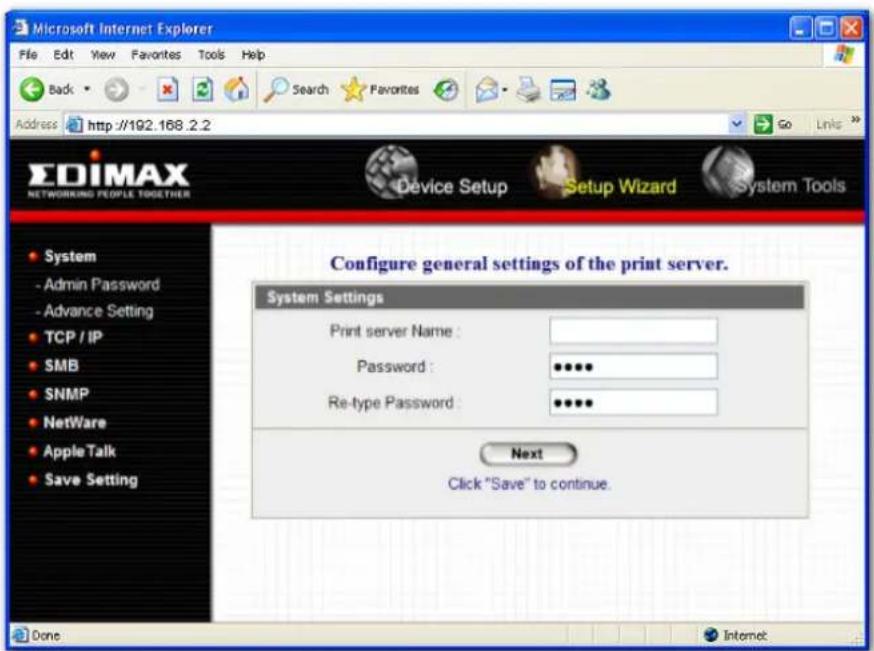
You can change the print server name and password of the print server from here.
Print Server Name, the name of the print server. You can use this name to identify the print server when you are searching for the print server by the administration and client utilities.
Password, enter the password you want to change to the print server. The password can be up to 7-digit alphanumeric format. The default password is “1234”.
Re-type Password, enter the password you want to change to the print server again.
8.4.2 Advanced Settings
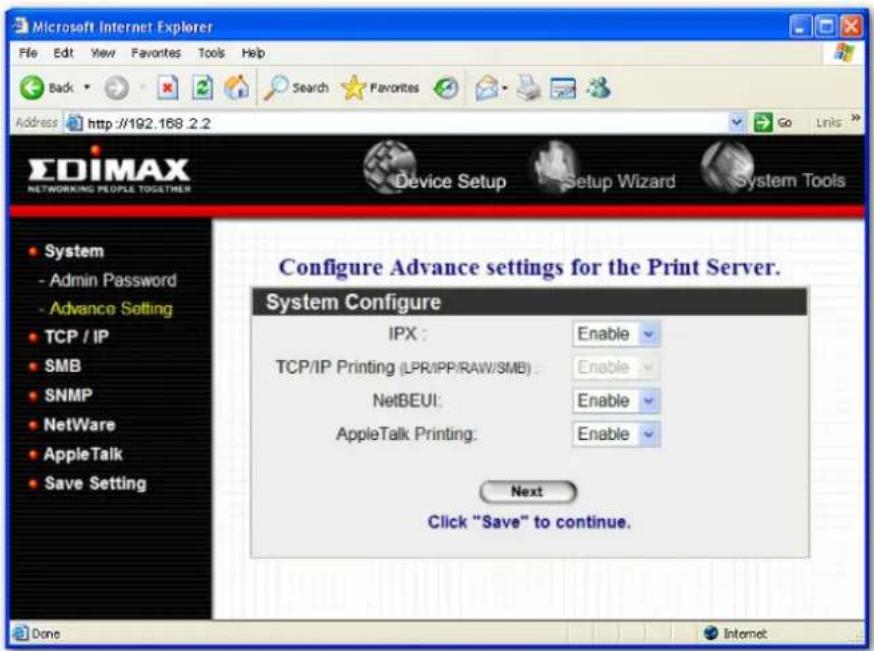
You can enable/disable the printing protocols from the screen. To enable the function, please select “Enable”; to disable the function, please select “Disable”.
8.4.3 TCP/IP
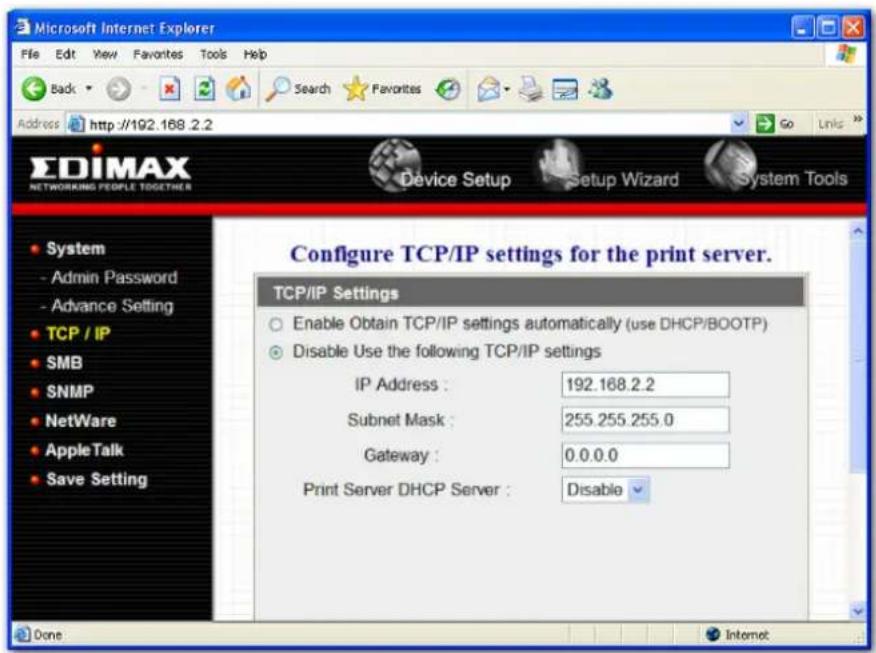
You can configure the print server to automatically get IP from DHCP server or manually specify static IP. The print server also has a built-in DHCP server. You can enable this DHCP server and let it manages IP for you.
If you need the print server to automatically get an IP from DHCP server, select “Enable Obtain TCP/IP Settings Automatically (Use DHCP/BOOTP)”. You also can select “Disable Use the following TCP/IP Settings” to manually assign “IP Address”, “Subnet Mask” and “Gateway” for the print server.
You can enable/disable or set auto for the print server's DHCP server. The DHCP server is disabled by default. If the DHCP Server is enabled or set Auto, you have to assign a range of IP addresses here. Fill in the "Start IP", "Range", "DNS", "Subnet Mask" and "Gateway", and the print server will assign a unique IP for each client. Note that when "Auto" is selected, the DHCP Server of the print server will be enabled only when there is no other DHCP Server within the network.
8.4.4 SMB
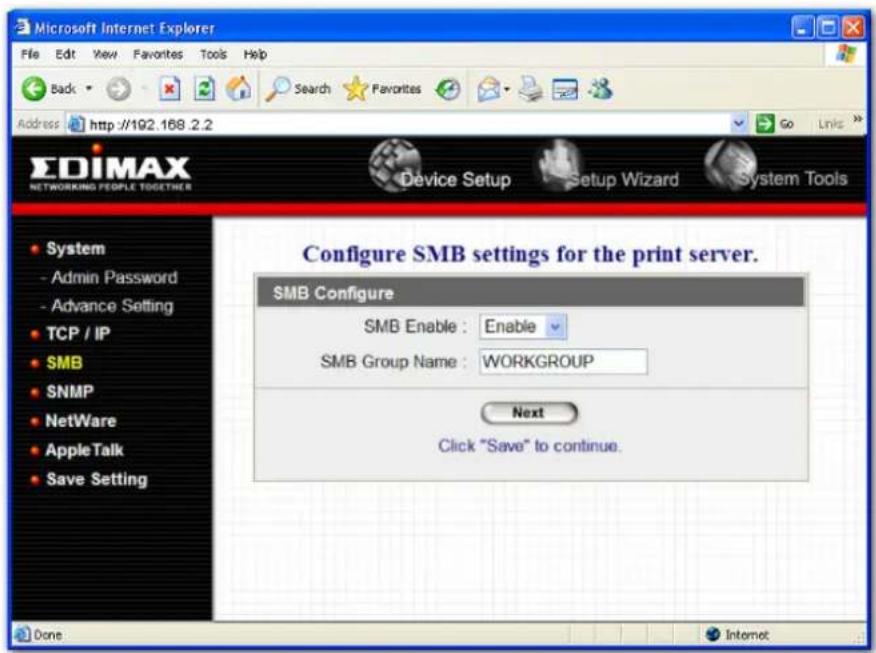
You can enable/disable the SMB protocol from here. If SMB is enabled, enter the “SMB Group Name” to specify the SMB group that this print server belongs to. All PC should join the same group before they can use this print server by SMB protocol.
8.4.5 SNMP
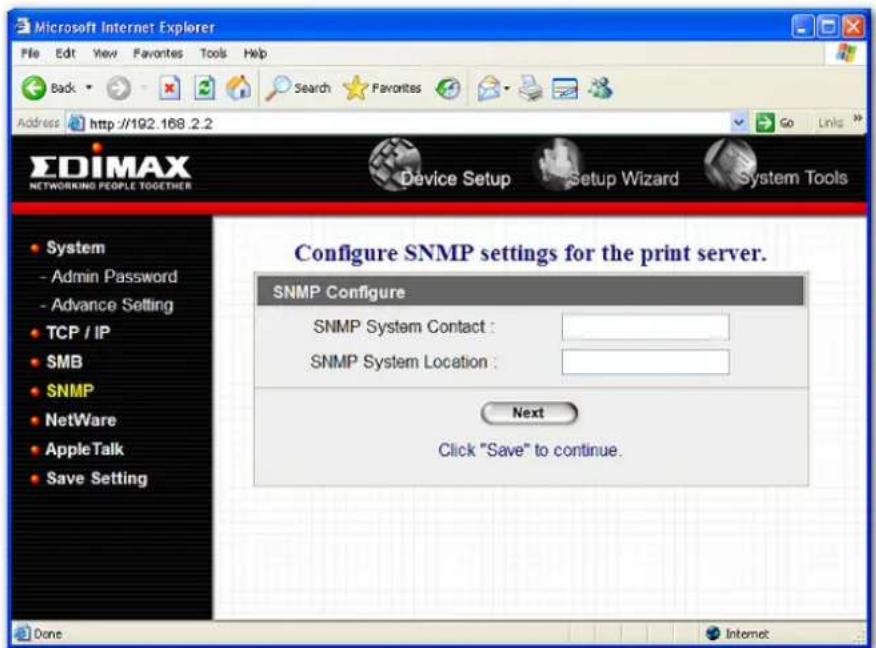
The print server supports SNMP configuration. If it is enabled, please set up the following parameters.
SNMP System Contact: You can enter the print server administrator's contact information here. This information will be displayed in the SNMP management tool.
SNMP System Location: You can enter the installed location of the print server here. This information will be displayed in the SNMP management tool.
8.4.6 NetWare
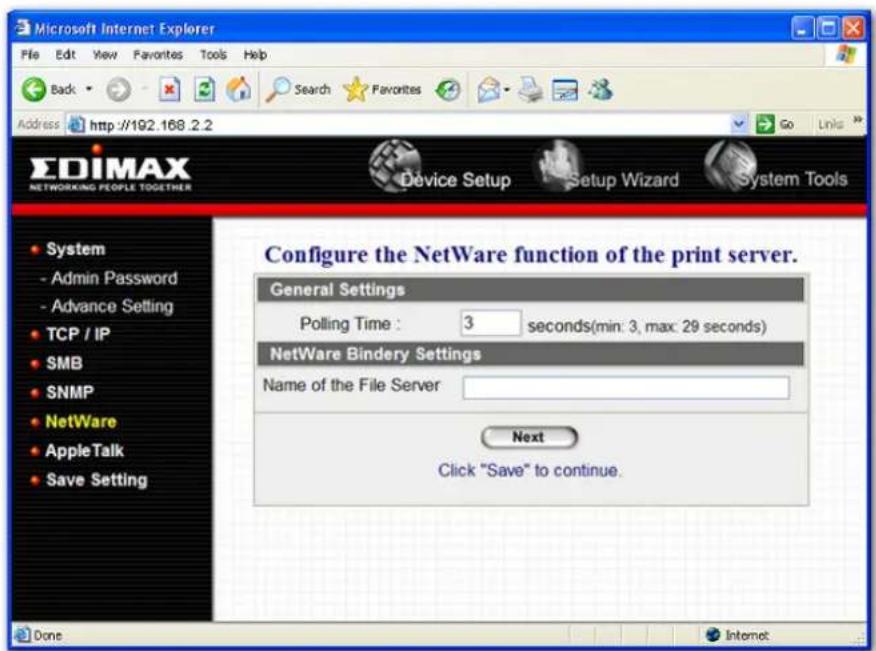
This print server supports NetWare Bindery Printing method. The print server periodically polls the NetWare server printer queues for printing jobs. You have to assign the NetWare server name, print server polling interval and the name of queue on the NetWare server for each printer port.
Polling Time is the polling interval of the print server for waiting printing jobs on the NetWare server.
Name of the File Server is the name of the NetWare file server that provides printer queues.
8.4.7 AppleTalk
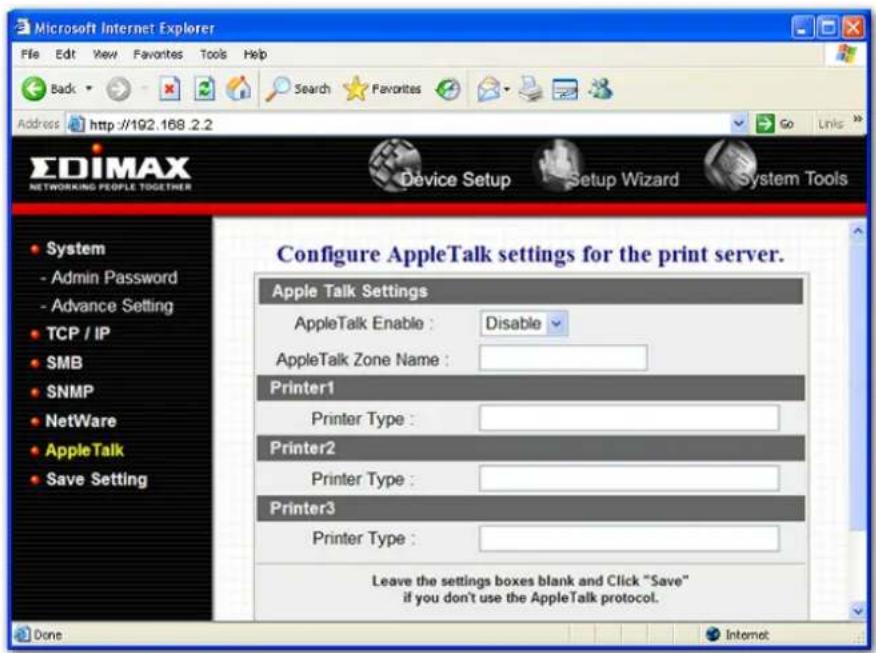
AppleTalk is a data communication protocol often used by Macintoshes. The print server can use these parameters to join the AppleTalk network and share the printer to other AppleTalk workstations. You have to select to enable or disable AppleTalk, and setup the “Zone Name” and “Printer Type” for each printer port of this print server.
AppleTalk Enable: Enable or disable "AppleTalk".
AppleTalk Zone Name: Print server has to join zones of AppleTalk before it can be shared to other workstations. Only workstations in the same zone can share the printer. If you want to share the printer to all workstations in all Zones, you should enter only “*” in the “Zone Name” field.
Printer Type, the type of printer attached to each printer port. You can get the printer type from the manufacturer of the printer.
8.4.8 Save Settings
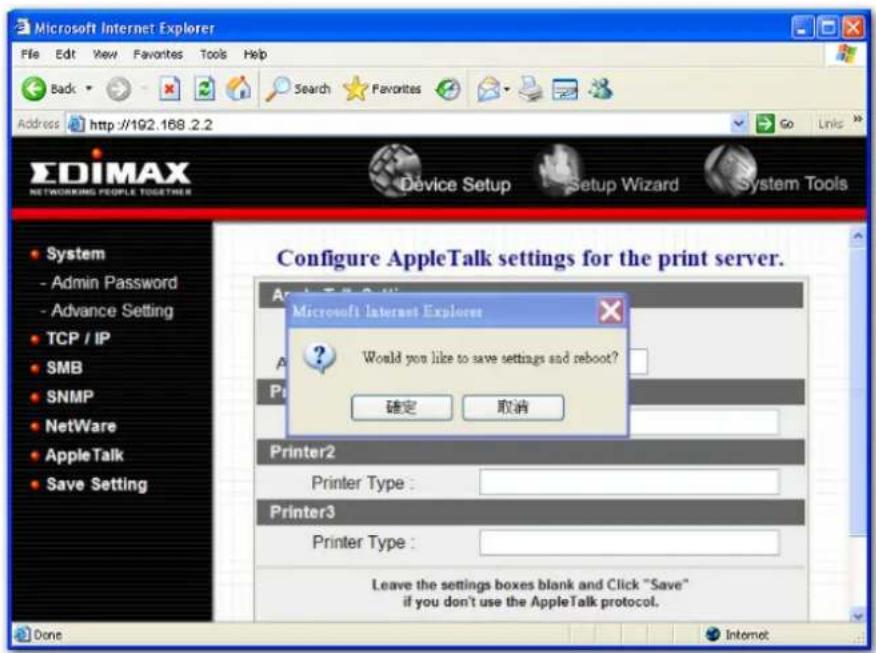
You can click the "Save Settings" to save the settings and restart the system.
8.5 System Tools
8.5.1 Load Default
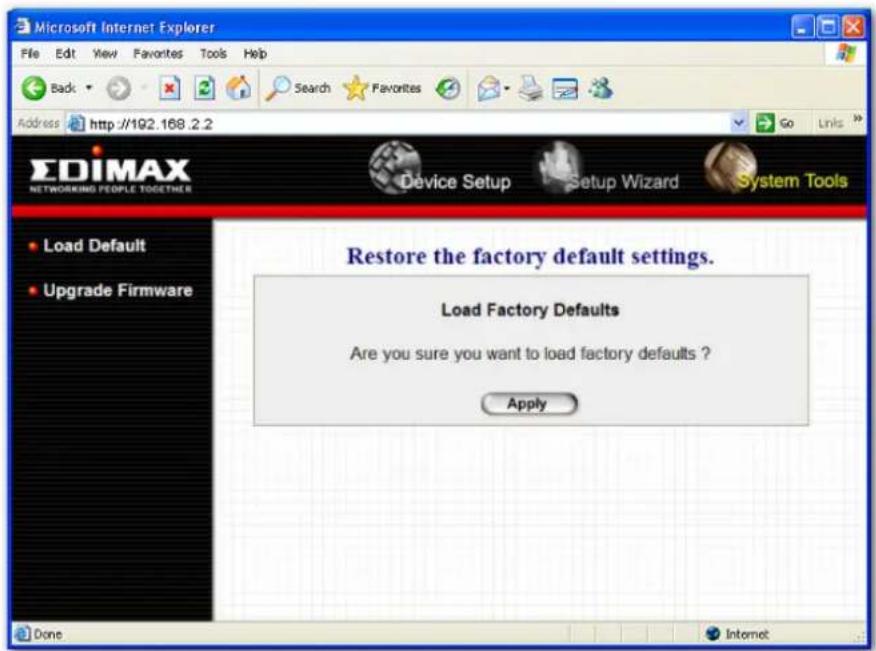
You can use this page to restore the factory default settings. All of your previous setup will be cleared.
8.5.2 Upgrade Firmware from Browser
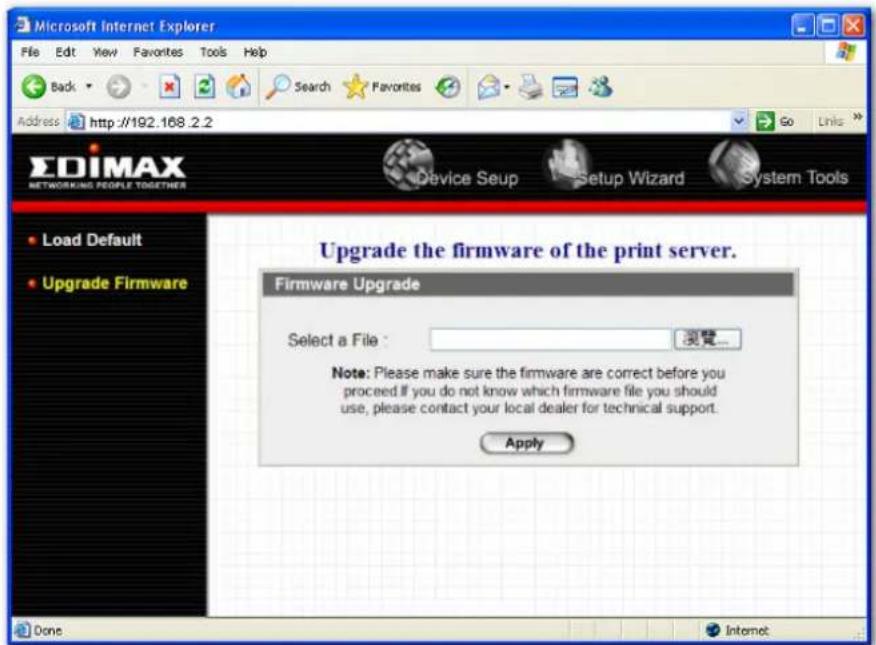
You can upgrade new firmware for this print server in this page. Click "Browse" to select the new firmware in your storage and then click "OK", the firmware will be updated in several minutes.
Be aware that if you have started upgrading firmware, you have to follow all the upgrading steps or the print server can't turn back to normal configuration.
9. IPP Printing
9.1 Introduction
IPP (Internet Printing Protocol) Printing provides a convenient way of remote printing service by TCP/IP. The print server can support IPP printing by default. It is needless to do any setting. Any PC that can support IPP printing, for example Windows 2000/XP, can directly use the print server by IP. By using the IPP printing, you can share the printer to all the PC's that can access the print server by IP. You can even share your printer to Internet users.
9.2 System Setup
9.2.1 Print Server Side
It is needless to do any setting on the print server side. Make sure the print server has correct IP settings. If you want to share the printers to Internet users, you have to set a real IP to the print server. You also have to make sure that any gateway, router or firewall does not block IPP protocol if you have these gateway devices installed in your network.
9.2.2 Client Side
You only need to perform Window's standard Add New Printer procedure.
Step1. Click "Start", choose "Settings" and select "Printers and Faxes".
Step2. Click "Add a Printer".
Step3. The "Add Printer Wizard" is displayed. Click "Next".
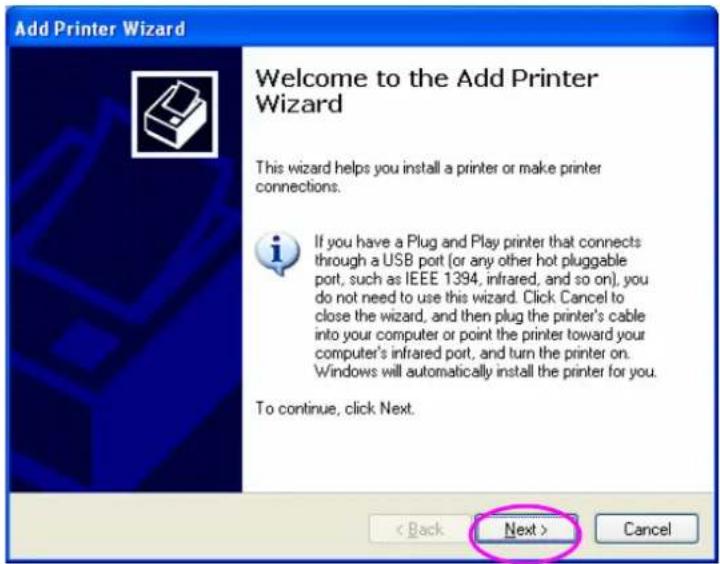
Step4. Select “A network printer, or a printer attached to another computer”. Click “Next”.
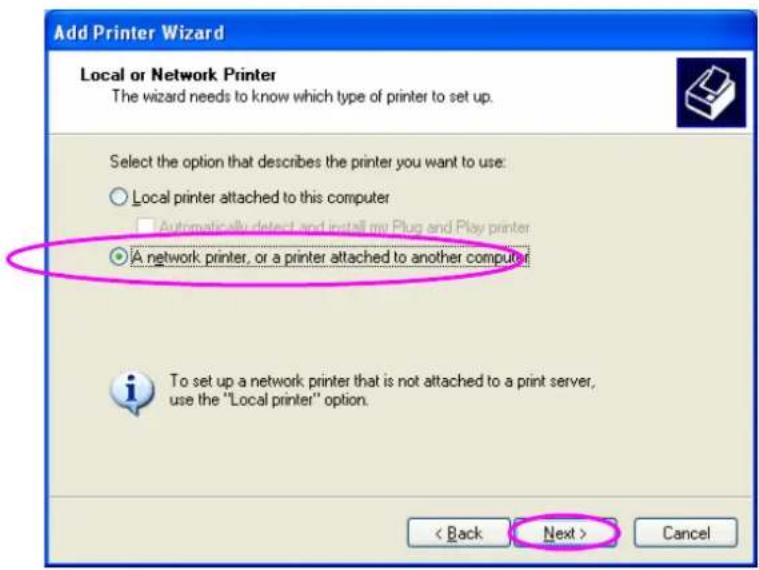
Step5. Select “Connect to a printer on the Internet or on a home or office network” and enter the URL of print server. The URL format is “http://IP:631/Port Name”. The IP should be the print server’s IP. The number 631 is IPP standard port number. Port Name is the port name of print server that your printer is connected to. The default port name is “lpt1”. One example of the URL is
http://192.168.3.66:631/lpt1. After entering the URL of print server, click "Next".
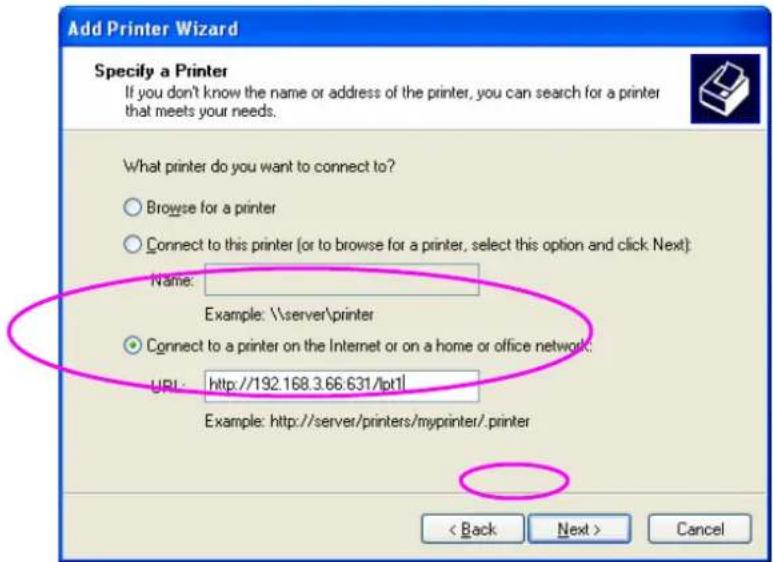
Step6. Select a suitable printer manufacturer and the printer model and click "Next". If your printer is not in the list, click "Have Disk..." to install the driver of the printer. After installation, the printer model will be added to the list.
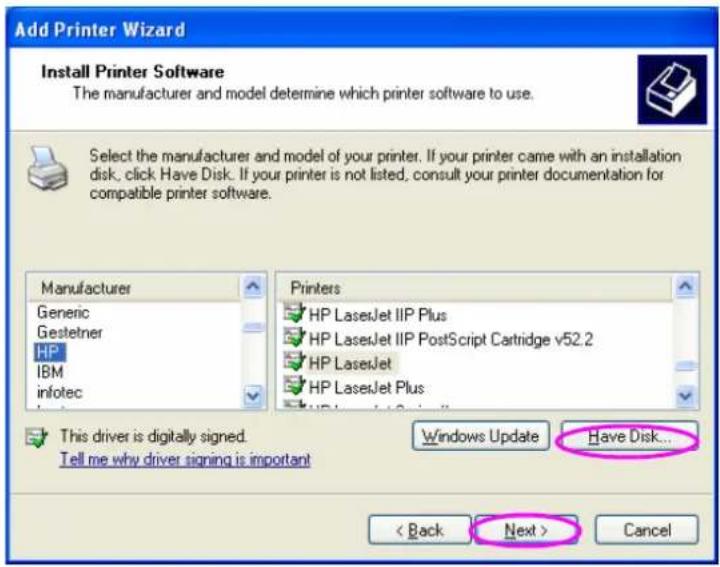
Step7. Choose to set the print whether as a default printer or not. Click "Next".
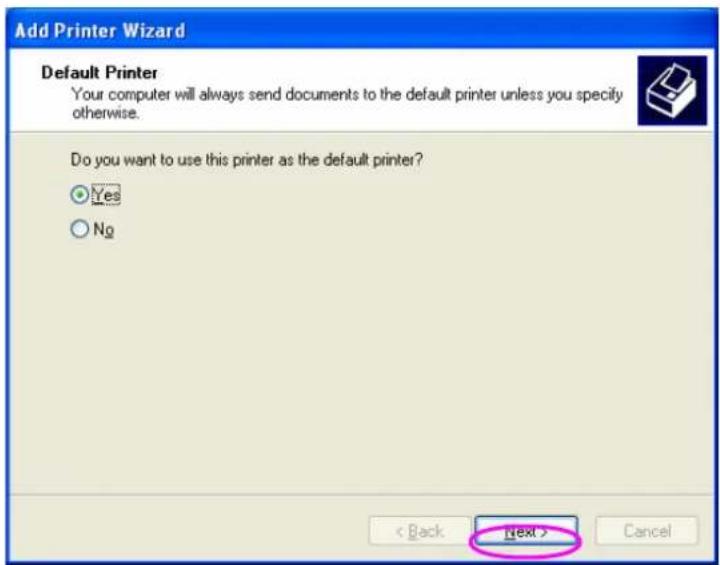
Step8. You have added the network printer to the PC successfully. The information of the printer is displayed in the windows. Click "Finish".
10. Windows XP SP2 Setup
In Windows XP SP2, XP SP2's firewall would block the unknown communications. This print server has allowed the communications data passed through the XP SP2's firewall. In case that you do not find any print server listed on the "Available Ports" in "Network Ports Quick Setup", please follow the steps below.
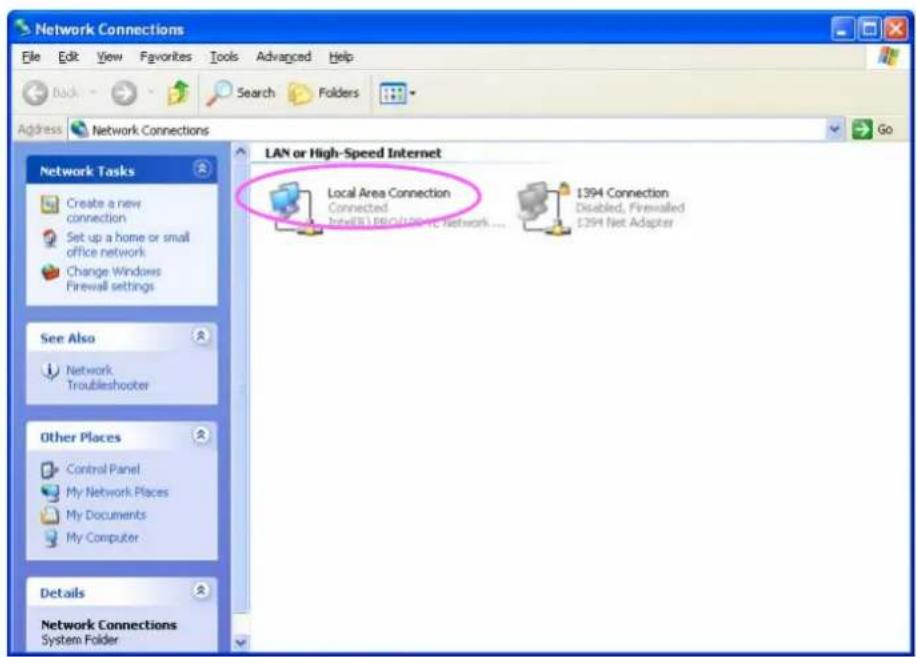
Step1. Click "Start", choose "Settings" and select "Network Connections".
Step2. Right click "Local Area Connection" and select "Properties".
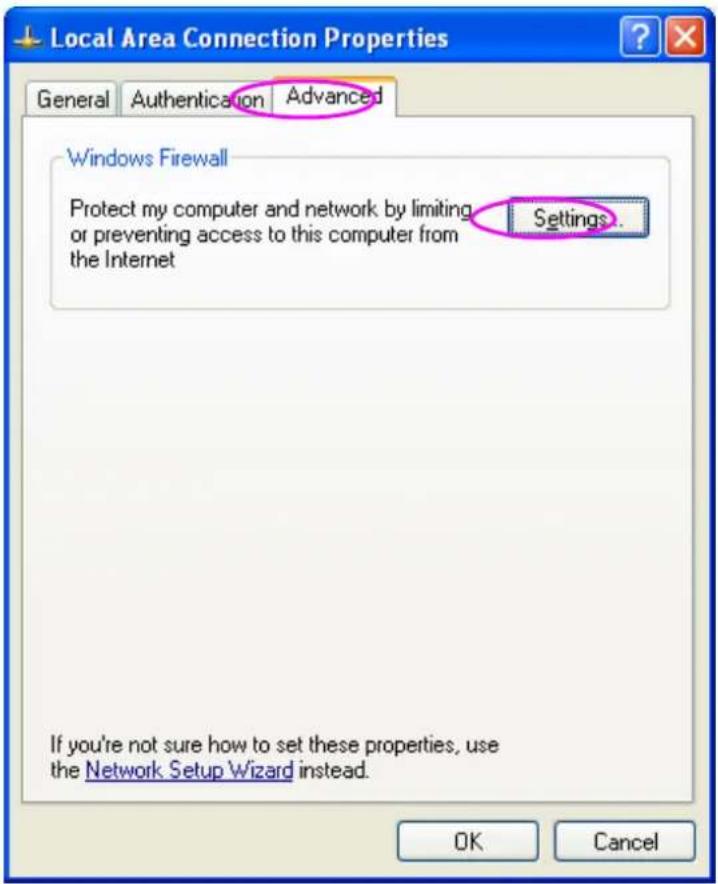
Step3. Select "Advanced" tab and click "Settings...".
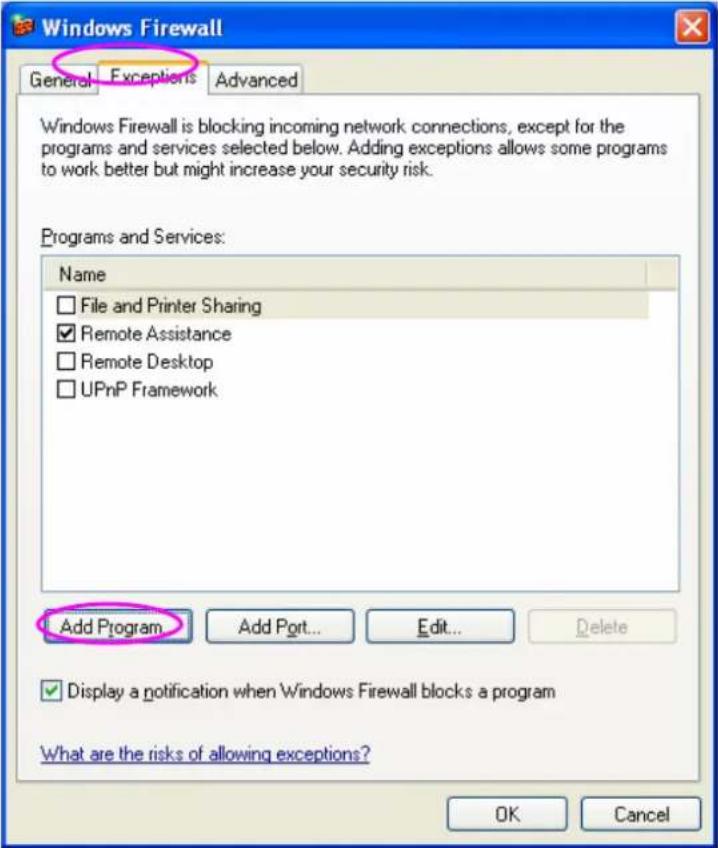
Step4. Select "Exceptions" tab and click "Add Program...".
Step5. Click "Browse" to add a new program.
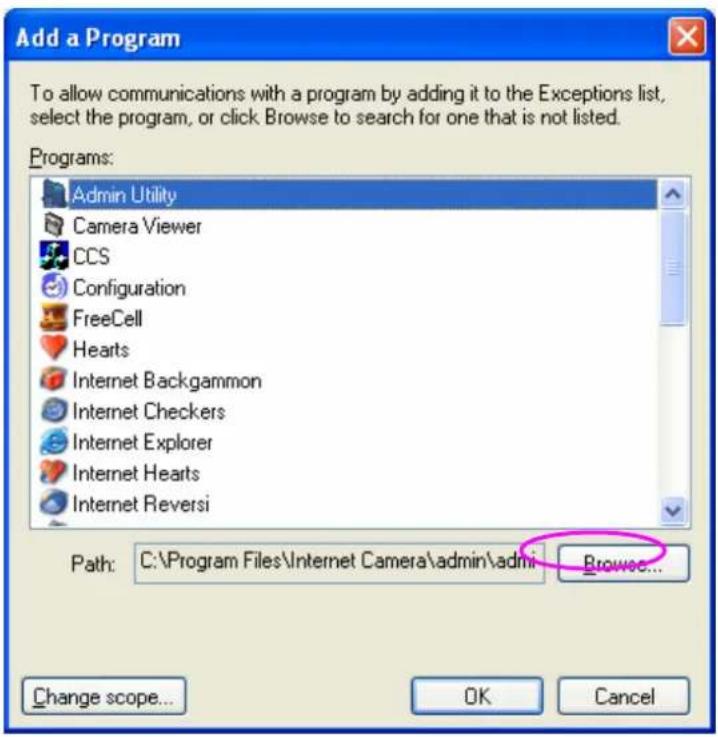
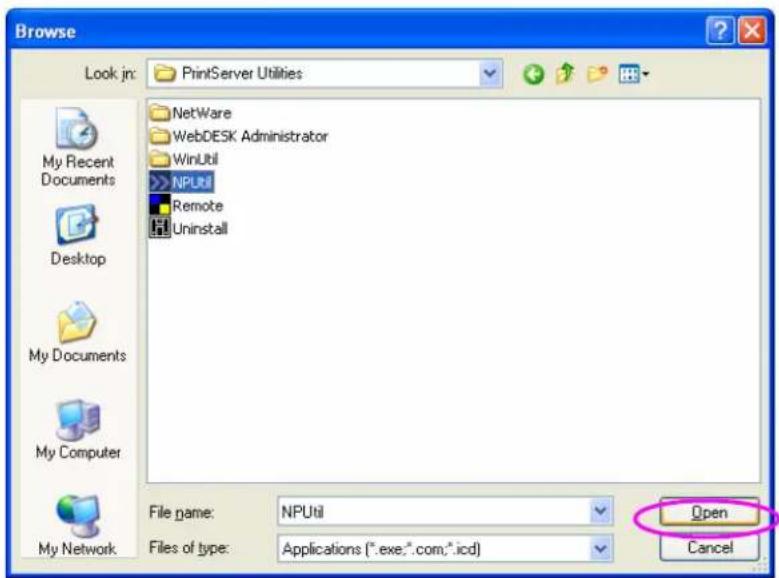
Step6. Open the "NPUtil" file from "C:\Program Files\PrintServer Utilities" (where C:\ is the system drive).
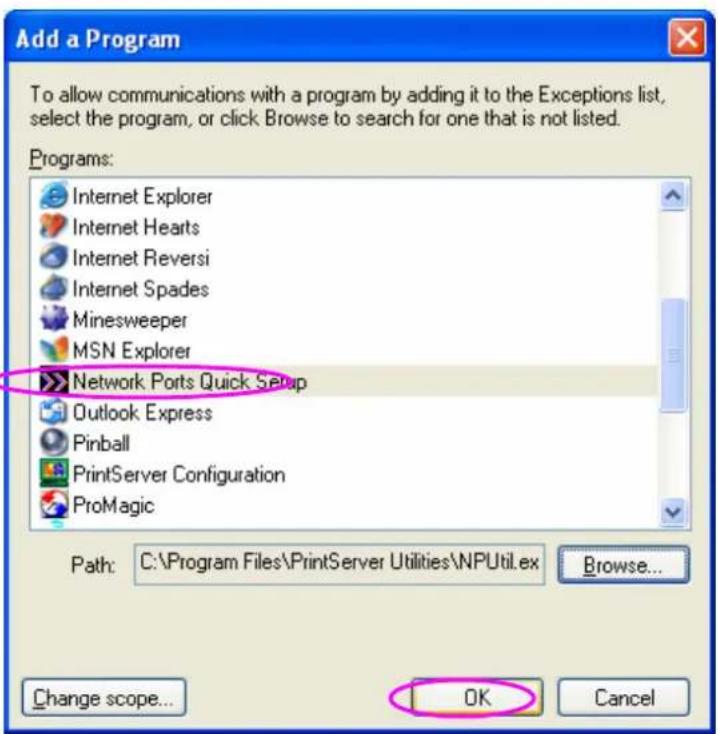
Step7. A new program "Network Ports Quick Setup" is displayed in the list, click "Ok".
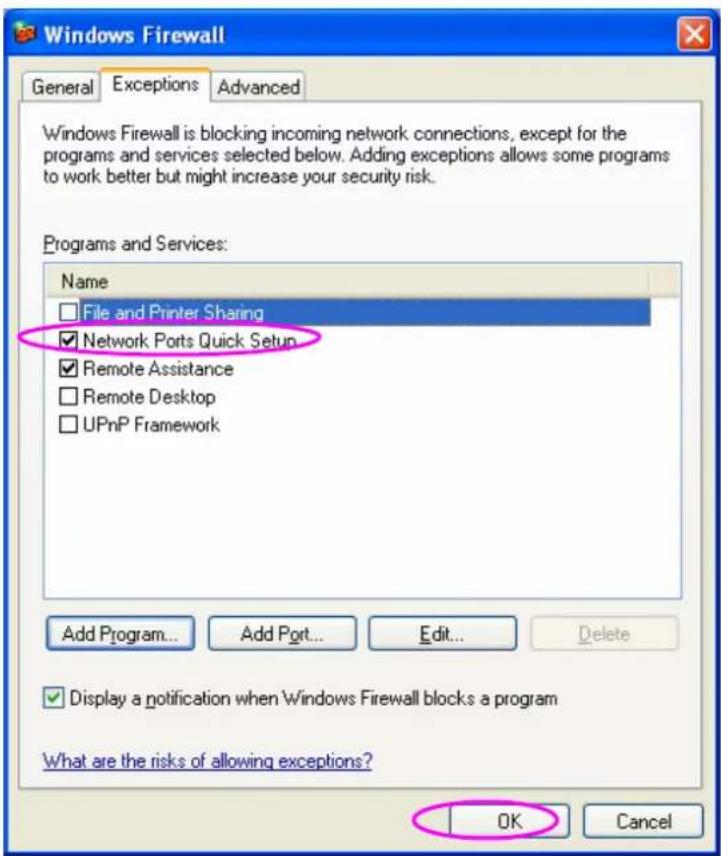
Step8. Click "Ok". You have completed the setting. The Windows XP SP2 will allow the incoming network connections activated by the program.


- EDIMAX NETWORKING PEOPLE TOGETHER
- Fast Ethernet Print Server
- User's Manual
- COPYRIGHT
- Federal Communication Commission Interference Statement
- FCC Caution
- Federal Communication Commission (FCC) Radiation Exposure Statement
- R&TTE Compliance Statement
- Safety
- EU Countries Intended for Use
- EU Countries Not intended for use
- DISCLAIMER
- Contents
- PRODUCT INTRODUCTION 1.1 PRODUCT INTRODUCTION....1
- WINDOWS PEER-TO-PEER NETWORK 3.1 SYSTEM ARCHITECTURE....9
- WINDOWS NT/2000/2003 NETWORK 4.1 SYSTEM ARCHITECTURE....28
- NETWARE NETWORK 5.1 SYSTEM ARCHITECTURE....31
- UNIX SYSTEM NETWORK 6.1 INTRODUCTION....35
- CONFIGURATION UTILITY 7.1 INTRODUCTION ..39
- WEB MANAGEMENT
- INTRODUCTION......62
- WINDOWS XP SP2 SETUP....78
- Product Introduction
- Product Introduction
- Product Package
- Network Printing Architecture
- Network Printing Functions for Clients
- UNIX / Linux
- MAC OS
- Network Printing Functions for Network Server
- Network Printing Environment
- Contents of the User's Manual
- Firmware & Printing Function
- Hardware Installation
- Windows Peer-to-Peer Network 3.1 System Architecture
- Administrator Installation and Setup
- Administrator Utilities
- Client Installation and Setup
- Client Utilities
- Network Ports Quick Setup
- Remote Ports (Utility)
- Windows Add Printer Procedure
- Windows NT/2000/2003 Network
- System Architecture
- Windows NT/2000/2003 Server Installation and Setup
- Step1.
- Step2.
- Step3.
- User Installation and Setup
- NetWare Network
- System Architecture
- NetWare 3.x/4.x/5.x Installation & Setup
- Installation Using PCONSOLE
- Configuring as Print Server Mode
- UNIX System Network
- Introduction
- Enable Print Server's TCP/IP Support
- Setup Print Server's IP Address
- DHCP
- BOOTP
- Verify Print Server's IP Address
- Configure Remote LPD Printing on the Host
- Configuration Utility
- Introduction
- Search for All Available Print Server
- Status of Print Server
- Setup the Print Server
- AppleTalk Configuration
- General Configuration
- Netware Print Server Configuration
- System Configuration
- TCP/IP Configuration
- Wireless Configuration
- SNMP Configuration
- Wizard
- Report
- Introduction
- Login
- Device Status
- System
- Printer
- TCP/IP
- SMB
- SNMP
- NetWare
- AppleTalk
- Setup Wizard
- System
- Advanced Settings
- TCP/IP
- SMB
- SNMP
- NetWare
- AppleTalk
- Save Settings
- System Tools
- Load Default
- Upgrade Firmware from Browser
- IPP Printing
- Introduction
- System Setup
- Print Server Side
- Client Side
- Windows XP SP2 Setup
- Step5. Click "Browse" to add a new program.
- Step6. Open the "NPUtil" file from "C:\Program Files\PrintServer Utilities" (where C:\ is the system drive).
- Step7. A new program "Network Ports Quick Setup" is displayed in the list, click "Ok".
Brand : Edimax
Model : PS-1206P
Category : Print Server