
PMXU43BT - Gramophone Pyle - Free user manual and instructions
Find the device manual for free PMXU43BT Pyle in PDF.


| Product Type | Wireless BT Streaming Studio Mixer DJ Controller Audio Mixing Console System |
| Model | PMXU43BT |
| Brand | Pyle |
| Input Channels | 2 x Mono MIC/LINE (combo XLR/1/4"), 1 x Stereo LINE (1/4"), 1 x MP3 (USB), 1 x USB sound card, 2 x Tape/CD (RCA) |
| Output Channels | 1 x Stereo Out (1/4" L/R), 1 x Phones (1/4"), 1 x Send, 1 x Return |
| Dimensions (L x W x H) | 9.3" x 7.5" x 2.6" (236 x 191 x 66 mm) |
| Power Supply | AC 100-240V, 50/60Hz via external adapter; DC +15V, -15V, +48V |
| Power Consumption | 11W |
| Phantom Power | +48V, switchable per channel |
| Wireless Bluetooth | Version 4.0, network name 'KT-08UP', range 15+ ft |
| Built-in Effects | 16-bit DSP with 16 presets (reverb, delay, etc.) |
| Equalization (per channel) | High: +/-15dB @ 12kHz shelving; Mid: +/-15dB @ 2.5kHz shelving; Low: +/-15dB @ 80Hz shelving |
| Gain Control | +20 to +64 dB (adjustable) |
| Pad Switch | 26dB attenuation |
| Peak LED | Indicates post-EQ signal within 3dB of clipping |
| Level Meter | 2 x 5-segment LED (+6, +3, 0, -3, -10 dB) |
| USB Interface | MP3 flash drive reader and computer connection (sound card) |
| Recording | Direct-to-computer recording via USB |
| Headphone Output | 1/4" stereo jack, adjustable volume |
| Frequency Response | 20Hz - 20kHz, +/-3dB |
| Input Distortion | 0.03% at 1kHz/150mV input |
| Cleaning | Use only a dry cloth |
| Safety | Do not expose to rain or moisture; unplug during lightning storms |
| Accessories Included | Power adapter (4-pin), user manual |
Frequently Asked Questions - PMXU43BT Pyle
User questions about PMXU43BT Pyle
0 question about this device. Answer the ones you know or ask your own.
Ask a new question about this device
Download the instructions for your Gramophone in PDF format for free! Find your manual PMXU43BT - Pyle and take your electronic device back in hand. On this page are published all the documents necessary for the use of your device. PMXU43BT by Pyle.
USER MANUAL PMXU43BT Pyle
PMXU83BT
★★★√+☆☆★★×√+☆☆★★×√+
★□※○▲+★▼□※○■*★◆※□★☆
DJ Controller Audio Mixing Console System
User Manual
TABLE OF CONTENTS
Important Safety Instructions 3
1. Introduction 4
General mixing console functions 4
Before you get started 4
2. Control Elements and Connectors 5
Channel Input 5
Main Control 6
3. Installation 7
Mains connection 7
Audio connections 8
4. Specifications 9
IMPORTANT SAFETY INSTRUCTIONS

Terminals marked with this symbol carry electrical current of sufficient magnitude to constitute risk of electric shock. Use only high-quality professional speaker cables with 14 " TS or twist-locking plugs pre-installed. All other installation or modification should be performed only by qualified personnel.
This symbol, wherever it appears, alerts you to the presence of uninsulated dangerous voltage inside the enclosure - voltage that may be sufficient to constitute a risk of shock.
This symbol, wherever it appears, alerts you to important operating and maintenance instructions in the accompanying literature. Please read the manual.
Caution To reduce the risk of electric shock, do not remove the top cover (or the rear section). No user serviceable parts inside. Refer servicing to qualified personnel.
Caution To reduce the risk of fire or electric shock, do not expose this appliance to rain and moisture. The apparatus shall not be exposed to dripping or splashing liquids and no objects filled with liquids, such as vases, shall be placed on the apparatus.
Caution These service instructions are for use by qualified service personnel only. To reduce the risk of electric shock do not perform any servicing other than that contained in the operation instructions. Repairs have to be performed by qualified service personnel.
-
Read these instructions.
-
Keep these instructions.
-
Heed all warnings.
-
Follow all instructions.
-
Do not use this apparatus near water.
-
Clean only with dry cloth.
-
Do not block any ventilation openings. Install in accordance with the manufacturer's instructions.
-
Do not install near any heat sources such as radiators, heat registers, stoves, or other apparatus (including amplifiers) that produce heat.
-
Do not defeat the safety purpose of the polarized or grounding-type plug. A polarized plug has two blades with one wider than the other. A grounding-type plug has two blades and a third grounding prong. The wide blade or the third prong are provided for your safety. If the provided plug does not fit into your outlet, consult an electrician for replacement of the obsolete outlet.
-
Protect the power cord from being walked on or pinched particularly at plugs, convenience receptacles, and the point where they exit from the apparatus.
-
Use only attachments/accessories specified by the manufacturer.
-
Use only with the cart, stand, tripod, bracket, or
As a tool is specified by the manufacturer, or sold with the apparatus. When a cart is used, use can on when moving the cart/apparatus combination to avoid injury from tip-over.
-
Unplug this apparatus during lightning storms or when unused for long periods of time.
-
Refer all servicing to qualified service personnel. Servicing is required when the apparatus has been damaged in any way, such as power supply cord or plug is damaged, liquid has been spilled or objects have fallen into the apparatus, the apparatus has been exposed to rain or moisture, does not operate normally, or has been dropped.
-
The apparatus shall be connected to a MAINS socket outlet with a protective earthing connection.
-
Where the MAINS plug or an appliance coupler is used as the disconnect device, the disconnect device shall remain readily operable.

1. INTRODUCTION
Caution!

We should like to draw your attention to the fact that extreme volumes may damage your hearing and/or your headphones or loudspeakers. Turn the MAIN MIX control and PHONES control in the main section fully counter-clockwise before you switch on the unit. Always be careful to set appropriate volume levels.
Important notes concerning installation
The sound quality may diminish within the range of powerful broadcasting stations and high-frequency sources. Increase the distance between the transmitter and the device and use shielded cables for all connections.
1.1 General mixing console functions
A mixing console fulfils three main functions:
- Signal processing: Preamplification, level adjustment, mixing of effects, frequency equalization.
- Signal distribution: Summing of signals to the aux sends for effects processing and monitor mix, distribution to one or several recording tracks, power amp(s), control room and 2-track outputs.
- Mix: Setting the volume level, frequency distribution and positioning of the individual signals in the stereo field, level control of the total mix to match the recording devices/crossover/power amplifier(s). All other mixer functions can be included in this main function.
The interface of the mixing consoles is optimized for these tasks enabling you to easily keep track of the signal path.
1.2 Before you get started
1.2.1 Shipment
Your mixing console was carefully packed in the factory to guarantee safe transport. Nevertheless, we recommend that you carefully examine the packaging and its contents for any signs of physical damage, which may have occurred during transit.
- If the unit is damaged, please do NOT return it to us, but notify your dealer and the shipping company immediately, otherwise claims for damage or replacement may not be granted.
1.2.2 Initial operation
Be sure that there is enough space around the unit for cooling purposes and to avoid over-heating please do not place your mixing console on high-temperature devices such as radiators or power amps. The console is connected to the mains via the supplied cable. The console meets the required safety standards. Blown fuses must only be replaced by fuses of the same type and rating.
- Never connect the Mixer to the power supply unit when the latter is connected to the mains! First connect the power supply unit to the console, then connect the power supply unit to the mains.
- Please note that all units must be properly grounded. For your own safety, you should never remove any ground connectors from electrical devices or power cables, or render them inoperative.
- Please ensure that only qualified people install and operate the mixing console. During installation and operation, the user must have sufficient electrical contact to earth, otherwise electrostatic discharges might affect the operation of the unit.
1.2.3 Online registration
Please register your new equipment right after your purchase by visiting PyleUSA.com/register and read the terms and conditions of our warranty carefully. Should your product malfunction, it is our intention to have it repaired as quickly as possible. To arrange for warranty service, please contact the retailer from whom the equipment was purchased. Should your dealer not be located in your vicinity, you may directly contact one of our subsidiaries. Corresponding contact information is included in the original equipment packaging. Should your country not be listed, please contact the distributor nearest you.
A list of distributors can be found in the support area of our website (www.PyleUSA.com).
Registering your purchase and equipment with us helps us process your repair claims more quickly and efficiently. Thank you for your cooperation!
2. CONTROL ELEMENTS AND CONNECTORS
This chapter describes the various control elements of your mixing console. All controls, switches and connectors will be discussed in detail.
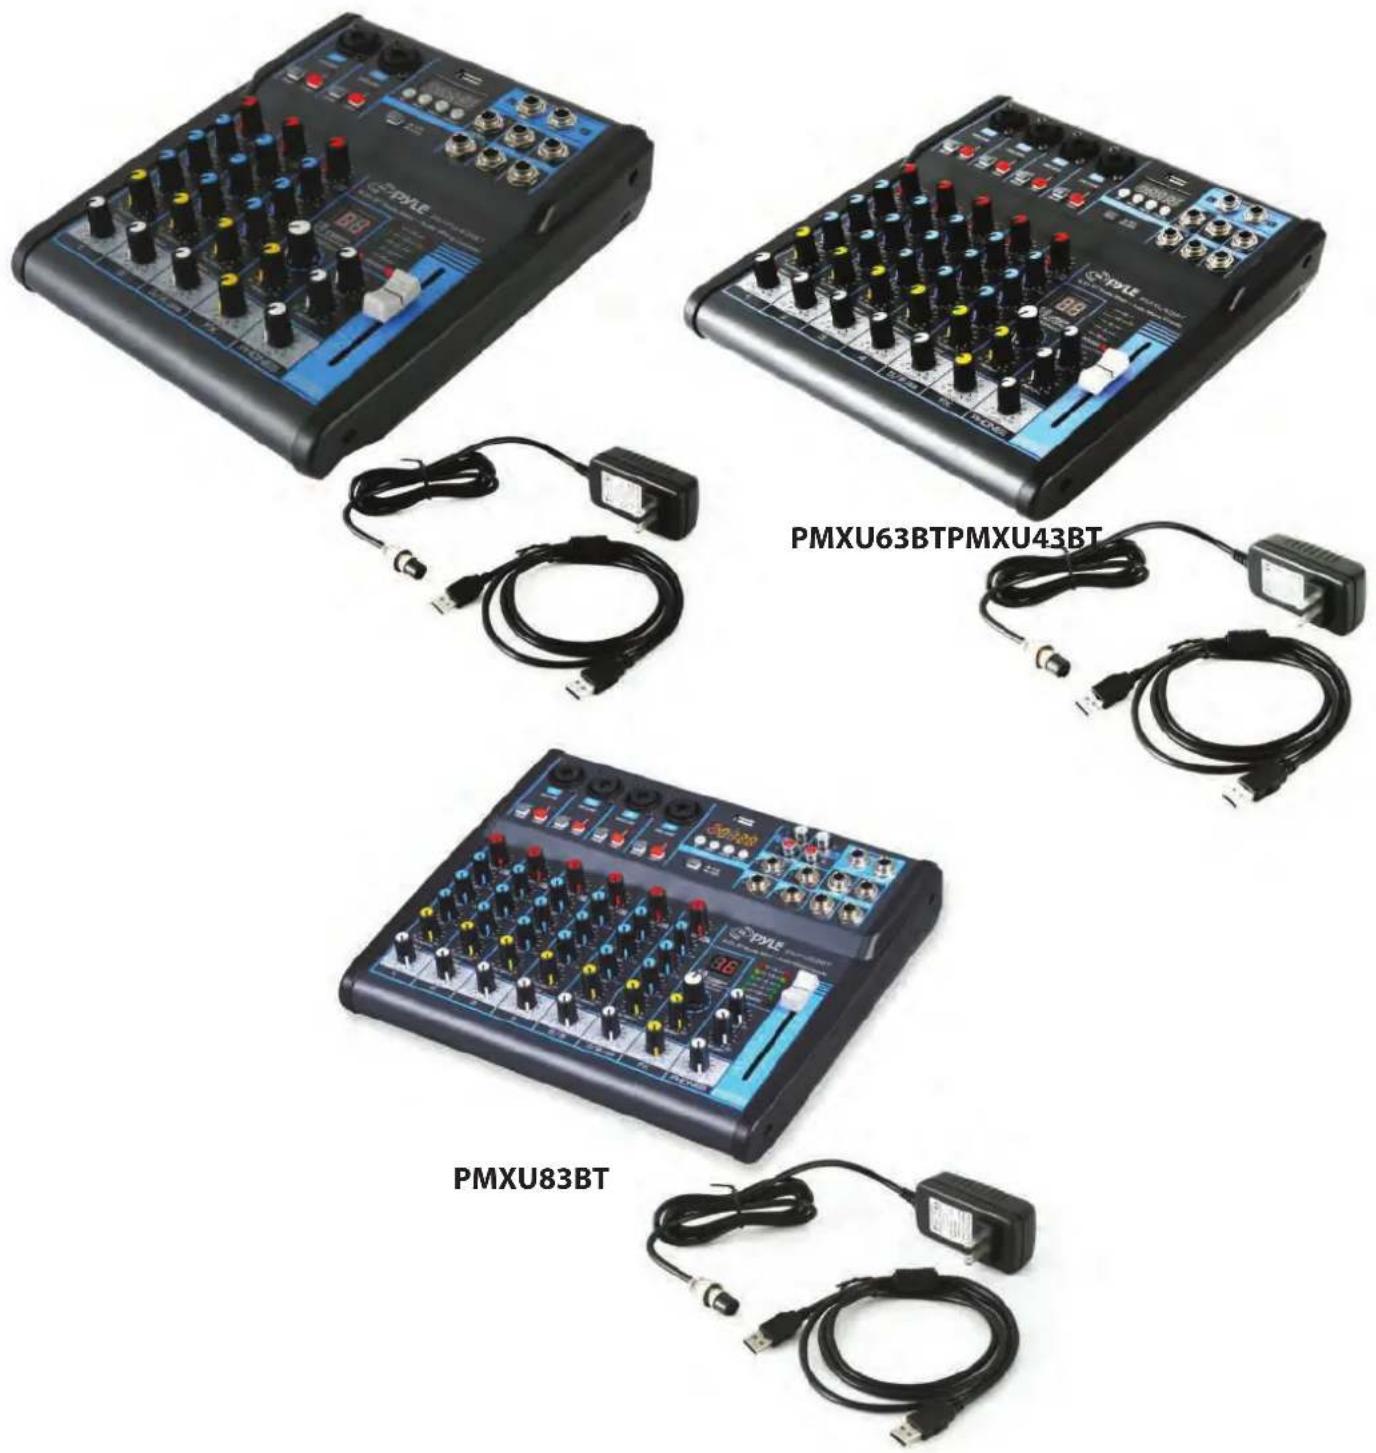
4 CHANNEL


6 CHANNEL


8 CHANNEL


2.1 CHANNEL INPUT

- [MIC/LINE] Mono Input: Connect the microphone, musical instrument or audio device (CD player and so on) to the device. The sockets are supports both XLR and UNBALANCED 1/4" PLUG.

XLR UNBALANCED 1/4 " PLUG
- [+48V PHANTOM] Button/LED: When the button is turned ON, the LED light is on, provide DC+48V phantom power to XLR plug on MIC/LINE mono input. Please turn ON this button when using the condenser microphone which is powered by a phantom power.
- [PAD] button: It will attenuate the sound input to the device when turned ON. You can turn on the switch if you hear the distortion or [PEAK]LED indicator light is on.
- [GAIN] Controller: Determines the basic volume of each channel, adjust for maximum volume performance. [PEAK] LED indicator light indicates the volume is too loud.
- [HIGH] Treble tone controller: Adjust the controller to enhance or attenuate for 15dB at 12KHz.
- [MID] Alto tone controller: Adjust the controller to enhance or attenuate for 15dB at 2.5KHz.
- [LOW] Bass tone controller: Adjust the controller to enhance or attenuate for 15dB at 80Hz.
- [FX] Controller: Adjust the signal level from the channel to the reverberation line. Please note, the single level will vary with the different setting of the channel attenuator. If using the stereo channel, will mix the signals from L and R channels, then, send it to reverberation line.
- [PEAK] LED indicator light: When the volume of input signal or volume after adjusting equalizer is too high, the LED indicator light will keep flashing, please rotate the[GAIN] CONTROLLER counterclockwise to turn down the volume.
- [LEVEL]: Controller, adjust to balance the volume of each channels.
MIC
Each mono input channel offers a balanced microphone input via the XLR connector and also features switchable +48/+15 V phantom power supply for condenser microphones. The preamps provide undistorted and noise-free gain as is typically known only from costly outboard preamps.
- Please mute your playback system before you activate the phantom power supply to prevent switch -on thumps being directed to your loud speakers.
LINE
Each mono input also features a balanced line input on a 1/4" connector. Unbalanced devices (mono jacks) can also be connected to these inputs.
- Please remember that you can only use either the microphone or the line input of a channel at any one time. You can never use both simultaneously!
GAIN
Use the GAIN control to adjust the input gain. This control should always be turned fully counterclockwise whenever you connect or disconnect a signal source to one of the inputs.
FX
FX sends (or AUX sends) enable you to feed signals via a variable control from one or more channels and sum these signals to a bus. The bus appears at the console's FX send output and can be fed from there to an external effects device. The return from the effects unit is then brought back into the console on the aux return connectors or normal channel inputs. Each FX send is mono and features up to +15 dB gain. As the name suggests, the FX sends of the mixing consoles are intended to drive effects devices (reverb, delay, etc) and are therefore configured post-fader. This means that the mix between dry signal and effect remains at the level determined by the channel's aux send, irrespective of the channel fader setting. If this were not the case, the effects signal of the channel would remain audible even when the level knob is lowered to -∞.
MAIN CONTROL

- [PROGRAM] Controller: Select from 16 kinds of internal digital effects, provides the same signal to L and R stereo.
- [REPEAT] Echo controller of internal effects: Adjust to achieve the desired state of internal echo signal.
- [FX LEVEL] Effects return level controller: Adjust the volume of effect.
- Level indicators can show the signal level from [STEREO OUT] output. Adjust the [LEVEL] controller to lower the level if [PEAK] indicator light up in RED.
- [LEVEL PHONES] Earphone controller: Adjusts the earphone's volume.
- [STEREO LEVEL] Fader: Adjust the overall volume from [STEREO OUT] output signal.
- [SEND] Level controller: Adjust the sending level.
-
[RETURN] Level controller: Adjust the return level.
-
USB interface: Use for MP3 input or computer connection (can be used for U disk or computer software recording)
- MP3 Display: Displays the status and details of the MP3 play.
- [MAIN OUT] Output: Connect the active speaker or amplifier.
- [CTRL OUT] Output: Connect the monitor room to monitor.
- Converting switch for channel 3/4 and USB signal.

-
Channel input socket (stereo): 8CH mixer with two group of input socket, 4CH and 6CH mixers with one group of input socket. If connected only to L (MONO) socket, the mixer will send out the same mono signal to L and R sockets.
-
[SEND & RETURN] Socket: When using the [SEND] output socket separately, can be connected with power amplifier, act as the monitoring signal. When using the [RETURN] input socket separately, can be connected with the audio source. When using two sockets together, can connect with the external audio processor.
-
[PHONES] Socket: Connect an earphone, the socket is supporting stereo phone plug.
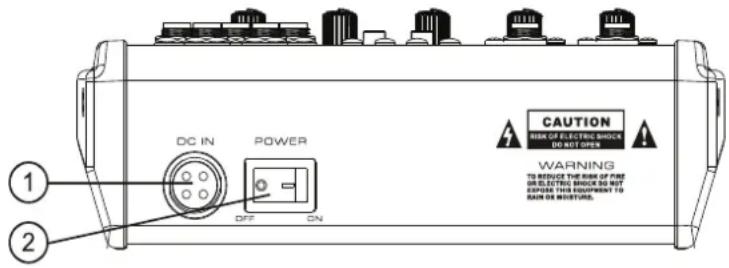
- The external power input socket, receiving external power supply, DC +15V, -15V, +48V, ground wire
- Power Switch
1. WIRELESS BT CONNECTION
a. Press the "MODE" button in order to select the BT mode, then the Wireless BT icon on display will flash and displays BT.
b. Open the Wireless BT, select "KT-08UP" for pairing, after the success of the pairing, there will be a sound prompt.
2. BUTTON FUNCTION
a. "▶" button: Short press to pause the playing song, press again to continue playing.
b. "◀/—" button: Short press to play the previous song, long press to reduce the input volume.
c."▶/+"button: Short press to play the next song, long press to increase the input volume.
d. [MODE] Selecting button: Switching the functional model, select USB, REC, BT in order;
a. Press the "MODE" key to select the REC state.
b. Press the "▶" button to start recording, the LED screen shows the recording time, press the "▶" button again to pause the recording.
c. Press the "MODE" key to back out the recording.
- Computer sound card: Connect the computer data cable to a PC and it will enter the PC playing state automatically. (The computer will install the driver automatically at the first connection, need to wait until the installation finish to play or record)
3. INSTALLATION
3.1 Mains connection
AC POWER IN
Connect the power supply to the 3-pin mains connector on the rear of the console. Use the AC adapter supplied to connect the console to the mains. The adapter complies with all applicable safety standards.
- Please use only the power supply unit provided with the console.
- Never connect the Studio Mixer to the power supply unit while the latter is connected to the mains! First connect the console to the power supply unit, then connect the power supply unit to the mains.
- Please note that both the power supply unit and the mixing console heat up considerably during operation. This is completely normal.
3.2 Audio Connections
You will need a large number of cables for different applications. The illustrations below show how the connectors should be wired. Be sure to use only high-grade cables. Please use commercial RCA cables to connect the 2-track inputs and outputs. You can, of course, also connect unbalanced devices to the balanced inputs/outputs. To do this, use either mono plugs or stereo plugs with the ring and sleeve bridged (pins 1 and 3 in the case of XLR connectors).
- Caution! Never use unbalanced XLR connectors (PIN 1 and 3 connected) on the MIC input connectors when using the phantom power supply.
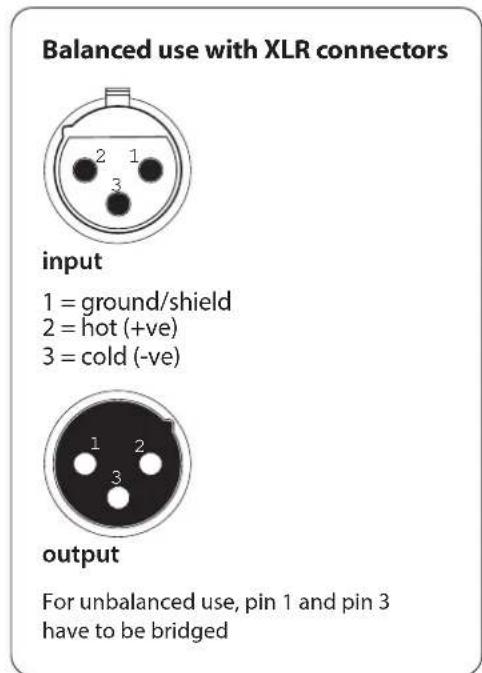
XLR CONNECTIONS

1/4 "MONO PLUG

STEREO PLUG FOR HEADPHONES CONNECTION

1/4 " STEREO PLUG
GENERAL SPECIFICATIONS
| MODEL | PMXU43BT | PMXU63BT | PMXU83BT | |
| 4 CHANNEL | 6 CHANNEL | 8 CHANNEL | ||
| Input Channels | Mono: MIC/LINE | 2 | 4 | 4 |
| Stereo LINE: | 1 | 1 | 2 | |
| MP3 | 1 | 1 | 1 | |
| USB sound card | 1 | 1 | 1 | |
| TAPE/CD Input | 2 | |||
| Output Channels | STEREO OUT | 1 | 1 | 1 |
| PHONES | 1 | 1 | 1 | |
| RETURN | 1 | 1 | 1 | |
| Bus | STEREO | 1 | 1 | 1 |
| SEND | 1 | 1 | 1 | |
| Input Channel Function | PAD | 26dB | ||
| EQ | HIGH: Gain: +15dB/-15dB, Frequency, 12kHz shelvingMID: Gain: +15dB/-15dB, Frequency, 2.5kHz shelvingLOW: Gain: +15dB/-15dB, Frequency, 80Hz shelving | |||
| PEAK LED | LED turns on when post EQ signal reaches 3 dB below clipping level | |||
| Level Meter | 2*5-segment LED meter, (+6,+3,0,-3,-10 dB) | |||
| Effects | Built-in | Built-in | Built-in | |
| Phantom Power Voltage | +48V | |||
| Power Requirements | AC 100-240V, 50/60Hz DC +15V, -15V, +48V | |||
| Power Consumption | 11W | 14W | 17W | |
| PMXU63BTPMXU43BT | PMXU83BT | |
| Multi 4-Channel Audio Source Mixing(2) XLR/14" Combo Audio LINE/Microphone Inputs1/4" Mono + Stereo Inputs1/4" Send + Return InputsInput Mixer Channels:4-Ch. (+ FX/Headphones)Dimensions (L x W x H):9.3" x 7.5" x 2.6" | Multi 6-Channel Audio Source Mixing(4) XLR/14" Combo Audio LINE/Microphone Inputs1/4" Mono + Stereo Inputs1/4" Send + Return InputsInput Mixer Channels:6-Ch. (+ FX/Headphones)Dimensions (L x W x H):9.3" x 9.7" x 2.6" | Multi 8-Channel Audio Source Mixing(4) XLR/14" Combo Audio LINE/Microphone Inputs(2) Pair RCA (L/R) Inputs(2) Pair 1/4" Mono + Stereo Inputs1/4" Send + Return InputsInput Mixer Channels:8-Ch. (+ FX/Headphones)Dimensions (L x W x H):9.3" x 10.8" x 2.6" |
PMXU43BT - PMXU63BT - PMXU83BT
Wireless BT Streaming Studio Mixer DJ Controller Audio Mixing Console System
Features:
• DJ & Studio Console Mixer System
• Built-in Wireless BT Receiver
• FX (Analog Effects) & 16 Bit DSP processor
- Direct-to-Computer Connect & Sound Record Ability
• LCD Digital Display & Front Panel Control Center
• Rotary Adjustment Knobs & LED Indicator Lights
• MP3 Digital Audio File Compatibility
- USB Interface: MP3 Flash Drive Reader/Computer Connection
- Connect & Stream Audio from External Devices
• (2) 1/4" (L/R) MAIN Outputs
• 1/4" Headphone Jack
- Stereo Level Fader/Slider
• Output Signal Level Indication
• BUS Audio Control, Sound Routing
• PAD Channel Source Input Switch
- Independent Channel Input Audio Configuration
- Gain, High, Mid, Low, FX/Send, Level, Base + Tone Adjustment
• +48V Phantom Power Control
• Power ON/OFF Switch
• Used for Professional Studio Applications & On-Stage Performances
Wireless BT Connectivity:
• Hassle-Free Audio Streaming Ability
- Works with All of Today's Latest Devices (Smartphones, Tablets, Laptops, Computers, etc.)
• Wireless BT Network Name: 'KT-08UP'
- Wireless BT Version: 4.0
- Wireless Range: 15' + ft .
What's in the Box:
• Wireless BT Studio Mixer
• Power Adapter Cable, 4-Pin
Technical Specs:
- Mic Input: Sensitivity/Impedance: 1.5mV/750 Ohm
- Input Frequency Response: 20Hz-20kHz, +/-3dB
- Input Distortion: 0.03%, 1kHz/150mV Input
- Channel GAIN Adjustment: +20/+64 (-6/+38)
• HIGH Gain: +/-15 dB, 12kHz Frequency Shelving
• MID Gain: +/-15 dB, 2.5kHz Frequency Shelving - LOW Gain: +/-15 dB, 80kHz Frequency Shelving
• HIGH/MID/LOW Adjustment: -15/+15dB - Stereo Output Level Meter: 5-Segment (+6, +3, 0, -3, -10dB)
• PAD Input Channel Adjustment: 26dB - Peak CLIP Level: < 3dB
• Phantom Power Voltage: +48V
• Power Supply: 100-240V (+/-15V DC Power Adapter)
• Digital Audio File Compatibility File-Types: MP3, WAV
PMXU43BT - PMXU63BT - PMXU83BT
Wireless BT Streaming Studio Mixer DJ Controller Audio Mixing Console System
PYLE
PyleUSA.com

natural_image
Illustration of a laptop with a red checkmark on screen, next to partial text (no readable document content)VISIT US ONLINE:
Have a question?
Need service or repair?
Want to leave a comment?
PyleUSA.com/ContactUs
PYLE
- TABLE OF CONTENTS
- Important Safety Instructions 3
- Introduction 4
- Control Elements and Connectors 5
- Installation 7
- Specifications 9
- IMPORTANT SAFETY INSTRUCTIONS
- INTRODUCTION
- Caution!
- Important notes concerning installation
- General mixing console functions
- Before you get started
- Shipment
- Initial operation
- Online registration
- CONTROL ELEMENTS AND CONNECTORS
- CHANNEL INPUT
- XLR UNBALANCED 1/4 " PLUG
- MIC
- LINE
- GAIN
- FX
- WIRELESS BT CONNECTION
- BUTTON FUNCTION
- INSTALLATION
- Mains connection
- AC POWER IN
- Audio Connections
- PMXU43BT - PMXU63BT - PMXU83BT
- Wireless BT Streaming Studio Mixer DJ Controller Audio Mixing Console System
- Features:
- Wireless BT Connectivity:
- What's in the Box:
- Technical Specs:
- PYLE
- PyleUSA.com
Brand : Pyle
Model : PMXU43BT
Category : Gramophone