
MPH500 - Heating DIMPLEX - Free user manual and instructions
Find the device manual for free MPH500 DIMPLEX in PDF.


User questions about MPH500 DIMPLEX
0 question about this device. Answer the ones you know or ask your own.
Ask a new question about this device
Download the instructions for your Heating in PDF format for free! Find your manual MPH500 - DIMPLEX and take your electronic device back in hand. On this page are published all the documents necessary for the use of your device. MPH500 by DIMPLEX.
USER MANUAL MPH500 DIMPLEX
A world of expertise
INSTRUCTION MANUAL
Installation and Operating
text_image
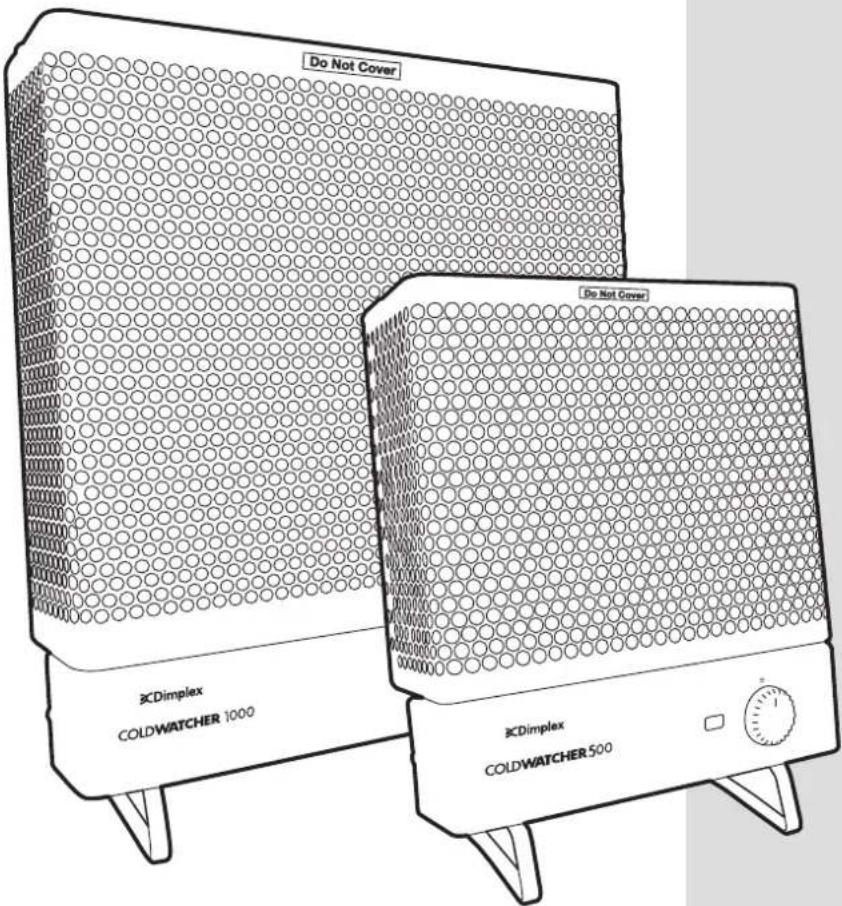
Do Not Cover CDimplex COLDWATCHER 1000 Do Not Cover CDimplex COLDWATCHER 500Coldwatcher Convector Heater
Models: MPH 500 & MPH 1000
These instructions should be read carefully and retained for future use. Note also the information presented on the appliance.
CAUTION: FAILURE TO FOLLOW THESE INSTRUCTIONS MAY CAUSE INJURY AND/OR DAMAGE AND MAY INVALIDATE YOUR GUARANTEE
IMPORTANT SAFETY ADVICE
WARNING - This appliance must not be used in a bathroom.
WARNING - To ensure safe operation, the heater may only be installed and connected in accordance with these installation and operating instructions. Read all information contained in this manual carefully
WARNING - Do not use this heater in the immediate surroundings of a bath, a shower or a swimming pool.
WARNING - This heater must not be located immediately below a fixed socket outlet.
WARNING - In order to avoid overheating, do not cover the heater.
WARNING - In order to avoid a hazard due to inadvertent resetting of the thermal cut-out, this appliance must not be supplied through an external switching device, such as a timer, or connected to a circuit that is regularly switched on and off by the utility.
This appliance can be used by children aged from 8 years and above and persons with reduced physical, sensory or mental capabilities or lack of experience or knowledge if they have been given supervision or instruction concerning the use of the appliance in a safe way and understand the hazards involved. Children shall not play with the appliance. Cleaning and user maintenance shall not be made by children without supervision.
Children of less than 3 years should be kept away unless continuously supervised. Children aged from 3 years and less than 8 years shall only switch on/off the appliance provided that it has been placed or installed in its intended normal operating position and they have been given supervision or instruction concerning the use of the appliance in a safe way and understand the hazards involved. Children aged from 3 years and less than 8 years shall not plug in, regulate and clean the appliance or perform user maintenance.
CAUTION - Some parts of this product can become very hot and cause burns. Particular attention has to be given where children and vulnerable people are present.
WARNING - If the mains lead is damaged, it must be replaced by the manufacturer or its service agent or a similarly qualified person in order to avoid a hazard.
All liability is disclaimed for any frost damage caused by a heating capacity that is insufficient for the room size, poor heat insulation of the room, incorrect use or force manurer (e.g. power failure).
Do not store or use any flammable materials or sprays in the vicinity of the appliance when the appliance is in use and do not use the appliance in flammable atmospheres.
Do not insert any foreign objects into the appliance openings. The appliance air inlet and outlet openings must not be obstructed.
Place the device in such a manner that it cannot be touched by a person in the bathtub or under the shower. Never touch live parts or operate the appliance with wet hands.
WARNING - The device carried the sticker on the top, which indicates that the heating device must under no circumstances be covered with any objects.
Do not expose the appliance to direct rainfall. The appliance is not for outdoor use unless sheltered under cover. The appliance must only be stored indoors.
WARNING - Do not use this heater if it has been dropped.
Do not use if there are visible signs of damage to the heater.
As with all portable heating appliances - This product is only suitable for well insulated spaces or occasional use.
In order to avoid overheating, do not cover the heater!
Do not use the appliance in room with bath, shower or swimming pool or in the vicinity of Wash basins or water connections.
Do not place the power supply cord over the heater.
If the appliance is switched on automatically while unattended, potential hazards may exist, e.g. appliances that have been covered or obstructed in your absence may pose a risk of fire.
DO NOT use the heater on deep pile carpets or the long hair type of rugs. Keep combustible materials such as drapes and other furnishings clear from the front, sides and rear of the heater.
Do not use the heater to dry your laundry.
Do not place the device directly below a wall socket.
CAUTION - Use this heater on a horizontal and stable surface, as applicable.
WARNING - Do not use this heater in small rooms when they are occupied by person not capable of leaving the room on their own, unless constant supervision is provided.
WARNING - To reduce the risk of fire, keep textiles, curtains, or any other flammable material a minimum distance of 1 m from the air outlet.
GENERAL
This product is designed to maintain defrosting condition and is not capable of reaching and maintaining human thermal comfort. It is therefore out of scope of the Ecodesign Directive for local space heaters.
Both models can be controlled by there variable thermostat which has a minimum setting suitable for frost protection. They are specially designed for use where localised heating is needed, or where a small heater is only necessary for general heating or a level of frost protection. These heaters are versatile and robust units ideal for greenhouses, lofts, garages, utility rooms, sheds, chalets, spare rooms, conservatories, airing cupboards, outside WCs, kiosks, checkouts etc.
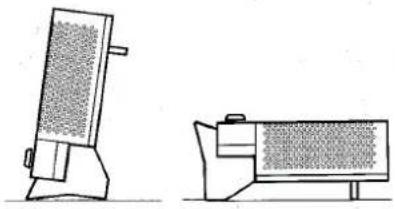
Suitable for fixed mounting on the wall or floor, they can also be used free-standing in a vertical or horizontal position. For maximum heating effectiveness the heater should be positioned as low as possible within the area to be heated. Note: If the heater is to be used unattended for long periods (e.g. in lofts) it should be permanently mounted in accordance with the fixing instructions given below.
Installation
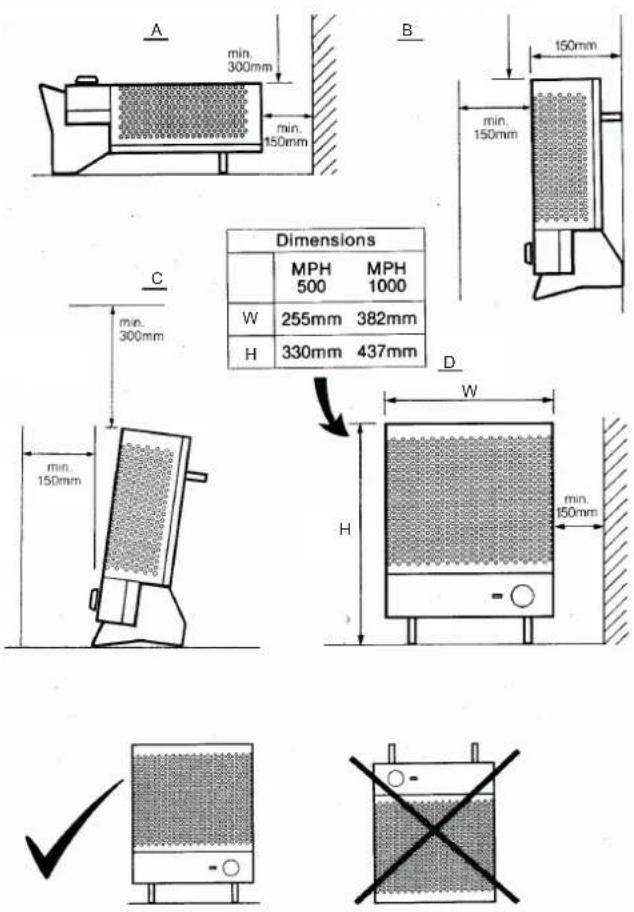
| Dimensions | ||
| MPH 500 | MPH 1000 | |
| W | 255mm | 382mm |
| H | 330mm | 437mm |
A. Horizontal mounting, fixed or portable: Minimum horizontal distances from sides and end of heater to obstruction. Minimum distances from top of heater to shelf or overhanging obstructions.
B. Wall mounting: Minimum vertical distance from top of heater to shelf or overhanging obstruction. Minimum horizontal distance from front of heater to obstruction.
C. Upright portable operation: Minimum vertical distance from top of heater to shelf or overhanging obstruction. Minimum horizontal distance from front of heater to obstruction.
D. Wall mounting or portable: Minimum distance to sidewall or obstruction.
Note 1 - For maximum heating effectiveness the heater should be positioned at a low level. Note2 - It is recommended that the heater is not fitted into an unventilated enclosure which is less than 10 cubic feet.
IMPORTANT - If wall mounted the heater should be mounted only in the upright position with the control panel at the bottom.
FIXING THE HEATER
The heater may be fixed to the wall or floor using the fixing holes provided in the mounting frame. Please refer to the Section "Heater Dimensions and Minimum Operating Distances" before fixing the heater in position.
FIXING TO THE WALL
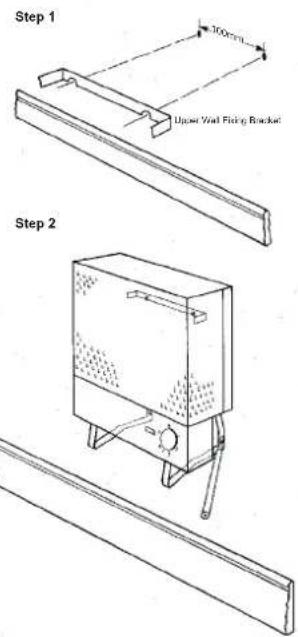
The heater must be fixed only in the upright position with the control panel at the bottom. The position of the two upper fixing points should first be marked on the wall, at a horizontal distance of 100mm apart, Step 1. Place the heater in position with the upper
natural_image
Two technical line drawings of a mechanical device, one showing front and side views (no text or symbols)wall bracket notches against these fixing points to check that the heater complies with the "minimum operating distances". These two fixing points should then be drilled and plugged. Suitable round headed size 8 screws should be fixed in these positions to such a depth that the heater may be hung in position while the positions of the lower fixing holes are marked, Step 2. The heater should then be removed while the lower fixing holes are drilled and plugged. Then the heater should be hung in position on the upper two screws while the lower two screws are tightened to hold the heater firmly on the wall. The tightness of the upper screws should be adjusted if necessary to ensure a firm fit.
text_image
Step 1 300mm Upper Wall Fitting Bracket Step 2FIXING TO THE FLOOR
The heater may be fixed to the floor in the lay-flat position. Before fixing the heater in position place it in the desired position and check that it complies with the requirements described in the section "Heater Dimensions and Minimum Operating Distances". For guidance on fixing the heater see the section on 'Fixing to the Wall'. The principles involved are the same.
User Controls
text_image
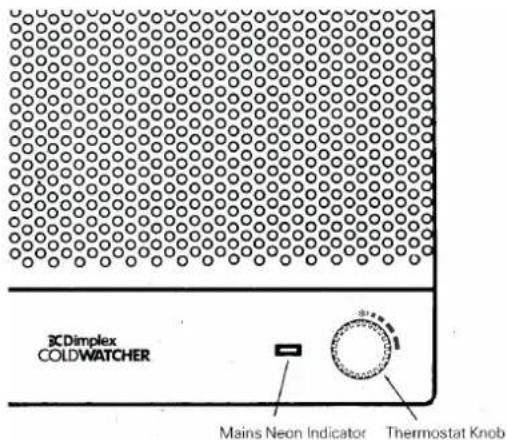
BCDimplex COLDWATCHER Mains Neon Indicator Thermostat KnobNEON INDICATOR
When your heater is plugged in and switched on at the mains, the neon indicator will glow showing that the heater is available for use, although the heating element may not be energised, depending on the setting on the thermostat knob.
THERMOSTAT
The thermostat knob is calibrated with a scale marked ✝ upto marked graphics. The lowest setting ✝ is designed to switch on in a temperature range of approximately 3°C to Minus 5°C and is suitable for frost protection.
The other settings represent a range of temperatures dependent on a number of factors including the size of the area to be heated and the outside temperature Actual settings should be found by experience for each set of conditions.
The heater will not emit heat if the temperature of the air surrounding the heater is above that set on the control knob, although the mains neon indicator will glow showing that the heater is available for use. The heating element will energise if the thermostat knob setting is increased, as indicated by an audible “click” when the thermostat knob is turned.
THERMAL OVERLOAD CUT-OUT
The built-in overheat cut-out switches off the appliance automatically in the event of a fault. Disconnect the electricity supply to the appliance. After a short cooling down phase, the appliance is ready for use again. If the fault should occur again, follow the advice in the “After Sales Service” section.
Operations
text_image
Water-tank LoftUSING THE HEATER FOR FROST PROTECTION
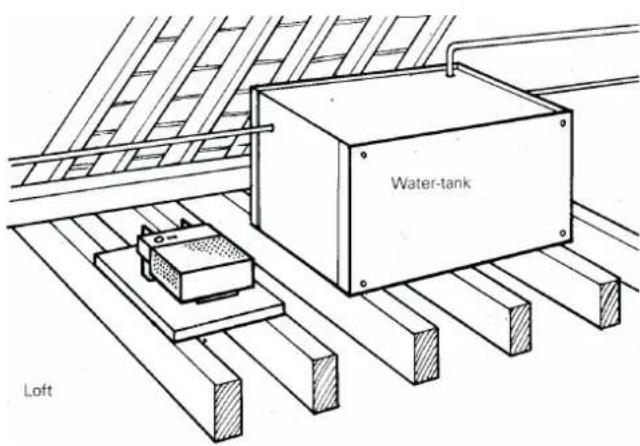
The Heater may be used to protect water-tanks (see Fig. 4), pipes and other frost-sensitive areas by setting the thermostat to the Frost position. When the thermostat is set at this position the heater elements will emit heat only when the temperature in the vicinity of the heater falls to a temperature range of approximately 3°C to Minus 5°C.
The heater will continue to emit heat until the surrounding air again reaches approximately 50C and will then switch off until the temperature falls again. In this way, frost protection will be
provided in the area surrounding the heater. The Heater will also guard against frost in a confined space such as a small greenhouse or unheated WC, provided the volume of the space in which it is installed is appropriate to its heat output. Users must satisfy themselves that the heat provided is adequate in all circumstances for the area to be protected.
Please be aware that frost protection is dependent on using the correct number of heaters for the size of the area, its insulation levels and heat-loss conditions. More than one heater may be required.
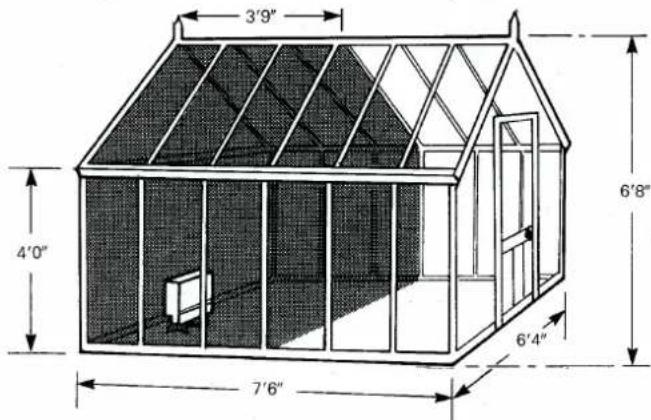
USING THE HEATER IN A GREENHOUSE
IMPORTANT: Do not use this product as a portable product in a greenhouse. Securely fix the product to a wall or floor, as described in the installation section.
Important: The electricity supply to a greenhouse should be installed by a competent electrician in accordance with the IEE wiring regulations. It is recommended that residual current circuit breaker (RCCB) protection is used.
text_image
3'9" 4'0" 6'8" 6'4" 7'6"The heat output of the Cold Watchers are similar to that of a small single burner greenhouse paraffin stove, however it has the advantage that they may be switched on overnight as a precaution against frost with the knowledge that they will not consume current on the frost setting unless the temperature in the vicinity of the heater falls below approximately 3^ C to Minus 5^ C.
If only one heater is being used in a full size greenhouse, it will be necessary to partition off that which requires frost protection, using for example heavy duty polythene sheeting, which can also be used to line the glazing of the greenhouse to reduce heat losses and therefore power consumption. As a guide to the effectiveness of a single Cold Watcher in a greenhouse, it will raise the temperature of the shaded section of the greenhouse by approximately 8 to 9°C.
If higher temperatures are required then the volume partitioned off should be made smaller. In this respect the only accurate method is to set the thermostat to a position which keeps the temperature at the desired level by using a maximum/minimum thermometer, positioned in the most critical part of the area to be heated. Although the heater is designed to be splash-proof it is recommended that it be removed during periods when spraying is being carried out in the greenhouse.
text_image
Airing cupboard Wire mesh 300mm minimum Air vents Floor SpaceUSING THE HEATER IN AN AIRING CUPBOARD
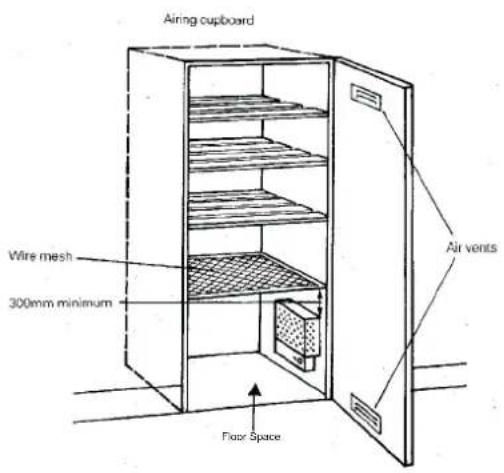
The heater is suitable for use in an airing cupboard where there is no other heat source, or where the hot water cylinder is so well insulated that insufficient heat is available for airing clothes.
The airing cupboard should be ventilated by means of vents for example in the upper and lower parts of the door. This will allow circulation and removal of moisture laden air. The heater should be positioned in the lower part of the airing cupboard. It is important that precautions are taken to prevent clothes from falling onto the heater causing it to overheat. This could take the form of a wire mesh positioned across the lower part of the airing cupboard not less than 300mm above the heater. (Also refer to "Heater
Dimensions and Minimum Operating Distances").
Clothing, bed linen or similar items must not be stored in this space if there is any possibility of their falling on to or against the heater or coming within 150 mm of the front or sides of the heater. A clear space of 300 mm must similarly be left above the heater. If this space is to be used for storing such items, a further mesh should be fixed not less than 150mm from the front of the heater.
Important
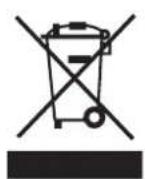
For electrical products sold within the European Community. At the end of the electrical products useful life it should not be disposed of with household waste. Please recycle where facilities exist. Check with a Local Authority or retailer for recycling advice in your country.
Batteries should be disposed of or recycled in accordance with WEEE Directive 2012/19/EU. Packaging should be recycled where possible.
What does a Dimplex Guarantee cover?
Dimplex designs and manufactures its products to ensure they deliver reliable service for normal, household use in domestic settings. All Dimplex products are individually tested before leaving the factory.
If you are a consumer and you experience a problem with your Dimplex product, which is found to be defective due to faulty materials or workmanship within the Guarantee Period, this Dimplex Guarantee will cover repair or - at the discretion of Dimplex - replacement with a functionally equivalent Dimplex product.
The Dimplex Guarantee Period is two calendar years from the date of purchase of your Dimplex product, or the date of delivery of the product, if later. The Dimplex Guarantee is conditional upon you providing the original purchase receipt as proof of purchase. Please therefore retain your receipt as proof of purchase.
If you do experience a problem with your Dimplex product please call the Helpline on 0844 879 3588 or visit http://www.dimplex.co.uk/about-us/contact-us/ and complete the online form. For ROI please email serviceireland@glendimplex.com or call +353(0)1 842 833. We will need details of your Dimplex product, its serial number and a description of the fault which has occurred. You can find the model number and serial number for your Dimplex product on the heaters side. Once we receive your information and proof of purchase we will contact you to make the necessary arrangements.
If your Dimplex product is not covered by this Dimplex Guarantee there may be a charge to repair your product. However, we will contact you for agreement to any charges before any chargeable service is carried out.
What is not covered by a Dimplex Guarantee?
The Dimplex Guarantee does not cover any of the following:
- Any fault or damage to your Dimplex product due to faulty materials or workmanship occurring outside the two year Guarantee Period.
- Any fault or damage occurring to any pre-owned Dimplex product or to any other equipment or property.
- Accidental damage to your Dimplex product or damage to your Dimplex product from external sources (for example, transit, weather, electrical outages or power surges).
- Fault or damage to your Dimplex product which is:
- Not due to faulty materials or workmanship or which is due to circumstances outside Dimplex's control.
DCDimplex®
Customer Helpline: 0844 879 3588
Fax: 0844 879 3583
aftersales@dimplex.co.uk
www.dimplex.co.uk
GDC Group Ltd.
Millbrook House, Grange Drive, Hedge End, Southampton,
© GDC Group Ltd. All rights reserved. Material contained in this publication may not be reproduced in whole or in part, without prior permission in writing of Dimplex. A division of GDC Group Ltd.

The product complies with the European Safety Standards EN60335:2-30 and the European Standard Electromagnetic Compatibility (EMC) EN55014:1, EN55014:2, EN61000:3-2 and EN61000:3-3 which cover the essential requirements of EMC Directive 2014/30/EU and the LVD Directive 2014/35/EU.