EDH10TRBW1 - Dehumidifier ELECTROLUX - Free user manual and instructions
Find the device manual for free EDH10TRBW1 ELECTROLUX in PDF.

| Brand | Electrolux |
| Model | EDH10TRBW1 |
| Product Type | Compressor Dehumidifier |
| Functions | Dehumidification (DEHUM), Clothes Drying (DRYER) |
| Modes | Smart, Manual, Sleep |
| Humidity Control Range | 35% to 85% RH in 5% increments, plus Continuous Operation (CO) |
| Fan Speeds | 3 (MIN, MID, MAX) |
| Airflow Direction | Auto swing louvre (up/down) |
| Timer | 0.5 to 12 hours (delayed start/stop) |
| Ionizer | Yes, with indicator |
| Child Lock | Yes, with indicator |
| Water Tank | Removable with handle and sealing cap; capacity approx. 2.5 L (estimated) |
| Continuous Drainage | Yes, via 12 mm hose (not included) |
| Filter | Washable mesh pre-filter |
| Operating Temperature | 5°C to 35°C (41°F to 95°F) |
| Power Supply | 220-240 V, 50 Hz |
| Power Consumption | Approx. 250 W (typical) |
| Safety Features | Automatic defrost, 3-minute compressor delay, overheat protection, water tank full auto shut-off |
| Clearance Requirements | 20 cm around unit, 40 cm on air outlet side |
| Control Panel | Digital display with touch buttons; auto-dim after 60 seconds of inactivity |
Frequently Asked Questions - EDH10TRBW1 ELECTROLUX
User questions about EDH10TRBW1 ELECTROLUX
0 question about this device. Answer the ones you know or ask your own.
Ask a new question about this device
Download the instructions for your Dehumidifier in PDF format for free! Find your manual EDH10TRBW1 - ELECTROLUX and take your electronic device back in hand. On this page are published all the documents necessary for the use of your device. EDH10TRBW1 by ELECTROLUX.
USER MANUAL EDH10TRBW1 ELECTROLUX
- SAFETY INFORMATION......3
- SAFETY INSTRUCTIONS ....4
- PRODUCT DESCRIPTION ....5
- BEFORE FIRST USE 7
- OPERATING INSTRUCTIONS ....8
- CARE, CLEANING AND STORAGE....13
- WHAT TO DO IF....15
- ENVIRONMENT CONCERNS....17
WE'RE THINKING OF YOU
Thank you for purchasing an Electrolux appliance. You've chosen a product that brings with it decades of professional experience and innovation. Ingenious and stylish, it has been designed with you in mind. So whenever you use it, you can be safe in the knowledge that you'll get great results every time.
Welcome to Electrolux.
Visit our website to:

Get usage advice, brochures, trouble shooter, service information:
www.electrolux.com
Register your product for better service:
www.registerelectrolux.com

Buy Accessories, Consumables and Original spare parts for your appliance:
www.electrolux.com/shop
CUSTOMER CARE AND SERVICE
Always use original spare parts.
When contacting our Authorised Service Centre, ensure that you have the following data available: Model, PNC, Serial Number, the information can be found on the rating plate.
Symbols in the instruction:
⚠ Warning / Caution-Safety information.
i General information and tips.
Environmental information.
Subject to change without notice.
1. ⚠️ SAFETY INFORMATION
Before the installation and use of the appliance, carefully read the supplied instructions. The manufacturer is not responsible for any injuries or damage that are the result of incorrect installation or usage. Always keep the instructions in a safe and accessible location for future reference.
- This appliance is intended to be used in household (indoors) and similar applications.
- This appliance is not intended for use by persons (including children) with reduced physical, sensory or mental capabilities, or lack of experience and knowledge, unless they have been given supervision or instruction concerning use of the appliance by a person responsible for their safety.
- Children should be supervised to ensure that they do not play with the appliance.
- Keep all packaging away from children and dispose of it properly.
- Cleaning and user maintenance shall not be made by children without supervision.
- Unplug the appliance before moving or carrying out any maintenance.
- If the supply cord is damaged, it must be replaced by the manufacturer, its service agent or similarly qualified persons in order to avoid a hazard.
- The appliance shall be installed in accordance with local wiring regulations.
- WARNING: Do not use mechanical devices or other means to accelerate the defrosting process, other than those recommended by the manufacturer.
-
Do not use or store the appliance in a room with operating ignition sources, such as open flames, operating gas appliances or electric heaters.
-
Do not use harsh abrasive cleaners or sharp metal scrapers to clean the appliance to avoid damaging the surface or water leakage.
- Use only accessories, parts or tools recommended for this appliance.
- The fuse is 250V, 3.15A.
2. SAFETY INSTRUCTIONS
- Do not install or use a damaged appliance or accessories. Do not change the specification of this appliance.
- Always use a correctly installed shockproof socket.
- Do not pull the mains cable to disconnect the appliance. Always pull the mains plug.
- Place the appliance on a horizontal surface to avoid water leakage.
- This appliance is intended to be used in a well-ventilated area where the room size corresponds to the room area as specified for the operation.
- Make sure the inlet and outlet ventilation of the appliance is not blocked.
- Keep the minimum distance of 20cm around the dehumidifier from walls, other appliances and units (at least 40cm of air space on air outlet).
- When using the drain pipe, install it so it slopes down towards the floor, to ensure that condensed water is drained continuously by force of gravity.
-
Remove the water collected in the water tank as required.
-
This appliance is intended to be used at ambient temperature ranging from 5°C to 35°C.
- Keep fingers away from the inlet or outlet of the appliance while operating to avoid the risk of injury.
-
Do not use the appliance:
-
near to source of fire;
– in areas where oil is likely to splash;
– in areas exposed to direct sunlight;
– in areas where water is likely to splash; -
near baths, showers or swimming pools;
– without mesh pre-filter installed; -
The appliance shall not be installed in the laundry room.
- Do not expose the appliance to very high or freezing temperatures.
- Do not immerse the appliance body, cord or plug in water.
- Do not use the appliance in an enclosed area, such as a closet, to avoid the risk of fire.
- Keep the appliance in an upright position during transport and storage to avoid damaging the compressor.
- All service or repairs must be carried out by the Authorised Service Centre.
3. PRODUCT DESCRIPTION
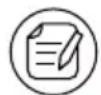
3.1 General overview
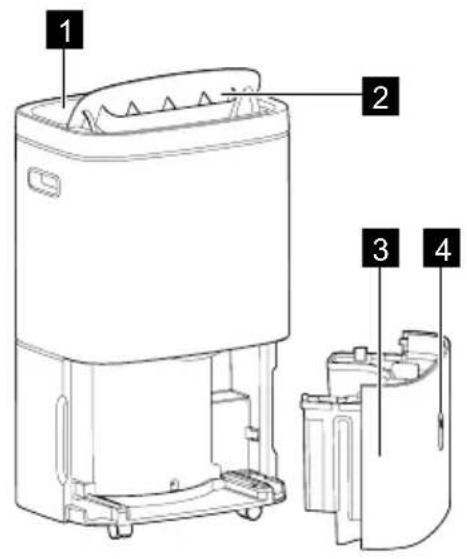
1 Control panel
2 Louvre / Air outlet
3 Water tank
4 Water level indication
5 Drainage plug / Water outlet
6 Castors
7 Mesh pre-filter
8 Filter lid / Air intake
9 Wire Tag
10 Power cord
11 Drainage hose
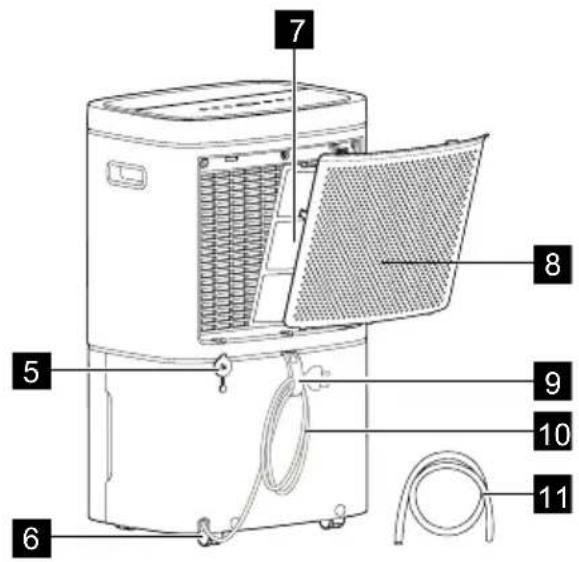
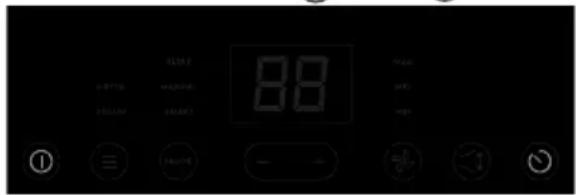
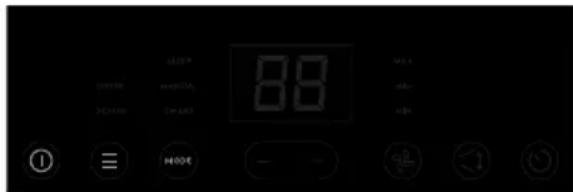
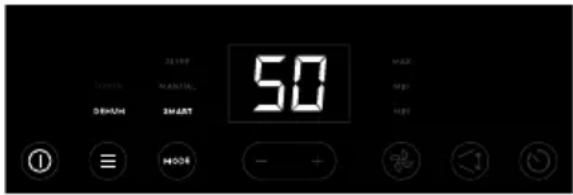
3.2 Control panel layout
| Number Symbol Buttons Description | |||
| 1 | 1 | ON/OFF button To activate and deactivate the appliance. | |
| 2 | ≡ | Function button | To switch between the function settings:• Dryer• Dehum |
| 3 | MODE | Mode button | To switch between the modes selection:• Sleep• Manual• Smart |
| 4 | -/+ | Minus / Plus button | To adjust the timer and humidity setting. |
| 5 | Fan speed button | To set the fan speed in Manual mode. You can switch between 3 speeds:• MAX• MID• MIN | |
| 6 | Swing mode button | To swing the louvre up and down and direct the air flow. | |
| 7 | Timer button | To set the switch-on and switch-off time. | |
| 8 | Digital display | To show the humidity level, timer setting and error codes. | |
| Indicators | |||
| 9 | Ionizer To show that the function is active. | ||
| 10 | Child lock To show that the function is active. | ||
| 11 | Alert | To show that an error occurred. | |
| 12 | Water tank full | To remind you that the water tank is full and to empty the water tank. | |
| To remind you that the water tank has not been installed correctly. | |||

See section "5. OPERATING INSTRUCTIONS" for the descriptions in detail.
4. BEFORE FIRST USE
4.1 Selecting a Location
Important
- Appliance must be upright for one hour prior to operating.
- Place the appliance in a location with minimum 20cm distance around the unit (at least 40cm of air space on air outlet).
- A dehumidifier operating in a storage room will have little or no effect in drying enclosed areas such as closets etc, unless there is adequate circulation of air in and out of the area.
- The appliance must be installed on a level floor that can support it even with a full tank of water.
- The presence of water in the water tank during first use is normal.
4.2 How It Works
- The unit is designed to operate between 5^ C ( 41^ F) and 35^ C ( 96^ F). The unit will not work properly if the temperature is out of this temperature range, or the performance of the unit decreases greatly.
- The compressor circuit has an automatic 3-minute time delayed start if the unit is turned off and on quickly. This prevents overheating of the compressor and possible circuit breaker tripping.
- If the appliance is unplugged or the electricity has been cut off when the unit is operating, the unit will set back to previous setting after the power is on again.
5. OPERATING INSTRUCTIONS
5.1 To Turn On the appliance
To begin operating the dehumidifier, make sure the appliance is plugged in correctly.
Once plugged, the appliance is on standby status. The indicators on the control panel are dimmed except "①" and "(#)
- Tap (touch and release) "①" to turn on the appliance. The display shows the current room humidity. The DEHUM function and SMART mode are activated by default.
- In active state, tap "①" to turn off the appliance. The appliance stops operating and switches to standby.
5.2 Discreet state
If user does not interact with the control panel for over 60 seconds, the control panel will enter inactive state where "☐", "≡" and "MODE" buttons are dimmed to 30% and the other text, icons and display screen will be dimmed to 0% (not visible).
- In inactive state, the appliance will keep operating according to your last setting.
- Tap any button on the control panel to 'wake up' the display, then press again to change setting. Tapping only once, when control panel is in discreet state, will not change any settings or turn off the appliance.
5.3 Basic function selection
Tap "button to chose your desired basic function between DRYER function and DEHUM function.
Dehum function
In this function, the appliance dehumidifies the air with decreasing the humidity to maintain comfortable humidity level, SMART mode is activated by default in the first use.
Dryer function
In this function, the appliance operates at the highest capacity and fan speed, with louvre swinging to the maximum angle to quickly decrease excess humidity found in the room. You can use this function in a scenario such as line drying of laundry.

NOTE:
- In DRYER function, the appliance operates at MAX fan speed by default, you can also adjust the fan speed as you want. User cannot set target humidity setting while in this function.
- The DRYER function operates for up to 8 hours if unattended, after that time the appliance will turn off automatically.
- The appliance will stop operating if the water tank is full before reach 8 hours. Please empty the water tank to restart the operation.

WARNING!
- Do not cover the air outlet of the appliance with clothes. It may cause excessive heat, fire or failure of unit.
- Do not place the wet clothes on the top of the appliance and do not make the
water drop into the unit. It may cause electric shock, creepage or failure of unit.
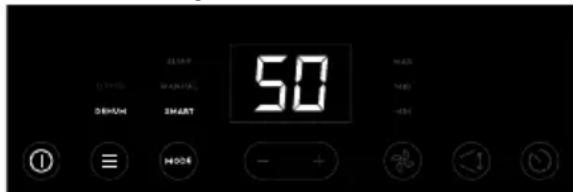
5.4 Mode selection
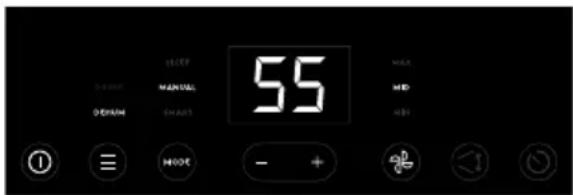
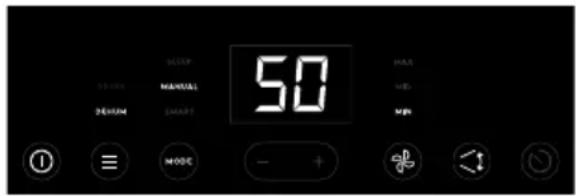
If you have chosen DEHUM function, tap "MODE" button to choose your desired mode between SMART mode, MANUAL mode and SLEEP mode.
NOTE:
- The MODE button is disabled when DRYER function is selected.
Smart mode
When choosing DEHUM function + SMART mode - the appliance aims to main the humidity at a comfortable level. The appliance will automatically adjust fan speed based on the room humidity level.
- In SMART mode, you cannot adjust the humidity setting and the fan speed.
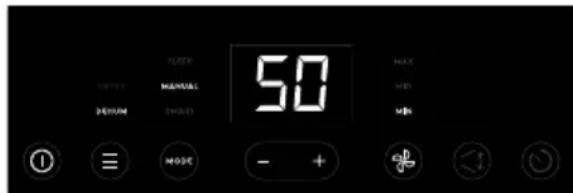
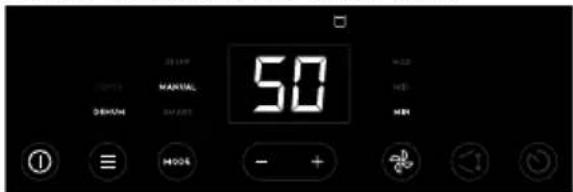
Manual mode
When choosing DEHUM function, in MANUAL mode, tap "—" and "+button to set target humidity in 5% increments between 35%-85% and tap "?" button to change the fan speed to MIN, MID, MAX.
NOTE:
- Once desired target humidity is selected, the display screen will shift back to showing 'current' real-time humidity level.
Sleep Mode
SLEEP mode is designed to be non-disturbing. When selected, it will aim to provide a low noise environment (as available) with lowest fan speed setting, dim display.

NOTE:
- In SLEEP mode, cannot set the target humidity and the fan speed.
- In SLEEP mode, after 10 seconds without any interaction with the control panel, the "①", "≡" and " " MODE buttons are dimmed to 30% and the other text, icons will be turned off completely to be non-disturbing.
5.5 To Run in Continuous Operation
- Choose DEHUM function + MANUAL mode, then tap the "—" button to reduce target humidity setting below 35% till the display shows "CO" and the appliance enters Continuous operation.
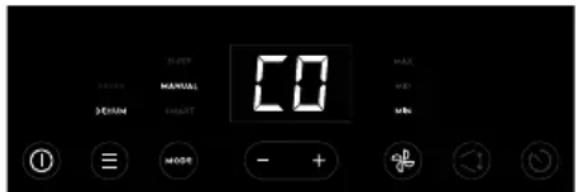
- To exit Continuous Operation (CO) function, tap the "≡" or "MODRton. You can also adjust the target humidity setting above 35% to exit this function.
NOTE:
- It is recommended to connect the drainage hose to dehumidifier when using in Continuous operation, to prevent the operation from stopping when the water tank is full frequently.
5.6 Swing
The air outlet in the appliance has an in-built louvre. You can turn on this feature, for the louvre to automatically move up & down continuously so as to better direct the air flow.
- Tap "◀" button to enable the auto swing feature, the louvre will swing up and down automatically.
- Tap the button again to stop the louvre at your desired angle/direction.
NOTE:
- Please do not adjust the position of louvre manually.
- Please ensure louvre is NOT stopped at completely closed position when deactivating SWING feature and appliance still operating, as this cause overheating.
5.7 Timer
The TIMER feature allows you to have either Delayed Start OR Delayed Stop for the appliance, in increments of 0.5 to 1 hours (up-to the max of 12 hours).
- When the appliance is on, tap "☐" button and display should change to "0.0" to reflect Delayed Stop is initiated. Tap or hold "-" and "+" button to change the time by 0.5 hour increments, up to 6 hours, then at 1 hour increments up to 12 hours. The appliance will count down the time remaining, until appliance switches OFF by itself.
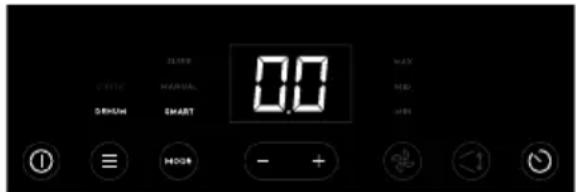
- When the appliance is off, tap "☐" button and display should change to "0.0" to reflect Delayed Start is initiated. Tap or hold "-" and "+" button to change the timer setting as mentioned above. The appliance will count down the time remaining, until appliance switches ON by itself.
- The selected time will be set as target (registered) when user does not interact with control panel for 5 seconds after choosing desired time. Once time is set, display screen will revert back to show room humidity levels, tap "☐" button once, display screen will show the remain time.
- To exit & cancel the timer feature, tap "☐" button twice OR turn the unit ON/OFF by pressing the power button
anytime OR adjust the timer setting to "0.0" hours.
NOTE:
- Before entering TIMER setting, make sure power is being supplied to the appliance.
- Before entering Delayed Start, make sure you have chosen your desired setting, for example, if you want the appliance turn on and operate with DEHUM function + MANUAL mode + 50% humidity + MAX fan speed after 5 hours automatically, tap "≡", "MODE"—" or "+" and " "sequentially to set your desired setting and turn off the appliance, then follow step 2 to initiate the Delayed Start time to 5 hours.
5.8 Ionizer Indicator
Long press "≡" and " " MODES simultaneously for 5 seconds to activate/inactivate the lonizer feature. When the lonizer feature is activated, the "⊖" indicator will show on the control panel and the lonizer is energized to help to clean the air. This function is recommended when the indoor air quality is in bad condition.
5.9 Child Lock Indicator
Long press "1 and " notons simultaneously for 5 seconds to activate/inactivate the Child Lock feature. When the Child Lock feature is activated, the " indicator will show on the control panel and the control panel is locked.
5.10 Water Tank Full Indicator
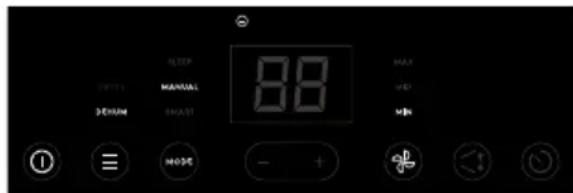
When the water tank is full, the indicator "☐" lights up and the unit will make a double short beeps and repeat the sounds after first double beeps to remind you to
empty the water tank and the appliance will stop immediately. See section "5.12 Use the Water Tank" to know how to handle and empty the water tank.
NOTE:
- In SLEEP mode, no beep sound reminder when the Water Tank is full.
5.11 Alerts & Errors
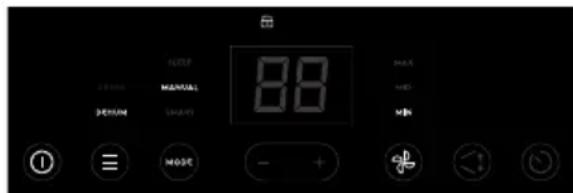
When a problem occurs in the appliance, the "⚠️" indicator will show on the control panel and the display will show the corresponding error code at the same time.
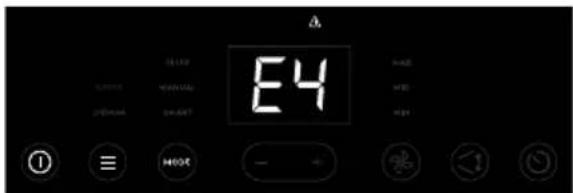
E4- DC Motor failure
E5- Humidity sensor failure
E6- Communication Failure
E7- Indoor defrost thermistor failure.
E8- Refrigerant Leakage
NOTE:
- When error code occurred, the appliance will stop operation completely.
- When error code occurred, unplug the unit and plug it back in. If error repeats, please contact Authorised Service Centre.
5.12 Removing collected water
There are two ways to remove collected water.
Use the Water Tank
When the water tank is full, the Water Tank Full indicator "☐" will flash and the unit will make a double short beeps and repeat the sounds after first double beeps to remind you to empty the water tank.
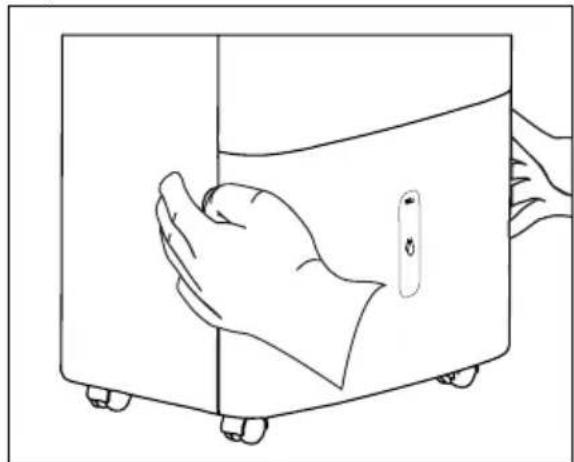
Following the steps below to remove the collected water from the water tank:
- Grip the water tank edges of the
grooves on both sides securely, then pull out the water tank a little.
natural_image
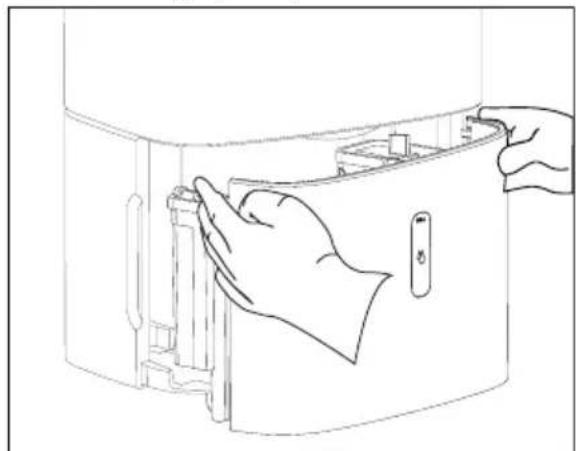
Line drawing of a hand opening a door with wheels, no text or symbols present- Hold both sides of the water tank with even strength, and pull it out from the unit.
natural_image
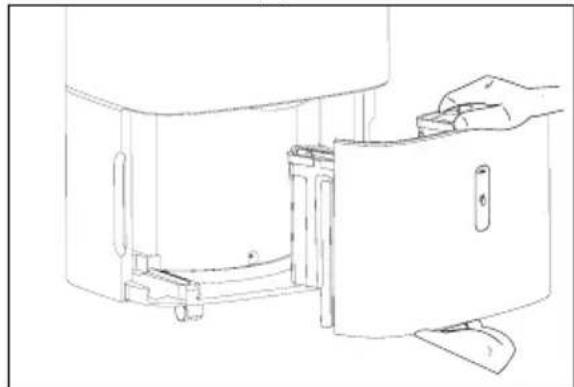
Line drawing of a hand inserting a device into a container (no text or symbols)- Grip the water tank handle and open the water tank sealing cap in the side corner, then empty the water tank.
natural_image
Line drawing of a kitchen appliance with a hand operating the door (no text or symbols)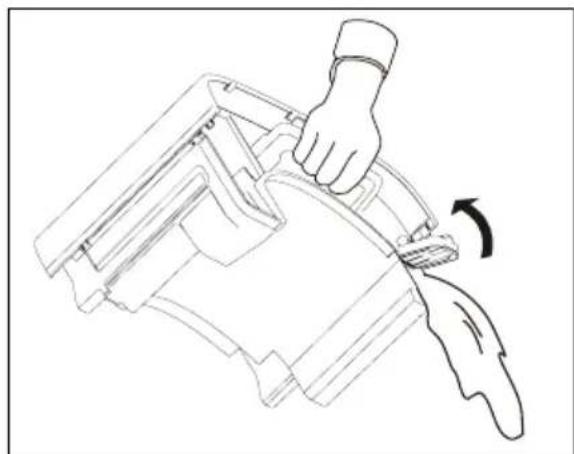
natural_image
Line drawing of a hand using a tool to lift a mechanical component, showing motion direction (no text or symbols)- Close the sealing cap and put back the water tank in place.
The water tank full indicator will turn off, and the unit will start up again when the water tank is restored in its correct position.
NOTE:
- When you remove the water tank, do not touch any parts inside the unit, otherwise the product may be damaged.
- Be sure to push the water tank gently all the way into the unit. Banging the water tank against anything or failing to push it in place may cause the unit not to operate.
- Because the castors cannot be locked, you need to apply a limited force so that appliance does not move suddenly.
- Discard water from water tank. The water in the water tank is not potable.
Continuous Drainage
Once the continuous drainage is enabled, water can be automatically emptied from the appliance and the water will not flow into the water tank unless there is something wrong with the continuous drainage. You will need a drainage hose and a drain nearby to discharge the water into before conducting this operation. Following the steps below to make sure the hose to be connected correctly:
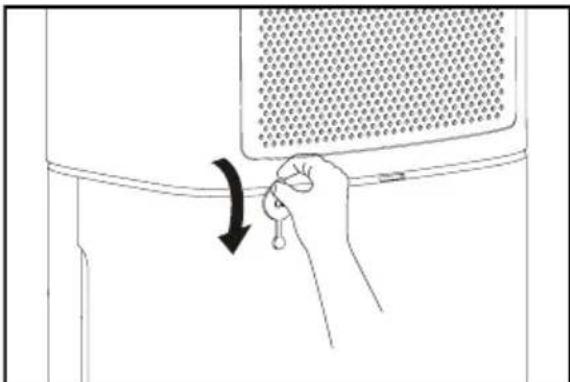
- Pull down the drainage plug at the back of the unit.
natural_image
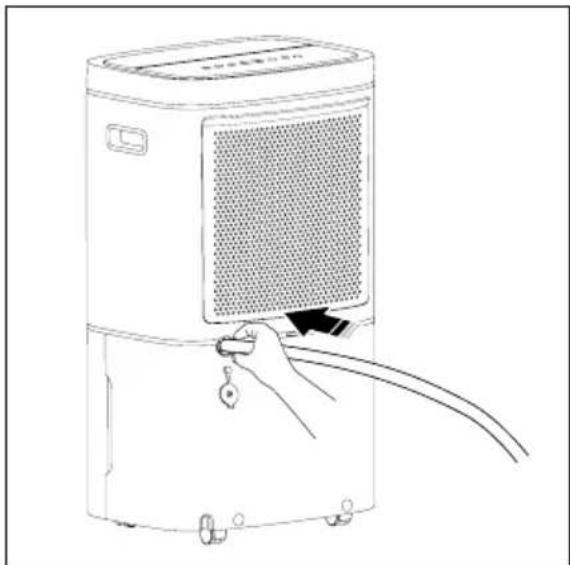
Line drawing of a hand holding a key inserted into a container with a mesh grille (no text or symbols)- Push the drainage hose firmly into the drainage outlet to make sure the hose to be connected to the unit properly so there will be no leaks.
natural_image
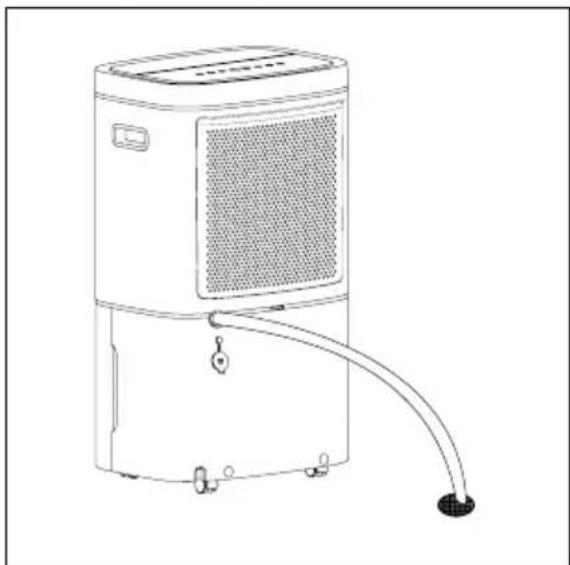
Line drawing of a portable air purifier with a hand holding a scroll and cable, no text or symbols present- Direct the hose toward the drain and place the other end of the hose into the drain, making sure that there are no kinks that will stop the water from flowing smoothly.
natural_image
Line drawing of a portable air purifier with attached piping and ventilation slots (no text or symbols)- Select the desired humidity setting and fan speed on the unit for continuous draining to start.
NOTE:
- Make sure the water tank has been installed properly before trying to connect the drainage hose to the drainage outlet.
- Shake or pull the hose slightly to make sure the hose is connected properly. If there is a leak, pull out the hose and repeat the above-mentioned hose connection process.
- It is recommended that a Dehumidifier Drain Hose - (12 mm) be used. Make sure there are no kinks or elevations in the hose.
6. CARE, CLEANING AND STORAGE
6.1 To Clean the appliance

WARNING!
Before cleaning the unit, make sure to disconnect the unit from power supply.
- Clean the Filter lid and Case
- The plastic surface of the appliance may be cleaned with an oil-free dry cloth or a vacuum cleaner equipped with a soft brush.
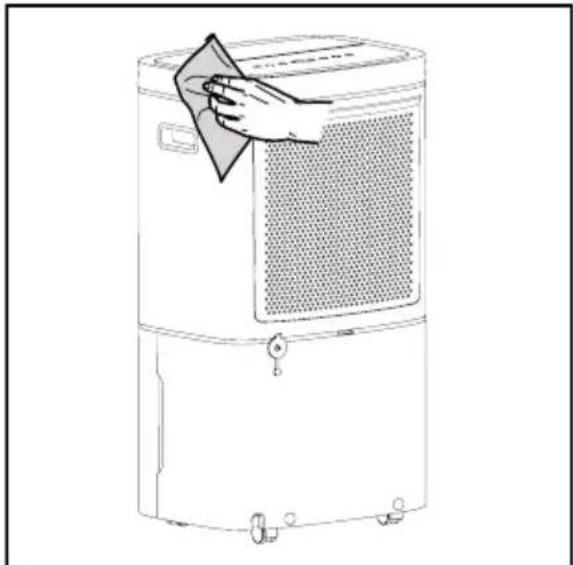
natural_image
Line drawing of a portable air purifier with a hand cleaning the lid (no text or symbols)- Use the slightly damp cloth. Do not use bleach or abrasives.
- Do not splash water directly onto the unit. Doing so may cause electric shock, insulation failure, or rusting.
-
The air intake grille and outlet get soiled easily, so cleaning such parts with a vacuum cleaner is recommended.
-
Clean the Water Tank
Every 4-6 weeks, clean the water tank to prevent growth of mold, mildew and bacteria.
a. Pull out the water tank from the unit.
b. Take off the handle following the steps as shown in below image.
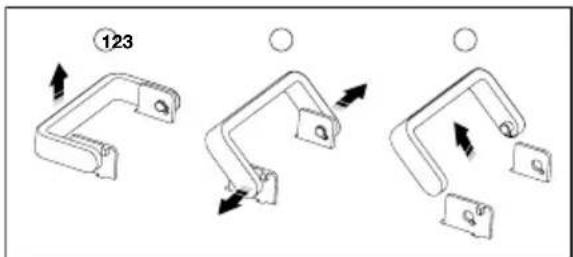
c. Open the cover lid of the water tank.
natural_image
Technical line drawing of a mechanical housing component with arrows indicating direction (no text or symbols)d. Partially fill the water tank with clean water and add a little mild detergent. Swish it around, then empty and rinse the water tank.
e. Reinstall the cover lid, handle and put the water tank back into the unit.
NOTE:
- Do not use a dishwasher to clean the water tank. After cleaning, the water tank must be put back in place so the appliance will operate properly.
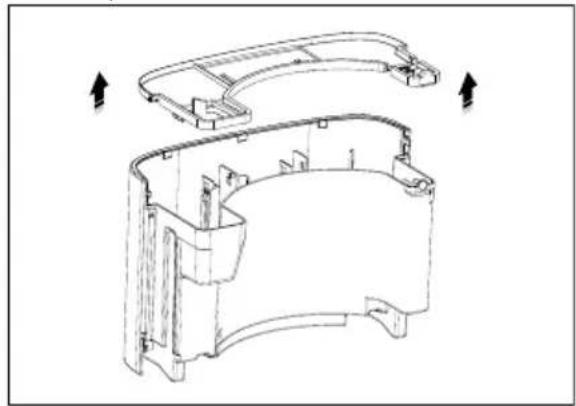
- Clean the Mesh Pre-filter
The mesh pre-filter is put together with the filter lid at the back of the appliance, it should be checked and cleaned at least every 30 days or more often if necessary.
NOTE: DO NOT PUT THE FILTER IN A DISHWASHER.
a. Open the filter lid and you will find the mesh pre-filter is put behind the back of the lid.

natural_image
Line drawing of a portable air purifier with a hand adjusting its side panel (no text or symbols)b. Take out the mesh pre-filter from the assembly.
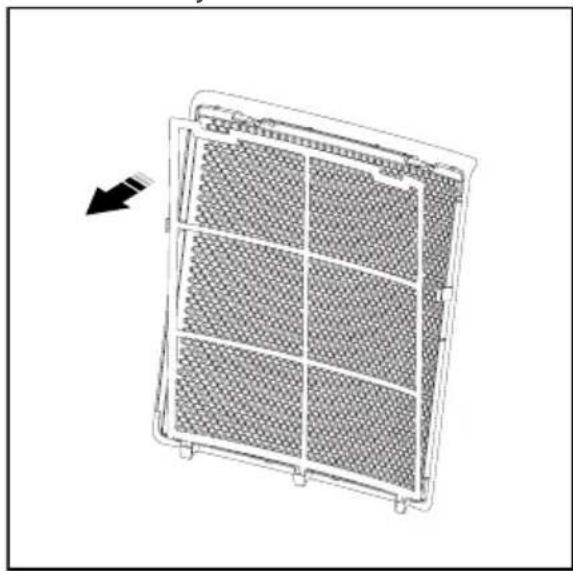
natural_image
Diagram of a grid-patterned air vent or filter structure with an arrow indicating direction (no text or symbols)c. Clean the mesh pre-filter with warm, soapy water. Rinse and dry it by airing before putting it back.
d. Reinstall the filter, then put the filter lid back.
! CAUTION!
DO NOT operate the appliance without a filter because dirt and lint will clog inside the appliance, which will affect the performance..
6.2 Storage
If you are not going to use the appliance for a long time, please store it properly.
- Unplug the appliance, then tidy up the power cord using the tag at the back of the unit.
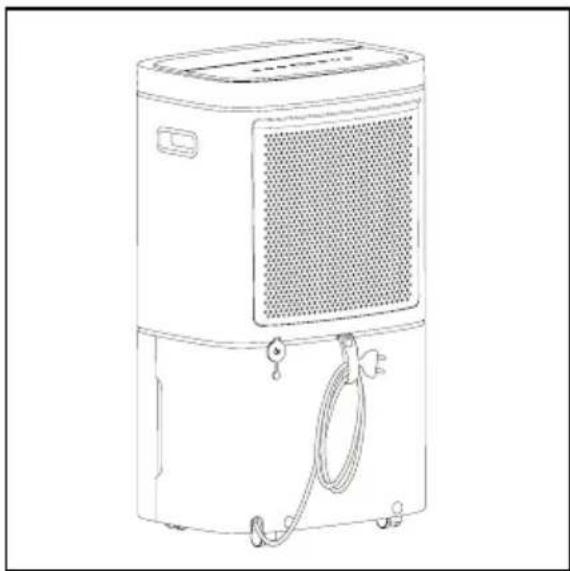
natural_image
Line drawing of a portable air purifier with ventilation grille and coiled cable (no text or symbols)- Empty the water tank and clean the mesh pre-filter.
- Dry the appliance and all accessories by airing.
- Pack it with plastic bag or return it to its carton then place the unit in a cool and dry place.
7. WHAT TO DO IF...
Before calling for service, review this list. It may save you time and expense. This list includes common occurrences that are not the result of defective workmanship or materials in this appliance.
| Occurrence Possible Cause Solution | ||
| Dehumidifier does not operate | Wall plug disconnected. | Push plug firmly into wall outlet. |
| House fuse blown or circuit breaker tripped. | Replace fuse with time delay type or reset circuit breaker. | |
| The dryness level you selected has been reached. | Dehumidifier automatically shuts off when selected amount of moisture has been removed from the air. If you want to remove more moisture, enter in Continuous operation. After the dehumidifier starts, reset the control panel to the desired setting. | |
| Water Tank not installed properly. | See “5.12 Removing Collected Water”. | |
| Water in the water tank has reached its preset level. | Dehumidifier automatically turns off when this occurs. Empty water tank and return it to position. | |
| Dehumidifier is not turned on. | Turn unit on. | |
| The programme / cycle lasts too long. | Windows or doors near dehumidifier are open to outdoors. | Close all windows or doors to outside. |
| Area to be dehumidified is too large. | Check with your dealer to see if capacity is adequate. | |
| Air movement through dehumidifier is blocked. Grill may be dirty. | Use brush attachment of vacuum cleaner to clean grill. See “6. Care, Cleaning and Storage”. Dehumidifier must be placed in a space that does not restrict air flowing into the air intake or outlet. | |
| Dehumidifier has been installed or restarted recently. | The higher the moisture in the room, the longer the dehumidifier will operate. | |
| Dehumidifier is in the Continuous operation and will remain on in this mode. | Exit this operation. | |
| Dehumidifier is operating, but room is not dry enough. | Humidity setting is too high. | Select Dehum function, and adjust in manual mode to a lower setting or choose Continuous operation for maximum dryness. |
| Dehumidifier has been installed or restarted recently. | The higher the moisture in the room air, the longer it takes for the room air to become dry. | |
| Dehumidifier does not have sufficient clearance to operate. | Air flow to air intake is blocked. See "4.1 Selecting a Location". | |
| Room temperature is too low. | Unit will not operate satisfactorily if the room temperature is below 5°C (41°F). See "4.2 How it Works". | |
| Refer to causes under "The programme / cycle lasts too long.". | ||
| Frost appears on coils above water tank. | Dehumidifier has been turned on recently. | This is normal due to refrigerant rushing through the coil. Frost will usually disappear within 60 minutes. |
| Abnormal noise. | Room Temperature is too low. | Please operate dehumidifier when room temperature is above 5°C (41°F). |
| The floor is not flat. | Please install the dehumidifier on level floor. | |
| "dF" code shows on the display, the compressor stop running and the dehumidifier works at MAX fan speed. | Room Temperature is low, the dehumidifier enters in Defrost function automatically. | This is normal, the dehumidifier will automatically quit Defrost function after some minutes and continue working with current operating setting. |
8. ENVIRONMENT CONCERNS
Recycle the materials with the symbol 📊 Put the packaging in applicable containers to recycle it. Help protect the environment and human health and to recycle waste of electrical and electronic appliances.
Do not dispose appliances marked with the symbol Ⓧ with the household waste. Return the product to your local recycling facility or contact your municipal office.
| RoHS compliant | Conformed to the stipulation on permissible content limitation of some hazardous & restricted chemical substances.(RoHS compliant)(According to the Circular No. 30/2011/TT-BCT, Vietnam, dated 10 th August, 2011) |