
Reflex Aston Martin - Stroller Silver Cross - Free user manual and instructions
Find the device manual for free Reflex Aston Martin Silver Cross in PDF.


| Product Type | Stroller (Pushchair) |
| Brand | Silver Cross |
| Model | Reflex Aston Martin |
| Suitable Age/Weight | From birth to 25 kg (55 lbs) |
| Basket Capacity | 5 kg (11 lbs) |
| Cupholder Capacity | 340 g (12 oz) |
| Harness Type | 5-point harness with adjustable shoulder height |
| Recline | Multi-position backrest recline |
| Handle Adjustment | 3-position adjustable handle |
| Front Wheels | Swivel wheels with lock |
| Brakes | Parking brake on rear wheels, activates both simultaneously |
| Hood | Removable, extendable with zip, foldable |
| Raincover | Included, attaches with Velcro and elastic loops |
| Bumper Bar | Removable, press-button release |
| Calf Support | Multi-position adjustable |
| Car Seat Compatibility | Silver Cross Simplicity (requires adapter, sold separately) |
| Folded Dimensions | Compact fold (exact dimensions not specified) |
| Weight | Not specified (typical approx. 12 kg) |
| Fabric Care | Sponge clean with warm soapy water; do not machine wash, tumble dry, iron, or bleach |
| Chassis Maintenance | Regular lubrication, check moving parts, wipe with dry cloth |
| Warranty | 36 months against manufacturing faults |
| Safety Standard | BS EN1888:2012 |
Frequently Asked Questions - Reflex Aston Martin Silver Cross
User questions about Reflex Aston Martin Silver Cross
0 question about this device. Answer the ones you know or ask your own.
Ask a new question about this device
Download the instructions for your Stroller in PDF format for free! Find your manual Reflex Aston Martin - Silver Cross and take your electronic device back in hand. On this page are published all the documents necessary for the use of your device. Reflex Aston Martin by Silver Cross.
USER MANUAL Reflex Aston Martin Silver Cross
All Silver Cross products are guaranteed for a period of 36 months against manufacturing faults, when the product is used correctly according to the instruction manual.
Garantie
natural_image
Line drawing of a stroller with wheels and handle (no text or symbols)
natural_image
Line drawing of a mechanical component or bracket (no text or symbols)1.3

natural_image
Simple line drawing of a 3D geometric shape resembling a truncated rectangular prism (no text or symbols)1.4
natural_image
Technical line drawing of two mechanical components with radial slots (no text or symbols)1.5

natural_image
Simple line drawing of a curved mechanical or electrical component with two protruding pins (no text or symbols)1.6

natural_image
Simple line drawing of a T-shaped object with two vertical panels above it, no text or symbols present.1.7

natural_image
Line drawing of a traditional East Asian-style robe or robe with front panel and side panels (no text or symbols)1.8
natural_image
Simple line drawing of a rectangular object with horizontal lines inside, resembling a stylized container or tray (no text or symbols)IMPORTANT: KEEP THESE INSTRUCTIONS FOR FUTURE REFERENCE
These instructions are important.
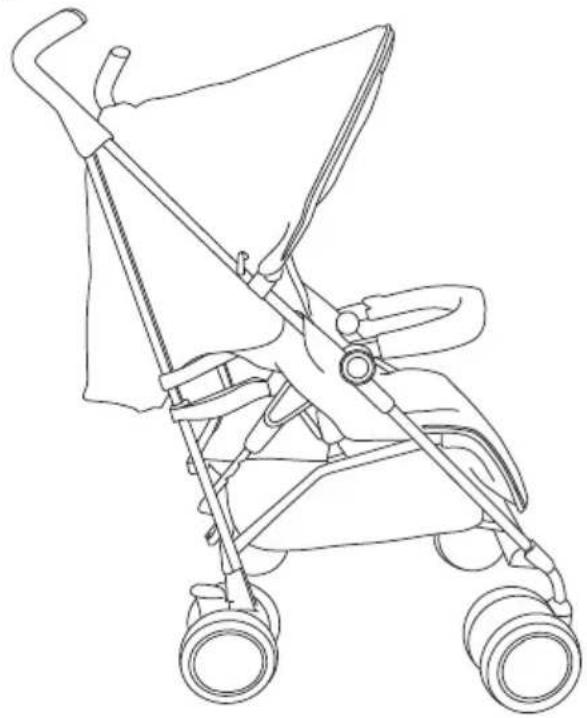
Read these instructions carefully before use and keep them for future reference. Your child's safety may be affected if you do not follow these instructions. Your Reflex pushchair is a high quality Silver Cross product. It meets current safety standards and care and regular light maintenance will ensure long service. This vehicle is intended for children from birth to 25kg. If somebody unfamiliar is using your Reflex pushchair always ensure that they read these instructions carefully so that they understand how the product works best. Always read all the instructions provided carefully and remember, the safety of your child is your responsibility.
WARNING: NEVER LEAVE YOUR CHILD UNATTENDED.
Contents
Your Reflex pushchair includes the following components, please check that you have all the items before proceeding:
1.1 Reflex Pushchair Chassis, Seat Fabrics and Basket
1.2 Reflex Hood
1.3 Reflex Raincover
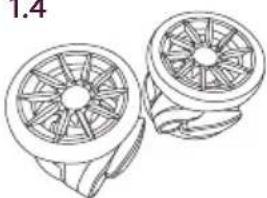
1.4 Reflex Front Wheel Assembly x2
1.5 Reflex Bumper Bar
1.6 Reflex Chest Pads and Crotch Pad
1.7 Reflex Seat Liner
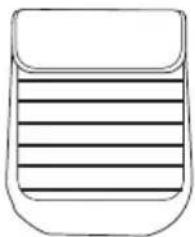
1.8 Reflex Apron
natural_image
Technical line drawing of a mechanical component with a downward arrow indicating a step (no text or symbols present)
natural_image
Line drawing of a mechanical assembly with hands adjusting parts (no text or symbols)2.3

natural_image
Line drawing of a baby stroller with hand and purple directional arrows indicating motion (no text or symbols)Assembling the Reflex
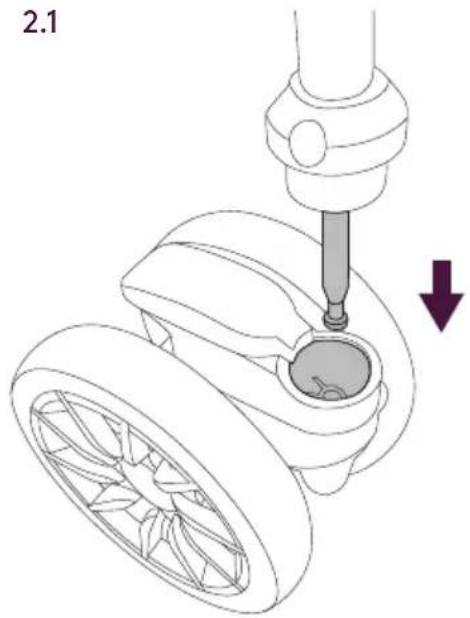
2.1 Attach the swivel wheels by locating the wheel under the steel attachment pin. Slide the wheel upwards and press until the wheel clicks into position.
WARNING: CHECK THE WHEEL IS SECURE BY PULLING GENTLY DOWNWARDS.
Repeat on both sides. Your Reflex is now ready to be unfolded.
2.2 Locate the locking catch on each side of the pushchair and lift to release from the locking stud.
2.3 Allow the pushchair to open by lifting the handles upwards and the wheels will naturally fall to the floor.


natural_image
Illustration of a hand holding a tool with a magnified inset showing a device, no text or symbols present
Assembling the Reflex (continued)
2.4 Finally, press down gently upon the rear locking catch, positioned between the rear wheels, to lock your pushchair.
WARNING: FAILURE TO DO THIS WILL CAUSE DAMAGE TO YOUR PUSHCHAIR.
Place the pushchair on a flat surface and ensure that the pushchair moves freely.
2.5 To fit your Reflex hood, locate the clips on the hood. Now attach the hood to the Reflex chassis by sliding clips over the hood connection bracket. A positive engagement should be ensured.
2.6 Unfasten the press stud attaching the seat fabric (1) and thread the hood fabric button hole over the press stud attached to the chassis (2). Attach the Seat Velcro strip to the corresponding one on the hood, and refasten the seat fabric press stud (3). Repeat this on the other side.
2.7 Connect the fabric of the hood to the rear leg of the chassis with two press studs, one on each side of the pushchair.
2.7

natural_image
Line drawing of a person's seatbelt buckle and seatbelt buckle (no text or symbols)2.8

natural_image
Line drawing of hands using a tool to adjust or install a component, with no visible text or symbols
natural_image
Line drawing of a person adjusting a seatbelt, showing a hand holding the seatbelt and a purple arrow indicating rotation (no text or symbols)Assembling the Reflex (continued)
2.8 Your Reflex hood can be opened and folded by pulling the hood forward or pushing backwards on the hood frame. Your hood can also be extended forwards by unzipping zip as shown in diagram 2.8. Please note when folding your Reflex pushchair you should always ensure the hood is folded away. Failure to do this could result in damage to your Reflex pushchair.
2.9 Your Reflex pushchair has a multi-position calf support. Locate the adjustment levers either side of the calf support. Pull levers towards you and adjust to the required position.
2.9

natural_image
Illustration of a hand holding a tool interacting with a seated object, with an arrow indicating direction (no text or symbols present)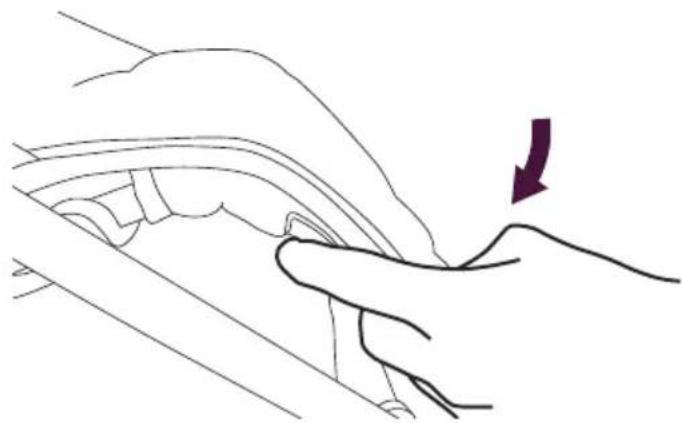
natural_image
Line drawing of a hand pressing down on a car wheel (no text or symbols)3.1
natural_image
Line drawing of a stroller with adjustable arms and wheels (no text or symbols)Reclining the Reflex
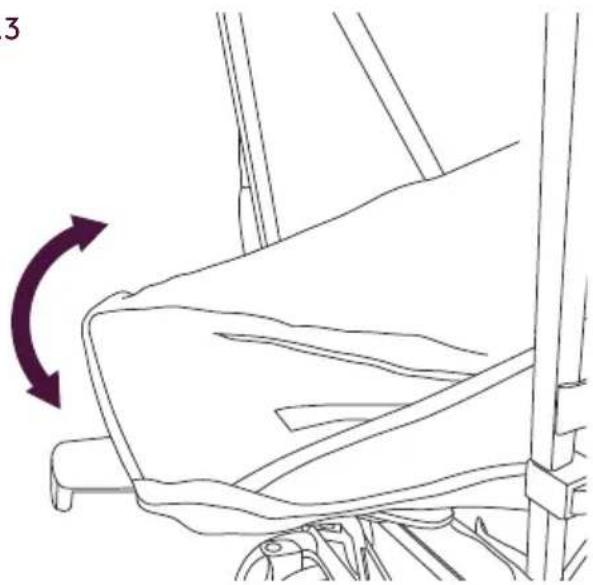
3.1 Your Reflex pushchair has a multi-position recline.
3.2 First, locate the backrest adjustment mechanism at the rear of the seat. Pull up the recline lever and gently lower to the desired position.
3.3 To raise the backrest locate the recline lever and pull up gently into the desired position. The backrest will rise to the desired height.
NOTE: The backrest should always be in the upright position and the hood folded away prior to folding.
3.2

natural_image
Line drawing of a hand holding a car seatbelt with a purple arrow indicating direction (no text or symbols)3.3
natural_image
Line drawing of a seatbelt mechanism with directional arrow indicating rotation (no text or symbols)4.1
Using the Harness
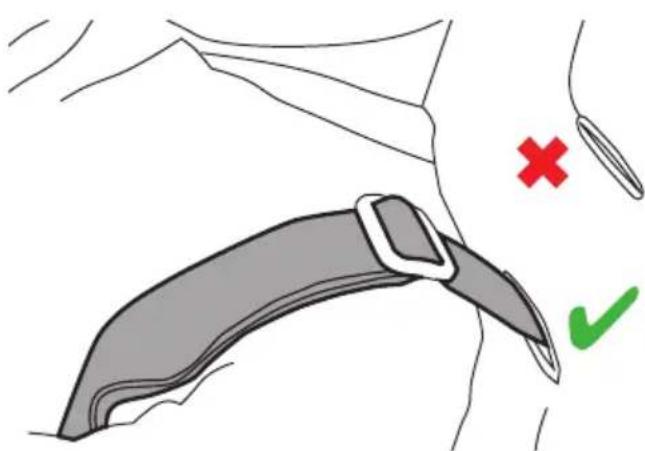
The harness is a five point system consisting of shoulder straps, waist straps and crotch strap. Before you use the pushchair, the harness must be adjusted to suit the size of the child.
4.1 It is very important that you make sure the shoulder straps are the correct height for your child. The shoulder straps should be level or just below your child's shoulders.
In a safe and secure environment, place your child in the pushchair with the backrest upright and assess which of the three shoulder strap height positions is most suitable for your child.
NOTE: Winter / Summer clothing can make a difference to the size of your child.
WARNING: NEVER LEAVE YOUR CHILD UNATTENDED DURING THIS PROCESS. REMOVE YOUR CHILD WHILST THE ABOVE ADJUSTMENTS ARE BEING MADE.
5.1
natural_image
Line drawing of a hand gripping a curved mechanical component, with a purple arrow indicating the joint detail (no text or symbols present)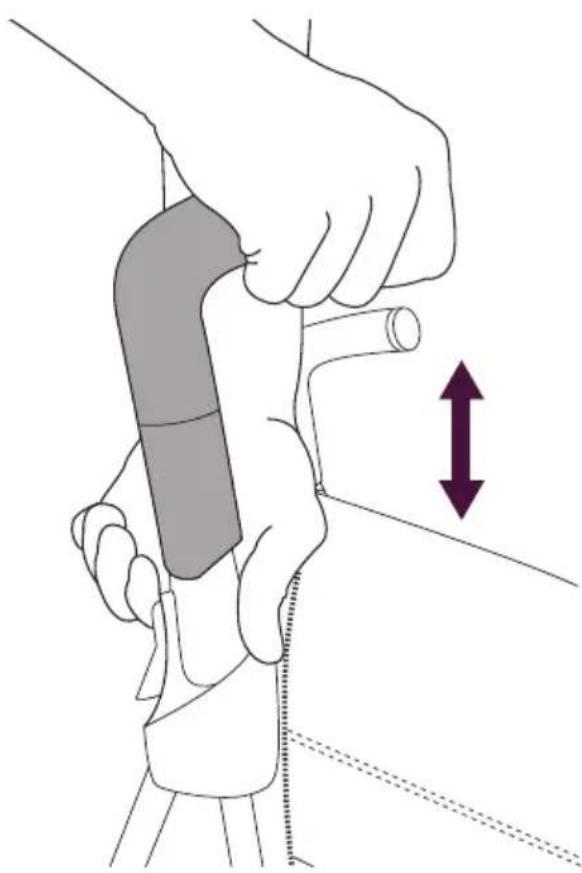
natural_image
Illustration of a hand holding a tool with a purple double-headed arrow indicating motion or pressure (no text or symbols)Adjusting the Reflex handles
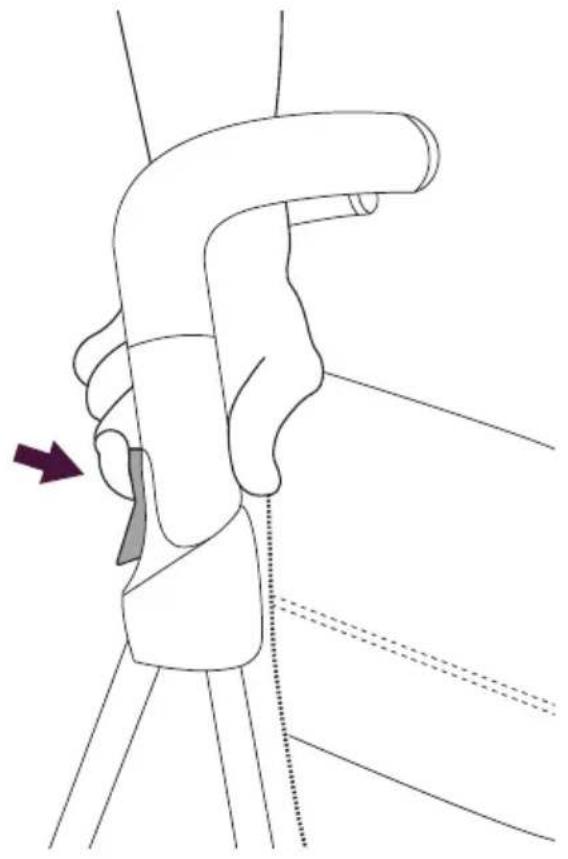
5.1 Your Reflex features 3-position adjustable handles. The desired position can be selected by depressing the button shown and either pulling up or pushing down the handles.
6.1

natural_image
Line drawing of a person wearing a seatbelt, with no text or symbols present6.2

natural_image
Line drawing of a hand holding a small object near a mechanical component (no text or symbols)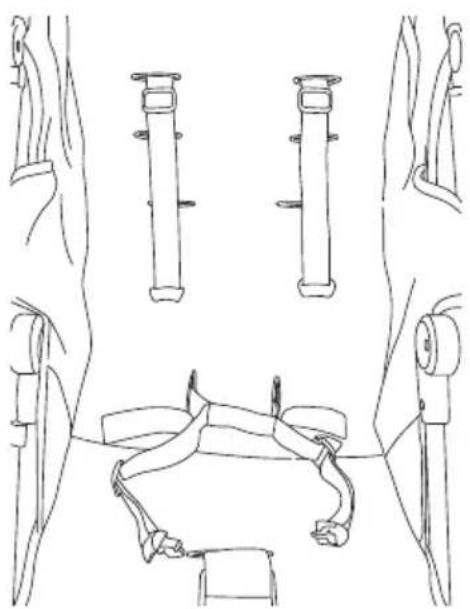
natural_image
Line drawing of a mechanical assembly with multiple vertical components and a central base (no text or symbols)Adjusting the harness
6.1 Your Reflex pushchair has a multi-position height adjustment for the harness. To adjust the shoulder strap height, start by disconnecting the shoulder clips from the waist clips.
6.2 Pass one of the shoulder clips through the button hole on the cover and backrest. Once the clip is fully through to the opposite side of the backrest, pass it back through the desired slot. Repeat these steps for the other shoulder clip, ensuring that the selected button holes are in line.

natural_image
Technical line drawing of a mechanical component with a highlighted lever (no text or symbols)Adjusting the harness
WARNING: ALWAYS ENSURE PLASTIC TOGGLES ON SHOULDER AND WAIST STRAPS ARE SECURELY AND CORRECTLY LOCATED INTO BACKREST.
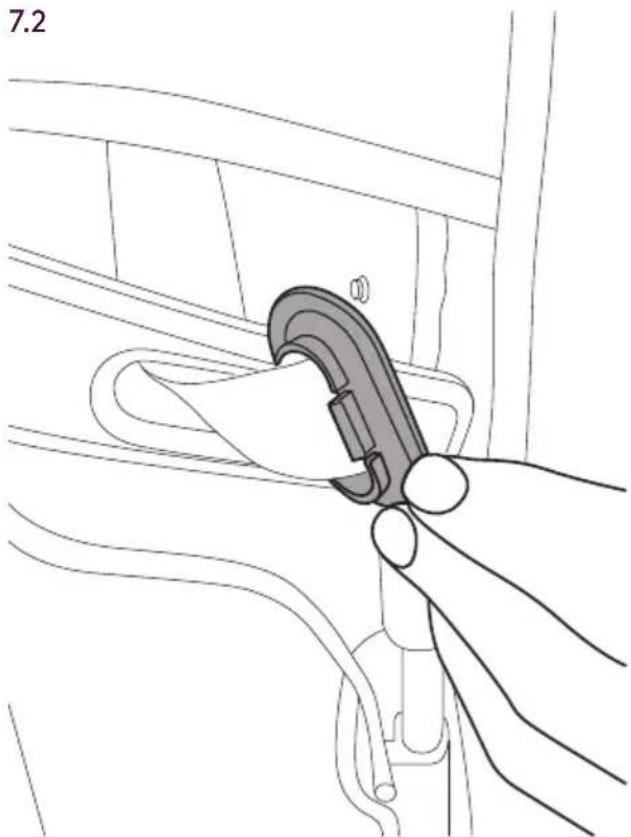
7.1 Plastic toggles must always be located correctly into backrest. They do not need to be removed to adjust harness.
72 If, for any reason, toggles are removed, they can be re-located by pushing into the hole on the backrest, ensuring 2 prongs click into place securely.
natural_image
Line drawing of a hand adjusting a car seatbelt component (no text or symbols)8.1

natural_image
Line drawing of a hand using a belt buckle to lift a car (no text or symbols)8.2

natural_image
Line drawing of a hand holding a car seatbelt, no text or symbols present8.3

Adjusting the harness
WARNING: ALWAYS ENSURE BUCKLE TOGGLE IS SECURELY AND CORRECTLY LOCATED INTO SEAT.
Buckle strap must always be located correctly into seat. It does not need to be removed to adjust harness.
NOTE: The buckle is not removable on some models.
8.1 If, for any reason, the buckle strap is removed, it can be re-located by pushing through both the buttonhole on seat fabric and buttonhole on seat substructure.
8.2 Ensure the buckle strap goes through both layers of fabrics.
8.3 Your harness is fully adjustable by moving the sliders (A), to make fitting easy. Normally, each shoulder strap is adjusted to the same length as the waist straps.
'D' rings are provided for fitting a separate harness if required (B), complying with BS 6684. Your child should always be harnessed in and should never be left unattended, even for short periods of time.
9.1

natural_image
Diagram showing three mechanical components with arrows indicating motion or force direction (no text or symbols)9.2
natural_image
Diagram showing two hands adjusting a circular component with directional arrows indicating movement or force (no text or symbols)9.3

natural_image
Line drawing of a medical procedure showing hand positioning and injection into a device (no text or symbols)9.4

natural_image
Line drawing of a hand adjusting a car seatbelt with a purple arrow indicating the direction (no text or symbols)Using the harness
Attach and release the buckle as necessary to facilitate harness adjustment and checking the harness tightness.
WARNING: ALWAYS USE THE CROTCH STRAP IN COMBINATION WITH THE WAIST BELT.
9.1 Start by connecting shoulder clips to waistclips.
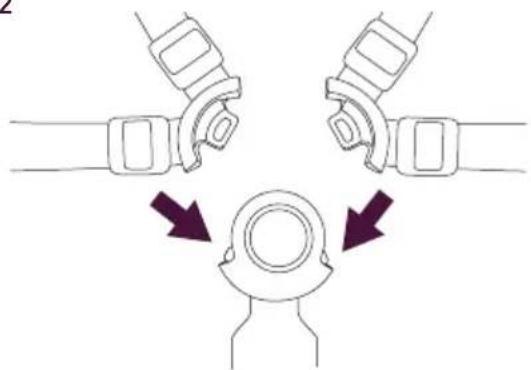
9.2 To fasten the harness insert the pairs of clips into each side of the buckle. Listen for the 'click'.
9.3 Pull sliders in one direction to length the strap
9.4 Pull slider in opposite direction to shorten strap
WARNING: ALWAYS USE THE RESTRAINT SYSTEM. TO RELEASE THE HARNESS, PRESS THE CENTRE AND PULL APART. THE SHOULDER CLIPS CAN BE DETACHED FROM THE WAIST CLIPS IF REQUIRED.
10.1

natural_image
Illustration of hands adjusting a seatbelt mechanism (no text or symbols present)
natural_image
Line drawing of a person adjusting a seatbelt (no text or symbols present)Harness tightness
It is important to ensure that your child is securely fastened into the harness by assessing the tightness of the straps.
10.1 You should only be able to insert 2 fingers between the shoulder straps and the waist straps.
NOTE: Winter /Summer clothing can make a difference to the size of your child.

natural_image
Top-down line drawing of a car seat with driver seats and seatbelt (no text or symbols)Attaching the seat liner
11.1 To attach the seat liner peel back the hood to reveal the velcro on the back of the seat.
11.2 Place the seat liner on the seat so the large velcro Tab is at the top. Fold the velcro tab over the seat so it fastens to the back of the seat.
11.3 Thread the harness through the button holes relative to the size of your child.
11.4 Fasten the small velcro tab to the underside of the calf support.

natural_image
Line drawing of a hand using a tool to adjust or install a vehicle seatbelt (no text or symbols present)
natural_image
Line drawing of a hand holding a belt switch inside a vehicle cabin (no text or symbols)
natural_image
Line drawing of a hand holding a tool over a mechanical component (no text or symbols)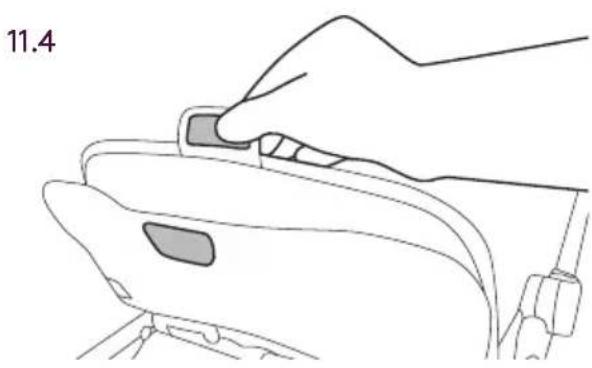
natural_image
Line drawing of a hand pressing a button on a device component (no text or symbols)12.1

natural_image
Diagram of a car steering wheel with a downward arrow indicating motion (no text or symbols present)12.2

natural_image
Diagram of a bicycle suspension system with a belt drive and wheel assembly (no text or labels)Using the brakes
12.1 Your Reflex pushchair has a parking brake. To apply the brake simply press downwards on either brake catch located on the rear wheels. The brake will automatically lock on both wheels simultaneously.
WARNING: PLEASE ENSURE BOTH BRAKE LEVERS ARE LOCKED IN POSITION SECURELY.
12.2 To release the parking brake simply lift either brake catch and both catches will release simultaneously.
NOTE: Always apply brake when placing and removing your child.

natural_image
Line drawing of a wheeled bicycle with wheels and seat (no text or symbols)
natural_image
Diagram of a bicycle steering wheel with a highlighted seat and arrow indicating motion (no text or symbols)Using the wheel locks
13.1 Your Reflex pushchair has front swivel wheels. To lock your swivel wheels locate the catch between the front wheels. Press down in any position. The wheels will automatically lock when the wheels are rotated. Repeat on each front wheels. To use the wheels in swivel mode lift the locking catch and the wheels will swivel freely. Repeat on each wheel.
NOTE: Do not attempt to swivel the wheels with the lock engaged as this may damage the swivel lock.
14.1

natural_image
Technical line drawing of a mechanical assembly with a hand adjusting a component (no text or symbols)14.2

natural_image
Line drawing of a bicycle steering wheel assembly with a hand pointing to the wheel (no text or symbols)Folding the Reflex
NOTE: The backrest should always be in the upright position and the hood folded away prior to folding.
14.1 To start folding, locate the rear locking catch (positioned between the rear wheels) and lift upwards with the toe of your shoe.
14.2 Now locate the secondary safety catch located above the right hand rear wheel. Gently press down until the lock has released.
NOTE: Check there are no large rigid items inside the basket before folding as presence of such items may lead to damage of the chassis.
natural_image
Line drawing of a hand operating a cart with attached sensors and wheels (no text or symbols)Folding the Reflex (continued)
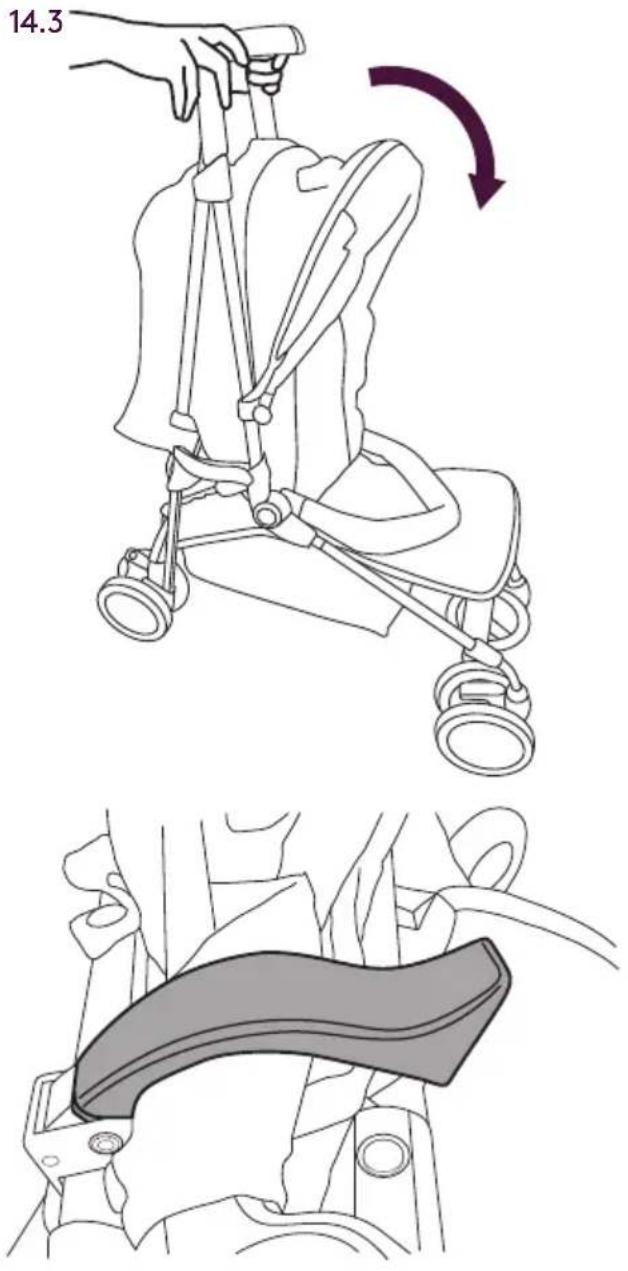
14.3 Push the handles forwards and the pushchair will naturally close in three dimensions to a compact size. Ensure the two locking catches (located either side of the pushchair) have engaged.
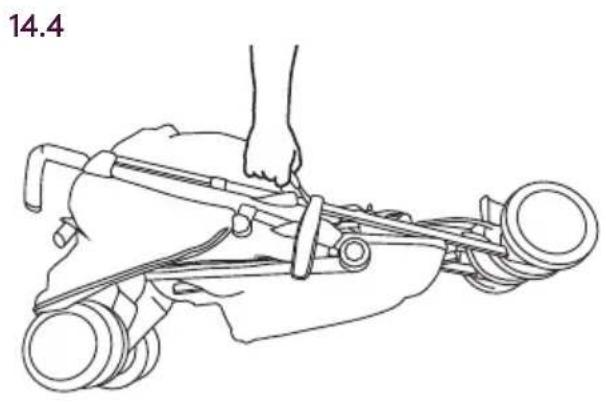
14.4 Your Reflex pushchair has a soft grip carry handle on the right hand side.
WARNING: THIS HANDLE IS THE ONLY POSITION FROM WHICH YOU SHOULD LIFT YOUR PUSHCHAIR TO AVOID POSSIBLE DAMAGE.
15.1
natural_image
Line drawing of a stroller with wheels and handle (no text or symbols)Attaching the raincover
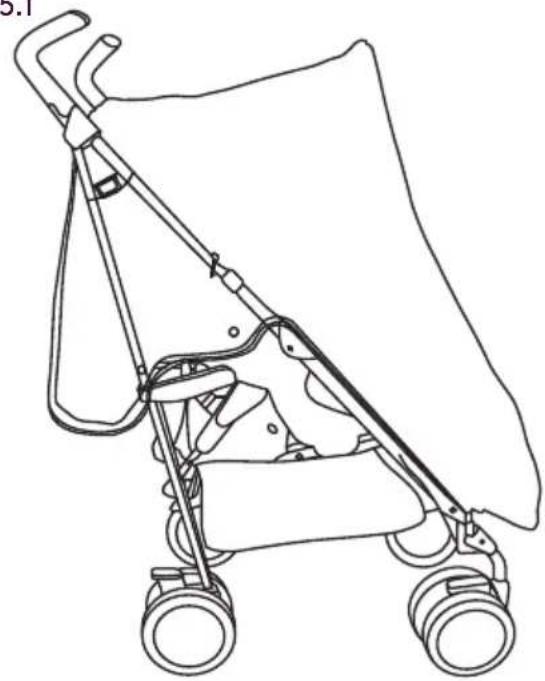
15.1 To attach your raincover locate guide holes over handles, slide the cover down over the chassis.
15.2 Fasten velcro handles to secure the raincover.
15.3 Hook elastic loops either side of raincover over plastic studs on chassis.
Pull raincover down to the bottom of the pushchair.
15.2

natural_image
Diagram of a mechanical clamp or bracket with no visible text or symbols15.3
natural_image
Mechanical diagram showing a tool inserted into a bracket with a purple arrow indicating direction (no text or symbols present)16.1

natural_image
Line drawing of a car seatbelt being adjusted for a seatbelt, showing hands adjusting the seatbelt (no text or symbols present)Fitting Reflex bumper bar
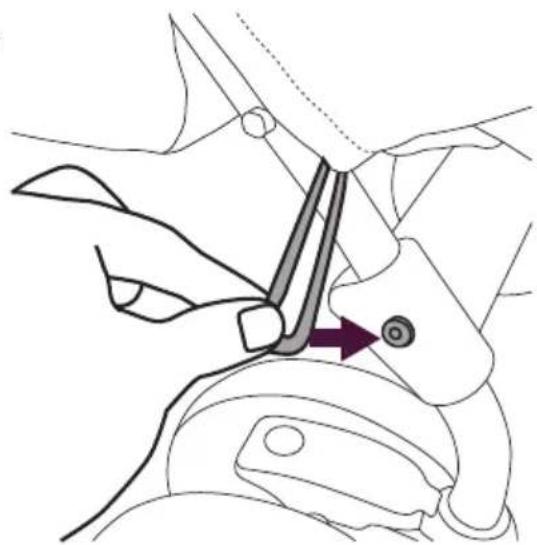
16.1 Insert bumper bar into connection point.
16.2 To remove the bumper bar press down and release button and pull the bumper bar towards you.
16.2

17.1

natural_image
Line drawing of a stroller with a hand operating the wheel (no text or symbols)17.2
natural_image
Line drawing showing two hands adjusting a car seatbelt with arrows indicating adjustment (no text or symbols)17.3

natural_image
Technical line drawing of a mechanical assembly with no visible text or symbolsAttaching your Simplicity car seat (sold separately)
17.1 Ensure your Reflex Seat unit is fully reclined and both hoods are removed.
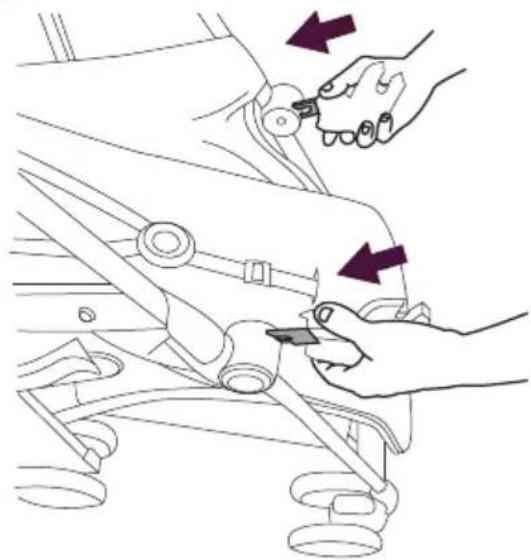
17.2 To enable you to connect the Silver Cross Simplicity Car Seat to your pushchair, adapters are available separately.
Insert one adapter into each of the connection points shown.
17.3 Your Simplicity Car Seat can now be placed onto the adapters.
17.4
17.5

natural_image
Illustration of a hand adjusting a car seatbelt with directional arrows indicating movement (no text or symbols)Removing your Simplicity Car Seat and adapters
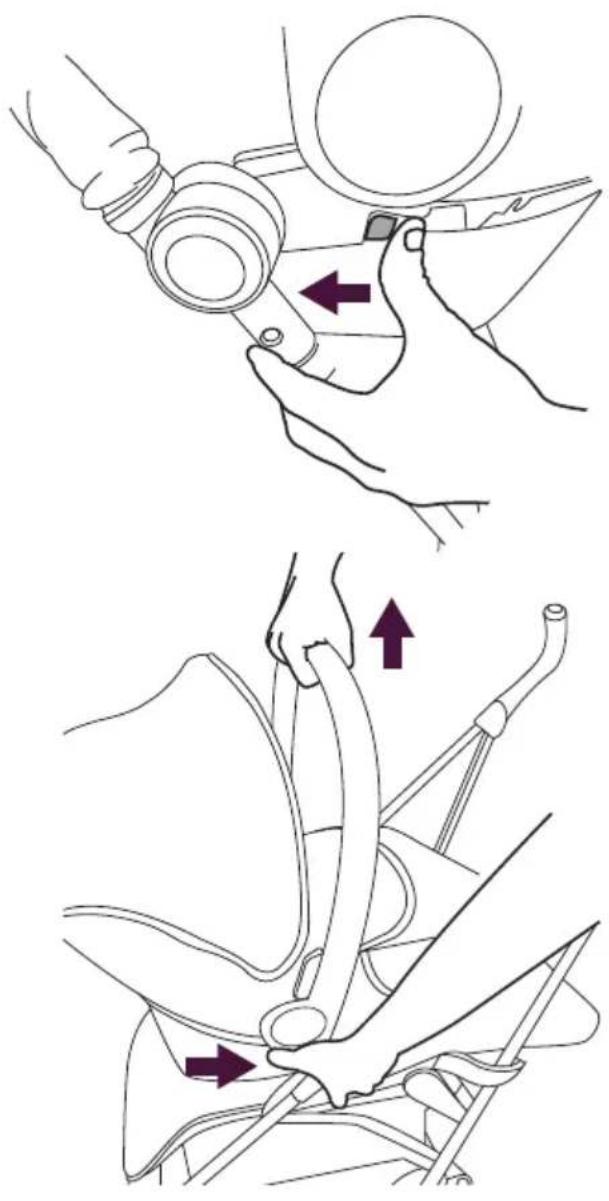
17.4 Press in the right-hand side release button as shown. This button will stay depressed. Press and hold in left-hand release button whilst lifting the car seat away from your Reflex pushchair.
17.5 To remove your car seat adapters press button and pull adapters away from chassis.
WARNING: BEFORE FOLDING YOUR REFLEX PUSHCHAIR THE CAR SEAT ADAPTERS MUST BE REMOVED, OTHERWISE DAMAGE WILL BE CAUSED.
Safety Notes
This item is a high quality Silver Cross product. It complies with BS EN1888:2012 and with correct use and maintenance will give good service. If however you should have any problems with your product, please contact your Silver Cross retailer who will take appropriate action.
WARNING:
THIS PRODUCT IS SUITABLE FROM BIRTH TO 25KG.
IT IS RECOMMENDED THE MOST RECLINED POSITION IS USED FOR NEW BORN BABIES.
DO NOT LET YOUR CHILD PLAY WITH THIS PRODUCT.
THIS PRODUCT IS NOT SUITABLE FOR RUNNING OR SKATING.
PARKING DEVICE SHALL BE ENGAGED WHEN PLACING OR REMOVING THE CHILD.
ANY LOAD ATTACHED TO THE HANDLE AND/OR THE BACK OF THE BACKREST AND/OR ON THE SIDE OF THE VEHICLE WILL AFFECT THE STABILITY OF THE VEHICLE.
DO NOT CARRY MORE THAN ONE CHILD IN THIS PUSHCHAIR.
CHECK THAT THE PRAM OR SEAT UNIT OR CAR SEAT ATTACHMENT OR DEVICES ARE CORRECTLY ENGAGED BEFORE USE.
DO NOT STAND A SECOND CHILD ON REAR LOCK AND USE AS A BUGGY BOARD.
DO NOT ATTACH A THIRD PARTY BUGGY BOARD.
ACCESSORIES WHICH ARE NOT APPROVED BY SILVER CROSS SHALL NOT BE USED.
ONLY REPLACEMENT PARTS SUPPLIED/RECOMMENDED BY SILVER CROSS SHALL BE USED.
DO NOT USE IF ANY PART IS BROKEN, TORN, OR MISSING.
THE CHILD SHOULD BE CLEAR OF MOVING PARTS WHILST MAKING ADJUSTMENTS.
DO NOT ALLOW YOUR CHILD TO CLIMB IN OR OUT OF THE PUSHCHAIR OF THEIR OWN ACCORD, AS THIS COULD RESULT IN INJURY TO YOUR CHILD OR DAMAGE TO YOUR PUSHCHAIR.
NEVER LEAVE YOUR CHILD IN THE PUSHCHAIR WITH THE RAINCOVER FULLY FITTED OTHER THAN IN NORMAL OUTSIDE USE.
THE SAFETY OF YOUR CHILD IS YOUR RESPONSIBILITY.
SEAT UNIT ONLY COMPATIBLE WITH: REFLEX CHASSIS.
BASKET CAPACITY: 5KG
CUPHOLDER CAPACITY: 340G
The child should always wear a safety harness complying with BS6684. "D" rings are provided for the attachment of an additional harness. These are located on the seat unit.
Always hold the seat when making adjustments. Be sure that the parking brake is on. If you have any difficulty in folding or unfolding the pushchair do not force as this will cause damage. Read the "To fold or unfold" instructions carefully. It may be unsafe to fit accessories or spare parts other than those supplied or recommended by Silver Cross. If anyone other than the owner is going to use this product (e.g. grandparent, child minder), please show them how to use it correctly.
Care and Maintenance
Chassis - Always check your pushchair for signs of wear. Regularly lubricate all moving parts. Check for freedom of movement of all locking devices. Polish metal work with a clean, dry cloth.
Dirt and dust within moving mechanisms may be rinsed away with clean water. Do not soak or submerge.
Fabric items - Please refer to the washcare instructions on each individual item's washcare label.
Seat Unit - To clean, sponge area with warm soapy water. Rinse well with clean water to avoid staining. Allow to dry naturally, away from direct heat and strong sunlight.
Never machine wash, tumble dry, iron or bleach any of the fabric items or seat unit. A certain degree of fading may occur over time through everyday use.
Warranty
All Silver Cross products are guaranteed for a period of 36 months against manufacturing faults, when the product is used correctly according to the instruction manual.
Please read these instructions carefully before using your new Silver Cross Product and keep for future reference.
www.silvercrossbaby.com

CE PRODUIT N'EST PAS CONÇU POUR LA COURSE OU LE PATINAGE.
LE FREIN DOIT ÊTRE ACTIONNÉ LORSQUE VOUS POSITIONNEZ OU RETIREZ VOTRE ENFANT DE LA POUSSETTE
TOUTE CHARGE POSÉE SUR LA POIGNÉE, LE DOSSIER OU LES BORDS DE LA POUSSETTE RISQUE DE COMPROMETTRE SA STABILITÉ.
NE TRANSPORTEZ PAS PLUS D'UN ENFANT SUR CETTE POUSSETTE.
NE LAISSEZ PAS UN AUTRE ENFANT SE TENIR DEBOUT SUR LE SYSTÈME DE VERROUILLAGE ARRIÈRE POUR VOUS EN SERVIR DE MARCHEPIED.
N'UTILISEZ PAS DE MARCHEPIED D'AUTRE PROVENANCE AVEC CETTE POUSSETTE.
AUCUN ACCESSOIRE NON APPROUVÉ PAR SILVER CROSS NE DOIT ÊTRE UTILISÉ.
N'UTILISEZ QUE DES PIÈCES DÉTACHÉES FOURNIES/ RECOMMANDÉES PAR SILVER CROSS.
N'UTILISEZ PAS CE PRODUIT SI L'UNE DES PIÈCES EST ENDOMMAGÉE, DÉCHIRÉE OU MANQUANTE.
ATTENTION : TENEZ LES PIÈCES MOBILES HORS DE LA PORTÉE DE VOTRE ENFANT LQRSQUE VOUS EFFECTUEZ DES RÉGLAGES.
NE LAISSEZ PAS VOTRE ENFANT GRIMPER TOUT SEUL DANS/HORS DE LA POUSSETTE CAR IL POURRAIT SE BLESSER OU ENDOMMAGER LA POUSSETTE.
NE LAISSEZ JAMAIS VOTRE ENFANT AVEC L'HABILLAGE PLUIE REFERMÉ SUR LA POUSSETTE AILLEURS QU'À L'EXTÉRIEUR.
VOUS ÊTES RESPONSABLE DE LA SÉCURITÉ DE VOTRE ENFANT.
HAMAC UNIQUEMENT COMPATIBLE AVEC : CHÂSSIS REFLEX
CAPACITÉ DU PANIER : 5 KG
PORTE-GOBELET : CHARGE MAX. = 340G
LÅT INTE BARNET LEKA MED PRODUKTEN.
PRODUKTEN ÄR INTE AVSEDD ATT ANVÄNDAS VID LÖPNING ELLER RULLSKRIDSKOÅKNING.
PARKERINGSBROMSEN SKA ANVÄNDAS NÄR BARNET PLACERAS I ELLER LYFTS UPP UR VAGNEN.
VIKT PLACERAD PÅ HANDTAGET OCH/ELLER RYGGSTÖDET OCH/ELLER VAGNENS SIDA PÅVERKAR DESS STABILITET.
HA ALDRIG MER ÄN ETT BARN I VAGNEN.
KONTROLLERA ATT LIGGDEL, SITTDEL BILBARNSTOL ÄR. ORDENTLIGT FASTSATT FÖRE ANVÄNDNING.
ANVÄND ALDRIG BAKHJULSLÅSET SOM STÅBRÄDA FÖR ETT BARN.
MONTERA INTE EN STÅBRÄDA AV ETT ANNAT FABRIKAT PÅ BARNVAGNEN.
TILLBEHÖR SOM INTE ÄR GODKÄNDA AV SILVER CROSS FÅR INTE ANVÄNDAS.
ANVÄND ENDAST RESERVDELAR TILLVERKADE ELLER REKOMMENDERADE AV SILVER CROSS.


- Garantie
- IMPORTANT: KEEP THESE INSTRUCTIONS FOR FUTURE REFERENCE
- These instructions are important.
- WARNING: NEVER LEAVE YOUR CHILD UNATTENDED.
- Contents
- Assembling the Reflex
- WARNING: CHECK THE WHEEL IS SECURE BY PULLING GENTLY DOWNWARDS.
- Assembling the Reflex (continued)
- WARNING: FAILURE TO DO THIS WILL CAUSE DAMAGE TO YOUR PUSHCHAIR.
- Reclining the Reflex
- Using the Harness
- Adjusting the Reflex handles
- Adjusting the harness
- WARNING: ALWAYS ENSURE PLASTIC TOGGLES ON SHOULDER AND WAIST STRAPS ARE SECURELY AND CORRECTLY LOCATED INTO BACKREST.
- WARNING: ALWAYS ENSURE BUCKLE TOGGLE IS SECURELY AND CORRECTLY LOCATED INTO SEAT.
- WARNING: ALWAYS USE THE CROTCH STRAP IN COMBINATION WITH THE WAIST BELT.
- Harness tightness
- Attaching the seat liner
- Using the brakes
- WARNING: PLEASE ENSURE BOTH BRAKE LEVERS ARE LOCKED IN POSITION SECURELY.
- Using the wheel locks
- Folding the Reflex
- Folding the Reflex (continued)
- Attaching the raincover
- Fitting Reflex bumper bar
- Attaching your Simplicity car seat (sold separately)
- Removing your Simplicity Car Seat and adapters
- Safety Notes
- WARNING:
- Care and Maintenance
- Warranty
Brand : Silver Cross
Model : Reflex Aston Martin
Category : Stroller