
B431dn+ - Printer OKI - Free user manual and instructions
Find the device manual for free B431dn+ OKI in PDF.


User questions about B431dn+ OKI
0 question about this device. Answer the ones you know or ask your own.
Ask a new question about this device
Download the instructions for your Printer in PDF format for free! Find your manual B431dn+ - OKI and take your electronic device back in hand. On this page are published all the documents necessary for the use of your device. B431dn+ by OKI.
USER MANUAL B431dn+ OKI
natural_image
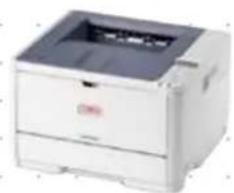
Exterior view of a white OPD printer with visible branding and control panel (no readable text beyond branding)User's Guide
B401d
B401dn
B411d
B411dn
B431d
B431dn
natural_image
White industrial paper printer with front panel and control panel (no visible text or labels)PREFACE
Every effort has been made to ensure that the information in this document is complete, accurate, and up-to-date. The manufacturer assumes no responsibility for the results of errors beyond its control. The manufacturer also cannot guarantee that changes in software and equipment made by other manufacturers and referred to in this guide will not affect the applicability of the information in it. Mention of software products manufactured by other companies does not necessarily constitute endorsement by the manufacturer.
While all reasonable efforts have been made to make this document as accurate and helpful as possible, we make no warranty of any kind, expressed or implied, as to the accuracy or completeness of the information contained herein.
The most up-to-date drivers and manuals are available from:
www.okiprintingsolutions.com
07108301 Iss.04; Copyright © 2012 Oki Europe Ltd. All rights reserved.
OKI is a registered trademark of Oki Electric Industry Co., Ltd.
Hewlett-Packard, HP, and LaserJet are registered trademarks of Hewlett-Packard Company.
Windows is a registered trademark of Microsoft Corporation.
ENERGY STAR is a trademark of the United States Environmental Protection Agency.
Apple, Macintosh, Mac and Mac OS are registered trademarks of Apple Inc.
Other product names and brand names are registered trademarks or trademarks of their proprietors.

As an ENERGY STAR Program Participant, the manufacturer has determined that this product meets the ENERGY STAR guidelines for energy efficiency.

This product complies with the requirements of the Council Directives 2004/108/EC (EMC), 2006/95/EC (LVD), 1999/5/EC (R&TTE), 2009/125/EC (ErP) and 20011/65/EU RoHS, as amended where applicable, on the approximation of the laws of the member states relating to Electromagnetic Compatibility, Low Voltage, Radio & Telecommunications Terminal Equipment and Energy
Using Products, Restriction on the use of certain hazardous substances in electrical and electronic equipment.
The following cables were used to evaluate this product to achieve EMC directive 2004/108/EC compliance and configurations other than this may affect that compliance.
| CABLE TYPE LENGTH(METRE) | CORE SHIELD | |
| Power 1.8 | × | |
| USB 5 | × | |
| Parallel 1.8 | × | |
| LAN | 15 | × |
EMERGENCY FIRST AID
Take care with toner powder:
If swallowed, give small amounts of cold water and seek medical attention. DO NOT attempt to induce vomiting.

If inhaled, move the person to an open area for fresh air. Seek medical attention.
If it gets into the eyes, flush with large amounts of water for at least 15 minutes keeping eyelids open. Seek medical attention.
Spillages should be treated with cold water and soap to help reduce risk of staining skin or clothing.
MANUFACTURER
Oki Data Corporation,
4-11-22 Shibaura, Minato-ku,
Tokyo 108-8551,
Japan
IMPORTER TO THE EU/ AUTHORISED REPRESENTATIVE
Oki Europe Limited
Blays House
Wick Road
Egham
Surrey TW20 0HJ
United Kingdom
For all sales, support and general enquiries contact your local distributor.
ENVIRONMENTAL INFORMATION

text_image
www.okiprintingsolutions.com OKICONTENTS
Preface 2
Emergency First Aid ....3
Manufacturer....3
Importer to the EU/ authorised representative....3
Environmental information ....3
Contents 4
Notes, Cautions and Warnings .....6
About this manual....7
Online usage. 7
Printing Pages. 7
Abbreviations used 8
Printer components....9
Getting started 11
Switching on. 11
Switching off....11
Energy saving settings....11
Returning to standby mode 11
Operator panels....12
LED indicators....12
LCD 13
Online button 13
Changing language 14
Configuration tool 14
Menu functions .....15
Printing menu settings 21
B431d, B431dn 22
Operator panel 22
Panel elements .....22
Menu functions .....23
Printing menu settings....30
Paper recommendations....31
Paper and envelope types 31
Transparencies and adhesive labels. 31
Postcards 32
Installing paper....32
Paper Tray 32
Multi purpose tray and manual feed tray 34
Paper feed, size and media setting 35
B401dn, B411d, B411dn 35
B431d, B431dn 36
Interfaces....38
Printer drivers....39
Windows operating systems 39
Installed options....39
Macintosh operating systems . . . . . . . . . . . . . . . . . . . . . . . . . . . . . . . . . . . . . . . . . . . . . . . . . . . . . . . . . . . 39
Installed options....39
Choosing a Mac driver ....39
Operation 40
Printer settings in Windows 40
Printing preferences in Windows applications .....40
PCL emulation....41
PS emulation 44
Setting from Windows control panel 46
Printer settings in Macintosh....49
2-sided printing 50
Auto duplex printing 50
Manual duplex printing using the paper tray (Windows only) .....50
Manual duplex printing using the Manual Feed Tray (B401dn, B411d, B411dn) 52
Overlays and Macros (Windows only)....54
What are overlays and macros? 54
Creating PostScript overlays 54
Creating the overlay image. 54
Create and download the project. 55
Test printing the overlay 55
Defining overlays 55
Printing with PostScript overlays .....56
Creating PCL Overlays .57
Creating the overlay image. 57
Create and download macros 57
Test printing the macro .....58
Defining overlays .....58
Printing with PCL overlays 59
Consumables and maintenance....60
When to replace the toner cartridge . . . . . . . . . . . . . . . . . . . . . . . . . . . . . . . . . . . . . . . . . . . . . . . . . . . . . . . . . . . . . . . . . . . 60
Replacing the toner cartridge . . . . . . . . . . . . . . . . . . . . . . . . . . . . . . . . . . . . . . . . . . . . . . . . . . . . . . . . . . . . . . . . . . . . . 60
When to replace the image drum 63
Replacing the image drum....63
Cleaning. 65
...the unit casing....65
...the paper feed rollers 65
...the LED head. . . . . . . . . . . . . . . . . . . . . . . . . . . . . . . . . . . . . . . . . . . . . . . . . . . . . . . . . . . . . . . . . . . . . . . 67
Troubleshooting 68
Status and error messages. 68
Paper jams 68
Input jam....69
Feed jam or exit jam 69
Print quality problems 74
Paper feed problems 75
Software problems 76
Hardware problems 76
Installing options 77
Installation procedure 77
Setting the driver device options. 77
Windows 77
MAC OS X. 78
Specifications 79
General 79
Paper and tray information....80
Notes/symbols/terms.82
Index....84
Oki contact details. 85
NOTES, CAUTIONS AND WARNINGS
NOTE
A note provides additional information to supplement the main text.
CAUTION!
A caution provides additional information which, if ignored, may result in equipment malfunction or damage.
WARNING!
A warning provides additional information which, if ignored, may result in a risk of personal injury.
For the protection of your product, and in order to ensure that you benefit from its full functionality, this model has been designed to operate only with genuine original toner cartridges. Any other toner cartridge may not operate at all, even if it is described as "compatible", and if it does work, your product's performance and print quality may be degraded.
Specifications subject to change without notice. All trademarks acknowledged.
ABOUT THIS MANUAL
This manual is the user's guide (check the Oki Printing Solutions website, www.okiprintingsolutions.com, for the most up-to-date version) for your printer and forms part of the overall user support listed below:
Quick Set-up Guide: to describe how to unpack, connect and power up your printer.
Installation Safety booklet: provides information for safe use of your product.
This is a paper document that is packaged with the product.
This User's Guide: to help you to operate your printer and make the best use of its many features. Also included are guidelines for troubleshooting and maintenance to ensure that it performs at its best. Additionally, information is provided for adding optional accessories as your printing needs evolve.
Network Guide: helps you become familiar with the functionality of the built in network interface card.
Installation Guides: accompany consumable items and optional accessories to describe how to install them.
Online Help: online information associated with the printer driver and Status Monitor software.
This manual has been written using more than one printer as a model and the illustrations/ screenshots reflect this. What you see will be appropriate to the model you are using.
ONLINE USAGE
This manual is intended to be read on screen using an Adobe Acrobat Reader. Use the navigation and viewing tools provided in Acrobat.
You can access specific information in two ways:
In the list of bookmarks down the left hand side of your screen, click on the topic of interest to jump to the required topic. (If the bookmarks are not available, use the Table of Contents.)
In the list of bookmarks click on Index to jump to the Index. (If the bookmarks are not available, use the Table of Contents.) Find the term of interest in the alphabetically arranged index and click on the associated page number to jump to the page containing the subject.
PRINTING PAGES
The whole manual, Individual pages, or sections may be printed. The procedure is:
-
From the toolbar, select File > Print (or press the Ctrl + P keys).
-
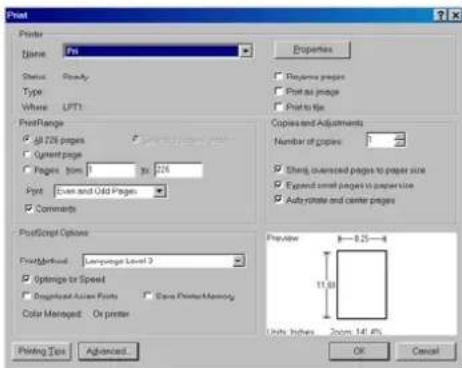
Choose which pages you wish to print:
(a) All pages, for the entire manual.
(b) Current page for the page at which you are looking.
text_image
Print Name: D:\ps Status: Ready Type Where: LPT1 PostRange □ All 226 pages □ Current page Pages: Sim. 0 Page: Even and Old Pages □ Comments PostScript Options First/Forward: Language Level 3 □ Options or Speed □ Background Action Points □ Same Print Memory Color Managed: On printer Properties □ Excessive pages □ Post as pages □ Print to key Copies and Adjustments Number of pages: 1 □ Shing, reversed pages to proper size □ Expand small pages to proper size □ Auto rotate and center pages Preview: 8 - 8.25 - 11.00 Units: inches Zoom: 14.00 OK Cancel(c) Pages from and to for the range of pages you specify by entering their page numbers.
3. Click OK.
ABBREVIATIONS USED
The following abbreviations are used in this manual:
| ABBREVIATION MEANING | |
| Ctrl Control | |
| dpi dots per inch | |
| DIMM Dual In-line Memory Module | |
| d | d u p |
| n network card installed | |
| LED Light Emitting Diode | |
| NIC Network Interface Card | |
| PCL Printer Control Language | |
| PS PostScript (emulation) | |
| PSE PostScript Emulation | |
| RAM | Random Access Memory |
PRINTER COMPONENTS
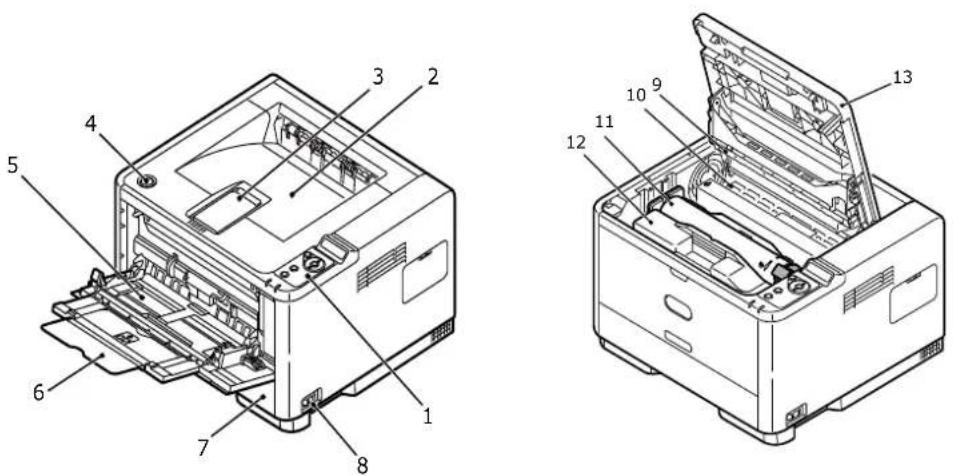
Apart from the Operator panels, which are described in the next chapter, the B401dn, B411d, B411dn, B431d, B431dn printers look similar from the outside. The important components are identified in the representations below. For illustration purposes the B431dn model is shown.
text_image
Technical diagram of an open printer with numbered parts for identification and assembly reference.- Operator panel
- Output Stacker (150 sheets, face down)
- Output Stacker extension
- Top cover release button
- Multi Purpose Tray (only for B431d, B431dn; 100 sheets)(shown in open position)
- Multi Purpose Tray extension
- Paper Tray 250 sheets
- ON/OFF switch
- LED array
- Fuser unit
- Toner cartridge
- Image drum
- Top cover
text_image
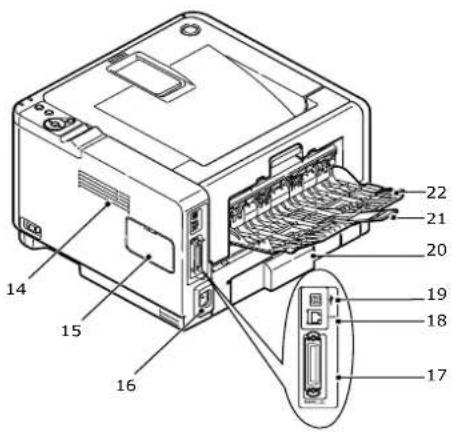
Technical diagram of an electronic device with numbered components and internal connectors- Cooling fan
- Memory panel (to upgrade your printer's memory RAM DIMM)
- Power cable connection
- Parallel interface connection
- LAN interface connection (only for B401dn, B411dn, B431dn)
- USB interface connection
- Paper Tray extension
- Rear Face Up Tray extension
- Rear Face Up Tray
GETTING STARTED
SWITCHING ON
- Plug the power cable into the power socket of your machine.
- Plug the power cable into the electric socket.
- Press the power switch ON.
SWITCHING OFF
Press the power switch off.
ENERGY SAVING SETTINGS
POWER SAVING MODE
If you do not use the machine for a while, it will enter the power saving mode to control the power consumption of the device.
RETURNING TO STANDBY MODE
To return the machine to standby mode from power save, press the Online button.
NOTE
When your machine receives a print job, it automatically returns to standby mode.
OPERATOR PANELS
This chapter describes the function of the operator panel on your printer. It is useful to describe the Configuration Tool at this point as it provides the B401dn, B411d, B411dn, the equivalent of the menu control panel on the B431d, B431dn (See "Printer drivers" on page 43 for installation of the Configuration Tool).
B401DN, B411D, B411DN
The B401dn, B411d, B411dn operator panel consists of 2 indicating LEDs, an LCD (3) and an Online (4) button. The LEDs indicate Ready (1) and Attention (2).
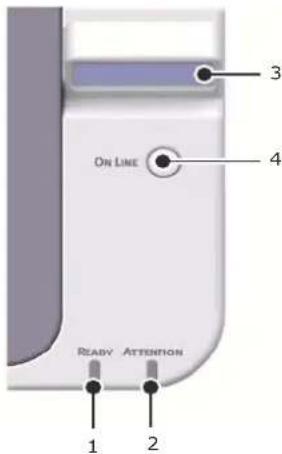
text_image
ON LINE READY ATTENTION 1 2 3 4LED INDICATORS
The LED indicators show the status of the printer and have three operating conditions as follows:
Indicator off
Indicator on
Flash
Both LED indicators come on momentarily when power is switched on using the main power switch.
Ready LED (green)
Indicator on - the printer is on-line and ready to receive data.
Indicator off - the printer is off-line and cannot receive data.
Attention LED (red)
Indicator on - this indicates a warning, (e.g. low toner).
Indicator off - this indicates normal condition.
The meaning of the indicator LEDs when they flash (x) is summarised as follows:
NOTE
The table below is also applicable for the B431d, B431dn models.
| FLASH TYPE | READY LED (1) | ATTENTION LED (2) | MEANING |
| Flash x The printer is receiving | and processing data during printing or the printer is resetting. | ||
| x There is a printing error, | for example, a problem with paper, the cover is open or the paper tray is empty while a job is processing. | ||
| x x There is a minor error | with the printer, for example, toner is low and the image drum needs to be changed. |
LCD
The LCD (3) has two rows of up to 16 alphanumeric digits, displaying print status and error messages.
ONLINE BUTTON
The primary functions of the Online button (4) are activated by pressing the switch momentarily and releasing. The primary functions are as follows:
Turning the printer off-line.
Turning the printer on-line (ready).
Resuming printing after page overflow.
Interrupting data processing when the printer is receiving and processing data.
Resuming data processing.
The secondary functions of the Online button are activated after turning the printer off line, then pressing and holding the switch for four seconds before releasing. The secondary functions are as follows:
Printing the demo and menu pages.
NOTE
Demo and menu pages can also be printed using the printer's Configuration Tool. See "Printing menu settings" on page 21.
Printing any data held in the buffer after printing has been cancelled.
CHANGING LANGUAGE
The default language used by your printer for display messages and for report printing is English. If required, this can be changed to:
German Danish
French Dutch
Italian Turkish
Spanish Portuguese
Swedish Polish
Russian Greek
Finnish Czech
Hungarian Norwegian
NOTE
-
The Operator Panel Language Setup Wizard will run automatically when you install the printer driver. Follow the instructions provided by this utility to set your chosen language.
-
The list above is neither conclusive nor exhaustive.
CONFIGURATION TOOL
Installation of the Configuration Tool can be found on the Drivers/Utilities DVD under the Utilities folder. Follow the on-screen instructions to complete the Configuration Tool installation. This Configuration Tool is used to control and change the various printer settings.
Using the Configuration Tool
Viewing or changing the printer settings are carried out as follows:
Click on Start > All Programs > Okidata > Configuration Tool and select the Configuration Tool.
MENU FUNCTIONS
The Configuration Tool allows you to view and change the printer's internal settings. You can think of this as the software equivalent of the LCD operator panel.
In the Configuration Tool, click the Device Setting tab. The settings are grouped into categories or "User Menu" such as Information Menu or Print Menu.
Some of these settings are similar to those found in your printer driver or application software. The settings that you can change using this software act as the printer's defaults. These can be overridden by the settings in your printer driver or application.
For example, if you have set the number of copies in the Print Menu settings to one, this will be overridden if you select three copies of your document in the printer driver.
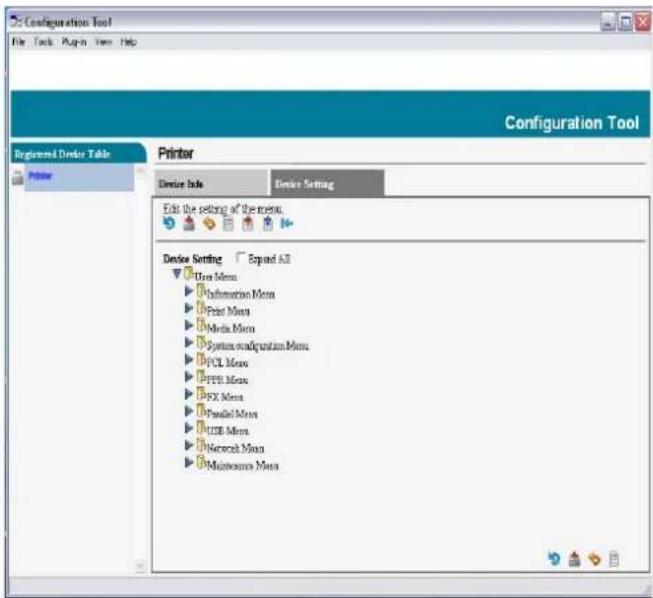
text_image
Configuration Tool File Tools | Plugin View Help Configuration Tool Registered Printer Table Printer Device Info Device Setting Edit the setting of the menu. Device Setting Expand All □ Print Menu ▶ Information Menu ▶ Print Menu ▶ Media Menu ▶ System configuration Menu ▶ PCL Menu ▶ PPSI Menu ▶ PEXI Menu ▶ Parallel Menu ▶ USB Menu ▶ Network Menu ▶ Maintenance MenuInformation menu
This menu provides a quick method of listing various items stored within the printer.
| ITEM ACTION | |
| PRINT MENU MAP EXECUTE | |
| NETWORKB401dn, B411dn only | EXECUTE |
| DEMO1 EXECUTE | |
| PRINT FILE LIST EXECUTE | |
| PRINT PCL FONT EXECUTE | |
| PRINT PPR FONT EXECUTE | |
| PRINT FX FONT EXECUTE | |
| PRINT ERROR LOG EXECUTE | |
| USAGE REPORT EXECUTE |
Print menu
This menu provides adjustment of various print job related functions.
| ITEM DEFAULT | |
| COPIES 1 | |
| DUPLEX OFF | |
| DUPLEX LAST PAGE SKIP BLANK PAGE | |
| MANUAL OFF | |
| PAPER FEED TRAY1 | |
| AUTO TRAY SWITCH ON | |
| TRAY SEQUENCE DOWN | |
| MEDIA CHECK ENABLE | |
| RESOLUTION 600DPI | |
| TONER SAVE MODE DISABLE | |
| ORIENTATION PORTRAIT | |
| LINES PER PAGE 64 LINES | |
| EDIT SIZE CASSETTE SIZE | |
Media menu
This menu provides adjustment to suit a wide range of print media.
| ITEM | DEFAULT |
| TRAY1 PAPERSIZE | A4 |
| TRAY1 MEDIATYPE | PLAIN |
| TRAY1 MEDIAWEIGHT | MEDIUM |
| TRAY2 PAPERSIZE ^1 When Tray2 is installed | A4 |
| TRAY2 MEDIATYPE ^1 When Tray2 is installed | PLAIN |
| TRAY2 MEDIAWEIGHT ^1 When Tray2 is installed | MEDIUM |
| MN PAPERSIZE | A4 |
| MN MEDIATYPE | PLAIN |
| MN MEDIAWEIGHT | MEDIUM |
| UNIT OF MEASURE | MILLIMETER |
| X DIMENSION 210 MILLIMETER | |
| Y DIMENSIONS | 297 MILLIMETER |
- Not B401
System configuration menu
This menu adjusts general printer settings to suit the way you prefer to work.
| ITEM DEFAULT | |
| POW SAVE TIME 1 MIN | |
| AUTO POWER OFF TIME 6 | HOURS |
| PERSONALITY AUTO EMULATION | |
| CLRABLE WARNING ONLINE | |
| AUTO CONTINUE ON | |
| MANUAL TIMEOUT 60 SEC | |
| TIMEOUT INJOB 40 SEC | |
| TIMEOUT LOCAL 40 SEC | |
| TIMEOUT NETB401dn, B411dn only | 90 SEC |
| LOW TONER CONTINUE | |
| JAM RECOVERY ON | |
| ERROR REPORT OFF |
PCL Emulation
This menu controls the printer's PCL emulation.
| ITEM DEFAULT | |
| FONT SOURCE RESIDENT | |
| FONT NO. | 10 |
| FONT PITCH | 10.00 CPI |
| SYMBOL SET | PC-8 |
| A4 PRINT WIDTH | 78 COLUMN |
| WHITE PAGE SKIP OFF | |
| CR FUNCTION | CR |
| LF FUNCTION | LF |
| PRINT MARGIN | NORMAL |
| PEN WIDTH ADJUST | ON |
| TRAY ID# | |
| PCL MNID | 2 |
| PCL T0ID | 4 |
| PCL T1ID | 1 |
| PCL T2IDWhen Tray2 is installed | 5 |
PPR Emulation
This menu controls the printer's PPR emulation.
| ITEM DEFAULT | |
| CHARACTER PITCH 10 CPI | |
| FONT CONDENSE 12CPI TO 20CPI | |
| CHARACTER SET SET-2 | |
| SYMBOL SET IBM-437 | |
| LETTER O STYLE DISABLE | |
| ZERO CHARACTER NORMAL | |
| LINE PITCH 6 LPI | |
| WHITE PAGE SKIP OFF | |
| CR FUNCTION CR | |
| LF FUNCTION LF | |
| LINE LENGTH 80 COLUMN | |
| FORM LENGTH 11.7 INCH | |
| TOF POSITION 0.0 INCH | |
| LEFT MARGIN 0.0 INCH | |
| FIT TO LETTER | DISABLE |
| TEXT HEIGHT SAME | |
FX Emulation
This menu controls the printer's FX emulation.
| ITEM | DEFAULT |
| CHARACTER PITCH | 10 CPI |
| CHARACTER SET | SET-2 |
| SYMBOL SET | IBM-437 |
| LETTER O STYLE | DISABLE |
| ZERO CHARACTER | NORMAL |
| LINE PITCH | 6 LPI |
| WHITE PAGE SKIP | OFF |
| CR FUNCTION CR | |
| LINE LENGTH | 80 COLUMN |
| FORM LENGTH | 11.7 INCH |
| TOF POSITION | 0.0 INCH |
| LEFT MARGIN | 0.0 INCH |
| FIT TO LETTER | DISABLE |
| TEXT HEIGHT | SAME |
Parallel menu
This menu controls the operation of the printer's parallel data interface.
| ITEM DEFAULT | |
| PARALLEL | ENABLE |
| BI-DIRECTION ENABLE | |
| ECP ENABLE | |
| ACK WIDTH NARROW | |
| ACK/BUSY TIMING ACK IN | BUSY |
| I-PRIME 3 MICRO SEC |
USB menu
This menu controls the operation of the printer's USB data interface.
| ITEM DEFAULT | |
| USB ENABLE | |
| SOFT RESET ENABLE | |
| SPEED 480 Mbps | |
| SERIAL NUMBER ENABLE |
Network menu
This menu controls the operation of the printer's 10Base-T/100Base-TX network interface.
NOTE
This is applicable only to the B401dn & B411dn model.
| ITEM DEFAULT | |
| TCP/IP ENABLE | |
| IP VERSION IPv4 | |
| NETBEUI DISABLE | |
| NETBIOS OVER TCP | ENABLE |
| NETWARE | ENABLE |
| ETHERTALK ENABLE | |
| FRAMETYPE | AUTO |
| IP ADDRESS SET | AUTO |
| IP ADDRESS | xxx.xxx.xxx.xxx |
| SUBNET MASK | xxx.xxx.xxx.xxx |
| GATEWAY ADDRESS | xxx.xxx.xxx.xxx |
| WEB | ENABLE |
| TELNET DISABLE | |
| FTP | DISABLE |
| SNMP ENABLE | |
| NETWORK SCALE NORMAL | |
| HUB LINK SETTING AUTO | NEGOTIATE |
| TCP ACK TYPE1 | |
| FACTORY DEFAULTS EXECUTE | |
Maintenance menu
This menu provides access to various printer maintenance functions.
| ITEM DEFAULT | |
| MENU RESET EXECUTE | |
| SAVE MENU EXECUTE | |
| RESTORE MENU EXECUTE | |
| POWER SAVE ENABLE | |
| AUTO POWER OFF AUTO CONFIG | |
| PAPER BLACK SET 0 | |
| DARKNESS 0 | |
| SMR SETTING 0 | |
| BG SETTING | 0 |
NOTE
RESTORE MENU is displayed only when SAVE MENU is executed.
Usage menu
This menu is for information only, and provides an indication of total usage of the printer and the expected life left in its consumable items. This is particularly useful if you do not have a full set of replacement consumables to hand and you need to know how soon you will need them.
| ITEM | DEFAULT | REMARKS |
| TRAY1 PAGE COUNT | nnnnnn | An indication of the number of pages printed from Tray1. |
| TRAY2 PAGE COUNT | nnnnnn | An indication of the number of pages printed from Tray2. (When Tray2 is installed.) |
| MN PAGE COUNT | nnnnnn | An indication of the number of pages printed from the Manual Feed Tray. |
| DRUM LIFE | REMAINING nnn% | An indication of the remaining drum life. |
| TONER (n.nK) | REMAINING nnn% | An indication of how much toner is left in the cartridge. |
PRINTING MENU SETTINGS
The menu settings can be printed as a menu map as follows.
Using the Online button
- Press the Online button to take the printer off-line.
- Press and hold down the Online button for at least four seconds, but less than seven seconds.
- The printer prints a list of the menu settings and a demo print page. See "Online button" on page 13.
Using the Configuration Tool
- Select Start > All Programs > Okidata > Configuration Tool > Configuration Tool.
The Configuration Tool page is displayed. - Select this printer displayed under the Registered Device table.
- Click Device Setting tab.
- Click Menu Setting. You can check Expand All menu items or click User Menu.
- Expand the Information Menu.
- To print a demo page or Menu Map, select either Demo1 or Print Menu Map and click Execute.
B431D, B431DN
text_image
1 2 3 4 5 6 ON LINE CANCEL Ready Attention 7 8OPERATOR PANEL
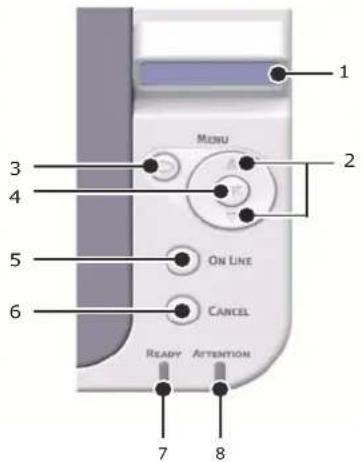
The B431d, B431dn operator panel consists of a menu driven control panel, an LCD display and two LED indicators.
PANEL ELEMENTS
-
Liquid crystal display. (LCD) panel. Two rows of up to 16 alphanumeric digits displaying print status, menu items in menu mode and error messages.
-
Menu Scroll Buttons. Press briefly to enter the MENU mode. Press briefly again to select the next menu. Press for more than 2 seconds to scroll through the different menus.
-
Back button. Press briefly to return to the previous higher level menu item or exit the menu when in MENU mode. In the ONLINE or OFFLINE mode/MENU mode: when pressed for 4 seconds, the printer starts to shutdown.
-
OK button. In the ONLINE or OFFLINE mode: press this briefly to enter the MENU mode. In the MENU mode: press this briefly to select the menu or setting indicated on the LCD.
NOTE
When pressed with DATA displayed (press and hold for five seconds), it forces the printer to print out the remaining data in the printer.
- Online button. Press to switch between ONLINE and OFFLINE status. Press to exit the menu and displays ONLINE, when in the MENU mode.
NOTE
When pressed in Menu mode, the Online button returns the printer to ONLINE status. Also when there is an error indicating wrong paper size, pressing the Online button forces the printer to print.
When manually feeding paper, pressing the Online button will start the printing.
- Cancel button. When printing press to cancel a print job (press the button for 2 sec or less). Press to exit the MENU mode and go ONLINE, when in the MENU mode.
NOTE
When there is an error, and there are print jobs in queue, pressing the Cancel button deletes the first job in the queue.
- Ready indicator (green). ON indicates ready to receive data. FLASHING indicates processing data. OFF indicates Offline.
- Attention indicator (red). ON indicates a warning (e.g. low toner). FLASHING indicates an error, (e.g. toner empty). OFF indicates normal condition.
MENU FUNCTIONS
The Printer Menu allows you to view and change the printer's internal settings.
The settings are grouped into categories or “menus” such as Information Menu or Print Menu.
Some of these settings are similar to those found in your printer driver or application software. The settings that you can change using this software act as the printer's defaults. These can be overridden by the settings in your printer driver or application.
For example, if you have set the number of copies in the Printer Menu settings to one, this will be overridden if you select three copies of your document in the printer driver.
Factory default settings are shown in the following tables.
Information menu
This menu provides a quick method of listing various items stored within the printer.
| ITEM ACTION | |
| PRINT MENU MAP EXECUTE | |
| NETWORKB431dn only | EXECUTE |
| DEMO 1 EXECUTE | |
| PRINT FILE LIST EXECUTE | |
| PRINT PSE FONT EXECUTE | |
| PRINT PCL FONT EXECUTE | |
| PRINT PPR FONT EXECUTE | |
| PRINT FX FONT EXECUTE | |
| PRINT ERROR LOG EXECUTE | |
| USAGE REPORT EXECUTE |
Shutdown menu
This menu shuts down the printer.
| ITEM ACTION | |
| SHUTDOWN START EXECUTE | |
Print menu
This menu provides adjustment of various print job related functions.
| ITEM DEFAULT | |
| COPIES 1 | |
| DUPLEX OFF | |
| DUPLEX LAST PAGE SKIP BLANK PAGE | |
| PAPER FEED TRAY1 | |
| AUTO TRAY SWITCH ON | |
| TRAY SEQUENCE DOWN | |
| MP TRAY USAGE DO NOT USE | |
| MEDIA CHECK ENABLE | |
| RESOLUTION 600DPI | |
| TONER SAVE MODE DISABLE | |
| ORIENTATION PORTRAIT | |
| LINES PER PAGE 64 LINES | |
| EDIT SIZE CASSETTE SIZE | |
Media Menu
This menu provides adjustment to suit a wide range of print media.
| ITEM | DEFAULT |
| TRAY 1 PAPERSIZE | A4 |
| TRAY 1 MEDIATYPE | PLAIN |
| TRAY 1 MEDIAWEIGHT | MEDIUM |
| TRAY2 PAPERSIZEWhen tray 2 is installed. | A4 |
| TRAY2 MEDIATYPEWhen tray 2 is installed. | PLAIN |
| TRAY2 MEDIAWEIGHTWhen tray 2 is installed. | MEDIUM |
| MPT PAPERSIZE A4 | |
| MPT MEDIATYPE PLAIN | |
| MPT MEDIAWEIGHT MEDIUM | |
| UNIT OF MEASURE | MILLIMETER |
| X DIMENSION | 210 MILLIMETER |
| Y DIMENSION | 297 MILLIMETER |
System configuration menu
This menu adjusts general printer settings to suit the way you prefer to work.
| ITEM DEFAULT | |
| POW SAVE TIME 1 MIN | |
| AUTO POWER OFF TIME 6 | HOURS |
| PERSONALITY AUTO EMULATION | |
| PARA PS-PROTOCOL ASCI | |
| NET PS-PROTOCOLB431dn only | RAW |
| USB PS-PROTOCOL RAW | |
| CLRABLE WARNING ONLINE | |
| AUTO CONTINUE OFF | |
| MANUAL TIMEOUT 60 SEC | |
| TIMEOUT INJOB 40 SEC | |
| TIMEOUT LOCAL 40 SEC | |
| TIMEOUT NETB431dn only | 90 SEC |
| LOW TONER CONTINUE | |
| JAM RECOVERY ON | |
| ERROR REPORT OFF | |
| START UP OFF |
PCL Emulation
This menu controls the printer's PCL emulation.
| ITEM DEFAULT | |
| FONT SOURCE RESIDENT | |
| FONT NO. 10 | |
| FONT PITCH 10.00 CPI | |
| SYMBOL SET PC-8 | |
| A4 PRINT WIDTH 78 COLUMN | |
| WHITE PAGE SKIP OFF | |
| CR FUNCTION CR | |
| LF FUNCTION LF | |
| PRINT MARGIN NORMAL | |
| PEN WIDTH ADJUST ON | |
| TRAY ID# | |
| PCL T0ID 4 | |
| PCL T1ID 1 | |
| PCL T2IDWhen tray 2 is installed. | 5 |
PPR Emulation
This menu controls the printer's PPR emulation.
| ITEM DEFAULT | |
| CHARACTER PITCH 10 CPI | |
| FONT CONDENSE 12CPI to 20CPI | |
| CHARACTER SET SET-2 | |
| SYMBOL SET IBM-437 | |
| LETTER O STYLE | DISABLE |
| ZERO CHARACTER | NORMAL |
| LINE PITCH | 6 LPI |
| WHITE PAGE SKIP OFF | |
| CR FUNCTION CR | |
| LF FUNCTION LF | |
| LINE LENGTH 80 COLUMN | |
| FORM LENGTH | 11.7 INCH |
| TOF POSITION | 0.0 INCH |
| LEFT MARGIN | 0.0 INCH |
| FIT TO LETTER | DISABLE |
| TEXT HEIGHT | SAME |
FX Emulation
This menu controls the printer's FX emulation.
| ITEM DEFAULT | |
| CHARACTER PITCH 10 CPI | |
| CHARACTER SET SET-2 | |
| SYMBOL SET IBM-437 | |
| LETTER O STYLE DISABLE | |
| ZERO CHARACTER NORMAL | |
| LINE PITCH 6 LPI | |
| WHITE PAGE SKIP OFF | |
| CR FUNCTION CR | |
| LINE LENGTH 80 COLUMN | |
| FORM LENGTH 11.7 INCH | |
| TOF POSITION 0.0 INCH | |
| LEFT MARGIN 0.0 INCH | |
| FIT TO LETTER DISABLE | |
| TEXT HEIGHT | SAME |
Parallel menu
This menu controls the operation of the printer's parallel data interface.
| ITEM DEFAULT | |
| PARALLEL | ENABLE |
| BI-DIRECTION ENABLE | |
| ECP | ENABLE |
| ACK WIDTH | NARROW |
| ACK/BUSY TIMING | ACK IN BUSY |
| I-PRIME | DISABLE |
| OFFLINE RECEIVE | DISABLE |
USB menu
This menu controls the operation of the printer's USB data interface.
| ITEM DEFAULT | |
| USB | ENABLE |
| SOFT RESET | DISABLE |
| SPEED | 480Mbps |
| OFFLINE RECEIVE | DISABLE |
| SERIAL NUMBER ENABLE |
Network menu
This menu controls the operation of the printer's 10Base-T/100Base-TX network interface.
NOTE
This is applicable only to the B431dn model.
| ITEM DEFAULT | |
| TCP/IP ENABLE | |
| IP VERSION IPv4 | |
| NETBEUI DISABLE | |
| NETBIOS OVER TCP ENABLE | |
| NETWARE ENABLE | |
| ETHERTALK ENABLE | |
| FRAMETYPE AUTO | |
| IP ADDRESS SET AUTO | |
| IP ADDRESS xxx.xxx.xxx.xxx | |
| SUBNET MASK xxx.xxx.xxx.xxx | |
| GATEWAY ADDRESS xxx.xxx.xxx.xxx | |
| WEB ENABLE | |
| TELNET | DISABLE |
| FTP | DISABLE |
| SNMP | ENABLE |
| NETWORK SCALE | NORMAL |
| HUB LINK SETTING | AUTO NEGOTIATE |
| TCP ACK | TYPE1 |
| FACTORY DEFAULTS EXECUTE |
Maintenance menu
This menu provides access to various printer maintenance functions.
| ITEM DEFAULT | |
| MENU RESET EXECUTE | |
| SAVE MENU EXECUTE | |
| RESTORE MENU EXECUTE | |
| POWER SAVE ENABLE | |
| AUTO POWER OFF AUTO CONFIG | |
| PAPER BLACK SET 0 | |
| DARKNESS 0 | |
| SMR SETTING 0 | |
| BG SETTING 0 |
NOTE
RESTORE MENU is displayed only when SAVE MENU is executed.
Usage menu
This menu is for information only, and provides an indication of total usage of the printer and the expected life left in its consumable items. This is particularly useful if you do not have a full set of replacement consumables to hand and you need to know how soon you will need them.
| ITEM DEFAULT REMARKS | ||
| TRAY1 PAGE COUNT nnnnn | An indication of the number | per of pagesprinted from Tray1. |
| TRAY2 PAGE COUNT nnnnn | An indication of the number | per of pagesprinted from Tray2. (When Tray2 is installed.) |
| MPT PAGE COUNT nnnnn | An indication of the number | of pagesprinted from the MPT. |
| DRUM LIFE REMAINING nnn% | An indication of the remaining drum life. | |
| TONER (n.nK) | REMAINING nnn% | An indication of how much toner is left in the cartridge. |
PRINTING MENU SETTINGS
Current menu settings can be confirmed by printing a Menu Map, using the control panel.
NOTE
This is applicable only to B431d, B431dn models.
- Press the Menu UP arrow or DOWN arrow button until the INFORMATION MENU is available, then press the OK button.
- Press the UP arrow or DOWN arrow button until PRINT MENU MAP EXECUTE is displayed.
- Press the OK button to print the menu map.
- Press the Cancel or Online or the BACK button repeatedly to exit the MENU mode.
PAPER RECOMMENDATIONS
For guidance on the media you can use with your printer, which input tray and which ejection method to use, see the section entitled "Paper and tray information" in the "Specifications" chapter.
NOTE
The reference to Manual Feed Tray is for the B401dn, B411d, B411dn models and the Multi Purpose Tray is for the B431d, B431dn models.
PAPER AND ENVELOPE TYPES
The manufacturer of this printer recommends the following guidelines when selecting paper and envelopes for use in your printer:
Paper and envelopes should be stored flat and away from moisture, direct sunlight and heat sources.
Use a smooth finished paper such as copier or laser type paper with a Sheffield (smoothness) rating of 250 or less. If in doubt, please ask your paper supplier.
Use paper and envelopes that are designed for use in laser type printers.
The use of heavily laid or textured paper will seriously impact on the life of the image drum.
Do not use very smooth, shiny/glossy paper.
Do not use heavily embossed headed paper.
Do not use specially treated papers such as carbon paper, non-carbon paper, thermal paper and impact paper.
Avoid using paper with perforations, cut-outs and ragged edges.
Do not use envelopes with windows or metal clasps.
Do not use envelopes with self sealing flaps.
Avoid using damaged or curled envelopes.
TRANSPARENCIES AND ADHESIVE LABELS
The manufacturer of this printer recommends the following guidelines when selecting transparencies and adhesive labels for use in your printer:
Always manually feed single sheets using a Manual Feed Tray or Multi Purpose Tray.
Always use rear output.
Media must be designed for use in laser printers or photocopiers and must be able to withstand 200°C for 0.1 sec.
Do not use media designed for use in colour laser printers and photocopiers.
Labels should cover entire carrier sheet.
Carrier sheet or adhesive must not be exposed to any part of the printer.
NOTE
You can use Thermal resistant transparencies used for Over Head Projectors.
POSTCARDS
The manufacturer of this printer recommends the following guidelines when selecting postcards for use in your printer:
Always manually feed single postcards using the Manual Feed Tray or Multi Purpose Tray, depending on your printer model.
Use unfolded double postcards.
Use postcards designed for use in laser type printers
Do not use postcards used for ink jet printers.
Do not use stamped or picture postcards.
INSTALLING PAPER
PAPER TRAY
NOTE
If you are topping up the paper in a paper tray, it is recommended that you remove the remaining paper from the tray first then add the new paper stock followed by the paper you removed. This ensures that the oldest paper is used first to help prevent paper jams.
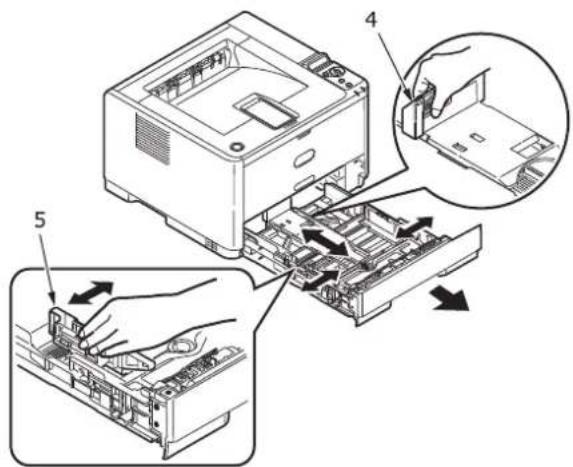
- Remove the paper tray from the bottom of the printer and place plain paper (1) in the tray, keeping the level of the paper in the tray below the paper full guide arrowheads shown on the paper guides (2).
NOTE
Load letter headed paper face down and top edge towards the front of the paper tray (3).
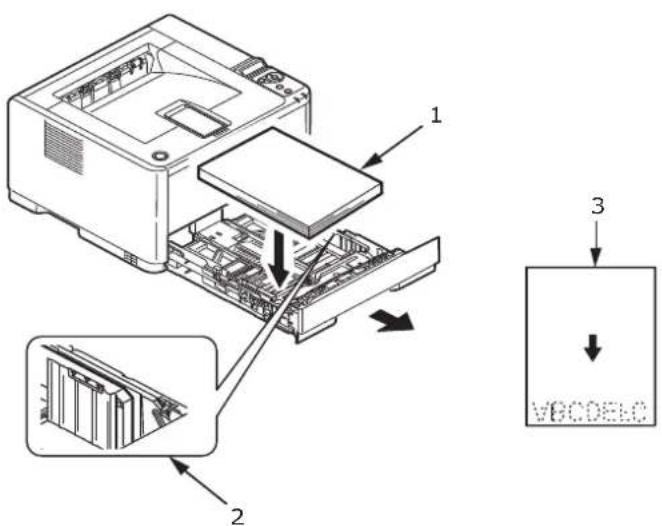
text_image
Diagram illustrating the internal structure and assembly of a device, labeled with components 1, 2, and 3, and a VBCODEL logo.- Adjust the rear paper support (4) to the size of paper you are using by gripping the lug, tilting and sliding the support forwards or backwards as necessary.
text_image
Technical diagram showing computer motherboard assembly with labeled parts and directional arrows indicating process steps-
Adjust the paper guides (5) by gripping the lug and moving it backwards or forwards to match the size of the paper used. It is important to adjust the paper guides correctly to ensure that the paper is not skewed in the print process. Paper jams may occur if this operation is not carried out correctly.
-
Replace the tray in the printer.
NOTE
If you have the optional second paper tray (Tray 2) and you are printing from the first (upper) tray (Tray 1), you can pull out the second (lower) tray to reload it. However, if printing from the second (lower) tray, do not pull out the first (upper) tray as this will result in a paper jam.
Face up and face down printing
For face down printing, make sure the Rear stacker is closed (the paper exits from the top of the printer). The Output Stacker on the top of the printer stacks printed pages face down, capacity 150 sheets of weight 80g/m². Pages printed in reading order (page 1 first) will be sorted in reading order (last page on top, facing down).
The face up stacker should be opened and the tray extension pulled out when required for use. (With the face up stacker either opened or closed, the driver setting of face down will successfully direct prints to the face down stacker.)
The face up stacker can hold up to 100 sheets 80g / m^2 standard paper.
Always use this stacker in conjunction with the Manual Feed Tray, Multi Purpose Tray or for heavyweight stocks to reduce the possibility of paper jams.
See "Paper and tray information" on page 80.
Automatic feed sequence
With no optional feed trays installed, the Autotray function in the Print Menu is set by default to ON and the Tray sequence function is set to DOWN. In this way, if a tray runs out of paper, automatic feed will take place in the order Tray 1, Tray 2 (if fitted), Multi Purpose Tray or the Manual Feed Tray, provided that these trays are set up for identical media. Also, configure the media size and media weight for the respective trays in the operator panel or Configuration Tool, depending on your printer model.
MULTI PURPOSE TRAY AND MANUAL FEED TRAY
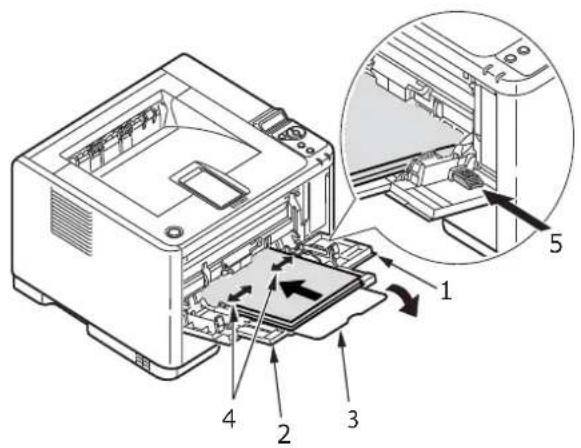
- B431: Pull down the Multi Purpose Tray (1), extend the tray (2) and fold out the paper supports (3), and adjust the paper guides to the width of the paper (4).
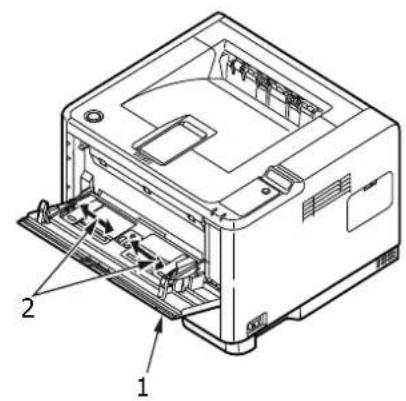
B401/ B411: Pull down the Manual Feed Tray (1), and adjust the paper guides (2) to the width of the paper.
text_image
Technical diagram of a printer internal structure with numbered components and an inset view showing the printer's internal structure.B431
text_image
Technical diagram of a computer printer with labeled parts 1 and 2, showing internal structure and component layout.B401/B411
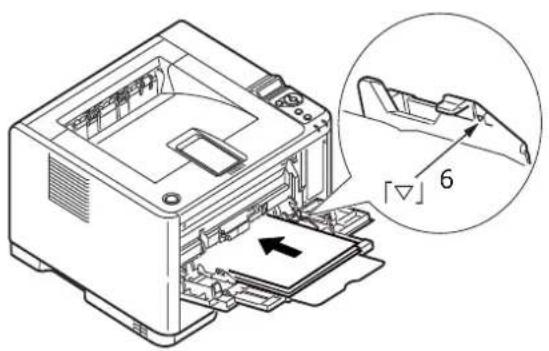
- B431: Load the paper into the Multi Purpose Tray and push the set button (5). Ensure that the paper is loaded below the arrow level (6) to avoid paper jam.
NOTE
Do not exceed the paper capacity of approximately 100 sheets or 10 envelopes depending on the media weight.
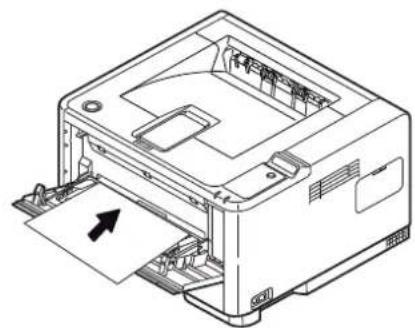
B401dn/ B411: Load single sheet at a time into the Manual Feed Tray.
text_image
Technical diagram of a printer with an inset showing a close-up view of the component labeled '6' and an arrow indicating direction.B431
natural_image
Line drawing of a printer with paper and paper spool, showing internal structure without any text or symbolsB401/B411
For single-sided printing on headed paper load the paper with the pre-printed side up and top edge into the printer.
For two-sided (duplex) printing on headed paper, load the paper with the pre-printed side down and top edge away from the printer.Envelopes should be loaded flap down, face up with the top edge to the left and short edge into the printer.
NOTE
Do not select Duplex printing on envelopes.
Load Transparencies face up and top edge into the printer.
For heavyweight paper or cardstock open the rear stacker to collect the printed output. This will give the paper a nearly straight path through the machine, avoiding paper jams and damage to the paper.
- B431: If required, set the media size and orientation in the media menu using the control panel, then issue the print command.
B401/ B411: If required, set the media size and orientation in the Configuration Tool, then issue the print command.
CAUTION!
Damage to the printer may occur if the incorrect paper setting is used when printing on a different media.
NOTE
You can also set the media type in your printer driver. However, the printer driver settings will override the settings on the control panel or Configuration Tool.
Remember to reset the printer for normal paper after printing on a different media.
PAPER FEED, SIZE AND MEDIA SETTING
The process used to fuse (fix) the printed image to the paper involves a mixture of pressure and heat. Too much heat will cause lightweight paper to crease or curl and corrugations in transparencies. Too little heat will cause the image not to fuse fully into heavyweight paper.
NOTE
Although media properties can be set in the printer driver for particular jobs, when filling a tray with media it is recommended that you manually set the printer to match the media as described here.
B401DN, B411D, B411DN
You can change the media type as follows:
-
Start the Configuration Tool.
-
Expand the User Menu to list the options.
-
Expand the Media Menu to list the options.
-
Click on the paper tray being used. Adjust the media type to the required setting and, if necessary, the paper size to the size of the paper being used.
-
Click Save to Device 📋 icon, to save the new settings.
-
Click OK.
B431D, B431DN
Using the control panel on your printer, you can choose:
which paper to use
the size of the paper you wish to use
the weight of the paper (thickness)
the type of paper
NOTE
If the settings in the printer differ from those selected on your computer, the printer will not print and the LCD will display an error message.
The following printer settings are given as a guide only. Some software applications require the paper feed, size and media settings to be selected from within the application (page setup).
Although media properties can be set in the printer driver for particular jobs, it is recommended that when filling a tray with media you manually set the printer to match the media as described here.
Paper feed selection
The paper feed, paper size, paper weight and media type can be set manually on the printer using the control panel as follows.
- Press the Menu UP arrow or DOWN arrow button repeatedly until PRINT MENU is displayed, then press the OK button.
- Press the UP arrow or DOWN arrow button until PAPER FEED is displayed, then press the OK button.
- Press the UP arrow or DOWN arrow button until the required paper feed is displayed.
- Press the OK button. An asterisk (*) appears next to the selected paper feed.
- Press the Cancel or Online or the BACK button repeatedly to exit the MENU mode.
NOTE
When the AUTO TRAY SWITCH is set to ON and more than one paper tray is fitted, paper feed automatically switches to the next available paper tray, providing non-stop printing.
Paper size
Set the paper size as follows.
NOTE
When using paper trays, standard paper sizes are recognised automatically with CASSETTE SIZE (default setting) selected. Paper size need only be set for custom paper sizes.
When using the Multi Purpose Tray, the paper size has to be selected.
- Press the Menu UP arrow or DOWN arrow button until PRINT MENU is displayed, then press OK button.
- Press either UP arrow or DOWN arrow button repeatedly until EDIT SIZE is displayed, then press OK button.
-
Press either UP arrow or DOWN arrow button until the required paper size is displayed, then press the OK button. An asterisk (*) appears next to the selected paper size.
-
Press the Cancel or Online or the BACK button repeatedly to exit the MENU mode.
- Select the correct paper settings in the printer driver before printing the file.
Media type and weight
Set media type and weight as follows:
CAUTION!
If media type or media weight are not correctly set, print quality deteriorates and the fuser roller may be damaged.
- Press the Menu UP arrow or DOWN arrow button until MEDIA MENU is displayed, then press the OK button.
- Press the UP arrow or DOWN arrow button until MEDIA TYPE or MEDIA WEIGHT for the required tray is displayed, then press OK button.
- Press the UP arrow or DOWN arrow button until the required paper type or weight is displayed, then press the OK button. An asterisk (*) appears next to the selected paper type or weight.
- Press the Cancel or Online or the BACK button repeatedly to exit the MENU mode.
- Select the correct paper settings in the printer driver before printing the file.
INTERFACES
Your printer is equipped with a selection of data interfaces:
-
Parallel – For direct connection to a PC. This port requires a bi-directional (IEEE 1284 compliant) parallel cable.
-
USB – For connection to a PC running Windows 2000 or later or Mac OS X or later. This port requires a cable conforming to USB version 2.0 or above.
The operation of a printer is not assured if a USB compatible device is connected concurrently with other USB-compatible machines.
When connecting multiple printers of the same type, they appear as *****, ***** (2), ***** (3), etc. These numbers depend on the order of connecting or turning on each printer.
- LAN – For network cable connection. This port is standard on the B401dn, B411dn and B431dn.
NOTE
It is not recommended that you connect serial/USB and parallel cables to the printer simultaneously.
Interface cables are not supplied with your printer.
If you are connecting your printer directly to a stand alone computer proceed to the chapter entitled "Printer Drivers".
If your printer is to be installed as a network printer, please refer to the relevant section in the Guide for the network interface card for further details on how to configure the network connection before installing the printer drivers.
NOTE
Administrator's authority is required when installing a network connection.
PRINTER DRIVERS
This chapter describes how to install a printer driver on two types of operating system – Windows and Macintosh.
The printer drivers are all contained on the printer driver DVD. Please refer to the readme file on this DVD for the latest information on printer driver installation.
- With Windows running, insert the printer driver DVD into your DVD-ROM drive.
- If the DVD does not run automatically, use Start > Run... and enter E:\setup (where E is your DVD-ROM drive) in the Open field.
- Click on OK.
- Select your printer model.
- Click on Driver Installation > Install Printer Driver and follow the on-screen prompts to complete your printer driver installation.
- For the B401dn, B411d, B411dn only, once the driver has been installed, install the Configuration tool. Follow the on-screen instructions to complete the Configuration Tool installation.
NOTE
Take time to note the facilities available on the DVD. For example, the Help facility briefly describes each of the Software Utilities.
- For the B431d, B431dn once the driver has been installed, the operator panel language switching utility will run automatically. Choose your preferred operating language. See "Changing language" on page 14.
INSTALLED OPTIONS
Certain options may have been installed in your printer. For those that are installed, check that they appear enabled on the Menu Map.
Ensure that your options are set up in the printer driver(s) by making the appropriate settings on the Device Options tab (PCL emulation) and/or Device Settings tab (PS emulation) described in the chapter entitled "Operation".
Please refer to the readme file on DVD for details on installing the appropriate Macintosh drivers.
INSTALLED OPTIONS
Ensure that any installed options are enabled in the printer driver.
CHOOSING A MAC DRIVER
The B401/B411 models allow you to use only a PCL Mac driver.
The B431 models can also use a PS driver on Macintosh operating systems.
OPERATION
This chapter provides a broad outline of how to operate your printer from either a Windows or a Macintosh environment. In the former, while PCL emulation is available on all printer models, PS emulation is optional on the B431d, B431dn models.
PRINTER SETTINGS IN WINDOWS
NOTE
The illustrations in this guide relate to Windows XP PCL and PS emulations – other operating system windows may appear slightly different but the principles are the same.
The operator panel controlled menus and Configuration Tool (described in the chapter entitled "Operator panels") provide access to many options.
The Windows printer driver also contains settings for many of these items. Where items in the printer driver are the same as those in the operator panel and Configuration Tool menus, and you print documents from Windows, the settings in the Windows printer driver will override those settings in the operator panel and Configuration Tool menus.
PRINTING PREFERENCES IN WINDOWS APPLICATIONS
When you choose to print your document from a Windows application program a Print dialogue box appears. This dialogue usually specifies the name of the printer on which you will print your document. Next to the printer name is a Properties button.
When you click Properties a new window opens which contains a short list of the printer settings available in the driver, which you can choose for this document. The settings available from within your application are only those which you may want to change for specific applications or documents. Settings you change here will usually only last for as long as the particular application program is running.
PCL EMULATION
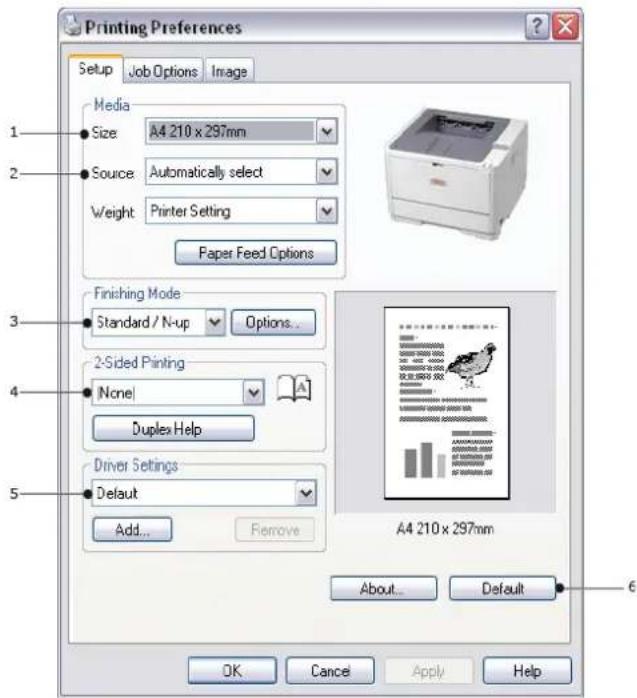
The tabs available are the Setup Tab, the Job Options Tab and the Image Tab.
Setup tab
text_image
Printing Preferences Setup Job Options Image Media Size A4 210 x 297mm Source Automatically select Weight Printer Setting Paper Feed Options Finishing Mode Standard / N-up Options... 2-Sided Printing [None] Duplex Help Driver Settings Default Add... Remove A4 210 x 297mm About Default OK Cancel Apply Help-
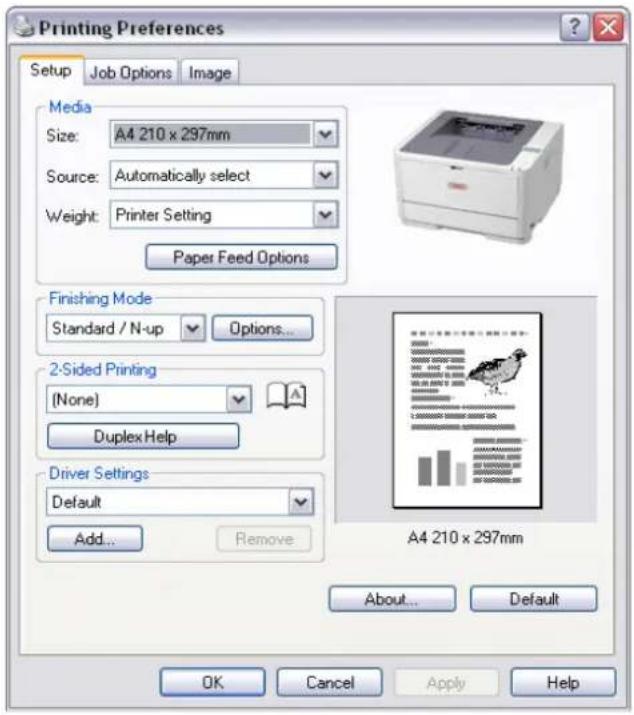
Paper size should be the same as the page size of your document (unless you wish to scale the printout to fit another size), and should also be the same as the size of paper you will feed into the printer.
-
You can choose the source of the paper to feed, which may be Tray 1 (the standard paper tray), Manual Feed Tray (B401dn, B411d, B411dn), Tray 2 (if you have the optional second paper tray installed) or the Multi Purpose Tray (B431d, B431dn). You can also click on the appropriate part of the screen graphic to select your preferred tray.
-
A variety of document finishing options can be selected, such as normal one page per sheet, or N-up (where N can be 2 or 4) for printing scaled down pages at more than one page per sheet.
-
Under 2-sided Printing, you can choose from auto or manual. Under manual 2-sided Printing you can choose to print on one side of a sheet only or to use 2-sided printing (duplex printing). Your printer allows you to carry out manual duplex printing, meaning you must pass the paper through the printer twice. For more information, see "2-sided printing" on page 50. The Duplex Help button also offers guidelines on how to carry out manual duplex printing.
-
If you have changed some printing preferences before and saved them as a set, you can recall them to avoid having to set them individually each time you need them.
-
A single on-screen button restores the default settings.
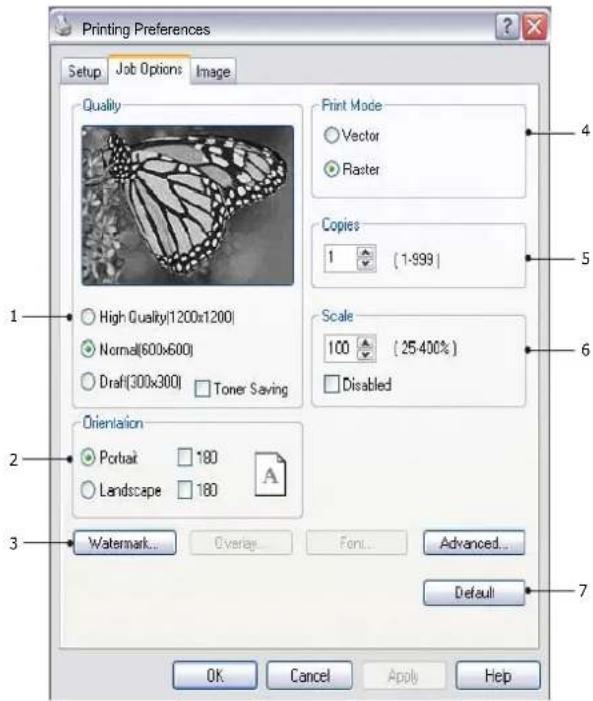
Job options tab
text_image
Printing Preferences Setup Job Options Image Quality High Quality(1200x1200) Normal(600x600) Draft(300x300) Toner Saving Orientation Portrait 180 Landscape 180 Watermark... Overlap Font... Advanced... Default OK Cancel Apply Help 4 5 6 7- The output resolution of the printed page can be set as follows.
The ProQ1200 setting for B401dn, B411d and B411dn prints at 2400 x 600dpi. This setting requires the most printer memory and takes the longest to print. Your printed pages can be scaled to fit larger or smaller stationery. It is the best option for printing photographs.
The High Quality setting prints at 1200 x 600dpi for B401dn, B411d, B411dn and 1200 x 1200dpi for B431d, B431dn is the best option for printing vector objects such as graphics and text.
The Normal setting prints at 600 x 600dpi and is suitable for most printing jobs.
The Draft setting prints at 300 x 300dpi and is suitable for printing draft documents that contain mainly text. You can select Toner Saving to save toner for some print jobs.
-
Page orientation can be set to either portrait (tall) or landscape (wide). Both views can be rotated by 180 degrees.
-
You can print watermark text behind the main page image. This is useful for marking documents as draft, confidential, etc.
If you would like to print on special stationery, such as forms and letterhead, but do not want to use pre-printed stationery, you can create your own using Overlays (for B431d, B431dn). For more information on Overlays and Macros refer to "Overlays and Macros (Windows only)" on page 54. The Overlays button also offers guidelines on how to carry out manual duplex printing.
-
In Raster (bitmap) mode, processing of the page image is done in the computer leaving little processing for the printer to do, although the file size may be large. In Vector mode, file sizes may be smaller and so transmission over a network, for example, may be faster. These effects are more pronounced for graphics printing than for text printing.
-
You can select up to 999 copies to print consecutively, although you will need to top up the paper tray during such a long print run.
-
Your printed pages can be scaled to fit larger or smaller stationery, within a range of 25% to 400% of the original size.
-
A single on-screen button restores the default settings.
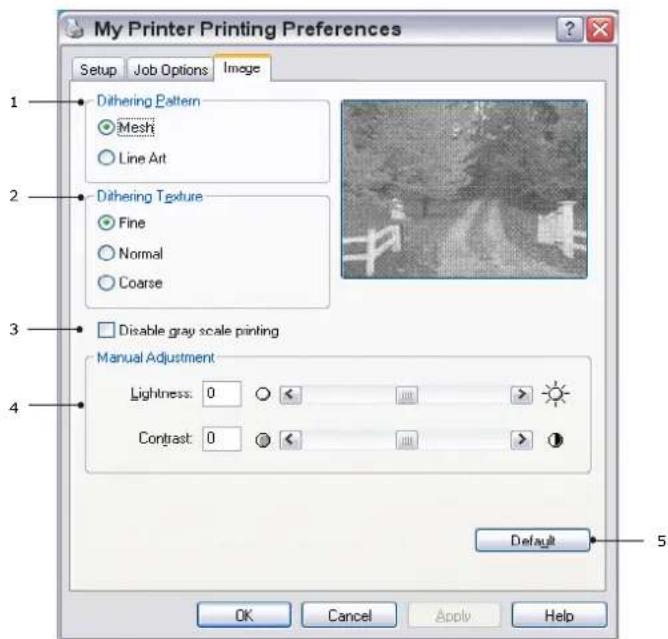
Image tab
text_image
My Printer Printing Preferences Setup Job Options Image 1 Dithering Pattern Mesh Line Art 2 Dithering Texture Fine Normal Coarse 3 Disable gray scale printing 4 Manual Adjustment Lightness: 0 < > Contrast: 0 < > Default 5 OK Cancel Apply Help- Dithering produces an intermediate greyscale by adjusting the combination of dots used in printing. Selecting a setting determines the degree of detail with which a graphics image will be printed. Mesh determines that a screen of dots is used for dithering while Line Art determines that an array of lines is used for dithering.
- Select dithering texture by setting the size of dots used in the halftone screen.
- Set this control to print greyscale effects in black without dithering. Select the check-box to disable greyscale printing or de-select the check-box to enable greyscale printing.
- You can manually adjust lightness (the higher the setting the lighter the print) and contrast (the higher the setting the greater the contrast).
- A single on-screen button restores the default settings.
PS EMULATION
The tabs available are the Layout Tab, the Paper/ Quality Tab and the Job Options Tab.
Layout tab
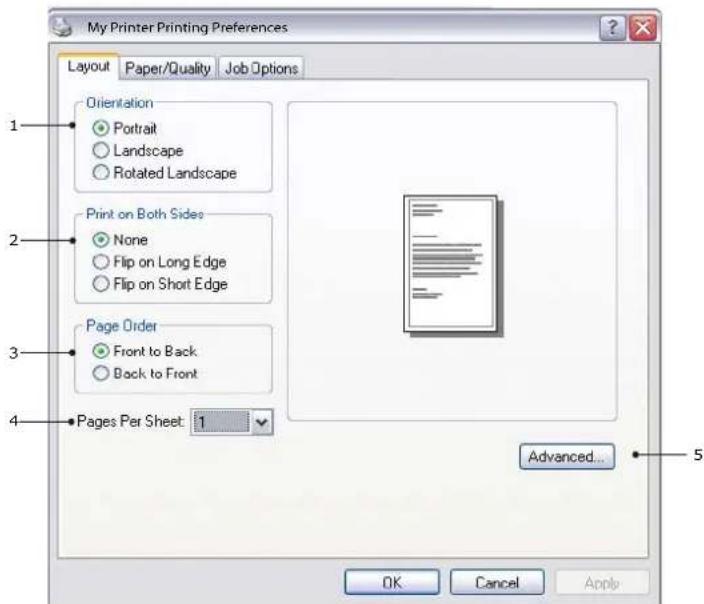
text_image
My Printer Printing Preferences Layout Paper/Quality Job Options 1 Orientation ● Portrait ○ Landscape ○ Rotated Landscape 2 Print on Both Sides ● None ○ Flip on Long Edge ○ Flip on Short Edge 3 Page Order ● Front to Back. ○ Back to Front 4 Pages Per Sheet: 1 Advanced... OK Cancel Apply- Page orientation can be set to portrait (tall), landscape (wide) or landscape rotated by 180 degrees.
- Print on both sides (duplex printing) can be set to long edge or short edge of the document.
- Printed page order can be set as front to back or back to front of the document.
- Set the number of pages to be printed on a single sheet. You can also set it to print a booklet.
- Click the Advanced button to be able to set further document options as follows:
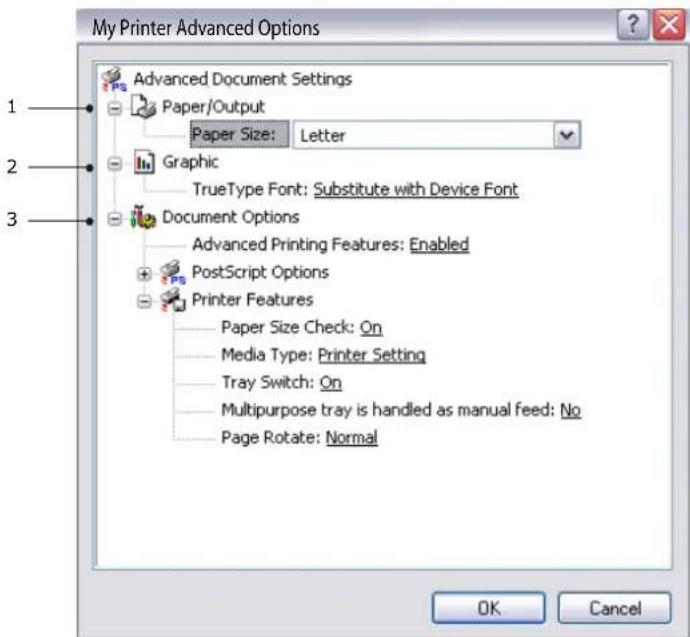
text_image
My Printer Advanced Options Advanced Document Settings Paper/Output Paper Size: Letter Graphic TrueType Font: Substitute with Device Font Document Options Advanced Printing Features: Enabled PostScript Options Printer Features Paper Size Check: On Media Type: Printer Setting Tray Switch: On Multipurpose tray is handled as manual feed: No Page Rotate: Normal OK Cancel- Select the required printed paper size.
- You can substitute another font for TrueType Font.
- You can set other document options as required, including PostScript options and printer features.
Paper/ Quality tab
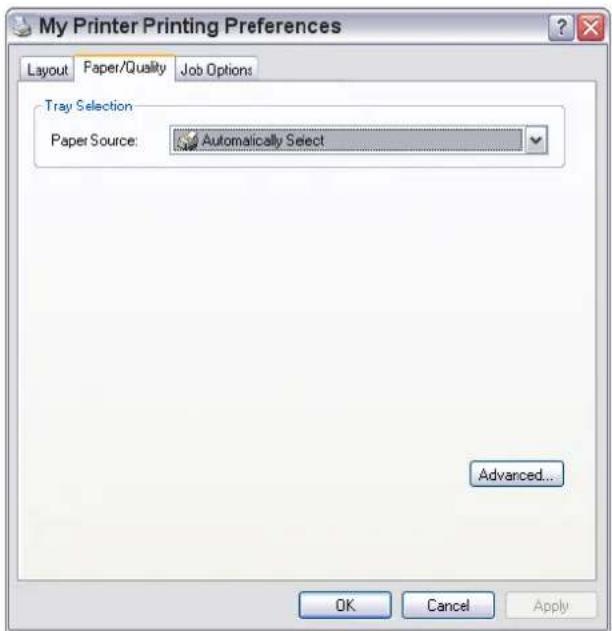
text_image
My Printer Printing Preferences Layout Paper/Quality Job Options Tray Selection Paper Source: Automatically Select Advanced... OK Cancel ApplyYou can set the paper source or leave it as automatic selection and by using the Advanced button you have access to the same set of options as described above for the Layout Tab.
Job options tab
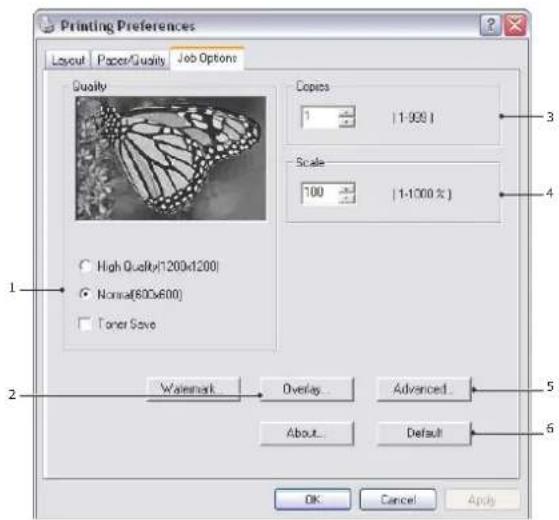
text_image
Printing Preferences Layout Paper/Quality Job Options Quality Copies 1 [1-999] Scale 100 [1-1000 x] High Quality(1200x1200) Normal(600x600) Toner Save Watermark Overlay Advanced About Default OK Cancel Apply- The output resolution of the printed page can be set as follows.
The High Quality setting prints at 1200 x 1200dpi for B431d, B431dn is the best option for printing vector objects such as graphics and text.
The Normal setting prints at 600 x 600dpi and is suitable for most printing jobs. You can select Toner Saving to save toner for some print jobs.
- You can print watermark text behind the main page image. This is useful for marking documents as draft, confidential, etc.
If you would like to print on special stationery, such as forms and letterhead, but do not want to use pre-printed stationery, you can create your own using Overlays (for B431d, B431dn). For more information on Overlays and Macros, refer to "Overlays and Macros (Windows only)" on page 54. The Overlays button also offers guidelines on how to carry out manual duplex printing.
-
You can select up to 999 copies to print consecutively, although you will need to top up the paper tray during such a long print run.
-
Your printed pages can be scaled to fit larger or smaller stationery.
-
Using the Advanced button gives you access to the facility to set mirror image printing and negative image printing.
-
A single on-screen button restores the default settings.
SETTING FROM WINDOWS CONTROL PANEL
When you open the driver properties window directly from Windows, rather than from within an application program, a somewhat more extensive range of settings is provided. Changes made here will generally affect all documents you print from Windows applications, and will be remembered from one Windows session to the next.
PCL emulation
The main tabs are the General Tab, Advanced Tab and Device Options Tab.
General tab
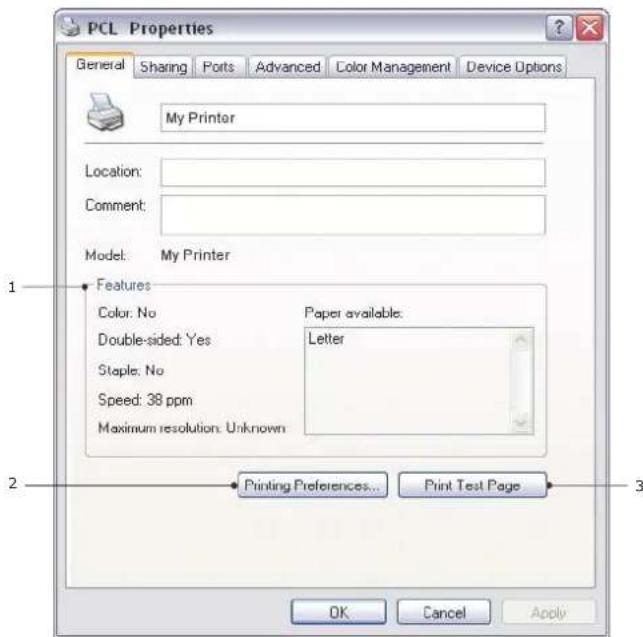
text_image
PCL Properties General Sharing Ports Advanced Color Management Device Options My Printer Location: Comment: Model: My Printer Features Color: No Paper available: Double-sided: Yes Letter Staple: No Speed: 38 ppm Maximum resolution: Unknown Printing Preferences... Print Text Page OK Cancel Apply-
This area lists some of the main features of your printer, including optional items.
-
This button opens the same windows as described earlier for items which can be set from within application programs. Changes you make here, however, will become the new default settings for all Windows applications.
-
This button prints a test page to ensure that your printer is working.
NOTE
The above features are provided by the Windows XP operating system and will vary with other operating systems.
Advanced tab
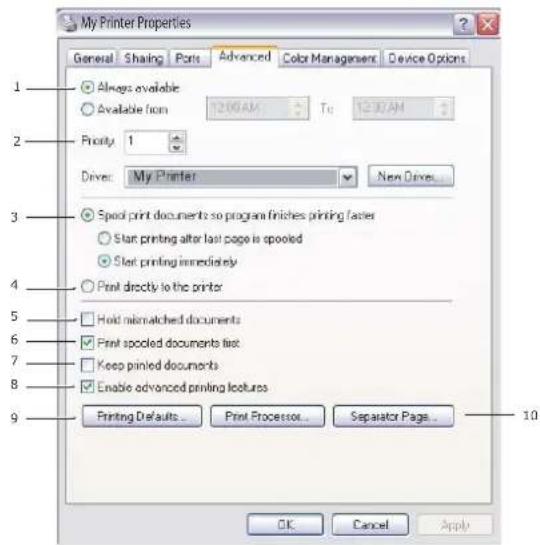
text_image
My Printer Properties General Sharing Ports Advanced Color Managers Device Options 1 Always available 2 Available from 12:00 AM To 12:00 AM Priority 1 Driver: My Printer Next Driver... 3 Speed print documents so program finishes printing faster 4 Start printing after last page is spooled 5 Start printing immediately 6 Print directly to the printer 7 Hold mismatched documents 8 Print spooled documents first 9 Keep printed documents 10 Enable advanced printing features Printing Defaults... Print Processor... Separator Page... OK Cancel Apply-
You can specify which times of day your printer will be available.
-
Indicates current priority, from 1 (lowest) to 99 (highest). Highest priority documents will print first.
-
Specifies that documents should be spooled (stored in a special print file) before being printed. The document is then printed in the background, allowing your application program to become available more quickly. Options follow:
This specifies that printing should not start until the last page has been spooled. If your application program needs a lot of time for further computation in the middle of printing, causing the print job to pause for more than a short period, the printer could prematurely assume that the document has finished. Selecting this option would prevent that situation, but printing will be completed a little later, as the start is delayed.
This is the opposite choice to the one above. Printing starts as soon as possible after the document begins spooling.
-
This specifies that the document should not be spooled, but printed directly. Your application will not normally be ready for further use until the print job is complete. This requires less disk space on your computer, since there is no spool file.
-
Directs the spooler to check the document setup and match it to the printer setup before sending the document to print. If a mismatch is detected, the document is held in the print queue and does not print until the printer setup is changed and the document restarted from the print queue. Mismatched documents in the queue will not prevent correctly matched documents from printing.
-
Specifies that the spooler should favour documents which have completed spooling when deciding which document to print next, even if completed documents are lower priority than documents which are still spooling. If no documents have completed spooling, the spooler will favour larger spooling documents over shorter ones. Use this option if you want to maximise printer efficiency. When this option is disabled the spooler chooses documents based only on their priority settings.
-
Specifies that the spooler should not delete documents after they are completed. This allows documents to be re submitted to the printer from the spooler instead of printing again from the application program. If you use this option frequently it will require large amounts of disk space on your computer.
- Specifies whether advanced features, such as pages per sheet, are available, depending on your printer. For normal printing keep this option enabled. If compatibility problems occur you can disable the feature. However, these advanced options may then not be available, even though the hardware might support them.
- This button provides access to the same setup windows as when printing from applications. Changes made via the Windows Control Panel become the Windows default settings.
- You can design and specify a separator page that prints between documents. This is particularly useful on a shared printer to help each user find their own documents in the output stack.
NOTE
The above features are provided by the Windows XP operating system and will vary with other operating systems.
Device options tab
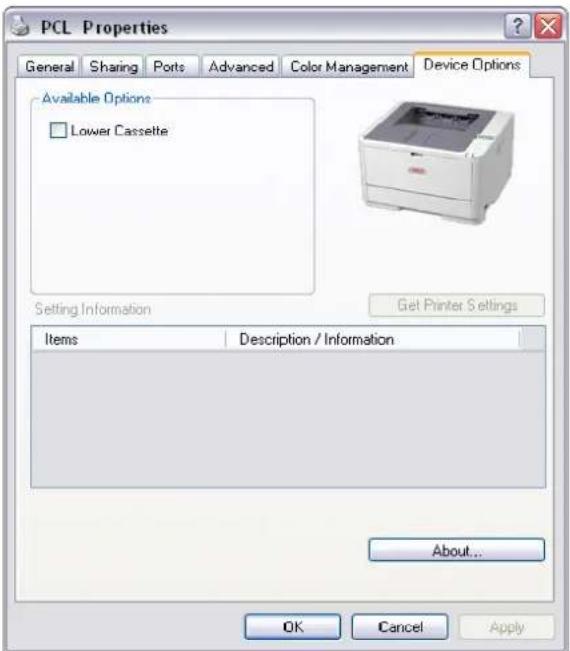
text_image
PCL Properties General Sharing Ports Advanced Color Management Device Options Available Options Lower Cassette Setting Information Get Printer Settings Items Description / Information About... OK Cancel ApplyIn this window you can select which optional upgrades are installed on your printer. See the chapter entitled "Installing options".
PS emulation
The main tabs are the General Tab, Advanced Tab and Device Settings Tab. The General and Advanced tabs are the same as for PCL emulation described earlier.
Device settings tab
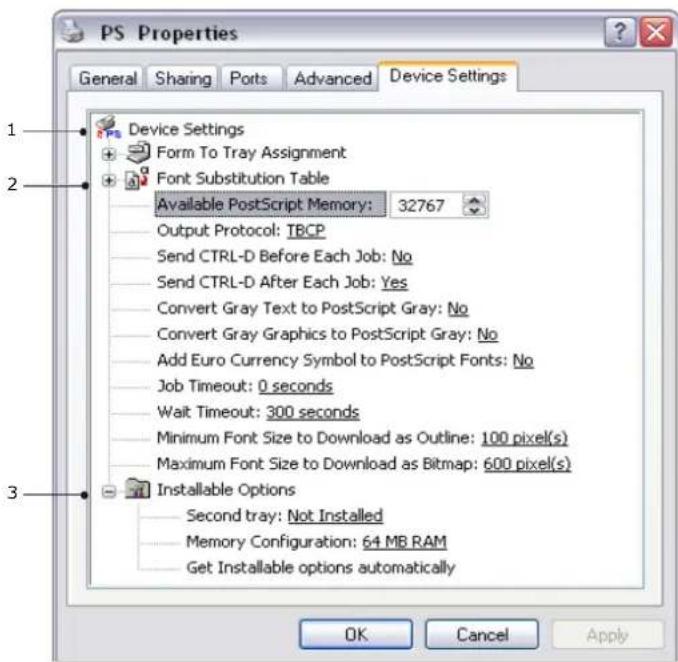
text_image
PS Properties General Sharing Ports Advanced Device Settings 1 Device Settings Form To Tray Assignment 2 Font Substitution Table Available PostScript Memory: 32767 Output Protocol: TBCP Send CTRL-D Before Each Job: No Send CTRL-D After Each Job: Yes Convert Gray Text to PostScript Gray: No Convert Gray Graphics to PostScript Gray: No Add Euro Currency Symbol to PostScript Fonts: No Job Timeout: 0 seconds Wait Timeout: 300 seconds Minimum Font Size to Download as Outline: 100 pixel(s) Maximum Font Size to Download as Bitmap: 600 pixel(s) Installable Options Second tray: Not Installed Memory Configuration: 64 MB RAM Get Installable options automatically OK Cancel Apply- You can set the desired paper sizes in each of the available paper feed trays.
- You can make a variety of font settings depending on your application.
- You can set which optional upgrades are installed on your printer. See the chapter entitled "Installing options".
PRINTER SETTINGS IN MACINTOSH
Refer to the readme file on the drivers DVD, and the online help provided in the driver software.
2-SIDED PRINTING
The duplex unit adds the function of two-sided printing, using less paper and making large documents easier to handle. It also enables booklet printing, which uses even less paper.
You can print using Auto Duplex or Manual Duplex function.
NOTE
The steps in the process relate to Windows XP PCL. Other operating system windows may appear slightly different, but the principles are the same.
AUTO DUPLEX PRINTING
This printer provides automatic two-sided printing only for Letter, A4, B5, Executive Legal 13, 13.5 and 14, using paper stocks from 60 - 122g/m ^2 .
To carry out Auto Duplex Printing:
- Select File > Print and click the Properties button.
- Select the input tray (Tray1, Tray2 (optional B411d, B411dn, B431d, B431dn), Multi Purpose Tray (B431d, B431dn) or Manual Feed Tray (B401dn, B411d, B411dn)) from the Source drop down.
- In the Duplex printing drop down menu, select either Long Edge (Auto) or Short Edge (Auto) according to your printing preferences.
- If you require further information, click the Duplex Help button.
- Click the Print button.
MANUAL DUPLEX PRINTING USING THE PAPER TRAY (WINDOWS ONLY)
NOTE
Manual Duplex printing is available only for Windows PCL Driver.
To carry out 2-sided, or Manual Duplex Printing you must pass paper through the printer twice. You can carry out 2-sided printing using the Paper Tray or the Manual Feed Tray (B401dn, B411d, B411dn) or the Multi Purpose Tray (B431d, B431dn). You can use A4, A5, A6, B5, Letter, Legal 13, 13.5 and 14, Statement, Executive and Custom paper sizes, using paper stocks from 60 - 122g/m².
NOTE
You cannot use A6 paper size for printing from Tray 2 (option).
You can print on Legal 13.5 paper only from Tray1, optional Tray2 and when using Auto Duplex function.
-
Ensure that there is enough paper in the Paper Tray to carry out the print job.
-
Select File > Print and click the Properties button.
-
Select Tray1 from the Source drop down.
-
In the 2-sided printing drop down menu, select either Long Edge (Manual) or Short Edge (Manual) according to your printing preferences. If you require further information, click the Duplex Help button. Then, Click the Print button.
text_image
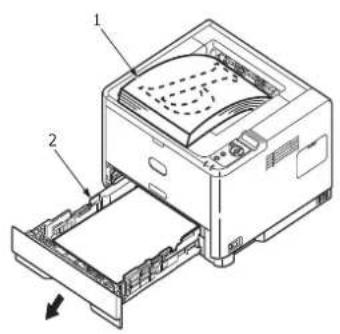
Printing Preferences Setup Job Options Image Media Size: A4 210 x 297mm Source: Automatically select Weight: Printer Setting Paper Feed Options Finishing Mode Standard / N-up Options... 2-Sided Printing (None) Duplex Help Driver Settings Default Add... Remove A4 210 x 297mm About... Default OK Cancel Apply Help- Every second page (1) of your document is printed first. When this is complete, a message appears on screen prompting you to take the paper, flip it and replace it in the Paper Tray.
text_image
Technical diagram of a printer with labeled parts and directional arrow indicating movement or assembly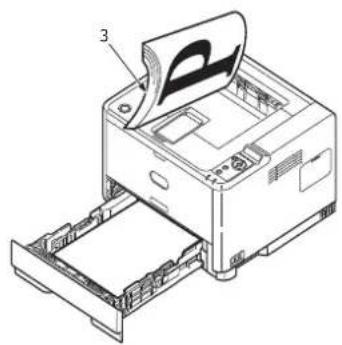
natural_image
Technical line drawing of a printer with paper feed and cover, showing internal structure (no text or symbols)-
Open the Paper Tray (2).
-
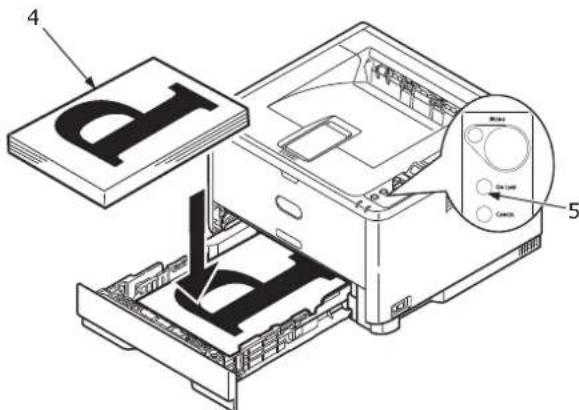
Take the printed paper from the Output Stacker (3) and place it in the Paper Tray, ensuring that the printed side is facing up and the bottom of the page facing into the printer (4).
text_image
4 5- Close the Paper Tray and press the Online (5) button. The message window should disappear from your screen and the document finishes printing the remaining pages of your document.
NOTE
You must press the Online button to start the printing for other side. The default time is set to one minute, failing which, the data is deleted and not printed.
MANUAL DUPLEX PRINTING USING THE MANUAL FEED TRAY (B401DN, B411D, B411DN)
NOTE
When using the Manual Feed Tray, feed pages one sheet at a time.
Use the Multi Purpose Tray for Manual Duplex Printing for B431d, B431dn, but the principles are the same. See "Multi purpose tray and manual feed tray" on page 34.
-
Position the paper guides on the Manual Feed Tray according to the paper size.
-
Place paper one sheet at a time in the Manual Feed Tray. The paper is automatically gripped in position.
-
Select File > Print to display the Print dialog box.
-
Click the Properties button.
-
Select Manual Feed from the Source drop down.
-
On the 2-sided printing drop down menu, select either Long Edge (Manual) or Short Edge (Manual) according to your printing preferences. If you require further information, click the Duplex Help button.
-
When every second page has printed, take the paper from the output stacker.
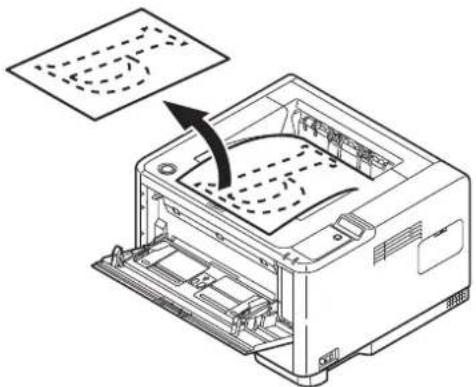
natural_image
Line drawing of a printer with an open lid and paper plane, showing internal structure and a circular arrow indicating rotation (no text or symbols)- Set the paper one page at a time in the Manual Feed Tray with the printed side facing down and the top of the page facing into the printer. Ensure that the paper is gripped in place.
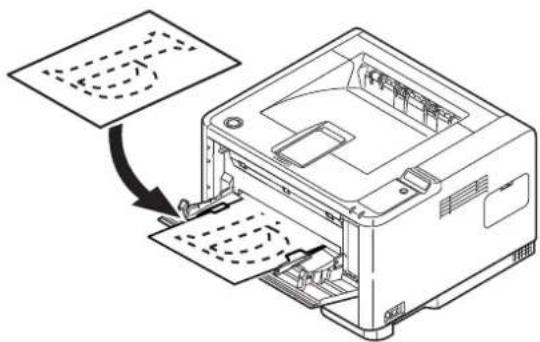
natural_image
Technical line drawing of a computer case with an open lid and internal components, showing part assembly (no text or symbols)- Press the Online button. The remaining pages of your document print on the blank side of the paper, one sheet at a time as you feed it into the Manual Feed Tray.
OVERLAYS AND MACROS (WINDOWS ONLY)
WHAT ARE OVERLAYS AND MACROS?
If you would like to print on special stationery, such as forms and letterhead, but do not want to use pre-printed stationery, you can create your own using these advanced features.
You can use PostScript overlays to generate all your special stationery and store it in the printer for use whenever you need it. If you have chosen to install the PCL driver, macros perform a similar function.
You can create several overlays or macros, and combine them in any way you like to produce a variety of forms and other special stationery. Each image can be printed on just the first page of a document, on all pages, on alternate pages, or just the pages that you specify.
CREATING POSTSCRIPT OVERLAYS
Three steps are required to create an overlay:
- Create the form data using your own application software and print it to a printer (.PRN) file.
- Use the Storage Device Manager utility software supplied on DVD with your printer to create a "project file," import the.PRN file(s), and download the generated filter (.HST) file to the printer. The project file will contain one or more overlay images which are functionally related, such as the cover page and the continuation page images for business letters.
- Use downloaded files to define your overlays ready for use when printing your documents.
When printing overlay files to disk, do not select any special features, such as two-sided printing or multiple copies. These are not appropriate to overlays, they apply only to your final documents.
CREATING THE OVERLAY IMAGE
-
Use your preferred application, perhaps a graphics program, to create the required overlay image and save it.
-
Open your application's Print... dialogue.
-
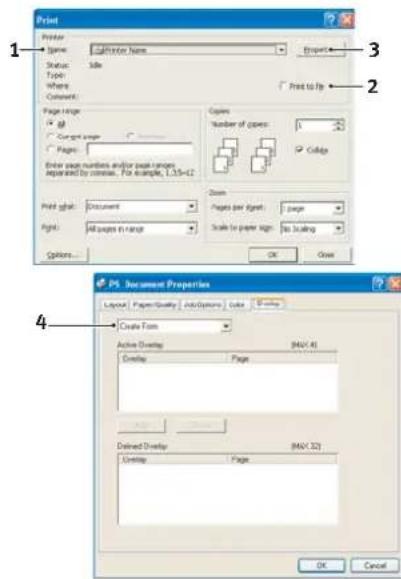
Make sure that the selected printer name (1) is that of your PostScript printer driver.
-
Select the Print To File (2) option.
-
Click the Properties button (3) to open the Document Properties window.
-
On the Overlay tab, choose Create Form from the drop-down list (4).
-
Click OK to close the Document Properties window.
-
Click OK again to close the Print dialogue.
-
When prompted for a print file name, enter a meaningful name with the extension.PRN.
-
Close your application.
text_image
Print Format: Calendar Name Status: Side Type: Where: Comment: Page range: All Current range: Pages: Enter user numbers and/or page ranges. Separated by columns. For example, L35-C2 Print size: Document Right: All pages in range Options... Pages per page: page Scale to paper size: No scaling OK Close PS Document Properties Layout Paper Quality Auto Systems Color Window Create From Active Overlay (MAX 41) Overlay Page Defined Overlay (MAX 32) Overlay Page OK CancelCREATE AND DOWNLOAD THE PROJECT
- From the Windows Start menu, start Storage Device Manager (SDM) and allow SDM to discover the printer.
- Choose Projects > New Project.
- Choose Projects > Add File to Project.
- Set the Files of Type drop-down list to PRN Files(*.prn).
- Navigate to the folder where the.PRN files are stored and select one or more of these to include in your overlay set.
You can have more than one printer (.PRN) file in a project. For example, one for top pages and another for continuation pages. Use standard Windows techniques (Shift or Ctrl keys) to select multiple files simultaneously if you need to. - Click Open to add these files to the current project.
- When a message box appears confirming that a filter file has been created, click OK to clear the message.
- The project window will display one.HST file for each printer file added. Make a careful note of each of these names. Ensure that you note them exactly as they appear, they are case sensitive, and you will need them later.
- Choose Projects > Save Project and enter a meaningful name (e.g. "Letter Stationery") so that you can recognise it later if you want to modify it.
- Choose Projects > Send Project Files to Printer to download the project to the printer.
If you have a hard disk in the printer, SDM will automatically download files to it. If not, SDM will download files to flash memory. If you have a hard disk but still prefer to download to flash memory, double-click the file name in the Project window and under Volume, type in % Flash0% and then click OK. - When the message "Command Issued" appears confirming that the download is complete, click OK to clear the message.
TEST PRINTING THE OVERLAY
- Click on the printer icon for the relevant printer and choose Printers→Test Form.
- In the Test PostScript Form window, to test each overlay select it and click OK. There will be a short pause while the printer processes the form, and then it will print.
- When each overlay has been tested, click Exit.
- Click the standard Windows Close (X) button, or choose Projects > Exit to close Storage Device Manager.
DEFINING OVERLAYS
This is the final step before the new overlays are ready for use.
- Open the Printers (called "Printers and Faxes" in Windows XP) window via the Start menu or the Windows Control Panel.
- Right-click on the Relevant PostScript printer icon and choose Printing Preferences from the pop-up menu.
-
On the Overlay tab, click the New button.
-
In the Define Overlays window, enter a suitable name (2) for this overlay and choose which page(s) (3) of your documents will use this overlay.
-
Enter the name of the overlay file (4) exactly as it appeared in the Storage Device Manager project window. Remember that this name is case sensitive.
If you forgot to note the overlay names when you created them, you can find them using Storage Device Manager to view the project file, or the printer's Information Menu to print a file list and identify them from there.
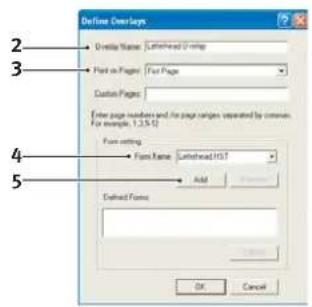
text_image
Define Over-Says 2 3 4 5 • Outline Name: Luttheaded Image • Part in Pages: Front Page Custom Pages: Enter page numbers and for page ranges separated by common. For example, 1.3.5.10 Form setting: • From Name: Luttheaded HIST Add Extract Forms: OK Cancel-
Click Add (5) to add this overlay into the defined overlays list.
-
Click OK to close the Define Overlay window.
The new overlay now appears in the Defined Overlays list in the printer properties window.
-
Repeat the above procedure if you wish to define more overlays.
-
When done, click OK to close the printer properties window.
Your new overlays are now ready and available to be used for any future documents you wish.
PRINTING WITH POSTSCRIPT OVERLAYS
Once you have defined your overlays you are ready to use them for any documents you wish. The example illustrated here uses two overlays for business letters. The first prints on just the top page, and the second prints on any or all subsequent pages.
-
Prepare your document in the normal way using your own application software. Remember, if necessary, to format the document so that it will fit within the appropriate space.
-
Open your application's Print... dialogue and choose any options you will require, ensuring that the target printer is your PostScript printer driver in which the overlays have been defined.
-
Click the Properties button to open the Printing Preferences window.
-
On the Overlays tab, choose Use Overlay from the drop-down list (1).
-
Click on the first overlay (2) you wish to use. In this example it is the Cover Page overlay. Then click the Add button (3).
-
If you want to use another overlay, in this case it is the Continuation page, click the second overlay (4) and then click the Add button (3) again.
-
When you have selected all the overlays you want to use for this document, click OK.
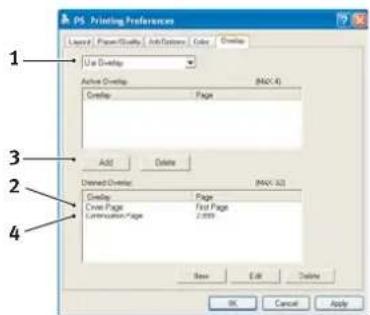
text_image
PS Printing Preferences Layer1 Form1 Quality Edit Options Color Options Use Overlay Active Overlay: Page (MAX: 4) Create Page Add Delete Deselect Overlay: Page (MAX: 32) Create Page Page Create Page First Page Communication Page / 100% New Edit Delete OK Cancel Apply- Finally, in your application's print dialogue, click OK to begin printing.
CREATING PCL OVERLAYS
Three steps are required to create an overlay:
- Create the form data using your own application software and print it to a printer (.PRN) file.
- Use the Storage Device Manager utility software supplied on DVD with your printer to create a "project file," import the .PRN file, and download the generated filter (.BIN) files to the printer.
- Use downloaded files to define your overlay ready for use with any future document.
When printing files to disk, do not select any special features, such as two-sided printing or multiple copies. These are not appropriate to macros, they apply only to your final documents.
CREATING THE OVERLAY IMAGE
- Use your preferred application, perhaps a graphics program, to create the required image and save it.
- Open your application's Print... dialogue.
- Make sure that the selected printer name (1) is that of your PCL printer driver.
- Select the Print To File (2) option.
- When prompted for a print file name, enter a meaningful name with the extension .PRN .
- Close your application.
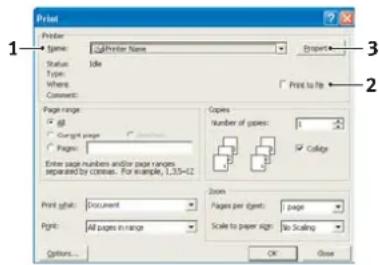
text_image
Print Printer Name: Publisher Name Status: Idle Type: Where: Comments: Print to Print Page range: @ • Page range • Pages Enter page numbers and/or page ranges separated by copies. For example, 1,35=12 Copies Number of copies: 1 ✓ Collage Print size: Document Pages per page: page Page: All pages in range Scale to paper size: No Scaling Options... OK CloseCREATE AND DOWNLOAD MACROS
- From the Windows Start menu, start Storage Device Manager (SDM) and allow SDM to discover the printer.
- Choose Projects > New Project to start a new project.
- Choose Projects >Filter Macro File. The Filter Printer Patterns dialogue box appears. Make any adjustments in the settings that you need and then click OK.
Example: If you create a black oval in MS Paint and leave all the colour command filters checked, the black oval will print as a black rectangle when the overlay is used. To maintain the oval shape, turn off (deselect) the "Configure Image Data," "Palette ID" and "Palette Control" filters.
-
Set the Files of Type drop-down list to PRN Files(*.prn).
-
Navigate to the folder where the overlay .PRN files are stored and select one or more of these to include in your overlay set.
You can have more than one macro file in a project. For example, one for top pages and another for continuation pages. Use standard Windows techniques (Shift or Ctrl keys) to select multiple files simultaneously if you need to.
-
Click Open to add these files to the current project. (You can also drag and drop files from Windows Explorer directly into the project window if you prefer.) When a message box appears confirming that a filter file has been created, click OK to clear the message.
-
The project window will display one .BIN file for each printer file added. Make a careful note of the name and ID number for each of the files. You will need them later.
If you wish to edit the names or ID numbers, double-click the file entry and edit the details.
Note that the names are case sensitive.
- Choose Projects > Save Project and enter a meaningful name (e.g. "Letter Stationery") so that you can recognise it.
- Choose Projects > Send Project Files to Printer to download the project to the printer.
- When the message "Command Issued" appears confirming that the download is complete, click OK to clear the message.
TEST PRINTING THE MACRO
- Choose Printers > Test Macro.
- In the Test Macro window, enter its ID number and click OK. After a short pause the printer will print the macro.
- When each macro has been tested, click Exit.
- Click the standard Windows Close (X) button, or choose Projects > Exit to close Storage Device Manager.
DEFINING OVERLAYS
This is the final step before the new overlays are ready for use.
- Open the Printers (called "Printers and Faxes" in Windows XP) window via the Start menu or the Windows Control Panel.
- Right-click on the Relevant PostScript printer icon and choose Printing Preferences from the pop-up menu.
- On the Job Options tab, click the Overlay button.
- In the Overlay window, Click the Define Overlays button (1).
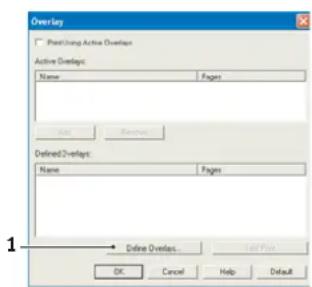
text_image
Overlay Pointing Active Overlaps Active Overlaps: Name Fages Add Remove Defined Overlaps: Name Fages 1 Online Overlaps.... Cancel Plus OK Cancel Help Default- In the Define Overlays window, enter the name (a) and ID (b) of the required overlay, and define which page(s) (c) of your documents will use this overlay. Then click the Add button (3) to add this overlay to the list of defined overlays. Repeat for any other related overlays. When done, click the Close button (4) to close the window.
The example illustrated shows two overlays defined, one for a cover page and one for continuation pages.
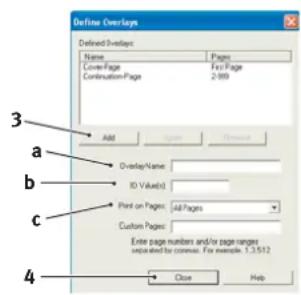
text_image
Define Ollays Defined Ollays: Name Pages Cover-Page Fire Page Continuation Page 2.983 Add Skip Finish Overlay Name: ID Value(s): Print on Pages: All Pages Custom Pages: Enter page numbers and/or page ranges used and for continues. For example: 1.3512 Close HelpRemember that names and IDs of overlay files must be entered exactly as they appeared in the Storage Device Manager project window. Remember also that names are case sensitive.
If you forgot to note the overlay name or ID when you created them, you can find them using Storage Device Manager to view the project file, or the printer's Information Menu to print a file list and identify them from there.
The new overlays will now appear in the Defined Overlays list in the printer properties window.
- When done, click OK to close the printing preferences window.
Your new overlays are now ready and available to be used for any future documents you wish.
PRINTING WITH PCL OVERLAYS
Once you have defined your overlays you are ready to use them for any documents you wish. The example illustrated here uses two overlays for business letters. The first prints on just the top page, and the second prints on any or all subsequent pages.
-
Prepare your document in the normal way using your own application software. Remember, if necessary, to format the document so that it will fit nicely within the plain areas on your letterhead overlay.
-
Open your application's Print... dialogue and choose any options you will require, ensuring that the target printer is your PCL printer driver in which the overlays have been defined.
-
Click the Properties button to open the Printing Preferences window.
-
On the Overlay tab, check the Use active overlays checkbox (1).
-
In the Defined Overlays list, click on the first overlay (2) you wish to use, and click the Add button (3) to add it to the Active Overlays list. (If you want a reminder of how this overlay looks, click the Test Print button.)
-
If you want to use another overlay with this document, in this example it is the "Continuation Page" overlay, click this overlay (4) in the list of defined overlays, and then click the Add button (3) again to add the second overlay overlays.

text_image
Overlay Print Using Active Overlaps Active Overlaps: Name: Pages Add Remove Defined Overlaps: Name: Pages Cover-Page: Text Place Continuation-Page: 2.955 Define Overlaps... Text Print OK Cancel Help Default-
When the list of active overlays contains all the items you want to use, click OK.
-
Finally, click the Print button in your application's Print dialogue to begin printing your document.
This section deals with the replacement of the toner cartridge and image drum and general maintenance.
WHEN TO REPLACE THE TONER CARTRIDGE
When the toner is running low, TONER LOW is displayed in the operator panel LCD. After Toner Low displays, the printer will print about 100 more pages then display Toner Empty and stop printing. Printing will resume after a new toner cartridge has been installed.
REPLACING THE TONER CARTRIDGE
WARNING!
Never expose a toner cartridge to an open flame. It can cause an explosion and you can be burned.
Be sure to switch off and unplug the machine before accessing the interior of a machine for cleaning, maintenance or fault clearance. Access to a live machine's interior can cause electric shock.
It is recommended that you clean the LED array at the same time as you change the toner cartridge.
The toner used in this printer is a very fine dry powder contained in the toner cartridge.
Have a sheet of paper handy so that you have somewhere to place the used cartridge while you install the new one.
Dispose of the old cartridge responsibly, inside the pack that the new one came in. Follow any regulations, recommendations, etc., which may be in force concerning waste recycling.
If you do spill any toner powder, lightly brush it off. If this is not enough, use a cool, damp cloth to remove any residue. Do not use hot water, and never use solvents of any kind. They will make stains permanent.
WARNING!
If you inhale any toner or get it in your eyes, drink a little water or bathe your eyes liberally in cold water. Seek medical attention immediately.
- Switch off the printer and allow the fuser to cool for about 10 minutes before opening the top cover.
WARNING!
If the printer has been powered on, the fuser may be hot. This area is clearly labelled. Do not touch.
- Press the top cover release button and open the printer's top cover fully.
NOTE
The B431dn model has been illustrated below. The principles are the same for all models of this printer.
- Pull the coloured lever (1) on the right side of the toner cartridge towards the front of the printer (unlock position) to close the cartridge then remove the used toner cartridge (2).
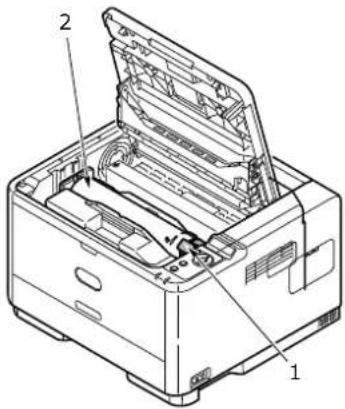
text_image
Technical diagram of a printer with labeled parts, showing internal structure and part numbers 1 and 2.-
Clean the top of the ID unit with a clean, lint free cloth.
-
Put the cartridge down gently onto a piece of paper to prevent toner from marking your furniture.
-
Remove the new cartridge from its box but leave its wrapping material in place for the moment.
-
Gently shake the cartridge (3) from end to end several times to loosen and distribute the toner evenly inside the cartridge.
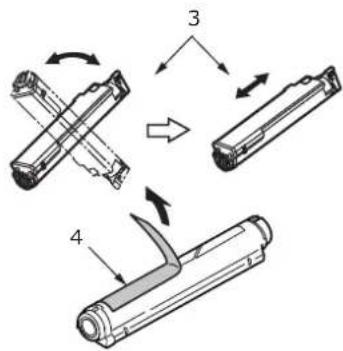
text_image
Technical diagram showing four sequential steps of a mechanical assembly or tool, labeled 3, 4, and 5.-
Remove the wrapping material and peel off the adhesive tape from the underside of the cartridge (4).
-
Holding the cartridge by its top centre with the coloured lever to the right, lower it into the printer over the image drum unit from which the old cartridge was removed.
-
Insert the left end of the cartridge into the top of the image drum unit first (5), push it against the pins on the drum unit, then lower the right end of the cartridge down onto the image drum unit.
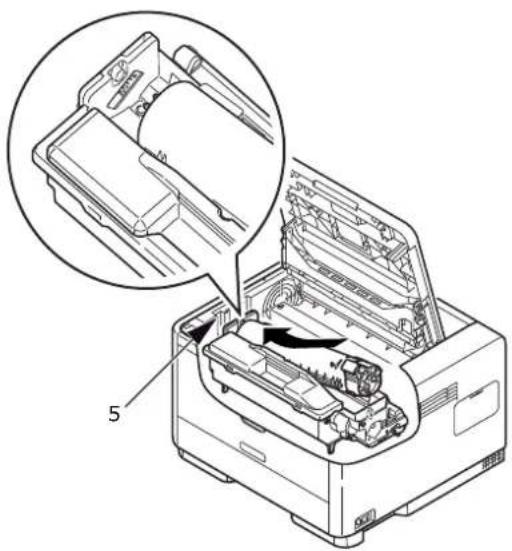
natural_image
Technical line drawing of an open printer with internal components and a magnified inset showing internal structure (no text or symbols)- Pressing gently down on the cartridge to ensure that it is firmly seated, push the coloured lever towards the rear of the printer (lock position) (6). This will lock the cartridge into place and release toner into the image drum unit.
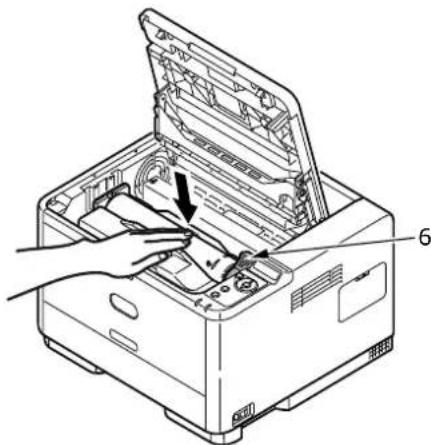
text_image
Technical diagram showing a hand operating an open printer with labeled parts and an arrow indicating the operation.- Gently wipe the LED array surface (7) with a soft, lint free cloth.
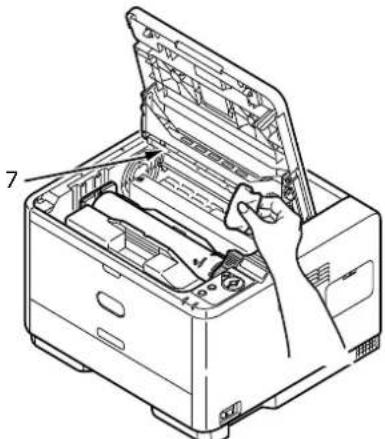
natural_image
Line drawing of a printer with open lid and internal compartments, no text or symbols present- Close the top cover and press it down to latch it closed.
WHEN TO REPLACE THE IMAGE DRUM
When the drum reaches 90% of its life, a REPLACE IMAGE DRUM message is displayed in the operator panel LCD. Change the image drum when the print becomes faint or begins to deteriorate.
REPLACING THE IMAGE DRUM.
WARNING!
Never expose a image drum to an open flame. It can cause an explosion and you can be burned.
Be sure to switch off and unplug the machine before accessing the interior of a machine for cleaning, maintenance or fault clearance. Access to a live machine's interior can cause electric shock.
NOTE
It is recommended that you change the toner cartridge and clean the LED array at the same time as you change the image drum.
The B431dn model has been illustrated below. The principles are the same for all the models of this printer.
- Press the cover release and open the printer's top cover fully.
WARNING!
If the printer has been powered on, the fuser may be hot. This area is clearly labelled. Do not touch.
- Holding it by its top centre, remove the used image drum and toner cartridge, out of the printer.
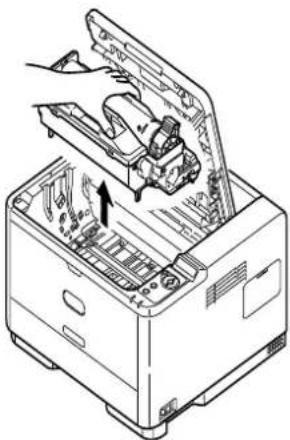
natural_image
Line drawing of a printer with an open lid and internal components, showing no text or symbols- Put the assembly down gently onto a piece of paper to prevent toner from marking your furniture and to avoid damaging the green drum surface.
CAUTION!
The green image drum surface at the base of the ID unit is very delicate and light sensitive. Do not touch it and do not expose it to normal room light for more than 5 minutes. If the drum unit needs to be out of the printer for longer than this, please wrap the cartridge inside a black plastic bag to keep it away from light. Never expose the drum to direct sunlight or very bright room lighting.
-
With the coloured toner release lever to the right, pull the lever towards you. This will release the bond between the toner cartridge and the image drum unit. (*)
-
Lift the right hand end of the toner cartridge and then draw the cartridge to the right to release the left hand end, and withdraw the toner cartridge out of the image driven cartridge. Place the cartridge on a piece of paper to avoid marking your furniture. (*)
-
Take the new image drum cartridge out of its packaging and place it on the piece of paper where the old cartridge was placed. Keep it the same way round as the old unit. Pack the old cartridge inside the packaging material for disposal.
NOTE
Follow instructions that come with the new image drum for additional information such as the removal of packaging material etc.
-
Place the toner cartridge onto the new image drum cartridge. Push the left end in first, and then lower the right end in. (*)
-
Push the coloured release lever away from you to lock the toner cartridge onto the new image drum unit and release toner into it.
-
Holding the complete assembly by its top centre, lower it into place in the printer locating the pegs (1 & 2) at each end into their slots in the sides of the printer cavity (3).
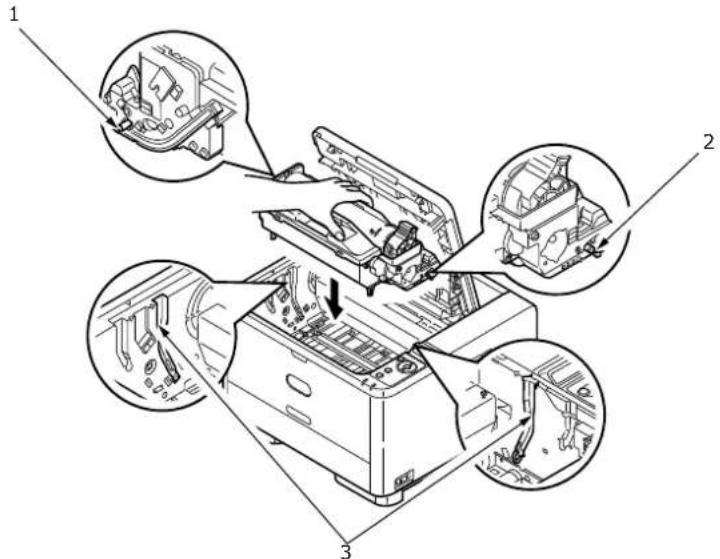
text_image
Technical diagram showing exploded view of a printer's internal components with numbered annotations-
Gently wipe the LED array surface with a soft, lint free cloth.
-
Close the top cover and press it down to latch it closed.
(*) Not B401
CLEANING
CAUTION!
Use a clean, moist, lint-free cloth for cleaning. Do not use benzine, thinners or alcohol as a cleaning agent.
...THE UNIT CASING
-
Switch the printer off.
-
Wipe the unit surface with a soft cloth moistened sparingly with water or neutral detergent.
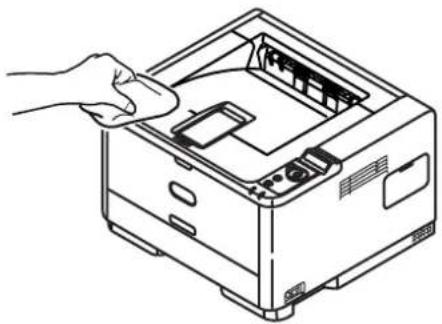
natural_image
Line drawing of a hand inserting a card into a computer tower (no text or symbols)- Use a soft dry cloth to dry the unit surface.
Use a clean, moist, lint-free cloth for cleaning. Do not use benzine, thinners or alcohol as a cleaning agent.
Clean the paper feed rollers if paper jams frequently occur.
-
Switch the printer off.
-
Remove the paper tray from the printer.
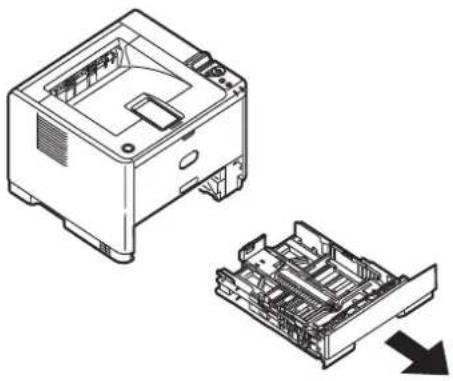
natural_image
Technical line drawing of a computer case with an exploded view showing internal components (no text or symbols)- Gaining access through the gap left by paper tray, wipe the feed rollers with a clean, lint-free cloth moistened with water.
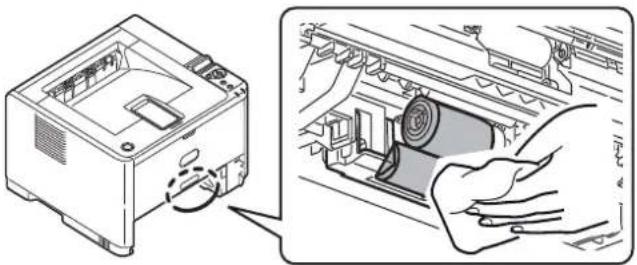
natural_image
Technical illustration showing a printer's internal structure being opened, with hands operating the component (no text or symbols present)- Wipe the feed roller on the paper tray.
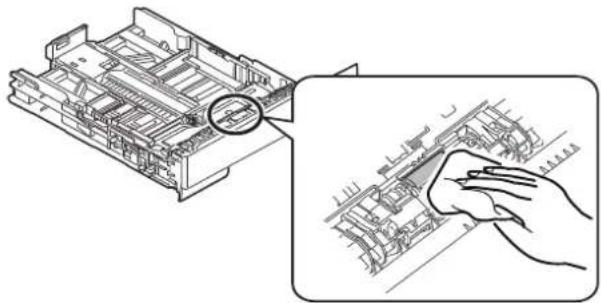
natural_image
Technical illustration of a mechanical assembly with a magnified inset showing a hand using a tool to clean or repair components (no text or symbols present)-
Replace the paper tray.
-
Open the Multi Purpose Tray (B431 only).
-
Press the tab to open the roller assembly cover and wipe the feed rollers.
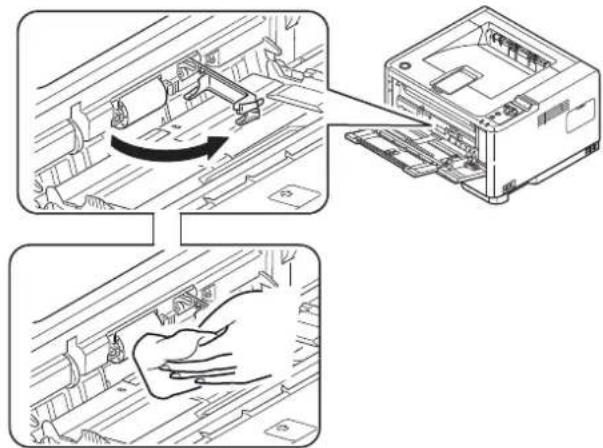
text_image
Diagram illustrating a printer's internal structure and cleaning process, showing part assembly and cleaning steps.Close the roller assembly cover.
- Close the Multi Purpose Tray.
...THE LED HEAD
CAUTION!
Do not use methyl alcohol or other solvents on the LED head as damage to the lens surface will occur.
Clean the LED array whenever a new toner cartridge is installed or if there are faded vertical areas or light printing down a page.
There is no need to switch off the printer to clean the lens.
- Press the top cover release button and open the printer's top cover fully.
- Gently wipe the LED head surface with a clean, lint free cloth.
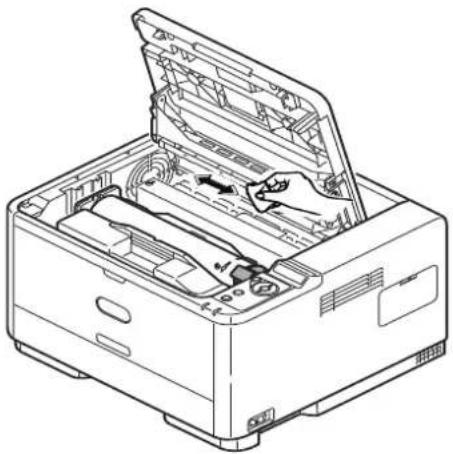
natural_image
Line drawing of an open printer with internal components and a hand inserting a component (no text or symbols)- Close the top cover and press it down to latch it closed.
TROUBLESHOOTING
STATUS AND ERROR MESSAGES
Your printer has been designed to give you helpful status feedback not only during normal operation but also if a printing problem occurs so that you can take appropriate corrective action.
The LCD on the printer operator panel provides the self-explanatory status and error messages in your chosen language. Error messages are accompanied by the Ready indicator being extinguished.
PAPER JAMS
Provided that you follow the recommendations in this guide on use of print media, and you keep the media in good condition prior to use, your printer should give years of reliable service. However, paper jams occasionally do occur, and this section explains how to clear them quickly and simply.
Jams can occur due to paper misfeeding from a paper tray or at any point on the paper path through the printer. When a jam occurs, the printer immediately stops, and the operator panel informs you of the event. If printing multiple pages (or copies), do not assume that having cleared an obvious sheet that others will not also be stopped somewhere along the path. These must also be removed in order to clear the jam fully and restore normal operation.
The printer may experience a paper jam in one of three areas.
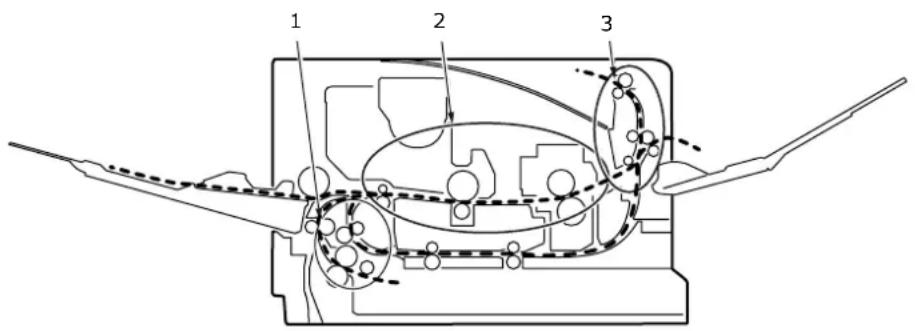
text_image
Technical diagram of a mechanical device with labeled components and motion paths- INPUT JAM - paper has failed to leave the selected feed tray and enter the internal paper path of the printer. A typical message indicates a paper jam and identifies the tray to check.
- FEED JAM - paper has entered the printer but failed to reach the exit. A typical message indicates a paper jam and advises you to open the top cover for access.
- EXIT JAM - paper has reached the exit but has failed to exit completely from the printer. A typical message indicates an exit jam and advises you to open the top cover for access.
| NPUT JAM
NOTE
The B431dn model has been illustrated below. The principles are the same for all models of this printer.
- Remove the paper tray from the printer (1).
- Remove any crumpled or folded paper.
- Remove any paper from the underside of the printer (2).
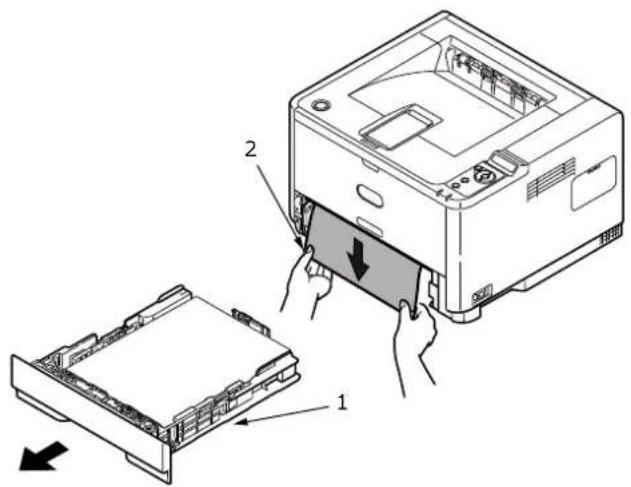
text_image
Diagram showing a printer's internal structure with labeled parts and directional arrows indicating assembly or operation.- Replace the paper tray.
After successful removal of any damaged or misfed paper, the printer should continue printing.
FEED JAM OR EXIT JAM
- Remove the tray and clear any misfed sheets as given above.
- Press the cover release and open the printer's top cover.
WARNING!
If the printer has been powered on, the fuser area will be hot. This area is clearly marked. Do not touch it.
CAUTION!
Never expose the image drum unit to light for more than 5 minutes. Never expose the image drum unit to direct sunlight. Always hold the image drum unit by the ends or from the top. Never touch the surface of the green drum inside the image drum unit.
- Carefully lift out the image drum, complete with the toner cartridge. Be careful not to touch or scratch the green drum surface.
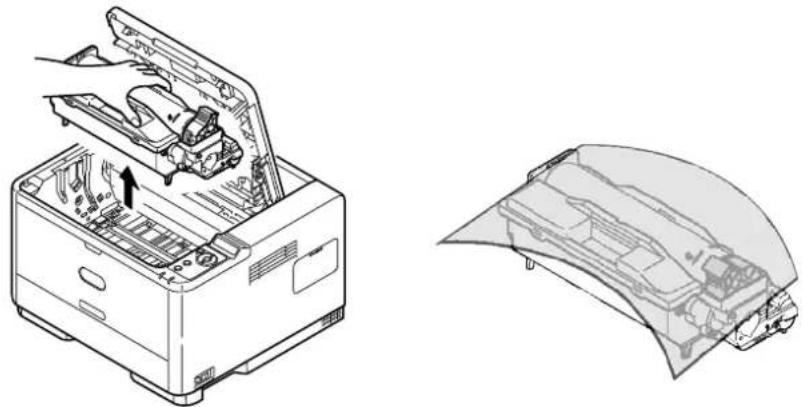
natural_image
Technical line drawing of a printer with internal components and external casing (no text or symbols)- Remove any jammed sheets from the paper path.
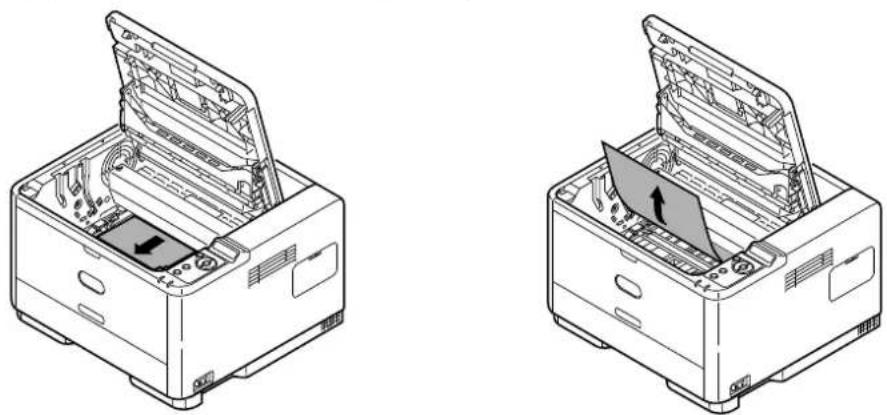
natural_image
Two technical line drawings of a printer with open lid and internal compartments, showing internal structure and assembly (no text or symbols)- Re-install the image drum complete with toner cartridge, ensuring that the pegs (1 & 2) correctly locate into the slots on each side of the printer (3).
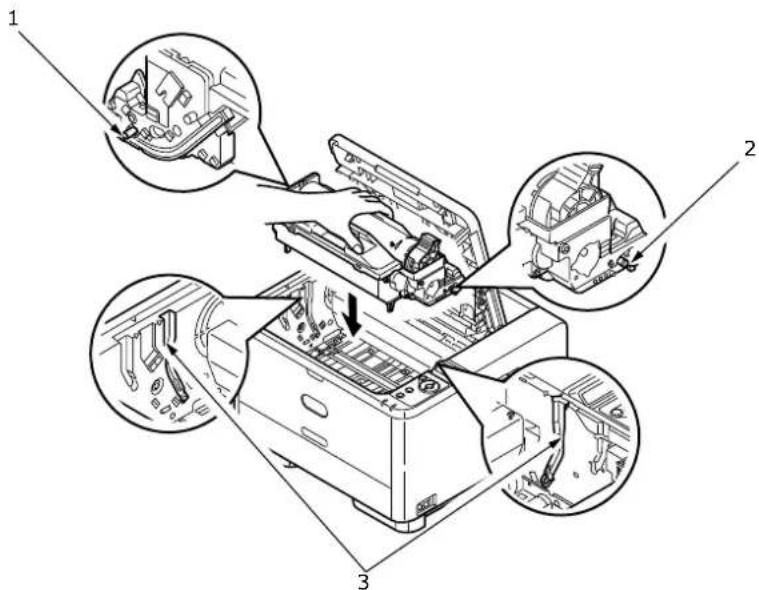
text_image
Technical diagram showing exploded view of a mechanical assembly with labeled components and directional arrows indicating assembly steps.-
Lower the top cover but do not press down to latch it closed yet. This will protect the drum from excessive exposure to room lighting, while you check the remaining area for jammed sheets.
-
Remove any jammed paper from the face down stacker.
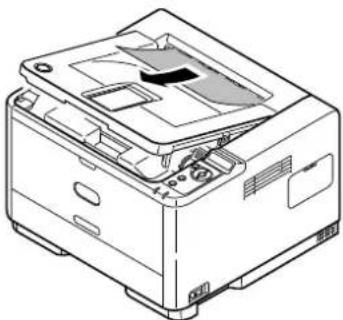
natural_image
Line drawing of a printer or printer with visible internal components and mounting holes (no text or symbols)NOTE
If the edge of the jammed paper protrudes (or can be seen) from the exit, reinstall the image drum, close the top cover and switch the printer on. Remove the jammed paper from the exit when the exit roller begins rotating after a few seconds after switching on. However, if the jammed paper cannot be removed, contact a service representative.
- Remove any jammed paper from the face up stacker.
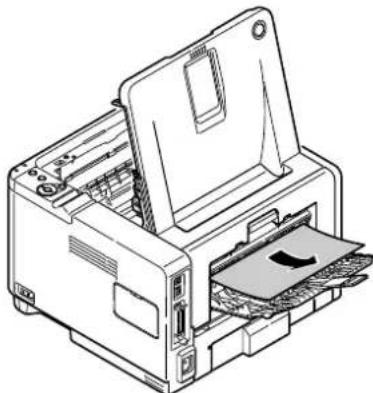
natural_image
Line drawing of a printer with paper feed and paper sheet (no text or symbols)- Open the rear cover and check for paper in the rear path.
Pull out any paper found in this area.
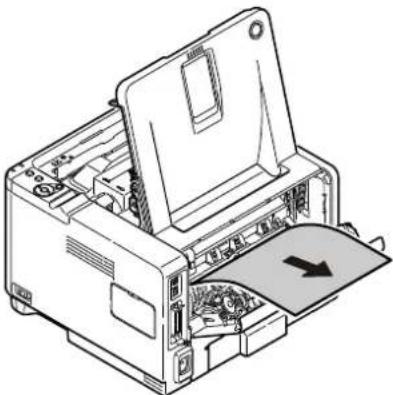
natural_image
Technical line drawing of a printer with an open lid and paper feed cover (no text or symbols)Close it once the paper is removed from this area.
- Check for paper jam in duplex unit.
Remove the Image Drum as described in step 3, then, remove the Duplex unit (1) by raising the coloured handles (2) on each side, and then by holding the handles and gently lifting it out.

text_image
Technical diagram of a printer with labeled parts and directional arrows indicating process flow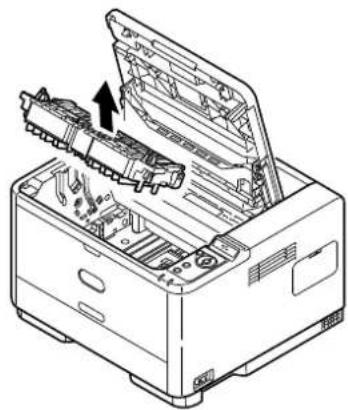
natural_image
Technical line drawing of an open industrial machine with internal components and a black arrow indicating a component (no text or symbols present)Remove any paper and replace the duplex unit.
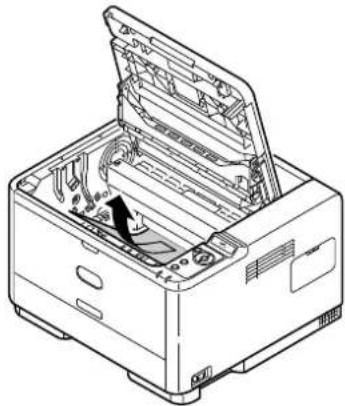
natural_image
Line drawing of an open industrial machine with internal components and a black arrow indicating a component (no text or symbols present)Re-install the image drum as described in step 5
- Check for paper jam under the Paper Guard.
Remove the Image Drum as described in step 3
Raise the Paper Guard (1) and remove the paper. Lower the Paper Guard back into position.
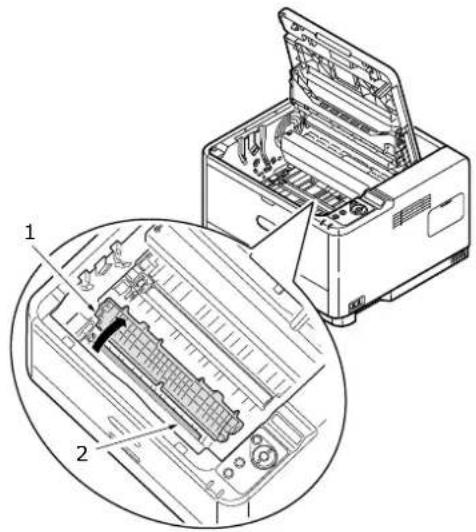
text_image
Technical diagram of a printer with labeled parts, showing internal structure and open casing assemblyRe-install the image drum as described in step 5
- Open the Multi Purpose Tray (1) (Manual Feed Tray for B401dn, B411d and B411dn).
Remove any paper that you find (2), and then close the tray.
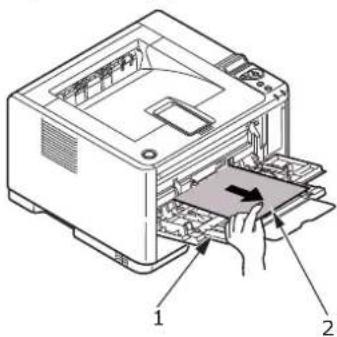
text_image
Diagram of a printer with labeled parts showing internal structure and hand placement for part 1-
Close the top cover and press down to latch it closed.
-
The printer will warm up and commence printing when ready. The page lost through the jam will normally be reprinted.
PRINT QUALITY PROBLEMS
Before consulting a service representative regarding a print quality problem, check the table below to see if there is a solution, or something you might have overlooked.
| SYMPTOM PROBLEM SOLUTION | ||
| Blank sheets printed. | Image drum cartridge not properly installed. | Reinstall image drum cartridge. |
| Empty or missing toner cartridge. | Install new toner cartridge. | |
| Entire page prints faintly. | Empty toner cartridge.Pages get fainter when toner is used up. | Install new toner cartridge. |
| LED array is dirty. Clean LED array. | ||
| Page has grey background. | Static electricity, generally from dry environments, causes toner to stick to background. | Change paper to a smoother laser bond or use a humidifier. |
| Page prints all black. | Hardware problem. Contact service. | |
| Oblong area of faint print appears on each page. | Drop out caused by using paper exposed to high humidity. | Change paper stocks, check paper storage environment or use a dehumidifier; check toner level. |
| Vertical white streaking or faint areas on page. | Toner is low and does not distribute properly, or the drum is worn out. | Replace toner cartridge. Check drum and replace the drum, if necessary. Contact service. |
| LED array is dirty. Clean LED array. | ||
| Vertical black lines. | Hardware problem. Contact service. | |
| Fuzzy print. LED array | is dirty. Clean LED array. | |
| Faded print. Toner cartridge is not correctly installed.Toner low. | Install toner cartridge correctly.Replace toner cartridge. | |
| Smeared or blotched print. | Dirty rollers; toner dropped inside printer or image drum problem. | Replace image drum and toner.Contact service. |
| Printed page is light/blurred. | Is toner low? Replace toner cartridge. | |
| Is paper meant for laser printers? | Use recommended paper. | |
| LED array is dirty. Clean LED array. | ||
| Bold characters and dark lines are smeared. | Toner is low. | Install new toner cartridge. |
| Print is darker than usual. | Darkness setting is too high. | Change darkness setting. |
| Pages curl excessively. | Printing on wrong side of paper. | Turn paper over in tray. (Note arrow on paper package). Install paper print side down in tray. |
| Moisture in paper. Improper storage. | Avoid storing paper in areas of excessive temperature and humidity. Store paper in protective wrapping. | |
| High humidity. Recommended operating humidity: 20-80%. | ||
PAPER FEED PROBLEMS
| SYMPTOM PROBLEM SOLUTION | ||
| Paper Jams occur frequently. Multiple sheets of paper are fed at the same time. | The printer is tilted. Place the paper on a stable and flat surface. | |
| Paper is too thick or too thin. Paper is moist, folded, creased or warped. | Use paper suitable for the printer. Avoid storing paper in areas of excessive temperature and humidity. Store paper in protective wrapping | |
| Paper is not aligned. Align the paper edges to the paper guides. | ||
| Only one sheet of paper is loaded in the Paper tray or Manual Feed/Multi Purpose tray. | Load several sheets of paper. | |
| Sheets of paper is added to the existing paper stock in the Paper tray or Manual Feed/ Multi Purpose tray. | Remove existing sheets of paper from the tray and add the new sheets to them, ensuring alignment and then load the tray. | |
| Postcards, envelopes, label sheets or transparencies are loaded in the Paper tray. | You cannot print using the Paper tray. Load postcards, envelopes, label sheets or transparencies in the Manual Feed tray or Multi Purpose tray. | |
| Postcards or envelopes are placed in the wrong orientation. | Check and load in the correct orientation. | |
| Paper is not fed into the printer. | Improper setting is selected for Paper Source in the printer driver. | Select the correct paper source from the Source drop down menu. |
| The printer menu setting is incorrect. | Set the size of the paper in the Setup Menu of the printer. | |
| Printing does not resume after removing jammed paper. | Printing does not resume only by removing paper jam. | Open and close the top cover. |
SOFTWARE PROBLEMS
Your software (operating environment, applications and printer drivers) controls the printing process. Make sure you have selected the right driver for use with your printer. See your software documentation for more information.
| SYMPTOM PROBLEM SOLUTION | ||
| Printing is garbled. Incorrect driver is installed. | Install an appropriate driver. | |
| Printer's output is below rated speed. | Much of the printing delays will be caused by your application.Sometimes purely text documents will print slowly depending on the selected fonts and how they are transferred to the printer. | For maximum speed, use text in your document and use a printer resident font. |
| Size of top margin increases with each page printed. | Creeping text. Number of lines per page in software is not equal to number of lines per page of printer. | Many software packages assume 66 lines per page, but your printer's default is 64. Adjust software accordingly, or set LINES Per PAGE in the soft control panel to equal lines per page in your software. |
HARDWARE PROBLEMS
| SYMPTOM PROBLEM SOLUTION | ||
| Graphic image prints partly on one page, partly on the next. | Insufficient printer memory for this image at this resolution. | Change the resolution, reduce the image size, or install more memory in your printer. |
| When you try to print nothing happens, but printer indicates it is ready to receive data. | Configuration error. Check | cable connection. If more than one printer is available, make sure your printer has been selected. |
| Garbage prints. Incorrect cable configuration. Also, see Software Problems. | Check cable configuration, continuity, and length. | |
| Printer freezes or displays error message when computer is rebooted. | Booting the computer while the printer is on can cause a communications error. | Turn printer off before rebooting computer. |
| Odours. Gases are given off by forms or adhesives passing through the hot fusing unit. | Make sure the forms you use can withstand heating, and provide adequate ventilation. | |
| Printer is on but must warm up before a job is printed. | Power Save mode is set on to conserve energy. The fuser must heat up before you can begin printing the next job. | To eliminate warm up delay, change Power Save setting. |
INSTALLING OPTIONS
The following options are available to extend the performance of your printer (B411d, B411dn, B431d, B431dn):
64, 128, 256MB RAM DIMM: to extend the main memory of your printer and speed up the processing of large files
Second paper tray: to increase your printer's paper handling capacity by 530 sheets (80g/m²)
OPTION MODEL NUMBER
Second paper tray N22204A
INSTALLATION PROCEDURE
To install any of the above options, follow the detailed installation sheet that accompanies the option.
SETTING THE DRIVER DEVICE OPTIONS
Once your new upgrade has been installed, you may need to update the printer driver so that the additional features are available to your applications.
Accessories such as additional paper trays will only be usable if the printer driver on your computer knows they are there.
In some cases the hardware configuration of your machine is automatically detected when the driver is installed. However, it is advisable to at least check whether all of the available hardware features are listed in the driver.
This procedure is essential if you subsequently add extra hardware features to your machine after the drivers have been installed and set up.
Remember that if your machine is shared between users on different computers, the driver must be adjusted on each user's machine.
WINDOWS
- Access the driver's Properties window.
(a) Open the Printers window (called "Printers and Faxes" in Windows XP) via the Start Menu or from the Windows Control Panel.
(b) Right-click the icon for this machine, and choose Properties from the pop-up menu.
- Select the Device Options tab.
In the Windows XP PostScript driver the tab may be called Device Settings.
-
Set the options for any devices you have just installed.
-
Click OK to close the window and save your changes.
MAC OS X
NOTE
Applies to the PS driver only.
Lion (Mac OS X 10.7), Snow Leopard (Mac OS X 10.6) and Leopard (Mac OS X 10.5)
- Open the Mac OS X Print & Fax Preferences.
- Ensure your machine is selected.
- Click Options & Supplies.
- Click Driver.
- Select all hardware options appropriate to your machine and click OK.
Tiger (Mac OS X 10.4)
- Open the Mac OS X Print & Fax Preferences.
- Ensure your machine is selected.
- Click Printer Setup....
- Click the menu and choose Installable Options....
- Select all hardware options appropriate to your machine and click Apply Changes....
Panther (Mac OS X 10.3)
- Open the Mac OS X Print & Fax Preferences.
- Click Printing.
- Click Set Up Printers....
- Ensure your machine is selected and select Show Info....
- Click the menu and choose Installable Options....
- Select all hardware options appropriate to your machine and click Apply Changes....
SPECIFICATIONS
GENERAL
| PRINTER MODEL MODEL NUMBER | |
| B401dn N22201BX | |
| B411d N22200BX | |
| B411dn N22201BX | |
| B431d N22202BX | |
| B431dn N22203BX | |
A summary of the basic characteristics of your printer appears in the table below:
| ITEM SPECIFICATIONS | |
| Dimensions 393mm x 364mm x 245mm (W x D x H) | |
| Weight 11.6kg approximately (without second tray) | |
| Power supply | 220 to 240VAC @ 50 - 60Hz ± 2% |
| Environmental conditions | Operation: 10 - 32°C, 20% - 80% RH,Storage: -10-43°C, 10% - 90% RHWhen the printer is stored, it should be in its original packaging, with no moisture formation. |
PAPER AND TRAY INFORMATION
Feed and ejection methods vary depending on the type, size and thickness of medium used. Use the chart below and the notes/symbols/terms on the following page for initial guidance. (Minor variations to settings may be necessary depending on user setup and environmental conditions).
| Feed Tray Ejection | Method | |||||||
| Paper type Size | Weight T1 T2 MPT MF | FU FD | ||||||
| Plain paper A4 | B5A5LetterExecutive16K (184 - 260mm)16K (195 - 270mm)16K (197 - 273mm) | L,ML,M,MH,H 0 | 0 0 0 0 | 0 | ||||
| Legal(13)Legal(13.5)Legal(14) | L,ML,M,MH,H 0 | 0 0 0 X | 0 | |||||
| A6Statement | L,ML,M,MH,H 0 | X 0 0 0 | 0 | |||||
| CustomW: 86 - 216mML: 140 - 1321mm | L,ML,M,MH,H | △ | △ | 0 | 0 | △ | 0 | |
| A4B5A5LetterExecutiveLegal(13)Legal(13.5)Legal(14) | UH | X | X 0 0 | 0 | X | |||
| A6Statement | UH | X | X 0 0 | 0 | X | |||
| CustomW: 86 - 216mML: 140 - 1321mm | UH | X | X 0 0 | 0 | X | |||
| Postcards | - | X | X 0 0 | 0 X | ||||
| Envelopes | Com-9Com-10DLC5C6MonarchCustomW: 86 - 216L: 140 - 356 | - | X | X | 0 | 0 | 0 | X |
| Feed Tray | Ejection Method | |||||||
| Paper type | Size | Weight | T1 | T2 | MPT | MF | FU | FD |
| Labels A4 | Letter | - | X | X | 0 | |||
| Transparencies A4 | Letter | - | X | X | 0 | |||
| Duplex Printing | ||||||||||
| Auto Manual | ||||||||||
| Paper type | Size Weight T1 T2 MPT MF T1 T2 MPT | MF | ||||||||
| Plain paper | A4B5LetterExecutiveLegal(13)Legal(13.5)Legal(14) | L,ML,M,MH,H | 0 | 0 | 0 | X | 0 | 0 | 0 | 0 |
| 16K (184 - 260mm)16K (195 - 270mm)16K (197 - 273mm) | L,ML,M,MH,H | 0 | 0 | 0 | x | 0 | 0 | 0 | 0 | |
| A6A5Statement | L,ML,M,MH,H | X | X | X | X | 0 | X | 0 | 0 | |
| CustomW: 86 - 216mML: 140 - 1321mm | L,ML,M,MH,H | △ | △ | △ | X | △ | △ | △ | △ | |
| A4B5LetterExecutiveLegal(13)Legal(13.5)Legal(14) | UH | X | X | X | X | X | X | X | X | |
| A6A5Statement | UH | X | X | X | X | X | X | X | X | |
| CustomW: 86 - 216mML: 140 - 1321mm | UH | X | X | X | X | X | X | X | X | |
| Postcards | - | X | X | X | X | X | X | X | X | |
| Duplex Printing | ||||||||||
| Auto | Manual | |||||||||
| Paper type | Size | Weight | T1 | T2 | MPT | MF | T1 | T2 | MPT | MF |
| Envelopes Com-9Com-10DLC5C6MonarchCustomW: 86 – 216L: 140 – 356 | - | X | X | X | X | X | ||||
| Labels A4Letter | - | X | X | X | X | X | ||||
| Transpa-rencies | A4Letter | - | X | X | X | X | X | |||
NOTES/ SYMBOLS/ TERMS
Notes:
- When an optional second paper tray is used, the original tray is referred to as Tray 1 and the optional tray as Tray 2.
- It is possible to use custom paper sizes with the PS emulation driver.
- Tray 1 can accommodate paper with width of 100 to 216mm and length of 148 to 356mm.
- Tray 2 can accommodate paper with width of 148 to 216mm and length of 210 to 356mm.
- When printing using Auto Duplex, paper will not be ejected face up.
- The printing speed is reduced when you set the paper size of A5, A6, Postcards, Envelopes as Medium heavy, Heavy or Ultra heavy.
- Change the ejection mode to face down if the paper is curled up.
- Change the ejection mode to face up if the paper curl is large.
- When changing media settings, allow 15 seconds for the printer to adjust to the new setting.
| SYMBOL/TERM | MEANING |
| T1 Paper Tray 1 | |
| T2 Paper Tray 2 | (optional) |
| MPT Multi Purpose Tray (B431) | |
| MF Manual Feed | Tray (B411) |
| FU Face Up printing from the rear of the printer | |
| FD Face Down printing from the top of the printer | |
| W, L | Width, Length in mm |
| L | Light paper weight: 60 - 66g/m2 |
| ML | Medium Light paper weight: 67 - 73g/m2 |
| M | Medium paper weight: 74 - 88g/m2 |
| MH | Medium Heavy paper weight: 89 - 104g/m2 |
| H | Heavy paper weight: 105 - 122g/m2 |
| UH | Ultra Heavy paper weight: 123g/m2 - 160g/m2 |
| o | C a n b |
| x Cannot be used | |
| Can be used depending on the size. | |
e u
INDEX
Numerics
2-sided printing.... 50
A
Adhesive labels 31
Advanced features enabling or disabling ..... 48
Attention LED.... 12
Auto duplex printing .... 50
E
Envelopes Types 31
Exit paper jam 69
F
Feed jam or exit jam.... 69
Feed paper jam.... 69
|
Image drum Replacing 63
Input paper jam.... 69
installed options Macintosh ....39 Windows ....39
Installing Paper 32
installing Configuration Tool .39
installing drivers Macintosh ....39 Windows ....39
Installing paper.... 32
interface parallel.... 38 USB.... 38
L
Labels....31, 32
LAN 38
LCD 22
LED array 65, 67
LED indicators 12
M
Macros.... 54
Maintenance Cleaning feed rollers..... 65 Cleaning LED array..... 67 Cleaning unit casing ..... 65
Manual Duplex Multi Purpose Tray .... 52 Paper Tray .... 50
Manual Duplex printing..... 50
media settings B411d, B411dn.... 35 B431d, B431dn.... 36
menu functions B411d, B411dn.... 15 B431d, B431dn.... 23
menu settings B411d, B411dn....21 B431d, B431dn....30
Menus FX menu .....18, 27 Information menu.....15, 23 Maintenance menu .....20, 29
Media menu....16, 24
Network menu......19, 28
Parallel menu....19, 27
PCL menu 17,26
PPR menu....18, 26
Print menu....16, 24
Shutdown menu 23
System configuration menu. 17, 25
Usage menu ......20, 29
USB menu 19,27
Multi purpose tray and manual feed tray 34
0
online button B411d, B411dn.... 13
operator panel B431d, B431dn.... 22
options installing 77
Overlays.... 54
Overlays and macros general ....42, 54
Overlays, PCL how to create .... 57 printing with overlays..58, 59
Overlays, PostScript defining in the Windows driver 55 how to create .... 54 printing with overlays.... 56
P
Page orientation setting in Windows.....42, 44
Paper Envelope types.... 31
Exit jam....69
Feed jam 69
feed sequence 33
Input jam 69
Installing 32
Label types ......31, 32
Paper types .... 31 size setting in Windows.... 41
Transparencies .....31, 32
tray selection in Windows. 4 1
Paper and envelope types..... 31
paper and trays 80
paper feed problems.... 75
Paper feed, size and media setting 35
Paper jams.... 68
Print order face down printing.... 33 face up printing .... 33
Print quality problems...... 74
Print settings how to save.... 41
printer components......9
Printer default settings Windows defaults.... 46
Printing different media....53 Label types....31, 32 Paper & envelope types....31 Quality problems....74
Transparency types.....31, 32
Priority print queue priority .... 47
R
Ready LED 12
Resolution setting in Windows .....42, 45
S
Separator page separating print jobs on a shared printer .... 48
Software problems.... 76
specifications general .... 79 paper and trays.... 80
Spooling Windows settings .... 47 status & error messages.... 68 support materials.... 7
T
Toner how to replace.... 60
Troubleshooting Hardware problems .... 76 Paper jams .... 68 Print quality problems .... 74 Software problems .... 76
U
user's guide printing....7 viewing....7
W
Watermark printing in Windows.....42, 46
OKI CONTACT DETAILS
Oki Systems (UK) Limited
550 Dundee Road
Slough Trading Estate
Slough
Berkshire
SL1 4LE
Tel:+44(0)1753819819
Fax:+44(0)1753819899
http://www.oki.co.uk
Oki Systems Ireland Limited
The Square Industrial Complex
Tallaght
Dublin 24
Tel:+353(0)14049590
Fax:+353(0)14049591
http://www.oki.ie
Oki Systems Ireland Limited - Northern Ireland
19 Ferndale Avenue
Glengormley
BT36 5AL
Northern Ireland
Tel:+44(0)7767271447
Fax:+44(0)14049520
http://www.oki.ie
Technical Support for all Ireland:
Tel:+353 1 4049570
Fax:+353 1 4049555
E-mail: tech.support@oki.ie
OKI Systems (Czech and Slovak), s.r.o.
IBC – Pobřežní 3
186 00 Praha 8
Czech Republic
Tel: +420 224 890158
Fax:+420 22 232 6621
Website: www.oki.cz, www.oki.sk
www.okiprintingsolutions.de
info@oki.de
OKI Printing Solutions
Platinum Business Park II, 3rd Floor
ul. Domaniewska 42
02-672 Warsaw
Poland
Tel: +48 22 448 65 00
Fax:+48 22 448 65 01
Website: www.oki.com.pl
E-mail: oki@oki.com.pl
Hotline: 0800 120066
E-mail: tech@oki.com.pl
Oki Systems (Ibérica) S.A.
Sucursal Portugal
Edifício Prime -
Av. Quinta Grande 53
7° C Alfragide
2614-521 Amadora
Portugal
Tel:+351 21 470 4200
Fax:+351 21 470 4201
Website: www.oki.pt
E-mail : oki@oki.pt
Oki Service
OKI Europe Ltd. (Russia)
Office 702, Bldg 1
Zagorodnoye shosse
117152, Moscow
Tel: +74 095 258 6065
Fax: +74 095 258 6070
e-mail: info@oki.ru
Website: www.oki.ru
Technical support:
Tel: +7 495 564 8421
e-mail: tech@oki.ru
Raisy Opkinoy Street,8
Building B, 2 ^nd Floor,
Kiev 02002
Ukraine
Tel: +380 44 537 5288
e-mail: info@oki.ua
Website: www.oki.ua
www.okiprintingsolutions.com.tr
Oki Systems (Belgium)
Medialaan 24
1800 Vilvoorde
Helpdesk: 02-2574620
Fax: 02 2531848
Website: www.oki.be
AlphaLink Bulgaria Ltd.
2 Kukush Str.
Building "Antim Tower", fl. 6
1463 Sofia, Bulgaria
tel: +359 2 821 1160
fax: +359 2 821 1193
Website: http://bulgaria.oki.com
OKI Printing Solutions
Herstedøstervej 27
2620 Albertslund
Danmark
Oki Systems (Norway) AS
Tevlingveien 23
N-1081 Oslo
Tel:+47(0)63893600
Telefax:+47(0)63893601
Ordrefax:+47(0)63893602
Website: www.oki.no
General Systems S.R.L.
(Romania)
Sos. Bucuresti-Ploiesti Nr. 135.
Bucharest 1
Romania
Tel: +40 21 303 3138
Fax: +40 21303 3150
Website: http://romania.oki.com
Oki Systems (Sweden) AB
Borgafjordsgatan 7
Box 1191
164 26 Kista
Tel. +46 (0) 8 634 37 00
e-mail:
WWW.OKIPRINTINGSOLUTIONS.COM