MG1800BK - Mill GORENJE - Free user manual and instructions
Find the device manual for free MG1800BK GORENJE in PDF.

| Product Type | Meat Grinder / Mill |
| Brand | Gorenje |
| Model | MG1800BK |
| Color | Black |
| Motor Unit | Included |
| Control | On/Off button, Reverse |
| Maximum Operating Time | 10 minutes (continuous) |
| Noise Level | <85 dB(A) |
| Power Supply | 220-240 V, 50 Hz |
| Cutting System | Metal cutter unit with grinding disc |
| Meat Preparation | Cut into 10 cm x 2 cm strips; do not use frozen meat |
| Safety Features | Release button for cutter housing; auto shut-off not specified |
| Material | Metal cutter housing and grinding disc; plastic feeding tray |
| Cleaning | Hand wash recommended; do not put metal parts in dishwasher |
| Included Accessories | Feeding tray, pusher, grinding disc, cutter unit, worm shaft, screw ring |
| Reverse Function | Yes |
| Usage | Household use only; not for commercial use |
| Warranty | Refer to Gorenje Customer Care Centre |
| Compliance | WEEE Directive 2012/19/EU |
Frequently Asked Questions - MG1800BK GORENJE
User questions about MG1800BK GORENJE
0 question about this device. Answer the ones you know or ask your own.
Ask a new question about this device
Download the instructions for your Mill in PDF format for free! Find your manual MG1800BK - GORENJE and take your electronic device back in hand. On this page are published all the documents necessary for the use of your device. MG1800BK by GORENJE.
USER MANUAL MG1800BK GORENJE
natural_image
Exterior view of a modern kitchen electrician (no text or symbols visible)MG 1800BK
natural_image
Exploded view diagram of a mechanical assembly showing components like bolts, gears, and a valve (no text or labels)
natural_image
3D mechanical component with pipe fitting and a curved housing (no visible text or symbols)
natural_image
3D mechanical component diagram showing a lever and base with a knob, labeled with number 3 (no text or symbols on the object itself)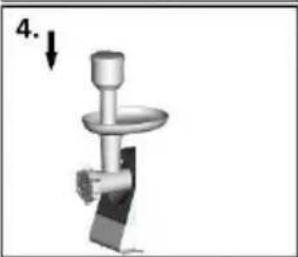
natural_image
Mechanical component diagram showing a lever and base with a downward arrow labeled '4.' (no text or symbols on the object itself)natural_image
Exploded view diagram of a mechanical assembly showing components like bolts, gears, and a T-joint (no text or labels)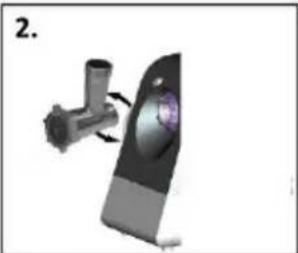
natural_image
3D rendered mechanical component with pipe fitting and a curved housing (no text or symbols visible)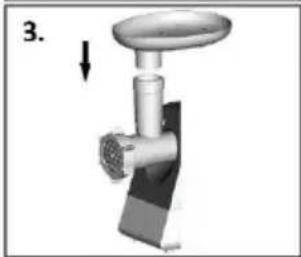
natural_image
Mechanical component diagram showing a lever and base with a knob, labeled with number 3 (no text or symbols on the object itself)
natural_image
Mechanical component diagram showing a lever and base with a downward arrow labeled '4.' (no text or symbols on the object itself)- Jedinica motora
- Dugme za uključivanje
- Povratak
- Dugme za otvaranje
- Kućište rezača
- Podložak
- Plošča za mletje
Važno
Pre upotrebe pažljivo pročitajte ovo uputstvo i sačuvajte ga za buduće potrebe.
• Jačina buke: Lc < 85 dB (A)
- Deca mlada od 8 godina moraju se udaljiti, osim ako su pod stalnim nadzorom.
- Ovaj uređaj mogu koristiti deca koja su napunila najmanje 8 godina i osobe sa smanjenim fizickim, culnim ili mentalnim sposobnostima, kao i osobe koje nemaju dovoljno iskustva i znanja ukoliko su pod nadzorom ili su dobili uputstva koja se odnose na upotrebu ovog uređaja na bezbedan nacin i razumeju povezane opasnosti.
- Deca se moraju nadgledati da biste bili sigurni da se ne igraju uređajem.
- Čiščenje I korisničko održavanje ne smeju obavljati deca koja nisu napunila najmanje 8 godina i koja nisu pod nadzorom.
- Pre uključivanja aparata proverite da li napon naznačen na aparatu odgovara naponu lokalne mreže.
- Da biste izbegli opasnu situaciju, ovaj aparat nikad ne sme biti priključen na prekidač kontrolisan tajmerom.
- Aparat ne upotrebljavajte ako su kabl, utikač ili drugi delovi oštećeni.
- Da bi se izbegao rizik, glavni kabl u slučaju oštećenja treba da zameni kompanija Gorenje, tj. servisni centar ovlašćen od strane kompanije Gorenje ili osoba sa odgovarajućim kvalifikacijama.
- Aparat čuvajte van domašaja dece.
- Aparat nikada ne ostavljajte da radi bez nadzora.
- Aparat za bilo koju namenu nikada ne upotrebljavajte duže od 10 minuta.
- Aparat uvek isključite pritiskom na dugme za uključivanje/isključivanje.
- Pre skidanja dodatnog pribora obavezno isključite aparat i isključite ga iz napajanja.
- Ne uranjajte jedinicu motora u vodu ili neku drugu tečnost, ne ispirajte je pod slavinom.
- Kada je aparat uključen, ne upotrebljavajte predmete (npr. lopaticu) ili prste da biste namirnice ubacili u cev za punjenje. Za ovu namenu upotrebljavajte isključivo potiskivač.
- Budite izuzetno pažljivi prilikom rukovanja jedinicom rezača, osobito kada je vadite iz pužne vodilice i prilikom čišćenja. Ivice rezača su veoma oštre!
- Nikada ne upotrebljavajte dodatke ili delove drugih proizvođača koji nisu preporučeni od strane kompanije Gorenje. U slučaju upotrebe takvih delova, garancija prestaje da vredi.
- Pre prve upotrebe temeljito očistite delove koji dolaze u kontakt sa namirnicama.
- Metalne delove ne perite u mašini za pranje sudova jer ti delovi mogu da potamne ili oksidiraju od deterdženata za mašinsko pranje. Upute o čišćenju različitih delova potražite u poglavlju Čišćenje.
- Da se ne biste izlagali opasnosti, aparat nikada ne priključujte na spoljni prekidač kontrolisan tajmerom niti na sistem sa daljinskom kontrolom.
- Aparat je namenjen isključivo upotrebi u domaćinstvu.
Mlevenje mesa - saveti i upozorenja
- Proverite da li su oštrice rezača okrenute prema spolja.
- Proverite da li žleb diska za mlevenje ulazi u istureni deo na kućištu rezača.
- Nikada ne koristite zamrznuto meso!
- Aparat prilikom upotrebe nemojte preopteretiti tako da u kućište rezača stavite previše mesa.
- Isecite meso na trake duge 10 cm i široke 2 cm.
- Uklonite što više kosti, hrskavica i tetiva.
- Pripremljeno meso stavite na podložak.
- Aparat uključite pritiskom na dugme za uključivanje/isključivanje. Potiskivačem lagano potisnite meso u kućište rezača.
- Za tartar biftek dva puta izmeljite meso pomoću srednje finog diska za mlevenje.

natural_image
Exploded view diagram of a mechanical assembly showing components like bolts, gears, and a T-joint (no text or labels)
natural_image
3D rendered mechanical component with pipe fitting and a circular housing (no text or symbols visible)
natural_image
Mechanical component diagram showing a lever and base with a knob, labeled with number 3 (no text or symbols on the object itself)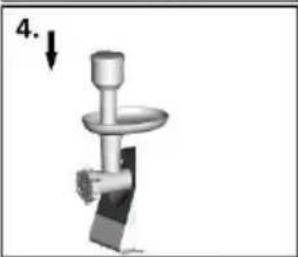
natural_image
Mechanical component diagram showing a lever and base with a downward arrow labeled '4.' (no text or symbols on the object itself)Čišćenje - saveti i upozorenja
- Meso koje je ostalo u kućištu rezača izvadite tako da kroz kućište provedete parče hleba.
- Aparat uvek isključite pre skidanja dodataka ili čišćenja jedinice motora.
- Skinite potiskivač i podložak.
- Odvrnite prsten sa navojem i skinite disk za mlevenje, jedinicu rezača i pužnu vodilicu.
- Kućište rezača skinite pritiskom na dugme za otvaranje i okrenite kućište rezača na desnu stranu.
- Jedinicu rezača i diskove za mlevenje treba lagano premazati masti ili uljem da ne bi zardali.
- Metalne delove ne perite u mašini za pranje sudova jer ti delovi mogu da potamne ili oksidiraju od deterdženata za mašinsko pranje.
Zaščita okoline
Simbol na proizvodu ili na njegovoj ambalaži označava, da se sa tim proizvodom ne sme postupati kao sa otpadom iz domaćinstva. Umesto toga, proizvod treba predati odgovarajućim sabirnim centrima za reciklažu elektronskih I električnih aparata. Ispravnim odvoženjem ovog proizvoda sprečićete potencijalne negativne posledice na životnu sredine I zdravlje ljudi, koji bi inače mogli biti ugroženi neodgovarajućim rukovanjem otpadom ovog proizvoda. Za dobijanje detaljnih informacija o tretmanu, odbacivanju I ponovnom korišćenju ovog proizvoda, stupite u kontakt sa prikladnim lokalnim ustanovama, službom za sakupljanje kućnog otpada ili sa prodavnicom u kojoj ste kupili ovaj proizvod.
Garancija i servis
Za informacije ili u slučaju problema obratite se Centru Gorenja za pomoć korisnicima u vašoj državi (telefonski broj naći ćete u međunarodnom garantnom listu). Ako u vašoj državi nema takvog centra, obratite se lokalnom prodavcu Gorenja, ili odelu Gorenja za male kućanske aparate.
Nije za komercialnu upotrebu!
GORENJE VAM ŽELI MNOGO ZADOVOLJSTVA U RADU S VAŠIM APARATOM! Pridržavamo pravo do promen
natural_image
Exploded view diagram of a mechanical assembly with components like gears, bolts, and a valve (no text or labels)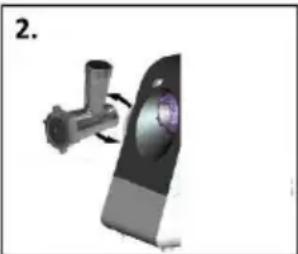
natural_image
3D mechanical component with pipe fitting and a circular housing (no visible text or symbols)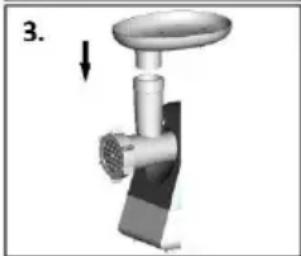
natural_image
3D mechanical component diagram showing a lever and base assembly (no text or symbols)
natural_image
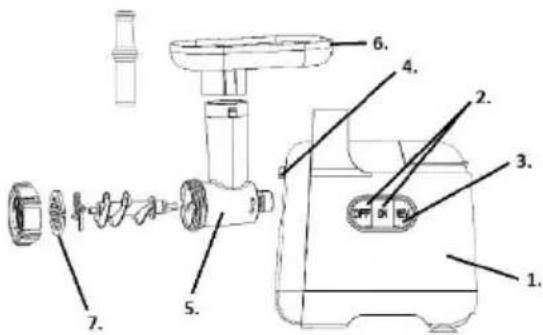
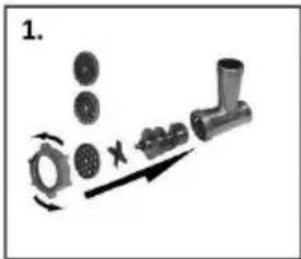
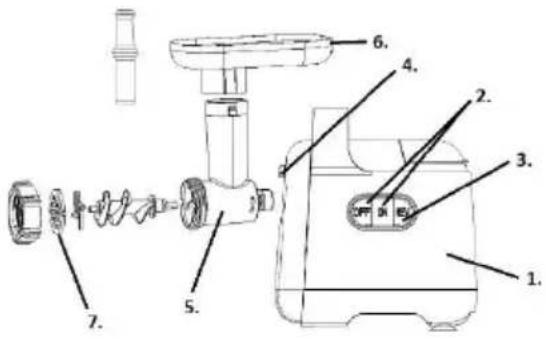
Mechanical component diagram showing a lever and base assembly (no text or symbols)- Motor unit
- On button
- Reverse
4 Release button - Cutter housing
- Feeding tray
- Grinding disc
Important
Read these instructions for use carefully before using the appliance and save them for future reference.
- Noise level: Lc <85 dB(A)
- This appliance can be used by children aged from 8 years and above and persons with reduced physical, sensory or mental capabilities or lack of experience and knowledge if they have been given supervision or instruction concerning use of the appliance in a safe way and understand the hazards involved.
• Children shall not play with the appliance. - Cleaning and maintenance shall not be made by children unless they are older than 8 and supervised.
- Check if the voltage indicated on the appliance corresponds to the local mains voltage before you connect the appliance.
- In order to avoid a hazardous situation, this appliance must never be connected to a timer switch.
- Do not use the appliance if the mains cord, the plug or other parts are damaged.
- If the mains cord is damaged, it must be replaced by Gorenje, a service centre authorized by Gorenje or similarly qualified persons in order to avoid a hazard.
- Keep the appliance out of the reach of children.
- Never let the appliance run unattended.
- Never exceed the maximum operating time of 10 minutes at all applications.
-
Always switch the appliance off by pressing the on/off button.
-
Switch the appliance off and unplug it before detaching any accessory.
- Never immerse the motor unit in water or any other liquid, nor rinse it under the tap.
- Never use your fingers or an object (e.g. a spatula) to push ingredients into the cutter housing while the appliance is running. Only the pusher is to be used for this purpose.
- Be very careful when handling the cutter unit, especially when removing it from the worm shaft and during cleaning. The cutting edges are very sharp!
- Never use any accessories or parts from other manufacturers or that have not been specifically advised by Gorenje, d.d.. Your guarantee will become invalid if such accessories or parts have been used.
- Thoroughly clean the parts that will come into contact with food before you use the appliance for the first time.
- Do not clean the metal parts in the dishwasher, as dishwasher detergents will cause these parts to darken or oxidize. See the Cleaning section for instructions on how to clean the various parts.
- This appliance is meant for household use only.
- Never connect this appliance to an external timer switch or remote control system in order to avoid a hazardous situation.
This appliance is marked according to the European directive 2012/19/EUon Waste Electrical and Electronic Equipment (WEEE). This guideline is the frame of a European-wide validity of return and recycling on Waste Electrical and Electronic Equipment.
Mincing meat - tips and warnings
- Make sure the cutting edges of the cutter unit are pointing outwards.
- Make sure the notch of the grinding disc fits onto the projection of the cutter housing.
- Never use frozen meat!
- Do not overload the appliance during use by pushing too much meat into the cutter housing.
- Cut the meat into 10cm-long, 2cm-thick strips.
- Remove bones, gristles and sinews as much as possible.
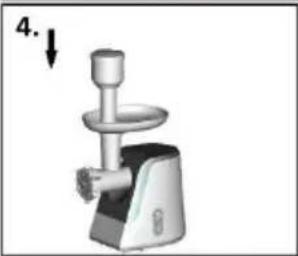
- Put the prepared meat on the feeding tray.
-
Press the on/off button to switch the appliance on.
-
Use the pusher to gently push the meat into the cutter housing.
- For steak tartare, mince the meat with the medium grinding disc twice.
natural_image
Exploded view diagram of a mechanical assembly showing components like gears, bolts, and a T-junction (no text or labels)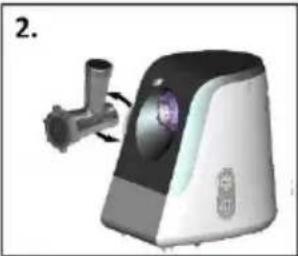
natural_image
3D rendering of a medical or laboratory device with a pipe fitting and a circular component (no visible text or symbols)
natural_image
Illustration of a kitchen meat maker with a handle and control panel (no text or symbols)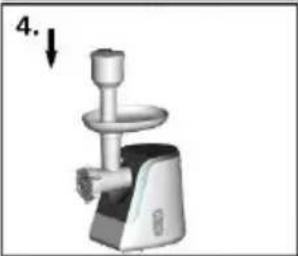
natural_image
Illustration of a kitchen grater with a handle and spool, labeled with number 4 (no text or symbols on the device itself)Cleaning - tips and warnings
- Remove any meat left in the cutter housing by passing pieces of bread through it.
- Always switch off and unplug the appliance before removing accessories or cleaning the motor unit.
- Remove the pusher and the feeding tray.
- Unscrew the screw ring and remove the grinding disc, the cutter unit and the worm shaft.
- Remove the cutter housing by pressing the release button and by turning the cutter housing to the right (see the Disassembly section,
- The cutter unit and grinding discs should be lightly brushed with fat or oil to prevent rusting.
- Do not clean the metal parts in the dishwasher, as dishwasher detergents will cause these parts to darken or oxidize.
Environment
Do not throw away the appliance with the normal household waste at the end of its life, but hand it in at an official collection point for recycling. By doing this, you help to preserve the environment.
Guarantee & service
If you need information or if you have a problem, please contact the Gorenje Customer
Care Centre in your country (you find its phone number in the worldwide guarantee leaflet). If there is no Customer Care Centre in your country, go to your local Gorenje dealer or contact the Service department of Gorenje domestic appliances.
For personal use only!
GORENJE WISHES YOU A LOT OF PLEASURE WHEN USING YOUR APPLIANCE
We reserve the right to any modifications!
natural_image
Exploded view diagram of a mechanical assembly showing components like gears, bolts, and a valve (no text or labels)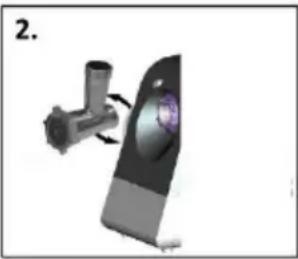
natural_image
3D mechanical component with pipe fitting and a circular component, no visible text or symbols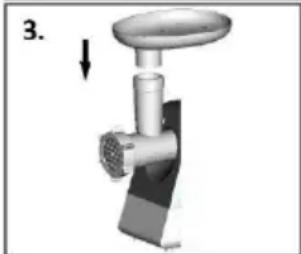
natural_image
3D mechanical component diagram showing a lever and base with a knob, labeled with number 3 (no text or symbols on the object itself)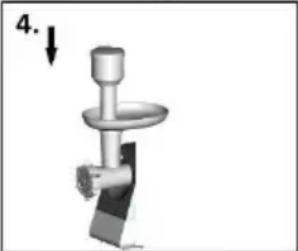
natural_image
Mechanical component diagram showing a lever and base assembly (no text or symbols)natural_image
Exploded view diagram of a mechanical assembly with gears and a valve (no text or labels)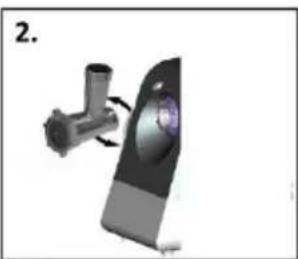
natural_image
3D mechanical component with pipe fitting and a curved housing (no visible text or symbols)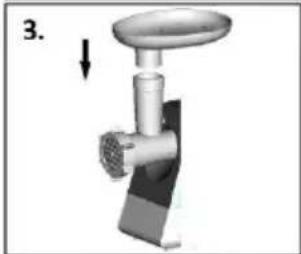
natural_image
Mechanical component diagram showing a lever and handle assembly (no text or symbols)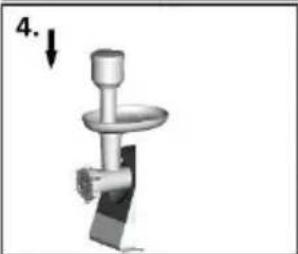
natural_image
Mechanical component diagram showing a lever and base with a downward arrow labeled '4.' (no text or symbols on the object itself)Înlocuirea
- Jednotka motora
- Tlačidlo zapnutia
- Spätný chod
- Telo mlynčeka
- Podávacia miska
- Disky na mletie
- Oddel'ovač
Dôležité
natural_image
Exploded view diagram of a mechanical assembly showing components like gears, bolts, and a T-junction (no text or labels)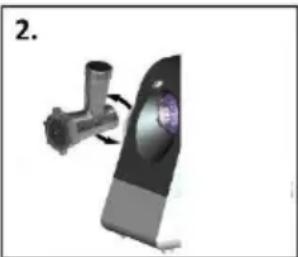
natural_image
3D mechanical component with pipe fitting and a circular component, no visible text or symbols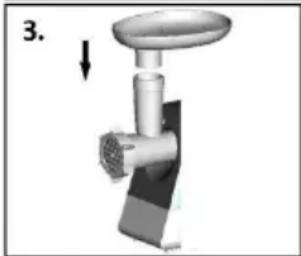
natural_image
3D rendering of a mechanical tool with a knob and base component (no text or symbols visible)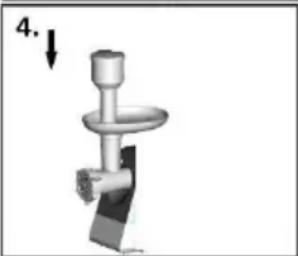
natural_image
Mechanical component diagram showing a lever and shaft assembly (no text or symbols)Čistenie - tipy a varovania
natural_image
Exploded view diagram of a mechanical assembly showing components like gears, bolts, and a valve (no text or labels)
natural_image
3D mechanical component diagram showing a pipe fitting and a curved housing with a purple circular feature (no text or symbols)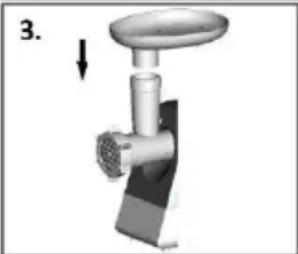
natural_image
3D mechanical component diagram showing a valve with a knob and a base, no text or symbols present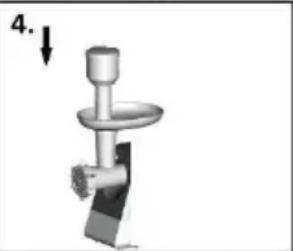
natural_image
Mechanical component diagram showing a lever and base assembly (no text or symbols)natural_image
Exploded view diagram of a mechanical assembly showing components like gears, bolts, and a valve (no text or labels)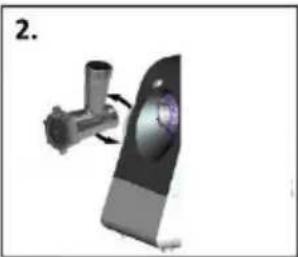
natural_image
3D mechanical component with pipe fitting and a circular housing (no visible text or symbols)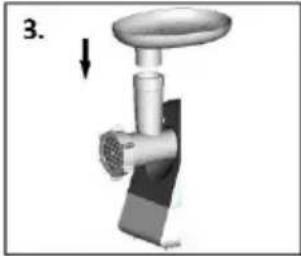
natural_image
3D diagram of a mechanical valve or pump assembly with a downward arrow indicating force or direction (no text or symbols present)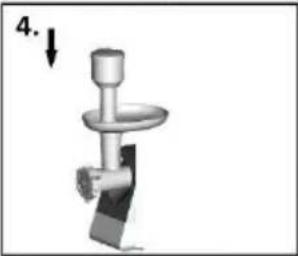
natural_image
Mechanical component diagram showing a lever and base assembly (no text or symbols)Почистване
natural_image
Exploded view diagram of a mechanical assembly showing parts like bolts, gears, and a pipe fitting (no text or labels)
natural_image
3D mechanical component with a pipe fitting and a curved housing, no visible text or symbols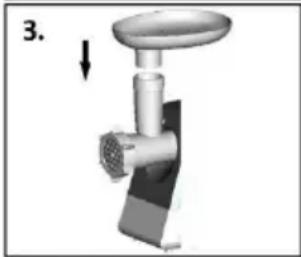
natural_image
Mechanical component diagram showing a lever and base assembly (no text or symbols)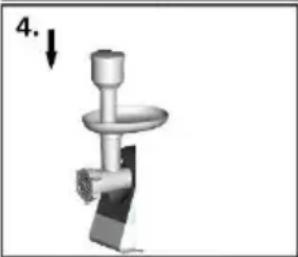
natural_image
Mechanical component diagram showing a lever and shaft assembly (no text or symbols)natural_image
3D mechanical assembly diagram showing a pipe fitting and a curved component with a central purple sphere (no text or symbols)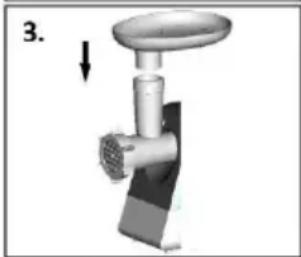
natural_image
3D mechanical component diagram showing a lever and base assembly (no text or symbols)
natural_image
Mechanical component diagram showing a lever and base with a downward arrow labeled '4.' (no text or symbols on the object itself)natural_image
Exploded view diagram of a mechanical assembly showing components like gears, bolts, and a valve (no text or labels)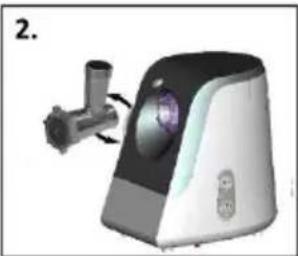
natural_image
3D rendering of a medical or laboratory device with a pipe fitting and a central purple component (no visible text or symbols)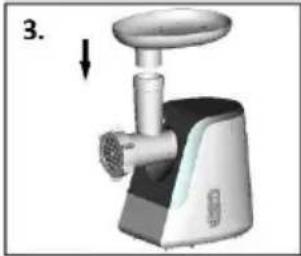
natural_image
Illustration of a kitchen electrician with a handle and control panel (no text or symbols)