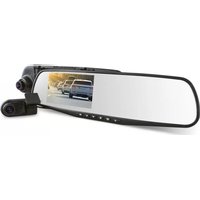
C6 - Dash cam Lamax - Free user manual and instructions
Find the device manual for free C6 Lamax in PDF.


| Product Type | Dash cam |
| Brand | Lamax |
| Model | C6 |
| Power Supply | 12V ignition power cord |
| Memory Card Slot | MicroSD, up to 32GB, Class 10 or higher |
| Video Resolution | Full HD 1080p (estimated typical) |
| Viewing Angle | 120° (estimated typical) |
| Loop Recording | Yes, automatically overwrites oldest unprotected files |
| G-Sensor | Yes, automatically protects video upon impact |
| Motion Detection | Yes, starts recording when movement detected, stops after 1 min of inactivity |
| Parking Mode | Yes, starts recording when vehicle vibration detected, stops after 30 seconds |
| LED Light | Yes, for external use (not while driving) |
| Mount | Suction cup windscreen mount |
| Connectivity | Mini USB port, microSD/USB adapter for file transfer |
| Controls | Power/OK, UP, DOWN, RESET buttons |
| Package Contents | Camera, suction cup mount, ignition power cord, microSD/USB adapter |
| Safety | Do not block airbags; mount securely; comply with local laws |
| Maintenance | Format microSD card monthly; keep firmware updated |
Frequently Asked Questions - C6 Lamax
User questions about C6 Lamax
0 question about this device. Answer the ones you know or ask your own.
Ask a new question about this device
Download the instructions for your Dash cam in PDF format for free! Find your manual C6 - Lamax and take your electronic device back in hand. On this page are published all the documents necessary for the use of your device. C6 by Lamax.
USER MANUAL C6 Lamax
natural_image
Line drawing of a digital camera with front and back views (no text or symbols)1
A


2

3

4


4

EN
1 PACKAGE CONTENTS
Ⓐ LAMAX C6 da
⑥ Suction cup windscreen mount
© Ignition power cord
MicroSD/USB adapter for transferring files to PC
2 GETTING TO KNOW YOUR CAMERA /
CONTROLS
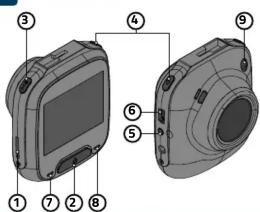
① Memory card slot
⑦ POWER/OK button
② POWER/OK
③ UP button
④ DOWN button
⑤ RESET button
⑥ Mini USB port
⑦ LED camera power indicator
( red/lit - camera plugged in )
( result = camera plugge © LED recording indicator
⑧ LED recording indicator (blue/lit = camera on, fl
(blue/lt = camera on, hashing = recording)
⑨ LED light
| VIDEO MODE | Power / OK button | Press | Start / Stop recording |
| Hold | Turn off camera | ||
| UP button | Press | Turn off / on Parking mode when recording | |
| Hold | Enter menu | ||
| DOWN button | Press | Mute / Unmute audio recording | |
| Hold | Change Video mode to Photo mode / File protect when recording | ||
| PHOTO MODE | Power / OK button | Press | Take photo |
| Hold | Turn off camera | ||
| UP button Hold | Enter menu | ||
| DOWN button | Hold | Change Photo mode to Playback mode | |
| PLAYBACK MODE | Power / OK button | Press | Start / Pause playbackStop fast playback |
| Hold | Turn off camera | ||
| UP button | Press | Navigate between filesChange video playback speed | |
| Hold | Enter recording management menu | ||
| DOWN button | Press | Navigate between filesChange video playback speed | |
| Hold | Change mode to Video mode | ||
| MENU | Power / OK button | Press | Confirm selection |
| Hold | Turn off camera | ||
| UP button | Press | Navigate the menu | |
| Hold | Go to camera settings / In camera settings exit the menu | ||
| DOWN button | Press | Navigate the menu | |
| Hold | Go to camera settings / In camera settings exit the menu | ||
| ANY TIME | RESET | Press with paperclip | Restart camera |
3 BASIC SETTINGS AND FUNCTIONS
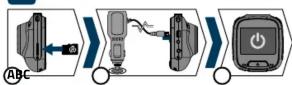
A Insert the microSD card into the camera as shown (connectors toward
the display
Use SD cards from reputable manufacturers of Class 10 and higher
with a capacity of up to 32GB.
Insert and remove card only when the camera is turned off.
The first time you use the card, format it directly in the camera and repeat
the formatting at least once a month to ensure that the camera works properly.
propen
③ Insert the power cable into the ignition switch and connect it to the camera.
The camera is primarily intended to be always be connected to the power.
The dashcam turns on automatically and starts recording.
For some vehicles, it is necessary to start the ignition first
BASIC FUNCTIONS:
Loop recording
The camera automatically divides the recording into shorter video files
and when the SD card is full, it starts overwriting the oldest unprotected
- Thanks to this, you do not have to worry about there being enough free
Thanks to this, you do space on the SD card
Space on the 5D V File protection
To protect
to protect a file against being overwritten, look it in Hayback House in the recording management menu or press the down arrow whilst
in the recording management method of press the client show which recording.
G- sensor
If the G-sensor detects an impact, it automatically protects the video
being currently recorded against being overwritten.
Note: at high sensitivity settings and driving over uneven surfaces, files may become automatically protected leading to the SD card becoming full.
May become automatically protected leading to the SD card becoming rail. Motion detection
The camera starts recording automatically when it detects movement
The camera stands recording automatically when it exists movement in the lens' field of view. When the movement stops, it stops recording
after about 1 minute
The function is used to monitor a parked vehicle, do not use whilst driving.
Parking mode
The camera starts recording automatically when it detects the vehicle vibrate.
If the movement does not happen again, it will stop recording after about 30 seconds and turn off.
and turn on LED light
LED light - Intended for use outside the vehicle, for example, for recording the scene after
intended to an accident
Do not use the LED light whilst driving
4
PLACEMENT ON GLASS /
SAFETY PRECAUTIONS
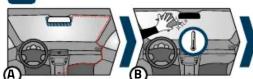
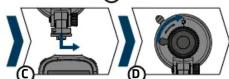
ⒶThe ideal place to mount the dashcam is the space between
the windscreen and the rearview mirror so that it does not obstruct
the driver's view.
⑧ Ensure that the glass at the point of attachment is clean and dry.
© Attach the suction cup to the camera and then place it on the glass
so that the camera has a good view.
Tighten the mount according to the lock icon on the holder.
Do not operate the camera whilst driving
- Do not operate the camera whilst driving. - A windscreen coated with any kind of film and heated glass can drive
3 A windscreen coated with any kind of film and heated glass can reduce the quality of the recording
the quality of the recording. Do not expose the camera
Do not expose the camera to extreme terrain in direct sunlight for an extended period.
- Make sure that the legislation of the country whom you enprete the vehicle
, Make sure that the legislative allows the use of dashcams.
To prevent injuries, the camera must always be mounted whilst driving
to prevent injuries, the camera must always be mounted with and must not block the path of safety features - especially airbags
5
ADDITIONAL INFORMATION
Find full instructions and firmware updates at
http://www.lamax-electronics.com/lamax-c6
Register your camera for the latest product information and other LAMAX news
DE
1
VERPACKUNGSINHALTs
(A) Autokamera LAMAX C6
natural_image
Line drawing of a digital camera with front and back views (no text or symbols)1

2
3
4
4