
OBO654TGG - Oven OMEGA - Free user manual and instructions
Find the device manual for free OBO654TGG OMEGA in PDF.


User questions about OBO654TGG OMEGA
0 question about this device. Answer the ones you know or ask your own.
Ask a new question about this device
Download the instructions for your Oven in PDF format for free! Find your manual OBO654TGG - OMEGA and take your electronic device back in hand. On this page are published all the documents necessary for the use of your device. OBO654TGG by OMEGA.
USER MANUAL OBO654TGG OMEGA
Thank you for purchasing an Omega appliance
Tailored for the modern aesthetic and lifestyle of busy people, your new Omega Appliance will make a welcome addition to the family.
Omega caters to style-savvy customers who look for balance between stunning form and clever function. This means a combination of sleek, chic, sophisticated design yet effortless functionality.
And we source from the best. The best craftsmanship. The best innovation. From the best international design-houses.
All brought together under an appliance that stands for design-led balance.
Please take the time to read through the following instruction manual to familiarise yourself with the installation, operation requirements and maintenance to ensure optimum performance.
Further Information
For important information about your Omega Appliance such as warranty registration, manuals, features, and specifications please visit omegaappliances.com.au (if you are in Australia) and omegaappliances.co.nz (if you are in New Zealand) or contact our Customer Care team on the below email or phone numbers.
Registering Your Warranty
For peace of mind you can register your warranty at omegaappliances.com.au. Further information on the Warranty can be found at the end of this manual.
Contact Us
Our customer service team is here to help you with any question or concern.
They are on call Monday to Friday 8.30am to 5.00pm and of course you can always send a email at your convenience.
Email: customercare@omegaappliances.com.au
Phone: 1300 739 033
To stay up to date and find simple and easy recipes, follow us on our socials:
facebook.com/omegaappliances
instagram.com/omegaappliances_aus
READ THE INSTRUCTION BOOKLET BEFORE INSTALLING AND USING THE APPLIANCE.
It is important that you retain these instructions, proof of purchase as well as other important documents about this product for future reference.
The manufacturer will not be responsible for any damage to property or to persons caused by incorrect installation or improper use of the appliance.
Due to continual product development, Omega reserves the right to alter specifications and appearances without notice.
Contents
Important Safety Warnings....1
Appliance Details....2
Electrical Connections....2
Installation Instructions....3-4
Operating Instructions 5-9
Oven Lamp Replacement 10
Cleaning....11
Troubleshooting 11
Australian & New Zealand Product Warranty Statements of Standard Warranty Conditions....12
Disposal Information
- Most of the packaging materials are recyclable. Please dispose of these materials through your local recycling depot or by placing them into appropriate collection containers.
- If you wish to discard this product, please contact your local authorities and ask for the correct method of disposal.
IMPORTANT: Read the assembly instruction section and safety precautions of this booklet carefully before removing the contents of this carton.
- This appliance is not intended for use by persons (including children) with reduced physical, sensory or mental capabilities, or lack of experience or knowledge, unless they have been given supervision or instruction concerning the use of the appliance by a person responsible for their safety. Children should be supervised to insure that they do not play with the appliance.
- In certain circumstances electrical appliances may be a danger hazard.
- Do not place heavy objects in or on these appliances, or use for storage, or let children play or swing from the door. These appliances are designed for cooking food only.
- This appliance is designed for domestic household use only and for the cooking of domestic food products. Use as a commercial appliance will void the warranty. It should not be used in a marine environment or outdoors.
- This appliance is supplied with a 10 amp plug.
- If the electrical supply cord is damaged, either when being installed or after installation, it must be replaced by the manufacturer, its service centre or similarly qualified persons in order to prevent a hazard.
- The electrical connection must be accessible after installation. The appliance must be electrically isolated before any maintenance can be performed, which includes changing a lamp.
- Electrical connection must be made as per local wiring rules and regulations. Do not disconnect the appliance with wet hands or bare feet, and do not disconnect the power cord with extreme force.
- Always grasp the oven door in the centre of the handle as the areas around the door edges may be hot due to the escape of hot air.
- Ensure that the kitchen is well ventilated or mechanical ventilation is in use while cooking in this appliance.
- Do not store or use flammable materials or aerosols near the oven. Items made from aluminium, plastic or plastic film should also be kept away from the appliance, as they may fuse to the surface.
- Never line the oven bottom with aluminium foil, as the consequent accumulation of heat could compromise the cooking and even damage the enamel.
- WARNING - The oven will become hot during and directly after use. Do not touch any components during this time, as they may be hot and can cause burns. Do not touch the heating elements inside the oven to avoid burns. Children should be kept away. Use heat resistant cooking gloves where-ever possible when moving food and cooking utensils in and out of the oven.
- Cleaning may only be commenced on the appliance once it has cooled down (best slightly warm). The appliance should be disconnected from the power outlet or turned off at your isolation switch before commencing any cleaning process. Do not use a steam jet or any other high pressure cleaning equipment to clean the appliance. Follow oven cleaner directions if these are being used.
- Wash all accessories in hot soapy water or in a dishwasher, wipe dry with a paper or cloth towel. If you use your oven for an extended period of time, condensation may form. Dry it using a soft dry cloth.
- When the appliance is not being used, the knobs must be kept in the 'OFF' position.
- Where this appliance is installed in a caravan, it shall NOT be used as a space heater.
- Do not modify this appliance.
- Do not use harsh abrasive cleaners or sharp metal scrapers to clean the oven door glass as it can scratch the surface, which may result in the glass shattering. Clean the glass door using warm damp cloth and dry it with a soft cloth.
- All cabinetry and materials used in the installation must be able to withstand a minimum temperature of 50^ C above the ambient temperature of the room it is located in, whilst in use. Certain types of vinyl or laminate kitchen furniture are particularly prone to heat damage or discolouration at temperatures outside the guidelines given above. Any damage caused by the appliance being installed without adhering to the temperature limits set out above will be the liability of the owner.
- This appliance must be correctly installed by a suitably qualified person, strictly in accordance with the manufacturer's instructions. Please see the specific section of this booklet that refers to installation.
- The appliance must be installed and put in operation by an authorised technician under the conditions provided by the manufacturer in this manual. The manufacturer cannot be held responsible for any damage that might occur due to faulty installation.
- The values indicated on the printed documents found on the product are values obtained in laboratory environment according to relevant standards. These values may vary according to the usage and environment conditions of product.
- This operating manual has been prepared jointly for multiple models. Some of the specifications explained in the manual, may not be included, in your appliance. Pay attention to the explanations with illustrations while reading the manual.
Electrical Details
| Model: | OBO654TGG |
| Rated Voltage: | 220-240V ~50Hz |
| Rated Power Input: | 1800-2200W |
| Supply Connection: | 10A Plug |
This information can be found on the rating plate (data label) affixed to the inside of the door jamb.
Dimensions
| LENGTH (mm) | WIDTH (mm) | HEIGHT (mm) |
| 595 | 570 | 595 |
Electrical Connections

Installation is only permitted by a licensed electrician, and carried out according to instructions provided by the manufacturer. Incorrect installation might cause harm and damage which the manufacturer accepts no responsibility.
ELECTRICAL INSTALLATION FOR THE LICENSED ELECTRICIAN
This oven must be connected to a 220-240V 50Hz power supply. It is earthed via the cord and 10A plug. Before carrying out the connection to the power supply, the voltage rating of the appliance (stamped on the appliance identification plate) must be checked for correspondence to the available mains supply voltage, and the mains electric wiring should be suitable for the oven's power rating (also indicated on the appliance identification plate);
The switched outlet must be connected to a suitable earth wiring, in conformity to current safety regulations. This appliance must be plugged into a 10A switched outlet. It should not be located above the appliance and no more than 1.25m away from it. The power supply cord must not touch against any hot surfaces and must be placed so that its temperature does not exceed 75°C at any point along its length.
After having installed the appliance, the switched outlet must always be in an accessible position.
NOTE: For connections to the mains power supply, never use adapters, reductions or multiple power points as these may overheat and catch fire.
The mains terminal block is located on the back of the oven and the terminals are accessible by opening the terminal block cover. Note: The terminal cover should not be opened when the mains power is still connected to the appliance and never by an unauthorized person.
The electrical safety of this appliance can only be guaranteed if the oven is correctly and efficiently earthed. The manufacturer declines all responsibility for damage resulting from an installation which has not been earthed correctly.
The use of adapters, multiple sockets and/or extensions, is not allowed.

The adjacent furniture must be able to withstand a minimum temperature rise of 50^ C above the ambient temperature of the room it is located in, during periods of use. The power supply to the appliance must be cut off before any adjustments or maintenance work is done on it.
PREPARATION FOR INSTALLATION AND USE
Manufactured with best quality parts and materials, this modern, functional and practical oven will meet your needs in all respects. Make sure to read the manual to obtain successful results so as not to experience any problems in the future. The information given below contains rules that are necessary for correct positioning and service operations. They should be read without fail, especially by the technician who will position the appliance.
CHOOSING A PLACE FOR THE APPLIANCES
There are several points to pay attention to when choosing a place for your oven. Make sure to take into account our recommendations below in order to prevent any problems and dangerous situations, which might occur later!
When choosing a place for the oven, attention should be paid that there are no flammable or combustible materials in the close vicinity, such as curtains, oil, cloth etc. which quickly catch fire.
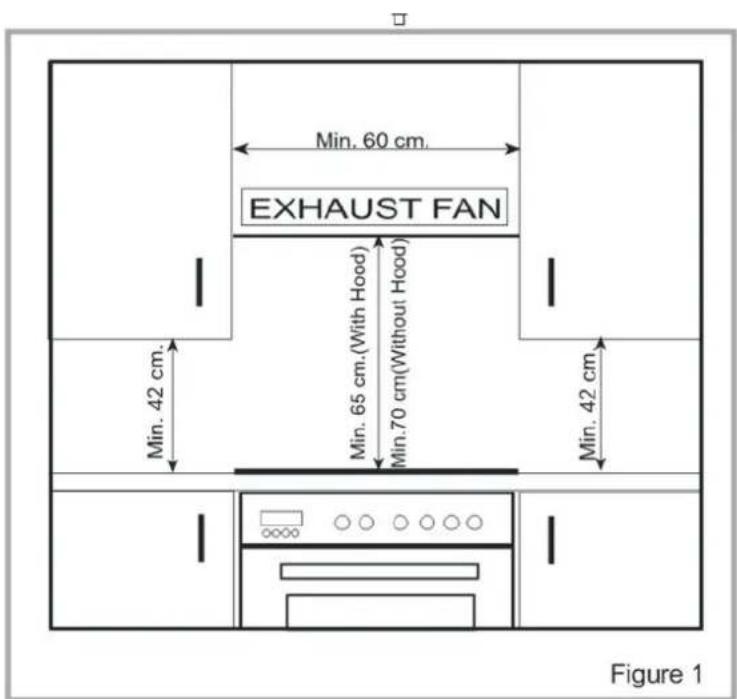
Furniture surrounding the oven or cooktop must be made of materials resistant to temperatures above 50 C°. Required changes to wall cabinets and exhaust fans above a built-in cooktop as well as minimum heights from the oven board are shown in Figure 1. Accordingly, the exhaust fan should be at a minimum height of 65 cm from the cooktop. If there is no exhaust fan the height should not be less than 70 cm.
text_image
EXHAUST FAN Min. 60 cm. Min. 42 cm. Min. 65 cm.(With Hood) Min.70 cm(Without Hood) Min. 42 cm. Figure 1INSTALLATION OF BUILT IN OVEN
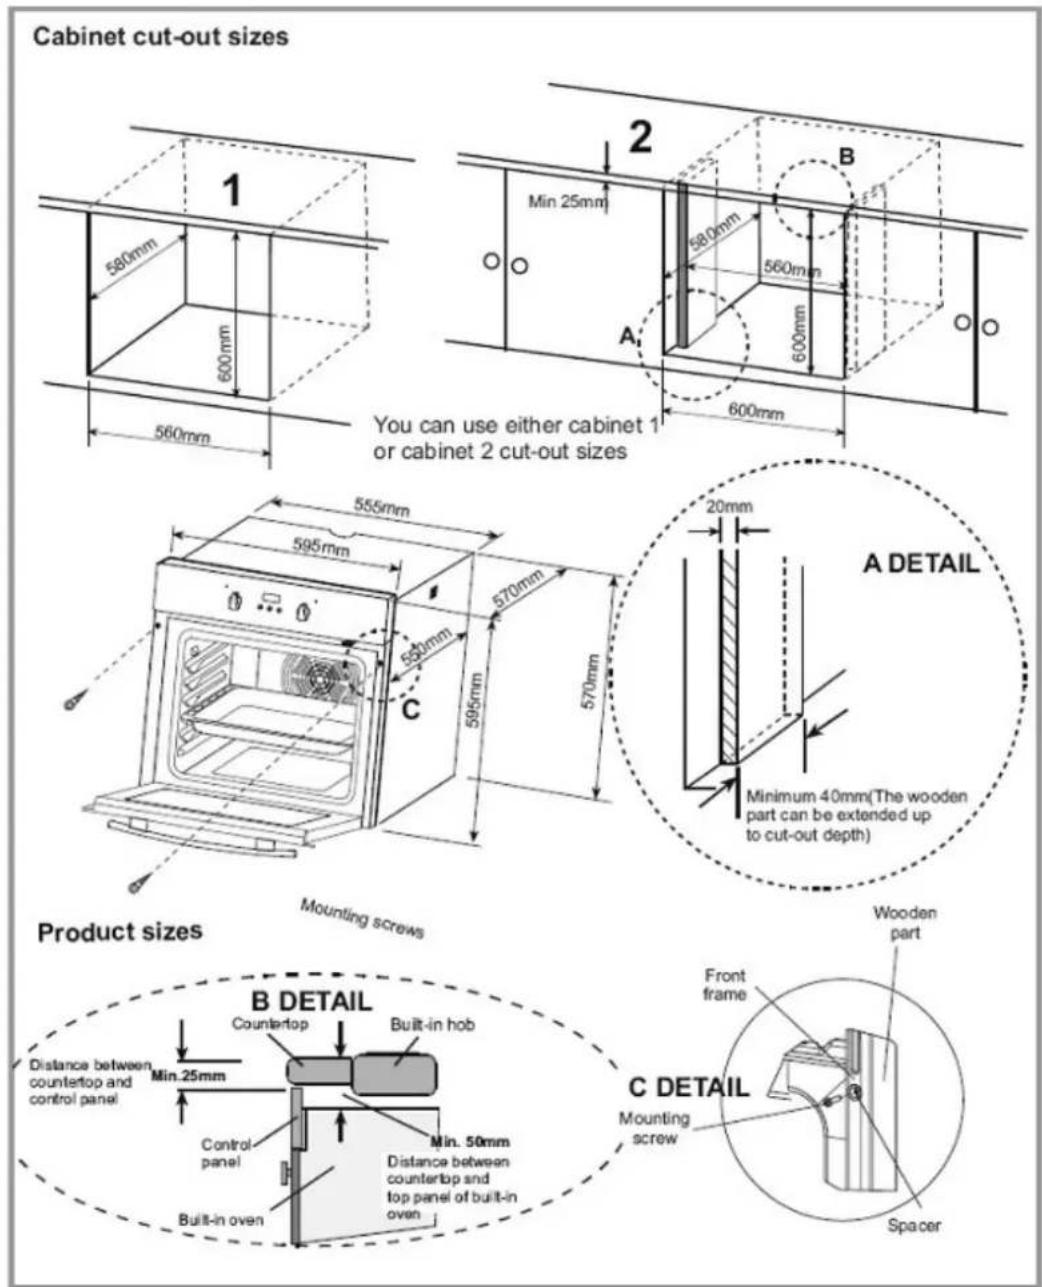
Insert the oven into cabinet partly by pushing it forward. Open the oven door and insert 2 screws into the holes on the oven frame. While the product frame touches the wooden surface of the cabinet, tighten the screws.
The dimensions and material of the cabinet in which the oven will be installed must be correct and resistant to increases in temperature. In a correct installation, contact with electrical or insulated parts must be prevented. Insulating parts need to be fitted in a way to ensure that they cannot be removed by using any kind of tool. Installing the appliance in the close vicinity of a refrigerator or a deep-freezer is not recommended as the performance of the above-mentioned appliances will be negatively affected due to emanating heat. After removing your oven from its packaging, be sure that the oven is not harmed. In case, you suspect of any damage to the appliance, do not use it; immediately contact an authorized Service Centre.
text_image
Cabinet cut-out sizes 1 560mm 500mm 560mm 2 Min 25mm 560mm 560mm 600mm 600mm A B You can use either cabinet 1 or cabinet 2 cut-out sizes 555mm 595mm 570mm 570mm 595mm C Mounting screws A DETAIL Minimum 40mm(The wooden part can be extended up to cut-out depth) Product sizes B DETAIL Countertop Built-in hob Min. 25mm Control panel Min. 50mm Distance between countertop and control panel Distance between countertop and top panel of built-in oven Mounting screw Front frame C DETAIL SpacerFront View
text_image
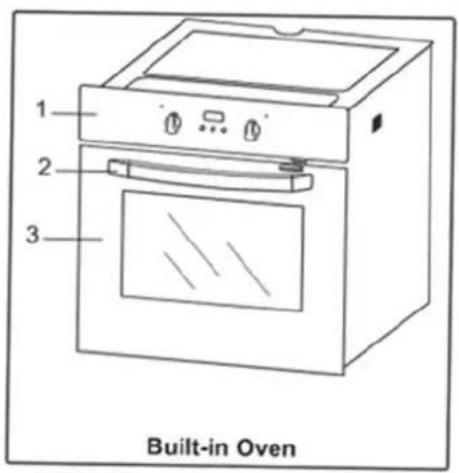
Built-in Oven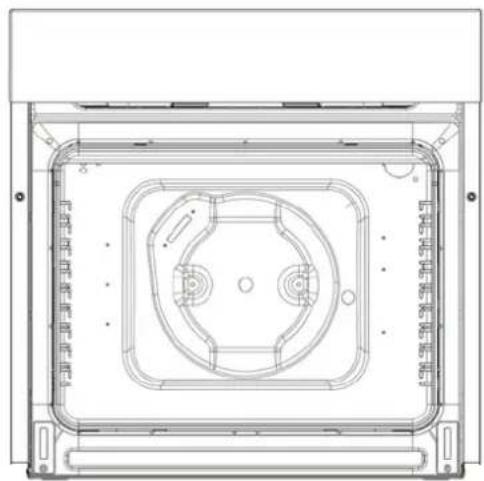
natural_image
Technical line drawing of a rectangular electronic device casing with internal compartments and mounting feet (no text or symbols)Internal View
text_image
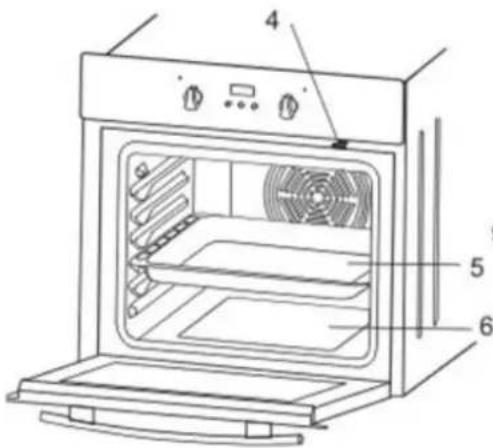
Technical diagram of an oven with numbered parts for identification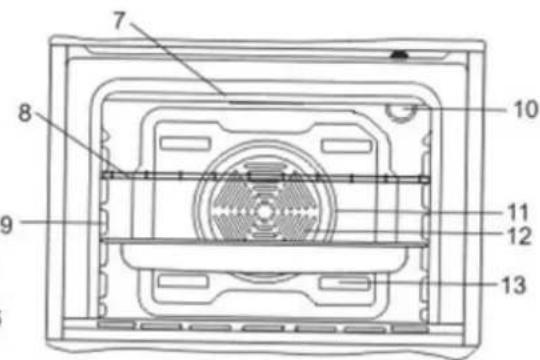
text_image
7 8 9 10 11 12 13- Control Panel
- Handle
- Oven Door
- Child Lock (Not available on these models)
- Tray
- Oven Bottom
-
Top Heating Element
-
Wire Grill.
- Racks/Shelf Holders.
- Oven Light.
- Turbo Heating Element.
- Fan.
- Air Outlet Shutters.
When you first run your oven a certain smell will be emanated arising from the insulation materials and the heater elements. For this reason, before using your oven, run it empty at maximum temperature for 45 minutes. At the same time you need to properly ventilate the environment in which the oven is installed.
In order to cook in your oven, the oven function and temperature setting controls need to be adjusted and the oven timer, if available, needs to be programmed. Otherwise, the oven will not operate.
Unplug your appliance when it is not in use.
Protect your appliance from atmospheric effects. Do not leave it under the effects of the sun, rain, snow, dust etc.
Controls
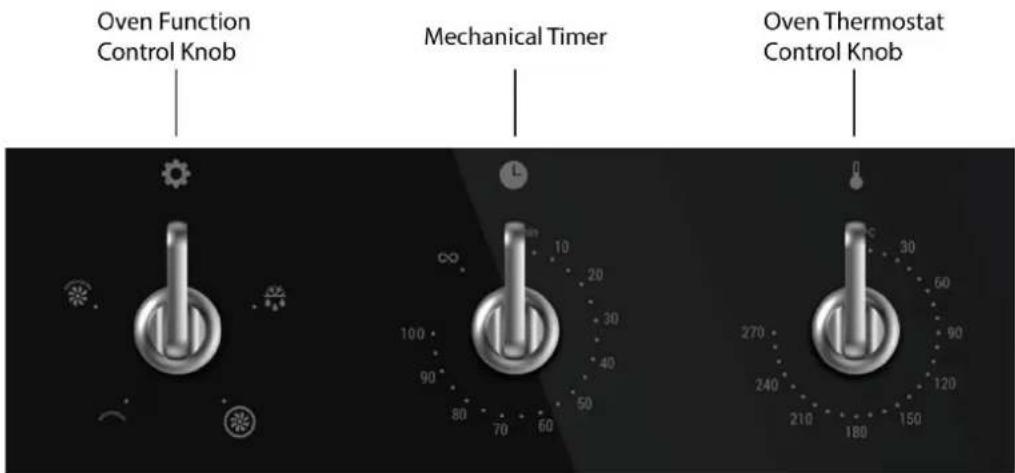
text_image
Oven Function Control Knob Mechanical Timer Oven Thermostat Control KnobOVEN FUNCTION/WARNING LIGHT CONTROL
The oven function selector is used to select the different functions. Each is explained in detail. To select a function, turn the control knob to the desired oven function and then set the temperature with the temperature selector.
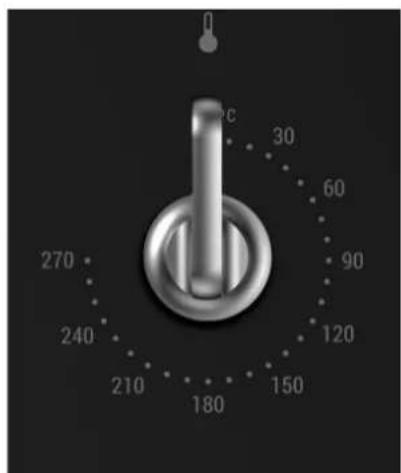
OVEN THERMOSTAT CONTROL
The oven thermostat control is used to select the desired temperature for cooking. When the temperature inside your oven reaches the value set, the thermostat will cut the circuit and the thermostat light will go off. When the temperature falls below the set value, the thermostat will again be turned on alongside the thermostat light. It is normal for this to occur during the cooking process, particularly when the door has been opened.
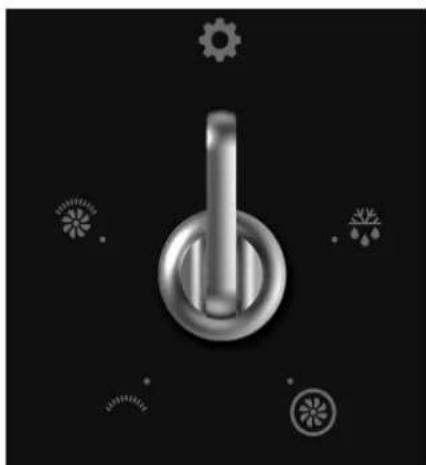
natural_image
Metal toggle switch icon on black background with gear and flower icons (no text or symbols)Function Selector
text_image
270 240 210 180 150 120 90 60 30 °CTemperature Selector
Oven Functions
The oven's mechanical timer must be on and in use or the control knob set to manual for the oven to work.
Note: Oven shelves are numbered from 9 at the top down to 1 at the bottom.
During heated oven functions a cooling fan in the top of the oven will operate in order to cool down the oven door and kitchen cabinet as well as reducing condensation in the oven. There will then be a slight release of warm air from the top of the closed oven door. This is not a leak in heat from the oven cavity.
Defrost
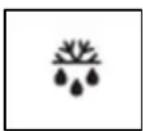
You can start the defrost operation by putting the frozen food into oven and bringing the function control knob to the indicated mark. This function will not cook/bake the food; it only helps to defrost it within a short time.
Put the food to be defrosted on the wire rack that you will place on the third rack support from the bottom (diagram opposite). To collect the water that accumulates due to the melting ice, insert an oven tray onto a lower rack. This function is perfect for finishing off the defrost process for frozen food that has been in the refrigerator from the evening before and may not be completely thawed out.
Fan Forced
This Fan Forced function uses the turbo heater (located in the back of the oven) to evenly disperse the heat in the oven. This function is suitable for cooking multiple dishes on various oven shelves. Adjust the function control knob so it indicates the Fan Forced function symbol. Adjust the thermostat control knob of your oven to a temperature recommended on the cooking table for the cooking operation you wish to perform.

Preheating of the oven for about 10 minutes is recommended. Place the food in a suitable container, then place into oven and cook for the required time.
If you are going to cook using two trays at the same time, while adjusting the cooking temperature, select the temperature that is the lowest among the levels suitable for your food of choice, as shown on the table.
Cooking with two trays requires additional cooking time compared to cooking with one tray. Usually, the food on each tray does not finish at the same time so you may need to take the tray of cooked food out of the oven, and continue the cooking operation for the remaining tray. After cooking, turn off the oven function and temperature control knobs and cancel the timer program if in use. Take the cooked food out of the oven and place it in a safe heatproof surface. As the oven will be hot, work near with caution and keep children away from the cooling oven.
Oven Functions
Mid-Grill
This function is used for grilling. Adjust the function control knob so it indicates the Mid-Grill function symbol and adjust the oven timer to the recommended time for cooking. Set the oven's thermostat control knob to the required temperature. After a preheating period of 10 minutes, put your food into the oven. For grilling, put the food on the grill rack and sit into the tray. Place the tray on the highest shelf (9). Placing the rack within the oven tray provided will ensure that any marinade, fat or oil dropping from the food will be collected. When grilling, the oven door must be closed. On this function, the middle heating elements/coins of the grill operate.
This setting is ideal for toasting bread, cheese melts and melting cheese topped dishes or finishing off a dish to lightly brown on the surface. Also used for herb and garlic bread.
After cooking, turn off the oven function and temperature control knobs and cancel the timer program if in use. Take the cooked food out of the oven and place it in a safe heatproof surface. As the oven will be hot, work near with caution and keep children away from the cooling oven.
Mid-Grill with Fan
This function will ensure complete, fast and all over grilling by working, the fan, the grill and the upper heating element at the same time. Adjust the function control knob so it indicates the Mid-Grill with Fan function symbol and adjust the oven timer to the recommended time for cooking. Set the oven's thermostat control to the required temperature. After a preheating period of 10 minutes, put your food into the oven. For grilling, put the food on the grill rack and sit into the tray. Place the tray on the highest shelf (9). Placing the rack within the oven tray provided will ensure that any marinade, fat or oil dropping from the food will be collected. When grilling, the oven door must be closed.
The Mid-grill with fan function is ideal for cooking food to achieve a crispy skin (such as chicken thigh or breast with the skin on) and lightly browning meat such as lamb and seafood. After cooking, turn off the oven function and temperature control knobs and cancel the timer program if in use. Take the cooked food out of the oven and place it in a safe heatproof surface. As the oven will be hot, work near with caution and keep children away from the cooling oven.
Energy Saving
Choose cookware of an appropriate size. Using a lid will reduce cooking times.
Minimize the amount of liquid or fat to reduce cooking times.
Oven door should not be opened often during cooking period
USING THE MECHANICAL TIMER
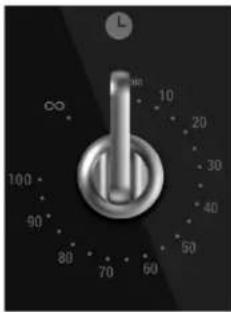
To set a time, rotate the timer control knob clockwise to a certain time range between 0 - 100 minutes, as shown in the figure below. The oven will stop when the set time range is completed, and the timer will give an audible warning once.
This is referred to as Manual use or Manual operation, when you want total control of the cooking functions and cooking time.
natural_image
Close-up of a metallic toggle switch dial with rotary knob (no visible text or symbols)ACCESSORIES
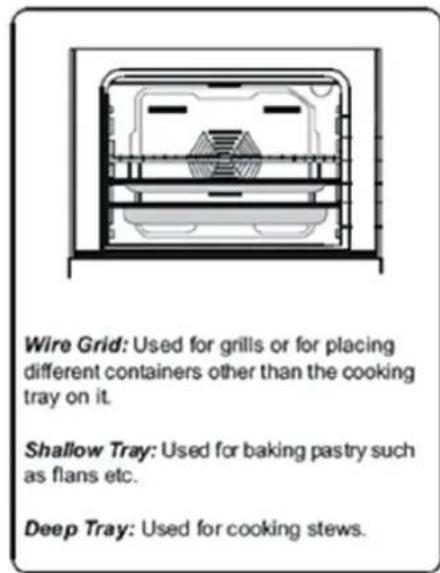
It is recommended that you use the containers indicated depending on the food you will cook in your oven. You can also use glass containers, cake pans and special oven trays suitable for use in your oven (available in kitchenware shops). Pay attention to the information given by the supplier for use of this cookware. The information given below should be implemented for enameled containers.
If the food to be cooked does not completely cover the oven tray, if the food is taken out of the deep-freezer or if the tray is used to collect the dripping juices of the foods during the grill operation, deformation might be observed on the tray over time due to high temperatures forming during the cooking/baking operation. This is a normal, physical state that results during the heat transfer. Do not leave a glass tray or container in a cold environment immediately after cooking in them. Do not place them on cold and wet surfaces. Ensure that they slowly cool off by placing them on a dry piece of cloth or wooden board, otherwise, the glass tray or container might break. If you are going to use the large wire oven rack/grill, insert a tray into one of the lower racks to collect fat or oil. To make cleaning easier, add some water into this tray. In a grilling operation, use the shelf in position 8 or 9.
text_image
Wire Grid: Used for grills or for placing different containers other than the cooking tray on it. Shallow Tray: Used for baking pastry such as flans etc. Deep Tray: Used for cooking stews.Pan anti-tilting wire

natural_image
Technical line drawing of a roof structure with ribbed roof and angled base (no text or symbols)- To locate grid correctly in the cavity, put it to any rack and push the grid up to the land.
• The pan anti-tilting wire must be placed inside of the cavity.
• The appliance must first be disconnected from the power outlet or turned off at your isolation switch.
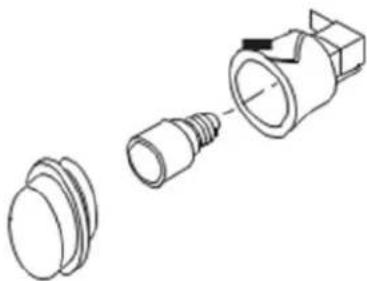
• Unscrew the glass cover attached to the lamp holder; anti-clockwise.
- Unscrew the lamp and replace it with another high-temperature lamp with the following characteristics:
| Type | E14 |
| Voltage Rating | 220-240V |
| Power Rating | 25W |
| Temperature Rating | 300°C |
• Remount the glass cover and reconnect the appliance to the power supply
NOTE: Should you experience any difficulty please contact your nearest after-sales service centre.
natural_image
Technical line drawing of a connector assembly showing two views of a cylindrical component (no text or symbols)
NOTE: Cleaning and maintenance operations must only be carried out when the oven is cool.
The appliance should be disconnected from the power outlet or turned off at your isolation switch before commencing any cleaning process.
Cleaning the oven exterior:
Before starting to clean your oven, be sure that all control buttons are off and your appliance has cooled off. Unplug the appliance.
Do not use cleaning materials containing particles that might scratch the enameled and painted parts of your oven. Use cream cleaners or liquid cleaners, which do not contain particles. As these cleaners may damage the surfaces, do not use caustic creams, abrasive cleaning powders, rough wire wool or hard tools. In the event of any excess liquids spilling over your oven surface during cleaning, clean up immediately so as to prevent possible damage to the enamel or metal surface. Do not use steam cleaners for cleaning the oven.
Cleaning the interior of the oven:
Make sure to unplug the oven before starting to clean it. You will obtain best results if you clean the oven interior while the oven is slightly warm (the oven should not be operating). Wipe your oven with a soft piece of cloth (e.g. dish cloth) dampened with warm soapy water after each use, rinse cloth in warm water then wipe oven again and then finish by wiping with a dry cloth. For a complete cleaning process, use dry and powder type oven cleaners, following the oven cleaning product's instructions.
Troubleshooting
If the oven does not operate:
• The oven may be unplugged from the power source or switched off at the power source.
• The household fuse has blown or household power supply is off.
- The Timer (if available) may not set correctly.
If the oven does not heat:
The heat may not be set correctly with the oven's temperature setting.
If the interior lighting lamp does not light:
• The lamps are defective. If they are defective, you can change them following the instructions within this manual.
Cooking (if lower-upper part does not cook equally):
• Control the shelf locations, cooking period and heat values according to the manual.
Unit smoking when first used:
• This is a result of protective oils being removed and is to be expected with a first use.
Oven fan is still running even though knobs in off position:
• The cooling fan has activated to cool down the control; this is normal and may stay on for some time.
Clock Flashing on Display
• Power failure or interruption
If you have any further problems with your product, please call your Authorised Service Centre.
Australian & New Zealand Product Warranty Statements of Standard Warranty Conditions
Australian Customers
Our goods come with guarantees that cannot be excluded under the Australian Consumer Law. You are entitled to a replacement or refund for a major failure and for compensation for any other reasonably foreseeable loss or damage. You are also entitled to have the goods repaired or replaced if the goods fail to be of acceptable quality and the failure does not amount to a major failure.
New Zealand Customers
Nothing herein contained shall be construed in any way as excluding or limiting your rights under the Consumer Guarantee Act 1993.
Our Warranty
This product is also covered by the manufacturer's warranty set out in this document (Our Warranty).
Our Warranty is for a period of twenty four (24) months from the date of purchase and for refrigeration appliances will have an additional thirty six (36) months after the first twenty four (24) months on the Sealed System (PARTS only) Compressor & condenser etc. The labour cost to replace these parts is the responsibility of the customer. This is in addition to (and does not exclude, restrict or modify) any rights or remedies to which you may already be entitled under the Australian Consumer Law or the New Zealand Consumer Guarantee Act 1993 relating to this product. Our Warranty (which is subject to the conditions below) covers rectification free of charge of any fault arising from defective materials or components, or faulty workmanship. The product will be repaired or replaced at the option of Omega, and all costs of installation, removal, cartage, freight travelling expenses and insurance are to be paid by the customer. Our Warranty is subject to the following conditions:
- That the purchaser contact Omega prior to any product repair.
- That the purchaser carefully follows all instructions provided with the product and complies with all relevant electrical & plumbing regulations in their State when installing the product.
- That the purchaser carefully follows the instructions provided in the owner's handbook relating to the proper use and care of the product and does not use the product for any purpose other than the DOMESTIC use for which it has been designed. If the appliance is used in commercial applications or for rental purposes, Our Warranty is limited to a warranty of Twelve (12) months covering all parts with Three (3) months on any labour cost of service or repair.
Service Area
The provision of service under Our Warranty is limited by the boundary / territory area of the nearest service centre. Travelling cost incurred for service outside this area is not covered by Our Warranty
and service will incur commercial cost to be paid by the customer regulated by the number of kilometres travelled beyond the service area. These costs will be disclosed to you for acceptance by you prior to your claim being processed. Microwave ovens must be returned to your nearest Authorised Service Centre for repair as they are a carry in serviceable appliance.
What is Covered by our Warranty
During the warranty period, Omega or its authorised Service Centre will, at no extra charge, if your appliance is readily accessible without the need of special equipment and subject to the terms and conditions of this warranty, repair or replace any parts which it considers defective.
What is not Covered by our Warranty
- Products installed damaged or incomplete or not in compliance with the relevant electrical & plumbing regulations in their State.
- Normal wear and tear e.g. cleaning, light globes, filters etc.
- Failure resulting from power surges and electrical storms.
- Insect or vermin infestation.
- Unauthorised repairs or use of non-genuine Omega parts.
- Any failure caused by the product not being used in accordance with the instruction and the installation manual provided with the product.
- Misuse or abuse, including failure to properly maintain or service.
- The clearing of blockages in pumps and hoses.
- Damage which occurs during delivery or installation.
- Claims to product surface coating due to liquid or solid spill-overs, accidental damage or damage caused from cleaning products not recommended by Omega.
How to Claim Our Warranty
While registering your warranty is not a requirement, for peace of mind you can register your warranty at omegaappliances.com.au.
To make a claim under Warranty you will need to contact Omega in Australia or New Zealand by using the contact details below.
If you are contacting Omega regarding any warranty claims and spare parts inquiries, please make sure you have the following information on hand:
- Product Name/Model Number
- Serial Number/s
- Purchase Date (as per invoice or proof of purchase)
- Purchased From
- Warranty Registration Number (if registered)
Contact Us Australia
Omega is a division of Shriro Australia Pty Ltd
Phone: 1300 739 033
Email: customercare@omegaappliances.com.au
Contact Us New Zealand
Omega is a division of Monaco Corporation (member of Shriro)
Phone: 09 415 6000
Email: customercare@monacocorp.co.nz