FourTrax Recon TRX250TM (2020) - ATV Honda - Free user manual and instructions
Find the device manual for free FourTrax Recon TRX250TM (2020) Honda in PDF.


User questions about FourTrax Recon TRX250TM (2020) Honda
0 question about this device. Answer the ones you know or ask your own.
Ask a new question about this device
Download the instructions for your ATV in PDF format for free! Find your manual FourTrax Recon TRX250TM (2020) - Honda and take your electronic device back in hand. On this page are published all the documents necessary for the use of your device. FourTrax Recon TRX250TM (2020) by Honda.
USER MANUAL FourTrax Recon TRX250TM (2020) Honda
These pages give an overview of the contents of your owner's manual.
The first page of each section lists the topics covered in that section.
ATV Safety ....1
Important safety information you should know, plus a look at the safety related labels on your ATV.
Indicators & Controls....9
The location and function of indicators and controls on your ATV and operating instructions for various controls and features.
Before Riding ......29
The importance of wearing a helmet and other protective gear, how to make sure you and your ATV are ready to ride, and important information about loading.
Basic Operation & Riding ....43
How to start and stop the engine, shift gears, and brake. Also, riding precautions.
Contents
Contents
Servicing Your Honda 77
Why your ATV needs regular maintenance, what you need to know before servicing your Honda, an owner maintenance schedule, and instructions for specific maintenance and adjustment items.
Tips 151
How to store and transport your ATV and how to be an environmentally responsible rider.
Taking Care of the Unexpected....161
What to do if you have a flat tire, your engine won't start, etc.
Technical Information 181
ID numbers, technical specifications, and other technical facts.
Consumer Information ....197
Information on warranties, emission controls, how to get Honda service manuals.
Index....204
Quick Reference
Handy facts about fuel, engine oil, tire sizes, and air pressures.
2020
Honda
TRX250TE
FOURTRAX RECON ES
OWNER'S MANUAL
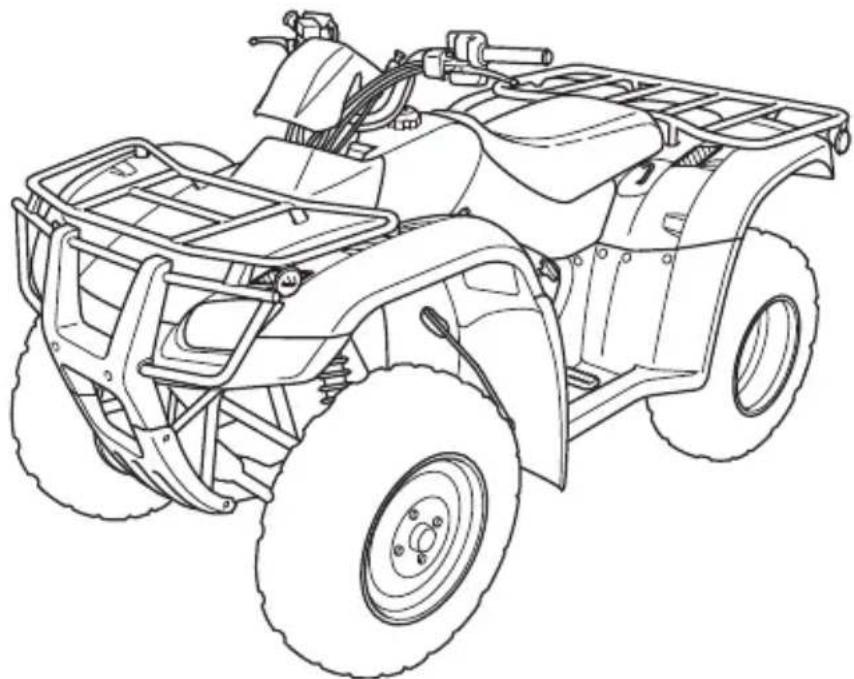
natural_image
Line drawing of a multi-axle off-road vehicle with visible wheels, frame structure, and suspension components (no text or symbols)FOR OFF-ROAD USE ONLY
This vehicle is designed and manufactured for off-road use only.
It conforms to US EPA Noise Emission regulations, but does not conform to Federal Motor Vehicle Safety Standards or US EPA On Highway Exhaust Emission regulations, and operation on public streets, roads, or highways is illegal. The vehicle is equipped with a USDA qualified spark arrester. Obey local laws and regulations.
It conforms to US EPA emission regulations for ATVs.
Congratulations on choosing your Honda ATV.
When you own a Honda, you're part of a worldwide family of satisfied customers — people who appreciate Honda's reputation for building quality into every product.
Your Honda was designed as a recreational ATV for off-road use by one rider only.
Before riding, take time to get acquainted with your ATV and how it works. To protect your investment, we urge you to take responsibility for keeping your ATV well maintained. Scheduled service is a must, of course. But it's just as important to observe the break-in guidelines, and perform all pre-ride and other periodic checks detailed in this manual.
We also recommend that you read this owner's manual before you ride. It's full of facts, instructions, safety information, and helpful tips. To make it easy to use, the manual contains a detailed list of topics at the beginning of each section and an index at the back of the book.
As you read this manual, you will find information that is preceded by a NOTICE. This information is intended to help you avoid damage to your Honda, other property, or the environment.
Read the Warranties Booklet (page 199) thoroughly so you understand the coverages that protect your new Honda and are aware of your rights and responsibilities.
Whenever you ride, tread lightly. By staying on established trails and riding only in approved areas, you help protect the environment and keep off-road riding areas open for the future.
If you have any questions, or if you ever need special service or repairs, remember that your dealer knows your ATV best and is dedicated to your complete satisfaction.
Please report any change of address or ownership to your dealer so we will be able to contact you concerning important product information.
You may also want to visit our website at www.powersports.honda.com.
Happy riding!
A Few Words About Safety
Your safety, and the safety of others, is very important. And operating this ATV safely is an important responsibility.
To help you make informed decisions about safety, we have provided operating procedures and other information on labels and in this manual. This information alerts you to potential hazards that could hurt you or others.
Of course, it is not practical or possible to warn you about all hazards associated with operating or maintaining an ATV. You must use your own good judgment.
You will find important safety information in a variety of forms, including:
Safety Labels — on the ATV.
Safety Messages — preceded by a safety alert symbol ⚠️ and one of three signal words: DANGER, WARNING, or CAUTION.
These signal words mean:
! DANGER
You WILL be KILLED or SERIOUSLY HURT if you don't follow instructions.
WARNING
You CAN be KILLED or SERIOUSLY HURT if you don't follow instructions.
CAUTION
You CAN be HURT if you don't follow instructions.
Safety Headings — such as Important Safety Reminders or Important Safety Precautions.
Safety Section — such as ATV Safety.
Instructions — how to use this ATV correctly and safely.
This entire manual is filled with important safety information — please read it carefully.
This section presents some of the most important information and recommendations to help you ride your ATV safely. Please take a few moments to read these pages. This section also includes information about the location of safety labels on your ATV.
Important Safety Information.... 2
Safety Labels 5
Important Safety Information
Your ATV can provide many years of service and pleasure if you take responsibility for your own safety and understand the challenges you can meet while riding.
There is much that you can do to protect yourself when you ride. You'll find many helpful recommendations throughout this manual. The following are a few that we consider to be most important.
Follow the Age Recommendation
The minimum recommended age for this ATV model is 16. Children under age 16 should never operate this vehicle. Refer to the age warnings provided in this manual and on the ATV.
Always Wear a Helmet
It's a proven fact: helmets significantly reduce the number and severity of head injuries. So always wear an approved motorcycle helmet. We also recommend that you wear eye protection, sturdy boots, gloves, and other protective gear (page 30).
Never Carry a Passenger
Your ATV is designed for one person only. There are no handholds, footrests, or seat for a second person, so never carry a passenger. A passenger could interfere with your ability to move around to maintain your balance and control of the ATV.
Ride Off-road Only
Your ATV is designed and manufactured for off-road use only. The tires are not made for pavement, and the ATV does not have turn signals and other features required for use on public roads. If you need to cross a paved or public road, get off and walk your ATV across.
Take Time to Learn & Practice
Even if you have ridden other ATVs, take time to become familiar with how this ATV works and handles. Practice in a safe area until you build your skills and get accustomed to the ATV's size and weight.
Because many crashes involve inexperienced or untrained riders, we urge all riders to take a ATV operator course approved by the ATV Safety Institute (ASI). See page 32.
Contact an authorized ATV dealer or call 1-800-887-2887 to find out about the training courses nearest you.
Be Alert for Off-road Hazards
The terrain can present a variety of challenges when you ride off-road. Continually “read” the terrain for unexpected turns, drop-offs, rocks, ruts, and other hazards. Always keep your speed low enough to allow time to see and react to hazards.
Important Safety Information
Ride within Your Limits
Pushing limits is another major cause of ATV crashes. Never ride beyond your personal abilities or faster than conditions warrant. Remember that alcohol, drugs, fatigue, and inattention can significantly reduce your ability to make good judgments and ride safely.
Don't Drink and Ride
Alcohol and riding don't mix. Even one drink can reduce your ability to respond to changing conditions, and your reaction time gets worse with every additional drink. So don't drink and ride, and don't let your friends drink and ride either.
Keep Your Honda in Safe Condition
It's important to keep your ATV properly maintained and in safe riding condition. Having a breakdown can be difficult, especially if you are stranded off-road far from your base. To help avoid problems, inspect your ATV before every ride and perform all recommended maintenance.
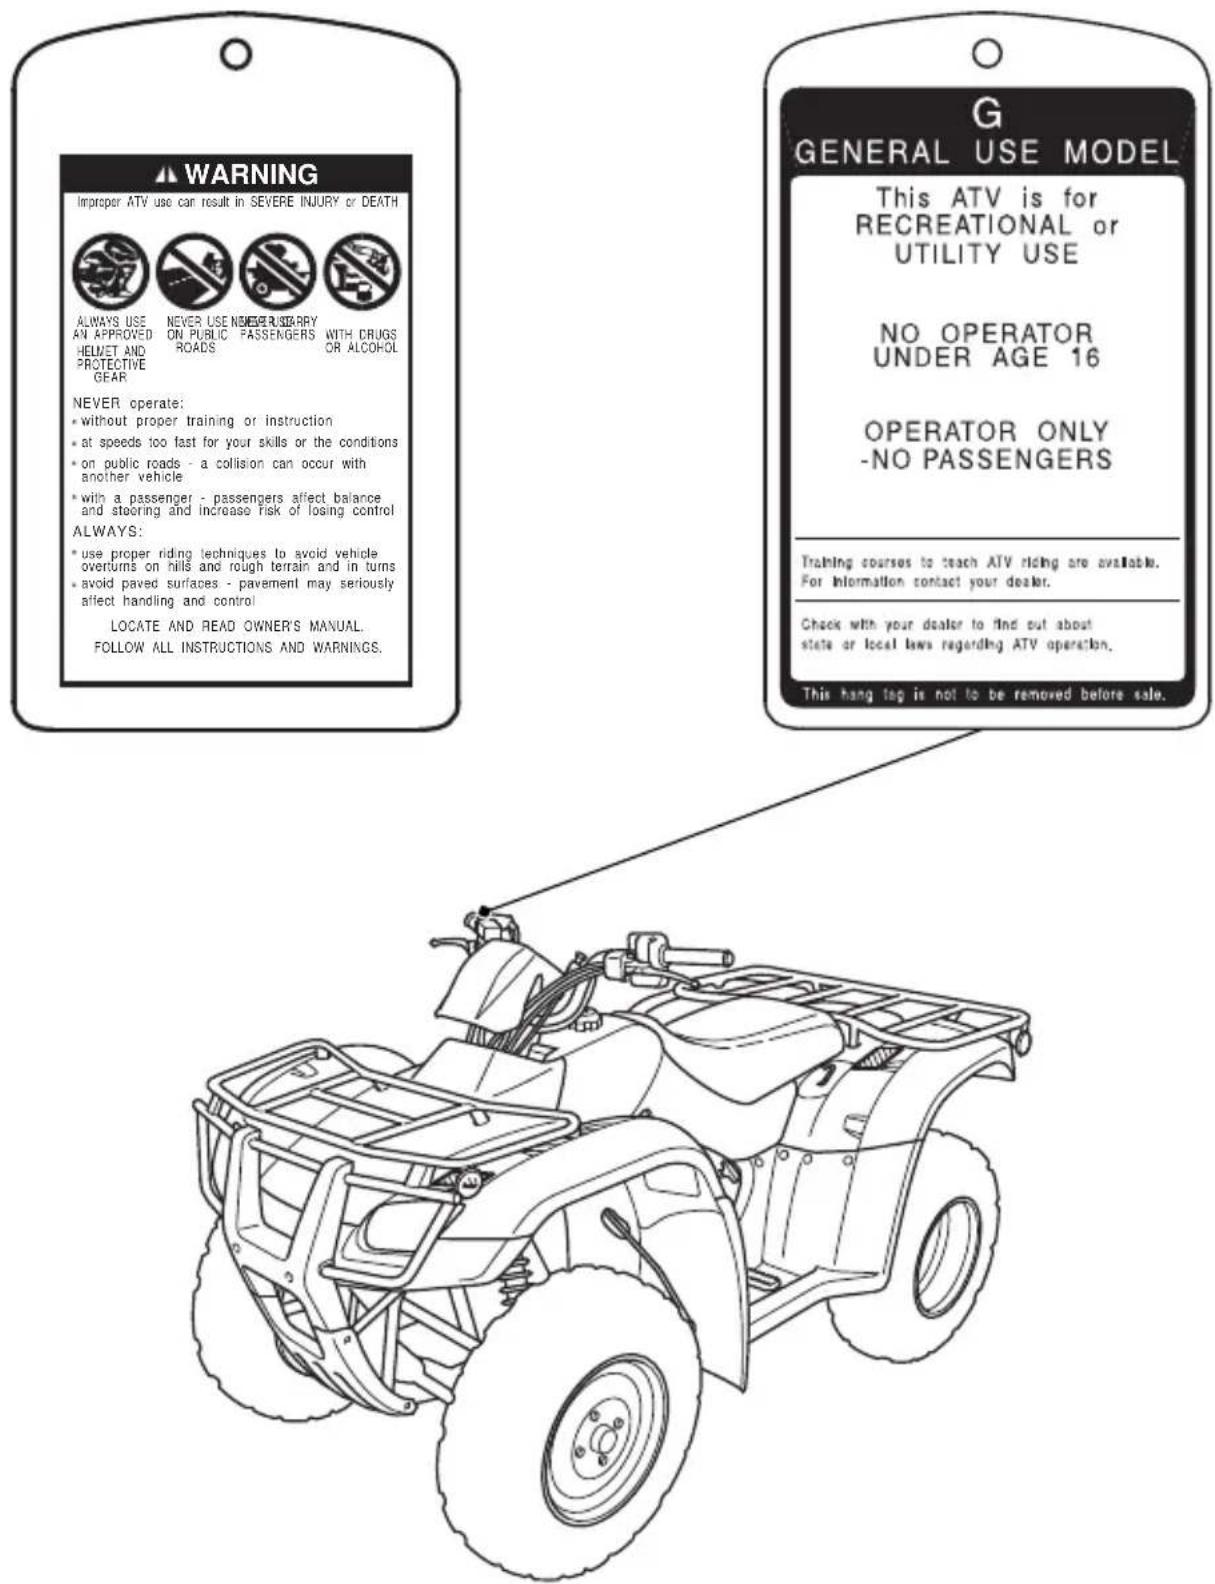
Your ATV comes with a hang tag and several labels containing important safety information. Anyone who rides the vehicle should read and understand this information before riding.
The labels should be considered permanent parts of the vehicle. If a label comes off or becomes hard to read, contact your dealer for replacements.
text_image
WARNING Improper ATV use can result in SEVERE INJURY or DEATH ALWAYS USE NEVER USE NOVER USTERRY ON PUBLIC PASSENGERS WITH DRUGS HELMET AND PROTECTIVE GEAR NEVER operate: • without proper training or instruction • at speeds too fast for your skills or the conditions • on public roads - a collision can occur with another vehicle • with a passenger - passengers affect balance and steering and increase risk of losing control ALWAYS: • use proper riding techniques to avoid vehicle overturns on hills and rough terrain and in turns • avoid paved surfaces - pavement may seriously affect handling and control LOCATE AND READ OWNER'S MANUAL. FOLLOW ALL INSTRUCTIONS AND WARNINGS. GENERAL USE MODEL This ATV is for RECREATIONAL or UTILITY USE NO OPERATOR UNDER AGE 16 OPERATOR ONLY -NO PASSENGERS Training courses to teach ATV riding are available. For information contact your dealer. Check with your dealer to find out about state or local laws regarding ATV operation. This hang tag is not to be removed before sale.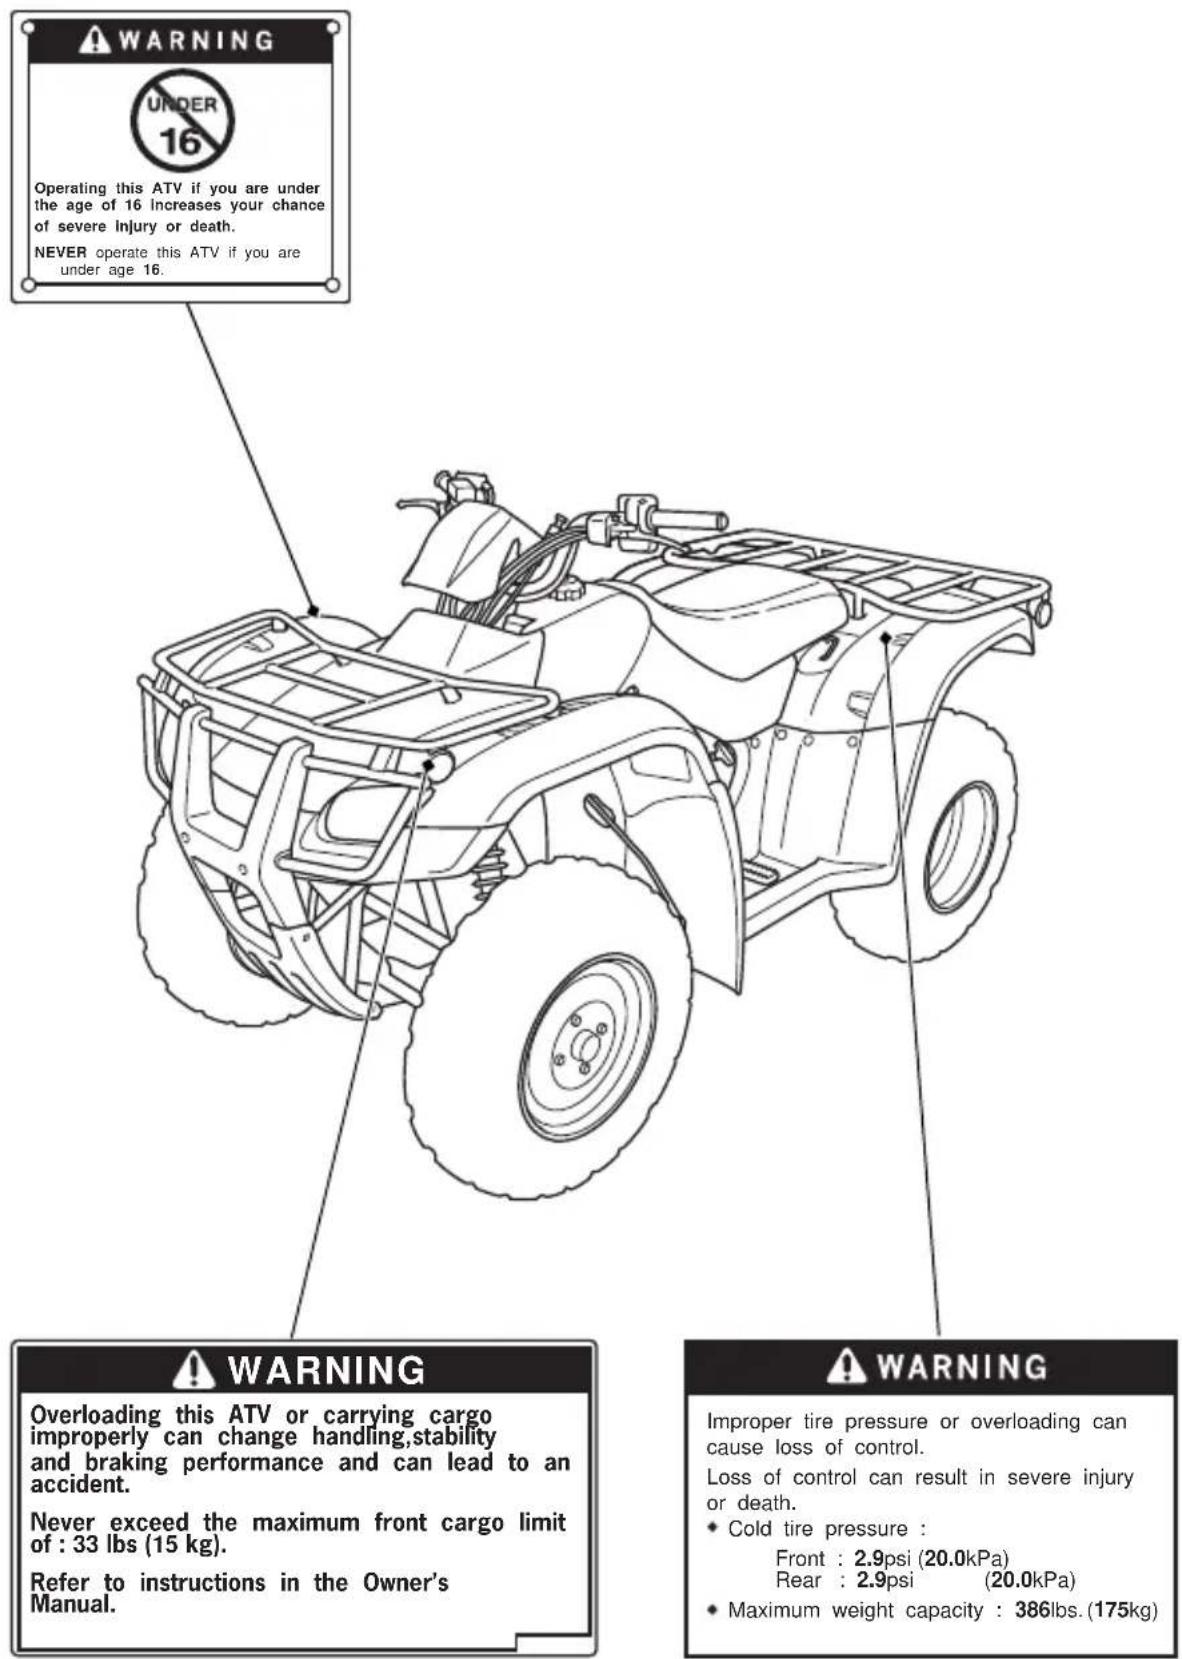
text_image
WARNING UNDER 16 Operating this ATV if you are under the age of 16 increases your chance of severe injury or death. NEVER operate this ATV if you are under age 16. WARNING Overloading this ATV or carrying cargo improperly can change handling,stability and braking performance and can lead to an accident. Never exceed the maximum front cargo limit of : 33 lbs (15 kg). Refer to instructions in the Owner's Manual. WARNING Improper tire pressure or overloading can cause loss of control. Loss of control can result in severe injury or death. • Cold tire pressure : Front : 2.9psi (20.0kPa) Rear : 2.9psi (20.0kPa) • Maximum weight capacity : 386lbs. (175kg)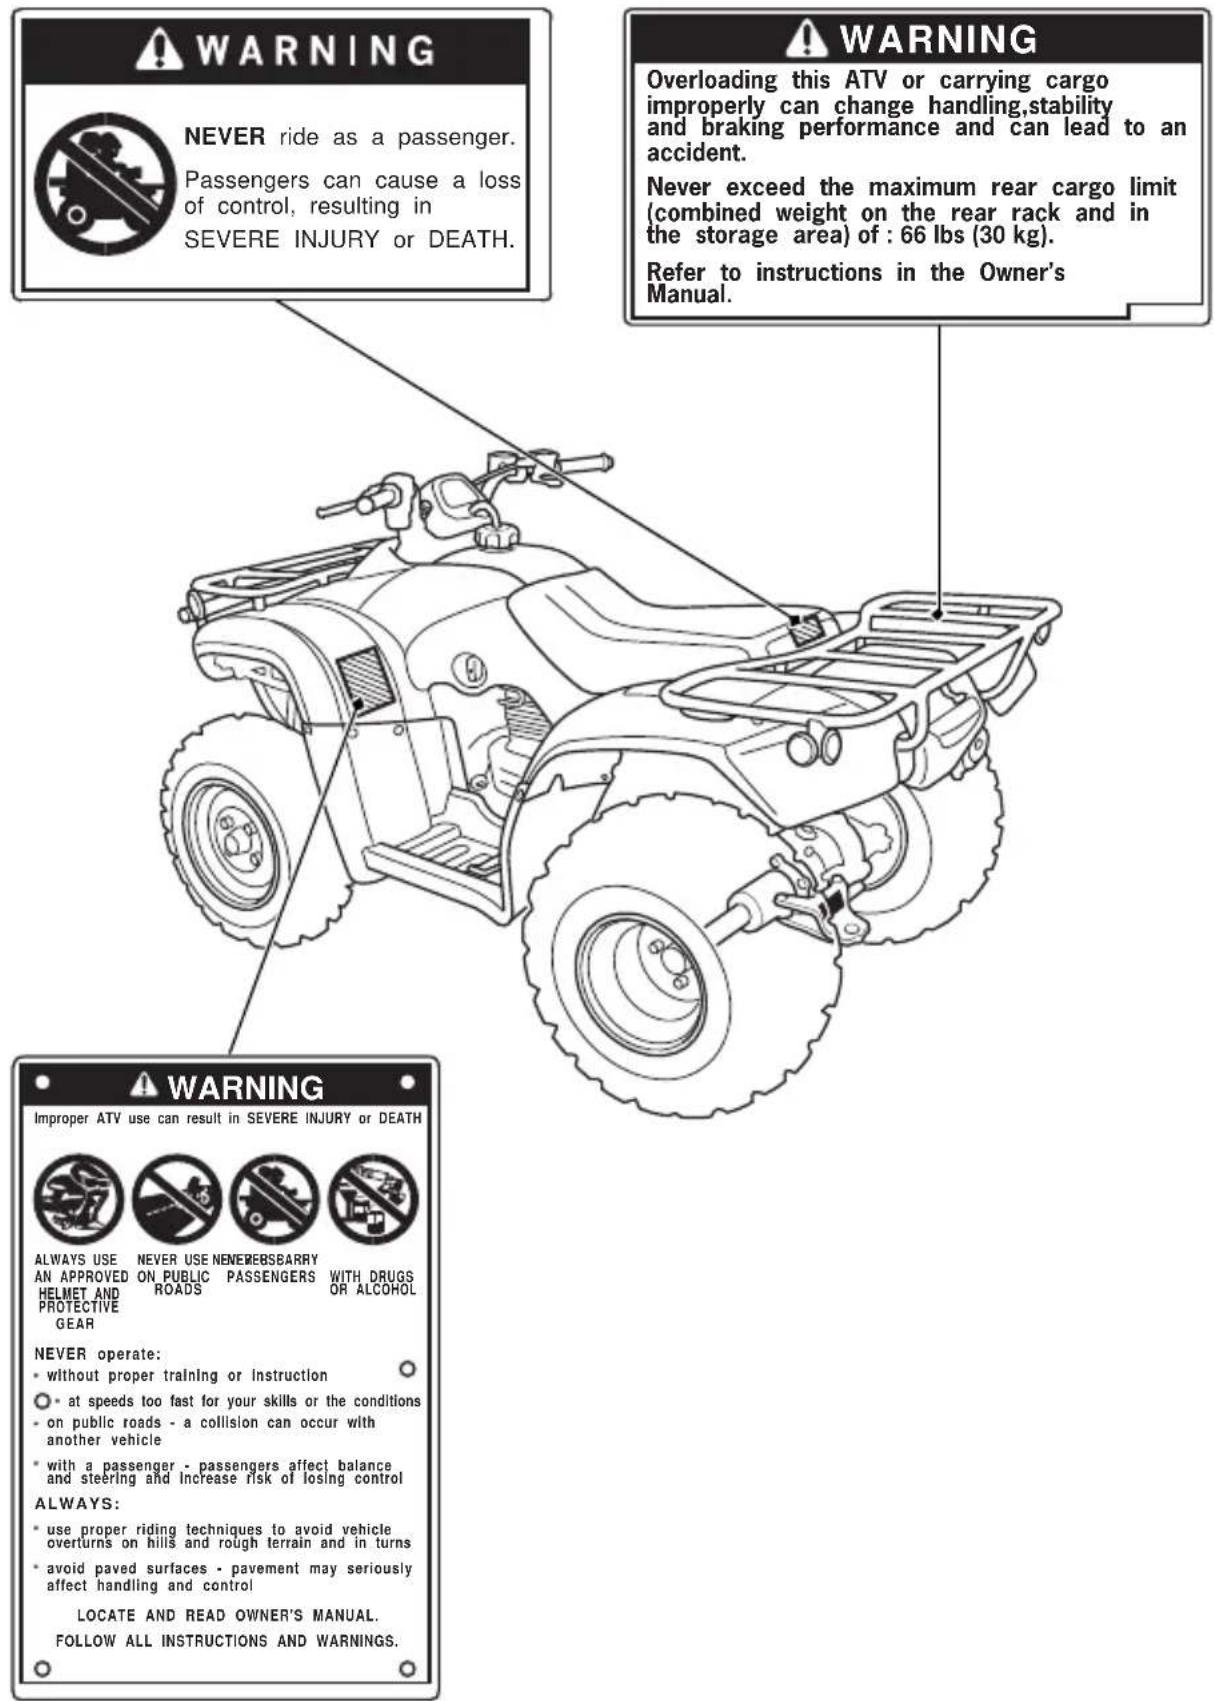
text_image
WARNING NEVER ride as a passenger. Passengers can cause a loss of control, resulting in SEVERE INJURY or DEATH. WARNING Overloading this ATV or carrying cargo improperly can change handling,stability and braking performance and can lead to an accident. Never exceed the maximum rear cargo limit (combined weight on the rear rack and in the storage area) of : 66 lbs (30 kg). Refer to instructions in the Owner's Manual. WARNING Improper ATV use can result in SEVERE INJURY or DEATH ALWAYS USE NEVER USE NENEREBSBARRY WITH DRUGS AN APPROVED ON PUBLIC PASSENGERS OR ALCOHOL HELMET AND ROADS OR PROTECTIVE GEAR NEVER operate: • without proper training or Instruction • at speeds too fast for your skills or the conditions • on public roads - a collision can occur with another vehicle • with a passenger - passengers affect balance and steering and increase risk of losing control ALWAYS: • use proper riding techniques to avoid vehicle overturns on hills and rough terrain and in turns • avoid paved surfaces - pavement may seriously affect handling and control LOCATE AND READ OWNER'S MANUAL. FOLLOW ALL INSTRUCTIONS AND WARNINGS.Indicators & Controls
This section shows the location of all indicators and controls you would normally use before or while riding your ATV.
The items listed on this page are described in this section.
Instructions for other components are presented in other sections of this manual where they will be most useful.
Operation Component Locations 11
Indicators 14
Reverse and Neutral Indicators 14
Gear Position Indicator.... 15
(cont'd)
Indicators & Controls
Controls & Features.... 16
Fuel Valve 16
Choke Knob 17
Ignition Switch.... 18
Start Button.... 19
Engine Stop Switch.... 19
Headlight Switch 20
Headlight Dimmer Switch 20
Recoil Starter 21
Throttle Lever 22
Gearshift Switch 23
Front Brake Lever.... 24
Rear Brake Lever/Parking Brake Lever 24
Rear Brake Pedal.... 24
Parking Brake/Reverse Lever (P/R Lever) 25
Flag Pole Bracket 27
Operation Component Locations
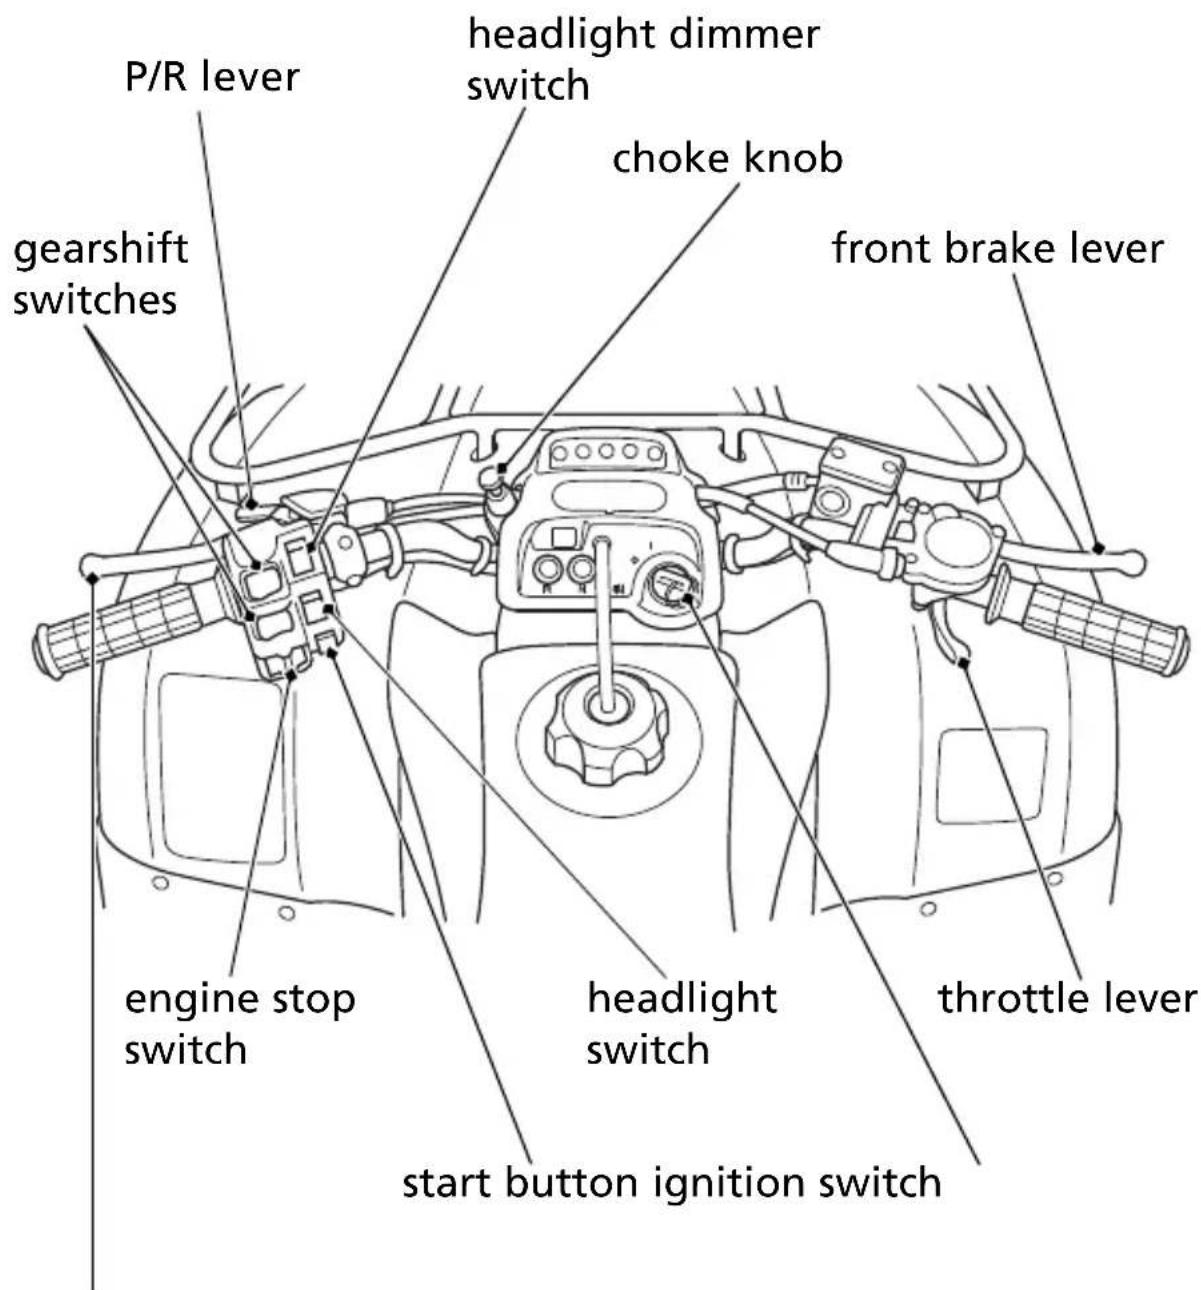
text_image
P/R lever headlight dimmer switch choke knob front brake lever gearshift switches engine stop switch headlight switch throttle lever start button ignition switchrear brake lever/ parking brake lever
Operation Component Locations
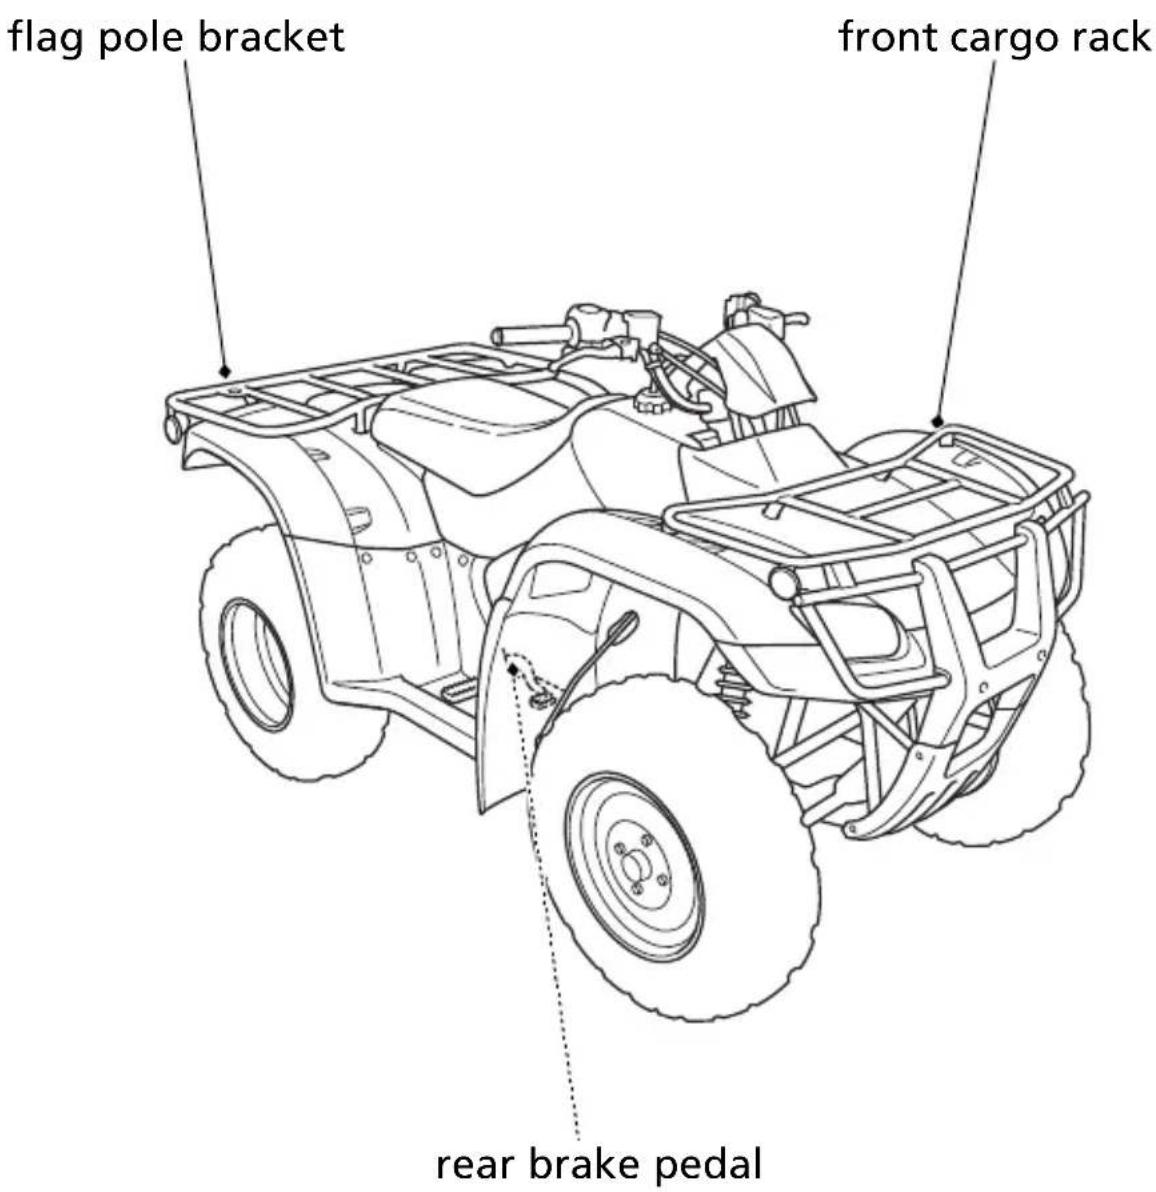
text_image
flag pole bracket front cargo rack rear brake pedalOperation Component Locations

text_image
fuel valve recoil starter seat lock lever rear cargo rackReverse and Neutral Indicators
The reverse indicator (1) and the neutral indicator (2) are next to the ignition switch.
The reverse indicator will light when the transmission is in reverse and the ignition switch is ON (1).
The neutral indicator will light when the transmission is in neutral and the ignition switch is ON (1).
If one of these indicators does not come on when it should, have your dealer check for burned-out bulbs or other problems.
CENTER OF HANDLEBAR
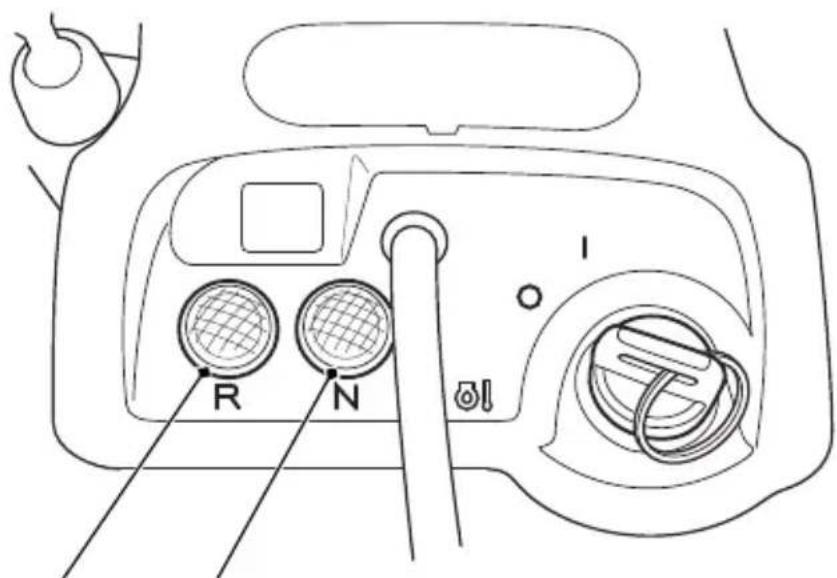
text_image
R N(2)(1)
(1) reverse indicator
(2) neutral indicator
Gear Position Indicator
The gear position indicator (I) shows the gear position when the ignition switch is in the ON (I) position and the engine is running.
The indicator shows: 1 – 5 for the five forward speed gears.
CENTER OF HANDLEBAR
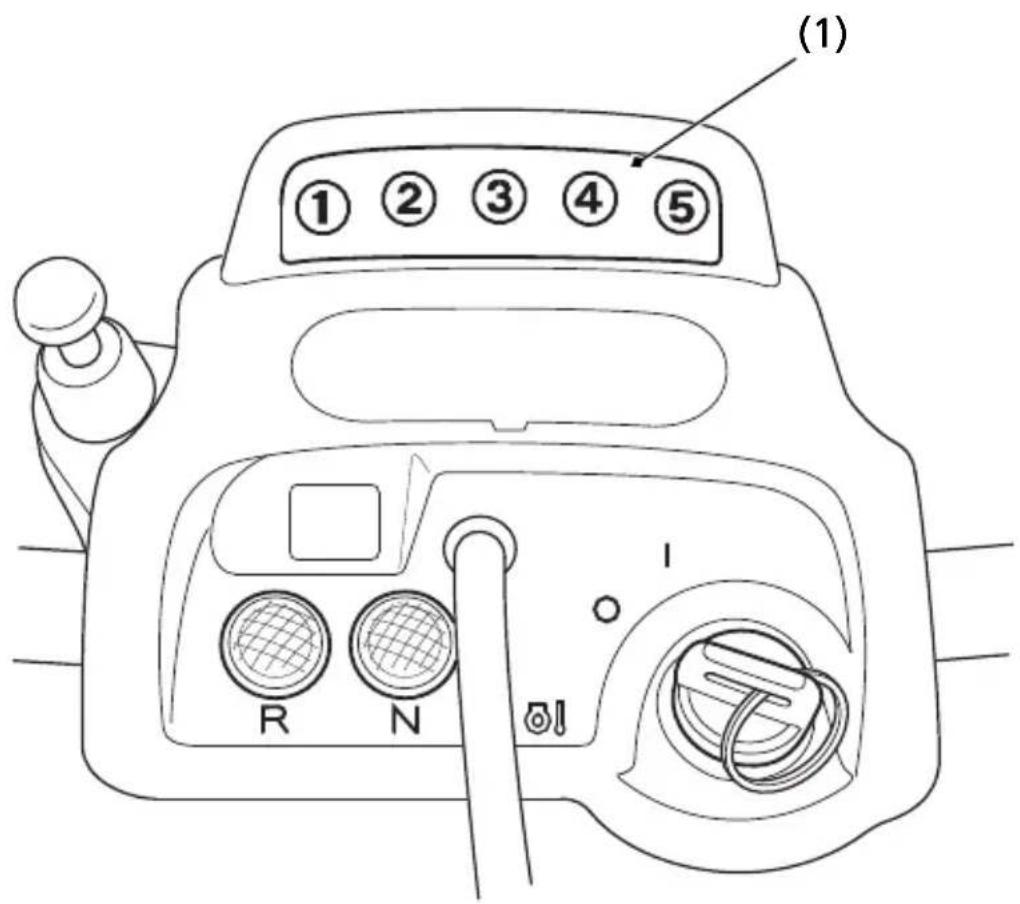
text_image
(1) ①②③④⑤ R N(1) gear position indicator
Fuel Valve
LEFT SIDE
ON OFF RES
text_image
(1) RES OFF FUEL ON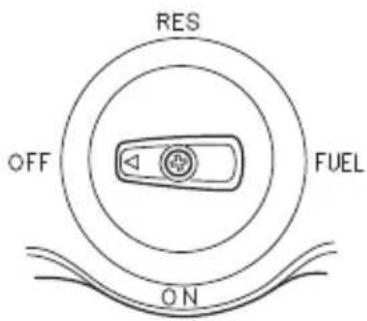
text_image
RES OFF FUEL ON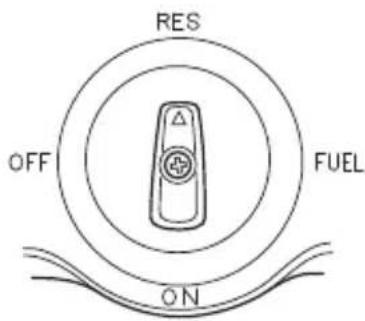
text_image
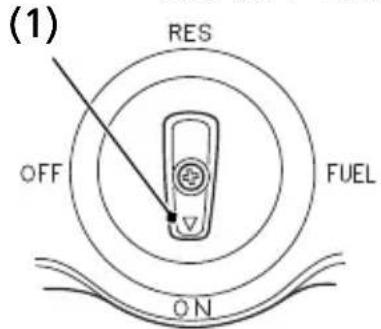
RES OFF FUEL ON(1) three-way fuel valve
The manual three-way fuel valve (1) is located on the left side of the fuel tank.
The fuel valve is used to control the flow of fuel from the fuel tank to the carburetor.
ON — normal position for riding.
OFF — for parking, storing, or transportation.
RES — for extra fuel to get to a gas supply for refueling.
Reserve Fuel
Remember to check that the fuel valve is in the ON position each time you refuel. If the fuel valve is left in the RES position, you may run out of fuel with no reserve.
For complete information about fueling your ATV, see page 93.
Choke Knob
|
LEFT HANDLEBAR
text_image
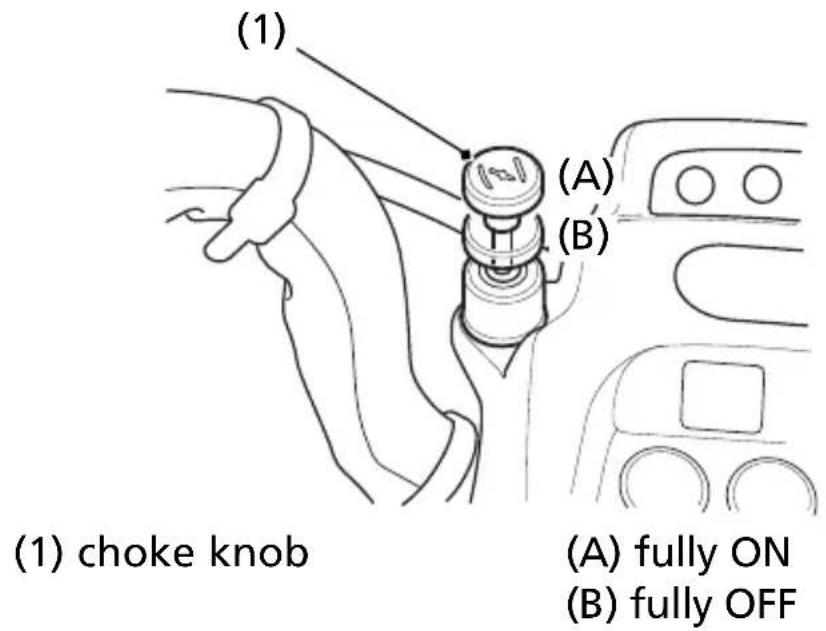
(1) (1) choke knob (A) fully ON (B) fully OFFThe choke knob (1) may be used when starting the engine. See page 52.
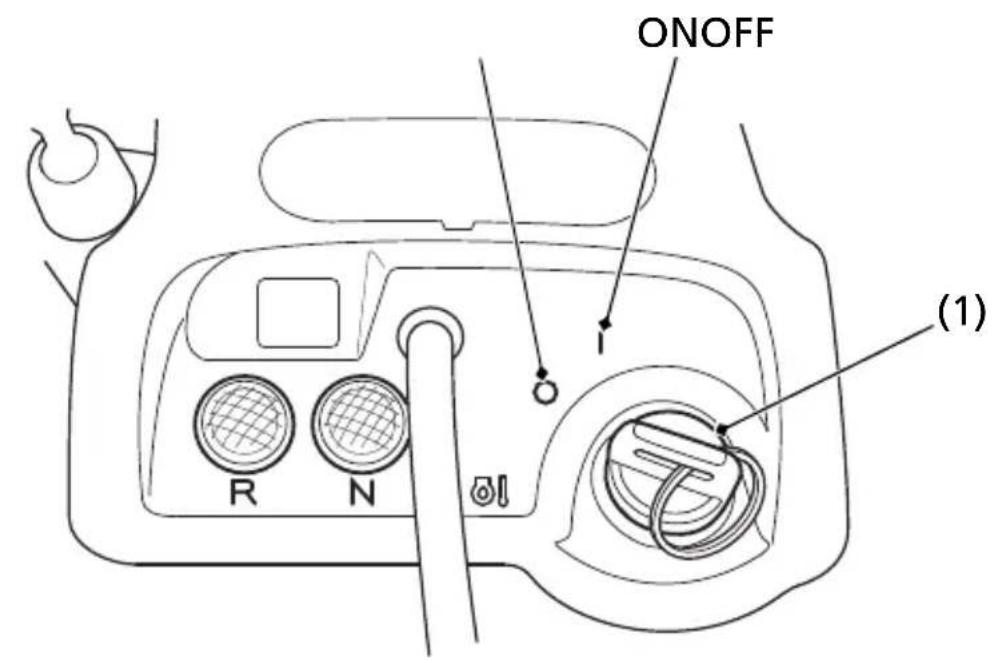
Ignition Switch
The ignition switch (1) is used for starting and stopping the engine (page 50). Insert the key and turn it to the right for the ON (I) position.
| Key Position Function | |
| ON (1) Electrical circuits on. | |
| OFF (○) No electrical circuits function. |
CENTER OF HANDLEBAR
text_image
ONOFF R N (1)(1) ignition switch
I ON
○ OFF
Start Button

LEFT HANDLEBAR
text_image
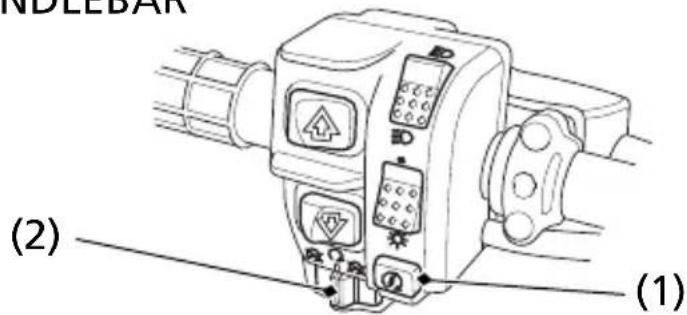
NDLEBAR (2) (1)(1) start button
START
(2) engine stop switch
OFF
RUN
The start button (1) is used for starting the engine. Pushing the button in starts the engine. See Starting Procedure, page 52.
When the start button is pushed, the starter motor will crank the engine. The starter motor will operate even if the engine stop switch is in the OFF (☒) position when the start button is pushed.
Engine Stop Switch


The engine stop switch (2) is used to stop the engine in an emergency. To operate, slide the switch to the OFF (✗) position. The switch must be in the RUN (○) position to start the engine, and it should normally remain in the RUN (○) position even when the engine is OFF.
If your ATV is stopped with the ignition switch ON (I) and the engine stop switch OFF (☒), the battery will discharge. Turn the ignition switch to OFF (O) to prevent battery discharge.
Headlight Switch

LEFT HANDLEBAR
text_image
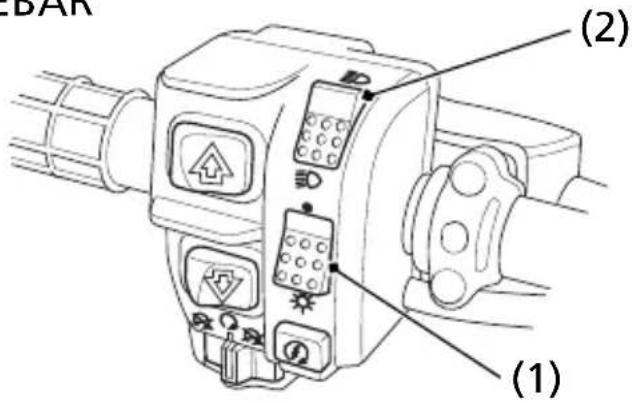
(1) (2)(1) headlight switch ON
- OFF
(2) headlight dimmer switch
EDHI
ED LO
The headlight switch (1) is used to turn the headlight ON (✗) or OFF (●). To operate, turn the switch to ON (✗) or OFF (●).
Headlight Dimmer Switch

The headlight dimmer switch (2) is used to change between the high and low beams of the headlight. To operate, turn the switch to HI (≡D) for high beam, LO (≡D) for low beam.
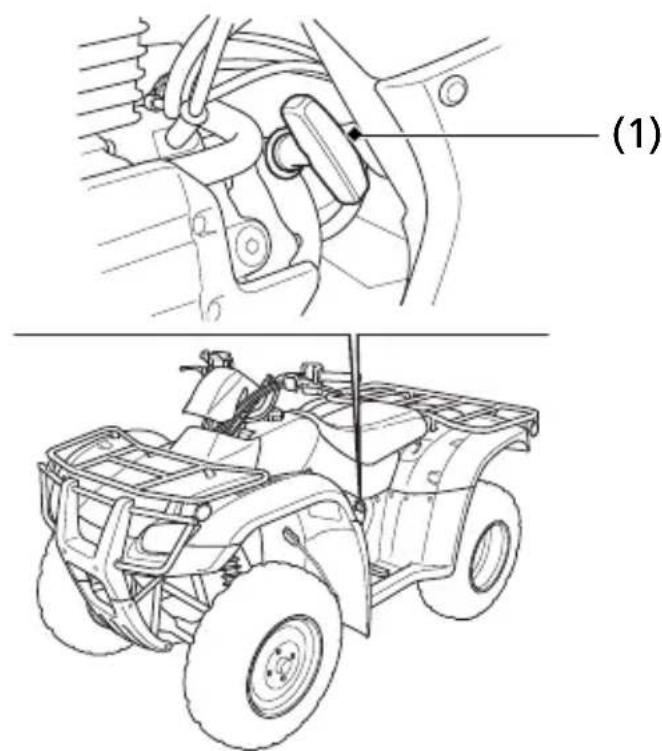
Recoil Starter
LEFT SIDE
text_image
(1)(1) recoil starter
The recoil starter (1) is used to start the engine when the battery is low. See Using the Recoil Starter, page 56.
Throttle Lever
RIGHT HANDLEBAR
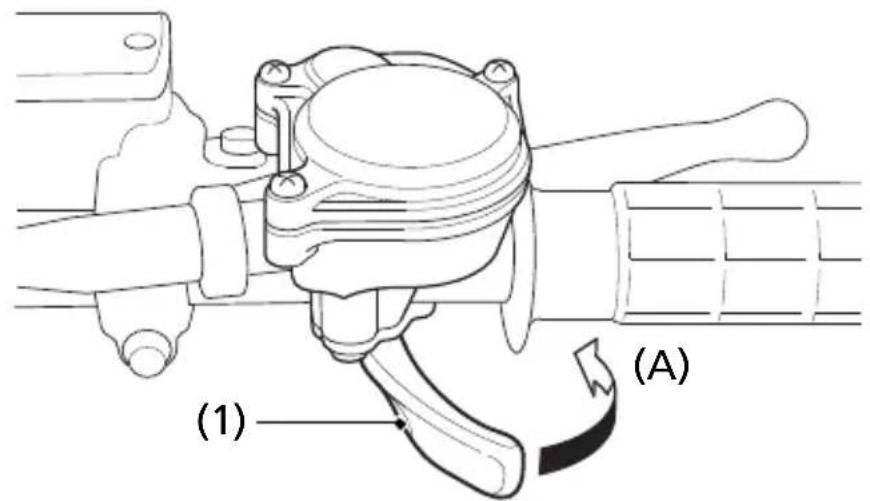
text_image
(1) (A)(1) throttle lever
(A) to open the throttle
The throttle controls engine rpm (speed). To increase engine rpm, press the throttle lever (1) with your thumb. To reduce engine rpm, release pressure on the throttle lever. The throttle will automatically return to the closed position (engine idle) when you remove your thumb.
Gearshift Switch
These switches are used to select the next higher or lower gear in the transmission. To operate, press the upshift switch (1) to engage the next higher gear or press the downshift switch (2) to engage the next lower gear.
See Shifting Gears, page 57.
LEFT HANDLEBAR
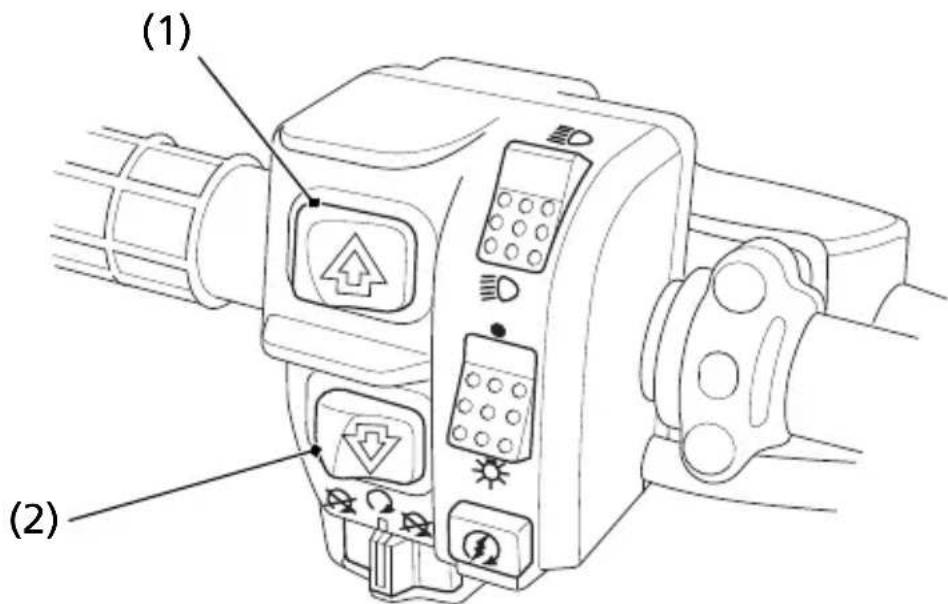
text_image
(1) (2)(1) upshift switch
(2)downshift switch
Front Brake Lever
The front brake lever is used to slow or stop your ATV. To operate, pull the lever. For information on braking techniques, see page 62.
Rear Brake Lever/Parking Brake Lever
The rear brake lever/parking brake lever is used to slow or stop your ATV. To operate, pull the lever. For information on braking techniques, see page 62.
Rear Brake Pedal
The rear brake pedal is used to slow or stop your ATV. To operate, depress the pedal. For information on braking techniques, see page 62.
Parking Brake/Reverse Lever (P/R Lever)
LEFT HANDLEBAR
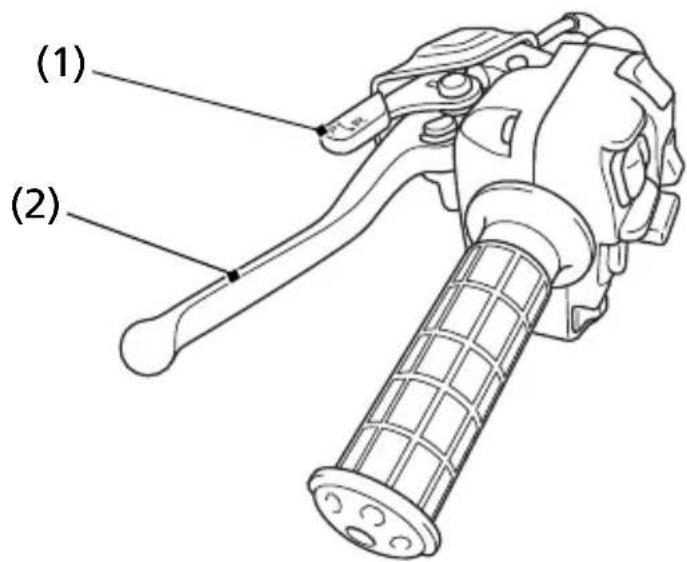
text_image
(1) (2)(1) P/R lever
(2) rear brake lever/parking brake lever
The P/R lever (1) on the rear brake lever/parking brake lever (2) is used to apply the parking brake or to shift the transmission into reverse.
Controls & Features
To apply the parking brake:
Bring the vehicle to a complete stop, make sure the transmission is in neutral.
Squeeze the rear brake lever/parking brake lever (1), then rotate the P/R lever (2) clockwise until it engages the slot on the rear brake lever/parking brake lever bracket.
For more information on Parking, see page 76.

text_image
(1) (2)(1) rear brake lever/parking brake lever
(2) P/R lever
To release the parking brake:
Squeeze the rear brake lever/parking brake lever until the P/R lever is released from the slot on the rear brake lever/parking brake lever bracket.
The brake light is activated by applying the parking brake. When using the parking brake, be sure to turn the ignition switch to OFF (O) to avoid discharging the battery.
To shift the transmission into reverse:
See Riding in Reverse, page 60.
Flag Pole Bracket
RIGHT REAR
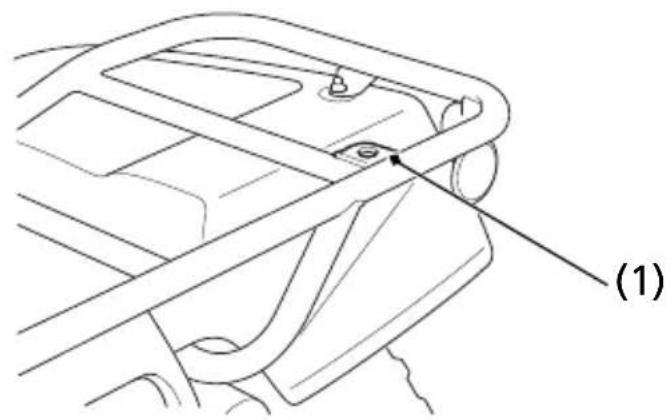
natural_image
Technical line drawing of a mechanical component with a labeled section (1), showing no text or symbols beyond the label.(1) flag pole bracket
Flag poles are optional equipment available from your dealer. To mount a pole in the bracket (1), follow the instructions that come with the flag pole kit.
Flag poles are required in some riding areas. Check local regulations before riding.
BLANK PAGE
Before each ride, you need to make sure you and your Honda are both ready to ride. To help get you prepared, this section discusses how to evaluate your riding readiness, what items you should check on your ATV, and adjustments to make for your comfort, convenience, or safety. This section also includes important information about loading.
Are You Ready to Ride? 30
Protective Apparel 30
Rider Training 32
Age Recommendation 33
No Passengers 33
No Alcohol or Drugs 34
Is Your ATV Ready to Ride? 35
Pre-ride Inspection 35
Load Limits & Guidelines.... 38
Loading 38
Load Limits 39
Loading Guidelines 40
Accessories & Modifications.... 41
Accessories.... 41
Modifications.... 42
Before you ride your ATV for the first time, we urge you to:
- Read this owner's manual and the labels on your ATV carefully.
- Make sure you understand all the safety messages.
- Know how to operate all the controls.
Before each ride, be sure:
- You feel well and are in good physical and mental condition.
- You are wearing an approved motorcycle helmet (with chin strap tightened securely), eye protection, and other protective clothing.
- You don't have any alcohol or drugs in your system.
Protective Apparel
For your safety, we strongly recommend that you always wear an approved motorcycle helmet, eye protection, boots, gloves, long pants, and a long-sleeved shirt or jacket whenever you ride.
Although complete protection is not possible, wearing proper gear can reduce the chance of injury when you ride.
Following are suggestions to help you choose the proper gear.
Helmet and Eye Protection
Your helmet is your most important piece of riding gear because it offers the best protection against head injuries. A helmet should fit your head comfortably and securely.
An open-face helmet offers some protection, but a full-face helmet offers more. Regardless of the style, look for a DOT (Department of Transportation) sticker on any helmet you buy. Always wear a face shield or goggles to protect your eyes and help your vision.
WARNING
Operating this ATV without wearing an approved motorcycle helmet, eye protection, and protective clothing could increase your chances of severe injury or death in the event of a crash.
Always wear an approved motorcycle helmet that fits properly and wear eye protection (goggles or face shield), gloves, boots, long-sleeved shirt or jacket and long pants.
Additional Riding Gear
In addition to a helmet and eye protection, we also recommend:
- Sturdy off-road motorcycle boots to help protect your feet, ankles, and lower legs.
- Off-road motorcycle gloves to help protect your hands.
- Riding pants with knee and hip pads, a riding jersey with padde d elbows, and a chest/shoulder protector.
Rider Training
Developing your riding skills is an on-going process. Even if you have ridden other ATVs, take time to become familiar with how this ATV works and handles. Practice riding the ATV in a safe area to build your skills. Do not ride in rough terrain until you get accustomed to the ATV's controls, and feel comfortable with its size and weight.
We urge all riders to take a ATV operator course approved by the ATV Safety Institute (ASI). For information about the ASI training course nearest you, call the national toll-free number; (800) 887-2887.
Other riding tips can be found in the Tips & Practice Guide for the ATV Rider booklet that came with your ATV.
WARNING
Operating this ATV without proper instruction could increase your risk of a crash which could lead to serious injury or death.
Beginning and inexperienced operators should complete the certified training course offered by Honda. They should then regularly practice the skills learned in the course and the operating techniques described in the owner's manual.
Age Recommendation
The minimum recommended age for this ATV model is 16. For safety, never let children under 16 years old operate this vehicle.
WARNING
A child using an ATV that is not recommended for their age could lose vehicle control while riding, resulting in severe injury or death.
A child under 16 should never operate an ATV with engine size greater than 90cc.
No Passengers
This ATV is designed as an operator-only vehicle. The long seat is designed to allow the rider to change body position, not for carrying a passenger. Never let a passenger ride on the seat or on the front or rear cargo racks.
WARNING
Carrying a passenger on this ATV greatly reduces your ability to balance and control this ATV and could cause a crash and you or your passenger could be injured or killed.
Never carry a passenger on this ATV.
No Alcohol or Drugs
Alcohol, drugs and ATVs don't mix. Even a small amount of alcohol can impair your ability to operate an ATV safely. Likewise, drugs — even if prescribed by a physician — can be dangerous while operating an ATV. Consult your doctor to be sure it is safe to operate a vehicle after taking medication.
WARNING
Operating this ATV after consuming alcohol or drugs can seriously affect your judgment, cause you to react more slowly, affect your balance and perception, and result in serious injury or death.
Never consume alcohol or drugs before or while operating this ATV.
Before each ride, it's important to inspect your ATV and make sure any problem you find is corrected. A pre-ride inspection is a must, not only for safety, but because having a breakdown, or even a flat tire, can be a major inconvenience.
If your ATV has overturned or been involved in a collision, do not ride the vehicle until it has been inspected by your dealer. There may be damage or other problems you cannot see.
WARNING
Improperly maintaining this ATV or failing to correct a problem before riding can cause a crash in which you can be seriously hurt or killed.
Always perform a pre-ride inspection before every ride and correct any problems.
Pre-ride Inspection
Check the following items before you get on the ATV:
Engine Oil Check the level and add oil if needed
(page 99).
Check for leaks.
Fuel Check the level and add fuel (page 94) if
needed. Also make sure the fuel fill cap is securely fastened.
Check for leaks.
(cont'd)
Is Your ATV Ready to Ride?
Tires Use a gauge to check the air pressure.
Adjust if needed. Also look for signs of damage or excessive wear (page 135).
Guards Check for damage or looseness (page 141).
Nuts & Bolts
Check the wheels to see that the axle nuts are tightened. Use a wrench to make sure all accessible nuts, bolts, and fasteners are tight.
Underbody & Exhaust System
Check for, and remove, any dirt, vegetation or other debris that could be a fire hazard or interfere with the proper operation of the vehicle.
Air Cleaner Housing Drain Tube
Check for deposits in the drain tube. If necessary, clean the tube (page 108) and check the air cleaner housing.
Leaks, Loose Parts Walk
around your ATV and look for anything that appears unusual, such as a leak or loose cable.
Cable Check the cable housings for wear. Check
the fittings for looseness. Replace or tighten as needed.
Lights Make sure the headlight, brake light and
taillight are working properly.
If you are carrying cargo, also check the following:
Loading Limits Make sure you do not exceed the load limits (page 39).
Cargo Check that all cargo is secure.
Check these items after you get on the ATV:
Throttle Check the freeplay and adjust if needed.
Press the throttle to make sure it moves smoothly without sticking, and snaps shut automatically when it is released, in all steering positions (page 109).
Brakes Squeeze the front and rear brake levers
and step on the rear brake pedal to check that the controls operate normally. Check for proper freeplay (pages 123, 127, 129). Make sure there is no brake fluid leakage.
Reverse Assist Lever Check the freeplay and adjust if needed
(page 113). Make sure the lever operates smoothly without sticking.
Headlight and Headlight Check for proper function (page 20).
Dimmer Switch
Engine Stop Switch Check for proper function (page 19).
Steering Check that the wheels turn properly as you
steer the handlebar. Move the handlebar right and left and check that there is no excessive backlash.
Remember, be sure to take care of any problem you find, or have your dealer correct it before you ride.
Your Honda was designed as a rider-only ATV. It was not designed to carry a passenger. It can carry cargo on the cargo racks, however, carrying cargo anywhere else or carrying a passenger could interfere with your balance and control of the ATV.
In addition, exceeding the weight limits or carrying an unbalanced load can seriously affect your ATV's handling, braking and stability. Adding accessories or making modifications that change this ATV's design and performance can also make it unsafe. Also, the weight of any accessories will reduce the maximum load the ATV can carry.
More specific information on load limits, accessories, and modifications follows.
Loading
How much weight you put on your ATV, and how you load it, are important to your safety. If you decide to carry cargo, you should be aware of the following information.
WARNING
Overloading, improper loading, or carrying a passenger can cause a crash and you can be seriously hurt or killed.
Follow all load limits and other loading guidelines in this manual.
Load Limits
Following are the load limits for your ATV:
There are limits to how much weight can be carried on your ATV and be pulled in a trailer.
The following load limits apply to standard equipment only. Modifying your ATV, using non-standard equipment, or riding on terrain that is not flat and smooth could further reduce these limits.
maximum weight capacity 386 lb (175 kg)
(includes the weight of the rider, all cargo, and accessories.)
front cargo rack weight limit = 33 lb (15 kg)
rear cargo rack weight limit = 66 lb (30 kg)
tow weight limit = 500 lb (225 kg)
(Combined weight of the trailer and all cargo in the trailer)
tongue weight = 30 lb (14 kg) recommended
(Weight on the trailer tongue)
tongue and rear cargo weight = 66 lb (30 kg)
(Combined weight on the trailer tongue and on the rear cargo rack, and in the storage area)
Tongue weight can be measured with an ordinary bathroom scale. Place the scale under the tongue, using either a tongue jack or other support to keep the trailer level.
The weight of added accessories will reduce the maximum cargo weight you can carry.
Loading Guidelines
Carrying cargo or pulling a trailer will affect how your ATV handles and greatly reduce its ability in accelerating, braking and making turns and other maneuvers.
Be sure to observe the weight limits and follow these guidelines:
- Check that the tires are properly inflated.
- Do not place cargo anywhere on the ATV other than on the front and rear racks. Otherwise, operating stability may be adversely affected.
- Never ride with a passenger on the front or rear cargo racks. The ATV is not designed to carry a passenger.
- Load cargo on the rear rack as far forward as possible. Make sure cargo on the front rack does not interfere with handlebar movement.
- Do not allow cargo to extend beyond the edges of either the front or rear racks.
- Make sure all cargo is secured before riding.
• Balance cargo weight evenly on both sides. - Never exceed the maximum weight limit.
- When towing a trailer, take care to maintain balance and stability. Distribute cargo between the front and rear of the trailer to obtain the recommended tongue weight.
- Allow extra room for starting, stopping and turning whenever you carry cargo or pull a trailer.
- Avoid riding on steep slopes when carrying cargo or pulling a trailer.
- Never cross a slope when towing a trailer.
Modifying your ATV or using non-Honda accessories can make your ATV unsafe.
Before you consider making any modifications or adding an accessory, be sure to read the following information.
WARNING
Improper accessories or modifications can cause a crash in which you can be seriously hurt or killed.
Follow all instructions in this owner's manual regarding accessories and modifications.
Accessories
We strongly recommend that you use only Honda Genuine Accessories that have been specifically designed and tested for your ATV. Because Honda cannot test all other accessories, you must be personally responsible for proper selection, installation, and use of non-Honda accessories.
Check with your dealer for assistance and always follow these guidelines:
- Make sure the accessory does not obscure any lights, reduce ground clearance, limit suspension travel or steering travel, or interfere with operating any controls.
- Make sure the accessory does not interfere with your ability to shift body position on the seat or operate hand and foot controls.
- Do not add any electrical equipment that will exceed the vehicle's electrical system capacity (pages 186, 187). A blown fuse can cause a loss of lights or engine power (page 174).
Modifications
We strongly advise you not to remove any original equipment or modify your ATV in any way that would change its design or operation. Such changes could seriously impair your ATV's handling, stability, and braking, making it unsafe to ride.
We also advise you not to make any modifications or remove any equipment (such as the USDA qualified spark arrester or emission control system components) that would make your ATV illegal in your area.
Removing or modifying your lights, exhaust system, emission control system, or other equipment can also make your ATV illegal.
Basic Operation & Riding
This section gives basic riding instructions, including how to start and stop your engine, and how to use the throttle and brakes. It also provides important information on riding with cargo.
To protect your new engine and enjoy optimum performance and service life, refer to Break-in Guidelines (page 188).
For information about carburetor adjustment for riding at high altitude, see page 189.
Safe Riding Precautions 45
Off-road Use Only 45
Keep Hands and Feet on Controls.... 46
Control Speed 47
Use Care on Unfamiliar or Rough Terrain 48
Do Not Perform Stunts.... 49
Starting & Stopping the Engine.... 50
Preparation.... 51
Starting Procedure 52
Flooded Engine.... 55
How to Stop the Engine.... 55
Using the Recoil Starter.... 56
Shifting Gears.... 57
Riding in Reverse 60
(cont'd)
Basic Operation & Riding
Braking....62
Riding Your ATV.... 64
Making Turns 64
Skidding or Sliding.... 66
Riding Up Hills 67
Riding Down Hills 71
Crossing or Turning on Hills or Slopes 72
Riding Over Obstacles 74
Riding Through Water 75
Parking....76
Before riding your ATV for the first time, please review the ATV Safety section beginning on page 1, and the Before Riding section beginning on page 29.
Even if you have ridden other ATVs, take time to become familiar with how this ATV works and handles. Practice in a safe area until you build your skills and get accustomed to the ATV's size and weight.
Off-road Use Only
Your ATV and its tires are designed and manufactured for off-road use only, not for pavement. Riding on pavement can affect handling and control. You should not ride your ATV on pavement.
WARNING
Operating this ATV on paved surfaces may seriously affect handling and control of the ATV, and may cause the vehicle to go out of control.
Never operate the ATV on any paved surfaces, including sidewalks, driveways, parking lots and streets.
When riding off-road, also remember to always obey local off-road riding laws and regulations. Obtain permission to ride on private property. Avoid posted areas and obey “no trespassing” signs.
Safe Riding Precautions
You should never ride your ATV on public streets, roads or highways, even if they are not paved. Drivers of street vehicles may have difficulty seeing and avoiding you, which could lead to a collision. In many states it is illegal to operate ATVs on public streets, roads and highways.
WARNING
Operating this ATV on public streets, roads or highways could cause you to collide with another vehicle.
Never operate this ATV on any public street, road or highway, even a dirt or gravel one.
Keep Hands and Feet on Controls
Always keep both hands on the handlebars and both feet on the footpegs when riding your ATV. This is important to maintain your balance and to control the vehicle. Removing even one hand from the handlebars or one foot from the footpegs can reduce your ability to control the ATV or could cause you to lose your balance and fall off the ATV.
WARNING
Removing hands from handlebars or feet from footpegs during operation can reduce your ability to control the ATV or could cause you to lose your balance and fall off of the ATV.
Always keep both hands on the handlebars and both feet on the footpegs of your ATV during operation.
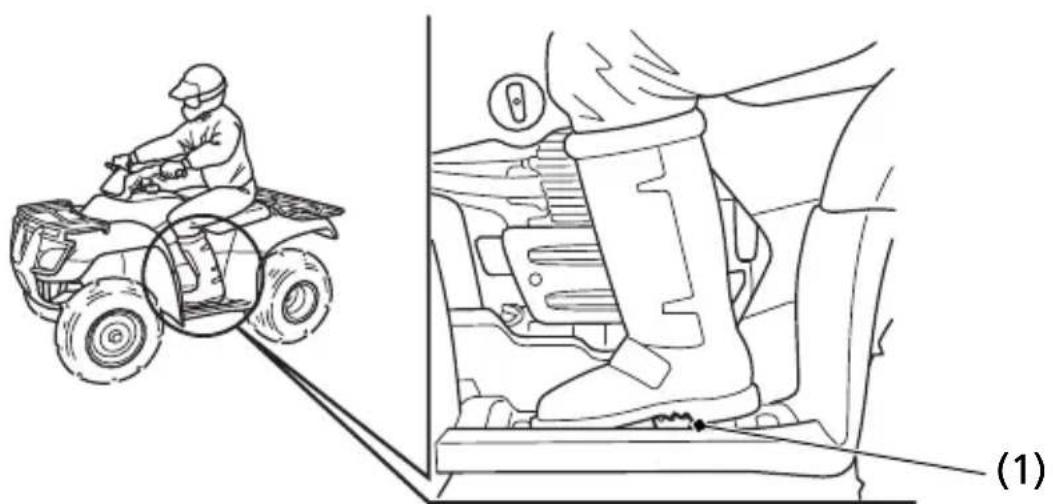
natural_image
Line drawing of a person riding an off-road vehicle, with a close-up inset showing the interior seat and dashboard (no text or symbols)(1) footpeg
Control Speed
Riding at excessive speed increases the chance of a crash. In choosing a proper speed, you need to consider the capability of your vehicle, the terrain, visibility and other operating conditions, plus your own skills and experience.
WARNING
Operating this ATV at excessive speeds increases your chances of losing control of the ATV, which can result in a crash.
Always go at a speed that is proper for your vehicle, the terrain, visibility and other operating conditions, and your experience.
Use Care on Unfamiliar or Rough Terrain
Before riding in a new area, always check the terrain thoroughly. Don't ride fast on unfamiliar terrain or when visibility is limited. (It's sometimes difficult to see obstructions like hidden rocks, bumps, or holes in time to react.)
WARNING
Failure to use extra care when operating this ATV on unfamiliar terrain could result in the ATV overturning or going out of control.
Go slowly and be extra careful when operating on unfamiliar terrain. Always be alert to changing terrain conditions when operating the ATV.
Never ride past the limit of visibility. Maintain a safe distance between your ATV and other off-road vehicles. Always exercise caution, and use extra care on rough, slippery and loose terrain.
WARNING
Failure to use extra care when operating on excessively rough, slippery or loose terrain could cause loss of traction or vehicle control, which could result in a crash, including an overturn.
Do not operate on excessively rough, slippery or loose terrain until you have learned and practiced the skills necessary to control the ATV on such terrain. Always be especially cautious on these kinds of terrain.
Do Not Perform Stunts
You should always operate your ATV in a safe and reasonable manner. When riding, always keep all four wheels on the ground.
WARNING
Attempting wheelies, jumps, and other stunts increases the chance of a crash, including an overturn.
Never attempt stunts, such as wheelies or jumps. Don't try to show off.
Starting & Stopping the Engine
Always follow the proper starting procedure described below.
For your safety, avoid starting or operating the engine in an enclosed area such as a garage. Your ATV's exhaust contains poisonous carbon monoxide gas which can collect rapidly in an enclosed area and cause illness or death.
WARNING
Running the engine of your vehicle while in an enclosed or even partially enclosed area can cause a rapid build-up of toxic carbon monoxide gas.
Breathing this colorless, odorless gas can quickly cause unconsciousness and lead to death.
Only run your vehicle's engine when it is located in a well ventilated area outdoors.
Preparation
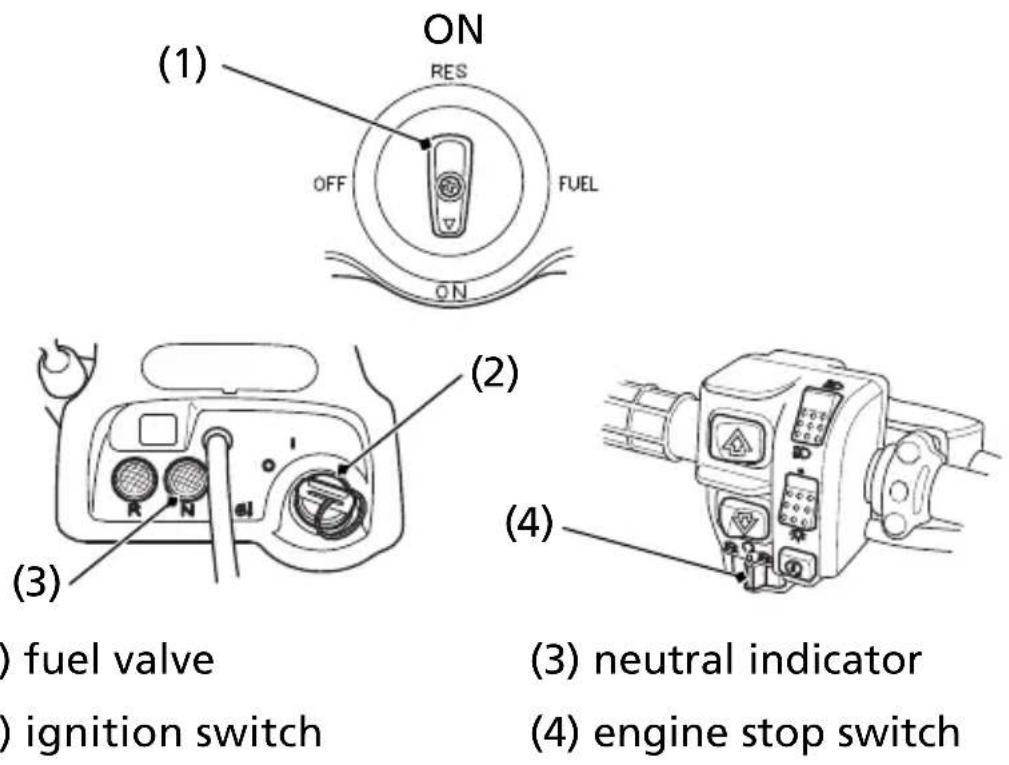
(1) fuel valve
(2) ignition switch
(3) neutral indicator
(4) engine stop switch
- Before starting, select a level surface and lock the parking brake (page 25).
- Turn the fuel valve (1) to ON and turn the ignition switch (2) to ON (1).
Confirm the following:
- The transmission is in neutral, and the neutral indicator (3) is ON.
- The engine stop switch (4) is set to RUN (O).
(cont'd)
Starting & Stopping the Engine
Starting Procedure
To restart a warm engine, follow the procedure for "High Air Temperature."
The starter motor will operate only when the transmission is in neutral.
Normal Air Temperature 10^ - 35^ (50° - 95°F)
LEFT HANDLEBAR
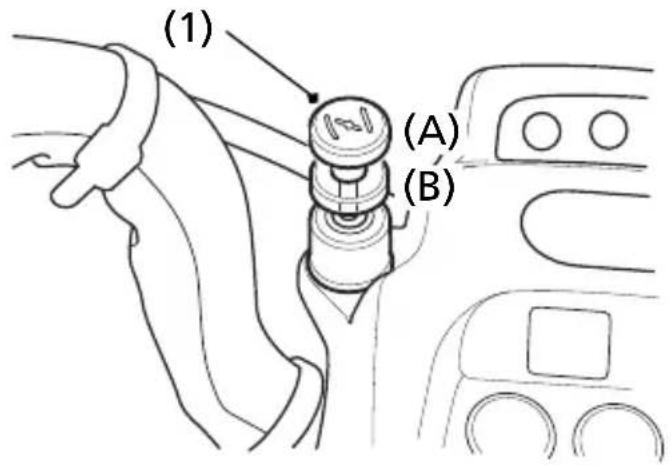
text_image
(1) (A) (B)(1) choke knob
(A) fully ON
(B) fully OFF
- Pull the choke knob (1) up all the way to fully ON (A).
- With the throttle slightly open, press the start button.
- Pressing the electric start button for more than 5 seconds at a time may cause the starter to overheat and damage the starter. Release the start button for approximately 10 seconds before pressing it again.
Starting & Stopping the Engine
- Warm up the engine by opening and closing the throttle slightly.
- About 5 seconds after the engine starts, push the choke knob down all the way to fully OFF (B).
- If idling is unstable, open the throttle slightly.
High Air Temperature 35^ C (95°F) or above
LEFT HANDLEBAR
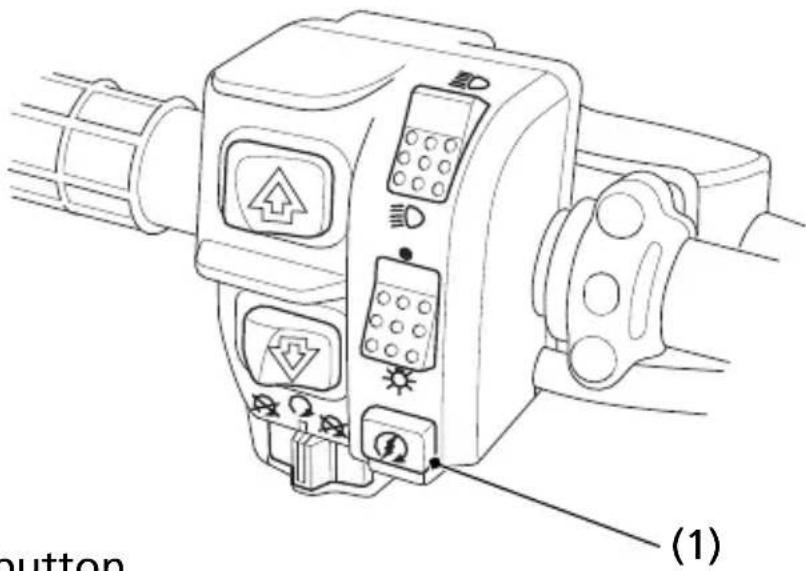
text_image
(1)(1) start button
- Do not use the choke.
- With the throttle slightly open, press the start button (1).
Starting & Stopping the Engine
Low Air Temperature 10°C (50°F) or below
- Follow steps 1 - 2 under "Normal Air Temperature."
- Warm up the engine by opening and closing the throttle slightly.
- Continue warming up the engine until it runs smoothly and responds to the throttle when the choke knob is at fully OFF (B).
If the engine doesn't start after pushing the start button several times, use the recoil starter.
NOTICE
Extended use of the choke may cause the spark plug to foul, impair piston and cylinder wall lubrication, and shorten the life of the engine.
Do not race the engine during the warm-up period.
Racing a cold engine wastes fuel and increases engine wear.
Snapping the throttle or fast idling for more than 5 minutes may cause exhaust pipe and muffler discolorations.
Flooded Engine
If the engine fails to start after repeated attempts, it may be flooded with excess fuel. To clear a flooded engine:
- Move the engine stop switch to OFF (✗).
- Push the choke knob down all the way to fully OFF.
- Open the throttle fully.
- Press the start button for 5 seconds.
- Wait 10 seconds, then turn the engine stop switch to RUN (Ω).
- Repeat the "Normal Air Temperature" starting procedure, but don't use the choke.
If the engine still won't start, refer to If Your Engine Quits or Won't Start, page 164.
How to Stop the Engine
Normal Engine Stop
To stop the engine, make sure the transmission is in neutral by checking that the neutral indicator light is on, then turn the ignition switch OFF (O).
The engine stop switch should normally remain in the RUN (Ω) position even when the engine is OFF.
If your ATV is stopped with the engine stop switch OFF (☒) and the ignition switch ON (I), the battery will discharge.
Emergency Engine Stop
To stop the engine in an emergency, use the engine stop switch. To operate, slide the switch to either OFF (✗) position.
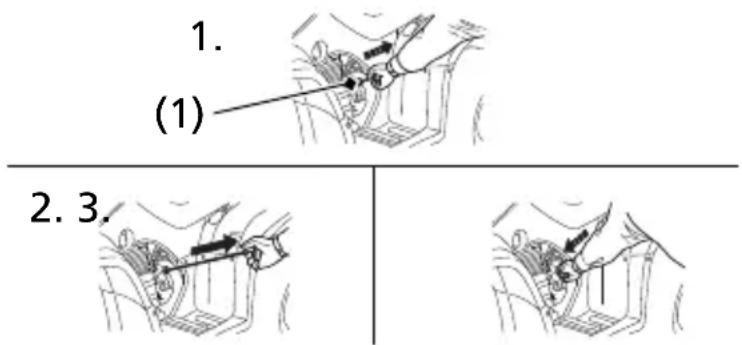
Using the Recoil Starter
The recoil starter is used to start the engine when the battery is low. To operate the recoil starter:
- Turn the ignition switch to ON and engine stop switch to RUN.
- Check that the transmission is in neutral.
- Grasp the starter grip (1) firmly, then pull it out slowly approximately 4 in (100 mm).
- Pull the grip up briskly and fully.
- After the engine starts, allow the starter grip to return slowly.
Pull the recoil starter grip straight out so that the cord does not touch the side cover. Repeated contact with the side cover can damage the starter cord.
If the starter grip does not return smoothly (because of dirt in the assembly), see your dealer.
LEFT SIDE
text_image
1. (1) 2. 3.(1) recoil starter grip
The engine cannot be started if the battery is disconnected, low or dead.
If the engine cannot be started with the battery connected, charge the battery (page 146).
When the engine cannot be started even if the battery is charged, see your dealer.
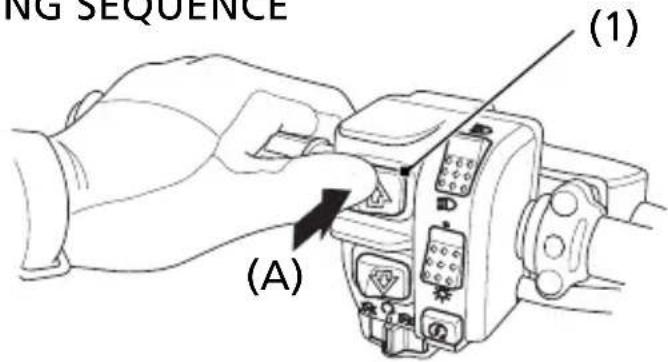
UPSHIFTING SEQUENCE
text_image
NG SEQUENCE (A) (1)Your ATV has five forward gears: 1, 2, 3, 4, and 5.
Two gearshift switches are located next to the left handlebar grip: upshift ( and downshift ( )
To upshift the transmission, press the upshift switch (1) once. To downshift the transmission, press the downshift switch (2) once. To select reverse, see Riding in Reverse, page 60.
After starting the engine and letting it warm up, follow these procedures:
-
With the transmission in neutral, release the parking brake, but continue squeezing the rear brake lever.
-
With the throttle closed, press the upshift switch once to shift into 1st gear.
-
Release the rear brake lever/parking brake lever and increase engine speed by gradually opening the throttle.
- When speed increases, release the throttle and shift to 2nd gear by pressing the upshift switch once.
- Repeat this sequence to progressively upshift to 3rd, 4th and 5th (top) gear.
- To downshift, press the downshift switch once. Remember to close the throttle each time you shift to the next lower gear.
The transmission cannot be upshifted from neutral to first gear when the engine speed is above 3,000 rpm or the ground speed is above 2 mph (3 km/h).
The transmission cannot be downshifted from 1st gear to neutral when the ground speed is above 2 mph (3 km/h).
If the electric shift system malfunctions, the transmission cannot be shifted by pressing the gearshift switches. See your dealer. (In an emergency, a gear may be selected manually so you may move the vehicle. See Emergency Gear Selection & Operation page 168).
Learning when to shift gears comes with experience. Keep the following tips in mind:
- As a general rule, shift while moving in a straight line.
- Close the throttle completely before shifting. Improper shifting may damage the engine, transmission, and drivetrain.
-
Upshift to a higher gear or reduce throttle before engine rpm (speed) gets too high. Learn the relationship between engine sound and the normal shifting points.
-
Downshift to a lower gear before you feel the engine laboring (lugging) at low rpm.
- Avoid downshifting to help slow your ATV when engine rpm is high. Downshifting when engine speed is near its allowable maximum may over-rev the engine and possibly cause damage.
- To prevent transmission damage, do not coast or tow the ATV for long distances with the engine off.
Recommended Shift Points
Ride in the highest gear that lets the engine run and accelerate smoothly.
This will give you good fuel economy and effective emissions control.
If you need to ride in reverse, make sure the area behind you is clear and only operate the ATV at low speed.
WARNING
Improperly operating in reverse could cause you to hit an obstacle or person behind you, resulting in serious injury.
Make sure there are no obstacles or people behind you before selecting reverse gear. When it is safe to proceed, go slowly.
- Bring the vehicle to a complete stop, then make sure the transmission is in neutral.
- Be sure there are no obstacles or people in the way.
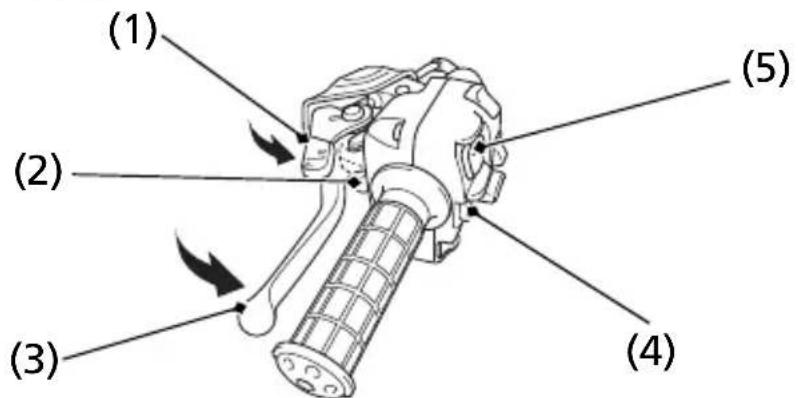
- Fully rotate the P/R lever (1) counterclockwise to engage the P/R lever with the reverse assist lever (2).
- While continuing to hold the P/R lever, squeeze the rear brake lever/parking brake lever (3), then press the downshift switch (4) once to shift into "R" (reverse) gear.
- Make sure that the reverse indicator comes on.
LEFT HANDLEBAR
text_image
(1) (2) (3) (4) (5)(1) P/R lever
(2) reverse assist lever
(3) rear brake lever/ parking brake lever
(4)downshift switch
(5) upshift switch
NOTICE
Your ATV may be equipped with a reverse speed limiter, which helps the vehicle to maintain a safe speed while riding in reverse gear.
- Release the rear brake lever/parking brake lever.
- Open the throttle gradually and ride slowly. Do not open the throttle suddenly or make abrupt turns.
- To stop, close the throttle and gradually apply both the front and rear brakes. Do not abruptly apply the rear brake alone.
- To shift out of reverse and into neutral, press the upshift switch (5) once to shift into "N" (neutral) gear (the neutral indicator is on.).
The transmission cannot be shifted from neutral back into reverse when the engine speed is above 3,000 rpm or speed of your ATV is above 2 mph (3 km/h).

WARNING
Applying only the rear brake abruptly when operating in reverse gear could cause the front wheels to lift off the ground and the ATV could overturn backwards.
Carefully apply both the front and rear brakes when stopping in reverse gear.
Your ATV is equipped with drum brakes on both front wheels which are hydraulically activated by operating the front brake lever. A single drum brake on the rear axle housing is mechanically activated by depressing the brake pedal or operating the rear brake lever/parking brake lever.
As a general rule, the front braking system provides about 70 percent of total stopping power.
For full braking effectiveness, use both the pedal and lever simultaneously. Using both braking systems will stop your ATV faster with greater stability.
To slow or stop, apply the brake lever and brake pedal smoothly, while downshifting to match your speed.
Gradually increase braking as you feel the brakes slowing your speed. The increase in engine compression from downshifting will help slow your ATV.
Applying the brakes too hard may cause the wheels to lock and slide, reducing control of your ATV. If this happens, release the brake controls, steer straight ahead until you regain control, then reapply the brakes more gently.
When possible, reduce your speed or complete braking before entering a turn. Avoid braking or closing the throttle quickly while turning. Either action may cause one or more wheels to slip and reduce your control of your ATV.
Your ability to brake in a turn and to brake hard in an emergency situation are important riding skills.
When descending a long, steep grade, use engine compression braking by downshifting, with intermittent use of both brakes. Continuous brake application can overheat the brakes and reduce their effectiveness.
Riding with your foot resting on the brake pedal or your hands on the brake levers may overheat the brakes, reducing effectiveness.
For information on how to apply the brakes in various riding situations, see the following section, Riding Your ATV.
Making Turns
Learn how to turn your ATV properly. Practice the techniques outlined in this section on level ground and at low speeds until you are confident in making turns.
WARNING
Turning improperly can make the ATV go out of control, causing a collision or overturn.
- Always follow proper procedures for turning as described in this owner's manual.
- Practice turning at low speeds before attempting to turn at faster speeds.
- Do not turn at excessive speeds.
natural_image
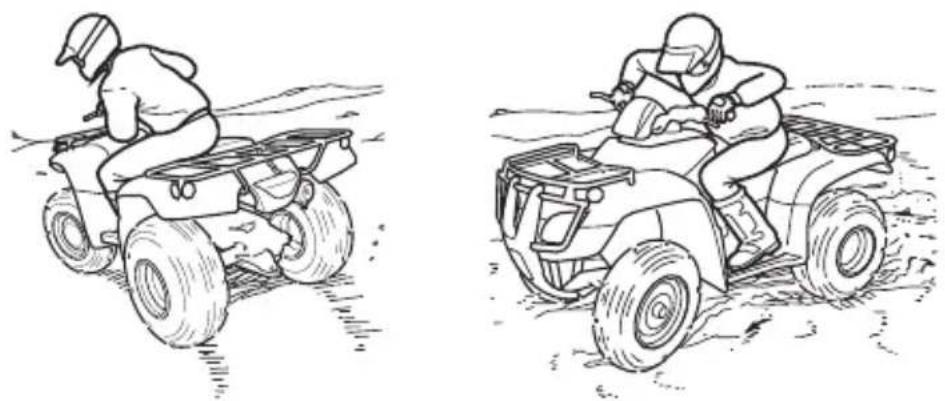
Two line drawings of a person riding an off-road vehicle in motion, showing different positions and terrain (no text or symbols)Lean your body to the inside of a turn and forward.
To make a turn on level ground: Steer the handlebar and lean your body toward the inside of the turn. Leaning helps balance the vehicle, and it feels more comfortable. Leaning into a turn is an important technique to master in riding an ATV.
To make a sharp turn at low speed: It helps to shift your body slightly forward on the seat, and lean inside, as you steer the handlebar. Shifting weight forward allows the rear wheels to turn easier, and it also improves front-wheel steering.
To make a turn from a full stop: Apply the throttle gradually when you turn and start at the same time. Remember to shift your body forward to make sharp low-speed turns and whenever you turn while accelerating from a full stop.
Skidding or Sliding
The terrain surface can be a major factor affecting turns. Skidding during a turn is more likely to occur on slippery surfaces, such as snow, ice, mud and loose gravel. If you skid on ice, you may lose all directional control. To avoid skidding on slippery terrain, keep your speed low and ride with caution.
WARNING
Skidding or sliding improperly may cause you to lose control of this ATV. You may also regain traction unexpectedly, which may cause the ATV to overturn.
Learn to safely control skidding by practicing at low speeds and on level, smooth terrain.
If your ATV skids sideways during a turn, steer in the direction of the skid. Avoid hard braking or accelerating until you have regained directional control.
Riding Up Hills
The ATV's ability to safely climb hills largely depends on the rider's skill and judgment. Begin by practicing on smooth, gentle slopes. As you gain experience, you'll learn the hazards and your own limitations. You may then proceed to ride on more difficult terrain. However, you must be able to decide which hills or hazards might cause the ATV to overturn. Avoid excessively steep hills.
WARNING
Operating on excessively steep hills can cause the vehicle to overturn more easily than operating on level surfaces or small hills.
Never operate the ATV on hills too steep for the ATV or for your abilities.
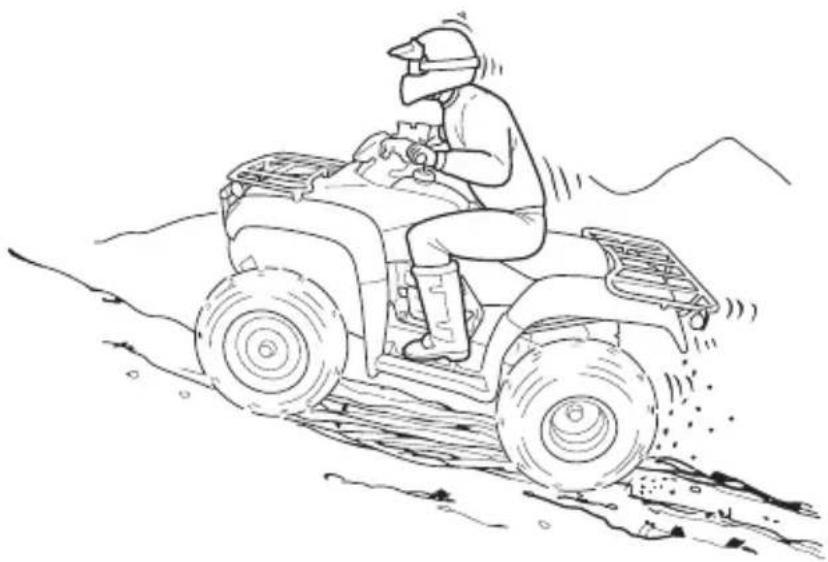
When climbing hills, you must shift weight toward the front wheels to help keep them on the ground. To do this, shift your body slightly forward on the seat and lean forward. For greater weight shift, move your body farther forward and lean forward.
WARNING
Climbing hills improperly could cause loss of control or cause the ATV to overturn.
Always follow proper procedures for climbing hills as described in this owner's manual.
natural_image
Line drawing of a person riding a off-road vehicle through mountainous terrain (no text or symbols)Shift weight forward when climbing hills
• Always check the terrain carefully before you start up any hill.
- Never climb hills with excessively slippery or loose surfaces.
- To climb a hill, take a running start in an appropriate gear and speed for the conditions. Maintain a steady speed as you ascend the hill.
- Never open the throttle suddenly or make sudden gear changes. The ATV could flip over backward.
- Never go over the top of any hill at high speed. An obstacle, a sharp drop, or another vehicle or person could be on the other side of the hill.
Stalling the ATV and/or Rolling Backwards:
If you incorrectly estimate climbing capability or terrain conditions, the ATV may not have enough power or traction to continue uphill. If this happens, the ATV can stall and/or roll backwards.
WARNING
Stalling, rolling backwards or improperly dismounting while climbing a hill could result in the ATV overturning.
Always follow proper procedures for climbing a hill as described in this owner's manual.
What to do if the ATV stalls or rolls backwards when climbing a hill:
If you are about to lose all forward speed:
- Using the front and rear brakes together, bring the ATV to a stop with the vehicle pointed straight uphill.
- Get off the ATV while you continue holding the brakes.
- Shift into neutral, set the parking brake and turn the engine off.
- Then assess the situation.
If the ATV starts rolling backwards before you begin braking:
- Keep your weight uphill.
- Carefully apply the front brakes first, then carefully apply the rear brake. Do not apply the rear brake only or abruptly if you are rolling backwards, or the vehicle may overturn.
If the ATV continues sliding backwards:
After you've applied the brakes, get off and away from the vehicle.
What to do after the ATV has stalled or rolled backwards:
If the hill is too steep or too slippery, or if you have any doubt whether you can safely walk the ATV back down the hill, leave the vehicle where it is and get help. If possible, block the wheels so the vehicle doesn't roll backwards.
If the hill is not too steep and you have good footing, you may be able to walk the ATV back down the hill. Make sure your intended path is clear in case you lose control of the ATV.
natural_image
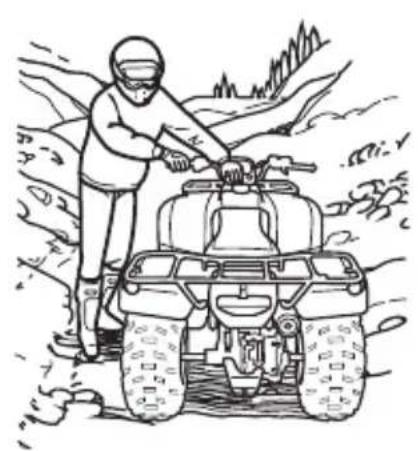
Line drawing of a person operating a multi-rotor vehicle in a field (no text or symbols)Be sure your legs are clear of the wheels.
natural_image
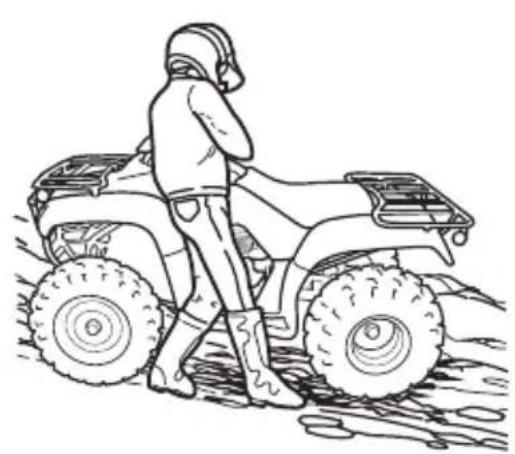
Line drawing of a person standing beside an off-road vehicle with large tires (no text or symbols)Body position for backing down a hill.
-
Stand with your body facing downhill, beside the vehicle so you can reach the rear brake lever with your right hand.
-
Be sure your legs are clear of the wheels. Check your footing.
-
Slowly and carefully back the ATV down the hill using the rear brake lever to control speed.
-
If you lose control of the ATV, for your safety, get away from the vehicle.
Riding Down Hills
It's usually advisable to descend hills with the ATV pointed straight downhill. Avoid angles that would cause the vehicle to lean sharply to one side.
WARNING
Going down a hill improperly could cause loss of control or cause the ATV to overturn.
Always follow proper procedures for going down hills as described in this owner's manual.
natural_image
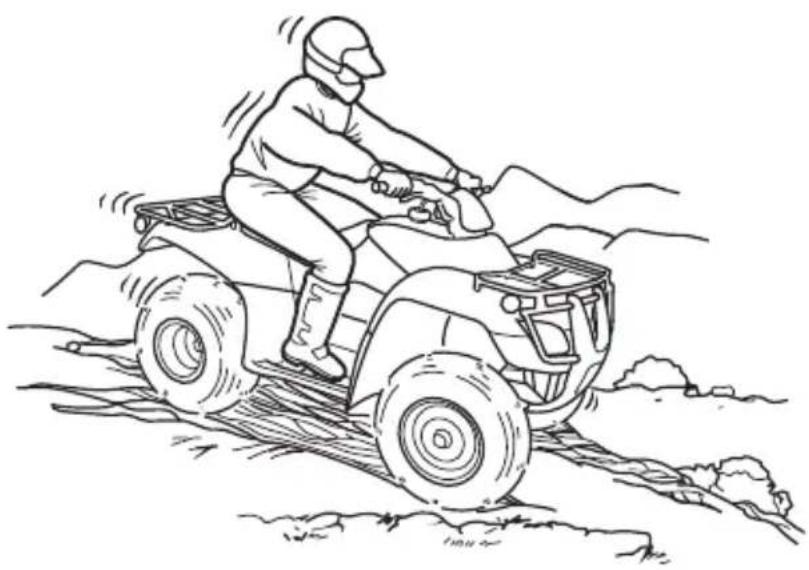
Line drawing of a person riding a small vehicle through a rugged terrain (no text or symbols)On downhills, shift your weight back.
As you approach a downhill, stop and survey the terrain below. Never ride past the limit of your visibility. Never go down a hill at high speed.
When you've selected a safe downhill path, shift into a lower gear, shift your weight back with your arms extended and braced against the handlebar, then go down slowly with the throttle closed.
Use mainly the rear brake to control speed. Avoid using either the front brake or rear brake hard or abruptly when riding down hills.
Remember, braking effectiveness is reduced on any hill with a loose surface.
Crossing or Turning on Hills or Slopes
Riding on hills or slopes is different from riding on level terrain. Be careful when riding on any hill. Make sure that you practice on gentle, smooth slopes before attempting to ride on steeper or more difficult terrain.
WARNING
Improperly crossing hills or turning on hills could cause loss of control or cause the ATV to overturn.
Always follow proper procedures for crossing or turning on slopes as described in this owner's manual. Avoid crossing steep hills if possible.
Crossing Hills or Slopes
- To maintain balance and stability when riding across a slope, you need to shift weight toward the uphill side of the vehicle. To do this, move your body off the center of the seat and lean toward the uphill side.
- On a slippery or loose surface, you may also need to steer slightly uphill to maintain a straight course across the slope.
- Avoid crossing hills that are excessively steep, slippery or rough.
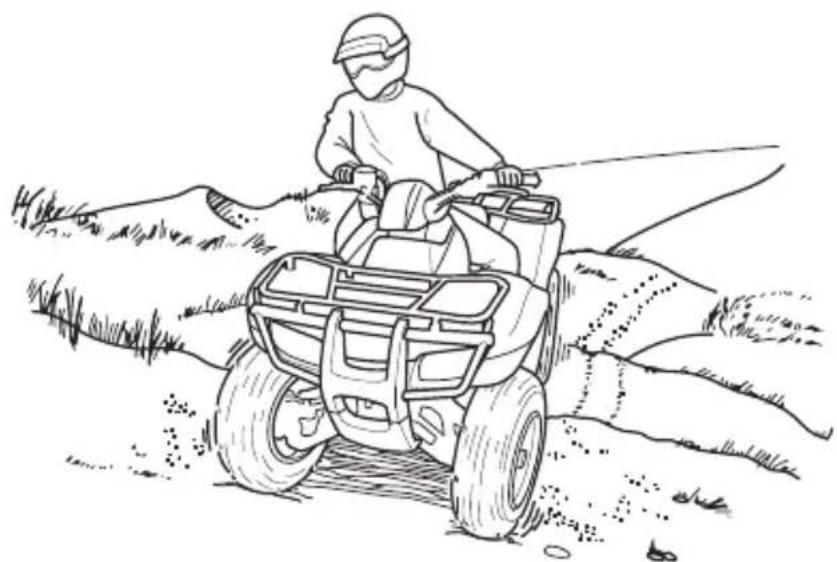
natural_image
Line drawing of a person riding a multi-rotor vehicle through a field (no text or symbols)Shift weight uphill when crossing slopes.
Making Turns on Slopes
- Compared to riding on level ground, you may need to shift more weight and lean more when making turns on slopes.
- Do not make turns on any slopes until you have first mastered the techniques for making turns on level terrain.
Riding Over Obstacles
Before operating in a new area, check for obstacles. Watch out for bumps, rain ruts, potholes and other obstacles in the terrain. When you approach any obstacle, reduce your speed and be prepared to stop.
Never try to ride over large obstacles, such as large rocks or fallen logs.
WARNING
Improperly operating over obstacles could cause loss of control or a collision and could cause the ATV to overturn.
When you go over obstacles, always follow proper procedures as described in this owner's manual.
Riding Through Water
Your ATV is designed to travel through water up to approximately 10 inches (254 mm) deep. Before crossing a stream, make sure the water is not too deep or flowing too fast.
WARNING
The ATV tires have some ability to float. Operating this ATV through deep or fast-flowing water may cause a loss of traction and loss of control, which could lead to a crash.
Never operate this ATV in fast-flowing water or in water deeper than that specified in this owner's manual.
- Choose a path where both banks have gradual slopes.
- Proceed through the water at a slow, steady speed.
- Watch out for submerged obstacles and slippery rocks.
- Avoid getting the spark plug or air cleaner wet, as this would cause the engine to stop.
-
After leaving the water, always test both the front and rear brakes.
-
Riding through water can make the brakes less effective than normal, and may reduce stopping ability.
- If necessary, apply the brakes repeatedly until they dry out and operate normally.
- If the brakes don’t regain effectiveness, stop your ATV and follow the procedures on page 134.
Parking
- Look for level parking area. Make sure the ground surface is firm.
- After bringing your ATV to a stop, hold the brakes while you shift into neutral.
- Set the parking brake.
- Turn the ignition switch OFF (O).
- If you're finished riding for the day, turn the fuel valve OFF.
If it is necessary to start the engine when your ATV in gear and is stopped on a grade, rock the vehicle back and forth to allow shifting the transmission into neutral.
The brake light is activated by applying the parking brake. When using the parking brake, be sure to turn the ignition switch OFF (O) to avoid discharging the battery.
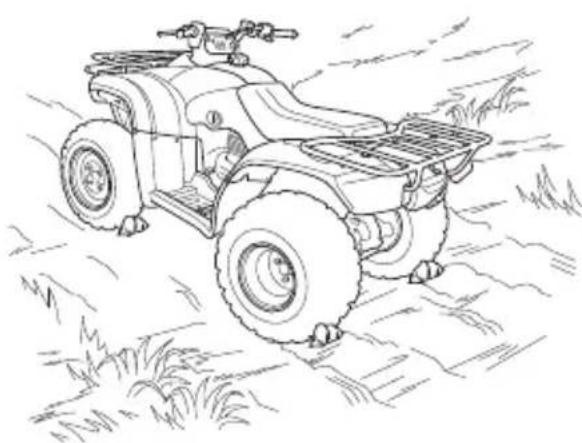
Parking on a Steep Incline or a Loose or Slippery Surface
If you must park your ATV on a steep incline or loose or slippery surface, use the following procedure:
- While holding the brakes, set the parking brake.
- Turn the ignition switch OFF (O) and release the brakes.
- If the ATV begins to move, either while sitting on it or after you dismount, find a better parking location.
- If rocks or other objects are available, you can block the wheels as shown for additional security.
natural_image
Line drawing of a grassy off-road vehicle with visible tracks and wheels (no text or symbols)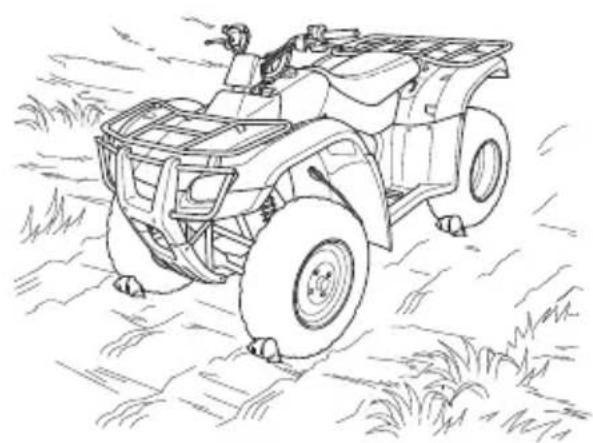
natural_image
Line drawing of a person driving a small utility vehicle through a field (no text or symbols)To help keep your ATV in good shape, this section includes a Maintenance Schedule for required service and step-by-step instructions for specific maintenance tasks. You'll also find important safety precautions, information on fuels and oils, and tips for keeping your Honda looking good.
For information about replacing fuses, see page 174.
For information about the exhaust emission and noise requirements of the U.S. Environmental Protection Agency (EPA), see page 190.
Maintenance, replacement or repair of the emission control devices and systems may be performed by any ATV repair establishment or individual using parts that are “certified” to EPA standards.
Before You Service Your Honda
The Importance of Maintenance.... 79
Maintenance Safety.... 80
Important Safety Precautions 81
Maintenance Schedule 82
Maintenance Record.... 86
Service Preparations
Maintenance Component Locations 87
Tool Kit 90
Owner's Manual Storage 91
Seat Removal....92
(cont'd)
Servicing Your Honda
Service Procedures
Fluids & Filters
Fuel....93
Engine Oil....96
Gear Case Oil 102
Air Cleaner 104
Engine
Throttle 109
Carburetor Choke Cable & Knob.... 111
Clutch System 112
Reverse Inhibitor System 113
Engine Idle Speed.... 114
Spark Plug 115
Valves.... 118
Spark Arrester 119
Chassis
Brakes 120
Tires 135
Guards 141
Electrical
Battery 142
Appearance Care.... 147
The Importance of Maintenance
A well-maintained ATV is essential for safe, economical, and trouble-free riding. It will also help reduce air pollution. Careful pre-ride inspections and good maintenance are especially important because your ATV is designed to be ridden over rough off-road terrain.
To help you properly care for your ATV, this section of the manual provides a Maintenance Schedule. The service intervals in this schedule are based on average riding conditions.
More frequent service is needed if you subject your ATV to severe use or ride in unusually wet or dusty areas.
WARNING
Improperly maintaining this ATV or failing to correct a problem before you ride can cause a crash in which you can be seriously hurt or killed.
Always follow the inspection and maintenance recommendations and schedules in this owner's manual.
Frequent servicing of the air cleaner is especially important to help you avoid a possible costly engine repair.
If your ATV overturns or is involved in a crash, be sure your dealer inspects all major parts, even if you are able to make some repairs.
This section includes instructions on how to perform some important maintenance tasks. If you have basic mechanical skills, you can perform many of these tasks with the tools provided with your ATV.
Other tasks that are more difficult and require special tools are best performed by professionals. Removing the wheels should normally be handled only by a Honda technician or other qualified mechanic. Instructions are included in this manual only to assist in emergency service.
Some of the most important safety precautions follow. However, we cannot warn you of every conceivable hazard that can arise in performing maintenance. Only you can decide whether or not you should perform a given task.
WARNING
Failure to properly follow maintenance instructions and precautions can cause you to be seriously hurt or killed.
Always follow the procedures and precautions in this owner's manual.
Important Safety Precautions
- Make sure the engine is off before you begin any maintenance or repairs. This will help eliminate several potential hazards:
Carbon monoxide poisoning from engine exhaust. Be sure there is adequate ventilation whenever you operate the engine.
Burns from hot ATV parts. Let the engine and exhaust system cool before touching.
Injury from moving parts. Do not run the engine unless instructed to do so.
- Read the instructions before you begin, and make sure you have the tools and skills required.
- To reduce the possibility of a fire or explosion, be careful when working around gasoline. Use only non-flammable solvent, not gasoline, to clean parts. Keep cigarettes, sparks, and flames away from all fuel-related parts.
Remember that your Honda dealer knows your ATV best and is fully equipped to maintain and repair it. To ensure the best quality and reliability, use only new Honda Genuine Parts or other equivalents for repair and replacement. If you have the tools and skills required for additional maintenance jobs, you can purchase an official Honda Service Manual (page 198).
The required Maintenance Schedule that follows specifies how often you should have your ATV serviced, and what things need attention. It is essential to have your ATV serviced as scheduled to maintain safe, dependable performance and proper emission control.
The service intervals in this Maintenance Schedule are based on average riding conditions. Some items will need more frequent service if you ride in unusually wet or dusty areas or at full throttle. Consult your dealer for recommendations applicable to your individual needs and use.
Some items in the Maintenance Schedule can be performed with basic mechanical skills and hand tools. Procedures for these items are provided in this manual. Other items involve more extensive procedures and may require special training, tools, and equipment. We recommend that you have your dealer perform these tasks unless you have advanced mechanical skills and the required tools and equipment. Procedures for such items in this schedule are provided in an official Honda Service Manual available for purchase (page 198).
If you do not feel capable of performing a given task or need assistance, remember that your Honda dealer knows your ATV best and is fully equipped to maintain and repair it. If you decide to do your own maintenance, use only Honda Genuine Parts or their equivalents for repair or replacement to ensure the best quality and reliability.
Perform the pre-ride inspection (page 35) and owner maintenance on this section at each scheduled maintenance period.
Each item on the maintenance schedule requires some mechanical knowledge. Certain items (particularly those marked * and **) may require more technical information and tools. Consult your dealer.
*Should be serviced by your dealer, unless the owner has proper tools and service data and is mechanically qualified. Refer to the official Honda Service Manual (page 198).
**In the interest of safety, we recommend these items be serviced only by your dealer.
Summary of Maintenance Schedule Notes & Procedures:
NOTES:
- Service more frequently when riding in dusty areas, sand or snow.
- Service more frequently after riding in very wet or muddy conditions.
- Replace every 2 years. Replacement requires mechanical skill.
Maintenance Procedures:
I: inspect and clean, adjust, lubricate, or replace, if necessary
C: clean
A: adjust
L: lubricate
R: replace
| FREQUENCYITEMS NOTE HOURS 20 100 200 | WHICHEVERCOMES FIRST | INITIAL MAINT. | REGULAR MAINT. INTERVAL | Refer to page | |||
| mi 100 | 600 1200 | ||||||
| km 150 | 1000 2000 | ||||||
| MONTH | 1 | 6 | 12 | ||||
| *FUEL LINE | — | ||||||
| *THROTTLE OPERATION | 109 | ||||||
| *CARBURETOR CHOKE | 111 | ||||||
| AIR CLEANER | NOTE 1 | C | C | 104 | |||
| *SUB AIR CLEANER | NOTE 1 | C | R | — | |||
| AIR CLEANER HOUSING DRAIN TUBE | NOTE 2 | I | I | 108 | |||
| SPARK PLUG | I | I | 115 | ||||
| * | VALVE CLEARANCE | I | I | I | 118 | ||
| ENGINE OIL | INITIAL= 100 mi (150 km), 20 operating hours or 1 month: RREGULAR= Every 600 mi (1,000 km), 100 operating hours or 12 months: R | 96 | |||||
| ** | ENGINE OIL CENTRIFUGAL FILTER | C | — | ||||
| * | ENGINE IDLE SPEED | I | I | I | 114 | ||
| *SECONDARY AIR SUPPLY SYSTEM | I | — | |||||
* Should be serviced by your dealer, unless the owner has proper tools and service data and is mechanically qualified. Refer to the official Honda Service Manual (page 198).
**In the interest of safety, we recommend these items be serviced only by your dealer.
Maintenance Schedule
| FREQUENCYITEMS NOTE | WHICHEVERCOMES FIRST | INITIAL MAINT. MAINT. INTERVAL | Refer to page | |||
| mi 100 | 600 1200 | |||||
| km 150 | 1000 2000 | |||||
| MONTH 1 | 6 | 1 | 2 | |||
| HOURS 20 | 100 200 | |||||
| REAR FINAL GEAR CASE OIL | (R: EVERY 2 YEARS) | 102 | ||||
| *BRAKE FLUID | NOTE 3 | I | 120 | |||
| *BRAKE SHOE WEAR | NOTE 1 | 132 | ||||
| * | BRAKE LIGHT SWITCH | I | I | 133 | ||
| BRAKE SYSTEM | I | I | 120 | |||
| *REVERSE INHIBITORSYSTEM | I | I | 113 | |||
| GUARDS | I | 141 | ||||
| * | CLUTCH SYSTEM | I | I | 112 | ||
| * | SUSPENSION | I | — | |||
| * | SPARK ARRESTER | C | 119 | |||
| * | NUTS, BOLTS, FASTENERS | I | — | |||
| ** | WHEELS/TIRES | I | I | 135 | ||
| ** | TIE-ROD AND JOINT BOOTS | I | I | — | ||
| ** | STEERING SHAFT HOLDER BEARINGS | — | ||||
| ** | STEERING SYSTEM | — | ||||
* Should be serviced by your dealer, unless the owner has proper tools and service data and is mechanically qualified. Refer to the official Honda Service Manual (page 198).
**In the interest of safety, we recommend these items be serviced only by your dealer.
Maintenance Record
Keeping an accurate maintenance record will help ensure that your ATV is properly maintained. Retain detailed receipts to verify the maintenance was performed. If the ATV is sold, these receipts should be transferred with the ATV to the new owner. Make sure whoever performs the maintenance completes this record. All scheduled maintenance, including the 100 mile (150 km) or 1 month or 20 hours initial maintenance, is considered a normal owner operating cost and will be charged for by your dealer. Use the space under Notes to record anything you want to remind yourself about or mention to your dealer.
| Miles (km) or months or hours | Date Performed By: Notes | |
| 100 (150) or 1 or 20 | ||
| 600 (1,000) or 6 or 100 | ||
| 1,200 (2,000) or 12 or 200 | ||
| 1,800 (3,000) or 18 or 300 | ||
| 2,400 (4,000) or 24 or 400 | ||
| 3,000 (5,000) or 30 or 500 | ||
| 3,600 (6,000) or 36 or 600 | ||
| 4,200 (7,000) or 42 or 700 | ||
| 4,800 (8,000) or 48 or 800 |
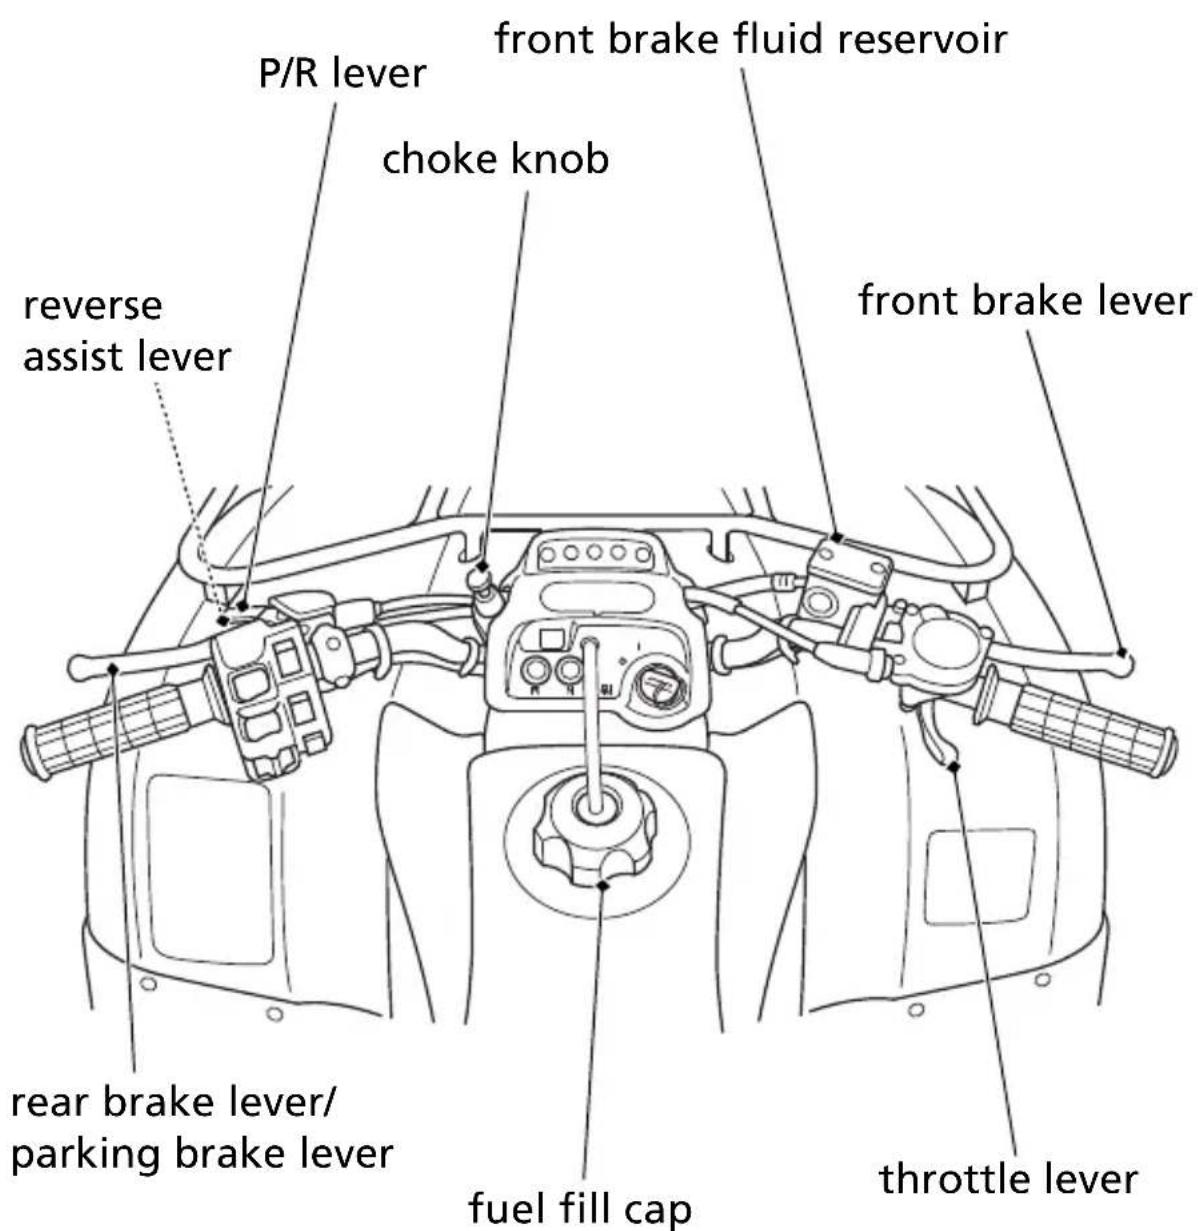
Maintenance Component Locations
text_image
P/R lever front brake fluid reservoir choke knob reverse assist lever front brake lever rear brake lever/ parking brake lever fuel fill cap throttle leverMaintenance Component Locations
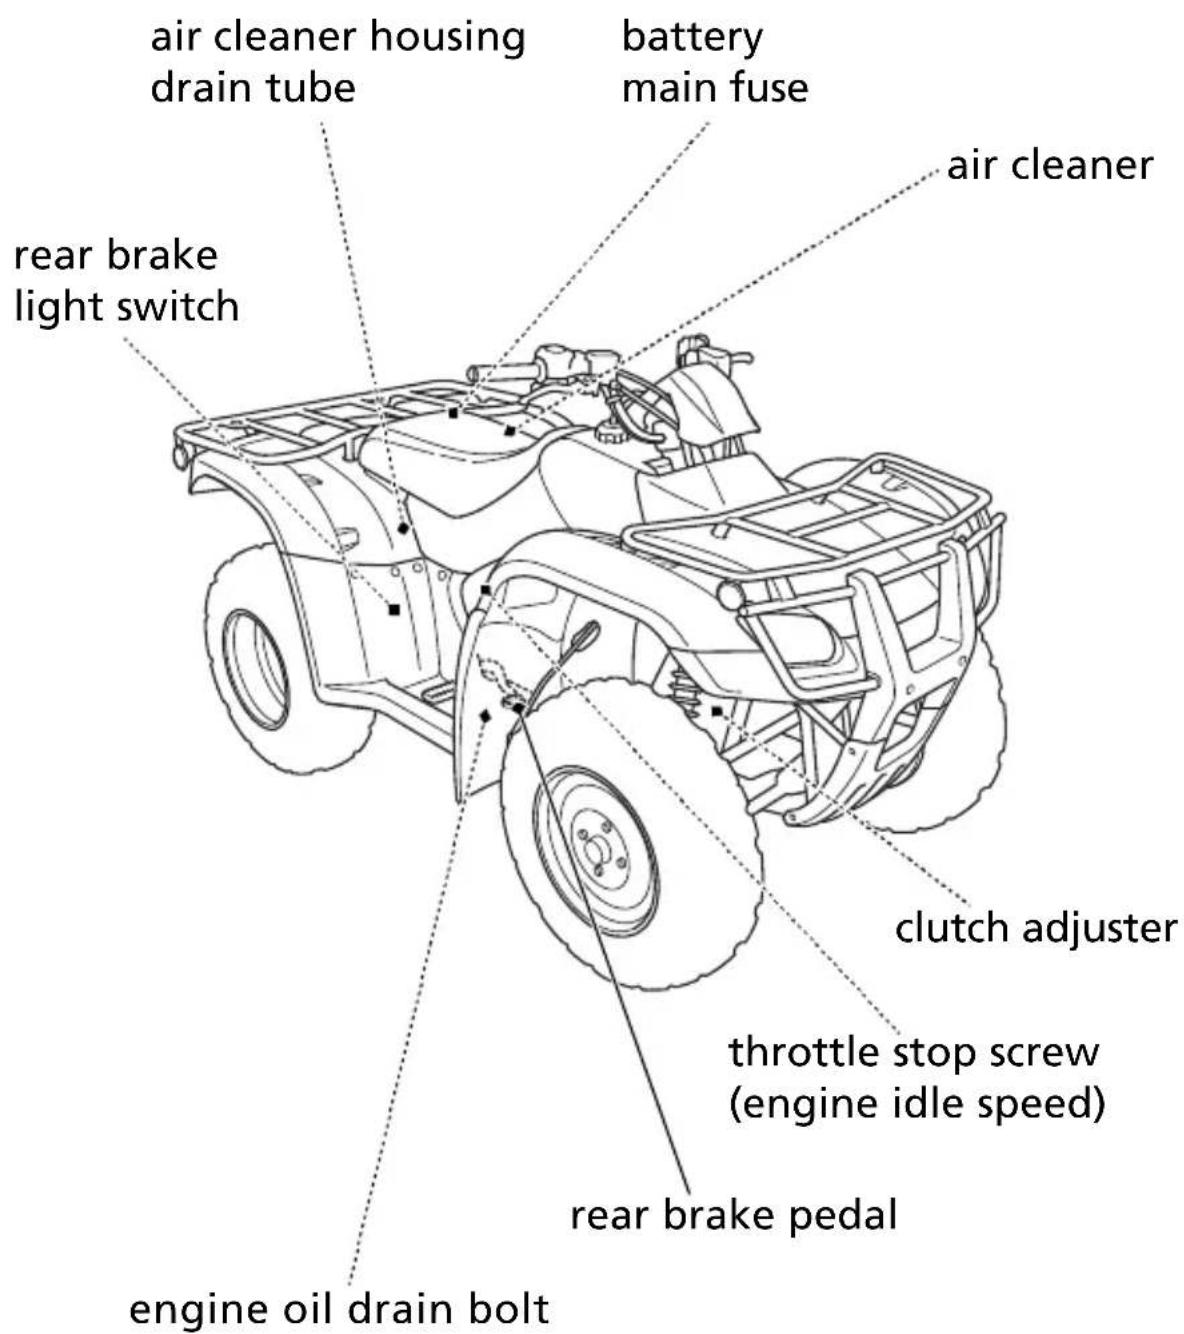
text_image
air cleaner housing drain tube rear brake light switch battery main fuse air cleaner clutch adjuster throttle stop screw (engine idle speed) rear brake pedal engine oil drain boltMaintenance Component Locations
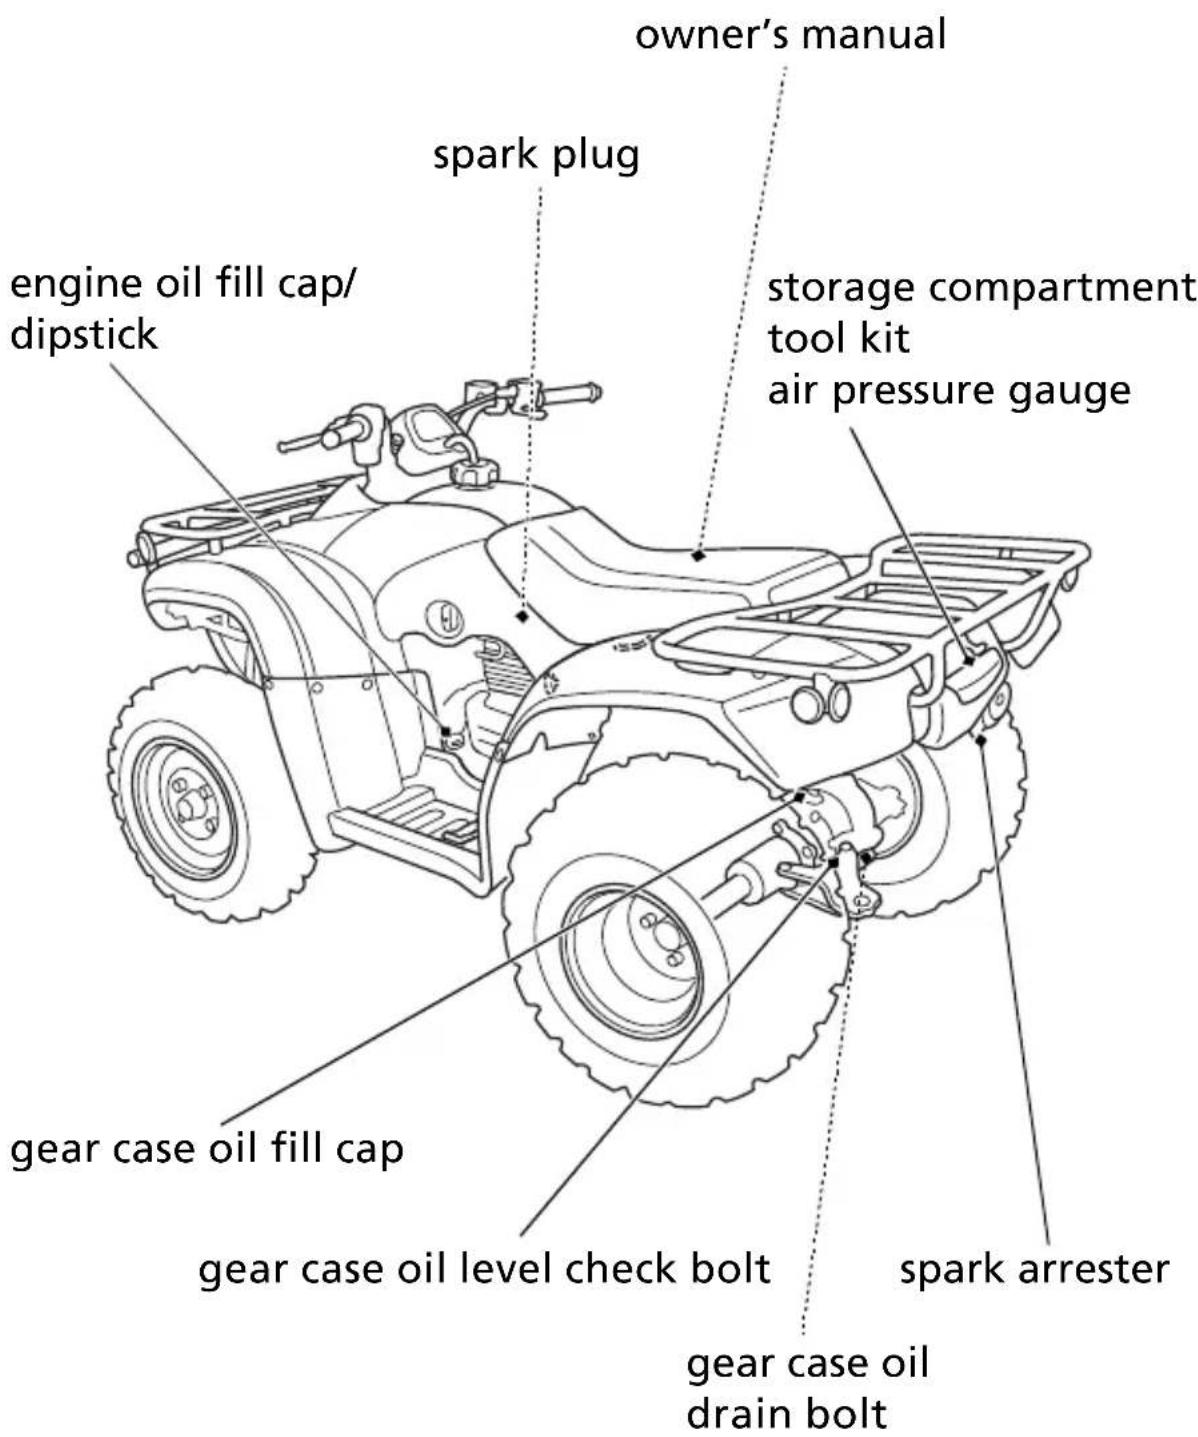
text_image
owner's manual spark plug storage compartment tool kit air pressure gauge engine oil fill cap/ dipstick gear case oil fill cap gear case oil level check bolt spark arrester gear case oil drain boltTool Kit
The tool kit (1) is stored in the storage compartment (2) below the rear cargo rack.
To open the compartment, unhook the rubber strap (3).
The gear change tool (4) is stored underside of the seat.
The air pressure gauge should be stored in the tool kit.
An optional, larger tool kit may be available. Check with your dealer's parts department.
REAR
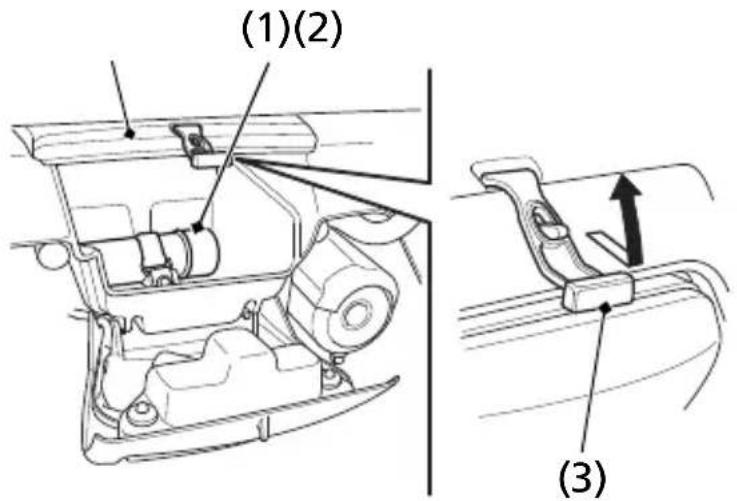
text_image
(1)(2) (3)SEAT UNDERSIDE
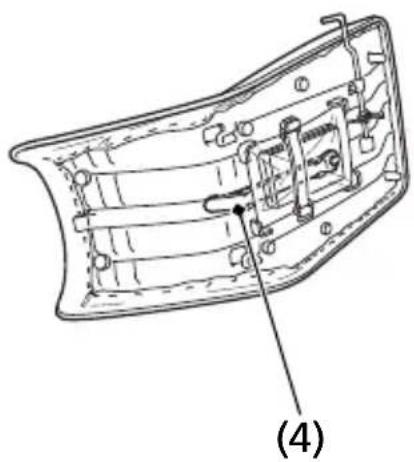
natural_image
Technical line drawing of a mechanical component with no visible text or symbols(1) tool kit
(2) storage compartment
(3) rubber strap
(4) gear change tool
Owner's Manual Storage
Your ATV provides storage for the owner's manual so you'll have it with you for easy reference. Store your owner's manual (1) in the plastic document bag underside of the seat (2).
The owner's manual and spare fuses (3) should be stored in the plastic document bag (4).
Be careful not to flood this area when washing your ATV or riding through water.
SEAT UNDERSIDE
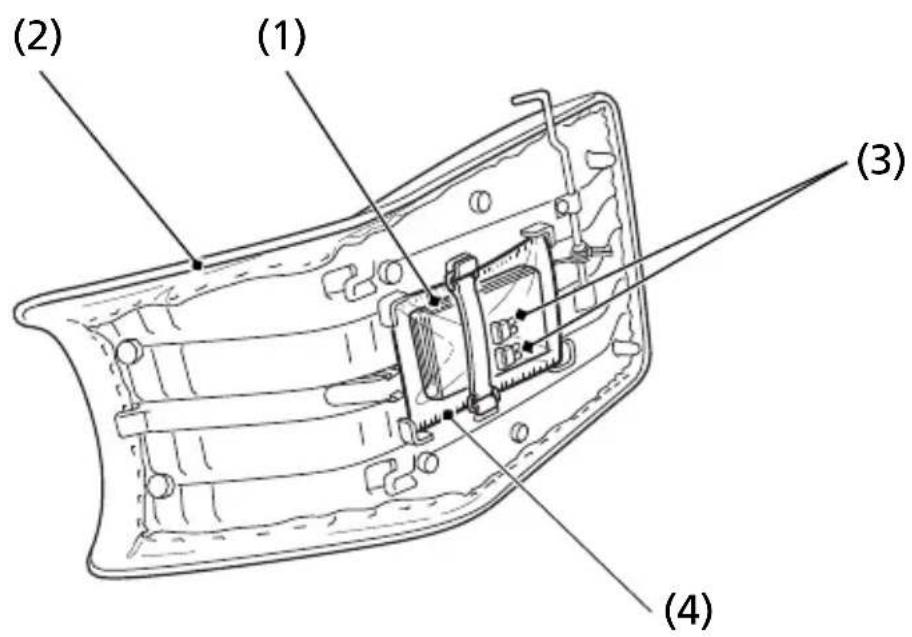
text_image
(2) (1) (3) (4)(1) owner's manual
(3) spare fuses
(2) seat
(4) plastic document bag
Refer to Safety Precautions on page 81.
The seat must be removed for air cleaner, battery and fuse maintenance.
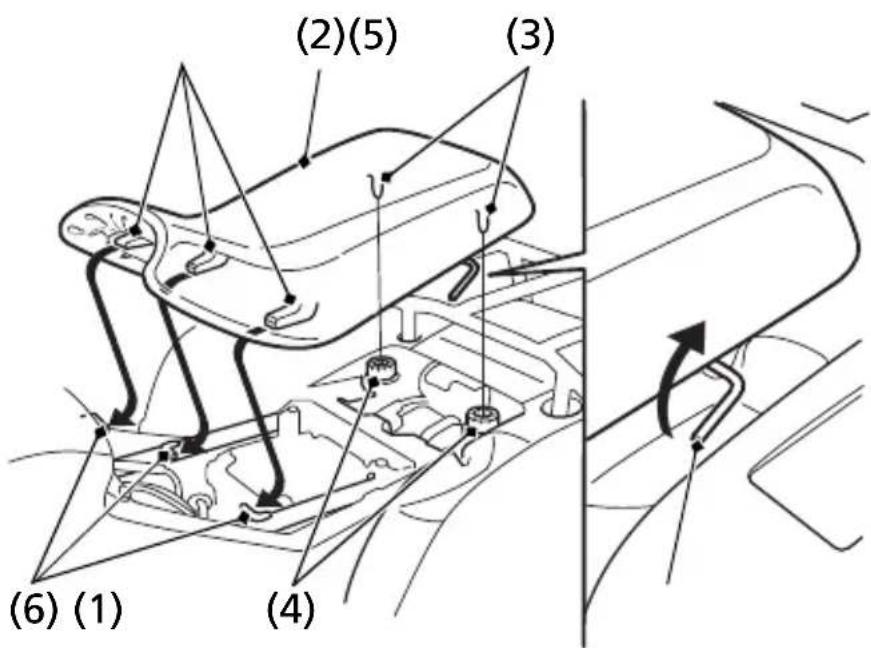
text_image
(2)(5) (3) (6)(1) (4)(1) seat lock lever
(4) grommets
(2) seat
(5) front prongs
(3) studs
(6) hooks
Removal
- Pull the seat lock lever (1) at the left side of the seat.
- Pull the seat (2) up from the rear to remove the studs (3) from the grommets (4).
- Slide the seat back and up.
Installation
- Insert the front prongs (5) into the hooks (6) on the frame and press the studs into the grommets.
- Press down on the seat until locks.
Refer to Safety Precautions on page 81.
Fuel Recommendation
| type unleaded | |
| pump octane number 86 | (or higher) |
Use only unleaded fuel in your Honda. The use of leaded fuel will damage the catalytic converter(s). If you ride your Honda in a country where leaded fuel might be available, take precautions to use only unleaded fuel.
Your engine is designed to use any unleaded gasoline that has a pump octane number of 86 or higher. Gasoline pumps at service stations normally display the pump octane number. For information on the use of oxygenated fuels, see page 194.
Use of lower octane gasoline can cause persistent “pinging” or “spark knock” (a loud rapping noise) which, if severe, can lead to engine damage. Light pinging experienced while operating under a heavy load, such as climbing a hill, is no cause for concern.
If pinging or spark knock occurs at a steady engine speed under normal load, change brands of gasoline. If pinging or spark knock persists, consult your dealer.
Never use stale or contaminated gasoline or an oil/gasoline mixture. Avoid getting dirt, dust, or water in the fuel tank.
Fuel Capacity
Fuel tank capacity, including reserve:
2.40 US gal (9.1 ℓ)
Reserve capacity:
0.63 US gal (2.4 ℓ)
The tank should be refilled as soon as possible after switching to reserve, and the fuel valve should be returned to the ON position after refueling to avoid running out of fuel with no reserve.
Refueling Procedure
Refer to Safety Precautions on page 81.
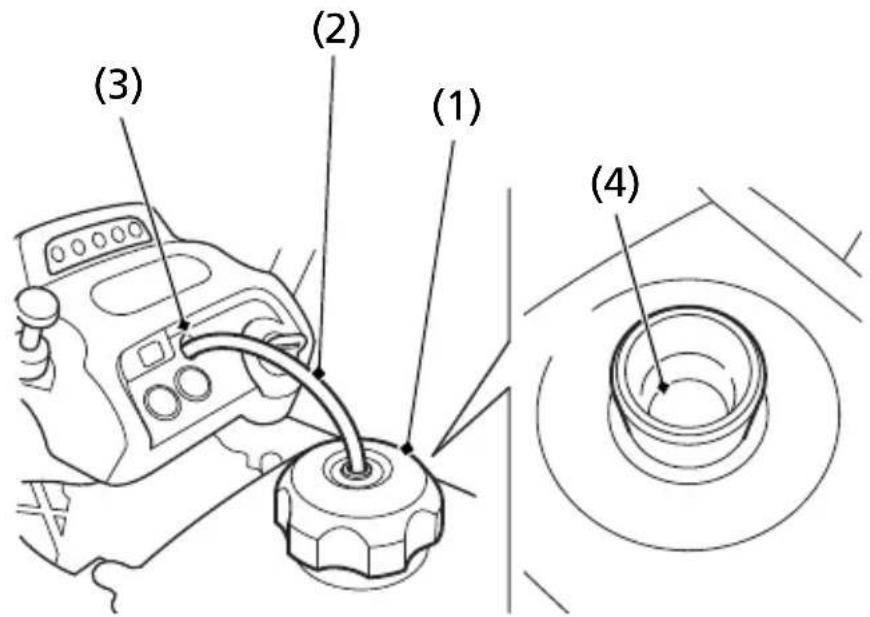
text_image
(1) (2) (3) (4)(1) fuel fill cap
(2) breather tube
(3) handlebar cover hole
(4) lower edge of filler neck
- To open the fuel fill cap (1), turn it counterclockwise.
- Pull the breather tube (2) out of the handlebar cover hole (3).
- Add fuel until the level reaches the bottom of the filler neck (4). Avoid over filling the tank. There should be no fuel in the filler neck.
WARNING
Gasoline is highly flammable and explosive. You can be burned or seriously injured when handling fuel.
- Stop the engine and keep heat, sparks and flame away.
- Handle fuel only outdoors.
-
Wipe up spills immediately.
-
After refueling, turn the fuel fill cap clockwise until it clicks.
- Insert the breather tube into the handlebar cover hole.
- If the fuel valve was set to RES, turn the fuel valve ON.
If you replace the fuel fill cap, use a Honda Genuine replacement part or equivalent.
Engine oil quality is a major factor that affects both the performance and the service life of the engine.
Using the proper oil (page 97) and filter, and regularly checking, adding, and changing oil will help extend your engine's life. Even the best oil wears out. Changing oil helps get rid of dirt and deposits in the engine. Operating the engine with old or dirty oil can damage your engine. Running the engine with insufficient oil can cause serious damage to the engine and transmission.
Change the engine oil as specified in the maintenance schedule on page 84. When running in very dusty conditions, oil changes should be performed more frequently than specified in the maintenance schedule.
Oil Recommendation
| API classification SG or | higher except oils labeled as energy conserving or resource conserving on the circular API service label |
| viscosity (weight) SAE | 10W-30 |
| JASO T 903 standard | MA |
| suggested oil* | Pro Honda GN4 4-stroke oil, or Honda 4-stroke oil, or an equivalent motorcycle oil. |
* Suggested oils are equal in performance to SJ oils that are not labeled as energy conserving or resource conserving on the circular API service label.
- Your ATV does not need oil additives. Use the recommended oil.
- Do not use oils with graphite or molybdenum additives. They may adversely affect clutch operation.
- Do not use API SH or higher oils displaying a circular API “energy conserving” or “resource conserving” service label on the container. They may affect lubrication and clutch performance.
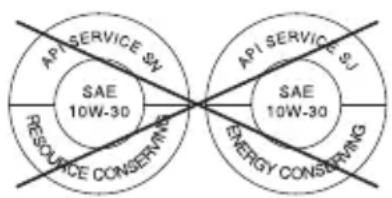
text_image
API SERVICE SN SAE 10W-30 RESOURCE CONSERVING API SERVICE SN SAE 10W-30 ENERGY CONSERVINGNOT RECOMMENDED
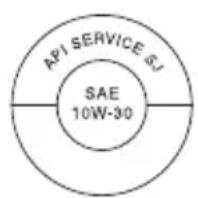
RECOMMENDED
- Do not use non-detergent, vegetable, or castor based racing oils.
Other viscosities shown in the following chart may be used when the average temperature in your riding area is within the indicated range.
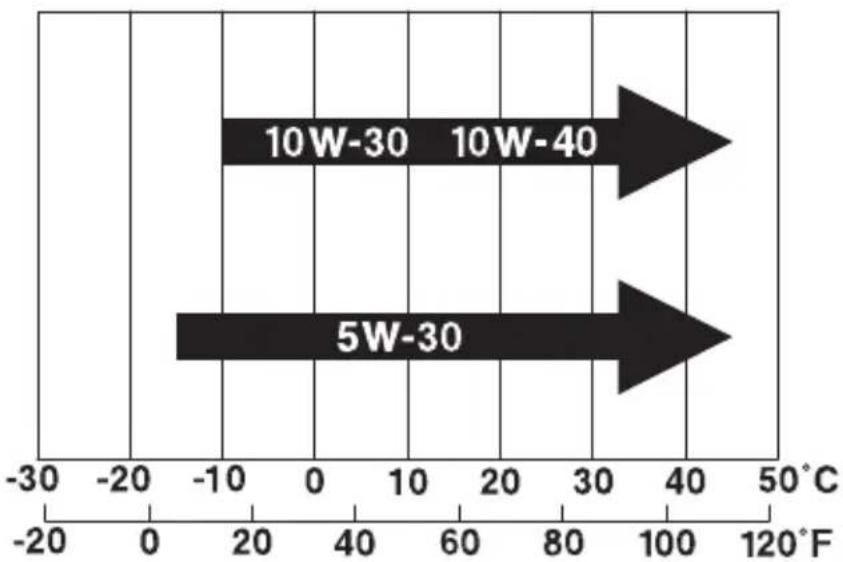
bar
| Range | Value | |---|---| | 10W-30 | 10W-40 | | 5W-30 | |JASO T 903 standard
The JASO T 903 standard is an index for engine oils for 4-stroke motorcycle engines.
There are two classes: MA and MB.
Oil conforming to the standard is labeled on the oil container. For example, the following label shows the MA classification.
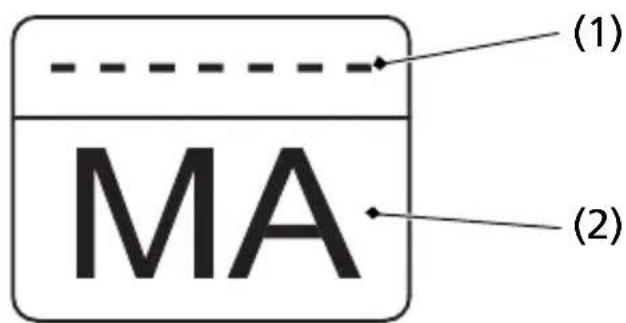
text_image
MA (1) (2)(1) oil code
(2) oil classification
Checking & Adding Oil
Refer to Safety Precautions on page 81.
Check the engine oil level each day before operating your ATV and add if needed.
Before riding your ATV, check the engine oil level.
- Park your ATV on a firm, level surface.
- Start the engine in a well-ventilated area and let it idle for 3 – 5 minutes. Stop the engine and wait 2 – 3 minutes.
- Remove the oil fill cap/dipstick (1) from the front crankcase cover and wipe it clean.
- Insert the oil fill cap/dipstick without screwing it in, then remove the oil fill cap/dipstick and check the oil level. The oil level should be between the upper level mark (2) and the lower level mark (3) on the oil fill cap/dipstick.
- If required, add the specified oil into the fill cap hole, up to the upper level mark on the oil fill cap/dipstick. Do not overfill.
- Reinstall the oil fill cap/dipstick.
NOTICE
Running the engine with an improper oil level can cause serious engine damage.
LEFT SIDE
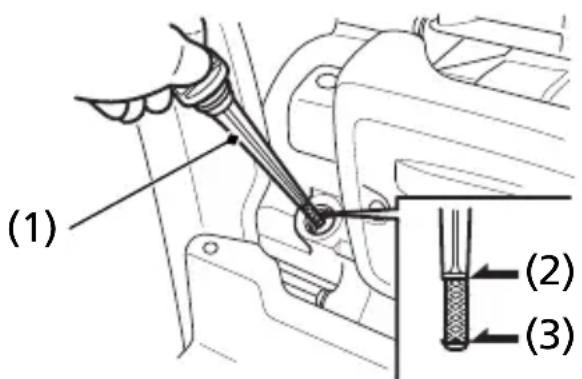
text_image
(1) (2) (3)(1) oil fill cap/dipstick
(2) upper level mark
(3) lower level mark
(cont'd)
Changing Engine Oil
Refer to Safety Precautions on page 81.
This procedure requires mechanical skill and professional tools such as a torque wrench as well as a means for disposing of the drained fluid (page 160). If you do not have the skills or the tools, see your dealer.
Drain the Engine Oil:
- With the ATV on level ground, remove the oil fill cap/dipstick from the front crankcase cover.
- Place an oil drain pan under the crankcase and remove the engine oil drain plug (1) and sealing washer (2).
UNDER ENGINE
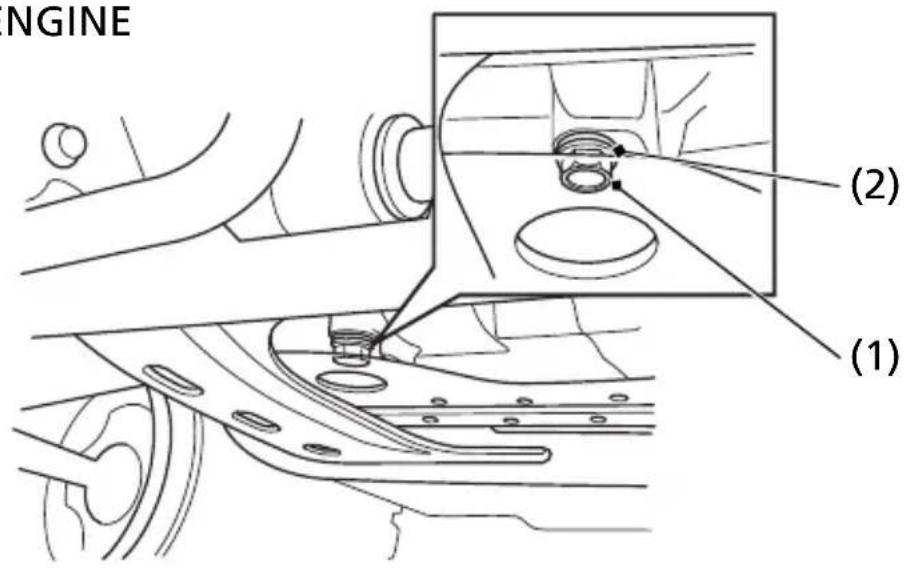
text_image
NGINE (1) (2)(1) engine oil drain plug
(2) sealing washer
- Pour the drained oil into a suitable container and dispose of it in an approved manner (page 160).
NOTICE
Improper disposal of drained fluids is harmful to the environment.
Add Engine Oil:
- Reinstall the oil drain plug with a new sealing washer, and tighten it to the specified torque:
18 lbf·ft (25 N·m, 2.5 kgf·m)
- Fill the crankcase with the recommended grade oil approximately:
1.6 US qt (1.5 ℓ)
- Reinstall the oil fill cap/dipstick.
- Start the engine and let it idle for 3 - 5 minutes.
- Stop the engine and check the oil level. Make sure the oil is between the upper and lower level marks on the oil fill cap/dipstick. If necessary, add more oil but do not overfill.
- Check that there are no oil leaks.
If a torque wrench is not used for installation, see your dealer as soon as possible to verify proper assembly.
Oil Recommendation
| type hypoid gear oil | |
| viscosity (weight) SAE | 80W-90 |
| suggested oil Honda shaft drive oil or equivalent | |
Changing Oil
Refer to Safety Precautions on page 81.
Change the oil with the gear case at normal operating temperature to assure complete and rapid draining.
- Park the ATV on level ground.
- Place an oil drain pan under the oil drain plug (1).
- Remove the oil fill cap (2) and the drain plug and sealing washer (3).
- After the oil has completely drained, reinstall the drain plug with a new sealing washer, and tighten it to the specified torque: 9 lbf·ft (12 N·m, 1.2 kgf·m)
- Pour the drained oil into a suitable container and dispose of it in an approved manner (page 160).
NOTICE
Improper disposal of drained fluids is harmful to the environment.
- Fill the gear case with the recommended oil.
2.7 US oz (80 cm ^3 )
-
Remove the oil level check bolt (4) and sealing washer. Make sure the oil level reaches the oil level check hole (5).
-
Install the oil level check bolt with a new sealing washer and tighten it to the specified torque:
9 lbf·ft (12 N·m, 1.2 kgf·m)
- Install the oil fill cap and tighten it to the specified torque:
9 lbf·ft (12 N·m, 1.2 kgf·m)
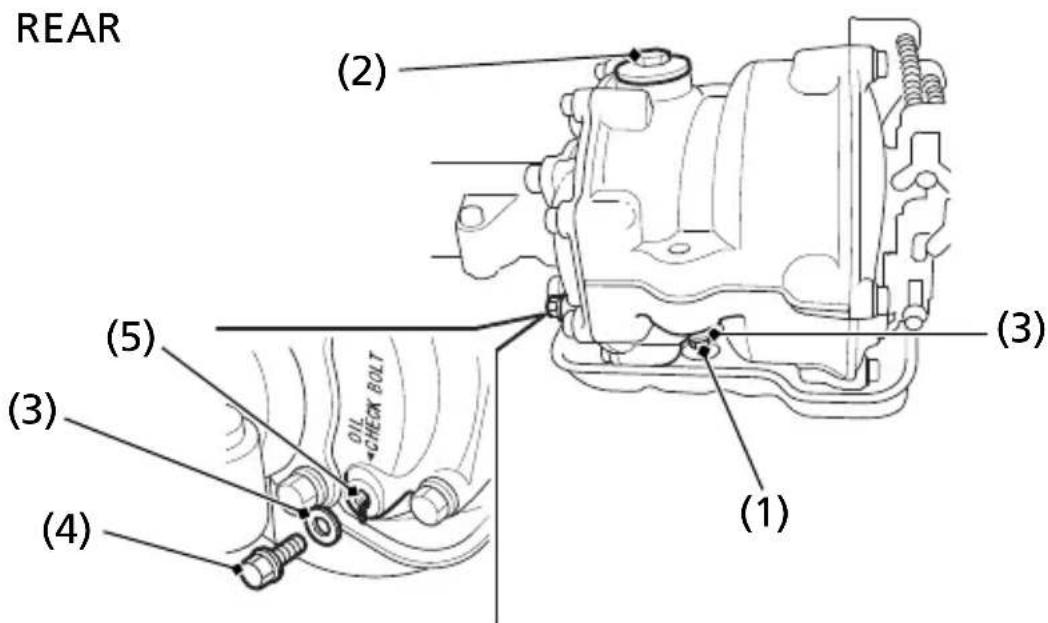
text_image
REAR (2) (3) (5) (4) (1) OIL *CHECK BOLT(1) oil drain plug
(2) oil fill cap
(3) sealing washer
(4) oil level check bolt
(5) oil level check hole
Refer to Safety Precautions on page 81.
Proper air cleaner maintenance is very important for off-road vehicles.
A dirty, water-soaked, worn-out, or defective air cleaner will allow dirt, dust, mud, and other impurities to pass into the engine.
Service the air cleaner more frequently if you ride in unusually wet or dusty areas. Your dealer can help you determine the correct service interval for your riding conditions.
Your ATV's air cleaner has very specific performance requirements. Use a new Honda Genuine air cleaner specified for your model or an air cleaner of equal quality.
NOTICE
Using the wrong air cleaner may result in premature engine wear.
Proper air cleaner maintenance can prevent premature engine wear or damage, expensive repairs, low engine power, poor gas mileage, and spark plug fouling.
NOTICE
Improper or lack of proper air cleaner maintenance can cause poor performance and premature engine wear.
Cleaning
- Remove the seat by pulling the seat lock lever (1) up (page 92). UNDER SEAT
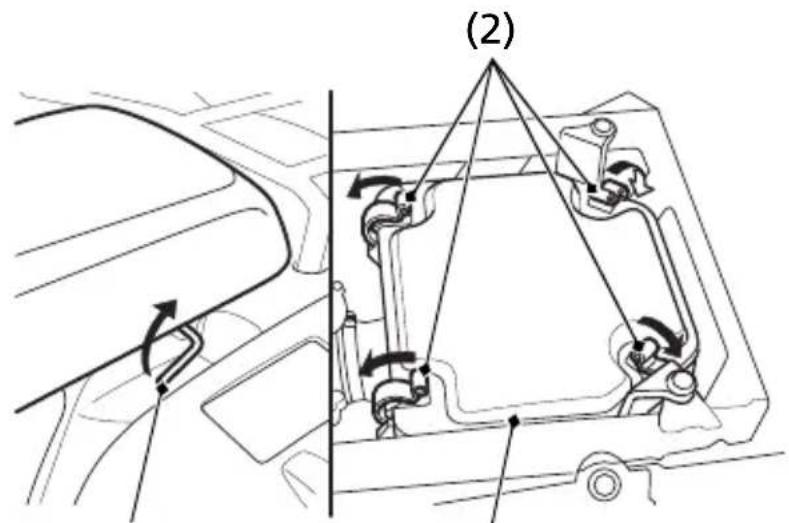
text_image
(2)(1) (3)
(3) air cleaner housing cover(1)
(2) retainer clips
- Unlatch the four retainer clips (2).
-
Remove the air cleaner housing cover (3).
-
Loosen the screws (4) and remove the air cleaner assembly (5) from the air cleaner housing.
-
Unscrew the clamp (6).
-
Remove the air cleaner (7) from the air cleaner body (8).
-
Gently wash the air cleaner in clean, non-flammable (high flash point) solvent such as kerosene — not gasoline. After cleaning, gently squeeze out the remaining solvent. Avoid twisting or wringing the air cleaner. This can tear the foam.
-
Inspect for tears or cracks in the foam or seams of the air cleaner. Replace the air cleaner if it is damaged.
-
Allow the air cleaner to dry thoroughly before applying oil. A wet air cleaner will not fully absorb the oil.
-
Pour clean Pro Honda Foam Filter Oil or an equivalent over the entire surface of the air cleaner. Use both hands to evenly spread the oil into the air cleaner. Gently squeeze out any excess oil. (To keep your hands dry, place the air cleaner in a clean plastic bag before spreading the oil into the air cleaner.)
UNDER SEAT
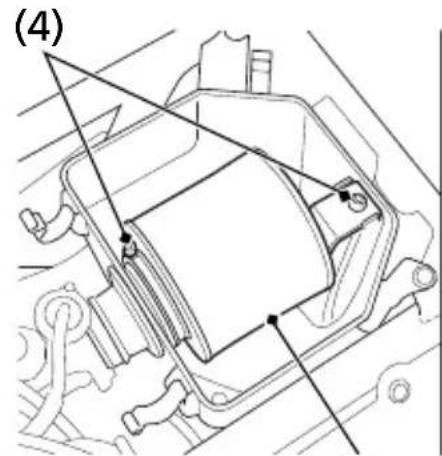
text_image
(4)(5)
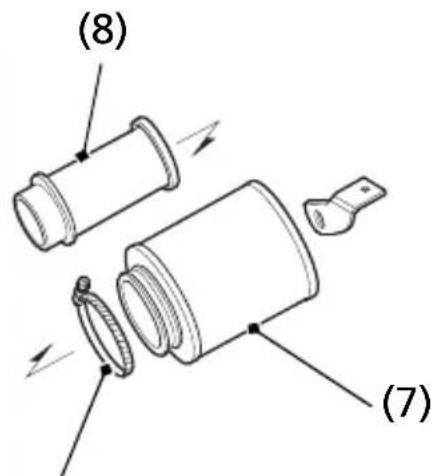
text_image
(8) (7)(6)
(4) screws
(5) air cleaner assembly
(6) clamp
(7) air cleaner
(8) air cleaner body
- Install the air cleaner on the air cleaner body.
- Apply a thin coat of grease to the sealing surface of the air cleaner assembly.
- Install the clamp.
- Insert the air cleaner assembly into the air cleaner housing.
- Fasten the screws.
Dust Cover
UNDER SEAT
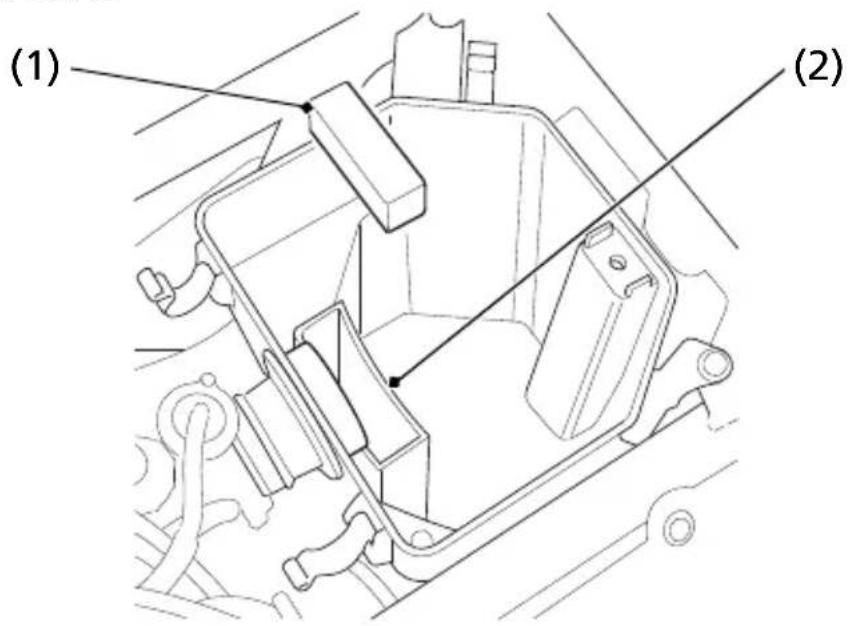
text_image
(1) (2)(1) dust cover (2) air cleaner housing
Do not push the dust cover (1) too far into the air cleaner housing (2).
If the dust cover is dirty, clean it.
Air Cleaner Housing Drain Tube
The air cleaner housing drain tube should be serviced in accordance with the Maintenance Schedule. (Riding through water may require more frequent inspection.) If deposits can be seen in the drain tube, the tube must be cleaned before starting the vehicle.
REAR
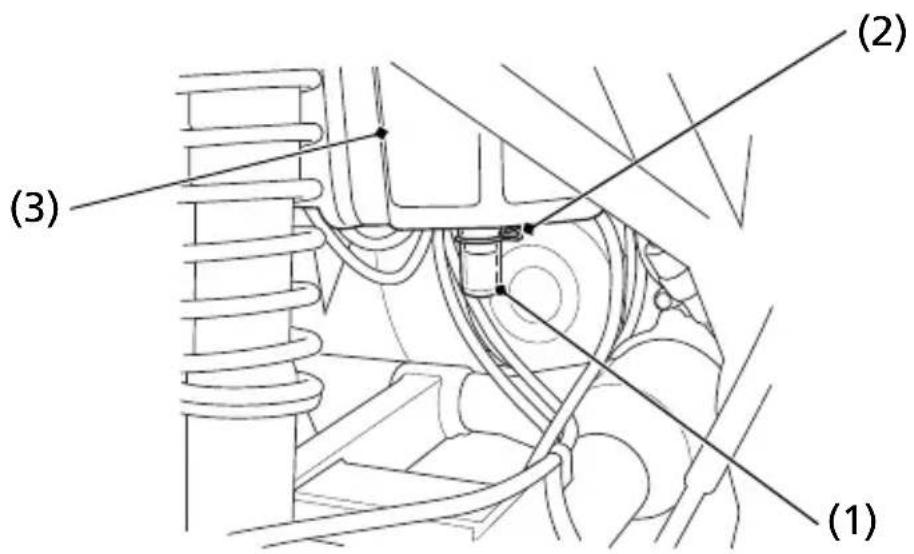
text_image
(1) (2) (3)(1) drain tube (3)
air cleaner housing
(2) clip
- Remove the drain tube (1) by removing the clip (2) under the air cleaner housing (3).
- Drain the deposits.
- Reinstall the drain tube, securing it with the clip.
Throttle Freeplay
Refer to Safety Precautions on page 81.
RIGHT HANDLEBAR
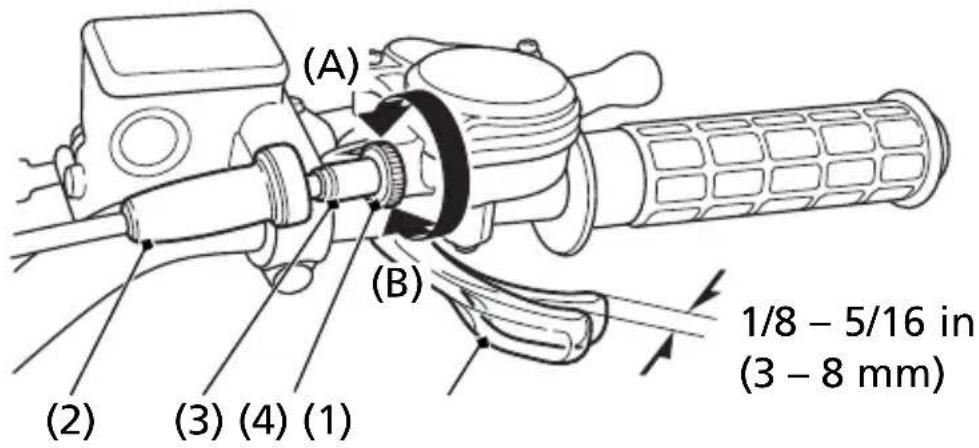
text_image
(A) (B) (2) (3) (4) (1) 1/8 - 5/16 in (3 - 8 mm)(1) throttle lever
(2) rubber sleeve
(3) throttle cable adjuster
(4) lock nut
(A) decrease freeplay
(B) increase freeplay
Inspection
Check freeplay at the throttle lever (1).
Freeplay:
$$ 1 / 8 - 5 / 1 6 \text { in } (3 - 8 \mathrm{mm}) $$
Adjustment
- Slide the rubber sleeve (2) back to expose the throttle cable adjuster (3).
- Loosen the lock nut (4).
- Turn the adjuster to obtain the correct freeplay.
- Tighten the lock nut and reinstall the sleeve.
- After adjustment, check for smooth operation of the throttle lever from fully closed to fully open in all steering positions.
Throttle Inspection
Refer to Safety Precautions on page 81.
- Check that the throttle assembly is positioned properly and the securing bolts are tight.
- Check for smooth operation of the throttle lever from fully open to fully closed in all steering positions. If there is a problem, see your dealer.
- Inspect the condition of the throttle cable from the throttle lever down to the carburetor. If the cable is kinked or chafed, have it replaced.
- Check the throttle cable for tension or stress in all steering positions.
- Lubricate the cable with a commercially available cable lubricant to prevent premature wear and corrosion.
Carburetor Choke Cable & Knob
Refer to Safety Precautions on page 81.
LEFT HANDLEBAR
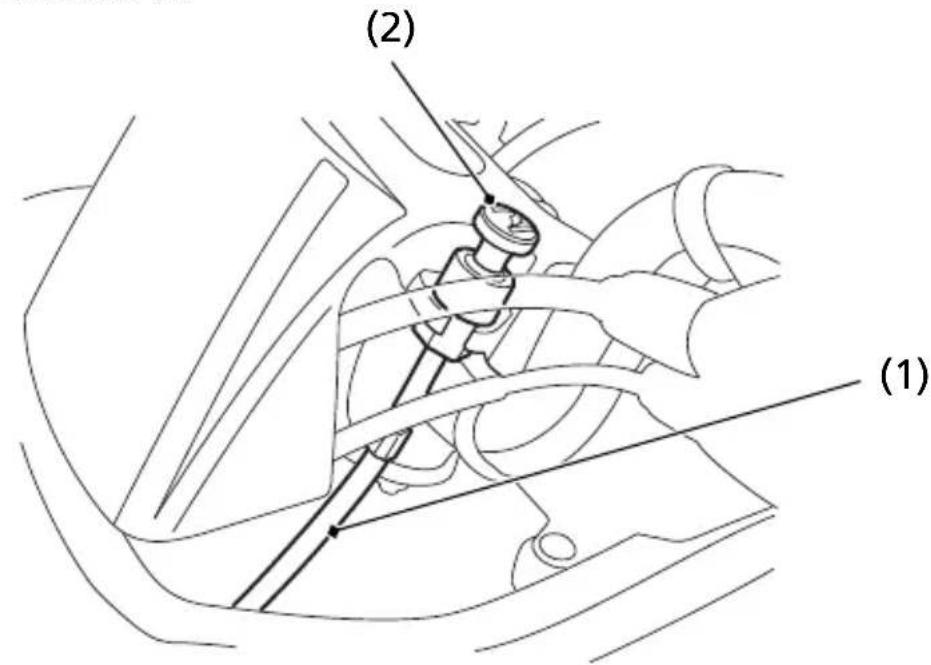
text_image
(1) (2)(2) choke knob(1) choke cable
- Check the condition of the choke cable (1).
- Check the operation of the choke knob (2).
If the cable is damaged or kinked, have it replaced by your dealer.
Your ATV's shift-activated, wet, multiplate clutch is part of the primary drive system. Proper adjustment allows a smooth, gradual engagement when shifting gears.
Clutch Adjustment
Refer to Safety Precautions on page 81.
FRONT
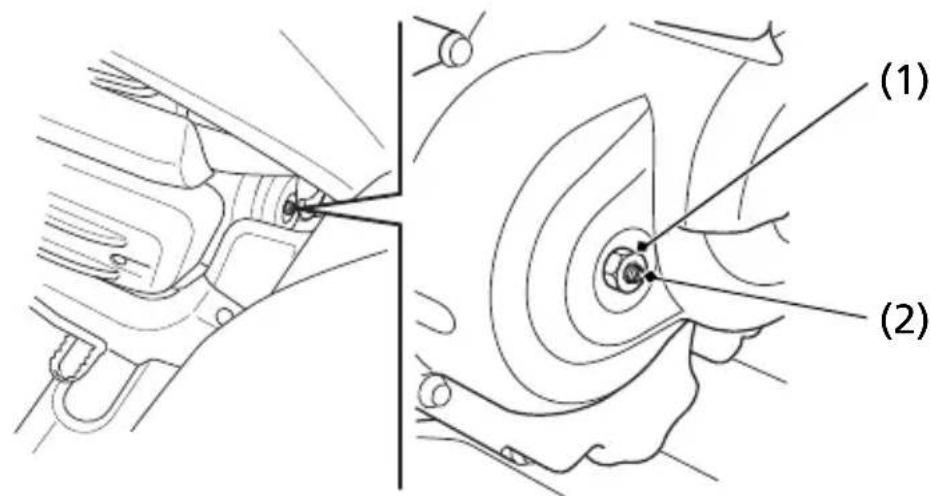
text_image
(1) (2)(2) clutch adjuster(1) lock
- Make sure the engine is cool.
- Make sure the ignition switch is OFF (O).
- Loosen the lock nut (1).
- Turn the clutch adjuster (2) counterclockwise until you feel slight resistance.
- Turn the adjuster 1/4 turn clockwise, then tighten the lock nut to hold the adjuster in this position.
- After adjustment, start the engine and test ride your ATV to be sure the clutch is operating properly.
If you cannot get proper adjustment, or the clutch does not work properly, the clutch friction discs may be worn. See your dealer or refer to official Honda Service Manual (page 198).
112 Servicing Your Honda
Reverse Inhibitor System Adjustment
Refer to Safety Precautions on page 81.
LEFT HANDLEBAR
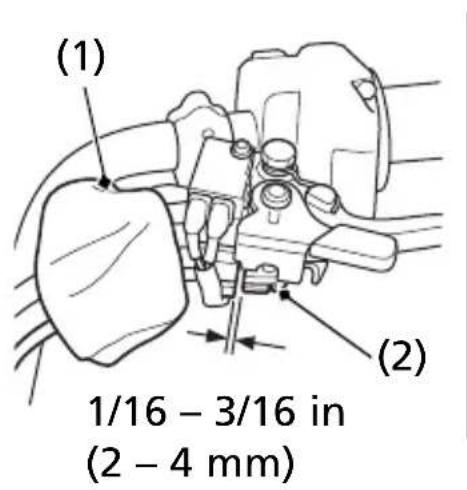
text_image
(1) (2) 1/16 - 3/16 in (2 - 4 mm)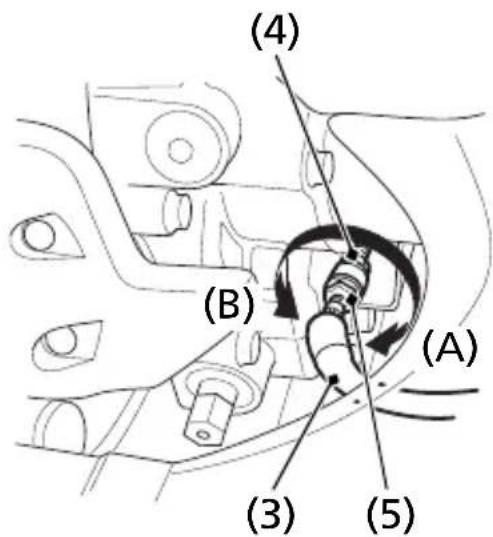
text_image
(4) (B) (A) (3) (5)(1) dust cover
(2) reverse assist lever
(3) rubber sleeve
(4) lock nut
(5) adjusting nut
(A) decrease freeplay
(B) increase freeplay
- Turn over the dust cover (1).
- Check the reverse assist lever (2) freeplay, measured at the reverse assist lever end near the cable:
- To adjust, slide the rubber sleeve (3), loosen the lock nut (4) and turn the adjusting nut (5) to obtain the correct freeplay.
After adjustment, tighten the lock nut securely. - Return the dust cover and rubber sleeve.
$$ 1 / 1 6 - 3 / 1 6 \text { in } (2 - 4 \mathrm{mm}) $$
Other Checks
Check the reverse assist lever and cable for loose connections or other damage. If the cable is worn or kinked, have it replaced by your dealer.
The best way to assure proper carburetion is to see your dealer for regularly scheduled servicing, including carburetor adjustment.
Remember, idle speed adjustment is not a “cure-all” for other problems in your engine’s fuel-delivery system. Adjusting the idle will not compensate for a fault elsewhere.
The engine must be at normal operating temperature for accurate idle speed adjustment.
For information about high altitude carburetor adjustment, see page 189.
Idle Speed Adjustment
Refer to Safety Precautions on page 81.
RIGHT SIDE
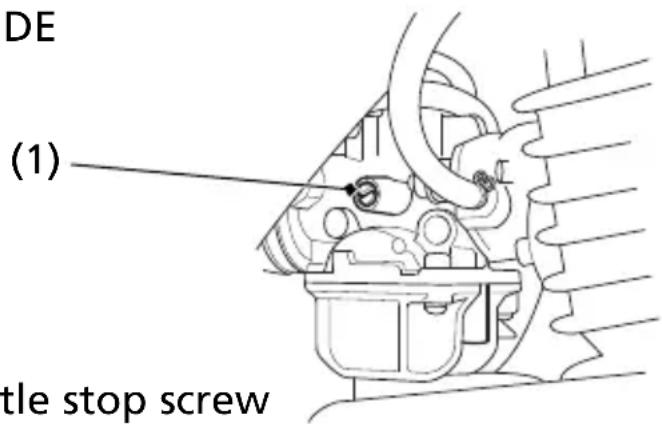
text_image
DE (1) tle stop screw(1) throttle stop screw
- If the engine is cold, start it and warm it up with 10 minutes of stop-and-go riding. Stop the engine.
- Park your ATV on a firm, level surface.
- Connect a tachometer to the engine.
- Shift into neutral. Start the engine.
- Adjust idle speed by turning the throttle stop screw (1). Idle speed (in neutral):
$$ 1, 4 0 0 \pm 1 0 0 \mathrm{rpm} $$
114 Servicing Your Honda
Spark Plug Recommendation
| standard spark plug DPR8 | EA-9 (NGK) or X24EPR-U9 (DENSO) |
| for cold climate (below 5°C, 41°F) | DPR7EA-9 (NGK) or X22EPR-U9 (DENSO) |
| for extended high speed riding | DPR9EA-9 (NGK) or X27EPR-U9 (DENSO) |
Use only the recommended type of spark plug in the recommended heat range.
NOTICE
Using spark plugs with an improper heat range can cause engine damage.
Spark Plug Inspection & Replacement
Refer to Safety Precautions on page 81.
- Clean any dirt from around the spark plug base.
- Disconnect the spark plug cap (1). Take care to avoid damaging the spark plug wire when disconnecting the cap.
- Using a spark plug wrench provided in the tool kit, remove the spark plug.

text_image
(1)(1) spark plug cap
(cont'd)
-
Inspect the electrodes and center porcelain for deposits, corrosion, or carbon fouling. If the corrosion or deposits are heavy, replace the plug. Clean a carbon or wet-fouled plug with a plug cleaner, if available, or a wire brush. Inspect the spark plug electrodes for wear. The center electrode (2) should have a flat tip and sharp edges, and the side electrode (3) should not be eroded. If the electrodes and insulator tip appear unusually fouled or burned, we suggest that you contact your dealer.
-
Discard the spark plug if there is apparent wear or if the insulator is cracked or chipped.
- Using a wire-type feeler gauge, check the spark plug gap (4). If adjustment is necessary, bend the side electrode carefully.
The gap should be:
0.03 - 0.04 in (0.8 - 0.9 mm)
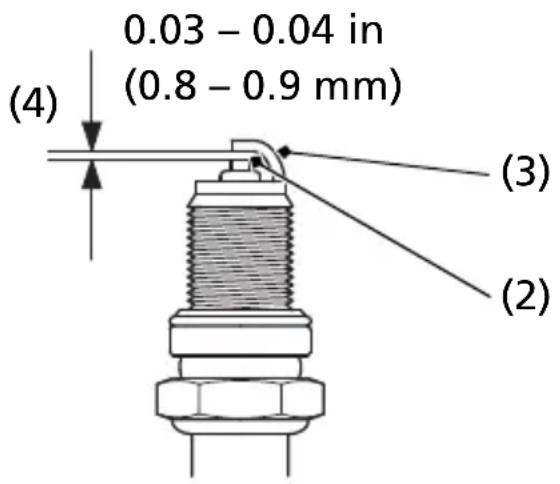
text_image
0.03 - 0.04 in (0.8 - 0.9 mm) (4) (3) (2)(2) center electrode (3) side electrode
(4) spark plug gap
- With the plug washer attached, thread the spark plug in by hand to prevent cross-threading.
- Tighten the spark plug:
- If the old plug is good:
1/8 turn after it seats.
- If installing a new plug, tighten it twice to prevent loosening:
a) First, tighten the plug:
NGK: 3/4 turn after it seats.
DENSO: 1/2 turn after it seats.
b) Then loosen the plug.
c) Next, tighten the plug again:
1/8 turn after it seats.
NOTICE
An improperly tightened spark plug can damage the engine. If a plug is too loose, the piston may be damaged. If a plug is too tight, the threads may be damaged.
- Connect the spark plug cap. Take care to avoid pinching any cables or wires.
Valve Inspection
Refer to Safety Precautions on page 81.
Valve clearance should be:
intake: 0.005 ± 0.001 in (0.13 ± 0.02 mm)
exhaust: 0.005 ± 0.001 in (0.13 ± 0.02 mm)
Excessive clearance will cause noise. Insufficient clearance will cause loss of power and possibly damage the valves.
For those who are mechanically proficient and have the proper tools, instructions on adjusting valve clearances are given in the official Honda Service Manual. Otherwise, the valves should be adjusted by your dealer.
Refer to Safety Precautions on page 81.
The spark arrester must be serviced every 100 operating hours to maintain its efficiency.
Regular servicing prevents carbon build up (which can diminish engine performance) and also complies with USDA regulations for regular maintenance to assure proper function. The spark arrester prevents random sparks from the combustion process in your engine from reaching the environment.
The use of safety glasses is recommended for this procedure.
Because of the possible fire hazard, check that there are no combustible materials in the area before purging the spark arrester.
REAR
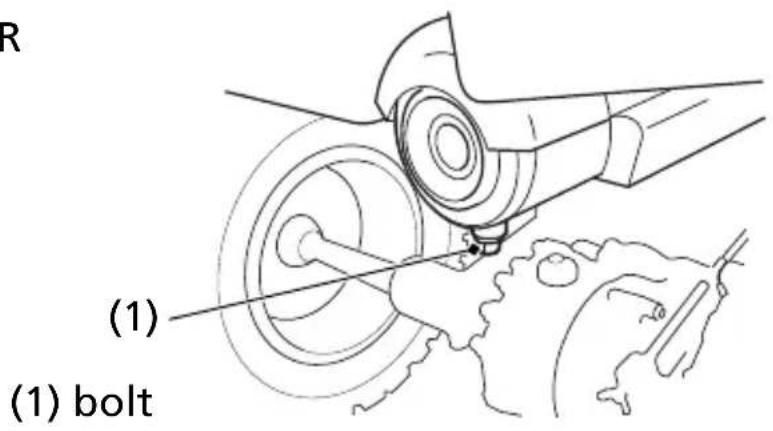
text_image
(1) bolt (1)-
Select a well-ventilated area free of combustible materials and make sure the exhaust pipe is cool.
-
Remove the bolt (1).
-
Start the engine and rev it up approximately twenty times while momentarily creating exhaust system back pressure by blocking the end of the muffler with a shop towel.
-
Stop the engine and allow the exhaust pipe to cool.
-
Reinstall the bolt securely.
The hydraulic drum brakes (front) and single mechanical drum brake (rear) on your ATV dissipate heat generated by the friction of the brake shoes on the drums as the wheels are slowed.
As the front brake shoes wear, brake fluid level will drop. A leak in the system will also cause the level to drop.
Inspect the system before each ride to ensure there are no fluid leaks. Periodically inspect the brake fluid level and front and rear brake shoes for wear.
If the brake lever or brake pedal freeplay does not feel within the normal range while riding, check the brake shoes for wear (page 132). Worn shoes should be replaced. If the shoes are not worn beyond the recommended limit, there is probably air in the brake system. See your dealer to have the air bled from the system.
Brake Fluid Recommendation
brake fluid Honda DOT 3 or DOT 4 Brake Fluid
The recommended brake fluid is Honda DOT 3 or DOT 4 Brake Fluid, or any brake fluid of equal quality and performance. Use fresh brake fluid from a sealed container. Be sure to read the label before opening the sealed container. An opened container may be contaminated or may have absorbed moisture from the air.
Fluid Level Inspection
Refer to Safety Precautions on page 81.
With the ATV in an upright position, check the fluid level. It should be above the LOWER level mark (1).
If the fluid is below the LOWER level mark, have your dealer add the recommended fluid.
Do not add or replace brake fluid, except in an emergency. Use only fresh brake fluid from a sealed container. If you do add fluid, have your dealer check the system as soon as possible.
NOTICE
Brake fluid can damage plastic and painted surfaces. Handle with care.
RIGHT HANDLEBAR
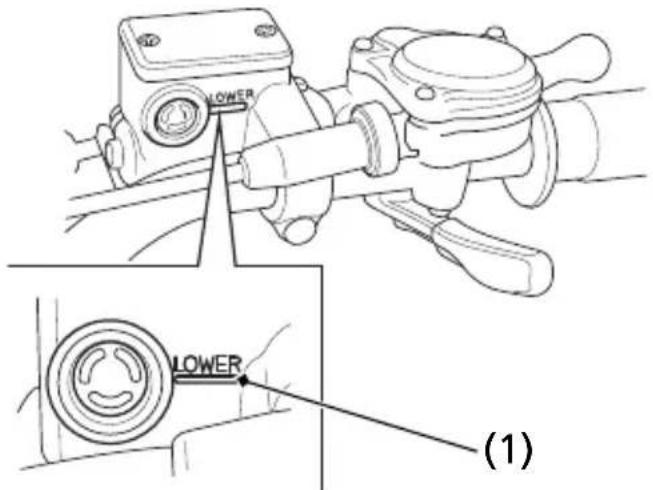
text_image
LOWER LOWER (1)(1) LOWER level mark
Wipe up spills immediately. Avoid brake fluid contact with skin or eyes.
If it comes in contact with your eyes, wash them out with clean water and immediately call a doctor. If it comes in contact with your skin, wash with clean water and, if necessary, call a doctor.
Other Inspections
- Make sure there are no fluid leaks.
- Check for deterioration or cracks in the hoses and fittings. If the hoses are worn or cracked, have them replaced by your dealer.
Front Brake Lever Freeplay & Shoe Lining Clearance
RIGHT HANDLEBAR
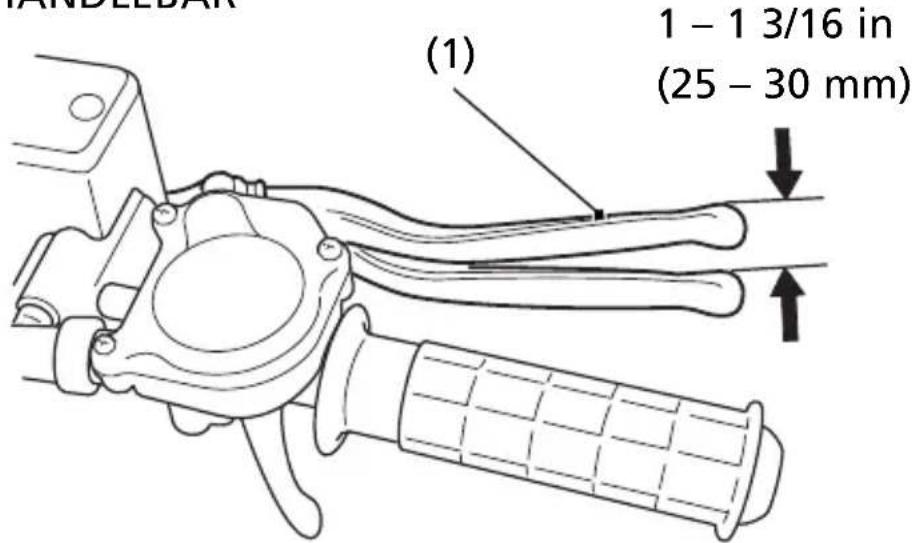
text_image
IANDLEBAR (1) 1 - 1 3/16 in (25 - 30 mm)(1) front brake lever
- Measure the distance the brake lever moves before the brakes start to take hold. Freeplay, measured at the tip of the front brake lever (1)
should be:
1 - 1 3/16 in (25 - 30 mm)
- Remove the inspection hole plug (2).
- Measure the lining thickness (3) on both front wheels:
Standard: 0.16 in (4.0 mm)
Service Limit: 0.04 in (1.0 mm)
If either lining is worn beyond the limit, both brake shoes must be replaced by your dealer.
- If the brake lever freeplay and the brake shoe lining thickness are within the recommended limits, reinstall the inspection hole plugs, seating them into the inspection hole as shown.
- If the brake lever freeplay is excessive but the linings are not worn beyond the service limit, adjust the brake lining clearance.
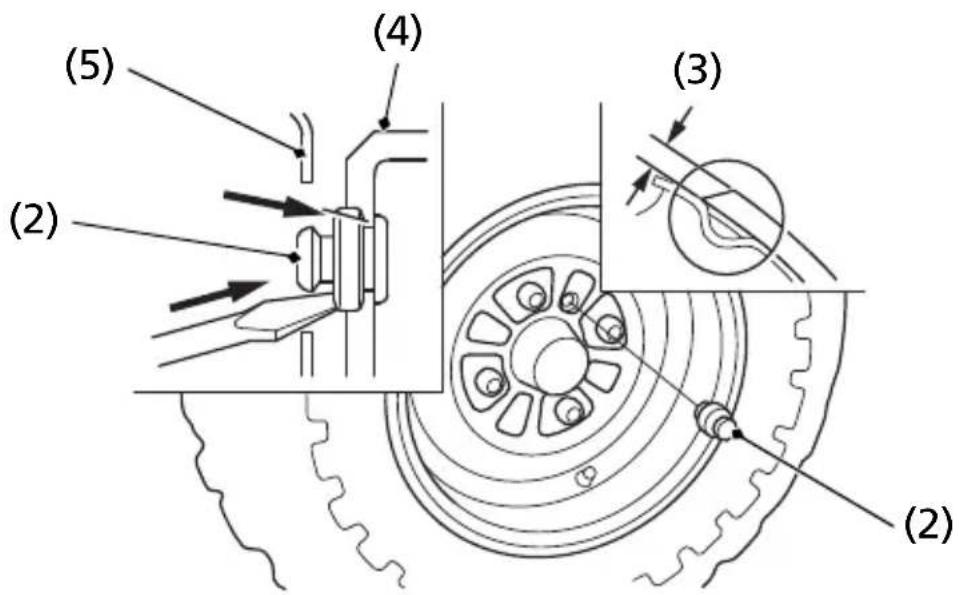
text_image
(2) (5) (4) (3) (2)(2) inspection hole plug
(3) lining thickness
(4) front brake drum
(5) front wheel rim
To adjust the brake lining clearance:
-
Squeeze the brake lever firmly two or three times, then release it.
-
Raise the front and rear wheels off the ground by placing a support block under the vehicle.
-
Beginning with either the left or right front wheel, remove the inspection hole plug and line up the hole with one of the brake adjusters.
-
Using a screwdriver, turn the brake shoe adjuster (1) until the front brake locks.
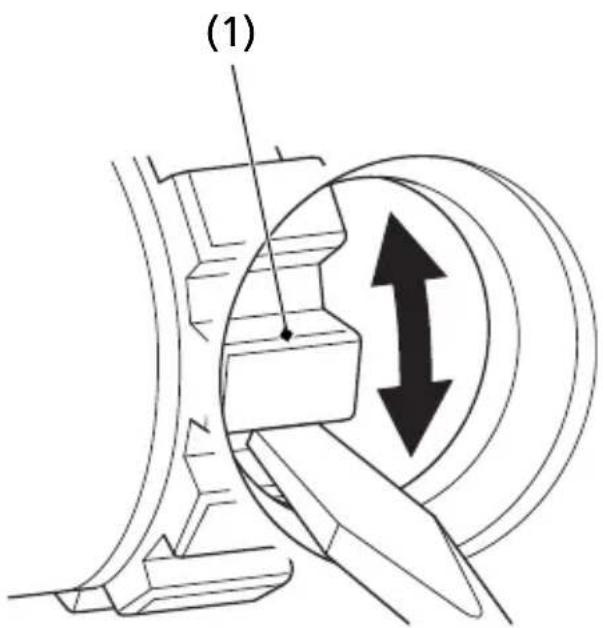
text_image
(1)(1) brake shoe adjuster
(cont'd)
- Back the adjuster off three clicks, then squeeze the brake lever several times. Spin the wheel manually to make sure the brake does not drag.
- Line up the inspection hole with the second adjuster and repeat steps 3 through 5.
- Reinstall the inspection hole plug, seating it into the inspection hole as shown.
- Follow steps 3 through 7 to adjust the other front brake.
- Recheck the brake lever freeplay. If freeplay is still excessive after adjusting the brake lining clearance, there is probably air in the brake system and it must be bled out. See your dealer for this service.
Rear Brake Pedal Freeplay
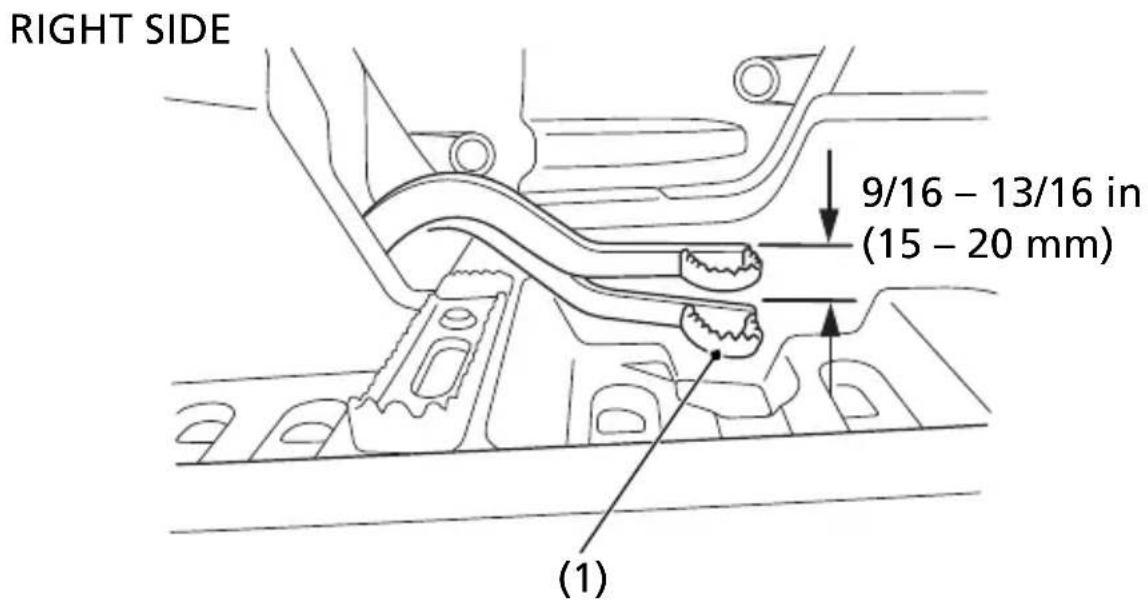
text_image
RIGHT SIDE 9/16 - 13/16 in (15 - 20 mm) (1)(1) rear brake pedal
Inspection
Measure the distance the rear brake pedal (1) moves before the brake starts to take hold. Freeplay, measurement at the tip of the end of the pedal, should be:
9/16 - 13/16 in (15 - 20 mm)
If necessary, adjust to the specified range.
Adjustment
RIGHT REAR
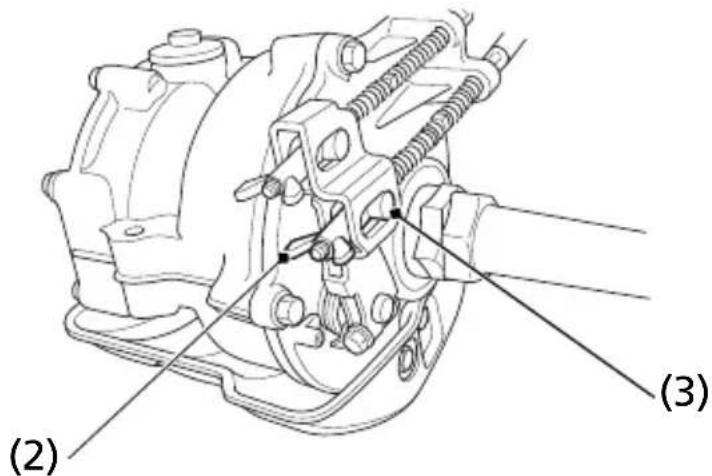
text_image
(2) (3)(2) brake pedal adjusting nut
(3) brake arm pin
- Turn the brake pedal adjusting nut (2), located on the brake operating rod at the rear of the frame. Make sure the cutout on the adjusting nut is properly seated on the brake arm pin (3).
- Adjust the freeplay of the rear brake pedal. Push the brake arm (4), then check the clearance between the brake arm and the brake arm pin.

natural_image
Diagram of a hand holding a tool with arrows indicating movement or force direction (no text or symbols present)(4) brake arm
128 Servicing Your Honda
Rear Brake Lever Freeplay
LEFT HANDLEBAR
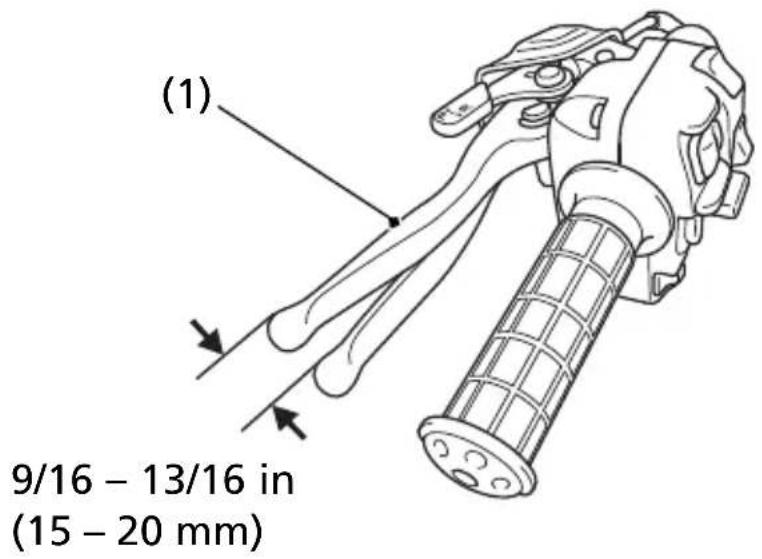
text_image
(1) 9/16 - 13/16 in (15 - 20 mm)(1) rear brake lever/parking brake lever
Inspection
Measure the distance the rear brake lever/parking brake lever (1) moves before the brake starts to take hold. Freeplay, (measurement at the tip of the end of the brake lever), should be:
9/16 - 13/16 in (15 - 20 mm)
If necessary, adjust to the specified range.
Adjustment
RIGHT REAR
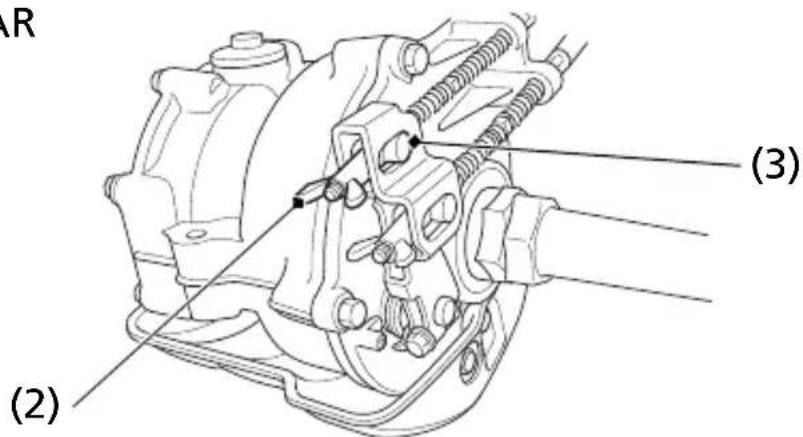
text_image
(2) (3)(2) brake lever adjusting nut
(3) brake arm pin
Adjust the freeplay of the rear brake lever/parking brake lever with the front wheels pointed straight ahead.
- Turn the brake lever adjusting nut (2), located on the brake operating rod at the rear of the frame. Make sure the cutout on the adjusting nut is properly seated on the brake arm pin (3).
- Adjust the freeplay of the rear brake lever/parking brake lever. Push the brake arm (4) then check the clearance between the brake arm and the brake arm pin.
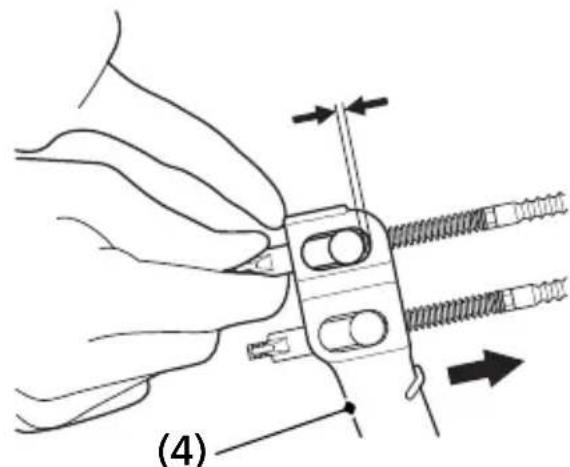
natural_image
Illustration of a hand using a tool to adjust or install a mechanical component, with arrows indicating direction (no text or symbols present)(4) brake arm
130 Servicing Your Honda
Other Inspections
- Check that the brake lever and brake pedal assemblies are positioned properly and the securing bolts are tight.
- Make sure that the brake cables, brake arm, spring, parking, and fasteners are in good condition.
Brake Shoe Wear
Refer to Safety Precautions on page 81.
The rear brake is equipped with an external brake wear indicator that lets you check brake wear without disassembly. Application of the brake control causes the arrow on the brake arm to move toward a reference mark on the brake panel.
RIGHT REAR
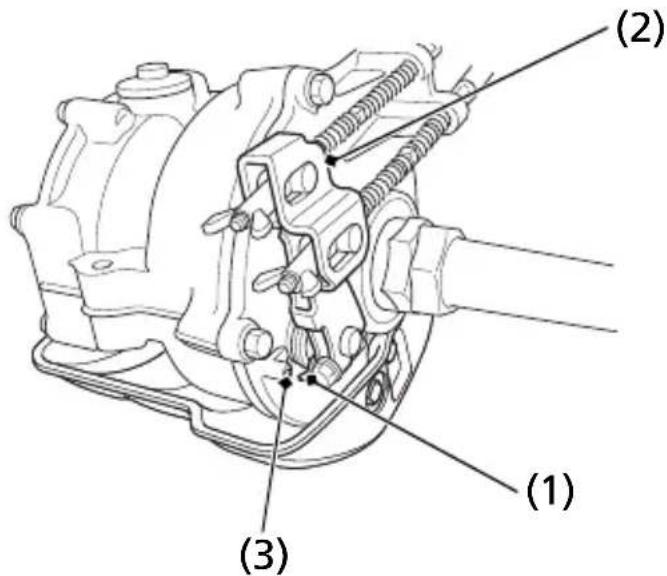
text_image
(1) (2) (3)(1) arrow
(3) reference mark
(2) brake arm
- Apply the brake control and check the movement of the arrow (1) on the brake arm (2).
- Replace the brake shoe if the arrow aligns with the reference mark (3) on the brake panel upon full application of the brake. If replacement is necessary, see your dealer.
132 Servicing Your Honda
Brake Light Switch Adjustment
Refer to Safety Precautions on page 81.
Rear Brake Only:
Check the operation of the rear brake light switch (1) at the right side behind the engine from time to time. Adjustment is done by turning the adjusting nut (2). Turn the nut in direction (A) if the switch operates too late and in direction (B) if the switch operates too soon.
RIGHT SIDE
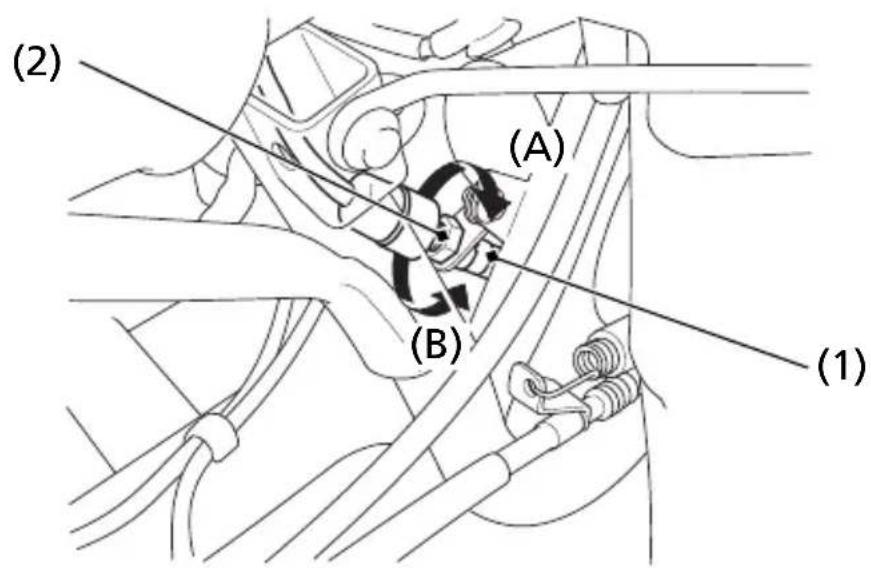
text_image
(2) (A) (B) (1)(1) rear brake light switch
(2) adjusting nut
Draining Water from Brakes
Refer to Safety Precautions on page 81.
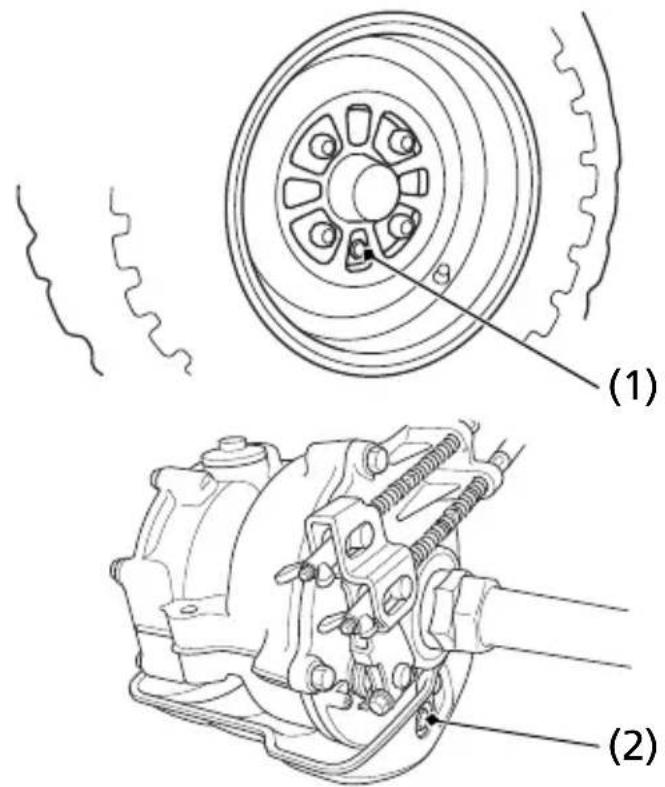
text_image
Technical diagram showing mechanical assembly with labeled parts (1) and (2), including a circular component and internal components.(1) front brake inspection hole plug
(2) rear brake drain bolt
- Make sure the engine is OFF and the parking brake is set.
- Remove the front brake inspection hole plug (1).
- Remove the rear brake drain bolt (2) from the bottom of the rear brake cover.
If any water drains, the brake seals must be replaced by your dealer as soon as possible.
134 Servicing Your Honda
To safely operate your ATV, your tires must be the proper type and size, in good condition with adequate tread, and correctly inflated.
WARNING
Using tires that are excessively worn or improperly inflated can cause a crash in which you can be seriously hurt or killed.
Follow all instructions in this owner's manual regarding tire inflation and maintenance.
This ATV is equipped with low pressure tubeless tires. Although the tires are designed specifically for off-road use, they are not immune to punctures. Always select your riding area with care.
The following pages give detailed information on how and when to check your air pressure, how to inspect your tires for wear and damage, and our recommendations for tire repair and replacement.
Air Pressure
Refer to Safety Precautions on page 81.
Properly inflated tires provide the best combination of handling, tread life, and riding comfort. Generally, underinflated tires wear unevenly, adversely affect handling, and are more likely to fail from being overheated. Overinflated tires make your ATV ride harshly, are more prone to damage from surface hazards, and wear unevenly.
Make sure the air valve caps are secure. If necessary, install new caps.
Always check air pressure when your tires are “cold.” If you check air pressure when your tires are “warm” — even if your ATV has only been ridden for a few miles — the readings will be higher. If you let air out of warm tires to match the recommended cold tire pressures, the tires will be underinflated. Be sure to check tire pressure at the riding site, since changes in altitude can affect air pressure.
The recommended "cold" tire pressures are:
| FRONT REAR | |||
| NO CARGO | RECOMMENDED PRESSURE | 2.9 psi (20.0 kPa) | 2.9 psi (20.0 kPa) |
| WITH CARGO | RECOMMENDED PRESSURE | 2.9 psi (20.0 kPa) | 2.9 psi (20.0 kPa) |
A manually operated tire pump should be used rather than the high pressure system found in service stations. This will minimize the possibility of tire damage from overinflation. If you use a high pressure system at a service station, add air in small amounts and check the pressure increase frequently to prevent possible tire damage from overinflation.
WARNING
Operating this ATV with improper tires, or with uneven tire pressure may cause loss of control, and you could be seriously injured or killed.
- Always use the size and type tires specified in this owner's manual for this vehicle.
- Always maintain proper tire pressure as described in this owner's manual.
Inspection
Refer to Safety Precautions on page 81.
Whenever you check the tire pressures, you should also look for:
- Bumps or bulges in the side of the tire or the tread. Replace any tire that has a bump or bulge.
- Cuts, slits, or cracks in the tires. Replace the tire if you can see fabric or cord.
- Nails or other foreign objects embedded in the side of the tire or tread.
- Excessive tread wear.
Tires
Also, if you hit a pothole or other hard object while riding, stop as soon as you safely can and carefully inspect the tires for damage.
Tread Wear
FRONT
REAR
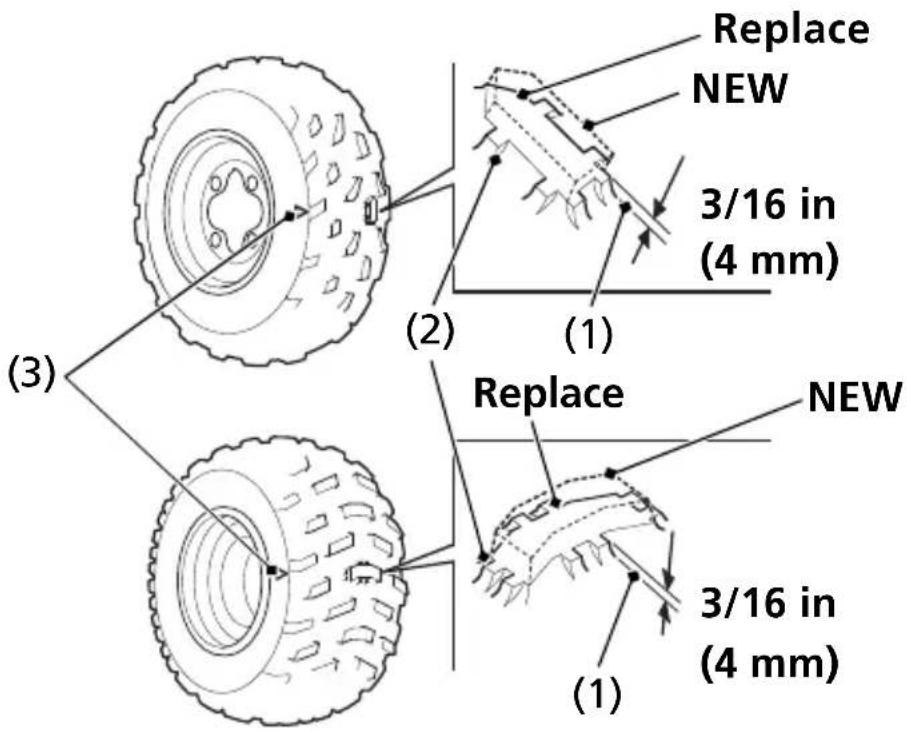
text_image
(3) (2) (1) Replace NEW 3/16 in (4 mm) (1) Replace NEW 3/16 in (4 mm)(1) groove depth
(2) wear indicator
(3) wear indicator location mark
To check the condition of a tire tread, measure the groove depth (1) in the center of the tire, or check the wear indicator (2).
For best performance, you should replace a tire before the tread depth at the center reaches the following limits:
| front 3/16 | in (4 mm) |
| rear 3/16 | in (4 mm) |
Tire Repair
Refer to Safety Precautions on page 81.
A tire that is repaired, either temporarily or permanently, will have lower speed and performance limits than a new or undamaged tire.
A temporary repair can sometimes be made in an emergency situation. However, since a temporary repair may not hold, you must ride very slowly, preferably without any cargo, and have the tire replaced or permanently repaired as soon as possible. (For more information on temporary repairs, see If You Have a Flat Tire, page 170.)
A permanent repair, such as an internal plug patch, can be made if a tire has only a small puncture in the tread area. However you may not be able to safely carry as much weight. If you choose to have a tire repaired, be sure the repair work is performed by a professional.
If you have a tire professionally repaired at a non-Honda facility, we recommend that you have the work checked by your dealer.
Tire Replacement
Refer to Safety Precautions on page 81.
The tires that came on your ATV were designed to match the performance capabilities of your ATV and provide the best combination of handling, braking, and comfort.
It is best to replace all four tires, however if that is not possible, you must replace the tires in pairs (front or rear) with tires of the same size and type as the originals. Never replace just one tire.
WARNING
Installing improper tires on your ATV can affect handling and stability. This can cause a crash in which you can be seriously hurt or killed.
Always use the size and type of tires recommended in this owner's manual.
The recommended tires for your ATV are:
| front AT22 × 7-1 | 1★MAXXIS M9803 |
| rear AT22 × 10-9 | ★MAXXIS M9804 |
When you replace a tire, remember:
Have the tire replaced by your dealer if possible.
If you have a tire professionally replaced at a non-Honda facility, we recommended that you have the work checked by your dealer.
Engine Guard & Skid Plates
Refer to Safety Precautions on page 81.
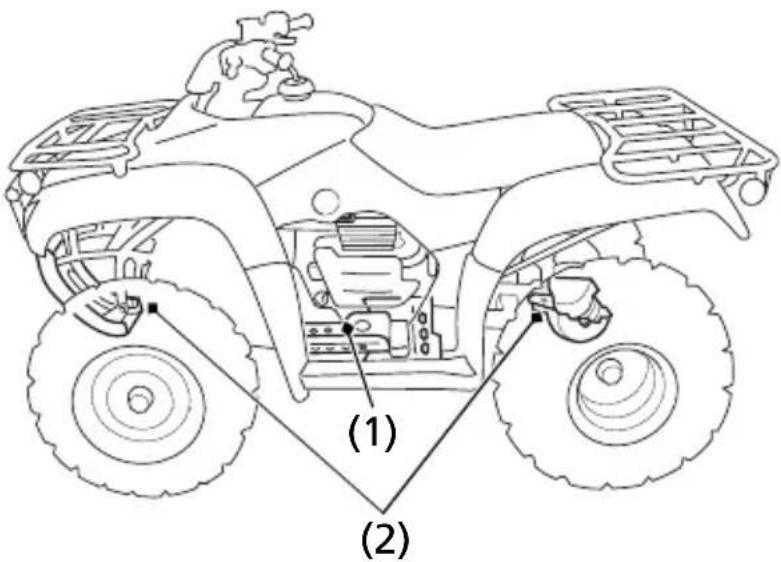
text_image
(1) (2)(1) engine guard
(2) skid plates
The engine guard (1) protects the engine crankcase. The skid plates (2) protect the frame and rear final gear case. Check the guard and plates for cracks, damage or looseness at intervals shown in the Maintenance Schedule.
Have the engine guard and skid plates replaced if they are cracked or damaged. If the guard and plate bolts are loose, tighten them securely.
Your ATV has a maintenance-free type battery. You do not have to check the battery electrolyte level or add distilled water as you would with a conventional-type battery.
NOTICE
Your battery is a maintenance-free type and can be permanently damaged if the cap strip is removed.
Electrical accessories use current from the battery, even when the ignition is OFF (O). Limited operation also allows the battery to discharge.
If you have electrical accessories on your ATV or do not ride frequently, we recommend that you charge the battery frequently (see Battery Charging, page 146).
If you do not expect to ride your ATV for at least two weeks, we recommend you remove the battery, or at least disconnect the battery cables (negative cable first).
If you plan to store your ATV, see Battery Storage, page 143.
If your battery seems weak and/or is leaking electrolyte (causing slow starting or other electrical problems), see your dealer.
WARNING: Battery posts, terminals and related accessories contain lead and lead compounds. Wash your hands after handling.
Battery Storage
Refer to Safety Precautions on page 81.
If you plan to store your ATV, we recommend you remove the battery and store it where it can be charged at least every 30 days to maintain its service life.
If you do not remove the battery, we recommend disconnecting the battery cables (negative cable first).
You will get the best storage results from removing the battery and slow charging it every 30 days (see Battery Charging, page 146).
Before you remove the battery, be sure to read all the information that follows, as well as the information on the battery label.
WARNING
The battery gives off explosive hydrogen gas during normal operation.
A spark or flame can cause the battery to explode with enough force to kill or seriously hurt you.
Wear protective clothing and a face shield, or have a skilled mechanic do the battery maintenance.
The battery is located in a compartment under the seat.
UNDER SEAT
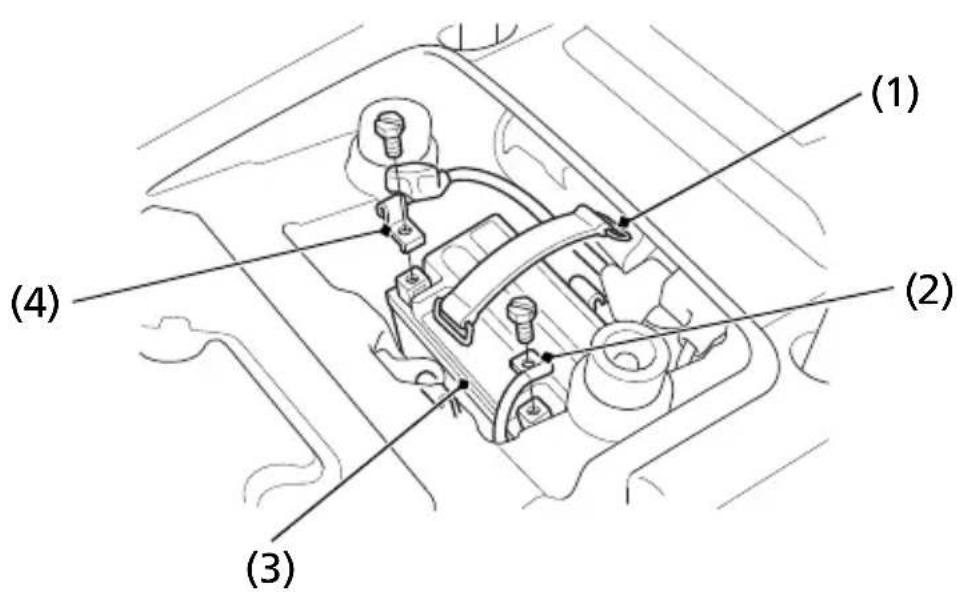
text_image
(1) (2) (3) (4)(1) rubber band
(3) battery
(2) negative (−) terminal lead
(4) positive (+) terminal lead
Removal
- Make sure the ignition switch is OFF (O).
- Remove the seat (page 92).
- Release the rings and remove the rubber band (1).
- Disconnect the negative (−) terminal lead (2) from the battery (3) first, then disconnect the positive (+) terminal lead (4).
- Remove the battery.
144 Servicing Your Honda
-
Charge the battery (see following section).
-
Store your battery in an easy-to-reach location off the floor, in an area protected from freezing temperature and direct sunlight.
-
Clean the battery box after removing the battery for storage. Dry the battery box.
-
Slow charge the battery (see following section) once every 30 days.
Installation
-
Check that the battery rubber (5) for damage. If necessary, replace the battery rubber.
-
Make sure the battery rubber is properly installed.
-
Reinstall in the reverse order of removal. Be sure to connect the positive (+) terminal first, then the negative (−) terminal.
-
Make sure all bolts and other fasteners are secure.
-
After installing the battery, check to see if the battery cables are routed correctly.
-
Install the removed parts in reverse order of removal.
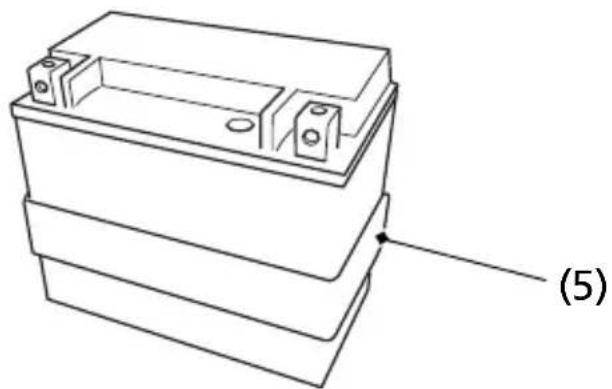
natural_image
Technical line drawing of a battery casing with mounting holes and a labeled component (5), no text or symbols present.(5) battery rubber
Battery Charging
Refer to Safety Precautions on page 81.
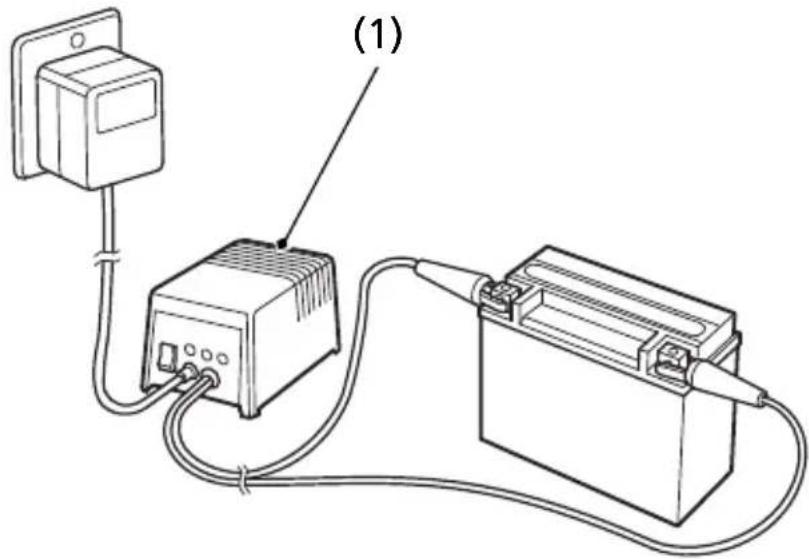
text_image
(1)(1) charger
Be sure to read the information that came with your battery charger and follow the instructions on the battery. Improper charging may damage the battery.
We recommend using a charger (1) designed specifically for your Honda, which can be purchased from your dealer. These units can be left connected for long periods without risking damage to the battery. However, do not intentionally leave the charger connected longer than the time period recommended in the charger's instructions. Avoid using an automotive-type battery charger. An automotive charger can overheat an ATV battery and cause premature damage.
Frequent cleaning and polishing will keep your Honda looking newer longer.
Frequent cleaning also identifies you as an owner who values his ATV. A clean ATV is also easier to inspect and service.
General Recommendations
Refer to Safety Precautions on page 81.
• To clean your ATV, you may use:
- water
- Hondabrite
- a mild, neutral detergent and water
- a mild spray and wipe cleaner/polisher
- a mild spray and rinse cleaner/ degreaser and water
- Avoid products that contain harsh detergents or chemical solvents that could damage the metal, paint, plastic, and camouflage coating on your ATV (Honda MUV).
- If your ATV is still warm from recent operation, give the engine and exhaust system time to cool off.
- Park in a shady area. Washing your ATV in bright sunlight may cause the finish to fade because water droplets intensify the sun's brightness.
- Spotting is also more likely because surface water can dry before you have time to wipe it off.
- Clean your ATV regularly to protect surface finishes.
- We recommend the use of a low pressure garden hose to wash your ATV. High pressure washers (like those at coin-operated car washers) can damage certain parts of your ATV.
NOTICE
High pressure water (or air) can damage certain parts of your ATV.
- After cleaning, inspect for damage, wear, and leaks (fuel, oil and brake fluid).
Washing Your ATV with a Mild Detergent
Refer to Safety Precautions on page 81.
- Cover or plug the exhaust outlet prior to washing your ATV.
- Rinse your ATV thoroughly with cool water to remove loose dirt.
- Fill a bucket with cool water. Mix in a mild, neutral detergent, such as dish washing liquid or a product made especially for washing motorcycles or automobiles.
- Wash your ATV with a sponge or soft towel. As you wash, check for heavy grime. If necessary, use a mild cleaner/ degreaser to remove the grime.
- After washing, rinse your ATV thoroughly with plenty of clean water to remove any residue. Detergent residue can corrode alloy parts.
- Dry your ATV with a chamois or a soft towel. Leaving water on the surface to air dry can cause dulling and water spots. As you dry, inspect for chips and scratches.
- Start the engine and let it idle for several minutes. The engine heat will help dry moist areas.
- As a precaution, ride your ATV at a slow speed and apply the brakes several times. This will help dry the brakes and restore normal braking performance.
The headlights' inside lens may fog temporarily after washing or while riding in the rain. This does not impact the headlight function. Any condensation inside the headlight should dissipate after a few minutes of running the engine with the headlight(s) on. However, if you see a large amount of water or ice accumulated inside the lens(es), have your vehicle inspected by your dealer.
Spray Cleaning Your ATV
Refer to Safety Precautions on page 81.
Avoid using spray cleaner products on the tires or suspension components.
Suggestions for using spray cleaner(s) follow:
| ATV condition Recommended Cleaning | |
| Dust and fingerprint smudges. | Apply a spray cleaner/polish and wipe paint, chrome, glass, and clear plastic. |
| Light road grimes. Spray any difficult-to-reach or very dirty areas with a spray cleaner/degreaser.Rinse and dry.Apply a spray cleaner/polish and wipe with a non-abrasive cloth. | |
| Heavy grime. Oil leaks. Brake dust. | Use a spray cleaner/degreaser.If necessary, rub with a sponge.Rinse and dry.Apply a spray cleaner/polish and wipe with a non-abrasive cloth. |
| Dull, corroded chrome or aluminum. | Apply a high quality chrome/aluminum polish and wipe with a non-abrasive cloth. |
Finishing Touches
Refer to Safety Precautions on page 81.
After washing your ATV, consider using a commercially available spray cleaner/polish or quality liquid or paste wax to finish the job. Use only a non-abrasive polish or wax made specifically for motorcycles or automobiles. Apply the polish or wax according to the instructions on the container.
If a surface on your ATV is chipped or scratched, your dealer has touch-up paint to match your ATV's color. Be sure to use your ATV's color code (page 183) when you buy touch-up paint.
If the frame has a chip that exposes the metal, first apply primer (to prevent corrosion) and then apply the touch-up paint. Several thin layers of touch-up paint are better than one thick coat.
Exhaust Pipe and Muffler Maintenance
The exhaust pipe and muffler are stainless steel but may become stained by mud or dust.
To remove mud or dust, use a wet sponge and a liquid kitchen abrasive, then rinse well with clean water. Dry with chamois or a soft towel.
If necessary, remove heat stains by using a commercially available fine texture compound. Then rinse by the same manner as removing mud or dust.
Here's helpful advice on how to prepare for an off-road adventure, how to transport and store your Honda, and how to be an environmentally responsible ATV owner.
Preparing for a Ride.... 152
What to Take to the Riding Area.... 152
What to Take on the Trail 153
Transporting Your Honda 154
Storing Your Honda.... 156
Preparation for Storage.... 156
Removal from Storage 159
You & the Environment 160
A safe and enjoyable ride begins with good planning and preparation. Always ride with at least one other person in case you have trouble, and let someone know where you're going and when you expect to return.
Before riding in an unfamiliar area, find out in advance if you need special permits, get maps so you can study the terrain, and talk to other riders who know the area. The Forest Service and the Bureau of Land Management, riding clubs, and off-road magazines are good sources of information.
What to Take to the Riding Area
Along with your ATV and riding gear, you should take along some tools and supplies in case you have a problem. For some of the difficulties you might encounter, see Taking Care of the Unexpected, which begins on page 162.
We recommend that you always take water, food, a first aid kit, and your owner's manual. Other items you should consider loading on your truck or trailer include:
- a tool kit
- tire repair supplies and tools, and tires
- extra parts, control levers, cables, and spark plugs
- wire, duct tape, and rope
- extra gasoline
For safety, all refueling should be done at a gas station on the way to the riding area or at your base camp.
What to Take on the Trail
What you take with you during a ride depends on the kind of terrain, how long you expect to ride, how far you might go from your base camp or help, and how experienced you or your companions are in making repairs.
If you decide to take some tools, spare parts, or other supplies on the trail, be sure you can carry them safely and know how to use them. Also, be sure to follow the loading guidelines and weight limit (page 39).
Transporting Your Honda
Do not tow your ATV behind a car or other vehicle.
When you transport your ATV, we recommend that you carry the vehicle in its normal operating position (on all four wheels). Do not incline the vehicle upright on its rear end. This can damage the vehicle, and leaking gasoline could be a hazard.
Follow these procedures:
- Set the parking brake.
- Turn the fuel valve OFF.
Transporting Your Honda
-
Secure the vehicle with tie-down straps in the areas shown.
-
Suitable tie-down straps are available from your dealer.
-
Ordinary rope is not recommended because it can stretch under load.
• Using tie-down straps in any other areas can damage your ATV. -
Rock the vehicle back and forth to make sure the tie-down straps are tight and the vehicle is secure.
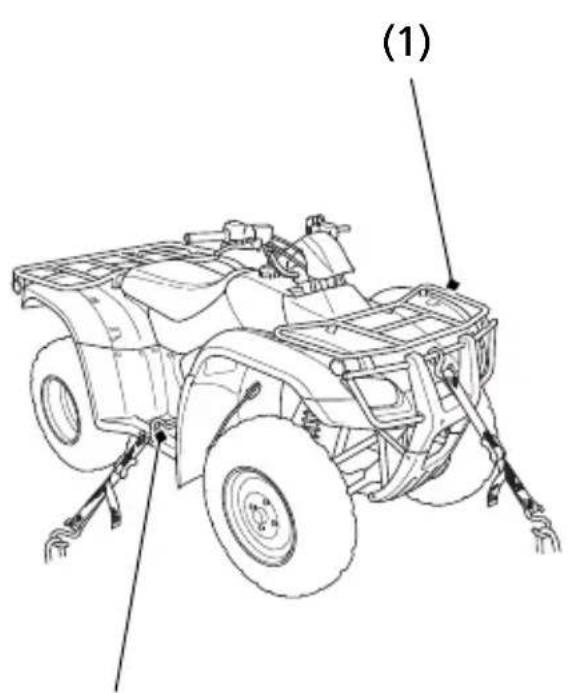
text_image
(1)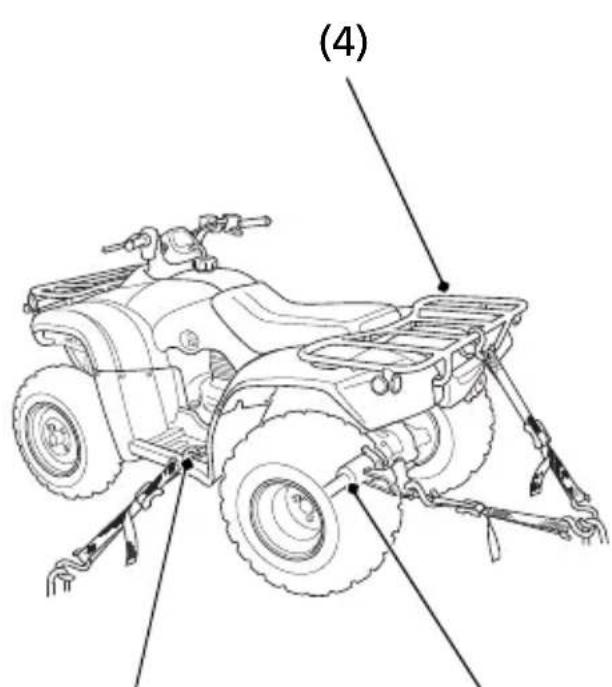
text_image
(4)(3)(2)
(1) front cargo rack
(3) left footpeg
(2) right footpeg
(4) rear cargo rack or rear axle shaft
If you won't be riding for an extended period, such as during the winter, thoroughly inspect your ATV and correct any problem before storing it. That way, needed repairs won't be forgotten and it will be easier to get your ATV running again.
For more information about storage, refer to the Honda Winter Storage Guide, available from your dealer.
We suggest you perform the following procedures to keep your ATV in top condition. These storage procedures will reduce the deterioration that can occur during storage.
Preparation for Storage
Refer to Safety Precautions on page 81.
This procedure requires a means for draining and disposing of drained fuel (page 160).
- Change the engine oil (page 100).
- Fill the fuel tank. Make sure the fuel fill cap is properly installed.
-
Check that the fuel valve is OFF.
-
Drain the carburetor into an approved gasoline container and dispose of it in an approved manner (page 160). If storage will last longer than one month, carburetor draining is important to assure proper performance after storage.
WARNING
Gasoline is highly flammable and explosive. You can be burned or seriously injured when handling fuel.
- Stop the engine and keep heat, sparks and flame away.
- Handle fuel only outdoors.
-
Wipe up spills immediately.
-
To prevent rusting in the cylinder, perform the following:
-
Remove the spark plug cap from the spark plug.
- Remove the spark plug.
Do not connect the spark plug to the spark plug cap. - Pour a tablespoon (15 – 20 cc) of clean engine oil into the cylinder and cover the spark plug hole with a piece of cloth.
- With the engine stop switch in the OFF (☒) position, press the start button several times to crank the engine and distribute the oil.
- Reinstall the spark plug and spark plug cap.
(cont'd)
- Remove the battery and charge it fully. Store it in an area protected from freezing temperatures and direct sunlight. Slow charge the battery (page 146) once a month.
WARNING
The battery gives off explosive hydrogen gas during normal operation.
A spark or flame can cause the battery to explode with enough force to kill or seriously hurt you.
Wear protective clothing and a face shield, or have a skilled mechanic do the battery maintenance.
- Wash and dry your ATV. Wax all painted surfaces.
- Inflate the tires to their recommended pressures (page 136).
- Store your ATV in an unheated area, free of dampness, away from sunlight, with a minimum of daily temperature variation.
- Place your ATV on blocks to lift all tires off the floor.
- Cover your ATV with a porous material. Avoid using plastic or similar non-breathing, coated materials that restrict air flow and allow heat and moisture to accumulate.
NOTICE
Do not store your ATV in an upright position for extended periods of time. The ATV should be stored with all four tires on the ground. This can damage the vehicle, and leaking gasoline could be a hazard.
Removal from Storage
Refer to Safety Precautions on page 81.
- Uncover and clean your ATV.
- If your ATV has been stored for more than four months — change the engine oil (page 100).
- If your ATV has been stored for more than two months — ask your dealer to drain and replace the fuel.
- Charge the battery (page 146) as required. Install the battery.
- Perform a pre-ride inspection (page 35), then test-ride your ATV at low speeds.
Owning and riding an ATV can be enjoyable, but you must do your part to protect nature. When you show respect for the land, wildlife, and other people, you also help preserve the sport of off-road riding.
Following are tips on how you can be an environmentally responsible ATV owner.
- Tread Lightly. Stay on existing roads and trails, avoid surfaces that are easily damaged, and ride only in areas approved for off-road vehicles.
- Keep the Noise Down. Loud vehicles can be offensive. Ride as quietly as possible, don’t remove your spark arrester, and don’t modify the muffler or any other part of your air intake and exhaust systems. Such modifications not only increase noise, they also reduce engine performance and may be illegal.
- Choose Sensible Cleaners. Use a biodegradable detergent when you wash your ATV. Avoid aerosol spray cleaners that contain chlorofluorocarbons (CFCs) which damage the atmosphere's protective ozone layer. Don't throw cleaning solvents away; see the following guidelines for proper disposal.
- Recycle Wastes. It’s illegal and thoughtless to put used engine oil in the trash, down a drain, or on the ground. Used oil, gasoline, and cleaning solvents contain poisons that can hurt refuse workers and contaminate our drinking water, lakes, rivers, and oceans. Before changing your oil, make sure you have the proper containers. Put oil and other toxic wastes in separate sealed containers and take them to a recycling center. Call your local or state office of public works or environmental services to find a recycling center in your area, and to get instructions on how to dispose of non-recyclable wastes.
Taking Care of the Unexpected
With all the challenges you can encounter off-road, there's a chance that sometime something may go wrong. This section gives practical advice to help you deal with a wide range of problems. Take time to read this section before you ride. Also review the tips in Preparing for a Ride (page 152).
General Guidelines 162
If Your Engine Quits or Won't Start 164
If the Shift Switches Do Not Function.... 167
Emergency Gear Selection & Operation 168
If You Have a Flat Tire.... 170
If a Fuse Blows.... 174
If You Crash 177
If You Lose Your Key 178
If the Battery Is Low (or Dead).... 179
If a Component Fails.... 180
General Guidelines
Keeping your ATV well-maintained is the best way to reduce the possibility of having a problem while riding. However, problems can arise even with well-maintained machines.
Remember to take along your owner's manual, the tool kit that came with your ATV, and any other items (such as tire repair supplies and additional tools) that might help you solve a problem on your own.
If something goes wrong during a ride, the first thing to do is stop as soon as you safely can. Do not continue riding if you have a flat tire, or you hear an unusual noise, or your ATV just doesn't feel right. If you continue riding, you could cause more damage and endanger your own safety.
After stopping, take time to assess the situation. Carefully inspect your ATV to identify the problem, then consider your options before you decide what to do.
If a problem is relatively minor and you have the tools, supplies, and skills to make a permanent repair, you may be able to fix it on the trail and continue riding. Or, you may be able to make a temporary repair that allows you to slowly ride back to your base where you can make a permanent repair or get help.
When a problem is more serious — or you don't have the tools, supplies, experience, or time to deal with it — you need to choose the safest way to get yourself and your ATV back to base. For example, if you are close enough, you (or you and another person) might be able to push it back.
162 Taking Care of the Unexpected
Taking Care of the Unexpected
Should you ever have a problem while riding, please follow these guidelines:
• Always put personal safety first.
- Take time to assess the situation and your options before deciding what to do.
- If the problem is relatively minor and you have the tools, supplies, and skills to make a temporary repair, be sure to have permanent repairs made as soon as possible.
- Do not continue riding if you are hurt or your ATV is not in safe riding condition.
Additional recommendations for specific problems follow.
If Your Engine Quits or Won't Start
Proper operation and maintenance can prevent starting and engine performance problems. In many cases, the cause of the problem may be a simple operational oversight.
If you have a problem starting the engine — or experience poor engine performance — the following information may help you. If you can't correct the problem, see your dealer.
If your ATV won't start, listen as you press the start button. If you don't hear the starter motor turning, refer to the Starter motor doesn't operate symptom. If you can hear the starter motor working normally, refer to the Starter motor works, but the engine won't start symptom.
| SYMPTOM: Starter motor doesn’t operate. | |
| POSSIBLE CAUSE WHAT TO DO | |
| ignition switch OFF Turn the ignition switch ON. | |
| transmission not in neutral | Shift into neutral. |
| blown fuse Replace with a new fuse of the same rating (page 174). | |
| battery lead loose Tighten the battery lead. | |
| low (or dead) battery Charge the battery (page 146).If charging doesn’t help, see your dealer. | |
| faulty starter motor If all possible causes are negative, the starter motor may be faulty. See your dealer. | |
| SYMPTOM: Starter motor works, but the engine won’t start. | |
| POSSIBLE CAUSE WHAT TO DO | |
| engine stop switch OFF Slide the engine stop switch to RUN. | |
| out of fuel Fill the fuel tank. | |
| flooded engine See Flooded Engine (page 55). | |
| loose or unconnected spark plug cap | Install the spark plug cap securely. If the engine still won’t start, see your dealer. |
| loose battery cables Tighten the battery terminal bolts. | |
| weak battery Charge the battery (page 146).If charging doesn’t help, see your dealer. | |
If Your Engine Quits or Won't Start
| SYMPTOM: Engine starts, but runs poorly. | |
| POSSIBLE CAUSE WHAT TO DO | |
| idles roughly, too fast, stalls | Check engine idle adjustment (page 114). If the problem persists, see your dealer. |
| poor engine performance at altitudes above 3,000 feet (1,000 m) | Ask your dealer to modify the carburetion with a high altitude jet.Refer to High Altitude Carburetor Adjustment, page 189. |
| runs erratically, misfires May damage catalytic converter. See your dealer. | |
| blubbers (rich fuel mixture) | See your dealer. |
| sooty exhaust (rich fuel mixture) | See your dealer. |
| detonates or pings under load | If applicable, switch to the recommended octane gasoline (page 93) or change your brand of gasoline. If the problem persists, see your dealer. |
| afterfires (backfires) May damage catalytic converter. See your dealer. | |
| pre-ignition (runs on after ignition switched OFF) | May damage catalytic converter. See your dealer. |
If the Shift Switches Do Not Function
If one or both shift switches do not function, see the following instructions. If proper function cannot be restored, see your dealer.
When the engine is running:
- Stop the ATV.
- Turn the ignition switch to the OFF (O) position.
- After the engine stops, turn the ignition switch to the ON (1) position.
- Press both shift switches and check that they are functioning.
- If both switches are functioning, shift into neutral and restart the engine.
If one or both switches are not functioning, see Emergency Gear Selection & Operation, page 168.
When the engine is stopped and the ignition switch is ON:
- Turn the ignition switch to the OFF (O) position.
- Turn the ignition switch to the ON (1) position.
- Press both shift switches and check that they are functioning.
- If both switches are functioning, shift into neutral and restart the engine.
If one or both switches are not functioning, see Emergency Gear Selection & Operation, page 168.
When the battery is low (or dead):
• See If the Battery Is Low (or Dead), page 179.
Emergency Gear Selection & Operation
If the shift switches do not operate, use the following procedure to manually select a gear so you may drive the vehicle to a location where it can be loaded and transported to your dealer.
- Turn the ignition switch to the ON (I) position.
- Remove the gear change tool from underside of the seat (page 90).
- Check the neutral indicator. If the transmission is in neutral, go to step 4. If the transmission is not in neutral, use the gear change tool to shift to neutral so you will be able to start the engine, Refer to How to Shift Gears Manually: (page 169).
- Apply the parking brake.
- Press the start button to start the engine.
- Select the gear you want. For running on level ground: use 3rd or 4th gear. For mountainous roads: use 2nd or 3rd gear. Refer to How to Shift Gears Manually: (page 169).
- Store the gear change tool underside of the seat.
- Get on the ATV. Drive it at a safe speed to a place where it can be repaired or serviced.
The manual shift procedure is intended for emergency use only, when the shift switches do not operate.
NOTICE
Continued or abusive manual shifting using the change tool may damage the gear change mechanism.
Emergency Gear Selection & Operation
How to Shift Gears Manually:
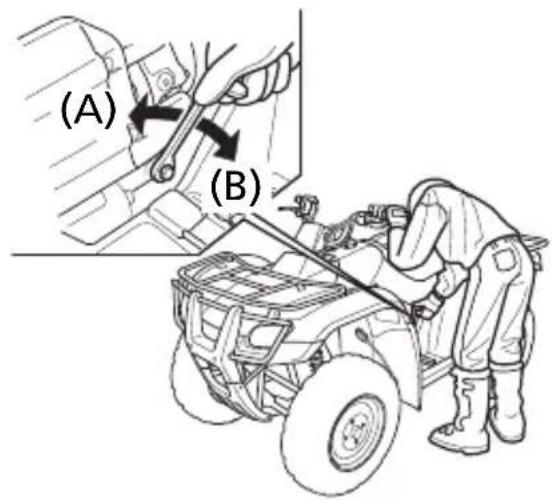
text_image
(A) (B)(A)downshift (counterclockwise)
(B) upshift (clockwise)
- With the ATV unoccupied, align the hexagonal hole of the gear change tool with the hexagonal end of the secondary spindle which is located near the left footpeg.
- Use slow, steady hand pressure to turn the spindle. (Do not use foot pressure) To downshift, turn the gear change tool counterclockwise (A).
To upshift, turn the tool clockwise (B).
- If the transmission does not shift, rock the vehicle back and forth and try again.
- Store the gear change tool underside of the seat.
Do not attempt to shift gears manually using the gear change tool while riding.
If the transmission is shifted manually when the electric shift system is functioning, the system will shutdown automatically and the shift switches will not operate. To reactivate the system, turn the ignition switch to the OFF (O) position, then turn it back to the ON (I) position.
How you handle a flat tire on the trail depends on how serious the tire damage is, and what tools and supplies you have with you.
If you have a slow leak or a minor puncture, use the plug method to make a temporary repair. (The plug method is applied from the outside of the tire and is the same as that for conventional tubeless tires.)
A plug-type repair kit, available at most auto parts stores or service stations, provides a plug, an installation tool, tire cement, and an instruction sheet. Follow the instructions provided with the repair kit to make a temporary repair.
As soon as possible, have the tire permanently repaired by your dealer. Any tire that cannot be repaired should be replaced.
Whenever the ATV is to be operated far from service facilities or available transportation, we recommend that you carry a tire pump and a repair kit with the vehicle.
If the leak is more serious, or a temporary repair doesn't hold, the tire must be replaced. The tire will also need to be replaced if it is damaged (page 140). Replacing a tire involves removing and reinstalling the wheel (page 172).
If you are unable to repair a flat tire on the trail, you will need to send for help. We strongly recommend that you do not try to ride with a flat tire. The ATV will be hard to handle, and if the tire comes off the rim, it may lock up the wheel and cause you to crash.
WARNING
Riding your ATV with a temporary tire repair can be risky.
If the temporary repair fails, you can crash and be seriously injured or killed. If you must ride with a temporary tire repair, ride slowly and carefully until the tire is permanently repaired or replaced.
Emergency Wheel Removal/Installation
Refer to Safety Precautions on page 81.
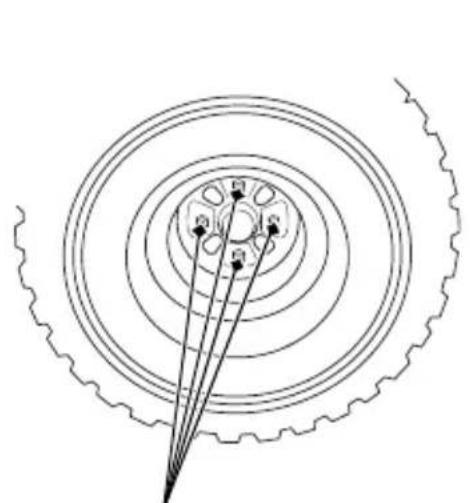
natural_image
Diagram of concentric circular layers with radial lines and a central pointer, no text or symbols present(1)
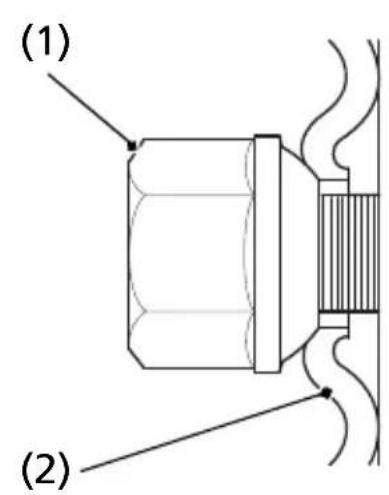
text_image
(1) (2)(1) wheel nuts (2) wheel rim
Removal
- Park your ATV on a firm, level surface.
- Loosen — but do not remove — the wheel nuts (1).
- Raise the front (or rear) wheels off the ground and place a support block under the vehicle.
- Remove the wheel nuts.
- Remove the wheel.
Installation
- Position the wheel.
- Position the wheel nuts so that the tapered sides face the wheel rim (2).
- Hand-tighten the wheel nuts on the wheel, then lower the ATV to the ground before tightening the nuts in a crisscross (rather than circular) pattern to the specified torque:
47 lbf·ft (64 N·m, 6.5 kgf·m)
If a torque wrench was not used for installation, see your dealer as soon as possible to verify proper assembly. Improper assembly may lead to loss of braking capability.
All of the electrical circuits on your ATV have fuses to protect them from damage caused by excess current flow (short circuit or overload).
If something electrical on your ATV stops working, the first thing you should check for is a blown fuse (1).
Check all the fuses before looking elsewhere for another possible cause of the problem. Replace any blown fuses and check component operation.
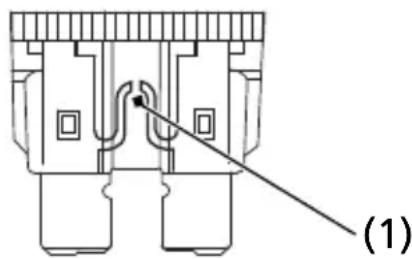
natural_image
Technical diagram of a mechanical component with no visible text or symbols(1) blown fuse
The main fuse is located in the battery compartment.
A spare fuse is located in the owner's manual storage area under the seat (page 91).
Recommended Fuses
| main fuse 15 A | |
| shift motor fuse 30 A |
Main and Shift Motor Fuse Access
UNDER SEAT
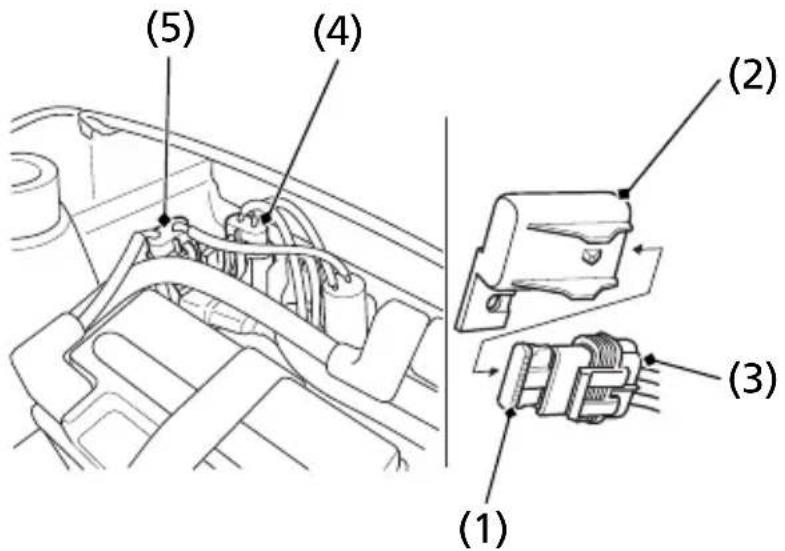
text_image
(5) (4) (2) (3) (1)(1) fuse
(2) fuse holder assembly
(3) fuse holder
(4) main fuse holder assembly
(5) shift motor fuse holder assembly
- To prevent an accidental short circuit, turn the ignition switch OFF (O) before checking or replacing the fuses.
- To access the fuse (1), remove the seat (page 92).
- Remove the fuse holder assembly (2).
- Pull the old fuse out of the fuse holder (3).
- Push the new fuse into the fuse holder.
If you do not have a replacement fuse with the proper rating for the circuit, install one with a lower rating.
NOTICE
Replacing a fuse with one that has a higher rating greatly increases the chance of damage to the electrical system.
- Install the fuse holder assembly and seat.
If a Fuse Blows
If you do not have a spare fuse and you cannot ride the ATV without fixing the problem, take a fuse of the same rating or a lower rating from one of the other circuits that you can do without temporarily.
If you replace a blown fuse with a spare fuse that has a lower rating, replace the fuse with the correct rating as soon as you can. Also remember to replace any spare fuses that were installed.
If the replacement fuse of the same rating burns out in a short time, there is probably a serious electrical problem on your ATV. Leave the blown fuse in that circuit and have your ATV checked by your dealer.
Personal safety is your first priority after a crash. If you or anyone else has been injured, take time to assess the severity of the injuries and whether it is safe to continue riding. If you cannot ride safely, send someone for help. Do not ride if you will risk further injury.
If you decide you are capable of riding safely, carefully inspect your ATV for damage and determine if it is safe to ride. Check the tightness of critical nuts and bolts securing such parts as the handlebar, control levers, brakes, and wheels.
If there is minor damage, or you are unsure about possible damage but decide to try riding the ATV back to your base, ride slowly and cautiously.
Sometimes, crash damage is hidden or not immediately apparent. When you get home, thoroughly check your ATV and correct any problems you find. Also, be sure to have your dealer check the frame and suspension after any serious crash.
If You Lose Your Key
Be sure to record your key number (1). Store the spare key and recorded key number in a safe location. You'll need this number to have a duplicate key made.
If you lose your key and aren't carrying a duplicate, either get your spare or have one made. If you don't know your key number, call the dealer where you purchased your Honda ATV. They may have it listed in their records. If they don't, transport your ATV to them or the nearest dealer. The dealer will probably have to remove the ignition switch assembly to find the key number so they can make a key for you.
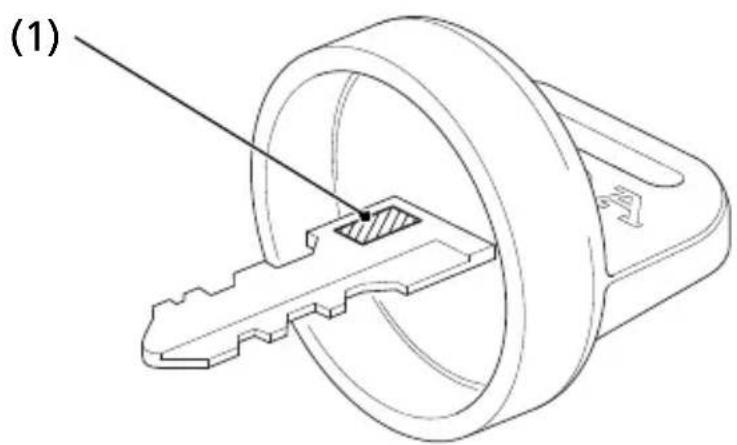
text_image
(1)(1) key number
Your ATV will operate even if the battery is low (or dead), as long as the engine is running. If the engine is not running, it may be started using the recoil starter.
- Turn the ignition switch to the ON (I) position.
- Remove the gear change tool from underside of the seat (page 90).
- Check if the transmission is in neutral by moving the vehicle back and forth.
- If the transmission is in neutral, the vehicle will move easily. Go to step 5.
If the transmission is not in neutral, the vehicle will not move. Use the gear change tool to shift to neutral so you will be able to start the engine. Refer to How to Shift Gears Manually: (page 169). - Apply the parking brake.
- Turn the ignition switch to the OFF (O) position, then turn it back to the ON (I) position.
- Use the recoil starter (page 56) to start the engine.
Jump starting is not recommended, especially if you use an automobile battery. The greater amperage of an automobile battery when the car engine is running can damage your ATV's electrical system.
Bump starting is also not recommended.
If you can't charge the battery or it appears unable to hold a charge, contact your dealer.
If a Component Fails
The brake levers or pedal, control cables, and other components can be damaged as you ride in dense brush or over rocky terrain. Making a trailside repair depends on how serious the damage is and what tools and supplies you have with you.
- If any component of the brake system is damaged, you may be able to ride carefully back to your base using the other brake components for slowing or stopping.
- If you damage a throttle cable or other critical component, y our ATV may be unsafe to ride. Carefully assess the damage and make any repairs that you can. But if there is any doubt, it's best to be conservative and safe.
Technical Information
This section contains dimensions, capacities, and other technical data, plus information on government requirements and how to break-in your ATV.
Vehicle Identification 182
Specifications 184
Break-in Guidelines.... 188
High Altitude Carburetor Adjustment 189
Emission Control Systems 190
Oxygenated Fuels 194
Catalytic Converter.... 196
Serial Numbers
The VIN, engine serial number, and key number may be required when ordering replacement parts. You may record these numbers in the Quick Reference section at the rear of this manual.
The VIN (1) is stamped on the front of the frame.
FRONT
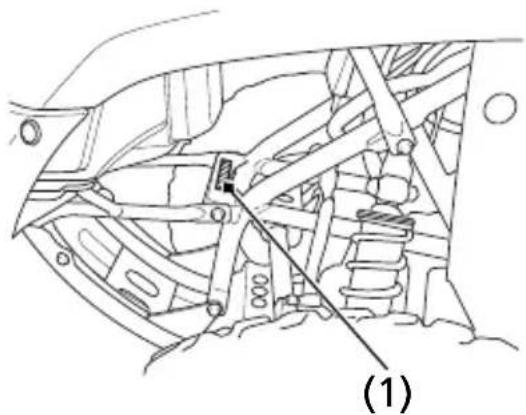
natural_image
Technical line drawing of a mechanical assembly with springs and brackets (no text or symbols)(1) VIN
The engine number (2) is stamped on the right side of crankcase.
RIGHT SIDE
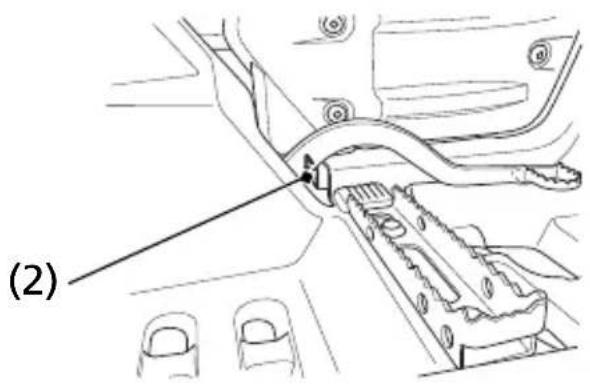
text_image
(2)(2) engine number
Color Label & Code
The color label (1) is attached to the frame below the seat. Remove the seat (page 92) to check the label.
The color code is helpful when ordering replacement parts. You may record the color and code in the Quick Reference section at the rear of this manual.
UNDER SEAT
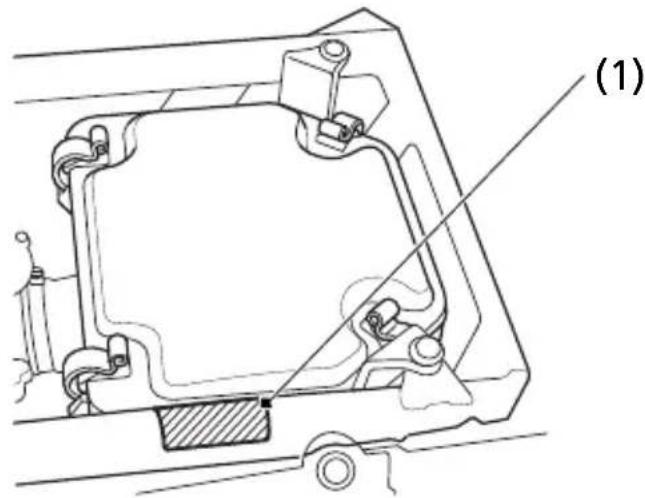
text_image
(1)(1) color label
Specifications
| Dimensions | |
| overall length 75.0 in (1,905 mm) | |
| overall width 40.7 in (1,035 mm) | |
| overall height 42.1 in (1,070 mm) | |
| wheelbase 44.5 in (1,131 mm) | |
| ground clearance 6.0 in (152 mm) |
| Fuel & Lubricants | |
| fuel recommendation | unleaded gasoline, pump octane number of 86 or higher |
| fuel tank capacity 2.40 US gal (9.1 ℓ) including reserve | |
| fuel tank reserve 0.63 US gal (2.4 ℓ) | |
| engine oil capacity | after disassembly: 2.0 US qt (1.9 ℓ) after draining: 1.6 US qt (1.5 ℓ) |
| engine oil API Service | Classification SG or higher except oils labeled as energy conserving or resource conserving on the circular API service label, SAE 10W-30, JASO T 903 standard MA, Pro Honda GN4 4-stroke oil, or Honda 4-stroke oil, or an equivalent motorcycle oil |
| Capacities | |
| passenger capacity | operator only |
| maximum weight capacity | 386 lb (175 kg) rider, all cargo and accessories |
| Engine Specifications | |
| displacement 14.0 cu-in (229 cm3) | |
| bore & stroke 2.70 × 2.45 in (68.5 × 62.2 mm) | |
| compression ratio 9.2 : 1 | |
| spark plug(standard) | DPR8EA-9 (NGK) orX24EPR-U9 (DENSO) |
| spark plug(cold climate) | DPR7EA-9 (NGK) orX22EPR-U9 (DENSO) |
| spark plug(high speedriding) | DPR9EA-9 (NGK) orX27EPR-U9 (DENSO) |
| spark plug gap 0.03 | -0.04 in (0.8 - 0.9 mm) |
| valve clearance(cold) | intake: 0.005 ± 0.001 in(0.13 ± 0.02 mm)exhaust: 0.005 ± 0.001 in(0.13 ± 0.02 mm) |
| idle speed 1,400 ± 100 rpm | |
| Power Transmission | ||
| primary reduction 3.086 | ||
| final reduction 3.692 | ||
| gear ratio | 1st 3.230 | |
| 2nd 2.166 | ||
| 3rd 1.666 | ||
| 4th 1.280 | ||
| 5th 1.041 | ||
| reverse 5.550 | ||
Specifications
| Power Transmission | |
| final drive shaft | |
| Chassis & Suspension | |
| caster 8° | |
| trail 1.7 in (42 mm) | |
| tire size, front AT22 | × 7-11★MAXXIS M9803 |
| tire size, rear AT22 | × 10-9★MAXXIS M9804 |
| tire pressure,front & rear (cold) | front:2.9 psi (20.0 kPa)rear:2.9 psi (20.0 kPa) |
| Electrical | |
| battery YTX12-BS | 12 V – 10 Ah (10HR) |
| generator 0.123 kW | /5,000 rpm |
| Lights | |
| headlight (Low/High) 12 V | 25/25 W × 2 |
| brake/tail light LED | |
| neutral indicator 12 V – | 1.7 W |
| reverse indicator 12 V – | 1.7 W |
| Fuses | |
| main 15 A | |
| shift motor 30 A | |
| Torque Specification | |
| engine oil drain plug | 18 lbf·ft (25 N·m, 2.5 kgf·m) |
| rear final gear case oil drain plug | 9 lbf·ft (12 N·m, 1.2 kgf·m) |
| rear final gear case oil fill cap | 9 lbf·ft (12 N·m, 1.2 kgf·m) |
| rear final gear case oil level check bolt | 9 lbf·ft (12 N·m, 1.2 kgf·m) |
| wheel nuts 47 lbf·ft | (64 N·m, 6.5 kgf·m) |
Break-in Guidelines
Help assure your ATV's future reliability and performance by paying extra attention to how you ride during the first operating day or 15 miles (25 km).
During this period, avoid full-throttle starts, rapid acceleration, and constant rpm operation.
High Altitude Carburetor Adjustment
At high altitude, the standard carburetor air-fuel mixture will be too rich. Performance will decrease, and fuel consumption will increase. A very rich mixture will also foul the spark plug and cause hard starting. Operation at an altitude that differs from that at which this engine was certified, for extended periods of time, may increase emissions.
High altitude performance can be improved by specific modifications to the carburetor. If you always operate your engine at altitudes above 6,500 feet (2,000 meters), have your servicing dealer perform this carburetor modification. This engine, when operated at high altitude with the carburetor modifications for high altitude use, will meet each emission standard throughout its useful life.
Even with carburetor modification, engine horsepower will decrease about 3.5% for each 1,000-foot (300-meter) increase in altitude. The effect of altitude on horsepower will be greater than this if no carburetor modification is made.
NOTICE
When the carburetor has been modified for high altitude operation, the air-fuel mixture will be too lean for low altitude use. Operation at altitudes below 5,000 feet (1,500 meters) with a modified carburetor may cause the engine to overheat and result in serious engine damage. For use at low altitudes, have your servicing dealer return the carburetor to original factory specifications.
Emission Control Systems
Exhaust Emission Requirements
The U.S. Environmental Protection Agency (EPA) require that your ATV comply with applicable exhaust emissions standards during its useful life, when operated and maintained according to the instructions provided.
The Vehicle Emission Control Information Label (1) is attached on the right side of the frame below the front fender.
RIGHT FRONT
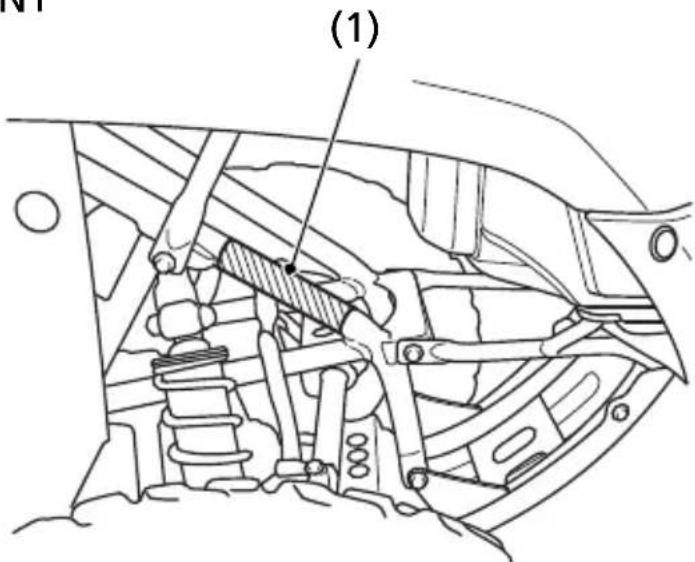
text_image
(1)(1) vehicle emission control information label
Source of Exhaust Emissions
The combustion process produces carbon monoxide (CO), oxides of nitrogen (NOx) and hydrocarbons (HC). Control of hydrocarbons and oxides of nitrogen is very important because, under certain conditions, they react to form photochemical smog when subjected to sunlight. Carbon monoxide does not react in the same way, but it is toxic.
Honda Motor Co., Ltd. utilizes various systems to reduce carbon monoxide, oxides of nitrogen and hydrocarbons.
Exhaust Emission Control System
The exhaust emission control system is composed of appropriate carburetor settings including oxidation catalytic converter and secondary air injection system.
No adjustments should be made except for an idle speed adjustment with the throttle stop screw or carburetor adjustment for high altitude operation.
The exhaust emission control system is separate from the crankcase emission control system.
Crankcase Emission Control System
The engine is equipped with a closed crankcase system to prevent discharging crankcase emissions into the atmosphere. Blow-by gas is returned to the combustion chamber through the air cleaner and the carburetor.
Problems That May Affect ATV Exhaust Emissions
If you are aware of any of the following symptoms, have the vehicle inspected and repaired by your ATV dealer.
Symptoms:
- Hard starting or stalling after starting
- Rough idle
- Misfiring or backfiring during acceleration
- After-burning (backfiring)
- Poor performance (driveability) and poor fuel economy
Federal regulations prohibit removing or disabling a device or element of design that may affect your engine's emission performance unless your ATV will be used exclusively in competition. If you modify your engine for use in sanctioned competition events, you must deface or destroy the emission control information label.
If you loan, sell, or give your competition modified Honda ATV to someone else, under applicable law, you must inform the new owner/operator in writing that the vehicle is to be used for competition only.
Noise Emission Control System
TAMPERING WITH THE NOISE CONTROL SYSTEM IS PROHIBITED: State laws prohibit the following acts or the causing thereof: (1) The removal or rendering inoperative by any person, other than for purposes of maintenance, repair or replacement, of any device or element of design incorporated into any new vehicle for the purpose of noise control prior to its sale or delivery to the ultimate purchaser or while it is in use; or (2) the use of the vehicle after such device or element of design has been removed or rendered inoperative by any person.
AMONG THOSE ACTS PRESUMED TO CONSTITUTE TAMPERING ARE THE FOLLOWING ACTS:
- Removal of, or puncturing the muffler, baffles, header pipes or any other component which conducts exhaust gases.
- Removal of, or puncturing of any part of the intake system.
- Lack of proper maintenance.
- Removing or disabling any emissions compliance component, or replacing any compliance component with a non-compliant component.
Fuel Permeation Emission Control System
This vehicle complies with the Fuel Permeation Emission Control regulations of the U.S. Environmental Protection Agency (EPA). The fuel tank, fuel hoses, and fuel vapor charge hoses used on this vehicle incorporate fuel permeation control technologies. Tampering with the fuel tank, fuel hoses, or fuel vapor charge hoses to reduce or defeat the effectiveness of the fuel permeation technologies is prohibited by federal regulations.
Some conventional gasolines are being blended with alcohol or an ether compound. These gasolines are collectively referred to as oxygenated fuels. To meet clean air standards, some areas of the United States use oxygenated fuels to help reduce emissions. If you use an oxygenated fuel, be sure it is unleaded and meets the minimum octane rating requirement.
Before using an oxygenated fuel, try to confirm the fuel's contents. Some states/provinces require this information to be posted on the pump.
The following are the EPA-approved percentages of oxygenates for off-high way vehicles:
ETHANOL (ethyl or grain alcohol) up to 10% by volume.
You may use gasoline containing up to 10% ethanol by volume. Gasoline containing ethanol may be marketed under the name "Gasohol".
Do not use gasoline containing more than 10% ethanol by volume. The use of gasoline containing a higher percentage (e.g. E15, E20, E85) of ethanol has not been approved for use in this vehicle and may cause starting and/or performance problems and can also damage metal, rubber, and plastic parts of the fuel system and are not covered by the Distributor's Limited Warranty.
METHANOL (methyl or wood alcohol) up to 5% by volume.
You may use gasoline containing up to 5% methanol by volume as long as it also contains cosolvents and corrosion inhibitors to protect the fuel system. Gasoline containing more than 5% methanol by volume may cause starting and/or performance problems. It may also damage metal, rubber, and plastic parts of your fuel system.
If you notice any undesirable operating symptoms, try another service station or switch to another brand of gasoline.
Fuel system damage or performance problems resulting from the use of an oxygenated fuel containing more than the percentages of oxygenates mentioned above are not covered under warranty.
Oxygenated fuels can damage paint and plastic. Be careful not to spill fuel when filling the fuel tank. Wipe up any spills immediately.
NOTICE
Oxygenated fuels can damage paint and plastic. Damage caused by spilled fuel is not covered by warranty.
This ATV is equipped with the oxidation catalytic converter. The catalytic converter contains precious metals that serve as catalysts, promoting chemical reactions to convert the exhaust gasses without affecting the metals.
The catalytic converter acts on HC and CO. A replacement unit must be an original Honda part or its equivalent.
The catalytic converter must operate at a high temperature for the chemical reactions to take place. It can set fire to any combustible materials that come near it. Park your ATV away from high grasses, dry leaves, or other flammables.
A defective catalytic converter contributes to air pollution, and can impair your engine's performance. Follow these guidelines to protect your ATV's catalytic converter.
- Always use unleaded gasoline. Even a small amount of leaded gasoline can contaminate the catalyst metals, making the catalytic converter ineffective.
- Keep the engine in good running condition. A poorly running engine can cause the catalytic converter to overheat causing damage to the converter or the ATV.
- If your engine is misfiring, backfiring, stalling, or otherwise not running properly, stop riding and turn off the engine. Have your ATV serviced as soon as possible.
Consumer Information
This section contains information on your warranty and how to get an official Honda service manual.
Authorized Manuals 198
Warranty Coverage 199
Warranty Service 200
Contacting Honda....201
Your Honda Dealer....202
The Service Manual used by your authorized dealer is available from your Honda dealer or Helm, Inc.
Also available but not necessary to service your model is the Honda Common Service Manual which explains theory of operation and basic service information for various systems on Honda motorcycles, scooters, ATVs, SXSs and PWCs.
The Winter Storage Guide in conjunction with the Owner's Manual and Service Manual can help you prepare your Honda motorcycle, scooter, ATV, and SXS for winter.
These Honda manuals are written for the professional technician, but most mechanically capable owners should find them easy to use if they have the proper tools and observe proper safety standards. Special Honda tools are necessary for some procedures.
| Publication Item No. Description |
| 61HS004 2020 TRX250TM/TE Service Manual |
| 61CSM00 Common Service Manual |
| S9507 Winter Storage Guide |
| 31HS0840 2020 TRX250TE Owner's Manual |
Order online: www.helminc.com
Order Toll Free: 1-888-CYCLE93 (1-888-292-5393)
(NOTE: For Credit Card Orders Only)
Monday - Friday 8:00 AM - 6:00 PM EST
Your new Honda is covered by these warranties:
- TRX Limited Warranty
- Emission Control System Warranty
There are responsibilities, restrictions, and exclusions which apply to these warranties. Please read the Warranties Booklet given to you by your Honda dealer at the time of purchase. Be sure to keep your Honda owner's card with your Warranties Booklet.
It is important to realize that your warranty applies to defects in material or workmanship of your Honda. Your warranty coverage does not apply to normal wear or deterioration associated with using the ATV.
Your warranty coverage will not be voided if you choose to perform your own maintenance. However, you should have the proper tools and service information, and be mechanically qualified. Failures that occur due directly to improper maintenance are not covered.
Almost all of your warranty coverage can be extended through the Honda Protection Plan. For more information, see your dealer.
Please remember that recommended maintenance interval servicing is not included in your warranty coverage. Additionally, your warranty does not apply to the normal wear of items (such as brakes, tires, etc.).
If you believe you have a problem with your ATV, call the service department of your dealer. Make an appointment for an inspection and diagnosis. Remember, as the owner of the ATV, you will be asked to authorize that inspection. Your dealer will give you the results of the inspection. If the problem is covered under warranty, your dealer will perform the warranty repairs for you.
If you have questions about warranty coverage or the nature of the repair, it is best to talk to the Service Manager of your dealer.
Sometimes, in spite of the best intentions of all concerned, a misunderstanding may occur. If you aren't satisfied with your dealer's handling of the situation, we suggest you discuss your problem with the appropriate member of the dealership's management team. If the problem has already been reviewed with the Service Manager, Parts Manager, Sales Manager, etc., contact the Owner of the dealership or their designated representative.
Your owner's manual was written to cover most of the questions you might ask about your Honda. Any questions not answered in the owner's manual can be answered by your dealer. If your dealer doesn't have the answer right away, they will get it for you.
If you have a difference of opinion with your dealer, please remember that each dealership is independently owned and operated. That's why it's important to work to resolve any differences at the dealership level.
If you wish to comment on your experiences with your Honda or with your dealer, please send your comments to the following address:
Motorcycle Division, American Honda Motor Co., Inc., P.O. Box 2200, Torrance, CA 90509-2200, mailstop: 100-4C-7B, telephone: (866) 784-1870.
Please include the following information in your letter:
• name, address, and telephone number
• product model, year, and VIN
- date of purchase
- dealer name and address
We will likely ask your dealer to respond, or possibly acknowledge your comments directly.
Your Honda Dealer
Once you purchase your new Honda, get familiar with the organization of your Honda dealer so you can utilize the full range of services available.
The service department is there to perform regular maintenance and unexpected repairs. It has the latest available service information from Honda. The service department will also handle warranty inspections and repairs.
The parts department offers Honda Genuine Parts, Pro Honda products, and Honda Genuine Accessories. The same quality that went into your Honda can be found in Honda Genuine replacement parts. You'll also find comparable quality in the accessories and products available from the parts department.
The sales department offers the Honda Protection Plan to extend almost all of your warranty coverage.
Your Honda dealer can inform you about competition and other riding events in your area.
We're sure you'll be as pleased with the service your Honda dealer continues to provide after the sale as you are with the quality and dependability of your Honda.
BLANK PAGE
A
accessories 41
age recommendation ....33
air cleaner, dust cover ....107
filter 104
housing drain tube 108
air pressure, gauge ....90
tire 135
altitude, high 189
American Honda, contacting 201
apparel, protective ....30
appearance care 147
authorized manuals ....198
B
battery 142
brake light switch adjustment 133
brakes, cables ....131
draining water from 134
fluid 120
front brake lever 24
parking 25
rear brake lever 24
rear brake lever freeplay 129
rear brake pedal 24
rear brake pedal freeplay 127
shoe lining clearance 123
shoe wear 132
braking 61
break-in guidelines 188
C
capacity, fuel 94
carburetor, altitude adjustment 189
care, appearance 147
cargo, loading and operational guidelines ....40
weight limit 39
catalytic converter 196
choke, cable ....111
knob 111
cleaning, appearance care 147
climbing hills 66
clutch system 112
color label 183
compartment, owner's manual ....91
tool kit 90
component fails ....180
consumer information 197
controls & features 16
crash, if you 177
crossing or turning on hills or slopes 71
customer service 201
D
dimmer switch, headlight 20
dipstick 99
E
emission control systems 190
(cont'd)
Index 205
Index
engine,
flooded 54
guards 141
idle speed 114
number 182
oil 96
pinging 93
starting 50
stop switch 19
stopping 54
won't start 164
environment 160
exhaust system,
cleaning 36
purging 119
F
flag pole bracket 27
flat tire 170
flooded engine 54
fuel,
fill cap 94
high altitude fuel mixture adjustment 189
oxygenated 194
recommendation 93
refueling 94
reserve fuel supply 94
tank capacity 94
valve 16
fuses 174
G
gap, spark plug 115, 185
gasohol 194
gasoline 93
gear case oil 102
gear shifting 56
guards 141
H
headlight dimmer switch 20
headlight switch 20
high altitude carburetor adjustment 189
hills,
crossing or turning on slopes 71
riding down hills 70
riding up hills 66
stopping on hills 68
Honda service manual 198
Honda,
contacting 201
dealer 202
|
identification, vehicle 182
idle speed, engine 114
ignition switch 18
indicators,
gear position indicator 15
neutral indicator 14
reverse indicator 14
inspection, pre-ride 35
Index
K
key,
lost 178
number 178
kit, tool 90
L
labels, safety 5
limit, weight 39
load limits 39
loading guidelines 40
lubrication,
engine oil 96
gear case oil 102
M
maintenance,
component locations 87
importance 79
precautions 81
record 86
safety 80
schedule 82
manual, service 198
maximum weight limit 39
modifications 42
N
neutral indicator 14
noise emission control systems 193
numbers, serial 182
0
obstacles, riding over 73
oil,
engine 96
gear case 102
operation component locations 11
owner's manual storage 91
oxygenated fuels 194
P
parking 75
passengers, no carrying 33
pavement, no riding on 45
pinging, engine 93
plug, spark 115
pre-ride inspection 35
problems, unexpected 162
protective apparel 30
R
rear final gear case oil 102
recoil starter 21
removal, seat 92
reverse,
assist cable 113
assist lever 113
gear, shifting into 59
indicator 14
riding in 59
rider training 32
(cont'd)
Index 209
Index
riding,
basic operation 43
clothing 30
over obstacles 73
precautions 45
preparing for 152
safety 2
safety precautions 45
through water 74
S
safety,
important precautions 81
labels 5
riding precautions 45
schedule, maintenance 82
seat removal 92
serial numbers 182
service,
customer 201
manuals 198
warranty 200
shifting gears 56
skid plates 141
skidding or sliding 65
spark arrester 119
spark knock 93
spark plug 115
specifications 184
stalling on a hill 68
start button 19
starting,
engine 50
troubleshooting 164
stop switch, engine 19
stopping engine 54
storage,
ATV 156
owner's manual 91
switch,
headlight 20
headlight dimmer 20
ignition 18
T
throttle,
cable 109, 110
lever 22,109,110
tires,
air pressure 135
flat 170
repairing 139
replacing 140
thread conditions 137, 138
tool kit 90
trailer towing,
operational guidelines 40
weight limits 39
training, rider 32
transporting your ATV 154
trouble, unexpected 161
troubleshooting, starting 164
(cont'd)
Index 211
Index
turning,
on hills or slopes 71
on level ground 63
V
valve clearance 118
valve, fuel 16
vehicle identification no. (VIN) 182
W
warning labels 5
warranty,
coverage 199
extended 200
service 200
washing your ATV 148
water,
draining from brakes 134
riding through 74
weight limit 39
wheel removal 172
The following is a brief, but important collection of information you need to know about your Honda. You'll also find space to record important notes.
How To Avoid Costly Repairs
The engine of your Honda can be the most expensive component to repair. Proper maintenance, especially the use of the recommended fluids and filters, prevents premature wear and damage.
Frequent causes of costly repairs are:
- Engine oil — insufficient quantity, improper oil.
- Air cleaner — dirty, leaking because of improper installation (poor seal).
Record important information on the following page:
| Engine No. | |
| VIN | |
| Color Label | |
| Owner's Name | |
| Address | |
| City/State | |
| Phone | |
| Dealer's Name | |
| Address | |
| City/State | |
| Phone | |
| Service Mgr. | |
| Scheduled Maintenance | Initial: 100 miles (150 km) Regular: every 600 miles (1,000 km) |
| Pre-ride Inspection | Check the following items each time before you ride (page 35): engine oil, fuel, tires, guards, nuts & bolts, underbody & exhaust system, air cleaner housing drain tube, leaks, loose parts, cables, lights, throttle, brakes, reverse assist lever, switches, steering. |
| Fuel/Capacity unleaded gasoline, pump octane number 86 or higher 2.40 US gal (9.1 ℓ) reserve: 0.63 US gal (2.4 ℓ) | |
| Engine Oil/ Capacity | API Service Classification SG or higher except oils labeled as energy conserving or resource conserving on the circular API service label, SAE 10W-30, JASO T 903 standard MA, Pro Honda GN4 4-stroke oil or Honda 4-stroke oil or equivalent 1.6 US qt (1.5 ℓ) after draining |
| Maximum Weight Capacity | 386 lb (175 kg) rider, all cargo and accessories |
| Tires Front: AT22 | × 7-11★MAXXIS M9803Rear: AT22 × 10-9★MAXXIS M9804 |
| Tire Pressure (cold) | Front: 2.9 psi (20.0 kPa)Rear: 2.9 psi (20.0 kPa) |
| Spark Plugs standard: | |
| Fuses main: 15 A | shift motor: 30 A |
These symbols are used in Controls & Features section:
| SYMBOL | COMPONENT SEE PAGE | |
| Ichoke | knob 17 | |
| ION — | ignition switch 18 | |
| OFF — | ignition switch 18 | |
| START button 19 | ||
| RUN — | engine stop switch 19 | |
| OFF — | engine stop switch 19 | |
| ON — | headlight switch 20 | |
| OFF — | headlight switch 20 | |
| D | HI — headlight dimmer switch | 20 |
| D | LO — headlight dimmer switch | 20 |
| △ | upshift switch — gearshift switch | 23 |
| ◇ | downshift switch — gearshift switch | 23 |
| P_IR | parking brake/reverse lever (P/R lever):P — parking brakeR — riding in reverse | 25 |