
M18 BPFP-CCST - Uncategorized MILWAUKEE - Free user manual and instructions
Find the device manual for free M18 BPFP-CCST MILWAUKEE in PDF.


User questions about M18 BPFP-CCST MILWAUKEE
0 question about this device. Answer the ones you know or ask your own.
Ask a new question about this device
Download the instructions for your Uncategorized in PDF format for free! Find your manual M18 BPFP-CCST - MILWAUKEE and take your electronic device back in hand. On this page are published all the documents necessary for the use of your device. M18 BPFP-CCST by MILWAUKEE.
USER MANUAL M18 BPFP-CCST MILWAUKEE
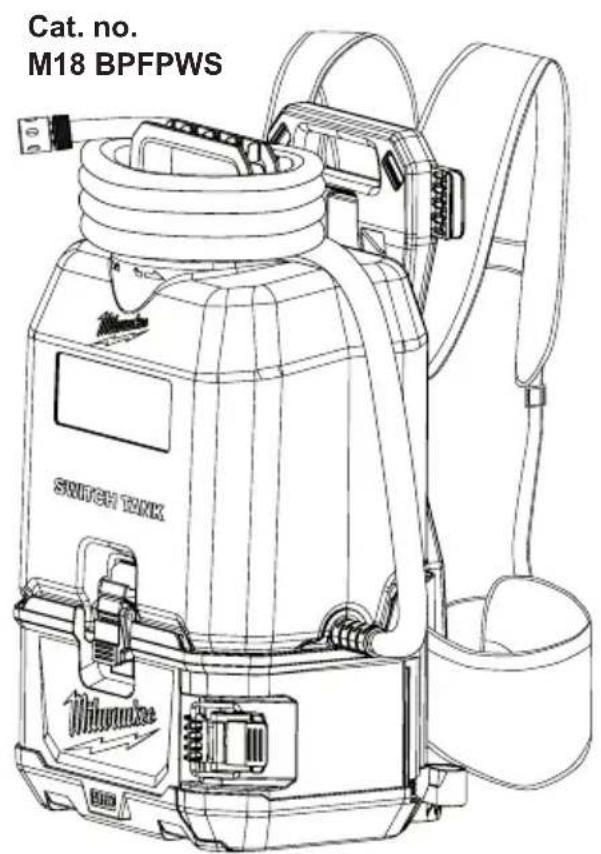
Cat. No.
M18 BPFPCCS, M18 BPFPCS, M18 BPFPWS, 491628PS, 491628CS, 491628WS
M18™ SWITCH TANK CONCRETE CHEMICAL TANK SPRAYER, WATER TANK SPRAYER, CHEMICAL TANK SPRAYER

WARNING
To reduce the risk of injury, user must read and understand operator's manual.

IMPORTANT SAFETY INSTRUCTIONS
WARNING
Read all safety warnings, instructions, illustrations and provided with this power tool.
specifications provided with this power tool. Failure to follow all instructions listed below may result in electric shock, fire and/or serious injury.
Save all warnings and instructions for future reference.
The term "power tool" in the warnings refers to your mains-operated (corded) power tool or battery-operated (cordless) power tool.
WORK AREA SAFETY
- Keep work area clean and well lit. Cluttered or dark areas invite accidents.
- Do not operate power tools in explosive atmospheres, such as in the presence of flammable liquids, gases or dust. Power tools create sparks which may ignite the dust or fumes.
- Keep children and bystanders away while operating a power tool. Distractions can cause you to lose control.
ELECTRICAL SAFETY
•Power tool plugs must match the outlet. Never modify the plug in any way. Do not use any adapter plugs with earthed (grounded) power tools. Unmodified plugs and matching outlets will reduce risk of electric shock.
- Avoid body contact with earthed or grounded surfaces, such as pipes, radiators, ranges and refrigerators. There is an increased risk of electric shock if your body is earthed or grounded.
•Do not expose power tools to rain or wet conditions. Water entering a power tool will increase the risk of electric shock.
•Outdoor use. Do not expose to rain; store indoors.
- Do not abuse the cord. Never use the cord for carrying, pulling or unplugging the power tool. Keep cord away from heat, oil, sharp edges or moving parts. Damaged or entangled cords increase the risk of electric shock.
- When operating a power tool outdoors, use an extension cord suitable for outdoor use. Use of a cord suitable for outdoor use reduces the risk of electric shock.
•If operating a power tool in a damp location is unavoidable, use a residual current device (RCD) protected supply. Use of an RCD reduces the risk of electric shock.
PERSONAL SAFETY
•Stay alert, watch what you are doing and use common sense when operating a power tool. Do not use a power tool while you are tired or under the influence of drugs, alcohol or medication. A moment of inattention while
•operating power tools may result in serious personal injury.
Use personal protective equipment. Always wear eye protection. Protective equipment such as a dust mask, non-skid safety shoes, hard hat or hearing protection used for appropriate conditions
•will reduce personal injuries. Prevent unintentional starting. Ensure the switch is in the off-position before connecting
• to power source and/or battery pack, picking up or carrying the tool. Carrying power tools with your finger on the switch or energising power tools that have the switch on invites accidents.
•Do not overreach. Keep proper footing and balance at all times. This enables better control of the power tool in unexpected situations.
- Dress properly. Do not wear loose clothing or jewelry. Keep your hair and clothing away from moving parts. Loose clothes, jewelry or long hair can be caught in moving parts.
- Do not let familiarity gained from frequent use of tools allow you to become complacent and ignore tool safety principles. A careless action can cause severe injury within a fraction of a second.
- Remove any adjusting key or wrench before turning the power tool on. A wrench or a key left attached to a rotating part of the power tool may result in personal injury.
- If devices are provided for the connection of dust extraction and collection facilities, ensure these are connected and properly used. Use of dust collection can reduce dust-related hazards.
POWER TOOL USE AND CARE
- Do not force the power tool. Use the correct power tool for your application. The correct power tool will do the job better and safer at the rate for which it was designed.
- Do not use the power tool if the switch does not turn it on and off. Any power tool that cannot be controlled with the switch is dangerous and must be repaired.
•Disconnect the plug from the power source and/or remove the battery pack, if detachable, from the power tool before making any adjustments, changing accessories, or storing power tools. Such preventive safety measures reduce the risk of starting the power tool accidentally.
- Store idle power tools out of the reach of children and do not allow persons unfamiliar with the power tool or these instructions to operate the power tool. Power tools are dangerous in the hands of untrained users.
- Maintain power tools and accessories. Check for misalignment or binding of moving parts, breakage of parts and any other condition that may affect the power tool's operation.
- Keep cutting tools sharp and clean. Properly maintained cutting tools with sharp cutting edges are less likely to bind and are easier to control.
• Use the power tool, accessories and tool bits etc. in accordance with these instructions, taking into account the working conditions and the work to be performed. Use of the power tool for operations different from those intended could result in a hazardous situation.
- Keep handles and grasping surfaces dry, clean and free from oil and grease. Slippery handles and grasping surfaces do not allow for safe handling and control of the tool in unexpected
BATTERY TOOL USE AND CARE
•Recharge only with the charger specified by the manufacturer. A charger that is suitable for one type of battery pack may create a risk of fire when used with another battery pack.
• Use power tools only with specifically designated battery packs. Use of any other battery packs may create a risk of injury and fire.
- When battery pack is not in use, keep it away from other metal objects, like paper clips, coins, keys, nails, screws or other small metal objects, that can make a connection from one terminal to another. Shorting the battery terminals together may cause burns or a fire.
• Under abusive conditions, liquid may be ejected from the battery; avoid contact. If contact accidentally occurs, flush with water. If liquid contacts eyes, additionally seek medical help. Liquid ejected from the battery may cause irritation or burns.
•Do not use a battery pack or tool that is damaged or modified. Damaged or modified batteries may exhibit unpredictable behaviour resulting in fire, explosion or risk of injury.
- Do not expose a battery pack or tool to fire or excessive temperature. Exposure to fire or temperature above 130^ (265°F) may cause explosion.
- Follow all charging instructions and do not charge the battery pack or tool outside the temperature range specified in the instructions. Charging improperly or at temperatures outside the specified range may damage the battery and increase the risk of fire.
SERVICE
- Have your power tool serviced by a qualified repair person using only identical replacement parts. This will ensure that the safety of the power tool is maintained.
- Never service damaged battery packs. Service of battery packs should only be performed by the manufacturer or authorised service providers.
ADDITIONAL BATTERY SAFETY RULES
⚠ WARNING To reduce the risk of fire, personal injury, and product damage due to short circuit, never immerse your tool, battery pack or charger in fluid or allow a fluid to flow i nside them. Corrosive or conductive fluids, such as seawater, certain industrial chemicals, and bleach or bleach-containing products, etc., can cause a short circuit.
SPECIFIC SAFETY RULES FOR BACKPACK SPRAYER
- ⚠️WARNING Risk of fire or explosion. Do not spray flammable liquids such as gasoline. Do not use tool around spark, flame, or smoke. Chemical may ignite.
• Use the correct tank for your application. These products are suitable for pesticide applications (such as insecticides, fungicides, or herbicides), fertilizers, concrete applications (such as sealants, curing compounds and form oil), and water supply applications, when used in accordance with these instructions and those supplied with the chemicals.
- Do not use bleach, caustic (alkali) self-heating or corrosive (acid) liquids in this sprayer. Do not pour hot or boiling liquids into the tank. These can corrode metal parts or weaken the tank and hose.
- Chemical sprayers shall be used only with plant protection products approved by local/national regulatory authorities for plant protection products for use with backpack sprayers.
- To reduce the risk of fire, personal injury, and product damage due to a short circuit, never immerse your tool, battery pack or charger in fluid or allow a fluid to flow inside them. Do not place or store tool where it can fall or be pulled into a tub or sink. Corrosive or conductive fluids, such as seawater, certain industrial chemicals, and bleach or bleach containing products, etc., can cause a short circuit.
• Electric shock hazard. Never spray toward electrical outlets.
- Spray area must be well ventilated to avoid hazardous fumes build-up.
- Avoid spraying on windy days. Spray can be blown onto people, plants, or objects that should not be sprayed.
- Do not store chemicals in the tank. Chemicals can degrade seals and hoses. Drain and clean after each use.
- Remove gloves before handling battery packs. Chemicals are harmful to plastics.
- Maintain your power tool. Thoroughly inspect inside and outside and examine all
components before each use. Check for cracked and deteriorated hoses, leaks, clogged nozzles, and missing or damaged parts. If damaged, have the power tool repaired before use. Many accidents are caused by poorly maintained power tools.
- Always unplug the charger and remove the battery pack from the charger or tool before performing any maintenance, storing, or draining the tool. Never disassemble the tool, battery pack or charger. Contact a MILWAUKEE® service facility for ALL repairs.
- Do not eat or smoke while handling or operating the tool. After use, wash with hot, soapy water to help reduce the risk of health hazards due to exposure to chemicals.
Always use common sense and be cautious when using tools. It is not possible to anticipate every situation that could result in a dangerous outcome. Do not use this tool if you do not understand these operating instructions or you feel the work is beyond your capability; contact MILWAUKEE® Tool or a trained professional for additional information or training.
- Do not use the battery compartment for storage.
- Maintain labels and nameplates. These carry important information. If unreadable or missing, contact a MILWAUKEE® service facility for a replacement.
WARNING Some dust created by power sanding, sawing, grinding,
drilling, and other construction activities contains chemicals known to cause cancer, birth defects or other reproductive harm. Some examples of these chemicals are:
- lead from lead-based paint
• crystalline silica from bricks and cement and other masonry products, and
• arsenic and chromium from chemically-treated lumber.
Your risk from these exposures varies, depending on how often you do this type of work. To reduce your exposure to these chemicals: work in a well-ventilated area, and work with approved safety equipment, such as those dust masks that are specially designed to filter out microscopic particles.
- When transporting and handling sprayers always secure the sprayer during transportation to prevent loss, damage or injury.
SAVE THESE INSTRUCTIONS SYMBOLOGY

Volts

Direct Current

Read operator's manual

Wear personal protective equipment (PPE) according to the chemical manufacturer's instructions.

Wear eye protection.

Wear gloves.

Regulatory Compliance mark (RCM). This product meets applicable regulatory requirements.

Do not spray flammable liquids
FUNCTIONAL DESCRIPTION
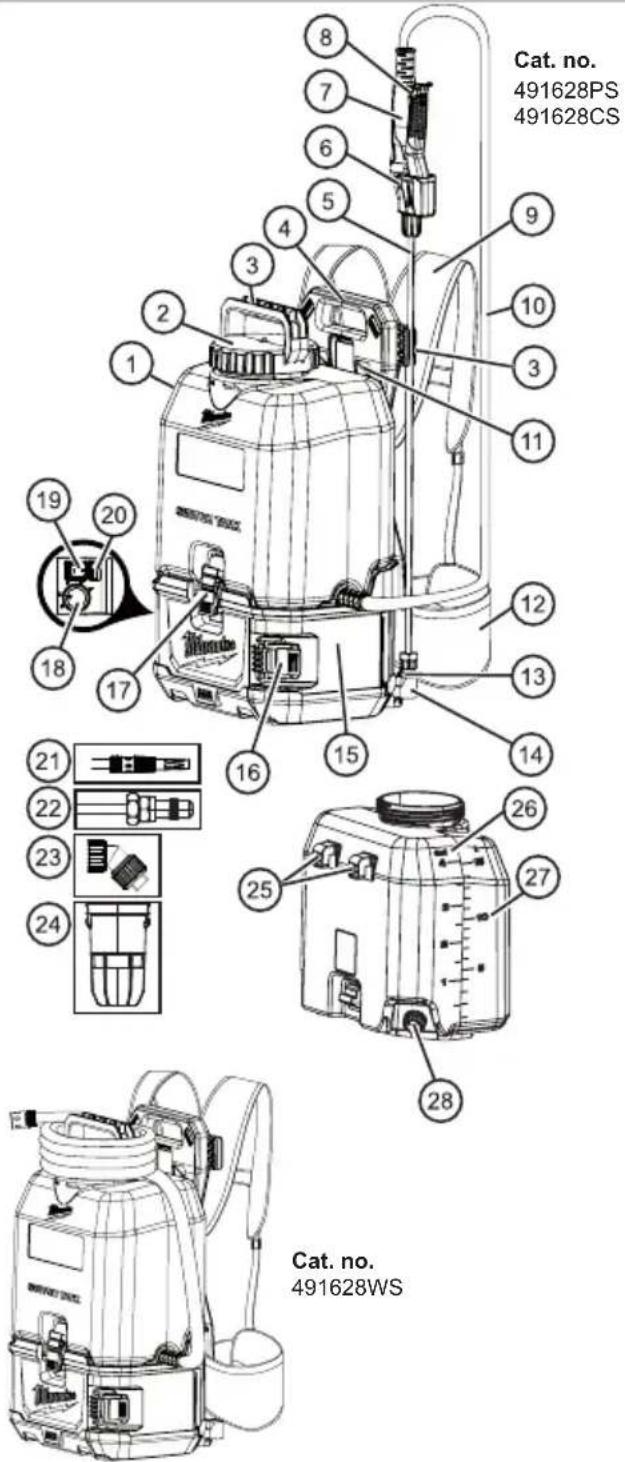
-
Tank
-
Tank cap
-
Wand storage location
-
Carry handle
-
Spray wand
-
Trigger lock-on ^
-
Trigger handle ^
-
Trigger lock-off ^
-
Shoulder straps
-
Hose
-
Tank hook receptacle
-
Waist strap
-
Adjustable nozzle ^
-
Nozzle holder
-
Battery compartment
-
Battery
compartment latch
-
Tank latch
-
Flow rate dial
-
On/Off switch
-
On/Off light
-
Water nozzle *
-
Adjustable nozzle ^
-
Fan nozzle ^
-
Strainer
-
Tank hooks
-
Gallon markings
-
Litre markings
-
Drain cap
* 491628WS only
^ 491628PS and
491628CS only
SPECIFICATIONS
Cat. No..... M18 BPFPCCS, M18 BPFPCS,
M18 BPFPWS
Volts.... 18V DC
Battery Type....M18™
Charger Type.... M18™
Recommended Ambient
Operating Temperature.... 0°C to 51°C
Tank Capacity.... 15 L
Dry Weight:
M18 BPFPCCS, M18 BPFPCS.... 7.75 kg
M18 BPFPWS.... 7.85 kg
Full Weight*
M18 BPFPCCS, M18 BPFPCS.... 23.6 kg
M18 BPFPWS.... 23.7 kg
*the weight is based on M18B4 4.0Ah battery
Flow Rate 0.37-4.2 L/min
Tank Only (Pesticide).... 491628PS
Tank Only (Concrete).... 491628CS
Tank Only (Water).... 491628WS
ASSEMBLY
WARNING Recharge only with the charger specified for the battery. For specific charging instructions, read the operator's manual supplied with your charger and battery.
Removing/ Inserting the Battery
To remove the battery, push in the release buttons and pull the battery pack away from the tool.
⚠ WARNING Always remove battery pack before changing or removing accessories.
To insert the battery, slide the pack into the body of the tool. Make sure it latches securely into place.
⚠ WARNING Only use accessories specifically recommended for this tool. Others may be hazardous.
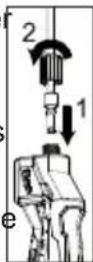
Connecting the Spray Wand to the Trigger Handle
(Cat. no. 491628PS, 491628CS)
-
Insert the spray wand into the trigger handle (1) until firmly seated.
-
Slide the nut onto the threaded coupling and hand tighten securely (2).
-
Pull on the spray wand to be certain it is properly secured.
-
Place the assembled trigger handle and wand into one of the wand storage locations.
Connecting the Nozzles
(Cat. no. 491628PS, 491628CS)
Select and screw on nozzle by job type. When using the adjustable nozzle, adjust spray pattern as desired by tightening/loosening the nozzle.
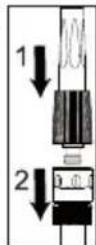
Connecting Water Supply or Nozzle (Cat. no. 491628WS)
To attach water supply hose to the tool or nozzle, push the quick connect fitting and tool/nozzle together (1). Pull on the connection to be certain it is properly secured. To remove, pull the collar back to release (2). When using the nozzle, adjust spray pattern as desired by tightening/loosening the nozzle.
WARNING chemicals are p
Ensure battery door is closed and latched whenever resent.
WARNING
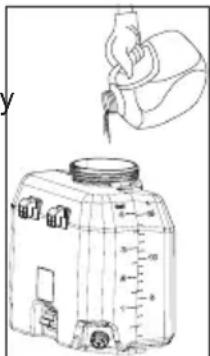
Filling the Tank Before filling the tank, remove the tank from the base.
Ensure battery door is closed and latched whenever chemicals are present.
Mix chemicals per manufacturer's instructions. Failure to follow instructions may cause harsh chemicals to injure user or damage tool.
A removable strainer prevents debris that can clog or damage the pump from entering the tank. Label tank contents accordingly during each use. Only put recommended liquids in tank. Only use water in water supply tank.
- Ensure the battery door is closed securely.
- Remove the tank from the base and set on a level surface away from the base to prevent exposing the base to harsh chemicals.
- Unscrew and remove the tank cap; ensure strainer is in place.
- Fill the tank (up to 15 litres; do not overfill). Use the litre markings on the side of the tank as a guide.
- Reinstall the tank cap.
- Reinstall the tank.
Installing the Tank
- Ensure the battery door is closed securely.
- Slide tank hooks' into base and seat fank into tank reservoir in the base.
- Secure tank to base with front and rear tank latches; ensuring the tank is level, firmly seated, and all seals are aligned.
WARNING When filled, the sprayer will be heavy, take care when putting on the backpack to avoid strain.
Putting on the Backpack
- Ensure tank is securely attached to base with front and rear tank latches, tank cap is installed, and battery door is latched.
-
Pick up the backpack by one of the shoulder straps, slide your arms through each shoulder strap.
-
With the sprayer on your back, tighten the shoulder and waist straps until they fit snugly and securely, high on your back. Connect chest strap.
-
Be sure the shoulder, chest, and waist straps are tight but comfortable; if they are too loose, the sprayer may slide around on your back, making it uncomfortable to wear.
-
Be aware tank contents may shift during use and movement, such as twisting or bending over.
OPERATION
Adjusting the Flow Rate
Select the desired flow rate from Low (1) to High (5), depending on the job and the chemical manufacturer's instructions.
| Flow Rate | M18 BPFPCS-0 (Stream Nozzle) | M18 BPFPCCS-0 (Stream Nozzle) | M18 BPFPWS-0 (Open Flow) |
| 1 | 0.37 L/min | 0.53 L/min | 0.5 L/min |
| 2 | 0.52 L/min | 0.79 L/min | 0.83 L/min |
| 3 | 0.90 L/min | 1.24 L/min | 1.32 L/min |
| 4 | 1.32 L/min | 1.66 L/min | 2.00 L/min |
| 5 | 1.93 L/min | 3.1 L/min | 4.2 L/min |
⚠ WARNING To reduce the risk of injury, always wear personal protective equipment (PPE) according to the chemical manufacturer's instructions. Always wear eye protection. Always ensure battery compartment latch is securely closed before use. Ensure trigger handle lock-on is not engaged before turning ON tool.
Turning the Sprayer ON/OFF
- Install the battery pack. Close and latch the battery compartment.
- To turn the sprayer ON, press the ON/OFF switch to "I". The Power LED will light green.
- To start the flow of liquid at the spray wand, pull the trigger.
- To stop the flow of liquid at the spray wand, release the trigger.
- To turn the sprayer OFF, press the ON/OFF switch to "0".
NOTE: Be aware some spray material may remain inside the spray wand and drip out. To drain, turn off the tool, then pull the trigger and point the tool down until dripping stops.
Trigger Lock-On (Cat. No. 491628PS, 491628CS)
Use trigger lock-on when spraying for an extended period of time or when covering a large area.
- To lock-on, pull the trigger and push in the lock-on button.
- To release the lock-on, pull and release the trigger.
NOTE: Ensure the trigger is not locked on before turning the sprayer off to avoid accidental spraying when the sprayer is restarted.
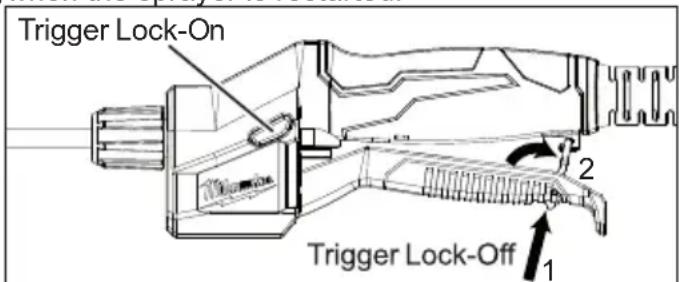
Trigger Lock-Off (Cat. no. 491628PS, 491628CS)
To avoid accidental spraying, lock-off the trigger.
1. Press the lock-off toggle at the end of the trigger (1).
2. Hook the lock-off tab onto the hook under the trigger (2).
3. To release, push the tab back into the trigger.
APPLICATIONS
WARNING Before using any chemicals and/or solutions, read and follow all original manufacturer instructions. Read all Safety Data Sheets (SDS) and container labels provided with the chemical. Chemicals can cause serious bodily injury, property damage, and/or damage the tool. Wear personal protective equipment (PPE) according to the chemical manufacturer's instructions. Always wear eye protection.
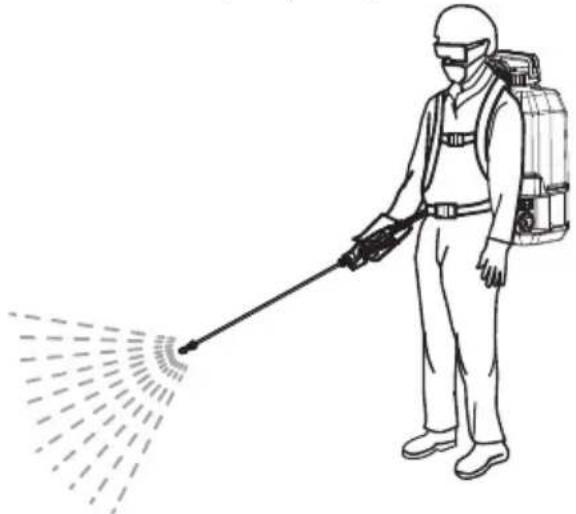
Spraying
(Cat. No. 491628PS, 491628CS)
- Fill the tank and then install onto the base.
- Put on the backpack and properly adjust the straps.
- Turn on the tool.
- Pull the trigger and begin sweeping the nozzle from side to side, coating the desired surface evenly in accordance with chemical manufacturer's instructions.
- If desired, lock-on the trigger for extended use.
- When done, release the trigger, turn off the tool, remove the backpack, drain, and clean the tank.
natural_image
Line drawing of a person in protective gear spraying disinfectant with a sprayer (no text or symbols)Supplying Water
(Cat. No. 491628WS)
- Fill the tank with clean water and then install onto the base.
- Place tool near the job within range of water supply hose.
- Attach water supply hose with the quick connect fitting. Pull on the connection to be certain it is properly secured.
- To start water flow, turn on the tool.
- Monitor water level in tank. When empty, turn off tool, disconnect the hose, and refill tank. Don't run tool when tank is empty.
- When done, turn off the tool, disconnect hose, drain, and clean the tank.
MAINTENANCE
WARNING Keep wand and hose pointed away from people, always angle the wand and hose downward and avoid direct contact with skin.
Maintaining Tool
Keep your tool, battery pack and charger in good repair by adopting a regular maintenance program. Inspect your tool for issues such as undue noise, misalignment or binding of moving parts, breakage of parts, or any other condition that may affect the tool operation. Return the tool, battery pack, and charger to a MILWAUKEE® service facility for repair. After six months to one year, depending on use, return the tool, battery
pack and charger to a MILWAUKEE® service facility for inspection. If the tool does not start or operate at full power with a fully charged battery pack, clean the contacts on the battery pack. If the tool still does not work properly, return the tool, charger and battery pack, to a MILWAUKEE® service facility for repairs.
⚠ WARNING To reduce the risk of personal injury and damage, never immerse your tool, battery pack or charger in liquid or allow a liquid to flow inside them. Do not use bleach as a cleaning agent.
Cleaning
Clean dust and debris from vents. Keep handles clean, dry and free of oil or grease. Use only mild soap and a damp cloth to clean, since certain cleaning agents and solvents are harmful to plastics and other insulated parts. Some of these include gasoline, turpentine, lacquer thinner, paint thinner, chlorinated cleaning solvents, ammonia and household detergents containing ammonia. Never use flammable or combustible solvents around tools.
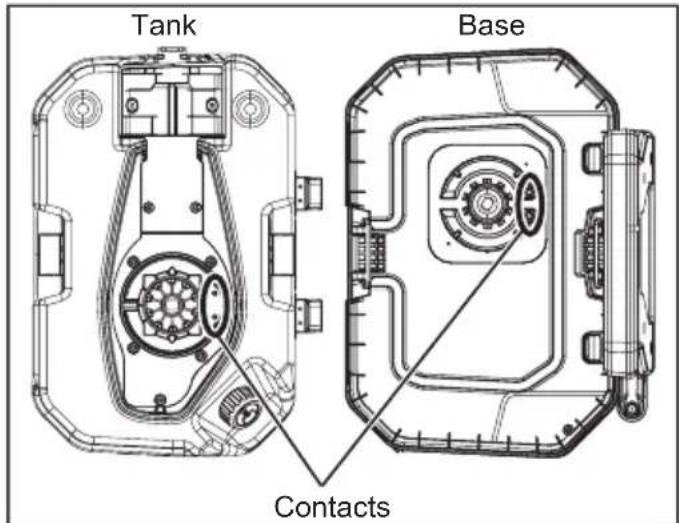
Cleaning Electrical Contacts
Keep electrical contact posts between bottom of tank and base clean.
WARNING Remove battery pack from tool before cleaning electrical contacts. Clean contacts with a dry, clean cloth only.
⚠ WARNING To reduce the risk of injury always wear personal protective equipment (PPE) according to the chemical manufacturer's instructions. Always wear eye protection.
Draining and Cleaning the Tank, Hose, and Spray Wand
If there is any liquid left in the tank after spraying, the tank should be drained before cleaning. Do not store chemicals in the tank. Tank must be cleaned before using another liquid. Do not mix liquids. Follow the chemical manufacturer's instructions for proper cleaning, storage and/or disposal of excess liquid. To Drain:
- Ensure the battery door is closed securely.
- Remove the tank from the base.
- Empty the tank into a suitable container through the fill area or by removing the drain cap and filter.
⚠ WARNING Always wear personal protective equipment (PPE) according to the chemical manufacturer's instructions. Always wear eye protection.
To Clean:
- Ensure the battery door is closed securely.
- Remove the tank from the base and set on a level surface away from the base to prevent exposing the base to harsh chemicals.
-
Remove the tank and fill it about one-third full with clean water. A small amount of mild household detergent may be added. Replace the cap and gently slosh the water around the tank.
-
Install the tank and spray the water until the tank has been emptied. Make sure to direct the spray toward an area that will not be damaged by residue chemicals in the tank.
-
Repeat the procedure with clean water until the tank is thoroughly clean. Wash outside of nozzles and dry with cloth.
-
Wipe the outside of the tank with a clean, dry cloth.
-
Allow all pieces to completely dry before reinstalling parts and storing the unit. Always reinsert strainer before replacing tank cap.
Storage
In the event the sprayer becomes blocked, return to a service agent for repair. Do not operate the unit and avoid direct contact with the unit.
Store indoors. Store spray wand securely in wand storage area. Store the sprayer in a secure, well-ventilated indoor space with the tank empty.
Repairs
For repairs, return the tool, battery pack and charger to the nearest service centre.
ACCESSORIES
⚠ WARNING Use only recommended accessories. Others may be hazardous. For a complete listing of accessories, go online to www.milwaukeetools.com.au/ www.milwaukeetools.co.nz or contact a distributor.
WARRANTY - AUSTRALIA and NEW ZEALAND
Please refer to Australian and New Zealand warranty supplied with tool. This warranty applies only to product sold in Australia and New Zealand.
SERVICE - AUSTRALIA and NEW ZEALAND
MILWAUKEE ^® prides itself in producing a premium quality product that is Nothing But Heavy Duty ^® . Your satisfaction with our products is very important to us! If you encounter any problems with the operation of this tool, please contact your authorised MILWAUKEE ^® dealer.
For a list of MILWAUKEE ^® dealers, guarantee or service agents please contact MILWAUKEE ^® Customer Service or visit our website.
(Australia Toll Free Telephone Number 1300 645 928)
(New Zealand Toll Free Telephone Number 0800 279 624)
or visit www.milwaukeetools.com.au / www.milwaukeetools.co.nz.
Milwaukee Electric Tool Corporation
13135 West Lisbon Road, Brookfield, Wisconsin U.S.A. 53005
Milwaukee Tool (Australia)
21 Kelletts Road, Rowville, VIC 3178
Melbourne, Australia
Milwaukee Tool (New Zealand)
2 Landing Drive, Mangere
Auckland, 2022, New Zealand
Designed by Milwaukee Electric Tool Corp.
Professionally Made in China for Milwaukee Tool (Australia) / Milwaukee Tool (New Zealand)
Printed in China

- IMPORTANT SAFETY INSTRUCTIONS
- WARNING
- WORK AREA SAFETY
- ELECTRICAL SAFETY
- PERSONAL SAFETY
- POWER TOOL USE AND CARE
- BATTERY TOOL USE AND CARE
- SERVICE
- ADDITIONAL BATTERY SAFETY RULES
- SPECIFIC SAFETY RULES FOR BACKPACK SPRAYER
- WARNING Some dust created by power sanding, sawing, grinding,
- SAVE THESE INSTRUCTIONS SYMBOLOGY
- FUNCTIONAL DESCRIPTION
- SPECIFICATIONS
- ASSEMBLY
- Connecting Water Supply or Nozzle (Cat. no. 491628WS)
- WARNING chemicals are p
- Installing the Tank
- WARNING When filled, the sprayer will be heavy, take care when putting on the backpack to avoid strain.
- Putting on the Backpack
- OPERATION
- Adjusting the Flow Rate
- Turning the Sprayer ON/OFF
- Trigger Lock-On (Cat. No. 491628PS, 491628CS)
- Trigger Lock-Off (Cat. no. 491628PS, 491628CS)
- APPLICATIONS
- Spraying
- (Cat. No. 491628PS, 491628CS)
- Supplying Water
- (Cat. No. 491628WS)
- MAINTENANCE
- WARNING Keep wand and hose pointed away from people, always angle the wand and hose downward and avoid direct contact with skin.
- Maintaining Tool
- ⚠ WARNING To reduce the risk of personal injury and damage, never immerse your tool, battery pack or charger in liquid or allow a liquid to flow inside them. Do not use bleach as a cleaning agent.
- Cleaning
- Cleaning Electrical Contacts
- To Clean:
- Storage
- Repairs
- ACCESSORIES
- WARRANTY - AUSTRALIA and NEW ZEALAND
- SERVICE - AUSTRALIA and NEW ZEALAND
Brand : MILWAUKEE
Model : M18 BPFP-CCST
Category : Uncategorized