
WACP450 - Air purifier Winix - Free user manual and instructions
Find the device manual for free WACP450 Winix in PDF.


| Product Type | Air Purifier |
| Brand | Winix |
| Model | WACP450 |
| Room Size | 450 sq. ft. |
| Power Supply | AC 120V / 60 Hz |
| Power Consumption | 110 W |
| CADR (Smoke) | 291 |
| CADR (Dust) | 298 |
| CADR (Pollen) | 343 |
| Unit Dimensions (W x D x H) | 10.24 in x 25.59 in x 17.32 in |
| Unit Weight | 19.40 lbs |
| Filtration Stages | 3-Stage (Carbon Pre-Filter, True HEPA, PlasmaWave) |
| Air Quality Sensor | Yes |
| Light Sensor | Yes (dims panel and lowers fan in Auto Mode) |
| Auto Mode | Yes |
| Manual Mode | Yes |
| PlasmaWave Technology | Yes (can be disabled) |
| Carbon Pre-Filter Replacement Interval | Every 3 months |
| True HEPA Filter Replacement Interval | Every 12 months |
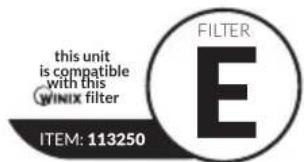
| Replacement Filter Part Number | 113250 (Filter E) |
| Remote Control | Included (CR2025 battery) |
| Warranty | 3 years from date of purchase |
| Safety Features | Auto shut-off? (not specified), do not operate without filters |
Frequently Asked Questions - WACP450 Winix
User questions about WACP450 Winix
0 question about this device. Answer the ones you know or ask your own.
Ask a new question about this device
Download the instructions for your Air purifier in PDF format for free! Find your manual WACP450 - Winix and take your electronic device back in hand. On this page are published all the documents necessary for the use of your device. WACP450 by Winix.
USER MANUAL WACP450 Winix
True HEPA Air Cleaner
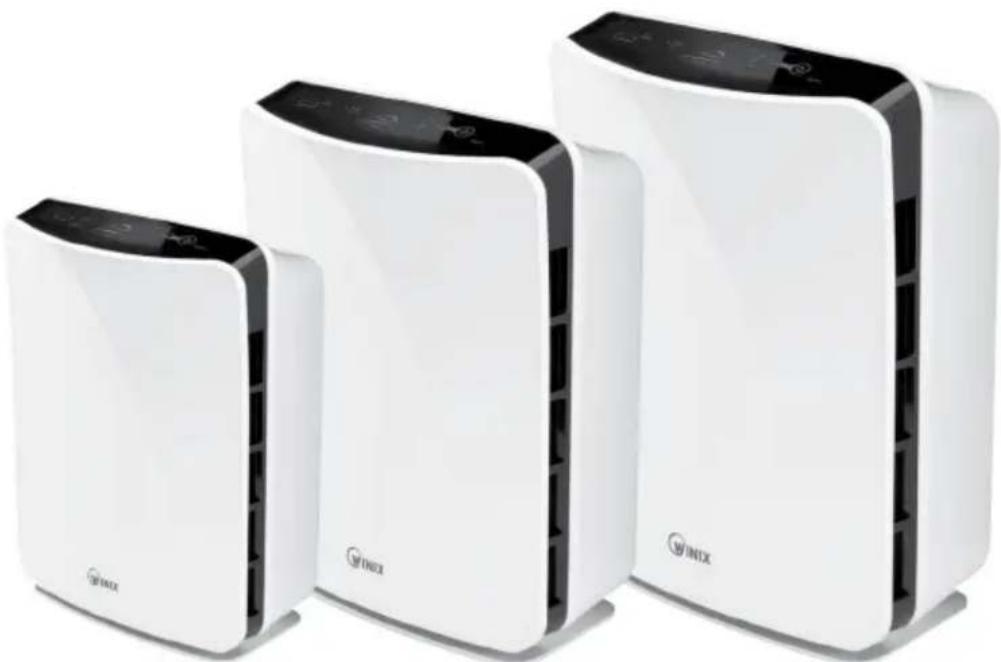
Model: WACP150, WACP300, WACP450
natural_image
Three white wireless devices with 'WINIX' branding, arranged in descending order (no visible text or symbols on the devices themselves)WACP150 WACP300 WACP450

Use & Care Guide

- Please read and follow all safety rules and instructions in this manual before operating.
- The product warranty is printed on the back of this guide, so please keep it in a safe place for future use.
CONTENTS
Warranty 3
Contents 3
Control Panel 4
Modes of Operation 4
Where to Use 5
Safety and Cautions 6
Features 7
Initial Set Up 8
Filter Replacement 10
Remote Control 12
Frequently Asked Questions 13
Unit Specifications 15
Safety Instructions 16
▶ This product is suitable for 120V only.
LIMITED WARRANTY
WINIX FRESHOME AIR CLEANERS LIMITED WARRANTY
Limited Warranty: Winix warrants the parts of the machine to be free of defects in material and workmanship and provides service and support for one (1) year from the date of purchase by the original consumer for model WACP150, and three (3) years from the date of purchase by the consumer for models WACP300 and WACP450.
If any part is found to be defective during the warranty period, your sole and exclusive remedy will be repair or replacement, at Winix's option and expense, of the defective part.
This warranty does not apply in cases of abuse, mishandling, failure to comply with product usage standards, operation using an improper power supply (other than listed on the label), or unauthorized repair.
Winix reserves the right to charge the consumers for any additional costs incurred by Winix to provide parts or services outside of the country where the air purifier is initially sold by an authorized reseller. This warranty does not include the air cleaner's replaceable filters, which are expendable parts that wear out from normal use.
ANY IMPLIED WARRANTY, INCLUDING THAT OF MERCHANTABILITY OR FITNESS FOR A PARTICULAR PURPOSE, IS HEREBY LIMITED IN DURATION TO THE APPROPRIATE WARRANTY PERIOD SET FORTH ABOVE.
In no event shall Winix be liable for any consequential or incidental damages attributable to this product.
This warranty gives you specific legal rights. The duration, terms and conditions of this warranty are valid worldwide, except where different limitations, restrictions, or conditions may be required by local law.
For more details or to obtain service under this warranty, please contact your local dealer.
CONTENTS
WACP300, WACP450
• (1) Winix Air Purifier
• (4) Carbon Pre-Filters
• (1) True HEPA Filter
• (1) Use & Care Guide
• (1) Remote control
• (1) 3V Lithium Battery
CR2025 installed in remote
WACP150
• (1) Winix Air Purifier
• (4) Carbon Pre-Filters
• (1) True HEPA Filter
• (1) Use & Care Guide
CONTROL PANEL
(A) Air Quality Sensor: Automatically monitors the air quality with in the environments.
(B) Auto Mode: Based on the Air Quality Sensor, Auto Mode adjusts the fan speed to purify the environment as efficiently as possible.
(C) Reset: Resets the Check Filter indicator light.
(D) Check Filter: Lights up to signal when it is time to replace the True HEPA filter.
( E ) PlasmaWave®: Displays whether PlasmaWave® is enabled or disabled.
(F) Air Quality Indicator: Displays the quality of air (Green / Yellow / Red).
( G ) Fan Speed Indicator: Displays the current fan speed.
( H ) Manual Control: Allows manual control of fan speeds.
(I) Power: Turns the unit on or off.
(J) Light Sensor: When in Auto Mode, the Light Sensors detect the amount of ambient light in the environment and dims the control panel lights.

MODES OF OPERATION
Auto Mode
By default, the unit is set to Auto Mode on start up. Auto Mode uses SmartSensors to automatically detect the impurities in the air, automatically adjusting the fan speed to filter out those impurities to maintain clean air.
Manual Mode
Pressing the Speed button will switch the unit into Manual Mode. This will allow the Fan Speed to chosen manually.
PlasmaWave®
By default PlasmaWave is activated ^® . To enable or disable this, press and hold the Auto Button for 3 seconds.
WHERE TO USE
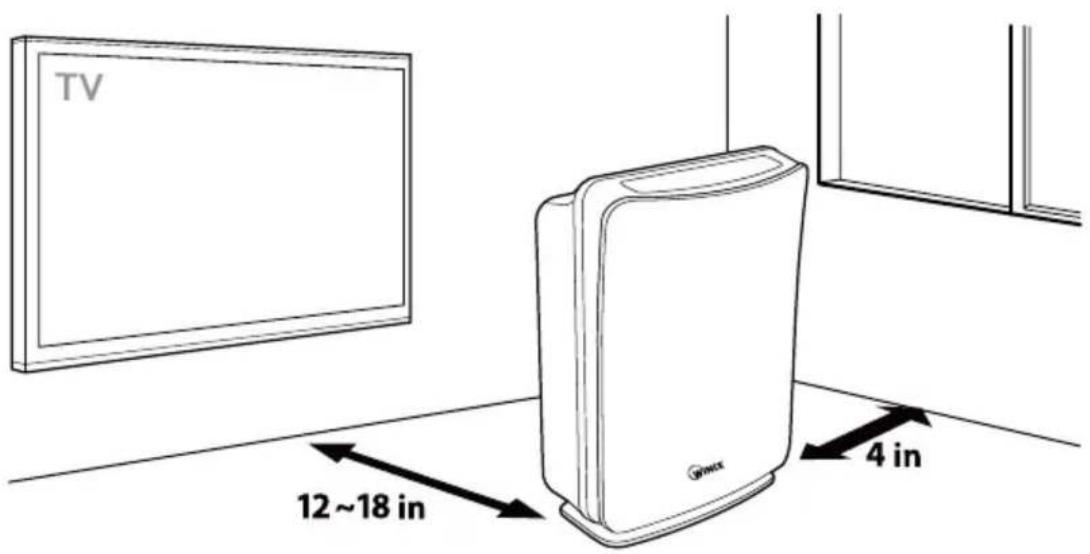
Allow 12 \~ 18 in. of space between TVs, radios, and other electronic products electromagnetic interference from certain electronics may cause product malfunction.
Place indoors away from direct sun light direct exposure may cause product malfunction or failure.
Only place on hard, flat surfaces flimsy or slanted surfaces may result in abnormal noise and vibrations.

WARNING
Follow these instructions to reduce the risk of serious injury or death and to reduce risk of damaging the unit.
Do not use around mist or fumes from industrial oil or around large quantities of metallic dust
Do not install in any sort of motor or transport vehicle (trucks, boats, ships, etc.)
Do not place near any flammable materials (aerosols, fuel, gases etc.)
Do not place below any electrical outlet
Do not place around heating elements
Do not place in an area with excessive amounts of noxious gases
Do not have unit facing into wind or draft
Do not place in excessively humid areas where unit may become wet
※ This unit is not intended to be used to preserve documents or in art conservation.
SAFETY AND CAUTIONS
Before operating this equipment, carefully read and follow these safety cautions and instructions to avoid damage and ensure safe use.
Ensure filters are inserted before running unit running unit without filters can shorten the units life and cause electric shock or injury.
Be sure foreign objects are NOT inserted into the vents on the unit objects can include pins, rods, and coins.
Do not touch any part of the interior of the unit with wet hands the high voltage may cause electric shock.
Ensure unit intake and outlet vents do not become blocked blockage may lead to increased internal temperatures causing product failure and deformation.
Do not use the unit as a step stool or place heavy objects on it personal injury may occur or product failure and deformation.

WARNING
Follow these instructions to reduce the risk of serious injury or death and to reduce risk of damaging the unit.
Do not pull on the power cord when unplugging the unit
If the unit becomes submerged in water, unplug it and contact customer service
Do not plug additional appliances into the same outlet or power supply
Unplug unit when not in operation for extended periods of time
Do not tie or knot power cord when unit is in operation
Do not unplug or move the unit while in operation
Do not touch the plug with wet hands
Cord can become damaged by forcefully bending, pulling, twisting, bundling, pinching or placing heavy objects on it
FEATURES
Quiet Operation
Offering low noise operation and Quiet speed for night time operation
Air Quality Sensor
Detects the presence of various pollutants in the air, controlling Auto Mode to adjust the fan speed.
Light Sensor
When in Auto Mode, detects the amount of ambient light in the environment and automatically dims the control panel light and lowers the fan speed to Quiet.
Multi-Stage Cleaning
3 stage air cleaning returning clean air back into the room.
PlasmaWave®
Breaks apart airborne pollutants on a molecular level, without producing harmful ozone.
Carbon Pre-Filter
Traps large particles such as; dust, pet hair and lint. Absorbs odor caused from smoking, cooking and pets.
- For optimal performance replace: Once every 3 months.
True HEPA Filter
Captures up to 99.97% of particles as small as 0.3 microns; including smoke, dust and pollen.
- For optimal performance replace: Once every 12 months.

NOTE
When the unit is running, you may hear a chirpping or buzzing sound. The sound is from large particles passing through PlasmaWave ^® , it is normal and does not signify product failure. To disable PlasmaWave ^® , see page 4.
INITIAL SET UP
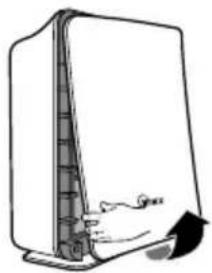
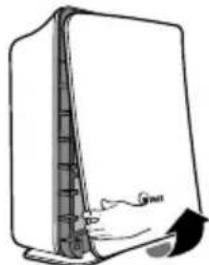
① Remove the front panel by grasping the lower edge and gently pulling towards yourself.
② Remove the Plastic Frame from the unit.
③ Remove the filters from the unit, they are protected inside a plastic wrap.
④ Remove filters from protective plastic wrap.
- Operating the unit without removing filters from plastic may cause abnormal noise, deformation, or fire as a result of overheating.
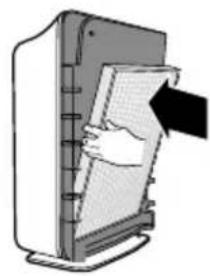
⑤ Insert the filters into the unit until they fit securely in place.
Filters must be installed in this order:
- True HEPA Filter (rear)
• Carbon Pre-Filter (front)
natural_image
Line drawing of a computer monitor with a scroll wheel and base mount (no text or symbols)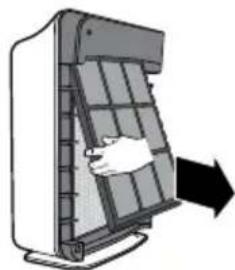
natural_image
Diagram of a device with a hand inserting a grid into a panel, showing a black arrow indicating direction (no text or symbols present)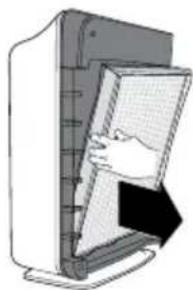
natural_image
Illustration of a hand inserting a card into a device (no text or symbols visible)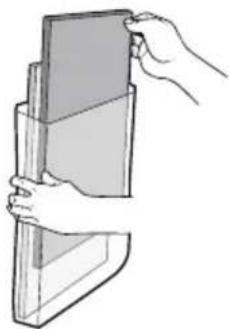
natural_image
Illustration of a hand holding a rectangular object, possibly a folded paper or document (no text or symbols visible)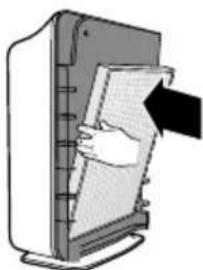
natural_image
Illustration of a hand inserting a card into a computer monitor (no text or symbols visible)INITIAL SET UP
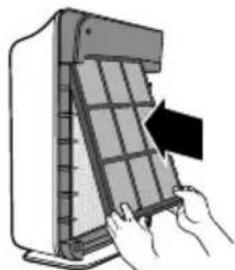
⑥ Insert the Plastic Frame in front of the Carbon Pre-Filter.
• The Plastic Frame will ensure the filters stay in place.
⑦ Replace the Front Cover.
- Insert the cover tabs into the top slots on the unit, then bring the bottom of the Front Cover to the bottom of the unit until snapping into place.
⑧ Plug the unit into an electrical outlet.
⑨ Press and hold the Power Button until a short "beep" sounds.
⑩ The unit will take 3 - 4 minutes in order for the Air Quality Sensor to calibrate to the environment.
- While in calibration the lights will flash on and off. Once it is complete the lights will indicate the unit is in Auto Mode.
⑪ Remove the plastic tab from the batter within the remote.
- Valid only for WACP300 & WACP450 units.
natural_image
Illustration of hands installing or adjusting a grid panel on a device (no text or symbols visible)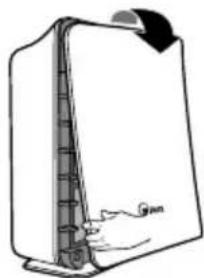
natural_image
Diagram of a folded paper or plastic sheet with a hand pressing down, showing no text or symbols.
FILTER REPLACEMENT
When the Check Filter indicator LED is on, it is time to replace the True HEPA filter.
| Filter Indicator Light | When to service | When to replace | |
| Carbon Pre-filter None | Can NOT be WASHED | Lasts up to 3 months | |
| True HEPA filter Check Filter | Lasts up to 12 months | ||
※ Intervals between filter replacement may vary depending on environment.
① Remove the front panel by grasping the lower edge and gently pulling towards yourself.
② Remove the Plastic Frame from the unit.
③ Remove the current filters from the unit.
④ Remove new filters from protective plastic wrap.
- Operating the unit without removing filters from plastic may cause abnormal noise, deformation, or fire as a result of overheating.
natural_image
Line drawing of a flat-panel hard drive with a black arrow indicating force or motion (no text or symbols)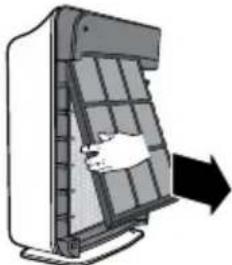
natural_image
Diagram of a door with a hand opening the window, showing airflow direction (no text or symbols)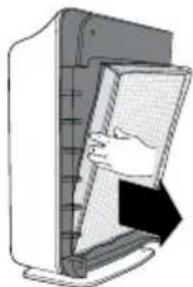
natural_image
Illustration of a hand inserting a card into a printer (no text or symbols visible)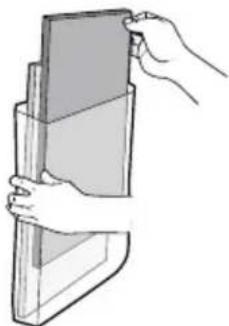
natural_image
Illustration of hands holding a rectangular object, possibly a folded paper or container (no text or symbols visible)FILTER REPLACEMENT
⑤ Insert the new filters into the unit until they fit securely in place.
Filters must be installed in this order:
• True HEPA Filter (rear)
• Carbon Pre-Filter (front)
⑥ Insert the plastic frame in front of the Carbon Pre-Filter.
• The Plastic Frame will ensure the filters stay in place
⑦ Replace the Front Cover.
- Insert the cover tabs into the top slots on the unit, then bring the bottom of the Front Cover to the bottom of the unit until snapping into place.
⑧ Reset the Check Filter Indicator.
- Use a thin item, such as a paper clip, to insert into the Reset area. The light will flash 5 times before a beeping sound occurs; which indicates the Check Filter has been reset.
natural_image
Illustration of a hand inserting a card into a computer monitor (no text or symbols visible)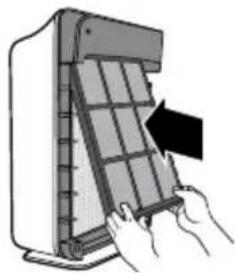
natural_image
Illustration of hands installing or adjusting a grid panel on a computer tower (no text or symbols visible)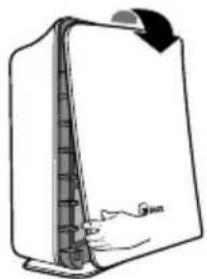
natural_image
Diagram of a folded paper or plastic sheet with a hand inserting a cable (no text or symbols)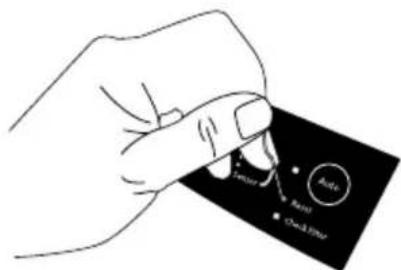
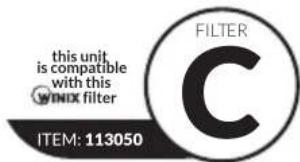
WACP150
To purchase replacement Winix filters:
(877)-699-4649
www.winixamerica.com
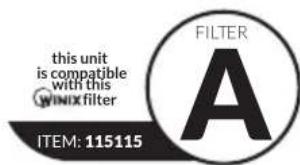
WACP300
WACP450
REMOTE CONTROL
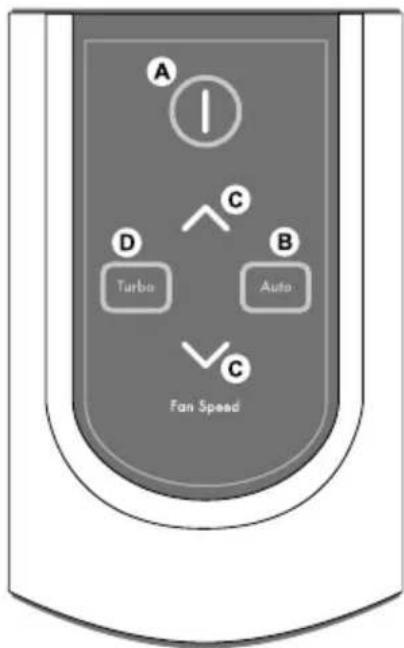
Remote is only for models WACP300 or WACP450.
operates in a 20 foot radius.
(A) Power: Turns the unit on or off.
(B) Auto: Enables Auto Mode.
(C) Fan Speed: Enters into Manual Mode while selecting Fan Speed.
(D) Turbo: Enters Manual Mode setting device directly to Turbo Fan Speed.
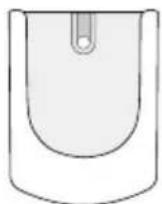
Cradle
Wall mountable storage cradle.
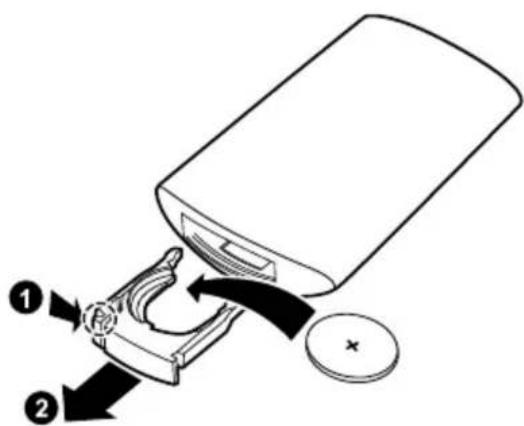
Battery Replacement
① Squeeze tabs of batter cover while pulling on the remote
② Remove old battery
③ Insert new batter, with PLUS side up.
• Always use CR2025 3V lithium battery.

WARNING
- Incorrect batter usage may cause battery fluid leakage and/or damage.
- When not using remote for extended periods of time, remove the battery.
- Avoid dropping or damaging the remote.
FREQUENTLY ASKED QUESTIONS
| Problem Check / Actions to take | |
| The remote control does not work. | ▸ Ensure the Remote batter is inserted correctly; (+) side up.▸ Ensure the Remote has a clear line of sight to the air cleaner.▸ Ensure the Remote is within a 20 ft. radius. |
| The unit does not remove smoke or odors effectively. | ▸ Ensure the Air Quality Sensor is not blocked or clogged.▸ Move the unit closer to the source of the odor.▸ Replace the Carbon Pre-Filter; as they may have reached their odor absorption capacity. |
| The unit seems to be running on High fan speed all the time. | ▸ Clear the Air Quality sensor with a vacuum; as it may be blocked or clogged. |
| The Air Quality Indicator is yellow or red; however the air seems to be clean. | ▸ Clear the Air Quality sensor with a vacuum; as it may be blocked or clogged. |
| The Air Quality Indicator is green; however the air seems to have dust and odor. | ▸ The unit captures a high percentage of dust and particles; however open doors, windows and Central HVAC may cause additional levels of dust to be entered into the environment.▸ Clear the Air Quality sensor with a vacuum; as it may be blocked or clogged.▸ Replace Carbon Pre-Filter and True HEPA Filter. |
| Unit interferes with radio or TV reception. | ▸ Reorient or relocate the receiving antenna on the unit having issues.▸ Increase the distance between the unit having issues and the air cleaner.▸ Plug the air cleaner into a different power outlet. |
| Check Filter indicator remains lit; after replacing the True HEPA filter. | ▸ Reset the Check Filter by using a thin item, such as a paper clip, to insert into the Reset area. The light will flash 5 times before a beeping sound occurs; which indicates the Check Filter has been reset. |
FREQUENTLY ASKED QUESTIONS
| Problem Check / Actions to take | |
| Can the filters be washed or cleaned? | ▶No; the filters are not designed to be washed with water or vacuumed. Doing so could cause them to be rendered unusable. |
| What is CADR? | ▶EDR means Clean Air Delivery Rate and the ratings are provided from a controlled testing environment through AHAM. The unit is rated for the optimal space to purifier air quality. |
| Can Sleep Mode be disabled? | ▶When the unit is running in Auto Mode, Sleep Mode is automatically enabled. To disable Sleep Mode the unit must run in Manual Mode. View page 4 for details. |
UNIT SPECIFICATIONS
| Model WACP150 WACP300 WACP450 | |||
| Room Size | 150 sq. ft. 300 sq. ft. 450 sq. ft. | ||
| Power Supply | AC 120V / 60 Hz | ||
| Watts | 40 W 60 W 110 W | ||
| CADR | Smoke (98) Dust (98) Pollen (103) | Smoke (197) Dust (197) Pollen (214) | Smoke (291) Dust (298) Pollen (343) |
| Unit Dimensions | 8.27 in (W) x 18.50 in (D) x 13.78 in (H) | 8.66 in (W) x 21.65 in (D) x 16.30 in (H) | 10.24 in (W) x 25.59 in (D) x 17.32 in (H) |
| Unit Weight | 11.15 lbs 13.95 lbs 19.40 lbs | ||
| Replacement Filter | Filter C Item: 113050 | Filter A Item: 115115 | Filter E Item: 113250 |
The exterior, design, and product specifications may be changed to improve product performance without prior notice.
Warning: Change or modifications to this unit not expressly approved by the party responsible for compliance could void the user's authority to operate the equipment.
Note: This equipment has been tested and found to comply with the limits for a Class B digital device, pursuant to Part 15 of the FCC Rules. These limits are designed to provide reasonable protection against harmful interference in a residential installation. This equipment generates, uses and can radiate radio frequency energy and, if not installed and used in accordance with the instructions, and may cause harmful interference to radio communications. However, there is no guarantee that interference will not occur in a particular installation. If this equipment does cause harmful interference to radio or television reception, which can be determined by turning the equipment off and on, the user is encouraged to try to correct the interference by one or more of the following measures.
• Reorient or relocate the receiving antenna.
• Increase the separation between the equipment and receiver.
- Connect the equipment into an outlet on a circuit different from that to which the receiver is connected.
- Consult the dealer or on experienced radio/TV technician for help.
This device complies with Industry Canada's license-exempt RSSs. Operation is subject to the following two conditions:
• This device may not cause interference; and
- This device must accept any interference, including interference that may cause undesired operation of the device.
Thank you for purchasing a Winix air cleaner. This product is for household use
IMPORTANT CAUTIONS FOR USING YOUR AIR PURIFIER
WARNING: Follow the instructions in this manual to reduce the risk of electric shock, short circuit, and/or fire.
- Do not repair or modify the unit unless specifically recommended in this manual. All other repairs should be completed by a qualified technician.
- The plug for this unit is polarized with one blade wider than the other. Do not force the plug into an electrical outlet. Do not alter the plug in any way. If the does not fit into the outlet, reverse the plug. If it still does not fit, contact a qualified technician to install a proper outlet.
- Do not use if the power cord or plug is damaged or the connection to the wall outlet is loose.
- Use AC 120V only.
- Do not damage, break, forcefully bend, pull, twist, bundle, coat, pinch, or place heavy objects on the power cord.
- Periodically remove dust from the power plug. This will reduce the risk of shock due to humidity build up.
- If the power plug is damaged, it must be replaced by the manufacturer or a qualified technician.
- Remove the power plug from the outlet before cleaning the unit. When removing the power plug, grasp by holding the plug itself, never hold by the cord.
- Remove the power plug from the outlet when not in use.
- Do not handle the power plug with wet hands.
- Do not operate the unit when using indoor smoke-generating insecticides.
- Do not clean unit with benzene or paint thinner. Do not spray insecticides on the unit.
- Do not use the unit where it is humid or where the unit may become wet, such as the bathroom.
- Do not insert fingers or foreign objects into air intake or outlet.
- Do not use use the unit near flammable gases. Do not use near cigarettes, incense, or other spark-creating items.
- Unit will not remove carbon monoxide emitted from heating appliances or
IMPORTANT PRECAUTIONS FOR USING YOUR AIR CLEANER
- Do not block the intake or outlet vents.
- Do not use near hot objects, such as a stove.
- Do not use where the unit may come into contact with steam.
- Do not use the unit on its side.
- Keep away from products that generate oily residue, such as a deep fryer.
- Do not use detergent to clean the unit.
- Do not operate without a filter.
- Do not wash and reuse the True HEPA Filter or the Carbon Pre-Filter.
- Hold the handle on the back of the unit to transport.
- Do not hold by the front panel.


Independently Tested. Consumer Trusted.
151216 Rev.2.1.1
To expedite service, please specify the model name and number, the nature of the problem, your contact information, and your address.
WINIX USA
• Dedicated Call Center : 📞(877) 699-4649
• Website : www.winixamerica.com
WINIX Europe
- Contact your local dealer
- True HEPA Air Cleaner
- CONTENTS
- LIMITED WARRANTY
- WINIX FRESHOME AIR CLEANERS LIMITED WARRANTY
- WACP300, WACP450
- WACP150
- CONTROL PANEL
- MODES OF OPERATION
- Auto Mode
- Manual Mode
- PlasmaWave®
- WHERE TO USE
- WARNING
- SAFETY AND CAUTIONS
- FEATURES
- Quiet Operation
- Air Quality Sensor
- Light Sensor
- Multi-Stage Cleaning
- Carbon Pre-Filter
- True HEPA Filter
- INITIAL SET UP
- FILTER REPLACEMENT
- To purchase replacement Winix filters:
- REMOTE CONTROL
- Remote is only for models WACP300 or WACP450.
- Cradle
- Battery Replacement
- FREQUENTLY ASKED QUESTIONS
- UNIT SPECIFICATIONS
- IMPORTANT CAUTIONS FOR USING YOUR AIR PURIFIER
- IMPORTANT PRECAUTIONS FOR USING YOUR AIR CLEANER
Brand : Winix
Model : WACP450
Category : Air purifier