True Image Home 11.0 - Software ACRONIS - Free user manual and instructions
Find the device manual for free True Image Home 11.0 ACRONIS in PDF.


| Product Type | Backup and Recovery Software |
| Version | 11.0 Home |
| Supported Operating Systems | Windows XP, Vista, 7 (32/64-bit) |
| Language | English, French, German, Japanese, and more |
| Installation Type | Download or CD-ROM |
| License | Single user, multiple PCs (depending on license) |
| Primary Functions | Full disk imaging, file backup, scheduled backups, disaster recovery |
| Backup Destinations | Local drive, external HDD, network share, FTP |
| Recovery Options | Bootable rescue media, full system restore, file-level recovery |
| Compression | High, normal, low; encryption (AES-128/256) |
| System Requirements (Minimum) | 1 GHz CPU, 1 GB RAM, 1.5 GB disk space for installation |
| File System Support | FAT16/32, NTFS, Ext2/3, ReiserFS (read-only) |
| Backup Scheduling | Daily, weekly, monthly, or custom intervals |
| Email Notifications | Send completion and error alerts |
| Hardware Compatibility | IDE, SATA, SCSI, USB, Firewire drives; CD/DVD writers |
| Disk Cloning | Clone entire HDD to another drive |
| Safety Features | Password protection, encryption, validation after backup |
| Maintenance | Check for updates online, verify backup integrity |
| Spare Parts | Not applicable (software); license keys can be re-issued |
| Repairability | Reinstall from original media; use recovery console |
Frequently Asked Questions - True Image Home 11.0 ACRONIS
User questions about True Image Home 11.0 ACRONIS
0 question about this device. Answer the ones you know or ask your own.
Ask a new question about this device
Download the instructions for your Software in PDF format for free! Find your manual True Image Home 11.0 - ACRONIS and take your electronic device back in hand. On this page are published all the documents necessary for the use of your device. True Image Home 11.0 by ACRONIS.
USER MANUAL True Image Home 11.0 ACRONIS
Copyright © Acronis, Inc., 2000-2007. All rights reserved.
"Acronis", "Acronis Compute with Confidence", "Acronis Active Restore", "Acronis Recovery Manager, "Acronis Secure Zone" and the Acronis logo are trademarks of Acronis, Inc.
Linux is a registered trademark of Linus Torvalds.
Windows and MS-DOS are registered trademarks of Microsoft Corporation.
All other trademarks and copyrights referred to are the property of their respective owners.
Distribution of substantively modified versions of this document is prohibited without the explicit permission of the copyright holder.
Distribution of this work or derivative work in any standard (paper) book form for commercial purposes is prohibited unless prior permission is obtained from the copyright holder.
DOCUMENTATION IS PROVIDED "AS IS" AND ALL EXPRESS OR IMPLIED CONDITIONS, REPRESENTATIONS AND WARRANTIES, INCLUDING ANY IMPLIED WARRANTY OF MERCHANTABILITY, FITNESS FOR A PARTICULAR PURPOSE OR NON-INFRINGEMENT, ARE DISCLAIMED, EXCEPT TO THE EXTENT THAT SUCH DISCLAIMERS ARE HELD TO BE LEGALLY INVALID.
ACRONIS, INC.
End User License Agreement (EULA)
BEFORE INSTALLING AND USING THE SOFTWARE PRODUCT WHICH EITHER YOU HAVE DOWNLOADED OR IS CONTAINED ON THESE DISKS ("SOFTWARE") YOU SHOULD CAREFULLY READ THE FOLLOWING LICENSE AGREEMENT ("AGREEMENT") THAT APPLIES TO THE SOFTWARE. CLICK "ACCEPT" IF YOU FULLY ACCEPT AND AGREE TO ALL OF THE PROVISIONS OF THIS AGREEMENT. OTHERWISE, CLICK "DO NOT ACCEPT." CLICKING "ACCEPT" OR OTHERWISE DOWNLOADING, INSTALLING AND OR USING THE SOFTWARE ESTABLISHES A BINDING AGREEMENT BETWEEN YOU AS THE PERSON LICENSING THE SOFTWARE (THE "LICENSEE") AND ACRONIS, INC. LOCATED AT: ACRONIS INTERNATIONAL GMBH VERWALTUNG EURO HAUS RHEINWEG 5 SCHAFFHAUSEN, SWITZERLAND CH-8200, ("LICENSOR"). IF YOU DO NOT ACCEPT ALL OF THE TERMS OF THIS AGREEMENT, YOU SHALL HAVE NOT RIGHT TO DOWNLOAD, INSTALL AND/OR USE THE SOFTWARE AND MUST DELETE THE SOFTWARE AND ASSOCIATED FILES IMMEDIATELY.
This Agreement applies to the Software, whether licensed under a Software License and/or an Evaluation License, each as defined and described below:
Purchased License of Software. Subject to the terms and conditions of this Agreement, upon purchase of a license to the Software, LICENSOR grants and LICENSEE accepts a nonexclusive, nontransferable, nonassignable license to use Software only for LICENSEE's own internal use solely on the specific number of computers that you have licensed. Installation of Software is LICENSEE's responsibility. The license described in this section shall be referred to as a "Software License".
Evaluation License of Software: The LICENSEE has the right to evaluate the Software for a period of time not to exceed fifteen (15) days (the "Evaluation Period") unless extended by LICENSOR. Software licensed under this Evaluation License may not be used in a production environment. There will be no charge to the LICENSEE for said evaluation of the Software under this Evaluation License. At the conclusion of the Evaluation Period, unless a Software License to the Software is purchased, the LICENSEE will delete the Software from its systems and have no further license or other rights with respect to the Software except as to the rights and responsibilities in this Agreement. LICENSOR SHALL NOT BE LIABLE FOR ANY SPECIAL, DIRECT, INDIRECT, PUNITIVE, OR CONSEQUENTIAL DAMAGES RESULTING FROM USE OF SOFTWARE UNDER THE EVALUATION LICENSE UNDER ANY CONTRACT, NEGLIGENCE, STRICT LIABILITY OR OTHER THEORY. THESE LIMITATIONS SHALL APPLY NOTWITHSTANDING ANY FAILURE OF ESSENTIAL PURPOSE OF ANY LIMITED REMEDY. The following sections of this Agreement also apply to Evaluation License(s) of the Software: Limitations, Confidentiality, Disclaimer of Warranties, LICENSEE Indemnity, Law, Export Restrictions, and Miscellaneous. The license described in this section shall be referred to as an "Evaluation License").
Use Rights:
Assigning the License. Before you run any instance of the Software under a Software License, you must assign that license to one of your PCs and that PC is the licensed PC for that particular Software License. You may assign other Software Licenses to the same PC, but you may not assign the same PC License to more than one PC except as identified herein.
You may reassign a Software License if you retire the licensed PC due to permanent PC failure. If you reassign a Software License, the PC to which you reassign the license becomes the new licensed PC for that particular Software License.
Running Instances of the Software. You have the rights to run the Software on one (1) PC. Every PC creating an image and every PC to which an image is either deployed to or restored from must have a valid license.
Support. By virtue of licensing a Software License and registering your Software License with LICENSOR, and at LICENSOR'S sole discretion, LICENSEE is entitled to: (1) "patch" or "dot releases (e.g., 11.01, 11.02, and 11.03 etc.) of the Software License. A major release(s) of the Software License (e.g., Version 12 Version 13, etc) are not included in Support and would require a paid upgrade fee; (2) email support ;and (3) other electronic services that LICENSOR may make generally available to its customers, such as an electronically available base of knowledge ("Knowledge Base") to assist in answering general questions about the Software License. In the event that LICENSEE makes any unauthorized modifications to the Software Product, Support services are null and void.
Limitations. Notwithstanding any references to “purchase” the Software is licensed and not sold pursuant to this Agreement. This Agreement confers a limited license to the Software and does not constitute a transfer of title to or sale of all or a portion of the Software, and LICENSOR retains ownership of all copies of the Software. LICENSEE acknowledges that the Software contain trade secrets of LICENSOR, its suppliers or licensors, including but not limited to the specific internal design and structure of individual programs and associated interface information. Accordingly, except as otherwise expressly provided under this Agreement, LICENSEE shall have no right, and LICENSEE specifically agrees not to: (i) transfer, assign or sublicense its license rights to any other person or entity, or use the Software on any equipment other than the PC, and LICENSEE acknowledges that any attempted transfer, assignment, sublicense or use shall be void; (ii) make error corrections to or otherwise modify or adapt the Software or create derivative works based upon the Software, or permit third parties to do the same; (iii) reverse engineer or decompile, decrypt, disassemble or otherwise reduce the Software to human-readable form, except to the extent otherwise expressly permitted under applicable law notwithstanding this restriction; (iv) use or permit the Software to be used to perform services for third parties, whether on a service bureau or time sharing basis or otherwise, without the express written authorization of LICENSEE; or (v) disclose, provide, or otherwise make available trade secrets contained within the Software in any form to any third party without the prior written consent of LICENSOR.
Confidentiality. The Software is a trade secret of LICENSOR and is proprietary to LICENSOR. LICENSEE shall maintain Software in confidence and prevent disclosure of Software using at least the same degree of care it uses for its own similar proprietary information, but in no event less than a reasonable degree of care. LICENSEE shall not disclose Software or any part thereof to anyone for any purpose, other than to employees for the purpose of exercising the rights expressly granted under this Agreement. License shall not, and shall not allow any third party to, decompile, disassemble or otherwise, reverse engineer or attempt to reconstruct or discover any source code or underlying ideas, algorithms, file formats or programming or interoperability interfaces of Software or of any files contained or generated using Software by any means whatsoever. The obligations under this paragraph shall survive any termination of the Agreement.
Disclaimer of Warranties. THE SOFTWARE IS PROVIDED "AS IS" AND LICENSOR DISCLAIMS ALL WARRANTIES, EXPRESSED OR IMPLIED WITH RESPECT TO SOFTWARE INCLUDING ALL IMPLIED WARRANTIES OF MERCHANTABILITY, TITLE, NON-INFRINGEMENT OF THIRD PARTIES' RIGHTS, AND FITNESS FOR A PARTICULAR USE. WITHOUT LIMITING THE FOREGOING, LICENSOR DOES NOT WARRANT THAT THE FUNCTIONS CONTAINED IN SOFTWARE WILL OPERATE IN THE COMBINATION LICENSEE SELECTS, THAT OPERATION OF SOFTWARE WILL BE UNINTERRUPTED OR ERROR-FREE AND/OR THAT DEFECTS IN THE SOFTWARE WILL BE CORRECTED. THE ENTIRE RISK AS TO THE RESULTS AND PERFORMANCE OF THE SOFTWARE IS ASSUMED BY LICENSEE. FURTHERMORE, LICENSOR DOES NOT WARRANT OR MAKE ANY REPRESENTATIONS REGARDING THE USE OR THE RESULTS OF THE USE OF THE SOFTWARE OR RELATED DOCUMENTATION IN TERMS OF THEIR CORRECTNESS, ACCURACY, RELIABILITY, CURRENTNESS, OR OTHERWISE. NO ORAL OR WRITTEN INFORMATION OR ADVICE GIVEN BY LICENSOR SHALL CREATE A WARRANTY OR IN ANY WAY INCREASE THE SCOPE OF THIS WARRANTY.
Liability Limitations. LICENSOR SHALL NOT BE LIABLE FOR ANY SPECIAL, INDIRECT, PUNITIVE, OR CONSEQUENTIAL DAMAGES RESULTING FROM USE OF SOFTWARE UNDER ANY CONTRACT, NEGLIGENCE, STRICT LIABILITY OR OTHER THEORY. LICENSOR'S CUMULATIVE LIABILITY FOR DAMAGES HEREUNDER, WHETHER IN AN ACTION IN CONTRACT, WARRANTY, TORT, NEGLIGENCE, STRICT LIABILITY, INDEMNITY, OR OTHERWISE, SHALL IN NO EVENT EXCEED THE AMOUNT OF LICENSE FEES PAID BY THE LICENSEE FOR THE SOFTWARE LICENSED UNDER THIS AGREEMENT. THESE LIMITATIONS SHALL APPLY NOTWITHSTANDING ANY FAILURE OF ESSENTIAL PURPOSE OF ANY LIMITED REMEDY.
LICENSEE Indemnity. LICENSEE agrees to indemnify and defend LICENSOR, and hold it harmless from all costs, including attorney's fees, arising from any claim that may be made against LICENSOR by any third party as a direct or indirect result of any use by LICENSEE of the Software,
Termination. This Agreement and the license may be terminated without fee reduction (i) by LICENSEE without cause on thirty (30) days notice; (ii) by LICENSOR, in addition to other remedies, if LICENSEE is in default and fails to cure within ten (10) days following notice; (iii) on notice by either party hereto if the other party ceases to do business in the normal course, becomes insolvent, or becomes subject to any bankruptcy,
insolvency, or equivalent proceedings. Upon termination for any reason, LICENSEE shall immediately return Software and all copies to LICENSOR and delete all Software and all copies from the Hardware.
Law. This Agreement shall be governed by the laws of the Commonwealth of Massachusetts, exclusive of its conflicts of laws provisions and without regard to the United Nations Convention on Contracts for the International Sale of Goods, and any suit under this Agreement shall exclusively be brought in a federal or state court in Massachusetts. Any action against LICENSOR under this Agreement must be commenced within one year after such cause of action accrues.
Government End Users. This provision applies to all Software acquired directly or indirectly by or on behalf of the United States Government. The Software is a commercial product, licensed on the open market at market prices, and was developed entirely at private expense and without the use of any U.S. Government funds. If the Software is supplied to the Department of Defense, the U.S. Government acquires only the license rights customarily provided to the public and specified in this Agreement. If the Software is supplied to any unit or agency of the U.S. Government other than the Department of Defense, the license to the U.S. Government is granted only with restricted rights. Use, duplication, or disclosure by the U.S. Government is subject to the restrictions set forth in subparagraph (c) of the Commercial Computer Software Restricted Rights clause of FAR 52.227-19.
Export Restriction. LICENSEE will not remove or export from the United States or the country originally shipped to by LICENSOR (or re-export from anywhere) any part of the Software or any direct product thereof except in compliance with applicable export laws and regulations, including without limitation, those of the U.S. Department of Commerce.
Miscellaneous. This Agreement contains the entire understanding of the parties and supersedes all other agreements, oral or written, including purchase orders submitted by LICENSEE, with respect to the subject matter covered in this Agreement. The delay or failure of either party to exercise any right provided in the Agreement shall not be deemed a waiver. All notices must be in writing and shall be delivered by hand (effective when received) or mailed by registered or certified mail (effective on the third day following the date of mailing). The notices addressed to LICENSOR shall be sent to its address set out above. If any provision is held invalid, all others shall remain in force. LICENSEE may not assign, pledge, or otherwise transfer this agreement, nor any rights or obligations hereunder in whole or in part to any entity. Paragraph headings are for convenience and shall have no effect on interpretation. In the event that it is necessary to undertake legal action to collect any amounts payable or to protect or to defend against the unauthorized use, disclosure, distribution, of the Software hereunder and/or other violation of this Agreement, LICENSOR shall be entitled to recover its costs and expenses including, without limitation, reasonable attorneys' fees.
A part of the Software is licensed under the terms of GNU General Public License, version 2. The text of the license is available at
http://www.acronis.com/support/licensing/gpl/
More information about the part of the Software licensed under the terms of GNU General Public License is available at
http://www.acronis.com/enterprise/support/licensing/
Table of Contents
Chapter 1. Introduction......10
1.1 What is Acronis® True Image Home?...... 10
1.2 New in Acronis True Image 11 Home....10
1.3 System requirements and supported media 12
1.3.1 Minimum system requirements 12
1.3.2 Supported operating systems.... 12
1.3.3 Supported file systems.... 12
1.3.4 Supported storage media 12
1.4 Technical support.... 13
Chapter 2. Acronis True Image Home installation and startup ....14
2.1 Installing Acronis True Image Home 14
2.2 Extracting Acronis True Image Home 14
2.3 Running Acronis True Image Home 15
2.4 Upgrading Acronis True Image Home 15
2.5 Removing Acronis True Image Home 15
Chapter 3. General information and proprietary Acronis technologies .....16
3.1 The difference between file archives and disk/partition images 16
3.2 Full, incremental and differential backups.... 16
3.3 Acronis Secure Zone™ 17
3.4 Acronis Startup Recovery Manager 18
3.4.1 How it works.... 18
3.4.2 How to use 18
3.5 Acronis backup locations.... 18
3.6 Acronis Active Restore ^® 20
3.6.1 Limitations in using Acronis Active Restore.... 20
3.6.2 How it works....20
3.6.3 How to use 20
3.7 Viewing disk and partition information 21
3.8 Try&Decide 21
3.9 DriveCleanser ^® , File Shredder, and System Clean-up....21
Chapter 4. Using Acronis True Image Home....23
4.1 Program workspace....23
4.2 Available operations 26
Chapter 5. Creating backup archives ....29
5.1 What data to back up? 29
5.2 The backup procedure....29
5.2.1 My Computer backup 29
5.2.2 My Data backup....31
5.2.3 My Application Settings backup.... 34
5.2.4 My E-mail backup 35
5.2.5 Selecting the backup destination 36
5.2.6 Selecting the backup mode.... 37
5.2.7 Selecting the backup options 38
5.2.8 Providing a comment 38
5.2.9 The operation summary and the backup process.... 38
5.3 Setting backup options 39
5.3.1 Archive protection....40
5.3.2 Source files exclusion 40
5.3.3 Pre/post commands 40
5.3.4 Compression level 40
5.3.5 Backup performance 41
5.3.6 Archive splitting.... 42
5.3.7 File-level security settings.... 42
5.3.8 Media components.... 43
5.3.9 Additional settings 43
5.3.10 Error handling.... 43
Chapter 6. Restoring the backup data ....45
6.1 Restore under Windows or boot from CD? 45
6.1.1 Network settings in rescue mode 45
6.2 Restoring files and folders from file archives 45
6.3 Restoring disks/partitions or files from images 48
6.3.1 Starting the Restore Data Wizard 48
6.3.2 Archive selection.... 49
6.3.3 Restoration type selection 49
6.3.4 Selecting a disk/partition to restore 51
6.3.5 Selecting a target disk/partition.... 51
6.3.6 Changing the restored partition type 52
6.3.7 Changing the restored partition file system 53
6.3.8 Changing the restored partition size and location.... 53
6.3.9 Assigning a letter to the restored partition 54
6.3.10 Restoring several disks or partitions at once....54
6.3.11 Setting restore options 54
6.3.12 Restoration summary and executing restoration 54
6.4 Setting restore options 54
6.4.1 Files overwriting mode 55
6.4.2 Files to preserve during restoration 55
6.4.3 Pre/post commands 55
6.4.4 Restoration priority 56
6.4.5 File-level security settings.... 56
6.4.6 Additional settings 56
Chapter 7 Try&Decide ....57
7.1 Using Try&Decide....57
7.2 Try&Decide usage examples 60
Chapter 8. Backup location management....61
8.1 Creating backup locations 61
8.1.1 Setting a path to the backup location 61
8.1.2 Setting the backup rules....62
8.2 Editing backup locations 63
8.3 Deleting a backup location....63
8.4 Exploring a backup location....63
Chapter 9. Scheduling tasks....64
9.1 Creating scheduled tasks 64
9.1.1 Setting up daily execution 67
9.1.2 Setting up weekly execution 68
9.1.3 Setting up monthly execution....69
9.1.4 Setting up one-time execution 70
9.2 Managing scheduled tasks 70
Chapter 10. Managing Acronis Secure Zone ....71
10.1 Creating the Acronis Secure Zone 71
10.2 Resizing Acronis Secure Zone 73
10.3 Changing the password for Acronis Secure Zone 74
10.4 Deleting Acronis Secure Zone....75
Chapter 11. Creating bootable media ....76
Chapter 12. Other operations....79
12.1 Validating backup archives....79
12.2 Operation results notification....79
12.2.1 Email notification 80
12.2.2 WinPopup notification....81
12.3 Viewing logs 81
Chapter 13. Exploring archives and mounting images ....83
13.1 Searching files in archives....83
13.2 Mounting an image....85
13.3 Unmounting an image 87
Chapter 14. Transferring the system to a new disk....88
14.1 General information....88
14.2 Security....89
14.3 Executing transfers....89
14.3.1 Selecting Clone mode....89
14.3.2 Selecting source disk....89
14.3.3 Selecting destination disk 90
14.3.4 Partitioned destination disk 91
14.3.5 Old and new disk partition layout 91
14.3.6 Old disk data....91
14.3.7 Destroying the old disk data....92
14.3.8 Selecting partition transfer method.... 93
14.3.9 Partitioning the old disk....94
14.3.10 Old and new disk partition layouts 94
14.3.11 Cloning summary 95
14.4 Cloning with manual partitioning....95
14.4.1 Old and new disk partition layouts.... 95
Chapter 15. Adding a new hard disk....97
15.1 Selecting a hard disk 97
15.2 Creating new partitions....97
15.3 Disk add summary....98
Chapter 16. Security and Privacy Tools....100
16.1 Using File Shredder 100
16.2 Acronis DriveCleanser 101
16.3 Using preset data destruction methods.... 102
16.4 Creating custom methods of data destruction.... 103
16.5 System Clean-up.... 104
16.6 System Clean-up Wizard settings.... 105
16.6.1 "Data Destruction Method" setting.... 105
16.6.2 "Files" settings.... 105
16.6.3 "Computers" setting 106
16.6.4 "Drive Free Space" setting 107
16.6.5 "Commands" setting.... 107
16.6.6 "System Password Filter" setting 108
16.7 Cleaning up separate system components 108
Appendix A. Partitions and file systems....109
A.1 Hard disk partitions.... 109
A.2 File systems....109
A.2.1 FAT16.... 109
A.2.2 FAT32....110
A.2.3 NTFS 110
A.2.4 Linux Ext2.... 110
A.2.5 Linux Ext3.... 110
A.2.6 Linux ReiserFS.... 111
Appendix B. Hard disks and BIOS setup ....112
B.1 Installing hard disks in computers.... 112
B.1.1 Installing a hard disk, general scheme.... 112
B.1.2 Motherboard sockets, IDE cable, power cable.... 112
B.1.3 Configuring hard disk drives, jumpers.... 113
B.2 BIOS 114
B.2.1 Setup utility.... 114
B.2.2 Standard CMOS setup menu 115
B.2.3 Arranging boot sequence, advanced CMOS setup menu 116
B.2.4 Hard disk initialization errors.... 117
Appendix C. Hard Disk Wiping methods....118
C.1 Information wiping methods' functioning principles.... 118
C.2 Information wiping methods used by Acronis 118
Appendix D. Startup Parameters....120
Chapter 1. Introduction
1.1 What is Acronis® True Image Home?
Acronis True Image Home is an integrated software suite that ensures security of all information on your PC. It can backup the operating system, applications, settings and all of your data, while also securely destroying any confidential data you no longer need. With this software, you can back up selected files and folders, Windows applications settings, settings and messages of Microsoft e-mail clients — or even the entire disk drive or selected partitions. Should your disk drive become damaged or your system attacked by a virus or malware, you can restore the back-up data quickly and easily, eliminating hours or days of work trying to rebuild your disk drive's data and applications from scratch.
Acronis True Image Home provides you with all the essential tools you need to recover your computer system should a disaster occur, such as losing data, accidentally deleting critical files or folders, or a complete hard disk crash. If failures occur that block access to information or affect system operation, you will be able to restore the system and the lost data easily.
The unique technology developed by Acronis and implemented in Acronis True Image Home allows you to perform exact, sector-by-sector disk backups, including all operating systems, applications and configuration files, software updates, personal settings, and data.
Acronis True Image Home now helps you protect your identity as well. Simply deleting old data will not remove it permanently from your computer. Acronis True Image now includes Acronis DriveCleanser, an application that permanently destroys files and wipes personal information from partitions and/or entire disks, as well as a wizard that cleans up your Windows system of all traces of user activity.
You can store backups on almost any PC storage device: internal or external hard drives, network drives or a variety of IDE, SCSI, FireWire (IEEE-1394), USB (1.0, 1.1 and 2.0) and PC Card (formerly called PCMCIA) removable media drives, as well as CD-R/RW, DVD-R/RW, DVD+R/RW, magneto-optical, Iomega Zip and Jaz drives.
When performing scheduled backup tasks, Acronis True Image Home automatically selects a backup mode (full, incremental, differential) in accordance with the backup policy set by the user.
If you are going to install a new hard disk drive, Acronis True Image Home will help you to transfer information from the old one in minutes, including operating systems, applications, documents, and personal settings. After migrating to the new hard disk you can destroy all confidential information on the old one securely. This is the recommended procedure if you intend to donate, throw away, or sell the old hard disk drive.
Wizards and a Windows XP-style interface will make your work easier. Just answer a few simple questions and let Acronis True Image Home take care of everything else! The Traffic Light bar makes it easier monitoring the system backup state. When a system problem occurs, the software will get you up and running in no time.
1.2 New in Acronis True Image 11 Home
- Try&Decide utility – This feature allows you to create a temporary copy of your hard disk. Using this copy, you can perform changes on the system that otherwise might not be advisable, such as installing new software, downloading files from the Internet, or opening e-mail attachments. If the operations on the virtual version of your system are
successful, you can apply those changes to the real system or discard the changes as you wish. If, during these operations, the system crashes or is infected by a virus, you can delete the temporary duplicate and restore your system to a known, healthy condition. A simple reboot will restore your original hard disk and any changes, including the virus or other unwanted changes, will be gone.
- DriveCleanser, File Shredder, and System Clean-up - Securely wipe data stored on an entire hard disk, individual partitions or in individual files and eliminate traces of user system activities. You have the option to delete files or erase a whole disk using any of eight standardized data destruction methods or custom, user-defined methods. This capability comes from the inclusion of Acronis DriveCleanser, a former stand-alone product that also was a component of the Acronis Privacy Expert Suite. As a stand-alone product, Acronis DriveCleanser won several Editors' Choice Awards.
- Flexible and powerful scheduler with more settings – A new scheduler allows you to schedule tasks for backups and validations with more flexibility. Additional settings greatly enhance usage options. New setting include: set schedule on logon/logoff, Windows start up, when added or deleted data exceeds a specified amount, or after a specified amount of time. Also you can setup to start a backup if computer is in an idle state, so the backup will be performed without affecting your productivity.
- More user-friendly – Many interface improvements and usability enhancements make Acronis True Image Home easier to use than ever before. Acronis True Image Home is packaged as a suite of smaller, simpler, independent utilities working together and it is ready to protect the computer right after installation, no reboot is necessary.
- Sector-by-sector images – You can create an exact sector-by-sector disk image. This feature is very useful when you need to backup corrupted disk drives or to make an image of a partition on which an important file has been deleted. This option lets you copy used and unused hard disk sectors.
- Ignore bad sectors – This option lets you run a backup even if there are bad sectors on the hard disk. This feature is also useful during unattended backups when you cannot control the backup process. If you enable this option, the backup will be preformed regardless of read and/or write errors that could occur on the bad sectors.
- Silent Mode – You can configure the program to ignore errors during backup/restore operations. In this mode, no notifications will be displayed to if errors occur while backup or restore task is running. Instead, you can view the detailed log of all operations after task is complete.
- Searching for file in an image – You can search for files in an image by name or a part of the name and then restore individual files easily and quickly.
- Browsing all backup locations with file search and drill-down to the file level – You can search for file through multiple archives and backup locations by name or by a part of the name and then restore individual files easily and quickly.
- Restoring files and folders without restoring absolute path – You can select an option of restoring files without restoring the absolute path so the restored items will be saved to the destination folder without creating multiple additional folders.
- Shell extension for archive validation – You can easily validate any archive right from the Windows Explorer context menu. Simply find a backup archive, right-click on it and select “Validate Backup Archive”.
1.3 System requirements and supported media
1.3.1 Minimum system requirements
Acronis True Image Home requires the following hardware:
- Pentium processor or higher
- 128 MB RAM
- FDD or CD-RW drive for bootable media creation
- Mouse (recommended).
1.3.2 Supported operating systems
- Windows® 2000 Professional SP 4
- Windows XP SP 2
• Windows XP Professional x64 Edition
• Windows Vista (all editions)
Acronis True Image Home also enables the creation of a bootable diskette or CD-R/W that can back up and restore a disk/partition on a computer running any Intel- or AMD- based PC operating system, including Linux®. The only exception is the Intel-based Apple Macintosh, which is not supported in native mode at this time.
1.3.3 Supported file systems
- FAT16/32
- NTFS
- Ext2/Ext3
- ReiserFS
- Linux SWAP
If a file system is not supported or is corrupted, Acronis True Image Home can copy d using a sector-by-sector approach.

The Ext2/Ext3, ReiserFS, and Linux SWAP file systems are supported only for disk or partition backup/restore operations. You cannot use Acronis True Image Home for file-level operations with these file systems (file backup, restore, search, as well as image mounting and file restoring from image), as well as for backups to disks or partitions with these file systems.
1.3.4 Supported storage media
- Hard disk drives
• Networked storage devices - FTP servers*
- CD-R/RW, DVD-R/RW, DVD+R (including double-layer DVD+R), DVD+RW, DVD-RAM* *
• USB 1.0 / 2.0, FireWire (IEEE-1394) and PC card storage devices - Floppy disks, ZIP®, Jaz® and other removable media
* An FTP server must allow for passive mode file transfers. Data recovery directly from FTP server requires the archive to consist of files of no more than 2GB each. It is recommended that you change the source computer firewall settings to open Ports 20 and 21 for both TCP and UDP protocols and disable the Routing and Remote Access Windows service.
** Burned write-once discs cannot be read in Windows NT 4 without third-party software. Burned rewritable discs cannot be read in Linux without kernel patch.
1.4 Technical support
As part of your purchase of this product, you are entitled to receive unlimited support and the minor releases of the product. For example, when you purchase version 11.0 of the product you can register the product and when "patch" releases (e.g., 11.01, 11.02, 11.03 etc) are made available you can download them at no additional charge. When we issue the next major release, e.g., Version 12 you would need to purchase an upgrade to get this release.
While you are using this product, please register the product on our website at www.acronis.com/homcomputing/my/products/registration/. Then when you require support you can log onto http://www.acronis.com/homecomputing/support/ to receive electronic support.
If you need immediate support or detailed, complex questions about the product you can purchase per-incident support
Buy Per-incident Support http://www.acronis.com/promo/buy/product1411753/SupportHome/http%3A/shop.acronis.com/dr/v2/ec_Main.Entry17c?V1=1411753&PID=&PN=1&SP=10034&SID=44905&CUR=840&CID=0
Chapter 2. Acronis True Image Home installation and startup
2.1 Installing Acronis True Image Home
To install Acronis True Image Home:
- Run the Acronis True Image Home setup file.
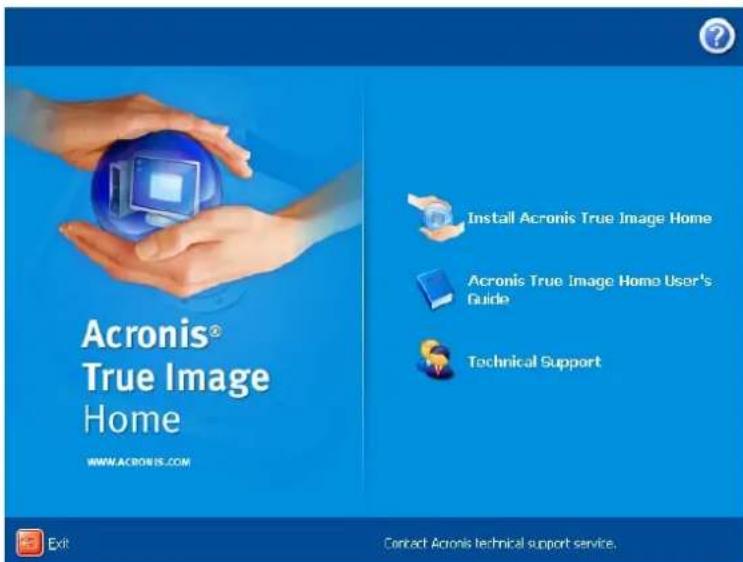
• In the Install Menu, select the program to install: Acronis True Image Home.
• Follow the install wizard instructions on the screen.
text_image
Acronis® True Image Home WWW.ACRONIS.COM Install Acronis True Image Home Acronis True Image Home User's Guide Technical Support Exit Contact Acronis technical support service.Typical, Custom and Complete installation is available. Having pressed Custom, you can choose to install, besides Acronis True Image Home, Rescue Media Builder.
With Rescue Media Builder you can create bootable rescue disks (see details in Chapter 11. Creating bootable media). You might not need this tool if you purchased a boxed product that contains a bootable CD. Installing the Bootable Rescue Media Builder will allow you to create bootable media or its ISO image at any time from the main program window or running Bootable Rescue Media Builder on its own.

When installed, Acronis True Image Home creates a new device in the Device Manager list (Control Panel -> System -> Hardware -> Device Manager -> Acronis Devices -> Acronis TrueImage Backup Archive Explorer). Do not disable or uninstall this device, as it is necessary for connecting image archives as virtual disks (see Chapter 13. Exploring archives and mounting images).

If you have the trial version of Acronis True Image 11 Home installed on your system, you must uninstall it before installing the commercial version of the product.
2.2 Extracting Acronis True Image Home
When installing Acronis True Image Home, you can save the setup (.msi) file on a local or network drive. This will help when modifying or recovering the existing component installation.
To save the setup file:
- Run the Acronis True Image Home setup file.
• In the Install Menu, right-click on the program name and select Extract. - Select a location for the setup file and click Save.
2.3 Running Acronis True Image Home
You can run Acronis True Image Home in Windows by selecting Start -> Programs -> Acronis -> Acronis True Image Home -> Acronis True Image Home or clicking on the appropriate shortcut on the desktop.
If your operating system does not load for some reason, you can run Acronis Startup Recovery Manager. However, this must be activated prior to use; see 3.4 Acronis Startup Recovery Manager to learn more about this procedure. To run the program, press F11 during bootup when you see a corresponding message that tells you to press that key. Acronis True Image Home will be run in the standalone mode, allowing you to recover the damaged partitions.
If your disk data is totally corrupted and the operating system cannot boot (or if you have not activated Acronis Startup Recovery Manager), load the standalone Acronis True Image Home version from the bootable media, supplied with the retail box or created by you using Rescue Media Builder. This boot disk will allow you to restore your disk from a previously created image.
2.4 Upgrading Acronis True Image Home
If you already have Acronis True Image Home installed, the new version will simply update it; there is no need to remove the old version and reinstall the software.
Please keep in mind that the backups created by the later program version may be incompatible with the previous program versions, so if you roll back Acronis True Image Home to an older version, you likely will have to re-create the archives using the older version. We strongly recommend that you create new bootable media after each Acronis True Image Home upgrade.
2.5 Removing Acronis True Image Home
Select Start -> Settings -> Control panel -> Add or remove programs ->
If you use Windows Vista, select Start -> Control panel -> Programs and Features ->
Chapter 3. General information and proprietary Acronis technologies
3.1 The difference between file archives and disk/partition images
A backup archive is a file or a group of files (also called "backups" in this guide), that contains a copy of selected file/folder data or a copy of all information stored on selected disks/partitions.
When you back up files and folders, only the data, along with the folder tree, is compressed and stored.
Backing up disks and partitions is performed in a different way: Acronis True Image Home stores a sector-by-sector snapshot of the disk, which includes the operating system, registry, drivers, software applications and data files, as well as system areas hidden from the user. This procedure is called “creating a disk image,” and the resulting backup archive is often called a disk/partition image.

By default, Acronis True Image Home stores only those hard disk parts that contain data (for supported file systems). Further, it does not back up swap file information (pagefile.sys under Windows NT/2000/XP/Vista) and hiberfil.sys (a file that keeps RAM contents when the computer goes into hibernation). This reduces image size and speeds up image creation and restoration. However, you might use the Create an image using the sector-by-sector approach option that lets you include all of the sectors of a hard disk in an image.

A partition image includes all files and folders. This includes all attributes (including hidden and system files), boot record, and FAT (file allocation table); as well as files in the root directory and the zero track of the hard disk with master boot record (MBR).

A disk image includes images of all disk partitions as well as the zero track with master boot record (MBR).
By default, files in all Acronis True Image Home archives have a “.tib” extension. Do not change this file extension.
It is important to note that you can restore files and folders not only from file archives, but from disk/partition images too. To do so, mount the image as a virtual disk (see Chapter 13. Exploring archives and mounting images) or start the image restoration and select Restore specified files or folders.
3.2 Full, incremental and differential backups
Acronis True Image Home can create full, incremental and differential backups.
A full backup contains all data at the moment of backup creation. It forms a base for further incremental or differential backup or is used as a standalone archive. A full backup has the shortest restore time as compared to incremental or differential ones.
An incremental backup file only contains data changed since the last full or incremental backup creation. Therefore, it is smaller and takes less time to create, but as it doesn't contain all data; all the previous incremental backups and the initial full backup are required for restoration. To restore an incremental image, the incremental image and full image must be in the same folder.
Unlike incremental backup, when every backup procedure creates the next file in a “chain,” a differential backup creates an independent file, containing all changes since the last full backup. Generally, a differential backup will be restored faster than an incremental one, as it does not have to process through a long chain of previous backups.
A standalone full backup might be an optimal solution if you often roll back the system to the initial state or if you do not like to manage multiple files. Remember, you need to keep all of the incremental or differential backups in the same folder as the full backup image. If you create a new full backup, you'll need to keep its incremental and differential images in the same folder as this full backup.
If you are interested in saving only the last data state to be able to restore it in case of system failure, consider the differential backup. It is particularly effective if your data changes tend to be few as compared to the full data volume.
The same is true for incremental backup. These are most useful when you need frequent backups and ability to roll back to a specific point in time. Having created a full backup once, if you then create an incremental backup each day of a month, you will get the same result as if you created full backups every day. Incremental images are considerably smaller than full or differential images.

An incremental or differential backup created after a disk is defragmented might be considerably larger than usual. This is because the defragmentation program changes file locations on disk and the backups reflect these changes. Therefore, it is recommended that you re-create a full backup after disk defragmentation.
3.3 Acronis Secure Zone™
The Acronis Secure Zone is a special, hidden partition for storing backups on the computer system itself. For archive security purposes, ordinary applications cannot access it. In the Acronis True Image Home wizards' windows, the zone is listed along with all partitions available for storing archives. The Acronis Secure Zone is necessary if you plan to use the Acronis Startup Recovery Manager, Acronis Active Restore, or Acronis Try&Decide features (see below).
The Acronis Secure Zone is available as a location to store backup files as long as there is free space in the Zone. If there is not enough space, older backups will be deleted to create free space.
Acronis True Image Home uses the following approach to clean up Acronis Secure Zone:
- If there is not enough free space in the zone to create a backup, the program deletes the oldest full backup with all subsequent incremental/differential backups.
- If there is only one full backup (with subsequent incremental/differential backups) left and a full backup is in progress, then the old full backup and incremental/differential backups are deleted.
- If you are in the process of creating an image and there is not enough free space, you will get an error message. In that case, you will have to increase the size of the Acronis Secure Zone and then run the backup operation again.
You can back up data automatically on a schedule (see Chapter 9. Scheduling tasks), and not worry about zone overflow issues. However, if you keep long chains of incremental backups, it will be a good practice to periodically check the zone free space, indicated on the second screen of the Manage Acronis Secure Zone wizard.
For information on how to create, resize or delete Acronis Secure Zone using this wizard, see in Chapter 10. Managing Acronis Secure Zone.
3.4 Acronis Startup Recovery Manager
3.4.1 How it works
The Acronis Startup Recovery Manager lets you start Acronis True Image Home without loading the operating system. With this feature, you can run Acronis True Image Home by itself to restore damaged partitions even if the operating system won't load for some reason. As opposed to booting from Acronis removable media, you will not need a separate media or network connection to start Acronis True Image Home.
3.4.2 How to use
To be able to use Acronis Startup Recovery Manager at boot time, prepare as follows:
- Install Acronis True Image Home.
- Create Acronis Secure Zone on the hard disk (see Chapter 10. Managing Acronis Secure Zone).
- Activate Acronis Startup Recovery Manager. To do so, click Activate Acronis Startup Recovery Manager and follow the wizard's instructions.
If you try to activate Acronis Startup Recovery Manager before you created an Acronis Secure Zone, you will be prompted to create the zone; then the Acronis Startup Recovery Manager will be activated. If the Acronis Secure Zone already exists, the Acronis Startup Recovery Manager will be activated immediately.

When Acronis Startup Recovery Manager is activated, it overwrites the master boot record (MBR) with its own boot code. If you have any third-party boot managers installed, you will have to reactivate them after activating the Startup Recovery Manager. For Linux loaders (e.g. LiLo and GRUB), you might consider installing them to a Linux root (or boot) partition boot record instead of MBR before activating Acronis Startup Recovery Manager.
If a failure occurs, turn on the computer and press F11 when you see the "Press F11 for Acronis Startup Recovery Manager" message. This will run a standalone version of Acronis True Image Home that differs only slightly from the complete version. For information on restoring damaged partitions, see Chapter 6. Restoring the backup data.

Be careful! Drive letters in standalone Acronis True Image Home might sometimes differ from the way Windows identifies drives. For example, the D: drive identified in the standalone Acronis True Image Home might correspond to the E: drive in Windows.
3.5 Acronis backup locations
The performance, capacity and cost of modern hard disk drives make them a convenient and reliable place for storing backup archives. External and networked drives have become the most popular storage locations. Backing up a computer drive to another internal drive is another common solution. One can organize a storage area on an FTP server and access it via the Internet. A hard drive, whether local, external or networked, provides plenty of space and is always available for unattended scheduled backup.
Another problem is that as operating systems, applications, and user files, such as music or videos, become ever larger, archive files eat up a lot of disk space. Therefore, it becomes important to get rid of old backups, at the same time preserving as many up-to-date
backups as possible. You might spend hours exploring multiple files in your backup archives trying to guess which of the outdated backups can be deleted without losing important data.
To save you from annoying search and analytic tasks, Acronis offers a new approach to backup strategy by providing automatic management of your archives, stored in local or network folders called backup locations.
A backup location will have the following attributes:
- flexible in size
- allows its behavior to be customized and its contents to be displayed
- located in a common folder on a local, external or networked drive or FTP server instead of a separate protected partition, such as the Acronis Secure Zone
The main principles of backup location organization are:
• automatic naming of backup files
- addressing to a backup location as to a whole folder
- automatic selection of backup mode (full, incremental, differential) in accordance with the backup policy set by the user for the scheduled backup tasks
- automatic consolidation or deletion of outdated backup files in accordance with the rules set by the user
Setting rules for backup locations
A user can organize one or more backup locations and set the overall limitations to size/storage time for each. These include:
• maximum storage space
• maximum number of backups
• maximum storage period for the archives
After creating a backup in a backup location, the program checks the location for quota violations, such as exceeding a pre-set maximum number of gigabytes set aside for backups and, if any limitation is exceeded, consolidates the oldest backups. For example, if you've pre-set your backup location to store 50GB of backup files and your backups reach 55GB, you have exceeded a quota and the system will respond automatically based on rules and policies that you've already set.
This operation creates a temporary file and thus requires disk space. Consider also that the quota must be violated so that the program could detect the fact of violation. Therefore, to be able to consolidate the files, the program needs some space on the disk in excess of the location quota. The extra space amount can be estimated as the size of the largest backup in the location.

When creating a backup task, be sure to select the backup location from the Backup Locations list, near the top of the directory tree. Doing so will enable the above processing of backups. If you select a backup location as a normal folder, the processing will not be performed.
Managing backup locations
A user can delete backup locations or edit backup rules for any location.
Changes to the rules will be applied at the next backup. As a result, the contents of the location will conform to the new rules.
3.6 Acronis Active Restore®
Acronis Active Restore allows you to boot the OS on a crashed computer before the system is completely restored from an image and start work seconds after the restoration is launched. The restoration will continue in the background.
3.6.1 Limitations in using Acronis Active Restore
- Acronis Active Restore is currently available for images located in the Acronis Secure Zone only.
- Acronis Active Restore does not support images of Windows Vista. If any Vista edition is detected in an image, the Active Restore option will not appear.
- Naturally, Acronis Active Restore cannot be used if the image contains no operating system (a logical partition or disk image) or when restoring file archives.
3.6.2 How it works
When the restoration procedure is started, Acronis True Image Home:
- Finds the sectors in the image that contain system files, and restores these sectors first. Thus, the OS is restored and can be started in a very short time. Having started the OS, the user sees the folder tree with files, though file contents are not recovered yet. Nevertheless, the user can start working.
- Writes on the hard disk its own drivers, which intercept system queries to the files. When the user opens files or launches applications, the drivers receive the system queries and restore the sectors that are necessary for the current operation.
- At the same time, Acronis True Image Home proceeds with the complete sector-by-sector image restoration in the background. However, the system-requested sectors have the highest priority.
Finally, the image will be fully restored even if the user performs no actions at all. But if you need to start working as soon as possible after the system failure, you will gain at least several minutes, considering that restoration of a 10-20GB image (most common image size) takes about 10 minutes. The larger the image size, the more time you save.
3.6.3 How to use
To be able to use Acronis Active Restore in case of a system crash, prepare as follows:
- Install Acronis True Image Home.
- Create Acronis Secure Zone on the hard disk (see Chapter 10. Managing Acronis Secure Zone).
- Activate Acronis Startup Recovery Manager (see 3.4 Acronis Startup Recovery Manager) and create bootable media with Acronis True Image Home (see Chapter 11. Creating bootable media).
- Back up (image) the system disk to Acronis Secure Zone (see 5.2.1 My Computer backup). You can back up other disks/partitions as well, but the system disk image is mandatory.

When performing Active Restore, the current Acronis True Image Home version always restores the entire system disk. Therefore, if your system disk consists of several partitions, all of them must be included in the image. Any partitions that are missing from the image will be lost.
If failure occurs, boot the computer from the bootable media or using F11. Start the recovery procedure (see 6.3 Restoring disks/partitions or files from images), select the system disk image from Acronis Secure Zone, choose Use Active Restore and in the next window, click Proceed. In a few seconds, the computer will reboot to the restored system. Log in and start work – no more reboots or other actions are required.
You can perform Active Restore running Acronis True Image Home in the supported Windows operating systems as well. However, it is mandatory to have bootable media in case Windows cannot boot.
3.7 Viewing disk and partition information
You can change the way data is represented in all schemes you see in various wizards.
To the right are three icons: Arrange Icons by, Choose Details and i (Display the properties of the selected item), the last duplicated in the context menu opened by right-clicking objects.
To sort messages by a particular column, click the header (another click will switch the messages to the opposite order) or Arrange Icons by button and select the column.
To select columns to view, right-click the headers line or left-click the Choose Columns button. Then flag the columns you want to display. When left-clicking the Choose Columns button, you can also change the order of columns display using Move Up and Move Down buttons.
If you click the i (Display the properties of the selected item) button, you will see the selected partition or disk properties window.
This window contains two panels. The left panel contains the properties tree and the right describes the selected property in detail. The disk information includes its physical parameters (connection type, device type, size, etc.); partition information includes both physical (sectors, location, etc.), and logical (file system, free space, assigned letter, etc.) parameters.
You can change the width of a column by dragging its borders with the mouse.
3.8 Try&Decide
The Acronis True Image Home's Try&Decide feature allows you perform potentially dangerous operations such as software installation or e-mail attachment opening without putting your PC at risk. It does this by creating essentially a controlled, secure, temporary workspace that is insulated from the rest of your computer. If the system crashes or your computer stops responding during these operations, you should restart the system and it will be reverted to the previous state by Acronis True Image Home. If operations are successful, you have a choice of applying the changes to the real system or discarding them. (For more details see Chapter 7 Try&Decide.)
3.9 DriveCleanser ^® , File Shredder, and System Clean-up
Acronis True Image Home contains utilities for secure destruction of data on an entire hard disk drive, individual partitions, as well as for erasing individual files and eliminating user system activity traces. When replacing your old hard drive with a new, higher-capacity one, you may unwittingly leave on the old disk lots of important and confidential information that can be recovered, even if you have reformatted it. The DriveCleanser application, included in Acronis True Image Home, used to be sold as a standalone product from Acronis. It provides for the destruction of confidential information on hard disk drives and/or partitions with the
help of techniques that meet or exceed most national and state standards. You can select an appropriate data destruction method depending on the importance of your confidential information. The File Shredder provides the same capabilities for individual files and folders. Finally, the System Clean-up wizard ensures elimination of all your activity traces; while working with a PC, you leave thousands of bytes of evidence showing your actions (records in various system files) that you don't even know about. This could include user names and passwords, as well as other personal information that could be used to steal your identity if it fell into the wrong hands. This utility wipes them completely from the disk drive.
Chapter 4. Using Acronis True Image Home
4.1 Program workspace
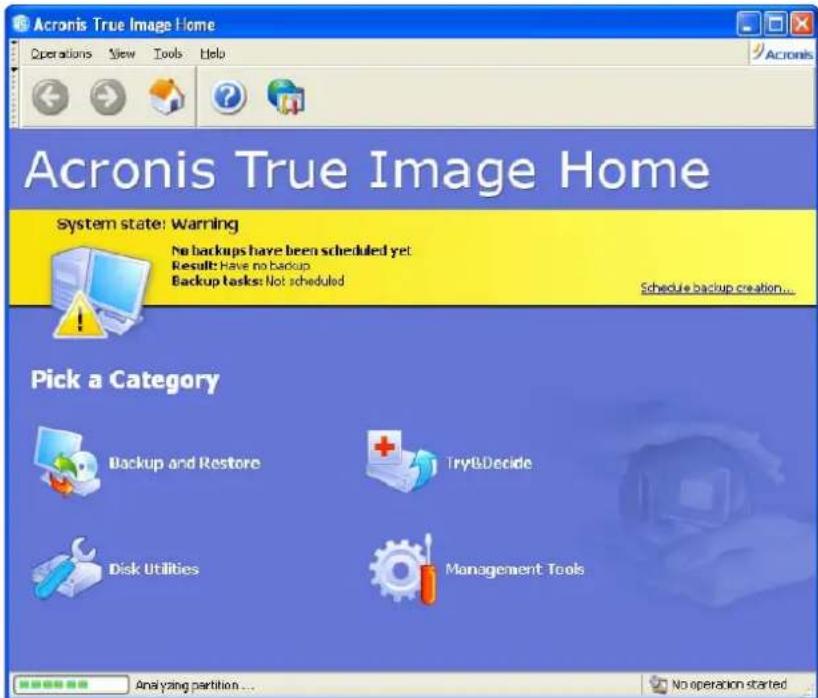
Often the first thing that strikes the eye after launching Acronis True Image Home is a wide colored bar in the main program window. This is called the "Traffic Light" bar.
The Traffic light bar lets you see at a glance the current state of your system with regard to backups. It also displays information on the date and time of the last backup and this backup's result, as well as whether backup tasks are scheduled or not.
The system state and Traffic light change as follows:
- When you have not performed any scheduled backups yet or the last scheduled backup was more than a week ago, the bar is yellow and the system is in the Warning state. In this case the bar will display the "Schedule backup creation..." link to the Schedule Task Wizard offering you to schedule a backup task right away.
text_image
Acronis True Image Home System state! Warning No backups have been scheduled yet Result: Have no backup Backup tasks: Not scheduled Schedule backup creation... Pick a Category Backup and Restore Try&Decide Disk Utilities Management Tools Analyzing partition... No operation started- When you scheduled a backup and it has been completed successfully, the system state changes to "Normal", the Traffic light turns green and remains green for a week; then it turns yellow again if no scheduled tasks ran during that time.

text_image
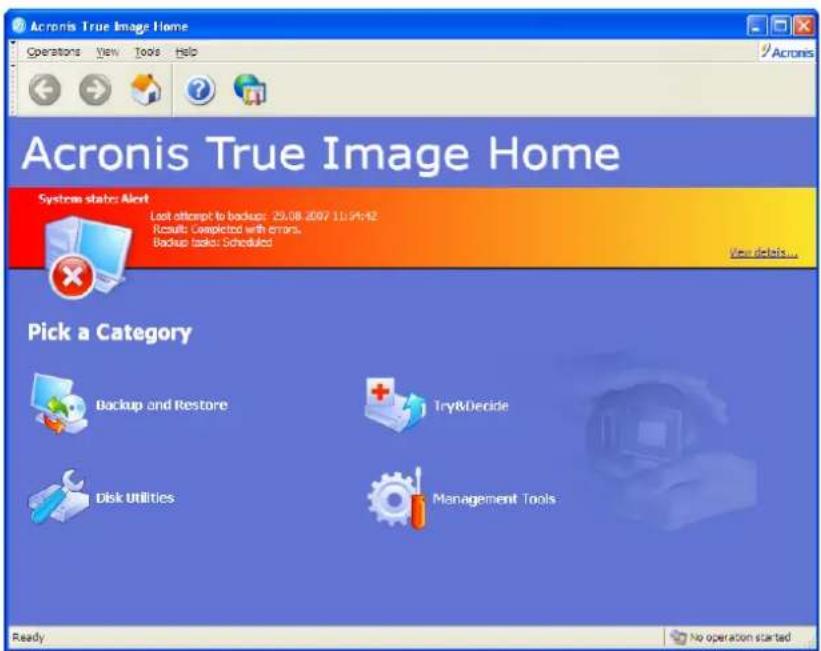
Acronis True Image Home Operations View Tools Help Acronis Acronis True Image Home System state: Normal Time of last backup: 9/12/00/07 3:00:01 PM Result: Completed Successfully Backup Tasks: Scheduled Pick a Category Backup and Restore Try&Decide Disk Utilities Management Tools Ready No operation started- If a scheduled backup has failed due to any reason, the system state changes to "Alert" and the Traffic light turns red.
text_image
Acronis True Image Home Operations View Tools Help Acronis Acronis True Image Home Systems status: Alert Last attempt to backup: 25.08.2007 11:54:42 Results Completed with errors Backup tasks: Scheduled Pick a Category Backup and Restore Try&Decide Disk Utilities Management Tools Ready No operation started
Only running the scheduled backups affects the Traffic light color and system state. If you launch the Create Backup Wizard manually and perform an unscheduled backup, the Traffic light color and system state will not change. The color will not change if you schedule a "One time only" backup task.
The main program window contains a menu, a browser-like toolbar, a main area and a status bar. The main area contains the Category icons in addition to the Traffic light bar described above.
The Category icons are as follows.
- Backup and Restore – Create a backup archive or restore data from a previously created archive
- Try&Decide –Make changes in a temporary copy of your system and then decide whether you want to apply the changes to the actual system
- Disk Utilities – Clone and add hard disk, wipe disks, securely destroy files, and clean up the system.
- Management Tools – Manage backup locations, archives, scheduled tasks, and view logs.
Program menu
The program menu bar features the Operations, View, Tools, and Help items.
The Operations menu contains a list of the available operations:
- Backup – Backup the desired data.
- Recovery – Restore the desired data.
- Try&Decide – Turn on the Try mode or make a decision.
- Create new task – Schedule a new task.
- Validate backup archive – Validate a backup archive of your choice.
• Explore backup archive – Explore a backup archive of your choice. - Mount image – Create a virtual disk by mounting an image archive.
- Unmount image – Unmount the image you mounted.
- Exit – Exit Acronis True Image Home.
The View menu contains items for managing the program window look:
- Toolbars – Contains commands that control toolbar icons size, enable/disable the Navigation and Help toolbars, as well as enable/disable text labels of the toolbar icons.
- Status Bar – Enables/disables the status bar
The Tools menu contains the following items:
- Activate Acronis Startup Recovery Manager – Activate the boot restoration manager (F11 key)
- Create Bootable Rescue Media – Run the bootable media creation procedure
- Management -> Manage Backup locations and Archives – Create, edit, delete, and explore backup locations; search files in backup locations for restoration
- Management -> Manage Acronis Secure Zone – Create, delete and resize a special hidden partition for storing archives (Acronis Secure Zone)
- Management -> Manage Tasks – Create, edit, delete scheduled tasks, change task schedules, and start tasks manually
- Clone Disk – Transfer the system to a new hard disk
- Add New Disk – Create partitions on an additional hard disk installed in the computer
- Acronis DriveCleanser – Securely wipe personal data from a hard disk drive
- File Shredder – Securely destroy confidential files you do not need anymore
- System Clean-up – Clean up your Windows activity traces
• Show Log – Open the Log Viewer window
- Options – Open a window for editing default backup/restore options, setting text appearance (fonts), configuring e-mail/Winpopup notifications, and other capabilities
The Help menu is used to display help and obtain information about Acronis True Image Home.
Status bar
At the bottom of the main window, there is a status bar that is divided into two parts. The left side briefly describes the selected operation; the right side indicates operation progress and results. If you double-click on the operation results, you will see the logs window.
Taskbar notification area icon
During most of the operations, a special indicator icon appears in the Windows taskbar notification area (the right portion of the status bar with the clock). If you mouse over the icon, you will see a tool tip indicating the operation's progress. Right-clicking on the icon invokes a context menu where you can change process priority or cancel the operation if necessary. When the Try mode is turned on, right-clicking on the icon invokes a context menu for the Try&Decide feature. This icon doesn't depend on the main program window being open. It is present for background execution of scheduled tasks as well.

You can change the appearance of text (fonts and their size) in the program's user interface and menu items. To do so, select Tools -> Options -> Appearance -> Fonts. Click the button to preview the results of text appearance changes.
4.2 Available operations
You can perform the following operations on the computer.
- Back up data, including system disks/partitions
Select Operations -> Backup or click Backup and Restore category in the main window, select Backup in the Backup and Restore window, then follow the wizard's instructions. See details in Chapter 5. Creating backup archives.
- Restore data, including system disks/partitions
Select Operations -> Recovery or click Backup and Restore category in the main window, select Restore in the Backup and Restore window, then follow the wizard's instructions. See details in Chapter 6. Restoring the backup data.
- Schedule backup or validation operations
Select Operations -> Create New Task or click Management Tools category in the main window, then select Manage Tasks in the Main group, and finally click Create New Task on the sidebar, then follow the wizard's instructions. See details in Chapter 9. Scheduling tasks.
- Browse logs of Acronis True Image Home operation
Select Tools -> Show Log or select Show Log on the sidebar to navigate to the Event Log window. See details in 12.3 Viewing logs.
- Set up backup/restore options, such as backup process priority or files overwriting mode
Select Tools -> Options -> Default backup options or Default restoration options and make settings. See details in 5.3 Setting backup options and 6.4 Setting restore options.
- Set up sending notifications about Acronis True Image Home operation
Select Tools -> Options -> Notifications and make settings. See details in 12.2 Operation results notification.
- Create backup locations
Create a folder with special properties for storing backup archives. Click Management Tools category in the main window, select Manage Backup Locations and Archives in the Main group, and finally click Create Backup Location in Backup Location category on the sidebar, then follow the wizard's instructions. See details in Chapter 8. Backup location management and 3.5 Acronis backup locations.
- Edit backup locations
Edit the backup location properties. Click Management Tools category in the main window, select Manage Backup Locations and Archives in the Main group, and finally click Edit Backup Location in Backup Location category on the sidebar, then follow the wizard's instructions. See details in Chapter 8. Backup location management and 3.5 Acronis backup locations.
- Delete backup locations
Delete the backup storage folder with special properties. Click Management Tools category in the main window, select Manage Backup Locations and Archives in the Main group, and finally click Delete Backup Location in Backup Location category on the sidebar, then follow the wizard's instructions. See details in Chapter 8. Backup location management and 3.5 Acronis backup locations.
- Manage Acronis Secure Zone (create, delete, resize, remove or change password)
Select Tools -> Management -> Manage Acronis Secure Zone, and then follow the wizard's instructions. You can also access this wizard by clicking Manage Acronis Secure Zone in the Backup Location group on the sidebar, when it is shown. See details in Chapter 10. Managing Acronis Secure Zone.
- Validate backup archives wherever they reside, be it on a local or network drive, or on removable media
Select Operations -> Validate Backup Archive and follow the wizard's instructions. See details in 12.1 Validating backup archives. You can also launch the wizard from Windows Explorer by right-clicking the archive and selecting Validate Backup Archive in the context menu.
- Activate Acronis Startup Recovery Manager
Select Tools -> Activate Acronis Startup Recovery Manager, then follow the wizard's instructions. See details in 3.4 Acronis Startup Recovery Manager.
Explore any archive's contents and restore individual files from any archive
Select Operations -> Explore Backup Archive and then select an archive for exploring on the directory tree in the left pane. See details in 13.1 Searching files in archives. You can also explore archives by right-clicking the archive and selecting Explore in the context menu of Windows Explorer.
- Mount partitions' images to explore and modify their contents, or to restore individual files
Select Operations -> Mount Image and follow the wizard's instructions. See details in 13.2 Mounting an image. Images can also be mounted through the Windows Explorer by right-clicking on an image archive and selecting Mount in the context menu.
- Unmount previously mounted partition images
Select Operations -> Unmount Image and follow the wizard's instructions. See details in 13.3 Unmounting an image. You can also do this in Windows Explorer by right-clicking on the virtual disk icon and selecting Unmount.
- Transfer the system to a new hard disk
Select Tools -> Clone Disk or select Disk Utilities category in the main window and click Clone Disk in the Hard Disk Utilities group, then follow the wizard's instructions. See Chapter 14. Transferring the system to a new disk.
- Format partitions on a new hard disk
Select Tools -> Add New Disk or select Disk Utilities category in the main window and click Add New Disk in the Hard Disk Utilities group, then follow the wizard's instructions. See Chapter 15. Adding a new hard disk.
- Securely destroy personal information on partitions and disks
Select Tools -> Acronis DriveCleanser or select Disk Utilities category in the main window and click Acronis DriveCleanser in the System Clean-up group, then follow the wizard's instructions. See Chapter 16. Security and Privacy Tools.
- Securely erase confidential files
Select Tools -> File Shredder or select Disk Utilities category in the main window and click File Shredder in the System Clean-up group, then follow the wizard's instructions. See Chapter 16. Security and Privacy Tools.
- Clean up all your Windows activity traces
Select Tools -> System Clean-up or select Disk Utilities category in the main window and click System Clean-up in the System Clean-up group, then follow the wizard's instructions. See Chapter 16. Security and Privacy Tools.
- Try to make changes in the system using a virtual mode and then decide whether to keep them or not
Click Try&Decide category in the main window or select Operations -> Try&Decide in the main menu, then click Start Try Mode button in the Try Mode Starting window. See details in Chapter 7 Try&Decide.
- Create bootable rescue media or its ISO image
Select Tools -> Create Bootable Rescue Media and then follow the wizard's instructions. See Chapter 11. Creating bootable media.
Chapter 5. Creating backup archives
To be able to restore lost data or roll back your system to a certain known-good state, you should first create a data or entire system backup file.
5.1 What data to back up?
If you plan to keep specific data protected, such as a current project, but are less concerned with restoring your operating system and settings, select the file-level backup. This will reduce the archive size, thus saving disk space and possibly reducing removable media costs.
Backing up the entire system disk (creating a disk image) takes more disk space but enables you to restore the system in minutes in case of a system crash or hardware failure. Moreover, the imaging procedure is much faster than copying files and could speed up the backup process significantly when it comes to backing up large volumes of data (see details in 3.1 The difference between file archives and disk/partition images).
Here are some recommendations you can use to plan your backups. You should store your system drive image in the Acronis Secure Zone or, better still, on a hard disk other than your primary hard disk C. This gives additional guarantee that you will be able to recover your system if your primary hard disk drive fails. You should also keep your personal data separate from your operating system and applications, for example, on the D drive. This allows speeding up the creation of data drive (or partition) images and reduces the amount of information you will need to restore.
Acronis True Image Home offers you backup of the following data categories:
My Computer (image backup of any set of disks/partitions)
My Data (file-level backup of any set of files, folders, or an entire file category)
My Application Settings (file-level backup of Windows applications settings)
My E-mail (file-level backup of Microsoft Outlook, Microsoft Outlook Express, and Windows Mail settings and messages).

File-level backup operations are supported only for the FAT and NTFS file systems.
5.2 The backup procedure
5.2.1 My Computer backup
Create a backup image of any set of your computer's hard disks and partitions or back up the system state.
- Invoke the Create Backup Wizard by selecting Operations -> Backup in the main program menu, and then select My computer.
You can also launch the wizard directly from the Windows Explorer window. To do so, right-click on a disk icon and select Backup in the context menu. In this case the program will automatically set My Computer mode.
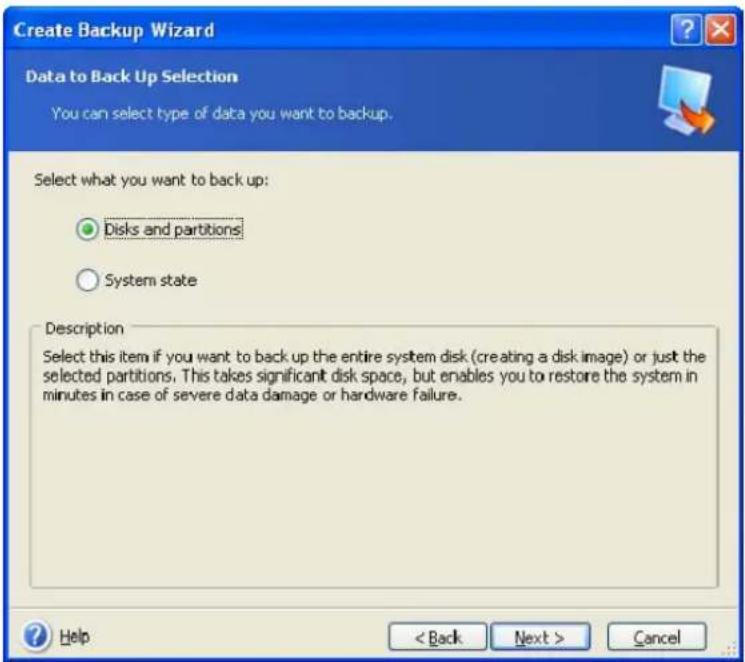
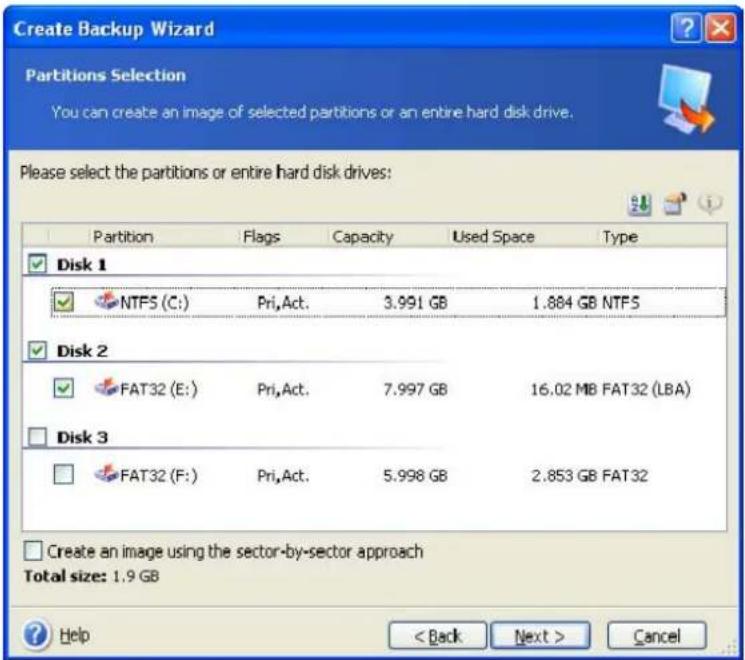
- Select the data to backup in the next window. You can backup either disks and partitions or the system state that comprises the boot files, registry, protected Windows files, and COM+ CLASS registration database. Backing up the System state allows you to restore the
system files, drivers, etc., but not the data files and folders you use in your work. To be able to restore the data files and folders, select the Disks and partitions. If such is the case, select disks or partitions to back up. You can select a random set of disks and partitions.
text_image
Create Backup Wizard Data to Back Up Selection You can select type of data you want to backup. Select what you want to back up: • Disks and partitions ○ System state Description Select this item if you want to back up the entire system disk (creating a disk image) or just the selected partitions. This takes significant disk space, but enables you to restore the system in minutes in case of severe data damage or hardware failure. Help < Back Next > CancelBy default the program copies only the hard disk sectors that contain data. However, sometimes it might be useful to make a full sector-by-sector backup. For example, perhaps you deleted some files by mistake and want to make a disk image before trying to undelete them because sometimes un-deleting may create havoc in the file system. To make a sector-by-sector backup, check the Create an image using the sector-by-sector approach box. Please note that this mode increases processing time and usually results in a larger image file because it copies used and unused hard disk sectors.
text_image
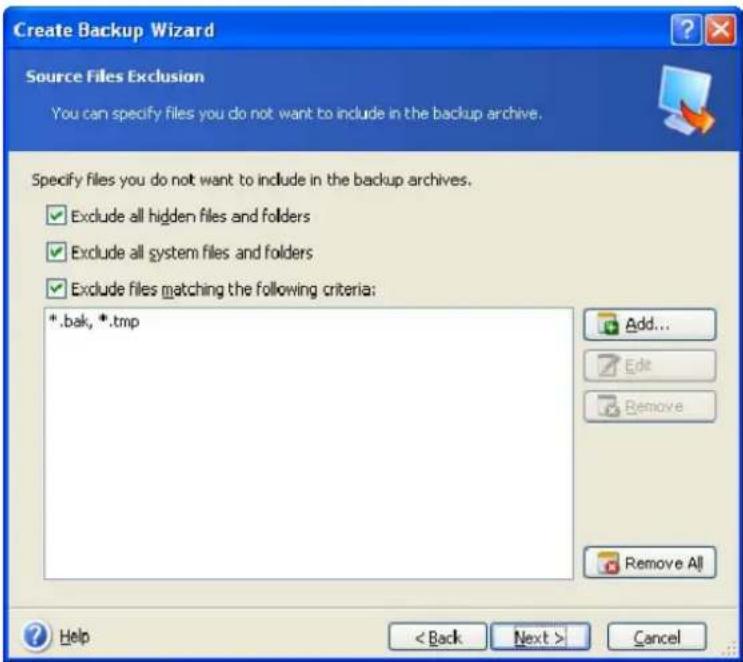
Create Backup Wizard Partitions Selection You can create an image of selected partitions or an entire hard disk drive. Please select the partitions or entire hard disk drives: Partition Flags Capacity Used Space Type Disk 1 NTFS (C:) Pri,Act. 3.991 GB 1.884 GB NTF5 Disk 2 FAT32 (E:) Pri,Act. 7.997 GB 16.02 MB FAT32 (LBA) Disk 3 FAT32 (F:) Pri,Act. 5.998 GB 2.853 GB FAT32 Create an image using the sector-by-sector approach Total size: 1.9 GB Help < Back Next > Cancel- If you backing up disks and/or partitions, select the files you want to exclude from backup (if any) using the checkboxes in the next window. You can exclude hidden or system files
and folders or files matching the criteria you specify. While adding criteria, you can use the common Windows wildcard characters. For example, to exclude all files with extension .tmp, add *.tmp.
text_image
Create Backup Wizard Source Files Exclusion You can specify files you do not want to include in the backup archive. Specify files you do not want to include in the backup archives. ✓ Exclude all hidden files and folders ✓ Exclude all system files and folders ✓ Exclude files matching the following criteria: *.bak, *.tmp Add... Edit Remove Remove All Help < Back Next > Cancel- Go to 5.2.5 Selecting the backup destination.
5.2.2 My Data backup
Back up categories of files: documents, finance, images, music, video. Each default category represents all files of associated types found on the computer's hard drives.
You can add any number of custom categories containing files and folders. The new categories will be remembered and displayed along with the above.
You can change contents of any custom or default file category (edit the category) or delete it. The default file categories cannot be deleted.
If you do not want to keep custom contents of the current backup, simply select files and folders without creating a category.
- Launch the Create Backup Wizard by selecting Operations -> Backup in the main program menu, and then select My Data.
You also can launch the wizard directly from the Windows Explorer window. To do so, right-click on a file or folder icon and select Backup in the context menu. In this case, the program will automatically set My Data mode and mark the selected file or folder for backup.
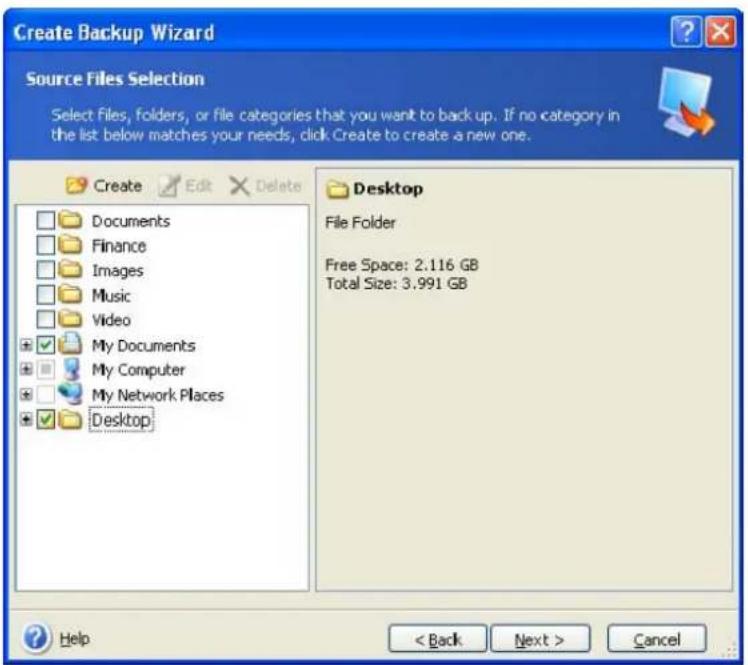
- Select the data category to back up: documents, finance, images, music, and video. Each category represents all files of associated types found on the computer's hard drives.
text_image
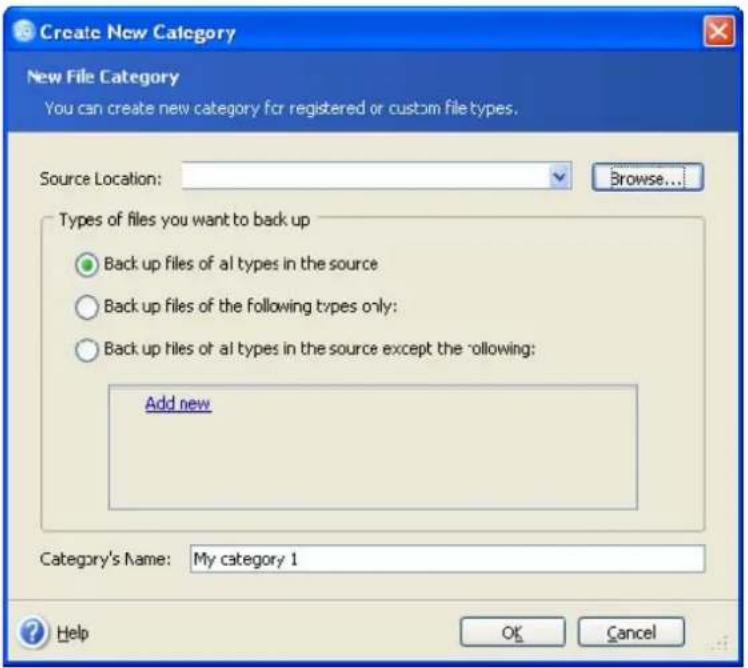
Create Backup Wizard Source Files Selection Select files, Folders, or file categories that you want to back up. If no category in the list below matches your needs, click Create to create a new one. Create Edit Delete Documents Finance Images Music Video My Documents My Computer My Network Places Desktop Desktop File Folder Free Space: 2.116 GB Total Size: 3.991 GB Help < Back Next > CancelTo add a custom data category, click Create, select the folder (data source) and provide a name for the category. You can include in the category all files in the selected folder or apply filters to select the specific types of files that you wish or do not wish to back up.
text_image
Create New Category New File Category You can create new category for registered or custom file types. Source Location: Browse... Types of files you want to back up ● Back up files of all types in the source ○ Back up files of the following types only: ○ Back up files of all types in the source except the following: Add new Category's Name: My category 1 Help OK CancelTo set a filter, select its type: Back up files of the following types only or Back up files of all types in the source except the following. Then click Add new and select the desired file types in the window that appears.

text_image
Add New Type File Types Selection You can add registered or custom file types for the category being created. Name: My file types set 1 Choose registered file types: Search: Extensions File Types jivf IVF File java JAVA Files jbf JBF File jif JPEG Image job Task Object jod Microsoft.Jet.OLEDB.4.0 ipe JPEG Image Edit custom file types... Help OK CancelYou can select file types as follows:
- By name. Enter the file name in the upper Name field. You can use the common Windows wildcard characters. For example, My??? .exe will select all .exe files with names consisting of five symbols and starting with "my".
- By type. Tick off the desired file types in the list. You can also search desired registered file types by entering their extension or description in the Search field.
- By extension. Click the Edit custom file types... link and enter the extensions (semicolon separated) in the File extensions field.
If you do not want to keep custom contents of the current backup, simply select the files/folders from the tree. This set will be effective only for the current backup task.
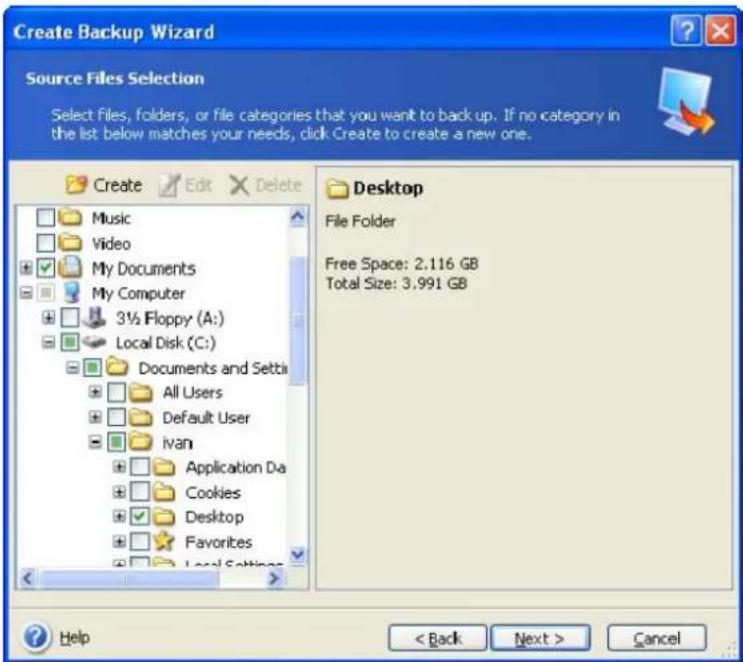
text_image
Create Backup Wizard Source Files Selection Select files, folders, or file categories that you want to back up. If no category in the list below matches your needs, click Create to create a new one. Create Edit Delete Music Video My Documents My Computer 3½ Floppy (A:) Local Disk (C:) Documents and Settings All Users Default User Ivan Application Da Cookies Desktop Favorites Local Settings Desktop File Folder Free Space: 2.116 GB Total Size: 3.991 GB Help < Back Next > CancelFile filtering can be applied to manually added folders as well. For example, you may want hidden and system files and folders, as well as files with .\~, .tmp and .bak extensions, not to be stored in the archive.
You can apply custom filters, using the common Windows wildcard characters. For example, to exclude all files with extension .bmp, add *.bmp mask.
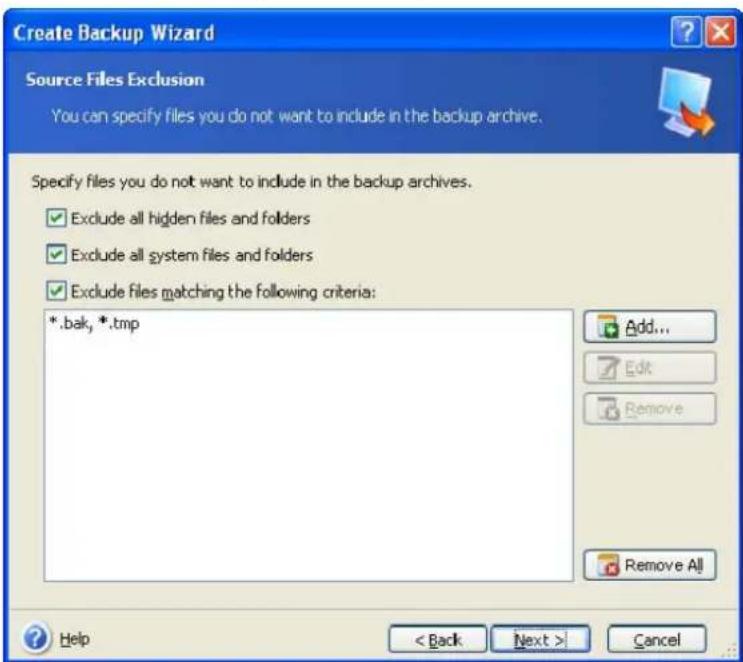
text_image
Create Backup Wizard Source Files Exclusion You can specify files you do not want to include in the backup archive. Specify files you do not want to include in the backup archives. ✓ Exclude all hidden files and folders ✓ Exclude all system files and folders ✓ Exclude files matching the following criteria: *.bak, *.tmp Add... Edit Remove Remove All Help < Back Next > CancelThese filter settings will take effect for the current task. For information on how to set the default filters that will be called each time you select folders to back up, see 5.3.2 Source files exclusion.
If you just want to exclude from backup some file types without creating custom categories, they can be specified in the next window. You can exclude hidden or system files and folders, as well as files matching the criteria you specify. While adding criteria, you can use the common Windows wildcard characters. For example, to exclude all files with extension .tmp, add *.tmp.
- Go to 5.2.5 Selecting the backup destination.
5.2.3 My Application Settings backup
Back up custom settings of Windows applications. This is a subset of file-level backup that backs up predefined folders and requires minimum user selections. The program displays a list of supported applications that has been found on the computer, sorted by categories. You can select a random set of categories and applications.

It is important to note that the program backs up only your settings, but not the application executable files. If an application seems to malfunction or ceases to run, reinstall it using the last updates and then recover your settings from the backup.
To select for backing up all the supported applications found on the computer, check the Installed Applications box.
For instant messenger applications, the program will back up both the settings and history.
The list of supported applications will be expanded gradually. Updates will be available with new program builds or via the Internet.
- Launch the Create Backup Wizard by selecting Operations -> Backup in the main program menu, and then select My Application Settings.
You can also launch the wizard directly from the desktop. To do so, right-click on the application label and select Backup in the context menu. In this case, the program will automatically set My Data mode and mark the application executable file for backup. To back up the application settings, choose My Application Settings.
- Select applications to backup. You can select a random set of categories and applications.
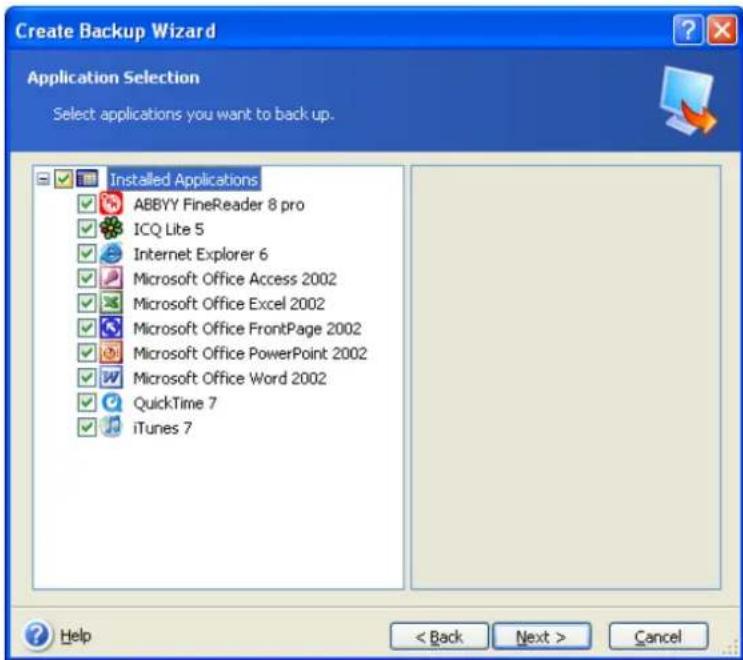
text_image
Create Backup Wizard Application Selection Select applications you want to back up. Installed Applications ABBYY FineReader 8 pro ICQ Lite 5 Internet Explorer 6 Microsoft Office Access 2002 Microsoft Office Excel 2002 Microsoft Office FrontPage 2002 Microsoft Office PowerPoint 2002 Microsoft Office Word 2002 QuickTime 7 iTunes 7 Help < Back Next > Cancel- Go to 5.2.5 Selecting the backup destination.
5.2.4 My E-mail backup
Acronis True Image Home offers a straightforward way to back up messages, accounts and settings for Microsoft Outlook 2000, 2002, 2003, Microsoft Outlook Express, and Windows Mail.
E-mail backup is a subset of file-level backup that backs up predefined folders and requires minimum user selections. However, if need be, you can select Microsoft Outlook components and folders individually.
The list of supported e-mail clients will be gradually built up. Updates will be available with new program builds or via the Internet.
- Launch the Create Backup Wizard by selecting Operations -> Backup.
- Select My E-mail.
- Select the mail client's components and folders to back up.
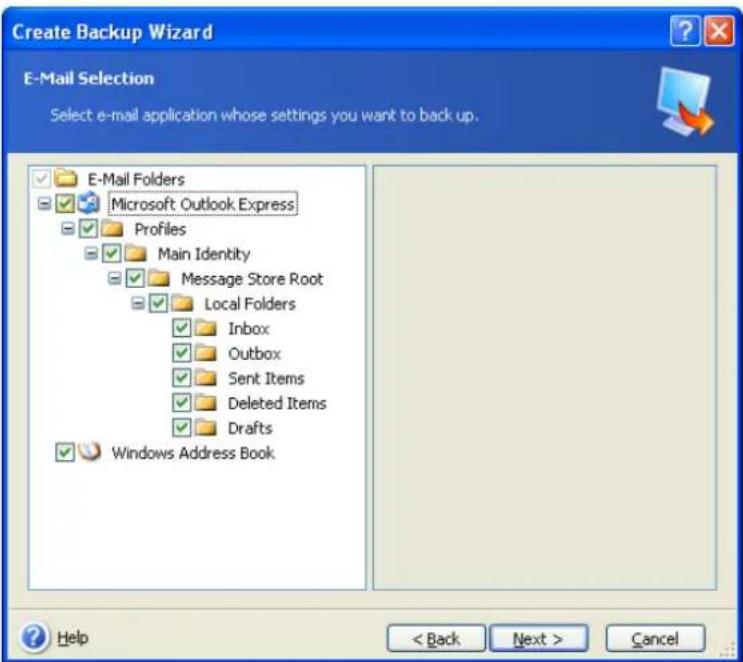
text_image
Create Backup Wizard E-Mail Selection Select e-mail application whose settings you want to back up. E-Mail Folders Microsoft Outlook Express Profiles Main Identity Message Store Root Local Folders Inbox Outbox Sent Items Deleted Items Drafts Windows Address Book Help < Back Next > CancelYou can select the following items:
Messages contained in .PST/.DBX Database Files
E-mail accounts
For Microsoft Office Outlook 2000, 2002, 2003
Mail Folders
Calendar
Contacts
Tasks
Notes
Signatures
News Folders
User Settings
Address Book
For Microsoft Outlook Express
Mail Folders
Address Book (select Windows Address Book).
Acronis True Image Home provides backup of IMAP (Internet Messages Access Protocol) mail folders for Microsoft Outlook. This means that you can back up folders stored on a mail server. For Microsoft Outlook Express and Windows Mail only local e-mail folders backup is available.
5.2.5 Selecting the backup destination
Select the destination location for the backup. If your choice is other than Acronis Secure Zone or a backup location, specify the archive name.
If you are going to create a new archive (i.e. perform a full backup), enter the new file name in the Folder line, or use the file name generator (a button to the right of the line). If you select an existing full backup file, it will be overwritten through a prompt. Overwriting a full backup means that you will discard the entire old archive and create a new one. In that
case, all incremental and differential files appended to the old full backup will be unusable. It is recommended that you delete these files.
If you are going to append an incremental or differential file to an existing archive, select any of the target archive files. It doesn't matter which one you select if the files are stored in the same folder, as the program recognizes them as a single archive. If you stored the files on several removable disks, use the latest archive file; otherwise, restoration problems might occur.
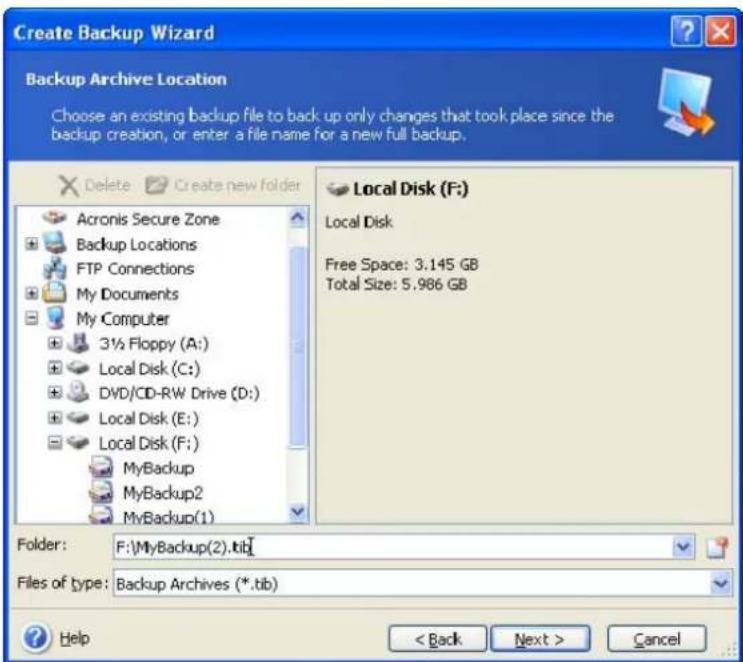
text_image
Create Backup Wizard Backup Archive Location Choose an existing backup file to back up only changes that took place since the backup creation, or enter a file name for a new full backup. Delete Create new folder Acronis Secure Zone Backup Locations FTP Connections My Documents My Computer 3½ Floppy (A:) Local Disk (C:) DVD/CD-RW Drive (D:) Local Disk (E:) Local Disk (F:) MyBackup MyBackup2 MyBackup(1) Local Disk (F:) Local Disk Free Space: 3.145 GB Total Size: 5.986 GB Folder: F:\MyBackup(2).tib\ Files of type: Backup Archives (*.tib) Help < Back Next > CancelThe "farther" you store the archive from the original folders, the safer it will be in case of disaster. For example, saving the archive to another hard disk will protect your data if the primary disk is damaged. Data saved to a network disk, FTP server or removable media will survive even if all your local hard disks are damaged. You can also use the Acronis Secure Zone (see details in 3.3 Acronis Secure Zone) or Acronis backup locations (see details in 3.5 Acronis backup locations) for storing backups. In that case, you need not provide the backup file name.

See notes and recommendations for supporting FTP server in 1.3.4 Supported storage media.
5.2.6 Selecting the backup mode
Select whether you want to create a full, incremental or differential backup. If you have not backed up the selected data yet, or the full archive is old and you want to create a new master backup file, choose full backup. Otherwise it is recommended that you create an incremental or differential backup (see 3.2 Full, incremental and differential backups).
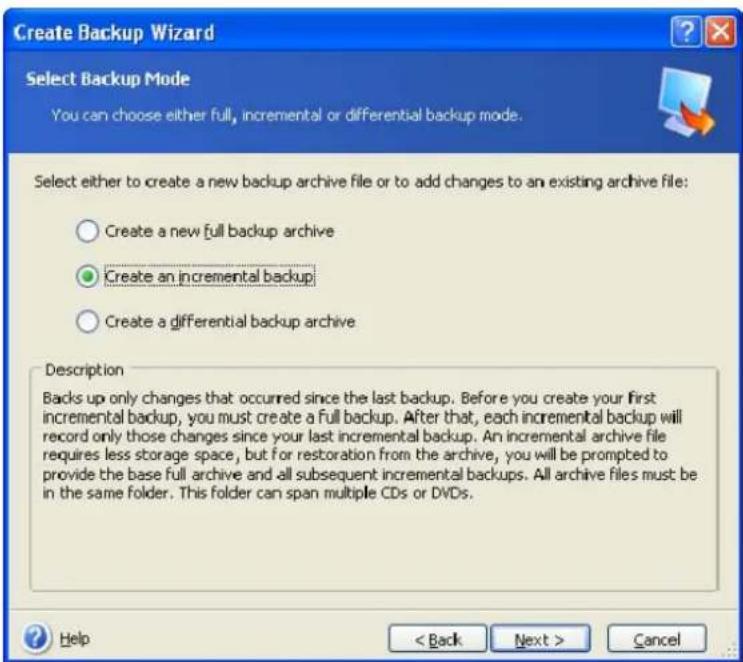
text_image
Create Backup Wizard Select Backup Mode You can choose either full, incremental or differential backup mode. Select either to create a new backup archive file or to add changes to an existing archive file: ○ Create a new full backup archive ● Create an incremental backup ○ Create a differential backup archive Description Backs up only changes that occurred since the last backup. Before you create your first incremental backup, you must create a full backup. After that, each incremental backup will record only those changes since your last incremental backup. An incremental archive file requires less storage space, but for restoration from the archive, you will be prompted to provide the base full archive and all subsequent incremental backups. All archive files must be in the same folder. This folder can span multiple CDs or DVDs. Help < Back Next > Cancel5.2.7 Selecting the backup options
Select the backup options (that is, backup file-splitting, compression level, password protection, etc.). You can Use default options or Set the options manually. If the latter is the case, the settings will be applied only to the current backup task. Or, you can edit the default options from the current screen. Then your settings will be saved as the defaults. See 5.3 Setting backup options for more information.
5.2.8 Providing a comment
Provide a comment for the archive. This can help identify the backup and prevent you from restoring the wrong data. However, you can choose not to make any notes. The backup file size and creation date are automatically appended to the description, so you do not need to enter this information.
5.2.9 The operation summary and the backup process
At the final step, the backup task summary is displayed. Up to this point, you can click Back to make changes in the created task. Clicking Proceed will launch the task execution.
The task progress will be shown in a special window. You can stop the procedure by clicking Cancel.
You can also close the progress window by clicking Hide. The backup creation will continue, but you will be able to start another operation or close the main program window. In the latter case, the program will continue working in the background and will automatically close once the backup archive is ready. If you prepare some more backup operations, they will be queued after the current one.
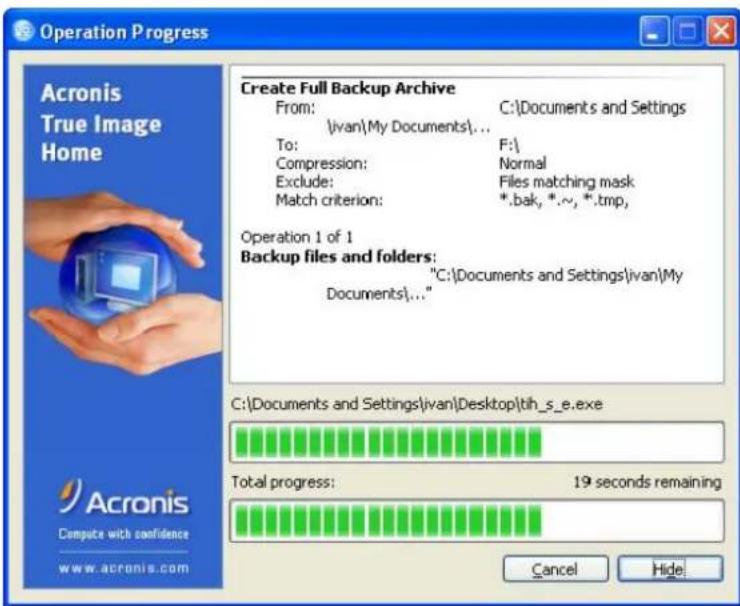
text_image
Operation Progress Acronis True Image Home Create Full Backup Archive From: C:\Documents and Settings \ivan\My Documents\... To: F:\ Compression: Normal Exclude: Files matching mask Match criterion: *.bak, *.~, *.tmp, Operation 1 of 1 Backup files and folders: "C:\Documents and Settings\ivan\My Documents\..." C:\Documents and Settings\ivan\Desktop\th_s_e.exe Total progress: 19 seconds remaining Acronis Compute with confidence www.acronis.com Cancel Hide
You may want to adjust the backup process priority. To do so, click on the process icon in the System Tray and select Low, Normal, or High priority from the menu that appears. For information on how to set the default priority, see 5.3.5 Backup performance

If you burn an archive to several removable media, be sure to number them, since you will have to insert them in order during restoration.
You might want to see the log when the task is completed. To view the log, select Tools -> Show Log in the main program menu.
5.3 Setting backup options
To view or edit the default backup options, select Tools -> Options -> Default Backup Options from the main program menu.
You can edit the default (or set the temporary) backup options while creating a backup task as well.
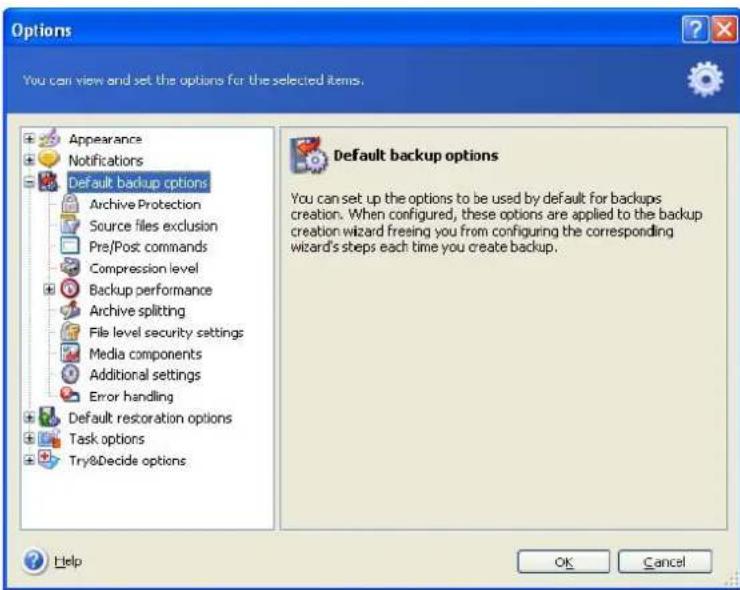
text_image
Options You can view and set the options for the selected items. Appearance Notifications Default backup options Archive Protection Source files exclusion Pre/Post commands Compression level Backup performance Archive splitting File level security settings Media components Additional settings Error handling Default restoration options Task options Try&Decide options Default backup options You can set up the options to be used by default for backups creation. When configured, these options are applied to the backup creation wizard freeing you from configuring the corresponding wizard's steps each time you create backup. Help OK Cancel5.3.1 Archive protection
The preset is no password.
An archive can be protected with a password. To protect the archive from being restored by anybody except you, enter a password and its confirmation in the text fields. A password should consist of at least eight symbols and contain both letters (upper and lower case, preferably) and numbers to make it more difficult to guess.
If you try to restore data from a password-protected archive, or append an incremental/differential backup to such an archive, Acronis True Image Home will ask for the password in a special window, allowing access only to authorized users.
5.3.2 Source files exclusion
By default, all files from the selected folders will be included in the archive.
You can set default filters for the specific types of files you do not wish to back up. For example, you may want hidden and system files and folders, as well as files with .\~, .tmp and .bak extensions, not to be stored in the archives.
You can apply filters, using the common Windows wildcard characters. For example, to exclude all files with extension .exe, add *.exe designation. My??? .exe will exclude all .exe files with names consisting of five symbols and starting with "my".
This option affects real folders selected at My Data backup. Backup of a file category uses file filters preset at creation of the category (see 5.2.2 My Data backup). My Application Settings or My E-mail backup implies dedicated lists of files that must not be filtered.
5.3.3 Pre/post commands
You can specify commands or batch files to be executed automatically before and after the backup procedure. For example, you may want to remove some tmp files from the disk before starting backup or configure a third-party antivirus product to be started each time before the backup starts. Click Edit to open the Edit Command window where you can easily input the command, its arguments and working directory or browse folders to find a batch file.
Please, do not try to execute interactive commands, i.e. commands that require user input (for example, "pause"). These are not supported.
Unchecking the Do not perform operations until the command's execution is complete box, checked by default, will permit the backup process to run concurrently with your commands execution.
If you want the backup to be performed even if your command fails, uncheck the Abort the operation if the user command fails box (checked by default).
You can test execution of the command you created by clicking the Test command button.
5.3.4 Compression level
The preset is Normal.
If you select None, the data will be copied without any compression, which may significantly increase the backup file size. However, if you select Maximum compression, the backup operation will take significantly longer.
The optimal data compression level depends on the type of files stored in the archive. For example, even maximum compression will not significantly reduce the archive size if the archive contains essentially compressed files like .jpg, .pdf or .mp3.
Generally, it is recommended that you use the default Normal compression level. You might want to select Maximum compression for removable media to reduce the number of blank disks required.
5.3.5 Backup performance
The three options below might have a more or less noticeable effect on the backup process speed. This depends on overall system configuration and physical characteristics of devices.
1. Backup process priority
The preset is Low.
The priority of any process running in a system determines the amount of CPU usage and system resources allocated to that process. Decreasing the backup priority will free more resources for other CPU tasks. Increasing the backup priority might speed up the backup process due to taking resources from the other currently running processes. The effect will depend on total CPU usage and other factors.
2. HDD writing speed
The preset is Maximum.
Backing up in the background to an internal hard disk (for example, to Acronis Secure Zone) may slow other programs' performance because of the large amounts of data transferred to the disk. You can limit the hard disk usage by Acronis True Image Home to a desired level. To set the desired HDD writing speed for data being backed up, drag the slider or enter the writing speed in kilobytes per second.
3. Network connection speed
The preset is Maximum.
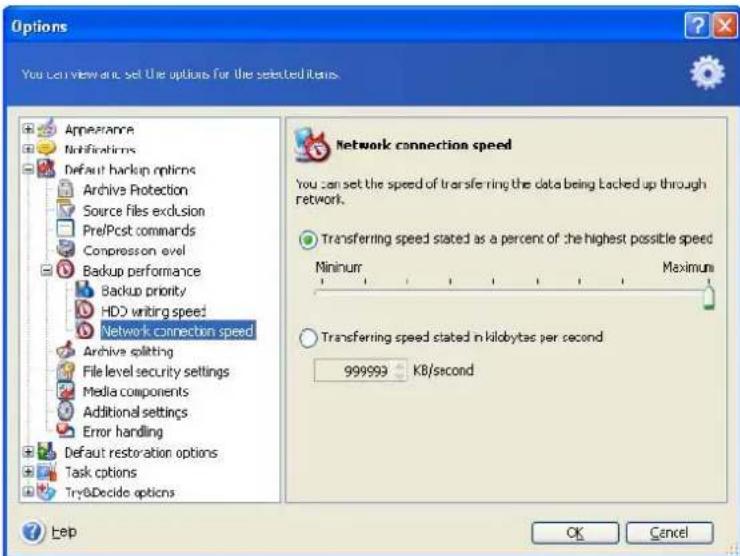
text_image
Options You can view any set the options for the selected items. Appearance Notifications Default backup options Archives Protection Source files exclusion Pre/Pcst commands Compression level Backup performance Backup priority HDD writing speed Network connection speed Archive splitting File level security settings Media components Additional settings Error handling Default restoration options Task options Try&Decide options Network connection speed You can set the speed of transferring the data being backed up through network. Transferring speed stated as a percent of the highest possible speed Minimum Maximum Transferring speed stated in kilobytes per second 999993 KB/second Help OK CancelIf you frequently backup data to network drives, think of limiting the network bandwidth used by Acronis True Image Home. To set the desired data transfer speed, drag the slider or enter the bandwidth limit for transferring backup data in kilobytes per second.
5.3.6 Archive splitting
Sizeable backups can be split into several files that together make the original backup. A backup file can be split for burning to removable media or saving on an FTP server (data recovery directly from an FTP server requires the archive to be split into files of no more than 2GB). A backup destined for a backup location or Acronis Secure Zone cannot be split.
The preset is Automatic. With this setting, Acronis True Image Home will act as follows.
When backing up to a hard disk: If the selected disk has enough space and its file system allows the estimated file size, the program will create a single archive file.
If the storage disk has enough space, but its file system does not allow the estimated file size, Acronis True Image Home will automatically split the backup into several files.

FAT16 and FAT32 file systems have a 4GB file size limit, but a hard drive's capacity is limited to 2TB. Therefore, an archive file might easily exceed this limit, if you are going to back up the entire disk.
If you do not have enough space to store the image on your hard disk, the program will warn you and wait for your decision as to how you plan to fix the problem. You can try to free some additional space and continue or click Back and select another disk.
When backing up to a diskette, CD-R/RW or DVD±R/RW: Acronis True Image Home will ask you to insert a new disk when the previous one is full.
Or, you can select Fixed size and enter the desired file size or select it from the drop-down list. The backup will then be split into multiple files of the specified size. That comes in handy when backing up to a hard disk with a view to burning the archive to CD-R/RW or DVD±R/RW later on.

Creating images directly on CD-R/RW or DVD+R/RW might take considerably more time than it would on a hard disk.
5.3.7 File-level security settings
Preserve file security settings in archives
By default, files and folders are saved in the archive with their original Windows security settings (i.e. permissions for read, write, execute and so on for each user or user group, set in file Properties -> Security). If you restore a secured file/folder on a computer without the user specified in the permissions, you may not be able to read or modify this file.
To eliminate this kind of problem, you can disable preserving file security settings in archives. Then the restored files/folders will always inherit the permissions from the folder to which they are restored (parent folder or disk, if restored to the root).
Or, you can disable file security settings during restoration, even if they are available in the archive (see 6.4.5 File-level security settings below). The result will be the same.
In archives, store encrypted files in decrypted state
The preset is disabled.
If you do not use the encryption feature available in Windows XP and Windows Vista operating systems, simply ignore this option. (Files/folders encryption is set in Properties -> General -> Advanced Attributes -> Encrypt contents to secure data).
Check the option if there are encrypted files in the backup and you want them to be accessed by any user after restore. Otherwise, only the user who encrypted the files/folders
will be able to read them. Decryption may also be useful if you are going to restore encrypted files on another computer.
These options relate only to file/folder backup.
5.3.8 Media components
The preset is disabled.
When backing up to removable media, you can make this media bootable and will not need a separate rescue disk.
The Acronis One-Click Restore is a minimal addition to your rescue media, allowing one-click data recovery from an image archive stored on this media. This means that at booting from the media and clicking “restore,” all data will be restored to its original place automatically. No options or selections such as resizing partitions will be available.
If you want more functionality during restoration, write a full standalone version of Acronis True Image Home to the rescue media. As a result, you will be able to configure the restore task using Restore Data Wizard.
Under Advanced tab you can select Acronis True Image Home (full version) and a standalone version of the Acronis DriveCleanser utility that will allow you to destroy confidential data on your PC disks easily and permanently even if you uninstall Acronis True Image Home. If you have other Acronis products installed on your computer, such as Acronis Disk Director Suite, the bootable versions of these programs' components will be offered under Advanced tab as well.
5.3.9 Additional settings
1. Validate backup archive upon operation completion
The preset is disabled.
When enabled, the program will check integrity of the just created or supplemented archive immediately after backup. When setting up a backup of critical data or a disk/partition backup, we strongly recommend you to enable the option to ensure that the backup can be used to recover lost data.

To check archive data integrity you must have all incremental and differential backups belonging to the archive and the initial full backup. If any of successive backups is missing, validation is not possible.
2. Ask for first media while creating backup archives on removable media
The preset is enabled.
You can choose whether to display the Insert First Media prompt when backing up to removable media. With the default setting, backing up to removable media may be not possible if the user is away, because the program will wait for someone to press OK in the prompt box. Therefore, you should disable the prompt when scheduling a backup to removable media. Then, if the removable media is available (for example, CD-R/RW inserted) the task can run unattended.
5.3.10 Error handling
1. Ignore bad sectors
The preset is disabled.
This option lets you run a backup even if there are bad sectors on the hard disk. Although most disks do not have bad sectors, the possibility that they might occur increases during the course of the hard disk's lifetime. This feature is also useful during unattended backups when you cannot control the backup process. If you enable this feature, the backup will be performed regardless of read and/or write errors that could occur on the bad sectors.
2. Do not show messages and dialogs while processing (silent mode)
The preset is disabled.
You can enable this setting to ignore errors during backup operations. This feature also was mainly designed for unattended backups when you cannot control the backup process. In this mode no notifications will be displayed to you if errors occur during backup. Instead you can view the detailed log of all operations after the task finishes by selecting Tools -> Show Log.
Chapter 6. Restoring the backup data
6.1 Restore under Windows or boot from CD?
As mentioned above (see 2.3 Running Acronis True Image Home), Acronis True Image Home can be run in several ways. We recommend that you first try to restore data running Acronis True Image Home under Windows, because this method provides more functionality. Boot from the bootable media or use the Startup Recovery Manager (see 3.4 Acronis Startup Recovery Manager) only if Windows does not load.
The boot CD, from which you loaded the program, does not keep you from using other CDs with backups. Acronis True Image Home is loaded entirely into RAM so you can remove the bootable CD to insert the archive disk.

Be careful! When you use the Acronis True Image Home rescue disk, the product creates disk drive letters that might differ from the way Windows identifies drives. For example, the D: drive identified in the standalone Acronis True Image Home might correspond to the E: drive in Windows. This is not an error with the software.

If a backup image is located on bootable media, you might have the choice of using Acronis One-Click Restore. This operation always restores the entire physical disk. Therefore, if your disk consists of several partitions, all of them must be included in the image. Any partitions missing from the image will be lost. Please make sure that the image contains all disk data you plan to restore. For more information on Acronis One-Click Restore, see 5.3.8 Media components.
6.1.1 Network settings in rescue mode
When booted from removable media or by Startup Recovery Manager, Acronis True Image Home might not detect the network. That can happen if there is no DHCP server in your network or your computer address was not identified automatically.
To enable the network connection, specify network settings manually in the window, available at Tools -> Options -> Network adapters.
6.2 Restoring files and folders from file archives
Here we describe how to restore file and folders from a file backup archive. You can restore the desired files and folders from a disk/partition image as well. To do so, mount the image (see Chapter 13. Exploring archives and mounting images) or start the image restoration and select Restore specified files or folders (see 6.3 Restoring disks/partitions or files from images).

File backup archives are supported only for the FAT and NTFS file systems.
- Launch the Restore Data Wizard by selecting Operations -> Recovery in the main program menu.
- Select the archive. If the archive is located in Acronis Secure Zone or in a backup location, select it to choose the archive on the next step.
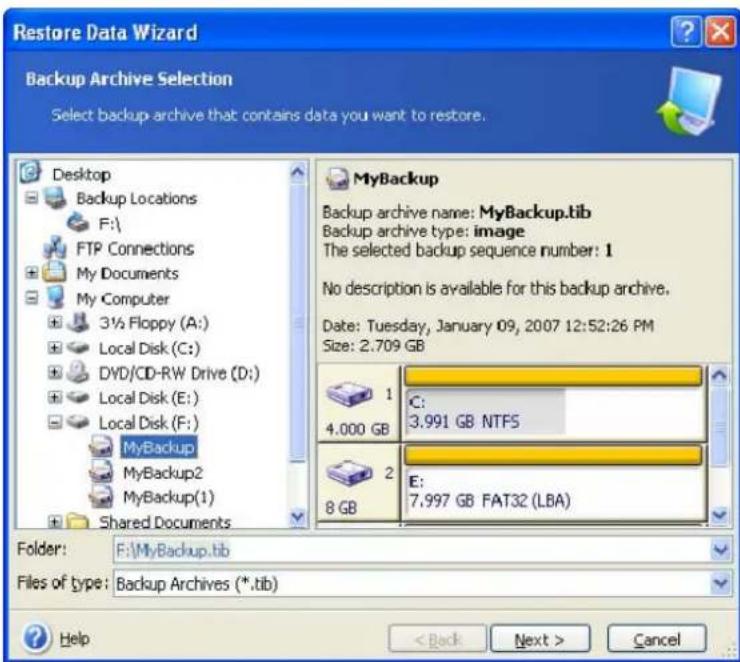
text_image
Restore Data Wizard Backup Archive Selection Select backup archive that contains data you want to restore. Desktop Backup Locations F:\ FTP Connections My Documents My Computer 3½ Floppy (A:) Local Disk (C:) DVD/CD-RW Drive (D:) Local Disk (E:) Local Disk (F:) MyBackup MyBackup2 MyBackup(1) Shared Documents MyBackup Backup archive name: MyBackup.tib Backup archive type: image The selected backup sequence number: 1 No description is available for this backup archive. Date: Tuesday, January 09, 2007 12:52:26 PM Size: 2.709 GB 1 C: 4.000 GB 3.991 GB NTF5 2 E: 8 GB 7.997 GB FAT32 (LBA) Folder: F:\MyBackup.tib Files of type: Backup Archives (*.tib) Help < Back Next > Cancel
If the archive is located on removable media, e.g. CD, insert the last disk in the series first and then insert disks in reverse order when the Restore Data Wizard prompts you.

Data recovery directly from an FTP server requires the archive to consist of files of no more than 2GB. If you suspect that some of the files are larger, first copy the entire archive (along with the initial full backup) to a local hard disk or a network share disk. See notes and recommendations for supporting FTP servers in 1.3.4 Supported storage media.

Please note that before restoring Microsoft Outlook mail messages, accounts, contacts, settings, etc. from My E-mail backup on a new computer with a newly installed Microsoft Outlook, you should launch the Outlook at least once. If Microsoft Outlook is launched for the first time after restoring the E-mail information, it may malfunction.
If you added a comment to the archive, it will be displayed to the right of the drives tree. If the archive was protected with a password, Acronis True Image Home will ask for it. The comment and the Next button will be unavailable until you enter the correct password.
- If you are to restore files from an archive containing incremental backups, Acronis True Image Home will suggest that you select one of successive incremental backups by its creation date/time. Thus, you can roll back the files/folders state to a certain date.

To restore data from an incremental backup, you must have all previous incremental backup files and the initial full backup. If any of successive backups is missing, restoration is not possible.
To restore data from a differential backup, you must have the initial full backup as well.
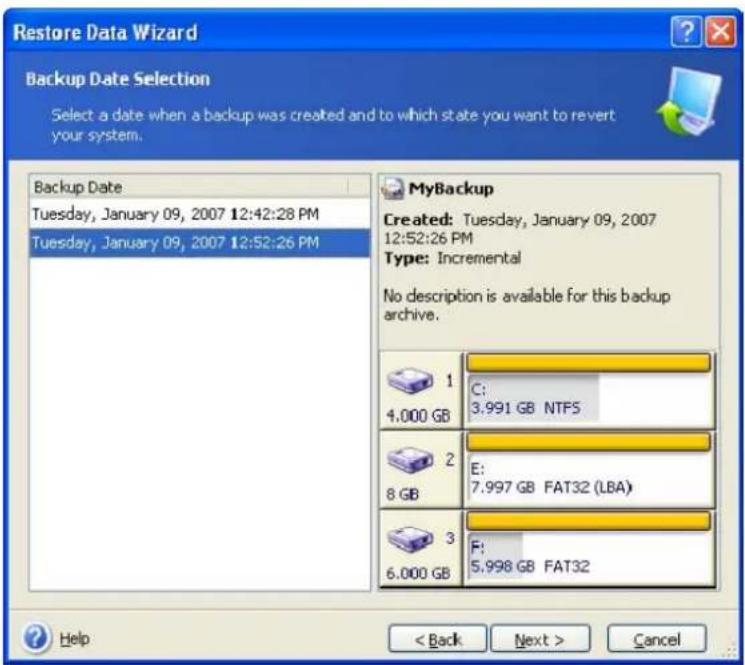
text_image
Restore Data Wizard Backup Date Selection Select a date when a backup was created and to which state you want to revert your system. Backup Date Tuesday, January 09, 2007 12:42:28 PM Tuesday, January 09, 2007 12:52:26 PM MyBackup Created: Tuesday, January 09, 2007 12:52:26 PM Type: Incremental No description is available for this backup archive. 1 C: 4.000 GB NTFS 2 E: 8 GB FAT32 (LBA) 3 F: 6.000 GB FAT32 Help < Back Next > Cancel- Select a folder on your computer where you want to restore selected folders/files (a target folder). You can restore data to its original location or choose a new location, if necessary.
When you choose a new location, the selected items by default will be restored without restoring the original, absolute path. You may also wish to restore the items with their entire folder hierarchy. If such is the case, select Restore absolute paths.
- Select files and folders to restore. You can choose to restore all data or browse the archive contents and select the desired folders or files.
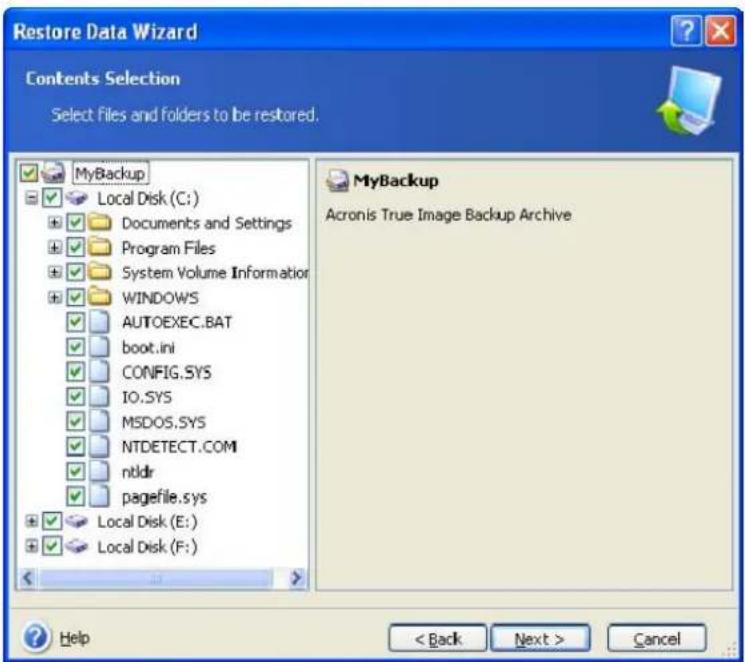
text_image
Restore Data Wizard Contents Selection Select files and folders to be restored. MyBackup Local Disk (C:) Documents and Settings Program Files System Volume Information WINDOWS AUTOEXEC.BAT boot.ini CONFIG.SYS IO.SYS MSDOS.SYS NTDETECT.COM ntldr pagefile.sys Local Disk (E:) Local Disk (F:) MyBackup Acronis True Image Backup Archive Help < Back Next > Cancel-
Select the options for the restoration process (that is, restoration process priority, file-level security settings, etc.). You can Use default options or Set the options manually. If the latter is the case, the settings will be applied only to the current restore task. Or, you can edit the default options from the current screen. Then your settings will be saved as default. See 6.4 Setting restore options for more information.
-
The next selection allows you to keep useful data changes made since the selected backup was created. Choose what to do if the program finds in the target folder a file with the same name as in the archive:
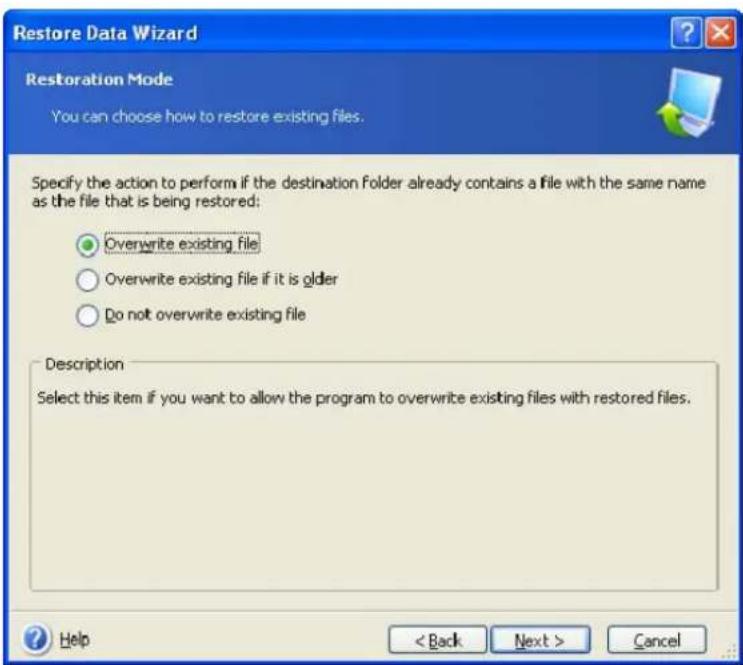
text_image
Restore Data Wizard Restoration Mode You can choose how to restore existing files. Specify the action to perform if the destination folder already contains a file with the same name as the file that is being restored: Overwrite existing file Overwrite existing file if it is older Do not overwrite existing file Description Select this item if you want to allow the program to overwrite existing files with restored files. Help < Back Next > Cancel- Overwrite existing file – this will give the archived file unconditional priority over the file on the hard disk
- Overwrite existing file if it is older – this will give the priority to the most recent file modification, whether it be in the archive or on the disk
- Do not overwrite existing file – this will give the file on the hard disk unconditional priority over the archived file
If you select one of the first two options, an additional window appears allowing to specify the files that should not be overwritten in the course of restoration. You can preserve from overwriting the system and hidden files as well as the files meeting the criteria you specify in this window.
- At the final step, the restoration summary is displayed. Up to this point, you can click Back to make changes in the created task. Clicking Proceed will launch the task execution.
- The task progress will be shown in a special window. You can stop the procedure by clicking Cancel. Please keep in mind that the aborted procedure still may cause changes in the destination folder.
6.3 Restoring disks/partitions or files from images
To restore a partition (disk) from an image, Acronis True Image Home must obtain exclusive access to the target partition (disk). This means no other applications can access it at that time. If you receive a message stating that the partition (disk) cannot be locked, close applications that use this partition (disk) and start over. If you cannot determine which applications use the partition (disk), close them all.
6.3.1 Starting the Restore Data Wizard
Launch the Restore Data Wizard by selecting Operations -> Recovery in the main program menu.
6.3.2 Archive selection
- Select the archive. If the archive is located in Acronis Secure Zone or in a backup location, select it to choose the archive at the next step.
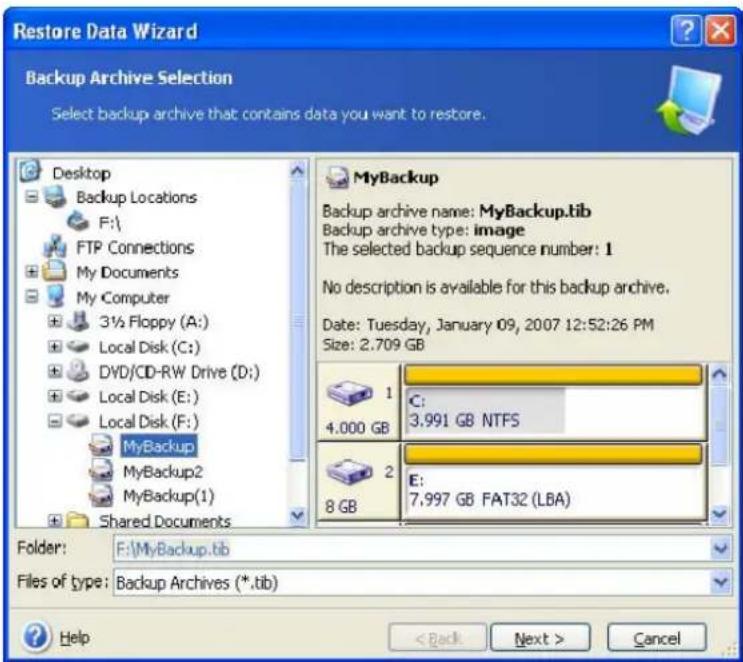
text_image
Restore Data Wizard Backup Archive Selection Select backup archive that contains data you want to restore. Desktop Backup Locations F:\ FTP Connections My Documents My Computer 3½ Floppy (A:) Local Disk (C:) DVD/CD-RW Drive (D:) Local Disk (E:) Local Disk (F:) MyBackup MyBackup2 MyBackup(1) Shared Documents MyBackup Backup archive name: MyBackup.tib Backup archive type: image The selected backup sequence number: 1 No description is available for this backup archive. Date: Tuesday, January 09, 2007 12:52:26 PM Size: 2.709 GB 1 C: 4.000 GB 3.991 GB NTFS 2 E: 8 GB 7.997 GB FAT32 (LBA) Folder: F:\MyBackup.tib Files of type: Backup Archives (*.tib) Help < Back Next > Cancel
If the archive is located on removable media, e.g. CD, first insert the last CD and then insert disks in reverse order when the Restore Data Wizard prompts you.

Data recovery directly from an FTP server requires the archive to consist of files of no more than 2GB each. If you suspect that some of the files are larger, first copy the entire archive (along with the initial full backup) to a local hard disk or network share disk. See notes and recommendations for supporting FTP servers in 1.3.4 Supported storage media.
If you added a comment to the archive, it will be displayed to the right of the drives tree. If the archive was protected with a password, Acronis True Image Home will ask for it. The partitions layout, the comment and the Next button will be unavailable until you enter the correct password.
- If you are to restore data from an archive containing incremental backups, Acronis True Image Home will suggest that you select one of successive incremental backups by its creation date/time. Thus, you can roll back the disk/partition state to a certain date.

To restore data from an incremental backup, you must have all previous incremental backup files and the initial full backup. If any of successive backups is missing, restoration is not possible.
To restore data from a differential backup, you must have the initial full backup as well.
6.3.3 Restoration type selection
Select what you want to restore:
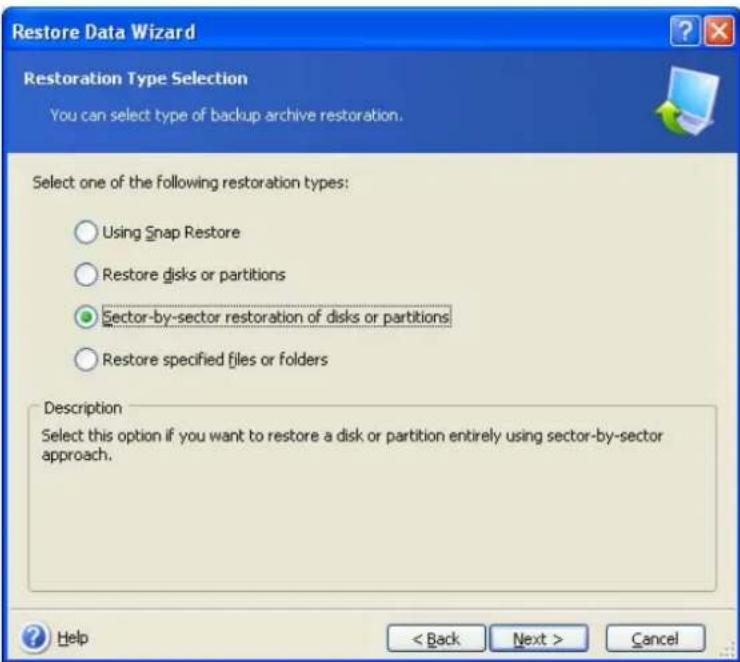
text_image
Restore Data Wizard Restoration Type Selection You can select type of backup archive restoration. Select one of the following restoration types: ○ Using Snap Restore ○ Restore disks or partitions ● Sector-by-sector restoration of disks or partitions ○ Restore specified files or folders Description Select this option if you want to restore a disk or partition entirely using sector-by-sector approach. Help < Back Next > CancelUsing Active Restore
When restoring a system disk/partition image (except for Windows Vista images) from Acronis Secure Zone, you have a choice of using use Acronis Active Restore. If you choose this option, you will proceed directly to the summary window (6.3.12 Restoration summary and executing restoration). A few seconds after pressing Proceed, the computer will reboot to the restored system. Log in and start work — no more reboots or other actions are required. For more about Acronis Active Restore, see 3.6 Acronis Active Restore.

When performing Active Restore, the current Acronis True Image Home version always restores the entire system disk. Therefore, if your system disk consists of several partitions and you are planning to use Acronis Active Restore, all partitions must be included in the image. Any partitions that are missing from the image will be lost.
You can choose a standard way of restoration for that image. This will allow you to make changes to the restored partition that would not be possible when using Acronis Active Restore.
Restore disks or partitions
Having chosen a disks or partition recovery type, you will now select the settings described below.
Sector by sector restoration of disks or partitions
The program will restore both used and unused sectors of disks or partitions.
Restore specified files or folders
Finally, if you are not going to recover the system, but only want to repair damaged files, select Restore specified files or folders. With this selection, you will be further asked to select where to restore selected folders/files (original or new location), choose files/folders to be restored, and so on. These steps look like those in file archive restore. However, watch your selection: if you are to restore files instead of a disk/partition, uncheck the unnecessary folders. Otherwise you will restore a lot of excess files. Then you will be taken directly to Restoration Summary screen (6.3.12 Restoration summary and executing restoration).

You can restore files from disk/partition images only if they have the FAT or NTFS file systems.
6.3.4 Selecting a disk/partition to restore
The selected archive file can contain images of several partitions or even disks. Select which disk/partition to restore.
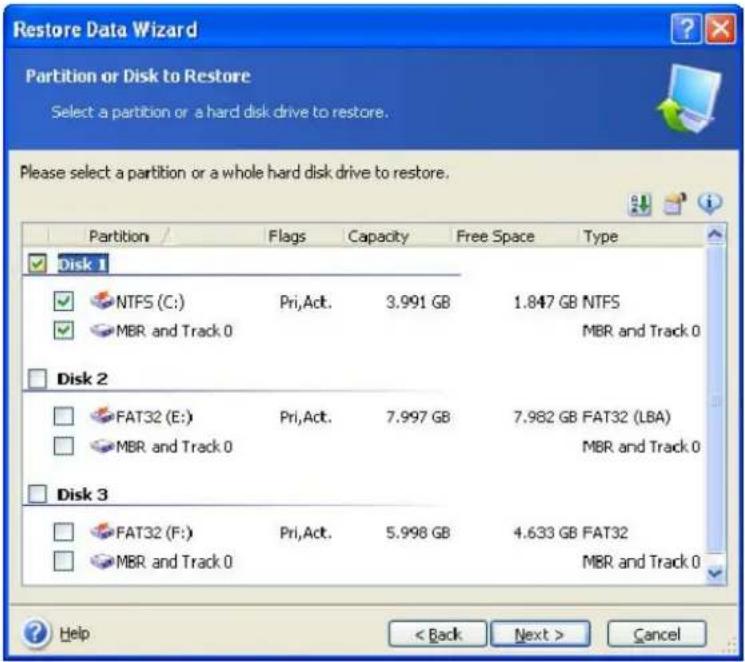
text_image
Restore Data Wizard Partition or Disk to Restore Select a partition or a hard disk drive to restore. Please select a partition or a whole hard disk drive to restore. Partition Flags Capacity Free Space Type Disk 1 NTFS (C:) Pri,Act. 3.991 GB 1.847 GB NTFS MBR and Track 0 MBR and Track 0 Disk 2 FAT32 (E:) Pri,Act. 7.997 GB 7.982 GB FAT32 (LBA) MBR and Track 0 MBR and Track 0 Disk 3 FAT32 (F:) Pri,Act. 5.998 GB 4.633 GB FAT32 MBR and Track 0 MBR and Track 0 Help < Back Next > CancelDisk and partition images contain a copy of track 0 along with MBR (master boot record). It appears in this window in a separate line. You can choose whether to restore MBR and track 0 by checking the respective box. Restore MBR if it is critical to your system boot.
6.3.5 Selecting a target disk/partition
- Select a target disk or partition where you want to restore the selected image. You can restore data to its initial location, to another disk/partition or to an unallocated space. The target partition should be at least the same size as the uncompressed image data.

All the data stored on the target partition will be replaced by the image data, so be careful and watch for non-backed-up data that you might need.
- When restoring an entire disk, the program will analyze the target disk structure to see whether the disk is free.
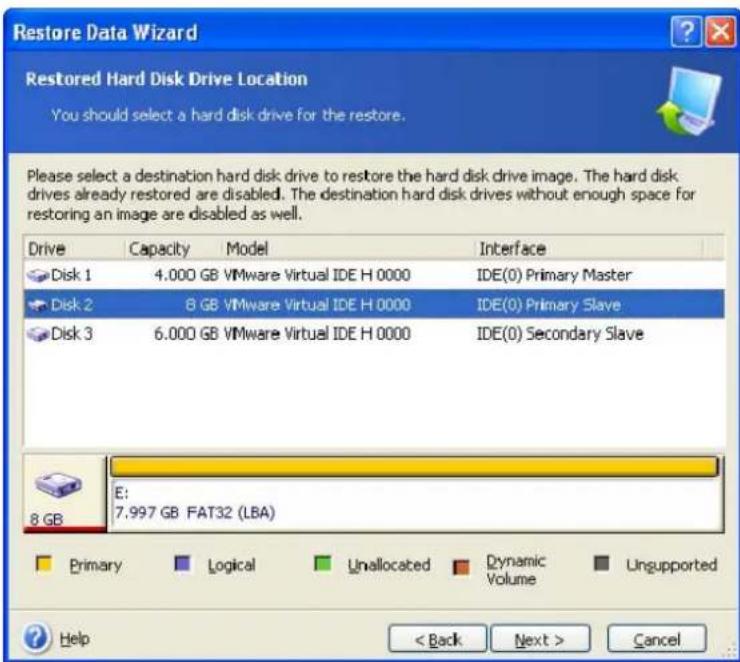
text_image
Restore Data Wizard Restored Hard Disk Drive Location You should select a hard disk drive for the restore. Please select a destination hard disk drive to restore the hard disk drive image. The hard disk drives already restored are disabled. The destination hard disk drives without enough space for restoring an image are disabled as well. Drive Capacity Model Interface Disk 1 4.000 GB VMware Virtual IDE H 0000 IDE(0) Primary Master Disk 2 8 GB VMware Virtual IDE H 0000 IDE(0) Primary Slave Disk 3 6.000 GB VMware Virtual IDE H 0000 IDE(0) Secondary Slave E: 7.997 GB FAT32 (LBA) Primary Logical Unallocated Dynamic Volume Ungrouped Help < Back Next > CancelIf there are partitions on the target disk, you will be prompted by the Nonempty Destination Hard Disk Drive window stating that the destination disk contains partitions, perhaps with data.
You will have to select between:
- Yes, I want to delete all the partitions on the destination hard disk before restoring – all existing partitions will be deleted and all their data will be lost.
- No, I do not want to delete partitions – no existing partition will be deleted, discontinuing the recovery operation. You will then have to cancel the operation or return to select another disk.

Note that no real changes or data destruction will be performed at this time! For now, the program will just map out the procedure. All changes will be implemented only when you click Proceed in the wizard's final window.
To continue, select the first choice and click Next. You will be taken directly to step 6.3.10 Restoring several disks or partitions at once.
6.3.6 Changing the restored partition type
When restoring a partition, you can change its type, though it is not required in most cases.
To illustrate why you might need to do this, let's imagine that both the operating system and data were stored on the same primary partition on a damaged disk.
If you are restoring a system partition to the new (or the same) disk and want to load the operating system from it, you will select Active.
Acronis True Image Home automatically corrects boot information during restore of the system partition to make it bootable even if it was restored to other than original partition (or disk).
If you restore a system partition to another hard disk with its own partitions and OS, most likely you will need only the data. In this case, you can restore the partition as Logical to access the data only.
By default, the original partition type is selected.

Selecting Active for a partition without an installed operating system could prevent your computer from booting.
6.3.7 Changing the restored partition file system
Though seldom required, you can change the partition file system during its restoration. Acronis True Image Home can make the following file system conversions: FAT 16 -> FAT 32, Ext2 -> Ext3. For partitions with other native file systems this option is not available.

Let's say you want to restore a partition from an old, low-capacity FAT16 disk to a newer disk. FAT16 would not be effective and might not even be available for the high-capacity hard disk. That's because FAT16 supports partitions up to 4GB, so you will not be able to restore a 4GB FAT16 partition to a partition that exceeds that limit without changing the file system. It would make sense here to change the file system from FAT16 to FAT32.
However, keep in mind that not all operating systems support FAT32. MS-DOS, Windows 95 and Windows NT 3.x, 4.x do not support it and will not be operable after you restore a partition and change its file system. These can be normally restored on a FAT16 partition only.
6.3.8 Changing the restored partition size and location
You can resize and relocate a partition by dragging it or its borders with a mouse on the horizontal bar on the screen or by entering corresponding values into the appropriate fields.
Using this feature, you can redistribute the disk space among partitions being restored. In this case, you will have to restore the partition to be reduced first.
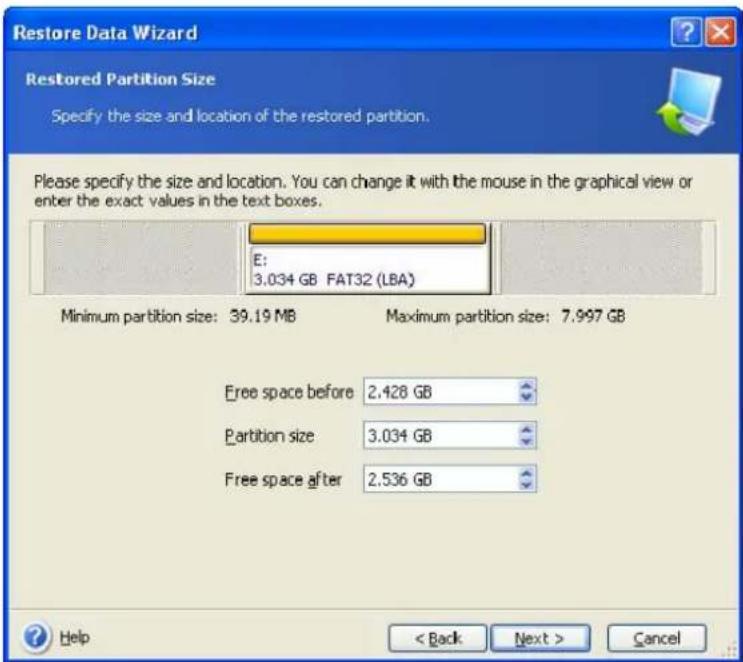
text_image
Restore Data Wizard Restored Partition Size Specify the size and location of the restored partition. Please specify the size and location. You can change it with the mouse in the graphical view or enter the exact values in the text boxes. E: 3.034 GB FAT32 (LBA) Minimum partition size: 39.19 MB Maximum partition size: 7.997 GB Free space before 2.428 GB Partition size 3.034 GB Free space after 2.536 GB Help < Back Next > Cancel
These changes might be useful if you are to copy your hard disk to a new high-capacity one by creating its image and restoring it to a new disk with larger partitions.
6.3.9 Assigning a letter to the restored partition
Acronis True Image Home will assign an unused letter to a restored partition. You can select the desired letter from a drop-down list. If you set the switch to No, no letters will be assigned to the restored partition, hiding it from OS.
You should not assign letters to partitions inaccessible to Windows, such as to those other than FAT and NTFS.
6.3.10 Restoring several disks or partitions at once
During a single session, you can restore several partitions or disks, one by one, by selecting one disk and setting its parameters first and then repeating these actions for every partition or disk to be restored.
If you want to restore another disk (partition), select Yes, I want to restore another partition or hard disk drive. Then you will return to the partition selection window (6.3.4) and will have to repeat the above steps. Otherwise, don't set this switch.
6.3.11 Setting restore options
Select the options for the restoration process (that is, restoration process priority, etc.). You can Use default options or Set the options manually. If the latter is the case, the settings will be applied only to the current restore task. Or, you can edit the default options from the current screen. Then your settings will be saved as defaults. See 6.4 Setting restore options for more information.
6.3.12 Restoration summary and executing restoration
At the final step, the restoration summary is displayed. Up to this point, you can click Back to make changes in the created task. If you click Cancel, no changes will be made to disk(s). Clicking Proceed will launch the task execution.
The task progress will be shown in a special window. You can stop the procedure by clicking Cancel. However, it is critical to note that the target partition will be deleted and its space unallocated – the same result you will get if the restoration is unsuccessful. To recover the "lost" partition, you will have to restore it from the image again.
6.4 Setting restore options
To view or edit the default restore options, select Tools -> Options -> Default Restoration Options from the main program menu.
You can edit the default (or set the temporary) restore options while creating a restore task as well.
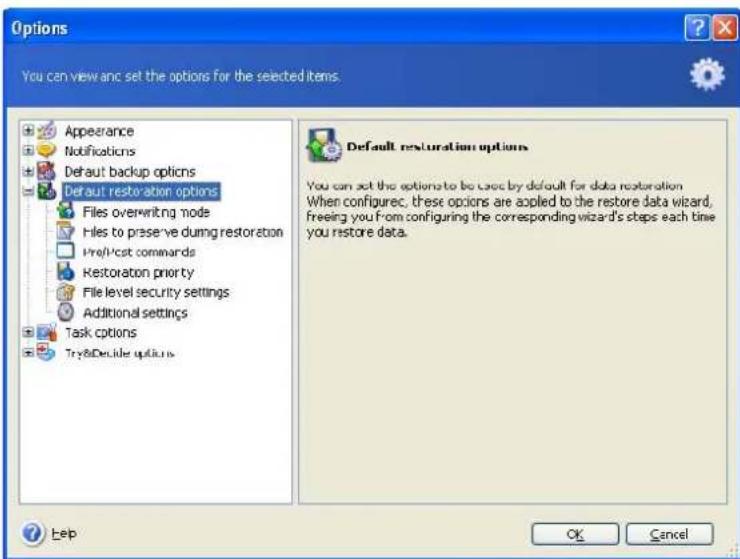
text_image
Options You can view and set the options for the selected items. Appearance Notifications Default backup options Default restoration options Files overwriting mode Files to preserve during restoration Pre/post commands Restoration priority File level security settings Additional settings Task options Try&Decide options Default restoration options You can set the options to be saved by default for data restoration When configure, these options are applied to the restore data wizard, freeing you from configuring the corresponding wizard's steps each time you restore data. Help OK Cancel6.4.1 Files overwriting mode
The option allows you to keep useful data changes made since the backup being restored was done. Choose what to do if the program finds in the target folder a file with the same name as in the archive:
- Overwrite existing file – this will give the archived file unconditional priority over the file on the hard disk.
- Overwrite existing file if it is older – this will give the priority to the most recent file modification, whether it be in the archive or on the disk.
- Do not overwrite existing file – this will give the file on the hard disk unconditional priority over the archived file.
6.4.2 Files to preserve during restoration
This option is not applicable to restoration of disks and partitions from images.
By default, all files will be restored from the archive.
You can set default filters for the specific types of files you wish to preserve during archive restoration. For example, you may want hidden and system files and folders, as well as files matching selected criteria not to be overwritten by the archive files.
While specifying the criteria, you can use the common Windows wildcard characters. For example, to preserve all files with extension .exe, add *.exe. My??? .exe will preserve all .exe files with names consisting of five symbols and starting with "my".
6.4.3 Pre/post commands
You can specify commands or batch files to be automatically executed before and after the restore procedure. Click Edit to open the Edit Command window where you can easily input the command, its arguments and working directory or browse folders to find a batch file.
Please note that interactive commands, i.e. commands that require user input, are not supported.
Unchecking the Do not perform operations until the commands execution is complete box, checked by default, will permit the restore procedure to run concurrently with your commands execution.
If you want the restore to be performed even if your command fails, uncheck the Abort the operation if the user command fails box (checked by default).
You can test execution of the command you created by clicking the Test command button.
6.4.4 Restoration priority
The preset is Low.
The priority of any process running in a system determines the amount of CPU usage and system resources allocated to that process. Decreasing the restoration priority will free more resources for other CPU tasks. Raising restoration priority may speed up the restore process as it takes resources from other currently running processes. The effect will depend on total CPU usage and other factors.
6.4.5 File-level security settings
The preset is Restore files with their security settings.
If the file security settings were preserved during backup (see 5.3.7 File-level security settings), you can choose whether to restore them or let the files inherit the security settings of the folder where they will be restored.
This option is effective only when restoring files from file/folder archives.
6.4.6 Additional settings
- You can choose whether to restore file date and time from the archive or assign the files the current date and time. By default the current date and time will be assigned.
- Before data is restored from the archive, Acronis True Image Home can check its integrity. If you suspect that the archive might have been corrupted, select Validate backup archive before restoration.

You must have all incremental and differential backups belonging to the archive and the initial full backup to check archive data integrity. If any backups are missing, the validation is not possible.
- Having restored a disk/partition from an image, Acronis True Image Home can check the integrity of the file system. To do so, select Check file system after restoration.

Verification of the file system is available only when restoring disk/partitions using FAT16/32 and NTFS file systems.
Chapter 7 Try&Decide
The Try&Decide feature allows to create a secure, controlled temporary workspace on your computer without requiring you to install special virtualization software. You can perform various system operations without worrying that you might damage your operating system, programs or data.
After making virtual changes you may apply all of the changes to your original system. You also can select to discard all changes. Note that you cannot select individual changes to keep and others to discard. If you make changes that you want to keep, you might want to commit those changes to the hard disk and then close out of Try&Decide. You can then relaunch the utility to try other functions. Among the functions you might attempt with this feature is to open mail attachments from unknown senders, install and run new software, or visit Web sites that might contain potentially troublesome content.
For example, if you visit a Web site or open an email attachment that puts a virus on your temporary duplicate, you can simply delete the duplicate and no harm done – the virus will not appear on your machine.

It is important to remember that if you download email from a POP mail server or if you create new files while in the TRY mode and then decide to eliminate your changes, those files and mail will no longer exist. If you use POP email, make sure to change the settings in your email to leave your mail on the server before you activate the TRY mode. This way, you can always retrieve your email again.
7.1 Using Try&Decide
To start the Try mode, proceed as follows:
- Select Operations -> Try&Decide in the main program menu or click the Try&Decide category in the main program window.
- When there is no Acronis Secure Zone on the hard disk, the program will offer you to create the Zone and then run the wizard again (see Chapter 10. Managing Acronis Secure Zone). To use this feature, you must accept this recommendation; you cannot use Try&Decide without the Acronis Secure Zone. Sometimes there may be too little free space on the Acronis Secure Zone. If such is a case, the program will inform you that it cannot start the Try mode due to lack of free space. To solve this problem, increase the size of the Acronis Secure Zone and then run the Try mode again.

In the Try mode the program may use the free space of the Acronis Secure Zone quite intensively, so we recommend creating the Zone with a size of at least 20% of the used space on your system disk or increase the size of the Acronis Secure Zone taking into account this recommendation.

If you already have an image of your hard disk on the Acronis Secure Zone, that image will not be affected or damaged if you launch the Try&Decide utility. Your image will be safe even if you choose not to keep the changes from the Try mode.

We do not recommend creating the Acronis Secure Zone on external media (USB drives, etc.), as in such a case the Try&Decide function will be unavailable.
- Set up the Try&Decide options:
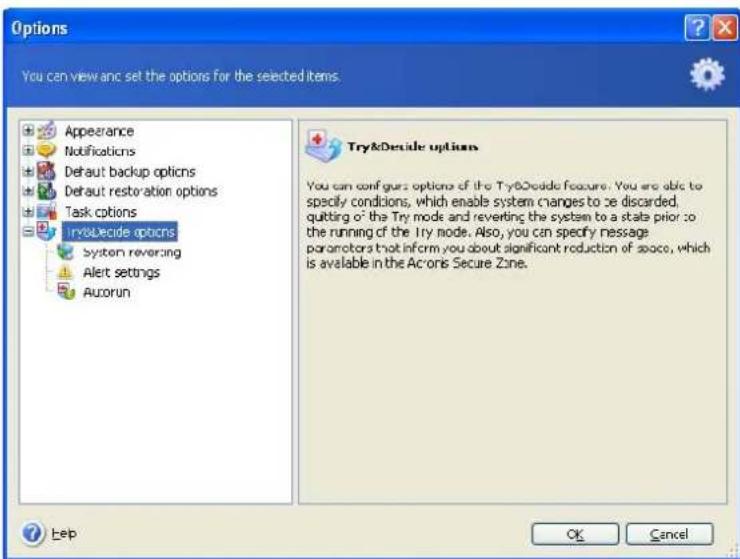
text_image
Options You can view and set the options for the selected items. Appearance Notifications Default backup options Default restoration options Task options Try&Decide options system revering Alert settings Aurorun Try&Decide options You can configure options of the Try&Decide feature. You are able to specify conditions, which enable system changes to be discarded, quitting of the Try mode and reverting the system to a state prior to the running of the Try mode. Also, you can specify message parameters that inform you about significant reduction of space, which is available in the Acorns Secure Zone. Help OK Cancel- System reverting - You can make settings determining program's behavior when discarding changes and reverting the system to the previous state. If you would like to have the choice of making a decision on whether to apply changes before system shutdown, leave the Show decision dialog at system shutdown box checked. If you uncheck the box, the changes you have made will be discarded automatically at system shutdown or rebooting without you being notified. You might want to limit the time allocated for trying changes. If such is the case, check the After the mode has been running for... box and specify the time for running the Try mode.
- Alert settings - You can select when to see messages that will warn and alert you about program's inability to track changes in the virtual mode due to expiration of Acronis Secure Zone space. You may specify either the Zone's remaining free space in percents or time in minutes left until the Zone is full estimated on basis of Zone filling rate.
- Autorun - You can select whether to run the Try mode automatically each time the computer starts. Set the Autorun mode: On or Off.

Please note that if, having set Autorun to On and then having turned on the Try mode, you will wish to turn Autorun off, you should turn on the Try mode again (if it has been turned off), set Autorun to Off, and then select Apply changes. This is because if you not apply the change in option setting, it will be discarded along with other changes when you select Discard changes or reboot the computer.
If you would like tracking changes on all disks and partitions of the system, uncheck the Track changes of system partition only box.
-
Start the Try mode by clicking the Start Try Mode button. The Acronis True Image Home starts tracking all changes made to the operating system and files and temporarily storing all the changes on a virtual disk, which it creates in the Acronis Secure Zone for this purpose.
-
Having performed all changes you wanted to try, invoke the Try&Decide wizard once more for making your decision. It can be done by clicking the icon in the system tray or running the wizard from the Acronis True Image Home main page.
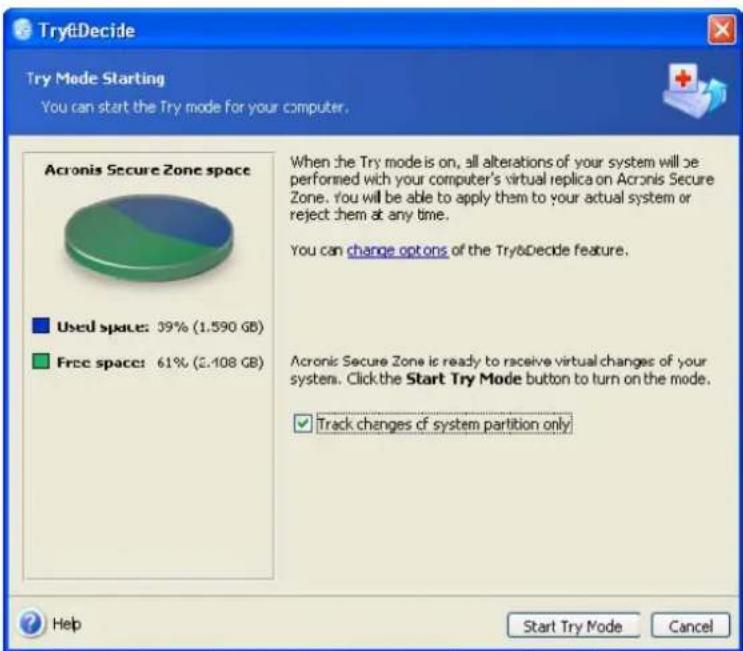
text_image
Try&Decide Try Mode Starting You can start the Try mode for your computer. Acronis Secure Zone space Used space: 39% (1.590 GB) Free space: 61% (£.108 GB) When the Try mode is on, all alterations of your system will be performed with your computer's virtual replica on Acronis Secure Zone. You will be able to apply them to your actual system or reject them at any time. You can change options of the Try&Decide feature. Acronis Secure Zone is ready to receive virtual changes of your system. Click the Start Try Mode button to turn on the mode. ✓ Track changes of system partition only Help Start Try Mode Cancel- If you are satisfied with the results, apply the changes to the real system by selecting Apply changes and then clicking the Decide button. You can also apply the changes by right-clicking on the program's icon in the system tray and selecting Make a Decision - >Apply changes in the context menu.
- If you do not want to apply the changes, select Discard changes and then click the Decide button. You can also discard the changes by right-clicking on the program's icon in the system tray and selecting Make a Decision -> Discard changes in the context menu. The system will reboot returning to the state it was in before activating the Try mode.
- If you think that may be you would like to try some more changes, leave checked Continue to work in Try mode (selected by default) and click the Cancel button.

It is important to note that the Try&Decide will automatically discard all changes when you reboot the computer, so do not reboot if you are going to apply the changes to the real system.

Acronis True Image Home will be tracking changes until the Acronis Secure Zone is almost full. Then the program will alert you that it cannot track changes anymore and will offer to apply or discard the changes made so far. If you choose to not heed the alert messages, the program will automatically restart the system when the Acronis Secure Zone is full, discarding the changes in the process of rebooting. At that point, all changes will be lost.

If you allocated time for trying changes in the System Reverting option, Acronis True Image Home will be tracking changes until the allocated time almost expires. Then it will display message "Your computer will be rebooted in 5 minutes", giving you time to make a decision to apply or discard the changes made so far. If you choose to not heed the message, the program will automatically reboot the system when the allocated time expires, discarding the changes in the process of rebooting. At that point, all changes will be lost.

Please note that while working in the Try mode you will experience slowing down the system performance. Furthermore, the process of applying changes could take considerable time.

Please be aware that the Try&Decide utility cannot track changes in disk partitions, so you will be unable to use the Try mode for virtual operations with partitions such as resizing partitions or changing their layout.

It is important to remember that in the Try mode you will not be able to perform backups (including scheduled ones) on the Acronis Secure Zone and restore data from the Zone because the Try&Decide feature locks the Acronis Secure Zone while running.
7.2 Try&Decide usage examples
The Try&Decide utility can help you in a variety of ways; here are some examples:
There are cases when the installation of antivirus software cripples functionality of some applications; in fact, some programs might even refuse to launch after antivirus installation. The Try&Decide utility can help you to avoid such a problem. Here's how:
- Select an antivirus program and download a trial version.
- Turn on the Try mode.
- Install the antivirus software.
- Try to work with the applications installed on your computer performing your usual tasks.
- If all works without any snags, you can be reasonably sure that there will be no incompatibility problems and can buy the antivirus software.
- If you encounter any problems, discard the changes in your system and try antivirus software of another vendor. The new attempt might turn out to be successful.
Here's another example: You have accidentally deleted some files and then emptied the Recycle Bin. Then you have remembered that the deleted files contained important data and now you are going to try to undelete them using an undelete software program. However, sometimes you may do something wrong while trying to recover deleted files, making things worse than before trying to recover them. Here's one way you could try to recover the lost files:
- Turn on the Try mode.
- Launch the file undelete utility.
- After the utility scans your disk in search of the deleted file or folder entries, it will present you the deleted entries it has found (if any) and offer you an opportunity to save whatever it is able to recover. There is always a chance that you might pick the wrong file and while recovering it the utility may overwrite the very file you are trying to recover. If not for the Try&Decide, this error would be fatal and the file would be lost irretrievably.
- But now you can just discard the changes made in the Try mode and make one more attempt to recover the files after turning on the Try mode again. Such attempts can be repeated until you recover the files or until you are sure that have done your best to recover the files.
Chapter 8. Backup location management
This section covers creation and deletion of backup locations, setting rules for backup locations and viewing archives contained in backup locations.
Before you start managing backup locations, be sure to read section 3.5 Acronis backup locations, stating their purpose and basic principles.
8.1 Creating backup locations
To launch the Create Backup Location wizard, select the Management Tools category in the main program window and click Manage Backup Locations and Archives in the Main group or select the Tools -> Management -> Manage Backup locations and Archives in the main program menu to navigate to the Backup Locations window. Then select Create Backup Location.
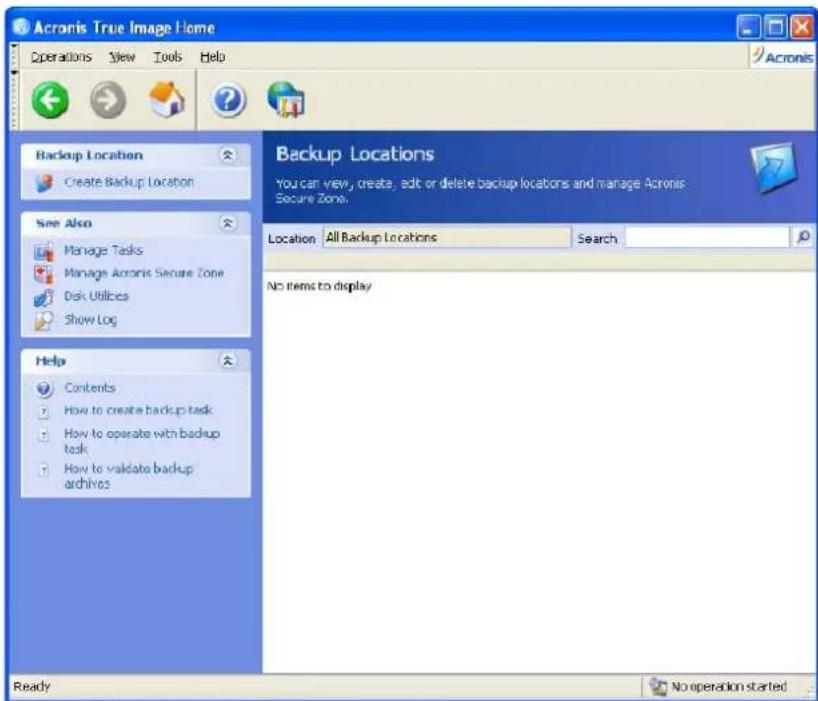
text_image
Acronis True Image Home Operations View Tools Help Acronis Backup Location Create Backup Location See Also Manage Tasks Manage Acronis Secure Zone Disk Utilities Show Log Help Contents How to create backup task How to operate with backup task How to validate backup archives Backup Locations You can view, create, edit or delete backup locations and manage Acronis Secure Zone. Location All Backup Locations Search No items to display Ready No operation startedCreating a location includes the following steps.
8.1.1 Setting a path to the backup location
Backup locations can be organized
• on a local (internal) hard drive
• on an external drive (USB or like)
- on rewritable media (flash card, for example), in case it is recognized by the BIOS as a hard drive and not as removable media
• on a network share
- on an FTP server
Provide the full path to the folder that will become a backup location along with the username and password for the network drive or FTP server access.
You want to avoid backing up to the same disk where your operating system and user data are located. If you have only one disk and cannot store your backups outside the computer, use the Acronis Secure Zone instead of backup locations.
When using removable media, a network share or an FTP server, consider the storage device's free space and availability of that storage in case you need data recovery.
8.1.2 Setting the backup rules
The rules include:
1) maximum size
This is the maximum storage space allowed for a backup location.
To estimate the location size, you can start a backup and select all data you are going to copy to the location. At the Choose Backup Options step, select Set the options manually, then set the compression level. You will see the estimated full backup size (for disk/partition backup) or the approximate compression ratio (for file-level backup) with which you can calculate the estimated full backup size. Multiply this by about 1.5 to be able to create incremental or differential backups (roughly). Also consider the next rule, especially if you are going to create multiple full backups.
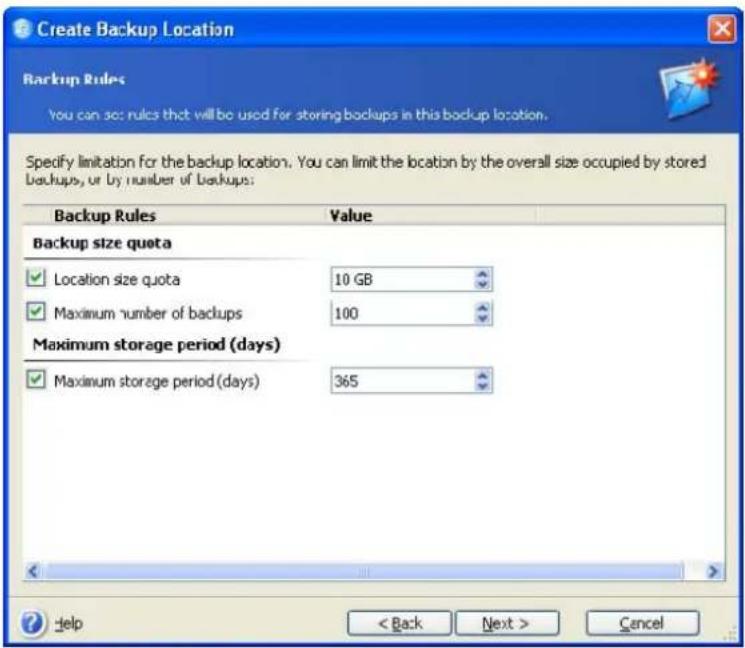
text_image
Create Backup Location Backup Rules You can set: rules that will be used for storing backups in this backup location. Specify limitation for the backup location. You can limit the location by the overall size occupied by stored backups, or by number of backups: Backup Rules Value Backup size quota ✓ Location size quota 10 GB ✓ Maximum number of backups 100 Maximum storage period (days) ✓ Maximum storage period (days) 365 ?Help < Back Next > Cancel2) maximum number of backups
This is the total number of backups allowed for a location
3) maximum storage period for the archives in a backup location
After creating a backup in a backup location, the program checks the location for quota violations and, if any limitation is exceeded, deletes or consolidates the oldest backups.

When creating a backup task, be sure to select the backup location from the Backup Locations list, near the top of the directory tree. Doing so will enable the processing of backups. If you select a backup location as a normal folder, the processing will not be performed.
8.2 Editing backup locations
To launch the Edit Backup Location wizard, select the Management Tools category in the main program window and click Manage Backup Locations and Archives in the Main group or select the Tools -> Management -> Manage Backup locations and Archives in the main program menu to navigate to the Backup Locations window. Then select Edit Backup Location.
Select the location and enter the new values for backup rules. The new rules will be applied to the entire location: at the next backup to this location, all its contents will be processed according to the new rules.
8.3 Deleting a backup location
To launch the Delete Backup Location wizard, select the Management Tools category in the main program window and click Manage Backup Locations and Archives in the Main group or select the Tools -> Management -> Manage Backup locations and Archives in the main program menu to navigate to the Backup Locations window. Then select Delete Backup Location.
Select a location. Expanding it in the folder tree will display the location contents. If you want to delete all archives stored there, check Remove Archive Contents. Otherwise the location will become a common folder and you will be able to access the archives using any file manager.
Then click Next and the wizard will display the contents of the location you are going to delete. Select Next, read the summary and click Proceed. The operation will be performed without a prompt.
8.4 Exploring a backup location
To explore a backup location, select the Management Tools category in the main program window and click Manage Backup Locations and Archives in the Main group or select the Tools -> Management -> Manage Backup locations and Archives in the main program menu to navigate to the Backup Locations window.
The window will show a list of your backup locations, if any. Then select a location to explore and click Explore Backup Location on the left side of the screen; this is the sidebar. If the location contains backup archives protected with a password, Acronis True Image Home will ask for it. Then the list of location contents grouped by archive types will be displayed. Select the archive you want to explore and click Show Backup Content on the sidebar. The window will display the archive contents. Select folders and/or files you want to restore (if any) and click Restore Selected Items in the Backup Content Selection group on the sidebar. This will launch Restore Data Wizard, which will guide you through the process of restoring the selected items.

If a location contains backups protected by different passwords, only the backups protected by the password you entered will be displayed. The backups protected by the other passwords will be invisible. To display them, select the same backup location again, click Explore Backup Location, and enter the next password, etc.
Chapter 9. Scheduling tasks
Acronis True Image Home allows you to schedule periodic backup and validation tasks. Doing so will give you peace of mind, knowing that your data is safe.
You can create more than one independently scheduled task. For example, you can back up your current project daily and back up the application disk once a week.
All the scheduled tasks appear in the Scheduled Tasks window, where you can create, edit, delete, rename, change their schedules, as well as start and stop them.
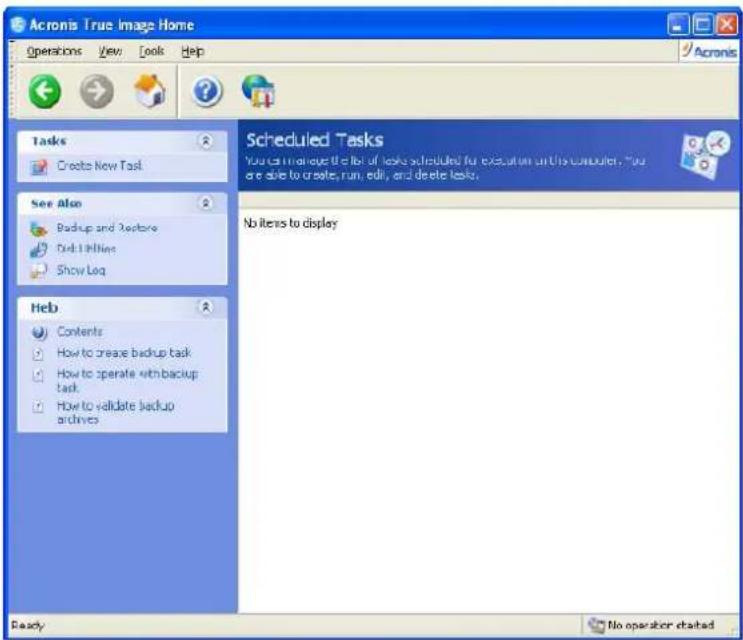
text_image
Acronis True Image Home Operations View Tools Help Acronis Tasks Creates New Task Scheduled Tasks You can manage the list of tasks scheduled for execution on this computer. You are able to create, run, edit, and delete tasks. See Also Backup and Restore Build Utilities Show Loq No items to display Help Contents How to create backup task How to operate with backup task How to validate backup archives Ready No operator startedTo navigate to the Scheduled Tasks window, click Management Tools in the main window, then select Manage Tasks in the Main group or select Tools -> Management -> Manage Tasks in the main program menu. You can also select the Manage Tasks on the sidebar when this item is shown on the sidebar.
9.1 Creating scheduled tasks
- To launch the Schedule Task Wizard, select Operations -> Create New Task from the main program menu. You can also click Management Tools category in the main window, then select Manage Tasks in the Main group to navigate to the Scheduled Tasks window. Then click the Create New Task on the sidebar.
- Select the type of a task you want to schedule: Backup or Validate. If you choose Validate, select the backup archive to validate in the Backup Archive Selection window, then go to step 7.

If the backup archive you want to validate is protected with a password, Acronis True Image Home will ask for it.

If you choose a backup location or the Acronis Secure Zone, Acronis True Image Home will validate all backups stored there. When any backup stored in the backup location is protected with a password, the program will ask for it.
-
If you choose Backup, select the data to back up. (See 5.2.1 - 5.2.4)
-
Select the destination for the backups that will be created on a schedule. If you choose to create the backup archive on a network drive, you will have to enter a user name and a password for network access.
-
If the archive destination is other than a backup location, select the backup mode (full, incremental, differential). See details in 5.2.6 Selecting the backup mode. For definitions and basic information about full, incremental and differential backup modes see 3.2 Full, incremental and differential backups.
If you chose to store backups in a backup location, set the backup policy for the backup task.
Acronis True Image Home offers three types of backup policies:
1) create full backups only
2) create full backups with specified number of incremental backups
3) create full backups with specified number of differential backups (recommended)
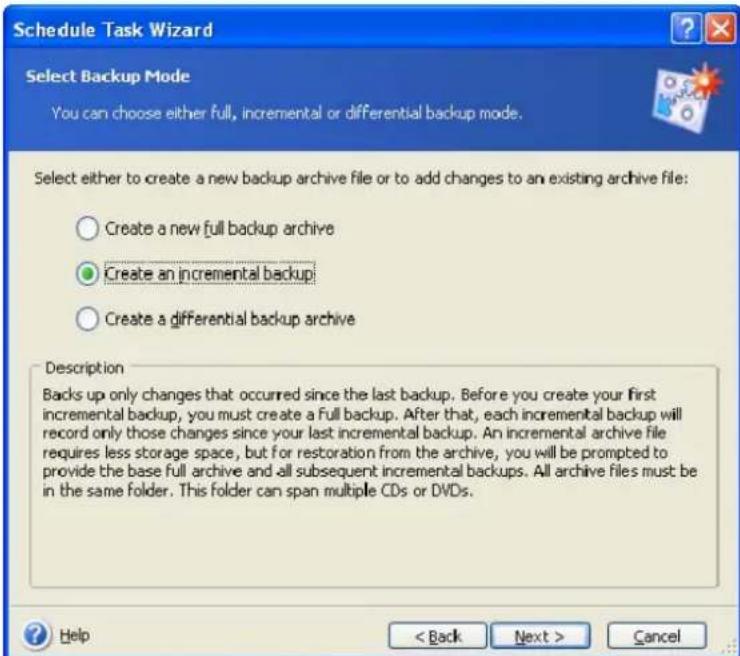
text_image
Schedule Task Wizard Select Backup Mode You can choose either full, incremental or differential backup mode. Select either to create a new backup archive file or to add changes to an existing archive file: ○ Create a new full backup archive ● Create an incremental backup ○ Create a differential backup archive Description Backs up only changes that occurred since the last backup. Before you create your first incremental backup, you must create a Full backup. After that, each incremental backup will record only those changes since your last incremental backup. An incremental archive file requires less storage space, but for restoration from the archive, you will be prompted to provide the base full archive and all subsequent incremental backups. All archive files must be in the same folder. This folder can span multiple CDs or DVDs. Help < Back Next > CancelWhen the first backup on a schedule is executed, a full backup will be created. If the choice was (2) or (3), the next backups will be incremental (or differential) until the specified number of incremental (differential) backups is reached. After the selected number of incremental or differential backups is made, the next time a new full backup and a set of subsequent incremental (differential) backups will be created; this process will then continue until you decide to change it.
Using incremental backup mode, you can maximize the number of stored data incidents given the restricted storage space. However, archives with very long incremental “chains” are less reliable since the corruption of any backup in a chain makes data recovery from the later backups impossible.
Storing only full backups could be regarded as the most reliable and the most space-consuming way.
Differential backups are almost as reliable as full ones since they do not depend on each other, but only on the initial full backup. No matter how many differential backups you
create, to recover data from each of them, you will additionally use only the base full backup.
-
Complete configuring the backup task in the usual way (see 5.2.7 Selecting the backup options and 5.2.8 Providing a comment).
-
Perform task running scheduling.
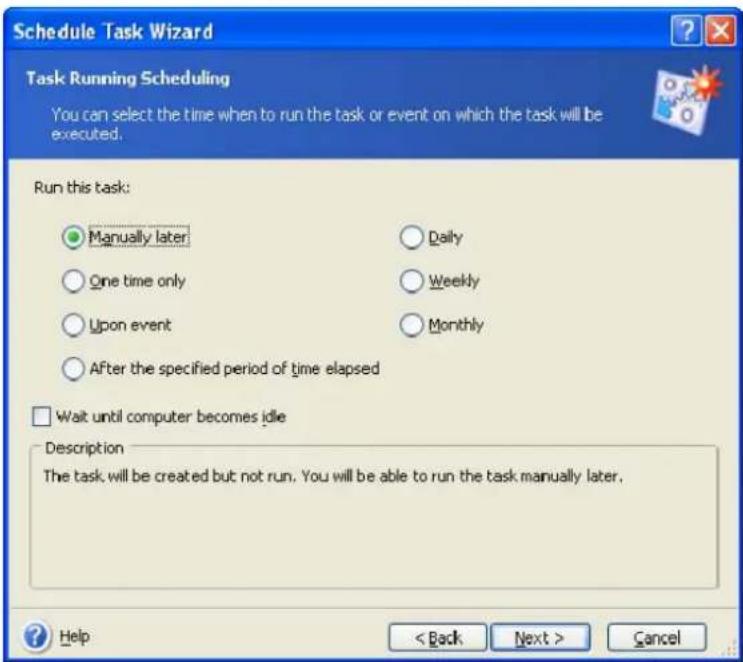
text_image
Schedule Task Wizard Task Running Scheduling You can select the time when to run the task or event on which the task will be executed. Run this task: Manually later Daily One time only Weekly Upon event Monthly After the specified period of time elapsed Wait until computer becomes idle Description The task will be created but not run. You will be able to run the task manually later. Help < Back Next > Cancel- Manually later – the task will be saved, but not launched automatically. You will be able to launch it later by clicking the Start Task icon on the sidebar in the Scheduled Tasks window
• One time only – the task will be executed once at the specified time and day
- Upon event – the task will be executed on an event to be selected in the Task Execution by Event window:
- At system startup – the task will be executed at every OS startup
- At system shutdown – the task will be executed before every system shutdown or reboot
- At user logon – the task will be executed each time the current user logs on to the OS
- At user logoff – the task will be executed each time the current user logs off of the OS.
- When free disk space changes – the task will be executed each time the free disk space decreases or increases by a value specified in the below field.

If you want to run a task only at the first occurrence of the event on the current day, check the Run the task once a day only box.
- After the specified period of time elapsed – the task will be executed periodically with a frequency to be specified in the Frequency of Task Execution window, where you specify the time between runs for the task being scheduled.
• Daily – the task will be executed once a day or once in several days
- Weekly – the task will be executed once a week or once in several weeks on the selected day
• Monthly – the task will be executed once a month on the selected day
To postpone a scheduled task until the next time when computer is idle, check the until computer becomes idle box. The task will automatically start when the computer is idle for the number of minutes specified in the Wait setting of the screen saver or when you log off. Once the task has started, it will be completed because task execution cannot be interrupted by user. However, you can work on the computer while the task is running.

Some of these options might be disabled depending on the operating system.
- Specify the task start time and other schedule parameters, according to the selected periodicity (see 9.1.1 - 9.1.4).
- Next you will have to specify the name of the user who owns the task to be executed; otherwise no scheduled execution will be available.
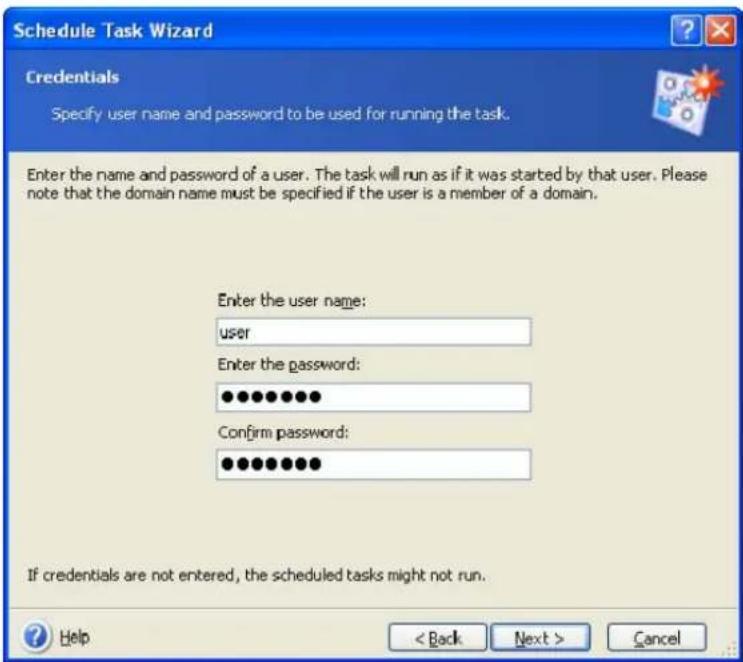
text_image
Schedule Task Wizard Credentials Specify user name and password to be used for running the task. Enter the name and password of a user. The task will run as if it was started by that user. Please note that the domain name must be specified if the user is a member of a domain. Enter the user name: user Enter the password: ●●●●●●●● Confirm password: ●●●●●●●● If credentials are not entered, the scheduled tasks might not run. Help < Back Next > CancelIn the upper field, enter the user name. Enter the password twice in the fields below.
-
At the final step, the task configuration is displayed. Up to this point, you can click Back to make changes in the created task. If you click Cancel, all settings will be lost. Click Finish to save the task.
-
The task schedule and default name appear in the Scheduled Tasks window. You can rename the task right off or may choose to do it later.
9.1.1 Setting up daily execution
If you select daily execution, set the Start time and days on which you want to execute the task:
- Every day
- Weekdays
• Every x days – once in several days (specify the interval).
If you want the task to be repeated several times per day, check Repeat task every x hours box and specify the interval in hours.

text_image
Schedule Task Wizard Daily Execution of Task Set parameters of daily task running. Select the time and day you want this task to start. Start time: 6 hours 0 minutes PM If the computer is turned off, run the missed tasks at start-up Perform this task: Every day Every weekday Every 2 days Repeat task every 2 hours Help < Back Next > CancelIf the computer is off when the scheduled time comes, the task won't be performed, but you can force the missed task to run at the next system startup by checking a box under the Start time fields.
9.1.2 Setting up weekly execution
If you select weekly execution, set the Start time, specify the task execution periodicity in the Every x weeks box (every week, every two weeks, etc.) and check the days on which to execute the task.
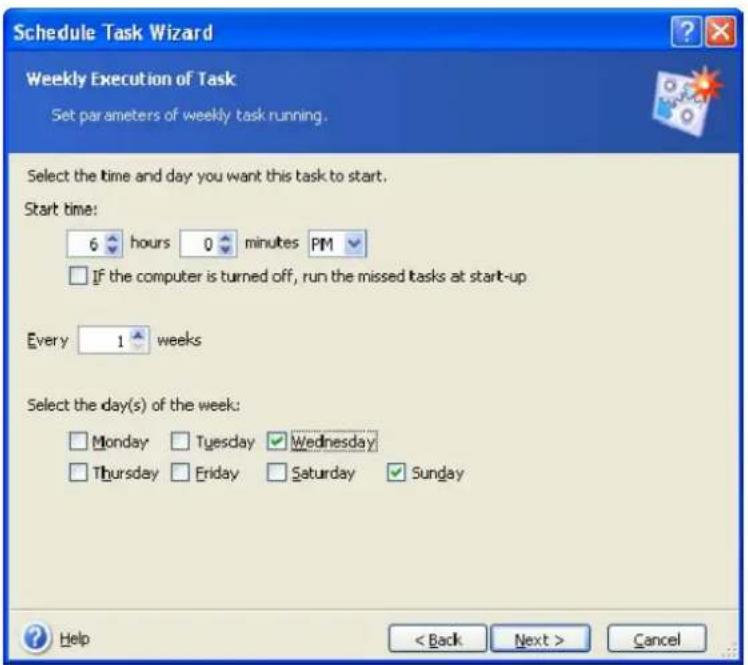
text_image
Schedule Task Wizard Weekly Execution of Task Set parameters of weekly task running. Select the time and day you want this task to start. Start time: 6 hours 0 minutes PM If the computer is turned off, run the missed tasks at start-up Every 1 weeks Select the day(s) of the week: Monday Tuesday Wednesday Thursday Friday Saturday Sunday Help < Back Next > CancelIf the computer is off when the scheduled time comes, the task won't be performed, but you can force the missed task to run at the next system startup by checking a box under the Start time fields.
9.1.3 Setting up monthly execution
If you select monthly execution, set the Start time and days on which to execute the task:
• Day – on the specified date
- The
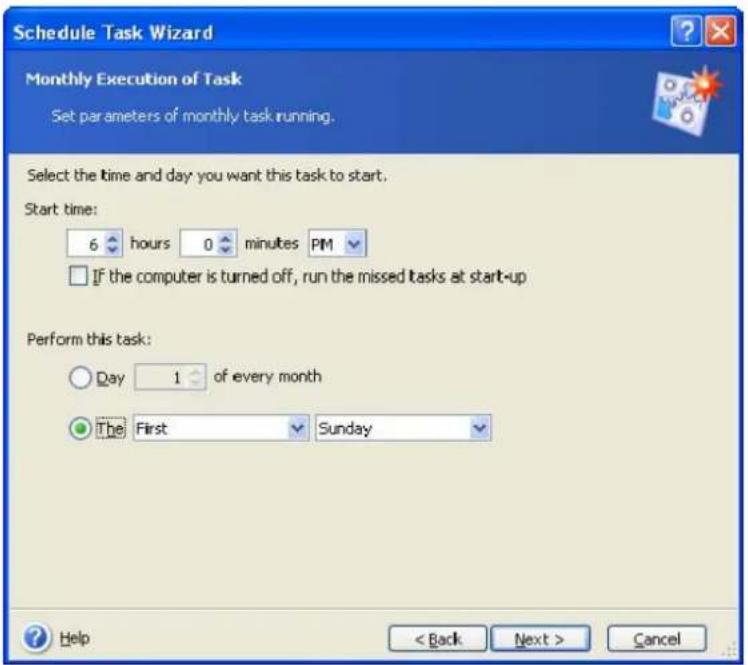
text_image
Schedule Task Wizard Monthly Execution of Task Set parameters of monthly task running. Select the time and day you want this task to start. Start time: 6 hours 0 minutes PM If the computer is turned off, run the missed tasks at start-up Perform this task: Day 1 of every month The First Sunday Help < Back Next > CancelIf the computer is off when the scheduled time comes, the task won't be performed, but you can force the missed task to run at the next system startup by checking a box under the Start time fields.
9.1.4 Setting up one-time execution
If you select the one-time only execution, set the Start time and date on which to execute the task:
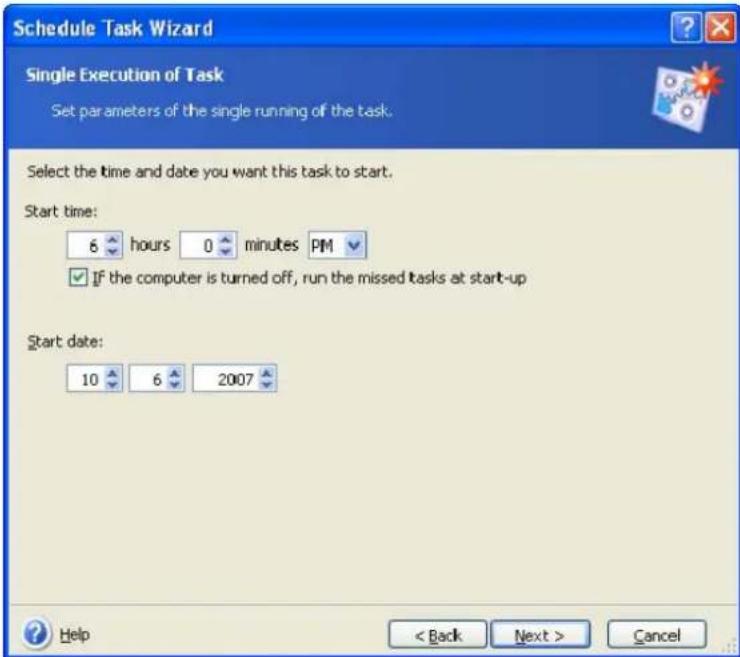
text_image
Schedule Task Wizard Single Execution of Task Set parameters of the single running of the task. Select the time and date you want this task to start. Start time: 6 hours 0 minutes PM ✓ If the computer is turned off, run the missed tasks at start-up Start date: 10 6 2007 Help < Back Next > CancelIf the computer is off when the scheduled time comes, the task won't be performed, but you can force the missed task to run at the next system startup by checking a box under the Start time fields.
9.2 Managing scheduled tasks
To navigate to the Scheduled Tasks window, click Management Tools in the main window, then select Manage Tasks in the Main group. You can also select Tools -> Management -> Manage Tasks in the main menu or click Manage Tasks on the sidebar when this item is shown on the sidebar. The Scheduled tasks window displays all scheduled tasks along with their Status, Schedule, Last Run Time, Last Result, and Owner. To view the other task details, mouse over their names.
By default you see only your own tasks, but you have an option to view or manage tasks of other users. To do so, select Tools -> Options -> Tasks from the main program menu. Then select Task Filter and uncheck Show only tasks created by a current user box.
There are two ways of changing the task parameters. One is by editing. This is performed in the same way as creation, however, the earlier selected options will be set, so you have to enter only the changes. To edit a task, select it and click Edit Task on the sidebar.
If you want to change only periodicity and/or start time, click Change Task Schedule on the sidebar. Then you will have to perform only scheduling steps, leaving the other task settings the same.
To delete a task with confirmation, select it and click Delete Task on the sidebar.
To rename a task, select it, click Rename on the sidebar and enter the new task name.
Chapter 10. Managing Acronis Secure Zone
The Acronis Secure Zone is a special partition for storing archives on the same computer that created the archive. The Acronis Secure Zone is a required component for using the Acronis Startup Recovery Manager and the Try&Decide feature. For more information about these functions, see 3.3 Acronis Secure Zone, 3.4 Acronis Startup Recovery Manager, and 3.8 Try&Decide
When you select Tools -> Manage Acronis Secure Zone in the main menu, the program searches for the zone on all local drives. If a zone is found, the wizard will offer to manage it (resize or change the password) or remove. If there is no zone, you'll be prompted to create it.
If the Acronis Secure Zone is password-protected, the proper password must be entered before any operation can take place.
10.1 Creating the Acronis Secure Zone
Acronis Secure Zone can be located on any internal disk. It is created using unallocated space, if available, or at the expense of free space on a partition. Partition resizing may require a reboot.

We do not recommend creating the Acronis Secure Zone on external media (USB drives, etc.), because this may lead to problems with computer booting if this external storage is disconnected. Furthermore, in this case the Try&Decide feature may not work properly.
A computer can have only one secure zone. To create a zone on another disk, you must first delete the existing zone.
-
Before creating a zone, you need to estimate its size. To do so, start a backup and select all data you are going to copy into it. At the Choose Backup Options step, select Set the options manually, then set the compression level. You will see the estimated full backup size (for disk/partition backup) or the approximate compression ratio (for file-level backup) with which you can calculate the estimated full backup size. Multiply this by 1.5 to be able to create incremental or differential backups. Remember that the average compression rate is 2:1, so you can use this as a guide as well to create a zone. Let's say you have a hard disk with 10GBs of programs and data. Under normal conditions, that will compress down to approximately 5GB. As a result, you might want to make the total size 7.5GB.
-
If there are several disks installed, select one on which to create Acronis Secure Zone.
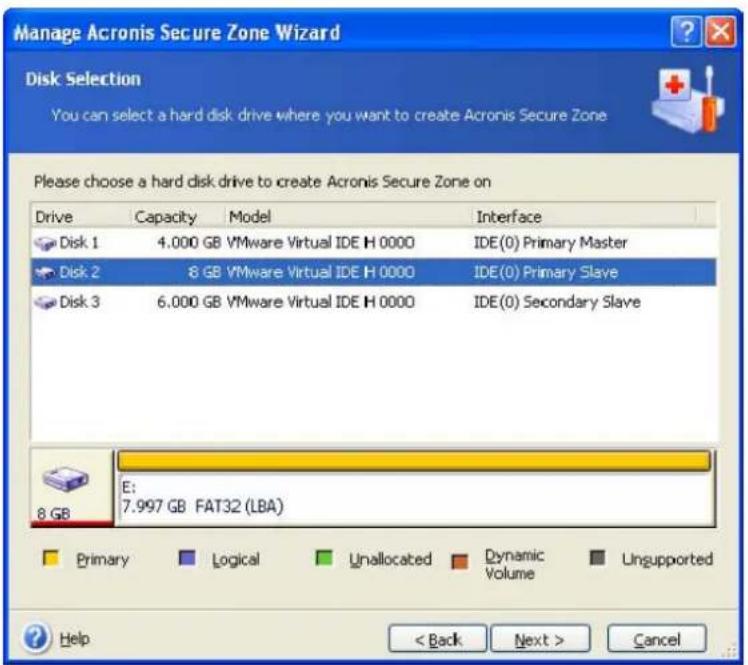
text_image
Manage Acronis Secure Zone Wizard Disk Selection You can select a hard disk drive where you want to create Acronis Secure Zone Please choose a hard disk drive to create Acronis Secure Zone on Drive Capacity Model Interface Disk 1 4.000 GB VMware Virtual IDE H 0000 IDE(0) Primary Master Disk 2 8 GB VMware Virtual IDE H 0000 IDE(0) Primary Slave Disk 3 6.000 GB VMware Virtual IDE H 0000 IDE(0) Secondary Slave E: 7.997 GB FAT32 (LBA) Primary Logical Unallocated Dynamic Volume Unsupported Help < Back Next > Cancel- Select the partitions from which space will be used to create the zone.
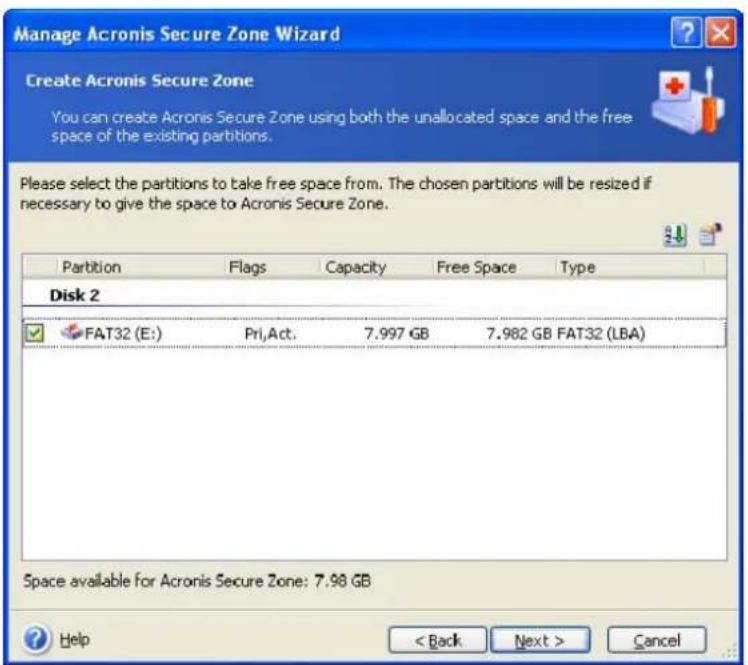
text_image
Manage Acronis Secure Zone Wizard Create Acronis Secure Zone You can create Acronis Secure Zone using both the unallocated space and the free space of the existing partitions. Please select the partitions to take free space from. The chosen partitions will be resized if necessary to give the space to Acronis Secure Zone. Partition Flags Capacity Free Space Type Disk 2 FAT32 (E:) Pri,Act. 7.997 GB 7.982 GB FAT32 (LBA) Space available for Acronis Secure Zone: 7.98 GB Help < Back Next > Cancel- In the next window, enter the Acronis Secure Zone size or drag the slider to select ar size between the minimum and maximum ones.
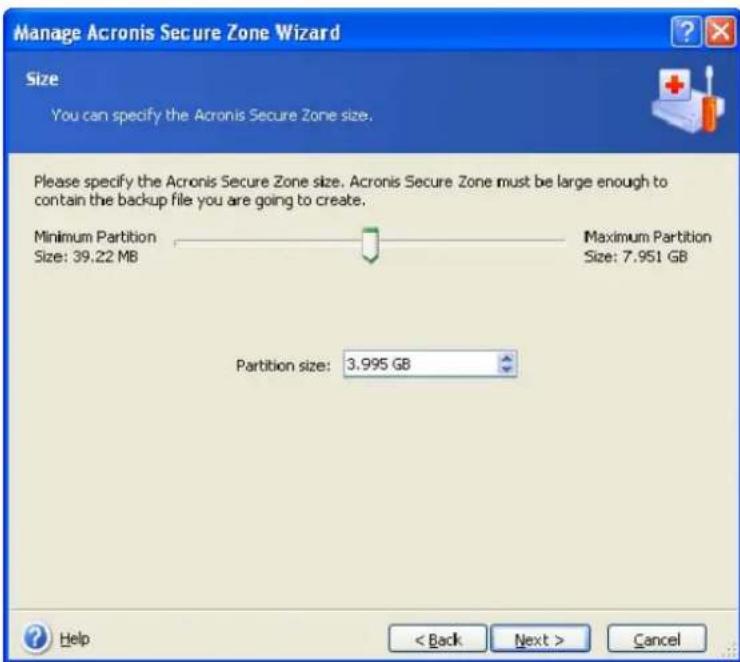
text_image
Manage Acronis Secure Zone Wizard Size You can specify the Acronis Secure Zone size. Please specify the Acronis Secure Zone size. Acronis Secure Zone must be large enough to contain the backup file you are going to create. Minimum Partition Size: 39.22 MB Maximum Partition Size: 7.951 GB Partition size: 3.995 GB Help < Back Next > CancelThe minimum size is about 35 MB, depending on the geometry of the hard disk. The maximum size is equal to the disk's unallocated space plus the total free space on all partitions selected at the previous step.
When creating the zone, the program will first use the unallocated space. If there is not enough unallocated space, the selected partitions will be decreased. Partition resizing may require a reboot.

Reducing a system partition to the minimum size might prevent your operating system from booting.
- You can set a password to restrict access to the zone. The program will ask for the password at any operation relating to it, such as data backup and recovery, mounting images or validating archives on the zone, rescue boot with the F11 key, resizing and deleting the zone.

Acronis True Image Home repair or update will not affect the password. However, if the program is removed and then installed again while keeping the Acronis Secure Zone on the disk, the password to the zone will be reset.
-
After this, you will be prompted to activate Acronis Recovery Manager, which will enable you to start Acronis True Image Home at boot time by pressing the F11 key. Or, you can activate this feature later from the main program window.
-
Then you will see a list of operations to be performed on partitions (disks).
After you click Proceed, Acronis True Image Home will start creating the zone. Progress will be reflected in a special window. If necessary, you can stop zone creation by clicking Cancel. However, the procedure will be canceled only after the current operation is finished.
Acronis Secure Zone creation might take several minutes or more. Please whole procedure is finished.
10.2 Resizing Acronis Secure Zone
-
When prompted by the wizard, select Manage Acronis Secure Zone.
-
Select to increase or decrease the zone. You might need to increase it to provide m space for archives. The opposite situation might arise if any partition lacks free space.
-
Select partitions from which free space will be used to increase Acronis Secure Zone or that will receive free space after the zone is reduced.
-
Enter the new size of the zone or drag the slider to select the size.
When increasing the Acronis Secure Zone, the program will first use unallocated space. If there is not enough unallocated space, the selected partitions will be decreased. Resizing of the partitions may require a reboot.
When reducing the zone, any unallocated space, if the hard disk has it, will be allocated to the selected partitions along with the space freed from the zone. Thus, no unallocated space will remain on the disk.
- Next you will see a list of briefly described operations to be performed on partitions (disks).
After you click Proceed, Acronis True Image Home will start resizing the zone. Progress will be reflected in a special window. If necessary, you can stop the procedure by clicking Cancel. However, the procedure will be canceled only after the current operation is finished.
Zone resizing can take several minutes or longer. Please wait until the whole procedure is finished.
10.3 Changing the password for Acronis Secure Zone
-
When prompted by the wizard, select Manage Acronis Secure Zone.
-
Select Change password.
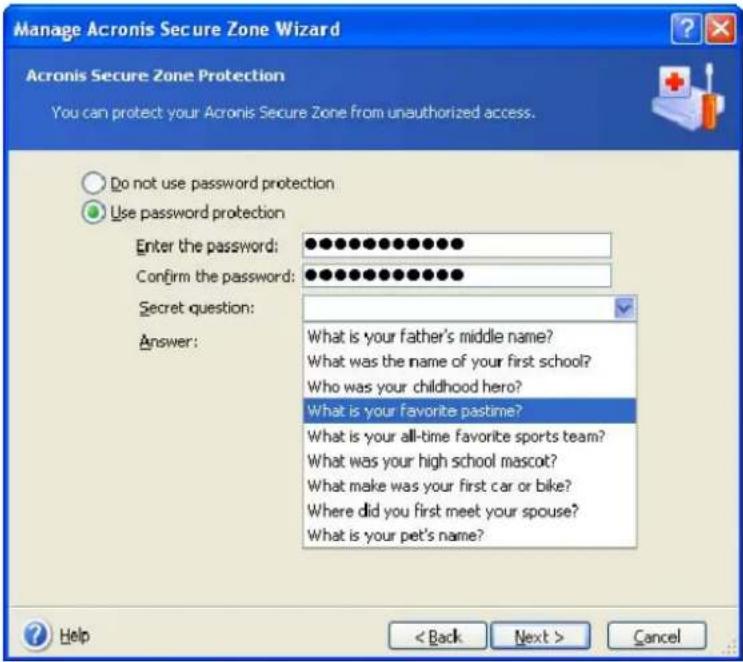
text_image
Manage Acronis Secure Zone Wizard Acronis Secure Zone Protection You can protect your Acronis Secure Zone from unauthorized access. Do not use password protection Use password protection Enter the password: Confirm the password: Secret question: Answer: What is your father's middle name? What was the name of your first school? Who was your childhood hero? What is your favorite pastime? What is your all-time favorite sports team? What was your high school mascot? What make was your first car or bike? Where did you first meet your spouse? What is your pet's name? Help < Back Next > Cancel-
Enter the new password and confirm it or select Do not use password protection. You can also select a secret question that will be asked in case you forget the password.
-
To perform the password change operation, click Proceed in the final wizard window.
10.4 Deleting Acronis Secure Zone
- When prompted by the wizard, select Remove Acronis Secure Zone.
- Select the partitions to which you want to add the space freed from the zone. If you select several partitions, the space will be distributed proportionally to each partition.
- Next, you will see a list of briefly described operations to be performed on partitions (disks).
After you click Proceed, Acronis True Image Home will start deleting the zone. Progress will be reflected in the opened window. If necessary, you can stop the procedure by clicking Cancel. However, the procedure will be canceled only after the current operation is finished.
Zone deletion might take several minutes or more. Please wait until the whole procedure is finished.

Acronis Secure Zone deletion will automatically destroy all backups stored in the zone and disable the Acronis Startup Recovery Manager.
Chapter 11. Creating bootable media
You can run Acronis True Image Home from an emergency boot disk on a bare-metal system or a crashed computer that cannot boot. You can even back up disks on a non-Windows computer, copying all its data into the backup archive by imaging the disk one sector at a time. To do so, you will need bootable media that has a copy of the standalone Acronis True Image Home version installed on it.
If you purchased the boxed product, you already have a bootable CD, because the installation CD itself is bootable in addition to serving as the program installation disk.
If you purchased Acronis True Image Home on the Web or as a download from a retailer, you can create bootable media using the Bootable Media Builder. For this, you will need a CD-R/RW blank, DVD±R/RW blank, several formatted diskettes (the wizard will tell you the exact number), or any other media from which your computer can boot, such as a Zip drive.
Acronis True Image Home also provides the ability to create an ISO image of a bootable disk on the hard disk.
If you have other Acronis products installed on your computer, such as Acronis Disk Director Suite, you can include standalone versions of these programs on the same bootable disk as well.

If you have chosen not to install the Bootable Media Builder during Acronis True Image Home installation, you will not be able to use this feature.

When booting from the Rescue Media, you cannot perform backups to disks or partitions with Ext2/Ext3, ReiserFS, and Linux SWAP file systems.
-
Click Create Bootable Rescue Media on the sidebar, or select Create Bootable Rescue Media from the Tools menu. You can also run the Bootable Rescue Media Builder without loading Acronis True Image Home by selecting Programs -> Acronis -> Acronis True Image Home -> Bootable Rescue Media Builder from the Start menu.
-
Select which components of Acronis programs you want to place on the bootable media.
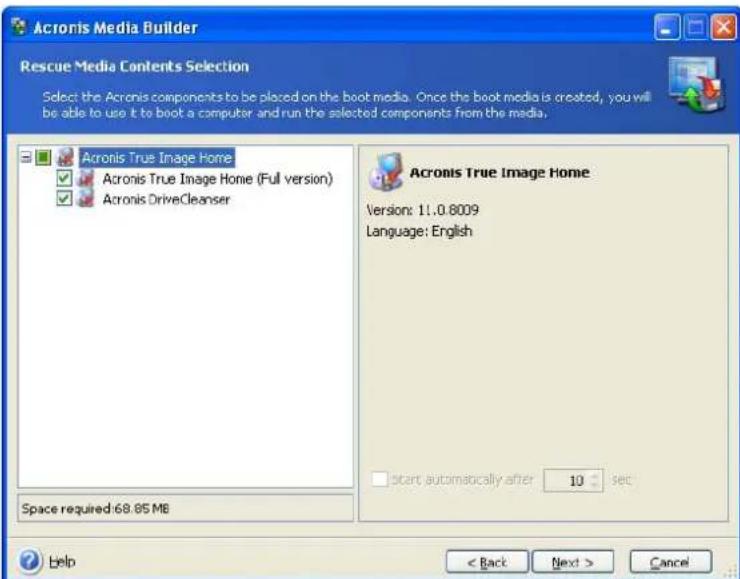
text_image
Acronis Media Builder Rescue Media Contents Selection Select the Acronis components to be placed on the boot media. Once the boot media is created, you will be able to use it to boot a computer and run the selected components from the media. Acronis True Image Home Acronis True Image Home (Full version) Acronis DriveCleanser Acronis True Image Home Version: 11.0.8009 Language: English Start automatically after 10 sec Space required:68.85 MB Help < Back Next > CancelAcronis True Image Home offers the following components:
• Acronis True Image Home full version
Includes support of USB, PC Card (formerly PCMCIA) and SCSI interfaces along with the storage devices connected via them, and therefore is strongly recommended.
• Acronis DriveCleanser
This is a standalone version of the Acronis DriveCleanser utility that will allow you to destroy confidential data on your PC disks easily and permanently even if you uninstall Acronis True Image Home.
In the next window you can set Bootable Media Startup Parameters in order to configure rescue media boot options for better compatibility with different hardware. Several options are available (nousb, nomouse, noapic, etc.). All the available startup parameters are listed in Appendix D. Startup Parameters. These parameters are provided for advanced users. If you encounter any hardware compatibility problem while testing boot from the rescue media, it may be the best to contact Acronis Technical Support.
You may also wish to add Acronis True Image Home safe version when creating your bootable rescue media. This version does not include USB, PC Card, or SCSI drivers. Recommended for use on rare occasions where problems running the full version occur. To add this version, you should download the appropriate installation file from Acronis web-site and then perform installation. After installation the Acronis True Image Home safe version will appear as one of the components to be offered by Acronis Media Builder for placing on the bootable media.

After installation the Acronis True Image Home safe version will also appear in the Default backup options (Media components) allowing you to place it on a removable media along with the data being backed up if you backup to the removable media.
By the way, you can also download an Acronis True Image Home plug-in for the well-known Bart PE utility that is used for booting into a Windows-like environment from CD. Applications are installed into Bart PE in the form of plug-ins. Downloading the plug-in provides ability to include Acronis True Image Home into a Bart PE plug-in tab.
- Select the type of bootable media (CD-R/RW, DVD±R/RW or 3.5" diskettes) to create. If your BIOS has this feature, you can create other bootable media such as removable USB flash drives. You can also choose to create a bootable disk ISO image.

When using 3.5" diskettes, you will be able to write on a diskette (or a set of diskettes) only one component at a time (for example, Acronis True Image Home). To write another component, start Bootable Media Builder again.
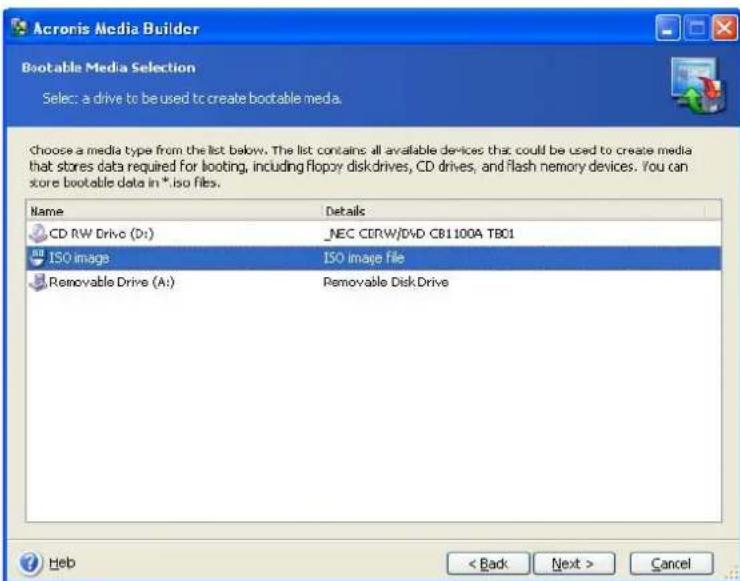
text_image
Acronis Media Builder Bootable Media Selection Select: a drive to be used to create bootable media. Choose a media type from the list below. The list contains all available devices that could be used to create media that stores data required for looting, including floppy disk drives, CD drives, and flash memory devices. You can store bootable data in *.iso files. Name Details CD RW Drive (D:) NEC CERW/DVD CB1100A TB01 ISO image ISO image file Removable Drive (A:) Removable Disk.Drive ? Heb < Back Next > Cancel- If you are creating a CD, DVD or any removable media, insert a blank disk so the program can determine its capacity. If you choose to create a bootable disk ISO image, specify the ISO file name and the folder in which to place it.
- Next, the program will estimate how many blank disks are required (in case you have not chosen ISO or CD) and give you time to prepare them. When you are finished, click Proceed.
After you create a boot disk, mark it and keep it in a safe place.
Please keep in mind that the backups created by the later program version may be incompatible with the previous program versions. Due to this reason, we strongly recommend that you create a new bootable media after each Acronis True Image Home upgrade.
Chapter 12. Other operations
12.1 Validating backup archives
You can check the integrity of your backup images to be certain that your archives are not damaged. You may perform such validations on a schedule (see Chapter 9. Scheduling tasks) or by launching the Backup Archive Validation Wizard.
-
To launch the Backup Archive Validation Wizard, select Operations -> Validate Backup Archive from the main program menu.
-
Select the archive to validate. The Acronis Secure Zone and backup locations can be selected only as a whole because all their contents are viewed by the program as a single archive. You can validate individual archives in backup locations using Windows Explorer. To do so, open a backup location as a common folder, then select the archive to validate, right-click the archive and select Validate Backup Archive in the context menu. The Backup Archive Validation Wizard will be launched with this archive selected. Click Next to continue.
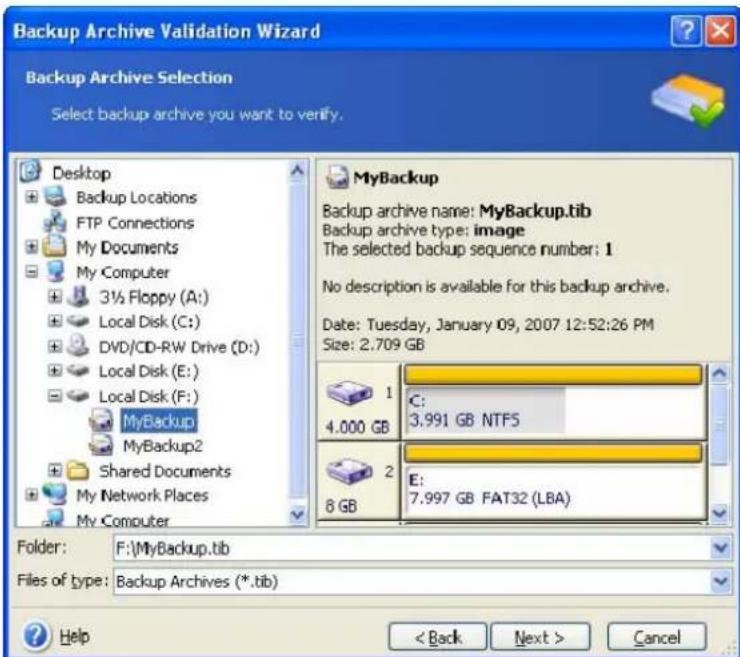
text_image
Backup Archive Validation Wizard Backup Archive Selection Select backup archive you want to verify. Desktop Backup Locations FTP Connections My Documents My Computer 3½ Floppy (A:) Local Disk (C:) DVD/CD-RW Drive (D:) Local Disk (E:) Local Disk (F:) MyBackup MyBackup2 Shared Documents My Network Places My Computer MyBackup Backup archive name: MyBackup.tib Backup archive type: image The selected backup sequence number: 1 No description is available for this backup archive. Date: Tuesday, January 09, 2007 12:52:26 PM Size: 2.709 GB 1 4.000 GB C: 3.991 GB NTF5 2 8 GB E: 7.997 GB FAT32 (LBA) Folder: F:\MyBackup.tib Files of type: Backup Archives (*.tib) Help < Back Next > Cancel- Clicking Proceed in the summary window will launch the validation procedure. After the validation is complete, you will see the results window. You can cancel validation by clicking Cancel.

To check archive data integrity you must have all incremental and differential backups belonging to the archive and the initial full backup in the same folder. If any of successive backups is missing, validation is not possible.
12.2 Operation results notification
Sometimes a backup or restore procedure can last for 30 minutes or more. Acronis True Image Home can notify you when it is finished using the WinPopup service or via e-mail. The program can also duplicate messages issued during the operation or send you the full operation log after operation completion.
By default all notifications are disabled.
12.2.1 Email notification
To set up e-mail notification, select Tools -> Options -> Notifications -> E-mail:
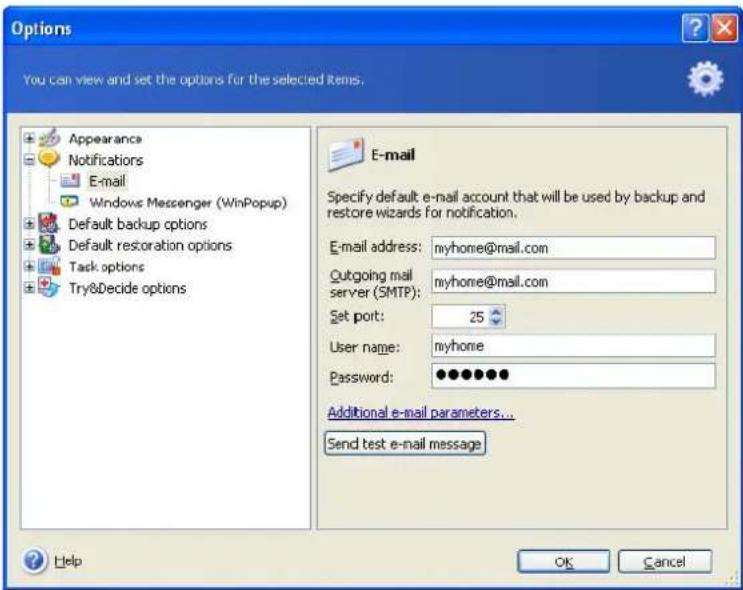
text_image
Options You can view and set the options for the selected items. Appearance Notifications E-mail Windows Messenger (WinPopup) Default backup options Default restoration options Task options Try&Decide options E-mail Specify default e-mail account that will be used by backup and restore wizards for notification. E-mail address: myhome@mail.com Outgoing mail server (SMTP): myhome@mail.com Set port: 25 User name: myhome Password: •••••••• Additional e-mail parameters... Send test e-mail message Help OK CancelProvide the email address to which notifications will be sent as well as the outgoing SMTP server name and port. A user name and a password might also be needed if the SMTP server requires user authentication.
To set up the additional e-mail parameters, click Additional e-mail parameters...
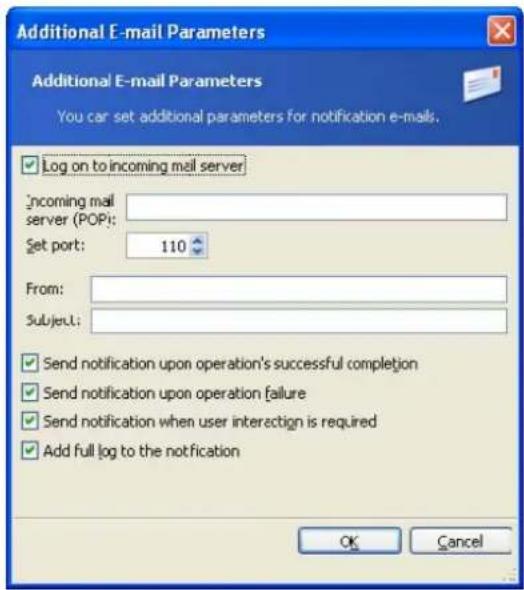
text_image
Additional E-mail Parameters Additional E-mail Parameters You can set additional parameters for notification e-mails. ✓ Log on to incoming mail server Incoming mail server (POP): Set port: 110 From: Subject: ✓ Send notification upon operation's successful completion ✓ Send notification upon operation failure ✓ Send notification when user interaction is required ✓ Add full log to the notification OK CancelIf the outgoing SMTP server requires logging on to incoming mail server before it allows sending outgoing messages, enter the necessary information for the incoming mail server.
At the bottom of this window you can choose whether you want to get notifications:
- when the operation is completed successfully (check Add full log to the notification to add the full operation log to the message)
- if the operation failed (check Add full log to the notification to add the full operation log to the message)
• during the operation when user interaction is required
After setting up e-mail notifications, you can send a test mail message by clicking the appropriate button.
12.2.2 WinPopup notification
To set up WinPopup notification, select Tools -> Options -> Notifications -> Windows Messenger (WinPopup):
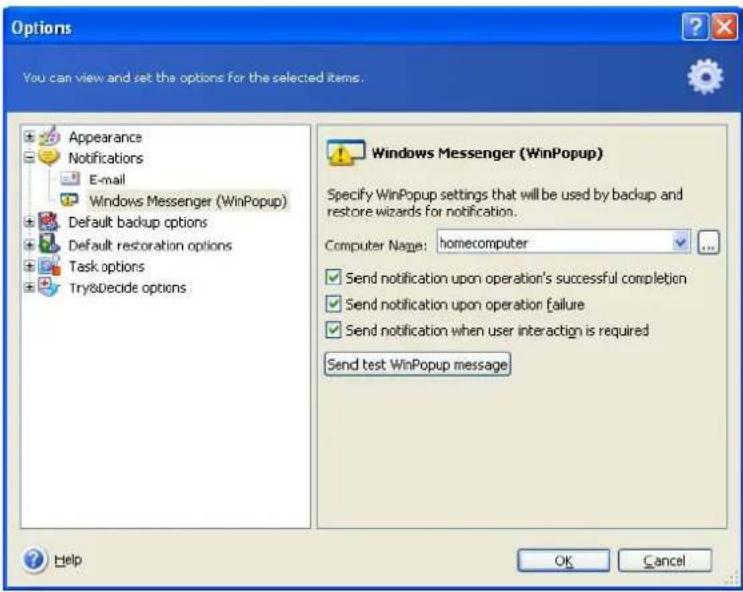
text_image
Options You can view and set the options for the selected items. Appearance Notifications E-mail Windows Messenger (WinPopup) Default backup options Default restoration options Task options Try&Decide options Windows Messenger (WinPopup) Specify WinPopup settings that will be used by backup and restore wizards for notification. Computer Name: homecomputer Send notification upon operation's successful completion Send notification upon operation failure Send notification when user interaction is required Send test WinPopup message Help OK CancelProvide the name of the computer to which notifications will be sent.
At the bottom of this window you can choose whether you want to get notifications:
- when the operation is completed successfully
- when the operation failed
• during the operation when user interaction is required
12.3 Viewing logs
Acronis True Image Home allows you to view its working logs. They can provide information about scheduled backup task results, including reasons for failure, if any.
To open the log window, select Show Log from the Tools menu or click Show Log on the sidebar.
The log browsing window contains two panes: the left one features the log list, while the right one shows selected log contents.
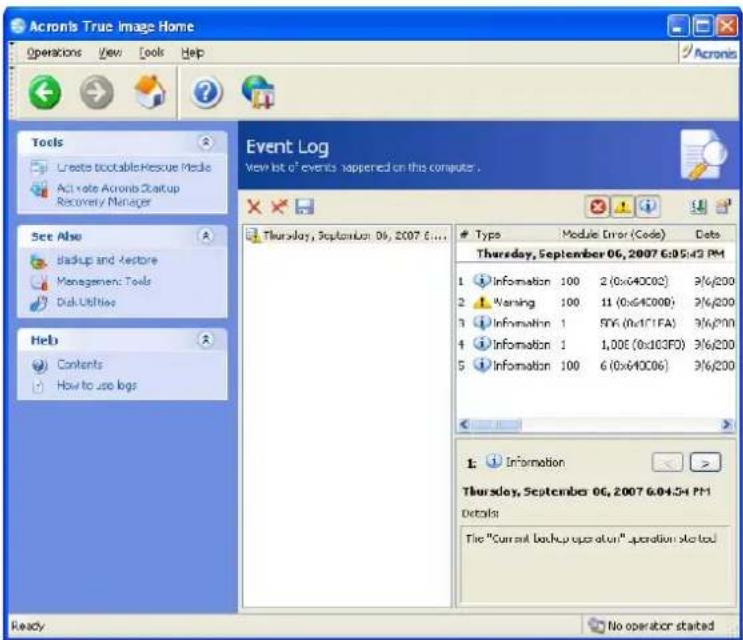
text_image
Acronis True Image Home Operations View Tools Help Tools Creates biocable Rescue Media ACI vote Acronis Startup Recovery Manager See Also backup and restore Management Tools Disk Utilities Help Contents How to use logs Event Log View list of events happened on the computer . Thursday, September 06, 2007 6:05:43 PM Type Module Error (Code) Data Thursday, September 06, 2007 6:05:43 PM 1 Information 100 2 (0x640C02) 9/6/200 2 Warning 100 11 (0x640C00) 9/6/200 3 Information 1 506 (0x1C1FA) 9/6/200 4 Information 1 1,00E (0x103F0) 9/6/200 5 Information 100 6 (0x640C06) 9/6/200 1 Information Thursday, September 06, 2007 6:04:54 PM Details File "Current Backup operation" operation started Ready No operator startedThe left pane can contain up to 50 log entries. If there are more, you can browse the list using the buttons with the left and right arrows.
To delete a log entry, select it and click the Delete icon. To delete all log entries click the Delete all log entries icon. You can also save a log entry to file by clicking the appropriate icon.
If any step was terminated by an error, the corresponding log will be marked with a red circle with a white cross inside.
The right window features the list of steps contained in the selected log. The three buttons to the right control message filters: the white cross in the red circle filters error messages, the exclamation sign in a yellow triangle filters warnings, and the "i" in the blue circle filters information messages.
To select columns (step parameters) to display, right-click the headers line or left-click the Choose Columns button. Then check the desired parameters.
To sort messages by a particular parameter, click its header (click again to reverse order) or the Arrange Icons by button (the second from the right) and select the desired parameter.
You can also change column width by dragging the borders with a mouse.
Chapter 13. Exploring archives and mounting images
Acronis True Image Home offers two kinds of archive contents management: mounting for images and exploring for both images and file-level archives.
Exploring images and file-level archives lets you view their contents and copy the selected files to the hard disk.
Mounting images as virtual drives lets you access them as though they were physical drives. This means that:
- a new disk with its own letter will appear in the drives list
- using Windows Explorer and other file managers, you can view the image contents as if they were located on a physical disk or partition
- you will be able to use the virtual disk in the same way as the real one: open, save, copy, move, create, delete files or folders. If necessary, the image can be mounted in read-only mode

The operations described in this Chapter are supported only for the FAT and NTFS file systems.
Please keep in mind that, though both file archives and disk/partition images have a default “.tib” extension, only images can be mounted. If you want to view file archive contents, use the Explore operation. Images residing in backup locations cannot be mounted if the Mount Image Wizard is launched from the main menu. However, such images can be mounted through the Windows Explorer by right-clicking on an image archive and selecting the Mount item in the context menu. The following is a brief summary of the Explore vs Mount operation:
E x p l o r e
Archive type File-level, disk or partition image Partition image
| Assigning | a | letter | No | Yes | |
| Archive | modification | No | Yes | (in | |
| Files | extraction | Yes | Yes | ||
| Backup | locations | support | Yes | No | |

The current version of Acronis True Image Home can mount or explore an image archive only if all its volumes reside in the same directory. If your archive spans several CD-R/RW discs and you wish to mount the image, you should copy all volumes to a hard disk drive or network drive.
13.1 Searching files in archives
- Select Tools -> Management -> Manage Backup Locations and Archives in the main program menu to navigate to the Backup Locations window. Or choose the Management Tools category in the main program window and then click Manage Backup Locations and Archives in the Main group.
- Select a backup location in the Backup Locations window and click Explore Backup Location on the sidebar or double-click on the selected backup location.
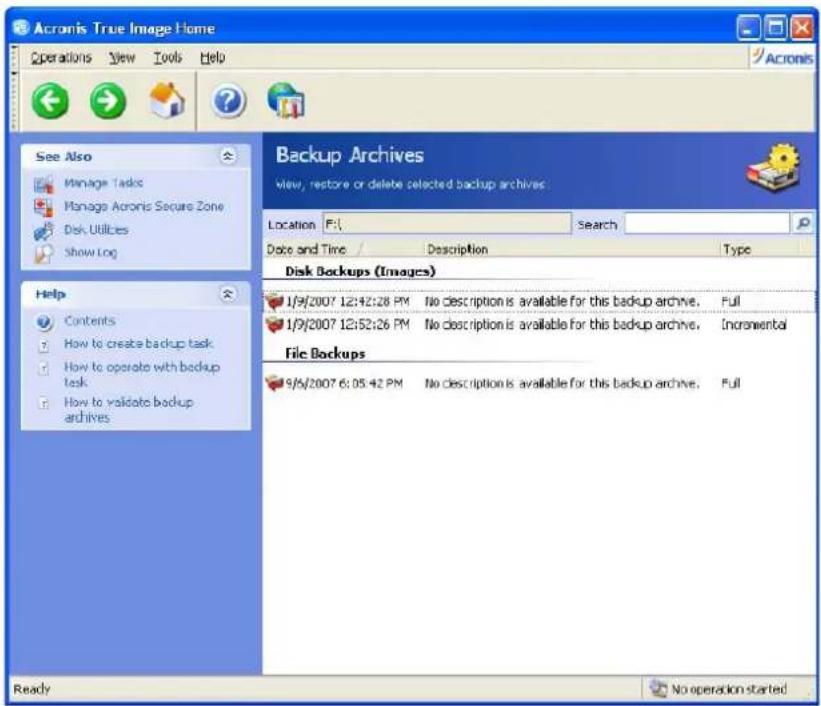
text_image
Acronis True Image Home Operations View Tools Help See Also Manage Tasks Manage Acronis Secure Zone Disk Utilities Show Log Backup Archives View, restore or delete selected backup archives. Location F: Search Date and Time Description Type Disk Backups (Images) 1/9/2007 12:42:26 PM No description is available for this backup archive. Full 1/9/2007 12:52:26 PM No description is available for this backup archive. Incremental File Backups 9/5/2007 6:05:42 PM No description is available for this backup archive. Full Help Contents How to create backup task How to operate with backup task How to validate backup archives Ready No operation started- The program opens Backup Archives window displaying the backup location contents. The backup archives are grouped by backup types. You can view the contents of a selected archive by clicking Show Backup Content on the sidebar or by double-clicking on the selected archive.
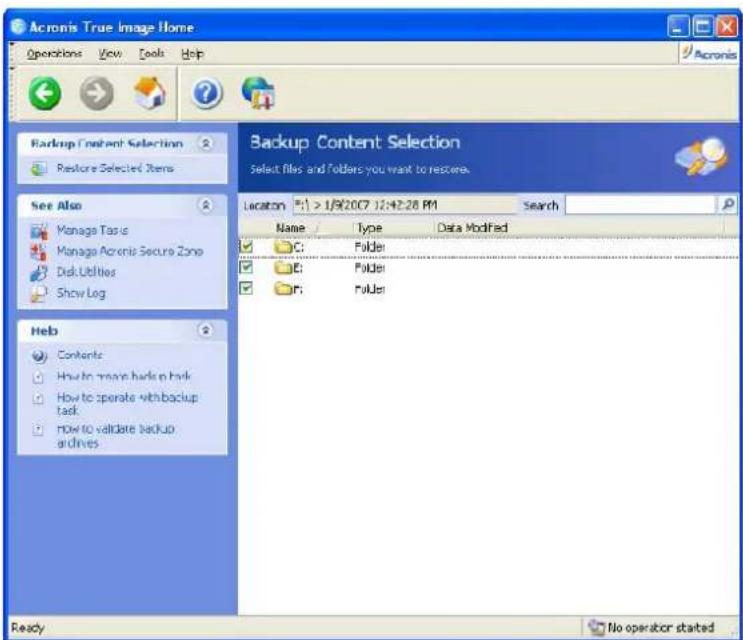
text_image
Acronis True Image Home Operations View Tools Help Backup Content Selection Restore Selected Items Backup Content Selection Select files and folders you want to restore. See Also Manage Task Manage Acronis Secure Zone Disk Utilities Show Log Location: F:\1 > 1/9/2007 12:42:28 PM Search Name Type Data Modified C: Folder C: Folder F: Folder Help Contents How to move hardtop task How to operate with backup task How to validate backup archives Ready No operator started- The program shows the contents of the selected archive. You can select any number of files or folders from the archive being explored and restore them.

To restore data from an incremental backup, you must have all previous incremental backups and the initial full backup. If any of successive backups is missing, restoration is not possible.
To restore data from a differential backup, you must have the initial full backup as well.
You can also search individual files for recovery the following way:
-
Select Tools -> Management -> Manage Backup Locations and Archives in the main program menu to open the Backup Locations window.
-
If you want to search a file in all the backup locations you have (including ones created on FTP servers and network share disks), type the filename in the Search field and click the Search button (with the magnifying glass icon).
You can enter a part of filename. For example, entering "report" will result in searching all files whose name contains the "report" string.
After the search has started, a new "cross" icon appears in the Search area. You can stop the search any moment by clicking this icon. The Search Results window will display the files found so far.

You can only select one Search Results item at a time. Mouse hovering over an item shows the full path to the location that stores the file.
Then you can restore the selected file. To do this, click Open Containing Backup on the sidebar or double-click on the selected file. The program opens the Backup Content Selection window showing the contents of the backup containing this file with the file marked. To restore the file, click Restore Selected Items in the Backup Content Selection group.
There is one more way of restoring an older version of a file if need be. Right-click on the file in Windows Explorer and select Search in Backup Archive in the context menu. Acronis True Image Home will search saved versions of the file in backup locations and then will display the files it has found in the Search Results window. You will be able to select the desired version by its backup date and restore the selected file by clicking on the sidebar first Open Containing Backup and then Restore Selected Items.
13.2 Mounting an image
-
Launch the Mount Image Wizard by selecting Operations -> Mount Image in the main program menu or by right-clicking on an image archive and selecting Mount in the Windows Explorer's context menu.
-
Select the archive from the drives tree. If the archive is located in Acronis Secure Zone, select it to choose the archive at the next step. The mount operation does not support backup locations, so they are not displayed in the tree. However, if an image is stored in a backup location, you can select this location in the tree as a normal folder and then select the image for mounting.
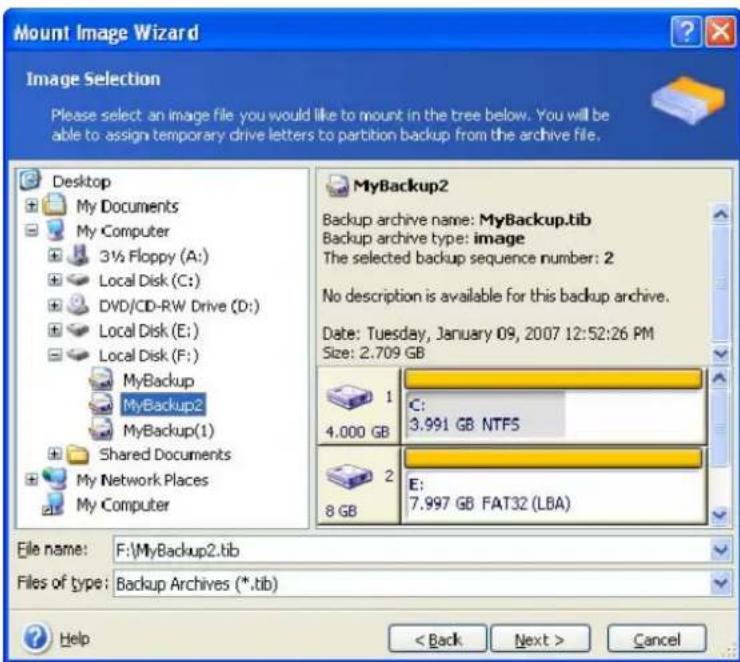
text_image
Mount Image Wizard Image Selection Please select an image file you would like to mount in the tree below. You will be able to assign temporary drive letters to partition backup from the archive file. Desktop My Documents My Computer 3½ Floppy (A:) Local Disk (C:) DVD/CD-RW Drive (D:) Local Disk (E:) Local Disk (F:) MyBackup MyBackup2 MyBackup(1) Shared Documents My Network Places My Computer MyBackup2 Backup archive name: MyBackup.tib Backup archive type: image The selected backup sequence number: 2 No description is available for this backup archive. Date: Tuesday, January 09, 2007 12:52:26 PM Size: 2.709 GB 1 4.000 GB C: 3.991 GB NTF5 2 8 GB E: 7.997 GB FAT32 (LBA) File name: F:\MyBackup2.tib Files of type: Backup Archives (*.tib) Help < Back Next > CancelIf you added a comment to the archive, it will be displayed to the right of the drives tree. If the archive was protected with a password, Acronis True Image Home will ask for it. Neither the partitions layout, nor the Next button will be enabled until you enter the correct password.
- If you selected an archive containing incremental images, Acronis True Image Home will suggest that you select one of the successive incremental images (also called "slices") by its creation date/time. Thus, you can explore the data state at a certain moment.

To mount an incremental image, you must have all previous incremental images and the initial full image. If any of the successive images are missing, mounting is not possible.
To mount a differential image, you must have the initial full image and the differential image in the same folder as well.
- Select a partition to mount as a virtual disk. (Note that you cannot mount an image of the entire disk except in the case when the disk consists of one partition).
You can also select a letter to be assigned to the virtual disk from the Drive letter dropdown list. If you do not want to mount the virtual drive, select Do not mount in the list.
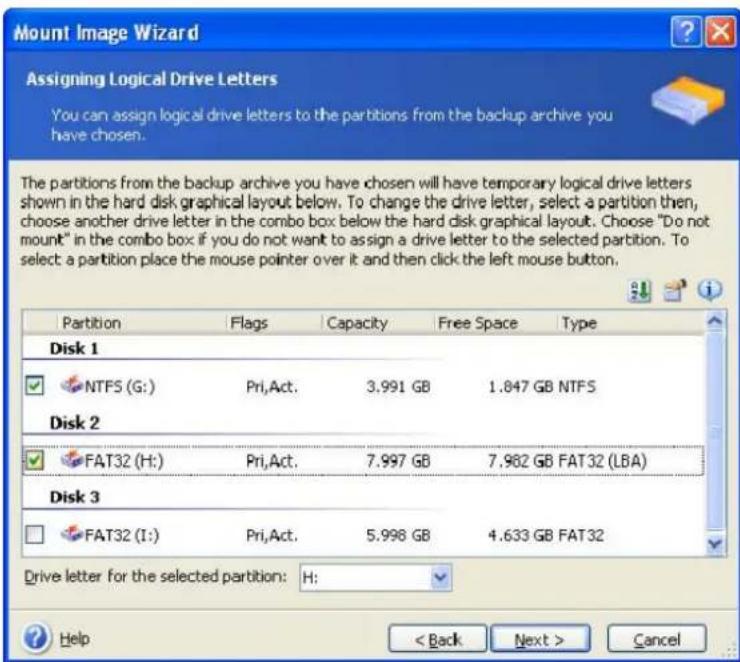
text_image
Mount Image Wizard Assigning Logical Drive Letters You can assign logical drive letters to the partitions from the backup archive you have chosen. The partitions from the backup archive you have chosen will have temporary logical drive letters shown in the hard disk graphical layout below. To change the drive letter, select a partition then, choose another drive letter in the combo box below the hard disk graphical layout. Choose "Do not mount" in the combo box if you do not want to assign a drive letter to the selected partition. To select a partition place the mouse pointer over it and then click the left mouse button. Partition Flags Capacity Free Space Type Disk 1 NTFS (G:) Pri,Act. 3.991 GB 1.847 GB NTFS Disk 2 FAT32 (H:) Pri,Act. 7.997 GB 7.982 GB FAT32 (LBA) Disk 3 FAT32 (I:) Pri,Act. 5.998 GB 4.633 GB FAT32 Drive letter for the selected partition: H: Help < Back Next > Cancel- Select whether you want to mount image in Read-only or Read/Write mode.
- If you select Read/Write mode, the program assumes that the connected image will be modified and creates an incremental archive file to capture the changes. It is strongly recommended that you list the forthcoming changes in the Comment section to this file.
- The program displays a summary containing a single operation. Click Proceed to connect the selected partition image as a virtual disk.
- After the image is connected, the program will run Windows Explorer, showing its contents. Now you can work with files or folders as if they were located on a real disk.
You can connect multiple partition images. If you want to connect another partition image, repeat the procedure.
13.3 Unmounting an image
We recommend that you unmount the virtual disk after all necessary operations are finished, as keeping up virtual disks takes considerable system resources. If you do not unmount the disk, it will disappear after your computer is turned off.
To disconnect the virtual disk, click Unmount Image and select the disk to unmount. You can also do this in Windows Explorer by right-clicking on the disk icon and selecting Unmount.
Chapter 14. Transferring the system to a new disk
14.1 General information
Sooner or later, most computer users find that their hard disk is too small. If you just don't have space for more data, you can add another disk just for data storage as described in the following chapter.
However, you might find that your hard disk does not have enough space for the operating system and installed applications, preventing you from updating your software or installing new applications. In this case, you have to transfer the system to a higher-capacity hard disk.
To transfer the system, you must first install the disk in the computer (see details in the Appendix B. Hard disks and BIOS setup). If your computer doesn't have a bay for another hard disk, you can temporarily install it in place of your CD drive or use a USB 2.0 connection to the external target disk. If that is not possible, you can clone a hard disk by creating a disk image and restoring it to a new hard disk with larger partitions.
There are two transfer modes available: automatic and manual.
In the automatic mode, you will only have to take a few simple actions to transfer all the data, including partitions, folders and files, to a new disk, making it bootable if the original disk was bootable.
There will be only one difference between these disks – partitions on the newer disk will be larger. Everything else, including the installed operating systems, data, disk labels, settings, software and everything else on the disk, will remain the same.

This is the only result available in the automatic mode. The program can only duplicate the original disk layout to the new one. To obtain a different result, you will have to answer additional questions about cloning parameters.
The manual mode will provide more data transfer flexibility.
-
You will be able to select the method of partition and data transfer:
-
as is
- new disk space is proportionally distributed between the old disk partitions
-
new disk space is distributed manually
-
You will also be able to select operations to perform on the old disk:
-
leave partitions (and data!) on the old disk
- remove all information from the old disk
- create new partitions on the old disk (and remove all the old information)

On program screens, damaged partitions are marked with a red circle and a white cross inside in the upper left corner. Before you start cloning, you should check such disks for errors using the appropriate operating system tools.
14.2 Security
Please note the following: if the power goes out or you accidentally press RESET during the transfer, the procedure will be incomplete and you will have to partition and format or clone the hard disk again.
No data will be lost because the original disk is only being read (no partitions are changed or resized) until data transfer is completed.
Nevertheless, we do not recommend that you delete data from the old disk until you are sure it is correctly transferred to the new disk, the computer boots up from it and all applications work.
14.3 Executing transfers
14.3.1 Selecting Clone mode
You will see the Clone mode window just after the welcome window.
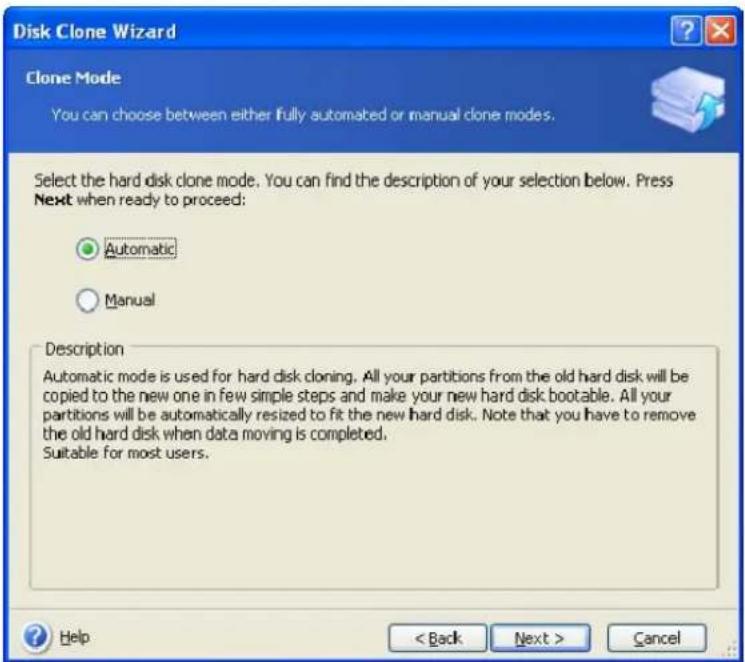
text_image
Disk Clone Wizard Clone Mode You can choose between either fully automated or manual clone modes. Select the hard disk clone mode. You can find the description of your selection below. Press Next when ready to proceed: Automatic Manual Description Automatic mode is used for hard disk cloning. All your partitions from the old hard disk will be copied to the new one in few simple steps and make your new hard disk bootable. All your partitions will be automatically resized to fit the new hard disk. Note that you have to remove the old hard disk when data moving is completed. Suitable for most users. Help < Back Next > CancelWe recommend using automatic mode in most cases. The manual mode can be useful if you need to change the disk partition layout.
If the program finds two disks, one partitioned and another unpartitioned, it will automatically recognize the partitioned disk as the source disk and the unpartitioned disk as the destination disk. In such a case, the next two steps will be bypassed.
14.3.2 Selecting source disk
If the program finds several partitioned disks, it will ask you which one is the source (i.e. the older data disk).
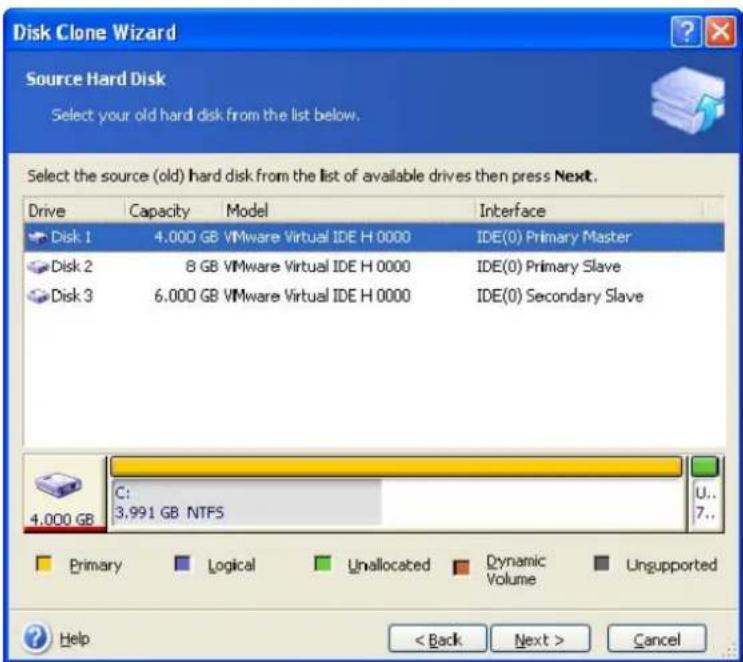
text_image
Disk Clone Wizard Source Hard Disk Select your old hard disk from the list below. Select the source (old) hard disk from the list of available drives then press Next. Drive Capacity Model Interface Disk 1 4.000 GB VMware Virtual IDE H 0000 IDE(0) Primary Master Disk 2 8 GB VMware Virtual IDE H 0000 IDE(0) Primary Slave Disk 3 6.000 GB VMware Virtual IDE H 0000 IDE(0) Secondary Slave C: 3.991 GB NTFS 4.000 GB U.. 7.. Primary Logical Unallocated Dynamic Volume Ungupported Help < Back Next > CancelYou can determine the source and destination using the information provided in this window (disk number, capacity, label, partition, and file system information).
14.3.3 Selecting destination disk
After you select the source disk, you have to select the destination where the disk information will be copied.
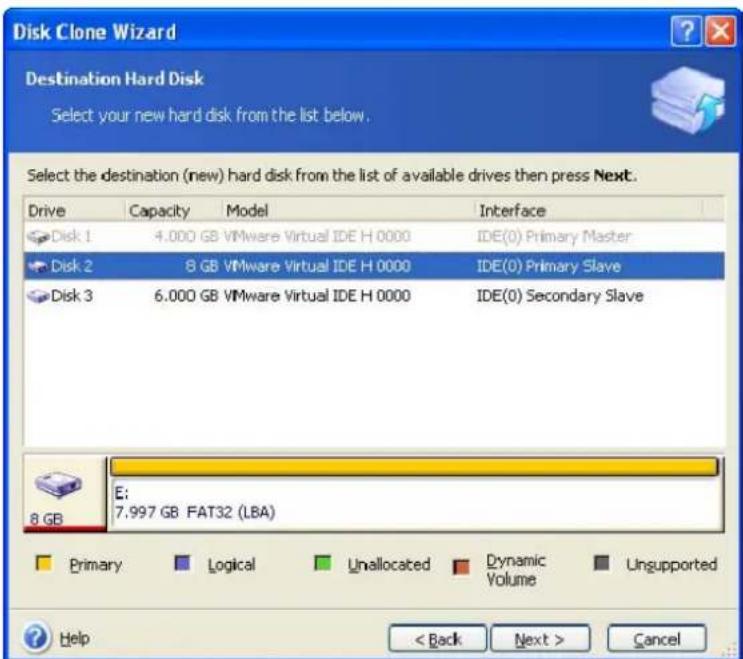
text_image
Disk Clone Wizard Destination Hard Disk Select your new hard disk from the list below. Select the destination (new) hard disk from the list of available drives then press Next. Drive Capacity Model Interface Disk 1 4.000 GB VMware Virtual IDE H 0000 IDE(0) Primary Master Disk 2 8 GB VMware Virtual IDE H 0000 IDE(0) Primary Slave Disk 3 6.000 GB VMware Virtual IDE H 0000 IDE(0) Secondary Slave E: 7.997 GB FAT32 (LBA) Primary Logical Unallocated Dynamic Volume Unsupported Help < Back Next > CancelThe previously selected source becomes grayed-out and disabled for selection.

If any disk is unpartitioned, the program will automatically recognize it as the destination and bypass this step.
14.3.4 Partitioned destination disk
At this point, the program checks to see if the destination disk is free. If not, you will be prompted by the Nonempty Destination Hard Disk window stating that the destination disk contains partitions, perhaps with data.
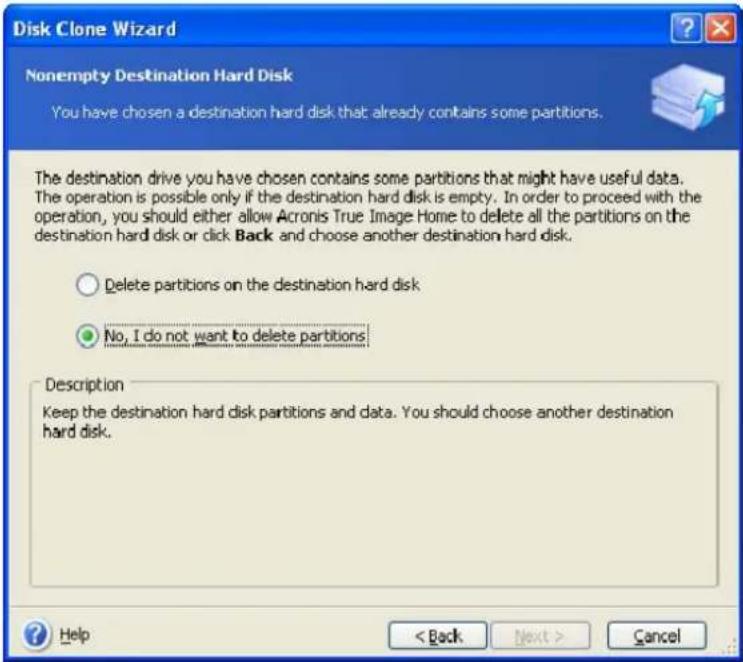
text_image
Disk Clone Wizard Nonempty Destination Hard Disk You have chosen a destination hard disk that already contains some partitions. The destination drive you have chosen contains some partitions that might have useful data. The operation is possible only if the destination hard disk is empty. In order to proceed with the operation, you should either allow Acronis True Image Home to delete all the partitions on the destination hard disk or click Back and choose another destination hard disk. Delete partitions on the destination hard disk No, I do not want to delete partitions Description Keep the destination hard disk partitions and data. You should choose another destination hard disk. Help < Back Next > CancelYou will have to select between:
- Delete partitions on the destination hard disk – all existing partitions will be deleted during cloning and all their data will be lost.
- No, I do not want to delete partitions – no existing partition will be deleted, discontinuing the cloning operation. You will have to cancel this operation and return to select another disk.
To continue, select the first choice and click Next.

Note that no real changes or data destruction will be performed at this time! For now, the program will just map out cloning. All changes will be implemented only when you click Proceed.
14.3.5 Old and new disk partition layout
If you selected the automatic mode, the program will not ask you anything else. You will see the window graphically illustrating information (as rectangles) about the source disk (partitions and unallocated space) and the destination disk layout.
Along with the disk number, some additional information is provided: disk capacity, label, partition and file system information. Partition types — primary, logical and unallocated space — are marked with different colors.
Next you will see the cloning summary.
14.3.6 Old disk data
If you selected the manual mode, the program will ask you what to do with the old disk:
- Create a new partition layout – All existing partitions and their data will be deleted (but they will also be cloned to the new disk, so you won't lose them)
- Keep data – leave the old disk partitions and data intact
- Destroy data – destroy all data on the old disk
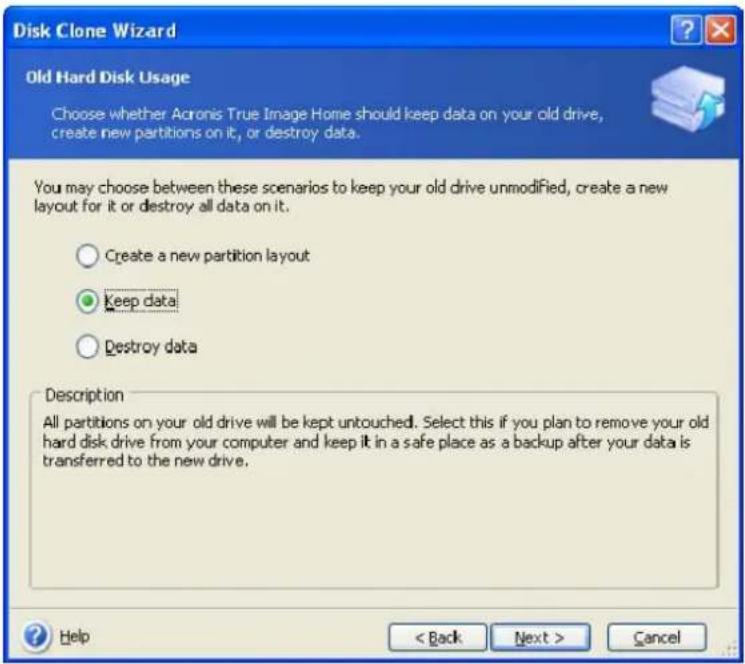
text_image
Disk Clone Wizard Old Hard Disk Usage Choose whether Acronis True Image Home should keep data on your old drive, create new partitions on it, or destroy data. You may choose between these scenarios to keep your old drive unmodified, create a new layout for it or destroy all data on it. ○ Create a new partition layout ● Keep data ○ Destroy data Description All partitions on your old drive will be kept untouched. Select this if you plan to remove your old hard disk drive from your computer and keep it in a safe place as a backup after your data is transferred to the new drive. Help < Back Next > CancelIf you are going to sell or give away your old disk, we recommend that you make sure you destroy the data on it.
If you are going to keep it for data storage, you can create a new partition layout on it. In this case, the disk will be ready right after cloning is complete.
To protect yourself from unforeseen consequences, it is recommended that you leave the old disk data intact and delete it later, once you know the cloning process was successful.
14.3.7 Destroying the old disk data
If you elected to destroy the old disk data in the previous step, you will have to select the destruction method now:
- Quick – quick one-pass destruction
• Normal – multipass destruction
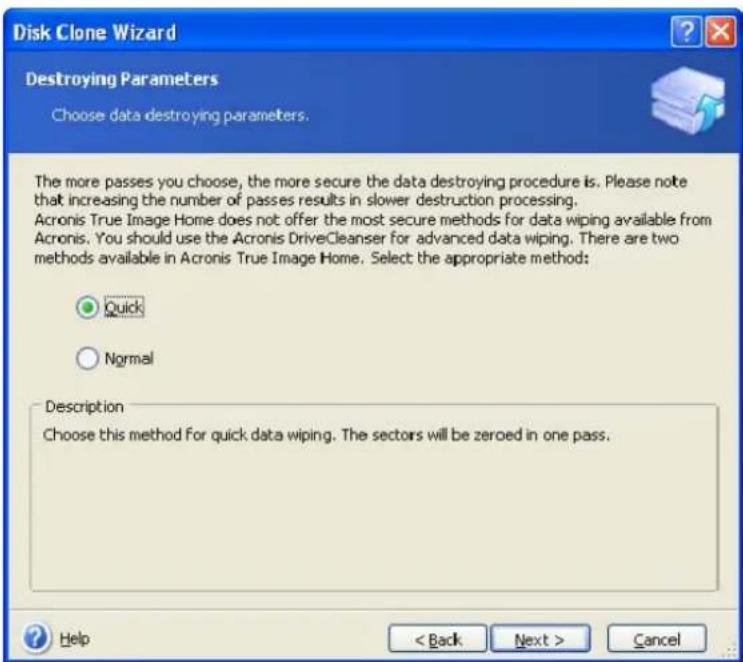
text_image
Disk Clone Wizard Destroying Parameters Choose data destroying parameters. The more passes you choose, the more secure the data destroying procedure is. Please note that increasing the number of passes results in slower destruction processing. Acronis True Image Home does not offer the most secure methods for data wiping available from Acronis. You should use the Acronis DriveCleanser for advanced data wiping. There are two methods available in Acronis True Image Home. Select the appropriate method: Quick Normal Description Choose this method for quick data wiping. The sectors will be zeroed in one pass. Help < Back Next > CancelThe second method takes more time, but makes it impossible to recover data afterwards, even with special equipment.
The first method is less secure, but is still suitable for most cases.
14.3.8 Selecting partition transfer method
Acronis True Image Home will offer you the following data transfer methods:
- As is
- Proportional – the new disk space will be proportionally distributed among cloned partitions
- Manual – you will specify the new size and other parameters yourself
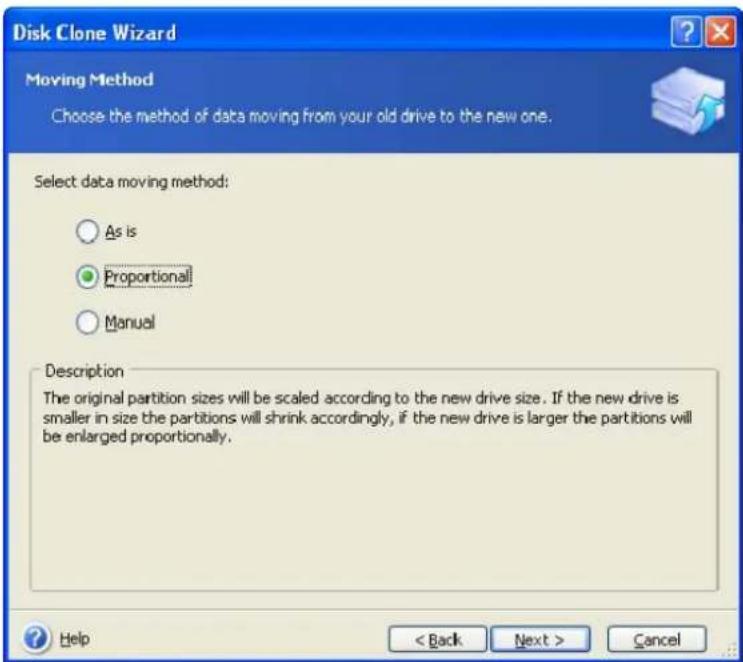
text_image
Disk Clone Wizard Moving Method Choose the method of data moving from your old drive to the new one. Select data moving method: ○ As is ● Proportional ○ Manual Description The original partition sizes will be scaled according to the new drive size. If the new drive is smaller in size the partitions will shrink accordingly, if the new drive is larger the partitions will be enlarged proportionally. Help < Back Next > CancelIf you elect to transfer information "as is," a new partition will be created for every old one with the same size and type, file system and label. The unused space will become unallocated. Afterwards, you will be able to use the unallocated space to create new partitions or to enlarge the existing partitions with special tools, such as Acronis Disk Director Suite.
As a rule, "as is" transfers are not recommended as they leave much unallocated space on the new disk. Using the "as is" method, Acronis True Image Home transfers unsupported and damaged file systems.
If you transfer data proportionally, each partition will be enlarged, according to the proportion of the old and new disk capacities.
FAT16 partitions are enlarged less than others, as they have a 4 GB size limit.
Depending on the selected combination, you will proceed to either the old disk partitioning window, or the disk partition layout window (see below).
14.3.9 Partitioning the old disk
If you selected Create a new partition layout earlier in the process, it is now time to repartition your old disk.
During this step, you will see the current disk partition layout. Initially, the disk has unallocated space only. This will change when you create new partitions.
Having completed the required steps, you will add a new partition. To create another one, simply repeat those steps.
If you make a mistake, click Back to redo.
After you create the necessary partitions, uncheck the Create new partition in unallocated space box and click Next.
14.3.10 Old and new disk partition layouts
In the next window, you will see rectangles indicating the source hard disk, including its partitions and unallocated space, as well as the new disk layout.
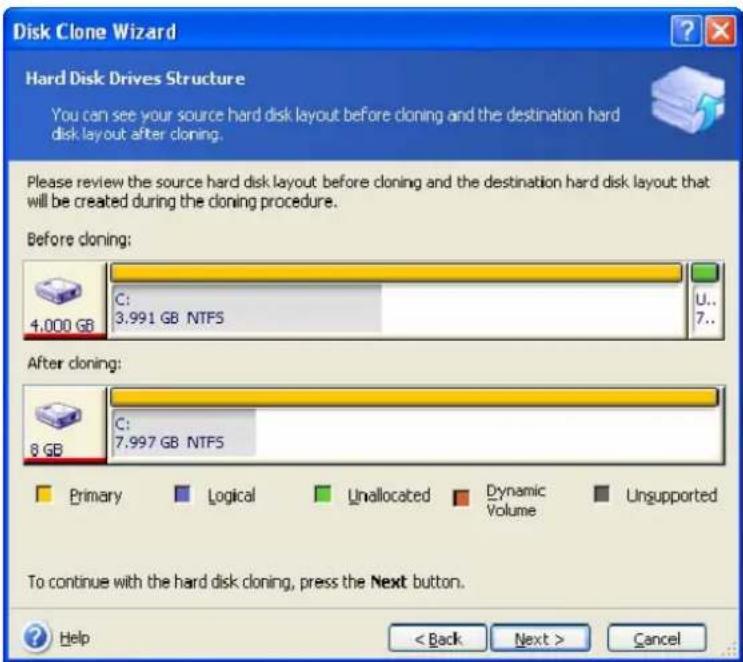
text_image
Disk Clone Wizard Hard Disk Drives Structure You can see your source hard disk layout before cloning and the destination hard disk layout after cloning. Please review the source hard disk layout before cloning and the destination hard disk layout that will be created during the cloning procedure. Before cloning: 4.000 GB C: 3.991 GB NTFS U.. 7.. After cloning: 8 GB C: 7.997 GB NTFS Primary Logical Unallocated Dynamic Volume Unsupported To continue with the hard disk cloning, press the Next button. Help < Back Next > CancelAlong with the hard disk number, you will see disk capacity, label, partition, and file system information. Different partition types, including primary, logical, and unallocated space are marked with different colors.

If you selected manual partition creation earlier, the partition layout will look different. This partitioning method is described below.
14.3.11 Cloning summary
In the next window, you will see a list of briefly described operations to be performed on the disks.
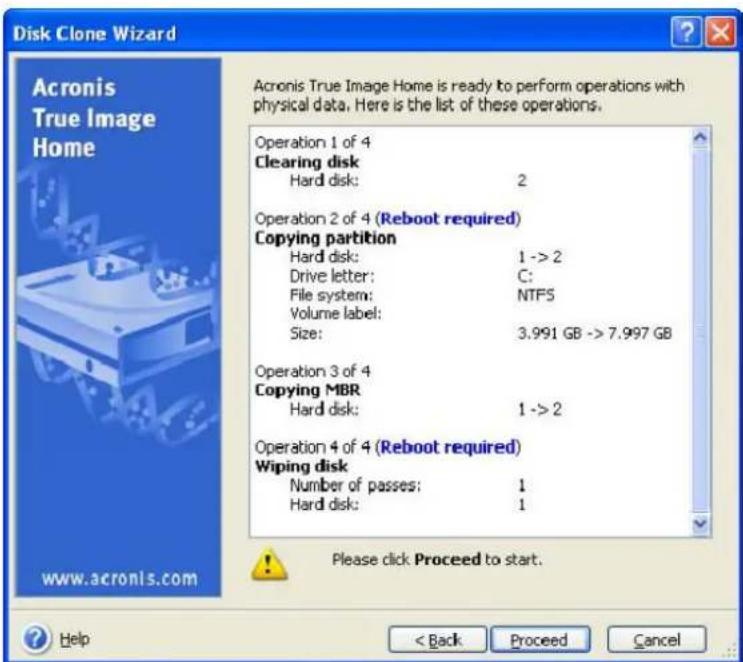
text_image
Disk Clone Wizard Acronis True Image Home Acronis True Image Home is ready to perform operations with physical data. Here is the list of these operations. Operation 1 of 4 Clearing disk Hard disk: 2 Operation 2 of 4 (Reboot required) Copying partition Hard disk: 1 -> 2 Drive letter: C: File system: NTFS Volume label: Size: 3,991 GB -> 7,997 GB Operation 3 of 4 Copying MBR Hard disk: 1 -> 2 Operation 4 of 4 (Reboot required) Wiping disk Number of passes: 1 Hard disk: 1 Please click Proceed to start. www.acronis.com Help < Back Proceed CancelCloning a disk containing the currently active operating system will require a reboot. In that case, after clicking Proceed you will be asked to confirm the reboot. Canceling the reboot will cancel the entire procedure. After the clone process finishes you will be offered an option to shut down the computer by pressing any key. This enables you to change the position of master/slave jumpers and remove one of the hard drives.
Cloning a non-system disk or a disk containing an operating system, but one that is not currently active, will proceed without reboot. After you click Proceed, Acronis True Image Home will start cloning the old disk to the new disk, indicating the progress in a special window. You can stop this procedure by clicking Cancel. In that case, you will have to repartition and format the new disk or repeat the cloning procedure. After the cloning operation is complete, you will see the results message.
14.4 Cloning with manual partitioning
14.4.1 Old and new disk partition layouts
The manual transfer method enables you to resize partitions on the new disk. By default, the program resizes them proportionally.
In the next window, you will see rectangles indicating the source hard disk, including its partitions and unallocated space, as well as the new disk layout.
Along with the hard disk number, you will see disk capacity, label, partition, and file system information. Different partition types, including primary, logical, and unallocated space are marked with different colors.
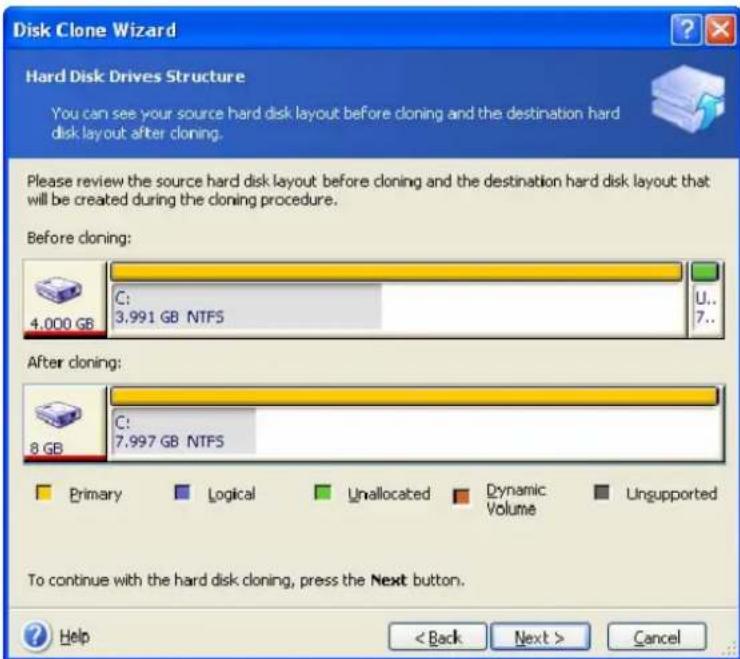
text_image
Disk Clone Wizard Hard Disk Drives Structure You can see your source hard disk layout before cloning and the destination hard disk layout after cloning. Please review the source hard disk layout before cloning and the destination hard disk layout that will be created during the cloning procedure. Before cloning: 4.000 GB C: 3.991 GB NTFS U.. 7.. After cloning: 8 GB C: 7.997 GB NTFS Primary Logical Unallocated Dynamic Volume Ungrouped To continue with the hard disk cloning, press the Next button. Help < Back Next > CancelTo resize any partition, check the Proceed relayout box. If you are satisfied with the partition layout shown, uncheck this box (if checked). Clicking Next, you will proceed to the cloning summary window.

Be careful! Clicking Back in this window will reset all size and location changes that you've selected, so you will have to specify them again.
First, select a partition to resize. It will be underlined in red.
Resize and relocate it on the next step.
You can do this by entering values to Unallocated space before, Partition size, Unallocated space after fields, by dragging partition borders or the partition itself.
If the cursor turns into two vertical lines with left and right arrows, it is pointed at the partition border and you can drag it to enlarge or reduce the partition's size. If the cursor turns into four arrows, it is pointed at the partition, so you can move it to the left or right (if there's unallocated space near it).
Having provided the new location and size, click Next. You will be taken two steps back to the partition layout. You might have to perform some more resizing and relocation before you get the layout you need.
Chapter 15. Adding a new hard disk
If you don't have enough space for your data, you can either replace the old disk with a new higher-capacity one (data transfers to new disks are described in the previous chapter), or add a new disk only to store data, leaving the system on the old disk. If the computer has a bay for another disk, it would be easier to add a data disk drive than to clone a system one.
To add a new disk, you must first install it in your computer.
15.1 Selecting a hard disk
Select the disk that you've added to the computer.
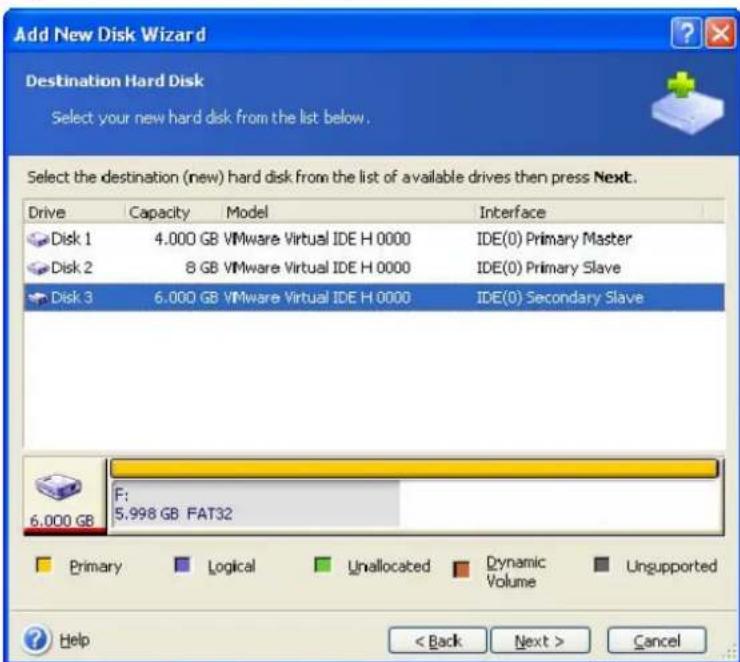
text_image
Add New Disk Wizard Destination Hard Disk Select your new hard disk from the list below. Select the destination (new) hard disk from the list of available drives then press Next. Drive Capacity Model Interface Disk 1 4.000 GB VMware Virtual IDE H 0000 IDE(0) Primary Master Disk 2 8 GB VMware Virtual IDE H 0000 IDE(0) Primary Slave Disk 3 6.000 GB VMware Virtual IDE H 0000 IDE(0) Secondary Slave F: 5.998 GB FAT32 6.000 GB Primary Logical Unallocated Dynamic Volume Unsupported Help < Back Next > Cancel
This window might be bypassed if the program detects the new disk itself. In this case, you will immediately proceed to the new partition creation.
If there are any partitions on the new disk, they must be deleted first.
Select Delete partitions on the destination hard disk and click Next to continue.
15.2 Creating new partitions
Next you will see the current partition layout. Initially, all disk space will be unallocated. This will change after you add new partitions.
To create a partition, select Create new partition in unallocated space and click Next to perform steps required by the partition creation wizard.
You will be prompted to set the new partition location and size. You can do this both by entering values to Unallocated space before, Partition size, Unallocated space after fields, and by dragging partition borders or the partition itself.
If the cursor turns into two vertical lines with left and right arrows, it is pointed at the partition border and you can drag it to enlarge or reduce the partition size. If the cursor turns into four arrows, it is pointed at the partition, so you can move it to the left or right (if
there is unallocated space near it). Having provided the new partition location and size, you can input a label for the new partition.
If you make a mistake at partitioning, click Back to redo the process.
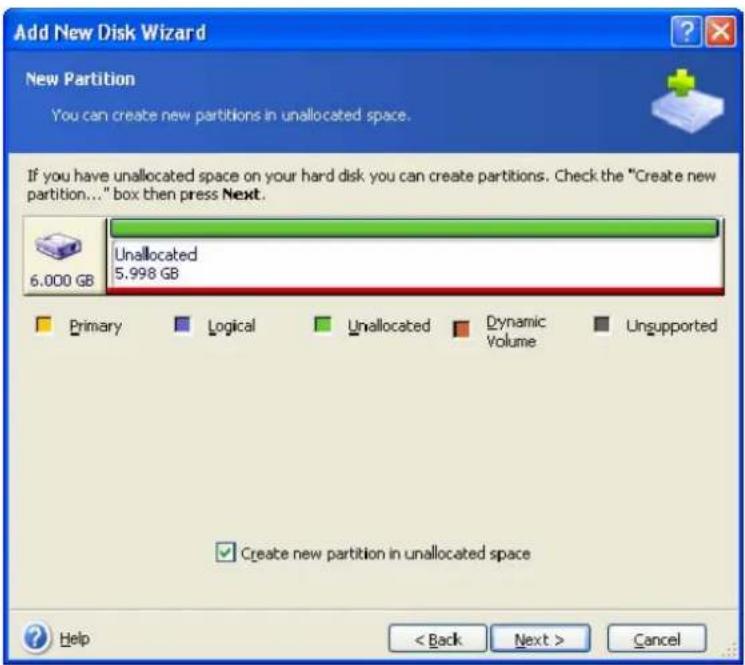
text_image
Add New Disk Wizard New Partition You can create new partitions in unallocated space. If you have unallocated space on your hard disk you can create partitions. Check the "Create new partition..." box then press Next. 6.000 GB Unallocated 5.998 GB Primary Logical Unallocated Dynamic Volume Unsupported ✓ Create new partition in unallocated space Help < Back Next > CancelFinally, you will be taken back to the partition layout screen. Check the resulting partitions layout and start creating another partition or move on by unchecking Create new partition in unallocated space and clicking Next.
15.3 Disk add summary
The disk add summary contains a list of operations to be performed on disks.
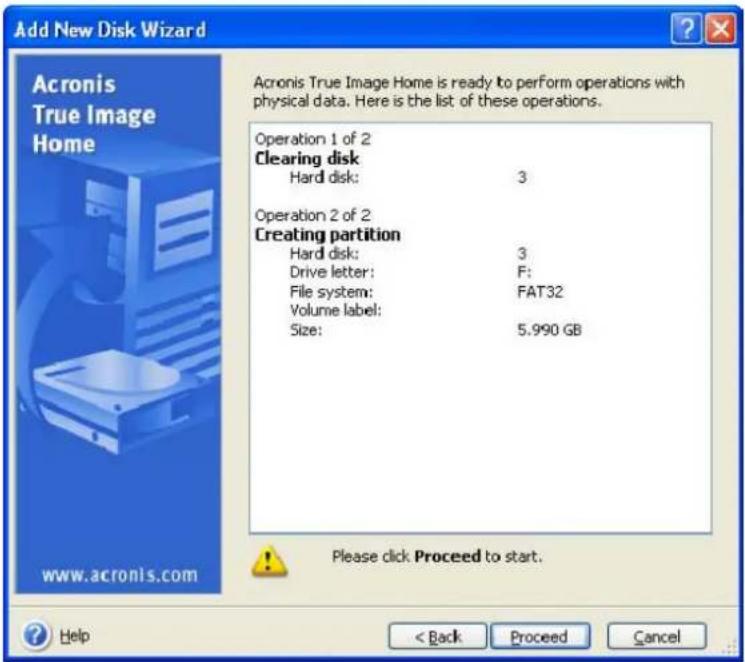
text_image
Add New Disk Wizard Acronis True Image Home Acronis True Image Home is ready to perform operations with physical data. Here is the list of these operations. Operation 1 of 2 Clearing disk Hard disk: 3 Operation 2 of 2 Creating partition Hard disk: 3 Drive letter: F: File system: FAT32 Volume label: Size: 5.990 GB Please click Proceed to start. www.acronis.com Help < Back Proceed CancelAfter you click Proceed, Acronis True Image Home will start creating new partitions, indicating the progress in a special window. You can stop this procedure by clicking Cancel. You will then have to repartition and format the new disk or repeat the disk add procedure.
Chapter 16. Security and Privacy Tools
Acronis True Image Home includes utilities for secure destruction of data on an entire hard disk drive, individual partitions, as well as for erasing individual files and eliminating user system activity traces.
These utilities ensure the security of your confidential information, as well as maintain your privacy when you work with a PC, because they clean-up the evidence showing your actions (records in various system files) that you don't even know about. This could include user names and passwords.
If you need to:
- Securely destroy files or folders you select, run File Shredder.
- Securely destroy data on selected partitions and/or disks so it can't be recovered, run Acronis DriveCleanser.
- Clean up Windows components (folders, files, registry sections, etc.) related to general system tasks and capable of retaining user PC activity evidence, run System Clean-up.
16.1 Using File Shredder
The File Shredder enables quick selection of files and folders to destroy them permanently.
To run the folders/files shredder, select the Disk Utilities category in the main program window, then click File Shredder. This launches File Shredder Wizard, which will guide you through the steps required for permanently destroying the selected files and folders.
- First select the files and/or folders you with to destroy.
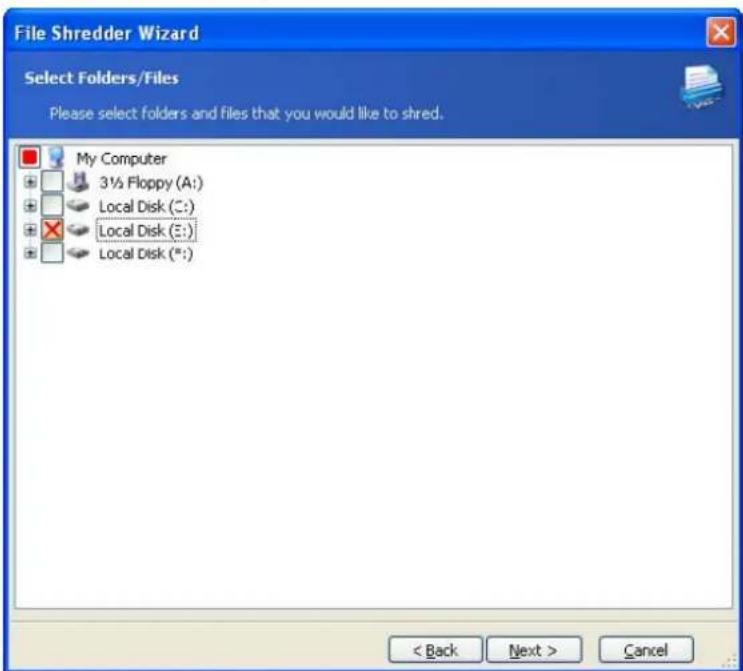
text_image
File Shredder Wizard Select Folders/Files Please select folders and files that you would like to shred. My Computer 3½ Floppy (A:) Local Disk (C:) Local Disk (E:) Local Disk (":) < Back Next > Cancel-
On the next wizard's page select the desired data destruction method. If you leave the default setting Use common method, the program will use the U.S. Standard, Department of Defense 5220.22-M method. Selecting Use custom method for this component allows you to choose one of the preset data destruction methods from the drop-down list.
-
To destroy permanently the selected files using the desired method, click Proceed in the next window.
16.2 Acronis DriveCleanser
Many operating systems do not provide users with secure data destruction tools, so deleted files can be restored easily by using simple applications. Even a complete disk reformat can't guarantee permanent confidential data destruction.
Acronis DriveCleanser solves this problem with guaranteed and permanent data destruction on selected hard disks and/or partitions. It allows you to select from a number of data destruction methods depending on the importance of your confidential information.
To launch Acronis DriveCleanser, select the Disk Utilities category in the main program window, then click Acronis DriveCleanser. Acronis DriveCleanser allows you to perform the following:
- clean up selected hard disks or partitions using preset methods;
- create and execute custom user methods of hard disk clean-up.
Acronis DriveCleanser is based on a wizard that scripts all hard disk operations, so no data destruction is performed until you click Proceed in the wizard's final window. At any moment, you can return to the previous steps to select other disks, partitions or data destruction methods.
First, you must select the hard disk partitions where you want to destroy data.
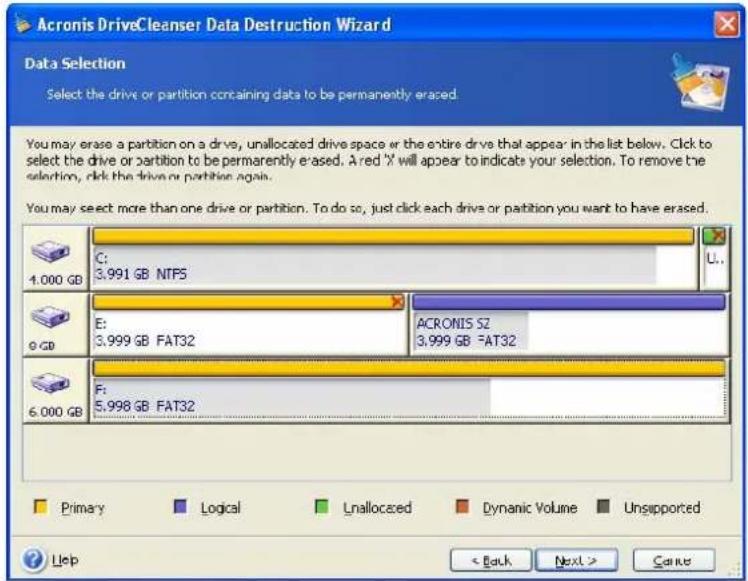
text_image
Acronis DriveCleanser Data Destruction Wizard Data Selection Select the drive or partition containing data to be permanently erased. You may erase a partition on a drive, unallocated drive space or the entire drive that appear in the list below. Click to select the drive or partition to be permanently erased. A red 'X' will appear to indicate your selection. To remove the selection, click the drive or partition again. You may select more than one drive or partition. To do so, just click each drive or partition you want to have erased. 1.000 GB C: 3.991 GB NTPS U.. 9 GB E: 3.999 GB FAT32 ACRONIS SZ 3.999 GB FAT32 6.000 GB F: 5.998 GB FAT32 Primary Logical Unallocated Dynamic Volume Unsupported Help < Back Next > CancelTo select a partition, click the corresponding rectangle. You will see a red mark in the upper right corner indicating that the partition is selected.
You can select an entire hard disk or several disks for data destruction. To do this, click the rectangle corresponding to the hard disk (with a device icon, disk number and capacity).
You can select at one time several partitions located on different hard disks or on several disks.
Click Next to continue.
In the Post-wiping actions window you can select actions to be performed on the partitions selected for data destruction. Acronis DriveCleanser offers you three choices:
- Leave partition as is — just destroy data using the method selected below
- Delete partition — destroy data and delete partition
- Format partition — destroy data and format partition (default)
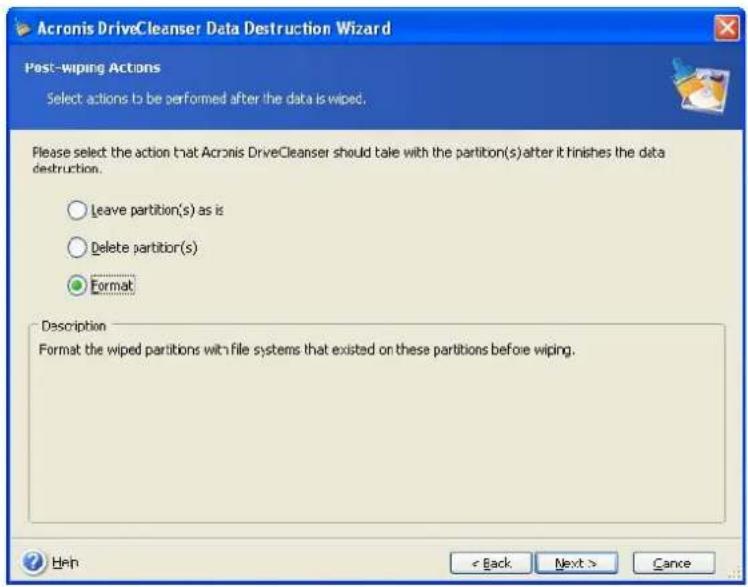
text_image
Acronis DriveCleanser Data Destruction Wizard Post-wiping Actions Select actions to be performed after the data is wiped. Please select the action that Acronis DriveCleanser should take with the partition(s) after it finishes the data destruction. Leave partition(s) as is Delete partition(s) Format Description Format the wiped partitions with file systems that existed on these partitions before wiping. Back Next > CancelIn this example, the switch is set to Format. This will allow you to see the results of partition and data destruction, along with the reformatting of the partition.
16.3 Using preset data destruction methods
Acronis DriveCleanser utilizes a number of the most popular data destruction methods described in detail in Appendix C. Hard Disk Wiping methods of this manual.
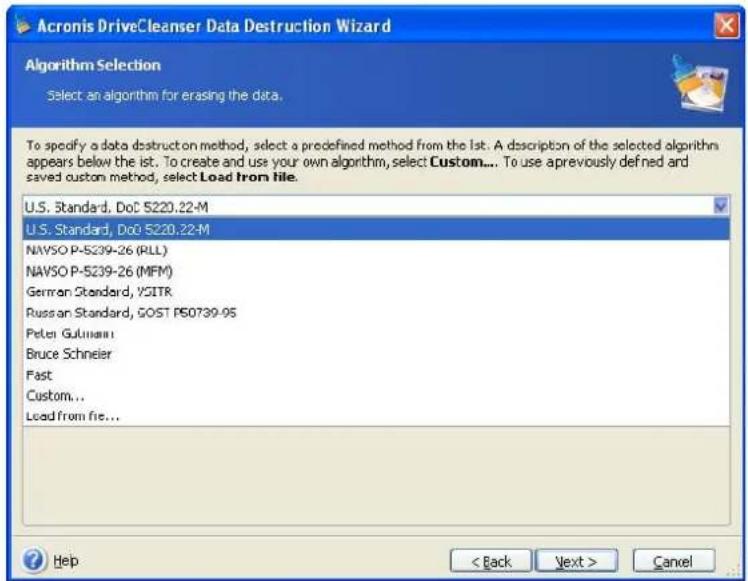
text_image
Acronis DriveCleanser Data Destruction Wizard Algorithm Selection Select an algorithm for erasing the data. To specify a data destruction method, select a predefined method from the list. A description of the selected algorithm appears below the list. To create and use your own algorithm, select Custom... To use apreviously defined and saved custom method, select Load Iron file. U.S. Standard, DoC 5220.22-M U.S. Standard, DoC 5220.22-M NAVSO P-S239-26 (RLL) NAVSO P-S239-26 (MFM) German Standard, YSITR Russian Standard, GOST PS0739-95 Peter Gulman Bruce Schneider Fast Custom... Load from file... Help < Back Next > CancelAfter you select a method and click Next, Acronis DriveCleanser will display the data destruction task summary. Up to this point, you can click Back to make changes in the created task. Clicking Proceed will launch the task execution. Acronis DriveCleanser will perform all actions necessary for destroying the contents of the selected partition or disk. After this is done, you will see a message indicating the successful data destruction.
Acronis DriveCleanser offers you another useful capability — to estimate the results of executing a data destruction method on a hard disk or partition. It features an integrated DiskViewer hard disk browsing tool.
The aforementioned methods offer various levels of confidential data destruction. Thus the picture you might see on disk or partition depends on the data destruction method. But what you actually see are disk sectors filled with either zeros or random symbols.
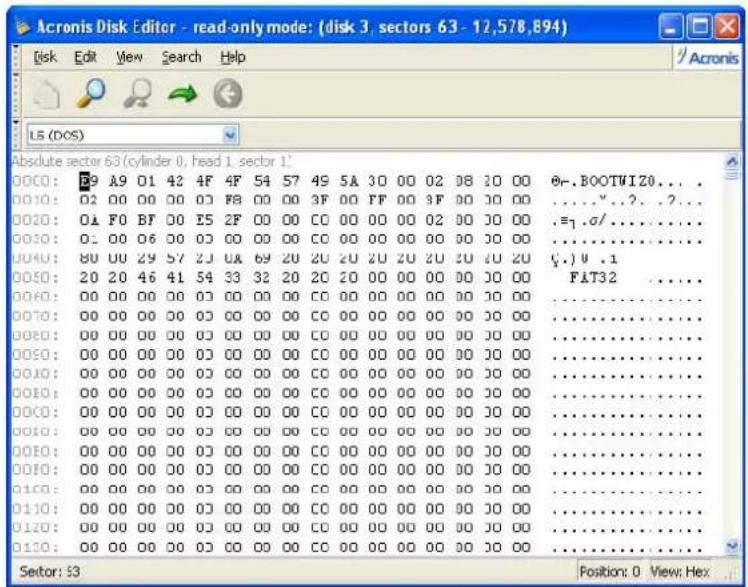
text_image
Acronis Disk Editor - read-only mode: (disk 3, sectors 63 - 12,578,894) Disk Edit View Search Help L5 (DOS) Absolute sector 63 (cylinder 0, head 1, sector 1* 0000: F9 A9 01 42 4F 4F 54 57 49 5A 30 00 02 08 10 00 Ø-.BOOTWIZO... . 0010: 02 00 00 00 03 F8 00 00 3F 00 FF 00 3F 00 30 00 .......... 0020: 01 F0 BF 00 E5 2F 00 00 CO 00 00 00 02 00 30 00 .=7 .σ/ .......... 0010: 0: 00 06 00 03 00 00 CO 00 00 00 00 00 30 00 .......... 0040: 80 UU 29 57 2J UA 69 2U 2U 2U 2U 2U 2U 2U (.)U .1 0050: 20 20 46 41 54 33 32 20 20 20 00 00 00 30 00 FAT32 .......... 0060: 00 00 00 00 03 00 00 CO 00 00 00 00 30 30 30 .......... 0070: 00 00 00 00 03 00 00 CO 00 00 00 00 30 30 30 .......... 0181: 18:18:18:18:18:18:18:18:18:18:18:18:18:18:18:18:18:18:18:18:18:18:18:18:18:18:18:18:18:18:18:18:18:18:2 DOSO: 18:18:18:18:18:18:18:18:18:18:18:18:18:18:18:18:18:18:18:18:18:18:18:18:18:18:18:18:18:18:18:18:1 DOSO: 2B : D : D : D : D : D : D : D : D : D : D : D : D : D : D : D : D : D : D : D : D : D : D : D : D : D : D : D : D : D : D : D : D : D : D : D : D : D : D : D : D : D : D : D : D : D : D : D : D : D : D :D :D :D :D :D :D :D :D :D :D :D :D :D :D :D :D :D :D :D :D :D :D :D :D :D :D :D :D :D :D :D :D :D :D :D :D :D :D :D :D :D :D :D :D :D :D :D :D :D :D :N DDCO: 2B /2B /2B /2B /2B /2B /2B /2B /2B /2B /2B /2B /2B /2B /2B /2B /2B /2B /2B /2B /2B /2B /2B /2B /2B /2B /2B /2B /2B /2B /2B /2B /2B /2B /4 DDCO: B4 /44 /44 /44 /44 /44 /44 /44 /44 /44 /44 /44 /44 /44 /44 /44 /44 /44 /44 /44 /44 /44 /44 /44 /44 /44 /44 /44 /44 /44 /44 /4 DDCO: B5 /55 /55 /55 /55 /55 /55 /55 /55 /55 /55 /55 /55 /55 /55 /55 /55 /55 /55 /55 /55 /55 /55 /55 /55 /55 /55 /55 /55 /55 /5 DDCO: B6 /66 /66 /66 /66 /66 /66 /66 /66 /66 /66 /66 /66 /66 /66 /66 /66 /66 /66 /66 /66 /66 /66 /66 /66 /66/66/66/66/66/66/66/66/66/66/66/66/66/66/66/66/66/66/66/66/66/66/66/6 DDCO: B7 /77 /77 /77 /77 /77 /77 /77 /77 /77 /77 /77 /77 /77/77/77/77/77/77/77/77/77/77/77/77/77/77/77/77/77/77/77/77/77/77/77/77/77/77/77/77/77/77/77/77/77/7 DDCO: B8 /9999999999999999999999999999999999999999999999999999999999999999999999999999999999999999999999999999 DDCO: BZI I I I I I I I I I I I I I I I I I I I I I I I I I I I I I I I I I I I I I I I I I I I I I I I I I I I I I I I I I I I I I I I I I I I I I I I I I I I I I I I I I I I I I DDCO: BZI II II II II II II II II II II II II II II II II II II II II II II II II II II II II II II II II II II II II II II II II II II II II II II II II II II II II II II II II II II II II II IIII III III III III III III III III III III III III III III III III III III III III III III III III III III III III III III III III III III III III III III III III III III III III III III III III III III III III III III III III III III III III III III III III III III III III III III III III III III III III III III III III III III III III III III III III III III III III III III III III IIIIII III III III III III III III III III III III III III III III III III III III III IIIIII III III III III III IIIIIIIIIIIIIIIIIIIIIIIIIIIIIIIIIIIIIIIIIIIIIIIIIIIIIIIIIIIIIIIIIIIIIIIIIIIIIIIIIIIIIIIIIIIIIIIIIIIIIIIIIIIIIIIIIIIIIIIIIIIIIIIIIIIIIIIIIIIIIIIIIIIIIIIIIIIIIIIIIIIIIIIIIIIIIIIIIIIIIIIIIIIIIIIIIIIIIIIIIIIIIIIIIIIIIIIIIIIIIIIIIIIIIIIIIIIIIIIIIIIIIIIIIIIIIIIIIIIIIIIIIIIIIIIIIIIIIIIIIIIIIIIIIIIIIIIIIIIIIIIIIIIIIIIIIIIIIIIIIIIIIIIIIIIIIIIIIIIIIIIIIIIIIIIIIIIIIIIIIIIIIIIIIIIIIIIIIIIIIIIIIIIIIIIIIIIIIIIIIIIIIII-II16.4 Creating custom methods of data destruction
Acronis DriveCleanser gives you an opportunity to create your own methods for wiping hard disks. Although the software includes several levels of data destruction, you can choose to create your own. This is recommended only for advanced users familiar with the principles of data destruction used in secure disk wiping methods.
To create a custom method of hard disk wiping, select the "Custom..." item from the dropdown list in the Method selection window.
Click the Next button to continue. This time the Custom method wizard will be started and you will be able to create a data destruction method matching your security requirements.
Having completed the creation, you can save the method you created. This will be handy if you are going to use it again.
To save your method, you need to give it a filename and show the path to the folder you want to store it in by selecting the folder from the tree shown in the left pane.

Each custom method is stored in a separate file with its own name. If you try to write a new method to an already existing file, the existing file's contents will be erased.
If you created and saved your method for data destruction while working with Acronis DriveCleanser, you can use it later the following way:
In the Method selection window, choose Load from file... from the drop-down list and select the file with custom data destruction method parameters. By default, such files have *.alg extension.
16.5 System Clean-up
The System Clean-up Wizard enables you to securely remove all traces of your PC actions stored by Windows.
It performs the following:
- Removes temporary files from respective Windows folders
- Removes custom folders/files from any media connected to a PC
- Securely destroys data in the Windows Recycle Bin
• Cleans up free space of any traces of information previously stored on it
• Cleans up opened/saved files history
• Cleans the list of user system passwords - Cleans the Windows prefetch directory, where Windows keeps the information about programs you have executed and run recently
- Removes traces of file searches on connected disks and computers in the local area network
After you run the wizard, it will search for any traces of user actions stored by Windows. The search results will be available in the right-hand part of the wizard window.
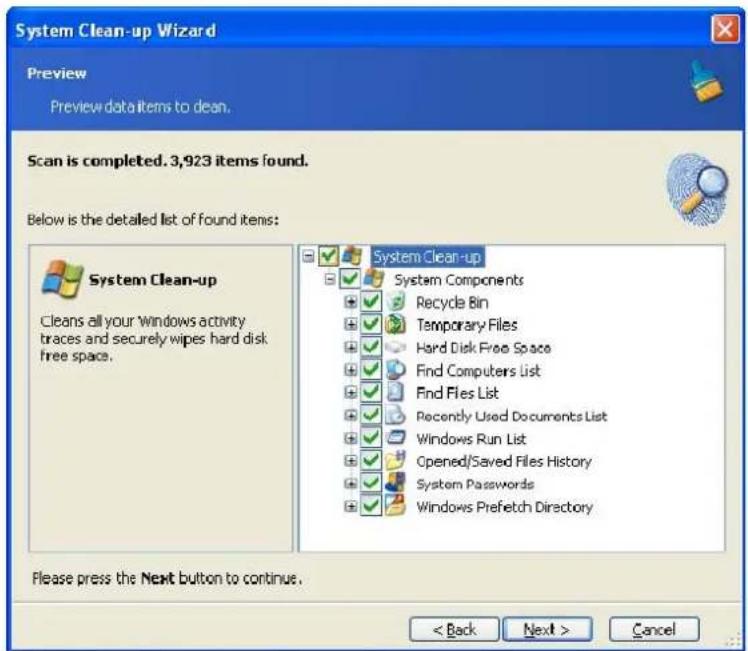
text_image
System Clean-up Wizard Preview Preview data items to clean. Scan is completed. 3,923 items found. Below is the detailed list of found items: System Clean-up Cleans all your windows activity traces and securely wipes hard disk free space. System Clean-up System Components Recycle Bin Temporary Files Hard Disk Free Space Find Computers List Find Files List Recently Used Documents List Windows Run List Opened/Saved Files History System Passwords Windows Prefetch Directory Please press the Next button to continue. < Back Next > CancelAfter the search is finished, you will be able to manually select components to remove.
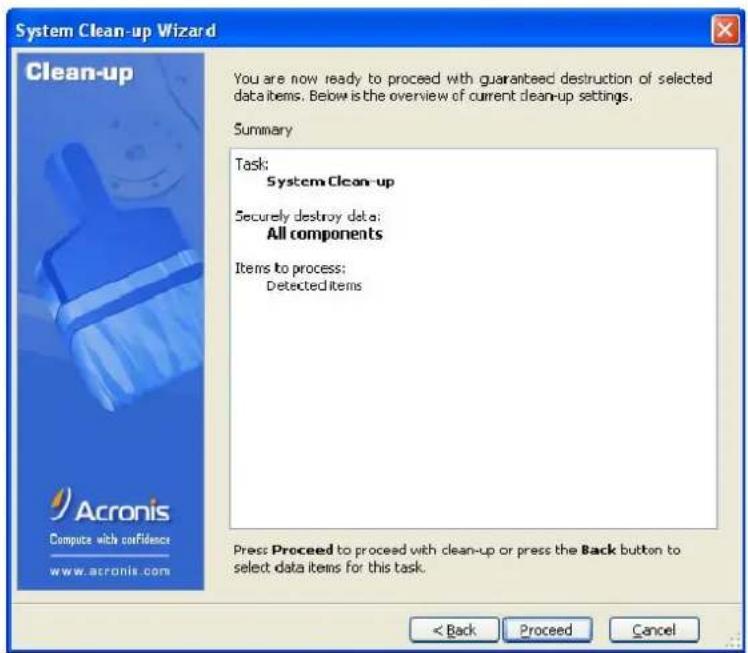
text_image
System Clean-up Wizard Clean-up You are now ready to proceed with guaranteed destruction of selected data items. Below is the overview of current clean-up settings. Summary Task: System Clean-up Securely destroy data: All components Items to process: Detected items Press: Proceed to proceed with clean-up or press the Back button to select data items for this task. < Back Proceed Cancel Acronis Compute with confidence www.acronis.comAfter selecting the components to remove, you can run the clean-up.
16.6 System Clean-up Wizard settings
If you want to change the default system clean-up settings, click the corresponding link in the first window of the System Clean-up Wizard.
To enable or disable any System Clean-up component, check or uncheck its Enable this component flag.
In the System Clean-up Wizard Properties window you can also set clean-up parameters for each system component. Some of these parameters apply to all components.

You can restore the default system clean-up settings by clicking the Restore Defaults button in the Properties window.
16.6.1 "Data Destruction Method" setting
This setting defines the method of guaranteed data destruction to use for cleaning up a given component.
By default, all components that have this setting have it set to Use common method (see Appendix C. Hard Disk Wiping methods can change the common method by clicking the Click to change this setting... link and selecting a desired method from the dropdown list.
If you need to set a custom method of data destruction for a component, choose Use custom method for this component and then select the one you prefer from the dropdown list (see Appendix C. Hard Disk Wiping methods).
16.6.2 "Files" settings
The "Files" setting defines the names of files to clean with Acronis System Clean-up and can be used with a search string.
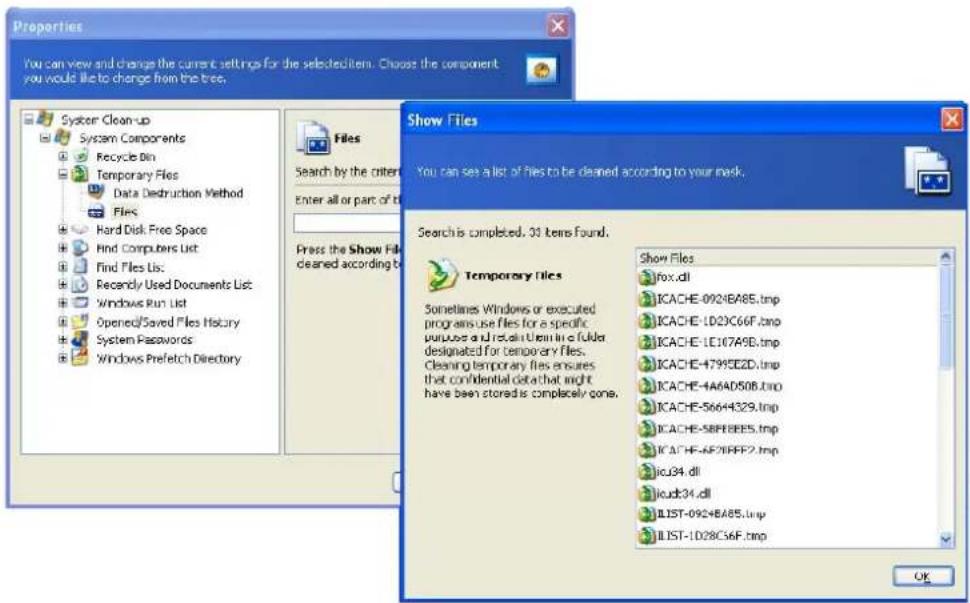
text_image
Properties You can view and change the current settings for the selected item. Choose the component you would like to change from the tree. System Clean-up System Components Recycle Bin Temporary Files Data Destruction Method Files Hard Disk Free Space Find Computers List Find Files List: Recently Used Documents List: Windows Run List Opened/Saved Files History System Passwords Windows Prefetch Directory Files Search by the criteria Enter all or part of this Press the Show File cleaned according to Show Files You can see a list of files to be cleaned according to your mask. Search is completed, 30 items found. Temporary files Sometimes Windows or executed programs use files for a specific purposes and install them in a folder designated for temporary files. Cleaning temporary files ensures that confidential data that might have been stored is completely cons. Show Files fox.dll ICACHE-0921BA85.tmp ICACHE-1D23C66F.tmp ICACHE-1E107A9D.tmp ICACHE-4799E2D.tmp ICACHE-4A64D50B.tmp ICACHE-56644329.tmp ICACHE-58F8E8E5.tmp ICACHE-6F20RFF2.tmp icu34.dll icub34.dll LIST-0924BA85.tmp LIST-1D28C56F.tmp OKUnder the Windows operating system, a search string can represent a full or partial filename. A search string can contain any alphanumeric symbols, including comma and Windows wildcard symbols, and can have values similar to the following:
- *.* – to delete all files from the Recycle Bin – with any file names and extensions
- *.doc – to delete all files with a specific extension – Microsoft document files in this case
- read*.* – to delete all files with any extensions, and names beginning with "read"
You can enter several different search strings separated by semicolons; for example:
*.bak; *.tmp; *.\~\~\~;
All files with names corresponding to at least one of the search strings will be deleted.
Upon entering the "Files" setting value, you can browse the files matching the search strings. To do this, click Show Files. You will see a window with the names of found files. These files will be cleaned.

The length of a search string with full or partial filenames is almost infinite! You can enter any number of filenames or their parts like *.tmp, read?.* separated by semicolons.
16.6.3 "Computers" setting
The "Computers" setting cleans up the registry search strings for finding computers in the local network. These strings keep information on what have interested you in the network. These items should also be deleted to maintain confidentiality.
The "Computers" setting is the same as "Files". The "Computers" setting is a string that can contain any number of full or partial computer names separated by semicolons. The deletion of computer search strings is based on a comparison with the "Computers" setting according to Windows rules.
If you simply need to delete all local network computer search strings (suitable in most cases):
- Select Find Computer List.
-
Check the Enable this component box for the Find Computers List.
-
Select the "Computers" setting and leave its default value (*.).
As a result, all computer search strings will be deleted from the registry.
Upon entering the "Computers" setting value, you can browse the search strings found by Acronis System Clean-up in the registry. To do so, click Show Computers. You will see the window with full and partial computer names searched for in the network. These items will be deleted.
16.6.4 "Drive Free Space" setting
Here you can manually specify physical and/or logical drives to clean up free space on.
By default, Acronis System Clean-up cleans up free space on all available drives.
If you want to change the settings of this parameter, you can use the Remove button to delete drives you don't need to clean free space on from the list.
If you need to add these drives to the list again, use the Add button.
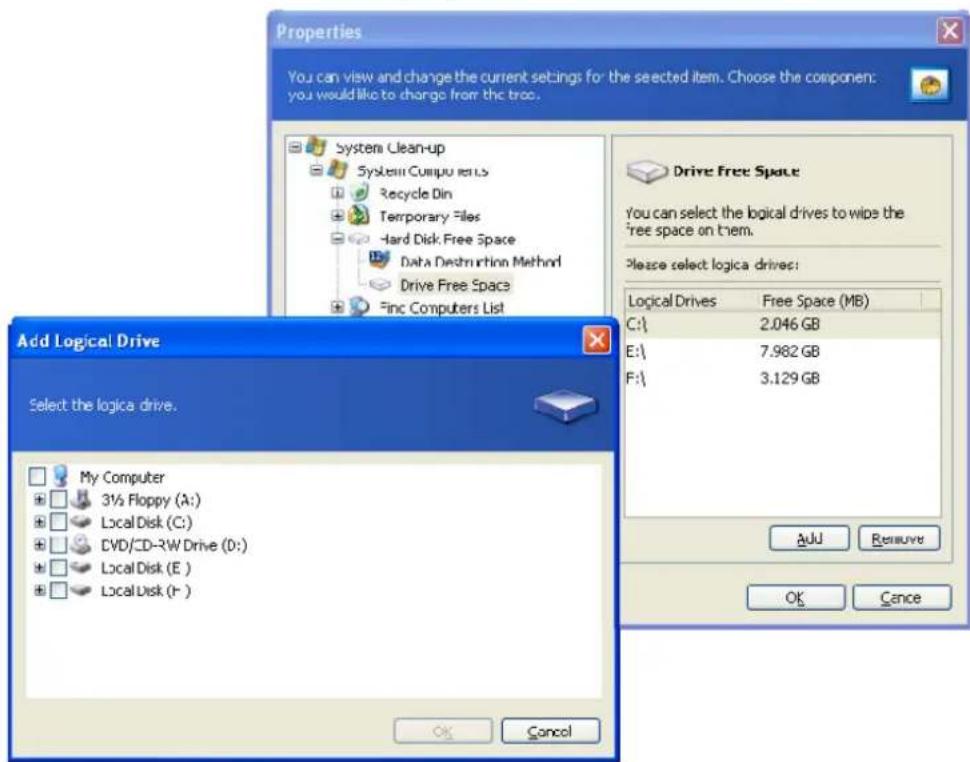
text_image
Properties You can view and change the current settings for the selected item. Choose the component: you would like to change from the troc. System Clean-up System Computers Recycle Din Temporary Files Hard Disk Free Space Data Destruction Method Drive Free Space Finc Computers List Add Logical Drive Select the logica drive. My Computer 3½ Floppy (A:) Local Disk (C:) DVD/CD-RW Drive (D:) Local Disk (E:) Local Disk (I:) Drive Free Space You can select the logical drives to wipe the free space on them. Please select logica drives: Logical Drives Free Space (MB) C:\ 2.046 GB E:\ 7.982 GB F:\ 3.129 GB Add Remove OK Cancel16.6.5 "Commands" setting
Here you can select the commands to remove during Windows Run List clean-up.
This template can contain any command names or their parts separated by semicolons, e.g.:
* help; cmd; reg*
This will result in removing commands with names corresponding to or containing any of the names or parts of names you entered.
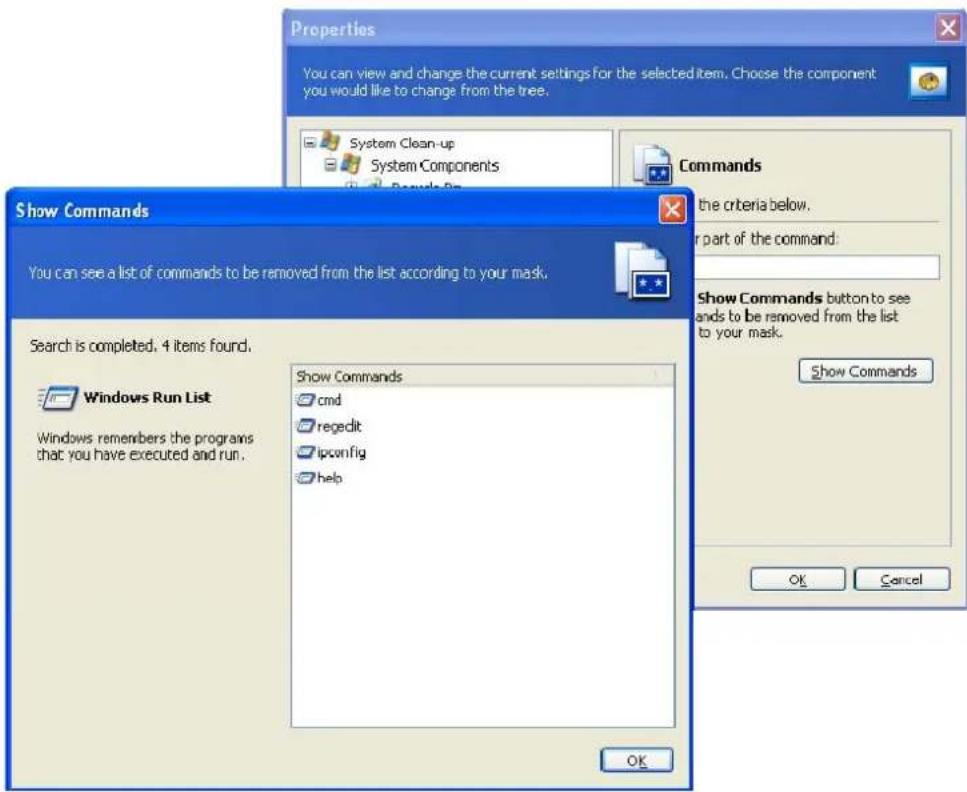
text_image
Properties You can view and change the current settings for the selected item. Choose the component you would like to change from the tree. System Clean-up System Components Command the criteria below. or part of the command: Show Commands button to see ands to be removed from the list to your mask. Show Commands You can see a list of commands to be removed from the list according to your mask. Search is completed. 4 items found. Windows Run List Windows remembers the programs that you have executed and run. Show Commands cmd regedit ipconfig help Show Commands OK Cancel16.6.6 "System Password Filter" setting
Here you can enter any full or partial passwords values separated by semicolons. You can also use * and ? wildcards to set this parameter.
To see the passwords to be cleaned according to your filter, click Show passwords.
16.7 Cleaning up separate system components
If you don't want to clean up all system components, you can clean an individual component separately.
In this case, all global settings of the System Clean-up Wizard will be valid for individual components as well.
To clean up individual components, select them in the System Components section in the System Clean-up window and run the System Clean-up Wizard.
Appendix A. Partitions and file systems
A.1 Hard disk partitions
The mechanism that allows you to install several operating systems on a single PC or to carve up a single physical disk drive into multiple “logical” disk drives is called partitioning.
Partitioning is performed by special applications. In MS-DOS and Windows, these are FDISK and Disk Administrator.
Partitioning programs perform the following:
- create a primary partition
- create an extended partition that can be split into several logical disks
- set an active partition (applied to a single primary partition only)

Information about partitions on a hard disk is stored in a special disk area – in the 1^st sector of cylinder 0, head 0, which is called the partition table. This sector is called the master boot record, or MBR.

A physical hard disk might contain up to four partitions. This limit is forced by the partition table that is suitable for four strings only. However, this does not mean you can have only four operating systems on your PC! Applications called disk managers support far more operating systems on disks. For example, Acronis OS Selector, a component of Acronis Disk Director Suite, enables you to install up to 100 operating systems!
A.2 File systems
An operating system gives user the ability to work with data by supporting some type of file system on a partition.
All file systems are made of structures that are necessary to store and manage data. These structures are usually composed of operating system boot sectors, folders and files. File systems perform the following basic functions:
- track occupied and free disk space (and bad sectors, if any)
• support folders and file names - track physical location of files on disks
Different operating systems use different file systems. Some operating systems are able to work with only one file system while others can use several of them. Here are some of the most widely used file systems:
A.2.1 FAT16
The FAT16 file system is widely used by DOS (DR-DOS, MS-DOS, PC-DOS, PTS-DOS. and other), Windows 98/Me, and Windows NT/2000/XP/Vista operating systems and is supported by most other systems.
Main features of FAT16 are the file allocation table (FAT) and clusters. FAT is the core of the file system. To increase data safety, it is possible to have several copies of the FAT (there are usually two of them) on a single disk. A cluster is a minimum data storage unit in FAT16 file system. One cluster contains a fixed number of sectors. FAT stores information about what clusters are free, what clusters are bad, and also defines in which clusters files are stored.
The FAT16 file system has a 2GB limit that permits a maximum 65,507 clusters that are 32KB in size. (Windows NT/2000/XP/Vista support partitions up to 4GB with up to 64KB clusters). Usually the smallest cluster size is used to make the total cluster amount within the 65,507 range. The larger a partition is, the larger its clusters are.

Usually the larger the cluster size, the more disk space is wasted. A single byte of data could use up one cluster, whether the cluster size is 32KB or 64KB.
Like many other file systems, the FAT16 file system has a root folder. Unlike others, however, its root folder is stored in a special place and is limited in size (standard formatting produces a 512-item root folder).
Initially, FAT16 had limitations on file names. They could only be eight characters long, plus a dot, plus three characters of name extension. However, long-name support in Windows 95 and Windows NT bypassed this limitation. The OS/2 operating system also supports long names, but does so in a different way.
A.2.2 FAT32
The FAT32 file system was introduced in Windows 95 OSR2. It is also supported by Windows 98/Me/2000/XP/Vista. FAT32 is an evolved version of FAT16. Its main differences from FAT16 are 28-bit cluster numbers and a more flexible root, whose size is unlimited. The reasons FAT32 appeared are the support of large hard disks (over 8GB in capacity) and the impossibility of implementing any more complex file system into MS-DOS, which is still the basis for Windows 98/Me.
The maximum FAT32 disk size is 2 terabytes (1 terabyte, or TB, is equal to 1024 gigabytes, or GB).
A.2.3 NTFS
NTFS is the main file system for Windows NT/2000/XP/Vista. Its structure is closed, so no other operating system is fully supported. The main structure of NTFS is the MFT (master file table). NTFS stores a copy of the critical part of the MFT to reduce the possibility of data damage and loss. All other NTFS data structures are special files. NTFS stands for NT File System.
Like FAT, NTFS uses clusters to store files, but cluster size does not depend on partition size. NTFS is a 64-bit file system. It uses unicode to store file names. It is also a journaling (failure-protected) file system, and supports compression and encryption.
Files in folders are indexed to speed up file search.
A.2.4 Linux Ext2
Ext2 is one of the main file systems for the Linux operating system. Ext2 is a 32-bit system. Its maximum size is 16TB. The main data structure that describes a file is an i-node. A place to store the table of all i-nodes has to be allocated in advance (during formatting).
A.2.5 Linux Ext3
Officially introduced with its version 7.2 of the Linux operating system, Ext3 is the Red Hat Linux journaling file system. It is forward and backward compatible with Linux ext2. It has multiple journaling modes and broad cross-platform compatibility in both 32- and 64-bit architectures.
A.2.6
Linux
ReiserFS
ReiserFS was officially introduced to Linux in 2001. ReiserFS overcomes many Ext2 disadvantages. It is a 64-bit journaling file system that dynamically allocates space for data substructures.
Appendix B. Hard disks and BIOS setup
The appendices below provide you with extra information on the hard disk organization, how information is stored on disks, how disks should be installed in the computer and plugged into the motherboard, configuring disks with BIOS, partitions and file systems, and how operating systems interact with disks.
B.1 Installing hard disks in computers
B.1.1 Installing a hard disk, general scheme
To install a new IDE hard disk, you should do the following (we will assume you have powered OFF your PC before you start!):
- Configure the new hard disk as slave by properly installing jumpers on the board of its controller. Disk drives generally have a picture on the drive that shows the correct jumper settings.
- Open your computer and insert the new hard disk into a 3.5" or 5.25" slot with special holders. Fasten down the disk with screws.
- Plug the power cable into the hard disk (four-threaded: two black, yellow and red; there is only one way you can plug in this cable).
- Plug the 40- or 80-thread flat data cable into sockets on the hard disk and on the motherboard (plugging rules are described below). The disk drive will have a designation on the connector or next to it that identifies Pin 1. The cable will have one red wire on an end that is designated for Pin 1. Make sure that you place the cable in the connector correctly. Many cables also are "keyed" so that they can only go in one way.
- Turn your computer on and enter BIOS setup by pressing the keys that are displayed on the screen while the computer is booting.
- Configure the installed hard disk by setting the parameters type, cylinder, heads, sectors and mode (or translation mode; these parameters are written on the hard disk case) or by using the IDE autodetection BIOS utility to configure the disk automatically.
- Set the boot sequence to A:, C:, CD-ROM or some other, depending on where your copy of Acronis True Image Home is located. If you have a boot diskette, set the diskette to be the first; if it is on a CD, make the boot sequence start with CD-ROM.
- Quit BIOS setup and save changes. Acronis True Image Home will automatically start after reboot.
- Use Acronis True Image Home to configure hard disks by answering the wizard's questions.
- After finishing the work, turn off the computer, set the jumper on the disk to the master position if you want to make the disk bootable (or leave it in slave position if the disk is installed as additional data storage).
B.1.2 Motherboard sockets, IDE cable, power cable
There are two slots on the motherboard to which the hard disks can be connected: primary IDE and secondary IDE.
Hard disks with an IDE (Integrated Drive Electronics) interface are connected to the motherboard via a 40- or 80-thread flat marked cable: one of the threads of the cable is red.
Two IDE hard disks can be connected to each of the sockets, i.e. there can be up to four hard disks of this type installed in the PC. (There are three plugs on each IDE cable: two for hard disks and one for the motherboard socket.)
As noted, IDE cable plugs are usually designed so that there is only one way to connect them to the sockets. Usually, one of the pinholes is filled on the cable plug, and one of the pins facing the filled hole is removed from the motherboard socket, so it becomes impossible to plug the cable in the wrong way.
In other cases, there is a jut on the plug on the cable, and an indentation in the socket of the hard disk and of the motherboard. This also ensures that there only one way to connect the hard disk and the motherboard.
In the past, this design of plug did not exist, so there was an empirical rule: the IDE cable is connected to the hard disk socket so that the marked thread is the closest to the power cable, i.e. the marked thread connected to pin #1 of the socket. A similar rule was used for connecting cables with the motherboard.
Incorrect connection of the cable with either the hard disk or the motherboard does not necessarily damage the electronics of the disk or the motherboard. The hard disk is simply not detected or initialized by BIOS.

There are some models of hard disks, especially the older ones, for which incorrect connection damaged the electronics of the drive.

We will not describe all the types of hard disks. Currently the most widespread are those with IDE or SCSI interfaces. Unlike IDE hard disks, there can be from six to 14 SCSI hard disks installed in your PC. However, you need a special SCSI controller (called a host adapter) to connect them. SCSI hard disks are not usually used in personal computers (workstations), but are found mostly in servers.
Aside from an IDE cable, a four-thread power cable must be connected to the hard disks. There is only one way to plug in this cable.
B.1.3 Configuring hard disk drives, jumpers
A hard disk drive can be configured in a computer as master or as slave. The configuring is done using special connectors (called jumpers) on the hard disk drive.
The jumpers are either located on the electronic board of the hard disk or a special socket that provides for the connection of the hard disk and the motherboard.
There is usually a sticker on the drive that explains the markings. Typical markings are DS, SP, CS and PK.
Each jumper position corresponds to one hard disk(s) installation mode:
- DS – master/factory default
- SP – slave (or no jumper required)
- CS – cable select for master/slave: the purpose of the hard disk is determined by its physical position with respect to the motherboard
- PK – jumper parking position: the position where one can put the jumper if it is not necessary in the existing configuration
The hard disk with the jumper in master position is treated by the basic input/output system (BIOS) as bootable.
The jumpers on hard disks that are connected to the same cable can be in the cable select for master/slave position. In this case, BIOS will deem as "master" the disk that is connected to the IDE cable closer to the motherboard than the other one.

Unfortunately, hard disk markings were never standardized. You might well find that markings on your hard disk differ from the ones described above. Moreover, for the old types of hard disks, their purpose could be defined by two jumpers instead of one. You should study the markings carefully before installing your hard disk in the computer.
It is not enough to physically connect the hard disk to the motherboard and set the jumpers properly for the hard disk to function — hard disks have to be properly configured with the motherboard BIOS.
B.2 BIOS
When you turn on your computer, you often see a number of short text messages before you see the splash screen of your operating system. These messages are from the POST (power-on self test) program that belongs to BIOS and is executed by the processor.
BIOS, or the basic input/output system, is a program that resides in the permanent memory chip (ROM or flash BIOS) on the motherboard of your computer and is its key element. The version of BIOS that you use "knows" all the peculiarities of all the components of the motherboard: processor, memory, integrated devices. BIOS versions are provided by the manufacturers of motherboards.
Main BIOS functions are:
- POST checking of processor, memory and I/O devices
- initial configuring of all software-manageable parts of the motherboard
- initialization of operating system (OS) booting process
Among numerous components of the computer, initial configuration is necessary for the external memory subsystem that controls hard disk drives, floppy disk drives, CD-ROM drives, DVDs, and other devices.
B.2.1 Setup utility
BIOS has a built-in setup utility for initial computer configuration. To enter it, you have to press a certain combination of keys (Del, F1, Ctrl+Alt+Esc, Ctrl+Esc, or some other, depending on your BIOS) during the POST sequence that starts right after you turn your computer on. Usually the message with the required combination of keys is displayed during the startup testing. Pressing this combination takes you to the menu of the setup utility that is included in your BIOS.
The menu can differ in appearance and sets of items and their names, depending on the BIOS manufacturer. The most widely known motherboards are Award/Phoenix and AMI. Moreover, while items in the standard setup menu are mostly the same for various BIOSes, items of the extended setup heavily depend on computer and BIOS version.
Below we describe the general principles of initial hard disk configuration.

Large PC manufacturers like Dell and Hewlett-Packard produce motherboards themselves, and develop their own BIOS versions. You should always refer to the documentation that came with your computer for instructions on proper BIOS configuration.
B.2.2 Standard CMOS setup menu
Parameters in the standard CMOS setup menu usually define the geometry of the hard disk. The following parameters (and values) are available for each hard disk installed in your PC:
| Parameter | Value | Purpose |
| Type | 1-47, Installed, Auto | TypNo or Not Installed is used when there is no hard disk installed (to uninstall it). Type 47 is reserved for user-defined parameters or for parameters detected by the IDE Auto detection utility.Auto value allows for automatic detection of IDE disk parameters during the boot sequence. |
| Cylinder (Cyl) | 1-65535 | The number of cylinders on a hard disk. For IDE disks, a logical number of cylinders is specified. |
| Heads (Hd) | 1-16 | The number of heads on a hard disk. For IDE disks, a logical number of heads is specified. |
| Sectors (Sec) | 1-63 | The number of sectors per track of a hard disk. For IDE disks, a logical number of sectors is specified. |
| Size (Capacity) | MBytes | The capacity of the disk in megabytes. It is calculated according to the following formula:Size=(Cyl x Hds x Sec x 512) / 1024 / 1024. |
| Mode(Translation Method) | Normal/LBA/Large/Auto | Method of translation of sector addresses. |
For example, to demonstrate the main features of Acronis True Image Home, we used a Quantum ^TM Fireball ^TM TM1700A hard disk as one of the disks examples. Its parameters have the following values:
| Parameter | Value |
| Type | Auto |
| Cylinder (Cyl) 827 | |
| Heads (Hd) 64 | |
| Sectors (Sec) 63 | |
| Mode | Auto |
| CHS | 1707 MB |
| Maximum LBA Capacity | 1707 MB |
In BIOS setup, you can set the Type parameter to User Type HDD (user-defined type). In this case, you also have to specify the value of the translation mode parameter, which can be Auto/Normal/LBA/Large.

Translation mode is how sector addresses are translated. This parameter appeared because in BIOS versions, there were limitations to the maximum address capacity of disks, which is 504 MB (1024 cylinders x 16 heads x 63 sectors x 512 bytes). There are two ways to bypass this limitation: (1) switch from physical to logical sector addresses (LBA), (2) use mathematics to reduce the number of addressed sectors (cylinders) and increase the number of heads; this method is called Large Disk (Large). The simplest decision is to set the value of this parameter to Auto.
If there are several hard disks connected to your motherboard, but you do not want to use some of them at the moment, you have to set the Type of these disks to Not Installed.
Parameters of hard disks can be set manually with the help of information provided by the hard disk manufacturer on its case, but it is easier to use the IDE autodetection utility that is usually included in modern BIOS versions.
The utility is sometimes a separate BIOS menu item and sometimes is included in the standard CMOS setup menu.

Please note that in "Appendix B. Hard disks and BIOS setup", we have described the general details of physical hard disk structure. Built-in IDE hard disk controls mask physical disk structure. As a result, the BIOS of the motherboard "sees" logical cylinders, heads and sectors. We are not going to elaborate on this issue here, but knowing about this can sometimes be useful.
B.2.3 Arranging boot sequence, advanced CMOS setup menu
Aside from standard CMOS setup, BIOS menu usually has an advanced CMOS setup item. Here you can adjust the boot sequence: C:: A:: CD-ROM:.

Please note that boot sequence management differs for various BIOS versions, e.g. for AMI BIOS, AWARDBIOS, and brand-name hardware manufacturers.
Several years ago, the operating system boot sequence was hard-coded into the BIOS. An operating system could be booted either from a diskette (drive A:), or from the hard disk C:. That was the sequence in which the BIOS queried external drives: if drive A: was ready, BIOS attempted to boot an operating system from a diskette. If the drive was not ready or there was no system area on diskette, BIOS tried to boot an operating system from hard disk C:.
At present, BIOS allows booting operating systems not only from diskettes or hard disks, but also from CD-ROMs, DVDs, and other devices. If there are several hard disks installed in your computer labeled as C:, D:, E:, and F:, you can adjust the boot sequence so that an operating system is booted from, for example, disk E:. In this case, you have to set the boot sequence to look like E:, CD-ROM:, A:, C:, D:.

This does not mean that boottindone from the first disk in this list; it only means that the first attempt to boot an operating system is to boot it from this disk. There may be no operating system on disk E:, or it may be inactive. In this case, BIOS queries the next drive in the list. Errors can happen during booting, see B.2.4 "Hard disk initialization errors".
The BIOS numbers disks according to the order in which they are connected to IDE controllers (primary master, primary slave, secondary master, secondary slave); next go the SCSI hard disks.
This order is broken if you change the boot sequence in BIOS setup. If, for example, you specify that booting has to be done from hard disk E:, numbering starts with the hard disk that would be the third in usual circumstances (it is usually the secondary master).
After you have installed the hard disk in your computer and have configured it in BIOS, one can say that the PC (or the motherboard) "knows" about its existence and its main parameters. However, it is still not enough for an operating system to work with the hard disk. In addition, you have to create partitions on the new disk and format the partitions using Acronis True Image Home. See Chapter 15. Adding a new hard disk.
B.2.4 Hard disk initialization errors
Devices are usually initialized successfully, but sometimes errors can happen. Typical errors related to hard disks are reported by the following messages:
PRESS A KEY TO REBOOT
This error message is not directly related to errors during hard disk initialization. However, it appears, for example, when the boot program finds no operating system on the hard disk, or when the primary partition of the hard disk is not set as active.
DISK BOOT FAILURE, INSERT SYSTEM DISK AND PRESS ENTER
This message appears when the boot program finds no available boot device, be it a floppy or a hard disk, or a CD-ROM.
C: DRIVE ERROR C: DRIVE FAILURE ERROR ENCOUNTERED INITIALIZING HARD DRIVE
This message appears when it is not possible to access the C: disk. If the disk is known to be functional, the reason for this error message is probably incorrect settings/connections of:
- hard disk parameters in BIOS setup
- jumpers on the controller (master/slave)
- interface cables
It is also possible that the device is out of order, or the hard disk is not formatted.
Appendix C. Hard Disk Wiping methods
Information removed from a hard disk drive by non-secure means (for example, by simple Windows delete) can easily be recovered. Utilizing specialized equipment, it is possible to recover even repeatedly overwritten information. Therefore, guaranteed data wiping is more important now than ever before.
The guaranteed wiping of information from magnetic media (e.g. a hard disk drive) means it is impossible to recover data by even a qualified specialist with the help of all known tools and recovery methods.
This problem can be explained in the following way: Data is stored on a hard disk as a binary sequence of 1 and 0 (ones and zeros), represented by differently magnetized parts of a disk.
Generally speaking, a 1 written to a hard disk is read as 1 by its controller, and 0 is read as 0. However, if you write 1 over 0, the result is conditionally 0.95 and vice versa – if 1 is written over 1 the result is 1.05. These differences are irrelevant for the controller. However, using special equipment, one can easily read the «underlying» sequence of 1 and 0.
It only requires specialized software and inexpensive hardware to read data «deleted» this way by analyzing magnetization of hard disk sectors, residual magnetization of track sides and/or by using current magnetic microscopes.
Writing to magnetic media leads to subtle effects summarized as follows: every track of a disk stores an image of every record ever written to it, but the effect of such records (magnetic layer) becomes more subtle as time passes.
C.1 Information wiping methods' functioning principles
Physically, the complete wiping of information from a hard disk involves the switching of every elementary magnetic area of the recording material as many times as possible by writing specially selected sequences of logical 1 and 0 (also known as samples).
Using logical data encoding methods in current hard disks, you can select samples of symbol (or elementary data bit) sequences to be written to sectors in order to repeatedly and effectively wipe confidential information.
Methods offered by national standards provide (single or triple) recording of random symbols to disk sectors that are straightforward and arbitrary decisions, in general, but still acceptable in simple situations. The most effective information-wiping method is based on deep analysis of subtle features of recording data to all types of hard disks. This knowledge speaks to the necessity of complex multipass methods to guarantee information wiping.
The detailed theory of guaranteed information wiping is described in an article by Peter Gutmann. Please see:
http://www.cs.auckland.ac.nz/\~pgut001/pubs/secure_del.html.
C.2 Information wiping methods used by Acronis
The table below briefly describes information wiping methods used by Acronis. Each description features the number of hard disk sector passes along with the number(s) written to each sector byte.
The description of built-in information wiping methods
| No. | Algorithm (writing method) | Writing Passes | Record |
| 1. | United States Department of Defense 5220.22-M | 4 | 1^st pass - randomly selected symbols to each byte of each sector, 2 - complementary to written during the 1^st pass; 3 - random symbols again; 4 - writing verification. |
| 2. | United States NAVSO P-5239-26 (RLL) | 4 | 1^st pass - 0x01 to all sectors, 2 - 0x27FFFFFFF, 3 - random symbol sequences, 4 - verification. |
| 3. | United States NAVSO P-5239-26 (MFM) | 4 | 1^st pass - 0x01 to all sectors, 2 - 0x7FFFFFFF, 3 - random symbol sequences, 4 - verification. |
| 4. | German: VSI TR 7 | ^st - 6^th - alternate sequences of: 0x00 and 0xFF; 7^th - 0xAA; i.e. 0x00, 0xFF, 0x00, 0xFF, 0x00, 0xFF, 0xAA. | |
| 5. | Russian: GOST Logical Zeros (0x00 numbers) to each P50739-95 | ||
| 6. | Peter Gutman Method | 35s Peter Gutman's method is very sophisticated. It's based on his theory of hard disk information wiping (see http://www.cs.auckland.ac.nz/~pgut001/pubs/secure_del.html). | |
| 7. | Bruce Schneider method | 7's Bruce Schneider offers a seven-pass overwriting method in his Applied Cryptography book. 1^st pass - 0xFF, 2^nd pass - 0x00, and then five times with a cryptographically secure pseudo-random sequence. | |
| 8. Fast | 1 Logical zeros (0x00 numbers) to all sectors to wipe. | ||
Appendix D. Startup Parameters
Additional parameters that can be applied prior to booting Linux kernel
Description
The following parameters can be used to load Linux kernel in a special mode:
- acpi=off
Disables ACPI and may help with a particular hardware configuration.
- noapic
Disables APIC (Advanced Programmable Interrupt Controller) and may help with a particular hardware configuration.
- nousb
Disables USB modules loading.
- nousb2
Disables USB 2.0 support. USB 1.1 devices still work with this option. This option allows using some USB drives in USB 1.1 mode, if they do not work in USB 2.0 mode.
- quiet
This parameter is enabled by default and the startup messages are not displayed. Deleting it will result in the startup messages being displayed as the Linux kernel is loaded and the command shell being offered prior to running the very Acronis program.
- nodma
Disables DMA for all IDE disk drives. Prevents kernel from freezing on some hardware.
- nofw
Disables FireWire (IEEE1394) support.
- nopcmcia
Disables PCMCIA hardware detection.
- nomouse
Disables mouse support.
- [module name]=off
Disables the module (e.g. sata_sis=off).
- pci=bios
Forces to use PCI BIOS, not access the hardware device directly. For instance, this parameter may be used if the machine has a non-standard PCI host bridge.
- pci=nobios
Disallows use of PCI BIOS; only direct hardware access methods are allowed For instance, this parameter may be used if you experience crashes upon boot-up, probably caused by the BIOS.
- pci=biosirq
Uses PCI BIOS calls to get the interrupt routing table. These calls are known to be buggy on several machines and they hang the machine when used, but on other computers it is the only way to get the interrupt routing table. Try this option, if the kernel is unable to allocate IRQs or discover secondary PCI buses on your motherboard.