52PFL7403 - TV PHILIPS - Free user manual and instructions
Find the device manual for free 52PFL7403 PHILIPS in PDF.


User questions about 52PFL7403 PHILIPS
0 question about this device. Answer the ones you know or ask your own.
Ask a new question about this device
Download the instructions for your TV in PDF format for free! Find your manual 52PFL7403 - PHILIPS and take your electronic device back in hand. On this page are published all the documents necessary for the use of your device. 52PFL7403 by PHILIPS.
USER MANUAL 52PFL7403 PHILIPS
Register your product and get support at
www.philips.com/welcome
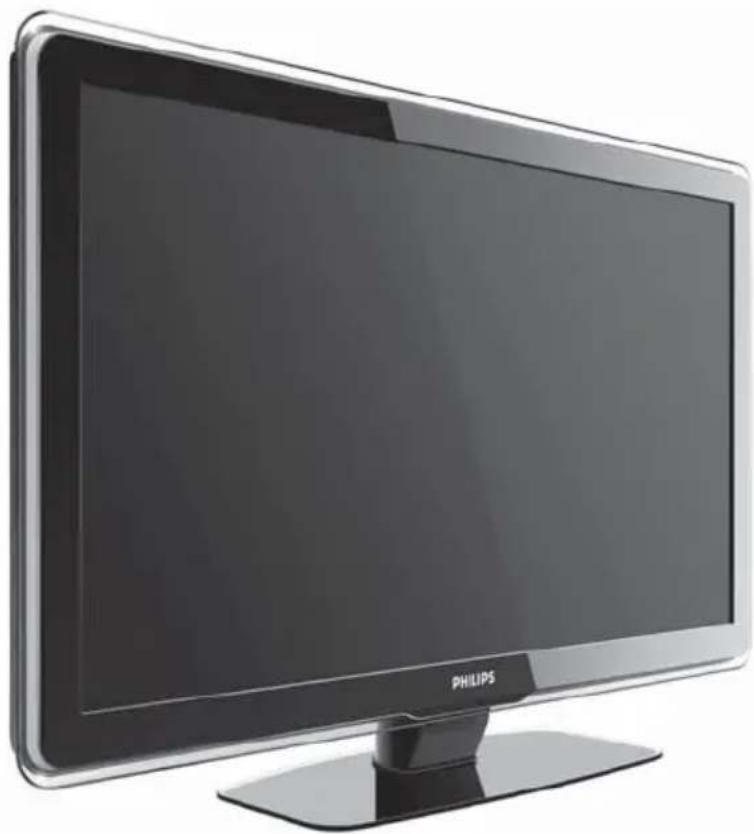
natural_image
Front view of a Philips TV displaying its blank screen and stand (no visible text or symbols on the device body)52PFL7803
42PFL7803
42PFL7603
52PFL7403
42PFL7403
52PFL5403
47PFL5403
42PFL5403
32PFL5403
42PFL5203
32PFL5203
42PFL3403
32PFL3403
| EN | USER | MANUAL |
| ZH | 用户手册 | |
| TH | คู่มือผู้ใช้ | |
| VI | Hướng dẫn Sử dụng | |
| AR | دليل المستخدم | |
Table of contents
1 Important 3
1.1 Safety 3
1.2 Screen care 4
1.3 Environmental care
2 Your TV 5
2.1 TV overview 5
3 Get started 7
3.1 Position the TV 7
3.2 Wall mount the TV 7
3.3 Connect the antenna cable 9
3.4 Connect the mains cord ..... 9
3.5 Manage cables
3.6 Insert the remote control batteries .. 10
3.7 Switch on the TV 10
3.8 Select your location ..... 10
3.9 Re-select your location 10
4 Use your TV 11
4.1 Switch your TV on/off or to standby . . 11
4.2 Watch TV 11
4.3 Watch connected devices 12
4.4 Use teletext
4.5 Use Ambilight 13
5 Use more of your TV 14
5.1 Remote control overview ..... 14
5.2 Use TV menus 16
5.3 Adjust picture and sound settings . . . . 17
5.4 Adjust Ambilight settings ..... 20
5.5 Use advanced teletext features ..... 20
5.6 Create a surf list 22
5.7 Use timers and child lock ..... 22
5.8 Use Demo mode 24
6 Install channels 26
6.1 Automatically install channels ..... 26
6.2 Manually install channels ..... 26
6.3 Manage channels 27
6.4 Change to Shop or Home mode ..... 29
7 Connect devices 30
7.1 Connection overview ..... 30
7.2 Select connection quality ..... 31
7.3 Connect devices 32
7.4 Setup devices 34
8 Use your TV as PC monitor..... 35
10 8.1 Configure PC mode....35
9 Use your TV in High Definition (HD) mode 36
9.1 Configure HD mode 36
9.2 Configure the TV in HD mode ..... 36
9.3 Display in native 1080 mode ..... 37
9.4 Supported formats ..... 37
10 Use Philips EasyLink.... 38
12 Technical data 39
12 Troubleshooting 40
12.1 General TV issues 40
12.2 Picture issues 40
12.3 Sound issues 40
12.4 HDMI connection issues ..... 41
12.5 PC connection issues ..... 41
12.6 Contact us .... 41
2007 © Koninklijke Philips Electronics N.V. All rights reserved. Specifications are subject to change without notice. Trademarks are the property of Koninklijke Philips Electronics N.V. or their respective owners.
Philips reserves the right to change products at any time without being obliged to adjust earlier supplies accordingly.
The material in this manual is believed adequate for the intended use of the system. If the product, or its individual modules or procedures, are used for purposes other than those specified herein, confirmation of their validity and suitability must be obtained. Philips warrants that the material itself does not infringe any United States patents. No further warranty is expressed or implied.
Warranty
No components are user-serviceable. Do not open or remove covers to the inside of the product. Repairs may only be done by Philips Service Centres and offi cial repair shops. Failure to do so shall void any warranty, stated or implied. Any operation expressly prohibited in this manual, any adjustments, or assembly procedures not recommended or authorised in this manual shall void the warranty.
Pixel characteristics
This LCD product has a high number of colour pixels. Although it has effective pixels of 99,999% or more, black dots or bright points of light (red, green or blue) may appear constantly on the screen. This is a structural property of the display (within common industry standards) and is not a malfunction.
Compliance with EMF
Koninklijke Philips Electronics N.V. manufactures and sells many products targeted at consumers, which, like any electronic apparatus, in general have the ability to emit and receive electromagnetic signals.
One of Philips' leading Business Principles is to take all necessary health and safety measures for our products, to comply with all applicable legal requirements and to stay well within the EMF standards applicable at the time of producing the products.
Philips is committed to develop, produce and market products that cause no adverse health effects.
Philips confi rms that if its products are handled properly for their intended use, they are safe to use according to scientific evidence available today.
Philips plays an active role in the development of international EMF and safety standards, enabling Philips to anticipate further developments in standardisation for early integration in its products.
Copyright

VESA, FDMI and the VESA Mounting Compliant logo are trademarks of the Video Electronics Standards Association.

Manufactured under license from BBE Sound, Inc. Licensed by BBE, Inc under one or more of the following US patents: 5510752,5736897. BBE and BBE symbol are registered trademarks of BBE Sound Inc.
® Kensington and Micro Saver are registered US trademarks of ACCO World Corporation with issued registrations and pending applications in other countries throughout the world. All other registered and unregistered trademarks are the property of their respective owners.
Important1
Congratulations on your purchase and welcome to Philips!
Read this user manual before you start to use this product.
Pay close attention to this section and follow the safety and screen care instructions. The product warranty does not apply if damage is caused by failing to follow these instructions.
To fully benefit from the support that Philips offers, register your product at www.philips.com/welcome.
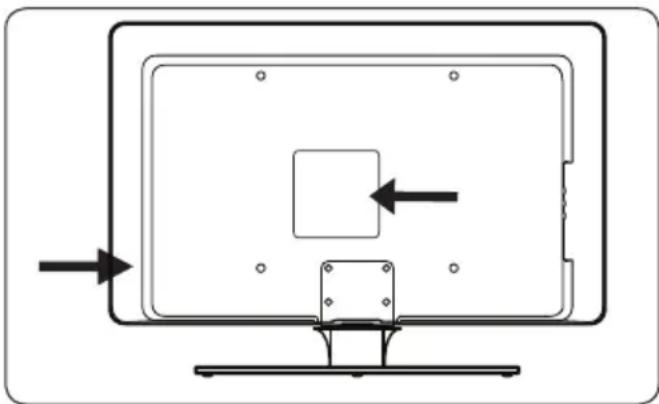
The model and serial number of your TV can be found on the back and side of the TV as well as on the packaging.
natural_image
Diagram of a computer monitor with an internal square component and directional arrows indicating flow or movement (no text or symbols)Safety1.1
Two people are required to lift and carry a TV that weighs more than 25 kg (55lb). Improper handling of the TV can result in serious injury.
If transporting the TV in low temperatures • (less than 5°C), open the box and wait until the TV matches the ambient temperature of the room before unpacking.
To avoid short circuit, do not expose the • TV, remote control or remote control batteries to rain or water.
Do not place vessels of water or other • liquids on top of or near the TV. Spilling liquids on the TV can cause electric shock.
If liquids are spilt on the TV, do not operate the TV. Immediately disconnect the TV from the mains and have the TV checked by a qualified technician.
To avoid risk of fire or electric shock, do not place the TV, remote control or remote control batteries near naked flame sources (e.g. lighted candles) and other heat sources including direct sunlight.
Do not install the TV in a confined space such as a bookcase. Leave a space of at least 10cm (four inches) around the TV for ventilation. Be sure air flow is not obstructed.
If placing the TV on a flat, solid surface be • sure to use only the supplied stand. Do not move the TV if the stand is not properly screwed to the TV.
Wall mounting of the TV should only be performed by qualified personnel. The TV must only be mounted on an appropriate wall bracket and on a wall that can safely hold the weight of the TV. Improper wall mounting can result in severe injury or damage. Do not attempt to wall mount the TV yourself.
If the TV is mounted on a swivel base or swivel arm, ensure no strain is placed on the power cord when the TV is swivelled. Strain on the power cord can loosen connections and cause arcing or fire.
Disconnect the TV from the mains and • antenna before lightning storms. During lightning storms do not touch any part of the TV, mains cord or antenna cable.
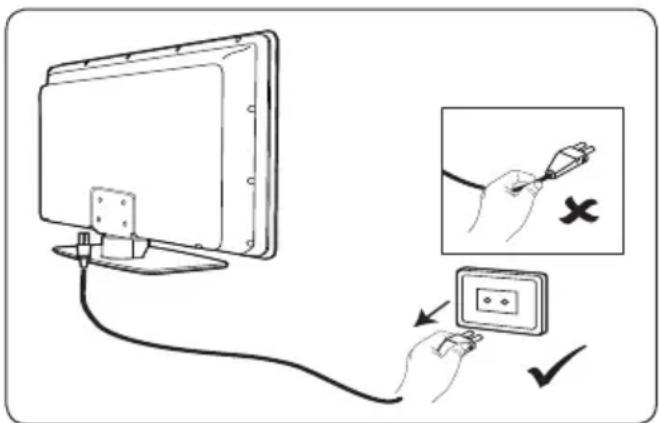
Be sure that you have full access to the • mains cord for easy disconnection of the TV from the mains.
- When disconnecting the TV from the mains, be sure to:
- Turn off the TV, then the mains power (if available).
Unplug the mains cord from the mains • socket outlet.
Unplug the mains cord from the power • connector at the back of the TV.
Always pull the mains cord by the plug.
Do not pull the mains cord.
text_image
Diagram showing a cable being inserted into an electrical outlet, with a magnified view indicating disassembly or disassembly of the switch.Permanent hearing loss may occur if you use earphones or headphones at high volumes. Though high volume may sound normal over time, it can damage your hearing. To protect your hearing, limit the amount of time you use earphones or headphones at high volume.
Screen care1.2
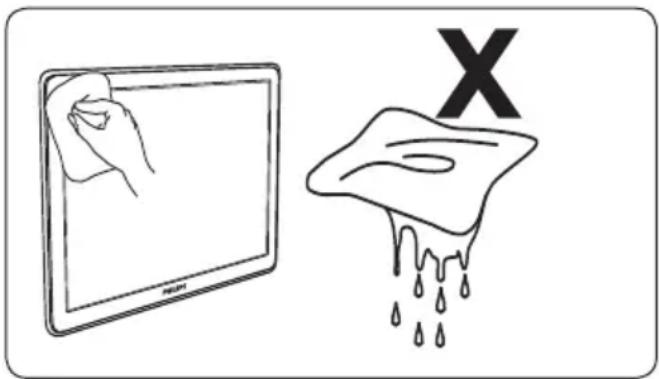
Turn off and unplug the mains cord before • cleaning the screen. Clean the screen with a soft, dry cloth. Do not use substances such as household cleaning agents as these may damage the screen.
text_image
Diagram showing a hand holding a tablet and a droplet labeled 'X' falling, likely illustrating a medical or cosmetic procedure.To avoid deformations or colour fading, • wipe off water droplets as soon as possible.
Do not touch, push, rub or strike the • screen with hard objects as this may damage the screen permanently.
Where possible, avoid stationary images • that remain on-screen for extended periods of time. Examples include screen menus, teletext pages, black bars or stock market tickers. If you must use stationary images, reduce the screen contrast and brightness to avoid screen damage.
Environmental care1.3
Recycling your packaging
The packaging of this product is intended to be recycled. Contact your local authorities for information on how to recycle the packaging.
Disposing your used product
Your product is manufactured with high-quality materials and components that can be recycled and reused. When you see the crossed-out wheel bin symbol attached to a product, it means the product is covered by the European Directive 2002/96/EC:
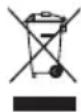
Do not dispose your used product with household waste. Ask your dealer for information on how to safely dispose of the product. Uncontrolled waste disposal harms both the environment and human health.
Disposing used batteries
The supplied batteries do not contain mercury or cadmium. Dispose supplied and all other used batteries according to your local regulations.
Power consumption
The TV consumes minimal energy in standby mode to minimise environmental impact. Active power consumption is displayed at the back of the TV.
For more product specifications, see the product leaflet at www.philips.com/support.
Your TV2
This section gives you an overview of commonly-used TV controls and functions.
TV overview2.1
Side controls and indicators

text_image
VOLUME MENU CHANNEL POWER 1 2 3 4 51. POWER
CHANNEL +/-2.
MENU3.
VOLUME +/-4.
Standby indicator / Remote control sensor5.
Side connectors
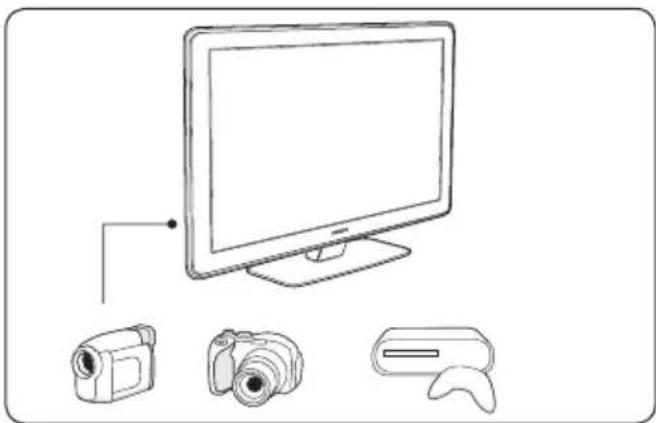
natural_image
Line drawing of a desktop computer setup with monitor, video camera, and remote control (no text or symbols)Use the TV side connectors to connect to mobile devices such as a camera or high-definition game console. You can also connect a pair of headphones.
Back connectors
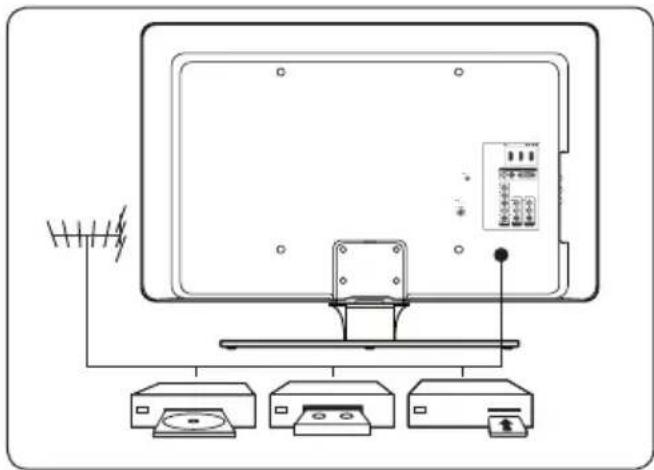
text_image
Diagram showing a TV setup with antenna, CD, and printer components connected to a monitor screenUse the TV back connectors to connect to the antenna and permanent devices such as a high-definition disc player, DVD player or VCR.
Note
For more information about TV connections, see Section 7 Connect devices.
Remote control
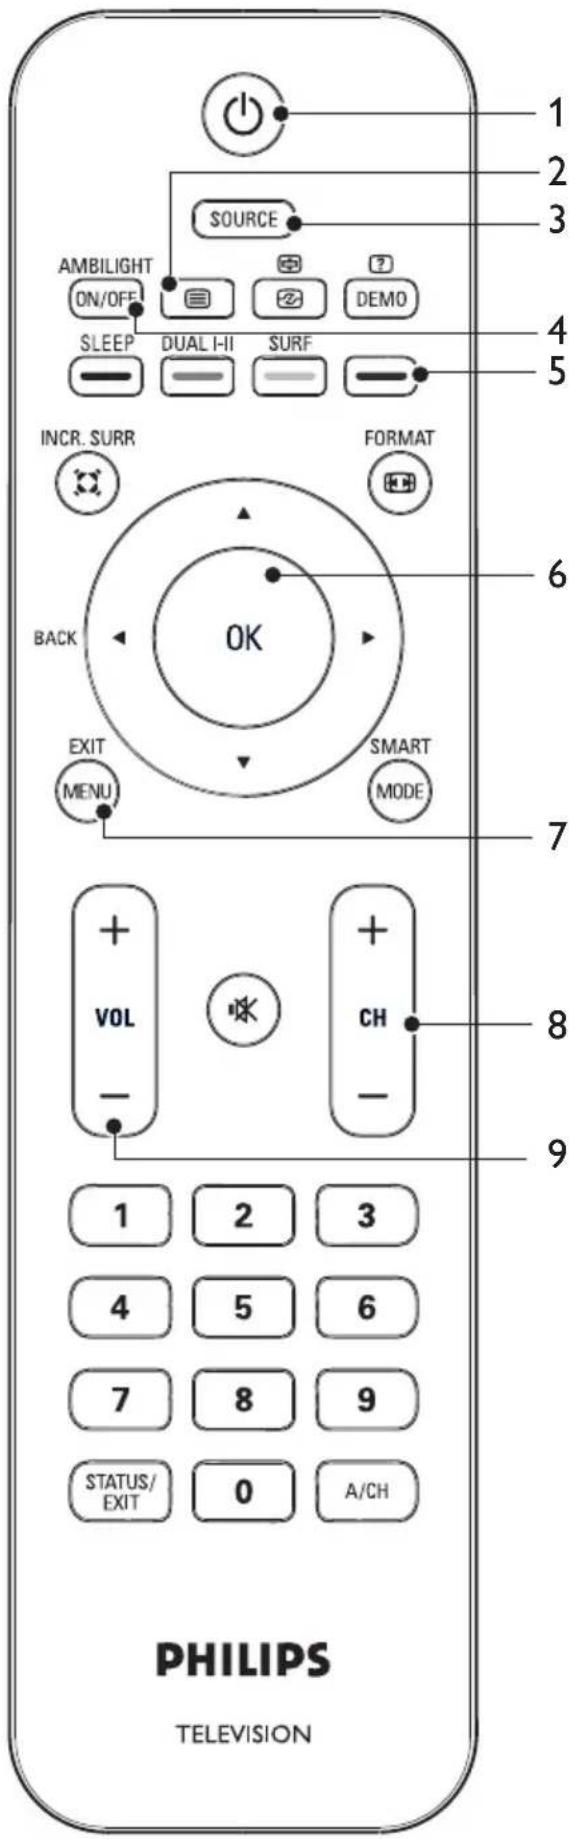
text_image
PHILIPS TELEVISION 1 2 3 SOURCE AMBILIGHT ON/OFF SLEEP DUAL I-II SURF FORMAT 6 OK BACK EXIT MENU SMART MODE 7 VOL - + - CH 8 9 1 2 3 4 5 6 7 8 9 STATUS/ EXIT 0 A/CHPOWER1.
TELETEXT2.
SOURCE3.
AMBILIGHT4.
COLOUR KEYS5.
From left: red, green, yellow, blue
NAVIGATION KEYS6.
Up ▲, Down ▼, Left ◀, Right ▶, OK
MENU7.
CHANNEL +/-8.
VOLUME +/-9.
For more information about the remote control, see Section 5.1 Remote control overview.
Get started3
This section helps you position and install the TV and supplements the information provided in the Quick Start Guide.
If necessary, refer to the Quick Start Guide for stand mounting instructions.
Position the TV3.1
In addition to reading and understanding the safety instructions in Section 1.1, consider the following before positioning your TV:
The ideal viewing distance for watching TV is three times its screen size.
Position the TV where light does not fall • directly on the screen.
Connect your devices before you position • your TV.
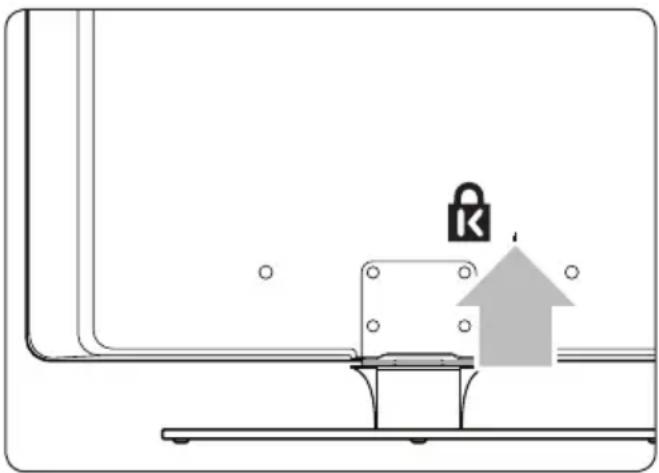
Your TV is equipped with a Kensington • Security Slot at the back of the TV.
natural_image
Illustration of a security lock icon emerging from a window, with an upward arrow symbolizing growth (no text or symbols present)If connecting an anti-theft Kensington lock (not supplied), position the TV within reach of a permanent object (such as a table) that can be easily attached to the lock.
For the best Ambilight effect, position the • TV 10cm (four inches) to 20cm (eight inches) away from the wall. Ambilight also works best in a room with dim lighting.
Wall mount the TV3.2
WARNING
Wall mounting of the TV should only be performed by qualified installers. Koninklijke Philips Electronics N.V. bears no responsibility for improper mounting that results in accident or injury.
Step 1 Purchase a VESA-compatible wall bracket
Depending on the size of your TV screen, purchase one of the following wall brackets:
| TV screen size (inches/cm) | VESA-compatible wall bracket type (millimeters) | Special instructions |
| 32”/82 cm | Adjustable 300 x 300 | The VESA-compatible bracket must be adjusted to 200 x 300 before securing to the TV |
| 42”/107 cm or larger | Fixed 400 x 400 | None |
Step 2 Remove the TV stand
Note
These instructions are only applicable to TV models with mounted stands. If your TV stand is not mounted, skip to Step 3 Connect cables.
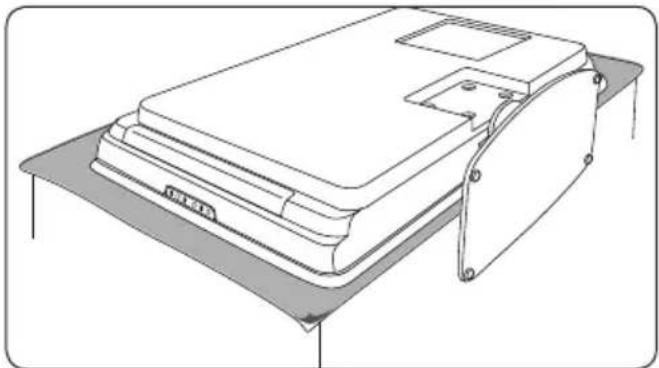
Carefully place the TV face down on a 1. flat, stable surface that is covered by soft cloth. The cloth should be thick enough to protect your screen.
natural_image
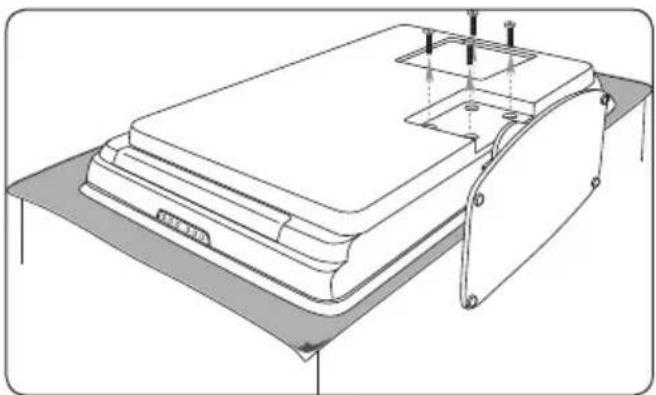
Line drawing of a mechanical device with mounting bracket and side panel (no text or symbols)Using a cross-head screwdriver (not 2. supplied), unscrew the four screws that secure the stand to the TV.
natural_image
Technical line drawing of a mechanical component with mounting flanges and internal compartments (no text or symbols)Firmly pull the stand from the bottom of 3. the TV. Place both the stand and screws in a secure location for future reinstallation.

natural_image
Technical line drawing of a mechanical device with a folded panel and mounting bracket (no text or symbols)Step 3 Connect cables
Connect the antenna cable, mains cord and all other devices to the back of the TV as described in the following sections and in Section 7 Connect devices.
Step 4 Secure the VESA-compatible wall bracket to the TV
WARNING
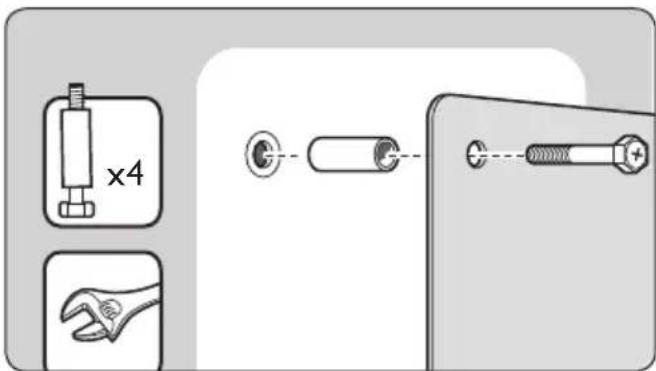
Use bolts (M6 for 32 inch models, M8 for all other models) and spacers to secure the VESA-compatible wall bracket to your TV.
Note
Depending on your VESA-compatible wall bracket, you may need to separate the mounting plate from the wall bracket for easier installation. Refer to your VESA-compatible wall bracket documentation for instructions.
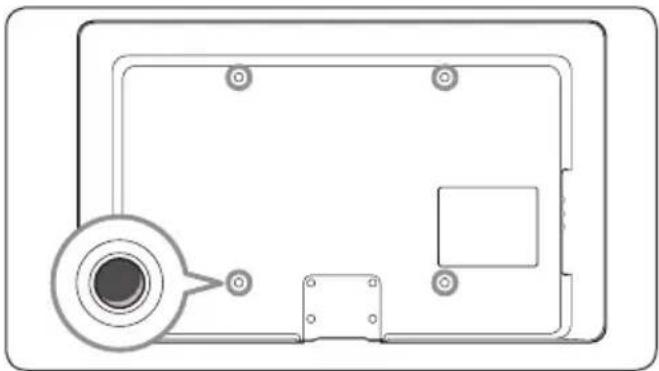
Locate the four mounting nuts at the back 1. of the TV.
natural_image
Top-down schematic of a device casing with mounting holes and a circular component (no text or symbols)Align the plate/bracket to the four 2. mounting nuts, placing the supplied spacers between the plate/bracket and the mounting nuts.
Using a spanner or cross-head screwdriver, insert the supplied bolts through the plate/ bracket and spacers, tightly securing the bolts to the mounting nuts.
text_image
Diagram showing three mechanical components: a screw, a wrench, and a spring-loaded component with cross-sectional view.Continue with the instructions provided 3. with your VESA-compatible wall bracket.
Connect the antenna cable3.3
text_image
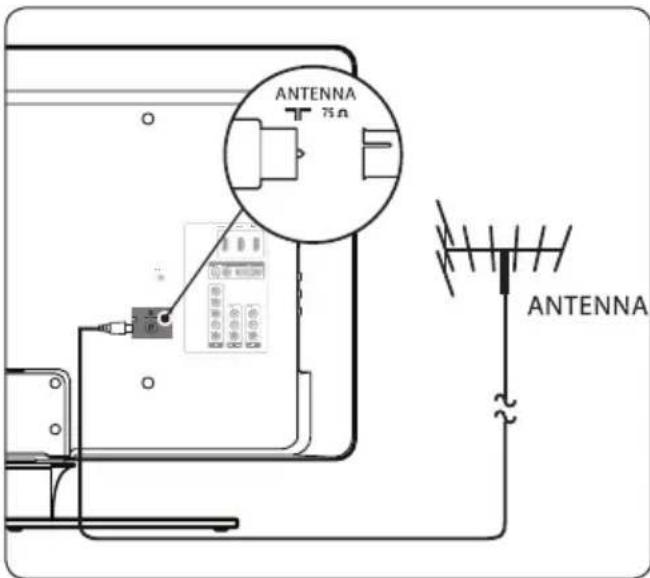
ANTENNA 70 ANTENNA- Locate the TV ANTENNA connector at the back of the TV.
Connect one end of the antenna cable 2. (not supplied) to the TV ANTENNA connector. Use an adaptor if the antenna cable does not fit.
Connect the other end of the antenna 3. cable to your antenna outlet, ensuring that the cable is tightly secured at both ends.
Connect the 3.4
WARNING
Verify that your mains voltage corresponds with the voltage printed at the back of the TV. Do not insert the mains cord if the voltage is different.
To connect the mains cord3.4.1.
Note
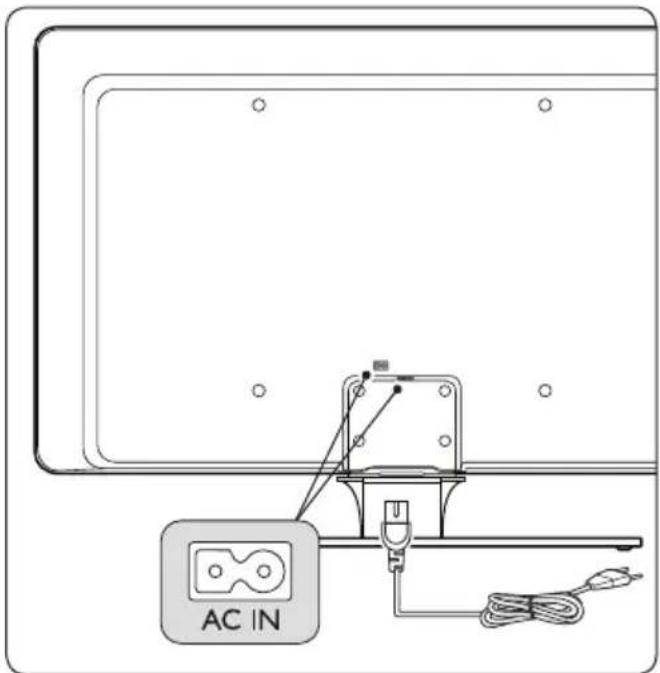
The location of the mains connector varies according to TV model.
text_image
AC IN-
Locate the AC IN mains connector at the back or on the bottom of the TV.
-
Connect the mains cord to the AC IN mains connector.
-
Connect the mains cord to the mains, ensuring that the cord is tightly secured at both ends.
Manage cables3.5
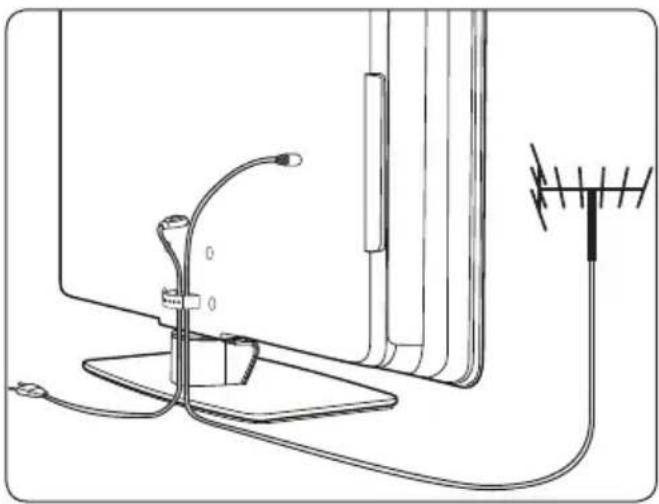
Route your mains cord, antenna cable and all other device cables through the cable holder at the back of the TV. This holder helps keep your cables tidy and easily manageable.
natural_image
Line drawing of a medical device with attached cables and a vertical antenna (no text or symbols)Insert the remote control 3.6 batteries
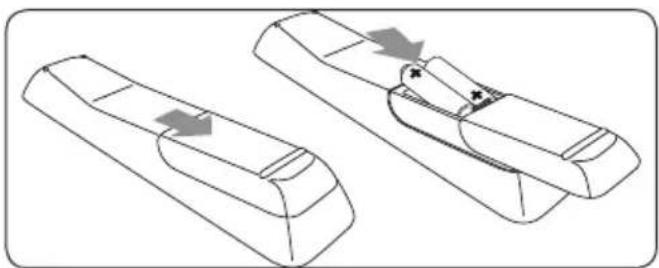
natural_image
Technical line drawing of two mechanical components with directional arrows indicating movement (no text or symbols)Slide the battery cover off the back of the 1. remote control.
Insert the two supplied batteries. Be sure 2. the + and - ends of the batteries line up with the markings inside the case.
Slide the cover back into position.3.
Note

Remove the batteries if not using the remote control for an extended period of time.
Switch on the TV3.7
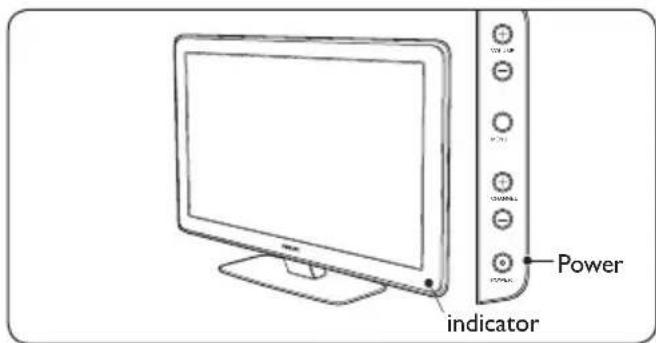
The first time you switch on the TV, check that the mains cord is properly connected. When ready, turn on the mains, then press POWER on the side of the TV.
Select your location3.8
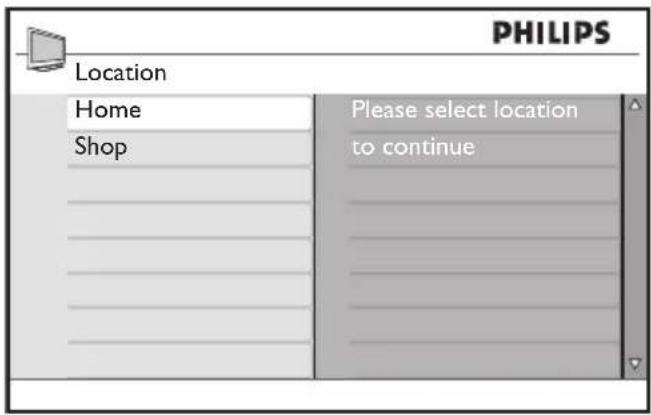
The first time and only the first time when you switch on the TV, an on-screen display will prompt you to select a location. The location settings is to maximise your viewing pleasure depending on your environment at home or at the shopfloor.
text_image
PHILIPS Location Home Shop Please select location to continue- Press ▲ or ▼ a location.
Press 5. OK to confirm your choice.
3.9 Re-select your location
If you wish to re-select your location, see Section 6.4 Change to Shop or Home mode.
Use your TV 4
This section helps you perform basic TV operations. Instructions on advanced TV operations are provided in Section 5 Use more of your TV.
4.1 Switch your TV on/off or to standby
Switch on your TV4.1.1.
text_image
power indicatorPress • POWER on the side of the TV. An indicator light comes on.
Switch off your TV4.1.2.
Press • POWER on the side of the TV. The indicator light switch off.
Switch your TV to standby4.1.3.
text_image
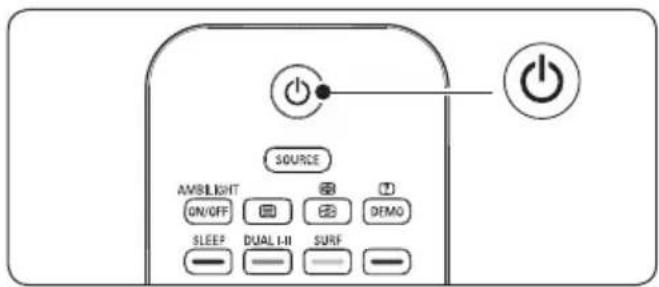
SOURCE AMBLIGHT ON/OFF SLEEP DUAL I-II SURF DEMOPress • ⏻ POWER on the remote control.
Tip
Though your TV consumes very little power when in standby, energy continues to be consumed as long as the mains remain connected and powered. When not in use for extended periods of time, switch off and disconnect the TV from the mains.
4.1.4. Switch on the TV from standby
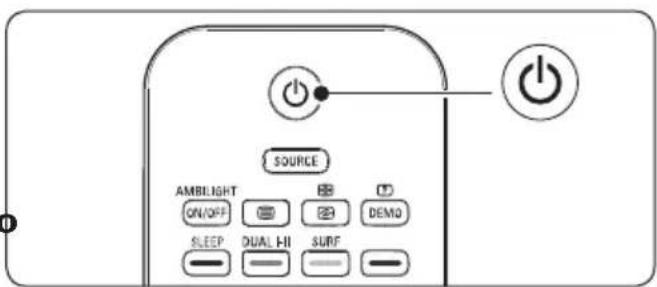
text_image
SOURCE AMBLIGHT ON/OFF SLEEP DUAL-HI SURF DEMO- If the standby indicator is on (red), press ⏻ POWER on the remote control.
Note
If you cannot locate your remote control and you want to switch on the TV from standby, press CHANNEL + or - on the side of the TV.
4.2 Watch TV
4.2.1. Switch channels
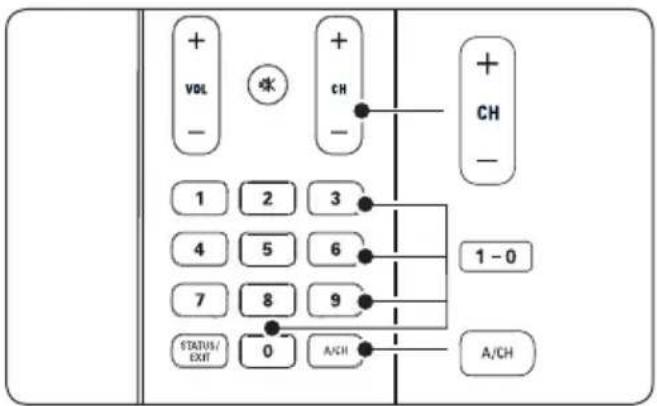
flowchart
graph TD
    A["+ VOL -"] --> B["1"]
    A --> C["2"]
    A --> D["3"]
    E["+"] --> F["4"]
    E --> G["5"]
    E --> H["6"]
    I["CH -"] --> J["7"]
    I --> K["8"]
    I --> L["9"]
    M["STATUS/EXIT"] --> N["0"]
    O["A/CH"] --> P["A/CH"]
    Q["1-0"] --> R["+ CH -"]
- Press a number (0 to 99) or press CH +/- on your remote control.
Press • CHANNEL +/- on the side controls of the TV.
Press • A/CH on the remote control to return to the previously viewed TV channel.
Adjust volume4.2.2.
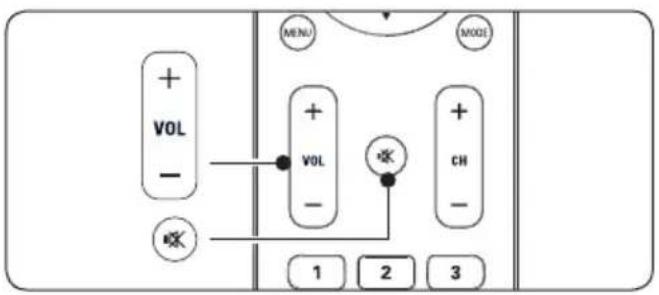
flowchart
graph TD
    A["+ VOL -"] --> B["+ VOL -"]
    B --> C["+ CH -"]
    D["MENU"] --> E["MODE"]
    F["1"] --> G["2"] --> H["3"]
- Press VOLUME + or - on the remote control.
- Press VOLUME + or - on the side controls of your TV.
Press ✗ on the remote control to mute the sound. Press ✗ again to unmute on the sound.
Watch connected devices4.3
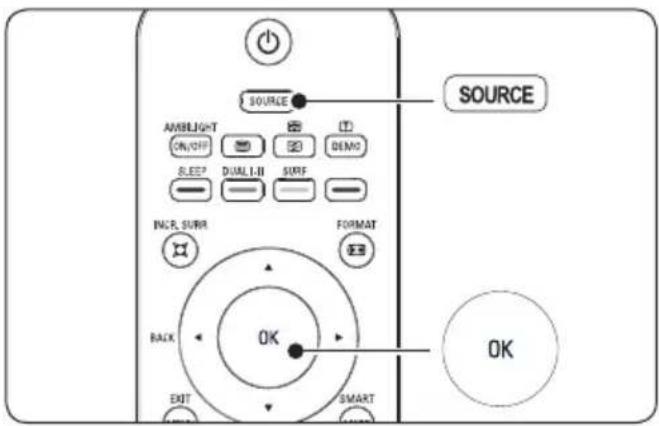
text_image
SOURCE AMBLIGHT ON/OFF SLEEP DUAL-11 SURF INLR, SURR BACK EXIT FORMAT SMART SOURCE OKSwitch on the device.1.
Press 2. SOURCE on the remote control then select the input your device is connected to.
Press 3. OK to select the device.
Use teletext4.4
Most TV channels broadcast information via teletext.
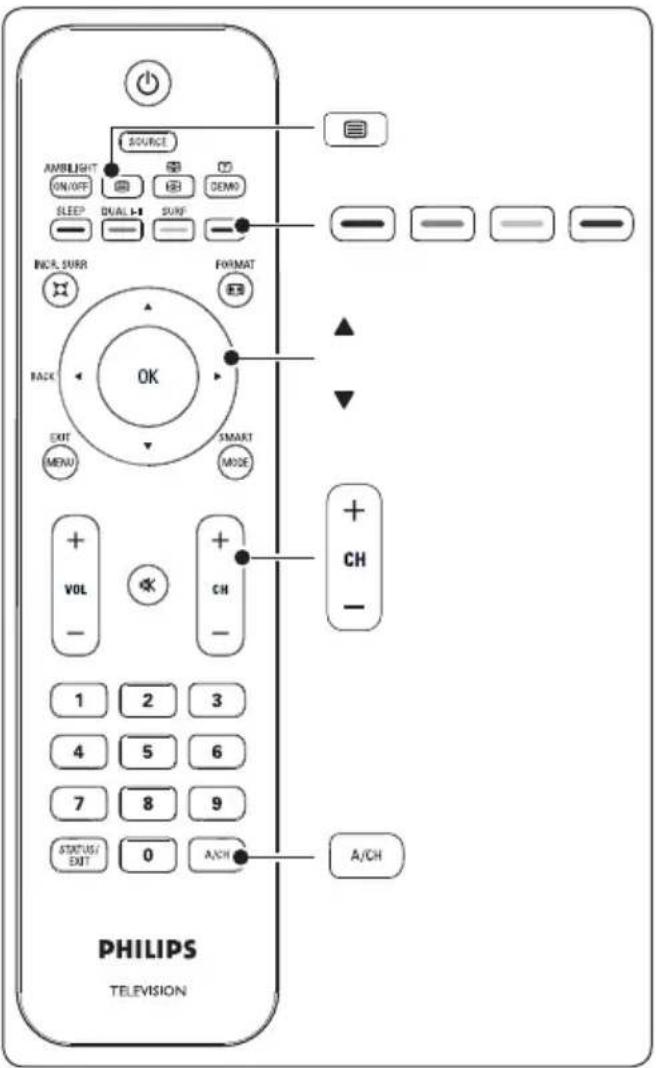
Press 1. ☐ on the remote control.
The main index page appears.
To select a page with the remote control:2.
- Enter the page number with the number keys.
- Press CH +/- or ▲/▼ to view the next or the previous page. - Press a colour key to select one of the colour coded items at the bottom of the screen.
Press 3. ☐ again to switch off teletext.
text_image
SOURCE AMBLEIGHT ON/OFF SLEEP DUALI SURF INCR. SURR FORMAT BACK OK EXIT MENU SMART MODE VOL + - CH + - 1 2 3 4 5 6 7 8 9 STATUS/ EXIT 0 A/CH A/CH PHILIPS TELEVISIONFor more information on teletext, see Section 5.5 Use advanced teletext features.
Use Ambilight 4.5
Ambilight is not available in all models.
Ambilight is an innovative Philips feature that adds reactive ambiant lighting to your viewing experience.
text_image
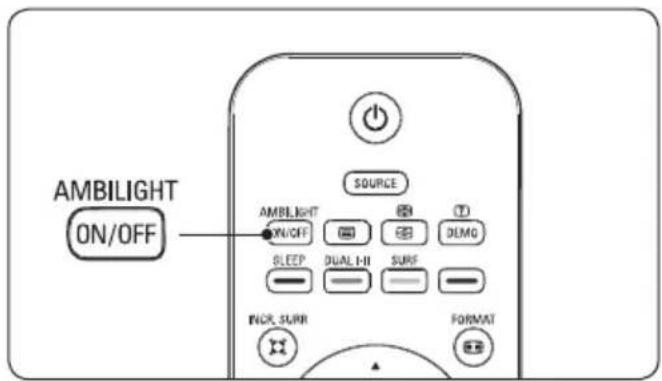
AMBILIGHT ON/OFF SOURCE AMBILIGHT ON/OFF SLEEP DUAL I-II SURF INCR. SURR FORMATPress 1. AMBILIGHT on the remote control. Ambilight turns on.
Press 2. AMBILIGHT again to turn off Ambilight.
For more information on Ambilight, see Section 5.4 Adjust Ambilight settings.
Tip
A dimly lit room is ideal for a complete Ambilight experience.
Use more of your TV5
This section helps you perform advanced TV operations, including how to:
Use the TV menus (• Section 5.2)
Adjust picture and sound settings • (Section 5.3)
Adjust Ambilight settings (• Section 5.4)
Use advanced teletext features (• Section 5.5)
Create a surf list (• Section 5.6)
Use timers and child lock (• Section 5.7)
Use Demo mode (•
5.1 Remote control overview
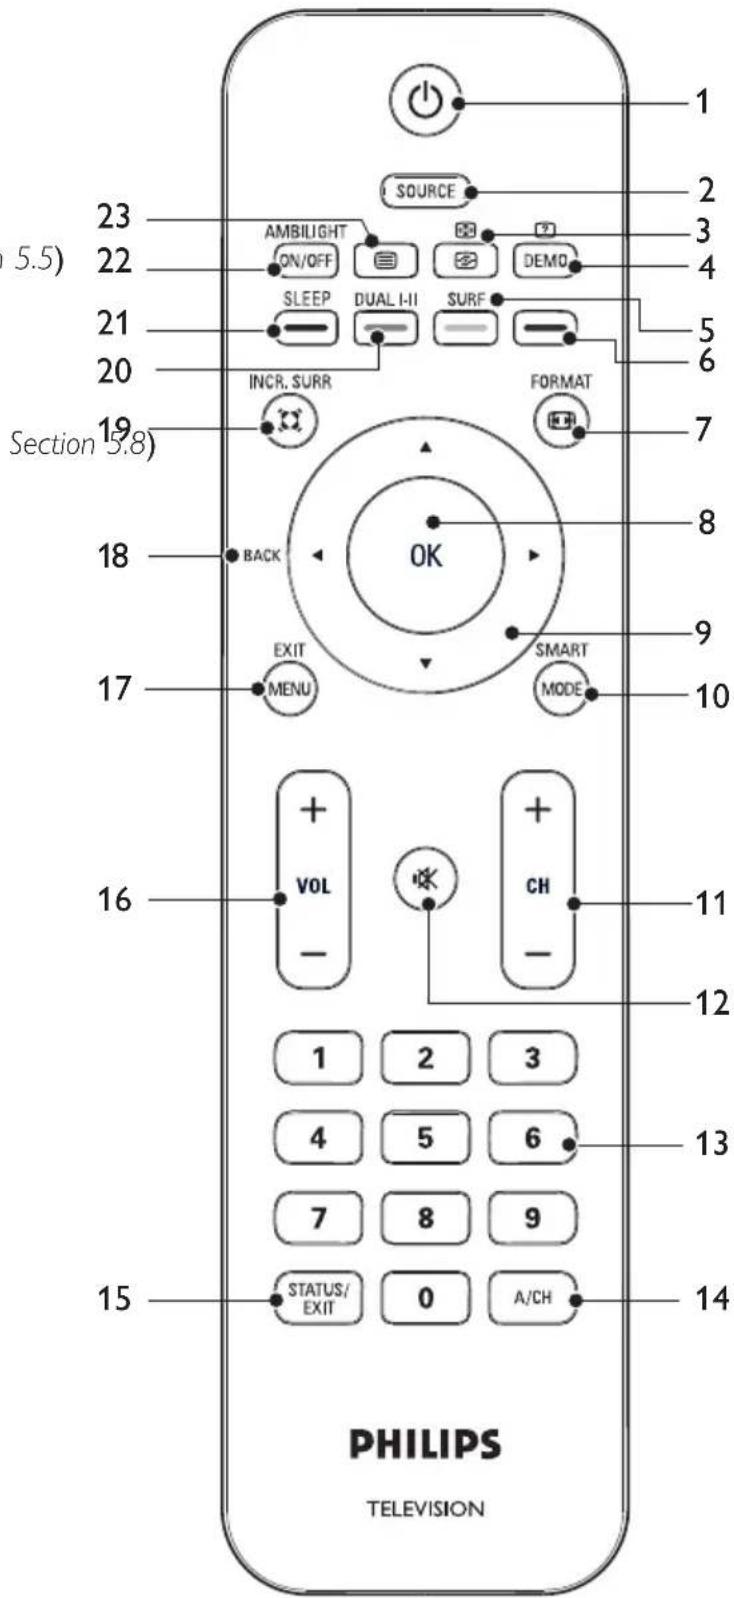
This section provides a detailed overview of remote control features.
text_image
PHILIPS TELEVISION 1 2 3 4 5 6 7 8 9 10 11 12 13 14 15 16 17 18 19 20 21 22 23 AMBILIGHT ON/OFF SLEEP DUAL I-II SURF INCR. SURR FORMAT EXIT MENU VOL CH - OUTPUT/EXIT 0 A/CH SOURCE DEMO OKPOWER1.
Switches the TV on from standby or back to standby.
SOURCE2.
Selects connected devices.
ACTIVE CONTROL3.
Select On, Off, or On + Light Sensor*. The TV measures and corrects incoming signals to provide the best picture.
DEMO\*4.
Toggles the Demo menu on or off.
SURF5.
Stores favourite channels.
COLOUR KEYS6.
Selects tasks or teletext pages.
FORMAT7.
Toggles through a selection of picture formats.
OK8.
Accesses the menus and activates settings.
NAVIGATION KEYS9.
Navigates the menu.
SMART MODE10.
Toggles through predefined picture and sound settings.
CHANNEL (CH) +/-11.
Switches to the next or previous channel.
MUTE12.
Turns the sound on or off.
13. NUMBER KEYS
Selects a channel, page or setting.
14. ALTERNATE CHANNEL
Returns to the previously-viewed channel.
15. STATUS/EXIT
Displays channel information or exits from a menu.
16. VOLUME +/-
Increases or decreases volume.
17. MENU/EXIT
Switches the menu on or off.
18. BACK
To return to the previous menu.
19. INCREDIBLE SURROUND
Enables Incredible Surround with stereo sources. Spatial mode is enabled with mono sources.
20. DUAL SOUND
Switches Stereo and Nicam Stereo to Mono. Selects first language (Dual I) or second language (Dual II) in bilingual programmes.
21. SLEEP
Activates the sleep timer.
22. AMBILIGHT\*
Switches Ambilight on or off.
23. TELETEXT
Switches Teletext on or off.
* Available in selected models.
Use TV menus5.2
On-screen menus help you install your TV, adjust picture, sound and Ambilight settings and access other features. This section describes how to navigate the menus.
Access the main menu5.2.1.
text_image
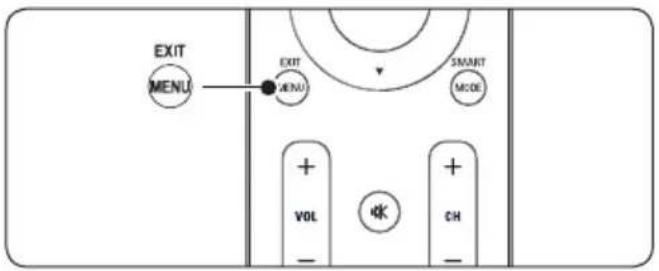
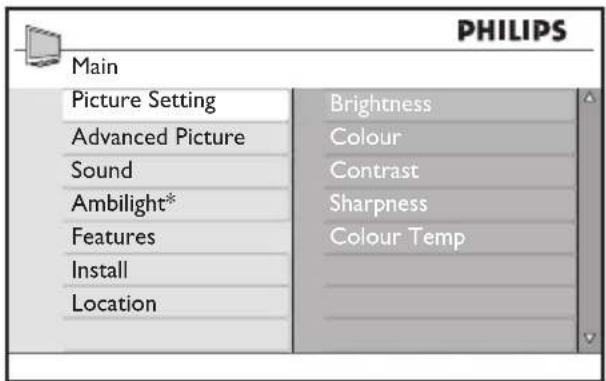
EXIT MENU EXIT MENU SMART MOOE + VOL - OK + CH -Press 1. MENU on the remote control to display the main menu.
text_image
PHILIPS Main Picture Setting Advanced Picture Sound Ambilight* Features Install Location Brightness Colour Contrast Sharpness Colour Temp* Available in selected models
Press 2. MENU to exit.
The main menu offers the following items:
Picture Setting•
To adjust picture settings such as Brightness, Colour, Contrast, Sharpness, and Colour Temperature. See Section 5.3 Adjust Picture and Sound settings.
Advanced Picture•
To turn on or off Advanced Picture settings such Contrast+, Active Control, Artifacts Reduction* and HD Natural Motion*. See Section 5.3 Adjust Picture and Sound settings.
* Available in selected models.
Sound•
To adjust sound settings such as Equalizer, Balance, Auto Volume Leveller, Incredible
Surround, and BBE. See Section 5.3 Adjust Picture and Sound settings.
Ambilight•
To turn Ambilight on or off and to change the mode. See Section 5.4 Adjust Ambilight settings.
Features•
To turn features on or off and to adjust special features such as Timer, Child Lock, Parental Lock and Demo See Section 5.7 Use timers and child lock and Section 5.8 Use Demo mode.
Install·
To select the display language, auto store, manual store, sort and name TV channels, and to store a list of favourite channels. See Section 6 Install channels.
Location•
To change your TV location to the Home or Shop mode. See Section 6.4 Change to Shop or Home mode.
5.2.2. Use the main menu
This section describes how to use the main menu.
text_image
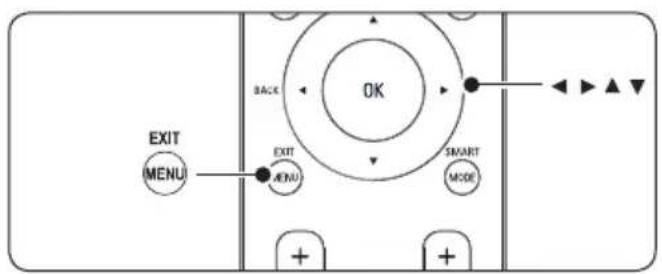
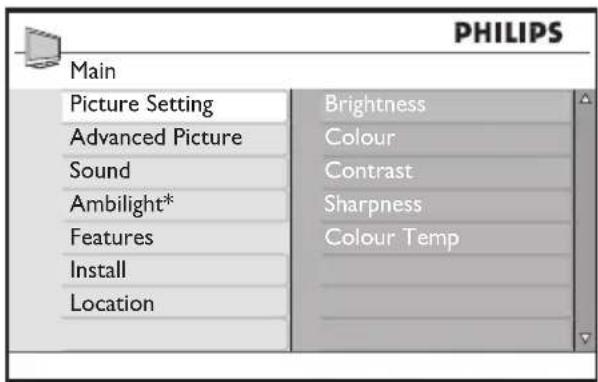
EXIT MENU BACK EXIT MENU OK SMART MODE + + +Press 1. MENU on the remote control to display the main menu.
text_image
PHILIPS Main Picture Setting Brightness Advanced Picture Colour Sound Contrast Ambilight* Sharpness Features Colour Temp Install Location* Available in selected models
Press 2. ▶ to enter the Picture Setting menu.
text_image
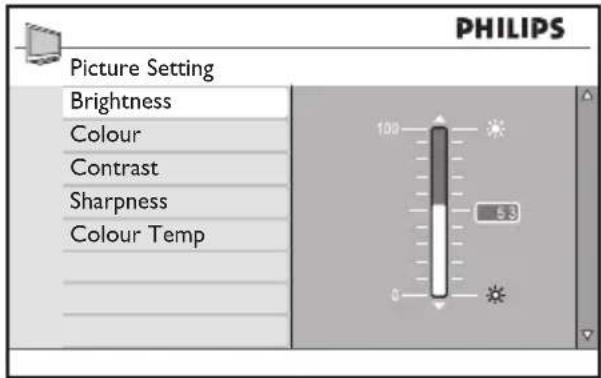
PHILIPS Picture Setting Brightness Colour Contrast Sharpness Colour TempPress 3. ▶ to select Brightness.
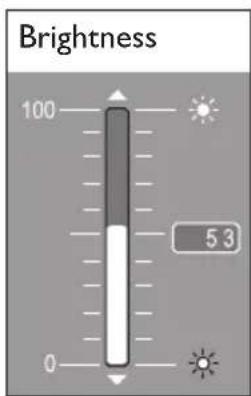
- Press ▶ to enter the Brightness setting.
text_image
Brightness 100 53 0- Press ▲ or ▼ to adjust the setting.
- Press ◀ to return to the Picture settings or press MENU to exit.
Note
More choices are available when HD equipment or PC is connected.
Adjust picture and sound 5.3 settings
This section describes how to adjust picture and sound settings.
Adjust picture settings5.3.1.
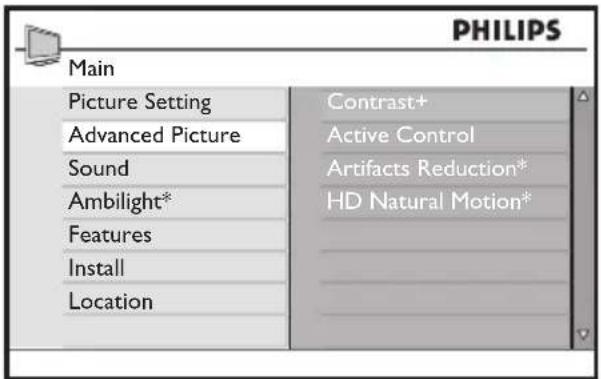
- Press MENU on the remote control and select Picture Setting or Advanced Picture.
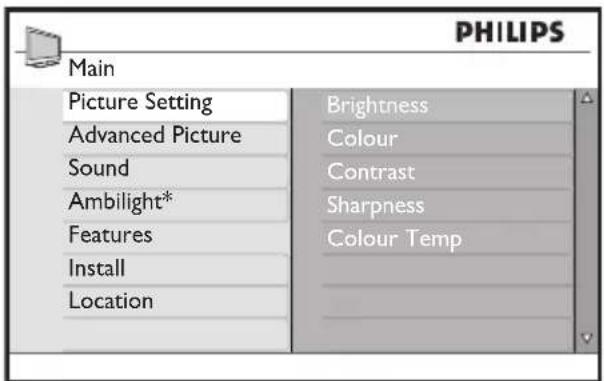
text_image
PHILIPS Main Picture Setting Brightness Advanced Picture Colour Sound Contrast Ambilight* Sharpness Features Colour Temp Install Location* Available in selected models
text_image
PHILIPS Main Picture Setting Contrast+ Advanced Picture Active Control Sound Artifacts Reduction* Ambilight* HD Natural Motion* Features Install Location* Available in selected models
Press 2. ▶ to enter the list.
- Press ▲ or ▼ to select a setting:
- Brightness
Changes the level of light in the picture.
- Colour
Changes the level of saturation.
Contrast•
Changes the level of bright parts in the picture keeping the dark parts unchanged.
- Sharpness
Changes the level of sharpness of fine details.
Colour Temperature•
Sets the colours to Normal, Warm (reddish) or Cool (bluish).
- Contrast+
Changes the contrast range of the picture. Switch on or off.
• Active Control
Corrects all incoming signals to provide
the best picture possible. Switch on, off, or on+light sensor*.
• Artifacts Reduction\*
Smoothens the transitions on digital pictures. Switch on or off.
HD Natural Motion\*•
Reduces the field and line flicker and reproduces smooth movement especially in movies. Switch on or off.
* Available in selected models.
5.3.2. Use Smart Mode
Apart from manually adjusting picture settings, you can use Smart Mode to set your TV to a predefined picture, sound and Ambilight setting.
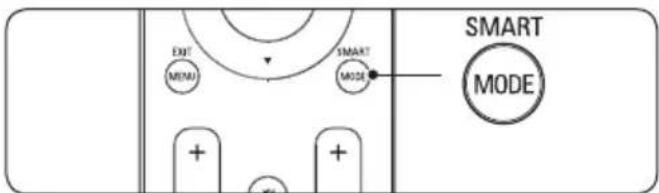
Press 1. SMART MODE on the remote control to toggle through a selection of pre-defined picture and sound settings.
text_image
EXIT MENU SMART MODE SMART MODESummary of smart modes
Vivid·
Sharp picture settings and clear sound for high action.
Standard·
For normal TV viewing.
Movie•
Brilliant picture settings for a cinematic experience.
Game•
Optimised for PCs, game consoles and playstations.
• Power Saver
Eco friendly settings to reduce power consumption.
- Personal
Based on the settings you customised in the Picture Setting menu.

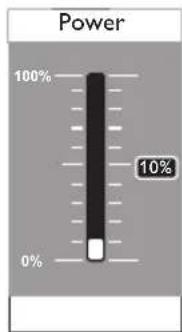
Note: The power meter displayed on the screen indicates the power consumption for each mode. For example, 10% means this mode uses 10% of the TV's total power consumption in wattage.
text_image
Power 100% 10% 0%5.3.3. Change picture format
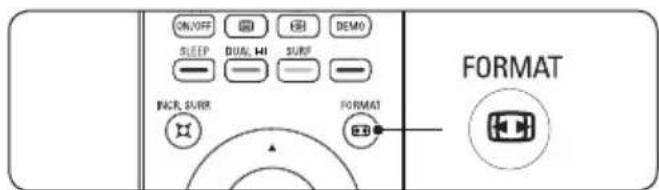
Change the picture format to suit your content.
- Press 📄 on your remote control.
text_image
ON/OFF SLEEP DUAL, 441 SURF PAGE, SURF FORMAT FORMAT- Press ◀ or ▶ to select one of the following picture formats:
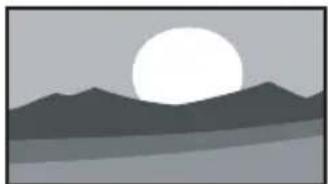
- Wide screen
natural_image
Simple grayscale illustration of a full moon over rolling hills (no text or symbols)The picture is displayed in the original proportions of images transmitted in 16:9 format.

Note: If you display a 4:3 picture in widescreen mode, the picture is stretched horizontally.
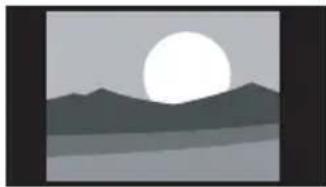
• 4:3
natural_image
Silhouette of a full moon over a mountain range with a lake below (no text or symbols)The picture is reproduced in 4:3 format and a black band is displayed on either side of the picture.
Movie expand 14:9•

natural_image
Simple grayscale landscape illustration with a full moon over distant mountains and water (no text or symbols)The picture is shown in 14:9 format. A thin black band remains on both sides of the picture and the top and bottom of the picture is clipped off.
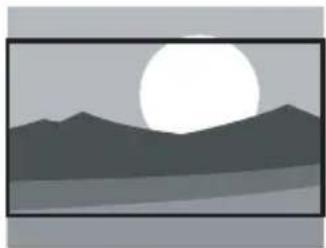
Movie expand 16:9•
natural_image
Silhouette of a mountain range under a full moon, no text or symbols presentThe picture is enlarged to 16:9 format. This mode is recommended when displaying pictures with black bands at the top and bottom (letterbox). In this mode, large parts of the top and the bottom of the picture are clipped off.
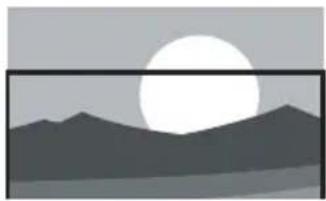
Subtitle Zoom ·
natural_image
Silhouette of a full moon over mountain silhouettes, no text or symbols presentThis mode is used to display 4:3 pictures using the full surface of the screen leaving the sub-titles visible. Part of the top of the picture is clipped off.
Super zoom•

natural_image
Silhouette of a full moon over mountain ranges at dusk (no text or symbols)This mode is used to display 4:3 pictures using the full surface of the screen by enlarging the sides of the picture.
Z
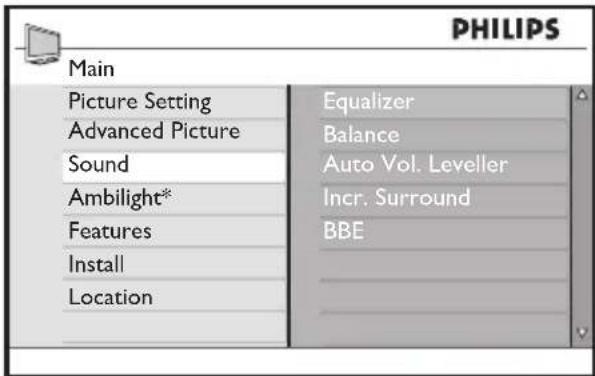
Adjust sound settings5.3.4.
This section describes how to adjust sound settings.
Press 1. MENU on the remote control and select Sound.
Press 2. ▶ to enter the list.
text_image
PHILIPS Main Picture Setting Advanced Picture Sound Ambilight* Features Install Location Equalizer Balance Auto Vol. Leveller Incr. Surround BBE* Available in selected models
- Press ▲ or ▼ to select one of the following settings:
- Equalizer
Adjusts each individual frequency (tone).
Balance•
Balances the left and right speaker's sound level.
Auto Volume Leveller•
Controls the sudden sound level increase when changing channels or during commercial break.
• Incredible Surround
Enhances stereo effect. Select Incr.
Surround or Stereo (when in stereo
mode) or Mono or Spatial (when in mono mode).
BBE• (High definition sound)
An enhancement technology licensed by BBE Sound. Restores clarity and presence for better speech intelligibility and musical realism.
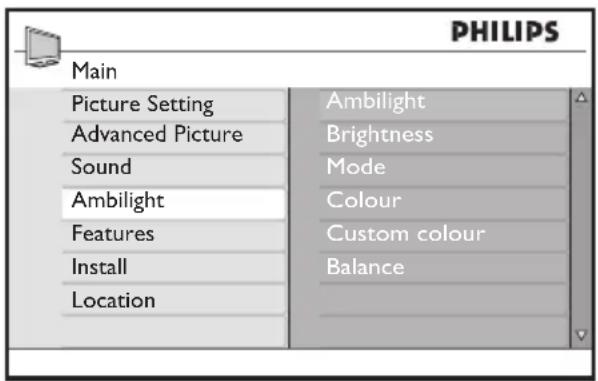
Adjust Ambilight settings5.4
This feature is not available on all models.
- Press MENU on the remote control and select Ambilight.
Press 2. ▶ to enter the list.
text_image
PHILIPS Main Picture Setting Advanced Picture Sound Ambilight Features Install Location Ambilight Brightness Mode Colour Custom colour Balance- Press ▲ or ▼ to select one of the following settings:
Ambilight•
Switches Ambilight on or off.
- Brightness
Changes the light output of Ambilight.
- Mode
Chooses from four Ambilight modes:
Colour, Relaxed, Moderate, and Dynamic.
- Colour
Selects a pre-defined colour setting (Warm white, Cool white, Blue, Red, Green, Yellow, Magenta, or make a custom colour of your own.
Note
This option appears only after you select Mode >Colour above.
- Custom Colour
Sets the colour saturation or palette.
Note
This option appears only after you select
Colour > Custom above.
• Balance
Sets the level of Ambilight on the left and right side of the TV.
Cauti!
To avoid poor remote control reception, do not place remote control sensors on your devices in range of Ambilight.
5.5 Use advanced teletext features
Depending on model, your TV has a 1,000 page memory that stores broadcasted teletext pages and sub pages. The teletext memory reduces page loading time.
To select a teletext page, see Section 4.4 Use teletext.
5.5.1. Select teletext sub pages
A teletext page can hold several sub pages. Sub pages are displayed on a bar next to the main page number.
Press 1. ☐ on the remote control.
- Select a teletext page.
Press 3. ◀ or ▶ to select a subpage.
5.5.2. Select T.O.P. teletext broadcasts
Table Of Pages (T.O.P.) teletext broadcasts allow you to jump from one subject to another without using page numbers. T.O.P. teletext is not broadcast on all TV channels.
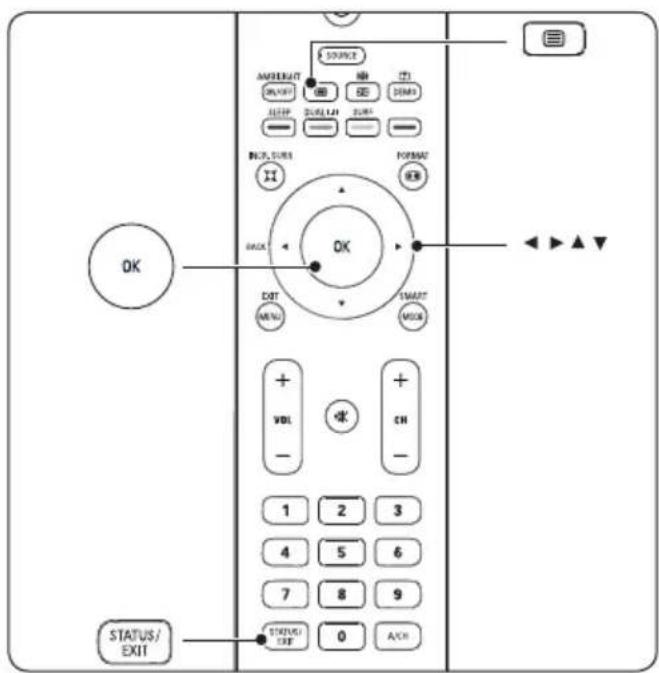
Press 1. ☐ on the remote control.
Press 2. STATUS/EXIT.
text_image
OK STATUS/ EXIT AMOUNT ON/OFF SOURCE MIN MAX SUM/LAT RUNS INPUT RESET RESET RESET RESET RESET RESET RESET RESET RESET RESET RESET RESET RESET RESET RESET RESET RESET RESET RESET RESET RESET RESET RESET RESET RESET RESET RESET RESET RESET RESET RESET RESET RESET RESET RESET RESET RESET RESET RESET RESET RESET RESET RESET RESET RESET RESET RESET RESET RESET RESET Rebe 10000000000000000000000000000000000000000000000000000000000000000000000000000000000000000000000000000The T.O.P. overview appears.
- Press ◀, ▶ or ▲, ▼ to select a subject.
Press 4. OK to view the page.
Search teletext5.5.3.
You can quickly jump to a subject linked to a series of page numbers or search for specific words in teletext pages.
Press 1. ☐ on the remote control.
Press 2. OK to highlight the first word or number.
- Press ▲, ▼ or ◀, ▶ to jump to the next word or number on the page.
Press 4. OK to search a page which holds the highlighted word or number.
Press 5. ▲ until no word or number is highlighted to quit the search.
Enlarge teletext pages5.5.4.
For more comfortable reading, you can enlarge the teletext page.
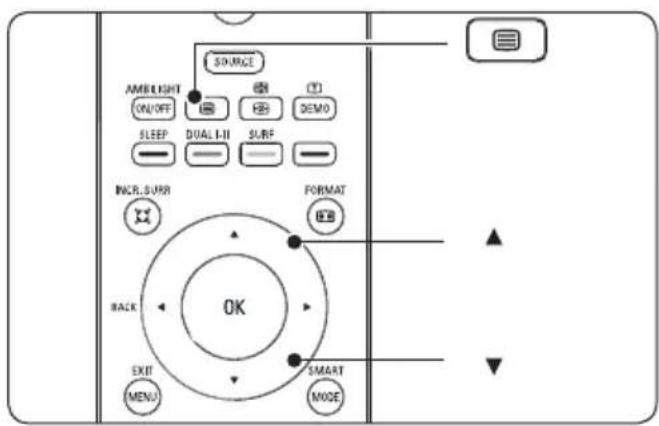
Press 1. ☐ on the remote control and select a teletext page.
- Press ▲ or ▼ on the remote control to enlarge the top half of the page.
text_image
SOURCE AMBI LIGHT ON/OFF SLEEP DUAL I-II SURF INCR.SURR FORMAT BACK OK EXIT MENU SMART MODEPress again to enlarge the bottom half of 3. the page.
Press again to return to the normal page 4. size.
Hold teletext pages5.5.5.
Certain pages contain sub-pages which are automatically displayed successively.
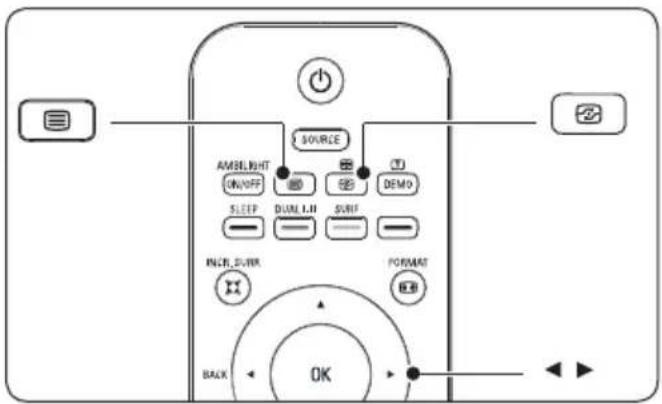
Press 1. ☐ on the remote control.
Press 2. ☐ to stop or resume sub-page progression.
- Press ◀ or ▶ to select previous or next sub-page.
text_image
SOURCE AMBELIGHT ON/OFF SLEEP DUAL, LIF SWIFT IN庫, DURR FORMAT BACK OKReveal hidden information5.5.6.
You can hide or reveal hidden information on a page, such as solutions to riddles or puzzles.
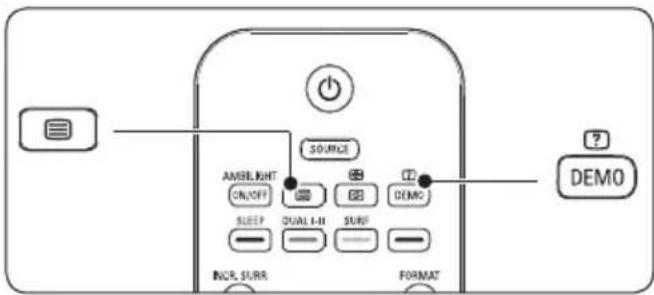
Press 1. ☐ on the remote control.
Press 2. ☐ to reveal or hide information.
text_image
AMSBLIGHT ON/OFF SLEEP CUAL I-II SURF INCR. SURR SOURCE DEMO ? DEMO FORMATCreate a surf list5.6
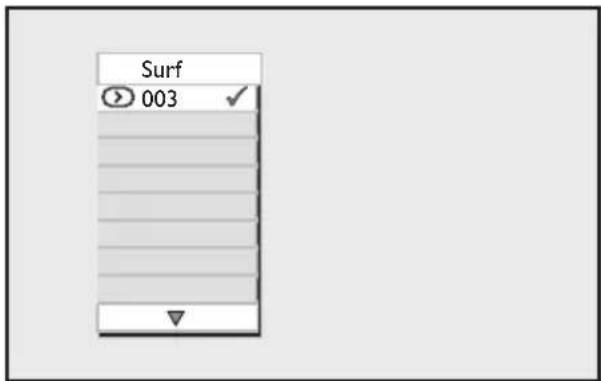
You can store up to eight frequently watched channels in a surf list.
Select a channel that you want to add to 1. the surf list.
Press 2. SURF on the remote control to display the surf list.
text_image
Surf 003Press 3. ▶ to add the selected channel to the surf list.
Repeat steps 1 to 3 to add more channels 4. to the list.
Press 5. STATUS/EXIT to exit.
To view the a channel from the surf list
Press 1. SURF to display the surf list.
- Press ▲ or ▼ until you find the channel.
To delete a channel from the surf list
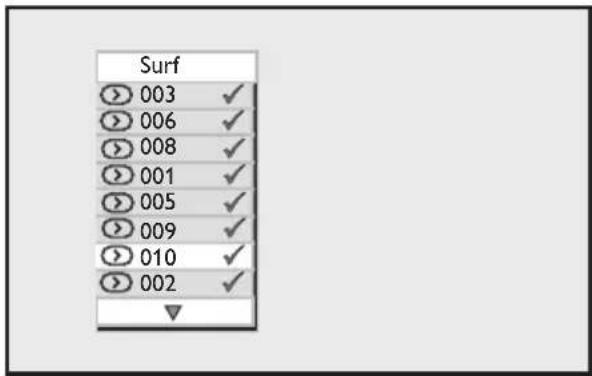
Press 1. SURF to display the surf list.
- Press ▲ or ▼ until you find the channel that you wish to delete.
text_image
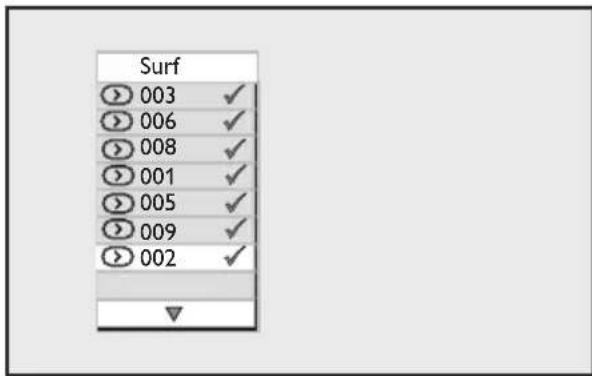
Surf 003 ✓ 006 ✓ 008 ✓ 001 ✓ 005 ✓ 009 ✓ 010 ✓ 002 ✓Press 3. ▶ to delete the channel.
text_image
Surf 003 ✓ 006 ✓ 008 ✓ 001 ✓ 005 ✓ 009 ✓ 002 ✓Repeat steps 1 to 3 to delete more 4. channels from the list.
Press 5. STATUS/EXIT to exit.
Use timers and child 5.7
This section describes how to switch the TV on or off at a specified time and to lock or unlock the TV. Child lock is useful in preventing your children from watching non-authorised content.
Automatically switch the TV to 5.7.1. standby (Sleep timer)
Sleep timer switches the TV to standby after a defined period of time.
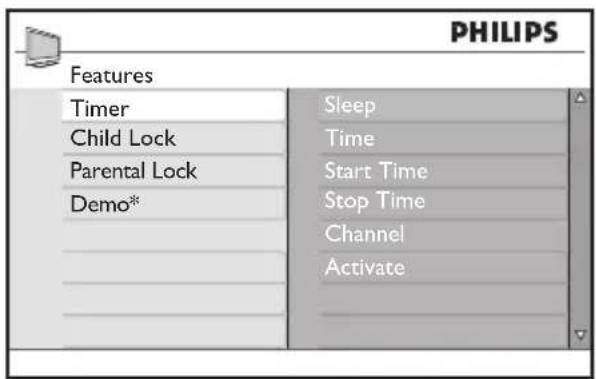
Press 1. MENU on the remote control and select Features > Timer > Sleep.
text_image
PHILIPS Features Timer Child Lock Parental Lock Demo* Sleep Time Start Time Stop Time Channel Activate* Available in selected models
- Press ▶ to enter the Sleep menu.
- Press ▲ or ▼ to select the sleep time. If set to zero minute the sleep timer is switched off.
- Press OK to activate the Sleep timer.
You can always switch off your TV earlier or reset the time during the countdown.
Automatically switch the TV on 5.7.2. (Timer)
Timer switches the TV to a specified channel at a specified time, from standby. Your TV must be in standby for the timer to work.
Press 1. MENU on the remote control and select Features > Timer.
- Press ▶ to enter the Timer menu.
- Use ▲ or ▼, ◀ or ▶ to select and enter the menu items to set a time, start time, stop time, channel, and frequency.
Press 4. OK to confirm.
Press 5. MENU to exit.
Tip
To switch off the timer, select Off in Features > Timer > Activate.
To set or change a PIN code
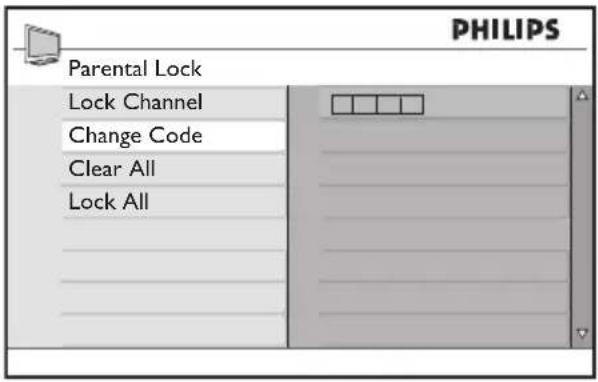
- Press MENU on the remote control and select Features > Parental Lock > Change code.
text_image
PHILIPS Parental Lock Lock Channel Change Code Clear All Lock AllPress 2. ▶ to enter the code setup.
- Enter your code with the number keys. The Features menu reappears with a message confirming that your code is created or changed.
Tip
If you forget your code, enter '0711' twice to override any existing codes.
To enter the Parental Lock menu
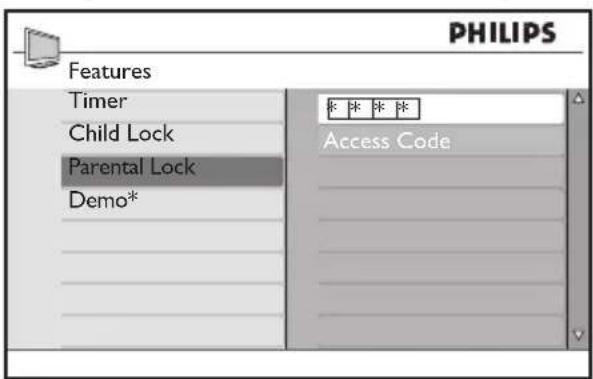
Press 1. MENU on the remote control and select Features > Parental Lock.
Press 2. ▶ to enter your code.
- Enter your code with the number keys.
text_image
PHILIPS Features Timer Child Lock Parental Lock Demo* Access Code* Available in selected models
Lock TV channels (Parental Lock)5.7.3
You can lock TV channels with a four digit code to prevent children from watching unauthorised content.
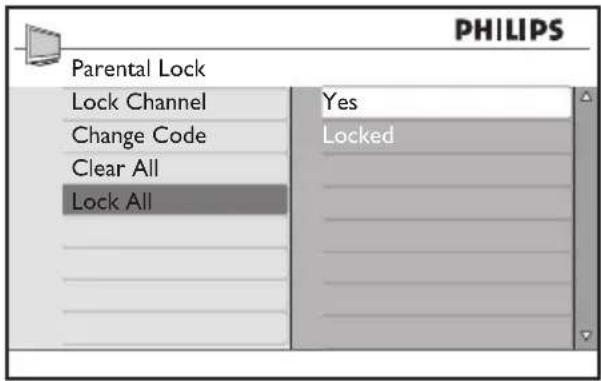
To lock or unlock all channels
- In the Parental Lock menu, select Lock All or Clear All.
- Press ▶ to enter.
Press 3. OK to confirm your choice.
text_image
PHILIPS Parental Lock Lock Channel Yes Change Code Locked Clear All Lock AllTo lock one or more channels
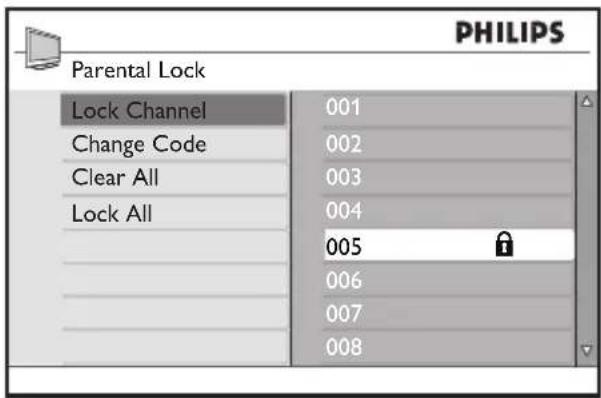
Press 1. MENU on the remote control and select Features > Parental Lock > Lock Channel.
Press 2. ▶ to enter.
- Press ▲ or ▼ to select the channels you want to lock.
- Press OK to lock the channel. A 🔒 symbol appears next to the channel number. To unlock, press OK again.
text_image
PHILIPS Parental Lock Lock Channel 001 Change Code 002 Clear All 003 Lock All 004 005 006 007 008Repeat the above steps to lock or unlock 5. more channels.
Lock the side controls (Child Lock)5.7.4.
You can lock the side controls of the TV to prevent children from changing channels. You can still change channel by using the remote control.
Press 1. MENU on the remote control and select Features > Child Lock.
- Press ▲ or ▼ to select On or Off.
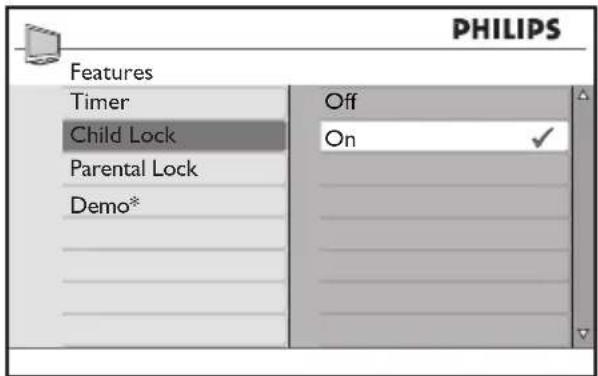
text_image
PHILIPS Features Timer Off Child Lock On Parental Lock Demo** Available in selected models
Press 3. OK to confirm.
Press 4. MENU to exit.
Use De 5.8
mo
Demo mode is not available in all models. Consult your product specification to see whether your set has demo mode.
The demo mode enables you to see the difference between the new video technologies available on your TV and conventional TVs without these features.
Press 1. MENU on the remote control and select Features > Demo.
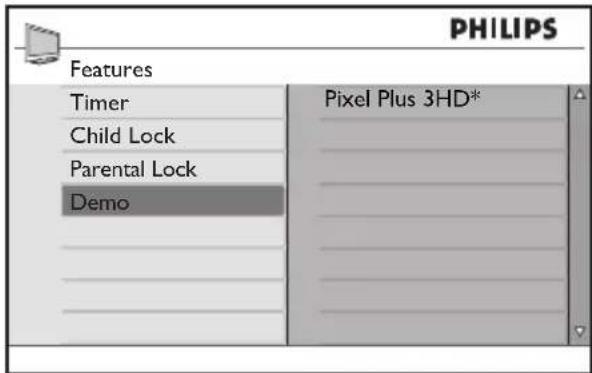
text_image
PHILIPS Features Timer Pixel Plus 3HD* Child Lock Parental Lock Demo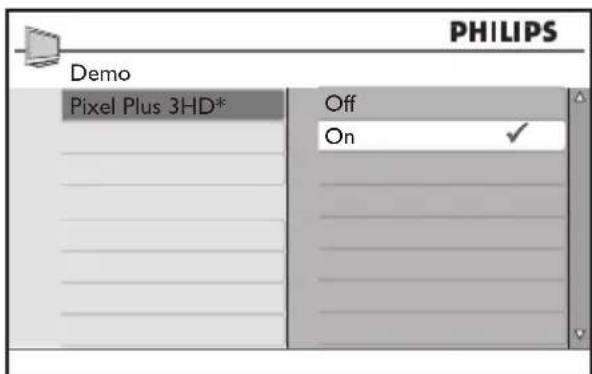
text_image
PHILIPS Demo Pixel Plus 3HD* Off On ✓* Varies according to models. Consult your product specification for details.
- Press ▲ or ▼ to select On or Off.
Press3. OK to confirm.
Press 4. MENU to exit.
Alternatively, you can turn on or off the Demo mode with the DEMO button on the remote control.
Press 1. DEMO on the remote control. The Demo mode turns on.
Press 2. DEMO again to turn off a demo.
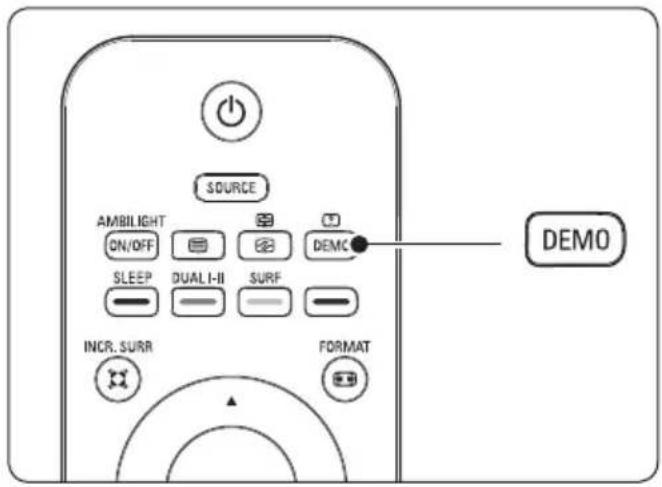
text_image
SOURCE AMBILIGHT ON/OFF SLEEP DUALI-II SURF INCR. SURR FORMAT DEMO6 Install channels
This chapter describes how to install channels and tune channels.
6.1 Automatically install channels
This section describes how to search and store channels automatically.
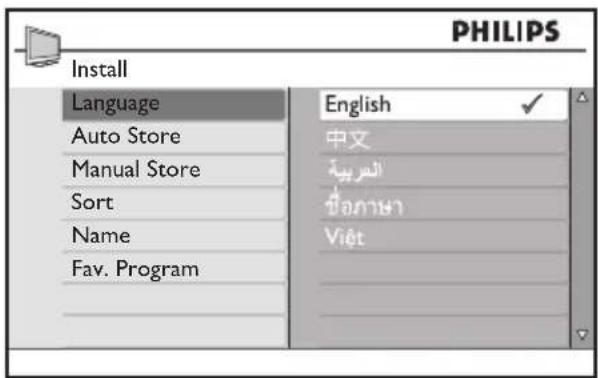
Step 1 Select your menu language
Press 1. MENU on the remote control and select Install > Language.
text_image
PHILIPS Install Language English Auto Store 中文 Manual Store العربية Sort الله Name Viet Fav. Program- Press ▲ or ▼ to select your language.
Press 3. OK to confirm.
Press 4. MENU to exit.
Step 2 Install channels automatically
Your TV searches and stores all available TV channels.
Press 1. MENU on the remote control and select Install > Auto Store.
Press 2. OK to start installation.
The installation may take a few minutes.
When the channel search is completed, 3. the TV will go to the first installed channel number.
Press 4. MENU to exit.
Tip
To rename, reorder or uninstall stored channels, see Section 6.3 Manage channels.
Manually install channels 6.2
This section describes how to search and store analogue channels manually.
Step 1 Select your system
Note
Skip to Step 2 Search and store new TV channels if your system settings are correct.
Press 1. MENU on the remote control and select Install > Manual Store.
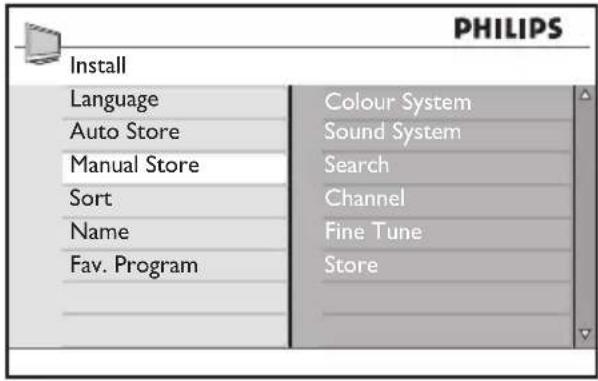
text_image
PHILIPS Install Language Auto Store Manual Store Sort Name Fav. Program Colour System Sound System Search Channel Fine Tune Store- Press ▶ to enter Manual Store.
- Press ▶ to enter Colour System.
- Press ▲ or ▼ to select the appropriate system.
Press 5. ◀ to return to the Manual Store menu.
Press 6. ▼ to select Sound System.
- Press ▲ or ▼ to select the appropriate system.
Press 8. ◀ to return to the Manual Store menu.
Step 2 Search and store new TV channels
Press 1. MENU on the remote control and select Install > Manual Store > Search.
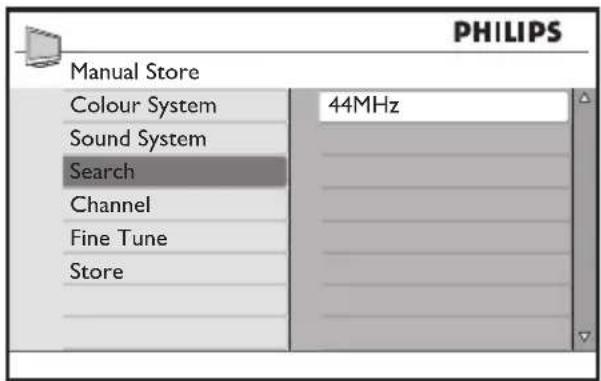
text_image
PHILIPS Manual Store Colour System 44MHz Sound System Search Channel Fine Tune StorePress 2. ▶ and the number keys on the remote control to manually enter the three-digit frequency.
Press 3. ◀ when the new channel is found.
Press 4. ▼ to select Channel.
- Press ▲ or ▼ to select a channel number. Alternatively, use the number keys on the remote control to manually enter the channel number.
Press 6. ▼ to store the new channel under a new channel number.
Press 7. ▶ to enter.
- Press OK. Stored appears.
Press 9. MENU to exit.
Fine tune channels6.2.1.
You can fine tune channels when reception is poor.
Press 1. MENU on the remote control and select Install > Manual Store > Fine Tune.
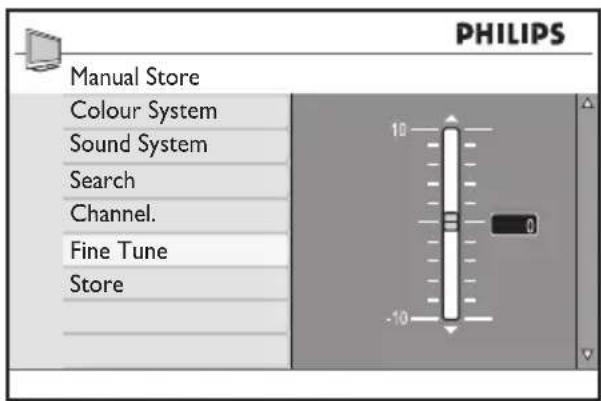
text_image
PHILIPS Manual Store Colour System Sound System Search Channel. Fine Tune Store- Press ▲ or ▼ to adjust the frequency
Press 3. ◀ when done.
Select 4. Store to store the fine tuned channel under the current channel number.
Press 5. ▶ to enter.
- Press OK. Stored appears.
Press 7. MENU to exit.
Manage channels6.3
This section describes how to reorder, name, rename, or store favourite channels.
Reorder channels6.3.1.
Press 1. MENU on the remote control and select Install > Sort.
- Press ▲ or ▼ to select the channel you want to reorder.
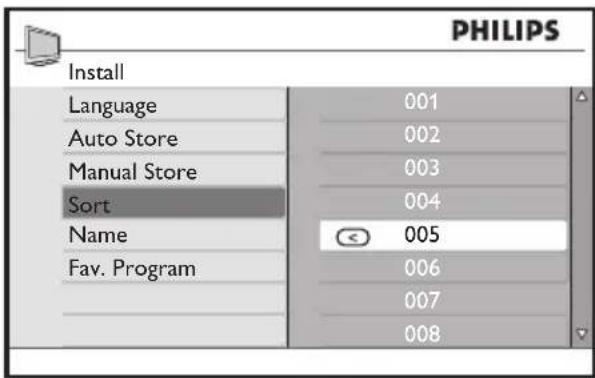
text_image
PHILIPS Install Language 001 Auto Store 002 Manual Store 003 Sort 004 Name 005 Fav. Program 006 007 008Press 3. ▶ to confirm.
- Press ▲ or ▼ to select the channel you want to change to.
Press 5. ◀ to confirm.
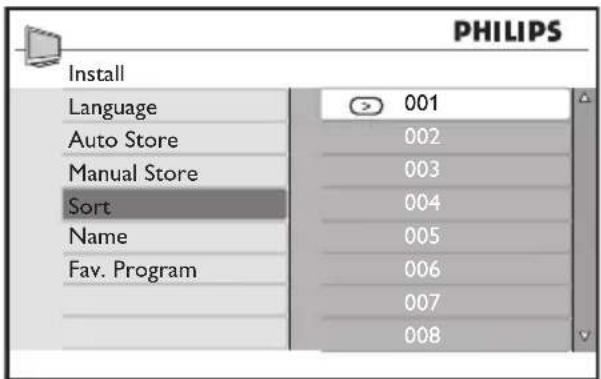
text_image
PHILIPS Install Language 001 Auto Store 002 Manual Store 003 Sort 004 Name 005 Fav. Program 006 007 008Repeat the above steps to reorder more 6. channels.
Press 7. MENU to exit.
Name or rename channels6.3.2.
This feature is not available for external channels.
Press 1. MENU on the remote control and select Install > Name.
- Press ▲ or ▼ to select the channel you want to rename.
Press 3. ▶ to start the process.
- Press ▲ or ▼ to select the characters or numbers from the list. You can use up to five characters or numbers.
Press 5. ◀ to end the process.
Repeat the above steps to name or rename 6. more channels.
Press 7. MENU to exit.
Store your favourite channels6.3.3.
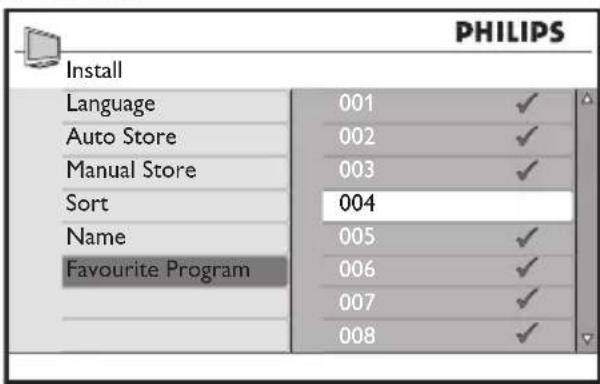
You can specify a list of favourite channels.
When you use the CH - / + keys of the remote control to access channels, only the favourite channels are accessed.
To access channels that are not in your list of favourites, use the 0 to 9 numerical keys.
Add or remove channels from your list of favourites
Press 1. MENU on the remote control and select Install > Fav. Program.
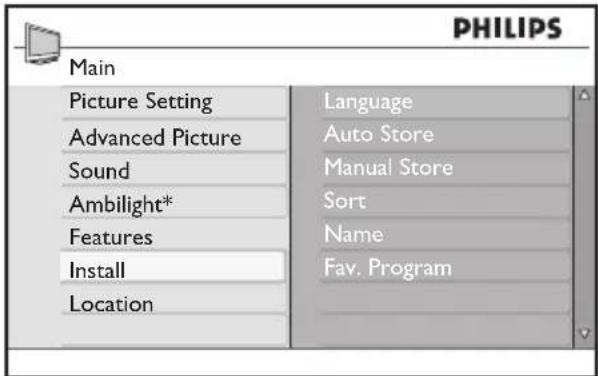
text_image
PHILIPS Main Picture Setting Advanced Picture Sound Ambilight* Features Install Location Language Auto Store Manual Store Sort Name Fav. Program* Available in selected models
- Press the ▲ or ▼ to select the channel number you want to add or remove from the list.
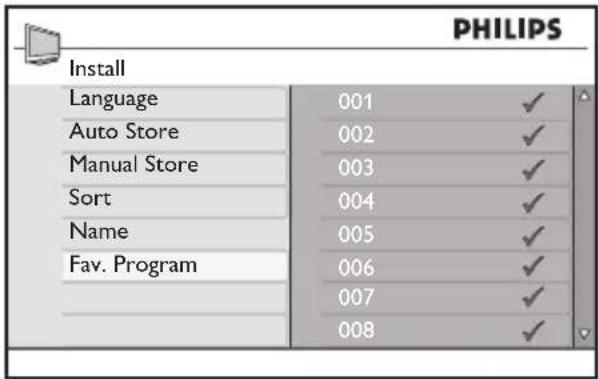
text_image
PHILIPS Install Language 001 ✓ Auto Store 002 ✓ Manual Store 003 ✓ Sort 004 ✓ Name 005 ✓ Fav. Program 006 ✓ 007 ✓ 008 ✓- Press ▶ or OK to add or remove the channel from your list.
When the √ is displayed on the right of the menu, the channel is in the list of favourites.
When the √ is not displayed on the right of the menu, the channel is not in the list of favourites.
text_image
PHILIPS Install Language 001 ✓ Auto Store 002 ✓ Manual Store 003 ✓ Sort 004 Name 005 ✓ Favourite Program 006 ✓ 007 ✓ 008 ✓- Press the ◀ key to return to the previous menu.
Press 5. MENU to exit.
Change to Shop or Home 6.4 mode
Press 1. MENU on the remote control and select Location.
Press 2. ▶ to enter the Location menu.
- Use ▲ or ▼ to select the TV mode:
Shop•
Sets smart settings to Vivid, ideal for a shop environment. The flexibility to change settings is limited.
Home•
Gives home users the full flexibility to change all TV settings.
Press 4. OK to confirm.

text_image
PHILIPS Main Picture Setting Advanced Picture Sound Ambilight* Features Install Location Home ✓ ShopPress 5. MENU to exit.
Connect devices7
Connection 7.1
overview
text_image
6 HDMI 1 HDMI 3:HDMI 2 AUDIO IN VGA 5 7 Y P0 P1 L R CVI-1 AV AV OUT VIDEO L R L R VIDEO 3 2 1 4 75Ω TV ANTENNABack connectors
text_image
HDMI 10 9 L-AUDIO-R 8 S-VIDEO VIDEOSide connectors
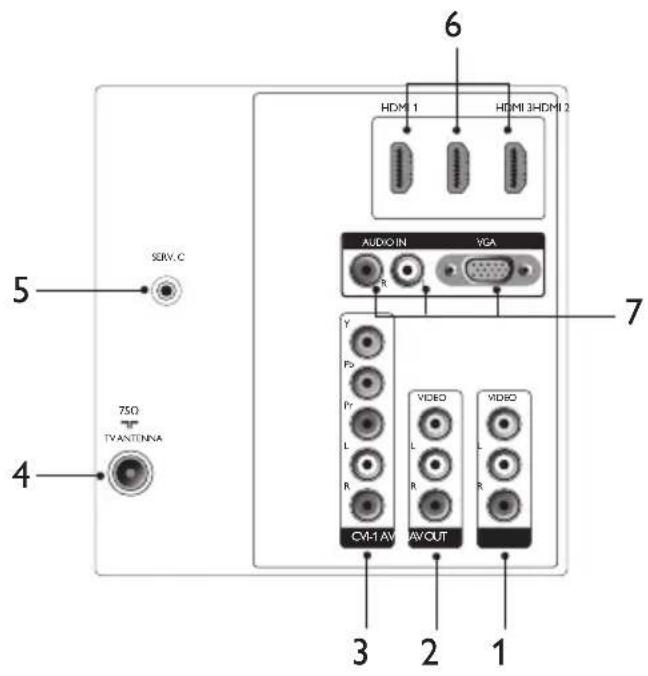
Back connectors
AV IN1.
Video and audio input cinch connectors for connection to devices.
AV OUT2.
Video output cinch connector and audio L/R connectors for connection to devices.
CVI-13.
Component video (Y Pb Pr) and Audio L/R input connectors for DVD players, digital receivers, game consoles and other component video devices.
4. TV ANTENNA
Aerial plug connector.
5. SERV C
For service use (do not insert the headphone here).
- HDMI 1/2/3 (available in selected models) HDMI input connectors for Blu-ray Disc players, digital receivers, game consoles and other high-definition devices.
7. VGA/AUDIO IN
Input connectors for PC or other devices. Audio connectors are also for devices that require a separate audio channel.
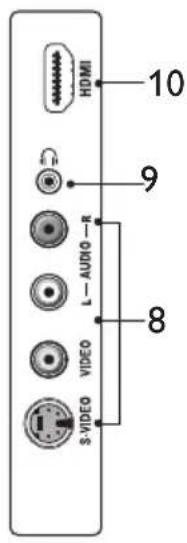
Side connectors
8. AUDIO L/R
Audio L/R input connectors for composite and S-Video devices.
9. Headphones
Stereo mini jack.
- (Variable in selected models)
Additional HDMI connector for mobile high-definition devices.
Select connection quality7.2
This section describes how you can enhance your audio visual experience by connecting your devices with the best possible connectors.
After connecting your devices, be sure to enable them as described in Section 7.4 Setup devices.
7.2.1. HDMI - Highest quality
natural_image
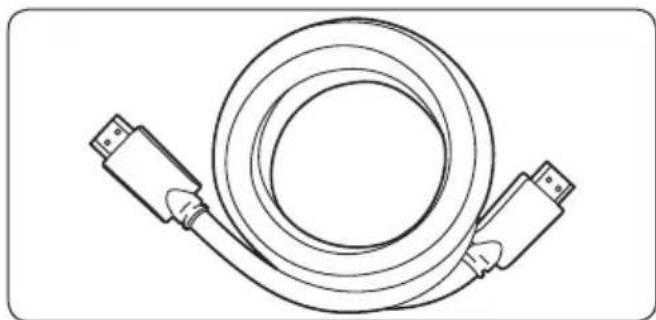
Line drawing of a coiled cable with two USB connectors (no text or symbols)HDMI produces the best audio visual quality possible. Both audio and video signals are combined in one HDMI cable, providing an uncompressed, digital interface between your TV and HDMI devices. You must use HDMI to experience full high-definition video.
Tip
If your device only has a DVI connector, use a DVI-HDMI adaptor to connect your device to a HDMI connector on the TV. As such a connection does not support sound, you must connect a separate audio cable from the device to the Audio L/R input at the AUDIO IN connectors on the TV.
Note
Philips HDMI supports HDCP (High-bandwidth Digital Contents Protection). HDCP is a form of Digital Rights Management that protects high definition content in DVD or Blu-ray Discs.
7.2.2. Component (YPbPr) - Higher quality
Component (Y Pb Pr) video provides better picture quality than S-Video or composite video connections. Though component video
supports high-definition signals, picture quality is lower than HDMI and is analogue.
When connecting a component video cable, match the cable colours to the CVI connectors on the back of the TV. Also, connect a Audio L/R cable to the red and white Audio L/R input connectors at CVI.
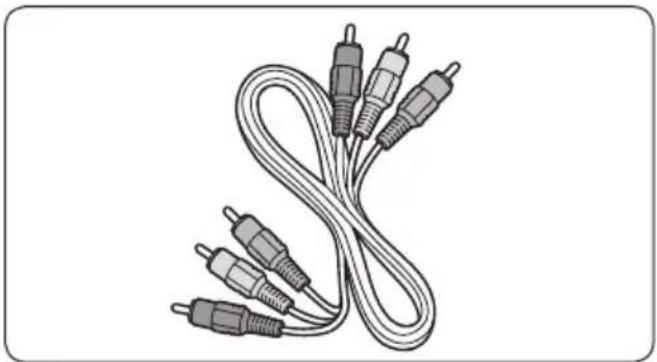
natural_image
Illustration of a multi-pin audio cable with multiple connectors (no text or symbols)Component video cable - Red, Green, Blue
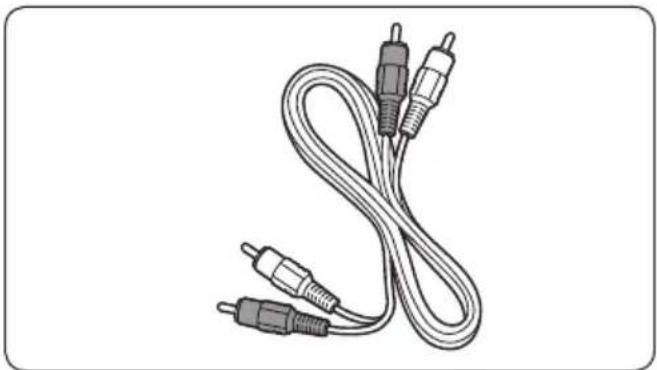
natural_image
Line drawing of a coiled audio cable with two connectors and two leads (no text or symbols)Audio L/R cable - Red, White
S-Video - Good quality 7.2.3.
S-Video provides better picture quality than composite video. When connecting your device with S-Video, plug the S-Video cable to the S-Video connector on the side of the TV. You must connect a separate Audio L/R cable from the device to the red and white Audio L/R input connectors on the side of the TV.
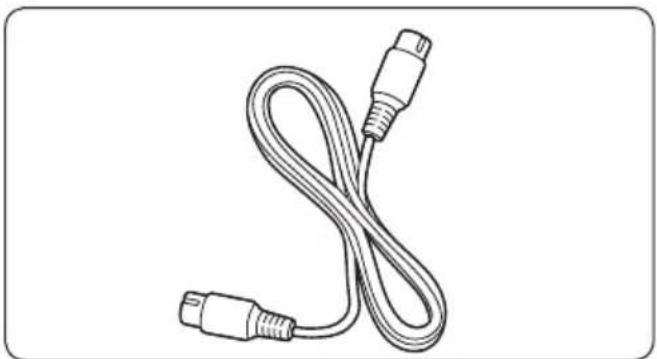
natural_image
Line drawing of a flexible cable with two connectors (no text or symbols)S-Video cable
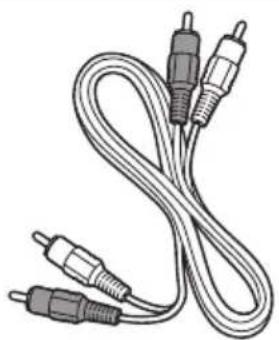
natural_image
Coiled electrical cable with two connectors and two external leads (no text or symbols visible)Audio L/R cable - Red, White
7.2.4. Composite - Basic quality
Composite video provides basic analogue connectivity, usually combining a (yellow) video cinch cable with (red and white) Audio L/R cinch cable. Match the cable colours when connecting to the composite Video and Audio L/R input connectors on the side of the TV.
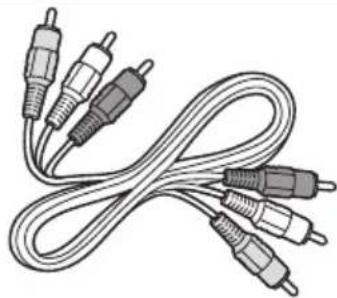
natural_image
Coiled audio/video cable with multiple connectors (no text or symbols visible)Composite audio/video cable- Yellow, red and white
Connect devices7.3
This section describes how to connect a selection of devices. Note that different types of connectors may be used to connect a device to your TV, depending on availability and your needs. The following sections are examples only.
Cable or set top box7.3.1.
Connect an aerial plug from the TV to the set up box. Then connect the set up box to the signal input cable from the cable provider.

text_image
Cable ANTENNA/CABLE TO TV Set top box TV 75Ω TV ANTENNA AUTO 10 AUTO 30/40/50 AUTO 10 AUTO 30/40/50 AUTO 10 AUTO 30/40/50 AUTO 10 AUTO 30/40/50 AUTO 10 AUTO 30/40/50Blu-ray Disc player7.3.2.
For full high-definition video, connect a HDMI cable to the Blu-ray Disc player or a HD game console and a HDMI connector on the back or side of the TV (available in selected models).
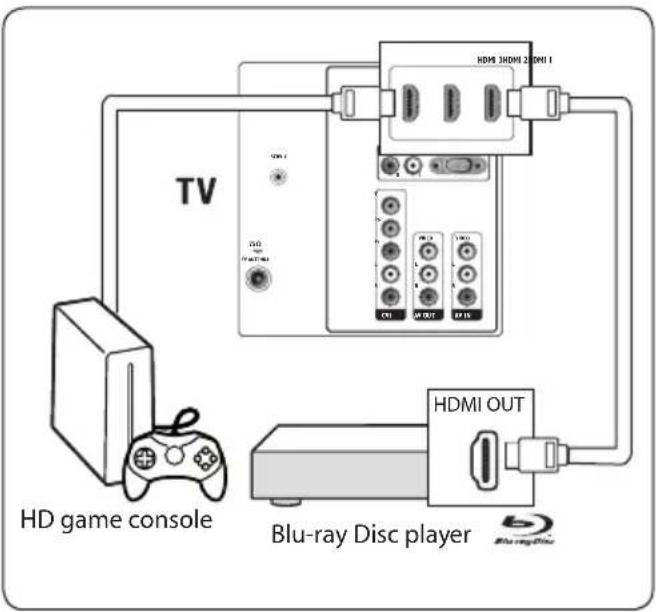
text_image
TV HD game console Blu-ray Disc player HDMI 3HDMI 2 HDMI 1 HDMI OUT HDMI CCL CCL CCL CCL CCL CCL CCL CCL CCL CCL CCL CCL CCL CCL CCL CCL CCL CCL CCL CCL CCL CCL CCL CCL CCL CCL CCL CCL CCL CCL CCL CCL CCL CCLDVD player/Home theatre system7.3.3.
DVD 7.3.5.
recorder ar
Connect a component video and audio cables from the DVD player to CVI connectors on the back of your TV.
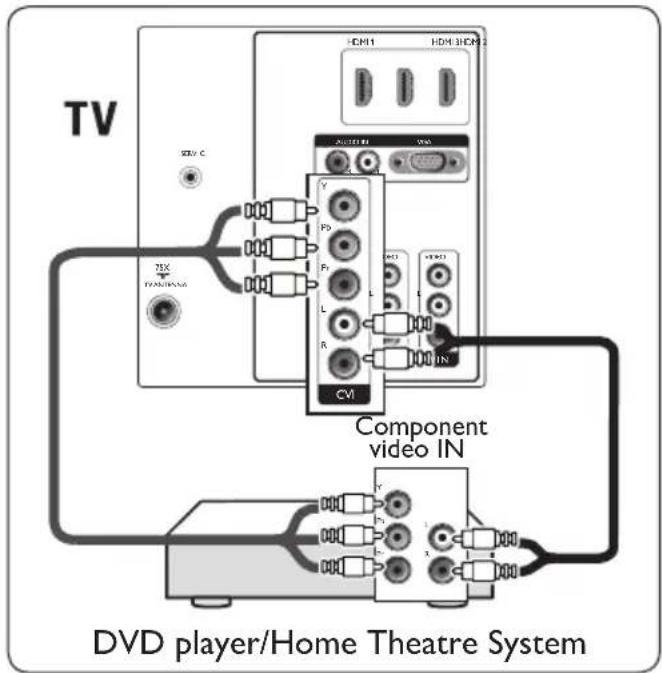
text_image
TV HDMI HDMI HDM 75X P0 P1 L R CVI Component video IN DVD player/Home Theatre SystemVCR7.3.4.
Connect a composite video cable from the player to the AV IN connectors on the back of the TV. For recording of TV programmes on a VCR, connect to the AV OUT connectors.
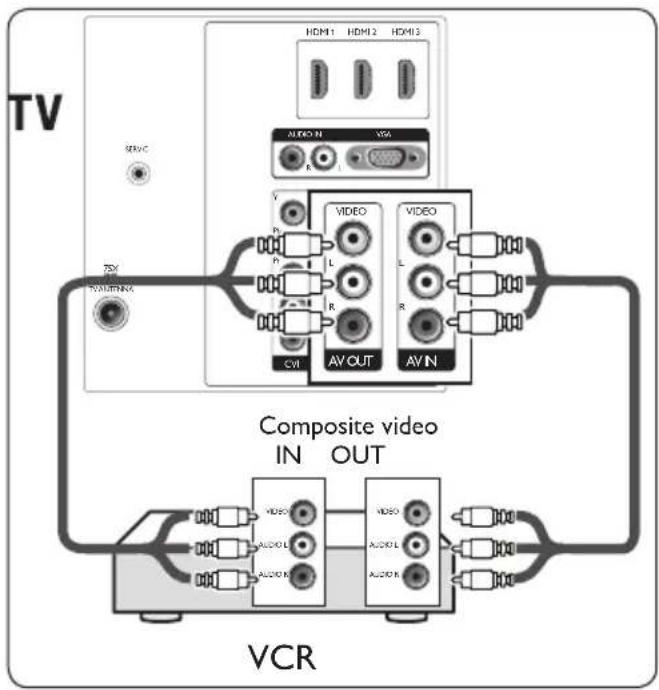
text_image
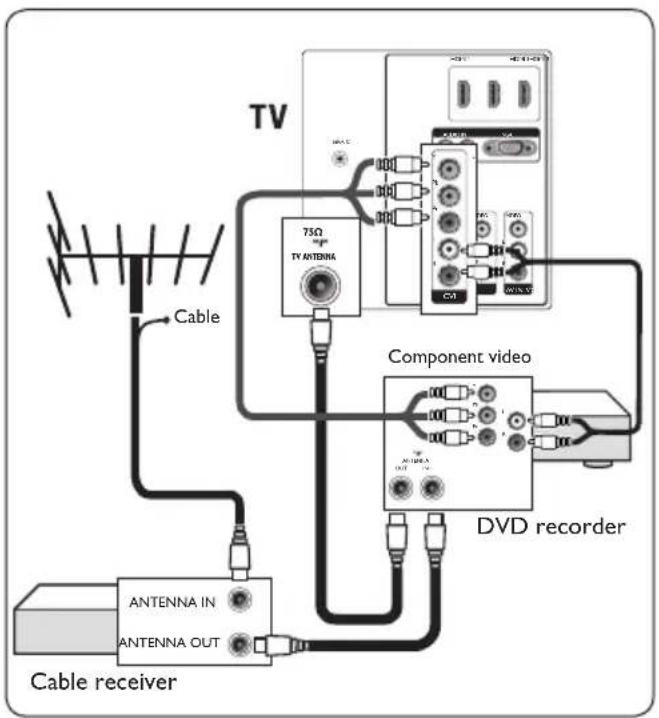
TV SERV.C 70K TOMENINA HDMI1 HDM12 HDM13 AUDIO IN VGA R L R CVI AV OUT AV IN VIDEO L R VIDEO L R Composite video IN OUT VIDEO AUDIO L AUDIO R VCRTo receive channels via a cable receiver and record programs on a DVD recorder, connect an antenna cable and a component video cable from the DVD recorder to your TV. Connect another antenna cable from the recorder to the cable receiver.
flowchart
graph TD
    TV["TV"] -->|Cable| Antenna_IN["ANTENNA IN"]
    TV -->|Cable| Antenna_OUT["ANTENNA OUT"]
    TV -->|75Ω TV ANTENNA| Antenna_IN
    TV -->|Component video| DVD["DVCD recorder"]
    TV -->|Component video| Antenna_OUT
    TV -->|Component video| Antenna_IN
    TV -->|Component video| Antenna_OUT
    TV -->|Component video| Antenna_IN
    TV -->|Component video| Antenna_OUT
    TV -->|Component video| Antenna_IN
    TV -->|Component video| Antenna_OUT
    TV -->|Component video| Antenna_IN
    TV -->|Component video| Antenna_OUT
    TV -->|Component video| Antenna_IN
    TV -->|Component video| Antenna_OUT

    A["Cable receiver"] --> Antenna_IN
    B["Cable receiver"] --> Antenna_OUT
    C["Cable receiver"] --> Antenna_IN
    D["Cable receiver"] --> Antenna_OUT
    E["Cable receiver"] --> Antenna_IN
    F["Cable receiver"] --> Antenna_OUT
    G["Cable receiver"] --> Antenna_IN
    H["Cable receiver"] --> Antenna_OUT
    I["Cable receiver"] --> Antenna_IN
    J["Cable receiver"] --> Antenna_OUT
    K["Cable receiver"] --> Antenna_IN
    L["Cable receiver"] --> Antenna_OUT
    M["Cable receiver"] --> Antenna_IN
    N["Cable receiver"] --> Antenna_OUT
7.3.6. Game console or camcorder
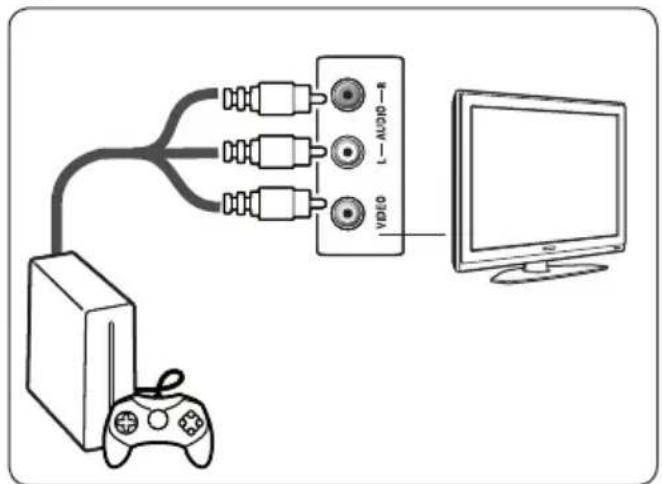
The most practical connection for a mobile game console or camcorder may be at the side of the TV. You can, for example, connect the game console or camcorder to VIDEO/S-Video and AUDIO L/R connectors at the side of the TV. An HDMI connector is also available for high-definition devices.
text_image
VIDEO L-AUDIO-6A permanent game console or camcorder can be connected to an HDMI connector or AV IN (component) connectors at the back of the TV.
7.3.7. Personal Computer
Caution
Before connecting the PC, set the PC monitor refresh rate to 60Hz. See Section 11 Technical data for a list of computer resolutions.
Connecting to the back of the TV (VGA)
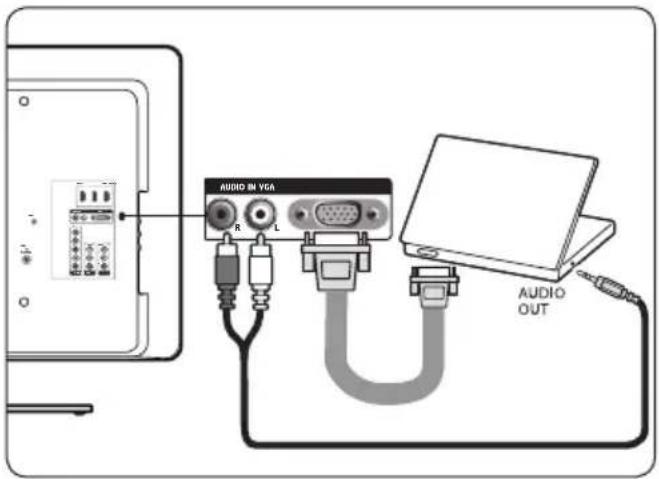
Connect your PC to the VGA connector at 1. the back of the TV.
Connect an audio cable from your PC to 2. AUDIO IN L/R connectors on the back of the TV.
text_image
AUDIO IN VGA R L AUDIO OUTConnecting to the side of the TV (S-Video)
If your PC has no VGA connection, use the S-VIDEO and AUDIO L/R input connectors at the side of the TV. This type of connection is best suited to applications such as Windows Media Center.
7.4 Setup devices
When all devices are connected, you must select the type of device attached to each connector.
7.4.1. Select connectors
To select the device connected to the connectors on your TV.
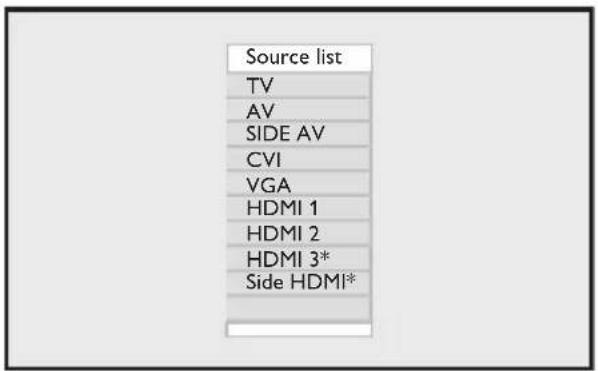
Press 1. SOURCE on the remote control.
text_image
Source list TV AV SIDE AV CVI VGA HDMI 1 HDMI 2 HDMI 3* Side HDMI** Available in selected models
- Press ▼ or ▲ to select a connector.
Press 3. OK to confirm.
- Repeat the above steps to select another connector.
Use your TV as PC 8 monitor
Confi gure PC mode8.1
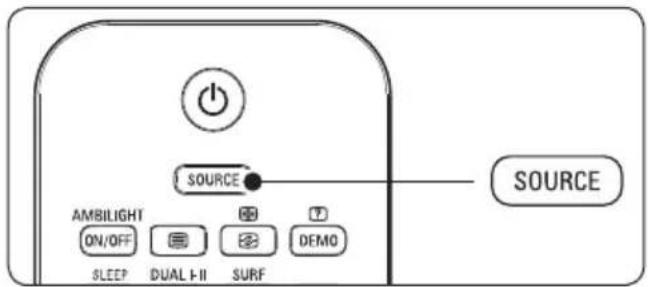
- Connect your computer in Section 7.3.7 Personal Computer.
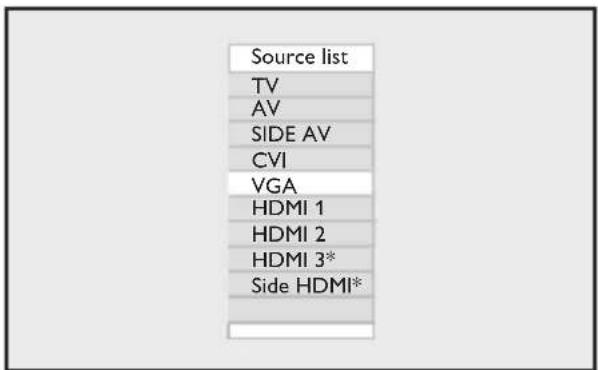
Press 2. SOURCE on the remote control.
text_image
SOURCE AMBILIGHT ON/OFF SLEEP DUAL I-II SURF DEMO SOURCEThe list of sources appears.
- Press ▼ to select VGA and press OK to confirm.
text_image
Source list TV AV SIDE AV CVI VGA HDMI 1 HDMI 2 HDMI 3* Side HDMI** Available in selected models
Note: ☑ Set your PC refresh rate to 60 Hz.
Picture settings in PC mode
Except for Horizontal Shift and Vertical Shift, all of the picture settings in PC mode are the same as the picture settings in TV mode.
Horizontal Shift•
To adjust horizontal position of the range.
- Vertical Shift
To adjust vertical position of the range.
Feature settings in PC mode
• Phase and Clock
To match the TV and computer display settings
- Auto Adjust
To synchronise the TV and computer Phase and Clock rate automatically. The geometry is also adjusted.
- Reset
To return to default settings.
Use your TV in High 9 Definition (HD) mode
The HD (High Definition) mode allows you to enjoy clearer and sharper pictures if you are using HD equipment that can produce high definition video signals.
Configure HD mode9.1
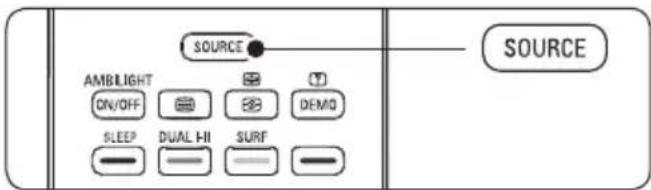
- Connect your HD equipment as shown in the Quick Start Guide
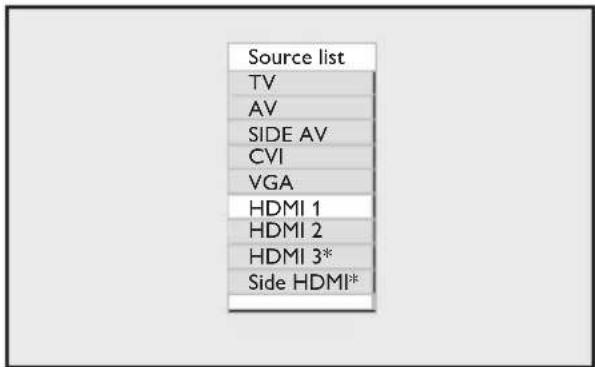
Press 2. SOURCE on the remote control.
text_image
SOURCE AMBLIGHT ON/OFF SLEEP DUAL-HI SURF DEMO SOURCEThe list of sources appears.
- Press ▼ to select the correct HDMI and press OK to confirm.
text_image
Source list TV AV SIDE AV CVI VGA HDMI 1 HDMI 2 HDMI 3* Side HDMI** Available in selected models
Press 4. MENU to display the on-screen menus.
-
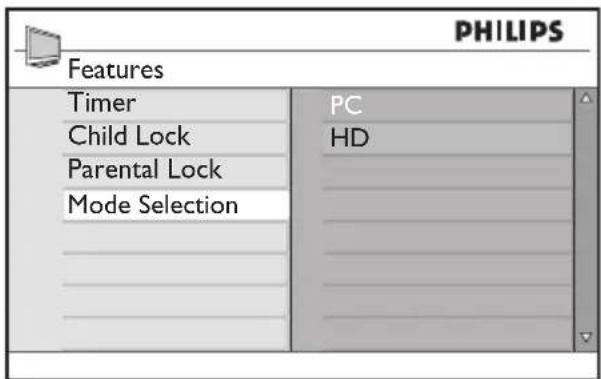
Go to Features > Mode Selection.
-
Press ▼ and OK to select HD.
text_image
PHILIPS Features Timer PC Child Lock HD Parental Lock Mode Selection _______________________________ _______________________________ _______________________________ _______________________________ _______________________________ _______________________________ _______________________________ _______________________________ _______________________________ _______________________________ _______________________________ _______________________________ _______________________________ _______________________________ _______________________________ _______________________________ _______________________________ _______________________________ _______________________________ _______________________________ _______________________________ _______________________________ _______________________________ _______________________________ _______________________________ ______________________________Press 7. MENU to exit.
Picture settings in HD mode
Except for Horizontal Shift and Vertical Shift, all of the picture settings in PC mode are the same as the picture settings in TV mode.
Horizontal Shift•
To adjust horizontal position of the range.
Vertical Shift·
To adjust vertical position of the range.
Sound settings in HD mode
All the sound settings in PC mode are the same as the sound settings in TV mode.
9.2 Confi gure the TV in HD mode
You must configure the TV in HD mode when you connect a HD equipment that supports the following resolutions: 480p, 720p, or 1080p.
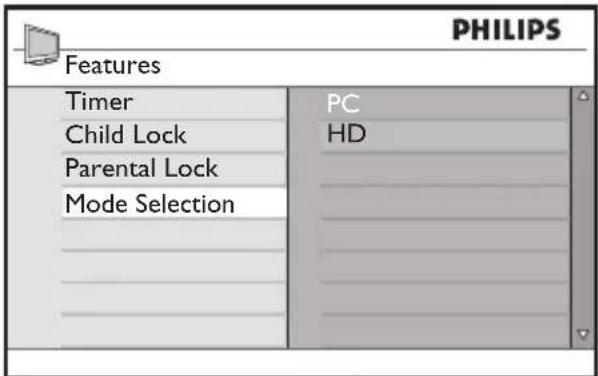
The Features menu includes the Mode Selection option and the Format option.
-
Press the MENU key to display the Main menu.
-
Press the ▲ or ▼ key to select Features, and press the ▶ or OK to enter the menu.
-
Press the ▼ key to select Mode Selection, and press ▶ or OK to enter the setting.
text_image
PHILIPS Features Timer PC Child Lock HD Parental Lock Mode Selection _______________________________ _______________________________ _______________________________ _______________________________ _______________________________ _______________________________ _______________________________ _______________________________ _______________________________ _______________________________ _______________________________ _______________________________ _______________________________ _______________________________ _______________________________ _______________________________ _______________________________ _______________________________ _______________________________ _______________________________ _______________________________ _______________________________ _______________________________ _______________________________ _______________________________ ______________________________-
Press the ▲ or ▼ key to select HD.
-
Press the ◀ key to return to the previous menu.
9.3 Display in native 1080 mode 9.4 Supported formats
Note: Only TVs with the full HD 1080p can display in native 1080i mode.
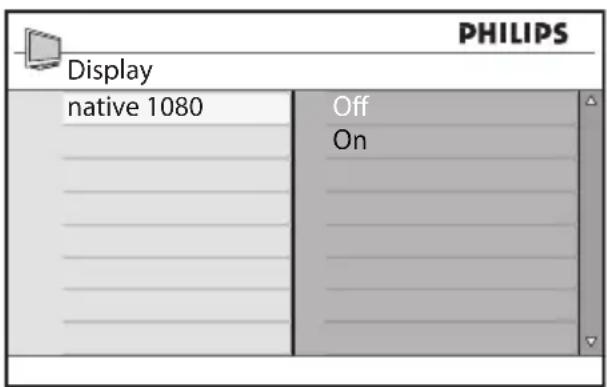
When you connect HD equipment that supports a resolution of 1080i or 1080p, the Display (native 1080) feature is available in the Features menu. This feature allows you to watch the original HD format in 1080i mode.
- Press the MENU key to display the Main menu.
- Press the ▲ or ▼ key to select Features, and press the ▶ or OK key to enter the menu.
- Press ▼ key to select Display.

text_image
PHILIPS Features Timer native 1080 Child Lock Parental Lock Display- Press the ▶ key to access Display.
- Press the ▶ key twice to access the Off/On option in the native 1080.
text_image
PHILIPS Display native 1080 Off On- Press the ▲▼ keys to select Off or On. Select On option to watch native 1080 mode.
- Press the ◀ key to return to the previous menu.
The following table list the supported input formats for HD mode.
| Non 1080p models | ||||
| HD format | 480p | 576p | 720p | 1080i |
| SD format | 480i | 576i | ||
| 1080p models | |||||
| HD format | 480p | 576p | 720p | 1080p | 1080i |
| SD format | 480i | 576i | |||
Note: Your Philips TV is HDMI compliant. If you do not get a good picture, please change the video format on your peripheral devices. Refer to the table above for details.
Use Philips EasyLink10
Your TV is enabled for HDMI-CEC connections with other devices. The following descriptions apply to devices that are CEC-compliant and connected to your TV through an HDMI cable.
One-touch play
When you connect your TV to devices that support One-touch play, you can control your TV and the devices with one remote control. For example, when you press one-touch play on your DVD's remote control, your Philips TV will automatically switch to the correct channel to show the DVD content.
One-touch standby
When you connect your TV to devices that supports one-touch standby, you can use your TV's remote control to put the devices to standby. To put a device into standby, press and hold the ⏻ button on the TV's remote control for 3-4 seconds.
Technical data11
Supported display resolutions
- HDMI Input:
Mode
Signal
PC Format 640x480@60Hz, 72Hz,
75Hz, 85Hz
720×400@70Hz, 85Hz
800×600@60Hz, 72Hz,
75Hz, 85Hz
1024×768@60Hz, 70Hz,
75Hz, 85Hz
1280x768@60Hz
1280×1024@60Hz
1360×768 @ 60Hz
Video Format 720x480p@60Hz
720(1440)×480i@60Hz
720x576p@50Hz
720x(1440)x576i@50Hz
1280x720p@60Hz
1280×720p@50Hz
1920×1080i@50Hz,
60Hz
1920x1080p@24Hz,
25Hz, 30Hz, 50Hz, 60Hz
• PC Analog, D-sub input:
Mode
Signal
PC Format 640x480@60Hz, 72Hz,
75Hz, 85Hz
720×400@70Hz, 85Hz
800×600@60Hz, 72Hz,
75Hz, 85Hz
1024×768@60Hz, 70Hz,
75Hz, 85Hz
1280×768@60Hz
1280x1024@60Hz
1360x768 @ 60Hz
Tuner / Reception / Transmission
• Antenna input: 75ohm coaxial (IEC75)
• TV system: PAL I, PAL B/G, PAL D/K, SECAM B/G, SECAM D/K
• Video playback: NTSC, SECAM, PAL
Sound
• Sound mode: Mono, Stereo, Incredible Surround, BBE, *WooX
Remote control
• Batteries: 2 x AAA size (LR03 type)
Connections (Rear)
• AV IN: Audio L/R, Video
• AV OUT: Audio L/R, Video
• CVI: Component (Y Pb Pr), Audio L/R in
• *HDMI 1/2/3
AUDIO IN
- VGA
• TV ANTENNA
Connections (Side)
• Headphone out (stereo mini jack)
• AUDIO L/R in
• Video (CVBS) in
- S-Video
• *HDMI
Power
• Mains power: AC 100-240V
• Power and standby power consumption: See technical specifications at www.philips.com
• Ambient temperature: 5°C - 35°C
Specifications are subject to change without notice. For detailed specifications of this product go to www.philips.com/support.
Troubleshooting 12
This section describes commonly-encountered issues and accompanying solutions.
General TV issues 12.1
The TV does not switch on:
Unplug the mains cord, wait for one minute • and plug in the mains again.
Verify that the mains cord is properly • connected and that the mains are powered.
The remote control is not working properly:
Verify that the remote control batteries • are correctly inserted according to the +/- orientation.
Replace the remote control batteries if they are flat or weak.
Clean the remote control and TV sensor • lens.
The standby light on the TV blinks red:
Turn off the TV and unplug the mains • cord. Wait until the TV cools down before reinserting the mains cord and turning on the TV. If the blinking occurs again, contact our Customer Support Centre.
You forgot your code to unlock channels
Enter '0711' as described in Section 5.7.3 Lock TV channels (Parental Lock).
The TV menu is in the wrong language
See Section 6 for instructions on how to change the TV menu to your preferred language.
Picture issues12.2
There is sound but no picture:
Verify that picture settings are correctly set. See Section 5.3.1 Adjust picture settings.
You receive poor TV reception from an antenna connection:
Check that the antenna is properly connected to the TV.
- Loud speakers, non-earthed audio devices, neon lights, high buildings or mountains can influence the picture quality. Try to improve the reception quality by changing the antenna direction or moving devices away from the TV.
- Verify if the correct TV system is selected for your region. See Section 6.2 Manually install channels.
- If reception on only one channel is poor, try to fine tune this channel. See Section 6.2.1 Fine tune channels.
You receive poor picture quality from connected devices:
- Check that the devices are connected properly. Also, be sure to assign devices to connectors as described in Section 7.4 Setup devices.
- Verify that picture settings are correctly set. See Section 5.3.1 Adjust picture settings.
The TV did not save my settings:
- Verify that the TV is set to the Home location, which offers you complete flexibility to change settings. See Section 6.4 Change to Shop or Home mode.
The picture does not fit the screen, it is too big or too small:
- Try using a different picture format as described in Section 5.3.3 Change picture format.
- Assign your device to connectors as described in Section 7.4 Setup devices.
12.3 Sound issues
• There is picture but no sound from the TV:
Note
If no audio signal is detected, the TV automatically switches off audio output and does not indicate malfunction.
Check that all cables are properly • connected.
Check that the volume is not set to 0.
Check that the sound is not muted.
There is a picture but sound quality is poor:
Check sound settings as described in • Section 5.3.4 Adjust sound settings. Verify that Stereo and Equalizer settings are correct.
There is a picture but sound comes from one speaker only:
Verify that the • Balance is correctly set, as described in Section 5.3.4 Adjust sound settings.
12.4 HDMI connection issues
You encounter problems with HDMI devices
- The HDMI - HDCP procedure might take a few seconds before the TV shows the picture from a device.
- If the TV does not recognise the device and the screen shows no picture, try switching from one device to another and back again to restart the HDCP procedure.
- If you experience intermittent sound disruptions, check the user manual of the HDMI device to verify that output settings are correct. Alternatively, try connecting the channeling of the audio signal from the HDMI device to the TV via an additional audio cable.
- If a HDMI-to-DVI adaptor or HDMI to DVI cable is used, check that an additional audio connection is in place to complete the DVI connection.
PC connection issues 12.5
The PC display on my TV is not stable or is not synchronised:
Check that a supported resolution and refresh rate is selected on your PC. See Section 11 Technical data for supported resolutions and refresh rates.
Contact us12.6
If you cannot solve your problem, contact the Customer Support Centre in your country as listed on the last page of this user manual. Alternatively, consult our website at www.philips.com/support.
WARNING
Do not attempt to repair the TV yourself. This may cause severe injury, irreparable damage to your TV and void your warranty.
Note
Please have available your TV model, product number and serial number before contacting us. These numbers are available on your TV as well as on the packaging accompanying your TV.