WH-D10 - Speaker Wharfedale - Free user manual and instructions
Find the device manual for free WH-D10 Wharfedale in PDF.


User questions about WH-D10 Wharfedale
0 question about this device. Answer the ones you know or ask your own.
Ask a new question about this device
Download the instructions for your Speaker in PDF format for free! Find your manual WH-D10 - Wharfedale and take your electronic device back in hand. On this page are published all the documents necessary for the use of your device. WH-D10 by Wharfedale.
USER MANUAL WH-D10 Wharfedale
natural_image
Simple line drawing of a circular object with two legs at the bottom, no text or symbols present.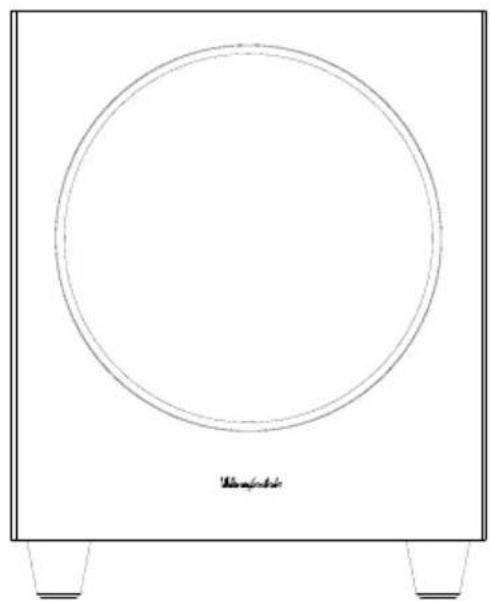
natural_image
Simple line drawing of a square frame with a circular hole and two legs at the bottom (no text or symbols)IMPORTANT SAFETY INFORMATION
text_image
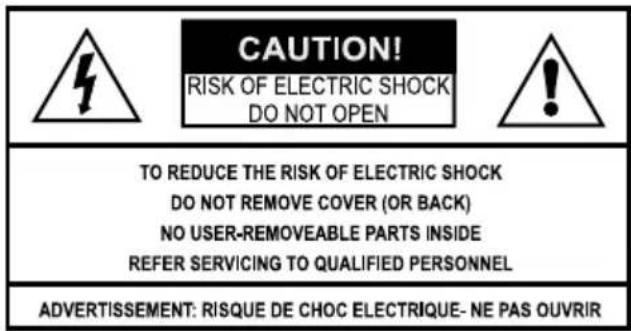
CAUTION! RISK OF ELECTRIC SHOCK DO NOT OPEN TO REDUCE THE RISK OF ELECTRIC SHOCK DO NOT REMOVE COVER (OR BACK) NO USER-REMOVEABLE PARTS INSIDE REFER SERVICING TO QUALIFIED PERSONNEL ADVERTISSEMENT: RISQUE DE CHOC ELECTRIQUE- NE PAS OUVRIR
This symbol indicates that there are important operating and maintenance instructions in the literature accompanying this unit.

This symbol indicates that dangerous voltage constituting a risk of electric shock is present within this unit.
WARNING: TO REDUCE THE RISK OF FIRE OF ELECTIC SHOCK, DO NOT EXPOSE THIS APPARATUS TO RAIN OR MOISTURE.
Read these instructions.
Keep these instructions.
Heed all warnings.
Follow all instructions.
Do not use this apparatus near water.
Clean only with cloth.
Do not block any ventilation openings.
Install in accordance with the manuf acturer's instructions.
Do not install near any heat sources such as radiators, heat registers, stoves, or other apparatus (including amplifiers) that produce heat.
Do not defeat the safety purpose of the polarised or grounding plug. A polarised plug has two blades with one wider than the other. A grounding plug has two blades and a third grounding prong. The wide blade or the third prong is provided for your safety. If the provided plug does not t into you outlet, consult an electrician for replacement of the obsolete outlet.
Protect the power cord from being walked on or pinched particularly at plugs, convenience receptacles, and the point where they exit from the apparatus.
Only use a achments/accessories speci ed by the manufacturer.

Use only with the cart, stand, tripod, bracket, or table speci ed by the manufacturer, or sold with the apparatus. When a cart or rack is used, use caution when moving the cart/us combination to avoid injury from tip-over.
Unplug the apparatus during lightning storms or when unused for long periods of time.
Refer all servicing to qualified personnel. Servicing is required when the apparatus has been damaged in any way, such as power supply cord or plug is damaged, liquid has been exposed to rain or moisture, does not operate normally, or has been dropped.
CAUTION: These servicing instructions are for use by qualified service personnel only. To reduce the risk of electric shock, do not perform any servicing other than that contained in the operating instructions unless you are qualified to do so.
WARNING: To reduce the risk of fire or electric shock, do not expose this apparatus to rain or moisture. The apparatus shall not be exposed to dripping or splashing and that objects filled with liquids, such as vases, shall not be placed on apparatus.
WARNING: The mains plug/appliance coupler is used as disconnect device shall remain readily operable.
No naked flame sources, such as lighted candles, should be placed on the apparatus.
Do NOT place heavy objects on top of loudspeaker cabinets. If you play them with the grilles removed be careful to protect the drive units from children and pets.
DO NOT change any connections to the subwoofer or your system without first switching off the power.
DO NOT use your amplifier or receiver at its maximum volume se ing. This will produce high levels of distortion which may damage your loudspeakers and subwoofer. Allow your ampli er a li le headroom so that it can operate without stress.
DO turn down the volume control on your amplifier or receiver before turning the equipment on or o . This will protect your subwoofer against switching 'thumps' and other spurious signals.
IAG-WHARFE
Correct disposal of this products. This marking indicates that this product should not be disposed with other household wastes throughout the EU. To prevent possible harm to the environment or human health from uncontrolled waste disposal, recycle it responsibly to
promote the sustainable reuse of material resources. To return your used device, please use the return and collection systems or contact the retailer where the product was purchased. They can take this product for environmentally safe recycling.

This equipment is a Class II or double insulated electrical appliance. It has been designed in such a way that it does not require a safety connection to electrical earth.
INTRODUCTION
The WH-D8 & WH-D10 is the latest in a long line of distinguished Wharfedale active subwoofers. These technologically advanced subwoofers will complement the finest electronics and decor.
Please read these instructions carefully before installing your subwoofers. A few minutes studying this manual will ensure superb performance from your subwoofer for many years.
INSTALLATION
Unpacking
Carefully unpack each subwoofer.
Retain all the packing materials so that your subwoofer can be repacked and shipped without damage.
If you dispose of the packing, do so with regard to all recycling provisions in your area.
Power Connection

This subwoofer is set to operate for the mains voltage marked on the amplifier panel. Before connecting check that this voltage is correct for your mains supply.
If you move to an area with a different mains supply voltage, please consult your Wharfedale dealer to arrange the conversion of this product.
Positioning the Subwoofer
Although the unit may be placed almost anywhere in the room, we recommend that it be placed in front of the listener and as central to the listening position as possible. There should be a mains outlet within easy reach. The subwoofer should not be operated within 450mm of a television set as the drive unit magnet may distort the picture. Remember that there should be a line of sight between the listening position and the front of the subwoofer otherwise the handset remote functions will not be operable.
We suggest you initially position the subwoofer about 20cm (8 inches) from the wall. Placing the unit close to the wall will enhance the bass; placing it across the corner of the room will increase the bass further, possibly at the expense of clarity. Do not place the subwoofer close to surfaces or objects that may rattle. The floor under the subwoofer should be sound with no loose floorboards, etc. Experiment with locations and sources before making a final decision.
Multi-Channel Room Placement
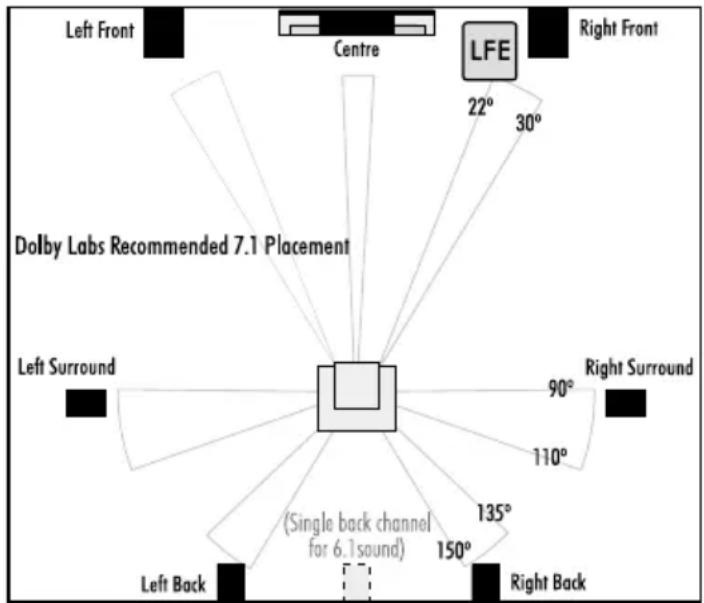
The diagram shows the Dolby Labs recommended positions for multi-channel operation. For 5.1 channel operation use the satellites in the front and surround positions with the Subwoofer in the LFE position.
If you have a 7.1 channel processor/ampli er you can enhance the system further by buying one of the larger loudspeakers from the Wharfedale range to use as front channel speakers and use the satellite units as back channels.
If you have any queries, your wharfedale dealer will be pleased to advise you.
text_image
Left Front Centre LFE 22° 30° Right Front Dolby Labs Recommended 7.1 Placement 90° 110° Right Surround Left Surround (Single back channel for 6.1 sound) 135° 150° Left Back Right BackBefore Connecting the Subwoofer
- Level the subwoofer taking care to make sure it sits squarely on all its spikes.
- Switch off you amplifier and all connected source units at the mains.
- Unplug the power cords to all system components if necessary.
- Make sure the subwoofer is disconnected from the mains and that the ON/OFF switch is OFF.
- Before re-connecting your system to the AC power supply, check that all the connections are properly made.
- Check that all speaker terminals are done up tightly.
- Ensure that there are no strands of wire shorting adjacent speaker terminals.
- Signal cables should be properly terminated and fully screened to minimise hum. If you connect your subwoofer via low level signals inputs, the cable between your control unit or processor and the subwoofer could be quite long so screening is particularly important. Consult your dealer if in doubt.
CONNECTING THE SUBWOOFER TO THE SYSTEM
Control Panel of the WH-D8 Subwoofer
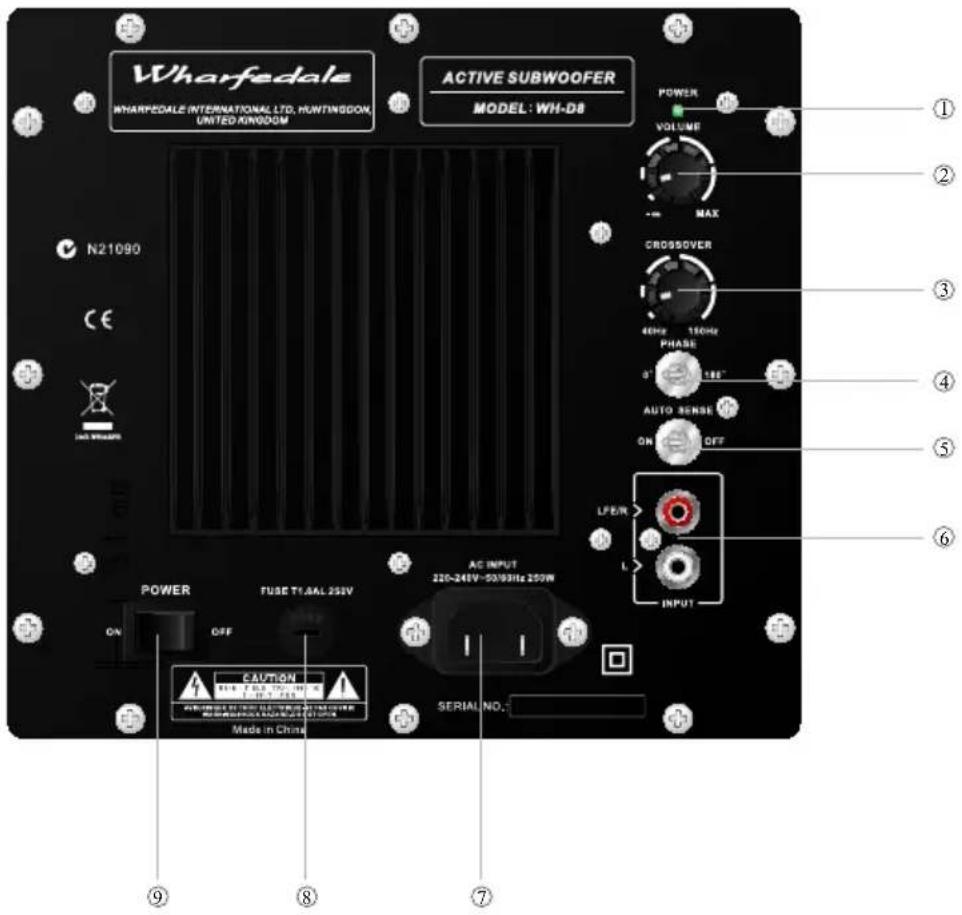
text_image
Wharfedale WHARPEDALE INTERNATIONAL LTD, HUNTINGDON, UNITED KINGDOM ACTIVE SUBWOOFER MODEL: WH-D8 N21090 POWER VOLUME MAX CROSSOVER 46Hz 150Hz PHASE 0° 180° AUTO SENSE ON OFF LF/ER > INPUT POWER TUBE TI.AAL 252V AC INPUT 220-241V-50/93Hz 250W ON OFF CAUTION AUX#R#EL #101# TINUM OF 252V 1.0V 7.5V MATERIALS AND INJUNCTIONS Made in China SERIAL NO. ① ② ③ ④ ⑤ ⑥ ⑨ ⑧ ⑦① Power Indicator
② Volume Control
③ Crossover Frequency Control
④ Phase Switch
⑤ Auto Sense Switch
⑥ Line Level Inputs/ LFE Input
⑦ IEC Mains Input Socket
⑧ Mains Power Fuse
⑨ Mains Power Switch
CONNECTING THE SUBWOOFER TO THE SYSTEM
Control Panel of the WH-D10 Subwoofer
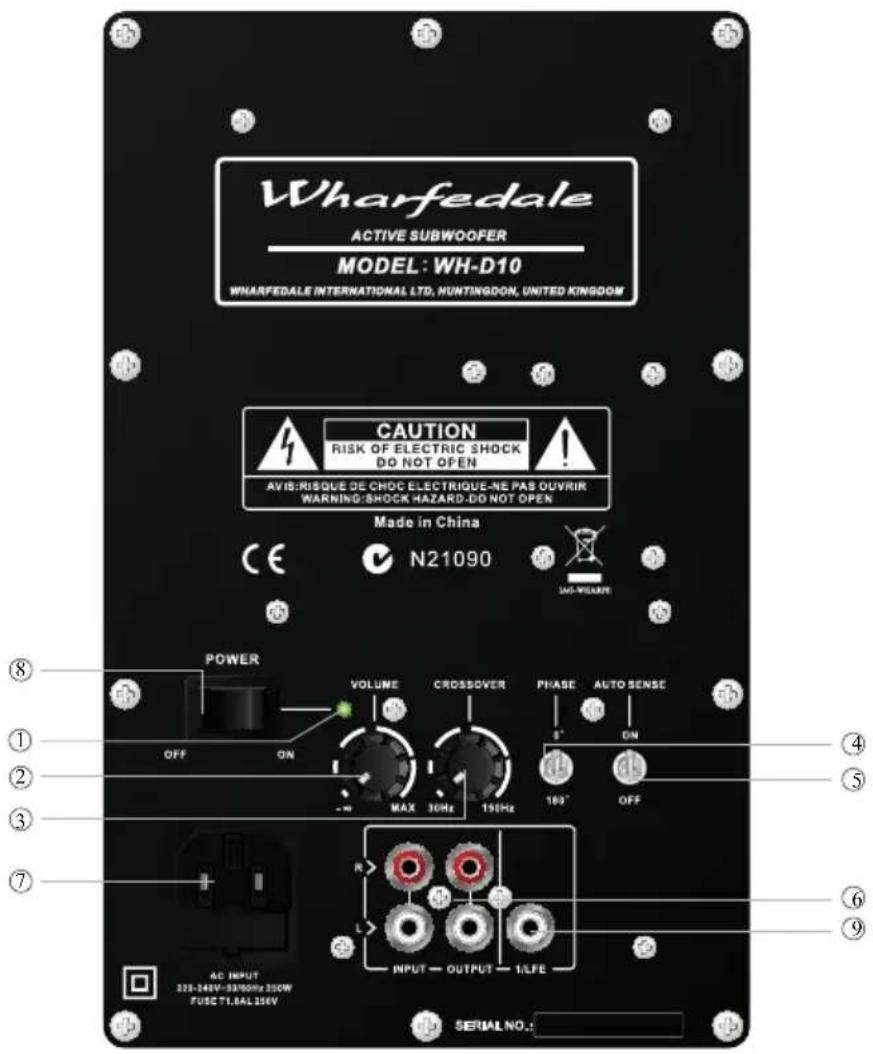
text_image
Wharfedale ACTIVE SUBWOOFER MODEL: WH-D10 WHARFEDALE INTERNATIONAL LTD, HUNTINGDON, UNITED KINGDOM CAUTION RISK OF ELECTRIC SHOCK DO NOT OPEN AVIS: RISQUE DE CHOC ELECTRIQUE-NE PAS OUVRIR WARNING:SHOCK-HAZARD:DO NOT OPEN Made in China N21090 POWER VOLUME CROSSOVER PHASE AUTO SENSE OFF ON MAX 30Hz 150Hz 160° OFF AC INPUT 228-248V=32900Hz 250W FUSE 71.8AL 256V INPUT→OUTPUT→1/LFE SERIAL NO.:① Power Indicator
② Volume Control
③ Crossover Frequency Control
④ Phase Switch
⑤ Auto Sense Switch
⑥ Line Level Inputs
⑦ IEC Mains Input Socket
⑧ Mains Power Switch
⑨ LFE Input
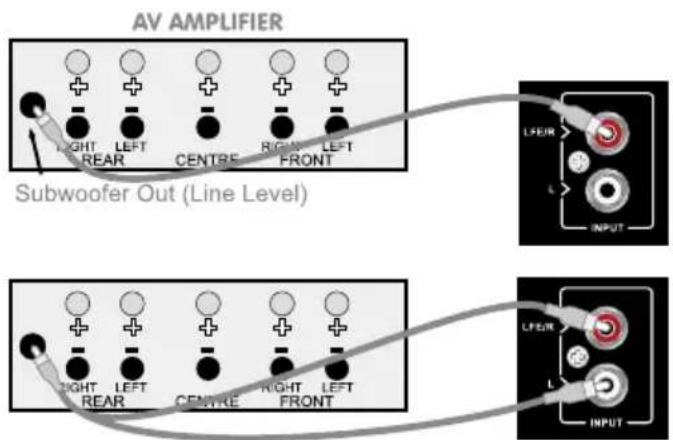
A/V Processor Connections
Your subwoofer has been designed for optimum performance with a digital processor. If your A/V processor has a line level or LFE subwoofer output you should use this connection. You will need to purchase a single screened RCA phono lead from your dealer. Connect this lead to the LFE input of the subwoofer as shown.
Alternatively, you may use a split mono lead from the processor to Line Inputs of the subwoofer. In this case the input level at the subwoofer will be slightly higher.
Stereo Line Output Connections
If your amplifier has a spare preamplifier output or a stereo subwoofer output, connect the subwoofer as shown. You will need a stereo screened RCA phone cable.
Pre Out - Main in Connections
If you use a stereo pre and power amplifier, or an amplifier where the pre and main amplifier cab be separated, connect the subwoofer as shown. There are two alternative methods.
You will need two screened RCA 'Y' adaptors and two single RCA phono cables.
Remove the Pre-Main links on your amplifier. Connect the socket (common) of an RCA 'Y' adaptor to the Left Channel Pre Out socket on the amplifier and the other leg to the Le Channel Main In socket. Connect the remaining plug on this combination to the Left Channel Line Level input on the subwoofer. Repeat this for the Right Channel.
text_image
AV AMPLIFIER Subwoofer Out (Line Level) LFEIR INPUT LFEIR INPUT
text_image
AV AMPLIFIER L R RIGHT LEFT REAR CENTRE RIGHT FRONT Stereo Outputs (Line Level) LZER INPUT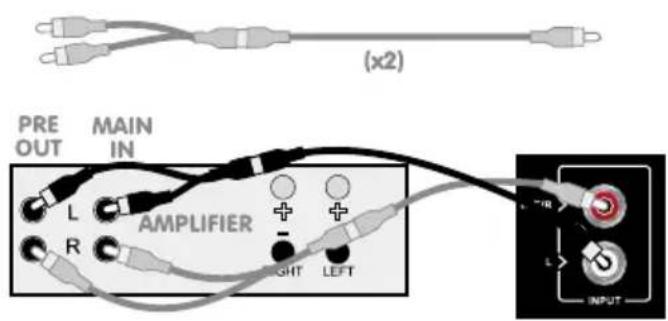
text_image
(x2) PRE OUT MAIN IN L AMPLIFIER + - RIGHT LEFT R INPUTOPERATING YOUR SUBWOOFER
Check that all connections to the subwoofer have been properly made and that the main volume control is at minimum. Plug the supplied power cord into the mains socket on the rear panel.
Initial Settings
Volume Control: Set the subwoofer volume control to the minimum before proceeding.
Crossover Control: Adjust frequency to integrate WH-D8 or WH-D10 subwoofer with your system requirement.
Phase Switch: The Phase switch should be initially set to 0^ .
Switching On
Plug in the mains plug and switch the power on. Now switch the subwoofer on with the rest of your system.
When switched on, the power indicator light will glow and the subwoofer will be operational.
Basic Tuning
Volume Setting: Play a programme with extended bass and set the system volume to a resonal level. Adjust the subwoofer volume control to produce the desired level of bass. The bass should be even and an extension of the main loudspeakers. Do not set the control too high or you will swamp the sound with too much bass and clarity and definition will suffer.
Phase Switch: If the bass is indistinct or lacks depth, the Phase switch may need adjustment. Set the switch to 0^ and listen carefully to some music with extended bass. If there is insufficient bass output from the subwoofer set the Phase switch to 180^ . Select the position which produces the most natural, extended bass.
Crossover Adjustment: This adjusts the blend between the subwoofer and the main speakers and enables the system to be set up for optimum bass performance. The higher settings are for use with small bookshelf loudspeakers, the lower setting for large floorstanding models. If you choose too low a setting with small speakers, there will be a 'hole' in the bass response; too high a setting with large speakers will result in the upper bass becoming bloated. Again the subwoofer should be an extension of the main loudspeakers.
Auto-Sense Switch: This feature reduces the power consumption when there is no music signal. When the Auto-Sense Switch is on, the amplifier will be activated immediately once an audio signal is detected at the inputs, and it will turn into the mute status when no signal is detected for about 20 minutes, which lowers the power consumption. This feature can be made invalid by setting this switch to off.
Mains Operation
When the system is not in use for extended periods, we suggest you switch o the subwoofer to protect it from switching noises caused by domestic appliances, etc. The best practice is to switch the complete system on and off from a central point. Bear in mind that if you play the system with the subwoofer switched off you will get no bass!
TROUBLESHOOTING
Before investigating a problem, always switch off the system at mains.
If your system is not working properly please work through this checklist before returning a unit to your dealer.
| Symptom | Possible Cause |
| No Sound | System not switched on; Speaker cables shorting terminals out; Wrong source selected |
| Sound lacks bass content | Subwoofer not switched on |
| Lack of bass reproduction | Subwoofer phase incorrect; Subwoofer crossover control too low |
| Excessive bass distortion at low volumes | Subwoofer set to high; LFE level set too high; Subwoofer incorrectly wired |
| Excessive or distorted bass at high levels | System level set too high; Bass control set too high; Subwoofer too close to room corners |
| Distorted / rattling sound at high levels | System level set too high; Objects too close to subwoofer |
| Popping or thumping from the subwoofer | System level set too high; Subwoofer level set too high; LFE level set too high |
| Television picture colour is distorted | Subwoofer too close to TV. (Switch off system and TV, move units away, wait for 15 minutes, switch on.) |
Subwoofer Maintenance
Subwoofer should only ever be cleaned with a soft dry cloth to remove fingermarks, etc.
Never touch subwoofer drive units as they can be damaged by improper handling.
Never use a vacuum cleaner to clean a subwoofer grille. Brush it carefully by hand with a soft brush.
When cleaning the floor under a subwoofer, switch it off, unplug it from the mains supply then lift it clear of the floor and move it to another location. Replace the subwoofer after cleaning.
SERVICING
Should a fault occur with you subwoofer, please pack it correctly, using the original packing, so you can ship it safely. Product for service should be returned to the appointed dealer from whom you purchased the product. If you experience difficulties or there is no Wharfedale dealer in your area, contact the Wharfedale distributor for your country or the office below.
UK
IAG House, 13/14 Glebe Road,
Huntingdon, Cambridgeshire,
PE29 7DL UK
Tel: +44 (0)1480 452561
Fax: +44 (0)1480 413403
Specifications
| WH-D8 | WH-D10 | |
| Description/Format | Active Dynamic-Drive IB subwoofer system | Active Dynamic-Drive IB subwoofer system |
| Drive Units | 1 x (8")200mm cone long-throw | 1 x (10")250mm cone long-throw |
| Frequency Response | 40 - 120Hz ±3dB | 35 - 150Hz ±3dB |
| Amplifier Power Output | 70W | 150W |
| Peak Power Output | 150W | 300W |
| Line Input Sensitivity | 100mv for maximum output | 100mv for maximum output |
| Crossover Range | 40 - 150Hz | 30 - 150Hz |
| Inputs | Stereo Line In (2 x RCA Phono) | Stereo Line In (2 x RCA Phono) |
| Mono (LFE) Line In (RCA Phono) | Mono (LFE) Line In (RCA Phono) | |
| Input Impedance | Line In 10kΩ | Line In 10kΩ |
| LFE 5kΩ | LFE 5kΩ | |
| Signal-to-noise ratio (S/N) | ≥85dB | ≥85dB |
| Avg. Max Output @1m | 105dB | 110dB |
| Features | Low pass filter slope adjustment | Low pass filter slope adjustment |
| Phase inversion | Phase inversion | |
| Auto on-off | Auto on-off | |
| High pass output | ||
| Dimensions | Height: (298+30)mm | Height: (363+30)mm |
| Width: 268mm | Width: 333mm | |
| Depth: (300+22)mm | Depth: (372+22)mm | |
| Net weight | 7.5kg | 14kg |
| Gross weight | 9.1kg | 16.5kg |
| Accessories | IEC power cord, spikes as standard | IEC power cord, spikes as standard |
* The right is reserved to alter all performance, specification and appearance as required.