MX3S - Radio Sanwa - Free user manual and instructions
Find the device manual for free MX3S Sanwa in PDF.


| Product Type | Portable AM/FM Radio |
| Brand | Sanwa |
| Model | MX3S |
| Frequency Range | FM: 87.5-108 MHz / AM: 520-1710 kHz |
| Power Source | 2 x AA batteries (1.5V) |
| Battery Life | Approximately 30 hours at moderate volume |
| Speaker Size | 3 inches (77 mm) |
| Audio Output Power | 1.0 W RMS |
| Dimensions (W x H x D) | 150 x 80 x 30 mm |
| Weight | 200 g (without batteries) |
| Color | Black with silver accents |
| Material | ABS plastic |
| Tuning Type | Analog wheel |
| Antenna | Telescopic rod antenna (FM) |
| Headphone Jack | 3.5 mm stereo |
| Auto-off Timer | Yes, 60 minutes |
| Signal Strength Indicator | LED bar graph |
| Carry Handle | Integrated folding handle |
| Cleaning Instructions | Wipe with a soft, dry cloth. Do not use liquids. |
| Safety Warnings | Keep away from water and heat sources. Do not disassemble. |
| Repairability / Spare Parts | Contact Sanwa service center for replacement parts. |
| General Info | Full band analog radio with clear sound and simple controls. |
Frequently Asked Questions - MX3S Sanwa
User questions about MX3S Sanwa
0 question about this device. Answer the ones you know or ask your own.
Ask a new question about this device
Download the instructions for your Radio in PDF format for free! Find your manual MX3S - Sanwa and take your electronic device back in hand. On this page are published all the documents necessary for the use of your device. MX3S by Sanwa.
USER MANUAL MX3S Sanwa
To Open slide Cover Install Batteries To Close slide cover
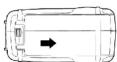
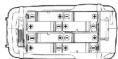
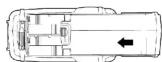
- Press down on the battery cover and slide in the direction of the arrow to remove
in the direction of the arrow to remove. - Install 8 pieces "AA" size alkaline batte
Indicated on the battery tray. Make sure to match
the polarity (+ and -) as shown in the battery compartment as the transmitter will not function
compartment of the transmitter will not function. - Install the battery cover in place and slide to close.
WARNING: Improper installation of transmitter batteries can cause serious damage to your system.
RECEIVER AND SERVO CONNECTIONS
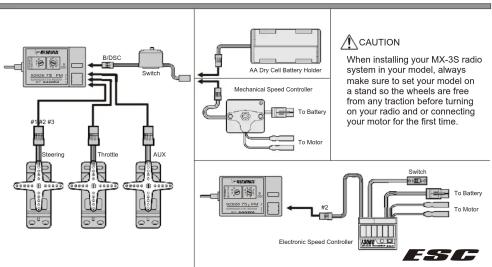
Your MX-3S Computer R/C system receiver is NOT equipped with BEC circuitry. DO NOT use more than 6.0 volts to power the receiver. Anything higher than 6.0 volts will burn-up or destroy your receiver. Only use a 4.8\~6.0 volt battery pack or a speed controller that is designed to lower the voltage to the receiver. The following diagram shows a typical connection for the servos and receiver.
Note that the receiver antenna should be located at least 2' (50mm) away from any servo leads and switches. In electric cars, we recommend that it be at least 4' (100mm) from the electric motor.
Extend the receiver antenna to the full length. Failure to do so will cause loss of control. Do not cut or bend the receiver antenna.
Insulate the connectors with tape or use tie wraps to avoid contact with metal or chassis.
avoid contact with metal car chassis. Please follow the model manufacturers recommendations
for the correct installation of your radio system in your car or boat.
TRIGGER POSITION ADJUSTMENT
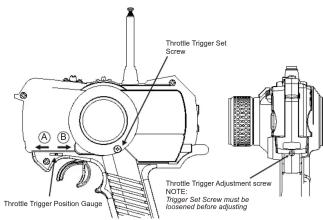
The Throttle Trigger can be adjusted to give you a more natural feel of the throttle. To Adjust:
- Loosen the Throttle Trigger set screw by turning counter clock-wise.
- Turning the adjustment screw clock-wise will move the trigger out or in the (A) direction.
- Turning the adjustment screw counter clock-wise will move the trigger in or towards the (B) direction.
- After adjustment is made, re-tighten the Trigger Set Screw
- Total adjustment for the trigger is 10mm. Do Not over tighten adjustment screw, it may damage the adjuster and or the threads.
TROUBLESHOOTING GUIDE and WARNINGS
If your radio system does not operate properly, please check the following items:
- Make sure the batteries are properly installed and
fully charged. Make certain all the batteries are installed in the correct direction. - Check that both the transmitter
switches are in the ON position. - Check the battery voltage by turning on the transmitter
and pushing both menu bottoms at the same time and releasing. - Make sure tha
the transmitter and receiver. - Make sure all the receiver and servo connections are tight.
are light.
WARNINGS: DO NOT OPERATE YOUR SYSTEM IF SOMEONE ELSE IS ON YOUR FREQUENCY AT THE SAME TIME.
YOUR MODEL CAN CAUSE SERIOUS DAMAGE OR INJURY SO PLEASE USE CAUTION AND COURTESY AT ALL TIMES.
DO NOT EXPOSE THE RADIO SYSTEM TO WATER OR EXCESSIVE MOISTURE.
PLEASE WATERPROOF THE RECEIVER AND SERVOS BY PLACING THEM IN A WATER TIGHT RADIO BOX WHEN OPERATING R/C BOAT MODELS.
The abbreviation, IC, before the registration number signifies that registration was performed based on a Declaration of Conformity indicating that Industry Canada technical specifications were met. It does not imply that Industry Canada approved the equipment.
RECEIVER CHANNEL SELECTION
By using the supplied screwdriver, you can set the channel number by turning the channel selector dial or dials, located on the front of the receiver. The 75MHz receiver has two dials. The dial on the left can be set from 6\~9 and the right dial can be set from 0\~9. For example, you what to set your receiver on channel 73. You first set the left dial to the number 7 and the right dial to the number 3. When using a 27MHz receiver, you can select channels 1\~6.
Available 75Mhz Channels. 61\~90 Available 27MHz Channels. 1\~6
NOTE: The receiver power must be turned off first before changing channels.

AIRTRONICS®
Get The Advantage
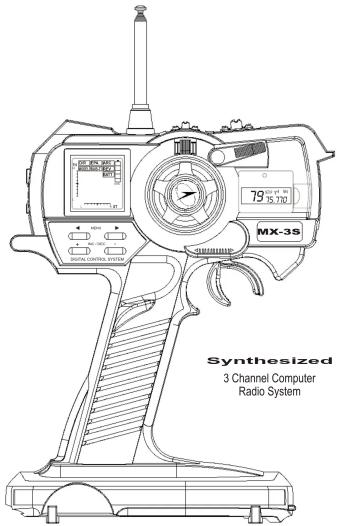
We appreciate your purchase of this new Airtronics MX-3S Synthesized Radio Control System. These instructions are intended to familiarize you with the many unique features of this modern, state of the art equipment. Please read them carefully so you may obtain maximum success and enjoyment from its operation.
Please note that the MX-3S is designed for comfort and precise control of all types of model cars and boats. We wish you the best of success with your radio system Enjoy and have fun.

SYSTEM FEATURES
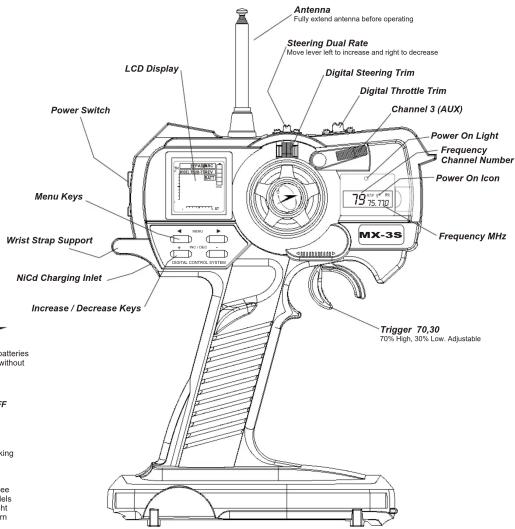
Unique and functional pistol grip transmitter design Well balanced for precise control Non-slip foam steering wheel Well placed digital trim levers Optimum third channel switch location Big LCD display Adjustable (70/30) Throttle trigger Low Battery warning Suick access Systemized Setup High performance micro 3 channel receiver High torque / high speed 94102Z servo Receiver dry battery holder Switch harness NiCd charger jack in transmitter Wrist strap holder (optional wrist strap part # 99104 Sound Beep (On / Off ) High Intensity Blue Power Light Channel and Frequency Display
Screen Display Digital Trim indicators (throttle and steering) Battery Fuel Tank Dual Rate Steering EPA Steering, Throttle, AUX ARC Steering, Throttle Model Memory (18) Sub-Trim Steering, Throttle Servo Rev Steering, Throttle, AUX Battery Voltage Display Audio On / Off
Synthesized Screen Display
SYSTEM SPECIFICATIONS
Transmitter Model: MX-3S Output power: 200 MW Modulation: FM/PPM Power supply: 8 AA alkaline dry cells DC 12V or 8 cell NiCd Pack. Weight: 14.46 ounces Frequencies: 27 MHz (6) frequencies 75 MHz (30) frequencies Receiver Model: 92927Z (27 MHz) or 92926Z (75 MHz) Modulation: FM/PPM Intermediate frequency: 455 KHz Power supply: DC 4.8 -6.0V Weight: 0.67 ounces Dimensions: 1.65°(L) x 1.06°(W) x 0.57°(H)
Servo Model: 9410ZZ Heavy duty standard servo Power supply: DC 4.8 - 6.0V Dimensions: 1.54"(L) x 0.79"(W) x 1.42"(H) Weight: 1.59 ounces Speed: 0.16 sec. At 6.0V for 60 deg rotation Torque: 53 in/oz at 6.0V Accessories 97001Z switch harness Frequency flag Receiver dry battery holder instruction manual Options 95046Z Transmitter NiCd Battery Pack (700mah) 95033Z NiCd Dual Battery Charger TX and RX 96317Z F3000 speed controller (no reverse) 99104 Deluxe wrist strap
AUDIO ON / OFF Beep

By default the audio sound beep is in the on position. This beep will sound out every time you press any of the input as him keys. You can turn the audio off by:
you press any c
- Turn radio power switch to the off position
- Press the INC key down and hold.
- Turn power switch to the on position
- Release the INC key.
To turn the audio sound on, repeat steps 1 \~ 4.

NOTE: When audio sound is "ON", there will be no icon displayed in the lower left of the display screen.
LCD DISPLAY SCREEN
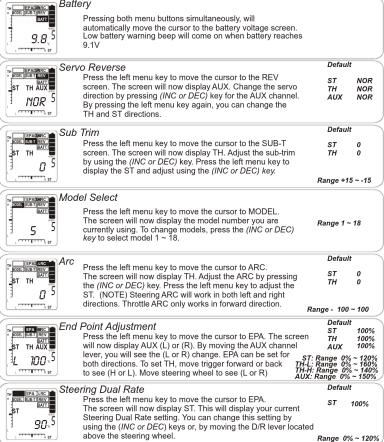
Pressing both menu buttons simultaneously, will automatically move the cursor to the battery voltage screen. Low battery warning beep will come on when battery reaches 9.1V
Servo Reverse Press the left menu key to move the cursor to the REV screen. The screen will now display AUX. Change the servo direction by pressing (INC or DEC) key for the AUX channel. By pressing the left menu key again, you can change the TH and ST directions.
Sub Trim Press the left menu key to move the cursor to the SUB-T screen. The screen will now display TH. Adjust the sub-trim by using the (INC or DEC) key. Press the left menu key to display the ST and adjust using the (INC or DEC) key.
Model Select Press the left menu key to move the cursor to MODEL. The screen will now display the model number you are currently using. To change models, press the (INC or DEC) key to select model 1 \~ 18.
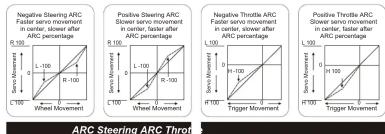
Arc Press the left menu key to move the cursor to ARC. The screen will now display TH. Adjust the ARC by pressing the (INC or DEC) key. Press the left menu key to adjust the ST. (NOTE) Steering ARC will work in both left and right directions. Throttle ARC only works in forward direction.
End Point Adjustment Press the left menu key to move the cursor to EPA. The scr will now display AUX (L) or (R). By moving the AUX channel lever, you will see the (L or R) change. EPA can be set for both directions. To set TH, move trigger forward or back
Steering Dual Rate Press the left menu key to move the cursor to EPA. The screen will now display ST. This will display your current Steering Dual Rate setting. You can change this setting by using the (INC or DEC) keys or, by moving the D/R lever loc
SYNTHESIZED FREQUENCY CHANNEL SETUP
Your new MX-3S is a synthesized system. This system allows you to change frequency channels to any channel listed below. With the batteries installed in the transmitter, the channel and frequency screen will always stay on. This will allow you to change the frequency channels without having the transmitter power on. This feature allows you to safely change frequencies without interfering with others. When the transmitter power is in the ON position, you can not change frequency channels.
Changing Frequency Channels
- Open the Setup switch cover door located on the right side of the Frequency Channel screen.
- Press the Setup button down one time. The word SETUP will flash in the Frequency Channel screen.
-
Use the + INC / DEC - keys to select the frequency channel desired.
-
If safe, turn on the transmitter power switch first and then the power switch to the car or truck. Check to make sure everything is working properly before starting your car or truck.
NOTE 1: When in the setup mode, press both + INC / DEC - keys together will default to CH 61. NOTE 2: Using the OFF position in the Frequency Channel screen. By pressing the + INC key in the setup mode past Ch 90, you will see OFF. By setting the Frequency Channel to the OFF position, you can now turn on the transmitter power switch to change models or setting without transmitting a signal. When the power switch is in the ON position, the Power On icon and the Power on Light will flash. This will indicate that you are not transmitting any signal. After you have changed your model number or settings, turn the transmitter power off and go to step 1 to set the desired frequency channel
Brand : Sanwa
Model : MX3S
Category : Radio