
DV552 - DVD player LG - Free user manual and instructions
Find the device manual for free DV552 LG in PDF.


| Product Type | DVD Player |
| Model | DV552 |
| Brand | LG |
| Disc Compatibility | DVD-VIDEO, DVD-R/RW, DVD+R/RW, Audio CD, CD-R/RW |
| File Formats Supported | DivX, MP3, WMA, JPEG |
| Playback Features | Progressive Scan, Repeat (Title/Chapter/Track/All), A-B Repeat, Zoom (100-400%), Slow Motion, Frame-by-Frame |
| Video Outputs | Composite Video (RCA), Component Video (YPbPr) |
| Audio Outputs | Analog Stereo (RCA), Digital Coaxial |
| USB Port | 1 x USB 2.0 (front) for playback and direct recording |
| Power Supply | AC 110-240V, 50/60 Hz |
| Power Consumption | 8 W |
| Dimensions (W x H x D) | 360 x 35 x 200 mm (without foot) |
| Net Weight | 1.4 kg |
| Laser Type | Semiconductor |
| Signal System | PAL / NTSC (auto selectable) |
| Region Code | Printed on rear; plays discs with matching code or "ALL" |
| Accessories Included | Remote Control, Audio/Video cable, Batteries |
| Safety Features | Laser class 1 product; no user-serviceable parts; do not expose to moisture |
| Maintenance | Clean exterior with a soft dry cloth; lens cleaning recommended if playback issues |
| Special Features (DV552) | USB Direct Recording (Audio CD to USB), Karaoke (with microphone on other models) |
Frequently Asked Questions - DV552 LG
User questions about DV552 LG
0 question about this device. Answer the ones you know or ask your own.
Ask a new question about this device
Download the instructions for your DVD player in PDF format for free! Find your manual DV552 - LG and take your electronic device back in hand. On this page are published all the documents necessary for the use of your device. DV552 by LG.
USER MANUAL DV552 LG
Please read this manual carefully before operating your set and retain it for future reference.
MODELS
DV551
DV552
DV581
DV586
P/NO : MFL63266909
Reg. No. P.1.LG5.00201.0210
DV551.586-P.BIDNLLK_MFL63266909 1/12/10 11:07 AM Page
Safety Precaution


CAUTION: TO REDUCE THE RISK OF ELECTRIC SHOCK. DO NOT REMOVE COVER (OR BACK). NO USER-SERVICEABLE PARTS INSIDE. REFER SERVICING TO QUALIFIED SERVICE PERSONNEL.

This lightning flash with arrowhead symbol within an equilateral triangle is intended to alert the user to the presence of uninsulated dangerous voltage within the product's enclosure that may be of sufficient magnitude to constitute a risk of electric shock to persons.

The exclamation point within an equilateral triangle is intended to alert the user to the presence of important operating and maintenance (servicing) instructions in the literature accompanying the product.
WARNING: TO PREVENT FIRE OR ELECTRIC SHOCK HAZARD, DO NOT EXPOSE THIS PRODUCT TO RAIN OR MOISTURE.
WARNING: Do not install this equipment in a confined space such as a book case or similar unit.
CAUTION: Do not block any ventilation openings. Install in accordance with the manufacturer's instructions. Slots and openings in the cabinet are provided for ventilation and to ensure reliable operation of the product and to protect it from over heating. The openings should be never be blocked by placing the product on a bed, sofa, rug or other similar surface. This product should not be placed in a built-in installation such as a bookcase or rack unless proper ventilation is provided or the manufacturer's instruction has been adhered to.
CAUTION: This product employs a Laser System. To ensure proper use of this product, please read this owner's manual carefully and retain it for future reference. Shall the unit require maintenance, contact an authorized service center.
Use of controls, adjustments or the performance of procedures other than those specified herein may result in hazardous radiation exposure.
To prevent direct exposure to laser beam, do not try to open the enclosure. Visible laser radiation when open. DO NOT STARE INTO BEAM.
CAUTION: The apparatus shall not be exposed to water (dripping or splashing) and no objects filled with liquids, such as vases, shall be placed on the apparatus.
CAUTION concerning the Power Cord
Most appliances recommend they be placed upon a dedicated circuit; That is, a single outlet circuit which powers only that appliance and has no additional outlets or branch circuits. Check the specification page of this owner's manual to be certain. Do not overload wall outlets. Overloaded wall outlets, loose or damaged wall outlets, extension cords, frayed power cords, or damaged or cracked wire insulation are dangerous. Any of these conditions could result in electric shock or fire. Periodically examine the cord of your appliance, and if its appearance indicates damage or deterioration, unplug it, discontinue use of the appliance, and have the cord replaced with an exact replacement part by an authorized service center. Protect the power cord from physical or mechanical abuse, such as being twisted, kinked, pinched, closed in a door, or walked upon. Pay particular attention to plugs, wall outlets, and the point where the cord exits the appliance.
To disconnect power from the mains, pull out the mains cord plug. When installing the product, ensure that the plug is easily accessible.
This device is equipped with a portable battery or accumulator.
Safe way to remove the battery or the battery from the equipment:
Remove the old battery or battery pack, follow the steps in reverse order than the assembly. To prevent contamination of the environment and bring on possible threat to human and animal health, the old battery or the battery put it in the appropriate container at designated collection points. Do not dispose of batteries or battery together with other waste. It is recommended that you use local, free reimbursement systems batteries and accumulators. The battery shall not be exposed to excessive heat such as sunshine, fire or the like.
Manufactured under license from Dolby Laboratories. Dolby and the double-D symbol are trademarks of Dolby Laboratories.
"DVD Logo" Is a trademark of DVD Format/Logo Licensing Corporation.
Table of Contents
Safety Precaution 2
Types of Playable Discs 3
Hooking up the unit 4
Remote Control 5
Main Unit 6
Adjust the settings 7-8 Displaying Data Information 9
Displaying Disc Information ....8 Playing a Disc ....0.10
Playing a Disc ....9-10 Playing a DivX movie file....10-11
Playing a DivX movie file 10-11 Listening to Music Disc or files 11
Listening to Music Disc of files ....11 Viewing photo files 12
USB Direct Recording (DV552/DV586 only) 13
Using an USB Flash Drive (DV552/DV586 only)....13
Using the Karaoke (DV551/DV581/DV586 only) .....14
Language Codes 15
Area Codes 15
Troubleshooting 16
Specifications 16
Types of Playable Discs
| Type | Logo |
| DVD-VIDEO: Discs such as movies that can be purchased or rented. | |
| DVD-R: Video mode and finalized only | |
| DVD-RW: VR mode, Video mode and finalized only | |
| DVD+R: Video mode only | |
| DVD+RW: Video mode only | |
| Audio CD: Music CDs or CD-R/CD-RW in music CD format that can be purchased. | |
| This unit plays DVD±R/RW and CD-R/RW that contains audio titles, DivX, MP3, WMA and/or JPEG files. Some DVD±RW/DVD±R or CD-RW/CD-R cannot be played on this unit due to the recording quality or physical condition of the disc, or the characteristics of the recording device and authoring software. | |
About the Symbol Display
" may appear on your TV display during operation and indicates that the function explained in this owner's manual is not available on that disc.
Regional Codes
This unit has a regional code printed on the rear of the unit. This unit can play only DVD discs labeled same as the rear of the unit or "ALL".
- Most DVD discs have a globe with one or more numbers in it clearly visible on the cover. This number must match your unit's regional code or the disc cannot play.
- If you try to play a DVD with a different regional code from your player, the message "Check Regional Code" appears on the TV screen.
Copyrights
It is forbidden by law to copy, broadcast, show, broadcast via cable, play in public, or rent copyrighted material without permission. This product features the copy protection function developed by Macrovision. Copy protection signals are recorded on some discs. When recording and playing the pictures of these discs picture noise will appear. This product incorporates copyright protection technology that is protected by U.S. patents and other intellectual property rights. Use of this copyright protection technology must be authorized by Macrovision, and is intended for home and other limited viewing uses only unless otherwise authorized by Macrovision. Reverse engineering or disassembly is prohibited.
CONSUMERS SHOULD NOTE THAT NOT ALL HIGH DEFINITION TELEVISION SETS ARE FULLY COMPATIBLE WITH THIS PRODUCT AND MAY CAUSE ARTIFACTS TO BE DISPLAYED IN THE PICTURE. IN CASE OF 525 OR 625 PROGRESSIVE SCAN PICTURE PROBLEMS, IT IS RECOMMENDED THAT THE USER SWITCH THE CONNECTION TO THE 'STANDARD DEFINITION' OUTPUT. IF THERE ARE QUESTIONS REGARDING OUR TV SET COMPATIBILITY WITH THIS MODEL 525p AND 625p UNIT, PLEASE CONTACT OUR CUSTOMER SERVICE CENTER.
DV551.586-P.BIDNLLK_MFL63266909 1/12/10 11:07 AM Page
Hooking up the unit
Audio and Video Connection
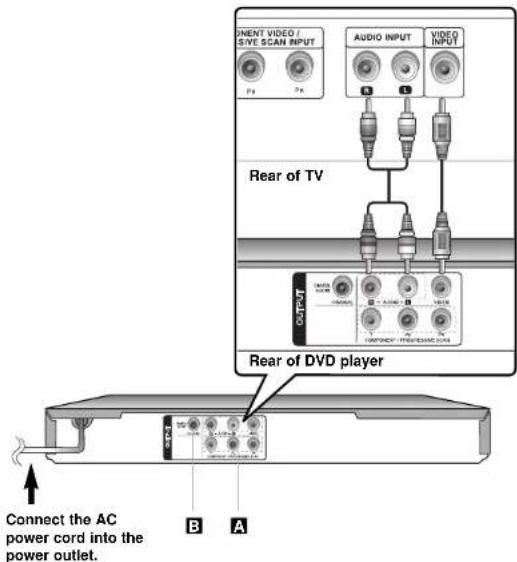
The unit Audio/Video jacks are color coded (yellow for video, red for right audio and white for left audio). If your TV has only one input for audio (mono), connect it to the left (white) audio jack on the unit.
4
Hooking up the unit - more you can do
A Component Video Connections
Connect the COMPONENT/PROGRESSIVE SCAN OUTPUT jacks on the unit to the corresponding input jacks on your TV using a YPBPR cable.
- You will still need to connect the left and right audio cables to the TV, or digital audio cable to your stereo.
- If your TV accepts progressive format signals, you must use this connection and set [Progressive Scan] to [On] on the setup menu. (See page 7)
B Digital Audio Output Connection
Connect one of the unit's DIGITAL AUDIO OUTPUT (COAXIAL) jack to the corresponding jack on your amplifier.
- If the audio format of the digital output does not match the capabilities of your amplifier, the amplifier will produce a strong, distorted sound or no sound at all.
- To see the audio format of the current disc in the on-screen display, press AUDIO.
- This unit does not perform internal (2 channel) decoding of a DTS sound track. To enjoy DTS multi channel surround, you must connect this unit to a DTS compatible amplifier via one of this unit's digital audio outputs.
DV551.586-P.BIDNLLK_MFL63266909 1/12/10 11:07 AM Page

Remote Control
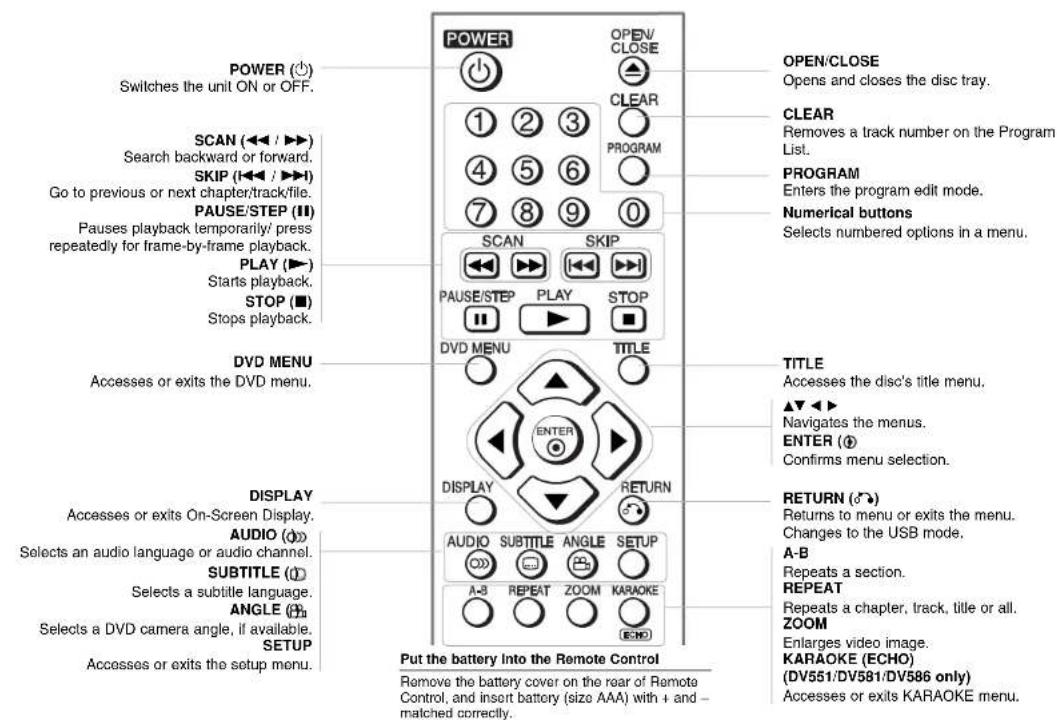
DV581 / DV586

1 Disc Tray
Insert a disc here.
2△ (Open / Close)
Opens or closes the disc tray.
3 Display window
Shows the current status of the unit.
4 Remote sensor
Point the remote control here.
5 (Power)
Tum the unit ON or OFF
6 MIC. (DV551/DV581/DV586 only)
Connect a microphone.
7 VOL. (DV551/DV581/DV586 only)
Adjust microphone volume.
8 USB Port (DV552/DV586 only)
Connect an USB Flash Drive.
9 • (Play)
Starts playback.
- ■ (Stop)
Stops playback.
- |◀◀ (Skip)
Returns to the beginning of current chapter/track/file or go to the previous chapter/track/file.
▶▶▶ (Skip)
Go to next chapter/track/file.

DV551.586-P.BIDNLLK_MFL63266909 1/12/10 11:07 AM Page
Adjust the settings
| ON REMOTE | |
| 1 Display setup menu: SETUP | |
| 2 S elect a desired option on the first level: | ▲▼ |
| 3 Move to second level: | ▶▶ |
| 4 Select a desired option on the second level: | ▲▼ |
| 5 Move to third level: | ▶▶ |
| 6 Change the setting: | ▲▼ / ENTER |
Adjust the settings - more you can do
When you turn on for the first time (optional)
The menu for a language selection will appear when you turn on the unit for the first time. You must select a language to use the unit. Use ▲▼◀▶ to select a language then press ENTER and the confirm menu will appear. Use ◀▶ to select [Enter] then press ENTER.
Adjust the language settings
Menu Language – Select a language for the Setup menu and on-screen display.
Disc Audio/Subtitle/Menu – Select a language for the Disc Audio/Subtitle/Menu.
[Original]: Refers to the original language in which the disc was recorded. [Other]: To select another language, press number buttons then ENTER to enter the corresponding 4-digit number according to the language code list. (see page 15) If you make a mistake while entering number, press CLEAR to delete numbers then correct it.
[Off] (for Disc Subtitle): Turn off Subtitle.
Adjust the display settings
TV Aspect – Select which screen aspect to use based on the shape of your TV screen.
[4:3]: Select when a standard 4:3 TV is connected.
[16:9]: Select when a 16:9 wide TV is connected.
Display Mode – If you selected 4:3, you'll need to define how you would like widescreen programs and films to be displayed on your TV screen.
[Letterbox]: This displays a widescreen picture with black bands at the top and bottom of the screen.
[Panscan]: This fills the entire 4:3 screen, cropping the picture as necessary.
Progressive Scan (For Component Video connections) – Selects whether the COMPONENT/PROGRESSIVE SCAN OUTPUT jacks output progressive signal. If your TV accepts progressive format signals, you will enjoy accurate color reproduction and high quality image by selecting [On]. If your TV does not accept progressive format signals, select [Off].
If you set Progressive Scan to [On] in error, you must reset the unit. First, remove the disc in the unit. Next, press and hold STOP for five seconds. The video output will be restored to the standard setting, and a picture will be visible on your TV.
Adjust the audio settings
Dolby Digital / DTS / MPEG – Selects the type of digital audio signal when using the DIGITAL AUDIO OUTPUT jack.
[Bitstream]: Select this when you connect this unit's DIGITAL AUDIO OUTPUT jack to an amplifier with a built-in Dolby Digital, DTS or MPEG decoder.
[PCM] (for Dolby Digital / MPEG): Select this when you connect this unit's DIGITAL AUDIO OUTPUT jack to an amplifier without a built-in Dolby Digital or MPEG decoder.
[Off] (for DTS): Select this when you connect this unit's DIGITAL AUDIO OUTPUT jack to an amplifier without a built-in DTS decoder.
Sample Freq. (Frequency) – Selects the sampling frequency of the audio signal.
[48 KHz]: The audio signals are always converted to 48 kHz. [96 KHz]: The audio signals are output in their original format
DRC (Dynamic Range Control) – Make the sound clear when the volume is turned down (Dolby Digital only). Set to [On] for this effect.
Vocal (DV552 only) – Set to [On] only when a multi-channel karaoke DVD is playing. The karaoke channels on the disc mix into normal stereo sound.
DV551.586-P.BIDNLLK_MFL63266909 1/12/10 11:07 AM Page
Adjust the lock settings
You must set the [Area Code] option to use the lock options. Select [Area Code] option then press ▶. Enter a 4-digit password then press ENTER. Enter it again then press ENTER to verify. If you make a mistake while entering number, press CLEAR then correct it.
If you forget your password you can reset it. First, remove the disc in the unit. Display setup menu then input the 6-digit number "210499". The "P CLr" appear in the display window and the password is deleted.
Rating – Select a rating level. The lower the level, the stricter the rating. Select [Unlock] to deactivate the rating.
Password – Sets or changes the password for lock settings.
[New]: Enter a new 4-digits password using the numerical buttons then press
ENTER. Enter the password again to confirm.
[Change]: Enter the new password twice after entering the current password.
Area Code – Select a code for a geographic area as the playback rating level. This determines which area's standards are used to rate DVDs controlled by the parental lock. (See page 15)
Adjust the others settings
B.L.E. (Black Level Expansion) – To select the black level of playback pictures, set your preference and monitor's ability.
REC Bitrate (DV552/DV586 only) - You can choose a bit rate for USB direct recording. Higher bit rate gives the better sound quality but uses more space on the USB Flash Drive. For USB direct recording, see page 13.
Score (DV551/DV581/DV586 only) – You can view the score after singing a song using microphone. Select [On] to use this feature. The score appears only when a chapter, title or track is fully finished. Fanfare sounds with high score.
DivX VOD
ABOUT DIVX VIDEO: DivX® is a digital video format created by DivX, Inc. This is an official DivX Certified device that plays DivX video. Visit www.divx.com for more information and software tools to convert your files into DivX video.
ABOUT DIVX VIDEO-ON-DEMAND: This DivX Certified ^a device must be registered in order to play DivX Video-on-Demand (VOD) content. To generate the registration code, locate the DivX VOD section in the device setup menu. Go to vod.divx.com with this code to complete the registration process and learn more about DivX VOD.
[Register]: Displays the registration code of your player.
[Deregister]: Deregister your player and display the deregister code.
Displaying Disc Information
| ON REMOTE | |
| 1 Press DISPLAY: DISPLAY | |
| 2 Select a item: | ▲▼ |
| 3 Adjust the Display menu settings: | ◀▶ / ENTER |
| 4 T o return the exit: | DISPLAY |
Displaying Disc Information - more you can do
You can select an item by pressing ▲▼ and change or select the setting by pressing ◀▶ or using the numbered buttons (0-9).
Current title number/total number of titles
01/14 Current chapter number/total number of chapters
C 0:02:18 T 0:45:07 Elapsed playing time Selected total time of current title/file
Selected audio language or channel
Off Selected subtitle 1/1 Selected angle/total number of angles
Symbol Used in this Manual
| All discs and files listed below Audio | ACDA | ||
| DVD | DVD and finalized DVD+R/RW | CD-G | CD-G discs |
| MP3 files | DivXI | DivX files | |
| WMA | WMA files |
Playing a Disc
| ON REMOTE | |
| 1 Open the disc tray: | ▲ OPEN/CLOSE |
| 2 Insert a Disc: | - |
| 3 Close the disc tray: | ▲ OPEN/CLOSE |
| 4 Start playback: | ▶ PLAY |
| 5 To stop playback: | ■ STOP |
Playing a Disc - more you can do
Stops the playback
The unit records the stopped point depending on the disc. "■" appears on the screen briefly. Press PLAY (▶) to resume playback (from the scene point). If you press STOP (■) again or unload the disc ("■" appears on the screen), the unit will clear the stopped point.
(■=Resume Stop, ■=Complete Stop)
The resume point may be cleared when a button is pressed (for example: POWER, OPEN/CLOSE, etc).
Playing a DVD that has a menu DVD
Most DVD now have menus which load first before the film begins to play. You can navigate these menus using ▲▼ ◀▶ or number button to highlight an option. Press ENTER to select.
Playing a DVD VR disc
This unit will play DVD-RW disc that is recorded using the Video Recording (VR) format. When you insert a DVD VR disc, the menu will appear on the screen. Use ▲▼ to select a title then press PLAY (▶):T o display DVD-VR menu, press DVD MENU or TITLE.
Some DVD-VR disc are made with CPRM data by DVD RECORDER.
Player does not support these kinds of discs.
Skip to the next/previous chapter/track/file ALL
Press SKIP (▶▶▶) to move to the next chapter/track/file.
Press SKIP (I◄◄) to return to the beginning of the current chapter/track/file.
Press SKIP (I◄◄) twice briefly to step back to the previous chapter/track/file.
Pause a playback ALL
Press PAUSE/STEP (II) to pause playback. Press PLAY (▶): to continue playback.
Frame-by-Frame playback DIVX
Press PAUSE/STEP (III) repeatedly to play Frame-by-Frame playback.
Playing repeatedly ALL
Press REPEAT repeatedly to select an item to be repeated. The current title, chapter, track or all will be played back repeatedly. To return to normal play-back, press REPEAT repeatedly to select [Off].
Fast forward or fast reverse

Press SCAN (◀◀ or ▶▶) to play fast forward or fast reverse during playback. You can change the various playback speed by pressing SCAN (◀◀ or ▶▶) repeatedly. Press PLAY (▶▶) to continue play at normal speed.
- DVD, DivX: ◀◀◀◀◀ ← ◀◀◀◀ ← ◀◀◀◀ ← ◀◀ / ▶▶ → ▶▶▶ → ▶▶▶▶ → ▶▶▶▶
- ACD, WMA, MP3: ◀◀x8 + ◀◀x4 + ◀◀x2 / ▶▶▶x2 → ▶▶▶x4 → ▶▶▶x8
Repeating a specific portion (A-B)

Press A-B at the beginning of the portion you wish to repeat and again at the end of the portion. Your selected portion will be repeated continually. To return to normal playback, press A-B to select [Off].
Selecting a subtitle language

During playback, press SUBTITLE (☐) repeatedly to select a desired subtitle language.
Watching from a different angle DVD
If the angle indicator appears on the screen for a moment, you can select a different camera angle by pressing ANGLE (☐) repeatedly.
Hearing a different audio

During playback, press AUDIO (repeatedly to switch between the available audio languages, channels or encoding methods.
Slow down the playing speed (Forward only)

While playback is paused, press SCAN (▶) to slow down forward playback. You can change the various playback speed by pressing SCAN (▶) repeatedly. Press PLAY (▶) to continue play at normal speed.
DV551.586-P.BIDNLLK_MFL63266909 1/12/10 11:07 AM Page

Watching a enlarged video image DivXD
During playback or pause mode, press ZOOM repeatedly to select zoom mode.
You can move through the zoomed picture using ▲▼◀▶ buttons.
Press CLEAR to exit. (100% → 200% → 300% → 400% → 100%)
Viewing the title menu DVD
Press TITLE to display the disc's title menu, if available.
Viewing the DVD menu DVD
Press DVD MENU to display the disc menu, if available.
Starting play from selected time DivXP
Searches for the starting point of entered time code. Press DISPLAY then select clock icon. Enter a time then press ENTER. For example, to find a scene at 1 hour, 10 minutes, and 20 seconds, enter "11020" and press ENTER. If you enter the wrong number, press CLEAR to enter again.
Last Scene Memory ACDD
This unit memorizes last scene from the last disc that is viewed. The last scene remains in memory even if you remove the disc from the player or switch off the unit. If you load a disc that has the scene memorized, the scene is automatically recalled.
Screen Saver
The screen saver appears when you leave the unit in Stop mode for about five minutes. If the Screen Saver is displayed for five minutes, the unit automatically turns itself off.
System Select
You must select the appropriate system mode for your TV system. Remove any disc that might be in the unit, press and hold PAUSE/STEP (II) for more than five seconds to be able to select a system (PAL, NTSC, AUTO).
Mixed disc or (USB Flash Drive DV552/DV586 only) – DivX, MP3/WMA and JPEG
When playing a disc or USB Flash Drive contained with DivX, MP3/WMA and JPEG files together, you can select which menu of files you would like to play by pressing TITLE.
Playing a DivX movie file
| ON REMOTE | |
| 1 Open the disc tray: | ▲ △ OPEN/CLOSE |
| 2 I insert a disc: - | |
| 3 C lose the disc tray: | ▲ △ OPEN/CLOSE |
| 4 Select a movie file from the menu:To go directly to file, enter the file numberusing the numbered buttons (0-9). | ▲ ▼, DVD MENU |
| 5 Start playback: | ▶ ▶ PLAY |
| 6 To stop playback: | ■ □ STOP |
Playing a DivX movie file - more you can do
Changing the character set to display DivX® subtitle correctly
Press and hold SUBTITLE for 3 seconds during playback. The language code will appear. Press ◀▶ to select another language code until the subtitle is displayed properly and then press ENTER.
DivX file requirement
DivX file compatibility with this player is limited as follows:
• A vailable resolution size: 720 x 576 (W x H) pixel.
• The file names of DivX and subtitle are limited to 20 characters.
- DivX file extensions: ".avi", ".mpg", ".mpeg"
- Playable DivX subtitle: SubRip (.srl/.txt), SAMI (.smi), SubStation Alpha (.ssa/.txt), MicroDVD (.sub/.txt), SubViewer 2.0 (.sub/.txt), TMPlayer (.txt), DVD Subtitle System (.txt)
- Playable Codec format: "DIVX3.xx", "DIVX4.xx", "DIVX5.xx", "MP43", "3IVX"
- Only the playback function is supported with DivX 6.0 in the unit.
- Playable Audio format: "Dolby Digital", "DTS", "PCM", "MP3", "WMA"
- Sampling frequency: within 8 to 48 kHz (MP3), within 32 to 48 kHz (WMA)
- Bit rate: within 8 to 320 kbps (MP3), within 32 to 192 kbps (WMA).
less than 4 Mbps (DivX file)
• CD-R/RW, DVD±R/RW Format: ISO 9660
• Maximum Files/Folders: Less than 600 (total number of files and folders)
DV551.586-P.BIDNLLK_MFL63266909 1/12/10 11:07 AM Page
- This player does not support the file that are recorded with GMC* 1 or Qpel ^2 . Those are video encoding techniques in MPEG4 standard, like DivX have. *1 GMC - Global Motion Compensation *2 Qpel - Quarter pixel
Listening to Music Disc or files
| ON REMOTE | |
| 1 Open the disc tray: | ▲ △ OPEN/CLOSE |
| 2 Insert a disc: - | |
| 3 C I o se the disc tray: | ▲ △ OPEN/CLOSE |
| 4 Select a music from the menu:To go directly to track/file, enter the track/file number using the numbered buttons (0-9). | ▲ ▼, DVD MENU |
| 5 Start playback: | ▶ △ PLAY |
| 6 To stop playback: | ■ □ STOP |
Listening to Music Disc or files - more you can do
Creating your own program
You can play the contents of a disc in the order you want by arranging the order of the musics on the disc. To add a music(s) on the program list, press PROGRAM to enter the program edit mode ( Ⓧ mark appears on the menu). Select a desired music on the [List] then press ENTER to add the music to the program list. Select a music from the program list then press ENTER to start programmed playback. To clear a music from the program list, select the music you want to clear then press CLEAR in program edit mode. To clear all music from the program list, select [Clear All] then press ENTER in program edit mode. The program is cleared when the disc is removed or the unit is turned off.
Playing a CD-G disc
Once you insert an CD-G disc, a menu appears on the screen. Use ▲▼ to select a track then press PLAY (▶). To display the CD-G menu during playback, press STOP (■) twice. You can display the setup menu by pressing SETUP only when CD-G menu appears on the TV screen.
Displaying file Information (ID3 Tag)
While playing a MP3 file containing file information, you can display the information by pressing DISPLAY repeatedly.
MP3/WMA music file requirement
MP3/WMA compatibility with this unit is limited as follows:
- File extensions: ".mp3", ".wma"
- Bit rate: within 8 to 320 kbps (MP3), within 32 to 192 kbps (WMA)
• CD-R/RW, DVD±R/RW Format: ISO 9660
• Maximum Files/Folders: Less than 600 (total number of files and folders)
- Sampling frequency: within 8 to 48 kHz (MP3), within 32 to 48 kHz (WMA)
Tip:
Press and hold ▲→move previous or the next page.
DV551.586-P.BIDNLLK_MFL63266909 1/12/10 11:07 AM Page

Viewing photo files
| ON REMOTE | |
| 1 Open the disc tray: | ▲ △ OPEN/CLOSE |
| 2 Insert a disc: · | |
| 3 C I o se the disc tray: | ▲ △ OPEN/CLOSE |
| 4 Select a photo file on the menu:To go directly to file, enter the file numberusing the numbered buttons (0-9). | ▲ ▼, DVD MENU |
| 5 D Isplay the selected file in full screen: | ▶ PLAY |
| 6 T o return to the menu: | ■ STOP |
Watching an enlarged photo image
While viewing a photo in full screen, press ZOOM repeatedly to select zoom mode. You can move through the zoomed photo using ▲▼◀▶ buttons. Press CLEAR to exit.
Photo file requirement
JPEG file compatibility with this unit is limited as follows: - File extensions: ".jpg"
• Photo size: Less than 2 MB recommended
- CD-R/RW, DVD±R/RW Format: ISO 9660
• Maximum Files/Folders: Less than 600 (total number of files and folders)
Viewing photo files - more you can do
Viewing photo files as a slide show
Use ▲▼◀▶ to highlight (■) icon then press ENTER to start slide show. You can change slide show speed using ◀▶ when (■) icon is highlighted.
Skip to the next/previous photo
Press SKIP (◀◀ or ▶▶◀) to view the previous/next photo.
Rotate a photo
Use ▲▼ to rotate the photo in full screen counterclockwise or clockwise while viewing a photo in full screen.
Pause a slide show
Press PAUSE/STEP (III) to pause a slide show. Press PLAY (▶) to continue the slide show.
Listening to music during slide show
You can listen to music during slide show, if the disc contain music and photo files together. Use ▲▼◀▶ to highlight (■,.) icon then press ENTER to start slide show.
USB Direct Recording (DV552/DV586 only)
| Connect USB Flash Drive to the unit before recording. Set [REC Bitrate] option as required. (See page 8) | |
| ON REMOTE | |
| 1 Insert an Audio CD: - | |
| 2 Select a track: To go directly to track, enter the track number using the numbered buttons (0-9). | ▲▼, DVD MENU |
| 3 S tart recording: AUDIO | ○○ |
| 4 T o stop recording: | ■□ STOP |
Recordable mode
You can record one desired track or all of the tracks in Audio CD to USB Flash
Drive
- For track recording: Press AUDIO in play, pause or resume stop mode.
- For disc recording: Press AUDIO in complete stop mode.
- For program list recording: In stop mode, press AUDIO after selecting a track on the program list.
Notes an USB direct Recording
• The recording is available only for Audio CD tracks.
- If you use this function, the "CD_REC" folder will be created automatically in the USB Flash Driver then the music file(s) is saved in it.
- If you remove USB Flash Drive, turn off or open the unit while recording, it can make a malfunction.
- If the remaining space on the USB Flash Drive is insufficient, the recording is not available. To increase the free space, delete files in it using your PC.
- CD-G disc and Audio CDs encoded in DTS cannot be recorded.
- External HDD, Multi Card reader, Multi Partition USB, Locked device and MP3 player are not supported.
- You can set the recording speed pressing AUDIO during USB direct recording.
- X1 Track: While normal speed recording, you can listen to the music.
- X4 Track: While 4X speed recording, you can not listen to the music.
• Recording format: MP3 file
• Encoding Bit rate: 128 Kbps / 160 Kbps / 192 Kbps / 256 Kbps / 320 Kbps
• Maximum Files/Folders: Less than 600 (total number of files and folders)
The making of unauthorized copies of copy-protected material, including computer programs, files, broadcasts and sound recording, may be an infringement of copyrights and constitute a criminal offence.
This equipment should not be used for such purposes.
Be responsible
Respect copyrights
Using an USB Flash Drive (DV552/DV586 only)
| ON REMOTE | |
| 1 Connect an USB Flash Drive to the USB - port on the unit: | |
| 2 Display the menu screen in stop mode: ➕ RETURN | |
| 3 Select a file:To go directly to file, enter the file number using the numbered buttons (0-9). | ▲▼, DVD MENU |
| 4 Play the file: | ▶ PLAY |
| 5 Remove the USB Flash Drive: | - |
Notes an USB Flash Drive
- Y ou can switch USB and DISC mode by pressing RETURN(●) only in stop mode.
- Do not extract the USB device in operating.
- Regular back up is recommended to prevent data loss.
- If you use a USB extension cable or USB HUB, the USB device might not be recognized.
- Music files (MP3/WMA), photo files (JPEG) and DivX files can be played.
For details of operations on each files, refer to relevant pages. - This unit is not supported when the total number of files is more than 600.
- Bit rate: within 8 to 320 kbps (MP3), within 32 to 192 kbps (WMA), less than 4 Mbps (DivX file)
• The USB function of this unit does not support all kinds of USB devices.
• Digital camera and mobile phone are not supported. - USB port of the unit can not be connected to PC. The unit can not be used as a storage device.
DV551.586-P.BIDNLLK_MFL63266909 1/12/10 11:07 AM Page

Using the Karaoke (DV551/DV581/DV586 only)
| ON REMOTE | |
| 1 Open the disc tray: | ▲ △ OPEN/CLOSE |
| 2 Insert a Karaoke DVD: - | |
| 3 C I o se the disc tray: | ▲ △ OPEN/CLOSE |
| 4 C onnect a microphone to MIC jack: - | |
| 5 Start playback and sing a song: | ▶ □ PLAY |
Using the Karaoke - more you can do
Adjust the Karaoke menu settings
Press KARAOKE to display karaoke menu. Use ▲▼ to select an option then press ◀ or ▶ to adjust the value of the selected option.
ECHO – You can adjust the echo volume.
MELODY – If you wish to sing only to the backing band or orchestra unaccompanied by a vocal guide melody, set MELODY to Off.
VOICE – If you wish to sing a duet with the recorded karaoke singer, select a voice you desire.
| Voice Select | Output | |
| Left speaker | Right speaker | |
| V1 | Voice1 | Voice1 |
| V2 | Voice2 | Voice2 |
| V1+V2 | Voice1 | Voice2 |
| Off | None voice | None voice |
KEY – You can change the key.
EFFECT - You can use Special Effects.
(OFF → Flanger → Chorus → Tremolo → Vibrato)
Notes the Karaoke
- If a microphone is not connected, the karaoke menu will not appear.
• The karaoke feature functions only with karaoke-compatible discs. - For more details, refer to the information attached with the disc.
• The VOICE and MELODY menus may not be available on some karaoke
discs. - There is microphone's sound output while PCM is set for DIGITAL AUDIO
OUTPUT - Depending on the disc, a karaoke option may not work.
Language Codes
Use this list to input your desired language for the following initial settings: Disc Audio, Disc Subtitle, Disc Menu.
| Language Code | Language Code | Language Code | Language Code | Language Code | Language Code | ||||||
| Afar | 6565 | Croatian | 7282 | Hausa | 7265 | Lingala | 7678 | Quechua | 8185 | Tajik | 8471 |
| Afrikaans | 6570 | Czech | 6783 | Hebrew | 7387 | Lithuanian | 7684 | Rhaeto-Romance | 8277 | Tamil | 8465 |
| Albanian | 8381 | Danish | 6865 | Hindi | 7273 | Macedonian | 7775 | Rumanian | 8279 | Telugu | 8469 |
| Ameharic | 6577 | Dutch | 7876 | Hungarian | 7285 | Malagasy | 7771 | Russian | 8285 | Thai | 8472 |
| Arabic | 6582 | English | 6978 | Icelandic | 7383 | Malay | 7783 | Samoan | 8377 | Tonga | 8479 |
| Armenian | 7289 | Esperanto | 6979 | Indonesian | 7378 | Malayalam | 7776 | Sanskrit | 8365 | Turkish | 8482 |
| Assamese | 6583 | Estonian | 6984 | Interlingua | 7365 | Maori | 7773 | Scotts Gaelic 7168 | Turkmen | 8475 | |
| Aymara | 6588 | Faroeese | 7079 | Irish | 7165 | Marathi | 7782 | Serbian | 8382 | Twi | 8487 |
| Azerbaljani | 6590 | Fiji | 7074 | Italian | 7304 | Moldavian | 7779 | Serbo-Croatian | 8372 | Ukrainian | 8575 |
| Bashkir | 6665 | Finnish | 7073 | Japanese | 7465 | Mongolian | 7778 | Shona | 8378 | Urdu | 8582 |
| Basque | 6985 | French | 7082 | Kannada | 7578 | Nauru 7865 | Sindhi | 8368 | Uzbek | 8590 | |
| Bengali, Bangla | 6678 | Frisian | 7089 | Kashmiri | 7583 | Nepali | 7869 | Singhalese | 8373 | Vietnamese | 8673 |
| Bhutani | 6890 | Galician | 7176 | Kazakh | 7575 | Norwegian | 7879 | Slovak | 8375 | Volapük | 8679 |
| Bihari | 6672 | Georgian | 7565 | Kirghiz | 7589 | Oriya | 7982 | Slovenian | 8376 | Welsh | 6789 |
| Brelon | 6682 | German | 6869 | Korean | 7579 | Panjabi | 8065 | Spanish | 6983 | Wolof | 8779 |
| Bulgarian | 6671 | Greek | 6976 | Kurdish | 7585 | Pashto, Pushto 8083 | Sudanese | 8385 | Xhosa | 8872 | |
| Burmese | 7789 | Greenlandic | 7576 | Laothlan | 7679 | Persian | 7065 | Swahili | 8387 | Yiddish | 7473 |
| Byelorussian | 6669 | Guarani | 7178 | Latin | 7665 | Polish | 8076 | Swedish | 8386 | Yoruba | 8979 |
| Chinese | 9072 | Gujarati | 7185 | Latvian, Lettish 7686 | Portuguese | 8084 | Tagalog | 8476 | Zulu | 9085 | |
Area Codes
Choose an area code from this list.
| Area Code | Area Code | Area Code | Area Code | Area Code | Area Code | ||||||
| Afghanistan | AF | Costa Rica | CR | Greenland | GL | Maldives | MV | Paraguay | PY | Sri Lanka | LK |
| Argentina | AR | Croatia | HR | Hong Kong | HK | Mexico | MX | Philippines | PH | Sweden | SE |
| Australia | AU | Czech Republic | CZ | Hungary | HU | Monaco | MC | Poland | PL | Switzerland | CH |
| Austria | AT | Denmark | DK | India | IN | Mongolia | MN | Portugal | PT | Taiwan | TW |
| Belgium | BE | Ecuador | EC | Indonesia | ID | Morocco | MA | Romania | RO | Thailand | TH |
| Bhutan | BT | Egypt | EG | Israel | IL | Nepal | NP | Russian Federation | RU | Turkey | TR |
| Bolivia | BO | El Salvador | SV | Italy | IT | Netherlands | NL | Saudi Arabia | SA | Uganda | UG |
| Brazil | BR | Ethiopia | ET | Jamaica | JM | Netherlands Antilles | AN | Sonegal | SN | Ukraine | UA |
| Cambodia | KH | Fiji | FJ | Japan | JP | New Zealand | NZ | Singapore | SG | United States | US |
| Canada | CA | Finland | FI | Kenya | KE | Nigeria | NG | Slovak Republic | SK | Uruguay | UY |
| Chile | CL | France | FR | Kuwait | KW | Norway | NO | Slovenia | SI | Uzbekistan | UZ |
| China | CN | Germany | DE | Libya | LY | Oman | OM | South Africa | ZA | Vietnam | VN |
| Colombia | CO | Great Britain | GB | Luxembourg | LU | Pakistan | PK | South Korea | KR | Zimbabwe | ZW |
| Congo | CG | Greece | GR | Malaysia | MY | Panama | PA | Spain | ES | ||
Troubleshooting
| Symptom | Cause | Correction |
| No power. | The power cord is disconnected. | Plug the power cord into the wall outlet securely. |
| The power is on, but the unit does not work. | No disc is inserted. | Insert a disc. |
| No picture. | The TV is not set to receive the signal from the unit. | Select the appropriate video input mode on the TV. |
| The video cable is not connected securely. | Connect the video cable securely. | |
| No sound. | The equipment connected with the audio cable is not set to receive the signal from the unit. | Select the correct input mode of the audio amplifier. |
| The AUDIO options are set to the wrong position. | Set the AUDIO settings to the correct position. | |
| The unit does not start playback. | An unplayable disc is inserted. | Insert a playable disc. (Check the disc type and regional code.) |
| The rating level is set. | Change the rating level. | |
| The remote control does not work properly. | The remote control is not pointed at the remote sensor on the unit. | Point the remote control at the remote sensor of the unit. |
| The remote control is too far from the unit. | Operate the remote control closer to the unit. |
Specifications
| General | |
| Power requirements AC 110 - 240 V, 50 / 60 Hz | |
| Power consumption 8 W | |
| Dimensions (Approx.) DV551/DV552: (360 x 35 x 200) mm(W x H x D) without foot DV581/DV586: (430 x 35 x 200) mm | |
| Net Weight (Approx.) DV551/DV552: 1.4 kgDV581/DV586: 1.5 kg | |
| Operating temperature 5 °C to 35 °C | |
| Operating humidity 5 % to 90 % | |
| Laser Semiconductor laser | |
| Signal system PAL/NTSC | |
| Inputs (DV552/DV586 only) | |
| USB IN 4 pin (USB 2.0 / 1.1 standard) | |
| Bus power supply DC 5 V 200 mA --- | |
| Outputs | |
| Video Output | 1.0 V (p-p), 75 Ω, sync negative,RCA jack x 1 |
| Component Video Output | (Y) 1.0 V (p-p), 75 Ω,sync negative, RCA jack x 1(Pb)/(Pr) 0.7 V (p-p), 75 Ω,RCA jack x 2 |
| Audio Output 2.0 Vrms (1 KHz, 0 dB), 600 Ω,RCA jack (L, R) x 1 | |
| Digital Output (Coaxial) | 0.5 V (p-p), 75 Ω, RCA jack x 1 |
| Accessories | |
| Video cable, Audio cable, Remote Control, Battery | |
Designs and specifications are subject to change without prior notice.

LG
Life's Good

As an ENERGY STAR Partner, LG has determined that this product or product models meet the ENERGY STAR guidelines for energy efficiency.
ENERGY STAR is a U.S. registered mark.
PT. LG ELECTRONICS INDONESIA
Kawasan Industri MM210 V Block G Cikarang Barat, Bekasi, Jawa Barat 17520 INDONESIA


LG
Life's Good
BAHASA
Buku Panduan
DVD Player
Silakan baca buku panduan ini dengan cermat sebelum mengoperasikan set anda dan simpan untuk referensi di masa mendatang.
MODEL
DV551
DV552
DV581
DV586
P/NO : MFL63266909
Reg. No. P.1.LG5.00201.0210
DV551.586-P.BIDNLLK_MFL63266909 1/12/10 11:07 AM Page
Tindakan Keselamatan


PERHATIAN: UNTUK MENGURANGI RESIKO KEJUTAN LISTRIK JANGAN BUKA COVER (ATAU BELAKANG) BAGIAN DALAM TIDAK BOLEH DIUBAH MINTALAH SERVIS KE AHLI SERVIS YANG BERPENGALAMAN.

Simbol cahaya pelir dengan ujung panah dalam segitiga dimaksudkan untuk mengingatkan pengguna akan bahaya tegangan listrik yang tidak disekat yang berada dibagian dalam produk dimana bila sampai pada jumlah yang besar dapat menimbulkan kejutan listrik pada seseorang. Tanda seru dalam segitiga dimaksudkan untuk mengingatkan pengguna akan pentingnya petunjuk pengoperasian dan pemeliharaan (servis) dalam literatur yang terlampir bersama alat.

PERINGATAN: UNTUK MENGURANGI RESIKO TERJADINYA API ATAU KEJUTAN LISTRIK, JANGAN LETAKKAN UNIT DI TEMPAT YANG TERKENA AIR HUJAN ATAU LEMBAB
PERINGATAN: Jangan memasang peralatan ini pada tempat yang sempit seperti rak buku atau tempat yang sejenis.
PERHATIAN: Jangan menutup lubang ventilasi. Rangkai sel sesuai dengan instruksi pemasangan. Celah atau lubang pada rak sangat bagus untuk ventilasi dan pastikan pengoperasian yang sesuai dari produk dan lindungi dari kelebihan panas. Lubang tidak akan tertutup dengan meletakkan produk pada ranjang, sofa, karpet atau permukaan yang sejenis. Produk ini jangan diletakkan atau dirangkai didalam seperti rak buku atau rak kecuali dengan ventilasi yang cukup atau instruksi pemasangan memperbolehkannya.
PERHATIAN: Produk ini menggunakan Sistem Laser. Agar dapat menggunakan produk ini dengan benar, bacalah buku panduan dengan baik dan simpanlah untuk keperluan mendatang. Bila alat harus diperbaiki, hubungi pusat servis resmi. Penggunaan kontrol, penyesuaian, atau prosedur
kerja yang tidak sesuai dengan yang dianjurkan dalam buku ini dapat menyebabkan terkena sinar radiasi yang berbahaya. Untuk mencegah terkena sinar langsung dari jarum laser, jangan membuka bagian dalam. Jika dibuka dapat terjadi radiasi laser pada penglihatan. JANGAN MENATAP JARUM LASER.
PERHATIAN: Peralatan ini tidak boleh terkena air (tertetesi atau terciprat) dan benda-benda yang diisi air, misalnya vas bunga, sebaiknya jangan diletakkan di atasnya.
PERHATIAN mengenal kabel Power
Kebanyakan peralatan menganjurkan ditempatkannya di atas sirkuit khusus; Arlinya, stopkontak sirkuit dengan power hanya untuk peralatan dan tidak memiliki stopkontak tambahan atau cabang sirkuit. Periksa halaman spesifikasi dari buku panduan ini untuk memastikan. Jangan memberikan beban terlalu berat pada stopkontak, stopkontak yang rusak atau longgar, kabel terlalu panjang, kabel power kusut, atau isolasi kabel yang retak atau rusak sangat berbahaya. Sebagian dari kondisi tersebut mengakibatkan sengatan listrik atau kebakaran. Periksa kabel secara berkala dari peralatan anda, dan jika ada indikasi kerusakan atau bahaya, cabut kabelnya, hentikan pemakaian peralatan, dan dapatkan kabel pengganti yang lepal di tempal servis yang resmi. Lindungi kabel power dari gangguan fisik atau mekanik, seperti terlalu patah, kusut, terjepit, dekat dengan pintu, atau terinjak-injak. Berikan perhatian berkala pada steker, stopkontak dan titik dimana kabel keluar dari peralatan. Untuk melepaskan power dari set utama, lepaskan kabel utama. Ketika memasang produk, pastikan bahwa soket dapat dengan mudah dijangkau.
Perangkat ini dilengkapi dengan baterai atau akumulator portabel. Cara aman untuk mengeluarkan baterai tua atau baterai dari peralatan: Keluarkan baterai tua atau kemasan baterai, ikuti langkah-langkah dalam urutan terbalik dari perakitan. Untuk mencegah kontaminasi lingkungan dan membawa pada kemungkinan ancaman kesehatan manusia dan hewan, baterai tua atau baterai masukkan ke dalam wadah yang sesuai pada bagian pengumpulan. Jangan buang baterai tua atau baterai bersama dengan sampah lainnya. Disarankan agar anda menggunakan baterai dan akumulator lokal, sistem bebas penggantian. Hindarkan baterai dari panas yang berlebihan seperti sinar matahari, apl atau sejenisnya.
Diproduksi di bawah lisensi dari Dolby Laboratories. Simbol Dolby dan double-D adalah merk dagang dari Dolby Laboratories.
"DVD Logo" adalah merk dagang dari DVD Format/Logo Licensing Corporation.
Daftar lsi
| Tindakan Keselamatan | 2 |
| Jenis Disk Yang Dapat Diputar | 3 |
| Menghubungkan unit | 4 |
| Remote Control | 5 |
| Main Unit | 6 |
| Menyesuaikan pengaturan | 7-8 |
| Tampilan Informasi Disk | 8 |
| Memutar Disk | 9-10 |
| Memutar file DivX movie | 10-11 |
| Mendengarkan Disk atau file musik | 11 |
| Mellhat file foto | 12 |
| Perekaman langsung USB (hanya DV552/DV586) | 13 |
| Menggunakan USB Flash Drive (hanya DV552/DV586) | 13 |
| Menggunakan Karaoke (hanya DV551/DV581/DV586) | 14 |
| Kode Bahasa | 15 |
| Kode Area | 15 |
| Pemecahan Masalah | 16 |
| Spesifikasi | 16 |
Jenis Disk Yang Dapat Diputar
| Jenis | Logo |
| DVD-VIDEO: Disk seperti film yang dapat untuk dibeli atau disewa. | |
| DVD-R: Hanya mode video dan telah jadi. | |
| DVD-RW: Mode VR, hanya mode video dan telah jadi. | |
| DVD+R: Hanya mode video. | |
| DVD+RW: Hanya mode video. | |
| Audio CD: CD musik atau CD-R/CD-RW dalam format CD musik yang dapat dibeli. | |
| Unit ini dapat memutar DVD+R/RW dan CD-R/RW yang berisi file audio title, DivX, MP3, WMA dan/atau JPEG. Beberapa DVD+RW/DVD+R atau CD-RW/CD-R tidak dapat diputar pada unit ini meskipun sesuai kualitas rekaman atau kondisi fisik dari disk, atau karakteristik dari peralatan rekaman dan software legal. | |
Tentang Tampilan Simbol ⊙
mungkin muncul di layar TV saat pengoperasian dan menunjukkan bahwa fungsi ini diterangkan di dalam buku panduan pemilik ini tidak ada pada disk.
Kode Regional
Unit ini memiliki kode regional yang tercetak pada belakang unit. Unit ini hanya dapat memutar disk DVD berlabel sama dengan yang tercetak di belakang unit atau "ALL".
- Kebanyakan disk DVD mempunyai globe dengan satu nomor atau lebih yang dapat dilihat dari tutupnya. Nomor ini harus sesuai dengan kode wilayah DVD player Anda, jika tidak disk tidak dapat diputar.
- Jika Anda mencoba memutar DVD dengan kode wilayah yang berbeda dengan kode player Anda, pesan "Periksa Kode Regional" akan muncul di layar TV.
Keterangan Hak Cipta:
Menurut hukum dilarang mengkopi, menyarkan, menunjukkan, menyarkan via kabel, memutar di tempat umum, atau menyewakan material yang ada hak cipta tanpa izin. Produk ini dilengkapi dengan alat proteksi copy yang dibuat oleh Macrovision. Sinyal proteksi Copy direkam di Disk tertentu. Saat Anda merekam atau memutar gambar dari disk-disk ini akan muncul suara berisik. Produk ini memiliki proteksi hak cipta teknologi yang dilindungi hak paten U.S dan hak properti intelektual yang dimiliki Macrovision Corporation dan hak lainnya. Penggunaan hak cipta ini harus dengan izin Macrovision corporation, dan ditujukan hanya untuk penggunaan dalam rumah dan penggunaan terbatas lainnya kecuali dengan seizin Macrovision Corporation. Dilarang membongkar produk ini untuk mempelajari cara kerjanya.
PEMBELI HENDAKNYA MENYADARI BAHWA TIDAK SEMUA TELEVISI DEFINISI TINGGI BENAR-BENAR KOMPATIBEL DENGAN PRODUK INI DAN MUNGKIN MENYEBABKAN DITAMPILKAN PEMBERITAHUAN TERTENTU. SEANDAINYA ADA PEMBERITAHUAN MASALAH GAMBAR PROGRESSIVE SCAN 525 ATAU 625, DISARANKAN AGAR PEMAKAI MEMINDAHKAN SAMBUNGAN KE OUTPUT 'STANDARD DEFINITION' APABILA ADA PERTANYAAN TENTANG KOMPABILITAS PESAWAT TV KAMI DENGAN MODEL DVD PLAYER 525p DAN 625p, SILAKAN HUBUNGI PUSAT LAYANAN PELANGGAN KAMI.
DV551.586-P.BIDNLLK_MFL63266909 1/12/10 11:07 AM Page
Menghubungkan unit
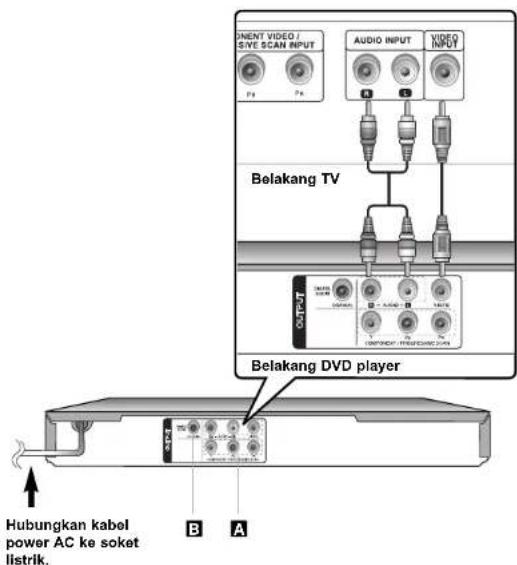
Hubungan Audio dan Video
Jack Audio/Video unit adalah berkode warna (kuning untuk video, merah untuk audio kanan dan putih untuk audio kiri). Jika TV anda hanya satu input untuk audio (mono), hubungkan jack audio kiri (putih) pada unit.
4
Menghubungkan unit - hal yang dapat anda lakukan
A Hubungan Component Video
Hubungkan jack COMPONENT/PROGRESSIVE SCAN OUTPUT pada unit ke jack input yang sesuai pada TV anda menggunakan kabel YPBPR.
- Anda tetap perlu untuk menghubungkan kabel audio kiri dan kanan ke TV, atau kabel digital audio ke stereo anda.
- Jika TV anda menerima sinyal format progressive, anda harus menggunakan hubungan ini dan atur [Progressive Scan] ke [Aktif] pada menu setup. (Lihat halaman 7)
B Hubungan Digital Audio Output
Hubungkan salah satu jack DIGITAL AUDIO OUTPUT unit (COAXIAL) ke jack yang sesuai pada amplifier anda.
- Jika format audio dari keluaran digital tidak sesuai dengan kemampuan amplifier Anda, amplifier akan menghasilkan suara yang kuat, distorsi atau tidak bersuara sama sekali.
- Untuk melihat format audio dari disk yang sedang diputar pada layar tampilan, tekan AUDIO.
- Unit ini tidak memalkan internal terkode (2 channel) dari track suara DTS. Untuk menikmati DTS multi channel surround, anda harus menghubungkan unit ini ke amplifier DTS yang sesuai melalui salah satu output digital audio unit ini.
DV551.586-P.BIDNLLK_MFL63266909 1/12/10 11:07 AM Page

Remote Control
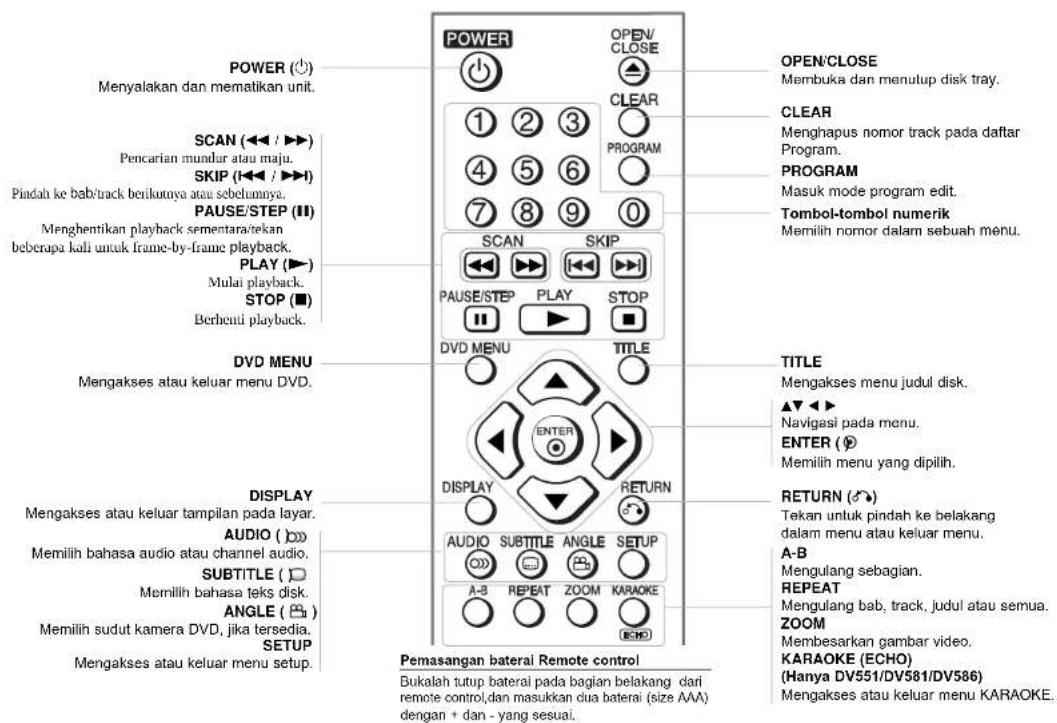
DV581 / DV586

1 Disk Tray
Masukkan disk disini.
2 △ (Open / Close)
Membuka atau menulup disk tray.
3 Jendela Tampilan
Menampilkan status unit yang aktif.
4 Remote sensor
Arahkan remote control kesini.
5 (Power)
Menyalakan dan mematikan unit.
6 MIC. (Hanya DV551/DV581/DV586)
Menghubungkan mikrofon.
7 VOL. (Hanya DV551/DV581/DV586)
Mengatur volume mikrofon.
8 USB Port (Hanya DV552/DV586)
Menghubungkan USB Flash Drive.
9 • (Play)
Memulai playback.
- ■ (Stop)
Menghentikan playback.
- |◀◀ (Skip)
Kembali ke awal dari bab atau track yang sedang
diputar atau pindah ke bab/track/file sebelumnya.
▶▶▶ (Skip)
Pindah ke bab/track/file berikutnya.

DV551.586-P.BIDNLLK_MFL63266909 1/12/10 11:07 AM Page
Menyesuaikan pengaturan
| PADA REMOTE | |
| 1 Menampilkan setup menu: | SETUP |
| 2 Memilih option diinginkan pada level pertama: | ▲▼ |
| 3 Pindah ke level kedua: | ▶ ▶ |
| 4 Memilih option diinginkan pada level kedua: | ▲▼ |
| 5 Pindah ke level ketiga: | ▶ ▶ |
| 6 Merubah setting: | ▲▼ / ENTER |
Menyesuaikan pengaturan - hal yang dapat anda lakukan
Ketika anda mengaktifkan untuk pertama kalinya (opsional)
Menu untuk pilihan bahasa akan muncul ketika Anda menghidupkan unit untuk pertama kalinya. Anda harus memilih bahasa untuk unit. Gunakan ▲▼◀▶ untuk memilih bahasa lalu tekan ENTER dan menu konfirmasi muncul. Gunakan ◀▶ untuk memilih [Pilih] lalu tekan ENTER.
Mengatur seting bahasa
Menu Bahasa – Pilih bahasa untuk menu Setup dan tampilan di layar tampilan.
Audio Disk/Teks Disk/Menu Disk – Pilih bahasa yang anda sukai untuk audio disk/ teks disk/ menu disk.
[Asil]: Lihat bahasa aslinya yang digunakan ketika disk direkam. [Lainnya]: Untuk memilih bahasa lain, tekan tombol numerik komudian ENTER untuk memasukkan angka 4-digit yang sesuai dengan daftar kode bahasa (lihat halaman 15) Jika Anda memasukkan kode bahasa yang salah, tekan CLEAR untuk menghapus nomor lalu diperbaiki.
[Mali] (unluk Teks Disk): Mematikan teks disk.
Mengatur setting tampilan
Format TV – Pilih sesuai format TV untuk digunakan berdasarkan bentuk dari layar TV anda.
[4:3]: Pilih ketika lebar TV 4:3 terhubung.
[16:9]: Pilih ketika lebar TV 16:9 terhubung.
Mode Tampilan – Jika anda memilih 4:3, Anda perlu menentukan bagaimana Anda ingin program layar lebar dan film yang akan ditampilkan pada layar TV Anda.
[Letterbox]: Ini akan menampilkan gambar dengan lebar pita hitam di baglan atas dan bawah layar.
[Panscan]: Ini mengisi seluruh layar 4:3, memotong gambar yang diperlukan.
Progressive Scan (Untuk hubungan Component Video) – Pilih ketika jack COMPONENT/PROGRESSIVE SCAN OUTPUT mengelurkan sinyal progressive. Jika TV anda menerima format sinyal progressive, anda akan menikmat hasil wama akurat dan gambar kualitas tinggi dengan memilih [Aktif]. Jika TV anda tidak menerima format sinyal progressive, pilih [Mat].
Jika anda mengatur Progressive Scan ke [Aktif] dalam kesalahan, anda harus mereset unit. Pertama, keluarkan disk dalam unit. Lalu, tekan dan tahan STOP selama lima detik. Video output akan kembali ke seting standard, dan gambar akan lerlihat pada TV anda.
Mengatur setting audio
Dolby Digital / DTS / MPEG – Pilih jenis dari sinyal digital audio ketika menggunakan jack DIGITAL AUDIO OUTPUT.
[Bitstream] – Pilih ini jika Anda menghubungkan jack DIGITAL AUDIO OUTPUT unit ini ke amplifier dengan built-in Dolby Digital, DTS atau MPEG decoder.
[PCM] (untuk Dolby Digital / MPEG) – Pilih ini jika Anda menghubungkan jack DIGITAL AUDIO OUTPUT unit ini ke amplifier tanpa built-in Dolby Digital atau MPEG decoder.
[Matl] (untuk DTS) – Pilih ini jika Anda menghubungkan jack DIGITAL AUDIO OUTPUT unit ini ke amplifier tanpa built-in DTS decoder.
Frek. Sampel (Frekuensi) - Pilih frekuensi sampel dari sinyal audio audio.
[48 KHz]: Sinyal audio selalu dikonversi ke 48 kHz.
[96 KHz]: Sinyal audio keluar pada format asli.
DRC (Dynamic Range Control) – Membuat suara tetap jelas ketika volume dikecilkan (hanya Dolby Digital). Atur ke [Aktif] untuk efek ini.
Vokal (Hanya DV552) – Atur ke [Aktif] hanya jika DVD karaoke multi-channel diputar. Channel karaoke pada disk akan tergabung dalam suara stereo normal.
DV551.586-P.BIDNLLK_MFL63266909 1/12/10 11:07 AM Page
Mengatur seting kunci
Anda harus mengatur [Kode Negara] untuk menggunakan kunci. Pilih [Kode Negara] lalu tekan ▶. Masukkan 4-digit kode pengaman lalu tekan ENTER. Masukkan kembali lalu tekan ENTER untuk menegaskan. Jika anda salah dalam memasukkan nomor, tekan CLEAR lalu diperbaiki.
Jika anda lupa Kode Pengaman anda dapat meresetnya. Pertama, keluarkan disk dari unit. Tampilkan menu setup lalu masukkan 6-digit nomor "210499". "P CLr" muncul pada jendela tampilan dan kode pengaman terhapus.
Tingkatan – Pilih level tingkatan. Level lebih rendah, tingkatan lebih ketat. Pilih [Buka Kunci] untuk menonaktilkan tingkatan.
Kode Pengaman – Atur atau rubah kode pengaman untuk seting kunci. [Baru]: Masukkan 4-digit kode pengaman baru menggunakan tombol numerik, lalu tekan ENTER. Masukkan kode pengaman kembali untuk konfirmasi. [Ganti]: Masukkan kode pengaman baru dua kali setelah memasukkan kode lama.
Kode Wilayah – Pilih kode untuk area geografis seperti level tingkatan playback. Hal ini menentukan standar area yang digunakan untuk mengontrol DVD sesuai kontrol orang tua (lihat halaman 15)
Mengatur seting lainnya
B.L.E. (Black Level Expansion) – Untuk memilih level kehitaman dari pemutaran gambar. Set kesukaan anda sesuai kemampuan monitor anda.
Kualitas Rekam (Hanya DV552/DV586) – Anda dapat memilih Kualitas Rekam untuk perekaman langsung USB. Kualitas rekam lebih tinggi memberikan kualitas suara lebih balk tetapi membutuhkan banyak tempat pada USB Flash Drive. Untuk perekaman langsung USB, ilhat halaman 13.
Skor (Hanya DV551/DV581/DV586) – Anda dapat melihat skor setelah menyanyi sebuah lagu menggunakan mikrolon. Pilih [Aktif] untuk menggunakan filur ini. Skor hanya muncul ketika bab, judul atau track selesai semuanya. Suara keruhan dengan skor terlinggi.
DivX VOD
MENGENAI DIVX VIDEO: DivX® merupakan format video digital dibuat oleh DivX, Inc. Ini merupakan perangkat Sertifikat DivX resmi yang memutar video DivX. Kunjungi www.divx.com untuk informasi lebih lanjut dan perangkat software untuk mengkonversi file ke Divx video. MENGENAI DIVX VIDEO-ON-DEMAND: Perangkat DivX Certified® harus teregister untuk memutar isi DivX Video-on-Demand (VOD). Untuk mendapatkan kode registrasi, lokasi baglan DivX VOD pada perangkat menu pengaturan. Pergi ke vod.divx.com dengan kode ini untuk melengkapi proses registrasi dan belajar lebih banyak tentang DivX VOD.
[Daftar]: Menampilkan kode registrasi player anda.
[Cabut Pendaftaran]: Menonaktifkan player anda dan menampilkan kode penonaktilan.
Tampilan Informasi Disk
| PADA REMOTE | |
| 1 Tekan DISPLAY: | |
| 2 Pilih item: | ▲▼ |
| 3 Mengatur seting menu Tampilan: | ◀▶/ ENTER |
| 4 Kembali keluar: | DISPLAY |
Tampilan Informasi Disk - hal yang dapat anda lakukan
Anda dapat memilih item menggunakan ▲▼ dan merubah atau memilih setting menggunakan ◀▶ atau menggunakan tombol numerik (0-9).

Jumlah/total judul yang sedang diputar dari judul
Jumlah/total bab yang sedang diputar dari bab

Sisa waktu pemutaran

Pemilihan total waktu dari title/file yang sedang diputar

Pemilihan bahasa audio atau channel

Pemilihan teks disk

Pemilihan sudut/ jumlah sudut
Simbol yang terdapat pada buku panduan

Semua disk pada daftar dibawah

DVD dan DVD±R/RW jadi

File MP3

File WMA

CD Audio

Disk CD-G

File DivX
Memutar Disk
| PADA REMOTE | ||
| 1 | Buka disk tray : | ▲ OPEN/CLOSE |
| 2 | Masukkan Disk: | - |
| 3 | Tutup disk tray: | ▲ OPEN/CLOSE |
| Mulai playback: | ▶PLA Y | |
| 5 | Berhenti playback : | ■ STOP |
Memutar Disk - hal yang dapat anda lakukan
Menghentikan playback
Unit merekam titik berhenti sesuai dengan disk. Muncul "■■" pada layar sekilas Tekan PLAY (▶) untuk kembali playback (dari titik adegan). Jika anda menekan STOP (■) kembali atau mengeluarkan disk (muncul "■" pada layar), unit akan menghapus titik berhenti.
(■■=Berhenti sementara, ■=Berhenti sepenuhnya Titik berhenti sementara kemungkinan terhapus ketika tombol ditekan (contohnya :POWER, OPEN/CLOSE, dll).
Memutar DVD yang memiiki menu DVD
Kebanyakan DVD terkini memiliki menu yang muncul pertama kali sebelum film diputar. Anda dapat navigasi menu menggunakan ▲▼◀▶ atau tombol numerik untuk menyorot option. Tekan ENTER untuk memilih.
Memutar disk DVD VR
Unit ini akan memutar disk DVD-R/RW yang direkam menggunakan format Video Recording (VR). Ketika anda memasukkan disk DVD VR, menu akan muncul pada layar. Gunakan ▲▼ untuk memilih judul lalu tekan PLAY (▶). Untuk monampilkan menu DVD-VR, tekan DVD MENU atau TITLE. Beberapa disk DVD-VR dibuat dengan CPRM data melalui DVD RECORDER. Player tidak mendukung jenis dari disk ini.
Melewati bab/track berikutnya/sebelumnya ALL
Tekan SKIP (▶▶▶) untuk pindah ke bab/track/file berikutnya. Tekan SKIP (▶◀◀) untuk kembali ke awal dari bab/track/file yang diputar. Tekan SKIP(▶◀◀) dua kali dengan cepat untuk kembali ke bab/track/file sebelumnya.
Menghentikan sementara playback ALL
Tekan PAUSE/STEP (II) untuk pause playback. Tekan PLAY (▶) untuk melanjutkan playback.
Frame-by-Frame playback DIVXD
Tekan PAUSE/STEP (III) berulang untuk memutar Frame-by-Frame playback.
Memutar berulang ALL
Tekan REPEAT berulang untuk memilih item berulang. Judul, Bab atau track yang diputar akan diputar berulang. Untuk kembali ke normal playback, tekan REPEAT berulang untuk memilih [Mati].
Maju cepat atau Mundur cepat MP3W
Tekan SCAN (◀◀ atau ▶▶) untuk memutar cepat kedepan atau cepat kebelakang saat playback. Anda dapat merubah kecepatan playback dengan menekan SCAN (◀◀ atau ▶▶) berulang. Tekan PLAY (▶▶) untuk melanjutkan pemutaran kecepatan normal. - DVD, DivX: ◀◀◀◀◀ + ◀◀◀◀ + ◀◀◀ + ◀◀ / ▶▶ + ▶▶▶ + ▶▶▶▶ - ACD, WMA, MP3: ◀◀◀x8 + ◀◀◀x4 + ◀◀◀x2 / ▶▶x2 + ▶▶x4 + ▶▶▶x8
Mengulang urutan (A-B) ACDF
Tekan A-B pada awal dari bagian yang diulang dan tekan kembali pada akhir dari yang diulang. Bagian yang anda pilih akan diulang terus menerus. Untuk kembali normal playback, tekan A-B untuk memilih [Mati].
Memilih bahasa teks disk DivXD
Ketika playback, tekan SUBTITLE (☐) berulang untuk memilih bahasa teks disk yang diinginkan.
Melihat dari sudut berbeda DVD
Jika indikator sudut muncul pada layar untuk sesaat, anda dapat memilih sudut kamera yang berbeda menggunakan ANGLE (☐) berulang.
Mendengarkan audio berbeda DivXD LCD-G
Ketika playback, tekan AUDIO ( ) berulang untuk mengganti antara bahasa audio, channel atau metode terkode yang ada.
Memperlambat kecepatan pemutaran DVD (Hanya maju)
Setelah playback dipause, tekan SCAN (▶) untuk memperlambat playback maju. Anda dapat merubah kecepatan playback dengan menekan SCAN (▶) berulang. Tekan PLAY (▶) untuk melanjutkan pemutaran kecepatan normal.
DV551.586-P.BIDNLLK_MFL63266909 1/12/10 11:07 AM Page
Melihat gambar video lebih besar DivXD
Ketika playback atau mode pause, tekan ZOOM berulang untuk memilih mode zoom. Anda dapat memindah zoom pada gambar menggunakan tombol ▲▼◀◀ Tekan CLEAR untuk keluar. (100% → 200% → 300% → 400% → 100%)
Melihat menu judul DVD
Tekan TITLE untuk menampilkan menu judul dari disk, jika tersedia.
Melihat menu DVD DVD
Tekan DVD MENU untuk menampilkan menu disk, jika tersedia.
Mulai memutar dari waktu yang ditentukan DivXb
Cari litik awal untuk memasukkan kode waktu. Tekan DISPLAY lalu pilih ikon jam. Masukkan waktu lalu tekan ENTER. Contoh, untuk menemukan adegan 1 jam, 10 menit, dan 20 detik, masukkan '11020' dan tekan ENTER.
Jika angka yang dimasukkan salah, tekan CLEAR untuk memasukkan kembali.
Memori Adegan Terakhir ACDD
Unit ini mengingat adegan terakhir dari disk yang diputar terakhir. Adegan terakhir tersimpan di memori meskipun Anda telah mengeluarkan disk atau mematikan unit. Apabila Anda memasukkan disk yang adegannya telah dimasukkan memori, adegan tersebut secara otomatis dipanggil.
Screen Saver
Gambar screen saver muncul ketika Anda membiarkan unit dalam mode stop selama 5 menit. Apabila Screen Saver ditampilkan selama lima menit, unit secara otomatis akan mati sendiri.
Memilih Sistem
Anda harus memilih mode sistem yang tepat untuk sistem TV anda. Keluarkan disk yang ada pada unit, tekan dan tahan PAUSE/STEP (II) selama lebih lima delik untuk dapat memilih sebuah sistem (PAL, NTSC).
Disk campuran atau (hanya USB Flash Drive DV552/DV586) – DivX, MP3/WMA dan JPEG
Ketika memutar disk atau USB Flash Drive yang berisi fle DivX, MP3/WMA dan JPEG bersamaan, anda dapat memilih menu dari file yang akan diputar dengan menekan TITLE.
Memutar file DivX movie
| PADA REMOTE | |
| 1 Buka disk tray: | ▲OPEN/CLOSE |
| 2 Masukkan disk: | - |
| 3 Tutup disk tray: | ▲OPEN/CLOSE |
| 4 Pilih file movie dari menu: Untuk pindah ke file secara langsung dan memutarnya, masukkan nomor file menggunakan tombol numerik (0-9). | ▲▼, DVD MENU |
| 5 Mulai playback: | ▶ PLAY |
| 6 Berhenti playback: | ■ STOP |
Memutar file DivX movie - hal yang dapat anda lakukan
Merubah karakter untuk menampilkan subtitle DivX® dengan benar
Tekan dan tahan SUBTITLE selama 3 detik saat playback. Kode bahasa akan muncul. Tekan ◀▶ untuk memilih kode bahasa lainnya hingga teks disk ditampilkan dengan benar dan kemudian tekan ENTER.
Persyaratan file DivX
Kompatibilitas file DivX dengan player ini terbatas sebagai berikut :
• Kemampuan ukuran resolusi: 720x576 (W x H) pixel.
- Nama file dari subtitle DivX adalah terbatas 20 karakter.
- File ekstensi DivX : ".avi", ".mpg", ".mpeg"
- Subtitle DivX yang dapat dputar: SubRip (.srt/.txt), SAMI (.smi), SubStation Alpha (.ssa/.txt), MicroDVD (.sub/.txt), SubViewer 2.0 (.sub/.txt), TMPlayer (.txt), DVD Subtitle System (.txt)
- Format Kode yang dapat diputar: "DIVX3.xx", "DIVX4.xx", "DIVX5.xx", "MP43", "3IVX"
• Hanya fungsi playback yang didukung DivX 6.0 pada unit.
- Format Audio yang dapat diputar: "Dolby Digital", "DTS", "PCM", "MP3", "WMA"
• Frekuensi sampel: antara 8 s.d 48 kHz (MP3), antara 32 s.d 48 kHz (WMA)
- Bil rate: antara 8 s.d 320 kbps (MP3), antara 32 s.d 192 kbps (WMA).
kurang dari 4 Mbps (file DivX)
• Format CD-R/RW, DVD+R/RW: ISO 9660
- File/Disk maksimum: Kurang dari 600 (jumlah total dari file dan folder)
DV551.586-P.BIDNLLK_MFL63266909 1/12/10 11:07 AM Page
- Player ini tidak mendukung file yang direkam dengan GMC ^+ atau Qpel ^+2 . Itu merupakan teknik encoding video dalam standar MPEG4, seperti dimiliki DivX. *1 GMC - Global Motion Compensation
*2 Qpel - Quarter pixel
Mendengarkan Disk atau file musik
| PADA REMOTE | |
| 1 Buka disk tray: | ▲OPEN/CLOSE |
| 2 Masukkan disk: | - |
| 3 Tutup disk tray: | ▲OPEN/CLOSE |
| 4 Pilih file musik dari menu:Untuk pindah ke track/file secara langsung dan memutamya,masukkan nomor track/file menggunakan tombol numerik (0-9). | ▲▼, DVD MENU |
| 5 Mulai playback: | ▶ PLAY |
| 6 Berhentl playback: | ■ STOP |
Mendengarkan Disk atau file musik - hal yang dapat anda lakukan
Membuat program pribadi
Anda dapat memutar isi disk sesuai yang anda inginkan berurut sesuai musik pada disk. Untuk menambahkan musik pada daftar program, tekan PROGRAM untuk masuk mode edit program edit (tanda 📄 muncul pada menu). Pilih musik yang diinginkan pada [Daftar] lalu tekan ENTER untuk menambah musik ke daftar program. Pilih musik pada daftar program lalu tekan ENTER untuk mulai playback terprogram. Untuk menghapus musik dari daftar program, pilih musik yang ingin dihapus lalu tekan CLEAR dalam mode edit program. Untuk menghapus semua musik dari daftar program, pilih [Clear All] lalu tekan ENTER dalam mode edit program. Program terhapus ketika disk dikeluarkan atau unit dimatikan.
Memutar disk CD-G
Ketika anda memasukkan CD-G, menu muncul pada layar. Gunakan ▲▼ untuk memilih track lalu tekan PLAY (▶). Untuk menampilkan menu CD-G saat playback, tekan STOP (■) dua kali. Anda dapat menampilkan menu setup dengan menekan SETUP hanya ketika menu CD-G muncul pada layar TV.
Menampilkan informasi file (ID3 TAG)
Saat memutar file MP3 yang berisi informasi file, anda dapat menampilkan informasinya dengan menekan DISPLAY secara berulang.
Persyaratan file musik MP3/WMA
Kompatibilitas MP3/WMA dengan player ini terbatas sebagai berikut:
- File ekstensi: ".mp3", ".wma"
• Frekuensi sampel: antara 8 s.d 48 kHz (MP3), antara 32 s.d 48 kHz (WMA) - Bit rate: antara 8 s.d 320 kbps (MP3), antara 32 s.d 192 kbps (WMA)
• Format CD-R/RW, DVD±R/RW: ISO 9660 - File/Disk maksimum: Kurang dari 600 (jumlah total dari file dan folder)
Tip:
Tekan dan tahan ▲▼ untuk pindah halaman sebelumnya atau berikutnya.
DV551.586-P.BIDNLLK_MFL63266909 1/12/10 11:07 AM Page

Melihat file foto
| PADA REMOTE | |
| 1 Buka disk tray: | ▲OPEN/CLOSE |
| 2 Masukkan disk: | - |
| 3 Tutup disk tray: | ▲OPEN/CLOSE |
| 4 Pilih file foto pada menu:Untuk pindah ke file secara langsung dan memutarnya,masukkan nomor file menggunakan tombol numerik (0-9). | ▲▼, DVD MENU |
| 5 Menampilkan file dipilih dalam layar penuh: | ▶ PLAY |
| 6 Kembali ke menu: | ■ STOP |
Melihat foto lebih luas
Ketika foto dalam layar penuh, tekan ZOOM berulang untuk memilih mode zoom. Anda dapat memindah zoom pada gambar menggunakan ▲▼◀▶. Tekan CLEAR untuk keluar.
Persyaratan file Foto
Kompatibilitas file JPEG dengan player ini terbatas sebagai berikut:
- File ekstensi: ".jpg"
• Ukuran foto: Disarankan kurang dari 2MB - Format CD-R/RW. DVD±R/RW: ISO 9660
• File/Disk maksimum: Kurang dari 600 (jumlah total dari file dan folder)
Melihat file foto - hal yang dapat anda lakukan
Mellihat file foto dalam slide show
Gunakan ▲▼ ◀▶ untuk menyorot ikon lalu tekan ENTER untuk mulai slide show. Anda dapat merubah kecepatan slide show menggunakan ◀▶ ketika ikon( ) disorot.
Melewatkan untuk ke foto berikut/sebelumnya
Tekan SKIP (I◀◀ atau ▶▶▶) untuk melihat foto sebelum/berikutnya.
Memutar foto
Gunakan ▲▼ untuk memutar foto dalam layar penuh searah jarum jam atau sebaliknya selama melihat foto dalam layar penuh.
Menghentikan sementara slide show
Tekan PAUSE/STEP (II) untuk pause slide show. Tekan PLAY (▶) untuk melanjutkan slide show.
Mendengarkan musik MP3 ketika slide show
Anda dapat mendengarkan musik MP3 ketika slide show, jika disk berisi file musik dan foto bersamaan. Gunakan ▲▼ ◀▶ untuk menyorot ikon (■-p) lalu tekan ENTER untuk memulai slide show.
Perekaman langsung USB (Hanya DV552/DV586)
Hubungkan USB Flash Drive ke unit sebelum perekaman. Atur option [Kualitas Rekam] sesuai diinginkan (lihat hal.8)
| PADA REMOTE | |
| 1 Masukkan Audio CD: | - |
| 2 Pilih track:Untuk pindah ke track secara langsung dan memutarnya, masukkan normor track menggunakan tombol numerik (0-9). | ▲▼, DVD MENU |
| 3 Mulai perekaman: | ○○ AUDIO |
| 4 Berhentl perekaman: | ■ STOP |
Mode mampu rekam
Anda dapat merekam satu track yang diinginkan atau semua track pada Audio CD ke USB Flash Drive.
- Untuk perekaman track: Tekan AUDIO pada mode play, pause atau resume stop.
- Untuk perekaman disk: Tekan AUDIO pada mode stop sepenuhnya.
- Untuk perekaman daftar program: Pada mode stop, Tekan AUDIO setelah pemilihan track pada daftar program.
Catatan perekaman langsung USB
• Perekaman hanya berlaku untuk track Audio CD.
- Jika anda menggunakan fungsi ini, folder "CD_REC" akan dibuat secara otomatis pada USB Flash Driver kemudian file musik disimpan di dalamnya
- Jika anda melepaskan USB Flash Drive atau mematikan unit kelika perekaman, hal ini dapat mengakibalkan kerusakan.
- Jika sisa ruang pada USB Flash Drive tidak mencukupi, perekaman tidak berfungsi. Untuk menambah ruang sisa, hapus file menggunakan PC
- Disk CD-G dan Audio CD tidak terkode dalam DTS tidak dapat direkam.
- HDD eksternal, Multi Card reader, Multi Partisi USB, perangkat terkunci dan MP3 player tidak didukung.
- Anda dapat mengatur kecepatan perekaman dengan menekan AUDIO perekaman langsung USB.
- X1 Track: Saat perekaman kecepatan normal, anda dapat mendengarkan musik.
- X4 Track: Saat perekaman kecepatan 4X, anda tidak dapat mendengarkan musik
- Format perekaman: MP3 file
- Encoding Bit rate: 128 kbps / 160 kbps / 192 kbps / 256 kbps / 320 kbps
- File/Disk maksimum: Kurang dari 600 (jumlah total dari file dan folder)
Pembuatan salinan yang ilegal dari material yang dikopi-protek, termasuk program komputer, file, siaran dan perekaman suara, termasuk pelanggaran dari hak cipta dan tindakan kriminal. Peralatan ini sebaiknya tidak digunakan untuk hal-hal tersebut.
Bertanggung jawab Menghargai hak cipta
Menggunakan USB Flash Drive (Hanya DV552/DV586)
Anda dapat memutar file MP3/WMA/JPEG/DivX pada USB Flash Drive menggunakan versi 2.0/1.1.
| PADA REMOTE | |
| 1 Hubungkan USB Flash Drive ke port USB pada unit: | - |
| 2 Tampilkan layar menu pada mode stop: | RETURN |
| 3 Pilih file:Untuk pindah ke file secara langsung dan memutarnya, masukkan nomor file menggunakan tombol numerik (0-9). | ▲▼, DVD MENU |
| 4 Putar file: | PLAY |
| 5 Lepaskan USB Flash Drive: | - |
Catatan USB Flash Drive
- Anda dapat mengganti mode USB dan DISK menggunakan RETURN (♂) hanya dalam mode stop.
dangan melepaskan USB kelika sedang beroperasi.
- Disarankan memback up secara berkala untuk mencegah kehilangan data. jika anda menggunakan kabel tambahan USB atau USB HUB, peralatan USB kemungkinan tidak dikenali.
File musik (MP3/WMA), file foto (JPEG) dan file DivX dapat diputar.
Lebih jelasnya dari pengoperasian setiap file, lihat halaman penjelasannya.
- Unit ini tidak mendukung ketika jumlah file lebih dari 600.
- Bit rate: antara 8 - 320 kbps (MP3), antara 32 - 192 kbps (WMA), kurang dari 4Mbps (DivX file)
- Fungsi USB dari unit ini tidak mendukung semua jenis perangkat USB. Kamera digital dan handphone tidak didukung.
- Port USB dari unit tidak dapat dihubungkan ke PC. Unit tidak dapat digunakan sebagai perangkat penyimpanan.
DV551.586-P.BIDNLLK_MFL63266909 1/12/10 11:07 AM Page
Menggunakan Karaoke (Hanya DV551/DV581/DV586)
| PADA REMOTE | |
| 1 Buka disk tray: | ▲OPEN/CLOSE |
| 2 Masukkan DVD Karaoke: | - |
| 3 Tutup disk tray: | ▲OPEN/CLOSE |
| 4 Hubungkan mikrofon ke Jack MIC: | - |
| 5 Mulai playback dan menyanyi sebuah lagu: | ▶ PLAY |
Menggunakan Karaoke - hal yang dapat anda lakukan
Menyesuaikan menu pengaturan Karaoke
Tekan KARAOKE untuk menampilkan menu karaoke. Gunakan ▲▼ untuk memilih satu pilihan lalu tekan ◀ atau ▶ untuk mengatur nilai dari pilihan yang dipilih.
ECHO – Anda dapat menyesuaikan volume echo.
MELODY – Jika anda ingin menyanyi hanya dengan band pendukung atau orkestra tanpa melodi pemandu vocal, maka aturlah MELODY ke posisi Off. VOICE – Jika anda ingin berduet dengan penyanyi dalam karaoke, pilih voice yang anda inginkan.
| Voice Select | Output | |
| Speaker kiri | Speaker kanan | |
| V1 | Voice1 | Voice1 |
| V2 | Voice2 | Voice2 |
| V1-V2 | Voice1 | Voice2 |
| Off None voice None voice | ||
KEY – Anda merubah kunci.
EFFECT – Anda dapat menggunakan efek khusus.
(OFF → Flanger → Chorus → Tremolo → Vibrato)
Catatan Karaoke
sika mikrofon tidak terhubungkan, menu karaoke tidak akan muncul.
- Fungsi fitur karaoke dapat digunakan hanya untuk disk karaoke.
- Untuk lebih jelas, lihat keterangan yang tersedia bersama disk.
- Menu VOICE dan MELODY mungkin tidak terdapat pada disk karaoke tertentu.
Terdapat keluaran suara mikrofon ketika PCM diset untuk DIGITAL AUDIO OUTPUT.
• Tergantung disknya, pilihan karaoke kemungkinan tidak bekerja.
Kode Bahasa
Gunakan daftar ini untuk memasukkan bahasa yang Anda inginkan untuk seting awal berikut: audio disk, teks disk dan menu disk.
| Bahasa | Kode | Bahasa | Kode | Bahasa | Kode | Bahasa | Kode | Bahasa | Kode | Bahasa | Kode |
| Afar | 6565 | Croatian | 7282 | Hausa | 7265 | Lingala | 7678 | Quechua | 8185 | Tajik | 8471 |
| Afrikaans | 6570 | Czech | 6783 | Hebrew | 7387 | Lithuanian | 7684 | Rhaeto-Romance | 8277 | Tamil | 8465 |
| Albanian | 8381 | Danish | 6865 | Hindi | 7273 | Macedonian | 7775 | Rumanian | 8279 | Telugu | 8469 |
| Ameharic | 6577 | Dutch | 7876 | Hungarian | 7285 | Malagasy | 7771 | Russian | 8285 | Thai | 8472 |
| Arabic | 6582 | English | 6978 | Icelandic | 7383 | Malay | 7783 | Samoan | 8377 | Tonga | 8479 |
| Armenian | 7289 | Esperanto | 6979 | Indonesian | 7378 | Malayalam | 7776 | Sanskrit | 8365 | Turkish | 8482 |
| Assamese | 6583 | Estonian | 6984 | Interlingua | 7365 | Maori | 7773 | Scots Gaelic | 7168 | Turkmen | 8475 |
| Aymara | 6588 | Faroese | 7079 | Irish | 7165 | Marathi | 7782 | Serbian | 8382 | Twi | 8487 |
| Azerbaijan | 6590 | Fiji | 7074 | Italian | 7384 | Moldavian | 7779 | Serbo-Croatian | 8372 | Ukrainian | 8575 |
| Bashkir | 6665 | Finnish | 7073 | Japanese | 7465 | Mongolian | 7778 | Shona | 8378 | Urdu | 8582 |
| Basque | 6985 | French | 7082 | Kannada | 7578 | Nauru 7865 | Sindhi | 8368 | Uzbek | 8580 | |
| Bengali, Bangla | 6678 | Frisian | 7089 | Kashmiri | 7583 | Nepali | 7869 | Singhalese | 8373 | Vietnamese | 8673 |
| Bhutani | 6890 | Galician | 7176 | Kazakh | 7575 | Norwegian | 7879 | Slovak | 8375 | Volapük | 8679 |
| Bihari | 6672 | Georgian | 7565 | Kirghiz | 7589 | Oriya | 7982 | Slovenian | 8376 | Welsh | 6789 |
| Brelon | 6682 | German | 6869 | Korean | 7579 | Panjabi | 8065 | Spanish | 6983 | Wulof | 8779 |
| Bulgarlan | 6671 | Greek | 6976 | Kurdish | 7585 | Pashto, Pushto | 8083 | Sudanese | 8385 | Xhosa | 8872 |
| Burmese | 7789 | Greenlandic | 7576 | Laotnian | 7579 | Persian | 7065 | Swahili | 8387 | Yiddish | 7473 |
| Byelcrussian | 6669 | Guarani | 7178 | Latin | 7665 | Polish | 8076 | Swedish | 8386 | Yoruba | 8979 |
| Chinese | 9072 | Gujarati | 7185 | Latvian, Lettish | 7686 | Portuguese | 8084 | Tagalog | 8476 | Zulu | 9085 |
Kode Area
Pilih kode area dari daftar.
| Area | Kode | Area | Kode | Area | Kode | Area | Kode | Area | Kode | Area | Kode |
| Afghanistan | AF | Costa Rica | CR | Greenland | GL | Maldives | MV | Paraguay | PY | Sri Lanka | LK |
| Argentina | AR | Croatia | HR | Hong Kong | HK | Mexico | MX | Philippines | PH | Sweden | SE |
| Australia | AU | Czech Republic | CZ | Hungary | HU | Monaco | MC | Poland | PL | Switzerland | CH |
| Austria | AT | Denmark | DK | India | IN | Mongolia | MN | Portugal | PT | Taiwan | TW |
| Belgium | BE | Ecuador | EC | Indonesia | ID | Morocco | MA | Romania | RO | Thailand | TH |
| Bhutan | BT | Egypt | EG | Israel | IL | Nepal | NP | Russian Federation | RU | Turkey | TR |
| Bolivia | BO | El Salvador | SV | Italy | IT | Netherlands | NL | Saudi Arabia | SA | Uganda | UG |
| Brazil | BR | Ethiopia | ET | Jamaica | JM | Netherlands Antilles | AN | Sonogal | SN | Ukraine | UA |
| Cambodia | KH | Fiji | FJ | Japan | JP | New Zealand | NZ | Singapore | SG | United States | US |
| Canada | CA | Finland | FI | Kenya | KE | Nigeria | NG | Slovak Republic | SK | Uruguay | UY |
| Chile | CL | France | FR | Kuwait | KW | Norway | NO | Slovenia | SI | Uzbekistan | UZ |
| China | CN | Germany | DE | Libya | LY | Oman | OM | South Africa | ZA | Vietnam | VN |
| Colombia | CO | Great Britain | GB | Luxembourg | LU | Pakistan | PK | South Korea | KR | Zimbabwe | ZW |
| Congo | CG | Greece | GR | Malaysia | MY | Panama | PA | Spain | ES |
Pemecahan Masalah
| Gejala | Kemungkinan Penyebab | Pembenahan |
| Tidak ada Power. | Kabel Power tidak tersambung | Masukkan kabel power ke dalam outlet dengan benar. |
| Power on, tetapi unit tidak bekerja. | Tidak ada disk yang dimasukkan. | Masukkan disk. |
| Tidak ada gambar. | TV tidak diatur untuk menerima Output sinyal dari unit. | Pilih mode masukan video yang sesuai pada TV. |
| Kabel video tidak tersambung dengan kuat. | Hubungkan kabel video dengan kuat. | |
| Tidak ada suara. | Peralatan yang terhubung dengan kabel audio tidak diatur untuk menerima keluaran sinyal dari unit. | Pilih mode input yang benar dari audio amplifier. |
| Pilihan AUDIO diset ke posisi yang salah. | Set seting AUDIO ke posisi yang benar. | |
| Unit tidak mulai playback. | Disk tidak bisa diputar dimasukkan. | Masukkan disk yang benar. (Periksa jenis disk dan kode regional.) |
| Tingkat Rating telah diset. | Ubah level rating. | |
| Remote control tidak berfungsi dengan benar. | Remote control tidak diarahkan ke sensor remote sensor pada unit. | Arahkan remote control ke remote sensor unit. |
| Remote control terlalu jauh dari unit. | Operasikan remote control lebih dekat ke unit. |
Spesifikasi
Umum
| Persyaratan daya | AC 110 - 240 V, 50 / 60 Hz |
| Konsumsi Daya | 8 W |
| Ukuran (kurang-lebih) | DV551/DV552: (360 x 35 x 200) mm |
| (P x T x L) tanpa kaki | DV581/DV586: (430 x 35 x 200) mm |
| Bobot (kurang-lebih) | DV551/DV552: 1.4 kgDV581/DV586: 1.5 kg |
| Temperatur pengoperasian | 5 °C s.d 35 °C |
| Kelembaban Pengoperasian | 5 % s.d 90 % |
| Laser Semiconductor laser | |
| Sistem Sinyal | PAL/NTSC |
Masukan (Input) (Hanya DV552/DV586)
| USB IN 4 pin (USB 2.0 / 1.1 standard) |
| Bus power supply DC 5 V 200 mA --- |
Keluaran (Output)
| Video Output | 1.0 V (p-p), 75 Ω, sync negative,jack RCA x 1 |
| Component Video Output (Y) | 1.0 V (p-p), 75 Ω,sync negative, jack RCA x 1(Pb)/(Pr) 0.7 V (p-p), 75 Ω,jack RCA x 2 |
| Audio Output 2.0 Vrms (1 KHz, 0 dB), 600 Ω,jack RCA (L,R) x 1 | |
| Digital Output (Coaxial) | 0.5 V (p-p), 75 Ω, jack RCA x 1 |
Aksesoris
| Kabel Video, kabel Audio, Remote Control, Baterai |
Desain dan spesifikasi bisa berubah tanpa pemberitahuan terlebih dahulu.

LG
Life's Good

Sebagai ENERGY STAR Partner, LG menelaskan bahwa produk ini atau model produk sesuai ke entluen ENERGY STAR untuk effisiensi energi.
ENERGY START merupakan anda leregisler U.S.
PT. LG ELECTRONICS INDONESIA
Kawasan Industri MM2100 Blok G Cikarang Barat, Bekasi, Jawa Barat 17520 INDONESIA
DOLBY DIGITAL


- MODELS
- Safety Precaution
- CAUTION concerning the Power Cord
- Table of Contents
- About the Symbol Display
- Regional Codes
- Copyrights
- Hooking up the unit
- Audio and Video Connection
- Hooking up the unit - more you can do
- A Component Video Connections
- B Digital Audio Output Connection
- Remote Control
- Adjust the settings - more you can do
- When you turn on for the first time (optional)
- Adjust the language settings
- Adjust the display settings
- Adjust the audio settings
- Adjust the lock settings
- Adjust the others settings
- DivX VOD
- Displaying Disc Information - more you can do
- Symbol Used in this Manual
- Playing a Disc - more you can do
- Stops the playback
- Playing a DVD that has a menu DVD
- Playing a DVD VR disc
- Skip to the next/previous chapter/track/file ALL
- Pause a playback ALL
- Frame-by-Frame playback DIVX
- Playing repeatedly ALL
- Fast forward or fast reverse
- Repeating a specific portion (A-B)
- Selecting a subtitle language
- Watching from a different angle DVD
- Hearing a different audio
- Slow down the playing speed (Forward only)
- Watching a enlarged video image DivXD
- Viewing the title menu DVD
- Viewing the DVD menu DVD
- Starting play from selected time DivXP
- Last Scene Memory ACDD
- Screen Saver
- System Select
- Mixed disc or (USB Flash Drive DV552/DV586 only) – DivX, MP3/WMA and JPEG
- Playing a DivX movie file - more you can do
- Changing the character set to display DivX® subtitle correctly
- DivX file requirement
- Listening to Music Disc or files - more you can do
- Creating your own program
- Playing a CD-G disc
- Displaying file Information (ID3 Tag)
- MP3/WMA music file requirement
- Tip:
- Watching an enlarged photo image
- Photo file requirement
- Viewing photo files - more you can do
- Viewing photo files as a slide show
- Skip to the next/previous photo
- Rotate a photo
- Pause a slide show
- Listening to music during slide show
- Recordable mode
- Notes an USB direct Recording
- Notes an USB Flash Drive
- Using the Karaoke - more you can do
- Adjust the Karaoke menu settings
- Notes the Karaoke
- LG
- LG ELECTRONICS INDONESIA
- DVD Player
- Tindakan Keselamatan
- PERHATIAN mengenal kabel Power
- Daftar lsi
- Tentang Tampilan Simbol ⊙
- Kode Regional
- Keterangan Hak Cipta:
- Menghubungkan unit
- Hubungan Audio dan Video
- Menghubungkan unit - hal yang dapat anda lakukan
- A Hubungan Component Video
- B Hubungan Digital Audio Output
- Menyesuaikan pengaturan - hal yang dapat anda lakukan
- Ketika anda mengaktifkan untuk pertama kalinya (opsional)
- Mengatur seting bahasa
- Mengatur setting tampilan
- Mengatur setting audio
- Mengatur seting kunci
- Mengatur seting lainnya
- Tampilan Informasi Disk - hal yang dapat anda lakukan
- Simbol yang terdapat pada buku panduan
- Memutar Disk - hal yang dapat anda lakukan
- Menghentikan playback
- Memutar DVD yang memiiki menu DVD
- Memutar disk DVD VR
- Melewati bab/track berikutnya/sebelumnya ALL
- Menghentikan sementara playback ALL
- Frame-by-Frame playback DIVXD
- Memutar berulang ALL
- Maju cepat atau Mundur cepat MP3W
- Mengulang urutan (A-B) ACDF
- Memilih bahasa teks disk DivXD
- Melihat dari sudut berbeda DVD
- Mendengarkan audio berbeda DivXD LCD-G
- Memperlambat kecepatan pemutaran DVD (Hanya maju)
- Melihat gambar video lebih besar DivXD
- Melihat menu judul DVD
- Melihat menu DVD DVD
- Mulai memutar dari waktu yang ditentukan DivXb
- Memori Adegan Terakhir ACDD
- Memilih Sistem
- Disk campuran atau (hanya USB Flash Drive DV552/DV586) – DivX, MP3/WMA dan JPEG
- Memutar file DivX movie - hal yang dapat anda lakukan
- Merubah karakter untuk menampilkan subtitle DivX® dengan benar
- Persyaratan file DivX
- Mendengarkan Disk atau file musik - hal yang dapat anda lakukan
- Membuat program pribadi
- Memutar disk CD-G
- Menampilkan informasi file (ID3 TAG)
- Persyaratan file musik MP3/WMA
- Melihat foto lebih luas
- Persyaratan file Foto
- Melihat file foto - hal yang dapat anda lakukan
- Mellihat file foto dalam slide show
- Melewatkan untuk ke foto berikut/sebelumnya
- Memutar foto
- Menghentikan sementara slide show
- Mendengarkan musik MP3 ketika slide show
- Perekaman langsung USB (Hanya DV552/DV586)
- Mode mampu rekam
- Catatan perekaman langsung USB
- Menggunakan USB Flash Drive (Hanya DV552/DV586)
- Catatan USB Flash Drive
- Menggunakan Karaoke - hal yang dapat anda lakukan
- Menyesuaikan menu pengaturan Karaoke
- Catatan Karaoke
- Kode Bahasa
- Kode Area
Brand : LG
Model : DV552
Category : DVD player