
KB813 - Keyboard DELL - Free user manual and instructions
Find the device manual for free KB813 DELL in PDF.


| Product Type | Wired Keyboard |
| Model | KB813 |
| Brand | Dell |
| Interface | USB 2.0 Type-A |
| Cable Length | 1.8 m (6 ft) |
| Keyboard Layout | 104-key US QWERTY (with Windows keys) |
| Built-in Features | Multimedia keys (volume, mute, play/pause) |
| Power Source | USB bus-powered (no external adapter required) |
| Dimensions (L x W x H) | 435 x 140 x 30 mm |
| Weight | 720 g |
| Material | High-grade ABS plastic |
| Color | Black |
| Compatible Operating Systems | Windows 10, 11; macOS; Linux (basic keys) |
| Safety Certification | CE, FCC, RoHS compliant |
| Repairability | Keycaps replaceable; individual keys not designed for repair; no user-serviceable parts |
| Cleaning Instructions | Disconnect USB, use compressed air for debris, wipe with damp cloth; avoid liquids |
| Warranty | 1 year limited hardware warranty from Dell |
| Included Accessories | Quick setup guide; no software disc |
| Manual Availability | Free PDF download from Dell support website |
Frequently Asked Questions - KB813 DELL
User questions about KB813 DELL
0 question about this device. Answer the ones you know or ask your own.
Ask a new question about this device
Download the instructions for your Keyboard in PDF format for free! Find your manual KB813 - DELL and take your electronic device back in hand. On this page are published all the documents necessary for the use of your device. KB813 by DELL.
USER MANUAL KB813 DELL
Congratulations on the purchase of your new Dell Smart Card Keyboard.
This user's guide has been developed to provide information that will assist you in the setup and operation of your new smart card keyboard.
The Dell Smart Card Keyboard can be used on PC systems running Windows 2000, Windows XP (32/64 bit), Windows Vista (32/64 bit), Windows 7 (32/64 bit), Windows 8 (32/64bit), Windows 10 (32/64bit), Windows Server 2003, Windows Server 2008, Windows Server 2008 R2, Windows Server 2012, ,Linux Ubuntu, OpenSuse and RedHat.
This product can be used for banking transactions, identification systems, secure web applications, and secure logon. This smart card interface can be used with all microprocessor smart cards.
For more details see Features.
Setup
NOTE: The drivers are already factory installed if the keyboard is purchased with computer. This section is included in case you have to re-load your operating system.
Install the Keyboard
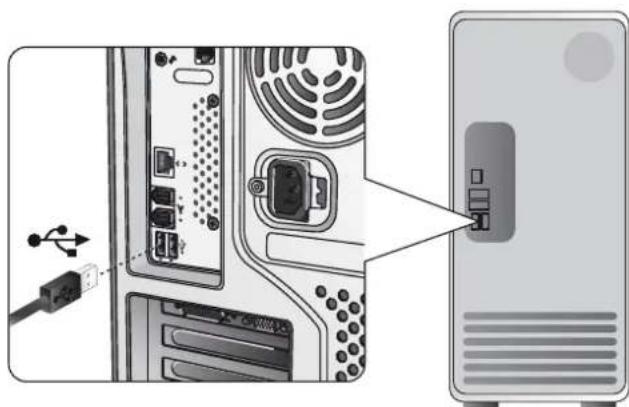
Connect the Keyboard to any USB port on the computer. The USB port shown in the diagram is at the rear of the computer. USB ports may also be located at the front.
natural_image
Diagram showing a computer tower with an attached USB cable and a close-up of the tower's internal components (no text or symbols visible)Follow the instructions in Install the driver section.
System Requirements
In order to properly install and operate your Dell Smart Card Keyboard, the following system requirements are necessary:
- Windows 2000, Windows XP (32/64 bit), Windows Vista (32/64 bit), Windows 7 (32/64 bit), Windows 8 (32/64 bit), Windows 10 (32/64 bit), Windows Server 2003, Windows Server 2008, Windows Server 2008 R2, Windows Server 2012, Linux Ubuntu, OpenSuse, and RedHat.
• The Smart Card Keyboard Driver CD - One free USB port
Features
- Reads from and writes to all ISO7816-1/2/3/4 microprocessor smart cards (T=0, T=1) up to 826Kbds (TA1=17) @4.8Mhz depending on smart card
• Supports 3 V, 5 V, and 1.8 V cards - Powers off automatically when the card is removed
- Smart Card secure PIN entry
• PC/SC 2.0 driver up to Windows 10
Install the Windows XP driver
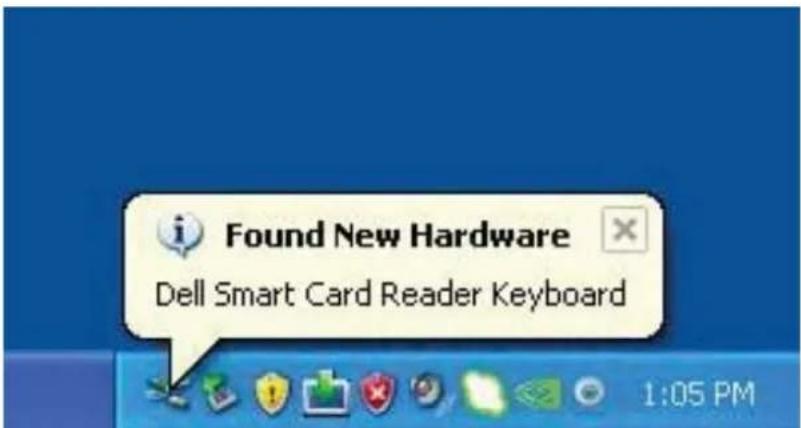
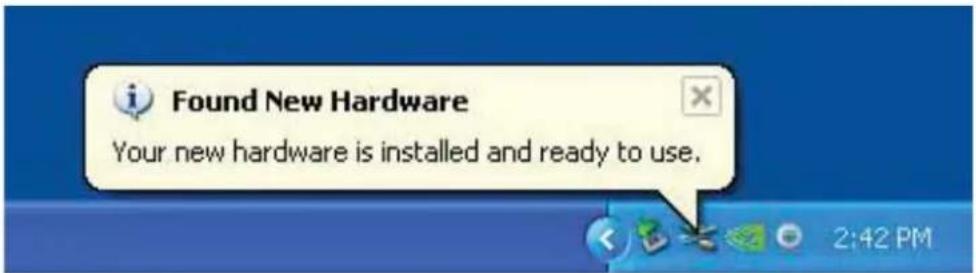
- When the Dell Smart Card Keyboard is plugged into a USB port, the following window will appear:
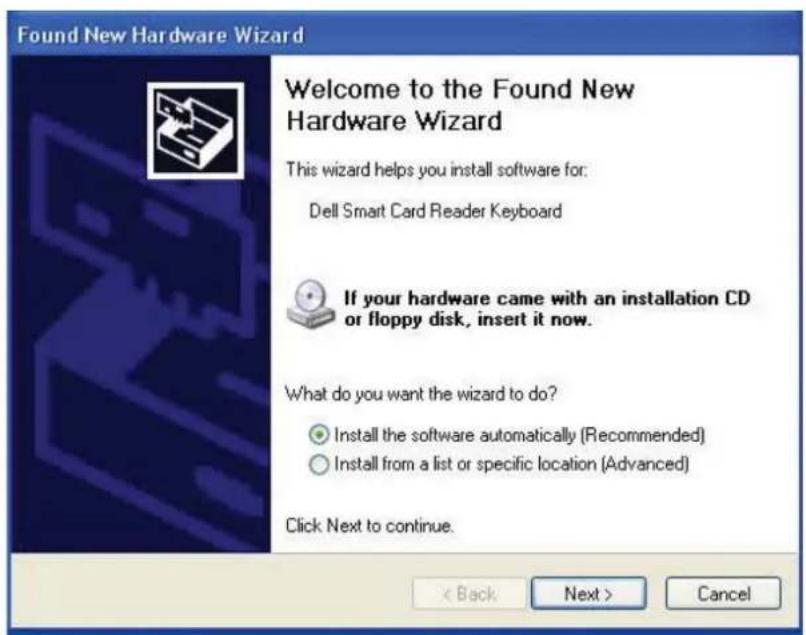
- Then the following window will appear:
Install the Keyboard | Install the Windows XP driver | Install the Vista driver Install the Windows 7 driver | Install the Windows 8 driver Install the Windows 10 driver
Update the Windows XP driver | Update the Vista driver
Update the Windows 7 driver | Update the Windows 8 driver
Update the Windows 10 driver
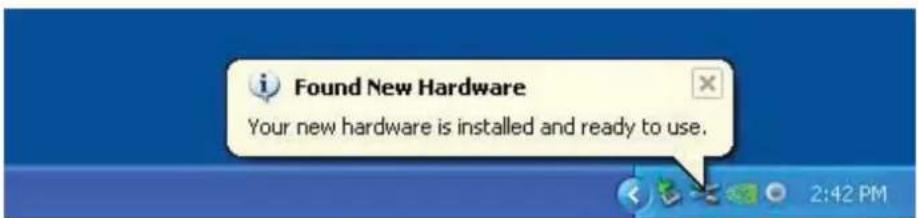
- The installation wizard will install the driver. After a successful installation, the system will prompt you with the following message:
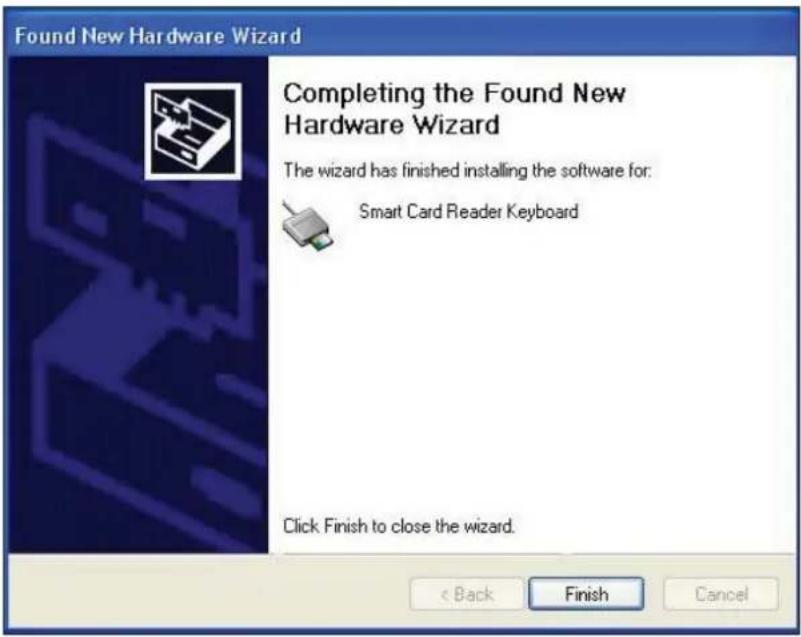
- Select Finish. Your Smartcard Keyboard is now ready for use.
Install the Keyboard | Install the Windows XP driver | Install the Vista driver
Install the Windows 7 driver | Install the Windows 8 driver
Install the Windows 10 driver
Update the Windows XP driver | Update the Vista driver
Update the Windows 7 driver | Update the Windows 8 driver
Update the Windows 10 driver
Install the Vista driver
- When the Dell Smart Card Keyboard is plugged into a USB port, the following window will appear:
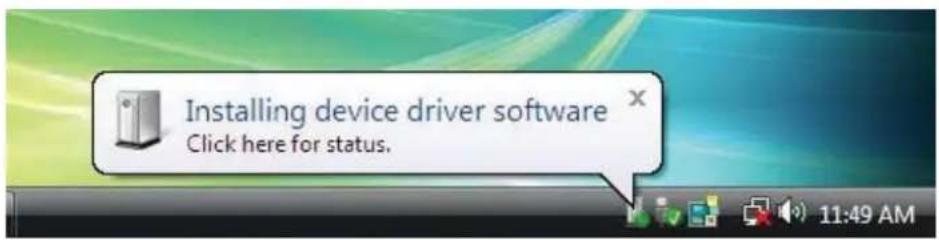
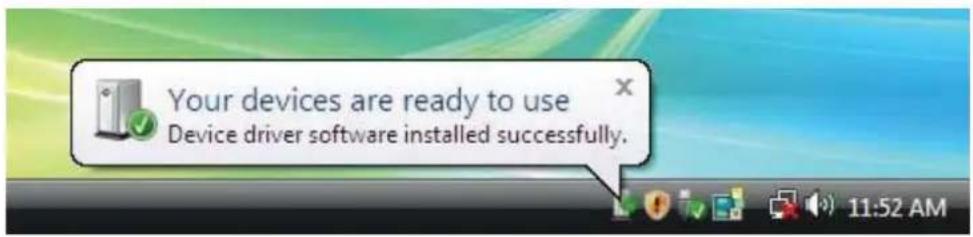
- Wizard will install driver. After a successful installation, the system will prompt you with the following message:
Install the Keyboard | Install the Windows XP driver | Install the Vista driver Install the Windows 7 driver | Install the Windows 8 driver Install the Windows 10 driver Update the Windows XP driver | Update the Vista driver Update the Windows 7 driver | Update the Windows 8 driver Update the Windows 10 driver
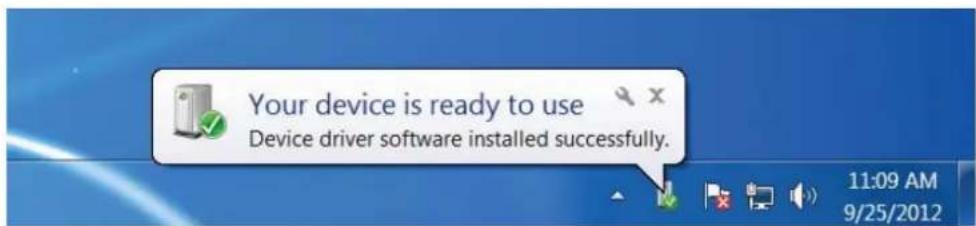
Install the Windows 7 driver
- When the Dell Smart Card Keyboard is plugged into a USB port the following window will appear:
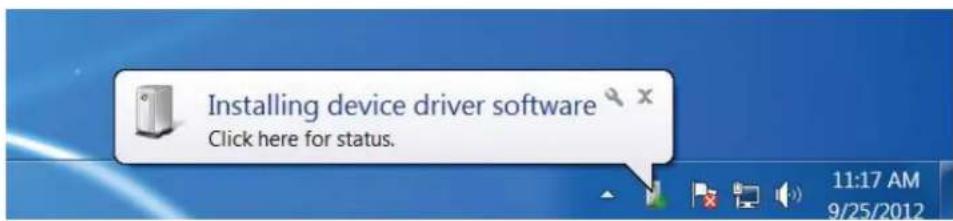
- The installation Wizard will install driver. After a successful installation, the system will prompt you with the following message:
Install the Keyboard | Install the Windows XP driver | Install the Vista driver
Install the Windows 7 driver | Install the Windows 8 driver
Install the Windows 10 driver
Update the Windows XP driver | Update the Vista driver
Update the Windows 7 driver | Update the Windows 8 driver
Update the Windows 10 driver
Install the Windows 8 driver
- When the Dell Smart Card Keyboard is plugged into a USB port, the following window will appear:
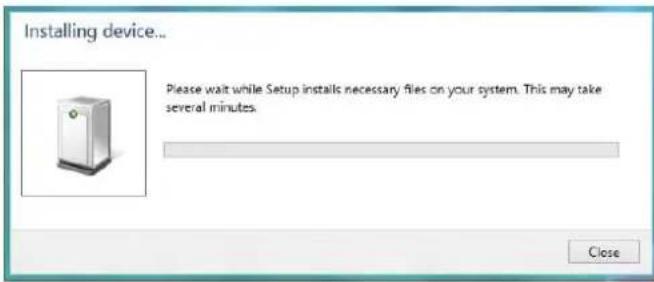
- The installation Wizard will install driver. During installation, the system will prompt you with the following window:
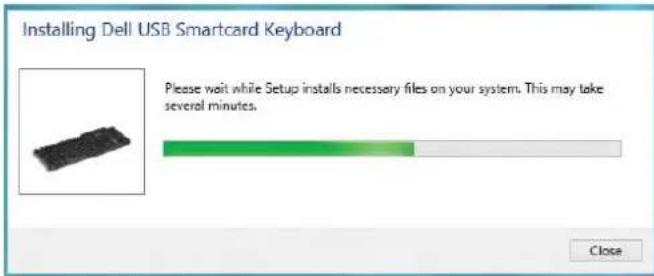
- When installation is completed, your device is ready to use.
Install the Keyboard | Install the Windows XP driver | Install the Vista driver
Install the Windows 7 driver | Install the Windows 8 driver
Install the Windows 10 driver
Update the Windows XP driver | Update the Vista driver
Update the Windows 7 driver | Update the Windows 8 driver
Update the Windows 10 driver
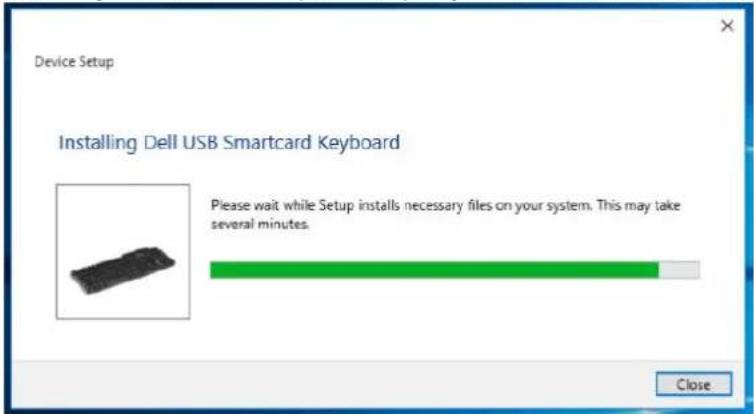
Install the Windows 10 driver
- When the Dell Smart Card Keyboard is plugged into a USB port, the following window will appear:
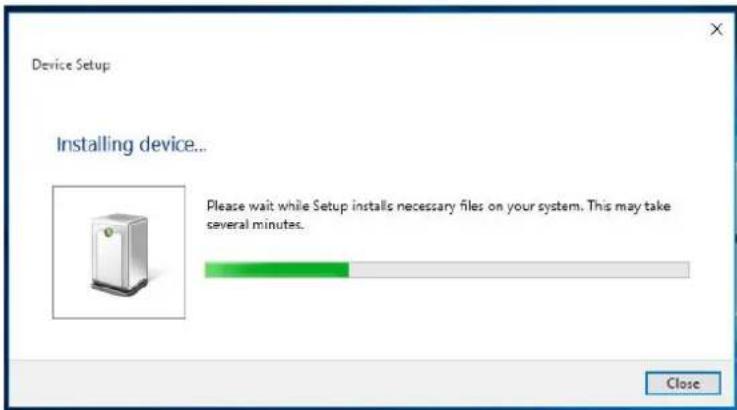
- The installation Wizard will install driver. During installation, the system will prompt you with the following window:
Install the Keyboard | Install the Windows XP driver | Install the Vista driver
Install the Windows 7 driver | Install the Windows 8 driver
Install the Windows 10 driver
Update the Windows XP driver | Update the Vista driver
Update the Windows 7 driver | Update the Windows 8 driver
Update the Windows 10 driver
Update the Windows XP driver
- With the Smart Card reader connected, the old driver that is built in inside the operating system will be installed automatically.
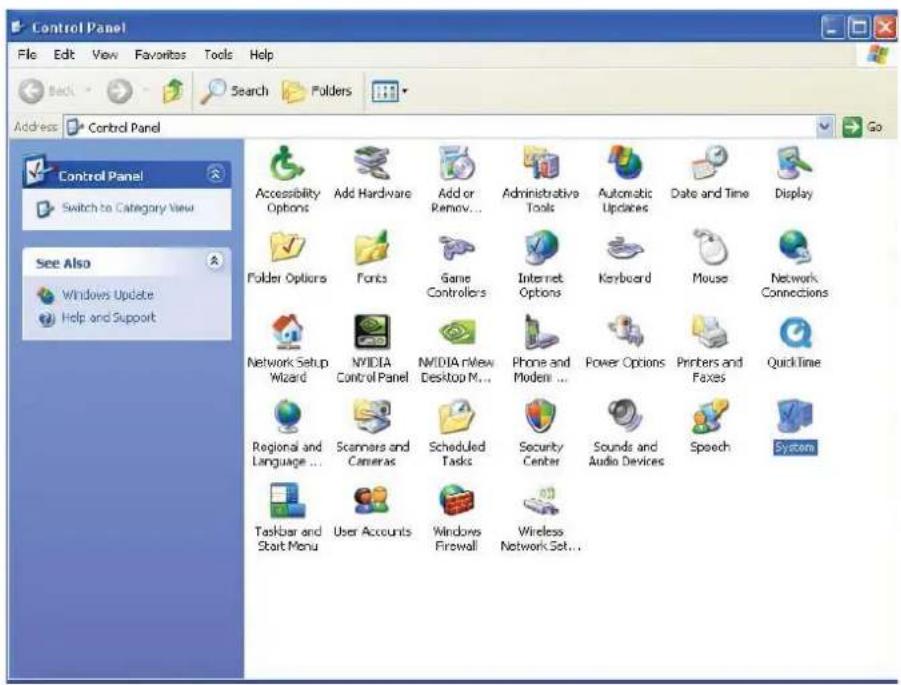
- From the Start Menu, open the Control Panel.
Install the Keyboard | Install the Windows XP driver | Install the Vista driver
Install the Windows 7 driver | Install the Windows 8 driver
Install the Windows 10 driver
Update the Windows XP driver | Update the Vista driver
Update the Windows 7 driver | Update the Windows 8 driver
Update the Windows 10 driver
Update the Windows XP driver
3. Double click System. The following window will be shown:
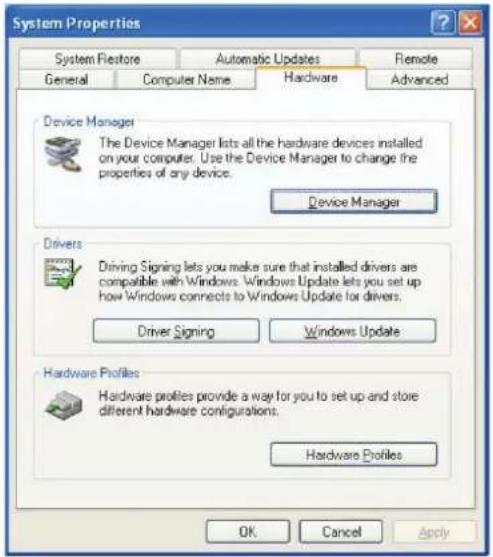
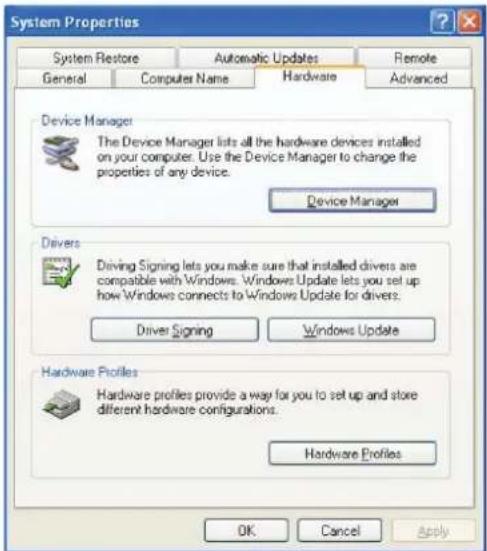
4. Select Hardware. The following screen displays:
Install the Keyboard | Install the Windows XP driver | Install the Vista driver
Install the Windows 7 driver | Install the Windows 8 driver
Install the Windows 10 driver
Update the Windows XP driver | Update the Vista driver
Update the Windows 7 driver | Update the Windows 8 driver
Update the Windows 10 driver
Update the Windows XP driver
5. Select Device Manager.
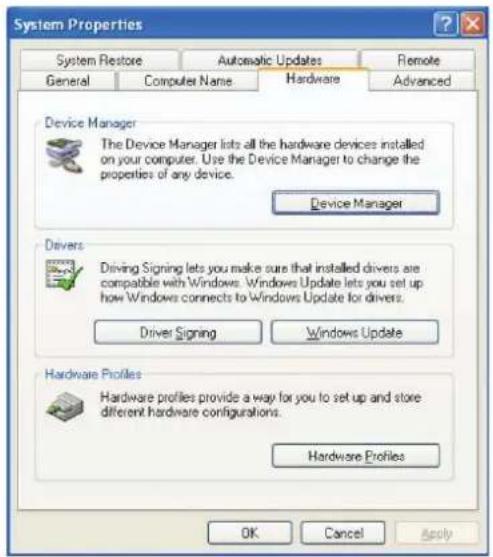
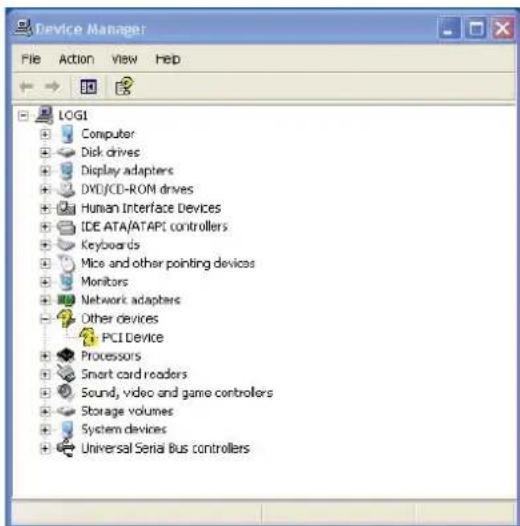
6. The following screen will be shown. Select Smart card readers.
Install the Keyboard | Install the Windows XP driver | Install the Vista driver Install the Windows 7 driver | Install the Windows 8 driver Install the Windows 10 driver
Update the Windows XP driver | Update the Vista driver Update the Windows 7 driver | Update the Windows 8 driver Update the Windows 10 driver
Update the Windows XP driver
7. Right click on Smart Card Reader Keyboard.
The display shows as follows:
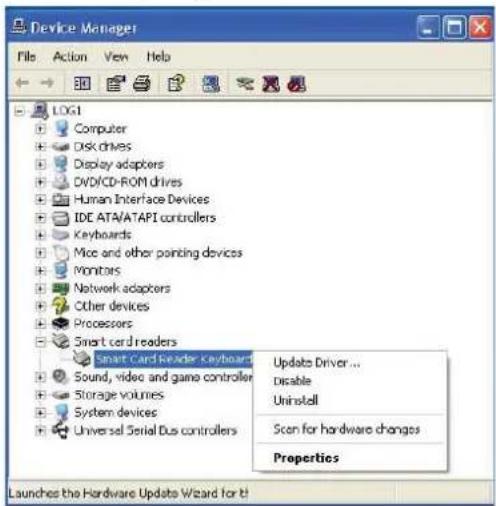
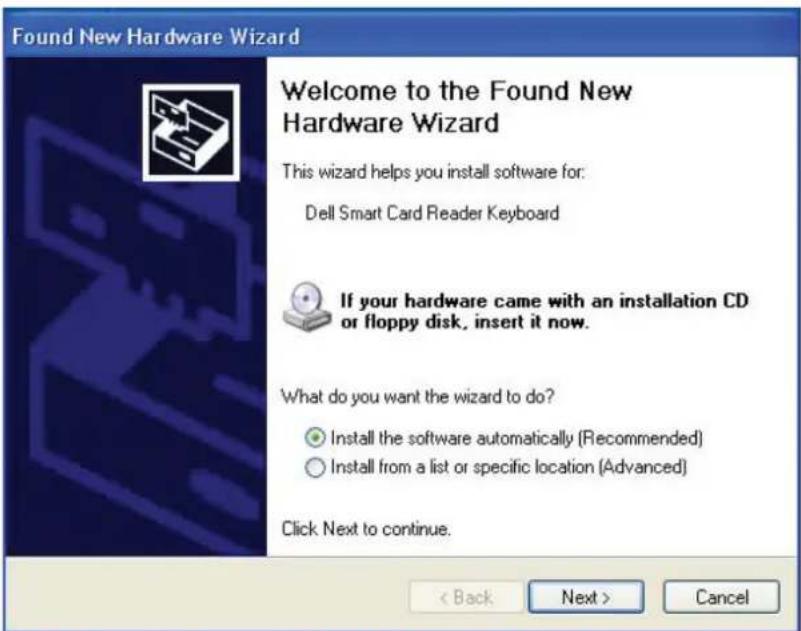
- Select Update Driver. Then, the following window will appear:
Install the Keyboard | Install the Windows XP driver | Install the Vista driver
Install the Windows 7 driver | Install the Windows 8 driver
Install the Windows 10 driver
Update the Windows XP driver | Update the Vista driver
Update the Windows 7 driver | Update the Windows 8 driver
Update the Windows 10 driver
Update the Windows XP driver
- Select Next. The wizard will install the driver. After a successful installation, the system will prompt you with the following message:
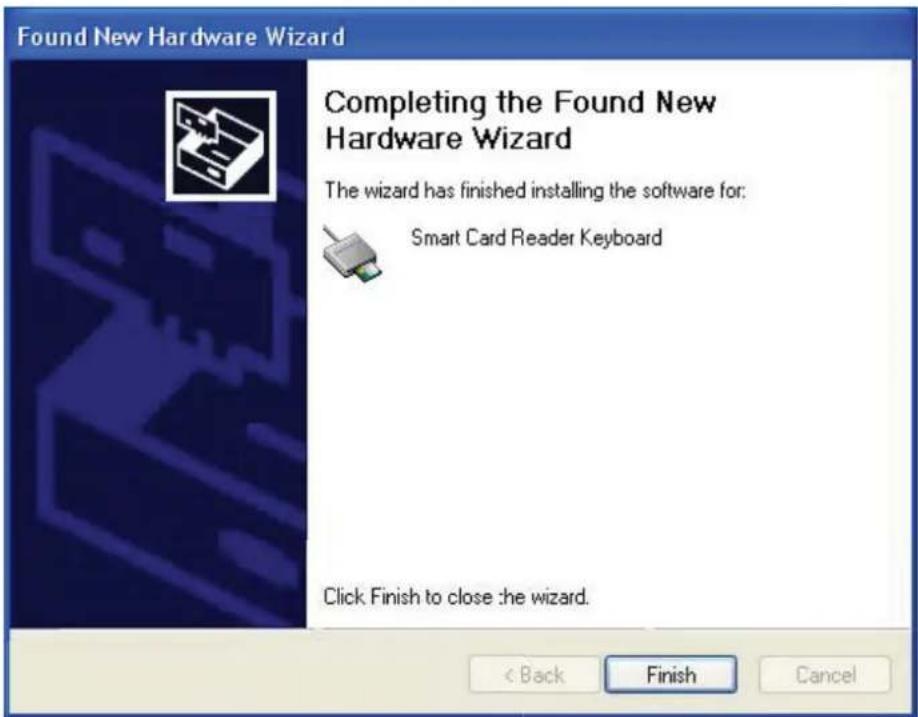
10 ce is ready to use. y.Select Finish. Your devic
Install the Keyboard | Install the Windows XP driver | Install the Vista driver
Install the Windows 7 driver | Install the Windows 8 driver
Install the Windows 10 driver
Update the Windows XP driver | Update the Vista driver
Update the Windows 7 driver | Update the Windows 8 driver
Update the Windows 10 driver
Update the Windows Vista driver
- With the Smart Card reader connected, the old driver that is built in inside the operating system will be installed automatically.
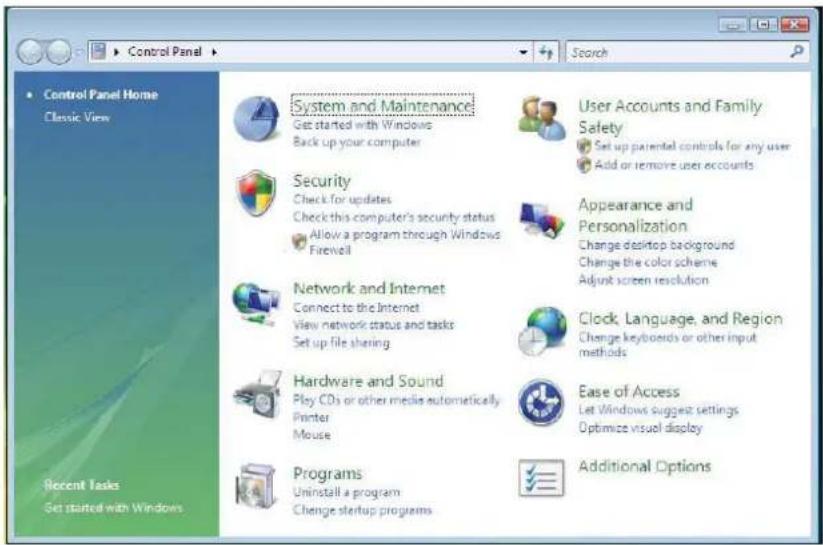
- From the Start Menu, open the Control Panel:
Install the Keyboard | Install the Windows XP driver | Install the Vista driver
Install the Windows 7 driver | Install the Windows 8 driver
Install the Windows 10 driver
Update the Windows XP driver | Update the Vista driver
Update the Windows 7 driver | Update the Windows 8 driver
Update the Windows 10 driver
Update the Windows Vista driver
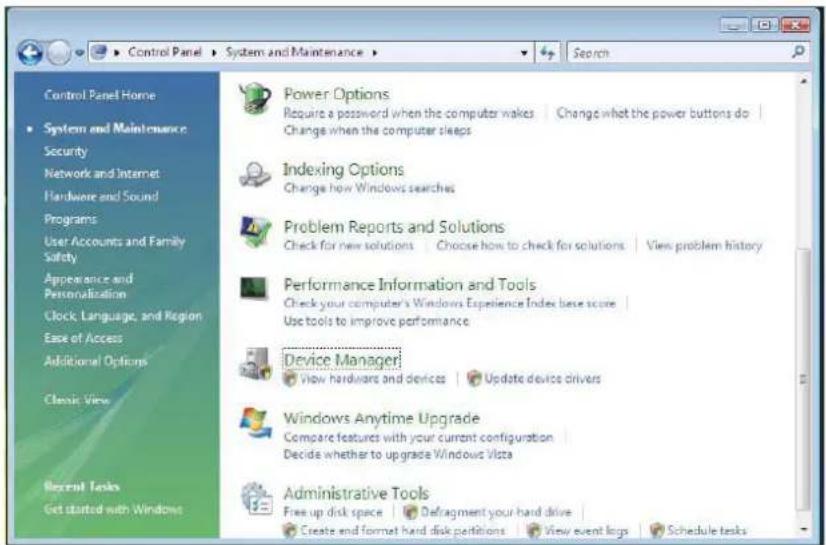
3. Select System and Maintenance.
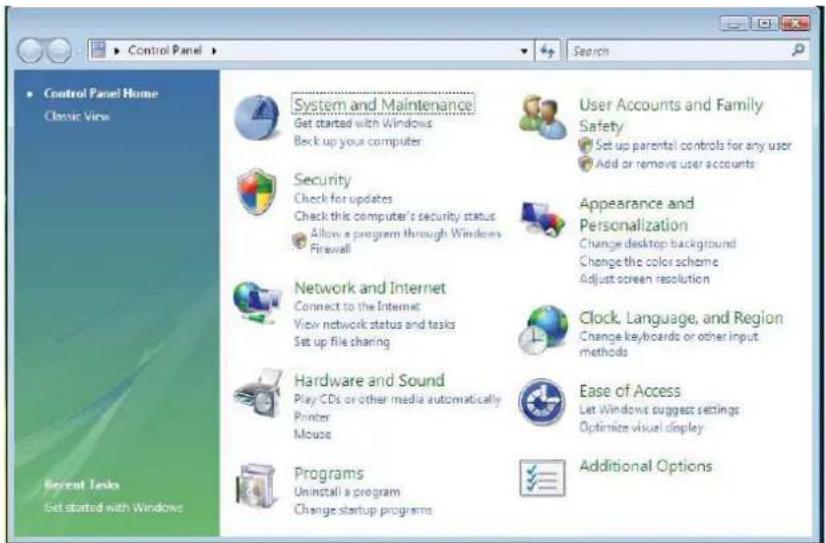
- Select Device Manager. Then, the operating system will pop up the Windows needs your permission to continue dialog box. Click Continue to install.
Install the Keyboard | Install the Windows XP driver | Install the Vista driver Install the Windows 7 driver | Install the Windows 8 driver Install the Windows 10 driver
Update the Windows XP driver | Update the Vista driver Update the Windows 7 driver | Update the Windows 8 driver Update the Windows 10 driver
Update the Windows Vista driver
5. Select Smart Card readers.
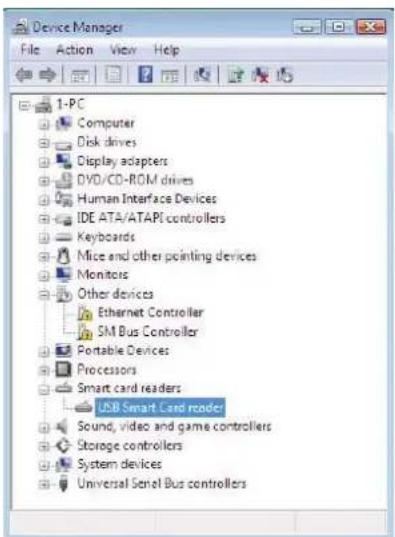
6. Right click on USB Smart Card reader. The display shows as held display shows as
Install the Keyboard | Install the Windows XP driver | Install the Vista driver
Install the Windows 7 driver | Install the Windows 8 driver
Install the Windows 10 driver
Update the Windows XP driver | Update the Vista driver
Update the Windows 7 driver | Update the Windows 8 driver
Update the Windows 10 driver
Update the Windows Vista driver
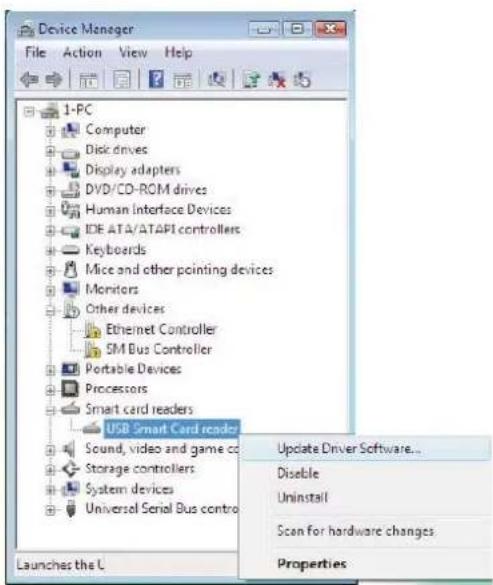
7. Select Update Driver Software.
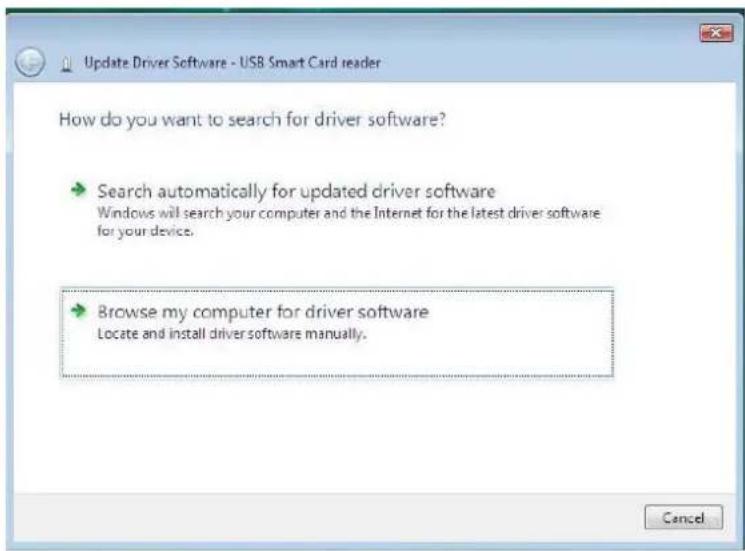
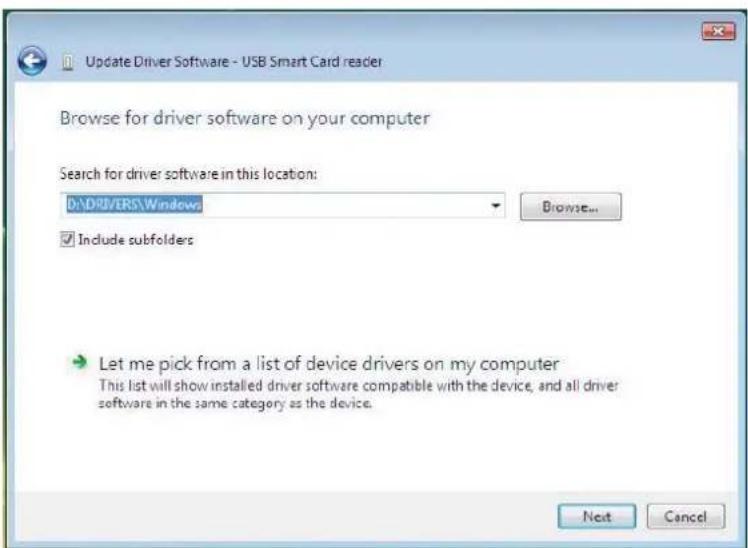
- Select Browse my computer for driver software.
- Insert the drivers CD into the CD/DVD drive, browse to Drivers folder, select Windows, and click Next.
Install the Keyboard | Install the Windows XP driver | Install the Vista driver
Install the Windows 7 driver | Install the Windows 8 driver
Install the Windows 10 driver
Update the Windows XP driver | Update the Vista driver
Update the Windows 7 driver | Update the Windows 8 driver
Update the Windows 10 driver
Update the Windows Vista driver
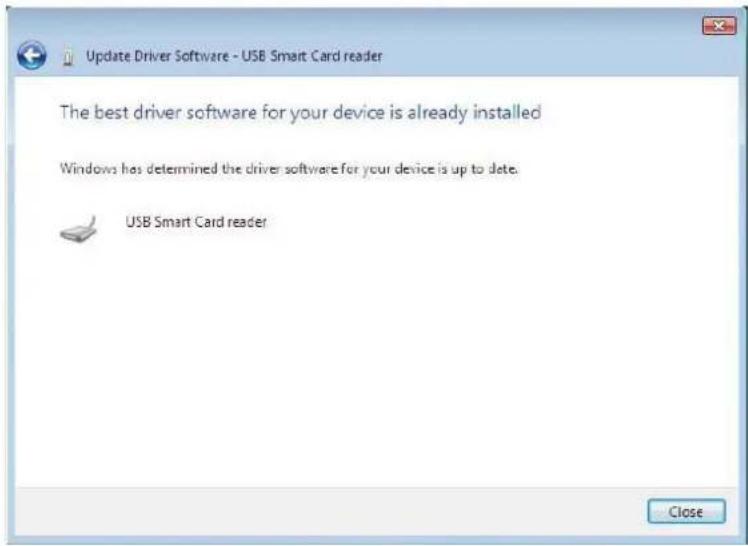
- The installation wizard will install driver. After a successful installation, the system will prompt you with the following message:
Install the Keyboard | Install the Windows XP driver | Install the Vista driver
Install the Windows 7 driver | Install the Windows 8 driver
Install the Windows 10 driver
Update the Windows XP driver | Update the Vista driver
Update the Windows 7 driver | Update the Windows 8 driver
Update the Windows 10 driver
Update the Windows 7 driver
- With the Smart Card reader connected, the old driver that is built in inside the operating system will be installed automatically.
- From the Start Menu, open the Control Panel.
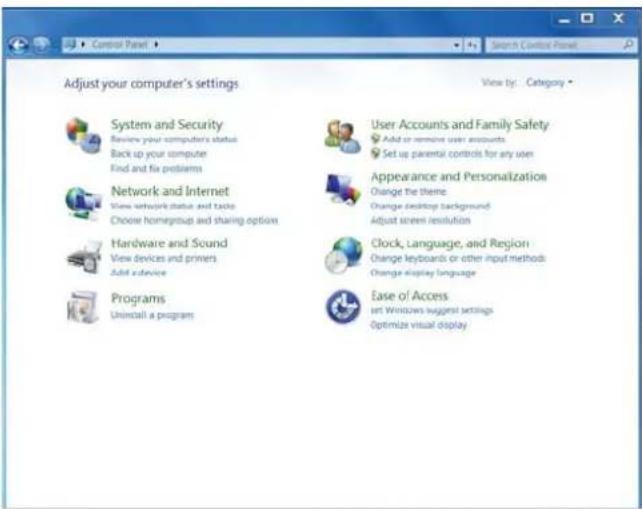
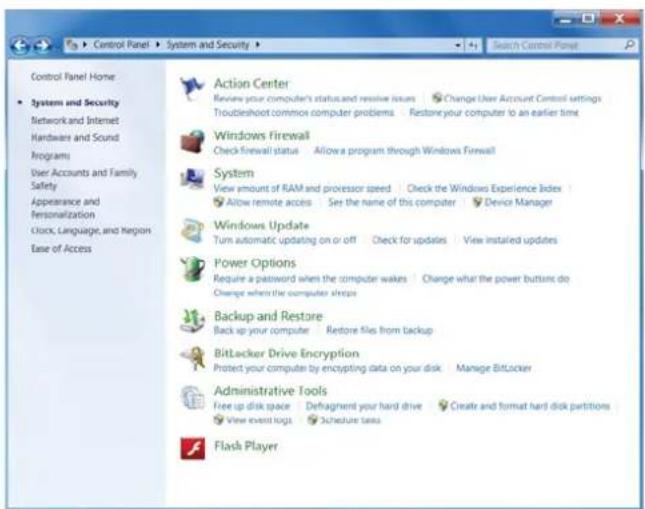
- Double click System and Security. The following window will be shown:
Install the Keyboard | Install the Windows XP driver | Install the Vista driver Install the Windows 7 driver | Install the Windows 8 driver Install the Windows 10 driver
Update the Windows XP driver | Update the Vista driver
Update the Windows 7 driver | Update the Windows 8 driver
Update the Windows 10 driver
Update the Windows 7 driver
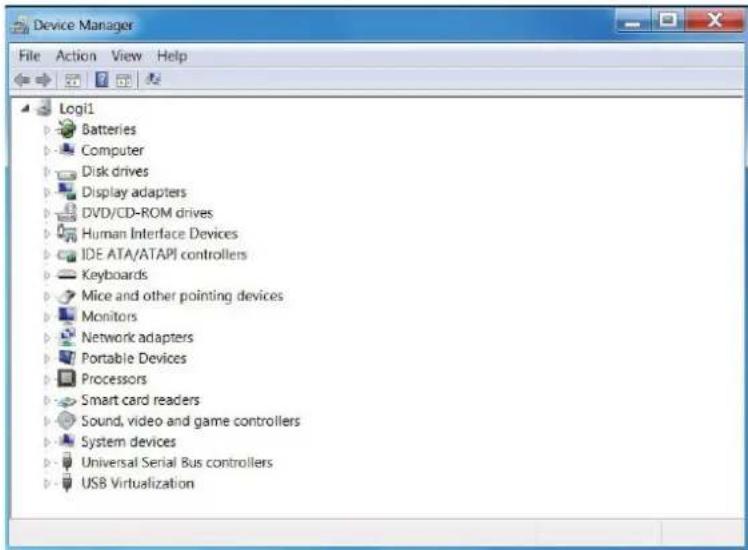
4. Select Device Manager under System. The following screen displays:
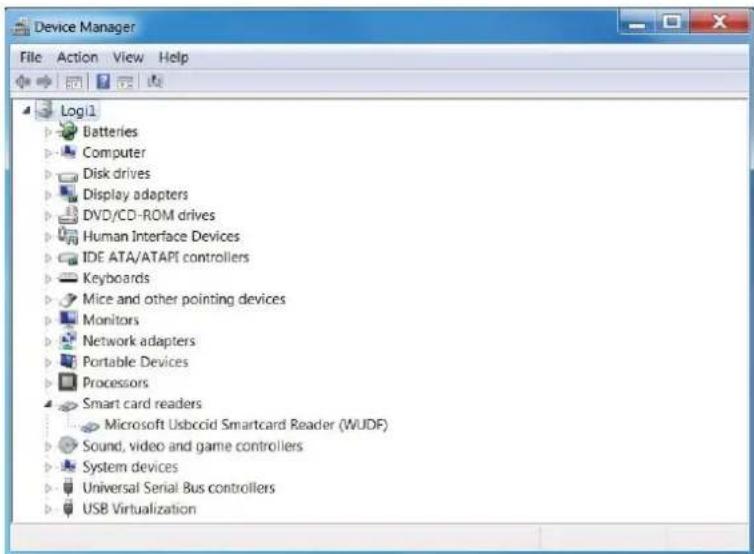
5. Select Smart card readers. The following screen will be shown:
Install the Keyboard | Install the Windows XP driver | Install the Vista driver
Install the Windows 7 driver | Install the Windows 8 driver
Install the Windows 10 driver
Update the Windows XP driver | Update the Vista driver
Update the Windows 7 driver | Update the Windows 8 driver
Update the Windows 10 driver
Update the Windows 7 driver
- Click on your right button of the device. The display shows as follows:
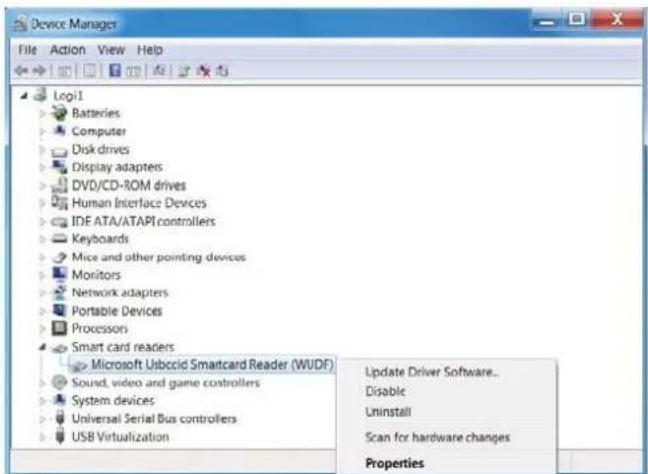
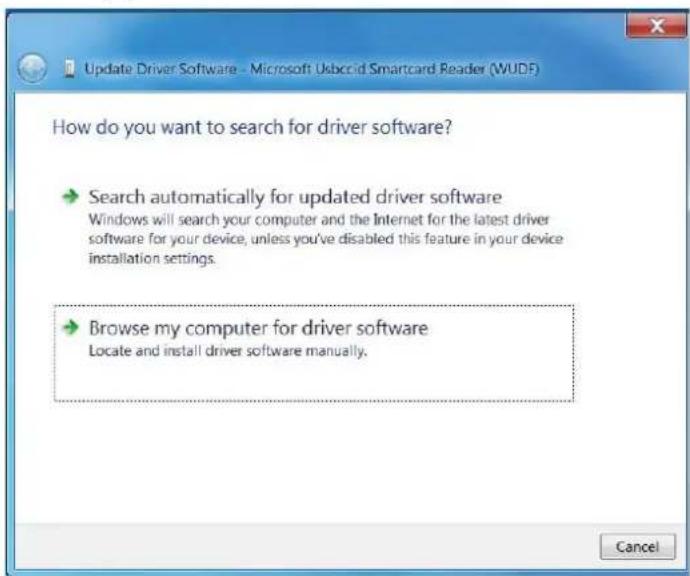
- Select Update Driver. Then, the following window will appear:
Install the Keyboard | Install the Windows XP driver | Install the Vista driver Install the Windows 7 driver | Install the Windows 8 driver Install the Windows 10 driver
Update the Windows XP driver | Update the Vista driver Update the Windows 7 driver | Update the Windows 8 driver Update the Windows 10 driver
Update the Windows 7 driver
- Insert the drivers CD into the CD/DVD drive, browse to the Drivers folder, select Windows, and click Next.
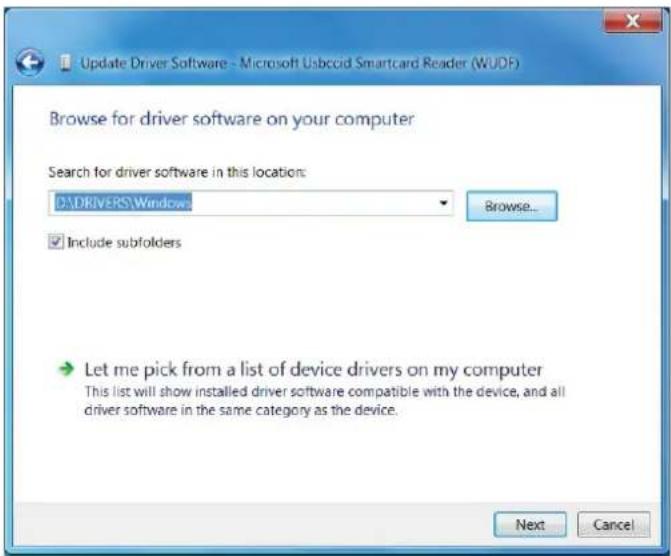
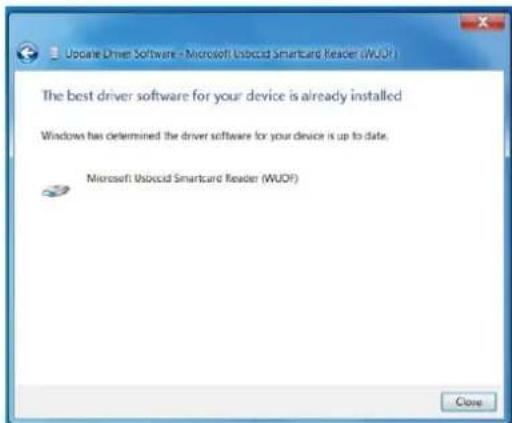
- Select Next. The installation wizard will install the driver. After a successful installation, the system will prompt you with the following message, and the device is ready to use.
Install the Keyboard | Install the Windows XP driver | Install the Vista driver Install the Windows 7 driver | Install the Windows 8 driver Install the Windows 10 driver
Update the Windows XP driver | Update the Vista driver
Update the Windows 7 driver | Update the Windows 8 driver
Update the Windows 10 driver
Update the Windows 8 driver
-
With the Smart Card reader connected, the old driver that is built in inside the operating system will be installed automatically.
-
Open the Control Panel.
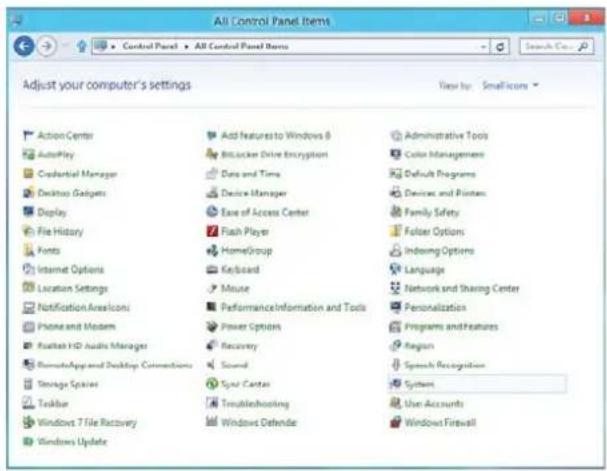
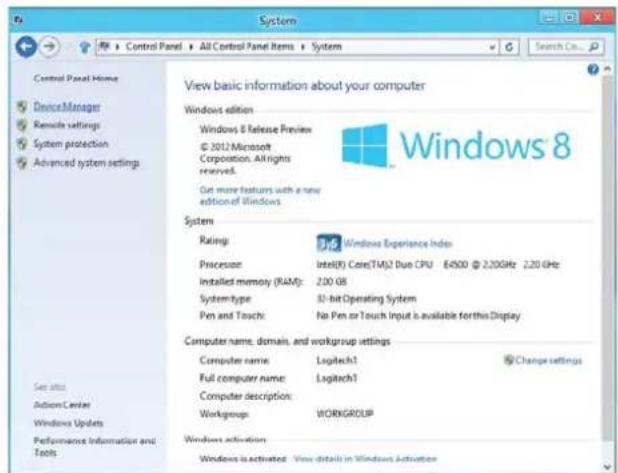
- Double click System. The following window will be shown:
Install the Keyboard | Install the Windows XP driver | Install the Vista driver Install the Windows 7 driver | Install the Windows 8 driver Install the Windows 10 driver
Update the Windows XP driver | Update the Vista driver Update the Windows 7 driver | Update the Windows 8 driver Update the Windows 10 driver
Update the Windows 8 driver
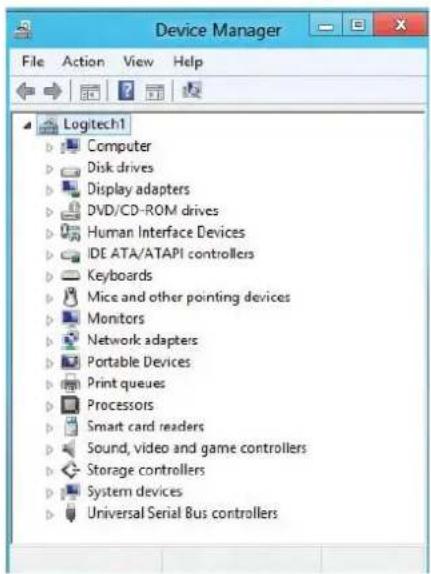
4. Select Device Manager under System. The following screen displays:
Install the Keyboard | Install the Windows XP driver | Install the Vista driver
Install the Windows 7 driver | Install the Windows 8 driver
Install the Windows 10 driver
Update the Windows XP driver | Update the Vista driver
Update the Windows 7 driver | Update the Windows 8 driver
Update the Windows 10 driver
Update the Windows 8 driver
5. Select Smart card readers and right click on the device. The device shows as follows:
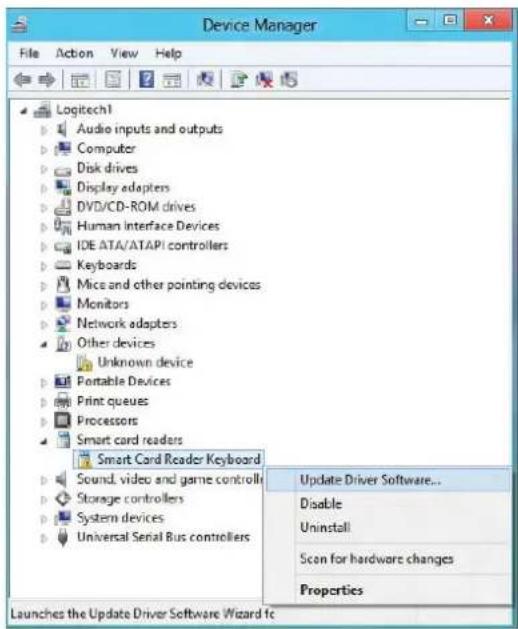
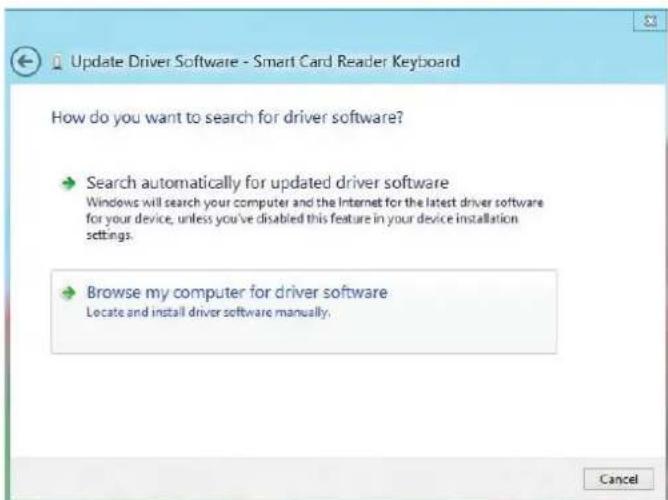
6. Select Update Driver, then the following window will appear:
Install the Keyboard | Install the Windows XP driver | Install the Vista driver Install the Windows 7 driver | Install the Windows 8 driver Install the Windows 10 driver
Update the Windows XP driver | Update the Vista driver
Update the Windows 7 driver | Update the Windows 8 driver
Update the Windows 10 driver
Update the Windows 8 driver
- Insert the drivers CD into the CD/DVD drive, browse to the Drivers folder, select Windows, and click Next.
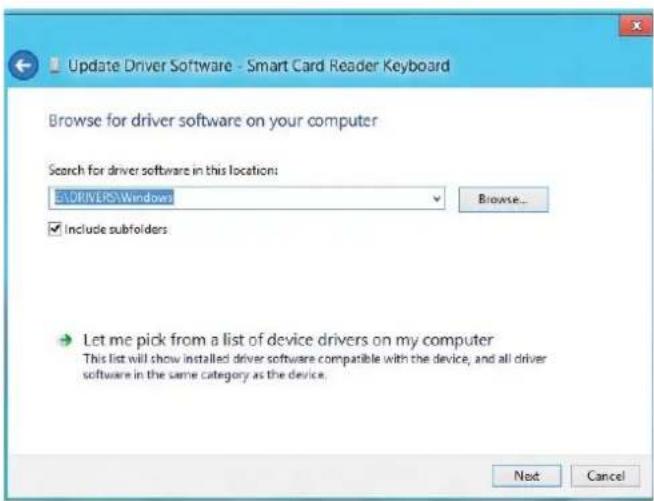
- The installation wizard will install the driver. After a successful installation, the system will prompt you with the following message and your device is now ready to use.
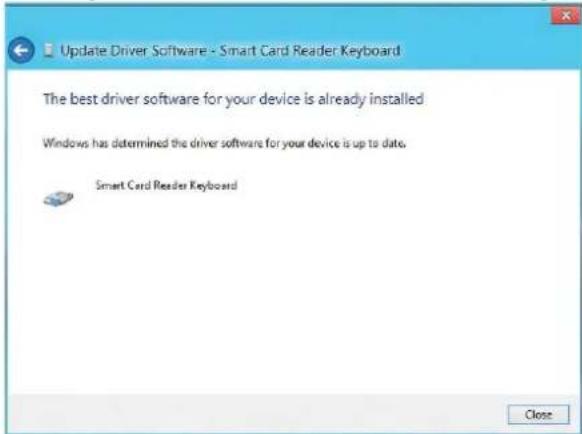
Install the Keyboard | Install the Windows XP driver | Install the Vista driver Install the Windows 7 driver | Install the Windows 8 driver Install the Windows 10 driver
Update the Windows XP driver | Update the Vista driver
Update the Windows 7 driver | Update the Windows 8 driver
Update the Windows 10 driver
Update the Windows 10 driver
- With the Smart Card reader connected, the old driver that is built in inside the operating system will be installed automatically.
- Open the Control Panel.
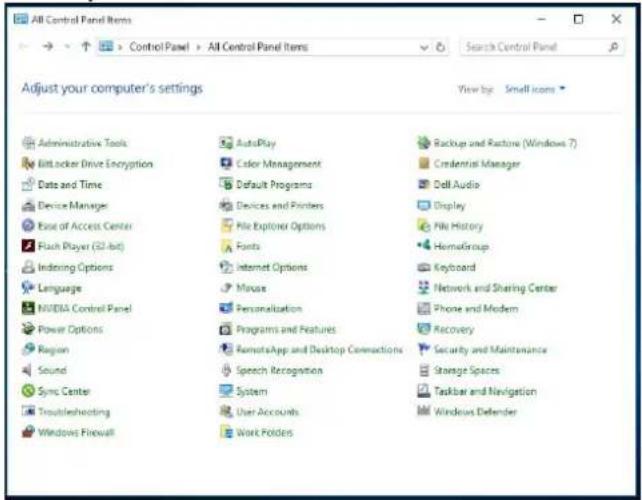
- Double click System. The following window will be shown:
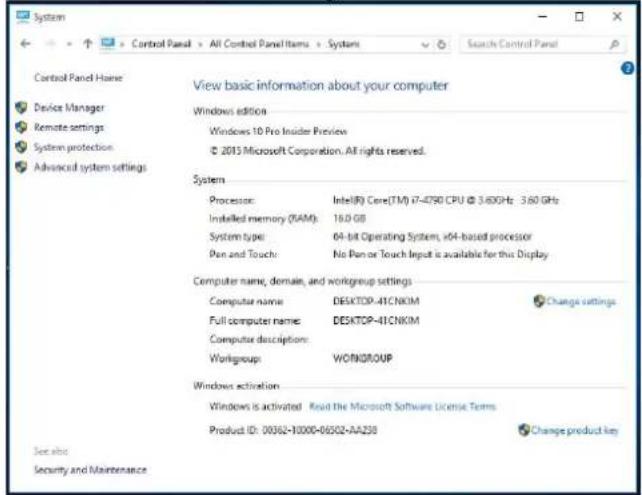
Install the Keyboard | Install the Windows XP driver | Install the Vista driver Install the Windows 7 driver | Install the Windows 8 driver Install the Windows 10 driver
Update the Windows XP driver | Update the Vista driver Update the Windows 7 driver | Update the Windows 8 driver Update the Windows 10 driver
Update the Windows 10 driver
4. Select Device Manager under System. The following screen displays:
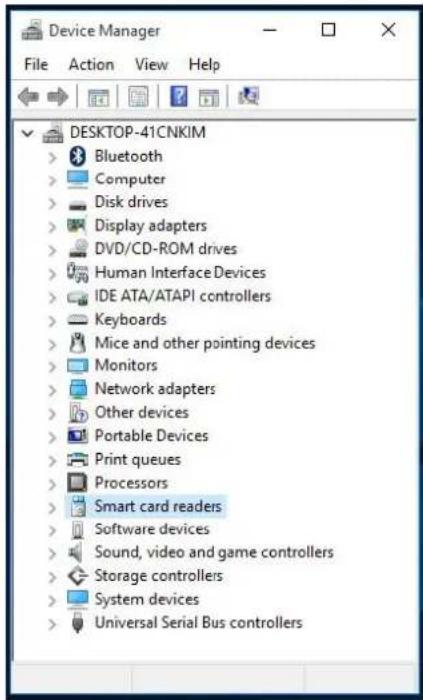
Install the Keyboard | Install the Windows XP driver | Install the Vista driver
Install the Windows 7 driver | Install the Windows 8 driver
Install the Windows 10 driver
Update the Windows XP driver | Update the Vista driver
Update the Windows 7 driver | Update the Windows 8 driver
Update the Windows 10 driver
Update the Windows 10 driver
5. Select Smart card readers and right click on the device. The device shows as follows:
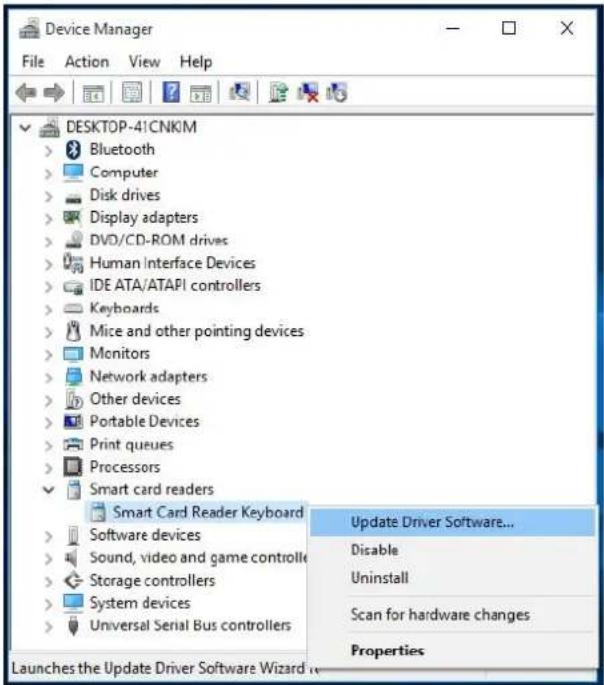
6. Select Update Driver, then the following window will appear:
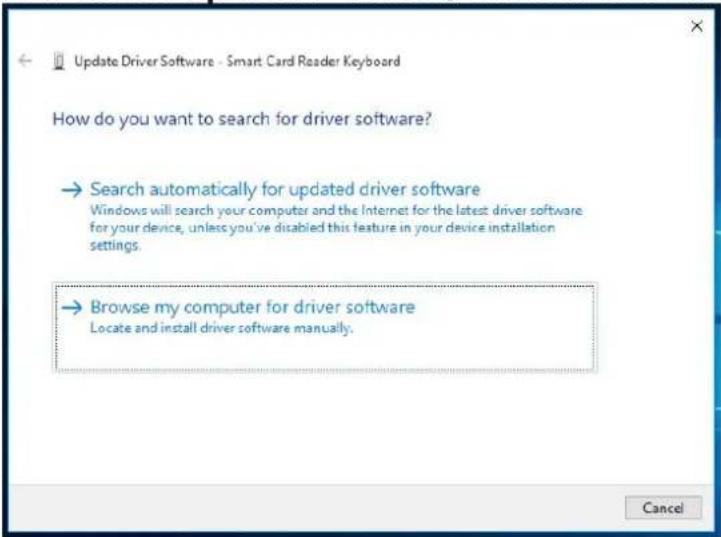
Install the Keyboard | Install the Windows XP driver | Install the Vista driver
Install the Windows 7 driver | Install the Windows 8 driver
Install the Windows 10 driver
Update the Windows XP driver | Update the Vista driver
Update the Windows 7 driver | Update the Windows 8 driver
Update the Windows 10 driver
Update the Windows 10 driver
- Insert the drivers CD into the CD/DVD drive, browse to the Drivers folder, select Windows, and click Next.
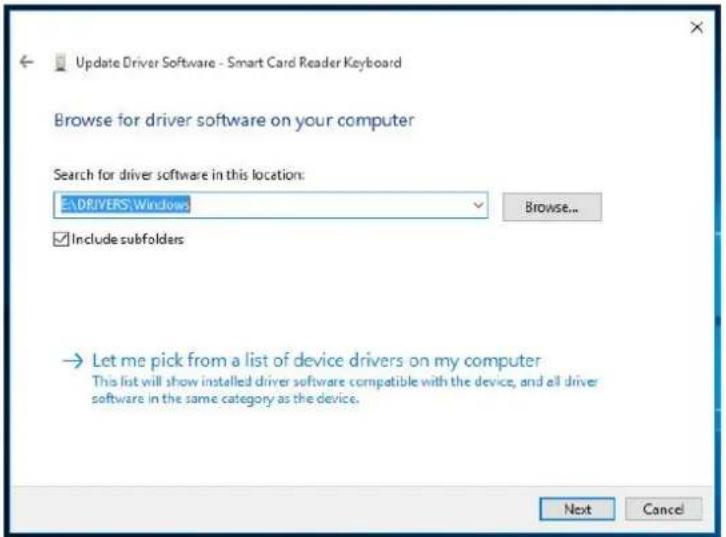
- The installation Wizard will install the driver. After a successful installation, the system will prompt you with the following message and your device is now ready to use.
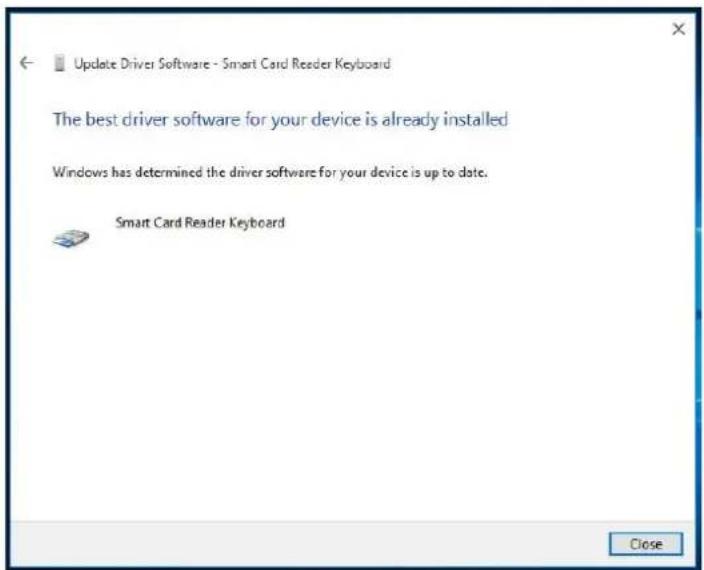
Install the Keyboard | Install the Windows XP driver | Install the Vista driver
Install the Windows 7 driver | Install the Windows 8 driver
Install the Windows 10 driver
Update the Windows XP driver | Update the Vista driver
Update the Windows 7 driver | Update the Windows 8 driver
Update the Windows 10 driver
Using the Smart Card Keyboard
Box Contents
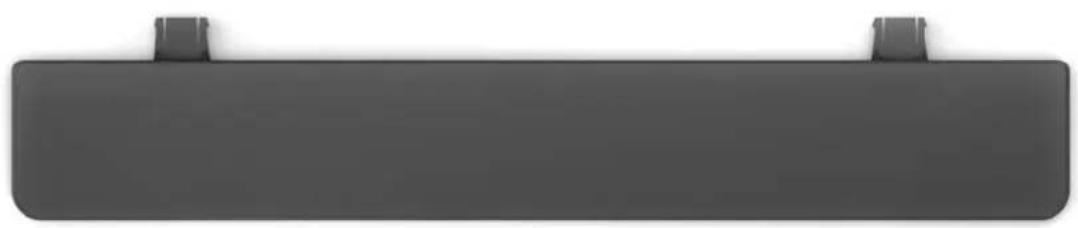
The Smart Card Keyboard includes the following items:
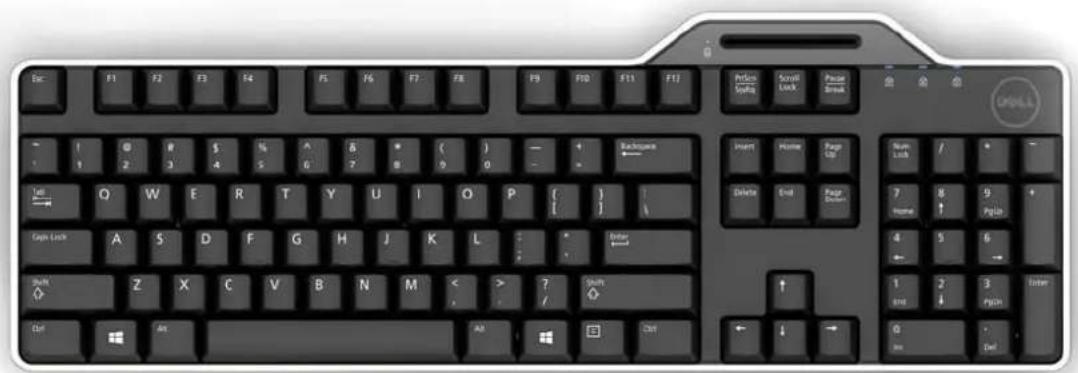
natural_image
Gray rectangular object with two small clips at the top (no text or symbols)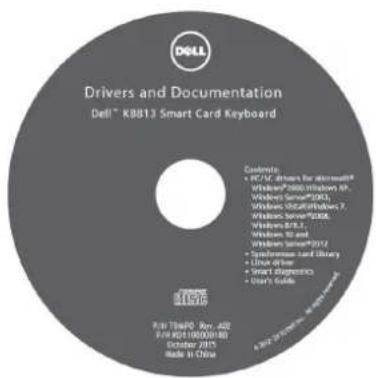
Open the package and remove the contents to begin the installation.
Box Contents | Connect Keyboard | Attach Palm Rest Inserting a Smart Card | LED indicator | The Windows Keys
Connect Keyboard
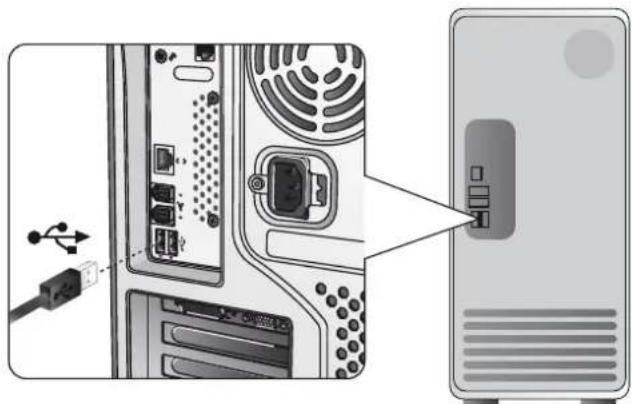
- Connect the keyboard to any USB port on the computer.
- The USB port shown in the diagram is at the rear of the computer. USB ports may also be located at the front.
natural_image
Diagram showing a computer tower with an attached drive and USB cable, no text or symbols presentAttach Palm Rest
- As an option, you may attach the Palm Rest to the keyboard as shown.
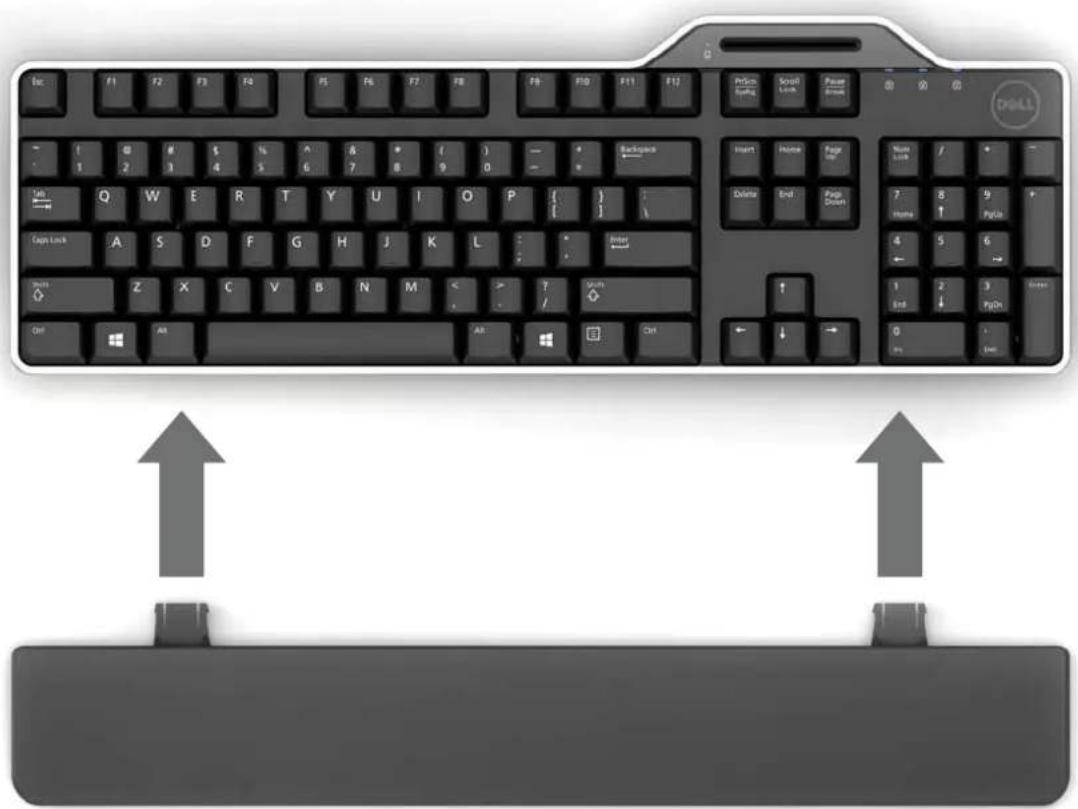
Inserting a Smart Card
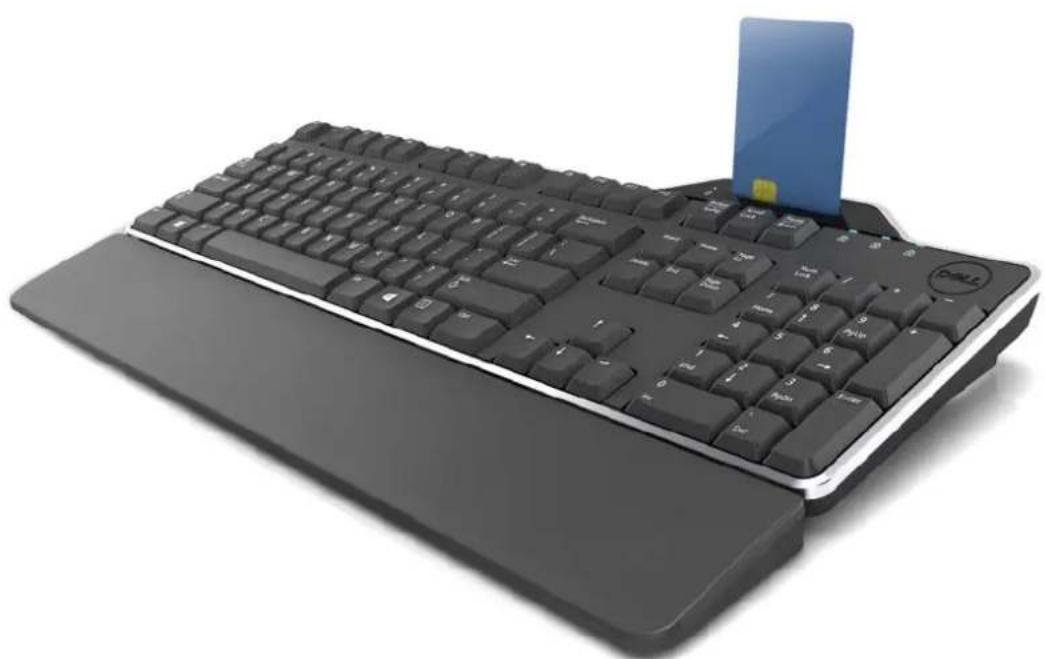
To insert a smart card in the Dell Smart Card keyboard, the side of the smart card with the metallic part (contacts) must face you. In the case of a credit card, your name must face you.
natural_image
Black computer keyboard with a blue card attached, no visible text or symbols on the keys or background.If the Dell Smart Card Keyboard is installed properly (see section Setup) and the smart card is inserted correctly, the smart card indicator LED should turn blue (see section LED Indicator for details about smart card indicator).
Box Contents | Connect Keyboard | Attach Palm Rest Inserting a Smart Card | LED indicator | The Windows Keys
LED indicator
On the Dell Smart Card Keyboard, there are four LED indicators:
- Three standard keyboard LEDs: Num Lock, Caps Lock, and Scroll Lock.
- One additional LED (2 colors) to indicate the smart card interface status as below:
| LED status Description | |
| OFF Smart Card is OFF or absent | |
| Blue ON Smart Card is present and powered on | |
| Blue Flashing Smart Card is used | |
| Amber ON Secure PIN Entry procedure : this is the safe moment to enter your PIN code |
The Windows Keys and Applications Keys
There are three specific keys on the keyboard for more convenient use, as described below. The two Windows logo keys located on the keyboard could be used in combination with other keys.
| Key Combinations Function | |
| One Application key The same shortcut menu as right-clicking | |
| the desktop while pressing this key | |
| Windows key Start | Menu |
| Windows key + E Windows Explorer | |
| Windows key + F Find Document | |
| Windows key + M Minimize All | |
| Windows key + R Display Run Dialog Box | |
| Windows key + F1 Display Help Menu | |
| Windows key + TAB Activate Next Taskbar Button | |
| Windows key + Ctrl + F Find Computer | |
| Windows key + Shift + M Undo Minimize All | |
| Windows key + Pause/Break Perform a System Function | |
Diagnostic and Troubleshooting
Diagnostics
NOTE 1: The diagnostic program needs to be installed on your system from the CD.
NOTE 2: Run this diagnostic software if you are having issues using smart cards with your application. It will be able to determine if the smart card software and hardware are loaded and functioning properly.
Install the Diagnostic Program
- To install the diagnostic program in the CD-ROM.
Click DIAGNOSTICS folder, and select the desired language. Then, launch the SmartDiag.msi under the desired language folder.
- Click "Next."
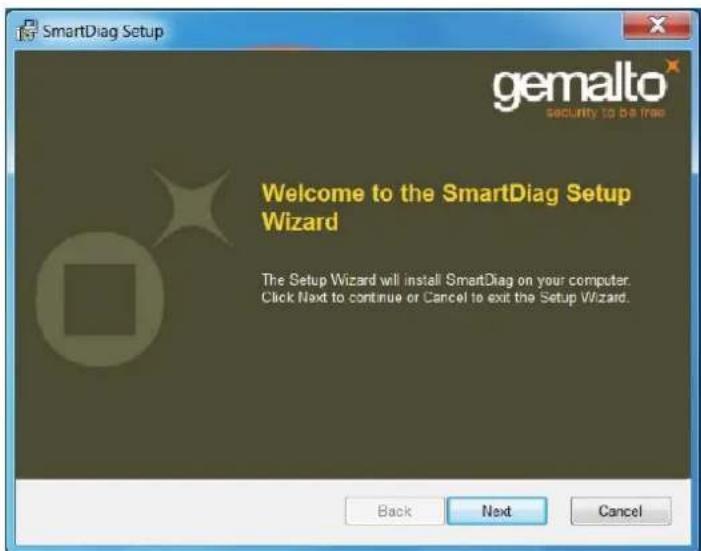
Diagnostic and Troubleshooting
3. Click Next.
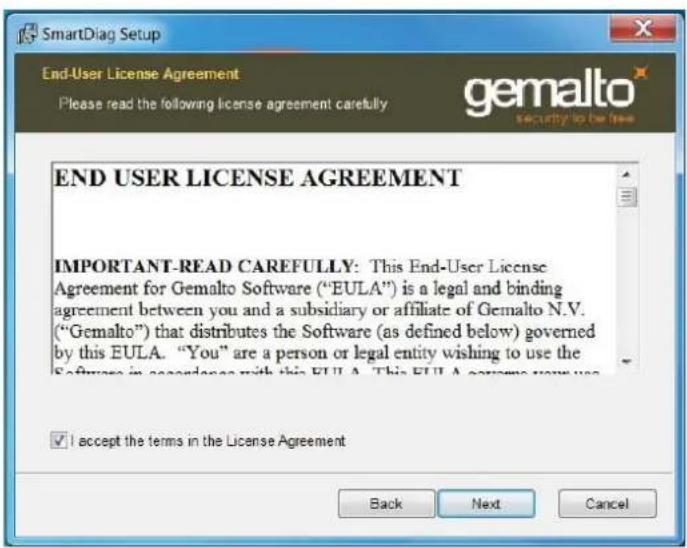
4. Read the agreement and then click Install.
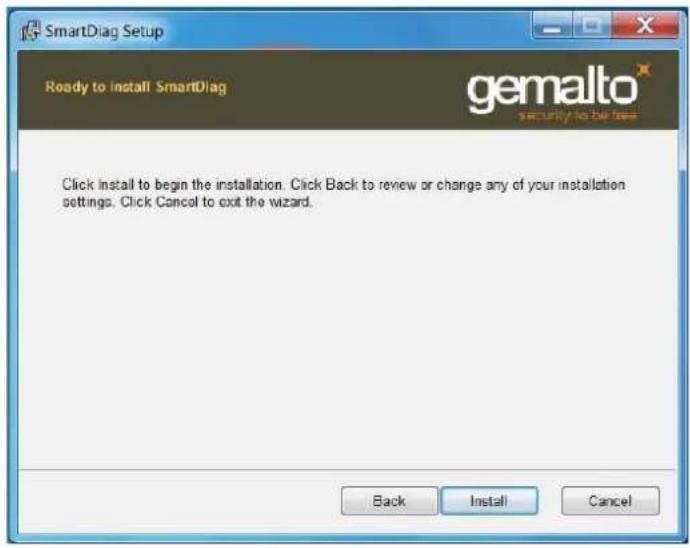
Diagnostic and Troubleshooting
5. Then installation starts.
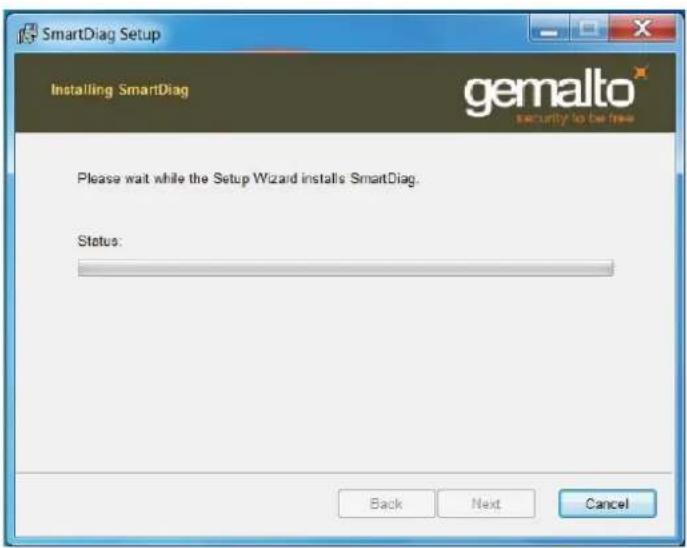
6. Installation completed.
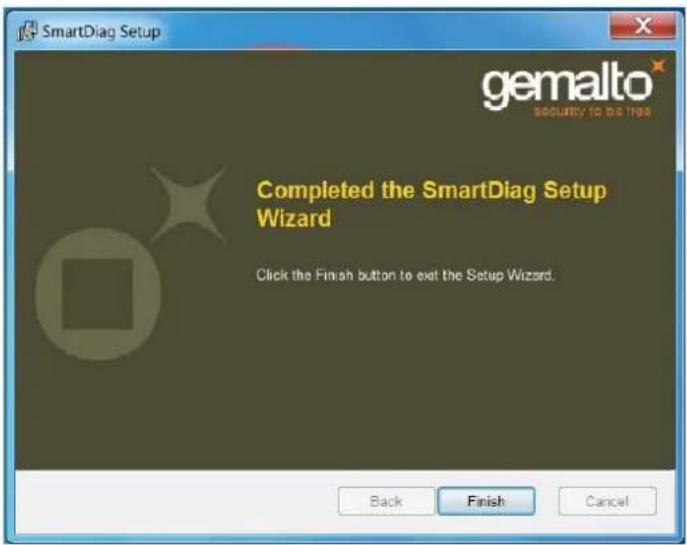
Diagnostic and Troubleshooting
7. Click Finish.
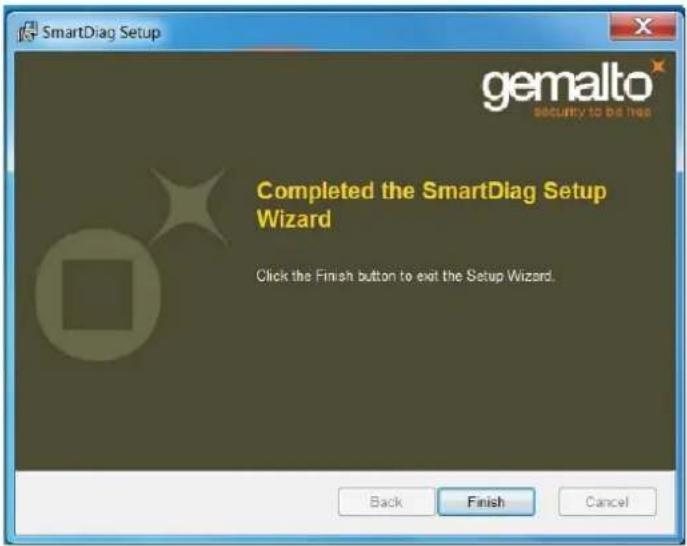
Run SmartDiag 2.4
- Execute the diagnostic software SmartDiag.
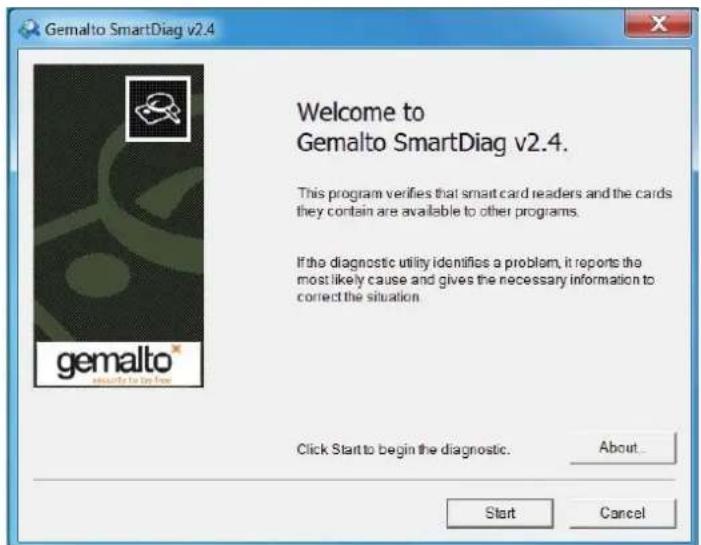
Diagnostic and Troubleshooting
2. Click Start.
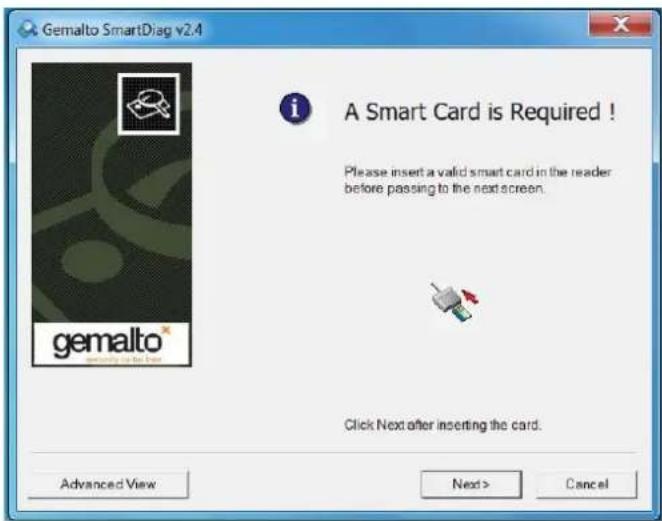
- If no smart card is present, the above screen will appear. Insert a smart card and click Next.
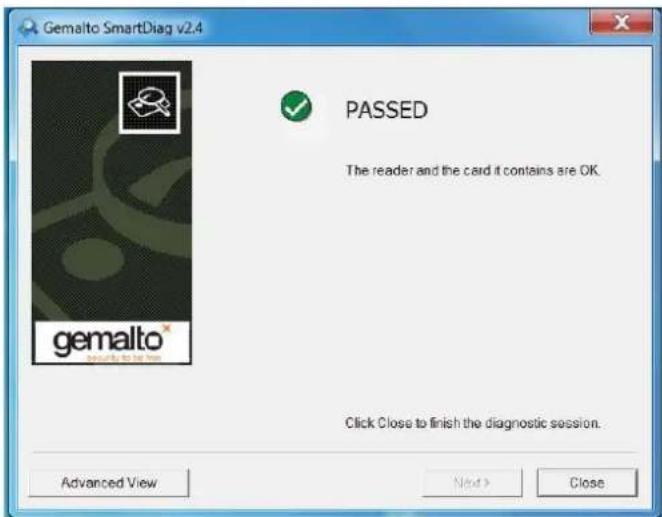
Diagnostic and Troubleshooting
If the smart card reader and smart card have Passed, this means the software and hardware are both working properly. Failed means the smart card driver or the hardware is not present or is not installed correctly. If this occurs, go to www.dell.com/support to resolve this problem.
Smart Card Present: (when Advanced view selected from the screen above)
![Gemalto SmartDiag v2.3 Action Report Help VISTA86-PC Dell Dell Smart Card Reader 1 [Unregistered Card] System Dell Dell Smart Card Reader Keyboard 0 The reader is available for use. Possible Actions: What's this? Property Name Value Vendor Dell Type USB Device Maximum Data Rate 344086 Model Dell Smart Card Reader Keyboard Ready](/content/2026/05/762565/images/c1aadf5ce14f48fe31e0d495fd756a1d6406615b28d1e663557eb49f817e1043.jpg)
The above screen shows that the smart card is inserted and the system is able to read the smart card.
Diagnostic and Troubleshooting
Smart Card Removed
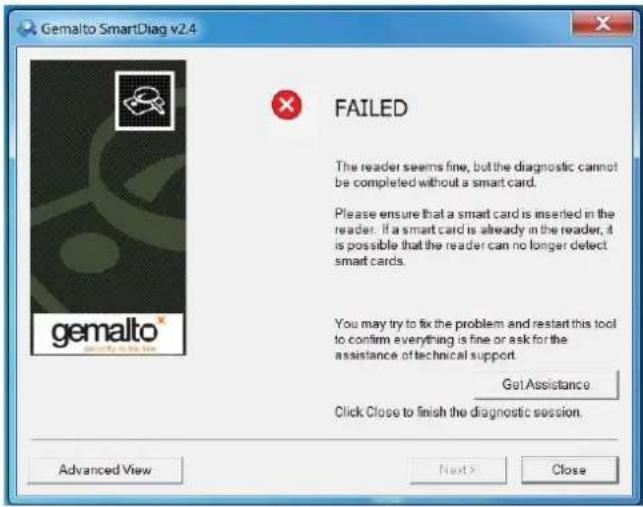
When the smart card is removed, the above screen will appear.
Diagnostic and Troubleshooting
Troubleshooting
My smart card is not detected.
A. The driver may not be installed or you may not be using the correct driver. Reinstall the driver (see Reinstall the Driver).
B. The reader could be contaminated. Extract and reinsert the smart card several times to dislodge any contaminants such as dust or foreign objects.
C. The smart card chip is damaged. Obtain a new smart card.
My smart card is detected, but does not work.
A. The smart card is not inserted correctly. The smart card must be inserted chip-end first. See diagram (section Inserting a smart card)
B. The smart card contacts may be dirty and need to be cleaned. To clean the smart card contacts use a dry tissue.
C. The smart card chip is damaged. Obtain a new smart card.
I can see the Dell Smart Card Keyboard in Windows device manager, but I cannot communicate with the smart card.
If this occurs, it is possible that the Microsoft Smart Card Resource Manager did not start. Type net start scardsvr.exe in the run dialog box. Once the Smart Card Resource Manager has been successfully started, the smart cards should be accessible. On the next boot, the resource manager should auto start.
The Dell Smart Card Keyboard LED goes solid green for a few seconds when I insert a smart card and then goes off again.
This is normal Operating System behavior. Please refer to Usage section of the User's Guide regarding LED indicators.
The Dell Smart Card Keyboard is not functioning under Windows NT4.0.
Windows NT4.0 does not support USB interfaces (see System Requirements).
Specifications
General
| Manufacturer | Liteon |
| Model number | KB813t |
| Connection type | USB |
| Supported operating systems | Microsoft Windows 2000, Microsoft Windows XP, Windows Vista, Windows 7, Windows 8, Windows 10, Microsoft Windows Server 2003, Windows Server 2008, Microsoft Server 2012, Linux Ubuntu, OpenSuse and RedHat |
| Keyboard interface | USB |
| Keyswitch feeling | Rubber dome tactile feedback |
| Rollover | Pseudo 6-key rollover capability |
Electrical
| Power requirements | 4.75 to 5.25 Vdc (through PC USB port) |
| Power consumption | 100mA max. |
| Switch actuation force | 59 g ± 12g |
Physical
| Height | 40 mm |
| Width | 446.5 mm |
| Depth | 151.5 mm |
| Weight | 670 g |
| Cable length | 1.8 m |
Environmental
| Operating temperature | -10 oC ~ 50 oC |
| Storage temperature | -40 oC ~ 65 oC |
| Operating humidity Storage humidity | 0 ~ 90% RH, non condensing0 ~ 90% RH, non condensing |
Reliability
| Card Reader Insertion Life | 100K times |
Regulatory
Regulatory Model : KB813t
Regulatory Notices
For additional regulatory information, see the Regulatory Compliance home page on www.dell.com at the following location: www.dell.com/regulatory_compliance
Certifications
Microsoft WHQL Logo
The Dell Smart Card Keyboard/Reader has passed WHQL logo testing by Microsoft Windows Hardware Quality Labs.
WHQL Logo is a certification provided by Microsoft Windows Hardware Quality Labs. This logo ensures that the hardware and accompanying software for the Dell Smart Card Keyboard are compatible with Microsoft Operating Systems.
EMV Level 1 Compliance
The Dell Smart card Keyboard is EMV Level 1 compliant.
EMV certification ensures security for customer card payments by reducing fraudulent transactions on counterfeited or lost/stolen cards.
USB IF Compliance
The Dell Smart Card Keyboard is compliant with USB Logo Testing Requirements.
The compliance testing ensures the quality of products and compatibility with other USB peripherals.
FIPS 201 Certification
The Dell Smart Card Keyboard is FIPS201 compliant.
FIPS 201 is a United States Federal Government standard that specifies Personal Identity Verification (PIV) requirements for Federal employees and contractors. The certification makes the product meet the standard.

- Setup
- Install the Keyboard
- System Requirements
- Features
- Install the Windows XP driver
- Install the Vista driver
- Install the Windows 7 driver
- Install the Windows 8 driver
- Install the Windows 10 driver
- Update the Windows XP driver
- Double click System. The following window will be shown:
- Select Hardware. The following screen displays:
- Select Device Manager.
- The following screen will be shown. Select Smart card readers.
- Right click on Smart Card Reader Keyboard.
- Update the Windows Vista driver
- Select System and Maintenance.
- Select Smart Card readers.
- Right click on USB Smart Card reader. The display shows as held display shows as
- Select Update Driver Software.
- Update the Windows 7 driver
- Select Device Manager under System. The following screen displays:
- Select Smart card readers. The following screen will be shown:
- Update the Windows 8 driver
- Select Smart card readers and right click on the device. The device shows as follows:
- Select Update Driver, then the following window will appear:
- Update the Windows 10 driver
- Connect Keyboard
- Attach Palm Rest
- Inserting a Smart Card
- LED indicator
- The Windows Keys and Applications Keys
- Diagnostic and Troubleshooting
- Diagnostics
- Install the Diagnostic Program
- Click Next.
- Read the agreement and then click Install.
- Then installation starts.
- Installation completed.
- Click Finish.
- Run SmartDiag 2.4
- Click Start.
- Smart Card Present: (when Advanced view selected from the screen above)
- Smart Card Removed
- Troubleshooting
- My smart card is not detected.
- My smart card is detected, but does not work.
- I can see the Dell Smart Card Keyboard in Windows device manager, but I cannot communicate with the smart card.
- The Dell Smart Card Keyboard LED goes solid green for a few seconds when I insert a smart card and then goes off again.
- The Dell Smart Card Keyboard is not functioning under Windows NT4.0.
- Specifications
- Regulatory
- Regulatory Notices
- Certifications
- Microsoft WHQL Logo
- EMV Level 1 Compliance
- USB IF Compliance
- FIPS 201 Certification
Brand : DELL
Model : KB813
Category : Keyboard