
TF-TV1212 - TV COBY - Free user manual and instructions
Find the device manual for free TF-TV1212 COBY in PDF.


| Product Type | LCD Television |
| Brand | Coby |
| Model | TF-TV1212 |
| Screen Size | 12.5 inches |
| Resolution | 1280 x 800 pixels |
| Display Type | TFT LCD |
| TV Tuner | NTSC (analog) and ATSC (digital) |
| Audio Output | 2 x 2W speakers |
| Power Consumption (Working) | 33W |
| Power Consumption (Standby) | <2W |
| Power Supply | AC 100-240V, 50/60Hz; DC 12V/3A via adapter |
| Inputs | RF Antenna, Composite Video (RCA), S-Video, VGA, PC Audio In, Line Out |
| Dimensions (W x H x D) | 220 x 125 x 385 mm |
| Weight | 5500 g (5.5 kg) |
| Remote Control Battery | 2 x AAA (not included) |
| Operating Temperature | 10°C to 40°C |
| Antenna Input Impedance | 75 ohms |
| Cleaning Instructions | Wipe with a dry soft cloth; do not use liquids |
| Safety Notices | Do not block ventilation; avoid moisture; use only specified accessories |
| Spare Parts and Repairability | Contact qualified service personnel; no user-serviceable parts inside |
Frequently Asked Questions - TF-TV1212 COBY
User questions about TF-TV1212 COBY
0 question about this device. Answer the ones you know or ask your own.
Ask a new question about this device
Download the instructions for your TV in PDF format for free! Find your manual TF-TV1212 - COBY and take your electronic device back in hand. On this page are published all the documents necessary for the use of your device. TF-TV1212 by COBY.
USER MANUAL TF-TV1212 COBY
Important Safety Instruction
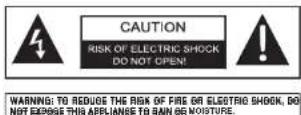

The lightning flash with arrowhead symbol, within an celestial triangle, is intended to use the user to the presence of unmarkedable 'dengreous voltage' within the product's enclosure that may be of sufficient magnitude to constitute a risk of electrons in persons.

The extension point will then an equalized angle is intended to slit the user to the presence of important operating and maintenance (passing) maintain in the literature accompanying the appearance.
CAUTION:
These servicing instructions are for use by qualified service personnel only. To reduce the risk of electric shock, do not perform any servicing other than that contained in the operating instructions unless you are qualified to do so. Refer to manual for servicing instructions.
POWER SUPPLY:
Connect one end of the supplied AC adapter to the DC12V jack on the unit side panel and the other end to the AC100-200V wall cuts. If the unit will not be used for a long time, decrease the plug from the socket.
POWER MANAGEMENT
Before plugging the power card into the AC outlet, more sure that all the connections have been properly made. If the unit will not be used for a long period of time, disconnect the power and remove the battery use from the remote.
Important Safety Instruction
-
Read these instructions.
-
Keep these instructions.
-
Head all warnings.
-
Follow all instructions.
-
Do not use near water.
-
Close only with dry cloth
-
Do not block any ventilation openings. Maintain well ventilated conditions around the product. Do
not out product on bed, so/s or anything that blocks ventilation. Install acceptance to instructions.
- Do not install near any heat sources such as radiators, heat registers, sloves, or other apparatus
including simply, that produced here.
- Do not defeat the safety purpose of the polarized or grounding-type plug. A polarized plug has two
blades with one wider than the other. If the provided plug does not fill into your outlet, consult an electrician for replacement of the obsolete outlet.
- Protect the power cord from being walked on or pinched particularly all plugs, convenience receptacles.
and the point where they exit from the apparatus.
-
Only use attachments/accessories specified by the manufacturer.
-
Use only with the part, stand, tripod, bracket, or table specified by the manufacturer, or sold with the
apparatus. When a cart is used, use caution when moving the cartiagratus combination to avoid
injury from the season
-
Unlike this apparatus during lightning storms or when unused for long periods of time.
-
Refer all services to qualified service personnel. Service is required when the apparatus has
base pharmacol in any use, such as power-supply cord or plan is, pharmacol liquid has been spilled
or rhinitis have fallen into the apparatus, the apparatus just been acquired to rain or moisture.
class pol operate marginally, or has been charged.
- Apparatus shall not be exposed to dropping or splashing and no objects filled with liquids, such as
vases, shall be placed on the apparatus.
Copyright Protection
Unauthorized copying, broadcasting, public performance, and lending of disks are prohibited. This
product incorporates copyright protection technology that is protected by method claims of certain U.S. patents and other intellectual property rights owned by Macrosion Corporation and other rights owners. Use of the copyright protection technology must be authorized by Innovation Corporation, and is intended for home and other limited viewing uses only unless otherwise authorized by
Table of Contents
Table Of Contents
Important Safety Instruction
Lingacking 1
Unit Value
Remore Control 3-4
Cable Connections 5
TV Function 6.9
AV Function 10
PS Function 11
Troubleshooting....12
Specifications 13
Unpacking
Please make sure the following items are included with your LCD TV monitor, if any items are missing, contact your dealer.
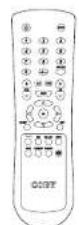
Remote Control
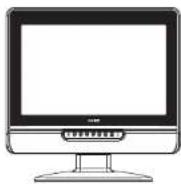
TFT-LCD
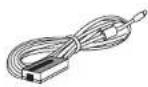
AC Adapter
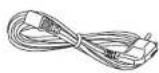
Power Cord
Unit View
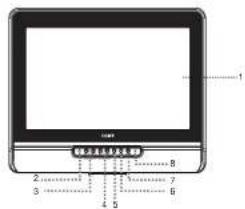
- TIT SCREEN
2 REACTIVE SENSOR
3 VOLUME 4
5 MENU
-
AERO
-
PC6F
-
POWER INDICATOR
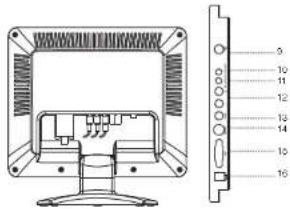
-
TV ARIT DRA
-
LINE OUT JACC
-
P.O ALDIO N
12.6000 IN
- VIDEO
14.9 MEED
- POWER JACK
Remote Control
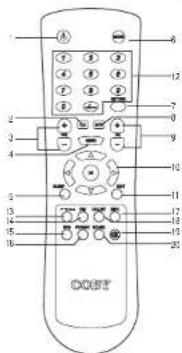
Remote Control Drawing
1 POWER BUTTON
Press to turn the power button.
- CC Bullon
Sol the CC mode (3)
Press to adjust the volume
- MENU button
Press to show the setup menu.
- GLEEP button
Please to set the soap timer. 6. MODE button
Press to select the working mode. (TV, AV, G VIDEO,
FCI
7 RETURN
Press to view the previous channel.
8.1214 Dress to select the TV audio mode
9 CHANNEL ← button
Press to skip channels.
10 Direction & Off hutton
Please the constant claims to keep the carkey Page 136 in currency exchange.
- EXIT button
-
Numeric key part
-
P MODE by 100
Setup the picture mode (Personal, Standard)
Soft. Dynan
- FAV station
Press to show the Favor Channels Ltd. The channel is set on this tel, the
EUNSH does not function.
-
EFG S5004 Power in the
-
FORMAT button
Press to set the screen format. (Normal, Zoom, Cinema, 48).
Lettenor.
- INFO button Press to show the current version slot v
Press 15 show the current working status. 18. CHUST button
Peking to show
- MUTE button
Press to muffle
So S23GRL: Environ Bore to change the sound more.
Remote Control
Remote Control
- Take all, the bark move and insert len A&A ballings and then run on the covers
inser, the patients while surviving the career (+) and ··· relective.
- Under normal use, the battery will last for six months.
Using Remote control
Part the remote to the remove sensor from no more than 7 meters and within about 60 degrees of the front unit.
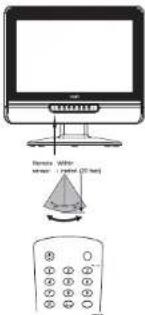
The operating distance may vary depending on the brightness around.
Notes:
Do not point bright lights directly at the remote control sensor.
Do not place objects between the remote control unit and the remote control sensor.
Do not use this remote control unit while simultaneously operating the remote control unit of any other equipment.
Cable Connections
Figure. Cable connections
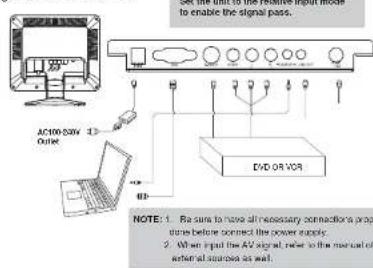
Antenna Connection
Correct: TV RF sources to the antennas por. TV RF signals include: receiving antenna CATV net. You can use 750- positional data to connect a wider antenna.
Line Out - Audio Output
Corried the "Line Out" part to the externs' speaker or the digital distancing amplifier to output sound. Line out cable is not supplied.
AV Signal Input
To input the AV signal, you can choose either the 8 Voice Input or the RDA Input.
The S-Video Input works much better on the image definition than PCA input does.
S-Video - Connect the "S-Video" port by the S-Video cable (not supplied) to input the video signal.
Connect the "Video" port to input the audio signal by the whistened plug of the RCA cable. RCA Connect the "Video" port to input the video signal by the yellow plug of the RCA cable. Connect the "F" port to input the audio signal by the whistened plug of the RCA cable.
VGA Connection (PC Connection)
When used so the computer screen, connected the VGA port by the 15-pin D-SUB square table and the PC Audio In port by the audio table.
Power Connection
I used one end of the adaptor to the 12V jacks at the unit and the other end to the wall outlet with AC-100-240V. If the unit will not be used for long period of time, please disconnect the power.
TV Function
TV Function
Preparations
-
Connect the antenna to the antenna ask on the unit side panel
-
Connect the power supply cord. Press POWER to turn on the line player.
-
Press MODE or the remote to select TV
-
Press CH1 buttons to skip channels or press numeric buttons to input channel directly.
Setup Menu
Various features can be prosel through the TV setup menu.
TV setup menu consists of six menus. They are Picture Menu, Audio Menu, Time Menu, Option Menu, Lock Menu as well as Channel Menu.
-
Press MENU to show the menu window.
-
Press the left-right button to select the menu, press OK to enter the menu.
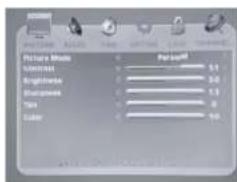
Working with menu
While working with the menu,
-
Pass the update direction button to select the item.
-
Press the left-right direction button to adjust
-
Press MENU to exit.
TV Function
Picture Setup
| ITEM | DESCRIPTION |
| Picture Mode | Setup the picture mode (Personal, Standard, Soft, Dynamic) |
| Compact | Adjust the compact Compact |
| Brightness | Adjust the brightness brightness |
| Sharpness | Adjust the display definition. |
| Tilt | Adjust the Image color. |
| Color | Adjust the display color. |
Audio Setup
| ITEM | DESCRIPTION |
| Sound Media Setup | the sound music as Music, Movie, Personal, Standard. |
| Bass Setup the base effect | |
| Table Setup the middle effect | |
| Balance Adjust the sound balance. | |
| Audio Language Setup the audio language (English, French, Danish) | |
Time Setup
| ITEM | DESCRIPTION |
| Sleep Time Select the sleep time, 15:30-6:12-15:40 Min/Min | |
| Time Zone Select the time zone. (Central) Mountain Pacific Alaska Texas Eastern. | |
| Day light Start Sit the time starting function on off. | |
| Time | |
Option Setup
| ITEM | DESCRIPTION |
| OSD Language | Group for OSD language. |
| Transparency | Adjust the OSD transparency |
| Color Mode | Solve the color mode. |
| Zoom Mode | Adjust the display mode / Normal, Zoom, Cinema 43h |
| Chrome Caption | Setup the closed caption type. Refer to "Closed Caption" for details. |
| Features Default | Features setting to the topology default. |
TV Function
Option Setup
Closed Caption Setup
Select "Closed Caption" from the Option menu, press OK to enter
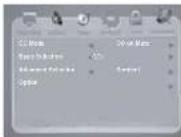
| ITEM | DESCRIPTION | |
| CC Media Setup the CC media, 100 On Multi-Offshore | ||
| Data Selection Select the best CC type (CCI, OUI, CCI, CNN, TXT, TEXT2, TEXT3, TEXT4) | ||
| Advanced Selection Set and the advanced CC type (baseline 1-service 6). | ||
| Option Setup the closest capton type to put out the reverseOption - Method - Default Customer | ||
Lock Setup (Parental Control)
You are required to enter the four-digit password to access the lock function
The initial password is 0000.
After the password is confirmed correct, the screen will display the parental control menu.
| ITEM | DESCRIPTION |
| Change password to the system's name | Used to change the password. Please be a member for this password about the system's name function would not contain the password to the default. |
| System Tools | Set the system book fund on account. |
| Set the book fund on account to access the control control setup | |
| Unrealt Lock | Set the unrealt closed book setup. |
TV Function
Channel Setup
| ITEM | DESCRIPTION |
| Adventor - Bagni & Lander, space & Cull, Cable | |
| Auto Scan, Scan, channels automatics. Press the right direction button to stand matching, press NLSU to stop. | |
| Event in: Make the information source collection. Press the upswing direction button to set and the channel press OK to set. Press OK against release. | |
| Channel Set: Show the increased channels. Press the upswing direction button to set and the channel press OK to set. Press OK against release. | |
| Channel No: Roll the channel level. Channel Label: 1. Solid Channel key, press the lettering direct on button to select the channel. 2. Select Channel label, press the right direction button to show the wall metal. In line name, press the lettering direct on button to move lettering, press the user's direction button to select or unknown. | |
AV Function
AV Function
The player has AV input functions. You can enjoy programs from external input sources.
Connect the external AV signal source to VIDEO or S-VIDEO pack, and then turn on the player and press the MODE button to send the AV input mode. (AV. S-VIDEO)
Setup Menu
Various features can be preset through the AV setup menu.
AV setup menu consists of two menus. They are Picture Menu, Audio Menu, Time Menu, Option Menu as well as Lock Menu.
-
Press MENU to show the menu window.
-
Press the laftight direction button to select the menu, press OK to enter the menu.
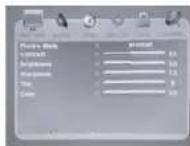
Working with menu
While working with the men.
-
Press the up/down direction button to select the item.
-
Press the left-right direction button to select
-
Press MENU to exit.
Note: Refer to the TV section for details on Picture Setup Audio Setup, Time Setup, Option Setup as well as Lock Setup.
PC Function
PC Function
You can use the TFT LCD as your computer's monitor
-
Shut down the unit and the computer. Connect the unit to the computer VGA jack by the VGA cable
-
Turn on the player and the computer. If the unit is in the standby mode, press POWER button
to switch on. Press the MODE button to select the 'PG' mode.
Setup Menu
Various features can be press, through the PC setup menu.
PG setup menu consists of four mems. They are Picture Menu, Audio Menu, Time Menu as well as
Option E-mail
-
Press MENU to show the menu window.
-
Press the left-right direction button to select the menu, press OK to enter the menu.
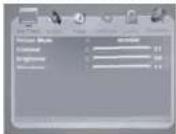
Working with menu
Wals working with the men
-
Press the unclear direction button to select the chem.
-
Press the left-right direction button to actual
-
Penny MENI in 401
Note: Refer to the TV section for details on Picture Setup, Audio Setup, Time Setup as well as Option Setup.
Adjust the PC Screen
Upon switching to the PC mode, the monitor will be automatically regulated for a
proper functioning. If the result is not up to your expectation, please perform the
following steps to adjust the screen manuals
- Select Auto under the PC Selura Menu and press the right button to start
a) by adjusting - Option Menu → B' Selva Menu → Auto
- Call you still have problems with the most often, adjust "H Profile"
(1) "Election" is also well as "Bose" is also very under the
- 2017. The first day of the October 2018
C 302p m/s
Trouble Shooting
| Symptom | Check and Action |
| No power | • Make the unit has been presented on maally. • Check if the power cord has open proprie controlled to the power outlet. • Check if the main power has been sealed with part. |
| No duration | • Try another TV of time. • Check if the system connected to the power and secure. • Check if the connection outside is damaged. |
| For sound | • Increase the volume. • Check if the MUTF member of the air has been activated. • Check if the sound system has been properly used. • Check if the AV set up a great liquid coil has been connected properly. |
| Color distorted | • Repeat the color system of the unit. • Check if the system has been properly connected. • Check if the AV value output input can be transmitted properly. |
| Pictures and sounds are distorted | • Check if the system has been completely connected. • Using sensitive, adjust the actions. |
| Remote control does not work | • Make sure the PCCRT button on the unit has been jumped or manually. • Remove the output between the remote control and the player. • Find the remote control towards the remote sensor on the player. • Check if the outside of the remote control have been locked with control purposes. • Replace the batteries of the remote control. |
| Math function | • Should the player develop a multifunction, unless the player for 30 minutes. After that, power on the player and the case is then on should press the player. |
Design specialist and sexual are stayed to change about previous
Specification
| TFT Portal encampalda | Size | 12.5" | |
| Resolution | 1200x100 | ||
| Max pitch | 0.3960±0.204 | ||
| TV characteristic | TV system | VHSC 8.35E-4.43 (VIDEO IN) | |
| Chronic received | VF-E | 55.25-1.00 (1MHz) | |
| VF-F | 137.60-42.00(1Hz) | ||
| UH | 442.00-15.20(1/2) | ||
| Intermittal frequency | F-score F | 58.3(1/2) | |
| Color | 34.2(70Hz) | ||
| Sound | 59.1(1/4) | ||
| Screening | Frequency | 15700 Hz | |
| Physical | 0Hz | ||
| Antenna frequency | 75.0GHz/Hz | ||
| Turing system | FS with P.L | ||
| Standard | ADC Oscillator | AC input | 100.24V/50.2GHz |
| DC SOUT | 127.3K | ||
| Power consumption | CV working | 3340 (200A) | |
| Stunting | >200 | ||
| Speaker | 2014 (12.3GHz) | ||
| Operating impulse charge | 10 ± 40 Ω | ||
| Dimension | 220x125x385 mm | ||
| Weight | 5500g | ||
| DTV characteristic | DTV system | ATBDCGAM | |
| Chronic received | VHF Lab 20 B (FT to 120MHz) VHF-Han Ch 100(125 to 500 MHz) UHF-ch, LL to 69 (125 to 660 MHz) | ||
| Intermittal frequency | Central F: 44.1MHz | ||

- CAUTION:
- POWER SUPPLY:
- POWER MANAGEMENT
- Important Safety Instruction
- Copyright Protection
- Table of Contents
- Unpacking
- Unit View
- Remote Control
- Remote Control Drawing
- Cable Connections
- Antenna Connection
- Line Out - Audio Output
- AV Signal Input
- VGA Connection (PC Connection)
- Power Connection
- TV Function
- Preparations
- Setup Menu
- Working with menu
- Option Setup
- Lock Setup (Parental Control)
- AV Function
- PC Function
- Adjust the PC Screen
- Trouble Shooting
Brand : COBY
Model : TF-TV1212
Category : TV