
42LX6900 - TV LG - Free user manual and instructions
Find the device manual for free 42LX6900 LG in PDF.


User questions about 42LX6900 LG
0 question about this device. Answer the ones you know or ask your own.
Ask a new question about this device
Download the instructions for your TV in PDF format for free! Find your manual 42LX6900 - LG and take your electronic device back in hand. On this page are published all the documents necessary for the use of your device. 42LX6900 by LG.
USER MANUAL 42LX6900 LG
LCD TV / LED LCD TV / PLASMA TV
Please read this manual carefully before operating your set and retain it for future reference.
Separate purchase
Wall Mounting Bracket
LSW100B or LSW100BG
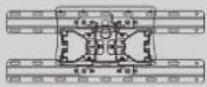
(32LE4***, 32LE5***, 32LE7***, 32LD4***, 32LD6***, 32LD7***, 32LD8***)
LSW200B or LSW200BG
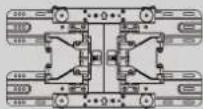
(37/42LE4***, 37/42/47LE5***, 37/42/47LE7***, 42/47LE8***, 37/42LD4***, 37/42/47LD6***, 42/47LD7***, 37/42LD8***, 42/47LX6***)
LSW400B or LSW400BG or DSW400B or DSW400BG
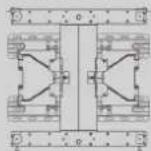
(55LE5***, 55LE7 ***, 55LE8 ***, 55LD6 ***, 55LX9 ***)
LSW200BX or LSW200BXG
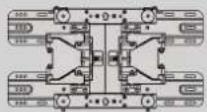
(47LX9***)
PSW400B or PSW400BG or DSW400BG
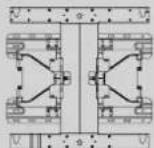
(50PK5 **, 50PK7 ***, 50PK9***, 50PX9 *** )
PSW600B or PSW600BG
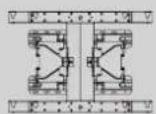
(60PK5**, 60PK7***, 60PK9***, 60PX9***)
Optional extras can be changed or modified for quality improvement without any notification. Contact your dealer for buying these items.
This device only works with compatible LG LED LCD TV, LCD TV, or Plasma TV.
Wireless Media Box (AN-WL100E)
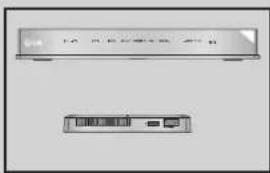
text_image
Scanned image of a device label with Chinese text and a small icon below it.(Except for 32/37/42LD4 ^*** )
Wireless LAN for
Broadband/ DLNA Adaptor (AN-WF100)
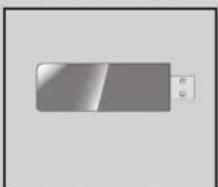
natural_image
Simple grayscale rectangular shape with gradient shading, no text or symbols present.(Except for 50/60PK950, 50/60PK950N, 50/60PK980, 50/60PK990, 50/60PX950N, 50/60PX980, 50/60PX990)
HDMI
HDMI, the HDMI logo and High-Definition Multimedia Interface are trademarks or registered trademarks of HDMI Licensing LLC.
PREPARATION
LED LCD TV Models : 32/37/42LE4***, 32/37/42/47/55LE5***, 32/37/42/47/55LE75**, 32/37/42/47/55LE78**, 32/37/42/47/55LE79**, 42/47/55LE8***, 42/47LX6***....A-1
LCD TV Models : 32/37/42LD4***,
32/37/42/47/55LD6***, 32/42/47LD7***,
32/37/42LD8***....A-15
LED LCD TV Models : 47/55LX9*** ......A-27
LED LCD TV Models : 42/47LE73** ...... A-36
PLASMA TV Models : 50/60PK5**, 50/60PK7 ***, 50/60PK9*** , 50/60PX9*** ...... A-45
EXTERNAL EQUIPMENT SETUP
Antenna Connection ....1
Connecting with a Component cable 2
Connecting with an HDMI cable 3
Connecting with an HDMI to DVI cable .....4
Connecting with a Euro Scart cable ....5
Usb setup....6
Connecting with AN RF Cable 6
Connecting with AN RCA cable 7
Connecting with a D-sub 15 pin cable ....8
Insertion of A CI Module 9
Headphone Setup 9
Digital audio out Setup 10
External Equipment Wireless Connection .....11
Supported Display Resolution 12
Screen Setup for PC mode 15
Network setup 19
WATCHING TV / PROGRAMME CONTROL
Turning on the TV 29
Initializing Setup 29
Programme Selection ......29
Volume Adjustment 29
Quick Menu 30
On Screen Menus Selection and adjustment ...31
Auto programme tuning 33
Cable DTV setting 38
Manual programme Tuning 39
Programme Edit 43
Booster 47
CI [Common Interface] Information .....48
Software Update ....49
Picture/Sound test 51
Signal Test 52
Product/service information....53
Network Test 53
Simple Manual 54
Selecting the Programme List ....55
Input List ....57
Input Label 58
Data Service 59
MHP Service 60
SIMPLINK 62
AV Mode 66
Initializing(Reset to original factory settings) ....67
NETCAST
Legal Notice 68
Netcast Menu 70
YOUTUBE....71
AccuWeather....73
picasa....74
TO USE THE BLUETOOTH
Bluetooth? 76
Setting the Bluetooth 77
Bluetooth headset 78
Remove the bluetooth device ....82
My Bluetooth Information 83
Receiving photos from external Bluetooth device 84
Listening to the Musics from external Bluetooth device 85
3D IMAGING
3D TECHNOLOGY 86
Viewing 3D Imaging ....86
When using 3D Glasses ....87
3D Imaging viewing range 87
Watching 3D Imaging ....88
CONTENTS
TO USE A USB OR PC DEVICE
When connecting a USB device .....90
DLNA....92
Movie list 96
Photo list 107
Music list 117
DivX Registration Code....126
Deactivation 127
GAME
Game 128
EPG(ELECTRONIC PROGRAMME GUIDE)(IN DIGITAL MODE)
Switch on/off EPG 130
Select a programme ....130
Button Function in NOW/NEXT Guide Mode .130
Button Function in 8 Day Guide Mode .....131
Button Function in Date Change Mode .....132
Button Function in Extended Description Box 132
Button Function in Record/Remind Setting Mode ..133
Button Function in Schedule List Mode .....134
PICTURE CONTROL
Picture Size (Aspect Ratio) Control ....135
Picture Wizard 137
Energy Saving 138
Preset Picture Settings ....139
Manual Picture Adjustment ....141
Picture Improvement Technology 143
Expert Picture Control ....144
Picture Reset 147
Trumotion 148
LED LOCAL DIMMING 149
Power Indicator 150
Image Sticking Minimization (ISM) Method ....151
Mode Setting 152
Demo Mode 153
SOUND & LANGUAGE CONTROL
Auto Volume Leveler....154
Clear Voice II 155
Preset Sound Settings-Sound Mode .....156
Sound Setting Adjustment -User Mode .....157
Infinite Sound 157
Balance 158
TV Speakers On/ Off Setup 159
DTV Audio Setting (in digital mode only) .....160
Selecting Digital Audio out ....161
Audio Reset 162
Audio Description (In digital mode only) .....163 I/II
- Stereo/Dual Reception (In Analogue Mode Only) .164
- NICAM Reception (In Analogue Mode Only) 165
- Speaker Sound Output Selection ....165
On-Screen Menu Language / Country Selection 166
Language Selection ....167
TIME SETTING
Clock Setup 169
Auto on/off time setting 170
Sleep Timer setting 171
PARENTAL CONTROL / RATINGS
Set Password & Lock System....172
Block Programme 173
Parental Control (In Digital Mode only) .....174
External Input Blocking ....175
Key Lock....176
TELETEXT
Switch on/off 177
SIMPLE Text....177
TOP Text....178
FASTEXT 178
Special Teletext Functions .....179
DIGITAL TELETEXT
Teletext within Digital Service ....180
Teletext in Digital Service ....180
APPENDIX
Troubleshooting....181
Maintenance....183
Product Specifications 184
IR Codes ....201
External Control Device Setup 202
Open source software notice ....209
PREPARATION
LED LCD TV MODELS : 32/37/42LE4**, 32/37/42/47/55LE5**, 32/37/42/47/55LE75*, 32/37/42/47/55LE78*, 32/37/42/47/55LE79*, 42/47/55LE8**, 42/47LX6*** ACCESSORIES
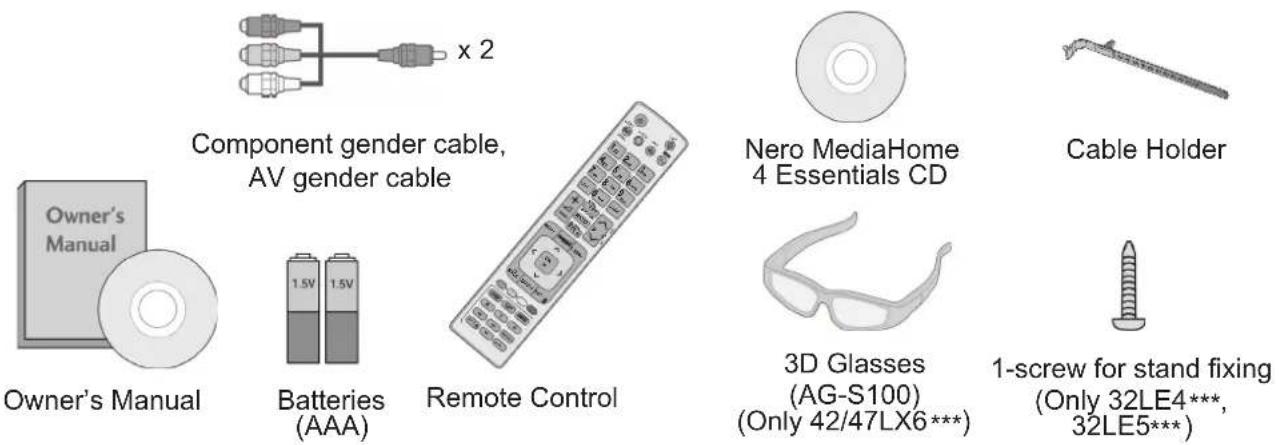
Ensure that the following accessories are included with your TV. If an accessory is missing, please contact the dealer where you purchased the TV.
■ Image shown may differ from your TV.
text_image
Owner's Manual Owner's Manual Components gender cable, AV gender cable Batteries (AAA) Remote Control Nero MediaHome 4 Essentials CD Cable Holder 3D Glasses (AG-S100) (Only 42/47LX6*** 1-screw for stand fixing (Only 32LE4***, 32LE5***)This item is not included for all models.
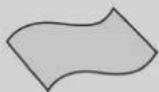
* Lightly wipe any stains or fingerprints on the surface of the TV with the polishing cloth.
Polishing Cloth Polishing cloth for use on the screen.
Do not use excessive force. This may cause scratching or discolouration.
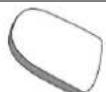

(Only 32/37/42/47/55LE75**, 32/37/42/47/55LE78**, 32/37/42/47/55LE79**)
Slightly wipe stained spot on the exterior only with the cleansing cloths(mitt) for the product exterior if there is stain or fingerprint on surface of the exterior.
For cleaning front frame, please slowly wipe in one direction after spraying water 1\~2 times on cleansing cloths. Please remove excessive moisture after cleaning. Excessive moisture may cause water stains on the frame.
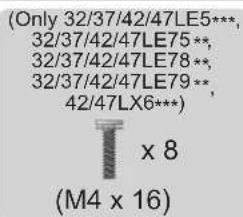
text_image
(Only 32/37/42/47LE5***, 32/37/42/47LE75**, 32/37/42/47LE78**, 32/37/42/47LE79**, 42/47LX6***) x 8 (M4 x 16)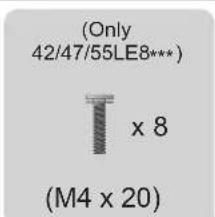
text_image
(Only 42/47/55LE8***) x 8 (M4 x 20)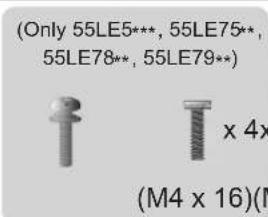
text_image
(Only 55LE5***, 55LE75**, 55LE78**, 55LE79**) x 4x (M4 x 16)(M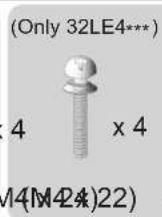
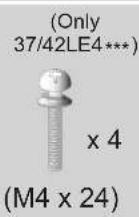
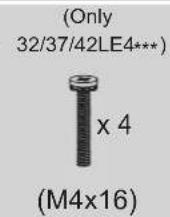
Bolts for stand assembly
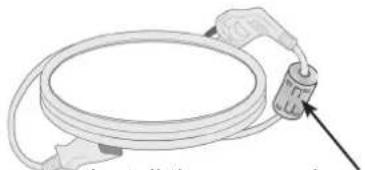
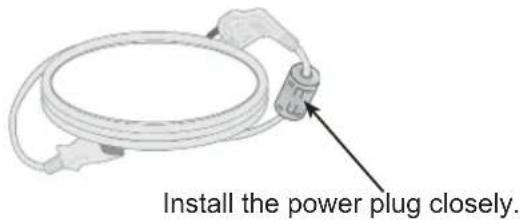
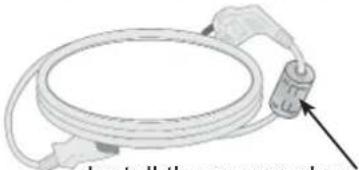
Use of ferrite core (This feature is not available for all models.)
Ferrite core can be used to reduce the electromagnetic wave when connecting the power cord.
The closer the location of the ferrite core to the power plug, the better it is.
natural_image
Diagram of a coiled cable with attached probe and sensor device (no text or symbols)
Ferrite Core
(This item is not included for all models.)
PREPARATION
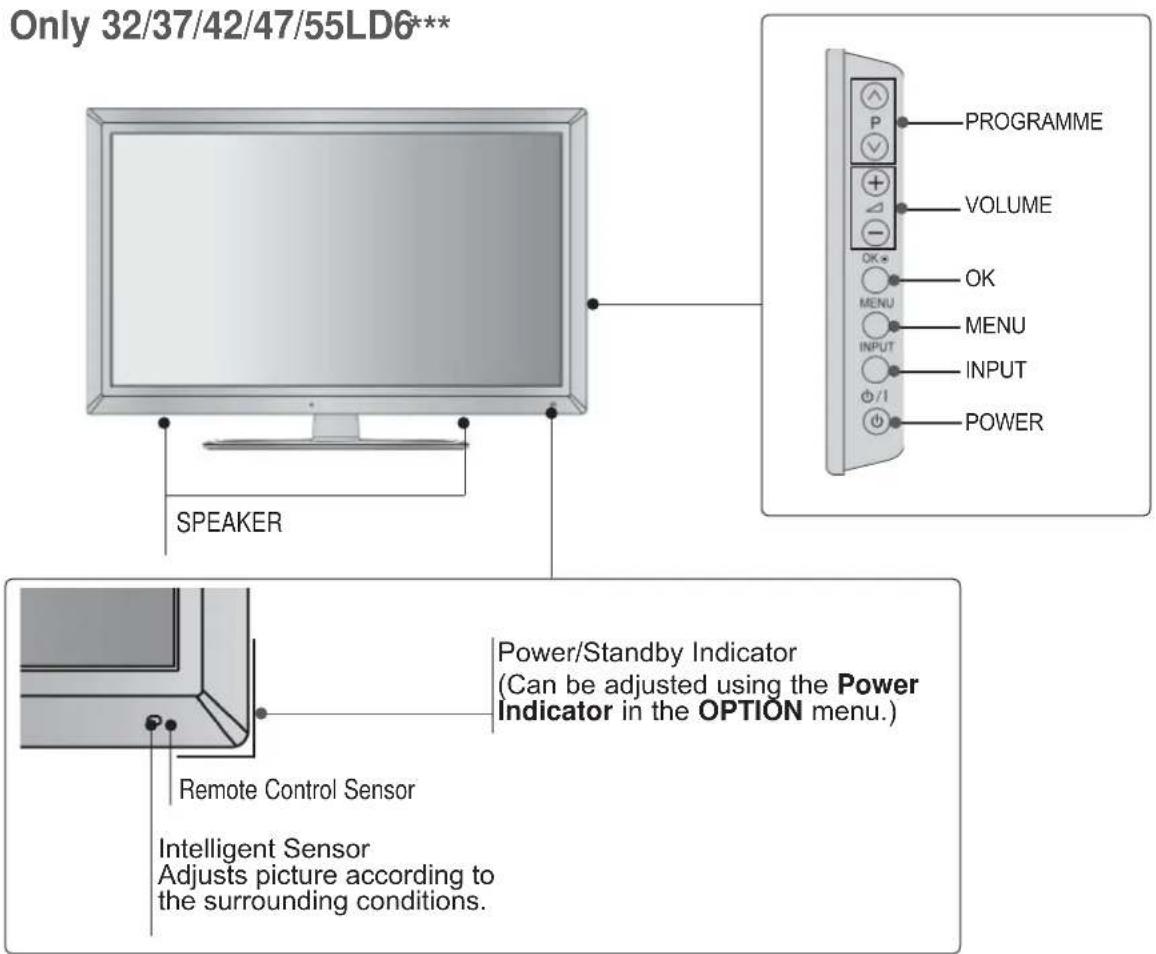
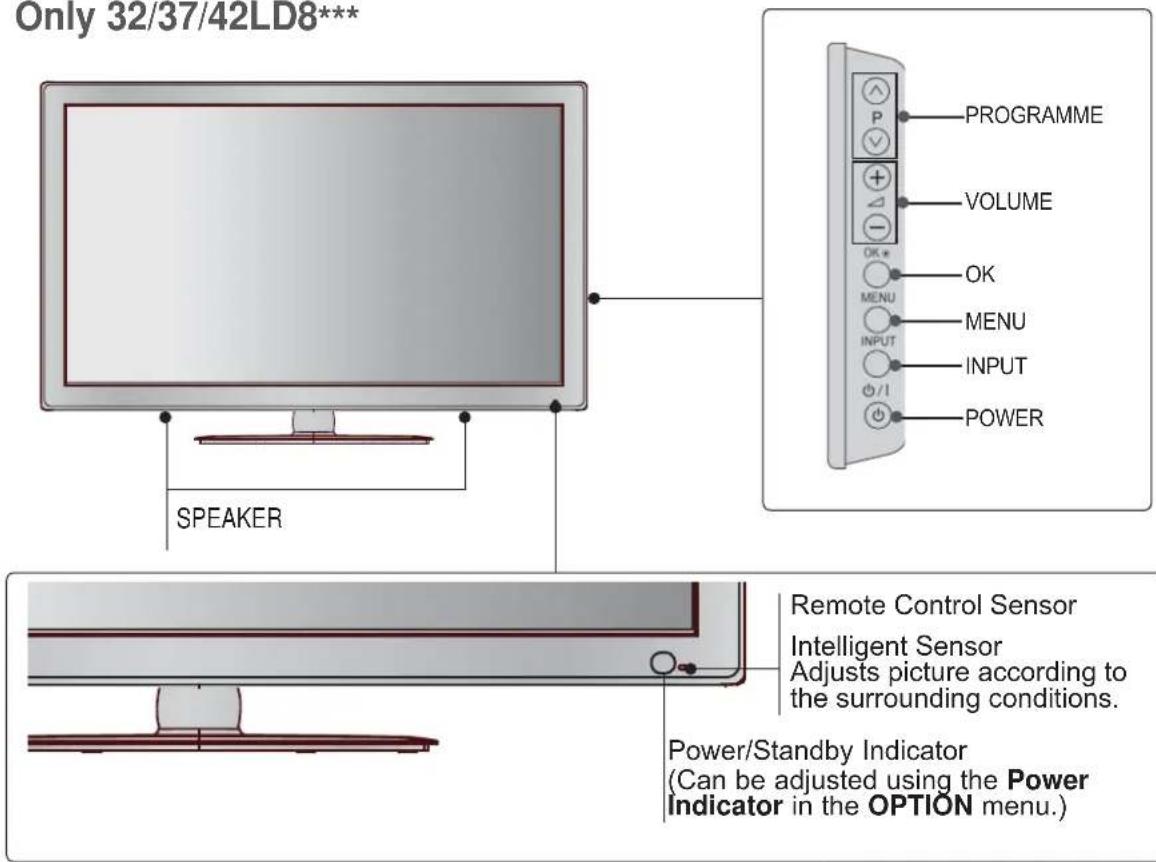
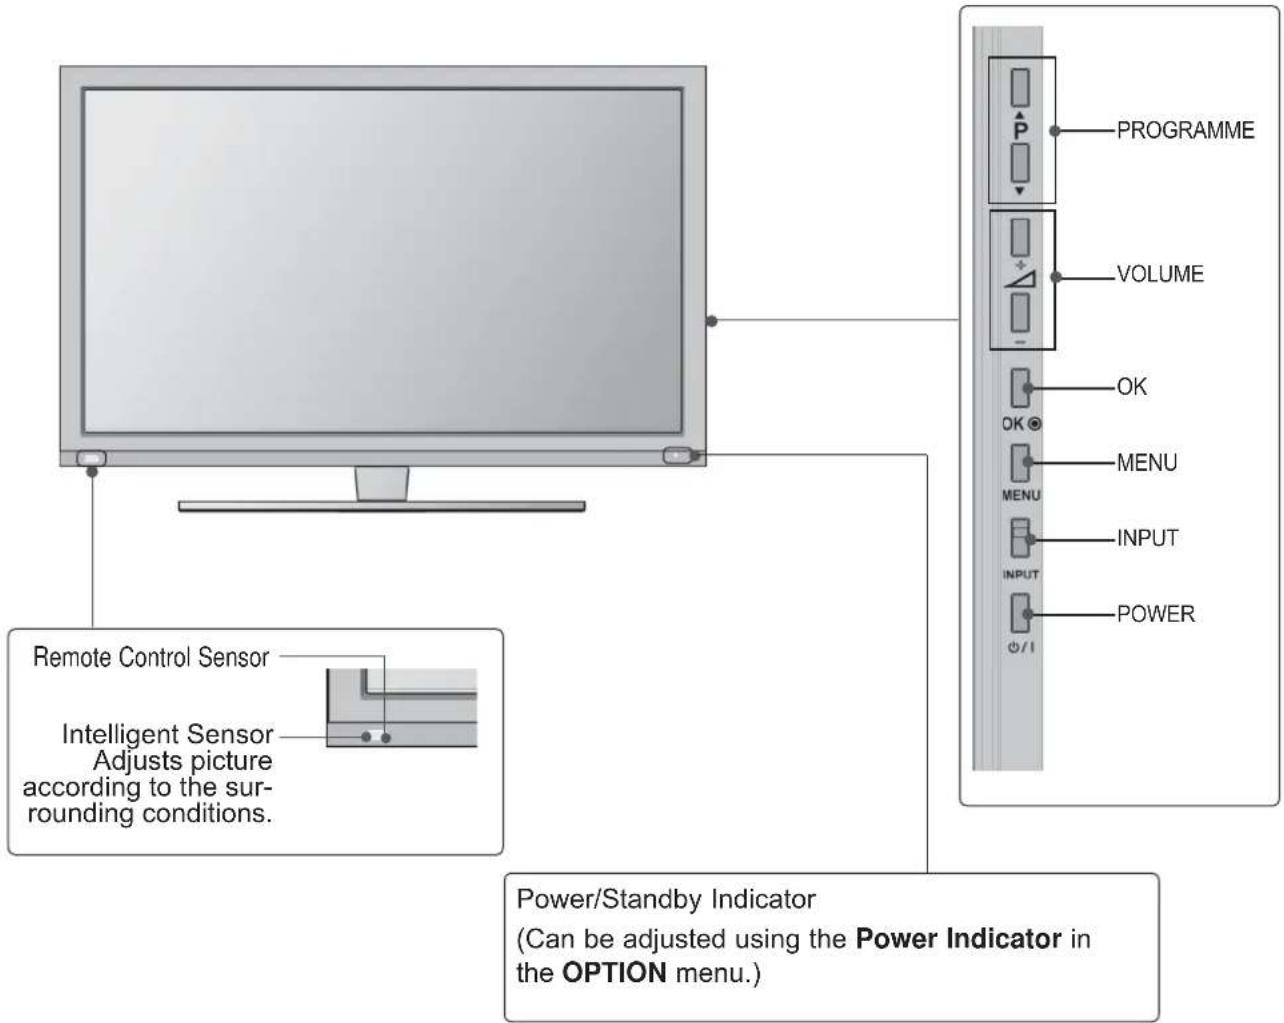
FRONT PANEL CONTROLS
NOTE
▶ TV can be placed in standby mode in order to reduce the power consumption. And TV should be switched off using the power switch on the TV if it will not be watched for some time, as this will reduce energy consumption.
The energy consumed during use can be significantly reduced if the level of brightness of the picture is reduced, and this will reduce the overall running cost.
CAUTION
▶ Do not step on the glass stand or subject it to any impact. It may break, causing possible injury from fragments of glass, or the TV may fall.
▶ Do not drag the TV. The floor or the product may be damaged.
■ Image shown may differ from your TV.
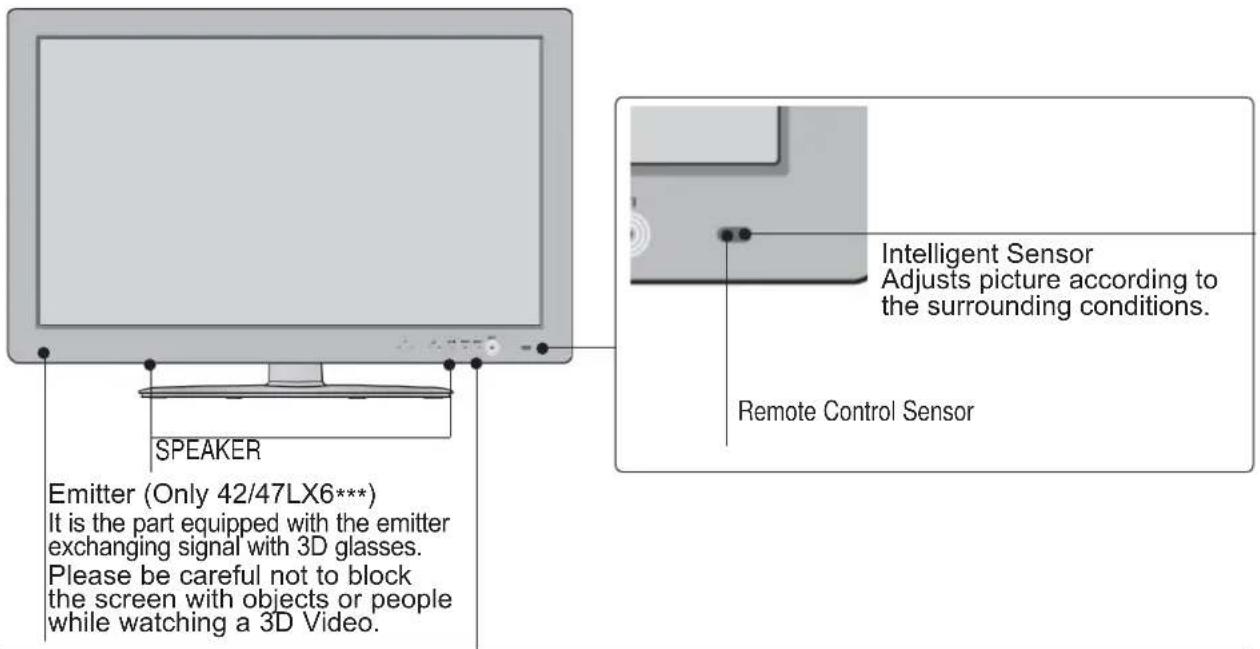
Only 32/37/42/47/55LE5***, 32/37/42/47/55LE75**, 32/37/42/47/55LE78**, 32/37/42/47/55LE79**, 42/47LX6***
text_image
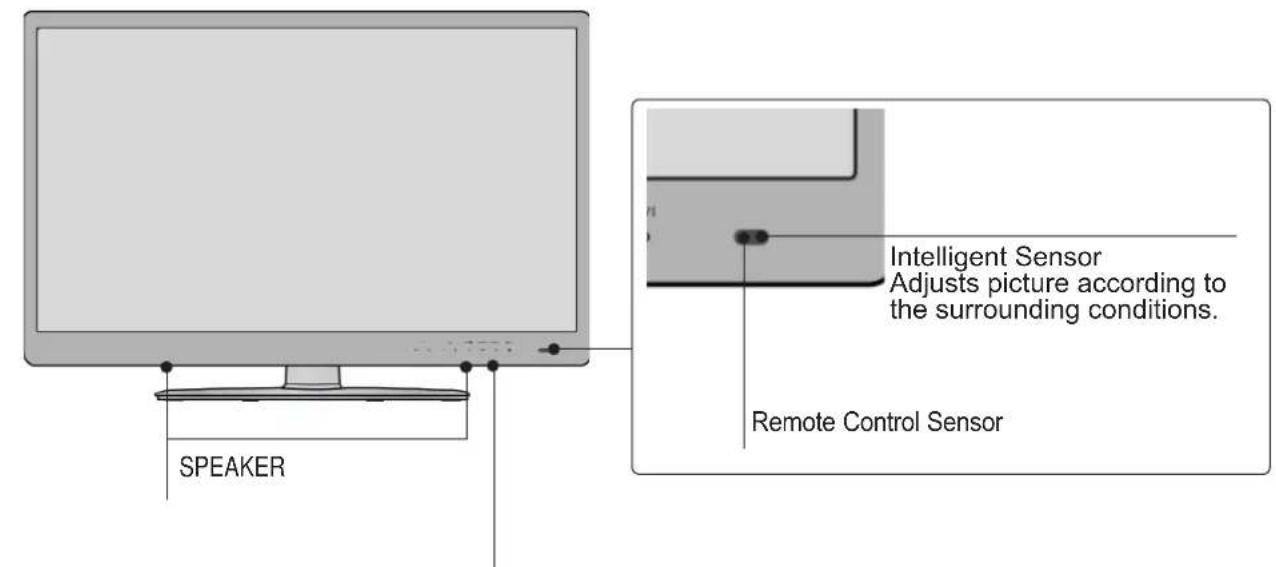
SPEAKER Emitter (Only 42/47LX6***) It is the part equipped with the emitter exchanging signal with 3D glasses. Please be careful not to block the screen with objects or people while watching a 3D Video. Intelligent Sensor Adjusts picture according to the surrounding conditions. Remote Control SensorTouch Button
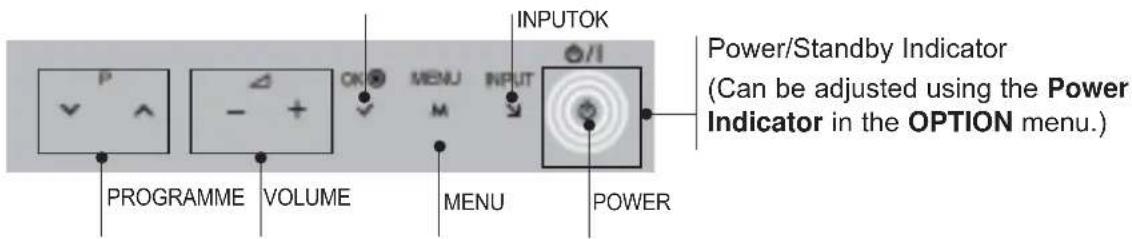
You can use the desired button function by touching.
text_image
PROGRAMME VOLUME OK MENU INPUT MENU INPUTOK POWER/Standby Indicator (Can be adjusted using the Power Indicator in the OPTION menu.) POWEROnly 42/47/55LE8***
text_image
SPEAKER Intelligent Sensor Adjusts picture according to the surrounding conditions. Remote Control SensorTouch Button
You can use the desired button function by touching.
text_image
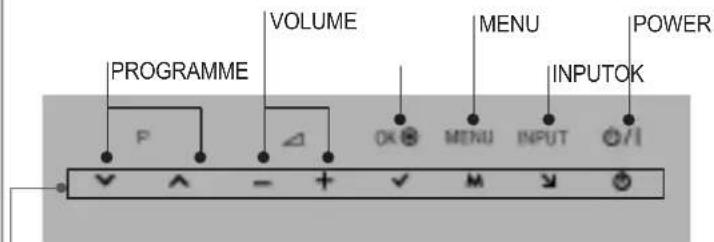
PROGRAMME VOLUME MENU POWER INPUTOK OK MENU INPUT ✓ ✓ M ✓Power/Standby Indicator
(Can be adjusted using the Power Indicator in the OPTION menu.)
Only 32/37/42LE4***
text_image
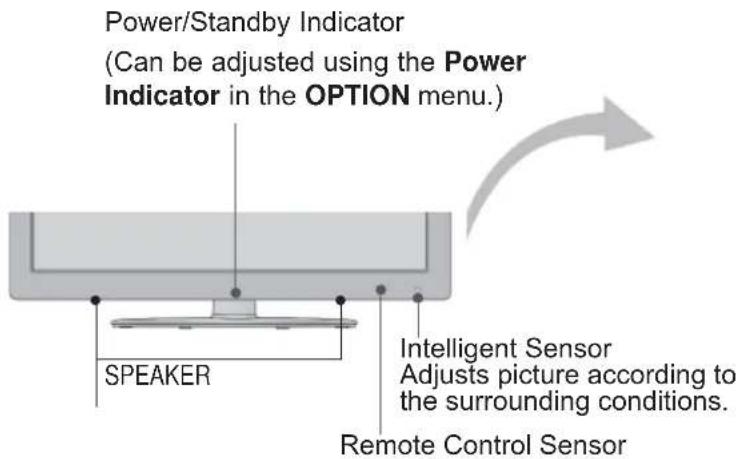
Power/Standby Indicator (Can be adjusted using the Power Indicator in the OPTION menu.) SPEAKER Intelligent Sensor Adjusts picture according to the surrounding conditions. Remote Control Sensor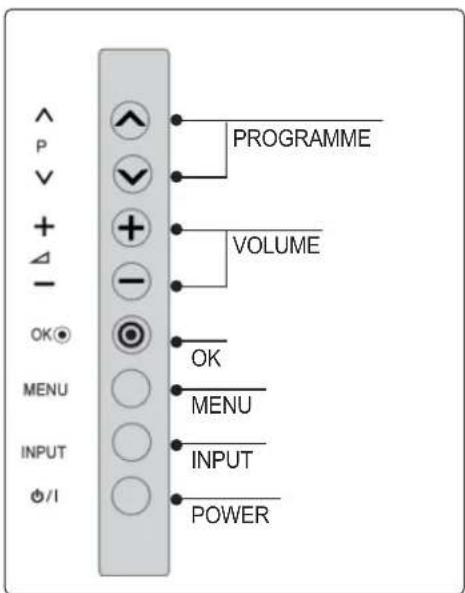
text_image
PROGRAMME VOLUME OK MENU INPUT POWERPREPARATION BACK PANEL INFORMATION
■ Image shown may differ from your TV.
text_image
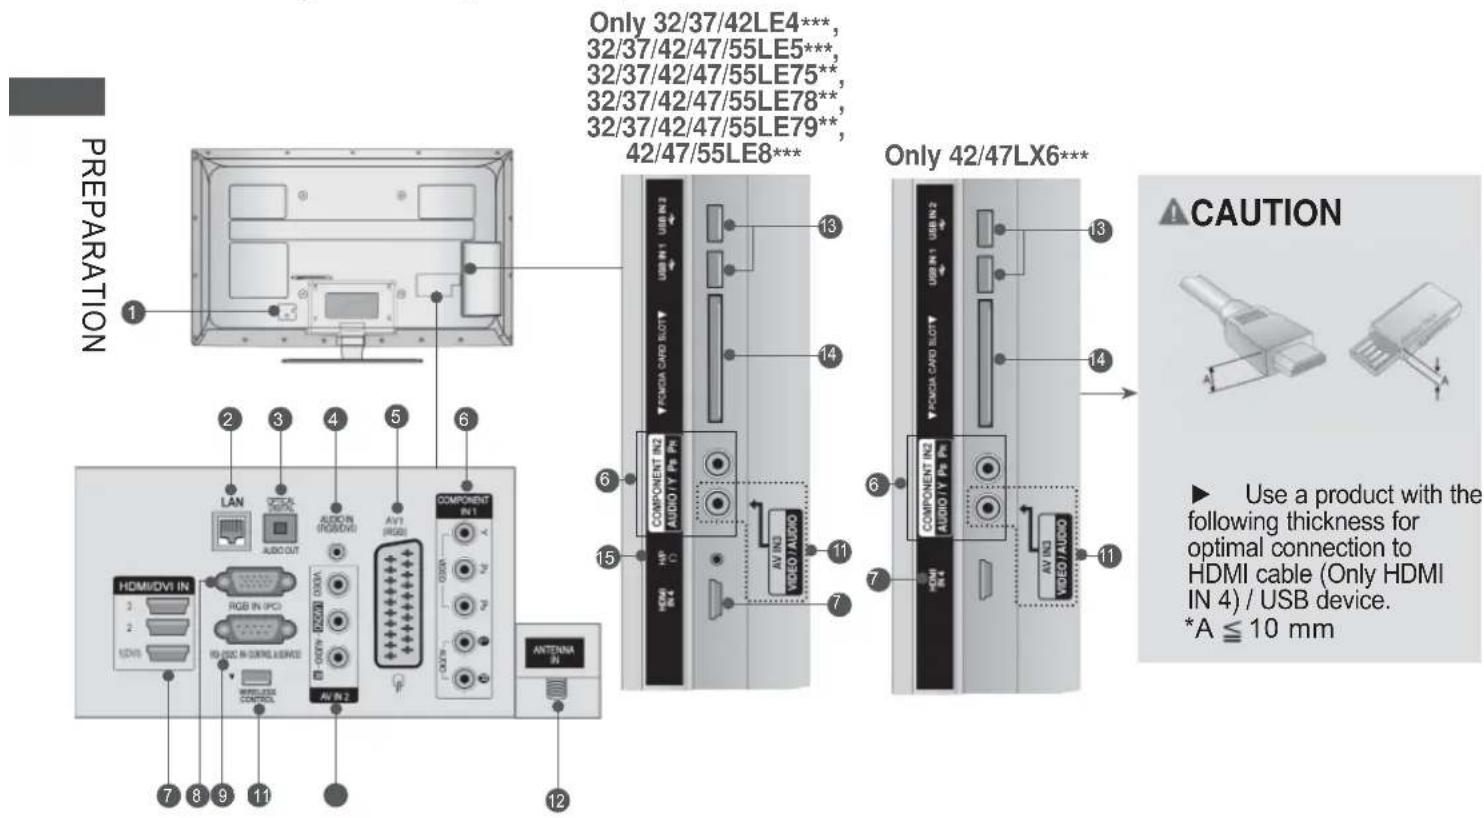
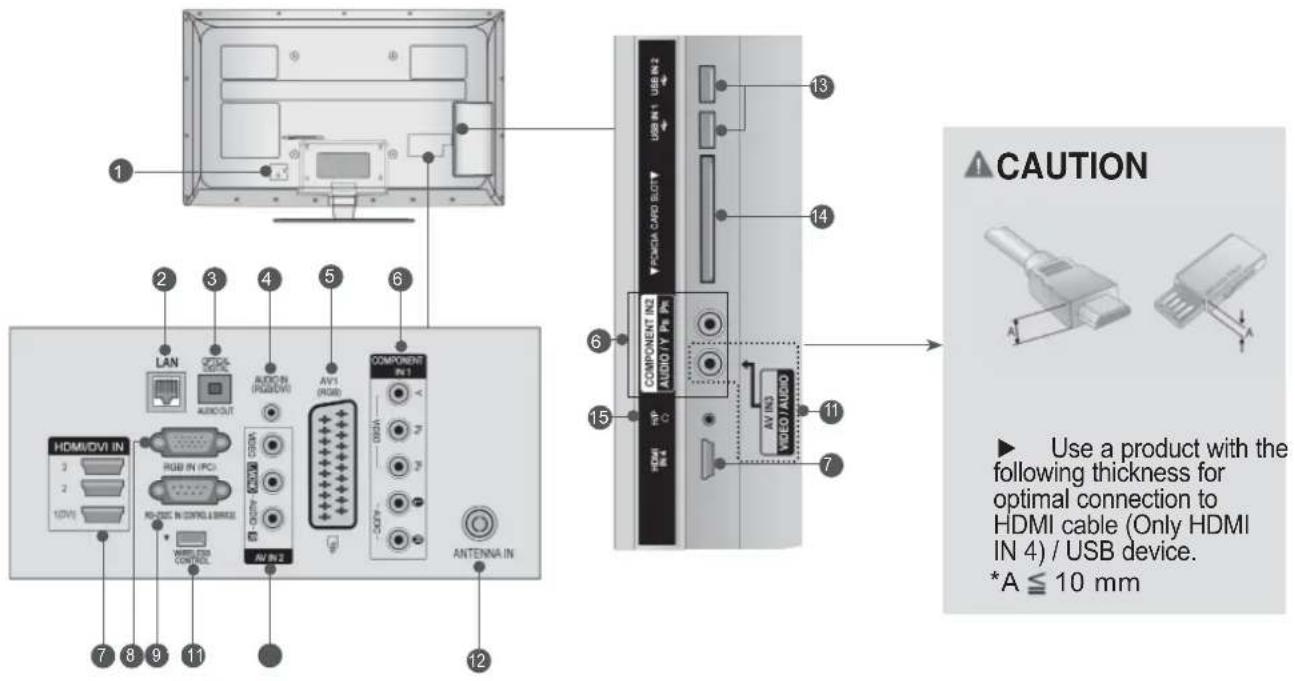
PREPARATION 1 2 3 4 5 6 7 8 9 10 11 HDMI/DAVI IN LAN AUDIO OUT AUDIO (RGB/DVI) AV1 (RGB) COMPONENT IN 1 AV IN 2 AV IN 2 ANTENNA IN COMPUTER CONTROL USB AUDIO AV IN 2 COMPUTER IN 1 AUDIO / Pn. Pt. AV IN VIDEO / AUDIO COMPONENT IN 2 AUDIO / Pn. Pt. AV IN VIDEO / AUDIO COMPONENT IN 3 AUDIO / Pn. Pt. AV IN VIDEO / AUDIO Only 32/37/42LE4***, 32/37/42/47/55LE5***, 32/37/42/47/55LE75**, 32/37/42/47/55LE78**, 32/37/42/47/55LE79**, 42/47/55LE8*** Only 42/47LX6*** CAUTION ► Use a product with the following thickness for optimal connection to HDMI cable (Only HDMI IN 4) / USB device. *A ≤ 10 mm1 Power Cord Socket
This TV operates on an AC power. The voltage is indicated on the Specifications page. (▶ p.184 to 200) Never attempt to operate the TV on DC power.
② LAN
Network connection for AccuWeather, Picasa, YouTube, etc. Also used for video, photo and music files on a local network.
3 OPTICAL DIGITAL AUDIO OUT
Connect digital audio to various types of equipment. Connect to a Digital Audio Component. Use an Optical audio cable.
4 RGB/DVI Audio Input
Connect the audio from a PC or DTV.
⑤ Euro Scart Socket (AV1)
Connect scart socket input or output from an external device to these jacks.
6 Component Input
Connect a component video/audio device to these jacks.
⑦ HDMI/DVI IN Input
Connect an HDMI signal to HDMI IN. Or DVI (VIDEO) signal to HDMI/DVI port with DVI to HDMI cable.
⑧ RGB IN Input
Connect the output from a PC.
9 RS-232C IN (CONTROL & SERVICE) PORT
Connect to the RS-232C port on a PC. This port is used for Service or Hotel mode.
10 WIRELESS Control
Connect the Wireless Ready Dongle to the TV to control the external input devices connected to Wireless Media Box wirelessly.
11 Audio/Video Input
Connect audio/video output from an external device to these jacks.
12 Antenna Input
Connect antenna or cable to this jack.
13 USB Input
Connect USB storage device to this jack.
14 PCMCIA (Personal Computer Memory Card International Association) Card Slot Insert the CI Module to PCMCIA CARD SLOT.
(This feature is not available in all countries.)
15 Headphone Socket
Plug the headphone into the headphone socket.
STAND INSTALLATION
■ Image shown may differ from your TV.
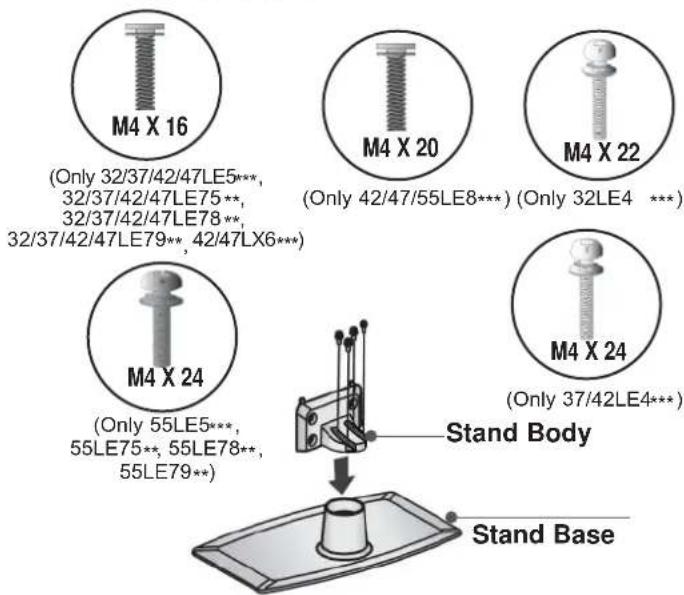
When assembling the desk type stand, check whether the bolt is fully tightened. (If not tightened fully, the product can tilt forward after the product installation.) If you tighten the bolt with excessive force, the bolt can deviate from abrasion of the tightening part of the bolt.
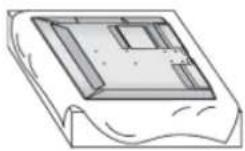
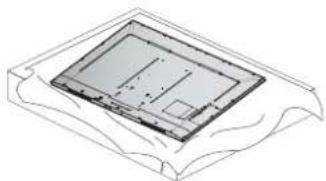
1 Carefully place the TV screen side down on a cushioned surface to protect the screen from damage.
② Assemble the parts of the Stand Body with the Stand Base of the TV.
At this time, tighten the screws that hold the Stand Body on.
text_image
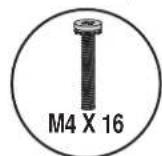
M4 X 16 (Only 32/37/42/47LE5***, 32/37/42/47LE75**, 32/37/42/47LE78**, 32/37/42/47LE79**, 42/47LX6**) M4 X 20 (Only 42/47/55LE8***) (Only 32LE4 ***) M4 X 22 M4 X 24 (Only 37/42LE4***) M4 X 24 (Only 55LE5***, 55LE75**, 55LE78**, 55LE79**) Stand Body Stand Base3 Assemble the TV as shown.
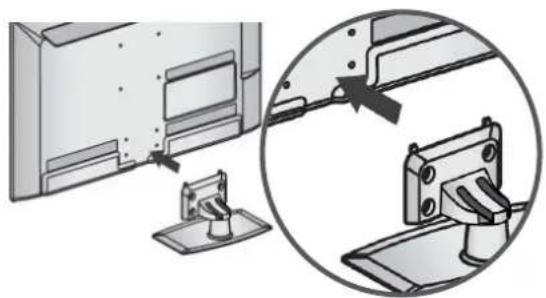
natural_image
Diagram showing a computer monitor with a close-up view of its internal components, no text or symbols present.4 Assemble the parts of the Stand Rear Cover with the TV.
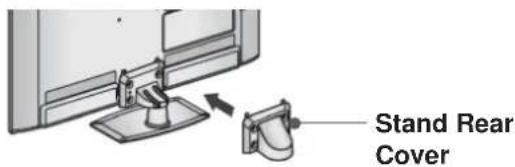
text_image
Stand Rear Cover5 Fix the 4 bolts securely using the holes in the back of the TV.
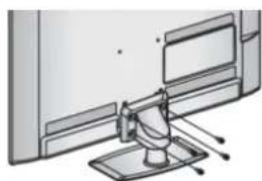
natural_image
Diagram of a computer monitor with a stand and cable, showing no text or symbols

(Only 42/47/55LE8*** )
32/37/42/47/55LE5***,
32/37/42/47/55LE75**,
32/37/42/47/55LE78**
32/37/42/47/55LE79**
42/47LX6***
(Only
32/37/42LE4***
PREPARATION
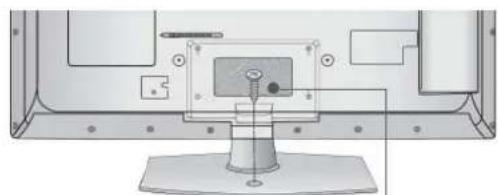
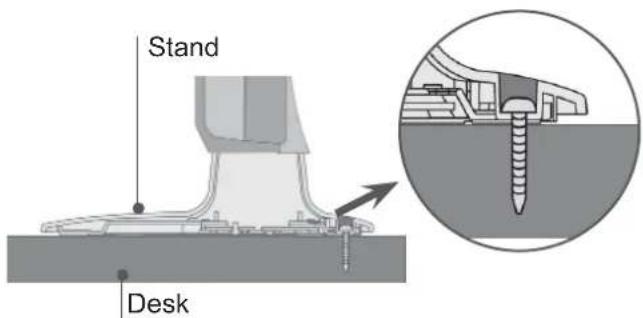
ATTACHING THE TV TO A DESK
(Only 32LE4***, 32LE5***)
■ Image shown may differ from your TV. The TV must be attached to desk so it cannot be pulled in a forward/backward direction, potentially causing injury or damaging the product. Use only an attached screw.
natural_image
Technical diagram of a mechanical assembly with mounting base and central component (no text or symbols)1-Screw (provided as parts of the product)
text_image
Stand DeskWARNING
▶ To prevent TV from falling over, the TV should be securely attached to the floor/wall per installation instructions. Tipping, shaking, or rocking the machine may cause injury.
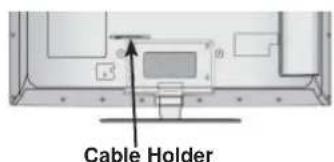
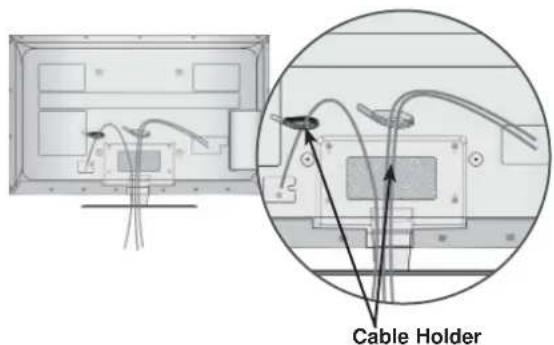
BACK COVER FOR WIRE ARRANGEMENT
■ Image shown may differ from your TV.
1 Secure the power cord with the Cable Holder on the TV back cover. It will help prevent the power cable from being removed by accident.
text_image
Cable Holder2 After connecting the cables as necessary, install Cable Holder as shown and bundle the cables.
text_image
Cable HolderSWIVEL STAND
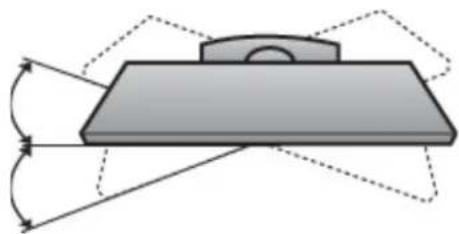
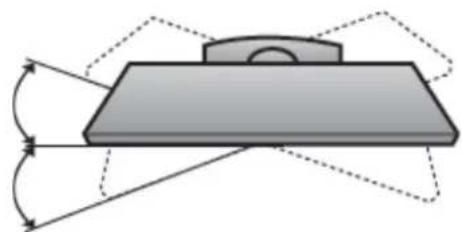
■ Image shown may differ from your TV. After installing the TV, you can adjust the TV set manually to the left or right direction by 20 degrees to suit your viewing position.
natural_image
Diagram of a mechanical component with angular and linear motion indicators (no text or symbols)KENSINGTON SECURITY SYSTEM
■ This feature is not available for all models.
■ Image shown may differ from your TV.
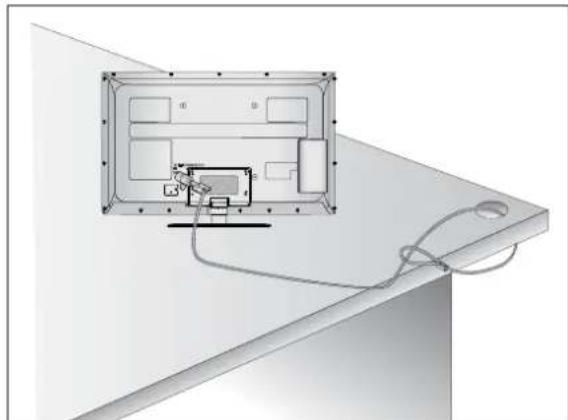
The TV is equipped with a Kensington Security System connector on the back panel. Connect the Kensington Security System cable as shown below.
For the detailed installation and use of the Kensington Security System, refer to the user's guide provided with the Kensington Security System.
For further information, contact http://www.kensington.com, the internet homepage of the Kensington
company. Kensington sells security systems for expensive electronic equipment such as notebook PCs and LCD projectors.

NOTE
The Kensington Security System is an optional accessory.
If the TV feels cold to the touch, there may be a small "flicker" when it is turned on.
This is normal, there is nothing wrong with TV.
▶ Some minute dot defects may be visible on the screen, appearing as tiny red, green, or blue spots. However, they have no adverse effect on the monitor's performance.
▶ Avoid touching the LCD screen or holding your finger(s) against it for long periods of time.
Doing so may produce some temporary distortion effects on the screen.
natural_image
Diagram of a room interior with furniture and wiring, no visible text or symbolsCAREFUL INSTALLATION ADVICE
■ You should purchase necessary components to fix the TV safety and secure to the wall on the market.
■ Position the TV close to the wall to avoid the possibility of it falling when pushed.
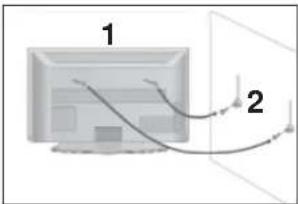
■ The instructions shown below are a safer way to set up the TV, by fixing it to the wall, avoiding the possibility of it falling forwards if pulled. This will prevent the TV from falling forward and causing injury. This will also prevent the TV from damage. Ensure that children do not climb or hang from the TV.
natural_image
Diagram of a computer monitor connected to cables, labeled with numbers 1 and 2 (no text or symbols beyond labels)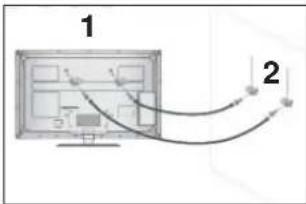
text_image
1 2
Use the eye-bolts or TV brackets/bolts to fix the product to the wall as shown in the picture. (If your TV has bolts in the eyebolts, loosen then bolts.)
* Insert the eye-bolts or TV brackets/bolts and tighten them securely in the upper holes.

Secure the wall brackets with the bolts on the wall. Match the height of the bracket that is mounted on the wall.
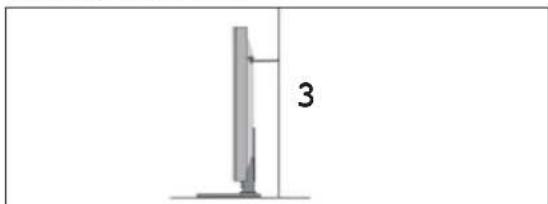
natural_image
Simple line drawing of a computer monitor with a vertical line and number 3, no text or symbols present.
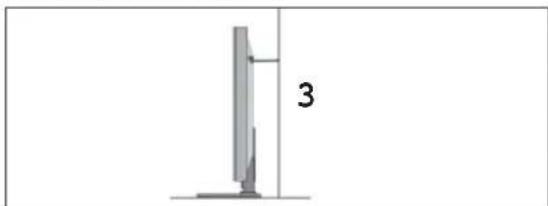
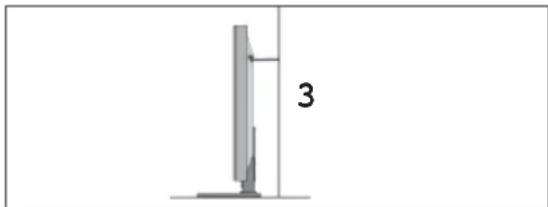
Use a sturdy rope to tie the product for alignment. It is safer to tie the rope so it becomes horizontal between the wall and the product.

NOTE
▶ When moving the TV undo the cords first.
▶ Use a platform or cabinet strong and large enough to support the size and weight of the TV.
▶ To use the TV safely make sure that the height of the bracket on the wall and on the TV is the same.
PREPARATION
■ The TV can be installed in various ways such as on a wall, or on a desktop etc.
■ The TV is designed to be mounted horizontally.
EARTHING
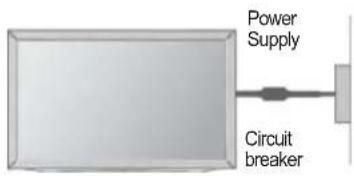
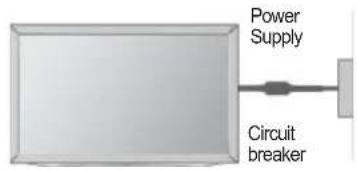
Ensure that you connect the earth wire to prevent possible electric shock. If grounding methods are not possible, have a qualified electrician install a separate circuit breaker.
Do not try to earth the TV by connecting it to telephone wires, lightening rods or gas pipes.
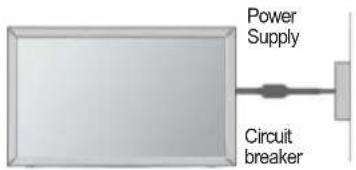
text_image
Power Supply Circuit breakerDESKTOP PEDESTAL INSTALLATION
■ Image shown may differ from your TV.
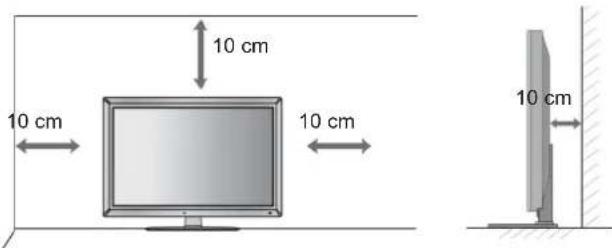
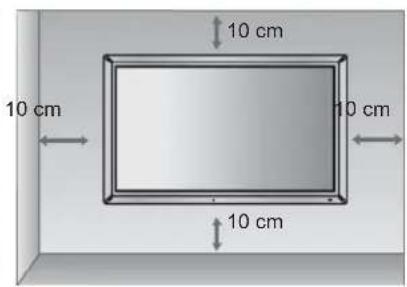
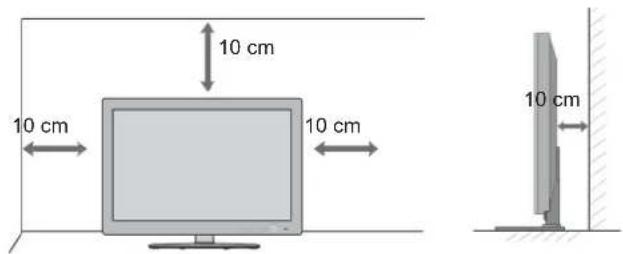
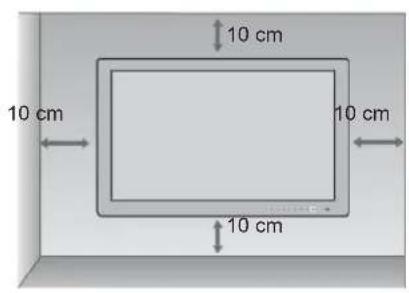
For adequate ventilation allow a clearance of 10 cm all around the TV.
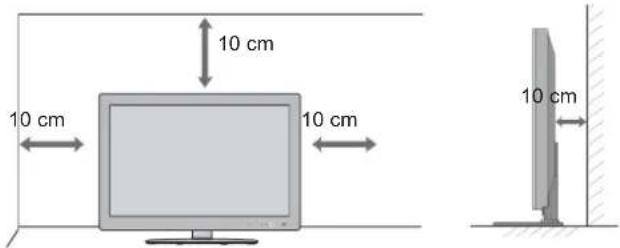
text_image
10 cm 10 cm 10 cm 10 cmWALL MOUNT: HORIZONTAL INSTALLATION
■ We recommend the use of a LG Brand wall mounting bracket when mounting the TV to a wall.
■ We recommend that you purchase a wall mounting bracket which supports VESA standard.
■ LG recommends that wall mounting be performed by a qualified professional installer.
NOTE
▶Should Install wall mount on a solid wall perpendicular to the floor.
▶Should use a special wall mount, if you want to install it to ceiling or slanted wall.
The surface that wall mount is to be mounted on should be of sufficient strength to support the weight of TV set; e.g. concrete, natural rock, brick and hollow block.
▶Installing screw type and length depends on the wall mount used. Further information, refer to the instructions included with the mount.
▶LG is not liable for any accidents or damage to property or TV due to incorrect installation:
- Where a non-compliant VESA wall mount is used.
- Incorrect fastening of screws to surface which may cause TV to fall and cause personal injury.
- Not following the recommended Installation method.
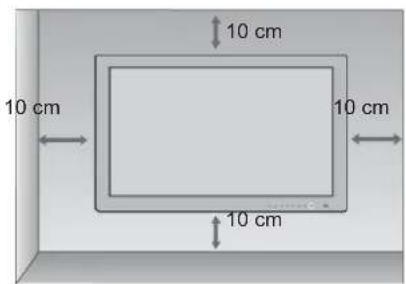
text_image
10 cm 10 cm 10 cm 10 cm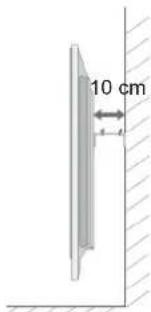
text_image
10 cm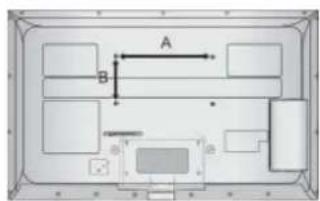
text_image
A B| Model | VESA (A * B) | Standard Screw | Quantity |
| 32LE4*** | 200 * 100 | M4 | 4 |
| 37/42LE4*** | 200 * 200 | M6 | 4 |
| 32LE5*** | 200 * 100 | M4 | 4 |
| 37/42/47LE5*** | 200 * 200 | M6 | 4 |
| 55LE5*** | 400 * 400 | M6 | 4 |
| 32LE75**, 32LE78**, 32LE79** | 200 * 100 | M4 | 4 |
| 37/42/47LE75**, 37/42/47LE78**, 37/42/47LE79** | 200 * 200 | M6 | 4 |
| 55LE7*** | 400 * 400 | M6 | 4 |
| 42/47LE8*** | 200 * 200 | M6 | 4 |
| 55LE8*** | 400 * 400 | M6 | 4 |
| 42/47LX6*** | 200 * 200 | M6 | 4 |
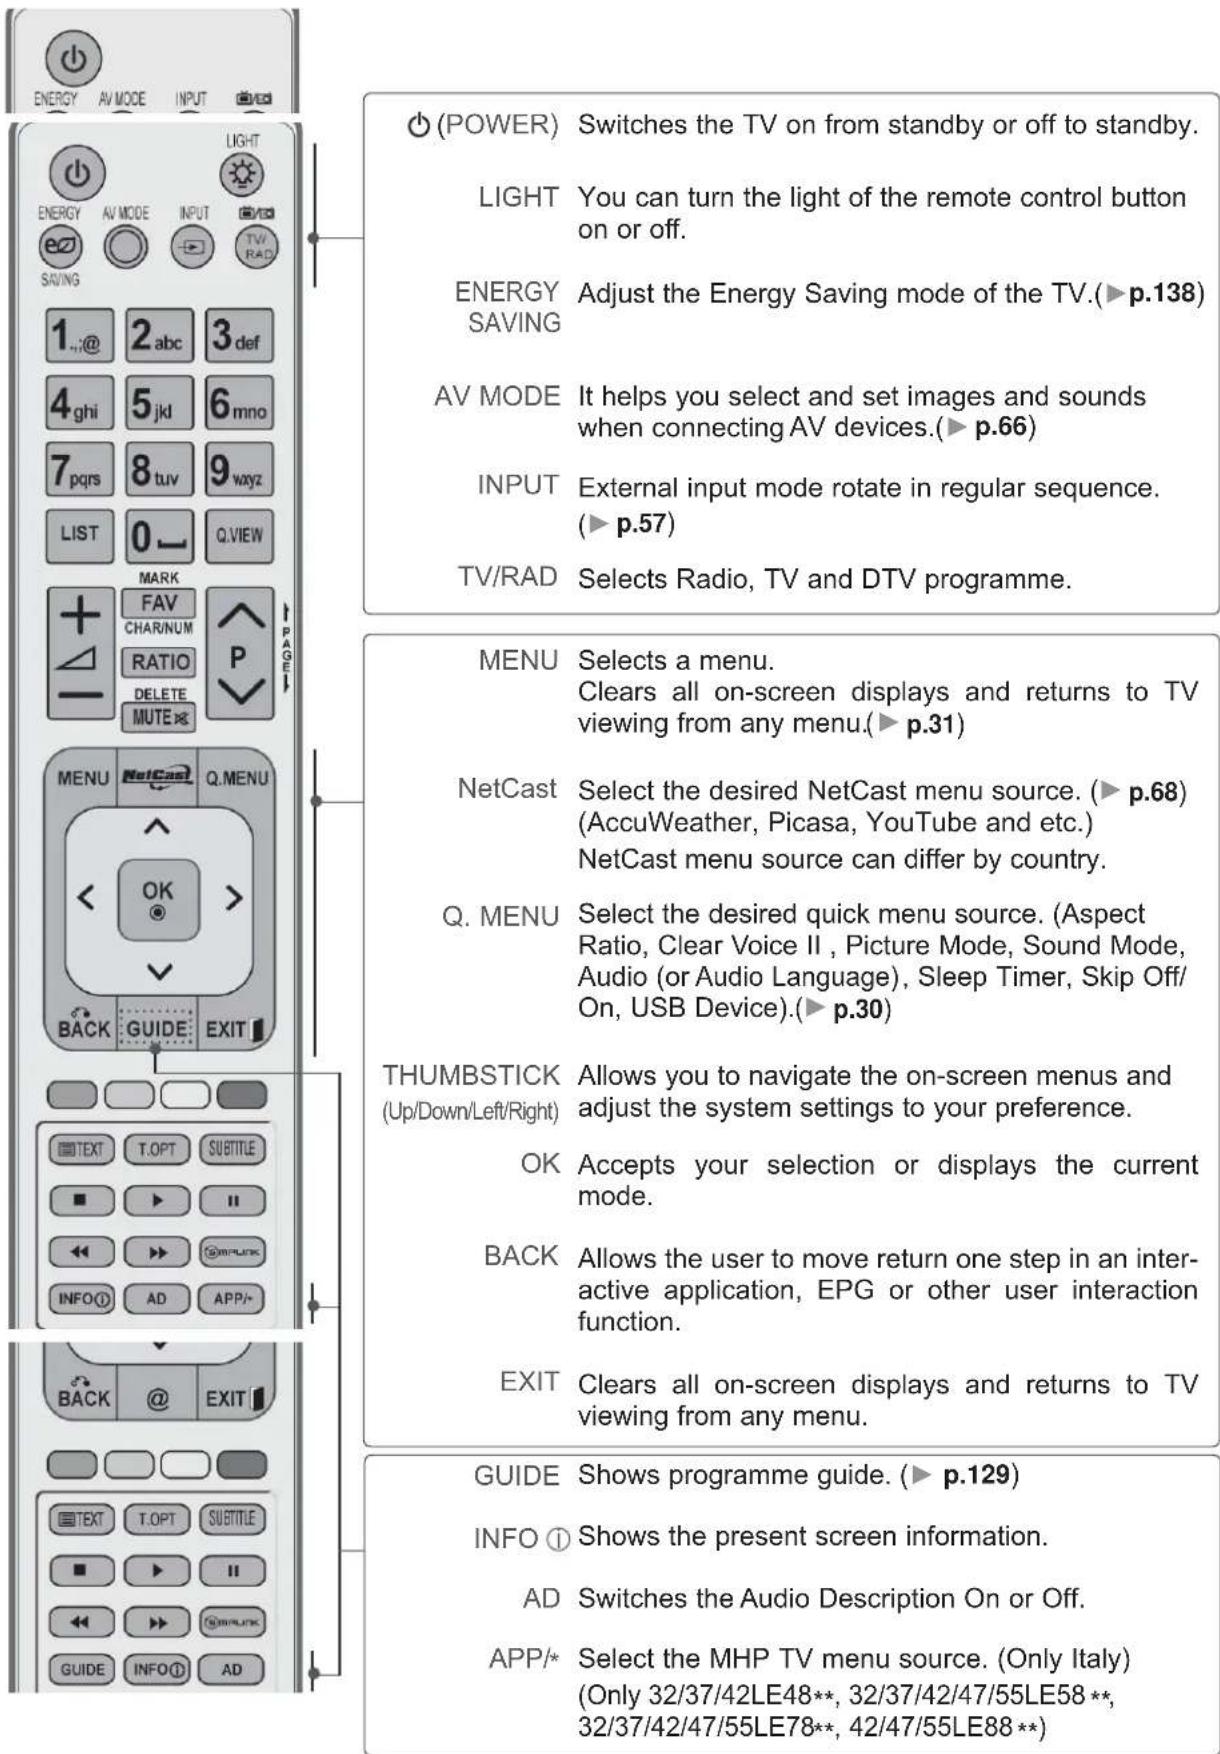
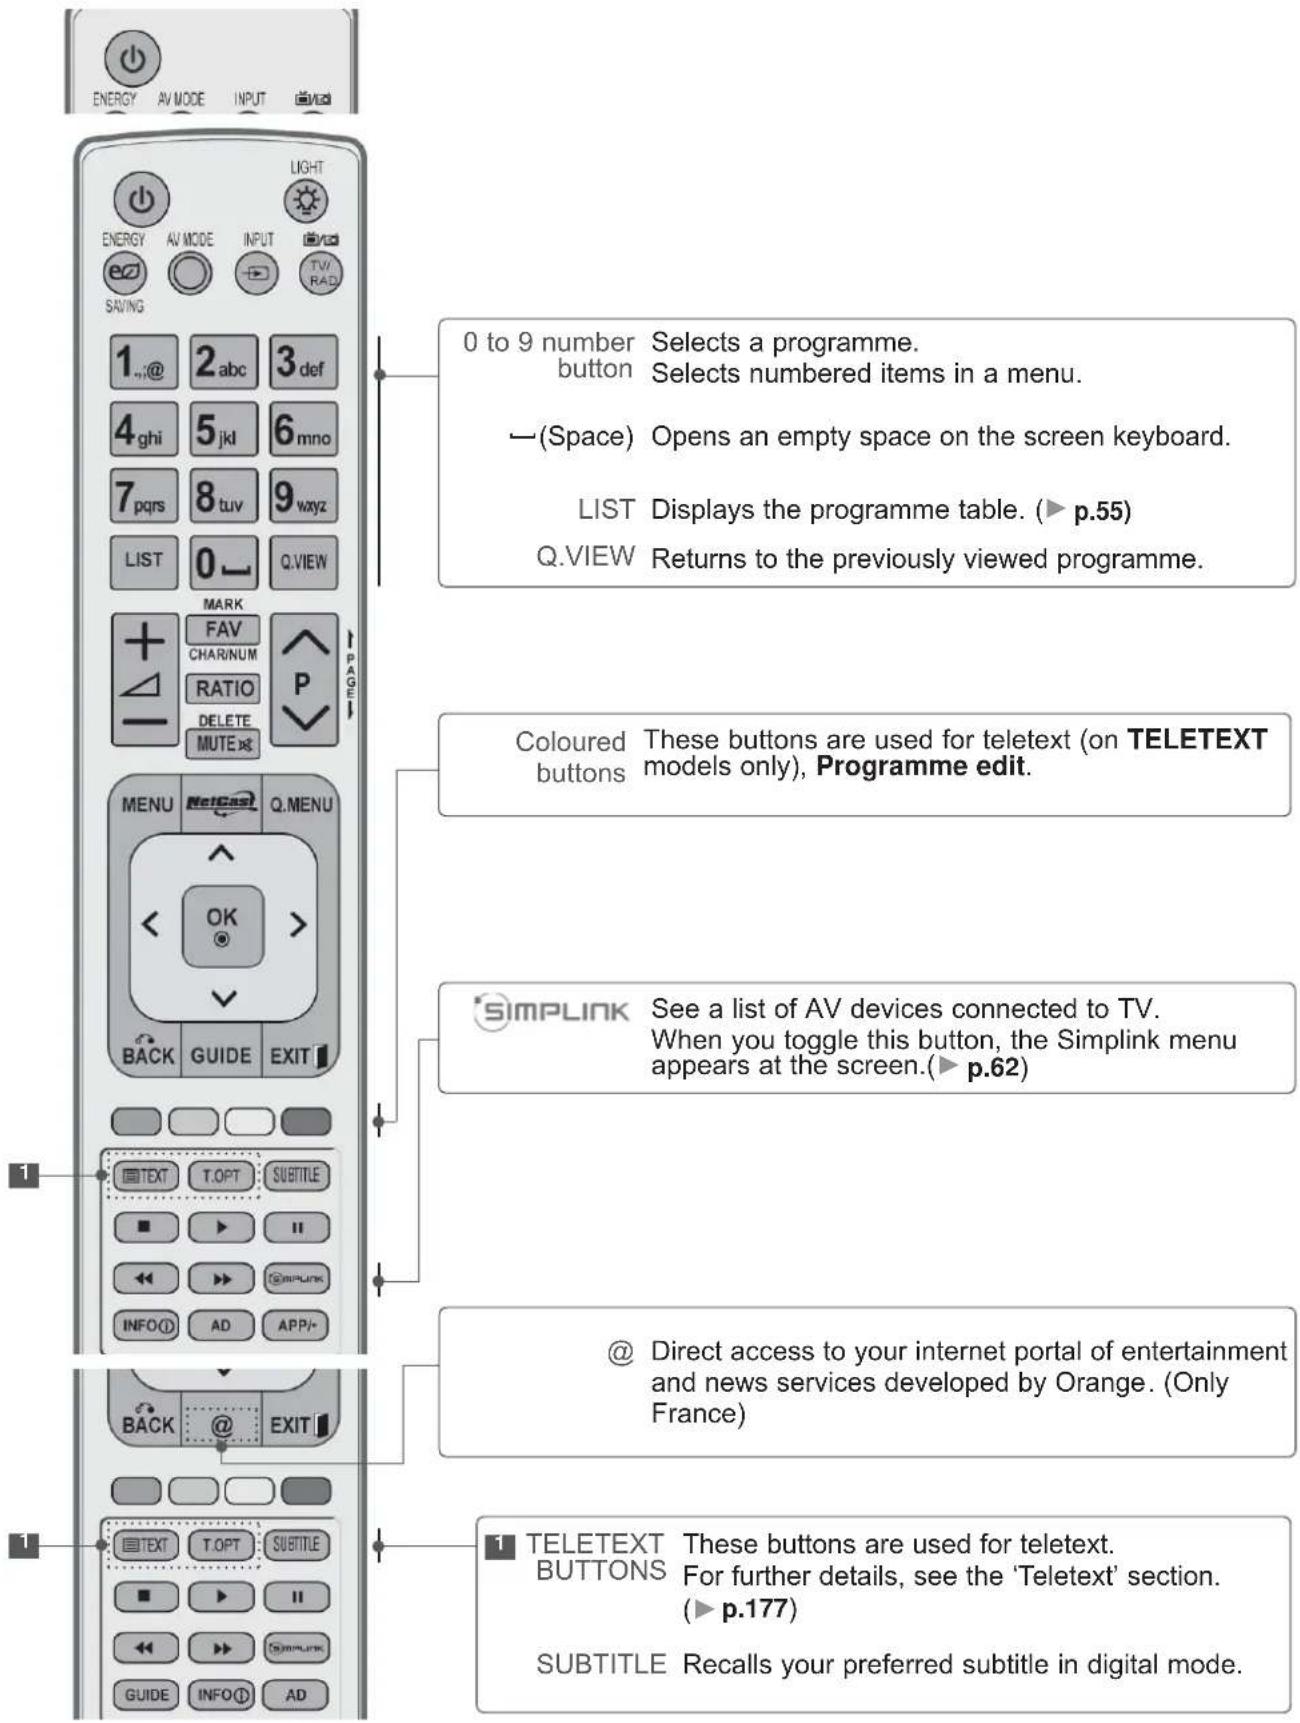
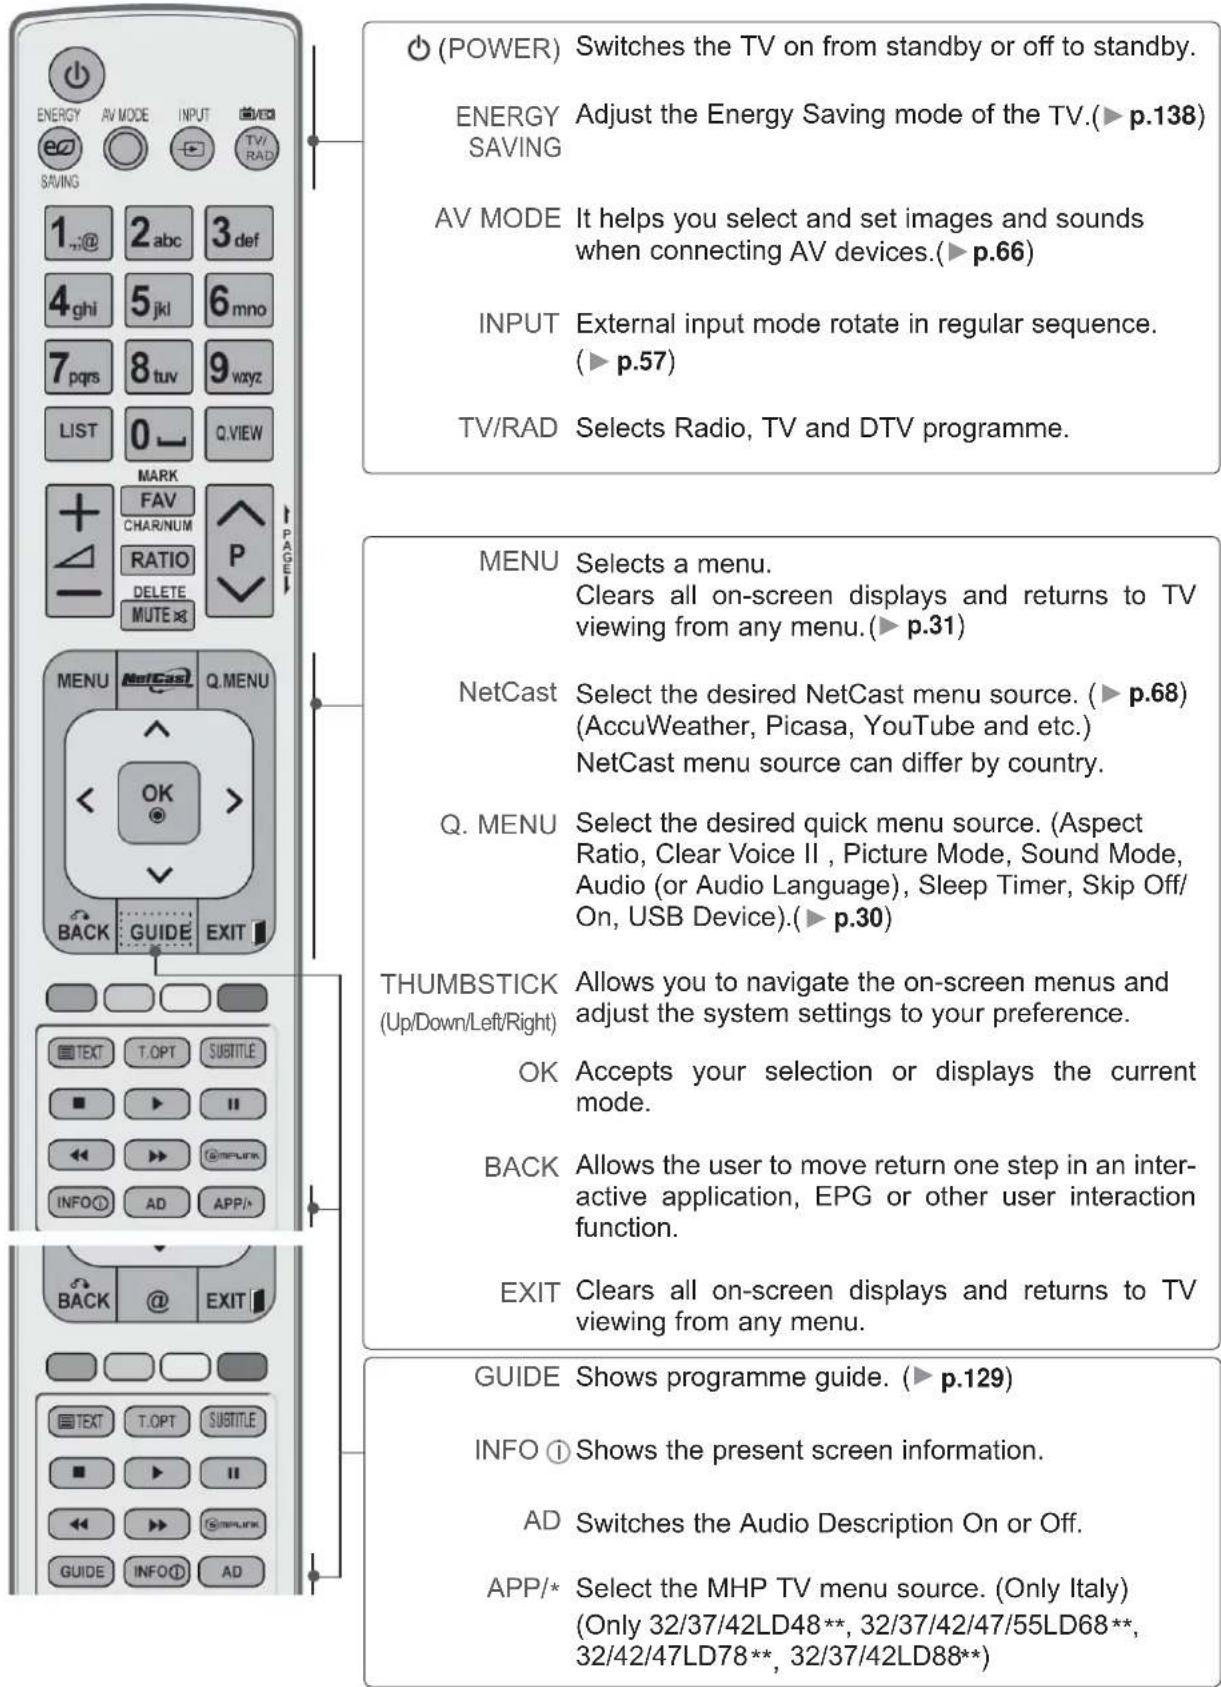
REMOTE CONTROL KEY FUNCTIONS (Only 32/37/42LE4\*\*\*, 32/37/42/47/55LE5\*\*\*, 32/37/42/47/55LE75\*\*, 32/37/42/47/55LE78\*\*, 32/37/42/47/55LE79\*\*, 42/47/55LE8\*\*\*)
When using the remote control, aim it at the remote control sensor on the TV.
text_image
(POWER) Switches the TV on from standby or off to standby. LIGHT You can turn the light of the remote control button ON or off. ENERGY SAVING Adjust the Energy Saving mode of the TV.(▶ p.138) AV MODE It helps you select and set images and sounds when connecting AV devices.(▶ p.66) INPUT External input mode rotate in regular sequence. (▶ p.57) TV/RAD Selects Radio, TV and DTV programme. MENU Selects a menu. Clears all on-screen displays and returns to TV viewing from any menu.(▶ p.31) NetCast Select the desired NetCast menu source. (▶ p.68) (AccuWeather, Picasa, YouTube and etc.) NetCast menu source can differ by country. Q. MENU Select the desired quick menu source. (Aspect Ratio, Clear Voice II , Picture Mode, Sound Mode, Audio (or Audio Language), Sleep Timer, Skip Off/ On, USB Device).(▶ p.30) THUMBSTICK Allows you to navigate the on-screen menus and adjust the system settings to your preference. OK Accepts your selection or displays the current mode. BACK Allows the user to move return one step in an inter- active application, EPG or other user interaction function. EXIT Clears all on-screen displays and returns to TV viewing from any menu. GUIDE Shows programme guide. (▶ p.129) INFO ① Shows the present screen information. AD Switches the Audio Description On or Off. APP/* Select the MHP TV menu source. (Only Italy) (Only 32/37/42LE48**, 32/37/42/47/55LE58**, 32/37/42/47/55LE78**, 42/47/55LE88**)PREPARATION
text_image
ENERGY AV MODE INPUT SALVING 1...@ 2abc 3def 4ghi 5jkl 6mno 7pqrs 8tuv 9wxyz LIST 0 Q.VIEW MARK FAV CHAR/NUM RATIO P DELETE MUTE x8 MENU NetCast Q.MENU < OK > BACK GUIDE EXIT 1 TEXT T.OPT SUBTITLE ■ ▶ II ◀ ◄ Simpunk INFO① AD APP/- 1 TEXT @ EXIT 1 TELETEXT These buttons are used for teletext. BUTTONS For further details, see the 'Teletext' section. (▶ p.177) SUBTITLE Recalls your preferred subtitle in digital mode.
text_image
ENERGY AV MODE INPUT SAVING LIGHT ENERGY AV MODE INPUT TV RAD 1..@ 2 abc 3 def 4 ghi 5 jkl 6 mno 7 pqrs 8 tuv 9 wxyz LIST 0 Q VIEW MARK FAV CHAR/NUM RATIO P DELETE MUTE PAGE MENU NetCast Q MENU OK > BACK GUIDE EXIT TEXT T.OPT SUBTITLE ■ ▶ II ◀◀ ▶ @ SIMILINK INFO① AD APP/- BACK @ EXIT TEXT T.OPT SUBTITLE ■ ▶ II ◀◀ ▶ @ SIMILINK GUIDE INFO① ADVOLUME UP /DOWN Adjusts the volume.
MARK Select the input to apply the Picture Wizard settings. Check and un-check programmes in the USB menu.
FAV Displays the selected favourite programme.
CHAR/NUM Shifts the Character or Number for NetCast menu.
RATIO Selects your desired Aspect Ratio of picture. (▶ p.135)
DELETE Deletes the entered character when entering the character on the screen keyboard.
MUTE Switches the sound on or off.
Programme Selects a programme. UP/DOWN
PAGE UP/ DOWN Move from one full set of screen information to the next one.
SIMPLINK / Controls SIMPLINK or MY MEDIA menu (Photo List, MY MEDIA Music List and Movie List). Menu ntrol buttons
Installing Batteries
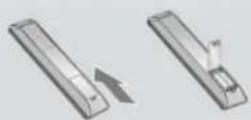
■ Open the battery compartment cover on the back and install the batteries matching correct polarity (+with +,-with -).
■ Install two 1.5 V AAA batteries. Do not mix old or used batteries with new ones.
■ Close cover
■ To remove the batteries, perform the installation actions in reverse.
PREPARATION
REMOTE CONTROL KEY FUNCTIONS (Only 42/47LX6\*\*\*)
When using the remote control, aim it at the remote control sensor on the TV.
text_image
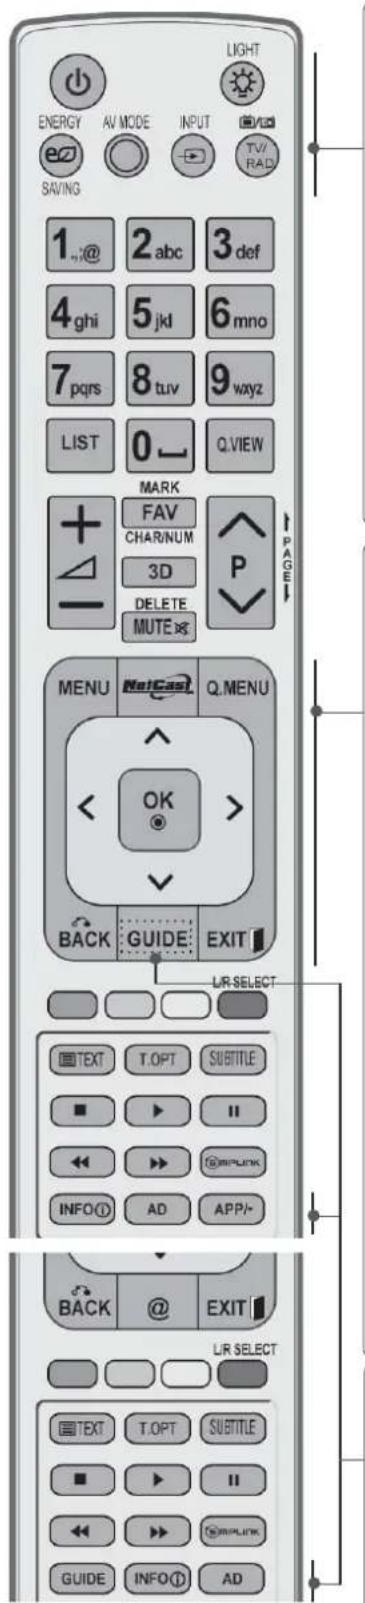
LIGHT ENERGY AV MODE INPUT TV/RAD SAVING 1. @ 2 abc 3 def 4 ghi 5 jkl 6 mno 7 pqrs 8 tuv 9 wayz LIST 0 Q VIEW MARK FAV CHAR/NUM 3D DELETE MUTE P PAGE MENU NetCast Q MENU < OK > BACK GUIDE EXIT LIR SELECT TEXT T.OPT SUBTITLE ■ ▶ II ◀ ▶ [SIRLINK] INFO① AD APP-/- BACK @ EXIT LIR SELECT TEXT T.OPT SUBTITLE ■ ▶ II ◀ ▶ [SIRLINK] GUIDE INFO① AD(POWER) Switches the TV on from standby or off to standby.
LIGHT You can turn the light of the remote control button on or off.
ENERGY Adjust the Energy Saving mode of the TV.(▶ p.138) SAVING
AV MODE It helps you select and set images and sounds when connecting AV devices.(▶ p.66)
INPUT External input mode rotate in regular sequence. (▶ p.57)
TV/RAD Selects Radio, TV and DTV programme.
MENU Selects a menu.
Clears all on-screen displays and returns to TV viewing from any menu.(▶ p.31)
NetCast Select the desired NetCast menu source. (▶ p.68) (AccuWeather, Picasa, YouTube and etc.) NetCast menu source can differ by country.
Q. MENU Select the desired quick menu source. (Aspect Ratio, Clear Voice II, Picture Mode, Sound Mode, Audio (or Audio Language), Sleep Timer, Skip Off/ On, USB Device). (▶ p.30)
THUMBSTICK Allows you to navigate the on-screen menus and adjust the system settings to your preference. (Up/Down/Left/Right)
OK Accepts your selection or displays the current mode.
BACK Allows the user to move return one step in an interactive application, EPG or other user interaction function.
EXIT Clears all on-screen displays and returns to TV viewing from any menu.
GUIDE Shows programme guide. (▶ p.129)
INFO ① Shows the present screen information.
AD Switches the Audio Description On or Off.
APP/* Select the MHP TV menu source. (Only Italy) (Only 42/47LX68**)
text_image
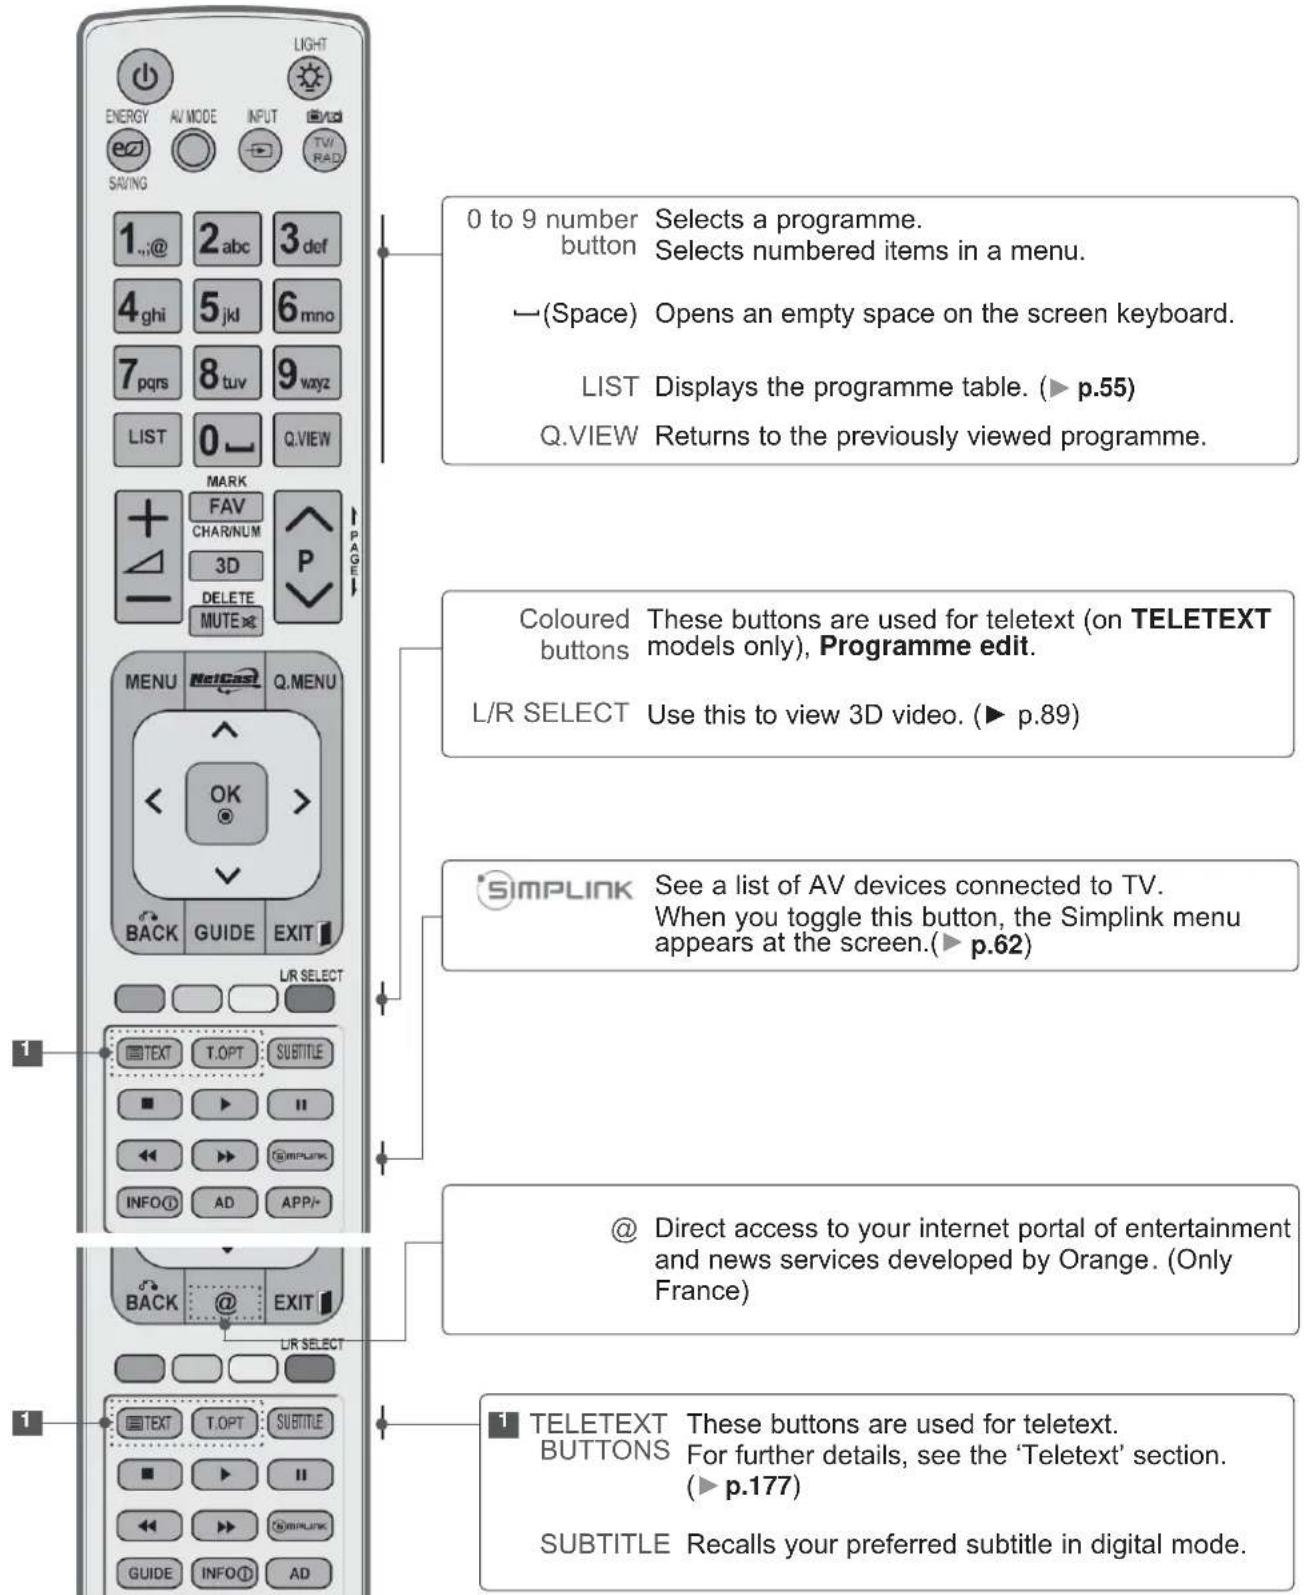
0 to 9 number Selects a programme. button Selects numbered items in a menu. ←(Space) Opens an empty space on the screen keyboard. LIST Displays the programme table. (▶ p.55) Q.VIEW Returns to the previously viewed programme. Coloured These buttons are used for teletext (on TELETEXT buttons models only), Programme edit. L/R SELECT Use this to view 3D video. (▶ p.89) SimplINK See a list of AV devices connected to TV. When you toggle this button, the Simplink menu appears at the screen.(▶ p.62) @ Direct access to your internet portal of entertainment and news services developed by Orange. (Only France) TELETEXT These buttons are used for teletext. BUTTONS For further details, see the 'Teletext' section. (▶ p.177) SUBTITLE Recalls your preferred subtitle in digital mode.PREPARATION
text_image
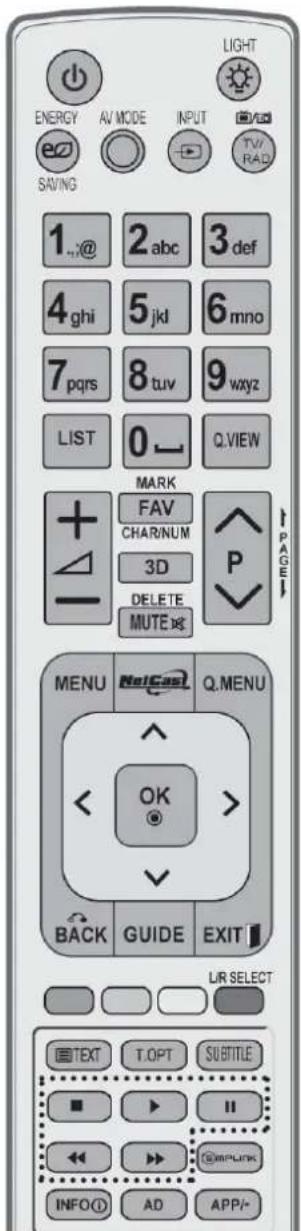
LIGHT ENERGY AV MODE INPUT TV/RAD SAVING 1._.@ 2_abc 3_def 4_ghi 5_jkl 6_mno 7_pqrs 8_tuv 9_wxyz LIST 0 Q.VIEW MARK FAV CHAR/NUM 3D DELETE MUTE P MENU NoCass Q.MENU OK > BACK GUIDE EXIT LIR SELECT TEXT T.OPT SUBTITLE ■ ▶ II ← ← → ← INFO AD APP/-VOLUME UP Adjusts the volume. /DOWN
MARK Select the input to apply the Picture Wizard settings. Check and un-check programmes in the USB menu.
FAV Displays the selected favourite programme.
CHAR/NUM Shifts the Character or Number for NetCast menu. 3D Use this to view 3D video. (▶ p.88)
DELETE Deletes the entered character when entering the character on the screen keyboard.
MUTE Switches the sound on or off.
Programme Selects a programme. UP/DOWN
PAGE UP/ DOWN Move from one full set of screen information to the next one.
SIMPLINK / Controls SIMPLINK or MY MEDIA menu (Photo List, MY MEDIA Music List and Movie List). Menu control buttons
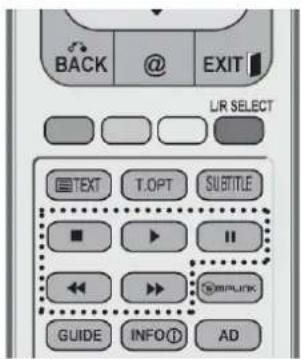
text_image
BACK @ EXIT LIR SELECT TEXT T.OPT SUBTITLE > > > > > > > GUIDE INFO① ADInstalling Batteries
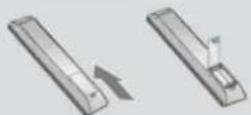
■ Open the battery compartment cover on the back and install the batteries matching correct polarity (+with +,-with -).
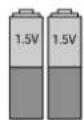
■ Install two 1.5 V AAA batteries. Do not mix old or used batteries with new ones.
■ Close cover
■ To remove the batteries, perform the installation actions in reverse.
LCD TV MODELS : 32/37/42LD4\*\*\*, 32/37/42/47/55LD6\*\*\*, 32/42/47LD7\*\*\*, 32/37/42LD8\*\*\*
ACCESSORIES
Ensure that the following accessories are included with your TV. If an accessory is missing, please contact the dealer where you purchased the TV.
■ Image shown may differ from your TV.

text_image
Owner's ManualOwner's Manual
Batteries (AAA)
natural_image
Illustration of a remote control with keypad and buttons (no text or symbols visible)Remote Control

Nero MediaHome
4 Essentials CD

Ferrite Core
(This item is not included for all models.)
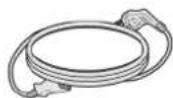
Power Cord
This item is not included for all models.
* Lightly wipe any stains or fingerprints on the surface of the TV with the polishing cloth.
Polishing Cloth Polishing cloth for use on the screen.
Do not use excessive force. This may cause scratching or discolouration.
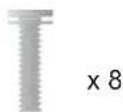
(M4x20)
Bolts for stand assembly

1-screw for stand fixing
(Only 32/37/42LD4***,
32/37/42LD6***
32/42LD7***,
32/37/42LD8***)
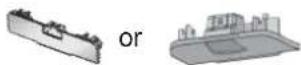
Protection cover
Use of ferrite core (This feature is not available for all models.)
Ferrite core can be used to reduce the electromagnetic wave when connecting the power cord.
The closer the location of the ferrite core to the power plug, the better it is.
text_image
Install the power plug closely.PREPARATION
FRONT PANEL CONTROLS
NOTE
▶ TV can be placed in standby mode in order to reduce the power consumption. And TV should be switched off using the power switch on the TV if it will not be watched for some time, as this will reduce energy consumption.
The energy consumed during use can be significantly reduced if the level of brightness of the picture is reduced, and this will reduce the overall running cost.
CAUTION
▶ Do not step on the glass stand or subject it to any impact. It may break, causing possible injury from fragments of glass, or the TV may fall.
▶ Do not drag the TV. The floor or the product may be damaged.
■ Image shown may differ from your TV.
text_image
Only 32/37/42/47/55LD6*** SPEAKER PROGRAMME VOLUME OK OK MENU MENU INPUT INPUT POWER Power/Standby Indicator (Can be adjusted using the Power Indicator in the OPTION menu.) Remote Control Sensor Intelligent Sensor Adjusts picture according to the surrounding conditions.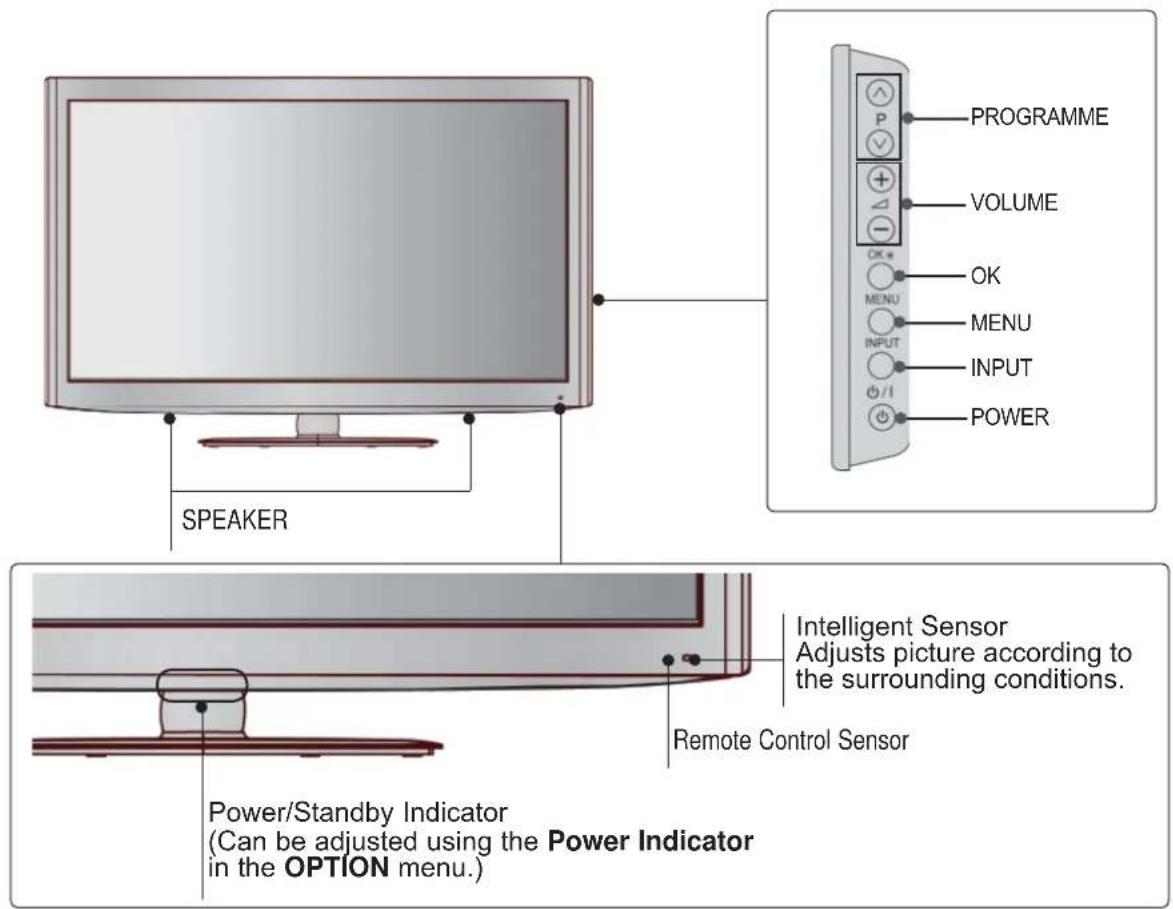
text_image
SPEAKER PROGRAMME VOLUME OK MENU INPUT POWER INTelligent Sensor Adjusts picture according to the surrounding conditions. Remote Control Sensor Power/Standby Indicator (Can be adjusted using the Power Indicator in the OPTION menu.)PREPARATION
Only 32/37/42LD8***
text_image
Only 32/37/42LD8*** SPEAKER PROGRAMME VOLUME OK OK MENU MENU INPUT INPUT POWER Remote Control Sensor Intelligent Sensor Adjusts picture according to the surrounding conditions. Power/Standby Indicator (Can be adjusted using the Power Indicator in the OPTION menu.)Only 32/37/42LD4***
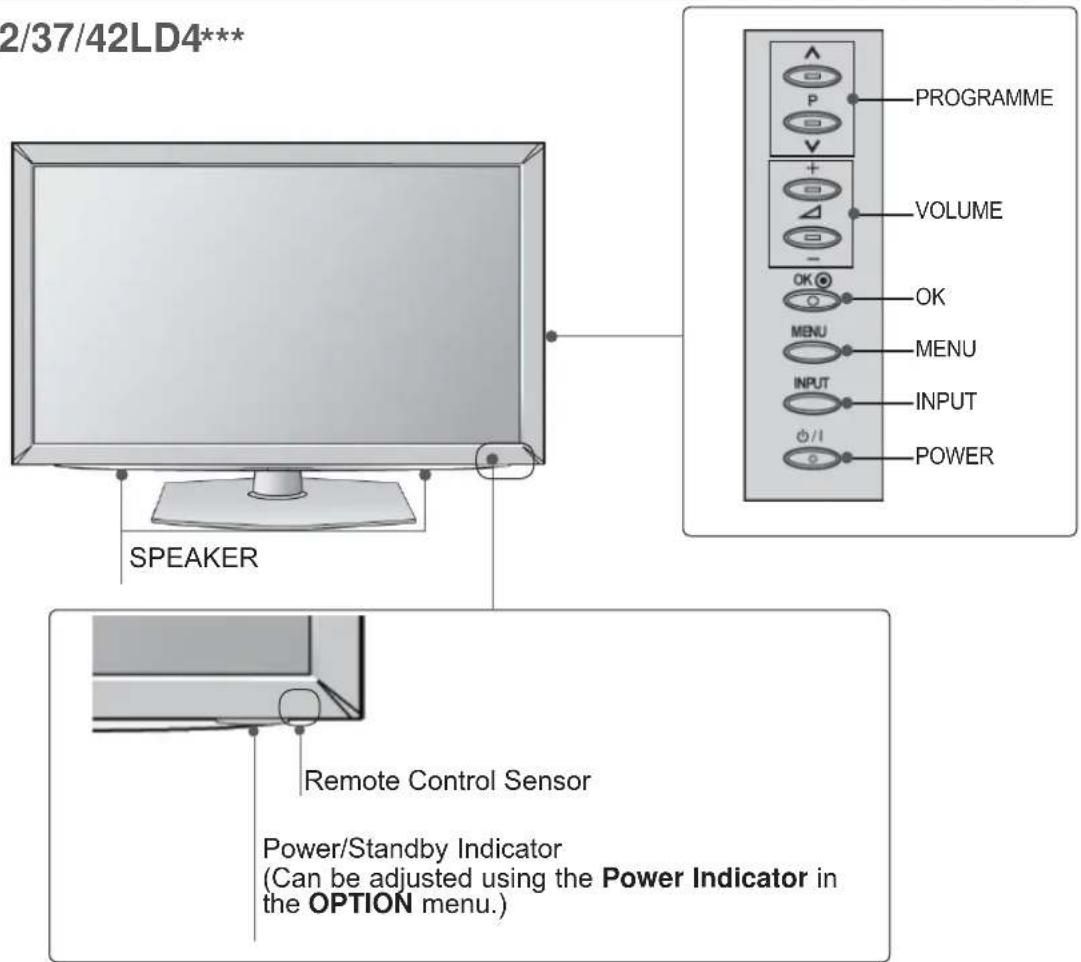
text_image
2/37/42LD4*** SPEAKER PROGRAMME VOLUME OK OK MENU MENU INPUT INPUT POWER Remote Control Sensor Power/Standby Indicator (Can be adjusted using the Power Indicator in the OPTION menu.)BACK PANEL INFORMATION
■ Image shown may differ from your TV.
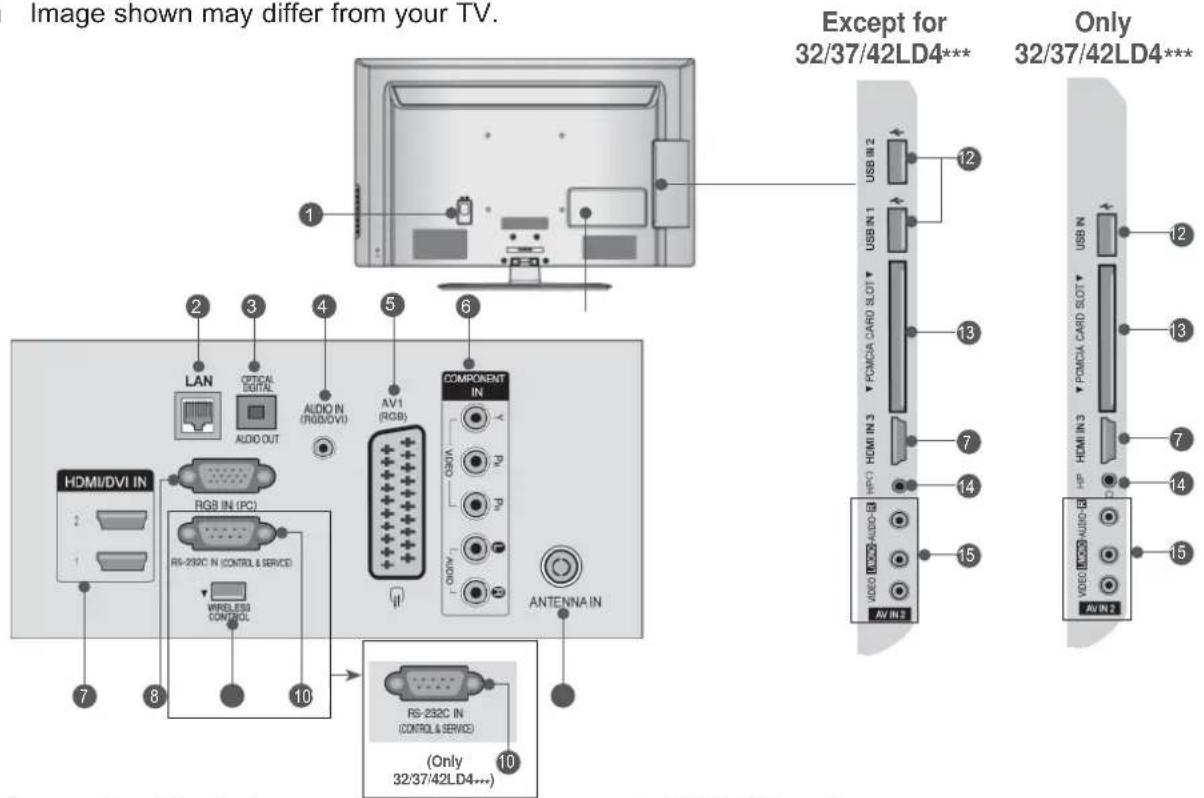
text_image
Image shown may differ from your TV. Except for 32/37/42LD4*** Only 32/37/42LD4***① Power Cord Socket
This TV operates on an AC power. The voltage is indicated on the Specifications page. (▶ p.184 to 200) Never attempt to operate the TV on DC power.
2 LAN
Network connection for AccuWeather, Picasa, YouTube, etc.
Also used for video, photo and music files on a local network.
3 OPTICAL DIGITAL AUDIO OUT
Connect digital audio to various types of equipment.
Connect to a Digital Audio Component. Use an Optical audio cable.
4 RGB/DVI Audio Input
Connect the audio from a PC or DTV.
⑤ Euro Scart Socket (AV1)
Connect scart socket input or output from an external device to these jacks.
6 Component Input
Connect a component video/audio device to these jacks.
⑦ HDMI/DVI IN Input
Connect an HDMI signal to HDMI IN. Or DVI (VIDEO) signal to HDMI/DVI port with DVI to HDMI cable.
8 RGB IN Input
Connect the output from a PC.
9 WIRELESS Control (Except for 32/37/42LD4**)
Connect the Wireless Ready Dongle to the TV to control the external input devices connected to Wireless Media Box wirelessly.
10 RS-232C IN (CONTROL & SERVICE) PORT Connect to the RS-232C port on a PC. This port is used for Service or Hotel mode.
11 Antenna Input
Connect antenna or cable to this jack.
② USB Input
Connect USB storage device to this jack.
13 PCMCIA (Personal Computer Memory Card International Association) Card Slot Insert the CI Module to PCMCIA CARD SLOT. (This feature is not available in all countries.)
14 Headphone Socket
Plug the headphone into the headphone socket.
15 Audio/Video Input
Connect audio/video output from an external device to these jacks.
PREPARATION
STAND INSTALLATION
■ Image shown may differ from your TV. When assembling the desk type stand, check whether the bolt is fully tightened. (If not tightened fully, the product can tilt forward after the product installation.) If you tighten the bolt with excessive force, the bolt can deviate from abrasion of the tightening part of the bolt.
1 Carefully place the TV screen side down on a cushioned surface to protect the screen from damage.
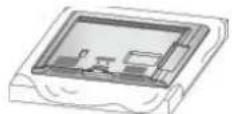
2 Assemble the parts of the Stand Body with the Stand Base of the TV.
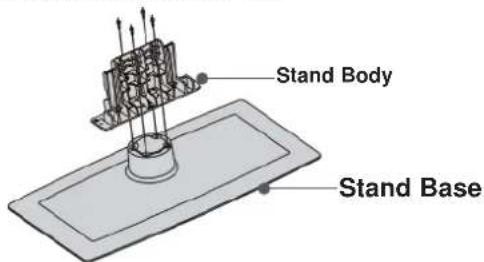
text_image
Stand Body Stand Base3 Assemble the TV as shown.
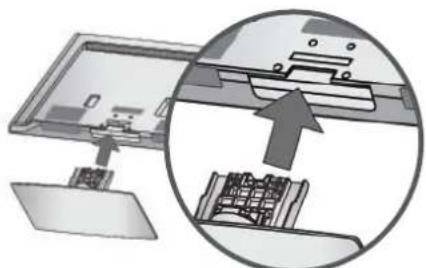
natural_image
Diagram showing a computer monitor with an inset close-up of internal components (no text or symbols)4 Fix the 4 bolts securely using the holes in the back of the TV.
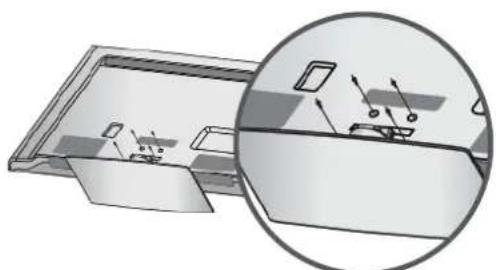
natural_image
3D diagram of a device with internal components and an inset magnified view showing internal structure (no text or symbols)5 Assemble the parts of the Stand Rear Cover with the TV. (Only 32/42/47LD7***, 32/37/42LD8***)
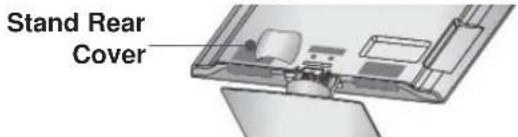
text_image
Stand Rear CoverBACK COVER FOR WIRE ARRANGEMENT
■ Image shown may differ from your TV.
1 Connect the cables as necessary. To connect additional equipment, see the External Equipment Setup section.
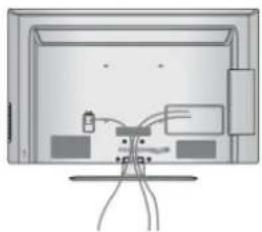
natural_image
Illustration of a monitor setup with cables and connectors, no text or symbols present② Open the Cable Management Clip as shown.
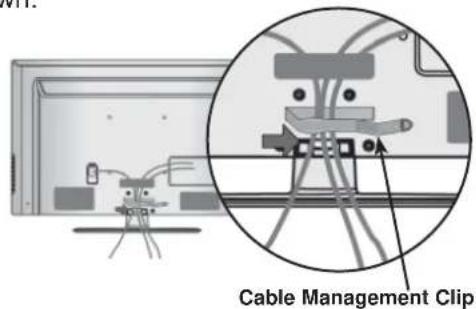
text_image
Cable Management Clip3 Fit the Cable Management Clip as shown.
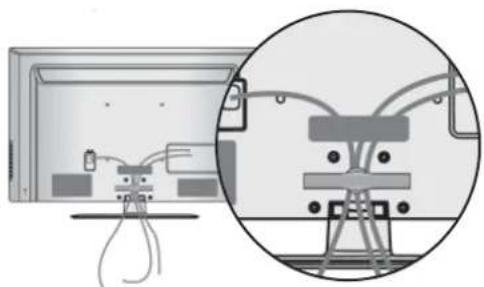
natural_image
Diagram showing a monitor with cable connectors and a close-up of its internal components (no text or symbols)NOTE
▶ Do not use the Cable Management Clip to lift the TV.
- If the TV is dropped, you may be injured or the TV may be damaged.
SWIVEL STAND
■ Image shown may differ from your TV. After installing the TV, you can adjust the TV set manually to the left or right direction by 20 degrees to suit your viewing position.
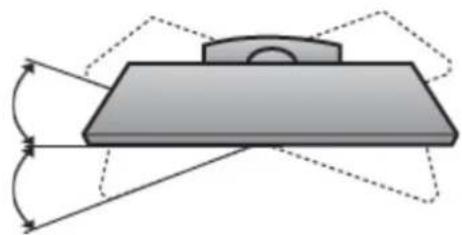
natural_image
Diagram of a mechanical component with angular and linear motion indicators (no text or symbols)NOT USING THE DESK-TYPE STAND
■ Image shown may differ from your TV. When installing the wall-mounted unit, use the protection cover.
Insert the Protection Cover into the TV until clicking sound.
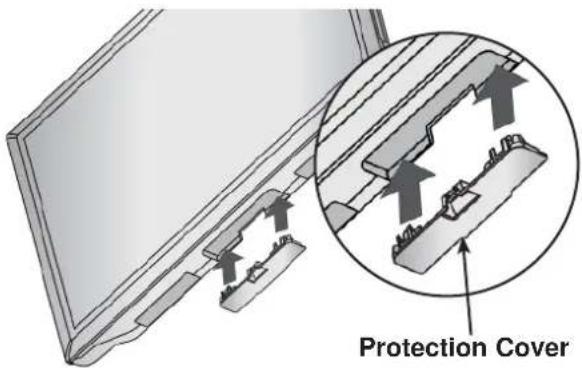
text_image
Protection CoverATTACHING THE TV TO A DESK (Only 32/37/42LD4\*\*\*,
32/37/42LD6***, 32/42LD7***, 32/37/42LD8***)
■ Image shown may differ from your TV.
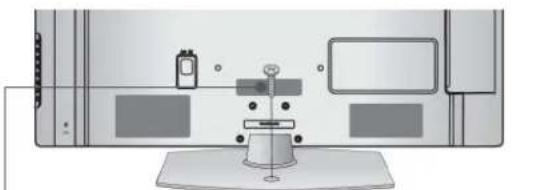
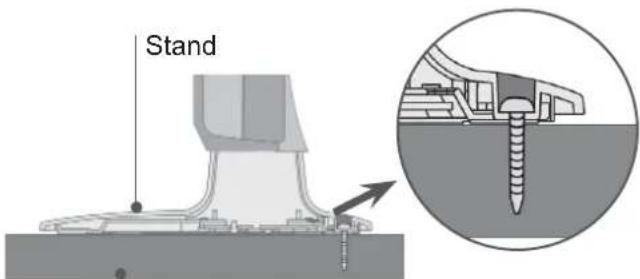
The TV must be attached to desk so it cannot be pulled in a forward/backward direction, potentially causing injury or damaging the product. Use only an attached screw.
natural_image
Diagram of a device setup with a central sensor and surrounding components (no text or labels)1-Screw (provided as parts of the product)
text_image
StandDesk
! WARNING
▶To prevent TV from falling over, the TV should be securely attached to the floor/wall per installation instructions. Tipping, shaking, or rocking the machine may cause injury.
PREPARATION
KENSINGTON SECURITY SYSTEM
■ This feature is not available for all models.
■ Image shown may differ from your TV.
The TV is equipped with a Kensington Security System connector on the back panel. Connect the Kensington Security System cable as shown below.
For the detailed installation and use of the Kensington Security System, refer to the user's guide provided with the Kensington Security System.
For further information, contact http://www.kensington.com, the internet homepage of the Kensington
company. Kensington sells security systems for expensive electronic equipment such as notebook PCs and LCD projectors.
NOTE
The Kensington Security System is an optional accessory.
If the TV feels cold to the touch, there may be a small "flicker" when it is turned on.
This is normal, there is nothing wrong with TV.
▶ Some minute dot defects may be visible on the screen, appearing as tiny red, green, or blue spots. However, they have no adverse effect on the monitor's performance.
▶ Avoid touching the LCD screen or holding your finger(s) against it for long periods of time.
Doing so may produce some temporary distortion effects on the screen.
natural_image
Illustration of a computer monitor mounted on a desk with cables, no text or symbols presentCAREFUL INSTALLATION ADVICE
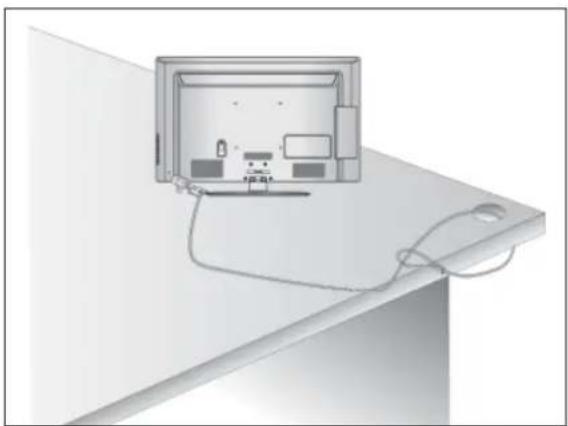
■ You should purchase necessary components to fix the TV safety and secure to the wall on the market.
■ Position the TV close to the wall to avoid the possibility of it falling when pushed.
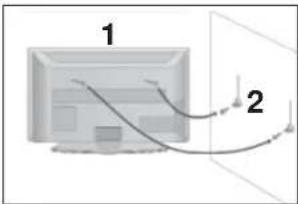
■ The instructions shown below are a safer way to set up the TV, by fixing it to the wall, avoiding the possibility of it falling forwards if pulled. This will prevent the TV from falling forward and causing injury. This will also prevent the TV from damage. Ensure that children do not climb or hang from the TV.
natural_image
Diagram of a monitor with two cables, labeled 1 and 2, showing wiring connections (no text or symbols beyond labels)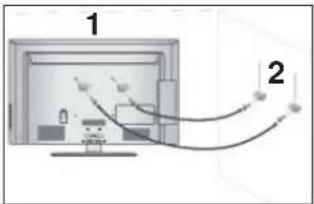
text_image
1 21 Use the eye-bolts or TV brackets/bolts to fix the product to the wall as shown in the picture. (If your TV has bolts in the eyebolts, loosen then bolts.)
* Insert the eye-bolts or TV brackets/bolts and tighten them securely in the upper holes.
2 Secure the wall brackets with the bolts on the wall. Match the height of the bracket that is mounted on the wall.
natural_image
Simple line drawing of a computer monitor with a vertical line and number 3, no text or symbols present.3 Use a sturdy rope to tie the product for alignment. It is safer to tie the rope so it becomes horizontal between the wall and the product.
NOTE
▶ When moving the TV undo the cords first.
▶ Use a platform or cabinet strong and large enough to support the size and weight of the TV.
▶ To use the TV safely make sure that the height of the bracket on the wall and on the TV is the same.
■ The TV can be installed in various ways such as on a wall, or on a desktop etc.
■ The TV is designed to be mounted horizontally.
EARTHING
Ensure that you connect the earth wire to prevent possible electric shock. If grounding methods are not possible, have a qualified electrician install a separate circuit breaker.
Do not try to earth the TV by connecting it to telephone wires, lightening rods or gas pipes.
text_image
Power Supply Circuit breakerDESKTOP PEDESTAL INSTALLATION
■ Image shown may differ from your TV.
For adequate ventilation allow a clearance of 10 cm all around the TV.
text_image
10 cm 10 cm 10 cm 10 cmWALL MOUNT: HORIZONTAL INSTALLATION
■ We recommend the use of a LG Brand wall mounting bracket when mounting the TV to a wall.
■ We recommend that you purchase a wall mounting bracket which supports VESA standard.
■ LG recommends that wall mounting be performed by a qualified professional installer.

NOTE
▶ Should Install wall mount on a solid wall perpendicular to the floor.
▶Should use a special wall mount, if you want to install it to ceiling or slanted wall.
The surface that wall mount is to be mounted on should be of sufficient strength to support the weight of TV set; e.g. concrete, natural rock, brick and hollow block.
▶Installing screw type and length depends on the wall mount used. Further information, refer to the instructions included with the mount.
▶ LG is not liable for any accidents or damage to property or TV due to incorrect installation:
- Where a non-compliant VESA wall mount is used.
- Incorrect fastening of screws to surface which may cause TV to fall and cause personal injury.
- Not following the recommended Installation method.
text_image
10 cm 10 cm 10 cm 10 cm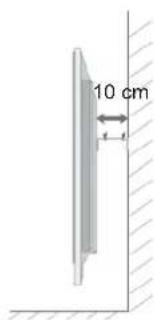
text_image
10 cm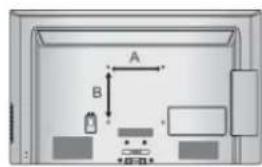
text_image
A B| Model | VESA (A * B) | Standard Screw | Quantity |
| 32LD4*** | 200 * 100 | M4 | 4 |
| 37/42LD4*** | 200 * 200 | M6 | 4 |
| 32LD6*** | 200 * 100 | M4 | 4 |
| 37/42/47LD6*** | 200 * 200 | M6 | 4 |
| 55LD6*** | 400 * 400 | M6 | 4 |
| 32LD7*** | 200 * 100 | M4 | 4 |
| 42/47LD7*** | 200 * 200 | M6 | 4 |
| 32LD8*** | 200 * 100 | M4 | 4 |
| 37/42LD8*** | 200 * 200 | M6 | 4 |
PREPARATION
REMOTE CONTROL KEY FUNCTIONS
When using the remote control, aim it at the remote control sensor on the TV.
text_image
POWER Switches the TV on from standby or off to standby. ENERGY Adjust the Energy Saving mode of the TV.(▶ p.138) SAVING AV MODE It helps you select and set images and sounds when connecting AV devices.(▶ p.66) INPUT External input mode rotate in regular sequence. (▶ p.57) TV/RAD Selects Radio, TV and DTV programme. MENU Selects a menu. Clears all on-screen displays and returns to TV viewing from any menu.(▶ p.31) NetCast Select the desired NetCast menu source. (▶ p.68) (AccuWeather, Picasa, YouTube and etc.) NetCast menu source can differ by country. Q. MENU Select the desired quick menu source. (Aspect Ratio, Clear Voice II , Picture Mode, Sound Mode, Audio (or Audio Language), Sleep Timer, Skip Off/ On, USB Device).(▶ p.30) THUMBSTICK Allows you to navigate the on-screen menus and adjust the system settings to your preference. OK Accepts your selection or displays the current mode. BACK Allows the user to move return one step in an inter- active application, EPG or other user interaction function. EXIT Clears all on-screen displays and returns to TV viewing from any menu. GUIDE Shows programme guide. (▶ p.129) INFO ① Shows the present screen information. AD Switches the Audio Description On or Off. APP/* Select the MHP TV menu source. (Only Italy) (Only 32/37/42LD48**, 32/37/42/47/55LD68**, 32/42/47LD78**, 32/37/42LD88**)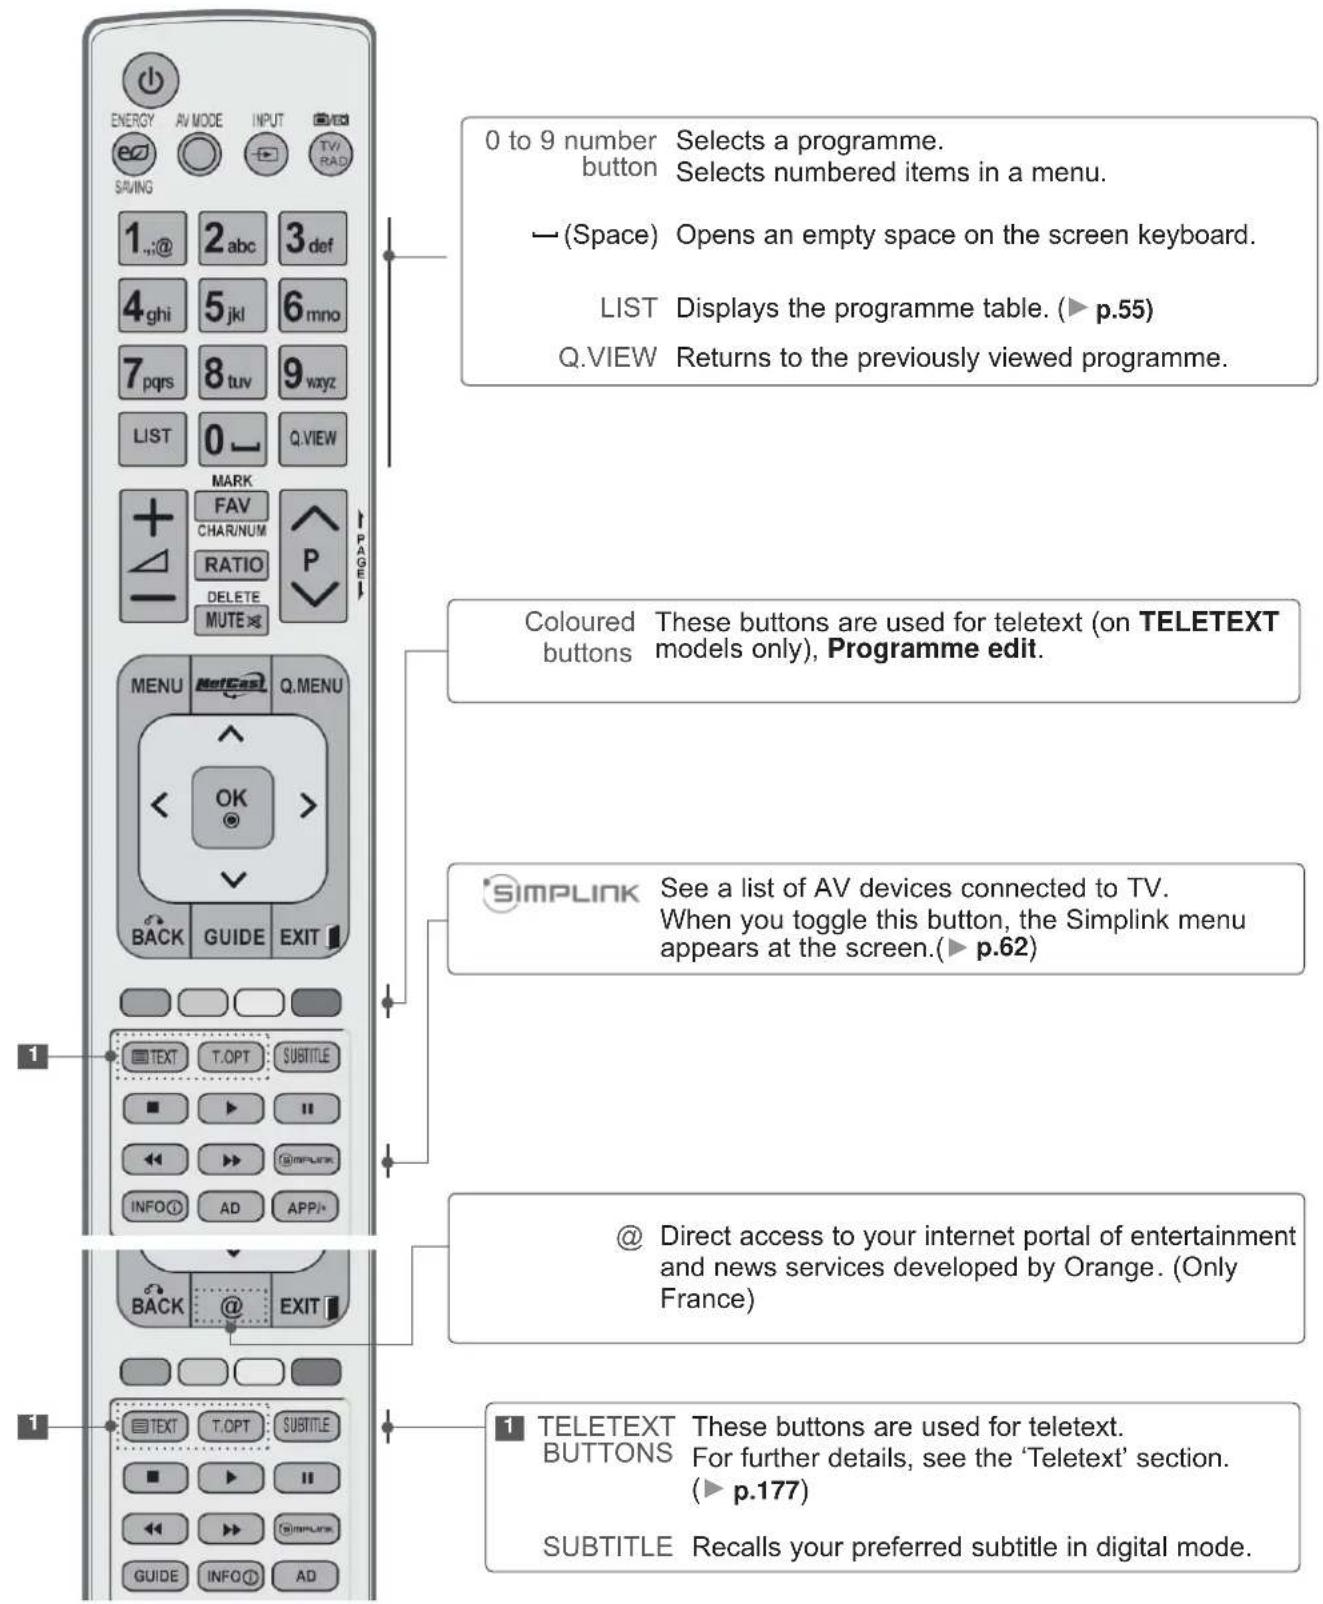
text_image
0 to 9 number Selects a programme. button Selects numbered items in a menu. →(Space) Opens an empty space on the screen keyboard. LIST Displays the programme table. (► p.55) Q.VIEW Returns to the previously viewed programme. Coloured These buttons are used for teletext (on TELETEXT buttons models only), Programme edit. SIMPLINK See a list of AV devices connected to TV. When you toggle this button, the Simplink menu appears at the screen.(► p.62) @ Direct access to your internet portal of entertainment and news services developed by Orange. (Only France) TELETEXT These buttons are used for teletext. BUTTONS For further details, see the 'Teletext' section. (► p.177) SUBTITLE Recalls your preferred subtitle in digital mode.PREPARATION
text_image
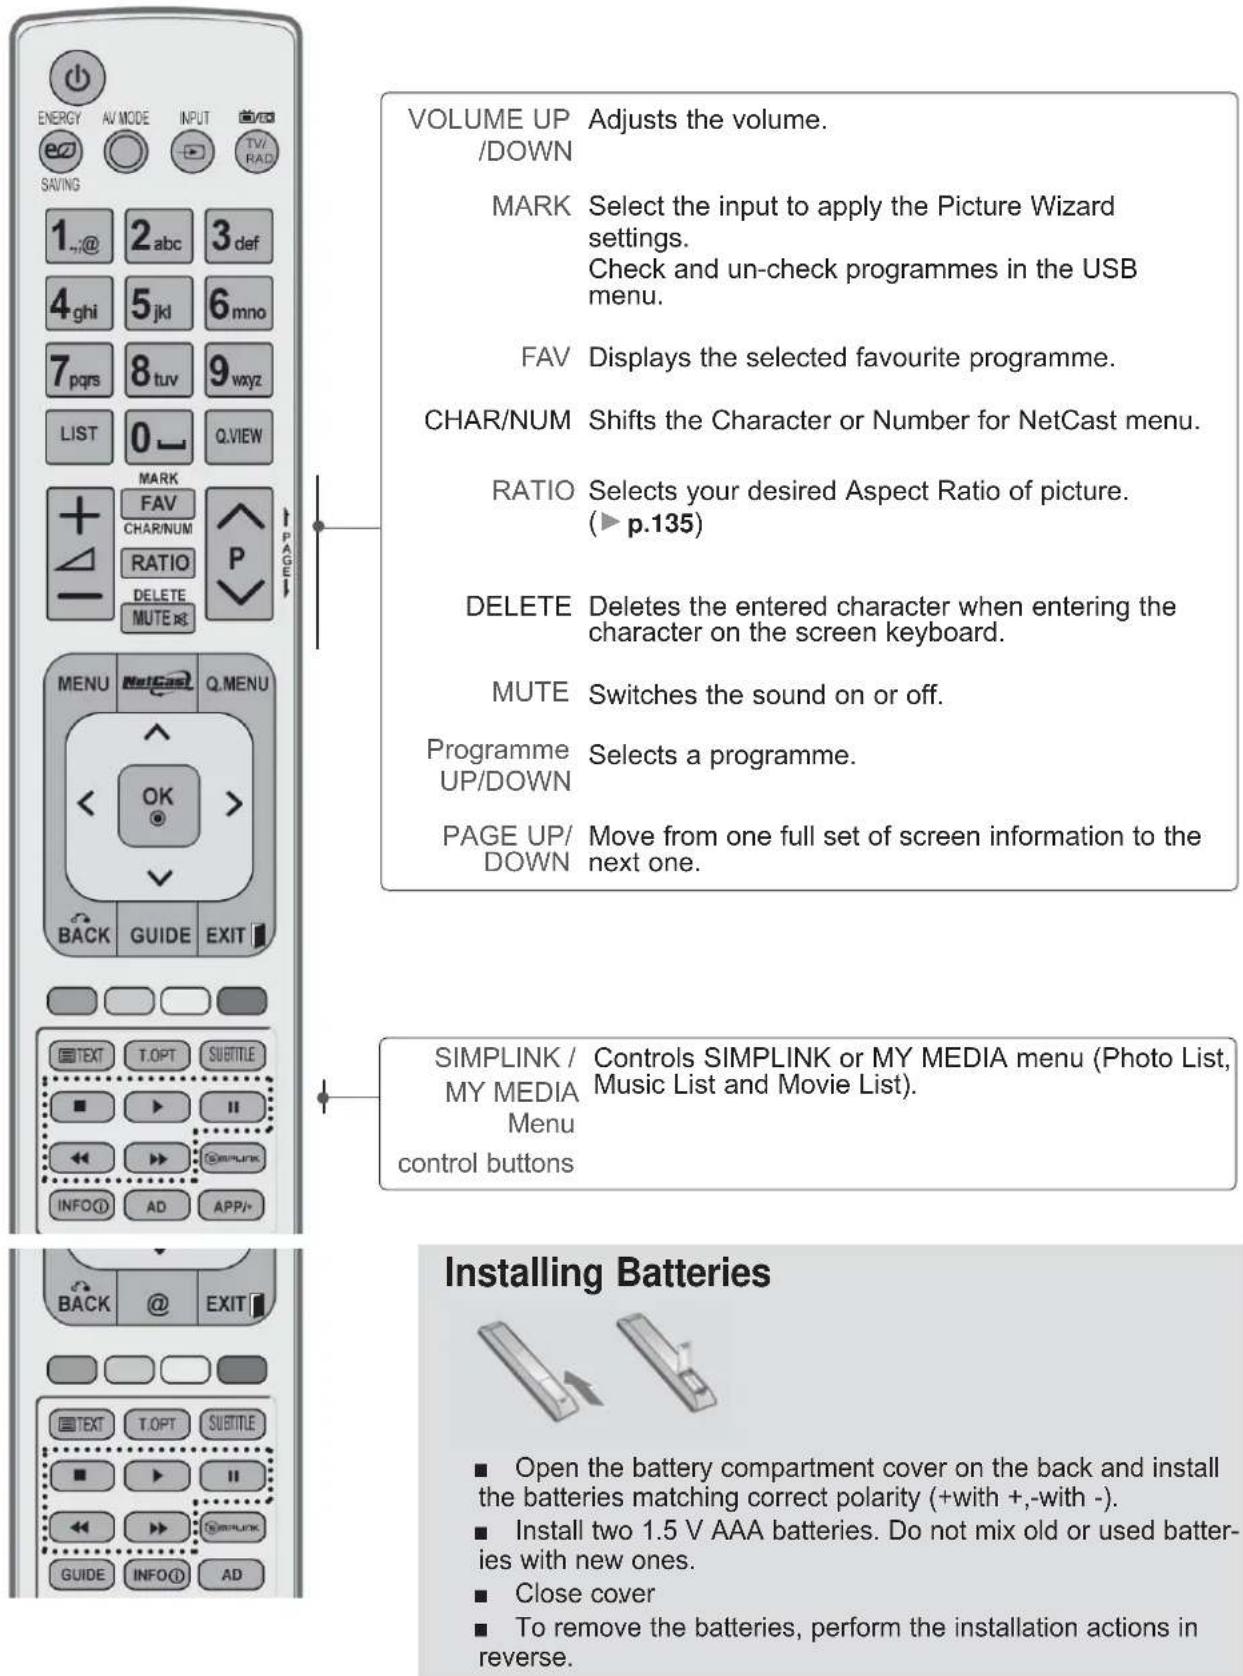
VOLUME UP /DOWN MARK Select the input to apply the Picture Wizard settings. Check and un-check programmes in the USB menu. FAV Displays the selected favourite programme. CHAR/NUM Shifts the Character or Number for NetCast menu. RATIO Selects your desired Aspect Ratio of picture. (▶ p.135) DELETE Deletes the entered character when entering the character on the screen keyboard. MUTE Switches the sound on or off. Programme UP/DOWN Selects a programme. PAGE UP/ DOWN Move from one full set of screen information to the next one. SIMPLINK / MY MEDIA Menu (Photo List, Music List and Movie List). Menu control buttons Installing Batteries ■ Open the battery compartment cover on the back and install the batteries matching correct polarity (+with +,-with -). ■ Install two 1.5 V AAA batteries. Do not mix old or used batteries with new ones. ■ Close cover ■ To remove the batteries, perform the installation actions in reverse.LED LCD TV MODELS : 47/55LX9 \*\*\*
ACCESSORIES
Ensure that the following accessories are included with your TV. If an accessory is missing, please contact the dealer where you purchased the TV.
■ Image shown may differ from your TV.

text_image
Owner's ManualOwner's Manual
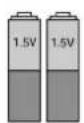
Batteries (AAA)
text_image
our TV.Remote Control
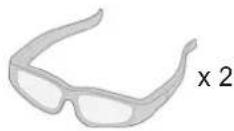
3D Glasses (AG-S100)
This item is not included for all models.
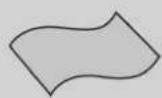
Polishing Cloth Polishing cloth for use on the screen.
* Lightly wipe any stains or fingerprints on the surface of the TV with the polishing cloth.
Do not use excessive force. This may cause scratching or discolouration.

Nero MediaHome
4 Essentials CD

Ferrite Core
(This item is not included for all models.)
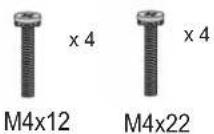
Bolts for stand assembly
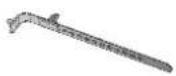
Cable Holder
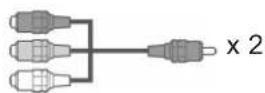
Component gender cable,
AV gender cable

Stand Rear
Cover
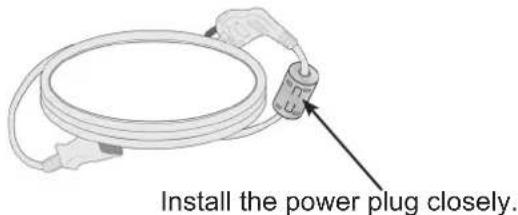
Use of ferrite core (This feature is not available for all models.)
Ferrite core can be used to reduce the electromagnetic wave when connecting the power cord.
The closer the location of the ferrite core to the power plug, the better it is.
text_image
Install the power plug closely.PREPARATION
FRONT PANEL CONTROLS
NOTE
▶ TV can be placed in standby mode in order to reduce the power consumption. And TV should be switched off using the power switch on the TV if it will not be watched for some time, as this will reduce energy consumption.
The energy consumed during use can be significantly reduced if the level of brightness of the picture is reduced, and this will reduce the overall running cost.
CAUTION
▶ Do not step on the glass stand or subject it to any impact. It may break, causing possible injury from fragments of glass, or the TV may fall.
▶ Do not drag the TV. The floor or the product may be damaged.
■ Image shown may differ from your TV.
text_image
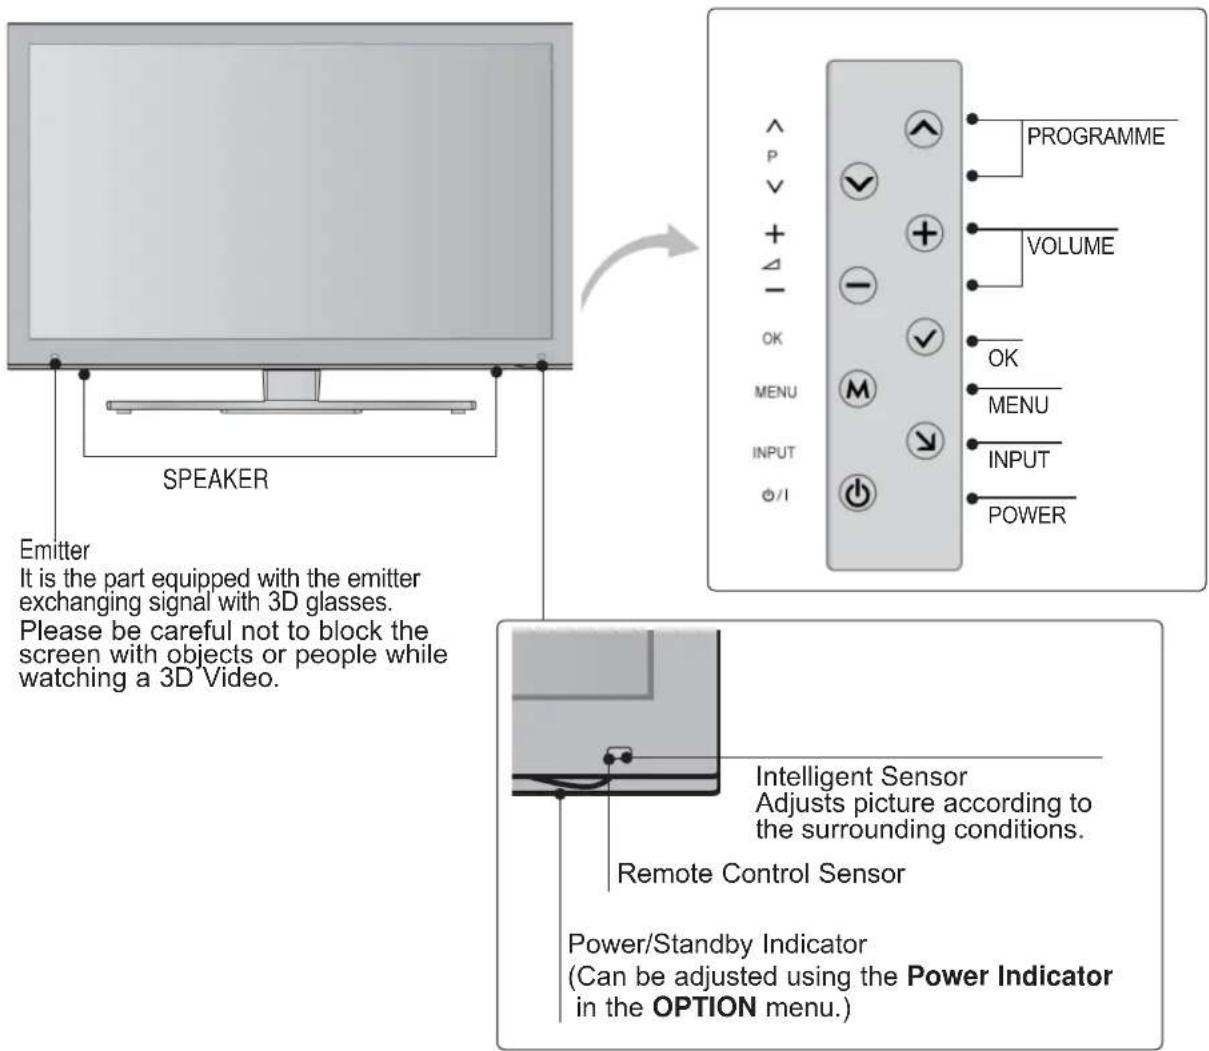
SPEAKER Emitter It is the part equipped with the emitter exchanging signal with 3D glasses. Please be careful not to block the screen with objects or people while watching a 3D Video. Intelligent Sensor Adjusts picture according to the surrounding conditions. Remote Control Sensor Power/Standby Indicator (Can be adjusted using the Power Indicator in the OPTION menu.)BACK PANEL INFORMATION
■ Image shown may differ from your TV.
text_image
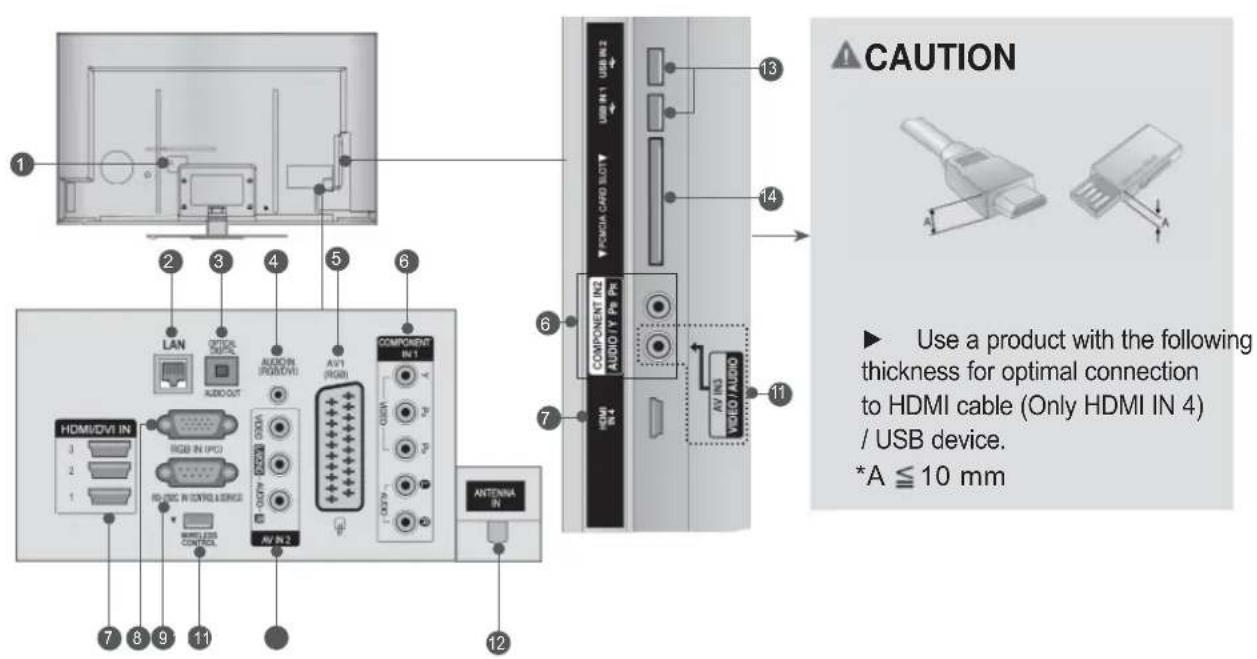
CAUTION ► Use a product with the following thickness for optimal connection to HDMI cable (Only HDMI IN 4) / USB device. *A ≤ 10 mm1 Power Cord Socket
This TV operates on an AC power. The voltage is indicated on the Specifications page. (▶ p.184 to 200) Never attempt to operate the TV on DC power.
② LAN
Network connection for AccuWeather, Picasa, YouTube, etc.
Also used for video, photo and music files on a local network.
3 OPTICAL DIGITAL AUDIO OUT
Connect digital audio to various types of equipment.
Connect to a Digital Audio Component. Use an Optical audio cable.
4 RGB/DVI Audio Input
Connect the audio from a PC or DTV.
⑤ Euro Scart Socket (AV1)
Connect scart socket input or output from an external device to these jacks.
6 Component Input
Connect a component video/audio device to these jacks.
7 HDMI/DVI IN Input
Connect an HDMI signal to HDMI IN. Or DVI (VIDEO) signal to HDMI/DVI port with DVI to HDMI cable.
8 RGB IN Input
Connect the output from a PC.
9 RS-232C IN (CONTROL & SERVICE) PORT
Connect to the RS-232C port on a PC.
This port is used for Service or Hotel mode.
10 WIRELESS Control
Connect the Wireless Ready Dongle to the TV to control the external input devices connected to Wireless Media Box wirelessly.
11 Audio/Video Input
Connect audio/video output from an external device to these jacks.
12 Antenna Input
Connect antenna or cable to this jack.
13 USB Input
Connect USB storage device to this jack.
14 PCMCIA (Personal Computer Memory Card International Association) Card Slot Insert the CI Module to PCMCIA CARD SLOT.
(This feature is not available in all countries.)
PREPARATION
STAND INSTALLATION
■ Image shown may differ from your TV. When assembling the desk type stand, check whether the bolt is fully tightened. (If not tightened fully, the product can tilt forward after the product installation.) If you tighten the bolt with excessive force, the bolt can deviate from abrasion of the tightening part of the bolt.
1 Carefully place the TV screen side down on a cushioned surface to protect the screen from damage.
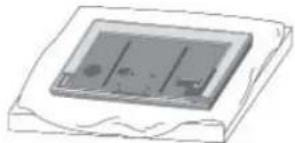
natural_image
Illustration of a rectangular electronic component with internal channels, placed on a textured base (no text or symbols visible)2 Assemble the parts of the Stand Body with the Stand Base of the TV.
At this time, tighten the screws that hold the Stand Body on.
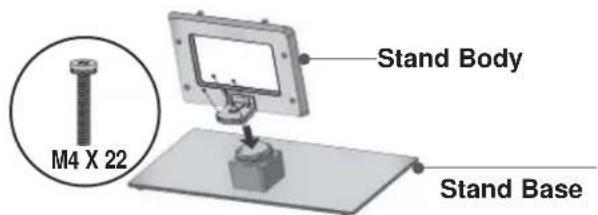
text_image
M4 X 22 Stand Body Stand Base3 Fix the 4 bolts securely using the holes in the back of the TV.
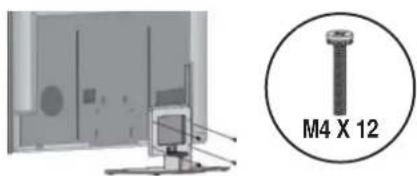
text_image
M4 X 124 Assemble the parts of the Stand Rear Cover with the TV.
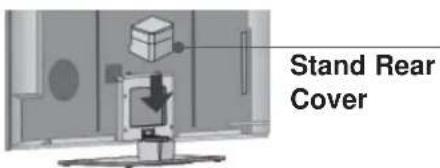
text_image
Stand Rear CoverBACK COVER FOR WIRE ARRANGEMENT
■ Image shown may differ from your TV.
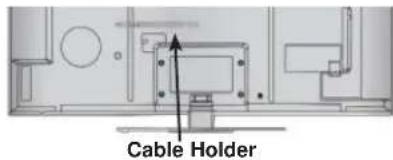
1 Secure the power cord with the Cable Holder on the TV back cover. It will help prevent the power cable from being removed by accident.
text_image
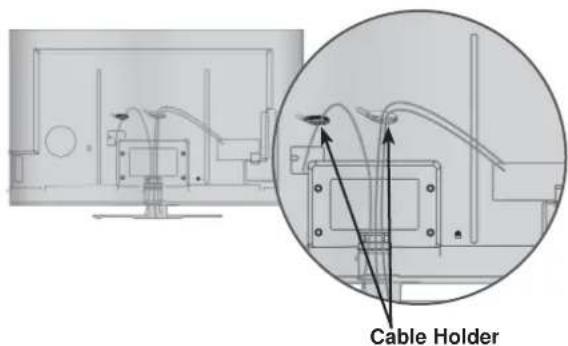
Cable Holder2 After connecting the cables as necessary, install Cable Holder as shown and bundle the cables.
text_image
Cable HolderSWIVEL STAND
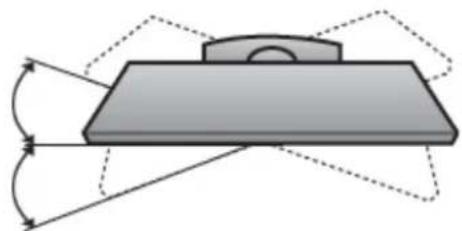
■ Image shown may differ from your TV. After installing the TV, you can adjust the TV set manually to the left or right direction by 20 degrees to suit your viewing position.
natural_image
Pure diagram of a mechanical component with no text, numbers, or symbolsKENSINGTON SECURITY SYSTEM
■ This feature is not available for all models.
■ Image shown may differ from your TV.
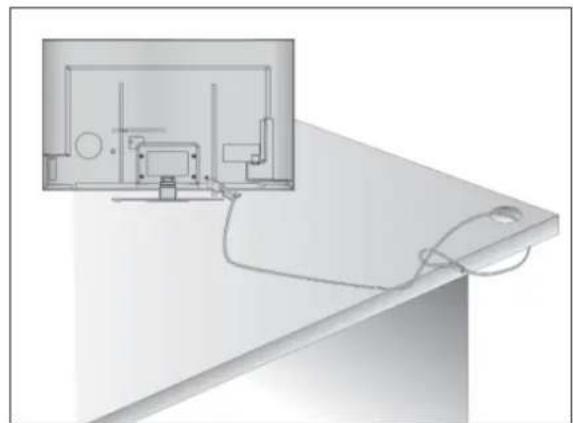
The TV is equipped with a Kensington Security System connector on the back panel. Connect the Kensington Security System cable as shown below.
For the detailed installation and use of the Kensington Security System, refer to the user's guide provided with the Kensington Security System.
For further information, contact http://www.kensington.com, the internet homepage of the Kensington
company. Kensington sells security systems for expensive electronic equipment such as notebook PCs and LCD projectors.

NOTE
The Kensington Security System is an optional accessory.
If the TV feels cold to the touch, there may be a small "flicker" when it is turned on.
This is normal, there is nothing wrong with TV.
▶ Some minute dot defects may be visible on the screen, appearing as tiny red, green, or blue spots. However, they have no adverse effect on the monitor's performance.
▶ Avoid touching the LCD screen or holding your finger(s) against it for long periods of time.
Doing so may produce some temporary distortion effects on the screen.
natural_image
Diagram showing a computer monitor with an attached cable, no text or symbols presentCAREFUL INSTALLATION ADVICE
■ You should purchase necessary components to fix the TV safety and secure to the wall on the market.
■ Position the TV close to the wall to avoid the possibility of it falling when pushed.
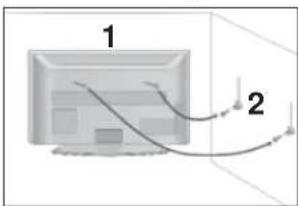
■ The instructions shown below are a safer way to set up the TV, by fixing it to the wall, avoiding the possibility of it falling forwards if pulled. This will prevent the TV from falling forward and causing injury. This will also prevent the TV from damage. Ensure that children do not climb or hang from the TV.
text_image
1 2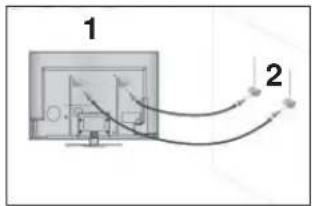
text_image
1 2
Use the eye-bolts or TV brackets/bolts to fix the product to the wall as shown in the picture. (If your TV has bolts in the eyebolts, loosen then bolts.)
* Insert the eye-bolts or TV brackets/bolts and tighten them securely in the upper holes.

Secure the wall brackets with the bolts on the wall. Match the height of the bracket that is mounted on the wall.
natural_image
Simple line drawing of a computer monitor with a vertical line and number 3, no text or symbols present.
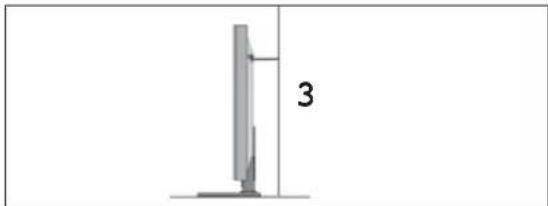
Use a sturdy rope to tie the product for alignment. It is safer to tie the rope so it becomes horizontal between the wall and the product.

NOTE
▶ When moving the TV undo the cords first.
▶ Use a platform or cabinet strong and large enough to support the size and weight of the TV.
▶ To use the TV safely make sure that the height of the bracket on the wall and on the TV is the same.
PREPARATION
■ The TV can be installed in various ways such as on a wall, or on a desktop etc.
■ The TV is designed to be mounted horizontally.
EARTHING
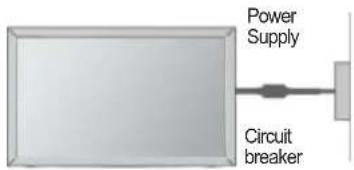
Ensure that you connect the earth wire to prevent possible electric shock. If grounding methods are not possible, have a qualified electrician install a separate circuit breaker.
Do not try to earth the TV by connecting it to telephone wires, lightening rods or gas pipes.
text_image
Power Supply Circuit breakerDESKTOP PEDESTAL INSTALLATION
■ Image shown may differ from your TV.
For adequate ventilation allow a clearance of 10 cm all around the TV.
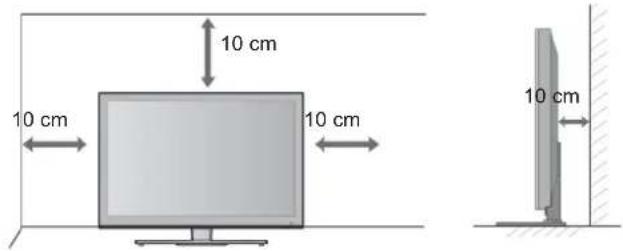
text_image
10 cm 10 cm 10 cm 10 cmWALL MOUNT: HORIZONTAL INSTALLATION
■ We recommend the use of a LG Brand wall mounting bracket when mounting the TV to a wall.
■ We recommend that you purchase a wall mounting bracket which supports VESA standard.
■ LG recommends that wall mounting be performed by a qualified professional installer.
NOTE
▶ Should Install wall mount on a solid wall perpendicular to the floor.
▶Should use a special wall mount, if you want to install it to ceiling or slanted wall.
The surface that wall mount is to be mounted on should be of sufficient strength to support the weight of TV set; e.g. concrete, natural rock, brick and hollow block.
▶Installing screw type and length depends on the wall mount used. Further information, refer to the instructions included with the mount.
▶LG is not liable for any accidents or damage to property or TV due to incorrect installation:
- Where a non-compliant VESA wall mount is used.
- Incorrect fastening of screws to surface which may cause TV to fall and cause personal injury.
- Not following the recommended Installation method.
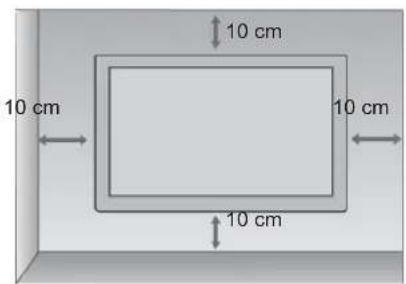
text_image
10 cm 10 cm 10 cm 10 cm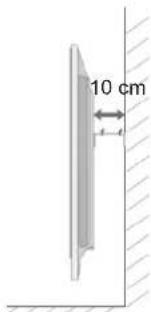
text_image
10 cm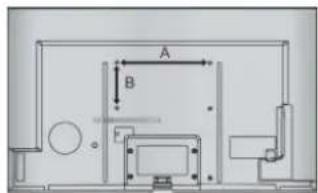
text_image
A B F| Model | VESA (A * B) | Standard Screw | Quantity |
| 47LX9*** | 200 * 200 | M6 | 4 |
| 55LX9*** | 400 * 400 | M6 | 4 |
REMOTE CONTROL KEY FUNCTIONS
When using the remote control, aim it at the remote control sensor on the TV.
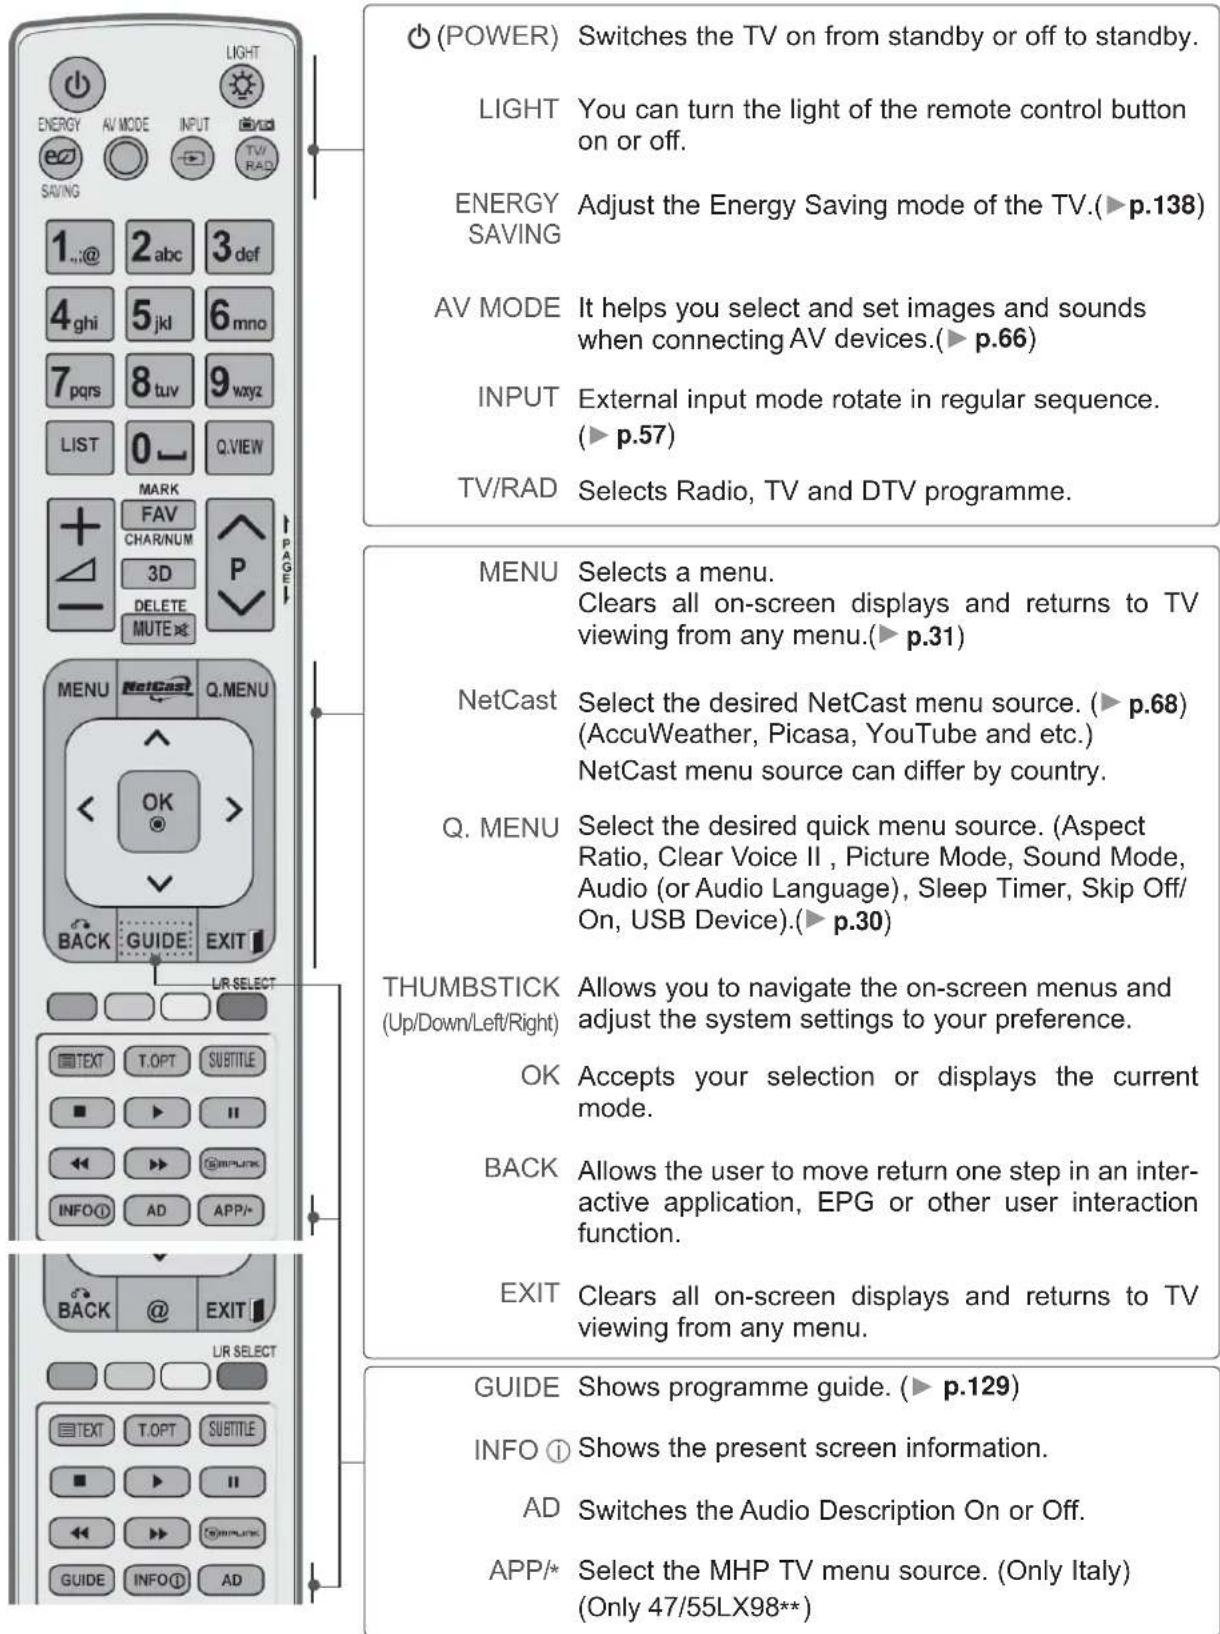
text_image
(POWER) Switches the TV on from standby or off to standby. LIGHT You can turn the light of the remote control button ON or off. ENERGY Adjust the Energy Saving mode of the TV.(▶p.138) SAVING AV MODE It helps you select and set images and sounds when connecting AV devices.(▶p.66) INPUT External input mode rotate in regular sequence. (▶p.57) TV/RAD Selects Radio, TV and DTV programme. MENU Selects a menu. Clears all on-screen displays and returns to TV viewing from any menu.(▶p.31) NetCast Select the desired NetCast menu source. (▶p.68) (AccuWeather, Picasa, YouTube and etc.) NetCast menu source can differ by country. Q. MENU Select the desired quick menu source. (Aspect Ratio, Clear Voice II , Picture Mode, Sound Mode, Audio (or Audio Language), Sleep Timer, Skip Off/ On, USB Device).(▶p.30) THUMBSTICK Allows you to navigate the on-screen menus and adjust the system settings to your preference. OK Accepts your selection or displays the current mode. BACK Allows the user to move return one step in an inter- active application, EPG or other user interaction function. EXIT Clears all on-screen displays and returns to TV viewing from any menu. GUIDE Shows programme guide. (▶p.129) INFO ① Shows the present screen information. AD Switches the Audio Description On or Off. APP/* Select the MHP TV menu source. (Only Italy) (Only 47/55LX98**)PREPARATION
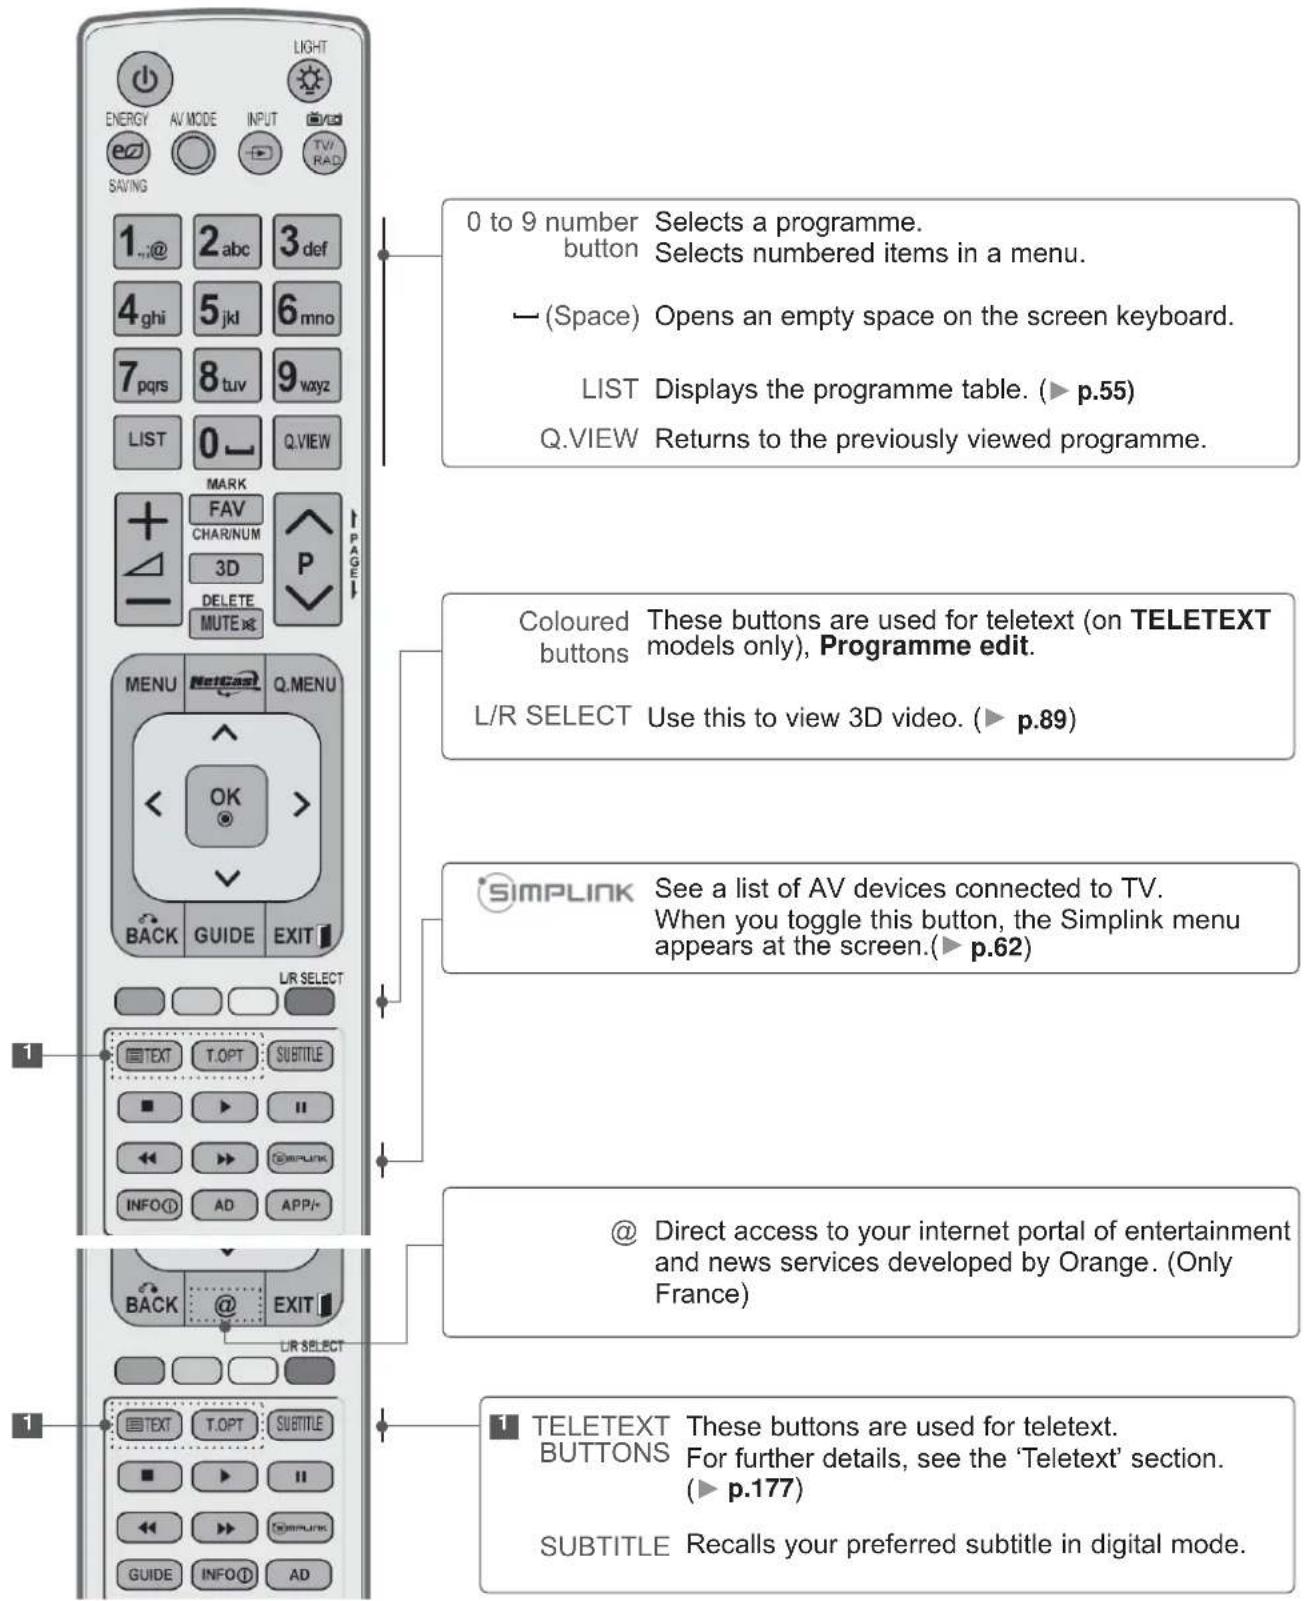
text_image
0 to 9 number Selects a programme. button Selects numbered items in a menu. — (Space) Opens an empty space on the screen keyboard. LIST Displays the programme table. (▶ p.55) Q.VIEW Returns to the previously viewed programme. Coloured These buttons are used for teletext (on TELETEXT buttons models only), Programme edit. L/R SELECT Use this to view 3D video. (▶ p.89) SIMPLINK See a list of AV devices connected to TV. When you toggle this button, the Simplink menu appears at the screen.(▶ p.62) @ Direct access to your internet portal of entertainment and news services developed by Orange. (Only France) TELETEXT These buttons are used for teletext. BUTTONS For further details, see the 'Teletext' section. (▶ p.177) SUBTITLE Recalls your preferred subtitle in digital mode.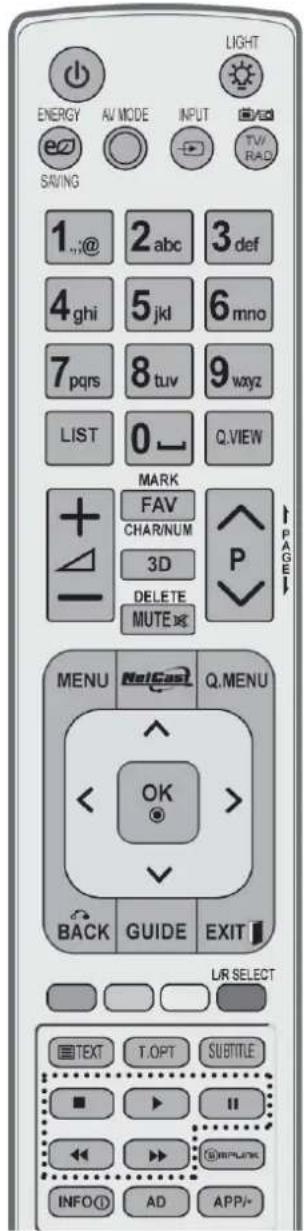
text_image
LIGHT ENERGY AV MODE INPUT TV/RAD SAVING 1..@ 2abc 3def 4ghi 5jkl 6mno 7pqrs 8tuv 9wxyz LIST 0 Q.VIEW MARK FAV CHAR/NUM 3D DELETE MUTE P MENU NetCast Q.MENU < OK > BACK GUIDE EXIT LIR SELECT TEXT T.OPT SUBTITLE ■ ▶ II ←→ → ←→ INFO(1) AD APP/-VOLUME UP /DOWN Adjusts the volume.
MARK Select the input to apply the Picture Wizard settings. Check and un-check programmes in the USB menu.
FAV Displays the selected favourite programme.
CHAR/NUM Shifts the Character or Number for NetCast menu.
3D Use this to view 3D video. (▶ p.88)
DELETE Deletes the entered character when entering the character on the screen keyboard.
MUTE Switches the sound on or off.
Programme Selects a programme. UP/DOWN
PAGE UP/ DOWN Move from one full set of screen information to the next one.
SIMPLINK / Controls SIMPLINK or MY MEDIA menu (Photo List, MY MEDIA Music List and Movie List). Menu control buttons
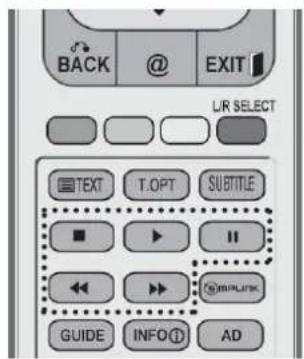
text_image
BACK EXIT L/R SELECT TEXT T.OPT SUBTITLE GUIDE INFO① ADInstalling Batteries
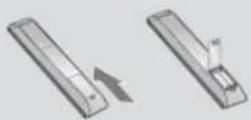
■ Open the battery compartment cover on the back and install the batteries matching correct polarity (+with +,-with -).
■ Install two 1.5 V AAA batteries. Do not mix old or used batteries with new ones.
■ Close cover
■ To remove the batteries, perform the installation actions in reverse.
PREPARATION
LED LCD TV MODELS : 42/47LE73\*\*
ACCESSORIES
Ensure that the following accessories are included with your TV. If an accessory is missing, please contact the dealer where you purchased the TV.
■ Image shown may differ from your TV.

Nero MediaHome
4 Essentials CD
Cable Holder

text_image
Owner's ManualOwner's Manual
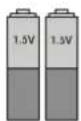
Batteries (AAA)
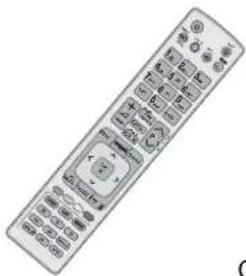
natural_image
Front view of a remote control device with keypad and function buttons (no visible text or symbols)Remote Control
Cable Management Clip
This item is not included for all models.
Polishing Cloth
Polishing cloth for
use on the screen.
* Lightly wipe any stains or fingerprints on the surface of the TV with the polishing cloth.
Do not use excessive force. This may cause scratching or discolouration.
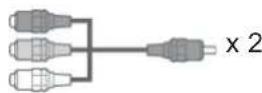
Component gender cable, AV gender cable

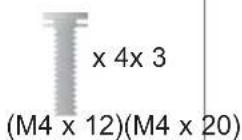
Bolts for stand assembly
Use of ferrite core (This feature is not available for all models.)
Ferrite core can be used to reduce the electromagnetic wave when connecting the power cord.
The closer the location of the ferrite core to the power plug, the better it is.
text_image
Install the power plugInstall the power plug closely.

Ferrite Core
(This item is not included for all models.)
FRONT PANEL CONTROLS
NOTE
▶ TV can be placed in standby mode in order to reduce the power consumption. And TV should be switched off using the power switch on the TV if it will not be watched for some time, as this will reduce energy consumption.
The energy consumed during use can be significantly reduced if the level of brightness of the picture is reduced, and this will reduce the overall running cost.
CAUTION
▶ Do not step on the glass stand or subject it to any impact. It may break, causing possible injury from fragments of glass, or the TV may fall.
▶ Do not drag the TV. The floor or the product may be damaged.
■ Image shown may differ from your TV.
text_image
PROGRAMME VOLUME OK OK MENU MENU INPUT POWER Power/Standby Indicator (Can be adjusted using the Power Indicator in the OPTION menu.) Remote Control Sensor Intelligent Sensor Adjusts picture according to the surrounding conditions.PREPARATION
BACK PANEL INFORMATION
■ Image shown may differ from your TV.
text_image
1 2 3 4 5 6 COMPONENT IN 1 COMPONENT IN AUDIO / FPs / Pn AV1 (RGB) AV2 (RGB) AV3 (RGB) AV4 (RGB) AV5 (RGB) AV6 (RGB) AV7 (RGB) AV8 (RGB) AV9 (RGB) AV10 (RGB) AV11 (RGB) AV12 (RGB) AV13 (RGB) AV14 (RGB) AV15 (RGB) AV16 (RGB) AV17 (RGB) AV18 (RGB) AV19 (RGB) AV20 (RGB) AV21 (RGB) AV22 (RGB) AV23 (RGB) AV24 (RGB) AV25 (RGB) AV26 (RGB) AV27 (RGB) AV28 (RGB) AV29 (RGB) AV30 (RGB) AV31 (RGB) AV32 (RGB) AV33 (RGB) AV34 (RGB) AV35 (RGB) AV36 (RGB) AV37 (RGB) AV38 (RGB) AV39 (RGB) AV40 (RGB) AV41 (RGB) AV42 (RGB) AV43 (RGB) AV44 (RGB) AV45 (RGB) AV46 (RGB) AV47 (RGB) AV48 (RGB) AV49 (RGB) AV50 (RGB) AV51 (RGB) AV52 (RGB) AV53 (RGB) AV54 (RGB) AV55 (RGB) AV56 (RGB) AV57 (RGB) AV58 (RGB) AV59 (RGB) AV60 (RGB) AV61 (RGB) AV62 (RGB) AV63 (RGB) AV64 (RGB) AV65 (RGB) AV66 (RGB) AV67 (RGB) AV68 (RGB) AV69 (RGB) AV70 (RGB) AV71 (RGB) AV72 (RGB) AV73 (RGB) AV74 (RGB) AV75 (RGB) AV76 (RGB) AV77 (RGB) AV78 (RGB) AV79 (RGB) AV80 (RGB) AV81 (RGB) AV82 (RGB) AV83 (RGB) AV84 (RGB) AV85 (RGB) AV86 (RGB) AV87 (RGB) AV88 (RGB) AV89 (RGB) AV90 (RGB) AV91 (RGB) AV92 (RGB) AV93 (RGB) AV94 (RGB) AV95 (RGB) AV96 (RGB) AV97 (RGB) AV98 (RGB) AV99 (RGB) AV100 (RGB)1 Power Cord Socket
This TV operates on an AC power. The voltage is indicated on the Specifications page. (▶ p.184 to 200) Never attempt to operate the TV on DC power.
② LAN
Network connection for AccuWeather, Picasa, YouTube, etc. Also used for video, photo and music files on a local network.
3 OPTICAL DIGITAL AUDIO OUT
Connect digital audio to various types of equipment. Connect to a Digital Audio Component. Use an Optical audio cable.
4 RGB/DVI Audio Input
Connect the audio from a PC or DTV.
⑤ Euro Scart Socket (AV1)
Connect scart socket input or output from an external device to these jacks.
6 Component Input
Connect a component video/audio device to these jacks.
7 HDMI/DVI IN Input
Connect an HDMI signal to HDMI IN. Or DVI (VIDEO) signal to HDMI/DVI port with DVI to HDMI cable.
8 RGB IN Input
Connect the output from a PC.
9 RS-232C IN (CONTROL & SERVICE) PORT
Connect to the RS-232C port on a PC. This port is used for Service or Hotel mode.
10 WIRELESS Control
Connect the Wireless Ready Dongle to the TV to control the external input devices connected to Wireless Media Box wirelessly.
11 Audio/Video Input
Connect audio/video output from an external device to these jacks.
12 Antenna Input
Connect antenna or cable to this jack.
13 USB Input
Connect USB storage device to this jack.
14 PCMCIA (Personal Computer Memory Card International Association) Card Slot Insert the CI Module to PCMCIA CARD SLOT.
(This feature is not available in all countries.)
15 Headphone Socket
Plug the headphone into the headphone socket.
STAND INSTALLATION
■ Image shown may differ from your TV.
When assembling the desk type stand, check whether the bolt is fully tightened. (If not tightened fully, the product can tilt forward after the product installation.) If you tighten the bolt with excessive force, the bolt can deviate from abrasion of the tightening part of the bolt.
1 Carefully place the TV screen side down on a cushioned surface to protect the screen from damage.
natural_image
Isometric line drawing of a layered electronic component or package (no text or symbols)2 Assemble the parts of the Stand Body with the Stand Base of the TV.
At this time, tighten the screws that hold the Stand Body on.
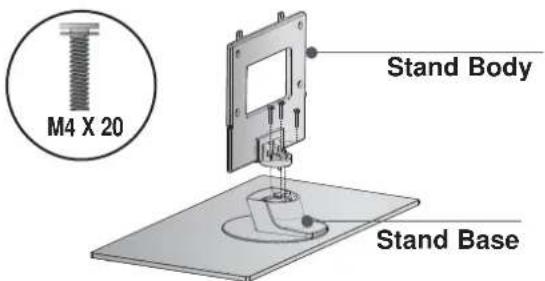
text_image
M4 X 20 Stand Body Stand Base3 Assemble the TV as shown.
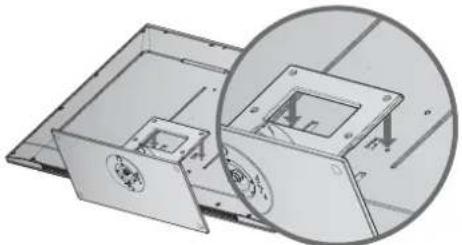
natural_image
Technical illustration of a mechanical assembly with a magnified inset showing internal components (no text or symbols)4 Fix the 4 bolts securely using the holes in the back of the TV.
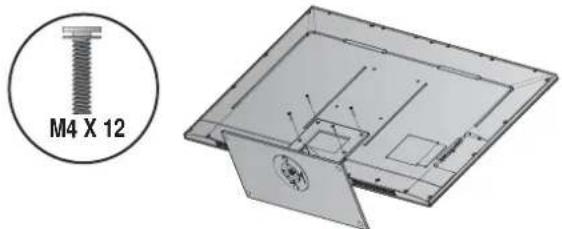
text_image
M4 X 12BACK COVER FOR WIRE ARRANGEMENT
■ Image shown may differ from your TV.
FOR DESK-TYPE STAND
1 Install the Cable Management Clip as shown.
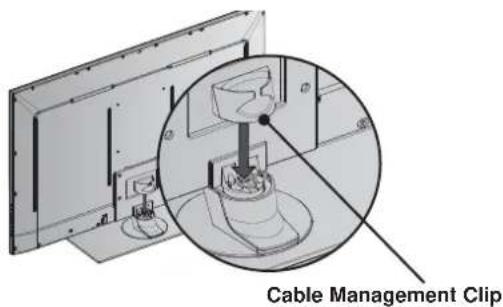
text_image
Cable Management Clip2 Connect the cables as necessary. To connect additional equipment, see the External Equipment Setup section.
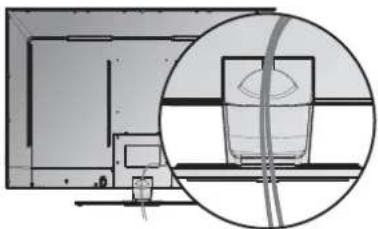
natural_image
Technical diagram showing a mechanical assembly with an inset close-up of a cylindrical component (no text or symbols visible)FOR WALL MOUNT
1 After Connecting the cables as necessary, install Cable Holder as shown and bundle the cables. To connect additional equipment, see the External Equipment Setup section.
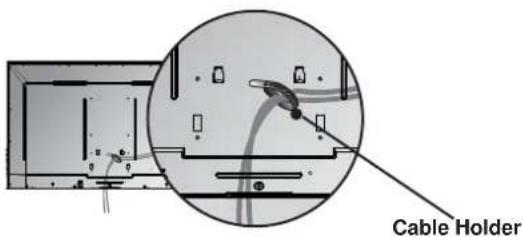
text_image
Cable HolderNOTE
▶ Do not use the Cable Management Clip to lift the TV.
- If the TV is dropped, you may be injured or the TV may be damaged.
PREPARATION
KENSINGTON SECURITY SYSTEM
■ This feature is not available for all models.
■ Image shown may differ from your TV.
The TV is equipped with a Kensington Security System connector on the back panel. Connect the Kensington Security System cable as shown below.
For the detailed installation and use of the Kensington Security System, refer to the user's guide provided with the Kensington Security System.
For further information, contact http://www.kensington.com, the internet homepage of the Kensington
company. Kensington sells security systems for expensive electronic equipment such as notebook PCs and LCD projectors.

NOTE
The Kensington Security System is an optional accessory.
If the TV feels cold to the touch, there may be a small "flicker" when it is turned on.
This is normal, there is nothing wrong with TV.
▶ Some minute dot defects may be visible on the screen, appearing as tiny red, green, or blue spots. However, they have no adverse effect on the monitor's performance.
▶ Avoid touching the LCD screen or holding your finger(s) against it for long periods of time.
Doing so may produce some temporary distortion effects on the screen.
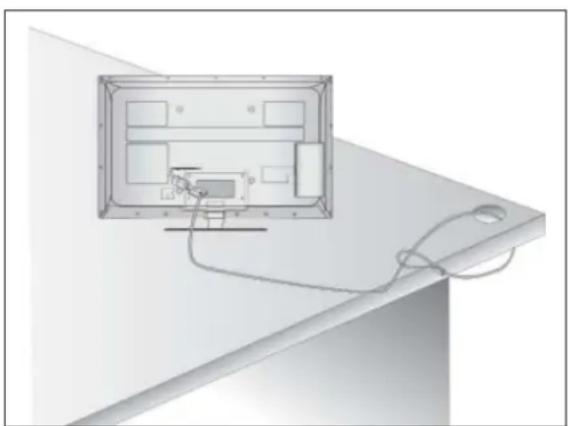
natural_image
Diagram of an electrical panel with a cable and connector, no text or symbols presentCAREFUL INSTALLATION ADVICE
■ You should purchase necessary components to fix the TV safety and secure to the wall on the market.
■ Position the TV close to the wall to avoid the possibility of it falling when pushed.
■ The instructions shown below are a safer way to set up the TV, by fixing it to the wall, avoiding the possibility of it falling forwards if pulled. This will prevent the TV from falling forward and causing injury. This will also prevent the TV from damage. Ensure that children do not climb or hang from the TV.
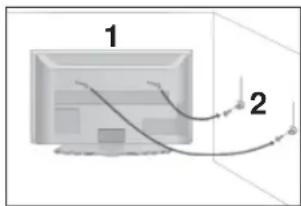
text_image
1 2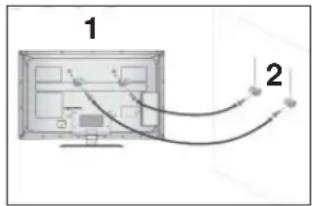
text_image
1 2
Use the eye-bolts or TV brackets/bolts to fix the product to the wall as shown in the picture. (If your TV has bolts in the eyebolts, loosen then bolts.)
* Insert the eye-bolts or TV brackets/bolts and tighten them securely in the upper holes.

Secure the wall brackets with the bolts on the wall. Match the height of the bracket that is mounted on the wall.
natural_image
Simple line drawing of a computer monitor with a vertical line and number 3, no text or symbols present.
Use a sturdy rope to tie the product for alignment. It is safer to tie the rope so it becomes horizontal between the wall and the product.
NOTE
▶ When moving the TV undo the cords first.
▶ Use a platform or cabinet strong and large enough to support the size and weight of the TV.
▶ To use the TV safely make sure that the height of the bracket on the wall and on the TV is the same.
■ The TV can be installed in various ways such as on a wall, or on a desktop etc.
■ The TV is designed to be mounted horizontally.
EARTHING
Ensure that you connect the earth wire to prevent possible electric shock. If grounding methods are not possible, have a qualified electrician install a separate circuit breaker.
Do not try to earth the TV by connecting it to telephone wires, lightening rods or gas pipes.
text_image
Power Supply Circuit breakerDESKTOP PEDESTAL INSTALLATION
■ Image shown may differ from your TV.
For adequate ventilation allow a clearance of 10 cm all around the TV.
text_image
10 cm 10 cm 10 cm 10 cmWALL MOUNT: HORIZONTAL INSTALLATION
■ We recommend the use of a LG Brand wall mounting bracket when mounting the TV to a wall.
■ We recommend that you purchase a wall mounting bracket which supports VESA standard.
■ LG recommends that wall mounting be performed by a qualified professional installer.
NOTE
▶ Should Install wall mount on a solid wall perpendicular to the floor.
▶Should use a special wall mount, if you want to install it to ceiling or slanted wall.
The surface that wall mount is to be mounted on should be of sufficient strength to support the weight of TV set; e.g. concrete, natural rock, brick and hollow block.
▶Installing screw type and length depends on the wall mount used. Further information, refer to the instructions included with the mount.
▶ LG is not liable for any accidents or damage to property or TV due to incorrect installation:
- Where a non-compliant VESA wall mount is used.
- Incorrect fastening of screws to surface which may cause TV to fall and cause personal injury.
- Not following the recommended Installation method.
text_image
10 cm 10 cm 10 cm 10 cm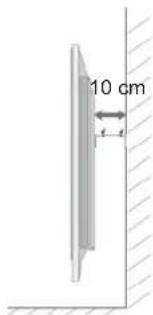
text_image
10 cm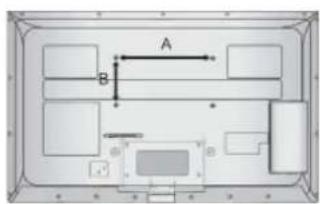
text_image
A BModel
VESA (A * B) Standard Screw Quantity
42/47LE73**
200 * 200 M6 4
SWIVEL STAND
■ Image shown may differ from your TV.
After installing the TV, you can adjust the TV set manually to the left or right direction by 20 degrees to suit your viewing position.
natural_image
Pure mechanical diagram showing a lever and pivot point without any text, numbers, or symbolsPREPARATION
REMOTE CONTROL KEY FUNCTIONS
When using the remote control, aim it at the remote control sensor on the TV.
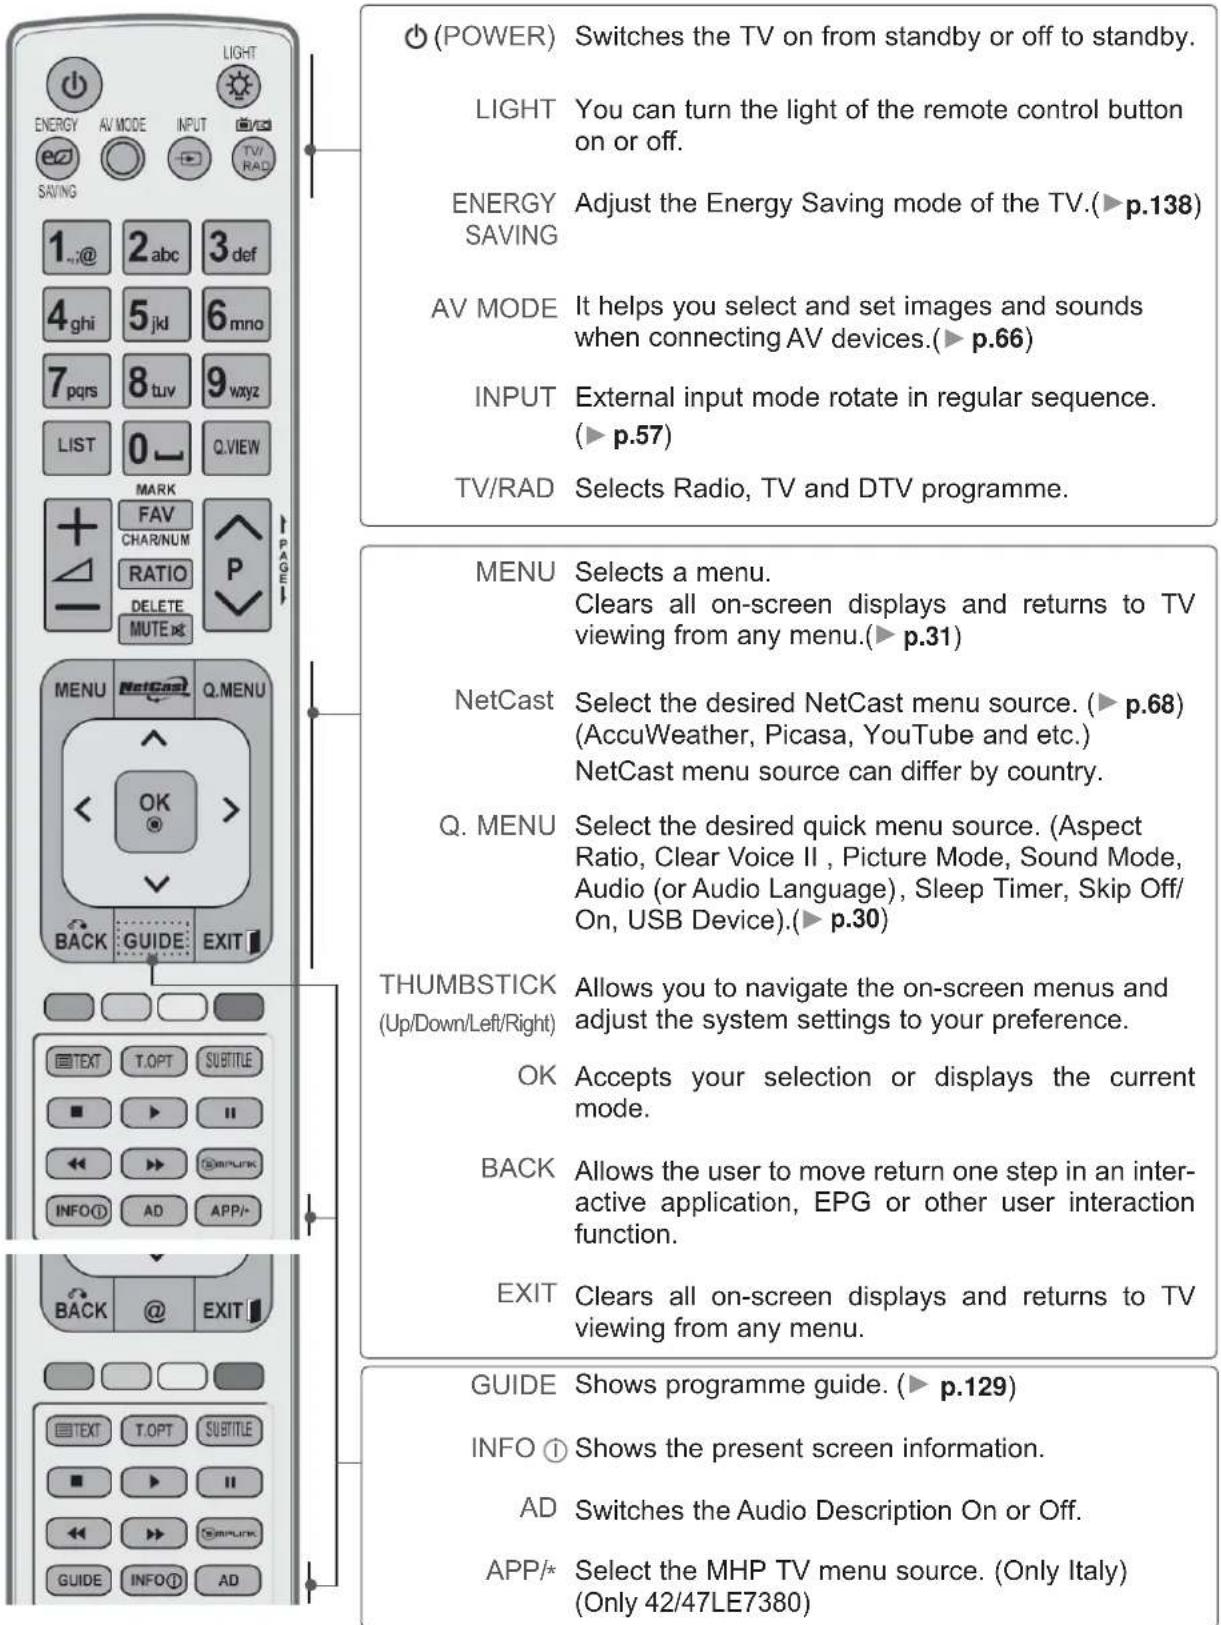
text_image
(POWER) Switches the TV on from standby or off to standby. LIGHT You can turn the light of the remote control button ON or off. ENERGY Adjust the Energy Saving mode of the TV.(►p.138) SAVING AV MODE It helps you select and set images and sounds when connecting AV devices.(►p.66) INPUT External input mode rotate in regular sequence. (►p.57) TV/RAD Selects Radio, TV and DTV programme. MENU Selects a menu. Clears all on-screen displays and returns to TV viewing from any menu.(►p.31) NetCast Select the desired NetCast menu source. (►p.68) (AccuWeather, Picasa, YouTube and etc.) NetCast menu source can differ by country. Q. MENU Select the desired quick menu source. (Aspect Ratio, Clear Voice II , Picture Mode, Sound Mode, Audio (or Audio Language), Sleep Timer, Skip Off/ On, USB Device).(►p.30) THUMBSTICK Allows you to navigate the on-screen menus and adjust the system settings to your preference. OK Accepts your selection or displays the current mode. BACK Allows the user to move return one step in an inter- active application, EPG or other user interaction function. EXIT Clears all on-screen displays and returns to TV viewing from any menu. GUIDE Shows programme guide. (►p.129) INFO Shows the present screen information. AD Switches the Audio Description On or Off. APP/* Select the MHP TV menu source. (Only Italy) (Only 42/47LE7380)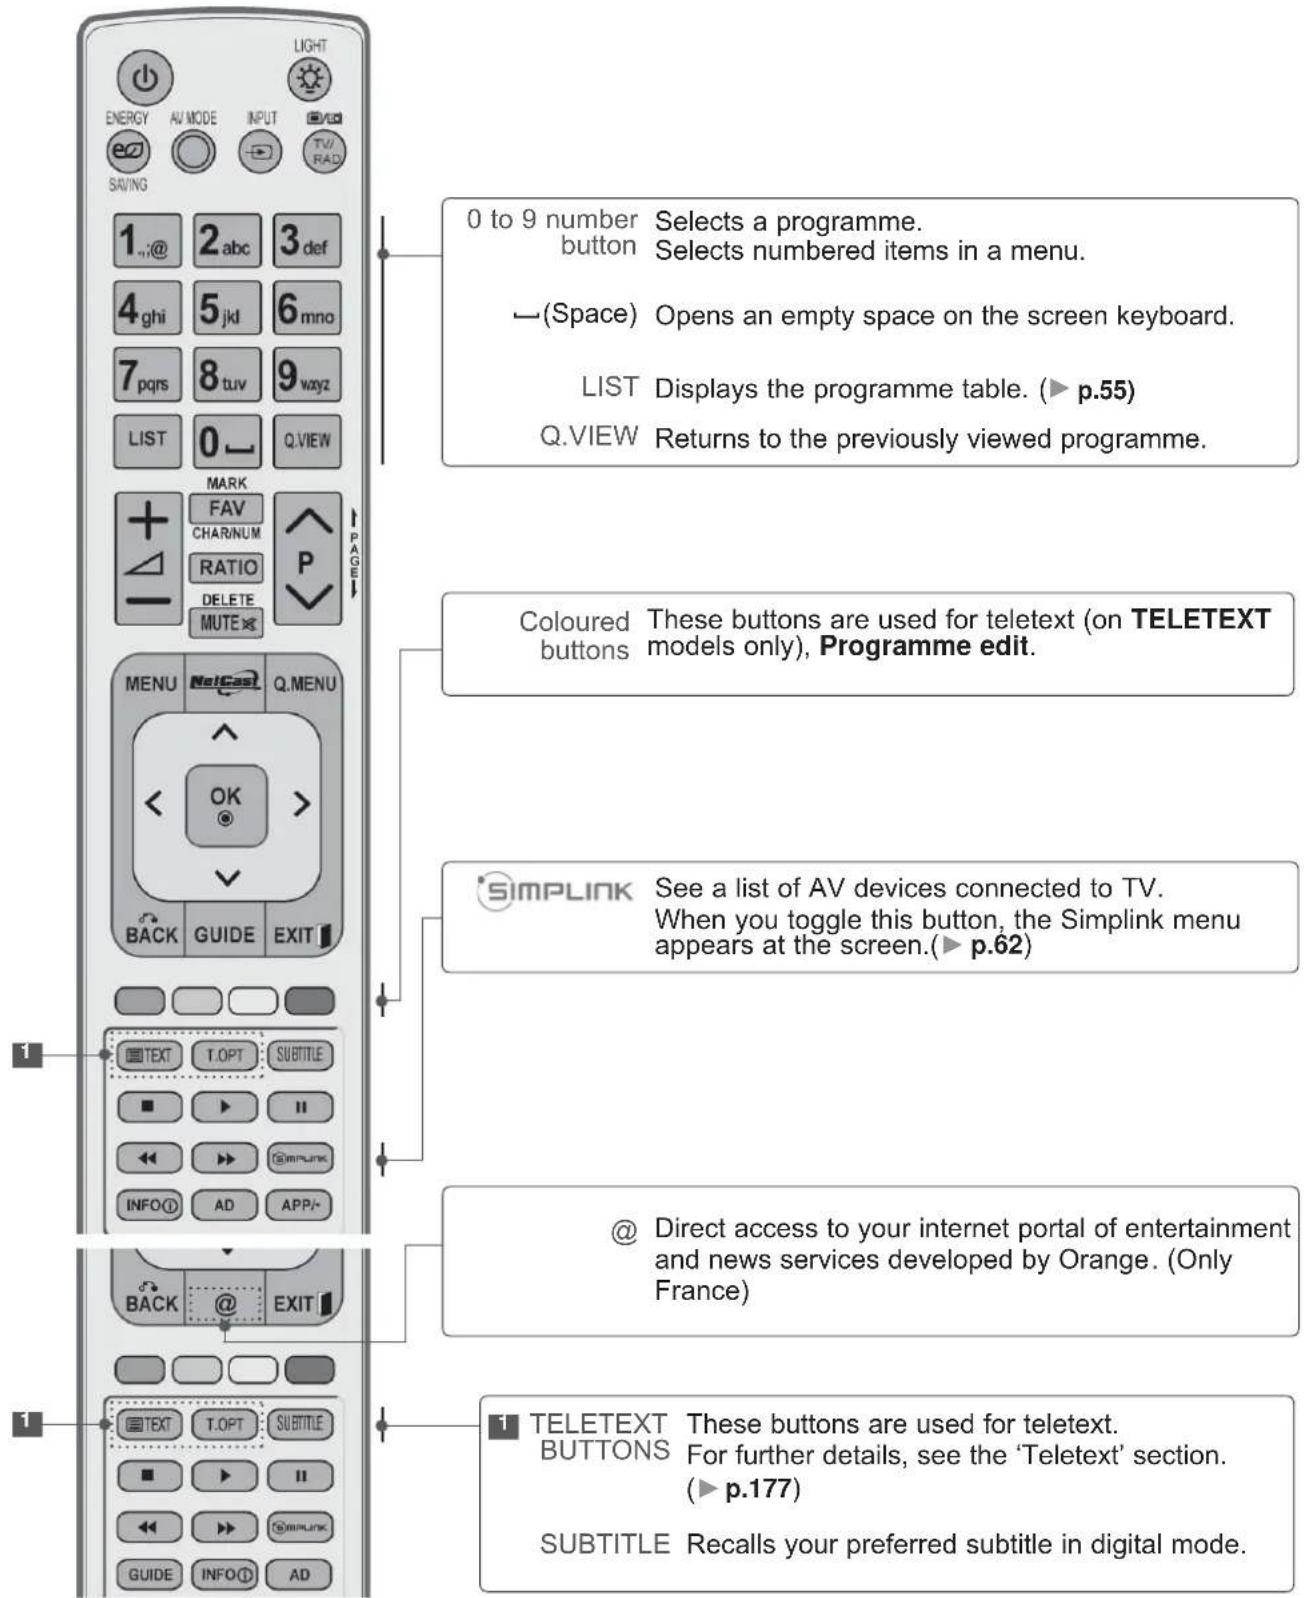
text_image
0 to 9 number Selects a programme. button Selects numbered items in a menu. ←(Space) Opens an empty space on the screen keyboard. LIST Displays the programme table. (▶ p.55) Q.VIEW Returns to the previously viewed programme. Coloured These buttons are used for teletext (on TELETEXT buttons models only), Programme edit. SIMPLINK See a list of AV devices connected to TV. When you toggle this button, the Simplink menu appears at the screen.(▶ p.62) @ Direct access to your internet portal of entertainment and news services developed by Orange. (Only France) TELETEXT These buttons are used for teletext. BUTTONS For further details, see the 'Teletext' section. (▶ p.177) SUBTITLE Recalls your preferred subtitle in digital mode.PREPARATION
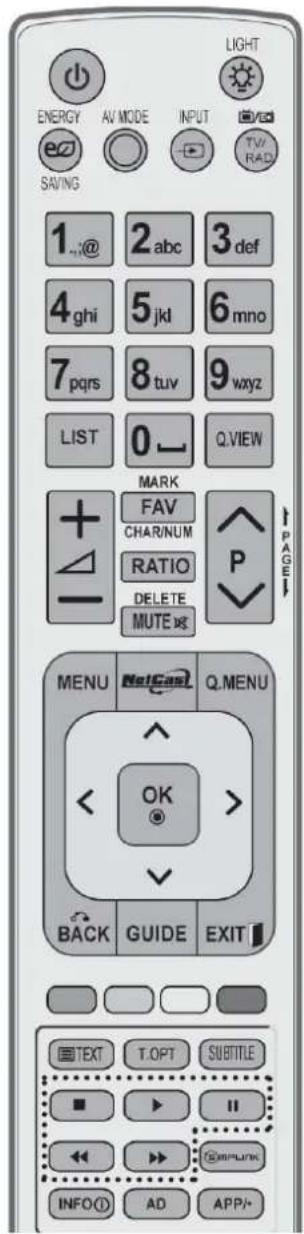
text_image
LIGHT ENERGY AV MODE INPUT TV/RAD SAVING 1...@ 2abc 3def 4ghi 5jkl 6mno 7pqrs 8tuv 9wxyz LIST 0 QVIEW MARK FAV CHAR/NUM RATIO P DELETE MUTE MENU NetCast Q.MENU < OK > BACK GUIDE EXIT TEXT T.OPT SUBTITLE ■ ▶ II ← → → ← INFO(1) AD APP/-VOLUME UP /DOWN Adjusts the volume.
MARK Select the input to apply the Picture Wizard settings. Check and un-check programmes in the USB menu.
FAV Displays the selected favourite programme.
CHAR/NUM Shifts the Character or Number for NetCast menu.
RATIO Selects your desired Aspect Ratio of picture. (▶ p.135)
DELETE Deletes the entered character when entering the character on the screen keyboard.
MUTE Switches the sound on or off.
Programme Selects a programme. UP/DOWN
PAGE UP/ Move from one full set of screen information to the DOWN next one.
SIMPLINK / Controls SIMPLINK or MY MEDIA menu (Photo List, MY MEDIA Music List and Movie List).
Menu control buttons
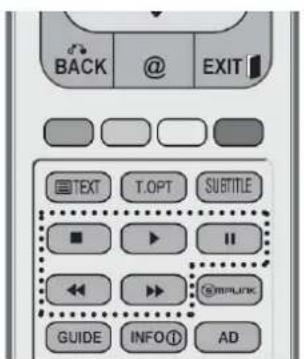
text_image
BACK @ EXIT TEXT T.OPT SUBTITLE GUIDE INFO① ADInstalling Batteries
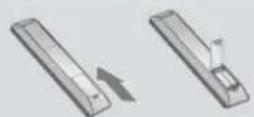
■ Open the battery compartment cover on the back and install the batteries matching correct polarity (+with +,-with -).
■ Install two 1.5 V AAA batteries. Do not mix old or used batteries with new ones.
■ Close cover
■ To remove the batteries, perform the installation actions in reverse.
PLASMA TV MODELS : 50/60PK5\*, 50/60PK7\*\*\*, 50/60PK9\*\*\*, 50/60PX9\*\*\*
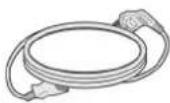
ACCESSORIES
Ensure that the following accessories are included with your TV. If an accessory is missing, please contact the dealer where you purchased the TV.
■ Image shown may differ from your TV.
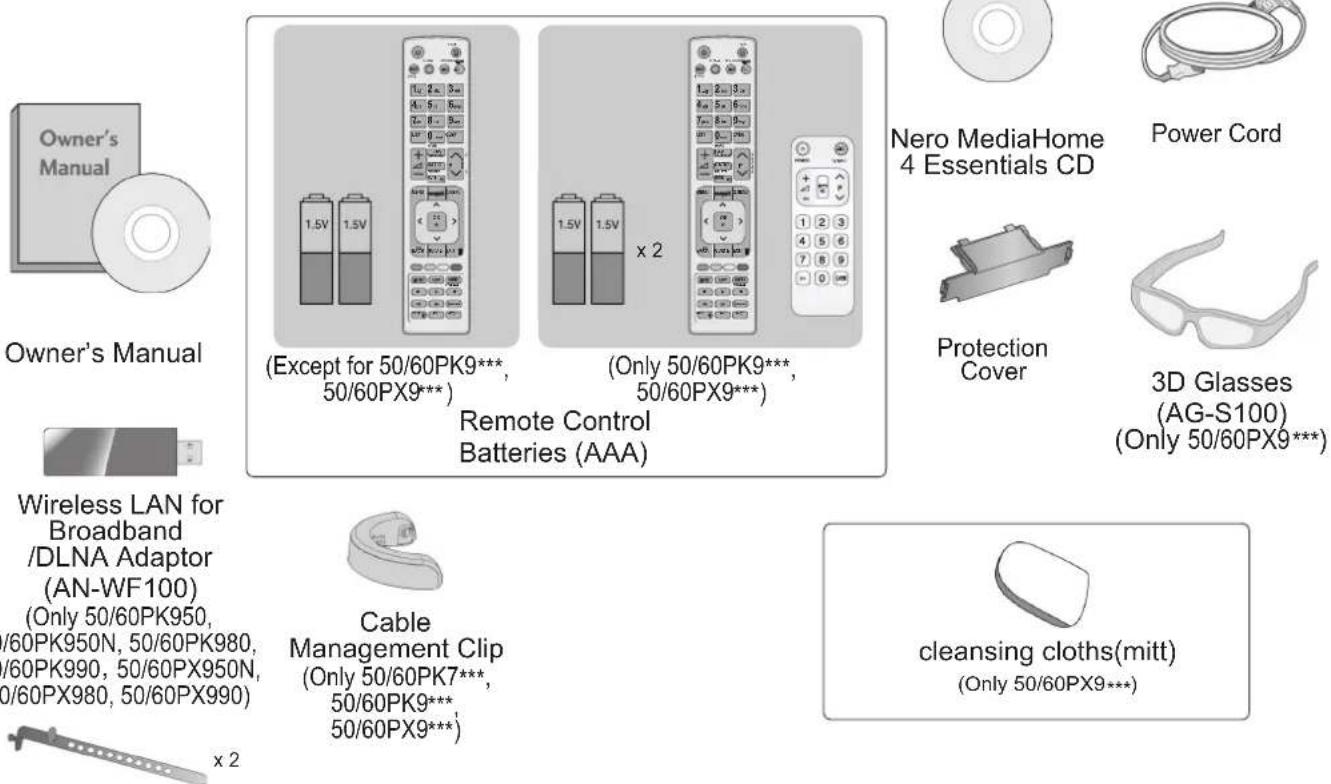
Wireless LAN for Broadband /DLNA Adaptor (AN-WF100) (Only 50/60PK950, 50/60PK950N, 50/60PK950, 50/60PK990, 50/60PX950, 50/60PX980, 50/60PX990)

Cable Holder
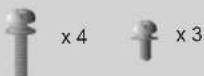
M4x28 M5x14
(Only 50PK5**)
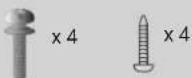
M4x28 M4x14
(Only 50PK7***, 50PK9***,
50PX9***)
Bolts for stand assembly
This item is not included for all models.
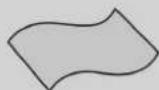
* Lightly wipe any stains or fingerprints on the surface of the TV with the polishing cloth.
Polishing Cloth Polishing cloth for use on the screen.
Do not use excessive force. This may cause scratching or discolouration.

Ferrite Core (This item is not included for all models.)
Ferrite core can be used to reduce the electromagnetic wave when connecting the power plug.
The closer the location of the ferrite core to the power plug, the better it is.
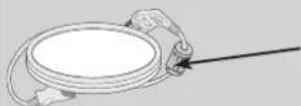
Install the power plug closely.

Ferrite Core (This item is not included for all models.)
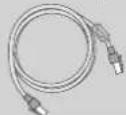
Ferrite core can be used to reduce the electromagnetic wave when connecting the LAN cable. Place the ferrite core far from TV and wind the LAN cable in the ferrite core once.
PREPARATION
FRONT PANEL CONTROLS
NOTE
▶ TV can be placed in standby mode in order to reduce the power consumption. And TV should be switched off using the power switch on the TV if it will not be watched for some time, as this will reduce energy consumption.
The energy consumed during use can be significantly reduced if the level of brightness of the picture is reduced, and this will reduce the overall running cost.
CAUTION
▶ Do not step on the glass stand or subject it to any impact. It may break, causing possible injury from fragments of glass, or the TV may fall.
▶ Do not drag the TV. The floor or the product may be damaged.
■ Image shown may differ from your TV.
Only 50/60PK5**
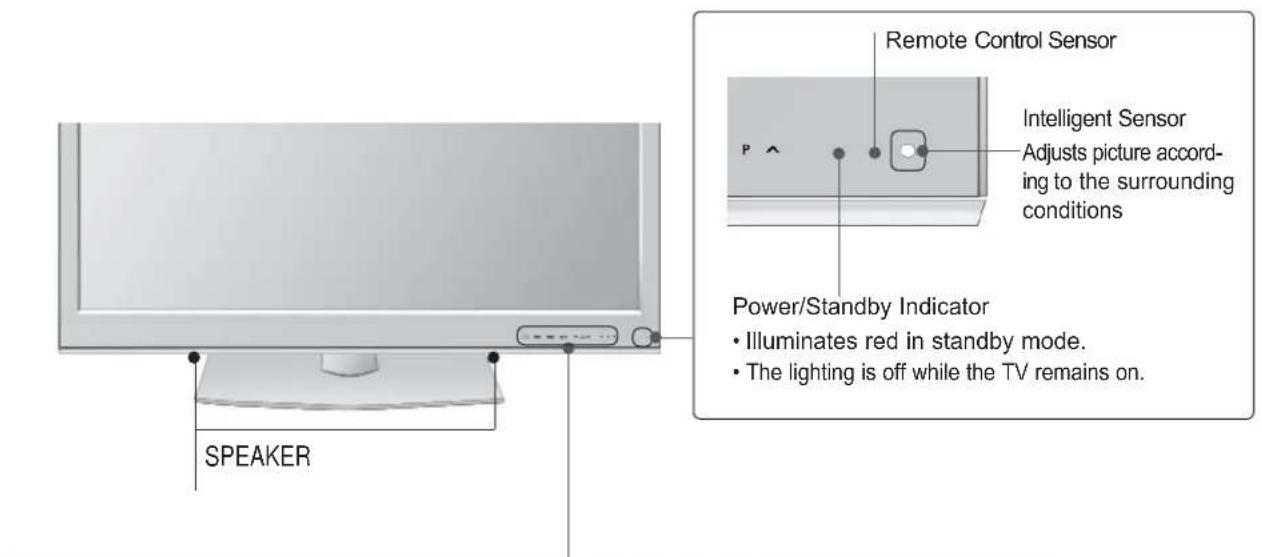
text_image
Remote Control Sensor Intelligent Sensor Adjusts picture according to the surrounding conditions Power/Standby Indicator • Illuminates red in standby mode. • The lighting is off while the TV remains on. SPEAKERTouch Button
You can use the desired button function by touching.
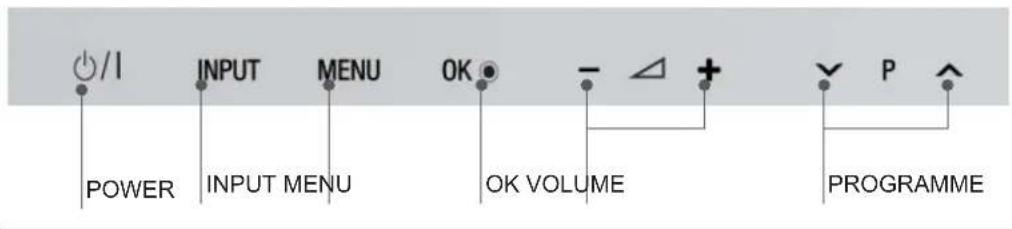
text_image
/I POWER INPUT MENU MENU OK OK VOLUME - △ + P PROGRAMMEOnly 50/60PK7\*\*\*, 50/60PK9\*\*\*, 50/60PX9\*\*\*
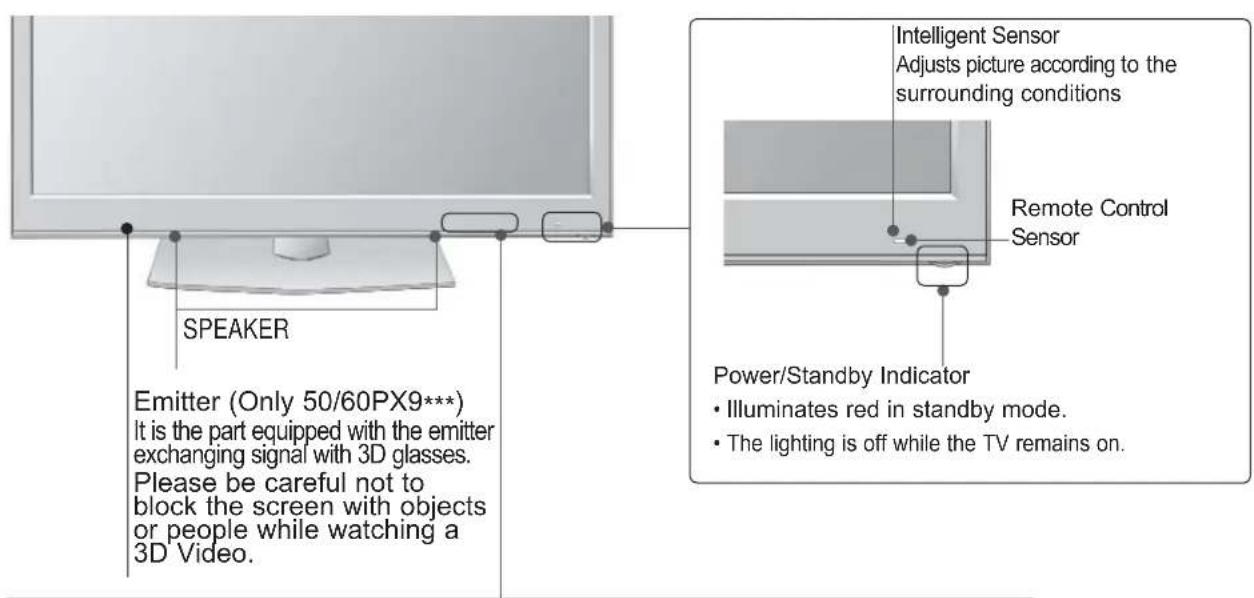
text_image
SPEAKER Emitter (Only 50/60PX9***) It is the part equipped with the emitter exchanging signal with 3D glasses. Please be careful not to block the screen with objects or people while watching a 3D Video. Intelligent Sensor Adjusts picture according to the surrounding conditions Remote Control Sensor Power/Standby Indicator • Illuminates red in standby mode. • The lighting is off while the TV remains on.Touch Button
You can use the desired button function by touching.
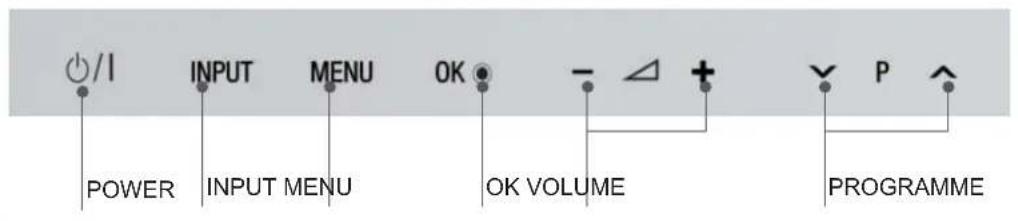
text_image
/I INPUT MENU OK POWER INPUT MENU OK VOLUME P PROGRAMMEPREPARATION
BACK PANEL INFORMATION
■ Image shown may differ from your TV.
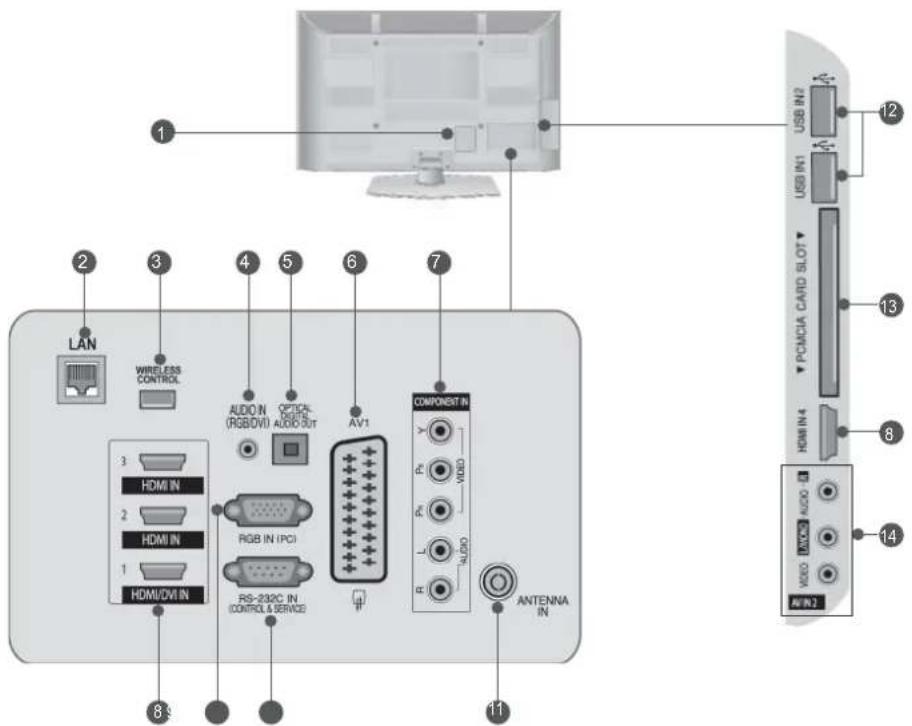
text_image
LAN WIRELESS CONTROL AUDIO N (RGB/DVI) OPTIONAL AUDIO SOT AV1 COMPONENT IN HDMI IN HDMI IN RS-232C IN (CONTROL & SERVICE) ANTENNA IN USB IN2 USB IN1 PCMCIA CARD SLOT HDMI IN4 HDMI IN AUDIO USB ARBI 2① Power Cord Socket
This TV operates on an AC power. Never attempt to operate the TV on DC power.
2 LAN
Network connection for AccuWeather,
Picasa, YouTube, etc.
Also used for video, photo and music files on
a local network.
3 WIRELESS Control
Connect the Wireless Ready Dongle to the TV to control the external input devices connected to Wireless Media Box wirelessly.
4 RGB/DVI Audio Input Connect the audio from a PC or DTV.
5 OPTICAL DIGITAL AUDIO OUT
Connect digital audio to various types of equipment.
Connect to a Digital Audio Component.
Use an Optical audio cable.
⑥ Euro Scart Socket (AV1)
Connect scart socket input or output from an external device to these jacks.
⑦ Component Input
Connect a component video/audio device to these jacks.
8 HDMI/DVI IN Input
Connect an HDMI signal to HDMI IN. Or DVI (VIDEO) signal to HDMI/DVI port with DVI to HDMI cable.
9 RGB IN Input Connect the output from a PC.
10 RS-232C IN (CONTROL & SERVICE) PORT Connect to the RS-232C port on a PC. This port is used for Service or Hotel mode.
11 Antenna Input Connect antenna or cable to this jack.
⑫ USB Input
Connect USB storage device to this jack.
13 PCMCIA (Personal Computer Memory Card International Association) Card Slot Insert the CI Module to PCMCIA CARD SLOT. (This feature is not available in all countries.)
14 Audio/Video Input Connect audio/video output from an external device to these jacks.
STAND INSTALLATION
■ Image shown may differ from your TV.
When assembling the desk type stand, check whether the bolt is fully tightened. (If not tightened fully, the product can tilt forward after the product installation.) If you tighten the bolt with excessive force, the bolt can deviate from abrasion of the tightening part of the bolt.
Only 50PK5\*\*
1 Carefully place the TV screen side down on a cushioned surface to protect the screen from damage.
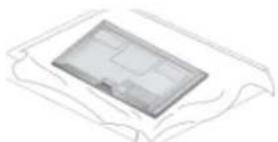
natural_image
Simple line drawing of a rectangular object with internal lines, enclosed in a curved frame (no text or symbols)2 Set the Stand Base on even floor. Assemble the parts of the Stand Body with the Stand Base of the TV.
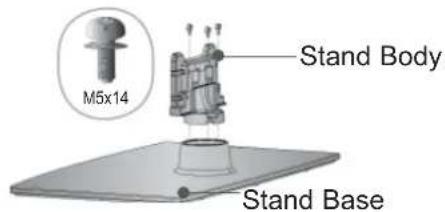
text_image
M5x14 Stand Body Stand Base3 Assemble the TV as shown.
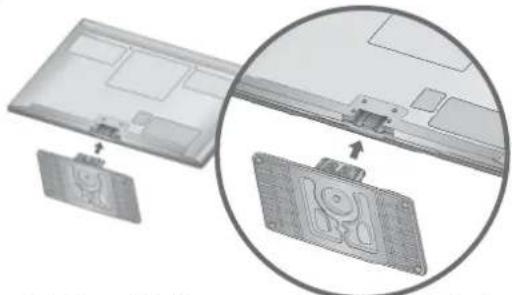
natural_image
Diagram showing a device with a close-up view of its internal components, no text or symbols present.4 Fix the 4 bolts securely using the holes in the back of the TV.
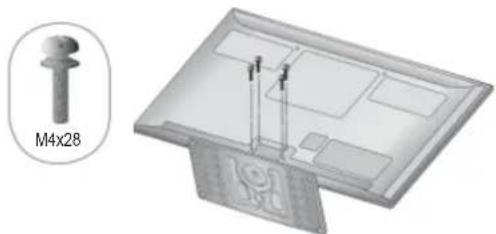
natural_image
3D CAD model of a mechanical assembly with mounting holes and a pin labeled M4x28 (no text or symbols on the component itself)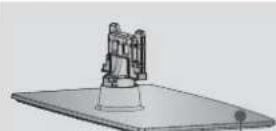
When assembling the stand, make sure to distinguish and assemble the front and rear side of the stand correctly.
Front
Only 50PK7\*\*\*, 50PK9\*\*\*, 50PX9\*\*\*
1 Carefully place the TV screen side down on a cushioned surface to protect the screen from damage.
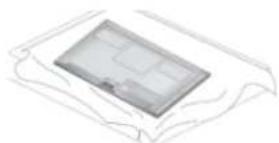
natural_image
Simple line drawing of a rectangular object with internal lines, enclosed in a curved frame (no text or symbols)2 Set the Stand Base on even floor. Assemble the parts of the Stand Body with the Stand Base of the TV.
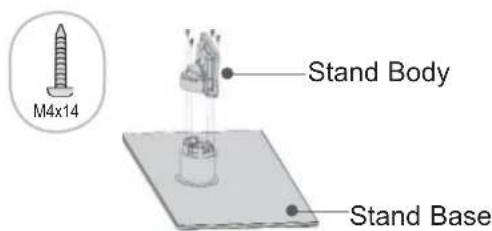
text_image
M4x14 Stand Body Stand Base3 Assemble the parts of the Cable Management Clip with the Stand Body.
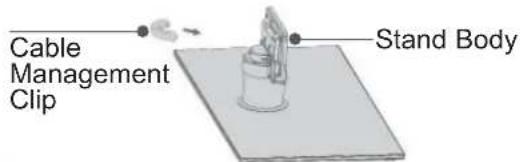
text_image
Cable Management Clip Stand Body4 Assemble the TV as shown.
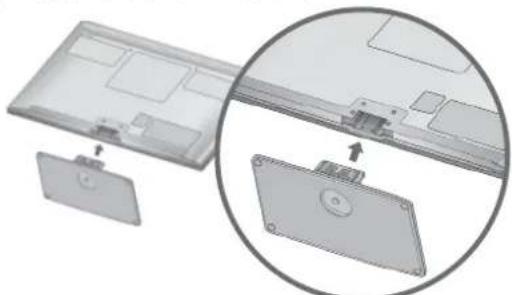
natural_image
Diagram showing a device with a close-up view of its internal components, no text or symbols present.5 Fix the 4 bolts securely using the holes in the back of the TV.
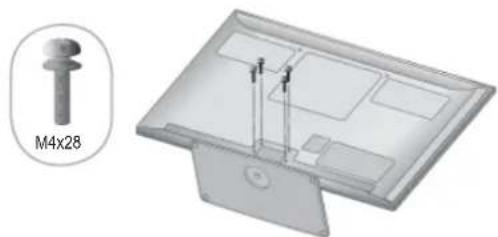
natural_image
3D CAD model of a mechanical component with mounting holes and a labeled bolt (M4x28), no readable text or symbols beyond the label.PREPARATION
BACK COVER FOR WIRE ARRANGEMENT
■ Image shown may differ from your TV. After connecting the cables as necessary, install Cable Holder as shown and bundle the cables. In case of the LAN cable, install as shown to reduce the electromagnetic wave.
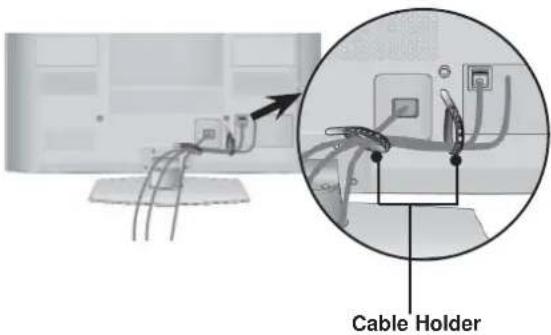
text_image
Cable HolderOnly 50/60PK7***, 50/60PK9***, 50/60PX9***
1 Connect the cables as necessary. To connect additional equipment, see the External Equipment Setup section.
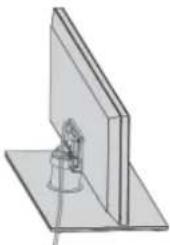
natural_image
Pure technical line drawing of a mechanical component or bracket (no text or symbols)2 Install the Cable Management Clip into the TV until clicking sound.
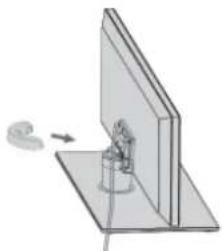
natural_image
Diagram of a mechanical setup with a cylinder inside a rectangular frame and an arrow indicating motion (no text or symbols)NOTE
▶ Do not use the Cable Management Clip to lift the TV.
- If the TV is dropped, you may be injured or the TV may be damaged.
HOW TO REMOVE THE CABLE MANAGEMENT CLIP
Only 50/60PK7***, 50/60PK9***, 50/60PX9***
■ Image shown may differ from your TV. Hold the Cable Management Clip with both hands and pull it backward as shown.
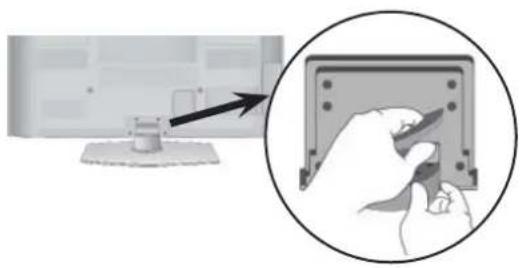
natural_image
Diagram showing a computer monitor with a mouse and a magnified view of the screen device being inserted (no text or symbols present)NOT USING THE DESK-TYPE STAND
■ Image shown may differ from your TV. When installing the wall-mounted unit, use the protection cover.
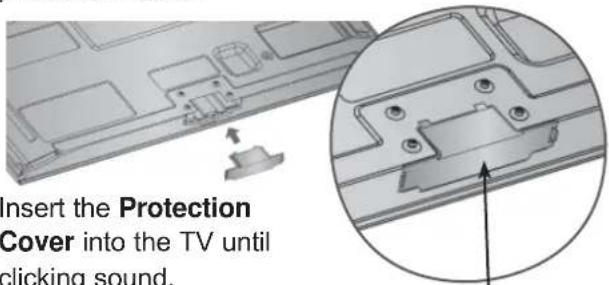
text_image
Insert the Protection Cover into the TV until clicking sound.Protection Cover (Fix a Guide to the Outsides.)
Insert the Protection Cover into the TV until clicking sound.
SWIVEL STAND
■ Image shown may differ from your TV. After installing the TV, you can adjust the TV set manually to the left or right direction by 20 degrees to suit your viewing position.
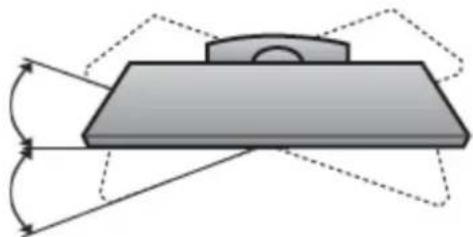
natural_image
Pure mechanical diagram showing a lever and pivot mechanism without any text or symbolsCAREFUL INSTALLATION ADVICE
■ You should purchase necessary components to fix the TV safety and secure to the wall on the market.
■ Position the TV close to the wall to avoid the possibility of it falling when pushed.
■ The instructions shown below are a safer way to set up the TV, by fixing it to the wall, avoiding the possibility of it falling forwards if pulled. This will prevent the TV from falling forward and causing injury. This will also prevent the TV from damage. Ensure that children do not climb or hang from the TV.
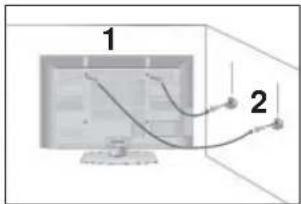
text_image
1 2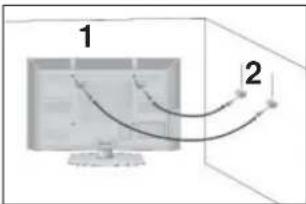
text_image
1 21 Use the eye-bolts or TV brackets/bolts to fix the product to the wall as shown in the picture. (If your TV has bolts in the eyebolts, loosen then bolts.)
* Insert the eye-bolts or TV brackets/bolts and tighten them securely in the upper holes.
2 Secure the wall brackets with the bolts on the wall. Match the height of the bracket that is mounted on the wall.
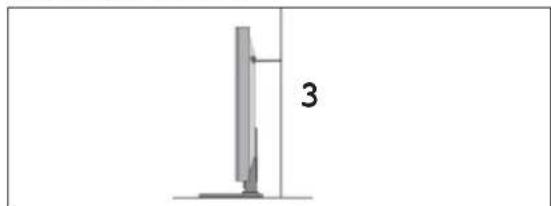
natural_image
Simple line drawing of a computer monitor with a vertical line and number 3, no text or symbols present.3 Use a sturdy rope to tie the product for alignment. It is safer to tie the rope so it becomes horizontal between the wall and the product.
NOTE
▶ When moving the TV undo the cords first.
▶ Use a platform or cabinet strong and large enough to support the size and weight of the TV.
▶ To use the TV safely make sure that the height of the bracket on the wall and on the TV is the same.
PREPARATION
■ The TV can be installed in various ways such as on a wall, or on a desktop etc.
■ The TV is designed to be mounted horizontally.
EARTHING
Ensure that you connect the earth wire to prevent possible electric shock. If grounding methods are not possible, have a qualified electrician install a separate circuit breaker.
Do not try to earth the TV by connecting it to telephone wires, lightening rods or gas pipes.
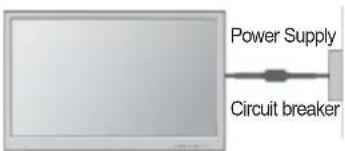
text_image
Power Supply Circuit breakerDESKTOP PEDESTAL INSTALLATION
■ Image shown may differ from your TV.
For adequate ventilation allow a clearance of 10 cm all around the TV.
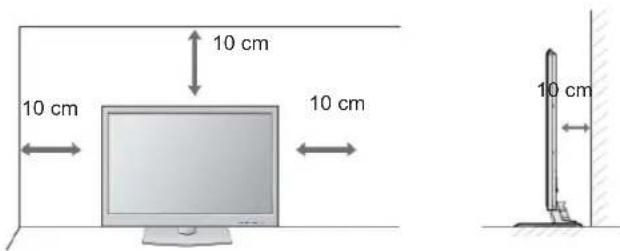
text_image
10 cm 10 cm 10 cm 10 cmWALL MOUNT: HORIZONTAL INSTALLATION
■ We recommend the use of a LG Brand wall mounting bracket when mounting the TV to a wall.
■ We recommend that you purchase a wall mounting bracket which supports VESA standard.
■ LG recommends that wall mounting be performed by a qualified professional installer.
NOTE
▶ Should Install wall mount on a solid wall perpendicular to the floor.
▶Should use a special wall mount, if you want to install it to ceiling or slanted wall.
The surface that wall mount is to be mounted on should be of sufficient strength to support the weight of TV set; e.g. concrete, natural rock, brick and hollow block.
▶Installing screw type and length depends on the wall mount used. Further information, refer to the instructions included with the mount.
▶LG is not liable for any accidents or damage to property or TV due to incorrect installation:
- Where a non-compliant VESA wall mount is used.
- Incorrect fastening of screws to surface which may cause TV to fall and cause personal injury.
- Not following the recommended Installation method.
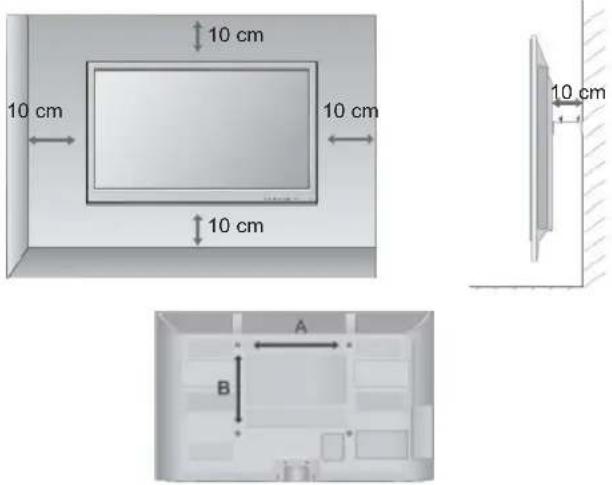
text_image
10 cm 10 cm 10 cm 10 cm A B| Model | VESA (A * B) | Standard Screw | Quantity |
| 50PK5** | 400 * 400 | M6 | 4 |
| 60PK5** | 600 * 400 | M8 | 4 |
| 50PK7*** | 400 * 400 | M6 | 4 |
| 60PK7*** | 600 * 400 | M8 | 4 |
| 50PK9*** | 400 * 400 | M6 | 4 |
| 60PK9*** | 600 * 400 | M8 | 4 |
| 50PX9*** | 400 * 400 | M6 | 4 |
| 60PX9*** | 600 * 400 | M8 | 4 |
REMOTE CONTROL KEY FUNCTIONS
(Only 50/60PK5**, 50/60PK7***, 50/60PK9***)
When using the remote control, aim it at the remote control sensor on the TV.
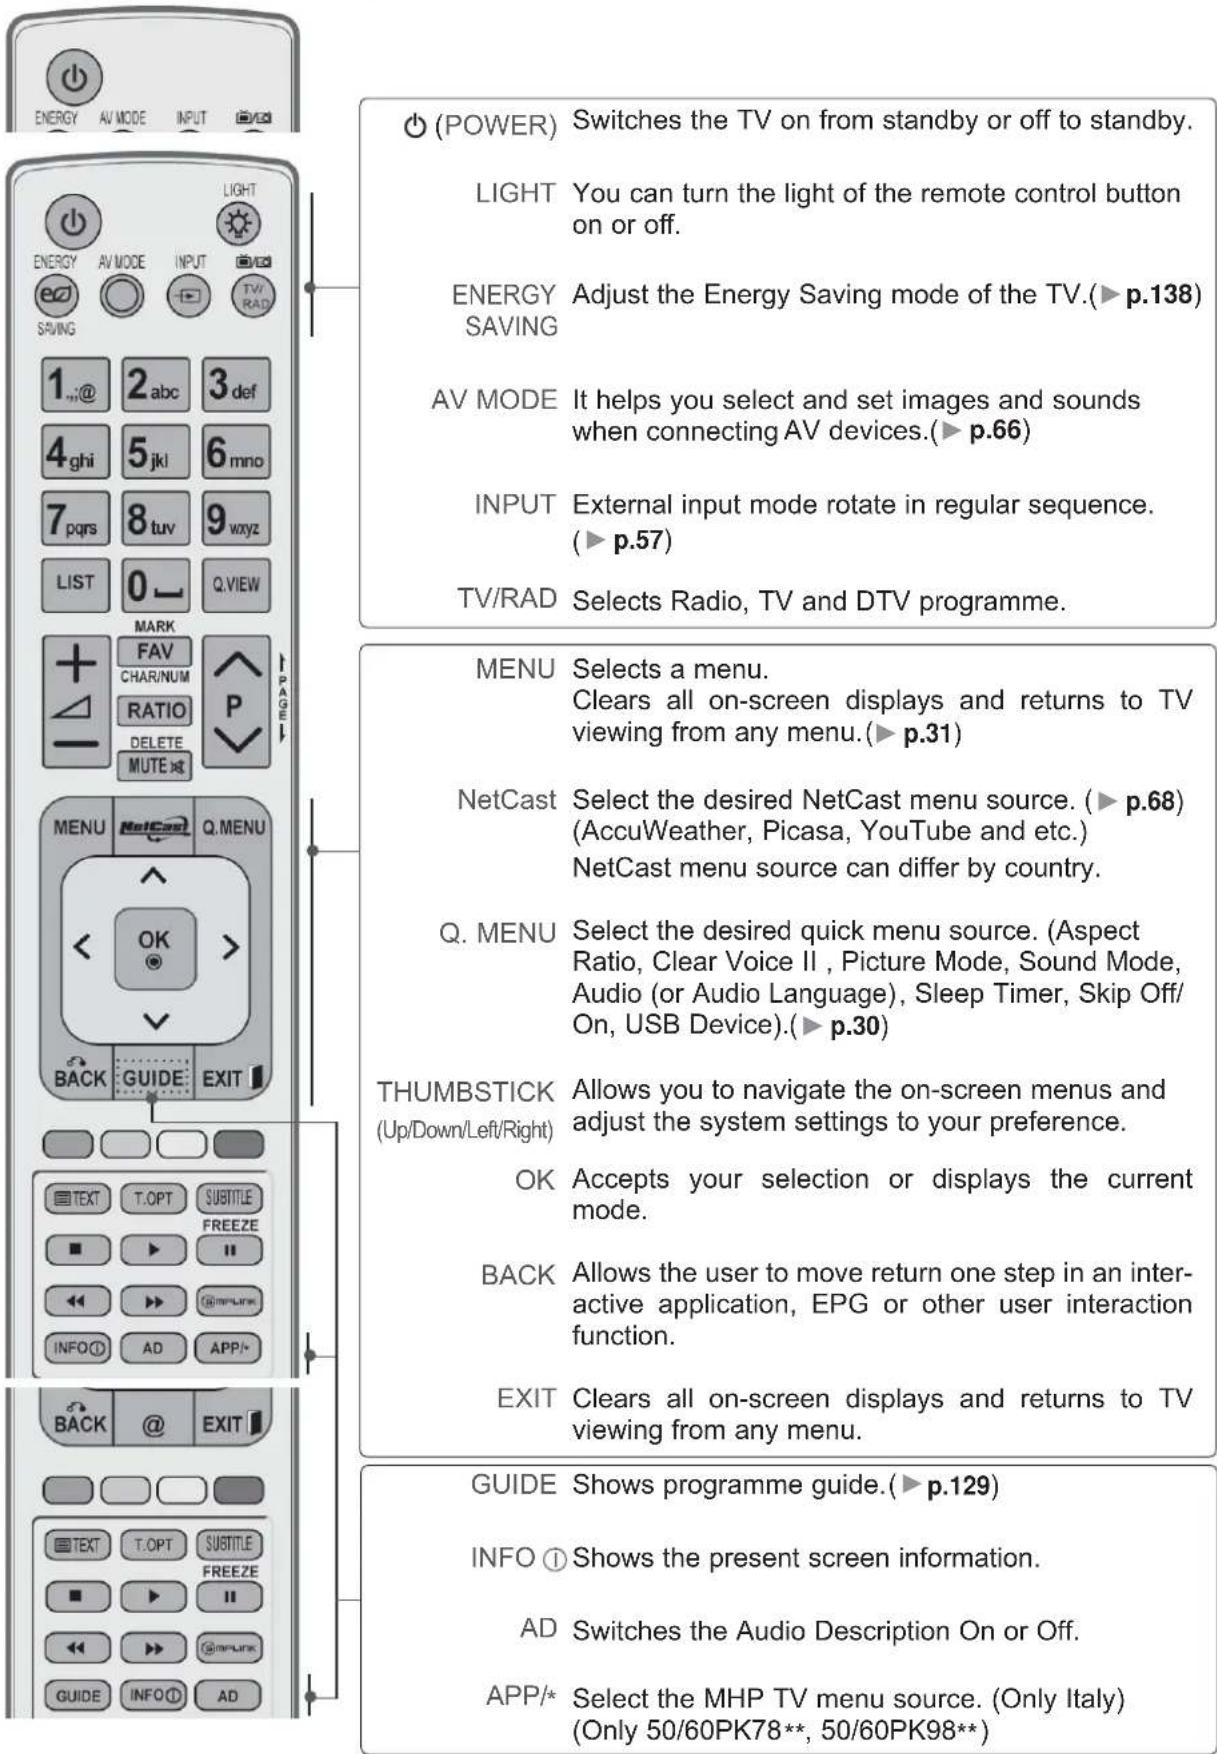
text_image
(POWER) Switches the TV on from standby or off to standby. LIGHT You can turn the light of the remote control button on or off. ENERGY Adjust the Energy Saving mode of the TV.(▶ p.138) SAVING AV MODE It helps you select and set images and sounds when connecting AV devices.(▶ p.66) INPUT External input mode rotate in regular sequence. (▶ p.57) TV/RAD Selects Radio, TV and DTV programme. MENU Selects a menu. Clears all on-screen displays and returns to TV viewing from any menu.(▶ p.31) NetCast Select the desired NetCast menu source. (▶ p.68) (AccuWeather, Picasa, YouTube and etc.) NetCast menu source can differ by country. Q. MENU Select the desired quick menu source. (Aspect Ratio, Clear Voice II , Picture Mode, Sound Mode, Audio (or Audio Language), Sleep Timer, Skip Off/ On, USB Device).(▶ p.30) THUMBSTICK Allows you to navigate the on-screen menus and adjust the system settings to your preference. (Up/Down/Left/Right) OK Accepts your selection or displays the current mode. BACK Allows the user to move return one step in an inter- active application, EPG or other user interaction function. EXIT Clears all on-screen displays and returns to TV viewing from any menu. GUIDE Shows programme guide.(▶ p.129) INFO ① Shows the present screen information. AD Switches the Audio Description On or Off. APP/* Select the MHP TV menu source. (Only Italy) (Only 50/60PK78**, 50/60PK98**)PREPARATION
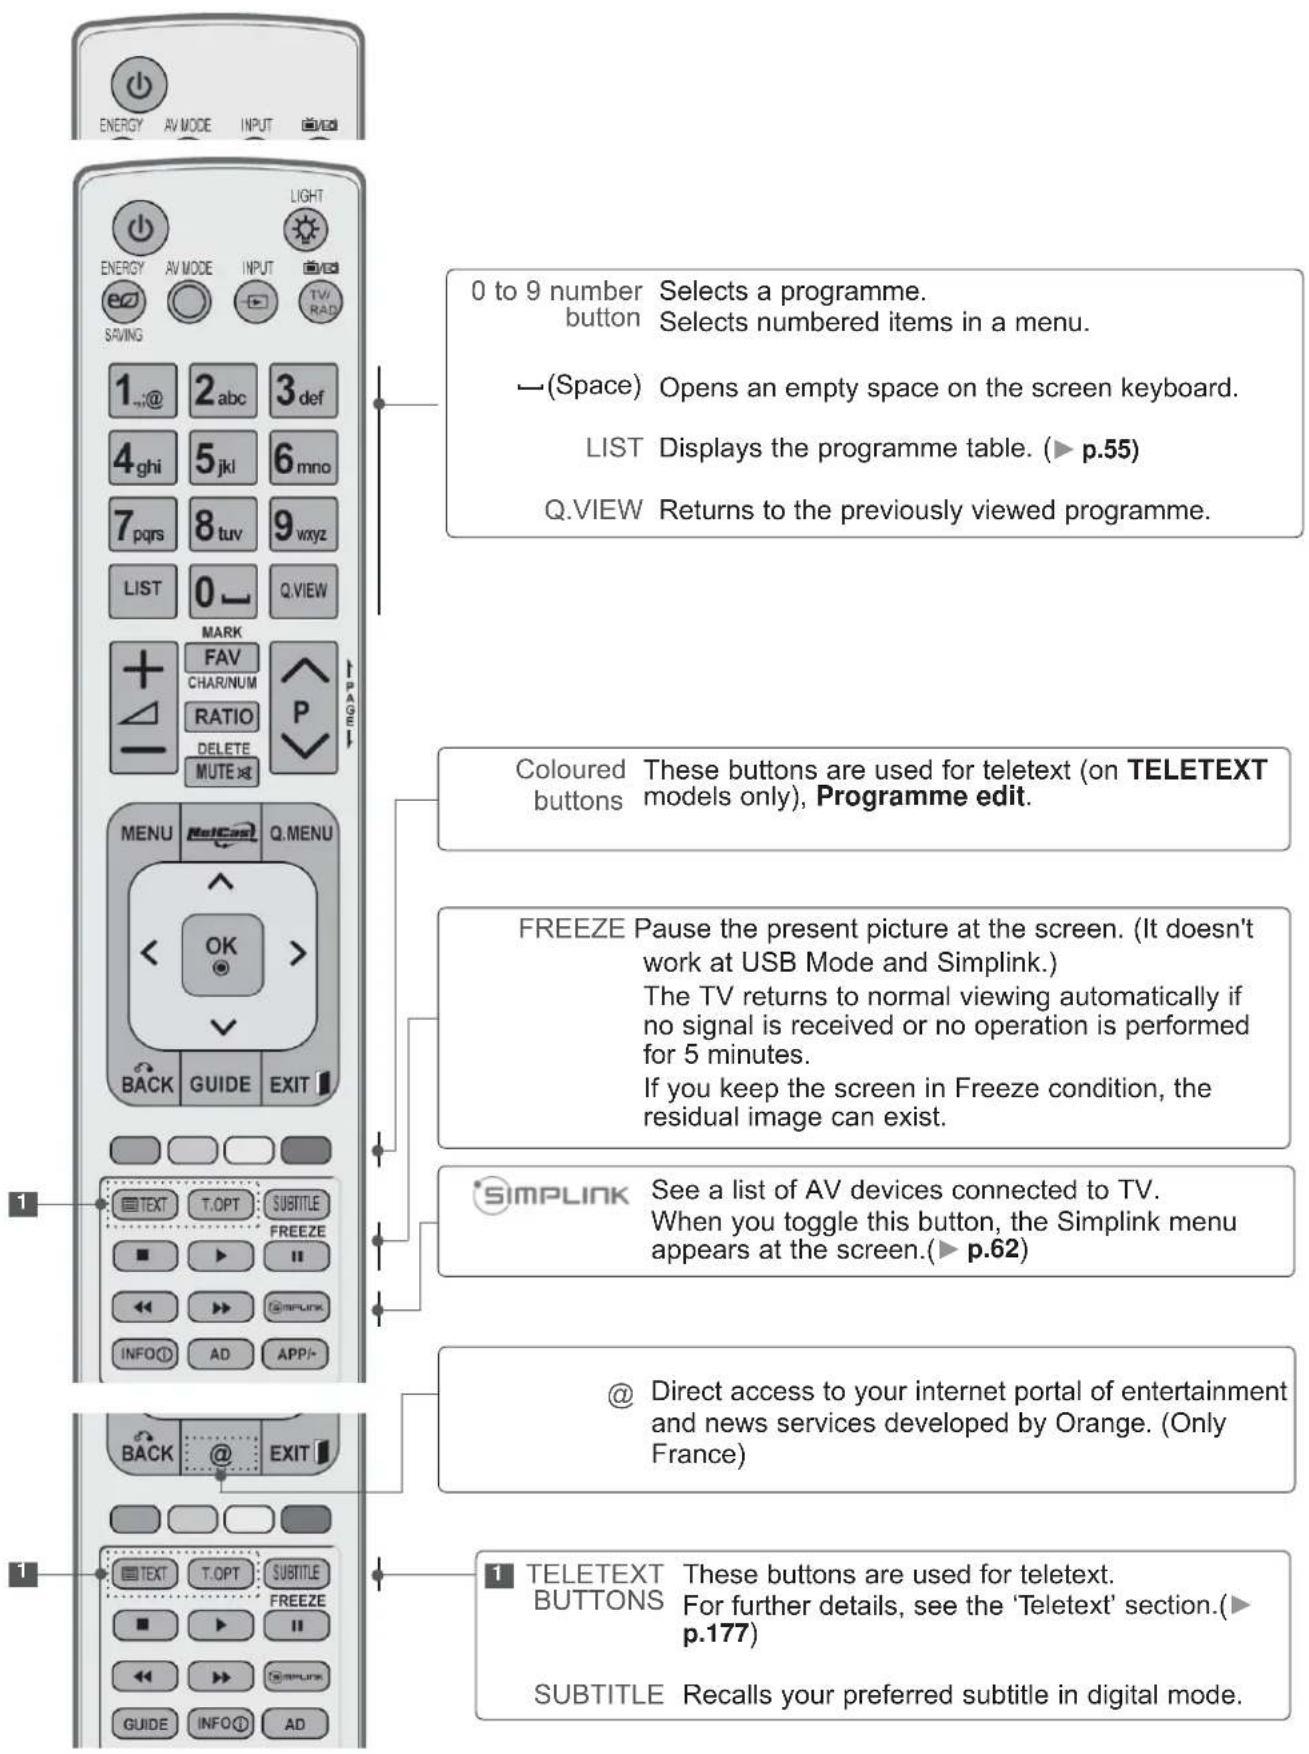
text_image
0 to 9 number Selects a programme. button Selects numbered items in a menu. →(Space) Opens an empty space on the screen keyboard. LIST Displays the programme table. (▶ p.55) Q.VIEW Returns to the previously viewed programme. Coloured These buttons are used for teletext (on TELETEXT buttons models only), Programme edit. FREEZE Pause the present picture at the screen. (It doesn't work at USB Mode and Simplink.) The TV returns to normal viewing automatically if no signal is received or no operation is performed for 5 minutes. If you keep the screen in Freeze condition, the residual image can exist. SimplINK See a list of AV devices connected to TV. When you toggle this button, the Simplink menu appears at the screen.(▶ p.62) @ Direct access to your internet portal of entertainment and news services developed by Orange. (Only France) TELETEXT These buttons are used for teletext. BUTTONS For further details, see the 'Teletext' section.(▶ p.177) SUBTITLE Recalls your preferred subtitle in digital mode.
text_image
ENERGY AV MODE INPUT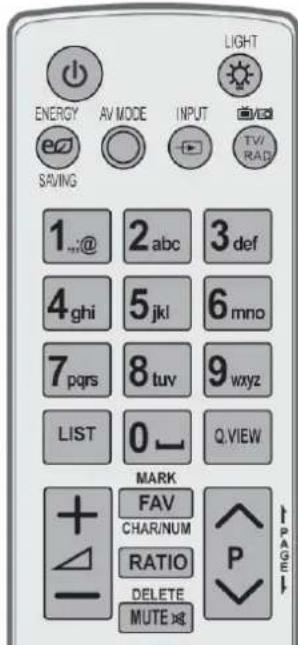
text_image
ENERGY SAVING AV MODE INPUT LIGHT TV/RAD 1_abc 3_def 4_ghi 5_jkl 6_mno 7_pqrs 8_tuv 9_wxyz LIST 0_ Q.VIEW MARK FAV CHAR/NUM RATIO DELETE MUTE P PAGE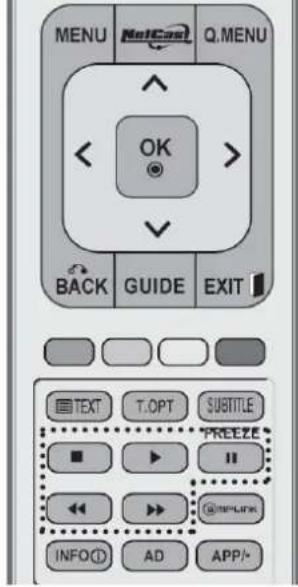
text_image
MENU NetCast Q MENU OK BACK GUIDE EXIT TEXT T.OPT SUBTITLE FREEZE INFO① AD APP/+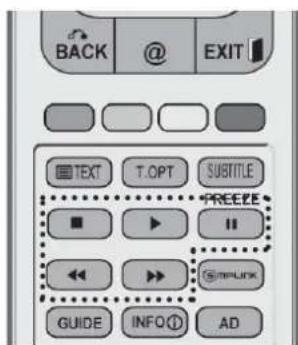
text_image
BACK @ EXIT TEXT T.OPT SUBTITLE FREE SMIPLINK GUIDE INFO① ADVOLUME UP Adjusts the volume.
/DOWN
MARK Select the input to apply the Picture Wizard settings.
Check and un-check programmes in the USB menu.
FAV Displays the selected favourite programme.
CHAR/NUM Shifts the Character or Number for NetCast menu.
RATIO Selects your desired Aspect Ratio of picture.
(▶ p.135)
DELETE Deletes the entered character when entering the character on the screen keyboard.
MUTE Switches the sound on or off.
Programme Selects a programme.
UP/DOWN
PAGE UP/ DOWN Move from one full set of screen information to the next one.
SIMPLINK / Controls SIMPLINK or MY MEDIA menu (Photo List, MY MEDIA Music List and Movie List).
Menu
control buttons
Installing Batteries
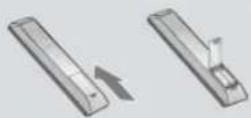
■ Open the battery compartment cover on the back and install the batteries matching correct polarity (+with +,-with -).
■ Install two 1.5 V AAA batteries. Do not mix old or used batteries with new ones.
■ Close cover
■ To remove the batteries, perform the installation actions in reverse.
PREPARATION
REMOTE CONTROL KEY FUNCTIONS (Only 50/60PX9\*\*\*)
When using the remote control, aim it at the remote control sensor on the TV.
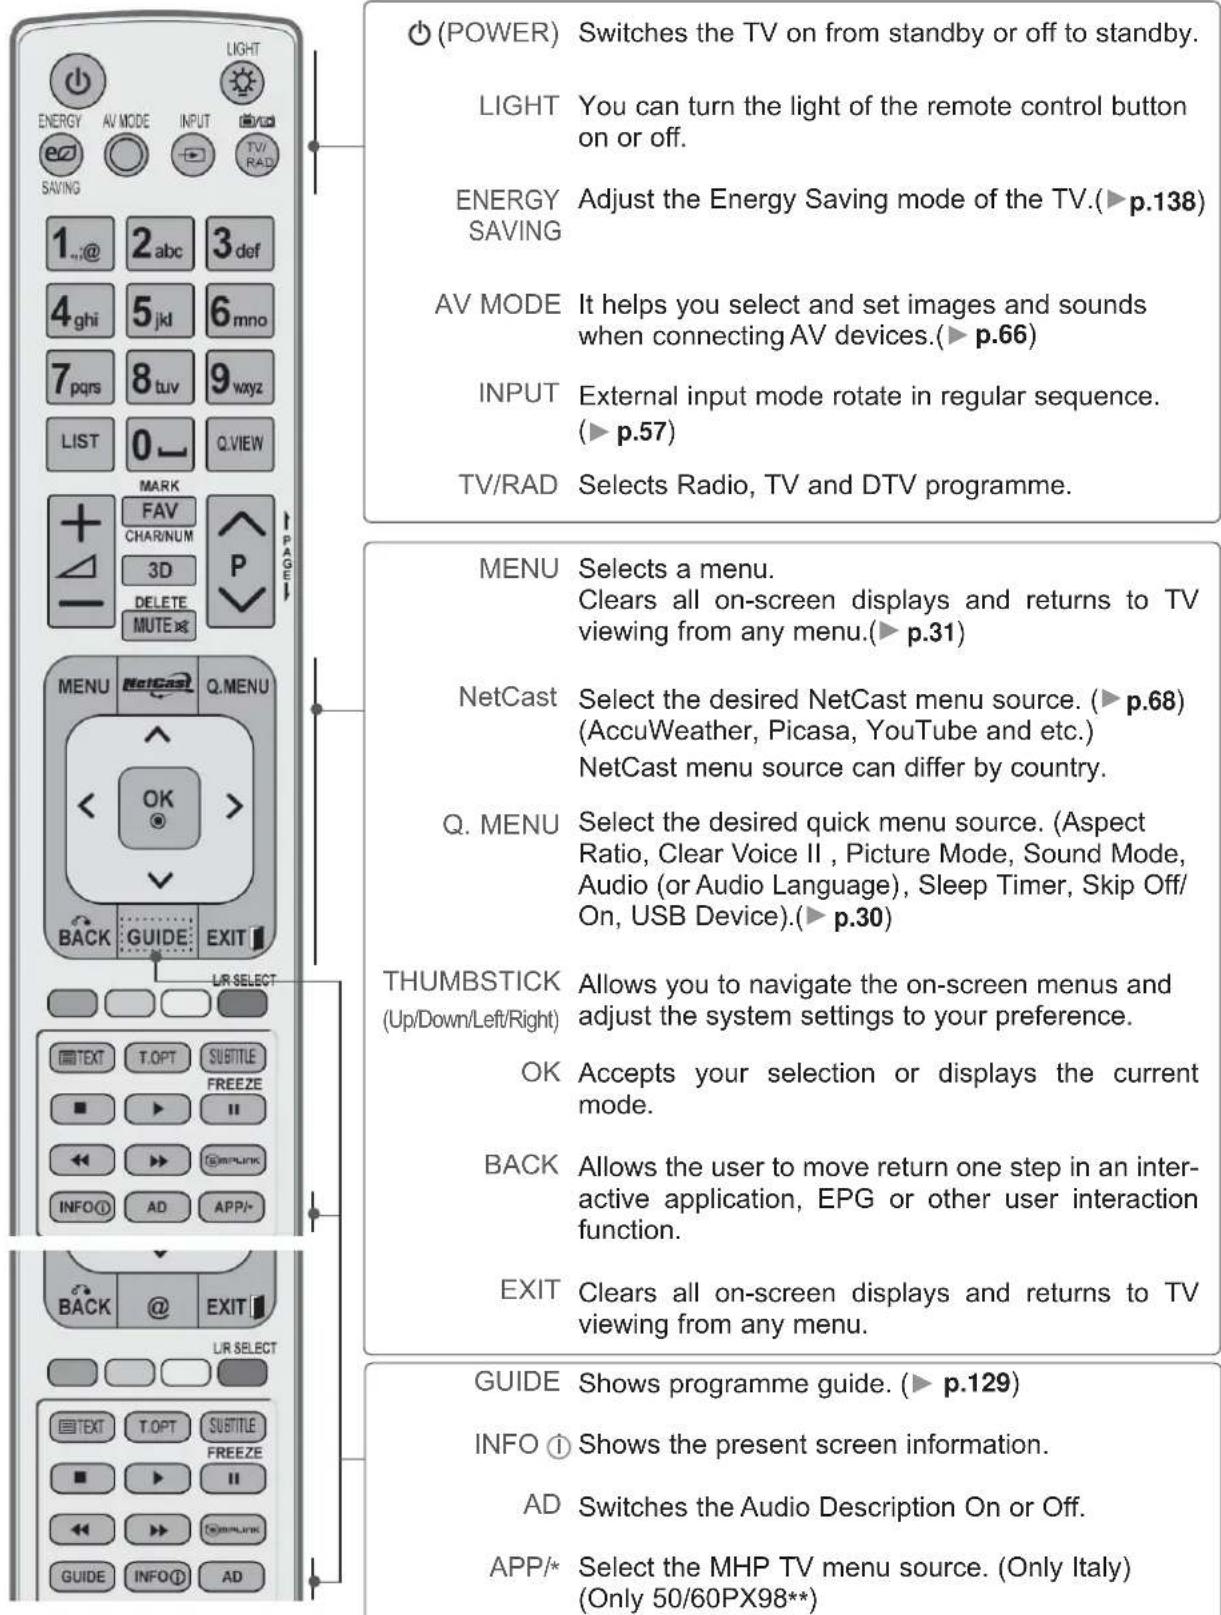
text_image
(POWER) Switches the TV on from standby or off to standby. LIGHT You can turn the light of the remote control button ON or off. ENERGY Adjust the Energy Saving mode of the TV.(►p.138) SAVING AV MODE It helps you select and set images and sounds when connecting AV devices.(►p.66) INPUT External input mode rotate in regular sequence. (►p.57) TV/RAD Selects Radio, TV and DTV programme. MENU Selects a menu. Clears all on-screen displays and returns to TV viewing from any menu.(►p.31) NetCast Select the desired NetCast menu source. (►p.68) (AccuWeather, Picasa, YouTube and etc.) NetCast menu source can differ by country. Q. MENU Select the desired quick menu source. (Aspect Ratio, Clear Voice II , Picture Mode, Sound Mode, Audio (or Audio Language), Sleep Timer, Skip Off/ On, USB Device).(►p.30) THUMBSTICK Allows you to navigate the on-screen menus and adjust the system settings to your preference. OK Accepts your selection or displays the current mode. BACK Allows the user to move return one step in an inter- active application, EPG or other user interaction function. EXIT Clears all on-screen displays and returns to TV viewing from any menu. GUIDE Shows programme guide. (►p.129) INFO ① Shows the present screen information. AD Switches the Audio Description On or Off. APP/* Select the MHP TV menu source. (Only Italy) (Only 50/60PX98**)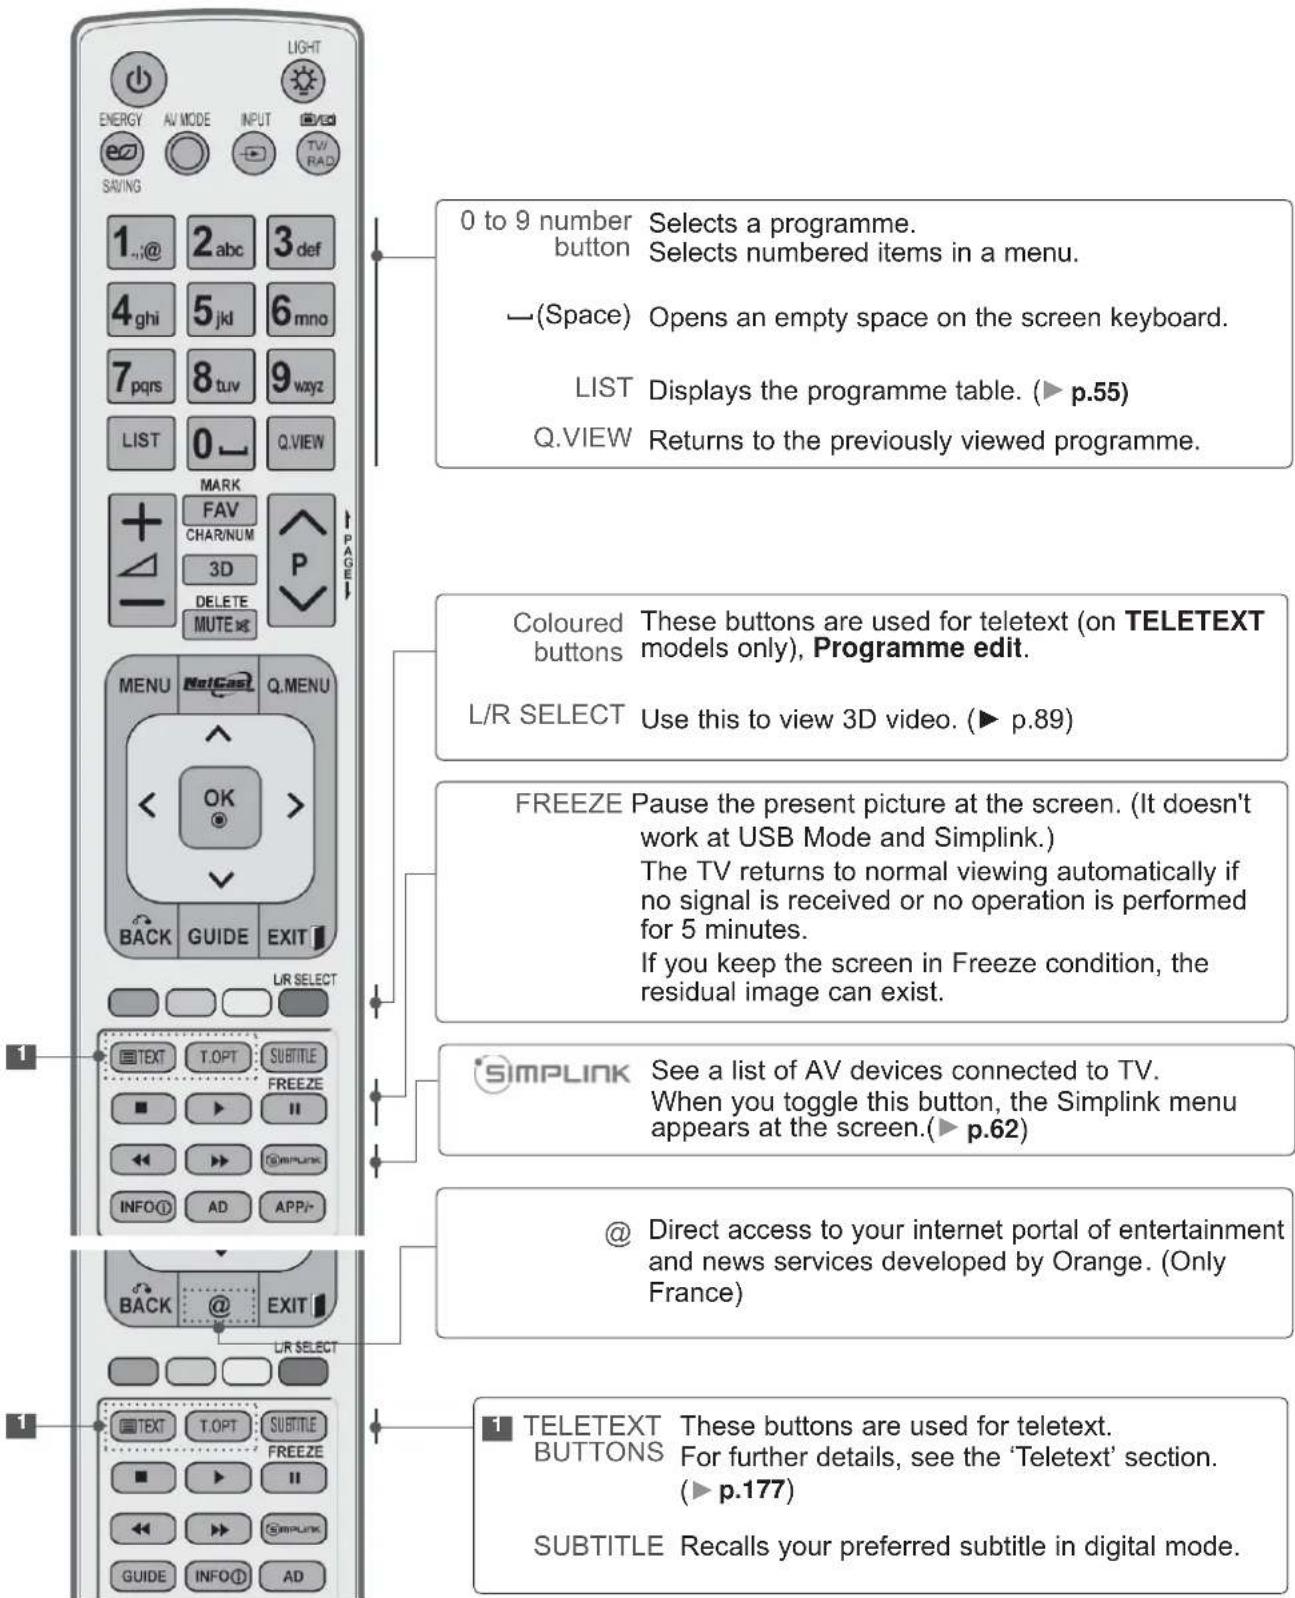
text_image
0 to 9 number Selects a programme. button Selects numbered items in a menu. —(Space) Opens an empty space on the screen keyboard. LIST Displays the programme table. (▶ p.55) Q.VIEW Returns to the previously viewed programme. Coloured These buttons are used for teletext (on TELETEXT buttons models only), Programme edit. L/R SELECT Use this to view 3D video. (▶ p.89) FREEZE Pause the present picture at the screen. (It doesn't work at USB Mode and Simplink.) The TV returns to normal viewing automatically if no signal is received or no operation is performed for 5 minutes. If you keep the screen in Freeze condition, the residual image can exist. SimplINK See a list of AV devices connected to TV. When you toggle this button, the Simplink menu appears at the screen.(▶ p.62) @ Direct access to your internet portal of entertainment and news services developed by Orange. (Only France) TELETEXT These buttons are used for teletext. BUTTONS For further details, see the 'Teletext' section. (▶ p.177) SUBTITLE Recalls your preferred subtitle in digital mode.PREPARATION

text_image
LIGHT ENERGY AV MODE INPUT TV/RAD SAVING 1..@ 2abc 3def 4ghi 5jkl 6mno 7pqrs 8tuv 9wxyz LIST 0 Q.VIEW MARK FAV CHAR/NUM 3D DELETE MUTE P PAGE MENU NetCast Q.MENU < OK > BACK GUIDE EXIT LIR SELECT TEXT T.OPT SUBTITLE FREEZE ■ ▶ II ← ← → Simplink INFO① AD APP/- BACK @ EXIT LIR SELECT TEXT T.OPT SUBTITLE FREEZE ■ ▶ II ← ← → Simplink GUIDE INFO① ADVOLUME UP Adjusts the volume.
/DOWN
MARK Select the input to apply the Picture Wizard settings.
Check and un-check programmes in the USB menu.
FAV Displays the selected favourite programme.
CHAR/NUM Shifts the Character or Number for NetCast menu.
3D Use this to view 3D video. (▶ p.88)
DELETE Deletes the entered character when entering the character on the screen keyboard.
MUTE Switches the sound on or off.
Programme Selects a programme.
UP/DOWN
PAGE UP/ Move from one full set of screen information to the DOWN next one.
SIMPLINK / Controls SIMPLINK or MY MEDIA menu (Photo List, MY MEDIA Music List and Movie List).
Menu
control buttons
Installing Batteries
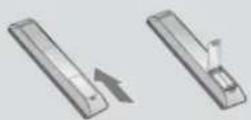
■ Open the battery compartment cover on the back and install the batteries matching correct polarity (+with +,-with -).
■ Install two 1.5 V AAA batteries. Do not mix old or used batteries with new ones.
■ Close cover
■ To remove the batteries, perform the installation actions in reverse.
Simple Remote Control (Only 50/60PK9\*\*\*, 50/60PX9\*\*\*)
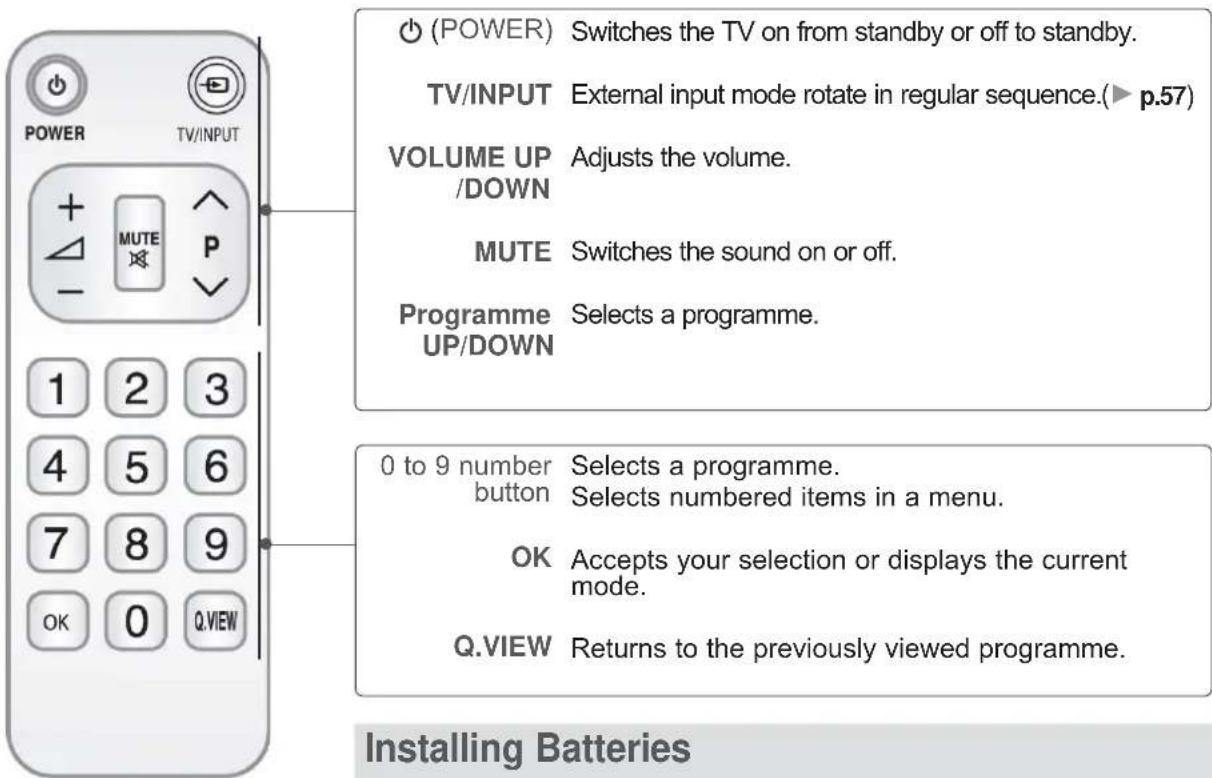
text_image
(POWER) Switches the TV on from standby or off to standby. TV/INPUT External input mode rotate in regular sequence.(▶ p.57) VOLUME UP Adjusts the volume. /DOWN MUTE Switches the sound on or off. Programme Selects a programme. UP/DOWN 0 to 9 number Selects a programme. button Selects numbered items in a menu. OK Accepts your selection or displays the current mode. Q.VIEW Returns to the previously viewed programme. Installing BatteriesInstalling Batteries
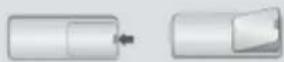
■ Open the battery compartment cover on the back and install the batteries matching correct polarity (+with +,-with -).
■ Install two 1.5V AAA batteries. Do not mix old or used batteries with new ones.
- Close cover.
■ To remove the batteries, perform the installation actions in reverse.
EXTERNAL EQUIPMENT SETUP
■ To prevent damage do not connect to the mains outlet until all connections are made between the devices.
ANTENNA CONNECTION
■ For optimum picture quality, adjust antenna direction.
■ An antenna cable and converter are not supplied.
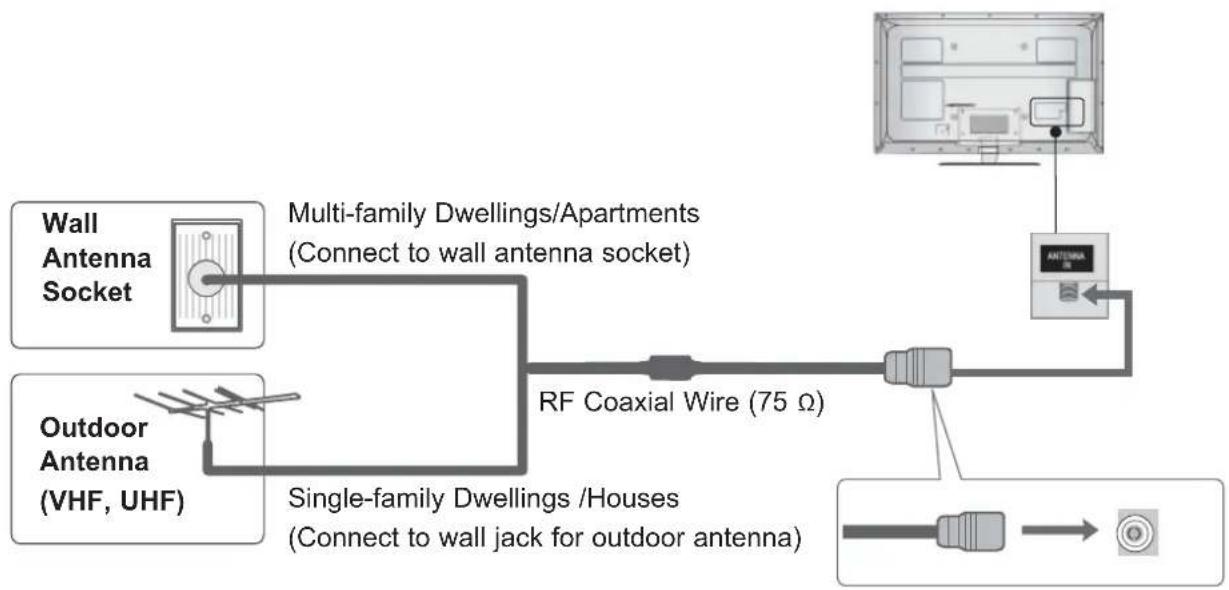
flowchart
graph LR
    A["Wall Antenna Socket"] --> B["Multi-family Dwellings/Apartments (Connect to wall antenna socket)"]
    C["Outdoor Antenna (VHF, UHF)"] --> D["Single-family Dwellings / Houses (Connect to wall jack for outdoor antenna)"]
    B --> E["RF Coaxial Wire (75 Ω)"]
    D --> E
    E --> F["Antenna"]
    F --> G["Output"]

flowchart
graph LR
    A["Antenna"] --> B["UHF"]
    A --> C["VHF"]
    B --> D["Signal Amplifier"]
    C --> D
    D --> E["Antenna"]
■ In poor signal areas, to achieve better picture quality it may be necessary to install a signal amplifier to the antenna as shown above.
■ If signal needs to be split for two TVs, use an antenna signal splitter for connection.
EXTERNAL EQUIPMENT SETUP
■ To avoid damaging any equipment, never plug in any power cord until you have finished connecting all equipment.
■ This section on EXTERNAL EQUIPMENT SETUP mainly uses diagrams for the 32/37/42/47/55LE7*** models.
■ Image shown may differ from your TV.
CONNECTING WITH A COMPONENT CABLE
This TV can receive Digital RF/Cable signals without an external digital set-top box. However, if you do receive Digital signals from a digital set-top box or other digital external device, refer to the diagram as shown below.
1 Connect the video outputs (Y, PB, PR) of the external equipment (digital set-top box, DVD, etc.) to the COMPONENT IN VIDEO jacks on the TV.
2 Connect the audio output of the external equipment (digital set-top box, DVD, etc.) to the COMPONENT IN AUDIO jacks on the TV.
3 Turn on the external equipment. (Refer to the external equipment's manual for operating instructions.)
4 Select the Component1 input source using the INPUT button on the remote control.
If connected to COMPONENT IN 2, select Component2 input source.
▶ HDMI Audio Supported format : Dolby Digital, PCM. DTS Audio format is not supported.
| Signal Component HDMI | ||
| 480i/576i O X | ||
| 480p/576p | O | O |
| 720p/1080i O O | ||
| 1080p | O(50 Hz / 60 Hz only) | O(24 Hz / 30 Hz /50 Hz / 60 Hz) |
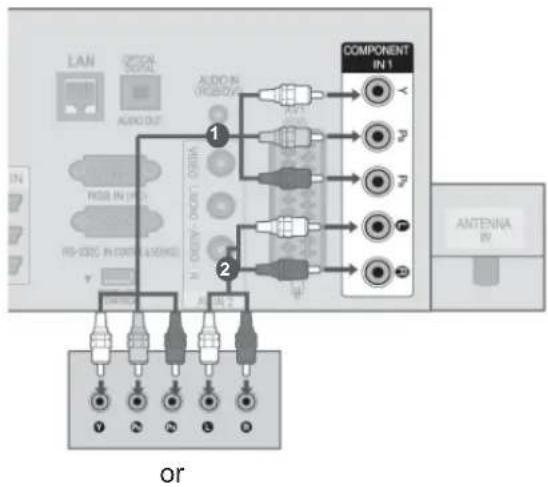
text_image
LAN AUDIO AVOC OUT AUDIO AVOC OUT 1 COMPONENT IN 1 2 ANTENNA IN or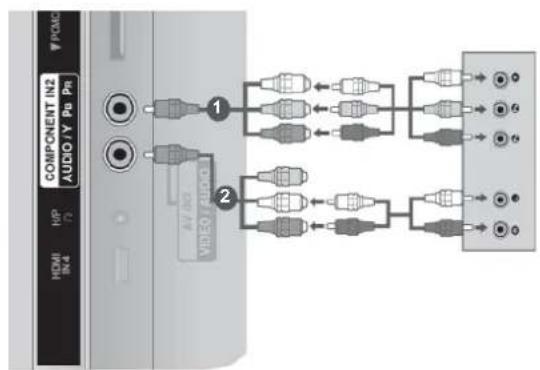
text_image
COMPONENT IN2 AUDIO / Y Pu Prn HDMI IN4 HP (7) VIDEO / RHO 1 2Component Input ports
To achieve better picture quality, connect a DVD player to the component input ports as shown below.
| Component ports on the TV | Y | P_B | P_R |
| Video output portson DVD player | Y | P_B | P_R |
| Y | B-Y | R-Y | |
| Y | Cb | Cr | |
| Y | Pb | Pr |
CONNECTING WITH AN HDMI CABLE
1 Connect the HDMI output of the external equipment (digital set-top box, DVD, etc.) to HDMI/DVI IN 1(DVI), HDMI/DVI IN 2, HDMI/DVI IN 3 or HDMI IN 4 (Except for 32/37/42LD4***, 32/37/42/47/55LD6***, 32/42/47LD7***, 32/37/42LD8***) jack on the TV.
2 Turn on the external equipment.
(Refer to the external equipment's manual for operating instructions.)
3 Select HDMI1, HDMI2, HDMI3 or HDMI4 (Except for 32/37/42LD4***, 32/37/42/47/55LD6***, 32/42/47LD7***, 32/37/42LD8***) input source using the INPUT button on the remote control.
NOTE
▶The TV can receive video and audio signals simultaneously when using an HDMI cable.
▶ If the DVD does not support Auto HDMI, you must set the output resolution appropriately.
▶ Check that your HDMI cable is High Speed HDMI Cable. If the HDMI cables are not High Speed HDMI Cable, flickering or no screen display can result. Please use the High Speed HDMI Cable.
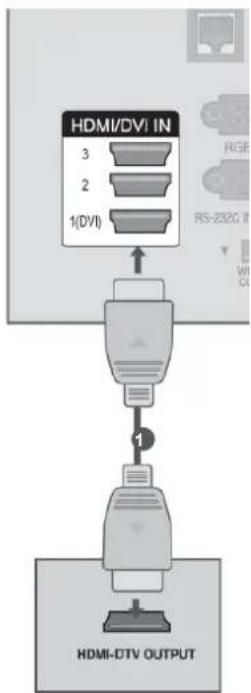
flowchart
graph TD
    A["HDMI/DVI IN"] --> B["3"]
    A --> C["2"]
    A --> D["1(DVI)"]
    B --> E["1"]
    C --> E
    D --> E
    E --> F["HDMI-DTV OUTPUT"]
EXTERNAL EQUIPMENT SETUP
CONNECTING WITH AN HDMI TO DVI CABLE
1 Connect the digital set-top box or the DVI output of the PC to HDMI/DVI IN 1(DVI) jack on the TV.
2 Connect the audio output of the digital set-top box or the PC audio output to the AUDIO IN (RGB/DVI) jack on the TV.
3 Turn on the digital set-top box or the PC and the TV.
(Refer to the digital set-top box or the PC manual for operating instructions.)
4 Select HDMI1 input source using the INPUT button on the remote control.
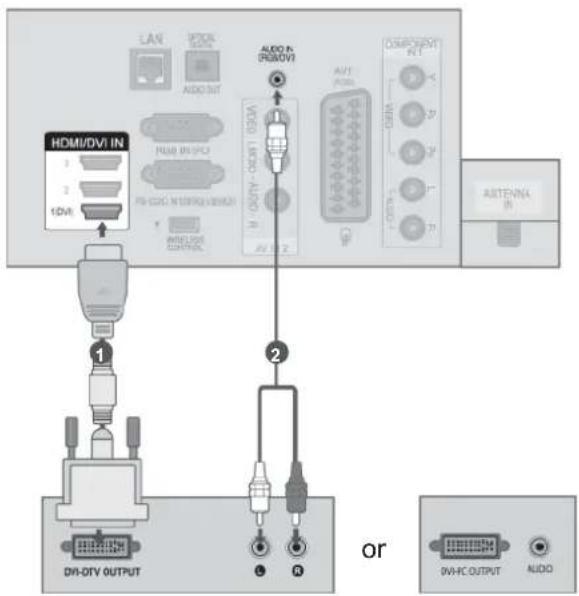
text_image
LAN 300K R200 AUDIO OUT HDMI/DVI IN 1 2 10VII USB ON/PCI PS-CCDC IN CONTROL VENUE WELCOME CONTROL AUDIO N 300K AVI OUTPUT AVI AVI COMPONENT RET GWR 27 28 29 27 AVIENNA IN DRI-DIV OUTPUT or 0V-FC OUTPUT AUDIOCONNECTING WITH A EURO SCART CABLE
1 Connect the Euro scart socket of the external equipment (DVD, VCR, etc.) to the AV1 Euro scart socket on the TV.
2 Turn on the external equipment. (Refer to the external equipment's manual for operating instructions.)
3 Select AV1 input source using the INPUT button on the remote control.
| Scart | Input Output | |||
| Video | Audio RGB | Video, Audio | ||
| AV1 | O | O | O | Analogue TV, Digital TV |
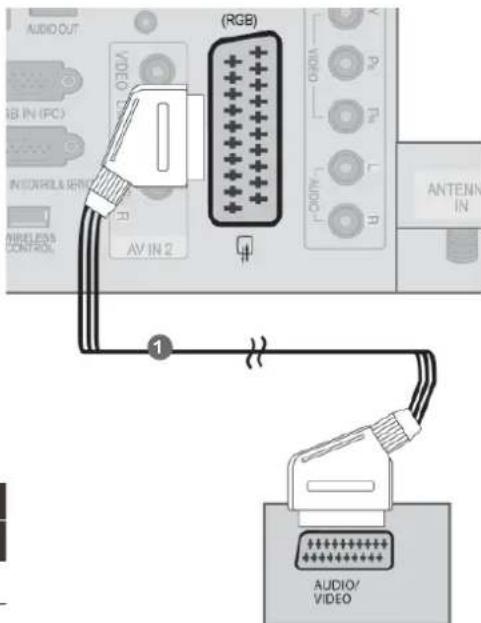
text_image
AUDIO OUT V --------- 1 AV IN 2 (RGB) AUDIO V --------- 1 ANTENN IN WIRELESS CONTROL AUDIO/ VIDEO| Output TypeCurrentinput mode | AV1(TV Out) | AV1(When DTV scheduled recording is in progress using recording equipment.) |
| Digital TV Digital TV | O | |
| Analogue TV, AV Analogue TV | O(The input mode is converted to DTV.) | |
| Component/RGB | Analogue TV | |
| HDMI | X | X |
▶ TV Out : Outputs Analogue TV or Digital TV signals.
NOTE
▶ Any Euro scart cable used must be signal shielded.
▶ When watching digital TV in 3D imaging mode, monitor out signals cannot be output through the SCART cable. (Only 42/47LX6***, 47/55LX9***, 50/60PX9***)
▶ If you set the 3D mode to On while a scheduled recording is performed on digital TV, monitor out signals cannot be output through the SCART cable, and the recording cannot be performed. (Only 42/47LX6***, 47/55LX9***, 50/60PX9***)
EXTERNAL EQUIPMENT SETUP
USB SETUP
1 Connect the USB device to the USB IN 1 or USB IN 2 jack on the TV.
2 After connecting the USB IN 1 or USB IN 2 jack, you use the USB function. (▶ p.90)
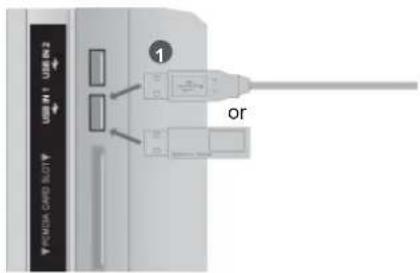
text_image
USB 1 USE IN 2 PUNDA CARD BOLT ① orCONNECTING WITH AN RF CABLE
To avoid picture noise (interference), allow adequate distance between the VCR and TV.
1 Connect the ANT OUT socket of the VCR to the ANTENNA IN socket on the TV.
2 Connect the antenna cable to the ANT IN socket of the VCR.
3 Press the PLAY button on the VCR and match the appropriate channel between the TV and VCR for viewing.
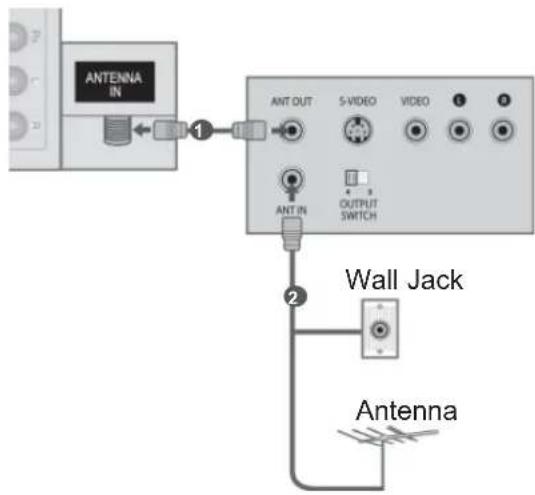
text_image
ANTENNA IN 1 ANT OUT S-VIDEO VIDEO OUTPUT SWITCH ANT IN 2 Wall Jack AntennaCONNECTING WITH AN RCA CABLE
1 Connect the AUDIO/VIDEO jacks between TV and VCR or external equipment. Match the jack colours (Video = yellow, Audio Left = white, and Audio Right = red)
2 Insert a video tape into the VCR and press PLAY on the VCR. (Refer to the VCR owner's manual.) Or, Operate the corresponding external equipment. (Refer to external equipment operating guide.)
3 Select AV2 input source using the INPUT button on the remote control. If connected to AV IN 3, select AV3 input source.
NOTE
▶ If you have a mono VCR, connect the audio cable from the VCR to the AUDIO L/MONO jack of the TV.
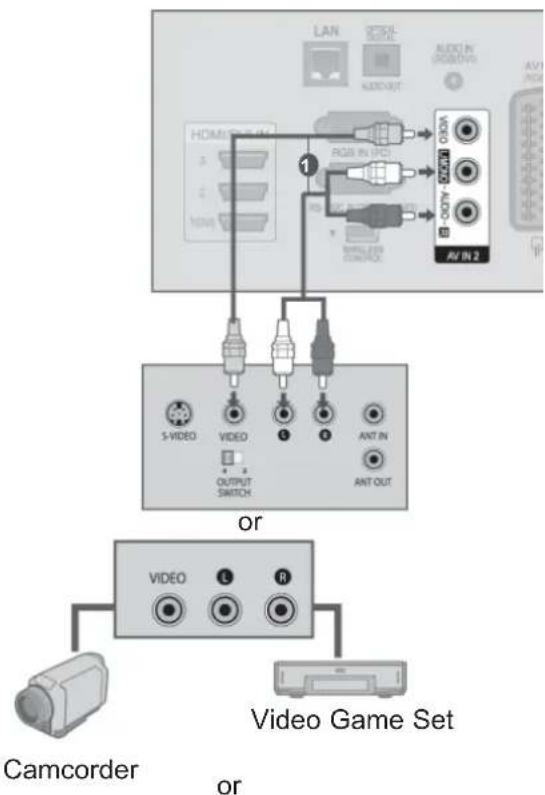
flowchart
graph TD
    A["Home Screen"] --> B["1"]
    B --> C["2"]
    B --> D["3"]
    B --> E["4"]
    B --> F["5"]
    B --> G["6"]
    B --> H["7"]
    B --> I["8"]
    B --> J["9"]
    B --> K["10"]
    B --> L["11"]
    B --> M["12"]
    B --> N["13"]
    B --> O["14"]
    B --> P["15"]
    B --> Q["16"]
    B --> R["17"]
    B --> S["18"]
    B --> T["19"]
    B --> U["20"]
    B --> V["21"]
    B --> W["22"]
    B --> X["23"]
    B --> Y["24"]
    B --> Z["25"]
    B --> AA["26"]
    B --> AB["27"]
    B --> AC["28"]
    B --> AD["29"]
    B --> AE["30"]
    B --> AF["31"]
    B --> AG["32"]
    B --> AH["33"]
    B --> AI["34"]
    B --> AJ["35"]
    B --> AK["36"]
    B --> AL["37"]
    B --> AM["38"]
    B --> AN["39"]
    B --> AO["40"]
    B --> AP["41"]
    B --> AQ["42"]
    B --> AR["43"]
    B --> AS["44"]
    B --> AT["45"]
    B --> AU["46"]
    B --> AV["47"]
    B --> AW["48"]
    B --> AX["49"]
    B --> AY["50"]
    B --> AZ["51"]
    B --> BA["52"]
    B --> BB["53"]
    B --> BC["54"]
    B --> BD["55"]
    B --> BE["56"]
    B --> BF["57"]
    B --> BG["58"]
    B --> BH["59"]
    B --> BI["60"]
    B --> BJ["61"]
    B --> BK["62"]
    B --> BL["63"]
    B --> BM["64"]
    B --> BN["65"]
    B --> BO["66"]
    B --> BP["67"]
    B --> BQ["68"]
    B --> BR["69"]
    B --> BS["70"]
    B --> BT["71"]
    B --> BU["72"]
    B --> BV["73"]
    B --> BW["74"]
    B --> BX["75"]
    B --> BY["76"]
    B --> Z["77"]
    B --> AA["78"]
    B --> AB["79"]
    B --> AC["80"]
    B --> AD["81"]
    B --> AE["82"]
    B --> AF["83"]
    B --> AG["84"]
    B --> AH["85"]
    B --> AI["86"]
    B --> AJ["87"]
    B --> AK["88"]
    B --> AL["89"]
    B --> AM["90"]
    B --> AN["91"]
    B --> AO["92"]
    B --> AP["93"]
    B --> AQ["94"]
    B --> AR["95"]
    B --> AS["96"]
    B --> AT["97"]
    B --> AU["98"]
    B --> AV["99"]
    B --> AW
    style A fill:#f9f,stroke:#333
    style BB fill:#ccf,stroke:#333
    style BC fill:#cfc,stroke:#333
    style BD fill:#fcc,stroke:#333
    style BE fill:#cff,stroke:#333
    style BF fill:#ffc,stroke:#333
    style BG fill:#fcf,stroke:#333
    style BH fill:#cff,stroke:#333
    style BI fill:#ffc,stroke:#333
    style BJ fill:#cff,stroke:#333
    style BK fill:#ffc,stroke:#333
    style BL fill:#cff,stroke:#333
    style BM fill:#ffc,stroke:#333
    style BN fill:#cff,stroke:#333
    style BO fill:#ffc,stroke:#333
    style BP fill:#ffc,stroke:#333
    style R fill:#ffc,stroke:#333
    style SC fill:#ffc,stroke:#333
    style SV fill:#ffc,stroke:#333
    style TW fill:#ffc,stroke:#333
    style X fill:#ffc,stroke:#333
    style Y fill:#ffc,stroke:#333
    style Z fill:#ffc,stroke:#333
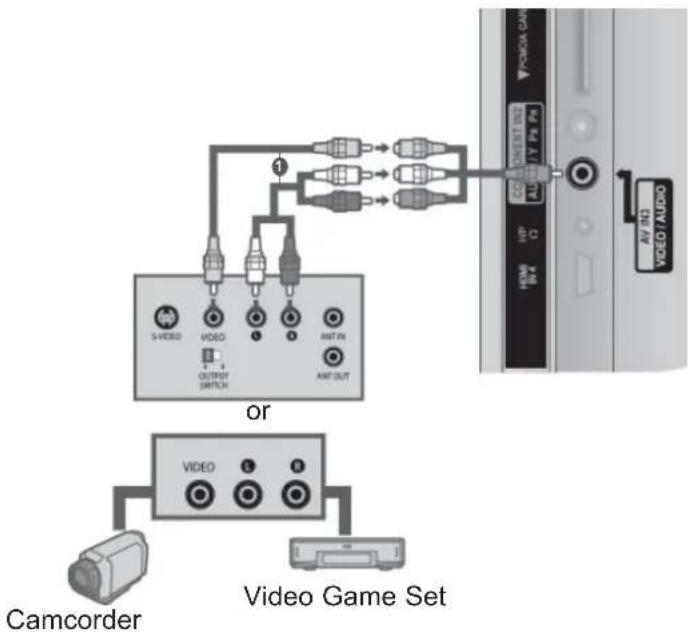
text_image
or Camcorder Video Game SetEXTERNAL EQUIPMENT SETUP
CONNECTING WITH A D-SUB 15 PIN CABLE
This TV provides Plug and Play capability, meaning that the PC adjusts automatically to the TV's settings.
1 Connect the RGB output of the PC to the RGB IN (PC) jack on the TV.
2 Connect the PC audio output to the AUDIO IN (RGB/DVI) jack on the TV.
3 Turn on the PC and the TV
4 Select RGB input source using the INPUT button on the remote control.
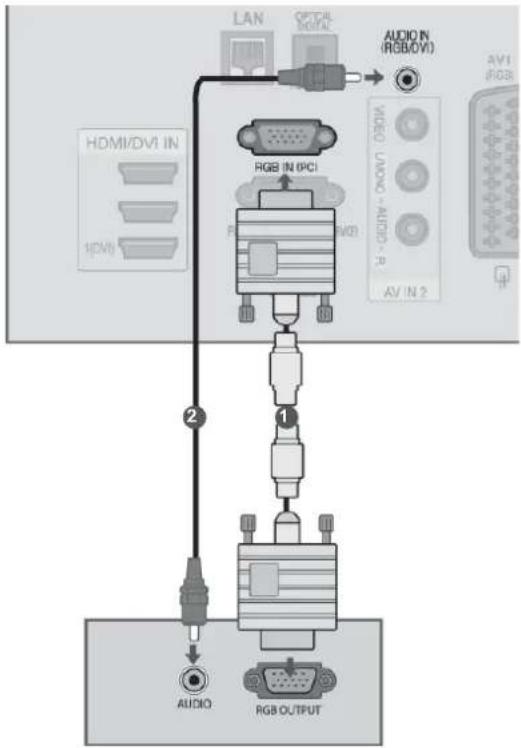
flowchart
graph TD
    A["LAN"] --> B["RGB IN (PCI)"]
    B --> C["1"]
    C --> D["AUDIO"]
    D --> E["RGB OUTPUT"]
    F["HDMI/DVI IN"] --> G["2"]
    H["VIDEO"] --> I["AUDIO IN (RGB/DVI)"]
    J["AVI"] --> K["2"]
INSERTION OF A CI MODULE
To view the encrypted (pay) services in digital TV mode. This feature is not available in all countries.
1
Insert the CI Module to PCMCIA (Personal Computer Memory Card International Association) CARD SLOT of TV as shown.
For further information, see p.48.
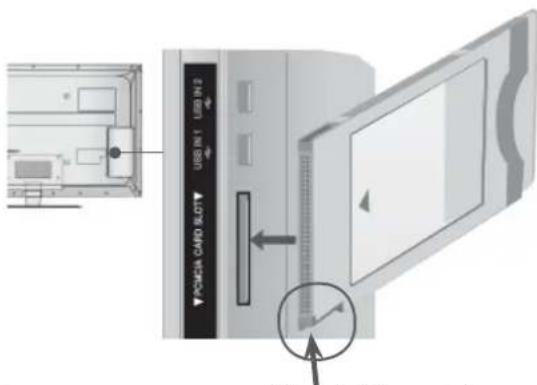
text_image
USB IN1 USB IN2 ▼CHINA CARD SLOT ← →Check this point as shown and insert the CI Module.
!
NOTE
▶ Check if the CI module is inserted into the PCMCIA card slot in the right direction. If the module is not inserted properly, this can cause damage to the TV and the PCMCIA card slot.
HEADPHONE SETUP
(Except for 50/60PK5**, 50/60PK7***, 50/60PK9***, 50/60PX9***, 42/47LX6***, 47/55LX9***)
You can listen the sound through the headphone.
1
Plug the headphone into the headphone socket.
2
To adjust the headphone volume, press the △ + or - button. If you press the MUTE button, the sound from the headphone is switched off.
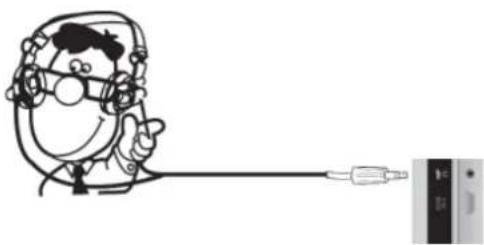
natural_image
Cartoon illustration of a person wearing headphones connected to a USB cable (no text or symbols)!
NOTE
▶ AUDIO menu items are disabled when connecting a headphone.
▶ When changing AV MODE with a headphone connected, the change is applied to video but not to audio.
▶ Optical Digital Audio Out is not available when connecting a headphone.
▶ Headphone impedance: 16 Ω
▶Max audio output of headphone: 10 mW to 15 mW
EXTERNAL EQUIPMENT SETUP
DIGITAL AUDIO OUT SETUP
Sending the TV's audio signal to external audio equipment via the Digital Audio Output (Optical) port. If you want to enjoy digital broadcasting through 5.1-channel speakers, connect the OPTICAL DIGITAL AUDIO OUT terminal on the back of TV to a Home Theater (or amp).
1 Connect one end of an optical cable to the TV Digital Audio (Optical) Output port.
2 Connect the other end of the optical cable to the digital audio (Optical) input on the audio equipment.
3 Set the "TV Speaker option - Off" in the AUDIO menu. (▶ p.159). Refer to the external audio equipment instruction manual for operation.
CAUTION
▶ Do not look into the optical output port. Looking at the laser beam may damage your vision.
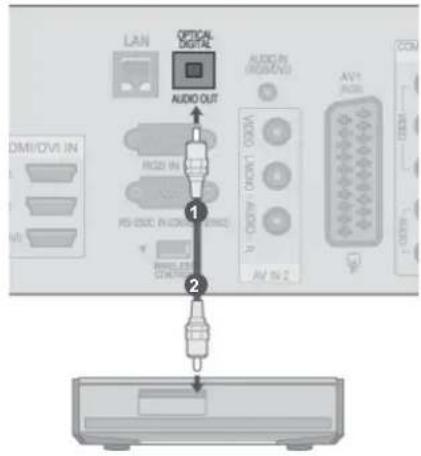
text_image
LAN OPTICAL DIGITAL AUDIO OUT AUDIO IN R222 IN VDDI LAMO AUDIO R AV1 IN 2 COM DMI/DVI IN PS-CCDC IN/CCC/CCC R/WLED DRINK 1 2EXTERNAL EQUIPMENT WIRELESS CONNECTION
(Except for 32/37/42LD4***)
LG TVs with a Wireless Control port support the LG Wireless Media Box, which is sold separately. When you connect the Wireless Ready Dongle (included with the Wireless Media Box) to the TV, external devices can be connected to the LG Wireless Media Box and video and audio will be sent to the TV wirelessly.
After the wireless is connected, press the INPUT button to view the wireless input screen.
Refer to the Wireless Media Box manual for operating instructions.
1 Connect the WIRELESS CONTROL jack of the Wireless Ready Dongle to the WIRELESS CONTROL jack on the TV.
2 Connect HDMI OUT jack of the Wireless Ready Dongle to the HDMI/DVI IN 1(DVI), HDMI/DVI IN 2, HDMI/DVI IN 3 or HDMI IN 4 (Except for 32/37/42LD4***, 32/37/42/47/55LD6***, 32/42/47LD7***, 32/37/42LD8***) jack on the TV.

text_image
LG AV1 AV2 COM RGB HDMI H08-1 H08-2 H08-3 H08-4 WIRELESS OFFLG Wireless Media Box
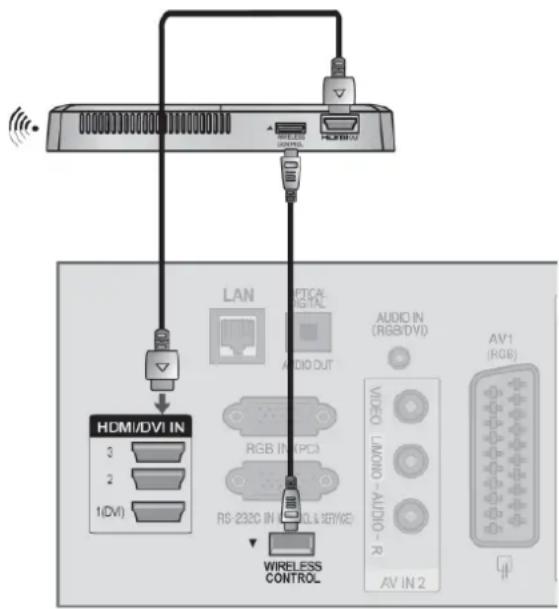
text_image
HDMI/DVI IN 3 2 1(DVI) LAN OPTICAL DIGITAL AUDIO OUT RGB (PCI) RS-232C IN (WILL & SERVICE) WIRELESS CONTROL AUDIO IN (RGB/DVI) VIDEO LAVIND - AUDIO - AV IN 2 AV1 (RGB)NOTE
▶ WIRELESS CONTROL : Wireless Ready Dongle power supply and control usage.
▶ HDMI : Video/Audio signal is connected in Wireless Ready Dongle.
▶ When you connect to the Wireless Media Box (Separately sold product), you can watch the external device connected to the Wireless Media Box through wireless connection.
▶ When using the external device connected to the Wireless Media Box, some functions of the TV menu may not work.
▶ In wireless external output, Real Cinema and Digital Noise Reduction functions are not supported.
EXTERNAL EQUIPMENT SETUP
SUPPORTED DISPLAY RESOLUTION
Plasma TV Models
RGB-PC, HDMI/DVI-PC mode
| Resolution | Horizontal Frequency (kHz) | Vertical Frequency (Hz) |
| 720x400 31.468 70.08 | ||
| 640x480 | 31.469 59.94 | |
| 800x600 37.879 60.31 | ||
| 1024x768 48.363 60.00 | ||
| 1280x768 47.78 59.87 | ||
| 1360x768 47.72 59.80 | ||
| 1280x1024 63.981 60.02 | ||
| 1920x1080 (RGB-PC) | 66.587 | 59.93 |
| 1920x1080 (HDMI-PC) | 67.5 60.00 | |
HDMI/DVI-DTV mode
| Resolution | Horizontal Frequency (kHz) | Vertical Frequency (Hz) |
| 720x480 | 31.469 | 59.94 |
| 31.5 | 60 | |
| 720x576 | 31.25 50 | |
| 1280x720 | 37.5 | 50 |
| 44.96 | 59.94 | |
| 45 | 60 | |
| 1920x1080 | 33.72 | 59.94 |
| 33.75 | 60 | |
| 28.125 | 50 | |
| 26.97 | 23.97 | |
| 27 | 24 | |
| 33.716 | 29.976 | |
| 33.75 | 30.00 | |
| 56.25 | 50 | |
| 67.43 | 59.94 | |
| 67.5 | 60 |
LCD TV Models / LED LCD TV Models
RGB-PC, HDMI/DVI-PC mode
| Resolution | Horizontal Frequency (kHz) | Vertical Frequency (Hz) |
| 720x400 31.468 70.08 | ||
| 640x480 | 31.469 59.94 | |
| 800x600 37.879 60.31 | ||
| 1024x768 48.363 60.00 | ||
| 1280x768 47.78 59.87 | ||
| 1360x768 47.72 59.80 | ||
| 1280x1024 63.981 60.02 | ||
| 1920x1080 (RGB-PC) | 66.587 | 59.93 |
| 1920x1080 (HDMI-PC) | 67.5 60.00 | |
HDMI/DVI-DTV mode
| Resolution | Horizontal Frequency (kHz) | Vertical Frequency (Hz) |
| 720x480 | 31.469 | 59.94 |
| 31.5 | 60 | |
| 720x576 | 31.25 50 | |
| 1280x720 | 37.5 | 50 |
| 44.96 | 59.94 | |
| 45 | 60 | |
| 1920x1080 | 33.72 | 59.94 |
| 33.75 | 60 | |
| 28.125 | 50 | |
| 26.97 | 23.97 | |
| 27 | 24 | |
| 33.716 | 29.976 | |
| 33.75 | 30.00 | |
| 56.25 | 50 | |
| 67.43 | 59.94 | |
| 67.5 | 60 |
EXTERNAL EQUIPMENT SETUP
NOTE
- Avoid keeping a fixed image on the set's screen for prolonged periods of time. The fixed image may become permanently imprinted on the screen; use a screen saver when possible.
There may be interference relating to resolution, vertical pattern, contrast or brightness in PC mode. Change the PC mode to another resolution or change the refresh rate to another rate or adjust the brightness and contrast on the menu until the picture is clear. If the refresh rate of the PC graphic card can not be changed, change the PC graphic card or consult the manufacturer of the PC graphic card.
▶ The synchronization input waveform for Horizontal and Vertical frequencies are separate.
▶ We recommend using 1920x1080, 60 Hz for the PC mode, this should provide the best picture quality.
▶ Connect the signal cable from the monitor output port of the PC to the RGB (PC) port of the TV or the signal cable from the HDMI output port of the PC to the HDMI IN (or HDMI/DVI IN) port on the TV.
▶ Connect the audio cable from the PC to the Audio input on the TV. (Audio cables are not included with the TV).
▶ If using a sound card, adjust PC sound as required.
▶ If the graphic card on the PC does not output analogue and digital RGB simultaneously, connect only one of either RGB or HDMI IN (or HDMI/DVI IN) to display the PC output on the TV.
▶ If the graphic card on the PC does output analogue and digital RGB simultaneously, set the TV to either RGB or HDMI; (the other mode is set to Plug and Play automatically by the TV.)
▶ DOS mode may not work depending on the video card if you use an HDMI to DVI cable.
▶ If you use too long an RGB-PC cable, there may be interference on the screen. We recommend using under 5m of cable. This provides the best picture quality.
SCREEN SETUP FOR PC MODE
Screen Reset
Returns Position, Size and Phase to the factory default settings.
This function works in the following mode : RGB[PC].
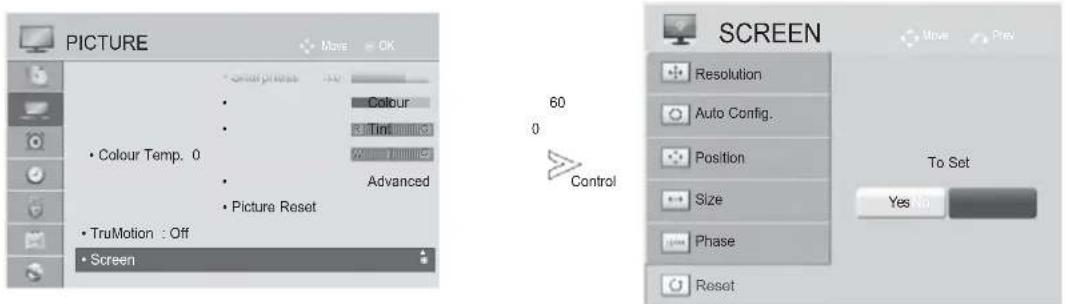
text_image
PICTURE Move OK • Colour Temp. 0 • Colour • Colour • R: Tint • Advanced • Picture Reset • TruMotion : Off • Screen 60 0 Control SCREEN Resolution Auto Config. Position Size Phase Reset To Set Yes No
Select PICTURE.
Select Screen.
Select Reset.
Select Yes.
Run Reset.
- Press the MENU/EXIT button to return to normal TV viewing.
- Press the BACK button to move to the previous menu screen.
EXTERNAL EQUIPMENT SETUP
Auto Configure (RGB [PC] mode only)
Automatically adjusts the picture position and minimizes image instability. After adjustment, if the image is still not correct, your TV is functioning properly but needs further adjustment.
Auto configure
This function is for automatic adjustment of the screen position, size, and phase The displayed image will be unstable for a few seconds while the auto configuration is in progress.
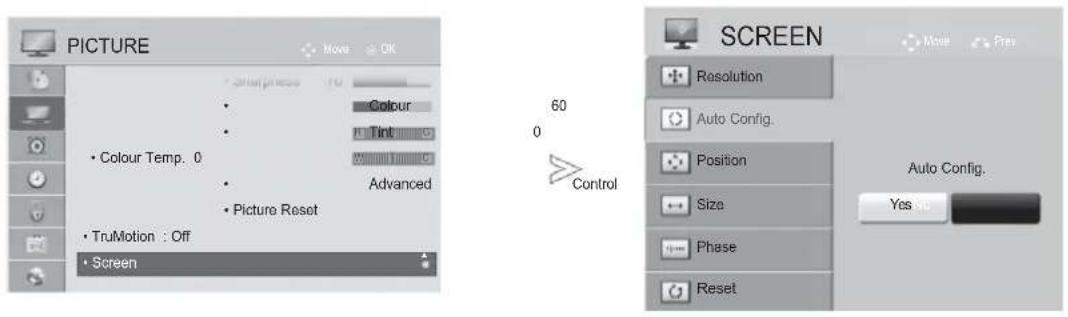
text_image
PICTURE • Colour Temp. 0 • Picture Reset • TruMotion : Off • Screen 60 0 Control SCREEN Resolution Auto Config. Position Size Phase Reset Auto Config. Yes OK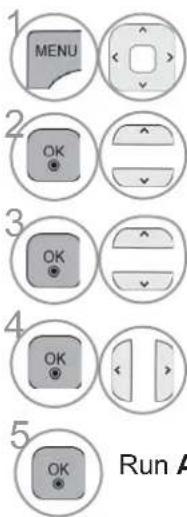
text_image
1 MENU 2 OK 3 OK 4 OK 5 OK Run ASelect PICTURE.
Select Screen.
Select Auto Config..
Select Yes.
Run Auto Config..
- If the position of the image is still not correct, try Auto adjustment again.
-
If picture needs to be adjusted again after Auto adjustment in RGB (PC), you can adjust the Position, Size or Phase.
-
Press the MENU/EXIT button to return to normal TV viewing.
- Press the BACK button to move to the previous menu screen.
Selecting Resolution
To view a normal picture, match the resolution of RGB mode and selection of PC mode.
This function works in the following mode: RGB[PC]
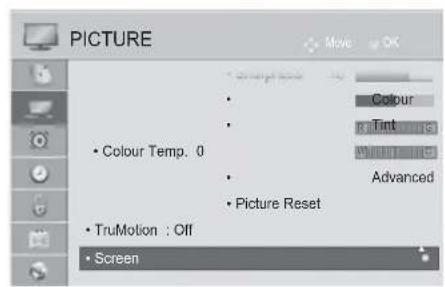
text_image
PICTURE • Colour Temp. 0 • Picture Reset • TruMotion : Off • Screen • Colour • Tint • Advanced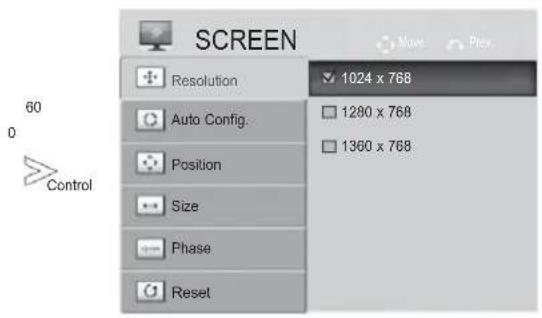
text_image
SCREEN Resolution Auto Config. Position Size Phase Reset 1024 x 768 1280 x 768 1360 x 768 60 0 Control
Select PICTURE.
Select Screen.
Select Resolution.
Select the desired resolution.
- Press the MENU/EXIT button to return to normal TV viewing.
- Press the BACK button to move to the previous menu screen.
EXTERNAL EQUIPMENT SETUP
Adjustment for screen Position, Size, Phase
If the picture is not clear after auto adjustment and especially if characters are still trembling, adjust the picture position manually.
This function works in the following mode : RGB[PC].
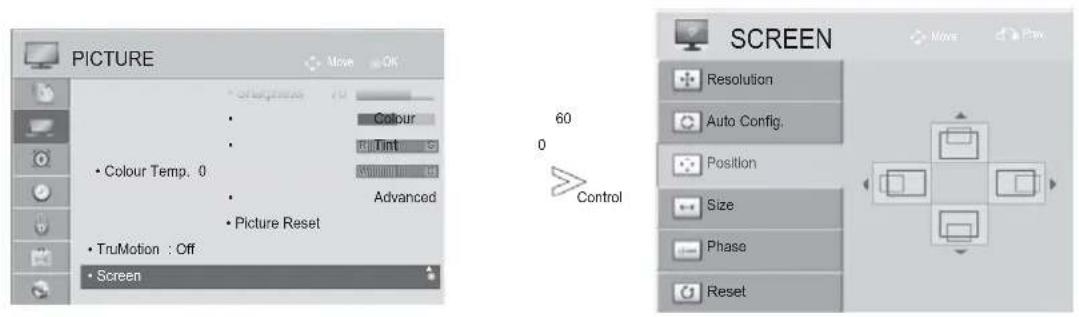
text_image
PICTURE • Colour Temp. 0 • Picture Reset • TruMotion : Off • Screen 60 0 Control SCREEN Resolution Auto Config. Position Size Phase Reset
Select PICTURE.
Select Screen.
Select Position, Size or Phase.
Make appropriate adjustments.
- Press the MENU/EXIT button to return to normal TV viewing.
- Press the BACK button to move to the previous menu screen.
NETWORK SETUP
Wired Network Connection
This TV can be connected to a local area network (LAN) via the LAN port. After making the physical connection, the TV needs to be set up for network communication.
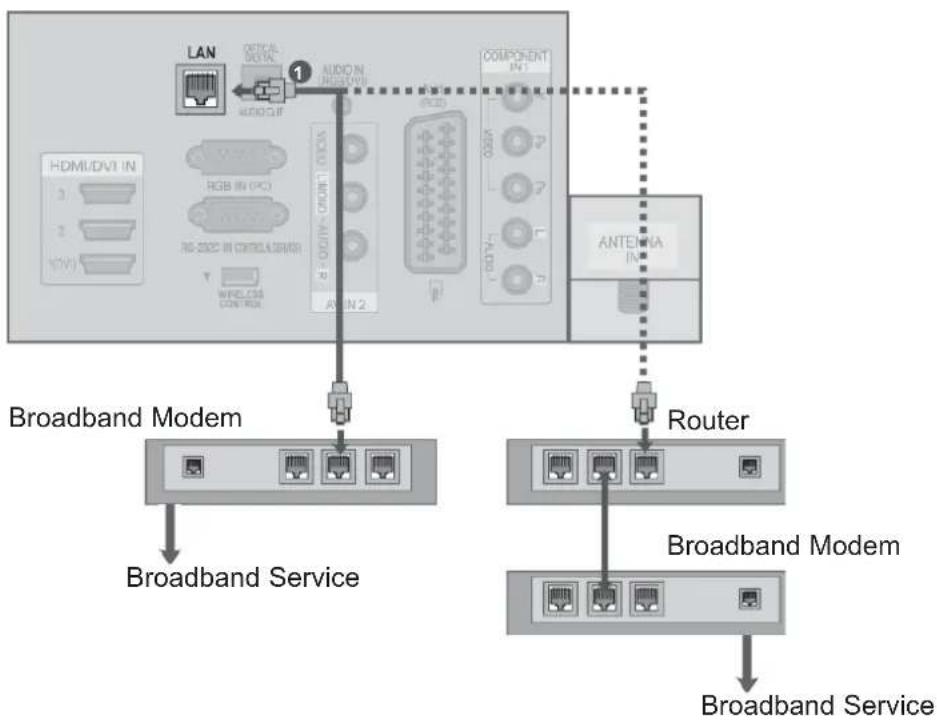
flowchart
graph TD
    A["LAN"] -->|AUDIO IN| B["Component"]
    B --> C["Antenna"]
    D["Antenna In"] --> E["Router"]
    F["Broadband Modem"] --> G["Broadband Service"]
    H["Broadband Modem"] --> I["Broadband Service"]
    J["Antenna In"] --> K["Antenna In"]
    style A fill:#f9f,stroke:#333
    style B fill:#ccf,stroke:#333
    style C fill:#cfc,stroke:#333
    style D fill:#fcc,stroke:#333
    style E fill:#ffc,stroke:#333
    style F fill:#fcc,stroke:#333
    style G fill:#cff,stroke:#333
    style H fill:#ffc,stroke:#333
    style I fill:#cff,stroke:#333
    style J fill:#ffc,stroke:#333
    style K fill:#fcc,stroke:#333
1 Connect the LAN port of the Modem or Router to the LAN port on the TV.
2 Select "Network Setting" in the NETWORK menu.
3 After connecting the LAN port, use the NetCast menu. For more information about NETCAST setup and troubleshooting, visit http://lgknowledgebase.com. Search for NetCast.
CAUTION
▶ Do not connect a modular phone cable to the LAN port.
▶ Since there are various connection methods, please follow the specifications of your telecommunication carrier or internet service provider.
EXTERNAL EQUIPMENT SETUP
Wired Network Setup
If wired and wireless networks are both available, wired is the preferred method.
After making a physical connection, a small number of home networks may require the TV network settings to be adjusted.
For detail information, contact your internet provider or router manual.
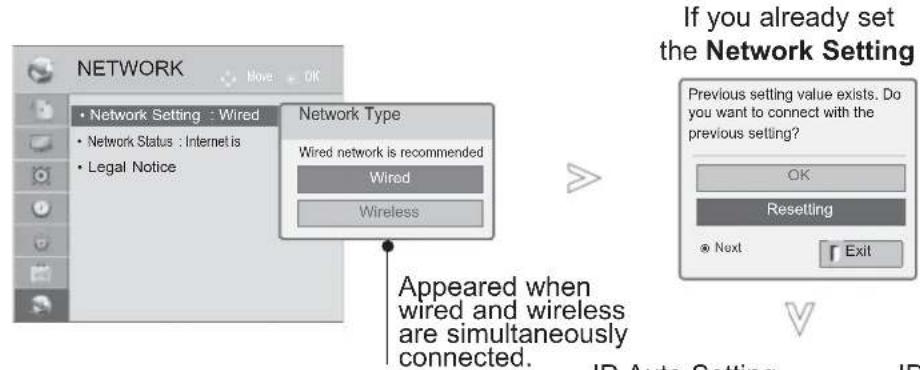
text_image
If you already set the Network Setting Network Setting : Wired Network Status : Internet is Legal Notice Network Type Wired network is recommended Wired Wireless Appeared when wired and wireless are simultaneously connected. Previous setting value exists. Do you want to connect with the previous setting? OK Resetting Next Exit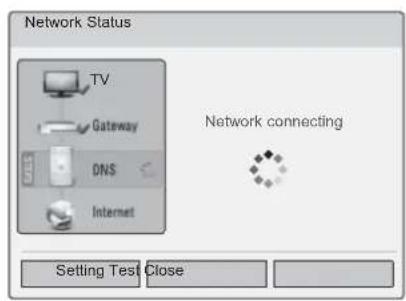
text_image
Network Status TV Gateway DNS Internet Network connecting Setting Test Close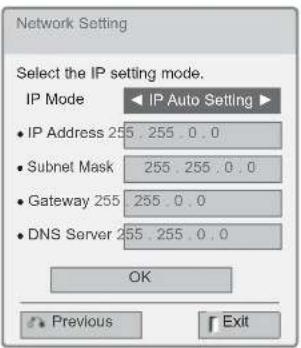
text_image
Network Setting Select the IP setting mode. IP Mode IP Auto Setting • IP Address 255 . 255 . 0 . 0 • Subnet Mask 255 . 255 . 0 . 0 • Gateway 255 . 255 . 0 . 0 • DNS Server 255 . 255 . 0 . 0 OK Previous Exit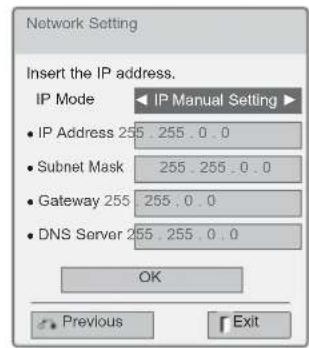
text_image
Network Setting Insert the IP address. IP Mode IP Manual Setting • IP Address 255 . 255 . 0 . 0 • Subnet Mask 255 . 255 . 0 . 0 • Gateway 255 . 255 . 0 . 0 • DNS Server 255 . 255 . 0 . 0 OK Previous Exit
Select NETWORK.

Select Network Setting.
Select Wired.
If you already set Network Setting: Select Resetting. The new connection settings resets the current network settings.
Select IP Auto Setting or IP Manual Setting.
When Selecting IP Manual Setting: IP addresses will need to be input manually.
Select OK.
■ This feature requires an always-on broadband internet connection.
■ You do not need to connect to a PC to use this function.
■ If Network Setting is not working, check your network conditions. Check the LAN cable and make sure your router has DHCP turned on if you wish to use the Auto Setting.
■ If the Network Setting is not completed, network may not operate normally.
■ IP Auto Setting: Select it if there is a DHCP server on the local area network (LAN) via wired connection, the TV will automatically be allocated an IP address. If you're using a broadband router or broadband modem that has a DHCP (Dynamic Host Configuration Protocol) server function, the IP address will automatically be determined.
■ IP Manual Setting: Select it if there is no DHCP server on the network and you want to set the IP address manually.
EXTERNAL EQUIPMENT SETUP
NOTE
For more information about Netcast setup and troubleshooting, visit http://lgknowledgebase.com. Search for Netcast.
▶ Use a standard LAN cable with this TV. Cat5 or better with a RJ45 connector.
▶ Many network connection problems during set up can often be fixed by re-setting the router or modem. After connecting the player to the home network, quickly power off and/or disconnect the power cable of the home network router or cable modem. Then power on and/or connect the power cable again.
▶ Depending on the internet service provider (ISP), the number of devices that can receive internet service may be limited by the applicable terms of service. For details, contact your ISP.
▶ LG is not responsible for any malfunction of the TV and/or the internet connection feature due to communication errors/malfunctions associated with your broadband internet connection, or other connected equipment.
▶ LG is not responsible for problems within your internet connection.
▶ Some content available through the network connection may not be compatible with the TV. If you have questions about such content, please contact the producer of the content.
▶ You may experience undesired results if the network connection speed does not meet the requirements of the content being accessed.
▶ Some internet connection operations may not be possible due to certain restrictions set by the Internet service provider (ISP) supplying your broadband Internet connection.
▶ Any fees charged by an ISP including, without limitation, connection charges are your responsibility.
▶ A 10 Base-T or 100 Base-TX LAN port is required for connection to this TV. If your internet service does not allow for such a connection, you will not be able to connect the TV.
▶ A DSL modem is required to use DSL service and a cable modem is required to use cable modem service. Depending on the access method of and subscriber agreement with your ISP, you may not be able to use the internet connection feature contained in this TV or you may be limited to the number of devices you can connect at the same time. (If your ISP limits sub-scription to one device, this TV may not be allowed to connect when a PC is already connected.)
The use of a "Router" may not be allowed or its usage may be limited depending on the policies and restrictions of your ISP. For details, contact your ISP directly.
The wireless network operates at 2.4 GHz radio frequencies that are also used by other household devices such as cordless telephone, Bluetooth® devices, microwave oven, and can be affected by interference from them. It can be interrupted by the device using 5 Ghz radio frequencies. It is same device with LG wireless media box, cordless telephone, other Wi-Fi device.
▶ It may decrease the service speed using Wireless network by surrounding wireless condition.
▶ Turn off all unused network equipment in your local home network. Some devices may generate network traffic.
▶ In some instances, placing the access point or wireless router higher up away from the floor may improve the reception.
The reception quality over wireless depends on many factors such as type of the access point, distance between the TV and access point, and the location of the TV.
▶ When connecting internet through the wired/wireless sharing machine, it may interrupt the connection because of the use limitation and confirmation of service company.
▶ To connect wireless AP, an AP that supports the wireless connection is necessary, and the wireless connection function of the AP needs to be activated. Please enquire to the AP supplier for the possibility of AP wireless connections.
▶ Please verify the security settings of AP SSID for wireless AP connection, and enquire to the AP supplier for the AP SSID security settings.
The TV can become slower or malfunction with wrong settings of network equipments (wired/wireless router, hub, etc). Please install correctly by referring to the manual of the equipment, and set the network.
▶WhAP is set to include 802.11 n(Except for Russia), and if Encryption is designated as WEP(64/128bit) or WPA(TKIP/AES), the connection may not be possible. There may be different connection methods according to the AP manufacturers.
Wireless Network Connection
The LG Wireless LAN for Broadband/DLNA Adaptor, allows the TV to connect to a wireless lan network.
The network configuration and connection method may vary depending on the equipment in use and the network environment. Refer to the setup instructions supplied with your access point or wireless router for detailed connection steps and network settings.
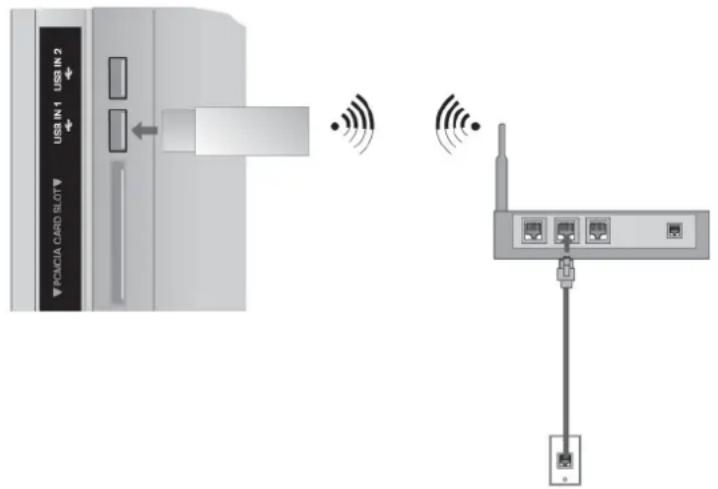
text_image
USB IN 1 USB IN 2 PANCIA CARD SLOT1 Connect the "LG Wireless LAN for Broadband/DLNA Adaptor" to the USB IN 1 or USB IN 2 jack on the TV.
2 Select "Network Setting" in the NETWORK menu. After connecting, you can use the NetCast menu.
NOTE
For enjoying pictures, music, or video stored in the PC using the router, the use of wired port in the router is recommended.
▶ When the wireless port of the router is used, there may be restrictions for some functions.
EXTERNAL EQUIPMENT SETUP
Wireless Network Setup
Setting up the AP (Access Point) or the wireless router is required before connecting the TV to the network.
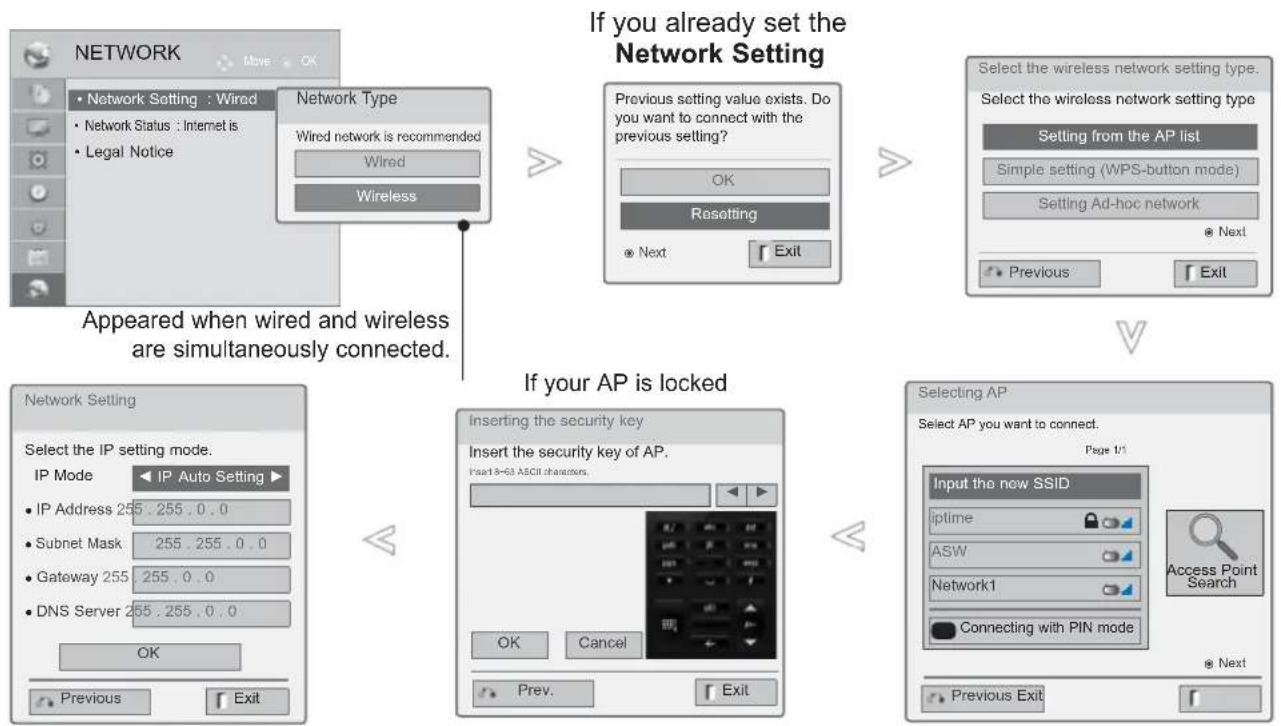
flowchart
graph TD
    A["If you already set the Network Setting"] --> B["Network Type: Wired & Wireless"]
    B --> C["Network Setting: Wired & Wireless"]
    C --> D["Select the wireless network setting type: Setting from the AP list, Simple setting (WPS-button mode), Setting Ad-hoc network"]
    D --> E["If your AP is locked"]
    E --> F["Inserting the security key: Insert the security key of AP, Insert 3-63 ASCII characters, Next"]
    F --> G["Selecting AP: Select AP you want to connect."]

Select NETWORK.
Select Network Setting.
Select Wireless.
If you already set Network Setting: Select Resetting.
The new connection settings resets the current network settings.
Scan the all available AP (Access Point) or wireless routers within range and display them as a list.
Select an AP (Access Point) or wireless router on the list. (If your AP is locked, insert the security key of AP).
Input the security key of AP.
9 Repeat step 4-5 on P.20.
Select Setting from the AP list.
When a security code is already set
PIN (Personal Identification Number)
If you want to connect the AP (Access Point) or router with PIN, use this feature.
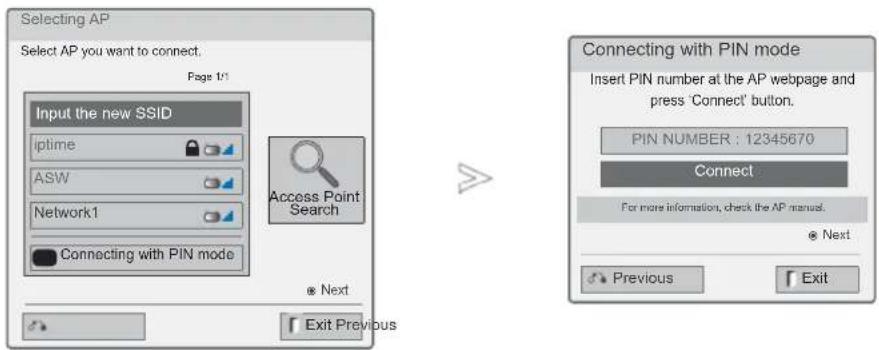
text_image
Selecting AP Select AP you want to connect. Page 1/1 Input the new SSID iptime ASW Network1 Connecting with PIN mode Access Point Search Next Exit Previous Connecting with PIN mode Insert PIN number at the AP webpage and press 'Connect' button. PIN NUMBER : 12345670 Connect For more information, check the AP manual. Next Previous Exit1 Repeat step 1-6 on P.24.

Connect the access point with PIN mode.
3 You can see the Network ID and Security Key on your TV screen. Enter the PIN number to your device.
Select Connect.
5 Repeat step 4-5 on P.20.
■ PIN number is the unique 8 digit number of the dongle.
EXTERNAL EQUIPMENT SETUP
Simple setting (WPS-button mode)
If your access point or wireless router that supports PIN or WPS (Wi-Fi Protected Setup), it's available to use your access point or wireless router within 120 counts. You do not need to know the access point name (SSID: Service Set Identifier) and security code of your access point or wireless router.
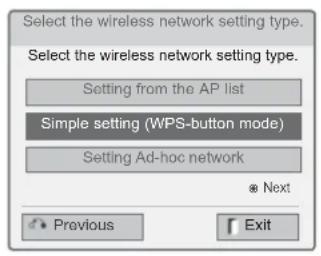
text_image
Select the wireless network setting type. Select the wireless network setting type. Setting from the AP list Simple setting (WPS-button mode) Setting Ad-hoc network * Next Previous Exit
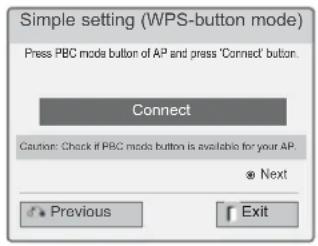
text_image
Simple setting (WPS-button mode) Press PBC mode button of AP and press 'Connect' button. Connect Caution: Check if PBC mode button is available for your AP. ● Next Previous Exit1 Repeat step 1-4 on P.24.
Select Simple setting (WPS-button mode).
Select Connect.
4 Repeat step 4-5 on P.20.
Ad-hoc Mode
This is the method of communicating directly with the machine to communicate without AP. This is the same as connecting two PCs with a cross cable.

- PC Setting Internet Protocol(TCP/IP) of PC needs to be set manually. IP address, Subnet Mask, and default Gateway can be set with your own discretion. i.e) IP address: 192.168.0.1 / Subnet Mask: 255.255.255.0 / default Gateway: 192.168.0.10 - TV Setting Verify IP address and gateway of PC. Input Gateway address of PC to IP Address, and IP Address of PC to Gateway, and select OK. i.e) IP address: 192.168.0.10 / Subnet Mask: 255.255.255.0 / default Gateway: 192.168.0.1
• Example of the PC setting that supports a wireless network
1. Find a wireless network device in your PC.
2. Select LGTV10 that appears in the list. (Select the same name as the network ID that appears on your TV screen.)
3. Type 111111111 in the Inserting the security key dialog.
(Type the security key that appears on your TV screen.)
1 Repeat step 1-3 on P.24.
Select Setting Ad-hoc network.
Select OK.
Insert the IP address.
Network setting is completed.
Select Close.
Select Connect to connect Ad-hoc network.
You can see the Network ID and Security Key on your TV screen.
Enter this Network ID and Security Key to your device. If a network may not operate, change the setting information using the RED button.
EXTERNAL EQUIPMENT SETUP
Network Status
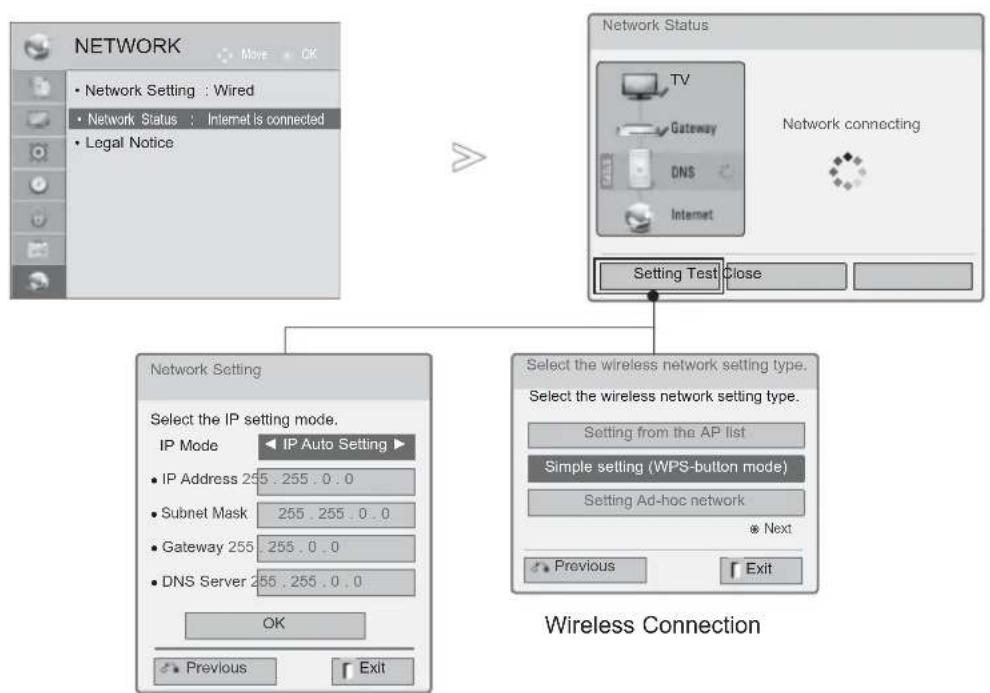
flowchart
graph TD
    A["NETWORK Setting"] --> B["Network Status"]
    B --> C["Setting Test Close"]
    C --> D["Select the wireless network setting type."]
    D --> E["IP Auto Setting"]
    E --> F["IP Address 255.255.0.0"]
    E --> G["Subnet Mask 255.255.0.0"]
    E --> H["Gateway 255.255.0.0"]
    E --> I["DNS Server 255.255.0.0"]
    D --> J["Setting from the AP list"]
    D --> K["Simple setting (WPS-button mode)"]
    D --> L["Setting Ad-hoc network"]
    L --> M["Next"]
    M --> N["Previous Exit"]
Wired Connection
Select NETWORK.
Select Network Status.
Check the network status.
■ Setting: Return to the network setting menu or wireless network setting type menu.
■ Test: Test the current network status after setting the network.
■ Close: Return to the previous menu.
WATCHING TV / PROGRAMME CONTROL
TURNING ON THE TV
When your TV is turned on, you will be able to use its features.
1
Firstly, connect the power cord correctly. At this stage, the TV switches to standby mode.
2
In standby mode to turn TV on, press the ⏻ / I, INPUT or P ∧ ∨ button on the TV or press the POWER, INPUT, P ∧ ∨ or NUMBER button on the remote control and the TV will switch on.
INITIALIZING SETUP
1
If the OSD (On Screen Display) is displayed on the screen after turning on the TV, you can adjust the Language, Mode Setting, Power Indicator(When you select Home Use from Mode Setting-Only LED LCD TV models), Country(Except for 32/37/42LE49**, 32/37/42/47/55LE59**, 42/47LE7390, 32/37/42/47/55LE79**, 42/47/55LE89**, 32/37/42LD49**, 32/37/42/47/55LD69**, 32/42/47LD79**, 32/37/42LD89**, 42/47LX69**, 50/60PK59*, 50/60PK79**, 50/60PK99**, 50/60PX99**) or Time Zone (When Russia is selected for Country) or Set Password(When France is selected for Country), Auto Tuning.
Note:
a. If you close without completing the initial setting, the Initial Setting menu can be displayed again.
b. Press the BACK button to change the current OSD to the previous OSD.
c. For those countries without confirmed DTV broadcasting standards, some DTV features might not work, depending on the DTV broadcasting environment.
d. "Home Use" mode is the optimal setting for home environments, and is the TV's default mode.
e. "Store Demo" mode is the optimal setting for store environments. If a user modifies image quality data, "Store Demo" mode initializes the product to the image quality set by us after a certain period of time.
f. The mode (Home Use, Store Demo) can be changed by executing Mode Setting in the OPTION menu.
g. When France is selected for Country, password is not '0', '0', '0', '0' but '1', '2', '3', '4'.
PROGRAMME SELECTION
1
Press the P ∧ ∨ or NUMBER buttons to select a programme number.
VOLUME ADJUSTMENT
1
Press the + or - button to adjust the volume.
2
If you wish to switch the sound off, press the MUTE button.
You can cancel this function by pressing the MUTE, + , - or AV Mode button.
WATCHING TV / PROGRAMME CONTROL
QUICK MENU
Your TV's OSD (On Screen Display) may differ slightly from that shown in this manual. Q.Menu (Quick Menu) is a menu of features which users might use frequently.

Aspect Ratio: Selects your desired picture format.
For Zoom Setting, select 14:9, Zoom and Cinema Zoom in Ratio Menu. After completing Zoom Setting, the display goes back to Q.Menu.
Clear Voice II : By differentiating the human sound range from others, it helps users listen to human voices better.
Picture Mode : Selects your desired Picture Mode.
Sound Mode : It is a feature to automatically set the sound combination which it deems the best for the images being watched. Selects your desired Sound Mode.
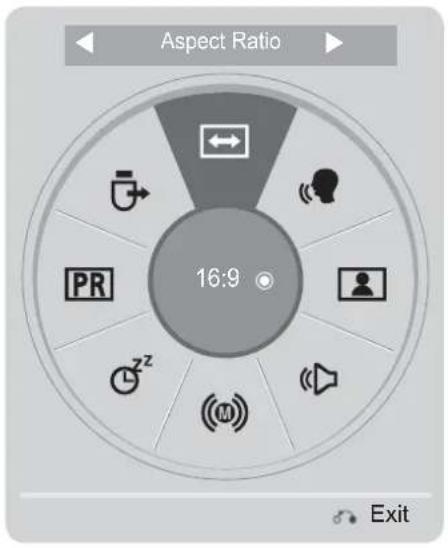
text_image
Aspect Ratio 16:9 Exit
Audio or Audio Language : Selects the sound output.
Sleep Timer : Sets the sleep timer.
Skip Off/On : Selects the Skip Off/On.
USB Device : Selects "Eject" in order to eject USB device.


Display each menu.
Select your desired Source.

- Press the Q.MENU/EXIT button to return to normal TV viewing.
- Press the BACK button to move to the previous menu screen.
ON SCREEN MENUS SELECTION AND ADJUSTMENT
Your TV's OSD (On Screen Display) may differ slightly from that shown in this manual.
Display each menu.
Select a menu item.
Move to the pop up menu.
- Press the RED button, you can check the Customer Support menu.
- Press the GREEN button, you can check the Simple Manual menu.
- Press the MENU/EXIT button to return to normal TV viewing.
- Press the BACK button to move to the previous menu screen.
NOTE
▶ It is possible to use ISM Method in Plasma TV models only.
▶ It is possible to use Backlight, Power Indicator in LCD TV/LED LCD TV models only.
▶ It is not possible to use CI Information in Analogue mode.
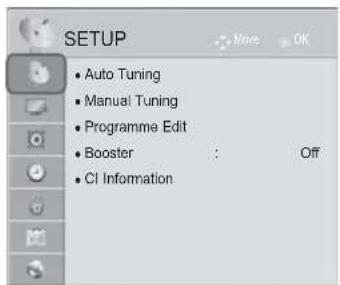
text_image
SETUP • Auto Tuning • Manual Tuning • Programme Edit • Booster : Off • CI Information
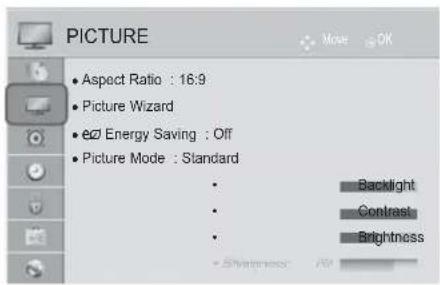
text_image
PICTURE Aspect Ratio : 16:9 Picture Wizard Energy Saving : Off Picture Mode : Standard Backlight Contrast Brightness
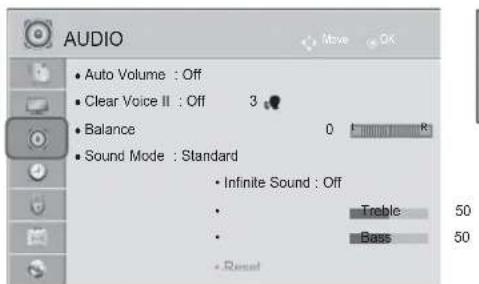
text_image
AUDIO • Auto Volume : Off • Clear Voice II : Off 3 • Balance 0 R • Sound Mode : Standard • Infinite Sound : Off • Treble 50 • Bass 50 • Reset
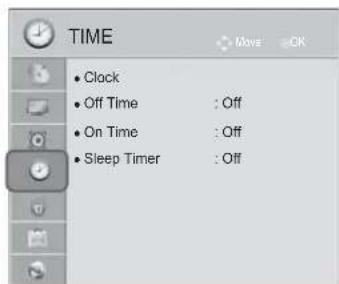
text_image
TIME Clock Off Time : Off On Time : Off Sleep Timer : OffWATCHING TV / PROGRAMME CONTROL
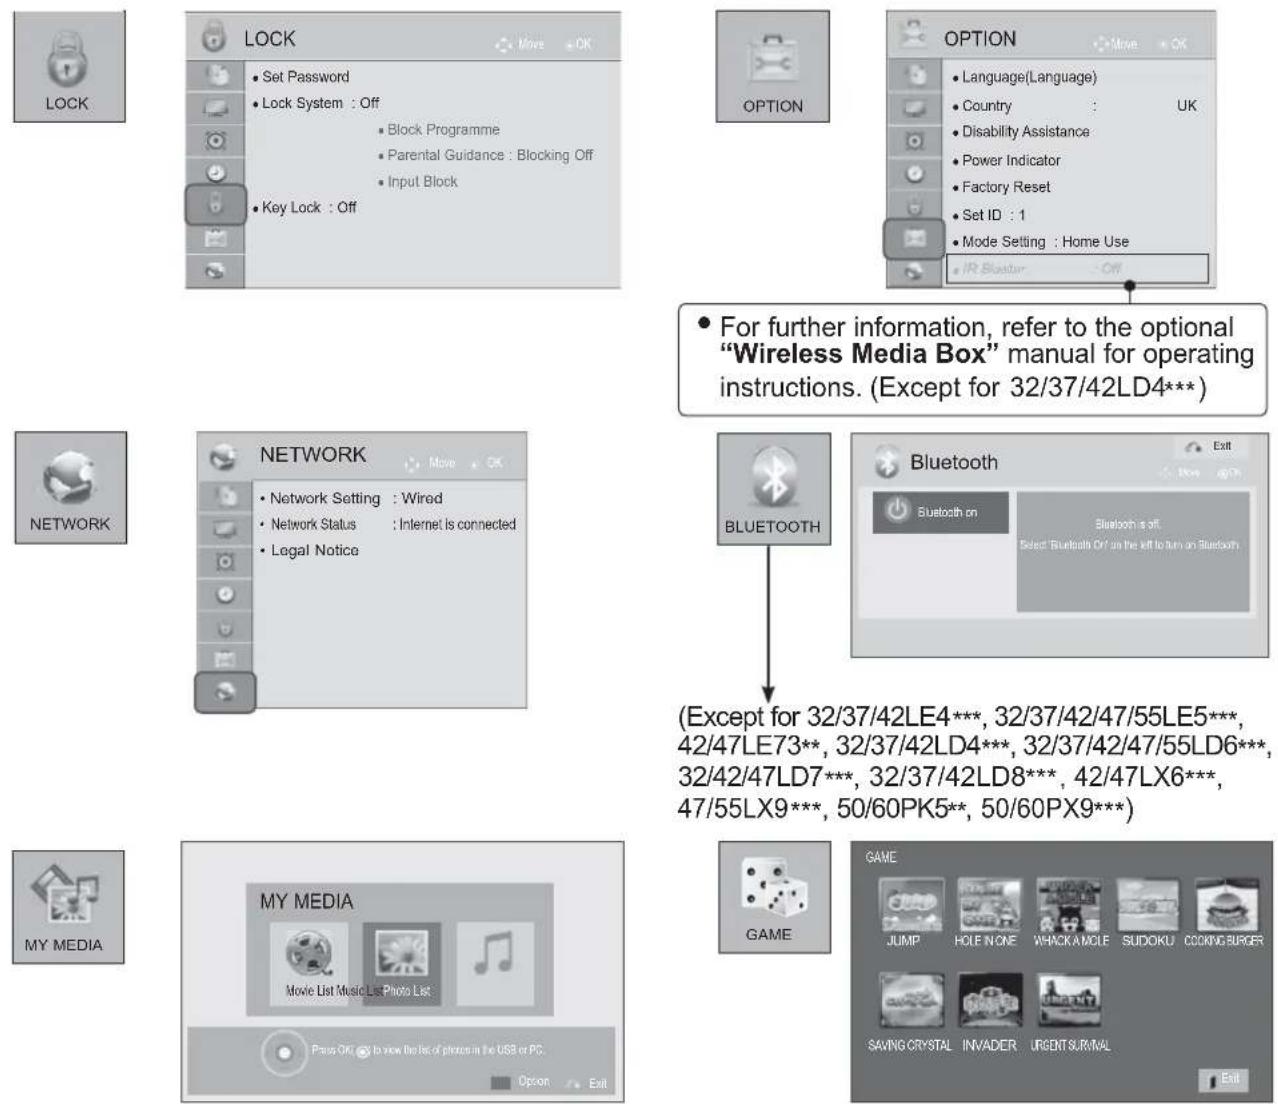
- For further information, refer to the optional "Wireless Media Box" manual for operating instructions. (Except for 32/37/42LD4***)
■ Image shown may differ from your TV.
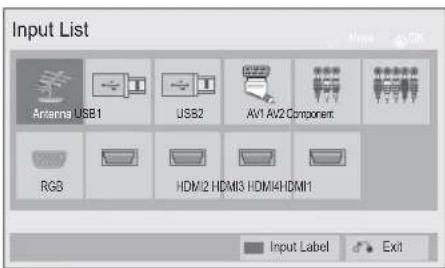
text_image
Input List Antenna USB1 USB2 AV1 AV2 Component RGS HDM/2 HDMI3 HDM/4HDMI1 Input Label Exit(Only 32/37/42LE4***, 32/37/42/47/55LE5***, 42/47LE73**, 32/37/42LD4***, 32/37/42/47/55LD6***, 32/42/47LD7***, 32/37/42LD8***, 42/47LX6***, 47/55LX9***, 50/60PK5**, 50/60PX9***)
AUTO PROGRAMME TUNING
Use this to automatically find and store all available programmes.
When you start auto programming, all previously stored service information will be deleted.
The maximum number of programmes that can be stored is 1,000. But the number may differ slightly depending on broadcasting signals.
DVB-T, DVB-C Auto Tuning is a menu for users in countries that support DVB cable.
If you want to select the Antenna,
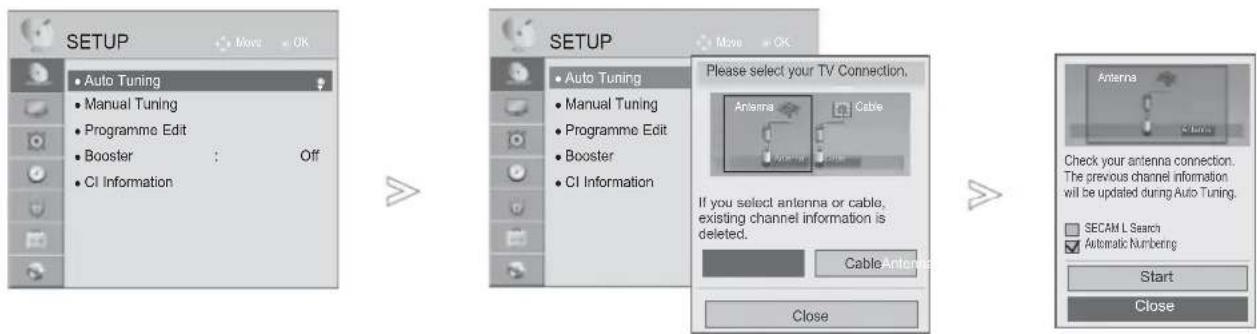

Select SETUP.
Select Auto Tuning.

Select Antenna.
Select Start.
Run Auto tuning.
- Use NUMBER buttons to input a 4-digit password in Lock System 'On'.
- If you wish to keep on auto tuning select Start using the ^ ∨ button. Then, press the OK button. Otherwise select Close.
• Automatic Numbering: Decide whether to use the programme numbers as sent by broadcasting stations for tuning. - SECAM L Search : Except for 32/37/42LE49**, 32/37/42/47/55LE59**, 42/47LE7390, 32/37/42/47/55LE79**, 42/47/55LE89**, 32/37/42LD49**, 32/37/42/47/55LD69**, 32/42/47LD79**, 32/37/42LD89**, 42/47LX69**, 50/60PK59*, 50/60PK79**, 50/60PK99**, 50/60PX99**
-
When select Italy in the County menu, If the pop up is displayed when the conflicted programme after Auto Tuning, select a broadcaster for Conflicting programme number to solve.
-
In the following country, DVB cable can be used: Germany, Netherlands, Sweden, Switzerland, Denmark, Austria, Finland, Norway, Slovenia, Hungary, Ukraine(Except for 42/47LX6***, 47/55LX9***, 50/60PX9**). (The supported country can be added.)
• In the following country, Digital TV can not be used : Slovakia, Bosnia, Serbia, Bulgaria, Albania, Kazakhstan
WATCHING TV / PROGRAMME CONTROL
If you want to select the Cable,
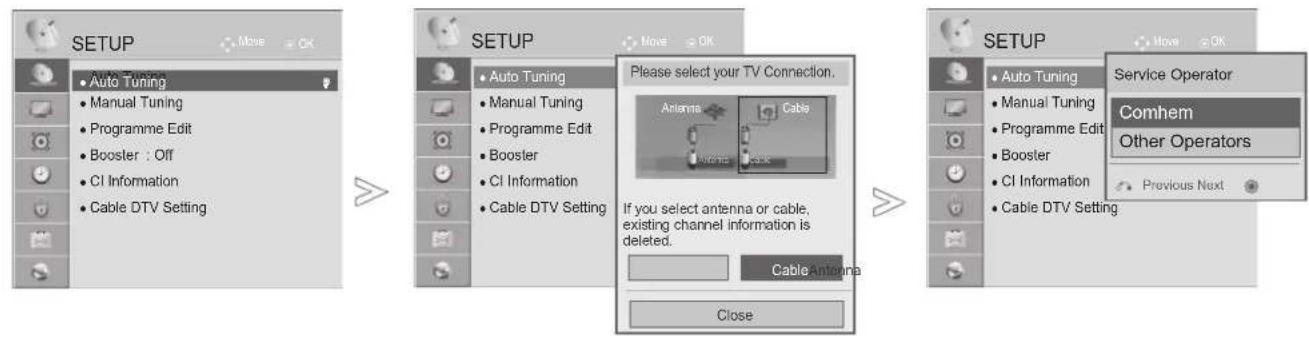
flowchart
graph LR
    A["SETUP"] --> B["Auto Tuning"]
    B --> C["Manual Tuning"]
    C --> D["Programme Edit"]
    D --> E["Booster : Off"]
    E --> F["CI Information"]
    F --> G["Cable DTV Setting"]

    H["SETUP"] --> I["Auto Tuning"]
    I --> J["Manual Tuning"]
    J --> K["Programme Edit"]
    K --> L["Booster"]
    L --> M["CI Information"]
    M --> N["Cable DTV Setting"]

    O["SETUP"] --> P["Service Operator"]
    P --> Q["Comhem"]
    Q --> R["Other Operators"]

    style O fill:#f9f,stroke:#333
    style P fill:#ccf,stroke:#333
text_image
1 MENU 2 OK 3 OK 4 OK 5Select SETUP.
Select Auto Tuning.
Select Cable.
Select Comhem or Other Operators.
Select Quick or Full.
- Use NUMBER buttons to input a 4-digit password in Lock System 'On'.
- When you select the Cable, the Cable Service Operator selection screen can differ or not exist by the Cable situation of the applicable country.
- The popup window to select between Service Operator is only shown initially for the 3 cases when you accessing the Initial Setting menu, when you change from Antenna to Cable or when you access the menu after changing the Country.
- When you want to select between Service Operator aside from the above 3 cases, you can do so by selecting Setup->Cable DTV Setting->Service Operator.
• Acquired certification SO : Sweden(Comhem, Canal Digital), Denmark(YouSee, Canal Digital, Stofa), Norway(Canal Digital), Netherlands(Ziggo)(Except for 42/47LX6**, 47/55LX9***, 50/60PX9**), Ukraine(Volia-Cable)(Except for 42/47LX6**, 47/55LX9***, 50/60PX9**), Germany(KDG)
- If there are not any Service Operator that you want, select Other Operators.
- If you select "Other Operators", or the selected country supports "Other Operators" only, it may take some time to search all the channels, or it may not search some of the channels. If some of the channels do not appear, follow the steps below:
- SETUP -> Auto Tuning -> Cable -> Setting
- Switch Home Tuning from "Off" to "On"
-
Input additional values such as the frequency, symbol rate, modulation, and network ID. (You can ask your cable service provider for the above information.)
-
Press the MENU/EXIT button to return to normal TV viewing.
- Press the BACK button to move to the previous menu screen.
■ When you select the Quick,
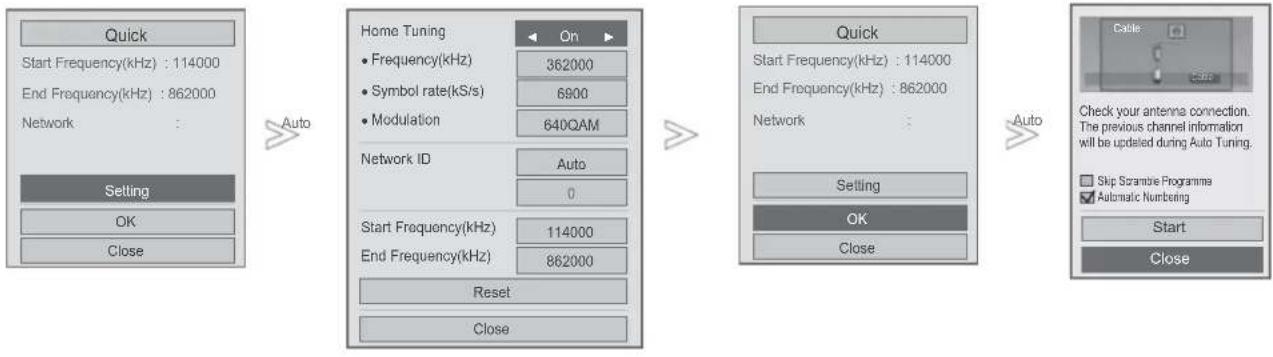
flowchart
graph LR
    A["Quick<br>Start Frequency(kHz) : 114000<br>End Frequency(kHz) : 862000<br>Network"] -->|Auto| B["Setting<br>OK<br>Close"]
    B --> C["Home Tuning<br>• Frequency(kHz) 362000<br>• Symbol rate(kS/s) 6900<br>• Modulation 640QAM"]
    C --> D["Network ID Auto 0"]
    D --> E["Start Frequency(kHz) 114000<br>End Frequency(kHz) 862000<br>Reset<br>Close"]
    E --> F["Quick<br>Start Frequency(kHz) : 114000<br>End Frequency(kHz) : 862000<br>Network"]
    F --> G["Setting<br>OK<br>Close"]
    G --> H["Auto"]
    H --> I["Cable<br>Check your antenna connection.<br>The previous channel information will be updated during Auto Tuning.<br>Skip Scrabble Programme<br>Automatic Numbering<br>Start<br>Close"]
Select Quick.

Select Setting.


Make appropriate adjustments.

Select Close.


Select OK.


Select Start.
Run Auto tuning.
- If you wish to keep on auto tuning, select Start using the ^ ∨ button. Then, press the OK button. Otherwise select Close.
• Automatic Numbering: Decide whether to use the programme numbers as sent by broadcasting stations for tuning. - Skip Scramble Programme : Scramble Programme is skipped in Auto Tuning and Manual Tuning.
WATCHING TV / PROGRAMME CONTROL
■ When you select the Full,
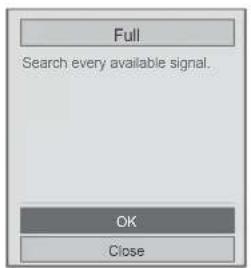
text_image
Full Search every available signal. OK Close
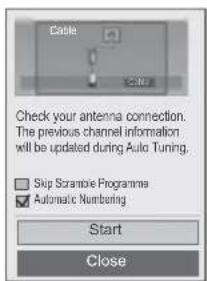
text_image
Check your antenna connection. The previous channel information will be updated during Auto Tuning. Skip Scrabie Programs Automatic Numbing Start Close
Select Full.
Select OK.
Select Start.
Run Auto tuning.
- If you wish to keep on auto tuning, select Start using the ∧ ∨ button. Then, press the OK button. Otherwise select Close.
• Automatic Numbering: Decide whether to use the programme numbers as sent by broadcasting stations for tuning. - Skip Scramble Programme : Scramble Programme is skipped in Auto Tuning and Manual Tuning.
- You can not select the Full when the service operator is set to "Ziggo" or "Other Operators" of Netherlands. (Except for 42/47LX6***, 47/55LX9***, 50/60PX9***)
The following values are needed in order to search all available programmes quickly and correctly. The commonly used values are provided as "default".
However, for correct settings, please inquire of the cable service provider.
When running Auto Tuning in DVB cable mode, selecting Full will search through all frequencies to find available channels.
In the case when the programme is not searched by selecting the Default, perform the searching by selecting the Full.
However, in the case when the programme is searched by selecting the Full, the Auto Tuning time can be taken too much.
• Frequency : Enter a user-defined frequency.
- Symbol rate : Enter a user-defined symbol rate (Symbol rate: Speed at which a device such as modem sends symbols to a channel).
- Modulation: Enter a user-defined modulation. (Modulation: Loading of audio or video signals onto carrier).
• Network ID : Unique identifier allocated for each user.
- Start Frequency : Enter a user-defined start frequency range.
- End Frequency : Enter a user-defined end frequency range.
WATCHING TV / PROGRAMME CONTROL
CABLE DTV SETTING
(IN CABLE MODE ONLY)
The range that a user can select from the Service Operator menu differs depending on number of Service Operator supported by each country, and if number of supported Service Operator for each country is 1, corresponding function becomes non-activation.
After changing Service Operator, a warning window saying that channel map will be deleted when OK button is pressed or Close is selected, and a Auto-tuning pop-up window appears when 'YES' is selected.
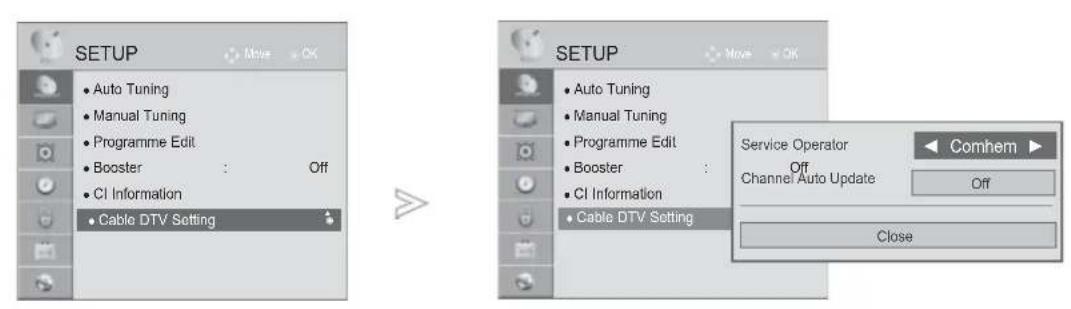

Select SETUP.
Select Cable DTV Setting.
Select Service Operator or Channel Auto Update.
Select your desired Source.
- If you select Cable, you can see Cable DTV Setting menu.
- When Channel Auto Update is On, you can update information for all the programmes that can be updated, including the programme currently being watched.
- When Channel Auto Update is Off, you can only update information for the programme currently being watched.
- You can not select the Cable DTV Setting when the service operator is set to "Ziggo". (Except for 42/47LX6***, 47/55LX9***, 50/60PX9***)
MANUAL PROGRAMME TUNING
(IN DIGITAL MODE)
Manual Tuning lets you manually add a programme to your programme list.
If you want to select the Antenna,
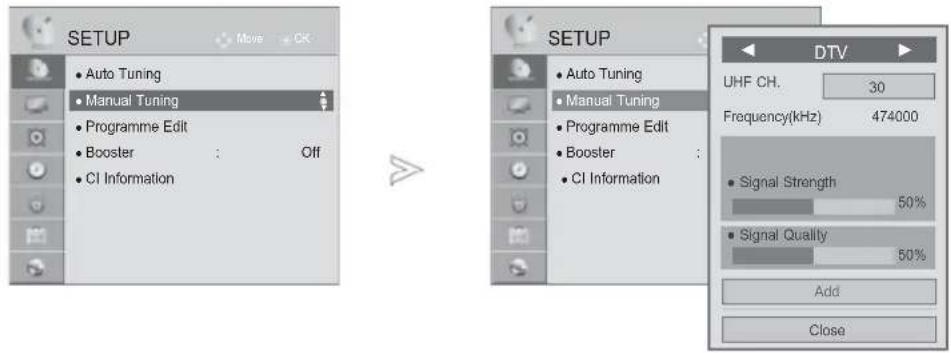
text_image
SETUP • Auto Tuning • Manual Tuning • Programme Edit • Booster : Off • CI Information SETUP • Auto Tuning • Manual Tuning • Programme Edit • Booster : • CI Information DTV UHF CH. 30 Frequency(kHz) 474000 • Signal Strength 50% • Signal Quality 50% Add Close
Select SETUP.
Select Manual Tuning.
Select DTV.
Select the desired channel number.
Select update or add if signal present.
- Use NUMBERbuttons to input a 4-digit password in Lock System 'On'.
-
You can select SBAND when the country is set to "Norway, Latvia."
-
Press the MENU/EXIT button to return to normal TV viewing.
- Press the BACK button to move to the previous menu screen.
WATCHING TV / PROGRAMME CONTROL
If you want to select the Cable,
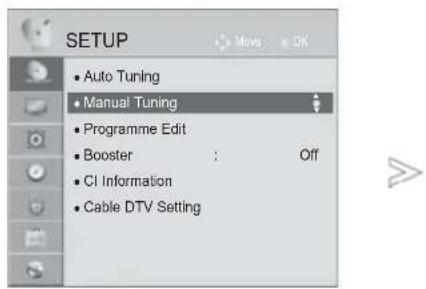
text_image
SETUP • Auto Tuning • Manual Tuning • Programme Edit • Booster : Off • CI Information • Cable DTV Setting
text_image
SETUP • Auto Tuning • Manual Tuning • Programme Edit • Booster • CI Information • Cable DTV Setting Cable DTV Frequency(kHz) 362000 Symbol rate(kS/s) 6875 Modulation 64QAM • Signal Strength 50% • Signal Quality 50% Add Close
Select SETUP.
Select Manual Tuning.
Select Cable DTV.
Make appropriate adjustments.
- Use NUMBERbuttons to input a 4-digit password in Lock System 'On'.
- Symbol rate : Enter a user-defined symbol rate (Symbol rate: Speed at which a device such as modem sends symbols to a channel).
- Modulation: Enter a user-defined modulation. (Modulation: Loading of audio or video signals onto carrier).
- You can not select the Cable DTV when the service operator is set to "Ziggo" or "Other Operators" of Netherlands. (Except for 42/47LX6***, 47/55LX9***, 50/60PX9***)
MANUAL PROGRAMME TUNING
(IN ANALOGUE MODE)
Manual Tuning lets you manually tune and arrange the stations in whatever order you desire.
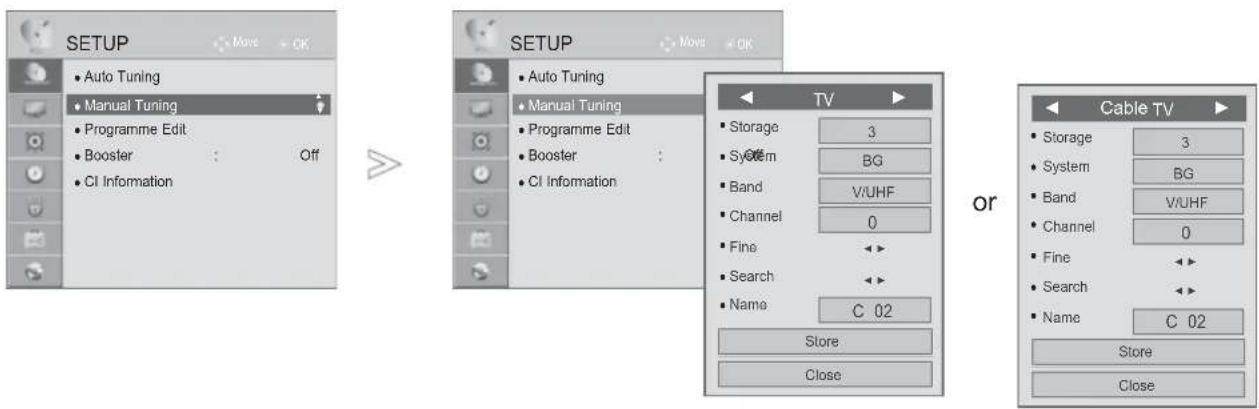
flowchart
graph LR
    A["SETUP"] --> B["Auto Tuning"]
    A --> C["Manual Tuning"]
    A --> D["Programme Edit"]
    A --> E["Booster"]
    A --> F["CI Information"]
    G["SETUP"] --> H["Auto Tuning"]
    G --> I["Manual Tuning"]
    G --> J["Programme Edit"]
    G --> K["Booster"]
    G --> L["CI Information"]
    M["TV"] --> N["Storage 3"]
    M --> O["System BG"]
    M --> P["Band V/UHF"]
    M --> Q["Channel 0"]
    M --> R["Fine"]
    M --> S["Search"]
    M --> T["Name C 02"]
    U["Cable TV"] --> V["Storage 3"]
    U --> W["System BG"]
    U --> X["Band V/UHF"]
    U --> Y["Channel 0"]
    U --> Z["Fine"]
    U --> AA["Search"]
    U --> AB["Name C 02"]
    AC["Store"] --> AD["Close"]
    AE["Close"] --> AF["Store"]

Select SETUP.
Select Manual Tuning.
Select TV or Cable TV.
or

Select the desired programme number on.
Select a TV system.
Select V/UHF or Cable.

Select the desired channel number.
Commence searching.
Select Store.
- Press the MENU/EXIT button to return to normal TV viewing.
- Press the BACK button to move to the previous menu screen.
• Use NUMBERButtons to input a 4-digit password in Lock System 'On'.
• L : SECAM L/L' (France)
BG : PAL B/G, SECAM B/G (Europe / East Europe / Asia / New Zealand / M.East / Africa)
I: PAL I (U.K. / Ireland / Hong Kong / South Africa)
DK : P AL D/K, SECAM D/K (East Europe / China / Africa / CIS)
• To store another channel, repeat steps 4 to 9.
WATCHING TV / PROGRAMME CONTROL

■ Assigning a station name
You can assign a station name with five characters to each programme number.
text_image
1 MENU 2 OK 3 OK 4Select SETUP.
Select Manual Tuning.
Select TV or Cable TV.
Select Name.
Select the position and make your choice of the second character, and so on.
You can use an the alphabet A to Z, the number 0 to 9, +/- and blank.
Select Close.
Select Store.
■ Fine Tuning
Normally fine tuning is only necessary if reception is poor.
Select SETUP.
Select Manual Tuning.

Select TV or Cable TV.
Select Fine.
Fine tune for the best picture and sound.
Select Store.
- Press the MENU/EXIT button to return to normal TV viewing.
- Press the BACK button to move to the previous menu screen.
PROGRAMME EDIT
When a programme number is skipped, it means that you will be unable to select it using P ∧ ∨ button during TV viewing.
If you wish to select the skipped programme, directly enter the programme number with the NUMBER buttons or select it in the Programme edit menu.
This function enables you to skip the stored programmes.
You can change the programme number using "Move" function, if "Automatic Numbering" is unchecked when you start Auto Tuning.
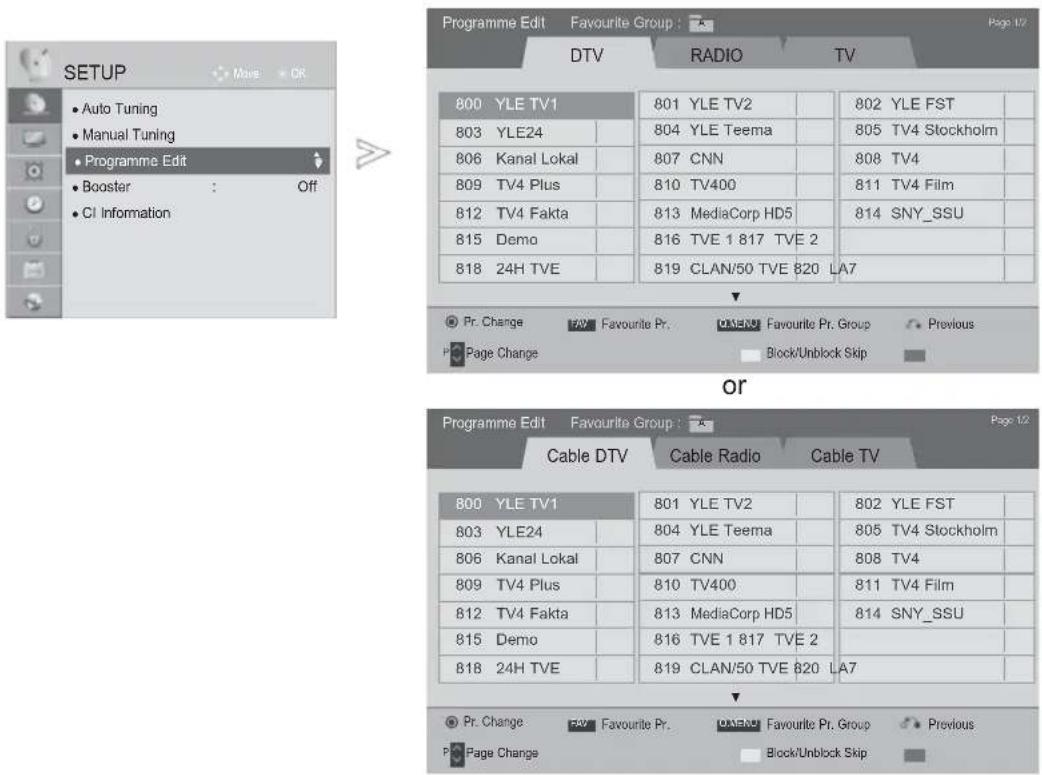
text_image
SETUP • Auto Tuning • Manual Tuning • Programme Edit • Booster : Off • CI Information Programme Edit Favourite Group : DTV RADIO TV 800 YLE TV1 801 YLE TV2 802 YLE FST 803 YLE24 804 YLE Teema 805 TV4 Stockholm 806 Kanal Lokal 807 CNN 808 TV4 809 TV4 Plus 810 TV400 811 TV4 Film 812 TV4 Fakta 813 MediaCorp HD5 814 SNY_SSU 815 Demo 816 TVE 1 817 TVE 2 818 24H TVE 819 CLAN/50 TVE 820 LA7 Pr. Change FAV Favourite Pr. COMEOT Favourite Pr. Group Previous Page Change Block/Unblock Skip or Programme Edit Favourite Group : Cable DTV Cable Radio Cable TV 800 YLE TV1 801 YLE TV2 802 YLE FST 803 YLE24 804 YLE Teema 805 TV4 Stockholm 806 Kanal Lokal 807 CNN 808 TV4 809 TV4 Plus 810 TV400 811 TV4 Film 812 TV4 Fakta 813 MediaCorp HD5 814 SNY_SSU 815 Demo 816 TVE 1 817 TVE 2 818 24H TVE 819 CLAN/50 TVE 820 LA7 Pr. Change FAV Favourite Pr. COMEOT Favourite Pr. Group Previous Page Change Block/Unblock Skip
text_image
1 MENU 2 OK 3 OK Enter 4 Select skipperSelect SETUP.
Select Programme Edit.
Enter the Programme Edit.
Select a programme to be stored or skipped.
- Press the MENU/EXIT button to return to normal TV viewing.
- Press the BACK button to move to the previous menu screen.
WATCHING TV / PROGRAMME CONTROL
IN DTV/RADIO MODE
■ Skipping a programme number

Select a programme number to be skipped.
BLUE
Turn the programme number to blue.
BLUE
Release.
- When programmes are to be skipped, the skipped programme shows in blue and these programmes will not be selected by the P ^ ∨ buttons during TV viewing.
- If you wish to select a skipped programme, directly enter the programme number with the NUMBER buttons or select it in the programme edit or EPG.
■ Locking a programme number

Select a programme number to be locked.
- It can be registered as Lock programme even when Lock System is turned Off.
YELLOW
Turn the programme number to yellow.
YELLOW
Release.
IN TV MODE
This function enables you to delete or skip the stored programmes.
You can also move some channels and use other programme numbers.
■ Deleting a programme

Select a programme number to be deleted.
RED
Turn the programme number to red.
- The selected programme is deleted, all the following programmes are shifted up one
■ Moving a programme

Select a programme number to be moved.
GREEN
Release.


Turn the programme number to green.
■ Skipping a programme number

Select a programme number to be skipped.

Turn the programme number to blue.

Release.
- When a programme number is skipped it means that you will be unable to select it using the P ^ ∨ button during normal TV viewing.
- If you wish to select a skipped programme, directly enter the programme number with the NUMBER buttons or select it in the programme edit or EPG.
■ Auto Sort

Start Auto Sort.
• After activating Auto Sort once, you can no longer edit programmes.
■ Locking a programme number

Select a programme number to be locked.
- It can be registered as Lock programme even when Lock System is turned Off.

Turn the programme number to yellow.

Release.
■ Selecting favourite programme
Favourite programmes is a convenient feature that lets you quickly scan up to programmes of your choice without having to wait for the TV to scan through all the in-between programmes.

Select your desired programme.

Add corresponding programme to Favourite list of current Favourite group.

Release.
■ Selecting favourite programme group

Select your desired programme.

Display a pop-up window where Favourite group can be changed.
Select a Favourite group.
BOOSTER
If reception is poor select Booster to "On".
When the signal is strong, select "Off".
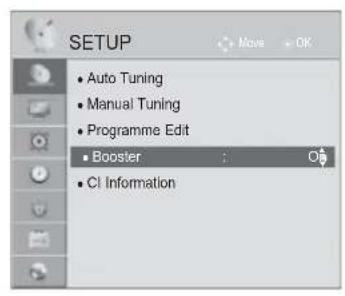
text_image
SETUP • Auto Tuning • Manual Tuning • Programme Edit • Booster • CI Information
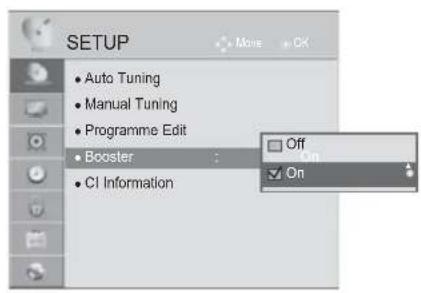
text_image
SETUP • Auto Tuning • Manual Tuning • Programme Edit • Booster • CI Information • Off • On • On
Select SETUP.
Select Booster.
Select On or Off.
Save.
- Press the MENU/EXIT button to return to normal TV viewing.
- Press the BACK button to move to the previous menu screen.
WATCHING TV / PROGRAMME CONTROL
CI [COMMON INTERFACE] INFORMATION
This function enables you to watch some encrypted services (pay services). If you remove the CI Module, you cannot watch pay services.
When the module is inserted into the CI slot, you can access the module menu.
To purchase a module and smart card, contact your dealer. Do not repeatedly insert or remove a CI module from the TV. This may cause a malfunction. When the TV is turned on after inserting a CI Module, you may not have any sound output.
This may be incompatible with the CI module and smart card.
CI (Common Interface) functions may not be possible depending upon the country broadcasting circumstances.
When using a CAM(Conditional Access Module), please make sure it meets fully the requirements of either DVB-CI or CI plus.
A abnormal process of CAM(Conditional Access Module) may cause a bad picture.
![LG 42LX6900 - CI [COMMON INTERFACE] INFORMATION - 1](/content/2026/05/762425/images/bc3d3571c20ffb2b86d01b03785037cc8d4db9822c4a0d2ee2ca5410d4814217.jpg)
text_image
SETUP • Auto Tuning • Manual Tuning • Programme Edit • Booster : Off • CI Information![LG 42LX6900 - CI [COMMON INTERFACE] INFORMATION - 2](/content/2026/05/762425/images/c566990cb2f05690fd932f0dec4494a88863ecaccc2b9d04e229183795a5b84a.jpg)
text_image
Viaccess Module Consultations Authorizations Module Information Select the item • This OSD is only for illustration and the menu options and screen format will vary according to the Digital pay services provider. • It is possible for you to change CI (Common Interface) menu screen and service by consulting your dealer.![LG 42LX6900 - CI [COMMON INTERFACE] INFORMATION - 3](/content/2026/05/762425/images/186bafc97ef5efdfd7ef74f35058b6e19409a2997627c5c685a0913fb19b4538.jpg)
text_image
1 MENU 2 OK 3 OK 4 OK Save.Select SETUP.
Select CI Information.
Select the desired item: Module information, smart card information, language, or software download etc.
Save.
SOFTWARE UPDATE
You can update the TV with the latest software to enhance the product operation and/or add new features. You can update the software by connecting the TV directly to the software update server. The Software Update function may not work properly depending on your internet environment. In this case, you can obtain the latest software from the authorized LG Electronics Service Center then update your TV.
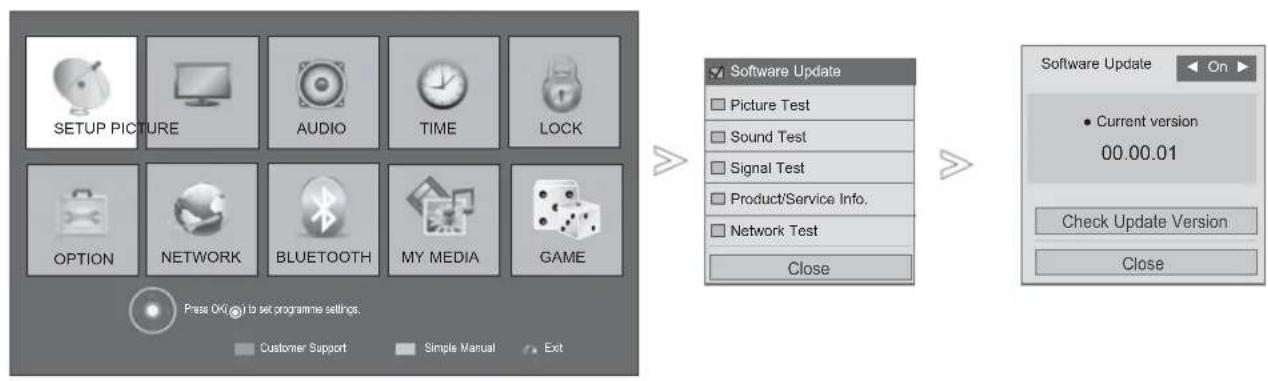
flowchart
graph LR
    A["SETUP PICTURE"] --> B["AUDIO"]
    B --> C["TIME"]
    C --> D["LOCK"]
    E["OPTION"] --> F["NETWORK"]
    F --> G["BLUETOOTH"]
    G --> H["MY MEDIA"]
    H --> I["GAME"]
    J["Press OK"] --> K["to set programme settings."]
    L["Customer Support"] --> M["Simple Manual"]
    N["Exit"] --> O["Close"]
    P["Software Update"] --> Q["Picture Test"]
    P --> R["Sound Test"]
    P --> S["Signal Test"]
    P --> T["Product/Service Info."]
    P --> U["Network Test"]
    P --> V["Close"]
    W["Software Update"] --> X["On"]
    Y["Current version 00.00.01"] --> Z["Check Update Version"]
    AA["Close"] --> AB["Close"]

Select Customer Support.
- Use the Check Update Version to update the latest software on the Network server manually.

Select Software Update.
Select On or Off.
- If you select On, a user confirm message box will be displayed to notify that new software is found.
Save.
- Press the MENU/EXIT button to return to normal TV viewing.
- Press the BACK button to move to the previous menu screen.
WATCHING TV / PROGRAMME CONTROL
■ When setting "Software Update"
Occasionally, a transmission of updated digital software information will result in the following menu on the TV screen.
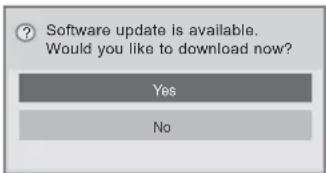
text_image
Software update is available. Would you like to download now? Yes NoSimple Update : for current update stream
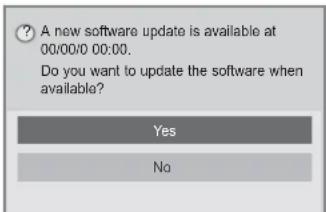
text_image
A new software update is available at 00:00/0 00:00. Do you want to update the software when available? Yes NoSchedule Update : for scheduled update stream
When the Software Update menu is "Off", the message to change it to "On" appears.
When new Software is available when connected to Internet, the following message will be displayed.
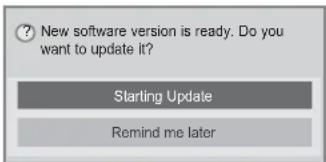
text_image
New software version is ready. Do you want to update it? Starting Update Remind me laterDownload starts when "Yes" is selected.
Download progress status can be checked from Software Update menu.
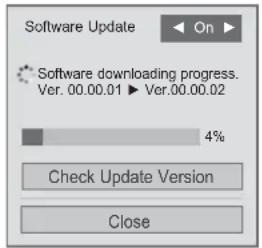
text_image
Software Update Software downloading progress. Ver. 00.00.01 ▶ Ver.00.00.02 4% Check Update Version CloseTV is restarted when download is completed.
① Update is completed. Rebooting now.
- During Progress of a Software Update, please note the following:
• Power to the TV must not be interrupted. - After Software Update, you can confirm the updated software version in Software Update menu.
- It may take hours to download the software, so make sure that the power stays on during the download.
- The antenna must not be disconnected.
- The software is downloaded only in Standby mode or in MUX with Software Update Service, and stops when the power cord is unplugged or when viewing MUX without Software Update Service.
- When you return to Standby mode or MUX with Software Update Service, the software download will resume from where it stopped.
- You do not disconnect the network while the software is being updated.
- When there is a new software update when you open NetCast, you will not be able to use NetCast without updating the software.
- You cannot open NetCast while the software is being updated.
PICTURE/SOUND TEST
This function is a customer support function that can execute picture and sound tests.
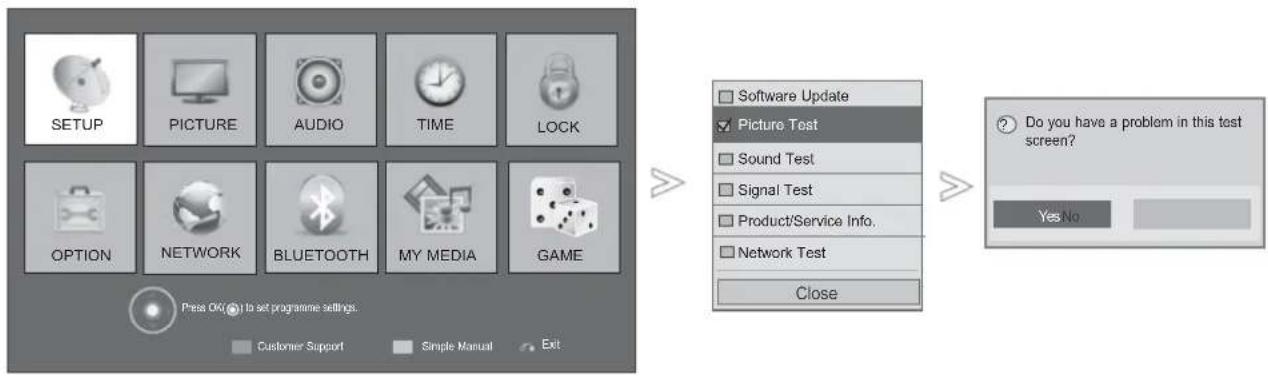
flowchart
graph LR
    A["SETUP"] --> B["PICTURE"]
    B --> C["AUDIO"]
    C --> D["TIME"]
    D --> E["LOCK"]
    F["OPTION"] --> G["NETWORK"]
    G --> H["BLUETOOTH"]
    H --> I["MY MEDIA"]
    I --> J["GAME"]
    K["Press OK to set programme settings."] --> L["Customer Support"]
    K --> M["Simple Manual"]
    K --> N["Exit"]
    O["Software Update"] --> P["Picture Test"]
    P --> Q["Sound Test"]
    P --> R["Signal Test"]
    P --> S["Product/Service Info."]
    P --> T["Network Test"]
    P --> U["Close"]
    V["Do you have a problem in this test screen?"] --> W["YesNo"]

Select Customer Support.

Select Picture Test or Sound Test.
Select Yes or No.
- Press the MENU/EXIT button to return to normal TV viewing.
- Press the BACK button to move to the previous menu screen.
WATCHING TV / PROGRAMME CONTROL
SIGNAL TEST
This function enables you to view information on the Manufacturer, Model/Type, Serial Number and Software Version.
This displays the information and signal strength of the tuned *MUX.
This displays the signal information and service name of the selected MUX.
(*MUX: A higher directory of channels in digital broadcasting (a single MUX contains multiple channels.))
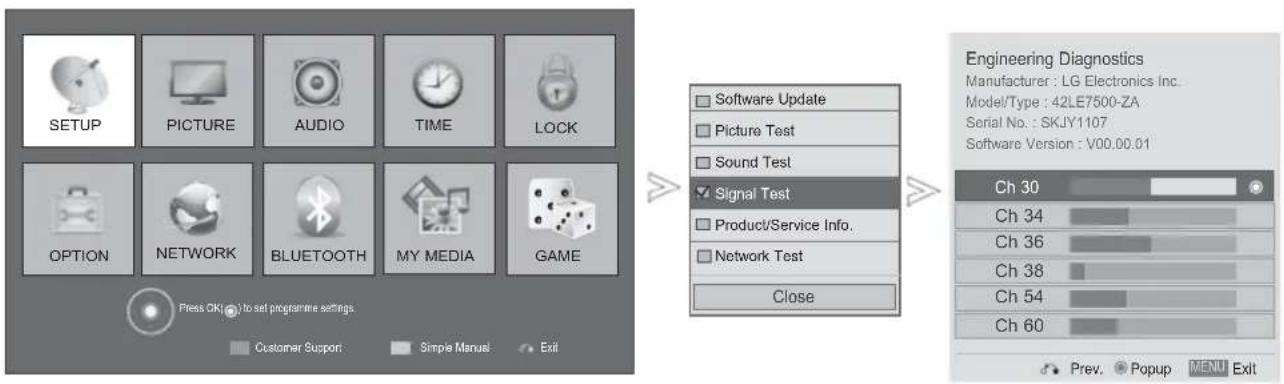
flowchart
graph LR
    A["SETUP"] --> B["PICTURE"]
    B --> C["AUDIO"]
    C --> D["TIME"]
    D --> E["LOCK"]
    F["OPTION"] --> G["NETWORK"]
    G --> H["BLUETOOTH"]
    H --> I["MY MEDIA"]
    I --> J["GAME"]
    K["Press CK"] --> L["to set programme settings"]
    L --> M["Customer Support"]
    L --> N["Simple Manual"]
    L --> O["Exit"]

    P["Software Update"] --> Q["Signal Test"]
    R["Picture Test"] --> Q
    S["Sound Test"] --> Q
    T["Product/Service Info."] --> U["Network Test"]
    V["Close"] --> W["Engineering Diagnostics"]
    X["Ch 30"] --> Y["Preve."]
    X["Ch 34"] --> Z["Popup"]
    X["Ch 36"] --> AA["MENU Exit"]

Select Customer Support.

Select Signal Test.
Display Manufacturer, Model/Type, Serial Number and Software Version.
Display the information of Channel.
- Press the MENU/EXIT button to return to normal TV viewing.
- Press the BACK button to move to the previous menu screen.
PRODUCT/SERVICE INFORMATION
This function is a customer support function that can see product/service information and customer service center information.
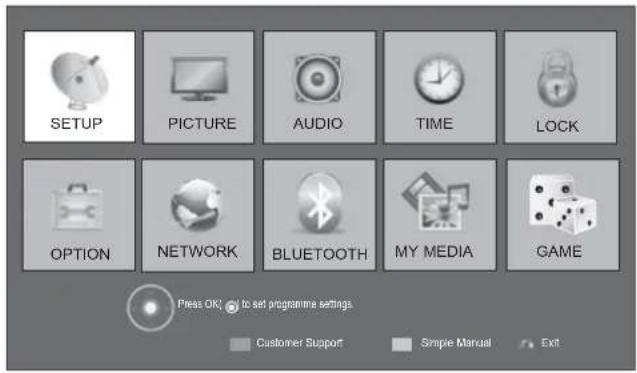
text_image
SETUP PICTURE AUDIO TIME LOCK OPTION NETWORK BLUETOOTH MY MEDIA GAME Press OK to set programme settings. Customer Support Simple Manual Ext
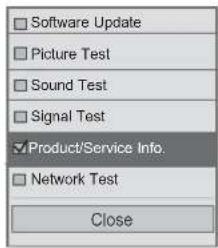
text_image
Software Update Picture Test Sound Test Signal Test ✓Product/Service Info. Network Test Close
RED Select Customer Support.

Select Product/Service Info..
Display Model/Type, Software version, Serial Number, Customer service center and Homepage.
- Press the MENU/EXIT button to return to normal TV viewing.
- Press the BACK button to move to the previous menu screen.
NETWORK TEST
Check the network status.
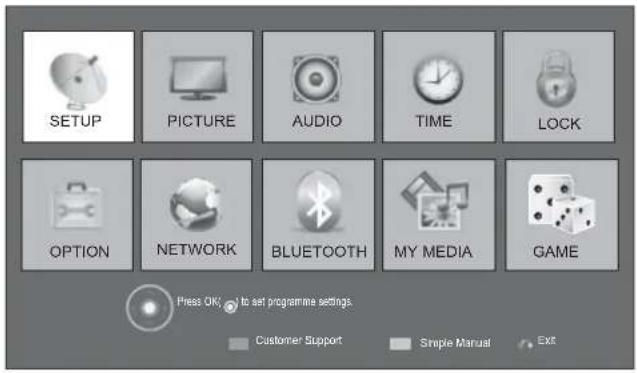
text_image
SETUP PICTURE AUDIO TIME LOCK OPTION NETWORK BLUETOOTH MY MEDIA GAME Press OK! To set programme settings Customer Support Simple Manual Ext
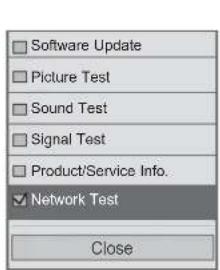
text_image
Software Update Picture Test Sound Test Signal Test Product/Service Info. Network Test Close
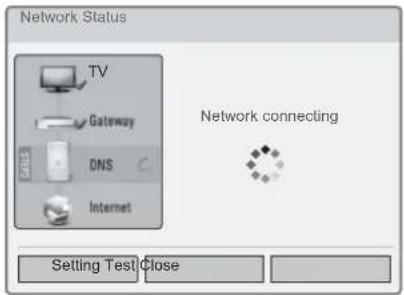
text_image
Network Status TV Gateway DNS Internet Network connecting Setting Test Close
Select Customer Support.
Select Network Test.
Check the network status.
- Press the MENU/EXIT button to return to normal TV viewing.
- Press the BACK button to move to the previous menu screen.
WATCHING TV / PROGRAMME CONTROL
SIMPLE MANUAL
You can easily and effectively access the TV information by viewing a simple manual on the TV. During the Simple Manual operation, audio will be muted.
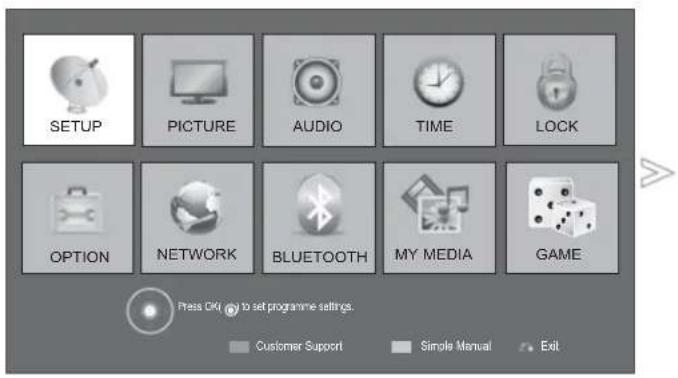
text_image
SETUP PICTURE AUDIO TIME LOCK OPTION NETWORK BLUETOOTH MY MEDIA GAME Press OK! to set programme settings. Customer Support Simple Manual Exit■ Image shown may differ from your TV.
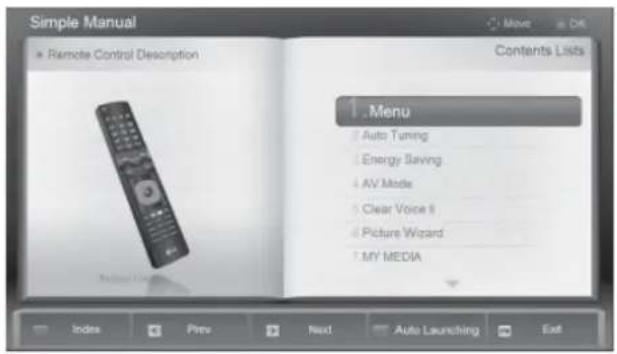
text_image
Simple Manual Remote Control Desorption Contents Lists Menu Auto Turning Energy Saving AV Mode Clear Voice 9 Picture Wizard MY MEDIA
Select Simple Manual.
- RED : Go to the Index page.
- BLUE : Play the Simple Manual automatically or manually.
Select the part of the manual you want to see.
SELECTING THE PROGRAMME LIST
You can check which programmes are stored in the memory by displaying the programme list.
text_image
Mini Glossary Displayed when the Locked Programme.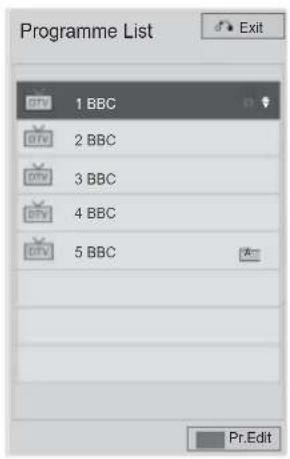
text_image
Programme List Exit 1 BBC 2 BBC 3 BBC 4 BBC 5 BBC Pr.Edit■ Displaying programme LIST

Display the Programme List.
- You may find some blue programmes. These have been set up to be skipped by auto programming or in the programme edit mode.
- Some programmes with the channel number shown in the programme LIST indicate there is no station name assigned.

Turn the programme edit.
■ Selecting a programme in the programme list

Select a programme.
Switch to the chosen programme number.

The mode will be switched between TV, DTV, and Radio from the programme you are currently watching.
WATCHING TV / PROGRAMME CONTROL
■ Paging through a programme list
Turn the pages.

Return to normal TV viewing.
■ Displaying the favourite program list
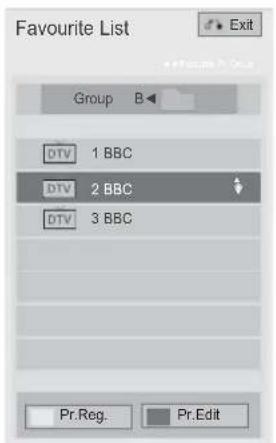
text_image
Favourite List Group B DTV 1 BBC DTV 2 BBC DTV 3 BBC Pr.Reg. Pr.Edit
Display the Favourite Programme List.

Turn the programme edit.

Current channel is registered/cancelled as preferred channel on currently selected Group.

Favourite group is changed.
INPUT LIST
HDMI and AV1 (SCART) can be recognized by a detect pin and thus enabled only when an external device approves voltage.
By using TV/RAD button, you can move from External Input to RF Input and to the last watched programme in DTV/RADIO/TV mode.
■ Image shown may differ from your TV.
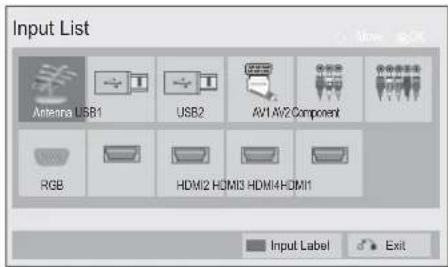
text_image
Input List Antenna USB1 USB2 AV1 AV2 Component RGB HDMI2 HDMI3 HDM4HDMI1 Input Label Exit
Select the input source.
- Antenna or Cable : Select it when watching the DTV/RADIO/TV.
- USB : Select it when using USB depends on connector.
- AV : Select it when watching the VCR or external equipment.
- Component : Select it when using the DVD or the Digital set-top box depends on connector.
- RGB :Select it when using PC depends on connector.
- HDMI: Select it when using DVD, PC or Digital set-top box depend on connector.
WATCHING TV / PROGRAMME CONTROL
INPUT LABEL
Selects a label for each input source.
■ Image shown may differ from your TV.
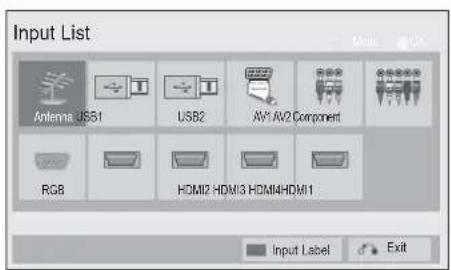
text_image
Input List Antenna US51 USB2 AV1 AV2 Component RGB HDMI2 HDMI3 HDMI4HDMI1 Input Label Exit
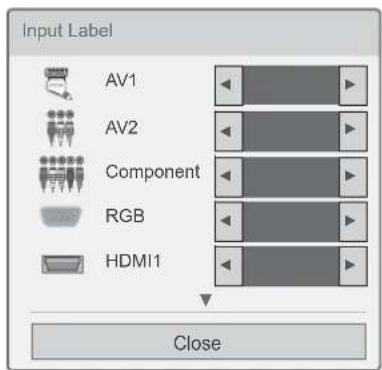
text_image
Input Label AV1 AV2 Component RGB HDMI1 Close
Select Input Label.

Select the source.
Select the label.
- Press the MENU/EXIT button to return to normal TV viewing.
- Press the BACK button to move to the previous menu screen.
DATA SERVICE
(This menu is enabled only in Ireland.)
This function allows users to choose between MHEG(Digital Teletext) and Teletext if both exist at the same time.
If only one of them exists, either MHEG or Teletext is enabled regardless of which option you selected.
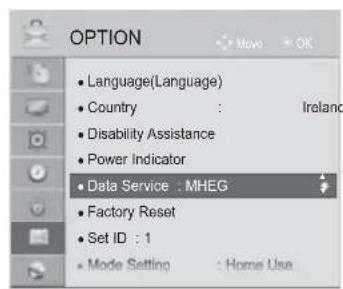
text_image
OPTION Language(Language) Country : Ireland Disability Assistance Power Indicator Data Service : MHEG Factory Reset Set ID : 1 Mode Setting : Home Use
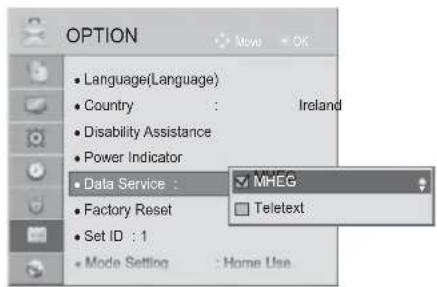
text_image
OPTION Language(Language) Country : Ireland Disability Assistance Power Indicator Data Service : Factory Reset Set ID : 1 Mode Setting : Home Use MHEG Teletext
Select OPTION.
Select Data Service.
Select MHEG or Teletext.
Save.
- Press the MENU/EXIT button to return to normal TV viewing.
- Press the BACK button to move to the previous menu screen.
WATCHING TV / PROGRAMME CONTROL
MHP SERVICE
(Only 32/37/42LE48**, 32/37/42/47/55LE58**, 32/37/42/47/55LE78**, 42/47LE7380, 42/47/55LE88**, 32/37/42LD48**, 32/37/42/47/55LD68**, 32/42/47LD78**, 32/37/42LD88**, 42/47LX68**, 47/55LX98**, 50/60PK78**, 50/60PK98**, 50/60PX98**)
(This menu is enabled only in Italy and MHP services of the other contries may not work properly.)
This function is Auto Start function of MHP, Italian data broadcast.
Use in channel with MHP signal.
Data broadcast function may not be smooth due to situation from the broadcasting station.
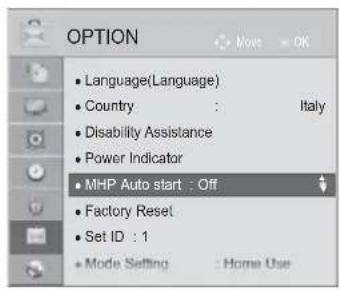
text_image
OPTION Language(Language) Country : Italy Disability Assistance Power Indicator MHP Auto start : Off Factory Reset Set ID : 1 Mode Setting : Home Use
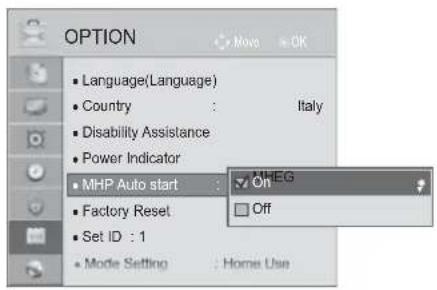
text_image
OPTION Language(Language) Country : Italy Disability Assistance Power Indicator MHP Auto start : HHEG Factory Reset Set ID : 1 Mode Setting : Home Use
Select OPTION.
Select MHP Auto start.
Select On or Off.
- Press the MENU/EXIT button to return to normal TV viewing.
- Press the BACK button to move to the previous menu screen.
■ When MHP Auto Start is set to On

Display the MHP.
■ When MHP Auto Start is set to Off
Display the MHP Application List.
Select your desired MHP broadcast.
- Press the EXIT button to return to normal TV viewing.
- Press the BACK button to move to the previous menu screen.
WATCHING TV / PROGRAMME CONTROL
SIMPLINK
This function operates only with devices with the SIMPLINK logo.
Please check the SIMPLINK logo.
This TV might not function properly when using it with other products with HDMI-CEC function.
This allows you to control and play other AV devices connected to the display through HDMI cable without additional cables and settings.
If you do not want SIMPLINK menu, select "Off".
In wireless external output, SIMPLINK function is not supported.
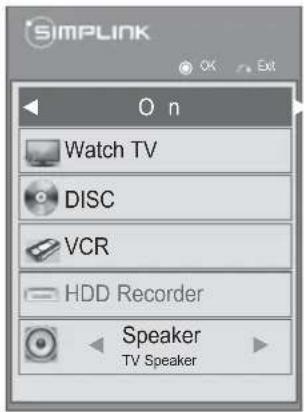
text_image
SIMPLINK ON Watch TV DISC VCR HDD Recorder Speaker TV Speaker
Display the SIMPLINK.
Select On or Off.
Save.
- Press the MENU/EXIT button to return to normal TV viewing.
- Press the BACK button to move to the previous menu screen.
Connecting to Home Theater with the SIMPLINK logo.
1 Connect the HDMI/DVI IN 1(DVI), HDMI/DVI IN 2, HDMI/DVI IN 3 or HDMI IN 4 (Except for 32/37/42LD4***, 32/37/42/47/55LD6***, 32/42/47LD7***, 32/37/42LD8***) terminal on the back of the TV and the HDMI output terminal of the Home Theater using HDMI cables.
2 Connect the Digital Audio output terminal on the back of the TV and the Digital Audio input terminal of the Home Theater using optical cables.
3 Select Home Theater in the Speaker menu by pushing the SIMPLINK button.
When you select or operate a media device with home theater function, the speaker automatically switches to home theater speaker (HT speaker).
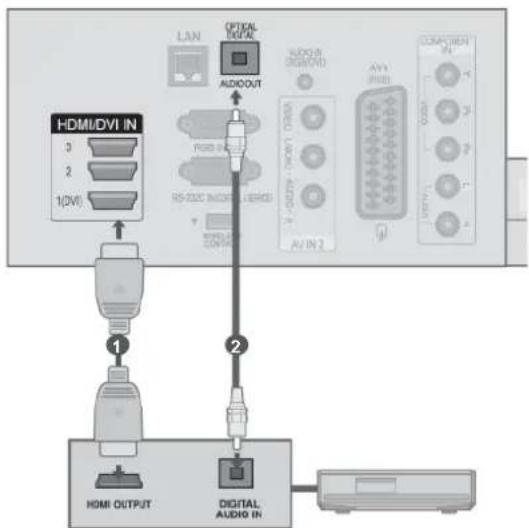
flowchart
graph TD
    A["1: HDMI/DVI IN"] --> B["2: 1(0V)"]
    B --> C["3: LAN"]
    C --> D["4: USB/USB"]
    D --> E["5: USB/USB"]
    E --> F["6: USB/USB"]
    F --> G["7: USB/USB"]
    G --> H["8: USB/USB"]
    H --> I["9: USB/USB"]
    I --> J["10: USB/USB"]
    J --> K["Digital Audio IN"]
    K --> L["11: AV/IN"]
    K --> M["12: AV/IN"]
    K --> N["13: AV/IN"]
    K --> O["14: AV/IN"]
    K --> P["15: AV/IN"]
    K --> Q["16: AV/IN"]
    K --> R["17: AV/IN"]
    K --> S["18: AV/IN"]
    K --> T["19: AV/IN"]
    K --> U["20: AV/IN"]
Home Theater
NOTE
▶ Connect the HDMI/DVI IN or HDMI IN terminal of the TV to the terminal (HDMI terminal) of the SIMPLINK device with the HDMI cable.
▶ When you switch the Input source using the INPUT button on the remote control, you can stop the operation of a device controlled by SIMPLINK.
WATCHING TV / PROGRAMME CONTROL
SIMPLINK Functions
Disc playback
Control connected AV devices by pressing the ^ v < >, OK, ▶, ■, II, ◀◀ and ▶▶ buttons.
Direct Play
After connecting AV devices to the TV, you can directly control the devices and play media without additional settings.
Select AV device
Enables you to select one of the AV devices connected to the TV and operate it.
Power off all devices
When you switch off the TV, all connected devices are turned off.
Switch audio-out
Offers an easy way to switch audio-out.
Sync Power on
When the equipment with Simplink function connected HDMI terminal starts to play, The TV will change automatically to turn on mode.
* A device, which is connected to the TV through an HDMI cable but does not support SIMPLINK, does not provide this function.
Note: To operate SIMPLINK, an High Speed HDMI Cable with *CEC function should be used. (*CEC: Consumer Electronics Control).
SIMPLINK Menu
Press the ^v< >button and then OK button to select the desired SIMPLINK source.
1 TV viewing : Switch to the previous TV programme regardless of the current mode.
② DISC playback : Select and play connected discs.
When multiple discs are available, the device type of discs are conveniently displayed at the bottom of the screen.
③ VCR playback : Play and control the connected VCR.
4 HDD Recordings playback : Play and control recordings stored in HDD.
5 Audio Out to Home theater/Audio Out to TV: Select Home theater or TV speaker for Audio Out.
• Home theater: Only one supported at a time
- DVD, Recorder: Up to three(Only 32/37/42LD4***, 32/37/42/47/55LD6***, 32/42/47LD7***, 32/37/42LD8**), four(Only 32/37/42LE4***, 32/37/42/47/55LE5***, 32/37/42/47/55LE7***, 42/47/55LE8***, 42/47LX6***, 47/55LX9***, 50/60PK5**, 50/60PK7***, 50/60PK9***, 50/60PX9***) supported at a time.
• VCR: Only one supported at a time
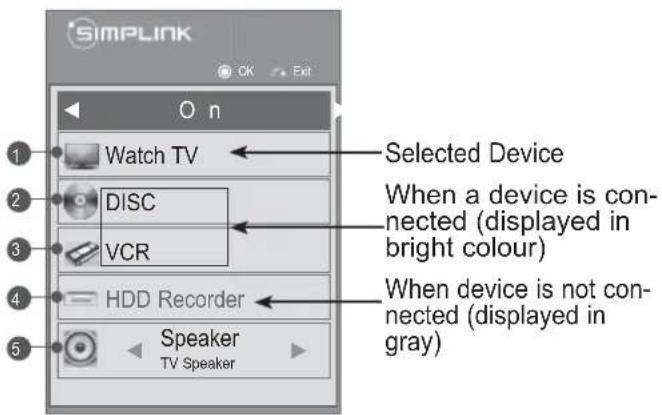
text_image
SIMP LINK OK Exit On Watch TV DISC VCR Selected Device When a device is connected (displayed in bright colour) HDD Recorder Speaker TV Speaker When device is not connected (displayed in gray)WATCHING TV / PROGRAMME CONTROL
AV MODE
You can select the optimal images and sounds when connecting AV devices to external input.
Off
Disables
the
AV
MODE.
Cinema or THX Cinema Optimizes video and audio for watching movies.
Sport Optimizes video and audio for watching sports events.
Game Optimizes video and audio for playing games.
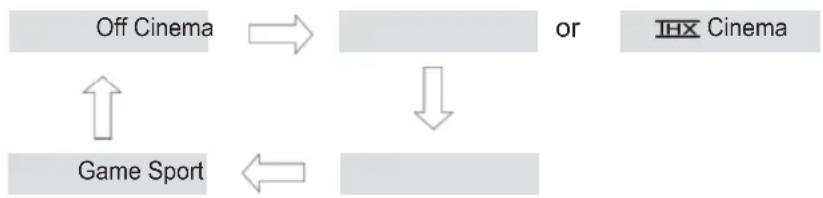
flowchart
graph TD
    A["Off Cinema"] --> B["Game Sport"]
    B --> C["IHX Cinema"]
    C --> D["or"]
    D --> E["Downward arrow"]
    E --> F["Downward arrow"]
Press the AV MODE button repeatedly to select the desired source.
- If you select Cinema or IHX Cinema in AV mode, Cinema or IHX Cinema will be selected both for Picture Mode and Sound Mode in PICTURE menu and AUDIO menu respectively.
- If you select "Off" in AV mode, the picture and image which you initially set will be selected.
- When playing a video game using PlayStation or Xbox, it is recommended to use the Game mode.
- When in Game mode, functions related to picture quality will be optimized for playing games.
INITIALIZING(RESET TO ORIGINAL FACTORY SETTINGS)
This function initializes all settings.
But the settings of Day and Night of the Picture Mode cannot be initialized.
It is useful to initialize the product or when you move to other city or country.
When the Factory Reset is completed, you must restart the Initializing setup.
When the Lock System menu is "On", the message to enter the password appears.
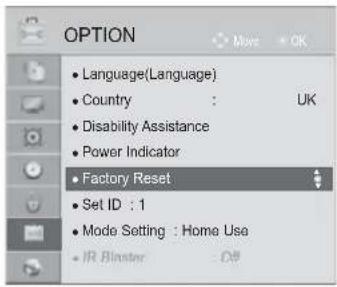
text_image
OPTION Language(Language) Country : UK Disability Assistance Power Indicator Factory Reset Set ID : 1 Mode Setting : Home Use IR Blaster - Off
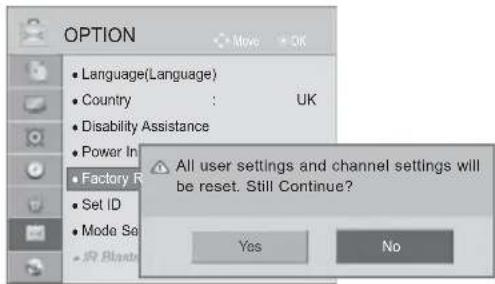
text_image
OPTION Language(Language) Country : UK Disability Assistance Power In Factory R Set ID Mode Set IR Blants All user settings and channel settings will be reset. Still Continue? Yes No
text_image
1 MENU 2 OK 3 OK 4 OK Start ISelect OPTION.
Select Factory Reset.
Select Yes.
Start Factory Reset.
- In Lock System "On", if you forget your password, press '0', '3', '2', '5' on the remote control handset.
- Press the MENU/EXIT button to return to normal TV viewing.
- Press the BACK button to move to the previous menu screen.
NETCAST
LEGAL NOTICE
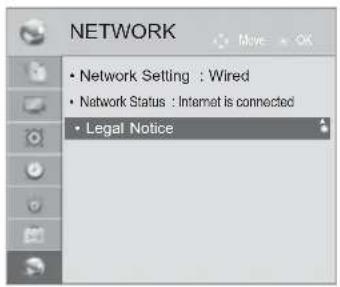
text_image
NETWORK • Network Setting : Wired • Network Status : Internet is connected • Legal Notice
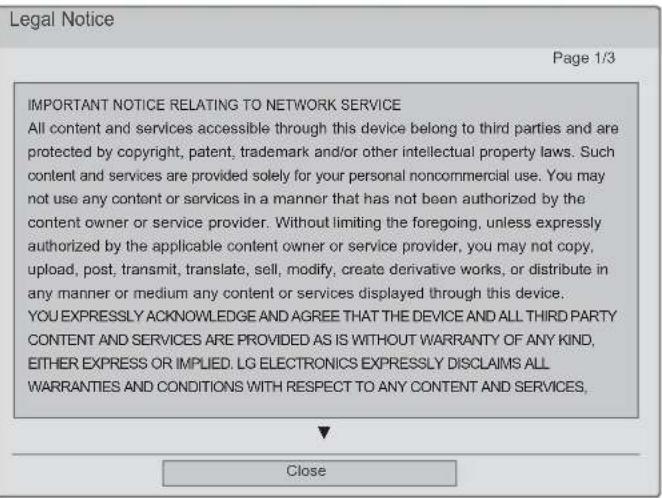
text_image
Legal Notice Page 1/3 IMPORTANT NOTICE RELATING TO NETWORK SERVICE All content and services accessible through this device belong to third parties and are protected by copyright, patent, trademark and/or other intellectual property laws. Such content and services are provided solely for your personal noncommercial use. You may not use any content or services in a manner that has not been authorized by the content owner or service provider. Without limiting the foregoing, unless expressly authorized by the applicable content owner or service provider, you may not copy, upload, post, transmit, translate, sell, modify, create derivative works, or distribute in any manner or medium any content or services displayed through this device. YOU EXPRESSLY ACKNOWLEDGE AND AGREE THAT THE DEVICE AND ALL THIRD PARTY CONTENT AND SERVICES ARE PROVIDED AS IS WITHOUT WARRANTY OF ANY KIND, EITHER EXPRESS OR IMPLIED. LG ELECTRONICS EXPRESSLY DISCLAIMS ALL WARRANTIES AND CONDITIONS WITH RESPECT TO ANY CONTENT AND SERVICES, Close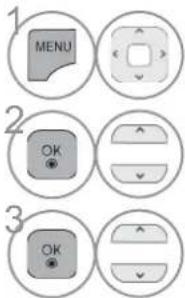
text_image
1 MENU 2 OK 3 OKSelect NETWORK.
Select Legal Notice.
Check Legal notice.
- Press the MENU/EXIT button to return to normal TV viewing.
IMPORTANT NOTICE RELATING TO NETWORK SERVICES
All content and services accessible through this device belong to third parties and are protected by copyright, patent, trademark and/or other intellectual property laws. Such content and services are provided solely for your personal noncommercial use. You may not use any content or services in a manner that has not been authorized by the content owner or service provider. Without limiting the foregoing, unless expressly authorized by the applicable content owner or service provider, you may not copy, upload, post, transmit, translate, sell, modify, create derivative works, or distribute in any manner or medium any content or services displayed through this device.
YOU EXPRESSLY ACKNOWLEDGE AND AGREE THAT THE DEVICE AND ALL THIRD PARTY CONTENT AND SERVICES ARE PROVIDED "AS IS" WITHOUT WARRANTY OF ANY KIND, EITHER EXPRESS OR IMPLIED. LG ELECTRONICS EXPRESSLY DISCLAIMS ALL WARRANTIES AND CONDITIONS WITH RESPECT TO ANY CONTENT AND SERVICES, EITHER EXPRESS OR, IMPLIED, INCLUDING BUT NOT LIMITED TO, WARRANTIES OF MERCHANTABILITY, OF SATISFACTORY QUALITY, FITNESS FOR A PARTICULAR PURPOSE, AND NON-INFRINGEMENT OF THIRD PARTY RIGHTS. LG DOES NOT GUARANTEE THE ACCURACY, VALIDITY, TIMELINESS, LEGALITY, OR COMPLETENESS OF ANY CONTENT OR SERVICE MADE AVAILABLE THROUGH THIS DEVICE AND DOES NOT WARRANT THAT THE DEVICE OR SERVICES WILL MEET YOUR REQUIREMENTS, OR THAT OPERATION OF THE DEVICE OR SERVICES WILL BE UNINTERRUPTED OR ERROR-FREE. UNDER NO CIRCUMSTANCES, INCLUDING NEGLIGENCE, SHALL LG BE LIABLE, WHETHER IN CONTRACT OR TORT, FOR ANY DIRECT, INDIRECT, INCIDENTAL, SPECIAL OR CONSEQUENTIAL DAMAGES, OR ANY OTHER DAMAGES ARISING OUT OF, ANY INFORMATION CONTAINED IN, OR ANY CONTENT OR SERVICE ACCESSED BY YOU OR ANY THIRD PARTY, EVEN IF ADVISED OF THE POSSIBILITY OF SUCH DAMAGES.
Third party services may be changed, suspended, removed, terminated or interrupted, or access may be disabled at any time, without notice, and LG makes no representation or warranty that any content or service will remain available for any period of time. Content and services are transmitted by third parties by means of networks and transmission facilities over which LG has no control. LG may impose limits on the use of or access to certain services or content, in any case and without notice or liability. LG expressly disclaims any responsibility or liability for any change, interruption, disabling, removal of or suspension of any content or service made available through this device.
LG is neither responsible nor liable for customer service related to the content and services. Any question or request for service relating to the content or services should be made directly to the respective content and service providers.
NETCAST
NETCAST MENU
These services are provided by separate Content Provider.
Content can be changed or deleted depending on Content Provider.
All content furnished by the service provider are subject to change at any time including, but not limited to the removal of content. Should you have any inquiry or problem related to the content, you may refer to the service provider's website for the most up-to-date information. Please note that LGE is not responsible for any content provided by the service provider or any changes concerning such content.
Please visit the content providers web site for specific information on their services. (But, some content manual maybe not provide depending on Content Provider).
NetCast menu source can differ by country.
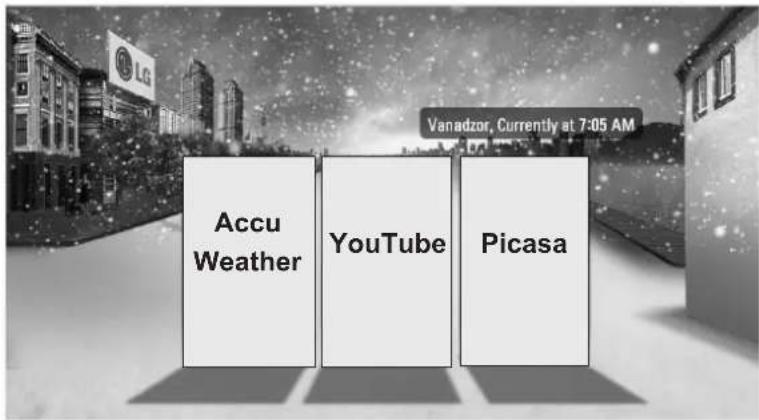
text_image
Accu Weather YouTube Picasa Vanadzor, Currently at 7:05 AM
Select NETCAST menu option.

Enjoy the AccuWeather, Picasa or YouTube.
NOTE
The videos list searched from the TV may different with the list searched from a web browser on PC.
The settings of this TV do not affect the YouTube's playback quality.
The playback videos may be paused, stopped or buffering occurring often depending on your broadband speed.
We recommend a minimum connection speed of 1.5 Mbps. For the best playback condition, a connection speed of 4.0 Mbps is required. Sometimes your broadband speed varies based on your ISP's network conditions. Contact your ISP if you have problems maintaining a fast connection that is reliable, or if you want to increase your connection speed. Many ISPs offer a variety of broadband speed options.
To view the owner's manual that provided by the Content Provider, visit our website at http://www.lg.com.
▶ To see the activation method of Orange or maxdome, click the Orange, maxdome in the CD manual (Only France or German).
For service that requires log in, join the applicable service on the website using the PC and log in through the TV to enjoy various additional functionalities.
▶ When you set the city you want with Setup by pressing the red button, the background of NetCast will be set to the weather of the selected city.
▶ If there is no user action 2 minutes following freezing image or video on screen, the screensaver will activate itself preventing fixed image remaining on screen. (Plasma TV only)
- Press the RED button to select Weather of area.
- Press the EXIT button to return to normal TV viewing.
YOUTUBE
YouTube is a video sharing website where users can upload, view, and share video clips.
YouTube Screen Components
1 YouTube menu
② Videos list
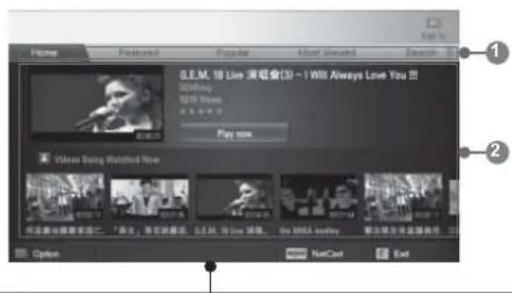
Return to TV viewing.
NOTE
▶ When you press the Q.menu button while the Youtube video is playing in full mode, you can set the video options.
NETCAST
YouTube Service menu
• Home: You can watch the popular video in real time.
- Featured: The featured videos list will be displayed.
- Popular: The best rated videos list from YouTube server will be displayed.
- Most Viewed: The most viewed videos list will be displayed.
- Search: The keypad/keyboard menu will be displayed.
- History: The videos list that you previously played will be displayed. Maximum of 20 videos can be stored.
- Favorites: In sign-in status, this menu will be displayed the videos list that is arranged in the YouTube server with your account (Some videos may not appear on the Favorites list, even if the videos are arranged in the server).
- Sign in (Sign Out): Displays the keypad/keyboard menu to sign in or returns to the sign-out status.
Using the remote control
| ■ Stops the video and displays related videos list. | |
| II Pause the video while it is playing. | |
| ▶ Play the selected video. | |
| Skip the playback forward or backward. | |
| RED | Set the option menu. |
| Return to Netcast menu. | |
| Return to TV viewing. | |
ACCUWEATHER
Accuweather is the programme to view the weather of the city the user wants.
AccuWeather Screen Components
1 AccuWeather menu
② Weather list by city
3 Corresponding buttons on the remote control
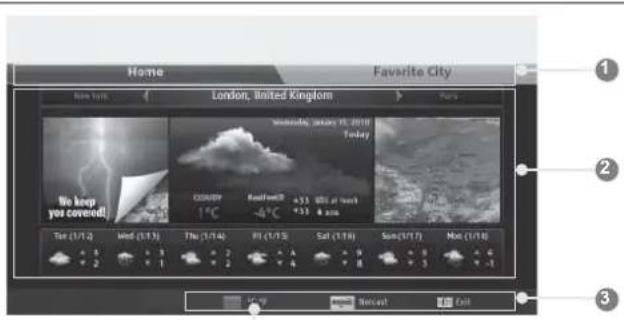
text_image
Home London, United Kingdom Favorite City New York Wednesday, January 10, 2010 Today We keep you covered! COCONY -4°C Rainfall +33 WTI of touch +35 & zoom Tel (1/14) Wind (1/15) Thu (1/14) Fri (1/15) Sat (1/16) Sun (1/17) Sat (1/18) Sat (1/19) Sat (1/20) Sat (1/21) Sat (1/22) Sat (1/23) Sat (1/24) Sat (1/25) Sat (1/26) Sat (1/27) Sat (1/28) Sat (1/29) Sat (1/30) Sat (1/31) Sat (1/32) Sat (1/33) Sat (1/34) Sat (1/35) Sat (1/36) Sat (1/37) Sat (1/38) Sat (1/39) Sat (1/40) Sat (1/41) Sat (1/42) Sat (1/43) Sat (1/44) Sat (1/45) Sat (1/46) Sat (1/47) Sat (1/48) Sat (1/49) Sat (1/50)


Change between Celsius and Fahrenheit.
Move the focus to the menu you want.
Select the focused menu.
Return to Netcast menu.
Return to TV viewing.
AccuWeather Service menu
• Home: The weather of selected city is displayed.
- Favorite City: Frequently checked cities can be registered to check the weather.
NOTE
▶ By default, New York, London and Paris are registered and the user can add/delete cities from Favorite City.
▶LG is not responsible for the accuracy of the weather forecast.
▶ Applicable weather information can differ from the actual weather depending on the information provided by Accuweather.
NETCAST
PICASA
Picasa is an application from Google that appreciates digital image files.
Picasa Screen Components
1 Picasa menu
② Photos list
3 Corresponding buttons on the remote control
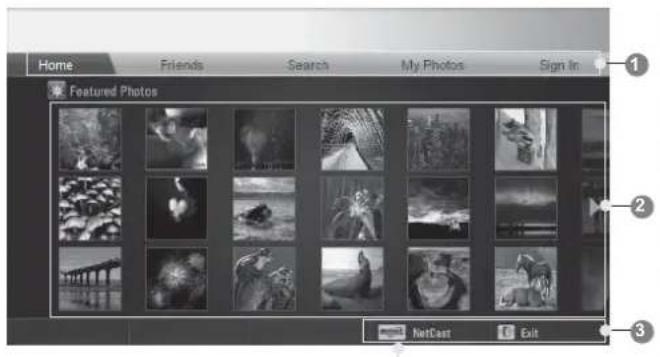
text_image
Home Friends Search My Photos Sign In Featured Photos NetCast Exit
Select the desired photo.
The selected photo file is displayed.

Return to Netcast menu.

Return to TV viewing.
Picasa Service menu
- Home: The featured photos list will be displayed.
- Friends: You can register users with the pictures you want as friends. You can add up to 10 friends.
- Search: The keypad/keyboard menu will be displayed.
- My Photos: You can view the pictures uploaded to the Web. This function can only be used when you sign in.
- Sign in (Sign Out): Displays the keypad/keyboard menu to sign in or returns to the sign-out status.
BLUETOOTH?
Bluetooth is a short distance networking technology using 2.4 GHz frequency to connect various types of information devices such as computers, cell phones and PDAs, as well as digital appliances through wireless connection, without having to connect any cable, to enable data exchange.
With the Bluetooth communication function, you can connect the Bluetooth enabled wireless headset or receive images(only JPEG), listen to music from the Bluetooth enabled cell phone using this TV.
- Communication Spec.: Bluetooth Specification Version 2.0 + EDR (Enhanced Data Rate)
• Output: Bluetooth Specification Power Class 2
• Maximum Communication Range: Line of open sight approx. 10 m (30 ft)
• Frequency Band: 2.4 GHz band (2.4 GHz to 2.4835 GHz) - Bluetooth Module: RBFS-B921A(Plasma TV), RBFS-B721A(LCD/LED LCD TV) (LG Electronics)
- Compatible Bluetooth Profile : GA/DP(Generic Audio/Video Distribution Profile)
A2DP(Advanced Audio Distribution Profile)
HSP(Headset
BIP(Basic Imaging Profile)
FTP(File
Profile)
OPP(Object Push Profile)
Transfer
C€ 0700 Profile)
Precautions when using the Bluetooth
▶ Use within 7 m (-45° to 45°) range.
▶ If you use the device out of the range or within the range with obstacles, it can result in communication error.
▶ Communication error can occur depending on the surrounding devices.
▶ Products using the same frequency of 2.4 GHz (Wireless LAN, microwave oven etc.), can cause communication error by using the same frequency bandwidth.
The device search time differs depending on the number of Bluetooth devices and the operating situation.
▶ The probability of search increases with less number of devices.
Electromagnetic wave can be interfered with applicable wireless devices.
▶ Because applicable wireless devices have the possibility of electromagnetic wave interference, they cannot provide services related to human life.
▶ You can only connect one Bluetooth device at a time.
▶ You cannot receive photos(only JPEG) or listen to music from other Bluetooth devices while using the Bluetooth headset.
▶ For details of Bluetooth, refer to the user manual of the Bluetooth device.
▶ Operation is subject to the following two conditions: (1) This device may not cause harmful interference, and (2) this device must accept any interference received, including interference that may cause undesired operation of the device.
▶ Bluetooth can be used about 30 seconds after the power is turned on.
▶ Depending on the transmission processing method and performance of the headset used, the audio can be instantly disconnected.
SETTING THE BLUETOOTH
If you want to listen to the broadcasted sound using the Bluetooth headset or receive the jpeg images from an external device and view them on the TV, listen to music from cell phone(Bluetooth device), you can use the wireless communication without having to connect any cables.
You can use the BLUETOOTH menu by selecting "Bluetooth on".
If you do not want to use the Bluetooth function, select "Bluetooth off".
If it is connected to the external Bluetooth device, you can select "Bluetooth off" after disconnecting the device.
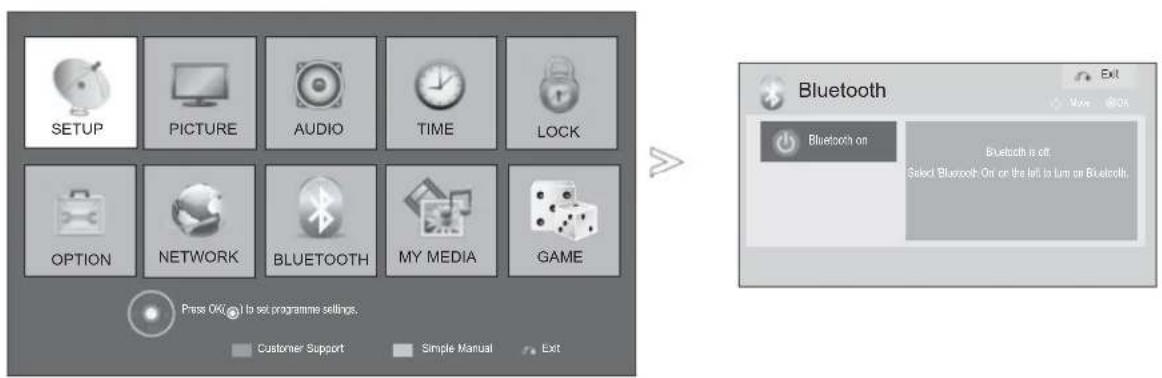
text_image
SETUP PICTURE AUDIO TIME LOCK OPTION NETWORK BLUETOOTH MY MEDIA GAME Press OK to set programme settings. Customer Support Simple Manual Exit Bluetooth Bluetooth on Bluetooth is off. Select Bluetooth On on the left to Turn or Bluetooth.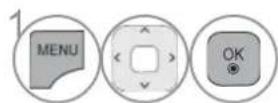
Select BLUETOOTH.
Select Bluetooth on.
- Press the EXIT button to return to normal TV viewing.
- Press the BACK button to move to the previous menu screen.
TO USE A BLUETOOTH
BLUETOOTH HEADSET
When you select the Bluetooth headset, you can listen to the TV sound in the Bluetooth headset through wireless communication.
You must pair it with any new Bluetooth device before the first use. For details, refer to the user manual of the applicable device.
A maximum of 12 devices can be paired.
When the unit is searching for the Bluetooth headset, other buttons except for the "Stop" (OK button) do not work.
Connecting a new Bluetooth headset
You can only search for the new Bluetooth headset only in the Disconnected condition.
When you run the search, it will show you the list of all Bluetooth headsets responding.
After new Bluetooth device is searched, the PIN number is validated to connect the device. For details, refer to the user manual of the applicable device.
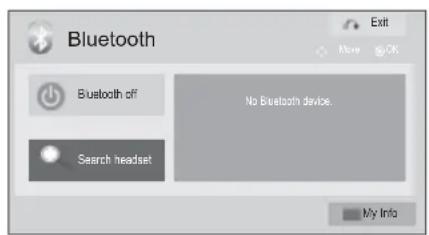
text_image
Bluetooth Bluetooth off No Bluetooth device. Search headset My Info
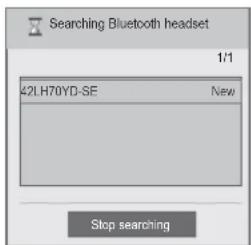
text_image
Searching Bluetooth headset 1/1 42LH70YD-SE New Stop searching

Select BLUETOOTH.
Select Search headset.
Select the desired Bluetooth headset.
Select the desired Bluetooth headset PIN number. Refer to the user manual of the applicable device for the PIN number.
Connect the Bluetooth headset.
- Press the EXIT button to return to normal TV viewing.
- Press the BACK button to move to the previous menu screen.
Connecting to Bluetooth headset already registered
Bluetooth headsets are listed in the order most recently used with the headset currently in use listed at the top.
When connecting to the Bluetooth device already registered, you can select and connect directly without any PIN validation.
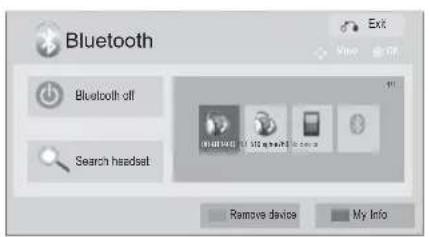
text_image
Bluetooth Bluetooth off Search headset Remove device My Info Exit View Off 101 102 103 104 105 106 107 108 109 110 111 112 113 114 115 116 117 118 119 120 121 122 123 124 125 126 127 128 129 130 131 132 133 134 135 136 137 138 139 140 141 142 143 144 145 146 147 148 149 150 151 152 153 154 155 156 157 158 159 160 161 162 163 164 165 166 167 168 169 170 171 172 173 174 175 176 177 178 179 180 181 182 183 184 185 186 187 188 189 190 191 192 193 194 195 196 197 198 199 200
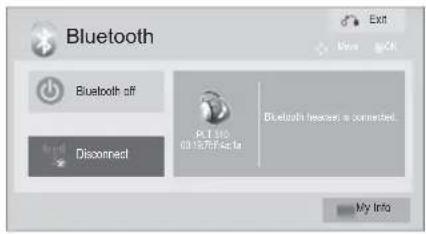
text_image
Bluetooth Bluetooth off Connect Pt 1.00 09:1275/Fa#a Bluetooth leaves a connected. My Info


Select BLUETOOTH.

Select the desired Bluetooth headset.
Connect the Bluetooth headset.
-
After connecting/using the Bluetooth headset, the headset setting will be the Disconnected condition automatically when you turn off the power of the TV and then turn on.
• After connecting the Bluetooth headset, the TV speaker is switched to Mute condition and the sound will only be generated from the headset. -
Press the EXIT button to return to normal TV viewing.
- Press the BACK button to move to the previous menu screen.
TO USE A BLUETOOTH
Disconnecting the Bluetooth headset during use
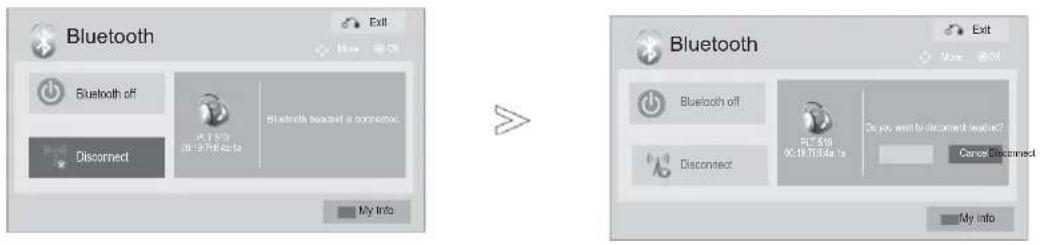
text_image
Bluetooth Bluetooth off Disconnect My Info Exit Bluetooth headed a connection. Bluetooth off 02.19.7143a My Info Bluetooth Bluetooth off Disconnect Do you want to disconnect home? Cancel Disconnect My Info
Select BLUETOOTH.

text_image
3 OK Select Disconnect.
text_image
4 Disconnect the Bluetooth headset.- Press the EXIT button to return to normal TV viewing.
- Press the BACK button to move to the previous menu screen.
When requesting to connect to TV from the Bluetooth headset
When the Bluetooth menu is "On" and there is a connection request from the headset, this message is displayed.
Not all headsets support the this feature.(Refer to the user manual of the applicable Bluetooth headset.)
Some headset types may make an attempt at connection when they are turned off/on even though they are not included in the Registered Device list.
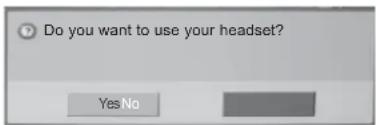
text_image
Do you want to use your headset? YesNo
Select Yes or No.
NOTE
▶ LG recommends the following headset models.
- Plantronics VOYAGER-855 / SONY HBH-DS970, HBH-DS980 / Motorola S605
There might be an audio delay, depending on the buffer memory size of the headset.
▶The stereo/mono headset officially certified to be Bluetooth compatible can be searched and connected.
▶The stereo/mono headset that supports the A2DP or HSP function among the Bluetooth devices can be connected.
▶ If the surrounding environment of the TV is as follows, the device may not be searched or connected properly.
-If there is strong electromagnetic wave.
-If there are many Bluetooth devices.
-If the headset is turned off, not in place or has an error.
-Because products such as microwave oven, wireless LAN, plasma light, gas range etc., use the same frequency range, it can cause communication error.
▶ Only one Bluetooth headset can be connected at once.
▶ Connection that is lost due to the TV being turned off etc. will not be automatically recovered. Try connecting the applicable device again.
▶ Some operations can be slower while operating the headset.
Even if you choose simplink Home Theater after using the headset during Simplink operation, the unit will not automatically switch to Home Theater speakers.
▶ When the headset connection continuously fails, pair the device one more time.
▶The audio quality of mono headsets will not be as good as that for stereo headsets.
▶Mono headsets may suffer from noise as the distance from the TV increases, because they use a different transmission method compared with stereo headsets.
▶ When a Bluetooth headset is in use, the Volume +/- and Mute keys do not work, and the Audio menu returns to the default value and is disabled.
▶With Bluetooth set to On, if any registered devices are turned on, the TV will switch to Bluetooth mode automatically even though you are watching in another input mode. In this case, set Bluetooth to Off.
TO USE A BLUETOOTH
REMOVE THE BLUETOOTH DEVICE
When 12 devices are registered, you cannot register any more devices, and the external device will no longer be able to pair up with the TV. In this case, you should delete one (disconnect first if a device is connected to the TV) and then you can register another device.
"Remove device" will be available when selecting the device that is not connected to the TV.
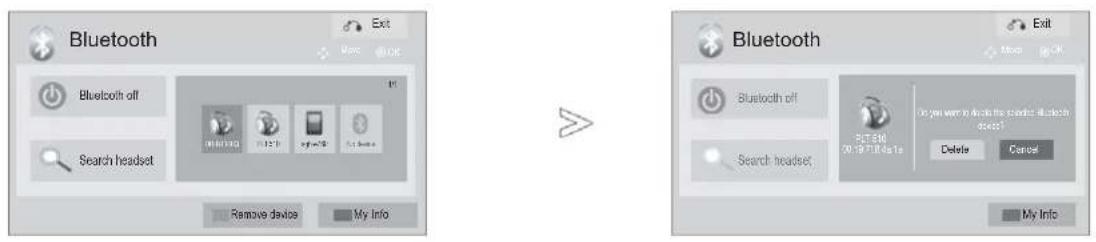
text_image
Bluetooth Bluetooth off Search headset Remove devices My Info Bluetooth off Search headset Exit OK Cancel Exit No. 12 KB My Info Do you want to locate the scatter Bluetooth access! Delete Cancel My Info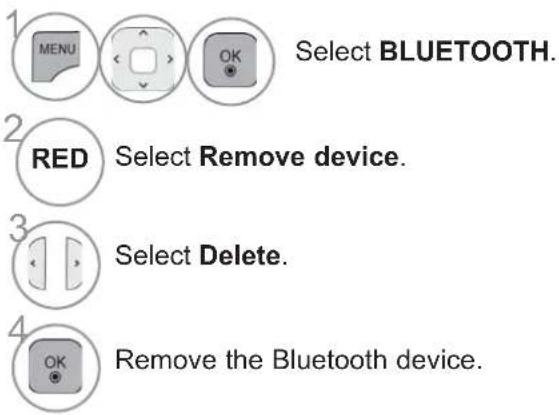
text_image
1 MENU Select BLUETOOTH. 2 RED Select Remove device. 3 Select Delete. 4 OK Remove the Bluetooth device.- Press the EXIT button to return to normal TV viewing.
- Press the BACK button to move to the previous menu screen.
MY BLUETOOTH INFORMATION
This function provides the My Bluetooth Information to the user. "Edit" will be available when TV is not connected with any device.
You can edit the Setup TV PIN or Setup TV name. You can check the TV address.
To accept connection from an external Bluetooth device or to connect to an external Bluetooth device, the PIN needs to be entered.
For details on how to set the PIN of the external Bluetooth device, refer to the user manual of the applicable device.
The TV PIN is composed of numbers of up to 16 digits. The TV PIN must have more than 1 digit.
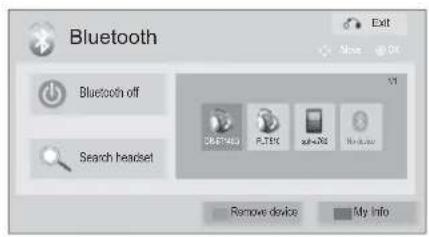
text_image
Bluetooth Bluetooth off Search headset Remove device My Info Exit Move OK DBERTED FILTER self-NS My Info
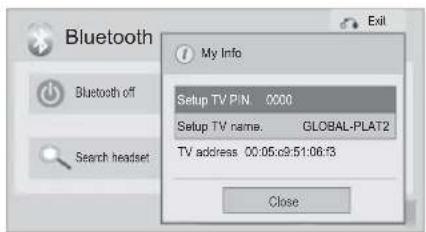
text_image
Bluetooth My Info Setup TV PIN: 0000 Setup TV name: GLOBAL-PLAT2 TV address: 00:05:c9:51:06:f3 Close
Select BLUETOOTH.
- Press the DELETE button to delete digits one by one.
2 BLUE Select My Info.
3 Select Setup TV PIN or Setup TV name.
4 You can use an the alphabet A to Z, the number 0 to 9, +/-, and blank.
5 OK Save.
- Press the EXIT button to return to normal TV viewing.
- Press the BACK button to move to the previous menu screen.
TO USE A BLUETOOTH
RECEIVING PHOTOS FROM EXTERNAL BLUETOOTH DEVICE
For details on how to send photos(only JPEG) from the external Bluetooth device to TV, refer to the user manual of the applicable device.

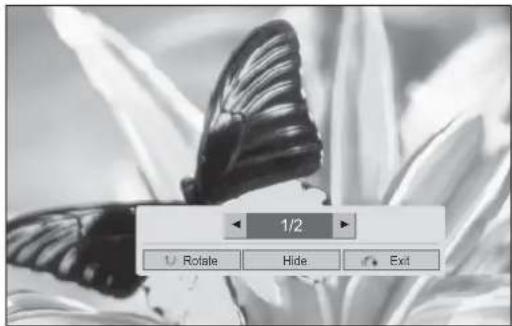
text_image
1/2 Rotate Hide Exit- When you select Hide with the v<> button, the OSD will disappear. And when you press the OK button again, it will appear again.

Select the desired photos.
(Rotate): Rotate photos.
■ Rotates the photo ^9 clockwise upon OK button on ☐(Rotate).
- The maximum accumulated size of the image(s) that can be received is 10MBytes.
- You cannot receive the image(s) while using the Bluetooth headset.
- You cannot receive the image(s) while listening to music from Bluetooth device.
- When the external Bluetooth device is currently sending the photo, press the BACK button to stop receiving the photo. All photos already received will be deleted as a result.
- With some Bluetooth devices, you may not be able to transmit an image (JPEG) file to the TV set.
LISTENING TO THE MUSICS FROM EXTERNAL BLUETOOTH DEVICE
For details on how to listen to the musics from the external Bluetooth device to TV, refer to the user manual of the applicable device.
You should use the Bluetooth device supporting A2DP(as external device).
- With some Bluetooth devices, you may not be able to listen to music via the TV speaker system.
- With some Bluetooth device, the sound can be slow or discontinued from time to time.

Listening to bluetooth music...
Press any key to finish.
- Press the + or - button to adjust the volume.
- If you wish to switch the sound off, press the MUTE button.
- Press the BACK button to return to normal TV viewing.

NOTE
▶ You cannot listen to music while using the Bluetooth headset.
▶ You cannot listen to music while receiving image(s).
3D IMAGING
(Only 42/47LX6 **; 47/55LX9 **; 50/60PX9 **)
3D TECHNOLOGY
This TV can display in 3D via 3D broadcasting or when the TV is connected to a compatible device, such as a Blu-ray 3D Player. You need such a device to watch the TV in 3D. The 3D TV displays two separate pictures formatted for each eye. The viewer needs to wear 3D glasses in order to see these images in 3D format.
Viewing 3D Imaging
WARNING
When viewing 3D images, it is important to watch the TV from an effective viewing angle and within the appropriate distance. The appropriate angle is 120^ (when the viewing distance is 2m (6.5 ft)) and distance is 2m - 7m (6.5ft - 22.9ft). If you exceed this viewing angle or distance, you may not be able to view the 3D imaging.
Further 3D images may not be displayed if they are viewed while you are lying down. (LCD TV/LED LCD TV only)
If you watch the 3D images too closely or for a long period of time, it may harm your eyesight. If you feel any sort of eyestrain stop viewing the 3D images remove the 3D glasses and rest.
Watching the TV or playing video games that incorporate 3D images with the 3D glasses for a long period of time can cause drowsiness, headaches or fatigue to you and/or your eyes. If you experience any of these symptoms stop viewing the 3D TV remove the 3D glasses and rest.
▶ Pregnant woman, seniors, persons with heart problems or persons who experience frequent drowsiness should refrain from watching 3D TV.
Do not use the 3D imaging or 3D glasses whilst walking or moving around. Using the 3D imaging and glasses while moving around may result in injuries due to running into objects, tripping and/or falling.
Some 3D imaging may cause you to duck or dodge the image displayed in the video. Therefore, it is best if you do not watch 3D TV near fragile objects or near any objects that can be knocked over easily.
Please prevent children under the age of 5 from watching 3D TV. It may affect their vision development.
▶ Warning for photosensitization seizure: Some viewers may experience a seizure or epilepsy when exposed to certain factors, including fl ashing lights or image as in TV or video games.
If you or anybody from your family has a history of epilepsy or seizure, please consult with your doctor before watching 3D TV.
If you experience any dizziness or light headedness, visual transition or altered vision, visual or facial instability, such as eye or muscle twitching, unconscious action, convulsion, loss of conscience, confusion or disorientation, loss of directional sense, cramps, or nausea immediately stop watching the 3D imaging and consult a doctor. Parents should monitor their children, including teenagers, for these symptoms as they may be more sensitive to the effects of watching 3D TV.
Risk of photosensitization seizure can be reduced with the following actions.
Take frequent breaks from watching 3D TV.
- For those who have vision that is different in each eye, they should watch the TV after taking vision correction measures.
- Watch the TV so that your eyes are on the same level as the 3D screen and refrain from sitting too closely to the TV
- Do not watch the 3D imaging when tired or sick, and avoid watching the 3D imaging for a long period of time.
- Do not wear the 3D glasses for any other purpose than viewing 3D imaging on a 3D TV.
- Some viewers may feel disoriented after watching 3D TV. Therefore, after you watch 3D TV, take a moment to regain awareness of your situation before moving.
NOTE
To watch the TV in 3D, you must put on your 3D glasses. For best results, you should wear LG Brand 3D glasses. The 3D imaging may not display properly when using another brand of 3D glasses. Please see the 3D glasses manual for instructions on how to use the 3D glasses.
▶ After powering on the TV, a few seconds may be needed for your TV to calibrate.
It may take a moment for you to see the 3D imaging if you look away from the TV and then revert your eyes back to the 3D program.
The TV may flicker slightly if the 3D imaging is displayed under 3 wavelength lamp fl fluorescent light (50 Hz - 60 Hz) or magnetic fl fluorescent lamp (50 Hz - 60 Hz). In such instances, it is recommended to turn the lights off.
▶ If there is an obstacle between the TV and the 3D glasses, the 3D imaging may not display properly.
▶ Do not use the TV in close proximity to other electronic equipment and IR equipment.
In Analog TV, 3D Imaging does not work.
When watching 2D images, it is recommended to take off the 3D glasses. If you watch 2D images with the 3D glasses on, you may see distorted images.
When watching digital TV in 3D imaging mode, monitor out signals cannot be output through the SCART cable.
If you set the 3D mode to On while a scheduled recording is performed on digital TV, monitor out signals cannot be output through the SCART cable, and the recording cannot be performed.
WHEN USING 3D GLASSES
▶3D glasses are sold separately. Refer to the 3D glasses manual for operating instructions.
▶ Do not use the 3D glasses to replace your corrective glasses, sunglasses or protective goggles.
▶ Do not store the 3D glasses in hot or cold locations.
▶ Do not drop objects onto the 3D glasses. Do not drop or bend the glasses.
▶Since the lenses of the 3D glasses are easily scratched, make sure to clean only with a soft cloth. Shake off any dust before using the cloth since the glasses are easily scratched.
3D IMAGING VIEWING RANGE
TV size, viewing angle & other circumstances may change the viewing distance and the angle of view.
| Viewing Distance | 2 m - 7 m |
| Viewing Angle | 120°(When the viewing distance is 2 m) |
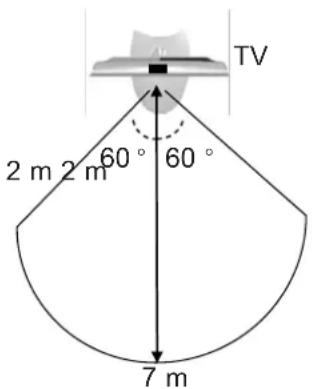
text_image
TV 2 m 2 m 60° 60° 7 m3D IMAGING
WATCHING 3D IMAGING
1 Play the video produced in 3D.
Refer to the following for the supported imaging.
| Signal Resolution | Horizontal Frequency (kHz) | Vertical Frequency (Hz) | Playable 3D video format | ||
| HDMI Input | 720p 1280x720 | 45 | 60 Top & | Bottom, Side by Side | |
| 89.9/90 59.94/60 | HDMI (V. 1.4 with 3D), Frame Packing | ||||
| 37.5 | 50 | Top & Bottom, Side by Side | |||
| 75 | HDMI (V. 1.4 with 3D), Frame Packing | ||||
| 1080i | 1920X1080 | 33.75 60 | Top & Bottom, Side by Side | ||
| 28.125 50 | |||||
| 1080p 1920X1080 | 67.50 60 | Top & Bottom, Side by Side, Checker Board, Single Frame Sequential | |||
| 56.250 50 | Top & Bottom, Side by Side | ||||
| 27 24 | Top & Bottom, Side by Side, Checker Board | ||||
| 53.95/54 23.98/24 | HDMI (V. 1.4 with 3D), Frame Packing | ||||
| 33.75 30 | Top & Bottom, Side by Side, Checker Board | ||||
| USB Input | 1080p 1920X1080 33.75 30 | Top & Bottom, Side by Side, Checker Board, MPO(Photo) | |||
| Component Input(Plasma TV Only) | 720p 1280x720 | 44.96 | 59.94 | ||
| 45.00 | 60.00 | Top & Bottom, Side by Side | |||
| 37.50 | 50.00 | ||||
| 1080i 1920x1080 | 33.72 | 59.94 | |||
| 33.75 | 60.00 | Top & Bottom, Side by Side | |||
| 28.125 | 50.00 | ||||
| Signal Playable 3D video format | |||||
| DTV | 720p, 1080i | Top & Bottom, Side by Side | |||
For 3D video feed that is input in the HDMI (V. 1.4 with 3D) Frame Packing format, it is automatically switched to 3D.
Media contents and a player need to support HDMI (V. 1.4 with 3D) Frame Packing to play in 3D. Video, which is input as HDMI (V. 1.4 with 3D) Frame Packing format, is switched into the 3D screen automatically.


After selecting the shape as shown in the screen on TV, wear the 3D glasses.
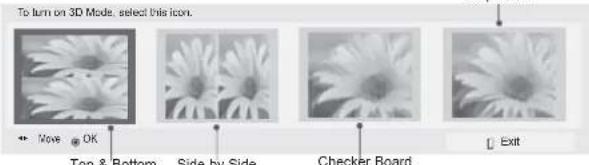
text_image
To turn on 3D Mode, select this icon. Move OK Top & Bottom Side by Side Checker Board Exitor


Select 3D video or 2D video. After selecting the shape as shown in the screen on TV, wear the 3D glasses.
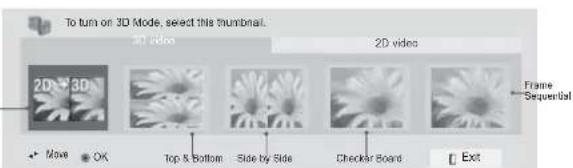
text_image
To turn on 3D Mode, select this thumbnail. 3D video 2D videos Frame Sequential + - Move + OK Top & Bottom Side by Side Checker Boards Exit• 3D video : Select it to view the 3D imaging.
• 2D video : Select it to view the 2D imaging.
Changed from 2D imaging to 3D imaging
Select Setting Left/Right or Left/Right image change.
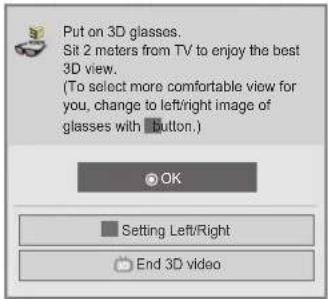
text_image
Put on 3D glasses. Sit 2 meters from TV to enjoy the best 3D view. (To select more comfortable view for you, change to left/right image of glasses with button.) OK Setting Left/Right End 3D videoor
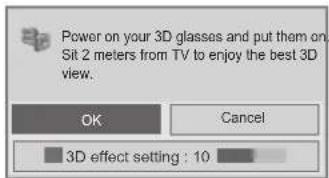
text_image
Power on your 3D glasses and put them on Sit 2 meters from TV to enjoy the best 3D view. OK Cancel 3D effect setting : 10or
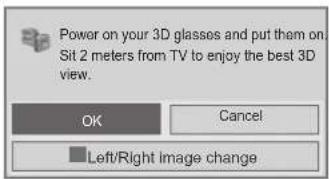
text_image
Power on your 3D glasses and put them on Sit 2 meters from TV to enjoy the best 3D view. OK Cancel Left/Right image change- In case of this OSD (On Screen Display), you can adjust the 3D effect setting with using button.
or
Select Left/Right or Right/Left.
Select the screen with 3D video with better visibility.
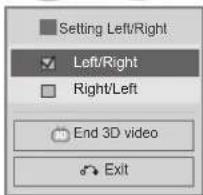
text_image
Setting Left/Right Left/Right Right/Left End 3D video Exitor
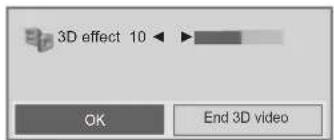
text_image
3D effect 10 OK End 3D videoor
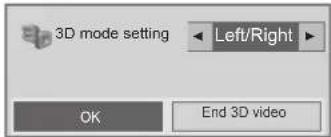
text_image
3D mode setting Left/Right OK End 3D video
If you select the 3D button, you can disable the 3D mode or view the image in 2D mode. Select the OK button to stop the 3D video being played. (Plasma TV Only)
When viewing 3D video When viewing 2D video
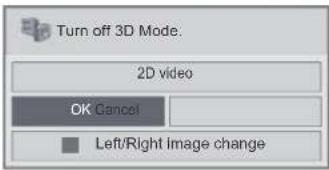
text_image
Turn off 3D Mode. 2D video OK Cancel Left/Right Image changeor
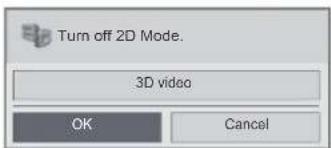
text_image
Turn off 2D Mode. 3D video OK Cancel- Press the 3D button to return to normal TV viewing.
NOTE
If you select 3D mode, "Power indicator" is turned off automatically. (LCD TV/LED LCD TV only)
While watching 3D imaging, you cannot adjust video/audio settings using the menu. (LCD TV/LED LCD TV only)
Some menus may not work while watching the TV in 3D.
▶ You can only choose "Standard → Cinema → Game" with the AV MODE button on remote control. AV Mode is set as Standard while playing in 3D. (LCD TV/LED LCD TV only)
If used 3D effect on the 2D source, 3D may not work.
The 3D imaging mode is disabled automatically when switching DTV channels.
The screen may not be displayed properly if you view 2D DTV images in 3D imaging mode.
3D effect can be seen when 3D Mode is selected appropriately for the 3D input signal supplied to the TV.
▶ Energy Saving is disabled while playing in 3D.
For MPO files (3D camera files), the 3D imaging mode is enabled automatically.
If you'd like to play the BGM using *.mpo file(3D camera file), In advance, the contents path for BGM should be set on full-sized photo view screen which isn't *.mpo file(3D camera file). (LCD TV/LED LCD TV only)
Picture mode is set as Standard, Energy Saving Off if entering to 3D modeCD TV/LED LCD TV only)
NOTES FOR VIEWING 3D IMAGE WITH 3D BROADCASTING In Analog TV, 3D Imaging does not work
When switching the 2D image display to the 3D image display with the 3D button on the remote control, the overlapped image may be displayed.
■ Disable the 3D imaging mode with the 3D button.
■ The 3D imaging mode is disabled automatically if you change the channel.
If the screen is divided into left/right or top/bottom when you change the channel
This channel supports the 3D imaging mode. Select the 3D imaging type displayed on the screen by pressing the 3D button on the remote control.
If your eyes are sore or the screen looks blurry while viewing 3D images
- Press the L/R SELECT button on the remote control and select L/R or R/L, which you find better for viewing 3D images.
TO USE A USB OR PC DEVICE
WHEN CONNECTING A USB DEVICE
When you connect a USB device, this pop up menu is displayed, automatically.
"POP UP MENU" will not be displayed while the OSD including Menu, EPG or Schedule list is activated or while the Bluetooth Headset is connected.
When the Pop Up menu appears, you can select Music List, Photo List or Movie List in the MY MEDIA menu. In USB device, you can not add a new folder or delete the existing folder.
After choosing the desired type of media, choose a device to open files from. The options are: USB device or DLNA.
1 Connect the USB device to the USB IN 1 or USB IN 2 jack on the TV.
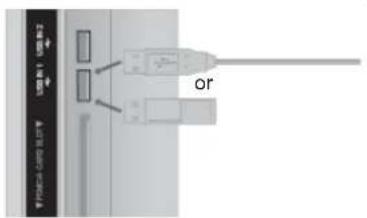
text_image
Or
Select Movie List, Photo List or Music List.
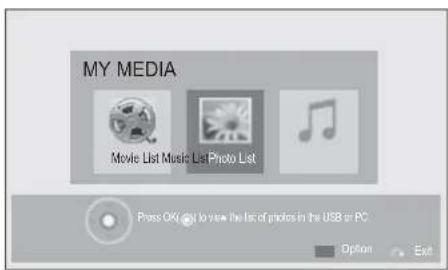
text_image
MY MEDIA Movie List Music List Photo List Press OK to view the list of photos in the USB or PC Option Exit
Select the desired device.

Search other network device.
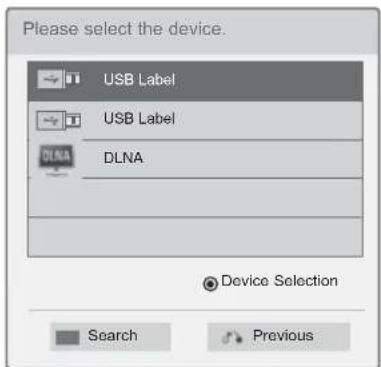
text_image
Please select the device. USB Label USB Label DLNA Device Selection Search Previous- Press the BACK button to move to the previous menu screen.
- Only photo(JPEG MPO(Only 42/47LX6***, 47/55LX9***, 50/60PX9**)), music (MP3) and movie(DAT, MPG, MPEG, VOB, AVI, DIVX, MP4, MKV, TS, TRP, TP, ASF, WMV) are supported.
When removing the USB device
Select the USB Device menu before removing the USB device.
Select USB Device.

Select Eject.
NOTE
■ Image shown may differ from your TV.
▶ In order to avoid losing the USB memory stick, use the USB connector(sold separately) to fix the USB memory stick to the USB connector holder of the TV. (Plasma TV only)
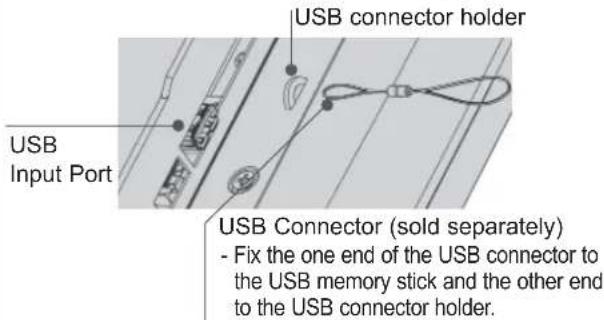
text_image
USB connector holder USB Input Port USB Connector (sold separately) - Fix the one end of the USB connector to the USB memory stick and the other end to the USB connector holder.Precautions when using the USB device
▶ Only a USB storage device is recognizable.
▶ If the USB storage device is connected through a USB hub, the device is not recognizable.
▶ A USB storage device using an automatic recognition programme may not be recognized.
▶ A USB storage device which uses its own driver may not be recognized.
▶ The recognition speed of a USB storage device may depend on each device.
▶ Please do not turn off the TV or unplug the USB device when the connected USB storage device is working. When such device is suddenly separated or unplugged, the stored files or the USB storage device may be damaged.
▶ Please do not connect the USB storage device which was artificially maneuvered on the PC. The device may cause the product to malfunction or fail to be played. Never forget to use only a USB storage device which has normal music files, image files or movie files.
▶ Please use only a USB storage device which was formatted as a FAT32 file system, NTFS file system provided with the Windows operating system. In case of a storage device formatted as a different utility programme which is not supported by Windows, it may not be recognized.
▶ Please connect power to a USB storage device(over 0.5 A) which requires an external power supply. If not, the device may not be recognized.
▶ Please connect a USB storage device with the cablered by the device maker.
▶ Some USB storage devices may not be supported or operated smoothly.
▶ File alignment method of USB storage device is similar to Window XP and filename can recognize up to 100 English characters.
▶ Be sure to back up important files since data stored in a USB memory device may be damaged. We will not be responsible for any data loss.
the USB HDD does not have an external power source, the USB device may not be detected. So be sure to connect the external power source. - Please use a power adaptor for an external power source. We do not guarantee an USB cable for an external power source.
▶ If your USB memory device has multiple partitions, or if you use a USB multi-card reader, you can use up to 4 partitions or USB memory devices.
▶ If a USB memory device is connected to a USB multi-card reader, its volume data may not be detected.
▶ If the USB memory device does not work properly, disconnect and reconnect it.
▶ How fast a USB memory device is detected differs from device to device.
▶ If the USB is connected in Standby Mode, specific hard disk will automatically be loaded when the TV is turned on.
The recommended capacity is 1 TB or less for a USB external hard disk and 32 GB or less for USB memory.
▶ Any device with more than the recommended capacity may not work properly.
▶ If a USB external hard disk with a "Energy Saving" function does not work, turn the hard disk off and on again to make it work properly.
▶ USB storage devices below USB 2.0 are supported as well. But they may not work properly in the movie list.
▶ Maximum of 999 folders or files can be recognized under one folder.
▶ If there are too many folders and files in one folder, it may not operate properly.
TO USE A USB OR PC DEVICE
DLNA
About DLNA
This TV can display and play many types of movie, photo and music files from your DLNA server and has been certified by DLNA for photos.
The Digital Living Network Alliance (DLNA) is a cross-industry organization of consumer electronics, computing industry and mobile device companies. Digital Living provides consumers with easy sharing of digital media through a wired or wireless network in the home.
The DLNA certification logo makes it easy to find products that comply with the DLNA Interoperability Guidelines. This unit complies with DLNA Interoperability Guidelines v1.5. When a PC running DLNA server software or other DLNA compatible device is connected to this TV, some setting changes of software or other devices may be required. Please refer to the operating instructions for the software or device for more information.
Please refer to pages 93 to 127 for additional information on supported file types and other instructions.
NOTE
The supplied Nero MediaHome 4 Essentials CD-ROM is a customized software edition only for sharing files and folders to this TV.
The supplied Nero MediaHome 4 Essentials software does not support following functions: Transcoding, Remote UI, TV control, Internet services and Apple iTunes
This manual explains operations with the English version of Nero MediaHome 4 Essentials as examples. Follow the explanation referring to the actual operations of your language version.
If there are too many folders and files in one folder, it may not operate properly.
For the DLNA option, use the Nero MediaHome programme that is provided with the TV. However, we cannot guarantee that third party programmes will work perfectly.
▶ You can select a channel while viewing the small preview channel list on your TV screen.
▶ Check your network settings when the DLNA option does not work properly.
If there is an abnormal operation or an error occurs in Nero Media Home, the DLNA option may not work properly. In this case, exit Nero Media Home and restart the programme. You can download the latest version of Nero Media Home by clicking the question mark at the bottom-left of the programme.
When the network is unstable, the device may be slower or may need to load during playback.
When playing a video in DLNA mode, the Multi Audio and Closed Caption features are not supported.
When selecting Full Screen in DLNA mode, the ratio of the outputted screen may differ from the original.
When more than one TV is connected to a single server in DLNA mode, a file may not play properly, depending on the server performance.
If the play time information is not provided by the server, it is displayed as "--:--:"
When using Movie List, DRM/*.tp /* .trp files in the DLNA server cannot be played.
The *.MPO file in DLNA server is not played when Photo List is in operation.
▶ DLNA operation may not work properly according to the AP manufacturers.
Installing Nero MediaHome 4 Essentials
Nero MediaHome 4 Essentials is easy to use DLNA server software for Windows.
Requirement PC system before you install Nero MediaHome 4 Essentials
■ Windows® XP (Service Pack 2 or higher), Windows Vista® (no Service Pack required), Windows® XP Media Center Edition 2005 (Service Pack 2 or higher), Windows Server® 2003
■ Windows Vista® 64-bit edition (application runs in 32-bit mode)
■ Hard drive space: 200 MB hard drive space for a typical installation of Nero MediaHome stand-alone
■ 1.2 GHz Intel® Pentium® III or AMD Sempron™ 2200+ processors
■ Memory: 256 MB RAM
■ Graphics card with at least 32 MB video memory, minimum resolution of 800 x 600 pixels, and 16-bit colour settings
■ Windows® Internet Explorer® 6.0 or higher
■ DirectX® 9.0c revision 30 (August 2006) or higher
■ Network environment: 100 Mb Ethernet, WLAN (IEEE 802.11 b/g/n) (IEEE 802.11 n: Except for Russia)
1 Start up your computer, and insert the Nero MediaHome 4 Essentials CD-ROM into your computer's CD-ROM drive.
An installation wizard will walk you through the quick and uncomplicated installation process.
2 Close all Microsoft Windows programmes and exit any anti-virus software that may be running.
3 Insert the Nero MediaHome 4 Essentials CD-ROM into your computer's CD-ROM drive.
4 Click Nero MediaHome 4 Essentials. The installation is prepared and the installation wizard appears.
5 Click the Next button to display the serial number input screen.
Click Next to go to the next step.
6 If you accept all conditions, click I accept the License Conditions check box and click Next. Installation is not possible without this agreement.
7 Click Typical and click Next. The installation process is started.
8 If you want to take part in the anonymous collection of data, select the check box and click the Next button.
9 Click the Exit button to complete the installation.
TO USE A USB OR PC DEVICE
Sharing files and folders
After installing Nero MediaHome, you must add folders you wish to share.
1 Double-click the Nero MediaHome 4 Essentials icon on the desktop.
2 Click Network icon on the left and define your network name in the Network name field. The Network name you enter will be recognized by your TV.
3 Click Shares icon on the left.
4 Click Local Folders tab on the Shared screen.
5 Click Add icon to open the Browse Folder window.
6 Select the folder containing the files you want to share. The selected folder is added to the list of shared folders.
7 Click Start Server icon to start the server.
NOTE
If the shared folders or files are not displayed on the TV, click the folder on the Local Folders tab and click Rescan Folder at the More button.
▶ Visit www.nero.com for more information and software tools.
Playing back shared contents
You can display and play movie, photo and music content stored on your computer or other DLNA media servers.
1 Start the server on your computer or other device that connected on your home network.

Select MY MEDIA.
Select Movie List, Photo List or Music List.
Select the DLNA.
Depending on the media server, this TV may need to get the permission from the server.
If you want to re-scan available media server, press blue colour button.
NOTE
▶ To play the file on the media server, the TV and the media server must be connected to the same access point.
▶Because the compatibility and available playback functions on the MY MEDIA menu are tested on the bundle DLNA server (Nero MediaHome 4 Essentials) environment, file requirements and playback functions on the MY MEDIA may differ depending on media servers.
The file requirements on this page are not always compatible. There may have some restrictions by file features and media server's ability.
Even the files that are not supported can be displayed in photo thumbnail or music thumbnail.
▶ Movie thumbnail is not supported in DLNA Movie.
▶ If there is an unplayable music file in the MY MEDIA menu, the TV will skip the file and play next file.
The file information indicated on the screen may not always correct for music and movie files in MY MEDIA menu.
This TV only supports movie subtitle files supplied by Nero MediaHome 4.
The subtitle file name and movie file name have to be the same and located at the same folder.
▶ If subtitle files have been added after a directory has been indexed already, the user has to remove and re-add the folder to the list of shares.
The playback and operating quality of the MY MEDIA function may be affected by your home network condition.
The files from removable media such as USB drive, DVD-drive etc. on your media server may not share properly.
▶ When playing the Media through DLNA connection, it does not support the DivX file play which is protected by DRM.
▶ Up to 200 folders in one folder and 999 including folders and files can be recognized.
▶ If there are too many folders and files in one folder may not operate properly.
TO USE A USB OR PC DEVICE
MOVIE LIST
You can play movie files on a USB or PC storage device.
The movie list is activated once USB is detected. It is used when playing movie files on TV.
Displays the movies in the USB folder and supports Play.
Allows playback of all movies in the folder and user desired files.
It is a movie list that displays folder information and movie file.
The On Screen Display may be different from your TV. Images are an example to assist with the TV operation.
Movie(*.mpg/*.mpeg/*.dat/*.ts/*.trp/*.tp/*.vob/*.mp4/*.mov/*.mkv/*.dvix/*.avi/*.asf/*.wmv/*.avi(motion-jpeg)/*.mp4(motion-jpeg)/*.mkv(motion-jpeg))supporting file
Video format : DivX3.11, DivX4.12, DivX5.x, DivX6, Xvid1.00, Xvid1.01, Xvid1.02, Xvid1.03, Xvid1.10 beta-1/beta-2, Mpeg-1, Mpeg-2, Mpeg-4, H.264/AVC, VC1, JPEG, Sorenson H.263
Audio format : Dolby Digital, AAC, Mpeg, MP3, LPCM, HE-AAC, ADPCM, WMA
Bit rate : within 32 kbps to 320 kbps(MP3)
External Subtitle format : *.smi/*.srt/*.sub(MicroDVD,Subviewer1.0/2.0)/*.ass/*.ssa/*.txt(TMPlayer)/*.psb(PowerDivX) Internal Subtitle format : only, XSUB (It is the subtitle format used in DivX6 files)
- Some user-created subtitles may not work properly.
- Some special characters are not supported in subtitles.
- HTML tags are not supported in subtitles.
- Subtitles in languages other than the supported languages are not available.
- Changing font and colour in subtitles is not supported.
- Subtitles in languages other than one specified are not supported.
• Video files with subtitle files of 1 MB or larger may not be played properly.
- The screen may suffer temporary interruptions (image stoppage, faster playback, etc.) when the audio language is changed.
- A damaged movie file may not be played correctly, or some player functions may not be usable.
- Movie files produced with some encoders may not be played correctly.
- If the video and audio structure of recorded file is not interleaved, either video or audio is outputted.
- HD videos with a maximum of 1920x1080@25/30P or 1280x720@50/60P are supported, depending on the frame.
- Videos with resolutions higher than 1920X1080@25/30P or 1280x720@50/60P may not work properly depending on the frame.
- Movie files other than the specified types and formats may not work properly.
- Max bitrate of playable movie file is 20 Mbps.
- We do not guarantee smooth playback of profiles encoded level 4.1 or higher in H.264/AVC.
• DTS Audio codec is not supported.
- A movie file more than 30 GB in file size is not supported for playback.
- A DivX movie file and its subtitle file must be located in the same folder.
- A video file name and its subtitle file name must be identical for it to be displayed.
- Playing a video via a USB connection that doesn't support high speed may not work properly.
- The movie file encoded by the GMC (Global Motion Compensation) and Qpel (Quarterpel Motion Estimation) is not supported.
- When you are watching the movie by Movie List function, you can adjust an image by Energy Saving and AV Mode key on the remote control. User setup for each image mode does not operate.
- Trick Mode does not support other functions than ▶▶ if video files do not have index information.
- When playing video file using network, the Trick mode is limited to 2-times speed.
- Video file names that contain special characters may not be playable.
Supported DivX file
| File Extensions | A/V | Codec | Profile/Level Support | Explanation |
| .asf.wmv | Video | VC-1 Advanced Profile | Advanced Profile@Level 3 (e.g. 720p60, 1080i60, 1080p30) | Only streams compliant to SMPTE 421M VC-1 standard are supported. |
| VC-1 Simple and Main Profiles | Simple Profile@Medium Level (e.g. CIF, QVGA) Main Profile@High Level (e.g. 1080p30) | |||
| Audio | WMA Standard | |||
| WMA 9 Professional | ||||
| .divx.avi | Video | DivX3.11 | Global motion compensation or quar-terpel motion esti-mation does not supported. Streams using this syntax are not supported. | |
| DivX4 DivX5 DivX6 | Advanced Simple Profile (e.g. 720p/1080i) | |||
| XViD | ||||
| H.264 / AVC | Main Profile@ Level 4.1 High Profile@ Level 4.1 (e.g. 720p60, 1080i60, 1080p30) | |||
| Audio | MPEG-1Layer I, II MPEG-1 Layer III(MP3) Dolby Digital | |||
| .mp4.m4v | Video | H.264 / AVC | Main Profile@ Level 4.1 High Profile@ Level 4.1 (e.g. 720p60, 1080i60, 1080p30) | Global motion compensation or quarterpel motion estimation does not supported. Streams using this syntax are not supported. |
| MPEG-4 Part 2 | Advanced Simple Profile (e.g. 720p/1080i) | |||
| Audio | AAC | AAC-LC and HE-AAC | ||
| .mkv | Video | H.264 / AVC | Main Profile@ Level 4.1 High Profile@ Level 4.1 (e.g. 720p60, 1080i60, 1080p30) | Most of the MKV content available is encoded by the open source x264 codec. |
| Audio | AAC Dolby Digital | AAC-LC and HE-AAC | ||
| .ts.trp.tp | Video | H.264 / AVC | Main Profile@ Level 4.1 High Profile@ Level 4.1 (e.g. 720p60, 1080i60, 1080p30) | |
| MPEG-2 | Main Profile@High Level(e.g. 720p60, 1080i60) | |||
| VC-1 | Simple Profile@Medium Level (e.g. CIF, QVGA) Main Profile@High Level (e.g. 1080p30) Advanced Profile@Level3 (e.g. 720p60, 1080i60, 1080p30) | Only streams compliant to SMPTE 421M VC-1 stand-ard are supported. | ||
| Audio | MPEG-1Layer I, II MPEG-1 Layer III(MP3) Dolby Digital | |||
| AAC | AAC-LC and HE-AAC | |||
| .vob | Video | MPEG-1 | ||
| MPEG-2 | Main Profile@High Level (e.g. 720p60, 1080i60) | |||
| Audio | Dolby Digital MPEG-1Layer I, II DVD-LPCM | |||
| .mpg | Video | MPEG-1 | Main Profile@High Level (e.g. 720p60, 1080i60) | Only streams compliant configured properly for TS, PS or ES |
| Audio | MPEG-1Layer I, II |
TO USE A USB OR PC DEVICE
Screen Components
You can also adjust USB in the INPUT menu.

Select MY MEDIA.
Select Movie List.
1 Moves to upper level folder
② Current page/Total pages
③ Corresponding buttons on the remote control
④ Contents under the folder focused on ①
⑤ Current page/ total pages of contents under the folder focused on ①
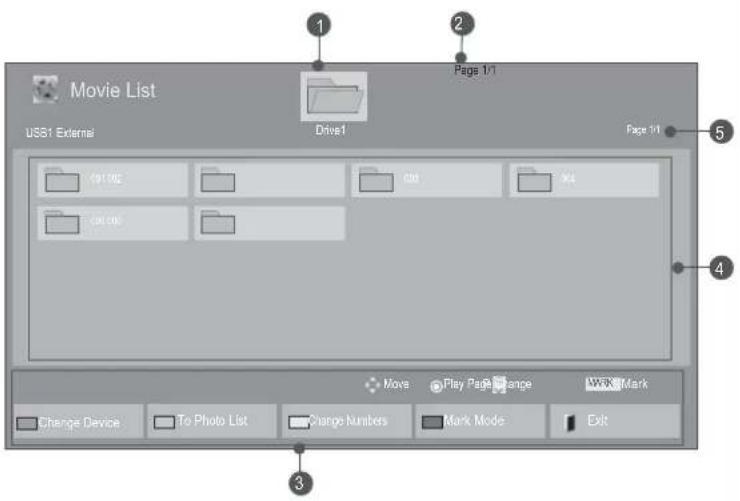
text_image
Movie List US31 External Drive1 Page 1/1 Page 1/1 5 4 3 Moves Play Page Change WORK Mark Change Device To Photo List Change Numbers Mark Mode Exit- Some files may be displayed the preview image by icon only.
text_image
5• Non-supported files are displayed the preview image by icon only.
text_image
5 !• Abnormal files are displayed in the form of bitmap.
text_image
5 ×Movie Selection
■ When playing movie files
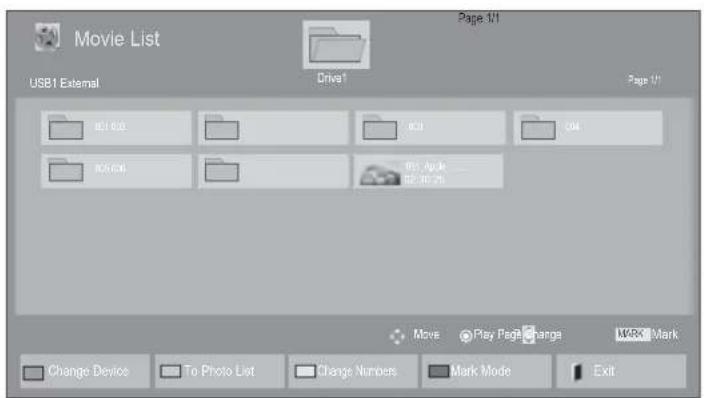
text_image
Movie List Page 1/1 USB1 External Drive1 Page 1/1 B1.022 B3.0 C04 B4.036 B5. Apple ... B6.02.26 Move Play Page Change WORK Mark Change Device To Photo List Change Numbers Mark Mode Exit
Select the target folder or drive.

Select the desired movie title.
Movie files are played.
- Use the P^^ button to navigation in the movie page.
Using the remote control
| RED | Change device. |
 | Repeatedly, press the GREEN button to converted to Photo List->Music List. |
 | A method to view in 5 large thumbnail or simple list. |
 | Convert to Mark Mode. |
 | Return to normal TV viewing. |
| Press the PLAY (►) button to return to normal playback. | |
TO USE A USB OR PC DEVICE
■ When selected movie files are played
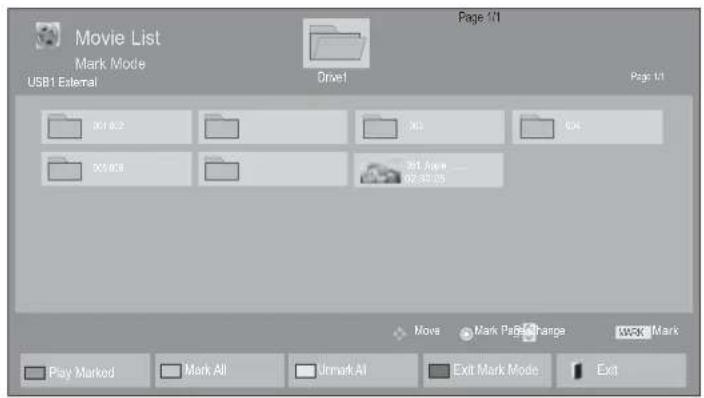
text_image
Movie List Mark Mode USB1 External Drive1 Page 1/1 Page 1/1 301 822 302 304 05 808 301 Page ... 02:30:05 Move Mark PageChange WORK Mark Play Marked Mark All Unmark All Exit Mark Mode Ext
Select the target folder or drive.
Select the desired movie title.
Convert to Mark Mode.
Mark desired Movie file.
Marked movie file is played.
- When one or more movie files are marked, the marked movies will be played in sequence.
NOTE
▶ In the case of files not supported, a message regarding non-supported file is displayed.
Using the remote control
 | Play the selected movie file.Once a movie file finishes playing, the next selected one will be played automatically. |
 | Mark all movie files on the screen. |
 | Deselect all marked movie files. |
 | Exit the Mark Mode. |
 | Return to normal TV viewing. |
NOTE
▶ If you select "Yes" from OSD when playing the same file after the movie file has been stopped, it will restart where it stopped previously.
▶ If continuous series files exist within the folder, the next file will automatically be played. But, this excludes cases when the Repeat function of Movie List Option is turned "On" (Refer to p. 104) or when set as Marked Play.
TO USE A USB OR PC DEVICE
Using the Movie List function, play
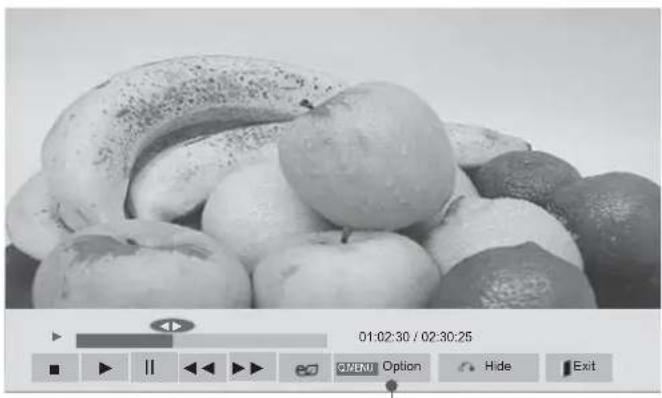
natural_image
Black-and-white photo of assorted fruits including bananas, apples, and oranges (no text or symbols visible)■ Image shown may differ from your TV.
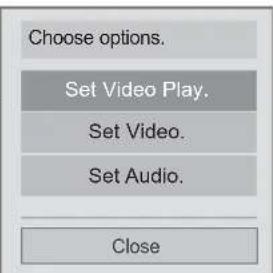
text_image
Choose options. Set Video Play. Set Video. Set Audio. Close
Show the Option menu.
Select Set Video Play., Set Video., Set Audio. or Set 3D video.(Only 42/47LX6***, 47/55LX9***, 50/60PX9**).
NOTE
▶ Option values changed in Movie List does not affect Photo List and Music List.
▶ Option value changed in Photo List and Music List are changed likewise in Photo List and Music List excluding Movie List.
▶ When replaying the video file after stopping, you can play from where it stopped previously.
Using the remote control
| ■ Stop the playing movie file. | |
| ▶ Press the PLAY (▶) button to return to normal playback. | |
| II | During playback, press the Pause(II) button.■ Still screen is displayed.■ If no buttons are pressed on the remote control for 10 minutes after pausing, the TV returns to the playback state.■ Press the Pau(II) button and then use the FF(▶▶) button for slow motion. |
 | When playing,repeatedly, press the REW(◀◀) button to speed up ◀◀(x2) -> ◀◀◀(x4) -> ◀◀◀◀(x8) -> ◀◀◀◀◀(x16) -> ◀◀◀◀◀◀(x32).repeatedly, press the FF(▶▶) button to speed up ▶▶(x2)-> ▶▶▶(x4) -> ▶▶▶▶(x8) -> ▶▶▶▶▶(x16) -> ▶▶▶▶▶▶(x32).■ Pressing these buttons repeatedly increases the fast forward/reverse speed. |
 or or  | Show the Option menu. |
 | Hide the menu on the full-sized screen.■ To see the menu again on the full-sized screen, press OK button to display. |
 | Return to normal TV viewing. |
| [VC07] | ■ When using theor > button during playback a cursor indicating the position can be viewed on the screen. |
 | Press the ENERGY SAVING button repeatedly to change the brightness of your screen.(Refer to p. 138) |
 | Press the AV MODE button repeatedly to select the desired source.(Refer to p. 66) |
TO USE A USB OR PC DEVICE
■ When you select the Set Video Play,
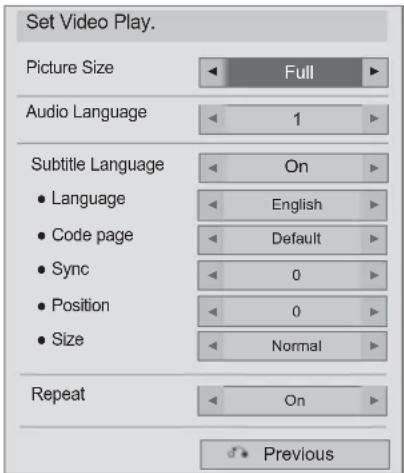
text_image
Set Video Play. Picture Size Full Audio Language 1 Subtitle Language On Language English Code page Default Sync 0 Position 0 Size Normal Repeat On Previous
Select Picture Size, Audio Language, Subtitle Langugae or Repeat.

Make appropriate adjustments.
| Subtitle Language | Support Language |
| Latin1 | English, Spanish, French, German, Italian, Swedish, Finnish, Dutch, Portuguese, Danish, Romanian, Norwegian, Albanian, Gaelic, Welsh, Irish, Catalan, Valencian |
| Latin2 | Bosnian, Polish, Croatian, Czech, Slovak, Slovenian, Serbian, Hungarian |
| Latin4 | Estonian, Latvian, Lithuanian |
| Cyrillic | Bulgarian, Macedonian, Russian, Ukrainian, Kazakh |
| Greek | Greek |
| Turkish | Turkish |
▶ Picture Size : Selects your desired picture format during movie play.
▶Audio Language : Changes the Language Group of the audio during movie play. Files with a single audio track cannot be selected.
▶ Subtitle LangugaeTurn on/off the subtitle.
▶ Language : Activated for SMI subtitle and can select the language within the subtitle.
▶ Code page : Can select the font for subtitle. When set to default, same font as general menu will be used.
▶ Sync : Adjusts the time synchronisation of the subtitle from -10 secs to +10 secs by steps of 0.5 secs during movie play.
▶ Position : Changes the position of the subtitle either up or down during movie play.
▶ Size : Selects your desired Subtitle size during movie play.
▶ Repeat : Turn on/off repeat function of movie playback. When turned on, the file within the folder will be played back repeatedly. Even when the repeated playback is turned off, it can run the playback if the file name is similar to the previous file.
NOTE
▶ Only 10,000 of sync blocks can be supported within the subtitle file.
▶ When playing a video, you can adjust the Picture Size by pressing the RATIO button.
■ When you select the Set Video,
■ Image shown may differ from your TV.
LCD TV/LED LCD TV only
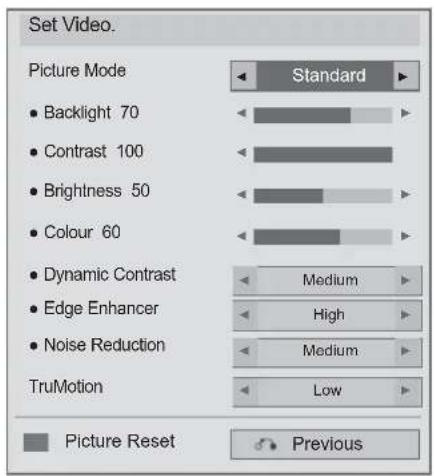
text_image
Set Video. Picture Mode • Backlight 70 • Contrast 100 • Brightness 50 • Colour 60 • Dynamic Contrast • Edge Enhancer • Noise Reduction TruMotion Standard Medium High Medium Low Picture Reset PreviousPLASMA TV Only
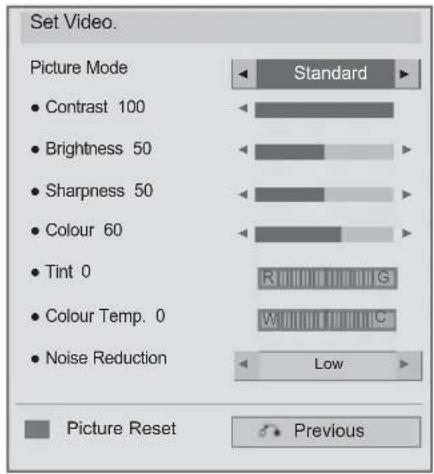
text_image
Set Video. Picture Mode • Contrast 100 • Brightness 50 • Sharpness 50 • Colour 60 • Tint 0 • Colour Temp. 0 • Noise Reduction Standard R G W C Low Picture Reset Previous

Select Picture Mode or TruMotion.
Make appropriate adjustments. (Refer to p. 139 to 148)
TO USE A USB OR PC DEVICE
■ When you select the Set Audio,
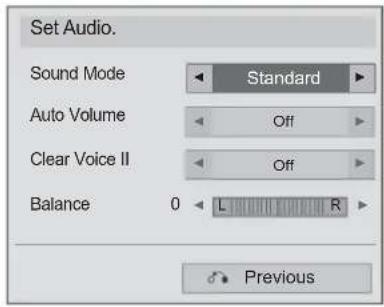
text_image
Set Audio. Sound Mode Standard Auto Volume Off Clear Voice II Off Balance 0 L R Previous
Select Sound Mode, Auto Volume, Clear Voice II or Balance.
Make appropriate adjustments. (Refer to p. 154 to 158)
■ When you select the Set 3D video Only 42/47LX6***, 47/55LX9***, 50/60PX9***
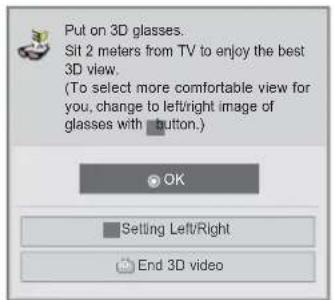
text_image
Put on 3D glasses. Sit 2 meters from TV to enjoy the best 3D view. (To select more comfortable view for you, change to left/right image of glasses with button.) OK Setting Left/Right End 3D videoor
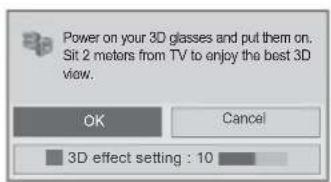
text_image
Power on your 3D glasses and put them on. Sit 2 meters from TV to enjoy the best 3D view. OK Cancel 3D effect setting : 10or
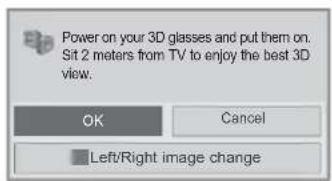
text_image
Power on your 3D glasses and put them on. Sit 2 meters from TV to enjoy the best 3D view. OK Cancel Left/Right image changeFor more information, see the 3D Imaging section in the Owner's Manual.
PHOTO LIST
You can view photo files on USB or PC storage device.
The On Screen Display may be different from your TV. Images are an example to assist with the TV operation.
When you are watching the photo by the Photo List function, you can not change the picture mode.
PHOTO(*.JPEG) supporting file
Baseline : 64 x 64 to 15360 x 8640
Progressive : 64 x 64 to 1920 x 1440
- You can play JPEG files only.
• Non-supported files are displayed in the form of predefined icon. - An error message occurs for corrupted files or file formats that cannot be played.
- Corrupted image files may not be displayed properly.
- It may take some time to view high-resolution images in full screen.
Only 42/47LX6***, 47/55LX9***, 50/60PX9***
| File Extensions | Item Profile | ||
| 2D | jpegjpgjpe | supproted file format | SOF0: baselineSOF1: Extend SequentialSOF2: Progressive |
| photo size | Min: 64 x 64Max - Normal Type: 15360 (W) x 8640 (H)Progressive Type: 1920 (W) x 1440 (H) | ||
| 3D | mpo | supproted file format | mpo |
| photo size | 4:3 size: 3,648 x 2,7362,592 x 1,9442,048 x 1,5363:2 size: 3,648 x 2,432 |
Screen Components
You can also adjust USB in the INPUT menu.

Select MY MEDIA.
Select Photo List.
① Moves to upper level folder
② Current page/Total pages
③ Corresponding buttons on the remote control
④ Contents under the folder focused on ①
⑤ Current page/ total pages of contents under the folder focused on ①
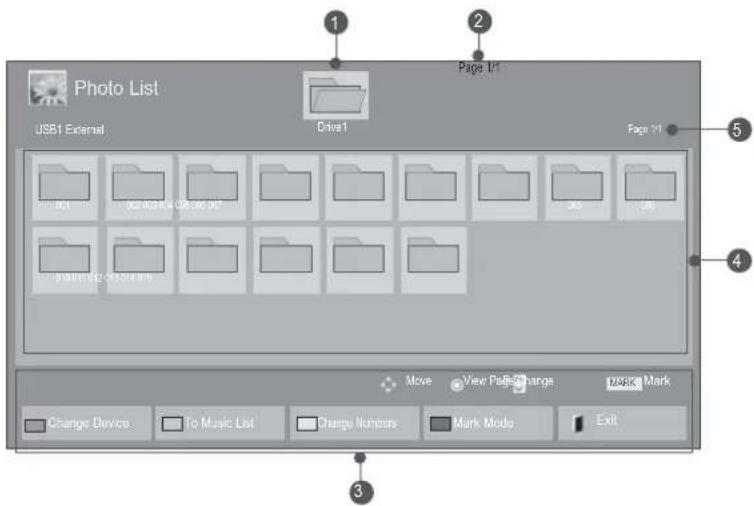
text_image
Photo List JSB1 External Drive1 Page 11 5 4 Move View Page Change Mark Mark Change Device To Music List Change Numbers Mark Mode Exit 3TO USE A USB OR PC DEVICE
Photo Selection
■ When playing photo files
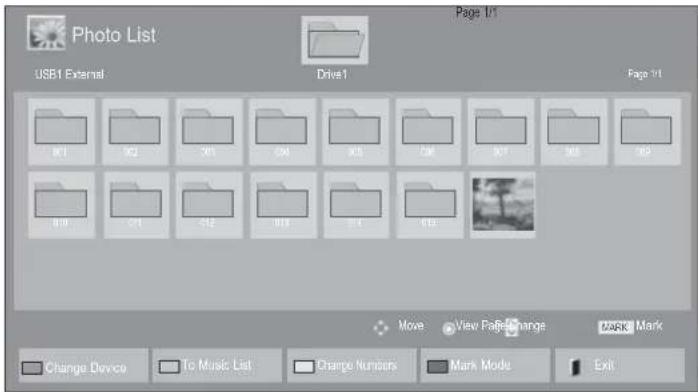
text_image
Photo List USB1 External Drive1 Page 1/1 Page 1/1 M1 M2 M3 M4 M5 M6 M7 M8 M9 0.0 0.1 0.2 0.3 0.4 0.5 Move View Page Change MARK Mark Change Device To Music List Change Numbers Mark Mode Exit
Select the target folder or drive.
- Use the P^v button to navigation in the photo page.
Select the desired photos.
Photo files are displayed.
Using the remote control
 | Change device. |
 | Repeatedly, press the GREEN button to converted to Music List->Movie List. |
 | A method to view in 5 large thumbnail or simple list. |
 | Convert to Mark Mode. |
 | Return to normal TV viewing. |
■ When selected photo files are displayed
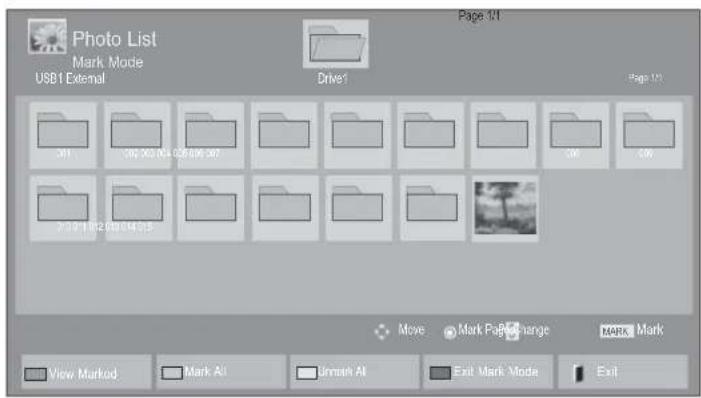
text_image
Photo List Mark Mode USB1 External Drive1 Page 1/1 01 02 03 04 05 06 07 08 09 10 11 12 13 14 15 Move Mark PageChange MARK Mark View Marked Mark Alt Print Alt Exit Mark Mode Exit
Select the target folder or drive.

Select the desired photos.

Convert to Mark Mode.

Mark desired photo file.
Marked photo file is displayed.
- When one or more photos are marked, you can view each marked photo or a slide show of the marked photos. If no photos are marked, you can view every individual photo in the folder or a slide show of all photos in the folder.
TO USE A USB OR PC DEVICE
Using the remote control
 | Display the selected photo file. |
| (KGTG) | Mark all photo files on the screen. |
 | Deselect all marked photo files. |
| (ZY7A) | Exit the Mark Mode. |
 | Return to normal TV viewing. |
How to view photo
Detailed operations are available on full-sized photo view screen.
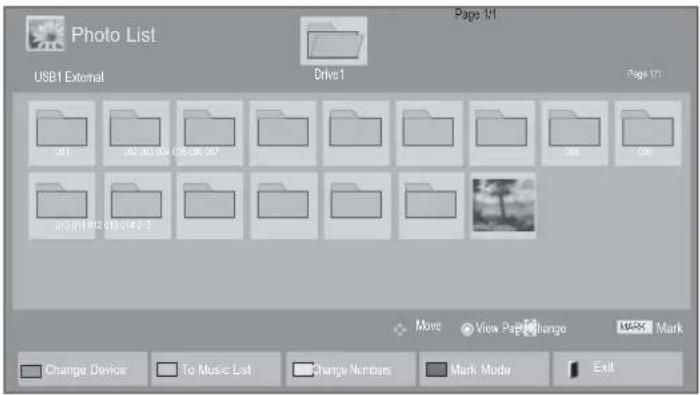
text_image
Photo List USB1 External Drive1 Page 1/1 Page 1/1 001 002 302.00x 003 806.00 004 005 006 007 008 009 010 101 201 301 401 5 Move View Page Change MSX Mark Change Device To Music List Change Numbers Mark Mode ExitV
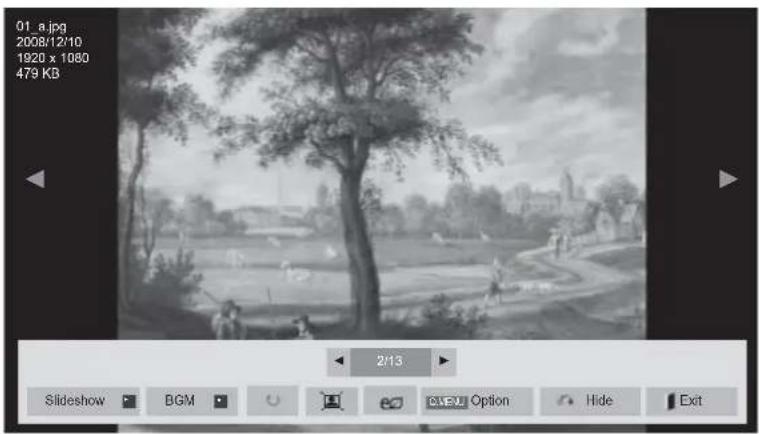
text_image
01 a.jpg 2008/12/10 1920 x 1080 479 KB 2/13 Slideshow BGM CWEU Option Hide ExitThe aspect ratio of a photo may change the size of the photo displayed on the screen in full size. Press the EXIT button to move to the previous menu screen.
Select the target folder or drive.

Select the desired photos.
The selected photo is displayed in full size.
- Use the P ^ v button to navigation in the photo page.
- Press the EXIT button to go back to Photo List.
- Press the BACK button to make Help OSD disappear.
TO USE A USB OR PC DEVICE
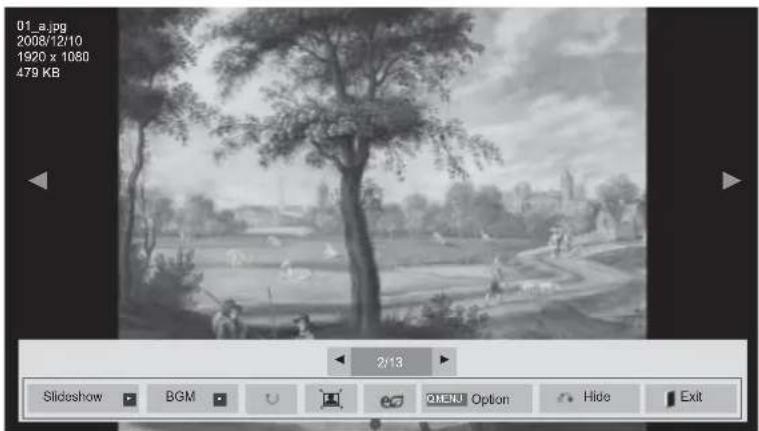
text_image
01. a.jpg 2008/12/10 1920 x 1080 479 KB 2/13 Slideshow BGM OEMU Option Hide Exit
Select the
Slideshow,
BGM, Ⓧ (Rotate),
Option, Hide or
Exit.
▶ Slideshow : When no picture is selected, all photos in the current folder are displayed during slide show. If some photos are selected, those photos are displayed in a slide show.
■ Set the time interval of the slide show in Option.
▶ BGM (Background Music) : Listen to music while viewing photos in full size.
■ Set the BGM device and album in Options before using this function.
■ You can adjust Option by Q.MENU or MENU button on the remote control.
▶ (Rotate) : Rotate photos.
■ Rotates the photo 90^ , 180^ , 270^ , 360^ clockwise.
It can not be rotate when the width of a picture is bigger than supported height.
/ : You can view the photo in Full or Original mode.
Press the ENERGY SAVING button repeatedly to change the brightness of your screen. (Refer to p. 138)
▶ OptiGet values for Slide Speed and BGM.
■ Use ^ < >button and OK button to set values. Press OK to save the settings.
■ You cannot change BGM while BGM is playing.
■ You can only select the MP3 folder saved on the device that currently displays the photo.
▶ Hide the menu on the full-sized screen.
■ To see the menu again on the full-sized screen, press OK button to display.
Press the EXIT button to go back to Photo List.
- Use < >button to select the previous or next photo.
- Use < >button to select and control the menu on the full-sized screen.
Using the Photo List function
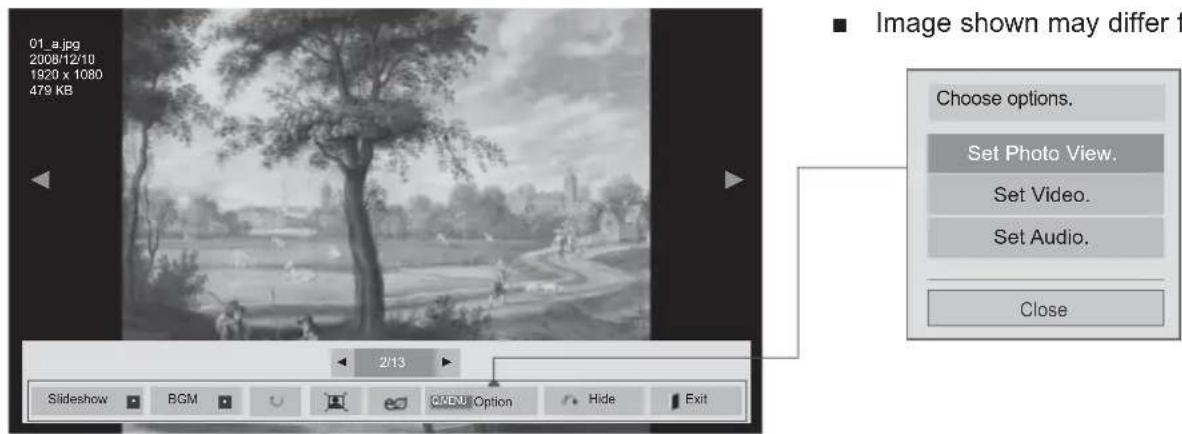
text_image
01_a.jpg 2008/12/10 1920 x 1080 479 KB ■ Image shown may differ f Choose options. Set Photo View. Set Video. Set Audio. Close 2/13 Slideshow BGM C:\BDM Option Hide Exit
or MENU Show the Option menu.

Select Set Photo View., Set Video., Set Audio. or Set 3D video.(Only 42/47LX6***, 47/55LX9***, 50/60PX9**).
NOTE
▶ Option values changed in Movie List does not affect Photo List and Music List.
▶ Option value changed in Photo List and Music List are changed likewise in Photo List and Music List excluding Movie List.
▶Y cannot select the Option in 3D imaging mode. (Only 42/47LX6***, 47/55LX9***)
▶ If you want to listen to BGM (background music) while viewing *mpo image files, play a *jpg file and set the BGM folder in "Option - Set Photo View." Then, you can select and listen to BGM when viewing *mpo files. (Only 42/47LX6***, 47/55LX9***)
TO USE A USB OR PC DEVICE
■ When you select the Set Photo View,
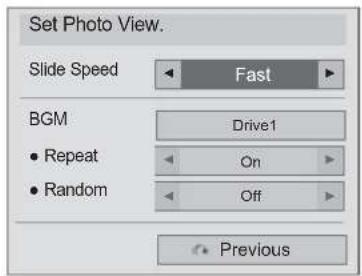
text_image
Set Photo View. Slide Speed Fast BGM Drive1 • Repeat On • Random Off Previous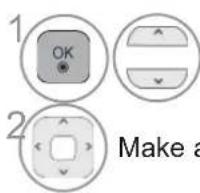
Select Slide Speed or BGM.
Make appropriate adjustments.
■ When you select the Set Video,
■ Image shown may differ from your TV.
LCD TV/LED LCD TV only
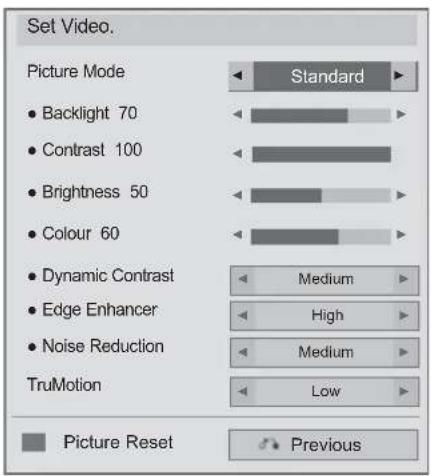
text_image
Set Video. Picture Mode • Backlight 70 • Contrast 100 • Brightness 50 • Colour 60 • Dynamic Contrast • Edge Enhancer • Noise Reduction TruMotion Standard Medium High Medium Low Picture Reset PreviousPLASMA TV Only
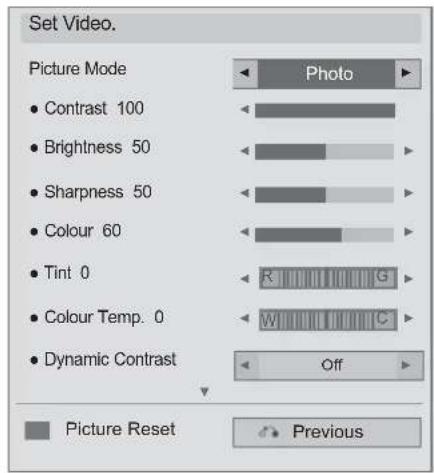
text_image
Set Video. Picture Mode • Contrast 100 • Brightness 50 • Sharpness 50 • Colour 60 • Tint 0 • Colour Temp. 0 • Dynamic Contrast Photo Off Picture Reset Previous

Select Picture Mode or TruMotion.

Make appropriate adjustments. (Refer to p. 139 to 148)
TO USE A USB OR PC DEVICE
■ When you select the Set Audio,
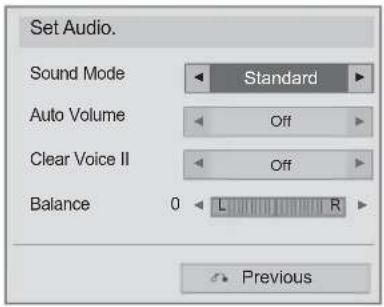
text_image
Set Audio. Sound Mode Standard Auto Volume Off Clear Voice II Off Balance 0 L R Previous
Select Sound Mode, Auto Volume, Clear Voice II or Balance.

Make appropriate adjustments. (Refer to p. 154 to 158)
■ When you select the Set 3D video(Only 42/47LX6***, 47/55LX9***, 50/60PX9***)
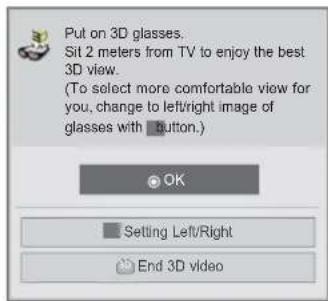
text_image
Put on 3D glasses. Sit 2 meters from TV to enjoy the best 3D view. (To select more comfortable view for you, change to left/right image of glasses with Button.) OK Setting Left/Right End 3D videoor
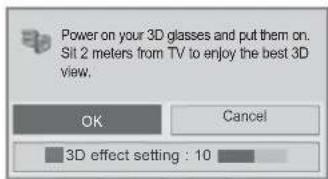
text_image
Power on your 3D glasses and put them on. Sit 2 meters from TV to enjoy the best 3D view. OK Cancel 3D effect setting : 10or
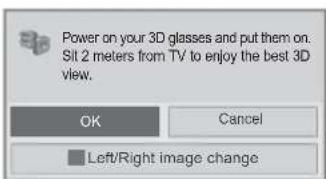
text_image
Power on your 3D glasses and put them on. Sit 2 meters from TV to enjoy the best 3D view. OK Cancel Left/Right image changeFor more information, see the 3D Imaging section in the Owner's Manual.
MUSIC LIST
You can play music files on USB or PC storage device.
Purchased music files(*.MP3) may contain copyright restrictions. Playback of these files may not be supported by this model.
Music file on your USB device can be played by this unit.
The On Screen Display may be different from your TV. Images are an example to assist with the TV operation.
MUSIC (*.MP3) supporting file
Bit rate 32 to 320
• Sampling rate MPEG1 Layer3 : 32 kHz, 44.1 kHz, 48 kHz
• Sampling rate MPEG2 Layer3 : 16 kHz, 22.05 kHz, 24 kHz
Screen Components
You can also adjust USB in the INPUT menu.
Select MY MEDIA.
Select Music List.
1 Preview: If any album jacket for the file(Album Art Image) exists, this jacket is displayed.
② Moves to upper level folder
③ Current page/Total pages
4 Corresponding buttons on the remote control
⑤ Contents under the folder focused on ②
⑥ Current page/ total pages of contents under the folder focused on ②
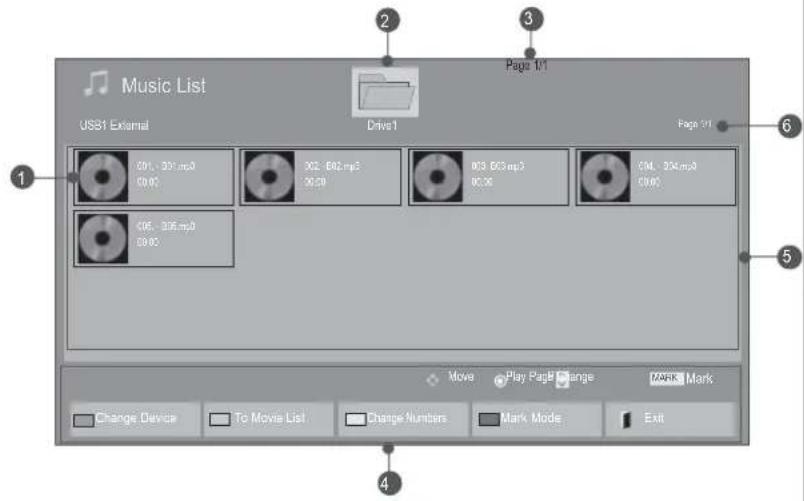
text_image
Music List US$1 External Drive1 Page 1/1 001 - 001.mp3 00.00 002 - 002.mp3 00.00 003 - 003.mp3 00.00 004 - 004.mp3 00.00 005 - 005.mp3 00.00 Page 2/1 Move Play Page Change MARK Mark Change Device To Movie List Change Numbers Mark Mode ExitTO USE A USB OR PC DEVICE
Music Selection
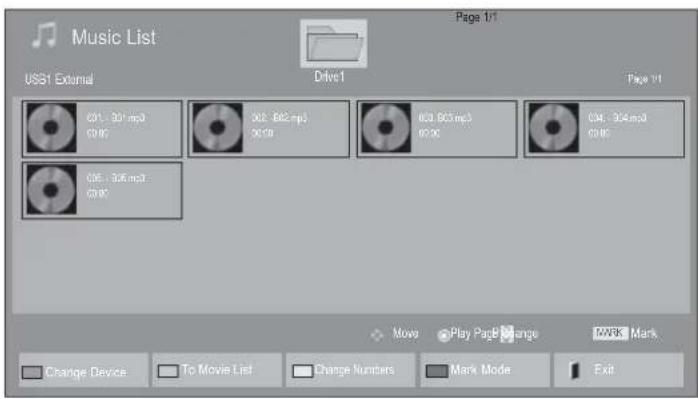
text_image
Music List Page 1/1 USB1 External Drive1 Page 1/1 001. 301.mp3 0016 302. 842.mp3 0019 803. 965.mp3 0026 004. 304.mp3 0046 0056 Mows Play Page Change MARK Mark Change Device To Movie List Change Numbers Mark Mode Exit■ When playing music files
Select the target folder or drive.
Select the desired music title.
Music files are played.
- Use the P ^ ∨ button to navigate up/down in the music page.
Using the remote control
 | Change device. |
 | Repeatedly, press the GREEN button to converted to Movie List->Photo List. |
 | A method to view in 5 large thumbnail or simple list. |
 | Convert to Mark Mode. |
 | Return to normal TV viewing. |
■ When selected music files are played
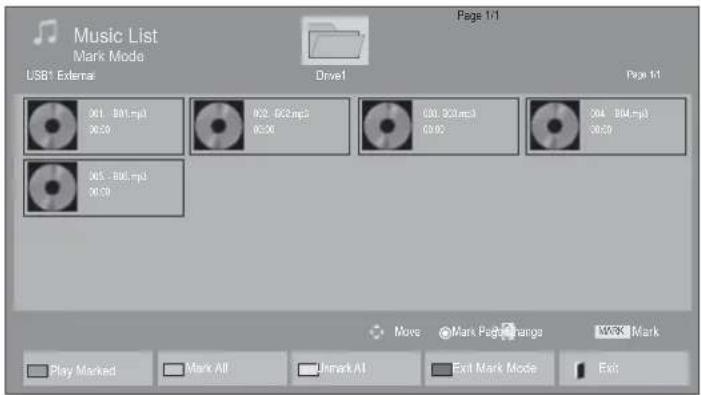
text_image
Music List Mark Mode USB1 External Page 1/1 Drive1 Page 1/1 001. 801.mp3 0020 0025. 802.mp3 0030 0035. 803.mp3 0040 0045. 804.mp3 0050 0060 - 806.mp3 0070 Move Mark Page Range Mark Mark Play Marked Mark All Unmark All Exit Mark Mode Exit
Select the target folder or drive.

Select the desired music title.

Convert to Mark Mode.

Mark desired music file.
Marked music file is played.
- When one or more music files are marked, the marked music title will be played in sequence. For example, if you want to listen to only one music repeatedly, just mark the music only and play it. If no music is marked, all the music in the folder will be played in sequence.
- If you want to activate Random playback, you must set Option->Set audio play.->Random to On.
TO USE A USB OR PC DEVICE
Using the remote control
 | Display the selected music file. |
| (KC2C) | Mark all music files on the screen. |
 | Deselect all marked music files. |
 | Exit the Mark Mode. |
 | Return to normal TV viewing. |
Using the Music List function, play
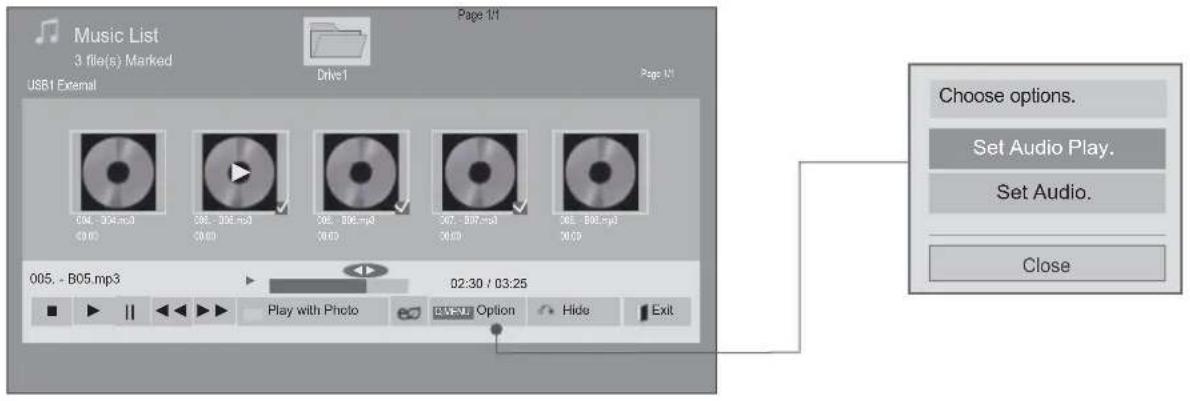
text_image
Music List 3 file(s) Marked Page 1/1 USB1 External Drive1 Page 1/1 004 - 004.mp3 $0.00 005 - 006.mp3 $0.00 007 - 008.mp3 $0.00 009 - 009.mp3 $0.00 005 - B05.mp3 Play with Photo 02:30 / 03:25 Choose options. Set Audio Play. Set Audio. Close Play with Photo Options Hide Exit
or

Show the Option menu.

Select Set Audio Play. or Set Audio.

NOTE
▶ Option values changed in Movie List does not affect Photo List and Music List.
▶ Option value changed in Photo List and Music List are changed likewise in Photo List and Music List excluding Movie List.
▶ You can listen to the music only within the device currently played.
TO USE A USB OR PC DEVICE
Using the remote control
| ■ Stop the playing music file. | |
| ▶ Press the PLAY (▶) button to return to normal playback. | |
| II | When you press the Pause(II) button while playing the file, the playback will be paused.When you press the Pause(II) button again while the playback is paused, it will resume the playback. |
| ◀◀/▶▶ | When playing,When you press the REW(◀◀) button, the previous music file will be played.When you press the FF(▶▶) button, the next music file will be played. |
 | Start playing the selected music files and then move to the Photo List. |
 | Press the ENERGY SAVING button repeatedly to change the brightness of your screen.(Refer to p. 138)Only Off/Screen Off operates from the Movie List, Photo List, Music List (LCD TV/LED LCD TV only). |
 or or  | Show the Option menu. |
 | ■ When you press the Back button while the music is playing, the music player currently playing will be hidden and only the music list will be displayed. |
 | ■ When you press the Exit button while the Music player is displayed, only the music will be stopped and the player will not return to normal TV viewing.■ When you press the Exit button while the music is stopped or while the music player is hidden, the player will return to normal TV viewing. |
| < > | ■ When using tker > button during playback a cursor indicating the position can be played. |
■ When you select the Set Audio Play,
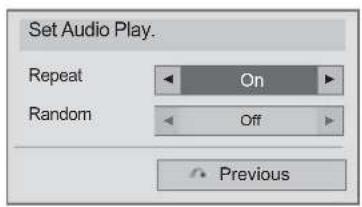
text_image
Set Audio Play. Repeat On Random Off Previous

Select Repeat or Random.
Make appropriate adjustments.
TO USE A USB OR PC DEVICE
■ When you select the Set Audio,
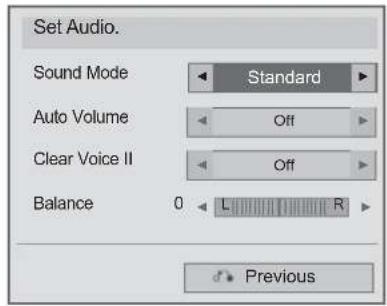
text_image
Set Audio. Sound Mode Standard Auto Volume Off Clear Voice II Off Balance 0 L R Previous
Select Sound Mode, Auto Volume, Clear Voice II or Balance.

Make appropriate adjustments. (Refer to p. 154 to 158)
■ If you don't press any button for a while during the playing, the play information box (as shown in the below) will float as a screen saver.
■ The 'Screen Saver'?
Screen saver is to prevent screen pixel damage due to an fixed image remaining on the screen for a extended period of time.

- B02.mp3
00:31 / 04:04

NOTE
▶ A damaged or corrupted music does not play but displays 00:00 in playtime.
▶ A music downloaded from a paid service with copyright protection does not start but displays inappropriate information in playtime.
▶ If you press OKuttons, screen saver is stopped.
The PLAY(▶), Pause(II), ▶, ◀◀ buttons on the remote control are also available in this mode.
▶ You can use the ▶▶ button to select the next music and the ◀◀ button to select the previous music.
TO USE A USB OR PC DEVICE
DIVX REGISTRATION CODE
Confirm the DivX registration code number of the TV. Using the registration number, movies can be rented or purchased at www.divx.com/vod.
With a DivX registration code from other TV, playback of rented or purchased DivX file is not allowed. (Only DivX files matched with the registration code of the purchased TV are playable.)
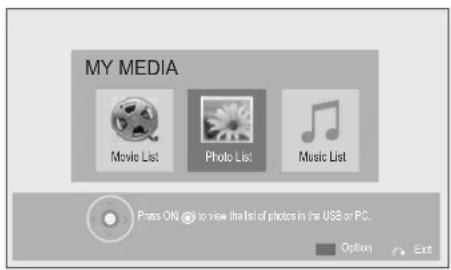
text_image
MY MEDIA Movie List Photo List Music List Press OK! You view the list of photos in the USB or PC. Option Exit
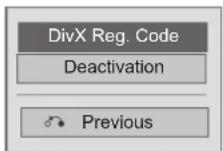

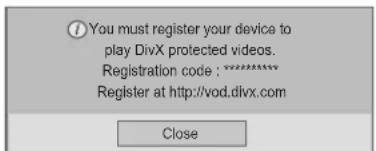
text_image
You must register your device to play DivX protected videos. Registration code : ********** Register at http://vod.divx.com Close

Select MY MEDIA.
BLUE

Select DivX Reg. Code.
Display DivX Reg. Code.
- Press the MENU/EXIT button to return to normal TV viewing.
DIVX HD
ABOUT DIVX VIDEO: DivX® is a digital video format created by DivX, Inc. This is an official DivX Certified® device that plays DivX video. Visit www.divx.com for more information and software tools to convert your files into DivX video.
ABOUT DIVX VIDEO-ON-DEMAND: This DivX Certified® device must be registered in order to play purchased DivX Video-on-Demand (VOD) movies. To obtain your registration code, locate the DivX VOD section in your device setup menu. Go to vod.divx.com for more information on how to complete your registration.
"DivX Certified® to play DivX® video up to HD 1080p, including premium content."
DivX®, DivX Certified® and associated logos are trademarks of DivX, Inc. and are used under license.
Covered by one or more of the following U.S. patents : 7,295,673; 7,460,668; 7,515,710; 7,519,274

NOTE
▶ Movie files are supported as follows
Resolution : under 1920x1080 WxH pixels
Frame rate : under 30 frames/sec(1920x1080), under 60 frames/sec(under 1280x720)
▶ Video Codec : MPEG 1, MPEG 2, MPEG 4, H.264/AVC, DivX 3.11, DivX 4.12, DivX 5.x, DivX 6, Xvid 1.00, Xvid 1.01, Xvid 1.02, Xvid 1.03, Xvid 1.10-beta1, Xvid 1.10-beta2, JPEG, VC1, Sorenson H.263/H.264
The DRM/*.tp /* .trp file in DLNA server is not played when Movie List is in operation.
DEACTIVATION
The purpose of deactivation is to allow deactivation of devices for users who have activated all the available devices through the web_server and are blocked from activating more devices. DivX VOD allowed the consumer to activate up to 6 devices under one account, but to replace or deactivate any of those devices, the consumer had to contact DivX Support and request deletion. Now with this added feature, consumers will be able to deactivate the device themselves and hence better manage their DivX VOD devices.
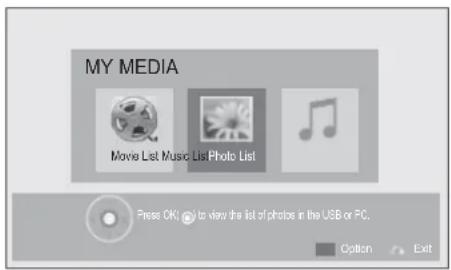
text_image
MY MEDIA Movie List Music List Photo List Press OK! to view the list of photos in the USB or PC. Option Exit
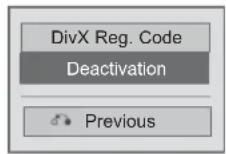

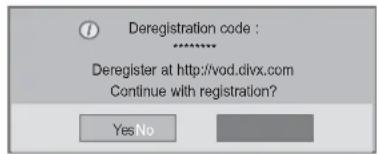
text_image
Deregistration code : ****** Deregister at http://vod.clvx.com Continue with registration? YesNo
Select MY MEDIA.

Select Deactivation.
Select Yes.
Display Deactivation.
- Press the MENU/EXIT button to return to normal TV viewing.
- Press the BACK button to move to the previous menu screen.
GAME
GAME
Allows you to enjoy the games installed on the TV.
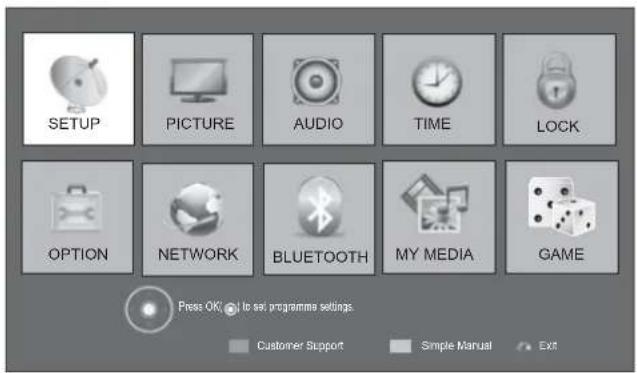
text_image
SETUP PICTURE AUDIO TIME LOCK OPTION NETWORK BLUETOOTH MY MEDIA GAME Press OK! to eat programmes settings. Customer Support Simple Manual Ext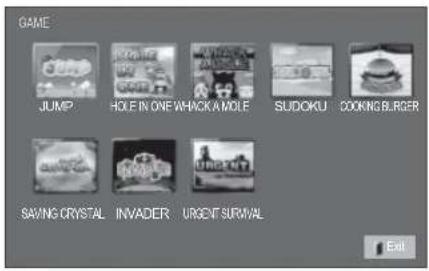
text_image
GAME JUMP HOLE IN ONE WHACK A MOLE SUDOKU COOKING BURGER SAVING CRYSTAL INVADER URGENT SURVIAL Exit
Select GAME.

Select the desired game.
Enter the selected game mode.
- Press the EXIT button to return to normal TV viewing.
EPG(ELECTRONIC PROGRAMME GUIDE) (IN DIGITAL MODE)
This system has an Electronic Programme Guide (EPG) to help your navigation through all the possible viewing options.
The EPG supplies information such as programme listings, start and end times for all available services. In addition, detailed information about the programme is often available in the EPG (the availability and amount of these programme details will vary, depending on the particular broadcaster).
This function can be used only when the EPG information is broadcast by broadcasting companies.
You must set the Clock in the Time menu, before using EPG function.
The EPG displays the programme details for 8 days.
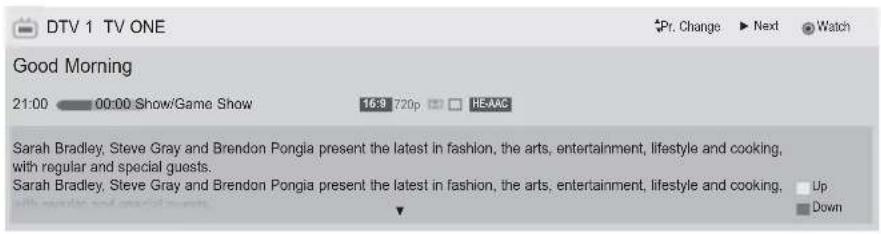
text_image
DTV 1 TV ONE Pr. Change ▶ Next ▶ Watch Good Morning 21:00 00:00 Show/Game Show 16:9 720p HEAAC Sarah Bradley, Steve Gray and Brendon Pongia present the latest in fashion, the arts, entertainment, lifestyle and cooking, with regular and special guests. Sarah Bradley, Steve Gray and Brendon Pongia present the latest in fashion, the arts, entertainment, lifestyle and cooking. Up Down
Shows current programme information


Displayed with a TV or DTV Programme. Displayed with a Teletext Programme.
Displayed with a Radio Programme. Displayed with a Subtitle Programme.
Displayed with a MHEG Programme. Displayed with a Scramble Programme.
Displayed with a HE-AAC Programme. Displayed with a Dolby Digital Programme.
Aspect ratio of broadcasting programme. Displayed with a Dolby Digital Plus Programme.
Aspect ratio of broadcasting programme. 576i/p, 720p, 1080i/p : Resolution of broadcasting programme
Broadcasted programme with the icon may not be displayed in Monitor Out depending on the information of the programme.
Displayed with a MHP Programme.

Shows next programme information.

Shows other programme information.
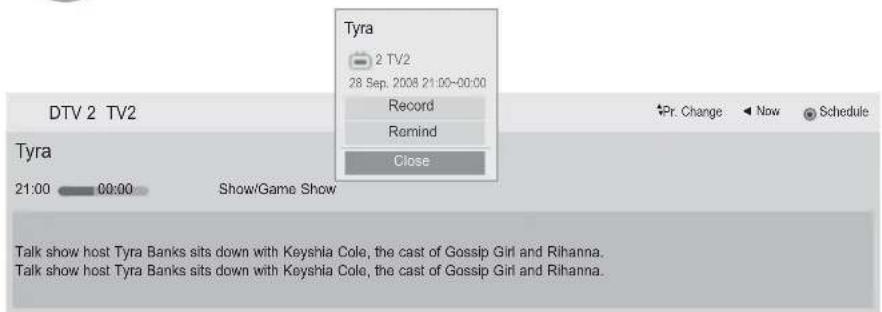
text_image
Tyra 2 TV2 28 Sep. 2008 21:00-00:00 Record Remind Close DTV 2 TV2 Tyra 21:00 00:00 Show/Game Show Pr. Change Now Schedule Talk show host Tyra Banks sits down with Keyshla Cole, the cast of Gossip Girl and Rihanna. Talk show host Tyra Banks sits down with Keyshla Cole, the cast of Gossip Girl and Rihanna.
A pop-up window for record/remind settings appear.

Select Timer Record/Remind setting mode.
EPG (ELECTRONIC PROGRAMME GUIDE)
Switch on/off EPG

Switch on or off EPG.
Select a programme

Select desired programme.
Button Function in NOW/NEXT Guide Mode
You can view a programme being broadcasted and one scheduled to follow.

Change EPG mode.

Enter Manual Timer mode.

Enter Schedule List mode.

When 'NOW' is selected, it is moved to selected programme and EPG disappears

When 'NEXT' is selected, a reservation pop-up window appears.

Select NOW or NEXT Programme.

Select the Broadcast Programme.
Page Up/Down.
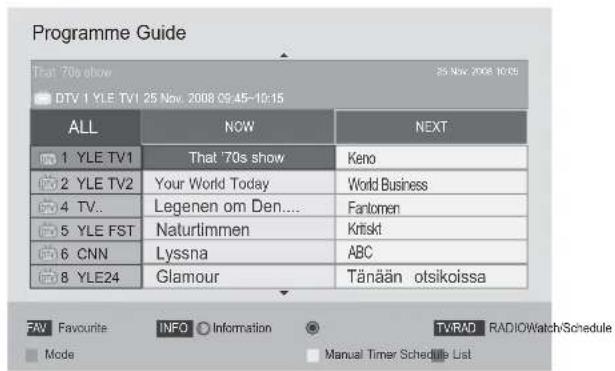
text_image
Programme Guide That 70s show 25 Nov 2008 10:05 DTV 1 YLE TV1 25 Nov. 2008 09:45-10:15 ALL NOW NEXT 1 YLE TV1 That '70s show Keno 2 YLE TV2 Your World Today World Business 4 TV.. Legenen om Den.... Fantomen 5 YLE FST Naturtimmen Kritskt 6 CNNLyssna ABC 8 YLE24 Glamour Tänään otsikoissa


Switch off EPG.

Select DTV or RADIO Programme.

Detail information on or off.
Button Function in 8 Day Guide Mode

Change EPG mode.
Enter Date setting mode.
Enter Manual Timer mode.
Enter Schedule List mode.
When ‘Currently broadcasting programme’ is selected, it is moved to selected programme and EPG disappears
When 'Future broadcasting programme' is selected, a reservation pop-up window appears.
Select Programme.
Select the Broadcast Programme.
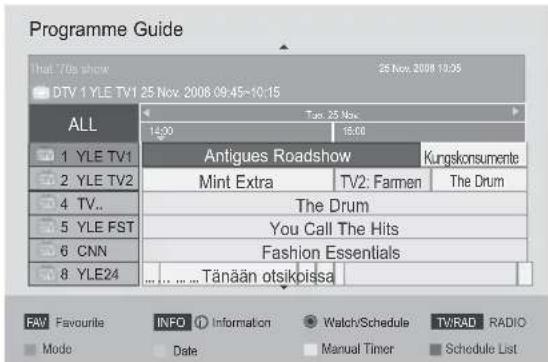
text_image
Programme Guide that 70p show 25 Nov. 2008 13:05 DTV 1 YLE TV1 25 Nov. 2008 09:45~10:15 ALL 14:00 Tang. 25 Nov. 16:00 Antigues Roadshow Kungskonsumente YLE TV1 Mint Extra TV2: Farmen The Drum YLE TV2 4 TV.. The Drum YLE FST You Call The Hits 6 CNN Fashion Essentials 8 YLE24 .... Tänään otsikoissa
Page Up/Down.

or or BACK EXIT Switch off EPG.

Select DTV or RADIO Programme.

Detail information on or off.
EPG (ELECTRONIC PROGRAMME GUIDE)
Button Function in Date Change Mode


Switch off Date setting mode.

Change to the selected date.

Select a date.


Switch off EPG.
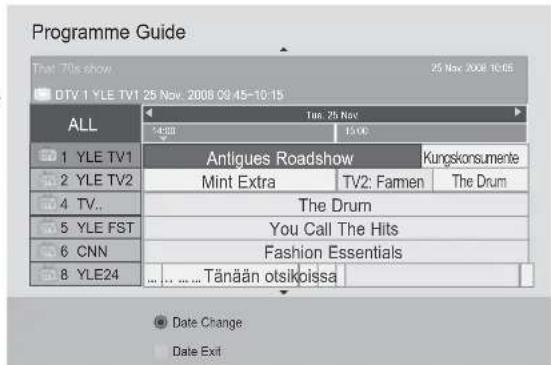
text_image
Programme Guide That 70s show 25 Nov 2008 10:05 DTV 1 YLE TV1 25 Nov 2008 09:45-10:15 ALL Tus: 25 Nov 14:50 15:00 1 YLE TV1 Antigues Roadshow Kungskonsumente 2 YLE TV2 Mint Extra TV2: Farmen The Drum 4 TV.. The Drum 5 YLE FST You Call The Hits 6 CNN Fashion Essentials 8 YLE24 .... Tänään otsikoissa Date Change Date ExitButton Function in Extended Description Box

The detail information on or off.

Text Up/Down.

Select Timer Record/Remind setting mode.


Switch off EPG.
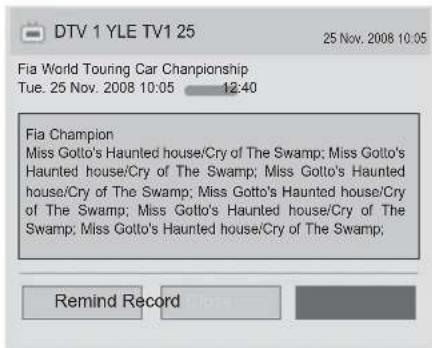
text_image
DTV 1 YLE TV1 25 25 Nov. 2008 10:05 Fia World Touring Car Championship Tue. 25 Nov. 2008 10:05 12:40 Fia Champion Miss Gotto's Haunted house/Cry of The Swamp; Miss Gotto's Haunted house/Cry of The Swamp; Miss Gotto's Haunted house/Cry of The Swamp; Miss Gotto's Haunted house/Cry of The Swamp; Miss Gotto's Haunted house/Cry of The Swamp; Miss Gotto's Haunted house/Cry of The Swamp;Button Function in Record/Remind Setting Mode
Sets a start or end time, programme for recording, and sets a start time, programme for the reminder with the end time grayed out.
This function is available only when recording equipment that use pin8 recording signalling has been connected to the TV-OUT(AV1) terminal, using a SCART cable.
Recording function is only supported in the Digital mode and not in the Analogue mode.

text_image
BACK YELLOW BLUE OKSwitch off Manual Timer mode.
Select Remind or Record function setting.
Select Type, Start Time, End time or Programme.
Change to Guide mode.
Change to Schedule List mode.
Save Timer Record/Remind.
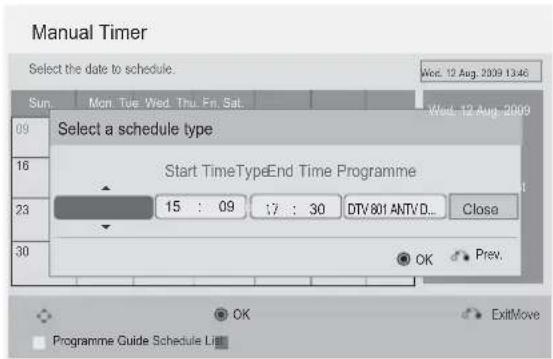
text_image
Manual Timer Select the date to schedule. Wed. 12 Aug. 2009 13:46 Sun Mon Tue Wed Thu Fri Sat Wed. 12 Aug. 2009 09 16 23 30 Select a schedule type Start TimeTypeEnd Time Programme 15 : 09 17 : 30 DTV801 ANTVD... Close OK Prev. Programme Guide Schedule ListEPG (ELECTRONIC PROGRAMME GUIDE)
Button Function in Schedule List Mode
If you've created a schedule list, a scheduled programme is displayed at the scheduled time even when you are watching a different programme at the time.
Currently recording item cannot be edited or deleted.

text_image
YELLOW BLUE BACK OK PChange to Manual Timer mode.
or

Change to Guide mode.
Switch off Schedule List.
Select your desired Option(Modify/Delete/Delete All).
Select programme.
Page Up/Down.
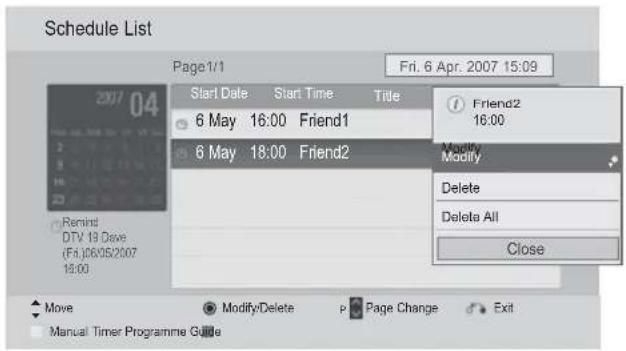
text_image
Schedule List Page1/1 Fri. 6 Apr. 2007 15:09 Start Date Start Time Victoria 6 May 16:00 Friend1 6 May 18:00 Friend2 Friend2 16:00 Modify Delete Delete All Close Move ModifyDelete Page Change Exit Manual Timer Programme GuidePICTURE CONTROL
PICTURE SIZE (ASPECT RATIO) CONTROL
You can watch the screen in various picture formats; 16:9, Just Scan, Original, Full Wide, 4:3, 14:9, Zoom and Cinema Zoom.
If a fixed image is displayed on the screen for a long time, that fixed image may become imprinted on the screen and remain visible.
You can adjust the enlarge proportion using ^ √ button.
This function works in the following signal.
text_image
Q MENU OKSelect Aspect Ratio.
Select the desired picture format.
- You can also adjust Aspect Ratio in the PICTURE menu.
- For Zoom Setting, select 14:9, Zoom and Cinema Zoom in Ratio Menu. After completing Zoom Setting, the display goes back to Q.Menu.
• 16:9
The following selection will allow you to adjust the picture horizontally, in linear proportion, to fill the entire screen(useful for viewing 4:3 formatted DVDs).
natural_image
Close-up of several round white spheres on a textured surface (no text or symbols visible)- Just Scan
Following Selection will lead to you view the picture of best quality without loss of original picture in high resolution image.
Note : If there is noise in original Picture, You can see the noise at the edge.
text_image
Just Scan• Original
When your TV receives a wide screen signal it will automatically change to the picture format broadcast.
text_image
Original• Full Wide
When TV receives the wide screen signal, it will lead you to adjust the picture horizontally or vertically, in a linear proportion, to fill the entire screen fully. 4:3 and 14:9 video is supported in full screen without any video distortion through DTV input.
text_image
Full WidePICTURE CONTROL
• 4:3
The following selection will allow you to view a picture with an original 4:3 aspect ratio.
natural_image
Close-up of a metallic object with rounded edges and a pointed tip, possibly a tool or component (no visible text or symbols)• 14:9
You can view a picture format of 14:9 or a general TV programme in the 14:9 mode. The 14:9 screen is viewed in the same way as in 4:3, but is moved to the up and down.
natural_image
Close-up of a ball with visible rind and speckles, no text or symbols present- Zoom
The following selection will allow you to view the picture without any alteration, while filling the entire screen. However, the top and bottom of the picture will be cropped.
natural_image
Close-up of a ball with white and gray stones on a surface (no text or symbols visible)- Cinema Zoom
Choose Cinema Zoom when you want to enlarge the picture in correct proportion. Note: When enlarging or reducing the picture, the image may become distorted.
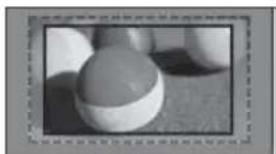
natural_image
Close-up of a white and gray ball on a textured surface (no visible text or symbols)◀ or ▶ button: Adjust enlarge proportion of Cinema Zoom. The adjustment range is 1 to 16.
▼ or ▲ button: Move the screen.
NOTE
▶ You can only select 4:3, 16:9 (Wide), 14:9, Zoom/Cinema Zoom in Component mode.
▶ You can only select 4:3, Original, 16:9 (Wide), 14:9, Zoom/Cinema Zoom in HDMI mode.
▶ You can only select 4:3, 16:9 (Wide) in RGB-PC, HDMI-PC mode only.
▶ In DTV/HDMI/Component (over 720p) mode, Just Scan is available.
In Analogue/DTV/AV/Scart mode, Full Wide is available.
PICTURE WIZARD
This feature lets you adjust the picture quality of the original image.
Use this to calibrate the screen quality by adjusting the Black and White Level etc. General users can calibrate the screen quality by easily following each stage.
When you adjust the image to Low, Recommended or High, you can see the changed result as an example.
In RGB-PC/HDMI-PC/DVI-PC mode, the changed Colour, Tint and H/V Sharpness values are not applied.
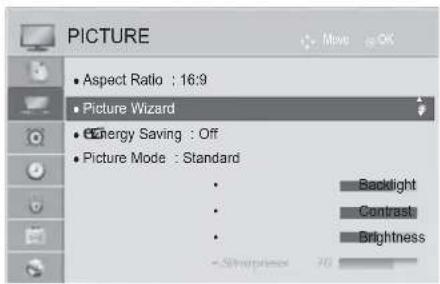
text_image
PICTURE Aspect Ratio : 16:9 Picture Wizard Energy Saving : Off Picture Mode : Standard Backlight Contrast Brightness -Sharpness 70
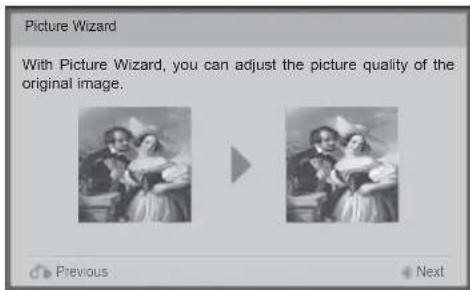
text_image
Picture Wizard With Picture Wizard, you can adjust the picture quality of the original image. Previous Next
text_image
1 MENU 2 OKSelect PICTURE.
OK Select Picture Wizard.
Adjust Standard(Black Level, White Level, Tint, Colour, Horizontal Sharpness, Vertical Sharpness, Backlight (LCD TV/LED LCD TV only)) or Preferred(Black Level, White Level, Tint, Colour, Sharpness, Dynamic Contrast, Colour Temperature, Backlight (LCD TV/LED LCD TV only)).
Select input source to apply the settings.
- If you stop the setting before the final stage, the changes will not be applied
- The adjustment value is saved to Expert1.
- Once the Picture Wizard sets the image quality, the Energy Saving is changed into Off.
- If the picture quality setting of Expert1 is changed, use the Picture Reset before entering the Picture Wizard to reset the picture quality setting.
- Standard : mode to set standard picture quality.
- Preferred : mode to set user preferred picture quality rather than standard picture.
PICTURE CONTROL
eENERGY SAVING
It reduces the TV's power consumption.
The default factory setting is adjusted to the comfortable level to be viewed at home.
You can increase the brightness of your screen by adjusting the Energy Saving level or by setting the Picture Mode.
When adjusting Energy Saving in MHEG/MHP mode, the Energy Saving setting is applied after MHEG/MHP is finished.
Selecting 'Screen Off' while tuned to a radio station channel will reduce power consumption.
LCD TV/LED LCD TV only
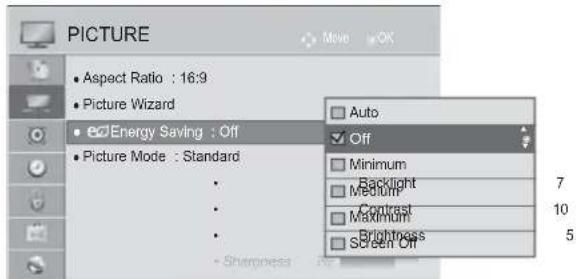
text_image
PICTURE Aspect Ratio : 16:9 Picture Wizard Energy Saving : Off Picture Mode : Standard Auto Off Minimum Medium Contrast Maximum Brightness Screen Off
Select PICTURE.
Select e∅ Energy Saving.
Select Auto(Except for 32/37/42LD4***), Off, Minimum, Medium, Maximum or Screen Off.
Plasma TV only
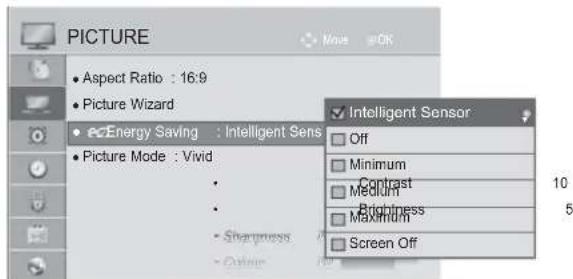
text_image
PICTURE Aspect Ratio : 16:9 Picture Wizard Energy Saving : Intelligent Sens Picture Mode : Vivid Sharpness Other Intelligent Sensor Off Minimum Contrast Medium Brightness Maximum Screen Off
Select PICTURE.
Select eEnergy Saving.
Select Intelligent Sensor, Off, Minimum, Medium, Maximum or Screen Off.
- Press the MENU/EXIT button to return to normal TV viewing.
-
Press the BACK button to move to the previous menu screen.
-
When you select Screen Off, the screen will be turned off in 3 seconds and Screen Off will start.
- If you adjust "Energy Saving-Auto(Except for 32/37/42LD4**), Maximum", Backlight feature will not work. (LCD TV/LED LCD TV only)
- If you adjust "Energy Saving-Intelligent Sensor", Sharpness, Colour, Colour Temperature feature will not work. (Plasma TV only)
- You can also adjust this feature by selecting Energy Saving button on the remote control.
- When selecting Auto, Backlight is automatically adjusted through intelligent sensor according to the surrounding condition when intelligent sensor is in the TV. (LCD TV/LED LCD TV only)(Except for 32/37/42LD4***)
PRESET PICTURE SETTINGS
Picture Mode-Preset
Vivid Strengthen the contrast, brightness, colour and sharpness for vivid picture.
Standard The most general screen display status.
APS Optimizes power consumption. (Plasma TV Only)
Cinema or IHX Cinema Optimizes video for watching movies.
THX Bright Room This is the specification to optimize TV viewing in Bright Room. (42/47/55LE8***, Plasma TV Only)
Sport Optimizes video for watching sports events.
Game Optimizes video for playing games.
LCD TV/LED LCD TV only
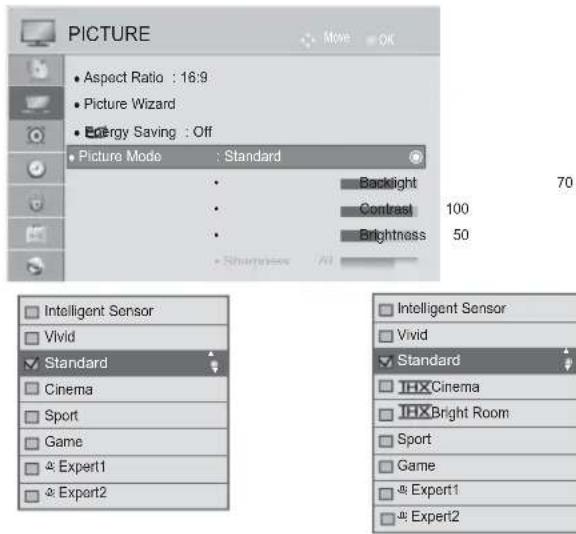
text_image
PICTURE Aspect Ratio : 16:9 Picture Wizard Energy Saving : Off Picture Mode : Standard Backlight Contrast 100 Brightness 50 Intelligent Sensor Vivid Standard Cinema Sport Game Expert1 Expert2 Intelligent Sensor Vivid Standard IHX Cinema IHX Bright Room Sport Game Expert1 Expert2(Except for 42/47/55LE8***) (only 42/47/55LE8***)

Select PICTURE.
Select Picture Mode.
Select Intelligent Sensor (Except for 32/37/42LD4***), Vivid, Standard, Cinema(Except for 42/47/55LE8***), THX Cinema(Only 42/47/55LE8***), THX Bright Room(Only 42/47/55LE8***), Sport or Game.
Plasma TV only
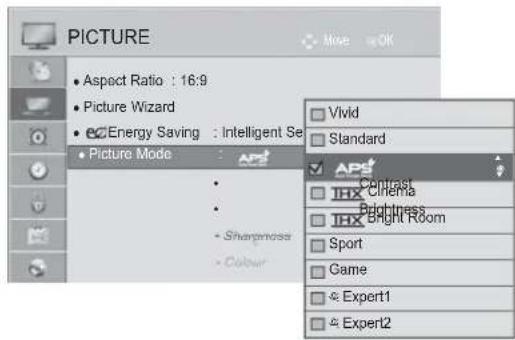
text_image
PICTURE Aspect Ratio : 16:9 Picture Wizard Energy Saving : Intelligent Se Picture Mode Vivid Standard Sharpness Colour Circuit Cinema Bright Room Sport Game Expert1 Expert2
Select PICTURE.
Select Picture Mode.
Select Vivid, Standard, APS, THX Cinema, Bright Room, Sport or Game.
- Press the MENU/EXIT button to return to normal TV viewing.
- Press the BACK button to move to the previous menu screen.
PICTURE CONTROL
- Picture Mode adjusts the TV for the best picture appearance. Select the preset value in the Picture Mode menu based on the programme category.
- When the Intelligent sensor function is on, the most suitable picture is automatically adjusted according to the surrounding conditions. (Except for 32/37/42LD4***)
- You can also adjust Picture Mode in the Q. Menu.
- Intelligent Sensor : Adjusts picture according to the surrounding conditions. (Except for 32/37/42LD4***)
- APS (Auto Power Saving): Maximize reducing the power consumption without hurting the picture quality. (Plasma TV Only)
- If you adjust "Picture Mode-THX Cinema, THX Bright Room", "Energy Saving-Intelligent Sensor, Minimum, Medium, Maximum" feature will not work. (Plasma TV Only)
- If you adjust "Picture Mode-THX Cinema, THXBright Room", "Energy Saving-Auto, Minimum, Medium, Maximum" feature will not work. (42/47/55LE8*** Only)
-
If you adjust "Picture Mode-APS", "Energy Saving-Off, Minimum, Medium, Maximum" feature will not work. (Plasma TV only)
-
Cinema (42/47/55LE8***, Plasma TV Only): This is cinema quality mode to provide you the experience of watching a movie at home. The user will be able to enjoy the best level of satisfactory screen quality in any movie without any separate adjustments. Cinema expresses the optimal screen quality when it is darkest.
When selecting THxCinema, THxBright Room Aspect ratio changes to Just scan. - THX Cinema(Thomlinson Holman's Experiment)is the audio and video certification standard of THX established by George Lucas,who directed the movie Star Wars,and Thomlinson.
This is the product to be certified in THX display area and guarantees screen quality that exceeds the display standard specification in both hardware and software.
MANUAL PICTURE ADJUSTMENT
Picture Mode-User option
Backlight (LCD TV/LED LCD TV only)
To control the brightness of the screen, adjust the brightness of LCD panel. Adjusting the backlight when setting the brightness of the set is recommended.
Contrast
Adjusts the signal level between black and white in the picture. You may use Contrast when the bright part of the picture is saturated.
Brightness
Adjusts the base level of the signal in the picture.
Sharpness
Adjusts the level of crispness in the edges between the light and dark areas of the picture. The lower the level, the softer the image.
Colour
Adjusts intensity of all colours.
Tint
Adjusts the balance between red and green levels.
Colour Temp.
Adjust to left direction to make a picture reddish or adjust to right direction to make a picture bluish.
It is not available to use this function in "Intelligent Sensor". (Except for 32/37/42LD4***)
LCD TV/LED LCD TV only
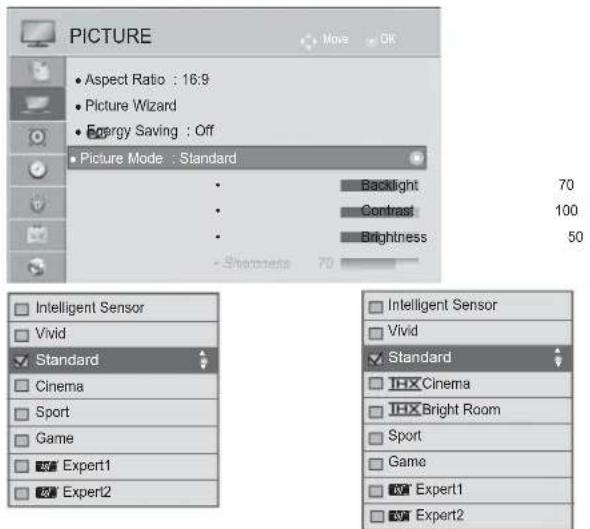
text_image
PICTURE Aspect Ratio : 16:9 Picture Wizard Energy Saving : Off Picture Mode : Standard Backlight 70 Contrast 100 Brightness 50 Intelligent Sensor Vivid Standard Cinema Sport Game Expert1 Expert2 Intelligent Sensor Vivid Standard IHX Cinema IHX Bright Room Sport Game Expert1 Expert2(Except for 42/47/55LE8***) (only 42/47/55LE8***)
Plasma TV only
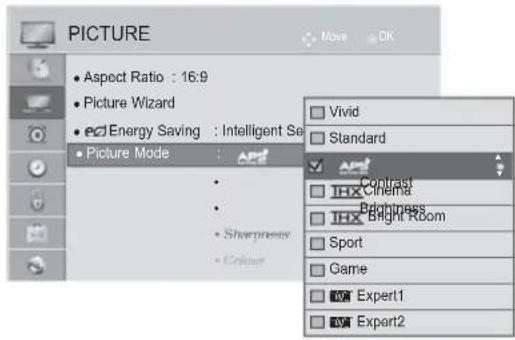
text_image
PICTURE Aspect Ratio : 16:9 Picture Wizard Energy Saving : Intelligent S Picture Mode Vivid Standard Contrast Cinema Bright Room Sport Game Expert1 Expert2
Select PICTURE.

Select Picture Mode.
Select Vivid, Standard,
Cinema(Except for
42/47/55LE8**), Sport or Game.
Select Backlight, Contrast, Brightness, Sharpness, Colour, Tint or Colour Temp..
Make appropriate adjustments.

Select PICTURE.
Select Picture Mode.
Select Vivid, Standard, Sport or Game.
Select Contrast, Brightness, Sharpness, Colour, Tint or Colour Temp..
Make appropriate adjustments.
- Press the MENU/EXIT button to return to normal TV viewing.
- Press the BACK button to move to the previous menu screen.
PICTURE CONTROL
• Benefits of using Backlight
(LCD TV/LED LCD TV only)
- The electricity consumption is reduced by up to 60 %.
- The black brightness is reduced. (As the black has greater depth, you can enjoy a better quality definition.)
- You can adjust brightness with maintaining original signal resolution.
NOTE
▶ You cannot adjust colour, sharpness and tint in the RGB-PC/HDMI-PC mode.
▶ When the Expert 1/2 is selected, you can select Backlight, Contrast, Brightness, H Sharpness, V Sharpness, Colour or Tint.
PICTURE IMPROVEMENT TECHNOLOGY
You can calibrate the screen for each Picture Mode or set the video value according to the special video screen.
You can set the video value differently for each input.
To reset to the factory default screen after making adjustments to each video mode, execute the "Picture Reset" function for each Picture Mode.
Image shown may differ from your TV.
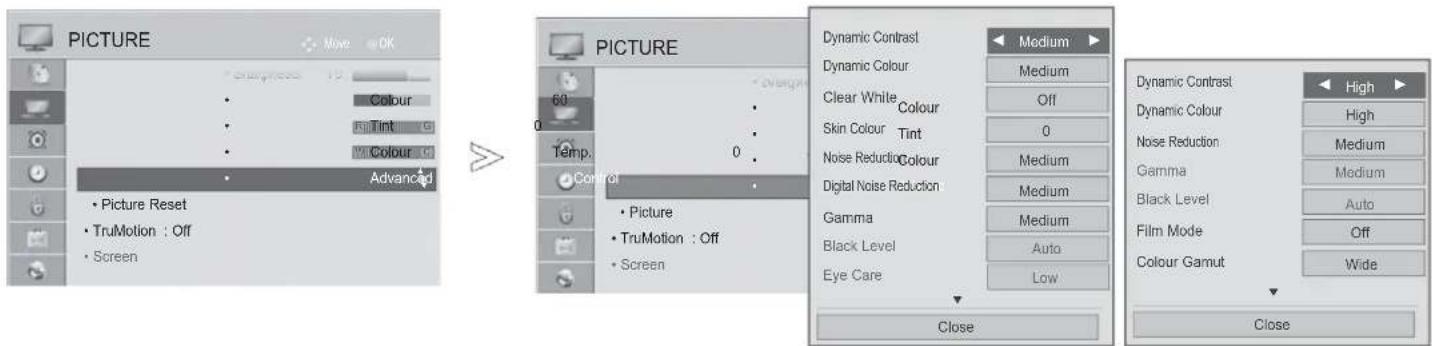
text_image
PICTURE Move OK Colour Tint Colour Advanced Picture Reset TruMotion : Off Screen 60 Temp. Control Picture TruMotion : Off Screen PICTURE Dynamic Contrast Dynamic Colour Clear White Colour Skin Colour Tint Noise Reduction Colour Digital Noise Reduction Gamma Black Level Eye Care Close Medium Off Medium Medium Medium Auto Low Dynamic Contrast Dynamic Colour Nose Reduction Gamma Black Level Film Mode Colour Gamut High High Medium Medium Auto Off Wide CloseLCD TV/LED LCD TV only Plasma TV only
Select PICTURE.
Select Advanced Control.
Select your desired Source.:
Dynamic Contrast, Dynamic Colour, Clear White(LCD TV/LED LCD TV only), Skin Colour (LCD TV/LED LCD TV only), Noise Reduction, Digital Noise Reduction (LCD TV/LED LCD TV only), Gamma, Black Level, Eye Care (LCD TV/LED LCD TV only), Real Cinema (LCD TV/LED LCD TV only), Film Mode(Plasma TV only), Colour Gamut, Edge Enhancer (Plasma TV only) or xvYCC. (Refer to p. 145 to 146)
Make appropriate adjustments.
- Press the MENU/EXIT button to return to normal TV viewing.
- Press the BACK button to move to the previous menu screen.
PICTURE CONTROL
EXPERT PICTURE CONTROL
By segmenting categories, Expert1 and Expert2 provide more categories which users can set as they see fit, offering the optimal picture quality for users.
This may also be used to help a professional optimize the TV performance using specific videos.
Image shown may differ from your TV.
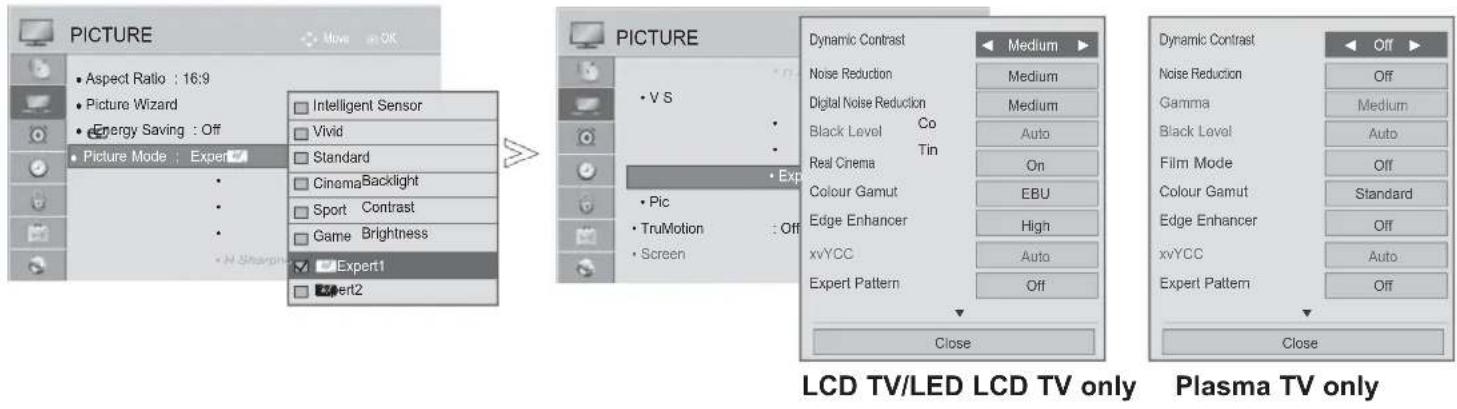
text_image
PICTURE Aspect Ratio : 16:9 Picture Wizard Energy Saving : Off Picture Mode : Expert Standard Cinema Backlight Sport Contrast Game Brightness Expert1 Expert2 PICTURE V S Dynamic Contrast Noise Reduction Digital Noise Reduction Black Level Co Real Cinema Tin Colour Gamut Edge Enhancer xvYCC Expert Pattern Close Medium Medium Auto On EBU High Auto Off Dynamic Contrast Noise Reduction Gamma Black Level Film Mode Colour Gamut Edge Enhancer xvYCC Expert Pattern Close Plasma TV only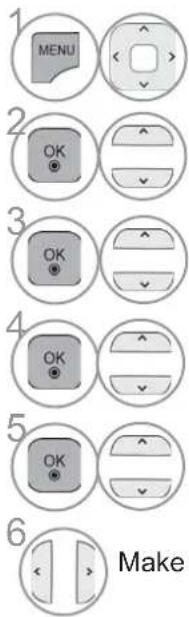
text_image
1 MENU 2 OK 3 OK 4 OK 5 OK 6 MakeSelect PICTURE.
Select Picture Mode.
Select isfExpert1 or isfExpert2.
Select Expert Control.
Select your desired Source.
Make appropriate adjustments.
- Press the MENU/EXIT button to return to normal TV viewing.
- Press the BACK button to move to the previous menu screen.
*This feature is not available for all models.
| Dynamic Contrast(Off/Low/Medium(LCD TV/LED LCD TV only)/High) | ■ Adjusts the contrast to keep it at the best level according to the brightness of the screen. The picture is improved by making bright parts brighter and dark parts darker. |
| Dynamic Colour(Off/Low/Medium(Plasma TV only)/High ) | ■ Adjusts screen colours so that they look livelier, richer and clearer. This feature enhances hue, saturation and luminance so that red, blue, green and white look more vivid. |
| Skin Colour(-5 to 5) | ■ Adjusts skin colour of the picture so that user can set his favourite skin colour. |
| Noise Reduction(Off/Low/Medium/High/Auto(In Analogue Mode Only)) | ■ Reduces screen noise without compromising video quality. |
| Digital Noise Reduction(Low/Medium/High/Off) | ■ Reduces noise regarding MPEG compressed video. |
| Gamma(Advanced Control:Low/Medium/HighExpert Control:1.9/2.2/2.4) | ■ You can adjust brightness of dark area and middle gray level area of the picture.Low/1.9 : Makes dark and middle gray level area of the picture brighter.Medium/2.2 : Expresses original picture levels.High/2.4: Makes dark and middle gray level area of the picture darker.When Antenna is used as input signal, it is set to Medium and deactivated.(Plasma TV only) |
| Black Level(Low/High/Auto) | · Low : The picture of the screen gets darker.High : The picture of the screen gets brighter.Auto : Sets black level of the screen to High or Low automatically according to the input signal level.■ This function enables to select 'Low' or 'High' in the following mode:AV(NTSC-M), HDMI or Component. Otherwise, 'Black level' is set to 'Auto'. |
| Clear White(Off/Low/High) | ■ Makes the white area of the screen brighter and clearer |
| Eye Care(Low/High/Off) | *This feature is not available for all models.■ Adjusts the brightness of the screen automatically to the best level for eyes when the screen is too bright.■ This feature is disable in "Picture Mode-Vivid, Cinema, Expert1,Expert2, Intelligent Sensor (Except for 32/37/42LD4***)". |
| Real Cinema(LCD TV/LED LCD TV only)/Film Mode(Plasma TV only)(On/Off) | ■ouYcan watch a cinema-like video by eliminating judder effect.■ Uses this function when you watch film-originated movie contents.■ This function can work whenruMotion is off. |
PICTURE CONTROL
| Colour Gamut(LCD TV/LED LCD TV: Advanced Control & Plasma TV: Advanced Control/Expert Control)(Wide/Standard) | ·Standard: Mode to use original colour area regardless of the display characteristics.·Wide: Mode to use maximum colour area of the TV display. |
| Colour Gamut(LCD TV/LED LCD TV: Expert Control)(EBU/SMPTE/BT709/Wide/Standard) | ·Standard: Mode to use original colour area regardless of the display characteristics.·Wide: Mode to use maximum colour area of the TV display.·EBU: Mode to display EBU colour area.·SMPTE: Mode to display SMPTE colour area.·BT709: Mode to display BT709 colour area. |
| Edge Enhancer(LCD TV/LED LCD TV:Off/Low/High Plasma TV:On/Off) | ■ Makes the edge of the picture clearer and distinctive.■ This function can use in “Picture Mode-Expert.” (LCD TV/LED LCD TV only) |
| xvYCC(Auto/off/on) | *This feature is not available for all models.■ This is the function to express richer colour.■ This function is enabled in "Picture mode - Cinema, Expert" when xvYCC signal is inputted through HDMI |
| Expert Pattern(Off/Pattern1/Pattern2) | ■ This is the pattern necessary for checking the picture of Digital TV.■ This function is enabled in "Picture Mode - Expert" when you watch DTV. |
| Colour Filter(Off/Red/Green/Blue) | ■ This is the function to filter the specific colours of the video.You can use the RGB filter to set colour saturation and hue accurately. |
| Colour Temperature(Medium/Warm/Cool) | This is the function to adjust the overall colour of the screen to the feeling you want.a. ·Method: 2 Points·Pattern: Inner, Outer·Red/Green/Blue Contrast, Red/Green/Blue Brightness:The adjustment range is -50 to +50.b. ·Method: 10 point IRE(LCD TV/LED LCD TV), 20 Point IRE(Plasma TV)·Pattern: Inner / Outer·IRE (Institute of Radio Engineers) is the unit to display the size of the video signal and can be set among 10, 20, 30 to 100(LCD TV/LED LCD TV), 5, 10, 15 to 100(Plasma TV). You can adjust Red, Green or Blue according to each setting.·Luminance: This function displays calculated luminance value for 2.2 gamma. You can input luminance value you want at 100 IRE, than the target luminance value for 2.2 gamma is displayed at every 10 steps from 10 IRE to 90 IRE. (LCD TV/LED LCD TV)·Red/Green/Blue: The adjustment range is -50 to +50. |
| Colour Management System | ■ As the tool used by the experts to make adjustments by using the test patterns, this does not affect other colours but can be used to selectively adjust the 6 colour areas (Red/Green/Blue/Cyan/Magenta/Yellow).Colour difference may not be distinctive even when you make the adjustments for the general video.■ Adjusts Red/Green/Blue/Yellow/Cyan/Magenta.·Red/Green/Blue/Yellow/Cyan, Magenta Colour: The adjustment range is -30 to +30.·Red/Green/Blue/Yellow/Cyan/Magenta Tint: The adjustment range is -30 to +30.■ This feature is disable in RGB-PC and HDMI (PC) mode. |
PICTURE RESET
Settings of the selected picture modes return to the default factory settings.
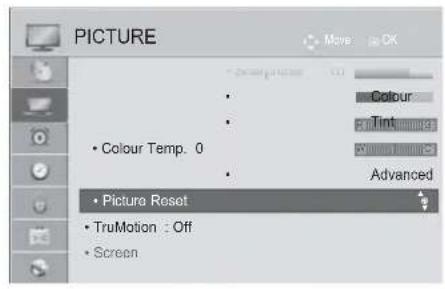
text_image
PICTURE • Colour Temp. 0 • Picture Reset • TruMotion : Off • Screen • Colour • Tint • Advanced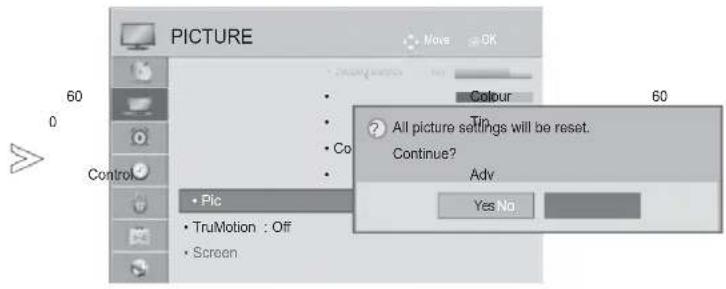
text_image
PICTURE 60 0 Control • Pic • TruMotion : Off • Screen • Colour All picture settings will be reset. Continue? Adv Yes No
Select PICTURE.
Select Picture Reset.
Select Yes.
Initialize the adjusted value.
- Press the MENU/EXIT button to return to normal TV viewing.
- Press the BACK button to move to the previous menu screen.
PICTURE CONTROL
TRUMOTION
(LCD TV/LED LCD TV ONLY)
It is used for the best picture quality without any motion blur or judder when you enter a quick image or Film Source.
High : Provide smoother picture movement.
Low : Provide smooth picture movement. Use this setting for standard use.
Off : Turn off TruMotion Operation.
User : User can adjust Judder and Blur level in TruMotion Operation, separately.
- Judder : Adjust noise of the screen.
- Blur : Adjust after-image of the screen.
This feature is disable in RGB-PC,HDMI-PC mode.
If you enable "TruMotion", noise may appear on the screen.
If this occurs, set "TruMotion" to "Off".
If you select "Picture Mode-Game", set "TruMotion" to "Off".
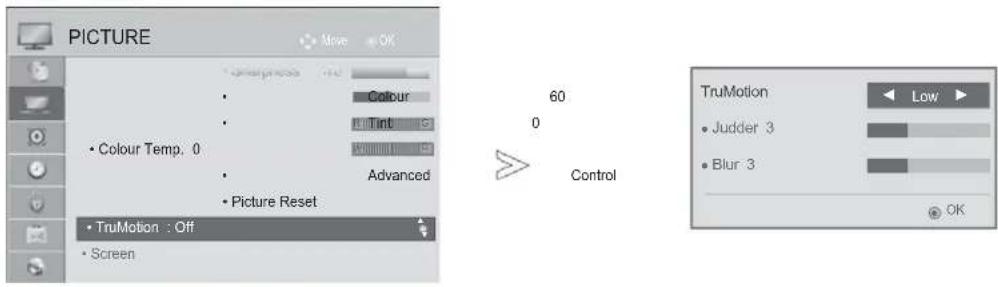
text_image
PICTURE Move OK • Colour Temp. 0 • Colour • Picture Reset • TruMotion : Off • Screen 60 0 Control TruMotion • Judder 3 • Blur 3 Low OK
Select PICTURE.
Select TruMotion.
Select Low, High, User or Off.
Make appropriate adjustments.
- Press the MENU/EXIT button to return to normal TV viewing.
- Press the BACK button to move to the previous menu screen.
LED LOCAL DIMMING
(Only 32/37/42LE4***, 42/47/55LE5***, 42/47/55LE75**, 42/47/55LE78**, 42/47/55LE79**, 42/47/55LE8***, 42/47LX6***, 47/55LX9***)
After analyzing the signal of the input video by areas of the screen, it adjusts the backlight to improve the contrast ratio.
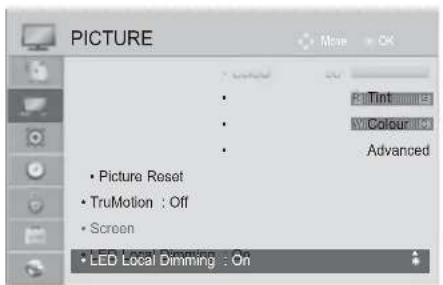
text_image
PICTURE • Picture Reset • TruMotion : Off • Screen • LED Local Dimming : On • Advanced • Tint • Colour • Advanced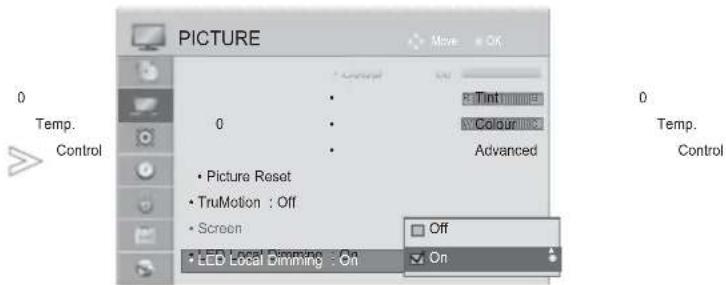
text_image
PICTURE 0 Temp. Control 0 • Picture Reset • TruMotion : Off • Screen • LED Local Dimming : On • Off • On • Advanced • Tint • Color Temp. Control0

Select PICTURE.
Select LED Local Dimming.
Select On or Off.
- Press the MENU/EXIT button to return to normal TV viewing.
- Press the BACK button to move to the previous menu screen.
PICTURE CONTROL
POWER INDICATOR
(LCD TV/LED LCD TV ONLY)
Adjust the power/standby indicator light on the front of the TV.
Standby Light
Determines whether to set the indicator light on the front of the TV to On or Off in standby mode.
Power Light
Determines whether to set the indicator light on the front of the TV to On or Off when the power turns on.
If you select 3D mode, Power indicator is turned off automatically.
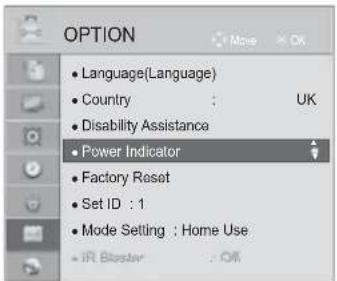
text_image
OPTION Language(Language) Country : UK Disability Assistance Power Indicator Factory Reset Set ID : 1 Mode Setting : Home Use IR Blaster : OK
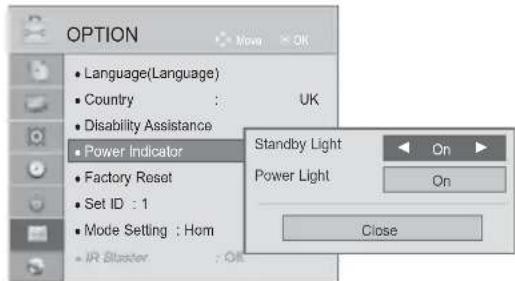
text_image
OPTION Language(Language) Country : UK Disability Assistance Power Indicator Factory Reset Set ID : 1 Mode Setting : Hom IR Blaster : Off Standby Light On Power Light On Close
Select OPTION.
Select Power Indicator.
Select Standby Light or Power Light.
Select your desired Source.
- Press the MENU/EXIT button to return to normal TV viewing.
- Press the BACK button to move to the previous menu screen.
IMAGE STICKING MINIMIZATION (ISM) METHOD
(PLASMA TV ONLY)
A frozen or still picture displayed on the screen for prolonged periods will result in a ghost image remaining even when you change the image. Avoid allowing a fixed image to remain on the screen for prolonged periods.
White Wash
White wash removes permanent images from the screen.
Note: An excessive permanent image may be impossible to clear entirely with White Wash.
Orbiter
Orbiter may help prevent ghost images. However, it is best not to allow any fixed image to remain on the screen. To avoid a permanent image on the screen, the screen will move every 2 minutes.
Colour Wash
The color block with the screen moved a little and the white pattern are alternately displayed. It is difficult to sense the afterimage occurred while the temporary afterimage is removed and the colour pattern is operating.
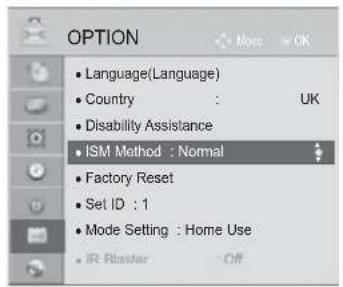
text_image
OPTION Language(Language) Country : UK Disability Assistance ISM Method : Normal Factory Reset Set ID : 1 Mode Setting : Home Use IR Blaster Off
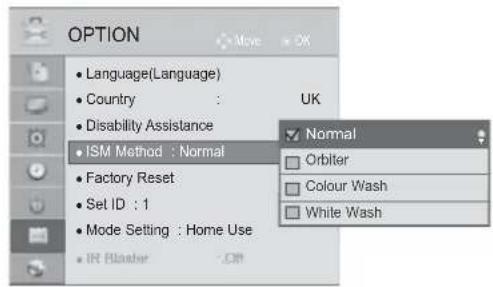
text_image
OPTION Language(Language) Country : UK Disability Assistance ISM Method : Normal Factory Reset Set ID : 1 Mode Setting : Home Use IN Blade
Select OPTION.
Select ISM Method.
Select Normal, Orbiter, Colour Wash or White Wash.

- If you do not need this function, set Normal.
- Press the MENU/EXIT button to return to normal TV viewing.
- Press the BACK button to move to the previous menu screen.
PICTURE CONTROL
MODE SETTING
We recommend setting the TV to "Home Use" mode for the best picture in your home environment.
"Store Demo" mode is an optimal setting for displaying at stores.
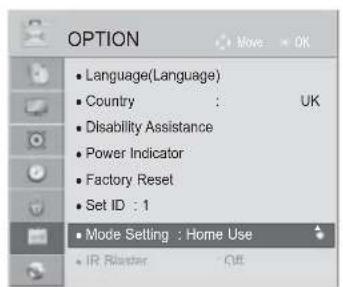
text_image
OPTION Language(Language) Country : UK Disability Assistance Power Indicator Factory Reset Set ID : 1 Mode Setting : Home Use IR Blaster Off
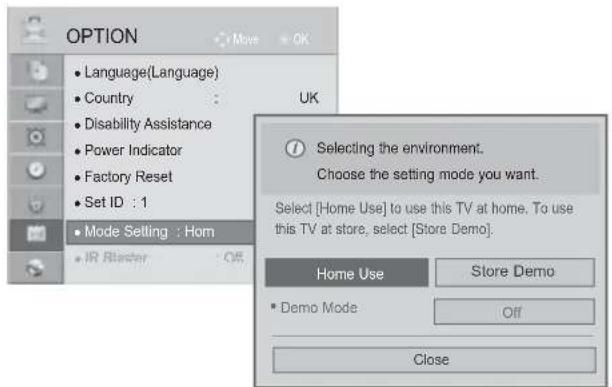
text_image
OPTION Language(Language) Country Disability Assistance Power Indicator Factory Reset Set ID : 1 Mode Setting : Hom IR Blade OK UK Selecting the environment. Choose the setting mode you want. Select [Home Use] to use this TV at home. To use this TV at store, select [Store Demo]. Home Use Store Demo Demo Mode Off Close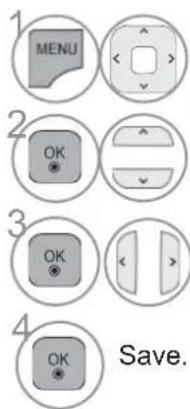
text_image
1 MENU 2 OK 3 OK 4 OK Save.Select OPTION.
Select Mode Setting.
Select Store Demo or Home Use.
Save.
- Press the MENU/EXIT button to return to normal TV viewing.
- Press the BACK button to move to the previous menu screen.
DEMO MODE
It is not possible to use Demo Mode in Home Use mode.
In Store Demo, Demo Mode is automatically set to On.
Once Demo Mode is set to Off in Store Demo, Demo Mode does not run and only the screen is reset.
The screen is reset automatically after 5 minutes in Demo Mode.
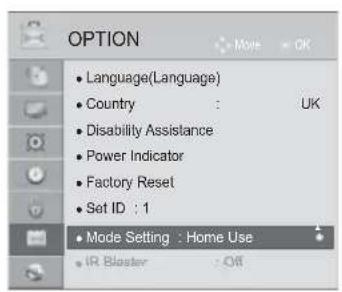
text_image
OPTION Language(Language) Country : UK Disability Assistance Power Indicator Factory Reset Set ID : 1 Mode Setting : Home Use IR Blaster : Off

text_image
OPTION Language(Language) Country : UK Disability Assistance Power Indicator Factory Reset Set ID : 1 Mode Setting : Hom JR-Blaster Off Home Use Store Demo Demo Mode On Close
Select OPTION.
Select Mode Setting.

Select Store Demo.
Select On.
Move to the previous menu screen.
If you want to stop the demo, press any button.
(except for MUTE, △ + , - button)
- Press the MENU/EXIT button to return to normal TV viewing.
- Press the BACK button to move to the previous menu screen.
SOUND & LANGUAGE CONTROL
AUTO VOLUME LEVELER
Auto Volume automatically remains on the same level of volume if you change programmes.
Because each broadcasting station has its own signal conditions, volume adjustment may be needed every time the programme is changed. This feature allows users to enjoy stable volume levels by making automatic adjustments for each programme.
If sound quality or volume is not at the level you want, it is recommended to use a separate home theater system or amp to cope with different user environments.
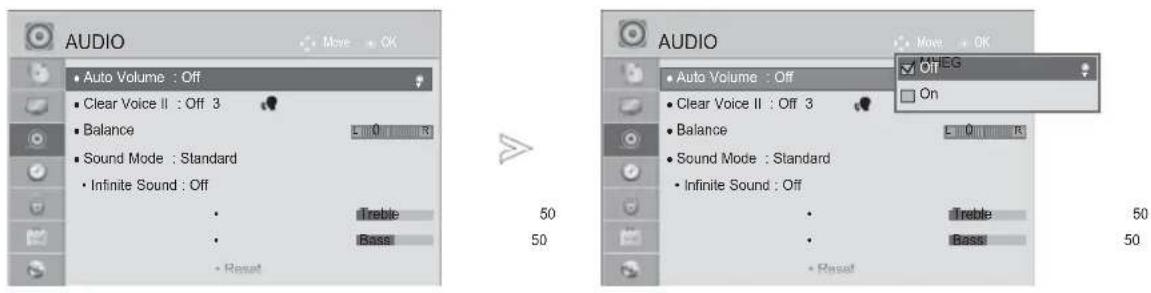
text_image
AUDIO • Auto Volume : Off • Clear Voice II : Off 3 • Balance • Sound Mode : Standard • Infinite Sound : Off • Treble • Bass • Reset 50 50 AUDIO • Auto Volume : Off • Clear Voice II : Off 3 • Balance • Sound Mode : Standard • Infinite Sound : Off • Treble • Bass • Reset 50 50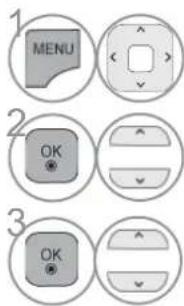
text_image
MENU OK OKSelect AUDIO.
Select Auto Volume.
Select On or Off.
- Press the MENU/EXIT button to return to normal TV viewing.
- Press the BACK button to move to the previous menu screen.
CLEAR VOICE II
By differentiating the human sound range from others, it helps users listen to human voices better.
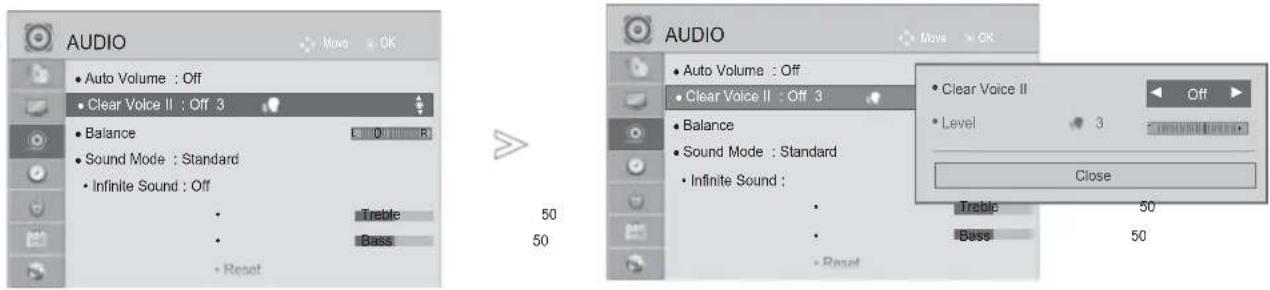
text_image
AUDIO • Auto Volume : Off • Clear Voice II : Off 3 • Balance • Sound Mode : Standard • Infinite Sound : Off • Treble • Bass • Reset 50 50 AUDIO • Auto Volume : Off • Clear Voice II : Off 3 • Balance • Sound Mode : Standard • Infinite Sound : • Treble • Bass • Reset 50 50 Close • Clear Voice II • Level 3 Off
Select AUDIO.
Select Clear Voice II.
Select On or Off.
- If you select "On" for Clear Voice II, Infinite Sound feature will not work.
- Select levels from '-6' to '+6'.
Adjustment for Clear Voice Level With selecting On
Select Level.
Make desired adjustment.
- Press the MENU/EXIT button to return to normal TV viewing.
- Press the BACK button to move to the previous menu screen.
SOUND & LANGUAGE CONTROL
You can select your preferred sound setting; Standard, Music, Cinema, Sport or Game and you can also adjust the Treble, Bass.
Sound Mode lets you enjoy the best sound without any Special adjustment as the TV sets the appropriate sound options based on the programme content.
Standard, Music, Cinema, Sport and Game are preset for optimum sound quality at the factory.
Standard Offers standard-quality sound.
Music Optimizes sound for listening to music.
Cinema Optimizes sound for watching movies.
Sport Optimizes sound for watching sports events.
Game Optimizes sound for playing games.
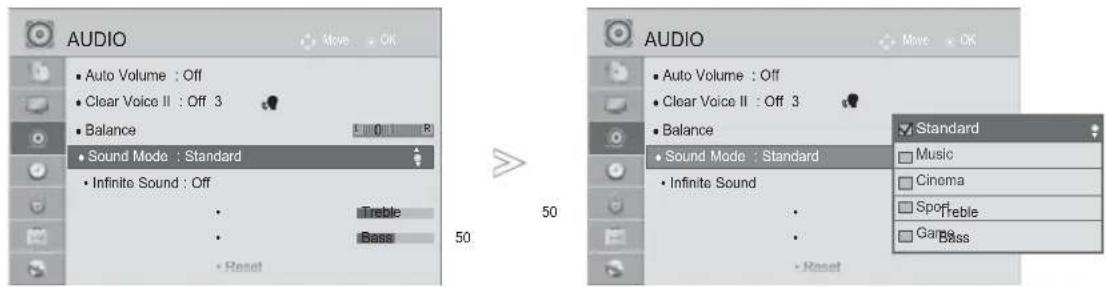
text_image
AUDIO • Auto Volume : Off • Clear Voice II : Off 3 • Balance • Sound Mode : Standard • Infinite Sound : Off • iTreble • iBass • Reset 50 50 AUDIO • Auto Volume : Off • Clear Voice II : Off 3 • Balance • Sound Mode : Standard • Infinite Sound • iTreble • iBass • Reset Standard Music Cinema Sportable Gauss
Select AUDIO.
- You can also adjust Sound Mode in the Q. Menu.
Select Sound Mode.
Select Standard, Music, Cinema, Sport or Game.
- Press the MENU/EXIT button to return to normal TV viewing.
- Press the BACK button to move to the previous menu screen.
SOUND SETTING ADJUSTMENT -USER MODE
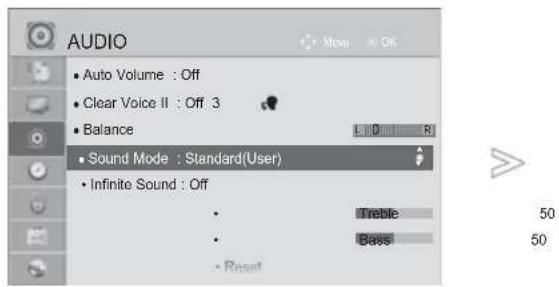
text_image
AUDIO • Auto Volume : Off • Clear Voice II : Off 3 • Balance • Sound Mode : Standard(User) • Infinite Sound : Off • Treble • Bass • Reset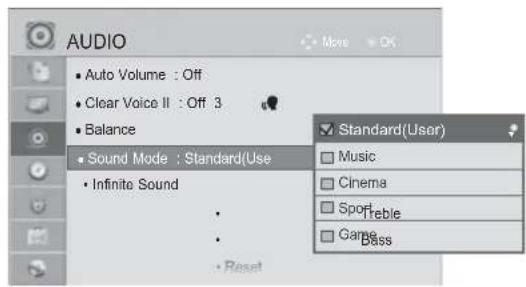
text_image
AUDIO • Auto Volume : Off • Clear Voice II : Off 3 • Balance • Sound Mode : Standard(Use) • Infinite Sound • Reset Standard(User) Music Cinema Sportable Games Dass
Select AUDIO.

Select Sound Mode.
Select Standard, Music, Cinema, Sport or Game.
Select Treble or Bass.
Set the desired sound level.
- Press the MENU/EXIT button to return to normal TV viewing.
- Press the BACK button to move to the previous menu screen.
INFINITE SOUND
Select this option to sound realistic.

Select AUDIO.
Select Infinite Sound.
Select On or Off.
Infinite Sound : Infinite Sound is a patented LG proprietary sound processing technology that strives immersive 5.1 surround sound impression with front two loudspeakers.
- Press the MENU/EXIT button to return to normal TV viewing.
- Press the BACK button to move to the previous menu screen.
SOUND & LANGUAGE CONTROL
BALANCE
You can adjust the sound balance of the speakers to preferred levels.
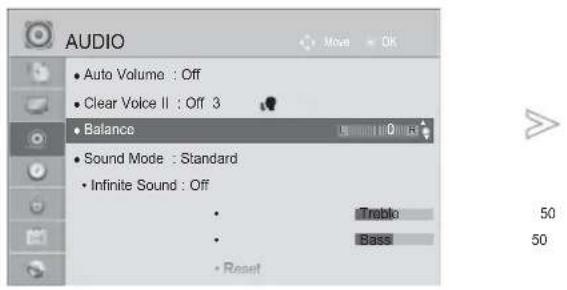
text_image
AUDIO • Auto Volume : Off • Clear Voice II : Off 3 • Balance • Sound Mode : Standard • Infinite Sound : Off • Treble • Bass • Reset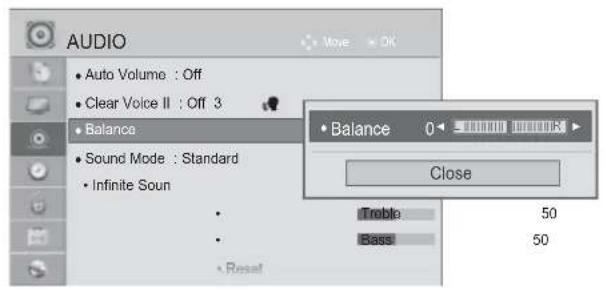
text_image
AUDIO • Auto Volume : Off • Clear Voice II : Off 3 • Balance • Sound Mode : Standard • Infinite Soun • • • Balance 0 Close Trobio 50 Bass 50 Reset
Select AUDIO.
Select Balance.
Make desired adjustment.
- Press the MENU/EXIT button to return to normal TV viewing.
- Press the BACK button to move to the previous menu screen.
You can adjust the TV internal speaker status.
In AV, COMPONENT, RGB and HDMI1 with HDMI to DVI cable, the TV speaker can be operational even when there is no video signal.
If you wish to use an external Hi-Fi system, turn off the TV's internal speakers.
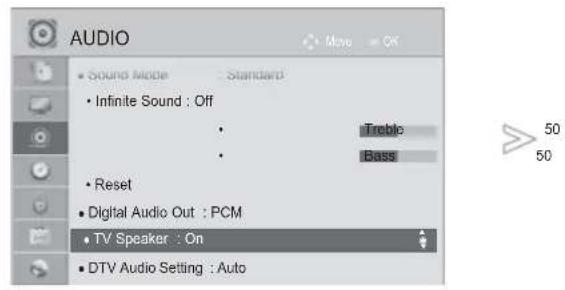
text_image
AUDIO Sound Mode Standard • Infinite Sound : Off • Reset • Digital Audio Out : PCM • TV Speaker : On • DTV Audio Setting : Auto Treble Bass 50 50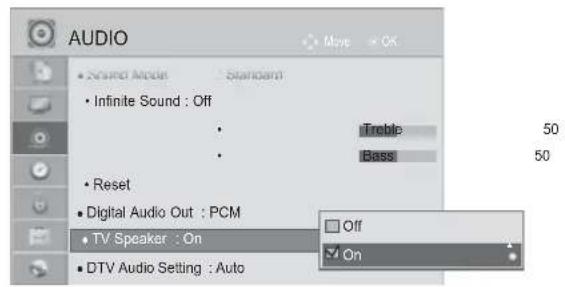
text_image
AUDIO • Sound Audio Standard • Infinite Sound : Off • Reset • Digital Audio Out : PCM • TV Speaker : On • DTV Audio Setting : Auto Treble 50 Bass 50 Off On
Select AUDIO.
Select TV Speaker.
Select On or Off.
- Press the MENU/EXIT button to return to normal TV viewing.
- Press the BACK button to move to the previous menu screen.
NOTE
When the TV speaker is turned off while the Simplink home theater is operating, the sound output automatically switches to the Home theater speaker, but when the TV speaker is turned on, the sound output the TV speaker.
▶ Some menus in AUDIO are disabled when TV Speaker is set to Off.
SOUND & LANGUAGE CONTROL
DTV AUDIO SETTING (IN DIGITAL MODE ONLY)
When different audio types exist in an input signal, this function allows you to select the audio type you want.
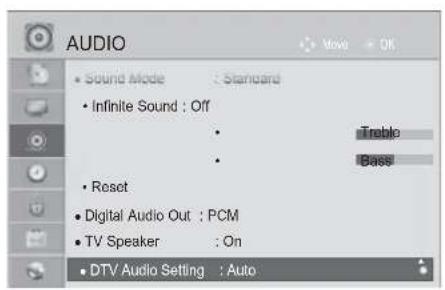
text_image
AUDIO • Sound Mode : Standard • Infinite Sound : Off • Reset • Digital Audio Out : PCM • TV Speaker : On • DTV Audio Setting : Auto Trable Base50 50
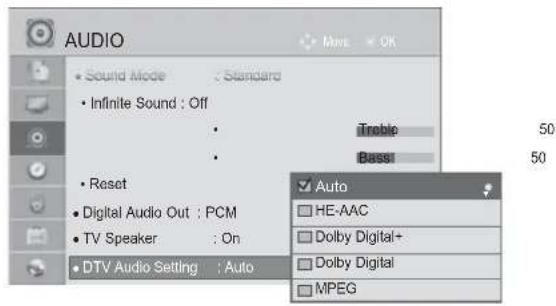
text_image
AUDIO Sound Mode : Standard Infinite Sound : Off Reset Digital Audio Out : PCM TV Speaker : On DTV Audio Setting : Auto Treble Bassi Auto HE-AAC Dolby Digital+ Dolby Digital MPEG
Select AUDIO.
Select DTV Audio Setting.
Select Auto, HE-AAC, Dolby Digital +, Dolby Digital or MPEG.
- Press the MENU/EXIT button to return to normal TV viewing.
-
Press the BACK button to move to the previous menu screen.
-
Auto: Automatically outputs in the order HE-AAC > Dolby Digital+ > Dolby Digital > MPEG. (Except for Italy)
Auto: Automatically outputs in the order HE-AAC > Dolby Digital+ > MPEG > Dolby Digital. (Only Italy) - HE-AAC, Dolby Digital +, Dolby Digital, MPEG: Allows users to select the audio type they want. ex) If MPEG is selected, MPEG is always outputted.
If MPEG is not supported, another audio type is set in that order.
• Refer to p. 167 to 168 (Audio Language Selection)
SELECTING DIGITAL AUDIO OUT
This function allows you to select your preferred Digital Audio Output.
When Dolby Digital is available, selecting Auto in the Digital Audio Out menu will set SPDIF(Sony Philips Digital InterFace) output to Dolby Digital.
If Auto is selected in the digital audio out menu when Dolby Digital is not available, SPDIF output will be PCM(Pulse-code modulation).
Even if both Dolby Digital and Audio language have been set in a channel which broadcast Dolby Digital Audio, only Dolby Digital will be played.
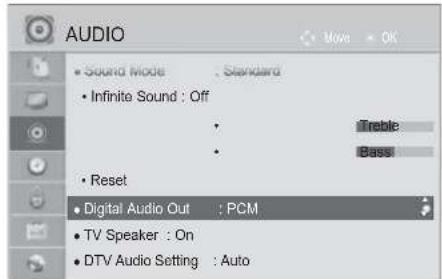
text_image
AUDIO Sound Mode : Standard Infinite Sound : Off Reset Digital Audio Out : PCM TV Speaker : On DTV Audio Setting : Auto
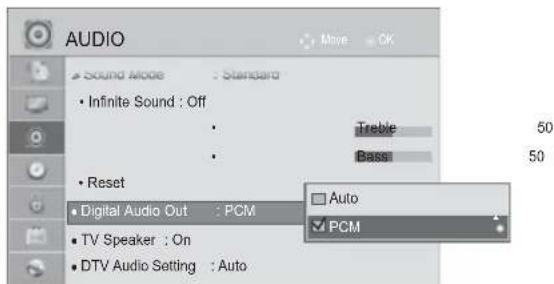
text_image
AUDIO Sound Mode : Standard • Infinite Sound : Off • Reset • Digital Audio Out : PCM • TV Speaker : On • DTV Audio Setting : Auto Treble Bassi Auto PCM
Select AUDIO.
Select Digital Audio Out.
Select Auto or PCM.
| DOLBY.DIGITAL PLUS | Manufactured under license from Dolby Laboratories. Dolby and the double-D symbol are trademarks of Dolby Laboratories. |
| • There is a possibility that when HDMI mode, some DVD players do not make SPDIF sound. At that time, set the output of the digital audio of the DVD player to PCM. (In HDMI, Dolby Digital Plus is not supported). | |
| Item Audio Input Digital Audio output | ||
| Auto(Speaker On) | MPEGDolby DigitalDolby Digital PlusHE-AAC | PCMDolby DigitalDolby DigitalPCM |
| Auto(Speaker Off) | MPEGDolby DigitalDolby Digital PlusHE-AAC | PCMDolby DigitalDolby DigitalDolby Digital |
| PCM | All PCM | |
- Press the MENU/EXIT button to return to normal TV viewing.
- Press the BACK button to move to the previous menu screen.
SOUND & LANGUAGE CONTROL
AUDIO RESET
Settings of the selected Sound Mode return to the default factory settings.
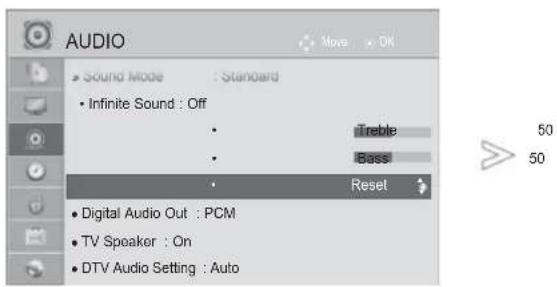
text_image
AUDIO Sound Mode : Standard • Infinite Sound : Off • Treble • Bass • Reset • Digital Audio Out : PCM • TV Speaker : On • DTV Audio Setting : Auto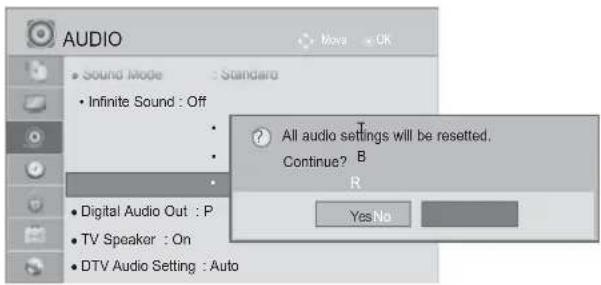
text_image
AUDIO Sound Mode • Infinite Sound : Off • Digital Audio Out : P • TV Speaker : On • DTV Audio Setting : Auto All audio settings will be resetted. Continue? B R Yes No
Select AUDIO.
Select Reset.
Select Yes.
Initialize the adjusted value.
- Press the MENU/EXIT button to return to normal TV viewing.
- Press the BACK button to move to the previous menu screen.
AUDIO DESCRIPTION (IN DIGITAL MODE ONLY)
This function is for the blind, and provides explanatory audio describing the current situation in a TV programme in addition to the basic audio.
When Audio Description On is selected, basic audio and Audio Description are provided only for those programmes that have Audio Description included.
Volume Changes the Audio Description volume
Beep Beeps when a programme with Audio Description information is selected
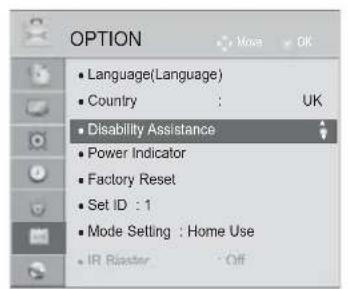
text_image
OPTION Language(Language) Country : UK Disability Assistance Power Indicator Factory Reset Set ID : 1 Mode Setting : Home Use IR Blaster Off
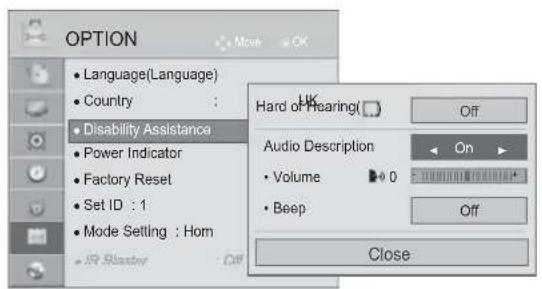
text_image
OPTION Language(Language) Country Disability Assistance Power Indicator Factory Reset Set ID : 1 Mode Setting : Hom IR Blaster Hard or Hearing(□) Audio Description Volume Beep Open Off Close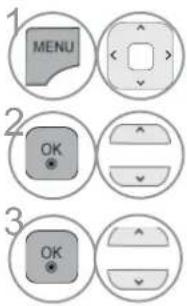
text_image
MENU OK OKSelect OPTION.
Select Disability Assistance.
Select Audio Description.
Adjustment for Audio Description Volume With selecting On
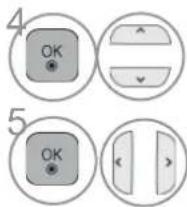
Select Volume or Beep.
Make desired adjustment.
- Press the MENU/EXIT button to return to normal TV viewing.
- Press the BACK button to move to the previous menu screen.
SOUND & LANGUAGE CONTROL
I/II
STEREO/DUAL RECEPTION (IN ANALOGUE MODE ONLY)
When a programme is selected, the sound information for the station appears with the programme number and station name.

Select Audio or Audio Language.
Select the sound output.
| Broadcast On Screen Display | |
| Mono | MONO |
| Stereo | STEREO |
| Dual | DUAL I, DUAL II, DUAL I+II |
■ Mono sound selection
If the stereo signal is weak in stereo reception, you can switch to mono. In mono reception, the clarity of sound is improved.
■ Language selection for dual language broadcast
If a programme can be received in two languages (dual language), you can switch to DUAL I, DUAL II or DUAL I+II.
DUAL I Sends the primary broadcast language to the loudspeakers.
DUAL II Sends the secondary broadcast language to the loudspeakers.
DUAL I+II Sends a separate language to each loudspeaker.
NICAM RECEPTION (IN ANALOGUE MODE ONLY)
If the TV is equipped with a receiver for NICAM reception, high quality NICAM (Near Instantaneous Companding Audio Multiplex) digital sound can be received.
Sound output can be selected according to the type of broadcast received.
1
When NICAM mono is received, you can select NICAM MONO or FM MONO.
2
When NICAM stereo is received, you can select NICAM STEREO or FM MONO. If the stereo signal is weak, switch to FM MONO.
3
When NICAM dual is received, you can select NICAM DUAL I, NICAM DUAL II or NICAM DUAL I+II or FM MONO.
SPEAKER SOUND OUTPUT SELECTION
In AV, Component, RGB and HDMI mode, you can select output sound for the left and right loudspeakers.
Select the sound output.
L+R: Audio signal from audio L input is sent to the left loudspeaker and audio signal from audio R input is sent to the right loudspeaker.
L+L: Audio signal from audio L input is sent to left and right loudspeakers.
R+R: Audio signal from audio R input is sent to left and right loudspeakers.
SOUND & LANGUAGE CONTROL
ON-SCREEN MENU LANGUAGE / COUNTRY SELECTION
The installation guide menu appears on the TV screen when it is switched on for the first time.
Select your desired language.
Select your country. (Except for 32/37/42LE49**, 32/37/42/47/55LE59**, 42/47LE7390, 32/37/42/47/55LE79**, 42/47/55LE89**, 32/37/42LD49**, 32/37/42/47/55LD69**, 32/42/47LD79**, 32/37/42LD89**, 42/47LX69**, 50/60PK59*, 50/60PK79**, 50/60PK99**, 50/60PX99**)
* If you want to change Language/ Country selection

Select OPTION.
Select Language(Language).
Select Menu Language.

Select your desired language.
Save.
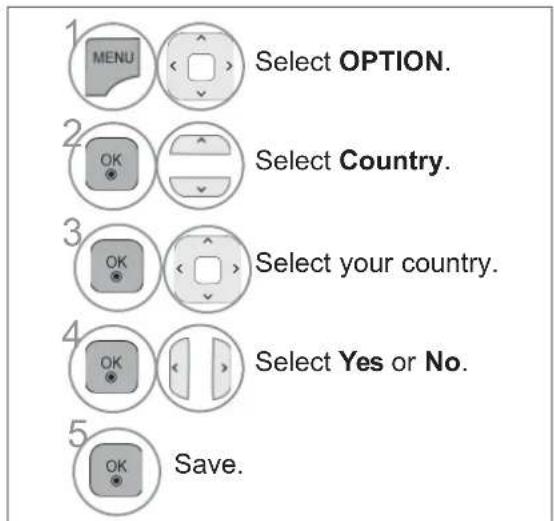
text_image
1 MENU Select OPTION. 2 OK Select Country. 3 OK Select your country. 4 OK Select Yes or No. 5 OK Save.(Except for 32/37/42LE49**, 32/37/42/47/55LE59**, 42/47LE7390, 32/37/42/47/55LE79**, 42/47/55LE89**, 32/37/42LD49**, 32/37/42/47/55LD69**, 32/42/47LD79**, 32/37/42LD89**, 42/47LX69**, 50/60PK59*, 50/60PK79**, 50/60PK99**, 50/60PX99**)
- Press the MENU/EXIT button to return to normal TV viewing.
- Press the BACK button to move to the previous menu screen.
NOTE
▶ If you do not finish the set-up Installation Guide by pressing BACK or if you time out on the OSD (On Screen Display) the installation menu will continuously appear until the set up is completed whenever the TV is switched on.
▶ If you select the wrong local country, teletext may not appear correctly on the screen and some problems may occur during teletext operation.
The CI (Common Interface) function may not be applied based on country broadcasting circumstances.
▶ DTV mode control buttons may not function based on country broadcasting circumstances.
In country that Digital broadcasting regulation isn't fixed, some DTV function may not work depending on digital broadcasting circumstances.
▶ The Country Setting "UK" should only be activated in UK.
If the country setting is set to "--", European terrestrial digital standard broadcasting programmes are available, but some DTV functions may not work properly.
LANGUAGE SELECTION
The Audio function allows selection of a preferred language.
If audio data in a selected language is not broadcast, the default language audio will be played.
Use the Subtitle function when two or more subtitle languages are broadcast. If subtitle data in a selected language is not broadcast, the default language subtitle will be displayed.
When the languages you selected as the primary for Audio Language and Subtitle Language and Text Language are not supported, you can select language in secondary category.
In Digital mode, use the Text language function when two or more Text languages are broadcast. If teletext data in a selected language is not broadcast, the default Text language page will be displayed.

Select OPTION.

Select Language(Language).
Select Audio Language, Subtitle Language or Text Language(Except for UK).
Select your desired language.
Save.

Select OPTION.
Select Disability Assistance.
Select Hard of Hearing(□).
Select On or Off.
- Press the BACK button to move to the previous menu screen.
SOUND & LANGUAGE CONTROL
< Audio Language Selection >
▶ When two or more audio languages are broadcast, you can select the audio language.
Select Audio or Audio Language.
Select an audio language.
Audio Language OSD Information
| Display Status | |
| N.A Not Available | |
| MPEG | MPEG Audio |
| D | Dolby Digital Audio |
| Audio for "Visual Impaired" | |
| ABC | Audio for "Hearing Impaired" |
| D+ | Dolby Digital Plus Audio |
| HE-AAC | HE-AAC Audio |
< Subtitle Language Selection >
▶ When two or more subtitle languages are broadcast, you can select the subtitle language with the SUBTITLE button on the remote control.
▶ Press the button to select a subtitle language.
- The audio/subtitles can be displayed in a simpler form with 1 to 3 characters broadcast by the service provider.
- When you select supplementary Audio (Audio for "Visual/Hearing Impaired") the TV may output a part of the Main audio.
- The audio/subtitles can be displayed in a simpler form with 1 to 3 characters broadcast by the service provider.
- When you select supplementary Audio (Audio for "Visual/Hearing Impaired") the TV may output a part of the Main audio.
TIME SETTING
CLOCK SETUP
The clock is set automatically when receiving a digital signal in Auto mode. You can set the clock manually in Manual mode.
You must set the time correctly before using on/off timer function.
The TV time is set by the time offset information based on Time Zone and GMT (Greenwich Mean Time) which is received with the broadcast signal and the time is set automatically by a digital signal.
When if the city name in Time Zone is changed into offset, you can change time by 1 hour.
Time Zone menu can be changed in Auto mode.
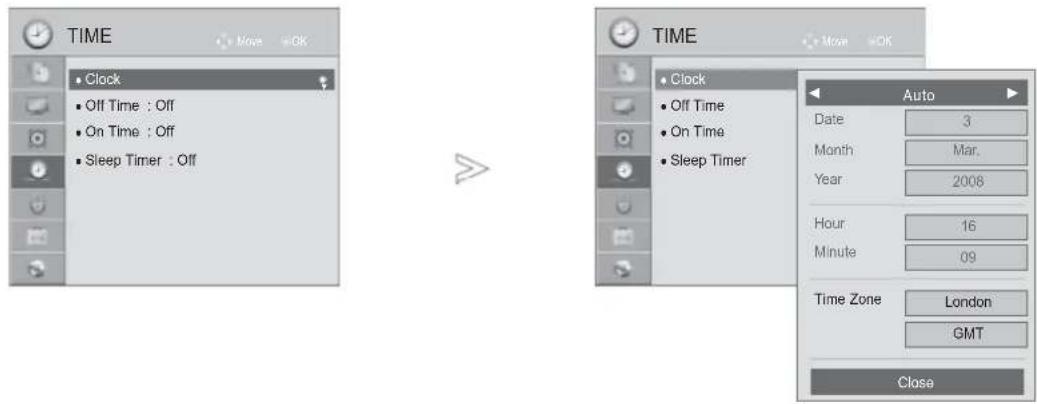
text_image
TIME Clock Off Time : Off On Time : Off Sleep Timer : Off TIME Clock Off Time On Time Sleep Timer Auto Date 3 Month Mar. Year 2008 Hour 16 Minute 09 Time Zone London GMT Close
text_image
1 MENU 2 OK 3 OK 4 OK 5 Set th ZoneSelect TIME.
Select Clock.
Select Auto or Manual.
Select either the year, month, date, time or Time Zone option.
Set the year, month, date, time or Time Zone option.
| Time Zone |
| Magadan, Kamchatka |
| Vladivostok |
| Yakutsk |
| Irkutsk |
| Krasnoyarsk |
| Omsk |
| Yekaterinburg |
| Moscow, Samara |
| Kaliningrad |
This Table means the Time Zone table of 9 area of Russia, and when the user selects the Time Zone for his or her area, it automatically sets the time for the corresponding area.
However, even though the user selected his or her area, if the broadcasting station's local time offset is not offered, or if the region information does not match, then the user may select the Offset from the Time Zone to set the correct time.
- Press the MENU/EXIT button to return to normal TV viewing.
- Press the BACK button to move to the previous menu screen.
TIME SETTING
AUTO ON/OFF TIME SETTING
The Off time function automatically switches the TV to standby at a preset time.
Two hours after the TV is switched on by the on time function it will automatically switch back to standby mode unless a button has been pressed.
The Off time function overrides the On time function if both are set to the same time.
The TV must be in standby mode for the On time to work.
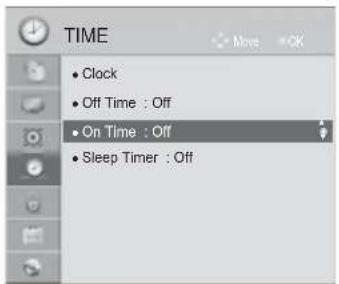
text_image
TIME Clock Off Time : Off On Time : Off Sleep Timer : Off
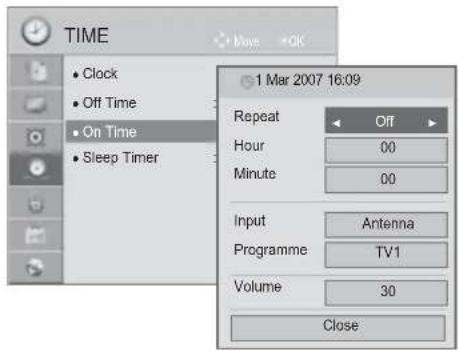
text_image
TIME Clock Off Time On Time Sleep Timer 1 Mar 2007 16:09 Repeat Off Hour 00 Minute 00 Input Antenna Programme TV1 Volume 30 Close
Select TIME.
Select Off Time or On Time.
Select Repeat.
Select Off, Once, Daily, Mon. \~ Fri., Mon. \~ Sat., Sat. \~ Sun. or Sun..
Set the hour.
Set the minutes.
- To cancel On/Off Time function, select Off.
- For On Time function only

Select Input.
Select the input source.
Set the programme.
Adjust volume level at switch-on.
- Press the MENU/EXIT button to return to normal TV viewing.
- Press the BACK button to move to the previous menu screen.
SLEEP TIMER SETTING
You do not have to remember to switch the TV off before you go to sleep.
The sleep timer automatically switches the TV to standby after the preset time has elapsed.

Select Sleep Timer.
Select Off, 10, 20, 30, 60, 90, 120, 180 or 240 min.
- When you switch the TV off, the preset sleep timer is cancelled.
- You can also adjust Sleep Timer in the TIME menu.
PARENTAL CONTROL / RATINGS
SET PASSWORD & LOCK SYSTEM
Enter the password, press '0', '0', '0', '0' on the remote control handset.
When France is selected for Country, password is not '0', '0', '0', '0' but '1', '2', '3', '4'.
When France is selected for Country, password cannot be set as '0', '0', '0', '0'.
If a channel is locked, enter the password to unlock it temporarily.
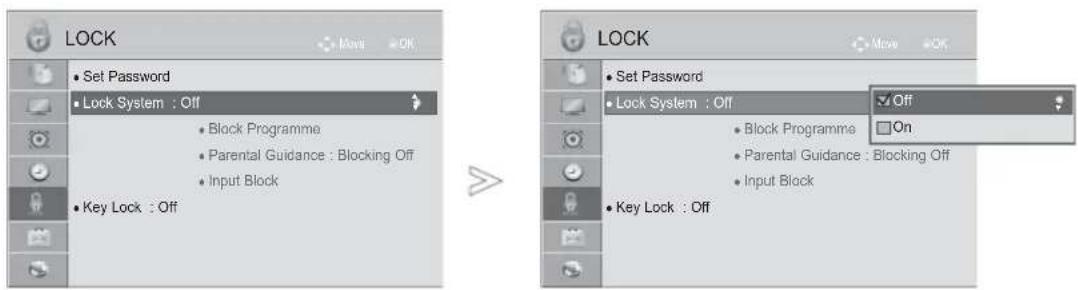
text_image
LOCK • Set Password • Lock System : Off Block Programme Parental Guidance : Blocking Off Input Block • Key Lock : Off LOCK • Set Password • Lock System : Off Block Programme Parental Guidance : Blocking Off Input Block • Key Lock : Off
Select LOCK.
Select Lock System.
Select On.
Set the password.
Input a 4-digit password.
Be sure to remember this number!
Re-enter new password for confirm.
- If you forget your password, press '0', '3', '2', '5' on the remote control handset.
- Press the MENU/EXIT button to return to normal TV viewing.
- Press the BACK button to move to the previous menu screen.
BLOCK PROGRAMME
Blocks any programme that you do not want to watch or that you do not want your children to watch.
It is available to use this function in Lock System "On".
Enter a password to watch a blocked programme.
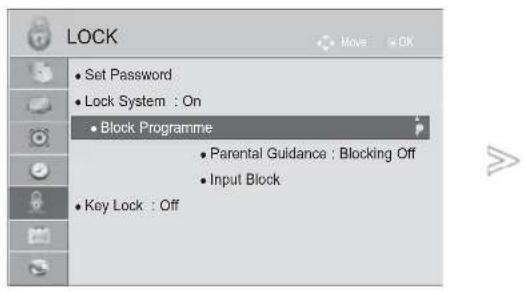
text_image
LOCK • Set Password • Lock System : On • Block Programme • Parental Guidance : Blocking Off • Input Block • Key Lock : Off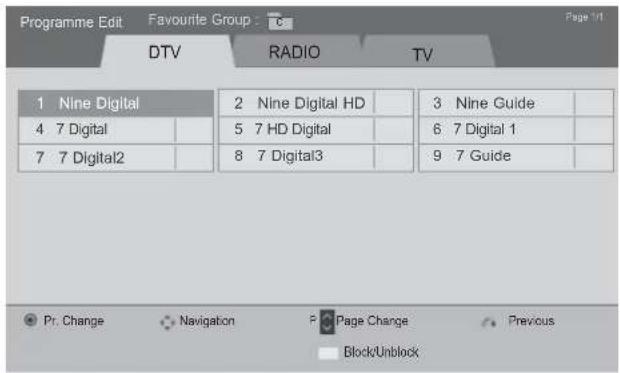
text_image
Programme Edit Favourite Group DTV RADIO TV 1 Nine Digital 2 Nine Digital HD 3 Nine Guide 4 7 Digital 5 7 HD Digital 6 7 Digital 1 7 7 Digital2 8 7 Digital3 9 7 Guide Pr. Change Navigation Page Change Previous Block/Unblockor
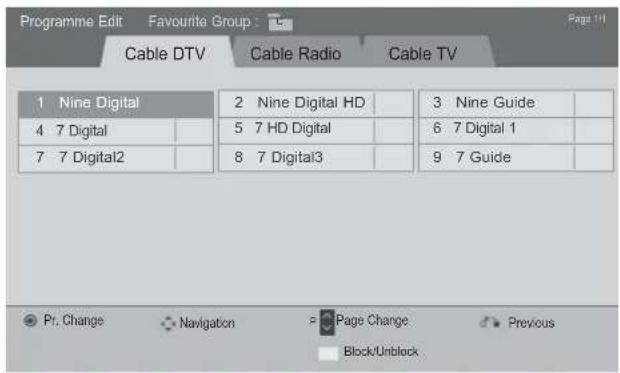
text_image
Programme Edit Favourite Group : Cable DTV Cable Radio Cable TV 1 Nine Digital 2 Nine Digital HD 3 Nine Guide 4 7 Digital 5 7 HD Digital 6 7 Digital 1 7 7 Digital2 8 7 Digital3 9 7 Guide Pr. Change Navigation Page Change Previous Block/Unblock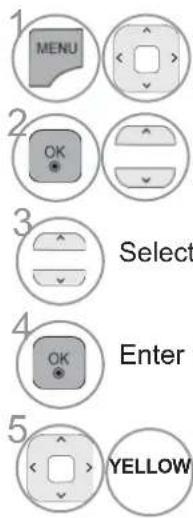
text_image
1 MENU 2 OK 3 Select 4 OK Enter 5 YELLOWSelect LOCK.
Select Lock System.
Select Block Programme.
Enter the Block Programme.
YELLOW Select a programme to be locked.
- Press the MENU/EXIT button to return to normal TV viewing.
- Press the BACK button to move to the previous menu screen.
PARENTAL CONTROL / RATINGS
PARENTAL CONTROL (IN DIGITAL MODE ONLY)
This function operates according to information from the broadcasting station. Therefore if the signal has incorrect information, this function does not operate.
A password is required to gain access to this menu.
This set is programmed to remember which option it was last set to even if you switch the set off.
Prevents children from watching certain adult's TV programmes, according to the ratings limit set.
Enter a password to watch a blocked programme.
Rating differs by country.
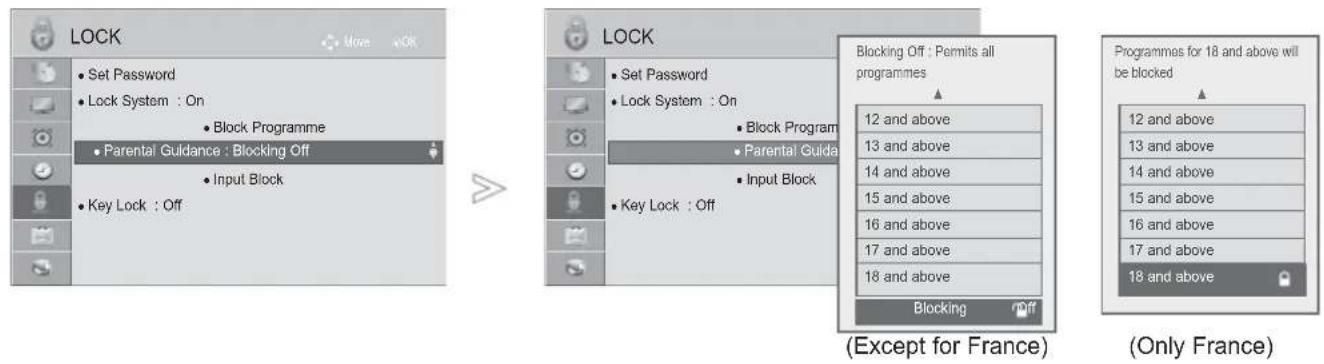

Select LOCK.
Select Lock System.
Select Parental Guidance.
Make appropriate adjustments.
- Press the MENU/EXIT button to return to normal TV viewing.
- Press the BACK button to move to the previous menu screen.
EXTERNAL INPUT BLOCKING
Enables you to block an input.
It is available to use this function in Lock System "On".
■ Image shown may differ from your TV.
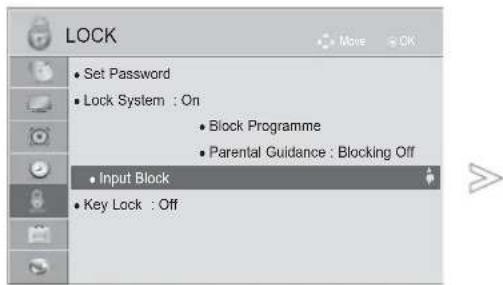
text_image
LOCK • Set Password • Lock System : On • Block Programme • Parental Guidance : Blocking Off • Input Block • Key Lock : Off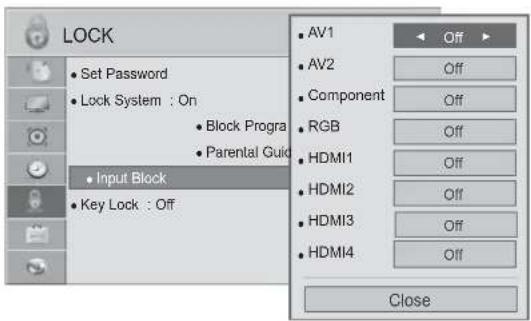
text_image
LOCK • Set Password • Lock System : On • Block Progra • Parental Guid • Input Block • Key Lock : Off AV1 AV2 Component RGB HDMI1 HDMI2 HDMI3 HDMI4 Off Off Off Off Off Off Close
Select LOCK.
Select Lock System.
Select Input Block.


Select input source.

Select On or Off.
- Press the MENU/EXIT button to return to normal TV viewing.
- Press the BACK button to move to the previous menu screen.
PARENTAL CONTROL / RATINGS
KEY LOCK
This feature can be used to prevent unauthorized viewing by locking out the front panel controls, so that it can only be used with the remote control.
This TV is programmed to remember which option it was last set to even if you turn the TV off.

text_image
LOCK • Set Password • Lock System : Off • Block Programme • Parental Guidance : Blocking Off • Input Block • • Key Lock : Off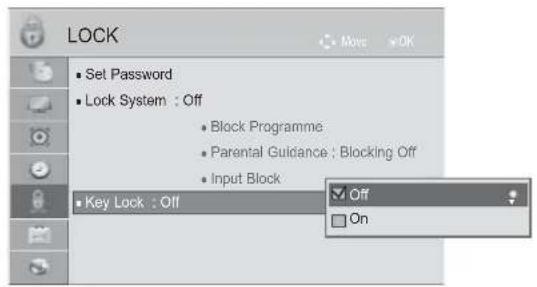
text_image
LOCK ■ Set Password ■ Lock System : Off ■ Block Programme ■ Parental Guidance : Blocking Off ■ Input Block ■ Key Lock : Off Off On
text_image
MENU OK OKSelect LOCK.
Select Key Lock.
Select On or Off.
- In Key Lock 'On', if the TV is turned off, press the ⏻ / I, INPUT, P^ ∨ button on the TV or POWER INPUT, P^ ∨ or NUMBER buttons on the remote control then the set will be turned on.
- With the Key Lock On, the display ' 🔑 Key Lock On' appears on the screen if any button on the front panel is pressed while viewing the TV.
-
When another OSD is displayed, '⚠ Key Lock On' will not operate.
-
Press the MENU/EXIT button to return to normal TV viewing.
- Press the BACK button to move to the previous menu screen.
TELETEXT
This feature is not available in all countries.
Teletext is a free service broadcast by most TV stations which gives up-to-the-minute information on news, weather, television programmes, share prices and many other topics.
The teletext decoder of this TV can support the SIMPLE, TOP and FASTEXT systems. SIMPLE (standard teletext) consists of a number of pages which are selected by directly entering the corresponding page number. TOP and FASTEXT are more modern methods allowing quick and easy selection of teletext information.
SWITCH ON/OFF
Press the TEXT button to switch to teletext. The initial page or last page viewed appears on the screen.
Two page numbers, TV station name, date and time are displayed on the screen headline. The first page number indicates your selection, while the second shows the current page displayed.
Press the TEXT button to switch off teletext. The previous mode reappears.
(Image shown may differ from your TV.)
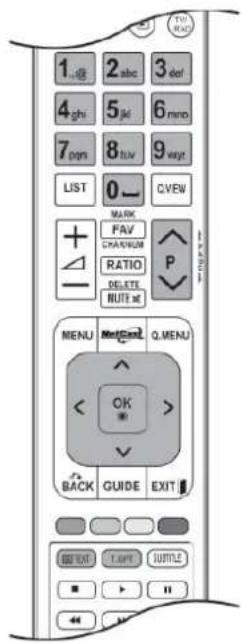
text_image
1.18 2.abc 3 def 4 ghi 5 jki 6 min 7 pgs 8 tluv 9 vgt LIST 0— QVEW + + RATIO P DELETS RUTE M MENU Men2 Gen2 Q MENU OK > BACK GUIDE EXIT BEVER LIST SUMMER ■ ▶ II ←SIMPLE TEXT
■ Page selection
① Enter the desired page number as a three digit number with the NUMBER buttons. If during selection you press a wrong number, you must complete the three digit number and then re-enter the correct page number.
② The P ∧ ∨ button can be used to select the preceding or following page.
TELETEXT
TOP TEXT
The user guide displays four fields-red, green, yellow and blue at the bottom of the screen. The yellow field denotes the next group and the blue field indicates the next block.
■ Block / group / page selection
① With the blue button you can progress from block to block.
② Use the yellow button to proceed to the next group with automatic overflow to the next block.
③ With the green button you can proceed to the next existing page with automatic overflow to the next group.
4 Alternatively the P^ button can be used.
The red button returns to the previous selection. Alternatively the P √ button can be used.
■ Direct page selection
As with SIMPLE teletext mode, you can select a page by entering it as a three digit number using the NUMBER buttons in TOP mode.
FASTEXT
The teletext pages are colour coded along the bottom of the screen and are selected by pressing the corresponding coloured button.
■ Page selection
1 Press the T.OPT button and then use ^ √button to select ≡i menu. Display the index page.
② You can select the pages which are colour coded along the bottom line with corresponding coloured buttons.
③ AS with SIMPLE teletext mode, you can select a page by entering its three digit page number with the NUMBER buttons in FASTEXT mode.
4 The P ∧ √ button can be used to select the preceding or following page.
SPECIAL TELETEXT FUNCTIONS
■ Press the T. OPT button and then use ^ ∨ button to select the Text Option menu.
In UK(In digital mod€), OPT button does not work.

Index
Select the each index page.

Time
When viewing a TV programme, select this menu to display the time at the top right hand corner of the screen.
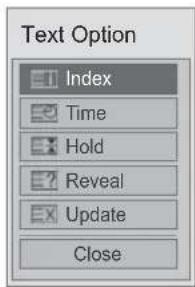
text_image
Text Option Index Time Hold Reveal Update CloseIn the teletext mode, press this button to select a sub page number. The sub page number is displayed at the bottom of the screen. To hold or change the sub page, press the RED/GREEN,<> or NUMBER buttons.

Hold
Stops the automatic page change which will occur if a teletext page consists of 2 or more sub pages. The number of sub pages and the sub page displayed is, usually, shown on the screen below the time. When this menu is selected the stop symbol is displayed at the top left-hand corner of the screen and the automatic page change is inactive.

■ Reveal
Select this menu to display concealed information, such as solutions to riddles or puzzles.

Update
Displays the TV picture on the screen while waiting for a new teletext page. The display will appear at the top left hand corner of the screen. When the updated page is available then display will change to the page number. Select this menu again to view the updated teletext page.
DIGITAL TELETEXT
*This function works in UK, Ireland only.
The TV gives you access to digital teletext which is greatly improved in various aspects such as text, graphics etc.
This digital teletext can access special digital teletext services and specific services which broadcast digital teletext.
TELETEXT WITHIN DIGITAL SERVICE
1 Press the numeric or P ∧ ∨ button to select a digital service which broadcasts digital teletext.
2 Follow the indications on digital teletext and move onto the next step by pressing TEXT, OK, ^< >, RED, GREEN, YELLOW, BLUE or NUMBER buttons and etc..
3 To change digital teletext service, select a different service by the numeric or P ∧ ∨ button.
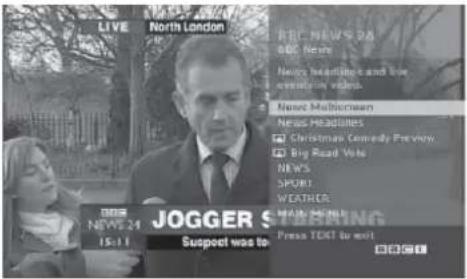
text_image
LIVE North London RRL NEWS 24 ABC News News Headline and live creation video. News Multicornen News Headlines Christmas Comedy Preview. Big Road Vote NEWS SPORT! WEATHER JOGGER S Suspost was to: Press TEXT by exitTELETEXT IN DIGITAL SERVICE
1 Press the numeric or P ∧ ∨ button to select a certain service which broadcasts digital teletext.
2 Press the TEXT or coloured button to switch on teletext.
3 Follow the indications on digital teletext and move onto the next step by pressing OK, ^ < >, RED, GREEN, YELLOW, BLUE or NUMBER buttons and so on.
4 Press the TEXT or colour button to switch off digital teletext and return to TV viewing.
Some services may allow you to access text services by pressing the RED button.
text_image
News 15:13 09 Dec Main Headlines UK World Politics In Depth UK Regions Sci-tech Health Community JOCGER STANDING BBC News 24 Press BLUE to change section GO TO TV SHORTCUTS BACK MENU BBC TTROUBLESHOOTING
The TV does not operate properly.
| The remote control does not work | Check to see if there is any object between the and the remote control causing an obstruction. Ensure you are pointing the remote control directly at the TV.Ensure that the batteries are installed with correct polarity (+ to +, - to -).Install new batteries. |
| Power is suddenly turned off | Is the sleep timer set?Check the power control settings. Has the Power supply been interrupted.If the TV is switched on and there is no input signal, it will switch off automatically after 15 minutes. |
The video function does not work.
| No picture & No sound | Check whether the is switched on.Try another channel. The problem may be with the broadcast.Is the power cord inserted correctly into the mains?Check your antenna direction and/or location.Test the mains outlet by plugging another TV into the same outlet. |
| Picture appears slowly after switching on | This is normal, the image is muted during the TV startup process. Please contact your service centre, if the picture has not appeared after five minutes. |
| No or poor colour or poor picture | Adjust Colour in menu option.Allow a sufficient distance between the TV and the VCR.Try another channel. The problem may be with the broadcast.Are the video cables installed properly?Activate any function to restore the brightness of the picture. |
| Horizontal/vertical bars or picture shaking | Check for local interference such as an electrical appliance or power tool. |
| Poor reception on some channels | Station or cable channel experiencing problems, tune to another station.Station signal is weak, reposition the antenna to receive weaker stations.Check for sources of possible interference. |
| Lines or streaks in pictures | Check antenna (Change the position of the antenna). |
| No picture when connecting HDMI | Check at your HDMI cable is High Speed HDMI Cable.If the HDMI cables are not High Speed HDMI Cable, flickering or no screen display can result. Please use the High Speed HDMI Cable. |
APPENDIX
| The audio function does not work. | |
| Picture OK & No sound | Press the + or - button.Sound muted? Press MUTE button.Try another channel. The problem may be with the broadcast.Are the audio cables installed properly? |
| No output from one of the speakers | Adjust Balance in menu option. |
| Unusual sound from inside the TV | A change in ambient humidity or temperature may result in an unusual noise when the TV is switched on or off and does not indicate a fault with the TV. |
| No sound when connecting HDMI or USB | Check HDMI cable High Speed HDMI Cable.Check USB cable over version 2.0.*This feature is not available for all models. |
| There is a problem in PC mode. (Only PC mode applied) | |
| The signal is out of range(Invalid format) | ■ Adjust resolution, horizontal frequency or vertical frequency.■ Check the input source. |
| Vertical bar or stripe on background & Horizontal Noise & Incorrect position | ■ Use to configure or adjust clock, phase, or H/V position. (Option) |
| Screen colour is unstable or single colour | ■ Check the signal cable.■ Reinstall the PC video card. |
| There is a problem with PICTURE settings. | |
| When the user changes the picture settings, the TV automatically converts back to the initial settings after a certain period of time. | ■ It means that the TV is currently set toStore Demo mode.To switch toHome usemode you should do the followings:From the TV Menu, chooseOPTION -> ChooseMode Setting -> ChooseHome use. Now, you have completed switching to theHome usemode. |
MAINTENANCE
Early malfunctions can be prevented. Careful and regular cleaning can prolong the life of your new TV.
Caution: Be sure to switch the power off and unplug the power cord before you begin any cleaning.
Cleaning the Screen
1 A good way to keep the dust off your screen for a while is to wet a soft cloth in a mixture of lukewarm water and a little fabric softener or dish washing detergent. Wring the cloth until it is almost dry, and then use it to wipe the screen.
2 Ensure there is no excess water on the screen. Allow any water or dampness to evaporate before switching on.
Cleaning the Cabinet
■ To remove dirt or dust, wipe the cabinet with a soft, dry, lint-free cloth.
■ Do not to use a wet cloth.
Extended Absence
CAUTION
▶ If you expect to leave your TV dormant for prolonged periods (such as a holiday), unplug the power cord to protect against possible damage from lightning or power surges.
APPENDIX
PRODUCT SPECIFICATIONS
| MODELS | 32LE5*** | ||
| 32LE5500-ZA / 32LE550N-ZA32LE5800-ZA / 32LE5900-ZA | 32LE5510-ZB / 32LE551N-ZB32LE5810-ZB / 32LE5910-ZB | ||
| Dimensions(Width x Height x Depth) | with stand | 784.6 mm x 558.1 mm x 221.0 mm 784.6 mm x 558.1 mm x 221.0 mm | |
| without stand | 784.6 mm x 499.5 mm x 39.9 mm 784.6 mm x 499.5 mm x 39.9 mm | ||
| Weight | with stand | 12.7 kg | 12.7 kg |
| without stand | 10.5 kg | 10.5 kg | |
| Power requirement | AC 100-240 V~ 50 / 60 Hz | AC 100-240 V~ 50 / 60 Hz | |
| Power Consumption | 130 W | 130 W | |
| MODELS | 37LE5*** | ||
| 37LE5500-ZA / 37LE550N-ZA37LE5800-ZA / 37LE5900-ZA | 37LE5510-ZB / 37LE551N-ZB37LE5810-ZB / 37LE5910-ZB | ||
| Dimensions(Width x Height x Depth) | with stand | 905.0 mm x 630.0 mm x 270.0 mm 905.0 mm x 630.0 mm x 270.0 mm | |
| without stand | 905.0 mm x 568.0 mm x 39.9 mm 905.0 mm x 568.0 mm x 39.9 mm | ||
| Weight | with stand | 15.6 kg | 15.6 kg |
| without stand | 12.8 kg | 12.8 kg | |
| Power requirement | AC 100-240 V~ 50 / 60 Hz | AC 100-240 V~ 50 / 60 Hz | |
| Power Consumption | 140 W | 140 W | |
| CI Module Size(Width x Height x Depth) | 100.0 mm x 55.0 mm x 5.0 mm | ||
| Environment condition | OperatingTemperatureOperating Humidity | 0 °C to 40 °CLess than 80 % | |
| Storage TemperatureStorage Humidity | -20 °C to 60°CLess than 85 % | ||
| Supported movie files | Refer to p. 96 to 97 | ||
■ The specifications shown above may be changed without prior notice for quality improvement.
| MODELS | 42LE5*** | ||
| 42LE5500-ZA / 42LE550N-ZA42LE5800-ZA / 42LE5900-ZA | 42LE5510-ZB / 42LE551N-ZB42LE5810-ZB / 42LE5910-ZB | ||
| Dimensions(Width x Height x Depth) | with stand | 1016.0 mm x 692.0 mm x 270.0 mm 1016.0 mm x 692.0 mm x 270.0 mm | |
| without stand | 1016.0 mm x 630.0 mm x 29.3 mm 1016.0 mm x 630.0 mm x 29.3 mm | ||
| Weight | with stand | 19.5 kg | 19.5 kg |
| without stand | 16.7 kg | 16.7 kg | |
| Power requirement | AC 100-240 V~ 50 / 60 Hz | AC 100-240 V~ 50 / 60 Hz | |
| Power Consumption | 150 W | 150 W | |
| MODELS | 47LE5*** | ||
| 47LE5500-ZA / 47LE550N-ZA47LE5800-ZA / 47LE5900-ZA | 47LE5510-ZB / 47LE5 51N-ZB47LE5810-ZB / 47LE5910-ZB | ||
| Dimensions(Width x Height x Depth) | with stand | 1126.6 mm x 757.9 mm x 284.4 mm 1126.6 mm x 757.9 mm x 284.4 mm | |
| without stand | 1126.6 mm x 692.0 mm x 29.3 mm 1126.6 mm x 692.0 mm x 29.3 mm | ||
| Weight | with stand | 22.9 kg | 22.9 kg |
| without stand | 19.6 kg | 19.6 kg | |
| Power requirement | AC 100-240 V~ 50 / 60 Hz | AC 100-240 V~ 50 / 60 Hz | |
| Power Consumption | 170 W | 170 W | |
| CI Module Size(Width x Height x Depth) | 100.0 mm x 55.0 mm x 5.0 mm | ||
| Environment condition | OperatingTemperatureOperating Humidity | 0 °C to 40 °CLess than 80 % | |
| Storage TemperatureStorage Humidity | -20 °C to 60°CLess than 85 % | ||
| Supported movie files | Refer to p. 96 to 97 | ||
■ The specifications shown above may be changed without prior notice for quality improvement.
APPENDIX
| MODELS | 55LE5*** | ||
| 55LE5500-ZA / 55LE550N-ZA55LE5800-ZA / 55LE5900-ZA | 55LE5510-ZB / 55LE551N-ZB55LE5810-ZB / 55LE5910-ZB | ||
| Dimensions(Width x Height x Depth) | with stand | 1306.0 mm x 867.0 mm x 328.0 mm | 1306.0 mm x 867.0 mm x 328.0 mm |
| without stand | 1306.0 mm x 797.0 mm x 30.7 mm | 1306.0 mm x 797.0 mm x 30.7 mm | |
| Weight | with stand | 34.5 kg | 34.5 kg |
| without stand | 28.8 kg | 28.8 kg | |
| Power requirementPower Consumption | AC 100-240 V~ 50 / 60 Hz200 W | AC 100-240 V~ 50 / 60 Hz200 W | |
| MODELS | 42LX6*** | 47LX6*** | |
| 42LX6500-ZD / 42LX650N-ZD42LX6800-ZD / 42LX6900-ZD | 47LX6500-ZD / 47LX650N-ZD47LX6800-ZD / 47LX6900-ZD | ||
| Dimensions(Width x Height x Depth) | with stand | 1016.0 mm x 692.0 mm x 270.0 mm 1126.6 mm x 757.9 mm x 284.4 mm | |
| without stand | 1016.0 mm x 630.0 mm x 29.3 mm 1126.6 mm x 692.0 mm x 29.3 mm | ||
| Weight | with stand | 19.5 kg | 22.9 kg |
| without stand | 16.7 kg | 19.6 kg | |
| Power requirementPower Consumption | AC 100-240 V~ 50 / 60 Hz160 W | AC 100-240 V~ 50 / 60 Hz180 W | |
| CI Module Size(Width x Height x Depth) | 100.0 mm x 55.0 mm x 5.0 mm | ||
| Environment condition | OperatingTemperatureOperating Humidity | 0 °C to 40 °CLess than 80 % | |
| Storage TemperatureStorage Humidity | -20 °C to 60°CLess than 85 % | ||
| Supported movie files | Refer to p. 96 to 97 | ||
■ The specifications shown above may be changed without prior notice for quality improvement.
| MODELS | 32LE7*** | ||
| 32LE7500-ZA / 32LE750N-ZA32LE7800-ZA / 32LE7900-ZA | 32LE7510-ZB / 32LE751N-ZB32LE7810-ZB / 32LE7910-ZB | ||
| Dimensions(Width x Height x Depth) | with stand | 786.4 mm x 556.2 mm x 221.0 mm 786.4 mm x 556.2 mm x 221.0 mm | |
| without stand | 786.4 mm x 500.4 mm x 39.9 mm 786.4 mm x 500.4 mm x 39.9 mm | ||
| Weight | with stand | 14.8 kg | 14.8 kg |
| without stand | 11.7 kg | 11.7 kg | |
| Power requirement | AC 100-240 V~ 50 / 60 Hz | AC 100-240 V~ 50 / 60 Hz | |
| Power Consumption | 130 W | 130 W | |
| MODELS | 37LE7*** | ||
| 37LE7500-ZA / 37LE750N-ZA37LE7800-ZA / 37LE7900-ZA | 37LE7510-ZB / 37LE751N-ZB37LE7810-ZB / 37LE7910-ZB | ||
| Dimensions(Width x Height x Depth) | with stand | 907.4 mm x 628.3 mm x 269.8 mm 907.4 mm x 628.3 mm x 269.8 mm | |
| without stand | 907.4 mm x 569.0 mm x 39.9 mm 907.4 mm x 569.0 mm x 39.9 mm | ||
| Weight | with stand | 18.8 kg | 18.8 kg |
| without stand | 14.7 kg | 14.7 kg | |
| Power requirement | AC 100-240 V~ 50 / 60 Hz | AC 100-240 V~ 50 / 60 Hz | |
| Power Consumption | 140 W | 140 W | |
| CI Module Size(Width x Height x Depth) | 100.0 mm x 55.0 mm x 5.0 mm | ||
| Environment condition | OperatingTemperatureOperating Humidity | 0 °C to 40 °CLess than 80 % | |
| Storage TemperatureStorage Humidity | -20 °C to 60° CLess than 85 % | ||
| Supported movie files | Refer to p. 96 to 97 | ||
■ The specifications shown above may be changed without prior notice for quality improvement.
APPENDIX
| MODELS | 42LE7*** | |||
| 42LE7500-ZA / 42LE750N-ZA / 42LE7800-ZA / 42LE7900-ZA | 42LE7510-ZB / 42LE751N-ZB / 42LE7810-ZB / 42LE7910-ZB | 42LE7300-ZA / 42LE730N-ZA / 42LE7380-ZA / 42LE7390-ZA | ||
| Dimensions (Width x Height x Depth) | with stand | 1018.2 mm x 692.5 mm x 269.8 mm | 1018.2 mm x 692.5 mm x 269.8 mm | 1009.2 mm x 694.5 mm x 286.5 mm |
| without stand | 1018.2 mm x 630.7 mm x 29.3 mm | 1018.2 mm x 630.7 mm x 29.3 mm | 1009.2 mm x 629.7 mm x 29.3 mm | |
| Weight | with stand | 23.2 kg | 23.2 kg | 25.5 kg |
| without stand | 19.1 kg | 19.1 kg | 21.0 kg | |
| Power requirement Power Consumption | AC 100-240 V~ 50 / 60 Hz | AC 100-240 V~ 50 / 60 Hz | AC 100-240 V~ 50 / 60 Hz | |
| 150 W | 150 W | 150 W | ||
| MODELS | 47LE7*** | |||
| 47LE7500-ZA / 47LE750N-ZA / 47LE7800-ZA / 47LE7900-ZA | 47LE7510-ZB / 47LE751N-ZB / 47LE7810-ZB / 47LE7910-ZB | 47LE7300-ZA / 47LE730N-ZA / 47LE7380-ZA / 47LE7390-ZA | ||
| Dimensions (Width x Height x Depth) | with stand | 1128.6 mm x 758.5 mm x 284.4 mm | 1128.6 mm x 758.5 mm x 284.4 mm | 1119.6 mm x 757.1 mm x 286.5 mm |
| without stand | 1128.6 mm x 693.3 mm x 29.8 mm | 1128.6 mm x 693.3 mm x 29.8 mm | 1119.6 mm x 691.3 mm x 29.3 mm | |
| Weight | with stand | 27.5 kg | 27.5 kg | 29.7 kg |
| without stand | 23.0 kg | 23.0 kg | 25.2 kg | |
| Power requirement Power Consumption | AC 100-240 V~ 50 / 60 Hz | AC 100-240 V~ 50 / 60 Hz | AC 100-240 V~ 50 / 60 Hz | |
| 170 W | 170 W | 170 W | ||
| CI Module Size (Width x Height x Depth) | 100.0 mm x 55.0 mm x 5.0 mm | |||
| Environment condition | Operating Temperature Operating Humidity | 0 °C to 40 °CLess than 80 % | ||
| Storage Temperature Storage Humidity | -20 °C to 60°C Less than 85 % | |||
| Supported movie files | Refer to p. 96 to 97 | |||
■ The specifications shown above may be changed without prior notice for quality improvement.
| MODELS | 55LE7*** | ||
| 55LE7500-ZA / 55LE750N-ZA55LE7800-ZA / 55LE7900-ZA | 55LE7510-ZB / 55LE751N-ZB55LE7810-ZB / 55LE7910-ZB | ||
| Dimensions(Width x Height x Depth) | with stand | 1306.0 mm x 868.1 mm x 328.0 mm 1306.0 mm x 868.1 mm x 328.0 mm | |
| without stand | 1306.0 mm x 797.4 mm x 31.2 mm 1306.0 mm x 797.4 mm x 31.2 mm | ||
| Weight | with stand | 39.6 kg | 39.6 kg |
| without stand | 33.5 kg | 33.5 kg | |
| Power requirement | AC 100-240 V~ 50 / 60 Hz | AC 100-240 V~ 50 / 60 Hz | |
| Power Consumption | 200 W | 200 W | |
| MODELS | 47LX9*** | 55LX9*** | |
| 47LX9800-ZA 55LX9800-ZA | |||
| Dimensions(Width x Height x Depth) | with stand | 1085.9 mm x 710.6 mm x 255.0 mm 1255.8 mm x 805.0 mm x 255.0 mm | |
| without stand | 1085.9 mm x 654.2 mm x 31.6 mm 1255.8 mm x 749.6 mm x 31.6 mm | ||
| Weight | with stand | 26.7 kg | 32.7 kg |
| without stand | 22.1 kg | 28.1 kg | |
| Power requirement | AC 100-240 V~ 50 / 60 Hz | AC 100-240 V~ 50 / 60 Hz | |
| Power Consumption | 210 W | 260 W | |
| CI Module Size(Width x Height x Depth) | 100.0 mm x 55.0 mm x 5.0 mm | ||
| Environment condition | OperatingTemperatureOperating Humidity | 0 °C to 40 °CLess than 80 % | |
| Storage TemperatureStorage Humidity | -20 °C to 60°CLess than 85 % | ||
| Supported movie files | Refer to p. 96 to 97 | ||
■ The specifications shown above may be changed without prior notice for quality improvement.
APPENDIX
| MODELS | 42LE8*** | ||
| 42LE8500-ZA / 42LE850N-ZA42LE8800-ZA / 42LE8900-ZA | 42LE8510-ZB / 42LE851N-ZB42LE8810-ZB / 42LE8910-ZB | ||
| Dimensions(Width x Height x Depth) | with stand | 1013.3 mm x 705.8 mm x 235.5 mm 1013.3 mm x 705.8 mm x 235.5 mm | |
| without stand | 1013.3 mm x 645.8 mm x 34.5 mm 1013.3 mm x 645.8 mm x 34.5 mm | ||
| Weight | with stand | 27.2 kg | 27.2 kg |
| without stand | 23.1 kg | 23.1 kg | |
| Power requirementPower Consumption | AC 100-240 V~ 50 / 60 Hz160 W | AC 100-240 V~ 50 / 60 Hz160 W | |
| MODELS | 47LE8*** | ||
| 47LE8500-ZA / 47LE850N-ZA47LE8800-ZA / 47LE8900-ZA | 47LE8510-ZB / 47LE851N-ZB47LE8810-ZB / 47LE8910-ZB | ||
| Dimensions(Width x Height x Depth) | with stand | 1122.6 mm x 769.3 mm x 275.0 mm 1122.6 mm x 769.3 mm x 275.0 mm | |
| without stand | 1122.6 mm x 707.3 mm x 34.5 mm 1122.6 mm x 707.3 mm x 34.5 mm | ||
| Weight | with stand | 31.6 kg | 31.6 kg |
| without stand | 27.0 kg | 27.0 kg | |
| Power requirementPower Consumption | AC 100-240 V~ 50 / 60 Hz170 W | AC 100-240 V~ 50 / 60 Hz170 W | |
| CI Module Size(Width x Height x Depth) | 100.0 mm x 55.0 mm x 5.0 mm | ||
| Environment condition | OperatingTemperatureOperating Humidity | 0 °C to 40 °CLess than 80 % | |
| Storage TemperatureStorage Humidity | -20 °C to 60° CLess than 85 % | ||
| Supported movie files | Refer to p. 96 to 97 | ||
■ The specifications shown above may be changed without prior notice for quality improvement.
| MODELS | 55LE8*** | ||
| 55LE8500-ZA / 55LE850N-ZA55LE8800-ZA / 55LE8900-ZA | 55LE8510-ZB / 55LE851N-ZB55LE8810-ZB / 55LE8910-ZB | ||
| Dimensions(Width x Height x Depth) | with stand | 1292.6 mm x 875.4 mm x 311.9 mm | 1292.6 mm x 875.4 mm x 311.9 mm |
| without stand | 1292.6 mm x 802.9 mm x 34.5 mm | 1292.6 mm x 802.9 mm x 34.5 mm | |
| Weight | with stand | 43.8 kg | 43.8 kg |
| without stand | 35.8 kg | 35.8 kg | |
| Power requirement | AC 100-240 V~ 50 / 60 Hz | AC 100-240 V~ 50 / 60 Hz | |
| Power Consumption | 230 W | 230 W | |
| MODELS | 32LD4*** | 37LD4*** | |
| 32LD480-ZB32LD490-ZB | 37LD480-ZB37LD490-ZB | ||
| Dimensions(Width x Height x Depth) | with stand | 799.0 mm x 555.0 mm x 207.0 mm 916.0 mm x 625.0 mm x 261.0 mm | |
| without stand | 799.0 mm x 506.0 mm x 73.5 mm 916.0 mm x 575.0 mm x 77.4 mm | ||
| Weight | with stand | 9.1 kg | 12.5 kg |
| without stand | 8.1 kg | 10.8 kg | |
| Power requirement | AC 100-240 V~ 50 / 60 Hz | AC 100-240 V~ 50 / 60 Hz | |
| Power Consumption | 120 W | 160 W | |
| MODELS | 42LD4*** | ||
| 42LD480-ZB42LD490-ZB | |||
| Dimensions(Width x Height x Depth) | with stand | 1023.0 mm x 685.0 mm x 261.0 mm | |
| without stand | 1023.0 mm x 635.0 mm x 76.6 mm | ||
| Weight | with stand | 15.1 kg | |
| without stand | 13.5 kg | ||
| Power requirement | AC 100-240 V~ 50 / 60 Hz | ||
| Power Consumption | 190 W | ||
| CI Module Size(Width x Height x Depth) | 100.0 mm x 55.0 mm x 5.0 mm | ||
| Environment condition | OperatingTemperatureOperating Humidity | 0 °C to 40 °CLess than 80 % | |
| Storage TemperatureStorage Humidity | -20 °C to 60°CLess than 85 % | ||
| Supported movie files | Refer to p. 96 to 97 | ||
■ The specifications shown above may be changed without prior notice for quality improvement.
APPENDIX
| MODELS | 32LD6*** | ||
| 32LD650-ZC / 32LD650N-ZC32LD680-ZC / 32LD690-ZB | 32LD651-ZB / 32LD651N-ZB32LD681-ZB / 32LD691-ZB | ||
| Dimensions(Width x Height x Depth) | with stand | 797.0 mm x 555.0 mm x 207.0 mm 797.0 mm x 555.0 mm x 207.0 mm | |
| without stand | 797.0 mm x 495.0 mm x 73.8 mm 797.0 mm x 495.0 mm x 73.8 mm | ||
| Weight | with stand | 9.8 kg | 9.8 kg |
| without stand | 8.7 kg | 8.7 kg | |
| Power requirement | AC 100-240 V~ 50 / 60 Hz | AC 100-240 V~ 50 / 60 Hz | |
| Power Consumption | 150 W | 150 W | |
| MODELS | 37LD6*** | ||
| 37LD650-ZC / 37LD650N-ZC37LD680-ZC / 37LD690-ZB | 37LD651-ZB / 37LD651N-ZB37LD681-ZB / 37LD691-ZB | ||
| Dimensions(Width x Height x Depth) | with stand | 916.0 mm x 625.0 mm x 261.0 mm 916.0 mm x 625.0 mm x 261.0 mm | |
| without stand | 916.0 mm x 560.0 mm x 77.7 mm 916.0 mm x 560.0 mm x 77.7 mm | ||
| Weight | with stand | 12.8 kg | 12.8 kg |
| without stand | 11.2 kg | 11.2 kg | |
| Power requirement | AC 100-240 V~ 50 / 60 Hz | AC 100-240 V~ 50 / 60 Hz | |
| Power Consumption | 170 W | 170 W | |
| CI Module Size(Width x Height x Depth) | 100.0 mm x 55.0 mm x 5.0 mm | ||
| Environment condition | OperatingTemperatureOperating Humidity | 0 °C to 40 °CLess than 80 % | |
| Storage TemperatureStorage Humidity | -20 °C to 60°CLess than 85 % | ||
| Supported movie files | Refer to p. 96 to 97 | ||
■ The specifications shown above may be changed without prior notice for quality improvement.
| MODELS | 42LD6*** | ||
| 42LD650-ZC / 42LD650N-ZC42LD680-ZC / 42LD690-ZB | 42LD651-ZB / 42LD651N-ZB42LD681-ZB / 42LD691-ZB | ||
| Dimensions(Width x Height x Depth) | with stand | 1024.0 mm x 685.0 mm x 261.0 mm | 1024.0 mm x 685.0 mm x 261.0 mm |
| without stand | 1024.0 mm x 621.0 mm x 76.8 mm | 1024.0 mm x 621.0 mm x 76.8 mm | |
| Weight | with stand | 15.5 kg | 15.5 kg |
| without stand | 13.9 kg | 13.9 kg | |
| Power requirementPower Consumption | AC 100-240 V~ 50 / 60 Hz210 W | AC 100-240 V~ 50 / 60 Hz210 W | |
| MODELS | 47LD6*** | ||
| 47LD650-ZC / 47LD650N-ZC47LD680-ZC / 47LD690-ZB | 47LD651-ZB / 47LD651N-ZB47LD681-ZB / 47LD691-ZB | ||
| Dimensions(Width x Height x Depth) | with stand | 1137.0 mm x 758.0 mm x 270.0 mm | 1137.0 mm x 758.0 mm x 270.0 mm |
| without stand | 1137.0 mm x 685.0 mm x 76.8 mm | 1137.0 mm x 685.0 mm x 76.8 mm | |
| Weight | with stand | 20.3 kg | 20.3 kg |
| without stand | 18.3 kg | 18.3 kg | |
| Power requirementPower Consumption | AC 100-240 V~ 50 / 60 Hz250 W | AC 100-240 V~ 50 / 60 Hz250 W | |
| CI Module Size(Width x Height x Depth) | 100.0 mm x 55.0 mm x 5.0 mm | ||
| Environment condition | OperatingTemperatureOperating Humidity | 0 °C to 40 °CLess than 80 % | |
| Storage TemperatureStorage Humidity | -20 °C to 60° CLess than 85 % | ||
| Supported movie files | Refer to p. 96 to 97 | ||
■ The specifications shown above may be changed without prior notice for quality improvement.
APPENDIX
| MODELS | 55LD6*** | ||
| 55LD650-ZC / 55LD650N-ZC55LD680-ZC / 55LD690-ZB | 55LD651-ZB / 55LD651N-ZB55LD681-ZB / 55LD691-ZB | ||
| Dimensions(Width x Height x Depth) | with stand | 1329.0 mm x 872.0 mm x 330.0 mm 1329.0 mm x 872.0 mm x 330.0 mm | |
| without stand | 1329.0 mm x 796.0 mm x 96.5 mm 1329.0 mm x 796.0 mm x 96.5 mm | ||
| Weight | with stand | 33.0 kg | 33.0 kg |
| without stand | 29.8 kg | 29.8 kg | |
| Power requirement | AC 100-240 V~ 50 / 60 Hz | AC 100-240 V~ 50 / 60 Hz | |
| Power Consumption | 340 W | 340 W | |
| MODELS | 32LE4*** | 37LE4*** | |
| 32LE4800-ZB32LE4900-ZB | 37LE4800-ZB37LE4900-ZB | ||
| Dimensions(Width x Height x Depth) | with stand | 786.0 mm x 559.0 mm x 221.0 mm 907.0 mm x 630.0 mm x 270.0 mm | |
| without stand | 786.0 mm x 500.0 mm x 39.9 mm 907.0 mm x 565.0 mm x 39.9 mm | ||
| Weight | with stand | 12.4 kg | 14.6 kg |
| without stand | 10.6 kg | 12.1 kg | |
| Power requirement | AC 100-240 V~ 50 / 60 Hz | AC 100-240 V~ 50 / 60 Hz | |
| Power Consumption | 130 W | 140 W | |
| MODELS | 42LE4*** | ||
| 42LE4800-ZB42LE4900-ZB | |||
| Dimensions(Width x Height x Depth) | with stand | 1018.0 mm x 692.0 mm x 270.0 mm | |
| without stand | 1018.0 mm x 627.0 mm x 29.8 mm | ||
| Weight | with stand | 19.7 kg | |
| without stand | 17.2 kg | ||
| Power requirement | AC 100-240 V~ 50 / 60 Hz | ||
| Power Consumption | 150 W | ||
| CI Module Size(Width x Height x Depth) | 100.0 mm x 55.0 mm x 5.0 mm | ||
| Environment condition | Operating Temperature | 0 °C to 40 °CLess than 80 % | |
| Operating Humidity | |||
| Storage Temperature | -20 °C to 60°C | ||
| Storage Humidity | Less than 85 % | ||
| Supported movie files | Refer to p. 96 to 97 | ||
■ The specifications shown above may be changed without prior notice for quality improvement.
| MODELS | 32LD7*** | ||
| 32LD750-ZA / 32LD750N-ZA32LD780-ZA / 32LD790-ZA | 32LD751-ZB / 32LD751N-ZB32LD781-ZB / 32LD791-ZB / 32LD752-ZD | ||
| Dimensions(Width x Height x Depth) | with stand | 804.0 mm x 567.0 mm x 212.0 mm 804.0 mm x 567.0 mm x 212.0 mm | |
| without stand | 804.0 mm x 510.0 mm x 73.8 mm 804.0 mm x 510.0 mm x 73.8 mm | ||
| Weight | with stand | 10.2 kg | 10.2 kg |
| without stand | 8.8 kg | 8.8 kg | |
| Power requirement | AC 100-240 V~ 50 / 60 Hz | AC 100-240 V~ 50 / 60 Hz | |
| Power Consumption | 150 W | 150 W | |
| MODELS | 42LD7*** | ||
| 42LD750-ZA / 42LD750N-ZA42LD780-ZA / 42LD790-ZA | 42LD751-ZB / 42LD751N-ZB42LD781-ZB / 42LD791-ZB / 42LD752-ZD | ||
| Dimensions(Width x Height x Depth) | with stand | 1032.0 mm x 700.0 mm x 260.0 mm 1032.0 mm x 700.0 mm x 260.0 mm | |
| without stand | 1032.0 mm x 639.0 mm x 76.8 mm 1032.0 mm x 639.0 mm x 76.8 mm | ||
| Weight | with stand | 16.5 kg | 16.5 kg |
| without stand | 13.8 kg | 13.8 kg | |
| Power requirement | AC 100-240 V~ 50 / 60 Hz | AC 100-240 V~ 50 / 60 Hz | |
| Power Consumption | 210 W | 210 W | |
| CI Module Size(Width x Height x Depth) | 100.0 mm x 55.0 mm x 5.0 mm | ||
| Environment condition | OperatingTemperatureOperating Humidity | 0 °C to 40 °CLess than 80 % | |
| Storage TemperatureStorage Humidity | -20 °C to 60° CLess than 85 % | ||
| Supported movie files | Refer to p. 96 to 97 | ||
■ The specifications shown above may be changed without prior notice for quality improvement.
APPENDIX
| MODELS | 47LD7*** | ||
| 47LD750-ZA / 47LD750N-ZA47LD780-ZA / 47LD790-ZA | 47LD751-ZB / 47LD751N-ZB47LD781-ZB / 47LD791-ZB / 47LD752-ZD | ||
| Dimensions(Width x Height x Depth) | with stand | 1144.0 mm x 764.0 mm x 260.0 mm | 1144.0 mm x 764.0 mm x 260.0 mm |
| without stand | 1144.0 mm x 704.0 mm x 76.8 mm | 1144.0 mm x 704.0 mm x 76.8 mm | |
| Weight | with stand | 20.9 kg | 20.9 kg |
| without stand | 18.2 kg | 18.2 kg | |
| Power requirementPower Consumption | AC 100-240 V~ 50 / 60 Hz | AC 100-240 V~ 50 / 60 Hz | |
| 250 W | 250 W | ||
| CI Module Size(Width x Height x Depth) | 100.0 mm x 55.0 mm x 5.0 mm | ||
| Environment condition | OperatingTemperatureOperating Humidity | 0 °C to 40 °CLess than 80 % | |
| Storage TemperatureStorage Humidity | -20 °C to 60°CLess than 85 % | ||
| Supported movie files | Refer to p. 96 to 97 | ||
■ The specifications shown above may be changed without prior notice for quality improvement.
| MODELS | 32LD8*** | |
| 32LD840-ZA / 32LD840N-ZA32LD880-ZA / 32LD890-ZA | ||
| Dimensions(Width x Height x Depth) | with stand | 803.0 mm x 568.0 mm x 212.0 mm |
| without stand | 803.0 mm x 502.0 mm x 73.4 mm | |
| Weight | with stand | 10.0 kg |
| without stand | 8.6 kg | |
| Power requirement | AC 100-240 V~ 50 / 60 Hz | |
| Power Consumption | 150 W | |
| MODELS | 37LD8*** | |
| 37LD840-ZA / 37LD840N-ZA37LD880-ZA / 37LD890-ZA | ||
| Dimensions(Width x Height x Depth) | with stand | 922.0 mm x 640.0 mm x 260.0 mm |
| without stand | 922.0 mm x 568.0 mm x 77.3 mm | |
| Weight | with stand | 13.9 kg |
| without stand | 11.3 kg | |
| Power requirement | AC 100-240 V~ 50 / 60 Hz | |
| Power Consumption | 170 W | |
| CI Module Size(Width x Height x Depth) | 100.0 mm x 55.0 mm x 5.0 mm | |
| Environment condition | OperatingTemperatureOperating Humidity | 0 °C to 40 °CLess than 80 % |
| Storage TemperatureStorage Humidity | -20 °C to 60° CLess than 85 % | |
| Supported movie files | Refer to p. 96 to 97 | |
■ The specifications shown above may be changed without prior notice for quality improvement.
APPENDIX
| MODELS | 42LD8*** | |
| 42LD840-ZA / 42LD840N-ZA42LD880-ZA / 42LD890-ZA | ||
| Dimensions(Width x Height x Depth) | with stand | 1030.0 mm x 701.0 mm x 260.0 mm |
| without stand | 1030.0 mm x 628.0 mm x 76.4 mm | |
| Weight | with stand | 16.5 kg |
| without stand | 13.9 kg | |
| Power requirement | AC 100-240 V~ 50 / 60 Hz | |
| Power Consumption | 210 W | |
| CI Module Size(Width x Height x Depth) | 100.0 mm x 55.0 mm x 5.0 mm | |
| Environment condition | OperatingTemperatureOperating Humidity | 0 °C to 40 °CLess than 80 % |
| Storage TemperatureStorage Humidity | -20 °C to 60°CLess than 85 % | |
| Supported movie files | Refer to p. 96 to 97 | |
■ The specifications shown above may be changed without prior notice for quality improvement.
| MODELS | 50PK5** | 60PK5** | |
| 50PK590-ZE 60PK590-ZE | |||
| Dimensions (Width x Height x Depth) | with stand | 1171.4 mm x 786.2 mm x 309.7 mm 1392.0 mm x 915.0 mm x 384.0 mm | |
| without stand | 1171.4 mm x 724.4 mm x 55.3 mm 1392.0 mm x 852.0 mm x 55.3 mm | ||
| Weight | with stand | 31.0 kg | 45.9 kg |
| without stand | 28.6 kg | 41.4 kg | |
| MODELS | 50PK7*** | 60PK7*** | |
| 50PK760-ZC / 50PK760N-ZC 50PK780-ZC / 50PK790-ZC | 60PK760-ZC / 60PK760N-ZC 60PK780-ZC / 60PK790-ZC | ||
| Dimensions (Width x Height x Depth) | with stand | 1184.0 mm x 801.0 mm x 294.5 mm 1402.8 mm x 934.3 mm x 384.0 mm | |
| without stand | 1184.0 mm x 738.5 mm x 52.4 mm 1402.8 mm x 866.8 mm x 52.4 mm | ||
| Weight | with stand | 34.5 kg | 50.3 kg |
| without stand | 29.9 kg | 42.7 kg | |
| CI Module Size (Width x Height x Depth) | 100.0 mm x 55.0 mm x 5.0 mm | ||
| Environment condition | Operating Temperature Operating Humidity | 0 °C to 40 °CLess than 80 % | |
| Storage Temperature Storage Humidity | -20 °C to 60°C Less than 85 % | ||
| Supported movie files | Refer to p. 96 to 97 | ||
■ The specifications shown above may be changed without prior notice for quality improvement.
■ For the power supply and power consumption, refer to the label attached to the product.
APPENDIX
| MODELS | 50PK9*** | 60PK9*** | |
| 50PK950-ZA / 50PK960-ZA50PK950N-ZA / 50PK980-ZA50PK990-ZA | 60PK950-ZA / 60PK960-ZA60PK950N-ZA / 60PK980-ZA60PK990-ZA | ||
| Dimensions(Width x Height x Depth) | with stand | 1190.0 mm x 804.5 mm x 294.5 mm 140 | 8.8 mm x 937.9 mm x 384.0 mm |
| without stand | 1190.0 mm x 737.0 mm x 52.4 mm 140 | 8.8 mm x 860.7 mm x 52.4 mm | |
| Weight | with stand | 34.8 kg | 50.9 kg |
| without stand | 30.2 kg | 43.3 kg | |
| MODELS | 50PX9*** | 60PX9*** | |
| 50PX960-ZA / 50PX950N-ZA /50PX980-ZA / 50PX990-ZA | 60PX960-ZA / 60PX950N-ZA /60PX980-ZA / 60PX990-ZA | ||
| Dimensions(Width x Height x Depth) | with stand | 1190.0 mm x 804.5 mm x 294.5 mm 140 | 8.8 mm x 937.9 mm x 384.0 mm |
| without stand | 1190.0 mm x 737.0 mm x 52.4 mm 1 | ||
| Weight | with stand | 34.8 kg | 50.9 kg |
| without stand | 30.2 kg | 43.3 kg | |
| CI Module Size(Width x Height x Depth) | 100.0 mm x 55.0 mm x 5.0 mm | ||
| Environment condition | OperatingTemperatureOperating Humidity | 0 °C to 40 °CLess than 80 % | |
| Storage TemperatureStorage Humidity | -20 °C to 60°CLess than 85 % | ||
| Supported movie files | Refer to p. 96 to 97 | ||
■ For the power supply and power consumption, refer to the label attached to the product.
| Digital TV Analogue TV | ||
| Television System | DVB-T | PAL/SECAM B/G/D/K, PAL I/II, SECAM L/L' |
| DVB-C | ||
| Programme Coverage | VHF, UHF | VHF: E2 to E12, UHF: E21 to E69, CATV: S1 to S20, HYPER: S21 to S47 |
| Maximum number of storable programmes | 1,000 | |
| External Antenna Impedance | 75 Ω 75 Ω | |
■ The specifications shown above may be changed without prior notice for quality improvement.
IR CODES
*This feature is not available for all models.
| Code (Hexa) | Function Note | |
| 95 Energy | Saving R/C BUTTON | |
| 08 | POWER R/C BUTTON(POWER ON/OFF) | |
| 0B INPUT | R/C BUTTON | |
| 79 RATIO | R/C BUTTON | |
| F0 TV/RAD | R/C BUTTON | |
| 45 Q.MENU | R/C BUTTON | |
| 43 MENU | R/C BUTTON | |
| AB GUIDE | R/C BUTTON | |
| 40 | Up (^) | R/C BUTTON |
| 41 | Down ( √) | R/C BUTTON |
| 07 | Left (<) | R/C BUTTON |
| 06 | Right ( >) | R/C BUTTON |
| 44 | OK(◎) | R/C BUTTON |
| 28 BACK | R/C BUTTON | |
| 5B EXIT | R/C BUTTON | |
| AA INFO i | ○ R/C BUTTON | |
| 30 AV MODE | R/C BUTTON | |
| 02 | △+ | R/C BUTTON |
| 03 | △- | R/C BUTTON |
| 1E | FAV (MARK) (CHAR/NUM) | R/C BUTTON |
| 09 | MUTE (DELETE) | R/C BUTTON |
| 00 | P ^ | R/C BUTTON |
| 01 | P √ | R/C BUTTON |
| 10 to 19 | Number Key 0 to 9 | R/C BUTTON |
| 53 LIST | R/C BUTTON | |
| 1A Q.VIEW | R/C BUTTON | |
| 72 RED Key | R/C BUTTON | |
| 71 GREEN Key | R/C BUTTON | |
| 63 YELLOW Key | R/C BUTTON | |
| 61 BLUE Key(L/R SELECT) | R/C BUTTON | |
| 20 | TEXT | R/C BUTTON |
| 21 T.OPT(T.Option) | R/C BUTTON | |
| 39 SUBTITLE | R/C BUTTON | |
| 7E SIMPLINK | R/C BUTTON | |
| 91 AD | R/C BUTTON | |
| B1 | ■ | R/C BUTTON |
| B0 | ▶ | R/C BUTTON |
| BA | II(FREEZE:Plasma TV only) | R/C BUTTON |
| 8F | ◀◀ | R/C BUTTON |
| 8E | ▶▶ | R/C BUTTON |
| 59 NetCast | R/C BUTTON | |
| 58 @ | R/C BUTTON | |
| DC 3D | R/C BUTTON | |
| 9F APP/* | R/C BUTT | ON |
APPENDIX
EXTERNAL CONTROL DEVICE SETUP
RS-232C Setup
Connect the RS-232C (serial port) input jack to an external control device (such as a computer or an A/V control system) to control the product's functions externally.
Connect the serial port of the control device to the RS-232C jack on the product back panel.
Note: RS-232C connection cables are not supplied with the product.
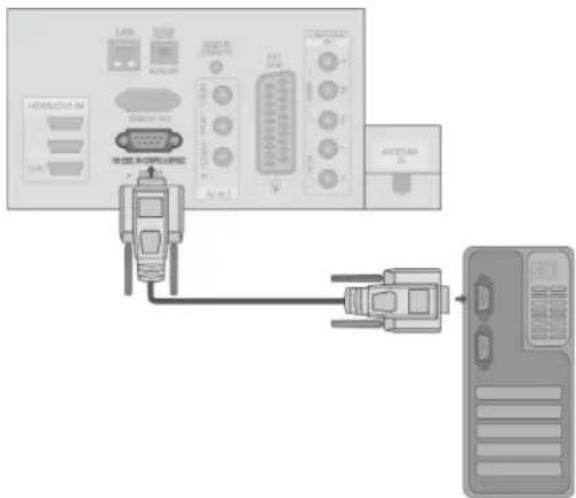
text_image
Diagram showing connections between a device interface with labeled ports and connected cables, including a separate computer terminal.Type of Connector; D-Sub 9-Pin Male
No. Pin Name
| 1 | No connection |
| 2 | RXD (Receive data) |
| 3 | TXD (Transmit data) |
| 4 | DTR (DTE side ready) |
| 5 | GND |
| 6 | DSR (DCE side ready) |
| 7 | RTS (Ready to send) |
| 8 | CTS (Clear to send) |
| 9 | No Connection |
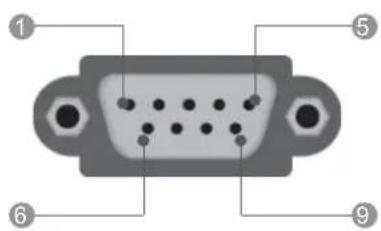
text_image
Diagram of a V1222 VGA connector with numbered pins pointing to the top and sides.RS-232C Configurations
7-Wire Configurations (Standard RS-232C cable)
| PC | TV | ||
| RXD | 2 | 3 | TXD |
| TXD | 3 | 2 | RXD |
| GND | 5 | 5 | GND |
| DTR | 4 | 6 | DSR |
| DSR | 6 | 4 | DTR |
| RTS | 7 | 8 | CTS |
| CTS | 8 | 7 | RTS |
| D-Sub 9 | D-Sub 9 | ||
3-Wire Configurations(Not standard)
| PC | TV | ||
| RXD | 2 | 3 | TXD |
| TXD | 3 | 2 | RXD |
| GND | 5 | 5 | GND |
| DTR | 4 | 6 | DTR |
| DSR | 6 | 4 | DSR |
| RTS | 7 | 7 | RTS |
| CTS | 8 | 8 | CTS |
| D-Sub 9 | D-Sub 9 | ||
Set ID
Use this function to specify a set ID number.
Adjust Set ID to choose the desired TV ID number.
The adjustment range of SET ID is 1 to 99.
- Press the BACK button to move to the previous menu screen.
APPENDIX
Communication Parameters
■ Baud rate : 9600 b(sART)
■ Data length : 8 bits
■ Parity : None
■ Stop bit : 1 bit
■ Communication code : ASCII code
■ Use a crossed (reverse) cable.
Command Reference List
| COMMAND1 | COMMAND2 | DATA(Hexadecimal) | |
| 01. Power | k | a | 00 to 01 |
| 02. Aspect Ratio | k | c | Refer to p. 205 |
| 03. Screen Mute | k | d | Refer to p. 205 |
| 04. Volume Mute | k | e | 00 to 01 |
| 05. Volume Control | k | f 00 to 64 | |
| 06. Contrast | k | g | 00 to 64 |
| 07. Brightness | k | h | 00 to 64 |
| 08. Colour | k | i | 00 to 64 |
| 09. Tint | k | j | 00 to 64 |
| 10. Sharpness | k | k | 00 to 64 |
| 11. OSD Select | k | l | 00 to 01 |
| 12. Remote control lock mode | k | m | 00 to 01 |
| 13. Treble | k | r | 00 to 64 |
| 14. Bass | k | s | 00 to 64 |
| 15. Balance | k | t 00 to 64 | |
| 16. Colour Temperature | x | u | 00 to 64 |
| 17. ISM Method | j | p | Refer to p. 207 |
| 18. Energy Saving | j | q | 00 to 05 |
| 19. Auto Configuration | j | u | 01 |
| 20. Tune Command | m | a | Refer to p. 207 |
| 21. Programme Add/Skip | m | b 00 to 01 | |
| 22. Key | m | c | Key Code |
| 23. Control Back Light | m | g 00 to 64 | |
| 24. Input select (Main) | x | b | Refer to p. 208 |
* Note : During USB operations such as DivX or EMF, all commands except Power(ka) and Key(mc) are not executed and treated as NG.
Transmission / Receiving Protocol
Transmission
[Command1][Command2][ ][Set ID][ ][Data][Cr]
* [Command 1] : First command to control the TV.
(j, k, m or x)
* [Command 2] : Second command to control the TV.
* [Set ID] : You can adjust the set ID to choose desired monitor ID number in option menu. Adjustment range is 1 to 99. When selecting Set ID '0', every connected set is controlled.
Set ID is indicated as decimal (1 to 99) on menu and as Hexa decimal (0x0 to 0x63) on transmission/receiving protocol.
* [DATA] : To transmit command data.
Transmit 'FF' data to read status of command.
* [Cr] : Carriage Return ASCII code '0x0D'
* [ ] : ASCII code 'space (0x20)'
OK Acknowledgement
[Command2][ ][Set ID][ ][OK][Data][x]
* The set transmits ACK (acknowledgement) based on this format when receiving normal data. At this time, if the data is data read mode, it indicates present status data. If the data is data write mode, it returns the data of the PC computer.
Error Acknowledgement
[Command2][ ][Set ID][ ][NG][Data][x]
* The set transmits ACK (acknowledgement) based on this format when receiving abnormal data from non-viable functions or communication errors.
Data 00: Illegal Code
01. Power (Command: k a)
▶ To control Power On/Off of the set.
Transmission
[k][a][ ][Set ID][ ][Data][Cr]
Data 00: Power Off 01: Power On
Ack
[a][ ][Set ID][ ][OK/NG][Data][x]
▶ To show Power On/Off.
Transmission
[k][a][ ][Set ID][ ][FF][Cr]
Ack
[a][ ][Set ID][ ][OK/NG][Data][x]
* Similarly, if other functions transmit '0xFF' data based on this format, Acknowledgement data feed back presents status about each function.
* OK Ack., Error Ack. and other message may display on the screen when TV is power On.
02. Aspect Ratio (Command: k c) (Main Picture Size)
▶ To adjust the screen format. (Main picture format) You can also adjust the screen format using the Aspect Ratio in the Q.MENU. or PICTURE menu.
Transmission
[k][c][ ][Set ID][ ][Data][Cr]
Data 01 : Normal screen (4:3) 07 : 14:9
02 : Wide screen (16:9) 09 : Just Scan
* Full Wide is supported only for Digital, Analogue, AV.
03. Screen Mute (Command: k d)
▶ To select screen mute on/off.
Transmission
[k][d][ ][Set ID][ ][Data][Cr]
Data 00 : Screen mute off (Picture on)
Video mute off
01: Screen mute on (Picture off)
10: Video mute on
Ack
[d][ ][Set ID][ ][OK/NG][Data][x]
* In case of video mute on only, TV will display On Screen Display(OSD). But, in case of Screen mute on, TV will not display OSD.
04. Volume Mute (Command: k e)
▶ To control volume mute on/off.
You can also adjust mute using the MUTE button on remote control.
Transmission
[k][e][ ][Set ID][ ][Data][Cr]
Data 00 : Volume mute on (Volume off)
01 : Volume mute off (Volume on)
Ack
[e][ ][Set ID][ ][OK/NG][Data][x]
05. Volume Control (Command: k f)
▶ To adjust volume.
You can also adjust volume with the VOLUME buttons on remote control.
Transmission
[k][f][ ][Set ID][ ][Data][Cr]
Data Min : 00 to Max : 64
* Refer to 'Real data mapping 1'. See page 207.
Ack
[f][ ][Set ID][ ][OK/NG][Data][x]
06. Contrast (Command: k g)
▶ To adjust screen contrast.
You can also adjust contrast in the PICTURE menu.
Transmission
[k][g][ ][Set ID][ ][Data][Cr]
Data Min : 00 to Max : 64
* Refer to 'Real data mapping 1'. See page 207.
Ack
[g][ ][Set ID][ ][OK/NG][Data][x]
07. Brightness (Command: k h)
▶ To adjust screen brightness.
You can also adjust brightness in the PICTURE menu.
Transmission
[k][h][ ][Set ID][ ][Data][Cr]
Data Min:00 to Max:64
* Refer to 'Real data mapping 1'. See page 207.
Ack
[h][ ][Set ID][ ][OK/NG][Data][x]
08. Colour (Command: k i)
▶ To adjust the screen colour.
You can also adjust colour in the PICTURE menu.
Transmission
[k][i][ ][Set ID][ ][Data][Cr]
Data Min : 00 to Max : 64
* Refer to 'Real data mapping 1'. See page 207.
Ack
[i][ ][Set ID][ ][OK/NG][Data][x]
APPENDIX
09. Tint (Command: k j)
▶ To adjust the screen tint.
You can also adjust tint in the PICTURE menu.
Transmission
[k][j][ ][Set ID][ ][Data][Cr]
Data Red : 00 to Green : 64
* Refer to 'Real data mapping 1'. See page 207.
Ack
[j][ ][Set ID][ ][OK/NG][Data][x]
10. Sharpness (Command: k k)
▶ To adjust the screen sharpness.
You can also adjust sharpness in the PICTURE menu.
Transmission
[k][k][ ][Set ID][ ][Data][Cr]
Data Min : 00 to Max : 64
* Refer to 'Real data mapping 1'. See page 207.
Ack
[k][ ][Set ID][ ][OK/NG][Data][x]
11. OSD Select (Command: k l)
▶ To select OSD (On Screen Display) on/off when controlling remotely.
Transmission
[k][l][ ][Set ID][ ][Data][Cr]
Data 00 : OSD off 01 : OSD on
Ack
[1][ ][Set ID][ ][OK/NG][Data][x]
12. Remote control lock mode (Command: k m)
▶ To lock the front panel controls on the monitor and remote control.
Transmission
[k][m][ ][Set ID][ ][Data][Cr]
Data 00 : Lock off 01 : Lock on
Ack
[m][ ][Set ID][ ][OK/NG][Data][x]
* If you are not using the remote control, use this mode. When main power is on/off, external control lock is released.
* In the standby mode, if key lock is on, TV will not turn on by power on key of IR & Local Key.
13. Treble (Command: k r)
▶ To adjust treble.
You can also adjust treble in the AUDIO menu.
Transmission
[k][r][ ][Set ID][ ][Data][Cr]
Data Min : 00 to Max : 64
* Refer to 'Real data mapping 1'. See page 207.
Ack
[r][ ][Set ID][ ][OK/NG][Data][x]
You can also adjust bass in the AUDIO menu.
Transmission
[k][s][ ][Set ID][ ][Data][Cr]
Data Min : 00 to Max : 64
* Refer to 'Real data mapping 1'. See page 207.
Ack
[s][ ][Set ID][ ][OK/NG][Data][x]
15. Balance (Command: k t)
▶ To adjust balance.
You can also adjust balance in the AUDIO menu.
Transmission
[k][t][ ][Set ID][ ][Data][Cr]
Data Min : 00 to Max : 64
* Refer to 'Real data mapping 1'. See page 207.
Ack
[t][ ][Set ID][ ][OK/NG][Data][x]
16. Colour Temperature (Command: x u)
▶ To adjust colour temperature. You can also adjust Colour Temperature in the PICTURE menu.
Transmission
[x][u][ ][Set ID][ ][Data][Cr]
Data Min: 00 to Max: 64
* Refer to 'Real data mapping 1'. See page 207.
Ack
[u][ ][Set ID][ ][OK/NG][Data][x]
17. ISM Method (Command: j p) (Plasma TV only)
▶ To control the ISM method. You can also adjust ISM Method in OPTION menu.
Transmission
[j][p][ ][Set ID][ ][Data][Cr]
Data 02: Orbiter
04: White wash
08: Normal
20: Colour Wash
Ack
[p][ ][Set ID][ ][OK/NG][Data][x]
18. Energy Saving (Command: j q)
▶ To reduce the power consumption of the TV. You can also adjust Energy Saving in PICTURE menu.
Transmission
[j][q][ ][Set ID][ ][Data][Cr]
| Power Saving Function | Level | Description | |||||||
| 7 | 6 | 5 | 4 | 3 2 1 | 0 | ||||
| 0 | 0 | 0 | 0 | Low Power | 0 0 | 0 0 | Off | ||
| 0 | 0 | 0 | 0 | Low Power | 0 0 | 0 1 | M | i n i m u | |
| 0 | 0 | 0 | 0 | Low Power | 0 0 | 1 0 | M | e | d i u m |
| 0 | 0 | 0 | 0 | Low Power | 0 0 | 1 1 | M | a x i m u | |
| 0 | 0 | 0 | 0 | Low Power | 0 1 | 0 0 | Auto(LCD TV/LED LCD TV only) | ||
| 0 | 0 | 0 | 0 | Low Power | 0 | 1 | 0 | 1 | Screen Off |
| 0 | 0 | 0 | 0 | Low Power | 0 1 | 0 0 | Intelligent Sensor(Plasma TV only) | ||
Ack
[q][ ][Set ID][ ][OK/NG][Data][x]
19. Auto Configure(Command: j u)
▶ To adjust picture position and minimize image shaking automatically. It works only in RGB (PC) mode.
Transmission
[j][u][ ][Set ID][ ][Data][Cr]
Data 01: To set
Ack
[u][ ][Set ID][ ][OK/NG][Data][x]
20. Tune Command (Command: m a)
▶ Select channel to following physical number.
Transmission
[m][a][ ][Set ID][ ][Data0][ ][Data1][ ][Data2][Cr]
Data00 : High channel data
Data01: Low channel data
ex. No. 47 -> 00 2F (2FH)
No. 394 -> 01 8A (18AH),
DTV No. 0 -> Don't care
Data02:0x00:Analogue Main
0x10 : DTV Main
0x20:Radio
Channel data range
Analogue - Min: 00 to Max: 63 (0 to 99)
Digital - Min: 00 to Max: 3E7 (0 to 999)
(Except For Sweden, Finland, Norway, Denmark, Ireland)
Digital - Min: 00 to Max: 270F (0 to 9999)
(Only Sweden, Finland, Norway, Denmark, Ireland)
Ack
[a][ ][Set ID][ ][OK/NG][Data][x]
Data Min: 00 to Max: 7DH
21. Programme Add/Skip(Command: m b)
▶ To set skip status for the current Programme.
Transmission
[m][b][ ][Set ID][ ][Data][Cr]
Data 00:Skip 01:Add
Ack
[b][ ][Set ID][ ][OK/NG][Data][x]
* Real data mapping 1
00: Step 0
A: Step 10 (Set ID 10) F: Step 15 (Set ID 15) 10: Step 16 (Set ID 16) 64: Step 100
6E: Step 110
73: Step 115
74: Step 116
CF: Step 199
FE : Step 254
FF: Step 255
APPENDIX
22. Key(Command: m c)
▶ To send IR remote key code.
Transmission
[m][c][ ][Set ID][ ][Data][Cr]
Data Key code - Refer to page 201.
Ack
[c][ ][Set ID][ ][OK/NG][Data][x]
23. Control Back Light (Command: m g) (LCD TV/LED LCD TV only)
▶ To Control the back light.
Transmission
[m][g][ ][Set ID][ ][Data][Cr]
Data : data Min: 00 to Max: 64
Ack
[g][ ][Set ID][ ][OK/NG][Data][x]
24. Input select (Command: x b) (Main Picture Input)
▶ To select input source for main picture.
Transmission
[x][b][ ][Set ID][ ][Data][Cr]
Data Structure
MSB
LSB
| 0 | 0 | 0 | 0 | 0 | 0 | 0 | 0 |
External Input Input Number
| External Input Data | ||||
| 0 | 0 | 0 | 0 | DTV |
| 0 | 0 | 0 | 1 | Analogue |
| 0 | 0 | 1 | 0 | AV |
| 0 | 1 | 0 | 0 | Component |
| 0 | 1 | 1 | 0 | RGB |
| 1 | 0 | 0 | 0 | HDMI |
| 0 | 1 | 1 | 1 | |
| 1 | 0 | 0 | 0 | |
| 1 | 0 | 0 | 1 | |
| 1 | 0 | 1 | 0 | |
| Input Number Data | ||||
| 0 | 0 | 0 | 0 | Input1 |
| 0 | 0 | 0 | 1 | Input2 |
| 0 | 0 | 1 | 0 | Input3 |
| 0 | 0 | 1 | 1 | Input4 |
Ack
[b][ ][Set ID][ ][OK/NG][Data][x]
OPEN SOURCE SOFTWARE NOTICE
The following GPL executables and LGPL, MPL libraries used in this product are subject to the GPL2.0/LGPL2.1/MPL1.1 License Agreements:
GPL EXECUTABLES:
Linux kernel 2.6, busybox, e2fsprogs, jfsutils, lzo, msdl-1.1, mtd-utils, ntpclient, procps
LGPL LIBRARIES:
Atk, cairo, directFB, ffmpeg, glib, GnuTLS, gtk+, iconv, libintl, libgcrypt, libgpg-error, libsoup, libusb, pango, uClibc, webkit
MPL LIBRARIES:
Nanox, spidermonkey
LG Electronics offers to provide source code to you on CD-ROM for a charge covering the cost of performing such distribution, such as the cost of media, shipping and handling upon e-mail request to LG Electronics : opensource@lge.com
This offer is valid for a period of three (3) years from the date of the distribution of this product by LG Electronics.
You can obtain a copy of the GPL, LGPL, MPL licenses on the CD-ROM provided with this product. Also you can obtain the translation of GPL, LGPL licenses from http://www.gnu.org/licenses/old-licenses/gpl-2.0-translations.html, http://www.gnu.org/licenses/old-licenses/lgpl-2.1-translations.html.
This product includes other open source software.
■ boost C++: software developed by http://www.boost.org distributed under the Boost Software License, Version 1.0
■ c-ares : copyright © 1998 by the Massachusetts Institute of Technology
■ expat:
• copyright © 1998, 1999, 2000 Thai Open Source Software Center Ltd and Clark Cooper
• copyright © 2001-2007 Expat maintainers.
■ fontconfig: copyright © 2001, 2003 Keith Packard
■ freetype: copyright © 2003 The FreeType Project (www.freetype.org).
■ ICU: copyright © 1995-2008 International Business Machines Corporation and others.
■ libcurl: copyright © 1996 - 2008, Daniel Stenberg.
■ libjpeg: This software is based in part on the work of the Independent JPEG Group copyright © 1991 – 1998, Thomas G. Lane.
■ libmng: copyright © 2000-2007 Gerard Juyn, Glenn Randers-Pehrson
■ libpng: copyright © 1998-2008 Glenn Randers-Pehrson
■ libupnp: copyright © 2000-2003 Intel Corporation
■ libxml2 : copyright © 1998-2003 Daniel Veillard
■ libxslt: copyright © 2001-2002 Daniel Veillard
■ lua interpreter: copyright © 1994–2008 Lua.org, PUC-Rio
■ md5: copyright © 1991-2, RSA Data Security, Inc
■ openSSL:
- cryptographic software written by Eric Young.
- software written by Tim Hudson.
- software developed by the OpenSSL Project for use in the OpenSSL Toolkit. (http://www.openssl.org)
APPENDIX
- pixman:
• copyright © 1987, 1988, 1989, 1998 The Open Group
• copyright © 1987, 1988, 1989 Digital Equipment Corporation
• copyright © 1999, 2004, 2008 Keith Packard
• copyright © 2000 SuSE, Inc.
• copyright © 2000 Keith Packard, member of The XFree86 Project, Inc.
• copyright © 2004, 2005, 2007, 2008 Red Hat, Inc.
• copyright © 2004 Nicholas Miell
• copyright © 2005 Lars Knoll & Zack Rusin, Trolltech
• copyright © 2005 Trolltech AS
• copyright © 2007 Luca Barbato
• copyright © 2008 Aaron Plattner, NVIDIA Corporation
• copyright © 2008 Rodrigo Kumpera
• copyright © 2008 André Tupinambá
• copyright © 2008 Mozilla Corporation
• copyright © 2008 Frederic Plourde
■ portmap: copyright © 1983,1991 The Regents of the University of California.
■ tiff: copyright © 1987, 1993, 1994 The Regents of the University of California.
■ tinyxml: copyright © 2000-2006 Lee Thomason
xyssl:
• copyright © 2006-2008 Christophe Devine
• copyright © 2009 Paul Bakker
zlib: copyright © 1995-2005 Jean-loup Gailly and Mark Adler
All rights reserved.
Permission is hereby granted, free of charge, to any person obtaining a copy of this software and associated documentation files (the "Software"), to deal in the Software without restriction, including without limitation the rights to use, copy, modify, merge, publish, distribute, sublicense, and/or sell copies of the Software, and to permit persons to whom the Software is furnished to do so, subject to the following conditions:
THE SOFTWARE IS PROVIDED "AS IS", WITHOUT WARRANTY OF ANY KIND, EXPRESS OR IMPLIED, INCLUDING BUT NOT LIMITED TO THE WARRANTIES OF MERCHANTABILITY, FITNESS FOR A PARTICULAR PURPOSE AND NONINFRINGEMENT. IN NO EVENT SHALL THE AUTHORS OR COPYRIGHT HOLDERS BE LIABLE FOR ANY CLAIM, DAMAGES OR OTHER LIABILITY, WHETHER IN AN ACTION OF CONTRACT, TORT OR OTHERWISE, ARISING FROM, OUT OF OR IN CONNECTION WITH THE SOFTWARE OR THE USE OR OTHER DEALINGS IN THE SOFTWARE.
OPEN SOURCE LICENSE
GNU GENERAL PUBLIC LICENSE
Version 2, June 1991
Copyright (C) 1989, 1991 Free Software Foundation, Inc., 51 Franklin Street, Fifth Floor, Boston, MA 02110-1301 USA Everyone is permitted to copy and distribute verbatim copies of this license document, but changing it is not allowed.
Preamble
The licenses for most software are designed to take away your freedom to share and change it. By contrast, the GNU General Public License is intended to guarantee your freedom to share and change free software--to make sure the software is free for all its users. This General Public License applies to most of the Free Software Foundation's software and to any other program whose authors commit to using it. (Some other Free Software Foundation software is covered by the GNU Lesser General Public License instead.) You can apply it to your programs, too.
When we speak of free software, we are referring to freedom, not price. Our General Public Licenses are designed to make sure that you have the freedom to distribute copies of free software (and charge for this service if you wish), that you receive source code or can get it if you want it, that you can change the software or use pieces of it in new free programs; and that you know you can do these things.
To protect your rights, we need to make restrictions that forbid anyone to deny you these rights or to ask you to surrender the rights. These restrictions translate to certain responsibilities for you if you distribute copies of the software, or if you modify it.
For example, if you distribute copies of such a program, whether gratis or for a fee, you must give the recipients all the rights that you have. You must make sure that they, too, receive or can get the source code. And you must show them these terms so they know their rights.
We protect your rights with two steps: (1) copyright the software, and (2) offer you this license which gives you legal permission to copy, distribute and/or modify the software.
Also, for each author's protection and ours, we want to make certain that everyone understands that there is no warranty for this free software. If the software is modified by someone else and passed on, we want its recipients to know that what they have is not the original, so that any problems introduced by others will not reflect on the original authors' reputations.
Finally, any free program is threatened constantly by software patents. We wish to avoid the danger that redistributors of a free program will individually obtain patent licenses, in effect making the program proprietary. To prevent this, we have made it clear that any patent must be licensed for everyone's free use or not licensed at all.
The precise terms and conditions for copying, distribution and modification follow.
GNU GENERAL PUBLIC LICENSE
TERMS AND CONDITIONS FOR COPYING, DISTRIBUTION AND MODIFICATION
- This License applies to any program or other work which contains a notice placed by the copyright holder saying it may be distributed under the terms of this General Public License. The "Program", below, refers to any such program or work, and a "work based on the Program" means either the Program or any derivative work under copyright law: that is to say, a work containing the Program or a portion of it, either verbatim or with modifications and/or translated into another language. (Hereinafter, translation is included without limitation in the term "modification".) Each licensee is addressed as "you".
Activities other than copying, distribution and modification are not covered by this License; they are outside its scope. The act of running the Program is not restricted, and the output from the Program is covered only if its contents constitute a work based on the Program (independent of having been made by running the Program). Whether that is true depends on what the Program does.
APPENDIX
- You may copy and distribute verbatim copies of the Program's source code as you receive it, in any medium, provided that you conspicuously and appropriately publish on each copy an appropriate copyright notice and disclaimer of warranty; keep intact all the notices that refer to this License and to the absence of any warranty; and give any other recipients of the Program a copy of this License along with the Program.
You may charge a fee for the physical act of transferring a copy, and you may at your option offer warranty protection in exchange for a fee.
- You may modify your copy or copies of the Program or any portion of it, thus forming a work based on the Program, and copy and distribute such modifications or work under the terms of Section 1 above, provided that you also meet all of these conditions:
a) You must cause the modified files to carry prominent notices stating that you changed the files and the date of any change.
b) You must cause any work that you distribute or publish, that in whole or in part contains or is derived from the Program or any part thereof, to be licensed as a whole at no charge to all third parties under the terms of this License.
c) If the modified program normally reads commands interactively when run, you must cause it, when started running for such interactive use in the most ordinary way, to print or display an announcement including an appropriate copyright notice and a notice that there is no warranty (or else, saying that you provide a warranty) and that users may redistribute the program under these conditions, and telling the user how to view a copy of this License. (Exception: if the Program itself is interactive but does not normally print such an announcement, your work based on the Program is not required to print an announcement.)
These requirements apply to the modified work as a whole. If identifiable sections of that work are not derived from the Program, and can be reasonably considered independent and separate works in themselves, then this License, and its terms, do not apply to those sections when you distribute them as separate works. But when you distribute the same sections as part of a whole which is a work based on the Program, the distribution of the whole must be on the terms of this License, whose permissions for other licensees extend to the entire whole, and thus to each and every part regardless of who wrote it.
Thus, it is not the intent of this section to claim rights or contest your rights to work written entirely by you; rather, the intent is to exercise the right to control the distribution of derivative or collective works based on the Program.
In addition, mere aggregation of another work not based on the Program with the Program (or with a work based on the Program) on a volume of a storage or distribution medium does not bring the other work under the scope of this License.
- You may copy and distribute the Program (or a work based on it, under Section 2) in object code or executable form under the terms of Sections 1 and 2 above provided that you also do one of the following:
a) Accompany it with the complete corresponding machine-readable source code, which must be distributed under the terms of Sections 1 and 2 above on a medium customarily used for software interchange; or,
b) Accompany it with a written offer, valid for at least three years, to give any third party, for a charge no more than your cost of physically performing source distribution, a complete machine-readable copy of the corresponding source code, to be distributed under the terms of Sections 1 and 2 above on a medium customarily used for software interchange; or,
c) Accompany it with the information you received as to the offer to distribute corresponding source code. (This alternative is allowed only for noncommercial distribution and only if you received the program in object code or executable form with such an offer, in accord with Subsection b above.)
The source code for a work means the preferred form of the work for making modifications to it. For an executable work, complete source code means all the source code for all modules it contains, plus any associated interface definition files, plus the scripts used to control compilation and installation of the executable. However, as a special exception, the source code distributed need not include anything that is normally distributed (in either source or binary form) with the major components (compiler, kernel, and so on) of the operating system on which the executable runs, unless that component itself accompanies the executable.
If distribution of executable or object code is made by offering access to copy from a designated place, then offering equivalent access to copy the source code from the same place counts as distribution of the source code, even though third parties are not compelled to copy the source along with the object code.
- You may not copy, modify, sublicense, or distribute the Program except as expressly provided under this License. Any attempt otherwise to copy, modify, sublicense or distribute the Program is void, and will automatically terminate your rights under this License. However, parties who have received copies, or rights, from you under this License will not have their licenses terminated so long as such parties remain in full compliance.
- You are not required to accept this License, since you have not signed it. However, nothing else grants you permission to modify or distribute the Program or its derivative works. These actions are prohibited by law if you do not accept this License. Therefore, by modifying or distributing the Program (or any work based on the Program), you indicate your acceptance of this License to do so, and all its terms and conditions for copying, distributing or modifying the Program or works based on it.
- Each time you redistribute the Program (or any work based on the Program), the recipient automatically receives a license from the original licensor to copy, distribute or modify the Program subject to these terms and conditions. You may not impose any further restrictions on the recipients' exercise of the rights granted herein. You are not responsible for enforcing compliance by third parties to this License.
- If, as a consequence of a court judgment or allegation of patent infringement or for any other reason (not limited to patent issues), conditions are imposed on you (whether by court order, agreement or otherwise) that contradict the conditions of this License, they do not excuse you from the conditions of this License. If you cannot distribute so as to satisfy simultaneously your obligations under this License and any other pertinent obligations, then as a consequence you may not distribute the Program at all. For example, if a patent license would not permit royalty-free redistribution of the Program by all those who receive copies directly or indirectly through you, then the only way you could satisfy both it and this License would be to refrain entirely from distribution of the Program.
If any portion of this section is held invalid or unenforceable under any particular circumstance, the balance of the section is intended to apply and the section as a whole is intended to apply in other circumstances.
It is not the purpose of this section to induce you to infringe any patents or other property right claims or to contest validity of any such claims; this section has the sole purpose of protecting the integrity of the free software distribution system, which is implemented by public license practices. Many people have made generous contributions to the wide range of software distributed through that system in reliance on consistent application of that system; it is up to the author/donor to decide if he or she is willing to distribute software through any other system and a licensee cannot impose that choice.
This section is intended to make thoroughly clear what is believed to be a consequence of the rest of this License.
- If the distribution and/or use of the Program is restricted in certain countries either by patents or by copyrighted interfaces, the original copyright holder who places the Program under this License may add an explicit geographical distribution limitation excluding those countries, so that distribution is permitted only in or among countries not thus excluded. In such case, this License incorporates the limitation as if written in the body of this License.
- The Free Software Foundation may publish revised and/or new versions of the General Public License from time to time. Such new versions will be similar in spirit to the present version, but may differ in detail to address new problems or concerns.
Each version is given a distinguishing version number. If the Program specifies a version number of this License which applies to it and "any later version", you have the option of following the terms and conditions either of that version or of any later version published by the Free Software Foundation. If the Program does not specify a version number of this License, you may choose any version ever published by the Free Software Foundation.
- If you wish to incorporate parts of the Program into other free programs whose distribution conditions are different, write to the author to ask for permission. For software which is copyrighted by the Free Software Foundation, write to the Free Software Foundation; we sometimes make exceptions for this. Our decision will be guided by the two goals of preserving the free status of all derivatives of our free software and of promoting the sharing and reuse of software generally.
APPENDIX
NO WARRANTY
- BECAUSE THE PROGRAM IS LICENSED FREE OF CHARGE, THERE IS NO WARRANTY FOR THE PROGRAM, TO THE EXTENT PERMITTED BY APPLICABLE LAW. EXCEPT WHEN OTHERWISE STATED IN WRITING THE COPYRIGHT HOLDERS AND/OR OTHER PARTIES PROVIDE THE PROGRAM "AS IS" WITHOUT WARRANTY OF ANY KIND, EITHER EXPRESSED OR IMPLIED, INCLUDING, BUT NOT LIMITED TO, THE IMPLIED WARRANTIES OF MERCHANTABILITY AND FITNESS FOR A PARTICULAR PURPOSE. THE ENTIRE RISK AS TO THE QUALITY AND PERFORMANCE OF THE PROGRAM IS WITH YOU. SHOULD THE PROGRAM PROVE DEFECTIVE, YOU ASSUME THE COST OF ALL NECESSARY SERVICING, REPAIR OR CORRECTION.
- IN NO EVENT UNLESS REQUIRED BY APPLICABLE LAW OR AGREED TO IN WRITING WILL ANY COPYRIGHT HOLDER, OR ANY OTHER PARTY WHO MAY MODIFY AND/OR REDISTRIBUTE THE PROGRAM AS PERMITTED ABOVE, BE LIABLE TO YOU FOR DAMAGES, INCLUDING ANY GENERAL, SPECIAL, INCIDENTAL OR CONSEQUENTIAL DAMAGES ARISING OUT OF THE USE OR INABILITY TO USE THE PROGRAM (INCLUDING BUT NOT LIMITED TO LOSS OF DATA OR DATA BEING RENDERED INACCURATE OR LOSSES SUSTAINED BY YOU OR THIRD PARTIES OR A FAILURE OF THE PROGRAM TO OPERATE WITH ANY OTHER PROGRAMS), EVEN IF SUCH HOLDER OR OTHER PARTY HAS BEEN ADVISED OF THE POSSIBILITY OF SUCH DAMAGES.
END OF TERMS AND CONDITIONS
How to Apply These Terms to Your New Programs
If you develop a new program, and you want it to be of the greatest possible use to the public, the best way to achieve this is to make it free software which everyone can redistribute and change under these terms.
To do so, attach the following notices to the program. It is safest to attach them to the start of each source file to most effectively convey the exclusion of warranty; and each file should have at least the "copyright" line and a pointer to where the full notice is found.
This program is free software; you can redistribute it and/or modify it under the terms of the GNU General Public License as published by the Free Software Foundation; either version 2 of the License, or (at your option) any later version.
This program is distributed in the hope that it will be useful, but WITHOUT ANY WARRANTY; without even the implied warranty of MERCHANTABILITY or FITNESS FOR A PARTICULAR PURPOSE. See the GNU General Public License for more details.
You should have received a copy of the GNU General Public License along with this program; if not, write to the Free Software Foundation, Inc., 51 Franklin Street, Fifth Floor, Boston, MA 02110-1301 USA.
Also add information on how to contact you by electronic and paper mail.
If the program is interactive, make it output a short notice like this when it starts in an interactive mode:
Gnomovision version 69, Copyright (C) year name of author Gnomovision comes with ABSOLUTELY NO WARRANTY; for details type 'show w'. This is free software, and you are welcome to redistribute it under certain conditions; type 'show c' for details.
The hypothetical commands `show w' and `show c' should show the appropriate parts of the General Public License. Of course, the commands you use may be called something other than `show w' and `show c'; they could even be mouse-clicks or menu items--whatever suits your program.
You should also get your employer (if you work as a programmer) or your school, if any, to sign a "copyright disclaimer" for the program, if necessary. Here is a sample; alter the names:
Yoyodyne, Inc., hereby disclaims all copyright interest in the program 'Gnomovision' (which makes passes at compilers) written by James Hacker.
This General Public License does not permit incorporating your program into proprietary programs. If your program is a subroutine library, you may consider it more useful to permit linking proprietary applications with the library. If this is what you want to do, use the GNU Lesser General Public License instead of this License.
GNU LESSER GENERAL PUBLIC LICENSE
Version 2.1, February 1999
Copyright (C) 1991, 1999 Free Software Foundation, Inc. 51 Franklin Street, Fifth Floor, Boston, MA 02110-1301 USA Everyone is permitted to copy and distribute verbatim copies of this license document, but changing it is not allowed.
[This is the first released version of the Lesser GPL. It also counts as the successor of the GNU Library Public License, version 2, hence the version number 2.1.]
Preamble
The licenses for most software are designed to take away your freedom to share and change it. By contrast, the GNU General Public Licenses are intended to guarantee your freedom to share and change free software--to make sure the software is free for all its users.
This license, the Lesser General Public License, applies to some specially designated software packages--typically libraries--of the Free Software Foundation and other authors who decide to use it. You can use it too, but we suggest you first think carefully about whether this license or the ordinary General Public License is the better strategy to use in any particular case, based on the explanations below.
When we speak of free software, we are referring to freedom of use, not price. Our General Public Licenses are designed to make sure that you have the freedom to distribute copies of free software (and charge for this service if you wish); that you receive source code or can get it if you want it; that you can change the software and use pieces of it in new free programs; and that you are informed that you can do these things.
To protect your rights, we need to make restrictions that forbid distributors to deny you these rights or to ask you to surrender these rights. These restrictions translate to certain responsibilities for you if you distribute copies of the library or if you modify it.
For example, if you distribute copies of the library, whether gratis or for a fee, you must give the recipients all the rights that we gave you. You must make sure that they, too, receive or can get the source code. If you link other code with the library, you must provide complete object files to the recipients, so that they can relink them with the library after making changes to the library and recompiling it. And you must show them these terms so they know their rights.
We protect your rights with a two-step method: (1) we copyright the library, and (2) we offer you this license, which gives you legal permission to copy, distribute and/or modify the library.
To protect each distributor, we want to make it very clear that there is no warranty for the free library. Also, if the library is modified by someone else and passed on, the recipients should know that what they have is not the original version, so that the original author's reputation will not be affected by problems that might be introduced by others.
Finally, software patents pose a constant threat to the existence of any free program. We wish to make sure that a company cannot effectively restrict the users of a free program by obtaining a restrictive license from a patent holder. Therefore, we insist that any patent license obtained for a version of the library must be consistent with the full freedom of use specified in this license.
Most GNU software, including some libraries, is covered by the ordinary GNU General Public License. This license, the GNU Lesser General Public License, applies to certain designated libraries, and is quite different from the ordinary General Public License. We use this license for certain libraries in order to permit linking those libraries into non-free programs.
When a program is linked with a library, whether statically or using a shared library, the combination of the two is legally speaking a combined work, a derivative of the original library. The ordinary General Public License therefore permits such linking only if the entire combination fits its criteria of freedom. The Lesser General Public License permits more lax criteria for linking other code with the library.
We call this license the "Lesser" General Public License because it does Less to protect the user's freedom than the ordinary General Public License. It also provides other free software developers Less of an advantage over competing non-free programs. These disadvantages are the reason we use the ordinary General Public License for many libraries. However, the Lesser license provides advantages in certain special circumstances.
For example, on rare occasions, there may be a special need to encourage the widest possible use of a certain library, so that it becomes a de-facto standard. To achieve this, non-free programs must be allowed to use the library. A more frequent case is that a free library does the same job as widely used non-free libraries. In this case, there is little to gain by limiting the free library to free software only, so we use the Lesser General Public License.
In other cases, permission to use a particular library in non-free programs enables a greater number of people to use a large body of free software. For example, permission to use the GNU C Library in non-free programs enables many more people to use the whole GNU operating system, as well as its variant, the GNU/Linux operating system.
APPENDIX
Although the Lesser General Public License is Less protective of the users' freedom, it does ensure that the user of a program that is linked with the Library has the freedom and the wherewithal to run that program using a modified version of the Library.
The precise terms and conditions for copying, distribution and modification follow. Pay close attention to the difference between a "work based on the library" and a "work that uses the library". The former contains code derived from the library, whereas the latter must be combined with the library in order to run.
GNU LESSER GENERAL PUBLIC LICENSE TERMS AND CONDITIONS FOR COPYING, DISTRIBUTION AND MODIFICATION
- This License Agreement applies to any software library or other program which contains a notice placed by the copyright holder or other authorized party saying it may be distributed under the terms of this Lesser General Public License (also called "this License"). Each licensee is addressed as "you".
A "library" means a collection of software functions and/or data prepared so as to be conveniently linked with application programs (which use some of those functions and data) to form executables.
The "Library", below, refers to any such software library or work which has been distributed under these terms. A "work based on the Library" means either the Library or any derivative work under copyright law: that is to say, a work containing the Library or a portion of it, either verbatim or with modifications and/or translated straightforwardly into another language. (Hereinafter, translation is included without limitation in the term "modification".)
"Source code" for a work means the preferred form of the work for making modifications to it. For a library, complete source code means all the source code for all modules it contains, plus any associated interface definition files, plus the scripts used to control compilation and installation of the library.
Activities other than copying, distribution and modification are not covered by this License; they are outside its scope. The act of running a program using the Library is not restricted, and output from such a program is covered only if its contents constitute a work based on the Library (independent of the use of the Library in a tool for writing it). Whether that is true depends on what the Library does and what the program that uses the Library does.
- You may copy and distribute verbatim copies of the Library's complete source code as you receive it, in any medium, provided that you conspicuously and appropriately publish on each copy an appropriate copyright notice and disclaimer of warranty; keep intact all the notices that refer to this License and to the absence of any warranty; and distribute a copy of this License along with the Library.
You may charge a fee for the physical act of transferring a copy, and you may at your option offer warranty protection in exchange for a fee.
- You may modify your copy or copies of the Library or any portion of it, thus forming a work based on the Library, and copy and distribute such modifications or work under the terms of Section 1 above, provided that you also meet all of these conditions:
a) The modified work must itself be a software library.
b) You must cause the files modified to carry prominent notices stating that you changed the files and the date of any change.
c) You must cause the whole of the work to be licensed at no charge to all third parties under the terms of this License.
d) If a facility in the modified Library refers to a function or a table of data to be supplied by an application program that uses the facility, other than as an argument passed when the facility is invoked, then you must make a good faith effort to ensure that, in the event an application does not supply such function or table, the facility still operates, and performs whatever part of its purpose remains meaningful.
(For example, a function in a library to compute square roots has a purpose that is entirely well-defined independent of the application. Therefore, Subsection 2d requires that any application-supplied function or table used by this function must be optional: if the application does not supply it, the square root function must still compute square roots.)
These requirements apply to the modified work as a whole. If identifiable sections of that work are not derived from the Library, and can be reasonably considered independent and separate works in themselves, then this License, and its terms, do not apply to those sections when you distribute them as separate works. But when you distribute the same sections as part of a whole which is a work based on the Library, the distribution of the whole must be on the terms of this License, whose permissions for other licensees extend to the entire whole, and thus to each and every part regardless of who wrote it.
Thus, it is not the intent of this section to claim rights or contest your rights to work written entirely by you; rather, the intent is to exercise the right to control the distribution of derivative or collective works based on the Library.
In addition, mere aggregation of another work not based on the Library with the Library (or with a work based on the Library) on a volume of a storage or distribution medium does not bring the other work under the scope of this License.
- You may opt to apply the terms of the ordinary GNU General Public License instead of this License to a given copy of the Library. To do this, you must alter all the notices that refer to this License, so that they refer to the ordinary GNU General Public License, version 2, instead of to this License. (If a newer version than version 2 of the ordinary GNU General Public License has appeared, then you can specify that version instead if you wish.) Do not make any other change in these notices.
Once this change is made in a given copy, it is irreversible for that copy, so the ordinary GNU General Public License applies to all subsequent copies and derivative works made from that copy.
This option is useful when you wish to copy part of the code of the Library into a program that is not a library.
- You may copy and distribute the Library (or a portion or derivative of it, under Section 2) in object code or executable form under the terms of Sections 1 and 2 above provided that you accompany it with the complete corresponding machine-readable source code, which must be distributed under the terms of Sections 1 and 2 above on a medium customarily used for software interchange.
If distribution of object code is made by offering access to copy from a designated place, then offering equivalent access to copy the source code from the same place satisfies the requirement to distribute the source code, even though third parties are not compelled to copy the source along with the object code.
- A program that contains no derivative of any portion of the Library, but is designed to work with the Library by being compiled or linked with it, is called a "work that uses the Library". Such a work, in isolation, is not a derivative work of the Library, and therefore falls outside the scope of this License.
However, linking a "work that uses the Library" with the Library creates an executable that is a derivative of the Library (because it contains portions of the Library), rather than a "work that uses the library". The executable is therefore covered by this License. Section 6 states terms for distribution of such executables.
When a "work that uses the Library" uses material from a header file that is part of the Library, the object code for the work may be a derivative work of the Library even though the source code is not. Whether this is true is especially significant if the work can be linked without the Library, or if the work is itself a library. The threshold for this to be true is not precisely defined by law.
If such an object file uses only numerical parameters, data structure layouts and accessors, and small macros and small inline functions (ten lines or less in length), then the use of the object file is unrestricted, regardless of whether it is legally a derivative work. (Executables containing this object code plus portions of the Library will still fall under Section 6.)
Otherwise, if the work is a derivative of the Library, you may distribute the object code for the work under the terms of Section 6. Any executables containing that work also fall under Section 6, whether or not they are linked directly with the Library itself.
- As an exception to the Sections above, you may also combine or link a "work that uses the Library" with the Library to produce a work containing portions of the Library, and distribute that work under terms of your choice, provided that the terms permit modification of the work for the customer's own use and reverse engineering for debugging such modifications.
You must give prominent notice with each copy of the work that the Library is used in it and that the Library and its use are covered by this License. You must supply a copy of this License. If the work during execution displays copyright notices, you must include the copyright notice for the Library among them, as well as a reference directing the user to the copy of this License. Also, you must do one of these things:
a) Accompany the work with the complete corresponding machine-readable source code for the Library including whatever changes were used in the work (which must be distributed under Sections 1 and 2 above); and, if the work is an executable linked with the Library, with the complete machine-readable "work that uses the Library", as object code and/or source code, so that the user can modify the Library and then relink to produce a modified executable containing the modified Library. (It is understood that the user who changes the contents of definitions files in the Library will not necessarily be able to recompile the application to use the modified definitions.)
b) Use a suitable shared library mechanism for linking with the Library. A suitable mechanism is one that (1) uses at run time a copy of the library already present on the user's computer system, rather than copying library functions into the executable, and (2) will operate properly with a modified version of the library, if the user installs one, as long as the modified version is interface-compatible with the version that the work was made with.
APPENDIX
c) Accompany the work with a written offer, valid for at least three years, to give the same user the materials specified in Subsection 6a, above, for a charge no more than the cost of performing this distribution.
d) If distribution of the work is made by offering access to copy from a designated place, offer equivalent access to copy the above specified materials from the same place.
e) Verify that the user has already received a copy of these materials or that you have already sent this user a copy.
For an executable, the required form of the "work that uses the Library" must include any data and utility programs needed for reproducing the executable from it. However, as a special exception, the materials to be distributed need not include anything that is normally distributed (in either source or binary form) with the major components (compiler, kernel, and so on) of the operating system on which the executable runs, unless that component itself accompanies the executable.
It may happen that this requirement contradicts the license restrictions of other proprietary libraries that do not normally accompany the operating system. Such a contradiction means you cannot use both them and the Library together in an executable that you distribute.
- You may place library facilities that are a work based on the Library side-by-side in a single library together with other library facilities not covered by this License, and distribute such a combined library, provided that the separate distribution of the work based on the Library and of the other library facilities is otherwise permitted, and provided that you do these two things:
a) Accompany the combined library with a copy of the same work based on the Library, uncombined with any other library facilities. This must be distributed under the terms of the Sections above.
b) Give prominent notice with the combined library of the fact that part of it is a work based on the Library, and explaining where to find the accompanying uncombined form of the same work.
-
You may not copy, modify, sublicense, link with, or distribute the Library except as expressly provided under this License. Any attempt otherwise to copy, modify, sublicense, link with, or distribute the Library is void, and will automatically terminate your rights under this License. However, parties who have received copies, or rights, from you under this License will not have their licenses terminated so long as such parties remain in full compliance.
-
You are not required to accept this License, since you have not signed it. However, nothing else grants you permission to modify or distribute the Library or its derivative works. These actions are prohibited by law if you do not accept this License. Therefore, by modifying or distributing the Library (or any work based on the Library), you indicate your acceptance of this License to do so, and all its terms and conditions for copying, distributing or modifying the Library or works based on it.
- Each time you redistribute the Library (or any work based on the Library), the recipient automatically receives a license from the original licensor to copy, distribute, link with or modify the Library subject to these terms and conditions. You may not impose any further restrictions on the recipients' exercise of the rights granted herein. You are not responsible for enforcing compliance by third parties with this License.
- If, as a consequence of a court judgment or allegation of patent infringement or for any other reason (not limited to patent issues), conditions are imposed on you (whether by court order, agreement or otherwise) that contradict the conditions of this License, they do not excuse you from the conditions of this License. If you cannot distribute so as to satisfy simultaneously your obligations under this License and any other pertinent obligations, then as a consequence you may not distribute the Library at all. For example, if a patent license would not permit royalty-free redistribution of the Library by all those who receive copies directly or indirectly through you, then the only way you could satisfy both it and this License would be to refrain entirely from distribution of the Library.
If any portion of this section is held invalid or unenforceable under any particular circumstance, the balance of the section is intended to apply, and the section as a whole is intended to apply in other circumstances.
It is not the purpose of this section to induce you to infringe any patents or other property right claims or to contest validity of any such claims; this section has the sole purpose of protecting the integrity of the free software distribution system which is implemented by public license practices. Many people have made generous contributions to the wide range of software distributed through that system in reliance on consistent application of that system; it is up to the author/donor to decide if he or she is willing to distribute software through any other system and a licensee cannot impose that choice.
This section is intended to make thoroughly clear what is believed to be a consequence of the rest of this License.
-
If the distribution and/or use of the Library is restricted in certain countries either by patents or by copyrighted interfaces, the original copyright holder who places the Library under this License may add an explicit geographical distribution limitation excluding those countries, so that distribution is permitted only in or among countries not thus excluded. In such case, this License incorporates the limitation as if written in the body of this License.
-
The Free Software Foundation may publish revised and/or new versions of the Lesser General Public License from time to time. Such new versions will be similar in spirit to the present version, but may differ in detail to address new problems or concerns.
Each version is given a distinguishing version number. If the Library specifies a version number of this License which applies to it and "any later version", you have the option of following the terms and conditions either of that version or of any later version published by the Free Software Foundation. If the Library does not specify a license version number, you may choose any version ever published by the Free Software Foundation. - If you wish to incorporate parts of the Library into other free programs whose distribution conditions are incompatible with these, write to the author to ask for permission. For software which is copyrighted by the Free Software Foundation, write to the Free Software Foundation; we sometimes make exceptions for this. Our decision will be guided by the two goals of preserving the free status of all derivatives of our free software and of promoting the sharing and reuse of software generally.
NO WARRANTY
- BECAUSE THE LIBRARY IS LICENSED FREE OF CHARGE, THERE IS NO WARRANTY FOR THE LIBRARY, TO THE EXTENT PERMITTED BY APPLICABLE LAW. EXCEPT WHEN OTHERWISE STATED IN WRITING THE COPYRIGHT HOLDERS AND/OR OTHER PARTIES PROVIDE THE LIBRARY "AS IS" WITHOUT WARRANTY OF ANY KIND, EITHER EXPRESSED OR IMPLIED, INCLUDING, BUT NOT LIMITED TO, THE IMPLIED WARRANTIES OF MERCHANTABILITY AND FITNESS FOR A PARTICULAR PURPOSE. THE ENTIRE RISK AS TO THE QUALITY AND PERFORMANCE OF THE LIBRARY IS WITH YOU. SHOULD THE LIBRARY PROVE DEFECTIVE, YOU ASSUME THE COST OF ALL NECESSARY SERVICING, REPAIR OR CORRECTION.
- IN NO EVENT UNLESS REQUIRED BY APPLICABLE LAW OR AGREED TO IN WRITING WILL ANY COPYRIGHT HOLDER, OR ANY OTHER PARTY WHO MAY MODIFY AND/OR REDISTRIBUTE THE LIBRARY AS PERMITTED ABOVE, BE LIABLE TO YOU FOR DAMAGES, INCLUDING ANY GENERAL, SPECIAL, INCIDENTAL OR CONSEQUENTIAL DAMAGES ARISING OUT OF THE USE OR INABILITY TO USE THE LIBRARY (INCLUDING BUT NOT LIMITED TO LOSS OF DATA OR DATA BEING RENDERED INACCURATE OR LOSSES SUSTAINED BY YOU OR THIRD PARTIES OR A FAILURE OF THE LIBRARY TO OPERATE WITH ANY OTHER SOFTWARE), EVEN IF SUCH HOLDER OR OTHER PARTY HAS BEEN ADVISED OF THE POSSIBILITY OF SUCH DAMAGES.
END OF TERMS AND CONDITIONS
How to Apply These Terms to Your New Libraries
If you develop a new library, and you want it to be of the greatest possible use to the public, we recommend making it free software that everyone can redistribute and change. You can do so by permitting redistribution under these terms (or, alternatively, under the terms of the ordinary General Public License).
To apply these terms, attach the following notices to the library. It is safest to attach them to the start of each source file to most effectively convey the exclusion of warranty; and each file should have at least the "copyright" line and a pointer to where the full notice is found.
Copyright (C)
This library is free software; you can redistribute it and/or modify it under the terms of the GNU Lesser General Public License as published by the Free Software Foundation; either version 2.1 of the License, or (at your option) any later version.
This library is distributed in the hope that it will be useful, but WITHOUT ANY WARRANTY; without even the implied warranty of MERCHANTABILITY or FITNESS FOR A PARTICULAR PURPOSE. See the GNU Lesser General Public License for more details.
You should have received a copy of the GNU Lesser General Public License along with this library; if not, write to the Free Software Foundation, Inc., 51 Franklin Street, Fifth Floor, Boston, MA 02110-1301 USA
Also add information on how to contact you by electronic and paper mail.
You should also get your employer (if you work as a programmer) or your school, if any, to sign a "copyright disclaimer" for the library, if necessary. Here is a sample; alter the names:
Yoyodyne, Inc., hereby disclaims all copyright interest in the library 'Frob' (a library for tweaking knobs) written by James Random Hacker.
Ty Coon, President of Vice
APPENDIX
MOZILLA PUBLIC LICENSE
Version 1.1
[EMPTY]
1. Definitions.
1.0.1. "Commercial Use" means distribution or otherwise making the Covered Code available to a third party.
1.1. "Contributor" means each entity that creates or contributes to the creation of Modifications.
1.2. "Contributor Version" means the combination of the Original Code, prior Modifications used by a Contributor, and the Modifications made by that particular Contributor.
1.3. "Covered Code" means the Original Code or Modifications or the combination of the Original Code and Modifications, in each case including portions thereof.
1.4. "Electronic Distribution Mechanism" means a mechanism generally accepted in the software development community for the electronic transfer of data.
1.5. "Executable" means Covered Code in any form other than Source Code.
1.6. "Initial Developer" means the individual or entity identified as the Initial Developer in the Source Code notice required by Exhibit A.
1.7. "Larger Work" means a work which combines Covered Code or portions thereof with code not governed by the terms of this License.
1.8. "License" means this document.
1.8.1. "Licensable" means having the right to grant, to the maximum extent possible, whether at the time of the initial grant or subsequently acquired, any and all of the rights conveyed herein.
1.9. "Modifications" means any addition to or deletion from the substance or structure of either the Original Code or any previous Modifications. When Covered Code is released as a series of files, a Modification is:
A. Any addition to or deletion from the contents of a file containing Original Code or previous Modifications.
B. Any new file that contains any part of the Original Code or previous Modifications.
1.10. "Original Code" means Source Code of computer software code which is described in the Source Code notice required by Exhibit A as Original Code, and which, at the time of its release under this License is not already Covered Code governed by this License.
1.10.1. "Patent Claims" means any patent claim(s), now owned or hereafter acquired, including without limitation, method, process, and apparatus claims, in any patent Licensable by grantor.
1.11. "Source Code" means the preferred form of the Covered Code for making modifications to it, including all modules it contains, plus any associated interface definition files, scripts used to control compilation and installation of an Executable, or source code differential comparisons against either the Original Code or another well known, available Covered Code of the Contributor's choice. The Source Code can be in a compressed or archival form, provided the appropriate decompression or de-archiving software is widely available for no charge.
1.12. "You" (or "Your") means an individual or a legal entity exercising rights under, and complying with all of the terms of, this License or a future version of this License issued under Section 6.1.
For legal entities, "You" includes any entity which controls, is controlled by, or is under common control with You. For purposes of this definition, "control" means (a) the power, direct or indirect, to cause the direction or management of such entity, whether by contract or otherwise, or (b) ownership of more than fifty percent (50%) of the outstanding shares or beneficial ownership of such entity.
2. Source Code License.
2.1. The Initial Developer Grant.
The Initial Developer hereby grants You a world-wide, royalty-free, non-exclusive license, subject to third party intellectual property claims:
(a) under intellectual property rights (other than patent or trademark) Licensable by Initial Developer to use, reproduce, modify, display, perform, sublicense and distribute the Original Code (or portions thereof) with or without Modifications, and/or as part of a Larger Work; and
(b) under Patents Claims infringed by the making, using or selling of Original Code, to make, have made, use, practice, sell, and offer for sale, and/or otherwise dispose of the Original Code (or portions thereof).
(c) the licenses granted in this Section 2.1(a) and (b) are effective on the date Initial Developer first distributes Original Code under the terms of this License.
(d) Notwithstanding Section 2.1(b) above, no patent license is granted: 1) for code that You delete from the Original Code; 2) separate from the Original Code; or 3) for infringements caused by: i) the modification of the Original Code or ii) the combination of the Original Code with other software or devices.
2.2. Contributor Grant.
Subject to third party intellectual property claims, each Contributor hereby grants You a world-wide, royalty-free, non-exclusive license
(a) under intellectual property rights (other than patent or trademark) Licensable by Contributor, to use, reproduce, modify, display, perform, sublicense and distribute the Modifications created by such Contributor (or portions thereof) either on an unmodified basis, with other Modifications, as Covered Code and/or as part of a Larger Work; and
(b) under Patent Claims infringed by the making, using, or selling of Modifications made by that Contributor either alone and/or in combination with its Contributor Version (or portions of such combination), to make, use, sell, offer for sale, have made, and/or otherwise dispose of: 1) Modifications made by that Contributor (or portions thereof); and 2) the combination of Modifications made by that Contributor with its Contributor Version (or portions of such combination).
(c) the licenses granted in Sections 2.2(a) and 2.2(b) are effective on the date Contributor first makes Commercial Use of the Covered Code.
(d) Notwithstanding Section 2.2(b) above, no patent license is granted: 1) for any code that Contributor has deleted from the Contributor Version; 2) separate from the Contributor Version; 3) for infringements caused by: i) third party modifications of Contributor Version or ii) the combination of Modifications made by that Contributor with other software (except as part of the Contributor Version) or other devices; or 4) under Patent Claims infringed by Covered Code in the absence of Modifications made by that Contributor.
3. Distribution Obligations.
3.1. Application of License.
The Modifications which You create or to which You contribute are governed by the terms of this License, including without limitation Section 2.2. The Source Code version of Covered Code may be distributed only under the terms of this License or a future version of this License released under Section 6.1, and You must include a copy of this License with every copy of the Source Code You distribute. You may not offer or impose any terms on any Source Code version that alters or restricts the applicable version of this License or the recipients' rights hereunder. However, You may include an additional document offering the additional rights described in Section 3.5.
3.2. Availability of Source Code.
Any Modification which You create or to which You contribute must be made available in Source Code form under the terms of this License either on the same media as an Executable version or via an accepted Electronic Distribution Mechanism to anyone to whom you made an Executable version available; and if made available via Electronic Distribution Mechanism, must remain available for at least twelve (12) months after the date it initially became available, or at least six (6) months after a subsequent version of that particular Modification has been made available to such recipients. You are responsible for ensuring that the Source Code version remains available even if the
Electronic Distribution Mechanism is maintained by a third party.
3.3. Description of Modifications.
You must cause all Covered Code to which You contribute to contain a file documenting the changes You made to create that Covered Code and the date of any change. You must include a prominent statement that the Modification is derived, directly or indirectly, from Original Code provided by the Initial Developer and including the name of the Initial Developer in (a) the Source Code, and (b) in any notice in an Executable version or related documentation in which You describe the origin or ownership of the Covered Code.
3.4. Intellectual Property Matters
(a) Third Party Claims.
If Contributor has knowledge that a license under a third party's intellectual property rights is required to exercise the rights granted by such Contributor under Sections 2.1 or 2.2, Contributor must include a text file with the Source Code distribution titled "LEGAL" which describes the claim and the party making the claim in sufficient detail that a recipient will know whom to contact. If Contributor obtains such knowledge after the Modification is made available as described in Section 3.2, Contributor shall promptly modify the LEGAL file in all copies Contributor makes available thereafter and shall take other steps (such as notifying appropriate mailing lists or newsgroups) reasonably calculated to inform those who received the Covered Code that new knowledge has been obtained.
APPENDIX
(b) Contributor APIs.
If Contributor's Modifications include an application programming interface and Contributor has knowledge of patent licenses which are reasonably necessary to implement that API, Contributor must also include this information in the LEGAL file.
(c) Representations.
Contributor represents that, except as disclosed pursuant to Section 3.4(a) above, Contributor believes that Contributor's Modifications are Contributor's original creation(s) and/or Contributor has sufficient rights to grant the rights conveyed by this License.
3.5. Required Notices.
You must duplicate the notice in Exhibit A in each file of the Source Code. If it is not possible to put such notice in a particular Source Code file due to its structure, then You must include such notice in a location (such as a relevant directory) where a user would be likely to look for such a notice. If You created one or more Modification(s)
You may add your name as a Contributor to the notice described in Exhibit A. You must also duplicate this License in any documentation for the Source Code where You describe recipients' rights or ownership rights relating to Covered Code. You may choose to offer, and to charge a fee for, warranty, support, indemnity or liability obligations to one or more recipients of Covered Code. However, You may do so only on Your own behalf, and not on behalf of the Initial
Developer or any Contributor. You must make it absolutely clear than any such warranty, support, indemnity or liability obligation is offered by You alone, and You hereby agree to indemnify the Initial Developer and every Contributor for any liability incurred by the Initial Developer or such Contributor as a result of warranty, support, indemnity or liability terms You offer.
3.6. Distribution of Executable Versions.
You may distribute Covered Code in Executable form only if the requirements of Section 3.1-3.5 have been met for that Covered Code, and if You include a notice stating that the Source Code version of the Covered Code is available under the terms of this License, including a description of how and where You have fulfilled the obligations of Section 3.2. The notice must be conspicuously included in any notice in an Executable version, related documentation or collateral in which You describe recipients' rights relating to the Covered Code. You may distribute the Executable version of Covered Code or ownership rights under a license of Your choice, which may contain terms different from this License, provided that You are in compliance with the terms of this License and that the license for the Executable version does not attempt to limit or alter the recipient's rights in the Source Code version from the rights set forth in this
License. If You distribute the Executable version under a different license You must make it absolutely clear that any terms which differ from this License are offered by You alone, not by the Initial Developer or any Contributor. You hereby agree to indemnify the Initial Developer and every Contributor for any liability incurred by the Initial Developer or such Contributor as a result of any such terms You offer.
3.7. Larger Works.
You may create a Larger Work by combining Covered Code with other code not governed by the terms of this License and distribute the Larger Work as a single product. In such a case, You must make sure the requirements of this License are fulfilled for the Covered Code.
- Inability to Comply Due to Statute or Regulation.
If it is impossible for You to comply with any of the terms of this License with respect to some or all of the Covered Code due to statute, judicial order, or regulation then You must: (a) comply with the terms of this License to the maximum extent possible; and (b) describe the limitations and the code they affect. Such description must be included in the LEGAL file described in Section 3.4 and must be included with all distributions of the Source Code. Except to the
extent prohibited by statute or regulation, such description must be sufficiently detailed for a recipient of ordinary skill to be able to understand it.
- Application of this License.
This License applies to code to which the Initial Developer has attached the notice in Exhibit A and to related Covered Code.
- Versions of the License.
6.1. New Versions.
Netscape Communications Corporation ("Netscape") may publish revised and/or new versions of the License from time to time. Each version will be given a distinguishing version number.
6.2. Effect of New Versions.
Once Covered Code has been published under a particular version of the License, You may always continue to use it under the terms of that version. You may also choose to use such Covered Code under the terms of any subsequent version of the License published by Netscape. No one other than Netscape has the right to modify the terms applicable to Covered Code created under this License.
6.3. Derivative Works.
If You create or use a modified version of this License (which you may only do in order to apply it to code which is not already Covered Code governed by this License), You must (a) rename Your license so that the phrases "Mozilla", "MOZILLAPL", "MOZPL", "Netscape", "MPL", "NPL" or any confusingly similar phrase do not appear in your license (except to note that your license differs from this License) and (b) otherwise make it clear that Your version of the license contains terms which differ from the Mozilla Public License and Netscape Public License. (Filling in the name of the Initial Developer, Original Code or Contributor in the notice described in Exhibit A shall not of themselves be deemed to be modifications of this License.)
7. DISCLAIMER OF WARRANTY.
COVERED CODE IS PROVIDED UNDER THIS LICENSE ON AN "AS IS" BASIS, WITHOUT WARRANTY OF ANY KIND, EITHER EXPRESSED OR IMPLIED, INCLUDING, WITHOUT LIMITATION, WARRANTIES THAT THE COVERED CODE IS FREE OF DEFECTS, MERCHANTABILITY, FIT FOR A PARTICULAR PURPOSE OR NON-INFRINGEMENT. THE ENTIRE RISK AS TO THE QUALITY AND PERFORMANCE OF THE COVERED CODE IS WITH YOU. SHOULD ANY COVERED CODE PROVE DEFECTIVE IN ANY RESPECT, YOU (NOT THE INITIAL DEVELOPER OR ANY OTHER CONTRIBUTOR) ASSUME THE COST OF ANY NECESSARY SERVICING, REPAIR OR CORRECTION. THIS DISCLAIMER OF WARRANTY CONSTITUTES AN ESSENTIAL PART OF THIS LICENSE. NO USE OF ANY COVERED CODE IS AUTHORIZED HEREUNDER EXCEPT UNDER THIS DISCLAIMER.
8. TERMINATION.
8.1. This License and the rights granted hereunder will terminate automatically if You fail to comply with terms herein and fail to cure such breach within 30 days of becoming aware of the breach. All sublicenses to the Covered Code which are properly granted shall survive any termination of this License. Provisions which, by their nature, must remain in effect beyond the termination of this License shall survive.
8.2. If You initiate litigation by asserting a patent infringement claim (excluding declaratory judgment actions) against Initial Developer or a Contributor (the Initial Developer or Contributor against whom You file such action is referred to as "Participant") alleging that:
(a) such Participant's Contributor Version directly or indirectly infringes any patent, then any and all rights granted by such Participant to You under Sections 2.1 and/or 2.2 of this License shall, upon 60 days notice from Participant terminate prospectively, unless if within 60 days after receipt of notice You either: (i) agree in writing to pay Participant a mutually agreeable reasonable royalty for Your past and future use of Modifications made by such Participant, or (ii) withdraw Your litigation claim with respect to the Contributor Version against such Participant. If within 60 days of notice, a reasonable royalty and payment arrangement are not mutually agreed upon in writing by the parties or the litigation claim is not withdrawn, the rights granted by Participant to You under Sections 2.1 and/or 2.2 automatically terminate at the expiration of the 60 day notice period specified above.
(b) any software, hardware, or device, other than such Participant's Contributor Version, directly or indirectly infringes any patent, then any rights granted to You by such Participant under Sections 2.1(b) and 2.2(b) are revoked effective as of the date You first made, used, sold, distributed, or had made, Modifications made by that Participant.
8.3. If You assert a patent infringement claim against Participant alleging that such Participant's Contributor Version directly or indirectly infringes any patent where such claim is resolved (such as by license or settlement) prior to the initiation of patent infringement litigation, then the reasonable value of the licenses granted by such Participant under Sections 2.1 or 2.2 shall be taken into account in determining the amount or value of any payment or license.
8.4. In the event of termination under Sections 8.1 or 8.2 above, all end user license agreements (excluding distributors and resellers) which have been validly granted by You or any distributor hereunder prior to termination shall survive termination.
9. LIMITATION OF LIABILITY.
UNDER NO CIRCUMSTANCES AND UNDER NO LEGAL THEORY, WHETHER TORT (INCLUDING NEGLIGENCE), CONTRACT, OR OTHERWISE, SHALL YOU, THE INITIAL DEVELOPER, ANY OTHER CONTRIBUTOR, OR ANY DISTRIBUTOR OF COVERED CODE, OR ANY SUPPLIER OF ANY OF SUCH PARTIES, BE LIABLE TO ANY PERSON FOR ANY INDIRECT, SPECIAL, INCIDENTAL, OR CONSEQUENTIAL DAMAGES OF ANY CHARACTER INCLUDING, WITHOUT LIMITATION, DAMAGES FOR LOSS OF GOODWILL, WORK STOPPAGE, COMPUTER FAILURE OR MALFUNCTION, OR ANY AND ALL OTHER COMMERCIAL DAMAGES OR LOSSES, EVEN IF SUCH PARTY SHALL HAVE BEEN INFORMED OF THE POSSIBILITY OF SUCH DAMAGES. THIS LIMITATION OF LIABILITY SHALL NOT APPLY TO LIABILITY FOR DEATH OR PERSONAL INJURY RESULTING FROM SUCH PARTY'S NEGLIGENCE TO THE EXTENT APPLICABLE LAW PROHIBITS SUCH LIMITATION. SOME JURISDICTIONS DO NOT ALLOW THE EXCLUSION OR LIMITATION OF INCIDENTAL OR CONSEQUENTIAL DAMAGES, SO THIS EXCLUSION AND LIMITATION MAY NOT APPLY TO YOU.
APPENDIX
10. U.S. GOVERNMENT END USERS.
The Covered Code is a "commercial item," as that term is defined in 48 C.F.R. 2.101 (Oct. 1995), consisting of "commercial computer software" and "commercial computer software documentation," as such terms are used in 48 C.F.R. 12.212 (Sept. 1995). Consistent with 48 C.F.R. 12.212 and 48 C.F.R. 227.7202-1 through 227.7202-4 (June 1995), all U.S. Government End Users acquire Covered Code with only those rights set forth herein.
11. MISCELLANEOUS.
This License represents the complete agreement concerning subject matter hereof. If any provision of this License is held to be unenforceable, such provision shall be reformed only to the extent necessary to make it enforceable. This License shall be governed by California law provisions (except to the extent applicable law, if any, provides otherwise), excluding its conflict-of-law provisions. With respect to disputes in which at least one party is a citizen of, or an entity chartered or registered to do business in the United States of America, any litigation relating to this License shall be subject to the jurisdiction of the Federal Courts of the Northern District of California, with venue lying in Santa Clara County, California, with the losing party responsible for costs, including without limitation, court costs and reasonable attorneys' fees and expenses. The application of the United Nations Convention on Contracts for the International Sale of Goods is expressly excluded. Any law or regulation which provides that the language of a contract shall be construed against the drafter shall not apply to this License.
12. RESPONSIBILITY FOR CLAIMS.
As between Initial Developer and the Contributors, each party is responsible for claims and damages arising, directly or indirectly, out of its utilization of rights under this License and You agree to work with Initial Developer and Contributors to distribute such responsibility on an equitable basis. Nothing herein is intended or shall be deemed to constitute any admission of liability.
13. MULTIPLE-LICENSED CODE.
Initial Developer may designate portions of the Covered Code as "Multiple-Licensed". "Multiple-Licensed" means that the Initial Developer permits you to utilize portions of the Covered Code under Your choice of the NPL or the alternative licenses, if any, specified by the Initial Developer in the file described in Exhibit A.
EXHIBIT A -Mozilla Public License.
The contents of this file are subject to the Mozilla Public License Version 1.1 (the "License"); you may not use this file except in compliance with the License. You may obtain a copy of the License at http://www.mozilla.org/MPL/
Software distributed under the License is distributed on an "AS IS" basis, WITHOUT WARRANTY OF ANY KIND, either express or implied. See the License for the specific language governing rights and limitations under the License.
The Original Code is ____.
The Initial Developer of the Original Code is ____. Portions created by ____ are Copyright (C) ____ ____. All Rights Reserved.
Contributor(s): ____.
Alternatively, the contents of this file may be used under the terms of the ____ license (the "[____] License"), in which case the provisions of [____] License are applicable instead of those above. If you wish to allow use of your version of this file only under the terms of the [____] License and not to allow others to use your version of this file under the MPL, indicate your decision by deleting the provisions above and replace them with the notice and other provisions required by the [____] License. If you do not delete the provisions above, a recipient may use your version of this file under either the MPL or the [____] License."
[NOTE: The text of this Exhibit A may differ slightly from the text of the notices in the Source Code files of the Original Code. You should use the text of this Exhibit A rather than the text found in the Original Code Source Code for Your Modifications.]

LG
Life's Good
Record the model number and serial number of the TV.
Refer to the label on the back cover and quote this information to your dealer when requiring any service.
Model :
Serial No.:

Digital Video
Broadcasting
Trade Mark of the DVB Digital Video
Broadcasting Project (1991 to 1996)