
Johnny G Bike JB950 - Exercise bike Spirit Fitness - Free user manual and instructions
Find the device manual for free Johnny G Bike JB950 Spirit Fitness in PDF.

| Product Type | Stationary exercise bike (indoor cycle) |
| Brand | Spirit Fitness |
| Model | Johnny G Bike JB950 |
| Resistance System | Magnetic resistance with electronic control |
| Resistance Adjustment | Forward Control Pad (+/- keys) and Handlebar Shifters |
| Console Display | LED panels showing Level, RPM, Time, Distance, Watts, Heart Rate |
| Training Programs | Warm Up, Manual, HR Zone, Power Zone (with FTP Test), Lap Program |
| Heart Rate Monitoring | ANT+ and Bluetooth FTMS compatible chest strap (not included) |
| Connectivity | ANT+ and Bluetooth FTMS (compatible with Garmin, MyZone, Strava, Spivi) |
| Power Source | Self-powered via pedaling (no external power required for normal operation) |
| Maximum User Weight | 350 lbs (159 kg) |
| Adjustable Seat | Height (pop-pin) and fore/aft (tension handle) |
| Adjustable Handlebar | Height and fore/aft (tension handles) |
| Pedal Type | Toe cages with adjustable straps |
| Dynamic Braking Handle | Emergency stop by pressing down on handle |
| Frame Material | Steel with protective coating |
| Stabilizers | Front and rear with leveling feet |
| Transport Wheels | Yes, on front stabilizer |
| Assembly Required | Yes, tools included (Allen wrenches, 15/17/19mm wrenches) |
| Maintenance | Daily wipe-down, weekly check of hardware, monthly inspection and waxing |
| Safety Features | Warning labels, emergency dynamic brake, child safety age 13+ |
| Warranty | Comprehensive warranty (details in manual) |
| Serial Number Location | Center floor tube behind crank |
Frequently Asked Questions - Johnny G Bike JB950 Spirit Fitness
User questions about Johnny G Bike JB950 Spirit Fitness
0 question about this device. Answer the ones you know or ask your own.
Ask a new question about this device
Download the instructions for your Exercise bike in PDF format for free! Find your manual Johnny G Bike JB950 - Spirit Fitness and take your electronic device back in hand. On this page are published all the documents necessary for the use of your device. Johnny G Bike JB950 by Spirit Fitness.
USER MANUAL Johnny G Bike JB950 Spirit Fitness
natural_image
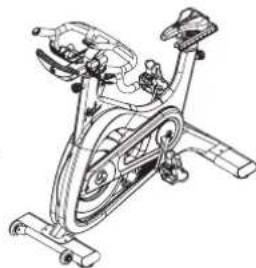
Line drawing of a stationary exercise bike with visible components and suspension (no text or symbols)JOHNNY G SPIRIT BIKE
OWNER'S MANUAL

natural_image
Line drawing of a stationary exercise bike with visible components and suspension rings (no text or labels)Johnny G by Spirit
5 IMPORTANT SAFETY INSTRUCTIONS
15 WARNING LABELS AND COMMUNICATION STICKERS
16 SAFEGUARDS
17 REGISTER YOUR PURCHASE
18 ASSEMBLY INSTRUCTIONS
25 TESTING THE BIKE
26 INSTRUCTIONS
30 TRAINING INFORMATION
32 CONSOLE OPERATION
36 PROGRAMS
37 PAIR HEART RATE DEVICE
51 MAINTENANCE MODE
65 GENERAL MAINTENANCE
68 CUSTOMER SUPPORT
Thank you for purchasing our product, please save these instructions. Please do not perform or attempt any customizing, adjustments, repair or maintenance that is not described in this manual.

Congratulations on your new Johnny G Spirit Bike and welcome to the Spirit Fitness family!
Thank you for your purchase of this quality Johnny G Spirit bike from Spirit Fitness. Your new bike was manufactured by one of the leading fitness manufacturers in the world and is backed by one of the most comprehensive warranties available. Through your dealer, Spirit Fitness will do all we can to make your ownership experience as pleasant as possible for many years to come. If not purchased direct from Spirit Fitness, the local dealership where you purchased this bike is your administrator for all Spirit Fitness warranty and service needs. Their responsibility is to provide you with the technical knowledge and service personnel to make your experience more informed and any difficulties easier to remedy.
Please take a moment at this time to record the name of the dealer, their telephone number, and the date of purchase below to make any future, needed contact easy. We appreciate your support and we will always remember that you are the reason that we are in business.
Yours in Health, Spirit Fitness
NAME OF DEALER
DEALER PHONE #
PURCHASE DATE ____

WARNING
This chapter includes precautions and fitness safeguards for the installation and use of the Johnny G Spirit Bike. Please read this chapter carefully before installing or using your equipment. Safety instructions are provided in the following languages (in the order shown):
- English, Dutch, French, German, Italian, Portuguese, Spanish, Swedish, Chinese, Japanese
USER SAFETY PRECAUTIONS
These safety notes are directed to you as the owner of the Johnny G Spirit Bike. Please train all your users and fitness staff to follow these safety instructions. DO:
- Do encourage each of your users to discuss their health program or fitness regimen with a healthcare professional.
- Do stop operating your bike if you feel dizzy or faint.
-
Do perform regular preventative maintenance.
• Do exercise slowly until you reach a level of comfort. -
Do not use in rainy weather outdoors, or in an enclosed pool environment.
- Do not drop or insert any object, hands, or feet into any opening or within the area of the flywheel.
- Do not attempt to remove any shrouds or modify the bike.
WARNING:
- Your Johnny G Spirit Bike is designed for aerobic exercise in a commercial or consumer environment.
- Please check with your physician prior to beginning any exercise program.
- Do not push yourself to excess. Stop if you are feeling faint, dizzy, or exhausted. Use common sense when biking.
- Read the owner's manual in its entirety before operating the bike.
- Failure to obey this warning can result in injury or death.
SPIRIT FITNESS® and the Spirit Fitness logo are registered trademarks of Dyaco International.
DO NOT:
- Do not let unsupervised children operate the bike.
- Do not use without proper athletic shoes.
VOORZORGSMAATREGELEN
The following fitness safeguards and operating precautions are directed to purchasers and users of the Johnny G Spirit Bike. Club Managers should ensure that members and fitness staff are trained to follow these same instructions. Failure to follow these safeguards may result in injury or serious health risk.
- Ensure that the seat height adjustment knob is properly secured and does not interfere with range of motion during exercise.
- Children under the age of 13 should not ride the bike. The bike mechanism and ergonomics are designed for adult use only.
- Do not insert any object, hands or feet into any openings, or expose hands, arms or feet to the drive mechanism or other potentially moving part of the bike.
- The maximum weight for individuals riding the bike should not exceed 350lbs /159kg.
- Do not dismount the bike until both the pedals and flywheel have stopped completely. Failure to comply may lead to loss of control and serious injury.
- If at any time you feel dizzy or have difficulty breathing, gradually stop pedaling and carefully dismount the bike.
-
Listen to your body, ride at a pace that feels right for you.
-
Keep children and pets away from the bike whenever it's in use.
• Never turn the pedal crank arms by hand. - Stay hydrated. Drink water throughout your ride as needed.
- Stay in control by executing all movements at a slow pace before attempting to increase your speed.
- Do not exercise at high speeds and intensity without having initially established a baseline fitness level and obtaining a medical clearance from your physician. Focus on form, posture and establishing a controllable pace before attempting any high intensity short duration sprints.
- Do not use the bike without proper footwear. Never operate the bike with bare feet.
- Never place your feet in any position on the bike other than the pedals.
The following pages show examples of Johnny G Spirit Bike warning labels and communication stickers placed on the equipment as part of the manufacturing process. It is critical that owners maintain the integrity and placement of these stickers. If you find any stickers missing or damaged contact your local dealer or distributor for a replacement. NOTE: STICKERS AND LABELS ARE NOT SHOWN TO SCALE.
EXERCISE WARNING DECAL
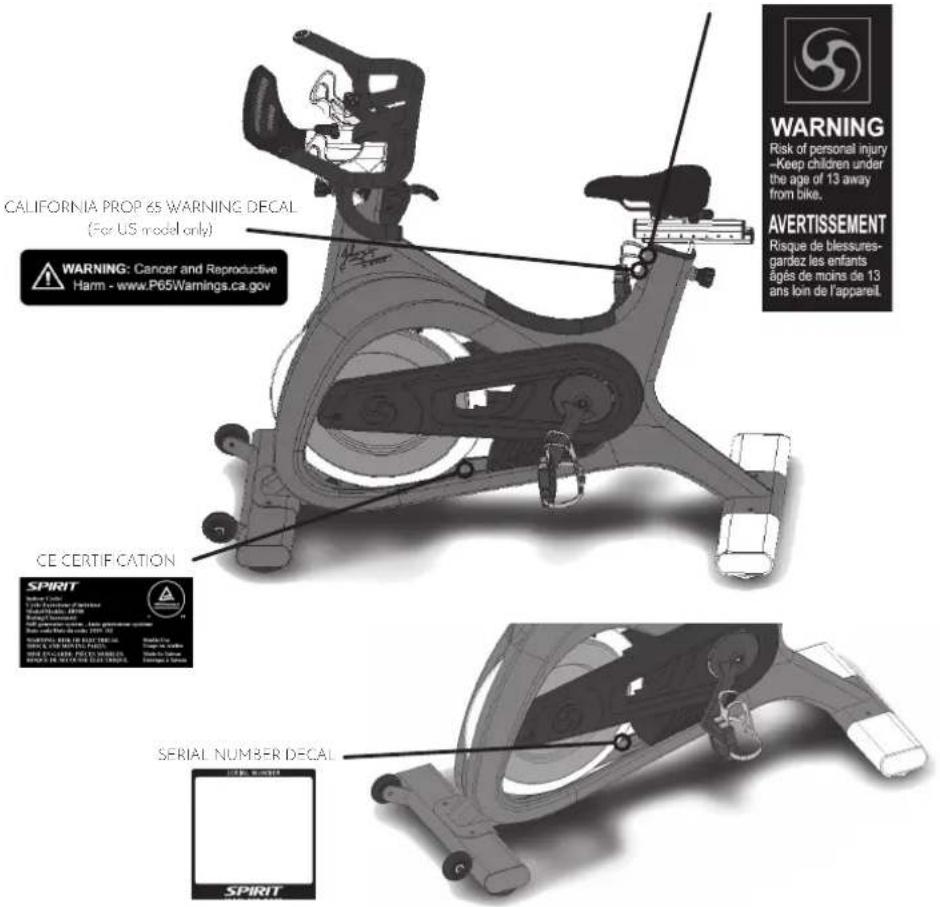

WARNING
This product can expose you to chemicals including Toluene and Acrylamide which are known to the State of California to cause Cancer and birth defects or other reproductive harm. For more information, go to www.P65Warnings.ca.gov
RECORD YOUR SERIAL NUMBER
Please record the serial number of this fitness product in the space provided below (serial number is located on the center floor tube behind the crank.)
Serial Number:
REGISTER YOUR PURCHASE
Please mail your warranty registration cord to the address below or call us at (866) 463-2662 to get your product registered:
Dyaco Commercial & Medical North America
18303 Bothell Everett Hwy.
Suite 210
Bothell, WA 98012
United States of America
Patent pending.
JOHNNY G SPIRIT BIKE PRE-ASSEMBLY
Use the following procedures to unpack and assemble your Johnny G Spirit Bike:
- Position the shipping carton so the Heavy End is located at the bottom.
- Cut the straps then lift the box over the unit and unpack. Remove all parts from the shipping carton and foam inserts, and verify that all parts are included in your shipment.
- Locate the hardware package. The hardware is separated into four steps. Remove the tools first. Remove the hardware for each step as needed to avoid confusion. The numbers in the instructions that are in parenthesis (#) are the item number from the assembly drawing for reference.
- Always have assistance when lifting main frame.
NOTE: All tools required to assemble the bike are included within the packaging. If you are missing any of the parts listed above, inspect the packing material and the box for items that may have been overlooked.
If parts are missing, or if you have any operational questions, please call your local Spirit Fitness's Service department or the distributor whom sold you the product. Please see the back of the manual for a listing of international corporate offices and locate the office nearest you. Have your serial number ready.
NOTE: Use the large foam packaging to prop the bike frame off of the ground to allow assembly of the front, then rear stabilizers.
CAUTION: Damage to the bike during assembly is not covered as part of the limited Spirit Fitness warranty. Take care not to drop or lean the bike on its side. Carefully stand the bike up in the normal upright position on a stable surface so it will not tip over during assembly.
Protect the environment by not disposing of this product with household waste. Check your local authority or approved waste center for recycling advice and facilities.
JOHNNY G SPIRIT BIKE PRE-ASSEMBLY
TOOLS NEEDED:
155. L M4 Allen Wrench (1 pc)
157.17mm Wrench (1 pc)
158.13/15 Wrench (1 pc)
159. L M2.5 Allen Wrench (1 pc)
167.19mm Wrench (1 pc)
Use of a large pedal wrench (not included) is highly recommended to secure the pedals.
NOTE: Use the large foam packaging to prop the bike frame off of the ground to allow assembly of the front, then rear stabilizers. ALWAYS have assistance when lifting main frame.
An assembly video is available to show the steps for assembly of the Johnny G Spirit bike. Follow the link below: http://dyaco.com/JG_Assembly
JOHNNY G SPIRIT BIKE
STEP ONE
| HARDWARE FOR STEP 1 | |||
| PART TYPE DESCRIPTION QTY | |||
| 65 | SHORT HEX HEAD BOLT M12 x P1.25 x 20L | 5 | |
| 41 | LONG HEX HEAD BOLT M10 x P1.5 x 55L | 1 | |
| 166 FLAT WASHER | ∅12.7 x ∅26 x 2T | 5 | |
| 25 | FLAT WASHER ∅10 x ∅25 x 15T | 1 | |
| 54 | PFDALS SET PFDALS R/L | 1 | |
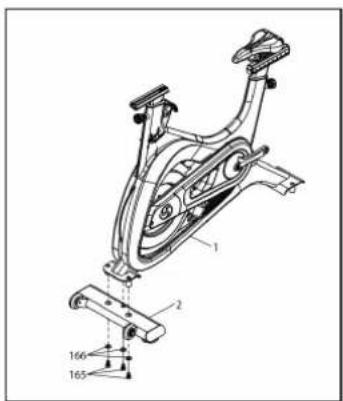
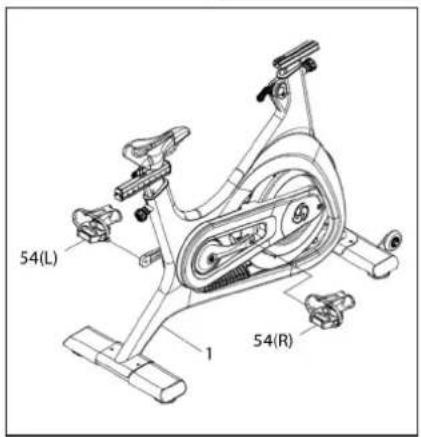
- Assemble FRONT STABILIZER (2) to MAIN FRAME (1) using THREE HEX BOLTS (165) and THREE WASHERS (166) with 19MM WRENCH (167). NOTE: Use the large foam packaging to prop the bike frame off of the ground to attach the stabilizers.
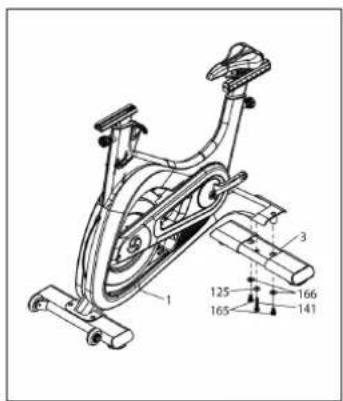
- Assemble REAR STABILIZER (3) to MAIN FRAME (1) using TWO SHORT HEX BOLTS (165), ONE LONG HEX BOLT (141), ONE WASHER (125) and TWO WASHERS (166) with 19MM WRENCH (167). The LONG HEX BOLT (141) and WASHER (125) are used in the center hole and tightened with 17MM ALLEN WRENCH (157).
- Assemble PEDALS (54) to bike using 15MM WRENCH (158). Use of a large pedal wrench (not included) is highly recommended to secure the pedals.
JOHNNY G SPIRIT BIKE STEP TWO
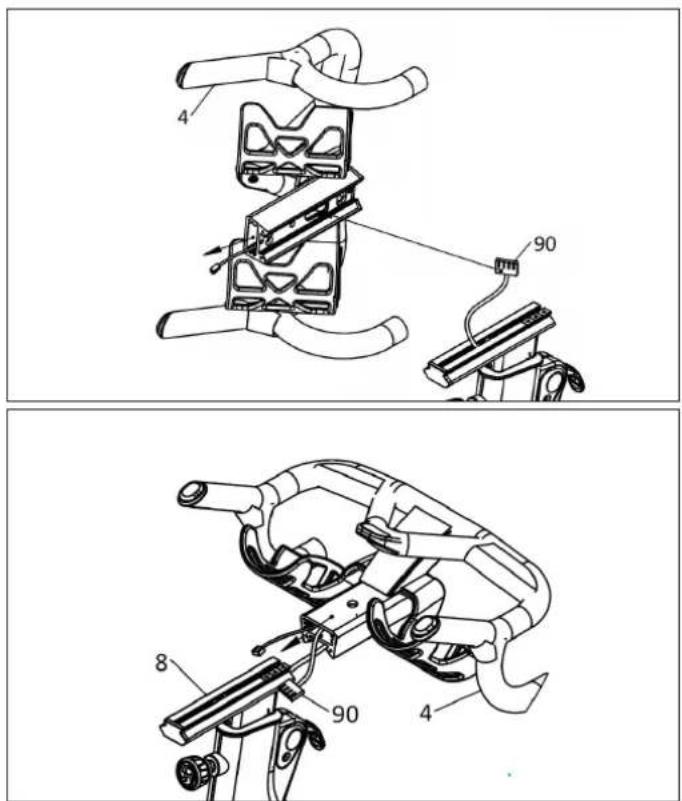
-
Run MAIN WIRE (90) through opening at bottom of HANDLEBARS (4) and out of the front.
-
Slide HANDLEBAR ASSEMBLY (4) onto aluminum slide rail. While assembling, simultaneously pull MAIN WIRE (90) out of front to prevent wire from being jammed. Wire connector should protrude from front of handlebars when fully installed.
NOTE: Be careful not to pinch and damage the MAIN WIRE (90) when sliding HANDLEBAR ASSEMBLY (4) on to main rail.
JOHNNY G SPIRIT BIKE STEP THREE
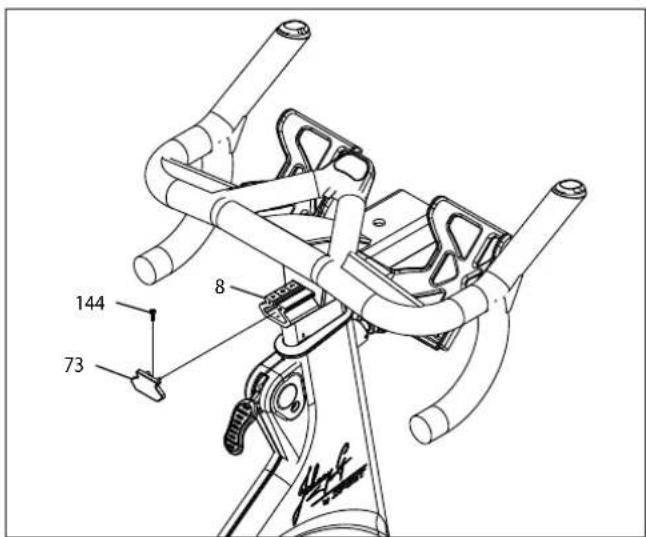
| HARDWARE FOR STEP 3 | |||
| PART TYPE DESCRIPTION QTY | |||
| 73 HANDLEBAR END CAP1 | |||
| 144 SOCKET HEAD CAP BIOLT M3XPO.SXIOL | 1 | ||
| 51 | HANDLEBAR ANCHOR 1 | ||
- Install HANDLEBAR END CAP (73) onto back end of ALUMINUM SLIDE RAIL (8) and secure with SOCKET HEAD CAP BOLT (144) using 2.5 MM ALLEN WRENCH (159).
- The HANDLEBAR ANCHOR (51) has been pre-installed into ALUMINUM SLIDE RAIL (8).
- Using a screwdriver or Allen Key, slide anchor forward to front endcap. Looking through handlebar hole slide handlebar forward to align with screw hole in anchor.
natural_image
Technical line drawing of a mechanical device with no visible text or symbols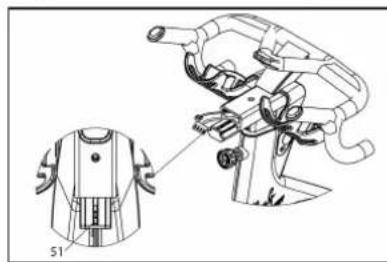
natural_image
Technical line drawing of a garment sleeve assembly with a close-up detail view (no text or symbols)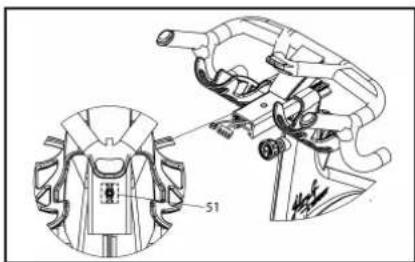
natural_image
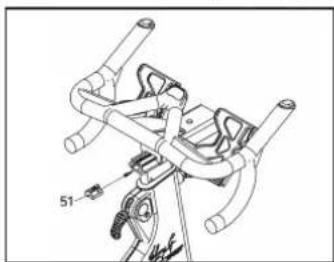
Technical line drawing of a mechanical device with a magnified inset showing a component labeled '51' (no text or symbols present)JOHNNY G SPIRIT BIKE STEP FOUR
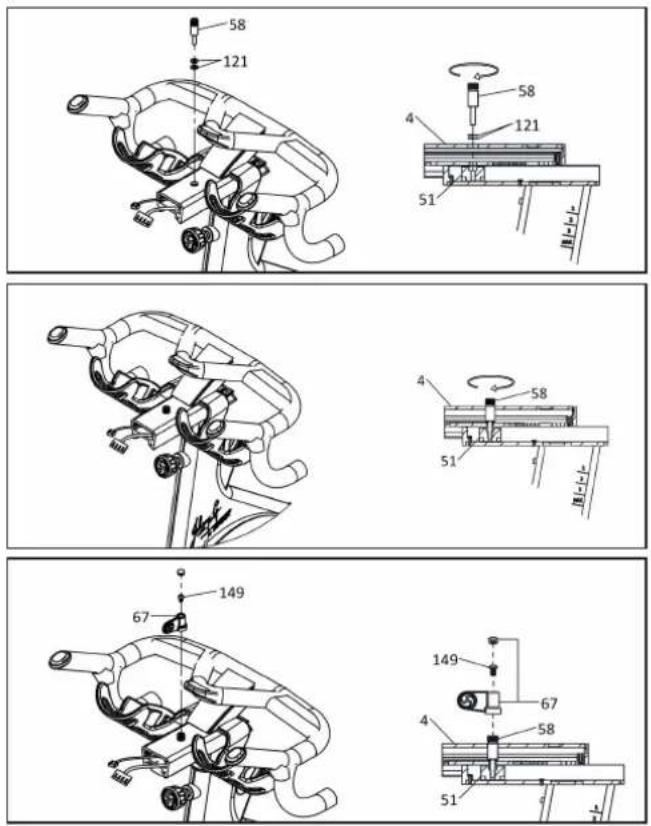
| HARDWARE FOR STEP 4 | |||
| PART TYPE DESCRIPTION QTY | |||
| 58 ADJUSTING AXLE 1 | |||
| 67 SOCKET HEAD CAP BOLT M3×P0.5×10L 1 | |||
| 121 FLAT WASHER ∅1/4" × 13 × 1.0T 2 | |||
| 149 BUTTON HEAD SOCKET BOLT | M6 × 10L 1 | ||
- Thread ADJUSTING AXLE (58) through hole into HANDLEBAR ANCHOR (51) with TWO FLAT WASHERS (121). Tighten fully, using LEVER (67) as a tool if necessary. NOTE: Gently pull on MAIN WIRE (90) allowing space for insertion of ADJUSTING AXLE (58) to prevent cable damage.
- Insert a small Allen wrench into lever from bottom to remove plastic cap at top of lever allowing access for bolt installation
- Install LEVER (67) in a 12 o'clock position. Attach LEVER (67) to ADJUSTING AXLE (58) using BUTTON HEAD SOCKET BOLT (149) using 4MM ALLEN WRENCH (155).
- Install plastic cap to seal lever.
JOHNNY G SPIRIT BIKE
STEP FIVE
| HARDWARE FOR STEP 5 | |||
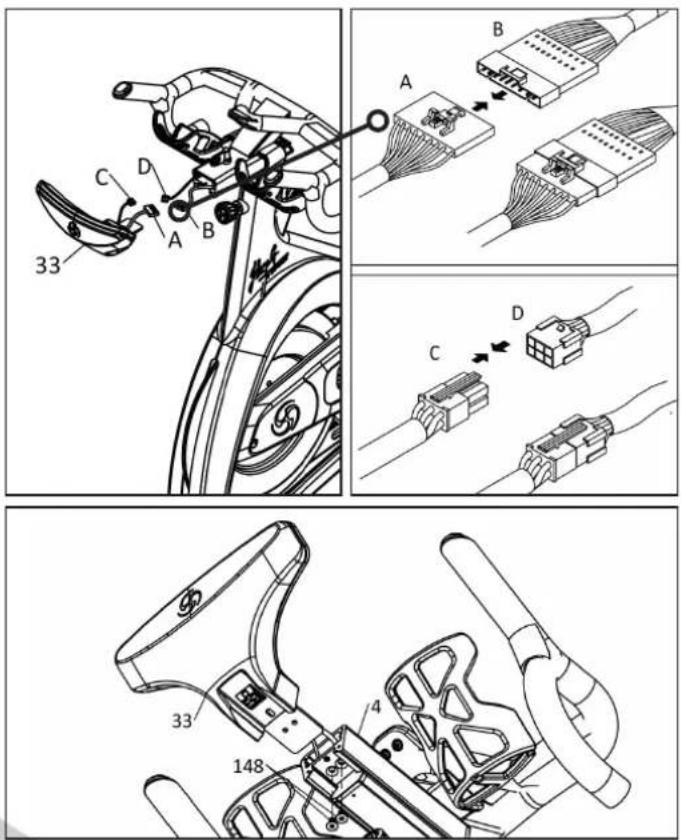
| PART TYPE DESCRIPTION QTY | |||
| 48 | FLAT HEAT COUNTER-SUNK BOT | M6 x PI.O x OL | 2 |
- Connect MAIN WIRE (A & B) and CONTROL WIRE (C & D) to CONSOLE (33).
- Attach CONSOLE (33) to ALUMINUM SLIDE RAIL (4) secure using TWO FLAT HEAD COUNTERSUNK BOLTS (148) using 4MM ALLEN WRENCH (155).
NOTE: Before pedaling bike, remove Flywheel Shim protecting proper magnet spacing. Locate Shim Hang Tag and pull on cord removing shim. Use shim when needing to transport bikes over long road distances.
Use this checklist to perform the bike test procedure.
☐ Recheck all the bolts and make sure they are all tightened to the proper torque specification (if indicated) and no parts are missing.
☐ Check the seat to make sure it is level and tight and does not rotate around or tilt. Tighten and adjust as needed.
☐ Test the seat and handlebar horizontal adjustment for smooth movement front to rear.
Adjust seat post and handlebar to your needs (refer to page 27). Ride/test the bike for proper operation according to this owner's manual.
CAUTION: Do not dismount the bike until the pedals to come to a complete stop.
☐ Pedal the bike at a moderate pace and test for proper and smooth movement of the pedals.
☐ When the testing is complete, tip the bike forward using the arms and roll it on a smooth surface to the final location and adjust the leveling feet so the bike is stable.
Your Johnny G Spirit Bike will be an exhilarating indoor cycling experience. The bike allows the user full control over the magnetic resistance by simply pressing on the + and - Keys, located at two locations; either the Forward Control Pad or the Handlebar Shifters. Providing two resistance adjustment locations was purposely done for the riders' convenience. The Forward Control Pad is ideally positioned for when the rider is in the saddle and hands are in home position or position-one. The Handlebar Shifters are positioned for riders that are out of the saddle and going through tough climbs.
Typically, lower resistance levels enable you to pedal at a faster pace, placing increased demand on the cardiovascular system. Higher resistance levels will typically deliver a greater muscle strength and endurance workout at lower RPM. RPM rates vary dramatically based on the type of ride you are doing (endurance vs. strength). The Johnny G Spirit Bike can display pedal rates up to 150 RPM. If unsure how to properly use the bikes RPM capabilities and resistance system adjustment, seek the help from a qualified indoor cycling instructor or take a class at your local indoor cycling facility as they will teach you how to ride properly and safely.
Additionally, the bike offers seat and handlebar adjustments, allowing the bike to be configured to each users' comfort zone. This section provides the instructions for making seat adjustments, handlebar adjustments, pedal strap adjustments, and for controlling resistance.
NOTE: In a club setting, we recommend each user to initially be properly fitted on the bike by a certified indoor cycling instructor.
Proper bike setup gives you a more comfortable ride and reduces your risk of injury. Proper seat height helps ensure
maximum exercise efficiency and comfort, while reducing the risk of injury. Adjust the seat height so that the knee joint is slightly flexed when the extended leg is at the bottom of the pedal stroke. Once the proper height has been achieved, adjust the seat forward or back so that when the feet are in the 3 o'clock and 9 o'clock positions, the forward knee is directly over the pedal axle. Recheck the seat height again after making the fore/aft adjustment, as moving the seat forward and backward can have the same effect as moving it higher or lower.
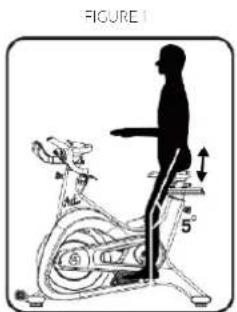
SEAT HEIGHT
Dismount the bike. Turn the seat height pop-pin counterclockwise and pull out on the pin to release it from its current preset location. Raise or lower the seat to the desired height, then gently release the pop-pin. Raise or lower the seat slightly, if necessary, until the pop-pin engages a preset hole, Turn the pop-pin clockwise to secure. Be sure to tighten firmly. (Figure 1)
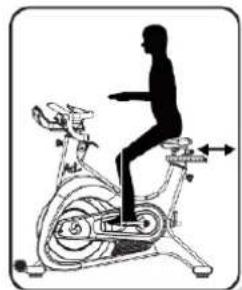
FORE/AFT POSITION
Loosen the seat fore-and-aft tension handle by turning the handle counterclockwise. Move the handlebar forward or back to the desired position, then tighten the tension handle by turning clockwise. Be sure to tighten the handle firmly. (Figure 2)
natural_image
Silhouette of a person riding an exercise bike (no text or symbols visible)HANDLEBAR ADJUSTMENTS
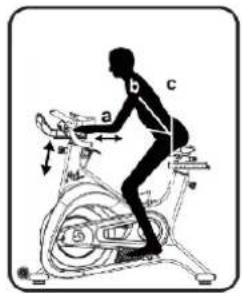
Position the handlebar at the same height as your seat, or higher if you feel any discomfort in your back. The Johnny G Spirit Bike allows for adjustment of handlebar height. Additionally, the bike allows for fore and aft adjustment of the handlebar.
TO ADJUST THE HANDLEBAR HEIGHT:
Loosen the handlebar height tension handle by turning the handle counterclockwise. Raise or lower the handlebar to the desired height, then tighten the tension handle by turning clockwise. Be sure to tighten firmly (Figure 3).
TO ADJUST THE HANDLEBAR FORE / AFT:
Loosen the handlebar fore-and-aft tension handle by turning the handle counterclockwise. Move the handlebar forward or back to the desired position, and then tighten the tension handle by turning clockwise. Be sure to tighten the handle firmly (Figure 3).
TO ADJUST THE PEDAL STRAPS:
Place the balls of your feet securely in the toe cages, with the ball of the foot (or the widest part of your shoe) over the center of the pedals. As you pedal, concentrate on keeping feet flat, which enables a more powerful pedal stroke. The front of the shoe may not completely fill the toe cage.
NOTE: The pedal straps should be adjusted to hold the foot snugly to the pedal.
FIGURE 3

natural_image
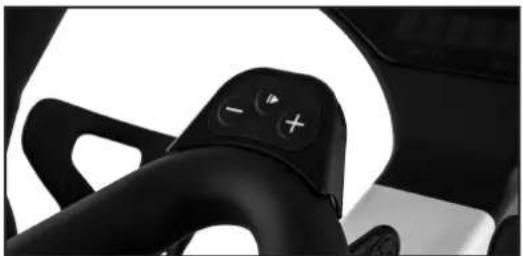
Close-up of mechanical components with no visible text or symbolsRESISTANCE CONTROL
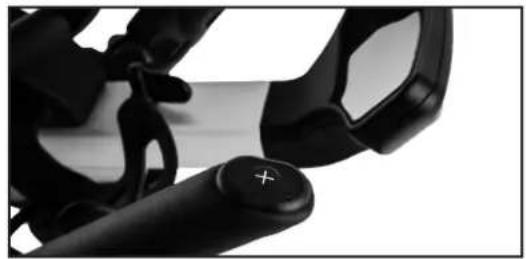
The bike allows the user full control over the magnetic resistance by simply pressing on the + and - Keys, located at two locations; either the Forward Control Pad or the Handlebar Shifters. Providing two resistance adjustment locations was done for the riders' convenience. The Forward Control Pad is ideally positioned for when the rider is in the saddle and hands are in home position or position-one. The Handlebar Shifters are positioned for riders that are out of the saddle and going through tough climbs.
natural_image
Close-up of a black automotive steering wheel with control buttons (no visible text or symbols)RESISTANCE FORWARD CONTROL PANEL RESISTANCE HANDLE BAR SHIFTERS
natural_image
Close-up of a black handheld device with a plus button, no visible text or symbols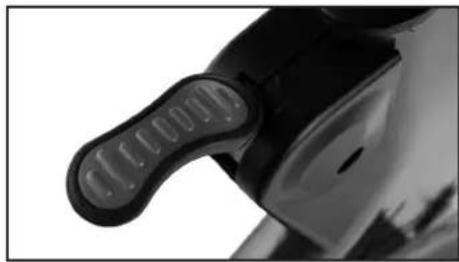
natural_image
Close-up of a black mechanical component with a textured handle and circular end (no visible text or symbols)DYNAMIC BRAKING HANDLE
NOTE: In case of emergency, you may press directly down on the Dynamic Braking Handle to bring the flywheel to an abrupt stop.
This section will provide very basic information regarding the structure of an indoor cycling workout.
IMPORTANT: User should be aware of the features, functions and proper operation of the bike before using the bike for the first time. If unsure how to properly use the bikes RPM capabilities and resistance system adjustments, seek help from a qualified indoor cycling instructor or take a class at your local indoor cycling facility as they will teach you how to ride properly and safely.
Be sure the seat, handlebar and pedal straps are adjusted for your body size and comfort before beginning your workout. Consult your physician before beginning this or any other exercise routine. Discontinue any exercise that causes you discomfort and consult a medical expert.
Once you are in position and sitting on the bike with your hands in a comfortable position on the handlebar, slowly begin pedaling. A gradual warm-up prepares the muscles and cardiovascular system for a more intense workout and helps prevent potential injuries from occurring. Your warm-up should be sufficient once your breathing rate begins to increase and you begin to perspire lightly. The warm-up period should last about five minutes.
A brisk and rhythmic workout will train the muscles and cardiovascular system to perform at a higher efficiency. The key is to exercise aerobically; typically, at 60% – 80% of your maximum heart rate.
Slow and relaxed activity after a workout allows the muscles and cardiovascular system to gradually return to a resting level.
WARNING: The flywheel momentum of the bike will keep the pedals turning even after the user stops pedaling, or in the event the user's feet slip off the pedals. DO NOT DISMOUNT THE BIKE OR REMOVE YOUR FEET FROM THE PEDALS UNTIL BOTH THE PEDALS AND THE FLYWHEEL HAVE STOPPED COMPLETELY. Failure to comply may lead to loss of control and serious personal injury.
You may stop the bike using any of the following methods:
- Pedal more slowly until the pedals come to a complete stop.
- Push down on the Push Brake System handle until the pedals come to a complete stop.
Your Johnny G Spirit Bike includes both an ANT+ and Bluetooth FTMS chips. Bluetooth FTMS is the new FITness Machine Service protocol to control fitness equipment, such as bike trainers, treadmills and rowing machines.
The Johnny G Spirit Bike is compatible with ANT+ and Bluetooth enabled technologies including: Garmin ^™ , MyZone ^™ , and Strava ^™ . Download and connect according to their individual app instructions. The bike also connects with leaderboards such as those from MyZone or Spivi ^® .

Johnny G by SPIRIT
JOHNNY G SPIRIT BIKE
CONSOLE OPERATION
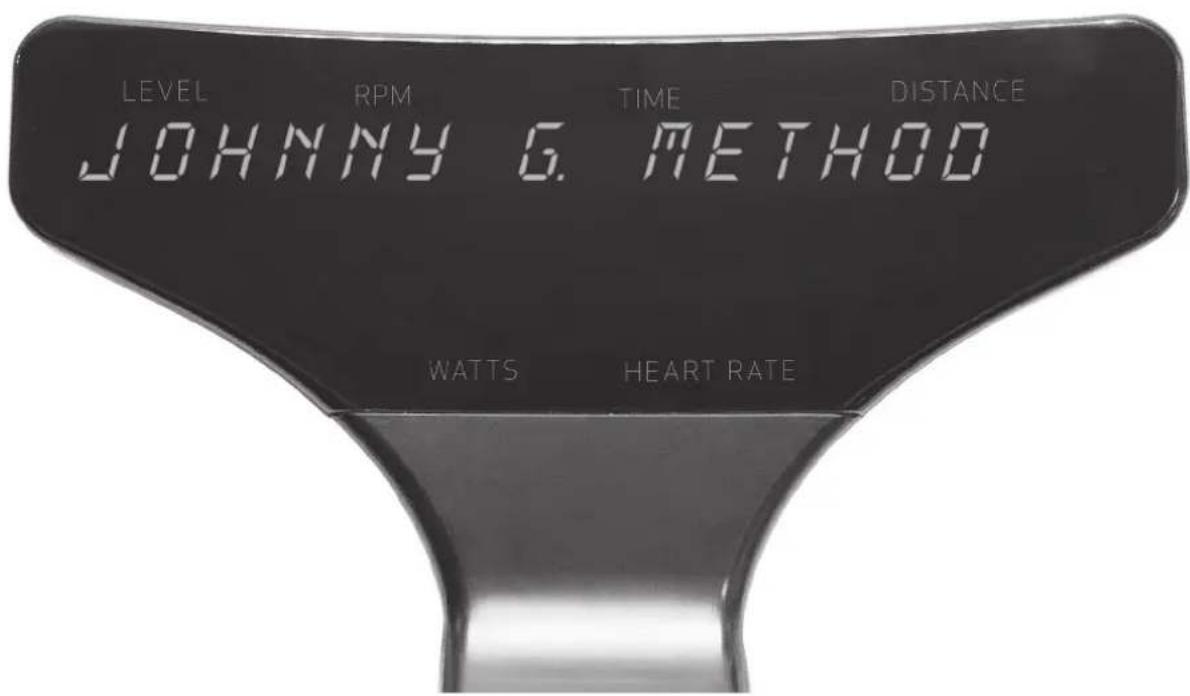
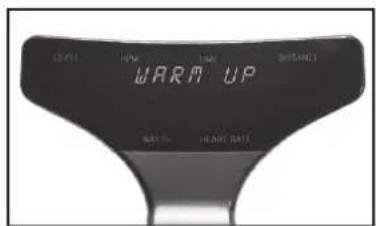
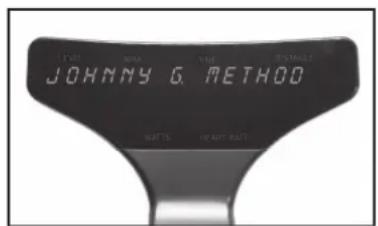
The Warm Up Mode is the most basic function of the Johnny G Spirit Bike. Riders can use this mode to prepare themselves for a class or when just pedaling to warm up for other activities. This mode is the first function that occurs when the console awakens from sleep mode. Riders can stay in this mode for as long as desired.
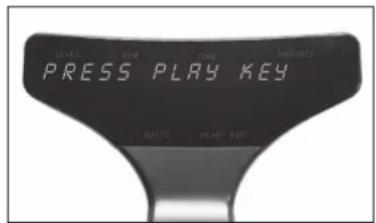
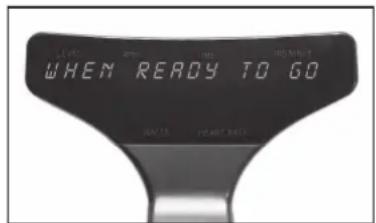
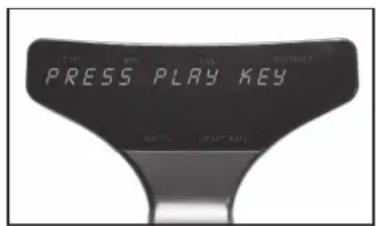
Upon console awakening, the words JOHNNY G. METHOD, THE RIDE OF TRUTH display, then WARM UP will flash 3 times, followed by PRESS PLAY KEY, WHEN READY TO GO. The Home screen appears displaying LEVEL, RPM, TIME, DISTANCE, WATTS, HEART RATE. Console continues Warm Up Mode until Play Key is pressed.
The warm up cycle continues until Play Key is pressed.
- During Warm Up mode, users can adjust level of intensity. Press + or - Key on either Forward Control Pad or handlebar ends to adjust resistance.
- Warm Up Mode will last as long as user stays in this mode.
- Warm Up Mode will NOT display a summary screen. Only the program screens display a summary.

MANUAL MODE
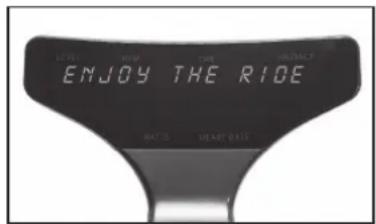
The Manual Mode is another basic function of the Johnny G Spirit Bike. The Manual Mode is also the HR Zone program. Once HR is paired during the Warm Up Mode, HR performace and zones will be tracked. Riders can use this mode for a complete workout or to prepare themselves for other activities. The only differences between this mode and the Warm Up Mode is that the rider will have a workout summary of their effort. At any time during Warm Up Mode, press Play Key to enter Manual Mode. Pressing the Play Key displays Enjoy THE RIDE followed by display screen. Any Time and Distance data collected during Warm Up Mode will be erased.
- Press + or - Key on either Forward Control Pad or handlebar ends to adjust resistance.
- When ride is completed at desired time, press Play Key. Current data will pause.
- Screen displays END WORKOUT, then NO will flash on display.
- Press either + or - Key to toggle between NO and YES for desired action.
- Pressing Play Key while NO will revert to Manual Mode.
- Time, Distance, Intensity and data will continue from moment data was paused.
• END WORKOUT function ends the workout.
If selecting YES:
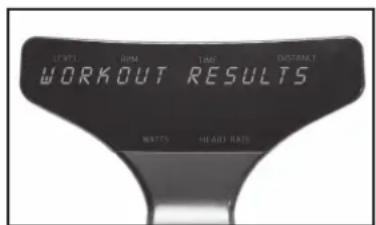
- Screen displays WORKOUT RESULTS, followed by Summary Data: TIME in minutes, DISTANCE in miles/km's, WATT AVG, WATT PEAK, SPEED AVG in miles/km's, SPEED PEAK in miles/km's, HR AVG, HR PEAK, RPM AVG, RPM PEAK.
- Pressing + or - Keys will scroll through Summary Data screens.
- Summary data screens will scroll every 5 seconds if + or - Keys are NOT pressed.
- Pressing Play Key will reset display and revert to Warm Up Mode.
Programs Mode provides the opportunity to pair a HR strap to the console and access to the training programs contained within the Johnny G Spirit Bike.
If just starting a ride and in the Warm Up Mode press and hold the Play Key for 3 seconds and the first program option will display, PAIR HR DEVICE.
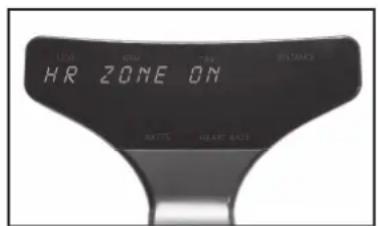
PAIR HR DEVICE is used to pair a HR strap. Once HR strap is paired the HR Zone program will automatically be started. The HR LED light in the lower right of the console will illuminate.
PROGRAMS:
- Pair HR Device
• Power Zone with FTP Test - Lap Program
- Exit
Descriptions for each of the programs is located on their program page. With the exception of the HR Zone program, the default setting for each program is OFF or DISABLED. Change their setting to ON or ENABLED. The HR Zone program has a default setting to ON.
PAIR HEART RATE DEVICE
HR Zone program requires connection of a Heart Rate Strap prior to using program. Connecting console to a Heart Rate Strap is accomplished by entering Programs Mode during the Warm Up Mode.
If user puts on a HR strap after leaving the Warm Up Mode and has not paired HR, console reset will be needed.
- While in the Warm Up Mode, press and hold Play Key for 3 seconds.
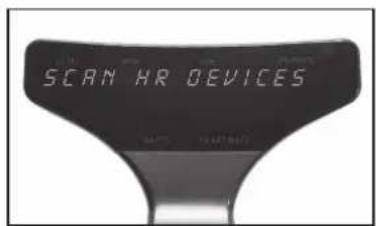
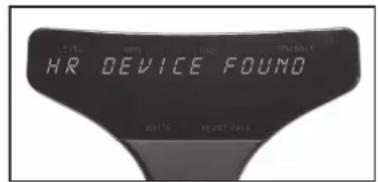
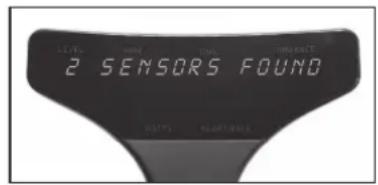
- PAIR HR DEVICE displays on console. Press Play Key to scan for HR devices. The console may display SCAN HR DEVICES up to 12 times.
- If sensors are detected, the number of sensors displays.
- If needed, reset console by simultaneously holding + Key and Play Key for 3 seconds.
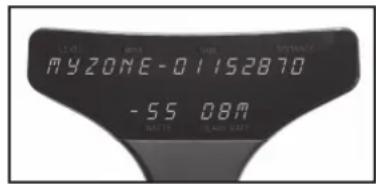
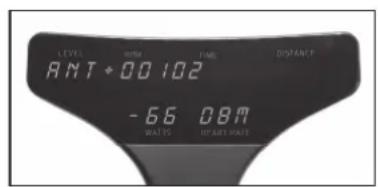
NOTE: Along with each device displayed is number indicating the distance each device is from the console. The number is in decibels meters and may display as 65DBM. Usually the smaller number is your chest strap but not always. If another rider is wearing a chest strap in front of you, their device may be closer to your console than you are. Ideally rider should be familiar with their MyZone SN# located on the back of the MyZone module or their devices ANT+ number. This will simplify selecting the appropriate HR strap.
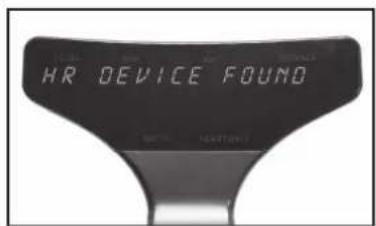
For example: 2 SENSORS FOUND. Press + Key if device shown is not your own.
• MYZONE-12345678 (SN# on your MYZONE device displays).
- NOTE: Ideally user should need to be familiar SN # of their MYZONE module, located on the backside.
- ANT+ 12345 (ID # for your ANT+ device displays).
• After selecting sensor, press Play Key to connect heart rate strap to console.
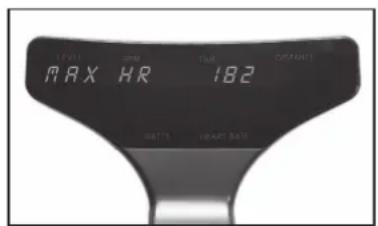
- ENTER AGE displays and default age 35 flashes. Press + or - Key to adjust age. Press Play Key.
- MAX HR displays and estimated max HR flashes. Press Play Key to accept.
- NOTE: Calculation: 208 - (0.7 x age) = MHR. Press + or - Key to adjust MHR only if actual is known or wanting to adjust MHR down. Do not adjust up without medical clearance.
• WARM UP MODE flashes 3 times.
- PRESS PLAY KEY, WHEN READY TO GO displays on console.
- Console HR LED light illuminates on right side of console.
• See page 40 for full description of HR color zones.
If zero sensors found:
- Re-scan displays.
• Dampen HR contacts on strap if dry.
- Press Play Key to re-scon.
- If not wanting to connect a heart rate strip, press + Key until screen displays DO NOT CONNECT.
- Press Play Key and screen displays WARM UP, flashing 3 times, then reverting to Warm Up Mode. The HR on lower display will remain blank.
• After 30 seconds WARM UP MODE recycles and flashes 3 times, then continuing with home screen.
- Press Play Key when ready to go and begin a ride without HR tracking.
HR ZONE PROGRAM
HR Zone Program estimates your Maximum HR (MHR) when riders' age is entered. The program will track the time spent within the 5 heart rate zones; less than 59% MHR to greater than 90% MHR. The console includes an LED light that will provide a visual guide to the riders' effort. The time spent in each of the HR Zones displays in the workout summary.
Console HR LED color changes based on user percent of max HR (%MHR). The HR LED is on right side of console. HR LED color spectrum is as follows:
- <59% = White
- 60 - 69% = Blue
- 70 - 79% = Green
- 80 - 89% = Yellow
- >90% = Red
To Start:
• Pair HR strap as instructed on page 37.
- Upon pressing Play Key, HR Zone Program will begin and ENJOY THE RIDE displays followed by home screen.
- Any data collected during Warm Up Mode will be erased.
• Home screen will appear and display: Level, RPM, Time, Distance, Watts, Heart Rate.
- Press + or - Key on either Forward Control Pad or handlebar ends to adjust resistance.
To end workout, refer to instructions on page 41 Ending Ride or User and the workout summary.
END WORKOUT
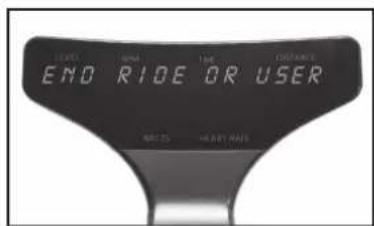
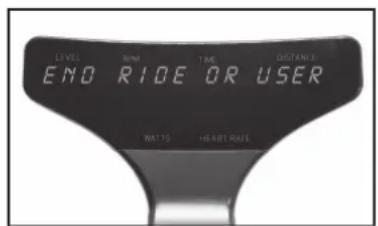
To End Ride or User:
- Press and hold Play Key for 3 seconds and all current data will pause.
• Screen displays END RIDE or USER.
- Press either + or - Key to toggle between END RIDE and USER.
- Press Play Key to select.
If END RIDE is selected:
• Screen displays END WORKOUT.
- NO will flash on display.
- Press either + or - Key to toggle between NO and YES for desired action.
- Pressing Play Key while NO displayed will revert to existing program.
WORKOUT RESULTS:
- Pressing Play Key while YES displayed will end workout.
- Screen displays WORKOUT RESULTS, followed by Summary Data: TIME in minutes, DISTANCE in miles/km's, WATT AVG, WATT PEAK, SPEED AVG in miles/km's, SPEED Peak in miles/km's, HR AVG, HR PEAK, RPM AVG, RPM PEAK.
- Pressing + or - Key will scroll through Summary Data screens.
- Summary Data screens will automatically scroll every 5 seconds if + or - Keys are NOT pressed.
- Pressing Play Key will reset display and revert to Warm Up Mode.
NOTE: If the HR Zone, Power Zone, or LAP program features are enabled for the workout, they will also be shown in the Workout Summary. See those programs for instructions on use. HR Zone, Power Zone or LAP results display after summary data listed above. The number of laps saved in memory for Workout Summary is last 5 laps completed. Time displays in Time window. Distance displays in Distance window.
POWER ZONE: Summary displays percent of total time in each zone.
- Press Play Key to display results; press + Key repeatedly to scroll POWER ZONE results.
• WHITE ZONE TIME, PCT
• BLUE ZONE TIME, PCT
- GREEN ZONE TIME, PCT
• YELLOW ZONE TIME, PCT
- RED ZONE TIME, PCT
- Pressing Play Key will revert to WORKOUT RESULTS and press + Key to advance to next screen or will happen automatically in 5 seconds.
HR ZONE: Summary displays the percent of time in each zone.
- Press Play Key to display results; press + Key repeatedly to scroll HR ZONE results.
• WHITE ZONE TIME, PCT
• BLUE ZONE TIME, PCT
- GREEN ZONE TIME, PCT
• YELLOW ZONE TIME, PCT
- RED ZONE TIME, PCT
- Pressing Play Key will revert to WORKOUT RESULTS. Press + Key again to advance and repeat screens.
- Pressing Play Key will reset display and revert to WARM UP Mode.
LAP PROGRAM: Summary displays time and distance for each lap.
• LAP 1, LAP 2, LAP 3, LAP 4, LAP 5 Time and Distance.
- If no laps were recorded this screen will not display.
- Only the last 5 laps will display on separate screens, if recorded.
If USER is selected:
The User function adds another program to run concurrently. The console is capable of running All three programs at the same time. The User feature is used to accomplish this. Once leaving the Warm Up Mode, if the Play Key is pressed for 3 seconds while in any program, END RIDE or USER will display; from there any program can be ended or started.
- Press Play Key and if HR is paired then DISCONNECT HR will display.
- Press + Key to scroll through programs: POWER ZONE, LAP.
- Use the + Key and Play Key to activate or disable each of the programs.
• Refer to each of the programs pages for instructions.
NOTE: Because USER function is activated after leaving Warm Up Mode, programs will not start with a Warm Up. HR can ONLY be paired during Warm Up Mode. If HR is not already paired, then USER function cannot activate HR. Console reset is required.
• Power Zone: USER function can turn ON or OFF program.
- FTP Test: USER function can be used to access and run FTP tests inside the Power Zone program.
- LAP Program: USER function can enable or disable program.
- Reset the console by pressing simultaneously and holding + Key and Play Key for 3 seconds. This action will revert to Warm Up Mode.
POWER ZONE PROGRAM
The Power Zone Program takes a riders Functional Threshold Power or FTP in watts and track their performance across 5 training zones; less than 55% FTP to greater than 106% FTP. The console includes an LED light that will provide a visual guide to the riders' effort. The time spent in each of the FTP Zones displays in the workout summary. Console can also administer an FTP test.
To start:
- If just beginning a riding session and HR strap has not been paired, refer to page 37 for pairing HR and passing the Warm Up Mode into the HR Zone program.
- Use the USER function as instructed on page 43 to access the Power Zone program.
-
POWER ZONE OFF or ON displays. Press + Key to display POWER ZONE ON. Power zone LED illuminates on lower left of console. Press Play Key.
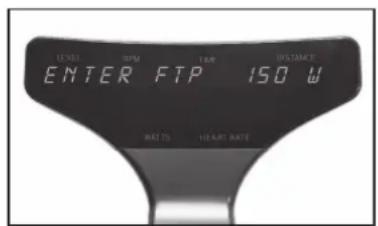
• ENTER FTP displays and 150W flashes. -
Press + or - Key to adjust FTP if actual is known up to 500.
- Users can enter their FTP or perform FTP test. (The default FTP level is 150W)
- Press Play Key.
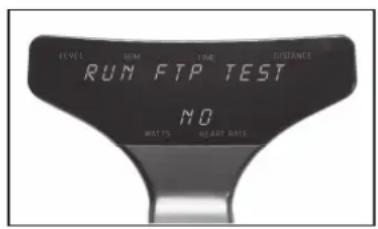
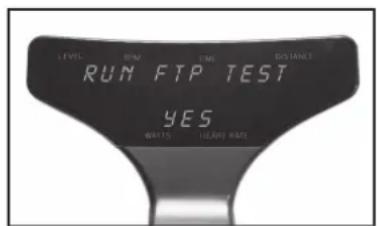
- RUN FTP TEST displays and NO flashes. Press either + or - Key to toggle between NO and YES for desired action.
- If NO, Upon pressing Play Key, Power Zone Program will begin.
• Home screen will appear and display: Level, RPM, Time, Distance, Watts, Heart Rate. - Press + or - Key on either Forward Control Pad or handlebar ends to adjust resistance. Console Power Zone LED color changes based on user percent of max FTP. Console Power LED is on left side of console. Power Zone LED color spectrum is as follows:

Console Power Zone LED color changes based on user percent of max FTP. Console Power LED is on left side of console. Power Zone LED color spectrum is as follows:
- < 55% FTP = White
- 56 - 75% FTP = Blue
- 76 - 90% FTP = Green
- 91 - 105% FTP = Yellow
- >106% FTP = Red
Press + or - Key on either Forward Control Pad or handlebar ends to adjust resistance. To end workout, refer to instructions on Ending Ride or User and the workout summary on page 41.
NOTE: Power Zone Program requires the use of users Functional Threshold Power or FTP in watts. If user does not have an FTP, console can administer FTP test. See FTP TEST for instructions.
FTP TEST
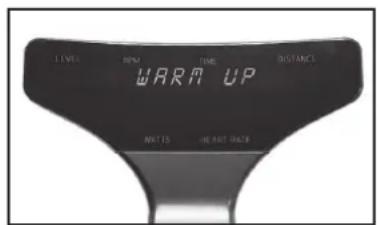
A thorough warm-up is important for a successful and accurate FTP test. Use Warm Up Mode for a minimum 5 minutes of steady pedaling and intervals prior to starting FTP test. If user needs to establish their FTP, console can administer FTP test. During set-up process:
- Enter Power Zone program as instructed on page 44.
• ENTER FTP displays and 150W flashes. - Press + or - Key to adjust FTP if actual is known.
- Users can enter their FTP or perform FTP test.
- Press Play Key.
• RUN FTP TEST displays and NO flashes.
- Press either + or - Key to toggle to YES. Press Play Key.
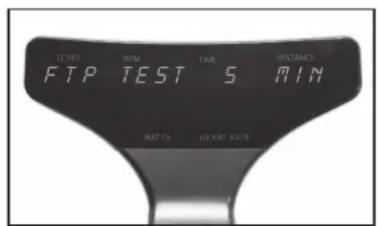
- FTP TEST displays and 5 MIN flashes. Press either + or - Key to toggle between a 5- and 20-min test.
- User can take either 5- or 20-MIN FTP test. A 20-minute test is a better measure of a user's FTP, however if choosing 5-minute test because of time constraints, attempt test again later for repeatability of the results.
- Press Play Key.
• WARM UP displays and 0.30 seconds counts down.
• GO Displays for 3 seconds. - FTP test begins, and test time counts down.
- Press + or - Key on either Forward Control Pad or handlebar ends to adjust resistance.
NOTE: Ideal pacing is a steady and consistent effort throughout the duration, where the average power for the first half is also the same as the average power for the second half. Listen to your body. Aim for a watt target that can be sustained.
Test will continue until completed or until ended by pressing the Play Key.
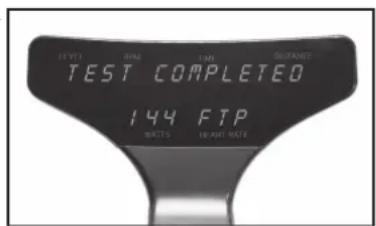
- If test terminated early, console displays TEST ENDED EARLY then reverts to FTP TEST.
- If test is completed, console displays TEST COMPLETED with FTP watts value displayed.
- FTP score after test = 95% of Average Watts during test.
- Press Play Key to return to Power Zone Program with FTP score entered program.
- If desired, reset the console by pressing simultaneously and holding + Key and Play Key for 3 seconds. This action will exit rider from Power Program and revert to warm up.
To end workout, refer to instructions on page 41 on Ending Ride or User and the workout summary.
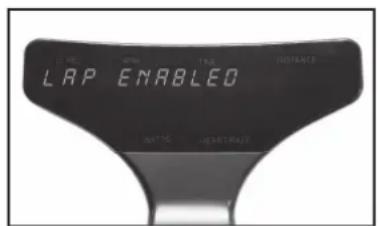
LAP PROGRAM
The Lap Program allows riders to perform repeated measures of Time and Distance efforts. The program will compare your current lap with your previous lap. Rider may perform as many laps as desired, but only the last 5 laps will display in the workout results.
To start:
- If just beginning a riding session and HR strap has not been paired, refer to page 37 for pairing HR and passing the Warm Up Mode into the HR Zone program.
-
Use the USER function as instructed on page 43 to access the LAP program.
-
Press + Key to ENABLE.
-
ENABLED setting is required for Lap Program to run and for lap results to display in workout summary.
-
Press and hold Play Key for 3 seconds to activate the LAP Program
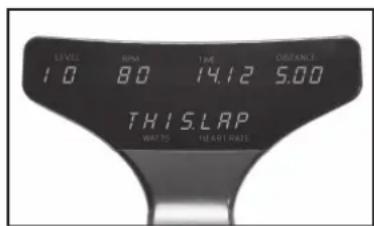
• Home screen will appear and display: LEVEL, RPM, TIME, DISTANCE, WATTS, HEART RATE. - Press + or - Key on either Forward Control Pad or handlebar ends to adjust resistance.
- Until Play Key is pressed to start a lap, the rider will remain in a Recovery Mode.
To start lap:
• At desired time of Recovery Mode, press Play Key.
- THIS.LAP displays on lower section of console, replacing Watts and Heart Rate.
• The TIME display will reset to 0.00.
• The DISTANCE display will reset to O.OO.
- Lap is being recorded.
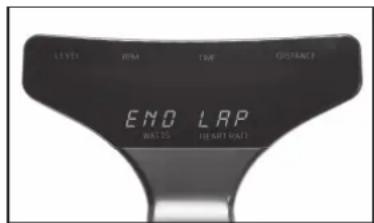
To end lap:
- Press Play Key again and display temporarily goes away with END LAP displayed on lower section of console.
• Display shows TIME and DISTANCE paused and THIS.LAP.
• After 5 seconds, full display returns with total accumulated Time and Distance from beginning of program. Watts and Heart Rate returns to display. - Lap has been recorded.
- At this point rider is in a recovery phase prior to beginning another lap or ending ride.
Next lap:
- If Play Key is pressed again, the cycle described above will repeat.
• THIS.LAP displays on lower section of console
• The TIME display will reset to 0.00.
• The DISTANCE display will reset to 0.00.
• After 5 seconds, LAST.LAP appears, flashing 3 times.
• Total time and distance will display from previous lap. - Words LAST.LAP will flash. Display will show LAST.LAP for 3 seconds, then back to THIS.LAP for 5 seconds.
- Cycle will repeat until Play Key is pressed, END LAP briefly displays, then THIS.LAP data displays for 5 seconds, then LAST.LAP for 5 seconds, then console exits to recovery mode and total workout information displays.
- User may continue using lap function, but number of laps saved in memory for display during workout summary is the last 5 laps completed.
To end the LAP Program and view workout results, refer to page 41 for complete instructions on ending workout.
- Press and hold Play Key for 3 seconds and all current data will pause.
- Screen displays END RIDE or USER with END RIDE flashing.
- Press Play Key to select.
• Screen displays END WORKOUT. - NO will flash on display.
- Press either + or - Key to toggle between NO and YES for desired action.
MAINTENANCE MODE
Maintenance Mode contains sensitive settings for your bike's console. Becoming familiar with the Maintenance Mode information used in this section important for your bike's proper operation. It is necessary that the console be powered in order to access the Maintenance Mode. Pedaling above 30RPM is all that is needed to illuminate the console. Maintenance Mode offers following bike settings:
• Key Test
- Display Test
- Odometer
- Units - English/Metric
- Brake Test
- RPM Sensor
- Update Software
- LED Brightness
- Bike ID
- Auto Pair HR
- HR Zone
- Demo Mode
- Calibration
ENTERING MAINTENANCE MODE
It will be necessary for light to moderate pedaling of bike to power on the console, enter Maintenance Mode and change the settings.
- Simultaneously press and hold + Key, - Key and Play Key on Forward Control Pad for 3 seconds.
- Console displays MAINTENANCE MODE.
Upon entering Maintenance Mode:
- Press Play Key.
• KEY TEST displays on console. - Press the + Key to scroll through different screens until the desired screen displays.
-
Press Play Key to enter displayed setting.
-
Once within setting, use + or - Key adjust.
- Press Play Key to confirm and exit some but not all settings.
- Press the + Key to scroll through to another screen.
- Exit Maintenance Mode by resetting console.
- Press Play Key and + Key simultaneously for 3 seconds. CONSOLE RESET displays on console.
NOTE: If console displays CONSOLE RESET, instead of MAINTENANCE MODE, then ALL 3 keys on Forward Control Pad were possibly not pressed and held simultaneously or for enough time; attempt action again.
KEY TEST
The purpose of this setting is to ensure that each of the buttons are signaling properly.
- Press Play Key to enter setting.
- Press Play Key and follow console direction PRESS ALL KEYS.
• There are 5 buttons that control the bike: - Forward Control Panel: + Key, - Key and Play Key.
- Handlebar Ends: Right Side + Key, Left Side - Key.
- TEST PASSED displays if all keys are communicating properly.
- System will revert to setting screen.
- Press + Key for next screen or reset console to exit Maintenance Mode.
DISPLAY TEST
The purpose of this setting is to ensure that each of the 23 LED Panels are fully functional.
- Press Play Key to enter setting.
- All sections of each of the 23 LED panels will illuminate.
- Press Play Key to turn off.
- Press Play Key again.
- All LED panels will illuminate the #1, then automatically cycle from #1 - 9 and A - Z.
• LED color lights for HR Zone and Power Zone cycle through colors. - Display will turn off then will revert to setting screen.
- Press + Key for next screen or reset console to exit Maintenance Mode.
ODOMETER
The purpose of this setting is to track the number of hours bike has been in use.
- System will automatically display ODOMETER HRS.
• HOLD PLAY TO RESET appears.
• To reset Odometer, press and hold Play Key. - It is useful to keep track of bike usage for routine maintenance considerations.
- It is useful when considering moving bike around in studio to even usage.
• System will revert to setting screen. - Press + Key for next screen or reset console to exit Maintenance Mode.
UNITS
The purpose of this setting is to change from ENGLISH (Imperial) to METRIC distance calculation.
- Press Play Key to change setting.
- Default setting is ENGLISH.
- SPD AVG and SPD PEAK in workout results will only display MPH.
- Press + Key for next screen or reset console to exit Maintenance Mode.
BRAKE TEST
Brake test controls are a sensitive setting for your bike's functionality. Proper training is required for this setting. The purpose of this setting is to test the magnetic resistance system.
- Press Play Key to enter Brake Test. MOTOR TEST AUTO is displayed.
- Press + Key or - Key to switch to Motor Manual and Limit Sensor and Exit.
- Press Play Key.
• LEVEL TO 20 displays, Press Play Key.
• Auto-run motor in a look from L-1 to L-20 and back to L-1.
- Press Play Key to end, revert to BRAKE TEST.
MOTOR TEST MANUAL
- Use + Key and - Key to move motor.
- Press Play Key to end, revert to BRAKE TEST.
- ENCODER displays. This is Encoder count or digital value. Upper right of display displays LIMIT SENSOR CONDITION.
• 1 = HOME
• 2 = ACTIVE RANGE
- 3 = END
- Lower display displays ENCODER SET VALUE.
LIMIT SENSOR
Limit Sensor tests for the proper movement of the flag the moves between the home sensor (S1) and the limit sensor (S2). This test is performed only when motor error has occurred.
- S1 OFF, S2 OFF, bottom number is encoder wheel count (O)
- Using the + and - Keys, adjust the motor to try and change S1 to ON
• Pedaling resistance should change as keys are pressed. - If S1 ON, stop pedaling immediately, allow console to turn off and let stand for 15 minutes minimum for memory to clear before trying bike.
- EXIT will revert to setting screen.
- Press + Key for next screen or reset console to exit Maintenance Mode.
RPM SENSOR TEST
RPM Sensor controls a sensitive setting for your bike's functionality. Proper training is required for this setting. The purpose of this setting is to test the functionality of the RPM detection system.
- Press Play Key to enter RPM Sensor Test.
• REED ON RPM displays ON or OFF. - When REED switch is closed, displays ON.
-
When REED switch is open, displays OFF.
• RPM displays PEDAL RPM. -
Press Play Key to exit to setting screen.
- Press + Key for next screen or reset console to exit Maintenance Mode.
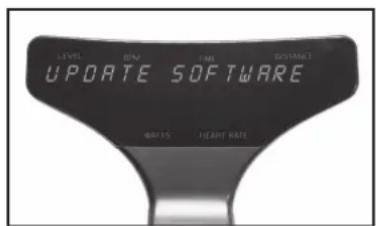
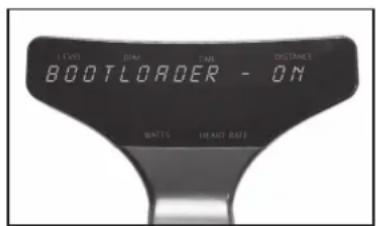
UPDATE SOFTWARE
The purpose of this setting is to update console software with the use of a USB inserted into a port underneath the console. Updating software requires a Blank USB memory stick and a computer to transfer updates from service website or e-mail from customer service, to USB, to console. No other material besides the updates should be in USB drive.
- Press Play Key to display BOOTLOADER - OFF.
- Press + or - Key switch to BOOTLOADER - ON.
- Press Play Key to advance out of software update
- Allow console to power down.
- Wait until console lights have turned off completely.
- Insert the USB drive.
• Pedal bike to awaken console.
• If successful, displays UPDATE DONE (flashing)
- If unsuccessful, displays UPDATE FAIL, check USB for proper insertion and re-attempt.
- Console will reset with JOHNNY G METHOD flashing.
- Remove the USB stick
LED BRIGHTNESS
The purpose of this setting is to change the brightness of the display.
- Press Play Key to change setting.
- Default brightness setting is 2.
- Press + Key or - Key switch between LED Brightness 1, 2, or 3.
- Press Play Key to accept and exit to setting screen.
- Press + Key for next screen or reset console to exit Maintenance Mode.
BIKE ID SETUP
The purpose of this setting is allowing numbering of the bike when using a Leaderboard software, such as Performance IQ or similar.
- Press Play Key to change setting.
- Console will display BIKE ID SETUP, and 1 on the lower console flashing.
- Press + Key or - Key to adjust the bike number to the desired number. Over 1,000 are available. Set each bike to a unique number. The number must be set to 1 or above, 0 is not a valid number.
- Press Play Key to accept, bike number will stop flashing momentarily then turn off indicating set.
- Press + Key for next screen or reset console to exit Maintenance Mode.
AUTO PAIR HR
The purpose of this setting is to turn ON or OFF the HR pairing function during the Warm Up Mode. Not all cycling classes are done using HR. Facilities have the option to simplify the user set-up and facilitate getting into the Manual Mode where HR tracking is not used. The default setting is OFF.
When OFF, pairing HR can only be done using the PAIR HR DEVICE function within the Programs Mode.
- Press Play Key to change setting.
- Default HR pairing setting is OFF.
- Press + or - Key switch OFF and ON.
- Press Play Key to accept and exit to setting screen.
- Press + Key for next screen or reset console to exit Maintenance Mode.
HR ZONE
The purpose of this setting is to turn ON or OFF the HR Zone LED light when a HR strap is paired. A facility may choose to deactivate this light if it were a distraction or against their class structure. If a HR strap is paired, the console maintains tracking of HR training performance regardless of the LED lights activation. The default setting is ON.
- Press Play Key to change setting.
- Default HR pairing setting is ON.
- Press Play Key to change between ON and OFF.
- Press + Key for next screen or reset console to exit Maintenance Mode.
DEMO MODE
For the console to continually display DEMO MODE, a plug-in cord would be required that can connect with the bikes electrical board. This setting is primarily used for manufacturer Trade Shows and requires access to electricity. The purpose of this setting is allowing the console to display.
- Press Play Key to enter DEMO MODE and the following display in a loop:
• JOHNNY G. METHOD
• THE RIDE OF TRUTH
• ENJOY THE RIDE
- Press Play Key to exit to setting screen.
- Press + Key for next screen or reset console to exit Maintenance Mode.
CALIBRATION
Calibration contains factory-sensitive settings for the bike's resistance system. Do not enter and make adjustments as they will negatively affect the bike's resistance profile.
FUNCTIONAL THRESHOLD POWER
Power/Watts - What is it?
It has been said that from a coaching perspective the Watt is the measurement of truth: why is this?
Because you either can perform at a set wattage at a given time or you can't, the response is instant. For the coach and athlete this is very useful as it provides unequivocal feedback of what has been performed in terms of intensity, duration and total workload. This adds a level of precision to workouts not otherwise possible with other metrics such as heart rate or RPE. Power provides an objective measure of progress and is an excellent indication of fitness.
Functional Threshold Power (FTP): Functional Threshold Power is one of the key factors of your power cycling armory but what is it? It's generally agreed that FTP is the maximal power output that can be sustained for the duration of one hour, the classic time trial.
This is why FTP is important. We know that the exercise intensity at which lactate begins to accumulate - the lactate threshold (LT) - is a powerful predictor of endurance ability, this is because although cardiovascular fitness, i.e., maximal oxygen uptake (VO2max) sets the upper limit to the rate of aerobic energy production, it is the metabolic fitness indicated, LT, that determines the percentage of VO2max that can be utilized for a given period of time. Consequently, LT - especially when expressed as a power output, is the single most important physiological determinant of performance. This therefore provides a physiologically sound basis around which to design power meter-based training programs.
How Do We Measure FTP?
There are several ways to test riders FTP but the two most commonly employed by riders is the 20-minute test and the other being much shorter at 5 minutes. Each of these has a high correlation to the 60-minute test but were developed for practical reasons of time and ability of most individuals.
20-minute Functional Threshold Power Protocol\*
• 20 minutes easy warm-up
- 3 x 1-minute speed bursts with a minute rest between (100 RPM pedal cadence)
- 5 minutes easy
- 5 minutes all out (hard at first, but not so hard that you can't complete the effort)
• 10 minutes easy
- 20-minute steady max effort (this is the test - like the previous 5-minute all-out effort, keep in control, hard but steady
• 10 to 15-minute cooldown
5-minute Functional Threshold Power Protocol:
• 20 minutes easy warm-up
- 3 x 1-minute speed bursts with a minute rest between (100 RPM pedal cadence)
- 5 minutes easy
- 5 minutes all out (this is the test so go hard at first, but not so hard that you can't complete the effort)
• 10 to 15-minute cool-down
* Training and Racing with a Power Meter: Allen and Coggan, 2nd Ed 2010.
FTP and Zones: Zones, be it in Heart rate or describing energy systems, can mislead people in to thinking that the levels are compartmentalized into set and discrete physiological responses. It must be emphasized that there is a sliding continuum that blends across one level to the next. There is no physiological 'switch' from one level to the next but a sliding scale of effort across the identified training outcomes. The reason we use zones is that it offers coaches a framework for understanding, to develop a structure for sustained improvement. A simple way to remember it in relation to time is: "the harder you do it, the less time you can do it for".
POWER TRAINING LEVELS Basis for the System/Number of Levels
The industry standard has been set at 5 levels as that was felt to be the optimum number needed to represent the range of physiological responses and to describe the different types of training required/used to meet the demands of fitness-based cycling. These zones are a guide only and are used alongside other information related to an individual's fitness capacity and specific goal-based training program.
The table shown below lists the primary physiological adaptations expected to result from training at each level, although these will obviously be influenced by factors such as the initial fitness of the individual, the duration of each workout, the time taken between each interval effort, etc.
| ZONE FTP% ASSOCIATED HEALTH AND FITNESS BENEFITS | |
| Red 106 - >150% Threshold Zone - Red | Line zone |
| Improved VO2 threshold and higher lactate tolerance ability. | |
| Yellow 91-105% Aerobic Zone or the Transition Zone - Shifting ratio of fuel | |
| Benefits: improved functional capacity, increases number and size of blood vessels, respiratory rate, max pulmonary ventilation, pulmonary diffusion, increase in difference in arterial - oxygen, increase in size and strength of heart. | |
| Green 76-90% The Temperate Zone or Recovery Zone | |
| Benefits: healthy heart, fat mobilization by moving fat from cell, fat to muscle, increase of mitochondria, increase of fat release from fat cell. | |
| Blue 56-75% Healthy Heart Zone - Easiest and most comfortable 'working' zone | |
| Benefits: lowered blood pressure, lowered cholesterol, and decreased risk of degenerative diseases. | |
| White <55% Starting zone, also used for complete recovery | |
| Basic physiological changes linked to 'warming up', 'warming down' and recovery. | |
Power is a useful tool for the following reasons:
- It correctly evaluates training sessions to avoid misinterpretation.
- It verifies the workouts have been executed correctly.
• It evaluates training status and performance. - It enables training load, overload and progression to be monitored.
- It allows the design of appropriate number and length of intervals in training.
- It helps decide and structure a race strategy or training session based on an athlete's strengths.
HR and Power are the two portions of that equation: what is being produced and at what cost to our body. Both are equally important to assess performance. If we only measure the body's response using a heart rate monitor and have no gauge of the output, then we are limited in how to determine changes in fitness. Having output-measuring devices such as a power meter gives a lot of options for workouts and, essentially, makes every workout a test of fitness progress.
The ratio of HR/Power is a good indicator of fitness and progression in a training program. In a well-structured, progressive and appropriate training program this ratio should get smaller, that is a lower HR for the same power output. The caveat here is of course that the Heart Rate values being used to evaluate what is an adequate output response are founded on an as accurate as possible personally tested Max Heart Rate and Max Threshold Heart Rate to allow for the correct identification of the relevant working zones.
The leading authors in the field of Power and its application to cycling are coaches such as Andrew Coggan, Hunter Allen, Joe Friel, Chris Carmichael, and Allen Lim. These authors have led the way in developing complex algorithms, software and websites to make training with power a simple method for the cyclists and the coach. It is their successful utilization of Power for training cycling professionals that has led the way. If you have an urgent need to get deep in to the science linked to the subject then the Internet will bring up many fascinating articles when you enter any of the names mentioned above, they are the leading authorities in pro riding with power.
A regular preventative maintenance schedule with all fitness equipment ensures that products are working at an optimal condition without affecting the end user exercise experience. To assist in the maintenance regiment, it is recommended to break service into: Daily, Weekly, & Monthly activities. Details on each activity can be found in the Maintenance section of this document.
Working on this product will require basic and/or sometimes specialty tools based on the type of service that will be performed at any time. To assist, Spirit Fitness recommends having the tools listed (Fig. 1) available when performing maintenance.
FIGURE 1
| TOOLS PURPOSE | |
| Crank Puller Removing crank | |
| Metric Allen (Hex Key) Wrench Set Tightening or removing various Allen head screws throughout the product. | |
| Metric Sockets Set Tightening or removing various hex nuts used throughout the product. | |
| Metric Open Wrench Set Tightening or removing various hex nuts used throughout the product. | |
| Square Drive Ratched Wrenches To use in conjunction with Allen head and or hex socket sets. | |
| Torque Wrench | Tightening various critical bolts throughout the product to specific torque specifications. |
| Phillips Head Screwdriver Set Tightening or removing various Phillips head screws used throughout the product. | |
| Flat Head Screwdriver Set Prying off | specific shrouds from wedged locations. |
To move the bike to a new location: Lift the bike from the rear and use the front wheels (located on the front leg, below the handlebar) to roll the bike from one location to another.
To level the bike: Use the four leveling adjusters (located on the underside of the front and rear legs) to compensate for uneven floor surfaces.
Perform regular scheduled preventive maintenance procedures to maintain your Johnny G Spirit Bike bike in serviceable condition.
The life of your product will be determined by how consistently you perform the daily maintenance procedures. Dry the Johnny G bike after each use to remove sweat and moisture. It is best to use a liquid non-abrasive cleaner diluted with water.
Wipe Down/Cleaning: To prevent the build-up of rust and other forms of corrosion, wipe down the bike at the end of each day (or preferably at the end of each class). Raise all posts to the highest setting to expose moisture. Using an absorbent cloth, focus on all areas that perspiration can settle. Give attention to the following areas:
- Handgrips
- Guard
- Seat / adjustable slide for the seat
- Pop-pins
- Back leg assembly
- Leveling feet
NOTE: Never use abrasive cleaning liquids or petroleum-based solvents when wiping down the bike.
Weekly maintenance should focus on the overall performance of your Johnny G Spirit Bike. During these inspections, look for vibration and possible loose assemblies. Have an experienced rider ride each bike to identify and help diagnose any vibration, noises, and any "unusual" feeling from the drive belt. Either faulty flywheel alignment or a loose belt can cause vibration. Check for proper flywheel alignment. If flywheel requires adjustment refer maintenance to a properly trained service tech. Inspect each bike for loose assemblies, parts, bolts and nuts. Give attention to the following:
- Tighten all frame base hardware.
- Tighten all pop-pin handles.
- Tighten seat hardware.
- Tighten pedal toe clip/toe straps.
The monthly maintenance check should be a comprehensive inspection of the overall frame and main assembly components of the Johnny G Spirit Bike in addition to the Weekly Maintenance.
Inspect major moving parts that require constant proper torque. Loose or misadjusted parts can result in personal injury or damage to the bike. Check the following parts for security and/or proper torque.
Pedals: Verify that the pedals are re-torqued after the first 10 hours of use and every 100 hours of operation, thereafter. Use a torque wrench if components are loose. IMPORTANT: It is not recommended that members change out the pedals on the bike. NOTE: The pedal to the crank arm bolt torque is: 30 - 35 lbf·ft.
It is recommended that the frame on the bike is sealed from sweat impurities that may speed the corrosion process at least once a month.
Cleaning: Using a clean terry cloth that is dampened in 30 parts water to 1 part non-abrasive detergent or car wash soap rub over the frame of the product.
Wash/Dry: Dampen a clean terry cloth in an only water solution to wipe away any soap residue. Using a second clean and dry terry cloth; dry off any liquid residue.
Sealing: The frame can be sealed by applying a wax or polishing coat that can help repel away liquids like human perspiration. Apply the wax or polish per the manufacturer's instructions for best results.
Depending on the use and maintenance of the product, certain items may need to be replaced upon inspection due to wear. These can be identified during scheduled inspections as described in the Preventative Maintenance section of this owner's manual beginning on page 66.
For international customers, please contact your local distributor.
MANUFACTURER
Dyaco Commercial & Medical
North America
18303 Bothell Everett Hwy.
Suite 210
Bothell, WA 98012
TEL: +1-425-659-2401 (Local)
TOLL-FREE: +1-866-463-2662
EMAIL: customerservice@dcmna.com
INTERNATIONAL OFFICES
Taipei HQ Office
12F, No.111, SongJiang
Rd. Taipei City, Taiwan, 10486
TEL: +886-2-2515-2288
FAX: +886-2-2515-9963
EMAIL: info@dyaco.com
Dyaco Japan
Ryogoku ST Bldg. 7F 2-17-17
Ryogoku Sumida Tokyo 130-0026, Japan
TEL: +81 3-5669-0405
FAX: +81 3-5669-0406
EMAIL: info@dyacojapan.co.jpc
Dyaco Shanghai
Room 210, No.350
Hengren Road
Yangpu District
Shanghai, China 200438
TEL: 86-21-65068300
FAX: 86-21-65068150
Dyaco UK Ltd
Fairbourne Drive
Atterbury
Milton Keynes
MK10 9RG UK
TEL: +44-0-800 029 3865
Dyaco Commercial & Medical North America
18303 Bothell Everett Hwy.
Suite 210
Bothell, WA 98012

Johnny G by SPIRIT
Johnny G Spirit Bike
Owners Manual
© 2020 All Rights Reserved
Revision: 01.28.2020

- JOHNNY G SPIRIT BIKE
- OWNER'S MANUAL
- WARNING
- USER SAFETY PRECAUTIONS
- WARNING:
- DO NOT:
- VOORZORGSMAATREGELEN
- RECORD YOUR SERIAL NUMBER
- REGISTER YOUR PURCHASE
- JOHNNY G SPIRIT BIKE PRE-ASSEMBLY
- TOOLS NEEDED:
- L M4 Allen Wrench (1 pc)
- 157.17mm Wrench (1 pc)
- 158.13/15 Wrench (1 pc)
- L M2.5 Allen Wrench (1 pc)
- 167.19mm Wrench (1 pc)
- STEP ONE
- JOHNNY G SPIRIT BIKE STEP TWO
- JOHNNY G SPIRIT BIKE STEP THREE
- JOHNNY G SPIRIT BIKE STEP FOUR
- STEP FIVE
- SEAT HEIGHT
- FORE/AFT POSITION
- HANDLEBAR ADJUSTMENTS
- TO ADJUST THE HANDLEBAR HEIGHT:
- TO ADJUST THE HANDLEBAR FORE / AFT:
- TO ADJUST THE PEDAL STRAPS:
- RESISTANCE CONTROL
- CONSOLE OPERATION
- MANUAL MODE
- If selecting YES:
- PROGRAMS:
- PAIR HEART RATE DEVICE
- HR ZONE PROGRAM
- To Start:
- END WORKOUT
- To End Ride or User:
- WORKOUT RESULTS:
- If USER is selected:
- POWER ZONE PROGRAM
- FTP TEST
- LAP PROGRAM
- To start lap:
- To end lap:
- Next lap:
- MAINTENANCE MODE
- ENTERING MAINTENANCE MODE
- KEY TEST
- DISPLAY TEST
- ODOMETER
- UNITS
- BRAKE TEST
- MOTOR TEST MANUAL
- LIMIT SENSOR
- RPM SENSOR TEST
- UPDATE SOFTWARE
- LED BRIGHTNESS
- BIKE ID SETUP
- AUTO PAIR HR
- HR ZONE
- DEMO MODE
- CALIBRATION
- FUNCTIONAL THRESHOLD POWER
- Power/Watts - What is it?
- How Do We Measure FTP?
- 20-minute Functional Threshold Power Protocol\*
- 5-minute Functional Threshold Power Protocol:
- POWER TRAINING LEVELS Basis for the System/Number of Levels
- MANUFACTURER
- Dyaco Commercial & Medical
- North America
- INTERNATIONAL OFFICES
- Taipei HQ Office
- Dyaco Japan
- Dyaco Shanghai
- Dyaco UK Ltd
Brand : Spirit Fitness
Model : Johnny G Bike JB950
Category : Exercise bike