
LC7i - Audio/video converter AudioControl - Free user manual and instructions
Find the device manual for free LC7i AudioControl in PDF.


| Product Type | Six Channel Line Output Converter with AccuBASS |
| Brand | AudioControl |
| Model | LC7i |
| Category | Audio/Video Converter |
| Dimensions (W x D x H) | 7.5 x 4.72 x 1.22 inches |
| Weight | 3 lbs |
| Power Supply Voltage | 14.4 VDC (standard automotive) |
| Power Consumption | 350 mA |
| Recommended Fuse Rating | 2 Amps |
| Maximum Speaker-Level Input | 400 watts per channel at 4 ohms |
| Maximum Output Level | 8.5 Vrms |
| Output Gain | +/-15 dB |
| Frequency Response | 10 Hz - 22 kHz |
| Total Harmonic Distortion | 0.01% |
| Input Impedance | 20 kOhms |
| Output Impedance | 150 Ohms |
| Remote Trigger Output Current | 1 Amp max |
| Key Features | AccuBASS bass compensation, GTO signal sensing turn-on, AutoMode (2 inputs to 3 outputs), internal channel summing, level matching controls, compact chassis |
| Optional Accessories | ACR-1 Remote Level Control (sold separately) |
| Warranty | 1 year (5 years if installed by authorized US dealer) |
| Inputs | 6 speaker-level inputs (left/right for channel 1, 2, 3) |
| Outputs | 6 RCA pre-amp outputs (front, rear, sub) |
| Maintenance | Wipe with dry cloth; no liquids |
| Safety | Install proper fuse on power wire near battery; avoid moisture |
Frequently Asked Questions - LC7i AudioControl
User questions about LC7i AudioControl
0 question about this device. Answer the ones you know or ask your own.
Ask a new question about this device
Download the instructions for your Audio/video converter in PDF format for free! Find your manual LC7i - AudioControl and take your electronic device back in hand. On this page are published all the documents necessary for the use of your device. LC7i by AudioControl.
USER MANUAL LC7i AudioControl
Six Channel Line Output Converter with AccuBASS™ for interfacing with factory installed audio systems
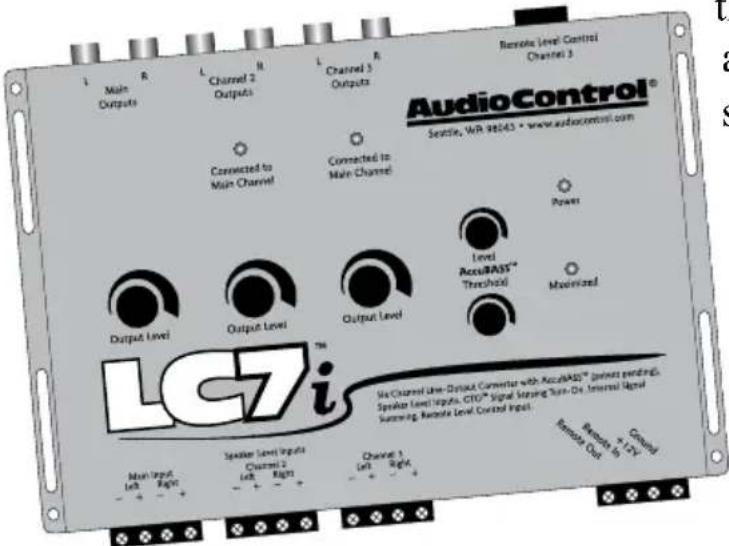
The LC7i transforms your under-performing factory audio system into a supreme audio machine! It is a compact, six-channel, high-performance active line output converter with AudioControl's patent-pending AccuBASS™ compensation that corrects the bass roll-off present in many factory equipped audio systems. The LC7i accepts up to six channels of speaker-level signal from factory-installed amplifiers or a source unit and converts it to a high-quality, after market low-noise, pre-amp level signal that can be fed to amplifiers and speakers. You may also add an optional ACR-1, remote level control, so you can adjust the output of the bass channels from the convenience of the driver's seat. With the LC7i you have a high performance audio system while maintaining the features, functions and aesthetics of your factory source unit!
This manual covers the features, functions, installation and usage of the LC7i so please take a few moments to read through it. If it's easier, read 140 characters at a time, just make sure to remember
where you stopped reading last time! We've tried to cover all possible situations and have included lots of facts and useful information. For more information visit our web site at http://www.audiocontrol.com
AudioControl®
Making Good Sound Great
Key features of the LC7i
- AccuBASS™ bass compensation corrects the bass roll-off in factory systems
- Speaker-level inputs can accept 400 watts per channel
- Six input and output channels!
- Internal channel summing eliminates factory crossover settings
• AutoMode turns 2 inputs into 3 outputs - GTO ^TM - signal sensing turns the LC7i on automatically
- 12 volt 1 amp remote output to power up processors and amplifiers
- Level matching controls
- Compact chassis for easy installation
- Recyclable cardboard box for easy storage or emergency heating needs
- Optional dash control (ACR-1) for remote level adjustment

- Bulletproof 5-year warranty (when installed by an authorized AudioControl dealer)
Quick Install Guide
Since some of you high energy enthusiasts will want to install your LC7i on your own, we offer a few reminders in the following short section to speed up your installation. You should also refer to diagrams on page 9 as guidelines.
- Physically mount the LC7i in a location that keeps it away from soda spills, food crumbs, and curious fingers. Select a location that allows you access to the top panel controls.
- The LC7i needs to be installed in the signal path between your factory source unit (or factory amplifier) and after-market amplifier(s) and/or processor(s). Do not connect the LC7i between the factory head unit and the factory amplifier. Locate the amplified speaker wires that are coming from your factory source unit
and/or amplifier and connect them to the speaker-level inputs on your LC7i. In many cases you can find factory speaker leads in the rear of the vehicle or at the factory amplifier.
Note: If your source unit has front, rear, and subwoofer speaker-level outputs, connect them to the three sets of inputs on your LC7i. If the source unit only has front and rear outputs, the AutoMode circuitry in your LC7i automatically routes the Channel 2 input signal to the Channel 3 (subwoofer) input.
- Use RCA cables to connect the RCA outputs of the LC7i to your aftermarket amplifier(s). If the use of these connections are not familiar to you, quickly pack up your LC7i and run to your nearest authorized AudioControl dealer to have them perform the installation. You will thank us later.
- Connect +12V power and ground. Note: The LC7i does have a 12-volt remote input but in most systems the GTO ^TM circuit turns the LC7i on automatically.
- Connect the 12-volt remote output of the LC7i to your amplifiers remote input.
- Turn your amp gains fully down before turning on the system.
- Turn on the system and level match your LC7i to your source unit, signal processor and amplifiers. For more help on level matching see our technical videos at http://www.audiocontrol.com
- If your authorized AudioControl dealer installs your LC7i, we will extend the normal one-year warranty to a full five years. AudioControl products are, by nature, more technical than many others and we spend a good deal of time training our dealers and installers so we know our products will be installed correctly. We do this so you will get the best possible results from your Audio-Control purchases.
Under the Hood - Internal Jumpers
Here are the internal jumpers that allow you to customize the LC7i for your particular installation.
-
Output Summing Jumpers: Many of today's better factory stereo systems include separately-amplified and crossed-over tweeters, mid-ranges, and subs. If you are going to add your own amps and speakers to the car you will need to combine (or sum) these separate signals into a single full-range signal for the new system. With the LC7i, summing is a snap. The LC7i has internal jumpers that allow you to select which input signals will be summed to the Main outputs. When the jumper is moved to the “summed” position, there will also be a corresponding green indicator light on the top front of the LC7i. The shipped-from-the-factory setting is the non-summed (separate) position.
-
Ground Isolation Selector: Occasionally alternator noise may appear in a system because the source unit and amplifier are using different grounding schemes. To help in this situation, we have provided alternative grounding connections. Make sure your system is turned OFF before you move these jumpers. We ship them in the Isolated position, which usually gives the best results.
-
GTO™: The GTO™ jumper enables/disables the Great Turn-On (GTO™) automatic turn-on circuit. Some cars have a network of connected systems (integrated mobile phone, assistance services, etc) that can turn the factory amplifier on at a time when the audio system is actually off. To prevent this from turning your system on unexpectedly, you can bypass the GTO™ circuit by moving the GTO™ jumper, and using an applied 12-volts at the Remote In terminal. However, defeating the GTO™ circuit may result in some factory features not working fully. Specifically, if the original factory system communicated via the factory amp and speakers, it cannot do so if the amplifier is off. We ship the LC7i with GTO™ in the “On” position.
-
AutoMode: Some cars have unusual signals on their speaker leads and will not be easily read by the AutoMode circuit. When this occurs you can manually bypass the AutoMode function. This is accomplished by moving the internal AutoMode jumper to
“Defeat”. In this mode, you will need signal on the Channel 3 inputs to output signals on the Channel 3 output. We ship the LC7i with the jumpers in the “On” position. See the “AutoMode Input” section under “More Highlights” on page 8 for more details.
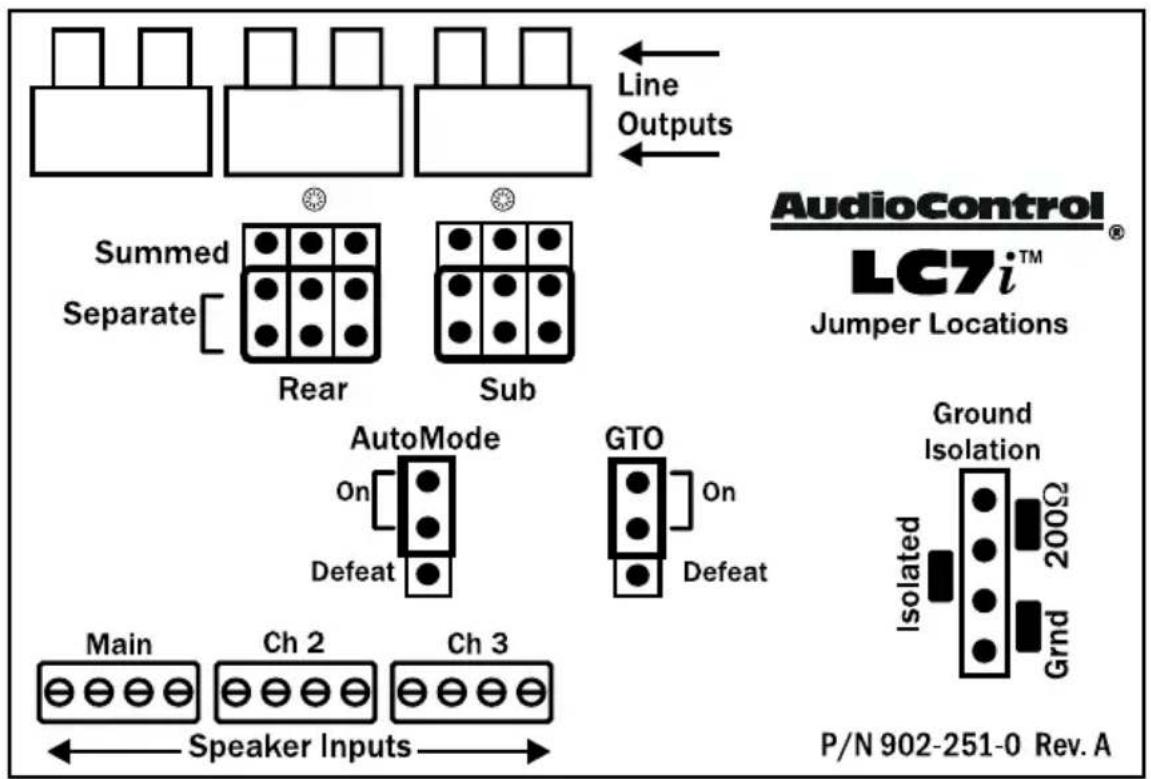
Internal Jumper Configuration
A Guided Tour of LC7i
① Speaker-level Inputs: The LC7i has six speaker-level inputs. These inputs get their signals from the speaker-level outputs of your factory-installed source unit or amplifier. If your source unit has front, rear, and subwoofer speaker-level outputs, connect them to the three sets of inputs on your LC7i. If the source unit only has front and rear outputs, the AutoMode circuitry in your LC7i automatically routes the Channel 2 signal to the Channel 3 (subwoofer) output.
The GTO ^TM circuit, mentioned previously, monitors the main speaker inputs for the presence of signal. If your installation does not use the main speaker inputs GTO ^TM will not function.
② AccuBASS™ Controls: The threshold and level controls let you determine when the AccuBASS™ circuit activates and the level of bass correction desired. More info on page 8.
③ Ground: Connect to a good, verified chassis ground. Warning: factory radio ground wires already have multiple devices connected to them and are not recommended.
④ +12V Power: Connect to a good source of 12-volt power. Make sure you install the proper size fuse on the power wire near the power source (i.e. battery) so that the power wire is protected in case of a short to ground or an installation mishap.
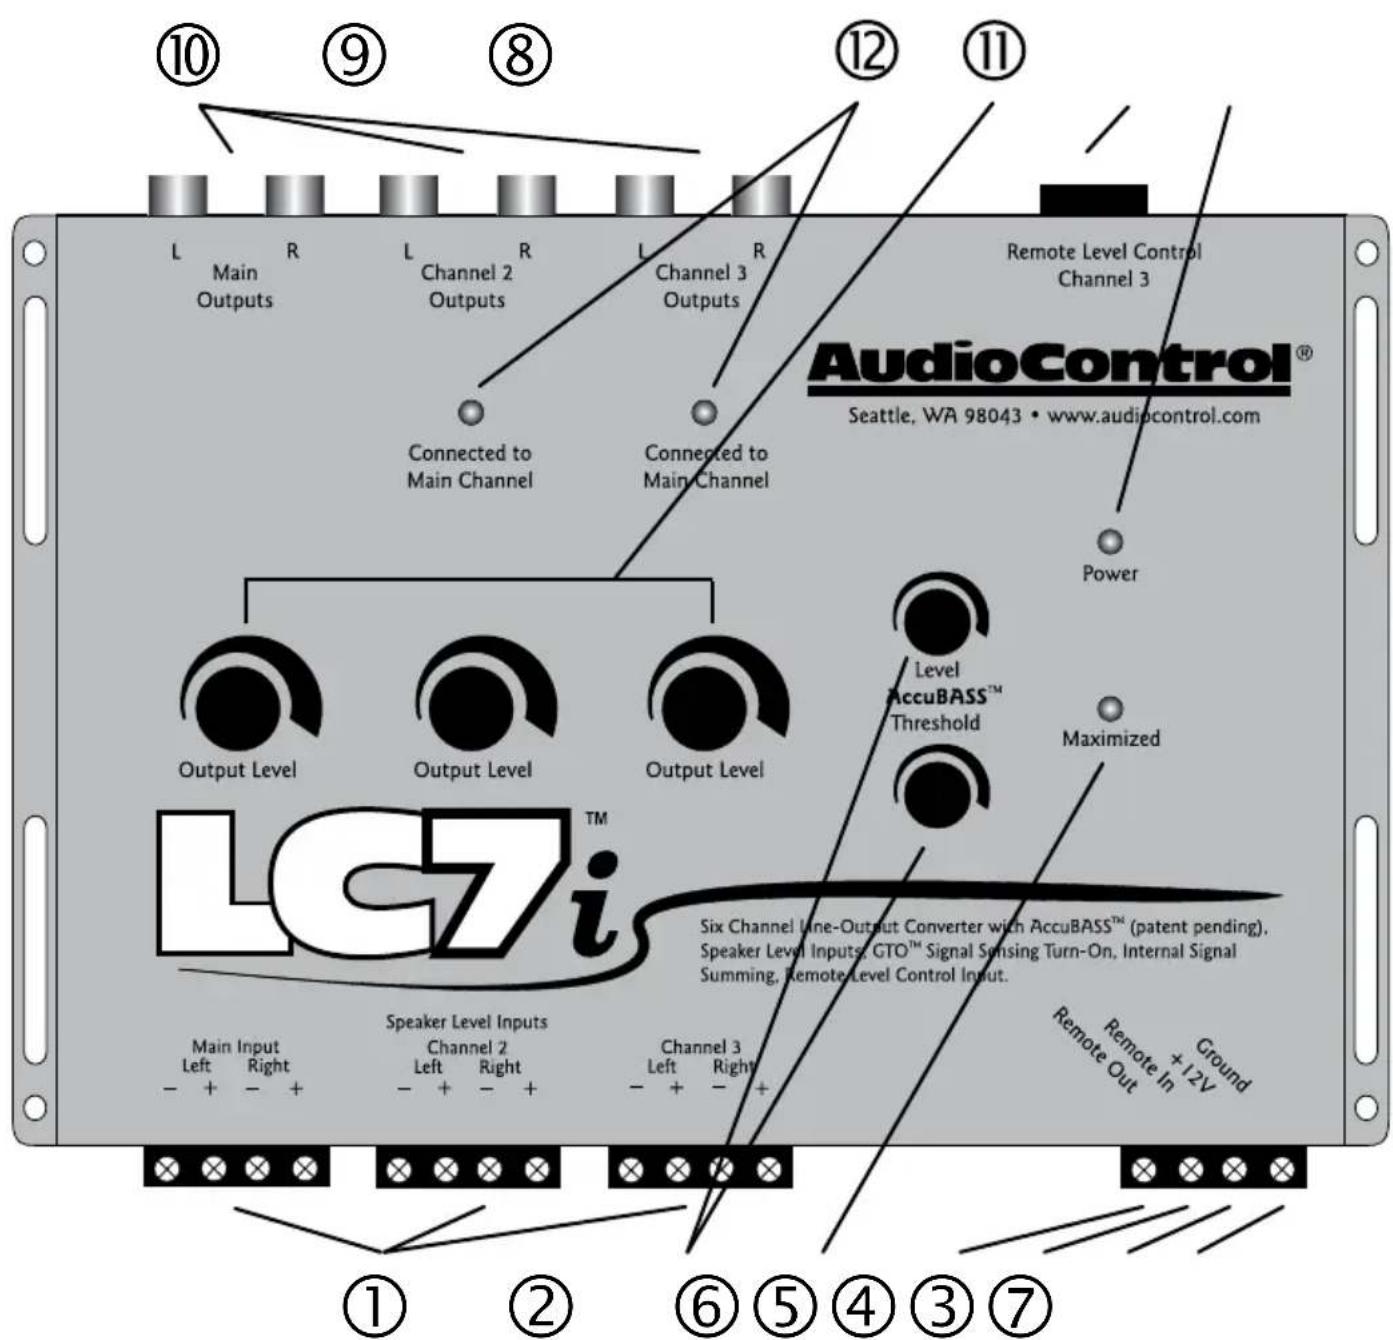
⑤ Remote In: In some installations, you may not want to use the GTO ^TM to turn on your system. For these cases the LC7i can be turned on remotely with a +12-volt trigger. When you use the +12-volt remote in, you should set the internal GTO ^TM jumper (see “Under the Hood” on page 6) to “Defeat”. This will prevent the car’s network system from turning the system on unexpectedly.
⑥ Remote Out: Supplies 12 volts “+” when the LC7i is powered up, and is used to turn on external devices like signal processors and amplifiers. Recommend fusing at 1 amp.
⑦ Maximized Indicator: This brightly colored LED indicates when the signal level is just below clipping within your LC7i. When properly level matched, this LED should flicker occasionally when your system is playing at its maximum volume level.
⑧ Power: If you have connected all of your power wires correctly, this light should be bright red when your system turns on.
⑨ Optional (ACR-1) Dash Mounted Control Input: You can add a dash control that allows you to set remotely the level of the subwoofer.
⑩ Pre-Amp Outputs: These RCA plugs should be connected to the next component after the LC7i, such as a crossover or amplifier. Do not connect any speakers directly to your LC7i outputs.
⑪ Output Levels: These knobs allow you to adjust the signal level from your source unit to match the input of your after-market amplifiers. Ideally you want to keep the output of the LC7i high and keep the amplifier gain(s) as low as possible.
⑫ Channel Summed Indicators: Under the cover of your LC7i are jumpers that will allow you to sum selected channels into the main (#1) channels. This is especially useful for factory-installed systems with actively crossed over speaker systems. These indicator LED’s let you know which channels are being summed into the main inputs.
Awesome Information
AccuBASS™ Processing
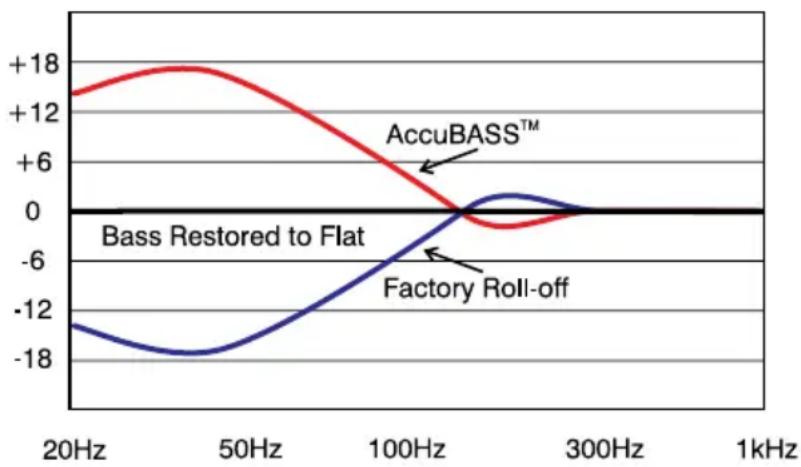
Factory installed amplifiers and speakers are NOT designed to reproduce bass frequencies at high volume levels. These factory systems actually remove the bass when you turn up the volume! AudioControl developed the patent pending AccuBASS™ circuit to restore the bass that the factory takes away. After a quick and easy one-time setting, the AccuBASS™ circuit adds the bass just as the factory system rolls off. You get smooth, seamless, and rock solid bass response regardless of volume level. The chart below shows how the AccuBASS™ operates to correct for the factory bass roll-off.
line
| Frequency | AccuBASS™ | Factory Roll-off | | --------- | ---------- | ---------------- | | 20Hz | +12 | -18 | | 50Hz | +18 | -18 | | 100Hz | +6 | -6 | | 300Hz | 0 | 0 | | 1kHz | 0 | 0 |Setting the Accu-BASS™ is a simple one-time operation:
After you have hooked up the system and are listening to music, play something with a good bass line, and set the volume at low.
- On the LC7i, set the Ac-
cuBASS ^TM Level Control to the 12:00 position.
- Turn the Threshold fully down (counter clockwise).
- Now turn up the volume on your stereo until you hear the bass start to drop out in relationship to the high frequencies and leave the volume there.
- Slowly turn up the Threshold control until you hear the bass come back up and leave it in that position.
- Adjust the level control to fine tune the amount of bass restoration you want.
- You're done! Now, every time the stereo gets to that volume, the AccuBASS™ will take over and restore the bass. You have smooth, seamless bass at all volumes and you can even use the level control to give a little extra kick to the bass if you want. It's your music your way!
More Highlights
Summed Outputs
The LC7i has the capability to combine together multiple (2, 4, or 6) input signals from the factory source unit into 2 channels. In some vehicles there is an actively crossed-over tweeter, midrange, and woofer all in the front of the vehicle. The LC7i lets you take all of those signals and sum them together to get a high-quality, full-range, pre-amp signal. Simply move the summing jumper located under the cover for the desired channel into the “Sum” position. If the green LED for that channel is on, you know it is being summed into the main output.
AutoMode
We have equipped your LC7i with an AutoMode feature that is designed to feed signal to the channel 3 section when the factory system only has front and rear outputs. AutoMode takes the channel 2 (rear) input signal and automatically feeds it to the channel 3 outputs to drive a subwoofer amp and crossover. This means your LC7i will accept two input channels (say, front and rear) and give you three output channels (front, rear, and sub).
ACR-1 Dash Control (Purchased Separately)
The ACR-1 is a remote that gives you control over the level of the channel 3/Subwoofer output so you can adjust the bass level from the driver's seat.
Placement and Mounting
The ACR-1 dash control may be mounted under the dash using its own bracket or through a custom hole in the dash. It should be within reach of the driver and in a spot where the LED is plainly visible. You could mount it in the trunk, but that defeats the whole purpose.
Bracket Installation
The dash control mounts with two screws, which attach to the underside of the dashboard. Slide under the dash and place the dash control in its mounting position, mark the two mounting holes, drill pilot holes, and secure with two screws.
Custom Installation
For that custom, finished look, the dash control can be flush mounted directly on the dashboard (or anywhere else). Disassemble the dash control from the mounting bracket. Start by pushing the LED from its holder followed by removing the circuit board and rotary control from the bracket. Drill a 9/32" hole in the dashboard for the control along with a 1/8" hole for the lock tab and a 13/64" hole for the LED holder. Reassemble the ACR-1 components in their new custom location.
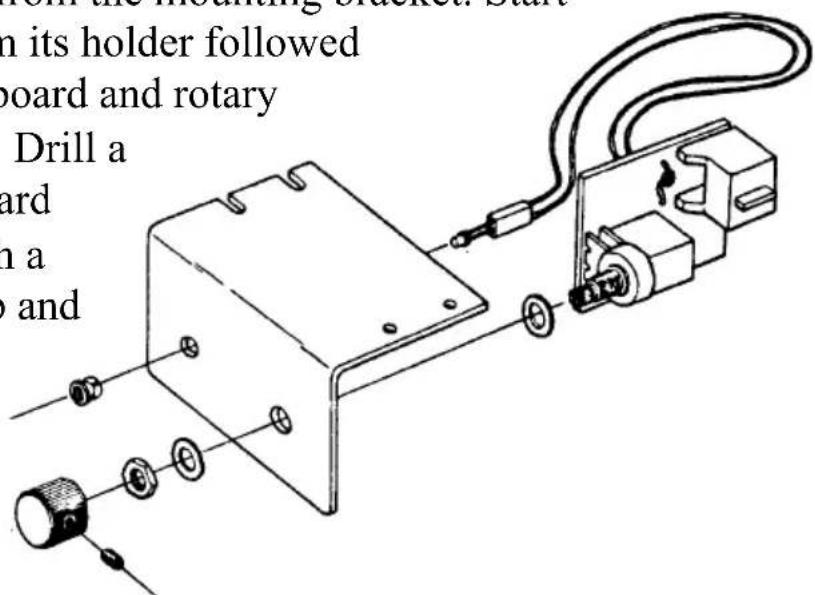
Dash Control Assembly
Basic Factory Upgrade System
If the factory radio doesn't have a bass output, the LC7i will provide it via automode.
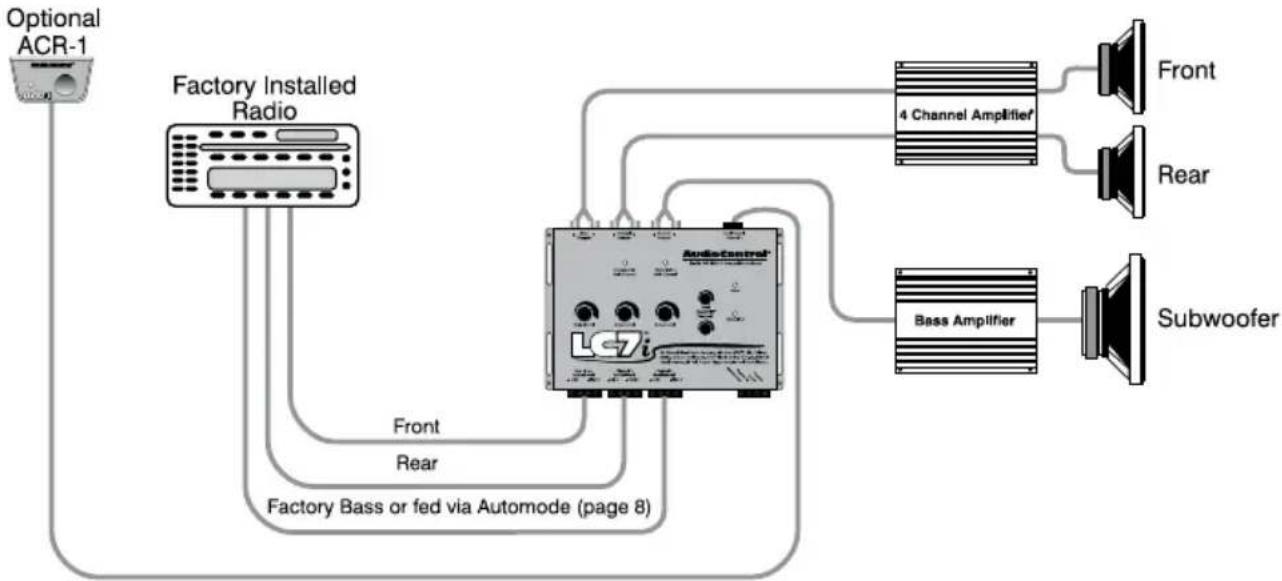
flowchart
graph TD
    A["Optional ACR-1"] --> B["Factory Installed Radio"]
    B --> C["AudioControl Unit"]
    C --> D["4 Channel Amplifier"]
    C --> E["Bass Amplifier"]
    D --> F["Front"]
    D --> G["Rear"]
    E --> H["Subwoofer"]
    B --> I["Factory Bass or fed via Automode (page 8)"]
    C --> J["Front"]
    C --> K["Rear"]
Upgrade for Factory System with Remote Mounted Factory Amplifier
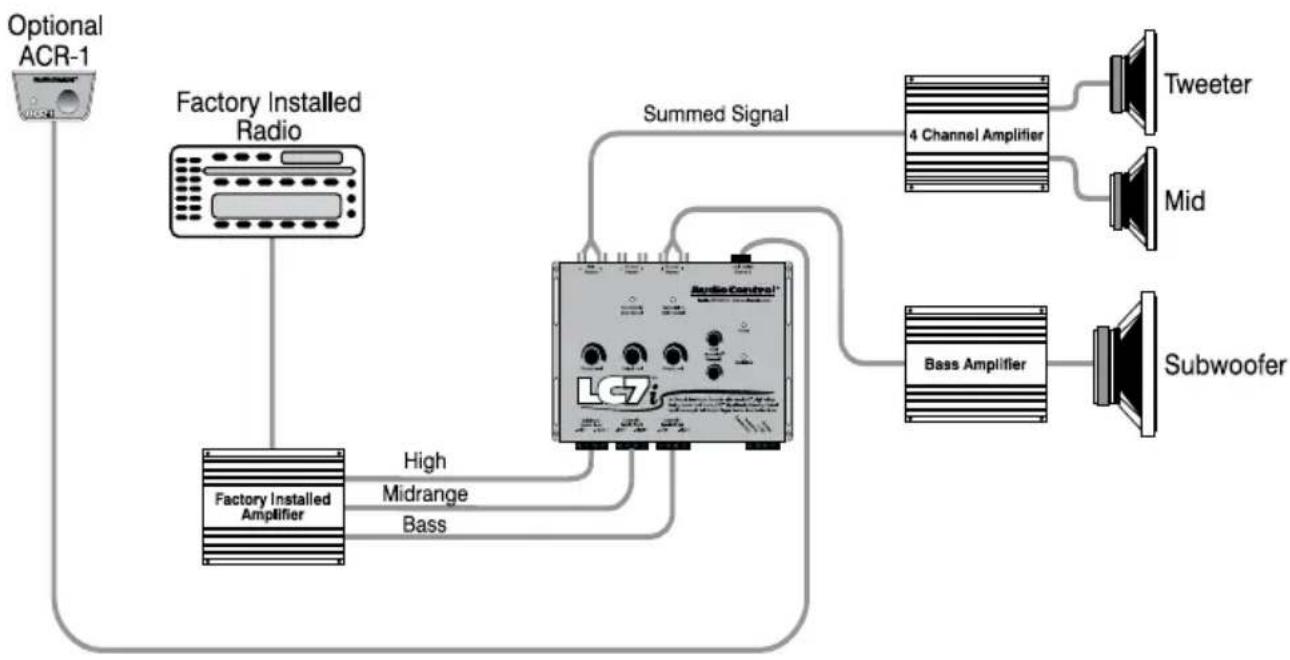
flowchart
graph TD
    A["Optional ACR-1"] --> B["Factory Installed Radio"]
    B --> C["Summed Signal"]
    C --> D["4 Channel Amplifier"]
    C --> E["Bass Amplifier"]
    D --> F["Tweeter"]
    D --> G["Mid"]
    E --> H["Subwoofer"]
    B --> I["Factory Installed Amplifier"]
    I --> J["High Midrange Bass"]
    J --> C
    C --> K["LG7i"]
Block Diagram of the LC7i
Feeling lost? Here's an internal “roadmap” to help you out. This simplified block diagram is a map of the paths the signals take through the LC7i. With this map you can follow each input through the processor. If you have an issue with the hook-up of your LC7i and need to call for technical assistance, please have this diagram available. We can help you trace the problem to get your system up and running.
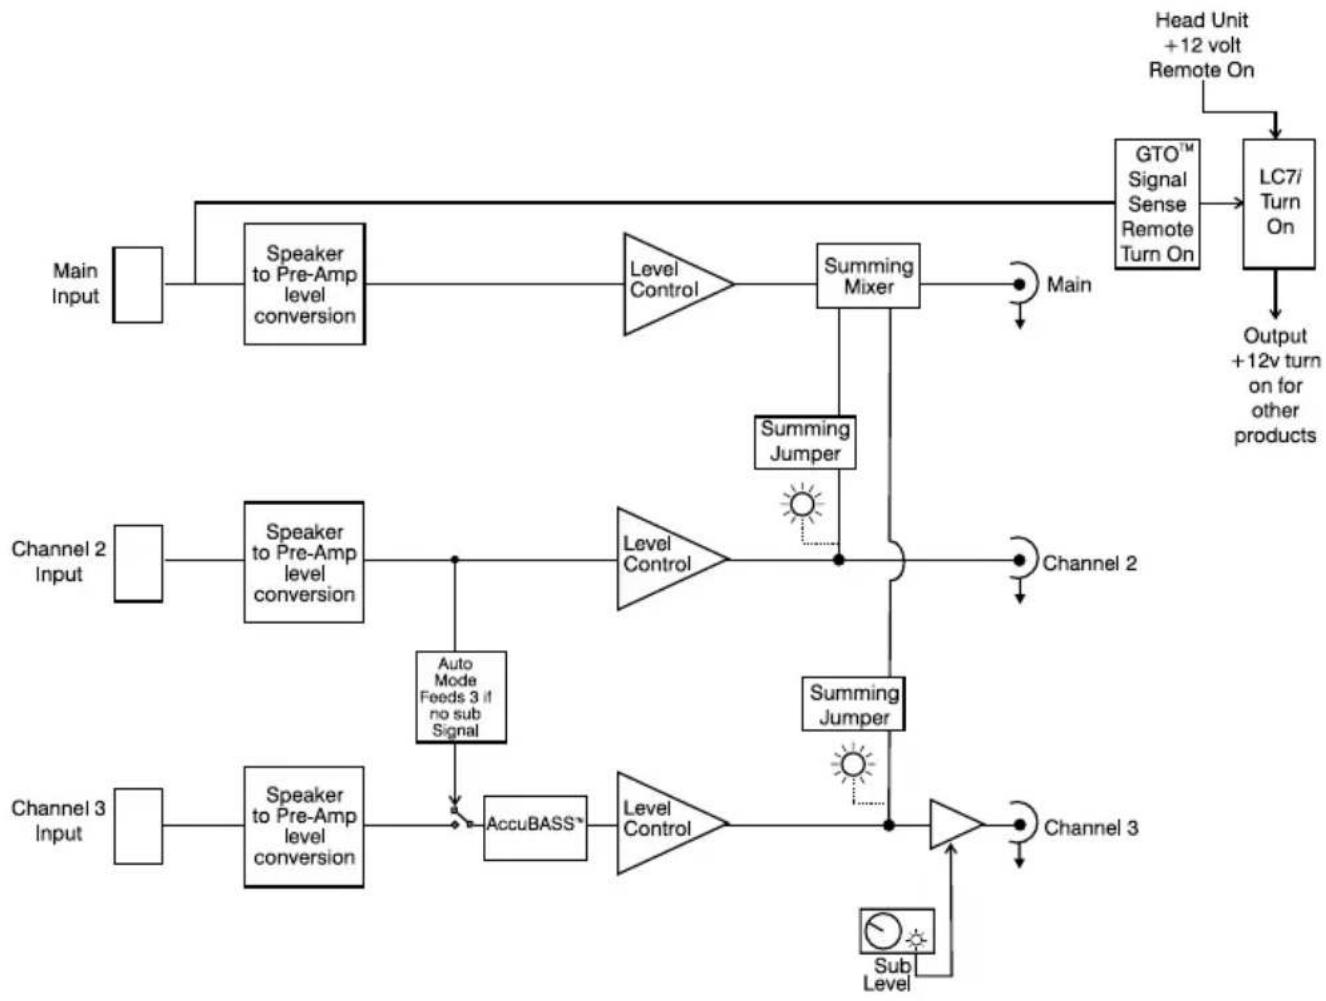
flowchart
graph TD
    A["Main Input"] --> B["Speaker to Pre-Amp level conversion"]
    B --> C["Level Control"]
    C --> D["Summing Mixer"]
    D --> E["Main"]
    F["Channel 2 Input"] --> G["Speaker to Pre-Amp level conversion"]
    G --> H["Level Control"]
    H --> I["Summing Jumper"]
    I --> J["Channel 2"]
    K["Channel 3 Input"] --> L["Speaker to Pre-Amp level conversion"]
    L --> M["AccuBASS*"]
    M --> N["Level Control"]
    N --> O["Summing Jumper"]
    O --> P["Channel 3"]
    Q["GTO™ Signal Sense Remote Turn On"] --> R["LC7i Turn On"]
    S["Head Unit +12 volt Remote On"] --> R
    T["Output +12v turn on for other products"] --> R
    U["Sub Level"] --> V["AccuBASS*"]
    V --> W["Auto Mode Feeds 3 if no sub Signal"]
    X["Sunlight"] --> I
The WARRANTY
People are scared of warranties. Lots of fine print, months of waiting around. Well, fear no more, this warranty is designed to make you rave about us to your friends. It’s a warranty that looks out for you and helps you resist the temptation to have your friend, “who’s good with electronics”, try to repair your AudioControl product. So go ahead, read this warranty, then take a few days to enjoy your new LC7i before going on-line to register your unit at www.audiocontrolregistration.com. We also look forward to your comments while you are registering your LC7i. “Conditional” doesn’t mean anything ominous. The Federal Trade Commission tells all manufacturers to use the term to indicate that certain conditions have to be met before they’ll honor the warranty. If you meet all of these conditions, we will warranty all materials and workmanship on the LC7i for one year from the date you bought it (five years if it is installed by an authorized United States AudioControl dealer) and we will fix or replace it, at our option, during that time. Here are the conditional conditions:
- You have to go to www.audiocontrolregistration.com warranty and register your LC7i within 15 days after purchase.
- You must keep your sales receipt for proof of purchase showing when and from whom the unit was bought. We're not the only ones who require this, so it's a good habit to get into with any major purchase.
- Your LC7i must have originally been purchased from an authorized AudioControl dealer. You do not have to be the original owner, but you do need a copy of the original sales slip.
- You cannot let anybody who isn't (A) the AudioControl factory; (B) somebody authorized in writing by AudioControl to service your LC7i. If anyone other than (A) or (B) messes with your LC7i, that voids your warranty.
- The warranty is also void if the serial number is altered or removed, or if the LC7i has been used improperly. Now that may sound like a big loophole, but here is all we mean by it. Unwarranted abuse is: (A) physical damage (don't use the LC7i for a car jack); (B) improper connections (120 volts into the power jack can fry the poor thing); (C) sadistic things. This is the best product
we know how to build, but if you mount it to the front bumper of your car, something will go wrong. If an authorized United States AudioControl dealer installs the LC7i, the warranty is five years. Assuming you conform to 1 through 5, and it really isn't all that hard to do, we get the option of fixing your old unit or replacing it with a new one.
LEGALESE SECTION
This is the only warranty given by AudioControl. This warranty gives you specific legal rights that vary from state to state. Promises of how well the LC7i will perform are not implied by this warranty. Other than what we have covered in this warranty, we have no obligation, express or implied. Also, we will not be obligated for direct or indirect consequential damage to your system caused by hooking up the LC7i. Failure to register warranty information negates any service claims.
LC7i SPECIFICATIONS
All specifications are measured at 14.4 VDC (standard automotive voltage). As technology advances, AudioControl reserves the right to change our specifications, like our Pacific Northwest weather although we are working on it.
Maximum speaker-level input ... 400 watts per channel at 4 ohms
Maximum output level....8.5Vrms
Output gain ....+/-15 dB
Frequency response.... 10Hz-22kHz
Total harmonic distortion....0.01%
Input Impedance.... 20 Kohms
Output Impedance....150 Ohms
Power supply......High headroom PWM switching
Power draw 350mA
Recommended fuse rating....2 Amps
Remote trigger max output current.... 1 Amp
Size....7.5"W x 4.72"D x 1.22"H
Weight.... 3 lbs
Patent....Pending
AudioControl®
Making Good Sound Great
©2012 AudioControl, Inc. All rights reserved
AudioControl, Making Good Sound Great, LC7i, AccuBASS, GTO and AutoMode are all trademarks of AudioControl Inc. This manual was conceived, designed, and written while on a road through the Pacific Northwest on a spectacularly rare, sunny, and cloudless day. The top was down and we were banging our head to 80's metal!
AudioControl®
Making Good Sound Great
22410 70th Avenue West
Seattle, WA 98043 USA
Phone 425-775-8461 • Fax 425-778-3166
www.audiocontrol.com
- Six Channel Line Output Converter with AccuBASS™ for interfacing with factory installed audio systems
- AudioControl®
- Key features of the LC7i
- Quick Install Guide
- Under the Hood - Internal Jumpers
- A Guided Tour of LC7i
- Awesome Information
- AccuBASS™ Processing
- Setting the Accu-BASS™ is a simple one-time operation:
- More Highlights
- Summed Outputs
- AutoMode
- ACR-1 Dash Control (Purchased Separately)
- Placement and Mounting
- Bracket Installation
- Custom Installation
- Basic Factory Upgrade System
- Block Diagram of the LC7i
- The WARRANTY
- LEGALESE SECTION
- LC7i SPECIFICATIONS
Brand : AudioControl
Model : LC7i
Category : Audio/video converter