KXT481SOS - Phone MaxCom - Free user manual and instructions
Find the device manual for free KXT481SOS MaxCom in PDF.


User questions about KXT481SOS MaxCom
0 question about this device. Answer the ones you know or ask your own.
Ask a new question about this device
Download the instructions for your Phone in PDF format for free! Find your manual KXT481SOS - MaxCom and take your electronic device back in hand. On this page are published all the documents necessary for the use of your device. KXT481SOS by MaxCom.
USER MANUAL KXT481SOS MaxCom
The telephone intended for use in public PSTN Model KXT481SOS
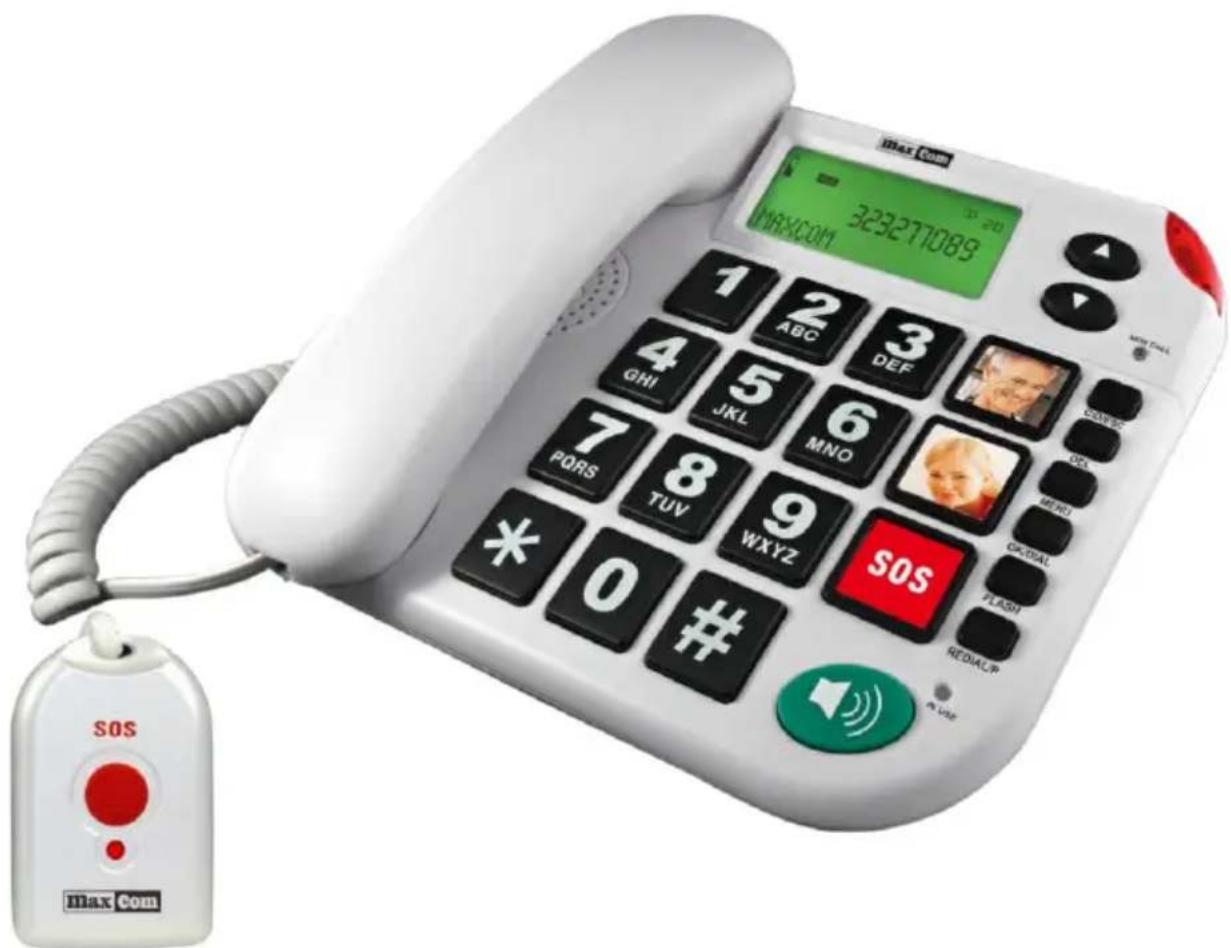
text_image
MAX COM 323277089 1 ABC 3 DEF GHI 4 5 6 PQRS 7 8 MNO TUV WXYZ 0 WXYZ SOS REDIALP PI UO SOS MAX COMUser manual
Table of contents
1 SPECIFICATIONS: 4
2 FUNCTIONS ....4
3 PACKAGE CONTENTS....5
4 SAFETY PRECAUTIONS....5
5 OVERVIEW OF THE PHONE....6
6 Installation....7
7 CHANGING THE BATTERIES IN THE REMOTE sos pendant....8
8 PHONE SETTINGS....8
8.1 Setting the dialing mode Pulse / Tone 9
8.2 Date and time settings....9
8.3 Setting the display contrast....9
8.4 Setting the flash time....9
8.5 Setting area code 9
8.6 Assign a voice name to a contact 10
8.7 Record the message SOS.... 10
8.8 Listening to recorded message.... 10
8.9 Language menu 10
8.10 Voice prompts 11
8.11 Adding new remote SOS 11
9 THE BASIC OPERATION OF THE TELEPHONE....11
9.1 Receiving phone calls.... 11
9.2 Making phone calls.... 12
9.3 Ending a call.... 12
9.4 Functions available during a call.... 13
Setting the handset volume....13
Switching between handset and hands-free 13
Setting the volume for hands-free....13
10 SOS EMERGENCY CALL....13
10.1 Answering an emergency call SOS.... 13
10.2 Completion of the SOS emergency call 14
10.3 Add a contact alarm.... 14
10.4 Delete an alarm contact.... 14
11 "CALLER ID" - THE INCOMING CALLER ID....15
11.1 Starting caller identification / CLIP / 15
Checking incoming call log 16
Callback for incoming numbers....16
Deleting a number from the call log of incoming 16
Save a number from the incoming call log to your phonebook 16
12 PHONEBOOK....16
12.1 Storing a number in the phone book.... 16
12.2 Viewing the Phonebook.... 17
12.3 Making a Call from the phonebook 17
12.4 Editing a contact from the phonebook.... 17
12.5 Delete a contact from the phonebook 17
12.6 Delete all contacts from the phone book.... 18
12.7 Assign a number to the direct memory 18
12.7.1 Adding photos to the direct memory buttons....18
13 THE INTER-DIGITAL BREAK - "PAUSE" 18
14 REPEAT THE LAST NUMBER DIALED (REDIAL) 18
15 HOLD FUNCTION....19
16 SET THE RINGER VOLUME....20
17 CLEANING....20
DECLARATION OF CONFORMITY....21

Correct disposal of this product (Waste Electrical and Electronic Equipment)
This marking shown on the product or relating to its literature, indicates that the product after the expiration of the period should not be disposed with other waste from households. To prevent possible harm to the environment or human health from uncontrolled waste disposal, please separate this from other types of wastes and recycle it responsibly to promote the sustainable reuse of material resources as a permanent practice in order to obtain information on where and how environmentally safe recycling of this Product Household users should contact either the retailer where they purchased this product, or their local government.
Business users should contact their supplier and check the terms of the purchase contract. Product should not be mixed with other commercial wastes for disposal
1 SPECIFICATIONS:
Dial mode: Tone (DTMF) / Pulse
Flash: 80/100/270/300/600 ms)
Power Supply:
Input / Input: AC 100V \~ 240V 50/60 Hz
Output / Output: 9 VDC 300 mA
Polarization
AC power adapter
Ambient temperature: +5 °C to +45 °C
Operating Humidity: 25 to 85%
2 FUNCTIONS
- SOS emergency call function with remote control
- An identification numbers of incoming CLIP (DTMF / FSK)
• Book telefoniczna- 30 entries (the ability to record name) - Direct memory keys M1 and M2 for quick connection to the programmed numbers
• Voice prompts main functions
• Voice prompts dialed (Pre-Dial) - Voice prompts incoming numbers or name of the caller (if the contact in the phonebook is assigned a speech)
• Large display, can adjust the display contrast (5 levels)
• Memory of 20 incoming calls - Hands-free, adjustable volume
- Adjusting the ringer volume -Switch ringer volume HI / MED / LO
- Adjusting the earpiece volume -Switch volume +/-
- Optical call
-
Compatible with hearing aids
-
Redial - Redial
- Pause
- Adjusting the Flash time (80/100/270/300/600 ms)
- Menu in 11 languages (including Polish)
• Voice message to the SOS call, you can record your voice message - Up to 5 alarm contacts - the user can decide whether to add a contact from your phonebook to the list of emergency numbers and determine the order of selection
- Remote SOS working at 433 MHz, which allows remote dial SOS.
- The remote control in open space up to 40m.
- The ability to log on to the 5 pilots SOS
- The ability to answer a call using the SOS button on the remote control. During an incoming call, hold down the SOS button for 3 seconds. The phone will turn on speakerphone. To end the call using the remote control, press and hold for 3 seconds, the SOS button on the remote control
- Compatible with hearing aids
3 PACKAGE CONTENTS
The base unit
Handset
OUT Power Supply DC9V, 0.3A
Torsion Cable
Telephone line cord
User manual
Remote SOS
Hearing Aids?
- The handset loudspeaker uses magnetic induction, so that the telephone is compatible with most models of hearing aids.
4 SAFETY PRECAUTIONS
- Do not use the device if the phone cord or the appliance itself is damaged.
- If the unit falls, before further use should be checked by an electrician.
- Do not open the housing or attempt to load objects through the ventilation holes.
- Do not allow liquids to get into the device. If this happens, pull the plug out of the socket.
- Do not touch the contacts with sharp or metal objects
- Do not make yourself any modifications or repairs to the unit.
- Repairs to the appliance or power cord must have a specialized service.
ENGLISH
5 OVERVIEW OF THE PHONE
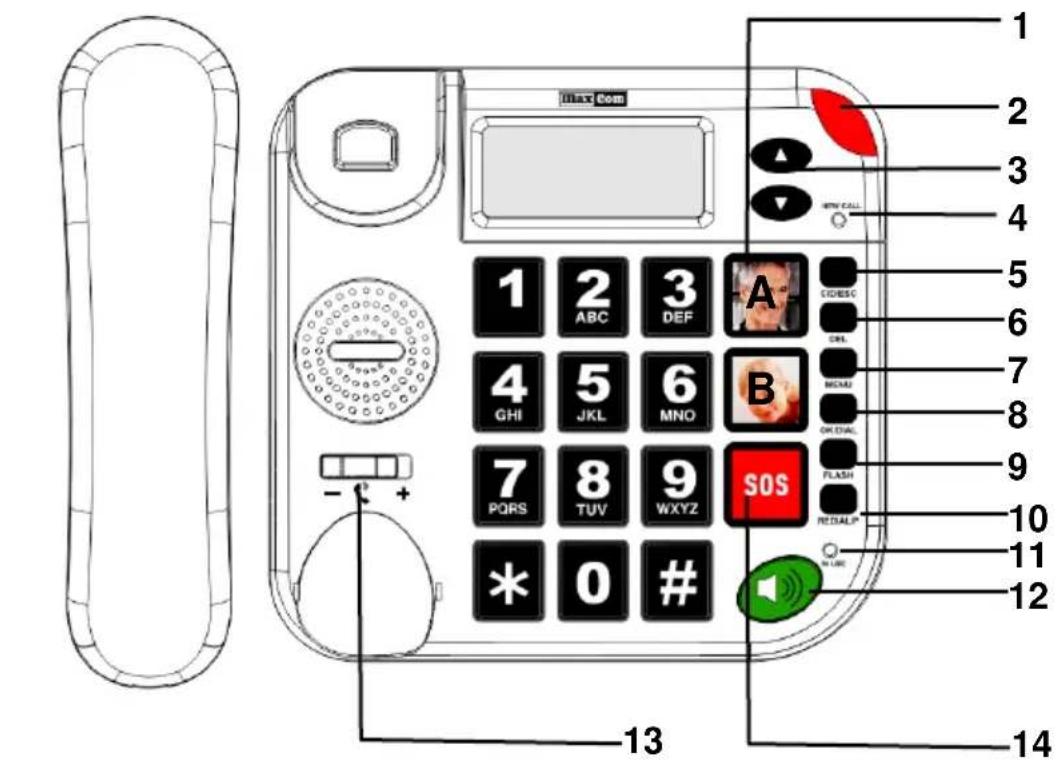
text_image
Max Com 1 2 3 4 5 6 7 8 9 10 11 12 13 14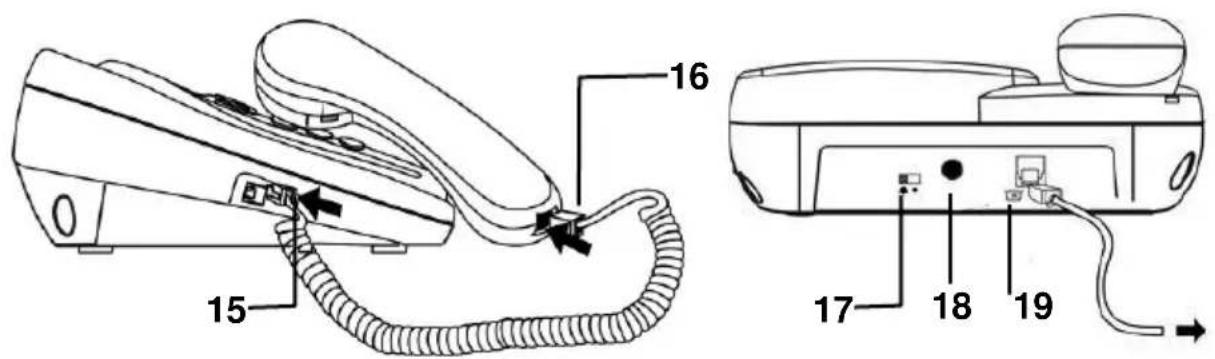
text_image
Technical diagram of a landline telephone with labeled components and wiring connections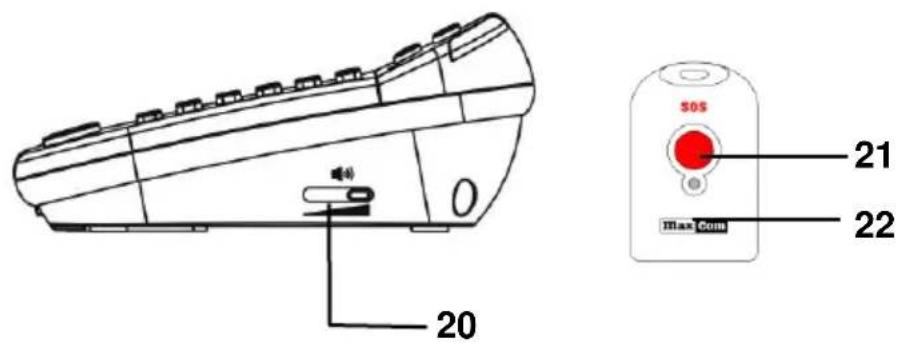
text_image
20 SOS 21 Max Com 22| 1A, 1B. Direct memory keys M1, M2 | 12 Key handsfree |
| 2 Illuminating signaling an incoming call | 13 switch for headphone volume +/- |
| 3 List the number of incoming s; scroll up / down | 14 SOS button |
| 4 LED NEW CALL-new call | 15 jack of twisted cord in a base |
| 5 CID / ESC - switching phone book / list of incoming calls; exit from the menu | 16 jack of twisted cord in a handset cord torsion |
| 6 del- delete character, withdrawal of the menu | 17 Switch of the ringer volume |
| 7. MENU - Access the menu; scrolling menu options | 18 AC power |
| 8. OK / dial-button to confirm / call the indicated number of the incoming call list or phone book. | 19 Telephone line jack |
| 9 Changing the FLASH | 20 Adjusting the volume on the speakerphone |
| 10 Last number redial Redial / Pause | 21 SOS button on the remote control |
| 11 LED - line busy | 22 LED testing batteries status |
6 INSTALLATION
1. Location
- The telephone should be within min. 1 meter away from electrical devices, eg. Television, radio, computer, microwave, etc., Otherwise it may affect their functioning
- The telephone cannot be installed in bathrooms and in areas with high humidity
- When choosing a place should be taken into account to base has always been within the remote SOS. The remote control SOS on the open space is 40 meters, it can be reduced through various obstacles.
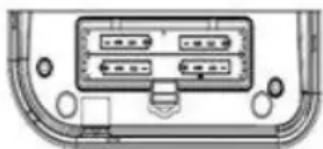
- Open the battery cover located at the bottom of the telephone.
Insert four batteries LR03 AAA 1,5V indicated by the arrow. Batteries are required for proper operation of the phone in the absence of power.
In the event of a power failure would be
natural_image
Diagram of a device rear panel with ports and connectors (no text or labels visible)impossible to make a call using the SOS button on the phone, or on the remote control. Phone numbers and voice recordings are stored in non-volatile memory and in case of battery replacement will not be deleted.
Do not use rechargeable batteries 1.2V
Close the battery cover.
ENGLISH
- Connect the cable to the socket swivel the handset (16), the other end of the torsion connect to the socket on the left side of the base (15)
- Insert the telephone cord into the socket on the back of the phone (19). The other end of the cable into the wall outlet. Both ends are terminated with RJ plug and connect to that telephone is suitable. If you have another outlet, make sure you have the appropriate adapter.
- Connect the power adapter cable into the socket on the base (18).
Before opening the battery cover, make sure that the phone is disconnected from the power supply and telephone line.
NOTE:
- Batteries are not supplied phone
- Do not use different types of batteries.
- Do not use rechargeable batteries
- When the display appears, Change the batteries. For safety reasons, the phone will be locked when the battery voltage drops below 2.5V. Turns off the screen and all functions except basic. Making and receiving calls will still work. After replacing the battery, connect the power adapter will run display and disappears. When Replacing the battery, disconnect the telephone line cord and AC
7 CHANGING THE BATTERIES IN THE REMOTE SOS PENDANT
Remote SOS is powered by 12V 23A battery (installed). Every time the red SOS button on the remote control is pressed, lights up the red LED to indicate the correct transmission. If the LED is not lit, replace the battery in the remote control with new ones.

Used batteries are harmful to the environment. Should be stored in specially designated point in a suitable container in accordance with local regulations. Do not throw batteries into the trash.
8 PHONE SETTINGS
In standby mode, press MENU appears on the LCD Contrast. Then use the keys ▲ or ▼ to navigate the menu:
TIME / DATE NUMBER → → SAVE REC. NAME → REC. VIEWS PRESS PRESS → → → MENU LANGUAGE PODPOW. FLASH VOICE → → → MODE DIAL room. REMOTE → NO WAY.
If you want to enter the settings displayed on the screen, press the OK / DIAL. Press DEL to go back to the menu one item. If you want to completely exit the menu to the standby mode, press CID / ESC.
If within 30 seconds during programming, do not press any key, the phone will leave the menu.
Enter the menu and navigate through them you can only in standby mode - on-hook.
8.1 Setting the dialing mode Pulse / Tone
The camera is factory set to tone dialing, which is currently the vast majority of central and which allows the use of the additional services offered by the operators.
To change the dialing mode Pulse or Tone select the MENU DIAL MODE option, then press OK / DIAL. Use the ▲ or ▼ select the appropriate mode (PULSE - for pulse dialing, TONE - for dial tone) and confirm with the OK / DIAL.
8.2 Date and time settings
When the function is activated caller ID in FSK and the phone receives a signal identifying the calling number, the date and time will be automatically set according to the data transmitted from the central city.
To set the date and time in the camera menu, select TIME / DATE and press OK / DIAL. The display shows "ENTER TIME". Use the ▲ or ▼ adjust the time, press OK / DIAL. Keys ▲ and ▼ set the minutes and press OK / DIAL. The display shows "ENTER DATE". Then set the month (using ▲ and ), Confirm by pressing the OK / DIAL. Using ▲ and ▼ set the date and confirm with OK / DIAL.
8.3 Setting the display contrast
To change the display contrast, in the phone menu, select LCD Contrast and press OK / DIAL. The default contrast is set at 3 Use the ▲ and ▶ select the desired contrast level (1 to 5) and confirm with OK / DIAL.
8.4 Setting the flash time
Flash (pause calibrated) allows you to use the additional features offered by the operator, or an internal panel. Setting the flash time depends on the standards of the local telephone network or PBX exchange. Please check with your provider or check the manual of internal control that is required FLASH time.
During a call signal is sent by pressing the FLASH FLASH KEY. You can set the time FLASH: 80/100/270/300/600 ms. The default is 100 milliseconds.
To change the flash in the camera menu, select FLASH and press OK / DIAL, and then using the keys ▲ and ▼ FLASH set the time and confirm with OK / DIAL.
8.5 Setting area code
In some countries (this does not include Polish) must be programmed local area code phone to distinguish between incoming local calls from long distance. Then
ENGLISH
the phone when an incoming call does not display local area code, while the long-distance call display number with intercity.
To set the code in the camera menu, select NO CODE and press OK / DIAL. The display shows the blinking "----". This is the place to enter CODE LOCAL. Use the ▲ and ▼ Set the first digit and press OK / DIA to go to set the next digit. To set another number, exactly the same procedure as in the case of the first digit. When all five digits, press OK / DIAL to return to standby mode.
8.6 Assign a voice name to a contact
RECORD NAMES option allows you to assign a user-recorded voice to a contact in the phonebook. This voice will be played during an incoming call from a saved contact, and when browsing the phonebook.
To assign a name to a contact, select the menu option REC phone. NAME and press OK / DIAL.'ll See a list of contacts from the phonebook. Select by ▲ and ▼ contact you want to assign a name tag, then press and hold the OK / DIAL. When you hear a beep and the top of the display starts flashing VOICE, you can record a message that is up to 3 seconds. When you have finished speaking the message, release the OK / DIAL. Feature to playback the message on an incoming call to work properly, you must enable VOICE PROMPTS.
8.7 Record the message SOS
This feature allows you to record a voice message that the SOS emergency call will be broadcast through the speaker phone, and transmitted to the recipient during an emergency call SOS. To record a message in your phone menu, select REC. COMMUNICATION, then press and hold the OK / DIAL. When you hear a beep and the top of the display starts flashing VOICE, you can record a message, lasting up to 15 seconds. When you have finished speaking the message, release the OK / DIAL.
By changing the message, make sure that the person assigned to contact SOS knows the procedure for receiving an emergency call.
8.8 Listening to recorded message
To check whether the message SOS was ams recorded in the phone menu, select VIEWS COMMUNICATION and press OK / DIAL. SOS message will be played through the loudspeaker.
Reset the message SOS
In order to restore the factory currently SOS, while listening, press the DEL key. The factory set SOS message "Emergency call, press the 0 key to answer".
8.9 Language menu
The phone has 11 menu languages: Polish, Portuguese, English, French, German, Spanish, Italian, Dutch, Swedish, Finnish and Danish. To change the menu language in the phone menu, select MENU LANGUAGE and press OK /
DIAL. Then using the ▲ and Select the desired language and confirm with OK / DIAL.
If you select a language Polish / English / French / German / Spanish / Italian and voice prompts are turned on, their language will be changed automatically. If you select a different language voice prompts are turned off.
In case of accidental change the language standby mode, press in sequence:
1x MENU
6x ▲
OK / DIAL
▲ select a language from the list
OK / DIAL
8.10 Voice prompts
To turn on voice prompts, the phone menu, select PODPOW. VOICE and press OK / DIAL. Then using the keys ▲ and ▼ Select the desired language and confirm by pressing OK / DIAL. voice prompts will be included in the dialed number (Pre-Dial), incoming number, menu, and contacts stored in the phone book. If you want to turn off voice prompts, instead of the language select VOICE OFF. and press OK / DIAL.
Voice prompts are available in the following languages: Polish / English / French / German / Spanish / Italian
8.11 Adding new remote SOS
The phone can work with 5 pilots SOS. Remote control to the provided phone is factory logged into the database to use it do not have to be added to the database.
To the base SOS phone log pilot in the camera menu, select the room. REMOTE and press OK / DIAL. Appears in the "PAIRING", press OK / DIAL. On the display for two minutes will flash "PAIRING ...". During this time, press and hold the SOS button on the remote control. If the pilot is successfully logged in, the display shows "DONE".
To remove logged pilot in phone menu, select the room. REMOTE and press OK / DIAL. Then using the Picture 138 and Picture 139 select DELETE? and press OK / DIAL. The display will show the message "REMOVE PILOT" and all SOS pilots will be logged off.
9 THE BASIC OPERATION OF THE TELEPHONE
9.1 Receiving phone calls
An incoming call is signaled with a beep and by the flashing LED. If the function is not available Caller ID, the display shows the incoming call number or name, if the contact is saved in the phonebook. When the feature is enabled on voice prompts, the number of name (if assigned) will be terminated.
While the phone is ringing pick w handset or press the speakerphone to answer the call


After lifting the handset automatically displays the talk time
9.2 Making phone calls
1

Lift the handset or press the speakerphone
→ The display will show time 00:00
2
Select the number you want to call
→ The display will show the dialed digits (max. 14 digits can be viewed)
You can first choose a number (if necessary, correct it by pressing DEL), and only then pick up the handset, press the handsfree key or press OK / DIAL. It is a preparatory dialing (pre-dial). You can enter a maximum of 32-digit number.
Number can also be selected:
- Pick up the handset and press the direct memory key (M1, M2)
- Pick up the handset and press REDIAL key / P to redial the last dialed number
- The memory register incoming numbers, selecting an appropriate number keys Up / Down, then press OK / DIAL
- From the phone book by selecting the corresponding number keys Up / Down button and press the OK / DIAL
After about 6 seconds after the start of the call, the display shows the duration of the call.
9.3 Ending a call
After completing the conversation place the handset on the base or press 📞 If you answer the call in speakerphone mode
9.4 Functions available during a call
Setting the handset volume
VOLUME CONTROL You can adjust the switch, which is located under the handset (13), (- Normally, + Loud).
Switching between handset and hands- free

During the conversation by headphone press And place the handset on the base to hold a conversation in hands-free mode

LED lights up on the speakerphone To hold a conversation via the handset lift it from the base Hands-free mode automatically turns off
Setting the volume for hands-free

Set the desired volume level using a potentiometer invested with the right side of the phone (17) The setting can be possible only for the speakerphone.
10 SOS EMERGENCY CALL
In order to establish an emergency call, press and hold for 3 seconds, the SOS key on the phone or on the remote control. During an emergency call phone:
- Start a loud alarm to a person in the vicinity could provide immediate help
- Then the phone will select the sequence numbers set as alarm
- The speaker factory set (or recorded by the user) message: "The alarm call, press the 0 key to answer"
10.1 Answering an emergency call SOS
The caller, who receives a call SOS will hear the message "Emergency call, press the 0 key to answer". (If not changed by the user)
To confirm the connection must press "0" on his phone, on your phone hands-free mode is activated for 2 minutes.
- After 2 minutes the call will be broadcast for 10 seconds warning sound "bi bi" and to continue the conversation, the caller must press the "1" and then press "5"
- the call will be extended for another 2 minutes. When you hear the "bi bi" proceed as before. When the message "bi bi" will not be pressed by the caller number 1, then 5, the current connection will be terminated and automatically attempt to connect with another emergency number
10.2 Completion of the SOS emergency call
To the caller ended the call must press "1" and then press "9", the alarm routine is completed.
In a situation where the caller ends the call by replacing the handset (without selecting the numbers 1 and 9), the procedure alarm will continue on, and the phone dials the next number set as an alarm.
If you want to end an emergency call, you should press the SOS on the phone or press and hold for 3 seconds, the SOS button on the remote control
When the first emergency call number for a minute did not answer the call, your phone will automatically be called to another emergency numbers until received. If no number is set as an alarm, after starting the emergency call phone will only emit a loud alarm for 15 seconds.
10.3 Add a contact alarm
You can select up to 5 emergency numbers. To program the numbers should be contact in the phonebook.
Assigning emergency contact should inform the person concerned and familiar with the procedure and receiving an SOS call termination
To add a contact SOS phone menu, select SAVE NUMBER
Press OK / DIAL.
Use the numeric keypad to enter the number (up to 22 digits, if you make a mistake, use the DEL key).
Press OK / DIAL
Use the numeric keypad to enter the contact name (up to 16 characters) Press OK / DIAL
The display shows "SOS OFF, press Picture ▲r To select "ON SOS". Press OK / DIAL
Press Picture ▲ or to select the location Press OK / DIAL
The contact is added to the list of emergency numbers. In the case of the inclusion of an emergency call, first dial the number saved under "LOCATION 1", and the last recorded under the heading "LOCATION 5"
10.4 Delete an alarm contact
To delete a contact SOS edit the contact and select "SOS OFF", see p. 18 Editing a contact from the phonebook.
11 "CALLER ID" - THE INCOMING CALLER ID
11.1 Starting caller identification / CLIP /
The identification number of the caller, in short CLIP or Caller ID, is a special service provided by the telephone company and needs to be agreed with the operator.
To start the identification number, please contact your operator.
If the service is running, then when calling the display will show the number of the person calling us. If your phone has not been received, the number and time of the call is stored. You can later check who and when to call us. If calling from this number was repeated, the number shows "REPEAT" and the all new calls that have occurred since the last check will display "NEW" and at the top of the camera will flash the LED NEW CALL. To disable it, you should look at the register of incoming calls.
The phone can store 30 calls received or missed, along with information about the time and date of the call. In standby mode, the display contains information about the number of new connections: "NEW: XX", where XX is the number of connections. If the memory is full, the oldest call is automatically removed and replaced with the newest.
If you see the following symbols mean:
"PRIVATE" it is a private conversation (the number of reserved),
"UNAVAILABLE" it is a call beyond the reach of the service, such as an international.
| Checking incoming call log | 1 | [IMAGE] | In standby mode, press TOP or DOWN→ The display will show the last entry |
| 2 | [IMAGE] | Use the UP / DOWN keys to display other numbers. If the function is turned on voice prompts, while browsing the registry will be spoken number or name of the caller (if the user has assigned him a voice name) | |
| Callback for incoming numbers | [IMAGE] | If the display shows the desired number, press OK / DIALand phone will automatically dial this number in the speakerphone mode. | |
| Deleting a number from the call log of incoming | [IMAGE] | If you want to remove from the list of the currently displayed number, press DEL.Appears on the display: "DELETE?". Press and hold the DEL key for 2 seconds until the display shows "SOLD"If you want to delete the entire list of incoming calls, when viewing the list, press the DEL button and hold for 2 seconds. The display shows "Delete All?" Again, press and hold the DEL key for 2 seconds until the display shows "SOLD" | |
| Save a number from the incoming call log to your phonebook | To save to the phone book a currently displayed number, press and hold MENU for 2 seconds. The display shows "COPY TO MEMORY". Then press OK / DIAL to confirm, the display shows "SAVED" |
12 PHONEBOOK
The phone memory can store in the phone book 30 contacts. Contacts can be up to 22 digits, and contact name with 16 characters. When the phone memory is full when you try to save a new contact, the message "MEMORY FULL". In such a situation, remove the contact from the phonebook to enter a new contact.
12.1 Storing a number in the phone book
- To save the number in the phone book in the phone menu, choose:
- SAVE NUMBER
- Press OK / DIAL.
- The display will blink the cursor. Use the numeric keypad to enter the number (up to 22 digits, if you make a mistake, use the DEL key).
- Press OK / DIAL, the cursor flashes on the bottom of the display. Use the numeric keypad to enter the contact name (up to 16 characters)
- Press OK / DIAL, the display shows "SOS OFF", it means that the number will not be added to the list of emergency numbers (if you do not want the number has been added to the list of emergency calls, simply press the OK / DIAL to finish adding the contact). If you want the number has been added to the list of emergency numbers, press Picture 45 or Picture 46, The display shows "SOS ON". If you press OK / DIAL, the display will show "LOCATION" with the number 1-5. Press OK / DIAL, the number will be added to the phone book, and if you select "SOS ON" number will also be added to the list of emergency numbers. In the case of the inclusion of an emergency call, first dial the number saved under "LOCATION 1", and the last recorded under the heading "LOCATION 5"
12.2 Viewing the Phonebook
To access the telephone, in standby mode, press CID / ESC. When the display shows Picture 236, Using the ▲ and ▼ You can move through the list of contacts. Number and contact name are displayed at the same time. In addition, when operating the voice prompts, pronounced saved contact's number or name (if the user has assigned tone to a contact).
12.3 Making a Call from the phonebook
While browsing the phone book, with keys Picture 37 and Picture 38 select the contact you want to call, and then press OK / DIAL. The connection will be established in speakerphone mode.
12.4 Editing a contact from the phonebook
To change the name or contact number stored in the phonebook, when browsing the phone book, with keys ▲ and ▼ select the contact you want to change, then hold for 2 seconds the MENU button until the display shows "EDIT?". Confirm with OK / DIAL. Will blink first digit of the number. Use ▲ and ▼ to change other digit, and the DEL key to delete the number. Press OK / DIAL to change the name of the contact, follow the same as when you change the number. Confirm with OK / DIAL. Appears in the "SOS OFF" or "ON SOS" by ▲ and ▼ You can change or add a contact to the list of emergency numbers. To exit, press OK / DIAL.
12.5 Delete a contact from the phonebook
To delete a single contact, while browsing the phonebook using the keys ▲ and ▼ select the contact you want to delete and press the DEL key. The display
ENGLISH
shows "DELETE?". Press and hold for 2 seconds the DEL key until the display shows "DELETED".
12.6 Delete all contacts from the phone book
To delete all contacts, while browsing the phonebook, press and hold the DEL button for 2 seconds until the display shows "Delete All?'. To confirm, press and hold the DEL key for 2 seconds until the display shows "DELETED". Phonebook is empty.
12.7 Assign a number to the direct memory
To assign a number to the direct memory M1 or M2 in the phone menu, choose: SAVE NUMBER
Press OK / DIAL.
Use the numeric keypad to enter the number (up to 22 digits, if you make a mistake, use the DEL key).
Press OK / DIAL (Do not type the name)
Press the direct memory M1 or M2
Confirm again by pressing the OK / DIAL. The display shows "SAVED".
If you want to dial a number stored under the key M1 or M2, lift the handset or press the hands-free function and press M1 or M2.
12.7.1 Adding photos to the direct memory buttons
- In order to provide greater comfort for direct memory keys can be added based on images of people, to which they were assigned numbers. To install the image is:
- Clear transparent plastic covering the memory key (pry it from the top using a sharp-pointed tool)
- Add a picture (or name of contact)
- Create transparent plastic on the key
13 THE INTER-DIGITAL BREAK - "PAUSE"
When your phone is connected to the control panel inside the phone number you chose correctly, you might want to enter a pause.
Pause is introduced using the REDIAL / P during the programming number, the display shows the symbol P. between groups of digits will be inserted interval of 3.6 seconds.
14 REPEAT THE LAST NUMBER DIALED (REDIAL)

Lift the handset or press the handsfree button
Press REDIAL / P
The last number dialed is automatically re-
dialed
15 HOLD FUNCTION
During a call, press the FLASH begin to play music on your phone with the receiver, then when you hang up on the hook recipient will continue to be on the line. The conversation is "suspended". To return to the call, you can:
Pick up the handset, the music is turned off and you can continue the conversation on the handset,
Press Picture 142 Music will be turned off and can be a conversation using the speakerphone.
Note: This function can also be used without putting the handset on the phone, the music can then turn off again by pressing the FLASH.
16 SET THE RINGER VOLUME
Ringer volume can be adjusted using the switch (18), which is located at the back of the phone
Set the switch on the left side - silent ringtone
Set the switch in the middle - medium bell
Telephone with a slightly damp cloth or an antistatic cloth. Do not use strong detergents or solvents.
DECLARATION OF CONFORMITY
This manual is intended for informational purposes only. Some of the described features and options may vary depending on the software and the country.
We reserve the right to make technical changes. The manufacturer is not liable for any losses arising directly or indirectly from errors, omissions or discrepancies between the product and documentation. Trademarks mentioned or referenced in this material are the property of their respective owners.
In the event of disruption of the equipment recommended to contact customer service to verify the issue.
Direct contact number 32 325 07 00 or email: serwis@maxcom.pl
Complains or device defects can be reported via website:
http://www.comtek.co.uk/maxcom-rma-service/
Mobile service address:
Comtek Network Systems
Unit 108, Tenth Avenue (Zone 3)
Deeside Industrial Estate
Deeside, Flintshire CH5 2UA