Bionic Bird - Drone XTIM - Free user manual and instructions
Find the device manual for free Bionic Bird XTIM in PDF.


User questions about Bionic Bird XTIM
0 question about this device. Answer the ones you know or ask your own.
Ask a new question about this device
Download the instructions for your Drone in PDF format for free! Find your manual Bionic Bird - XTIM and take your electronic device back in hand. On this page are published all the documents necessary for the use of your device. Bionic Bird by XTIM.
USER MANUAL Bionic Bird XTIM
(To read imperatively before use. Adjustments required during the first flight)
14+
THANK YOU FOR PURCHASING BIONIC BIRD
The first Bionic Bird !
Technical Specifications
Bird
- Ultra light bird, weight 9.30 g.
- Powerful main motor (1.2 watt output) with aluminum heat sink.
- Electronic protection against overheating.
- 1:36 Reducer (patented) ultra-compact and lightweight (0.3 g).
- Precise power control (128 steps).
- Adjustable tail angle for slow or fast flights (indoor/outdoor).
- Sharp and immediate steering control by wing distortion (patented) for aerial stunts.
- Impressive gliding due to its very low ratio weight/wing area (3.42 g/dm ^2 ).
- On-board hybrid lithium polymer battery, 55 mAh (1.6 g).
- Full battery protection against short circuit, overload and complete discharge, for a longer life.
- Up to 6 min flight at full speed, 7.5 min max for normal flight, or a distance of 1.8 km.
- Short charging time of the Bird in 18 minutes.
- The bird charges on the plug adapter on which it connects automatically by retractable magnetic contacts.
Application "The Flying App":
- Compatibility: Check compatibility with systems and devices on www.mybionicbird.com
- Range: The controllable distance of the bird is 100m in all directions.
- Protocol: Bluetooth 4 (Bluetooth Smart).
- Multiplayer system with Bluetooth connection, ability for multiple players in one place.
-
User interface: 2 intuitive modes ("Easy", "Steering Wheel") and 2 joystick modes ("One Finger", "Classic RC")
-
Easy: Tactile control of the acceleration, steer by tilting the phone, all with one hand.
- Steering Wheel: Tactile control of the acceleration, steer by turning the phone like a steering wheel.
- One Finger: Control the acceleration and steering with your index finger, while holding the phone with your other hand.
- Classic RC: Tactile control of acceleration and steering (Classic remote control).
- The sensitivity of each mode is independently configurable.
- Spring back effect ("Cruise control") on throttle can be activated or not.
- Battery level of the bird and strength of the BT signal.
- Interactive Sound
- Immersive sound environment.
Dimensions & performance:
Bird length: 17 cm
Bird wingspan: 33 cm
Bird weight: 9.20 g
Bird controls: Power (altitude) and steering
Onboard accumulator: LiPO 55 mAh, 20 C-1100 mA
Autonomy of the bird in normal flight: 7.5 min
Charging time of the bird: 18 min
Range control of the bird in flight: 100 m
Protocol: Bluetooth 4
Engine rotation speed (no load): 53,000 rpm
Engine rotation speed (full load): 35,000rpm
Wings flapping frequency max: 18 Hz
Wings flapping amplitude: 55 °
Ratio weight/wing area: 3.42 g/dm²
Max wing thrust: 10 g
Required Level: Beginner
This product is warranted against defects in material and workmanship under normal use for thirty (30) days from the date of purchase (Keep your purchase receipt). For any questions regarding this product, please contact our customer service by email: contact@mybionicbird.com.
You can find video tutorials at: www.mybionicbird.com.
WARNING:
This product complies with the following standard and complies with FCC part 15 (2008);
R&TTE 2008 (EN300440-2. EN301489-1. EN301489-3);
DEEE (WEEE) directive 2002/96/EC.
FCC ID: 2ADQDBB1
This device complies with part 15 of the FCC rules. Operation is subject to the following conditions:
1- This device may not cause harmful interference, and
2- This device must accept any interference received, including interference that may cause undesired operation.
WARNING: Changes or modifications to this unit not expressly approved by the party responsible for compliance could void the user's authority to operate the equipment.
FCC NOTE: This equipment has been tested and found to comply with the limits for a Class B digital device, pursuant to part 15 of the FCC rules. These limits are designed to provide reasonable protection against harmful interference in a residential installation.
This equipment generates, uses and can radiate radio frequency energy and, if not installed and used in accordance with the instructions, may cause harmful interference to radio communications.
However, there is no guarantee that interference will not occur in a particular installation. If this equipment does cause harmful interference to radio or television reception, which can be determined by turning the equipment off and on, the user is encouraged to try to correct the interference by one or more of the following measures:
* Reorient or relocate the receiving antenna.
* Increase the separation between the equipment and receiver.
* Connect the equipment into an outlet on a circuit different from that to which the receiver is connected.
* Consult the dealer or an experienced radio/TV technician for help.

Users should keep and retain this manual for future reference.
Keep the packaging since it contains important information. Keep name and address.
SAFETY PRECAUTIONS:
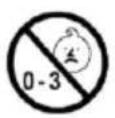
Not suitable for children under 36 months, small parts may be swallowed.
Do not play next to an animal or a person.
Do not use near electrical lines or during a storm.
Do not fly Bionic Bird near electrical lines, trees, buildings and any other obstacles.
Keep away from water.
Never fly or follow Bionic Bird in the streets.
Keep away Bionic Bird from face and eye.
Never put your fingers close to Bionic Bird when it moves.
Always place the Bionic Bird on the "OFF" position when not flying.
BATTERY CAUTIONS:
Works with 1 rechargeable LI-PO (lithium-polymer) battery (included inside the bird).
It cannot be extracted or replaced.
Rechargeable batteries are only to be charged by an adult.
Respect the correct polarity (-) or (+)
The supply terminals are not to be short-circuited.
Only use the battery charger provided with the box to charge the LI-PO battery of your product: the USB cable to the BIONIC BIRD.
DEEE:
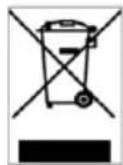
When this appliance is out of use, please remove all batteries and dispose of them separately. Bring electrical appliances to the local collecting points for waste electrical and electronic equipment. Do not throw in domestic refuse.




WARNING :
CHOKING HAZARD- Small Parts Not for children under 3 years.
INSTRUCTION MANUAL
MANUFACTURER NOTES:
*The suitcase packing must be kept and used to store and carry the product in good conditions. This will increase product lifespan a lot.
NEVER TRY TO MOVE WINGS MANUALLY!
*This product was tested for a lifespan of hundreds of cycles in flight; however it remains a high technology product that should be handled with care when not flying. Avoid seizing it by the wings or tail, place it carefully and gently on the charging slot, proceed gently also when replacing wings.
*It is strongly recommended not to let children handle the bird, or pick it up from the ground after a flight. On the other hand, according to their aptitude, they can certainly try to control it in the air, under adult monitoring. Or simply enjoy watching BIONIC BIRD flying!
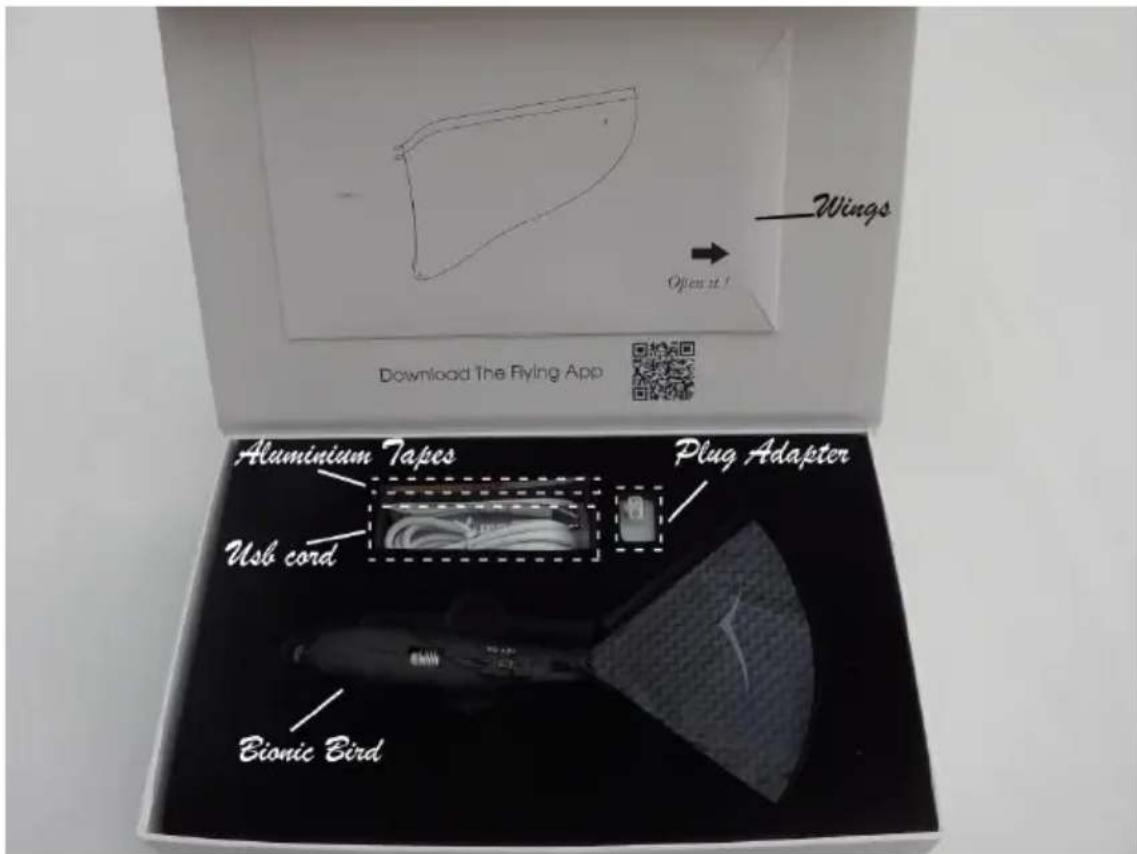
I – UNPACKING YOUR BIONIC BIRD
text_image
Wings Open it Download The Flying App Aluminium Tapes Plug Adapter Usb cord Bionic BirdCheck your product is complete as described above.
II - INSTALLING THE APPLICATION ON YOUR SMARTPHONE
Visit the app store using your smartphone and search for "Bionic Bird". Then, install "The Flying App" on your device.
Before launching the application make sure your Bluetooth is activated.
NB: For optimal and safe use, disable your Wi-Fi and call reception, and adjust your power saving options to restrict your phone from sleeping to ensure The Flying App isn't interrupted during your flight!
The language used by the app is automatically adjusted to the language of your OS. French/English (for all other languages).
Guide: When you first launch the application, the guide will initially be displayed. It consists of several simple pages with images outlining basic instructions that are essential to understanding the product and its calibration. You must read these pages by scrolling from right to left, from the first to the last page, where you will find the "NEST" button, which will take you to the main screen of the application.
NB: During your second use, the detection screen for the bird will be displayed when launching the application. The guide is always available by clicking on the NEST. - On the last page of the guide, you can also find a link to video tutorials, which are very useful for understanding the main instructions "first-hand".
Once in the "NEST", press the "FIND BIRD" button to launch the bird detection screen.
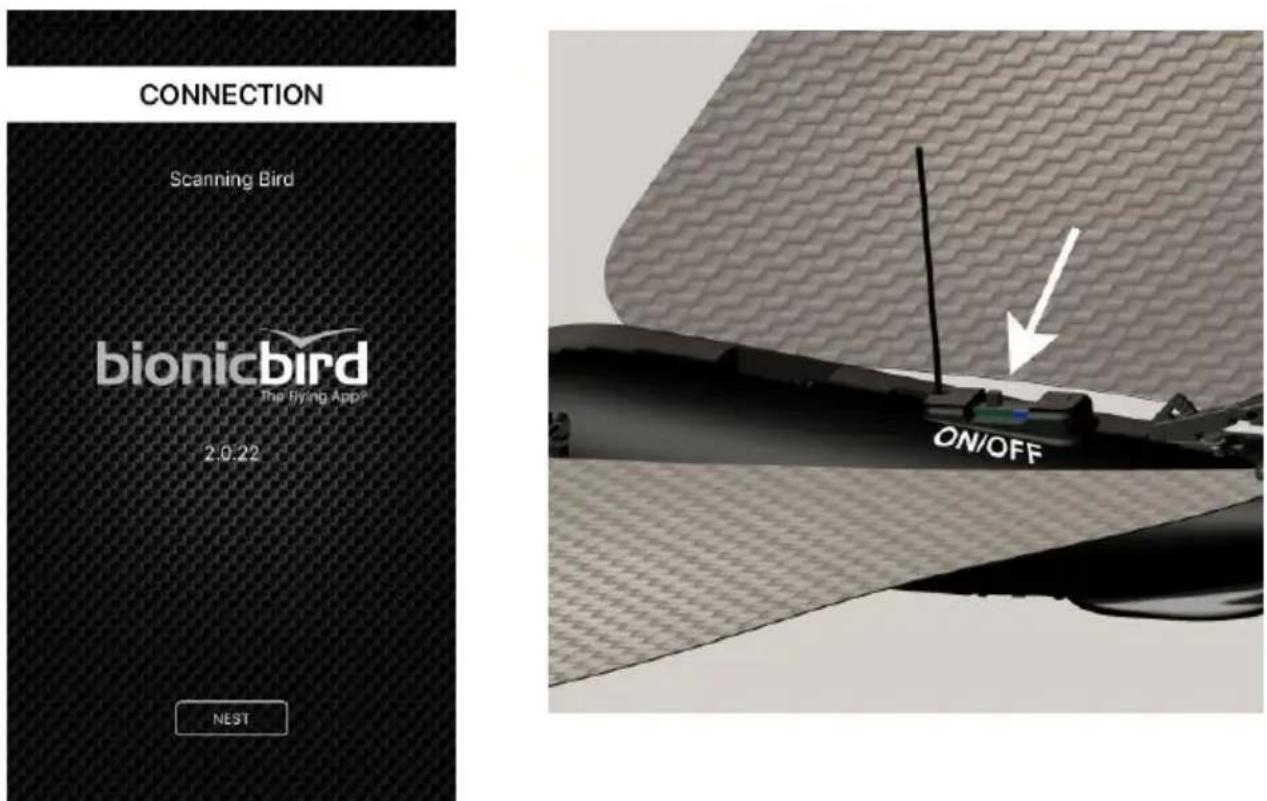
Detecting the bird: Launch the application (or click on "FIND BIRD" in the NEST), and turn on the bird. The "scanning bird" screen above will appear. The bird will be detected immediately.
Its name will appear on the screen (by default "Bionic Bird"), and you just need to click it.
NB: If more names appear, it's because more birds have been detected nearby. Choose your bird.
text_image
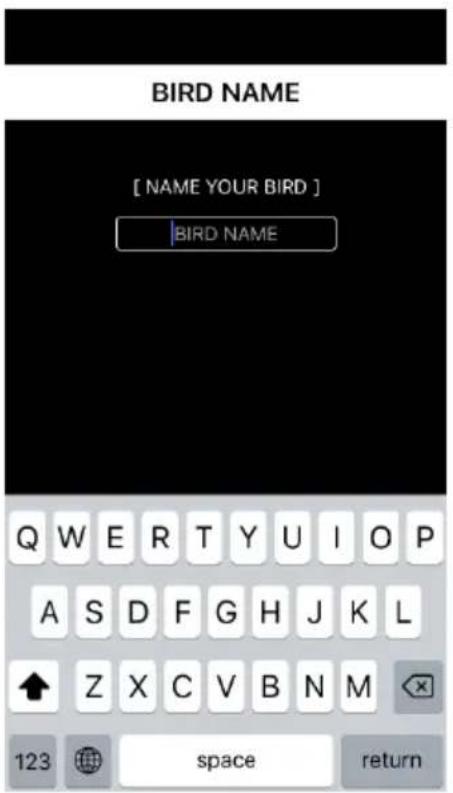
BIRD NAME [ NAME YOUR BIRD ] BIRD NAME Q W E R T Y U I O P A S D F G H J K L ↑ Z X C V B N M 123 space returnIf this is the first time you use it, another screen appears to name your BIONIC BIRD. Next time, it will be recognized automatically with its name, and this screen will be skipped.
NB: The bird detection process lasts a maximum of 5 seconds. If your bird isn't detected during this time, the "NEST" screen will appear. Use the "find bird" button to access the bird detection screen and restart the detection process.
flowchart
graph TD
    A["Choose type of command. Change by clicking on “>”."] --> B["Click to launch the interface of your choice"]
    B --> C["Link to this manual"]
    B --> D["Go to bird detection screen"]
    E["INTUITIVE"] --> F["Easy"]
    E --> G["Steering Wheel"]
    H["NEST"] --> I["[ MODE SELECTION "]]
    I --> J["[ MORE "]]
    J --> K["MANUAL"]
    J --> L["GUIDE"]
    J --> M["FIND BIRD"]
    J --> N["NAME BIRD"]
    O["Quick starter guide"] --> P["Rename your BIONIC BIRD"]
"NEST" screen:
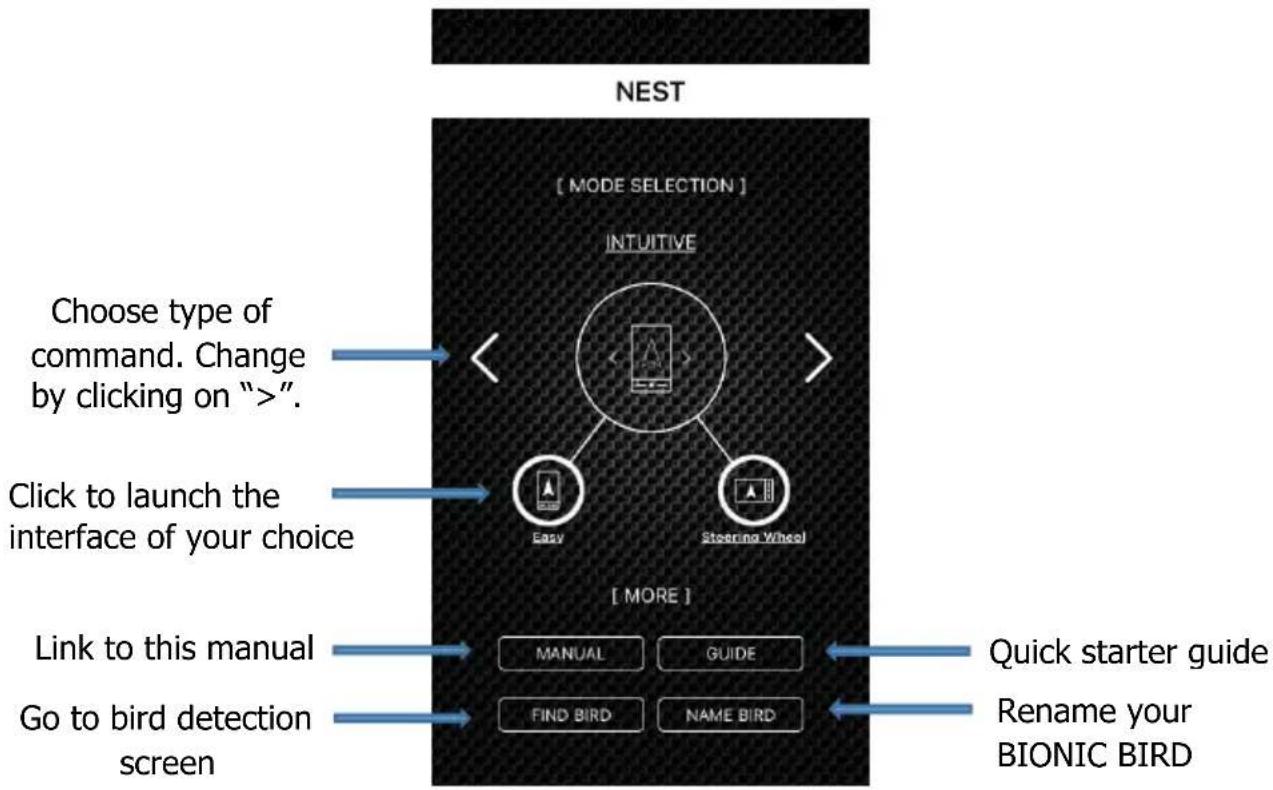
The "NEST" will appear, which is the screen for choosing the type of command and flying interface on the app. The four flying interfaces are as follows:
- The "intuitive" interfaces:
- Easy (portrait screen mode) – An interface where only the throttle is controlled by a touch slider on the screen using the thumb. Turning is controlled by tilting your hand. Everything is controlled with a single hand.
- Steering Wheel (landscape screen mode) – An interface where only the throttle is controlled by a touch slider, and changes in direction are made by turning the smartphone with both your hands like a steering wheel.
- The "joystick" interfaces:
- One Finger (Portrait screen mode): An interface with a touch slider to control the throttle (vertical movement) and the steering (horizontal movement). Use your index finger to steer the bird and accelerate.
- Classic RC (Landscape screen mode): An interface with a touch slider to control the throttle and another for steering. Accelerate and steer the bird with your thumbs as if you were using a radio control. Choose between left or right-handed mode in the settings.
Launch the flying screen by clicking on the icon of your chosen flying interface.
In the NEST you can also find:
- The link to the pdf version of the MANUAL.
- A quick start GUIDE, with a cheat sheet of information necessary for use.
- The return to the bird detection step ("FIND BIRD"), as well as where you can give the bird a NAME.
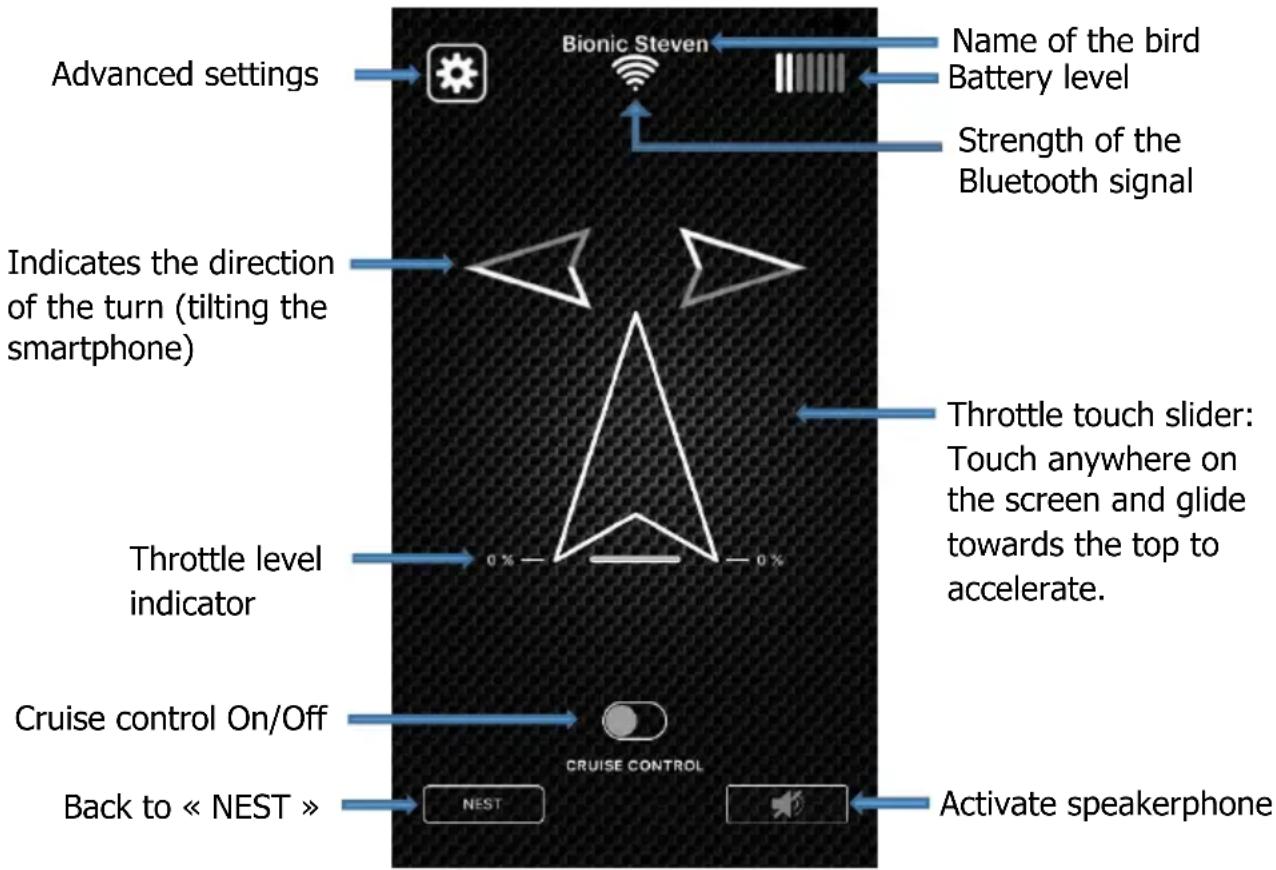
"Easy" interface ("Intuitive" mode): hold your smartphone with one hand, controlling the throttle with your thumb, and tilting your device to control the flight direction. This is the most immersive mode, which quickly frees your mind from the commands and allows you to become one with your Bionic Bird. Tip: Don't grasp your smartphone using your whole hand, rather rest it on your four fingers with your thumb on the front so you can give yourself the greatest freedom to tilt on both sides by turning your wrist.
flowchart
graph TD
    A["Advanced settings"] --> B["Bionic Steven"]
    B --> C["Name of the bird Battery level"]
    B --> D["Strength of the Bluetooth signal"]
    E["Indicates the direction of the turn (tilting the smartphone)"] --> F["Throttle touch slider: Touch anywhere on the screen and glide towards the top to accelerate."]
    G["Throttle level indicator"] --> H["Cruise control On/Off"]
    H --> I["CRUISE CONTROL"]
    J["Back to « NEST »"] --> K["NEST"]
    L["Activate speakerphone"] --> M["Speakerphone icon"]
Direction: The direction of a turn (right/left) and its angle is controlled by the tilt angle of the smartphone. The arrow becomes progressively grey when the tilting is active. Tilt sensitivity can be altered in the advanced settings screen.
Throttle control: This controls the power of the flapping of the wings and therefore the speed at which the bird gains altitude. The cursor position is relative - all you need to do is place your finger somewhere on the screen to create the zero position. Then, glide your finger towards the top to accelerate, and towards the bottom to reduce the throttle. When CRUISE CONTROL is inactive, the cursor returns to zero as soon as you lift your finger (it springs back) and the bird begins to glide. Place your finger on the screen again and slide it towards the top to set the throttle to your desired level. When CRUISE CONTROL is active, the cursor can be released and the throttle level will remain at the speed at which it's set. You can freely control the bird at a constant speed by tilting your smartphone without worrying about the screen. To regain control of the throttle, simply touch the screen again with your thumb.
Attention: In this scenario, there may be a lag when stopping the bird so ensure the bird has adequate space, free from risks.
Attention: Not touching the screen for extended periods can activate your smartphone's standby screen during the flight if the power saving controls haven't been changed.
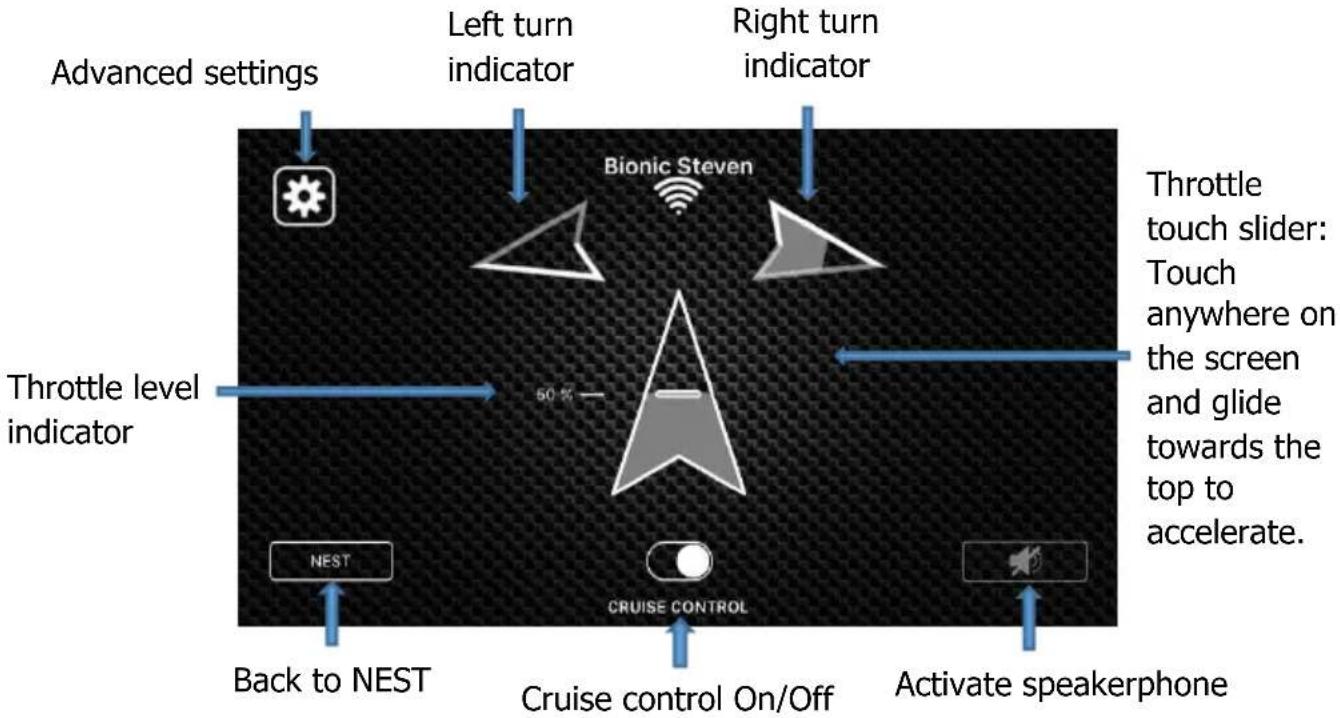
"Steering Wheel" interface ("Intuitive" mode): For this mode, hold the device using two hands in front of you in landscape mode. Control the throttle using your thumb on the screen, and steer the bird by turning the smartphone like a steering wheel.
text_image
Advanced settings Left turn indicator Right turn indicator Bionic Steven Throttle level indicator 50 % NEST Back to NEST Cruise control On/Off Cruise control Cruise CONTROL Activate speakerphone Throttle touch slider: Touch anywhere on the screen and glide towards the top to accelerate.Typically, for a right-handed person, the right thumb guides the speed while the hands turn the smartphone like a steering wheel to steer the bird.
Direction: The direction of a turn (right/left) and its angle is controlled by the tilt angle of the smartphone. The arrow becomes progressively grey when the tilting is active. Tilt sensitivity can be altered in the advanced settings screen.
Throttle control: This controls the power of the flapping of the wings and therefore the speed at which the bird gains altitude. The cursor position is relative - all you need to do is place your finger somewhere on the screen to create the zero position. Then, glide your finger towards the top to accelerate, and towards the bottom to reduce the throttle.
When CRUISE CONTROL is inactive, the cursor returns to zero as soon as you lift your finger (it springs back) and the bird begins to glide. Place your finger on the screen again and slide it towards the top to set the throttle to your desired level. When CRUISE CONTROL is active, the cursor can be released and the throttle level will remain at the speed at which it's set. You can freely control the bird at a constant speed by tilting your smartphone without worrying about the screen. To regain control of the throttle, simply touch the screen again with your thumb.
Attention: In this scenario, there may be a lag when stopping the bird so ensure the bird has adequate space, free from risks.
Attention: Not touching the screen for extended periods can activate your smartphone's standby screen during the flight if the power saving controls haven't been changed.
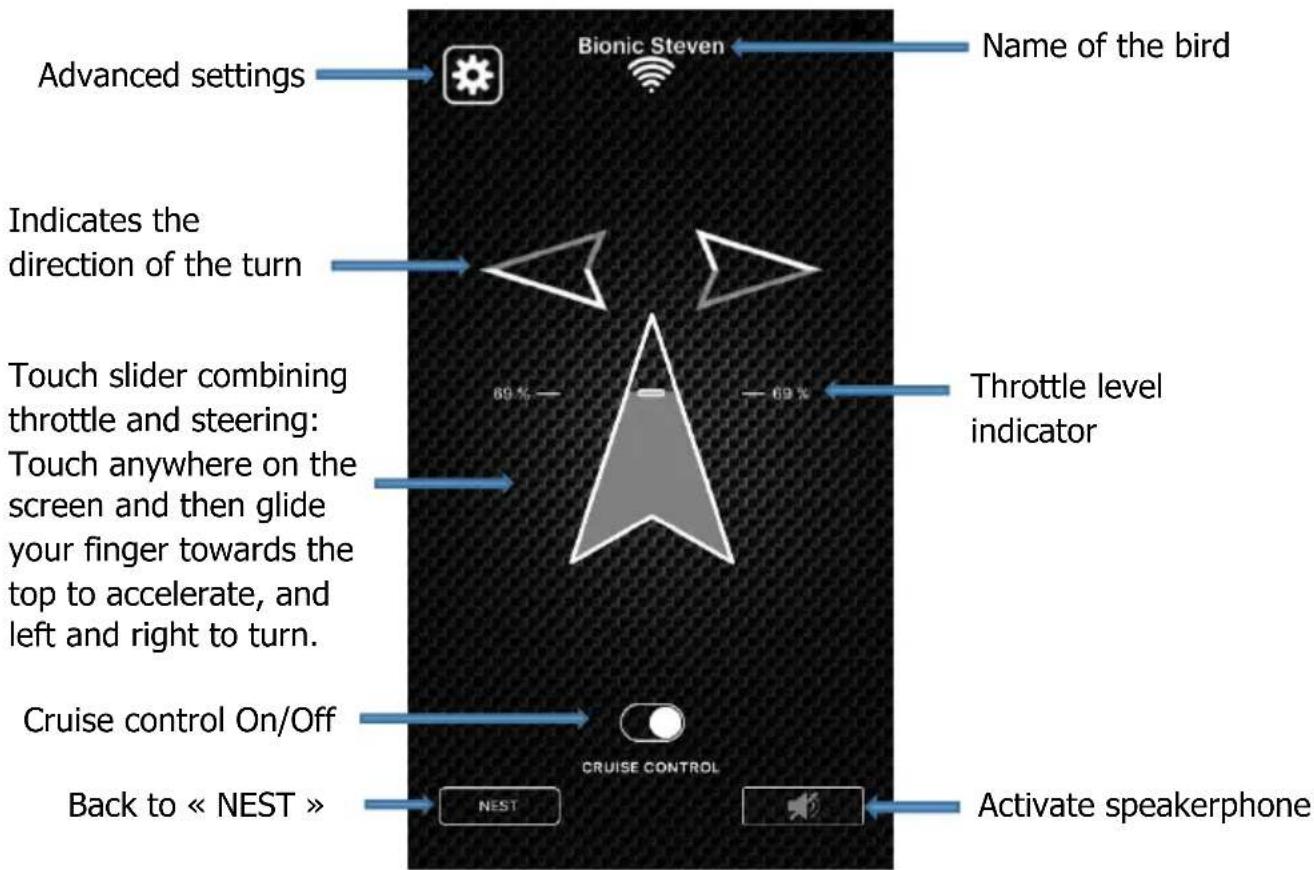
"One Finger" interface ("Joystick" mode): For this mode, hold the device in one hand, and control the throttle and the steering with the index finger of your other hand.
text_image
Advanced settings Bionic Steven Name of the bird Indicates the direction of the turn 69% Throttle level indicator Touch slider combining throttle and steering: Touch anywhere on the screen and then glide your finger towards the top to accelerate, and left and right to turn. Cruise control On/Off Back to « NEST » CRUISE CONTROL NEST Activate speakerphoneBy placing your index finger on the screen, you define the zero position of the throttle/steering cursor.
Steering: Gliding your finger either left or right allows you to control the steering.
Sensitivity can be altered in the advanced settings screen.
Throttle: Gliding your finger up and down allows you to control the throttle.
Sensitivity can be altered in the advanced settings screen.
When CRUISE CONTROL is inactive, the cursor returns to zero as soon as you lift your finger (it springs back) and the bird begins to glide. Place your finger on the screen again and slide it towards the top to set the throttle to your desired level.
When CRUISE CONTROL is active, the cursor can be released and the throttle level will remain at the speed at which it's set. However, the steering always returns to the centre position.
Attention: In this scenario, there may be a lag when stopping the bird so ensure the bird has adequate space, free from risks.
Attention: Not touching the screen for extended periods can activate your smartphone's standby screen during the flight if the power saving controls haven't been changed.
flowchart
graph TD
    A["Advanced settings"] --> B["Bionic Steven"]
    C["Direction arrows: Indicate direction of the turn."] --> D["39%"]
    E["Activate speakerphone"] --> F["Back to « NEST »"]
    G["NEST"] --> H["Cruise control on/off"]
    I["CHUISE CONTROL"] --> H
    J["Throttle level indicator"] --> K["->"]
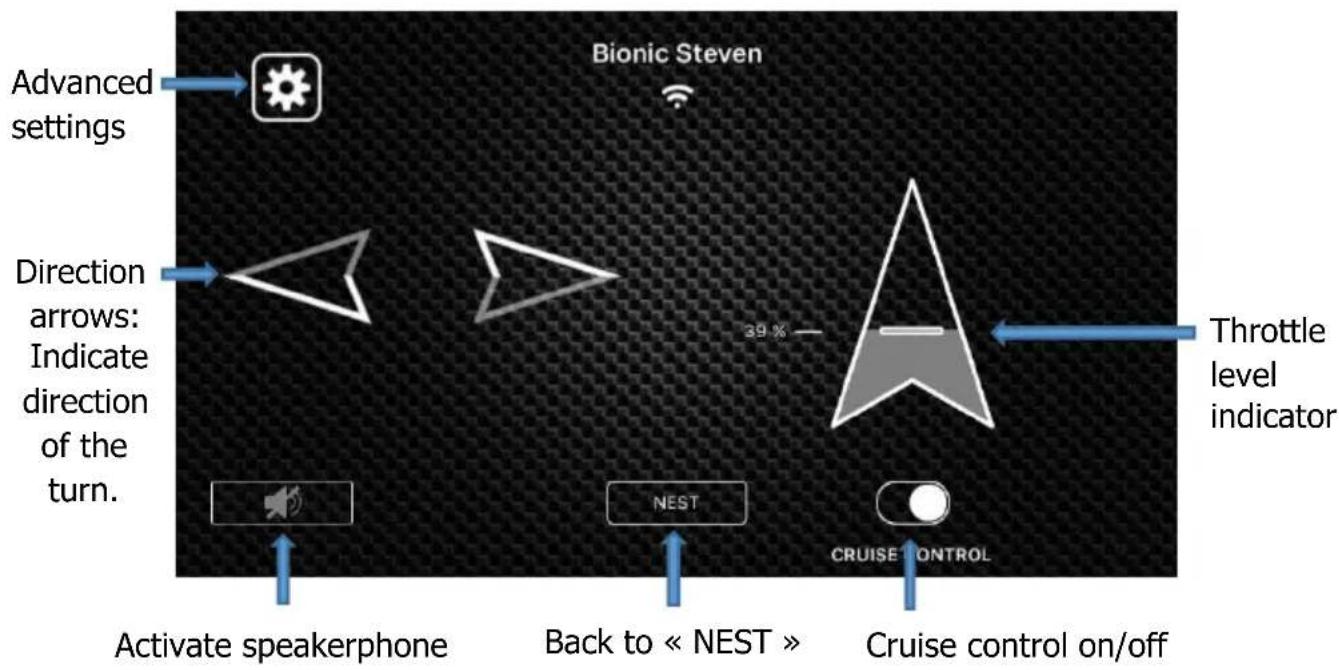
"RC Classic" interface ("Joystick" mode): For this mode, take the device in your two hands in landscape mode, and activate the commands using your two thumbs.
Typically, for a right-handed person, the right thumb controls the throttle, and the left thumb controls the steering. For a left-handed person, this would be the reverse. You can select the "left-handed" option in the advanced settings.
The active zones of the cursors are larger than their graphic representations, which are there to clearly indicate the zones when glancing at the screen.
When CRUISE CONTROL is inactive, the cursor returns to zero as soon as you lift your finger (it springs back) and the bird begins to glide. Place your finger on the screen again and slide it towards the top to set the throttle to your desired level.
When CRUISE CONTROL is active, the cursor can be released and the throttle level will remain at the speed at which it's set.
Attention: In this scenario, there may be a lag when stopping the bird so ensure the bird has adequate space, free from risks.
Attention: Not touching the screen for extended periods can activate your smartphone's standby screen during the flight if the power saving controls haven't been changed.
Note: This mode allows for the use of physical joysticks (not included), notably screen sticks, which attach to the screen to transform your smartphone into a veritable classic radio control.
text_image
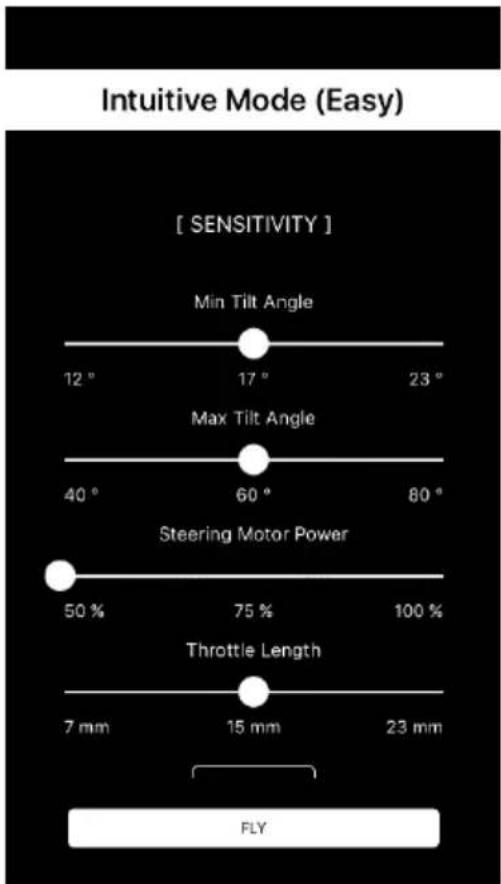
Intuitive Mode (Easy) [ SENSITIVITY ] Min Tilt Angle 12° 17° 23° Max Tilt Angle 40° 60° 80° Steering Motor Power 50% 75% 100% Throttle Length 7 mm 15 mm 23 mm FLY"Easy" interface settings:
Min and max tilt angle: The minimum angle of the hand (horizontally) at which the steering will be activated is 17^ by default. You can set the angle to be between 12^ and 23^ . This angle allows you to alter the tolerance for holding the smartphone at a perfectly flat position, to avoid triggering a turn by a slight movement. Similarly, it's possible to adjust the maximum steering angle to be between 40^ and 80^ . The maximum angle at which the rudder is pushed to the bottom is 60^ by default.
Between these two tilting angles, the power of the turn varies from 0 to 100% ( 17^ = 0% , 60^ = 100% ).
Motor steering power: In case of difficulty when turning the bird, increase the power to help by accelerating the change of direction. The default value is 50%.
Throttle path: Set the desired length of the path (movement of the finger) to go from minimum to maximum power (15mm by default).
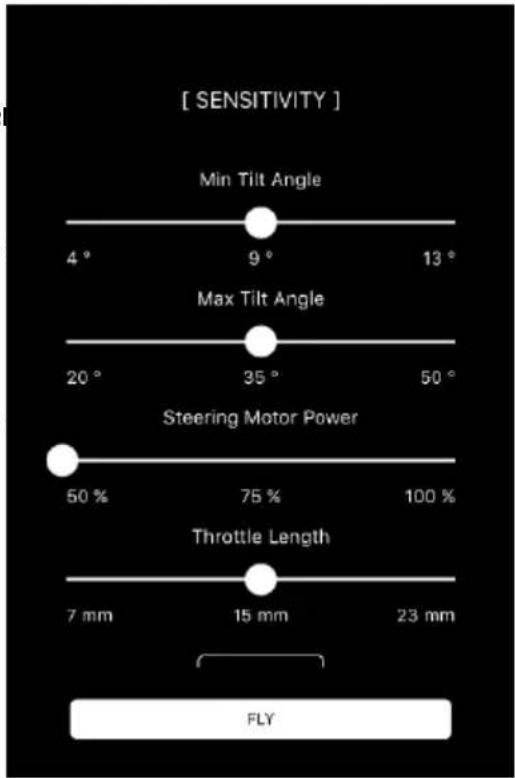
"Steering wheel" interface settings:
Min and max tilt angle: The minimum angle of the hand (horizontally) at which the steering will be activated is 9^ by default. You can set the angle to be between 4^ and 13^ . This angle allows you to alter the tolerance for holding the smartphone at a perfectly flat position, to avoid triggering a turn by a slight movement. Similarly, it's possible to adjust the maximum steering angle to be between 20^ and 50^ . The maximum angle at which the rudder is pushed to the bottom is 35^ by default.
Between these two tilting angles, the power of the turn varies from 0 to 100% ( 9^ = 0% , 35^ = 100% ). Motor steering power: In case of difficulty when turning the bird, increase the power to help by accelerating the change of direction. The default value is 50% .
Throttle path: Set the desired length of the path (movement of the finger) to go from minimum to maximum power (15mm by default).

Intuitive Mode (Steering Wheel)
gauge
| Parameter | Value | | --------------------- | ----- | | Min Tilt Angle | 4° | | Min Tilt Angle | 9° | | Max Tilt Angle | 20° | | Max Tilt Angle | 35° | | Steering Motor Power | 50% | | Steering Motor Power | 75% | | Steering Motor Power | 100% | | Throttle Length | 7 mm | | Throttle Length | 15 mm | | Throttle Length | 23 mm | [SENSITIVITY] FLY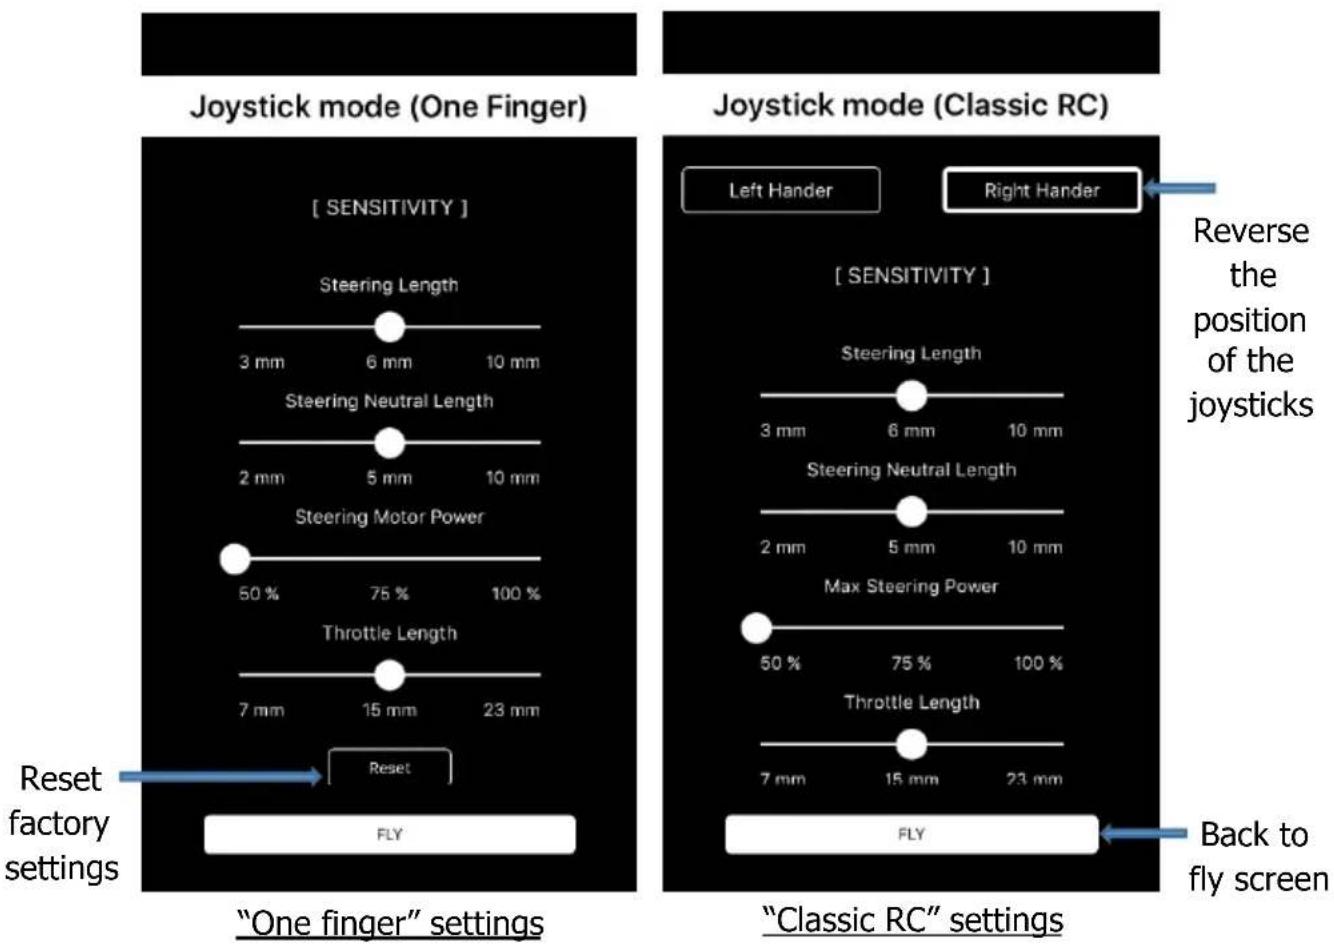
text_image
Joystick mode (One Finger) [ SENSITIVITY ] Steering Length 3 mm 6 mm 10 mm Steering Neutral Length 2 mm 5 mm 10 mm Steering Motor Power 50 % 75 % 100 % Throttle Length 7 mm 15 mm 23 mm Reset FLY "One finger" settings Joystick mode (Classic RC) Left Hander Right Hander Reverse the position of the joysticks [ SENSITIVITY ] Steering Length 3 mm 6 mm 10 mm Steering Neutral Length 2 mm 5 mm 10 mm Max Steering Power 50 % 75 % 100 % Throttle Length 7 mm 15 mm 23 mm FLY "Classic RC" settings Back to fly screen"Joystick" interface settings ("Classic RC" and "One finger"):
Neutral steering path and Steering path: These settings configure the path your finger needs to follow (movement of the finger) to start triggering a turn, and also to attain a maximum turn. They are set by default at 6mm and 5mm.
Motor steering power: In case of difficulty when turning the bird, increase the power to help by accelerating the change of direction. The default value is 50%.
Throttle path: Set the desired length of the path (movement of the finger) to go from minimum to maximum power (15mm by default).
Setting available for the Classic RC mode only: Right-handed/Left-handed
This setting allows you to reverse the position of the joysticks that control the throttle and the steering, to allow the screen to reflect your dominant hand. You can choose between right or left-handed display (or mode 1 and mode 2 for the RC enthusiasts).
Once your settings are finalised, click on the "Fly" button to return to the flying screen. Pressing the "RESET" button on the bottom of each setting screen allows you to restore the factory settings.
Conditions of use:
Indoor use doesn't require any conditions except a room big enough to fly around without obstacle. Outdoor use requires adapted weather conditions, ideally no wind at all (recommended for beginner, and compulsory to balance wings, see below), and no rain. For an experienced user, wind up to 8 mph is acceptable, if it's steady. So it's better to choose an open area, far from trees or buildings, which could create whirlwinds. Avoid flying near a road, or water, where it could fall by accident.
Adjusting the tail
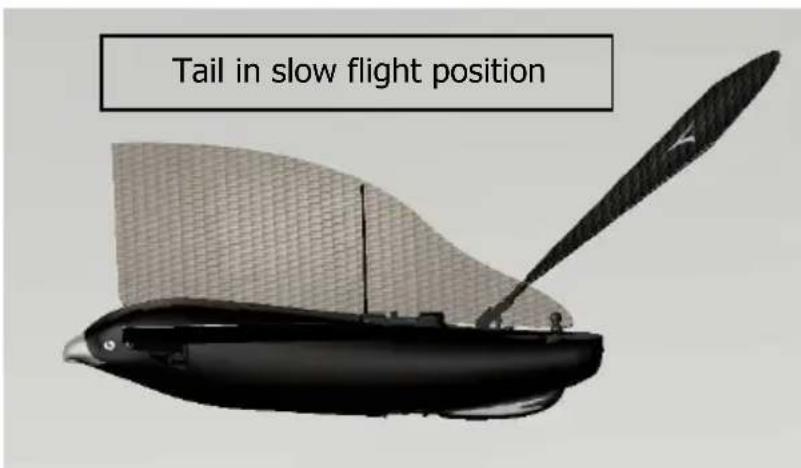
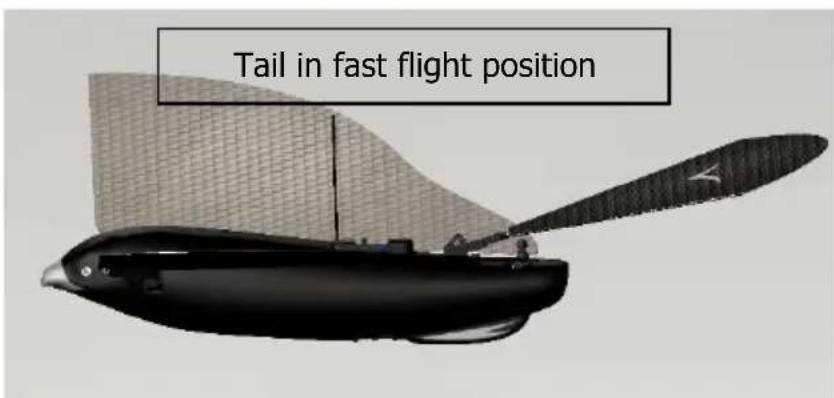
The tail angle is adjustable (5 notches), making possible to adjust the speed of BIONIC BIRD. To change the notch, just push or pull on the base of the tail.
text_image
Tail in slow flight position* For indoor flights, in a confined space, or for slow flights: set the tail in a high position (choose the notch n° 3, starting from the bottom, among the 5 possible positions). The notches 4 and 5 are not recommended at begin.
text_image
Tail in fast flight position* For outdoor flights, in a big space or for fast flights: adjust the tail in a low position (using the notch 1 or 2). Notch 2 is recommended for beginners. Notch 1 is for best performance but requires a bit of practice, and wings adjustment (see below). NB: When picking up the bird after landing, always check that the tail hasn't moved to another notch. If so, set it back again.
Flying BIONIC BIRD
* Launching: Push the throttle stick 34 of the way up. Always point BIONIC BIRD facing the wind, launch the bird from your hand with a gentle horizontal toss. Let it gain some altitude before trying any turns. If it flies downward, you can try with the tail one notch higher.
* Gliding flight: To make BIONIC BIRD glide: gain altitude, reduce speed and get the bird flying straight, then cut the throttle.
* Out of range: If BIONIC BIRD flies out of range of the transmitter, just get closer to the bird and it will connect again immediately.
* Emergency landing: If you need to land BIONIC BIRD quickly (in a risky situation), turn right or left to maximum and cut throttle, then release the direction stick. BIONIC BIRD will nosedive towards the ground. Generally, doing tight turns will cause BIONIC BIRD to descend. It is a good way to control its flight.
WARNING: do not keep the direction stick at maximum on one side for a long time, even when the bird is not flying because it could cause the steering micro-motor to overheat.
* End of flight: When BIONIC BIRD flight becomes less powerful it is time to recharge it (see above). When the LiPO battery inside bird is 95% empty the power to the wings will be cut and the bird will glide down to the ground.
* Battery power off: It may happen sometimes at the end of the flight, that the battery voltage become too low, and it powers off automatically (bird LED is OFF), although the switch is still ON.
No problem, when you put the bird back on charge, it will be reactivated.
First flight - Adjusting the wings
From the very first flight, it is essential to check the wings balance, to adjust it if needed. To do this, it needs to fly outdoor without any wind, and set the tail in flat position (notch 1).
If while flying, you notice the following unbalanced flight:
- Immediately when launched, the bird turns to one side and go directly to the ground (big unsteadiness).
- The direction stick is in the middle position but the bird turn left or right in small circles.
- It seems that the bird turns more easily to one side than to the other.
Then you will have to trim the wings.
A bag with small pieces of aluminium tape (ballast) is supplied with your BIONIC BIRD.
You must ballast opposite wings to the turning side you observed (in other words, the tape must be stuck on the end of the wings which on the external of the turning).

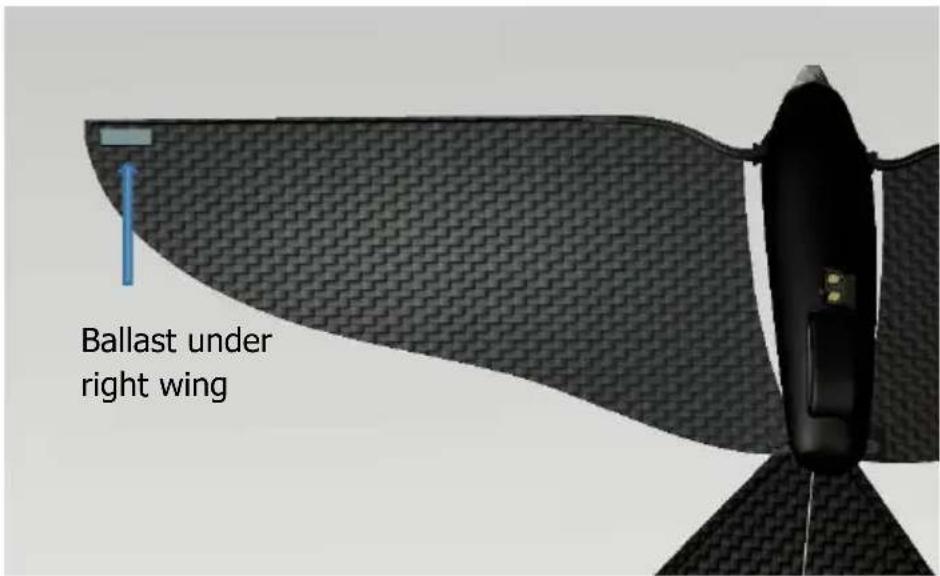
Bird turns to the left
text_image
Ballast under right wingIf the bird tends to turn to the left, add some weight to the right wing: Take one of the aluminium tape piece and stick it near the tip of the right wing, below the wing, as shown on the picture.
If the bird tends to turn to the right, add the tape on the left wing same way.
Try flying the bird again, and if necessary, add another tape upon first one. Repeat process until you get a straight flight or a slight turn to the other side than observed first. Your BIONIC BIRD is now balanced and its performance is optimized.
NB: - BIONIC BIRD is pre-balanced in factory, there may be some tape already stuck on one wing. If a wing already have too much ballast, choose to remove a tape on this wing rather than adding one on the opposite wing.
- Flying with tail set in a high position may require a different wing adjustment. In order to fly the bird with tail in high position in a confined space and keep a precise control, it is recommended to do a very precise wing adjustment with the tail in that position.
Battery protection:
The electronic protection on the LI-PO battery prevents it from irreversible damage. It operates (by cutting off the power) in the following 2 cases:
- A short-circuit
- When the battery discharges below 2.5 Volts.
This happens inevitably when you forget to switch off your BIONIC BIRD, and the battery keeps on discharging slowly for hours. Then, the body LED will switch off (even though the power switch is still ON). You just need to charge BIONIC BIRD again to reactivate the battery. During charge, the bird LED will start lighting again).
WARNING: if BIONIC BIRD doesn't light up, whatever the switch position, try to charge it. (Probably the battery protection system has been activated).
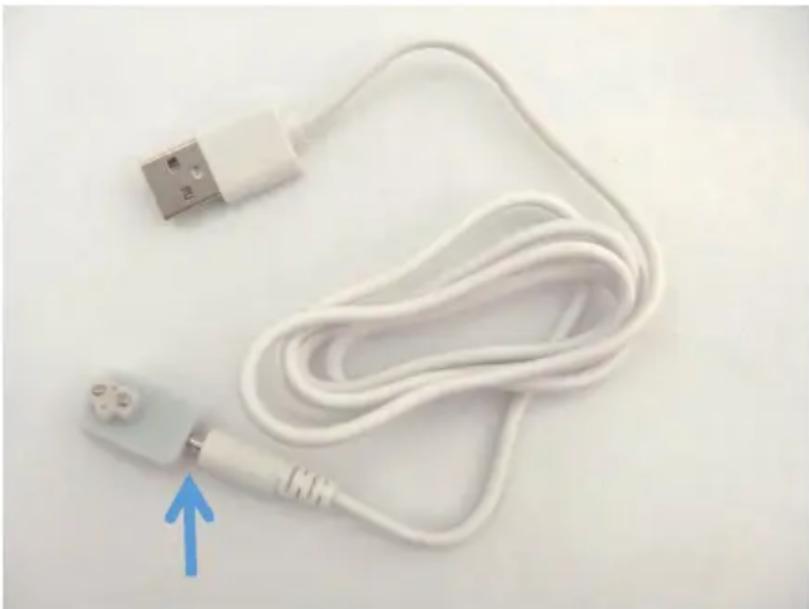
natural_image
Coiled white cable with a small connector and a USB port, no visible text or symbolsThe first thing to do is to plug the USB cable to the adapter.
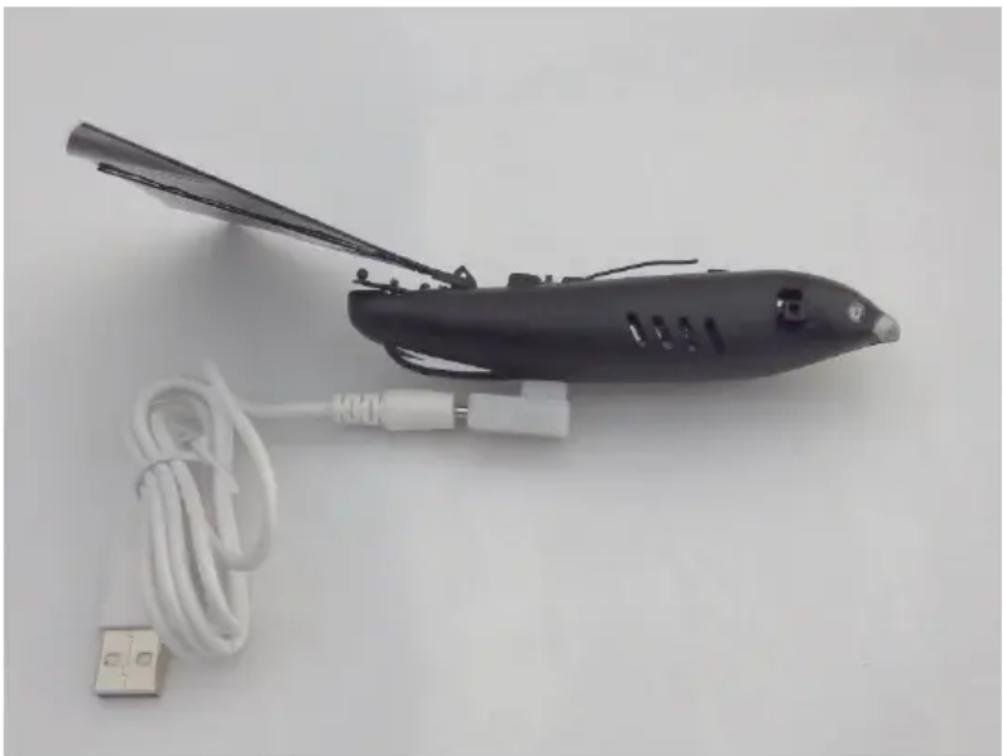
natural_image
Black 3D printer with attached cable and connector, placed on a plain surface (no text or symbols visible)To charge BIONIC BIRD, simply connect the magnetic contact points located under the bird's body and the top of the plug adapter as shown on the picture. They magnetically connect to each other automatically and the bird will sit firmly on it. Then connect the cable to your smartphone charger or to a USB socket of your computer.
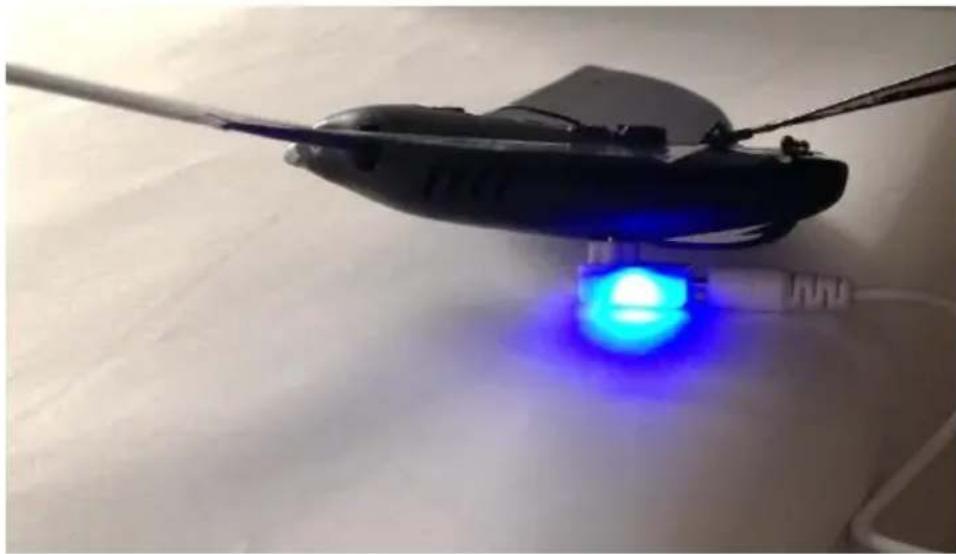
natural_image
Close-up of a black robotic device with a blue LED light emitting light, mounted on a white surface (no visible text or symbols)The upper part of the adapter lights in red when it starts to charge. Charging takes around 18 minutes. When BIONIC BIRD is fully charged and ready to fly again, light turn in blue. Note: - The light can be difficult to see when outdoors in direct sunlight. It's easiest to check the light in a shadow to see whether BIONIC BIRD is charged.
WARNING: It is compulsory to use the plug adapter supplied only to charge BIONIC BIRD. Any other charging device could damage the bird battery. In order to protect the LI-PO battery inside your BIONIC BIRD, do not leave the bird totally discharged when you stop using it. Before to store it, remember to charge the bird a few minutes, and then to switch it OFF.
VII - WINGS REPLACEMENT
If a wing is broken, you can replace it with the spare set of wings included in the box.
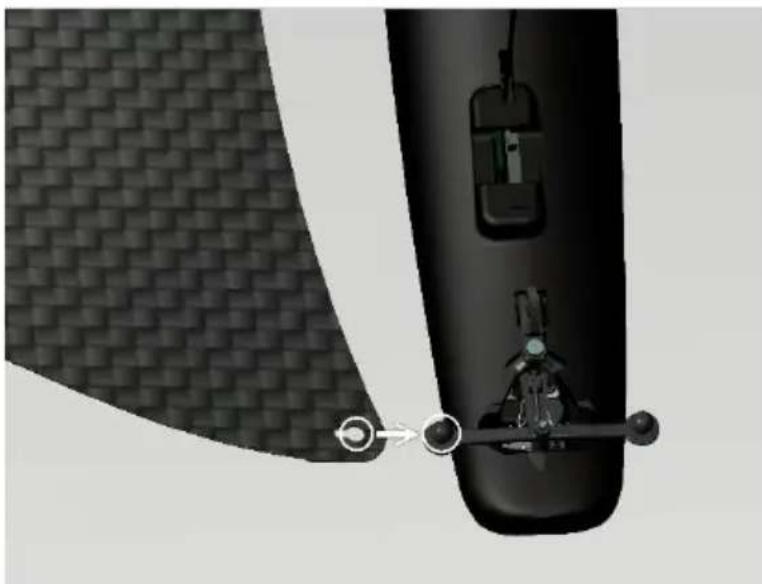
natural_image
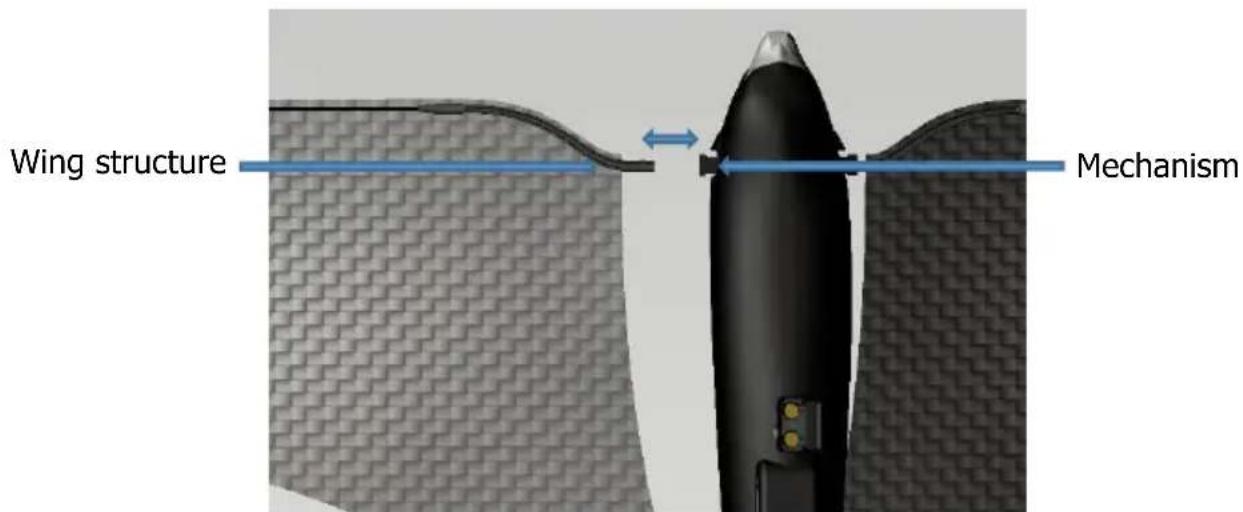
Close-up of a black remote control panel with a textured fabric pattern and a mechanical lever mechanism (no text or symbols visible)Lift the tail to the maximum notch. Pinch one side of the wing, at the back of the wing where the wing is clipped to the round knob, and take it off the knob.
text_image
Wing structure MechanismThen detach the front of the wing: hold the wing structure firmly and pull it out so that it comes out the slot. It is not necessary to change both wings, when just one is broken. Choose the appropriate spare wing (left or right) corresponding to the one to be replaced. Proceed reverse way: Start by inserting the wing structure in the slot, you should feel a "click" which means that the wing is correctly inserted.
Clip the back of the wing to the round knob, underneath the tail.
VIII – REPLACING OTHER PARTS
If ever the foam body, the tail or other parts were destroyed, please feel free to contact our customer's service at: sav@mybionicbird.com to get replacement parts and instructions on how to replace them.
IMPORTANT NOTES ABOUT THE USE OF BIONIC BIRD:
- It is strongly recommended to charge the bird at least at 50% of the battery capacity before to store it after use. Or the battery life will be shortened a lot.
- At cold temperature, the batteries are losing most of their power. It may happen that your BIONIC BIRD performance decrease. The egg may also take more time to charge it. It is advised to charge the bird indoor (warm temperature), then to go out for flying. Below 0°C (32 F), the wings may also unstick. It is advisable not to play in such low temperature.
- The motor and clockworks inside BIONIC BIRD are very efficient, with very tight tolerance.
They need a training period during which they will get free of frictions. The maximum power and flying time will be reached after about ten flights.