SSL 2+ - Hi-Fi Solid State Logic - Free user manual and instructions
Find the device manual for free SSL 2+ Solid State Logic in PDF.


| Product Type | USB Audio Interface |
| Brand | Solid State Logic |
| Model | SSL 2+ |
| Category | Hi-Fi |
| Dimensions (approx.) | 270 x 160 x 70 mm |
| Weight (approx.) | 1 kg |
| Power Supply | USB bus powered or external DC adapter (sold separately) |
| Sample Rate | Up to 192 kHz / 24-bit |
| Microphone Inputs | 2 combo XLR/TRS inputs with +48V phantom power |
| Instrument Inputs | 2 high-Z instrument inputs (shared with mic inputs) |
| Headphone Outputs | 2 independent headphone outputs with dedicated volume control |
| Monitor Outputs | 2 balanced TRS line outputs (L/R) |
| MIDI I/O | MIDI input and output (5-pin DIN) |
| USB Connection | USB Type-C (USB 2.0 compatible) |
| Legacy 4K Button | Analog enhancement feature on each input channel |
| Recording Software | Includes Ableton Live Lite, SSL Native plugins, and more |
| Maintenance and Cleaning | Wipe with a dry soft cloth; avoid liquids and abrasives |
| Safety Precautions | Keep away from moisture, heat, and direct sunlight; do not open the device |
| Spare Parts and Repairability | Contact Solid State Logic support for service and replacement parts |
| General Information | High-quality audio interface for home studio and professional use |
Frequently Asked Questions - SSL 2+ Solid State Logic
User questions about SSL 2+ Solid State Logic
0 question about this device. Answer the ones you know or ask your own.
Ask a new question about this device
Download the instructions for your Hi-Fi in PDF format for free! Find your manual SSL 2+ - Solid State Logic and take your electronic device back in hand. On this page are published all the documents necessary for the use of your device. SSL 2+ by Solid State Logic.
USER MANUAL SSL 2+ Solid State Logic
SSL Support > Audio Interfaces > SSL 2 | SSL 2+ MKI & MKII
Search site...


SSL 2+ MKII User Guide
Follow
13 August 2024 10:03
Home Sign in / Register
text_image
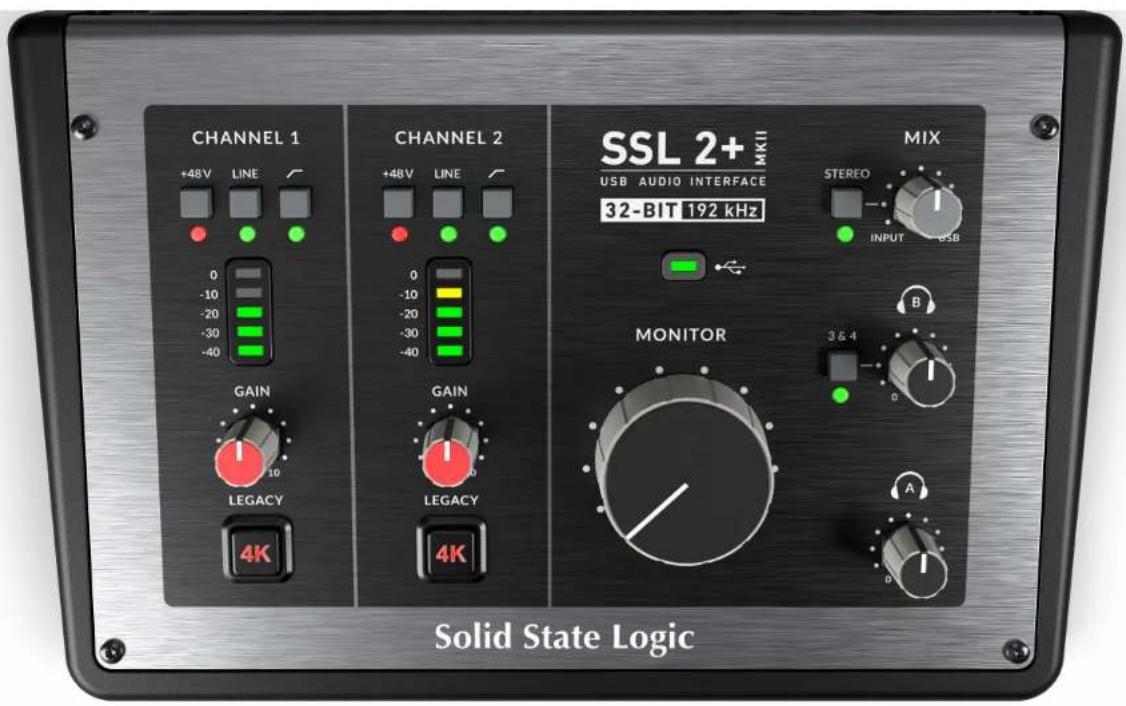
CHANNEL 1 +48V LINE 0 -10 -20 -30 -40 GAIN LEGACY 4K CHANNEL 2 +48V LINE 0 -10 -20 -30 -40 GAIN LEGACY 4K SSL 2+ MKII USB AUDIO INTERFACE 32-BIT 192 kHz MIX STEREO INPUT USB MONITOR 3 & 4 A Solid State LogicIntroduction to SSL 2+ MKII
Congratulations on purchasing your SSL 2+ MKII USB audio interface. A whole world of recording, writing and production awaits you! We know you're probably keen to get up and running, so this User Guide is set out to be as informative and
What is SSL 2+ MKII?
SSL 2+ MKII is a USB-powered audio interface that enables you to get studio-quality audio into and out of your computer with minimal fuss and maximum creativity. On Mac, it's class-compliant - this means that you don't need to install any software audio drivers. On Windows, you'll need to install our SSL USB Audio ASIO/WDM driver, which you'll find on our website - see the Quick-Start section of this guide for more information on getting up and running. Once you've done this, you'll be ready to start connecting your microphones and musical instruments. The signals from these inputs will be sent into your favourite music creation software / DAW (Digital Audio Workstation). The outputs from the tracks in your DAW session (or indeed your favourite media player) can be sent out of the monitor and headphone outputs, so you can hear your creations in all their glory, with stunning clarity.
Features
- 2 x SSL-designed microphone preamps with unrivalled EIN performance and huge gain range for a USB-powered device.
- Switchable Mic/Line, +48V phantom power & high-pass filter per input
• LINE input bypasses pre-amp stage - ideal for connecting the output of an external preamp
• Auto-detect Instrument (DI) input per input - Per channel Legacy 4K switches - analogue colour enhancement for any input source, inspired by the 4000-series console
- 2 x professional-grade, independent headphone outputs with separate volume controls & plenty of power
• 32-bit / 192 kHz AD/DA Converters - capture and hear all the detail of your creations
Home Sign in / Register
- Stereo Loopback virtual input for podcasting, content creation and streaming
- SSL Production Pack Software Bundle: including SSL Native Vocalstrip 2 and Drumstrip DAW plug-ins, plus much more!
- USB 2.0, bus-powered audio interface for Mac/PC - no power supply required
• MIDI 5-Pin DIN Inputs & Outputs
• K-Lock Slot for securing your SSL 2+
SSL 2 MK II vs SSL 2+ MK II
Which one is right for you, the SSL 2 MKII or the SSL 2+ MKII? The table below will help you to compare and contrast the differences between SSL 2 MKII and SSL 2+ MKII. Both have 2 input channels for recording and balanced monitor outputs for connecting to your speakers. The SSL 2+ MKII gives you 'that little bit more', with 2 additional balanced outputs (outputs 3&4) and 2 x independent high-powered outputs, with their own volume controls. SSL 2+ also features traditional MIDI input and MIDI outputs, for connecting to drum modules or keyboards.
| FEATURE SSL 2 MKII SSL 2+ MKII | |
| Best Suited For Individuals Collaborators | |
| Mic/Line/Instrument Inputs 2 2 |
Home Sign in / Register
| Balanced L & R Monitor Outputs Yes Yes | ||
| Additional Balanced Outputs - Yes x 2 (4 Total) | ||
| Headphone Outputs 2 (same mix & levels) 2 (independent mixes & levels) | ||
| Low Latency Monitor Mix Control | Yes Yes | |
| MIDI I/O - Yes | ||
| Stereo Loopback Yes Yes | ||
| SSL Production Pack Software Yes Yes | ||
| DC-Coupled Outputs Yes Yes | ||
| USB Bus-Powered | Yes | Yes |
Get-Started
Unpacking
The unit has been carefully packed and inside the box, you will find the following items:
- SSL 2+ MKII
- Safety Guide
• 1.5m 'C' to 'C' USB Cable
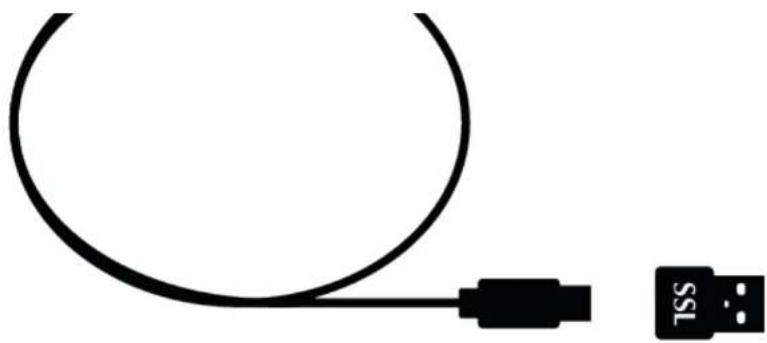
Please use the provided USB 'C' to 'C' Cable to connect the SSL 2+ MKII to your computer. The connector on the rear of SSL 2 MKII is a 'C' type. The type of USB port you have available on your computer will determine if you should use the included 'C' to 'A' adapter. Newer computers may have 'C' ports, whereas older computers may have 'A' ports. As this is a USB 2.0-compliant device, it will make no difference to the performance if you require the additional adapter to connect to your system. SSL 2+ MKII is powered entirely from the computer's USB-bus power and therefore requires no external power supply. When the unit is receiving power correctly, the green USB LED will light a steady green colour. For best stability and performance, we recommend using one of the included USB cable. Long USB cables (especially 3m and above) should be avoided as they tend to suffer from inconsistent performance and are unable to provide steady and reliable power to the unit.
USB Hubs
Wherever possible, it is best to connect SSL 2+ MKII directly to a spare USB port on your computer. This will give you the stability of an uninterrupted supply of USB power. However, if you do need to connect via a USB 2.0 compliant hub, then it is recommended that you choose one of high enough quality to provide reliable performance - not all USB hubs were created equally. With SSL 2+ MKII, we've pushed the limits of audio performance on a USB bus-powered interface and as such, some low-cost self-powered hubs might not always be up to the task. Usefully, you can check out our FAQs at solidstatelogic.com/support to see which hubs we've successfully used and found to be reliable with SSL 2+ MKII.
System Requirements
Mac and Windows operating systems and hardware are constantly changing. Please search for 'SSL 2+ MKII Compatibility' in our online FAQs to see if your system is currently supported.
Registering your SSL USB audio interface will grant you access to an array of exclusive software from us and other industry-leading software companies - we call this incredible bundle the 'SSL Production Pack'

text_image
http://www.solidstatelogic.com/get-startedTo register your product, head to www.solidstatelogic.com/get-started and follow the on-screen instructions. During the registration process, you'll need to input the serial number of your unit. This can be found on the label on the base of your unit.
SERIAL NUMBER
Please note: the actual serial number begins with the letters 'SP2'
Once you have completed registration, all of your software content will be available in your logged-in user area. You can return to this area at any time by logging back into your SSL account at www.solidstatelogic.com/login should you wish to download the software another time.
What is the SSL Production Pack?
The SSL Production Pack is an exclusive software bundle from SSL and other third-party companies. To find out more please visit the SSL 2+ MKII product pages on the website.
Quick-Start / Installation
- Connect your SSL USB audio interface to your computer using the included USB cable, with or without the included adapter.
Home Sign in / Register
natural_image
Simple line drawing of a USB cable with a USB icon labeled 'SSL' (no text or symbols on the cable itself)1.5m C to C
C to A USB Adapter
Apple Mac Installation

natural_image
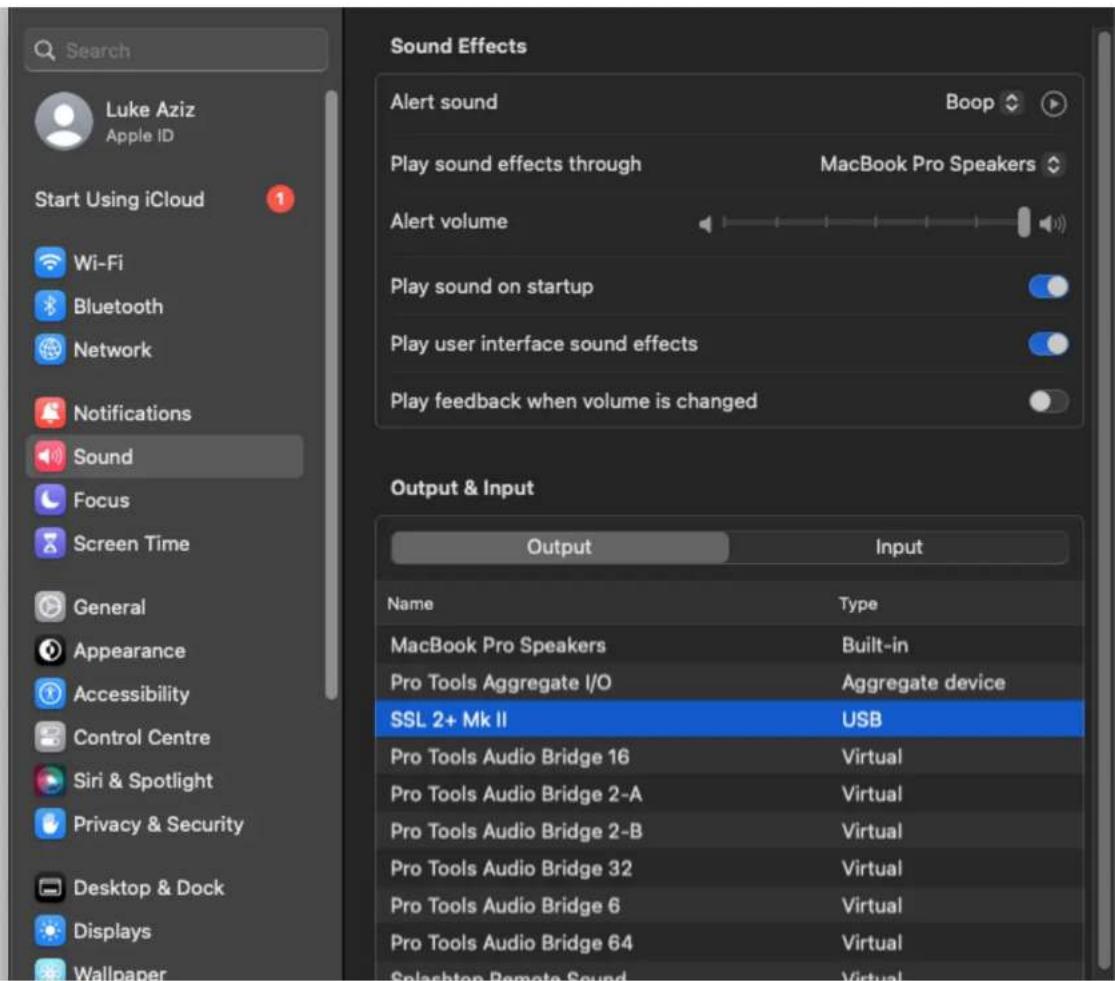
Black silhouette of an apple with a bite mark, no text or symbols present.- Go to 'System Preferences' then 'Sound' and select 'SSL 2+ MKII' as the input and output device (drivers are not required for operation on Mac)
10/30/24, 12:24 PM
SSL 2+ MKII User Guide – SSL Support
Home Sign in / Register
Home Sign in / Register
text_image
Search Luke Aziz Apple ID Start Using iCloud Wi-Fi Bluetooth Network Notifications Sound Focus Screen Time General Appearance Accessibility Control Centre Siri & Spotlight Privacy & Security Desktop & Dock Displays Wallpaper Sound Effects Alert sound Boop Play sound effects through MacBook Pro Speakers Alert volume Play sound on startup Play user interface sound effects Play feedback when volume is changed Output & Input Output Input Name Way MacBook Pro Speakers Built-in Pro Tools Aggregate I/O Aggregate device SSL 2+ Mk II USB Pro Tools Audio Bridge 16 Virtual Pro Tools Audio Bridge 2-A Virtual Pro Tools Audio Bridge 2-B Virtual Pro Tools Audio Bridge 32 Virtual Pro Tools Audio Bridge 6 Virtual Pro Tools Audio Bridge 64 Virtual Splasticon Remote Sound VirtualHome Sign in / Register
Lock Screen
- Open up your favourite media player to begin listening to music or open up your DAW to begin creating music.
Windows Installation

natural_image
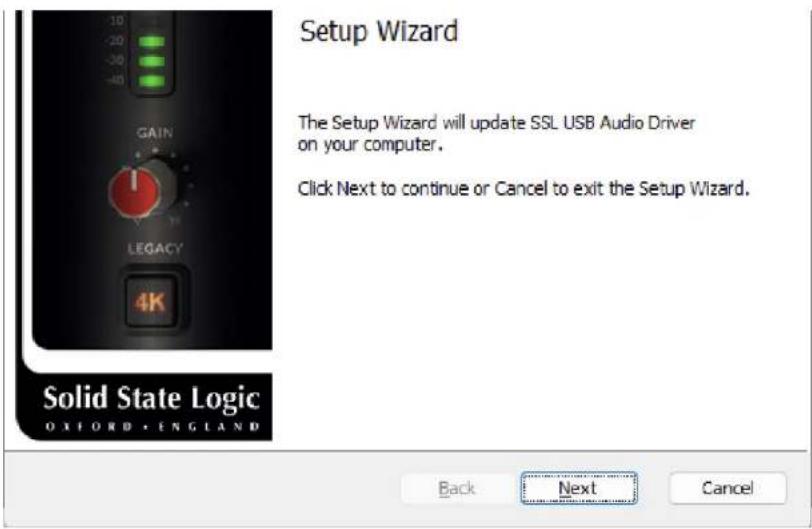
Pure geometric logo with four black squares arranged in a 2x2 grid (no text or symbols)- Download and install the SSL USB ASIO/WDM audio driver for your SSL 2+ MKII. Go to the following web address: www.solidstatelogic.com/support/downloads
10/30/24, 12:24 PM
SSL 2+ MKII User Guide – SSL Support
Home Sign in / Register
text_image
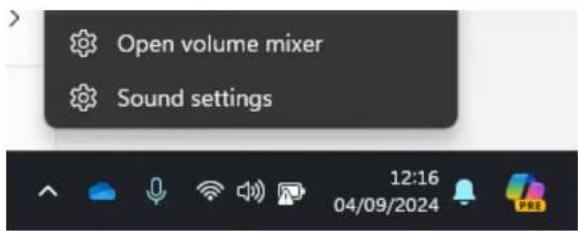
Setup Wizard The Setup Wizard will update SSL USB Audio Driver on your computer. Click Next to continue or Cancel to exit the Setup Wizard. Solid State Logic OX FORD, EN GLAND Back Next Cancel- Go to 'Control Panel' then 'Sound Settings' and select 'SSL 2+ MKII USB' as the default device on both the 'Playback' and 'Recording' tabs
Home Sign in / Register
text_image
Open volume mixer Sound settings 12:16 04/09/2024Home Sign in / Register
Output

Choose where to play sound
Apps might have their own settings
Output 1/2

Speakers
Realtek(R) Audio

Output 1/2
2- SSL 2+ MKII USB Audio Device

PL2480H
HD Audio Driver for Display Audio

Output 3/4
2- SSL 2+ MKII USB Audio Device
Pair a new output device
Add device
Volume


Mono audio
Combine left and right audio channels into one
Off

Input

Choose a device for speaking or recording
Apps might have their own settings
Input ^

Loopback L/R
2- SSL 2+ MKII USB Audio Device

Microphone Array
Intel® Smart Sound Technology for Digital Microphones

Input
2- SSL 2+ MKII USB Audio Device
[Non-Text]
Pair a new input device
Add device
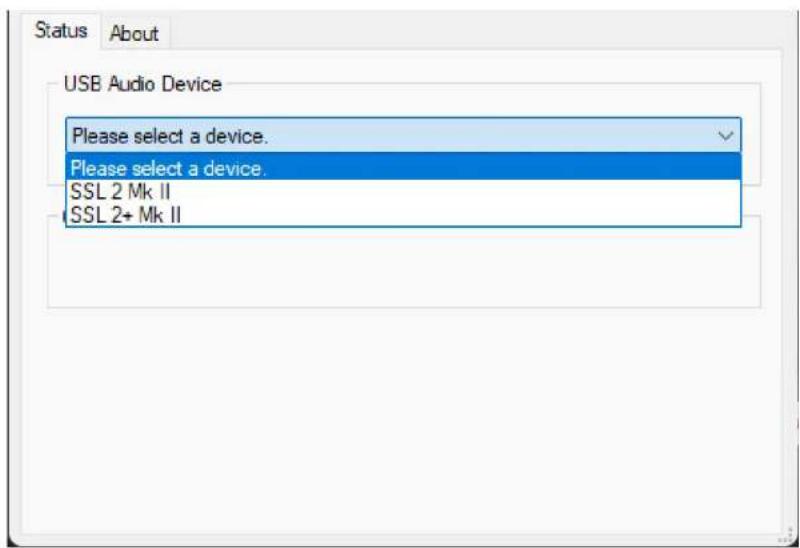
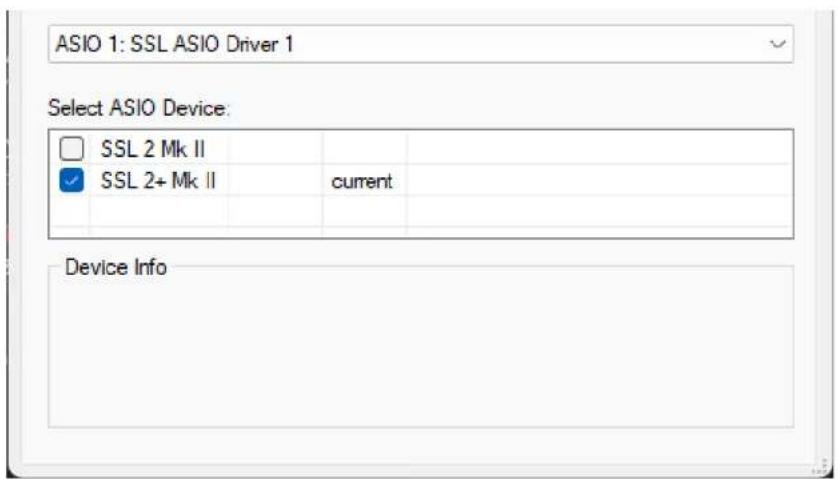
- Go Into the SSL USB Control Panel & Select your SSL Interface & Assign the ASIO Driver (1-4)
10/30/24, 12:24 PM
SSL 2+ MKII User Guide – SSL Support
Home Sign in / Register
text_image
Status About USB Audio Device Please select a device. Please select a device. SSL 2 Mk II SSL 2+ Mk IIHome Sign in / Register
text_image
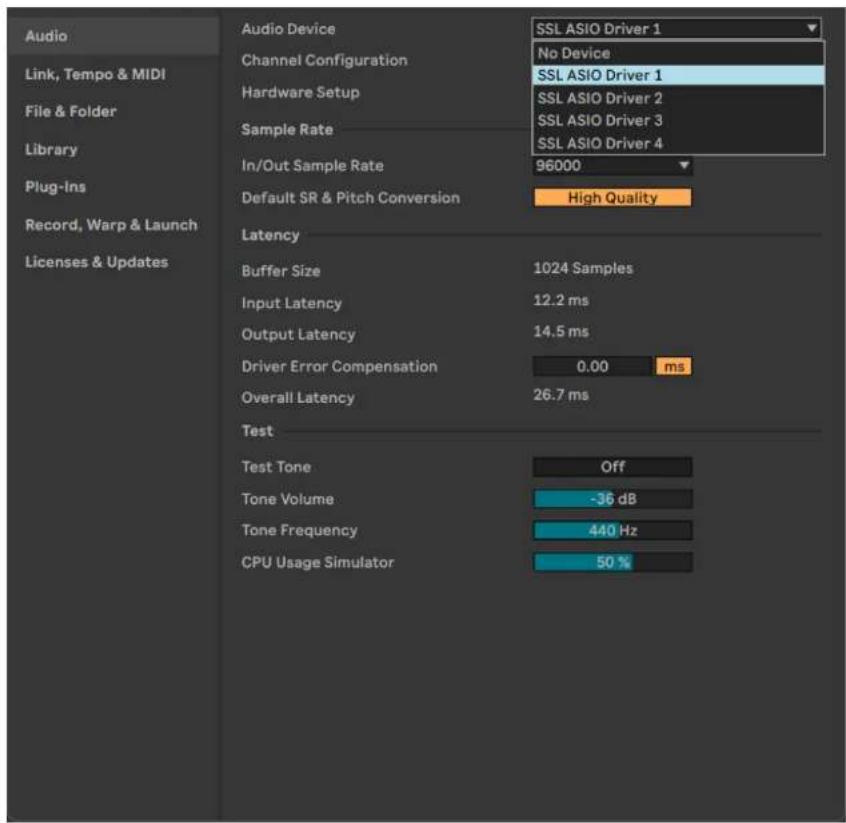
ASIO 1: SSL ASIO Driver 1 Select ASIO Device: SSL 2 Mk II SSL 2+ Mk II current Device Info- Go to your DAW's Audio preferences panel and select the correct ASIO Driver for the interface you are using.
Home Sign in / Register
text_image
Audio Link, Tempo & MIDI File & Folder Library Plug-Ins Record, Warp & Launch Licenses & Updates Audio Device Channel Configuration Hardware Setup Sample Rate In/Out Sample Rate Default SR & Pitch Conversion Latency Buffer Size Input Latency Output Latency Driver Error Compensation Overall Latency Test Test Tone Tone Volume Tone Frequency CPU Usage Simulator SSL ASIO Driver 1 No Device SSL ASIO Driver 1 SSL ASIO Driver 2 SSL ASIO Driver 3 SSL ASIO Driver 4 96000 High Quality 1024 Samples 12.2 ms 14.5 ms 0.00 ms 26.7 ms Off -36 dB 440 Hz 50 %The SSL USB ASIO/WDM driver supports multiple ASIO instances. This means that you can have multiple ASIO applications working with multiple SSL USB devices. For example, SSL 2 MKII working with Pro Tools and SSL 12 working
to link your desired SSL device to one of the 4 ASIO Driver instances in the control panel and then choose that same Driver (SSL ASIO Driver X) in your DAW.
For more information on this process, please visit the SSL Windows ASIO Driver setup Page
Can't Hear Anything?
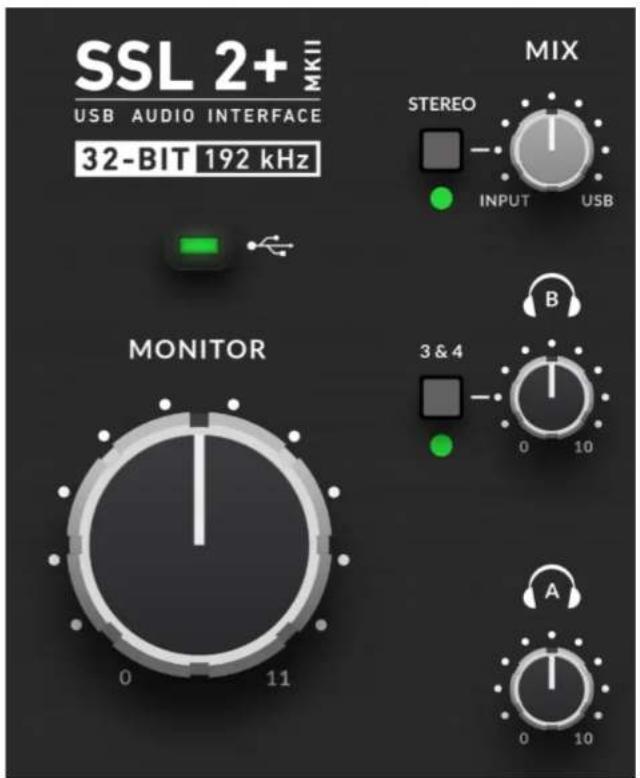
If you have followed the Quick-Start steps but are still not hearing any playback from your media player or DAW, check the position of the MIX control. In the left-most position, you will hear only the inputs you have connected. In the right-most position, you will hear the USB playback from your media player/DAW.
Home Sign in / Register

flowchart
graph TD
    A["Input"] --> B["MONITORS & HEADPHONES"]
    C["USB"] --> B
    D["INPUT"] --> E["MIX"]
    F["USB"] --> E
    G["INPUT"] --> H["MEDIA PLAYERS & DAW PLAYBACK"]
In your DAW, ensure that 'SSL 2+ MKII' is selected as your audio device in the audio preferences or playback engine settings. Don't know how? Please see below....
Selecting SSL 2+ MKII As Your DAW's Audio Device
https://support.solidstatelogic.com/hc/en-gb/articles/20859917333789-SSL-2-MKII-User-Guide#ssl-2-mkii-user-guide-0-0
preferences/ playback settings. Below are examples in Pro Tools and Ableton Live Lite. If you are unsure, please refer to your DAW's User Guide to see where these options can be found.
Pro Tools Setup
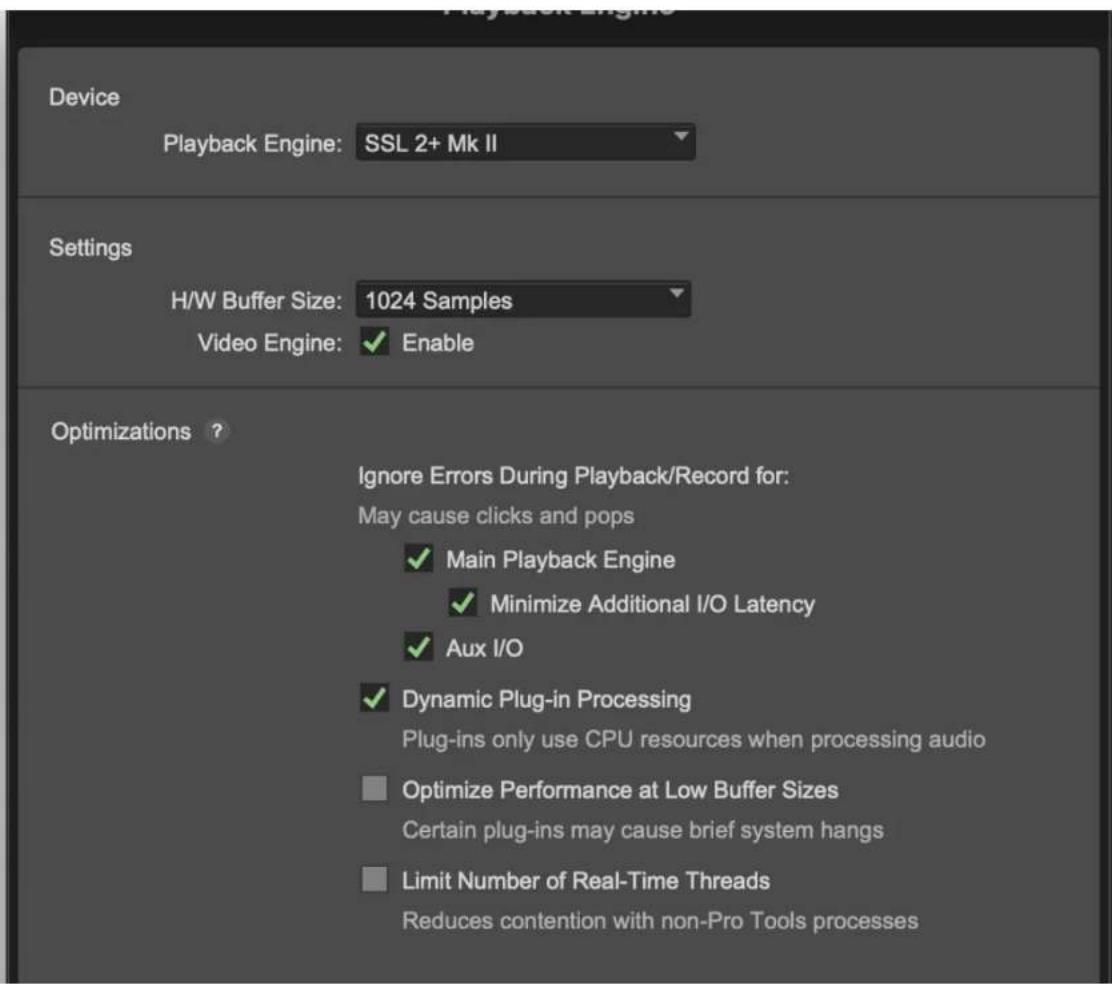
Open Pro Tools and go to the 'Setup' menu and choose 'Playback Engine...'. Make sure that SSL 2+ MKII is selected as the 'Playback Engine' and that 'Default Output' is Output 1-2 because these are the outputs that will be connected to your monitors.
Note: On Windows, ensure that 'Playback Engine' is set to 'SSL 2+ MKII ASIO' for the best possible performance.
Home Sign in / Register
text_image
Playback Engine Device Playback Engine: SSL 2+ Mk II Settings H/W Buffer Size: 1024 Samples Video Engine: ✓ Enable Optimizations ? Ignore Errors During Playback/Record for: May cause clicks and pops ✓ Main Playback Engine ✓ Minimize Additional I/O Latency ✓ Aux I/O ✓ Dynamic Plug-in Processing Plug-ins only use CPU resources when processing audio ☐ Optimize Performance at Low Buffer Sizes Certain plug-ins may cause brief system hangs ☐ Limit Number of Real-Time Threads Reduces contention with non-Pro Tools processesHome Sign in / Register
text_image
Lower values reduce memory usage. Higher values improve disk performance. OKAbleton Live Lite Setup
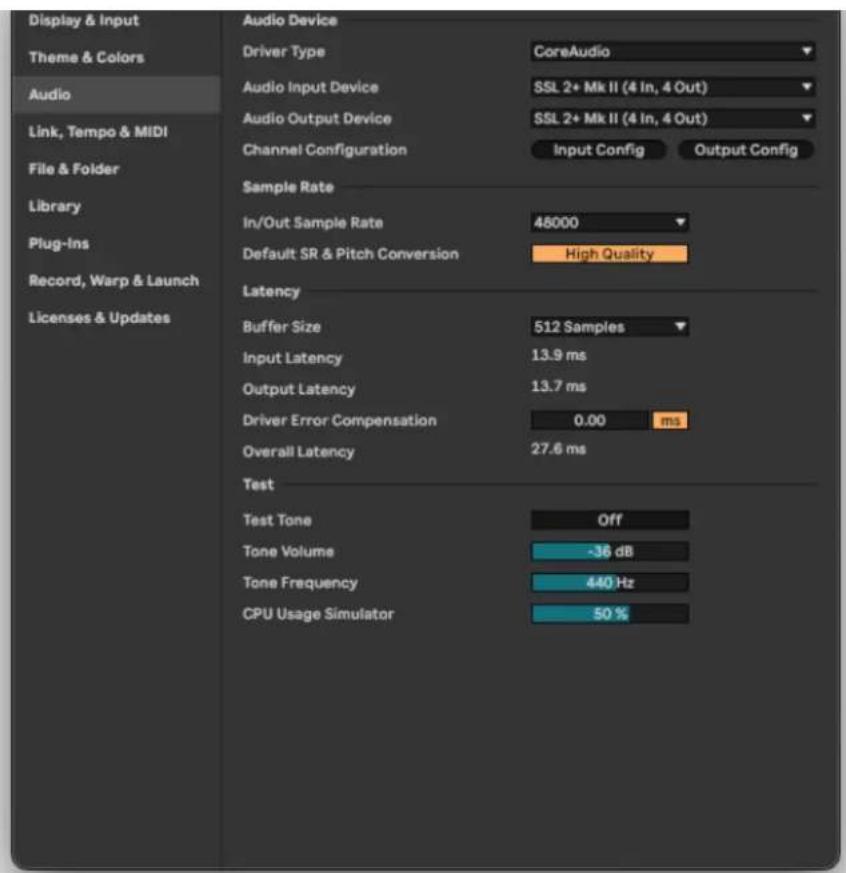
Open up Live Lite and locate the 'Preferences' panel. Make sure that SSL 2+ MKII is selected as the 'Audio Input Device' and 'Audio Output Device' as shown below.
Note: On Windows, ensure that the Driver Type is set to 'ASIO' for the best possible performance.
Home Sign in / Register
text_image
Display & Input Theme & Colors Audio Link, Tempo & MIDI File & Folder Library Plug-ins Record, Warp & Launch Licenses & Updates Audio Device Driver Type CoreAudio Audio Input Device SSL 2+ Mk II (4 In, 4 Out) Audio Output Device SSL 2+ Mk II (4 In, 4 Out) Channel Configuration Input Config Output Config Sample Rate In/Out Sample Rate 45000 Default SR & Pitch Conversion High Quality Latency Buffer Size 512 Samples Input Latency 13.9 ms Output Latency 13.7 ms Driver Error Compensation 0.00 ms Overall Latency 27.6 ms Test Test Tone Off Tone Volume ~36 dB Tone Frequency 440 Hz CPU Usage Simulator 50 %Home Sign in / Register
text_image
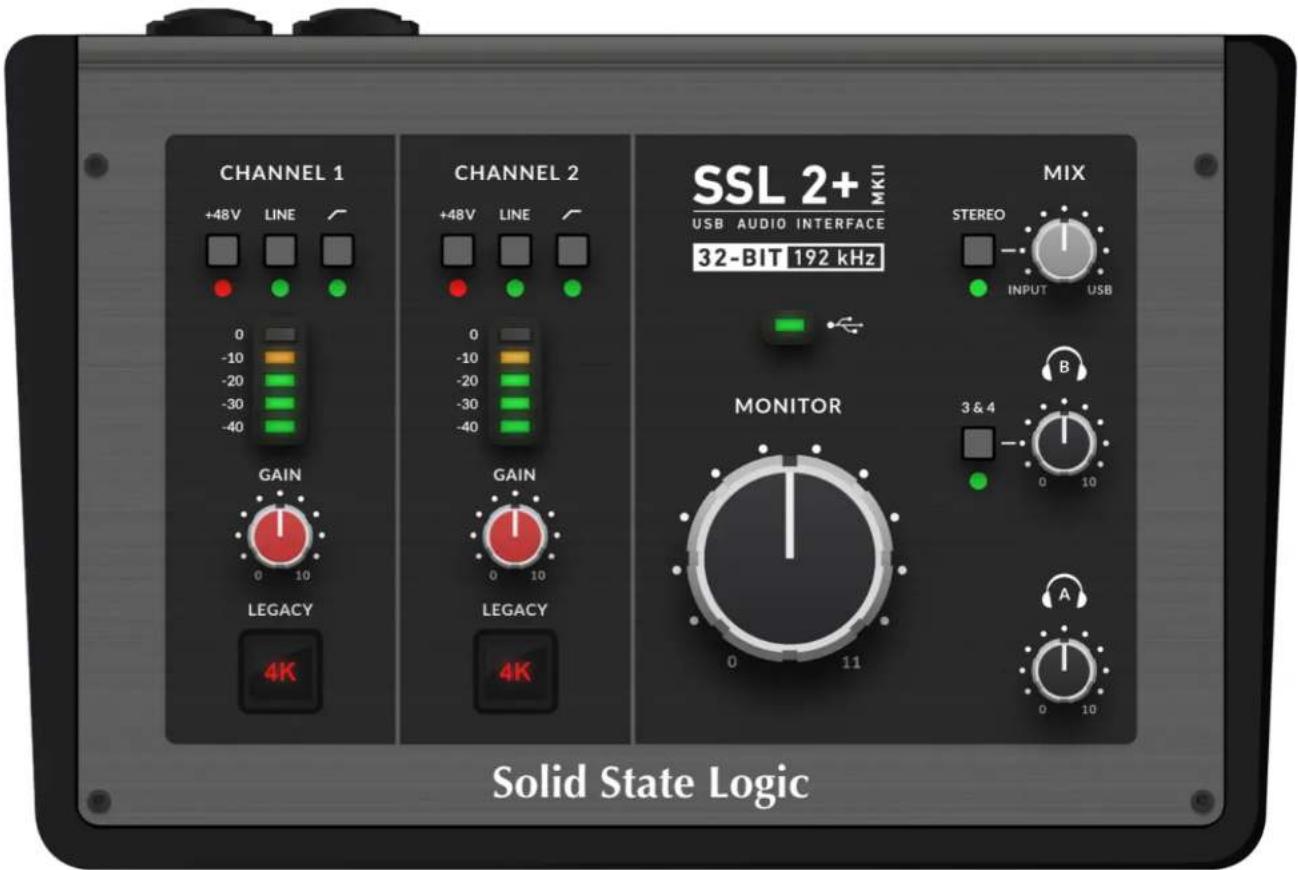
CHANNEL 1 +48V LINE 0 -10 -20 -30 -40 GAIN 0 10 LEGACY 4K CHANNEL 2 +48V LINE 0 -10 -20 -30 -40 GAIN 0 10 LEGACY 4K SSL 2+ MKII USB AUDIO INTERFACE 32-BIT 192 kHz MIX STEREO INPUT USB MONITOR 3 & 4 0 10 A Solid State LogicThis section describes the controls for Channel 1. The controls for Channel 2 are exactly the same.
+48V
This switch enables phantom power on the combo XLR connector, which will be sent down the XLR microphone cable to the microphone. Phantom power is required when using Condenser or Active Ribbon microphones. BE AWARE! Dynamic & Passive Ribbon microphones DO NOT require phantom power to operate and can damage some microphones if improperly engaged.
LINE
This switch changes the source of the channel input to be from the balanced Line input. Connect line-level sources (such as keyboards and synth modules) using a TRS Jack cable into an input on the rear panel. The LINE input bypasses the pre-amp section, making it ideal to connect the output of an external preamp to if you so wish. When operating in LINE mode, the GAIN control provides up to 27 dB of clean gain.
HI-PASS FILTER
This switch engages the Hi-Pass Filter with a cut off frequency at 75Hz with a 18dB/Octave slope. This is ideal for removing unwanted low-end frequencies from an input signal and cleaning up unnecessary rumble. This is suitable for sources such as Vocals or Guitars.
LED METERING
dBFS.
GAIN
This control adjusts the pre-amp gain applied to your microphone, line-level source or instrument. Adjust this control so that your source is lighting all 3 green LEDs most of the time whilst you are singing/playing your instrument. This will give you a healthy recording level into the computer. Note that when in LINE mode, the gain range is deliberately reduced to 27 dB (instead of 64 dB for Mic/Instrument), to provide a more appropriate gain range for line-level sources.
LEGACY 4K - ANALOGUE ENHANCEMENT EFFECT
Engaging this switch allows you to add some extra analogue 'magic' to your input when you need it. It injects a combination of high-frequency EQ-boost, together with some finely tuned harmonic distortion to help enhance sounds. We have found it to be particularly pleasant on sources such as vocals and acoustic guitar.
This enhancement effect is created completely in the analogue domain and is inspired by the kind of extra character the legendary SSL 4000-series console (often referred to as '4K') could add to a recording. The 4K was renowned for many things, including a distinctive 'forward', yet musical-sounding EQ, as well as its ability to impart a certain analogue 'mojo'. You will find that most sources become more exciting when the 4K switch is engaged!
'4K' is the abbreviation given to any SSL 4000-series console. 4000-series consoles were manufactured between 1978 and 2003 and are widely regarded as one of the most iconic large-format mixing consoles in history, due to their sound, flexibility and comprehensive automation features. Many 4K consoles are still in use today by the world's leading mix engineers.
Home Sign in / Register
monitor speakers and the headphone output.
text_image
SSL 2+ MKII USB AUDIO INTERFACE 32-BIT 192 kHz MIX STREEO INPUT USB B MONITOR 3 & 4 0 10 A 0 10without latency.
If you are recording a stereo input source (e.g. a stereo keyboard or synth) using Channels 1 and 2, press the STEREO switch so that you hear it in stereo. If you are only recording using one Channel (e.g. a vocal recording), make sure that STEREO is not pressed, otherwise, you will hear the vocal in one ear!
When the MIX control is set to the right-most position labelled USB, you will hear only the audio output from your computer's USB stream e.g. music playing from your media player (e.g. iTunes/Spotify/Windows Media Player) or the outputs of your DAW tracks (Pro Tools, Live, etc).
Positioning the control anywhere in between INPUT and USB will give you a variable blend of the two options. This can be really useful when you need to record with no audible latency. Please refer to the How-To / Application Examples section for more information on using this feature.
GREEN USB LED
Illuminates solid green to indicate that the unit is successfully receiving power over USB.
MONITOR Level (Large Black Control)
This control directly affects the level sent out of OUTPUTS 1 (Left) and 2 (Right) to your monitors. Turn the knob to make the volume louder. Please note the MONITOR LEVEL goes to 11 because it's one louder...
HEADPHONE OUTPUTS
PHONES A & B allow for two sets of headphones to be connected, both of which can be configured to allow independent mixes for artists and engineers. Their output levels are set by the PHONES A and PHONES B controls on the front panel.
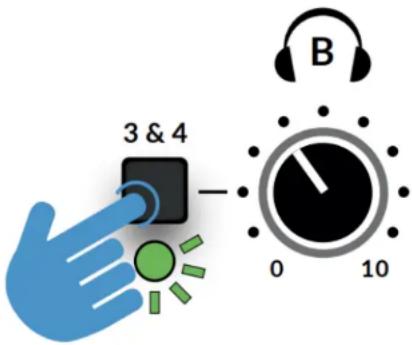
Next to the Headphones B control, is a button labelled 3&4. When unselected, Headphones B will receive the same mix as Headphones A (DAW Outputs 1-2). Engaging the 3&4 button instead sources Headphones B from DAW Outputs 3-4, allowing for the creation of an independent mix (perhaps for the artist). You would use aux sends in the DAW routed to outputs 3-4 to create this independent mix.
By default, the Headphones B Output with 3&4 engaged will not respect the MIX control e.g. Only DAW Outputs 3-4 are sent to Headphones B. Pressing and holding 3&4 until the LED starts to flash will allow Headphones B to respect the MIX control, allowing the artist to benefit from a mix of the low-latency input signals (Inputs 1-2), together with a custom headphone mix (3&4). You can toggle between the two modes whenever you like.
text_image
3 & 4 B 0 10Front Panel Connections
text_image
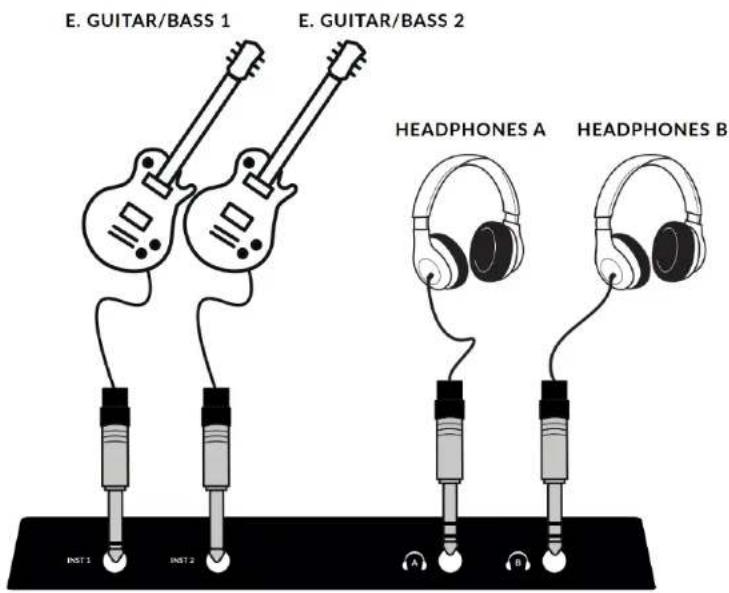
E. GUITAR/BASS 1 E. GUITAR/BASS 2 HEADPHONES A HEADPHONES B INST 1 INST 2 A BINST 1 & 2: 1/4" Input Jacks
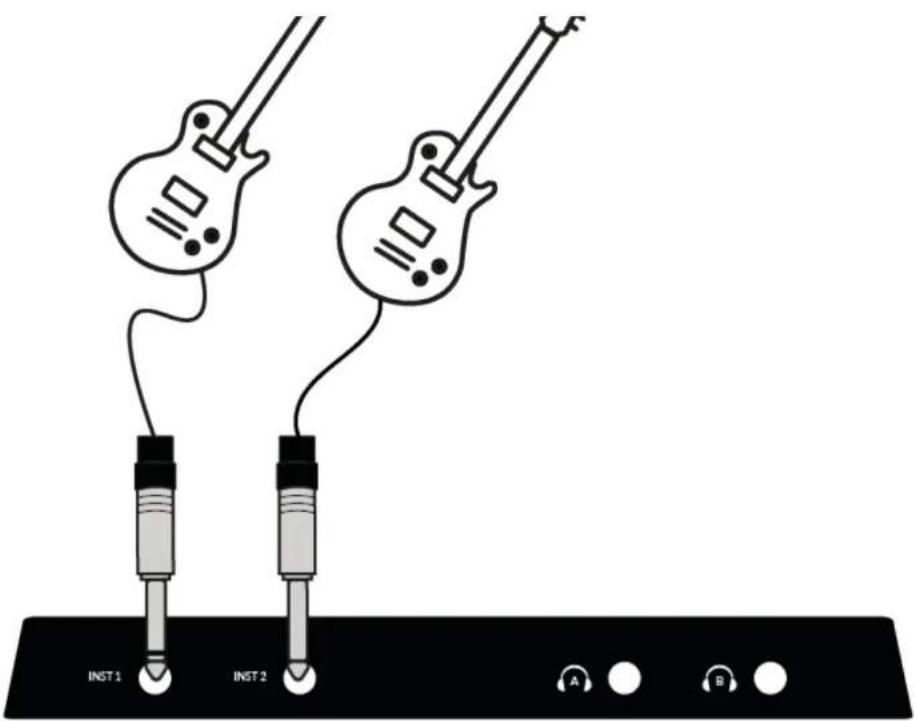
2 x Hi-Z (DI) 1/4" input jacks for connecting Instrument sources such as electric guitar or bass. Plugging into the INST jack will automatically select it, overriding Mic/Line selection on the channel.
PHONES A & B: 1/4" Output Jacks
2 x independent Headphones outputs, with individual level controls and ability for PHONES B to source outputs 1-2 or 3-4.
text_image
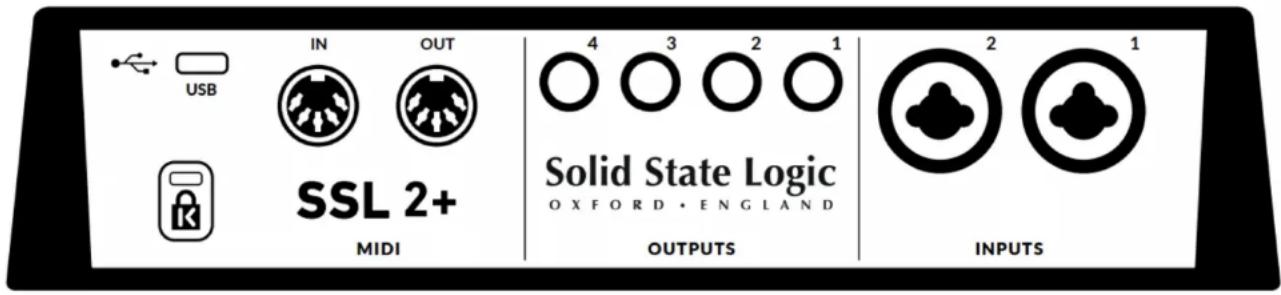
USB IN OUT SSL 2+ MIDI 4 3 2 1 Solid State Logic OX FORD • EN GLAND OUTPUTS INPUTSINPUTS 1 & 2 : Combo XLR / 1/4" Jack Input Sockets
This is where you connect your mic/line input sources (microphones, keyboards etc) to the unit. Once connected, your inputs are controlled using front panel Channel 1 and Channel 2 controls respectively. The combo XLR / 1/4" Jack socket contains an XLR and a 1/4" Jack in one connector (the Jack socket is the hole in the middle). If you are connecting a microphone, then use an XLR cable. If you want to connect a Line level Input such as or keyboard/synth, then use a Jack cable (TS or TRS Jacks). For connecting an instrument directly (bass guitar/guitar), use the INST 1 & 2 jack connections at the front (not the Combo XLR/Jack socket on the rear), which automatically apply an appropriate instrument impedance (1 MΩ).
Please note that the line-level input can only be accessed via the rear panel Combo jack socket, not the XLR). If you have a line-level devices that outputs on XLR, please use a XLR to jack adapter.
BALANCED LINE OUTPUTS 1 - 4 : 1/4" TRS Jack Output Sockets
Outputs 1 & 2 are primarily to be used for your main monitors and the physical volume is controlled by the Monitor Knob on
CV-enabled outboard FX.
Please Note: More information is available in the CV Control via Ableton® Live CV Tools section in this User Guide.
When using outputs 1-2 for CV output, remember the Monitor Control Knob is still affecting the signal. Some experimentation on finding the best level for your connected CV controlled synth/FX unit may be required.
USB 2.0 Port : 'C' Type Connector
Connect this to a USB port on your computer, using one of the two cables provided in the box.
MIDI IN & OUT
The MIDI (DIN) IN & OUT allow the SSL 2+ MKII to be used as a MIDI interface. MIDI IN will receive MIDI signals from keyboards or controllers & MIDI OUT allows MIDI information to be sent out to trigger Synths, Drum machines or any MIDI controllable equipment you have available.
Kensington Security Slot
The K slot can be used with a Kensington Lock to secure your SSL 2+ MK II.
How-To / Application Examples
Connections Overview
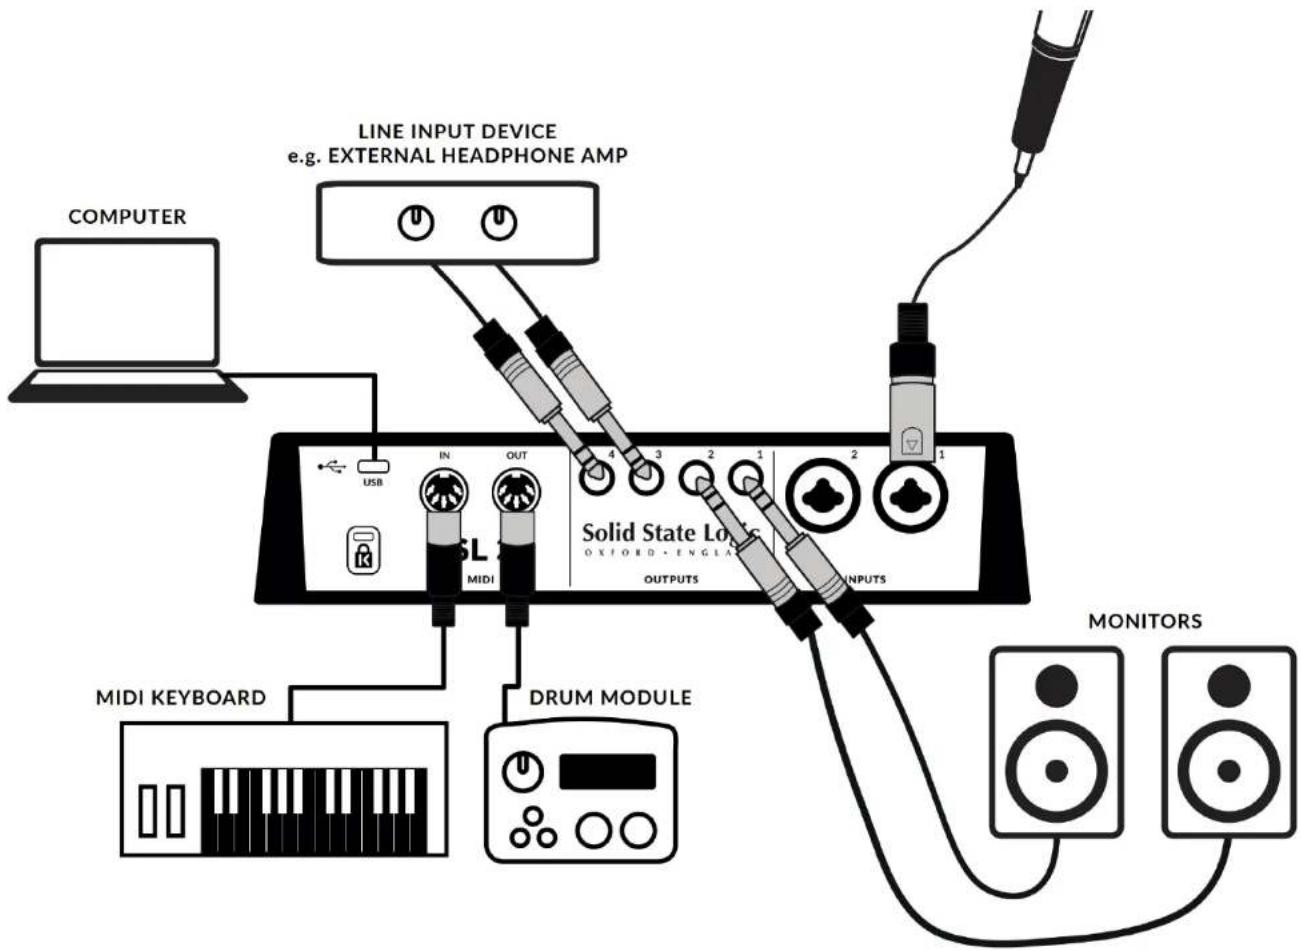
The diagram below illustrates where the various elements of your studio connect to SSL 2+ MKII on the rear panel.
Home Sign in / Register
flowchart
graph TD
    A["COMPUTER"] --> B["LINE INPUT DEVICE e.g. EXTERNAL HEADPHONE AMP"]
    B --> C["USB"]
    C --> D["SL MIDI"]
    D --> E["4 OUT"]
    E --> F["3 2 1"]
    F --> G["2 OUTPUTS"]
    G --> H["1 INPUTS"]
    H --> I["MONITORS"]
    I --> J["DRUM MODULE"]
    J --> K["MIDI KEYBOARD"]
    K --> L["50/80/160/160/160/160/160/160/160/160/160/160/160/160/160/160/160/160/160/160/160/160/160/160/160/160/160/12"]
    style A fill:#f9f,stroke:#333
    style B fill:#ccf,stroke:#333
    style C fill:#cfc,stroke:#333
    style D fill:#fcc,stroke:#333
    style E fill:#cff,stroke:#333
    style F fill:#ffc,stroke:#333
    style G fill:#cfc,stroke:#333
    style H fill:#fcc,stroke:#333
    style I fill:#cfc,stroke:#333
    style J fill:#fcc,stroke:#333
    style K fill:#cfc,stroke:#333
    style L fill:#fcc,stroke:#333
Home Sign in / Register
text_image
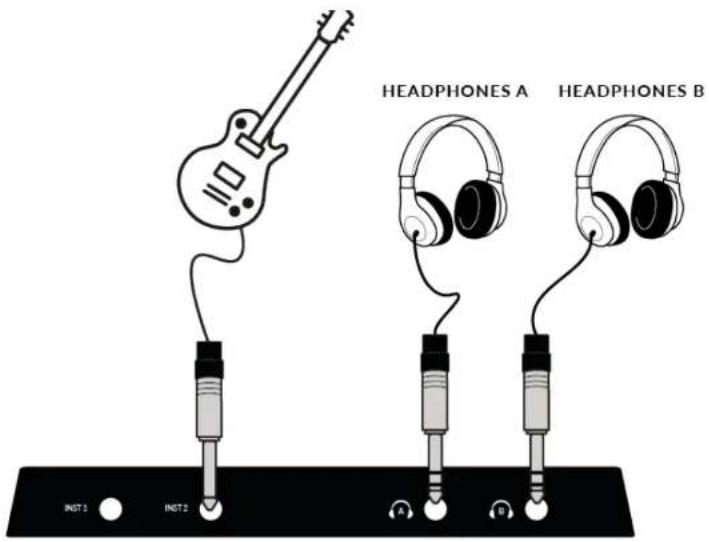
HEADPHONES A HEADPHONES B INST 1 INST 2This diagram shows the following:
- A microphone plugged into INPUT 1, using an XLR cable
- An Electric Guitar / Bass plugged into INST 2, using an TS cable
• Monitor speakers plugged into OUTPUT 1 (Left) and OUTPUT 2 (Right), using TRS jack cables (balanced cables) - An external Line Input Device being plugged from OUTPUTS 3 & 4
• A MIDI enabled keyboard connected to the MIDI input
Selecting Your Input and Setting Levels Dynamic & Passive Ribbon Microphones
Plug your microphone into INPUT 1 or INPUT 2 on the rear panel using an XLR cable.
- On the front panel, make sure that Neither +48V or LINE are pressed down.
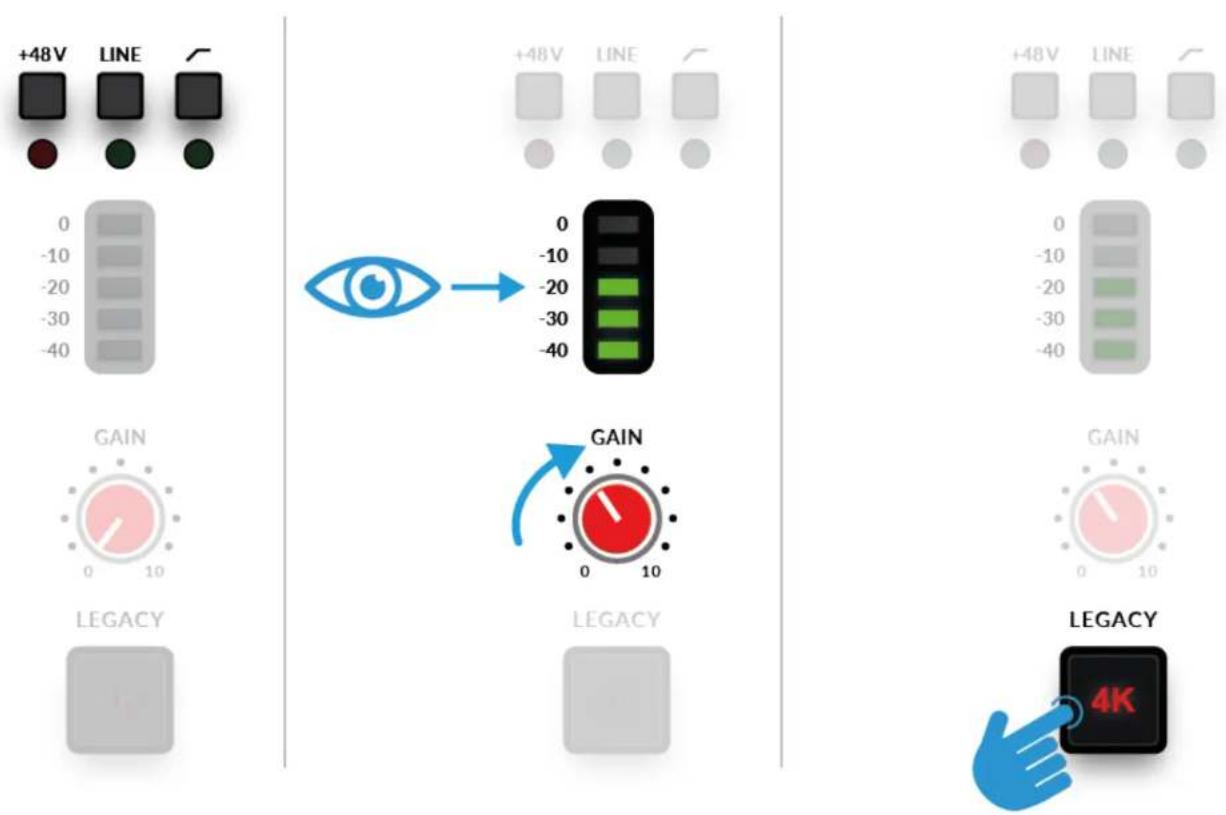
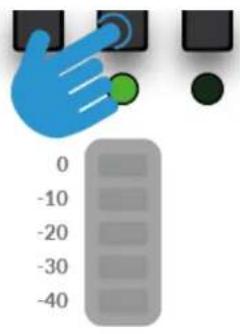
- Whilst singing or playing your instrument that has been mic'd up, turn the GAIN control up until you consistently get 3 green lights on the meter.
This represents a healthy signal level. It's OK to light up the amber LED (-10) occasionally but make sure you don't hit the top red LED. If you do, you'll need to turn the GAIN control down again to stop clipping. Engage the High Pass Filter switch to remove unwanted subsonic rumble, if you need it.
- Push the LEGACY 4K switch to add some extra analogue character to your input, if you need it.
Home Sign in / Register
Condenser & Active Ribbon Microphones
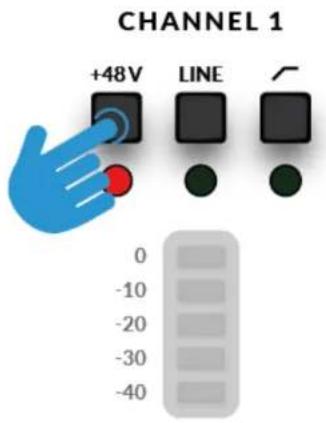
blink whilst phantom power is applied. The audio will be muted for a few seconds. Once phantom power has been engaged, proceed with steps 2 and 3 like before.
text_image
CHANNEL 1 +48V LINE 0 -10 -20 -30 -40Keyboards and Other Line-Level Sources
- Plug your keyboard/line-level source into INPUT 1 or INPUT 2 on the rear panel using a jack cable.
- Follow Steps 2, 3 & 4 on the previous page to set your levels for recording.
10/30/24, 12:24 PM
SSL 2+ MKII User Guide – SSL Support
Home Sign in / Register
text_image
0 -10 -20 -30 -40Electric Guitars and Basses (Hi-Impedance Sources)
Home Sign in / Register
text_image
INST1 INST2 A B- Plug your guitar/bass into INST 1 or INST 2 on the lower front panel using a jack cable.
- Follow Steps 2 and 3 on the previous page to set your levels for recording.
Home Sign in / Register
Once you have selected the correct input source and have a healthy 3 green LEDs of signal coming in, you're ready to monitor your incoming source.
- First, ensure that the MIX control is rotated towards the side labelled INPUT.
- Secondly, turn up the PHONES control to listen on headphones. If you want to listen through your monitor speakers, turn up the MONITOR LEVEL control.
Home Sign in / Register
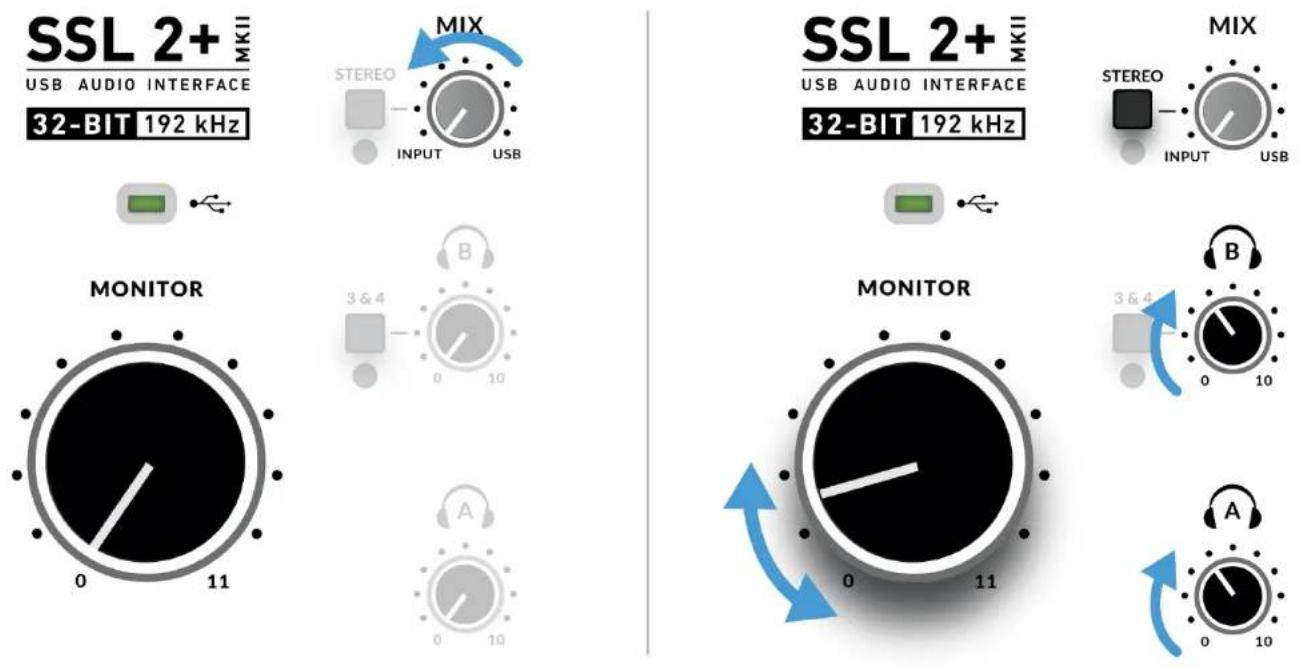
CAUTION! If you are using a microphone, and monitoring the INPUT be careful about turning the MONITOR LEVEL control up because this can cause a feedback loop if the microphone is close to your speakers. Either keep the monitor control at a low-level or monitor through headphones.
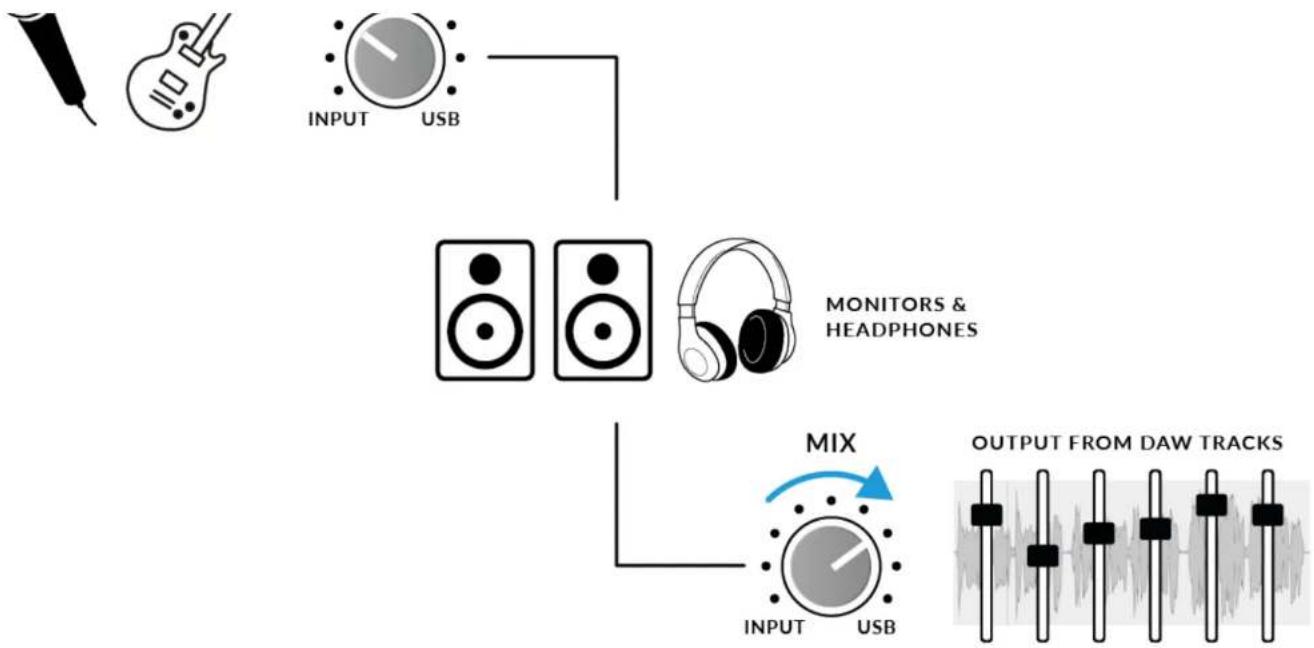
blend the Input signal and DAW playback.
- First, ensure that the DAW INPUT channel is muted to avoid doubling the signal in your headphones.
- Secondly, turn the MIX control to listen to a balance of the signals, finding a suitable level for each for comfortable levels.
Home Sign in / Register
flowchart
graph TD
    A["Input"] --> B["MONITORS & HEADPHONES"]
    C["USB"] --> B
    D["MONITOR 1"] --> E["MIX"]
    F["MONITOR 2"] --> E
    G["MONITOR 3"] --> E
    H["MONITOR 4"] --> E
    I["MONITOR 5"] --> E
    J["MONITOR 6"] --> E
    K["MONITOR 7"] --> E
    L["MONITOR 8"] --> E
    M["MONITOR 9"] --> E
    N["MONITOR 10"] --> E
    O["MONITOR 11"] --> E
    P["MONITOR 12"] --> E
    Q["MONITOR 13"] --> E
    R["MONITOR 14"] --> E
    S["MONITOR 15"] --> E
    T["MONITOR 16"] --> E
    U["MONITOR 17"] --> E
    V["MONITOR 18"] --> E
    W["MONITOR 19"] --> E
    X["MONITOR 20"] --> E
    Y["MONITOR 21"] --> E
    Z["MONITOR 22"] --> E
    AA["MONITOR 23"] --> E
    AB["MONITOR 24"] --> E
    AC["MONITOR 25"] --> E
    AD["MONITOR 26"] --> E
    AE["MONITOR 27"] --> E
    AF["MONITOR 28"] --> E
    AG["MONITOR 29"] --> E
    AH["MONITOR 30"] --> E
    AI["MONITOR 31"] --> E
    AJ["MONITOR 32"] --> E
    AK["MONITOR 33"] --> E
    AL["MONITOR 34"] --> E
    AM["MONITOR 35"] --> E
    AN["MONITOR 36"] --> E
    AO["MONITOR 37"] --> E
    AP["MONITOR 38"] --> E
    AQ["MONITOR 39"] --> E
    AR["MONITOR 40"] --> E
    AS["MONITOR 41"] --> E
    AT["MONITOR 42"] --> E
    AU["MONITOR 43"] --> E
    AV["MONITOR 44"] --> E
    AW["MONITOR 45"] --> E
    AX["MONITOR 46"] --> E
    AY["OUTPUT FROM DAW TRACKS"]
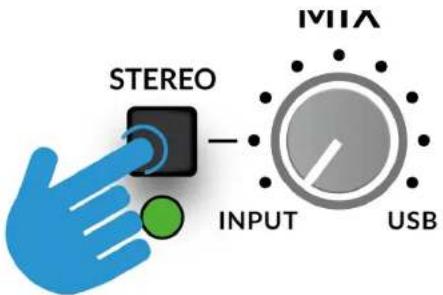
When To Use The STEREO Switch
Home Sign in / Register
text_image
STEREO INPUT USB MIAIf you are recording a single source (a single microphone into one channel) or two independent sources (such as a microphone on the first channel and a guitar on the second channel), leave the STEREO switch unpressed, so that you hear the sources in the middle of the stereo image. However, when you are recording a stereo source such as the left and right sides of a keyboard (coming into channels 1 and 2 respectively), then pressing the STEREO switch will allow you to monitor the
keyboard in true stereo, with CHANNEL 1 being sent to the left side and CHANNEL 2 being sent to the right side.
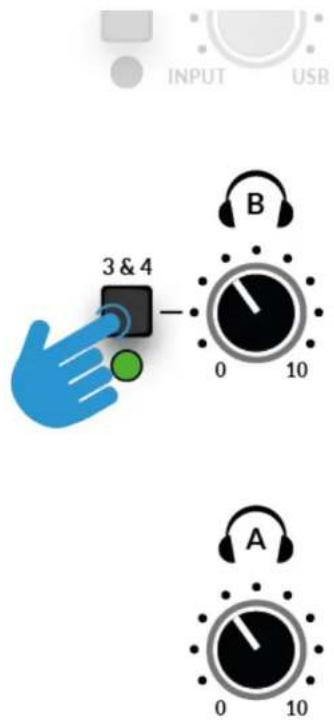
Using The 3&4 Button
Engaging the 3&4 button changes the source for Headphones B from Outputs 1&2 to DAW Outputs 3-4, allowing for the creation of an independent mix (perhaps for the artist). You would use aux sends in the DAW routed to outputs 3-4 to create this independent mix.
10/30/24, 12:24 PM
SSL 2+ MKII User Guide – SSL Support
Home Sign in / Register
text_image
INPUT USB 3 & 4 B 0 10 A 0 10By default, the Headphones B Output with 3&4 engaged will not respect the MIX control e.g. Only DAW Outputs 3-4 are sent to Headphones B. Pressing and holding 3&4 until the LED starts to flash will allow Headphones B to respect the MIX control, allowing the artist to benefit from a mix of the low-latency input signals (Inputs 1-2), together with a custom headphone mix (3&4). You can toggle between the two modes whenever you like.
Home Sign in / Register
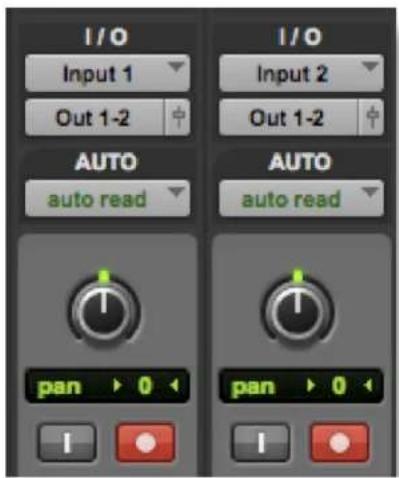
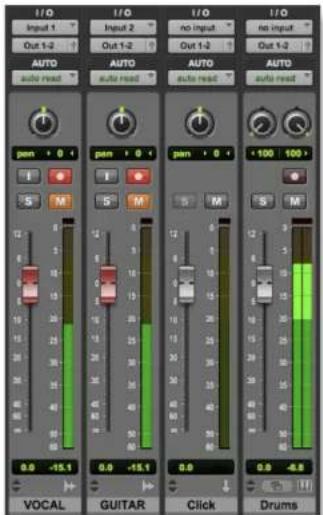
Now that you have chosen your input(s), set the levels and can monitor them, it's time to record into the DAW. The following image is taken from a Pro Tools session but the same steps will apply to any DAW. Please consult your DAW's User Guide for its operations. If you have not already done so, please ensure that SSL 2+ MKII is the selected Audio Device in your DAW's audio setup.
text_image
I/O Input 1 Out 1-2 AUTO auto read I/O Input 2 Out 1-2 AUTO auto read pan ▶ 0 pan ▶ 0Setting Up Your DAW Tracks
- Set up new audio track(s) in your DAWs.
Low Latency - Using The Mix Control
What is Latency in relation to recording sound?
Latency is the time it takes for a signal to pass through a system and then be played out again. In the case of recording, latency can cause the performer significant issues as it results in them hearing a slightly delayed version of their voice or instrument, sometime after they played or sung a note, which can be very off-putting when trying to record.
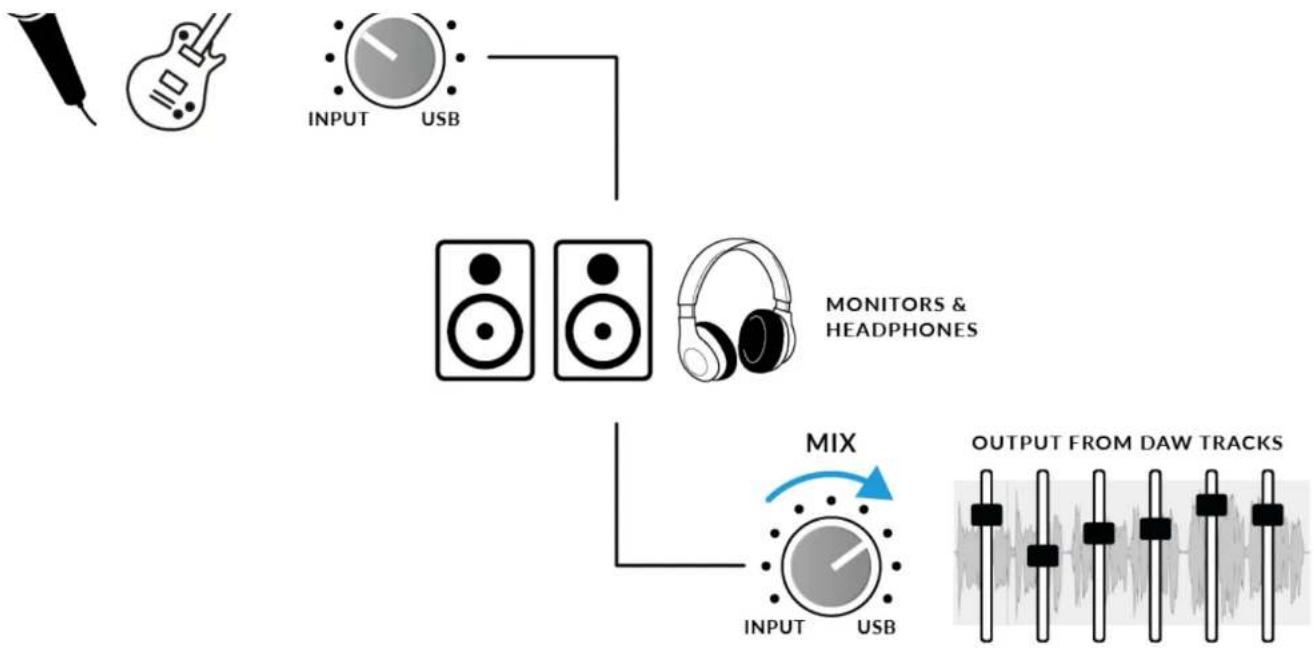
The main purpose of the MIX control is to provide you with a way of hearing your inputs before they pass into the computer, with what we describe as 'low-latency'. It is, in fact, so low (under 1ms) that you will not hear any perceivable latency when playing your instrument or singing into the microphone.
How To Use The Mix Control When Recording & Playing Back
Often when recording, you'll need a way of balancing the input (microphone/instrument) against the tracks playing back from the DAW session.
Use the MIX control to balance how much of your 'live' input you are hearing with low-latency in the monitors/headphones, against how much of the DAW tracks you have to perform against. Setting this correctly will help enable either yourself or the performer to produce a good take. To put it simply, turn the knob to the left to hear 'more me' and to the right for 'more backing track'.
Home Sign in / Register
flowchart
graph TD
    A["Input"] --> B["MONITORS & HEADPHONES"]
    C["USB"] --> B
    D["MONITOR 1"] --> E["MIX"]
    F["MONITOR 2"] --> E
    G["MONITOR 3"] --> E
    H["MONITOR 4"] --> E
    I["MONITOR 5"] --> E
    J["MONITOR 6"] --> E
    K["MONITOR 7"] --> E
    L["MONITOR 8"] --> E
    M["MONITOR 9"] --> E
    N["MONITOR 10"] --> E
    O["MONITOR 11"] --> E
    P["MONITOR 12"] --> E
    Q["MONITOR 13"] --> E
    R["MONITOR 14"] --> E
    S["MONITOR 15"] --> E
    T["MONITOR 16"] --> E
    U["MONITOR 17"] --> E
    V["MONITOR 18"] --> E
    W["MONITOR 19"] --> E
    X["MONITOR 20"] --> E
    Y["MONITOR 21"] --> E
    Z["MONITOR 22"] --> E
    AA["MONITOR 23"] --> E
    AB["MONITOR 24"] --> E
    AC["MONITOR 25"] --> E
    AD["MONITOR 26"] --> E
    AE["MONITOR 27"] --> E
    AF["MONITOR 28"] --> E
    AG["MONITOR 29"] --> E
    AH["MONITOR 30"] --> E
    AI["MONITOR 31"] --> E
    AJ["MONITOR 32"] --> E
    AK["MONITOR 33"] --> E
    AL["MONITOR 34"] --> E
    AM["MONITOR 35"] --> E
    AN["MONITOR 36"] --> E
    AO["MONITOR 37"] --> E
    AP["MONITOR 38"] --> E
    AQ["MONITOR 39"] --> E
    AR["MONITOR 40"] --> E
    AS["MONITOR 41"] --> E
    AT["MONITOR 42"] --> E
    AU["MONITOR 43"] --> E
    AV["MONITOR 44"] --> E
    AW["MONITOR 45"] --> E
    AX["MONITOR 46"] --> E
    AY["OUTPUT FROM DAW TRACKS"]
Hearing Double?
10/30/24, 12:24 PM
SSL 2+ MKII User Guide – SSL Support
Home Sign in / Register
text_image
I/O Input 1 Out 1-2 AUTO auto read I/O Input 2 Out 1-2 AUTO auto read I/O no input Out 1-2 AUTO auto read I/O no input Out 1-2 AUTO auto read VOCAL GUITAR Click DrumsRecord Tracks Muted
DAW Buffer Size
From time to time, you may need to alter the Buffer Size setting in your DAW. Buffer Size is the amount of samples stored/buffered, before being processed. The bigger the Buffer Size, the more time the DAW has to process the incoming audio, the smaller the Buffer Size, the less time the DAW has to process the incoming audio.
Generally speaking, higher buffer sizes (256 samples and above) are preferable when you have been working on a song for some time and have built up several tracks, often with processing plug-ins on them. You'll know when you need to
from the DAW with as little latency as possible. For instance, you want to plug an electric guitar directly into your SSL 2+ MKII, put it through a guitar amp simulator plug-in (like Native Instruments Guitar Rig Player) and then monitor that 'affected' sound whilst you record, instead of just listening to the 'dry' input signal.
Sample Rate
What is meant by Sample Rate?
All musical signals coming into and out of your SSL 2+ MKII USB audio interface need to be converted between analogue and digital. Sample rate is a measure of how many 'snapshots' are taken to build a digital 'picture' of an analogue source being captured into the computer, or deconstruct a digital picture of an audio track to play back out of your monitors or headphones.
The most common sample rate that your DAW will default to is 44.1 kHz, which means that the analogue signal is being sampled 44,100 times per second. SSL 2 MKII supports all major sample rates including 44.1 kHz, 48 kHz, 88.2 kHz, 96 kHz, 176.4 kHz and 192 kHz.
Do I need to change the Sample Rate?
The pros and cons of using higher sample rates are beyond the scope of this User Guide but in general, the most common sample rates of 44.1 kHz and 48 kHz are still what many people choose to produce music at, so this is the best place to start.
One reason to consider increasing the sample rate you work at (e.g. to 96 kHz) is that it will lower the overall latency introduced by your system, which could be handy if you need to monitor guitar amp simulator plug-ins or lots or virtual instruments through your DAW. However, the trade-off of recording at higher sample rates is that it requires more data to be
How do I change the Sample Rate?
You do this in your DAW. Some DAW's allow you to change the sample rate after you have created a session - Ableton Live Lite for instance allows this. Some require you to set the sample rate at the point at which you create the session, like Pro Tools.
SSL USB Control Panel (Windows Only)
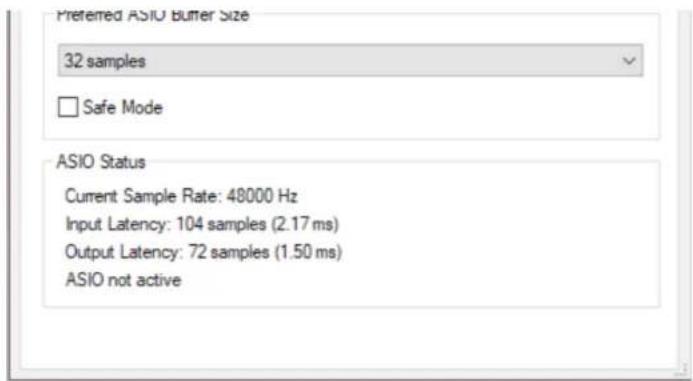
If you're working on Windows and have installed the USB Audio Driver required to make the unit operational, you will have noticed that as part of the installation, the SSL USB Control Panel will be installed onto your computer. This Control Panel will report details such as what Sample Rate and Buffer Size your SSL 2+ MKII is running at. Please note that both Sample Rate and Buffer size will be taken control of by your DAW when it is opened.
Safe Mode
One aspect you can control from the SSL USB Control Panel is the tickbox for Safe Mode on the 'Buffer Settings' tab. Safe mode defaults to ticked but can be unticked. Unticking Safe Mode will reduce the overall Output Latency of the device, which may be useful if you are looking to achieve the lowest possible roundtrip latency in your recording. However, unticking this may cause unexpected audio clicks/pops if your system is under strain.
Home Sign in / Register
text_image
Preferred ASIO Buffer Size 32 samples □ Safe Mode ASIO Status Current Sample Rate: 48000 Hz Input Latency: 104 samples (2.17 ms) Output Latency: 72 samples (1.50 ms) ASIO not activeSSL 2+ MKII DC-Coupled Outputs
The SSL 2+ MKII Interface allows the user to send out a DC Signal from any output on the interface. This allows CV-enabled equipment to receive the signal to control parameters.
What is CV?
CV is an abbreviation of "Control Voltage"; an analogue method of controlling synthesizers, drum machines and other similar equipment.
What are CV Tools?
CV Tools is a free pack of CV-enabled instruments, synchronisation tools, and modulation utilities that enable users to seamlessly integrate Ableton Live with various devices in the Eurorack format or Modular Synthesisers & Analog effects
Home Sign in / Register

text_image
Flutter Fast CV 1 Remote 19 % 100 % Waveform Random Shape -38 % Steps Off Jitter 0 % Smooth 38 % Rate Hz F ×10 Depth 74.8 % Offset 0 % Phase 50 % Hold R CV Utility Value Amount Map 0 % 100 % CV Depth 100 % Offset 0.00 % 0.00 % Audio CV To Ext. Out 3/4 Min -100 % Max 100 %- Open your Ableton Live session
- First set up a new Audio Track that you'll use to send out the CV Signal.
- Then insert onto the Audio track a CV Utilities Plug-In from the packs menu.
- Once the CV Utility Plug-In is Open, set the CV To to your designated Output. In this example, we've set this to Output 3/4 from the SSL 2+ MKII.
- Set up a second Audio track with the input signal from the Effect/Instrument and record arm to monitor the input back into Ableton Live.
- ow using the CV Value knob on the CV Control channel, you can automate the CV signal sent out of Ableton to your External Instrument/FX unit. This can then be mapped to a MIDI controller to control in realtime, record the Automation into your session, or like here assign the CV to an LFO.
- Now you can record the audio back into your Ableton Session, or other DAW you may be using to record your Audio back onto your system.
- Please note that multiple CV Utility plugs can be set up when using the SSL 2+ MKII as EVERY PHYSICAL OUTPUT is able to send DC signal for CV Control. Therefore you can use up to 8 CV control signals at any one time
Home Sign in / Register
• Live 10 Suite (version 10.1 or later)
• Live 10 Standard + Max for Live (version 10.1 or later)
- A DC-coupled audio interface (for CV hardware integration) such as the SSL 2+ MKII
• Some understanding of Ableton Live Packs
- Some understanding of how to use CV-enabled hardware with Live
Best Practices & Safety
- Never send CV directly to your speakers (direct voltage can cause damage to your speakers).
- The CV Instrument device is only capable of calibrating oscillators that use bipolar voltage (+/-5V) for 1v/oct. tuning. However, some digital oscillator modules exclusively use unipolar signals (+5V or above) for tuning. As a result, CV Tools will be incompatible with these modules. If you are unsure whether this applies to the modules in your system, please consult the user manual for the device.
- Remember - Eurorack signals are up to 5x louder than line-level audio! Before connecting your modular system to a digital audio interface, be sure to reduce the signal down to line-level using a dedicated output module.
Specifications
Audio Performance Specifications
Measurement device input impedance: 200 kΩ (100 kΩ unbalanced)
Unless otherwise quoted all figures have a tolerance of ±0.5dB or 5%
Microphone Inputs
Frequency Response: ± 0.1 dB
Dynamic Range (A-Weighted): 116.5 dB
THD+N (@ 1kHz): -100 dB / < 0.001 % @ -8 dBFS
EIN (A-Weighted, 150 Ω termination): -130.5 dBu
Maximum Input Level: +9.7 dBu
Gain Range: 64 dB
Input Impedance: 1.2 kΩ
Line Inputs
Frequency Response: ± 0.05 dB
Dynamic Range (A-Weighted): 117 dB
THD+N (@ 1kHz): -104 dB / < 0.0007 % @ -1 dBFS
Maximum Input Level: +24 dBu
Gain Range: 27dB
Input Impedance: 14 kΩ
Instrument Inputs
Frequency Response: ± 0.05 dB
Dynamic Range (A-Weighted): 116 dB
Input Impedance: 1 MΩ
Balanced Outputs
Frequency Response: ± 0.03 dB
Dynamic Range (A-Weighted): 120 dB
THD+N (@ 1kHz): -108 dB / < 0.0004%
Maximum Output Level: +14.5 dBu
Output Impedance: 150 Ω
Headphone Outputs
Frequency Response: ± 0.05 dB
Dynamic Range: 119.5 dB
THD+N (@ 1kHz): -106 dB / < 0.0005% @ -8 dBFS
Maximum Output: Level +13 dBu
Output Impedance: <1 Ω
Digital Audio
Supported Sample Rates: 44.1 kHz, 48 kHz, 88.2 kHz, 96 kHz, 176.4 kHz, 192 kHz
Clock Source Internal
USB 2.0
Low-Latency Monitor Mix Input to Output: < 1ms
Roundtrip Latency at 96 kHz: Windows 10, Reaper: < 3.65 ms (Safe Mode Off)
Mac OS, Reaper: < 5.8 ms
Analogue Inputs 1&2
Connectors XLR: "Combo" for Microphone/Line/Instrument on rear panel
Input Gain Control: Via front panel
Microphone/Line Switching: Via front panel switches
Instrument Switching: Automatic upon jack connecting
Phantom Power: Via front panel switches
Legacy 4K Analogue Enhancement: Via front panel switches
Analogue Outputs
Connectors: 1/4" (6.35 mm) TRS jacks: on rear panel
Stereo Headphone Output 1/4" (6.35 mm) TRS jack: on rear panel
Monitor Outputs L/R Level Control: Via front panel
Monitor Mix Input - USB Blend: Via front panel
Monitor Mix - Stereo Input: Via front panel
Headphones Level Control: Via front panel
Rear Panel Miscellaneous
USB 1 x USB 2.0, 'C' Type Connector
Kensington Security Slot 1 x K-Slot
Legacy 4K Analogue Enhancement Per Channel - 1 x red
USB Power 1 x green
Weight & Dimensions
Width x Depth x Height 234 mm x 159 mm x 70 mm (including knob heights)
Weight 900 g
Box Dimensions 277 mm x 198 mm x 104 mm
Boxed Weight 1.22 kg
Troubleshooting & FAQs
Frequently Asked Questions and additional support contacts can be found on the Solid State Logic Website at: www.solidstatelogic.com/support
Table of contents
SSL 2+ MKII User Guide
Introduction to SSL 2+ MKII
What is SSL 2+ MKII?

Home Sign in / Register
Get-Started
Unpacking
USB Cables & Power
USB Hubs
System Requirements
Registering Your SSL 2+ MKII
What is the SSL Production Pack?
Quick-Start / Installation
Apple Mac Installation
Windows Installation
Can't Hear Anything?
Selecting SSL 2+ MKII As Your DAW's Audio Device
Pro Tools Setup
Ableton Live Lite Setup
10/30/24, 12:24 PM
SSL 2+ MKII User Guide – SSL Support
Home Sign in / Register
Get in touch


