
Mavic Mini Two-Way Charging Hub - Drone DJI - Free user manual and instructions
Find the device manual for free Mavic Mini Two-Way Charging Hub DJI in PDF.


| Product Type | Two-Way Charging Hub for Drones |
| Brand | DJI |
| Model | MM1CH |
| Compatible Batteries | Mavic Mini Intelligent Flight Battery (MB2-2400mAh-7.2V) |
| Compatible Charger | DJI 18W USB Charger or FCC/CE-certified Quick Charge charger |
| Input | 5V⎓2A / 9V⎓2A / 12V⎓2A |
| USB Port Output | Max 5V⎓2A |
| Weight | Approx. 80 g |
| Operating Temperature | 5° to 40°C (41° to 104°F) |
| Charging Time (3 batteries) | Approx. 4.5 hours with DJI 18W USB Charger |
| Number of Battery Ports | 3 |
| Battery Charging Priority | Highest power battery charged first |
| Battery Discharge Priority (Power Bank) | Lowest power battery discharged first |
| Function Button | Press to check battery level; press and hold to switch charging priority |
| Status LEDs | Indicates charging status and battery level per port |
| Power Bank Function | Can charge external devices (e.g., remote controller, smartphone) via USB port |
| Cable Included | Micro USB cable (×1) |
| Safety Features | Overcurrent protection, overcharge protection, temperature control (recommendations only) |
| Placement | Use on flat, stable, insulated surface |
| Maintenance | Clean metal terminals with dry cloth if buildup |
Frequently Asked Questions - Mavic Mini Two-Way Charging Hub DJI
User questions about Mavic Mini Two-Way Charging Hub DJI
0 question about this device. Answer the ones you know or ask your own.
Ask a new question about this device
Download the instructions for your Drone in PDF format for free! Find your manual Mavic Mini Two-Way Charging Hub - DJI and take your electronic device back in hand. On this page are published all the documents necessary for the use of your device. Mavic Mini Two-Way Charging Hub by DJI.
USER MANUAL Mavic Mini Two-Way Charging Hub DJI
Two-Way Charging Hub
User Guide
使用说明
使用說明
ユーザーガイド
사용자 가이드
Bedienungsanleitung
Guía del usuario
natural_image
Line drawing of a rectangular electronic device casing with internal components and mounting holes (no text or symbols)Contents
EN User Guide 2
CHS 使用说明 11
CHT 使用者指南 16
JP ユーザーガイド 22
KR 사용자 가이드 30
flowchart
graph TD
    A["Device with battery"] -->|Click| B["Printer"]
    B --> C["Device with controller"]
    C -->|Click| D["Mobile"]
EN
Disclaimer
Please read this entire document and all safe and lawful practices DJI ^™ provided carefully before use. Failure to read and follow instructions and warnings may result in serious injury to yourself or others, damage to your DJI product, or damage to other objects in the vicinity. By using this product, you hereby signify that you have read this disclaimer and warning carefully and that you understand and agree to abide by the terms and conditions herein. You agree that you are solely responsible for your own conduct while using this product, and for any consequences thereof. DJI accepts no liability for damage, injury or any legal responsibility incurred directly or indirectly from the use of this product. This document and all other collateral documents are subject to change at the sole discretion of DJI.
Warning
-
When using the MAVIC™ Mini Two-Way Charging Hub (hereinafter referred to as "charging hub") to charge the Mavic Mini Intelligent Flight Batteries, it is recommended to use a DJI 18W USB Charger or an FCC/CE-certified USB charger that supports Quick Charge protocol.
-
Place the charging hub on a flat and stable surface when in use. Ensure the device is properly insulated to prevent fire hazards.
-
DO NOT attempt to touch the metal terminals on the charging hub.
-
Clean the metal terminals with a clean, dry cloth if there is any noticeable buildup.
In the Box
Charging Hub × 1 Micro USB Cable × 1
Overview
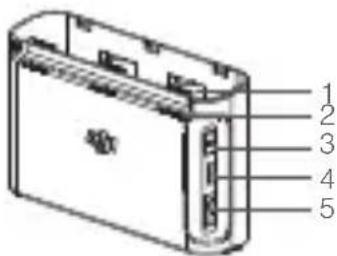
-
Battery Ports
-
Status LEDs
-
Function Button
-
Power Port (Micro USB)
-
USB Port
Introduction
The Mavic Mini Two-Way Charging Hub is designed both to charge Intelligent Flight Batteries connected to the battery ports and external devices such as a Mavic Mini Remote Controller, smartphones, or tablets connected to the USB port. The following scenarios explain more about how the charging hub works.
-
When a charger is connected to the charging hub with the Intelligent Flight Batteries inserted and external devices disconnected from the USB port, the charging hub will only charge the Intelligent Flight Batteries.
-
When connecting a charger to the charging hub, with the Intelligent Flight Batteries inserted and external devices connected to the USB port, the Intelligent Flight Batteries will be prioritized by default. The external devices will be charged when all the inserted batteries are fully charged. Press and hold the function button on the charging hub to switch to charging the external devices first.
- When the Intelligent Flight Batteries are inserted into the charging hub, with external devices connected to the USB port and the charger disconnected from the charging hub, the batteries can be used as a power bank to charge the connected external devices.
Usage
Charging Intelligent Flight Batteries
- As shown in Figure A, insert the battery into the battery port until there is a click. Connect the charging hub to a power outlet (100-240 V, 50/60 Hz) using a Micro USB cable and a DJI 18W USB Charger.
- The Intelligent Flight Battery with the highest power level will be charged first and the rest will be charged in sequence according to their power levels. The status LEDs will glow solid white after the corresponding battery is fully charged. Remove the battery from the charging hub as shown in Figure B.
Using Intelligent Flight Batteries as Power Banks
As shown in Figure C, insert the Intelligent Flight Battery into the charging hub without connecting it to a charger, then connect any external device to the USB port in the charging hub. The Intelligent Flight Battery with the lowest power level will be discharged first and the rest in sequence according to their power levels. The status LEDs will display the power level of the battery that supplies power when the external devices are being charged.

Press the function button on the charging hub once to activate charging if charging does not begin automatically.
Switching Devices to Charge
When inserting the Intelligent Flight Batteries into the charging hub, if both a charger and external devices are connected to the charging hub, it will prioritize the Intelligent Flight Batteries and charge them first. After all the Intelligent Flight Batteries have been fully charged, the external devices will be charged.
Press and hold the function button on the charging hub for two seconds to prioritize charging external devices. Charge for Intelligent Flight Batteries will be continued after the external devices are fully charged or they have been charged for two hours. When charging external devices, press and hold the function button for two seconds to switch back to charging Intelligent Flight Batteries.

- When the input of the charging hub is lower than 5V/2A, there is a chance that the USB port will be unable to charge the external devices.

- When charging an external device such as a smartphone or tablet, if it has high standby power consumption, the charging hub may not detect whether the device is fully charged. In this case, charging will not switch to Intelligent Flight Batteries automatically until after charging the external devices for two hours. Users can manually switch the charging priority by pressing and holding the function button.
Checking Battery Levels
The status LEDs will display battery levels for five seconds after the batteries are inserted into the charging hub. Users can also check the battery levels by pressing the function button once. Refer to the section below for the battery level description.
Status LEDs Descriptions
Charging Status
Each battery port has its corresponding status LED array.
| Status LEDs in an array blink successively (quickly) | The battery in the corresponding battery port is being charged using a Quick Charge charger. |
| Status LEDs in an array blink successively (slowly) | The battery in the corresponding battery port is being charged using a normal charger. |
| Status LEDs in an array blink successively (slowly for approx. 30 s, then blink very slowly with a gap of 2 s) | The battery in the corresponding battery port is being charged. In this case, charging will be extremely slow. It is recommended to use another Micro USB cable for charging. |
| Status LEDs in an array are solid | The battery in the corresponding battery port is fully charged. |
| All status LEDs blink in sequence No battery is inserted. | |
Battery Level
Each battery port has its corresponding status LED array, from LED1 to LED4 (from left to right). The battery level description is the same as the one for the battery level LEDs on the aircraft. Refer to the Mavic Mini User Manual for more information.
Abnormal Status
The abnormal status display of each battery status LED array is the same as the one for the battery level LEDs on the aircraft when inserting the battery into the aircraft. Refer to the Mavic Mini User Manual for more information.
Specifications
Model MM1CH
Compatible DJI Charger DJI 18W USB Charger
Compatible DJI Battery MB2-2400mAh-7.2V Intelligent Flight Battery
| Operating Temperature 5° to 40°C (41° to 104°F) | |
| Input 5 V | =2 A / 9 V =2A / 12 V 2A |
| USB Port Output Max: 5 V | =2 A |
| Weight Approx. 80 g | |
| Charging Time* | For three MB2-2400mAh-7.2V batteries:Approx. 4.5 hours |
* Charging time was tested using a DJI 18W USB Charger in a lab environment and should be used as reference only.
CHS
免责声明
- Two-Way Charging Hub
- Contents
- EN
- Disclaimer
- Warning
- In the Box
- Overview
- Introduction
- Usage
- Charging Intelligent Flight Batteries
- Using Intelligent Flight Batteries as Power Banks
- Switching Devices to Charge
- Checking Battery Levels
- Status LEDs Descriptions
- Charging Status
- Battery Level
- Abnormal Status
- Specifications
- CHS
- 免责声明
Brand : DJI
Model : Mavic Mini Two-Way Charging Hub
Category : Drone