
ELPDC21 - Visualiser EPSON - Free user manual and instructions
Find the device manual for free ELPDC21 EPSON in PDF.


| Product Type | Document Camera (Visualiser) |
| Brand | Epson |
| Model | ELPDC21 |
| Dimensions (W x D x H) | Approx. 365 x 365 x 230 mm (closed) |
| Weight | Approx. 2.5 kg |
| Power Supply | AC adapter (100-240 V AC, 50/60 Hz) |
| Image Sensor | 1/3-inch CMOS |
| Optical Zoom | 10x optical zoom |
| Digital Zoom | 10x digital zoom |
| Total Zoom | 100x (combined) |
| Resolution | HD (1920 x 1080) output via HDMI, USB 2.0 |
| Frame Rate | Up to 30 fps |
| Lighting | Built-in LED light source |
| Output Interfaces | HDMI, USB-B (for computer), VGA (optional) |
| Functions | Live capture, freeze, rotate, mirror, zoom, annotation via software |
| Maintenance | Clean lens with soft, dry cloth; keep out of direct sunlight |
| Safety Precautions | Avoid water, do not disassemble, use only supplied adapter |
| Spare Parts / Repairability | Spare parts available from Epson service centers; lamp not user-replaceable |
| Compatible Operating Systems | Windows, macOS, Chrome OS (via USB) |
| Included Accessories | AC adapter, USB cable, HDMI cable, quick start guide |
Frequently Asked Questions - ELPDC21 EPSON
User questions about ELPDC21 EPSON
0 question about this device. Answer the ones you know or ask your own.
Ask a new question about this device
Download the instructions for your Visualiser in PDF format for free! Find your manual ELPDC21 - EPSON and take your electronic device back in hand. On this page are published all the documents necessary for the use of your device. ELPDC21 by EPSON.
USER MANUAL ELPDC21 EPSON
Document Camera User's Guide
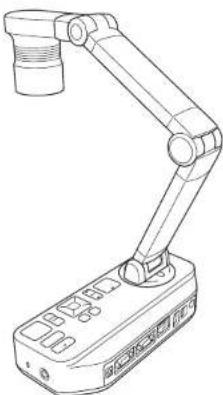

Meaning of Symbols in the Guide
• Symbols for Safety
The documentation and this product use graphical symbols to show how to use this product safely.
The indications and their meaning are as follows. Make sure you understand and respect these caution symbols to avoid injury to persons or property.
| [XY06] Warning | This symbol indicates information that, if ignored, could possibly result in personal injury or even death due to incorrect handling. |
| [27TC8] Caution | This symbol indicates information that, if ignored, could possibly result in personal injury or physical damage due to incorrect handling. |
• Symbols for General Information
| Attention | Indicates information that, if ignored, could cause the product to malfunction or cause damage. |
 | Indicates additional information and points which may be useful to know regarding a topic. |
| Indicates a page where detailed information regarding a topic can be found. | |
| [Name] Indicates button names for the remote control or the control panel.Example: [Return] button | |
| Menu Name Displays Configuration menu items.Example:Select Brightness from Picture Quality.Picture Quality - Brightness | |

Safety Instructions
Read this User's Guide and follow all safety instructions for your document camera. Keep this guide at hand for future reference.
Environmental Precautions

Warning
Do not use or store the document camera or remote control in a hot location, such as near a heater, in direct sunlight, or in a closed vehicle. Thermal damage, fire, or malfunction may occur.
Do not use or store the document camera outdoors for an extended length of time, or where it may be exposed to rain, water, or excessive humidity. Fire or electric shock may result.
Do not use or store the document camera where it may be exposed to smoke, steam, corrosive gases, or excessive dust. Fire or electric shock may result.

Caution
Do not set up the document camera near high-voltage electrical wires or sources of magnetic fields. This may interfere with correct operation.
Operate in the proper environmental conditions. "General Specifications" p.58
Do not place or store the document camera where it is accessible to small children. It may drop or tip over, causing personal injury.
Do not place the document camera where it may be exposed to vibration or shock.

Electrical Precautions

Warning
Never open any covers on the document camera except as specifically explained in this User's Guide. Never attempt to disassemble or modify the document camera. Refer all repairs to qualified service technicians.
Unplug the document camera from the outlet and contact your local dealer or Epson for help under the following conditions:
- If smoke, strange odors, or strange noises come from the device
- If liquid or foreign objects get inside the device
- If the device has been dropped or the housing has been damaged
Continuing to use under these conditions may result in fire or electric shock.
Do not attempt to use any adapter other than the AC adapter and power cord included with the device. Using an improper adapter may cause damage, overheating, fire, or electric shock.
Be sure to use the AC adapter with the proper voltage indicated in this guide. Use of a different power source may result in fire or electric shock.
If the AC adapter, power cord, or document camera is damaged, turn the power off, unplug the AC adapter from the electrical outlet, and contact your local dealer or Epson for help.
Do not touch the device, the AC adapter, or the plug with wet hands. Otherwise, you may receive an electric shock.
Do not use a power cord that is damaged. This may result in fire or electric shock. Take the following precautions when handling the power cord:
- Do not modify the power cord.
- Do not place heavy objects on the power cord.
- Do not bend, twist or pull the power cord excessively.
- Keep the power cord away from hot electrical appliances.
Take the following precautions when handling the plug. Failure to comply with these precautions could result in fire or electric shock.
- Do not overload wall outlets, extension cables, or power strips.
- Do not insert the plug into a dusty outlet.
- Insert the plug firmly into the outlet.
- Do not pull the power cord when disconnecting the plug; always be sure to hold the plug when disconnecting it.
Do not touch the plug during an electrical storm. Otherwise, you may receive an electric shock.
The cords included with this product contain chemicals, including lead, known to the State of California to cause birth defects or other reproductive harm. Wash hands after handling. (This notice is provided in accordance with Proposition 65 in Cal. Health & Safety Code § 25249.5 and following.)


Caution
Turn off the document camera and unplug it after use.
Make sure the power is turned off, the plug is disconnected from the outlet, and all cables are disconnected before moving the document camera.
If a malfunction occurs due to static electricity, thunder, and so on, the product begins recovery operations. During recovery operations, do not touch any switches on the product.
Installation Precautions

Warning
Do not use adhesives to prevent the screws from loosening and do not use oils or lubricants. This may cause the document camera housing to crack and could cause serious injury.

Caution
Do not place the document camera in an unstable location, such as on a shaky table or slanted surface. The document camera may drop or tip over, causing personal injury. If you use a table, cart, or stand, make sure it is stable and will not fall over.
When using the mounting points under the document camera to secure it to a table, cart, or stand, fasten the two bolts securely but do not overtighten them. Do not use adhesives.
Do not place the document camera in a poorly ventilated place where heat can accumulate.
Do not place the document camera on a carpet, blanket, and so on, or cover it during use.
Do not install the document camera in a hot location, such as near a heater.
Route cables so that they are not a tripping hazard. Otherwise, they could trip someone and cause a fall or injury.

Cleaning Precautions

Warning
Use a dry cloth (or, for stubborn stains, a moist cloth that has been wrung dry) for cleaning. Do not use liquid, aerosol cleaners, or solvents such as alcohol, thinner or benzine.
Do not place any containers of liquid on top of or near the document camera.
Do not spill liquid or spray fine mist into the document camera. Liquids entering the document camera may cause malfunction, fire, or electric shock. If you spill liquid, turn the power off, unplug the AC adapter from the electrical outlet, and contact your local distributor. Using the damaged device may cause fire or electric shock.
Never allow objects of any kind to enter any openings in the document camera. Do not leave objects, especially flammable objects, near the document camera. Doing so may result in fire or electric shock.

Caution
Unplug the AC adapter from the outlet before cleaning to prevent electric shock.
Usage Precautions

Caution
Do not look into the lens when the LED illumination lamp is on. The bright light can damage your eyes.
Do not use excessive force when adjusting the document camera. The document camera may be broken, resulting in personal injury.
Do not place heavy objects on the document camera. Otherwise, it may be damaged.
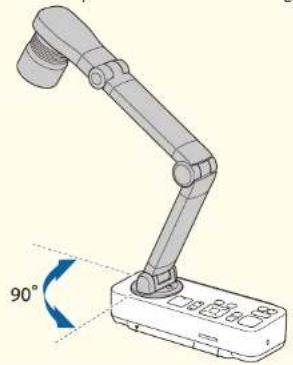
Do not try to press the arm flat or fold it backwards. Otherwise, it may be damaged.

Battery Precautions

Warning
Incorrect battery usage may cause batteries to rupture and leak battery fluid, which could result in fire, injury, or corrosion of the remote control.
If battery fluid gets in your eyes, do not rub your eyes. Wash them well with clean water and contact a doctor immediately.
If battery fluid enters your mouth, rinse immediately with plenty of water and contact a doctor immediately.
If battery fluid comes in contact with your skin or clothes, wash with water to prevent possible skin damage.
Keep batteries out of the reach of children; they are choking hazards and are very dangerous if swallowed.
Prepare two replacement manganese or alkaline AA batteries. Do not install batteries of different types, or mix new and old batteries.
Insert batteries so that the polarities (+ and -) are correct. Not doing so may cause leakage, overheating, or explosion.
Be sure to replace both batteries with new ones of the same type. Not doing so may cause leakage, overheating, or explosion.
Remove the batteries if you will not be using the remote control for a long period of time. When a battery runs down, take it out of the remote control immediately. If a used-up battery is left inside for a long time, gas emitted from the battery may cause leakage, overheating, explosion, or damage to the remote control.
Do not expose batteries to heat, flame, or water.
Dispose of used batteries according to local regulations.
Contents

Meaning of Symbols in the Guide .... Projecting
Safety Instructions ....
Positioning the Document Camera 22
Plugging In and Turning On 23
Introduction
Projecting 24
Switching the Projected Image .... Outputting Images and Sound...... Freezing an Image....2 Projecting Small Objects Displaying Whiteboard Images Projecting Through a Microscope
Turning Off 29
Included Items ....
Document Camera Parts ....
Top/Side/Rear.... Camera Head Control Panel.... Interface Base....14
Remote Control Buttons 15
Remote Control.... Projector operations...... Document camera operation....
Displaying Saved Images as a Slideshow
Saving Images 31 Recording Movies 32
Displaying a Slideshow (SD Card Viewer Function) .....
Dividing the Screen and Displaying Two Images (Split Screen) Displaying live images and images on an SD card
Projector....18
Available combinations for the Split Screen function 18
Image Adjustments and Effects
Using the On-screen Menu 39
On-Screen Menu Table 40
Image Menu 40 Function Menu....41 SD Card Menu 42 Info Menu 43
Connecting
Connecting the Document Camera Directly to a
Connecting Using a Computer Cable (Supplied) ..... Connecting Using an HDMI Cable.... When Using a Computer......
Connecting to a Projector Using a Computer 2
On-Screen Menu Table 40
Contents

Using the Computer Software
Symbols Indicating the Device Meets the IEC60950-1 A2 Safety
Standards 60
Using Easy Interactive Tools 45
General Notice 62
Operating Requirements....45 Installing....4 Copyrights and Trademarks....63 Uninstalling....46 Responsible Use of Copyrighted Materials....
Using Other Software 48
Trademarks 63
Installing....48
Uninstalling 48
Solving Problems
Problems and Solutions 50
Operation Problems....50
Image Quality Problems 50
SD Card Problems....50
Problems Connecting a Laptop....51
Epson Projector Contact List 52
EUROPE 52
AFRICA 54
MIDDLE EAST 54
NORTH, CENTRAL AMERICA & CARIBBEAN ISLANDS....55
SOUTH AMERICA 55
ASIA AND OCEANIA 55
Notices
Specifications 58
General Specifications....58

Introduction
You can use this document camera to capture and project pages from books or other documents, and even three-dimensional objects. You can also use the software supplied to operate the document camera from a computer.
Included Items

- Remote control with 2 AA batteries •Power cord and adapter
- Computer cable
- USB cable •EPSON Document Camera Software CD-ROM
- Document CD-ROM
- Quick Start Guide
- Microscope adapter
Top/Side/Rear
| Name Function | ||
| 1 | Camera head | "Camera Head" p.12 |
| 2 | Remote receiver Receives signals from the remote control. | |
| 3 | Control panel | "Control Panel" p.13 |
| 4 | SD card slot Lets you save and display images on an SD card."Displaying Saved Images as a Slideshow" p.30 | |
| 5 | Security slot The security slot is compatible with the Microsaver security system manufactured by Kensington. | |
| 6 | Interface | "Interface" p.14 |
| Name Function | ||
| 7 | Security cable installation point | Lets you attach a commercially available security cable to lock the document camera in place. |
Camera Head
| Name Function | ||
| 1 | Microphone Captures sound when you record a video. | |
| 2 | lamp switch | Changes the LED lamp status in three steps: bright, dim, and off. |
| 3 | LED lamp Provides additional light when there is not enough light on your document. | |
| 4 | Camera lens Captures the image. | |
| 5 | Camera arm Extends or retracts to adjust the height of the camera head. | |
Attention
Do not rub the lens with harsh materials or subject it to shock, as it can be easily damaged. Use a soft cloth to gently wipe the lens.
Control Panel![graph TD A["Input"] --> B["Source"] B --> C["Enter"] C --> D["Menu"] C --> E["Esc"] D --> F["Zoom"] E --> F F --> G["Focus"] G --> H["Capture"] G --> I["Record"] H --> J["Freeze"] I --> J J --> K["Output 1"]](/content/2026/05/761112/images/f0bd475a6eca6ac1dcc8fa6afbf8a9863935a213c6854bef566ee6fb9b34d997.jpg)
| Name Function | ||
| 1 | [⏻] power button Turns the document camera on or off. | |
| 2 | [Source] button [💡] [💡] | Switches the output image to the device connected to the Display Out port. [💡]: Projects images (live or on an SD card) from the document camera. [💡]: Projects images from a computer connected to the Computer In port. |
| Name Function | ||
| 3 | [Menu] button Opens and closes the menu. | |
| 4 | [▲][▼]◀▶buttons | When the menu screen is displayed, pressing these buttons selects menu items and setting values. |
| [◇][●]buttons | Adjusts the brightness of the image if pressed while projecting images from the document camera. | |
| [◀][▶]buttons | Adjusts the focus of the image if pressed while projecting images from the document camera. | |
| 5 | [Enter] button | • When the menu is displayed, pressing this button confirms the current item.• Displays the SD Card menu and images on the SD card if pressed while projecting live images.◆"Displaying a Slideshow (SD Card Viewer Function)" p.33 |
| 6 | [Esc] button Stops the current function. When the menu is displayed, pressing this button moves to the previous menu level. | |
| 7 | [Zoom] button [◇][⊖] | Enlarges or reduces the image without changing the projection size. |
| 8 | [Capture] button [☐] | Captures still images.◆"Saving Images" p.31 |
| 9 | [Focus] button | Focuses the image automatically.The document camera cannot focus on objects that are approximately 10 cm (4 inches) or less from the surface of the camera lens. |
| 10 | [Freeze] button | Freezes live images. Press the button again to resume projection. |
| 11 | [Record] button [■■] | Starts and stops video recording. |
Interface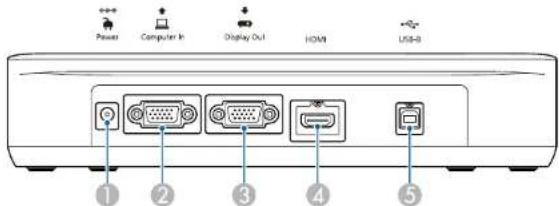
| Name Function | ||
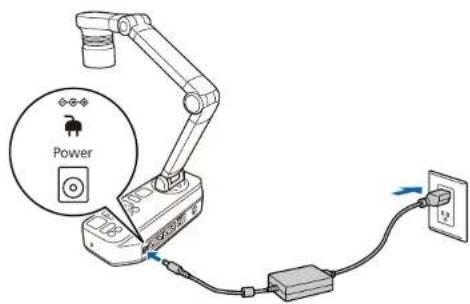
| 1 | Power (AC adapter/DC In) port | Connects the supplied power cord and adapter. |
| 2 | Computer In port Inputs image signals from a computer. | |
| 3 | Display Out port Outputs images to image devices such as projectors. | |
| 4 | I HDMI port Outputs images and audio to a video device that is compatible with HDMI signals. | |
| 5 | USB-B (TypeB) port Connects the document camera to your computer with the USB cable supplied. By using the software supplied, you can operate the document camera from a computer. | |
Base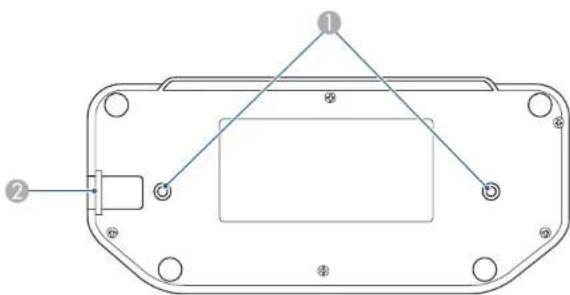
| Name Function | ||
| 1 | Mounting points You can attach the document camera to a table, cart,or stand with commercially available M4 bolts. Youcan thread them to a maximum depth of 9 mm(0.35 inch).AttentionFasten the bolts securely but do not overtighlen them. Do not use adhesives. | |
| 2 | Security cable installation point | Lets you attach a commercially available securitycable to lock the document camera in place. |
Remote Control
Projector operations
| Name Function | ||
| 1 | [∅] power button | When used with an Epson projector, turns the projector on or off. You cannot operate the document camera with this button. |
| 2 | [A/V Mute] button Turns | the video and audio of an Epson projector on or off. |
| 3 | [Source Search] button Changes the input source connected to an Epson projector.5 | |
* This is not supported by some projectors. For more details, contact your local dealer or the nearest service center provided in this guide. "Epson Projector Contact List" p.52
Document camera operation
| Name Function | ||
| 4 | [○] power button 'Turns the document camera on or off. You cannot operate a projector with this button. | |
| 5 | [Auto Focus] button Focuses the image automatically.The document camera cannot focus on objects that are approximately 10 cm (4 inches) or less from the surface of the camera lens. | |
| 6 | [Rotate Image] button [○] | Lets you turn an image upside-down. |
| 7 | [Menu] button Opens and closes the menu. | |
| 8 | [◀][◀]◀◀buttons | When the menu screen is displayed, pressing these buttons selects menu items and setting values. |
| 9 | [Enter] button | • When the menu is displayed, pressing this button confirms the current item.• Displays the SD Card menu and images on the SD card if pressed while projecting live images. |
| 10 | [Brightness] button [💡] [💡] | Adjusts the projected image brightness. |
| 11 | [SD Card Viewer] button Project images and movies on the SD card as a slideshow. Press the [Single] button to display the image on one screen, and press the [Split] button to display two images on the left and right. 🔗 "Displaying a Slideshow (SD Card Viewer Function)" p.33 | |
| 12 | [Camera] buttons Projects live images from the document camera. | |
| 13 | [Zoom] button [💡] [💡] | Enlarges or reduces the image without changing the projection size. |
| 14 | [Focus] button [▲] [▼] | Adjusts the focus of the image manually. |
| 15 | [Esc] button Stops the current function. When the menu is displayed, pressing this button moves to the previous menu level. | |
| 16 | [Record] button [💡] | Starts and stops video recording. |
| 17 | [Capture] button [💡] | Captures still images. |
| 18 | [Freeze] button Freezes live images. Press the button again to resume projection. | |
| 19 | [Source] button [💡] [💡] | Switches the output image to the device connected to the Display Out port. [💡]: Projects images from a computer connected to the Computer In port. [💡]: Projects images (live or on an SD card) from the document camera. |
| 20 | Remote control light-emitting area | Outputs remote control signals. |

Connecting
Follow the instructions in this section to set up the document camera.
Connecting the Document Camera Directly to a Projector

You can connect the document camera directly to image devices, such as a projector or external monitor, using a computer cable or HDMI cable.

You can also connect the document camera to a projector through a computer.
"Connecting to a Projector Using a Computer" p.20
Connecting Using a Computer Cable (Supplied)
Connect the Display Out port on the document camera to a projector using the computer cable. Images (live or on an SD card) from the document camera are output from the projector. Audio is not output.
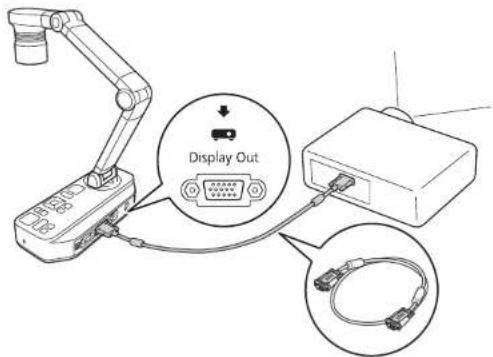
Connecting Using an HDMI Cable
Connect the HDMI port on the document camera to a projector using an HDMI cable (commercially available). Images (live or on an SD card) from
the document camera are output from the projector. Only audio from the SD card is output.
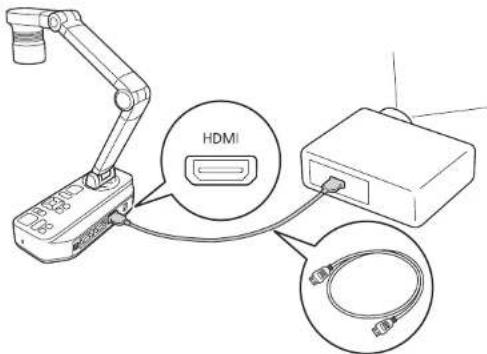

When image devices that support the HDMI CEC standard are connected to the document camera, operations for the document camera and the image device can be linked together. Set HDMI Link on the document camera. See "Function - HDMI Link" on page 41.
For necessary settings on the image device, see the documentation provided with the device.
When Using a Computer
When the Computer In port on the document camera is connected to a computer using a computer cable, you can project PowerPoint slides or images from any other application from a projector.
Connecting the Document Camera Directly to a Projector

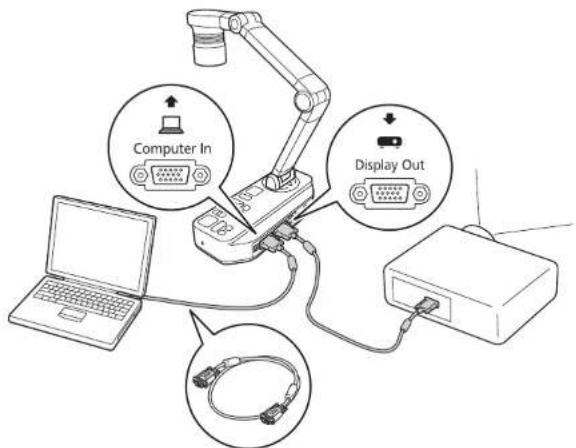

- This connection method is only available when the document camera is connected to a computer using a computer cable. If the computer you are using does not have a VGA output port, connect the computer directly to the projector.
- Images on the computer connected to the document camera are only output from the Display Out port.
You can switch the projected image between [☐] or [☑] using the [Source] button on the document camera or the remote control.
[☐]: Projects images from a computer. | ▶ |: Projects images (live or on an SD card) from the document camera.
Connecting to a Projector Using a Computer

When the document camera is connected to a computer using a USB cable, you can operate the document camera from the computer. Using the software supplied, you can save images and video, adjust picture quality, zoom, and so on.
"Using the Computer Software" p.44
Connect the USB-B port on the document camera to a computer using a USB cable.
Next, connect the computer to the projector. The cable used to create the connection differs depending on the computer and projector you are using. See the documentation provided with the computer and projector you are using.
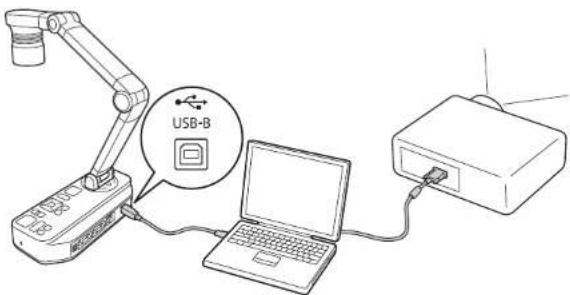

- You cannot project images by directly connecting the document camera to a projector with a USB cable.
- Connect the document camera to a USB 2.0 port of a computer. If you connect it to a USB 3.0 port, it may not function properly.
- Do not connect multiple document cameras to one computer at the same time.

Projecting
Positioning the Document Camera

22
1 Raise the camera arm with one hand while holding the base of the camera with your other hand.
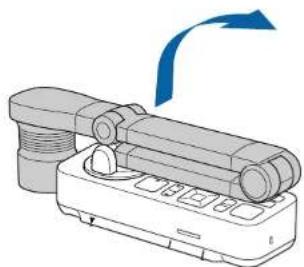
2 Rotate the camera arm as shown.
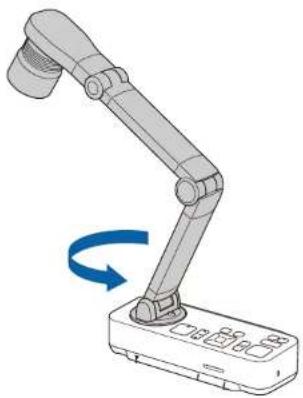
3 Position the camera head above the projection area.
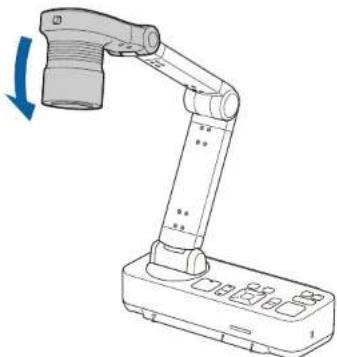
Attention
Do not try to press the arm flat or fold it backwards. Otherwise, the document camera may be damaged. The camera arm can only rotate within the range shown below.
Plugging In and Turning On

23
Connect the document camera to the projector with a cable before turning on the document camera. "Connecting" p.17
1 Connect the power cord as shown and plug the cord into a wall outlet.
2 Press the [☐] power button on the document camera or remote control.
![graph TD A["Power"] --> B["Source"] B --> C["Mouse"] C --> D["Text"] D --> E["Engine"] E --> F["Output"] G["Auto Focus"] --> H["Freeze"] H --> I["Capture"] I --> J["Record"] K["Rotate Image"] --> L["Computer"] M["Source"] --> N["Camera"]](/content/2026/05/761112/images/2276f551d7170586259a5e7ed0351e1caf9bae9ad9b3cad93e373f0529a43187.jpg)
The power indicator flashes blue. When startup is complete, the power indicator and the camera indicator are lit blue. Startup takes approximately 15 seconds.
3 Turn on your projector.
4 Select the appropriate source on the projector depending on the port to which you connected. Live images from the document camera are projected from the projector.
Projecting

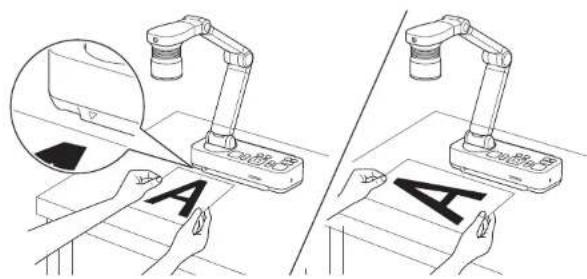
1 Place your document on the table under the camera head. Align the center of your document with the ▽ mark on the side of the document camera.

- When projecting A4-size or letter size paper, align the edge of the paper with the guides on the side of the document camera.
•The maximum paper size that can be projected is A3 landscape.
2 Slide the lamp switch to illuminate the document.
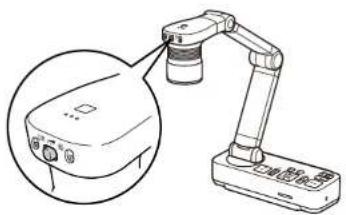

If necessary, you can adjust the brightness of the image using the ⏻ or ⏻ on the document camera or remote control.
3 Press the [Focus] button on the document camera or the [Auto Focus] button on the remote control.
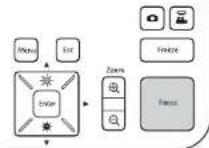
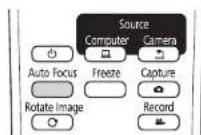
The focus is adjusted automatically.

To sharpen hard-to-focus objects, use the [◀]/[▶] buttons on the document camera, or the [Focus] buttons [▲]/[▼] on the remote control.
4 To zoom in on part of the image, press the [Zoom] - [⊕] button on the document camera or remote control. Press the [Zoom] ⊕) [ button to zoom out.
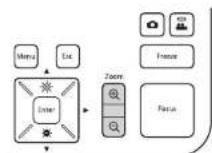
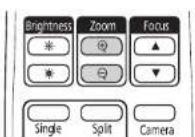
Projecting


- You can zoom up to 12x optically and 10x digitally. (When the optical zoom rate reaches the maximum value, it switches to the digital zoom.)
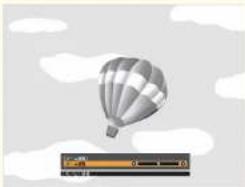
When using the optical zoom:
![Adjust Zoom. Adjust Zoom. [+] / [+] Adjust.](/content/2026/05/761112/images/354721c2487ff8192532dec320d3fff097a9e466243e4b6c0423191a581c0903.jpg)
When using the digital zoom:

- To enable the digital zoom, press the [Menu] button and set Image > Digital Zoom to On.
- When using the digital zoom, you can scroll (Pan/Tilt) the enlarged image by pressing the [▲], [▼], [◀], and [▶] buttons.
- Image quality declines when using the digital zoom function.
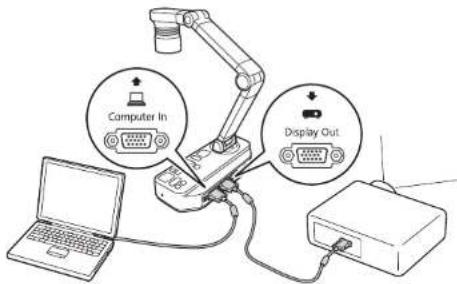
Projects images from a computer. [●]: Projects images (live or on an SD card) from the document camera.
Switching the Projected Image
When a computer is connected to the document camera, you can switch the image projected from the projector using the [Source] button on the document camera or the remote control.
Outputting Images and Sound
When connecting multiple devices to one document camera, the image and audio are output as follows.
When [ ] is selected using the Source button
- Display Out port: Images from the computer •HDMI port: Live images from the document camera
- USB-B port: Live images from the document camera and audio from the internal microphone

Images on the computer connected to the document camera are only output from the Display Out port.
When [ ] is selected using the Source button
When projecting live images from the document camera
- Display Out port: Live images from the document camera •HDMI port: Live images from the document camera
- USB-B port: Live images from the document camera and audio from the internal microphone

When recording live images or taking photos using the document camera, images and audio cannot be output from the USB-B port.
When projecting images from an SD card
- Display Out port: Images from the SD card •HDMI port: Images and audio from the SD card

When a computer is connected to the USB-B port, the SD card viewer is unavailable.
Freezing an Image
Press and release the |Freeze| button on the document camera or the remote control to freeze the image.
After freezing the image, you can remove your document while leaving its image displayed on the screen. Place your next document under the camera lens and press the [Freeze] button again; your presentation continues without interruption.
Projecting Small Objects
To project a small object, lower the camera arm. You can place the camera head within approximately 10 cm (4 inches) of the object.
To zoom in on part of the image, press the |Zoom| - [ ⊕] button on the document camera or remote control. Press the |Zoom|⊖] button to zoom out.
Displaying Whiteboard Images
You can use the document camera to display a lecture or presentation at the front of a room, or to capture images of a whiteboard or chalkboard.

Press the [Rotate Image] button Ⓐ on the remote control to turn an image upside-down. You can also rotate the image by pressing the [Menu] button and then selecting Image > Image Rotation > 180 degrees.
1 Rotate the camera head and set it in the direction of the object.

2 Press the [Focus] button on the document camera or the [Auto Focus] button on the remote control.
![graph TD A["Menu"] --> B["Edit"] B --> C["Zoom"] C --> D["Freeze"] D --> E["Focus"] F["Enter"] --> G["Zoom"] G --> H["Freeze"] H --> I["Source"] I --> J["Computer"] I --> K["Camera"] L["Auto Focus"] --> M["Freeze"] M --> N["Capture"] O["Rotate Image"] --> P["Record"]](/content/2026/05/761112/images/68a16aaf62a9cc7ef8be8a7dfbf97dff120fcada71aa36da60d4bfe6d5194b80.jpg)
The image is automatically focused.

You can make an audio/video recording of your projection. The recorded images are saved to the SD card.
"Recording Movies" p.32
Projecting Through a Microscope
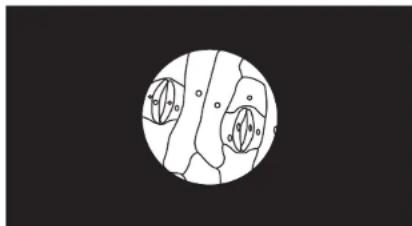
Projected image
To display objects as seen through a microscope, use the included microscope adapter.

- Before installing the document camera, make the following settings: - Focus the microscope and adjust the zoom
- Press the [Menu] button, and then select Image > Microscope > On.
- Images may not be displayed correctly depending on the optical properties of your microscope.
1 Attach the microscope adapter to the microscope's eyepiece.
Projecting


2 With the microscope's eyepiece in the center of the microscope adapter, tighten the three screws on the microscope adapter to secure it in place.
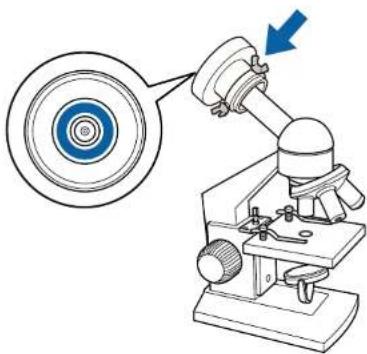
3 Adjust the height and angle of the camera head, and then attach it to the microscope adapter.
![graph TD A["Before"] --> B["Left Arm"] B --> C["Microscope with Sensor"] C --> D["After"] D --> E["Left Arm"] E --> F["Device with Sensor"]](/content/2026/05/761112/images/5733a100e44bb0665b453b8ddf8485523dafe6f5c50fdfe35b5babdf196acc8c.jpg)
Turning Off

Turn off the document camera after use.
1 Press the [⏻] power button on the document camera or remote control.
![graph TD A["User"] --> B["Sensor"] B --> C["Audio"] C --> D["Computer"] D --> E["Camera"] E --> F["Auto Focus"] E --> G["Freeze"] E --> H["Capture"] E --> I["Record"] style A fill:#f9f,stroke:#333 style B fill:#ccf,stroke:#333 style C fill:#cfc,stroke:#333 style D fill:#fcc,stroke:#333 style E fill:…](/content/2026/05/761112/images/0a6569f4044ec82c9c401d150dc7becd1a7ecf5e2077f51de816355d6dac63de.jpg)
The following message is displayed on the projected image.
Do you want to turn off the document camera?
Yes: Press ⏻ button
No: Press any other button
2 Press the [⏻] power button again. The projected image disappears, and the power indicator turns off.
3 Disconnect the power cord and any other connected cables, and then fold down the camera arm.
![graph TD A["Top Arm"] --> B["Left Arm"] B --> C["Right Arm"] C --> D["Bottom Arm"] D --> E["Left Arm"] E --> F["Right Arm"]](/content/2026/05/761112/images/7a75580dc97f7634274f9c87df27f300912ff4c399ade11971bdd0fcdf57013b.jpg)

Displaying Saved Images as a Slideshow
You can save live images from the document camera to an SD card and then display the saved images and movies as a slideshow.
This section explains how to perform operations using the document camera or the remote control. You can save images using software on your computer.
"Using the Computer Software" p.44

- FAT16 SD cards (up to 2 GB) and FAT32 SDHC cards (up to 32 GB) are supported.
- EX-FAT SDXC cards are not supported.
- SD cards with a security function cannot be used.
Attention
In the following situations, data on the SD card may be lost or corrupted.
- If the card is subjected to static electricity or electronic noise
- If the card is not handled correctly
- If a malfunction occurs or during repairs
- If damage occurs due to a natural disaster
Note that Epson accepts no responsibility for lost or corrupted data, even if the loss occurs during the warranty period.
Saving Images

You can save images from the document camera to an SD card as still images.

- Images are saved in JPEG format (1920 x 1080).
- You can change the background color for the image in Background Color. When White is set and the image is saved, if you print the image on white paper, the area around the image may not stand out. Function - Background Color p.41
1 Insert an SD card into the SD card slot on the document camera.
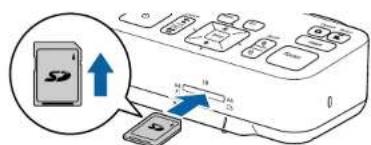
2 Project the image you want to save. 3 Press the [Capture] button to capture the image.

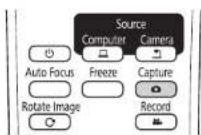
The number of photos available is displayed at the top right of the screen next to 📄, and captured images are saved to the following folder on the SD card:
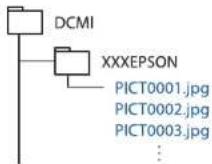
4 Repeat steps 2 and 3 for any additional images you want to save.

If there is no space on the SD card, the message "No free space on the SD Card." is displayed, and the image is not saved.
Recording Movies

You can save images and audio from the document camera to an SD card as movies.

- Movies are saved in AVI format (images: Motion JPEG 720p/30 fps, audio: Linear PCM).
- You can record individual files at the following sizes: Capacity: up to 2 GB
Recording time: up to approximately 29 minutes
If the maximum capacity or recording time are exceeded while recording, the movie up to that point is saved and the recording ends.
- You can check the amount of available free space on the SD card in SD Card Info. 📄 SD Card - SD Card Info. p.42
- Set Sleep Mode to Off to prevent the power turning off while recording. 🚙️ Function - Sleep Mode p.41
1. Insert an SD card into the SD card slot on the document camera.
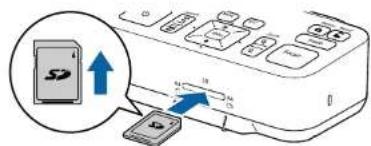
2. Project the image you want to save. 3. Press the [Record] button 📁 to start recording.
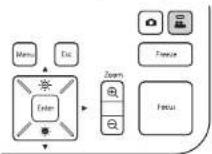

The recording indicator is lit blue while recording.

- While recording, the elapsed time is displayed at the top right of the screen. This is not displayed on the saved image.
- If there is no space on the SD card, the message "No free space on the SD Card." is displayed, and the movie is not saved.
- Do not remove the SD card while recording. •The following operations are available while recording: Freeze, Zoom (Pan/Tilt), Auto Focus, Brightness adjustment, Focus adjustment. Note that operation sounds are also recorded.
- While recording, a blue screen is displayed on the computer connected to the document camera using a USB cable.
4. To stop recording, press the button again.
While saving recordings, the recording indicator flashes blue, and when saving is complete the indicator turns off. Movies are saved to the following folder on the SD card:

Displaying a Slideshow (SD Card Viewer Function)

You can display images saved on an SD card as a slideshow.
This function is unavailable in the following situations:
- When the document camera is connected to a computer using a USB cable
- When recording a movie
- When a 480p signal is being output from the HDMI port. Files that can be played as a slideshow.
| Type File Type Notes | ||
| Still im- agcs | JPEG (DCF-compliant) | Files with a resolution over 7680 x 5760 pixels cannot be played. |
| Movies AVI | (images: Motion JPEG, audio: Linear PCM) | Files that are larger than 2 GB cannot be played. |

You can also display files that were not captured by the document camera as a slideshow. To display files, they must be saved to the specified folder. See the following for more details.
"SD Card Problems" p.50
1 Press the [Single] button on the remote control.
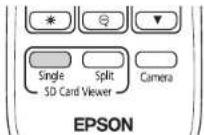
The final file and thumbnail on the SD card are displayed.

You can start a slideshow using the [Enter] button on the document camera or the remote control. Press the [Enter] button while projecting a live image, and then select Single Screen from the SD Card menu.
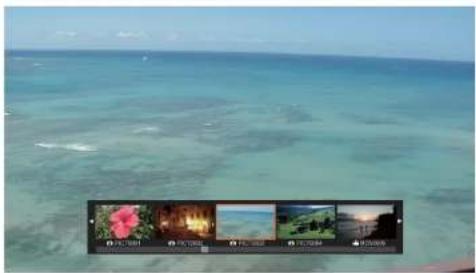
Thumbnails

If a file cannot be displayed because it is damaged or too big, a black screen is displayed.
2 Press the [◀] [▶] buttons to select the thumbnail for the file you want to display.
Press the [▲] [▼] buttons to change the thumbnails page.
Displaying a Slideshow (SD Card Viewer Function)

3 Press the [Enter] button to hide the thumbnails.
|◀| button: Displays the previous file.
|▶| button: Displays the next file.
[Esc] button: Displays the thumbnails again.
4 Hide the thumbnails, and then press the [Enter] button to play the movie.

Press the [Enter] button to pause/play the movie.
5 Press the [Menu] button to access the following functions.
| Rotate to Right*1 | Rotates the image 90 degrees to the right. |
| Rotate to Left1 | Rotates the image 90 degrees to the left. |
| Delete | Deletes the selected file. |
| Split Screen*1 | 'The screen switches to a split screen display, a you can display a live image and an image on th SD card on the left and right. |
| Return to Camera | 'The slideshow is closed and a live image is displayed. |
Thumbnail*2 Displays thumbnails.
*1 This is not available while a movie is being displayed.
*2 This is not displayed while thumbnails are displayed.
Attention
If the images on the SD card are rotated when displayed by the document camera, the original image can be saved as the rotated image. Backup data on the SD card to other media as often as necessary.
6 End the slideshow by pressing the [Camera] button on the remote control.

You can also close the slideshow by pressing the [Esc] button when thumbnails are displayed.
Dividing the Screen and Displaying Two Images (Split Screen)
You can display live images and images on an SD card side-by-side on the screen. You can also display two images on an SD card at the same time.
Displaying a Slideshow (SD Card Viewer Function)

Displaying live images and images on an SD card
1 Press the [Split] button on the remote control.

A live image and an image on the SD card are displayed side-by-side on the screen.

You can start the split screen projection using the [Enter] button on the document camera or the remote control. Press the [Enter] button while projecting a live image, and then select Split Screen from the SD Card menu.
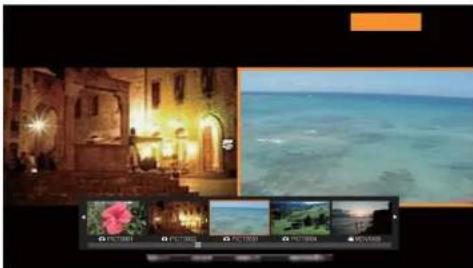
2 Press the [◀] [▶] buttons to select the thumbnail for the image you want to display.
Press the [▲] [▼] buttons to change the thumbnails page.

When projecting a live image from the document camera, you cannot display a movie from the SD card.
3 Press the [Enter] button to hide the thumbnails.
|◀| button: Displays the previous file.
|▶| button: Displays the next file.
[Esc] button: Displays the thumbnails again.
4 Press the [Menu] button to access the following functions. Some functions are not available depending on the image being projected.
| Rotate to Right | Rotates the image 90 degrees to the right. |
| Rotate to Left | Rotates the image 90 degrees to the left. |
| Single Screen | Changes to a single image display. |
| Flip | Switches the images on the left and right. |
| Camera/SD Mode SD/SD Mode | Changes the combination of displayed images. •Live Image and Image on SD card •Two Files on SD Card |
| Return to Camera | The slideshow is closed and a live image is displayed. |
| Thumbnail* | Displays thumbnails. |
* This is not displayed while thumbnails are displayed.

You can use the following adjustment functions for live images: Brightness adjustment, Focus adjustment (automatic and manual), Freeze, Zoom (Pan/Tilt).
5 End the slideshow by pressing the [Camera] button on the remote control.
Displaying a Slideshow (SD Card Viewer Function)

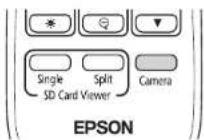

You can also close the slideshow by pressing the [Esc] button when thumbnails are displayed.
Displaying two images on an SD card
1 Press the [Split] button on the remote control.
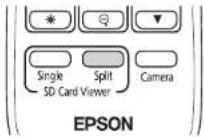
A live image and an image on the SD card are displayed side-by-side on the screen.

You can start the split screen projection using the [Enter] button on the document camera or the remote control. Press the [Enter] button while projecting a live image, and then select Split Screen from the SD Card menu.

2 Press the [Menu] button on the document camera or the remote control, and then select SD/SD Mode.
![[Split Screen] Return, Rotate to Right, Rotate to Left, Single Screen, Flip, SD/SD Mode +, Return to Camera.](/content/2026/05/761112/images/021e66fc7e92bc56167c8ed4b124d9de86d0a911326eff9bfa28269cb0655de5.jpg)
Two files on the SD card are displayed side-by-side on the screen. You can change the file surrounded by the orange frame.
3 Press the [◀] [▶] buttons to select the thumbnail for the file you want to display.
Press the ▲ | ↓ buttons to change the thumbnails page.
4 To move the orange frame between the right and left of the screen to re-select the file, press the [Menu] button while thumbnails are displayed, and then select Change Focus.
Displaying a Slideshow (SD Card Viewer Function)

![[Split Screen] Return, Rotate to Right, Rotate to Left, Change Focus, Single Screen, Camera/SD Mode, Return to Camera.](/content/2026/05/761112/images/6e727edd36b8247909c4d76056ae89967ddb93035c1820b2598606043d2f97af.jpg)
5 Press the [Enter] button to hide the thumbnails.
[◀] button: Displays the previous file.
[▶] button: Displays the next file.
[Esc] button: Displays the thumbnails again.
6 End the slideshow by pressing the [Camera] button on the remote control.
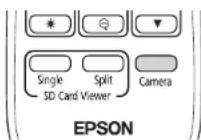

You can also close the slideshow by pressing the [Esc] button when thumbnails are displayed.
Available combinations for the Split Screen function
| Left Source Right Source | |
| Live Image SD Card Image | |
| SD Card Image Live Image | |
| SD Card Image SD Card Image |
| Left Source Right Source | |
| SD Card Movie SD Card Image |

Movies cannot be displayed on the right-hand side of the screen.

Image Adjustments and Effects
The document camera provides a full range of image adjustments and effects, including freeze image, black-and-white, and the ability to change the display for color images.
Press the [Menu] button on the document camera or remote control to view the on-screen menu. See the following for details on each item in the on-screen menu.
"On-Screen Menu Table" p.40

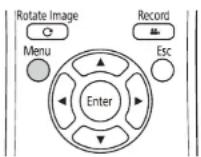
The following menu is displayed:

Use the [▲] |▼| [◀] |▶] buttons to navigate the menu and adjust the settings. Press [Enter] to select a setting. When you are done adjusting the settings, press the [Menu] or [Esc] button to close the menu and save your settings.

The menu cannot be displayed when connecting to a computer using a USB cable.
Image Menu
| Setup Item Explanation/Select | |
| White Balance | Select the setting according to the lighting in the room where you are using the document camera. Auto*: Automatically adjusts the image color according to the display environment. Cloudy: Suitable for use in cloudy weather. Daylight: Suitable for use in fair weather. Fluorescent: Suitable for use in a room with fluorescent lighting. Incandescent: Suitable for use in a room with incandescent lamps. |
| Focus Lock Enables or disables the | auto-focus while zooming. On: Disables auto-focus while using the optical zoom. Off: Enables auto-focus while using the optical zoom. |
| Image Mode | You can select from the following settings to adjust for the image type you are displaying: Normal*: Default setting. Text: Suitable for projecting black-and-white text. Display: Suitable for projecting images from a tablet display, and so on. |
| Digital Zoom Adjusts the digital zoom settings. | On: Enables digital zoom operations after performing the optical zoom. Off*: Disables digital zoom operations. |
| Color/B&W/Negative Select the display method for color images. Color*: Displays the image in color. Black&White: Displays the image in black-and-white. Negative: Displays a photographic negative in true color. | |
| Image Rotation Lets you rotate the | image. Normal*: Displays the image as it actually is. 180 degrees: Displays the image upside-down. |
| Microscope Optimizes the image settings for use with a microscope. On: Sets the optimal image settings for use with a microscope. Off*: Returns to the normal settings. | |
| Noise Reduction Settings related to Noise Reduction for the live image. Off: Deactivates Noise Reduction. NR1, NR2, NR3: Enables Noise Reduction. Use this setting if noise occurs. | |
| Advanced Makes advanced settings of | live image.Exposure: Adjusts the light volume of images.Contrast: Adjusts the difference between bright and dark areas of images.Color Adjustment: Adjusts the reddish and bluish colors of the whole image.Edge Enhancement: Adjusts the emphasis on the contours of the image.Gamma: Adjusts the coloring that occurs while displaying the image. |
| Reset | Resets the Image menu settings to the default values. |
* Default setting at time of purchase
* Default setting at time of purchase Function Menu
| Setup Item Explanation/Select | |
| Output Resolution | Sets the output resolution when connecting a computer cable to the Display Out port. Auto*: Sets automatically according to the resolution of the image device. XGA 1024x768 WXGA 1280x800 WXGA 1360x768 SXGA 1280x1024 Full HD 1920x1080 |
| HDMI Output | Sets the output resolution when connecting an HDMI cable to the HDMI port. Auto*: Sets automatically according to the resolution of the image device. SDTV (480p) HDTV (720p) HDTV (1080p) |
| Mic. Volume Sets the volume for the internal microphone. | |
| HDMI Link | When image devices that support the HDMI CEC standard are connected to the document camera, operations for the document camera and the image device can be linked together.HDMI Link: Set to Oh to enable the HDMI Link function. The changes are enabled when you turn off the document camera.Power On/Off Link: When this is set to On, the connected device turns on when the document camera is turned on. Also, when the connected device is turned off, the document camera turns off. The default setting is Off. |
| Sleep Mode Operation settings when | the document camera is inactive.On: The power automatically turns off if the document camera is inactive for a certain amount of time.Off*: The power remains on even if the document camera is inactive for a certain amount of time. |
| Sleep Mode Timer | Sets the time from when the document camera is last operated until the power automatically turns off in Sleep Mode.1 to 6 hour(s) |
| Background Color Select the display | background for the projected image.Black*White |
| Flicker Reduction | Eliminates flicker when giving presentations in regions with different electrical systems.50Hz*60Hz |
| Language Changes the on-screen menu language. | |
| Reset | Resets the Function menu settings to the default values. |
SD Card Menu
You can only make settings when an SD card has been inserted in the document camera.
| Setup Item Explanation/Select | |
| Single Screen | The slideshow starts. |
| Split Screen | Split screen projection starts. |
| SD Card Info. Displays information about the SD card. | Memory Status: Displays the usage ratio of the SD card.Recordable Images: Displays the number of images that can be stored on the SD card.Total Memory: Displays the total capacity of the SD card. |
Info Menu
| Setup Item Explanation | |
| Output(HDMI) | Displays the set content for HDMI Output. ➕ "Function Menu" p.41 |
| Output(RGB) | Displays the output resolution for the image signal. |
| Version Displays the firmware version for the document camera. | |
| Serial Number | Displays the serial number for the document camera. |

Using the Computer Software
The included software lets you operate the document camera from a computer. The software also lets you capture live images and record them as movies.
Using Easy Interactive Tools

When using the Easy Interactive Tools camera screen, you can display images from the document camera on a computer connected via a USB cable. You can adjust the image size, brightness, and so on, and save it as an image file or a movie file.
For more details on Easy Interactive Tools, see the Easy Interactive Tools Operation Guide.

When projecting an image using a projector that supports the interactive pen or touch operations, you can operate the Easy Interactive Tools on the projected image.
Operating Requirements Windows
| OS | Windows Vista 1 | Ultimate 32 bitEnterprise 32 bitBusiness 32 bitHome Premium 32 bitHome Basic 32 bit |
| Windows 7 Ultimate | 32/64 bitEnterprise 32/64 bitProfessional 32/64 bitHome Premium 32/64 bitHome Basic 32 bit | |
| Windows 8 Windows | 8 32/64 bitWindows 8 Pro 32/64 bitWindows 8 Enterprise 32/64 bit | |
| Windows 8.1 Windows | 8.1 32/64 bitWindows 8.1 Pro 32/64 bitWindows 8.1 Enterprise 32/64 bit |
| Windows 10 Home | 32/64 bitPro 32/64 bitEnterprise 32/64 bitEducation 32/64 bit | |
| CPU | Intel Core2 Duo 1.2 GHz or fasterRecommended: Intel Core i3 or faster | |
| Amount of Memory | 1 GB or moreRecommended: 2 GB or more | |
| Hard Disk Space | 100 MB or more | |
| Display | Resolutions no lower than XGA (1024 x 768) and higher than WUXGA (1920 x 1200)Display color of 16-bit color or more | |
* Service Pack 2 or later
Mac
| OS* | OS X 10.7.xOS X 10.8.xOS X 10.9.xOS X 10.10.xOS X 10.11.xmacOS 10.12.x |
| CPU | Intel Core2 Duo 1.2 GHz or fasterRecommended: Intel Core i5 or faster |
| Amount of Memory | 1 GB or moreRecommended: 2 GB or more |
| Hard Disk Space | 100 MB or more |
| Display | Resolutions no lower than XGA (1024 x 768) and higher than WUXGA (1920 x 1200) Display color of 16-bit color or more | no |
* Requires QuickTime 7.7 or later.
Installing

- The software should be installed by a user with administrator access.
- Close all running applications before starting the installation.
Windows
1 Turn on your computer.
2 Insert the EPSON Document Camera Software CD-ROM in your computer.
The installer screen is automatically displayed.
3 Select Drawing on the Camera screen on the installer screen to start installation.
Mac
1 Turn on your computer.
2 Insert the EPSON Document Camera Software CD-ROM in your computer.
The installer screen is automatically displayed.
3 Double-click the Install Navi icon in the EPSON window.
4 Select Drawing on the Camera screen on the installer screen to start installation.
Uninstalling
Windows Vista/Windows 7
1 Click Start, and then Control Panel. 2 Click Uninstall a program. 3 Select Easy Interactive Tools Ver.X.XX, and then click Uninstall.
Windows 8/Windows 8.1
1 Select Search on the Charms, and then search for Easy Interactive Tools Ver.X.XX. 2 Right-click (press and hold) Easy Interactive Tools Ver.X.XX, and then select Uninstall from the app bar. 3 Select Easy Interactive Tools Ver.X.XX, and then select Uninstall.
Windows 10
1. Right-click Start. 2. Click Control Panel. 3. Click Uninstall a program. 4. Select Easy Interactive Tools Ver.X.XX, and then click Uninstall.
Mac
1. Double-click Application - Easy Interactive Tools Ver.X.XX.
Using Easy Interactive Tools

2. Run Easy Interactive Tools Uninstaller from the Tools folder. 3. Follow the on-screen instructions to uninstall.
You need to install TWAIN Driver for Epson Document Camera (Ver. 2.00 or later) to use software that supports TWAIN. (Supports Windows only)
Installing
1. Turn on your computer. 2. Insert the EPSON Document Camera Software CD-ROM in your computer. 3. Double-click Computer - TWAIN Driver for Epson Document Camera - setup.exe. The installer screen is automatically displayed. 4. Follow the instructions on the screen to install all the software.
Uninstalling
Windows Vista/Windows 7
1. Click Start - Control Panel. 2. Click Uninstall a program. 3. Select TWAIN Driver for Epson Document Camera Ver.X.XX, and then click Uninstall.
Windows 8/Windows 8.1
1. Select Search from the Charm bar, and then search for TWAIN Driver for Epson Document Camera Ver.X.XX.
2. Right-click (and hold) on TWAIN Driver for Epson Document Camera Ver.X.XX, and then select Uninstall from the application bar.
3 Select TWAIN Driver for Epson Document Camera Ver.X.XX, and then select Uninstall.
Windows 10
1 Right click Start.
2 Click Control Panel.
3 Click Uninstall a program.
4 Select TWAIN Driver for Epson Document Camera Ver.X.XX, and then click Uninstall.

Solving Problems
Operation Problems
No image appears on the screen
- After you press the power button, wait a few moments for the image to appear. It takes approximately 15 seconds for the document camera to output an image.
- Make sure all necessary cables are securely connected and the power is on for the projector and the document camera. "Connecting the Document Camera Directly to a Projector" p.18 "Connecting to a Projector Using a Computer" p.20
- If you have connected a laptop, see the following. "Problems Connecting a Laptop" p.51 •To project live images from the document camera, press the [Source] - [Button] button on the document camera or the remote control.
- Select the correct source on your projector. The source refers to the port on the projector to which you have connected the cable.
- Press the projector's power button to wake it from standby or sleep mode. Make sure the image has not been "muted" or turned off. Also see if your document camera is in sleep mode.
- If the power indicator on the document camera flashes, reconnect the power cord. If no images are output even after pressing the [O] power button again, stop using the document camera, contact your local dealer or the nearest service center provided in this guide. "Epson Projector Contact List" p.52
Image Quality Problems
The image is fuzzy or out of focus
- If the surroundings are dark and the contrast in the projected image is low, the document camera's auto focus function may not work correctly. Press the [■] [■] buttons on the document camera or the [Focus] buttons [▲] [▼] on the remote control, and then adjust the contrast manually.
- Make sure the camera head is at least 10 cm (4 inches) away from the object you are viewing.
- If you are using a projector to display the image, check its focus.
The image brightness or colors are incorrect
- Press the [÷] or [●] button to increase or decrease image brightness.
- Set the White Balance setting to Auto to adjust the color automatically. If the colors are still not correct, select the best setting for the type of lighting in your environment (Cloudy, Daylight, Fluorescent, or Incandescent).
"Image Menu" p.40
- If the document camera was used with a microscope, make sure you set the Microscope setting to Off when you return to displaying documents.
"Image Menu" p.40
Other image problems
- If the image is stretched or has black bars, change the Output Resolution or the HDMI Output from the Function menu.
"Function Menu" p.41

To return all image settings to their initial values, select the Reset menu.
"Image Menu" p.40
SD Card Problems
Some images do not appear
Check the file format when copying images to the SD card from a computer.
Problems and Solutions

- Images must be DCF-compliant. JPEG files to be displayed, such as those from a digital camera. Do not edit the images, as this may change their format and prevent them from being displayed.
- Images must be named using the format ABCD1234.JPG, where ABCD is any combination of upper- or lowercase letters and 1234 is any combination of numbers. (For example: Pict0001, Pict0002)
- Images must be placed in a folder named DCIM\123ABCDE, where 123 is any combination of numbers and ABCDE is any combination of upper- or lowercase letters. If this folder structure does not exist, first create a folder named DCIM, then create a folder within it with the desired name. (For example: 100EPSON)
Image files do not have the correct time stamp
The document camera does not have a built-in clock. Therefore, when you view captured image files from your computer, the actual time they were created is not displayed.
Hold down the laptop's Fn key and press the key labeled with □□ or CRT/LCD. (See your laptop manual for details.) Wait a few seconds for an image to appear. To display on both the laptop's monitor and the projector, try pressing the same keys again. If the same image is not displayed by the laptop and projector, check the Windows Display utility to make sure the external monitor port is enabled and extended desktop mode is disabled. (See your computer or Windows manual for instructions.)
•Mac
From the Apple menu, open the System Preferences utility and select Displays. Click the Arrangement tab and select the Mirror Displays checkbox.
Problems Connecting a Laptop
If images are not displayed from a PC laptop, you need to set up the laptop to display on an external monitor. If images are not displayed from a Mac laptop, you need to set up the laptop for mirrored display. (See your laptop manual for details.)
Epson Projector Contact List

See the following contact list if any problems occur when using the document camera outside Japan.
See the Web Home Page provided with each contact for the latest contact information. If the country you are in is not provided, see the main home page, www.epson.com.
EUROPE
ALBANIA
ITD Sh.p.k.
http://www.itd-al.com
AUSTRIA
Branch office Belgium
http://www.epson.be
BOSNIA AND HERZEGOVINA
NET d.o.o. Computer Engineering
http://www.net.com.ba
BULGARIA
Epson Service Center, Bulgaria
http://www.kolbis.com
CROATIA
MR servis d.o.o.
CYPRUS
Mechatronic Ltd.
http://www.mechatronic.com.cy
CZECH REPUBLIC
Epson Europe B.V.
Branch Office Czech Republic
http://www.epson.cz
DENMARK
Epson Denmark
http://www.epson.dk
ESTONIA
Epson Service Center, Estonia
http://www.epson.ee
FINLAND
Epson Finland
http://www.epson.fi
FRANCE and DOM-TOM TERRITORIES
Epson France S.A.
http://www.epson.fr
GERMANY
Epson Projector Contact List

GREECE
Oktabit S.A.
http://www.oktabit.gr
HUNGARY
Epson Europe B.V.
Branch Office Hungary
http://www.epson.hu
IRELAND
Epson (UK) Ltd.
http://www.epson.ie
ISRAEL
Epson Israel
http://www.epson.co.il
ITALY
Epson Italia s.p.a.
http://www.epson.it
KAZAKHSTAN
Epson Kazakhstan Rep. Office
http://www.epson.kz
LATVIA
Epson Service Center, Latvia
http://www.epson.lv
LITHUANIA
Epson Service Center Lithuania
http://www.epson.lt
LUXEMBURG
Epson Europe B.V. Branch office Belgium
http://www.epson.be
MACEDONIA
Digit Computer Engineering
http://www.digit.com.mk
NETHERLANDS
Epson Europe B.V. Benelux sales office
http://www.epson.nl
NORWAY
Epson Norway
http://www.epson.no
POLAND
Epson EUROPE B.V. Branch Office Poland
http://www.epson.pl
PORTUGAL
Epson Ibérica S.A.U. Branch Office Portugal
http://www.epson.pt
ROMANIA
Epson Europe B.V. Branch Office Romania
http://www.epson.ro
RUSSIA
Epson CIS
http://www.epson.ru
UKRAINE
Epson Kiev Rep Office
http://www.epson.ua
SERBIA
AVG d.o.o. Beograd
http://www.a-v-g.rs
SLOVAKIA
Epson EUROPE B.V. Branch Office Czech Republic
http://www.epson.sk
SLOVENIA
Birotehna d.o.o
http://www.birotehna.si
SPAIN
Epson Ibérica, S.A.U.
http://www.epson.es
SWEDEN
Epson Sweden
http://www.epson.se
SWITZERLAND
Epson Deutschland GmbH Branch office Switzerland
http://www.epson.ch
TURKEY
http://www.epson.co.uk
Indication of the manufacturer and the importer in accordance with requirements of EU directive
Manufacturer: SEIKO EPSON CORPORATION
Address: 3-5, Owa 3-chome, Suwa-shi, Nagano-ken 392-8502 Japan
Telephone: 81-266-52-3131
http://www.epson.com/
Importer: EPSON EUROPE B.V.
Address: Atlas Arena, Asia Building, Hoogoorddreef 5,1101 BA Amsterdam Zuidoost
The Netherlands
Telephone: 31-20-314-5000
http://www.epson.com/europe.html
AFRICA
http://www.epson.co.za or http://www.epson.fr
SOUTH AFRICA
Epson South Africa
http://www.epson.co.za
MIDDLE EAST
Epson (Middle East)
http://www.epson.ac
NORTH, CENTRAL AMERICA & CARIBBEAN ISLANDS
CANADA
Epson Canada, Ltd.
http://www.epson.ca
COSTA RICA
Epson Costa Rica, S.A.
http://www.epson.co.cr
MEXICO
Epson Mexico, S.A. de C.V.
http://www.epson.com.mx
ECUADOR
Epson Ecuador
http://www.epson.com.ec
U.S.A.
Epson America, Inc.
http://www.epson.com
SOUTH AMERICA
ARGENTINA
Epson Argentina S.R.L.
Epson Venezuela S.A.
http://www.epson.com.ve
ASIA AND OCEANIA
AUSTRALIA
Epson Australia Pty. Ltd.
http://www.epson.com.au
CHINA
Epson (CHINA) CO., Ltd.
Epson Projector Contact List

http://www.epson.com.cn
HONG KONG
Epson Hong Kong Ltd.
http://www.epson.com.hk
INDIA
Epson India Pvt., Ltd.
http://www.epson.co.in
INDONESIA
PT. Epson Indonesia
http://www.epson.co.id
JAPAN
SEIKO EPSON CORPORATION
TOYOSHINA OFFICE
http://www.epson.jp
KOREA
Epson Korea Co., Ltd.
http://www.epson.co.kr
MALAYSIA
Epson Malaysia Sdn. Bhd.
http://www.epson.com.my
NEW ZEALAND
Epson New Zealand
http://www.epson.co.nz
PHILIPPINES
Epson Philippines Co.
http://www.epson.com.ph
SINGAPORE
Epson Singapore Pte. Ltd.
http://www.epson.com.sg
TAIWAN
Epson Taiwan
Technology & Trading Ltd.
http://www.epson.com.tw
THAILAND
Epson (Thailand) Co., Ltd.
http://www.epson.co.th

Notices
General Specifications
| Product name | ELPDC21 | |
| Dimensions | Open (W × D × H): 270 × 328 × 502 mm (10.6 × 12.9 × 19.8 inches)Folded (W × D × H): 375 × 122 × 120 mm (14.8 × 4.8 × 4.7 inches) | |
| Type of sensor | 1/2.7 inch CMOS sensor | |
| Lens | F=3.4-5 | |
| Effective pixels | 2 megapixel (1920 × 1080) | |
| Imaging area | 1080p: 29.7 × 52.6 cm (11.7 × 20.7 inches) | |
| Focus adjustment | Automatic/manual | |
| Zoom adjustment | 12x optical zoom (at infinity)10x digital zoom | |
| Frame rate | Up to 30 fps | |
| Internal microphone | 1 (monaural input) | |
| Power supply AC adapter | 100to 240 VAC ±10%, 50/60 Hz | |
| Main unit | 12 VDC | |
| Power consumption | Operating: 13 WStandby: 0.2 W | |
| Operating temperature | +5 to +35C, without condensation | |
| Storage temperature | -10 to +60C, without condensation | |
| Operating humidity | 20 to 80% RH, without condensation | |
| Storage humidity | 10 to 90% RH, without condensation | |
| Weight | Approx. 3.0 kg (6.6 lb) | |
| Input port Computer | In port 1 | Mini D-Sub15-pin (female) | |
| Output port Display | Out port 1 | Mini D-Sub15-pin (female)Output: SXGA (1280 x 1024)/XGA (1024 x 768)/WXGA (1280 x 800)/HD (1360 x 768)/1080p(1920 x 1080) | |
| HDMI port 1 | 1 | HDMIOutput: SDTV (480p)/HDTV (720p, 1080p) | |
| Connector port USB-B port *2 | 1 | USB connector (TypeB)Output: VGA/SVGA/XGA/SXGA/WXGA/720p/1080p | |
*1 HDMI CEC is supported, however, the operation of all compatible devices is not guaranteed. *2 USB 2.0 is supported, however, the operation of all USB compatible devices is not guaranteed.
This product is also designed for IT power distribution system with phase-to-phase voltage 230V.
Symbols Indicating the Device Meets the IEC60950-1 A2 Safety Standards

The following table lists the meaning of the safety symbols labeled on the equipment.
| No. | Symbol mark Approved standards | Meaning | |
| 1 | IEC60417No.5007 | "ON" (power)To indicate connection to the mains. | |
| 2 |  | IEC60417No.5008 | "OFF" (power)To indicate disconnection from the mains. |
| 3 |  | IEC60417No.5009 | Stand-byTo identify the switch or switch position by means of which part of the equipment is switched on in order to bring it into the stand-by condition. |
| 4 |  | ISO7000No.0434BIEC3864-B3.1 | CautionTo identify general caution when using the product. |
| 5 |  | IEC60417No.5041 | Caution, hot surfaceTo indicate that the marked item can be hot and should not be touched without taking care. |
| 6 | IEC60417No.6042ISO3864-B3.6 | Caution, risk of electric shockTo identify equipment that has risk of electric shock. | |
| 7 |  | IEC60417No.5957 | For indoor use onlyTo identify electrical equipment designed primarily for indoor use. |
| 8 |  | IEC60417No.5926 | Polarity of d.c. power connectorTo identify the positive and negative connections (the polarity) on a piece of equipment to which a d.c. power supply may be connected. |
| No. | Symbol mark Approved | standards | Meaning | |
| 9 |  | IEC60417No.5001B | Battery, generalOn battery powered equipment. To identify a device for instance a cover for the battery compartment, or the connector terminals. | |
| 10 |   | IEC60417No.5002 | Positioning of cellTo identify the battery holder itself and to identify the positioning of the cell(s) inside the battery holder. | |
| 11 |  | IEC60417No.5019 | Protective earthTo identify any terminal which is intended for connection to an external conductor for protection against electric shock in case of a fault, or the terminal of a protective earth electrode. | |
| 12 |  | IEC60417No.5017 | EarthIndicates a grounding port when No. 11 is not explicitly called for. | |
| 13 |  | IEC60417No.5032 | Alternating currentTo indicate on the rating plate that the equipment is suitable for alternating current only; to identify relevant terminals. | |
| 14 |  | IEC60417No.5031 | Direct currentTo indicate on the rating plate that the equipment is suitable for direct current only; to identify relevant terminals. | |
| 15 |  | IEC60417No.5172 | Class II equipmentTo identify equipment meeting the safety requirements specified for Class II equipment according to IEC 61140. | |
| 16 |  | ISO 3864 General prohibitionTo identify actions or operations that are prohibited. | ||
Symbols Indicating the Device Meets the IEC60950-1 A2 Safety Standards

| No. | Symbol mark Approved | standards | Meaning |
| 17 |  | ISO 3864 Contact | prohibitionTo indicate injury that could occur due to touching a specific part of the equipment. |
| 18 |  | --- Never look into the optical lens while the projector is on. | |
| 19 |  | --- To indicate that the marked item don't place anything on projector. | |
| 20 |  | ISO3864IEC60825-1 | Caution, laser radiationTo indicate the equipment has a laser radiation part. |
| 21 |  | ISO 3864 Disas | sembly prohibitionTo indicate a risk of injury, such as electric shock, if the equipment is disassembled. |
| 22 |  | --- Indicates that you should not look into the lens while the LED is on. | |
DECLARATION of CONFORMITY
According to 47CFR, Part 2 and 15
Class B Personal Computers and Peripherals; and/or
CPU Boards and Power Supplies used with Class B Personal Computers
We: Epson America, Inc.
Located at: 3840 Kilroy Airport Way
MS: 3-13
Long Beach, CA 90806
Tel: 562-981-3840
Declare under sole responsibility that the product identified herein, complies with 47CFR Part 2 and 15 of the FCC rules as a Class B digital device. Each product marketed, is identical to the representative unit tested and found to be compliant with the standards. Records maintained continue to reflect the equipment being produced can be expected to be within the variation accepted, due to quantity production and testing on a statistical basis as required by 47CFR 2.909. Operation is subject to the following two conditions: (1) this device may not cause harmful interference, and (2) this device must accept any interference received, including interference that may cause undesired operation.
Trade Name: EPSON
Type of Product: Document Camera
Model: ELPDC13/ELPDC21
FCC Compliance Statement
For United States Users
This equipment has been tested and found to comply with the limits for a Class B digital device, pursuant to Part 15 of the FCC Rules. These limits are designed to provide reasonable protection against harmful interference in a residential installation. This equipment generates, uses, and can radiate radio frequency energy and, if not installed and used in accordance with the instructions, may cause harmful interference to radio communications.
However, there is no guarantee that interference will not occur in a particular installation. If this equipment does cause interference to radio and television reception, which can be determined by turning the equipment off and on, the user is encouraged to try to correct the interference by one or more of the following measures.
- Reorient or relocate the receiving antenna.
- Increase the separation between the equipment and receiver.
- Connect the equipment into an outlet on a circuit different from that to which the receiver is connected.
- Consult the dealer or an experienced radio/TV technician for help.
WARNING
The connection of a non-shielded equipment interface cable to this equipment will invalidate the FCC Certification or Declaration of this device and may cause interference levels which exceed the limits established by the FCC for this equipment. It is the responsibility of the user to obtain and use a shielded equipment interface cable with this device. If this equipment has more than one interface connector, do not leave cables connected to unused interfaces. Changes or modifications not expressly approved by the manufacturer could void the user's authority to operate the equipment.
For Canadian Users
CAN ICES-3 (B) / NMB-3 (B)
Copyrights and Trademarks

All rights reserved. No part of this publication may be reproduced, stored in a retrieval system, or transmitted in any form or by any means, electronic, mechanical, photocopying, recording, or otherwise, without the prior written permission of Seiko Epson Corporation. No patent liability is assumed with respect to the use of the information contained herein. Neither is any liability assumed for damages resulting from the use of the information contained herein.
Neither Seiko Epson Corporation nor its affiliates shall be liable to the purchaser of this product or third parties for damages, losses, costs, or expenses incurred by the purchaser or third parties as a result of: accident, misuse, or abuse of this product or unauthorized modifications, repairs, or alterations to this product, or (excluding the U.S.) failure to strictly comply with Seiko Epson Corporation's operating and maintenance instructions.
Seiko Epson Corporation shall not be liable against any damages or problems arising from the use of any options or any consumable products other than those designated as Original Epson Products or Epson Approved Products by Seiko Epson Corporation.
The contents of this guide may be changed or updated without further notice.
Illustrations in this guide and the actual projector may differ.
Responsible Use of Copyrighted Materials
Epson encourages each user to be responsible and respectful of the copyright laws when using any Epson product. While some countries' laws permit limited copying or reuse of copyrighted material in certain circumstances, those circumstances may not be as broad as some people assume. Contact your legal advisor for any questions regarding copyright law.
Trademarks
Mac, OS X and macOS are registered trademarks of Apple Inc.
Microsoft, Windows, Windows Vista, and the Windows logo are trademarks or registered trademarks of Microsoft Corporation in the United States and/or other countries.

SDHC Logo is a trademark of SD-3C, LLC.
HDMI and High-Definition Multimedia Interface are the trademarks or registered trademarks of HDMI Licensing LLC
Other product names used herein are for identification purposes only and may be trademarks of their respective owners. Epson disclaims any and all rights in those marks.
This information is subject to change without notice.
© SEIKO EPSON CORPORATION 2017. All rights reserved.
- DOCUMENT CAMERA USER'S GUIDE
- MEANING OF SYMBOLS IN THE GUIDE
- SYMBOLS FOR SAFETY
- SAFETY INSTRUCTIONS
- WARNING
- CAUTION
- ELECTRICAL PRECAUTIONS
- INSTALLATION PRECAUTIONS
- CLEANING PRECAUTIONS
- USAGE PRECAUTIONS
- BATTERY PRECAUTIONS
- CONTENTS
- MEANING OF SYMBOLS IN THE GUIDE .... PROJECTING
- INTRODUCTION
- DISPLAYING SAVED IMAGES AS A SLIDESHOW
- IMAGE ADJUSTMENTS AND EFFECTS
- CONNECTING
- USING THE COMPUTER SOFTWARE
- USING EASY INTERACTIVE TOOLS
- USING OTHER SOFTWARE
- SOLVING PROBLEMS
- PROBLEMS AND SOLUTIONS
- EPSON PROJECTOR CONTACT LIST
- NOTICES
- SPECIFICATIONS
- INCLUDED ITEMS
- ATTENTION
- CONNECTING THE DOCUMENT CAMERA DIRECTLY TO A PROJECTOR
- CONNECTING USING A COMPUTER CABLE (SUPPLIED)
- CONNECTING USING AN HDMI CABLE
- WHEN USING A COMPUTER
- CONNECTING TO A PROJECTOR USING A COMPUTER
- PROJECTING
- POSITIONING THE DOCUMENT CAMERA
- PLUGGING IN AND TURNING ON
- SWITCHING THE PROJECTED IMAGE
- OUTPUTTING IMAGES AND SOUND
- FREEZING AN IMAGE
- PROJECTING SMALL OBJECTS
- DISPLAYING WHITEBOARD IMAGES
- PROJECTING THROUGH A MICROSCOPE
- TURNING OFF
- SAVING IMAGES
- RECORDING MOVIES
- DISPLAYING A SLIDESHOW (SD CARD VIEWER FUNCTION)
- DIVIDING THE SCREEN AND DISPLAYING TWO IMAGES (SPLIT SCREEN)
- DISPLAYING LIVE IMAGES AND IMAGES ON AN SD CARD
- DISPLAYING TWO IMAGES ON AN SD CARD
- SD CARD MENU
- INSTALLING
- WINDOWS
- MAC
- UNINSTALLING
- WINDOWS VISTA/WINDOWS
- WINDOWS 8/WINDOWS
- OPERATION PROBLEMS
- IMAGE QUALITY PROBLEMS
- THE IMAGE BRIGHTNESS OR COLORS ARE INCORRECT
- OTHER IMAGE PROBLEMS
- SD CARD PROBLEMS
- IMAGE FILES DO NOT HAVE THE CORRECT TIME STAMP
- PROBLEMS CONNECTING A LAPTOP
- EUROPE
- GREECE
- HUNGARY
- IRELAND
- ISRAEL
- ITALY
- KAZAKHSTAN
- LATVIA
- LITHUANIA
- LUXEMBURG
- MACEDONIA
- NETHERLANDS
- NORWAY
- POLAND
- PORTUGAL
- ROMANIA
- RUSSIA
- UKRAINE
- SERBIA
- SLOVAKIA
- SLOVENIA
- SPAIN
- SWEDEN
- SWITZERLAND
- TURKEY
- AFRICA
- SOUTH AFRICA
- MIDDLE EAST
- NORTH, CENTRAL AMERICA & CARIBBEAN ISLANDS
- CANADA
- COSTA RICA
- MEXICO
- ECUADOR
- U.S.A
- SOUTH AMERICA
- ARGENTINA
- ASIA AND OCEANIA
- AUSTRALIA
- CHINA
- HONG KONG
- INDIA
- INDONESIA
- JAPAN
- KOREA
- MALAYSIA
- NEW ZEALAND
- PHILIPPINES
- SINGAPORE
- TAIWAN
- THAILAND
- SYMBOLS INDICATING THE DEVICE MEETS THE IEC60950-1 A2 SAFETY STANDARDS
- DECLARATION OF CONFORMITY
- FCC COMPLIANCE STATEMENT
- FOR UNITED STATES USERS
- COPYRIGHTS AND TRADEMARKS
- RESPONSIBLE USE OF COPYRIGHTED MATERIALS
- TRADEMARKS
Brand : EPSON
Model : ELPDC21
Category : Visualiser