
H 7262 BP - Oven MIELE - Free user manual and instructions
Find the device manual for free H 7262 BP MIELE in PDF.


User questions about H 7262 BP MIELE
0 question about this device. Answer the ones you know or ask your own.
Ask a new question about this device
Download the instructions for your Oven in PDF format for free! Find your manual H 7262 BP - MIELE and take your electronic device back in hand. On this page are published all the documents necessary for the use of your device. H 7262 BP by MIELE.
USER MANUAL H 7262 BP MIELE
Operating and installation instructions
Oven
natural_image
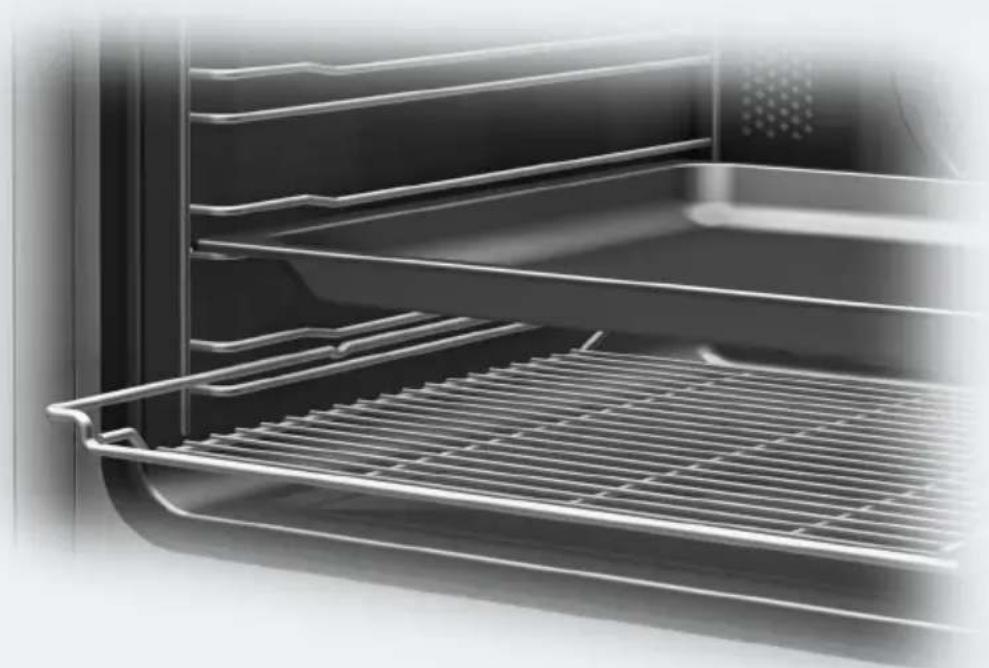
Interior view of a modern oven with metal grilles and rack (no text or symbols visible)To avoid the risk of accidents or damage to the appliance it is essential to read these instructions before it is installed and used for the first time.
Contents
Warning and safety instructions 5
Caring for the environment 14
Guide to the appliance.... 15
Controls.... 16
On/Off sensor control.... 17
Display.... 17
Sensor controls 17
Symbols.... 19
Using the appliance.... 20
Selecting a menu option 20
Changing a setting in a list 20
Changing the setting with a segment bar 20
Selecting a function or operating mode.... 21
Entering numbers 21
Features...... 22
Data plate 22
Scope of delivery.... 22
Accessories supplied and available to order 22
Safety features ...... 30
PerfectClean treated surfaces 30
Before using for the first time 31
Basic settings.... 31
Heating up the oven for the first time.... 32
Settings 33
Settings overview 33
Opening the "Settings" menu.... 34
Language 34
Time.... 34
Lighting.... 34
Display.... 35
Volume.... 35
Units 36
Booster.... 36
Recommended temps.... 36
Pyrolytic reminder.... 36
Main and sub-menus 40
Energy saving tips 41
Operation.... 43
Changing values and settings for a cooking programme.... 43
Changing the temperature and core temperature 43
Setting cooking durations 44
Changing the set cooking durations 44
Deleting the set cooking durations.... 44
Cancelling a cooking programme 45
Pre-heating the oven 45
Booster 45
Automatic programmes 46
Categories 46
Using automatic programmes.... 46
Handy hints 46
Further applications 47
Defrost 47
Low temperature cooking.... 48
Frozen food/Ready meals.... 50
Heat crockery 50
Baking.... 51
Tips on baking....51
Notes on the cooking charts 51
Notes on the functions 52
Roasting 53
Tips for roasting 53
Notes on the cooking charts 53
Notes on the functions 54
Food probe.... 55
Grilling 58
Tips for grilling.... 58
Notes on the cooking charts 58
Notes on the functions 59
Cleaning and care 60
Unsuitable cleaning agents 60
Contents
Removing normal soiling.... 61
Removing stubborn soiling (excluding the FlexiClip runners) 61
Stubborn soiling on the FlexiClip runners 62
Pyrolytic cleaning of the oven compartment.... 62
Door removal....65
Dismantling the door 66
Fitting the door 70
Removing the side runners with FlexiClip runners.... 71
Lowering the top heat/grill element.... 72
Problem solving guide 73
Service....78
Contact in the event of a fault 78
Warranty 78
Installation.... 79
Installation dimensions....79
Installation in a tall or base unit.... 79
Side view 80
Connections and ventilation....81
Installing the oven 82
Electrical connection 83
Oven 83
Electrical connection: Other countries 84
Cooking charts 85
Batter 85
Rubbed in mixture....86
Yeast dough 87
Quark dough....88
Sponge mixture 89
Choux pastry, puff pastry, meringue.... 90
Savoury dishes....91
Beef 92
Veal 93
Pork 94
Lamb, game 95
Poultry, fish 96
Notes for test institutes 97
Test food acc. to EN 60350-1 97
Energy efficiency class according to EN 60350-1....98
This oven complies with all current local and national safety requirements. However, inappropriate use can lead to personal injury and damage to property.
Read the operating and installation instructions carefully before using the oven. They contain important information on safety, installation, use and maintenance. This prevents both personal injury and damage to the oven.
In accordance with standard IEC/EN 60335-1, Miele expressly and strongly advises that you read and follow the instructions in the chapter on installing the oven as well as the safety instructions and warnings.
Miele cannot be held liable for damage caused by non-compliance with these instructions.
Keep these instructions in a safe place and pass them on to any future owner.
Appropriate use
This oven is intended for domestic use and use in other similar environments.
The oven is not intended for outdoor use.
The oven is intended for domestic use only to bake, roast, grill, cook, defrost and dry food.
All other types of use are not permitted.
This oven may only be used by people with reduced physical, sensory or mental capabilities or lack of experience and knowledge if they are supervised whilst using it.
They may only use it unsupervised if they have been shown how to use it in a safe manner. They must be able to recognise and understand the dangers of misuse.
The oven compartment is equipped with special lamps to cope with particular conditions (e.g. temperature, moisture, chemical resistance, abrasion resistance and vibration). These special lamps must only be used for the purpose for which they are intended. They are not suitable for room lighting.
Safety with children
Children under 8 years of age must be kept away from the oven unless they are constantly supervised.
Children aged 8 and older may only use the oven without supervision if they have been shown how to use it in a safe manner. Children must be able to understand and recognise the possible dangers caused by incorrect operation.
Children must not be allowed to clean or maintain the oven unsupervised.
Children should be supervised in the vicinity of the oven. Never allow children to play with the oven.
Risk of suffocation due to packaging material. Whilst playing, children may become entangled in packaging material (such as plastic wrapping) or pull it over their head, presenting the risk of suffocation.
Keep packaging material away from children.
Risk of injury caused by hot surfaces. Children's skin is far more sensitive to high temperatures than that of adults. External parts of the oven such as the door glass, control panel and the vent become quite hot.
Do not let children touch the oven when it is in operation.
Danger of injury caused by hot surfaces. Children's skin is far more sensitive to high temperatures than that of adults. The oven gets much hotter during pyrolytic cleaning than during normal use. Do not let children touch the oven during pyrolytic cleaning.
▶ Risk of injury from the open door.
The oven door can support a maximum weight of 15 kg. Children could injure themselves on an open door.
Do not let children sit on the open door, lean against it or swing on it.
Technical safety
▶ Unauthorised installation, maintenance and repairs can cause considerable danger for the user. Installation, maintenance and repairs must only be carried out by a Miele authorised technician.
▶ Damage to the oven can compromise your safety. Check the oven for visible signs of damage. Do not use a damaged oven.
▶ Reliable and safe operation of this oven can only be assured if it has been connected to the mains electricity supply.
The electrical safety of this oven can only be guaranteed when correctly earthed. It is most important that this basic safety requirement is fulfilled. If in doubt, the electrical installation should be checked by a qualified electrician.
The connection data (voltage and frequency) on the data plate of the oven must match the mains electricity supply in order to avoid the risk of damage to the oven. Compare this before connecting the appliance to the mains. If in any doubt, consult a qualified electrician.
Multi-socket adapters and extension leads do not guarantee the required safety of the appliance. Do not use these to connect the oven to the mains electricity supply.
For safety reasons, the oven may only be used when it has been fully installed.
The oven must not be used in a non-stationary location (e.g. on a ship).
Risk of injury due to electric shock. Any contact with live connections or tampering with the electrical or mechanical components of the oven will endanger your safety and may lead to the oven malfunctioning.
Do not open the oven housing under any circumstances.
While the oven is under warranty, repairs should only be undertaken by a Miele authorised service technician. Otherwise the warranty will be invalidated.
▶ Miele can only guarantee the safety of the oven when original Miele spare parts are used. Faulty components must only be replaced by original spare parts.
If the oven is delivered without a power connection cable, a special cable must be installed by a Miele authorised service technician (see “Installation”, “Electrical connection”).
If the connection cable is damaged, it must be replaced with a special connection cable by a Miele authorised service technician (see “Installation”, “Electrical connection”).
During installation, maintenance and repair work, e.g. if the oven interior lighting is faulty (see “Problem solving guide”), the oven must be completely disconnected from the household electricity supply. To ensure this, do one of the following:
- Disconnect the mains fuse
- Completely unscrew the screw-out fuse (in countries where this is applicable)
- Pull out the plug (if one is present) at the wall socket To do this, pull the plug and not the mains connection cable.
The oven requires a sufficient supply of cool air for efficient operation. Make sure that the supply of cool air is not hindered in any way (e.g. by fitting heat insulation strips in the housing unit). Furthermore, the required supply of cool air must not be excessively heated by other heat sources (e.g. solid fuel stoves).
If the oven is built in behind a furniture front (e.g. a door), do not close the furniture door while the oven is in use. Heat and moisture can build up behind the closed furniture door. This can result in damage to the oven, housing unit and floor. Leave the furniture front/door open until the oven has cooled down completely.
Correct use
Risk of injury caused by hot surfaces. The oven gets hot during operation. You could burn yourself on the heating elements, oven compartment, accessories or food.
Wear oven gloves when placing hot food in the oven or removing it and when adjusting oven shelves, for example, in a hot oven compartment.
▶ Due to the high temperatures radiated, objects left near the oven could catch fire. Do not use the oven to heat up the room.
▶ Oils and fats can ignite if allowed to overheat. Never leave the oven unattended when cooking with oil or fats. Never attempt to put out oil or fat fires with water. Switch the oven off and extinguish the flames by leaving the door closed.
Grilling food for excessively long cooking durations can cause it to dry out with the risk of catching fire. Do not exceed the recommended cooking durations.
▶ Certain foods dry out quickly and may catch fire due to high grill temperatures.
Never use grill modes to finish baking partially baked rolls or bread or to dry flowers or herbs. Instead, use the Fan plus 📁 or Conventional heat ☐ function.
If using alcohol in your recipes, please be aware that high temperatures can cause the alcohol to evaporate. The vapour can catch fire on hot heating elements.
When using residual heat to keep food warm, corrosion from high air humidity and condensation can occur in the oven. This can also cause damage to the control panel, worktop and surrounding kitchen furniture. Keep the oven on and select the lowest temperature available for the selected function. The cooling fan will then continue to run automatically.
▶ Food which is stored in the oven compartment or left in it to be kept warm can dry out and the moisture released can lead to corrosion damage in the oven. Always cover food that is left in the oven to keep warm.
An accumulation of heat can cause the enamel on the oven compartment floor to crack or flake off.
Never line the floor of the oven compartment with aluminium foil or oven liners.
If you wish to place crockery on the floor of the oven compartment during cooking, or place crockery on the floor of the oven compartment to heat it up, you can do so, but only with the Fan plus 📁 or Eco Fan heat 🔒 function, without the Booster function.
The oven compartment floor can become damaged by items being pushed around on it. When placing pots, pans or crockery on the oven compartment floor, ensure that you avoid pushing them around.
Risk of injury caused by steam. Pouring a cold liquid onto a hot surface creates steam, which can cause severe scalding. The sudden temperature change can also cause damage to hot enamelled surfaces. Never pour cold liquids directly onto hot enamelled surfaces.
It is important that the temperature in the food being cooked is evenly distributed and sufficiently high. This can be achieved by stirring or turning the food.
Plastic dishes that are not suitable for use in an oven will melt and may ignite at high temperatures, and can damage the oven. Use only plastic containers that are suitable for use in an oven. Follow the manufacturer's instructions.
▶ Heating up food in closed containers, such as tins or sealed jars, will result in an increase in pressure, which can cause them to explode. Do not heat up unopened tins or jars of food in the oven.
Risk of injury from the open door. You could bang into the open door or trip over it. Avoid leaving the door open unnecessarily.
The door can support a maximum load of 15 kg. Do not lean or sit on an open door, or place heavy items on it. Make sure that nothing gets trapped between the door and the oven compartment. This could damage the oven.
The following applies to stainless steel surfaces:
Adhesives will damage the stainless steel surface and cause it to lose its dirt-repellent protective coating. Do not use sticky notes, adhesive tape or other types of adhesive on the stainless steel surface.
Magnets can cause scratches. Do not use the stainless steel surface as a magnetic notice board.
Cleaning and care
Risk of injury due to electric shock. The steam from a steam cleaning appliance could reach live electrical components and cause a short circuit. Do not use a steam cleaner to clean the appliance.
Scratches on the door glass can cause the glass to break. Do not use abrasive cleaners, hard sponges, brushes or sharp metal tools to clean the door glass.
The side runners can be removed (see “Cleaning and care” – “Removing the side runners with FlexiClip runners”). Refit the side runners correctly.
▶ Coarse soiling in the oven compartment can cause thick smoke to develop. Coarse soiling should be removed from the oven compartment before running the pyrolytic cleaning programme.
In warm, moist environments, there is a higher probability of pest infestations (such as cockroaches). Ensure the oven and the area surrounding it are always kept clean.
Damage caused by pests is not covered by the warranty.
Accessories
▶ Only use original Miele accessories. If other parts are used, warranty, performance and product liability claims will be invalidated.
The Miele gourmet oven dish HUB 5000/HUB 5001 (if available) must not be inserted into shelf level 1. This will damage the floor of the oven. The lack of clearance will create an accumulation of heat which can cause the enamel to crack or flake off. Never place a Miele oven dish on the upper support of shelf level 1 either as it will not be secured by the non-tip safety notches. As a general rule, use shelf level 2.
▶ Only use the Miele food probe supplied with the appliance. If it is faulty, it must be replaced with a new original Miele food probe.
The plastic on the food probe can melt at very high temperatures. Do not use the food probe when using the grill functions. Do not store the food probe in the oven compartment when it is not being used.
Remove all accessories as well as the runners and any extra accessories such as FlexiClip runners from the oven interior before starting the Pyrolytic cleaning programme.
The high temperatures needed for pyrolysis will damage them.
Disposal of the packing material
The packaging is designed to protect the appliance from damage during transportation. The packaging materials used are selected from materials which are environmentally friendly for disposal and should be recycled.
Recycling the packaging reduces the use of raw materials in the manufacturing process and also reduces the amount of waste in landfill sites.
Disposing of your old appliance
Electrical and electronic appliances often contain valuable materials. They also contain specific materials, compounds and components, which were essential for their correct function and safety. These could be hazardous to human health and to the environment if disposed of with your domestic waste or if handled incorrectly. Please do not, therefore, dispose of your old appliance with your household waste.
Please dispose of it at your local community waste collection / recycling centre for electrical and electronic appliances, or contact your dealer or Miele for advice. You are also responsible for deleting any personal data that may be stored on the appliance being disposed of. Please ensure that your old appliance poses no risk to children while being stored prior to disposal.
Oven
text_image
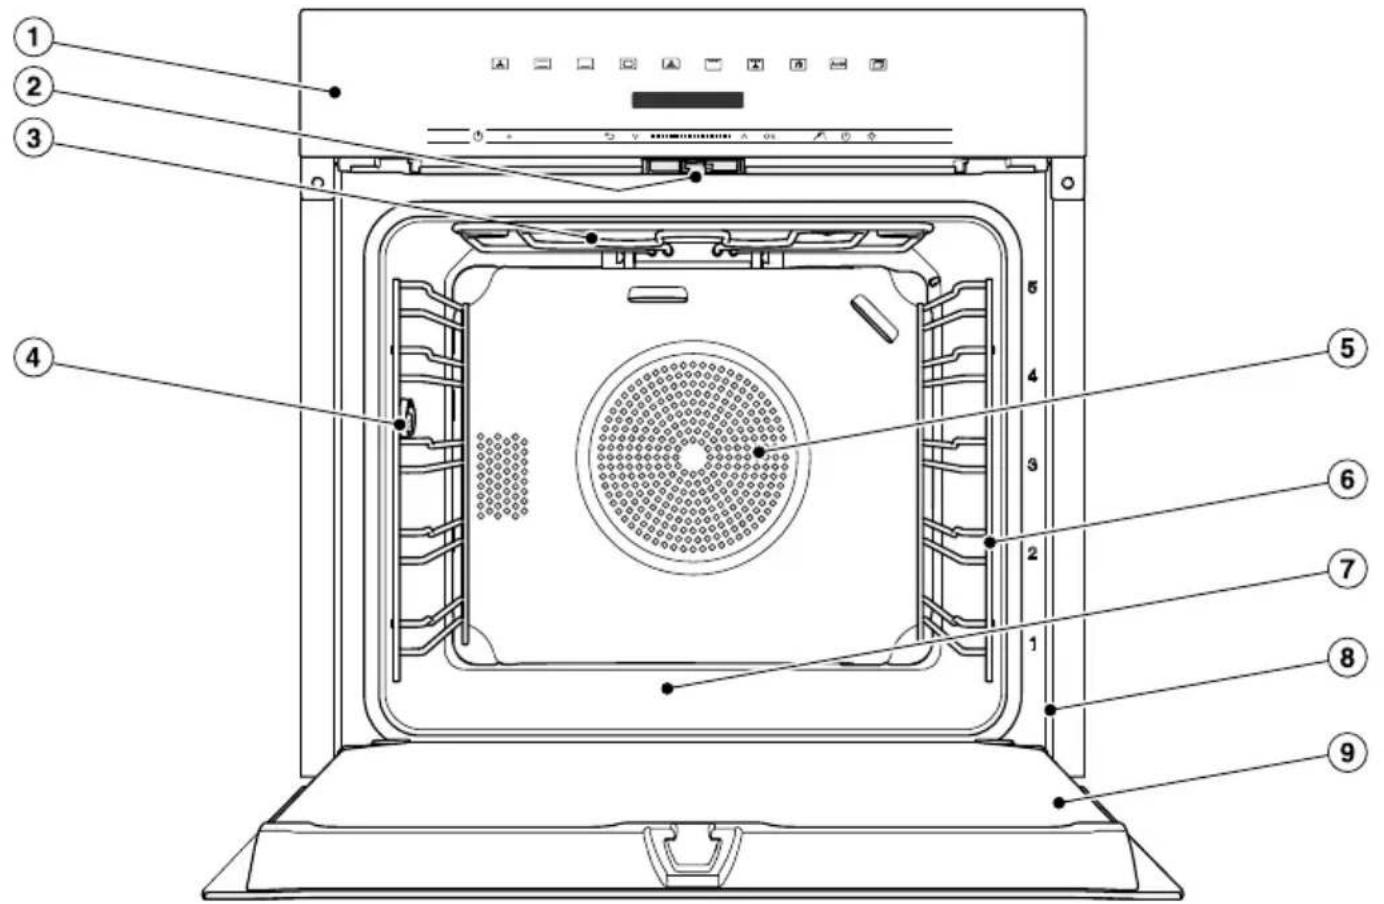
Labeled diagram of an oven interior with numbered parts for identification① Control elements
② Door lock
③ Top heat/grill element
④ Connection socket for the food probe
⑤ Air inlet for the fan with ring heating element behind it
⑥ Side runners with 5 shelf levels
⑦ Oven floor with bottom heat element underneath it
⑧ Front frame with data plate
⑨ Door
text_image
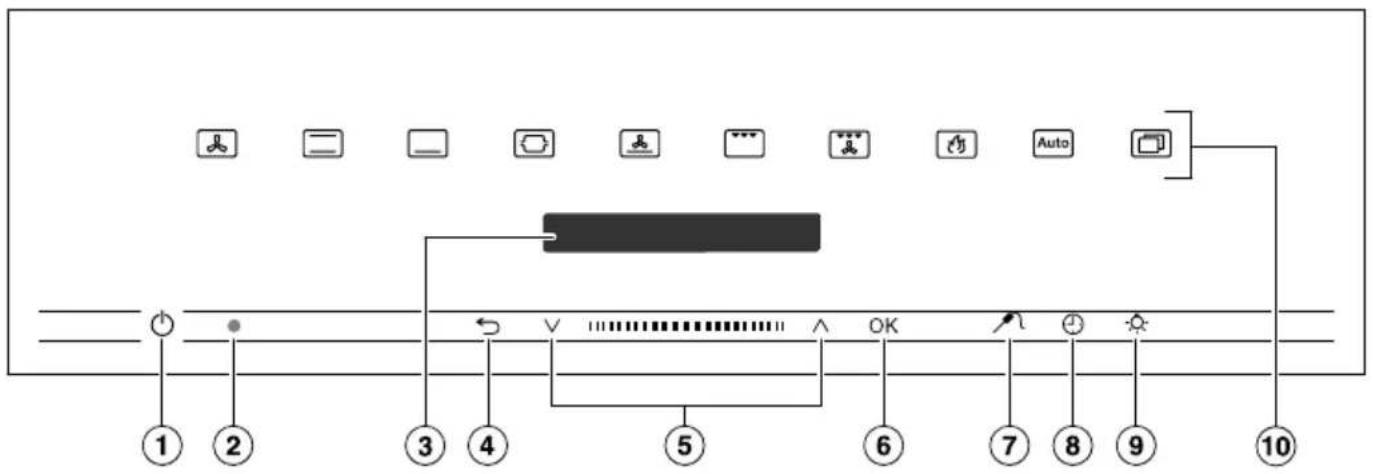
1 2 3 4 5 6 7 8 9 10① Recessed ⏻ On/Off sensor control For switching the oven on and off
② Optical interface (For Miele Service only)
③ Display
For displaying the time of day and information on operation
④ sensor control
For going back a step and cancelling
a cooking programme
⑤ Navigation area with ∧ and ∨ arrow buttons
For scrolling through lists and for changing values
⑥ OK sensor control
For selecting functions and saving settings
⑦ sensor control
For setting the core temperature and switching the display between core temperature and time left
⑧ ⏻ sensor control
For setting a minute minder, the cooking duration or the start or end time for the cooking programme
⑨ sensor control
For switching the oven interior lighting on and off
⑩ Sensor controls
For selecting functions, automatic programmes and settings
On/Off sensor control
The ⏻ On/Off sensor control is recessed and reacts to touch.
Use this sensor control to switch the oven on and off.
Display
The display is used for showing the time of day or information about functions, temperatures, cooking durations, automatic programmes and settings.
After switching the oven on with the ⏻ On/Off sensor control, Select function will appear in the main menu.
Sensor controls
The sensor controls react to touch. Every touch of a sensor is confirmed with an audible keypad tone. You can turn this keypad tone off using Further □ | Settings | Volume | Keypad tone.
If you want the sensor controls to respond even when the oven is switched off, select the Display | QuickTouch | On setting.
Sensor controls above the display
For information on the functions and operating modes, see “Main and submenus”, “Settings”, “Automatic programmes” and “Further applications”.
Sensor controls under the display
| Sensor control | Function |
| ⇐ Depending on which menu you are in, this sensor control will take you back a level or back to the main menu.If a cooking programme is in progress at the same time, use this sensor control to cancel the programme. | |
| ∨ |||||| ∧ | In the navigation area, use the arrow buttons or the area between them to scroll up or down in the selection lists. The display shows the menu option that you want to select.You can change the values and settings using the arrow buttons or the area between them. |
| OK As soon as you reach a confirmable value, message or setting, the OK sensor control will light up orange.By selecting this sensor control you can access functions such as the minute minder, save changes to values or settings or confirm instructions. | |
| When you use the food probe, you can use this sensor control to set the core temperature and switch between the time left display and the core temperature display. | |
| 💡 If no cooking programme is in progress, you can use this sensor control to set a minute minder (e.g. when boiling eggs) at any point.If a cooking programme is in progress at the same time, you can set a minute minder, the cooking duration and a start or end time for the programme. | |
| 💡 Select this sensor control to switch the oven interior lighting on and off.Depending on the setting selected, the oven interior lighting switches off after 15 seconds or remains constantly switched on or off. | |
Symbols
The following symbols may appear in the display:
| Symbol Meaning | |
| i This symbol indicates that there is additional information and advice about using the appliance. Press the OK sensor control to confirm the information. | |
| Minute minder | |
| ✓ A tick indicates the option which is currently selected. | |
| ■■■■■■■■■■■■■■■■■■■■■■■■■■■■■■■■■■■■■■■■■■■■■■■■■■■■■■■■■■■■■■■■■■■■■■■■■■■■■■■■■■■■■■■■■■■■■■■■■■■■ | |
| The system lock prevents the oven being switched on by mistake (see “Settings – Safety”). |
Use the ∧ and ∨ arrow buttons or the ||||||| area between them in the navigation area to use the oven.
As soon as you reach a confirmable value, message or setting, the OK sensor control will light up orange.
Selecting a menu option
■ Touch the ∧ or ∨ arrow buttons or swipe to the right or left in the ⌊‖‖‖‖ area until you reach the desired menu option.
Tip: If you press and hold an arrow button, the list continues scrolling automatically until you release the arrow button.
■ Confirm your selection with OK.
Changing a setting in a list
A √ tick will appear beside the current setting.
■ Touch the ∧ or ∨ arrow buttons or swipe to the right or left in the ⌊‖‖‖‖ area until you reach the desired value or setting.
■ Confirm with OK.
The setting is now saved. This will take you back to the previous menu.
Changing the setting with a segment bar
Some settings are represented by a bar ■■■■二二コ with seven segments. If all of the segments are illuminated, the maximum value is selected.
If none of the segments are illuminated, or only one of them is, the minimum value is selected or the setting is switched off altogether (e.g. volume).
■ Touch the ∧ or ∨ arrow buttons or swipe to the right or left in the ||||||| area until you reach the desired setting.
■ Confirm your selection with OK.
The setting is now saved. This will take you back to the previous menu.
Selecting a function or operating mode
The sensor controls for the functions and operating modes (e.g. Further ☐) are located above the display (see "Controls" and "Settings").
■ Touch the sensor control for the desired function.
The sensor control on the fascia panel lights up orange.
■ For functions and operating modes: set values such as the temperature.
■ Under Further ☐: scroll through the lists until you reach the desired menu option.
■ Confirm with OK.
Changing the function
You can change to another function during a cooking programme.
The sensor control for the previously selected function lights up orange.
■ Touch the sensor control of the new function or operating mode.
The new function appears in the display with its corresponding recommended values.
The sensor control for the new function lights up orange.
Under Further ☐, scroll through the lists until you reach the desired menu option.
Entering numbers
Numbers that can be changed are highlighted.
■ Touch the ∧ or ∨ arrow buttons or swipe to the right or left in the ||||||| area until the desired number is highlighted.
Tip: If you press and hold an arrow button, the numbers continue scrolling automatically until you release the arrow button.
■ Confirm with OK.
The changed number is now saved. This will take you back to the previous menu.
A list of the models described in these operating and installation instructions can be found on the back page of this booklet.
Data plate
The data plate is located on the front frame, visible when the door is open.
The data plate states the model number, the serial number as well as connection data (voltage, frequency and maximum rated load).
Please have this information to hand, should you need to contact Miele regarding any questions or problems.
Scope of delivery
- Operating and installation instructions for using the oven
- A cookbook with recipes for the automatic programmes and other functions
- Food probe
- Screws for securing your oven in the housing unit
- Various accessories
Accessories supplied and available to order
Features will vary depending on model.
Side runners, universal tray and wire rack (or "rack" for short) are supplied as standard with the oven.
Depending on the model, your oven may also come supplied with some of the accessories listed here.
All the accessories listed as well as the cleaning and care products are designed for Miele ovens.
These are available to order via the Miele Webshop, the Miele Customer Service Department or from your Miele dealer.
When ordering, please quote the model number of your oven and the reference number of the accessories required.
Side runners
There are runners on the left and right of the oven compartment with shelves 5_1 for inserting accessories.
The numbers for the shelf levels are marked on the front frame.
Each level consists of 2 rails, one above the other.
The accessories (e.g. the rack) are pushed into the oven between the two rails.
You can remove the side runners (see "Cleaning and care" – "Removing the side runners with FlexiClip runners").
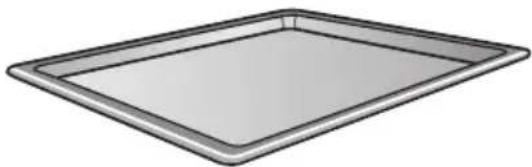
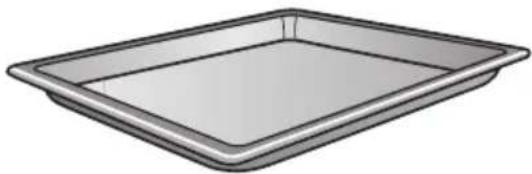
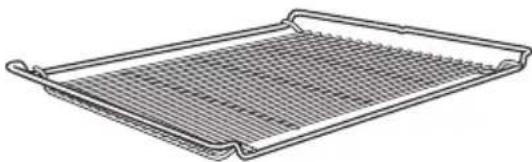
Baking tray, universal tray and rack with non-tip notches
Baking tray HBB 71:
natural_image
Simple line drawing of a rectangular tray or baking pan (no text or symbols)Universal tray HUBB 71:
natural_image
Illustration of a rectangular baking tray (no text or symbols)Rack HBBR 71:
natural_image
Line drawing of a rectangular metal tray with a grid pattern (no text or symbols)These accessories are inserted into the oven between the two rails of a shelf in the side runner.
Always place the rack with the loading surface in the lower position.
These accessories have non-tip safety notches fitted in the middle of their short sides. The non-tip safety notches prevent the trays from being pulled out completely from the side runners when you only wish to pull accessories out partially.
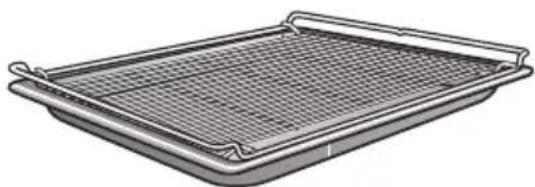
natural_image
Illustration of a rectangular metal tray with a mesh inner layer and a curved handle (no text or symbols)If you are using the universal tray with the rack on top, insert the tray between the rails of a shelf of the side runners and the rack will automatically slide in above them.
FlexiClip runners HFC 70-C
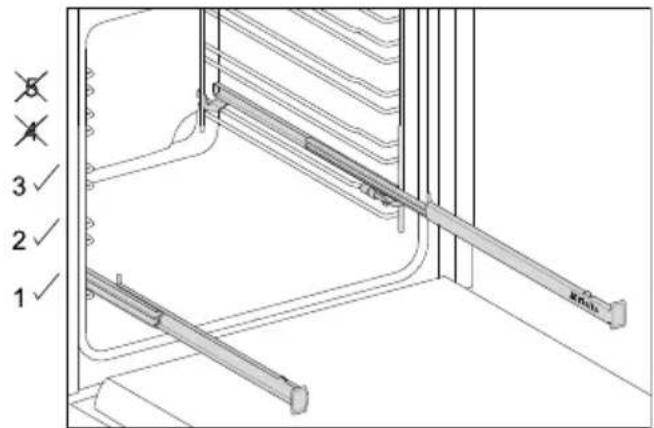
text_image
1 ✓ 2 ✓ 3 ✓FlexiClip runners can only be fitted on levels 1, 2 and 3.
The FlexiClip runners can be drawn right out of the oven individually to give a good overview of cooking in progress.
Push the FlexiClip runners right into the oven compartment before placing accessories on them.
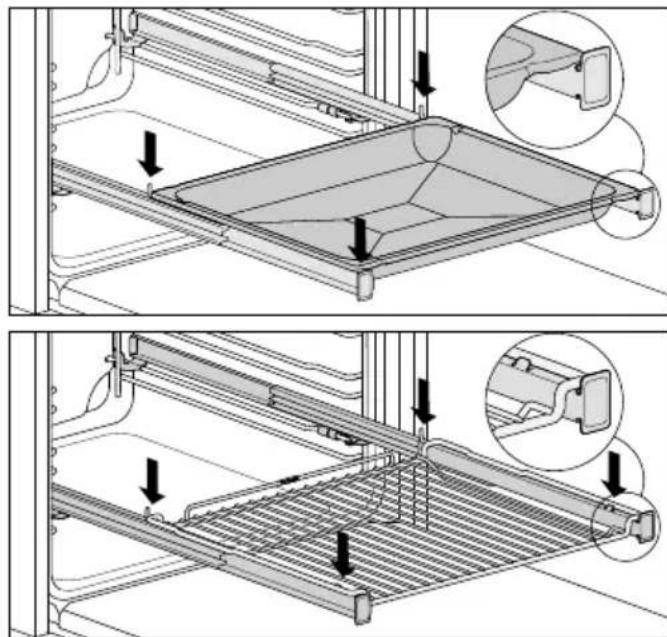
text_image
Technical diagram showing two views of a mechanical assembly with labeled components and directional arrows indicating assembly steps.To prevent the risk of accessories sliding off the runners:
- Make sure that they are sitting securely on their runners in between the stoppers at either end of each runner.
- Always place the rack with the loading surface in the lower position on the FlexiClip runners.
The FlexiClip runners can support a maximum load of 15 kg.
Because the FlexiClip runners sit on the top rail of the side runners, the gap between the level the FlexiClip runners are on and the one above is smaller than if, for instance, racks were fitted on each level. Cooking results will be affected if the gap is too small.
You can use more than one baking tray, universal tray or rack at a time.
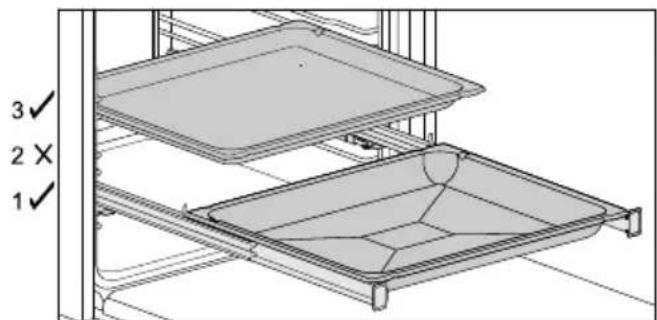
text_image
3 ✓ 2 X 1 ✓■ Place the baking tray, universal tray or rack on the FlexiClip runners.
■ Leave at least one shelf level free between the FlexiClip runner and any baking tray, universal tray or rack above it.
You can use the universal tray together with the rack on the FlexiClip runners.
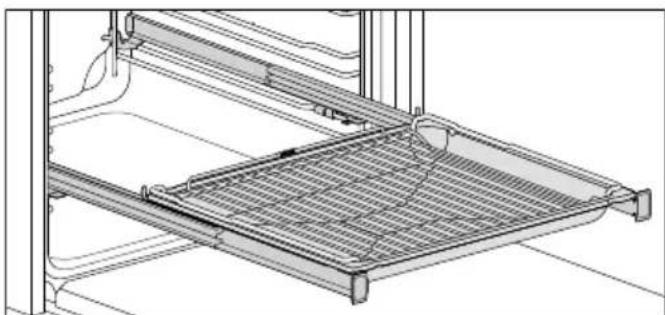
natural_image
Technical line drawing of a metal rack with grating and mounting brackets (no text or symbols)■ Place the universal tray together with the rack on the FlexiClip runners. The rack will automatically slide between the rails of the shelf level above the FlexiClip runners.
■ Leave at least one shelf level free between the FlexiClip runner and any baking tray, universal tray or rack above it.
Fitting the FlexiClip runners

Risk of injury caused by hot s.
The oven gets hot during operation. You could burn yourself on the heating elements, oven compartment or accessories.
Allow the heating elements, oven compartment and the accessories to cool before fitting or removing the FlexiClip runners.
Preferably fit the FlexiClip runners onto level 1. You can then use them for food which should be cooked on level 2.
One level of the side runners consists of two rails. The FlexiClip runners are fitted on the upper rail of the two rails that make up a shelf level.
The FlexiClip runner with the Miele logo is fitted on the right.
When fitting or removing the FlexiClip runners, do not extend them.

text_image
1.■ Hook the FlexiClip runner onto the front of the top rail of a side runner (1.).
text_image
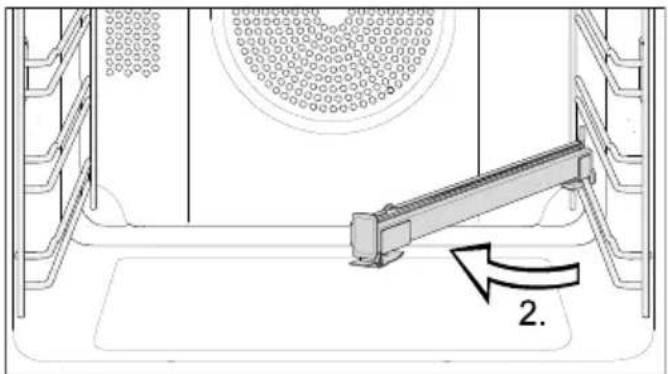
2.■ Then hold the FlexiClip runner at an angle towards the middle of the oven compartment (2.).
text_image
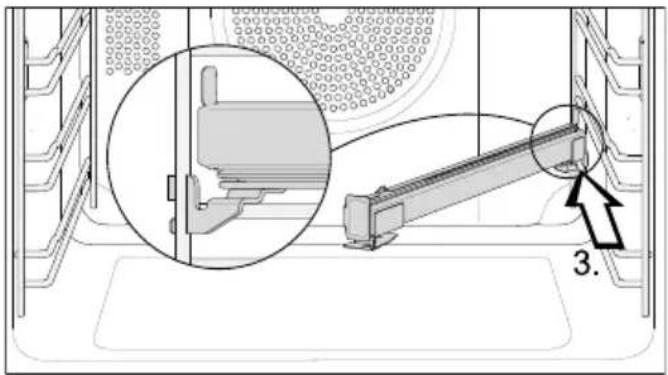
Technical diagram showing a mechanical assembly with labeled component '3.' and an inset magnified view of a bracket mechanism.■ Slide the FlexiClip runner at an angle along the top rail as far as it will go (3.).
text_image
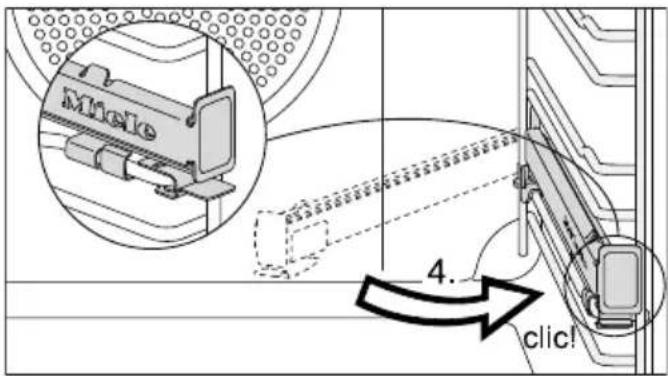
Mcle 4. click!■ Then swing the FlexiClip runner back to the side of the oven compartment and secure it to the top rail with an audible click (4.).
If the FlexiClip runners are difficult to pull out after fitting, you may need to pull firmly on them once to release them.
Removing the FlexiClip runners
Risk of injury caused by hot surfaces.
The oven gets hot during operation. You could burn yourself on the heating elements, oven compartment or accessories.
Allow the heating elements, oven compartment and the accessories to cool before fitting or removing the FlexiClip runners.
■ Push the FlexiClip runner in all the way.
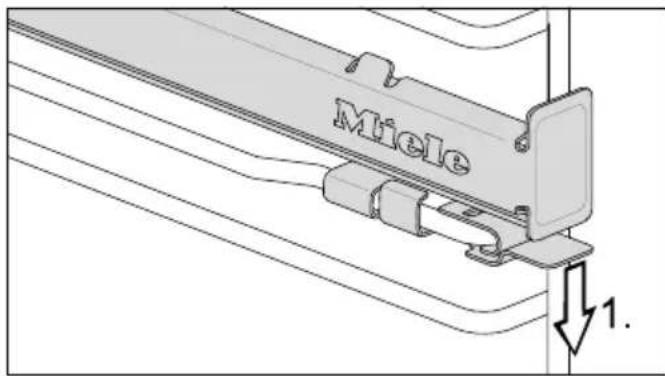
text_image
Miele 1.■ Push down on the tab at the front of the FlexiClip runner (1.).

text_image
Technical diagram showing a mechanical assembly with labeled parts 2 and 3, including a circular component and directional arrows.■ Swing the FlexiClip runner towards the middle of the oven compartment (2.), then pull it forwards along the top rail (3.).
■ Lift the FlexiClip runner off the rail and take it out of the oven.
FlexiClip runners HFC 7x
natural_image
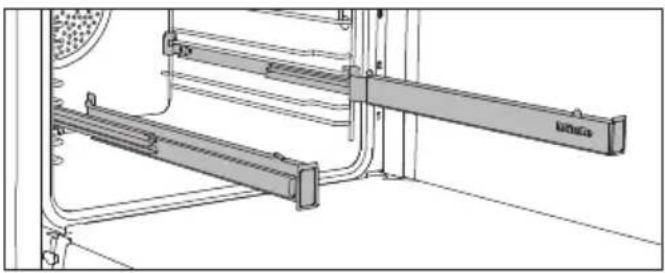
Technical line drawing of a mechanical assembly with no visible text or symbolsYou can use the FlexiClip runners on shelf levels 1–4.
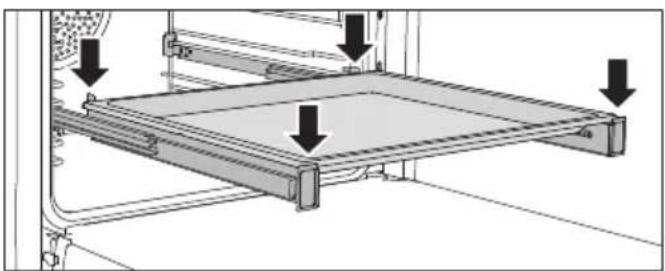
Push the FlexiClip runners right into the oven compartment before placing accessories on them.
The accessories will then automatically sit securely in between the stoppers at either end of each runner and be prevented from sliding off.
natural_image
Technical diagram of a mechanical assembly with arrows indicating force or movement (no text or symbols present)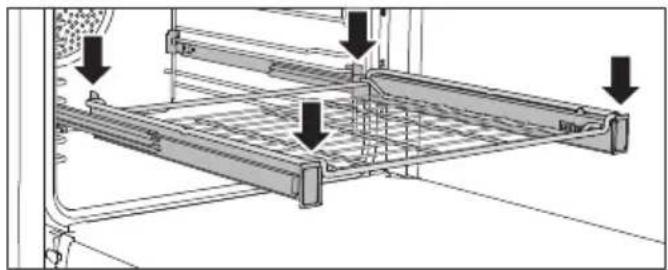
natural_image
Technical diagram of a mechanical assembly with arrows indicating force or movement (no text or symbols present)The FlexiClip runners can support a maximum load of 15 kg.
Fitting and removing FlexiClip runners
Danger of injury caused by hot surfaces.
The oven gets hot during operation. You could burn yourself on the heating elements, oven compartment or accessories.
Allow the heating elements, oven compartment and the accessories to cool before fitting or removing the FlexiClip runners.
The FlexiClip runners are fitted in between the two rails that make up a shelf level.
The FlexiClip runner with the Miele logo should be fitted on the right.
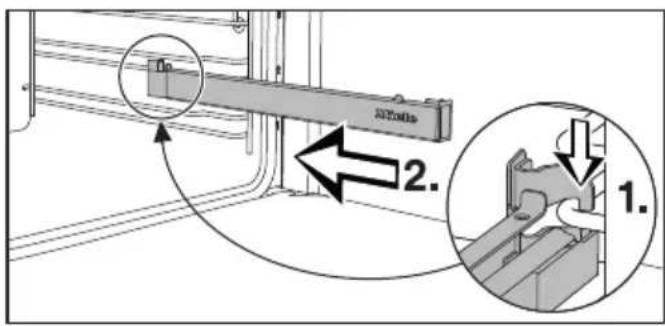
When fitting or removing the FlexiClip runners, do not extend them.
text_image
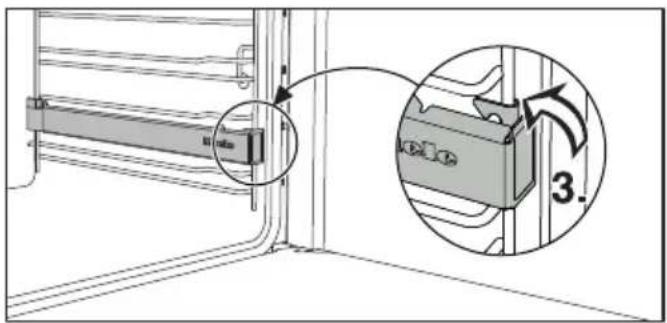
2. 1.■ Hook the FlexiClip runner onto the front of the lower rail of a shelf level (1.) and then push it along the rail into the oven compartment (2.).
text_image
Technical diagram showing a door lock mechanism with an inset close-up highlighting a component labeled '3.'■ Then secure the FlexiClip runner to the lower rail of the shelf level (3.).
If the FlexiClip runners are difficult to pull out after fitting, pull firmly on them once to release them.
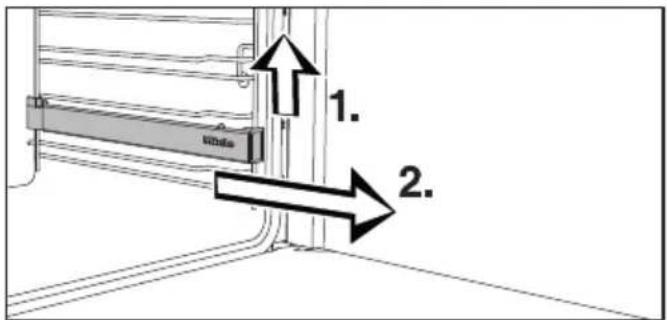
To remove a FlexiClip runner, proceed as follows:
■ Push the FlexiClip runner in all the way.
text_image
1. 2.■ Remove the FlexiClip runner by raising it at the front (1.) then pulling it forwards along the rail of the shelf level and out (2.).
Round baking trays
natural_image
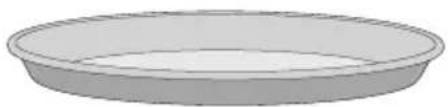
Simple 3D illustration of a bowl-shaped object with no text or symbolsThe solid round baking tray HBF 27-1 is suitable for cooking pizzas, flat cakes made with yeast or whisked mixtures, sweet and savoury tarts, baked desserts, flat bread, and can also be used for frozen cakes and pizzas.
The perforated round baking tray HBFP 27-1 has been specially developed for baked goods made from fresh yeast and quark dough and for baking bread and rolls. The tiny perforations assist in browning the underside of baked goods. The tray can also be used for dehydrating or drying food.
The enamelled surface of both baking trays has been treated with PerfectClean.
■ Insert the rack and place the round baking tray on the rack.
Perforated gourmet baking tray HBBL 71

natural_image
Illustration of a rectangular baking tray with mesh pattern (no text or symbols)The perforated gourmet baking tray has been specially developed for the preparation of baked goods made from fresh yeast and quark doughs, as well as bread and bread rolls.
The tiny perforations assist in browning the underside of baked goods.
The gourmet baking tray can also be used for dehydrating or drying food.
The enamelled surface has been treated with PerfectClean.
The round perforated baking tray HBFP 27-1 can be used for the same things.
Baking stone HBS 60
natural_image
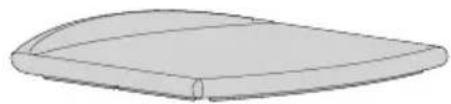
Simple 3D diagram of a curved surface with a small circular indentation (no text or symbols)The baking stone is ideal for items which need a well baked base such as pizza, quiche, bread, bread rolls and savoury snacks.
The baking stone is made from heat-retaining fireclay and is glazed. A paddle made of untreated wood is supplied with the baking stone for placing food on it and taking it off.
■ Slide the rack in and place the baking stone on it.
Grilling and roasting insert HGBB 71

natural_image
3D rendering of a flat, meshed metal sheet or panel (no text or symbols visible)The grilling and roasting insert fits in the universal tray.
The juices from the food being grilled or roasted collect under the insert, preventing them from burning on. The juices can then be used for making gravy and sauces.
The enamelled surface has been treated with PerfectClean.
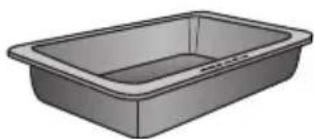
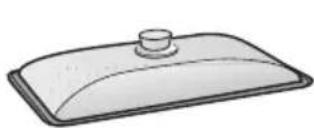
HUB gourmet oven dishes HBD gourmet oven dish lids
Unlike other oven dishes, Miele gourmet oven dishes can be placed in the oven directly on the shelf runners.
They have non-tip safety notches like the rack to prevent them from being pulled out too far.
The surface of the oven dish has a non-stick coating.
Gourmet oven dishes are available in different depths. The width and the height are the same.
Suitable lids are available separately.
Please quote the model number when ordering.
Depth: 22 cm Depth: 35 cm
HUB 5000-M
HUB 5001-XL*
HUB 5001-M*
natural_image
Simple 3D illustration of a rectangular basin or container (no text or symbols)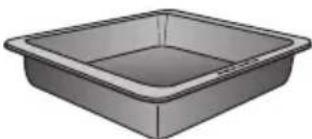
natural_image
Simple 3D illustration of a rectangular basin or container (no text or symbols)HBD 60-22 HBD 60-35
natural_image
Simple line drawing of a rectangular object with a circular top and curved base (no text or symbols)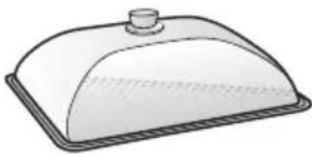
natural_image
Illustration of a dome-shaped food item with a lid (no text or symbols)* Suitable for use on induction hobs
Food probe
natural_image
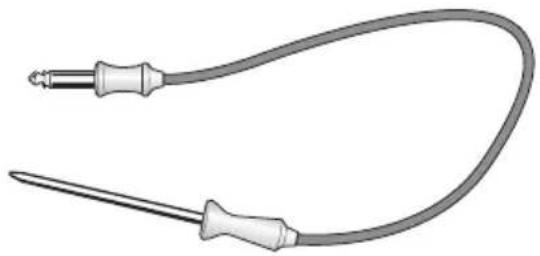
Illustration of a medical or electrical tool with two probes and a curved tube (no text or symbols)Using the food probe enables the temperature during the cooking programme to be monitored very precisely (see “Roasting” – “Food probe”).
■ When using the food probe, do not insert the FlexiClip runners with wire rack on shelf level 4, otherwise this will block the socket.
Handle HEG
natural_image
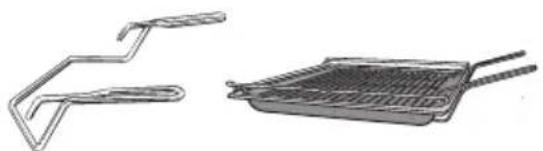
Two types of kitchen utensils: a metal frame and a grater with chopsticks (no text or symbols)The handle makes it easier to take the universal tray, baking tray and rack out of the oven.
Accessories for cleaning and care
- Miele all-purpose microfibre cloth
- Miele oven cleaner
Safety features
- System lock 🔒
(see "Settings – Safety")
- Sensor lock
(see "Settings – Safety")
- Cooling fan
(see "Settings – Cooling fan run-on")
- Safety switch-off
This safety switch-off is activated automatically if the oven has been operating for an unusually long period of time. The period of time will depend on the particular oven function being used.
- Ventilated door
The oven door is made of glass panes that have a heat-reflective coating on part of their surface. When the oven is operating, air is passed through the door to keep the outer pane cool. The door can be removed and disassembled for cleaning purposes (see “Cleaning and care”).
- Door locking for pyrolytic cleaning At the beginning of a pyrolytic cleaning programme the door will lock for safety reasons. The door will only be unlocked when the temperature in the oven compartment has dropped to below 280 °C.
PerfectClean treated surfaces
PerfectClean surfaces have very good non-stick properties and are exceptionally easy to clean.
Food can be easily removed from these surfaces. Soiling from baking and roasting can be easily removed from these surfaces.
Food can be sliced or cut up on PerfectClean surfaces.
However, do not use ceramic knives as these will scratch the PerfectClean surface.
Surfaces treated with PerfectClean enamel can be cleaned as you would clean glass.
Read the instructions in “Cleaning and care” so that the benefits of the non-stick properties and easy cleaning are retained.
PerfectClean treated surfaces:
- Side runners
- Rack
- Universal tray
- Baking tray
- Grilling and roasting insert
- Perforated gourmet baking tray
- Round perforated baking tray
- Round baking tray
Basic settings
The following settings must be made before starting up for the first time. You can change these settings again at a later time (see “Settings”).

Risk of injury caused by hot s.
The oven gets hot during operation.
For safety reasons, the oven may only be used when it has been fully installed.
The oven will switch on automatically when it is connected to the electricity supply.
Setting the language
■ Select the desired language.
If you have selected the wrong language by mistake, proceed as described in "Settings – ↗ Language".
Setting the location
■ Select the required location.
Setting the time
■ Set the time of day in hours and minutes.
■ Confirm with OK.
Completing the commissioning process
■ Follow any further instructions in the display.
The oven is now ready for use.
Heating up the oven for the first time
When the oven is heated up for the first time it may give off a slight smell. This can be eliminated by heating the oven for at least an hour.
It is important to ensure that the kitchen is well ventilated during this operation.
Prevent the odour from escaping into other rooms.
■ Remove any protective wrapping and stickers from the oven and accessories.
■ Before heating the oven up, wipe the oven compartment with a damp cloth to remove any dust or bits of packaging that may have accumulated inside during storage and unpacking.
■ Fit the FlexiClip runners (if present) to the side runners and insert all trays and the rack.
■ Turn the oven on using the On/Off ⏻ sensor control.
Select function appears.
■ Select Fan plus 🖱️.
The recommended temperature will appear (160 °C).
The oven heating, lighting and cooling fan will switch on.
■ Set the maximum possible temperature (250 °C).
■ Confirm with OK.
Heat the oven for at least an hour.
■ After at least an hour, switch the oven off with the ⏻ On/Off sensor control.
Cleaning the oven compartment after heating it up for the first time
Danger of injury caused by hot surfaces.
The oven gets hot during operation. You could burn yourself on the heating elements, oven compartment or accessories.
Allow the heating elements, oven compartment and the accessories to cool before manual cleaning.
■ Take all accessories out of the oven compartment and clean them by hand (see “Cleaning and care”).
■ Clean the oven compartment with a clean sponge and a solution of hot water and washing-up liquid or a clean, damp microfibre cloth.
■ Dry all surfaces with a soft cloth.
Leave the oven door open until the oven compartment is completely dry.
Settings overview
| Menu option Available | settings |
| Language ▶ | ... | deutsch | english | ...Location |
| Time Display | On* | Off | Night dimmingClock format12 h | 24 h*Set |
| Lighting On | "On" for 15 seconds*Off |
| Display Brightness | ■■■■二二□QuickTouchOn | Off* |
| Volume Buzzer tones | Melodies* ■■■■二二□Solo tone ■■■■■■■■= = = = = =□Keypad tone■■■■二二□Welcome melodyOn* | Off |
| Units Temperature | °C* | °F |
| Booster On * | Off | |
| Recommended temps. | |
| Pyrolytic reminder | On * | Off |
| Cooling fan run-on Temperature controlled*Time controlled | |
| Safety Sensor lock | On | Off*System lock 📁On | Off* |
| Software version | |
| Showroom programme Demo modeOn | Off* | |
| Factory default Appliance settingsRecommended temps. | |
* Factory default setting
Opening the "Settings" menu
In the Further ☐ | Settings menu, you can personalise your oven by adapting the factory default settings to suit your requirements.
■ Select Further 📋.
■ Select Settings ▶.
■ Select the desired setting.
You can check settings or change them.
Settings cannot be changed while a cooking programme is in progress.
Language
You can set your language and location.
After selecting and confirming your choice, the language you have selected will appear in the display.
Tip: If you have selected the wrong language by mistake, select the
☐ sensor control. Follow the ▶ symbol to get back to the Language ▶ sub-menu.
Time
Display
Select how you want the time of day to show in the display when the oven is switched off:
- On
The time is always visible in the display.
If you also select the Display | QuickTouch | On setting, all sensor controls react to touch as normal. If you also select the Display |
QuickTouch | Off setting, the oven has to be switched on before it can be used.
- Off
To save energy, the display does not light up. The oven has to be switched on before it can be used.
- Night dimming
To save energy, the time only shows in the display between 05:00 a.m. and 11:00 p.m. The display remains dark at all other times.
Clock format
The time of day can be displayed in the 24 or 12-hour format (24 h or 12 h).
Set
Set the hours and the minutes.
If there is a power cut, the current time of day will reappear once power has been restored. The time of day is saved for approx. 150 hours.
Lighting
- On
The oven interior lighting is switched on during the entire cooking period.
- "On" for 15 seconds
The oven interior lighting switches off 15 seconds after a cooking programme has begun. Press the sensor control to switch the oven interior lighting on again for 15 seconds.
- Off
The oven interior lighting is switched off. Press the ⚙ sensor control to switch on the oven interior lighting for 15 seconds.
Display
Brightness
The display brightness is represented by a bar with seven segments.

Maximum brightness

Minimum brightness
QuickTouch
Select how the sensor controls should respond when the oven is switched off:
- On
If you have also selected the Time | Display | On or Night dimming setting, the sensor controls will also respond when the oven is switched off.
- Off
Independently of the Time | Display setting, the sensor controls only respond when the oven is switched on, as well as for a certain amount of time after switching it off.
Volume
Buzzer tones
If buzzers are switched on, a buzzer will sound when the set temperature is reached and at the end of a set time.
Melodies
At the end of a process, a melody will sound several times in intervals.
The volume of the melody is represented by a bar with seven segments.

Maximum volume

Melody is switched off
Solo tone
At the end of a process, a continuous tone will sound for a period of time.
The pitch of this continuous tone is represented by a segment bar.

Maximum pitch

Minimum pitch
Keypad tone
The volume of the tone that sounds each time you touch a sensor control is represented by a bar with seven segments.

Maximum volume

Tone is switched off
Welcome melody
The melody that sounds when you touch the ⏻ On/Off sensor control can be switched on or off.
Units
Temperature
You can set the temperature in degrees Celsius (°C) or degrees Fahrenheit (°F).
Booster
The Booster function is used to quickly pre-heat the oven compartment.
- On
The Booster function is automatically switched on during the heating-up phase of a cooking programme. The top heat/grill element, ring heating element and hot air fan pre-heat the oven compartment to the set temperature at the same time.
- Off
The Booster function is switched off during the heating-up phase of a cooking programme. Only the heating elements for the selected oven function are used to pre-heat the oven compartment.
Recommended temps.
If you often cook with different temperatures, it makes sense to change the recommended temperatures.
After selecting this menu option, the list of functions will appear in the display together with their recommended temperatures.
■ Select the desired function.
■ Change the recommended temperatures.
■ Confirm with OK.
Pyrolytic reminder
You can set whether you want a reminder to run the pyrolytic cleaning programme to come on (On) or not (Off).
Cooling fan run-on
The cooling fan will continue to run for a while after the oven has been switched off to prevent any humidity building up in the oven compartment, on the fascia panel or on the oven housing unit.
- Temperature controlled
The cooling fan switches off when the temperature in the oven drops below 70 °C.
- Time controlled
The cooling fan switches off after a period of about 25 minutes.
Condensate can damage the oven housing unit and the worktop and lead to corrosion in the oven. If you have set the cooling fan to Time controlled and leave food in the oven compartment to keep warm, moisture levels in the oven will increase, leading to condensation forming on the fascia panel and surrounding kitchen furniture, and drops of moisture collecting under the worktop.
Do not leave food in the oven compartment to keep it warm if you have selected Time controlled.
Safety
Sensor lock
The sensor lock prevents the cooking programme being switched off by mistake or settings being changed. Apart from the ⏻ On/Off sensor control, the activated sensor lock prevents the sensor controls and fields in the display from working a few seconds after a programme has been started.
- On
The sensor lock is activated. Touch the OK sensor control for at least 6 seconds to deactivate the sensor lock for a short period of time.
- Off
The sensor lock is deactivated. All sensor controls react to touch as normal.
System lock 🔒
The system lock prevents the oven being switched on by mistake.
The minute minder can still be used when the system lock is active.
The system lock will remain activated even after a mains outage.
- On
The system lock has been activated. Before you can use the oven, touch the OK sensor control for at least 6 seconds.
- Off
The system lock is deactivated. You can use the oven as normal.
Software version
The software version is intended for the Miele Customer Service Department. You do not need this information for domestic use.
Showroom programme
This function enables the oven to be demonstrated in showrooms without heating up. Do not activate this setting for domestic use.
Demo mode
If you have demo mode activated, Demo mode active. Appliance heating off will appear when you switch the oven on.
- On
Touch the OK sensor control for at least 4 seconds to activate demo mode.
- Off
Touch the OK sensor control for at least 4 seconds to deactivate demo mode. You can use the oven as normal.
Factory default
- Appliance settings
Any settings that have been altered will be reset to the factory default settings.
- Recommended temps.
Any recommended temperatures that have been changed will be reset to the factory default settings.
Using the Min. minder function
The ⏱ minute minder can be used to time other activities in the kitchen, e.g. boiling eggs.
The minute minder can also be used at the same time as a cooking programme for which the cooking duration start and finish times have been set (e.g. as a reminder to stir the food or add seasoning, etc.).
■ The maximum minute minder time that can be set is 59 minutes and 59 seconds.
Tip: When using a function that uses moisture, use the timer to remind you to inject steam manually at the desired time.
Setting the minute minder
If you have selected the Display | QuickTouch | Off setting, you will need to switch the oven on before setting the minute minder. The minute minder can then be seen counting down in the display when the oven is switched off.
Example: you want to boil some eggs and set a minute minder duration of 6 minutes and 20 seconds.
■ Select the ⏻ sensor control.
■ Select Min. minder if a cooking programme is in progress at the same time.
The prompt Set 00:00 min appears.
■ Using the navigation area, set 06:20.
■ Confirm with OK.
The minute minder duration is now saved.
When the oven is switched off, the minute minder time counts down in the display and 🔒 appears instead of the time of day.
If you are cooking at the same time without a set cooking duration, ⏱ and the minute minder time appear as soon as the selected temperature is reached.
If you are cooking at the same time with a set cooking duration, the minute minder counts down in the background as the cooking duration appears first in the display.
If you are in a menu, the minute minder counts down in the background.
At the end of the minute minder time, will flash, the time will start counting up and a buzzer will sound.
■ Select the ⏻ sensor control.
■ If required, confirm with OK.
The buzzer will stop and the symbols in the display will go out.
Changing the minute minder duration
■ Select the ⏻ sensor control.
■ Select Min. minder if a cooking programme is in progress at the same time.
■ Select Change.
■ Confirm with OK.
The minute minder duration selected appears.
■ Change the duration set for the minute minder.
■ Confirm with OK.
The altered minute minder duration is now saved.
Deleting the minute minder duration
■ Select the ⏻ sensor control.
■ Select Min. minder if a cooking programme is in progress at the same time.
■ Select Delete.
■ Confirm with OK.
The minute minder duration is now deleted.
Main and sub-menus
| Menu Recommended | value | Range |
| Oven functions | ||
| Fan plus 160 °C 30–250 °C | ||
| Conventional heat 180 °C 30–280 °C | ||
| Bottom heat 190 °C 100–280 °C | ||
| Auto roast 160 °C 100–230 °C | ||
| Intensive bake 170 °C 50–250 °C | ||
| Full grill 240 °C 200–300 °C | ||
| Fan grill 200 °C 100–260 °C | ||
| Pyrolytic | ||
| Automatic programmes Auto | ||
| Further | ||
| Eco Fan heat 190 °C 100–250 °C | ||
| Defrost 25 °C 25–50 °C | ||
| Settings | ||
Cooking programmes
- If possible, use the automatic programmes for cooking food.
- Remove all accessories from the oven compartment that are not required for cooking.
- In general, if a range of temperatures is given in a recipe or chart, it is best to select the lower temperature and to check the food after the shortest duration.
- Preheat the oven compartment only if instructed to do so in the recipe or the cooking chart.
- If possible, do not open the door during a programme.
- Use dark, matt bakeware and cooking containers made of non-reflective materials (enamelled steel, heat-resistant glass, coated aluminium). Shiny materials such as stainless steel or aluminium reflect the heat and therefore can give a more uneven food heating result. Do not cover the oven floor or the rack with heat-reflecting aluminium foil.
-
Monitor cooking durations to avoid wasting energy when cooking. Set the cooking duration, or use a food probe if you have one.
-
The Fan plus ⚙ function can be used for cooking many types of food. Because the fan distributes the heat in the oven compartment straight away, it allows you to use a lower temperature than you would with Conventional heat ☐. It also enables you to cook on multiple shelf levels at the same time.
- Eco Fan heat is an innovative function which is suitable for smaller foodstuffs, e.g. frozen pizzas, part-baked rolls, biscuits and for meat dishes and roasts. Energy-efficient cooking thanks to optimal utilisation of heat. When cooking on a single shelf, up to 30 % less energy is used with comparatively good cooking results. Do not open the door during the cooking programme.
- Fan grill 📁 is the best function for grilled dishes. With this function you can use lower temperatures than in other grill functions which use the maximum temperature setting.
- Whenever possible you should cook multiple foods at the same time. Place them next to each other in the oven or on different shelf levels.
- Foods which you are unable to cook at the same time should, if possible, be cooked one after the other in order to make use of existing heat in the oven.
Residual heat utilisation
- In cooking programmes using temperatures greater than 140 °C and with cooking durations longer than 30 minutes, the temperature can be turned down to the lowest possible level about 5 minutes before the end of the cooking programme. The residual heat in the oven is sufficient for cooking the food until it is done. However, never switch the oven off (see “Warning and safety instructions”).
- If you have set a cooking duration for a cooking programme, the oven heating elements will switch off automatically shortly before the end of cooking. The residual heat in the oven is sufficient to complete the cooking process.
- It is best to start the pyrolytic cleaning programme immediately after a cooking programme. The residual heat in the oven will help reduce the amount of energy required.
Customising settings
■ Select Display | QuickTouch | Off for the control elements to reduce energy consumption.
For the oven interior lighting, select Lighting | Off or "On" for 15 seconds. The oven interior lighting can be switched on again at any time by touching the sensor control.
Energy-saving mode
The oven will switch itself off automatically to save energy if a programme is not being run and controls have not been operated. The time of day will appear in the display or the display will remain dark (see "Settings").
■ Switch the oven on.
The main menu will appear.
■ Place the food in the oven.
■ Select the desired function.
The function will appear first, followed by the recommended temperature.
■ Change the recommended temperature if necessary.
The recommended temperature will be accepted within a few seconds. You can change the temperature subsequently via the arrow buttons.
■ Confirm with OK.
The actual temperature will appear and the heating-up phase will commence.
You will see the temperature increasing. A buzzer will sound when the set temperature is reached for the first time.
■ After cooking, select the sensor control for the selected function to end the cooking programme.
■ Take the food out of the oven.
■ Switch the oven off.
Changing values and settings for a cooking programme
Depending on the function, as soon as a cooking programme is in progress, you can change the values or settings for this programme.
Depending on the function, you can change the following settings:
- Temperature
- Core temperature
- Duration
- Finish at
- Start at
Changing the temperature and core temperature
You can permanently reset the recommended temperature to suit your cooking preferences by selecting Further □ | Settings ▶ | Recommended temps..
The core temperature only appears if you are using the food probe (see "Roasting – Food probe").
■ Select the ∧ or ∨ arrow buttons or swipe to the right or left in the ||||||| area.
The desired temperature appears in the display.
■ Change the temperature and the core temperature if necessary.
■ Confirm with OK.
Tip: You can change the temperature directly via the navigation area. To change the core temperature, select the sensor control.
The cooking process will resume with the new desired temperatures.
Setting cooking durations
Cooking results can be impaired if there is a long delay between the food being placed in the oven and the start of cooking. Fresh food can change colour and even deteriorate. When baking, the cake mixture or dough can dry out, and the raising agents can lose their effectiveness. Select as short as possible a time until the cooking programme starts.
You have placed the food in the oven compartment, selected an operating mode and the required settings such as the temperature.
By entering Duration, Finish at or Start at via the ⏻ sensor control, you can automatically switch the cooking process off or on and off.
- Duration
Enter the desired cooking duration for the food. The heating will switch off automatically once this duration has elapsed. The maximum cooking duration that can be set depends on the operating mode that you have selected.
- Finish at
Specify when you want the cooking process to end. The oven heating will switch off automatically at the time you have set.
- Start at
This function will only appear in the menu if you have set a Duration or Finish at time. With Start at, you have to specify when you want the cooking process to start. The oven heating will switch on automatically at the time you have set.
■ Select the ⏻ sensor control.
■ Set the desired times.
■ Confirm with OK.
■ Touch the sensor control to return to the menu for the selected operating mode.
Changing the set cooking durations
■ Select the ⏻ sensor control.
■ Select the desired time.
■ Confirm with OK.
■ Select Change.
■ Change the set time.
■ Confirm with OK.
■ Touch the sensor control to return to the menu of the selected function.
These settings will be deleted in the event of a power failure.
Deleting the set cooking durations
■ Select the ⏻ sensor control.
■ Select the desired time.
■ Confirm with OK.
■ Select Delete.
■ Confirm with OK.
■ Touch the sensor control to return to the menu of the selected function.
If you delete Duration, the set times for Finish at and Start at are also deleted.
If you delete Finish at or Start at, the cooking programme will start using the cooking duration set.
Cancelling a cooking programme
■ Touch the sensor control for the selected function or the sensor control.
■ When Cancel process appears in the display, confirm with OK.
The oven compartment heating and lighting will then switch off. Any cooking durations set will be deleted.
The main menu will appear.
Pre-heating the oven
The Booster is used in conjunction with certain functions to quickly pre-heat the oven.
It is only necessary to pre-heat the oven in a few instances.
■ Most dishes can be placed in the cold oven to make use of the heat produced during the heating-up phase.
■ Pre-heat the oven when cooking the following food with the following functions:
- Dark bread dough as well as beef sirloin joints and fillet with the Fan plus 📁 and Conventional heat 📄 functions
- Cakes and pastries with a short cooking duration (approx. 30 minutes or less) as well as delicate items (e.g. sponge) with the Conventional heat function (without the Booster function)
Booster
The Booster function is used to quickly pre-heat the oven compartment.
This function is switched on as the factory default setting for the following functions (Further □ | Settings ▶ | Booster | On):
- Fan plus
- Conventional heat
- Auto roast
If you set a temperature above 100 °C and the Booster function is switched on, a rapid heating-up phase heats the oven compartment to the set temperature. The top heat/grill element and the ring heating element come on together with the hot air fan.
Delicate items (e.g. sponge or biscuits) will brown too quickly on the top if the Booster function is used.
Switch off the Booster function for these items.
Switching off the Booster for a cooking programme
■ Select the Booster | Off setting before selecting the desired function.
The Booster function is switched off during the heating-up phase. Only the heating elements associated with the function are pre-heating the oven compartment.
If you then want to restart a cooking programme with the Booster function, select the Booster | On setting to switch the function on again.
The wide range of automatic programmes enables you to achieve excellent results with ease.
Categories
The Auto automatic programmes are sorted into categories to provide a better overview. Simply select the appropriate programme for the type of food you are cooking and follow the instructions in the display.
Using automatic programmes
■ Select Automatic programmes Auto.
A list will appear in the display.
■ Select the desired food category.
The automatic programmes available for the food category selected will then appear.
■ Select the desired automatic programme.
■ Follow the instructions in the display.
Some automatic programmes will prompt you to use the food probe. Read the information under “Roasting – Food probe”.
The core temperature cannot be changed for the automatic programmes.
Handy hints
- When using automatic programmes, the recipes provided are designed as a guide only. Other similar recipes, including those using different quantities, can be used for the automatic programme in question.
- After cooking, allow the oven compartment to cool down to room temperature again before starting an automatic programme.
- Some automatic programmes require a pre-heating phase before food is placed in the oven compartment. A prompt will appear in the display indicating when this needs to be done.
- Some automatic programmes require the addition of liquid after a certain cooking duration. You will be prompted by a message in the display when this needs to be done (e.g for adding liquid).
- The duration quoted for automatic programmes is an estimate. It may increase or decrease depending on the programme. The duration, in particular with meat, will vary depending on the initial temperature of the food.
- When using the food probe, the cooking duration will be determined by when the core temperature is reached.
This section provides information on the following applications:
- Defrost
- Low temperature cooking
- Heating crockery
- Frozen food/ready meals
Defrost
Gentle defrosting of frozen goods means that the vitamins and minerals are generally retained.
■ Select Further 📋.
■ Select Defrost.
■ Alter the recommended temperature if necessary.
Air is circulated throughout the oven compartment to gently defrost the frozen goods.

Risk of infection from bacteria.
Bacteria such as salmonella can cause life-threatening food poisoning.
It is particularly important to observe food hygiene rules when defrosting fish and meat, and in particular when defrosting poultry.
Do not use the liquid produced during defrosting.
Process the food as required as soon as it has been defrosted.
Tips
- Remove the packaging and place the frozen goods on the universal tray or in a suitable bowl or dish.
- Use the universal tray with the rack placed on top of it for defrosting poultry. This way the frozen goods will not be lying in the defrosted liquid.
- Meat, poultry or fish does not need to be fully defrosted before cooking. Defrost until the food has started to thaw. The surface will then be sufficiently thawed to take herbs and seasoning.
Low temperature cooking
Low temperature cooking is ideal for cooking delicate cuts of beef, pork, veal or lamb when a tender result is desired.
First sear the meat all over at a high temperature on the hob in order to seal it.
Then place the meat in the pre-heated oven compartment where the low temperature and long cooking duration will cook it to perfection and ensure it is very tender.
The meat will relax. The juices inside will start to circulate evenly throughout the meat to reach the outer layers.
This gives very tender and succulent results.
■ Use lean meat which has been correctly hung and trimmed. Bones must be removed before cooking.
■ For searing, use a suitable cooking oil or fat that can withstand high temperatures (e.g. clarified butter, vegetable oil).
■ Do not cover meat during cooking.
The cooking duration takes approx. 2–4 hours depending on the weight and size of the meat and how well you want it cooked.
■ As soon as the cooking programme is done, you can carve the meat straight from the oven. It does not need to rest.
■ The meat can be left in the oven compartment to keep warm until you serve it. This will not affect results in any way.
■ Serve on pre-heated plates with very hot sauce or gravy to prevent it cooling down too quickly. The meat is at the ideal temperature for eating straight away.
If using the food probe, please observe the information under "Roasting – Food probe".
Using Conventional heat
Take a look at the information in the cooking charts at the end of this booklet.
Use the universal tray with the rack placed on top of it. Switch off the Booster function for the pre-heating phase.
■ Place the rack together with the universal tray on shelf level 2.
■ Select the Conventional heat function and a temperature of 120 °C without the Booster function.
■ Pre-heat the oven together with the universal tray and rack for approx. 15 minutes.
■ Whilst the oven compartment is preheating, sear the meat thoroughly on all sides on the hob.
Danger of burning due to hot surfaces.
The oven gets hot during operation. You could burn yourself on the heating elements, oven compartment or accessories.
Use oven gloves when placing food in the oven or removing it and when working in the hot oven compartment.
■ Place the seared meat on the rack.
■ Reduce the temperature to 100 °C (see “Cooking charts”).
■ Continue cooking until the end of the cooking duration.
Frozen food/Ready meals
Tips for cakes, pizza and baguettes
- Bake cakes, pizza and baguettes on baking paper on the rack.
Do not use the baking tray or the universal tray for frozen foods with a large surface area. The tray could become warped and difficult, or even impossible, to remove from the oven compartment when hot. Additional use will make the warping worse. - Use the lowest temperature recommended on the packaging.
Tips for French fries, croquettes and similar items
- These frozen items can be cooked on the baking tray or universal tray.
Place baking parchment on the tray so that they cook gently. - Use the lowest temperature recommended on the packaging.
- Turn food several times during cooking.
Preparing frozen food/ready meals
Handling food carefully will help protect your health. Cakes, pizzas and french fries should be cooked until golden, not dark brown.
■ Select the function and temperature recommended on the packaging.
■ Pre-heat the oven compartment.
■ Place the food in the pre-heated oven compartment on the shelf level recommended on the packaging.
■ Check the food at the end of the shortest cooking duration recommended on the packaging.
Heat crockery
Use the Fan plus ⚙ function for pre-heating crockery.
Only pre-heat heat-resistant crockery.
■ Place the rack on shelf level 1 and place the crockery to be pre-heated on it. Depending on the size of the crockery, you can also place the rack on the oven floor and take the side runners out to make more room.
■ Select Fan plus 🖱️.
■ Set the temperature to 50–80 °C.

Danger of burning!
Use oven gloves when removing the crockery from the oven. Droplets of water may have accumulated underneath the crockery.
■ Remove the heated crockery from the oven.
Handling food carefully will help protect your health.
Cakes, pizzas and french fries should be cooked until golden, not dark brown.
Tips on baking
- Set a cooking duration. If used for baking, do not delay the start for too long. Cake mixture or dough will dry out, and the raising agents will lose their effectiveness.
- Generally speaking, you can use racks, baking trays, universal trays and any type of baking tray made of heat-resistant material.
- Avoid using bright, thin-walled tins as they give an uneven or poor browning result. Under adverse circumstances, the food will not cook properly.
- Position rectangular tins with the longer side across the width of the oven compartment for optimum heat distribution and even baking results.
- Always place bakeware on the rack.
- Bake cakes with fruit toppings or deep cakes on the universal tray.
Using baking parchment
Miele accessories, e.g. the universal tray, are treated with PerfectClean enamel (see “Features”). Surfaces treated with PerfectClean enamel generally do not need to be greased or covered with baking parchment.
■ Use baking parchment when baking lye mixtures because the sodium hydroxide used can damage the surface treated with PerfectClean.
■ Use baking parchment when baking sponge, meringue, macaroons or similar items. Due to their high egg white content, these are more likely to stick.
■ Use baking paper when cooking frozen food on the rack.
Notes on the cooking charts
You can find the cooking charts at the end of this book.
Selecting the 🔊 temperature
As a general rule, select the lower temperature given in the chart. Baking at temperatures higher than those recommended may reduce the cooking duration, but will lead to uneven browning of the food, and unsatisfactory cooking results.
Selecting the ⏻ cooking duration
Unless otherwise stated, the cooking durations given in the cooking charts are for an oven compartment which has not been pre-heated. With a pre-heated oven compartment, shorten times by around 10 minutes.
■ As a general rule, check the food after the shortest duration. Stick a wooden skewer into the food.
If it comes out clean without any batter/dough on it, the food is done.
Notes on the functions
You can find an overview of all the functions with their recommended values in “Main and sub-menus”.
Using Automatic programmes Auto
■ Follow the instructions in the display.
Using Fan plus
Because the fan distributes the heat around the oven compartment straight away, it allows you to use a lower temperature than you would with the Conventional heat function.
Use this function if you are baking on multiple shelves at the same time.
■ 1 shelf: place the food in shelf level 2.
■ 2 shelves: place the food on shelf levels 1+3 or 2+4.
■ 3 shelves: place the food on shelf levels 1+3+5.
Tips
- If you are cooking on multiple shelves at the same time, slide the universal tray in on the lowest level.
- For moist biscuits and cakes, bake on a maximum of 2 shelf levels at once.
Using Intensive bake
Use this function for baking cakes with moist toppings.
Do not use this function for baking thin biscuits.
■ Place cakes on shelf level 1 or 2.
Using Conventional heat ☐
Dark metal, enamel, or aluminium bakeware with a matt finish, as well as heat-resistant glass, ceramic, and coated bakeware can be used.
Use this function for baking traditional recipes. If using an older recipe or cookbook, set the oven temperature 10 °C lower than the recommended one. This will not change the cooking duration.
■ Place the food in shelf level 1 or 2.
Using Eco Fan heat
Use this function for cooking small amounts of food, e.g. frozen pizzas, part-baked rolls or biscuits, while saving energy.
■ Place the food in shelf level 2.
Tips for roasting
- You can use all crockery made from temperature-resistant materials, e.g. roasting dishes, roasting pans with lid, ovenproof glass dishes, roasting bags, dishes made from earthenware or cast iron, the universal tray, rack and/or anti-splash insert (if available) on top of the universal tray.
- Pre-heating the oven compartment is only required when roasting beef sirloin joints and fillet. Pre-heating is generally not necessary.
- Use a closed roasting dish for roasting meat, such as an oven dish. The meat stays succulent. The oven compartment will also stay cleaner than when roasting on the rack. This ensures that sufficient stock remains for making gravy.
- If you are using a roasting bag, follow the instructions on the packaging.
- If you are using the rack or an open roasting dish for roasting, you can add a little fat or oil to very lean meat or place a few strips of streaky bacon on the top.
-
Season the meat and place in the roasting dish. Dot with butter or margarine or brush with oil or cooking fat if necessary. For large lean cuts of meat (2–3 kg) and fatty poultry add about 1/8 litre of water to the dish.
-
Do not add too much liquid during cooking as this will hinder the browning process. Browning only occurs towards the end of the cooking duration. Remove the lid about halfway through the cooking duration if a more intensive browning result is desired.
- At the end of the programme, take the food out of the oven compartment, cover it and leave to stand for about 10 minutes. This helps retain juices when the meat is carved.
- For a crisp finish, baste poultry 10 minutes before the end of the cooking duration with slightly salted water.
Notes on the cooking charts
You can find the cooking charts at the end of this book.
■ Take note of the temperature range, the shelf levels and the timings. These also take the type of cooking container, the size of the meat and cooking practices into account.
Selecting the 🔊 temperature
■ As a general rule, select the lower temperature given in the chart. If higher temperatures are used, the meat will brown on the outside, but will not be properly cooked through.
■ When cooking with Fan plus 📁 and Auto roast 📋, select a temperature 20 °C lower than when using Conventional heat 📋.
■ For cuts which weigh more than 3 kg, select a temperature approx. 10 °C lower than that given in the roasting chart. The roasting process will take longer, but the meat will cook evenly through and the skin or crackling will not be too thick.
■ When roasting on the rack, set a temperature approx. 10 °C lower than for roasting in a covered oven dish.
Selecting the ⏻ cooking duration
Unless otherwise stated, the durations given in the cooking chart are for an oven compartment which has not been pre-heated.
■ The traditional British method for calculating the roasting time is to allow 15 to 20 minutes per lb/450 grammes, according to type of meat, plus approx. 20 minutes, adjusting the length of time as roasting proceeds to obtain the required result. The roasting time can also be determined by multiplying the thickness of the roast [cm] with the time per cm [min/cm] stated below, depending on the type of meat:
- Beef/venison: 15–18 min/cm
- Pork/veal/lamb: 12–15 min/cm
- Sirloin/fillet: 8–10 min/cm
■ As a general rule, check the food after the shortest duration.
Tips
- For frozen meat, increase the cooking duration by approx. 20 minutes per kg.
- Frozen meat weighing less than approx. 1.5 kg does not need to be defrosted before roasting.
Notes on the functions
You can find an overview of all the functions with their recommended values in “Main and sub-menus”.
Use the Bottom heat ☐ function towards the end of the cooking duration to brown the base of the food.
Do not use the Intensive bake function for roasting as the juices will become too dark.
Using Automatic programmes Auto
■ Follow the instructions in the display.
Using Fan plus 📁 or Auto roast 📄
These functions are suitable for roasting meat, fish and poultry that needs to be well browned as well as sirloin joints and fillet.
The Fan plus ⚙ function allows you to use a lower temperature than you would with the Conventional heat ⚡ function, because the heat is immediately distributed around the oven compartment.
In the Auto roast function, the oven compartment heats initially to a high searing temperature (approx. 230 °C). As soon as this temperature has been reached, the oven automatically drops the temperature back down to the pre-selected roasting temperature (continued roasting).
■ Place the food in shelf level 2.
Using Conventional heat
Use this function for baking traditional recipes. If using an older recipe or cookbook, set the oven temperature 10 °C lower than the recommended one. This will not change the cooking duration.
■ Place the food in shelf level 2.
Using Eco Fan heat
Use this function for cooking smaller roasts or meat dishes while saving energy.
■ Place the food in shelf level 2.
Food probe
natural_image
Coiled medical or electrical probe with two probes, no visible text or symbolsThe food probe allows the temperature to be monitored precisely during a cooking programme.
How it works
The metal tip of the food probe must be fully inserted into the centre of the food all the way to the handle. There is a temperature sensor in the metal tip which measures the core temperature of the food during cooking. The rise in the core temperature of the food reflects the progress of cooking. Set a lower or higher core temperature, depending on whether you want your roast to be medium or well done.
The core temperature can be set up to 99 °C. Information on food and respective core temperatures can be found in the cooking charts at the end of this book.
The cooking duration will be similar when cooking with or without the food probe.
When to use the food probe
Some automatic programmes and special applications will prompt you to use the food probe.
You can also use the food probe in the following operating modes:
- Auto roast
- Fan plus
- Intensive bake
- Conventional heat
Important usage notes
- You can place the meat in a pot or on the rack.
- The metal tip of the food probe must be fully inserted into the centre of the food so that the temperature sensor reaches more or less to the core.
- When cooking poultry, insert the metal tip into the thickest part of the breast. Press the breast with your index finger and thumb to find the thickest part.
- The metal tip must not touch any bone or be inserted in areas with a lot of fat. Heavily marbled areas and bones can cause cooking to end prematurely.
- If the meat is very heavily marbled with fat, select the highest core temperature given in the cooking charts.
- When using aluminium foil or roasting bags, insert the food probe through the foil/bag into the centre of the food. You can also place meat inside the bag or foil with the food probe already inserted. Follow the roasting bag manufacturer's instructions.
Using the food probe
■ Insert the metal tip of the food probe completely into the centre of the food all the way to the handle.
If you are cooking several pieces of meat at the same time, insert the food probe into the largest piece of meat.
■ Place the food in the oven compartment.
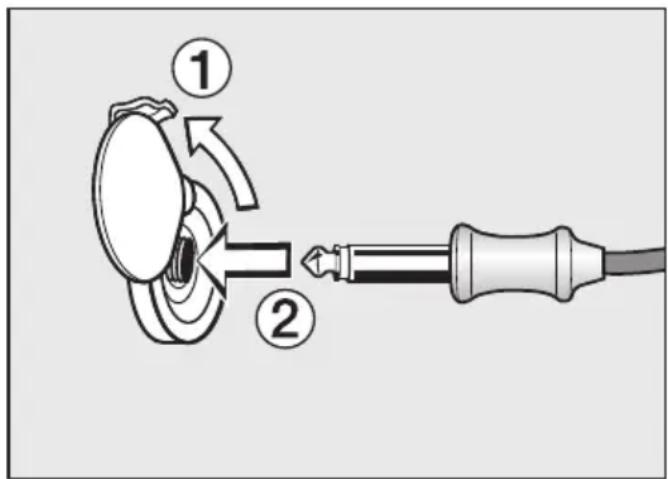
text_image
Diagram showing a mechanical device with labeled parts and directional arrows indicating motion or movement.■ Insert the plug of the food probe into the socket until you feel it engage.
■ Close the door.
■ Select the function or automatic programme.
■ Set the temperature and the core temperature if necessary.
The core temperatures cannot be changed for the automatic programmes.
Follow the instructions on the display.
The cooking programme is brought to an end as soon as the core temperature is reached.
⚠️ Risk of injury caused by hot surfaces.
The food probe can get hot. You could burn yourself on it.
Wear oven gloves when removing the food probe from its socket.
Delaying the start of a cooking programme with food probe
You can set the cooking process to start at a later time.
■ Once you have selected a function, touch the ⏻ sensor control.
■ Select Start at.
The finish time can be calculated approximately because the duration of a cooking process is about the same, whether or not the food probe is used.
You cannot set Duration and Finish at because the total cooking duration is determined by when the set core temperature is reached.
Time left display
If the temperature set for a cooking process is above 140 °C, the estimated time required to complete it (time left) will appear in the display once cooking is underway.
The time left is calculated from the cooking temperature selected, the set core temperature and the progress of the core temperature as it rises.
The time left first shown is an estimate. As the cooking process continues, the time left is revised continuously, and a more accurate figure is shown.
The time left will be deleted if the cooking or core temperature is changed or if a different operating mode is selected. If the door is left open for a prolonged period of time, the time left will be recalculated.
Switching between the time left display and the core temperature display
You can switch between the time left display and the core temperature display as soon as the time left appears in the display.
■ Select the 🔗 sensor control.
The time left or the core temperature appears in the display in addition to the temperature.
⚠️ Risk of injury caused by hot surfaces.
If you grill with the door open, hot air will escape from the oven instead of being cooled by the cooling fan. The control elements will get hot.
Grill with the oven door closed.
Tips for grilling
- Pre-heating is necessary when grilling. Pre-heat the top heat/grill element for approx. 5 minutes with the door closed.
- Trim the meat if necessary. Do not season the meat with salt before grilling as this draws the juices out.
- Add a little oil to lean meat if necessary. Do not use other types of fat as they can easily burn and cause smoke.
- Clean fish in the normal way. To enhance the flavour, season with a little salt. Fish can also be drizzled with lemon juice.
- Use the universal tray with the wire rack or the grilling and roasting insert (if present) in place. The juices collect under the insert. This prevents them from spitting and making the oven dirty and they can then be used for making gravy and sauces. Brush the wire rack or the grilling and roasting insert with oil and then place the food on top.
Do not use the baking tray.
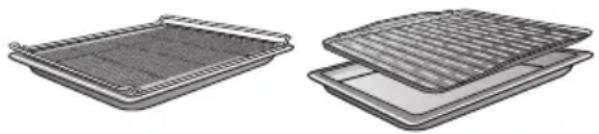
natural_image
Two views of a grid-patterned tray or filter device, shown from different angles (no text or symbols visible)Notes on the cooking charts
You can find the cooking charts at the end of this book.
■ Take note of the temperature range, the shelf levels and the durations. These take the size of the meat and cooking practices into account.
■ Check the food after the shortest duration quoted.
Selecting the 🔊 temperature
■ As a general rule, select the lower temperature given in the chart. If higher temperatures are used than those specified, the meat will brown on the outside, but will not be properly cooked through.
Choosing a shelf level
■ Select the shelf level depending on the thickness of the food to be cooked.
■ Place flat food in shelf level 3 or 4.
■ Place thicker food in shelf level 1 or 2.
Selecting the ⏻ cooking duration
- Grill thinner cuts of meat/slices of fish for approx. 6–8 minutes per side. It is best to grill food of a similar thickness at the same time so that the cooking durations do not vary too much.
■ As a general rule, check whether the food is cooked after the shortest duration.
■ To test the food, press down on the meat with a spoon. This lets you determine how well the meat has been cooked.
- Rare/pink
If the meat gives easily to the pressure of the spoon, it will still be red on the inside.
- Medium
If there is some resistance, the inside will be pink.
- Well done
If there is very little resistance, it is cooked through.
Tip: If the surface of a thicker cut of meat is browned but the centre is still raw, move the food to a lower level or reduce the temperature and continue grilling. This will stop the surface from becoming excessively charred.
Notes on the functions
You can find an overview of all the functions with their recommended values in “Main and sub-menus”.
The plastic on the food probe can melt at very high temperatures.
Do not use the food probe when using the grill functions.
Do not store the food probe in the oven compartment when it is not being used.
Using Full grill
Use this function to grill flat thin cuts in large quantities and for browning large baked dishes.
The whole of the top heating/grill element glows red to provide the required heat.
Using Fan grill
This function is suitable for grilling thicker food, such as chicken.
A temperature setting of 220 °C is generally recommended for thinner types of food, while 180–200 °C is recommended for thicker cuts.
Danger of injury caused by hot surfaces.
The oven gets hot during operation. You could burn yourself on the heating elements, oven compartment or accessories.
Allow the heating elements, oven compartment and the accessories to cool before manual cleaning.
⚠️ Risk of injury due to electric shock.
The steam from a steam cleaning appliance could reach live electrical components and cause a short circuit.
Never use a steam cleaner for cleaning.
Surfaces can discolour or alter if unsuitable cleaning agents are used. The oven front is particularly susceptible to damage from oven cleaners or descaling agents. All surfaces are susceptible to scratching. Scratches on glass can in some circumstances lead to breakage.
Remove all cleaning agent residues immediately.
Unsuitable cleaning agents
To avoid damaging the surfaces, do not use:
- cleaning agents containing soda, ammonia, acids or chlorides
-
cleaning agents containing descaling agents on the front
-
abrasive cleaning agents (e.g. powder cleaners, scouring milk, scouring pads)
- solvent-based cleaning agents
- stainless-steel cleaning agents
- dishwasher cleaner
- glass cleaning agents
- cleaning agents for ceramic glass hobs
- hard, abrasive brushes or sponges (e.g. pot scourers, brushes or sponges which have been previously used with abrasive cleaning agents)
- melamine eraser blocks
- sharp metal scrapers
- wire wool
- spot cleaning with mechanical cleaning agents
- oven cleaners
- stainless-steel spiral pads
If soiling is left on for any length of time, it may become impossible to remove. If items are used frequently without being cleaned, it may become very difficult to clean them. It is therefore best to remove any soiling immediately.
The accessories are not dishwasher-safe.
Tip: Soiling caused by spilt fruit juices and cake mixtures is best removed while the oven compartment is still warm.
To make it easier to clean the oven:
■ Remove the door.
■ Take out the side runners with FlexiClip runners (if fitted).
■ Lower the top heat/grill element.
Removing normal soiling
There is a delicate fibreglass seal around the oven compartment to seal the glass in the oven door. This can be damaged by rubbing or scouring.
Avoid cleaning the fibreglass seal.
■ Remove normal residues immediately with warm water, washing-up liquid and a clean sponge or a clean, damp microfibre cloth.
■ Remove all cleaning agent residues thoroughly with clean water.
This is particularly important for any parts with a PerfectClean finish, as cleaning agent residues will impair the non-stick function.
■ After cleaning, wipe the surfaces dry using a soft cloth.
Cleaning the food probe
Do not put the food probe into water or clean it in the dishwasher as this will damage it.
Clean the food probe with a damp cloth only.
Removing stubborn soiling (excluding the FlexiClip runners)
Spilt fruit and roasting juices may cause lasting discolouration or matt patches on surfaces. This discolouration will not affect the properties of the surface finish. Do not attempt to remove these stains. Only use the equipment specified.
■ Baked-on deposits can be removed with a glass scraper or with a stainless-steel spiral pad (e.g. Spontex Spirinett), hot water and washing-up liquid.
Using oven cleaners
■ Very stubborn soiling on PerfectClean surfaces can be cleaned using the Miele oven cleaner, which must only be applied to cold surfaces.
If the oven spray gets into gaps and openings, a strong odour is generated during subsequent cooking programmes.
Do not spray the oven cleaner onto the roof of the oven compartment.
Do not spray the oven cleaner into the gaps and openings of the oven compartment walls and rear wall.
■ Follow the instructions on the packaging.
Oven cleaners from other manufacturers must only be used in a cold oven and for no longer than a maximum of 10 minutes.
■ You can then also use the scouring pad on the back of a washing-up sponge to remove the soiling.
■ Remove all cleaning agent residues thoroughly with clean water.
■ Dry all surfaces with a soft cloth.
Stubborn soiling on the FlexiClip runners
Cleaning FlexiClip telescopic runners in a dishwasher would remove the special grease which is essential for their smooth functioning.
Never attempt to clean FlexiClip telescopic runners in a dishwasher.
For stubborn surface soiling or if the bearings become sticky with spilled fruit juices proceed as follows:
■ Soak the FlexiClip runners for approx. 10 minutes in a solution of hot water and washing-up liquid.
If necessary use the back of a washing-up sponge to remove the soiling. The bearings can be carefully cleaned with a soft brush.
Cleaning may cause some discolouration or fading in places, however this will not affect the functioning of the runners in any way.
Pyrolytic cleaning of the oven compartment
Instead of cleaning the oven compartment manually you can run the Pyrolytic function.
During pyrolytic cleaning the oven compartment reaches temperatures in excess of 400 °C. Any residual soiling is burnt off and turned to ash by the high temperatures.
There are 3 pyrolytic settings available, each with a different duration:
- Level 1 for light soiling
- Level 2 for heavier soiling
- Level 3 for very heavy soiling
The oven door is automatically locked when the pyrolytic cleaning process is started. It cannot be opened until after the programme has finished.
The timer can be used to delay the start time of the pyrolytic cleaning programme, for instance to make use of cheaper electricity tariffs.
At the end of the pyrolytic cleaning programme any residues such as ash from the pyrolytic process, which are formed depending on the oven compartment's degree of soiling can be easily wiped away.
Preparing for pyrolytic cleaning
Accessories will be damaged by the high temperatures in pyrolytic cleaning.
Remove all accessories from the oven before starting the pyrolytic cleaning programme. This also applies to the side runners and any optional accessories.
Coarse soiling in the oven can cause thick smoke to develop.
Burnt-on residues can cause lasting discolouration or dull spots on enamelled surfaces.
Before starting the pyrolytic cleaning programme, remove coarse soiling from the oven and scrape any burnt-on residues off enamelled surfaces with a glass scraper.
■ Remove any accessories from the oven compartment, including the side runners.
Starting pyrolytic cleaning

Risk of injury caused by hot s.
The oven gets much hotter during pyrolytic cleaning than during normal use.
Do not let children touch the oven during pyrolytic cleaning.
■ Select Pyrolytic 📂.
■ Select the level required according to the amount of soiling.
■ Confirm with OK.
Follow the instructions in the display.
■ Confirm with OK.
You can start the pyrolytic cleaning programme straight away or delay the start time.
Starting pyrolytic cleaning straight away
■ To start the pyrolytic cleaning programme straight away, select Start now.
■ Confirm with OK.
The pyrolytic cleaning programme will start.
The door will lock automatically. The oven heating and the cooling fan will then switch on automatically.
The oven interior lighting will not come on during the pyrolytic cleaning programme.
The time remaining for the pyrolytic cleaning programme will start counting down in the display. You cannot alter the duration.
You can use the minute minder at the same time as running the cleaning programme. At the end of the minute minder time the buzzer will sound, ⏻ will start flashing and the time can be viewed counting up in the display. To switch of the visual and acoustic signals, touch the ⏻ sensor control.
Starting pyrolytic cleaning at a later time
■ To start the pyrolytic cleaning programme later, select Start at.
■ Confirm with OK.
■ Set the time when you want the pyrolytic cleaning programme to start.
■ Confirm with OK.
The door will lock automatically. Start at and the start time set will appear in the display.
The ☐ sensor control lights up orange.
You can reset the start time via the ⏻ sensor control at any point up to the starting time.
As soon as the start time has been reached, the oven heating and cooling fan will switch on automatically and the time remaining will appear in the display.
Finishing off the pyrolytic cleaning process
When the time remaining has counted down to 0:00 h, a message will appear in the display to tell you that the door is unlocking.
Process finished will appear in the display and a buzzer will sound as soon as the door has been unlocked.
■ Switch the oven off.
The visual and acoustic signals will switch off.
⚠️ Risk of injury caused by hot surfaces.
At the end of the pyrolytic cleaning programme, the oven will still be very hot. You could burn yourself on the heating elements and oven compartment.
Allow the heating elements and the oven compartment temperature to drop to a safe level before removing any residues.
■ Clean the oven compartment to remove any pyrolytic residues (e.g. ash) that may have built up depending on the degree of soiling in the oven.
Most residues can be removed with warm water, a little washing-up liquid and a clean sponge or a clean, damp microfibre cloth.
Depending on the level of soiling, a visible deposit could build up on the glass on the inside of the oven door. This can be removed with a dishwashing sponge, a glass scraper or a stainless steel spiral scourer and a little washing-up liquid.
There is a delicate fibreglass seal around the oven compartment to seal the glass in the oven door. This can be damaged by rubbing or scouring.
Avoid cleaning the fibreglass seal.
Enamelled surfaces can be permanently discoloured by spilt fruit juices. Such discolouration does not affect the properties of the enamel. Do not attempt to remove these stains.
Door removal
The door weighs approx. 10 kg.
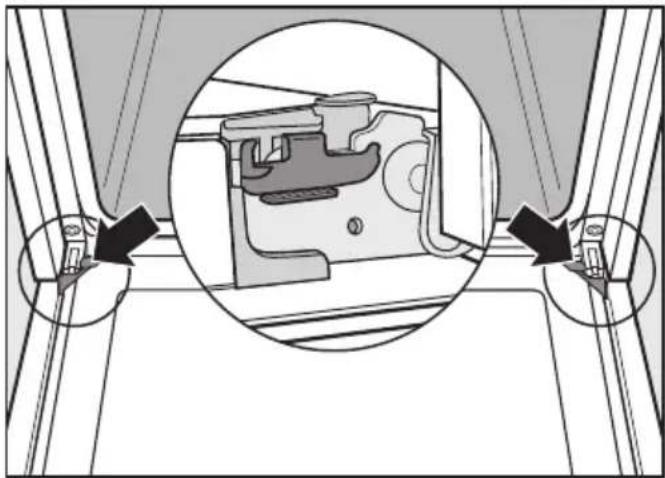
natural_image
Technical diagram showing a mechanical component inside a frame, with arrows indicating assembly or alignment (no text or symbols present)The oven door is connected to the door hinges by retainers.
Before removing the door from the retainers, the locking clamps on both door hinges have to be released.
■ Open the door fully.
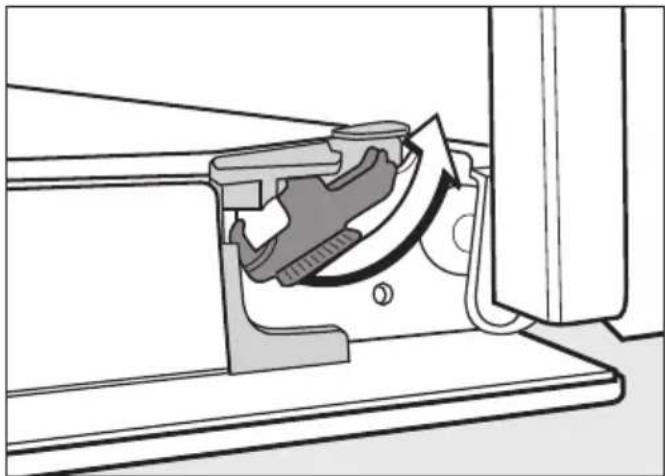
natural_image
Technical diagram of a mechanical assembly with no visible text or symbols■ Release the locking clamps by turning them as far as they will go.
The oven could become damaged if you incorrectly remove the door.
Never pull the door horizontally off its retainers, as they will spring back against the oven.
Never pull the door off the retainers by the handle, as the handle could break off.
■ Raise the door up till it rests partially open.
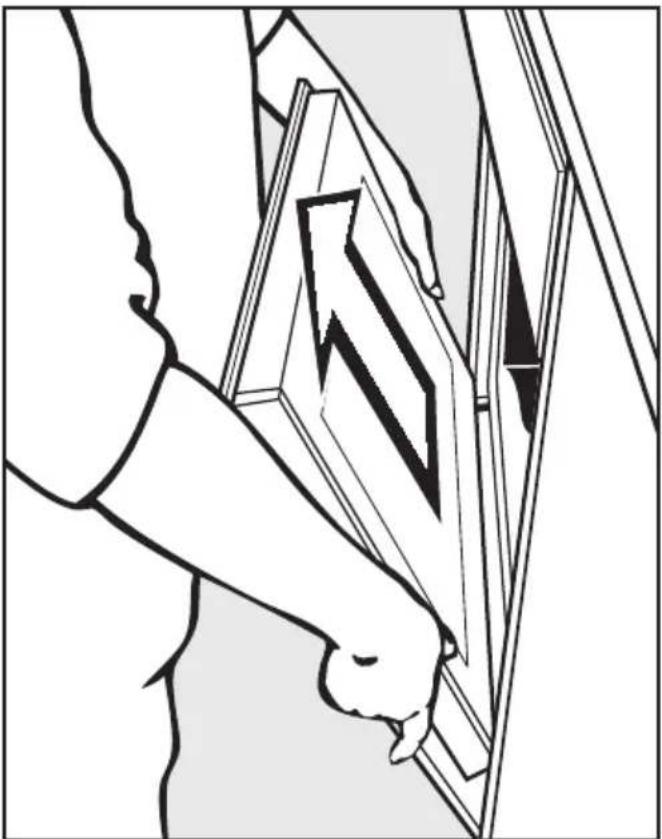
natural_image
Line drawing of a person using a tool to adjust or install a mechanical component (no text or symbols present)■ Hold the door on either side and pull it diagonally upwards off the retainers. Make sure that the door goes back on straight.
Dismantling the door
The oven door is an open system with 4 glass panes which have a heat-reflective coating on some of their surfaces.
When the oven is operating, air is directed through the door to keep the outer pane cool.
If soiling has worked its way in between the glass panes, the door can be dismantled in order to clean in between the panes.
Scratches on the door glass can cause the glass to break.
Do not use abrasive cleaners, hard sponges, brushes or sharp metal tools to clean the door glass.
When cleaning the door glass, you must also follow the instructions that apply to the oven front.
The different sides of the door glass have different coatings. The sides facing the oven compartment have heat-reflecting properties.
The oven could become damaged if you fit the door glass the wrong way round.
Make sure that you place the door glass back in the right position after cleaning.
Oven cleaners will damage the surface of the aluminium profiles.
Only clean these parts with warm water and washing-up liquid, applied with a clean sponge cloth or a clean, damp microfibre cloth.
The door glass could break if dropped.
Keep the disassembled door glass in a safe place.
Risk of injury caused by door slamming shut.
The door may slam shut if you attempt to disassemble it when it is fitted to the oven.
Always remove the door before disassembling it.
■ Place the door with the outer glass pane on a soft surface (e.g. a tea towel) to prevent it getting scratched. The door handle should line up with the edge of the table so that the glass lies flat and does not get broken during cleaning.
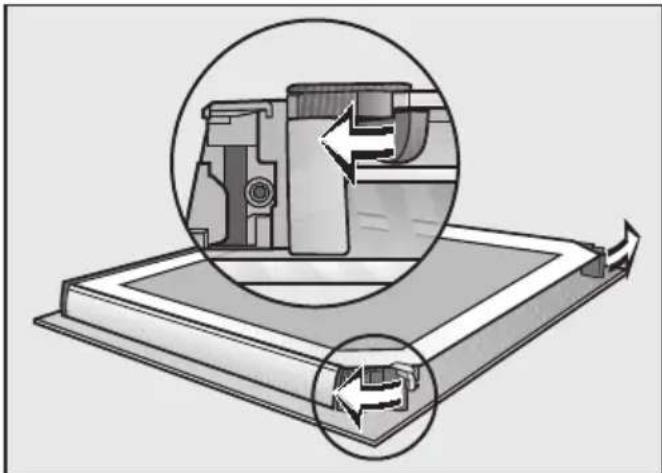
natural_image
Diagram of a mechanical device with internal components and directional arrows indicating motion (no text or symbols)■ Flip the two glass pane retainers outwards to open them.
You can now remove the inner panes and the two middle panes one after the other:
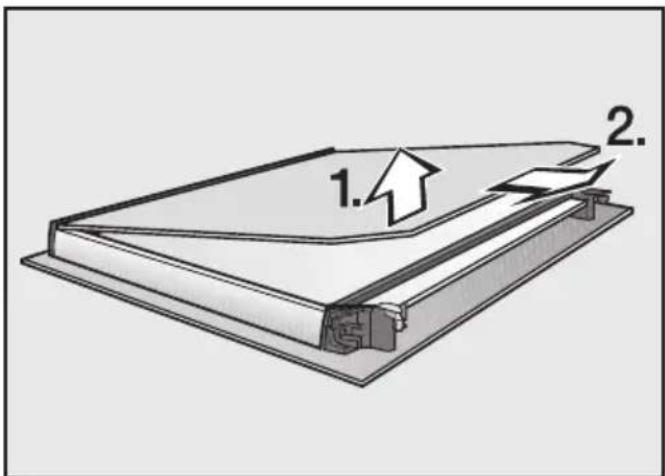
text_image
1. 2.■ Gently lift the inner pane up and out of the plastic strip.
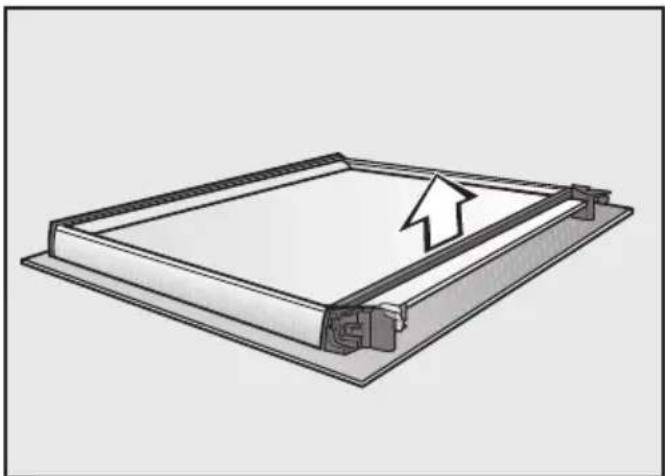
natural_image
Diagram of a rectangular frame with a diagonal arrow indicating upward motion, no text or symbols present■ Remove the seal.
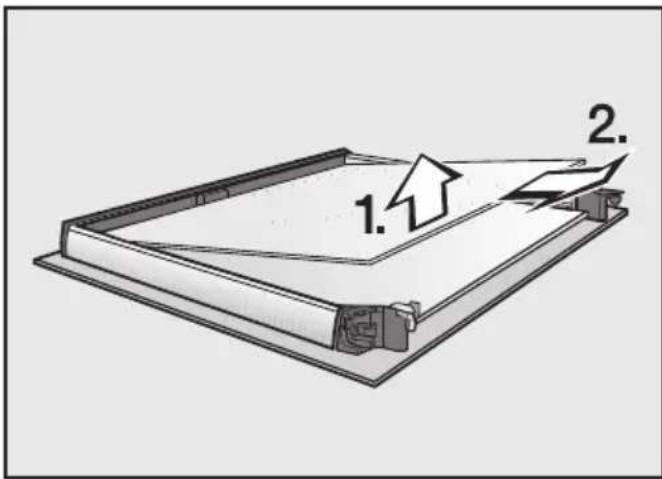
text_image
1. 2.■ Carefully lift the top of the two middle panes up and take it out.
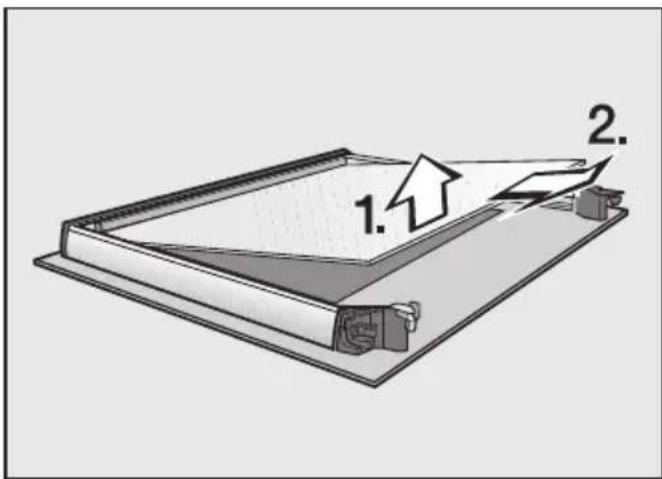
text_image
1. 2.■ Then lift the bottom of the two middle panes up carefully and take it out.
■ Clean the door panes and other parts with a clean sponge and a solution of hot water and washing-up liquid or a clean, damp microfibre cloth.
■ Dry all parts with a soft cloth.
Then reassemble the door carefully:
The two middle panes are identical. To help you put them back in correctly, the material number is printed on the panes.
■ Refit the lower of the two middle panes in such a way that the material number is legible (i.e. not reversed).
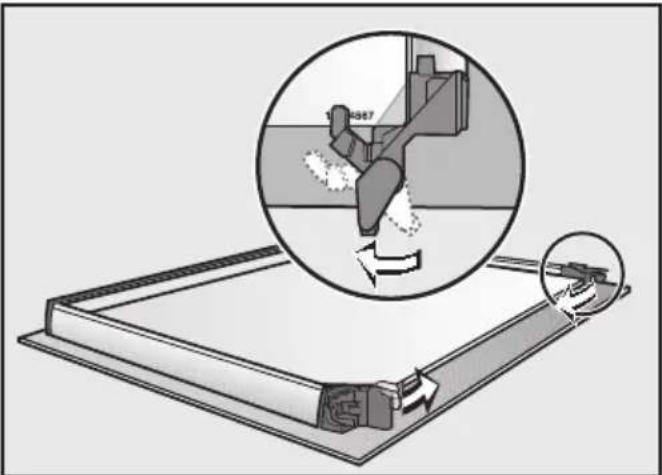
natural_image
Diagram showing a mechanical device with a circular inset view of a person operating a lift, no text or symbols present.■ Flip both the glass pane retainers inwards in such a way that they fit over the lower of the two middle panes.
■ Refit the upper of the two middle panes in such a way that the material number is legible (i.e. not reversed). The pane must rest on the retainers.
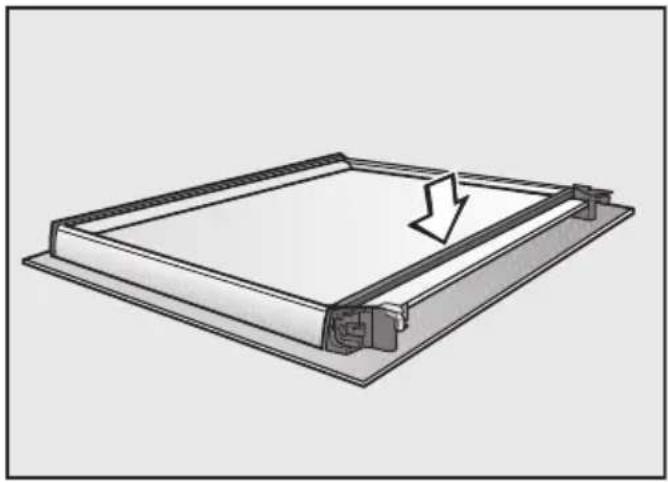
natural_image
Diagram of a rectangular frame with a downward arrow indicating compression or dislocation (no text or symbols present)■ Refit the seal.
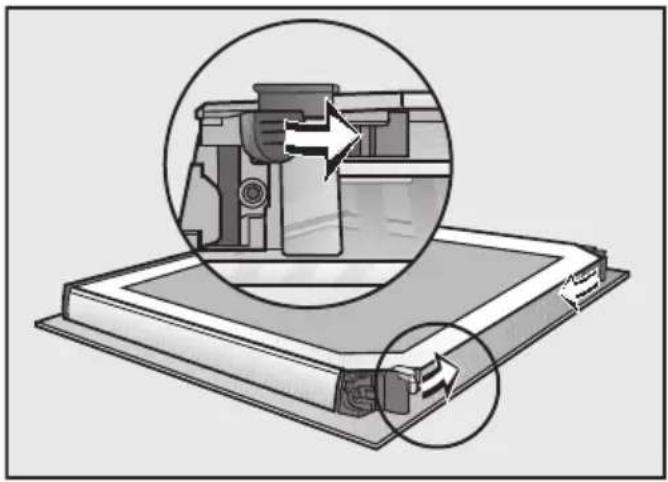
natural_image
Diagram of a mechanical assembly with a magnified inset showing internal components (no text or symbols)■ Flip both the glass pane retainers inwards to close them.
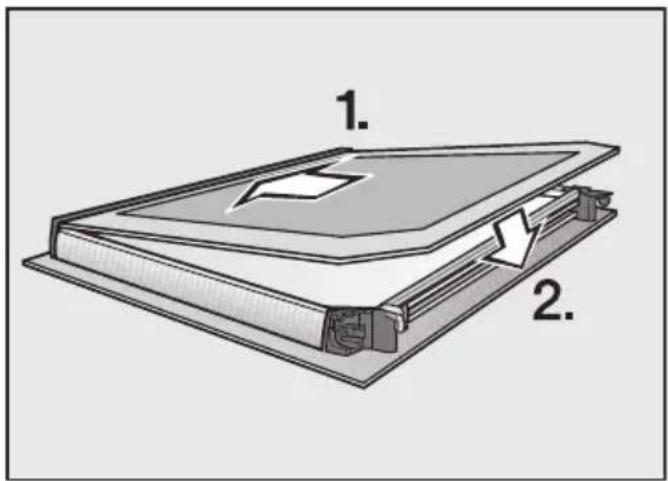
text_image
1. 2.■ Push the inner pane with the matt printed side facing downwards into the plastic strip and place it between the retainers.
The door is now reassembled.
Fitting the door
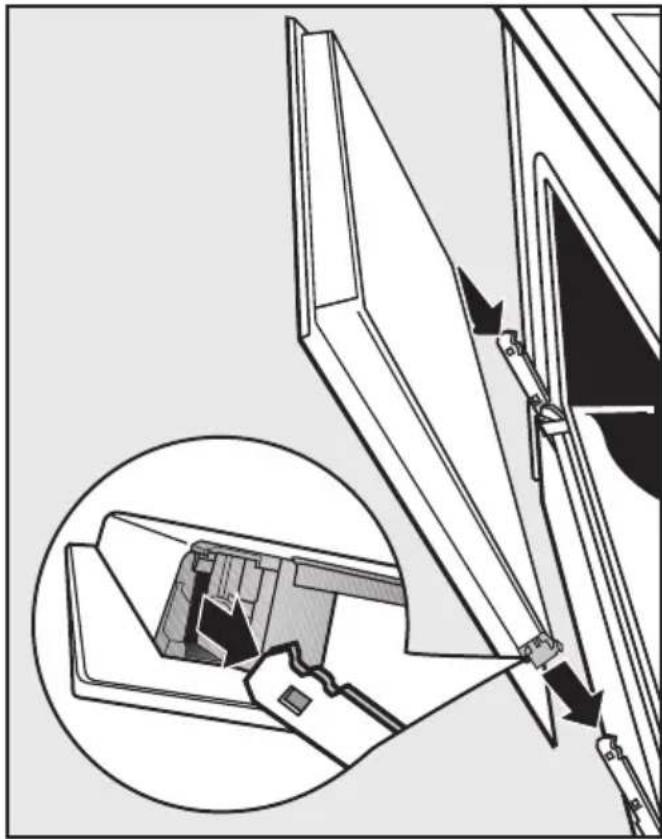
natural_image
Technical diagram showing a mechanical assembly with an inset close-up of a component detail (no text or symbols)■ Hold the door securely on both sides and carefully fit it back into the hinge retainers. Make sure that you fit the door straight.
■ Open the door fully.
If the locking clamps are not locked, the door could become loose, resulting in damage.
Always ensure that the locking clamps are locked after refitting the door.
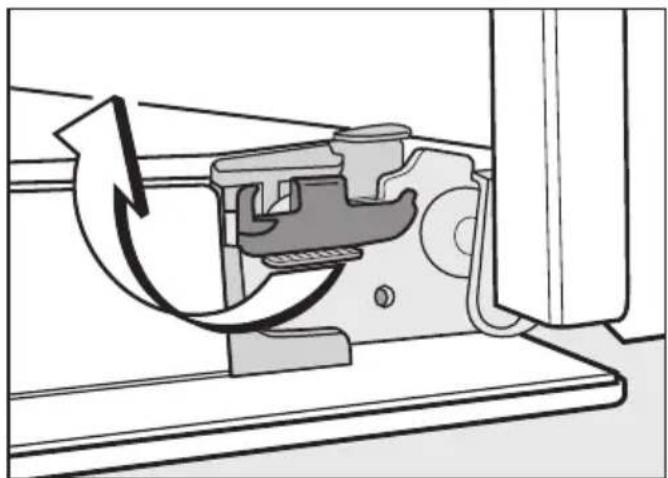
natural_image
Mechanical assembly diagram showing a rotating component with directional arrows (no text or symbols)■ To relock the locking clamps, turn them back up to the horizontal position as far as they will go.
Removing the side runners with FlexiClip runners
The side runners can be removed together with the FlexiClip runners (if inserted).
If you wish to remove the FlexiClip runners separately beforehand, please follow the instructions in "Features" – "Fitting and removing FlexiClip runners".

Danger of injury caused by hot surfaces.
The oven gets hot during operation.
You could burn yourself on the heating elements, oven compartment or accessories.
Allow the heating elements, oven compartment and accessories to cool before removing the side runners.
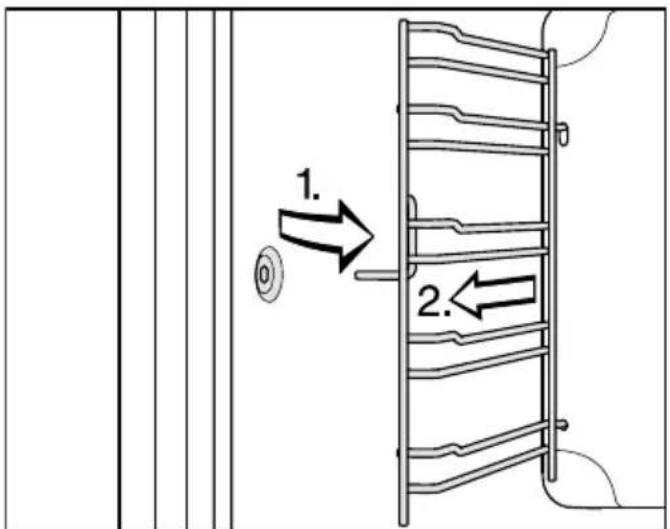
text_image
1. 2.■ Pull the side runners out of holder (1.) and remove them (2.).
Reassemble by following these instructions in reverse order.
■ Insert the components carefully.
Lowering the top heat/grill element
If the oven compartment roof is badly soiled, the top heat/grill element can be lowered to make cleaning easier. Clean the oven compartment roof regularly with a damp cloth or a dishwashing sponge.
Danger of injury caused by hot surfaces.
The oven gets hot during operation. You could burn yourself on the heating elements, oven compartment or accessories.
Allow the heating elements, oven compartment and the accessories to cool before manual cleaning.
The enamel on the oven floor can become damaged by fastening nuts being dropped on it.
Place a cloth or similar item over the oven compartment floor to protect it.
■ Remove the side runners.
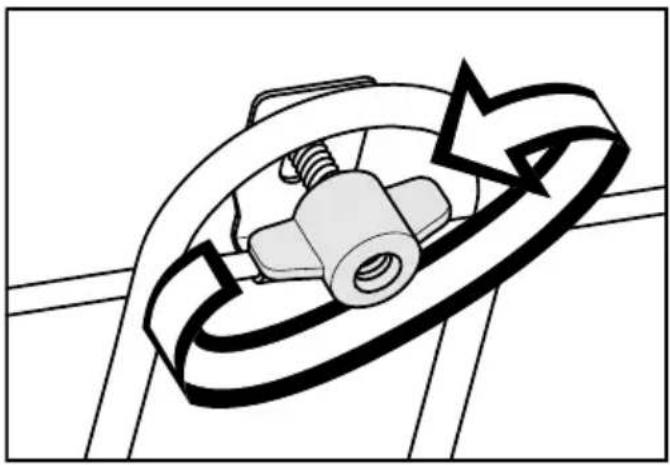
natural_image
Mechanical component diagram showing a rotating shaft and housing with directional arrows (no text or symbols)■ Unscrew the wing nut.
Be careful not to damage the top heat/grill element.
Never use force when lowering the top heat/grill element.
■ Carefully lower the top heat/grill element.
You can now access the top of the oven compartment.
■ Clean the oven compartment roof with a clean sponge and a solution of hot water and washing-up liquid or a damp microfibre cloth.
■ After cleaning, raise the top heat/grill element gently back up again.
■ Replace the wing nut and tighten it securely.
■ Refit the side runners.
Many malfunctions and faults that can occur in daily operation can be easily remedied. Time and money will be saved because a service call will not be needed.
The following guide may help you to find the reason for a malfunction or a fault, and to correct it.
| Problem Cause and remedy | |
| The display is dark. | You have selected the Time | Display | Off setting.When the oven is switched off, the display is dark.■ As soon as the oven is switched on, the main menu will appear. If you want the time of day to be displayed constantly, select the Time | Display | On setting. |
| There is no power to the oven.■ Check whether the fuse has tripped. Contact a qualified electrician or the Miele Customer Service Department. | |
| The buzzer does not sound. | The buzzers are deactivated or set at too low a volume.■ Switch on the buzzers or increase the volume with the Volume | Buzzer tones setting. |
| The oven compartment does not heat up. | Demo mode is active.You can select menu options in the display and the sensor controls, but the oven heating does not work.■ Deactivate demo mode with the Showroom programme | Demo mode | Off setting. |
| Press “OK” for 6 secs appears in the display when the oven is switched on. | The ➕ system lock has been activated.■ You can deactivate the system lock for a programme by touching the OK sensor control for at least 6 seconds.■ If you want to permanently deactivate the system lock, select the Safety | System lock ➕ | Off setting. |
| Problem Cause and remedy | |
| The sensor controls do not respond. | You have selected the Display | QuickTouch | Off setting. When the oven is switched off, the sensor controls do not respond.■ As soon as the oven is switched on, the sensor controls will respond. If you want the sensor controls to respond even when the oven is switched off, select the Display | QuickTouch | On setting. |
| The oven is not connected to the power supply.■ Check that the oven plug is correctly inserted into the socket and switched on.■ Check whether the fuse has tripped. Contact a qualified electrician or the Miele Customer Service Department. | |
| There is a fault with the controls.■ Touch and hold the ⏻ On/Off sensor control until the display switches off and the oven restarts. | |
| Power cut appears in the display. | There has been a brief power cut. This has caused the current cooking programme to stop.■ Switch the oven off and then back on again.■ Restart the cooking programme. |
| 12:00 appears in the display. | The power supply was interrupted for longer than 150 hours.■ Reset the time and date. |
| Max. op. hours reached appears in the display. | The oven has been operating for an unusually long time. This has triggered the safety switch-off function.■ Confirm with OK.The oven is now ready to use. |
| ⚠ Fault F32 appears in the display. | The door lock for pyrolytic cleaning has not locked.■ Switch the oven off and then back on again. Start the pyrolytic cleaning programme again.■ If the message appears again, contact the Miele Customer Service Department. |
| Problem Cause and remedy | |
| ⚠ Fault F33 appears in the display. | The door lock for pyrolytic cleaning has not opened.■ Switch the oven off and then back on again.■ If the door lock still does not deactivate itself, contact the Miele Customer Service Department. |
| Fault and a fault code not listed here appears in the display. | A fault has occurred that you cannot resolve.■ Call the Miele Customer Service Department. |
| A noise can be heard after a cooking programme. | The cooling fan remains switched on after a cooking programme (see “Settings – Cooling fan run-on”). |
| The oven has switched itself off. | To save power, the oven switches off automatically if a button is not pressed after a certain amount of time or after a cooking programme has ended.■ Switch the oven back on. |
| Cakes/biscuits are not cooked properly after the duration given in the cooking chart. | A different temperature from the one given in the recipe was used.■ Select the temperature required for the recipe. |
| The ingredient quantities are different from those given in the recipe.■ Check whether you amended the recipe. The addition of more liquid or more eggs makes a moister mix which requires a longer cooking duration. | |
| The browning of the baked goods is uneven. | The wrong temperature or shelf level was selected.■ There will always be a slight unevenness in browning. If browning is very uneven, check whether the correct temperature and shelf level were selected. |
| The material or colour of the bakeware is not suitable for the oven function selected.■ When using the Conventional heat ☐ function, light coloured, shiny tins will not produce as desirable results. Dark, matt tins are best for baking. | |
| The FlexiClip runners do not push in or pull out smoothly. | The bearings in the FlexiClip runners are not sufficiently lubricated.■ Lubricate the bearings with the special Miele lubricant.Only the special Miele lubricant is designed for the high temperatures in the oven compartment. Other lubricants may resinify when heated and will gum up the FlexiClip runners. You can obtain the special Miele lubricant from your Miele dealer or from the Miele Customer Service Department. |
| There is still soiling in the oven compartment after a pyrolytic cleaning programme. | The pyrolytic cleaning programme burns off soiling in the oven and leaves it as ash.■ Remove the ash using a damp microfibre cloth or with a clean sponge and a solution of hot water and washing-up liquid.If there is still coarse soiling left in the oven after the pyrolytic cleaning programme you should start the programme again, selecting a longer duration if necessary. |
| The oven interior lighting switches off after a short time. | You have selected the Lighting | “On” for 15 seconds setting.■ If you want the oven interior lighting to be switched on during the entire cooking programme, select the Lighting | On setting. |
| The oven interior lighting is off. | You have selected the Lighting | Off setting.■ Press the 🔍 sensor control to switch on the oven interior lighting for 15 seconds.■ If required, select the Lighting | On or “On” for 15 seconds setting. |
The oven interior lighting does not switch on.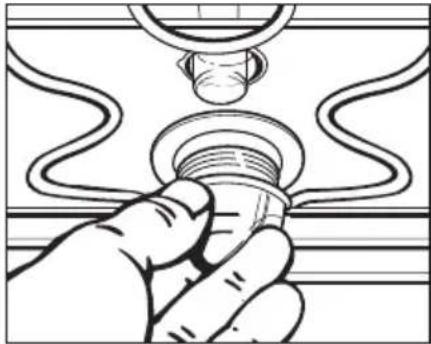 | The halogen lamp is faulty.⚠️ Risk of injury caused by hot surfaces.The oven gets hot during operation. You could burn yourself on the heating elements, oven compartment or accessories.Allow the heating elements, oven compartment and the accessories to cool before manual cleaning.■ Disconnect the appliance from the mains. Switch off at the wall and withdraw the plug from the socket or switch off the fuse of the electrical installation.■ Turn the lamp cover a quarter turn anti-clockwise to release it and then pull it together with its seal downwards to take it out.■ Replace the halogen lamp (Osram 66725 AM/A, 230 V, 25 W, G9).■ Refit the lamp cover together with its seal and turn clockwise to secure.■ Reconnect the appliance to the electricity supply. |
Contact in the event of a fault
In the event of any faults which you cannot remedy yourself, please contact your Miele dealer or the Miele Customer Service Department.
You can book a Miele Customer Service Department call-out online at www.miele.com/service.
Contact information for the Miele Customer Service Department can be found at the end of this document.
Please quote the model identifier and serial number of your appliance (Fabr./SN/Nr.) when contacting the Miele Customer Service Department. This information can be found on the data plate.
Please note that telephone calls may be monitored and recorded for training purposes and that a call-out charge will be applied to service visits where the problem could have been resolved as described in this booklet.
This information is given on the data plate, which is visible on the front frame of the oven when the door is fully open.
Warranty
For information on the appliance warranty specific to your country please contact Miele. See back cover for address.
In the UK, your appliance warranty is valid for 2 years from the date of purchase. However, you must activate your cover by calling 0330 160 6640 or registering online at www.miele.co.uk.
Installation dimensions
Dimensions are given in mm.
Installation in a tall or base unit
When building the oven into a base unit underneath a hob, please also observe the installation instructions for the hob as well as the building-in depth required for the hob.
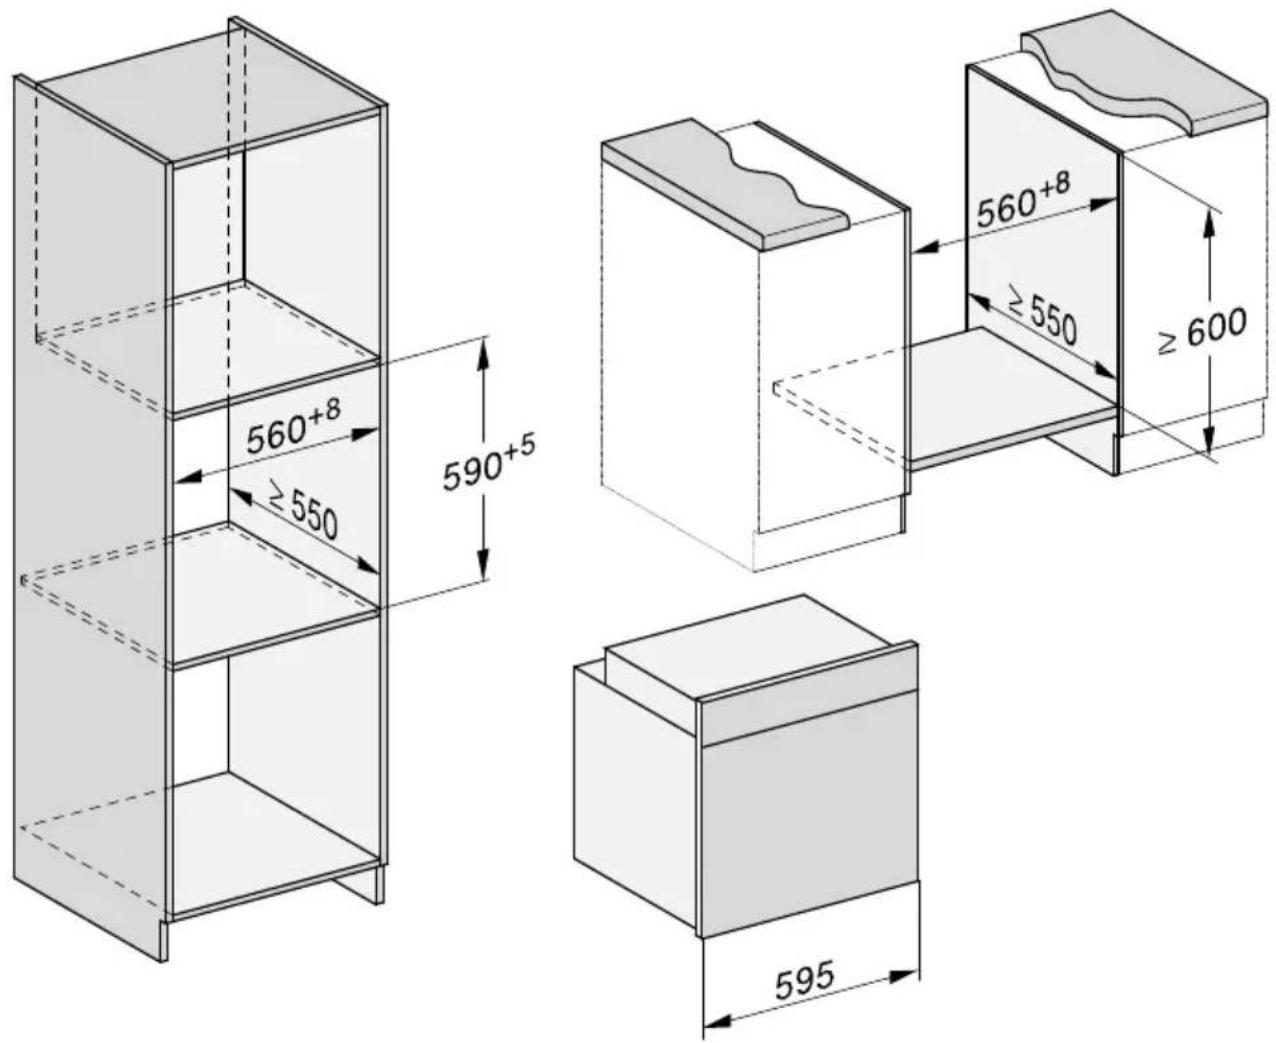
text_image
560+8 ≥550 590+5 560+8 ≥550 ≥600 595Side view
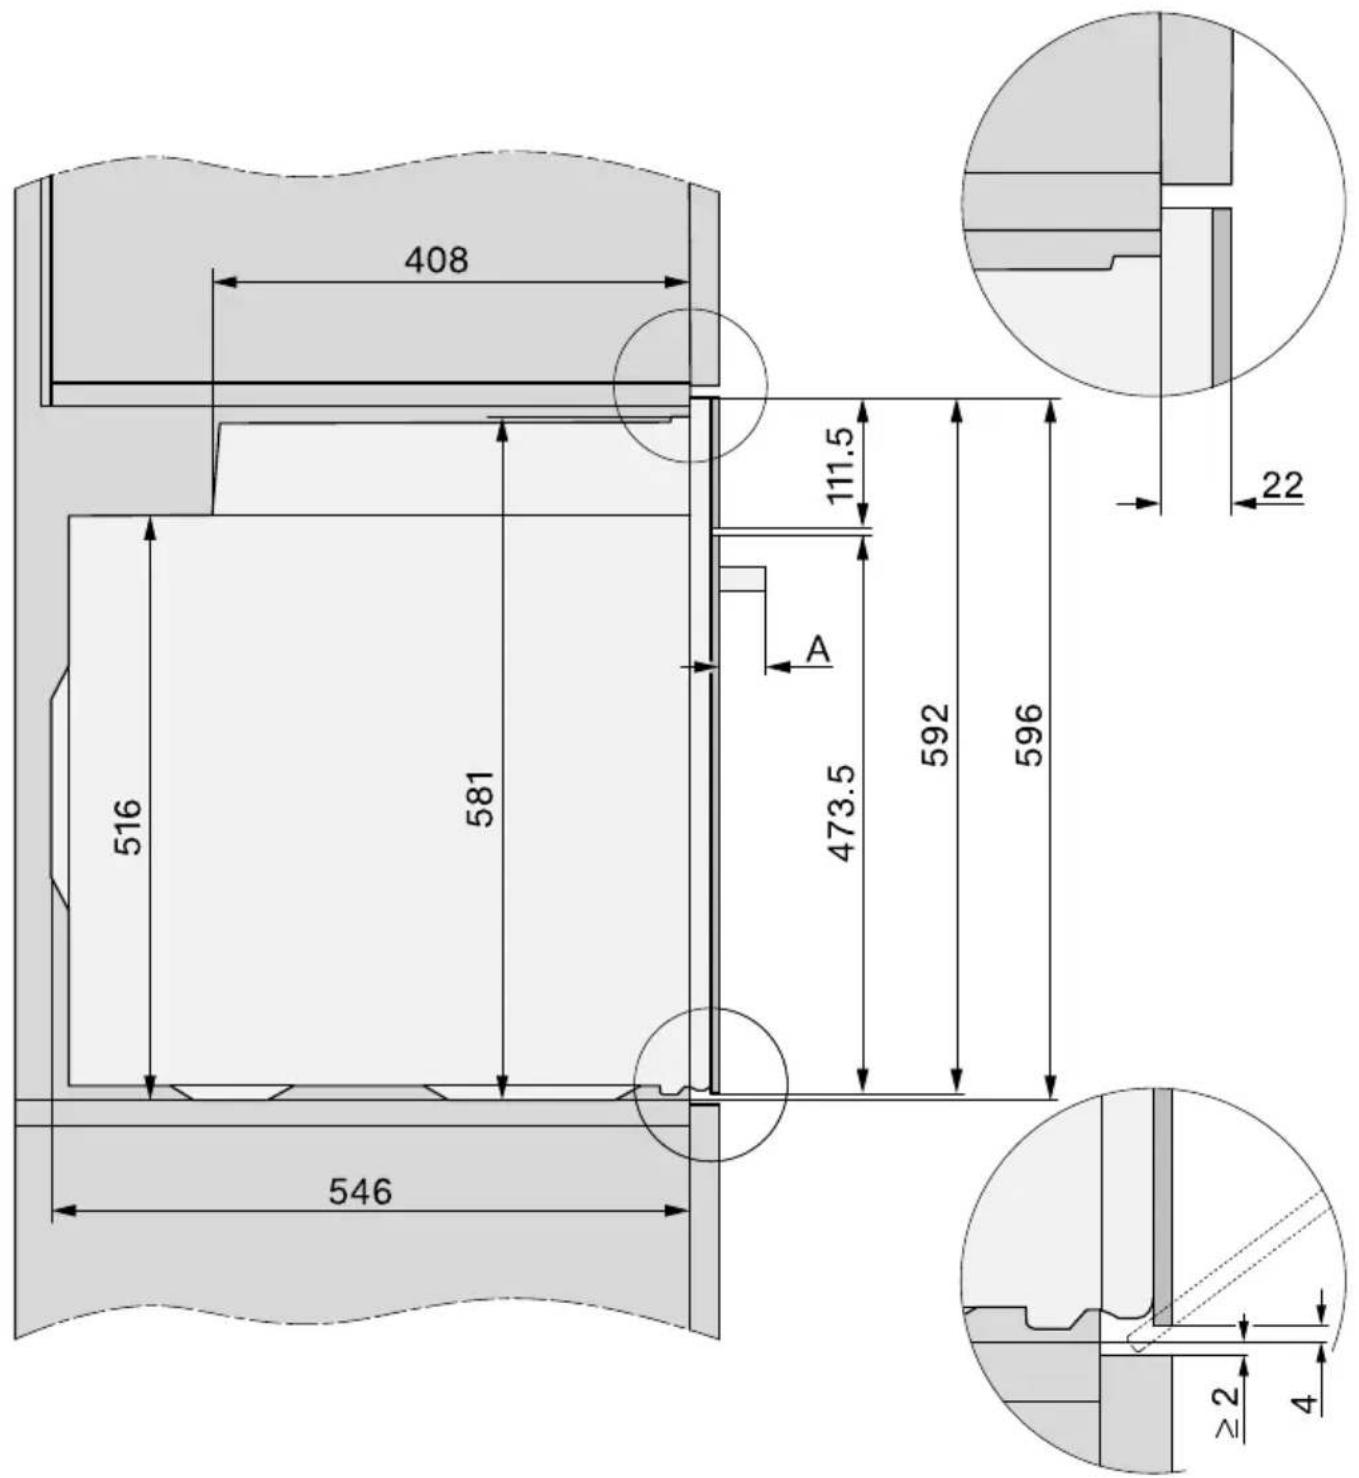
text_image
408 111.5 22 516 581 A 473.5 592 596 546 ≥2 4A H 71xx: 43 mm
H 72xx: 47 mm
Connections and ventilation
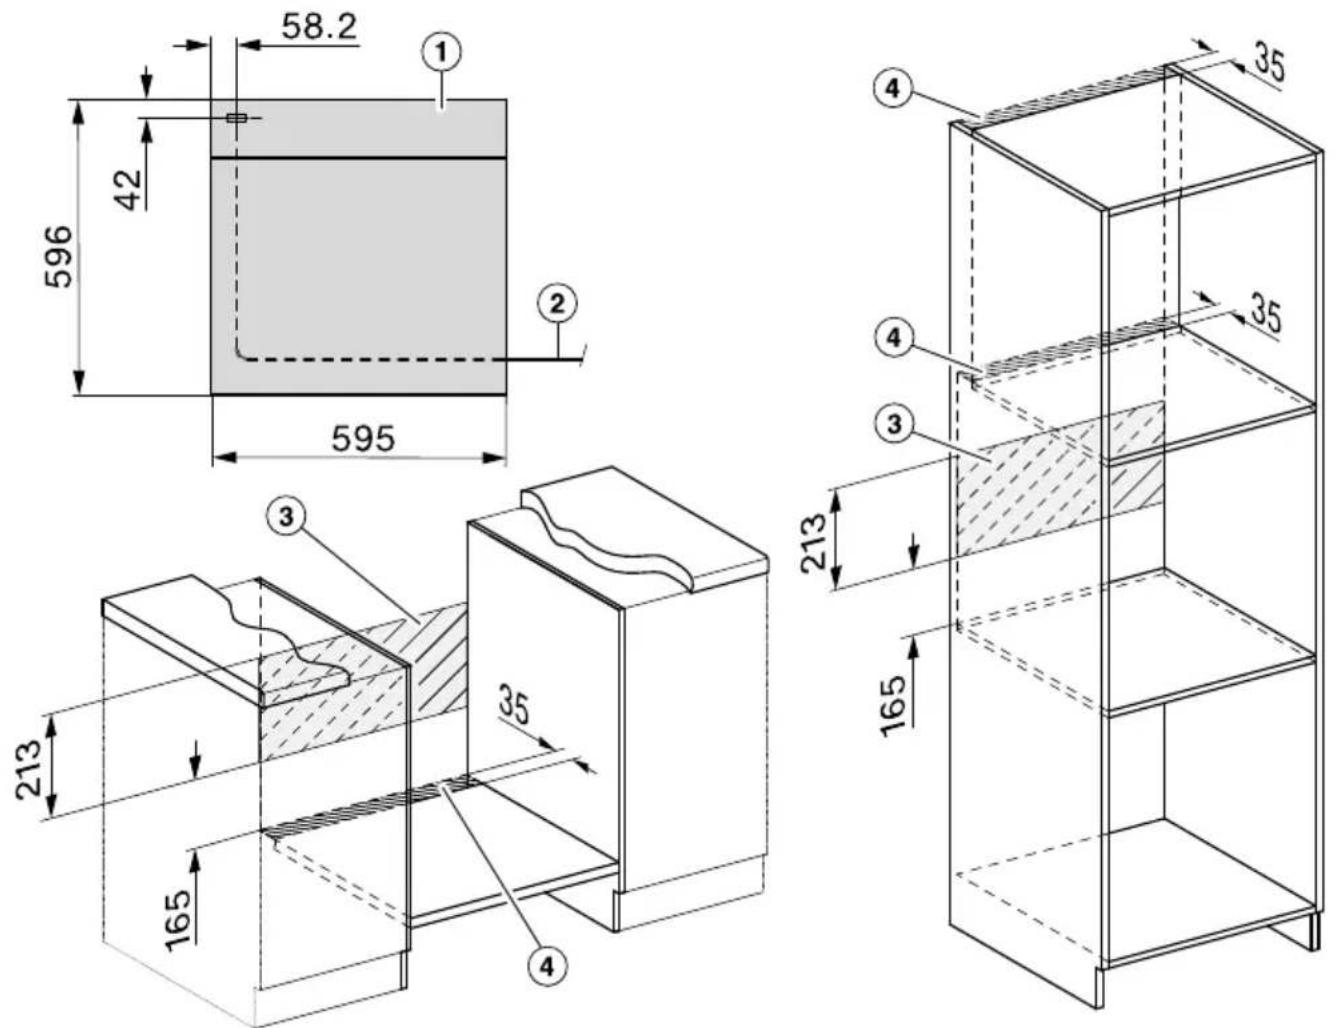
① Front view
② Mains connection cable, length = 1500 mm
③ No connections permitted in this area
④ Ventilation cut-out, min. 150 cm ^2
Installing the oven
For safety reasons, the oven may only be used when it has been fully installed.
The oven requires a sufficient supply of cool air for efficient operation. The required supply of cool air must not be excessively heated by other heat sources (e.g. solid fuel stoves).
The following must be observed when installing the appliance: Make sure that the shelf that the oven sits on does not touch the wall. Do not fit heat insulation strips to the side walls of the housing unit.
■ Connect the oven to the electrical supply.
Do not carry the oven by the door handle. The door can be damaged. Use the handle cut-outs on the side of the housing to lift the appliance.
It is a good idea to remove the door (see “Cleaning and care” – “Door removal”) and to remove the accessories before installing the appliance. This makes the oven lighter when you push it into the housing unit and you do not run the risk of lifting it by the door handle by mistake.
■ Push the oven into the housing unit and align it.
■ Open the door, if you have not removed it.
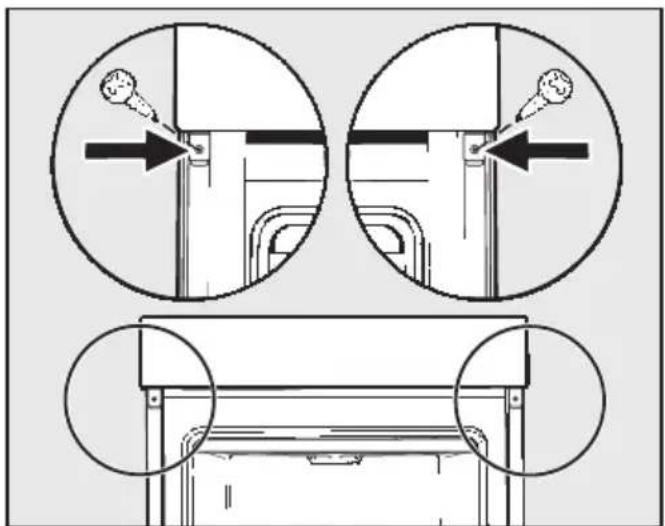
natural_image
Technical diagram showing three views of a mechanical assembly with arrows indicating force application (no text or symbols present)■ Use the screws supplied to secure the oven to the side walls of the housing unit.
■ Refit the door if necessary (see "Cleaning and care" – "Fitting the door").
Electrical connection

Danger of injury!
Installation, repairs and other work by unqualified persons could be dangerous. Miele cannot be held liable for unauthorised work.
Connection to the electrical supply must be carried out by a suitably qualified and competent person in accordance with local and national safety regulations. Ensure power is not supplied to the appliance until after installation or repair work has been carried out.
All electrical work should be carried out by a suitably qualified and competent Miele approved service technician in strict accordance with current national and local safety regulations (BS 7671 in the UK).
Connection should be made via a fused connection unit or a suitable isolator, which complies with national and local safety regulations, and the on/off switch should be easily accessible after the appliance has been installed.
If the switch is not accessible after installation (depending on country) an additional means of disconnection must be provided for all poles.
Switches with a minimum all-pole contact gap of 3 mm are suitable for isolating the appliance. These include circuit breakers, fuses and protective devices.
Connection data
The required connection data are given on the data plate located on the oven trim visible when the door is open.
Ensure that these match the mains supply.
■ When contacting Miele, please quote the following:
- Model number
- Serial number
- Connection data (voltage/frequency/maximum connected load)
When replacing the cable supplied with another cable or changing the connection, only cable type H05VV-F with a suitable cross-sectional area (CSA) may be used.
Oven
The wires in the mains lead are coloured as follows:
Green/yellow = earth
Blue = neutral
Brown = live

WARNING - THIS APPLIANCE
MUST BE EARTHED
For extra safety it is advisable to protect the appliance with a suitable residual current device (RCD).
Maximum connected load: see data plate.
Electrical connection: Other countries
All electrical work should be carried out by a suitably qualified and competent Miele approved service technician in strict accordance with local and national safety regulations.
Connection should be made via a fused connection unit or a suitable isolator, which complies with national and local safety regulations, and the on/off switch should be easily accessible after the appliance has been installed.
If the switch is not accessible after installation (depending on country) an additional means of disconnection must be provided for all poles.
Switches with a minimum all-pole contact gap of 3 mm are suitable for isolating the appliance. These include circuit breakers, fuses and protective devices.
The voltage and rated load are given on the data plate situated at the front of the oven interior. Please ensure that these match the household mains supply.
For extra safety it is advisable to install a suitable residual current device (RCD) / ground fault interrupter (GFI). Contact a qualified electrician for advice.
If the cord is damaged a new cord must be fitted by a Miele approved service technician.

WARNING - THIS APPLIANCE
MUST BE EARTHED
Hong Kong
This appliance is supplied with a power cord with plug for connection to a 230 V, 50 Hz socket outlet.
Taiwan
This appliance is supplied with a power cord with plug for connection to a 220 V, 60 Hz socket outlet.
Batter
| Cakes/biscuits (accessories) | [°C] | [min] | |||
| Muffins (1 tray) | 150-160 | -2 25 | -35 | ||
| Muffins (2 trays) 150-160 - 1+3 | 30-40^3 | ||||
| Small cakes (1 tray)* | 150 - | 2^2 | 25-35 | ||
| 160^1 | - | 3^2 | 20-30 | ||
| Small cakes (2 trays)* | 150^1 | - | 1+3^2 | 25-35 | |
| Madeira cake (loaf tin, 30 cm) | 150-160 | -2 60 | -70 | ||
| 155-165^1 | -2 | 60-70 | |||
| Marble, nut cake (loaf tin, 30 cm) | 150-160 | -2 55 | -65 | ||
| 150-160 | √ | 2 60-70 | |||
| Marble, nut cake (ring tin/Bundt cake tin, ∅ 26 cm) | 150-160 | √ | 2 55-65 | ||
| 150-160 | √ | 2 60-70 | |||
| Fresh fruit cake (tray) | 155-165 | -2 40 | -50 | ||
| 155-165 | √ | 1 55-65 | |||
| Fresh fruit cake (springform cake tin, ∅ 26 cm) | 150-160 | √ | 2 55-65 | ||
| 165-175^1 | -2 | 50-60 | |||
| Flan base (flan base tin, ∅ 28 cm) | 150-160 | -2 25 | -35 | ||
| 170-180^1 | -2 | 15-25 |
☐ Function, ⚡ Temperature, ⚡ Booster, ☐ Shelf level, ⏻ Cooking duration, ⏱ Fan plus, ☐ Conventional heat, √ On, – Off
* The settings also apply for testing in accordance with EN 60350-1.
^1 Pre-heat the oven before putting food inside.
^2 Remove the FlexiClip runners if fitted.
^3 Take the trays out of the oven early if the food is sufficiently browned before the specified cooking duration has elapsed.
Rubbed in mixture
| Cakes/biscuits (accessories) | [°C] | [min] | |||
| Biscuits (1 tray) | 140-150 | -2 25 | -35 | ||
| 150-160 | -2 25 | -35 | |||
| Biscuits (2 trays) 140-150 - 1+3 | 25-35^3 | ||||
| Drop cookies (1 tray)* | 140 - | 2^2 | 35-45 | ||
| 160^1 | - | 3^2 | 20-30 | ||
| Drop cookies (2 trays)* 140 - | 1+3^2 | 40-50^3 | |||
| Flan base (flan base tin, ∅ 28 cm) | 150-160 | -2 35 | -45 | ||
| 170-180^1 | -2 | 20-30 | |||
| Cheesecake (springform cake tin, ∅ 26 cm) | 170-180 | -2 80 | -90 | ||
| 150-160 | -2 80 | -90 | |||
| Apple pie, single crust (springform cake tin, ∅ 20 cm)* | 160 - | 2^2 | 80-100 | ||
| 180 - | 1^2 | 80-90 | |||
| Apple pie, double crust (springform cake tin, ∅ 26 cm) | 180-190^1 | -2 | 60-70 | ||
| 160-170 | -2 60 | -70 | |||
| Fresh fruit cake, glazed (springform cake tin, ∅ 26 cm) | 170-180 | -2 60 | -70 | ||
| 150-160 | -2 55 | -65 | |||
| Fresh fruit cake, glazed (tray) | 170-180 | -2 50 | -60 | ||
| 160-170 | -2 45 | -55 | |||
| Sweet Swiss apple pie (tray) | 210-220^1 | √ | 1 55 | -65 | |
| 180-190 | -1 35 | -45 |
☐ Function, 🔊 Temperature, 🔊 Booster, ☐ Shelf level, ⏻ Cooking duration, 🔒 Fan plus, 🔒 Eco fan heat, ☐ Conventional heat, 🔒 Intensive bake, √ On, – Off
* The settings also apply for testing in accordance with EN 60350-1.
1 Pre-heat the oven before putting food inside.
2 Remove the FlexiClip runners if fitted.
^3 Take the trays out of the oven early if the food is sufficiently browned before the specified cooking duration has elapsed.
Yeast dough
| Cakes/biscuits (accessories) | [°C] | [min] | |||
| Bundt cake (Bundt cake tin, ∅ 24 cm) | 150–160 | -250 | -60 | ||
| 160–170 | -250 | -60 | |||
| Stollen | 150–160 | -255 | -65 | ||
| 160–170 | √ | 255 | -65 | ||
| Streusel cake with/without fruit (tray) | 160–170 | -240 | -50 | ||
| 170–180 | √ | 345 | -55 | ||
| Fresh fruit cake (tray) | 160–170 | √ | 245 | -55 | |
| 170–180 | √ | 345 | -55 | ||
| Apple turnovers/raisin whirls (1 tray) | 160–170 | √ | 225 | -35 | |
| Apple turnovers/raisin whirls (2 trays) | 160 | -170√1 | +3 | 30–40^3 | |
| White loaf (free form) | 180–190 | √ | 235 | -45 | |
| 190–200 | -230 | -40 | |||
| White bread (loaf tin, 30 cm) | 180–190 | √ | 235 | -45 | |
| 190–200^1 | √ | 230 | -40 | ||
| Wholegrain bread (loaf tin, 30 cm) | 180–190 | √ | 255 | -65 | |
| 200–210^1 | √ | 245 | -55 | ||
| Proving yeast dough | 30–35 – | -^2 | - |
☐ Function, ⚡ Temperature, ⚡ Booster, □ Shelf level, ⏻ Cooking duration, ⚠ Fan plus, ☐ Conventional heat, √ On, – Off
^1 Pre-heat the oven before putting food inside.
^2 Place the rack on the floor of the oven and stand the bowl containing the dough on the rack. Depending on the size of the bowl, you may need to remove the side runners.
^3 Take the trays out of the oven early if the food is sufficiently browned before the specified cooking duration has elapsed.
Quark dough
| Cakes/biscuits (accessories) | [°C] | [min] | |||
| Fresh fruit cake (tray) | 160–170 | √ | 2 40–50 | ||
| 170–180 | √ | 3 50–60 | |||
| Apple turnovers/raisin whirls (1 tray) | 160–170 | -3 25–35 | |||
| Apple turnovers/raisin whirls (2 trays) | 150–160 | √ | 1+3 | 25–35 ^1 | |
☐ Function, ⚡ Temperature, ⚡ Booster, ☐ Shelf level, ⏻ Cooking duration, ⚠ Fan plus, ☐ Conventional heat, √ On, – Off
1 Take the trays out of the oven early if the food is sufficiently browned before the specified cooking duration has elapsed.
Sponge mixture
| Cakes/biscuits (accessories) | [°C] | [min] | |||
| Sponge cake base (2 eggs, springform cake tin, ∅ 26 cm) | 160-170^1 | -2 | 15-25 | ||
| Sponge cake base (4-6 eggs, springform cake tin, ∅ 26 cm) | 150-160^1 | -2 | 30-40 | ||
| Whisked sponge (springform cake tin, ∅ 26 cm)* | 180- | 2^2 | 25-35 | ||
| 150-170^1 | - | 2^2 | 25-45 | ||
| Swiss roll sponge (baking tray) | 180-190^1 | -2 | 10-20 |
☐ Function, ⚡ Temperature, ⚡ Booster, ☐ Shelf level, ⏻ Cooking duration, ⚠ Fan plus, ☐ Conventional heat, √ On, – Off
* The settings also apply for testing in accordance with EN 60350-1.
^1 Pre-heat the oven before putting food inside.
^2 Remove the FlexiClip runners if fitted.
Choux pastry, puff pastry, meringue
| Cakes/biscuits (accessories) | [°C] | [min] | |||
| Choux buns (1 tray) | 160–170 | -230 | -40 | ||
| Pastry puffs (1 tray) | 180–190 | -220 | -30 | ||
| Pastry puffs (2 trays) | 180–190 | -1+3 | 20-30^1 | ||
| Macaroons (1 tray) | 120–130 | -225 | -50 | ||
| Macaroons (2 trays) | 120–130 | -1+3 | 25-50^1 | ||
| Meringues/pavlovas (1 tray of 6, each ∅ 6 cm) | 80–100 | -2120 | -150 | ||
| Meringues/pavlovas (2 trays of 6, each ∅ 6 cm) | 80–100 | -1+3 | 150–180 |
☐ Function, 🔊 Temperature, 🔊 Booster, ☐ Shelf level, ⏻ Cooking duration, 🔒 Fan plus, √ On, – Off
1 Take the trays out of the oven early if the food is sufficiently browned before the specified cooking duration has elapsed.
Savoury dishes
| Food (accessories) | [°C] | [min] | |||
| Savoury Swiss apple pie (tray) | 220-230^2 | √ | 1 35 | -45 | |
| 180-190 | -1 30 | -40 | |||
| Onion tart (tray) | 180-190^2 | √ | 2 25 | -35 | |
| 170-180 | -2 30 | -40 | |||
| Pizza, yeast dough (tray) | 170-180 | √ | 2 25 | -35 | |
| 210-220^2 | -2 | 20-30 | |||
| Pizza, quark-oil dough (tray) | 170-180 | √ | 2 25 | -35 | |
| 190-200^2 | √ | 2 25 | -35 | ||
| Frozen pizza, pre-cooked (rack) | 200-210 | -2 20 | -25 | ||
| Toast* (rack) | 300 - 3 5 | -8 | |||
| Baked dishes/gratins (e.g. toast) ^1 | 275^3 | -3 | 3-6 | ||
| Grilled vegetables^1 | 275^3 | -4 | 5-10^4 | ||
| 250^3 | -3 | 5-10^4 | |||
| Ratatouille (universal tray) | 180-190 | -2 40 | -60 |
☐ Function, 🔊 Temperature, 🔊 Booster, ☐ Shelf level, ⏻ Cooking duration,
Conventional heat, Intensive bake, Fan plus, Eco fan heat, Full grill, Fan grill, √ On, – Off
* The settings also apply for testing in accordance with EN 60350-1.
^1 Use the rack and universal tray.
^2 Pre-heat the oven before putting food inside.
^3 Pre-heat the oven for 5 minutes before putting food inside.
^4 Turn the food halfway through cooking.
Beef
| Food (accessories) | [°C] | [min] | ||||
| Braised beef, approx. 1 kg (oven dish with lid) | 150-160^3 | √ | 2 | 120-130^6 | -- | |
| 170-180^3 | √ | 2 | 120-130^6 | -- | ||
| 180-190 | -2 | 160-180^7 | -- | |||
| Fillet of beef, approx. 1 kg (universal tray) | 180-190^3 | √ | 2 | 25-60 45-75 | ||
| Fillet of beef, “rare”, approx. 1 kg^1 | 80-85^4 | -2 | 70-80 | 45-48 | ||
| Fillet of beef, “medium”, approx. 1 kg^1 | 90-95^4 | -2 | 80-90 | 54-57 | ||
| Fillet of beef, “well done”, approx. 1 kg^1 | 95-100^4 | -2 | 110-130 | 63-66 | ||
| Sirloin joint, approx. 1 kg (universal tray) | 180-190^3 | √ | 2 | 35-65 45-75 | ||
| Sirloin joint, “rare”, approx. 1 kg^1 | 80-85^4 | -2 | 80-90 | 45-48 | ||
| Sirloin joint, “medium”, approx. 1 kg^1 | 90-95^4 | -2 | 110-120 | 54-57 | ||
| Sirloin joint, “well done”, approx. 1 kg^1 | 95-100^4 | -2 | 130-140 | 63-66 | ||
| Burgers, patties*,1 | 300^5 | -4 | 15-25^8 | -- |
☐ Function, 🔊 Temperature, 🔒 Booster, ☐ Shelf level, ⏻ Cooking duration, 🔍 Core temperature, 📄 Auto roast, ☐ Conventional heat, 🌐 Eco fan heat, 🌐 Full grill, √ On, – Off
* The settings also apply for testing in accordance with EN 60350-1.
^1 Use the rack and universal tray.
^2 Sear the meat on the hob first.
^3 Pre-heat the oven before putting food inside.
^4 Pre-heat the oven at 120 °C for 15 minutes. Reduce the temperature when you place the food in the oven.
^5 Pre-heat the oven for 5 minutes before putting food inside.
^6 Roast with the lid on first. Then remove the lid after roasting for 90 minutes and add approx. 0.5 litres of liquid.
7 Roast with the lid on first. Then remove the lid after roasting for 100 minutes and add approx. 0.5 litres of liquid.
^8 Place the rack on shelf level 4 and the universal tray on shelf level 1. Turn the food halfway through cooking.
Veal
| Food (accessories) | [°C] | [min] | [°C] | |||
| Braised veal, approx. 1.5 kg (oven dish with lid) | 160-170^3 | √ | 2 | 120-130^5 | -- | |
| 170-180^3 | √ | 2 | 120-130^5 | -- | ||
| Fillet of veal, approx. 1 kg (universal tray) | 160-170^3 | √ | 2 | 30-60 45-75 | ||
| Fillet of veal, “rare”, approx. 1 kg^1 | 80-85^4 | -2 | 50-60 45-48 | |||
| Fillet of veal, “medium”, approx. 1 kg^1 | 90-95^4 | -2 | 80-90 54-57 | |||
| Fillet of veal, “well done”, approx. 1 kg^1 | 95-100^4 | -2 | 90-100 63-66 | |||
| Saddle of veal, “rare”, approx. 1 kg^1 | 80-85^4 | -2 | 80-90 45-48 | |||
| Saddle of veal, “medium”, approx. 1 kg^1 | 90-95^4 | -2 | 100-130 54-57 | |||
| Saddle of veal, “well done”, approx. 1 kg^1 | 95-100^4 | -2 | 130-140 63-66 |
☐ Function, 🔊 Temperature, 🔊 Booster, ☐ Shelf level, ⏻ Cooking duration, 🔍 Core temperature, ☐ Auto roast, ☐ Conventional heat, √ On, – Off
^1 Use the rack and universal tray.
^2 Sear the meat on the hob first.
^3 Pre-heat the oven compartment before putting food inside.
^4 Pre-heat the oven compartment at 120 °C for 15 minutes. Reduce the temperature when you place the food in the oven.
^5 Roast with the lid on first. Then remove the lid after roasting for 90 minutes and add approx. 0.5 litres of liquid.
Pork
| Food (accessories) | [°C] | [min] | ||||
| Pork joint/pork neck roast, approx. 1 kg (oven dish with lid) | 160–170 | √ | 2 | 130-140^5 | 80–90 | |
| 170–180 | √ | 2 | 130-140^5 | 80–90 | ||
| Pork joint with crackling, approx. 2 kg (oven dish) | 180–190 | √ | 2 | 130-150^6 | 80–90 | |
| 190–200 | √ | 2 | 130-150^6 | 80–90 | ||
| Fillet of pork, approx. 350 g^1 | 90-100^3 | -2 | 70–90 | 60–69 | ||
| Ham roast, approx. 1.5 kg (oven dish with lid) | 160–170 | -2 | 130-160^7 | 80–90 | ||
| Gammon joint, approx. 1 kg (universal tray) | 150–160 | √ | 2 | 50–60 | 63–68 | |
| Gammon joint, approx. 1 kg^1 | 95-105^3 | -2 | 140 | -160 | 63–66 | |
| Meat loaf, approx. 1 kg (universal tray) | 170–180 | √ | 2 | 60-70^6 | 80–85 | |
| 190–200 | √ | 2 | 70-80^6 | 80–85 | ||
| Bacon ^1 | 300^4 | -4 | 3–5 | -- | ||
| Sausage ^1 | 220^4 | -3 | 8-15^8 | -- |
☐ Function, 🔊 Temperature, 🔊 Booster, ☐ Shelf level ⏻ Cooking duration, 🔍 Core temperature, ☐ Auto roast, ☐ Conventional heat, 🔒 Fan plus, 🔒 Eco fan heat, 🔑 Full grill, √ On, – Off
1 Use the rack and universal tray.
2 Sear the meat on the hob first.
3 Pre-heat the oven at 120 °C for 15 minutes. Reduce the temperature when you place the food in the oven.
4 Pre-heat the oven for 5 minutes before putting food inside.
5 Roast with the lid on first. Then remove the lid after roasting for 60 minutes and add approx. 0.5 litres of liquid.
6 Add approx. 0.5 litres of liquid halfway through cooking.
7 Roast with the lid on first. Then remove the lid after roasting for 100 minutes and add approx. 0.5 litres of liquid.
8 Turn the food halfway through cooking.
Lamb, game
| Food (accessories) | ||||||
| Leg of lamb, on the bone, approx. 1.5 kg (oven dish with lid) | 170–180 | -2 | 100–120^4 | 64–82 | ||
| Saddle of lamb, off the bone (universal tray) | 180–190^2 | √ | 2 | 10–20 53–80 | ||
| Saddle of lamb, off the bone (rack and universal tray) | 95–105^3 | -2 | 40–60 | 54–66 | ||
| Saddle of venison, off the bone (universal tray) | 160–170^2 | -2 | 70–90 | 60–81 | ||
| Roebuck saddle, off the bone (universal tray) | 140–150^2 | -2 | 25–35 | 60–81 | ||
| Leg of wild boar, off the bone, approx. 1 kg (oven dish with lid) | 170–180 | -2 | 100–120^4 | 80–90 |
☐ Function, 🔊 Temperature, 🔊 Booster, ☐ Shelf level, ⏻ Cooking duration, 🔍 Core temperature, ☐ Conventional heat, √ On, – Off
1 Sear the meat on the hob first.
^2 Pre-heat the oven before putting food inside.
^3 Pre-heat the oven at 120 °C for 15 minutes. Reduce the temperature when you place the food in the oven.
^4 Roast with the lid on first. Then remove the lid after roasting for 50 minutes and add approx. 0.5 litres of liquid.
Poultry, fish
| Food (accessories) | [°C] | [min] | ||||
| Poultry, 0.8–1.5 kg (universal tray) | 170–180 | √ | 25 | 5–6585–90 | ||
| Chicken, approx. 1.2 kg (rack on top of universal tray) | 180–190^1 | -2 | 55–65^3 | 85–90 | ||
| Poultry, approx. 2 kg (oven dish) | 180–190 | √ | 2 | 100–120^4 | 85–90 | |
| 190–200 | √ | 2 | 110–130^4 | 85–90 | ||
| Poultry, approx. 4 kg (oven dish) | 160–170 | √ | 2 | 180–200^5 | 90–95 | |
| 180–190 | √ | 2 | 180–200^5 | 90–95 | ||
| Fish, 200–300 g (e.g. trout) (universal tray) | 210–220^2 | -2 | 15–25 | 75–80 | ||
| Fish, 1–1.5 kg (e.g. salmon trout) (universal tray) | 210–220^2 | -2 | 30–40 | 75–80 | ||
| Fish fillet in foil, 200–300 g (universal tray) | 200–210 | -2 | 25–30 | 75–80 |
☐ Function, 🔊 Temperature, 🔊 Booster, ☐ Shelf level, ⏻ Cooking duration, 🔍 Core temperature, ☐ Auto roast, 🔒 Fan grill, ☐ Conventional heat, 🔒 Eco fan heat, √ On, – Off
^1 Pre-heat the oven for 5 minutes before putting food inside.
^2 Pre-heat the oven before putting food inside.
^3 Turn the food half way through grilling.
^4 Add approx. 0.25 litres of liquid at the start.
5 Add approx. 0.5 litres of liquid after 30 minutes.
Test food acc. to EN 60350-1
| Test food (accessories) | [°C] | ↑ | 51 | [min] | |
| Small cakes (1 baking tray1) | 150 - 2 2 | 5-35 | |||
| 1604 | -3 | 20-30 | |||
| Small cakes (2 baking trays1) | 1504 | -1 | +3 25 | -35 | |
| Drop cookies (1 baking tray1) | 140 - 2 3 | 5-45 | |||
| 1604 | -3 | 20-30 | |||
| Drop cookies (2 baking trays1) | 140 - 1+3 | 40-506 | |||
| Apple pie (rack1, springform cake tin2,∅ 20 cm) | 160 - 2 8 | 0-100 | |||
| 180 - 1 8 | 0-90 | ||||
| Whisked sponge (rack1, springform cake tin2,∅ 26 cm) | 180 - 2 2 | 5-35 | |||
| 150-1704 | -2 | 25-45 | |||
| Toast (rack1) | 300 - 3 5 | -8 | |||
| Burgers (rack1 on top of universal tray1) | 3005 | -4 | 15-257 |
☐ Function, 🔊 Temperature, 🔊 Booster, ☐ Shelf level, ⏻ Cooking duration, 🔒 Fan plus, ☐ Conventional heat, ☑ Full grill, √ On, – Off
^1 Only use original Miele accessories. Remove the FlexiClip runners if fitted.
^2 Use a dark matt springform cake tin.
Place the springform cake tin centrally on the rack.
3 In general, if a range of temperatures is given, it is best to select the lower temperature and to check the food after the shortest duration.
^4 Pre-heat the oven before putting food inside.
^5 Pre-heat the oven for 5 minutes before putting food inside.
^6 Take the trays out of the oven early if the food is sufficiently browned before the specified cooking duration has elapsed.
7 Place the rack on shelf level 4 and the universal tray on shelf level 1. Turn the food halfway through cooking.
Energy efficiency class according to EN 60350-1
The energy efficiency class is determined in accordance with EN 60350-1.
Energy efficiency class: A+
Please observe the following when conducting testing:
- Testing is undertaken using the Eco Fan heat function.
- Select the Lighting | "On" for 15 seconds setting (see "Settings – "Lighting").
- Only accessories that are required for testing should be in the oven compartment during tests.
Do not use other accessories that might be available such as FlexiClip runners or catalytic enamelled panels (e.g. side panels or roof liners).
- An important pre-condition for determining the energy efficiency class is that the door must be tightly shut during testing.
Depending on which measurement devices are used, the functioning of the door seal can be affected to a greater or lesser extent. This will have a negative impact on the test results.
Pushing against the door will compensate for this. In certain unfavourable circumstances, suitable technical aids may also be necessary for this. This issue does not occur in normal use.
Data sheet for household ovens
In acc. with delegated regulation (EU) No. 65/2014 and regulation (EU) No. 66/2014
| MIELE | |
| Model name/identifier H 7162 BP, H 7262 BP | |
| Energy efficiency index/cavity (EEI _cavity ) 81,7 | |
| Energy efficiency class/cavity | |
| A+++ (most efficient) to D (least efficient) A+ | |
| Energy consumption per cycle for each cavity in conventional mode 1,10 kWh | |
| Energy consumption per cycle for each cavity in fan-forced convection mode | 0,71 kWh |
| Number of cavities 1 | |
| Heat source(s) per cavity electric | |
| Volume of cavity 76 l | |
| Mass of the appliance 47,0 kg | |
United Kingdom
Miele Co. Ltd., Fairacres, Marcham Road, Abingdon, Oxon, OX14 1TW
Tel: 0330 160 6600, Internet: www.miele.co.uk/service, E-mail: info@miele.co.uk
Australia
Miele Australia Pty. Ltd.
ACN 005 635 398
ABN 96 005 635 398
1 Gilbert Park Drive
Knoxfield, VIC 3180
Tel: 1300 464 353
Internet: www.miele.com.au
China Mainland
Miele Electrical Appliances Co., Ltd.
1-3 Floor, No. 82 Shi Men Yi Road
Jing' an District
200040 Shanghai, PRC
Tel: +86 21 6157 3500
Fax: +86 21 6157 3511
E-mail: info@miele.cn,
Kowloon Bay, Hong Kong
Tel:(852)26101025
Fax: (852) 3579 1404
Email:
customerservices@miele.com.hk
Website: www.miele.hk
India
Miele India Pvt. Ltd.
1st Floor, Copia Corporate Suites,
Commercial Plot 9,
Mathura Road, Jasola,
New Delhi - 110025
E-mail: customercare@miele.in
Website: www.miele.in
Ireland
Miele Ireland Ltd.
2024 Bianconi Avenue
Citywest Business Campus
Dublin 24
Tel: (01) 461 07 10
Fax: (01) 461 07 97
E-Mail: info@miele.ie
Internet: www.miele.ie
Malaysia
Miele Sdn Bhd
Suite 12-2, Level 12
Menara Sapura Kencana
Petroleum
Solaris Dutamas No. 1
Jalan Dutamas 1
50480 Kuala Lumpur, Malaysia
Phone: +603-6209-0288
Fax: +603-6205-3768
New Zealand
Miele New Zealand Limited
IRD 98 463 631
8 College Hill
Freemans Bay, Auckland 1011
New Zealand
Tel: 0800 464 353
Internet: www.miele.co.nz
Singapore
Miele Pte. Ltd.
29 Media Circle
11-04 ALICE@Mediapolis
Singapore 138565
sTel: +65 6735 1191
Fax: +65 6735 1161
E-Mail: info@miele.com.sg
Internet: www.miele.sg
South Africa
Miele (Pty) Ltd.
63 Peter Place
Bryanston 2194
P.O. Box 69434
Bryanston 2021
Tel: (011) 875 9000
Fax: (011) 875 9035
E-mail: info@miele.co.za
Internet: www.miele.co.za
Thailand
Miele Appliances Ltd.
BHIRAJ TOWER at EmQuartier
43rd Floor Unit 4301-4303
689 Sukhumvit Road
North Klongton Sub-District
Vadhana District
Bangkok 10110, Thailand
United Arab Emirates
Miele Appliances Ltd.
Showroom 1
Eiffel 1 Building
Sheikh Zayed Road, Umm Al She
P.O. Box 114782 - Dubai
Tel. +971 4 3044 999
Fax. +971 4 3418 852
800-MIELE (64353)